Page 1
Level 2, 180 Albert Road, South Melbourne, Victoria 3205. T 1800 148 165 F 03 9690 8010 E [email protected]
W www.medtechglobal.com
Medtech32 Australia
Version 9.3.0 Build 4620
ECLIPSE Release Notes
This Release Notes document contains important information for all Medtech32 users. Please ensure that they are circulated amongst all your staff. We suggest these should be filed safely for future reference.
Page 2
Version 9.3.0 Build 4620 – ECLIPSE Release Notes
Copyright © Medtech Healthcare Pty Ltd Page 2
Table of Contents 1. Introduction ....................................................................................................................... 6
2. ECLIPSE ............................................................................................................................ 7
2.1 ECLIPSE Participants List ......................................................................................12
2.1.1 Menu Option .......................................................................................... 12
2.1.2 ECLIPSE Participants window ............................................................... 13
2.1.3 ECLIPSE Participants Context Menu ..................................................... 13
2.1.4 Update ECLIPSE Participants ............................................................... 14
2.1.5 View ECLIPSE Participants ................................................................... 16
2.1.6 Print ECLIPSE Participants ................................................................... 16
2.2 Payment Levels for Health Funds...........................................................................18
2.2.1 Set up a Payment Level ........................................................................ 18
2.2.2 Invoice Type - ‘In-Patient Medical Claim’ ............................................... 18
2.2.3 Configure Payment Level ...................................................................... 20
2.3 Staff Setup .............................................................................................................22
2.3.1 Configure New ECLIPSE Participant ..................................................... 22
2.3.2 Delete ECLIPSE Participant Entry ......................................................... 24
2.4 Service Setup .........................................................................................................25
2.4.1 Fund Agreement .................................................................................... 26
2.4.2 Fund Scheme ........................................................................................ 27
2.4.3 IMC Fixed Payments ............................................................................. 29
2.5 Staff Access Rights to create IMC Accounts ..........................................................31
2.6 Medicare Claim Review Panel (MCRP) Items ........................................................32
2.7 Hospital Setup ........................................................................................................34
2.8 Setup Credit Adjust Reasons .................................................................................35
2.8.1 Menu Option .......................................................................................... 35
2.8.2 IMC Credit Adjust Reasons – Contextual Menu ..................................... 36
2.8.3 Add a new IMC Credit Adjust Reason ................................................... 36
2.8.4 View / Edit IMC Credit Adjust Reason Entry .......................................... 37
2.9 Setup Debit Adjust Reasons ...................................................................................38
2.9.1 Menu Option .......................................................................................... 38
2.9.2 IMC Debit Adjust Reasons – Contextual Menu ...................................... 39
2.9.3 Add a new IMC Debit Adjust Reason ..................................................... 39
2.9.4 View / Edit IMC Debit Adjust Reason Entry ........................................... 40
2.10 Patient Register Window ........................................................................................41
2.11 New IMC Invoice ....................................................................................................44
2.11.1 IMC Invoice – Main Tab ......................................................................... 44
Page 3
Version 9.3.0 Build 4620 – ECLIPSE Release Notes
Copyright © Medtech Healthcare Pty Ltd Page 3
2.11.2 IMC Invoice – Invoice Annotation Tab ................................................... 62
2.11.3 IMC Invoice – Payment Annotation Tab ................................................ 62
2.11.4 IMC Invoice – Audit Tab ........................................................................ 62
2.12 Patient Account ......................................................................................................63
2.12.1 Account Summary View ........................................................................ 65
2.12.2 New/ View Transaction .......................................................................... 66
2.12.3 View Transaction Details ....................................................................... 67
2.12.4 Credit Adjust .......................................................................................... 68
2.12.5 Debit Adjust ........................................................................................... 69
2.12.6 Modify Transaction ................................................................................ 70
2.12.7 Delete Transaction ................................................................................ 71
2.12.8 Patient Account Filter ............................................................................ 72
2.12.9 New Payment ........................................................................................ 73
2.12.10 Re-printing Transactions ....................................................................... 76
2.12.11 Print Individual Statement ...................................................................... 76
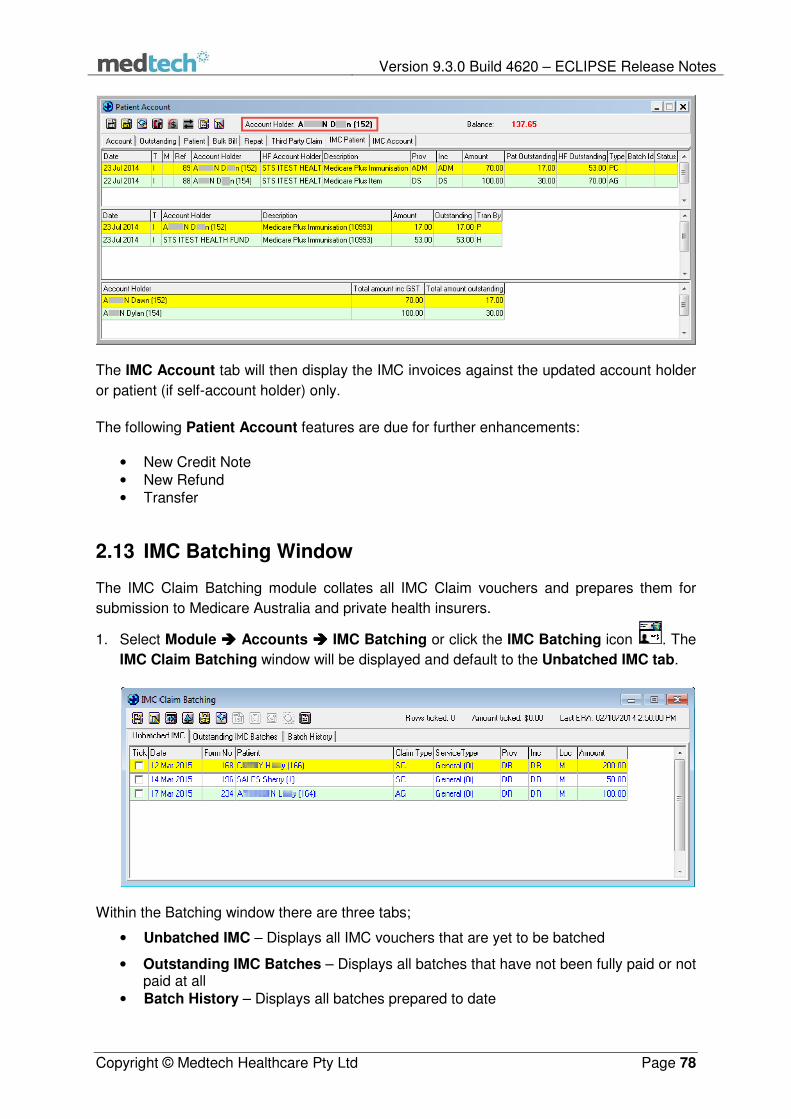
2.12.12 Change Account Holder ........................................................................ 77
2.13 IMC Batching Window ............................................................................................78
2.13.1 Unbatched IMC tab ............................................................................... 79
2.13.1.1 IMC Batching Contextual Menu ....................................................... 80
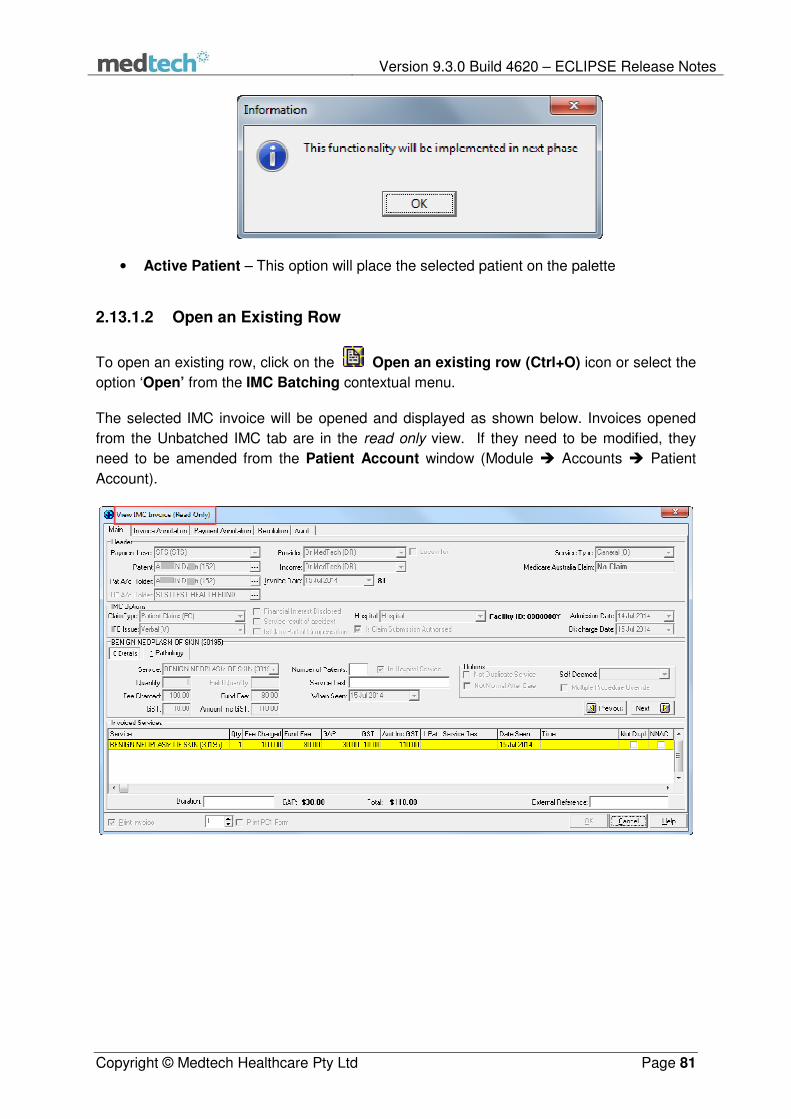
2.13.1.2 Open an Existing Row ....................................................................... 81
2.13.1.3 Filtering Results ................................................................................ 82
2.13.1.4 Shrinking or Expanding IMC Claim Batching Window ...................... 82
2.13.1.5 Placing the Active Patient on the Palette ......................................... 83
2.13.1.6 Closing off the batch ........................................................................ 83
2.13.1.7 Paying off Multiple Batches ............................................................. 83
2.13.1.8 Viewing Medicare Australia Transmission Log ................................. 84
2.13.1.9 IMC Batching - Labels ....................................................................... 84
2.13.2 Outstanding IMC Batches ...................................................................... 85
2.13.2.1 Open an Outstanding IMC Batch ...................................................... 87
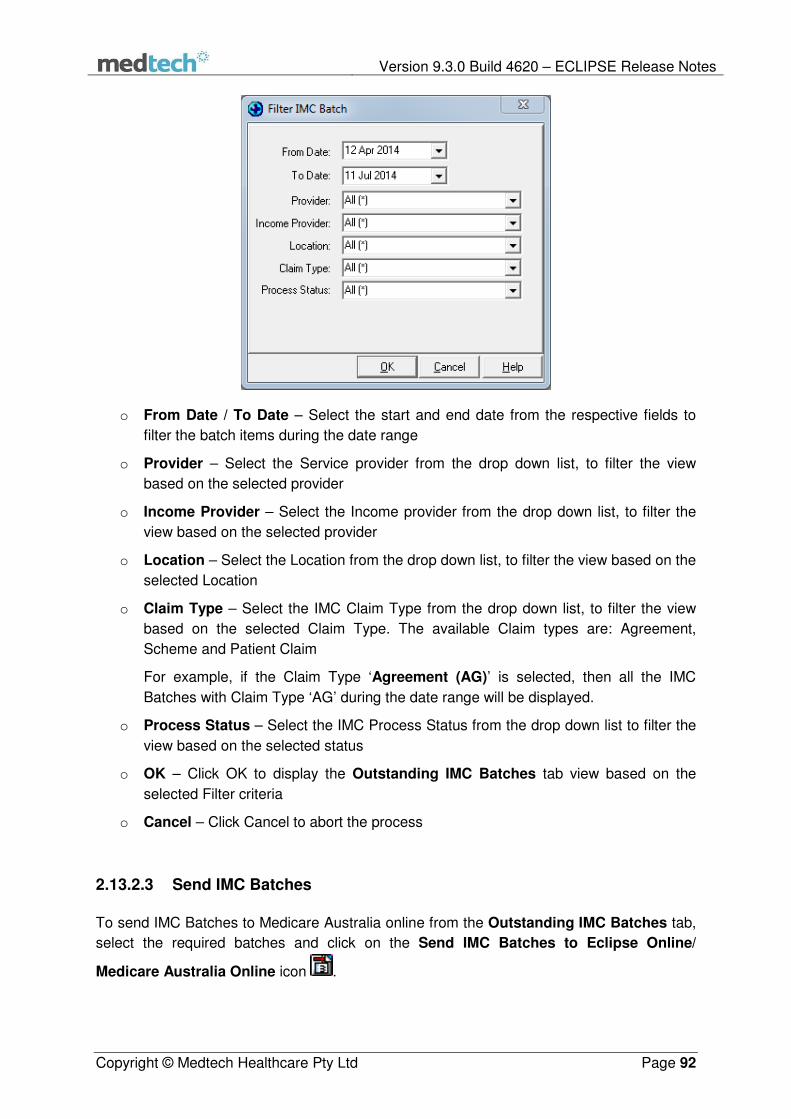
2.13.2.2 Filter an IMC Batch ........................................................................... 91
2.13.2.3 Send IMC Batches ............................................................................. 92
2.13.2.4 Check and Update Batch Status ....................................................... 94
2.13.2.5 Generate Process Report ................................................................. 96
2.13.2.6 Generate Pending ERA Report ......................................................... 97
2.13.2.7 ERA Report ....................................................................................... 98
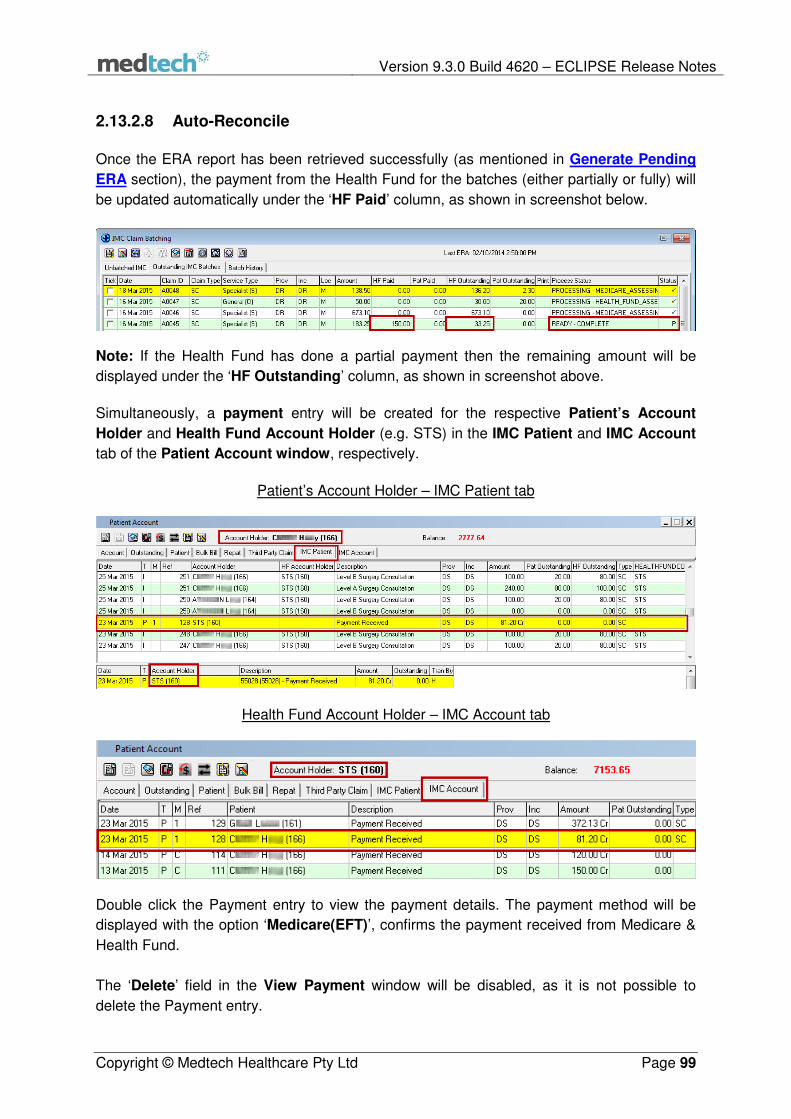
2.13.2.8 Auto-Reconcile ................................................................................. 99
2.13.2.9 Search for a Specific Batch ............................................................. 100
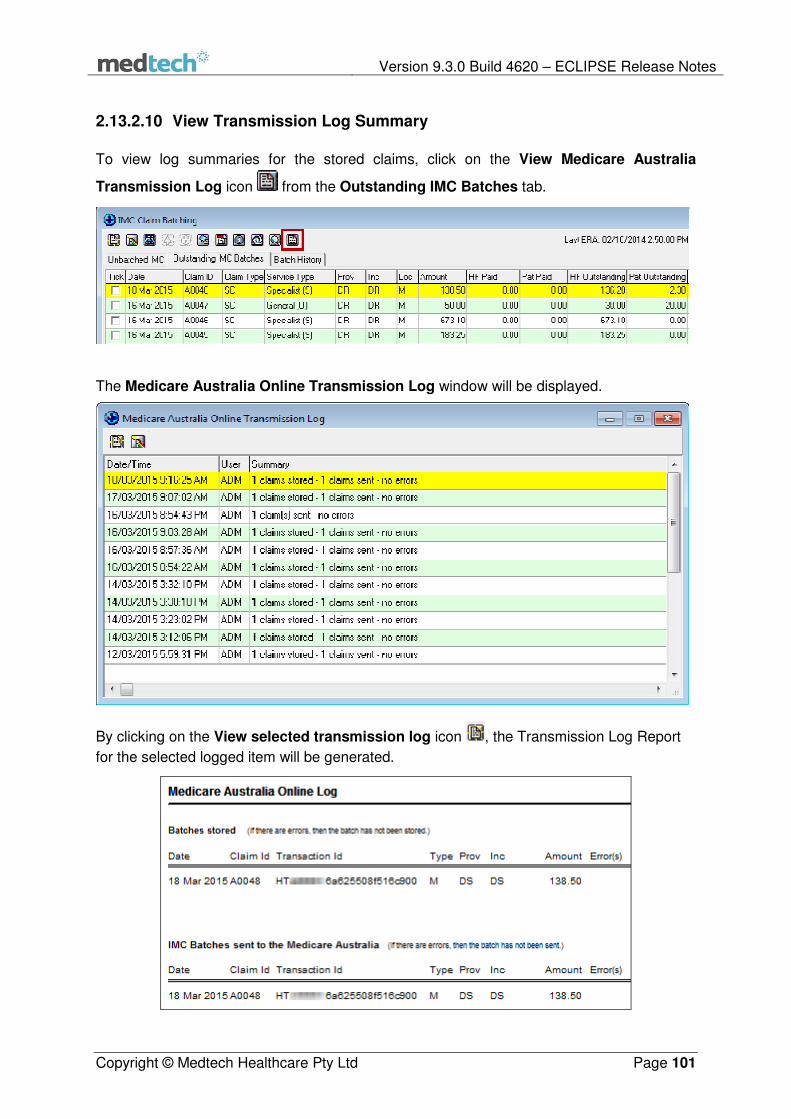
2.13.2.10 View Transmission Log Summary ................................................... 101
Page 4
Version 9.3.0 Build 4620 – ECLIPSE Release Notes
Copyright © Medtech Healthcare Pty Ltd Page 4
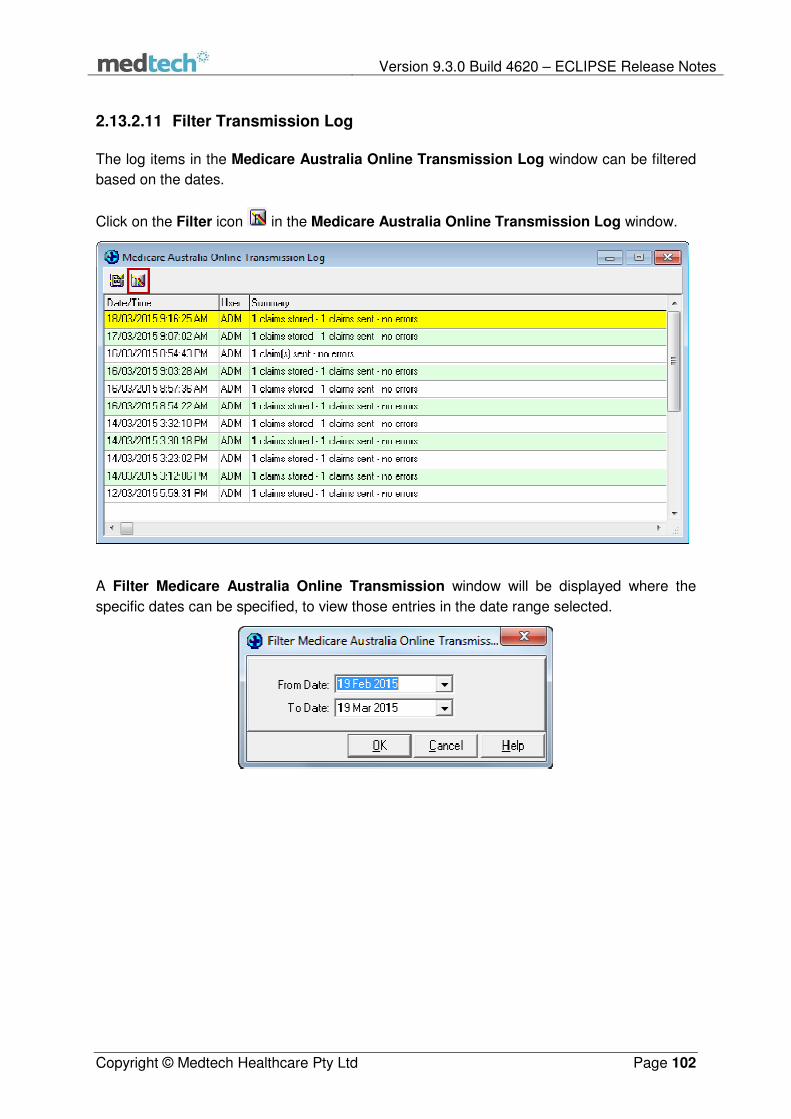
2.13.2.11 Filter Transmission Log ................................................................... 102
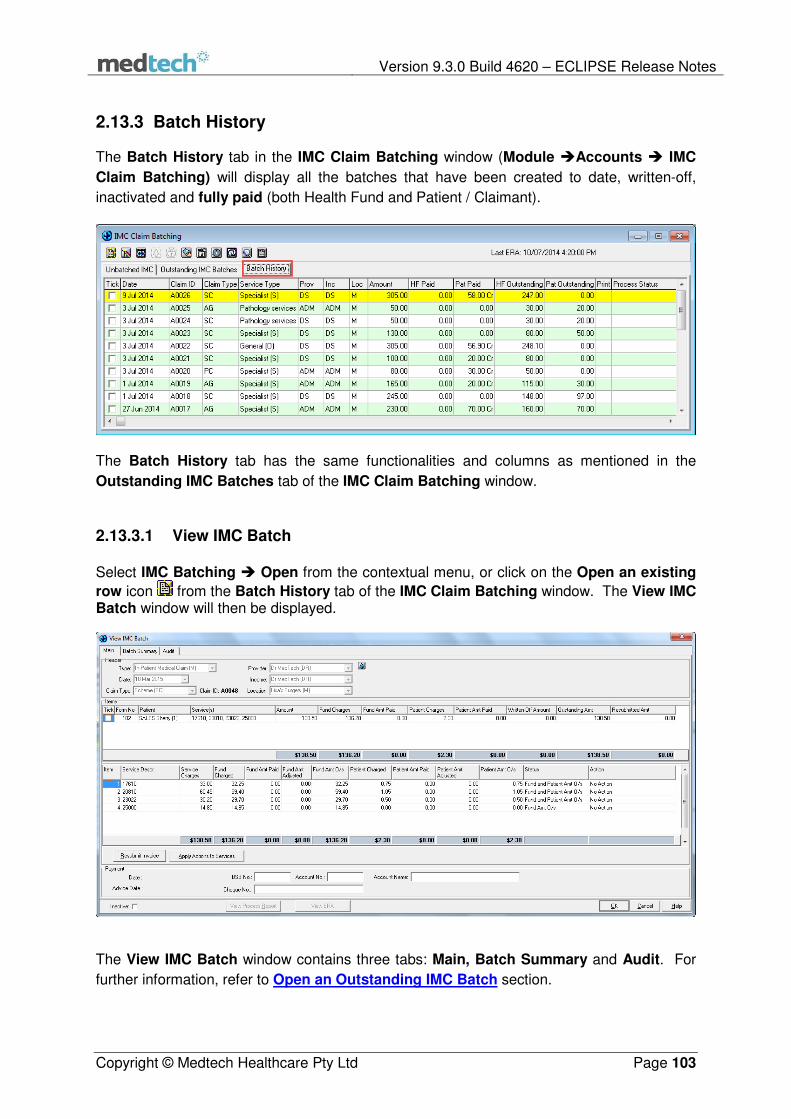
2.13.3 Batch History ....................................................................................... 103
2.13.3.1 View IMC Batch .............................................................................. 103
2.13.3.2 View IMC Invoice ............................................................................ 104
2.13.3.3 View Process Report....................................................................... 104
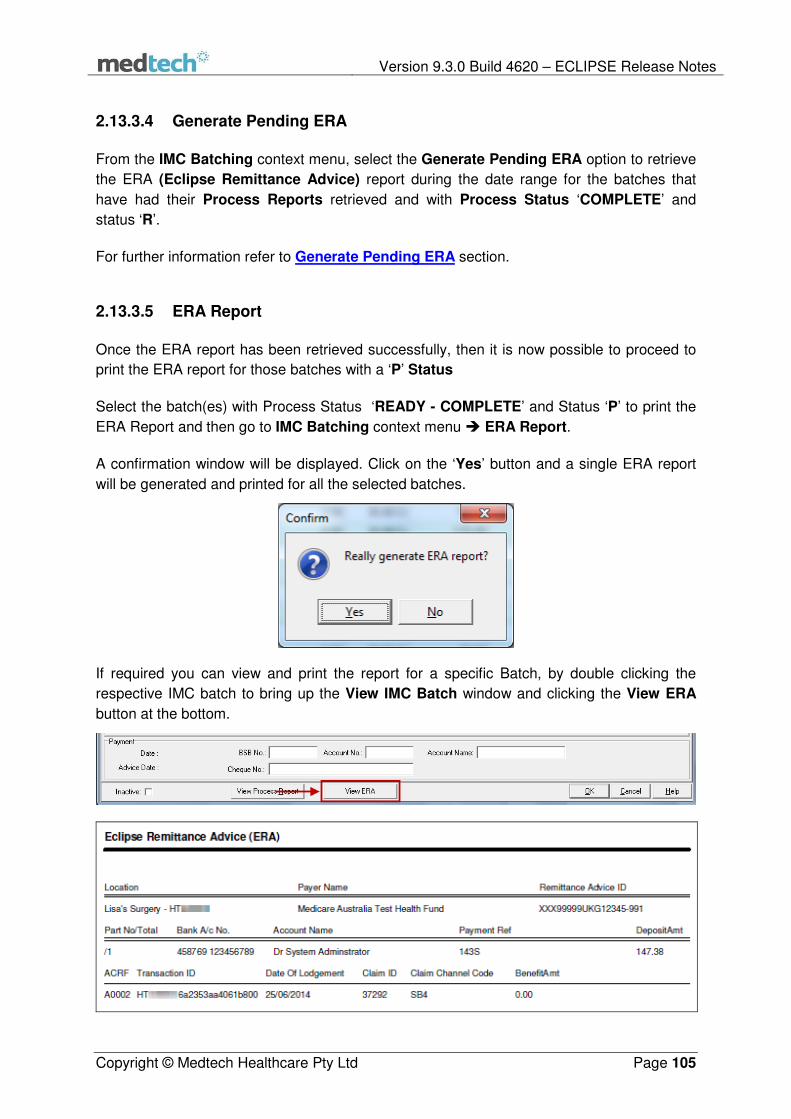
2.13.3.4 Generate Pending ERA ................................................................... 105
2.13.3.5 ERA Report ..................................................................................... 105
2.13.3.6 Auto-Reconcile ............................................................................... 106
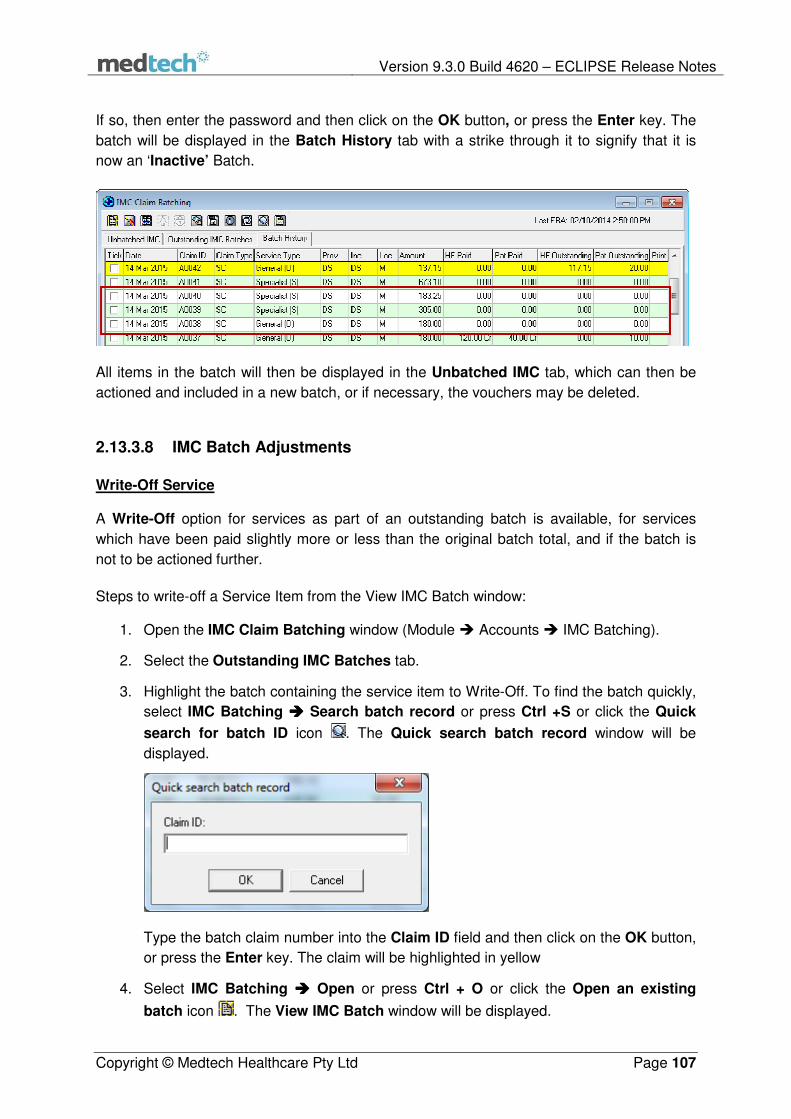
2.13.3.7 Inactivate Batch .............................................................................. 106
2.13.3.8 IMC Batch Adjustments .................................................................. 107
2.13.3.9 Make Patient in Batch Active on the Palette ................................. 112
2.14 Resubmit a Voucher (Invoice) .............................................................................. 113
2.15 Resubmit a Service Item ...................................................................................... 114
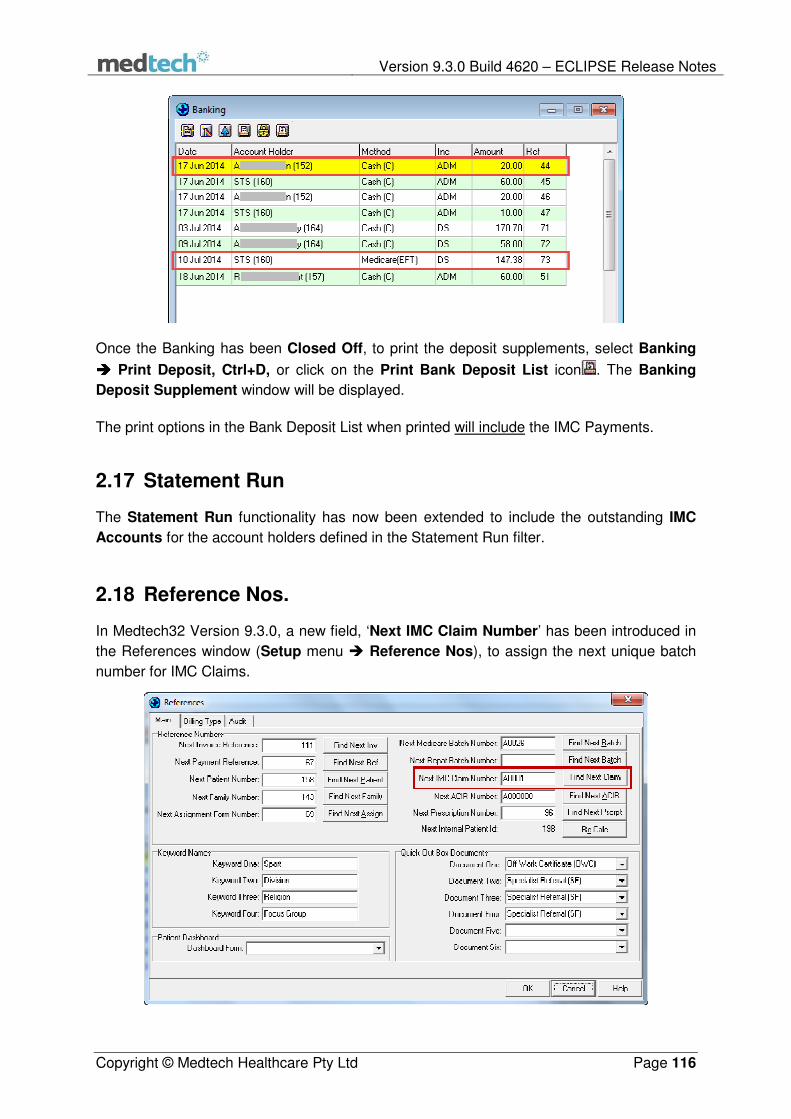
2.16 Banking ................................................................................................................ 115
2.16.1 Banking Process Detailed ................................................................... 115
2.17 Statement Run ..................................................................................................... 116
2.18 Reference Nos. .................................................................................................... 116
2.19 Location Settings .................................................................................................. 117
2.20 Tool Bar ............................................................................................................... 117
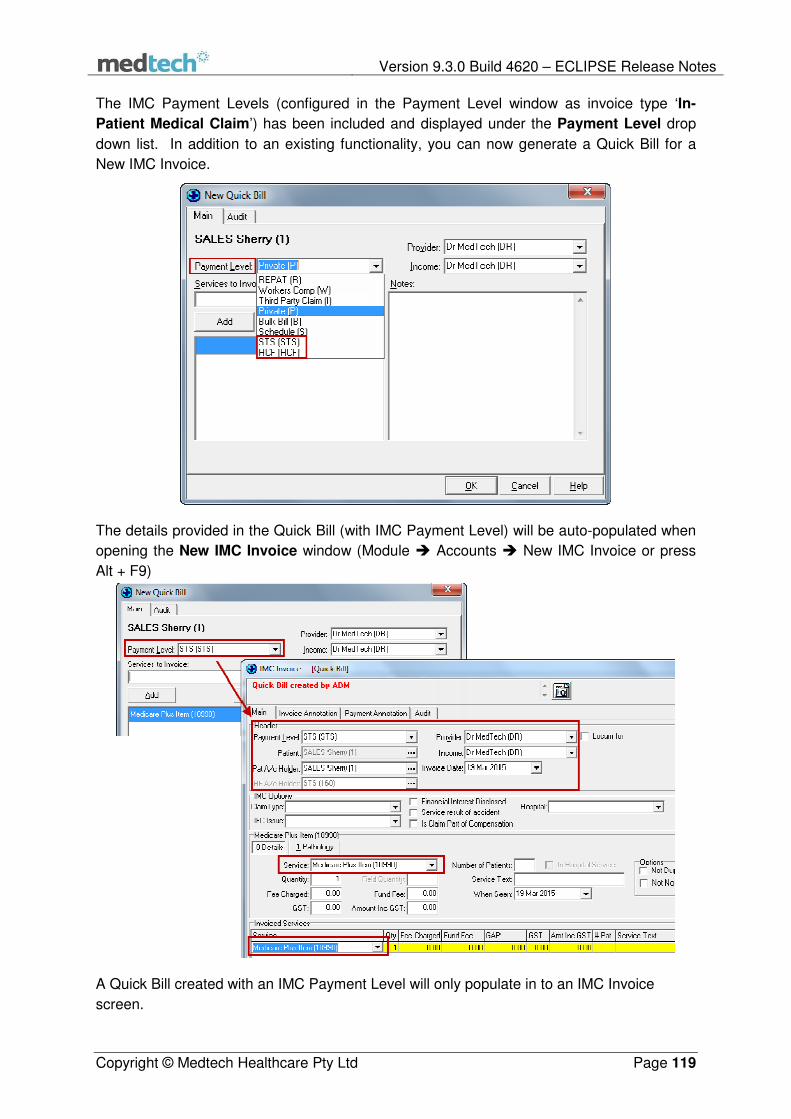
2.21 Quick Bill Enhancements ..................................................................................... 118
3. Consolidated Accounts ................................................................................................. 120
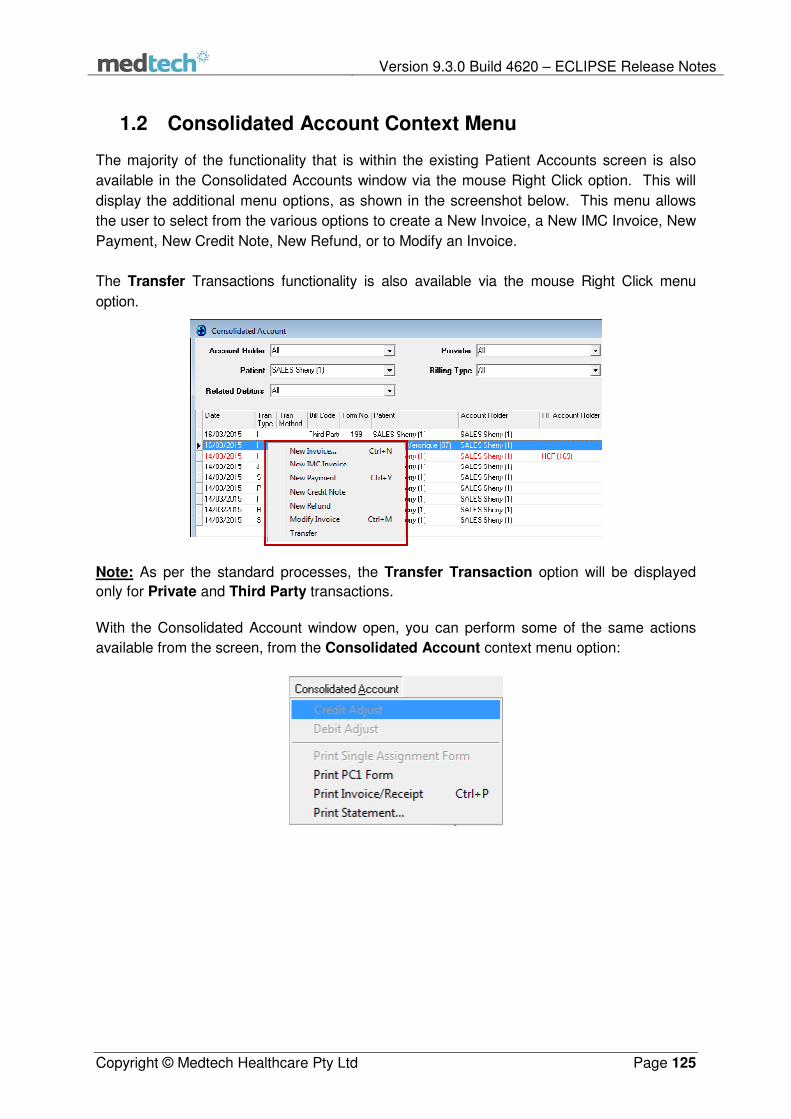
1.2 Consolidated Account Context Menu ................................................................... 125
3.5.1 Print Single Assignment Form ............................................................. 126
3.5.2 Print PC1 Form.................................................................................... 126
3.5.3 Print Invoice / Receipt.......................................................................... 126
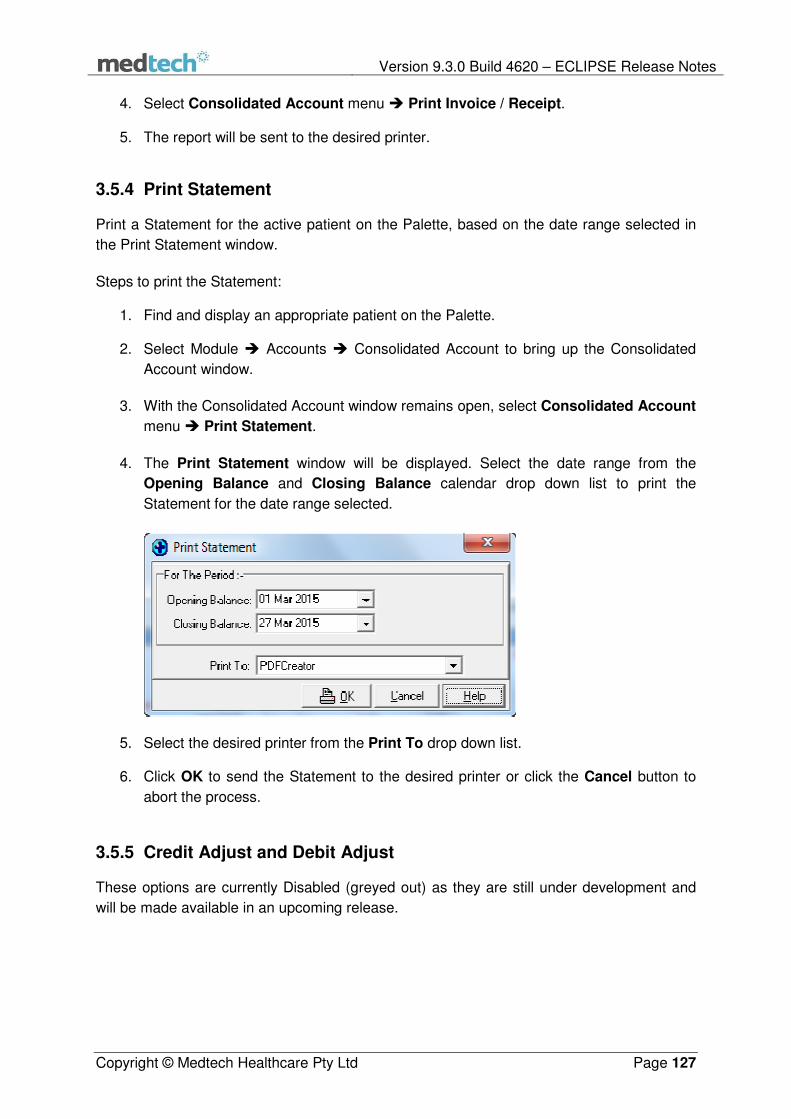
3.5.4 Print Statement.................................................................................... 127
3.5.5 Credit Adjust and Debit Adjust ............................................................. 127
4. Known Limitations / Issues ........................................................................................... 128
4.1 Consolidated Account window .............................................................................. 128
4.1.1 Consolidated Account – Context menu ................................................ 128
4.1.2 Transactions not being Displayed ........................................................ 128
4.1.3 Term ‘CR’ does not Display for the Credit transactions ........................ 129
4.1.4 Consolidated Account – Performance Lag ........................................... 129
4.2 View IMC Batch – Resubmit Button Disabled ....................................................... 129
4.3 Resubmitted PC Claims not Displayed in the Unbatched IMC Tab ....................... 129
4.4 Adjustment Reason does not display in the Credit/Debit Adjustment Window ...... 129
4.5 Resubmitted Service – Transmitted to Medicare Online ....................................... 130
4.6 Resubmitted Invoice – Details not Updating Correctly .......................................... 130
Page 5
Version 9.3.0 Build 4620 – ECLIPSE Release Notes
Copyright © Medtech Healthcare Pty Ltd Page 5
Disclaimer
Every effort has been made to ensure the accuracy of the information in the Medtech32
Release Notes.
The names of Medical Centres, Patients, Staff, and Companies used as examples in this Guide
are fictitious, and any resemblance to actual Medical Practices, Patients, Staff and Companies
is purely coincidental.
The contents of the Medtech32 Release Notes are subject to change.
Enquiries should be addressed directly to:
Medtech Limited
Level 2
180 Albert Road
South Melbourne
Victoria 3205
Phone 1800 148 165 (Option 1); Fax 03 9690 8010
Email: [email protected]
Page 6
Version 9.3.0 Build 4620 – ECLIPSE Release Notes
Copyright © Medtech Healthcare Pty Ltd Page 6
1. INTRODUCTION Medtech32 Version 9.3.0 Build 4620 is a Key Release of Medtech32. This document provides information on the new feature ECLIPSE, which allows healthcare
providers and billing agents to submit claims securely over the internet to both Medicare and
private health insurers, saving time and money.
This major release provides several other new features like: After Hours – Auto Billing,
Consolidated Account, eRx-Medtech32 Integration Service and Medtech Fax Service, and
also includes a large number of resolved issues, enhancements and changes to the Medtech32
application. Please refer to the separate document Medtech32 Information for Release and
Installation for further information.
The MedtechGlobalHIService (CDA Bridge) installer has been upgraded, hence it is mandatory
to download and install the latest MedtechGlobalHIService (CDA Bridge) installer from the DVD.
Please refer to the separate Medtech32 Release Notes - V9.3.0 Build 4620
MedtechGlobalHIService document for the installation instructions.
IMPORTANT NOTE
WARNING: It is HIGHLY recommended to employ ONLY qualified system engineers when
performing ANY installation and upgrade. The consequences of ruining a database during
upgrade could possibly lead to data corruptions and, as a result, data loss and systems
downtime.
If in doubt, please consult with your qualified IT technician/service provider, or contact one of
the Medtech Channel Partners listed on our web site:
http://www.medtechglobal.com/au/support-au/channel-partners-au/
For further information on this release, or any other queries regarding Medtech32
Version 9.3.0 Build 4620, please contact the Medtech Helpdesk on:
Tel: 1800 148 165 or Email [email protected] .
Page 7
Version 9.3.0 Build 4620 – ECLIPSE Release Notes
Copyright © Medtech Healthcare Pty Ltd Page 7
2. ECLIPSE ECLIPSE is an acronym for Electronic Claim Lodgement and Information Processing
Service Environment. ECLIPSE is an extension to Medicare Australia’s online claiming
solutions and offers a secure connection and direct communication between medical
practices/providers, Medicare and most health funds/ private health insurers.
ECLIPSE allows hospitals, billing agents and providers to lodge In-Patient Medical Claims IMC)
and In-Hospital claims (IHC) directly to Department of Human Services (DHS) and the private
health insurers in one transaction.
IMPORTANT NOTE • ECLIPSE has been integrated as a separate LICENSING module. Therefore it is required to
obtain a license for this module to access ECLIPSE related screens.
• Certain configuration is required to be set up within Medtech32 to start using ECLIPSE. To
allow access to IMC Accounts related functions for Staff members, ensure the option ‘IMC
Accounts’ has been selected in the Security tab of their Staff setup. Refer to the Access
Rights for IMC Accounts section for further information.
The online claiming can be used for both paid and unpaid medical claims, lodged directly to
Medicare through Medtech32.
ECLIPSE allows healthcare providers and billing agents to submit claims securely over the
internet to both Medicare, and private health insurers, saving time and money. The benefits for
health care providers includes:
• Easier way to obtain informed financial consent from patients
• Paperless interaction with Department of Human Services and private health insurers
• Quicker processing times—reduction from weeks to days
• Reduced administration time resulting in reduced management costs
• Faster resolution of complex claims
• Better data quality with fewer errors and speedier resolutions
• One system for all private health insurers
• A one stop shop for electronic business—access to Department of Human Services
(DHS), the Australian Childhood Immunisation Register (ACIR) and private health
insurers in one product
• Electronic remittance advice from private health insurers resulting in a more efficient
reconciliation of your accounts
• Increased patient satisfaction by offering this feature from within your Practice.
Page 8
Version 9.3.0 Build 4620 – ECLIPSE Release Notes
Copyright © Medtech Healthcare Pty Ltd Page 8
IMPORTANT NOTE – Manual IMC Claim Submission Practices can submit the IMC Claims electronically through ECLIPSE. There is no manual
submission process to ECLIPSE. If the Practice wants to submit manually, then they need to
submit the Claims to Fund directly and follow the current process.
In the event a claim has been processed and payment made by Medicare and finds any
discrepancies, the Practice has to follow a manual process for making any adjustments. There
is a specific form that the Practice can download from the Medicare website. However, this is a
manual process and driven by the user.
ABBREVIATIONS & TERMINOLOGY
1. In-Patient Medical Claim
An In-Patient Medical Claim (IMC) relates to claims for admitted patient's episodes of
care where financial claim(s) are lodged by providers or agents against Medicare, and in
most cases a Health Fund, on behalf of a patient for the provision of health care
services.
There are five types of IMC available:
i. IMC Agreements (IMC AG)
There are two types of Agreements:
• Hospital Purchaser Provider Agreement/Practitioner Agreements (HPPA/PA) is the combination of agreements between the practitioner and the hospital, and between the hospital and a Private Health Fund.
• Medical Purchaser Provider Agreements (MPPA) is an agreement between the Provider and the private health fund.
• The provider has signed an Agreement (AG) (MPPA, HPPA/PA, verbal or signed
agreements) with the Fund (of which the patient is a member) specified in the claim
• Payment goes to the provider or Billing Agent via the Health Fund
• Only unpaid in-patient medical claims can be submitted under this claim type.
ii. IMC Schemes (IMC SC)
• The provider is operating under a Scheme (Approved Gap Cover Scheme, SC) with the
Fund (of which the patient is a member) specified in the claim
• Payment goes to the provider or Billing Agent via the Health Fund
• Only unpaid in-patient medical claims can be submitted under this claim type.
iii. IMC Patient Claims (IMC PC)
• Patient is a member of the Fund specified in the claim
• If the claim has been paid, the payment from Medicare goes to the patient or claimant
and payment from the Fund goes to the member
• If the claim has not been paid, the payment from Medicare and the Fund goes to the
patient, via cheque (made out to the provider), who then passes it on to the provider
Page 9
Version 9.3.0 Build 4620 – ECLIPSE Release Notes
Copyright © Medtech Healthcare Pty Ltd Page 9
iv. IMC Medicare Benefits (IMC MB)
• Payment from both Medicare and the specified Fund goes to the specified Billing Agent
v. IMC Medicare Only (IMC MO)
• Payment from Medicare goes to the specified Billing Agent
• There is no Fund involvement
IMPORTANT NOTE
In Medtech32 Version 9.3.0 Build 4620, the following is available as part of ECLIPSE 1) In-Patient Medical Claiming 2) IMC Types AG, SC and PC
2. Brand
A code related to a Health Fund's Trading Name.
3. Payee Provider A payee (or Principal) provider is the health care provider who is paid for the services that they or another servicing provider has performed.
4. 90 Day Pay Doctor Cheque Scheme Under this scheme, Medicare will automatically cancel Medicare cheques made payable to eligible health professionals through their patient when the cheque hasn’t been banked after 90 days. The amount is then paid directly into the health professional’s nominated bank account.
5. Get Participants Report A Get Participants report returns the details of all ECLIPSE enabled private health insurers.
6. Patient Verification Fund Checks if the patient is a verified member of the Health Fund.
7. Online Patient Verification Checking the validity of patient details with Medicare or a Health Fund. This can be done in real time and allows for the provision of aliases which cuts down on mismatches.
8. IFC- Informed Financial Consent When a practice submits any in-patient medical claim under a known or No Gap cover scheme, the practice must indicate that informed financial consent has been given before the claim can be submitted for assessment.
Where IFC is not required, and therefore not obtained, as the patient would not have any out of pocket expenses under a Gap Cover Scheme, the practice uses a ‘Not Obtained’ indicator.
9. Known Gap Cover Where the patient does have out of pocket expenses and the provider must provide written Informed Financial Consent.
10. Claim Status
Page 10
Version 9.3.0 Build 4620 – ECLIPSE Release Notes
Copyright © Medtech Healthcare Pty Ltd Page 10
Check the status of an in-patient medical claim at any time. You will always have a clear view of where your claim is up to in the process.
11. Processing report A claim processing report provides information on the medical services provided in a claim.
12. Electronic Remittance Advice (ERA) Report An ERA report provides information relating to the payment for medical services provided in a claim.
13. UPI- Unique Patient Identifier Used by a health fund to identify a patient; usually the Patient Membership Number.
IMPORTANT NOTE
ECLIPSE READINESS
Below are some simple steps to assist in getting your Practice ready to be able to use the
Eclipse functionality. Please ensure that you have followed the steps detailed below to ensure
that all the required processes have been completed.
STEP 1 – GETTING ECLIPSE READY Please familiarise yourself with the Eclipse User Guide 2.2, which can be found here:
http://www.medicareaustralia.gov.au/provider/business/online/eclipse/
Although a copy of the Eclipse User Guide is also available on the Medtech32 Version 9.3.0
B4620 DVD, or the document can be downloaded from the link provided here:
http://www.medicareaustralia.gov.au/forms/9173.pdf
The Eclipse User Guide provides details about the prerequisites, eligibility checking, patient
verification, process of claiming, description of error messages and other related information.
It is recommended that the user familiarises themselves with the following sections of the Eclipse User Guide:
• Getting Eclipse Ready
• Eligibility Checking
• Interpreting eligibility response information
• Submitting in-patient medical claims
• Reports
Page 11
Version 9.3.0 Build 4620 – ECLIPSE Release Notes
Copyright © Medtech Healthcare Pty Ltd Page 11
STEP 2 – CO-ORDINATING WITH FUNDS The contact names and phone numbers of various funds can be found at: http://www.humanservices.gov.au/spw/health-professionals/services/simplified-billing-and-
eclipse/resources/health-fund-functionality-and-contact-details.rtf The following are recommended actions to be taken with private health insurers before
processing (for each provider) your first IMC AG or IMC SC claim.
1. Organise the type of simplified billing arrangement you wish to have with the private
health insurer e.g., Agreements (AG) or Schemes (SC).
2. Whether you need to quote a Fund Payee ID to direct payment and if so, make sure you
know what it is.
3. Ensure your EFT banking details are registered with the private health insurer. This is a
mandatory requirement for submitting claims through ECLIPSE.
4. Please advise the respective funds that you will be submitting ECLIPSE invoices so that
the fund is aware of the initial invoices you are submitting. If there are any issues, they
will provide the necessary support.
STEP 3 – CONFIGURATION SETUP The following configurations must be completed before generating the first IMC Invoice:
• ECLIPSE Participants List
• Payment Levels
• Service Setup
• Staff Setup
• Medicare Claim Review Panel
(MCRP) Items
• Hospital Setup
Page 12
Version 9.3.0 Build 4620 – ECLIPSE Release Notes
Copyright © Medtech Healthcare Pty Ltd Page 12
2.1 ECLIPSE Participants List ECLIPSE Participants are the ECLIPSE enabled Private Health Insurers / Health Funds.
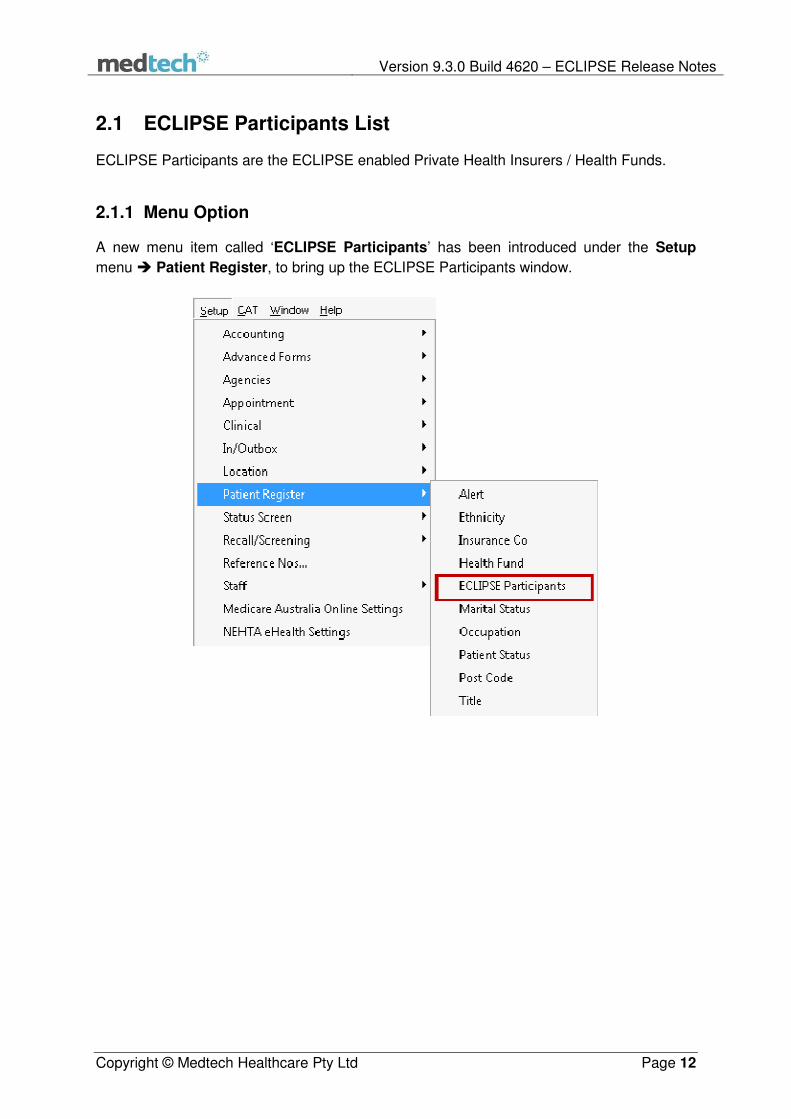
2.1.1 Menu Option A new menu item called ‘ECLIPSE Participants’ has been introduced under the Setup
menu � Patient Register, to bring up the ECLIPSE Participants window.
Page 13
Version 9.3.0 Build 4620 – ECLIPSE Release Notes
Copyright © Medtech Healthcare Pty Ltd Page 13
2.1.2 ECLIPSE Participants window Selecting the ECLIPSE Participants menu option will bring up a new window called
‘ECLIPSE Participants’, as shown below:
This window will list the Health Funds that participate in ECLIPSE. You do not have an
option to add a new ECLIPSE Participant entry, but can update the list whenever required by
clicking the “Update Eclipse Participants” option from the context menu.
Refer to Update ECLIPSE Participants section for further information.
2.1.3 ECLIPSE Participants Context Menu A new contextual menu item ECLIPSE Participants will be displayed next to the Module
menu when the ECLIPSE Participants window is the active window. The ECLIPSE
Participants menu has the following sub-menu items: Open, Print ECLIPSE Participants
and Update ECLIPSE Participants.
Page 14
Version 9.3.0 Build 4620 – ECLIPSE Release Notes
Copyright © Medtech Healthcare Pty Ltd Page 14
2.1.4 Update ECLIPSE Participants Follow the steps below to update the ‘ECLIPSE Participants’ list:
1. Open the ‘ECLIPSE Participants’ window (Setup menu � Patient Register �
ECLIPSE Participants).
2. Go to ECLIPSE Participants context menu and select the option ‘Update ECLIPSE
Participants’.
3. The processing screen will be displayed, as shown below:
4. Once the update has completed, the message box shown below will be displayed:
5. An updated list of those funds that participate in ECLIPSE will be listed in the
‘ECLIPSE Participants’ window:
Page 15
Version 9.3.0 Build 4620 – ECLIPSE Release Notes
Copyright © Medtech Healthcare Pty Ltd Page 15
The following columns are displayed in the ‘ECLIPSE Participants’ window:
• Code – Code used for the specific Health Fund
• Description – Name of the Health Fund
• Claim Type – Participated under which IMC Claim Type
IMPORTANT NOTE Prior to the Medtech32 V9.3 upgrade, if the Health Fund list (Setup � Patient Register �
Health Fund) had not been updated previously in your Medtech32 version, then the
ECLIPSE Participant’s list will not auto update during the Medtech32 V9.3 upgrade, as it is
dependent on the existing Health Fund lists provided in the Health Funds window.
In such cases, the ECLIPSE Participants list will have to be manually updated. To manually
add the list, select the Update ECLIPSE Participants option from the contextual ECLIPSE
Participants menu. This will then update the Health Fund list automatically.
Page 16
Version 9.3.0 Build 4620 – ECLIPSE Release Notes
Copyright © Medtech Healthcare Pty Ltd Page 16
2.1.5 View ECLIPSE Participants Steps to view the details of the Funds participating in ECLIPSE:
1. Open the ‘ECLIPSE Participants’ window (Setup menu � Patient Register �
ECLIPSE Participants).
2. Select the Health Fund that you wish to view and then click on the Open icon from
the ECLIPSE Participants context menu, or double-click on the Health Fund entry.
3. The View ECLIPSE Participants window will be displayed.
IMPORTANT NOTE The fields available in the View ECLIPSE Participants window are read only, and cannot be
edited.
2.1.6 Print ECLIPSE Participants Steps to print the list of participants:
1. Open the ‘ECLIPSE Participants’ window (Setup menu � Patient Register �
ECLIPSE Participants).
2. Go to the ‘ECLIPSE Participants’ context menu and select the option Print ECLIPSE
Participants… OR
Page 17
Version 9.3.0 Build 4620 – ECLIPSE Release Notes
Copyright © Medtech Healthcare Pty Ltd Page 17
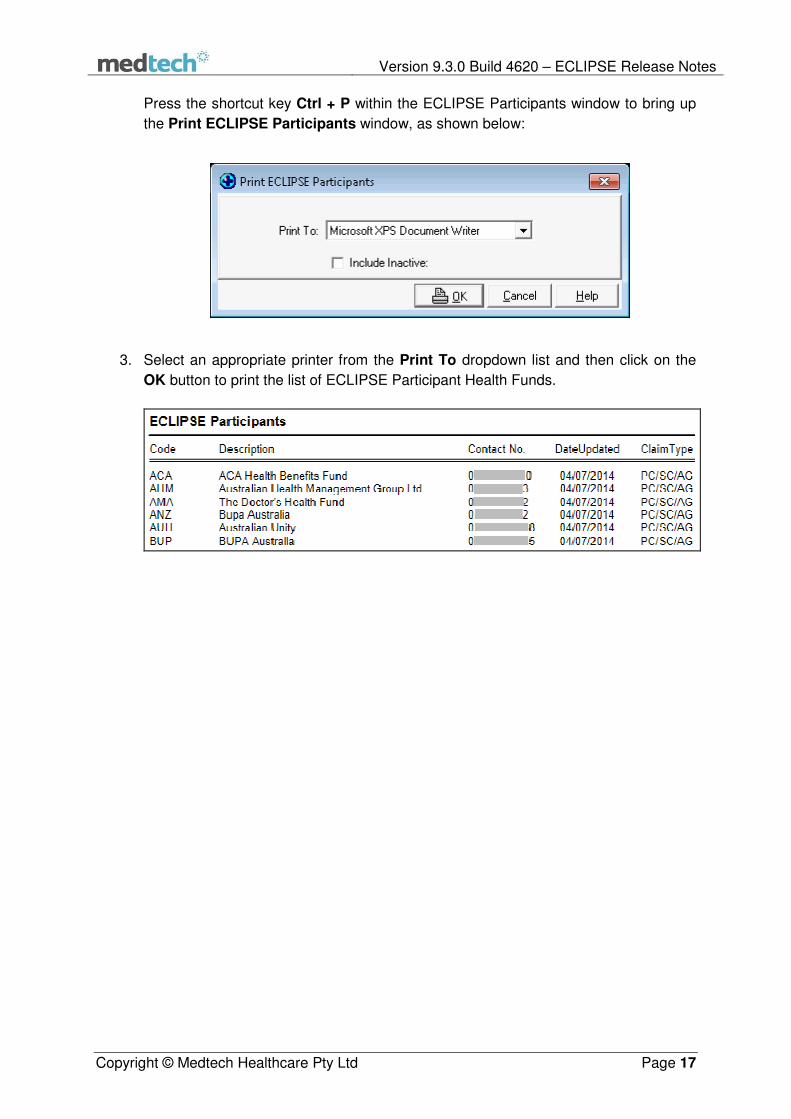
Press the shortcut key Ctrl + P within the ECLIPSE Participants window to bring up
the Print ECLIPSE Participants window, as shown below:
3. Select an appropriate printer from the Print To dropdown list and then click on the
OK button to print the list of ECLIPSE Participant Health Funds.
Page 18
Version 9.3.0 Build 4620 – ECLIPSE Release Notes
Copyright © Medtech Healthcare Pty Ltd Page 18
2.2 Payment Levels for Health Funds For every Health Fund that your Practice has an agreement with, a specific Payment Level
will need to be set up and configured for their Health Fund billing. Once these have been set
up, the user will be able to select the Health Fund as a Payment Level from within the
Invoice screen.
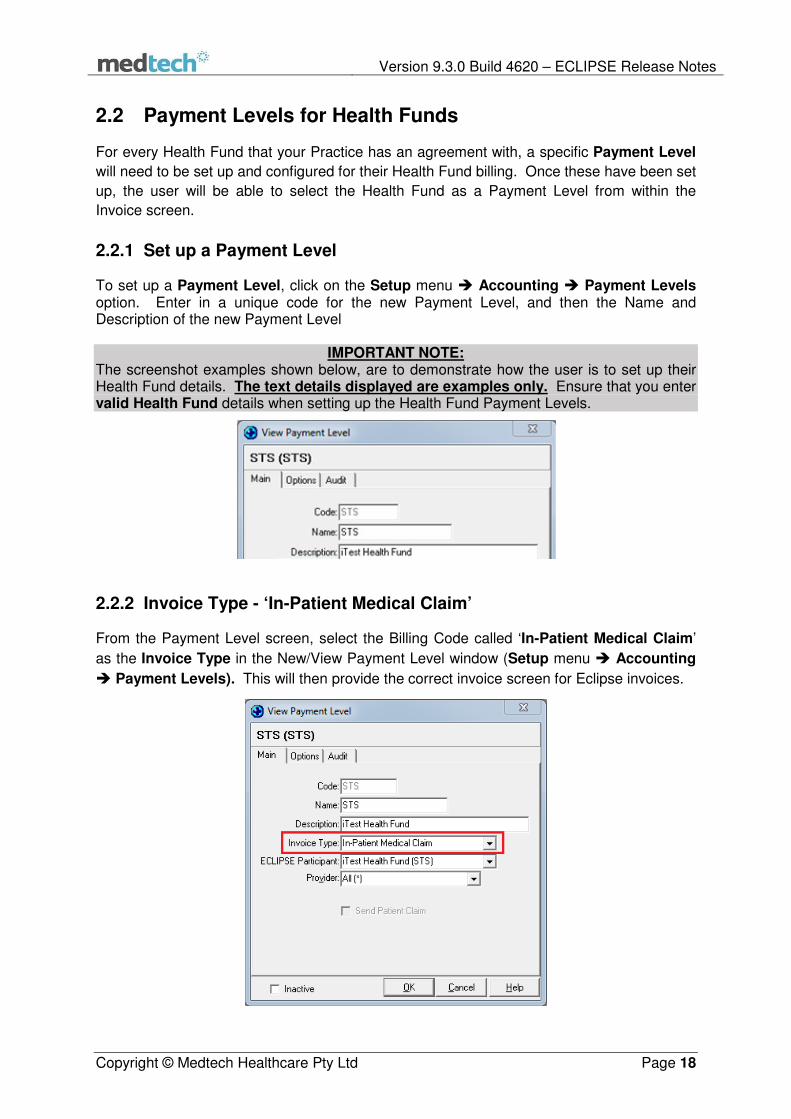
2.2.1 Set up a Payment Level To set up a Payment Level, click on the Setup menu � Accounting � Payment Levels option. Enter in a unique code for the new Payment Level, and then the Name and Description of the new Payment Level
IMPORTANT NOTE: The screenshot examples shown below, are to demonstrate how the user is to set up their Health Fund details. The text details displayed are examples only. Ensure that you enter valid Health Fund details when setting up the Health Fund Payment Levels.
2.2.2 Invoice Type - ‘In-Patient Medical Claim’ From the Payment Level screen, select the Billing Code called ‘In-Patient Medical Claim’
as the Invoice Type in the New/View Payment Level window (Setup menu � Accounting
� Payment Levels). This will then provide the correct invoice screen for Eclipse invoices.
Page 19
Version 9.3.0 Build 4620 – ECLIPSE Release Notes
Copyright © Medtech Healthcare Pty Ltd Page 19
When the option ‘In-Patient Medical Claim’ has been selected as an Invoice Type, the new
drop-down field ‘ECLIPSE Participant’ will be enabled. This will allow you to select from the
full list of all the ECLIPSE Participant Health Funds.
As a result of selecting the ‘In-Patient Medical Claim’ option, the Send Patient Claim
option will also be automatically disabled as this option is only applicable for Private
Payment Level.
IMPORTANT NOTE
Prior to selecting the default Account Holder for the IMC Payment Level, it is mandatory to
create an Account Holder for each ECLIPSE Participant Health Fund (this could be in the
same name as that of the Health Fund).
Page 20
Version 9.3.0 Build 4620 – ECLIPSE Release Notes
Copyright © Medtech Healthcare Pty Ltd Page 20
2.2.3 Configure Payment Level In the Options tab of the New/View Payment Level window, under the Account Holder
Options section, the Account holder default option alone will be enabled for the Invoice
Type ‘In-Patient Medical Claim’.
It is mandatory to configure an Account holder for the IMC Payment Level from the Search
Patient / Company window by clicking the ellipsis button .
If trying to save IMC Payment Level without the Account holder default selected, you will
encounter the following warning message
Page 21
Version 9.3.0 Build 4620 – ECLIPSE Release Notes
Copyright © Medtech Healthcare Pty Ltd Page 21
Note: The selected Account Holder will be displayed as the Health Fund Account Holder
in the IMC Invoice window for this Payment Level, as per the example shown below:
Module � Accounts � New IMC Invoice (Alt + F9)
IMPORTANT NOTE The warning message shown below will be displayed when clicking OK button on the New /
View Payment Level window without selecting the ECLIPSE Participant from the drop down
list for an IMC Invoice Type:
Click on the OK button to Save and Exit the new Health Fund Payment Level screen.
Page 22
Version 9.3.0 Build 4620 – ECLIPSE Release Notes
Copyright © Medtech Healthcare Pty Ltd Page 22
2.3 Staff Setup A new tab called ECLIPSE has been introduced in the Staff setup window to configure the
ECLIPSE Participant Health Fund(s) the Provider is allied with. The selected Health Fund
will be displayed in the New IMC Invoice window for the Provider.
2.3.1 Configure New ECLIPSE Participant
IMPORTANT NOTE
Before configuring the ECLIPSE Participant Health Fund for the Provider, ensure the
respective Health Funds have been configured as an In-Patient Medical Claim Invoice
Type in the Payment Level window (Setup � Accounting � Payment Level). Refer to
Payment Level Setup section for further information.
Steps to configure a New ECLIPSE Participant for the Provider:
1. Open the Staff Setup window (Setup menu � Staff � Members) and click on the
ECLIPSE tab.
2. Select the ECLIPSE Participant Health Fund the Provider is allied with, from the
ECLIPSE Participant drop down list.
Page 23
Version 9.3.0 Build 4620 – ECLIPSE Release Notes
Copyright © Medtech Healthcare Pty Ltd Page 23
Note: The Health Funds that have been configured as an In-Patient Medical Claim
as the Invoice Type from within the Payment Level window, will be displayed in the
ECLIPSE Participant drop down list
3. Enter the Fund Payee ID of the Provider i.e. the Health Fund Agreement identifier for
the Provider.
4. Select the Claim Type from the Claim Type drop down list. Claim Types are either
Agreements (AG), Scheme (SC), or Patient Claims (PC).
5. Select the Location from the Location drop down list.
6. Click on the Add button to save the entry and it will be added as a new row in the grid.
7. Click on the OK button to save and close the Staff setup window.
When trying to configure an existing ECLIPSE Participant Health Fund entry, i.e. duplicate
entry (having similar ECLIPSE Participant, Claim Type and Location), the warning message
shown below will be displayed when the OK button is clicked:
Page 24
Version 9.3.0 Build 4620 – ECLIPSE Release Notes
Copyright © Medtech Healthcare Pty Ltd Page 24
2.3.2 Delete ECLIPSE Participant Entry Steps to delete an ECLIPSE Participant entry from the Staff setup window:
1. Open the Staff Setup window (Setup menu � Staff � Members) and click on the
ECLIPSE tab.
2. Highlight the Health Fund entry that needs to be removed and then click on the
Delete button.
3. The selected entry will be removed from the Staff setup window.
Page 25
Version 9.3.0 Build 4620 – ECLIPSE Release Notes
Copyright © Medtech Healthcare Pty Ltd Page 25
2.4 Service Setup In Medtech32 Version 9.3.0, a new tab called ‘ECLIPSE’ has been introduced into the
Services setup window (Setup menu � Accounting � Services).
For all Service Item Codes that are to be invoiced for ECLIPSE IMC Invoicing, you will
need to open each Service Item code individually, and set the parameters per Provider
for each relevant Eclipse Participant.
This tab contains two sections:
• Fund Agreement
• Fund Scheme.
Page 26
Version 9.3.0 Build 4620 – ECLIPSE Release Notes
Copyright © Medtech Healthcare Pty Ltd Page 26
2.4.1 Fund Agreement The Fund Agreement section within the ECLIPSE tab in the Service window screen has the
following columns;
• Eclipse Participant – Select the required Health Fund from the Eclipse Participant
drop down list. This field will list only the Health Funds that have been linked to one
of the Payment Levels (refer to Payment Levels section) and set up for any one of
the Staff member for a claim type AG (refer to Staff setup section)
• Provider – This will list all the Service Providers from the Staff setup window. Select
an appropriate provider from the drop down list
• Location – The Location field will list all the locations of the Practice from the
Location settings window. Select an appropriate location from the drop down list
• Base Amount – Enter the base amount the Provider agreed with the selected Health
Fund for this service. The amount entered will be displayed in the IMC Invoice
window ‘Fund Fee’ field, for a Claim Type of Agreement, as shown below:
Page 27
Version 9.3.0 Build 4620 – ECLIPSE Release Notes
Copyright © Medtech Healthcare Pty Ltd Page 27
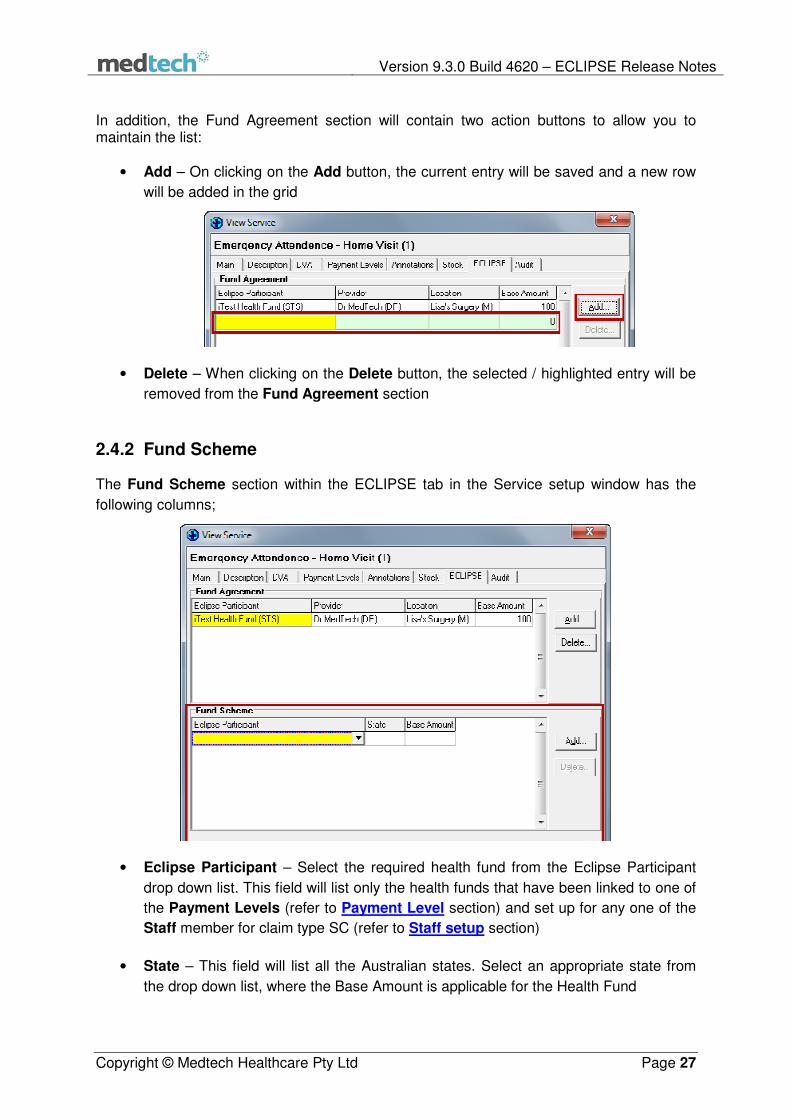
In addition, the Fund Agreement section will contain two action buttons to allow you to maintain the list:
• Add – On clicking on the Add button, the current entry will be saved and a new row
will be added in the grid
• Delete – When clicking on the Delete button, the selected / highlighted entry will be
removed from the Fund Agreement section
2.4.2 Fund Scheme The Fund Scheme section within the ECLIPSE tab in the Service setup window has the
following columns;
• Eclipse Participant – Select the required health fund from the Eclipse Participant
drop down list. This field will list only the health funds that have been linked to one of
the Payment Levels (refer to Payment Level section) and set up for any one of the
Staff member for claim type SC (refer to Staff setup section)
• State – This field will list all the Australian states. Select an appropriate state from
the drop down list, where the Base Amount is applicable for the Health Fund
Page 28
Version 9.3.0 Build 4620 – ECLIPSE Release Notes
Copyright © Medtech Healthcare Pty Ltd Page 28
• Base Amount – Enter the base amount for this service. The amount entered will be
displayed in the IMC Invoice window ‘Fund Fee’ field for the Claim Type ‘Scheme’,
as shown below:
The Fund Scheme section also has two action buttons to allow you to maintain this list:
• Add – On clicking on the Add button, the current entry will be saved and a new row
will be added in the grid
• Delete – On clicking on the Delete button, the selected entry will be removed from
the Fund Scheme section
Page 29
Version 9.3.0 Build 4620 – ECLIPSE Release Notes
Copyright © Medtech Healthcare Pty Ltd Page 29
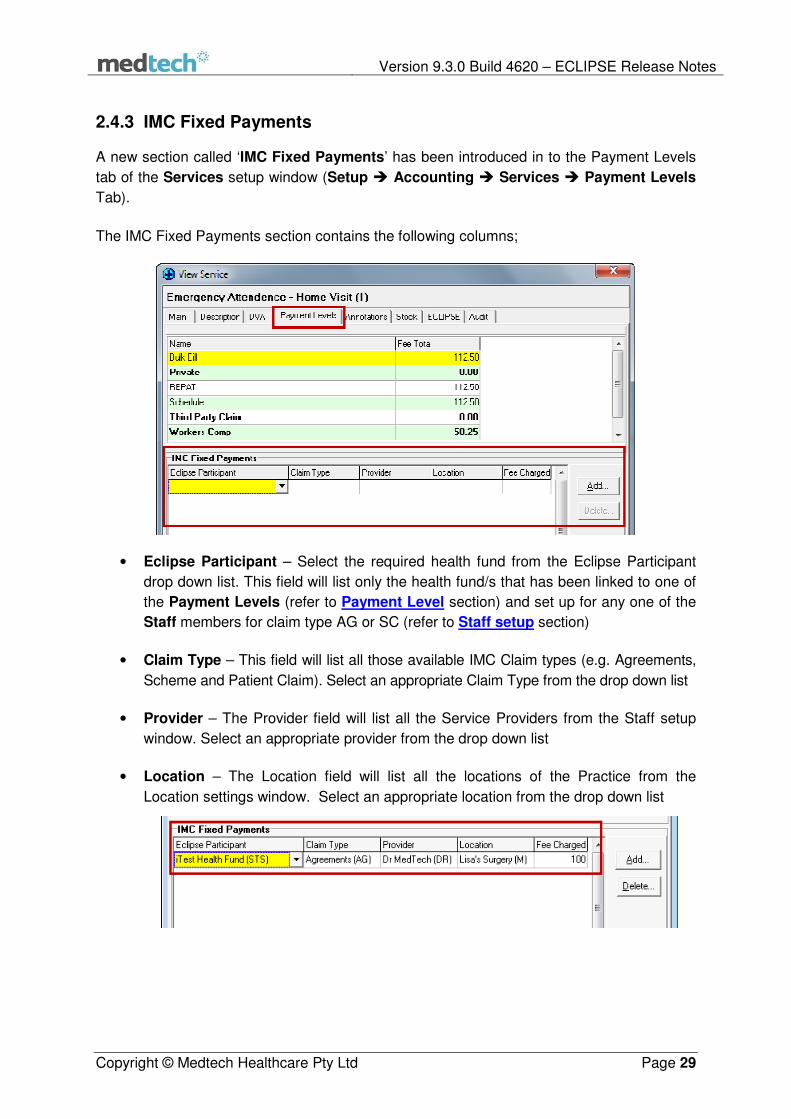
2.4.3 IMC Fixed Payments A new section called ‘IMC Fixed Payments’ has been introduced in to the Payment Levels
tab of the Services setup window (Setup � Accounting � Services � Payment Levels
Tab).
The IMC Fixed Payments section contains the following columns;
• Eclipse Participant – Select the required health fund from the Eclipse Participant
drop down list. This field will list only the health fund/s that has been linked to one of
the Payment Levels (refer to Payment Level section) and set up for any one of the
Staff members for claim type AG or SC (refer to Staff setup section)
• Claim Type – This field will list all those available IMC Claim types (e.g. Agreements,
Scheme and Patient Claim). Select an appropriate Claim Type from the drop down list
• Provider – The Provider field will list all the Service Providers from the Staff setup
window. Select an appropriate provider from the drop down list
• Location – The Location field will list all the locations of the Practice from the
Location settings window. Select an appropriate location from the drop down list
Page 30
Version 9.3.0 Build 4620 – ECLIPSE Release Notes
Copyright © Medtech Healthcare Pty Ltd Page 30
• Fee Charged – Enter the amount for this service to be charged for the selected
Claim Type. The amount entered will be displayed in the IMC Invoice window ‘Fee
Charged’ field, when the respective Health Fund, Claim Type and the Provider
combination is selected
Two action buttons are included in the ‘IMC Fixed Payments’ section;
• Add – On clicking on the Add button, the current entry will be saved and a new row
will be added in the grid
• Delete – On clicking on the Delete button, the selected entry will be removed from
this section.
Page 31
Version 9.3.0 Build 4620 – ECLIPSE Release Notes
Copyright © Medtech Healthcare Pty Ltd Page 31
2.5 Staff Access Rights to create IMC Accounts Once your Practice has obtained the license for the ECLIPSE Module, the Staff Members
within your Practice will now need to be set up for access to the IMC Accounts related
screens.
From the Setup > Staff > Staff Members option, select the Provider that needs to be given
access rights to the IMC Accounts feature. From the Security Tab, check/tick the option
called ‘IMC Accounts’ to enable this feature for the Provider. This will grant the Provider
access to the various IMC Accounts screens.
Once the ‘IMC Accounts’ option has been enabled, the Provider will be able to access the
following IMC screens:
• IMC Invoice window (Module � Accounts � New IMC Invoice)
• IMC Batching window (Module � Accounts � IMC Batching)
If the Provider Staff Setup has not had the ‘IMC Accounts’ option enabled, when attempting
to access the aforementioned IMC screens, then the message box shown below will be
displayed.
Note: Once the ‘IMC Accounts’ option has been enabled, you might have to log-off and log-
on again to Medtech32 for the changes to take effect.
Page 32
Version 9.3.0 Build 4620 – ECLIPSE Release Notes
Copyright © Medtech Healthcare Pty Ltd Page 32
2.6 Medicare Claim Review Panel (MCRP) Items Claims for the MCRP services cannot be accepted via ECLIPSE as these services require
‘demonstrated’ clinical needs such as clinical and/or photogenic evidence. Therefore these
claims should be lodged manually with Medicare or the Health Fund.
A new option Service Item Defaults has been introduced in to the Accounting module
under Setup � Accounting � Service Item Defaults.
The Default Service Items window has two tabs:
• Medicare Plus – For information about this tab please refer to Default Service
Items section in the Medtech32 Release Notes – Version 9.3.0 Build 4620
document
• MCRP Items – This tab lists the MBS codes for the MCRP items. Note: the valid
Service Items will be populated to this screen.
Page 33
Version 9.3.0 Build 4620 – ECLIPSE Release Notes
Copyright © Medtech Healthcare Pty Ltd Page 33
The MCRP items are identified through the item description wording ‘where it can be
demonstrated’ in the Description tab of the View Service window under Setup �
Accounting � Services.
Therefore, any items containing such wording in their item description will be
considered as an MCRP item and will be listed in the Default Services Items >
MCRP Items. This is a non-editable field.
Page 34
Version 9.3.0 Build 4620 – ECLIPSE Release Notes
Copyright © Medtech Healthcare Pty Ltd Page 34
2.7 Hospital Setup The Provider No. field introduced under Setup ���� Location ���� Hospital has been changed
to be called the Facility ID in Medtech V9.3.0.
• Facility ID – Hospital Facility Provider Number
The Facility ID configured in this window will be displayed next to the Hospital field of the
IMC Invoice window, when selecting this hospital from the Hospital drop down list.
Page 35
Version 9.3.0 Build 4620 – ECLIPSE Release Notes
Copyright © Medtech Healthcare Pty Ltd Page 35
2.8 Setup Credit Adjust Reasons A new feature called ‘Credit Adjust’ has been introduced in Medtech32 Version 9.3.0. A
Credit Adjust will decrease the outstanding amount of the selected transaction.
There is a provision in the Setup menu to enter the Credit Adjust Reasons for the same.
The reasons configured here will be listed as options in the Credit Adjust Reasons window,
when raising a Credit Adjust against an IMC Invoice (refer to Credit Adjust section for
further details).
2.8.1 Menu Option A new menu item called ‘Credit Adjust Reasons’ has been introduced under the Setup
menu � Accounting, to access the IMC Credit Adjust Reasons window screen.
Once selected from the menu option above, the Credit Adjust Reasons will be displayed.
Page 36
Version 9.3.0 Build 4620 – ECLIPSE Release Notes
Copyright © Medtech Healthcare Pty Ltd Page 36
2.8.2 IMC Credit Adjust Reasons – Contextual Menu A new contextual menu item IMC Credit Adjust Reasons will be displayed next to the
Module menu, when the IMC Credit Adjust Reasons window has been selected, and is the
active window. The IMC Credit Adjust Reasons menu has the following sub-menu items:
New and Open.
2.8.3 Add a new IMC Credit Adjust Reason Follow the steps below to Add a new IMC Credit Adjust Reason:
1. Open the IMC Credit Adjust Reasons window (Setup menu � Accounting �
Credit Adjust Reasons).
2. Click on the Add a New IMC Credit Adjust Reasons icon , or press the shortcut
key Ctrl + N in the IMC Credit Adjust Reasons window to bring up the new IMC
Credit Adjust Reasons window
• Code – A Code will be assigned by default and is non-editable
• Description – Enter the new IMC Credit Adjust Reason description
• Inactive – Select this checkbox to inactivate the reason. The entry will appear
with a ‘Strike Through’ to show it has been made ‘Inactive’
• OK – Click on the OK button to save the new IMC Credit Adjust Reason entry
• Cancel – Click on the Cancel button to abort the process
Page 37
Version 9.3.0 Build 4620 – ECLIPSE Release Notes
Copyright © Medtech Healthcare Pty Ltd Page 37
2.8.4 View / Edit IMC Credit Adjust Reason Entry Follow the steps below to view / modify an existing IMC Credit Adjust Reason from the IMC
Credit Adjust Reason window:
1. Open the IMC Credit Adjust Reasons window (Setup menu � Accounting �
Credit Adjust Reasons).
2. Select the IMC Credit Adjust Reason for which you wish to view details. Then click on
the Open an existing IMC Credit Adjust Reason icon , or double click on the
desired entry, or press the shortcut key Ctrl + O to bring up the View IMC Credit
Adjust Reasons window.
3. Modify the details as required and then click on the OK button to save the changes.
Page 38
Version 9.3.0 Build 4620 – ECLIPSE Release Notes
Copyright © Medtech Healthcare Pty Ltd Page 38
2.9 Setup Debit Adjust Reasons A new feature called ‘Debit Adjust’ has been introduced in Medtech32 Version 9.3.0. A
Debit Adjust will increase the outstanding amount of the selected transaction.
There is a provision in the Setup menu to enter the Debit Adjust Reasons for the same. The
reasons configured here will be listed in the Debit Adjust Reasons window, when raising a
Debit Adjust against an IMC Invoice (refer to Debit Adjust section for further details).
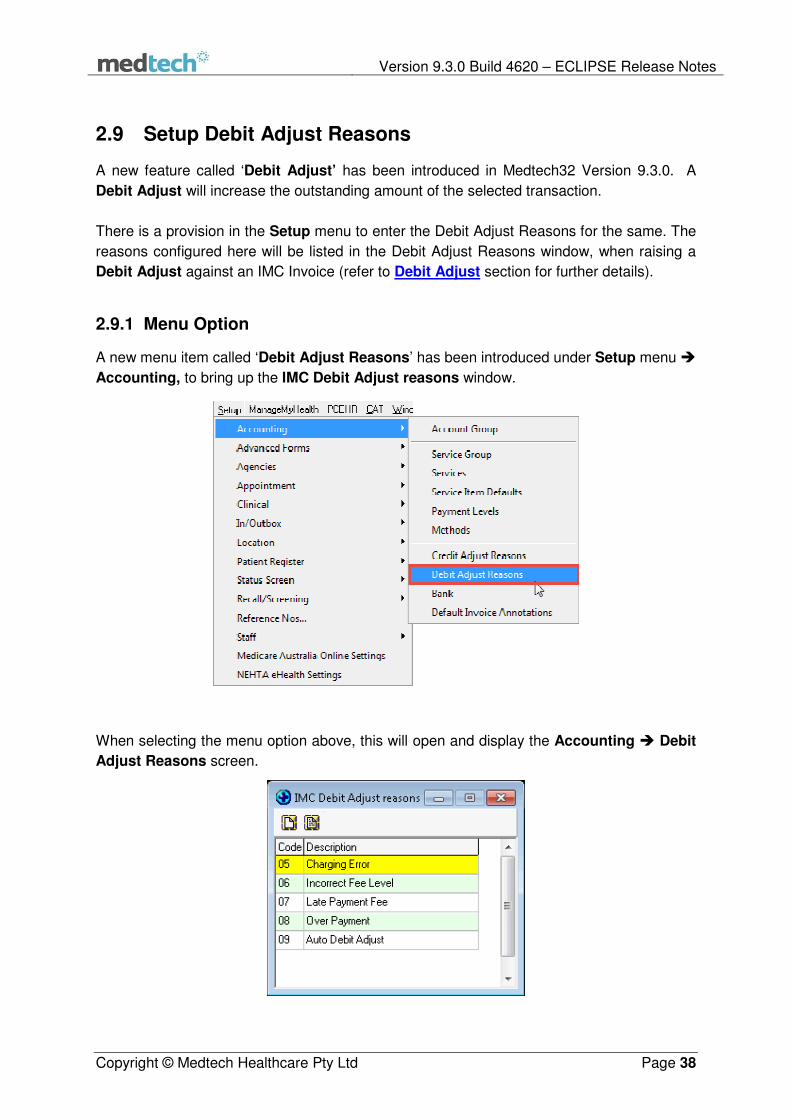
2.9.1 Menu Option A new menu item called ‘Debit Adjust Reasons’ has been introduced under Setup menu �
Accounting, to bring up the IMC Debit Adjust reasons window.
When selecting the menu option above, this will open and display the Accounting � Debit
Adjust Reasons screen.
Page 39
Version 9.3.0 Build 4620 – ECLIPSE Release Notes
Copyright © Medtech Healthcare Pty Ltd Page 39
2.9.2 IMC Debit Adjust Reasons – Contextual Menu A new contextual menu item IMC Debit Adjust Reasons will be displayed next to the
Module menu, when the IMC Debit Adjust Reasons window is the active window. The IMC
Debit Adjust Reasons menu has the following sub-menu items: New and Open.
2.9.3 Add a new IMC Debit Adjust Reason Follow the steps below to add a new IMC Debit Adjust Reason:
1. Open the IMC Debit Adjust reasons window (Setup menu � Accounting � Debit
Adjust Reasons).
2. Click on the Add a New IMC Debit Adjust Reasons icon , or press the shortcut
key Ctrl + N in the IMC Debit Adjust Reasons window to bring up the new IMC Debit
Adjust Reasons window.
• Code – A Code will be assigned by default and will be non-editable
• Description – Enter the new IMC Debit Adjust Reason Description
• Inactive – Select this checkbox to inactivate the reason. The entry will appear
with a ‘Strike Through’ to show it has been made ‘Inactive’
• OK – Click on the OK button to save the new IMC Debit Adjust reason entry
• Cancel – Click on the Cancel button to abort the process
Page 40
Version 9.3.0 Build 4620 – ECLIPSE Release Notes
Copyright © Medtech Healthcare Pty Ltd Page 40
2.9.4 View / Edit IMC Debit Adjust Reason Entry Follow the steps below to view / modify an existing IMC Debit Adjust Reason from the IMC
Debit or Credit Adjust Reason window:
1. Open the IMC Debit Adjust Reasons window (Setup menu � Accounting � Debit
Adjust Reasons).
2. Select the IMC Debit Adjust reason whose details you wish to view, and then click on
the Open an existing IMC Debit Adjust Reason icon , or double click on the
desired line entry, or press the shortcut key Ctrl + O to bring up the View IMC Debit
Adjust Reasons window.
3. Modify the details as required and then click on the OK button to save the changes.
Page 41
Version 9.3.0 Build 4620 – ECLIPSE Release Notes
Copyright © Medtech Healthcare Pty Ltd Page 41
2.10 Patient Register Window When no Health Fund (i.e. ECLIPSE Participant Health Fund) has been selected in the
‘Accounts’ tab of the Patient Register window (Module � Patient Register), the Payment
Level field in the IMC Invoice window (Module � Accounts � New IMC Invoice) will be
displayed as a ‘blank’ field, as shown in the screenshot below:
However, it is still possible to select a configured Health Fund from the drop down menu to
continue processing the IMC Invoice.
If an ECLIPSE Participant Health Fund (see Note below) has been selected in the
‘Accounts’ tab of the Patient Register window, then the same Health Fund will be
reflected for the Payment Level field in the IMC Invoice window, as shown in the
screenshot below:
Note: ECLIPSE Participant Health Fund - configured as an Invoice Type ‘In-Patient Medical
Claim’ in the Payment Level window, refer to the Payment Levels section for further
information.
Page 42
Version 9.3.0 Build 4620 – ECLIPSE Release Notes
Copyright © Medtech Healthcare Pty Ltd Page 42
However, in the case when a non-ECLIPSE Participant Health Fund (see Note below) has
been selected in the ‘Accounts’ tab of the Patient Register window, the Payment Level
field in the IMC Invoice window will be displayed as a blank field, as shown in the
screenshot below:
Note: Where a Health Fund is not configured as an Invoice Type ‘In-Patient Medical Claim’ in the Payment Level window – refer to the Payment Levels section for further information.
Page 43
Version 9.3.0 Build 4620 – ECLIPSE Release Notes
Copyright © Medtech Healthcare Pty Ltd Page 43
Furthermore, the Payment Level field in the ‘Name’ tab of the Patient Register window will
only display those non-IMC Payment Levels setup under the Setup � Accounting �
Payment Levels.
Page 44
Version 9.3.0 Build 4620 – ECLIPSE Release Notes
Copyright © Medtech Healthcare Pty Ltd Page 44
2.11 New IMC Invoice A new menu ‘New IMC Invoice’ option has been introduced under the Module ���� Accounts
menu, as shown below:
Selecting this menu will bring up the ‘IMC Invoice’ window. The IMC Invoice has four tabs
similar to the normal General Invoice. The details of these four tabs are explained below.
2.11.1 IMC Invoice – Main Tab The Main Tab of an IMC Invoice has multiple sections. These sections vary based on the
Service Type chosen in the invoice screen itself
The sections specific to each Service Type are described below.
• Service Type – General (O) will display the following sections. o Header
o IMC Options
o Details
o Invoiced Services
o Payment
Page 45
Version 9.3.0 Build 4620 – ECLIPSE Release Notes
Copyright © Medtech Healthcare Pty Ltd Page 45
• Service Type – Specialist (S) will display the following sections. o Header
o IMC Options
o Details
o Invoiced Services
o Payment
o Referral/Request
Page 46
Version 9.3.0 Build 4620 – ECLIPSE Release Notes
Copyright © Medtech Healthcare Pty Ltd Page 46
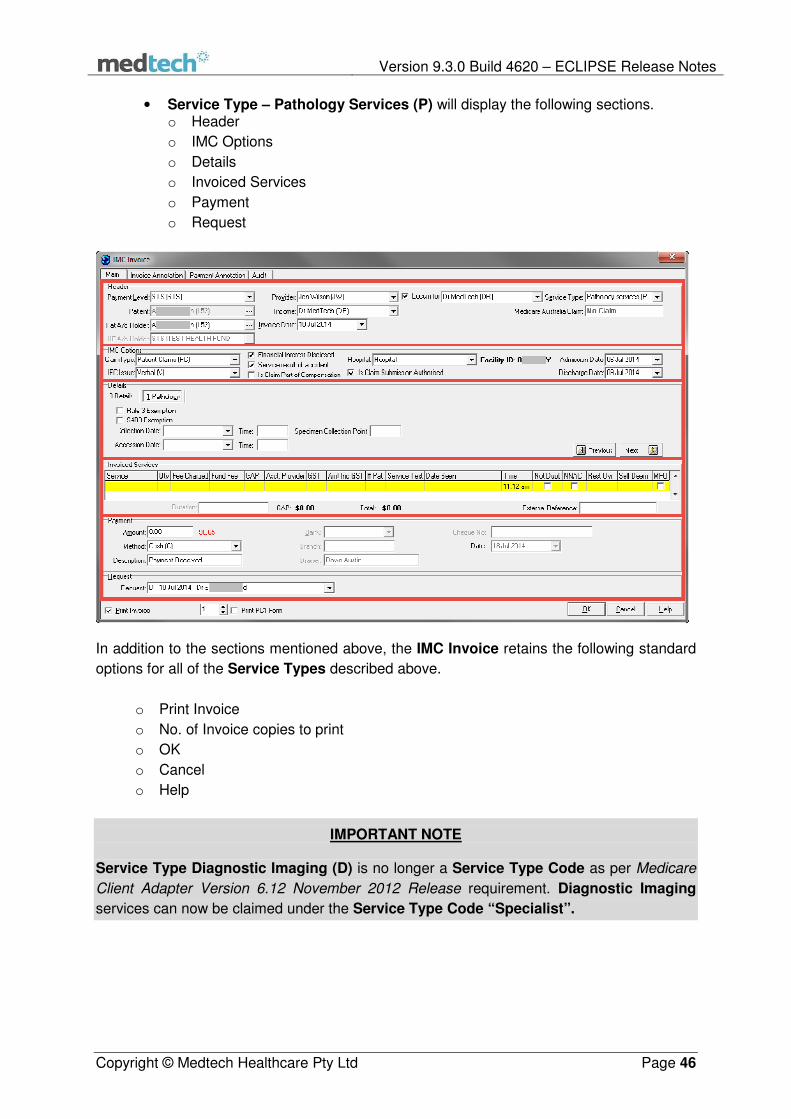
• Service Type – Pathology Services (P) will display the following sections. o Header
o IMC Options
o Details
o Invoiced Services
o Payment
o Request
In addition to the sections mentioned above, the IMC Invoice retains the following standard
options for all of the Service Types described above.
o Print Invoice
o No. of Invoice copies to print
o OK
o Cancel
o Help
IMPORTANT NOTE Service Type Diagnostic Imaging (D) is no longer a Service Type Code as per Medicare
Client Adapter Version 6.12 November 2012 Release requirement. Diagnostic Imaging
services can now be claimed under the Service Type Code “Specialist”.
Page 47
Version 9.3.0 Build 4620 – ECLIPSE Release Notes
Copyright © Medtech Healthcare Pty Ltd Page 47
The various sections in an IMC Invoice are explained further below. To open this invoice, Search for, and place a patient on to the Palette first.
• Header
o Payment Level
The Payment Level will default to the one that is linked with the Health Fund
selected in the Patient Register for the selected patient. For further information,
refer to Payment Levels section.
o Patient
The Patient field is locked and will display the active patient on the Palette. To
change the patient – run a Patient Search, and place the desired patient on the
Palette.
o Pat A/c Holder
This is the Patient Account Holder field. The Pat A/c Holder field will default to the account holder selected in the Patient
Register window of the active patient.
To change the account holder, click the ellipsis button. The Search Patient /
Company window will be displayed. Enter the account holders name and click on the
Search button Select an appropriate account holder from the list and then click on
the OK button or press the Enter key.
o HF A/c Holder
This is the Health Fund Account Holder field. The HF A/c Holder field will default to the account holder linked to the selected
Payment Level. For further information, refer to Payment Levels section.
o Provider and Income
The Provider and Income fields default to the Provider of the appointment being
invoiced (if using the preferred method to place the patient on the palette).
If the patient is invoiced directly, that is, not from the Appointment Book, the provider will default to the provider listed in the Patient Register screen.
Page 48
Version 9.3.0 Build 4620 – ECLIPSE Release Notes
Copyright © Medtech Healthcare Pty Ltd Page 48
o Invoice Date
This field is to capture the date when the patient is invoiced, i.e. the date when the
invoice is raised. This date can be back dated if required.
o Locum For
Where a Locum has provided the service, select the ‘Locum for’ checkbox to
introduce a drop down list to choose the Service Provider who is being substituted by
the Locum.
In the previous screenshot, Dr. Jen Wilson is the Locum who is providing the
service, and Dr Medtech is the Service Provider for which Dr Jen Wilson is the
Locum for.
The Income Provider is the default Income Provider chosen for the selected Service
Provider, i.e. the Income Provider is that of Dr Medtech’ s.
On enabling the ‘Locum for’ field to indicate the service is being rendered by a
Locum, a notation is populated in to the Service Text field in the format ‘Locum for’
and the Provider Number of the Provider for whom the Locum is substituting. For
further information, please refer to Service Text section.
If the ‘Locum for’ checkbox is selected but a Service Provider is not selected, the
following warning message will be displayed when the user attempts to save the
invoice.
IMPORTANT NOTE
A valid Provider Number needs to be configured for the Provider for whom the
Locum is substituting.
Not configuring a valid Provider Number in the setup will result in the following
warning message being displayed when selecting the Provider.
Page 49
Version 9.3.0 Build 4620 – ECLIPSE Release Notes
Copyright © Medtech Healthcare Pty Ltd Page 49
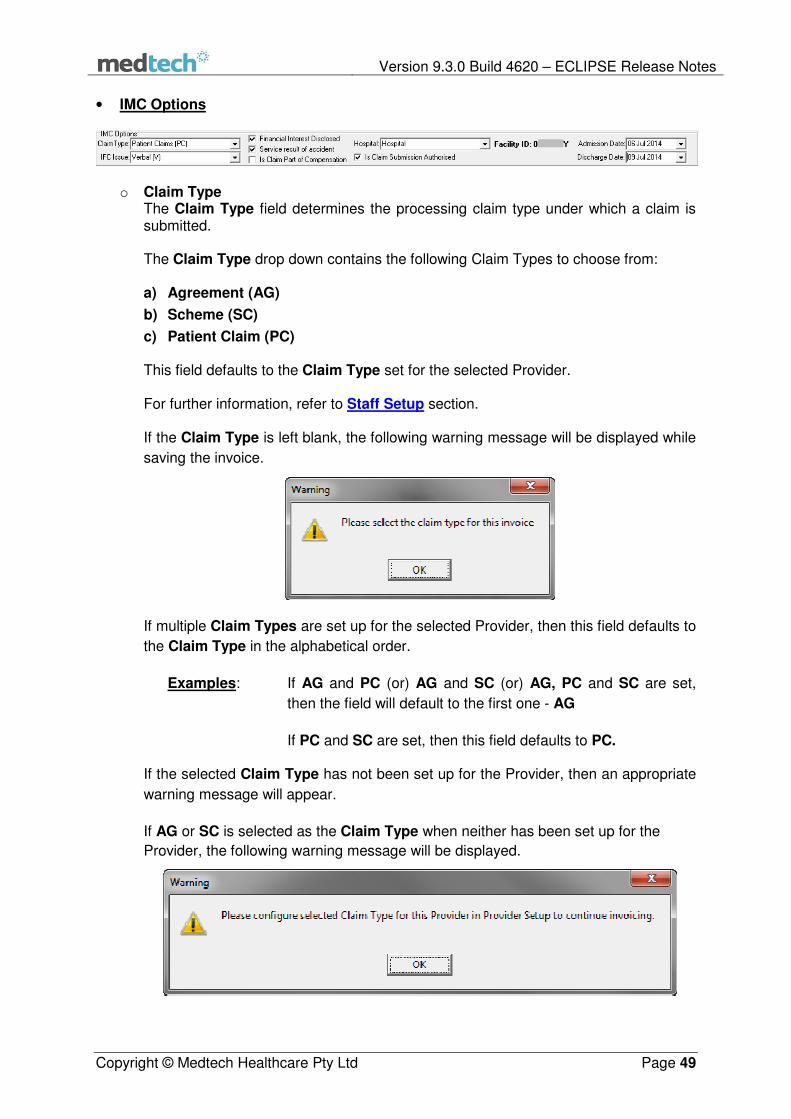
• IMC Options
o Claim Type The Claim Type field determines the processing claim type under which a claim is submitted. The Claim Type drop down contains the following Claim Types to choose from:
a) Agreement (AG)
b) Scheme (SC)
c) Patient Claim (PC)
This field defaults to the Claim Type set for the selected Provider. For further information, refer to Staff Setup section. If the Claim Type is left blank, the following warning message will be displayed while
saving the invoice.
If multiple Claim Types are set up for the selected Provider, then this field defaults to
the Claim Type in the alphabetical order.
Examples: If AG and PC (or) AG and SC (or) AG, PC and SC are set,
then the field will default to the first one - AG
If PC and SC are set, then this field defaults to PC.
If the selected Claim Type has not been set up for the Provider, then an appropriate
warning message will appear.
If AG or SC is selected as the Claim Type when neither has been set up for the
Provider, the following warning message will be displayed.
Page 50
Version 9.3.0 Build 4620 – ECLIPSE Release Notes
Copyright © Medtech Healthcare Pty Ltd Page 50
Unless the required Claim Type AG or SC is set up, the invoice will not be saved
with the selected Claim Type.
Either, the Claim Type has to be changed to one that has been set for the Provider
(or) the invoice has to be closed and the required Claim Type set up for the selected
Provider before invoicing again.
If PC is selected as the Claim Type when it has not been set up for the Provider, the
following confirmation message will be displayed.
This confirmation message indicates that the selected PC Claim Type has not been
set up but will allow the user to override the message and continue with invoicing
with the Claim Type selected as PC.
o IFC Issue This is the IFC Issue Code field. When there is an out of pocket expense, the IFC Issue field indicates the type of
Informed Financial Consent that has been obtained from the patient.
The IFC Issue drop down contains the following IFC Issue Codes to choose from:
a) Verbal (V)
b) Inwriting (W)
c) Not issued (N)
d) Not Obtained (X)
For a Claim Type of Agreement (AG), the IFC Issue Code will need to be either
Verbal (V), In Writing (W) or Not Obtained (X).
If Not Issued (N) is selected, the following warning message will be displayed when
saving the invoice.
Page 51
Version 9.3.0 Build 4620 – ECLIPSE Release Notes
Copyright © Medtech Healthcare Pty Ltd Page 51
For a Claim Type Scheme (SC), the IFC Issue Code will need to be In Writing (W)
or Not Obtained (X).
If the IFC Issue Code selected is Verbal (V) or Not Issued (N) then the following
warning message will be displayed when saving the invoice.
The below message box will be displayed, when clicking OK button on the IMC
Invoice window without selecting an appropriate option from the IFC Issue field:
o Financial Interest Disclosed This field indicates if Financial Interest has been disclosed by the Provider to the
insured person/ patient.
For a Claim Type Scheme (SC), if the Financial Interest is not disclosed (the
Financial Interest Disclosed box is not selected) then the following warning
message will be displayed when saving the invoice.
o Service result of accident
This field indicates whether or not the associated information relates to the patient
experiencing an accident.
o Is Claim Part of Compensation
This field indicates whether or not the voucher contains services that are subject to a
compensation claim.
Page 52
Version 9.3.0 Build 4620 – ECLIPSE Release Notes
Copyright © Medtech Healthcare Pty Ltd Page 52
o Is Claim Submission Authorised This field indicates whether the claimant has authorised the location to submit the
claim on their behalf.
This Authorisation is mandatory for a Claim Type of ‘PC’. If a Claim Type is PC, and ‘Is Claim Submission Authorised’ is unchecked, the
following warning message will be displayed while saving this invoice.
o Hospital This field lists all the Hospitals that have been set up in Setup ���� Location ����
Hospital Setup. For further information, refer to Hospital Setup section.
The drop down list allows you to choose the Hospital where the service was rendered. On selecting a Hospital, the Facility ID is displayed as a label beside the Hospital field.
As all IMC invoices render ‘In Hospital’ services, if a Hospital is not selected the
following warning message will be displayed when saving the invoice.
If the Hospital is selected but Facility ID of the Hospital is not configured in the
Hospital Setup, then the following warning message will be displayed.
Page 53
Version 9.3.0 Build 4620 – ECLIPSE Release Notes
Copyright © Medtech Healthcare Pty Ltd Page 53
o Admission Date
This indicates the date the patient was admitted to the hospital. Select / Enter the Admission Date in the respective fields. Ensure that the
Admission Date is less than or equal to the Invoice Date. If not, the following
warning message will be displayed while saving the invoice.
The below message box will be displayed when clicking OK button on the IMC
Invoice window, without entering / selecting an appropriate Admission Date from the
Calendar drop down list:
o Discharge Date
This indicates the date the patient was discharged from the hospital.
Select / Enter the Discharge Date in the respective fields. Ensure that the
Discharge Date is greater than or equal to the Date of Admission and the Invoice
Date. If not, the warning message shown below will be displayed:
Page 54
Version 9.3.0 Build 4620 – ECLIPSE Release Notes
Copyright © Medtech Healthcare Pty Ltd Page 54
• Details
a) Details
o Service
From the dropdown list select the service the patient is being invoiced for.
o Quantity This field can be used to indicate the Quantity required for the selected Service.
o Field Quantity The field indicates the number of fields irradiated or the quantity of time blocks for
derived fee intrathecal or epidural infusion services
If Field Quantity is set when Number of Patients is set then the following warning
message is displayed
o Fee Charged The Fee Charged is the fee set up in Fixed Payments in Setup ���� Accounting ����
Services ���� Payment Levels Tab ���� IMC Fixed Payments section. For further
information, refer to Service Setup – IMC Fixed Payments section.
If a Fixed Payment fee is not set up, then the Fee Charged field defaults to the
Fund Fee. For further information, refer to Service Setup section.
If the Fee Charged is less than or equal to zero, then the following message will be
displayed when saving the invoice.
Page 55
Version 9.3.0 Build 4620 – ECLIPSE Release Notes
Copyright © Medtech Healthcare Pty Ltd Page 55
o Fund Fee
The Fund Fee is the Fee set up as base amount in Setup ���� Accounting ����
Services ���� Eclipse Tab ���� Fund Agreement/ Fund Scheme sections. For further
information refer to Service Setup section.
The Fund Fee is the fee amount that gets assigned as an outstanding amount
against the selected Health Fund Account Holder.
If the Fund Fee is greater than the Fee Charged, the following warning message will
be displayed while saving the invoice.
The below message box will be displayed when clicking OK button on the IMC
Invoice window if the Fund Fee field remains empty:
o GST This is the Goods and Services Tax field. This field indicates the GST calculated on the Fee Charged. If the item number has been selected to have GST added to it in the Medtech32
setup, then the GST will be calculated automatically. However, this fee can be
modified by overwriting the figure in this field.
Note: Services claimed through IMC Billing do not attract GST.
o Amount Inc GST This is the Amount Inclusive of GST field. This field displays the Total Fee Charged amount for the service inclusive of GST.
Page 56
Version 9.3.0 Build 4620 – ECLIPSE Release Notes
Copyright © Medtech Healthcare Pty Ltd Page 56
o Number of Patients If necessary, enter the number of patients seen in this field. If a derived fee item
number has been selected, the number of patients entered into the Derived Fee
Details window will default in this field.
If Number of Patients is set when the Field Quantity is also set, then the following
warning message will be displayed
o In Hospital Service This field indicates that the service was rendered in a hospital. For an IMC Invoice
this is selected by default and is not an editable field.
o Service Text
This is a free text field used to provide additional information to assist with the benefit
assessment of the service.
In the Header section of the IMC Invoice Main Tab, on enabling the Locum for field
to indicate the service is being rendered by a Locum, a notation is populated in the
Service Text field in the format ‘Locum for and the Provider Number of the Provider
for whom the Locum is substituting’. For example: Locum for 2XXXXXXY.
o When Seen
This drop down field allows the user to enter in the date of when the patient was actually seen by the Provider.
o Options The Options section contains the Not Duplicate Service, Self-Deemed, Not
Normal After Care and Multiple Procedure Override.
Note: The user must tick the relevant checkboxes for when any of these options are
applicable, and not just enter in the supporting information in to the Service Text
fields. Where claims have been sent with only the Service Text information, and the
relevant checkbox not ticked – those claims not be paid by Medicare.
Page 57
Version 9.3.0 Build 4620 – ECLIPSE Release Notes
Copyright © Medtech Healthcare Pty Ltd Page 57
b) Pathology
The Pathology Tab of the Details section of the IMC Invoice is the same as the
Pathology Tab of the Details section of a General Invoice.
• Invoiced Services
o Service
From the dropdown list select the service the patient is being invoiced for.
o Qty Indicates the Quantity required for the selected Service.
o Fee Charged The Fee Charged is the fee set up in Fixed Payments in Setup ���� Accounting ����
Services ���� Payment Levels Tab ���� IMC Fixed Payments section.
For further information refer to IMC Fixed Payments section.
If a Fixed Payment fee is not set up, then the Fee Charged field defaults to the
Fund Fee.
For further information, refer to Service Setup section.
o Fund Fee
The Fund Fee is the fee set up as base amount in Setup ���� Accounting ����
Services ���� Eclipse Tab ���� Fund Agreement/ Fund Scheme sections.
The Fund Fee is the fee amount that gets assigned as an outstanding amount
against the selected Health Fund Account Holder.
For further information refer to Service Setup section.
o GAP
This field indicates the GAP that needs to be paid for the selected service and is non
editable
. GAP = (Fee Charged + GST) – Fund Fee The GAP amount is the fee amount that gets assigned as an outstanding amount
against the Patient Account Holder for the selected Patient.
Page 58
Version 9.3.0 Build 4620 – ECLIPSE Release Notes
Copyright © Medtech Healthcare Pty Ltd Page 58
If the GAP amount is greater than the Fee Charged, then the following warning
message is displayed while saving the invoice.
o GST
This is the Goods and Services Tax field. This field indicates the GST calculated on the Fee Charged. If the item number has been selected to have GST added to it in the Medtech32
setup, then the GST will be calculated automatically. However, this fee can be
modified by overwriting the figure in this field.
o Amt Inc GST
This is the Amount Inclusive of GST field. This field displays the Total Fee Charged for the service inclusive of GST.
o # Pat.
If necessary, enter the number of patients seen in this field. If a derived fee item
number has been selected, the number of patients entered into the Derived Fee
Details window will default in this field.
o Service Text
This is a free text field used to provide additional information to assist with the benefit
assessment of the service.
In the Header section of the IMC Invoice Main Tab, on enabling the Locum for field
to indicate the service is being rendered by a Locum, a notation is populated in the
Service Text field in the format ‘Locum for and the Provider Number of the Provider
for whom the Locum is substituting’. For example: Locum for 2XXXXXXY
o Date Seen
This drop down field allows to choose the date when the patient was consulted.
o Time This field indicates the time the service was rendered.
o Not Dupl.
This field indicates if the Provider attended to the patient on more than one occasion
on a same day.
o NNAC
This field indicates if the service was Not Normal After Care for the patient
Page 59
Version 9.3.0 Build 4620 – ECLIPSE Release Notes
Copyright © Medtech Healthcare Pty Ltd Page 59
o Self Deem A Self Deemed Service is a service provided by a consultant physician or specialist
as an additional service to a valid request. A substituted service is a service provided
that has replaced the original service requested.
o MPO
This field indicates whether the service is a part of a multiple procedure or not.
o Duration This field indicates the duration of the service rendered in minutes.
This is a 3 digit number field that cannot be set to 000 and must be represented in 15
minutes internals, i.e. 015, 030, 045.
If the Duration is set and;
a) If Number of Patients is set, then the following message is displayed
b) If Field Quantity is set, then the following message is displayed
o External Reference This field provides the ability to record the External Reference if required.
o Labels a) GAP – Indicates the Total GAP of the invoice
b) Total – Indicates the Total Amount of the Invoice
• Payment
Page 60
Version 9.3.0 Build 4620 – ECLIPSE Release Notes
Copyright © Medtech Healthcare Pty Ltd Page 60
o Amount
The payment made against the GAP or the Total Invoice Amount can be entered in
this Amount field. The label next to the Amount field displays the Total Outstanding
of selected Patient Account Holder (i.e., IMC Accounts Outstanding + General
Accounts Outstanding)
The amount entered as a payment here will be used to pay off the GAP outstanding
only for this invoice. Any payment received in excess of the GAP amount here will
remain as unallocated cash (in credit) against the Patient Account Holder.
o Method
Select the method of payment from the Method dropdown list
If the payment method of Cheque is selected, the following fields will be enabled:
Bank, Branch, Drawer and Cheque Number. These fields are not mandatory to
complete. Once completed, some of these details will default as the patients future
Cheque payment details but can be overridden if required.
o Description
The description usually defaults to Payment Received. This can be manually
overridden if required.
• Date
Indicates the date when payment is/ was received.
• Print Invoice
Tick the Print Invoice check box if the invoice is to be printed. Medtech32 remembers the
status of the Print Invoice check box. This means the next invoice created under that logon
will have the check box selected if that was the option selected in the previous invoice. The
No. of copies to be printed can be selected from the box beside the Print Invoice field.
• IMC Patient Claim Consent and Declaration This appears only for IMC PC Claims. An IMC Patient Claim Consent and Declaration
form opens up when the OK button in the IMC invoice (after all validations are carried out) is
selected.
A sample printout of the IMC Patient Claim Consent and Declaration form is shown on the
following page.
Page 61
Version 9.3.0 Build 4620 – ECLIPSE Release Notes
Copyright © Medtech Healthcare Pty Ltd Page 61
The Verbal Consent obtained from the patient can be indicated in this IMC Patient Claim
Consent and Declaration form, and this form can be sent to the printer selected in the Print
To dropdown box.
The OK button in this form is Enabled only after the Verbal Consent received from the
patient has been ticked/indicated in the field on the form. Clicking on the OK button will bring
up the Account Details window.
Note: The screen above is similar to the existing Lodge Patient Claim window that comes
up when transmitting a General Private Claim.
Page 62
Version 9.3.0 Build 4620 – ECLIPSE Release Notes
Copyright © Medtech Healthcare Pty Ltd Page 62
2.11.2 IMC Invoice – Invoice Annotation Tab No change
2.11.3 IMC Invoice – Payment Annotation Tab No change
2.11.4 IMC Invoice – Audit Tab No change
IMPORTANT NOTE
The Medtech32 standard message box shown below will be displayed when clicking OK
button on the IMC Invoice window, if any of the mandatory fields (mentioned on the
Message box) are not filled in the Patient Register window.
• Click Yes to bring up the Patient Register window to update the details, or
• Click No to abort the update
Page 63
Version 9.3.0 Build 4620 – ECLIPSE Release Notes
Copyright © Medtech Healthcare Pty Ltd Page 63
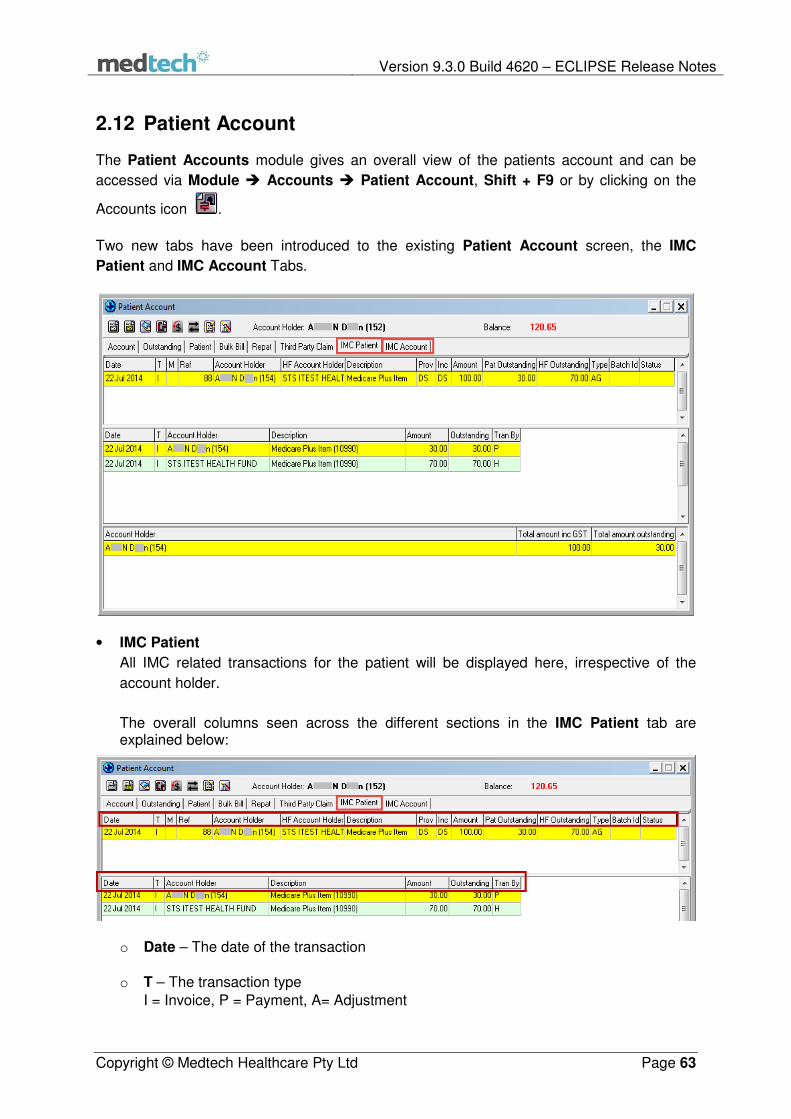
2.12 Patient Account The Patient Accounts module gives an overall view of the patients account and can be
accessed via Module � Accounts � Patient Account, Shift + F9 or by clicking on the
Accounts icon .
Two new tabs have been introduced to the existing Patient Account screen, the IMC
Patient and IMC Account Tabs.
• IMC Patient
All IMC related transactions for the patient will be displayed here, irrespective of the
account holder.
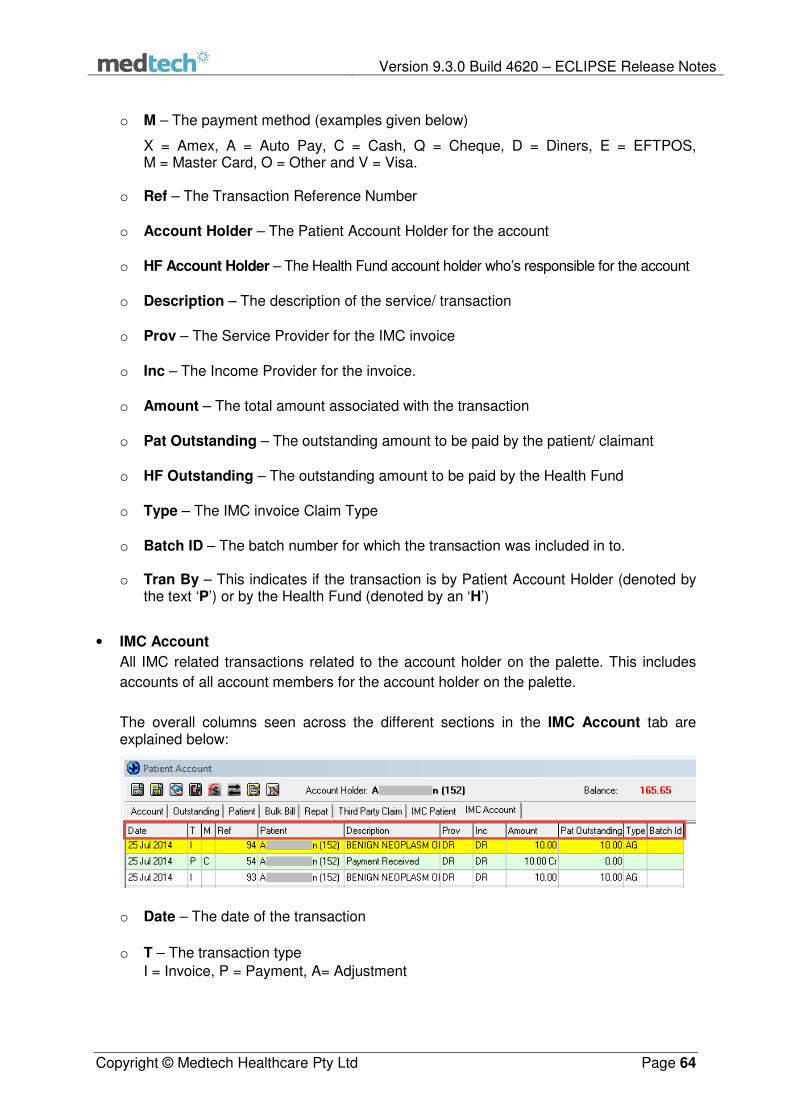
The overall columns seen across the different sections in the IMC Patient tab are explained below:
o Date – The date of the transaction
o T – The transaction type
I = Invoice, P = Payment, A= Adjustment
Page 64
Version 9.3.0 Build 4620 – ECLIPSE Release Notes
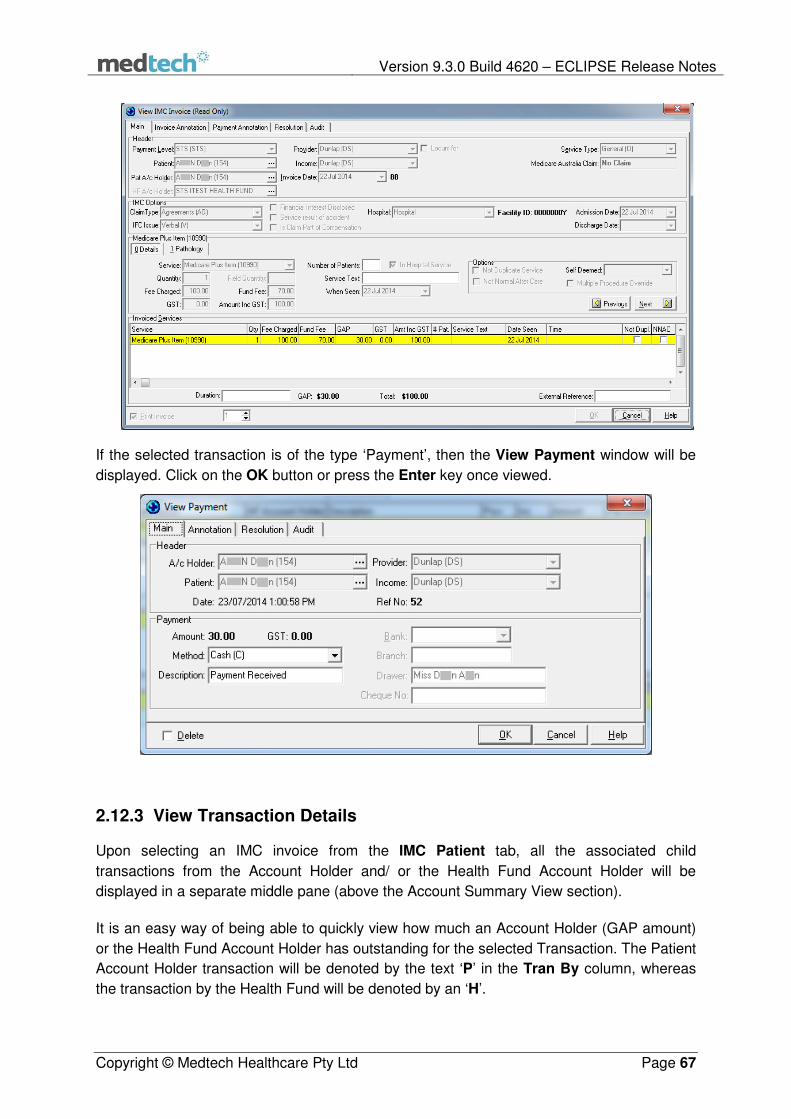
Copyright © Medtech Healthcare Pty Ltd Page 64
o M – The payment method (examples given below)
X = Amex, A = Auto Pay, C = Cash, Q = Cheque, D = Diners, E = EFTPOS, M = Master Card, O = Other and V = Visa.
o Ref – The Transaction Reference Number
o Account Holder – The Patient Account Holder for the account
o HF Account Holder – The Health Fund account holder who’s responsible for the account
o Description – The description of the service/ transaction
o Prov – The Service Provider for the IMC invoice
o Inc – The Income Provider for the invoice.
o Amount – The total amount associated with the transaction
o Pat Outstanding – The outstanding amount to be paid by the patient/ claimant
o HF Outstanding – The outstanding amount to be paid by the Health Fund
o Type – The IMC invoice Claim Type
o Batch ID – The batch number for which the transaction was included in to.
o Tran By – This indicates if the transaction is by Patient Account Holder (denoted by
the text ‘P’) or by the Health Fund (denoted by an ‘H’)
• IMC Account
All IMC related transactions related to the account holder on the palette. This includes
accounts of all account members for the account holder on the palette.
The overall columns seen across the different sections in the IMC Account tab are explained below:
o Date – The date of the transaction
o T – The transaction type
I = Invoice, P = Payment, A= Adjustment
Page 65
Version 9.3.0 Build 4620 – ECLIPSE Release Notes
Copyright © Medtech Healthcare Pty Ltd Page 65
o M – The payment method (examples shown below)
X = Amex, A = Auto Pay, C = Cash, Q = Cheque, D = Diners, E = EFTPOS,
M = Master Card, O = Other and V = Visa.
o Ref – The transaction reference number
o Patient – The name of the patient the transaction related to
o Description – The description of the transaction
o Prov – The provider associated to the IMC invoice
o Inc – The income earner for the invoice.
o Amount – The total Gap amount for an IMC invoice
o Pat Outstanding – The outstanding amount to be paid by the patient
o Type – The IMC invoice claim type
o Batch ID – The batch number for the transaction was included in to.
o Tran By – This indicates if the transaction is by Patient Account Holder (denoted by
the text ‘P’) or by the Health Fund (denoted by an ‘H’)
The Account Holder is listed at the top of the window, with the balance outstanding
displayed in red text next to the Balance label.
The IMC Patient and IMC Account tab will have the same menu options/ icons enabled in
the Patient Accounts window.
The options available in the Patient Account context menu or as icons in the Patient
Account Screen (with the IMC Patient or IMC Account tabs chosen) are explained below.
Patient Account Screen Options
2.12.1 Account Summary View The Account Summary View is an existing feature in the Patient Accounts window that gives
a breakdown of all outstanding amounts within the patient / account holders account. This
feature has been retained for the new tab IMC Patient only.
The Account Summary View will not be available for the IMC Account tab in the Patient
Accounts window.
From the IMC Patient tab or the IMC Account tab, select Patient Account � Account
Summary View � Visible. A tick will appear next to Visible indicating the Summary view
has been activated.
Page 66
Version 9.3.0 Build 4620 – ECLIPSE Release Notes
Copyright © Medtech Healthcare Pty Ltd Page 66
To deactivate the Summary view, from the IMC Patient tab or the IMC Account tab, select
Patient Account � Account Summary View � Visible. Untick the option to remove the
Summary view.
2.12.2 New/ View Transaction
1. Place the desired patient on the palette.
2. Select Patient Account � New, Ctrl+N or click the Add a new invoice icon . The
New IMC Invoice window will be displayed.
3. To view an existing transaction, select Patient Account � Open, Ctrl+O or click the
Open an existing transaction icon . If the highlighted transaction is of the type
‘Invoice’ then the View IMC invoice window will be displayed in a read-only format.
Page 67
Version 9.3.0 Build 4620 – ECLIPSE Release Notes
Copyright © Medtech Healthcare Pty Ltd Page 67
If the selected transaction is of the type ‘Payment’, then the View Payment window will be
displayed. Click on the OK button or press the Enter key once viewed.
2.12.3 View Transaction Details Upon selecting an IMC invoice from the IMC Patient tab, all the associated child
transactions from the Account Holder and/ or the Health Fund Account Holder will be
displayed in a separate middle pane (above the Account Summary View section).
It is an easy way of being able to quickly view how much an Account Holder (GAP amount)
or the Health Fund Account Holder has outstanding for the selected Transaction. The Patient
Account Holder transaction will be denoted by the text ‘P’ in the Tran By column, whereas
the transaction by the Health Fund will be denoted by an ‘H’.
Page 68
Version 9.3.0 Build 4620 – ECLIPSE Release Notes
Copyright © Medtech Healthcare Pty Ltd Page 68
The amount column indicates the total amount of the transaction and the outstanding column
indicates the outstanding amount for the corresponding transaction in this middle pane.
This feature has also been implemented in the IMC Account tab. However, only the IMC
transactions that have been placed against the Account Holder or Patient (if self-account
holder) will be displayed.
In the first pane, the Invoice amount allocated for the Account Holder will only be displayed
under the Amount column. In the second pane, the amount allocated for each service to
the account holder will only be displayed for the selected Invoice under the Amount column.
2.12.4 Credit Adjust To credit adjust a transaction from Patient Account window, select Module ���� Accounts ����
Patient account. The Patient Account window will be displayed. Select the IMC Patient
tab ���� Highlight the transaction that needs the credit adjusted (from the middle pane) and
from the contextual menu select the option Credit Adjust. The New Credit Adjustment
screen will be displayed.
Page 69
Version 9.3.0 Build 4620 – ECLIPSE Release Notes
Copyright © Medtech Healthcare Pty Ltd Page 69
The New Credit Adjustment window contains following details
• A/C Holder -Name of the A/C Holder
• Original Amount – Total Gap amount at the time of invoice
• Current Balance – The outstanding the amount which needs to be paid by the
Account Holder
• Amount to Credit – The amount that needs to be credited for the account holder
• Reason – The reason for the credit adjustment
Enter the amount to be credit adjusted in the Amount to Credit field and click OK.
2.12.5 Debit Adjust To debit adjust a particular transaction from Patient Account window select Module ����
Accounts ���� Patient Account. The Patient account window will be displayed. Select the
IMC Patient tab � Highlight the transaction that needs to be debit adjusted (from the middle
pane) and from the contextual menu select the option Debit Adjust. The New Debit
Adjustment screen will be displayed.
The New Debit Adjustment window contains following details
• A/C Holder – Name of the A/C Holder
Page 70
Version 9.3.0 Build 4620 – ECLIPSE Release Notes
Copyright © Medtech Healthcare Pty Ltd Page 70
• Original Amount – Total Gap amount at the time of invoice
• Current Balance – The outstanding the amount which needs to be paid by the
Account Holder
• Amount to Debit – The amount that needs to be debited for the account holder
• Reason – The reason for the Debit adjustment
Enter the amount to be Debit adjusted in the Amount to Debit field and then click on the OK
button.
2.12.6 Modify Transaction From the IMC Patient tab, highlight the transaction to be modified. Select Patient Account
� Modify Invoice, Ctrl+M or click on the Modify the current Invoice icon . The Modify
IMC Invoice window will be displayed.
Make any modifications as necessary, and then click on the OK button or press the Enter key. Only those IMC invoices that have not been batched are able to be modified. For IMC invoices, the ability to modify all fields within invoices is removed from the system
once the Banking has been Closed Off, for the period of time in which the IMC invoice was
created. As such, the user will have all the functionalities that currently exist under the
system until that point in time.
Page 71
Version 9.3.0 Build 4620 – ECLIPSE Release Notes
Copyright © Medtech Healthcare Pty Ltd Page 71
2.12.7 Delete Transaction Highlight the transaction to be deleted from the IMC Patient tab in the Patient Accounts
window. If selecting a Payment transaction, from the context menu, select Patient Account
� Open, Ctrl+O or click the Open an existing transaction icon . The View Payment
window will be displayed.
Tick the Delete check box located in the bottom left corner of the window.
Click on the OK button or press the Enter key. A warning message will be displayed.
Click either ‘Yes’ or press the Enter key. The Supervisor Password window may appear if
the Supervisor Password has been configured.
If so, then enter the password and then click on the OK button or press the Enter key.
For pending IMC invoices, select the Modify the current Invoice (Ctrl + M) icon . From
the displayed Modify IMC Invoice, tick the Delete checkbox at the bottom left corner of the
window and then click on the OK button.
Page 72
Version 9.3.0 Build 4620 – ECLIPSE Release Notes
Copyright © Medtech Healthcare Pty Ltd Page 72
If the IMC Invoice is associated with a higher level transaction, e.g. a Payment, then the
Delete option will not be available for the IMC invoice until the higher level transaction (the
Payment) has been Deleted.
Once the OK button has been clicked, the steps mentioned above for deleting a Payment will follow.
2.12.8 Patient Account Filter The Filter can be used to find certain transactions; e.g. payments, invoices. It can also be
used to display deleted or inactivated transactions.
From the IMC Patient tab of the Patient Accounts window, click on the Filter icon or
select the Patient Account � Filter, Ctrl + F. The Filter Account window will be displayed.
Page 73
Version 9.3.0 Build 4620 – ECLIPSE Release Notes
Copyright © Medtech Healthcare Pty Ltd Page 73
Select the filter criteria by clicking the mouse in the relevant Transaction Type radio buttons
and/ or the Include Inactive tick box.
Click on the OK button or press the Enter key. Any results matching the Filter criteria will
be displayed. The deleted or inactivated transactions will be displayed with a strike through
across the text.
2.12.9 New Payment Processing a New Payment will create a new transaction and an associated reference
number, which will be displayed in the IMC Patient tab as well as the IMC Account tab of
the patient account holder.
Payments can be viewed; however, modifications are restricted to the Method, Description
and Deletion fields
With the patient or the account holder on the palette, select Module � Accounts � New
Payment or click on the New Payment icon . The New Payment window will be
displayed.
The New Payment window can also be accessed from the context menu Patient Account
� New Payment.
Ensure the account holder in the A/c Holder field is correct. To change the account holder,
type the first few letters of the surname and press the tab key. Highlight the correct account
holder from the Search Patient / Company window and then click on the OK button or
press the Enter key
Page 74
Version 9.3.0 Build 4620 – ECLIPSE Release Notes
Copyright © Medtech Healthcare Pty Ltd Page 74
Enter the amount being paid in the Amount field. The total amount outstanding is displayed
in red to the right of this field.
Select the payment method from the associated dropdown list; alternatively, type the code
directly into the Method field; e.g. C = Cash.
If the selected method is Cheque, then the following fields are enabled: Bank, Branch,
Drawer and Cheque Number. Once these fields are completed, they will appear as the
default details on any future Cheque payments, but these can be overwritten if required.
Page 75
Version 9.3.0 Build 4620 – ECLIPSE Release Notes
Copyright © Medtech Healthcare Pty Ltd Page 75
The Description that will be displayed on the invoice and statement for this payment
transaction is from the Medtech32 default setup and usually states Payment Received. This
description can be changed for the transaction by typing directly into the field.
Within the Invoices section, tick the IMC invoice/s being paid. The amount will automatically
be displayed in the To Pay column. The amount being paid is also displayed in bold with
black text in the bottom right corner of the window. If an IMC invoice is being partially paid,
click in the ‘to Pay’ column and type the relevant payment amount.
If required, enter a Payment Annotation by selecting the Annotation tab and typing the
notes directly into the white area.
Page 76
Version 9.3.0 Build 4620 – ECLIPSE Release Notes
Copyright © Medtech Healthcare Pty Ltd Page 76
If only a receipt is required, tick the Print Receipt Only check box. If both an invoice and
receipt is required, tick the Print Invoice/ Receipt check box.
If there is no requirement for a printout - leave both of the above check boxes blank.
If another payment is being made at this stage, click the ‘Another’ button. Proceed as usual,
and then click on the OK button or press the Enter key once you have completed the
payment.
A new column ‘Claim Type’ has been introduced to differentiate Normal Invoice and IMC
Invoice. For IMC Invoice, the Claim Type will be displayed as ‘M’ and for Non-IMC Invoice
(i.e. normal invoice) the claim type will be displayed as ‘N’.
2.12.10 Re-printing Transactions The following forms can be printed using the same set of instructions;
• Invoice/ Receipt Different printing options will be available depending on the transaction that has been
highlighted in the Patient Account window.
Highlight the transaction to be printed and then select the relevant option from the context
menu Patient Account � Print, or (Ctrl+P) e.g. Patient Account � Print Invoice/ Receipt.
2.12.11 Print Individual Statement The Print Statement option will print a transaction history for a defined period of time. The
statement format depends on what has been selected in the Medtech32 setup for the
patients account group.
Page 77
Version 9.3.0 Build 4620 – ECLIPSE Release Notes
Copyright © Medtech Healthcare Pty Ltd Page 77
With the patient or the account holder on the palette, open the Patient Account window and
select the Print Statement option from the context menu Patient Account � Print
Statement. The Print Statement window will then be displayed.
Specify the opening and closing balance dates from the associated calendar dropdown lists
or type the date directly into the Opening/ Closing Balance fields.
Select the printer required from the ‘Print To’ dropdown list. Click on the OK button or press
the Enter key to print the Statement.
2.12.12 Change Account Holder Open the Patient Account window and from the context menu, select Patient Account �
Change Account Holder option, or Ctrl+H. The Search Patient/ Company window will be
displayed.
Enter the surname (or part thereof) and then click on the Search button or press the Enter key.
Select the person required from the list and then click the OK button or press the Enter key.
The account holder for the patient will then be updated. This will be reflected in the IMC
Patient tab and the IMC Account tab with the updated Account Holder label on the top.
Page 78
Version 9.3.0 Build 4620 – ECLIPSE Release Notes
Copyright © Medtech Healthcare Pty Ltd Page 78
The IMC Account tab will then display the IMC invoices against the updated account holder
or patient (if self-account holder) only.
The following Patient Account features are due for further enhancements:
• New Credit Note • New Refund • Transfer
2.13 IMC Batching Window The IMC Claim Batching module collates all IMC Claim vouchers and prepares them for
submission to Medicare Australia and private health insurers.
1. Select Module ���� Accounts ���� IMC Batching or click the IMC Batching icon . The
IMC Claim Batching window will be displayed and default to the Unbatched IMC tab.
Within the Batching window there are three tabs;
• Unbatched IMC – Displays all IMC vouchers that are yet to be batched
• Outstanding IMC Batches – Displays all batches that have not been fully paid or not paid at all
• Batch History – Displays all batches prepared to date
Page 79
Version 9.3.0 Build 4620 – ECLIPSE Release Notes
Copyright © Medtech Healthcare Pty Ltd Page 79
2.13.1 Unbatched IMC tab
The columns in Unbatched IMC tab are explained below.
• Tick – A tick indicates this item is selected to be included in the batch. No tick
indicates the item is on hold (the item will be displayed in blue)
• Date – The date the item was invoiced
• Form No – The Assignment Form number
• Patient – The patient who was invoiced
• Claim Type – The type of claim (Agreement or Scheme or Patient claim)
• Service Type – The type of service for the IMC invoice
• Prov – The initials of the Service Provider
• Inc – The initials of the consulting income provider
• Loc – The location of the consultation
• Amount – The total amount of the invoice
Double Click – Double clicking on an invoice in the outstanding IMC batches tab will open the respective invoice
Page 80
Version 9.3.0 Build 4620 – ECLIPSE Release Notes
Copyright © Medtech Healthcare Pty Ltd Page 80
2.13.1.1 IMC Batching Contextual Menu
Selecting the Module ���� Accounts ���� IMC Batching will enable a new contextual menu to
appear next to the Module menu option, as shown below. This contextual menu is with the
Unbatched IMC tab in focus / selected.
The options listed in the contextual menu are enabled / disabled based on the IMC Batching tab that is in focus / selected.
• Open – This option will open up the IMC invoice in a read only view
• Expand – This option will either expand or shrink the IMC Claim Batching window in size
• Filter – This option will open the Filter IMC Batch window
• Tick All – Ticks/selects all the IMC invoices listed in the active IMC Batches tab
• Untick All – Unticks all the ticked/selected IMC claims in the active IMC Batches tab
• Close Off – Select this option to Close Off the selected IMC Batches and it will move
the batches to the Outstanding IMC Batches tab. This option will be disabled for
the Outstanding IMC Batches and Batch History tab
• Batch Payment – The functionality of this menu item will only be available in the
next phase of Medtech32 ECLIPSE.
On clicking this menu option the following message box will be displayed:
Page 81
Version 9.3.0 Build 4620 – ECLIPSE Release Notes
Copyright © Medtech Healthcare Pty Ltd Page 81
• Active Patient – This option will place the selected patient on the palette 2.13.1.2 Open an Existing Row
To open an existing row, click on the Open an existing row (Ctrl+O) icon or select the
option ‘Open’ from the IMC Batching contextual menu.
The selected IMC invoice will be opened and displayed as shown below. Invoices opened
from the Unbatched IMC tab are in the read only view. If they need to be modified, they
need to be amended from the Patient Account window (Module � Accounts � Patient
Account).
Page 82
Version 9.3.0 Build 4620 – ECLIPSE Release Notes
Copyright © Medtech Healthcare Pty Ltd Page 82
2.13.1.3 Filtering Results
To Filter the Unbatched IMC invoices, click on the Filter IMC Batch icon, or select the
Filter option from the IMC Batching contextual menu to bring up the Filter IMC Batch
window.
o From Date / To Date – Select the start and end date from the respective fields to
filter the batch items during the date range
o Provider – Select the Service provider from the drop down list, to filter the view
based on the selected provider
o Income Provider – Select the Income provider from the drop down list, to filter the
view based on the selected provider
o Location – Select the Location from the drop down list, to filter the view based on the
selected Location
o Claim Type – Select the IMC Claim Type from the drop down list, to filter the view
based on the selected Claim Type. The available Claim types are: Agreement,
Scheme and Patient Claim
For example, if the Claim Type ‘Agreement (AG)’ is selected, then all the IMC
Batches with Claim Type ‘AG’ during the date range will be displayed.
o OK – Click OK to display the Unbatched IMC Batches tab view, based on the selected
Filter criteria
o Cancel – Click Cancel to abort the process
2.13.1.4 Shrinking or Expanding IMC Claim Batching Window
To shrink or expand the IMC Claim Batching window click on the - Expand window (Ctrl
+ E), or select the Expand option from the contextual menu
Page 83
Version 9.3.0 Build 4620 – ECLIPSE Release Notes
Copyright © Medtech Healthcare Pty Ltd Page 83
2.13.1.5 Placing the Active Patient on the Palette
To place the active patient on the palette click on the - Select this patient as the active
patient (Ctrl + A) icon, or select the Active Patient menu option from the contextual menu.
2.13.1.6 Closing off the batch
To close off the IMC Batch click on the - Close off the batch icon for the selected
invoices and it will move the batch to the outstanding IMC batches tab.
IMPORTANT NOTE The below message box will be displayed when selecting and closing an IMC Invoice from
the IMC Claim Batching window, having Non-MBS service(s) alone.
If the selected IMC Invoice has both MBS and Non-MBS Service(s), the Close-Off will be
done but the Non-MBS Item(s) will not be sent for claiming.
2.13.1.7 Paying off Multiple Batches
Paying off multiple batches will be implemented in the next phase of ECLIPSE
implementation. Clicking on the - Pay off multiple batches (Ctrl + E) will display the
following message:
Page 84
Version 9.3.0 Build 4620 – ECLIPSE Release Notes
Copyright © Medtech Healthcare Pty Ltd Page 84
2.13.1.8 Viewing Medicare Australia Transmission Log
To view the Medicare Australia Transmission Log, click on the View Medicare Australia
Transmission Log icon and it will display the following window:
The Summary column will report on the number of Claims stored, Claims sent, and advise of
any Errors during the transmission process.
2.13.1.9 IMC Batching - Labels
• Rows ticked – The Rows ticked label will display the number of invoices selected
• Amount ticked – The Amount ticked label will display the total amount of the
selected invoices
• Last ERA – The Last ERA (Electronic Remittance Advise) label will display the
time and date when the last ERA was generated
Page 85
Version 9.3.0 Build 4620 – ECLIPSE Release Notes
Copyright © Medtech Healthcare Pty Ltd Page 85
2.13.2 Outstanding IMC Batches The Outstanding IMC Batches tab in the IMC Claim Batching window from Module
�Accounts �IMC Claim Batching, will display a list of batches that have not been paid in
full or not paid at all (including unsent batches).
The Last ERA label on the right side of the IMC Claim Batching window will display the
time and date when the last ERA was generated.
Both the Outstanding IMC Batches tab and the Batch History tab will contain the same
columns.
• Tick – A tick indicates the item is selected
• Date – The date the batch was closed off
• Claim ID – The Batch number ID within Medtech32
• Claim Type – The IMC Claim Type (AG, SC or PC)
• Service Type – The IMC invoice service type (General, Specialist or Pathology
Services)
• Prov – The initials of the Service Provider
• Inc – The initials of the Income Provider
• Loc – The location of the consultation
• Amount – The total amount of the batch
• HF Paid – The amount paid from Health Fund
• Pat Paid – The amount paid by the patient / claimant
Page 86
Version 9.3.0 Build 4620 – ECLIPSE Release Notes
Copyright © Medtech Healthcare Pty Ltd Page 86
• HF Outstanding – The unpaid amount owed by the Health Fund
• Pat Outstanding – The unpaid amount owed by the patient / claimant
• Print – A tick will be displayed in this column once the Batch Header or Batch
Summary has been printed
• Process Status – Indicates the processing status of the claim / request. The
Process Status output could be:
Process Status Description
RECEIVED The claim has been received and accepted for processing
MEDICARE_UNVERIFIED Delayed PVM failed
MEDICARE_VERIFIED PVM completed; performing PVF/PVC/PVE
MEDICARE_REJECTED The claim has been rejected by Medicare and a report is available
MEDICARE_UNAVAILABLE Medicare is unavailable to perform OEC assessing
HEALTH_FUND_UNVERIFIED PVF/PVC/PVE failed
HEALTH_FUND_VERIFIED PVF/PVC/PVE completed
HEALTH_FUND_REJECTED The claim has been rejected by the Health Fund and a report is available
HEALTH_FUND_UNAVAILABLE Health fund unavailable to perform OEC assessing
MEDICARE_ASSESSING The claim is currently being assessed by Medicare
HEALTH_FUND_ASSESSING The claim is currently being assessed by the nominated Health Fund
REQUESTED_DELETE The provider requested this claim be deleted by Medicare
COMPLETE The claim assessment is complete and a report is now available
• Status – The Status column will display three options:
1. Tick = indicates that the batch has been sent
2. R = Process report received
3. P = Electronic Remittance Advice received (ERA)
Page 87
Version 9.3.0 Build 4620 – ECLIPSE Release Notes
Copyright © Medtech Healthcare Pty Ltd Page 87
2.13.2.1 Open an Outstanding IMC Batch
To open an existing Outstanding IMC Batch, go to Module � Accounts � IMC Claim
Batching � Outstanding IMC Batches tab, and click on the icon, or select a batch and
double-click it to open the batch.
The View IMC Batch window will be displayed. A single batch item may include multiple invoices. The View IMC Batch window contains three tabs: Main, Batch Summary and Audit.
The View IMC Batch window – Main tab has the following sections:
Page 88
Version 9.3.0 Build 4620 – ECLIPSE Release Notes
Copyright © Medtech Healthcare Pty Ltd Page 88
Header The header section contains the following fields:
• Type – Invoice Type and default to In-Patient Medical Claim (M). This field will be
greyed out by default, i.e. non-editable
• Date – The date the batch was closed off. This field will be greyed out by default, i.e.
non-editable
• Provider – Name of the Service Provider. This field will be greyed out by default, i.e.
non-editable
• Income – Name of the Income Provider. This field will be greyed out by default, i.e.
non-editable
• Location – The location of the consultation. This field will be greyed out by default,
i.e. non-editable
• Claim Type – The IMC Claim Type (AG, SC or PC)
• Claim ID – Batch Number ID
Items A single batch item may include multiple invoices and all the invoices will be listed in the
Items sections. If the batch has a single invoice entry then only one entry will be listed, as
shown in below screenshot:
• Tick – A tick indicates the invoice is selected
• Form No – The Assignment Form number of the Invoice
• Patient – The patient who was invoiced
• Service(s) – Services rendered by the Provider
• Amount – The total amount of the Invoice
• Fund Charges – Total fund fee of the invoice
• Fund Amt Paid – Total amount paid from Health Fund
Page 89
Version 9.3.0 Build 4620 – ECLIPSE Release Notes
Copyright © Medtech Healthcare Pty Ltd Page 89
• Patient Charges – Total amount to be paid by the Patient / Claimant
• Patient Amt Paid – Total amount paid by Patient / Claimant
• Written-Off Amount – Total Written-Off amount
• Outstanding Amt – Total outstanding amount of the invoice
• Resubmitted Amt – If any of the service item is resubmitted, then the total amount
of that service item will be displayed under this column
Service Grid This section will list out the services in the invoice that are highlighted / selected in the Items
section.
• Service – Service Item Number
• Service Charges – Total amount of the Service rendered
• Fund Charged – Total fund fee of the Service
• Fund Amt Paid – Total amount paid from Health Fund for the service
• Fund Amt Adjusted – If the option ‘Transfer Patient O/s to Fund’ is selected from
the Action drop down list and ‘Apply Actions to Services’ button is clicked, then
the Patient outstanding amount will be transferred to this field
• Fund Amt O/s – The unpaid amount owed by the Health Fund
• Patient Charged – Amount to be paid by the Patient / Claimant for the service
• Patient Amt Paid – Amount paid from Patient / Claimant for the service
• Patient Amt Adjusted – If the option ‘Transfer Fund O/s to Patient’ is selected
from the Action drop down list and ‘Apply Actions to Services’ button is clicked,
then the Fund outstanding amount will be transferred to this field
• Patient Amt O/s – The unpaid amount owed by the Patient / Claimant
• Status – Populated value, based on the values of ‘Fund Amt O/s’ and ‘Patient Amt
O/s’ columns
Page 90
Version 9.3.0 Build 4620 – ECLIPSE Release Notes
Copyright © Medtech Healthcare Pty Ltd Page 90
• Action – You can perform any of the following actions on the View IMC Batch
window. After selecting the required action, click on the Apply Actions to Services
button to complete the action
o No Action – By default the option ‘No Action’ will be displayed
o Resubmit – Select this option to resubmit the respective service item. On
clicking the Apply Actions to Services button, a confirmation message ‘Are you
sure to apply selected actions against the Services?’ will be displayed, as
shown below. Click on the OK button to resubmit the service.
The resubmitted Service item will appear in ‘Italic’ and ‘grey’ font. The Status
column will be updated as ‘Resubmitted’ and the Action field will be displayed
with ‘No Action’.
The item will be taken out of the batch and placed into the Unbatched IMC tab
which can then be included in a new batch and sent to Medicare.
o Transfer Patient O/s to Fund – Select this option to transfer the Patient
Outstanding amount displaying in the ‘Patient Amt O/s’ column to the ‘Fund Amt
O/s’ column
o Transfer Fund O/s to Patient – Select this option to transfer the Health Fund
Outstanding amount displaying in the ‘Fund Amt O/s’ column to the ‘Patient
Amt O/s’ column
o Write-Off – Select this option to write-off the amount
Payment Once a Payment has been retrieved from the Health Fund, the Payment details will be
displayed automatically.
Batch Summary tab The overall summary of the record will be displayed in the Batch Summary tab, i.e. Total
amount Paid / Written-Off / Adjusted / Outstanding / Resubmitted from Health Fund and
Patient.
Page 91
Version 9.3.0 Build 4620 – ECLIPSE Release Notes
Copyright © Medtech Healthcare Pty Ltd Page 91
Audit tab The Audit tab will record the information of when the Batch was created and last updated.
2.13.2.2 Filter an IMC Batch
To filter the list of batch items in the Outstanding IMC Batches tab, click on the Filter icon
or press Ctrl + F.
The Filter IMC Batch window will then be displayed.
Page 92
Version 9.3.0 Build 4620 – ECLIPSE Release Notes
Copyright © Medtech Healthcare Pty Ltd Page 92
o From Date / To Date – Select the start and end date from the respective fields to
filter the batch items during the date range
o Provider – Select the Service provider from the drop down list, to filter the view
based on the selected provider
o Income Provider – Select the Income provider from the drop down list, to filter the
view based on the selected provider
o Location – Select the Location from the drop down list, to filter the view based on the
selected Location
o Claim Type – Select the IMC Claim Type from the drop down list, to filter the view
based on the selected Claim Type. The available Claim types are: Agreement,
Scheme and Patient Claim
For example, if the Claim Type ‘Agreement (AG)’ is selected, then all the IMC
Batches with Claim Type ‘AG’ during the date range will be displayed.
o Process Status – Select the IMC Process Status from the drop down list to filter the
view based on the selected status
o OK – Click OK to display the Outstanding IMC Batches tab view based on the
selected Filter criteria
o Cancel – Click Cancel to abort the process
2.13.2.3 Send IMC Batches
To send IMC Batches to Medicare Australia online from the Outstanding IMC Batches tab,
select the required batches and click on the Send IMC Batches to Eclipse Online/
Medicare Australia Online icon .
Page 93
Version 9.3.0 Build 4620 – ECLIPSE Release Notes
Copyright © Medtech Healthcare Pty Ltd Page 93
A confirmation window will be displayed.
Click on the 'Yes' button to continue and an Eclipse Online window will be displayed.
Select the desired Printer to print the statement and enter the Location Pass Phrase to send
the batches.
Once the IMC Batch(es) has been sent successfully, a tick will be displayed in the Status
column of the Outstanding IMC Batches tab.
Note: The Resubmit Invoice and Apply Actions to Services buttons in the View IMC
Batch window will be greyed out, for the IMC Batch that has been sent.
Page 94
Version 9.3.0 Build 4620 – ECLIPSE Release Notes
Copyright © Medtech Healthcare Pty Ltd Page 94
2.13.2.4 Check and Update Batch Status
From the Outstanding IMC Batches tab, click on the Checks and updates the Status for
selected batch icon or select the menu option ‘Status Check’ from the IMC Batching contextual menu.
A confirmation window will be displayed. Click 'Yes' to continue.
Once the update process has completed, the status of the sent batches that have been
checked and updated accordingly in the Process Status column of the Outstanding IMC
Batches tab will be displayed.
Similarly, the status for multiple batches during the date range can be checked and updated
by selecting the Status Request Range option from the contextual IMC Batching menu.
Page 95
Version 9.3.0 Build 4620 – ECLIPSE Release Notes
Copyright © Medtech Healthcare Pty Ltd Page 95
A confirmation window will be displayed. Click ‘Yes’ to continue.
The Date Range Selection window will be displayed. Select the required date range from
the Date From and Date To field to check the status for the batches during the date range.
Note: The specified date range should not exceed 30 days. If the date range does exceed
this limit, then the warning message shown below will be displayed:
Page 96
Version 9.3.0 Build 4620 – ECLIPSE Release Notes
Copyright © Medtech Healthcare Pty Ltd Page 96
2.13.2.5 Generate Process Report
To generate a Process Report for the selected batches, click on the Generates/ reprints
the Process report for selected batch icon from the Outstanding IMC Batches tab or
select the menu option ‘Process Report’ from the IMC Batching context menu.
A Process Report can only be generated for batches that are in a COMPLETE status.
To generate the Process Report for a selected transaction, the Process Status needs to
be ‘COMPLETE’. Once a Process Report has been generated, the Status column of that
particular transaction will then change to ‘R’.
The IMC Process report for all the IMC Batches with Status ‘R’ will be printed. If required
you can print the report for a specific Batch, by double-clicking the respective IMC batch to
bring up the View IMC Batch window and clicking the View Process Report button at the
bottom.
Page 97
Version 9.3.0 Build 4620 – ECLIPSE Release Notes
Copyright © Medtech Healthcare Pty Ltd Page 97
2.13.2.6 Generate Pending ERA Report
From the IMC Batching context menu, select the Generate Pending ERA option to retrieve
the ERA (Eclipse Remittance Advice) report during the date range for the batches that
have had their Process Reports retrieved and with Process Status ‘COMPLETE’ and
status ‘R’.
1. A confirmation window will be displayed.
2. Click ‘Yes’ to continue or ‘No’ to exit this screen.
3. Select the date range for the pending ERA claims and then click on the ‘OK’ button.
Note: The specified date range should not exceed 30 days. If the date range
exceeds this limit, then the warning message shown below will be displayed:
The ERA report will be retrieved for the batches during the date range selected and the
Status column in the Outstanding IMC Batches tab for those batches will be updated to ‘P’.
Page 98
Version 9.3.0 Build 4620 – ECLIPSE Release Notes
Copyright © Medtech Healthcare Pty Ltd Page 98
2.13.2.7 ERA Report
Once the ERA report has been retrieved successfully, then proceed to print the ERA report
for the batches with Status ‘P’.
Select the batch(es) with Process Status ‘READY - COMPLETE’ and Status ‘P’ to print the
ERA Report and then go to IMC Batching context menu � ERA Report.
A confirmation window will be displayed. Click on the ‘Yes’ button and a single ERA report
will be generated and printed for all the selected batches.
If required you can view and print the report for a specific Batch, by double clicking the
respective IMC batch to bring up the View IMC Batch window and clicking the View ERA
button at the bottom.
Page 99
Version 9.3.0 Build 4620 – ECLIPSE Release Notes
Copyright © Medtech Healthcare Pty Ltd Page 99
2.13.2.8 Auto-Reconcile
Once the ERA report has been retrieved successfully (as mentioned in Generate Pending
ERA section), the payment from the Health Fund for the batches (either partially or fully) will
be updated automatically under the ‘HF Paid’ column, as shown in screenshot below.
Note: If the Health Fund has done a partial payment then the remaining amount will be
displayed under the ‘HF Outstanding’ column, as shown in screenshot above.
Simultaneously, a payment entry will be created for the respective Patient’s Account
Holder and Health Fund Account Holder (e.g. STS) in the IMC Patient and IMC Account
tab of the Patient Account window, respectively.
Patient’s Account Holder – IMC Patient tab
Health Fund Account Holder – IMC Account tab
Double click the Payment entry to view the payment details. The payment method will be
displayed with the option ‘Medicare(EFT)’, confirms the payment received from Medicare &
Health Fund.
The ‘Delete’ field in the View Payment window will be disabled, as it is not possible to
delete the Payment entry.
Page 100
Version 9.3.0 Build 4620 – ECLIPSE Release Notes
Copyright © Medtech Healthcare Pty Ltd Page 100
2.13.2.9 Search for a Specific Batch
To search for a specific batch among the list of claims from the Outstanding IMC Batches
tab, click on the Quick Search batch record icon or select the Search batch record option from the IMC Batching context menu.
A Quick search batch record window will be displayed, where a specific claim ID can be
searched for.
Page 101
Version 9.3.0 Build 4620 – ECLIPSE Release Notes
Copyright © Medtech Healthcare Pty Ltd Page 101
2.13.2.10 View Transmission Log Summary
To view log summaries for the stored claims, click on the View Medicare Australia
Transmission Log icon from the Outstanding IMC Batches tab.
The Medicare Australia Online Transmission Log window will be displayed.
By clicking on the View selected transmission log icon , the Transmission Log Report
for the selected logged item will be generated.
Page 102
Version 9.3.0 Build 4620 – ECLIPSE Release Notes
Copyright © Medtech Healthcare Pty Ltd Page 102
2.13.2.11 Filter Transmission Log
The log items in the Medicare Australia Online Transmission Log window can be filtered
based on the dates.
Click on the Filter icon in the Medicare Australia Online Transmission Log window.
A Filter Medicare Australia Online Transmission window will be displayed where the
specific dates can be specified, to view those entries in the date range selected.
Page 103
Version 9.3.0 Build 4620 – ECLIPSE Release Notes
Copyright © Medtech Healthcare Pty Ltd Page 103
2.13.3 Batch History The Batch History tab in the IMC Claim Batching window (Module �Accounts � IMC
Claim Batching) will display all the batches that have been created to date, written-off,
inactivated and fully paid (both Health Fund and Patient / Claimant).
The Batch History tab has the same functionalities and columns as mentioned in the
Outstanding IMC Batches tab of the IMC Claim Batching window.
2.13.3.1 View IMC Batch
Select IMC Batching � Open from the contextual menu, or click on the Open an existing
row icon from the Batch History tab of the IMC Claim Batching window. The View IMC Batch window will then be displayed.
The View IMC Batch window contains three tabs: Main, Batch Summary and Audit. For
further information, refer to Open an Outstanding IMC Batch section.
Page 104
Version 9.3.0 Build 4620 – ECLIPSE Release Notes
Copyright © Medtech Healthcare Pty Ltd Page 104
2.13.3.2 View IMC Invoice
To view an IMC Invoice from the View IMC Batch window, double click the mouse on the
invoice. The View IMC Invoice window will open up in a Read Only format.
2.13.3.3 View Process Report
A Process Report is generated for batches that are in the COMPLETE status. For further
information on how to generate Process Report, refer to Generate Process Report section.
The Process Report for a specific batch can be viewed from the View IMC Batch screen by
clicking on the View Process Report button.
Page 105
Version 9.3.0 Build 4620 – ECLIPSE Release Notes
Copyright © Medtech Healthcare Pty Ltd Page 105
2.13.3.4 Generate Pending ERA
From the IMC Batching context menu, select the Generate Pending ERA option to retrieve
the ERA (Eclipse Remittance Advice) report during the date range for the batches that
have had their Process Reports retrieved and with Process Status ‘COMPLETE’ and
status ‘R’.
For further information refer to Generate Pending ERA section.
2.13.3.5 ERA Report
Once the ERA report has been retrieved successfully, then it is now possible to proceed to
print the ERA report for those batches with a ‘P’ Status
Select the batch(es) with Process Status ‘READY - COMPLETE’ and Status ‘P’ to print the
ERA Report and then go to IMC Batching context menu � ERA Report.
A confirmation window will be displayed. Click on the ‘Yes’ button and a single ERA report
will be generated and printed for all the selected batches.
If required you can view and print the report for a specific Batch, by double clicking the
respective IMC batch to bring up the View IMC Batch window and clicking the View ERA
button at the bottom.
Page 106
Version 9.3.0 Build 4620 – ECLIPSE Release Notes
Copyright © Medtech Healthcare Pty Ltd Page 106
2.13.3.6 Auto-Reconcile
Once the ERA report has been generated successfully (as mentioned in Generate Pending
ERA section), the payment from the Health Fund for the batches (either partially or fully) will
be updated automatically under the ‘HF Paid’ column, as shown in the screenshot below.
Note: If the Health Fund has done a partial payment then the outstanding amount will be
displayed under the ‘HF Outstanding’ column, as shown in screenshot above.
For further information, refer to the Auto-Reconcile section. 2.13.3.7 Inactivate Batch
To inactivate an entire batch, highlight the batch to be inactivated from the Batch History
tab of the IMC Claim Batching window.
Select IMC Batching � Open, or click the Open an existing batch icon . The View IMC
Batch window will be displayed. Check the Inactive tick box in the bottom left of the View
Batch window.
Click OK to continue. A Confirmation window will be displayed.
Click on the Yes button, or press the Enter key to inactivate the batch. The Supervisor
Password window may be displayed, if this configuration setting has been applied.
Page 107
Version 9.3.0 Build 4620 – ECLIPSE Release Notes
Copyright © Medtech Healthcare Pty Ltd Page 107
If so, then enter the password and then click on the OK button, or press the Enter key. The
batch will be displayed in the Batch History tab with a strike through it to signify that it is
now an ‘Inactive’ Batch.
All items in the batch will then be displayed in the Unbatched IMC tab, which can then be
actioned and included in a new batch, or if necessary, the vouchers may be deleted.
2.13.3.8 IMC Batch Adjustments
Write-Off Service A Write-Off option for services as part of an outstanding batch is available, for services
which have been paid slightly more or less than the original batch total, and if the batch is
not to be actioned further.
Steps to write-off a Service Item from the View IMC Batch window:
1. Open the IMC Claim Batching window (Module � Accounts � IMC Batching).
2. Select the Outstanding IMC Batches tab.
3. Highlight the batch containing the service item to Write-Off. To find the batch quickly,
select IMC Batching ���� Search batch record or press Ctrl +S or click the Quick
search for batch ID icon . The Quick search batch record window will be
displayed.
Type the batch claim number into the Claim ID field and then click on the OK button,
or press the Enter key. The claim will be highlighted in yellow
4. Select IMC Batching ���� Open or press Ctrl + O or click the Open an existing
batch icon . The View IMC Batch window will be displayed.
Page 108
Version 9.3.0 Build 4620 – ECLIPSE Release Notes
Copyright © Medtech Healthcare Pty Ltd Page 108
5. Highlight the item to Write-Off.
6. Select the option ‘Write-Off’ from the Actions column and click on the Apply
Actions to Services button at the bottom of the grid. A confirmation message ‘Are
you sure to apply selected actions against the Services’ will be displayed as
shown below:
Click on the Yes button to Write-Off the item - or the Cancel button to cancel the process. Once Written-Off, the Patient Outstanding Amount and the Fund Outstanding
Amount column for the Service item will be changed to ‘0’ (zero). The Status column
will be updated as ‘Written-Off’ and the Action field will be displayed with ‘No
Action’. Click OK to save the changes.
Written-off entries for both the Patient / Account Holder and Health Fund Account
Holder will be displayed in the IMC Patient tab of Patient Account window (middle
pane) as a transaction type ‘W’, when selecting the respective Invoice from the first
pane, as shown in below screenshot:
IMPORTANT NOTE The Write-Off option is an irreversible function, once the Service Item has been
written-off, it cannot be undone. A warning message shown below will be displayed
while changing the Action for the written-off service in the View IMC Batch window:
Page 109
Version 9.3.0 Build 4620 – ECLIPSE Release Notes
Copyright © Medtech Healthcare Pty Ltd Page 109
Transfer Patient Outstanding to Health Fund From the View IMC Batch window, you can transfer the Patient’s outstanding amount for a
Service Item to a Health Fund. Find the steps below to achieve this:
1. Open the IMC Claim Batching window (Module � Accounts � IMC Batching).
2. Select the Outstanding IMC Batches tab.
3. Highlight the batch containing the Service Item to transfer the Patient’s outstanding
amount to a Health Fund. To find the Batch quickly, select IMC Batching ���� Search
batch record or press Ctrl +S or click the Quick search for batch ID icon . The
Quick search batch record window will be displayed.
Type the Batch Claim number into the Claim ID field and then click on the OK button,
or press the Enter key. The Claim will be highlighted in yellow.
4. Select IMC Batching ���� Open or press Ctrl + O or click the Open an existing
batch icon . The View IMC Batch window will be displayed.
5. Highlight the Service Item for which the Patient’s outstanding amount is to be
transferred to the Health Fund.
6. Select the option ‘Transfer Patient O/s to Fund’ from the Actions column and click
on the Apply Actions to Services button at the bottom of the grid.
7. A confirmation message ‘Are you sure to apply selected actions against the
Services’ will be displayed as shown below:
Page 110
Version 9.3.0 Build 4620 – ECLIPSE Release Notes
Copyright © Medtech Healthcare Pty Ltd Page 110
Click ‘Yes’ to transfer the Patient’s outstanding amount to Health Fund. Click OK to
save the changes.
From the above screenshot, the patient’s outstanding amount is ‘$30’ and the Health
Fund outstanding is ‘$50’. After transfer the Patient Outstanding Amount and Health
Fund Outstanding will be changed to ‘$0’ and ‘$80’, respectively. The Status column
will be updated as ‘Fund Amt O/s’ and the Action field will be displayed with ‘No
Action’, as shown below:
Transfer entries for both the Patient / Account Holder and Health Fund Account
Holder will be displayed in the IMC Patient tab of Patient Account window (middle
pane) as a transaction type ‘A’ and the transfer amount in Credit ‘Cr’ for the Patient,
when selecting the respective Invoice from the first pane, as shown in below
screenshot:
Page 111
Version 9.3.0 Build 4620 – ECLIPSE Release Notes
Copyright © Medtech Healthcare Pty Ltd Page 111
Transfer Health Fund Outstanding to Patient From the View IMC Batch window, you can transfer the Health Fund outstanding amount for
a Service Item to Patient. Find the steps below to achieve this:
1. Open the IMC Claim Batching window (Module � Accounts � IMC Batching).
2. Select the Outstanding IMC Batches tab.
3. Highlight the batch containing the service item to transfer Health Fund outstanding
amount to Patient. To find the batch quickly, select IMC Batching ���� Search batch
record or press Ctrl +S or click the Quick search for batch ID icon . The Quick
search batch record window will be displayed.
Type the batch claim number into the Claim ID field and then click on the OK button,
or press the Enter key. The claim will be highlighted in yellow.
4. Select IMC Batching ���� Open or press Ctrl + O or click the Open an existing
batch icon . The View IMC Batch window will be displayed.
5. Highlight the Service Item for which the Health Fund outstanding amount is to be
transferred to Patient.
6. Select the option ‘Transfer Fund O/s to Patient’ from the Actions column and click
on the Apply Actions to Services button at the bottom of the grid. A confirmation
message ‘Are you sure to apply selected actions against the Services’ will be
displayed as shown below:
Click ‘Yes’ to transfer the Health Fund outstanding amount to Patient. Click OK to
save the changes.
From the example in the screenshot above, the Health Fund outstanding amount is
‘$30’ and the Patient outstanding is ‘$20’. After transferring the Health Fund
Page 112
Version 9.3.0 Build 4620 – ECLIPSE Release Notes
Copyright © Medtech Healthcare Pty Ltd Page 112
Outstanding Amount, and the Patient Outstanding amount – these will be updated to
‘$0’ and ‘$50’, respectively. The Status column will be updated as ‘Patient Amt O/s’
and the Action field will be displayed with ‘No Action’, as shown below:
Transfer entries for both the Patient / Account Holder and Health Fund Account
Holder will be displayed in the IMC Patient tab of Patient Account window (middle
pane) as a transaction type ‘A’. The transfer amount will display as a Credit ‘Cr’ for
the Health Fund, when selecting the respective Invoice from the first pane, as shown
in the screenshot below:
2.13.3.9 Make Patient in Batch Active on the Palette
Click on the Make the patient the active patient icon in the Header section of the View
IMC Batch window. The highlighted patient will now be displayed on the palette.
Page 113
Version 9.3.0 Build 4620 – ECLIPSE Release Notes
Copyright © Medtech Healthcare Pty Ltd Page 113
2.14 Resubmit a Voucher (Invoice) Follow the steps below to Resubmit a Voucher from the View IMC Batch window:
1. Open the IMC Claim Batching window (Module � Accounts � IMC Batching).
2. Select the Outstanding IMC Batches tab.
3. Highlight the batch containing the voucher to be resubmitted. To find the batch
quickly, select IMC Batching ���� Search batch record or press Ctrl +S or click the
Quick search for batch ID icon . The Quick search batch record window will be
displayed.
Type the batch claim number into the Claim ID field and then click on the OK button,
or press the Enter key. The claim will be highlighted in yellow.
4. Select IMC Batching ���� Open or press Ctrl + O or click the Open an existing
batch icon . The View IMC Batch window will be displayed.
5. Highlight the invoice to be resubmitted from the Items section.
6. Click on the Resubmit button at the bottom of the grid.
Page 114
Version 9.3.0 Build 4620 – ECLIPSE Release Notes
Copyright © Medtech Healthcare Pty Ltd Page 114
7. The Invoice entry will be removed from the View IMC Batch window. Click OK to
save the changes.
8. The voucher will be taken out of the batch and placed into the Unbatched IMC tab
which can be included in a new batch and sent to Medicare.
2.15 Resubmit a Service Item Steps to resubmit a Service Item from the View IMC Batch window:
1. Open the IMC Claim Batching window (Module � Accounts � IMC Batching).
2. Select the Outstanding IMC Batches tab.
3. Highlight the batch containing the service item to be resubmitted. To find the batch
quickly, select IMC Batching ���� Search batch record or press Ctrl +S or click the
Quick search for batch ID icon . The Quick search batch record window will be
displayed.
Type the batch claim number into the Claim ID field and then click on the OK button,
or press the Enter key. The claim will be highlighted in yellow.
4. Select IMC Batching ���� Open or press Ctrl + O or click the Open an existing
batch icon . The View IMC Batch window will be displayed.
5. Highlight the item to be resubmitted.
6. Select the option ‘Resubmit’ from the Actions column and click on the Apply Actions to Services button at the bottom of the grid. A confirmation message ‘Are you sure to apply selected actions against the Services’ will be displayed as shown below:
Click ‘Yes’ to resubmit the item.
Page 115
Version 9.3.0 Build 4620 – ECLIPSE Release Notes
Copyright © Medtech Healthcare Pty Ltd Page 115
Once resubmitted the Service item will appear in ‘Italic’ and ‘grey’ font. The Status column will be updated as ‘Resubmitted’ and the Action field will be displayed with ‘No Action’. Click OK to save the changes.
7. The item will be taken out of the batch and placed into the Unbatched IMC tab which can then be included in a new batch and sent to Medicare.
Resubmitted entries for both the Patient / Account Holder and Health Fund Account Holder will be displayed in the IMC Patient tab of Patient Account window (middle pane) as a transaction type ‘A’ and Tran By - ‘R’, when selecting the respective Invoice from the first pane, as shown in the screenshot below:
2.16 Banking The Banking module will collate the IMC payments along with the payments made against all
other General Invoices accumulated since the last time banking was closed off.
2.16.1 Banking Process Detailed
Select Module ���� Accounts ���� Banking or click on the Banking icon . The Banking
window will be displayed.
The Banking window will display the IMC Gap Payments made by Patient Account Holders
and the Electronic Payments received from the Health Funds.
Page 116
Version 9.3.0 Build 4620 – ECLIPSE Release Notes
Copyright © Medtech Healthcare Pty Ltd Page 116
Once the Banking has been Closed Off, to print the deposit supplements, select Banking
���� Print Deposit, Ctrl+D, or click on the Print Bank Deposit List icon . The Banking
Deposit Supplement window will be displayed.
The print options in the Bank Deposit List when printed will include the IMC Payments.
2.17 Statement Run The Statement Run functionality has now been extended to include the outstanding IMC
Accounts for the account holders defined in the Statement Run filter.
2.18 Reference Nos. In Medtech32 Version 9.3.0, a new field, ‘Next IMC Claim Number’ has been introduced in
the References window (Setup menu � Reference Nos), to assign the next unique batch
number for IMC Claims.
Page 117
Version 9.3.0 Build 4620 – ECLIPSE Release Notes
Copyright © Medtech Healthcare Pty Ltd Page 117
The new billing type ‘In-Patient Medical Claim’ (non-editable field) can also be seen in the
Billing Type tab.
2.19 Location Settings In Medtech32 Version 9.3.0, the Banking & Transaction settings in the Postal & Accounting
Details tab of the New/ View Location window have been extended to include the
additional IMC Billing features. These are listed below:
• Default Standard Hours Service (will be left blank for IMC Invoices)
• Medicare Plus Additional Payment
• Allow Backdating of Invoice/Payment/Credit Note/Refund.
• Allow Modify Transaction after banking close-off
• Default new invoice to unticked for IMC Batching
• Enable Footers on Patient Claiming Forms
• Allow Re-Transmission of Sent Batches
• Disable Reprint on Modify
• Print Logo on Invoice
• Print Logo on Statement
• Look Back Range
• Enable Payment Credit Allocation
2.20 Tool Bar
In Medtech32 Version 9.3.0, the following icons have been introduced to the toolbar:
• New IMC Invoice – to bring up the IMC Invoice window
• IMC Batching – to bring up the IMC Batching window
Page 118
Version 9.3.0 Build 4620 – ECLIPSE Release Notes
Copyright © Medtech Healthcare Pty Ltd Page 118
In the Setup Toolbar window, select the New IMC Invoice option and IMC Batching option
in the ‘Not Selected’ pane and click the Add Option to Toolbar icon to move the option into the ‘Selected’ pane. Click on the OK button to save the changes. The New IMC Invoice icon and the IMC
Batching icon will now be displayed in the Medtech32 Toolbar, as shown in the screenshots
below:
2.21 Quick Bill Enhancements The Quick Bill functionality has been enhanced to adapt to the changes due to the
implementation of new Eclipse feature. The changes are listed below:
• IMC Payment Levels are included in the Payment Level drop down list
• Quick Bills created with an IMC Payment Level will be populated only in the New IMC
Invoice window
• Quick Bills created with a Non-IMC Payment Level will be populated only in the New
Invoice window
Page 119
Version 9.3.0 Build 4620 – ECLIPSE Release Notes
Copyright © Medtech Healthcare Pty Ltd Page 119
The IMC Payment Levels (configured in the Payment Level window as invoice type ‘In-
Patient Medical Claim’) has been included and displayed under the Payment Level drop
down list. In addition to an existing functionality, you can now generate a Quick Bill for a
New IMC Invoice.
The details provided in the Quick Bill (with IMC Payment Level) will be auto-populated when
opening the New IMC Invoice window (Module � Accounts � New IMC Invoice or press
Alt + F9)
A Quick Bill created with an IMC Payment Level will only populate in to an IMC Invoice
screen.
Page 120
Version 9.3.0 Build 4620 – ECLIPSE Release Notes
Copyright © Medtech Healthcare Pty Ltd Page 120
3. CONSOLIDATED ACCOUNTS A new Accounts option called ‘Consolidated Account’ has been introduced with this
Medtech32 Version 9.3.0 Build 4620 upgrade. This new menu is accessible from the
Module > Accounts > Consolidated Accounts option. The Consolidated Accounts window
provides the user with enhanced functionality and will be further developed in upcoming
releases.
From the Consolidated Accounts window, the user has the ability to filter and view all
those transactions (Invoice, Payments, Credit Note and Refund) for both the Patients and
their Account Holders.
Note: If the Practice is registered for the ECLIPSE feature, then this screen will also include
all those IMC Transactions. The existing Patient Accounts screen does not display the
patients’ IMC Transactions entries.
When accessing the Consolidated Account window from the menu option Module �
Accounts � Consolidated Account, there must firstly be a patient on the Palette. If there
is no patient on the Palette, then the Consolidated Accounts menu will appear as ‘greyed
out’ and not accessible.
The Consolidated Account window has three sections, each section is summarised below:
• Section 1 – Contains the various filter options available to view the transactions of
the Patients / Account Holders
• Section 2 – Will list out the transactions based on the filter selection in Section 1
• Section 3 – Will display each detail of the transaction highlighted in Section 2
Note: Transactions with Outstanding balances will be displayed in ‘Red’ font.
Section 1:
Page 121
Version 9.3.0 Build 4620 – ECLIPSE Release Notes
Copyright © Medtech Healthcare Pty Ltd Page 121
The first section of the Consolidated Account window has the following filters.
• Account Holder – The Account Holder field lists all of the recorded Account Holders
for the active patient on the palette. If required, you can select and view the
transactions related to that Account Holder. By default, the option ‘All’ will be
displayed
• Patient – By default the name of the active patient on the palette will be displayed.
You can select the option ‘All’ from this field to view the transactions of all other
patients for the selected Account Holder.
• Related Debtors – This field has been included to filter and view all IMC
Transactions. All the Health Fund Account Holders will be listed out in this field.
Select an Account Holder from the list to view the IMC transactions for that Account
Holder or select ‘All’ to view all the Transactions (including IMC transactions). By
default, the option ‘All’ will be displayed.
• Provider – All the Servicing Providers in Medtech32 will appear in this list. Select a
Provider from the list to view the transactions for a specific Provider or select ‘All’ to
view the transactions for all the providers. By default, the option ‘All’ will be
displayed.
• Billing Type – All the billing types available in Medtech32 will be displayed in this
list. These would normally be: Bulk Billing, Third Party, Repatriation, IMC, Private and
Group Invoices. For example, to view only the Private transactions, select the billing
type Private or to view only the Bulk Bill transactions select the billing type ‘Bulk
Billing’. By default, the option ‘All’ will be displayed.
Page 122
Version 9.3.0 Build 4620 – ECLIPSE Release Notes
Copyright © Medtech Healthcare Pty Ltd Page 122
• Options – This field will display the various Transaction types available to select and
display. By default, the option ‘All’ is selected.
o Invoices – Select this option to view only Invoice entries
o Payments – Select this option to view only Payment entries
o Outstanding – Select this option to view only the Outstanding Invoices and
Payments
o Date Range – On selecting the Date Range, additional fields From and To will
appear. Select the calendar drop down option in the relevant fields to define a
particular date range to display. Then click on the Search button. Transactions
during the specified date range will be displayed
o Medicare Batch No – On selecting the Medicare Batch Number option, this will
present an additional Batch ID field, where the user is able to enter the specific
Batch Number, and then click on the Search button.
o All – Select All to view all the transactions
Page 123
Version 9.3.0 Build 4620 – ECLIPSE Release Notes
Copyright © Medtech Healthcare Pty Ltd Page 123
Section 2: This section is dependent on the Filter selections from Section 1, and will display all of those transactions based on the Filter options used.
The grid in this section has the following columns:
• Date – The date of transaction
• Tran Type – The Transaction Types: I = Invoice, P = Payment, C = Credit Note,
R = Refund, D = Discount, J = Journal Adjustment, and G = Group Invoice
Note: Transaction Type IDs will not be displayed for Bulk Bill and REPAT
transactions.
• Tran Method – Payment method used for the ‘Payment’ and ‘Refund’ transactions
• Bill Code – This will display the associated Billing Codes for the Invoices: Private,
Bulk Bill, REPAT, Third Party and In-Patient Medical (for IMC)
• Form No – Display transaction reference number for each transactions
• Patient – Name of the Patient
• Account Holder – Name of the Account Holder
• HF Account Holder – Health Fund Account Holder (for ECLIPSE transactions)
• Description – Service item description
• Amount – Total amount of the transaction
• Prov – Service Provider associated to the transaction
• Inc – Income Provider associated to the transaction
• Pat Outstanding – The unpaid amount owed by the patient
• HF Outstanding – The unpaid amount owed by the Health Fund (for IMC
transactions – ECLIPSE functionality).
• Claim Type – The IMC Claim Type – AG, SC or PC (for IMC transactions –
ECLIPSE functionality).
• Batch ID – The batch number the transaction is included in. Will be displayed only
for the billing codes - Bulk Bill, REPAT and IMC - (ECLIPSE functionality).
Page 124
Version 9.3.0 Build 4620 – ECLIPSE Release Notes
Copyright © Medtech Healthcare Pty Ltd Page 124
• Claim Status – Indicates the processing status of the claim / request (only for Private
Invoices)
Section 3: This screen will display the breakdown of the transaction details of the particular entry highlighted by the user from the above Section 2.
As shown in the screenshot above, if the transaction selected in Section 2 is an ‘IMC
Invoice’, then the breakdown of the invoice details (i.e. the amount to be paid by Health
Fund and the amount to be paid by the patient / claimant) will be segregated as a separate
line item.
Note: For the transaction type ‘Payment’ and ‘Refund’ no breakdown details will be displayed.
Page 125
Version 9.3.0 Build 4620 – ECLIPSE Release Notes
Copyright © Medtech Healthcare Pty Ltd Page 125
1.2 Consolidated Account Context Menu The majority of the functionality that is within the existing Patient Accounts screen is also
available in the Consolidated Accounts window via the mouse Right Click option. This will
display the additional menu options, as shown in the screenshot below. This menu allows
the user to select from the various options to create a New Invoice, a New IMC Invoice, New
Payment, New Credit Note, New Refund, or to Modify an Invoice.
The Transfer Transactions functionality is also available via the mouse Right Click menu
option.
Note: As per the standard processes, the Transfer Transaction option will be displayed
only for Private and Third Party transactions.
With the Consolidated Account window open, you can perform some of the same actions
available from the screen, from the Consolidated Account context menu option:
Page 126
Version 9.3.0 Build 4620 – ECLIPSE Release Notes
Copyright © Medtech Healthcare Pty Ltd Page 126
3.5.1 Print Single Assignment Form
It is possible to reprint an Assignment Form for Bulk Bill and REPAT invoices from the
Consolidated Account window by following the steps below:
1. Find and display an appropriate patient on the Palette.
2. Select Module � Accounts � Consolidated Account to bring up the Consolidated
Account window.
3. Highlight the Invoice (Bulk Bill or REPAT) for which the Assignment form is to be
printed.
4. Select Consolidated Account menu � Print Single Assignment Form.
5. The Assignment Form will be sent to the desired printer.
3.5.2 Print PC1 Form It is possible to also print the Medicare PC1 Form for Private, IMC and Third Party invoices
from the Consolidated Account window by following the steps below:
1. Find and display an appropriate patient on the palette.
2. Select Module � Accounts � Consolidated Account to bring up the Consolidated
Account window.
3. Highlight the Invoice (Private or IMC or Third Party) that you wish to reprint the PC1
form.
4. Select Consolidated Account menu � Print PC1 Form.
5. The Medicare PC1 Form will be sent to the desired printer.
3.5.3 Print Invoice / Receipt Print the report for an Invoice or Payment or Refund or Credit Note for the Billing Codes –
Private, IMC and Third Party from the Consolidated Account window by following the steps
below:
1. Find and display an appropriate patient on the Palette.
2. Select Module � Accounts � Consolidated Account to bring up the Consolidated
Account window.
3. Highlight the Invoice / Payment / Credit note / Refund of the Billing Code (Private or
IMC or Third Party) to send to the printer.
Page 127
Version 9.3.0 Build 4620 – ECLIPSE Release Notes
Copyright © Medtech Healthcare Pty Ltd Page 127
4. Select Consolidated Account menu � Print Invoice / Receipt.
5. The report will be sent to the desired printer.
3.5.4 Print Statement Print a Statement for the active patient on the Palette, based on the date range selected in
the Print Statement window.
Steps to print the Statement:
1. Find and display an appropriate patient on the Palette.
2. Select Module � Accounts � Consolidated Account to bring up the Consolidated
Account window.
3. With the Consolidated Account window remains open, select Consolidated Account
menu � Print Statement.
4. The Print Statement window will be displayed. Select the date range from the
Opening Balance and Closing Balance calendar drop down list to print the
Statement for the date range selected.
5. Select the desired printer from the Print To drop down list.
6. Click OK to send the Statement to the desired printer or click the Cancel button to
abort the process.
3.5.5 Credit Adjust and Debit Adjust These options are currently Disabled (greyed out) as they are still under development and
will be made available in an upcoming release.
Page 128
Version 9.3.0 Build 4620 – ECLIPSE Release Notes
Copyright © Medtech Healthcare Pty Ltd Page 128
4. KNOWN LIMITATIONS / ISSUES
4.1 Consolidated Account window The following are the known issues / limitations in the Consolidated Account window.
4.1.1 Consolidated Account – Context menu After upgrade to Medtech32 Version 9.3.0 Build 4620, you can view the sub menu options –
Credit Adjust and Debit Adjust – under the Consolidated Account context menu which
are always greyed out. These options are still under development and will be made
available on the upcoming release.
4.1.2 Transactions not being Displayed When selecting the Billing Type ‘Private’ and Options as ‘All’ in the Consolidated Accounts
window, the Refund, Payment and Journal Transactions are not getting displayed.
Similarly, no payment entries are getting displayed when selecting the Billing Type –
Private or Third Party or Group Invoice – and the Options as ‘Payments’.
These issues will be resolved in the upcoming release.
Page 129
Version 9.3.0 Build 4620 – ECLIPSE Release Notes
Copyright © Medtech Healthcare Pty Ltd Page 129
4.1.3 Term ‘CR’ does not Display for the Credit transactions The term ‘CR’ (for Credit) is not getting displayed for the following transactions – Credit
Adjustment, Resubmit and Write-Off – under the Patient Outstanding column.
This issue will be resolved in the upcoming release.
4.1.4 Consolidated Account – Performance Lag When connecting to large databases, there might be a notable lag in the performance and
response time (time taken to refresh and display transactions) in the consolidated accounts
window.
This issue will be resolved in the upcoming release.
4.2 View IMC Batch – Resubmit Button Disabled There is a known issue in the View IMC Batch window wherein the Resubmit button is
greyed out / disabled if the Health Fund Balance has been paid manually through New
Payment window. In general, the Resubmit button should be disabled only after received
payment from Health Fund.
This issue will be resolved in the upcoming release.
4.3 Resubmitted PC Claims not Displayed in the Unbatched
IMC Tab There is a known issue in the IMC Batching window; wherein the Resubmitted PC Claims
are not getting displayed in the Unbatched IMC tab. Instead, the user needs to open and
resubmit the respective invoice from the Patient Account window to get displayed in the
Unbatched IMC tab.
This issue will be resolved in the upcoming release.
4.4 Adjustment Reason does not display in the Credit/Debit
Adjustment Window There is a known issue in the View Credit Adjustment & View Debit Adjustment window;
wherein the reason for the adjustment is not getting displayed in the Reason drop down list
for the transactions transferred from View IMC Batch window.
Page 130
Version 9.3.0 Build 4620 – ECLIPSE Release Notes
Copyright © Medtech Healthcare Pty Ltd Page 130
This issue will be resolved in the upcoming release.
4.5 Resubmitted Service – Transmitted to Medicare Online When sending IMC Claims, the resubmitted Service within a batch also gets transmitted to
Medicare & Health Fund through ECLIPSE.
This issue will be resolved in the upcoming release.
4.6 Resubmitted Invoice – Details not Updating Correctly After resubmitting an IMC Invoice from the View IMC Batch window (as mentioned in the
Resubmit a Voucher (Invoice) section), the amount displaying in the Patient Paid and
Patient Amount Outstanding column in the IMC Batching window are not updated
accordingly.
This issue will be resolved in the upcoming release.
For further information on this Medtech32 Version 9.3.0 Build 4620 Release, please
contact the Medtech Helpdesk on Tel: 1800 148 165, or Email
[email protected] .