Page 1
Metes and Bounds Help
Topics:
Drawing Wizard
Data Entry o Entering Metes and Bounds Data o Entering Section Call Data
Layers
o Layer Options
o Analyze Layer Closing Error
Tabs
Drawing Options
o Drawing Labels and Captioning
Pictures
o Background Picture
o Floating Pictures
o Snapshots
3rd Party Imaging
Opening, Saving, Printing, Importing and Exporting
Calculations Menu
Tools Menu
Window Menu
Conversion Table Preferences
Registering, Upgrading and Renewing
Copyright (c) 2001-2018 by Sandy Knoll Software, LLC
Page 2
Drawing Wizard
The Drawing Wizard is an optional way to start a new drawing and can be found under the File menu. It will ask you
several questions about what type of drawing you plan on creating. Based on your answers to these questions, the
wizard will preset some of the drawing values to help you accomplish your goals. Using the wizard does not lock you
into a particular workflow; it only presets a few options. You can always change any of the drawing options to better
suit your needs.
Simple
o This option is optimized for working with a single layer. It will keep the drawing centered in the middle
of your screen. It is very similar to the blank drawing that you get when you do not use the wizard.
Page 3
Drawing Wizard (Continued)
Complex
o This option is optimized for working with multiple layers/plots/tracts in a single drawing. It also
provides the option of using a scaled background image, such as a section or topographical map.
Section Based
o This option will start your drawing using the Section Finder. It allows for easy entry of section calls
such as "The northwest quarter of the southeast quarter".
Lat / Long o This option will start your drawing using the Lat/Long to Layer tool. Use this option to turn a list of
Lat/Long coordinates into a series of metes and bounds calls.
If the Show New Drawing Wizard at Startup checkbox is checked, the wizard will appear each time you start Metes
and Bounds. If you uncheck this box, you can still access the wizard from the File menu.
Page 4
Entering Data
Data can be entered either manually or by using the Data Entry form.
To enter data manually, enter the call into the entry field and press the Add button.
The data should be entered as {N/S} {DD:MM:SS} {E/W} {Distance}. Example: N 44:30:25 E 100. You can also
enter "due" north/south/east/west by entering just the direction and the distance. Example: N 100 would be due north
100 feet.
Line calls can also be entered in the following format: {N/S}{DD.MMSS}{E/W} {Distance}. Example: n33.3333e
100.
Distances entered manually are assumed to be feet. To have the software assume a unit of measurement other than feet
choose Data Entry Mode from the Tools menu. This will activate a menu button that can be used to change the unit of
measurement to that which is being entered. Values entered in this way will be converted to feet. This menu button can
be seen below.
In most cases, a "v" or "m" can be added to the distance to indicate that the value being entered is either a vara or
meter. Example: N 45 E 100v would indicate 100 varas. The full text of the unit type can also be used, such as N 45 E
100 Yards.
Additional Call Entries:
Curve - Brings up the curve editor.
Line - Brings up the line editor.
Draw - Enters call drawing mode.
POB - Creates a call that returns from the end of the last call to the POB.
@ - Creates a new layer.
@LayerName - Creates a new layer with the specified name.
/ - Adding this slash before a call will create in invisible call.
Page 5
Data Entry Form
To enter data using the Data Entry form, press the Enter Data button. This will bring up the Data Entry form. You can
also bring up this form by right-clicking in the main drawing area or the call list and choosing Enter Data from the
popup menu.
Page 6
Entering Line Data:
To add a line to the drawing, make sure that the Line tab is selected. Then, enter the call data and press the Add Line
button.
If the Call Visible box is unchecked, then the call will not be drawn on the screen, nor will it be used in calculations
such as area. An invisible call will be shaded in red in the call list. Calls can be made visible/invisible by right-clicking
on the call in the main window.
To delete the last line of the drawing, press the Delete Last button.
You can edit any line by choosing it from the Edit Line menu button.
You can bring up a unit conversion calculator by pressing the popup menu arrow next to the distance unit popup
menu.
If the call's angle is expressed as a decimal or compass direction, you can press the popup menu arrow next to the
degree box to bring up one of the angle converters.
Page 7
Entering Curve Data:
To enter a curve, select the Curve tab.
Choose which direction the curve is facing, either Left or Right.
Enter the Radius of the curve. Clicking the Popup Menu Triangle next to the radius will bring up a menu of options for
finding the radius if the radius isn’t given.
Page 8
Choose the correct tab to enter the curve data in the format that you are using.
Arc Length (ft)
Page 11
Radial Line
Press the Add Curve button to add the curve.
Page 12
You can convert a Chord Length and Radius to Arc Length by pressing the popup menu arrow next to the Arc
Length field. This the button will bring up the conversion form:
Enter the Radius and Chord Length. Pressing the Convert button will enter the Arc Length into the appropriate field on
the main data entry form.
To enter non-tangent curves, enter the deflection as a line with a length of 0 feet, then enter the curve call.
To enter curve data manually:
On the main window, enter Right or Left, space, Radius, space, arc length in degree. For example, to enter a left facing
curve, with a radius of 50 feet and an arc length of 30 degrees, 25 minutes enter "L 50 30:25". Then press the Add
button.
Page 13
Entering Corner Call Data
Entering a Corner Call simplifies the process of setting layers to use the same starting point. The Corner Call line is an
invisible line from the drawing's origin to a section corner. For example, if your layer's description starts something like
"Beginning at a point South 300.00 feet from the northwest corner of the northeast quarter of Section 19", you could
create an invisible call from the drawing's origin to the section corner as described. Then you would create another
invisible line call for South 300 feet. This allows all of the layers to share the same origin, thus facilitating the
automatic scaling and placement of each layer within a section.
If the drawing’s origin is not one of the corners, you will have to choose a corner to calculate the Corner Call from. Use
this same corner for any additional layers.
This call should be the first call in the call list. If not, you can move it to the top of the call list using the Moving Calls
feature outline below.
Page 14
Bounded Line:
This tab allows you to enter a call that will be cropped at the boundary of another layer. Or it allows you to enter a
bearing with an unknown length that will be cropped at the boundary of another layer. First choose the bounding layer,
then enter either the call or bearing. If entering a bearing with an unknown length, use an * asterisks for the length.
Note: This option cannot be used if the drawing's origin is set to Auto-Center. It also requires that the drawing contain
at least two layers - one for the bounding layer and the layer for which the call is being entered.
Page 15
Entering Calls Via Text Editor
Calls can also be entered via a text editor interface by pressing the Text Entry button on the Data Entry form.
Any calls that can be entered in the call entry box on the main window can also be entered here.
Search and Replace can be found under the Edit menu.
Options:
Convert Degree/Distance to Azimuth Call: This menu option will “roll up” Degree<enter>Distance<enter> entries into
azimuth calls.
Page 16
Entering Missing, Incomplete or Vague Calls:
An incomplete or poorly written description may be missing part or all of a call. The software can help solve for these
bad calls with several caveats.
There can only be one bad call per layer.
The layer will now close completely, even if it wouldn't have otherwise.
The resulting call will be a line and not a curve.
To use this feature, enter a question mark (?) in place of the call. The question mark can only be entered using the
manual entry field.
Moving Calls:
You can move calls up or down in the call list by right-clicking on the call and choosing Move Up or Move Down from
the popup menu.
Return to Call:
You can return to the endpoint of a previous call by right-clicking on the call that you want to return to in the call list
and choosing Return to Call. This will create an invisible call that returns to the endpoint of the chosen call. The
recommended way to return to a call is to create a new layer using the Return to Call custom layer. Using this method
of Return to Call can cause some functions to act unexpectedly, such the Split Layer function and area calculations.
However, depending on how you intended to use the software, this option may be the easiest way to accomplish your
goals.
Page 17
Set Call Label:
You can set a custom label for an individual call by right-clicking on the call in the call list and choosing Set Call Label
from the popup menu. This will bring a the Set Call Label form. Enter the call's label and press the Set Label button.
The call label uses the same settings as the layer Show Call feature.
Convert Unit of Measurement:
You can convert the unit of measurement for a line call by right-clicking on the call and choosing Convert Unit of
Measurement from the popup menu.
Drawing Calls: See the Call Drawing Tool for information on drawing calls.
Page 18
Section Finder
This feature will show a graphical representation of a section description. For example:
To enter a section call, enter it into the Call text box and then press the Add button.
To enter a quarter, enter NW/4, NE/4, SW/4 or SE/4
To enter a half, enter N/2, S/2, E/2 or W/2
To enter a three fourth quarter, enter N3/4, S3/4, E3/4 or W3/4
To enter in feet, enter N, S, E or W, followed by the distance in feet. For example, "the north 600 feet" would
be: N600
To enter exceptions in feet, enter -N, -S, -E or -W, followed by the distance in feet. For example, "EXC N 300
feet" would be -N300
To enter exceptions in acres, enter ~N, ~S, ~E or ~W, followed by the acreage. For example, "EXC N 27 AC"
would be ~N27
Page 19
Click on the Fill Color to change the color used to draw the next added call.
Slide the transparency slider to adjust the calls transparency. The far left is fully transparent.
Choose the fill style to be used for the next added call by choosing the desired style from the Style popup menu.
To edit a call, choose the call from the call list. Make the desired changes and then press the Edit button.
To delete a call, choose the call from the call list and press the Remove button.
To delete all calls for a section, press the Remove All button.
Entering the Township, Range and Section is optional.
You can enter data for up to 36 sections. To view all 36 sections at once, choose View All from the section popup
menu.
When viewing all sections, click on the desired section to edit it.
Grid Overlay
This popup menu will allow you to choose a grid to draw for the sections. Options are No Grid, 1/4, 1/16 and 1/64
sections.
Show Area
Checking this checkbox will draw area of the entered calls in the lower left hand corner of the drawing.
Directions
Checking this checkbox will draw North/South/East/West markers on the drawing.
Page 20
Section Finder Options Menu
Save Picture as File: This menu option allows you to save the section drawing as a picture.
Save Picture as Background: This menu option allows you to set the current drawing's background picture to the
current section drawing.
Print: This menu option will print the current section.
Create New Layer From Selected Aliquot Part: This menu option will create a series of calls in the current drawing that
represent the selected section call.
New Drawing from Current Section: This menu option will create a new drawing containing calls for each section part.
It will also use the section picture for the drawing's background.
Calls from Sections 1-36: This menu option will create metes and bounds calls for all 36 sections. The "unused" section
will not be included.
Page 21
Calculate
Area of Section: This menu will calculate the area of the drawn section.
Area From All Sections: This menu will calculate the drawn area of all of the sections in the selected range.
View
View Ranges: The software supports up to 9 ranges. Choosing this option allows you to select which range to work
with.
View Current Range Sections: This option shows you all of the selections in the currently selected range. This is the
same as choosing View All from the section popup menu.
Page 22
Layers
Layers Menu:
Add New Layer:
Use this menu to create a new layer. You will be presented with a form allowing you to name the new layer. The new
layer will become the drawings current layer.
Checking the "Set Layer's Offset to Last Layer's Offset" checkbox will cause the new layer to have the same offset as
the last layer in the layer list.
Page 23
Add New Advanced Layer:
Section Layer
This option is a quick way to create a 1 to 5 mile square section. If you pick a size larger than 1 mile, you'll be
given the option to include tick marks at the mile marks. You can also choose which quadrant to create the section
in. This allows you to choose if the section is drawn north/south and east/west of the drawing's origin. Creating a
Section Layer requires that the drawing's origin be set to something other than Auto-Center. The recommended
origin setting is Center of Screen.
Page 24
Return to Call
Creating a Return to Call layer will create a new layer that starts at the endpoint of the layer and call that is chosen.
It will automatically create a series of invisible calls, from the drawing's origin, to the chosen call's endpoint. This
makes it easy to return to a common point when multiple tracts start at the same reference point. Creating a Return
to Call layer requires that the drawing's origin be set to something other than Auto-Center. The recommended
origin setting is Center of Screen. This method is the recommended way to return to a call, however, in some cases
the "Return to Call" call option may also be viable.
Page 25
Rotated Layer
This option will create a new layer by rotating or flipping the selected layer. This will create a new set of calls for
the new layer. The recommended origin setting is Center of Screen.
Page 26
Compass Rule Layer
This option will create a new layer by applying the Compass Rule to the selected layer. The default colors for this
layer will be set to the selected color. The recommended origin setting is Center of Screen.
Page 27
Reverse Direction Layer
This option will create a new layer by reverse the direction of the calls. For example, if a plot runs clockwise, the
new plot layer will run counter-clockwise.
Check the Retain Leading Invisible Calls checkbox to have the new layer copy any leading invisible calls from the
original layer.
Page 28
Grid Layer
This option will create a new layer. This layer will contain a grid of the specified width and the specified spacing.
Page 29
Center Line Offset
Enter the left and right offsets.
Page 30
Delete Current Layer:
This menu will prompt you to delete the current layer.
Rename Current Layer:
This menu will bring up a form that will let you rename the current layer. Enter a new name and press the Rename
button.
Duplicate Current Layer:
This menu will duplicate the current layer. The new layer will be placed in the center of the drawing window. The new
layer will become the current layer.
Page 31
Attributes
The Layer Attributes form allows you to assign up to 10 attributes to a layer. These attributes can be searched as well
as exported in .SHP and .KML files. Some attribute types, such as Owner, allow you to enter in a value. Other attribute
types, such as Area, are calculated automatically.
To edit the master list of attribute types that will be used for all layers, press the Edit button.
Page 32
The Layer Attributes Configuration form allows you to set the type for each attribute. If you pick the Custom type, then
you will be able to enter a name to use for this type. This name will be displayed on the Layer Attributes form.
Page 33
Clicking the View as Grid button will bring up the Layer Attribute Grid window.
Page 34
Set Current Layer Origin X,Y:
Choosing this option will bring up the following form. It can be used to set the X,Y coordinates for the layer's origin.
This has no visual effect on the drawing, but will be used when showing/saving the point coordinates, exporting the
current layer as a DXF file and when viewing the endpoint X,Y. This setting also has no effect on the Offset or Origin
functions.
Enter the X and Y coordinates and press the Set button.
Page 35
You can also view origin X,Y for all layers at once by selecting View All Layers from the Options menu. Doing so will
bring up the following form:
The X, Y values can be edited on this form by clicking in any X, Y cell and entering a new value.
A set of x,y coordinates can be applied to all layers by choosing the option from the popup menu triangle.
Page 36
Set Current Layer POB Lat/Long:
Choosing this option will bring up the following form. It can be used to set the latitude and longitude coordinates for
the POB. This has no visual effect on the drawing, but will be used by the various other Lat/Long functions as a starting
point offset.
Enter the latitude and longitude coordinates and press the Set button.
Clicking the menu popup triangle provides additional options for setting the POB's lat/long.
Find POB Lat/Long From Endpoint Lat/Long
o Choose the endpoint that you know the lat/long for from the endpoint menu and enter its lat/long. Press
the Find POB Lat/Long button. This will close the current form and populate the POB Lat/Long form
with the POB's lat/long values.
Page 37
Find Lat/Long From Layer Endpoint
o You can also choose to rotate the selected layer prior to calculating the layer's lat/long values.
Lat/Long From UTM
o See UTM To Lat/Long Calculator under Calculate menu.
Set Other Layers POB Lat/Long
o Allows you to set the POB Lat/Long values for other layers. Rotation/Declination can optionally be
applied.
Page 38
Convert Origin Lat/Long to POB Lat/Long
o Convert a layer's Origin lat/long value to the layer's POB Lat/Long.
Page 39
You can also view origin Lat/Long for all layers at once by selecting View All Layers from the Options menu. Doing
so will bring up the following form:
Page 40
Offset Current Layer
* Each layer can be moved around by using the mouse.
* Holding down the shift key while dragging a layer allows you to drag all of the unlocked layers at once.
* Holding down the shift and control keys will bring up scrollbars that can be used to move all layers, including locked
layers, at the same time. This allows you to move all of the layers even if there is no layer visible to grab. This can be
useful for "scrolling" around the drawing while the scale setting is zoomed in.
The Offset window can be used to nudge a layer 1 pixel at a time or it can set a layers offset to the same offset as
another layer. It can also return a layer to its point of origin. The origin setting can be set in the Drawing Options.
Set All Layers to Origin:
This menu option will return all of the unlocked layers offsets back to zero.
Page 41
Align Layers by Endpoints:
This form will allow you to align layers via their endpoints. Note: This option is not available for drawing's with their
origin set to Auto-Center.
Select a base layer. This layer will not move. When you select a layer, it's endpoints will be numbered on the main
drawing. Select a base endpoint. This is the endpoint that the 'move layer' will move to. Select a move layer. This is the
layer that will move to the selected base endpoint. Select the move endpoint that you want to line up with the base
endpoint. Press the Align Layers button.
Page 42
Align Layers by Lat/Long:
This form will allow you to align layers via their POB Lat/Long values. Note: This option is not available for drawing's
with their origin set to Auto-Center.
This form will create a new, invisible starting call for each selected layer from the Origin's POB to each layer's
Lat/Long POB.
Origin Lat/Long:
This is the Lat/Long to use for the drawing's origin. You can pick this value from a layer's POB Lat/Long by clicking
on the popup menu triangle.
Align Layers:
This popup menu lets you choose which layers to align. The checkbox lets you skip or include locked layers.
X,Y Offset:
This option allows you to clear each layer's existing x,y offset, keep the existing x, y offset or set the offset to a specific
layer's x,y offset.
Page 43
Convert Current Layer Offset to Call:
The option will convert the current layer's offset into an invisible metes and bounds call.
Current Layer Closure Tools:
Convert Auto Completion to Call
This command is similar to the Auto Complete layer option. But instead of just drawing the completing line, this option
will create a new call that will close the plot and append it to the call list.
Adjust Closing Error
This form allows you to minimize a closure error by adjust the length of a line until the closure gap is at its smallest.
Select the line that you want to adjust. Select an interval. The interval is how large or small of increments the software
will use to close the gap. Then press the Adjust Line button.
Page 44
Bearing-Bearing Intersection
This form allows you to enter in bearings for the last two lines. Enter in the two bearings without entering a distance.
Distance-Distance Intersection
This form allows you to enter in two distances for the last two lines. Press the Find Intersections button to see the two
possible choices. Select the choice that you were looking for.
Page 45
Split Current Layer
Split Tool:
You can use this feature to turn a single layer into two plots.
First, choose the call where you want to start the split.
Next, move the slider to the desired point in the line where you would like the split to occur. A red bull's-eye will
appear on the main drawing to show you where the line will be split. You can also use the popup menu arrow to set
the line lengths to the desired values. Press the Next button to choose the ending marker for the split.
Page 46
Now choose the call for the other end of the split.
Move the slider to choose the second split point. Or, if you select the Find Nearest Half checkbox, the program will
find the point on the 2nd line where the two new plots are closest to having the same area. You can also use the popup
menu arrow to enter in precise values.
Page 47
You can view the new plots area either in square feet or in acres.
Press the Split button to create your two new plots. The two new layers will be added to your drawing if you have the
Pro version, or two new windows will be created if you have the Basic version.
If you press the 3rd Point button instead of pressing the Split button, the software will create a 3rd point at the center
point of the new cut line. You can then create 2 lines for the cut line instead of just one line.
Use the large arrows to move the 3rd point in 1 foot increments and the small arrows to move the point in 1 inch
increments. The 3rd point will not be allowed to move outside of the plot's boundary.
Page 48
Set Non-Current Layers Invisible will uncheck each layer's visibility checkbox accept for the current layer. This will
cause all of the layers, other than the current layer to become invisible.
Set All Layers Visible will check each layer's visibility checkbox. This will cause all of the layers to become visible.
Manage Layer Visibility. Choosing this menu will bring up the Layer Visibility form where you can set all of the
layers visibility in one place.
Check or clear each checkbox to set that layer's visibility.
Press the Check All button to make all layers visible.
Press the Clear All button to make all layers invisible.
Page 49
Lock Non-Current Layers. Choosing this option will mark all of the layers, other than the current layer, as locked.
Unlock All Layers. Choosing this option will mark all of the layers, including the current layer, as unlocked.
Hide Non-Current Layers. When this menu option is checked, selecting a layer from the layer popup menu will cause
all of the other layers to be hidden. This makes it so that only one layer is visible at a time. The other layer's visibility
setting is not effected.
Hide Non-Current Layer Endpoints. When this menu option is checked, only the current layer's endpoint data is
shown. This checkbox does not affect the other layer's endpoint settings.
Highlight Current Layer:
This option will cause the current layer to be drawn with a yellow highlight around it.
You can also temporarily enable layer highlighting by holding down the shift key.
Page 50
Selecting the Current Layer:
To select a layer, choose it from the layer selection menu on the main window.
When you select a new layer, it will become the current layer. All of the layer's calls will be shown in the call list and
all of the layer's options will be set in the layer options area.
You can also select a current layer by right clicking on the layer itself or the layers floating call list (if visible) in the
drawing and choosing the Make Current Layer option.
Edit Menu Layer Options:
Copy Drawing as Picture - This will place a copy of the current screen picture onto the clipboard.
Copy Current Layer's Description as Text - This will create a plot description for the current layer. It will
show the description on the screen in a popup window as well as placing the description text onto the clipboard.
Copy Current Calls - This will copy the calls of the current layer onto the clipboard.
Paste Calls as New Layer - This will allow you to create a new layer and paste the copied calls into that new
layer.
Paste Calls into Current Layer - This will paste a set of copied calls into the current layer. The calls will be
added at the insertion point.
Holding down the Shift key while selecting the Edit menu will change this option to Paste Clipboard Text as
Call List. This will take the text on the clipboard and paste it as a list of calls. Each call must already be
formatted as a valid call. This is a quick way to paste calls from another text document that had been previously
copied and pasted from Metes and Bounds.
Clear Current Calls - This will clear the current layer’s call list. This is the equivalent of selecting each call
and pressing the Remove button.
Page 51
Layer Order:
You can change the order of the layers in the layer popup menu by right-clicking on the layer popup menu and
choosing Change Layer Order. Changing the order will change the order in which the layers are rendered on the screen.
The first layer in the list will be drawn first and the last layer in the list will be drawn last.
To change a layer's order, select the layer in the list and press either the Up button or the Down button. Press the Save
and Close button to commit any changes and to close the form.
Page 52
Layer Options
Layer Visible
This will toggle the layer's visibility.
Lock Offset
When this box is checked, the layer's offset will be locked. This means that it cannot be moved, either by the mouse or
by the offset form. If a layer is locked, it will be shown with a lock icon in the main drawing. This setting can also be
set/cleared by right clicking on a layer and choosing Lock/Unlock Layer from the popup menu.
Auto Complete
If a plot's description does not contain a closing line, checking this box will draw the completing line.
Page 53
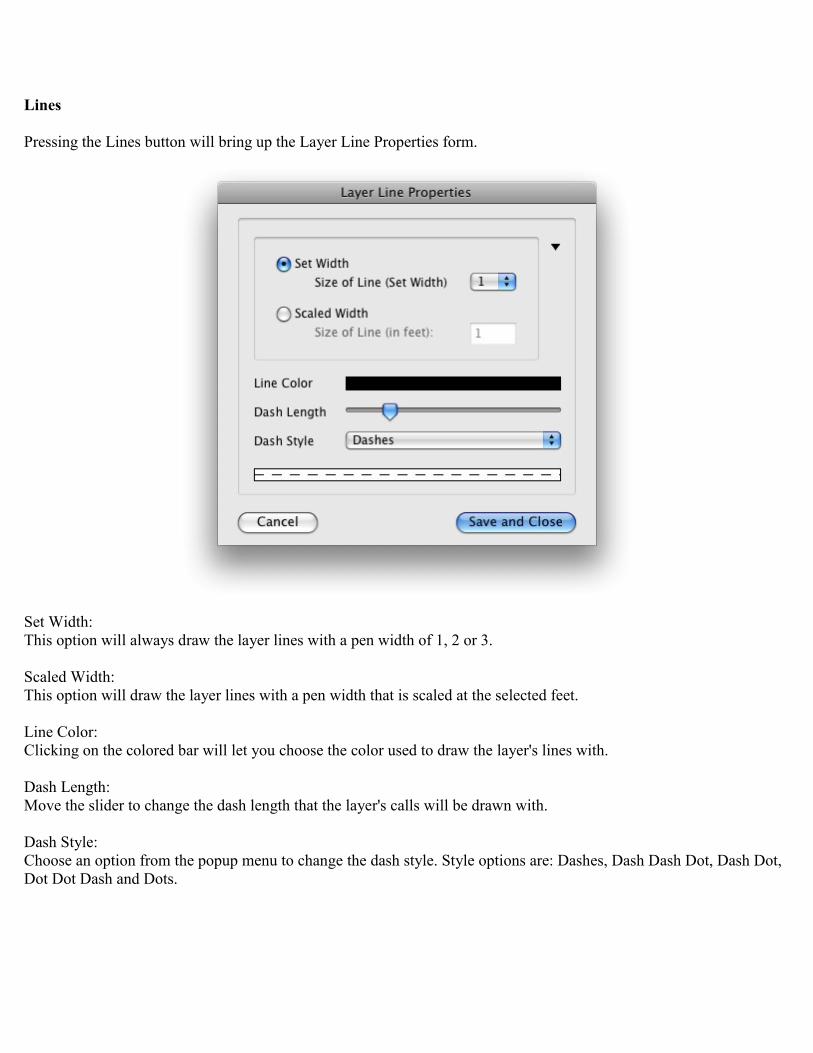
Lines
Pressing the Lines button will bring up the Layer Line Properties form.
Set Width:
This option will always draw the layer lines with a pen width of 1, 2 or 3.
Scaled Width:
This option will draw the layer lines with a pen width that is scaled at the selected feet.
Line Color:
Clicking on the colored bar will let you choose the color used to draw the layer's lines with.
Dash Length:
Move the slider to change the dash length that the layer's calls will be drawn with.
Dash Style:
Choose an option from the popup menu to change the dash style. Style options are: Dashes, Dash Dash Dot, Dash Dot,
Dot Dot Dash and Dots.
Page 54
Captions and Labels
Pressing this button will bring up the Layer Captions and Labels form.
The Show Lengths option will draw the line lengths on the drawing. You can choose the unit of measurement from the
measurement menu. If the In-Line checkbox is checked, then the lengths will be drawn in-line with the lines.
Pressing any of the Font buttons will bring up a font dialog that will allow you to choose the font style used for the
chosen caption.
Page 55
If the Show Calls checkbox is selected, the calls will be drawn on the lines. You can choose the unit of measurement
from the measurement menu. If Line #s Only is selected, then only the call's line number will be drawn.
If In-Line is selected, then the calls will be drawn in-line with the lines. In-Line Staggered will alternate if the call is
drawn above or below the line, for every other call.
Show Layer Name
This option will have the layer draw it's caption in the center of the plot. The angle of the layer name can be adjusted
using the angle up/down buttons. The angle setting is shared with the Layer Area.
Show Layer Area
This option will have the layer draw it's area in the center of the plot. It will be drawn below the layer's name if visible.
You can choose to show the area in acres or square feet. The angle of the layer area can be adjusted using the angle
up/down buttons. The angle setting is shared with the Layer Name.
Page 56
Point Labels
The Point Labels tab is a secondary interface to adding X,Y Waypoints. It is designed to make adding layer based
labels easier than using the X,Y Waypoints form directly.
To add a Point Label, enter the label's caption in the text box and press the Create Layer Label button. This will create
an X,Y Waypoint with no icon and set the description field to show. All labels created this way will have their X,Y
points set to 0,0.
Page 57
Call Labels
Allows you to edit the label for each call. Call labels can also be edited by right-clicking on the call in the main call list
and selecting Set Call Label from the popup menu.
Check the "Only show calls with labels" checkbox to limit the calls shown to only the calls that already have a label
defined.
Page 58
Fill Color
Pressing this button will bring up the Fill Layer Form.
When Show Fill is checked, the plot area will be filled with the selected color.
To select a different color, click on the color rectangle. A color selection window will appear. Choose the desired color.
To change the fill pattern, choose a new pattern from the fill pattern popup menu.
The transparency of each layer's fill can be set using the Fill Transparency slider.
Checking the Use Gradient checkbox will cause the layer to be filled with a slight gradient instead a plain, solid color.
Page 59
End Points
Pressing this button will bring up the following form:
Checking Show Point Number will draw the point number next to each end point.
Checking Show X,Y will show the X,Y coordinates next to each end point. You can choose to show the X,Y
coordinates in any of the supported units.
Checking Show Lat/Long will show the Lat/Long coordinates next to each end point. Checking as DMS will show the
Lat/Long coordinates as Degrees/Minutes/Seconds instead of in decimal. The line popup menu allows you to choose if
the lat/long values are on the same line or separate lines. You can create new X,Y Points that contain the Lat/Long
values by choosing an option from the popup menu arrow.
Page 60
Checking Show Point Angles will show the interior and exterior angles of the end points. The line popup menu allows
you to choose if the angles are on the same line or separate lines or to show internal angles only. You can create new
X,Y Points that contain the angle values by choosing an option from the popup menu arrow.
Checking Show End Points will highlight the end points of each line on the layer.
Select the endpoint style from the style popup menu. The options are circles or plus signs.
Click the color bar to change the color of this layer's end points.
Checking the Show Sweeping Arcs checkbox will cause sweeping arcs to be drawn at each corner. The size and color
of the arcs can be adjusted using the color and radius settings.
Checking the Show Last End Point checkbox will cause the last end point to draw its information as well. This option is
helpful for drawing endpoints when a plot closes and when it doesn't.
Page 61
Floating Lists
Pressing this button will bring up the Floating Lists form.
Call List:
Checking the Show Floating Call List option will draw a call list on the drawing. You can move the call list by clicking
on it and dragging it to a new location. You can also make this call list's layer the current layer by right-clicking on it
and choosing Make Current Layer from the popup menu. The popup menu will also allow you to hide the call list.
Checking the Include Layer Name checkbox will include the layer's name at the top of the call list.
Checking the Include Call Numbers will include the call number of each call.
Checking the Include Call Labels will include the call labels in the call list.
Page 62
Checking the Shaded checkbox will cause the call list to be drawn shaded instead of with a plain black box.
Checking the Use Fill Color checkbox will cause the call lists shading to be drawn in the same color as the layer's fill
color. You can turn on layer's fill option by clicking on the popup menu arrow.
You can control how invisible calls are displayed in the call list by choosing one of the options from the Invisible Calls
popup menu.
Show Call Lengths As allows you to choose the unit of measurement used when showing the calls.
Floating Call Lists can also be set to be Single Column or Double Column.
Show Call Lengths As allows you to choose the unit of measurement used when showing the calls.
Page 63
Endpoint List:
Checking the Show Endpoint List box will draw a list of endpoints on the drawing. This list can include the layer's
name as well as each endpoint's x,y, Lat/Long and angles. Lat/Long can be displayed as either DMS or decimals.
Page 64
Layer Information:
Checking the Show Layer Information checkbox will draw a floating list that contains the information that is also
checked.
Page 65
Layer Attributes:
Checking the Show Layer Attributes checkbox will draw a floating list that contains the layer's attributes.
Page 66
Waypoints
Pressing this button will bring up a popup menu with the choice of entering Lat/Long based waypoints or X,Y based
waypoints.
Lat/ Long Waypoints
Choosing the Lat/Long popup menu will bring up the Waypoints and Tracks form. This form can be used to enter
miscellaneous points and lines using latitude and longitude settings.
Enter the latitude and longitude coordinates into the appropriate fields. You can change the icon used by clicking on the
icon and choosing a new icon from the icon picker form. You can enter an optional description as well (label
placeholders are also supported).Press the Add button to add this point to the list. To edit a point, click on the
appropriate cell and change the data accordingly. To delete a point, select it from the list and then press the Delete
button. Checking the Display as DMS box will cause the coordinates to be displayed in Degree/Minute/Second form
instead of decimal form. Latitude and Longitude values can be entered as either decimal are DMS values.
Page 67
Right-Clicking on a line will present you with a menu for copying a point to either Point 1 or Point 2 of the line tab.
You can also delete the point by selecting Delete Point from the menu.
Clicking on the icon column will bring up a form allowing you to change the icon used to mark the lat/long waypoint.
Checking the checkbox for a waypoint will show that waypoint’s description on the drawing.
Use the Visible checkbox to turn on/off the visibility of all of the waypoints.
Click on the Font icon to change the font used for a particular waypoint description.
Entering a Radius value will draw a circle around the waypoint with the given radius.
Importing Waypoints
Waypoints can be imported from a GPX, KML or CSV files by choosing Import from the File menu.
Exporting Waypoints
Waypoints can be exported to a GPX file by choosing the Export Waypoints as GPX menu from the File menu.
Create Points From Endpoints
This will create lat/long waypoints for each endpoint of the current layer.
Project Waypoint
You can choose this option from the Options menu. This will take the current value in the Lat/Long fields and prompt
you for an angle and a distance (in feet). It will then create a new waypoint at that location.
Create Layer From Waypoints
This feature is found under the Options menu. Choosing this will send all of the waypoints to the Lat/Long to Layer
converter.
Page 68
Tracks
Enter the two sets of latitude and longitude coordinates. You can enter an option description as well. Press the Add
button to add the line. A black line will be drawn between the two points on the drawing after pressing the Save and
Close button. Checking the "Move Point 2 to Point 1 after Add" checkbox will move the latitude and longitude values
from the Point 2 fields into the Point 1 fields and then set the focus to the Point 2 fields. This is useful when entering
data that produces a continuous line made up of multiple segments.
Pressing the Cancel button will close the form without saving any of the point or line changes.
You can delete all of the waypoints or tracks by choosing the appropriate menu from the File menu.
Use the Visible checkbox to turn on/off the visibility of all of the tracks.
Page 69
X,Y Waypoints
Choosing the X,Y popup menu will bring up the X,Y Points form. This form can be used to enter miscellaneous points
using x,y settings. These points can be used similar to lat/long waypoints or they can be used as a labeling system for a
given layer.
If you know the specific x,y coordinates that you want to use for the waypoint:
Choose Custom X,Y from the Placement popup menu.
Enter in the x and y values.
Choose the desired Icon.
Make sure that the Show Description box is not checked.
Press the Add button.
Page 70
If you want to use the x,y waypoints as a layer labeling system:
Description - Enter your label caption here. Label Placeholders are also supported.
X,Y and Placement
o You can enter in custom x,y values. You can later use the mouse to move the label.
o If you choose one of the endpoints from the Placement popup, you can then choose an option from the
popup menu triangle at the end of the description text field. Choosing an option from this menu will fill
in the description field with the appropriate values.
Icon - Picker the desired icon.
Show Description - If this is meant to be a label, make sure that this box is checked.
Press the Add button.
You can change any value be selecting it in the list and making the appropriate changes. The dx,dy fields are used to
offset the description when it is displayed on the drawing. Alternately, you can use the mouse to move the icons and
descriptions/labels on the drawing.
To delete a X,Y Waypoint, select it from the list and press the Delete button.
Click on the Font icon to change the font used for a particular waypoint description.
Changing the Rotation value will cause the text to be drawn at that degree of angle. Note: This function is not available
in the Linux version.
Entering a Radius value will draw a circle around the waypoint with the given radius.
Clicking on the icon column will produce the icon picker form, allowing you to change the icon used to mark the
waypoint.
Checking the checkbox for a waypoint will show that waypoint’s description on the drawing.
Use the Visible checkbox to turn on/off the visibility of all of the waypoints.
Page 71
Options
Delete All Point Choosing this option will delete all x,y points.
Show All Descriptions Choosing this option will check the Show Description checkbox for each point.
Hide All Descriptions Choosing this option will uncheck the Show Description checkbox for each point.
Set All Icons to Currently Selected Icon Choosing this option will set the icon for each x,y point to the currently selected icon.
Create Points From Endpoints Choosing this menu option will create an x,y point based on the x,y of each end point on the current layer.
Create Points From Endpoints with Lat/Long
o Decimal on 1 Line
Creates a point with the Lat/Long in decimal as the description.
o Decimal on 2 Lines
Creates two points for each endpoint. The Lat value in decimal for the 1st description and the Long
value in decimal for the 2nd description.
o DMS on 1 Line
Creates a point with the Lat/Long in DMS as the description.
o DMS on 2 Lines
Creates two points for each endpoint. The Lat value in DMS for the 1st description and the Long value
in DMS for the 2nd description.
Create Points From Endpoints with Angles
o On 1 Line
Creates a point with the endpoint's angles as the description.
o On 2 Lines
Creates two points for each endpoint. One point contains the interior angle and the other point contains
the exterior angle.
Create Points From Line Midpoints Choosing this menu option will create an x,y point based on the x,y of the midpoint of each line in the current
layer.
Page 72
Create Points From Line Midpoints with Calls Choosing this menu option will create an x,y point based on the x,y of the midpoint of each line in the current
layer and pre-populate the description field with the line's call. It will also check the show description checkbox.
If the layer's Show Calls In-line checkbox is checked, this option will set the waypoints rotation to match.
Create Points From Layer Name and Area Settings Choosing this menu option will create am x,y point for the layer name and layer area at the center of the layer.
Create Layer From Points
Choosing this menu will take you to the X,Y to Layer form and pre-populate the form with the x,y waypoints.
Page 73
Analyze Layer Closing Error
This utility will examine a layer that doesn't close completely for common errors that may have caused the closing
error. An example of this would be a curve that should have gone to the left but was entered in as a curve to the right.
The utility will present you with a list of possible errors along with a potential solution for the error.
You can press Previous Change or Next Change to look at the different potential solutions the utility found. Press the
Apply Change button to apply the selected change to the call.
Press the slider arrows to see the original layer side by side with the suggested layer change.
Page 74
Tabs
Tabs can be used to create additional views from the same layer and call data. Each tab is based on the same layer calls,
but can have its own scale, background picture, fill options, etc. This allows for multiple views of the same data to be
saved within a single file.
Every drawing has a main tab. The main tab cannot be deleted.
To create a new tab, press the New Tab button. The new tab will be a copy of the tab that was selected when the new
tab button was pressed.
To switch between tabs, click on the desired tab in the tab bar.
To delete a tab press the red X button on the tab that you wish to delete. Deleting a tab deletes all of the view
configurations associated with that tab. Deleting a tab cannot be undone. Deleting a tab will not remove any of the
layers or call data, even if the calls or layers where added while viewing the deleted tab.
The tab bar can be hidden by un-checking the Show Tabs menu found under the Windows menu. The default for
showing tabs can be set in the preferences.
Page 75
Drawing Options
Scale
The scale can be adjusted by moving the slider control.
Clicking on the scale indicator will toggle it between 1"=X' and 1:X formats.
Clicking on the popup menu arrow will present you with a popup menu of some common scale settings. You can also
choose Custom from the popup menu to enter your own ratios. Choosing Scale Current Layer to Window will set the
scale so that the current layer will fill the screen.
Page 76
Screen Centric vs. Printer Centric
The drawing can be set to either Screen Centric or to Printer Centric. Screen Centric lets you use your entire screen for
the drawing area. This gives you a larger drawing area, but makes printing to a single sheet of paper more difficult.
Printer Centric limits your drawing area to the size of your printer's page setup, but printing to a single sheet of paper is
easy. Printer Centric defaults to a 8"x10.5" paper size, but can be changed using the Page Setup menu option.
Origin
The starting point for the drawing can also be set.
Auto Center - Causes the plot to remain centered in the drawing unless you manually move it.
Top Left - Causes the starting point of the first call to be drawn in the upper, left hand corner of the drawing.
Top Right - Causes the starting point of the first call to be drawn in the upper, right hand corner of the drawing.
Bottom Left - Causes the starting point of the first call to be drawn in the lower, left hand corner of the
drawing.
Bottom Right - Causes the starting point of the first call to be drawn in the lower, right hand corner of the
drawing.
Center of Drawing - Causes the starting point of the first call to be drawn in the center of the drawing. Unlike
the Auto-Center option, this only keeps the starting point centered in the drawing and does not keep the entire
plot centered in the drawing.
The Auto Center option is useful for single layer drawings. The other five options are useful when multiple layers share
the same starting point.
Page 77
View Settings
Show Area
Choosing this option will draw the selected area measurement in the upper left hand corner of the drawing. You can
choose to show the area with 0 to 5 decimal places. The number of decimal points chosen here will also be used for
other area displays such as label placeholders and layer area captions.
Show Scale
This option toggles the visibility of the scale tape. If the scale is visible, you can also select which corner of the
drawing that you want it to be drawn in. The scale defaults to feet, but the unit of measurement can be changed to any
of the supported units of measurement using the unit’s popup menu.
Show North Arrow
This option toggles the visibility of the north arrow. If the arrow is visible, you can also select which corner of the
drawing that you want it to be drawn in. There are also several different styles of arrow that can be chosen from the
Style popup menu.
Show Border
This option draws a thick border around the entire drawing. This can be useful for print outs.
Show Watermark
This option will draw a watermark in the center of the drawing. The watermark will be the text entered in the
watermark text field.
Page 78
Labels
The labels button will bring on the Label Manager form.
Pictures
Clicking this button will bring up a popup menu. Choosing Background Picture from the popup menu will bring up the
Background Picture form. Choosing Snapshots will bring up the Snapshots form.
Title Block
This button will bring up the Title Block form. To make the title block visible, check the Show Title Block checkbox.
You can choose to anchor the title block in the lower-left or the lower-right of the drawing. The title block fields can
also use the % placeholders.
Style 1:
There are 6 fields that you can enter data into. Directly beneath the data fields is a preview of what the title block will
look like.
Page 79
Style 2:
Style 2 of the Title Block will show a custom label, the set date, the drawing's scale, the file path, and information
about the drawing such as the current layers area and call list.
Page 80
Style 3:
Style 3 of the Title Block will show a custom label, the set date, the drawing's scale, the file path, and information and
call lists for each layer. The title block will fill the entire bottom of the page and will resize itself up to half of the
drawing's height in order to show all of the visible layer's calls. Each layer's text can have the same look, or you can
choose to have each layer's calls have a different appearance.
Page 81
Style 4:
Style 4 of the Title Block will show a custom label, the set date, the drawing's scale, the file path and layer information.
The title block will fill the entire bottom of the page and will resize itself up to half of the drawing's height in order to
show all of the visible layer's information. Each layer's text can have the same look, or you can choose to have each
layer's calls have a different appearance.
Page 82
Style 5:
Style 5 of the Title Block will show three custom labels, the set date, the current layer's information and the option to
show the current layer's calls. The title block will fill the entire bottom of the page and the middle field will resize to
show all of the entered data.
Section Finder
See Section Finder.
Page 83
Labels and Captioning
Captioning
You can enter a single caption for the drawing by entering the caption in the Drawing Caption field.
This caption will appear in the lower left hand corner of the drawing. Pressing the Set button will display the caption
prior to closing the Label Manager form.
Page 84
Labels
You can add labels to the drawing by pressing the Labels button. This will bring up the labels manager form. Existing
labels can be edited by right clicking on the label in the main drawing window.
The Labels Visible checkbox can be used to toggle the visibility of the layers.
Page 85
To create a new label, enter the label's text in the caption field and press the Add button.
A label's caption can also automatically be filled with information about the plot. Click on the button to get a
menu of choices.
Each label can be rotated in 90-degree increments. Pick the label's angle by choosing the angle from the menu.
To edit a label, click on the label in the list. The caption and angle fields will populate with that label's information.
Press the Edit button to save your changes to the label.
To remove a label, click on the label in the list and then press the Remove button. To remove all labels at once, press
the Remove All button.
Press the Font button to choose the font style used for the labels.
Moving Labels
The labels can be positioned on the main drawing by clicking on them and dragging them to the desired location. The
labels will attempt to keep their position relative to the scale, when the scale is changed. You can also reset them back
to the center by selecting the label in the Label Manager and pressing the Reset Location button.
Label Placeholders
Labels can also contain placeholder. Placeholders are a symbol that the label will replace with a calculated.
Placeholders started with the percent symbol (%).
%1 - Current Layer - Area in
Sq. Feet
%2 - Current Layer - Area in
Acres
%3 - Current Layer - Area in
Hectares
%4 - Current Layer - Area in
Sq. Meters
%5 - Scale %6 - All Layers - Area in
Sq. Feet
%7 - All Layers - Area in
Acres
%8 - Current Layer -
Perimeter in Feet
%9 - All Layers - Perimeter
in Feet
%10 - Current Layer -
Perimeter in Meters
%11 - All Layers - Perimeter
in Meters
%12 - Layer Name (when in
context)
%13 - Layer Setting - Area
(when in context)
Page 86
Floating Text Blocks
Pressing the Edit Floating Text Blocks button will bring up the Float Text editor.
Press the Add button to create a new floating text block. Enter your text into the text entry field. Press the Save button.
You can make the text block invisible by un-checking the Visible checkbox. The text block's black border can be
toggled using the Show Border checkbox. The text block's background can be solid or transparent.
To edit a floating text block, select it from the list and press the Edit button. Make your changes and press the Save
button.
Press the Font button to change the text block's font.
To delete a floating text block, select it from the list and press the Delete button.
Moving Floating Text Blocks
Floating text blocks will start out at the top, left corner of the drawing. You can move them by clicking on them and
dragging them. You can resize them by clicking on the resizing block in the bottom, right hand corner of the floating
text block.
Page 87
Background Picture
You can add a background to the drawing by pressing the Pictures button and choosing Background Picture from the
popup menu. This will bring up the Background Picture form. You can also bring up this form by right clicking in the
main drawing window and choosing Change Background from the popup menu.
Page 88
Click the Load Picture From File button to select a picture to use as the background.
Click the Load Picture From Clipboard to paste a picture from the clipboard for the background image.
Click the Load Picture from Snapshots button to bring up the Snapshots form.
The background picture can also be set from the Section Finder.
Click the Remove Picture button to remove the picture from the background.
You can use the Transparency slider to adjust the picture's level of transparency.
The visible checkbox can be used to make the background visible or invisible without having to load or remove the
picture.
The up/down arrows can be used to rotated the background picture by +- .1 degrees.
Fit to Screen
This option will cause the background picture to stretch to the size of the drawing.
Other
This option will allow you to choose where the background is drawn. You can either choose an option from the popup
menu or press the button to bring up a visual picker.
(Visual Picker)
Page 89
Section
Auto Center - This will keep the background drawn in the center of the drawing.
Top Left - This will keep the top left corner of the background picture pinned to the top left corner of the
drawing.
Top Right - This will keep the top right corner of the background picture pinned to the top right corner of
the drawing.
Bottom Left - This will keep the bottom left corner of the background picture pinned to the bottom left
corner of the drawing.
Bottom Right - This will keep the bottom right corner of the background picture pinned to the bottom
right corner of the drawing.
Top Left at Center - This will keep the top left corner of the background picture pinned to the center of
the drawing.
Top Right at Center - This will keep the top right corner of the background picture pinned to the center of
the drawing.
Bottom Left at Center - This will keep the bottom left corner of the background picture pinned to the
center of the drawing. Bottom Right at Center - This will keep the bottom right corner of the background picture pinned to the
center of the drawing.
Quarter Section
Left Middle at Center - This will keep the middle of the left hand side of the background picture
pinned to the center of the drawing.
Right Middle at Center - This will keep the middle of the right hand side of the background
picture pinned to the center of the drawing.
Top Middle at Center - This will keep the middle of the top edge of the background picture
pinned to the center of the drawing.
Bottom Middle at Center - This will keep the middle of the bottom edge of the background
picture pinned to the center of the drawing.
Page 90
Quarter of Quarter Section
NW/4 Top Middle at Center - This will keep the middle of the top edge of the northwest quarter
of the background picture pinned to the center of the drawing.
NW/4 Left Middle at Center - This will keep the middle of the left hand side of the north west
quarter of the background picture pinned to the center of the drawing.
NW/4 Right Middle at Center - This will keep the middle of the right hand side of the north west
quarter of the background picture pinned to the center of the drawing.
NW/4 Bottom Middle at Center - This will keep the middle of the bottom edge of the northwest
quarter of the background picture pinned to the center of the drawing.
NE/4 Top Middle at Center - This will keep the middle of the top edge of the northeast quarter of
the background picture pinned to the center of the drawing.
NE/4 Left Middle at Center - Same as NW/4 Right Middle at Center.
NE/4 Right Middle at Center - This will keep the middle of the right side of the north east quarter
of the background picture pinned to the center of the drawing.
NE/4 Bottom Middle at Center - This will keep the middle of the bottom edge of the northeast
quarter of the background picture pinned to the center of the drawing.
SW/4 Top Middle at Center - Same as NW/4 Bottom Middle at Center
SW/4 Left Middle at Center - This will keep the middle of the left hand side of the south west
quarter of the background picture pinned to the center of the drawing.
SW/4 Right Middle at Center - This will keep the middle of the right hand side of the south west
quarter of the background picture pinned to the center of the drawing.
SW/4 Bottom Middle at Center - This will keep the middle of the bottom edge of the south west
quarter of the background picture pinned to the center of the drawing.
SE/4 Top Middle at Center - Same as NE/4 Bottom Middle at Center
SE/4 Left Middle at Center - Same as SW/4 Right Middle at Center
SE/4 Right Middle at Center - This will keep the middle of the right hand side of the south east
quarter of the background picture pinned to the center of the drawing.
SE/4 Bottom Middle at Center - This will keep the bottom edge of the south east quarter of the
background picture pinned to the center of the drawing.
NW/4 Center at Center - This will keep the center of the north west quarter of the background
picture pinned to the center of the drawing.
NE/4 Center at Center - This will keep the center of the north east quarter of the background
picture pinned to the center of the drawing.
SW/4 Center at Center - This will keep the center of the south west quarter of the background
picture pinned to the center of the drawing.
SE/4 Center at Center - This will keep the center of the south east quarter of the background
picture pinned to the center of the drawing.
Page 91
Scale as 1 Mile
When this option is selected, the background will be scaled as if it represented 1 square mile. This option will be
automatically checked when the background picture is set from the Section Finder.
Scale as 4 Miles
When this option is selected, the background will be scaled as if it represented 4 square miles.
Scale Picture
Check this box to have the background draw to scale. Enter the number of feet that the width of the background picture
represents and the number of feet that the height of the background picture represents. Common scales, such as 1
square mile, are available from the popup menu arrow.
Lock Offset This option allows you to keep the background’s offset locked to its origin, or its offset can be locked to a layer’s
offset. If the background is locked to layer’s offset, then the background will move with the layer if the layer is moved
by hand.
Gird Overlay
This option will draw a grid over the background image. This option is best suited for square background images.
If no background picture is selected, the grid will still be displayed.
Remove Offsets
Clicking this button will remove the backgrounds x,y offset that was created when the background was moved with the
mouse.
Save Picture
You can export the background picture to a regular picture file by choosing Save Picture from the File menu.
Page 92
Edit Picture Choosing this menu option will open the currently selected background image in a new window. This window will
allow you to crop, resize and rotate the background image.
Click and drag on the picture to make a selection.
Set Picture as Background
Choosing this menu will set the current picture as the background picture.
Keep Selection Square
When this menu is checked, when making a selection, the selection will constrain itself to a square. Press the shift key
while making a selection will also constrain the selection to a square.
Rotate
Choosing either of the Rotate menus will cause the picture to rotate 1/10th of a degree either clockwise or counter-
clockwise.
Page 93
Floating Pictures
This feature lets you place pictures onto your drawing. The pictures can be moved and resized by clicking on them on
the drawing.
To add a floating picture, click the add button and select your picture. The picture will be added to the upper-left hand
corner of your drawing.
Checking the Background checkbox will cause the picture to be drawn on the background layer, behind the layer
drawings.
Click on the Rotation field to enter a degree to rotate this picture by.
To delete a floating picture, select the picture from the list and press the Delete button.
Page 94
Snapshots
The Snapshots feature is a repository for images. The images stored as snapshots can come from external sources or
they can be created from within the software. Snapshots can be used to store images such as different views of the
drawing or different pictures to use as background pictures.
Page 95
Adding Snapshots:
To save the current drawing as a snapshot, press the Save Drawing as Snapshot button. You can optionally enter in a
description for the snapshot prior to pressing the save button.
To load an external image as a snapshot, press the Load File as Snapshot button.
Managing Snapshots:
To manage a snapshot, select it from the Stored Snapshots list. Once selected, the following options will become
available:
View Snapshot: Press this button to view the snapshot in a full screen viewer. Press the Close button to close the full
screen viewer.
Print Snapshot: Press this button to print the selected snapshot.
Export Snapshot: Press this button to save the snapshot as a external picture file.
Change Description: Press this button to change the snapshots description. This will bring a a form where you can enter
in a new description. Press the Save button to close the Change Description form.
Delete Snapshot: Press this button to delete the selected snapshot.
Set as Background: Press this button to set the selected snapshot as the background picture for the drawing.
Page 96
Opening, Saving, Printing and Exporting
New Drawing
To create a new drawing, choose New Drawing from the File menu. This will open a new, blank window.
Open
To open a saved drawing, choose Open from the File menu. The last 5 opened or saved files can be chosen from the
Open Recent file menu. You can also use Open to open files sent by the mobile versions of Metes and Bounds.
Open As Layer
An existing saved file can be opened as a new layer in the current drawing by choosing Open As Layer from the File
menu.
Saving
To save your drawing, choose Save from the File menu.
To save a copy of your drawing, choose Save As from the File menu.
Pictures
The drawing can also be saved as a picture. To save a picture of the drawing exactly as it appears on screen, choose
Save as Picture (Screen) from the File menu. To save a full size picture of the drawing, choose Save as Picture (Full)
from the File menu. This option is helpful for pictures that are scaled larger than the screen.
A picture of the current drawing can also be copied to the clipboard. To copy the drawing to the clipboard choose Copy
Drawing as Picture from the Edit menu.
Print Call Lists
This will print the call lists for all visible layers.
Page 97
Import
Import Call List: This option will allow you to choosing between importing a call list in the Metes and Bounds style or
one of the Alternate styles. The Alternate styles can be used to import call lists from other 3rd party programs.
Import X,Y Points: This option will allow you to import a list of x,y points and create a new layer from them.
Import DXF File: This option will allow you to import a DXF file.
Import Lat/Long: This option will allow you to import the following types of Lat/Long files:
Comma separated list of lat/long values
GPX Tracks
GPX Waypoints
KML files
Import Shapefile: This option will allow you to import a Shapefile(.shp).
Import GeoJSON: This option will allow you to import a GeoJSON file.
Page 98
Export
DXF: The drawing data can be exported as a DXF file.
To export just the current layer as DXF, choose Export as DXF from the File menu.
Often 3rd party applications require the DXF file to be in a specific format in order to import properly. Choose
the DXF format that best works with your 3rd party application.
To export all of the visible layers as DXF, choose Export All Layers as DXF from the File menu. Exporting a single
layer will use the POB X,Y settings (if any) for the coordinates. Exporting all of the layers will use its own coordinates
so that the DXF will look identical to the layers drawn on the screen.
Page 99
Point Coordinates: This will allow you to save the point coordinates, as shown using the Show Layer Point
Coordinates menu under the Tools menu, as a delimited text file. The points will be saved using the POB X,Y settings
(if any). Choosing this menu option will bring up the following window:
Choose either comma, tab or space from the popup menu to pick which character will be used to delimit the file.
Check the Include Layer # checkbox if you want include a layer number as an additional field in the file.
Choose the unit of measurement so save the coordinates in.
Check the Round to Nearest Unit checkbox to round the exported values to the nearest unit.
Page 100
KML Format: This will save the current layer in the KML file format. Choosing this menu will bring up the following
dialog box that will allow you to modify some of the KML settings.
Page 101
Call List: This will allow you to export the call list to a text file. The call list can be exported as either the Metes and
Bounds style (N 12:34:56 E 100) or an Alternate style (n12.3456e 100). The Alternate style can be used to export call
lists for importing into other 3rd party programs. The current layer can be exported in both styles. Exporting all layers
can only be done in the alternate style.
Page 102
Lat/Long Waypoints as GPX: This will allow you to export any layer's lat/long waypoints as a GPX file.
Export Current Layer as Shapefile: This will allow you to export the current layer as a lat/long shapefile.
Export Current Layer as SVG: This will allow you to export the current layer as a SVG file.
Page 103
Export Compass Rule:
This option will allow you to save or print a table showing the compass rule data for the selected layer.
Page 104
Printing
Page Setup
This will preset you with the page setup dialog for your printer. These setting will be used by the Size Window
to Printer and Show Printer Watermark features listed below. This also allows you to set the drawing size for
Printer Centric drawings.
Screen Centric Printing These features help you setup a Screen Centric drawing for printing.
Size Window to Printer
This will resize the drawing window so that the drawing area will represent a single piece of paper. Printing
with the drawing window sized to the same size as the printer settings will produce the highest quality printing.
Show Printer Watermark
This will cause a watermark to be drawn that represents a single piece of paper.
Print
This will present you with a print option form. This form allows you to preview how the drawing will print
using several different printing options.
o Use the arrows to help center the drawing.
o Press the Scale button to adjust the printings scale.
o Press the Reset button to clear all printing adjustments.
o Print as Printer Centric. This will print the drawing as if drawing was set as Printer Centric. It is also the
same as choosing the Size Window to Printer option.
o Printer Watermark. This will print the area of the drawing that is shown under the Show Printer Water
overlay.
o Print Scaled. This will scale the drawing to fit on a single sheet of paper.
Page 105
Printer Centric Printing Printing a Printer Centric drawing is automatic as the drawing has already been configured for the printer. So
features such as Size Window to Printer and Show Printer Watermark are not needed.
Print
This will print the current drawing.
Print Picture
(Screen) will resize the visible drawing to fit on a single sheet of paper and then print the drawing as a picture.
(Full) will print the drawing at the full-scale size and will print on as many sheets of paper as needed.
Page 106
Calculate Menu
Find Area You can find the area of a plot by choosing one of the Find options from the Calculate menu. You can find the area in
feet, meters, acres and hectares.
Current Layer Area From Line Width
When the layer's line width is set to scale, choosing this option will calculate the area represented by the
width of the line.
Area of Layer Minus Sub-Plots
This function allows you to find the area of a master plot, minus the area of multiple sub-plots.
Page 107
Choose a master plot from the layer list. Check all of the layers that are considered a sub-plot of the master plot. Press
the Calculate button. You will be presented with the area of the master plot, the area of each selected sub-plot, and the
area remaining after the sub-plots' area is subtracted from the master plot's area.
Estimate Layer Overlap
Choose two different layers and press the Estimate Layer Overlap button. The software will calculate the area where
the two layers overlap.
Page 108
Show Current Layer's Description
This menu will create a description from the current layer's calls. This description can be saved to a text file or copied
to the clipboard.
Page 109
Show Layer X,Y Point Coordinates
You can find the X, Y points of a drawing by choosing Show Point Coordinates from the Calculate menu. These values
will use the POB X,Y settings if available. You can choose the number of decimal places to show the list as well as the
type of units to use. The list can be exported as a text file or copied to the clipboard.
Page 110
Calculate Perimeter
To find the perimeter distance of a plot, choose Calculate Perimeter from the Calculate menu. You can choose which
unit of measurement this calculation is made in. You can also create a new layer label from this calculation.
Page 111
Current Layer Angle Totals
This function provides a total count of the internal and external angles for the current layer.
Page 112
Check for Closure
You can check to see if a plot description closes completely by choosing Check for Closure from the Calculate menu. If
the plot description does not close, this will show you how far off the description is. You can also create a new layer
label from this data. You can also choose which unit of measurement this information is presented in.
Unit Conversion Calculator Choose this menu option to bring up the conversion calculator form.
Page 113
Decimal Angle to Degrees
This will bring up a form that will allow you to convert an angle that is expressed as a decimal into an angle that is
expressed in degrees, minutes and seconds.
Degree Angle to Decimal
This will bring up a form that will allow you to enter an angle that is in Degree/Minute/Second format and convert it
into a decimal angle.
Page 114
Azimuth to Bearing
This feature can be used to change compass style calls into bounds data.
Page 115
Angle Calculator
This feature can be used to convert a plot description that is written using interior and exterior angles into a plot
description that is written using metes and bounds.
Page 116
Call Between Two Endpoints
This feature will return the metes and bounds call between two endpoints for the current layer.
Page 117
Latitude / Longitude Calculator
To calculate the distance, angle or bearing between any two latitude/longitude points enter the data into points 1 and 2
and then press the appropriate calculation button.
To project a waypoint enter the starting point into Point #1 and press the Project Point button. This will bring up the
Project Waypoint form. Enter in the angle and distance to the new waypoint. The new waypoint's lat/long will be
placed in Point #2.
Page 118
Latitude / Longitude Calculator (Continued)
The latitude/longitude of each end point for a given layer can be calculated by choosing the appropriate layer from the
layer popup menu and pressing the Get Coordinates button. If the latitude and longitude for the POB has not yet been
set, you will be prompted to enter this value. You can choose how many decimal places the coordinates are calculated
to by choosing the number from the Decimal Places popup menu.
Once the end point lat/long has been calculated, you can easily enter the point data into the calculator above by
selecting the point and pressing either the Set Point 1 or the Set Point 2 button.
A layer's end point lat/long coordinates can be saved as a GPX file from by choosing Export Lat/Long as GPX from the
File menu.
A layer's end point lat/long coordinates can be saved as a text file by choosing Export Lat/Long as Text File from the
File menu.
A layer's end point lat/long coordinates can be saved as a comma delimited text file by choosing Export Lat/Long as
Comma Delimited from the File menu.
A layer's end point lat/long coordinates can be sent to the Lat/Long to Layer tool by choosing Send Coordinates to
Layer Converter from the Options menu.
A layer's end point lat/long coordinates can be set as waypoints by choosing the Create Waypoints From Lat/Long
from the Options menu. The waypoints will be added to the main window's currently selected layer.
Point #2 can be used to set the current layer's POB by selecting Set Current Layer POB to Point 2 Lat/Long from the
Options Menu.
Checking the Display as DMS box will cause the lat/long coordinates to be displayed as Degree/Minute/Second instead
of as decimal values.
Page 119
Declination Calculator
This function will find the declination between two lat/long points calculated by the software and two lat/long points as
measured by a separate device. Select the two endpoints for the calculated coordinates. Enter the measured lat/long for
the same two points. Press the Find Declination button to find the rotation between the calculated and measured values.
Page 120
UTM to Lat/Long Calculator
Use this form to convert UTM values to Lat/Long and vise-versa. Easting and Northing values can be entered from a
World File by using the popup menu triangle.
Page 121
SPCS to Metes and Bounds Call
This feature will return a metes and bounds call for two SPCS points. It can also create a new layer from a series of
SPCS points. When creating a layer, the software can import comma separated values files in the form of P,Y,X,Z and
X,Y.
Page 122
Project Waypoint
Project Waypoint takes the Lat/Long of an existing waypoint, an angle and a distance and calculates a new waypoint.
Or, you can use the Lat/Long of an existing waypoint and a metes and bounds call to calculate a new waypoint.
Page 123
Tools Menu
Set Scale
This option allows you to set the drawing's scale numerically. This is the same as Right-Clicking on the scale in the
drawing options and choosing Custom.
Measurement Tool
Checking this menu will put the software in measurement mode. This mode allows you to see the distance between any
two points on the screen. It will also show you the call represented by the line between those two points.
When first activated, there will be a message in the upper left hand corner of the drawing prompting you to pick the
first point. Click anywhere on the drawing to set the first point. If you hold down the shift key while selecting a point,
the endpoints will be marked with easy to hit targets. Then, click anywhere else on the drawing to set the second point.
The message will now change to the distance between those two points. Click anywhere on the drawing to reset the
measurement tool. The measurement mode can be turned off by pressing the escape key, clicking on the measurement
message or by un-checking this menu.
After the second point has been selected, you can turn the line into a call by selecting Measurement Tool - Add Call
from the Tools menu.
Call Drawing Tool
Selecting this tool will allow you to draw calls on the drawing. If the current layer already has at least one call, the
drawn call will be appended to the existing call list. If the current layer does not contain any calls, the first call created
will be an invisible call from the drawing's origin to the first point selected. All subsequent calls will be visible. This
tool is not available if the drawing's origin is set to Auto-Center. Press the Escape key (Esc) or uncheck the tool menu
to exit call drawing mode.
Move Background
When this menu option is checked, the background can be moved by clicking on it and dragging it with the mouse.
Uncheck this menu option when you are finished moving the background.
Alignment Tool
Checking this menu will put the software in layer alignment mode. This mode allows for point-and-click positioning of
layers.
While in this mode each layer will be drawn with its endpoints on. Click on the first endpoint and then click on an
endpoint of a second layer. The first endpoint will align itself to the second endpoint.
Page 124
Merge Layers
This function helps with merging two layers into a single, new layer.
See Tutorial #8 for additional information on merging layers.
Segment Calls
Segment Calls allows you to break calls into lengths that are no longer than N feet. Doing this will create a new layer
with the calls broken into lengths no greater than N feet. This only effects lines and will not make any changes to
curves.
Page 125
Search for Text
The search function will search for a piece of text. It will search the X,Y Waypoint Descriptions, Call Labels and layer
Attributes for this text. The search results will be displayed in the Search Results window. If you uncheck a checkbox,
then that area will not be searched.
Page 126
The search results window will show which layers contain the searched for text. Selecting a layer from the list and
pressing the Set Current Layer button will set that layer to be the drawing's current layer.
Data Entry Mode
See Entering Data.
Set Views to Data Entry Mode
While in Data Entry Mode, choosing this menu option will set the "view as" options for the call list, line lengths and
floating call list to match that of the current data entry mode.
Number Pad Entry Mode
While this menu is checked, the call entry field on the main window will function in Number Pad Entry mode. This
mode allows you to enter line calls using just the number pad. The entry format used is N33.3333E 100. Use the + key
to enter an N or E. Use the - key to enter an S or W.
Convert Auto-Center to Center of Drawing
This option will convert a drawing from Auto-Center to Center of Drawing.
Current Layer Convert Unit Type
This option allows you to convert all of the calls in the current layer to a specific unit of measurement.
Page 127
Current Layer Replace Unit Type
This option will replace the unit of measurement for all calls in the current layer. This function will not convert the
length entered for the call to the new unit of measurement. For example, 100 feet will become 100 meters.
Page 128
Convert Lat/Long to Layer
To convert a set of latitude, longitude coordinates into a set of metes and bounds calls, enter the points into the above
form and press the Convert to Layer button. This will create a new layer and populate it with the data represented by
the latitude and longitude points. You can set the layer's name by entering it in the Layer Name field.
Pressing the Project Point button will take the current value in the Lat/Long fields and prompt you for an angle and a
distance (in feet). It will then create a new point at that location.
Page 129
Convert Lat/Long to Layer (continued)
Choosing Import GPX File from the File menu will import a list a waypoints or tracks to be converted to a new layer.
Choosing Import Delimited Text File from the File menu will import a list of lat/long coordinates to be converted to a
new layer.
Choosing Import KML File from the File menu will import a layer from a KML file. If the KML file includes more
than one layer you will be prompted to select which layer to import. Note: Importing KML files only works on text
based KML files. Binary KML files cannot be imported.
Page 130
Convert X,Y to Layer
This form will convert a set of X,Y coordinates into a set of Metes and Bounds calls.
Enter the data as X,Y and press the Add button.
Pressing the Delete button will delete the selected X,Y coordinate.
Pressing the Convert to Layer button will create the Metes and Bounds calls.
Press the Cancel button to close the form without creating any Metes and Bounds calls.
You can choose a name for the layer by entering it into the Name field.
You can choose the unit of measurement that the units are in from the unit popup menu.
Import Comma Separated Values: Choosing this option from the File menu will allow you to import a comma
delimited text file of X,Y points.
Page 131
Window Menu
This menu will allow you to open any of the data entry and drawing/layer settings forms.
Show Status Bar
Checking this menu will cause the status bar to be visible for this window. The status bar will show information for
which drawing item is currently under the mouse cursor.
Show Toolbar
Checking this menu will cause the toolbar to be visible for this window. The toolbar can be customized in the
preferences.
Show Tab Bar
Checking this menu will cause the tab bar to be visible for this window.
The bottom of the Window menu will show all open files. Selecting one of these menu items will bring that window to
the foreground.
Page 132
Conversion Table
Conversion Table
3 hands = 1 foot
1 span = 9 inches
1 rod, pole or perch = 16.5 feet
40 poles = 1 furlong
8 furlongs = 1 mile
320 rods = 1 mile
3 miles = 1 league
1 vara = 33 1/3 inches
1 square foot = 144 sq. in.
1 square yard = 9 sq. ft
1 acre = 4,840 sq. yd
1 square mile = 640 acres
To Convert: Feet to Meters: Multiply Feet by 0.3048
Meters to Feet: Multiply Meters by 3.281
Yards to Meters: Multiply Yards by 0.9144
Meters to Yards: Multiply Meters by 1.094
Miles to Kilometers: Multiply Miles by 1.609
Kilometers to Miles: Multiply Kilometers by 0.6214
Sq. Feet to Sq. Meters: Multiply Sq. Feet by .0929
Sq. Meters to Sq. Feet: Multiply Sq. Meters by 10.76
Acres to Hectares: Multiply Acres by 0.4047
Hectares to Acres: Multiply Hectares by 2.471
Also see the conversion calculator.
Page 133
Conversion Calculator
You can use the conversion calculator to convert between any two units of measurement.
Page 134
Preferences
Settings Tab
Page 135
Colors:
To change the various colors that Metes and Bounds uses to draw the different components, click on the associated
colored rectangle. Press the Defaults button to return the colors back to their original settings.
Include Page Numbers
This option allows you to print the page numbers when printing a full/multi-page drawing.
Show Status Bar in New Drawings
Checking this will cause the status bar to be visible when a new drawing window opens.
Show Tab Bar in New Drawings
Checking this will cause the tab bar to be visible when a new drawing window opens.
Scroll Wheel / Gesture
This popup menu allows you to choose how the scroll wheel, or other gestures, will function.
Use 1" Scale Type
Checking this box will cause the scale tape to always draw as 1" instead of the auto-adjusting its size.
Show Rods/Poles/Perch as …
Use this setting to select what label the software uses for Rods/Poles/Perch in places such as the floating call list and
line labels.
Enable Large Scales
Checking this option will increase the size the amount by which the drawing can be zoomed out. However, some
features may not respond as expected while this option is turned on.
Default to Meters When Available
When this option is checked, the software will default to meters instead of feet when choosing meters is available. For
example, if calls are entered on the main screen, the lengths will be considered to be meters instead of feet. And other
forms, such as the floating call list, will default to showing meters instead of feet.
Check For Updates
Check this box to be notified when new versions of the software are available.
Page 136
Defaults Tab
Drawing:
Use this section to set the default scale, origin and other options for new drawings.
Page 137
Layers:
Press the Set Layer Defaults button to set the current layer's configuration to be used for all new layers. This can be
cleared by pressing the Defaults button.
Background Picture:
Set the default width in feet and the default height in feet to use for the background picture.
Toolbar Tab
Show Toolbar in New Drawings
Checking this will cause the toolbar to be visible when a new drawing window opens.
Toolbar Items The items that are checked will appear in the toolbar.
Page 138
How to Register, Upgrade or Renew Metes and Bounds
How to Register: To register Metes and Bounds choose Register... from the File menu. Enter your serial number into the serial number
box and press the Register button. If you need to purchase a serial number you can press the Purchase Basic button to
purchase the Basic version or Purchase Professional to purchase the Pro version.
Upgrading from Basic to Pro: If you wish to upgrade your Basic version to the Pro version you can do so by selecting Upgrade... from the File menu.
Enter your upgrade serial number into the serial number box and press the Register button. If you need to purchase an
upgrade serial number you can do so be pressing the Upgrade to Professional button.
Renewing an update subscription: If your update subscription has expired or is about to expire, your can renew your subscription for another year by
choosing Renew Update Subscription... from the File menu. Enter your renewal code (serial number) in the renewal
code box and press the Renew button. If you need to purchase a renew code you can do so by pressing the Purchase
Renewal Code button.
You can view how long your current update subscription is good for by opening the About Box. A new renewal code
will add 1 year from the date that the renewal code was purchased.
Please Note: Renewing is optional. If you are happy with your current version, then there is no need to renew. You only
need to renew if you want to keep up with all of the latest updates.
Note #2: If you currently own the Basic version and the update subscription has expired and you have been considering
upgrading to the Pro version, now may be a good time to do so. The Basic to Pro Upgrade will also renew your update
subscription for another year.
Registering Metes and Bounds on a new computer:
If you have purchased a new computer, or are recovering from a hard drive failure, you can use these steps to re-
register Metes and Bounds:
1. Enter your Basic or Pro serial number. If you purchased the Basic version and then upgraded to the Pro version,
you will need to enter in your Basic serial number first and then enter your Basic to Pro Upgrade serial number.
2. If your Basic or Pro serial number has expired, you will be prompted to enter in your renewal code. Enter in
your most recent renewal code.
Page 139
Expired Serial Numbers/Renewal Codes:
If the software tells you that your serial number has expired, that means that your serial number is too old to use the
latest version of the software. There are two options available to address this.
1. Purchase an Update Subscription Renewal. This will allow you to use the latest version of the software. It will
also allow you to use any new updates that are released in the next year.
2. Install an older version of the software that will work with your serial number. To find the last version of the
software to support your serial number, open the About Box and click on the Advanced tab. Note the
Subscription Renewal Code. Then go to the older versions website and download the version that matches your
code.
Lost Serial Numbers:
If you have lost your serial number(s), you can find them by going to our support web page and clicking on the find
serial number link.