13
Email: [email protected] Web Page: http://training.health.ufl.edu Microsoft Access 2010 Crash Course Part 2

Email: [email protected]
Web Page: http://training.health.ufl.edu
Microsoft Access 2010 Crash Course Part 2

Updated 9/21/2015
Microsoft Access Crash Course Part 2 2.0 hours
In this workshop we will go more in-depth with Queries, Forms, and Reports. We will create queries with multiple criteria; multiple data sources; and using the summary tools. We will create a form in the design view, with buttons; and create and modify reports.
QUERIES .................................................................................................................................................................................. 1
1. Table Filters ................................................................................................................................................................ 1
2. Patients Sort 1 ‐ Building a query ............................................................................................................................... 1
3. Set Navigation Pane to show All Access Objects ........................................................................................................ 2
4. Patients Sort 2 ‐ Using the * field ............................................................................................................................... 2
5. Patients Criteria Exact ‐ Setting criteria ...................................................................................................................... 3
6. Patients Which City? ‐ Missing parameter values ...................................................................................................... 3
7. Patients Criteria Range ‐ Between and Wildcards * ................................................................................................... 4
8. Doctor Time Summary ‐ Using Totals ......................................................................................................................... 5
FORMS ..................................................................................................................................................................................... 5
1. Instant columnar form ................................................................................................................................................ 5
2. Other Instant Forms ................................................................................................................................................... 6
3. Employees Form ‐ Wizard Justified Form ................................................................................................................... 6
4. Patients Form ‐ New Form Design View ..................................................................................................................... 6
Add fields to create a custom Form ........................................................................................................................... 7
REPORTS .................................................................................................................................................................................. 7
1. Instant Report ............................................................................................................................................................. 7
2. Report Wizards ........................................................................................................................................................... 8
3. Patients Justified 2 ‐ Fix Table Field Sizes and Report Wizard .................................................................................... 8
4. Patients Report ‐ Report Wizard ................................................................................................................................ 8
Parts of the Window ................................................................................................................................................... 9
5. New Report, Design View ........................................................................................................................................... 9
Form/Report Tables (Stacked and Tabular) .............................................................................................................. 10
ADD A NEW FIELD TO THE DATABASE .................................................................................................................................. 10
1. Add a new field to a table ......................................................................................................................................... 10
2. Add a new field to a query........................................................................................................................................ 10
BACKING UP DATABASE ........................................................................................................................................................ 11
Pandora Rose Cowart Education Coordinator UF Health IT Training
C3‐013 Communicore (352) 273‐5051 PO Box 100152 [email protected] Gainesville, FL 32610‐0152 http://training.health.ufl.edu

1
Queries
1. Table Filters
The filter tools allow you to create a temporary "query" based on criteria. When you click on the filter arrow next to the field names in any Datasheet view you will see a menu similar to the one shown here. You will also get this menu when you click on the large Filter button on the toolbar based on the current field.
‐ Open Table: Patients
‐ In Field City: Right‐click on Waldo
‐ Choose Equals Waldo ( 9 records)
‐ Turn off filter
~ Filter button on the Home tab
~ Toggle Filter at the bottom of the window
~ Clear Filter from City on the City Filter list
‐ In Field Address: Select AVE, right‐click on the selection AVE, choose Contains Ave (13 records)
‐ Close and save the table with only the 13 records showing
‐ Open the table, all records should be back
~ Turn on filter
2. Patients Sort 1 ‐ Building a query
To make a "saved" filter, we create a Query. We'll work with the Query wizards later, first let's start
with the Query Design.
‐ Choose Query Design from the Create tab
‐ Use table Patients
~ Close show table box
~ Right‐click, remove table
~ Drag Patients from the Navigation Pane
‐ Double‐click Med Rec #
‐ Double‐click Last
~ No matter where you are on the bottom half of the window, the double‐click will always add
the field to the end of the dataset
‐ Drag and Drop First on top of Last in the bottom half of the window to move First before Last
‐ Click in the next blank field, choose Address from drop down list
‐ Click on City, shift‐click on Zip
~ Drag all three to next blank

Page 2
By default, Access sorts by the Primary Key field. For our Patients table, our key is the Med Rec #. A
temporary sort can be created in the Datasheet view, but a custom sort order can be built in the design
view of the query.
‐ Temporary sort in the Datasheet View (76 records)
~ Sort by Last Ascending
~ Sort by City Descending
~ Clear Sort (returns to default of Med Rec#)
‐ Custom Sort in the Design View
~ Sort by Last Ascending, City Descending
a. Datasheet is not sorting correctly
~ Return to the design view and move City is before Last
‐ Close and save as Patients Sort 1
3. Set Navigation Pane to show All Access Objects
When we save the query, it doesn't appear in the navigation pane. This is
because the Pane is set to only show Tables.
‐ Click on the title Tables at the top of the navigation pane on the left
side of the window
‐ Choose All Access Objects
4. Patients Sort 2 ‐ Using the * field
Many computer searching tools use the asterisk (*) as a wildcard to find anything and everything.
We'll use it later in our criteria, but we see it at the top of our table in the query design. Adding this
'field' to our query, adds everything from inside the table. You cannot sort or set criteria on * fields,
so if you add the individual fields as well, you may want them to not Show.
‐ Choose Query Design from the Create tab
‐ Use table Patients
‐ Move * field down (double‐click or drag) and view result (76 records)
‐ Move down City Field
~ Sort by City Descending
a. Datasheet view ‐ Notice 2 City Fields (Patient.City and Field0)
b. Design View ‐ uncheck the Show box for the field City
~ Sort by Last Ascending
a. Don't show!
‐ Close and save as Patients Sort 2

3
5. Patients Criteria Exact ‐ Setting criteria
To limit the records pulled into our query, we set criteria. Text fields will match data in quotes
("Text"), date/time fields with hashtag/pound signs (#9/15/2020#), and numbers left alone (123).
The records that show in our result should match the criteria we create in the design view.
‐ Choose Query Design from the Create tab
‐ Use table Patients
‐ Double‐click on title of the Patients table and move down all fields
‐ Set Criteria for field City to Waldo ..................................................................... ( 9 records)
‐ There is no data in a query. The structure gives us a current subset of the data that matches our
query specifications. Look at SQL View
~ SELECT Patients.[MED REC], Patients.LAST, Patients.FIRST, Patients.ADDRESS, Patients.CITY, Patients.ST, Patients.ZIP FROM Patients WHERE (((Patients.CITY)="Waldo"));
‐ In the design view, under Waldo, add Starke ................................................... (12 records)
‐ Clear the Criteria and set new Criteria
~ Field Zip = "32608" ...................................................................................... (12 records)
a. View the datasheet. See mistake w/ Micanopy?
~ Add criteria to field City= "Gainesville" ....................................................... ( 9 records)
a. Keeping both settings on the same line makes this an "AND", meaning both values have
to be true
‐ Close and save the Query as Patients Criteria Exact
6. Patients Which City? ‐ Missing parameter values
When a field is use in an expression, or on a line outside of the Field line in the query design, we put
brackets [ ] around the name. If Access cannot find that field, it will ask for the user to input the value.
Sometimes this is because a field that used to exist is missing, but here we're using it to our advantage.
‐ Choose Query Design from the Create tab
‐ Use table Patients
‐ Double‐click on title of the Patients table and move down all fields
‐ Criteria for field City: [Which city?]
‐ Datasheet View
~ Use Refresh button to try other cities: Gainesville (55
records); Micanopy ( 9); Waldo ( 9); Starke ( 3)
‐ Close and Save as Patients Which City

Page 4
7. Patients Criteria Range ‐ Between and Wildcards *
So far in our queries, the criteria had to be an exact match to the dataset, but sometimes we just
need something "sort of close". We can use statements such as AND, OR, NOT, IN, and BETWEEN to
help us find what we really need.
‐ Choose Query Design from the Create tab
‐ Use table Patients, Double‐click on title of the Patients table and move down all fields
‐ Set criteria for Zip
~ Between 32600 And 32699 ........................................................................ (51 records)
a. This is the same criteria as >= 32600 AND <=32699
b. This is a great option for dates and missing parameter values
Between #7/1/2014# and #6/30/2015#
Between [Enter first date] and [Enter Last Date]
We can also use LIKE in conjunction with our wildcards asterisk (*) and question mark (?) . The
asterisk * represents multiple characters (Anything/Everything), and the question mark ? represents
one character.
‐ Clear Criteria and try these for the last name:
~ j* (Like "j*") ............................................... (10 records) Begins with J
~ *s (Like "*s") ................................................ (21 records) Ends with S
~ j*s (Like "j*s") ............................................. ( 6 records) Beings J & Ends S
~ *e* (Like "*e*") .......................................... (42 records) Contains E
~ Like "?e*" ..................................................... (11 records) 2nd char is an E
‐ Clear criteria and set these for Address
~ Like *box* ................................................... (14 records) Contains box
~ Like *box * .................................................. (12 records) with space
~ Not Like *box * ........................................... (64 records) Does not contain box
‐ Set Final Criteria
~ Address: Not Like *box *
~ Zip: Between 32600 and 32699
~ Last: Like *e* ............................................... (21 records)
‐ Close and Save as Patients Criteria Range
5
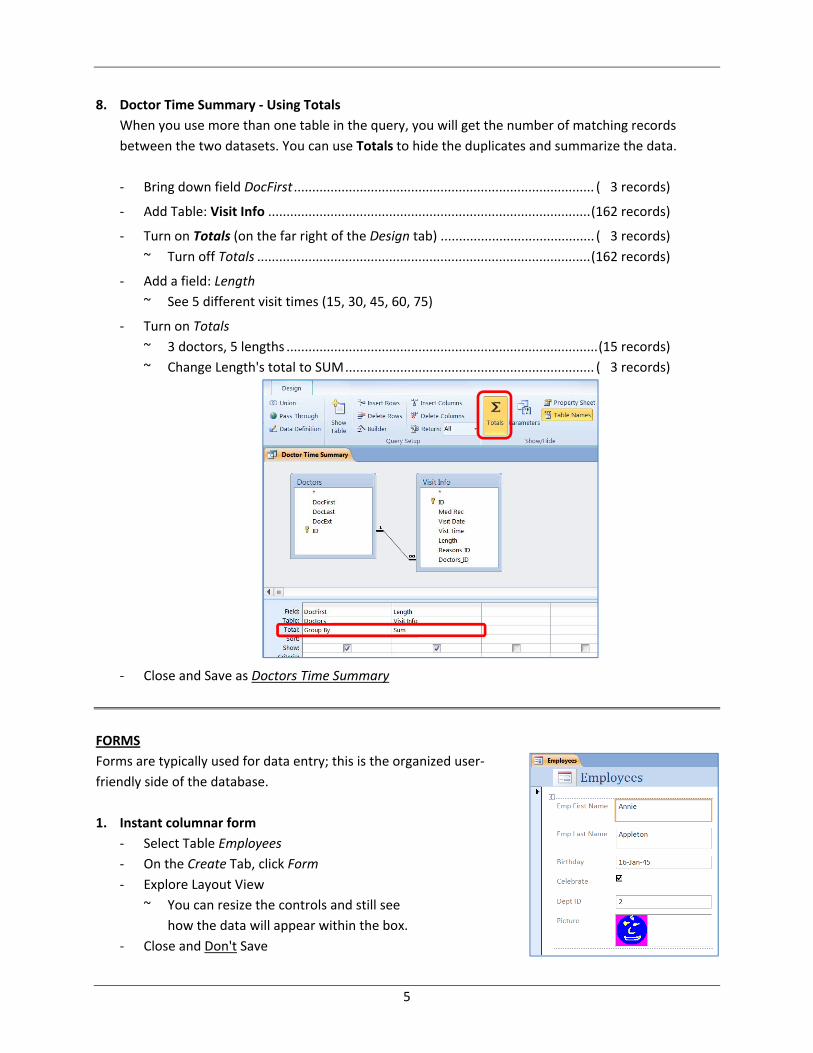
8. Doctor Time Summary ‐ Using Totals
When you use more than one table in the query, you will get the number of matching records
between the two datasets. You can use Totals to hide the duplicates and summarize the data.
‐ Bring down field DocFirst .................................................................................. ( 3 records)
‐ Add Table: Visit Info ........................................................................................ (162 records)
‐ Turn on Totals (on the far right of the Design tab) .......................................... ( 3 records)
~ Turn off Totals ........................................................................................... (162 records)
‐ Add a field: Length
~ See 5 different visit times (15, 30, 45, 60, 75)
‐ Turn on Totals
~ 3 doctors, 5 lengths ..................................................................................... (15 records)
~ Change Length's total to SUM .................................................................... ( 3 records)
‐ Close and Save as Doctors Time Summary
FORMS
Forms are typically used for data entry; this is the organized user‐
friendly side of the database.
1. Instant columnar form
‐ Select Table Employees
‐ On the Create Tab, click Form
‐ Explore Layout View
~ You can resize the controls and still see
how the data will appear within the box.
‐ Close and Don't Save
Page 6
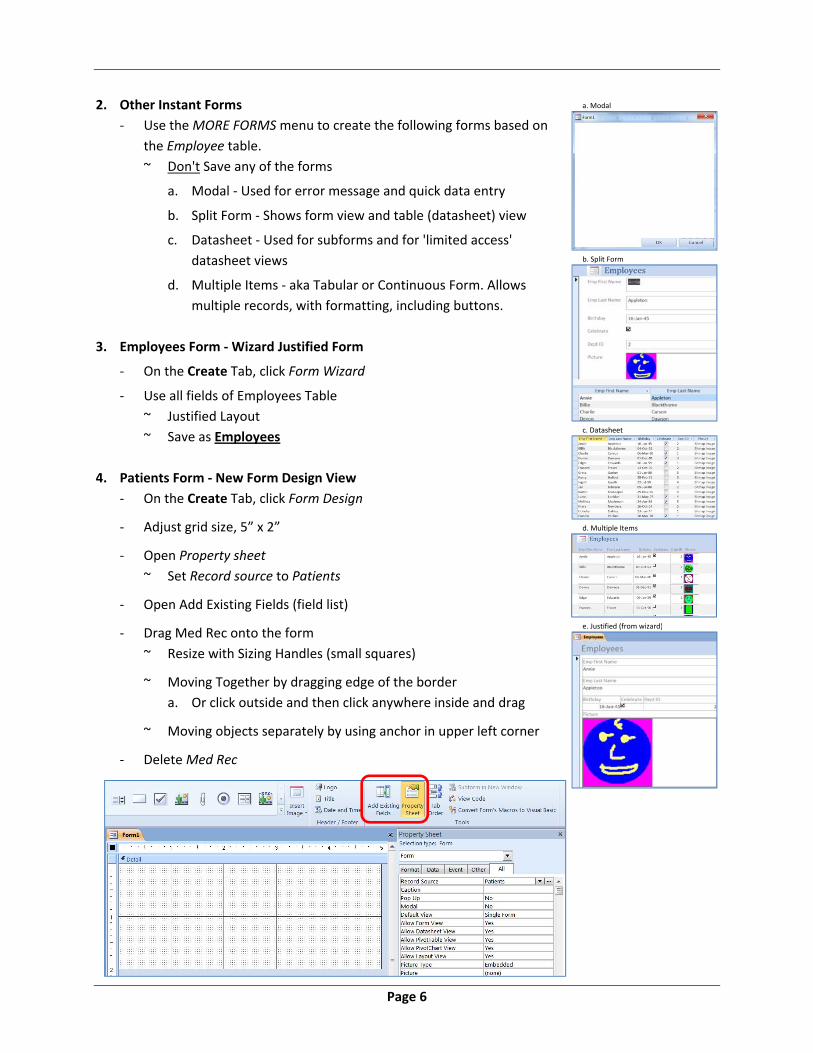
2. Other Instant Forms
‐ Use the MORE FORMS menu to create the following forms based on
the Employee table.
~ Don't Save any of the forms
a. Modal ‐ Used for error message and quick data entry
b. Split Form ‐ Shows form view and table (datasheet) view
c. Datasheet ‐ Used for subforms and for 'limited access'
datasheet views
d. Multiple Items ‐ aka Tabular or Continuous Form. Allows
multiple records, with formatting, including buttons.
3. Employees Form ‐ Wizard Justified Form
‐ On the Create Tab, click Form Wizard
‐ Use all fields of Employees Table
~ Justified Layout
~ Save as Employees
4. Patients Form ‐ New Form Design View
‐ On the Create Tab, click Form Design
‐ Adjust grid size, 5” x 2”
‐ Open Property sheet
~ Set Record source to Patients
‐ Open Add Existing Fields (field list)
‐ Drag Med Rec onto the form
~ Resize with Sizing Handles (small squares)
~ Moving Together by dragging edge of the border
a. Or click outside and then click anywhere inside and drag
~ Moving objects separately by using anchor in upper left corner
‐ Delete Med Rec
a. Modal
b. Split Form
c. Datasheet
d. Multiple Items
e. Justified (from wizard)

7
Add fields to create a custom Form
‐ Add other fields to create this form
~ Keep Form 5"x2"
‐ Adjust Alignments with tools on the
Arrange tab
~ To select multiple items
a. use the shift‐key
b. drag around the items
c. click in the ruler along the path of the objects
‐ Make sure you can view all the labels in the Form view
‐ Switch First Name and Last Name
~ Drag and drop the fields so they swap places
~ Align to top
~ Form View, tab order out of sync
~ Adjust Tab Order (Design tab or right‐click grid)
‐ Add Buttons from controls on Design tab
~ Click on button tool to turn it on, and then click on the form to drop the button
~ Follow the steps of the wizard to create Record Navigation buttons to go to the
Previous and Next Record
‐ Save as Patients
REPORTS
Reports are designed to create an organized output of information from your database. With a report,
you can group and summarize information.
1. Instant Report
‐ Select Table Patients
‐ On the Create Tab, Choose Report
‐ Explore Layout View
‐ Resize the fields so they fit within the margins
‐ Close and Don't Save

Page 8
2. Report Wizards
‐ Patients Columnar
~ Patients, All fields, No Group, No Sort
~ Columnar, Portrait
~ Save as Patients Columnar
‐ Patients Tabular
~ Patients, All fields, No Group, No Sort
~ Tabular, Portrait
~ Save as Patients Tabular
‐ Patients Justified
~ Patients, All fields, No Group, No Sort
~ Justified, Portrait
~ Save as Patients Justified
3. Patients Justified 2 ‐ Fix Table Field Sizes and Report Wizard
The Justified report looks especially awful. When you go through the wizard for the report, Access
looks at the Field Size property in the table to determine the size of the boxes. We can fix the table
and then go through the wizard again; however any forms or reports that have already been created
will not change.
‐ Open Table Patients in Design view
‐ Change the field size for each field:
~ Last, First, and City ...................... 50
‐ Close and Save (Yes, it's ok if data is lost)
‐ Repeat Report wizard for Justified Report
4. Patients Report ‐ Report Wizard
‐ Patients, All fields
‐ No Group, No Sort
‐ Tabular, Landscape
‐ Save as Patients
‐ Set Zoom to four pages

9
Parts of the Window
‐ Report Header, first page only
‐ Page Header/Footer, every page
‐ Detail, every record
5. New Report, Design View
‐ On the Create Tab, click Report Design
‐ Open Property sheet,
~ Set the Report Property Record Source: Patients
~ Set the Section Detail Property Height: 3"
‐ Open Add Existing Fields (Field list)
~ Double‐click Med Rec to add it to the report detail section
Report Header
Page Header
Detail
Page Footer
Report Header ‐ top of first page
Page Header ‐ top of every page
Detail ‐ repeats for each record in the dataset
Page Footer ‐ Bottom of each page
Page 10
‐ Adjust Detail size to be as small as possible
‐ Move Last Name Label to Page Header
~ Cut/Paste Last Name Label
‐ Select all, Delete
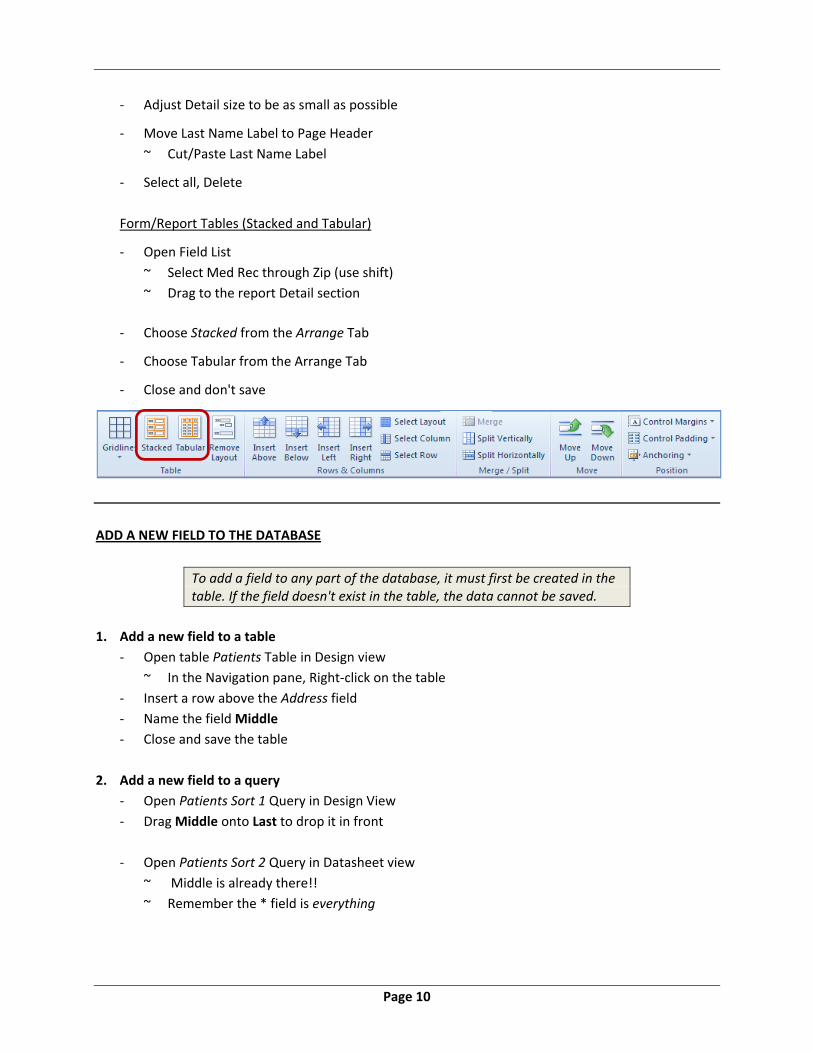
Form/Report Tables (Stacked and Tabular)
‐ Open Field List
~ Select Med Rec through Zip (use shift)
~ Drag to the report Detail section
‐ Choose Stacked from the Arrange Tab
‐ Choose Tabular from the Arrange Tab
‐ Close and don't save
ADD A NEW FIELD TO THE DATABASE
To add a field to any part of the database, it must first be created in the table. If the field doesn't exist in the table, the data cannot be saved.
1. Add a new field to a table
‐ Open table Patients Table in Design view
~ In the Navigation pane, Right‐click on the table
‐ Insert a row above the Address field
‐ Name the field Middle
‐ Close and save the table
2. Add a new field to a query
‐ Open Patients Sort 1 Query in Design View
‐ Drag Middle onto Last to drop it in front
‐ Open Patients Sort 2 Query in Datasheet view
~ Middle is already there!!
~ Remember the * field is everything

11
3. Add a new field to a Report
‐ Open Patients Report in Design View
‐ Select everything from the Page Header and Detail sections
~ Use the ruler to select everything in the section
‐ From the Arrange tab choose the table Tabular
‐ From the Design tab choose Add existing fields
‐ Drag Middle into place within the table
‐ Switch to Layout View
‐ Adjust the text boxy sizes, if necessary to get back into the margins
BACKING UP DATABASE
1. From the File Tab choose Info
a. Choose Compact and Repair
You should do this every time it crashes, or begins to run slowly, or starts acting funny, or before you share it with me
2. From the File Tab choose Save & Publish
a. Under advanced choose Back up Database
You should do this on a regular basis, but definitely before you make any major changes, or before you share it with me
3. Exit Access
a. Right‐Click on File, Choose "Send to Compressed Zipped Folder"
If you would like to email yourself the file, email the "Zipped Folder"
The Access Database inside the zipped folder is READ ONLY, meaning you cannot make changes to it. If you want to make the file editable, you will need to drag it out of the zipped folder.


