39
Microsoft Access Microsoft Access Data Base Application Data Base Application
| Date post: | 30-Dec-2015 |
| Category: |
Documents |
| Upload: | paula-mckenzie |
| View: | 220 times |
| Download: | 0 times |

Microsoft AccessMicrosoft Access
Data Base ApplicationData Base Application

A Few TermsA Few Terms
Database – A collection of related Database – A collection of related information.information.
Field - A Field - A columncolumn on a datasheet and on a datasheet and defines the type of data. For example, if defines the type of data. For example, if you were creating a mailing list database, you were creating a mailing list database, you might include fields for first name, last you might include fields for first name, last name, address, city, state, zip code, and name, address, city, state, zip code, and telephone number. telephone number.
Record-A Record-A recordrecord in a in a rowrow on a datasheet on a datasheet and is collection of fields. In a mailing list and is collection of fields. In a mailing list table, each record would contain the data table, each record would contain the data for one person as specified by the for one person as specified by the intersecting fields. intersecting fields.

Terms (cont.)Terms (cont.)
Design ViewDesign View provides the tools provides the tools for creating fields in a table. for creating fields in a table.
Datasheet ViewDatasheet View allows you to allows you to update, edit, and delete update, edit, and delete
information from a table.information from a table.

Microsoft AccessMicrosoft Access
Database - An application that Database - An application that allows you to allows you to savesave, , sortsort, , organizeorganize, and , and reportreport data. data.
Data - Individual Data - Individual piecespieces of of informationinformation..
UselessUseless by themselves. by themselves. How a Database isHow a Database is organizedorganized..

Vocabulary Terms:Vocabulary Terms:
FieldField - contains a - contains a singlesingle piece of piece of information.information.Examples:Examples: Last Name Last Name
First NameFirst NameAddressAddress
RecordRecord - is a - is a groupgroup of of fieldsfields..Example:Example: Your Your namename, , gendergender,,
and and I.D. NumberI.D. Number make up one make up one recordrecord..
Vocabulary TermsVocabulary Terms
FileFile - is a - is a groupgroup of of recordsrecords..
Example - Each Example - Each classclass in my in my gradebookgradebook is a file. is a file.
So........So........ • Each • Each classclass is a is a filefile;;
• • Each student is a Each student is a recordrecord;;
• • Every piece of Every piece of informationinformation is a is a
fieldfield..
The database process is a three The database process is a three step process:step process:
1.1. DesignDesign the database with field the database with field informationinformation
2.2. Create a Create a FormForm for data entry for data entry
3.3. ReportReport all or partial information all or partial information from the database. from the database.

Step One: Designing the Step One: Designing the databasedatabase
Open Microsoft Access. Open Microsoft Access. Select a Select a Blank Access DatabaseBlank Access Database if this is your first or a new if this is your first or a new database to be created.database to be created.
Blank Database

NameName your database. Give it an your database. Give it an appropriateappropriate name. (a name that makes sense for the name. (a name that makes sense for the database, such as “database, such as “EmployeeEmployee” for a database ” for a database of employees.of employees.

After naming your database, a selection window will After naming your database, a selection window will appear. Database objects are located on the left side appear. Database objects are located on the left side of the window.of the window.The best way to begin creating a database is to create The best way to begin creating a database is to create
a Table in the Design View.a Table in the Design View.

The next screen you get will look like this: The next screen you get will look like this:
Enter the necessary Enter the necessary field namesfield names that you need. Enter the that you need. Enter the first field name, then press first field name, then press TabTab. This takes you to the . This takes you to the Data TypeData Type area. area.

The The defaultdefault data type is data type is texttext. You may change the . You may change the type by clicking the type by clicking the down arrowdown arrow on the right side of the on the right side of the cell and choosing another option. cell and choosing another option. TextText, , numbersnumbers, , time/datetime/date, or , or currencycurrency are other available options. are other available options. When in doubt, choose text.When in doubt, choose text.

Enter your field names and data types.Enter your field names and data types.A A fieldfield name can contain up to name can contain up to 6464 characters. Don’t characters. Don’t use use periodsperiods (.) or exclamation marks (!). (.) or exclamation marks (!).
Change the field size in the lower part of the screenChange the field size in the lower part of the screen

Enter information until you Enter information until you have all that you need. have all that you need.

Once you have created all of your Once you have created all of your fieldsfields, it’s time to fill in the , it’s time to fill in the datadata (information)!(information)!
CloseClose the window. the window. You will be asked if you want to save You will be asked if you want to save
changes to Table1. Click changes to Table1. Click “Yes”“Yes” You will get a “Save As” screen. You will get a “Save As” screen.
Give your table a name. (ex. - Give your table a name. (ex. - Employee InformationEmployee Information))
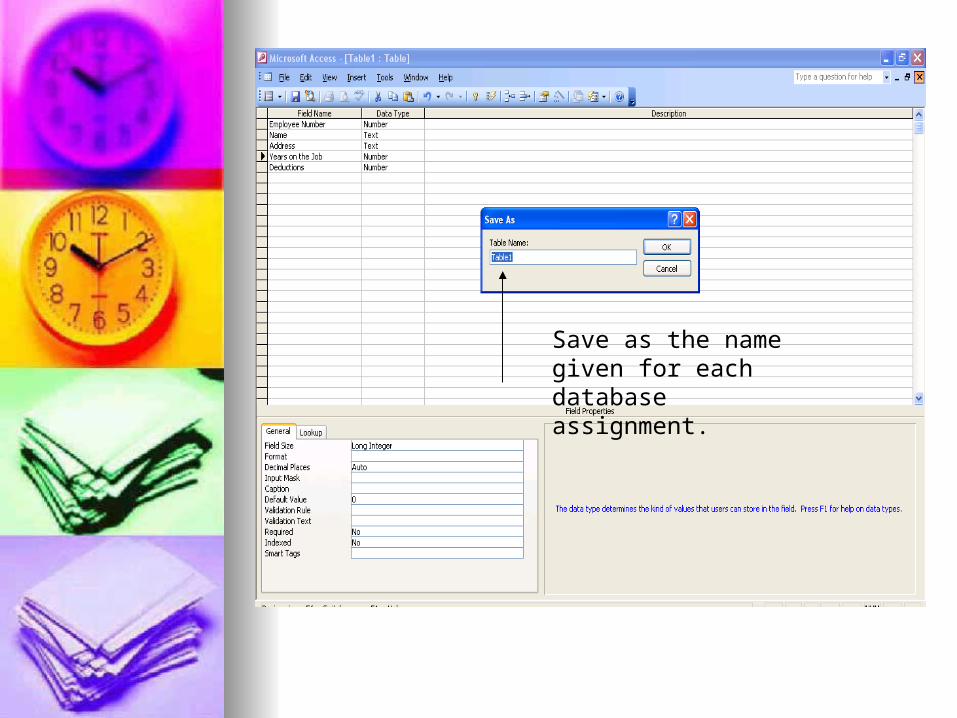
Save as the name given for each database assignment.

You will be asked if you want to Create a primary key. Say “no”.You’re now ready for step two in the database process!

Step Two: Creating a form for data entryStep Two: Creating a form for data entryYou should be back at the object selection window. You should be back at the object selection window. Click on the Form Object on the left side of the windowClick on the Form Object on the left side of the window

Create a form using the Create a form using the wizardwizard

Select ALL the fields for your form using the double Select ALL the fields for your form using the double arrow button. This will send the AVAILABLE FIELDS arrow button. This will send the AVAILABLE FIELDS over to the SELECTED FIELDS side. Click Next after over to the SELECTED FIELDS side. Click Next after you have made your selections.you have made your selections.

Click next to get passed this window. Leave Click next to get passed this window. Leave
the form in thethe form in the Column Column stylestyle..

This screen allows you to choose the This screen allows you to choose the background color scheme for your form. background color scheme for your form.
Choose an option you would like.Choose an option you would like. ThenThen click click next.next.

Click Next.Click Next.Title your Form. Click Finish.Title your Form. Click Finish.

You should now have an electronic form in which to enter your data. You should now have an electronic form in which to enter your data. You will be making up the data for your databases. Be consistent in You will be making up the data for your databases. Be consistent in your data entry. (ex: employee numbers should all be the same your data entry. (ex: employee numbers should all be the same length, salaries should be reasonable and consistent in length and length, salaries should be reasonable and consistent in length and time frame, i.e. annual vs. monthly.)time frame, i.e. annual vs. monthly.)

Completing your FormsCompleting your Forms As you As you TabTab from one field to another, a from one field to another, a newnew record record
will automatically appear when you finish one will automatically appear when you finish one record.record.
Follow the Arrows

To go from one record to another, use To go from one record to another, use the the arrowsarrows. To get to the . To get to the firstfirst or or lastlast record, click record, click on the on the arrowsarrows with with vertical linesvertical lines. .
Arrows with vertical lines
arrows
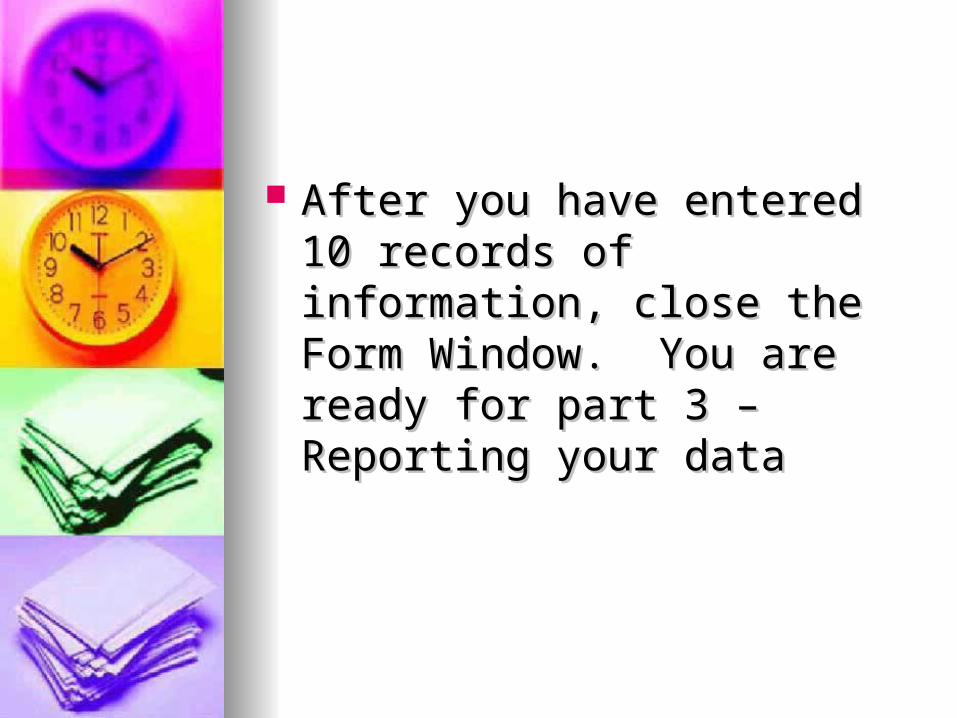
After you have entered 10 After you have entered 10 records of information, close the records of information, close the Form Window. You are ready Form Window. You are ready for part 3 – Reporting your datafor part 3 – Reporting your data

Step Three: Reporting Step Three: Reporting database informationdatabase information
You should be back at the object selection window. Click on the Reports Object on the left side of the window. Create a report by using the wizard.
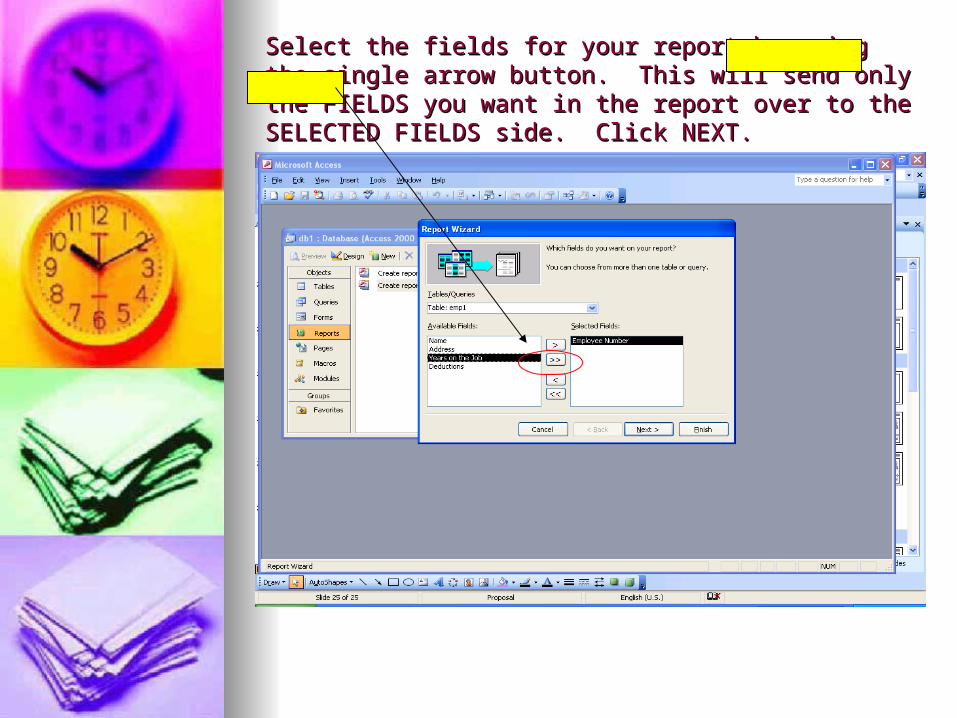
Select the fields for your report by using the single arrow Select the fields for your report by using the single arrow button. This will send only the FIELDS you want in the report button. This will send only the FIELDS you want in the report over to the SELECTED FIELDS side. Click NEXT.over to the SELECTED FIELDS side. Click NEXT.

Click Next to move forwardClick Next to move forward

Click next again to move Click next again to move forwardforward

Click next one last timeClick next one last time

Select a Style for your report Select a Style for your report and click Next.and click Next.

Give your report a Title, according to the Give your report a Title, according to the directions on the database assignment. Click directions on the database assignment. Click Finish when you’re done.Finish when you’re done.
Title of report according to assignment.

Your report will look similar to this Your report will look similar to this depending on the style you have depending on the style you have selected.selected.

Select Design View to open the Select Design View to open the following window and toolbox.following window and toolbox.
Design View
Tool Box

All reports should contain a LABEL box added All reports should contain a LABEL box added for your name. See your instructor or a peer for your name. See your instructor or a peer trainer for instructions.trainer for instructions.
Label Box
Click and drag to make label box
Click this icon for label box

Like this:Like this:
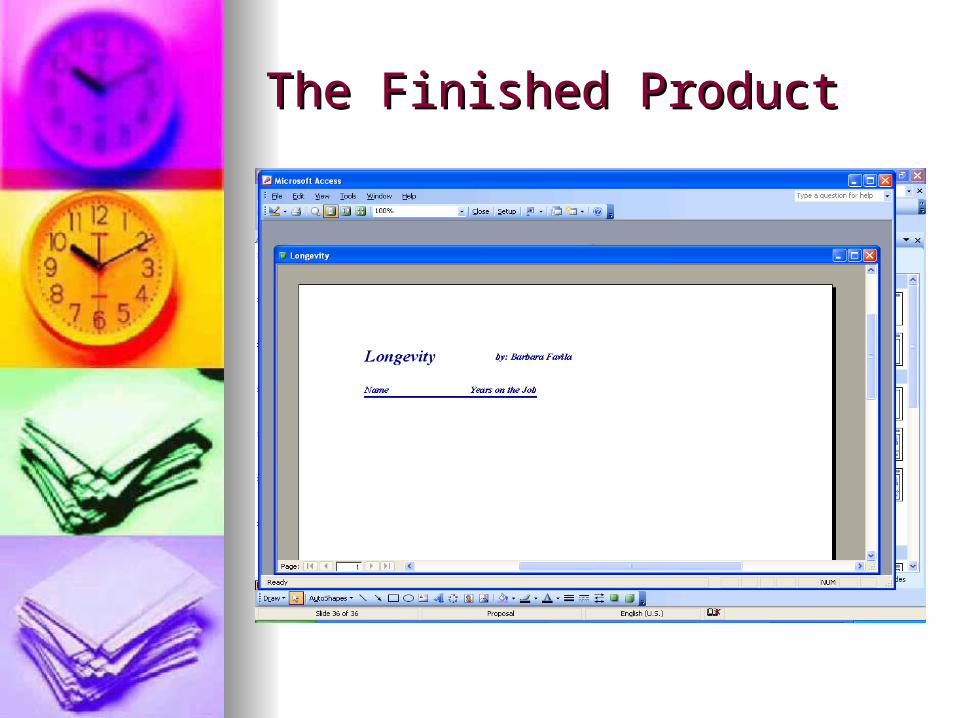
The Finished ProductThe Finished Product


