37
User's Guide Microsoft Dynamics CRM Plug-in Release 4.0 Printed on 13 March, 2009

User's Guide
Microsoft Dynamics CRM Plug-in
Release 4.0
Printed on 13 March, 2009

© 2009 Avaya Inc. All Rights Reserved.
Notice While reasonable efforts were made to ensure that the information in this document was complete and accurate at the time of printing, Avaya Inc. can assume no liability for any errors. Changes and corrections to the information in this document may be incorporated in future releases.
Documentation disclaimer Avaya Inc. is not responsible for any modifications, additions, or deletions to the original published version of this documentation unless such modifications, additions, or deletions were performed by Avaya.
Link disclaimer Avaya Inc. is not responsible for the contents or reliability of any linked Web sites referenced elsewhere within this Documentation, and Avaya does not necessarily endorse the products, services, or information described or offered within them. We cannot guarantee that these links will work all of the time and we have no control over the availability of the linked pages.
License USE OR INSTALLATION OF THE PRODUCT INDICATES THE END USER'S ACCEPTANCE OF THE TERMS SET FORTH HEREIN AND THE GENERAL LICENSE TERMS AVAILABLE ON THE AVAYA WEBSITE AT http://support.avaya.com/LicenseInfo/ ("GENERAL LICENSE TERMS"). IF YOU DO NOT WISH TO BE BOUND BY THESE TERMS, YOU MUST RETURN THE PRODUCT(S) TO THE POINT OF PURCHASE WITHIN TEN (10) DAYS OF DELIVERY FOR A REFUND OR CREDIT.
Avaya grants End User a license within the scope of the license types described below. The applicable number of licenses and units of capacity for which the license is granted will be one (1), unless a different number of licenses or units of capacity is specified in the Documentation or other materials available to End User. "Designated Processor" means a single stand-alone computing device. "Server" means a Designated Processor that hosts a software application to be accessed by multiple users. "Software" means the computer programs in object code, originally licensed by Avaya and ultimately utilized by End User, whether as stand-alone Products or pre-installed on Hardware. "Hardware" means the standard hardware Products, originally sold by Avaya and ultimately utilized by End User.
License type(s) Concurrent User License (CU). End User may install and use the Software on multiple Designated Processors or one or more Servers, so long as only the licensed number of Units are accessing and using the Software at any given time. A "Unit" means the unit on which Avaya, at its sole discretion, bases the pricing of its licenses and can be, without limitation, an agent, port or user, an e-mail or voice mail account in the name of a person or corporate function (eg., webmaster or helpdesk), or a directory entry in the administrative database utilized by the Product that permits one user to interface with the Software. Units may be linked to a specific, identified Server.
Copyright Except where expressly stated otherwise, the Product is protected by copyright and other laws respecting proprietary rights. Unauthorized reproduction, transfer, and or use can be a criminal, as well as a civil, offense under the applicable law.
Third-party components

Certain software programs or portions thereof included in the Product may contain software distributed under third party agreements (“Third Party Components”), which may contain terms that expand or limit rights to use certain portions of the Product (“Third Party Terms”). Information identifying Third Party Components and the Third Party Terms that apply to them is available on Avaya’s web site at: http://support.avaya.com/ThirdPartyLicense/.
Avaya fraud intervention If you suspect that you are being victimized by toll fraud and you need technical assistance or support, call Technical Service Center Toll Fraud Intervention Hotline at +1-800-643-2353 for the United States and Canada. Suspected security vulnerabilities with Avaya Products should be reported to Avaya by sending mail to: [email protected].
For additional support telephone numbers, see the Avaya Web site: http://www.avaya.com/support.
Trademarks Avaya is a trademark of Avaya Inc.
All non-Avaya trademarks are the property of their respective owners.
Avaya support Avaya provides a telephone number for you to use to report problems or to ask questions about your contact center. The support telephone number is 1-800-242-2121 in the United States. For additional support telephone numbers, see the Avaya Web site: http://www.avaya.com/support.
For the most current versions of documentation, go to the Avaya support Web site: http://www.avaya.com/support.

iv
Contents
Introduction 5 Microsoft Dynamics CRM Svc Plug-in Integration Overview.....................................................................6
Components.....................................................................................................................................10 Licensing .........................................................................................................................................11
Installation 11
Administration 12 Integrating Microsoft Dynamics CRM with Contact Center Express.........................................................13 Configure Microsoft Dynamics CRM Plug-in............................................................................................16
Main Tab .........................................................................................................................................16 Identification Tab ............................................................................................................................17 ASContact Tab ................................................................................................................................18 Microsoft Dynamics CRM Tab .......................................................................................................19 Synchronization Tab........................................................................................................................20
Set Up Public Microsoft Dynamics CRM Queue .......................................................................................22 Create Program to Work Flow Microsoft Dynamics CRM Activities ........................................................23 Configure Microsoft Dynamics CRM Svc Plug-in.....................................................................................26 Customize Microsoft Dynamics CRM Server ............................................................................................28 Create Rules................................................................................................................................................29
Rules Overview ...............................................................................................................................29 Create Rule ......................................................................................................................................30
Operation 34 Process Multimedia Work Items.................................................................................................................35 Process Microsoft Dynamics CRM Activities ............................................................................................36
Index 37

5
C H A P T E R 1
Introduction
In This Chapter Microsoft Dynamics CRM Svc Plug-in Integration Overview 6

Introduction 6
Microsoft Dynamics CRM Svc Plug-in Integration Overview Integrating Microsoft Dynamics CRM with Contact Center Express Desktop allows agents to:
Conveniently view and use Microsoft Dynamics CRM within the Contact Center Express Desktop screen. What's more, if details of the incoming work item are matched to a Microsoft Dynamics CRM account or contact record, the record displays as a tab on the work item, ready for the agent to view or edit.

Introduction 7
Dial from any Microsoft Dynamics CRM web page that displays one or more phone numbers. This could be an account, contact, invoice, lead, campaign response, quote, sales order, system user or phone call. Contact Center Express Desktop uses its in-built Smart Dial functionality to strip phone numbers saved inside these activities of any spaces or formatting, eg. - (+.

Introduction 8
It also allows an administrator to:
Create rules that will automatically perform actions on Microsoft Dynamics CRM call events. Deliver Microsoft Dynamics CRM activities (task, email, fax, letter, phone call, campaign
response, campaign activity, case, appointment or service) to a public Microsoft Dynamics CRM queue, which Contact Center Express Desktop can then collect and distribute (as multimedia work items) to call center agents.

Introduction 9
Synchronizing your Microsoft Dynamics CRM database with ASContact Database
Microsoft Dynamics CRM Plug-in gives you the option of transferring (synchronizing) the data in your Microsoft Dynamics CRM database into the ASContact Database, the contact directory used by Contact Center Express Desktop.
There are several benefits to doing this:
Faster, easier searching. Using Contact Center Express Desktop's directory to search for a Microsoft Dynamics CRM customer record (ie. searching the ASContact Database) offers many benefits over searching the Microsoft Dynamics CRM database directly. Firstly, the directory allows you to search by many data types, including name, phone number and email address, whereas Microsoft Dynamics CRM only allows you to search by name. Secondly, searching a SQL database is much quicker than searching a web-based database. Thirdly, it is more convenient and efficient to use one directory mechanism.
More telephony options. Once Microsoft Dynamics CRM customers are listed in the ASContact Database, you can then dial them directly from the directory without having to open the Microsoft Dynamics CRM record. What's more, if you have an active call, Contact Center Express Desktop's directory gives you the ability to transfer or conference the call to any Microsoft Dynamics CRM customer. (Transferring and conferencing are not available to you via Microsoft Dynamics CRM even when it is viewed within Contact Center Express Desktop.)
Smart handling of phone number formatting. Smart SQL searching procedures strip out non-numerics on-the-fly to correctly find matches even when phone numbers are stored in human friendly format, eg. +64 (9) 4770500. When searching the Microsoft Dynamics CRM database directly, the phone numbers must be stored exactly as you would phone them, without formatting and spaces.

Introduction 10
Components There are three components that enable you to integrate Microsoft Dynamics CRM with Contact Center Express Desktop.
Microsoft Dynamics CRM Plug-in
This plug-in allows the agent to view and edit Microsoft Dynamics CRM contacts and accounts when incoming work items are received. It also allows an administrator to create rules that automatically perform actions on Microsoft Dynamics CRM call events.
Microsoft Dynamics CRM Svc Plug-in
This plug-in collects Microsoft Dynamics CRM activities (task, email, fax, letter, phone call, campaign response, campaign activity, case, appointment or service) from a public Microsoft Dynamics CRM queue and distributes them (as multimedia work items) to call center agents.
Microsoft Dynamics CRM Phonebook Synchronizer
This component ensures changes made to Microsoft Dynamics CRM account and contact records (in the Microsoft Dynamics CRM database) are automatically updated in the ASContact Database.

Installation 11
Licensing To integrate Microsoft Dynamics CRM Plug-in with Contact Center Express Desktop, you need to buy a CCE MS-CRM license key (this license key covers unlimited users).
To use Contact Center Express Desktop's full range of functionality (voice and multimedia), you also need to buy one CCE Multimedia license key with enough run-time licenses to cover the number of agents using Contact Center Express Desktop and one CCE Voice license key with the same number of run-time licenses.
To just use Contact Center Express Desktop's voice capability, you only need to buy one CCE Voice license key with enough run-time licenses to cover the number of agents using Contact Center Express Desktop.
Installation
Microsoft Dynamics CRM Plug-in is automatically installed as part of the Contact Center Express Desktop installation. To learn how to install Contact Center Express Desktop, refer to the Contact Center Express Installation Guide.

12
C H A P T E R 2
Administration
In This Chapter Integrating Microsoft Dynamics CRM with Contact Center Express............................................................................................13Configure Microsoft Dynamics CRM Plug-in ...................16Set Up Public Microsoft Dynamics CRM Queue...............22Create Program to Work Flow Microsoft Dynamics CRM Activities............................................................................................23Configure Microsoft Dynamics CRM Svc Plug-in ............26Customize Microsoft Dynamics CRM Server....................28Create Rules .......................................................................29

Administration 13
Integrating Microsoft Dynamics CRM with Contact Center Express How to Integrate Microsoft Dynamics CRM with Contact Center Express Desktop

Administration 14

Administration 15
How to Work Flow Microsoft Dynamics CRM Activities

Administration 16
Configure Microsoft Dynamics CRM Plug-in Note: When you first open ASGUIHost.ini, Microsoft Dynamics CRM Plug-in is disabled (commented out) in the Plug In Assembly List (;Microsoft Dynamics CRM Plug-in = Microsoft Dynamics CRM Plug-in). To enable Microsoft Dynamics CRM Plug-in and to display the Microsoft Dynamics CRM tab in the Options dialog box, remove the semi-colon.
Main Tab This tab allows you to connect to your Microsoft Dynamics CRM environment.
Administration 17
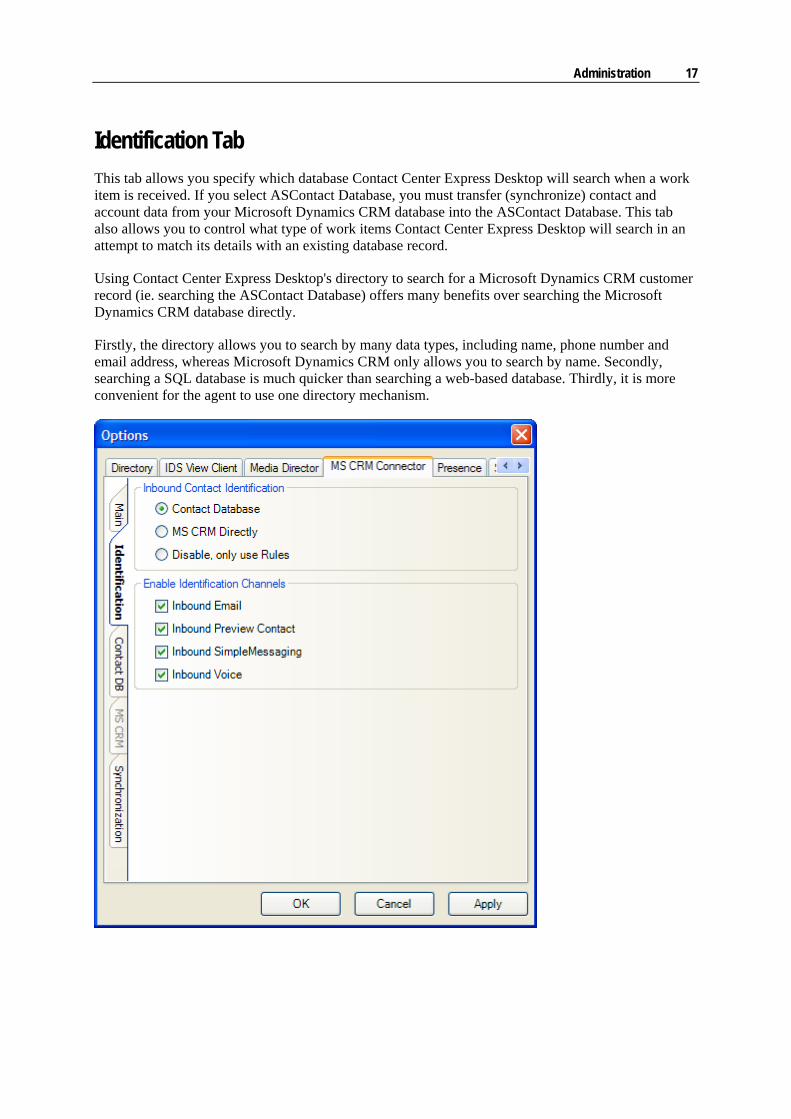
Identification Tab This tab allows you specify which database Contact Center Express Desktop will search when a work item is received. If you select ASContact Database, you must transfer (synchronize) contact and account data from your Microsoft Dynamics CRM database into the ASContact Database. This tab also allows you to control what type of work items Contact Center Express Desktop will search in an attempt to match its details with an existing database record.
Using Contact Center Express Desktop's directory to search for a Microsoft Dynamics CRM customer record (ie. searching the ASContact Database) offers many benefits over searching the Microsoft Dynamics CRM database directly.
Firstly, the directory allows you to search by many data types, including name, phone number and email address, whereas Microsoft Dynamics CRM only allows you to search by name. Secondly, searching a SQL database is much quicker than searching a web-based database. Thirdly, it is more convenient for the agent to use one directory mechanism.

Administration 18
ASContact Tab The ASContact tab allows you to define how Contact Center Express Desktop behaves if the details of an inbound work items match the details of a contact in the ASContact Database. If no match is found, you can opt for the application to do nothing or open a blank account record or contact record. If a single match is found, you can order the application to do nothing or display a screen pop for the match. If multiple matches around found, you also have the option to display a grid of matches, allowing the user to decide which record they want to display in full.
Note: This tab is only enabled if you selected ASContact Database on the Identification tab.

Administration 19
Microsoft Dynamics CRM Tab The Microsoft Dynamics CRM tab allows you to select if you want Microsoft Dynamics CRM accounts, Microsoft Dynamics CRM contacts or both to be searched when inbound work items arrive.
It allows you to select the particular fields you want to be searched, and to control how Contact Center Express Desktop behaves if a match is found. If no match is found, you can opt for the application to do nothing or open a blank account record or contact record. If a single match is found, you can order the application to do nothing or display a screen pop for the match. If multiple matches around found, you also have the option to display a grid of matches, allowing the user to decide which record they want to display in full.
Note: This tab is only enabled if you selected Microsoft Dynamics CRM directly on the Identification tab.

Administration 20
Synchronization Tab This tab allows you to do an initial, one-off transfer (synchronization) of all the data in your Microsoft Dynamics CRM database into the ASContact Database, the contact directory used by Contact Center Express Desktop. Synchronization can take a while if you have a large number of customer records. For example, to synchronize 70,000 records can take up to 20 minutes.
After this initial synchronization, any future changes to Microsoft Dynamics CRM accounts and records are automatically updated in real-time via the Microsoft Dynamics CRM Phonebook Synchronizer, which is installed on the Microsoft Dynamics CRM Server.
Pre-requisite Set-up In order for the Microsoft Dynamics CRM Server to provide realtime updates of accounts and contacts to Contact Center Expresss ASContact Database, it requires customization. The customization involves the Microsoft Dynamics CRM Entity Callout model.
1 Copy all files from [DVD:\Utilities\Microsoft Dynamics CRM Server Customisations\Realtime Phonebook Synchronizer] to the [C:\Program Files\Microsoft Dynamics CRM\Server\bin\assembly] folder in your Microsoft Dynamics CRM server.

Administration 21
Note: The included callout.config.xml file instructs Microsoft Dynamics CRM to load the Phonebook synchronizer assembly whenever changes occur in Accounts and Contacts. If you are already using other customizations and would like to keep your original callout.config.xml, please amend your current callout.config.xml with additional entries found in the included callout.config.xml file.
2 Update the ASMSCRMPhonebookSynchronizer.ini. The ASContact Database Connection String needs to be set to your Contact Center Express Database.

Administration 22
Set Up Public Microsoft Dynamics CRM Queue To set up a public queue inside Microsoft Dynamics CRM, which Contact Center Express Desktop will search to collect Microsoft Dynamics CRM activities, consult your Microsoft Dynamics CRM administrator. This picture shows Microsoft Dynamics CRM activities awaiting assignment in a public queue called 'Support'.

Administration 23
Create Program to Work Flow Microsoft Dynamics CRM Activities
To create a program for exclusively routing Microsoft Dynamics CRM activities to Contact Center Express Desktop agents: 1 Open Contact Center Express Control Panel.
2 Expand the Media Store Database node and expand the node for the ASMediastore Database you want to add the program to.
3 Right-click the Program node and select Add Program from the pop-up menu.

Administration 24
The Add Program tab appears:
1 Complete the fields using the following descriptions:
Name. A common name for this program.
Description. A short description of this program.
Used by. Tick Preview Contact Media Store.
Prompt. This field is not used by Microsoft Dynamics CRM activities. Leave blank.
Program Configuration
AutoText list name. This field is not used by Microsoft Dynamics CRM activities. Leave blank.
Work code list name. The identifier of the AutoText group (in this case a group of work codes) you want the agent to view when they work on work items generated via this program.

Administration 25
Automatically drop phantom call. If ticked, this puts the agent in pending Auxiliary mode and drops the phantom call as soon as the agent accepts a work item.
Automatic drop reason code. If the Automatically drop phantom call parameter is ticked, this reason code is used when the agent is put in Auxiliary mode.
Program access mode. A program is public (allowed or open) or private (denied or closed).
Outbound
This section is reserved for future use.
Preview Contact Client
This section is not used by Microsoft Dynamics CRM activities. Leave blank.
2 Click the Customized Configuration tab.
1 Add a key called Work Item Type and set the value to 100. This will allow Microsoft Dynamics CRM activities to be correctly identified and handled by Contact Center Express Desktop's Microsoft Dynamics CRM Plug-in.
2 To save the program, right-click and select Save and Close.
The new program is immediately enabled. It automatically appears under the Interactions list for the Preview Contact Media Store connected to the same ASMediastore Database.

Administration 26
Configure Microsoft Dynamics CRM Svc Plug-in Note: When you first open ASPreviewContactMediaStore.ini, Microsoft Dynamics CRM Svc Plug-in is disabled (commented out) in the Plug In Assembly List (;Microsoft Dynamics CRM Svc Plug-in = Microsoft Dynamics CRM Svc Plug-in). To enable Microsoft Dynamics CRM Svc Plug-in, remove the semi-colon.
Microsoft Dynamics CRM Svc Plug-in
Assembly File Name. The name of the plug-in file to be loaded. If the plug-in is not located in the default file path (the same folder as the host application), also specify the file path. For this plug-in, use: ASMSCRMSvcPlugin.dll
Enable Error Logging. A setting that allows you to write plug-in specific error information to the application's error log files. True=enabled, False=disabled.
MS CRM Login User Name. The user name for logging into Microsoft Dynamics CRM Webservices.
MS CRM Login User Password. The password associated with the above user name.
MS CRM Domain Name. The Windows domain name of the Microsoft Dynamics CRM Server.
MS CRM Web Service URL. THe URL of the Microsoft Dynamics CRM Service. The default is: http://YourMSCRMServer:5555/mscrmservices/2006/crmservice.asmx
MS CRM Web Service Reconnect Interval. When the connection to the Microsoft Dynamics CRM Web Service has failed, this value determines, how often, in seconds, Microsoft Dynamics CRM Svc Plug-in will wait before attempting to reconnect to it. The default is 300.
MS CRM Public Queues Workflowed Via CCE. The name of the public queue Microsoft Dynamics CRM Svc Plug-in will check for new activities and the name of the Contact Center Express program ID it will use. The parameter takes the format MS CRM Public Queues Workflowed Via CCE=MSCRMPublicQueueName:CCEPreviewContactProgramId
Note: If you want to work flow Microsoft Dynamics CRM activities via two or more public queues, separate the values with a comma. For example, MS CRM Public Queues Workflowed Via CCE=MSCRMPublicQueueName1:CCEPreviewContactProgramId1, MSCRMPublicQueueName2:CCEPreviewContactProgramId2
MS CRM Public Queues Check Interval. How often, in seconds, Microsoft Dynamics CRM Svc Plug-in will check Microsoft Dynamics CRM public queues for new activities to distribute to call center agents. The default is 300.
Service Restart Synchronization Wait Interval. If Preview Contact Media Store has to restart when Microsoft Dynamics CRM work items have already been created but not yet delivered to agents, this parameter determines how long, in seconds, Microsoft Dynamics CRM Svc Plug-in will wait for the media store to tell it how many items remain in the ASMediastore Database. After this interval, the plug-in will start checking the Microsoft Dynamics CRM public queue again for activities and check if it should ignore any activities for which Microsoft Dynamics CRM work items already exist. The default is 300.

Administration 27
Note: It is preferable that the number of work items that can queue inside Media Director is larger than the number of Microsoft Dynamics CRM work items that can remain in the ASMediastore Database) if Preview Contact Media Store shuts down. The recommended Maximum queued work items setting is 100 or more.

Administration 28
Customize Microsoft Dynamics CRM Server If you have synchronized your Microsoft Dynamics CRM database with the ASContact Database, you must install the Microsoft Dynamics CRM Phonebook Synchronizer on the Microsoft Dynamics CRM Server. This component ensures any ongoing changes made to Microsoft Dynamics CRM account and contact records are automatically updated in the ASContact Database.
Adding dial buttons to Microsoft Dynamics CRM web pages that contain one or more phone numbers is optional if you are integrating Contact Center Express Desktop with Microsoft Dynamics CRM.
Note: These procedures apply to Microsoft Dynamics CRM Server, Version 1.2, 3.0 and 4.0.
To add dial buttons to Microsoft Dynamics CRM web pages: 1 If you are already using a customization, copy your existing isv.config.xml file to another
location.
2 Ensure ISV (Independent software vendor) Integration is enabled by modifying the main 'web.config' configuration file located under [C:\Inetpub\wwwroot\]. Also ensure that ISV Extensions are enabled for all desired Microsoft Dynamics CRM Security Roles.
3 Copy all files (images, htm, isv.config.xml) from [DVD:\Utilities\Microsoft Dynamics CRM Server Customizations\Microsoft Dynamics CRM Server Installation Notes] to the [C:\Inetpub\wwwroot\_Resources] folder on your Microsoft Dynamics CRM Server.
4 If you completed step 1, copy any new entries from the latest isv.config.xml file into your original isv.config.xml. Copy the updated file back into the folder on your Microsoft Dynamics CRM Server.
To install Microsoft Dynamics CRM Phonebook Synchronizer on the Microsoft Dynamics CRM Server: 1 If you are already using a customization, copy your existing callout.config.xml file to another
location.
2 Copy all the files from [DVD:\Utilities\Microsoft Dynamics CRM Server Customizations\Realtime Phonebook Synchronizer] to the [C:\Program Files\Microsoft Dynamics CRM\Server\bin\assembly] folder on your Microsoft Dynamics CRM Server.
3 If you completed step 1, copy any new entries from the latest callout.config.xml file into your original callout.config.xml. Copy the updated file back into the folder on your Microsoft Dynamics CRM Server.
4 Update the ASMSCRMPhonebookSynchronizer.ini. The AS Contact Database Connection String needs to be set to your ASContact Database.

Administration 29
Create Rules
Rules Overview Contact Center Express Desktop's Rules Window allows administrators to create rules that will automatically perform actions on call events that meet certain criteria. For example, you can configure a rule to deflect calls from a specific phone number to voicemail, or create automatic screen pops of information.
Essentially, a rule fits into a simple statement; when a certain event occurs and a call property matches this value, do this action then either continue rules processing, jump to another rule or stop.
The Rules Window, which is a user interface for the Rules Plug-in, allows you to create multiple rules for a call event. The Rules Plug-in processes them in the order in which they appear in the Rules Window. Once a match is found, that action is taken and no further rules are processed. You can change the processing order at any time.
This rule functionality is similar to the email rules capability in Microsoft Outlook.
Rules are stored as simple text strings in Contact Center Express Desktop's configuration file.

Administration 30
Examples
When an external phone call is received, the following rule will force the application to create a Microsoft Dynamics CRM phone call (inbound) activity, then display it.
When Voice.WIDelivered And CallerDN > Nothing And CallerDN > 99999 Do ReturnEvent MSCRM.CreateThenScreenpop,phonecall,description|directioncode|from|phonenumber|subject|to,%UserEnteredCode%|0|%CallerDN%|%CallerDN%|%UUI%|%CalledDN% Then Continue
When an external phone call is received, the following rule will force the application to look up the contact in the contact's list and try to match the phone number. It will then create a screen pop.
When Voice.WIDelivered And CallerDN > Nothing and CallerDN > 99999 Do ReturnEvent MSCRM.LookupThenScreenpop,contact,mobilephone|telephone1|telephone2|telephone3,%CallerDN%,1,1,2,1 Then CONTINUE
For detailed information on how to make up rules using the different key words and events available via the Rules Window, refer to the Rules Plug-in User Guide.pdf on the Avaya Contact Center Express DVD.
Create Rule To create a rule:
1 Select Tools > Rules from the menu bar.
1 Click the New button.

Administration 31
When (creating a trigger) 2 Select the event you want to trigger the rule from the When drop-down list box.
Conditions (creating a filter) 1 If you do not want to place any conditions on when the rule is used with this event (ie. the rule
always applies when that call event is received), leave the tick in the Always check box.
1 If you do want to place some conditions on when the rule is used with this event:
a) Remove the tick.
b) Type the filter criteria in the And text box. For information on key/values and keyword operators (<,> and =), refer to refer to the Rules Plug-in User Guide.pdf. The event key/values are compared to either a literal string value or the keyword Nothing. If they are compared to a literal string value, type that in the text box.
A rule supports multiple And clauses that can be chained to allow checking of a number of event properties. If you want to add more conditions to the rule, add them to the text already in the text box.
For example: CallerDN = 4567 And UUI > Nothing
Action 2 To set up what action will be taken if the event type and event conditions are met, select an action
from the Do drop-down list box.

Administration 32
Action value placeholders relating to your selected action automatically appear. Note: Some actions have one action value, others have several. Here are two examples:
1 Click the placeholders one by one and type the required action value.
Then
The Then keyword clause is optional.
2 To specify what happens after this rule has been executed, select an option from the Then drop-down list box.
Available keywords are: Continue, GotoRule, Stop.
1 If required, add any additional text to complete the clause.
2 To ensure the clauses combine to create a valid rule, click the OK button on the Rules Window.
If the syntax is not valid, an error message appears.
If the syntax is valid, the rule appears in the left-hand panel of the Rules Window.
1 Continue to create rules.
2 To change the order in which a rule appears in the sequence, select the rule and press the Up or Down buttons.
Note: The Rules Plug-in processes rules in the order in which they appear in the Rules Window. Once a match is found, that action is taken and no further rules are processed.
3 To delete a rule, select it and click the Delete button.

Administration 33
4 To close the Rules Window, click OK.
Storage of rules for Contact Center Express Desktop
Rules are stored as simple text strings in Contact Center Express Desktop's configuration file. Each rule will be on a single line and will be passed to the Rules Plug-in for processing.
Note: It is essential that event parameters are typed accurately, with uppercase letters in the right place and without spaces between words. To confirm a parameter, refer to the Rules Plug-in User Guide.pdf.

34
C H A P T E R 3
Operation
In This Chapter Process Multimedia Work Items ........................................35Process Microsoft Dynamics CRM Activities ...................36

Operation 35
Process Multimedia Work Items If your company has enabled Microsoft Dynamics CRM Plug-in, Contact Center Express Desktop will try to match details of the incoming work item to one of the Microsoft Dynamics CRM account or contact records. If it doesn't find a match, Microsoft Dynamics CRM Plug-in behaves according to its configuration settings; it either does nothing or it opens a blank contact or account record (as the vertical tab on the work item) for you to fill in. If it finds a match, the contact's record displays for you to view or edit.
A match was made when the following voice work item was received.

Operation 36
Process Microsoft Dynamics CRM Activities If your company has enabled Microsoft Dynamics CRM Plug-in, you can receive Microsoft Dynamics CRM activities (task, email, fax, letter, phone call, campaign response, campaign activity, case, appointment or service) via Contact Center Express Desktop.
Receiving a Microsoft Dynamics CRM activity is the same as receiving a normal Contact Center
Express work item; you either click or the text alert at the bottom right-hand corner of your screen. Once the activity is displayed, you complete it as you would if you were working directly within Microsoft Dynamics CRM.

37
A Administration • 12 ASContact Tab • 18
C Components • 10 Configure Microsoft Dynamics CRM Plug-in •
16 Configure Microsoft Dynamics CRM Svc
Plug-in • 26 Create Program to Work Flow Microsoft
Dynamics CRM Activities • 23 Create Rule • 30 Create Rules • 29 Customize Microsoft Dynamics CRM Server •
28
I Identification Tab • 17 Installation • 11 Integrating Microsoft Dynamics CRM with
Contact Center Express • 13 Introduction • 5
L Licensing • 11
M Main Tab • 16 Microsoft Dynamics CRM Svc Plug-in
Integration Overview • 6 Microsoft Dynamics CRM Tab • 19
O Operation • 34
P Process Microsoft Dynamics CRM Activities •
36 Process Multimedia Work Items • 35
R Rules Overview • 29
S Set Up Public Microsoft Dynamics CRM
Queue • 22 Synchronization Tab • 20
Index


