41
Microsoft Exchange 2013 Cookbook Michael Van Horenbeeck Peter De Tender Chapter No. 6 "Implementing and Managing High Availability"
Microsoft Exchange 2013 Cookbook
Michael Van Horenbeeck
Peter De Tender
Chapter No. 6
"Implementing and Managing High Availability"
In this package, you will find: A Biography of the authors of the book
A preview chapter from the book, Chapter NO.6 "Implementing and Managing
High Availability"
A synopsis of the book’s content
Information on where to buy this book
About the Authors Michael Van Horenbeeck is a technology consultant, Microsoft Certified Solutions
Master (MCSM), and Exchange Server MVP from Belgium, mainly working on
projects involving Microsoft Exchange, Office 365, Active Directory, and a
bit of Lync.
Michael has been active in the industry for about 12 years and developed a love for
Exchange back in 2000. He is a frequent blogger and a member of the Belgian
Unified Communications User Group Pro-Exchange, ( ).
Besides writing about technology, Michael is a regular contributor to The UC
Architects podcast ( ) and he speaks regularly at
various conferences around the world.
You can follow Michael via twitter ( ) or his
blog: .
For More Information: www.packtpub.com/microsoft-exchange-2013-cookbook/book
Peter De Tender started his career as an IT professional with over 16 years of
experience. Peter has a strong focus on Microsoft Infrastructure technologies, with
an expertise in Exchange Server since Version 4.0 back in 1995. He has worked on
numerous design and implementation projects in Belgium and with International
Customers. He has also worked in SMB environments and on large-scale 50,000
mailbox platforms. Besides doing Exchange consulting, Peter frequently works on
general Microsoft Core IO platform integration and consultancy projects as an
Infrastructure Architect, mainly working with Windows Server, HyperV, and
System Center Operations Manager.
Peter is a also a recognized Microsoft Certified Trainer and out of that expertise he is
both country lead for Belgium and European Chairman of IAMCT, the International
Association of Microsoft Certified Trainers ( ). He is also
a Microsoft Springboard Series member.
For the last few years, Peter has been regularly traveling around the world for speaking
at international conferences on Microsoft technologies such as MCT Summits NA and
EU, TechFuse Minneapolis and Community Day, or for working as a staff member at
Microsoft TechEds NA and EU, MMS, and so on.
Peter started his career as a database admin for an international organization, where he
got his first exposure to with Windows Server NT4 back in 1996. He decided to work as
an IT engineer on Windows Server, and never looked back. Having worked for some of
the largest IT organizations in Belgium, he became the managing partner of a Microsoft
technology oriented company in Belgium having 25 high-skilled consultants under his
wings. Peter is now working as an independent and has also his own company out of
which he is available for hire for giving training, coaching, consulting ,or speaking at
your conference.
As a technical writer for TrainSignal ( ) and Petri
Knowledgebase ( ), Peter writes many technical how-to
articles on a multitude of Microsoft products, always with a twist from his own
experience. You can follow Peter via
Besides this Cookbook, Peter is also the co-author of Upgrading Skills to Exchange
Server 2013, a courseware training guide published by MVP-Press
( ).
For More Information: www.packtpub.com/microsoft-exchange-2013-cookbook/book
Microsoft Exchange 2013 Cookbook Microsoft Exchange Server has come a long way since it was first introduced. Back in the
days, Exchange was nothing more than a simple mail server. Today, Exchange is much
more than that. It has grown to become the cornerstone for collaboration and related
technologies within many companies.
On one hand, managing Exchange has never been so easy with the all-new web-based
Exchange Admin Center. On the other hand, however, the multitude of features which
come built-in to the product can sometimes make it a real challenge to pick the right
feature and implement it accordingly.
This book will guide you through the process of installing and configuring Exchange
Server 2013. We will tackle how to install Exchange in a green field deployment, and
also have a chapter dedicated to migrating from previous versions of Exchange. We will
cover everything there is to know to successfully deploy Exchange 2013 and its most
used features.
Our goal is to remain as practical as possible. As such, you will find lots of step-by-step
examples, which help you reproducing them in your own lab before executing
them in production.
What This Book Covers Chapter 1, Planning an Exchange Server 2013 Infrastructure, will help you with the
architectural part of an Exchange deployment. This chapter will tell you what server
hardware, server software you need, how to size your databases correctly, what about
security features, and so on.
Chapter 2, Installing Exchange Server, will walk you through the basic concepts and
how-to of an Exchange Server installation. Starting with the Active Directory
prerequisites, you will learn how to install your first Exchange 2013 server by using
GUI and PowerShell.
Chapter 3, Configuring the Client Access Server Role, will dive deeper into the
Exchange CAS server role. You will learn what it does, what has changed compared
to previous Exchange versions, how to configure SSL certificates, and more.
Chapter 4, Configuring and Managing the Mailbox Server Role, explains all there is
to know about configuring and managing your mailbox and public folder databases.
Chapter 5, Configuring External Access, will guide you through configuring mobile
access to your mailbox from any device. It will explain the best practices, as well as
how to secure these external connections, and more.
For More Information: www.packtpub.com/microsoft-exchange-2013-cookbook/book
Chapter 6, Implementing and Managing High Availability, covers features like
Database Availability Groups and Load Balancing, helping you with real-life
scenarios on how to deploy an almost 100 percent redundant
Exchange environment.
Chapter 7, Transitioning to Exchange Server 2013, is specifically written towards
the Exchange admins or consultants who are responsible for doing Exchange server
migrations; mainly transitioning from Exchange 2010 to Exchange 2013.
Chapter 8, Configuring Security and Compliance Features, covers the updated
security concepts of Exchange 2013, how to secure your mail flow and secure your
mail data content.
Chapter 9, Performing Backup, Restore, and Disaster Recovery, is the chapter which
talks about specifics there are to know about how to manage Exchange Server backups,
which are reliable for doing restores, when needed. We also walk you through some
steps that will help you in restoring or rebuilding your Exchange Server in case
of a disaster.
Chapter 10, Implementing Security, introduces you to the updates of Role Based
Access Control (RBAC), how to configure mailbox access rights and permissions,
ending with some technical details on SSL certificate requirements in an Exchange
Server environment.
Appendix, Getting to know Exchange Server 2013, is a theoretical guide in learning
what has changed with the 2013 version of Exchange server. It describes the newest
features, which features are removed, and what has changed from an architecture
perspective. Although it's now an appendix, if you are totally new to Exchange 2013,
we actually recommend starting here to get you up to speed.
For More Information: www.packtpub.com/microsoft-exchange-2013-cookbook/book
6Implementing and
Managing High Availability
In this chapter, you will learn how to create an Exchange environment that is more resilient to failure by making different aspects of your deployment highly available. We will cover the following recipes:
Designing for high availability
Creating a highly available Client Access Server infrastructure
Load balancing at layer 4 using DNS round robin
Load balancing at layer 4 using a single IP address and a load balancer
Load balancing at layer 4 using multiple IP addresses and a load balancer
Load balancing at layer 7 using a load balancer
Creating a highly available mailbox server infrastructure
Confi guring a DAG
Managing a DAG
Confi guring transport high availability
Confi guring redundant inbound mail delivery
Performing maintenance in a highly available environment
For More Information: www.packtpub.com/microsoft-exchange-2013-cookbook/book
Implementing and Managing High Availability
186
IntroductionIn its early days, e-mail was, next to the already existing and more traditional methods, no more than another way of communicating. At that time, people used the phone, written letters and fax as their main way of communication. Even if you wanted to switch to primarily using e-mail, you would not have been able to. Not everyone that was connected to the Internet—if at all, had an e-mail address or used one.
The popularity of the personal computer at home defi nitely contributed to the fast-growing adoption of e-mail. Many probably realized that e-mail is easy to use, usually delivered promptly and cheap when compared to other communication channels, especially for a message that is traveling half way around the globe.
Over the years, e-mail has grown from yet another way of communicating with people to probably the most important way of non-direct communication.
In our modern world, one could state that—at least for some, e-mail has become a commodity like electricity or water. Many companies rely on e-mail to run their business. Not being able to send or receive e-mail potentially makes them lose money which in turn feeds the company's need for a resilient, highly available messaging environment.
Designing for high availabilityPrior to taking on the design task, it's highly recommended that you go talk to the business to understand where the need for high availability comes from and what exactly their need is. There's nothing easier than to overestimate the actual needs, increasing the overall complexity and thus the costs related to setting up and maintaining the solution.
How to do it...Before heading off and diving into the technical details, it's important that you know what you are actually designing for. There's more than only Exchange that comes into play in a resilient and highly available messaging solution. Consider the effect a single non-Exchange component might have on your end user's experience. For instance, what good is your Exchange infrastructure, only to fi nd out that none of your messages were delivered in a timely fashion because your Internet connection went down for a few hours?
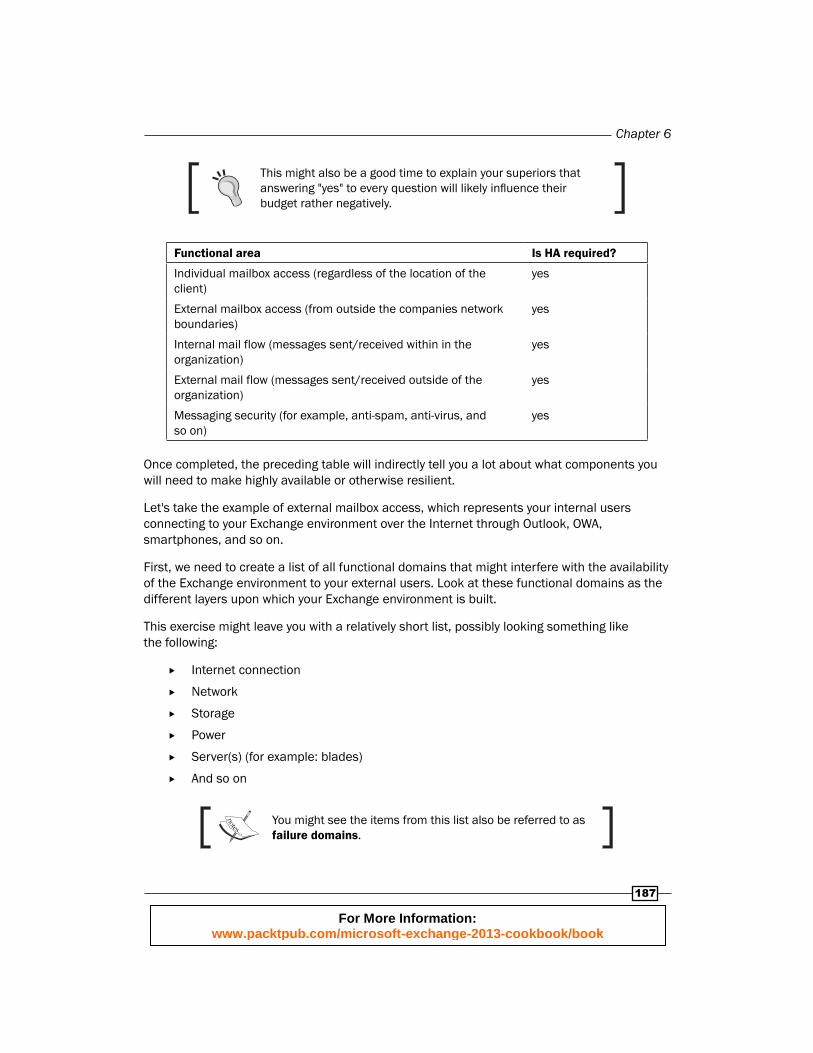
In order to determine what aspects of your environment you need to take into account, you can start with asking yourself (and the business!) some simple questions. Use the following table as a guideline to determine what parts of your messaging environment are required to be highly available. Do add functional areas that are specifi c to your organization to the table. For example, if your company is storing voice mails in Exchange, it might be a functional requirement to make access to these voice mails highly available.
For More Information: www.packtpub.com/microsoft-exchange-2013-cookbook/book
Chapter 6
187
This might also be a good time to explain your superiors that answering "yes" to every question will likely infl uence their budget rather negatively.
Functional area Is HA required?
Individual mailbox access (regardless of the location of the client)
yes
External mailbox access (from outside the companies network boundaries)
yes
Internal mail flow (messages sent/received within in the organization)
yes
External mail flow (messages sent/received outside of the organization)
yes
Messaging security (for example, anti-spam, anti-virus, and so on)
yes
Once completed, the preceding table will indirectly tell you a lot about what components you will need to make highly available or otherwise resilient.
Let's take the example of external mailbox access, which represents your internal users connecting to your Exchange environment over the Internet through Outlook, OWA, smartphones, and so on.
First, we need to create a list of all functional domains that might interfere with the availability of the Exchange environment to your external users. Look at these functional domains as the different layers upon which your Exchange environment is built.
This exercise might leave you with a relatively short list, possibly looking something like the following:
Internet connection
Network
Storage
Power
Server(s) (for example: blades)
And so on
You might see the items from this list also be referred to as failure domains.
For More Information: www.packtpub.com/microsoft-exchange-2013-cookbook/book
Implementing and Managing High Availability
188
Once you have created this list, you will need to identify what potential risks are involved for each of these failure domains. Then, you need to determine what you can do about each of the identifi ed risks.
Each risk that you identify must either be mitigated or simply accepted, meaning that you will either try to resolve or work around the risk or that you know about the risk but that you deliberately choose to not do anything about it. What action you decide on will strongly depend on a number of things, including the availability rate you agreed upon with the business and the available budget. Discussing why (or why not) you should do something about a risk would carry us way too far from the purpose of this chapter and will therefore not be discussed. However, in the light of your own deployment, it is important that you take a look at each risk and see how it can potentially impact the agreed service level. When a risk is deemed too high to ignore, there are basically two options: either you do something about it in your design, which usually leads to an increased cost or you go back to the business and re-negotiate the service level.
Let's move on and take a closer look at one of the earlier defi ned failure domains and take the Internet connection as example. Let's assume you have only a single DSL Internet connection. The fact that you only have a single connection represents a risk of you losing external access to your entire infrastructure (including Exchange) when that connection becomes unavailable. As possible solution for this risk would be to put in an additional Internet connection alternatively, you could try negotiating better service levels with your ISP, if at all possible.
After you go through each of the potential risks and defi ned what actions you will (or will not) take, go through them again. You will notice that some of the mitigating actions that you wrote down might bring in new risks that require your attention.
For example: you defi ned that adding a second Internet connection might solve the risk of losing external access. But what if there's only a single operator in the area? What if that operator experiences an outage? What if you choose to use to separate carriers, only to fi nd out that both operators share the same physical cable for the so-called "last mile" to your company infrastructure?
As you can see, solving one problem might raise others. How far you go in your quest for a solution, again, depends on the agreements you have made (if at all) with the business.
In order to evaluate whether or not you should do something about a risk depends of a few criteria including the impact on the business (or service levels), the probability that the risk would occur and the cost of mitigating the risk.
For example, a risk that has high impact but is unlikely to happen is more easily decided to be accept able than a risk that has a lower impact but a higher chance of happening.
For More Information: www.packtpub.com/microsoft-exchange-2013-cookbook/book
Chapter 6
189
If you decide to mitigate a risk, a part of the strategy might include making the component that is responsible for the risk more resilient and more highly available. That way, the failure of a single device or component doesn't necessarily cause a service outage leading to an infringement of your service levels with the business.
If we go back to our example of the single Internet connection, the mitigation strategy will likely include the addition of a second fi rewall, router, and switch next to adding in a second Internet connection.
In the end, how to create high availability for a given component depends on the product or device that you are working with. Exchange Server 2013 defi nitely made some vast improvements in that area, which makes that creating a resilient, highly available messaging solution with Exchange has never been so easy.
Creating a highly available Client Access Server infrastructure
In order to make your CAS infrastructure highly-available, you need to load balance traffi c across the different servers in the CAS pool. That pool of Client Access Servers by itself doesn't necessarily create high availability. There are other components and mechanisms that play an equal important part in the process. For example, the load balancing solution should be able to determine whether or not a Client Access Server is still a viable endpoint. If not, you risk ending up sending traffi c to a non-functional server, therefore impacting on an end user's experience.
Unlike Exchange 2010, Exchange 2013 offers you the ability to load balance traffi c between two or more Client Access Servers over layer 4 (L4). This means that load balancing is now effectively performed at the transport layer (remember the OSI model?!), opening the door for solutions like DNS round robin.
Load balancers operating at layer 4 are content-agnostic because they have no clue of what data or type of traffi c is passing through. Basically, it boils down to this: traffi c is load balanced based on its destination IP address. No more, no less.
On the other hand, if you are load balancing at layer 7, the load balancer is operating at the application layer and has full access to the protocol stack and/or the data that is passing through it. This allows for more advanced load balancing scenarios where routing decisions can be taken based on the content fl owing through the load balancer.
When traffi c is unencrypted, most load balancers can operate natively at layer 7. However, because most Exchange traffi c is encrypted with SSL by default, the load balancer needs to decrypt the content fi rst in order to get access to it. Some vendors require you to buy additional licenses for this feature, also known as "SSL Decryption". Also, because SSL decryption requires additional resources on the load balancer it can drive up the cost as it might force you into buying a higher-end model.
For More Information: www.packtpub.com/microsoft-exchange-2013-cookbook/book
Implementing and Managing High Availability
190
The reason that Exchange 2013 no longer requires a layer 7 load balancer is because Microsoft removed the need to keep affi nity between the source (client) and the destination (server). Before, some workloads like Outlook Web App required that—once the connection was built—subsequent traffi c within that particular session was always exchanged between the client and the same backend server. To do this, the load balancer keeps a routing table where mappings between clients and servers are stored. However, in order to identify what session a packet belongs to, the load balancer needed to be able to access the content. Hence the need for layer 7 load balancing.
Even though layer 7 load balancing is no longer a requirement in Exchange 2013, it doesn't mean that you cannot use it anymore. In fact, as you will see later in this chapter, load balancing at layer 7 still offers some benefi ts over layer 4 load balancing.
There are several solutions that you can use to load balance Exchange 2013 Client Access Servers. Basically, we can make the following distinction:
DNS round robin
Load balancing at layer 4
Load balancing at layer 7
Windows Network Load Balancing (WNLB)
Strictly speaking, WNLB is a valid and supported solution for load balancing Exchange 2013. However, its use is not very recommended. Personally, I'm no big fan of WNLB either because of its limitations and the issues that might arise from a networking point-of-view. That, and the fact you cannot use WNLB when you're deploying a multi-role Exchange server are some of the reasons why we won't be discussing here how it works or how to set it up.
Instead, we will focus on the following four scenarios:
Load balancing at layer 4 using DNS Round Robin
Load balancing at layer 4 with a single IP address and using a load balancer
Load balancing at layer 4 with multiple IP addresses and using a load balancer
Load balancing at layer 7 using a load balancer
Load balancing at layer 4 using DNS round robin
DNS Round Robin is the easiest way of load balancing. Although it's not as powerful as the other solutions, it doesn't require setting up a load balancing device. Instead, it's leveraging features in DNS that have already been there for a while. In this recipe we will guide you through the different steps of setting up DNS round robin using Windows DNS.
For More Information: www.packtpub.com/microsoft-exchange-2013-cookbook/book

Chapter 6
191
Getting readyIn order to execute the following tasks, you need access to the Windows DNS Management console for your domain. In order for load balancing to work properly, you need to ensure that all Client Access Servers are confi gured with the same certifi cate.
How to do it...1. Open the DNS management console on one of your domain controllers.
2. Navigate to your internal DNS zone.
3. Right-click on the internal zone and select New Host (A or AAAA)....
4. Choose a name for the host. For example: outlook.yourdomain.com.
5. Enter the IP address of your fi rst Client Access Server and click on OK.
6. Repeat step 3 to step 5 for every Client Access Server in the site. This time, do use the same name as in step 4, but change the IP address to match the one of the additional Client Access Server(s).
For More Information: www.packtpub.com/microsoft-exchange-2013-cookbook/book
Implementing and Managing High Availability
192
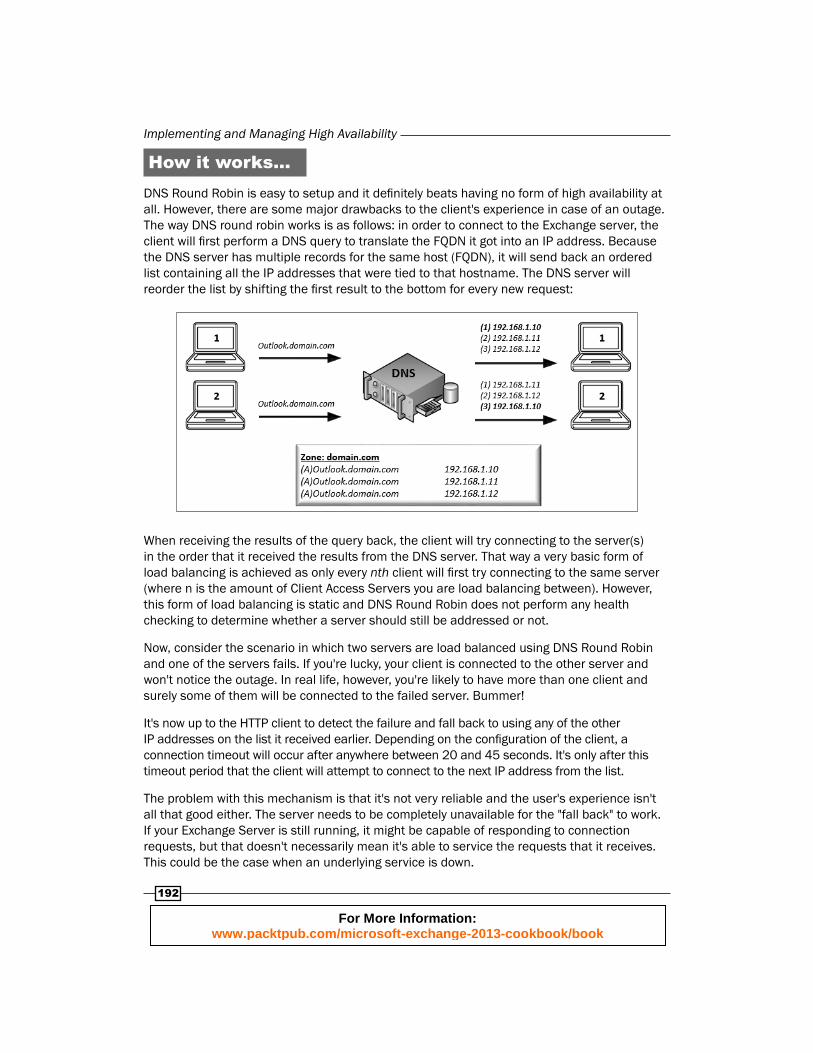
How it works...DNS Round Robin is easy to setup and it defi nitely beats having no form of high availability at all. However, there are some major drawbacks to the client's experience in case of an outage. The way DNS round robin works is as follows: in order to connect to the Exchange server, the client will fi rst perform a DNS query to translate the FQDN it got into an IP address. Because the DNS server has multiple records for the same host (FQDN), it will send back an ordered list containing all the IP addresses that were tied to that hostname. The DNS server will reorder the list by shifting the fi rst result to the bottom for every new request:
When receiving the results of the query back, the client will try connecting to the server(s) in the order that it received the results from the DNS server. That way a very basic form of load balancing is achieved as only every nth client will fi rst try connecting to the same server (where n is the amount of Client Access Servers you are load balancing between). However, this form of load balancing is static and DNS Round Robin does not perform any health checking to determine whether a server should still be addressed or not.
Now, consider the scenario in which two servers are load balanced using DNS Round Robin and one of the servers fails. If you're lucky, your client is connected to the other server and won't notice the outage. In real life, however, you're likely to have more than one client and surely some of them will be connected to the failed server. Bummer!
It's now up to the HTTP client to detect the failure and fall back to using any of the other IP addresses on the list it received earlier. Depending on the confi guration of the client, a connection timeout will occur after anywhere between 20 and 45 seconds. It's only after this timeout period that the client will attempt to connect to the next IP address from the list.
The problem with this mechanism is that it's not very reliable and the user's experience isn't all that good either. The server needs to be completely unavailable for the "fall back" to work. If your Exchange Server is still running, it might be capable of responding to connection requests, but that doesn't necessarily mean it's able to service the requests that it receives. This could be the case when an underlying service is down.
For More Information: www.packtpub.com/microsoft-exchange-2013-cookbook/book
Chapter 6
193
In such cases, no timeout will occur and your clients will experience a service outage. Whenever a complete server failure does occur, connected clients will still have to wait for about one minute before they will automatically try connecting to another server.
Lastly, an administrator will have to manually remove the corresponding host record from DNS for the duration of the outage to avoid new clients from still receiving the IP address of the failed server.
All in all, DNS might do the trick but isn't really suited for larger deployments. In fact, I wouldn't recommend using DNS Round Robin but for the smallest deployments or in deployments where there's no room (or budget) for other solutions. It's better to have some high availability than it is to have none, right?!
If you really want to carry on through with this solution, you might want to have a look at alternate methods that might help making DNS Round Robin a more viable solution. For instance, System Center Orchestrator could help you to automatically remove the records from DNS when a certain condition is detected. Alternatively, creating a script in PowerShell might prove useful in order to limit the amount of manual steps that you need to take. One thing I'd do for certain when using Round Robin, is lower the Time-To-Live (TTL) value for the Exchange-related DNS records to about 5 minutes. This ensures that the client-side cache for these DNS records expires after 5 minutes and as a result changes to DNS, such as removing a bad server entry from your DNS, get carried through to your clients more quickly.
Load balancing at layer 4 using a single IP address and a load balancer
Unlike DNS Round Robin, load balancing at layer 4 usually requires some sort of load balancing device to be confi gured. Although, technically speaking, Windows Network Load Balancing would also be a valid option and doesn't require a load balancing device.
In the following recipe we will describe the steps that are necessary to set up your load balancing device for layer 4 load balancing. Because there are many vendors and device models out there, we will describe the principles to this setup but we won't be covering product-specifi c confi guration steps.
Getting readyTo complete the following steps, you will need to use a virtual or hardware load balancer. The load balancer does not need to have any SSL offl oading capabilities. In order for load balancing to work properly, you need to ensure that all Client Access Servers are confi gured with the same certifi cate. To guarantee the user experience, the confi guration of the different web services should match as well.
For More Information: www.packtpub.com/microsoft-exchange-2013-cookbook/book
Implementing and Managing High Availability
194
How to do it...
Please note that depending on the model and make of the load balancer you are using, the terminology that is used might be different. Nonetheless, the same principles apply.
Execute the following tasks on your load balancer:
1. Create a new Virtual Service/Server (VS).
2. Confi gure the VS to perform the following:
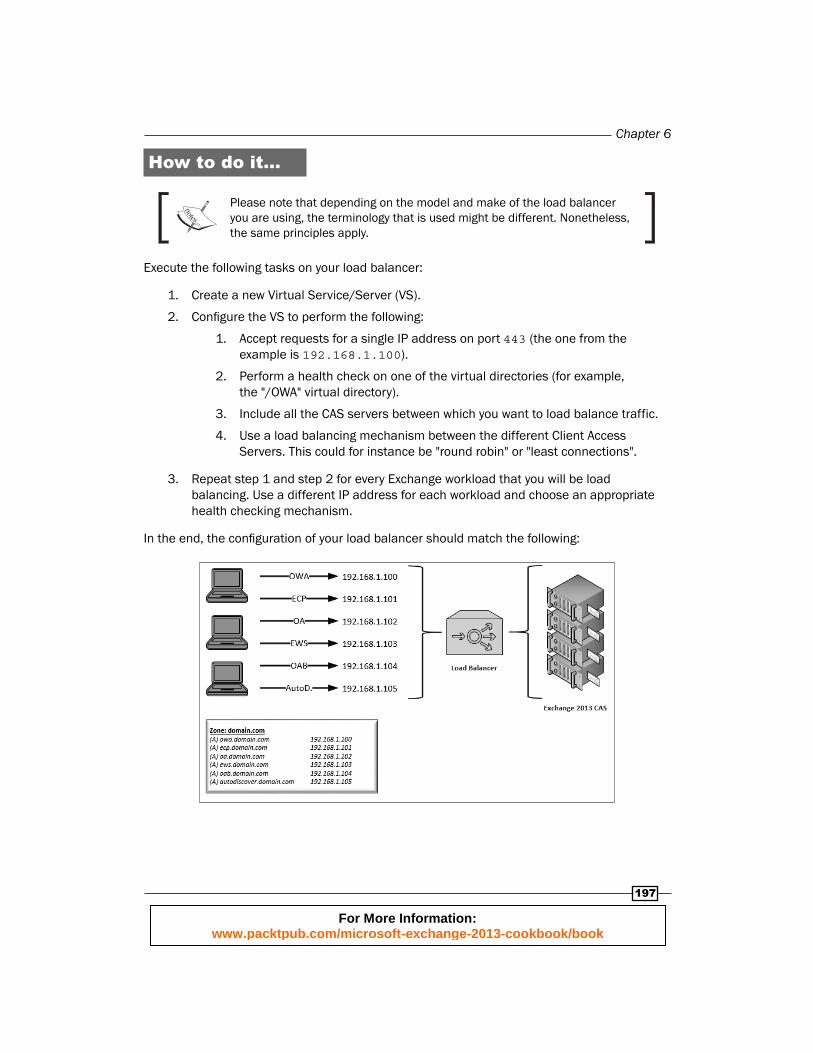
1. Accept requests for a single IP address on port 443 (the one from the example is 192.168.1.100).
2. Perform a health check on one of the virtual directories (for example, the "/OWA" virtual directory).
3. Include all the CAS servers between which you want to load balance traffic.
4. Use a load balancing mechanism between the different Client Access Servers. This could for instance be "round robin" or "least connections".
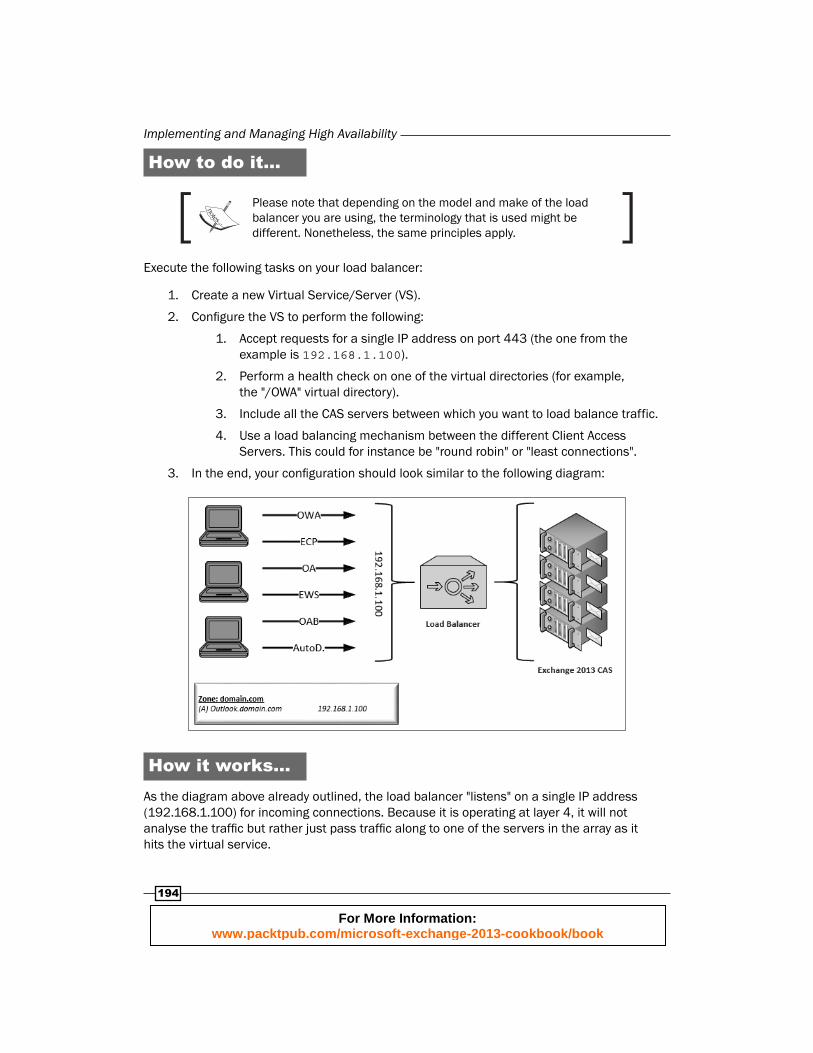
3. In the end, your confi guration should look similar to the following diagram:
How it works...As the diagram above already outlined, the load balancer "listens" on a single IP address (192.168.1.100) for incoming connections. Because it is operating at layer 4, it will not analyse the traffi c but rather just pass traffi c along to one of the servers in the array as it hits the virtual service.
For More Information: www.packtpub.com/microsoft-exchange-2013-cookbook/book
Chapter 6
195
How the load balancer will distribute the load between the servers in the array depends on the load balancing mechanism that you confi gured. Sometimes this mechanism is also referred to as scheduling mechanism. Typically, load balancers support a multitude of options, including "Round Robin", "Least Connections", "Random", "Weighted Round Robin", and so on. While most vendors mechanism will pretty much work the same, some differences might exist between devices from different vendors.
The following bullet list will provide some basic information on the aforementioned scheduling methods:
Round robin: The load balancer will cycle through the list of servers, one by one. Each new connection will be sent to the next server in the list.
Least connections: The load balancer will evaluate which server currently has the least amount of active connections and forward the new connection to that server.
Random: As it says a random server will be picked.
Weighted round robin: You can assign a weight to the servers in your array. The load balancer will cycle through the list of server, taking into account the weight that was assigned to a server. Servers with a higher weight will automatically be revised more and get more connections.
In most situations "round robin", which will distribute load between servers by cycling through them one at a time, will do the trick. Of course, this is only true when all servers in your array are identical. Sometimes, however, you might have to deal with servers that have different CPUs or even memory. In such cases, you can for example use "weighted round robin", which allows you to assign a different weight to your servers. When load balancing traffi c, across your servers, this weight is taken into account. Servers with a higher weight will automatically get more connections.
Aside from more advanced load balancing mechanisms, hardware (or virtual) load balancers also offer the ability to perform health checking against the servers in the array. The purpose of a health check is to verify whether a server in the array is still working as expected. Health checks can be performed in many ways, ranging from a simple ping, to verify if the server is still responding, to more advanced checks that execute scripts on the server. The problem with using ping to verify if a server is healthy or not is that it doesn't take into account if the service is actually behaving properly. An Exchange server might respond properly to a ping, but that doesn't necessarily mean OWA is working as it should.
If a health check fails or returns improper results, the server is deemed offl ine and will automatically be taken out of the array. That way, the load balancer ensures that no new traffi c is sent to the failed server.
Because the load balancer is operating at layer 4, you can only use a single health check to verify the health of your servers. This could cause all sorts of issues. Let's take a closer look by using an example.
For More Information: www.packtpub.com/microsoft-exchange-2013-cookbook/book
Implementing and Managing High Availability
196
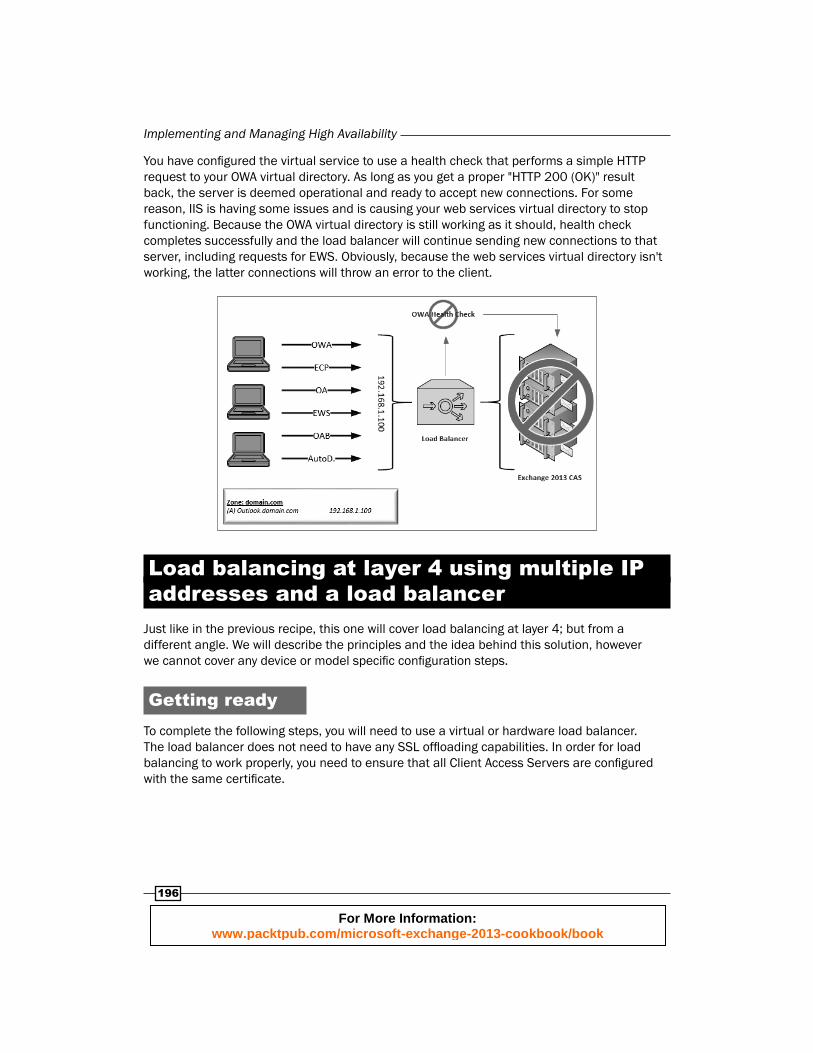
You have confi gured the virtual service to use a health check that performs a simple HTTP request to your OWA virtual directory. As long as you get a proper "HTTP 200 (OK)" result back, the server is deemed operational and ready to accept new connections. For some reason, IIS is having some issues and is causing your web services virtual directory to stop functioning. Because the OWA virtual directory is still working as it should, health check completes successfully and the load balancer will continue sending new connections to that server, including requests for EWS. Obviously, because the web services virtual directory isn't working, the latter connections will throw an error to the client.
Load balancing at layer 4 using multiple IP addresses and a load balancer
Just like in the previous recipe, this one will cover load balancing at layer 4; but from a different angle. We will describe the principles and the idea behind this solution, however we cannot cover any device or model specifi c confi guration steps.
Getting readyTo complete the following steps, you will need to use a virtual or hardware load balancer. The load balancer does not need to have any SSL offl oading capabilities. In order for load balancing to work properly, you need to ensure that all Client Access Servers are confi gured with the same certifi cate.
For More Information: www.packtpub.com/microsoft-exchange-2013-cookbook/book
Chapter 6
197
How to do it...
Please note that depending on the model and make of the load balancer you are using, the terminology that is used might be different. Nonetheless, the same principles apply.
Execute the following tasks on your load balancer:
1. Create a new Virtual Service/Server (VS).
2. Confi gure the VS to perform the following:
1. Accept requests for a single IP address on port 443 (the one from the example is 192.168.1.100).
2. Perform a health check on one of the virtual directories (for example, the "/OWA" virtual directory).
3. Include all the CAS servers between which you want to load balance traffic.
4. Use a load balancing mechanism between the different Client Access Servers. This could for instance be "round robin" or "least connections".
3. Repeat step 1 and step 2 for every Exchange workload that you will be load balancing. Use a different IP address for each workload and choose an appropriate health checking mechanism.
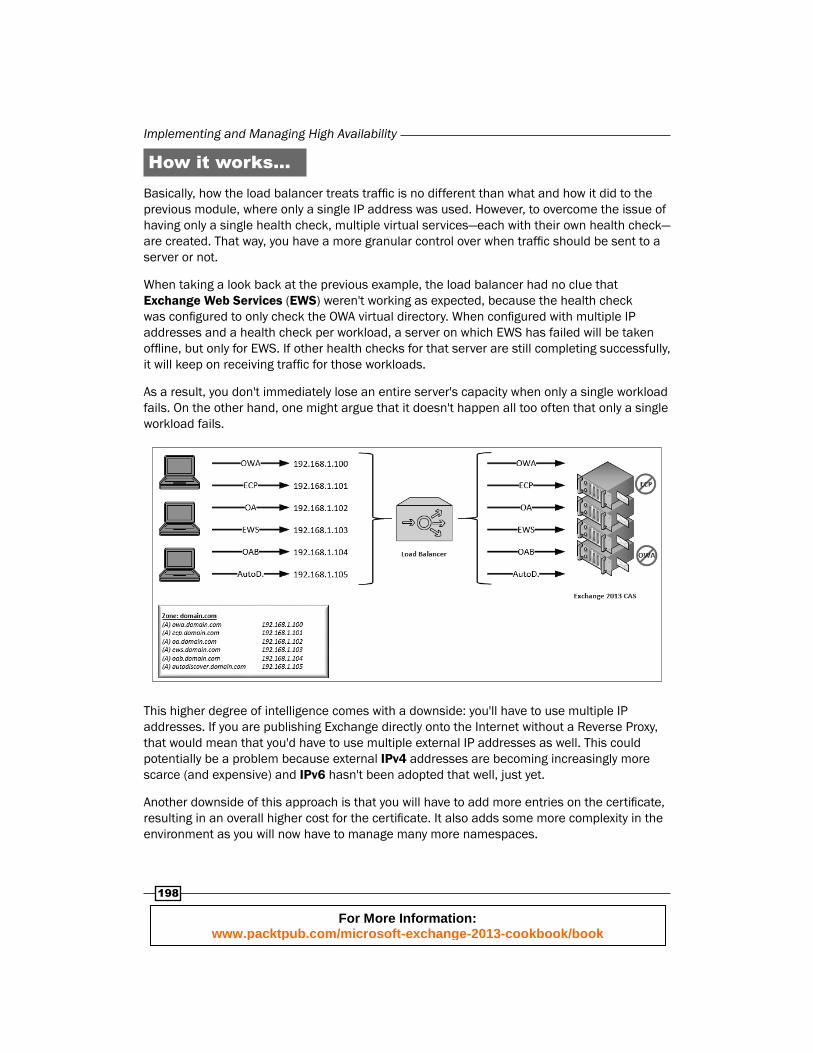
In the end, the confi guration of your load balancer should match the following:
For More Information: www.packtpub.com/microsoft-exchange-2013-cookbook/book
Implementing and Managing High Availability
198
How it works...Basically, how the load balancer treats traffi c is no different than what and how it did to the previous module, where only a single IP address was used. However, to overcome the issue of having only a single health check, multiple virtual services—each with their own health check—are created. That way, you have a more granular control over when traffi c should be sent to a server or not.
When taking a look back at the previous example, the load balancer had no clue that Exchange Web Services (EWS) weren't working as expected, because the health check was confi gured to only check the OWA virtual directory. When confi gured with multiple IP addresses and a health check per workload, a server on which EWS has failed will be taken offl ine, but only for EWS. If other health checks for that server are still completing successfully, it will keep on receiving traffi c for those workloads.
As a result, you don't immediately lose an entire server's capacity when only a single workload fails. On the other hand, one might argue that it doesn't happen all too often that only a single workload fails.
This higher degree of intelligence comes with a downside: you'll have to use multiple IP addresses. If you are publishing Exchange directly onto the Internet without a Reverse Proxy, that would mean that you'd have to use multiple external IP addresses as well. This could potentially be a problem because external IPv4 addresses are becoming increasingly more scarce (and expensive) and IPv6 hasn't been adopted that well, just yet.
Another downside of this approach is that you will have to add more entries on the certifi cate, resulting in an overall higher cost for the certifi cate. It also adds some more complexity in the environment as you will now have to manage many more namespaces.
For More Information: www.packtpub.com/microsoft-exchange-2013-cookbook/book
Chapter 6
199
Load balancing at layer 7 using a load balancer
Although from a high level perspective the confi guration steps to setup load balancing at layer 7 are very similar to setting up load balancing at layer 4, its differences—the idea behind the setup and the way it works—are important enough to dedicate a recipe to it.
In the following recipe we will talk about the specifi cs, and explain how you would be able to confi gure a load balancing device to handle traffi c at layer 7. Just like the previous recipes, we won't be able to provide you with model-specifi c guidance as there are way too many different vendors and models out there. Instead, the purpose is to cover the principles so that you'd be able to translate those into the proper confi guration for the device model you are using.
Getting readyTo complete the following steps, you will need to use a virtual or hardware load balancer. The load balancer should be able to decrypt and re-encrypt SSL traffi c. In order for load balancing to work properly, you need to ensure that all Client Access Servers are confi gured with the same certifi cate.
How to do it...Execute the following tasks on your load balancer:
1. Create a new Virtual Server/Service (VS)
2. Confi gure the VS to perform the following:
1. Accept requests from a single IP address on port 443 (the one from the example is 192.168.1.100).
2. Decrypt and re-encrypt SSL traffic (layer 7).
3. Configure one, preferably multiple health checks. To configure more health checks, your load balancer needs to support sub-virtual services or a mechanism also referred to as content-switching.
4. Include all the Client Access Servers between which you want to load balance traffic. Depending on how your load balancer treats the multiple health checks, you might need to define an array per subvirtual service or a global one.
5. Select a load balancing mechanism between the different Client Access Servers. This could for instance be "round robin" or "least connections".
For More Information: www.packtpub.com/microsoft-exchange-2013-cookbook/book
Implementing and Managing High Availability
200
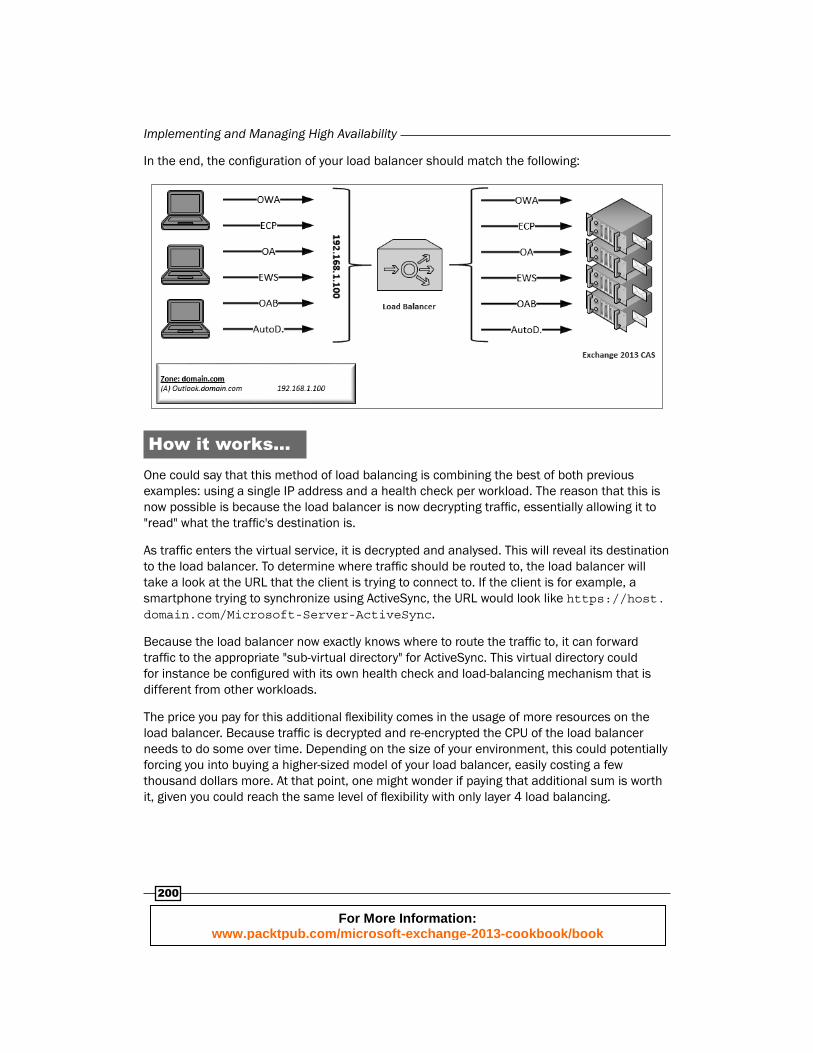
In the end, the confi guration of your load balancer should match the following:
How it works...One could say that this method of load balancing is combining the best of both previous examples: using a single IP address and a health check per workload. The reason that this is now possible is because the load balancer is now decrypting traffi c, essentially allowing it to "read" what the traffi c's destination is.
As traffi c enters the virtual service, it is decrypted and analysed. This will reveal its destination to the load balancer. To determine where traffi c should be routed to, the load balancer will take a look at the URL that the client is trying to connect to. If the client is for example, a smartphone trying to synchronize using ActiveSync, the URL would look like https://host.domain.com/Microsoft-Server-ActiveSync.
Because the load balancer now exactly knows where to route the traffi c to, it can forward traffi c to the appropriate "sub-virtual directory" for ActiveSync. This virtual directory could for instance be confi gured with its own health check and load-balancing mechanism that is different from other workloads.
The price you pay for this additional fl exibility comes in the usage of more resources on the load balancer. Because traffi c is decrypted and re-encrypted the CPU of the load balancer needs to do some over time. Depending on the size of your environment, this could potentially forcing you into buying a higher-sized model of your load balancer, easily costing a few thousand dollars more. At that point, one might wonder if paying that additional sum is worth it, given you could reach the same level of fl exibility with only layer 4 load balancing.
For More Information: www.packtpub.com/microsoft-exchange-2013-cookbook/book

Chapter 6
201
There's more...One constant in all of the previous load balancing scenarios, is the fact that your load-balancing mechanism (also referred to as scheduling method) can be pretty much anything you want. Because you are not using any affi nity, this means that each subsequent request from a client might potentially end up at another Client Access Server. Although this isn't much of a problem since the Client Access Server will merely 'proxy' traffi c to the appropriate mailbox server, it is still responsible for authenticating traffi c.
Does this mean that every (new) connection is re-authenticated? Yes. And also that isn't much of a problem. When a Client Access Server authenticates a user for the fi rst time, that user will receive an authentication cookie. To ensure that only appropriate Exchange Servers can read the content of that cookie, it will be encrypted using the certifi cate from the Client Access Server. When a user hits another CAS during the same session, the client will present this authentication cookie (instead of prompting the user for credentials). Assuming that you have confi gured the same certifi cate on all Client Access Servers, this 'new' CAS will be able to decrypt the cookie and authenticate the connection without any further actions.
As you might've guessed, it's extremely important that you confi gure the same SSL certifi cate on all Client Access Servers in the array if you want it to work properly.
Creating a highly available mailbox server infrastructure
In contrast to creating high availability for your Client Access Server infrastructure, doing it for your mailbox servers is quite different. Since Exchange's early days, you had to create a cluster (with shared storage) if you wanted Exchange to be somewhat highly available. At that time, the clustering components upon which Exchange relied were notorious for their diffi culty to set up, maintain, and troubleshoot.
Over time, Microsoft made signifi cant changes to the failover clustering component in Windows, improving the overall experience. Not only for the administrator, but also from an end user's perspective. Even today with Windows Server 2012, Microsoft keeps on improving dramatically.
Creating a cluster might ensure you servers are highly available, they usually don't care what the state of the data is. In the past, Exchange clusters relied heavily on the underlying storage to provide high availability. At the same time, it was that storage that created a single point of failure as only a single copy of the data would be used between multiple Exchange servers.
With the launch of Exchange 2007, Microsoft drastically changed how Exchange would be clustered and introduced a software-level replication mechanisms like CCR, SCR, and LCR that would be able to copy data between two Exchange servers, at nearly real-time.
For More Information: www.packtpub.com/microsoft-exchange-2013-cookbook/book
Implementing and Managing High Availability
202
Since then, Microsoft has been developing and improving Exchange along the same path. When Exchange 2010 was launched, the Database Availability Group (also referred to as DAG) was also born. The DAG was a huge leap forward how replication was performed and maintained improving the overall experience, fl exibility and resiliency of Exchange.
Today, in Exchange 2013, we can see that—although the principles of the DAG remain untouched—it has further evolved, building on the feedback Microsoft received on Exchange 2010 and their experience running a cloud-based service such as, Offi ce 365.
Confi guring a DAGThe following recipe will describe the process of setting up a DAG.
Getting readyIn order to complete the following steps, you need to launch the Exchange Management Shell or open the Exchange Admin Center. You will also need at least two servers running the mailbox server role.
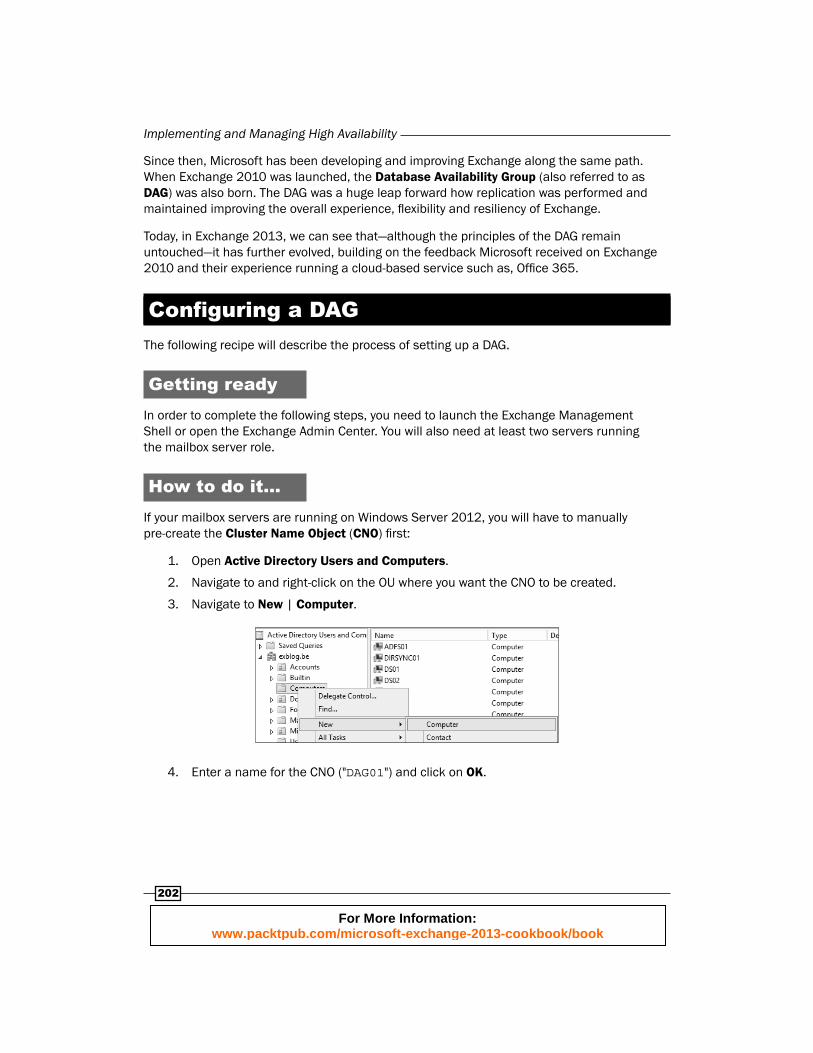
How to do it...If your mailbox servers are running on Windows Server 2012, you will have to manually pre-create the Cluster Name Object (CNO) fi rst:
1. Open Active Directory Users and Computers.
2. Navigate to and right-click on the OU where you want the CNO to be created.
3. Navigate to New | Computer.
4. Enter a name for the CNO ("DAG01") and click on OK.
For More Information: www.packtpub.com/microsoft-exchange-2013-cookbook/book

Chapter 6
203
5. Right-click on the new CNO and select Disable Account. Click on OK to confi rm.
Next, the Exchange Trusted Subsystem should get appropriate permissions on the CNO:
1. Open Active Directory Users and Computers and make sure you select Advanced Features under View fi rst.
2. Then, right-click on the CNO and select Properties.
3. Click on the Security tab and click on Add.
4. Type in Exchange Trusted Subsystem and click on Check Names. Click on OK to confi rm.
For More Information: www.packtpub.com/microsoft-exchange-2013-cookbook/book
Implementing and Managing High Availability
204
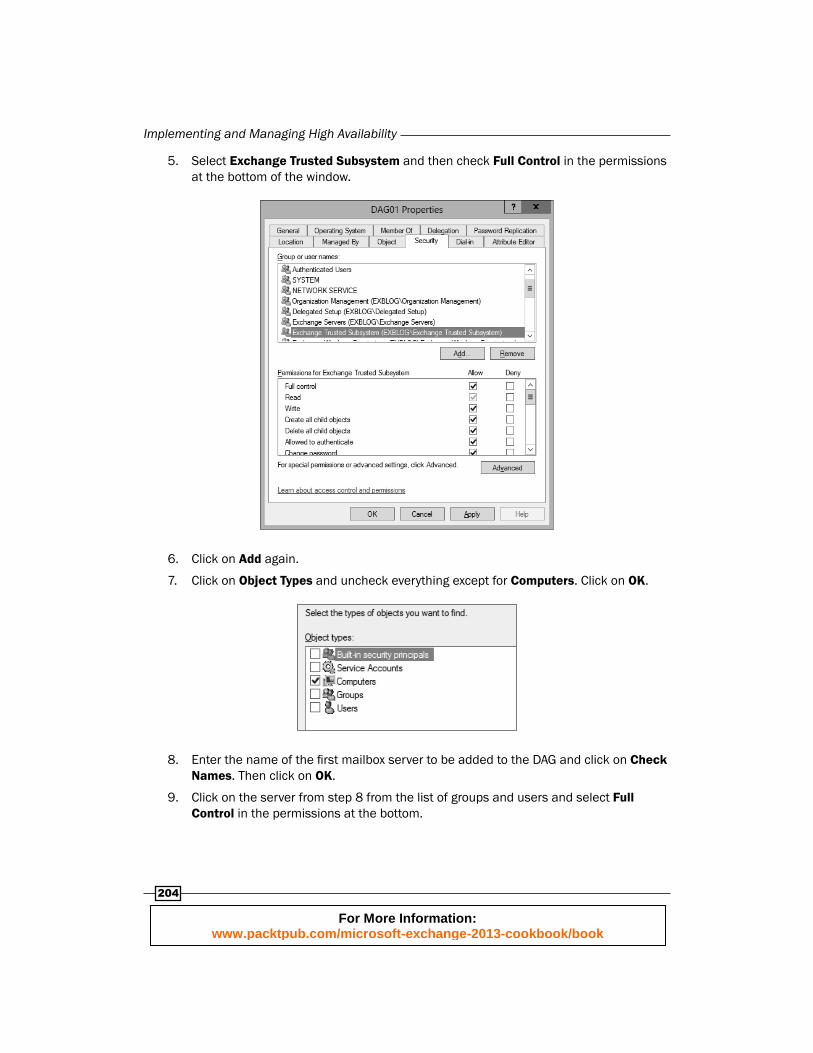
5. Select Exchange Trusted Subsystem and then check Full Control in the permissions at the bottom of the window.
6. Click on Add again.
7. Click on Object Types and uncheck everything except for Computers. Click on OK.
8. Enter the name of the fi rst mailbox server to be added to the DAG and click on Check Names. Then click on OK.
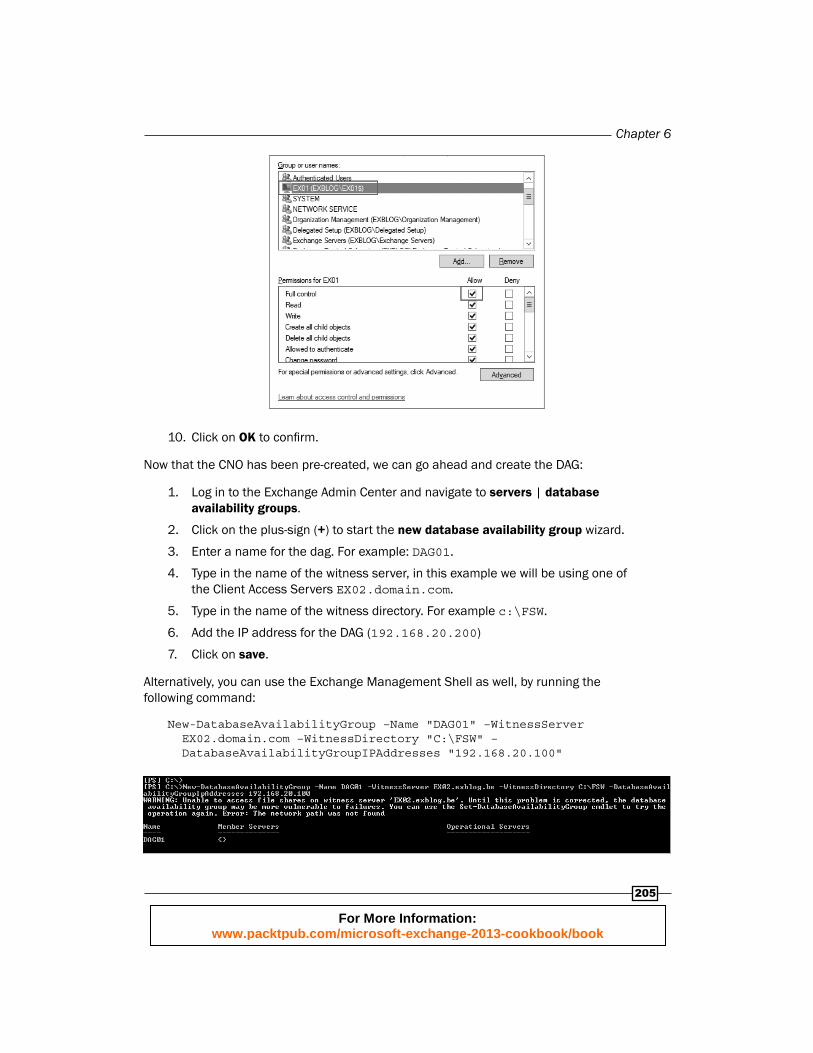
9. Click on the server from step 8 from the list of groups and users and select Full Control in the permissions at the bottom.
For More Information: www.packtpub.com/microsoft-exchange-2013-cookbook/book
Chapter 6
205
10. Click on OK to confi rm.
Now that the CNO has been pre-created, we can go ahead and create the DAG:
1. Log in to the Exchange Admin Center and navigate to servers | database availability groups.
2. Click on the plus-sign (+) to start the new database availability group wizard.
3. Enter a name for the dag. For example: DAG01.
4. Type in the name of the witness server, in this example we will be using one of the Client Access Servers EX02.domain.com.
5. Type in the name of the witness directory. For example c:\FSW.
6. Add the IP address for the DAG (192.168.20.200)
7. Click on save.
Alternatively, you can use the Exchange Management Shell as well, by running the following command:
New-DatabaseAvailabilityGroup –Name "DAG01" –WitnessServer EX02.domain.com –WitnessDirectory "C:\FSW" – DatabaseAvailabilityGroupIPAddresses "192.168.20.100"
For More Information: www.packtpub.com/microsoft-exchange-2013-cookbook/book
Implementing and Managing High Availability
206
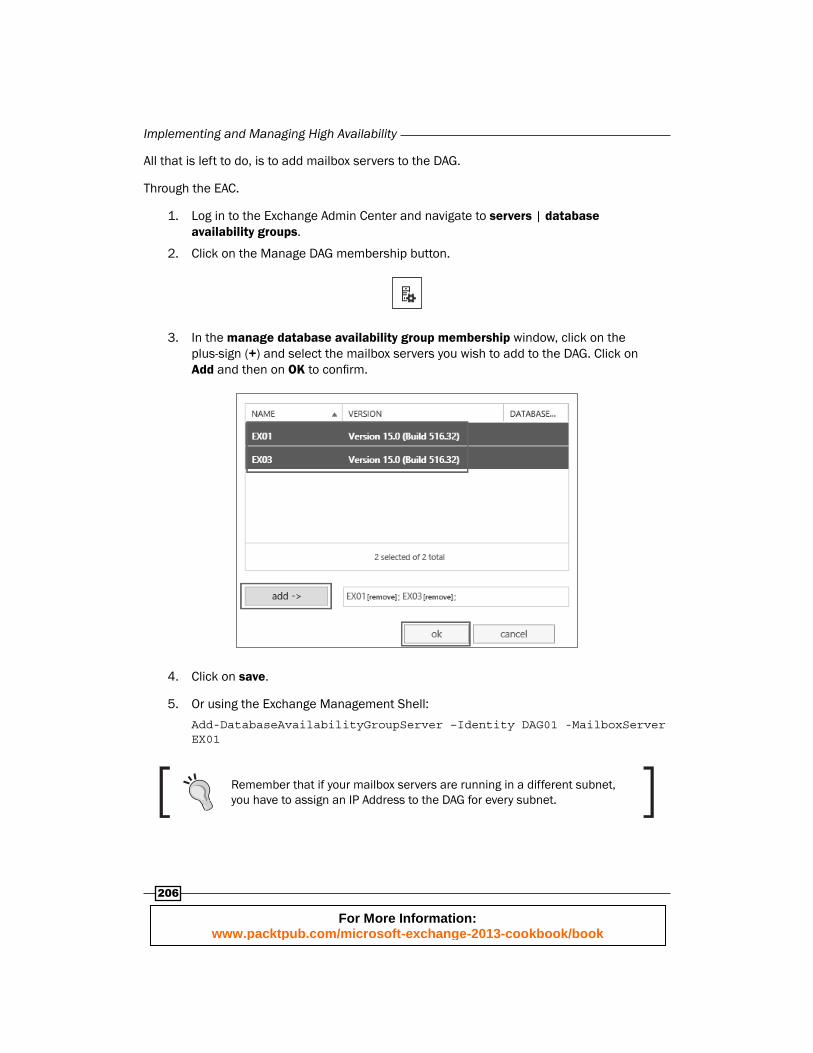
All that is left to do, is to add mailbox servers to the DAG.
Through the EAC.
1. Log in to the Exchange Admin Center and navigate to servers | database availability groups.
2. Click on the Manage DAG membership button.
3. In the manage database availability group membership window, click on the plus-sign (+) and select the mailbox servers you wish to add to the DAG. Click on Add and then on OK to confi rm.
4. Click on save.
5. Or using the Exchange Management Shell:
Add-DatabaseAvailabilityGroupServer –Identity DAG01 -MailboxServer EX01
Remember that if your mailbox servers are running in a different subnet, you have to assign an IP Address to the DAG for every subnet.
For More Information: www.packtpub.com/microsoft-exchange-2013-cookbook/book
Chapter 6
207
How it works...As briefl y explained in the introduction, a DAG uses a subset of Windows' failover clustering components. In fact, the DAG is a cluster that is using the "Node Majority and File Share Witness" quorum model. In general, a cluster requires more than half of the nodes to be up and running, also referred to as "having quorum".
Quorum is designed to prevent so-called "split-brain" situations. A split-brain is a situation in which two or more nodes in a cluster are bringing up the same resource online. A split-brain situation could potentially occur when your network becomes partitioned, for instance due to an outage, and knocks out communication between some or all nodes of your cluster.
If a cluster "loses quorum", meaning that more than half of the servers in the cluster become unavailable, all remaining nodes in the cluster will go offl ine to prevent split-brain. The result, however, is that the service that is hosted by the cluster becomes unavailable.
To make things more complicated, Windows Server 2012 introduced something that is called "dynamic quorum". Dynamic quorum, as the name suggests, will dynamically adjust the number of votes in the cluster after a node outage. Because the number of votes can change, so will the number of "votes" you need to have quorum. In the end, dynamic quorum should allow you to have a cluster running with a single node.
If you will, Exchange 2013 can take advantage of this feature. While the idea of increased availability might sound tempting, the purpose of a DAG shouldn't be to end up with a single server. Besides, if more than half of your servers are going down, you've probably got other things to worry about.
As described through the different tasks, the process of creating a DAG contains a few steps. First, when you run the New DAG wizard or execute the New-DatabaseAvailabilityGroup cmdlet a "placeholder" object is created in AD.
This object holds all the confi guration data of the DAG with exception of the cluster-specifi c confi guration settings which are stored in the cluster database. At this time, the cluster isn't created yet.
Along with the AD object, a Cluster Name Object or CNO is (or should manually be) created. The CNO is a (disabled) computer account which plays an important role in the internal operations of the cluster.
Lastly, the cluster is effectively created when the fi rst mailbox server is added to the DAG. This happens while issuing the Add-DatabaseAvailabilityGroupServer cmdlet, mailbox servers that do not have the necessary failover clustering components on the system prior to running the cmdlet, will get them automatically installed.
For More Information: www.packtpub.com/microsoft-exchange-2013-cookbook/book
Implementing and Managing High Availability
208
As mailbox servers are added to or removed from the DAG, all necessary confi guration changes are automatically made at the cluster level which makes that you should never have to use the built-in Failover Clustering management tools to manage a DAG.
Managing a DAGThe purpose of a DAG is to host one, preferably more, copies of a mailbox database. In the following examples, we will have a look at the different tasks you, as an Administrator, might have to perform.
Getting readyTo execute the following steps, you need access to the Exchange Admin Center or launch the Exchange Management Shell.
How to do it...We will cover various task related to DAG in this section:
Adding database copiesThrough the EAC:
1. Login to the EAC and navigate to servers | databases.
2. Select the database for which you want to add a new copy and select add database copy.
If you don't see the add database copy link, click on the three dots (...) to show more options.
3. In the add mailbox database copy window, select the mailbox server on which you want to create a new copy.
4. Set the Activation preference number to 2.
5. Click on save.
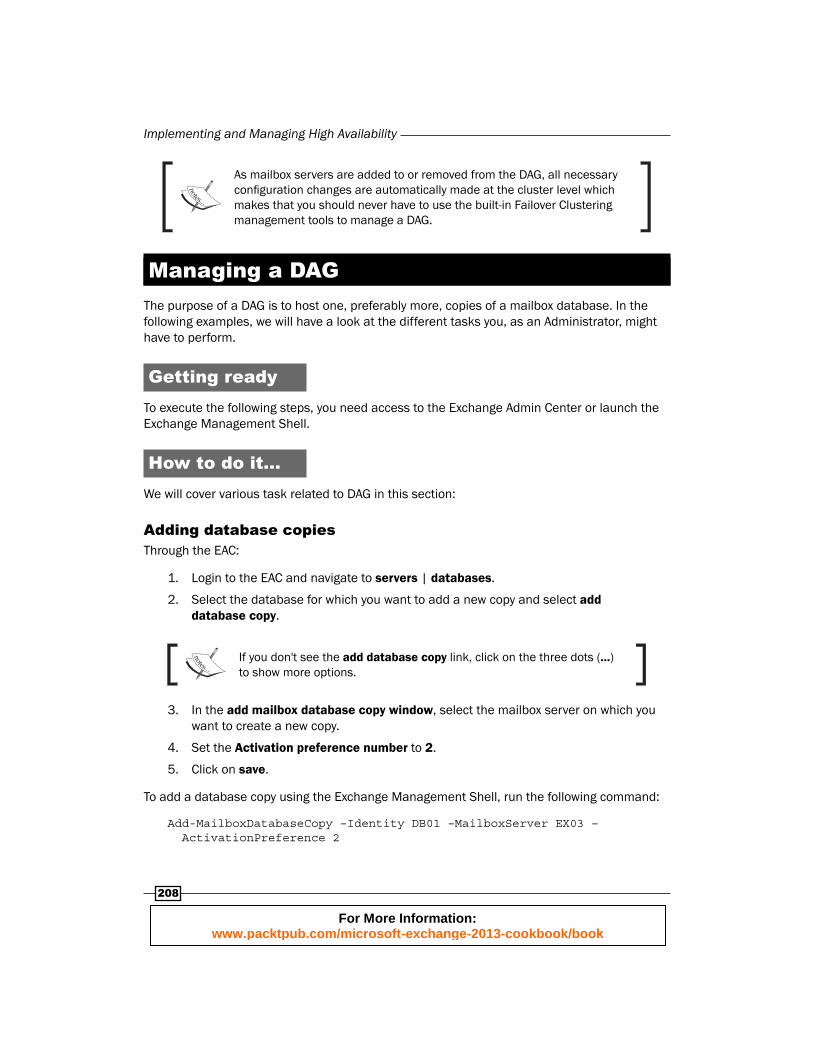
To add a database copy using the Exchange Management Shell, run the following command:
Add-MailboxDatabaseCopy –Identity DB01 –MailboxServer EX03 – ActivationPreference 2
For More Information: www.packtpub.com/microsoft-exchange-2013-cookbook/book
Chapter 6
209
Moving database pathsAs long as databases are replicated within the DAG, you cannot move the database fi les to another path. First, you need to remove existing database copies. However, we will only delete the "logical" element from Exchange and not the physical fi les and folders on the server. The fi les and folders on the different servers should be copied manually into their new location in order to avoid complete reseeding of the database.
In this example, we will remove the database copy we created earlier:
1. Login to the EAC and navigate to servers | databases.
2. Locate the database copy that you want to remove and select it.
3. From the right side of the EAC, click on Remove.
4. Verify this is the database copy you want to remove and click on yes to confi rm.
5. Click on OK when the warning shows.
To remove a database copy from the Exchange Management Shell, run the following command:
Remove-MailboxDatabaseCopy EX03\DB01 –Confirm:$false
Although you could go ahead and manually delete the fi les, this would require you to re-seed the entire database afterwards. It might be a better option to keep the fi les and move them into the new location manually.
Once all but the active copies have been removed, the database can be moved into a new location. During the move, the database will be dismounted. You cannot use the EAC to initiate a database move, so you will have to run the following command:
Move-DatabasePath DB01 –EdbFilePath D:\Newlocation\DB01.edb – LogFilePath D:\Newlocation\Logs –Confirm:$false
If you haven't dismounted the database prior to executing the command, you will be asked to temporarily dismount it. Confi rm this by pressing Y.
Once the fi les have been moved, use the procedure outlined before to re-add the database copies to other servers in the DAG.
Checking replication statusAs part of the maintenance tasks involved with running a DAG, you need to keep an eye on the health of your database copies. One way of doing that is to verify that all copies are replicated correctly and are in a healthy state.
Through the EAC:
1. Login to the EAC and navigate to servers | databases.
2. Select the database for which you want to check the status.
For More Information: www.packtpub.com/microsoft-exchange-2013-cookbook/book
Implementing and Managing High Availability
210
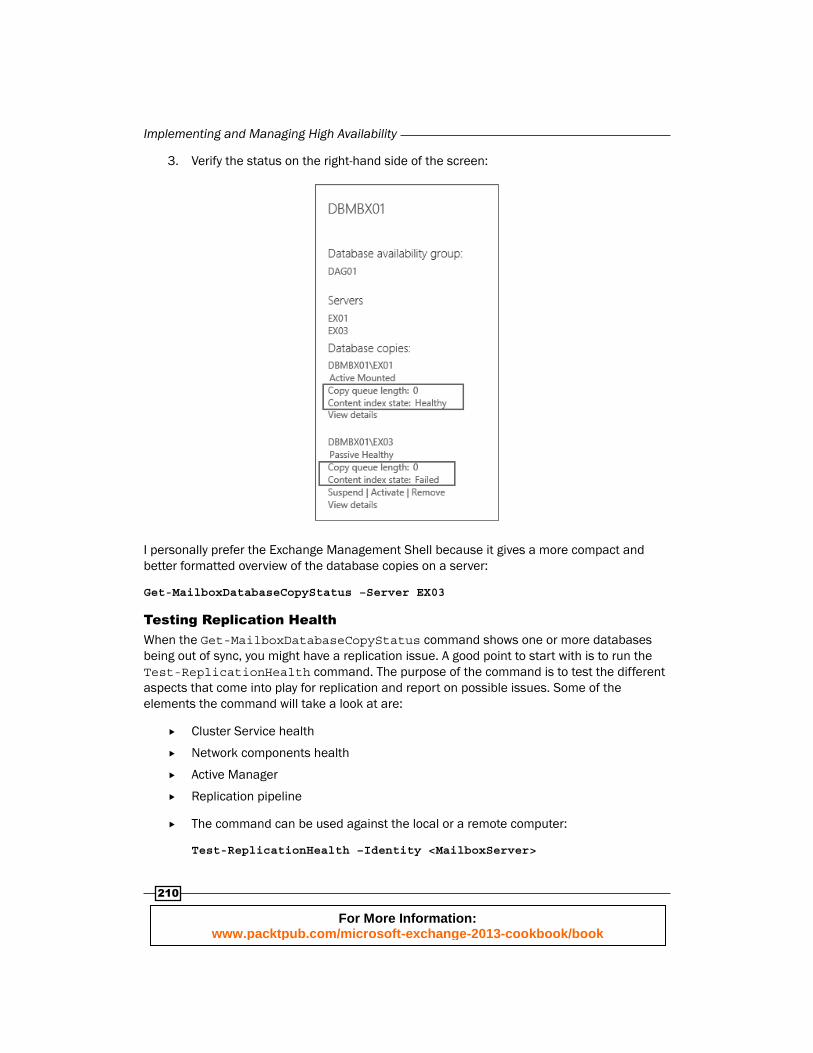
3. Verify the status on the right-hand side of the screen:
I personally prefer the Exchange Management Shell because it gives a more compact and better formatted overview of the database copies on a server:
Get-MailboxDatabaseCopyStatus –Server EX03
Testing Replication HealthWhen the Get-MailboxDatabaseCopyStatus command shows one or more databases being out of sync, you might have a replication issue. A good point to start with is to run the Test-ReplicationHealth command . The purpose of the command is to test the different aspects that come into play for replication and report on possible issues. Some of the elements the command will take a look at are:
Cluster Service health
Network components health
Active Manager
Replication pipeline
The command can be used against the local or a remote computer:
Test-ReplicationHealth –Identity <MailboxServer>
For More Information: www.packtpub.com/microsoft-exchange-2013-cookbook/book
Chapter 6
211
How it works...The principle of a DAG is simple: multiple servers in a failover cluster host one (or more) copies of a mailbox database. These copies can be activated when the current (active) copy fails, becomes corrupted or is unavailable because the server on which it is hosted failed.
To keep copies between different servers in sync, log fi les are copied from the server hosting the active mailbox database to the server(s) with a passive copy of that database. When the log fi le reaches a server hosting a passive copy, it's replayed into that passive database copy to bring it up-to-date. This all happens automatically when you confi gure a new database copy.
After the initial setup of a mailbox database copy, referred to as the seeding of a new database, transactions logs are copied in their entirety to catch up with the active copy. Once the new (passive) mailbox database copy is up-to-speed however, the replication process switches to "block mode" which means that instead of the full transaction logs, blocks of data that have been written to the transaction logs on the active database are immediately copied to the passive copy. That way, the time difference between the active database and passive copies is greatly minimized because the server hosting the passive copy doesn't have to wait for a new transaction log fi le to be rolled on the server with the active database. Sometimes, you might see that replication from the active copy to the passive copy switches back to fi le-level copying. This can happen when the replication between the active copy and passive copy encountered some problems or when the passive copy couldn't keep up.
When an error occurs and the current active copy becomes unusable or unavailable, active manager will search for a suitable passive copy on one of the servers in the DAG which it can activate. The process to select a passive copy is called best copy selection. In short, active manager will use a number of criteria to determine the state of a passive copy. The passive copy with the best state, which is the copy that is equal or as equal as possible to the active copy, will be activated. If multiple valid passive copies are found, the copy with the lowest preference number (and thus the highest preference) is mounted.
Once the failed server or database is brought back online, it will function as a passive copy and bring itself up-to-date again. Once that has completed successfully, Active Manager will then be able to use that copy to failover to in case something happens with the current active copy.
Because it is crucial that passive copies are in sync with the active copy, it's important to monitor the health of the copies as described earlier. If the output of the Get-MailboxDatabaseCopyStatus cmdlet shows a CopyQueueLength or ReplayQueueLength that is too high, your passive copy might be unusable and active manager might not be able to (automatically) failover to it. Ideally, both numbers should be 0. An elevated value for the ReplayQueueLength command will affect the amount of time it takes to mount (activate) the passive copy. The CopyQueueLength command on the other hand indicates the number of transaction logs that still need to be copied from the active copy. If that number is too high, active manager might not be able to automatically mount the passive copy, and although Exchange has all sorts of mechanisms to prevent it, data loss might still occur.
For More Information: www.packtpub.com/microsoft-exchange-2013-cookbook/book
Implementing and Managing High Availability
212
There's more...There are some very interesting (and very good) reporting scripts out in the wild that might help you to better follow-up on the health of your database copies.
There is one script in particular, written by Exchange Server MVP Paul Cunningham, that I like a lot. Have a look at it on the following page:
http://exchangeserverpro.com/get-daghealth-ps1-database-availability-group-health-check-script
Confi guring transport high availabilityWhile shadow Redundancy is the mechanism used to provide high availability for messages in transit and the DAG is the primary mechanism for mailbox high availability, safety net (formerly known as the transport dumpster) is designed to keep a copy of messages that were processed successfully by a server for a confi gurable amount of time.
First released in Exchange 2007, the "transport dumpster" underwent some signifi cant changes in Exchange 2010. These changes allowed the transport dumpster to help protecting database copies in a DAG by keeping messages that weren't replayed into passive database copies yet. Although its purpose hasn't changed much in Exchange 2013 "safety net", has been improved greatly yet again.
How to do it...Actually, there isn't much to confi gure. By default both shadow redundancy and safety net are enabled. The process of resubmitting messages from safety net to a mailbox database is also fully automatic, requiring no intervention of an administrator. Isn't that great?!
On the other hand, there are some confi gurable settings for safety net that allow you to control the number of days messages are kept in safety net. This could be useful when you are working with lagged mailbox database copies.
Confi guring safety net parametersTo change the amount of days that messages should be kept by safety net to 4 days, run the following command from the Exchange Management Shell:
Set-TransportConfig –SafetyNetHoldTime 4.00:00:00
For More Information: www.packtpub.com/microsoft-exchange-2013-cookbook/book
Chapter 6
213
How it works...
Shadow RedundancyAfter a message enters the organization and is forwarded by the frontend transport service to one of the mailbox servers, Exchange will automatically create a copy of that message on another mailbox server in the organization. This process is referred to as Shadow Redundancy and should avoid messages from getting lost when a transport services (or the server hosting the transport service) goes down for whatever reason.
When this shadow copy of a messages is created, Exchange will automatically take into account the organization's topology and tries to create the copy so that the highest level of availability is achieved.
For example, when a DAG spans multiple sites, Exchange will try creating the shadow copy on a mailbox server located in one of the other sites. That way, not only redundancy for the message is achieved, but also what is called "geo-redundancy": if one data center fails, the other still has a copy of the messages. The process itself contains many more steps than what I outlined. However, you should have a fi rm idea of what the intent of Shadow Redundancy is by now.
If you need more details on how the shadow copy is exactly created (and what the logic behind it is), have a read through the following article: http://technet.microsoft.com/en-us/library/dd351027(v=exchg.150).aspx.
Safety netOne could say that safety net kicks in where shadow redundancy has left of. Once messages are processed successfully, they are stored in a safety net; creating a "bucket" of messages that have been sent/received over a certain amount of days. By default, safety net will keep messages for two days. But as we explained earlier, the amount of days is confi gurable and becomes important when you are working with lagged mailbox database copies.
Although its intent is not for an administrator to manually resubmit messages, safety net is there to resubmit messages to a mailbox database whenever the latter requests it. In fact, there are two scenarios in, which safety net might be queried for messages:
After the (manual) failover of a mailbox database
When a lagged mailbox database copy is activated (brought up-to-date)
For More Information: www.packtpub.com/microsoft-exchange-2013-cookbook/book
Implementing and Managing High Availability
214
In the fi rst scenario, sometimes it happens that the passive copy that gets activated wasn't fully up-to-date. In an attempt to bring that database to the same level as the former active database, active manager—a component of the mailbox replication service, which manages DAGs and mailbox databases. It will also try different things amongst which is requesting missing data from the (former) active copy. However, in case that the former active copy is unrecoverable or otherwise unavailable, active manager will request the resubmission of the missing messages from safety net as the latter will contain all messages that were received over the past x-amount of time.
The same applies in the second scenario where a lagged mailbox database copy is activated. Normally, when a lagged mailbox database copy is activated, the replicated log fi les are replayed against the database to bring it up-to-date. Sometimes, you might not be able to replay these transactions logs because they are missing, have become corrupt or simply because you choose to. In that case, during the activation of the database all missing messages are requested from safety net. Of course, this requires that safety net is confi gured to keep messages for the same or longer period that the lag time of the lagged mailbox database copy. Keep in mind that this could mean that you'd have to keep messages in safety net for 14 days or more because that's the maximum confi gurable lag time of a database copy. Needless to say, you should plan where to store safety net accordingly as it might end up using quite a large amount of disk space.
Confi guring redundant inbound mail deliveryExchange is able to receive messages from the Internet with only very little confi guration. However, none of the confi guration steps you take would matter without "letting others know" where your mail server can be reached at. You could compare it to making the address of your post-offi ce publicly available so that others know where to send messages addressed to you to.
Getting readyIn order to confi gure MX records for your domain(s), you will need access to the confi guration tool of your DNS provider. The tool that you will be using will depend on the provider.
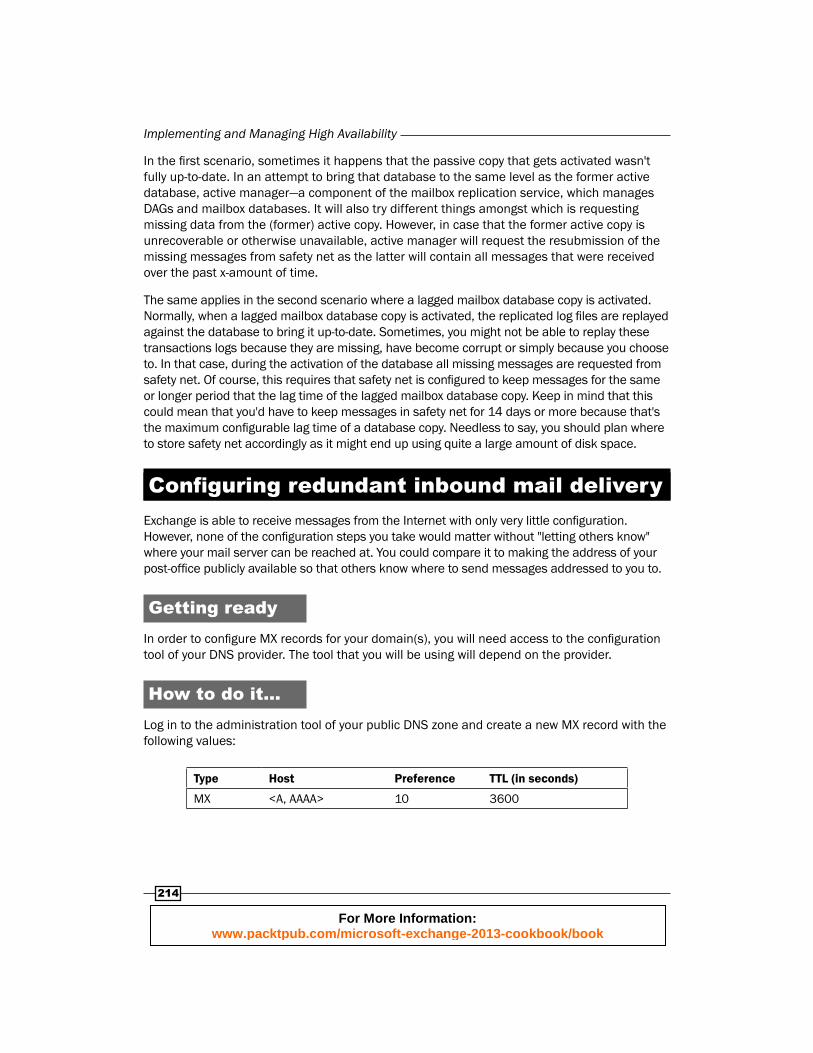
How to do it...Log in to the administration tool of your public DNS zone and create a new MX record with the following values:
Type Host Preference TTL (in seconds)
MX <A, AAAA> 10 3600
For More Information: www.packtpub.com/microsoft-exchange-2013-cookbook/book
Chapter 6
215
The hostname value should either be an A-record in case you have a public IPv4 address or an AAAA-record in case it's IPv6 pointing to the external IP address of your Exchange infrastructure. The entry point into your organization could be a cloud-based message hygiene solution like Exchange Online Protection, an on-premise message hygiene solution like the Exchange 2010 Edge Transport server or even a direct connection to one of your Client Access Servers.
The value of the hostname of your MX record should not point to a CNAME record. The RFC documentation (2181 (SMTP)) around this is pretty clear:
The domain name used as the value of a NS resource record, or part of the value of a MX resource record must not be an alias. Not only is the specifi cation clear on this point, but using an alias in either of these positions neither works as well as might be hoped, nor well fulfi lls the ambition that may have led to this approach. This domain name must have as its value one or more address records. Currently those will be A records, however in the future other record types giving addressing information may be acceptable. It can also have other RRs, but never a CNAME RR.
Although some messaging systems won't care, it's better to follow the standards than to fi nd out that you're having problems later down the road.
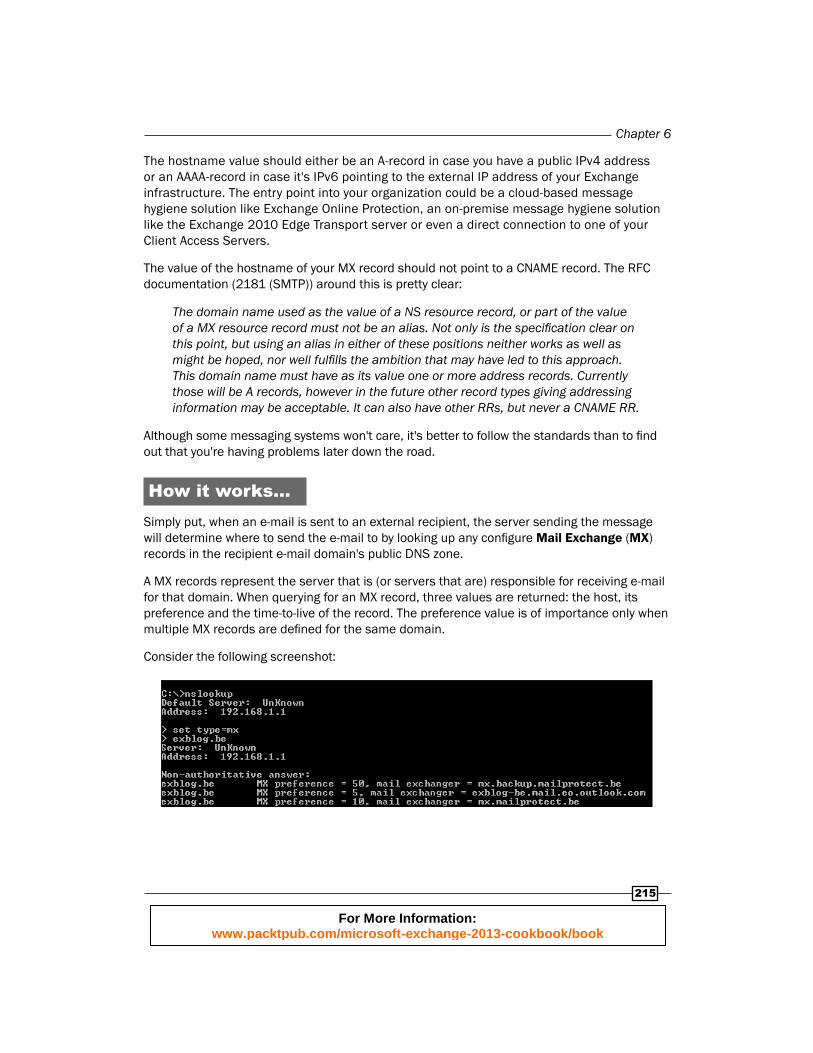
How it works...Simply put, when an e-mail is sent to an external recipient, the server sending the message will determine where to send the e-mail to by looking up any confi gure Mail Exchange (MX) records in the recipient e-mail domain's public DNS zone.
A MX records represent the server that is (or servers that are) responsible for receiving e-mail for that domain. When querying for an MX record, three values are returned: the host, its preference and the time-to-live of the record. The preference value is of importance only when multiple MX records are defi ned for the same domain.
Consider the following screenshot:
For More Information: www.packtpub.com/microsoft-exchange-2013-cookbook/book
Implementing and Managing High Availability
216
In case multiple MX records are found with different preference values, the sending server will attempt to deliver e-mail to the host that has the lowest value (and thus the highest priority) fi rst. Only in specifi c cases where e-mail cannot be delivered to the preferred host, will the sending server fall back and attempt to send messages to a host with a higher preference value.
If multiple MX records exist with the same preference value, the sending server will randomly pick one of these records with the same value. If, for some, reason the sending server cannot connect to the fi rst host, it will fall back and try connecting to one of the other—equally preferred hosts.
There's more...Having multiple MX records does not necessarily guarantee redundant inbound mail delivery unless you also have multiple gateways or edge transport servers capable of accepting messages.
Another option is to use a cloud-based service which, in case of an outage of your messaging environment, will temporarily store messages and redeliver them after your on-premises environment comes back online.
Performing maintenance in a highly available environment
Setting up a highly available environment is one thing, being able to support and maintain it another. To be quite honest, 80 percent of setting up a highly available messaging solution is all about planning; 20 percent of the effort is required to set it up. Maintaining the solution afterwards, requires 100 percent attention and effort. Exchange has come a long way and supporting high availability is no more than a fraction of what it used to be. In the following recipe we'll dive a little deeper into the maintenance mode of Exchange and explain how you can (temporarily) take an Exchange server out of service allowing you to troubleshoot, update or otherwise perform any action on it.
Getting readyTo complete the following steps, you will need to open the Exchange Management Shell.
How to do it...We will cover the many tasks in accordance with the maintenance.
For More Information: www.packtpub.com/microsoft-exchange-2013-cookbook/book
Chapter 6
217
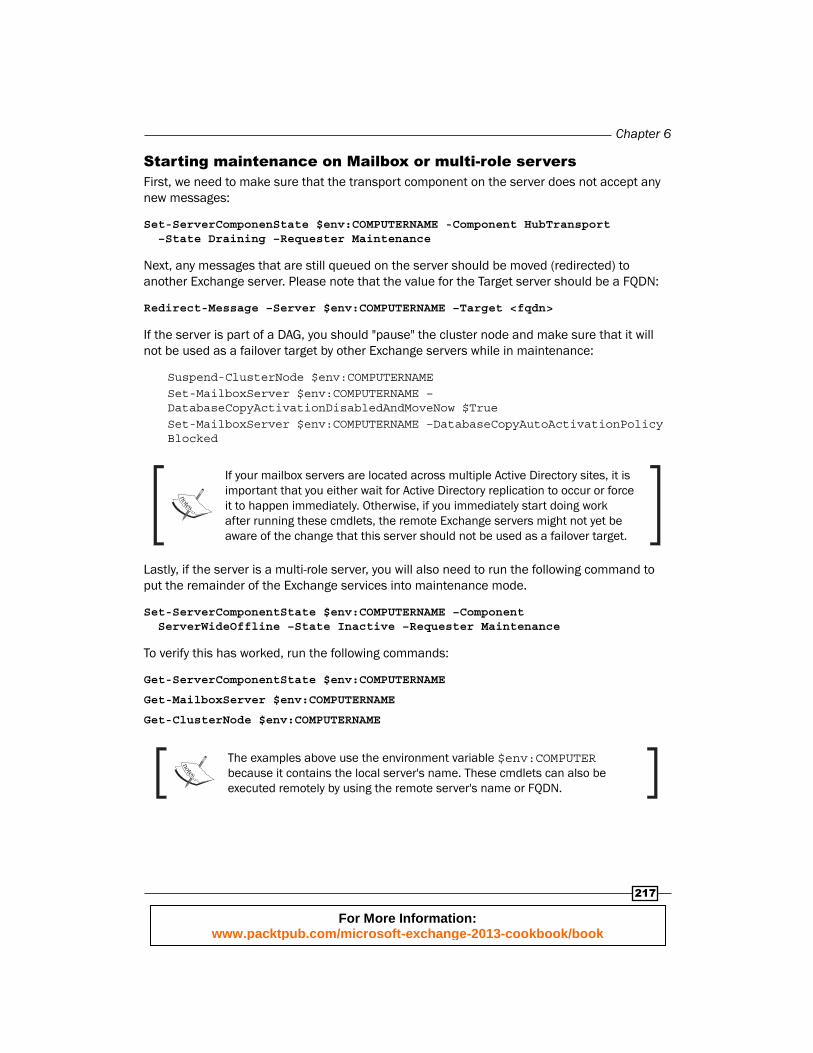
Starting maintenance on Mailbox or multi-role serversFirst, we need to make sure that the transport component on the server does not accept any new messages:
Set-ServerComponenState $env:COMPUTERNAME -Component HubTransport –State Draining –Requester Maintenance
Next, any messages that are still queued on the server should be moved (redirected) to another Exchange server. Please note that the value for the Target server should be a FQDN:
Redirect-Message –Server $env:COMPUTERNAME –Target <fqdn>
If the server is part of a DAG, you should "pause" the cluster node and make sure that it will not be used as a failover target by other Exchange servers while in maintenance:
Suspend-ClusterNode $env:COMPUTERNAMESet-MailboxServer $env:COMPUTERNAME –DatabaseCopyActivationDisabledAndMoveNow $TrueSet-MailboxServer $env:COMPUTERNAME –DatabaseCopyAutoActivationPolicy Blocked
If your mailbox servers are located across multiple Active Directory sites, it is important that you either wait for Active Directory replication to occur or force it to happen immediately. Otherwise, if you immediately start doing work after running these cmdlets, the remote Exchange servers might not yet be aware of the change that this server should not be used as a failover target.
Lastly, if the server is a multi-role server, you will also need to run the following command to put the remainder of the Exchange services into maintenance mode.
Set-ServerComponentState $env:COMPUTERNAME –Component ServerWideOffline –State Inactive –Requester Maintenance
To verify this has worked, run the following commands:
Get-ServerComponentState $env:COMPUTERNAME
Get-MailboxServer $env:COMPUTERNAME
Get-ClusterNode $env:COMPUTERNAME
The examples above use the environment variable $env:COMPUTER because it contains the local server's name. These cmdlets can also be executed remotely by using the remote server's name or FQDN.
For More Information: www.packtpub.com/microsoft-exchange-2013-cookbook/book
Implementing and Managing High Availability
218
Starting maintenance on Client Access ServersSet-ServerComponentState $env:COMPUTERNAME –Component ServerWideOffline –State Inactive –Requester Maintenance
Stopping maintenanceStopping maintenance mode is simply reverse-executing the actions you performed to put a server into maintenance mode, with the exceptions that there is no need to redirect messages from one server to another.
For a mailbox or multi-role server:
Set-ServerComponentSate $env:COMPUTERNAME –Component ServerWideOffline –State Active –Requester Maintenance
Resume-ClusterNode $env:COMPUTERNAME
Set-MailboxServer $env:COMPUTERNAME – DatabaseCopyActivationDisabledAndMoveNow $False
Set-MailboxServer $env:COMPUTERNAME – DatabaseCopyAutoActivationPolicy Unrestricted
Set-ServerComponentState $env:COMPUTERNAME -Component HubTransport -State Active -Requester Maintenance
For a Client Access Server:
Set-ServerComponentSate $env:COMPUTERNAME –Component ServerWideOffline –State Active –Requester Maintenance
How it works...Exchange 2013 contains a feature called "managed availability", which could be seen as a sort of in-product monitoring platform that keeps an eye on the health of the system. As such, managed availability regularly executes probes (health checks, if you will) to determine whether a service or component is working as expected.
If a problem is detected, managed availability can take a bunch of corrective measures ranging from anything like simply restarting a service to forcibly rebooting a server (also referred to as bug checking the server).
Although regular Exchange cumulative updates should automatically put a server into maintenance mode, they won't take any actions like moving databases or suspending a cluster node, just like other 3rd-party applications probably won't do. Therefore, managed availability might mistakenly assume the server is behaving badly and try to take corrective actions while you are working on the server. I can imagine you wouldn't want your server to spontaneously reboot while doing some application updates, right?
For More Information: www.packtpub.com/microsoft-exchange-2013-cookbook/book
Chapter 6
219
To prevent managed availability from stepping in, there are several tasks to complete depending on what Exchange server roles you are running on the machine. The Client Access Server is obviously the easiest one, as you will only have to put the Exchange components into a temporary offl ine state by means of a single command.
A mailbox server and notably a mailbox server that is part of a DAG requires some additional attention. First, you need to ensure no messages are left on the server. Next, you need to make sure the server cannot be used a failover target while you are performing maintenance. To achieve this, you will have to move all active mailbox database copies to another server in the DAG, pause the server node in the DAG, make sure that other servers know they cannot use it as a failover target and mark the remaining components as offl ine.
There's more...Michael has put together a handy script that will automatically put a server into maintenance mode, taking into account whether the server is a standalone or multi-role server.
Check it out here at http://michaelvh.wordpress.com/2013/04/08/script-putting-exchange-server-2013-into-maintenance-mode/.
For More Information: www.packtpub.com/microsoft-exchange-2013-cookbook/book
Where to buy this book You can buy Microsoft Exchange 2013 Cookbook from the Packt Publishing website:
.
Free shipping to the US, UK, Europe and selected Asian countries. For more information, please
read our shipping policy.
Alternatively, you can buy the book from Amazon, BN.com, Computer Manuals and
most internet book retailers.
www.PacktPub.com
For More Information: www.packtpub.com/microsoft-exchange-2013-cookbook/book


