40
Microsoft Office 2010 - Illustrated Fundamentals Unit B: Understanding File Management
| Date post: | 01-Jan-2016 |
| Category: |
Documents |
| Upload: | latifah-hamilton |
| View: | 57 times |
| Download: | 0 times |

Microsoft Office 2010 -Illustrated Fundamentals
Unit B: Understanding File Management

2Microsoft Office 2010 - Illustrated Fundamentals
Objectives
• Understand folders and files• Create and save a file • Explore the files and folders on
your computer• Change file and folder views

3Microsoft Office 2010 - Illustrated Fundamentals
Objectives (cont.)
• Open, edit, and save files• Copy files• Move and rename files• Search for files, folders, and
programs• Delete and restore files

4Microsoft Office 2010 - Illustrated Fundamentals
Unit B Introduction
• To organize with files and folders you need to understand how your computer stores them
• File management skills help you save a file in a place where you can find it later
• To keep your computer files organized, you will need to copy, move, and rename them
• When you have files you no longer need, it is a good idea to delete them so that you only have current files store on your computer

5Microsoft Office 2010 - Illustrated Fundamentals
Understanding Folders and Files
• File management refers to the strategy and tasks that you use to organize and maintain the folders and files on a disk
• When you save files, you usually save them inside folders, which are storage areas on your computer
• The files and folders on your computer are organized in a file hierarchy, a system that arranges files and folders in different levels

6Microsoft Office 2010 - Illustrated Fundamentals
Understanding Folders and Files (cont.)
• The following guidelines will help you to organize your files:• use the Start menu or double-click a folder to open
Windows Explorer to view folders and subfolders, which are folders inside folders
• view files in windows which are divided into sections• the Navigation pane on the left shows the folder
structure• the File list on the right displays the contents of
an open folder• the Details pane at the bottom provides
information about selected files in the File list

7Microsoft Office 2010 - Illustrated Fundamentals
Understanding Folders and Files (cont.)
• understand file addresses• a window contains an Address bar which shows
the location or address of the files in the File list
• an address is a sequence of folder names that displays the path to a desired file or folder and displays all levels of the computer hierarchy

8Microsoft Office 2010 - Illustrated Fundamentals
Understanding Folders and Files (cont.)
• navigate upward and downward using the Address bar and File list
• to navigate upward click a folder or subfolder in the Address bar
• to navigate downward double-click a subfolder in the File list
• you can also use the Navigation pane to navigate among folders

9Microsoft Office 2010 - Illustrated Fundamentals
Understanding Folders and Files (cont.)
Sample folder and file hierarchy

10Microsoft Office 2010 - Illustrated Fundamentals
Understanding Folders and Files (cont.)
Windows Explorer window

11Microsoft Office 2010 - Illustrated Fundamentals
Plan your file organization
• First, identify the types of files you wish to work with, such as images, music, reports
• Think of a folder organization that will help you find them later, such as use subfolders in the My Pictures folder to separate and group photos
• In the My Documents folder you might group personal files in one subfolder and business files in another subfolder
• Folder structures can be reevaluated and changes made if desired

12Microsoft Office 2010 - Illustrated Fundamentals
Creating and Saving a File
• When you create a new file it exists in your computer’s RAM (Random access memory) which is temporary storage• RAM only contains information when your computer is
on• turning off your computer automatically clears the
contents of RAM so files need to be saved if wanting to keep them
• One important storage device is your computer’s hard disk
• Another popular storing option is a USB flash drive, which is universal, small and portable

13Microsoft Office 2010 - Illustrated Fundamentals
Creating and Saving a File (cont.)
Saving a document
Save As dialog box

14Microsoft Office 2010 - Illustrated Fundamentals
Using Windows 7 libraries
• A library gathers files and folders from different locations on your computer and displays them in one location
• Files stay in the same place but the file name appears in the library
• A library is not a folder that stores files, but rather a way of viewing similar types of documents that are stored in multiple locations
• Deleting a library does not delete the file
Libraries

15Microsoft Office 2010 - Illustrated Fundamentals
Exploring the Files and Folderson Your Computer
• Even if you are not saving a document, you will want to examine your computer and its existing folder and file structure
• In a Windows Explorer window, you can navigate through your computer contents using the File list, the Address bar, and the Navigation pane

16Microsoft Office 2010 - Illustrated Fundamentals
Exploring the Files and Folderson Your Computer (cont.)
Window showing storage devices
Your User Name folder

17Microsoft Office 2010 - Illustrated Fundamentals
Exploring the Files and Folderson Your Computer (cont.)
Drive names and icons

18Microsoft Office 2010 - Illustrated Fundamentals
Sharing Information with homegroups and libraries
• Windows 7 lets you create a homegroup, a named set of computer that can share information
• If your computer is in a homegroup you can share libraries and printer
Sharing a library

19Microsoft Office 2010 - Illustrated Fundamentals
Changing File and Folder Views
• You can change the file and folder views to see as many files and folders at a time, or details about a file or folder
• Windows 7 lets you choose eight different views
• Each view provides different information about the files and folders
• You can list files and folders by different size icons

20Microsoft Office 2010 - Illustrated Fundamentals
Changing File and Folder Views(cont.)
• You can sort files and folders to change the order in which the folders and files are listed
• If you want to see what a file looks like, but don’t want to open it, you can see a preview of it in the Preview pane
• the Preview pane is an area on the right side of a window
• it is especially useful for document files so that you can see the first few paragraphs of a large document

21Microsoft Office 2010 - Illustrated Fundamentals
Changing File and Folder Views(cont.)
Preview of selected file
More options shortcut menu
Viewing in large icons

22Microsoft Office 2010 - Illustrated Fundamentals
Opening, Editing, and SavingFiles
• Once a file is created and saved, you can easily open and edit, make changes to it
• Examples of editing a file could be, adding to it, deleting text, or changing a color in a drawing
• After completing the edits you want, you then save the file again and the “new” file with the edits replaces the existing file
• When you save a file that you have changed you use the Save command

23Microsoft Office 2010 - Illustrated Fundamentals
Comparing Save and Save As
• The first time you save a file, the Save As dialog box opens whether you choose Save or Save As• in the Save As dialog box you choose the drive and
folder where you want to save the file, and then enter its filename
• If you edit a previously saved file, you can save the file using the Save command
• The Save command updates the stored file
• If wanting to save and name a copy of the file differently you use the Save As command

24Microsoft Office 2010 - Illustrated Fundamentals
Opening, Editing, and SavingFiles (cont.)
Navigating the Open dialog box
Edited document
Saving a revised file

25Microsoft Office 2010 - Illustrated Fundamentals
Copying Files
• At times you may want to put a copy of a file on a different storage device to share
• Or you may want to create a copy as a backup, or replacement, in case something happens to your original file
• Copying files and folders is easy using the Copy command and then place the copy in another location using the Paste command
• Copying and pasting a file leaves the file in its original location

26Microsoft Office 2010 - Illustrated Fundamentals
Copying Files (cont.)
• When you use the Copy command, Windows 7 places a duplicate copy of the file in an area of RAM called the clipboard
• The file, in the clipboard, is ready to copy to a new location
• The file remains in the clipboard until you copy something else or end your Windows 7 session
• You cannot have two copies of the file with the same name in the same folder

27Microsoft Office 2010 - Illustrated Fundamentals
Copying Files (cont.)
Coping a file
Pasted duplicate file

28Microsoft Office 2010 - Illustrated Fundamentals
Copying files using Send to
• You can copy and paste a file to an external storage device using the Send to command
Selected Send to menu commands

29Microsoft Office 2010 - Illustrated Fundamentals
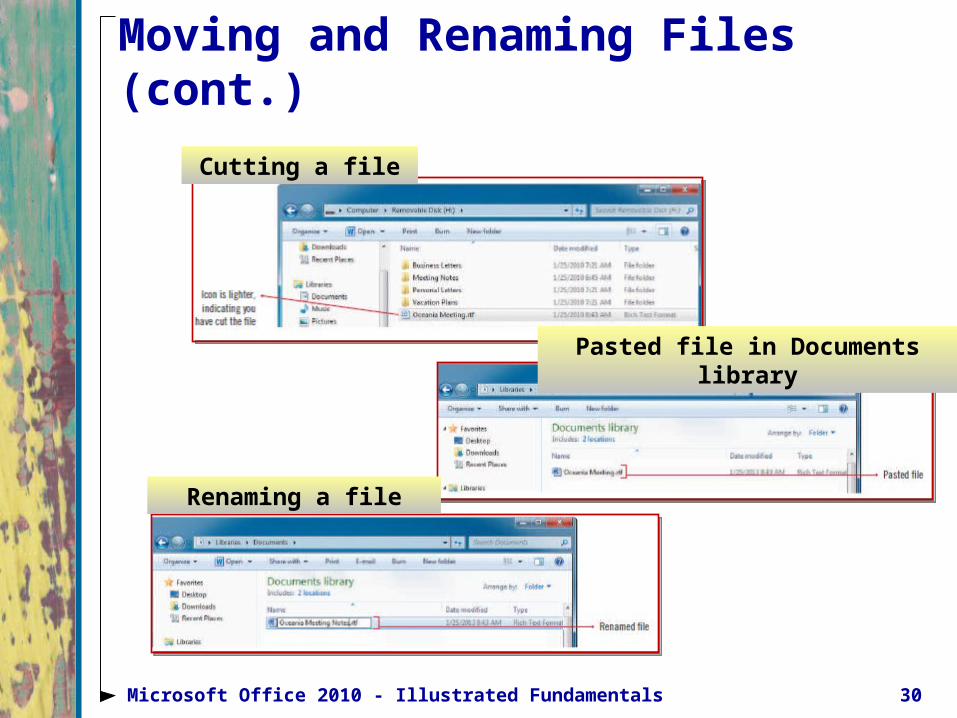
Moving and Renaming Files
• You can move files and folders to a different folder on the same drive or a different drive
• When you move a file, the file is transferred to the new location
• You can move a file using the Cut and Paste commands
• After creating a file you may find that the original filename isn’t clear so you can rename it to make it more descriptive or accurate
30Microsoft Office 2010 - Illustrated Fundamentals
Moving and Renaming Files(cont.)
Cutting a file
Pasted file in Documents library
Renaming a file

31Microsoft Office 2010 - Illustrated Fundamentals
Using drag and drop to copy ormove files to new locations
• Drag and Drop is a technique in which you use your pointing device to drag a file or folder into a different location and then drop it
• Using drag and drop does not copy your file to the clipboard
• If you drag and drop a file to a folder on another drive, Windows copies the file
• If you drag and drop a file to a folder on the same drive, Windows moves the file
Copying a file using drag and drop

32Microsoft Office 2010 - Illustrated Fundamentals
Searching for Files, Folders, and Programs
• Windows Search helps you quickly find any file, folder or program
• You type one or more letter sequences, as your search criteria, to help Windows 7 identify the item you want to locate
• Search criteria can be a filename, part of a filename, or any character you choose

33Microsoft Office 2010 - Illustrated Fundamentals
Searching for Files, Folders, and Programs (cont.)
• To search your entire computer, including its attached drives, you can use the Search box on the Start menu
• To search within a particular folder, you can use the Search box in a Windows Explorer window
• Your search results will differ, depending on the programs and files on your computer
• File properties are details that Windows stores about a file

34Microsoft Office 2010 - Illustrated Fundamentals
Searching for Files, Folders, and Programs (cont.)
Searching on criterion
Search Computer text box

35Microsoft Office 2010 - Illustrated Fundamentals
Deleting and Restoring Files
• If you delete a folder (all contents included) or file from the hard drive, Windows 7 places the folder or file in the Recycle Bin
• If you delete a folder or file and then change your mind, you can open the Recycle Bin and restore the folder or file to its original location
• Deleting files that are no longer needed keeps your computer uncluttered

36Microsoft Office 2010 - Illustrated Fundamentals
Deleting and Restoring Files(cont.)
• If you delete a folder or file from removable storage media, such as a USB flash drive, the folder or file is not placed in the Recycle Bin and they are permanently deleted and cannot be restored
• Emptying the Recycle Bin permanently removes the deleted folders and files from your computer

37Microsoft Office 2010 - Illustrated Fundamentals
Deleting and Restoring Files
Delete file dialog box
Restoring a file

38Microsoft Office 2010 - Illustrated Fundamentals
Selecting more than one file
• To select a group of items that are next to each other, click the first item in the group, press and hold [Shift], then click the last item and the first, last and all items in between are selected
• To select files that are not next to each other, click the first file, press and hold [Ctrl], then click the other items you want to select as a group
39Microsoft Office 2010 - Illustrated Fundamentals
Summary
• File Management skills help you work with the files and folders on your computer
• File hierarchy is a system that arranges files and folders in different levels
• Files exist in RAM when being created and then are saved to a permanent storage device
• You can view your folders and files in eight different views depending on what you want to see

40Microsoft Office 2010 - Illustrated Fundamentals
Summary
• You can edit, or make changes to all files and when you resave the file it automatically replaces the original
• Use Save As the first time you save a file, or to rename or to place a file in a different location
• Copying a file makes a copy of the file and places it in a different location of your choice
• Moving a file moves the files to a new location
• You can enter search criteria in the Search box to help locate a file, folder, or program


