117
Microsoft ® Office O O u u t t l l o o o o k k 2 2 0 0 0 0 7 7 T T r r a a i i n n i i n n g g G G u u i i d d e e
Microsoft® Office
OOuuttllooookk 22000077 TTrraaiinniinngg GGuuiiddee


Sarasota County Government 3
Table of Contents The Fundamentals.................................................................................................................................................... 5
Starting Outlook 2007.............................................................................................................................................6 Understanding the Outlook 2007 Program Screen ................................................................................................7 Understanding Items ..............................................................................................................................................9 Understanding the Message Window...................................................................................................................10 Understanding the Ribbon.................................................................................................................................... 11 Using the Office Button and Quick Access Toolbar ..............................................................................................12 Using the Navigation Pane...................................................................................................................................13 Using the To-Do Bar .............................................................................................................................................15 Using Menus and Toolbars ...................................................................................................................................16 Using Keyboard Commands ................................................................................................................................18 Using Help ............................................................................................................................................................19 Exiting Outlook 2007 ............................................................................................................................................21
Composing and Sending E-mail ........................................................................................................................... 22 Composing an E-mail Message ...........................................................................................................................23 Changing Message Format ..................................................................................................................................24 Formatting Text .....................................................................................................................................................25 Inserting a Signature ............................................................................................................................................27 Attaching a File to a Message ..............................................................................................................................29 Working with Hyperlinks .......................................................................................................................................30 Specifying Message Options ................................................................................................................................32 Checking your Spelling.........................................................................................................................................34 Sending E-mail .....................................................................................................................................................35 Working with Distribution Lists..............................................................................................................................37 Saving Unfinished Messages (Drafts) ..................................................................................................................39 Using the Out of Office Assistant..........................................................................................................................40
Receiving and Sorting E-mail ............................................................................................................................... 41 Receiving and Reading E-mail .............................................................................................................................42 Replying to and Forwarding a Message...............................................................................................................44 Opening an Attachment ........................................................................................................................................46 Flagging a Message for Follow-up .......................................................................................................................48 Using Color Categories ........................................................................................................................................50 Sorting Messages.................................................................................................................................................52 Changing Views....................................................................................................................................................53 Printing a Message...............................................................................................................................................54
Organizing and Finding Information .................................................................................................................... 55 Exploring the Folder List.......................................................................................................................................56 Creating and Using Folders..................................................................................................................................57 Managing Folders.................................................................................................................................................59 Creating and Using Search Folders .....................................................................................................................60 Modifying and Deleting Search Folders ...............................................................................................................62
Working with Contacts .......................................................................................................................................... 63 Adding a Contact ..................................................................................................................................................64 Adding an E-mail Sender to the Contacts List......................................................................................................65 Editing and Deleting Contacts ..............................................................................................................................66 Changing Contact Views ......................................................................................................................................67 Working in a Contact Window ..............................................................................................................................68 Finding and Organizing Contacts .........................................................................................................................70 Printing the Contacts List......................................................................................................................................72
4
Using the Calendar ................................................................................................................................................74 Viewing the Calendar ...........................................................................................................................................75 Scheduling Appointments and Events..................................................................................................................77 Editing and Rescheduling Appointments and events ...................................................................................................................................................................79 Working with Recurring Appointments..................................................................................................................80 Color-coding Calendar Items................................................................................................................................82 Viewing Calendar Items........................................................................................................................................84 Arranging Calendar Items.....................................................................................................................................85 Working with Meeting Requests ...........................................................................................................................86 Setting Reminders ................................................................................................................................................88 Configuring Calendar Options ..............................................................................................................................90 Printing the Calendar............................................................................................................................................91
Working with Tasks................................................................................................................................................92 Adding a Task .......................................................................................................................................................93 Changing Task Views ...........................................................................................................................................95 Updating a Task....................................................................................................................................................97 Creating a Recurring Task ....................................................................................................................................98 Attaching an Item to a Task ..................................................................................................................................99 Assigning a Task.................................................................................................................................................101 Printing a Task ....................................................................................................................................................103 Completing a Task ..............................................................................................................................................104
Collaborating with Other Users ..........................................................................................................................106 Working with Group Schedules ..........................................................................................................................107 Setting and Publishing Free/Busy Appointment time .....................................................................................................................................................................109 Opening Shared Calendars................................................................................................................................ 110 Sharing Your Calendar ....................................................................................................................................... 111 Sharing Outlook Folders..................................................................................................................................... 113
Advanced Topic................................................................................................................................................... 115 Using Outlook Web Access ................................................................................................................................ 116

Sarasota County Government 5
TThhee FFuunnddaammeennttaallss
Starting Outlook 2007.......................................... 6 Windows XP .............................................. 6
Understanding the Outlook 2007 Program Screen................................................................... 7
Understanding Items........................................... 9
Understanding the Message Window.............. 10
Understanding the Ribbon ............................... 11 Tabs ......................................................... 11 Groups ..................................................... 11 Buttons..................................................... 11
Using the Office Button and Quick Access Toolbar................................................................ 12
Using the Navigation Pane ............................... 13 Switch between panes............................. 13
Using the To-Do Bar .......................................... 15
Using Menus and Toolbars............................... 16 Menu bar.................................................. 16 Toolbars ................................................... 16
Using Keyboard Commands ............................ 18 Keystroke shortcuts ................................. 18 Key Tips ................................................... 18
Using Help.......................................................... 19 Search for help ........................................ 19 Browse for help........................................ 19 Choose the Help source .......................... 20
Exiting Outlook 2007 ......................................... 21
Welcome to Microsoft Outlook 2007! Microsoft Outlook lets you send and receive e-mail messages, schedule appointments, and organize your contacts and addresses. It also reminds you of tasks you need to complete.
This chapter introduces the Outlook fundamentals. Besides learning how to start and exit the Outlook program, you will learn how to find your way around the Outlook screen and item windows. You will also learn how to use keyboard commands and access Outlook’s help features. Let’s get started!
1

6
Starting Outlook 2007 In order to use a program, you must start—or launch—it first.
Windows XP
1. Click the Windows Start button.
The Start menu appears.
2. Select All Programs.
The programs and menus listed here will depend on the programs installed on your computer.
3. Select Microsoft Office.
4. Select Microsoft Office Outlook 2007.
The Outlook program screen appears.
Note: A desktop icon will be available.
Exercise
• Exercise File: None required.
• Exercise: Start the Microsoft Office Outlook 2007 program.
Figure 1-1: The Start menu in Windows XP.
The Fundamentals

Sarasota County Government 7
Understanding the Outlook 2007 Program Screen The Outlook 2007 program screen may seem confusing and overwhelming at first. This lesson will help you become familiar with it.
Title bar: Displays the name of the program you are currently using (Outlook) and the item you are currently working with (Inbox).
Instant Search: Enter key words to perform a search of message content and folders.
Menu bar: Displays a list of menus that you use to give commands to Outlook. Clicking a menu name displays a list of commands—for example, clicking the Edit menu name displays different editing commands like Cut and Paste.
Reading Pane: Displays the selected message.
Standard toolbar: Contains buttons for common commands such as creating new items, printing items, and getting help. The buttons on the Standard toolbar change depending on what you’re working on.
Help text box: Type a question about Outlook here and press the <Enter> key to search Outlook Help for answers. The Outlook Help window displays the results.
Inbox: Folder that displays your incoming e-mail messages. Close button: Click the close button in the Title bar to exit the Outlook program.
Exercise Notes
• Exercise File: None required.
• Exercise: Understand and experiment with the different parts of the Microsoft Office Outlook 2007 program screen.
The Fundamentals

8
To-Do Bar: Keep tabs on your calendar, appointments, and tasks all in one place. The To-Do Bar can also be displayed in a minimized format.
Navigation Pane: Contains buttons and icons you can click to move among Outlook’s folders and tools. The pane’s contents change when you click a different Navigation Pane button—i.e. Mail, Calendar, or Contacts.
Status bar: Displays messages and feedback. Mail folders: Displays all your mail folders, including the Inbox, Outbox, Junk E-mail, Drafts, and Sent Items folders.
Navigation Pane Buttons: Click a button to see the folders and tools for a certain category—i.e. Mail, Calendar, or Contacts.
Scroll bars: Use the vertical scroll bars to view different parts of the panes.

Sarasota County Government 9
Understanding Items In Outlook, an item is the basic element that holds information. Items are used to send and view e-mails, and also to organize information like tasks and contacts.
Since they present different types of information, different types of items differ in their appearance.
Table 1-1: Outlook Items provides an overview of items available in Outlook.
Table 1-1: Outlook Items
Mail Message Compose a message to be sent by e-mail.
Appointment Add an appointment to your calendar.
Meeting Request Set up an appointment to which you invite other people or reserve resources such as a conference room.
Contact Enter information about a person including their name, company, job title, and e-mail address.
Distribution List Crate a collection of contacts that allows you to quickly send mass e-mails.
Task Enter to-do items that can be tracked until completion.
Task Request Inform someone else of a task you would like them to perform.
Exercise
• Exercise File: None required.
• Exercise: Explore and understand the various types of items available in Outlook 2007.
The Fundamentals

10
Understanding the Message Window The mail message window, like other item windows in Outlook 2007, features the new Ribbon in place of menus and toolbars. This lesson will help you become familiar with the basic features of the message window.
Office Button and Quick Access Toolbar: The Office Button allows you to see everything you can do to your document. The Quick Access Toolbar contains common commands such as Save and Undo. You can add more commands as well.
Send button: Click here to send the message once you’ve finished composing it.
Ribbon: The tabs and groups of commands on the Ribbon replace the menus and toolbars found in the message window in previous versions of Outlook.
Message Area: Type your e-mail message here as you would using a word processor. The ribbon will open when you start your message.
Tips: Double-clicking on the Message tab on the Ribbon opens and closes it. A mini-toolbar is available when you click in front of the typed message.
Recipients: Enter the e-mail addresses of the recipients in the To field. Use the CC field to send a copy of the message to any recipients who are not directly involved, but who might be interested in the message. (Blind Copy, Bcc, is also available when you click on the CC field)
Signature: You can create a customized signature that appears on your messages. You can include contact information and even a logo.
Subject line: Enter a title here so that recipients quickly know the reason for your e-mail.
Scroll bar: Use the scroll bar to view different parts of a long message.
Exercise Notes
• Exercise File: None required.
• Exercise: Understand and experiment with the different parts of the Microsoft Office Outlook 2007 screen.
The Fundamentals

Sarasota County Government 11
Understanding the Ribbon In most of the Office 2007 programs, menus and toolbars have been completely replaced by the Ribbon. Outlook 2007 is different. Menus and toolbars remain on the Outlook 2007 program screen, while the new Ribbon appears only in item windows such as message windows. The Ribbon keeps commands visible while you work instead of hiding them under menus or toolbars.
The Ribbon is made up of three basic components:
Tabs Commands are organized into tabs on the Ribbon. Each tab contains a different set of commands. In Outlook, there are two different types of tabs:
• Command tabs: These tabs appear by default whenever you open an item window. For example, in a new message window, the Message, Insert, Options and Format Text tabs appear by default.
• Contextual tabs: Contextual tabs appear whenever you perform a specific task and offer commands relative to only that task. For example, if you insert a table in a message, the Design and Layout tabs appear on the Ribbon.
Groups The commands found on each tab are organized into groups of related commands. For example, the Basic Text group contains commands for formatting message text. Click the Dialog Box Launcher ( ) in the bottom-right corner of a group to display even more commands. Some groups also contain galleries that display several formatting options.
Buttons One way to issue a command is by clicking its button on the Ribbon. Buttons are the smallest element of the Ribbon.
Tips
You can minimize the Ribbon so that only tab names appear, giving you more room in the item window. To do this, double-click the currently displayed command tab. To display the Ribbon again, click any tab.
Based on the size of the item window, Outlook changes the appearance and layout of the commands within the groups.
Exercise
• Exercise File: None required.
• Exercise: Click the New button on the Standard toolbar to create a new e-mail message. Then click each tab on the Ribbon to view its commands.
Figure 1-2: Ribbon elements.
Figure 1-3: Minimizing the Ribbon gives you more room in the Message window.
The Fundamentals
Command tab Contextual tab
Group Button Dialog Box Launcher

12
Using the Office Button and Quick Access Toolbar Near the Ribbon at the top of an item window are two other tools you can use to give commands in Outlook 2007: The Office Button and the Quick Access Toolbar.
Office Button The Office Button appears in the upper-left corner of an item window and contains basic file management commands including New, which creates a new item; Save, which saves the current item; and Close, which closes the currently opened item.
Tips
The Office Button replaces the File menu found in item windows in previous versions of Outlook.
Quick Access Toolbar The Quick Access Toolbar appears to the right of the Office Button and provides easy access to the commands you use most frequently. By default, the Save, Undo, Redo, Previous Item and Next Item buttons appear on the toolbar; however, you can customize this toolbar to meet your needs by adding or removing buttons. To customize it:
• Click the Customize Quick Access Toolbar button at the end of the Quick Access Toolbar and select the commands you want to add or remove.
Tips
You can change where the Quick Access Toolbar appears in the program window. To do this, click the Customize Quick Access Toolbar button at the end of the Quick Access Toolbar. Select Show Below the Ribbon or Show Above the Ribbon, depending on the toolbar’s current location.
Exercise
• Exercise File: None required.
• Exercise: Click the New button on the Standard toolbar to create a new e-mail message, if necessary. Click the Office Button to open it. Move the Quick Access Toolbar below the Ribbon, then move it back above the Ribbon. Click the message window’s close button (the X button in the upper-right corner of the message).
Figure 1-4: The Office Button menu.
Figure 1-5: The Quick Access Toolbar.
The Fundamentals
Save
Undo
Redo
Customize
Next Item
Previous Item

Sarasota County Government 13
Using the Navigation Pane The Outlook program is made up of several sets of tools and folders, each with their own separate and unique screens. You can switch between these sets of tools by using the Navigation Pane.
The Mail pane appears by default when you start Outlook, but you can display other panes by clicking different Navigation Pane buttons such as Calendar, Contacts, or Tasks.
Switch between panes
• Click a navigation pane button (for example, Mail, Calendar, Contacts, or Tasks) in the Navigation Pane.
The selected pane appears.
Other Ways to Switch Panes: Click Go on the menu bar and select the pane you want to view.
Table 1-2: The Navigation Pane provides an overview of the contents of the Navigation Pane.
Tips
To minimize or expand the Navigation Pane in the window, click the Minimize the Navigation Pane or Expand the Navigation Pane button at the top of the Navigation Pane.
Table 1-2: The Navigation Pane
Compose, manage, organize, send, and receive messages.
Inbox Contains all your recent incoming e-mail messages.
Unread Mail Contains all your unread messages.
Sent Items Stores copies of messages you have sent.
Mailbox Provides a preview of your day; summarizes appointments, tasks, and new e-mail messages.
Deleted Items Works like the Windows Recycle Bin; where you can find deleted Outlook items.
Drafts Stores draft messages that you haven’t yet completed.
Outbox Temporarily stores any messages that you’ve composed that have not been sent.
Exercise
• Exercise File: None required.
• Exercise: Display and explore the Calendar, Contacts, and Tasks panes, one at a time. Then return to the Mail pane.
Figure 1-6: The Navigation Pane with Mail displayed.
The Fundamentals

14
Table 1-2: The Navigation Pane
Search Folders Provides quick access to color categorized messages, messages flagged for follow-up, messages with large attachments, and unread messages.
Enables you to view and schedule appointments, events, and meetings.
Stores addresses, numbers, e-mail addresses, and other information about people you contact.
Allows you to organize and manage to-do items.
Notes Works like electronic sticky notes; allows you to jot down quick bits of information.
Folder List Displays all the folders in Microsoft Outlook.
Shortcuts Contains shortcuts (that you add yourself) to other folders, such as the My Documents folder.
Configure buttons Allows you to add or remove buttons from the Navigation Pane.
The Fundamentals

Sarasota County Government 15
Using the To-Do Bar The To-Do Bar is new for Outlook 2007 and combines a basic calendar, the day’s appointments, and current tasks into one pane. It allows you to keep tabs on multiple sources of information in Outlook all at once.
Display the To-Do Bar
• Select View → To-Do Bar → Normal from the menu.
The To-Do Bar appears on the right-hand side of the screen.
Tips
To minimize the To-Do Bar, click the Minimize the To-Do Bar button, which is located at the top of the To-Do Bar.
If you click a date on the calendar in the To-Do Bar, the Calendar module is displayed on the screen.
Exercise
• Exercise File: None required.
• Exercise: Display the To-Do Bar, minimize it, and then maximize it again.
Figure 1-7: The To-Do Bar.
The Fundamentals
Date Navigator
Appointments
Tasks and To-Do items
Minimize the To-Do Bar

16
Using Menus and Toolbars Using menus and toolbars are two good ways to give commands in Outlook. While they have been replaced by the Ribbon in item windows, they still remain on the Outlook 2007 program screen.
There are also two more tools that you can use in Outlook 2007 that make relevant commands even more readily available: contextual menus and the Mini Toolbar.
Menu bar The menu bar is located just beneath Outlook’s title bar. The menus on the menu bar include: File, Edit, View, Go, Tools, Actions, and Help. Within each menu is a list of related commands. To issue a command using a menu:
1. Click the menu name with the mouse.
The menu appears.
Other Ways to Open a Menu: Press <Alt> and then the underlined letter in menu.
2. Select a command from the menu.
Tip: Additional submenus will appear under certain menu items.
Toolbars Outlook’s toolbars provide an even faster way to give commands. By default, the Standard toolbar appears on the program screen, displaying buttons for issuing the most commonly used commands. To give a command using a toolbar:
• Click the button on the toolbar for the command you want to issue.
Tips
To display the Advanced and Web toolbars, right-click anywhere in the menu or toolbar area of the Outlook program screen and select the toolbar you want to display from the menu.
Toolbar buttons change depending on which folder is open. For example, when the Inbox is displayed, Outlook displays message-related buttons. When Calendar is displayed, appointment-related buttons appear.
To display a toolbar button’s description, point to the button and wait a second. A ScreenTip appears, telling you what the button does.
Exercise
• Exercise File: None required.
• Exercise: Explore the commands available under each of the menus on the menu bar, then explore the commands available on the Standard toolbar. Right-click a message in the Inbox pane to display a contextual menu.
Figure 1-8: The Menu bar.
Figure 1-9: The Standard toolbar.
Figure 1-10: The Advanced toolbar.
Figure 1-11: The Web toolbar.
The Fundamentals

Sarasota County Government 17
Contextual menus Another type of Outlook menu, a contextual menu, displays a list of commands related to a specific object or area. To open a contextual menu:
1. Right-click an object or area in the item window or program screen.
A contextual menu appears, displaying commands that are relevant to the object or area you clicked.
2. Select an option from the contextual menu, or click anywhere outside the contextual menu to close it without selecting anything.
Mini Toolbar New in Outlook 2007 is the Mini Toolbar, which appears when you select text in a new item window, and contains common text formatting commands. To view the Mini Toolbar:
1. Select text in an item window.
The Mini Toolbar appears above the text you selected.
Trap: Sometimes the Mini Toolbar can be hard to see due to its transparency. To make the Mini Toolbar more visible, point to it.
Tip: A larger version of the Mini Toolbar also appears along with the contextual menu whenever you right-click in an item window.
2. Click the desired command on the Mini Toolbar or click anywhere outside the Mini Toolbar to close it.
Figure 1-12: A contextual menu.
Figure 1-13: The Mini Toolbar.
The Fundamentals

18
Using Keyboard Commands Another way to give commands in Outlook 2007 is using the keyboard. There are two different types of keyboard commands in Outlook 2007: keystroke shortcuts and Key Tips.
Keystroke shortcuts Keystroke shortcuts can save time when issuing common commands, such as creating a new mail message.
In order to issue a command using a keystroke shortcut, you simply press a combination of keys on your keyboard. For example, rather than clicking the New button on the Standard toolbar to create a new mail message, you could press and hold the keystroke shortcut, <Ctrl> + <N>.
Table 1-3: Common Keystroke Shortcuts provides an overview of commonly used keystroke shortcuts.
Key Tips New in Outlook 2007, Key Tips appear whenever you press the <Alt> key in an item window.
To issue a command using a Key Tip:
1. Press the <Alt> key.
Tiny letters and numbers, called badges, appear on the Office Button, the Quick Access Toolbar, and all of the tabs on the Ribbon.
2. Depending on the tab or command you want to select, press the letter or number key indicated on the badge.
3. Repeat this step as necessary until the desired command has been issued.
Exercise
• Exercise File: None required.
• Exercise: Memorize some common keystroke shortcuts.
Table 1-3: Common Keystroke Shortcuts
<Ctrl> + <O> Opens the selected item.
<Ctrl> + <N> Creates a new item.
<Ctrl> + <S> Saves the currently opened item.
<Ctrl> + <P> Prints the selected item.
<Ctrl> + <B> Toggles bold font formatting.
<Ctrl> + <I> Toggles italic font formatting.
<Ctrl> + <C> Copies the selected text or object.
<Ctrl> + <X> Cuts the selected text or object.
<Ctrl> + <V> Pastes the selected text or object.
Figure 1-14: Press the <Alt> key to display Key Tips.
The Fundamentals
Key Tip badge

Sarasota County Government 19
Using Help When you don’t know how to do something in Outlook 2007, look up your question in the Outlook Help files. The help files can answer your questions and offer tips about Outlook’s features.
Search for help
1. Click the Microsoft Office Outlook Help button ( ) on the Standard toolbar.
The Outlook Help window appears.
Other Ways to Open the Help window: Press <F1> or type a question in the “Type a question for help” box on the menu bar.
2. Type what you want to search for in the “Type words to search for” box and press <Enter>.
A list of help topics appears.
3. Click the topic that best matches what you’re looking for.
Outlook displays information regarding the selected topic.
Browse for help
1. Click the Microsoft Office Outlook Help button ( ) on the Standard toolbar.
The Outlook Help window appears.
2. Click the category that you want to browse.
The topics within the selected category appear.
3. Click the topic that best matches what you’re looking for.
Outlook displays information regarding the selected topic.
Exercise
• Exercise File: None required.
• Exercise: Browse topics in the “What’s new” category of Help. Then search the phrase “create a new message”. Change the help source to the “Outlook Help” section under “Content from this computer” and search the term again.
Figure 1-15: The Outlook Help window.
The Fundamentals
Enter search keywords here.
Browse help topic categories.
Choose a help source.
20
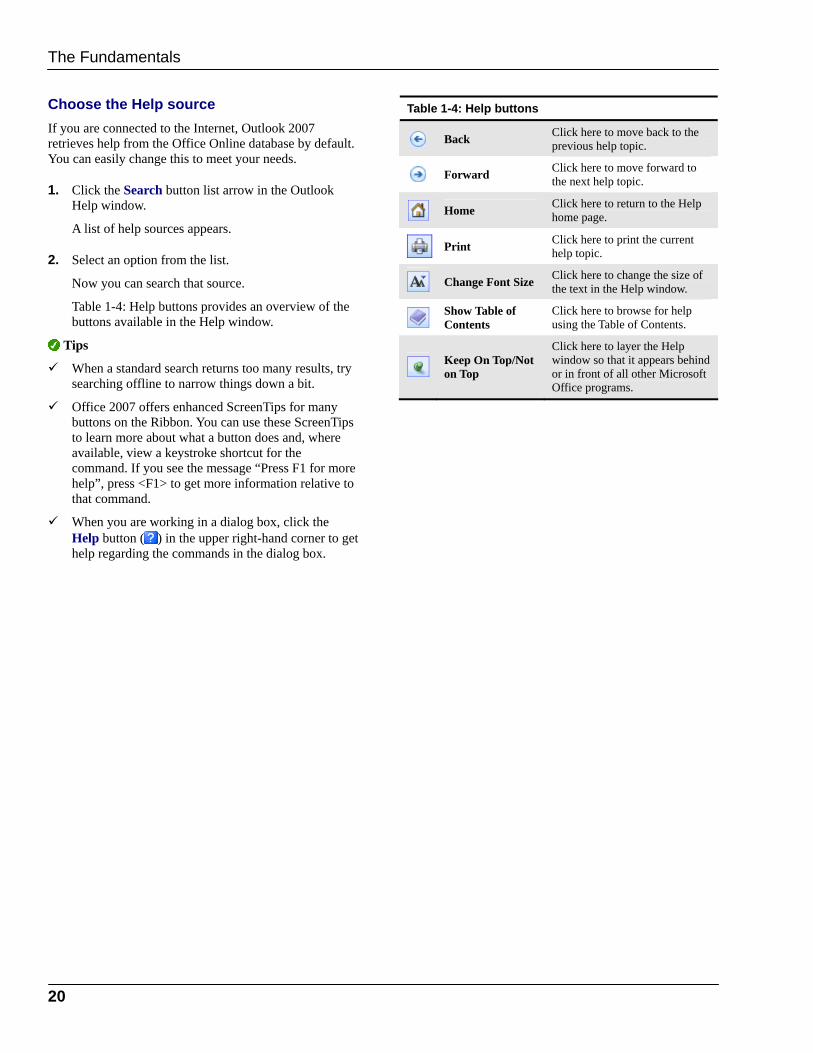
Choose the Help source If you are connected to the Internet, Outlook 2007 retrieves help from the Office Online database by default. You can easily change this to meet your needs.
1. Click the Search button list arrow in the Outlook Help window.
A list of help sources appears.
2. Select an option from the list.
Now you can search that source.
Table 1-4: Help buttons provides an overview of the buttons available in the Help window.
Tips
When a standard search returns too many results, try searching offline to narrow things down a bit.
Office 2007 offers enhanced ScreenTips for many buttons on the Ribbon. You can use these ScreenTips to learn more about what a button does and, where available, view a keystroke shortcut for the command. If you see the message “Press F1 for more help”, press <F1> to get more information relative to that command.
When you are working in a dialog box, click the Help button ( ) in the upper right-hand corner to get help regarding the commands in the dialog box.
Table 1-4: Help buttons
Back Click here to move back to the previous help topic.
Forward Click here to move forward to the next help topic.
Home Click here to return to the Help home page.
Print Click here to print the current help topic.
Change Font Size Click here to change the size of the text in the Help window.
Show Table of Contents
Click here to browse for help using the Table of Contents.
Keep On Top/Not on Top
Click here to layer the Help window so that it appears behind or in front of all other Microsoft Office programs.
The Fundamentals

Sarasota County Government 21
Exiting Outlook 2007 When you’re finished using Outlook 2007, you can exit it.
• Select File → Exit from the menu.
The Outlook program closes.
Other Ways to Exit Outlook: Click the Close button on the title bar.
Tips
Having too many programs open at a time can slow down your computer, so it’s a good idea to exit programs that aren’t being used.
Exercise
• Exercise File: None required.
• Exercise: Exit the Microsoft Office Outlook 2007 program.
Figure 1-16: Exiting Outlook.
The Fundamentals
Click here…
…or here to exit Outlook..

22
CCoommppoossiinngg aanndd SSeennddiinngg EE--mmaaiill
Composing an E-mail Message ....................... 23
Changing Message Format............................... 24 Change the format of all messages......... 24 Change the format of a single message.. 24
Formatting Text.................................................. 25 Change Font Type ................................... 25 Change Font Size .................................... 25 Change Font Color .................................. 25 Change Font Style ................................... 26
Inserting a Signature......................................... 27 Create a signature ................................... 27 Adjust signature defaults ......................... 28 Manually insert a signature...................... 28
Attaching a File to a Message .......................... 29
Working with Hyperlinks................................... 30 Insert a Hyperlink..................................... 30 Change the text of a hyperlink................. 30 Open a hyperlink...................................... 31
Specifying Message Options............................ 32 Set message priority ................................ 32 Request a read or delivery receipt........... 32 Other Options .......................................... 33
Checking your Spelling..................................... 34 Spell check a single word ........................ 34
Sending E-mail................................................... 35 Send a message...................................... 35 Recall a message .................................... 35
Working with Distribution Lists........................ 37 Create a distribution list ........................... 37 Send an e-mail using a distribution list .... 38
Saving Unfinished Messages (Drafts) ............. 39 Save an unfinished message .................. 39 Open a saved message........................... 39
Using the Out of Office Assistant .................... 40 Microsoft Exchange Server 2007 ............ 40
This chapter covers two of the most-used functions in Microsoft Outlook: How to compose and send an e-mail message.
The steps involved in composing and sending a message are pretty basic, but there’s quite a bit you can do in between these processes to maximize the effect that your messages have. This chapter will show you how to insert a signature, attach a file to a message, and more.
Using Exercise Files This chapter suggests exercises to practice the topic of each lesson. There are two ways you may follow along with the exercise files:
• Open the exercise file for a lesson, perform the lesson exercise, and close the exercise file.
• Open the exercise file for a lesson, perform the lesson exercise, and keep the file open to perform the remaining lesson exercises for the chapter.
The exercises are written so that you may “build upon them”, meaning the exercises in a chapter can be performed in succession from the first lesson to the last.
2

Sarasota County Government 23
Composing an E-mail Message This lesson explains how to perform the most basic e-mail task of all: how to compose an e-mail message.
1. Click the Inbox folder in the Navigation Pane.
The contents of your Inbox appear.
2. Click the New Mail Message button on the Standard toolbar.
An Untitled – Message window appears.
Other Ways to Create a New Message: Select File → New from the menu and select Mail Message from the submenu. Or, press <Ctrl> + <N>.
3. Type the recipient’s e-mail address in the To, Cc and/or Bcc field(s). (See Table 2-1: Ways to Address an E-mail Message for a description of each field.)
If you want to send the message to more than one person, simply place a semicolon ( ; ) between each recipients’ e-mail address—for example, [email protected]; [email protected].
Tip: If you don’t know the recipient’s e-mail address, but he or she is in your Address Book, click the To button to select the address from your Address Book.
4. Type the subject of the e-mail in the Subject field.
The Subject field of a message lets your recipients know what the message is about. It also
5. Click inside the body area of the message window and type your message.
Exercise
• Exercise File: None required.
• Exercise: Compose a new e-mail message, entering your own e-mail address in the To field and “FYI” in the Subject field. Type “Today I learned how to compose and send an e-mail message.” in the message body area.
Figure 2-1: The Untitled – Message window.
Table 2-1: Ways to Address an E-mail Message
To Sends the message to the recipient you specify.
Carbon Copy (Cc) Sends a copy of the message to a recipient who is not directly involved, but who might be interested in the message.
Blind Carbon Copy (Bcc)
Sends a copy of the message to a recipient without any other recipients knowing. To display the Bcc field, click the Options tab on the Ribbon and click the Show Bcc button in the Fields group.
Composing and Sending E-mail
24
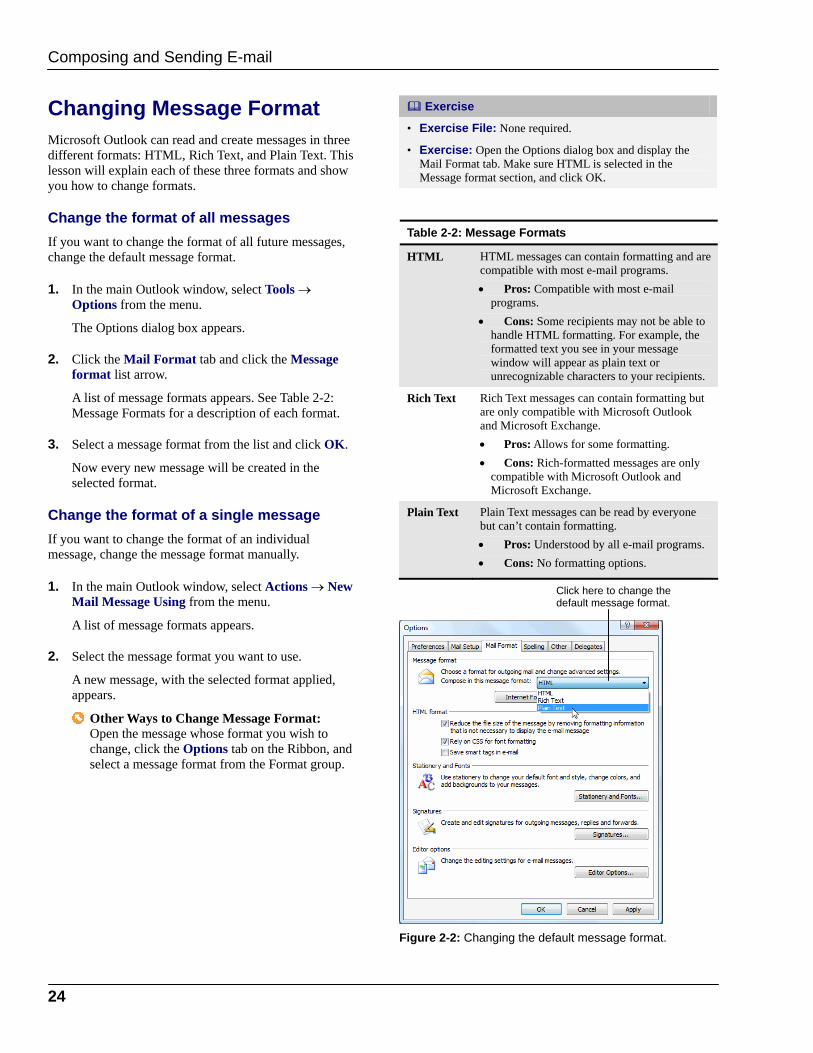
Changing Message Format Microsoft Outlook can read and create messages in three different formats: HTML, Rich Text, and Plain Text. This lesson will explain each of these three formats and show you how to change formats.
Change the format of all messages If you want to change the format of all future messages, change the default message format.
1. In the main Outlook window, select Tools → Options from the menu.
The Options dialog box appears.
2. Click the Mail Format tab and click the Message format list arrow.
A list of message formats appears. See Table 2-2: Message Formats for a description of each format.
3. Select a message format from the list and click OK.
Now every new message will be created in the selected format.
Change the format of a single message If you want to change the format of an individual message, change the message format manually.
1. In the main Outlook window, select Actions → New Mail Message Using from the menu.
A list of message formats appears.
2. Select the message format you want to use.
A new message, with the selected format applied, appears.
Other Ways to Change Message Format: Open the message whose format you wish to change, click the Options tab on the Ribbon, and select a message format from the Format group.
Exercise
• Exercise File: None required.
• Exercise: Open the Options dialog box and display the Mail Format tab. Make sure HTML is selected in the Message format section, and click OK.
Table 2-2: Message Formats
HTML HTML messages can contain formatting and are compatible with most e-mail programs. • Pros: Compatible with most e-mail
programs. • Cons: Some recipients may not be able to
handle HTML formatting. For example, the formatted text you see in your message window will appear as plain text or unrecognizable characters to your recipients.
Rich Text Rich Text messages can contain formatting but are only compatible with Microsoft Outlook and Microsoft Exchange. • Pros: Allows for some formatting. • Cons: Rich-formatted messages are only
compatible with Microsoft Outlook and Microsoft Exchange.
Plain Text Plain Text messages can be read by everyone but can’t contain formatting. • Pros: Understood by all e-mail programs. • Cons: No formatting options.
Figure 2-2: Changing the default message format.
Composing and Sending E-mail
Click here to change the default message format.

Sarasota County Government 25
Formatting Text In this lesson you will learn how to change the font type, size, style and color of the text in your e-mail messages.
Trap: You cannot format message text if your message format is set to Plain Text. To see which message format you are using, visit the Format group on the Options tab.
Change Font Type One way to emphasize text in a message is by changing its font type.
1. Select the text you wish to format.
2. Click the Format Text tab on the Ribbon and click the Font list arrow in the Font group.
A list of available fonts appears.
3. Select a font type from the list.
Change Font Size
Making text larger is another way to emphasize text.
1. Select the text you wish to format.
2. Click the Format Text tab on the Ribbon and click the Font Size list arrow in the Font group.
A list of font sizes appears.
3. Select a font size from the list.
Change Font Color Changing font color is another way to emphasize text in an e-mail message.
1. Select the text you wish to format.
2. Click the Format Text tab on the Ribbon and click the Font Color list arrow in the Font group.
A list of font colors appears.
3. Select the color you want to use.
Other Ways to Change Font Type, Size and Color: Use the commands located in the Basic Text group on the Message tab, or use the commands found on the Mini Toolbar.
Exercise
• Exercise File: None required.
• Exercise: If necessary, create a new e-mail message with your e-mail address in the To field, “FYI” in the Subject field, and the text “Today I learned how to create and send an e-mail message” in the message body area. Select the text in the message body area and change the font type to Arial Black. Select the word “compose” and change the font color to red, and do the same for the word “send.”
Figure 2-3: The Font group on the Format Text tab.
Figure 2-4: You can also format text using the Mini Toolbar or the Basic Text group on the Message tab.
Composing and Sending E-mail
Bold
Italics
Underline
Font Font Size
Font Color
Mini Toolbar Basic Text group
26
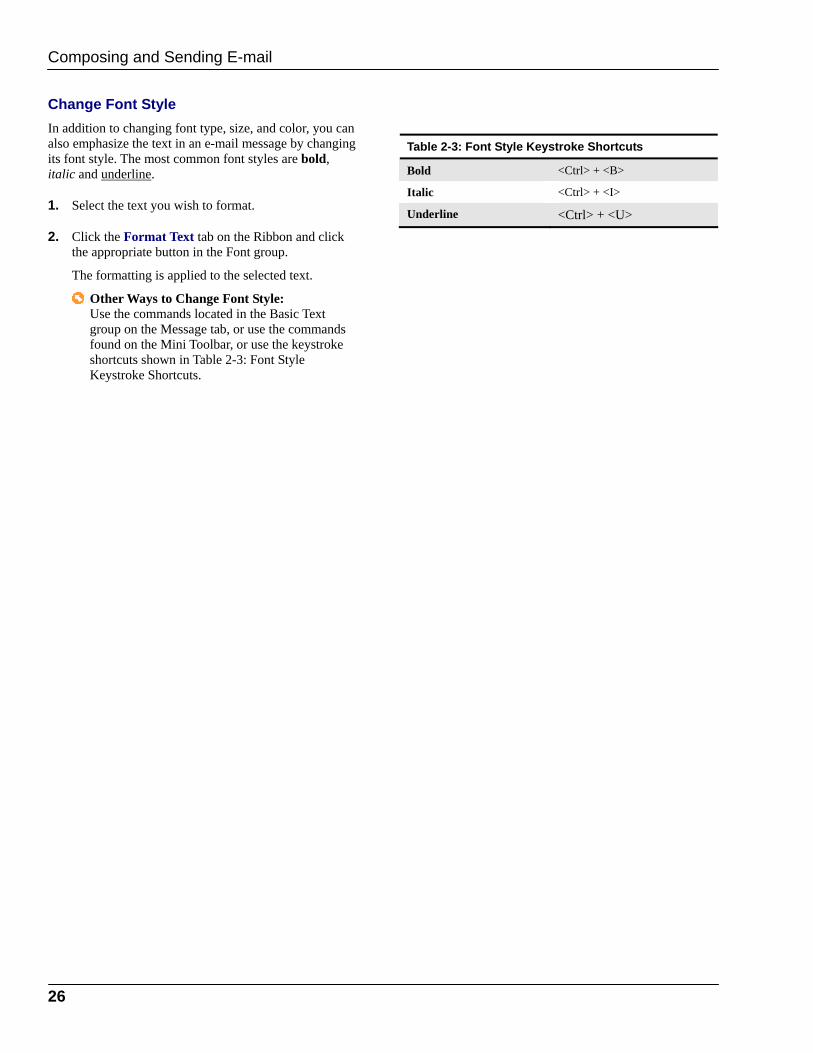
Change Font Style In addition to changing font type, size, and color, you can also emphasize the text in an e-mail message by changing its font style. The most common font styles are bold, italic and underline.
1. Select the text you wish to format.
2. Click the Format Text tab on the Ribbon and click the appropriate button in the Font group.
The formatting is applied to the selected text.
Other Ways to Change Font Style: Use the commands located in the Basic Text group on the Message tab, or use the commands found on the Mini Toolbar, or use the keystroke shortcuts shown in Table 2-3: Font Style Keystroke Shortcuts.
Table 2-3: Font Style Keystroke Shortcuts
Bold <Ctrl> + <B>
Italic <Ctrl> + <I>
Underline <Ctrl> + <U>
Composing and Sending E-mail

Sarasota County Government 27
Inserting a Signature A signature is boilerplate text or a file that can be attached to an e-mail message. Your signature appears at the bottom of any new messages you compose and can include such things as:
• Your name, title, and organization
• Your phone and fax number
• Your address
• A link to your Web page
Create a signature
1. In the main Outlook window, select Tools → Options from the menu.
The Options dialog box appears.
2. Click the Mail Format tab and click Signatures.
The Signatures and Stationery dialog box appears. Here you can create new signatures and manage existing ones.
3. Click New, enter a name for the signature, and click OK.
4. In the Edit signature field, type the text that you want to appear in the signature. Then, format the signature as desired.
5. Insert pictures or hyperlinks, if desired.
6. Click OK, and then click OK again to save the signature.
The next time you create a new message, your signature will appear.
Tip: You can create more than one signature in Microsoft Outlook. For example, you might want to use one signature for professional correspondence and another for personal.
Exercise
• Exercise File: None required.
• Exercise: Open the Options dialog box, display the Mail Format tab, and click Signatures. Create a new signature named “Practice” and, in the Edit signature field, type “Jeanne Trudeau.” Press <Enter> and type “Director of Business Development.” Apply boldface formatting to “Jeanne Trudeau,” and italicize “Director of Business Development.” Click OK, OK when you’re finished.
Figure 2-5: The Signatures and Stationery dialog box.
Figure 2-6: An example of what a professional signature might look like.
Composing and Sending E-mail
Signature
Click here to insert a picture
Click here to insert a hyperlink

28
Adjust signature defaults By default, your signature will appear at the bottom of every new message you compose. However, you can change this and other options to meet your needs.
1. In the main Outlook window, select Tools → Options from the menu.
2. Click the Mail Format tab and click Signatures.
The Signatures and Stationery dialog box appears.
Other Ways to Open the Signatures and Stationery Dialog Box: In the message window, click the Insert tab on the Ribbon and click the Signature button in the Include group. Select Signatures from the menu.
3. Under Choose default signature, click the appropriate list arrow and specify the appropriate options.
Take a look at Table 2-4: Signature Options for a description of each option.
4. Click OK, then click OK again to save your changes.
Manually insert a signature By default, your signature will appear at the bottom of every new message you compose. If you have specified otherwise, however, follow these steps to insert a signature manually.
1. In the Message window, click the Insert tab on the Ribbon.
2. Click the Signature button in the Include group and select the signature you want to insert from the list.
The signature is inserted into the message.
Table 2-4: Signature Options
E-mail account Select the account for which you want to assign the signature.
New messages If you have created multiple signatures, click this list arrow to select the signature you want to use. Or, select (none) if you don’t want to use a signature.
Replies/forwards By default, your signature does not appear at the bottom of any forwarded messages or replies. If you would like your signature to appear at the bottom of forwarded messages and replies, click the list arrow and select the signature you want to use.
Figure 2-7: To manually insert a signature, click the Signature button in the Include group and select a signature from the list.
Composing and Sending E-mail
Signature button
Sarasota County Government 29
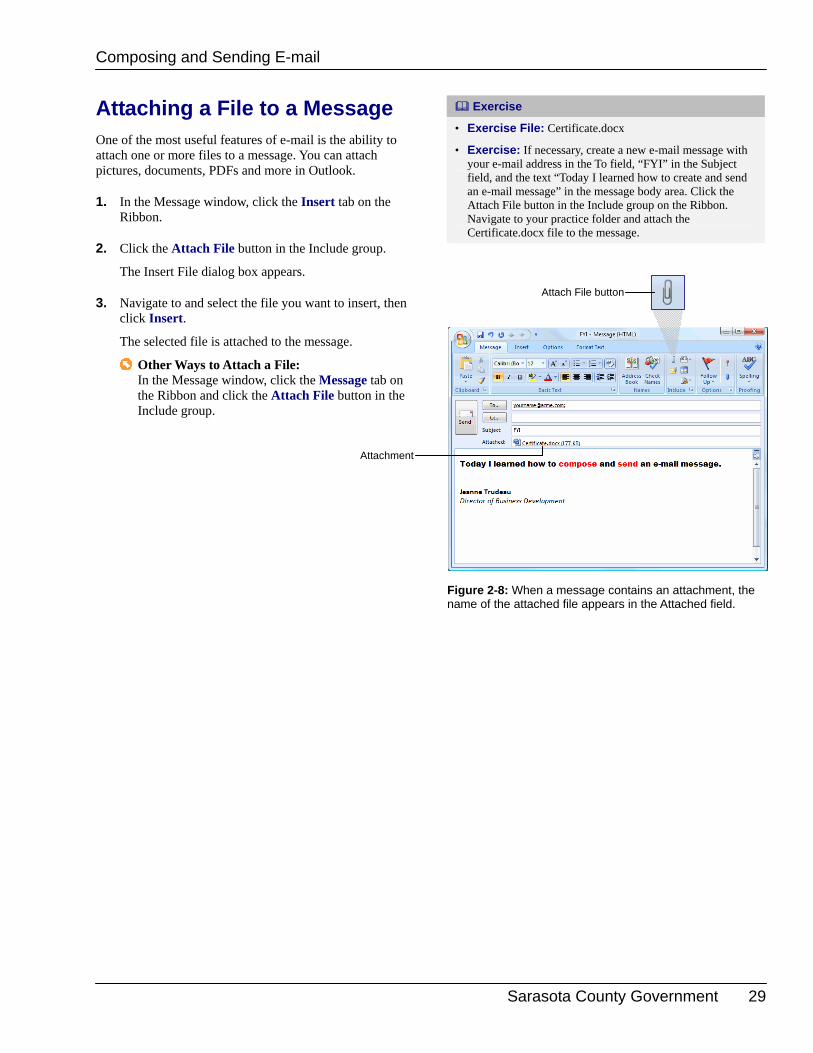
Attaching a File to a Message One of the most useful features of e-mail is the ability to attach one or more files to a message. You can attach pictures, documents, PDFs and more in Outlook.
1. In the Message window, click the Insert tab on the Ribbon.
2. Click the Attach File button in the Include group.
The Insert File dialog box appears.
3. Navigate to and select the file you want to insert, then click Insert.
The selected file is attached to the message.
Other Ways to Attach a File: In the Message window, click the Message tab on the Ribbon and click the Attach File button in the Include group.
Exercise
• Exercise File: Certificate.docx
• Exercise: If necessary, create a new e-mail message with your e-mail address in the To field, “FYI” in the Subject field, and the text “Today I learned how to create and send an e-mail message” in the message body area. Click the Attach File button in the Include group on the Ribbon. Navigate to your practice folder and attach the Certificate.docx file to the message.
Figure 2-8: When a message contains an attachment, the name of the attached file appears in the Attached field.
Composing and Sending E-mail
Attach File button
Attachment
30
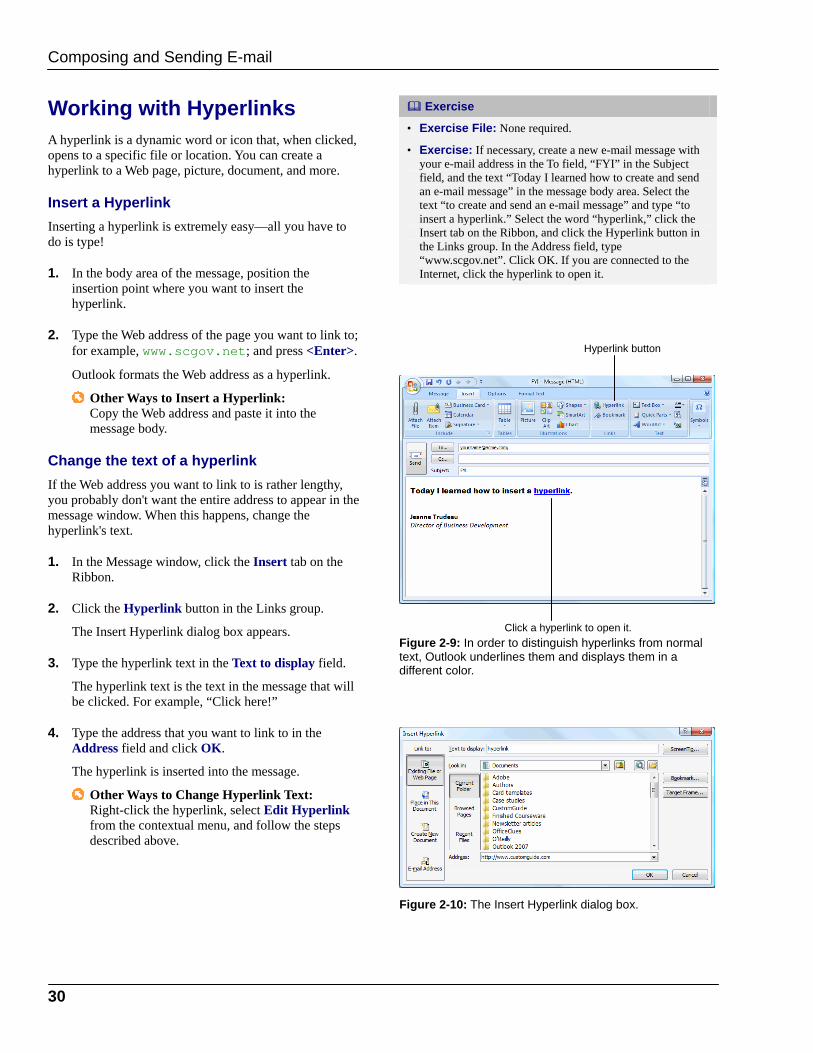
Working with Hyperlinks A hyperlink is a dynamic word or icon that, when clicked, opens to a specific file or location. You can create a hyperlink to a Web page, picture, document, and more.
Insert a Hyperlink Inserting a hyperlink is extremely easy—all you have to do is type!
1. In the body area of the message, position the insertion point where you want to insert the hyperlink.
2. Type the Web address of the page you want to link to; for example, www.scgov.net; and press <Enter>.
Outlook formats the Web address as a hyperlink.
Other Ways to Insert a Hyperlink: Copy the Web address and paste it into the message body.
Change the text of a hyperlink If the Web address you want to link to is rather lengthy, you probably don't want the entire address to appear in the message window. When this happens, change the hyperlink's text.
1. In the Message window, click the Insert tab on the Ribbon.
2. Click the Hyperlink button in the Links group.
The Insert Hyperlink dialog box appears.
3. Type the hyperlink text in the Text to display field.
The hyperlink text is the text in the message that will be clicked. For example, “Click here!”
4. Type the address that you want to link to in the Address field and click OK.
The hyperlink is inserted into the message.
Other Ways to Change Hyperlink Text: Right-click the hyperlink, select Edit Hyperlink from the contextual menu, and follow the steps described above.
Exercise
• Exercise File: None required.
• Exercise: If necessary, create a new e-mail message with your e-mail address in the To field, “FYI” in the Subject field, and the text “Today I learned how to create and send an e-mail message” in the message body area. Select the text “to create and send an e-mail message” and type “to insert a hyperlink.” Select the word “hyperlink,” click the Insert tab on the Ribbon, and click the Hyperlink button in the Links group. In the Address field, type “www.scgov.net”. Click OK. If you are connected to the Internet, click the hyperlink to open it.
Figure 2-9: In order to distinguish hyperlinks from normal text, Outlook underlines them and displays them in a different color.
Figure 2-10: The Insert Hyperlink dialog box.
Composing and Sending E-mail
Hyperlink button
Click a hyperlink to open it.

Sarasota County Government 31
Open a hyperlink Opening a hyperlink is extremely easy…
• Click the hyperlink.
Other Ways to Open a Hyperlink: Right-click the hyperlink and select Open Hyperlink from the contextual menu.
Tips
If the address you want to link to contains spaces or characters, you must enclose the entire address in chevrons. For example, <file://C:\My Documents\Sales Results.doc>.
If the URL begins with www, you do not need to type http://. Outlook will automatically format the URL as a link to the Web.
Composing and Sending E-mail
32
Specifying Message Options Just like you can assign parcel insurance or specify overnight delivery for letters and packages, Outlook lets you specify options for your e-mail messages. You can mark messages as urgent, specify a read receipt for all messages, or request that your messages be encoded so that they can only be read by the intended recipient(s).
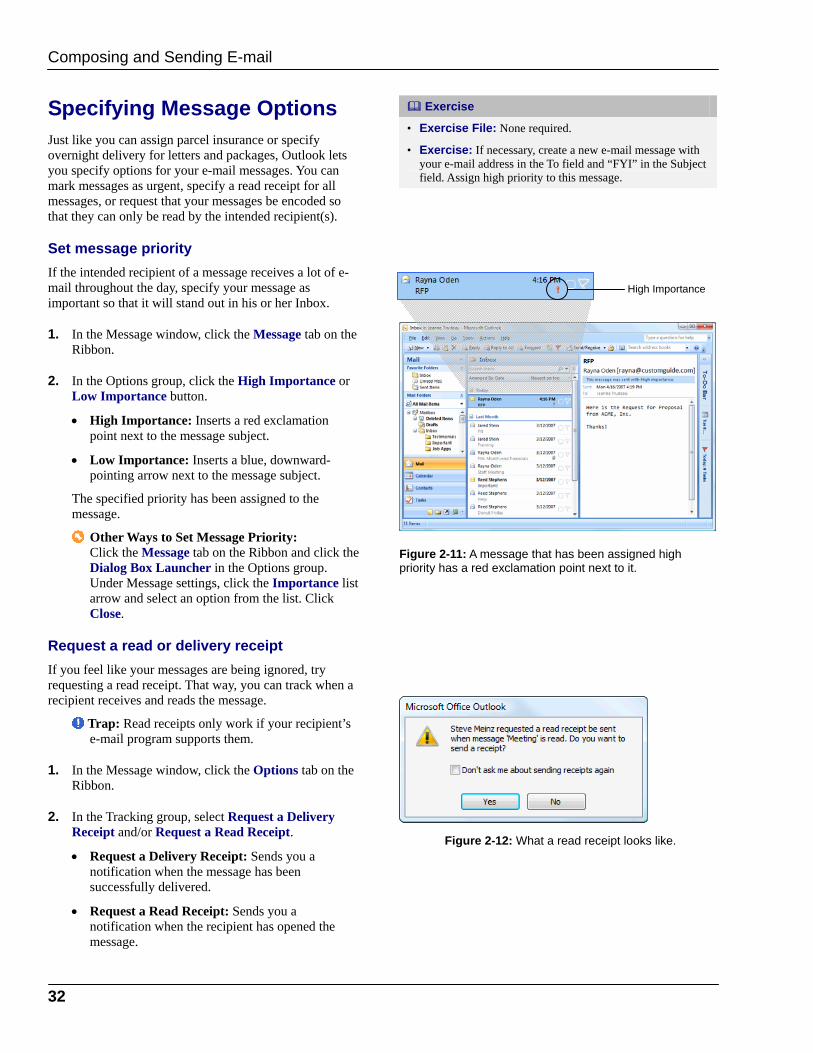
Set message priority If the intended recipient of a message receives a lot of e-mail throughout the day, specify your message as important so that it will stand out in his or her Inbox.
1. In the Message window, click the Message tab on the Ribbon.
2. In the Options group, click the High Importance or Low Importance button.
• High Importance: Inserts a red exclamation point next to the message subject.
• Low Importance: Inserts a blue, downward-pointing arrow next to the message subject.
The specified priority has been assigned to the message.
Other Ways to Set Message Priority: Click the Message tab on the Ribbon and click the Dialog Box Launcher in the Options group. Under Message settings, click the Importance list arrow and select an option from the list. Click Close.
Request a read or delivery receipt If you feel like your messages are being ignored, try requesting a read receipt. That way, you can track when a recipient receives and reads the message.
Trap: Read receipts only work if your recipient’s e-mail program supports them.
1. In the Message window, click the Options tab on the Ribbon.
2. In the Tracking group, select Request a Delivery Receipt and/or Request a Read Receipt.
• Request a Delivery Receipt: Sends you a notification when the message has been successfully delivered.
• Request a Read Receipt: Sends you a notification when the recipient has opened the message.
Exercise
• Exercise File: None required.
• Exercise: If necessary, create a new e-mail message with your e-mail address in the To field and “FYI” in the Subject field. Assign high priority to this message.
Figure 2-11: A message that has been assigned high priority has a red exclamation point next to it.
Figure 2-12: What a read receipt looks like.
Composing and Sending E-mail
High Importance

Sarasota County Government 33
Tip: Don’t rely too heavily on read receipts; your recipients have the option to deny them.
Other Ways to Request Receipts: Click the Options tab on the Ribbon and click the Dialog Box Launcher in the Tracking group. Under Voting and Tracking options, select Request a delivery receipt for this message, Select a read receipt for this message, or both. Click Close.
Other Options You might have noticed a variety of other message options on the Ribbon or in the Message Options dialog box. See Table 2-5: Other Options for a description of each.
Figure 2-13: The Message Options dialog box. Table 2-5: Other Options
Sensitivity Displays a tag indicating how the recipient should treat the message.
Security Settings Encodes the message so it is not readable by anyone except the intended recipient(s).
Have replies sent to Sends all replies to the message to someone else, such as an assistant.
Do not deliver before Waits to send the message until the date and time you specify.
Expires after Makes the message unavailable after a specified date and time.
Composing and Sending E-mail

34
Checking your Spelling It’s usually a good idea to spell-check your messages before you send them. Not only do spelling errors make you look unprofessional, they also reflect poorly on your product or organization.
Spell check a single word By default, Outlook checks for spelling errors as you type, underlining misspelled words in red. This makes it easy to correct spelling errors individually.
1. Right-click the misspelled word.
A contextual menu appears, offering suggestions for the correct spelling of the word.
2. Select the correct spelling of the word from the contextual menu.
Outlook corrects the spelling of the word and the red underline disappears.
Tip: If a word is underlined in red but you know it is correctly spelled, you can get rid of the red underline by selecting Ignore, Ignore All, or Add to Dictionary.
Other Ways to Check Spelling: In the Message window, click the Message tab on the Ribbon and click the Spelling & Grammar button in the Proofing group.
Exercise
• Exercise File: None required.
• Exercise: If necessary, create a new e-mail message with your e-mail address in the To field, “FYI” in the Subject field, and the text “Today I learned how to insert a hyperlink” in the message body area. Select the text “insert a hyperlink” and type “check my spelalling.” Right-click the misspelled word, “spelalling,” and select “spelling” from the contextual menu.
Table 2-6: Spelling Options
Ignore Once Accepts the spelling as is and moves on to the next spelling error.
Ignore All Accepts the spelling as is and ignores all future occurrences of the word in the message.
Add to Dictionary If a word cannot be found in the Microsoft Office Dictionary, it is marked as misspelled. This option adds the word to the dictionary so that it is recognized during future spell checks.
Figure 2-14: To correct a spelling error, right-click it and select a correction from the contextual menu.
Composing and Sending E-mail
Click here to display the Spelling dialog box.
Outlook checks for spelling errors as you type, underlining questionable words in red.
Sarasota County Government 35
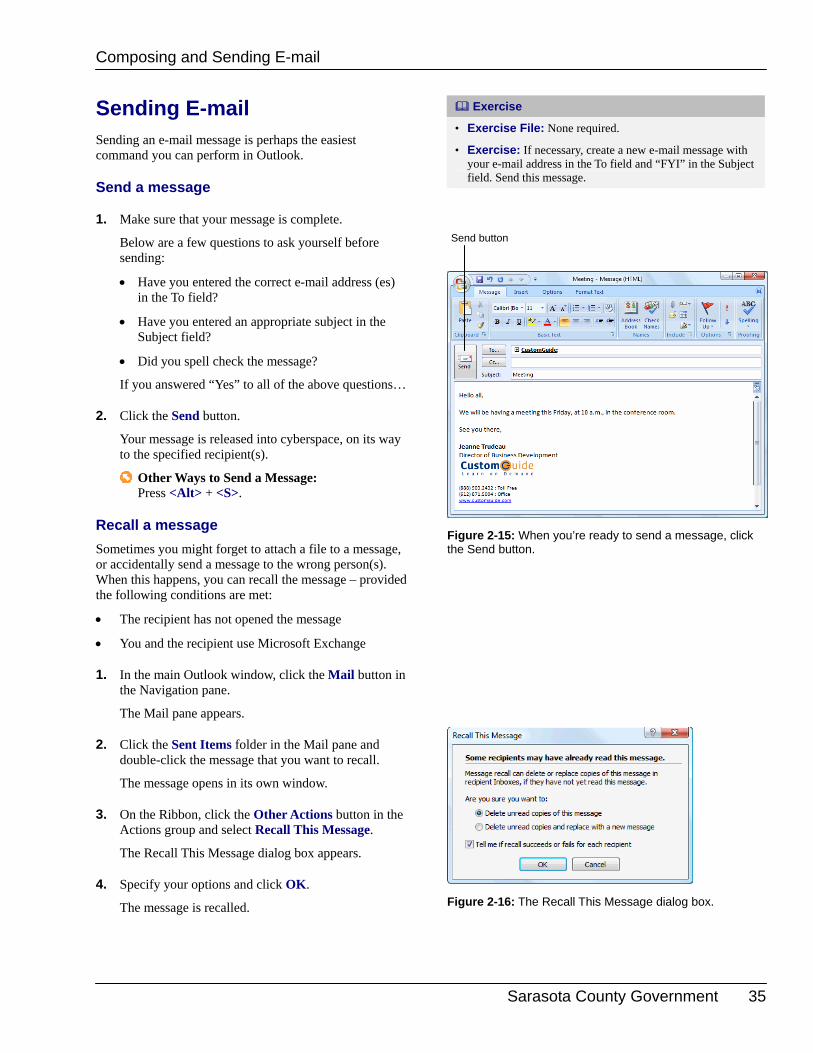
Sending E-mail Sending an e-mail message is perhaps the easiest command you can perform in Outlook.
Send a message
1. Make sure that your message is complete.
Below are a few questions to ask yourself before sending:
• Have you entered the correct e-mail address (es) in the To field?
• Have you entered an appropriate subject in the Subject field?
• Did you spell check the message?
If you answered “Yes” to all of the above questions…
2. Click the Send button.
Your message is released into cyberspace, on its way to the specified recipient(s).
Other Ways to Send a Message: Press <Alt> + <S>.
Recall a message Sometimes you might forget to attach a file to a message, or accidentally send a message to the wrong person(s). When this happens, you can recall the message – provided the following conditions are met:
• The recipient has not opened the message
• You and the recipient use Microsoft Exchange
1. In the main Outlook window, click the Mail button in the Navigation pane.
The Mail pane appears.
2. Click the Sent Items folder in the Mail pane and double-click the message that you want to recall.
The message opens in its own window.
3. On the Ribbon, click the Other Actions button in the Actions group and select Recall This Message.
The Recall This Message dialog box appears.
4. Specify your options and click OK.
The message is recalled.
Exercise
• Exercise File: None required.
• Exercise: If necessary, create a new e-mail message with your e-mail address in the To field and “FYI” in the Subject field. Send this message.
Figure 2-15: When you’re ready to send a message, click the Send button.
Figure 2-16: The Recall This Message dialog box.
Composing and Sending E-mail
Send button

36
5. If you chose to replace the recalled message with a new message, make your edits as necessary and click Send.
The recalled message appears.
6. Click the Close button to close the recalled message.
To see if your recall was successful, check your Inbox for a notification.
Figure 2-17: After you recall a message, a notification appears in your Inbox telling you whether or not the recall was successful.
Composing and Sending E-mail
Recall notification

Sarasota County Government 37
Working with Distribution Lists A distribution list, sometimes called a group, is an Address Book entry comprised of several names from the Address Book. You use distribution lists to send an e-mail message to every member of the group in a single mailing. You can use distribution lists to quickly send e-mails to:
• All employees in the same department or organization
• Members on the same project or committee
• A group of friends
Distribution lists show up as items in your Address Book and Contacts list the same way that a person’s name does. To address an e-mail message using a distribution list, follow the same procedures that you would with any other message.
In this lesson, you will learn how to create a distribution list that you can use to send e-mails to multiple recipients.
Create a distribution list Before you can send e-mails to recipients in a distribution list, you need to create the list.
1. Click the New button list arrow on the Standard toolbar (a drop down menu will appear) and select Distribution List.
The Untitled – Distribution List window appears.
2. Enter a name for the distribution list in the Name field.
For example, you could call the distribution list “Family” or “Management Team”.
Now you’re ready to choose which recipients you want to include in the distribution list.
3. Click the Select Members button in the Members group on the Ribbon.
The Select Members dialog box appears, giving you access to all of the contacts in your address book.
4. Find and double-click the names of recipients you want to add to the distribution list.
As you add recipients, their names appear in the Members field at the bottom of the dialog box.
Exercise
• Exercise File: None required.
• Exercise: Create a distribution list named “Friends” and add several of your friends to the list. Send them an e-mail using the new distribution list.
Figure 2-18: The Select Members dialog box.
Figure 2-19: The Distribution List window.
Composing and Sending E-mail
Select the address book that contains the recipients you want to add to the distribution list.
Recipients that have been added to the distribution list.
Select recipients to add to the distribution list
Recipients that have been added to the distribution list.
38
Tip: To search for recipients in different address books—for example, the Contacts folder—click the Address Book list arrow at the top of the Select Members dialog box and select the desired address book.
Other Ways to Add Recipients: Select the name of the recipient, then click the Members button at the bottom of the Select Members dialog box.
5. Click OK when you’re finished.
You return to the Distribution List window. The name you entered for the distribution list now appears in the title bar and the names of the recipients are listed in the window.
6. Click the Save & Close button in the Actions group on the Ribbon.
The window closes and the new distribution list is saved.
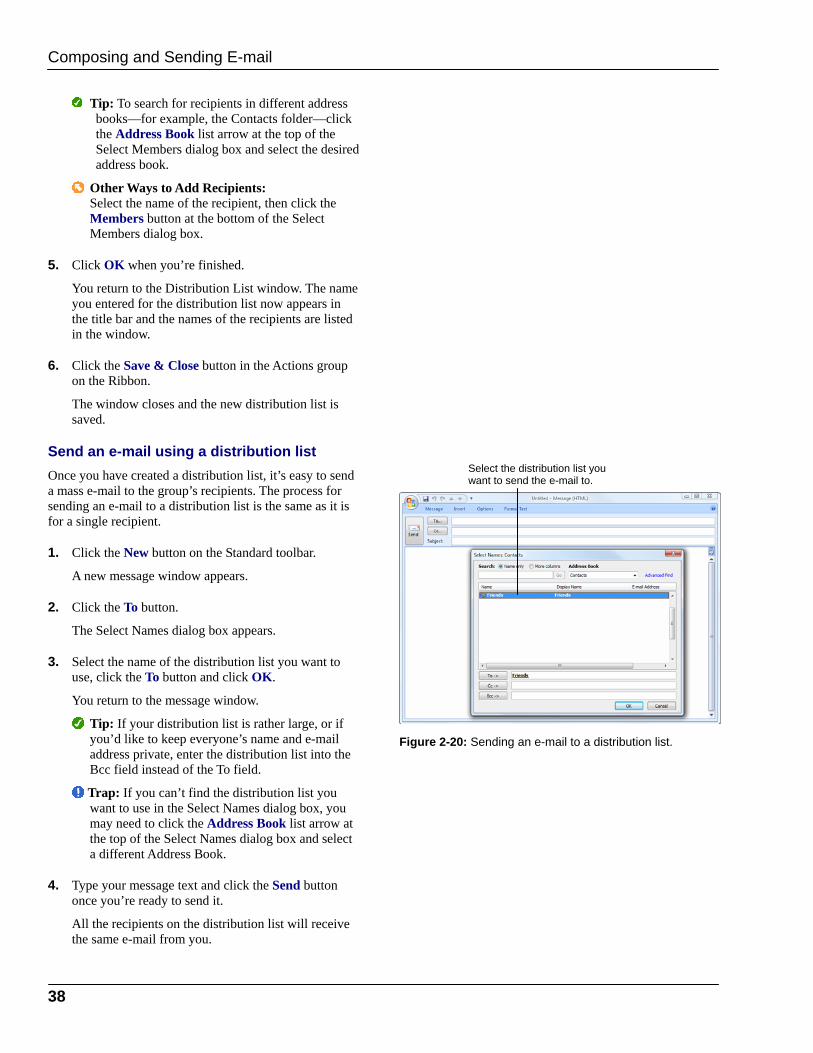
Send an e-mail using a distribution list Once you have created a distribution list, it’s easy to send a mass e-mail to the group’s recipients. The process for sending an e-mail to a distribution list is the same as it is for a single recipient.
1. Click the New button on the Standard toolbar.
A new message window appears.
2. Click the To button.
The Select Names dialog box appears.
3. Select the name of the distribution list you want to use, click the To button and click OK.
You return to the message window.
Tip: If your distribution list is rather large, or if you’d like to keep everyone’s name and e-mail address private, enter the distribution list into the Bcc field instead of the To field.
Trap: If you can’t find the distribution list you want to use in the Select Names dialog box, you may need to click the Address Book list arrow at the top of the Select Names dialog box and select a different Address Book.
4. Type your message text and click the Send button once you’re ready to send it.
All the recipients on the distribution list will receive the same e-mail from you.
Figure 2-20: Sending an e-mail to a distribution list.
Composing and Sending E-mail
Select the distribution list you want to send the e-mail to.

Sarasota County Government 39
Saving Unfinished Messages (Drafts) If you get interrupted while composing an e-mail message, all is not lost; you can save the unfinished message and return to it later.
Save an unfinished message
• Click the Office Button and select Save from the menu.
Outlook saves the unfinished message to the Drafts folder.
Other Ways to Save a Message: Click the Save button on the Quick Access Toolbar.
Open a saved message It’s easy to return to an unfinished message.
1. In the main Outlook window, click the Mail button in the Navigation Pane.
2. Click the Drafts folder.
A list of unfinished messages appears.
3. Double-click the message you want to finish.
The message opens in its own window, exactly how you left it.
Exercise
• Exercise File: None required.
• Exercise: Create a new message to yourself with “Practice” in the Subject field and the text “I’ll finish this message later” in the message body area. Save a draft of this message. Open the Drafts folder and double-click the “Practice” message. Close this message.
Figure 2-21: Anytime a message is closed unexpectedly, Outlook asks if you would like to save it.
Figure 2-22: Opening an unfinished message that has been saved to the Drafts folder.
Composing and Sending E-mail
Double-click the message you want to finish.
Drafts folder

40
Using the Out of Office Assistant If you know that you’re going to be out of the office for a few days, it’s a good idea to set up the Out of Office Assistant. The Out of Office Assistant sends an automatic response to any messages you receive while you’re away.
Trap: The Out of Office Assistant only works if you are using Microsoft Exchange.
Microsoft Exchange Server 2007 If you are using Microsoft Exchange Server 2007, you have access to several new Out of Office features:
• Rich text formatting: now you can apply fonts, colors and formatting to your replies,
• Customization: Now your replies can be customized based for recipients both inside and outside your organization. For example, you could specify that your co-workers receive a different message than your clients.
• Start and stop time: Tired of forgetting to turn off the Out of Office Assistant? Now you can apply a start and stop time in advance.
1. In the main Outlook window, select Tools → Out of Office Assistant from the menu.
The Out of Office Assistant dialog box appears.
2. Click the Send Out of Office auto-replies option and specify a start and stop time, if desired.
Now you need to enter the text that will appear in your auto-reply.
3. On the Inside My Organization and/or Outside My Organization tab(s), type your auto-reply.
4. Click OK.
Exercise
• Exercise File: None required.
• Exercise: Open the Out of Office Assistant dialog box. Take a look at the options available in this dialog box, and then close it.
Figure 2-23: The Out of Office Assistant dialog box, if you are using Exchange Server 2007.
Composing and Sending E-mail Composing and Sending E-mail

Sarasota County Government 41
RReecceeiivviinngg aanndd SSoorrttiinngg EE--mmaaiill
Receiving and Reading E-mail ......................... 42 Retrieve e-mail manually ......................... 42 Retrieve e-mail automatically .................. 42 Read e-mail ............................................. 42
Replying to and Forwarding a Message.......... 44 Reply to a message................................. 44 Forward a message................................. 44 Delete a message.................................... 45
Opening an Attachment .................................... 46 Preview an attachment ............................ 46 Open an attachment ................................ 46 Save an attachment................................. 47
Flagging a Message for Follow-up .................. 48 Flag a message ....................................... 48 Change flags............................................ 48 Set a reminder date ................................. 48 Remove a flag.......................................... 49
Using Color Categories..................................... 50 Assign a color category ........................... 50 Clear a category ...................................... 50 Rename a category ................................. 50 Create a new category ............................ 51 Change the Quick Click category ............ 51
Sorting Messages.............................................. 52
Changing Views................................................. 53
Printing a Message............................................ 54 Use the Print dialog box .......................... 54 Use Quick Print........................................ 54
Now that you know how to compose and send e-mail messages, you need to know how to receive and sort them.
In this chapter, we’ll show you how to receive messages from your e-mail server and what to do with those messages once they appear in your Inbox. For example, you can reply to a message, forward a message on to someone else, flag a message for later follow-up, and more.
Using Exercise Files This chapter suggests exercises to practice the topic of each lesson. There are two ways you may follow along with the exercise files:
• Open the exercise file for a lesson, perform the lesson exercise, and close the exercise file.
• Open the exercise file for a lesson, perform the lesson exercise, and keep the file open to perform the remaining lesson exercises for the chapter.
The exercises are written so that you may “build upon them”, meaning the exercises in a chapter can be performed in succession from the first lesson to the last.
3

42
Receiving and Reading E-mail There are two ways to retrieve e-mail in Outlook—manually and automatically.
Retrieve e-mail manually If you don’t want to wait for Outlook to retrieve your messages automatically, you can retrieve your messages manually.
1. Click the Mail button in the Navigation pane.
The Inbox appears.
2. Click the Send/Receive button on the Standard toolbar.
Retrieve e-mail automatically Outlook checks your mail server for new messages every 30 minutes by default, but you can change this to meet your needs.
1. In the main Outlook window, select Tools → Options from the menu.
The Options dialog box appears.
2. Click the Mail Setup tab and click Send/Receive.
The Send/Receive Groups dialog box appears.
3. Under Setting for group “All Accounts,” make sure the Schedule an automatic send/receive every box is checked.
Now you need to specify how much time you want to elapse between new message downloads.
4. Enter the number of minutes you want to elapse between downloads.
5. Click Close, and then click OK.
Read e-mail Any new, unread messages appear in bold and have a closed envelope icon ( ) next to them. To view a message in the Reading pane, click the message. To view a message in its own window, double-click the message.
• Click or double-click the message that you want to read.
The message appears.
Exercise
• Exercise File: None required.
• Exercise: Create and send a new message to yourself. Then, click the Send/Receive button on the toolbar and open the message you just sent yourself in its own window.
Figure 3-1: The main Outlook window.
Figure 3-2: New messages appear in bold.
Receiving and Sorting E-mail
The Reading pane
The Send/Receive button
Sarasota County Government 43
Tips
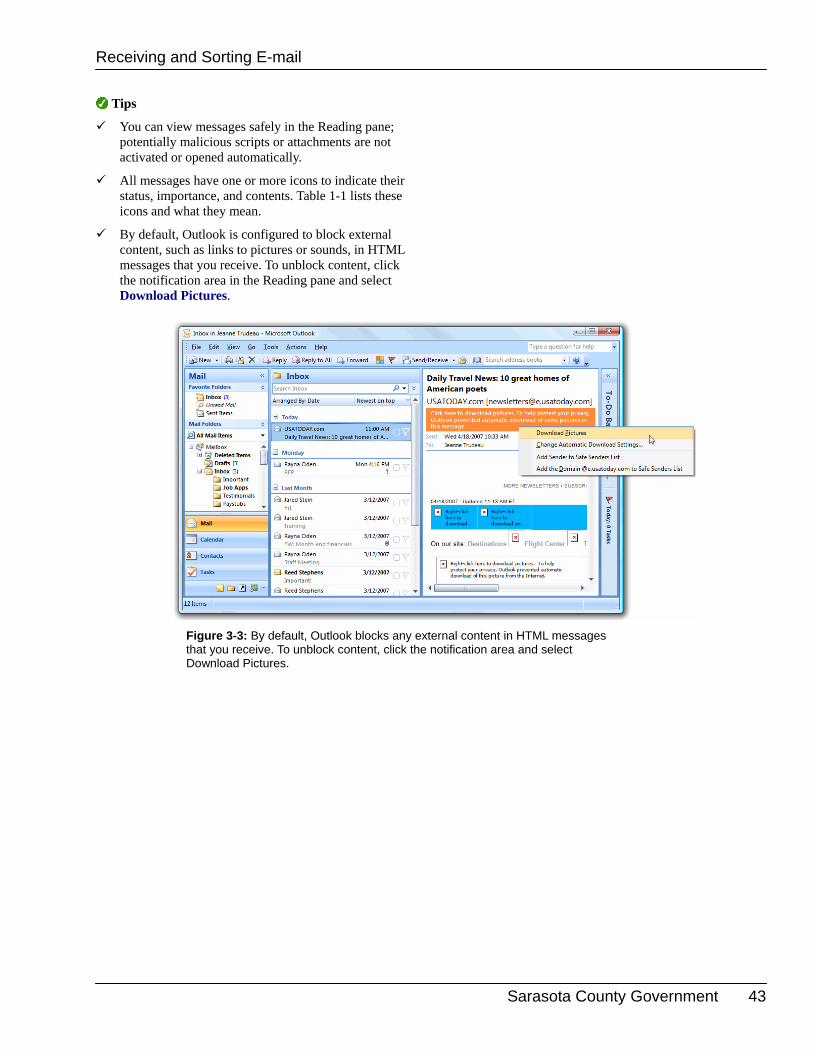
You can view messages safely in the Reading pane; potentially malicious scripts or attachments are not activated or opened automatically.
All messages have one or more icons to indicate their status, importance, and contents. Table 1-1 lists these icons and what they mean.
By default, Outlook is configured to block external content, such as links to pictures or sounds, in HTML messages that you receive. To unblock content, click the notification area in the Reading pane and select Download Pictures.
Figure 3-3: By default, Outlook blocks any external content in HTML messages that you receive. To unblock content, click the notification area and select Download Pictures.
Receiving and Sorting E-mail

44
Replying to and Forwarding a Message You can reply to an e-mail message just like you would answer a letter.
Reply to a message Replying to an e-mail is like answering a letter—it acknowledges your receipt of the message and allows you to respond.
1. Click the Mail button in the Navigation pane and double-click the message that you want to reply to.
The message opens in its own window.
2. Click the Reply or Reply to All button in the Respond group on the Ribbon.
• Reply: Sends your reply to the author of the message only.
• Reply to All: Sends your reply to the author and everyone else who received the message.
3. Type your reply and click the Send button when you’re finished.
Other Ways to Reply to a Message: In the Inbox, click the message you want to reply to and click Reply or Reply to All on the Standard toolbar.
Forward a message Forwarding a message is very similar to replying to a message, except that you send the message on to someone else instead of back to the original sender.
1. Click the Mail button in the Navigation pane and double-click the message that you want to forward.
The message opens in its own window.
2. Click the Forward button in the Respond group on the Ribbon.
3. In the To field, enter the e-mail address(es) of the person(s) you want to forward the message to.
4. Type any comments you wish to add to the message, and click the Send button when you’re finished.
Other Ways to Do Something: In the Inbox, click the message that you want to forward and click the Forward button on the Standard toolbar.
Exercise
• Exercise File: None required.
• Exercise: If necessary, create and send a new message to yourself and then open it in its own window. Click the Reply button in the Respond group on the Ribbon, and type “Replying to an e-mail acknowledges your receipt of the e-mail.” in the message body area. Click Send, and when this response appears in your Inbox, delete it.
Figure 3-4: Use the buttons in the Respond group on the Ribbon to Reply to or Forward a message.
Figure 3-5: When you reply to a message, the Name and Subject fields are filled in for you automatically. All you have to do is type your reply and click Send.
Receiving and Sorting E-mail
Type your reply here
The Respond group
Sarasota County Government 45
Trap: When you forward a message, it’s important to note that all attachments and message properties, such as “High Importance” tags, are included with the message.
Delete a message When you’re finished with a message it’s a good idea to delete it. Deleting messages as soon as you’re done with them keeps your Inbox organized and free from clutter.
• Click the message you want to delete and press the <Delete> key.
The message is removed from your Inbox and placed in the Deleted Items folder.
Tips
Many companies and organizations impose a limit on how much space Outlook can acquire on the server—translation: how many messages you can have in your Mailbox. If you have such a limit, deleting a message as soon as you’re finished with it helps to ensure that your Inbox stays within your limit.
To permanently delete your messages, right-click the Deleted Items folder in the Navigation pane and select Empty “Deleted Items” Folder from the contextual menu.
Receiving and Sorting E-mail

46
Opening an Attachment Whenever you see a paper clip icon ( ) next to a message, the message contains an attachment. This lesson will show you how to preview, open, and save an attachment.
Tips
Never open an unfamiliar or suspicious attachment. Install a good anti-virus program on your computer, and save files to your hard disk before opening them.
Preview an attachment A new feature in Outlook 2007, Attachment Preview lets you preview an attachment before you open it.
1. Click the Mail button in the Navigation pane and double-click the message containing the attachment.
The message opens in its own window.
2. Click the attachment that you want to preview.
A warning message appears, reminding you that you should only preview files from a trustworthy source. If you trust the sender of the attachment, continue to the next step.
3. Click Preview file.
The attachment appears in the Previewer.
4. Click the Message button to exit the Previewer.
Other Ways to Preview an Attachment: In the Inbox, click the message containing the attachment that you want to preview. Then, click the attachment in the Reading pane and click Preview file.
Open an attachment To open an attachment, double-click it.
1. Click the Mail button in the Navigation pane and double-click the message containing the attachment.
The message opens in its own window.
2. Double-click the attachment that you want to open.
The Opening Mail Attachment dialog box appears, reminding you that you should only open files from a trustworthy source. If you trust the sender of the attachment, continue to the next step.
3. Click Open.
The attachment opens.
Exercise
• Exercise File: Certificate.docx
• Exercise: Create a new e-mail with your e-mail address in the To field and “Congratulations” in the Subject field. Click the Attach File button in the Include group, navigate to your Practice folder, select the Certificate.docx file, and click Insert. Click Send. When this message appears in your Inbox, double-click it. Open the Certificate.docx attachment.
Figure 3-6: Messages that contain an attachment have a tiny paper clip icon next to them.
Figure 3-7: Previewing an attachment in the Reading pane.
Receiving and Sorting E-mail
When you’re finished previewing the attachment, click the Message button to return to the message.

Sarasota County Government 47
Other Ways to Open an Attachment: In the Inbox, click the message containing the attachment that you want to open. Then, double-click the attachment in the Reading pane.
Save an attachment If you’re going to be making changes to an attachment, you’ll need to save it to your computer first.
1. Double-click the attachment that you want to save.
The Opening Mail Attachment dialog box appears.
2. Click Save.
The Save As dialog box appears.
3. Enter a new name for the file, if necessary, and specify where you want to save the file.
4. Click Save.
Other Ways to Save an Attachment: In the Inbox, click the message containing the attachment that you want to save. Right-click the attachment in the Reading pane and select Save As from the contextual menu.
Figure 3-8: The Opening Mail Attachment dialog box.
Receiving and Sorting E-mail
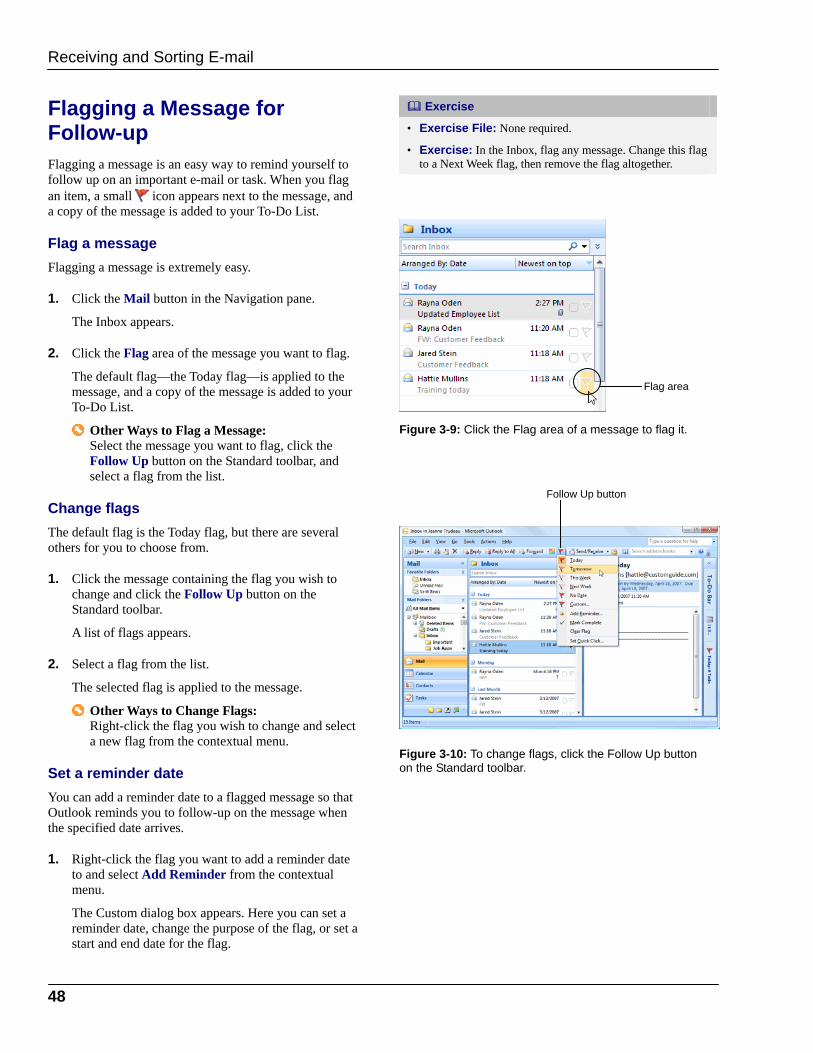
48
Flagging a Message for Follow-up Flagging a message is an easy way to remind yourself to follow up on an important e-mail or task. When you flag an item, a small icon appears next to the message, and a copy of the message is added to your To-Do List.
Flag a message Flagging a message is extremely easy.
1. Click the Mail button in the Navigation pane.
The Inbox appears.
2. Click the Flag area of the message you want to flag.
The default flag—the Today flag—is applied to the message, and a copy of the message is added to your To-Do List.
Other Ways to Flag a Message: Select the message you want to flag, click the Follow Up button on the Standard toolbar, and select a flag from the list.
Change flags The default flag is the Today flag, but there are several others for you to choose from.
1. Click the message containing the flag you wish to change and click the Follow Up button on the Standard toolbar.
A list of flags appears.
2. Select a flag from the list.
The selected flag is applied to the message.
Other Ways to Change Flags: Right-click the flag you wish to change and select a new flag from the contextual menu.
Set a reminder date You can add a reminder date to a flagged message so that Outlook reminds you to follow-up on the message when the specified date arrives.
1. Right-click the flag you want to add a reminder date to and select Add Reminder from the contextual menu.
The Custom dialog box appears. Here you can set a reminder date, change the purpose of the flag, or set a start and end date for the flag.
Exercise
• Exercise File: None required.
• Exercise: In the Inbox, flag any message. Change this flag to a Next Week flag, then remove the flag altogether.
Figure 3-9: Click the Flag area of a message to flag it.
Figure 3-10: To change flags, click the Follow Up button on the Standard toolbar.
Receiving and Sorting E-mail
Follow Up button
Flag area

Sarasota County Government 49
2. Click the Reminder Date list arrow, and select a date from the Calendar.
3. Click OK.
Outlook will send you a reminder to follow-up on the message when the specified date arrives.
Remove a flag Once you’ve followed-up on a flagged message, you can remove the flag or mark it as “Complete”.
1. Right-click the flag you want to remove.
2. Select Mark Complete or Clear Flag from the contextual menu.
Depending on the option you selected, the Flag is either replaced by a checkmark ( ) or removed altogether.
Other Ways to Mark a Flag “Complete”: Click the flag.
Tips
You can also control message flags from inside the Message window. To do so, click the Follow Up button in the Options group and select an option from the menu.
You can also flag contacts and tasks.
You cannot color-code flags in Outlook 2007.
Figure 3-11: The Custom dialog box.
Receiving and Sorting E-mail

50
Using Color Categories Color categories let you organize your Outlook items into specific groups, making the information they contain easier to distinguish. You can choose from a set of default categories, or you can even create your own.
Assign a color category By default, you have eight color categories to choose from.
1. Click the Mail button in the Navigation pane.
The Inbox appears.
2. Click the message you wish to categorize and click the Categorize button on the Standard toolbar.
A list of categories appears.
3. Select a category from the list.
The selected category is applied to the message.
Tip: You can assign multiple categories to a message.
Other Ways to Categorize a Message: Right-click the message you want to categorize, select Categorize from the contextual menu, and select a category from the list.
Clear a category If you decide you don’t want to categorize a message after all, you can clear the category.
• Right-click the category you wish to clear and select Clear All Categories from the contextual menu.
Rename a category You can rename Outlook’s color categories to meet your needs.
1. Click the Mail button in the Navigation pane.
The Inbox appears.
2. Click the Categorize button on the Standard toolbar and select All Categories.
The Color Categories dialog box appears.
3. Click the color category you wish to rename, and click Rename.
4. Type a new name for the category, and click OK when you’re finished.
Exercise
• Exercise File: None required.
• Exercise: Assign the Red category to any message in your Inbox. Create a new category named “Practice,” using any color you wish. Apply this category to the same message that you applied the Red category to. Clear these categories from the message.
Figure 3-12: To assign a color category to a message, click the Categorize button on the Standard toolbar and select a category from the menu.
Figure 3-13: The Rename Category dialog box.
Receiving and Sorting E-mail
Categorize button
Enter a new name for the category here
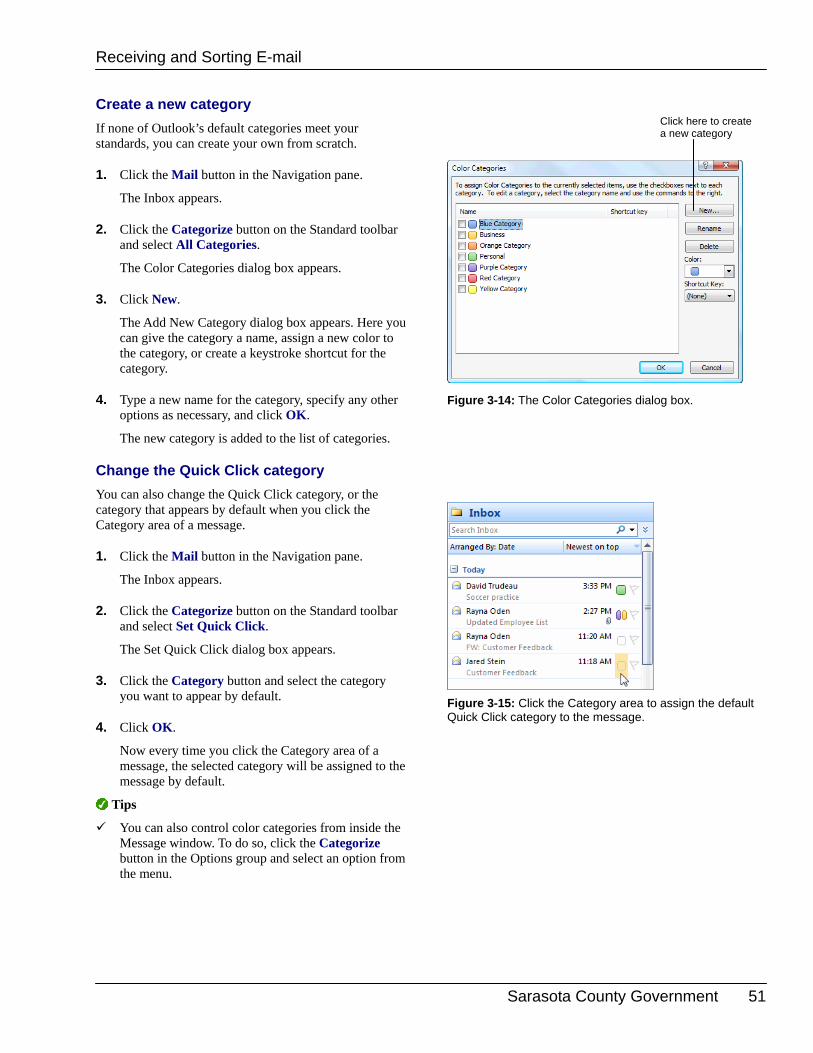
Sarasota County Government 51
Create a new category If none of Outlook’s default categories meet your standards, you can create your own from scratch.
1. Click the Mail button in the Navigation pane.
The Inbox appears.
2. Click the Categorize button on the Standard toolbar and select All Categories.
The Color Categories dialog box appears.
3. Click New.
The Add New Category dialog box appears. Here you can give the category a name, assign a new color to the category, or create a keystroke shortcut for the category.
4. Type a new name for the category, specify any other options as necessary, and click OK.
The new category is added to the list of categories.
Change the Quick Click category You can also change the Quick Click category, or the category that appears by default when you click the Category area of a message.
1. Click the Mail button in the Navigation pane.
The Inbox appears.
2. Click the Categorize button on the Standard toolbar and select Set Quick Click.
The Set Quick Click dialog box appears.
3. Click the Category button and select the category you want to appear by default.
4. Click OK.
Now every time you click the Category area of a message, the selected category will be assigned to the message by default.
Tips
You can also control color categories from inside the Message window. To do so, click the Categorize button in the Options group and select an option from the menu.
Figure 3-14: The Color Categories dialog box.
Figure 3-15: Click the Category area to assign the default Quick Click category to the message.
Receiving and Sorting E-mail
Click here to create a new category

52
Sorting Messages When your Inbox is jam-packed with messages, it can be difficult to find what you’re looking for. When this happens, try sorting your messages using Outlook’s arrangement options. You can sort your messages by the date they were sent, who sent them, and more.
1. Click the Mail button in the Navigation pane.
The Inbox appears.
2. Select View → Arranged By from the menu.
A list of available arrangement options appears. See Table 3-1: Arrangement Options for a description of each option.
3. Select an arrangement from the list.
Other Ways to Sort Messages: In the Inbox, click Arranged By and select an option from the list.
Exercise
• Exercise File: None required.
• Exercise: Sort the messages in your Inbox by subject. Then, sort the messages in your Inbox by date.
Figure 3-16: Another way to sort messages is using the Arranged By button in the Inbox.
Table 3-1: Arrangement Options
Date Arranges messages by date, starting with today.
Conversation Arranges messages by conversation topic.
From Arranges messages by sender.
To Arranges messages by recipient.
Categories Arranges messages by assigned categories.
Flag: Start Date Arranges flagged messages by their start date.
Flag: Due Date Arranges flagged messages by their due date.
Size Arranges messages by size, largest to smallest.
Subject Arranges messages alphabetically by subject.
Type Arranges messages by type.
Attachments Arranges messages by whether or not they have an attachment.
E-mail Account Arranges messages by e-mail account.
Importance Arranges messages by importance.
Receiving and Sorting E-mail
Arranged By button

Sarasota County Government 53
Changing Views There are a variety of different ways to view the messages in your Inbox. For example, you could choose to only display messages that haven’t been read, or view your messages on a timeline. This lesson shows you how.
1. Click the Mail button in the Navigation pane.
The Inbox appears.
2. Select View → Current View from the menu.
A list of available views appears. See Table 3-2: Inbox Views for a description of these views.
3. Select a view from the list.
Other Ways to Change Views: In the main Outlook window, select Tools → Organize from the menu. Click Using Views and select a view from the list.
Exercise
• Exercise File: None required.
• Exercise: Switch to Message Timeline view. Switch to Messages with AutoPreview view. Switch back to Messages view.
Figure 3-17: The Current View menu.
Figure 3-18: Messages with AutoPreview view lets you view the first three lines of any unread messages.
Table 3-2: Inbox Views
Messages The default view in Outlook. Displays the Navigation, Mail and Reading panes.
Messages with AutoPreview
Displays the first three lines of any unread messages.
Last Seven Days Only displays messages from the past seven days.
Unread Messages in This Folder
Only displays messages that haven’t been read.
Sent To Displays the recipient(s) of each message in the Mail pane.
Message Timeline Displays the messages in your Inbox on a timeline.
Receiving and Sorting E-mail

54
Printing a Message Sometimes it can be refreshing to read a message in hard copy, especially if the message is long. Printing a message in Outlook is extremely easy.
Use the Print dialog box If you want to control certain parts of the printing process, such as the number of copies you want to print, use the Print dialog box.
1. Open the message you want to print.
2. Click the Office Button and select Print.
The Print dialog box appears.
3. Specify the appropriate options in the Print dialog box (see Table 3-3: Print Options for a description of these options), and click OK to begin printing.
Other Ways to Open the Print Dialog Box: Press <Ctrl> + <P>.
Use Quick Print If you’re in a hurry, you can use Outlook’s default print settings to Quick Print a message.
1. In the main Outlook window, click the message you want to print.
2. Click the Print button on the Standard toolbar.
The message is sent to the default printer.
Other Ways to Quick Print: Right-click the message you want to print and select Print from the contextual menu.
Exercise
• Exercise File: None required.
• Exercise: Select a message in your Inbox and open the Print dialog box. Display this message in Print Preview, then print the message.
Figure 3-19: The Print dialog box.
Table 3-3: Print Options
Name Select which printer you want to use.
Properties Displays the Properties dialog box, where you can specify various printer options. These options vary by printer.
Number of pages Specify which pages you want to print.
Number of copies Specify how many copies of the message you want to print.
Page Setup Displays the Page Setup dialog box, where you can add a Header/Footer, change page size, etc.
Print options Depending on the item you are trying to print, this section offers additional options.
Preview Click here to display the message in Print Preview.
Receiving and Sorting E-mail
Sarasota County Government 55
OOrrggaanniizziinngg aanndd FFiinnddiinngg IInnffoorrmmaattiioonn
Exploring the Folder List .................................. 57
Creating and Using Folders ............................. 58 Create a new folder ................................. 58 Move messages between folders ............ 58
Managing Folders.............................................. 60 Rename a folder ...................................... 60 Move a folder ........................................... 59 Delete a folder ......................................... 59 Creating and Using Search Folders ........ 61
Modifying and Deleting Search Folders.......... 63
When you work at your desk for a while, papers and files can pile up into a mess. The same thing happens after you’ve worked with Outlook for a while—your e-mails becoming disorganized and harder to find.
In this chapter, you’ll learn how to take control and organize your Outlook information. You’ll learn how to search for items, manage data in folders, and automatically manage your e-mails.
4

56
Exploring the Folder List Just like a filing cabinet is used to organize information into related folders, Windows uses folders to organize your files and programs. You can copy, move, and delete files to and from the folders on your hard drive.
Similar to Windows, Outlook has its own set of folders for storing the items you create in various modules: e-mail messages, appointments, contacts, and so on. Each tool in Outlook stores its information in its own folders, which can be viewed in the Folder List in the Navigation Pane.
By default, when you open Outlook you see only your Mail folders in the Navigation Pane; you can display all your Outlook folders (including folders such as the Calendar and Contacts folders) with the click of a button.
1. Click the Folder List button at the bottom of the Navigation Pane.
The Folder List appears in the Navigation Pane, showing you where all of your Outlook items are stored.
2. Click any folder in the All Folders list to display that folder’s contents on the screen.
Tips
Sometimes you may find that one of your Outlook folders is getting too big to manage and you will need to organize and move its information into several new folders or subfolders. For example, you could create a “Personal” folder to store your personal e-mail.
Exercise
• Exercise File: None required.
• Exercise: Display the Folder List in the Navigation Pane.
Figure 4-1: The Folder List.
Organizing and Finding Information
Folder List button

Sarasota County Government 57
Creating and Using Folders Outlook normally saves all your e-mail messages in the Inbox folder, but sooner or later you may need to expand your horizons and create your own folders to help organize your e-mail messages and other Outlook items more effectively.
This lesson will show you how to create a new folder for storing and organizing your Outlook items.
Create a new folder
1. Click the New button arrow on the Standard toolbar and select Folder.
The Create New Folder dialog box appears.
Other Ways to Open the Create New Folder Dialog Box: Right-click in the Folder List and select New Folder.
2. Type a name for the folder in the Name box.
3. Click the Folder contains list arrow and select the type of item the new folder will contain.
For example, you would select Mail and Post Items if you were creating a new folder to hold e-mail messages.
Next, you need to decide whether you want the folder to be a subfolder of another folder or not.
4. Select a folder in the “Select where to place the folder” list and click OK.
The new folder appears as a subfolder within the folder you selected.
Tips
If you don’t want the new folder to be a subfolder, make sure you select the Mailbox folder at the top of the list when you’re creating the new folder—in which case the new folder will appear alphabetically with the other folders in the list.
Move messages between folders Once you set up the folders you want, you can organize your messages by moving them into the desired folders.
1. Select the folder in the Folder List that contains the message(s) you want to move.
Tip: To move multiple messages at once, press and hold the <Ctrl> key while you select the messages.
Exercise
• Exercise File: None required.
• Exercise: Create a new mail folder in your Mailbox and name it “Custom Guide”. Move a message from your Inbox into the Custom Guide folder, then move it back.
Figure 4-2: The Create New Folder dialog box.
Figure 4-3: Moving a message from the Inbox folder to the CustomGuide folder.
Organizing and Finding Information
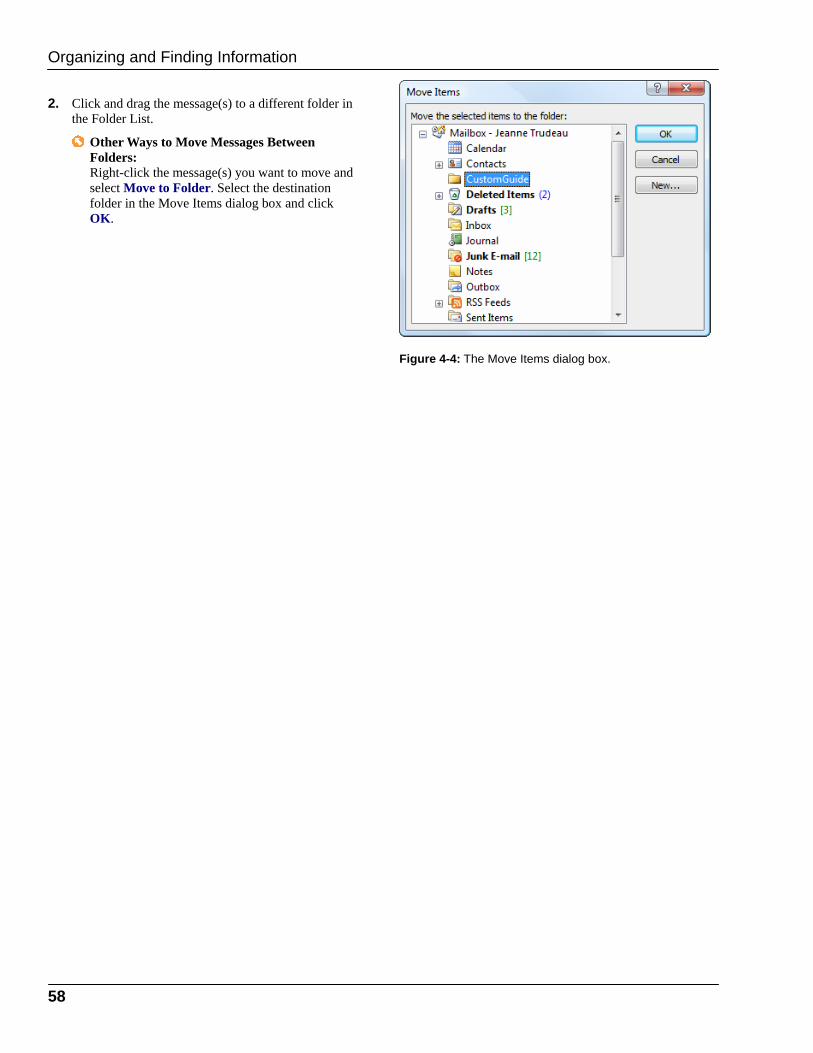
58
2. Click and drag the message(s) to a different folder in the Folder List.
Other Ways to Move Messages Between Folders: Right-click the message(s) you want to move and select Move to Folder. Select the destination folder in the Move Items dialog box and click OK.
Figure 4-4: The Move Items dialog box.
Organizing and Finding Information

Sarasota County Government 59
Managing Folders You can reorganize your folders by renaming them, moving them, and even deleting them.
Tips
To rename, move, or delete a folder, you need to first display either the Folder List or the Mail pane.
If a folder in the folder list has subfolders, it will have a plus symbol next to it. Click the plus symbol to expand the folder and view the subfolders. Click the minus symbol to collapse them again.
Rename a folder
1. Right-click the folder and select Rename from the contextual menu.
2. Enter a new name and press <Enter>.
Move a folder • Click and drag the folder to the desired location.
If you drag a folder into another folder, it becomes a subfolder of that folder.
Tip: If multiple folders are at the same folder level in the folder list, they are arranged alphabetically.
Delete a folder
1. Right-click the folder you want to delete in the Folder List and select Delete “folder name”.
A warning message appears, asking if you’re sure you want to delete the folder.
2. Click Yes to confirm the deletion.
Exercise
• Exercise File: None required.
• Exercise: If necessary, create a folder named “CustomGuide”, then rename it “Practice”. Move the folder so that it is a subfolder of the Inbox folder. Delete the “Practice” folder.
Figure 4-5: Renaming a folder.
Figure 4-6: Moving the CustomGuide folder so it becomes a subfolder of the Inbox folder.
Organizing and Finding Information

60
Creating and Using Search Folders Search Folders are valuable e-mail management tools. Search Folders are unlike the other folders in Outlook, such as the Inbox folder that stores all incoming e-mail messages.
Search Folders are virtual folders that do not actually contain messages; they are more like views of e-mails that match specific criteria. When you open a Search Folder, the messages you see are stored in other Outlook folders.
Because you don’t have to constantly move and copy items to other folders in Outlook, Search Folders are easy to use and are more effective for sorting and organizing than standard folders.
There are four Search Folders that are created by default in Outlook:
• Categorized Mail: All messages that have been assigned a color category.
• For Follow Up: All messages with flags appear here.
• Large Mail: E-mail items larger than 100 KB appear here.
• Unread Mail: All messages that haven’t been read appear here.
You can also modify or create new Search Folders that follow your own search criteria. This lesson will teach you how to use and create Search Folders.
Use a Search Folder
• Click a Search Folder in the Navigation Pane to view messages that match its criteria.
Create a new Search Folder
1. Select File → New from the menu and select Search Folder from the submenu.
The New Search Folder dialog box appears.
Other Ways to Open the New Search Folder Dialog Box: Press <Ctrl> + <Shift> + <P>.
2. Select Create a custom Search Folder from the list.
Tip: Instead of creating a completely customized Search Folder as we’re doing here, you can create a new Search Folder using one of the pre-set options in the list. Outlook provides Search Folders in commonly used categories such as
Exercise
• Exercise File: None required.
• Exercise: View the Unread Messages Search Folder. Create a new custom Search Folder called “Staff Meetings” and set its criteria to search only the Inbox folder for messages that contain “staff meeting” in the subject or message body.
Figure 4-7: Search Folders in the Navigation Pane.
Figure 4-8: The New Search Folder dialog box.
Organizing and Finding Information

Sarasota County Government 61
Reading Mail, Mail from People and Lists, and Organizing Mail. All you need to do is select an option and enter any additional criteria.
3. Click the Choose button.
The Custom Search Folder dialog box appears.
4. Type a name for the Search Folder in the Name box.
5. Click the Criteria button.
The Search Folder Criteria dialog box appears. Here you can enter criteria for your search on the Messages, More Choices, and Advanced tabs.
6. Enter criteria for the Search Folder and click OK.
Now you need to select which folders you want to search using those criteria.
7. Click the Browse button.
The Select Folder(s) dialog box appears.
8. Select the folders you want to search, and click OK.
9. Click OK twice to close the dialog boxes.
Figure 4-9: The Custom Search Folder dialog box.
Figure 4-10: The Search Folder Criteria dialog box.
Organizing and Finding Information

62
Modifying and Deleting Search Folders You don’t always have to create a new Search Folder. Save time by modifying an existing Search Folder’s criteria instead. And if you find that the criteria for an existing Search Folder is no longer needed, you can delete it since it does not actually store items.
Modify a Search Folder
1. Right-click the Search Folder and select Customize this Search Folder from the contextual menu.
The Customize “Search Folder name” dialog box appears.
2. Modify the Search Folder name, criteria, or search folders.
3. Click OK.
Delete a Search Folder
1. Right-click the Search Folder and select Delete “Search Folder name” from the menu.
A warning message appears, asking if you’re sure you want to delete the Search Folder.
2. Click Yes to confirm the deletion.
The Search Folder is deleted.
Exercise
• Exercise File: None required.
• Exercise: Change the Categorized Mail Search Folder’s criteria so it searches for only messages marked Red. Create a new Search Folder and then delete it.
Figure 4-11: Customizing a Search Folder.
Organizing and Finding Information

Sarasota County Government 63
WWoorrkkiinngg wwiitthh CCoonnttaaccttss
Adding a Contact ............................................... 65
Adding an E-mail Sender to the Contacts List65
Editing and Deleting Contacts ......................... 66
Changing Contact Views................................... 67
Working in a Contact Window.......................... 68 Show different pages ............................... 68 Communicate with a contact ................... 68
Finding and Organizing Contacts .................... 70 Find contacts ........................................... 70 Add a contacts folder ............................... 70
Printing the Contacts List ................................. 72
As you may recall, people used to keep track of their contacts in a Rolodex, which was basically a small box filled with note cards. Contact information was typed or scribbled on each card, and the cards were arranged alphabetically by the contact’s name. You would then spin a knob on the side of the box to rotate the cards to find a person. A Rolodex seems like a primitive way to manage contact information, but this was the best option until computers came along.
Outlook’s Contacts list is a “technological Rolodex” database that keeps track of names, addresses, phone numbers, and lots of other information. Once you have entered a person’s name and details into Outlook, the possibilities are endless. You can instantly find, e-mail or print contact information, or even create a map to a contact’s business or home address.
5

64
Adding a Contact The Contacts list contains information about people and organizations you interact with. The Contacts list lets you enter as much or as little information about your contacts as you want, such as their names, phone numbers, and addresses. You can then use the information in the Contacts list with the other Outlook tools.
For example, with a few clicks of the mouse, you can send an e-mail to a contact or schedule an appointment with him or her. You can even use the Contacts list with other programs. For example, you could store all the information in your Contacts list on a Palm organizer.
Tips
By default, contacts appear in Outlook in Business Cards view. In this view, your contacts are displayed as Electronic Business Cards, which look like actual paper business cards on the screen.
1. Click the Contacts button in the Navigation pane.
Outlook displays the Contacts list. Here you can see your contacts.
2. Click the New Contact button on the Standard toolbar.
The Untitled – Contact window appears. It’s up to you how much information you enter about a contact. You can enter the contact’s name, company, job title, e-mail address, Web page address, phone numbers and addresses.
Tip: To add a picture of a contact, click the Add Contact Picture button (located next to the Name and Company fields).
3. Enter as much contact information as you want in the window.
Tip: Several of the fields in the Contact item window have buttons and list arrows next to them. The buttons display dialog boxes to assist you with the fields, while the arrows are used if a contact has more than one phone number, e-mail account, or address.
4. Click the Save & Close button in the Actions group.
The Contact window closes and the new contact appears in the contacts list.
Exercise
• Exercise File: None required.
• Exercise: Add Jeanne Trudeau to your Contacts list. Be sure to include the following information: Name: Jeanne Trudeau; Company: CustomGuide, Inc.; E-mail: [email protected]; Business Phone Number: 888-903-2432; Business Address: 1502 Nicollet Avenue, Minneapolis, MN 55403.
Figure 5-1: The Outlook Contacts list, displayed in Business Cards view.
Figure 5-2: A Contact window.
Working with Contacts

Sarasota County Government 65
Adding an E-mail Sender to the Contacts List You may receive an e-mail message from someone who you want to add to your Contacts list. To add an e-mail sender’s name and e-mail address to your Contacts list, simply drag the e-mail to the Contacts button in the Navigation Pane. Outlook will add the sender’s name and e-mail address to the Contacts list—and you can add any additional information yourself.
1. Click the Mail button in the Navigation Pane.
The Inbox appears.
2. Click and drag an e-mail from the person you want to add to the Contacts list to the Contacts button in the Navigation Pane.
The Contact window opens and the person’s name and e-mail address are filled in automatically.
Other Ways to Add an E-mail Sender to the Contacts List: Open an e-mail message (or just view it in the Preview pane), right-click the name in the From line, and select Add to Outlook Contacts from the contextual menu.
3. Enter any additional information for the contact.
4. Click the Save & Close button in the Actions group.
The Contact window closes. If you look in Contacts, the new contact now appears.
Exercise
• Exercise File: None required.
• Exercise: Find an e-mail from a business associate and add that person to your contacts list using the e-mail message. If you have any additional information about the contact, such as phone numbers or addresses, enter those items in the Contact window as well.
Figure 5-3: Adding a Contact from an e-mail message.
Working with Contacts

66
Editing and Deleting Contacts It’s easy to view and change information about your contacts. You can edit contact information by double-clicking a contact to open it in the Contact window, or you can edit information about a contact directly in the Contacts list. The latter method is more efficient; simply select the entry you wish to edit and make your changes.
Edit a contact
1. Click the Contacts button in the Navigation pane.
Outlook displays the Contacts list.
2. Double-click the contact you want to edit in the Contacts list.
That person’s contact window appears.
3. Make the necessary changes.
4. Click the Save and Close button in the Actions group.
The window closes and the changes to the contact’s information are saved.
Other Ways to Edit a Contact: If you are using a view other than Business Cards, or have the Reading Pane displayed, modify the information right there, without opening the Contact window.
Tip: You can also attach files or other Outlook items to contact records. Open a contact’s window, click the Insert tab on the Ribbon and click the Attach File or Attach Item button in the Include group.
Delete a contact You can also delete contacts if you no longer need them.
• Select a contact in the Contacts list and click the Delete button on the Standard toolbar.
The contact is moved to the Deleted Items folder in your Mailbox.
Other Ways to Delete a Contact: Select the contact and press the <Delete> key.
Exercise
• Exercise File: None required.
• Exercise: Enter Brad Miller as a contact and enter his address as 1600 Pennsylvania Avenue NW, Washington, DC 55403. Save and close the contact. Enter Ron Dean as a contact (just his name), save and close. Edit the Brad Miller contact and change his zip code to 20500. Delete the Ron Dean contact.
Figure 5-4: Edit a Contact in the Contact’s window.
Figure 5-5: The Standard toolbar in a Contact window.
Working with Contacts
Delete

Sarasota County Government 67
Changing Contact Views Outlook is flexible enough to keep all of your contacts in one place, yet display them differently depending on the type of work you’re doing. By default, contacts appear in Outlook in Business Cards view. In this view, your contacts are displayed as Electronic Business Cards, which look like actual paper business cards on the screen.
But, like other folders in Outlook, the Contacts list has several different ways to look at the same information. These different views are very useful when it comes to organizing the Contacts list. You can use these views to:
• Display more detailed information about each contact with fewer contacts on the screen at once (Address Cards and Detailed Address Cards).
• Display more contacts on the screen at once with less detailed information about each contact (Phone List).
• Organize and sort your contacts by their category, company, or location (By Category, By Company, or By Location).
In this lesson, you will learn how to utilize Outlook’s views to help you sort and organize the Contacts list. See Table 5-1: Contact Views for more description of views.
1. Click the Contacts button in the Navigation pane.
Outlook displays the Contacts list.
2. Select the view you want to use from the Current View menu, located in the Navigation Pane.
Other Ways to Change Contact Views: Display the Contacts list, click the View menu on the Standard toolbar, point to Current View, and select a view from the submenu.
Table 5-1: Contact Views
Business Cards Displays contacts as traditional business cards. This is the default view for the Contacts list.
Address Cards Displays contacts on individual cards with one mailing address and business and home phone numbers.
Detailed Address Cards This is the most detailed view of the Contacts list. Everything is displayed on individual cards: business and home addresses, phone numbers, and any other information.
Phone List Displays contacts in a list with company name, business phone number, business fax number, and home phone number. Phone List View displays more contacts on the screen at a time but has less detailed information.
By Category Displays your contacts in a table and organizes and sorts contacts by color category (if categories have been assigned to contacts).
By Company Displays your contacts in a table and organizes and sorts contacts by company.
By Location Displays your contacts in a table and organizes and sorts contacts by country and state.
Outlook Data Files Displays your contacts in a table and sorts them alphabetically.
Exercise
• Exercise File: None required.
• Exercise: View your contacts in each of the different views, then return to Business Cards view.
Figure 5-6: Current View options in the Navigation Pane.
Working with Contacts
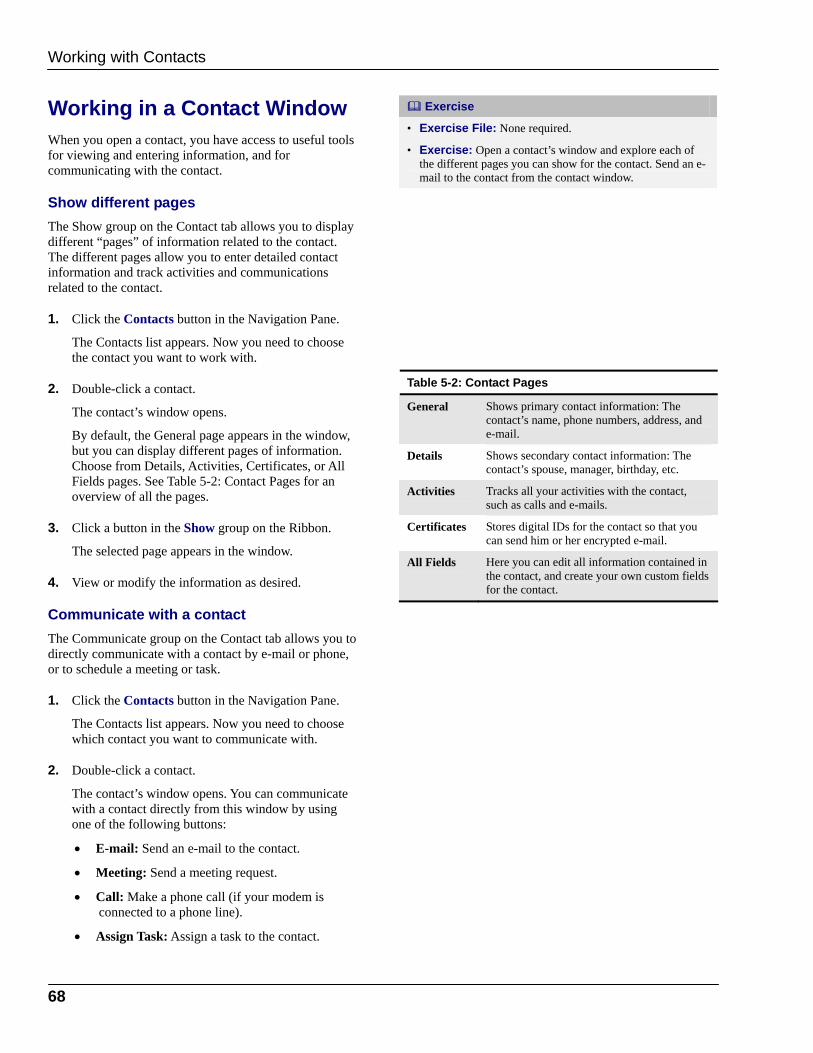
68
Working in a Contact Window When you open a contact, you have access to useful tools for viewing and entering information, and for communicating with the contact.
Show different pages The Show group on the Contact tab allows you to display different “pages” of information related to the contact. The different pages allow you to enter detailed contact information and track activities and communications related to the contact.
1. Click the Contacts button in the Navigation Pane.
The Contacts list appears. Now you need to choose the contact you want to work with.
2. Double-click a contact.
The contact’s window opens.
By default, the General page appears in the window, but you can display different pages of information. Choose from Details, Activities, Certificates, or All Fields pages. See Table 5-2: Contact Pages for an overview of all the pages.
3. Click a button in the Show group on the Ribbon.
The selected page appears in the window.
4. View or modify the information as desired.
Communicate with a contact The Communicate group on the Contact tab allows you to directly communicate with a contact by e-mail or phone, or to schedule a meeting or task.
1. Click the Contacts button in the Navigation Pane.
The Contacts list appears. Now you need to choose which contact you want to communicate with.
2. Double-click a contact.
The contact’s window opens. You can communicate with a contact directly from this window by using one of the following buttons:
• E-mail: Send an e-mail to the contact.
• Meeting: Send a meeting request.
• Call: Make a phone call (if your modem is connected to a phone line).
• Assign Task: Assign a task to the contact.
Exercise
• Exercise File: None required.
• Exercise: Open a contact’s window and explore each of the different pages you can show for the contact. Send an e-mail to the contact from the contact window.
Table 5-2: Contact Pages
General Shows primary contact information: The contact’s name, phone numbers, address, and e-mail.
Details Shows secondary contact information: The contact’s spouse, manager, birthday, etc.
Activities Tracks all your activities with the contact, such as calls and e-mails.
Certificates Stores digital IDs for the contact so that you can send him or her encrypted e-mail.
All Fields Here you can edit all information contained in the contact, and create your own custom fields for the contact.
Working with Contacts

Sarasota County Government 69
3. Click a button in the Communicate group on the Ribbon.
A window opens to help you execute the selected form of communication. For example, if you clicked the E-mail button, a new message window appears, addressed to the contact.
4. Modify and send the communication.
Figure 5-7: Groups in the Contact tab on the Ribbon.
Working with Contacts
Display different pages in the Contact window.
Communicate directly with a contact.

70
Finding and Organizing Contacts Once you start to accumulate a large number of contacts, you may want to use Outlook’s find features to find contact information; you may also want to organize your contacts in several different folders.
Find contacts There are several ways to search for information in your contacts.
1. Click the Contacts button in the Navigation Pane.
The Contacts list appears. To find a contact or contact information, choose from the following search methods:
Search address books: Enter a contact’s name or company name in the Search address books box on the Standard toolbar and press <Enter>.
Instant Search: Just as you can search e-mail messages using keywords, you can also search contacts. Enter search keywords (or even a phone number) in the Search Contacts box at the top of the Contacts list window.
Alphabetical index: If you are viewing your contacts in Business Cards, Address Cards, or Detailed Address Cards view, click a letter button in the index that appears by the cards to display contacts beginning with that letter.
Sort table: If you are viewing your contacts in a table view such as the Phone List, click a column heading to sort the contacts by that column’s criteria.
Advanced Find: Click Tools on the menu bar, point to Instant Search, and select Advanced Find. Enter search information in the Advanced Find dialog box. Here you can be specific about which fields you want to search.
2. Select a search method and complete your search.
Add a contacts folder You can organize your contacts by creating folders for specific categories of contacts.
1. Click the Contacts button in the Navigation Pane.
The Contacts list appears.
Exercise
• Exercise File: None required.
• Exercise: Search for “Jeanne” in the Search Contacts box. Add a folder named “Office” and move the Jeanne Trudeau contact into it.
Figure 5-8: Finding Contacts in Business Cards view.
Figure 5-9: Finding Contacts in Phone List view.
Working with Contacts
Click a column heading to sort the table by that column.
Search address books
Instant Search
Alphabetical index

Sarasota County Government 71
2. Select File → New from the menu and select Folder from the submenu.
The Create New Folder dialog box appears.
3. Enter a name for the new folder and make sure Contact Items is selected under the “Folder contains” list arrow.
4. Click OK.
The new folder appears in the Navigation Pane under My Contacts.
Now you can move contacts into the new folder.
5. Click and drag a contact from the Contacts list to the new folder’s icon in the Navigation pane.
The contact is moved to the new folder.
Tips
You can also organize contacts by assigning them to color categories. Right-click a contact in the Contacts list, point to Categorize, and select a category.
Figure 5-10: The Create New Folder dialog box.
Figure 5-11: The new “Office” folder appears in the Navigation Pane.
Working with Contacts
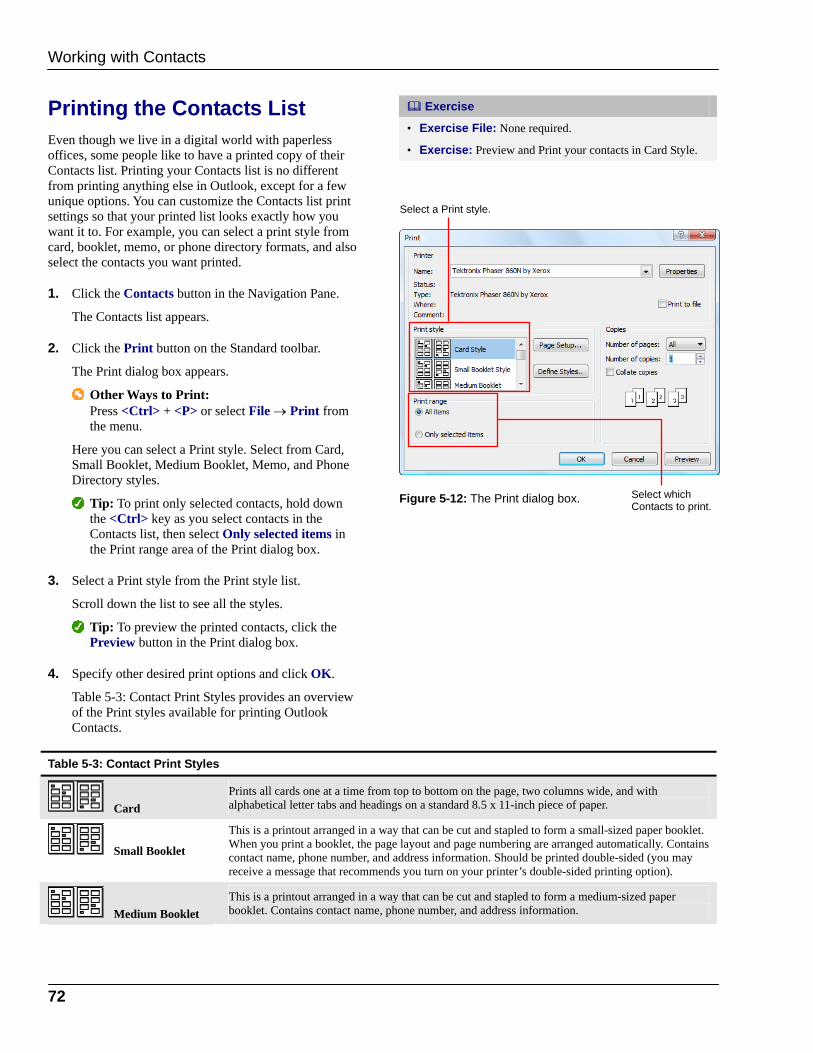
72
Printing the Contacts List Even though we live in a digital world with paperless offices, some people like to have a printed copy of their Contacts list. Printing your Contacts list is no different from printing anything else in Outlook, except for a few unique options. You can customize the Contacts list print settings so that your printed list looks exactly how you want it to. For example, you can select a print style from card, booklet, memo, or phone directory formats, and also select the contacts you want printed.
1. Click the Contacts button in the Navigation Pane.
The Contacts list appears.
2. Click the Print button on the Standard toolbar.
The Print dialog box appears.
Other Ways to Print: Press <Ctrl> + <P> or select File → Print from the menu.
Here you can select a Print style. Select from Card, Small Booklet, Medium Booklet, Memo, and Phone Directory styles.
Tip: To print only selected contacts, hold down the <Ctrl> key as you select contacts in the Contacts list, then select Only selected items in the Print range area of the Print dialog box.
3. Select a Print style from the Print style list.
Scroll down the list to see all the styles.
Tip: To preview the printed contacts, click the Preview button in the Print dialog box.
4. Specify other desired print options and click OK.
Table 5-3: Contact Print Styles provides an overview of the Print styles available for printing Outlook Contacts.
Table 5-3: Contact Print Styles
Card Prints all cards one at a time from top to bottom on the page, two columns wide, and with alphabetical letter tabs and headings on a standard 8.5 x 11-inch piece of paper.
Small Booklet
This is a printout arranged in a way that can be cut and stapled to form a small-sized paper booklet. When you print a booklet, the page layout and page numbering are arranged automatically. Contains contact name, phone number, and address information. Should be printed double-sided (you may receive a message that recommends you turn on your printer’s double-sided printing option).
Medium Booklet This is a printout arranged in a way that can be cut and stapled to form a medium-sized paper booklet. Contains contact name, phone number, and address information.
Exercise
• Exercise File: None required.
• Exercise: Preview and Print your contacts in Card Style.
Figure 5-12: The Print dialog box.
Working with Contacts
Select a Print style.
Select which Contacts to print.
Sarasota County Government 73
Table 5-3: Contact Print Styles
Memo This is a printout with detailed information about only the currently selected contact.
Phone Directory
This is a nicely condensed directory that shows only the contacts’ names and phone numbers.
Working with Contacts

74
UUssiinngg tthhee CCaalleennddaarr
Viewing the Calendar ........................................ 75 Day view .................................................. 75 Week view................................................ 75 Month view............................................... 75 Jump to a specific date............................ 76
Scheduling Appointments and Events ............ 77 Schedule an appointment........................ 77 Copy an appointment............................... 77 Schedule an event ................................... 78
Editing and Rescheduling Appointments and Events ................................................................. 79
Edit an appointment or event................... 79 Reschedule an appointment or event...... 79 Delete an appointment or event .............. 79
Working with Recurring Appointments ........... 80 Create a recurring appointment............... 80 Edit a recurring appointment ................... 80 Delete a recurring appointment ............... 81
Color-coding Calendar Items ........................... 82 Assign a color category ........................... 82 Rename a color category ........................ 82 Create a new category............................. 82
Viewing Calendar Items .................................... 84
Arranging Calendar Items................................. 85
Working with Meeting Requests ...................... 86 Create a meeting request ........................ 86 Respond to a meeting request ................ 87 Check responses to a meeting request ... 87
Setting Reminders............................................. 88 For existing appointments, meetings or events ...................................................... 88 Change the default reminder settings...... 88
Configuring Calendar Options ......................... 90 Other settings .......................................... 90
Printing the Calendar ........................................ 91
Coming in at a close second to e-mail, the Calendar is one of the most-used tools in Microsoft Outlook. The Calendar lets you keep track of appointments, such as a visit to the dentist; and events, such as a vacation. It’s amazingly simple to add or reschedule an appointment or event in the Calendar. And once you’ve entered your schedule into the Calendar, you can display it in a variety of different views.
In this chapter, you’ll learn how to create and reschedule appointments and events, how to add a reminder to your appointments so that you don’t forget about them, and how to view your schedule using the various Calendar views. You will also learn how to create a recurring appointment, such as a weekly staff meeting.
Using Exercise Files This chapter suggests exercises to practice the topic of each lesson. There are two ways you may follow along with the exercise files:
• Open the exercise file for a lesson, perform the lesson exercise, and close the exercise file.
• Open the exercise file for a lesson, perform the lesson exercise, and keep the file open to perform the remaining lesson exercises for the chapter.
The exercises are written so that you may “build upon them”, meaning the exercises in a chapter can be performed in succession from the first lesson to the last.
6

Sarasota County Government 75
Viewing the Calendar There are three main Calendar views in Microsoft Outlook: Day, Week and Month view. This lesson will talk about each of these views, and how to navigate within them.
Display the Calendar First, we need to display the Calendar.
• Click the Calendar button in the Navigation pane.
The Calendar appears.
Day view Day view gives you an hour-by-hour breakdown of your daily schedule.
• Click the Day button in the Calendar.
Other Ways to Switch to Day View: Click View on the menu bar and select Day from the menu. Or, press <Ctrl> + <Alt> + <1>.
Week view Week view has two display choices: Work Week and Full Week. Work Week view displays your schedule Monday through Friday, while Full Week view displays the full seven-day work week.
1. Click the Week button in the Calendar.
2. Click the Show work week or Show full week option.
Other Ways to Switch to Week View: Click View on the menu bar and select Week or Work Week from the menu. Or, press <Ctrl> + <Alt> + <2> or <Ctrl> + <Alt> + <3>.
Month view Month view is the default view in the Calendar. Month view shows your schedule for the entire month.
• Click the Month button in the Calendar.
Tip: To view more or less information in Month view, use the Details buttons at the top of the Calendar.
Other Ways to Switch to Month View: Click View on the menu bar and select Month from the menu. Or, press <Ctrl> + <Alt> + <4>.
Exercise
• Exercise File: None required.
• Exercise: Open the Calendar, and display it in Day view. Use the Go To Date dialog box to jump to your Birthday. Switch to Month view.
Figure 6-1: The Calendar displayed in Month view.
Figure 6-2: If the current Calendar view does not contain any appointments, one or both appointment navigation buttons appear on either side of the Calendar. Click these buttons to jump to the next or previous appointment.
Using the Calendar
Appointment navigation buttons
Navigation buttons Details buttons

76
Jump to a specific date If you’re in a hurry, use the Go To dialog box to jump to a specific date.
1. Select Go → Go to Date from the menu.
The Go To Date dialog box appears.
2. Enter or select the date you want to jump to, and click OK when you’re finished.
Tip: To switch back to the current day, select Go → Today from the menu.
Figure 6-3: Go To Date dialog box.
Using the Calendar
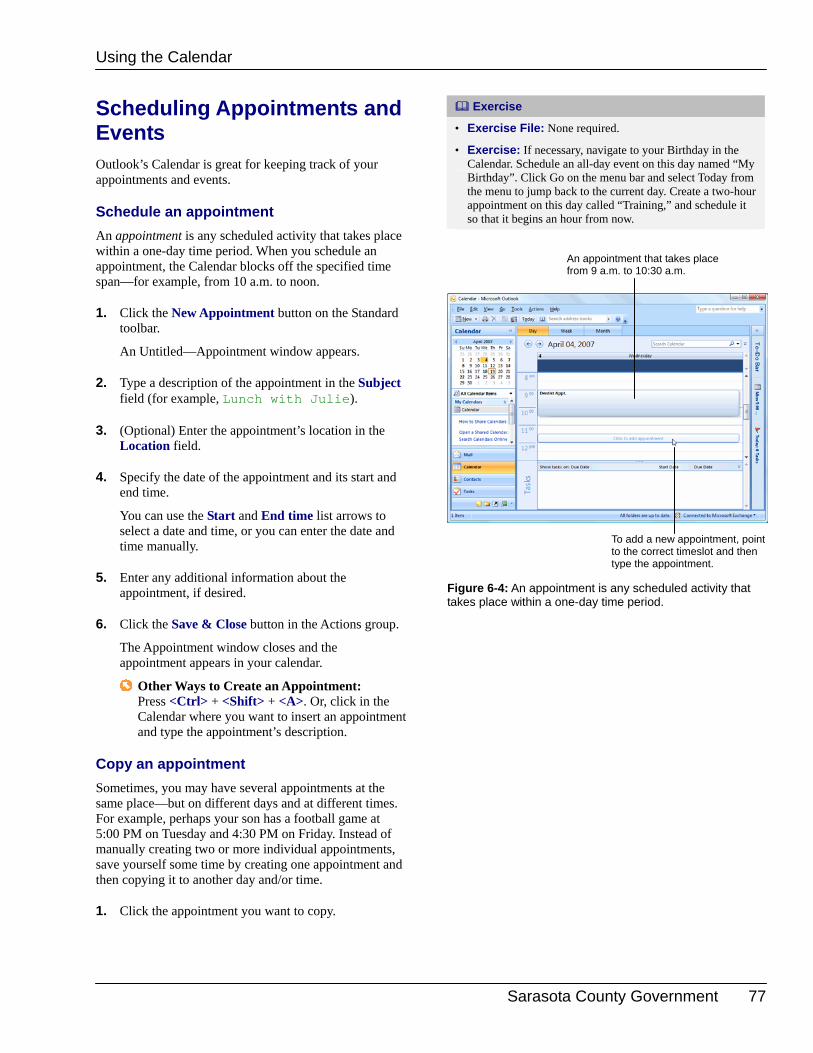
Sarasota County Government 77
Scheduling Appointments and Events Outlook’s Calendar is great for keeping track of your appointments and events.
Schedule an appointment An appointment is any scheduled activity that takes place within a one-day time period. When you schedule an appointment, the Calendar blocks off the specified time span—for example, from 10 a.m. to noon.
1. Click the New Appointment button on the Standard toolbar.
An Untitled—Appointment window appears.
2. Type a description of the appointment in the Subject field (for example, Lunch with Julie).
3. (Optional) Enter the appointment’s location in the Location field.
4. Specify the date of the appointment and its start and end time.
You can use the Start and End time list arrows to select a date and time, or you can enter the date and time manually.
5. Enter any additional information about the appointment, if desired.
6. Click the Save & Close button in the Actions group.
The Appointment window closes and the appointment appears in your calendar.
Other Ways to Create an Appointment: Press <Ctrl> + <Shift> + <A>. Or, click in the Calendar where you want to insert an appointment and type the appointment’s description.
Copy an appointment Sometimes, you may have several appointments at the same place—but on different days and at different times. For example, perhaps your son has a football game at 5:00 PM on Tuesday and 4:30 PM on Friday. Instead of manually creating two or more individual appointments, save yourself some time by creating one appointment and then copying it to another day and/or time.
1. Click the appointment you want to copy.
Exercise
• Exercise File: None required.
• Exercise: If necessary, navigate to your Birthday in the Calendar. Schedule an all-day event on this day named “My Birthday”. Click Go on the menu bar and select Today from the menu to jump back to the current day. Create a two-hour appointment on this day called “Training,” and schedule it so that it begins an hour from now.
Figure 6-4: An appointment is any scheduled activity that takes place within a one-day time period.
Using the Calendar
An appointment that takes place from 9 a.m. to 10:30 a.m.
To add a new appointment, point to the correct timeslot and then type the appointment.

78
2. Press and hold down the <Ctrl> key, and click and drag the appointment to another day and/or time.
The appointment is copied.
Schedule an event An event is any appointment that lasts a day or more, such as conferences or vacation. Events are not displayed as blocked-out time periods.
1. Click the New Appointment button on the Standard toolbar.
An Untitled—Appointment window appears.
2. Type a description of the event in the Subject field (for example, Tradeshow in Atlanta).
3. (Optional) Enter the event’s location in the Location field.
4. Specify a start and end date.
You can use the Start and End time list arrows to select a date or you can enter the date manually.
5. Click the All day event check box.
6. Enter any additional information about the event, if desired.
7. Click the Save & Close button in the Actions group.
The Appointment window closes and the event appears in your calendar.
Other Ways to Schedule an Event: Click and drag on the Calendar until the correct block of time is selected. Then, type the event’s description and press <Enter>.
Figure 6-5: Creating a new event.
Figure 6-6: Events that take place over several days appear as banners in the Calendar.
Using the Calendar
Click here to save the event.
Click here to specify that this is an all-day event.

Sarasota County Government 79
Editing and Rescheduling Appointments and Events Having to edit and reschedule appointments and events is an unavoidable task in today’s busy world. Co-workers cancel at the last minute, meeting locations change, etc. This lesson shows you just how easy it is to edit or reschedule your appointments and events in Outlook.
Edit an appointment or event To edit an appointment or event you need to open it in its own window.
1. Double-click the appointment or event you want to edit.
The appointment or event opens in its own window.
2. Edit the appointment or event as necessary.
3. Click the Save & Close button in the Actions group.
Outlook saves your changes.
Reschedule an appointment or event Rescheduling an appointment or event is extremely easy—simply click and drag the appointment or event in the Calendar.
• Click and drag the appointment or event to a new date and/or time.
Other Ways to Reschedule an Appointment or Event: Double-click the appointment or event you want to reschedule and specify a new date and/or time using the Start time and End time controls.
Delete an appointment or event If an appointment or event has been canceled indefinitely, delete it.
1. In the Calendar, click the appointment or event that you want to delete.
2. Press the <Delete> key.
The appointment or event is removed from the Calendar.
Other Ways to Delete an Appointment or Event: Right-click the appointment or event and select Delete from the contextual menu.
Exercise
• Exercise File: None required.
• Exercise: If necessary, create a two-hour appointment that occurs today called “Training,” and schedule it so that it begins an hour from now. Reschedule this appointment so that it begins tomorrow at 10 a.m.
Figure 6-7: To reschedule an appointment, click and drag the appointment in the Calendar.
Using the Calendar

80
Working with Recurring Appointments A recurring appointment is an appointment that occurs at regular intervals; for example, every Friday at 10 a.m.
Create a recurring appointment
1. Click the New Appointment button on the Standard toolbar.
An Untitled—Appointment window appears.
2. Type a description of the appointment in the Subject field (for example, Staff Meeting).
3. Click the Recurrence button in the Options group.
The Appointment Recurrence dialog box appears. Here you need to specify the time of the appointment, how often the appointment should recur (for example, every Friday), and the start and end date of the recurrence.
4. Make your specifications in the Appointment Recurrence dialog box, and click OK.
5. Click the Save & Close button in the Actions group.
Edit a recurring appointment
1. Double-click the appointment you want to edit.
The Open Recurring Item dialog box appears. You have two options here:
• Open this occurrence: Edits only the selected occurrence of the recurring appointment.
• Open the series: Edits every occurrence of the recurring appointment.
2. Select the appropriate option and click OK.
The appointment opens in its own window.
3. Edit the appointment as necessary.
4. Click the Save & Close button in the Actions group.
Outlook saves your changes.
Other Ways to Edit a Recurring Appointment: Right-click the appointment you want to edit and select Edit Series from the contextual menu.
Exercise
• Exercise File: None required.
• Exercise: Create a recurring appointment named “Marathon Training” that occurs every Monday from 5 a.m. to 7 a.m. and ends after 10 occurrences.
Figure 6-8: Scheduling a recurring appointment.
Figure 6-9: The Appointment Recurrence dialog box.
Using the Calendar
Recurrence button

Sarasota County Government 81
Delete a recurring appointment
1. In the Calendar, click the appointment that you want to delete.
2. Press the <Delete> key.
The Confirm Delete dialog box appears. You have two options here:
• Delete this occurrence: Deletes only the selected occurrence of the recurring appointment.
• Delete the series: Deletes every occurrence of the recurring appointment
3. Select the appropriate option and click OK.
Outlook removes the recurring appointment from your Calendar.
Other Ways to Delete a Recurring Appointment: Right-click the appointment you want to delete and select Delete from the contextual menu. Select the appropriate option and click OK.
Figure 6-10: The Confirm Delete dialog box.
Using the Calendar

82
Color-coding Calendar Items Color categories let you organize your Outlook items by color, making it easier to distinguish between different types of information. In the Calendar, you can color-code your appointments, meetings, and events.
Assign a color category By default, you have eight color categories to choose from.
1. Select the appointment, meeting or event you want to color-code and click the Categorize button on the Standard toolbar.
A list of color categories appears.
2. Select a color category from the list.
The selected color is applied to the appointment.
Other Ways to Color-code an Item: Right-click the item you want to color-code, point to Categorize in the contextual menu, and select a color category from the list.
Rename a color category You can rename Outlook’s color categories to meet your needs.
1. Click the Categorize button on the Standard toolbar and select All Categories.
The Color Categories dialog box appears.
2. Click the color category you wish to rename, and click Rename.
3. Type a new name for the category, and click OK when you’re finished.
Create a new category If none of Outlook’s default categories meet your standards, you can create your own from scratch.
1. Click the Categorize button on the Standard toolbar and select All Categories.
The Color Categories dialog box appears.
2. Click New.
The Add New Category dialog box appears. Here you can give the category a name, assign a new color to the category, or create a keystroke shortcut for the category.
Exercise
• Exercise File: None required.
• Exercise: If necessary, create a recurring appointment named “Marathon Training” that occurs every Monday from 5 a.m. to 7 a.m. and ends after 10 occurrences. Color-code this appointment using the color of your choice.
Figure 6-11: Color-coding an appointment.
Using the Calendar

Sarasota County Government 83
3. Type a new name for the category, specify any other options as necessary, and click OK.
The new category is added to the list of categories.
Tips
You can also control color categories from inside the Appointment window. To do so, click the Categorize button in the Options group and select an option from the menu.
Figure 6-12: The Color Categories dialog box.
Using the Calendar

84
Viewing Calendar Items When your Calendar is jam-packed with appointments, meetings, and events, it can be difficult to separate the forest from the trees. Fortunately, Outlook lets you view your Calendar by item, such as active appointments or annual events.
1. Select View → Current View from the menu.
A list of views appears. Take a look at Table 6-1: Current Views for a description of each view.
2. Select a view from the list.
The Calendar updates itself to accommodate the selected view.
Exercise
• Exercise File: None required.
• Exercise: Switch to Active Appointments view.
Table 6-1: Current Views
Day/Week/Month The default view. Each view has its own button in the Calendar grid.
Day/Week/Month View With AutoPreview
Same as above, except the first few lines of text appear for each item.
All Appointments Displays all appointments you have set in the Calendar, both past and present.
Active Appointments Lists all current and future appointments.
Events Lists all events that you have scheduled.
Annual Events Lists events that only occur annually.
Recurring Appointments Lists only those appointments that occur more than one time.
By Category Lists all of your appointments and events by the category you assigned.
Outlook Data Files Lists all of the data files you have created in Microsoft Outlook.
Birthday Shows only those appointments containing the keyword “Birthday”.
Figure 6-13: The Calendar displayed in Active Appointments view. Active Appointments view lists all of your current and future appointments.
Using the Calendar

Sarasota County Government 85
Arranging Calendar Items Outlook’s Current views are helpful, but also very generalized. For example, if you have a lot of active appointments in your Calendar, and you choose the Active Appointments view, you are going to have a lot to look at and sift through.
Luckily, Outlook offers a variety of arrangement options you can use to further sort the items in your Calendar. You can sort your items by date, category, and more.
1. Select View → Current View from the menu.
A list of views appears. Here you need to select which Calendar items you want to view.
2. Select the items you want to view.
The items you selected appear in the Calendar.
3. Select View → Arrange By from the menu.
A list of arrangement options appears.
Tip: The options in this list will vary depending on the Calendar item you are sorting.
4. Select an arrangement from the list.
Other Ways to Arrange Items: Click the column heading you want to arrange the items by; for example, Date.
Exercise
• Exercise File: None required.
• Exercise: If necessary, switch to Active Appointments view. Sort these messages by subject.
Figure 6-14: You can use Outlook’s arrangement options to further sort your Calendar items.
Using the Calendar

86
Working with Meeting Requests In addition to appointments and events, you can also use the Outlook Calendar to plan and schedule meetings. This lesson will show you how to create, track, and respond to a meeting request.
Create a meeting request
1. Select Actions → New Meeting Request from the menu.
An Untitled – Meeting window appears.
2. Click the To button.
The Select Attendees and Resources dialog box appears. Here you need to specify who you want to invite to the meeting.
3. Click the name of the person you want to invite to the meeting, and then click one of the following options:
• Required: These people are required to attend the meeting.
• Optional: These people are not required to attend the meeting.
• Resources: A resource can be a conference room, a laptop, or other equipment.
4. Repeat Step 3 until all attendee’s have been selected. Then, click OK.
The selected individuals appear in the To field.
5. Enter a description of the meeting in the Subject field (for example, Marketing meeting).
6. Enter the location of the meeting in the Location field (for example, Conference Room B).
7. Specify the date of the meeting and its start and end time.
You can use the Start and End time list arrows to select a date and time, or you can enter the date and time manually.
8. Click the Send button.
Your meeting request is sent and on its way to the intended recipients.
Other Ways to Create a Meeting Request: Press <Ctrl> + <Shift> + <Q>.
Exercise
• Exercise File: None required.
• Exercise: Create a new meeting request called “Lunch” and address it to several of your friends. Request that it occur next week sometime and then click Send.
Figure 6-15: The Select Attendees and Resources dialog box.
Figure 6-16: Filling out a meeting request.
Using the Calendar
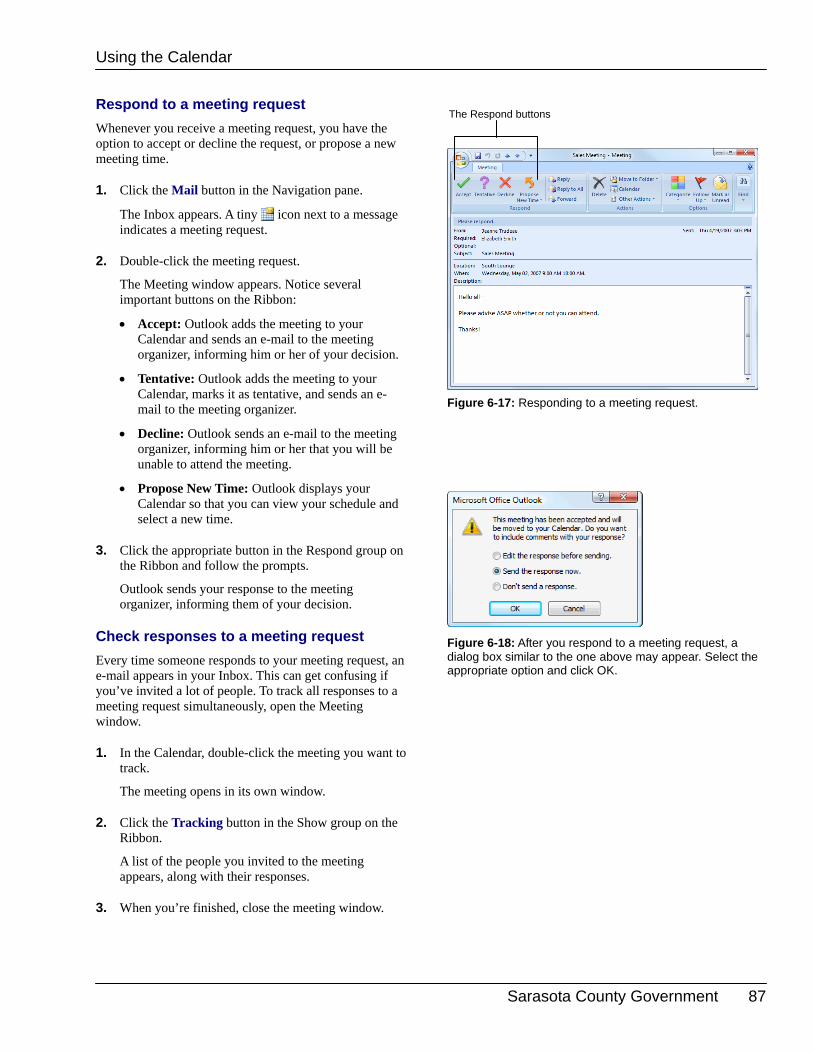
Sarasota County Government 87
Respond to a meeting request Whenever you receive a meeting request, you have the option to accept or decline the request, or propose a new meeting time.
1. Click the Mail button in the Navigation pane.
The Inbox appears. A tiny icon next to a message indicates a meeting request.
2. Double-click the meeting request.
The Meeting window appears. Notice several important buttons on the Ribbon:
• Accept: Outlook adds the meeting to your Calendar and sends an e-mail to the meeting organizer, informing him or her of your decision.
• Tentative: Outlook adds the meeting to your Calendar, marks it as tentative, and sends an e-mail to the meeting organizer.
• Decline: Outlook sends an e-mail to the meeting organizer, informing him or her that you will be unable to attend the meeting.
• Propose New Time: Outlook displays your Calendar so that you can view your schedule and select a new time.
3. Click the appropriate button in the Respond group on the Ribbon and follow the prompts.
Outlook sends your response to the meeting organizer, informing them of your decision.
Check responses to a meeting request Every time someone responds to your meeting request, an e-mail appears in your Inbox. This can get confusing if you’ve invited a lot of people. To track all responses to a meeting request simultaneously, open the Meeting window.
1. In the Calendar, double-click the meeting you want to track.
The meeting opens in its own window.
2. Click the Tracking button in the Show group on the Ribbon.
A list of the people you invited to the meeting appears, along with their responses.
3. When you’re finished, close the meeting window.
Figure 6-17: Responding to a meeting request.
Figure 6-18: After you respond to a meeting request, a dialog box similar to the one above may appear. Select the appropriate option and click OK.
Using the Calendar
The Respond buttons
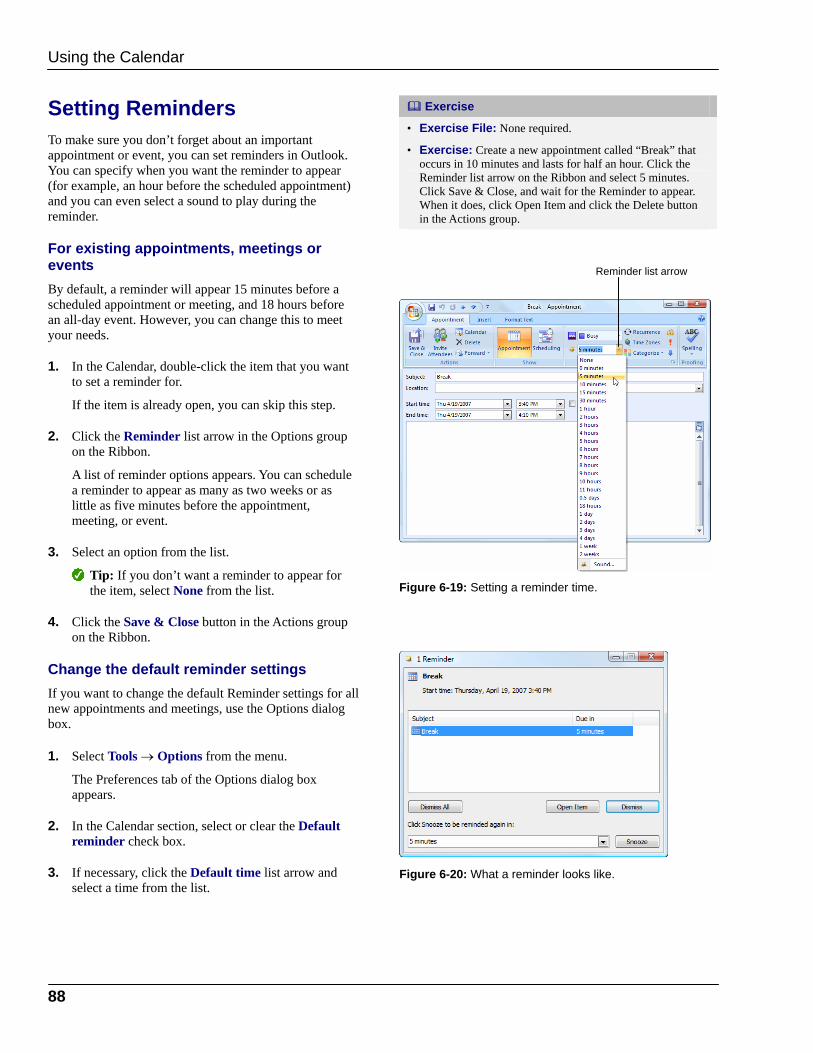
88
Setting Reminders To make sure you don’t forget about an important appointment or event, you can set reminders in Outlook. You can specify when you want the reminder to appear (for example, an hour before the scheduled appointment) and you can even select a sound to play during the reminder.
For existing appointments, meetings or events By default, a reminder will appear 15 minutes before a scheduled appointment or meeting, and 18 hours before an all-day event. However, you can change this to meet your needs.
1. In the Calendar, double-click the item that you want to set a reminder for.
If the item is already open, you can skip this step.
2. Click the Reminder list arrow in the Options group on the Ribbon.
A list of reminder options appears. You can schedule a reminder to appear as many as two weeks or as little as five minutes before the appointment, meeting, or event.
3. Select an option from the list.
Tip: If you don’t want a reminder to appear for the item, select None from the list.
4. Click the Save & Close button in the Actions group on the Ribbon.
Change the default reminder settings If you want to change the default Reminder settings for all new appointments and meetings, use the Options dialog box.
1. Select Tools → Options from the menu.
The Preferences tab of the Options dialog box appears.
2. In the Calendar section, select or clear the Default reminder check box.
3. If necessary, click the Default time list arrow and select a time from the list.
Exercise
• Exercise File: None required.
• Exercise: Create a new appointment called “Break” that occurs in 10 minutes and lasts for half an hour. Click the Reminder list arrow on the Ribbon and select 5 minutes. Click Save & Close, and wait for the Reminder to appear. When it does, click Open Item and click the Delete button in the Actions group.
Figure 6-19: Setting a reminder time.
Figure 6-20: What a reminder looks like.
Using the Calendar
Reminder list arrow

Sarasota County Government 89
4. Click OK.
The Options dialog box closes. Now every new appointment or meeting will have the selected settings applied.
Tips
You cannot change the default Reminder settings for events.
To change the sound that plays when a Reminder appears, click the Reminder list arrow and select Sound from the list. Click the Browse button, find and select the file you want to use, and click Open. Then, click OK.
Figure 6-21: The Options dialog box. Click the Reminder list arrow to select a new reminder time.
Using the Calendar
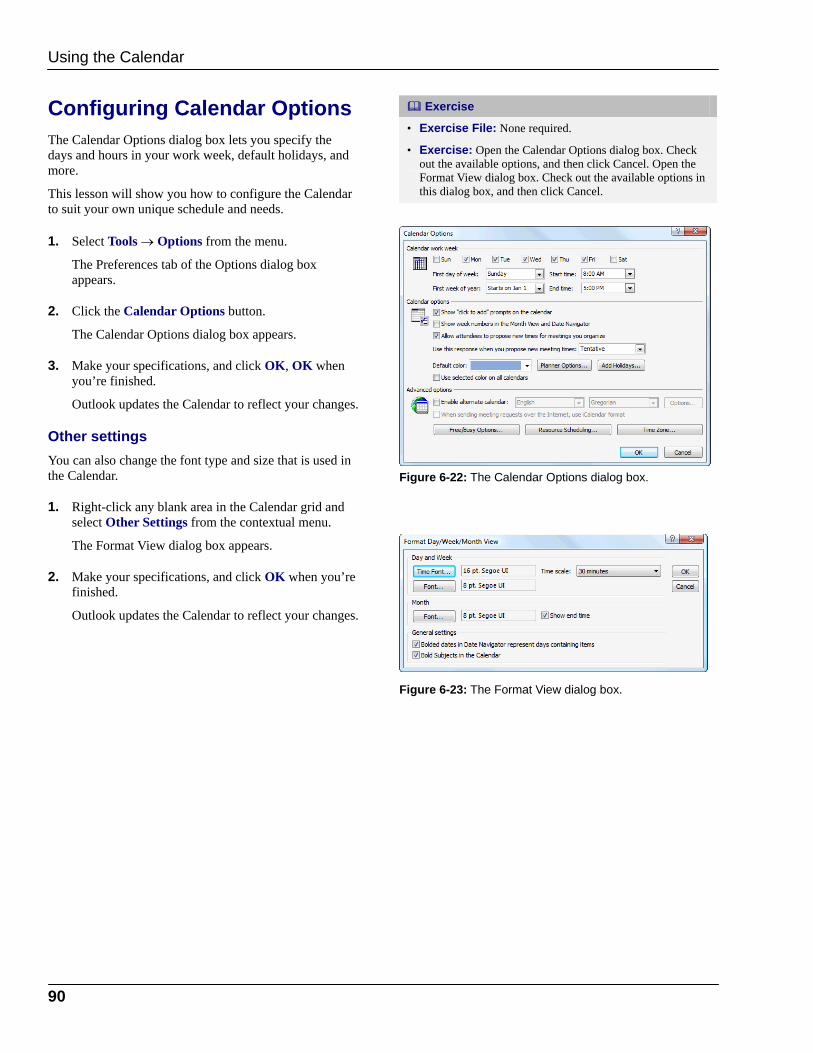
90
Configuring Calendar Options The Calendar Options dialog box lets you specify the days and hours in your work week, default holidays, and more.
This lesson will show you how to configure the Calendar to suit your own unique schedule and needs.
1. Select Tools → Options from the menu.
The Preferences tab of the Options dialog box appears.
2. Click the Calendar Options button.
The Calendar Options dialog box appears.
3. Make your specifications, and click OK, OK when you’re finished.
Outlook updates the Calendar to reflect your changes.
Other settings You can also change the font type and size that is used in the Calendar.
1. Right-click any blank area in the Calendar grid and select Other Settings from the contextual menu.
The Format View dialog box appears.
2. Make your specifications, and click OK when you’re finished.
Outlook updates the Calendar to reflect your changes.
Exercise
• Exercise File: None required.
• Exercise: Open the Calendar Options dialog box. Check out the available options, and then click Cancel. Open the Format View dialog box. Check out the available options in this dialog box, and then click Cancel.
Figure 6-22: The Calendar Options dialog box.
Figure 6-23: The Format View dialog box.
Using the Calendar

Sarasota County Government 91
Printing the Calendar Printing the Calendar is no different than printing anything else in Outlook, except for a few unique Calendar-related options that you need to be aware of. You can customize the Calendar print settings so your printed calendar looks the way you want it to. For example, you can specify Daily, Weekly, or Monthly formats and the range of dates you want print.
1. Select File → Print from the menu.
The Print dialog box appears.
2. Specify the appropriate options in the Print dialog box, and click OK to begin printing.
Other Ways to Print the Calendar: Click the Print button on the Standard toolbar or press <Ctrl> + <P>.
Check out Table 6-2: Calendar Print Styles for descriptions of different print styles.
Exercise
• Exercise File: None required.
• Exercise: Open the Print dialog box, click Weekly Style in the Print style section, and select the current week in the Print range section. Preview your selections, and then print.
Figure 6-24: The Print dialog box. Table 6-2: Calendar Print Styles
Daily Prints one day per page, from 7:00 AM to 7:00 PM, with tasks and notes areas. This is the most detailed calendar style.
Weekly Prints one week per page without tasks and notes areas.
Monthly Prints a calendar similar to the type you hang on your wall: one month per page without tasks and notes areas.
Tri-fold This is a printout broken into three parts: One section that displays the hours and appointments in the selected day, one section that displays the task list, and one section that displays the appointments in a selected week.
Calendar Details
This is a printout of all calendar items that are currently displayed, arranged in a list format.
Figure 6-25: What a printed Calendar looks like.
Using the Calendar

92
WWoorrkkiinngg wwiitthh TTaasskkss
Adding a Task .................................................... 93 Add a task................................................ 93 Create a to-do item.................................. 94
Changing Task Views........................................ 95 View tasks in Tasks.................................. 95 View tasks in the To-Do Bar..................... 95 View tasks in Calendar ............................ 96
Updating a Task ................................................. 97 Update a task........................................... 97 Send a status report ................................ 97
Creating a Recurring Task ................................ 98
Attaching an Item to a Task .............................. 99
Assigning a Task ............................................. 101 Assign a task ......................................... 101 Accept or reject an assigned task.......... 101 Forward a task ....................................... 102
Printing a Task ................................................. 103
Completing a Task........................................... 104 Mark as complete .................................. 104 Clear a follow-up flag............................. 104 Delete a task.......................................... 104
Even if you’re not an organized person, you’ve probably scrawled a to-do list on a piece of paper to help you remember everything that you have to do. The problem with paper to-do lists is that they’re easy to misplace and often not in front of you when you need them.
You can throw away your paper to-do lists, because Outlook’s To-Do List is difficult to misplace (when was last time you couldn’t find your computer?) and is always right in front of you.
Creating tasks and to-do items in Outlook is almost easier than writing them on paper. In this chapter, you will learn skills like how to create a task or to-do item, view them in different ways, mark a task as complete once it’s finished, assign and forward tasks. You will also learn how to create a recurring task that appears at a specified interval, such as a reminder to get a weekly report in to your boss.
7

Sarasota County Government 93
Adding a Task Recording your tasks makes them easier to remember and manage. Outlook tasks provide a good way to organize what you need to get done.
In Outlook 2007, you can create a task item that you can track until completion, or you can create a to-do item, which is an e-mail message or contact that has been flagged for follow-up. All these items appear in the To-Do List.
In this lesson, we’ll look at how to add a task or create a to-do item from a message or contact.
Add a task
1. Click the Tasks button in the Navigation Pane.
The To-Do List appears in Tasks.
Tip: To view a list of tasks only—instead of all to-do items—select the Tasks folder in the My Tasks area of the Navigation Pane. The Tasks list appears.
2. Click the New button on the Standard toolbar.
A Task item window appears. Table 7-1: Task Item Window Fields provides an overview of the fields that are available in this window.
3. Enter a subject and other information about the task.
The table to the right provides an overview of the fields available in the task item window.
You can add detail about the task in the text area.
4. Enter task details in the text area.
Tip: Click the Details button in the Show group on the Ribbon to access the Details page. Here you can enter secondary information about the task.
5. Click the Save & Close button in the Actions group on the Ribbon.
Other Ways to Add a Task: Double-click in an open area of the Tasks list or the To-Do List to display a Task item window. Or, click in the Click here to add a new Task text box in the Tasks list or the To-Do List and type a subject for the task. Or, double-click in the Tasks area of the Calendar. Or, click in the Type a new task box in the To-Do Bar and enter a task subject.
Exercise
• Exercise File: None required.
• Exercise: Add a new task with the Subject “New Marketing Plan”. Enter today as the start date and make the end date a week later. Select In Progress as the status and enter this description in the text area: “Develop guidelines for first phase of new marketing plan.” Then, select an e-mail in your Inbox and flag it for follow-up. View the new task and the flagged e-mail in the To-Do List.
Figure 7-1: A new Task item window.
Table 7-1: Task Item Window Fields
Start date Specifies the date when the task will appear in the Tasks list as a reminder.
Due date Specifies the due date for when the task must be completed.
Status Specifies the status of the task: Not Started, In Progress, Completed, Waiting on Someone else, or Deferred.
Priority Specifies the importance level of the task: Low, Normal, or High.
% Complete Specifies the percentage of the task that is finished.
Reminder Displays a reminder for the item.
Owner Specifies the name of the person who created the task. If the task is sent to another person, that person becomes the owner of the task.
Working with Tasks

94
Create a to-do item A to-do item is any Outlook item, such as a task, e-mail, or contact that has been flagged for follow-up. Tasks are automatically flagged as to-do items when you create them, while you must flag e-mails and contacts yourself.
• Right-click an e-mail message or contact, point to Follow-up, and select a follow-up flag.
The item is marked for follow-up, and will appear in Tasks. You can select follow-up flags of varying time periods, such as Today, Tomorrow, or This Week.
Other Ways to Create a To-Do Item: In the Inbox, click an e-mail’s flag icon. Or, add a task (a task is automatically flagged as a to-do item).
Tips
Flagging an e-mail message or contact creates a to-do item, but doesn’t create a new task. Because the to-do item is still an e-mail message or contact after being flagged, you can’t assign it as a task to someone else, or track its progress or percentage of completeness.
Figure 7-2: An e-mail message flagged for follow-up.
Figure 7-3: The To-Do List in Tasks.
Tasks and to-do items
Working with Tasks
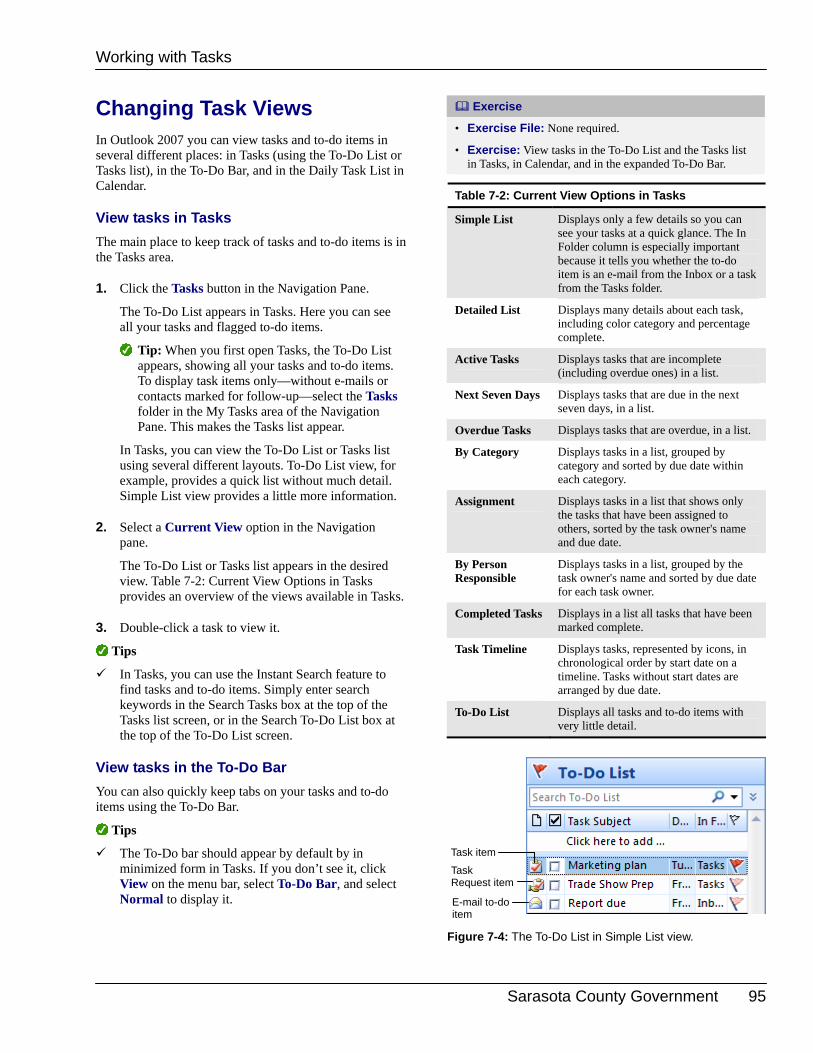
Sarasota County Government 95
Changing Task Views In Outlook 2007 you can view tasks and to-do items in several different places: in Tasks (using the To-Do List or Tasks list), in the To-Do Bar, and in the Daily Task List in Calendar.
View tasks in Tasks The main place to keep track of tasks and to-do items is in the Tasks area.
1. Click the Tasks button in the Navigation Pane.
The To-Do List appears in Tasks. Here you can see all your tasks and flagged to-do items.
Tip: When you first open Tasks, the To-Do List appears, showing all your tasks and to-do items. To display task items only—without e-mails or contacts marked for follow-up—select the Tasks folder in the My Tasks area of the Navigation Pane. This makes the Tasks list appear.
In Tasks, you can view the To-Do List or Tasks list using several different layouts. To-Do List view, for example, provides a quick list without much detail. Simple List view provides a little more information.
2. Select a Current View option in the Navigation pane.
The To-Do List or Tasks list appears in the desired view. Table 7-2: Current View Options in Tasks provides an overview of the views available in Tasks.
3. Double-click a task to view it.
Tips
In Tasks, you can use the Instant Search feature to find tasks and to-do items. Simply enter search keywords in the Search Tasks box at the top of the Tasks list screen, or in the Search To-Do List box at the top of the To-Do List screen.
View tasks in the To-Do Bar You can also quickly keep tabs on your tasks and to-do items using the To-Do Bar.
Tips
The To-Do bar should appear by default by in minimized form in Tasks. If you don’t see it, click View on the menu bar, select To-Do Bar, and select Normal to display it.
Exercise
• Exercise File: None required.
• Exercise: View tasks in the To-Do List and the Tasks list in Tasks, in Calendar, and in the expanded To-Do Bar.
Table 7-2: Current View Options in Tasks
Simple List Displays only a few details so you can see your tasks at a quick glance. The In Folder column is especially important because it tells you whether the to-do item is an e-mail from the Inbox or a task from the Tasks folder.
Detailed List Displays many details about each task, including color category and percentage complete.
Active Tasks Displays tasks that are incomplete (including overdue ones) in a list.
Next Seven Days Displays tasks that are due in the next seven days, in a list.
Overdue Tasks Displays tasks that are overdue, in a list.
By Category Displays tasks in a list, grouped by category and sorted by due date within each category.
Assignment Displays tasks in a list that shows only the tasks that have been assigned to others, sorted by the task owner's name and due date.
By Person Responsible
Displays tasks in a list, grouped by the task owner's name and sorted by due date for each task owner.
Completed Tasks Displays in a list all tasks that have been marked complete.
Task Timeline Displays tasks, represented by icons, in chronological order by start date on a timeline. Tasks without start dates are arranged by due date.
To-Do List Displays all tasks and to-do items with very little detail.
Figure 7-4: The To-Do List in Simple List view.
Working with Tasks
Task item
Task Request item
E-mail to-do item

96
1. If necessary, click the Expand the To-Do Bar button, located at the top of the To-Do Bar.
The expanded To-Do Bar appears on the right side of the screen. At the bottom of the To-Do Bar, below the calendar and appointments, you can see all your tasks and flagged to-do items.
Tip: To minimize the To-Do Bar again, click the Minimize the To-Do Bar button. To turn it off, click View on the menu bar, select To-Do Bar, and select Off.
2. Double-click a task to view it.
View tasks in Calendar You can also access your tasks in the Daily Task List in Calendar.
1. Click the Calendar button in the Navigation Pane.
The Calendar appears. In Day and Week views, you can see a Tasks area beneath the calendar. Here you can view and work with tasks and to-do items.
2. Double-click a task to view it.
Figure 7-5: The To-Do Bar in Minimized and Normal views.
Figure 7-6: Viewing Tasks in Calendar.
Working with Tasks
Minimized view Normal view
Tasks and to-do items
Tasks and to-do items

Sarasota County Government 97
Updating a Task Once you’ve created a task, you can edit or update it to show your progress. You can even send a progress report to others.
Update a task
1. Click the Tasks button in the Navigation pane.
The To-Do List appears.
2. Double-click the task that you want to update.
Here in the Task item window you can make changes to the task. You can do things like change the start or due date, select a new status or priority, or update the % Complete.
3. Enter updated percentage of completion information, or other information, as desired.
Tip: Remember, you can only enter start and completion dates and percentage of completion information in Task items—not in e-mail messages or contacts flagged as to-do items.
4. Click the Save & Close button in the Actions group on the Ribbon.
Send a status report You can send an e-mail to inform someone else of the progress you’re making on a task.
1. Click the Tasks button in the Navigation pane.
The To-Do List appears.
2. Double-click the task you want to work with.
The Task item window appears.
3. Click the Send Status Report button in the Manage Task group on the Ribbon.
An e-mail message appears that contains a report about the task item. It includes the start and due dates, current status, % Complete, the Date completed (if it has been completed), and the number of hours spent on the task.
4. Enter a recipient in the To box, type a message, and click the Send button.
The message is sent.
Exercise
• Exercise File: None required.
• Exercise: Open (or create, if necessary) a task with the subject “New Marketing Plan”. Change the Status to “Waiting on someone else” and e-mail yourself a status report about the task.
Figure 7-7: Updating a task in the Task’s item window.
Working with Tasks
Send a status report

98
Creating a Recurring Task If you have a task that you do on a regular basis—like a weekly report—you can create a recurring task that automatically repeats.
1. Click the Tasks button in the Navigation pane.
The To-Do List appears.
2. Click the New button on the Standard toolbar.
A Task item window appears.
3. Enter the task information, then click the Recurrence button in the Options group.
The Task Recurrence dialog box appears.
In the “Recurrence pattern” area, you tell Outlook when and how often the task recurs. You have several choices here:
• Daily: Tasks that recur every day or every work day.
• Weekly: Tasks that recur on the same day(s) of the week, such as a report due every Friday or a payroll due every other Thursday.
• Monthly: Tasks that recur on a monthly basis, such as an inventory audit that occurs on the 5th of every month.
• Yearly: Tasks that recur on an annual basis, such as tax filing days.
4. Select a recurrence pattern option.
The options to the right will change based on whether you selected Daily, Weekly, Monthly, or Yearly.
5. Select additional recurrence options from the options that appear, then set the start and end date in the “Range of recurrence” area.
6. Click OK.
Tips
To stop the task from recurring, open the task, click the Recurrence button in the Options group, and click Remove Recurrence.
To skip just the current occurrence of a recurring task, open the task and click the Skip Recurrence button in the Options group on the Ribbon.
If you set a reminder for a recurring task, you will be reminded again every time the task recurs.
Exercise
• Exercise File: None required.
• Exercise: Create a new task with “Write newsletter” as the subject and set it to recur every second Friday of the month. You can leave the Range of recurrence settings alone.
Figure 7-8: Setting up a task to recur.
Figure 7-9: The Task Recurrence dialog box.
Working with Tasks
Set the task to recur.

Sarasota County Government 99
Attaching an Item to a Task You can attach an Outlook item—such as an e-mail or contact—or another file to a task in Outlook.
Attach an Outlook item
1. Open a task item.
The Task item window appears.
2. Click the Insert tab on the Ribbon.
The Insert tab commands appear.
3. Click the Attach Item button in the Include group.
The Insert Item dialog box appears. Here you can browse for items in all Outlook folders. You can attach mail messages, contacts, calendar items, or even other task items.
4. Select a folder in the Look in list, then select an item from that folder in the Items: list.
You can also select whether you want to insert the item as an Attachment, or Text only.
5. Select an “Insert as” option and click OK.
The item is inserted into the task item.
Tip: You can also attach an electronic business card to the task. In the Task item window, click the Business Card button in the Include group on the Insert tab and select someone’s business card.
6. Click the Task tab on the Ribbon, then click the Save & Close button in the Actions group.
The task is saved with the item attached.
Attach a file You can also attach other types of files to a task.
1. Open a task item.
The Task item window appears.
2. Click the Insert tab on the Ribbon.
The Insert tab commands appear.
3. Click the Attach File button in the Include group.
The Insert File dialog box appears.
Exercise
• Exercise File: Marketing Plan.docx.
• Exercise: Send yourself an e-mail with the Subject “Plan update”. Open (or create, if necessary) the task with the subject “New Marketing Plan” and attach the “Plan update” e-mail to the task. Then attach the Marketing Plan.docx Word file from your Practice folder. Save & Close the task.
Figure 7-10: A new Task item window with the Insert tab displayed.
Figure 7-11: The Insert Item dialog box.
Working with Tasks
Attach a file
Attach an Outlook item

100
4. Browse to the file you want to attach and select it.
5. Click the Insert button.
The file is attached to the task.
6. Click the Task tab on the Ribbon, then click the Save & Close button in the Actions group.
The task is saved with the file attached.
Working with Tasks

Sarasota County Government 101
Assigning a Task Besides creating tasks for yourself, you can assign a task to someone else. A task assignment is sent by e-mail and the recipient has the option to accept or reject it.
Assign a task
1. Click the New button arrow on the Standard toolbar and select Task Request.
A Task Request item window appears.
2. Enter desired task information.
Be sure you enter at least the assignee’s e-mail address in the To box and a description of the task in the Subject box.
3. Make sure the Keep an updated copy of this task on my task list and Send me a status report when this task is complete check boxes are selected.
That way, Outlook will display the assigned task on your own task list so you can keep tabs on it and you will be notified when the task is completed.
4. When you are finished entering task information, click the Send button.
The task is sent, and a copy appears in your Sent Items folder.
Tips
You can also pass along a task that you’ve previously created or been assigned. Open the task and click the Assign Task button in the Manage Task group on the Ribbon. Enter the new assignee’s e-mail address and send.
Accept or reject an assigned task If you’re on the receiving end of a task assignment, you need to accept or reject the task.
1. Click the Mail button in the Navigation Pane.
The Inbox appears.
2. Double-click the Task Request message.
The message item window opens.
Other Ways to Accept or Reject a Task: If the Reading Pane is displayed, you can select the message in the Inbox and then click Accept or Reject in the Reading Pane.
Exercise
• Exercise File: None required.
• Exercise: Create a new Task Request item with the Subject “This is a test” and send it to a coworker (make sure you keep a copy in your task list). Then go into Tasks and forward that task to yourself.
Figure 7-12: Assigning a task using a Task Request.
Figure 7-13: A task request in the Inbox.
Working with Tasks
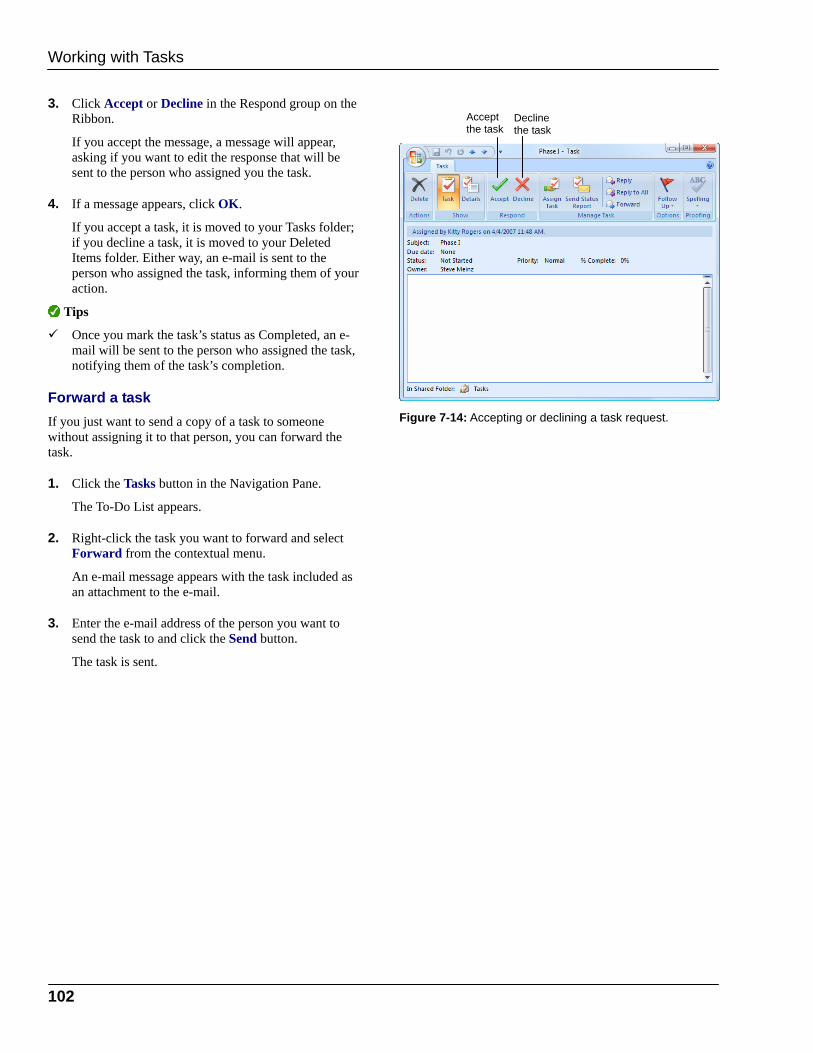
102
3. Click Accept or Decline in the Respond group on the Ribbon.
If you accept the message, a message will appear, asking if you want to edit the response that will be sent to the person who assigned you the task.
4. If a message appears, click OK.
If you accept a task, it is moved to your Tasks folder; if you decline a task, it is moved to your Deleted Items folder. Either way, an e-mail is sent to the person who assigned the task, informing them of your action.
Tips
Once you mark the task’s status as Completed, an e-mail will be sent to the person who assigned the task, notifying them of the task’s completion.
Forward a task If you just want to send a copy of a task to someone without assigning it to that person, you can forward the task.
1. Click the Tasks button in the Navigation Pane.
The To-Do List appears.
2. Right-click the task you want to forward and select Forward from the contextual menu.
An e-mail message appears with the task included as an attachment to the e-mail.
3. Enter the e-mail address of the person you want to send the task to and click the Send button.
The task is sent.
Figure 7-14: Accepting or declining a task request.
Working with Tasks
Accept the task
Decline the task

Sarasota County Government 103
Printing a Task You can print a list of your tasks or just individual tasks.
Print a task list
1. Click the Tasks button in the Navigation Pane.
The To-Do List appears.
Whichever list is visible will be the one that is printed, so if you want only tasks to be printed, make sure the Tasks list is displayed (click the Tasks folder under My Tasks in the Navigation Pane). If you’d rather print all your to-do items, leave the To-Do List displayed.
Tip: To print selected tasks from the list, press and hold the <Ctrl> key while you select the items you want to print.
2. Select File → Print from the menu.
The Print dialog box appears.
3. Make sure Table Style is selected in the Print style box and select other print options, as desired.
4. Click OK.
The task list prints.
Print a task item
1. Click the Tasks button in the Navigation Pane.
The To-Do List appears.
2. Double-click the task you want to print in the list.
The Task item window appears.
3. Click the Office Button and select Print.
The Print dialog box appears.
4. Select desired print options and click OK.
The task prints.
Tips
Click the Preview button in the Print dialog box to preview before you print.
Exercise
• Exercise File: None required.
• Exercise: Print your entire To-Do List. Then open one task of your choice and print it.
Figure 7-15: The Print dialog box.
Figure 7-16: Printing a task item.
Working with Tasks

104
Completing a Task Whether you’ve completed a task, given up on it, or are otherwise through with it, at some point you’re going to want to clear some tasks off your list. In this lesson, we’ll look at how to go about completing, clearing, and deleting tasks.
Mark as complete You can mark tasks and to-do items as complete once you’re done with them.
1. Click the Tasks button in the Navigation Pane.
The To-Do List appears.
Tip: To make it easy to mark a task as complete in the To-Do List, make sure Simple List is selected under Current View in the Navigation Pane.
2. In Simple List view, click the Complete box next to a task in the list to mark it.
The task appears with a line through it to let you know it is complete.
Other Ways to Mark a Task as Complete: Right-click a task anywhere it’s displayed and select Mark Complete from the contextual menu. Or, if the item is a to-do item but not a Task item, right-click it, point to Follow Up and select Mark Complete. Or, open the task’s item window, click the Status list arrow and select Complete or enter 100% in the % Complete box.
Clear a follow-up flag You can remove to-do items that are not tasks—such as e-mail messages marked with a flag for follow-up—from the To-Do List by clearing the item’s flag.
Tips
You can clear a to-do item’s follow-up flag anywhere it is displayed—in the To-Do List, To-Do Bar, Calendar, or even in the Inbox if it is an e-mail.
• Right-click the to-do item anywhere it’s displayed, point to Follow Up, and select Clear Flag.
The item is no longer flagged and is not included on To-Do List.
Delete a task You can also delete a task whether it’s completed or not.
Exercise
• Exercise File: None required.
• Exercise: Create a new task with the Subject “Quick Project”, then mark it as complete in the To-Do List. Send yourself an e-mail with the Subject “Flagged” and flag it for follow-up in the Inbox. Then go into Tasks and clear the flag on the “Flagged” to-do item.
Figure 7-17: Marking a task as complete in the To-Do List in Simple List view.
Figure 7-18: Clearing a follow-up flag from an e-mail to-do item.
Working with Tasks
Mark a task as complete.

Sarasota County Government 105
1. Select the task anywhere it’s displayed.
You can select the task in the To-Do List, Task list, To-Do Bar, or Calendar.
2. Click the Delete button on the Standard toolbar.
The task is deleted.
Tip: If you try to delete an e-mail that has been flagged as a to-do item, you will see a message warning you that the e-mail will also be deleted from the Inbox.
Working with Tasks

106
CCoollllaabboorraattiinngg wwiitthh OOtthheerr UUsseerrss
Working with Group Schedules ..................... 107 Create a group schedule ....................... 107 View a group schedule .......................... 108
Setting and Publishing Free/Busy Appointment Time .................................................................. 109
Set Free/Busy appointment time ........... 109 Publish your Free/Busy information....... 109
Opening Shared Calendars ............................ 110
Sharing Your Calendar .................................... 111 Share Your Calendar ..............................111 Change other people’s access to your calendar ................................................. 112
Sharing Outlook Folders................................. 113 Share a folder ........................................ 113 Delegate access .................................... 113 Open a shared folder ............................. 114
With Microsoft Outlook, you can keep track of your committee’s next meeting on your calendar, lay out the all tasks you need to finish, and use e-mail to communicate with people outside your committee. Wouldn’t it be nice if the rest of your committee had access to all of that information?
Fortunately, they do. Outlook lets you share your appointment schedule and even add content to other people’s folders.
8

Sarasota County Government 107
Working with Group Schedules Whether it’s board meetings, team conferences, or committee workshops, it can be hard to get a group of people together, and virtually impossible to stay on top of the schedules of individual members. That’s why Outlook lets you create Groups to track and manage the schedules of other people. Once you create a group, you can look at your group’s schedule to see everyone’s agenda and find out who is and who isn’t able to attend a meeting.
Create a group schedule One of the advantages of creating a group is that you can view everyone’s calendars at the same time. It is also easy to schedule meetings this way.
1. Click the Calendar button in the Navigation Pane.
The Calendar appears.
2. Click the View Group Schedules button on the toolbar.
The Group Schedules dialog box appears.
3. Click the New button to create a new group.
The Create New Group Schedule dialog box appears.
4. Enter a name for your group and click OK.
A dialog box for the new group appears.
5. Click Add Others and select Add from Address Book.
The Select Members dialog box appears.
6. Double-click the names of the people you want to add to the group.
The names appear in the To text box.
7. Click OK.
The names are added to the Group Members column.
8. Click Save and Close.
The dialog box closes and the group is created.
Exercise
• Exercise File: None required.
• Exercise: Create a group schedule for you and two other people in your Contacts.
Figure 8-1: The Group Schedules dialog box.
Figure 8-2: View several people’s schedules at one time.
Collaborating with Other Users
View Group Schedule button
Add Others button

108
View a group schedule Once a group schedule has been created, it’s easy for you to view it.
1. Click the View Group Schedules button on the toolbar.
The Group Schedules dialog box appears.
2. Click the group whose schedule you want to view and click Open.
The schedule is displayed.
Use the scroll buttons and the Go to list arrow to browse different dates in the calendar.
3. Click Save and Close when finished.
Collaborating with Other Users
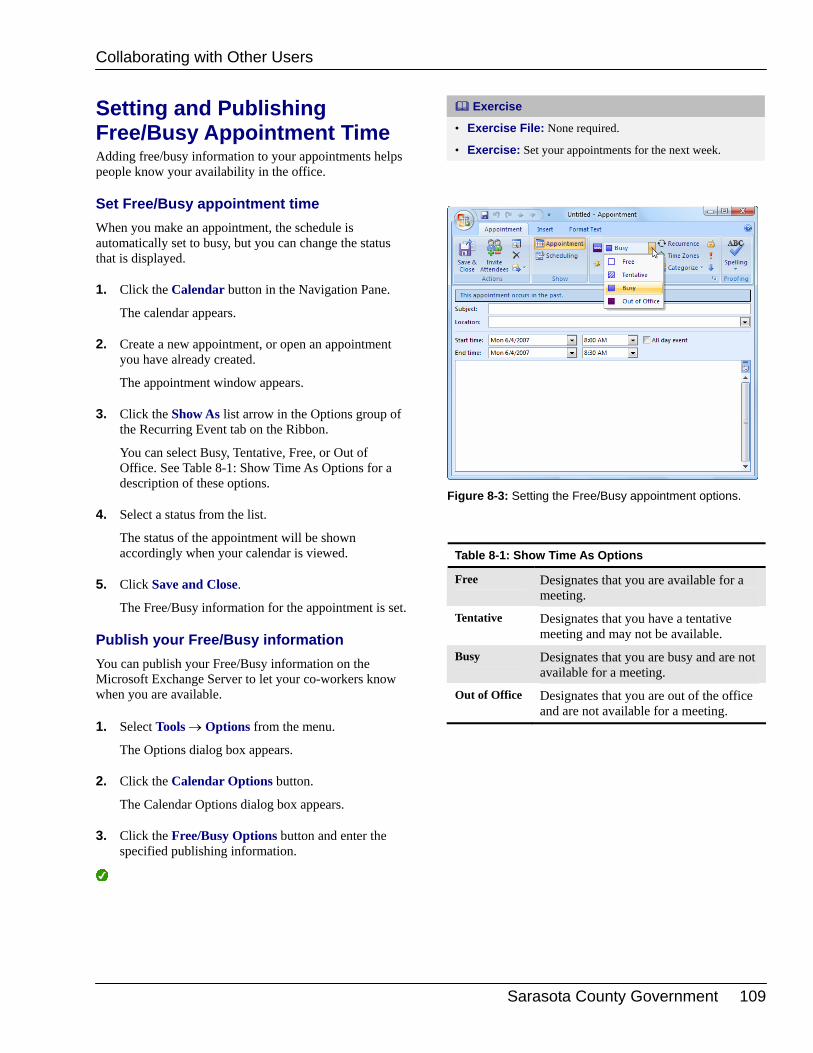
Sarasota County Government 109
Setting and Publishing Free/Busy Appointment Time Adding free/busy information to your appointments helps people know your availability in the office.
Set Free/Busy appointment time When you make an appointment, the schedule is automatically set to busy, but you can change the status that is displayed.
1. Click the Calendar button in the Navigation Pane.
The calendar appears.
2. Create a new appointment, or open an appointment you have already created.
The appointment window appears.
3. Click the Show As list arrow in the Options group of the Recurring Event tab on the Ribbon.
You can select Busy, Tentative, Free, or Out of Office. See Table 8-1: Show Time As Options for a description of these options.
4. Select a status from the list.
The status of the appointment will be shown accordingly when your calendar is viewed.
5. Click Save and Close.
The Free/Busy information for the appointment is set.
Publish your Free/Busy information You can publish your Free/Busy information on the Microsoft Exchange Server to let your co-workers know when you are available.
1. Select Tools → Options from the menu.
The Options dialog box appears.
2. Click the Calendar Options button.
The Calendar Options dialog box appears.
3. Click the Free/Busy Options button and enter the specified publishing information.
Exercise
• Exercise File: None required.
• Exercise: Set your appointments for the next week.
Figure 8-3: Setting the Free/Busy appointment options.
Table 8-1: Show Time As Options
Free Designates that you are available for a meeting.
Tentative Designates that you have a tentative meeting and may not be available.
Busy Designates that you are busy and are not available for a meeting.
Out of Office Designates that you are out of the office and are not available for a meeting.
Collaborating with Other Users

110
Opening Shared Calendars Getting a lot of people to coordinate their schedules can feel like herding butterflies. Outlook 2007 makes the process easier by letting you view other people’s calendars and share your calendar with them. When your company uses Microsoft Exchange, you can view the calendars that your coworkers have opted to share, provided you have their permission to view it.
1. Click the Calendar button in the Navigation Pane.
The Calendar opens. If someone has already shared their calendar with you, it will appear in the Navigation Pane under People’s Calendars.
2. Click Open A Shared Calendar in the Navigation Pane.
The Open a Shared Calendar dialog box appears.
3. Click the Name button.
The Select Name: Global Address List dialog box appears.
4. Select the contact whose calendar you want to view and click OK.
The Global Address List dialog box closes and the contact’s name appears in the Open a Shared Calendar dialog box.
5. Click OK.
If you have been given permission to share the calendar, it now appears in the Outlook window and their name appears in the People’s Calendars area of the Navigation Pane.
Tip: If you have not received permission to view this calendar, Outlook opens a permissions dialog box asking if you would like to request permission to view it. Click Yes, then complete the e-mail permissions request and click Send. If you are granted permission to view the calendar, you will receive an e-mail from the contact.
Tips
You can view up to 30 calendars side-by-side.
For quick access in the future, click the check box of a shared calendar you have opened previously in the People’s Calendars area of the Navigation Pane to display or hide the calendar.
When you request permission to view other people’s calendars, you can send them a sharing invitation to view yours.
Exercise
• Exercise File: None required.
• Exercise: Open two shared calendars and view them in side-by-side mode.
Figure 8-4: A Sharing Invitation to view someone else’s calendar.
Figure 8-5: Viewing two calendars side-by-side.
Collaborating with Other Users

Sarasota County Government 111
Sharing Your Calendar If you’re not the person in the office who schedules meetings, count your blessings. Then share your calendar to make things easier for the poor soul saddled with that responsibility. Outlook 2007 provides two ways to share your calendar with others. This lesson will show you how to share your calendar with coworkers using Microsoft Exchange.
Share your calendar Exchange users can share their own calendars with other users on the server. This will let other people view your appointments.
1. Click the Calendar button in the Navigation Pane.
The calendar appears, with calendars showing links displayed in the Navigation Pane.
2. Click Share My Calendar in the Navigation Pane.
A Sharing invitation window appears.
3. Type the name or names of the people you would like to share your calendar with in the To box.
Other Ways to Enter Names: Click the To button to enter names from your address list. Select the contact’s name, then click the To button. Click OK when finished.
4. (Optional) If you would like permission to view the calendars of the people you are sending an invitation to, click the Request permission to view recipient’s calendar check box above the message body area.
Tip: You can only request access to the recipient’s default calendar. If you would like permission to view a different calendar, you must send a separate request.
5. Type information into the subject line and message body.
6. Click Send.
A dialog box appears, asking you to confirm the message.
7. Click Yes.
The message is sent. The recipient will now be able to access your calendar.
Other Ways to Share Your Calendar: If someone sends you a sharing request via e-mail, click Allow, then click Yes.
Exercise
• Exercise File: None required.
• Exercise: Share your calendar with three other people.
Figure 8-6: A sharing invitation for others to view your calendar.
Collaborating with Other Users

112
Change other people’s access to your calendar Committees change, people move on, and that creepy guy from accounting is scheduling his breaks so he can talk to you about his medical problems. It’s a good thing that you can change or revoke someone’s access permissions to your calendar.
1. Click the Calendar button in the Navigation Pane.
The Calendar is displayed.
2. Right-click the calendar under My Calendars in the Navigation Pane that you’d like to change permissions for.
3. Select Change Sharing Permissions from the contextual menu.
The Permissions tab of the Calendar Properties dialog box appears.
4. Select the name of the person whose access you want to change in the Name box.
Tip: To remove or change access permissions for everyone, click Default in the Name box.
5. Click the Permission Level list arrow and select the permission level you want to assign to the person.
When you select different permission levels, the options that are selected in the Read, Write, Delete items, and Other sections change.
6. Click OK when you are finished.
The access permissions for this user have been changed.
Tip: If you want to limit access permissions instead of revoking them, click a different option to change permissions.
Figure 8-7: The Permissions tab of the Calendar Properties dialog box.
Table 8-2: Access Permission Roles
Owner Create, read, modify and delete all items and files and create subfolders. As the folder owner, you can change the permission levels others have for the folder.
Publishing Editor
Create, read, modify, and delete all items and files, and create subfolders.
Editor Create, read, modify, and delete all items and files.
Publishing Author
Create and read items and files, create subfolders and modify and delete items and files you create.
Author Create and read items and files, and modify and delete items and files you create.
Non-editing Author
Create, read, and delete items and files you create. Cannot modify items.
Reviewer Read items and files only.
Contributor Create items and files only. The contents of the folder do not appear.
None Cannot open the folder; you have no permission.
Collaborating with Other Users

Sarasota County Government 113
Sharing Outlook Folders Outlook has a lot of options for people who want to share information.
Tips
These options are only available to people using Microsoft Exchange Server. If you are using a home version of Outlook, or if your organization does not use Exchange Server, you won’t be able to complete these tasks.
Share a folder Allow other people in your office to read the contents of your Inbox, Contacts, Calendar, Journal, Notes, and Tasks folders.
1. Click the Folder List button in the Navigation Pane.
The Folder List appears.
2. Right-click the folder you want to share and select Share from the contextual menu.
A Sharing invitation window appears.
3. Click the To button and select the name(s) with whom you want to share the folder. Click OK.
Once the names of the people you want to share the folder with are entered, you’re ready to send the message.
4. Click Send and click Yes to confirm the invitation.
Another message appears, letting you know the folder has been shared.
5. Click OK.
Delegate access When things get really busy, it can help to let someone else take the wheel. Choose a delegate to handle a few or all of the features in Outlook. Your delegate can rearrange materials in folders, schedule your appointments, or even send e-mail from your account.
1. Select Tools → Options from the menu.
The Options dialog box appears with the Preferences tab displayed.
2. Click the Delegates tab.
The Delegates tab appears.
Exercise
• Exercise File: None required.
• Exercise: Delegate Editor status over your Calendar and Tasks folders.
Figure 8-8: A Sharing Folders invitation.
Figure 8-9: The Delegates tab of the Options menu.
Collaborating with Other Users

114
3. Click Add.
The Add Users dialog box appears.
4. Double-click the name(s) of the people you’d like to assign as delegates. Click OK.
The Delegate Permissions dialog box appears. This list lets you choose which parts of Outlook your delegates can control. Table 8-3: Access Permission Roles lists the different tasks available to each role.
5. Select delegate permissions as desired. Click OK.
The delegate permissions box closes. The default settings will allow your delegate to create and modify items in your calendar and tasks.
6. Click OK.
The delegates’ permissions are set.
Open a shared folder You can open other people’s folders if they have given you permission to open them.
1. Select File → Open → Other User’s Folder from the menu.
The Open Other User’s Folder dialog box appears.
Other Ways to Open a Shared Folder: Click the Open the Folder button in a sharing invitation that you receive from the individual sharing their folder with you.
2. Click the Name button.
The Select Name dialog box appears with a list of names from your address book.
3. Double-click the name of the person who owns the folder you want to open.
The person’s name appears in the Open Other User’s Folder dialog box and the available folders appear in the drop down menu.
4. Click the Folder type list arrow and select the folder you want to open.
5. Click OK.
Figure 8-10: Choose Permission levels for the folders in Outlook.
Table 8-3: Access Permission Roles
Owner Create, read, modify and delete all items and files and create subfolders. As the folder owner, you can change the permission levels others have for the folder.
Publishing Editor Create, read, modify, and delete all items and files, and create subfolders.
Editor Create, read, modify, and delete all items and files.
Publishing Author Create and read items and files, create subfolders and modify and delete items and files you create.
Author Create and read items and files, and modify and delete items and files you create.
Non-editing Author
Create and read items and files and delete items and files you create. Cannot modify items.
Reviewer Read items and files only.
Contributor Create items and files only. The contents of the folder do not appear.
None Not open the folder; you have no permission.
Collaborating with Other Users

Sarasota County Government 115
AAddvvaanncceedd TTooppiicc
Using Outlook Web Access............................ 115 Connect to Outlook Web Access ........... 116 Check e-mail.......................................... 116 Send e-mail............................................ 117 Use other Outlook folders...................... 117
This chapter details features for using the Web version of Outlook from any computer.
9

116 © 2007 CustomGuide, Inc.
Using Outlook Web Access If your organization has set up an Outlook Web Access account, all you’ll need is a user name and a password and you can access your Outlook account, including e-mail, calendar, and other features from anywhere.
Connect to Outlook Web Access Your administrator needs to set up your Outlook Web Access account for you. Once it has been set up, you can access your Outlook account from any computer with an Internet connection. Here’s how:
1. Open a browser window and enter the URL address of your company’s Outlook Web Access account in the Address Bar.
The Outlook Web Access login page appears.
Trap: You may see a security certificate page. Make sure you have typed in the correct address and click Continue to current web page.
2. Enter your user name and password and click the Log On button.
Your Outlook Web Access account appears.
Tip: If you are accessing your Outlook Web Access account from a library or other public space, don’t forget to log out when you’re finished.
Check e-mail Although Outlook Web Access looks a little different than your full Outlook program, the two programs work pretty much the same way. If you know your way around Outlook, you won’t have much difficulty navigating Outlook Web Access.
Tips
Outlook Web Access has been optimized for Microsoft’s Internet Explorer. If you use another Web browser, the buttons may look very different.
1. Log on to Outlook Web Access.
The Inbox folder of Outlook Web Access appears.
Exercise
• Exercise File: None required.
• Exercise: Check your e-mail using Web Access and send a message from Web Access.
Figure 9-1: The Login page for Outlook Web Access.
Table 9-1: Inbox Toolbar Options in Outlook Web Access
Compose E-mail
Copy a message
Delete a message
Reply to a message
Reply to all addresses in a message
Forward a message
Check for new messages
Open contacts
Log off of Outlook Web Access
Advanced Topic

Sarasota County Government 117
2. Select a message in the Message Pane.
The full text of the message appears in the Reading Pane.
Send e-mail
Your options for sending e-mail in Outlook Web Access are very similar to your options in Outlook 2007. You can reply to or forward a message or you can create a new one. Here’s how to create a new message.
1. Click the New button on the toolbar.
A blank message appears in a new window.
2. Type the name or names of your recipients.
Other Ways to Add Recipient Addresses: Click the To button to add names from your Outlook Web Access Contacts list.
3. Enter a subject and message text.
4. Click the Send button.
Use other Outlook folders All of the available folders in Outlook Web Access are listed in the Navigation Pane. Each folder has its own toolbar. Accessing a new folder is simple.
1. Click the button in the Navigation Pane for the folder you wish to open.
The folder appears.
Table 9-2: Message Toolbar Options
Send Message
Save A Draft
Add Signature
Spell Check
Insert Attachment
Name Check
Set Importance
Table 9-3: Folders in Outlook Web Access
Check or send e-mail
Check or schedule appointments
View or change address book
Check or schedule tasks
Open or edit public folders
Check or create rules
View or change options
Advanced Topic


![Microsoft ® Office Outlook ® 2003 Training Organize meetings with Outlook [Your company name] presents:](https://static.documents.pub/doc/80x56/56649d7f5503460f94a62ad1/microsoft-office-outlook-2003-training-organize-meetings-with-outlook.jpg)


