Page 1
Page | 1
Microsoft Office Word
Microsoft Word is likely the most commonly used program used by people today. It
allows you to type formal and informal papers with ease and creates all sorts of
documents. While the concept of this program seems easy (all you do is type, right?),
there are many different things that you can manipulate to make your paper exactly how
you want it. This tutorial will delve deep into nearly every aspect of Word, so if you have
any question whatsoever about this program, this tutorial is the one to read.
_______________________________________________________
File Tab
1. When you open Microsoft Word, your screen will look similar to the one below.
As you can see, the main components are listed at the top, in your menu. The first
thing you want to do when you start a paper is save it so that if you want to work
Page 2
Page | 2
on it another time you can. To begin this process, click on the “File” tab in the top
right-hand corner of your screen.
2. You will be taken to a screen similar to the one below. You have a variety of
options to choose from. If you are saving a document FOR THE FIRST TIME,
click on the “Save as” tab on the left-hand side of the page. If you need to access
an old document, click the OPEN tab. If you want to print your current
document, click PRINT.
3. If you click SAVE AS, your computer will take you to its folder system. This is
where you can store documents. To name your paper, type in the text box. To
finish saving your document, click the “Save” button in the bottom right hand
corner. This process lets you keep your work and access it in the future. Keep in
mind; you ONLY have to click SAVE AS if you are saving something for the first
Page 3
Page | 3
time. Every time after you have already clicked SAVE AS, you only need to click
SAVE.
4. Your computer will also take you to this pop-up if you click OPEN. This allows
you to look through your files to access whichever one you want to edit or view.
Basic Buttons
1. Now, let’s examine the basic buttons on Microsoft Word:
I. II.
IV.
III.
V.
Page 4
Page | 4
I. Save: Click this button to save the document you are working on to your
computer. Remember: you must save before you exit the program or your
document will be lost when you try to access it again.
II. Undo: Made a mistake? You can click this button to erase the action that
you just did. For example, if you typed in a word incorrectly, you can click
the undo button and then that word will go away.
III. Text Size: Change the number in this box to change the size of the text you
type.
IV. Font Style: You can change the look of your text. There are three styles: (1)
bold, (2) italic, and (3) underline. Click the appropriate button and then
the text you type after will be in that style.
V. Text Color: By clicking this button, you are brought up to a screen of
different colors. Pick one of these and then the text you type will be that
color.
2. These five basic options above will allow you to create effective documents that
look professional and neat. Once you finish a document, hit the “Save” button
(see Part I above). You will be prompted to save the document to some place on
your computer. Pick a place you remember and click “Save.” If you want to print
the document you are making onto an actual piece of paper, click “Ctrl” and then
“P” (hold the Ctrl while you are pressing P).
3. If you want to send an email with a Microsoft Word document “attached,” see our
tutorial series on email to find out.
Page 5
Page | 5
Customization Options
I. Bullets and Numbering: If you want you can make a list of items instead of
a simple paragraph. By clicking on the button on the left (the one with blue
circles), a circle (“bullet”) pops up on your screen. You can begin typing
and when you click the “Enter” button on your keyboard, a new “bullet”
will pop up below the original one. This same mechanism works for
“numbered” lists. Clicking the button on the right (with blue numbers)
begins a list (with 1, 2, 3, etc.). When you click enter, the next number will
automatically come up on the next line.
II. Line Spacing: You can change the space in between lines of text by
pressing this button and selecting the corresponding number (1.0 is the
smallest spacing between lines and space increases as the number goes
up).
I. II.
Page 6
Page | 6
_______________________________________________________
Home Tab
1. The next important Tab to be aware of is the “Home” tab. This is located on your
main menu at the top directly to the right of the “File” tab. Here there are many
different utilities that are used very commonly when creating a document. First is
the font box (I). With this, you can change the style of font you use (basically how
your words and letters look), the size of your font, the color, whether or not it’s
underlined, bolded, highlighted, or italicized, etc. Each of these can be accessed
in the same general area as what is circled.
2. The next section relates to the spacing and indentation of the document (II). The
top area relates to bullets and numbers. The bottom correlates to how you want
your words to be aligned on the page. For example, this tutorial has all the words
aligned on the left side of the page. To change such, all one would have to do
would be to highlight the document and click on one of the other options, which
allow for centering the words or moving them to the right side of the page.
Finally, the little bucket allows you to change the background of a text. For
example, you could make the background blue but still have black text.
3. The third and fourth boxes (III) are less commonly used, but are still an
important aspect of Word. They deal with the spacing and different styles of text,
as well, except they are some presets that you can use if you’re not as familiar
with the other boxes. For example, you can click “Heading 2” and it will
automatically space your document a certain way and make the text a certain
color. Also, when you click CHANGE STYLES, you can personalize such even
more, this time with more control over the color, fonts, etc. The “Editing” box is
Page 7
Page | 7
for finding specific words and highlighting them in your document. For example,
if you wanted to highlight every time you used the word “pepper” in your
document, you could click FIND and then type “pepper” in the corresponding
text box.
I. II. III.
Page 8
Page | 8
_______________________________________________________
Insert Tab
1. The next major tab is the “Insert” tab. This is mainly used when you need to
insert a picture, symbol, or something else into your document. The first section
of this tab is labeled “Pages” (I). Within such, there are three different utilities
which deal with the format of pages. The first is COVER PAGE, which allows you
to create and customize your own cover page for your document (click on it and
choose from numerous selections). BLANK PAGE is used to clear the page of all
words and pictures (be careful, you may lose your work). Finally, page break is
used if you want to make such within your document. For example, you may want
to cut off your text before the beginning of another page. This is a very intricate
method of editing your document, but you may need it at some point.
2. The next two sections are “Tables” and “Illustrations” (II). The only tool within
the “table” box is for creating a table for math or statistics oriented documents.
The “Illustrations” box is more towards inserting images into the document. The
PICTURE button allows for you to take your saved images on your computer and
enter them into the document. You simply click on it and scroll through your
assorted files, which will pop up on the screen. CLIP ART is a tool that allows you
to choose from many images that are stored on Microsoft Word. Simply click on
CLIP ART and type your desired image (plant, car, square, etc.) in the text box
that appears. The SHAPES button is for entering simple images (squares, circles,
triangles, arrows, etc.), while SMARTART and CHART are for creating different
graphs and assorted matrixes and entering them into the document. Screen
clipping is the last aspect of these illustrations. This is for taking a screenshot of
Page 9
Page | 9
your computer screen and entering it into the document. The images you see in
this document are created using this tool.
3. The next two boxes are “Links” and “Header & Footer” (III). The “Links” box
corresponds to hyperlinks and things related to such. These are used most often
with books as they are often used as references and citations for quotes and ideas.
Headers, Footers, and Page Numbers are also common with books and are fairly
straightforward: to use, simply click on each and you will be given a number of
options on types of each to use. For example, many high school students must
know how to use Page Numbers because they are required to use MLA format in
their assignments.
4. Finally, you have the “Text” and “Symbols” boxes (IV). These are very commonly
used in Word as they incorporate aspects such as word art and symbols. TEXT
BOX is used when creating a separate text box from the ones automatically given
to you in Word. To use such, you must click on the TEXT BOX icon, choose which
type you want, and then it will pop up on your screen. An empty one is shown
below. Word Art is a very commonly used design aspect of
word. It is mainly used as a title to a document because it looks
aesthetically appealing. To use, click on WORD ART, choose
your style, and then type the text you want to appear in such a design. The
“Symbols” box contains EQUATION and SYMBOL, which are exactly what they
sound like. If you need to insert an Σ or © or something similar, click on
SYMBOL find such. Equation is exclusively used for math and has a list of many
different equations if you click on the arrow underneath the button.
Text Box
Page 10
Page | 10
_______________________________________________________
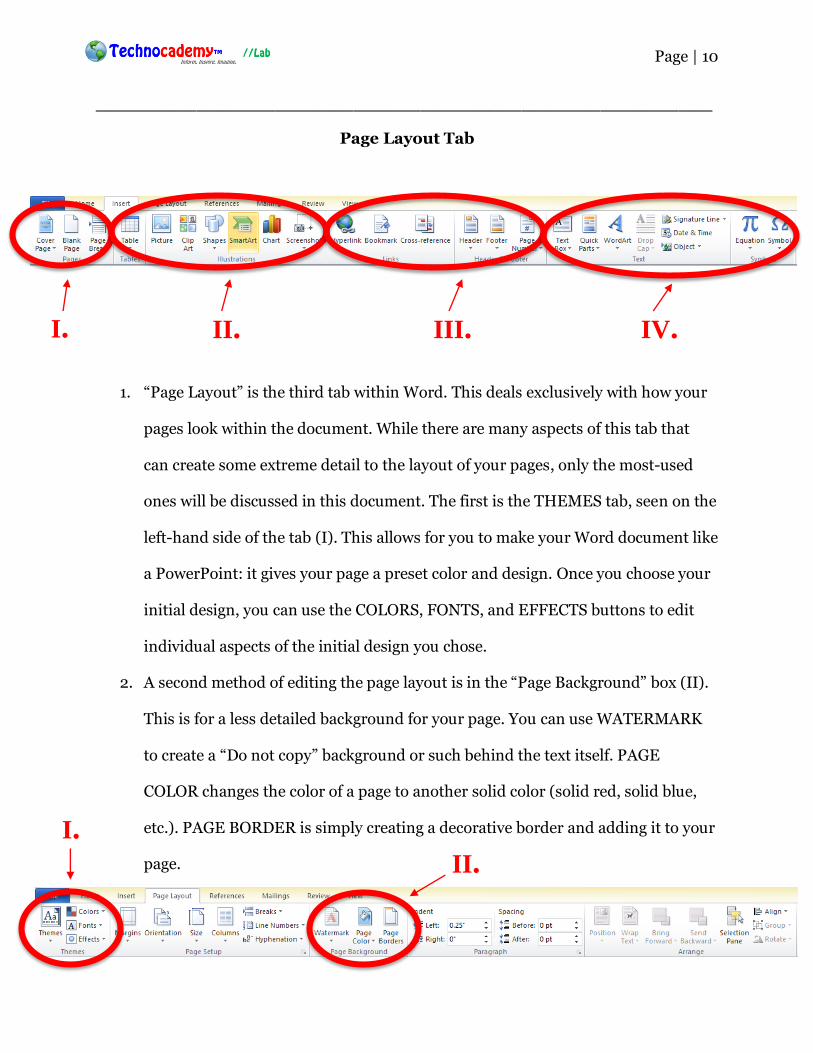
Page Layout Tab
1. “Page Layout” is the third tab within Word. This deals exclusively with how your
pages look within the document. While there are many aspects of this tab that
can create some extreme detail to the layout of your pages, only the most-used
ones will be discussed in this document. The first is the THEMES tab, seen on the
left-hand side of the tab (I). This allows for you to make your Word document like
a PowerPoint: it gives your page a preset color and design. Once you choose your
initial design, you can use the COLORS, FONTS, and EFFECTS buttons to edit
individual aspects of the initial design you chose.
2. A second method of editing the page layout is in the “Page Background” box (II).
This is for a less detailed background for your page. You can use WATERMARK
to create a “Do not copy” background or such behind the text itself. PAGE
COLOR changes the color of a page to another solid color (solid red, solid blue,
etc.). PAGE BORDER is simply creating a decorative border and adding it to your
page.
I. II. III. IV.
II. I.
Page 11
Page | 11
_______________________________________________________
References, Mailings, Review, View Tabs
1. The final four tabs in Microsoft Word are “References”, “Mailings”, “Review”, and
“View”. These are all components that are only used for very detailed documents,
and most of the tools within you won’t need to use in the future. However, in each
tab there are useful functions that you may need to use at some point. The
“References” tab is mostly used for Table of Contents, Works Cited pages, and
Captions for pictures. Each of these has its own personal button on the tab which
represents the ideal way to make each in Microsoft Word.
2. Next is the “Mailings” tab. This deals with sending your document to other people
through Microsoft Word itself. This feature is only accessible if you are involved
and comfortable with Microsoft Outlook. There are many aspects to explore here,
such as mail merging and selecting recipients, but usually most people decide to
print their letter and mail it the old fashioned way due to a lack of knowledge
about Outlook.
3. The “Review” tab is all about grammar. If you have any uncertainties about
spelling or punctuation, go to this tab. The most used components in this tab are
Page 12
Page | 12
the Spelling/Grammar Check, the Thesaurus, and Translate. Each can be seen in
the visual below. They are all fairly straightforward: click on SPELLING &
GRAMMAR underneath the check mark to make sure your document contains
proper diction and punctuation, THESAURUS to find synonyms so you don’t
repeat words, and TRANSLATE to add another language or comprehend such
within a paper.
4. Finally, there is the “View” tab. This is for when you are finished with your
document and want to see how it will look once you print it. What you need to
know about this tab is that it is, essentially, unnecessary BECAUSE it is all
available in a much simpler form in the bottom right-hand corner of Microsoft
Word. The primary components of this tab are zooming in/out of your document
so you can see more or see less as well as viewing your document in book form or
in another manner. As you can see
below, all of such is included in the
bottom corner of your screen. The Bar
with the + and – signs indicate the
zooming of your document, and the
little paper icons to the left of such
represent how you want to view your
document.
Page 13
Page | 13
The final aspect of Word that you must know is the Undo button. This is by far the most
powerful button in all of Word because it allows you to fix your mistakes quite easily.
When you make a mistake using one of the tabs and don’t like what you’ve done, click
undo. When you accidentally delete your entire paper and think the world is about to
end, click undo. This button is your saving grace. It is the crux of Microsoft Word, and
you MUST know how to use it and where it is if you are serious about using this program
to the peak of your abilities.
Microsoft Word is a very complicated program to use. You just learned a lot of new
information, and it is likely somewhat overwhelming. When in doubt, do not worry.
Simply scroll your mouse over a button and a description will pop up below, telling you
exactly what to do.
Phone: (470) 222-5194
Email: [email protected]
Website: www.technocademy.org


![[MS-OFFDI]: Microsoft Office File Format Documentation … · 2017-09-19 · Microsoft Word 97 Microsoft Word 2000 Microsoft Word 2002 Microsoft Office Word 2003 Microsoft Office](https://static.documents.pub/doc/80x56/5edde022ad6a402d66691993/ms-offdi-microsoft-office-file-format-documentation-2017-09-19-microsoft-word.jpg)


