23
T r a i n i n g G u i d e 2 – Outlook 2010 basics Microsoft Outlook 2010 – Level 1

T r a i n i n g G u i d e
2 – Outlook 2010 basics
Microsoft Outlook 2010
– Level 1

Microsoft Outlook 2010 - Level 1
© Learning and Development Service Page 2 Outlook 2010 basics
OUTLOOK 2010 BASICS
Outlook 2010 is a time and information management program that helps you to manage your day-to-day tasks and information quickly and effectively.
This chapter covers some of the basic principles and navigation methods to help you get up and running with Outlook 2010 as quickly as possible.
In this booklet you will:
gain an overview of what Outlook 2010 is used for
learn how to start Outlook
gain an overview of the common Outlook 2010 screen elements
learn how to use the Ribbon
learn how to use the keytip badges on the ribbon
learn how to minimise the ribbon
gain an understanding of Backstage View in Microsoft Outlook
learn how to access the Backstage View
gain an understanding of the Quick Access Toolbar
learn how to add commands to the Quick Access Toolbar
learn how to navigate to specific features of Outlook
learn how to customise the Navigation pane
learn how to work with the To-Do Bar to help manage your time and priorities
gain an overview of the Mail screen
gain an overview of the Calendar screen
gain an overview of the Contacts screen
gain an overview of the Tasks screen
gain an overview of the Notes screen
gain an overview of the Outlook Today screen
learn how to close Outlook
INFOCUS

Microsoft Outlook 2010 - Level 1
© Learning and Development Service Page 3 Outlook 2010 basics
UNDERSTANDING OUTLOOK 2010
Microsoft Outlook is designed to help you manage the way that you organise the day-to-day aspects of your business and personal life and the way that you interact
with other computer users. You can use it
to communicate with others, to keep track of your appointments and meetings, and to manage the contact details of individuals or
businesses.
Key Features of Outlook 2010
Microsoft Outlook is both a personal information manager and electronic messaging
system rolled into one. Outlook can be used to keep track of your diary, hold the contact details of your customers, suppliers and associates, schedule meetings, send
messages, and generally keep track of things you have to do.
To do this, Outlook provides you with five main tools. These are Mail, Calendar, Contacts, Tasks and Notes. These tools work together, as well as independently, to provide you with a useful package known as Microsoft Office Outlook 2010.
The Mail tool allows you to manage electronic mail. You use this aspect of Outlook to send messages and to receive them from
others. These messages can either be ones sent from within your own organisation (internal email) or externally using the Internet.
Calendar
The Calendar tool provides you with an electronic diary which can also be used to schedule and plan meetings with other people connected to your computer system or over the Internet.
Contacts
The Contacts tool allows you to manage business and personal contacts by recording the names, addresses, telephone numbers,
and email details of people such as colleagues, customers, suppliers, friends, relatives, and the like.
Tasks
The Tasks tool provides you with a To-Do list. You can also use it to prioritise tasks and to delegate them to others and track how many of them have been completed.
Notes
The Notes tool allows you to type memory jogging notes into your
computer so that you can refer to them again later.
There are several other subsidiary tools in Outlook that you may find useful. These include the Journal which automatically records actions you choose that relate to specific contacts and places those actions in a timeline view, and Outlook Today which allows you to see what messages you have, what you need to do, plus other important information in one handy screen.
How Outlook Is Used
Outlook can be opened and used as required, or it can be left open and operating behind the scenes while you are working with other applications. Generally, it is left open so that new mail and invitations can be received at any time. Outlook can then notify you even if you are working with another application.
Since it is designed to allow you to communicate with other people, Outlook will
operate on both your network and Internet connections.

Microsoft Outlook 2010 - Level 1
© Learning and Development Service Page 4 Outlook 2010 basics
STARTING OUTLOOK
Try This Yourself:
Before you begin, ensure that your computer is switched on and that the Windows desktop is displayed on your screen…
1 Click on the Windows Start button at the bottom left-hand corner of the screen to display the menu
It’s a round button with
the Windows logo...
2 Click on All Programs
3 Click on Microsoft Office
4 Click on Microsoft Office Outlook 2010
After a few moments the Inbox in the Mail feature will open in Outlook 2010
For Your Reference…
To start Microsoft Outlook: 1. Click on the Windows Start button 2. Click on All Programs 3. Click on Microsoft Office 4. Click on Microsoft Office Outlook
2010
Handy to Know…
You can also start Outlook by double-
clicking on an Outlook shortcut.
1
2
To send an email message or invite staff to a meeting, the first thing that you need to do is to start Microsoft Outlook. As a standard software application, how
Microsoft Outlook is started is largely determined by Windows. For example, it can be started from the Windows Start menu or from a shortcut on the desktop or taskbar.
4
3

Microsoft Outlook 2010 - Level 1
© Learning and Development Service Page 5 Outlook 2010 basics
COMMON OUTLOOK 2010 SCREEN ELEMENTS
3
Outlook can do so many different things for you and as a consequence its screen is probably the most interesting of all. No two Outlook 2010 screens will ever appear
alike because of how Outlook works, what
data it receives, and what functions a person prefers to use regularly. Nevertheless, your screen will have many of the key features
that are shown below.
1 The Title bar displays the name of the feature that you are currently using, followed by ‘Microsoft Outlook’.
2 The File tab is used to access the Backstage view which contains settings that are not directly related to creating or managing Outlook items such as Print and Save commands, and account management functions such as opening calendars and importing files. Outlook Options are also available so that you can set your working preferences and options for Outlook 2010.
3 The Ribbon is the tabbed band that appears across the top of the window. It is the control centre of Outlook 2010. Instead of menus, you use the tabs on the
Ribbon to access the commands that have been categorised into groups. The commands include galleries of formatting options that you can select from, such as the Quick Steps gallery shown here.
4 The Navigation pane provides a quick way of switching between the various
Outlook features such as Mail, Calendar, Contacts, and so on.
5 The Status bar indicates what is going on in Outlook at the present moment. It also changes depending upon the feature you are using and the tool that you are
working with.
6 The resizing buttons allow you to minimise (make smallest), maximise (make largest), restore down (return to the size between minimise and
maximise), and close the application window.
7 The To-Do bar integrates your follow-up messages, tasks and appointments in one central location.
1
4
5
7
6 2

Microsoft Outlook 2010 - Level 1
© Learning and Development Service Page 6 Outlook 2010 basics
USING THE RIBBON
For Your Reference…
To use the Ribbon: 1. Click on a tab to display the commands 2. Click on a tool to activate a command,
display a gallery or display a dialog box
Handy to Know…
Clicking on some commands will open a new window with its own ribbon and tabs specific to the function. For example, when you click on New E-mail in the New group on the Home tab, a new
untitled message window will open complete with tabs and commands relevant to creating a new message.
1
2
The Ribbon is the command centre for Outlook. It provides a series of commands organised into groups that are placed on relevant tabs. Tabs are
activated by clicking on their name to
display the command groups. Commands are activated by clicking on a button, tool or gallery option. Everything you could possibly want to do in Outlook will be found
somewhere on this Ribbon.
3
5
Try This Yourself:
Before starting this exercise ensure Outlook has started…
1 Examine the groups on the Home tab
These contain the most commonly used commands relevant to the Outlook feature that you are currently using (for example, Inbox in Mail in
this case)...
2 Click on the View tab
The commands on this tab are used to change how the information will display in the window...
3 Click on Change View in
the Current View group to display the View gallery
This includes three viewing options as well as three menu options at the bottom of the list...
4 Click on each of the tabs and examine the commands
Some of these open dialog boxes...
5 On the Folder tab, click on New Search Folder in the New group to open the New
Search Folder dialog box
6 Click on [Cancel] then click on the Home tab

Microsoft Outlook 2010 - Level 1
© Learning and Development Service Page 7 Outlook 2010 basics
USING RIBBON KEYTIPS
Try This Yourself:
Before starting this exercise ensure Outlook has started…
1 Press to display the
KeyTips
2 Press to activate the
Folder tab and display the keytip for the Folder commands
3 Press + to display
the Clean Up Folder options
You can use the arrow keys and to move
through the options or press the specific letter...
4 Press twice to return to the previous level of access keys
5 Press several times to
cycle through the commands on the Folder tab
6 Press to return to normal mode
For Your Reference…
To use KeyTips to access commands: 1. Press to display the KeyTips
2. Press the letter key of the command or tab that you want to select
3. Press to return to normal mode
Handy to Know…
You can still use the shortcut keys for menu commands that were available in previous versions of Office. For example, + applies bold to
selected text in an email message.
1
2
The Ribbon is normally accessed with a mouse. However, you can also use the keyboard to access Ribbon commands. When you press , the letters known as
key tips or access keys, will appear next
to commands on the ribbon. Pressing a key on the keyboard will activate the corresponding command on the Ribbon just as if you’d clicked the command with the
mouse.
3
5

Microsoft Outlook 2010 - Level 1
© Learning and Development Service Page 8 Outlook 2010 basics
MINIMISING THE RIBBON
Try This Yourself:
Before starting this exercise ensure Outlook has started…
1 Click on the Send / Receive tab to display the Send and Receive commands
2 Double-click on the Send / Receive tab to minimise the ribbon
While the tabs stay visible, the rest of the commands are hidden...
3 Click on the Home tab to redisplay the ribbon, this time with the Home commands
4 Click back in the window
The ribbon will hide again – it only becomes visible when you need it. You can redisplay it permanently though...
5 Double-click on the Folder tab to redisplay the Ribbon permanently
6 Click on the Home tab
For Your Reference…
To hide/display the Ribbon: 1. Double-click on the active tab to hide
the Ribbon 2. Click on a tab to see the Ribbon
temporarily
3. Double-click on a tab to redisplay the Ribbon permanently
Handy to Know…
You can also minimise the Ribbon by clicking on Minimise the Ribbon
and then maximise it again by clicking on Expand the Ribbon . These
buttons are located at the right end of
the Ribbon.
1
2
The Ribbon at the top of the screen, valuable as it is, does tend to occupy a reasonable amount of space. You can minimise the Ribbon so that only the tabs
appear visible. You can minimise the
Ribbon as a once-off operation, or have it remain constantly minimised and display full commands only briefly while a tab has been clicked.
3
4
5
Microsoft Outlook 2010 - Level 1
© Learning and Development Service Page 9 Outlook 2010 basics
UNDERSTANDING THE BACKSTAGE VIEW
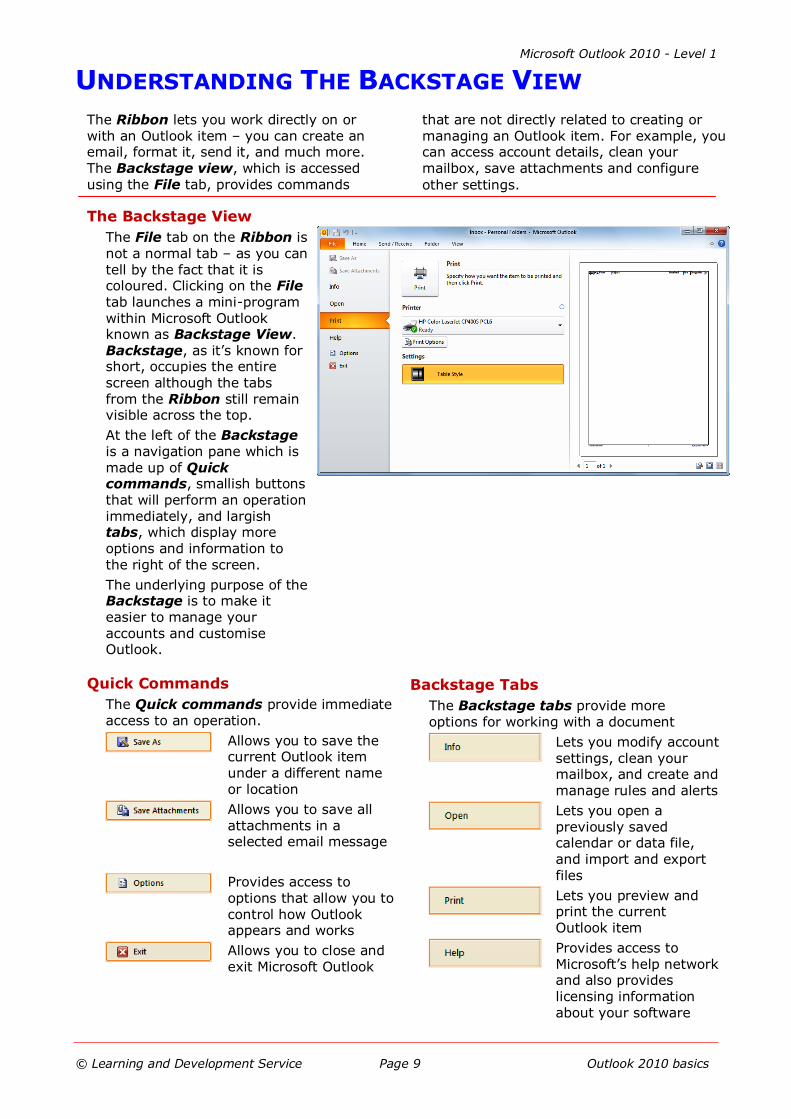
The Ribbon lets you work directly on or with an Outlook item – you can create an email, format it, send it, and much more. The Backstage view, which is accessed
using the File tab, provides commands
that are not directly related to creating or managing an Outlook item. For example, you can access account details, clean your mailbox, save attachments and configure
other settings.
The Backstage View
The File tab on the Ribbon is not a normal tab – as you can tell by the fact that it is coloured. Clicking on the File
tab launches a mini-program within Microsoft Outlook known as Backstage View. Backstage, as it’s known for short, occupies the entire screen although the tabs from the Ribbon still remain visible across the top.
At the left of the Backstage is a navigation pane which is made up of Quick commands, smallish buttons that will perform an operation immediately, and largish tabs, which display more options and information to the right of the screen.
The underlying purpose of the Backstage is to make it easier to manage your accounts and customise Outlook.
Backstage Tabs
The Backstage tabs provide more options for working with a document
Lets you modify account
settings, clean your mailbox, and create and manage rules and alerts
Lets you open a previously saved calendar or data file, and import and export
files
Lets you preview and print the current Outlook item
Provides access to Microsoft’s help network and also provides
licensing information about your software
Quick Commands
The Quick commands provide immediate access to an operation.
Allows you to save the current Outlook item under a different name or location
Allows you to save all attachments in a selected email message
Provides access to options that allow you to control how Outlook appears and works
Allows you to close and exit Microsoft Outlook

Microsoft Outlook 2010 - Level 1
© Learning and Development Service Page 10 Outlook 2010 basics
ACCESSING THE BACKSTAGE VIEW
Try This Yourself:
Before starting this exercise ensure Outlook has started…
1 Click on the File tab on the Ribbon to display the Backstage view, then click on the Info tab if it is not already selected
2 Spend a few moments studying the types of commands that are available
3 Click on the Print
tab (at the left) to see the printing options
A preview of how the item will print will appear to the right…
4 Click on the Help tab (on the left) to see the help options and also product licensing information
5 Click on the Home
tab of the Ribbon to close Backstage view and return to the Inbox
For Your Reference…
To access the Backstage view: 1. Click on the File tab on the Ribbon 2. Click on the desired tab or quick
command at the left
Handy to Know…
You can also close the Backstage
view by pressing .
3
4
Many Outlook settings that are not directly related to creating or managing Outlook items, such as Print and account management options, are placed in the
Backstage view. You usually access the
Backstage by clicking on the File tab to the left of the Ribbon, but it can also open when you select specific commands such as the keyboard shortcut for Print ( + ).

Microsoft Outlook 2010 - Level 1
© Learning and Development Service Page 11 Outlook 2010 basics
UNDERSTANDING THE QUICK ACCESS TOOLBAR
The Quick Access Toolbar, also known as the QAT, is a small toolbar that appears at the top left corner of the Outlook window. It is designed to provide access to the
command tools you use most frequently,
such as Send/Receive All Folders and Undo. You can add buttons to the Quick Access Toolbar to make finding your
favourite commands easier.
The Quick Access Toolbar
The Quick Access Toolbar is positioned at the top left corner of the Microsoft Outlook 2010 screen. In its default state, it includes the Send/Receive All Folders tool and
the Undo tool.
Customising the Quick Access Toolbar
Appearing immediately to the right of the Quick Access Toolbar, the Customise Quick Access Toolbar tool displays a list of commonly used commands that you can
add to the toolbar. You can select the items that you want to add. The ticks that appear to the left of the menu options show you that an option is already displayed.

Microsoft Outlook 2010 - Level 1
© Learning and Development Service Page 12 Outlook 2010 basics
ADDING COMMANDS TO THE QAT
Try This Yourself:
Before starting this exercise ensure Outlook has started…
1 Point to the first button on the Quick Access Toolbar to see the name of the tool and its shortcut
In this case, it is Send/Receive All Folders…
2 Right-click on Junk which appears in the Delete group on the Home tab to display a shortcut menu
3 Select Add to Quick Access Toolbar to add the Junk tool to the
QAT
4 Click on the Customise Quick Access Toolbar tool to display a menu
5 Select Empty Deleted Items to add this tool to
the QAT
It is just as easy to remove tools you don’t want from the QAT…
6 Right-click on Junk and select Remove from Quick Access Toolbar
7 Repeat step 6 to remove Empty Deleted Items from the QAT
For Your Reference…
To customise the Quick Access Toolbar: 1. Right-click on the command you want
to add and select Add to Quick Access Toolbar
Or
Click on the Customise Quick Access Toolbar tool and select a command
Handy to Know…
You can move the QAT under the ribbon by clicking on the Customise Quick Access Toolbar tool and
selecting Show Below the Ribbon. This puts the tools that you use most frequently closer to your Outlook item
making it quicker to access them.
1
2
The Quick Access Toolbar is a handy location to place commands from the Ribbon that you use most frequently. Adding commands from the Ribbon
involves locating the command, right- clicking on it and choosing the Add to Quick Access Toolbar option from the short cut menu that appears.
3
5

Microsoft Outlook 2010 - Level 1
© Learning and Development Service Page 13 Outlook 2010 basics
NAVIGATING TO OUTLOOK FEATURES
For Your Reference…
To navigate to Outlook features: 1. From the View tab, click on
Navigation Pane in the Layout group and select Normal to display the Navigation pane
2. Click on the desired button to display the feature
Handy to Know…
You can use the Navigation Pane Options dialog box to turn folders on or off in the Navigation pane. To display this dialog box, click on
Configure buttons , which is located
in the bottom right corner of the Navigation pane and select
Navigation Pane Options.
1 2
You use the Navigation pane to navigate to the various features in Outlook. The Navigation pane, which appears to the left of the screen, normally displays a
folder list and a series of buttons that
provide access to the various Outlook features. The Navigation pane can be displayed or hidden from view, and it can be
resized to display larger or smaller buttons.
4 5
Try This Yourself:
Before starting this exercise ensure Outlook has started...
1 Click on the View tab, then click on Navigation Pane
in the Layout group and select Normal to display the Navigation pane
The Mail feature is currently open in the examples and
its button, which is located towards the bottom of the Navigation pane, will appear highlighted...
2 Click on [Calendar] in the Navigation pane to open the Calendar feature
3 Click on [Contacts] in the Navigation pane to open the Contacts feature
4 Hover over the narrow grey box in the Navigation pane (as shown), press and hold down the mouse button,
then drag down until only the Mail, Calendar and Contacts buttons are visible in the Navigation pane
5 Repeat step 4 to drag the grey box up until all seven buttons are visible, as
shown
6 Click on [Mail] to display the Mail feature
Microsoft Outlook 2010 - Level 1
© Learning and Development Service Page 14 Outlook 2010 basics
THE NAVIGATION PANE
For Your Reference…
To minimise or maximise the Navigation pane:
1. Click on Minimise the Navigation Pane to minimise the Navigation pane
or Click on Expand the Navigation Pane to expand the Navigation pane
Handy to Know…
You can also close the Navigation pane by right-clicking on the Navigation pane and selecting Off.
If you exit Outlook with the Navigation pane minimised, the
Navigation pane will be minimised when you next start Outlook.
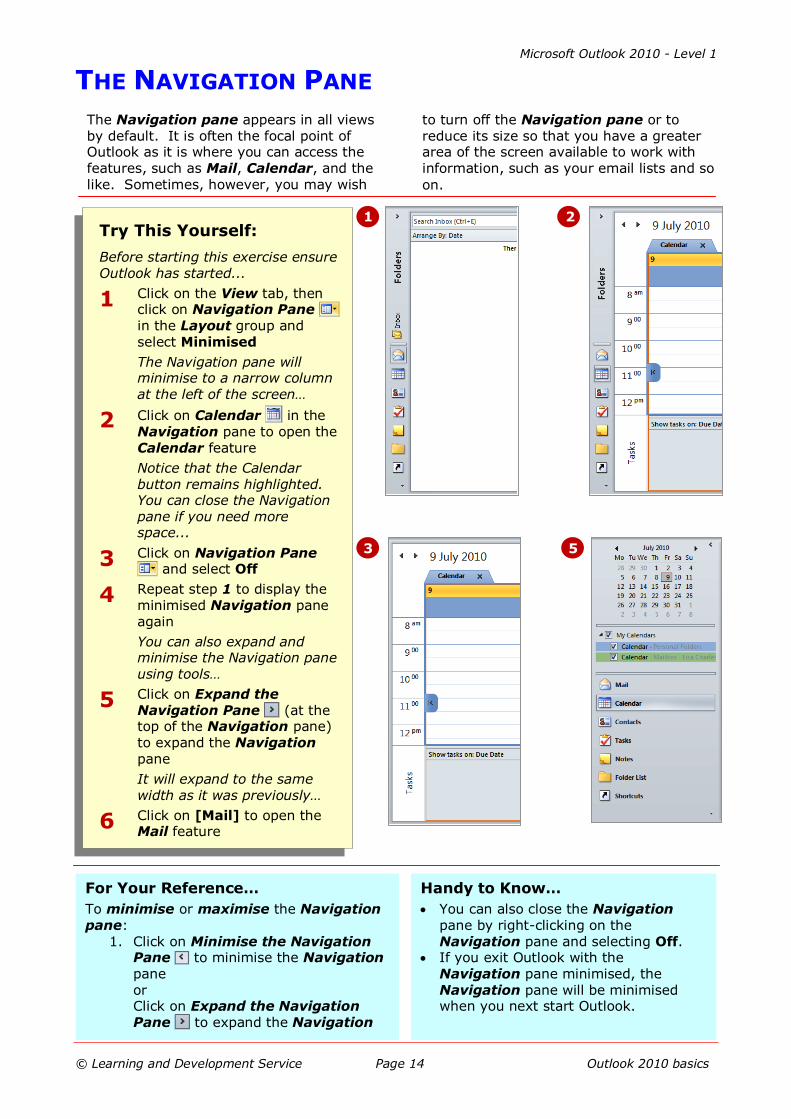
The Navigation pane appears in all views by default. It is often the focal point of Outlook as it is where you can access the features, such as Mail, Calendar, and the
like. Sometimes, however, you may wish
to turn off the Navigation pane or to reduce its size so that you have a greater area of the screen available to work with information, such as your email lists and so
on.
1 2
3 5
Try This Yourself:
Before starting this exercise ensure Outlook has started...
1 Click on the View tab, then click on Navigation Pane in the Layout group and select Minimised
The Navigation pane will minimise to a narrow column at the left of the screen…
2 Click on Calendar in the Navigation pane to open the Calendar feature
Notice that the Calendar button remains highlighted. You can close the Navigation pane if you need more space...
3 Click on Navigation Pane and select Off
4 Repeat step 1 to display the minimised Navigation pane again
You can also expand and minimise the Navigation pane using tools…
5 Click on Expand the Navigation Pane (at the top of the Navigation pane) to expand the Navigation
pane
It will expand to the same width as it was previously…
6 Click on [Mail] to open the Mail feature

Microsoft Outlook 2010 - Level 1
© Learning and Development Service Page 15 Outlook 2010 basics
THE TO-DO BAR
For Your Reference…
To work with the To-Do Bar:
Click on Minimise the To-Do Bar to minimise the To-Do Bar
Click on Expand the To-Do Bar to maximise the To-Do Bar
Right-click on the To-Do Bar to
change any of its settings
Handy to Know…
You can drag the left border of the To-Do Bar to make it wider. By doing this, you can not only see more of your appointment and task information, but you may also see another month or
two of calendar information at the top of the To-Do Bar.
The To-Do Bar integrates your tasks, emails flagged for follow-up, forthcoming appointments and calendar information in one central place on the screen.
Additionally, if you subscribe to a
SharePoint task list, any tasks assigned to you can also be included in the To-Do Bar. The To-Do Bar consolidates in one view all of your priorities so that you can easily
manage and track them.
1 2
4
7
Even in its minimised state, Outlook shows today’s appointments and number of tasks in the To-Do bar.
Try This Yourself:
Before starting this exercise ensure Outlook has started...
1 Click on the View tab, then click on To-Do Bar in the Layout group and select Normal
Any upcoming appointments and tasks will appear in the To-Do Bar on the right side of the screen. You can modify the
contents in the bar...
2 Click on To-Do Bar and select Appointments to turn off the Appointments feature
3 Repeat step 2 to turn on the Appointments feature again
4 Right-click on the To-Do Bar
and select Options to open the To-Do Bar Options dialog box
You can see clearly what tasks will appear…
5 Click on [Cancel]
Let’s return the bar to the
default minimised state again…
6 Click on Minimise the To-Do Bar to minimise the To-Do Bar
7 Click on any part of the minimised To-Do Bar to temporarily expand the bar, then click outside the bar to minimise it again

Microsoft Outlook 2010 - Level 1
© Learning and Development Service Page 16 Outlook 2010 basics
THE MAIL SCREEN
1
The Mail screen in Outlook is used to manage your email, both incoming (received from someone else) and outgoing (sent to another person).
The Mail screen can be configured to show various amounts of information and details about messages.
2
1 The Ribbon provides tools to help you when working with the Mail feature. For
example, it provides commands to help you reply to messages, delete messages,
forward messages, and so on.
2 The Mail Navigation pane displays a series of folders specific to email and email
operations. These folders are a little bit like the trays you keep on your desk for
messages. For example, there is an Inbox folder which lists the messages that have
been sent to you, a Sent Items folder which lists the messages that you have sent to
others, and an Outbox which is a temporary folder where messages are stored before
they have been sent by the system.
3 The Message view displays the messages that are in the current folder. Normally you
can only view one folder at a time – and the one you are looking at is the current folder.
A folder is made current by clicking on its name in the Navigation pane. All of the
messages for the folder will be displayed in the Message view. These messages can be
arranged in a specific order and even listed in specific groupings. Messages that have
not yet been sent or read appear in bold.
4 The minimised To-Do bar.
5 The Reading pane (which is optional) displays the contents of the message currently
highlighted in the Message view. The Reading pane allows you to read the contents
of messages without having to open them in their own specific window.
6 The Outlook Social Connector, or People pane, appears minimised as a single line at
the bottom of the Reading pane. The People pane, when expanded, lets you view and
access information that the Outlook Social Connector displays from social networks. If
your organisation uses Microsoft Office SharePoint Server 2010, the Outlook Social
Connector can automatically connect with your organisation's SharePoint sites to display
your colleagues' available activity items.
(Note: You must download and install an Outlook Social Connector provider add-in for
each internet social network that you want to use.)
3
4
5
6

Microsoft Outlook 2010 - Level 1
© Learning and Development Service Page 17 Outlook 2010 basics
THE CALENDAR SCREEN
1
The Calendar screen in Outlook is designed to allow you to create a calendar or diary of events. These events appear in a calendar layout style allowing you to
quickly see the start and finish times for these events. You can also set alarms against events so that Outlook will remind you when they are imminent.
2
1 The Ribbon provides tools to help you when working with the Calendar feature.
For example, you can change how the calendar displays, create new
appointments and meetings, share your calendar and so on.
2 The Monthly Calendar allows you to quickly navigate to a specific day simply by
clicking on the date in the Monthly Calendar. When you click on a date the
calendar for that day will appear in the right pane.
3 The Calendar selection allows you to choose which calendars to display in the
pane to the right of the screen. In the example above there is one calendar on
display. Outlook allows you to display multiple calendars on the screen.
4 The Calendar area is where the calendar or calendars appear. You can display
multiple calendars and these can be either private (accessible only to the current
user) or shared. Shared calendars allow you to display calendars for groups of
people such as those working on a specific task or project.
5 The Daily Task List displays your tasks and to-do items. It appears by default
only in the Day, Work Week and Week views of the Calendar.
3
4
5
Microsoft Outlook 2010 - Level 1
© Learning and Development Service Page 18 Outlook 2010 basics
THE CONTACTS SCREEN
1
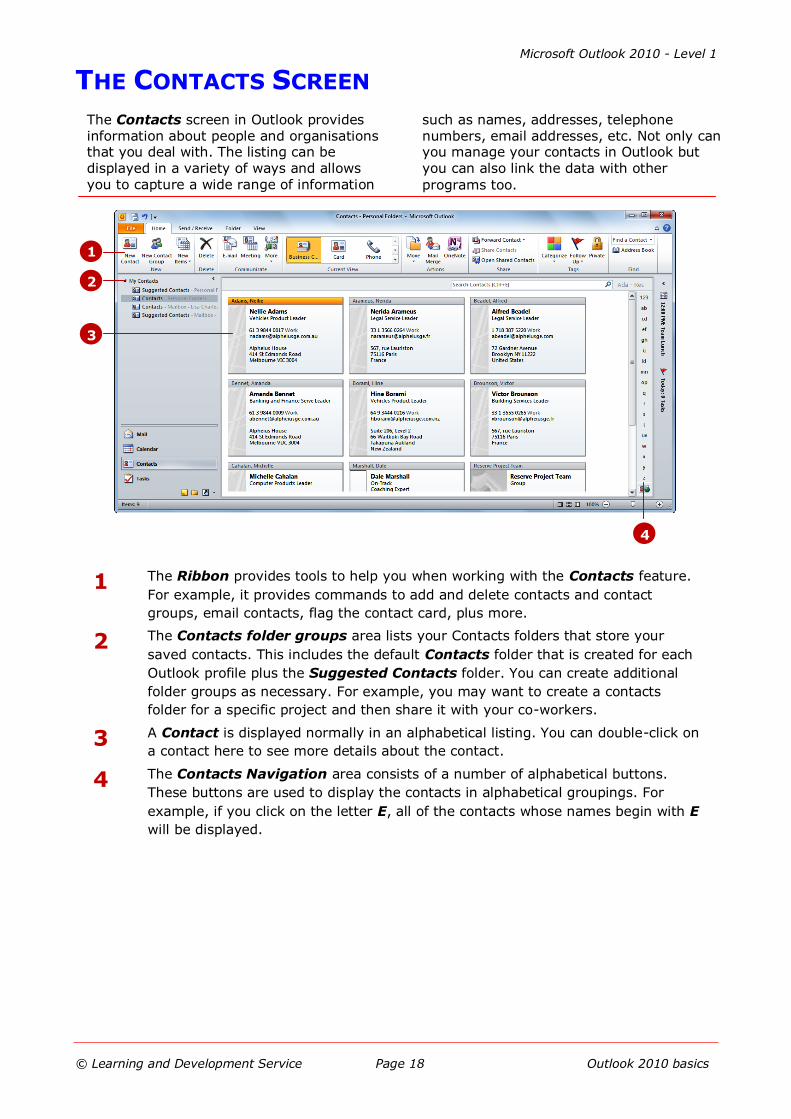
The Contacts screen in Outlook provides information about people and organisations that you deal with. The listing can be displayed in a variety of ways and allows
you to capture a wide range of information
such as names, addresses, telephone numbers, email addresses, etc. Not only can you manage your contacts in Outlook but you can also link the data with other
programs too.
2
1 The Ribbon provides tools to help you when working with the Contacts feature.
For example, it provides commands to add and delete contacts and contact
groups, email contacts, flag the contact card, plus more.
2 The Contacts folder groups area lists your Contacts folders that store your
saved contacts. This includes the default Contacts folder that is created for each
Outlook profile plus the Suggested Contacts folder. You can create additional
folder groups as necessary. For example, you may want to create a contacts
folder for a specific project and then share it with your co-workers.
3 A Contact is displayed normally in an alphabetical listing. You can double-click on
a contact here to see more details about the contact.
4 The Contacts Navigation area consists of a number of alphabetical buttons.
These buttons are used to display the contacts in alphabetical groupings. For
example, if you click on the letter E, all of the contacts whose names begin with E
will be displayed.
3
4

Microsoft Outlook 2010 - Level 1
© Learning and Development Service Page 19 Outlook 2010 basics
THE TASKS SCREEN
1
The Tasks screen in Outlook is designed as a place to record and track tasks. It is, in essence, a To-Do listing. The Tasks screen can be used to display tasks in
chronological order, and it is where you
can mark off tasks as they are in progress and when they are completed. Tasks created here are also displayed on the To-Do bar
and in the Daily Task List in the Calendar.
2
1 The Ribbon provides tools to help you when working with the Task feature. For
example, it provides commands to add tasks, delete unwanted tasks, complete
tasks, and so on.
2 The My Tasks area lets you view the tasks either in a To-Do List (which
displays a task’s details in the right pane when selected, as shown above) or as a
summarised Tasks list. You can filter the tasks that appear using the options in
the Current View gallery – for example, you can display only active (unfinished)
tasks, only completed tasks, plus more.
3 The Tasks area displays a list of tasks, such as those that have not yet been
completed.
3

Microsoft Outlook 2010 - Level 1
© Learning and Development Service Page 20 Outlook 2010 basics
THE NOTES SCREEN
1
The Notes screen in Outlook is used to jot down and manage short notes. These notes can be anything that you like such as short simple memory joggers, telephone
numbers, receipt numbers, prices, shopping lists, and more. In many ways the Notes section is like the sticky notes you use at
your desk.
2
1 The Ribbon provides tools to help you when working with the Notes feature. For
example, it provides commands to create and delete notes, display the notes as
large or small icons, and find notes.
2 The Notes themselves appear in the main part of the window. When you double-
click on a note, it will open in a small window and it will look very similar to the
sticky (‘Post-it’) notes that you use at your desk.

Microsoft Outlook 2010 - Level 1
© Learning and Development Service Page 21 Outlook 2010 basics
THE OUTLOOK TODAY SCREEN
1
The Outlook Today screen provides a preview of your day. By using Microsoft’s Outlook Today, you can see a summary of your appointments, a list of your tasks,
and how many new email messages you
have. You can set this page to be the first page that opens when you start Outlook. You can also change the way Outlook
Today appears.
2
1 To view your Outlook Today page, click on either Personal Folders (as in the
example above) or Mailbox − Your name (for a Microsoft Exchange account) in
the Navigation pane. You can also click on Shortcuts (at the bottom of the
Navigation pane) and click on Outlook Today to view your Outlook Today
page.
2 The Calendar area shows a summary of your appointments for today as well as
appointments for a designated number of days after today’s date.
3 The Tasks area shows all tasks or it can be customised to show only tasks that
need to be worked on today.
4 The Messages area shows you a count of the number of unread messages in your
Inbox and Outbox folders, plus the number of messages in the Drafts folder.
But, you can customise this area to show a count for any of your Mail folders.
5 Click on [Customise Outlook Today] to access a screen where you can specify
all custom settings for how you want Outlook Today to appear. You can control
how many days of information will be displayed in the Calendar, how the tasks
will be displayed and sorted, and which Mail folders will be displayed in the
Messages area. You also are given the option to make Outlook Today your
start-up page and you can change the style used for Outlook Today to a different
predefined style.
3 4
5

Microsoft Outlook 2010 - Level 1
© Learning and Development Service Page 22 Outlook 2010 basics
EXITING OUTLOOK
Try This Yourself:
Before starting this exercise ensure Outlook has started...
1 Click on the File tab to open the Backstage view
2 Click on the Exit quick command at the bottom left of the screen
After a moment Outlook will close
For Your Reference…
To exit Outlook: 1. Click on the File tab and click on the
Exit quick command or
Click on close
Handy to Know…
Since Mail and accessing Contacts is almost an integral part of working with your computer, it is better to keep Outlook minimised rather than close it.
You can also close Outlook by double-
clicking on the small Office button in the top left corner of the title bar.
1
Outlook conforms to standard Windows conventions and can therefore be closed using either the Exit command in the Backstage view or by clicking on the
close button at the top right corner of
the application window. When you close Outlook you will be disconnected from your
mail servers.

Microsoft Outlook 2010 - Level 1
© Learning and Development Service Page 23 Outlook 2010 basics
CONCLUDING REMARKS
Congratulations!
You have now completed the Outlook 2010 basics booklet. This booklet was designed to get you to the point where you can competently perform a variety of operations as listed in the objectives on page 2.
We have tried to build up your skills and knowledge by having you work through specific tasks. The step by step approach will serve as a reference for you when you need to repeat a task.
Where To From Here…
The following is a little advice about what to do next:
Spend some time playing with what you have learnt. You should reinforce the skills that you have acquired and use some of the application's commands. This will test just how much of the concepts and features have stuck! Don't try a big task just yet if you can avoid it - small is a good way to start.
Some aspects of the course may now be a little vague. Go over some of the points that you may be unclear about. Use the examples and exercises in these notes and have another go - these step-by-step notes were designed to help you in the classroom and in the work place!
Here are a few techniques and strategies that we've found handy for learning more about technology:
visit CLD’s e-learning zone on the Intranet
read computer magazines - there are often useful articles about specific techniques
if you have the skills and facilities, browse the Internet, specifically the technical pages of the application that you have just learnt
take an interest in what your work colleagues have done and how they did it - we don't suggest that you plagiarise but you can certainly learn from the techniques of others
if your software came with a manual (which is rare nowadays) spend a bit of time each day reading a few pages. Then try the techniques out straight away - over a period of time you'll learn a lot this way
and of course, there are also more courses and booklets for you to work through
finally, don’t forget to contact CLD’s IT Training Helpdesk on 01243-752100


