29
Meibox Meibographer Portable USB Meibography Camera User’s Manual
Meibox MeibographerPortable USB Meibography Camera
User’s Manual

1
Table of Contents
ABOUT THIS GUIDE...................................................................................................................2
1. INTRODUCTION.....................................................................................................................3
1.1 FEATURES AND BENEFITS.................................................................................................................................31.2 UNPACKING THE PACKAGE...............................................................................................................................31.3 SYSTEM REQUIREMENTS...................................................................................................................................41.4 PHYSICAL DESCRIPTION....................................................................................................................................4
2. HARDWARE INSTALLATION..............................................................................................52.1 ATTACHING THE CAMERA TO THE SLIT LAMP...............................................................................................52.2 USB EXTENDER.....................................................................................................................................................52.3 SETTING UP THE CAMERA SOFTWARE............................................................................................................6
3. PHOTO CAPTURE.................................................................................................................13
4. PHOTO ENHANCEMENT....................................................................................................16
5. FREQUENTLY ASKED QUESTIONS.................................................................................20
TECHNICAL SUPPORT............................................................................................................22

2
About This Guide
This manual provides instructions and illustrations on how to use your Meibox Meibographer, includes:
Chapter 1, Introduction, provides the general information on the camera.
Chapter 2, Installation, describes the hardware and software installation procedure for the Meibox.
Chapter 3, Security, explains the security feature of the camera.
Chapter 4, Application of the Camera, provides the illustrations of the camera’s applications.
Chapter 5, Using the Camera, guides you through the configuration using the web browser.
Chapter 6, IPView Pro, helps you to install and use the software.
Chapter 7, Appendix.
Please note that the illustrations or setting values in this manual are FOR YOUR REFERENCE ONLY. The actual settings and values depend on your system and network. If you are not sure about the respective information, please ask your network administrator or MIS staff for help.

3
1. IntroductionDevice Description: Meibox is simply a Camera that takes still pictures (natural light) of the eyelid.
Indications for use: Meibox is a high-definition camera intended to take photos of directly illuminated everted eyelids through non-contact (NCT) meibography. The camera is designed to mount on a slit lamp for fluid incorporation within the clinic workflow.
Disclaimer: Meibox does not image or monitor physiological processes and does not diagnose disease.
1.1 Features and Benefits
Simple To UseThe Meibox was designed with quality, clinical efficiency and durability in mind. Composed of a durable brushed aluminum chassis, the Meibox is unobtrusive and fits perfectly in the flow of any clinic. Mounted on a slit lamp it can be placed in a centralized location as a screening tool or placed in any examination room for easy integration. This design element has helped doctors adapt the technology to their clinic flow instead of the other way around.
Cloud Based Database:The Meibox utilizes Amazon Web Services a HIPPA Compliant storage database providing doctors convenience, security and peace of mind. The advantages of a cloud based software systems include:
- Protection of data ensured by Amazon Web Services- No concerns of lost data due to server malfunctions- Automatic updates ensuring the latest software updates are implemented- Easy download of data to PC for attachment into electronic medical records- Multi-location offices can access data for patients anywhere
Photo Enhancing SoftwareVision processing technology is available for enhancing your photos of the meibomian glands. With the click of a button, pictures of the glands are enhanced with increased border definition. Inversion lighting allows you to see a negative of the photo increasing the ability for you to interpret the photos. The intelligent lighting features allow you to click on any area of the picture that you would like to see and enhances the surrounding light.
1.2 Unpacking the Package
Unpack the package and check all the items carefully. In addition to this User’s Guide, be certain that you have:
One Meibox Meibographer Unit. (Imaging box and slit lamp attachment) One Quick Installation Guide One 10 foot USB A to USB Cable One cordless mouse

4
If any item contained is damaged or missing, please contact your local dealer immediately. Also, keep the box and packing materials in case you need to ship the unit in the future.
1.3 System Requirements
Networking Minimum internet speed recommended: 10Mbps Download and 3Mbps Upload
Accessing the Camera Operating System: Microsoft® Windows® 10 CPU: Intel iCore 5 or above Memory Size: 6GB RAM Resolution: 1920x1080 or above Windows 64 bit processing(Recommended minimum outcomes are for optimal performance. Lower specifications have been compatible for the Meibox software, but cannot be guaranteed)
1.4 Physical Description
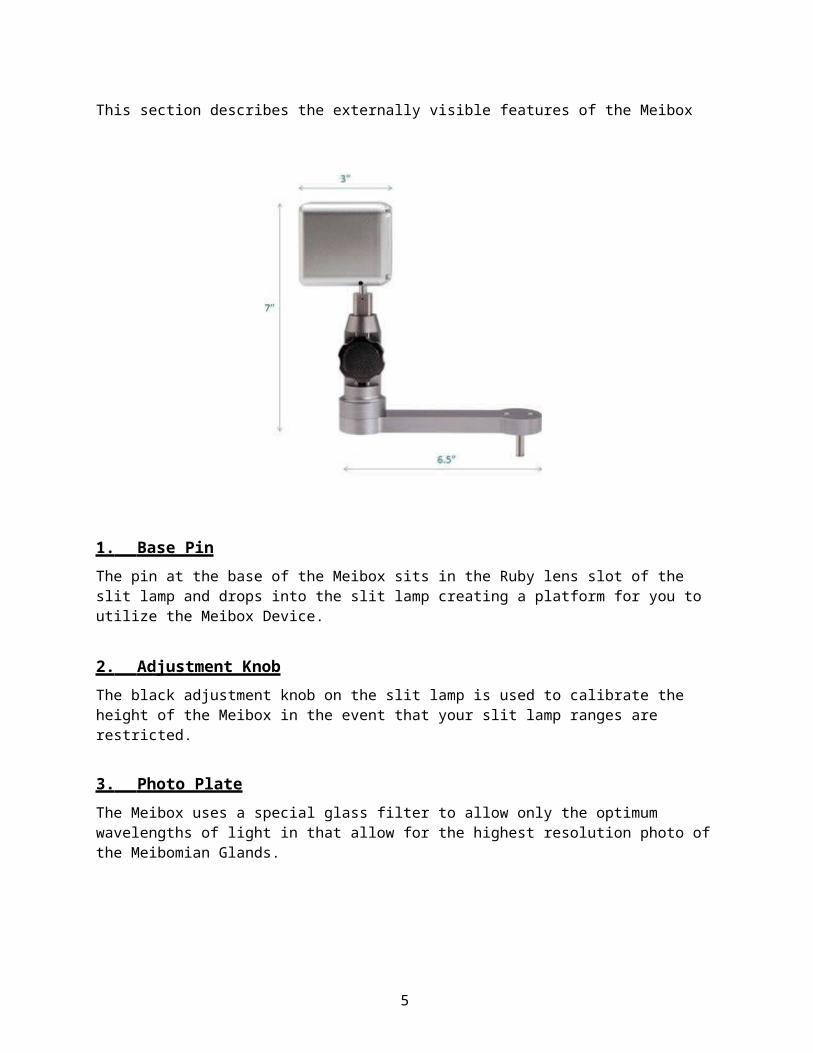
This section describes the externally visible features of the Meibox
1. Base Pin The pin at the base of the Meibox sits in the Ruby lens slot of the slit lamp and drops into the slit lamp creating a platform for you to utilize the Meibox Device.
5
2. Adjustment Knob The black adjustment knob on the slit lamp is used to calibrate the height of the Meibox in the event that your slit lamp ranges are restricted.
3. Photo Plate The Meibox uses a special glass filter to allow only the optimum wavelengths of light in that allow for the highest resolution photo of the Meibomian Glands.
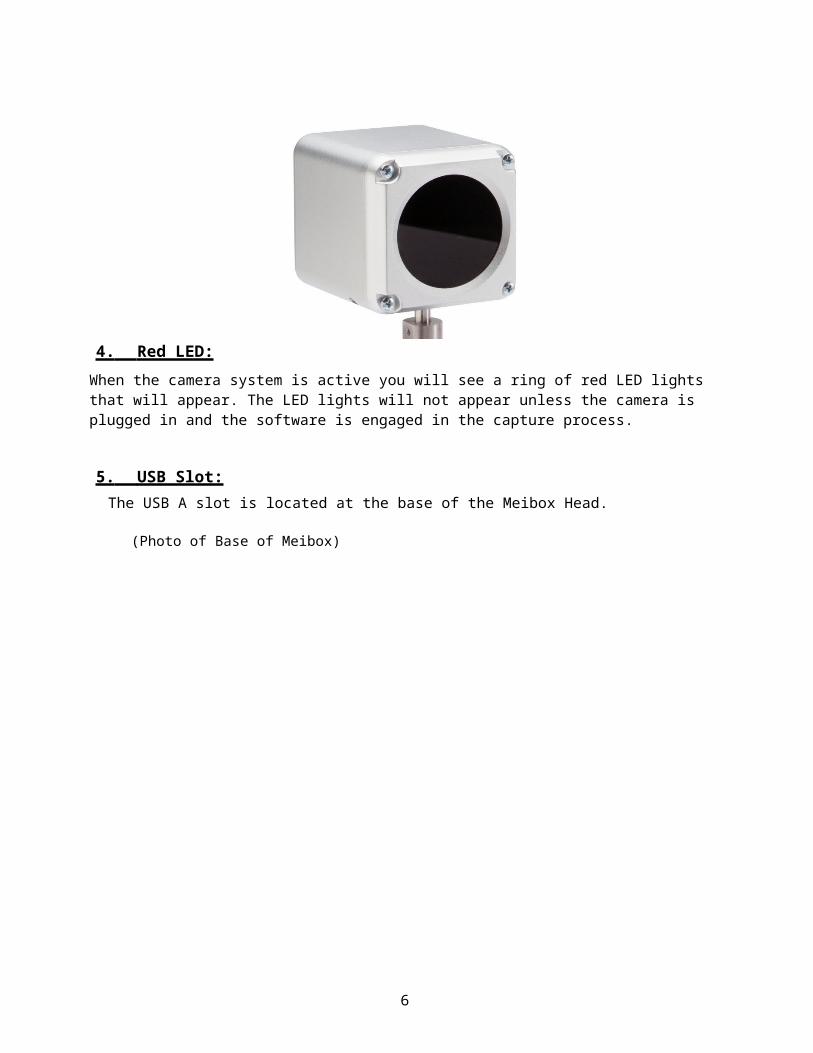
4. Red LED: When the camera system is active you will see a ring of red LED lights that will appear. The LED lights will not appear unless the camera is plugged in and the software is engaged in the capture process.
5. USB Slot: The USB A slot is located at the base of the Meibox Head.
(Photo of Base of Meibox)
6
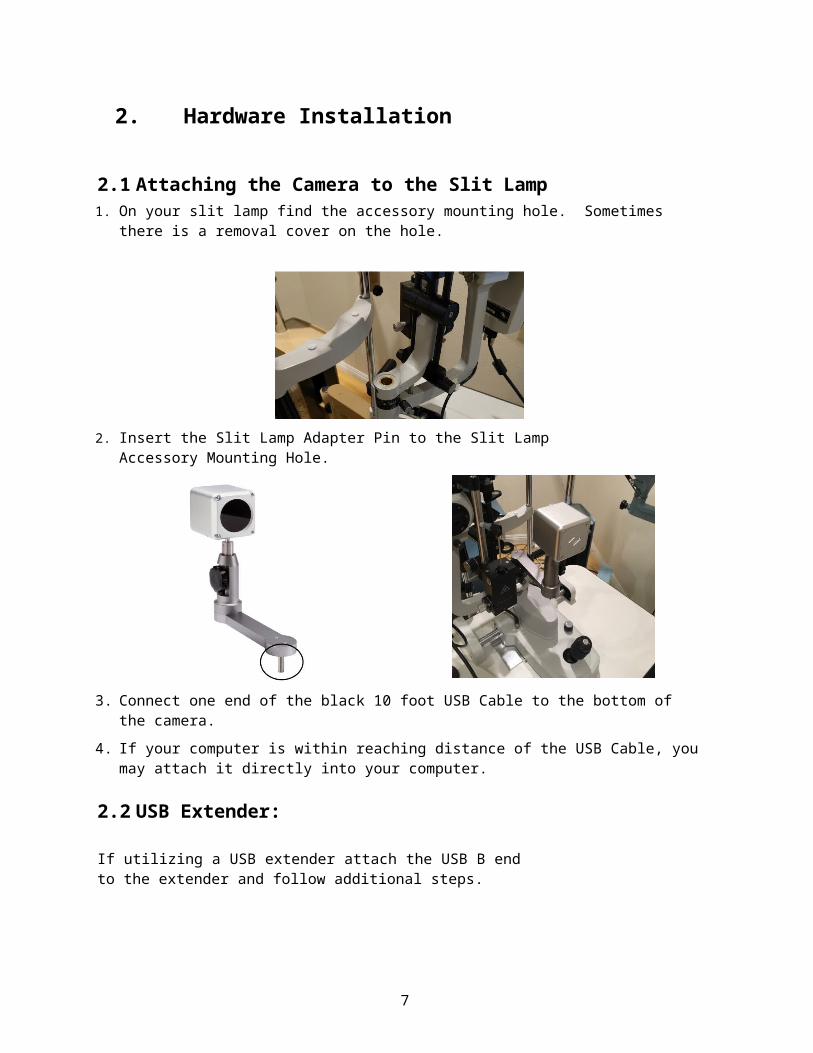
2. Hardware Installation
2.1 Attaching the Camera to the Slit Lamp1. On your slit lamp find the accessory mounting hole. Sometimes there is a removal cover
on the hole.
2. Insert the Slit Lamp Adapter Pin to the Slit Lamp Accessory Mounting Hole.
3. Connect one end of the black 10 foot USB Cable to the bottom of the camera.
4. If your computer is within reaching distance of the USB Cable, you may attach it directly into your computer.
2.2 USB Extender:
If utilizing a USB extender attach the USB B end to the extender and follow additional steps.
7
2.3 Setting up the Camera Software
Installing the Setup Wizard
Visit www.boxmedicalsolutions.com/meibox-install-page/ to obtain software install link.
1. Select save and open application.
2. Click OK

8
3. Click Next
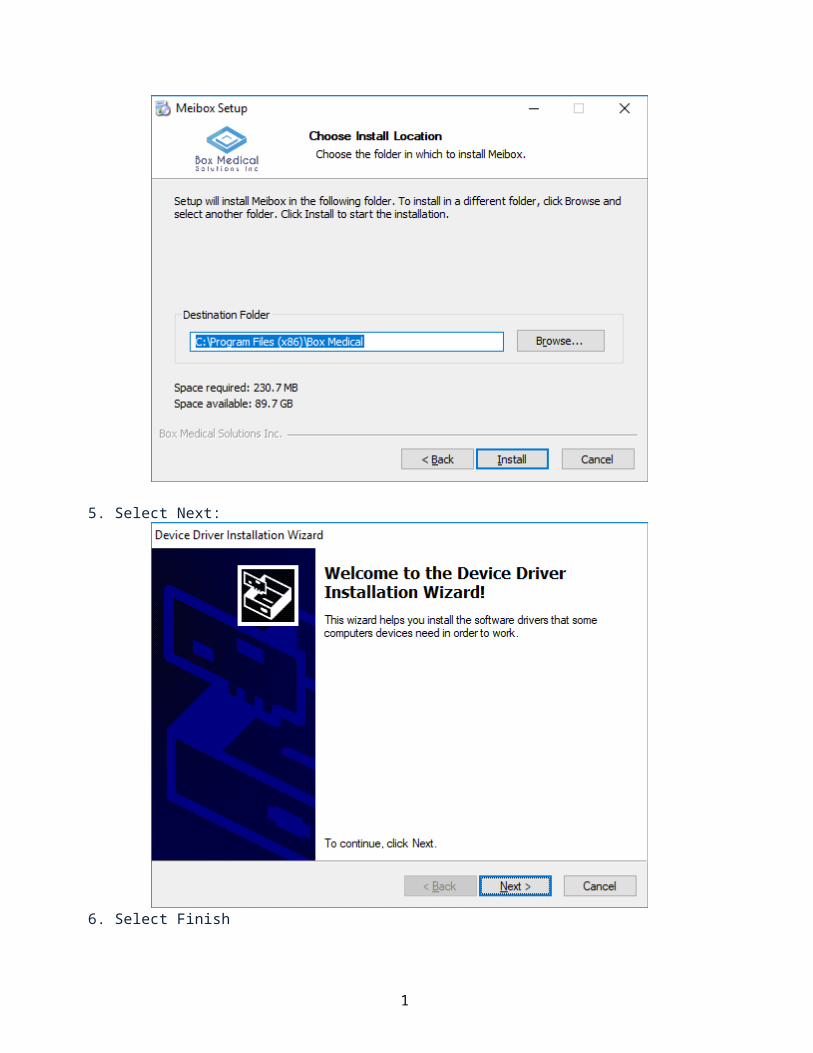
4. Select Install:

9
5. Select Next:
6. Select Finish
1
7. Select Complete
Creating an Account
1. Select "Create an Account"

1
2. Upload Clinic Logo and enter information. It is important to enter an email address that is valid and will be a point of correspondence. This is where a password verification will be sent and future emails regarding updates. It is important that this email account be checked regularly.

1
3. Connect camera and register. Select finish when completed.
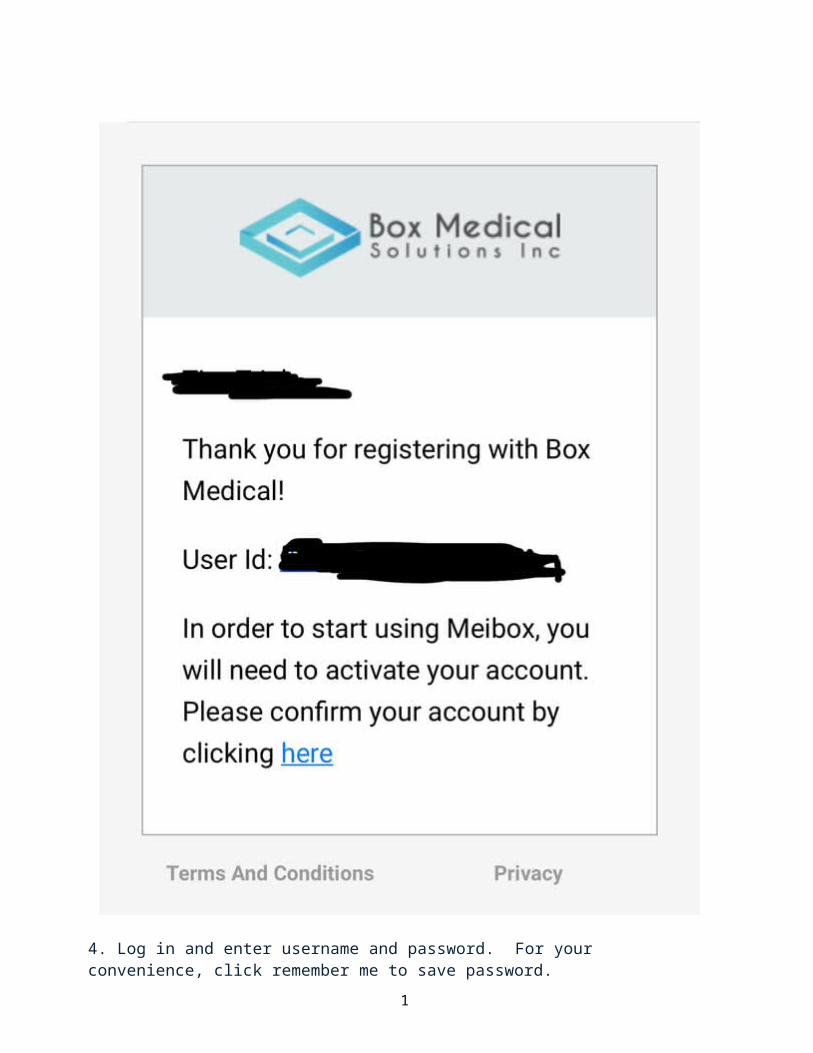
4. Access account email address and click to confirm account creation.

1
4. Log in and enter username and password. For your convenience, click remember me to save password.
1

1
3. Photo Capture
Photo capture process:
Step 1 Add new patient by selecting upper right section:
Step 2 Enter patient demographics information:
Step 3 Start new session (upper right hand corner)

1
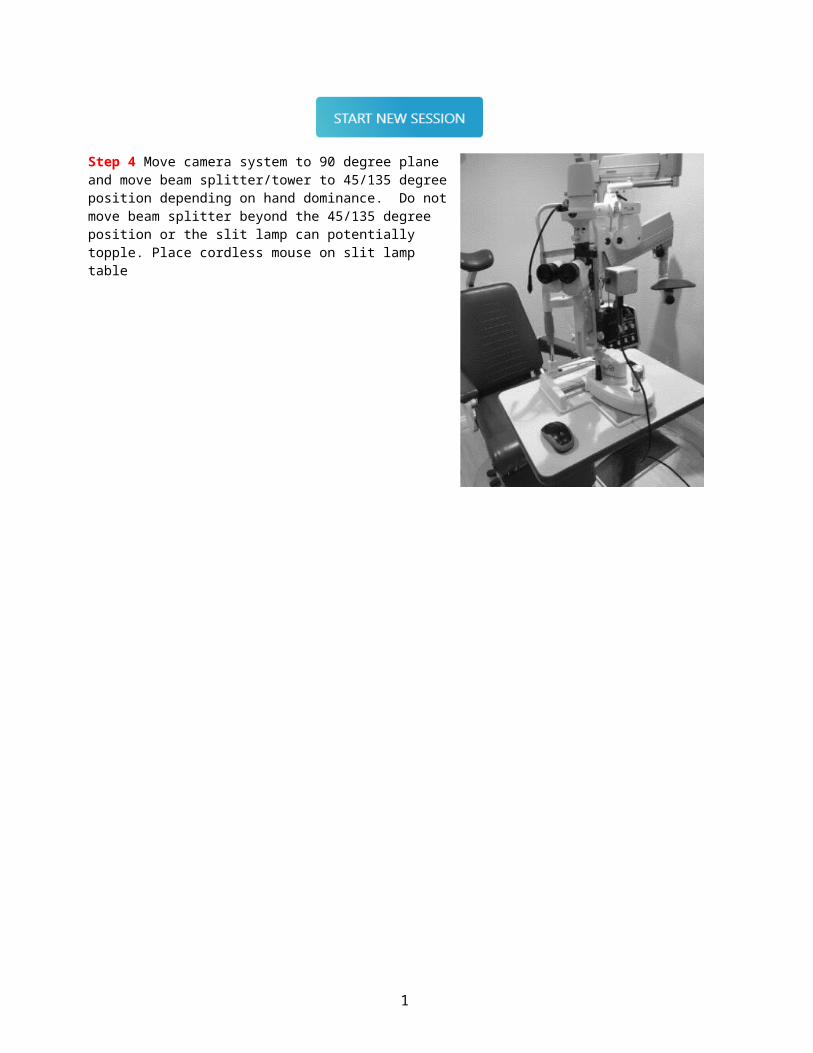
Step 4 Move camera system to 90 degree plane and move beam splitter/tower to 45/135 degree position depending on hand dominance. Do not move beam splitter beyond the 45/135 degree position or the slit lamp can potentially topple. Place cordless mouse on slit lamp table
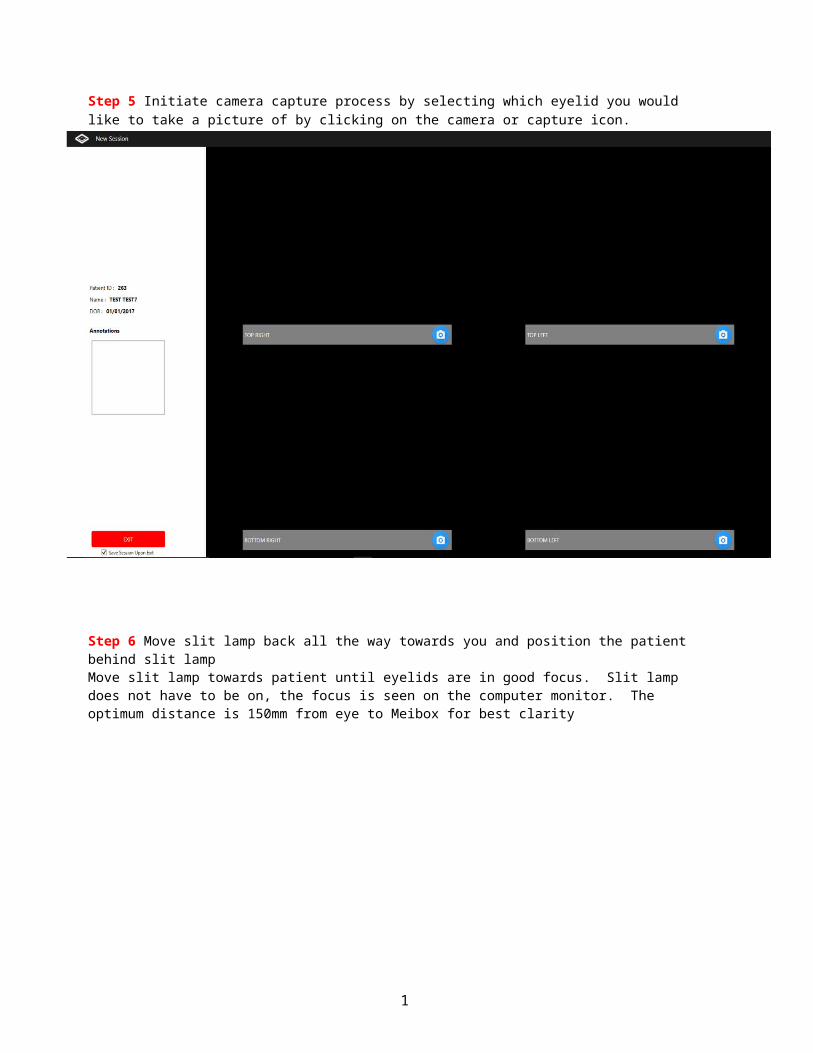
Step 5 Initiate camera capture process by selecting which eyelid you would like to take a picture of by clicking on the camera or capture icon.
1
Step 6 Move slit lamp back all the way towards you and position the patient behind slit lampMove slit lamp towards patient until eyelids are in good focus. Slit lamp does not have to be on, the focus is seen on the computer monitor. The optimum distance is 150mm from eye to Meibox for best clarity
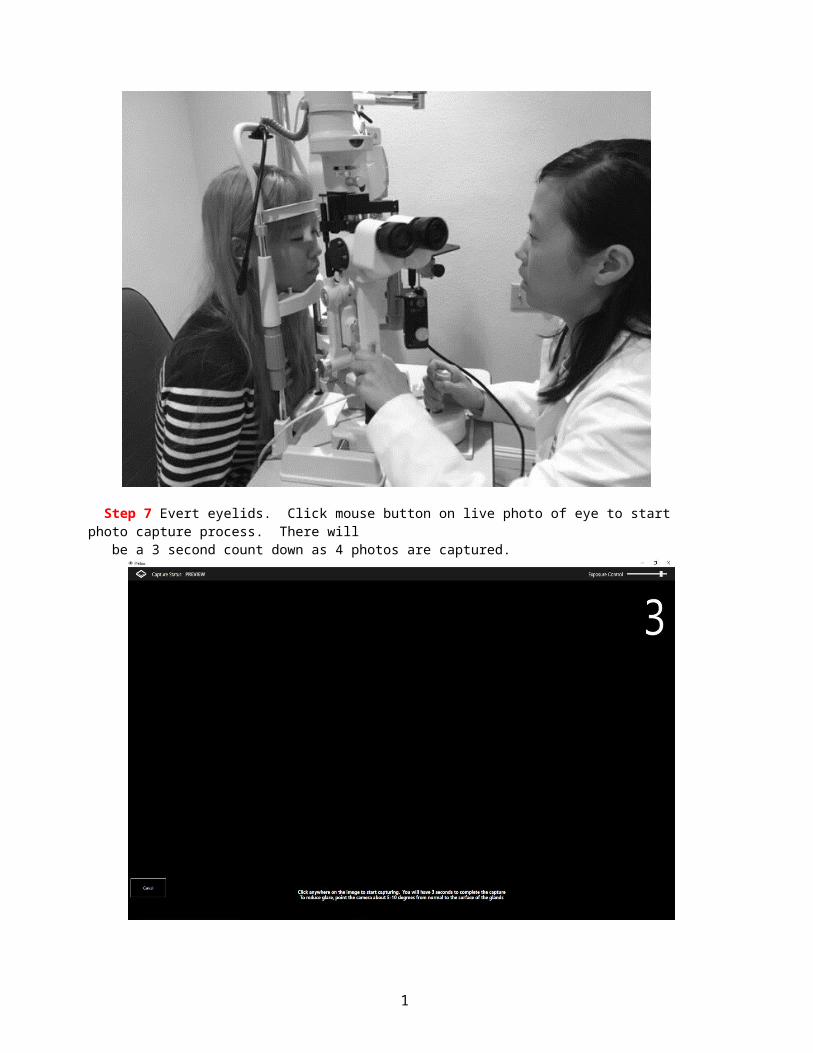
Step 7 Evert eyelids. Click mouse button on live photo of eye to start photo capture process. There will be a 3 second count down as 4 photos are captured.
1
4. Photo Enhancement
Step 1 Click on photo you would like to enhance from the summary screen
Step 2 Once the photo is selected you will have several enhancement options. Scroll bar has multiple photos that you can select from the previous patient sessions to allow for quick and easy access for comparison
1
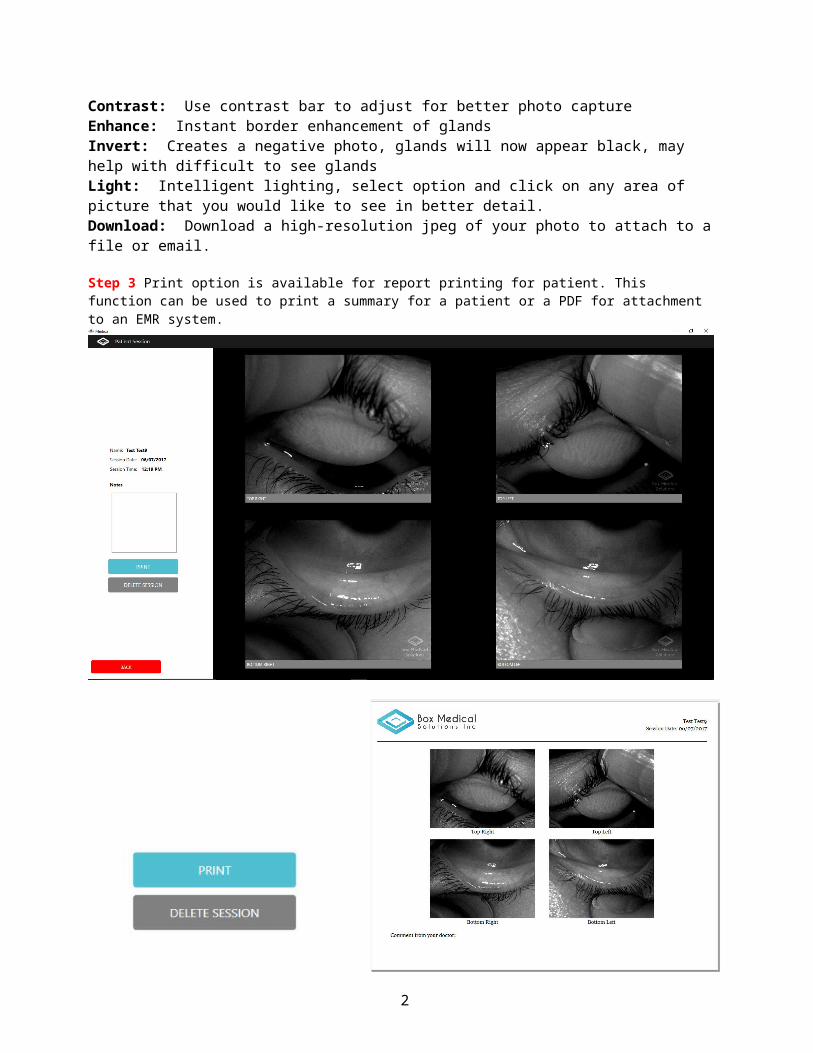
Contrast: Use contrast bar to adjust for better photo captureEnhance: Instant border enhancement of glandsInvert: Creates a negative photo, glands will now appear black, may help with difficult to see glandsLight: Intelligent lighting, select option and click on any area of picture that you would like to see in better detail.Download: Download a high-resolution jpeg of your photo to attach to a file or email.
Step 3 Print option is available for report printing for patient. This function can be used to print a summary for a patient or a PDF for attachment to an EMR system.
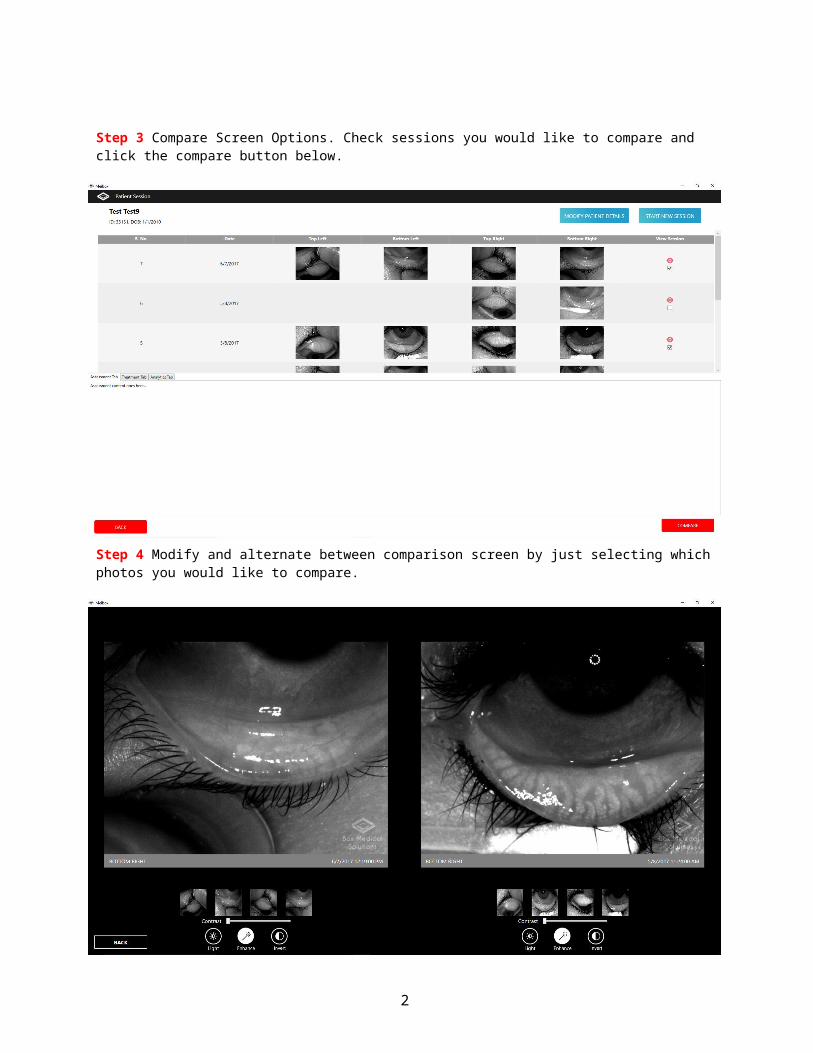
Step 3 Compare Screen Options. Check sessions you would like to compare and click the compare button below.

2
Step 4 Modify and alternate between comparison screen by just selecting which photos you would like to compare.
2
5. Appendix
5.1 Frequently Asked Questions
Frequently Asked Questions:Attachment Questions:Q: How does the Meibox attach to the slit lamp?A: The Meibox has a pin and attaches to the base of the slit lamp where the old Ruby Lens slot would attach.
Q: Is the Meibox compatible with any slit lamp?A: The Meibox has been tested with over 35 different slit lamp models and designs including Haag Streit style slit lamps and Zeiss style slit lamps and have always been able to mount.
Q: Is the Meibox difficult to install and remove from the slit lamp?A: The Meibox can be installed with one hand since it is dropped directly into the slot. It can just as easily be removed and is attached to your computer via a USB cord.
Q: Does the Meibox need to be removed during the slit lamp examination?A: For the most part, the Meibox is fairly unobtrusive and can be pushed aside during a slit lamp examination. The exception remains for Haag Streit style slit lamps with goldman tonometry. For these situations, the Meibox can simply be lifted off and placed on a stand on your desk.
Q: My computer is not detecting the Meibox camera systemA: Re-install Meibox driver and ensure that the camera is plugged in during installation. If the Meibox is still not being detected by the computer following re-installation unplug the USB cord from the computer and attempt another slot. If it is still not functioning, ensure that the USB cord to the camera is secure.
Q: The Meibox works when directly plugged into the computer system, but does not work when plugged into the adapter. What do I do?A: Check to make sure that the power to the USB adapter is on. Ensure that the cables are all connected firmly. If after completing the wire check and the camera is still not detected, unplug from the USB adapter and plug the USB cable directly into the computer to check to see if the camera is detected. If functioning, there may be an issue with the USB adapter. Contact us at [email protected] and we will send another adaptor.
Q: The photos appear grainyA: Ensure that your computer meets the minimum specifications in the beginning of the manual. Update your computer and display drivers and ensure that your computer resolution is at a minimum of 1920 x 1080.
Q: Is a computer provided with the Meibox unit?A: A computer does not come standard with a Meibox unit. The Meibox unit is designed to be compatible with most computer technology. See specifications page for details for optimum PC requirements.
Q: Does the Meibox work with a Mac?A: No unfortunately at this time, the device is not compatible with a Mac.
2
Q: Can the Meibox operate with a PC tablet?A: Absolutely, the Meibox software is compatible with any PC tablet. If your office is not outfitted with a PC in each room, this would actually be a great option to be able to provide the doctor the ability to open the software to view photos from any location.
Q: Do you have a centralized option to act as a screening device?A: Our centralized unit is slated to be released starting August 1st!
Q: How many units do you recommend for an office?A: Typically we would recommend one unit per 3 exam rooms or one unit per doctor treating dry eyes. For the large offices, the centralized option would also be viable. Ask us for the bulk discount options.
Q: Can a technician be trained to use the Meibox?A: Almost all of our doctors agree, the Meibox is extremely technician friendly. Due to its size and portability, technicians are encouraged to bring the testing to the patients instead of patients to the testing location. This reduces chair time and choke points in your examination room.
Q: Is the Meibox compatible with any slit lamp?A: The Meibox has been tested with over 35 different slit lamp models and designs including Haag Streit style slit lamps and Zeiss style slit lamps and have always been able to mount.
Q: Is the Meibox difficult to install and remove from the slit lamp?A: The Meibox can be installed with one hand since it is dropped directly into the slot. It can just as easily be removed and is attached to your computer via a USB cord.

2

2
7.1 Specifications
Video specificationResolution: 1920 x 1080 pixelGain control: AutomaticExposure: AutomaticWhite Balance: Automatic
Hardware InterfaceCPU: Intel I-core 5 or EquivalentRAM: 6GBOperating System: Windows 10 64 bitPower consumption:LED Indicator: Red (Active
Capture Phase) Cables: USB A to USB attachment
SoftwareApplication Software: Meibox Software
Operating environmentOperating temperature: 5OC ~ 40OC Storage temperature: -25OC ~ 50OCHumidity: 5% ~ 95%, non-condensing

2
Technical Support
E-mail: [email protected]
om
Toll Free: 818-736-0078
Web Site: www.boxmedicalsolutions.com
* Actual data throughput will vary. Network conditions and environmental factors lower actual data throughput rate. Specifications are subject to change without notice. All products and trademarks are the property of their respective owners. Copyright ©2007 AirLink101®


