27
MIDLAND G5 C * Depending on terrain Coverage* PMR446 TRANSCEIVER › USER MANUAL

MIDLAND G5 C
* Depending on terrain
Coverage*
PMR446 TRANSCEIVER
› USER MANUAL

Index
Content 2Coverage/range 2
Description of the controls and functions 3
Operations and functions 6Power On/power Off 6Volume adjustment 6Channel selection 6Transmission and reception 7Squelch 7Monitor 7Keypad Lock 7CTCSS tones 8Vox 10Beep Tone 10Roger Beep (end of transmission tone) 10Call Alert selection 11Dual Watch 11Out of Range 12Baby Sitter channels 14

The battery compartment and the belt clip 15
Recharging the battery and power save 16
Memory effect of rechargeable batteries 17
Battery level indicator 17
Use and care 18
Table of solutions 19
Technical specifications 21

Midland G5 C user manual | 1
Thanks for choosing Midland! Midland G5 C is a portable transceiver that is free use in almost all European countries. For further information, we suggest you look at the “Restrictions on the use”chart.
Midland G5 C is a new PMR446 transceiver; small-size and easy to use but com-plete and reliable at the same time. Besides the many functions usually included in PMR446 radios, G5 C is also equipped with the Baby Sitter mode, to listen to your baby at distance. In this manual you will find the detailed description of the functions supplied with G5 C.

2 | Midland G5 C user manual
Content• 2 Midland G5 C transceiver• 6 x AAA rechargeable batteries 800mAh• 2 beltclips• 2 wall chargers
Coverage/rangeThe maximum range depends on terrain condition and is obtained during use in an open spaces.The only limitations to maximum possible range are environmental factors such as blockage caused by trees, buildings, or other obstructions. Inside a car or a metallic construction, the range can be reduced.Normally the coverage in the city, with buildings or other obstructions is about 1 or 2 Km. In open spaces but with obstructions like trees, leaves or houses the maximum possible range is about 4-6Km. In open spaces,without obstructions and insight,like for example in mountain,the coverage can be more than 12Km.
Midland G5 C user manual | 3
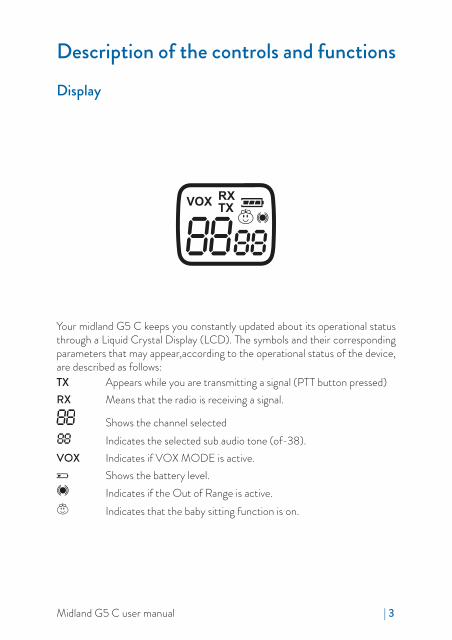
Description of the controls and functionsDisplay
Your midland G5 C keeps you constantly updated about its operational status through a Liquid Crystal Display (LCD). The symbols and their corresponding parameters that may appear,according to the operational status of the device, are described as follows:TX Appears while you are transmitting a signal (PTT button pressed)RX Means that the radio is receiving a signal.
Shows the channel selected Indicates the selected sub audio tone (of-38).
VOX Indicates if VOX MODE is active. Shows the battery level. Indicates if the Out of Range is active. Indicates that the baby sitting function is on.

4 | Midland G5 C user manual
1
2
35
6 7
4 8

Midland G5 C user manual | 5
Refer to the picture to identify the various parts of the device:1. ANTENNA 2. BUILT-IN SPEAKER - Here is where the speaker is housed.3. BUILT-IN MICROPHONE - Here is where sound is picked up by the
microphone.4. PTT (push to talk) Push this button to transmit.5. ▲▼ use these buttons for changing the settings 6. / - Pressing this button you can use the Out of range function. If you
keep it pressed for about 5 seconds, the keypad lock is activated.7. MODE/ - Press this button to enter the radio’s menu. If you keep it
pressed for about 3 seconds, you turn on/turn off the radio.8. EXTERNAL SPEAKER/MIC/CHG JACK - It allows the connection
with external devices such as headsets, microphones, charger…

6 | Midland G5 C user manual
Operations and functions
Power On/power OffPress and keep pressing the button for about 3 seconds. The transceiver will make 3 different beep tones and the display will do an auto scanning for about 1 second. You will visualize on the display the latest used channel.
Volume adjustmentUse the ▲▼ to increase or decrease the volume setting.
Channel selectionPress the MODE button. The number of the channel will start flashing on the display.Press the scroll buttons ▼▲ till you select the desired channel. Press the PTT button to confirm, or wait for 5 seconds.
Channel Freq. RX/TX (Mhz) Channel Freq. RX/TX (Mhz)01 446.00625 05 446.0562502 446.01875 06 446.0687503 446.03125 07 446.0812504 446.04375 08 446.09375
The pre-set channels correspond (as here following) to:Channel Channels and CTCSS tones
09 corresponds to channel 01 1610 corresponds to channel 02 1611 corresponds to channel 03 1612 corresponds to channel 04 1613 corresponds to channel 05 1614 corresponds to channel 06 1615 corresponds to channel 07 1616 corresponds to channel 08 1617 corresponds to channel 01 3118 corresponds to channel 03 31
Midland G5 C user manual | 7
19 corresponds to channel 05 3120 corresponds to channel 07 3121 corresponds to channel 02 3122 corresponds to channel 04 3123 corresponds to channel 06 3124 corresponds to channel 08 31
For displaying the channel/sub audio toneTo momentarily display the PMR446 channel and the subadio tone used in the pre-set channels, go to the desired channel (from 9 to 24) and keep pressed the buttons ▲▼ for 5 seconds.
Transmission and receptionTo communicate, all radios in your group must be set on the same channel.To transmit, press and hold the PTT button and speak in a normal voice into the microphone. The “TX” icon will appear continuously on the LCD display while transmitting.You can communicate also using an external accessory or a hand mic, pressing and holding the PTT button on the side of the hand mic. To receive a CALL, release the PTT button. The “RX” icon will appear on the display when your radio is receiving a transmission.
SquelchIn MIDLAND G5 C the squelch (filter to suppress noises) is always active.
MonitorPress MODE and / at the same time to open the squelch and allow the reception of weak signals.
Keypad LockKeep pressed the button / for about 5 seconds and the lock function will be activated. “Lc on” will appear on the display. To disable this function, keep pres-sed again the button / for 5 seconds approx. The display will show “Lc of”.

8 | Midland G5 C user manual
CTCSS tonesThe CTCSS tones are codes that can be added to the channels for creating new private ones.For each channel you can choose until 38 CTCSS. The addi-tion of these codes can be made on the main PMR channels (from 01 to 08).The pre-set channels from 9 to 24 can not be modified.To select a privacy code for the current channel press twice the MODE but-ton, then with the scroll buttons ▲▼ select the desired code. To confirm the-selection, press the PTT button or wait for 5 seconds.The selected Privacy Code will appear on the display.To disable the CTCSS function, select the private code and then press the MODE button, until you visualize the flashing CTCSS Privacy Code on the display. Select then “off” using the scroll buttons ▲▼.To confirm, press PTT or wait for 5 seconds.Note: To communicate with other radios, they must be set to the same channel and Privacy Code selections.

Midland G5 C user manual | 9
CTCSS Tone TableNumber displayed Tone Frequ.Hz Number displayed Tone Frequ.Hz
01 67.0 20 131.802 71.9 21 136.503 74.4 22 141.304 77.0 23 146.205 79.7 24 151.406 82.5 25 156.707 85.4 26 162.208 88.5 27 167.909 91.5 28 173.810 94.8 29 179.911 97.4 30 186.212 100.0 31 192.813 103.5 32 203.514 107.2 33 210.715 110.9 34 218.116 114.8 35 225.717 118.8 36 233.618 123.0 37 241.819 127.3 38 250.3

10 | Midland G5 C user manual
VoxYour G5 C has 4 VOX levels (off, 1, 2, 3, and 4). This function allows the user to activate the communication without pressing the PTT button. You just have to speak and the communication is on.You can set the VOX on 3 levels, with or without accessories.The fourth level activates the VOX with Talkback function: when one of the two devices transmit for more than 20 seconds, the VOX Talkback stops the transmission for 10 seconds; so the other user has himself the opportunity to-talk.To set the VOX level, press the MODE button, until the display shows “Vo of” and “VOX” flashing in the upper side of the display. After that, with the scroll buttons ▲▼, select “1”,”2”,”3” or “4”.To confirm, press the PTT button or wait for 5 seconds.To disable the VOX function, follow the previous indications, but select “oF” and then push the PTT key to confirm.
Beep ToneThis function permits you to produce a beep tone every time you press a but-ton.If you want to disable this function, press the MODE button until the display shows “bp on”, then select by the scroll buttons ▲▼ “bp of”. To confirm,press the PTT button or wait for 5 seconds.In this way, all “beeps” and “tones” are disabled.To re-enable this function, repeat the procedure selecting the “bp on” using the scroll buttons ▲▼ and confirm by pressing the PTT button or wait for 5 seconds.
Roger Beep (end of transmission tone)When the PTT button is released, the radio will beep to confirm to other users that you’ve finished your transmission and that they can begin to talking. To turn the ROGER BEEP on, press the MODE button till the display shows “rb of”; then by the scroll buttons ▲▼, select “rb on”.To confirm, push the PTT button or wait for 5 seconds.To disable this function, repeat the procedure selecting the “rb of”.
Midland G5 C user manual | 11
Call Alert selectionG5 C allows to send a CALL alert signal to all the users of the same channel.To call, quickly press twice the PTT button. On the display the “TX” icon appe-ars and the tone of confirmation can be heard by your own speaker.G5 C has 3 selectable CALL alerts (oF, 1, 2 and 3).To select, press the MODE button until a “CA” icon with the current CALL alert number is displayed.Use the scroll button ▲▼ to make the CALL alert selections; the radio will emit a corresponding tone for each selection. Note that all this is possible only if the radio is set on “BP on”.To confirm, press the PTT button or wait for 5 seconds.To disable this function repeat this procedure selecting “CA of”.
Dual WatchThe DUAL WATCH function enables users to monitor, only in reception, 2 selected channels for any activity. To turn on the DUAL WATCH function, press the MODE button until the display shows “of-TX/RX”.Select the second channel with the scroll buttons ▲▼. If you also want to se-lect one of the 38 CTCSS tone for the second channel press again the MODE button and select with ▲▼ the desired tone.To confirm press the PTT button or wait for 5 seconds.To turn off the DUAL WATCH function, you can just press the MODE button.When the radio will receive a signal on one of the two channels selected, the “DUAL WATCH” function will temporarily stops, allowing the transmission and the reception of the active signal on the channel in use.G5 C will stay in the active channel as long as the signal is present and will resume scanning 5 seconds after the signal is no longer present.

12 | Midland G5 C user manual
Out of RangeThe G5 C is equipped with the “out of range” function: with this feature you can verify if there are some radios within your range.With the Midland G5 C you can choose between the automatic Out of Range or the manual one. To enable/disable the Out-Of-Range function:
Automatic Out of RangePress MODE till the display shows “OU of”, than select “OU AU” (automatic) with the buttons ▲▼. Confirm the settings with the PTT button or wait for 5 seconds. The display will shows .By setting this mode a pair of G5 C is transmitting every 60 seconds a data control code. As soon as the contact between both units is getting lost and one station doesn’t receive this data control code twice consecutively, the icon “OU no” will flash on the display and will be blinking till the radio goes back within the range.
Manual Out of range:Press MODE till the display shows “OU of”, than select “OU PB” (manual) with the buttons ▲▼. Confirm the settings with the PTT button or wait for5 seconds. The display will show .To send out a manual call, press the button / .If the radio is within the range, you will hear a beep tone.Note: a radio in reception mode will automatically reply to your call, even though it does not have the manual Out of range enabled.! This function is automatically disabled when the Dual Watch will be activated.
To disable this function, push MODE till “OU AU” or “OU PB” is displayed; select “OU of” (disabled) with the buttons ▲▼. Confirm your selection by pushing PTT or waiting for 5 seconds.
Midland G5 C user manual | 13
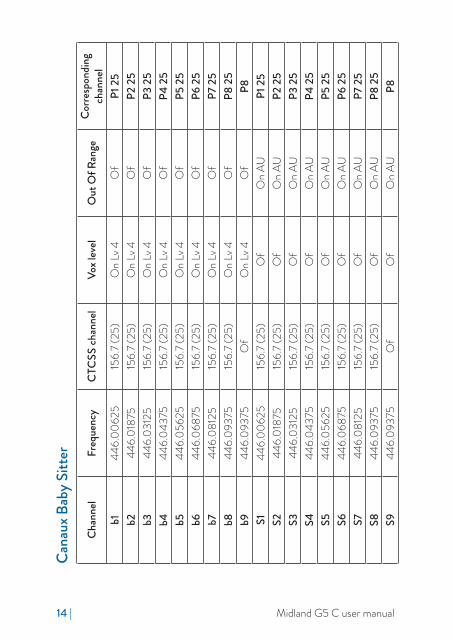
Baby Sitter functionYour G5 C is equipped with the “Baby Sitter” function.Press the MODE button till the display shows “Bp of”.Select with the scroll buttons ▲▼ the baby mode “b” or the sitter (parents) mode “p”.To confirm, press the PTT button or wait for 5 seconds. The display will show the selected mode and the icon . The baby channels “b” (from b1 to b9) have the VOX with Talkback function activated by default. This unit set on one of these baby channels, should be placed near the baby; while the one used for listening to the baby should be set on the sitter channels “p” (from p1 to p9). This unit has the automatic Out of Range function activated by default. In the baby channels you can set the Manual Out of Range and the VOX le-vels; in addiction to these two functions, in the sitter channels you can also set the Automatic Out of Range.These functions can be selected using the MODE button.In order to have the baby-sitter function properly and correctly activated, the 2 radios should operate on the same frequency band (same channel and same CTCSS tone, see the table below).
For example: if the radio place near the baby is set on the channel b1, the other one used for listening to the baby should be set on channel p1.
To momentarily display the PMR446 channel and the sub-audio tone of the Baby sitter channel, , go to the desired channel and keep pressed the ▲▼ buttons for 5 seconds.
14 | Midland G5 C user manual
Cana
ux B
aby S
itter
Chan
nel
Freq
uenc
yC
TCSS
chan
nel
Vox l
evel
Out
Of R
ange
Corre
spon
ding
ch
anne
lb1
446.
0062
5 15
6.7
(25)
On
Lv 4
Of
P1 2
5b2
446.
0187
5 15
6.7
(25)
On
Lv 4
Of
P2 2
5b3
446.
0312
5 15
6.7
(25)
On
Lv 4
Of
P3 2
5b4
446.
0437
515
6.7
(25)
On
Lv 4
Of
P4 2
5b5
446.
0562
5 15
6.7
(25)
On
Lv 4
Of
P5 2
5b6
446.
0687
5 15
6.7
(25)
On
Lv 4
Of
P6 2
5b7
446.
0812
5 15
6.7
(25)
On
Lv 4
Of
P7 2
5b8
446.
0937
5 15
6.7
(25)
On
Lv 4
Of
P8 2
5b9
446.
0937
5 O
fO
n Lv
4O
fP8
S144
6.00
625
156.
7 (2
5)O
fO
n AU
P1 2
5S2
446.
0187
5 15
6.7
(25)
Of
On
AUP2
25
S344
6.03
125
156.
7 (2
5)O
fO
n AU
P3 2
5S4
446.
0437
515
6.7
(25)
Of
On
AUP4
25
S544
6.05
625
156.
7 (2
5)O
fO
n AU
P5 2
5S6
446.
0687
5 15
6.7
(25)
Of
On
AUP6
25
S744
6.08
125
156.
7 (2
5)O
fO
n AU
P7 2
5S8
446.
0937
5 15
6.7
(25)
Of
On
AUP8
25
S944
6.09
375
Of
Of
On
AUP8

Midland G5 C user manual | 15
The battery compartment and the belt clip
Installing and removing the belt clip:with the belt clip you can easily attach the transceiver to your belt.The clip however, must be removed in order to install or change the batteries. To remove the belt clip lift the trigger and slide the clip down.To fix the clip back to the device slot it in the guides at the back of the transcei-ver until it clicks into place.
Installation of the batteries:Remove the belt clip. Insert the AAA Alkaline battery or the rechargeable bat-tery into the battery compartment; replace the battery cover and fix the belt clip.
1 2

16 | Midland G5 C user manual
Recharging the battery and power saveThe battery power saving feature enables a reduction in the consumption of up to 50%; power saving comes on automatically when the transceiver does not receive any signal for more than 7 seconds.To recharge the batteries you need to connect the socket of the wall adaptor to a main power socket and insert the jack of the wall adaptor into the charging jack of the G5 C. It takes 10/12 hours to fully recharge.For maximum battery life, we recommend charging the battery pack when the G5 C is off and the low battery icon comes on. When the batteries are dischar-ged, the icon appears “bt lo” on the display.
Warnings:! Do not overcharge the batteries! When these are fully charged the charging
process does not stop automatically. Do not forget therefore, to remove the transceiver from the charger as soon as the batteries are charged.
! Do not try to charge alkaline batteries or non rechargeable batteries. Make sure that when you charge the radio, only rechargeable NI-MH batteries should be contained in the battery compartment! It is very dangerous at-tempting to recharge other types of batteries (for example alkaline or man-ganese batteries). Batteries which are not suitable to be recharged may leak, explode or even burn and cause damage!
! Using a different battery charger, other than the one specified can cause damage to your device or may even cause explosions and personal injuries.Therefore we recommend to used the wall charger model S0006MV1200020 supplied in this packaging.
! Do not throw batteries into fire or place them near heat, as this may cause ex-plosions or personal injuries. Dispose of the batteries according to procedures set out by local regulations.
! Do not mix old and new batteries or batteries of different types or batteries which have been used in different manners.

Midland G5 C user manual | 17
Memory effect of rechargeable batteriesRechargeable NiMH (Nickel-Metal-Hydrate) batteries are affected by what is known as the “memory effect”. This phenomenon is associated with a drastic reduction of battery autonomy and is triggered if the batteries are regularly charged before being fully discharged and/or are not completely recharged.To avoid the memory effect:• When possible, recharge the batteries only when they are completely di-
scharged (until the device turns itself off during normal use)• Do not disconnect the battery charger before the time indicated for a full
battery charge.• Discharge and recharge your batteries completely at least twice a month. In
any case, the best solution for avoiding the memory effect is to use in turn two battery sets: one in use, and the other as a spare set.
The memory effect can be easily eliminated by completely discharging/char-ging the batteries 3 or 4 times.
The memory effect should not be confused with the normal battery life, which is 300-400 cycles of charge/discharge on average.It is completely normal for operating duty to decrease when the batteries have reached the end of their life; at this point, you will need to substitute the bat-teries.
Battery level indicatorYou can check the battery level thanks to the icon at the top right of the display.The greater the number of bars visible, the stronger the battery level will be. When the battery level is low, the battery icon “bt lo” will flash in the di-splay, indicating that your batteries should be replace or recharged if using a rechargeable battery.

18 | Midland G5 C user manual
Use and care! Use a soft damp cloth to clean the radio. Do not use alcohol or cleaning solu-
tions.! Do not immerse the radio in water.! Turn off the radio and remove the batteries during long term storage.
Warnings! DO NOT OPEN THE RADIO FOR ANY REASON!The mechanics and electronics radio precision require experience and speciali-zed equipment; for the same reason, the radio should under no circumstances be realigned as it has already been calibrated for maximum performance.Unauthorized opening of the transceiver will void the warranty.
Midland G5 C user manual | 19
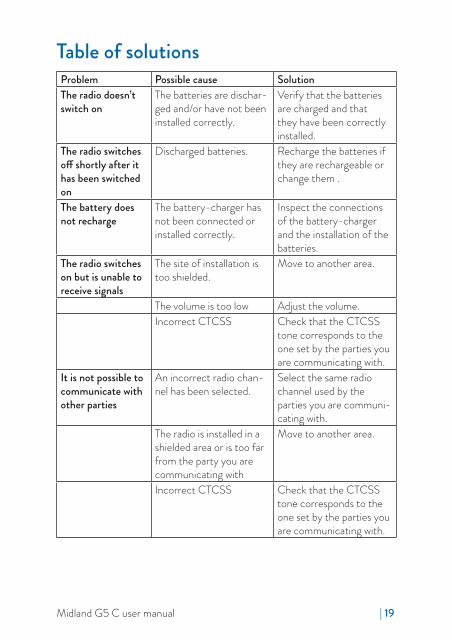
Table of solutionsProblem Possible cause SolutionThe radio doesn’t switch on
The batteries are dischar-ged and/or have not been installed correctly.
Verify that the batteries are charged and that they have been correctly installed.
The radio switchesoff shortly after it has been switched on
Discharged batteries. Recharge the batteries if they are rechargeable or change them .
The battery does not recharge
The battery-charger has not been connected or installed correctly.
Inspect the connections of the battery-charger and the installation of the batteries.
The radio switches on but is unable to receive signals
The site of installation is too shielded.
Move to another area.
The volume is too low Adjust the volume.Incorrect CTCSS Check that the CTCSS
tone corresponds to the one set by the parties you are communicating with.
It is not possible tocommunicate with other parties
An incorrect radio chan-nel has been selected.
Select the same radio channel used by the parties you are communi-cating with.
The radio is installed in a shielded area or is too far from the party you are communicating with
Move to another area.
Incorrect CTCSS Check that the CTCSS tone corresponds to the one set by the parties you are communicating with.

20 | Midland G5 C user manual
Reception is fragmented and/or disturbed
The transmission distance is excessive and/or there are obstacles in the transmission path
Move closer to the party you are communicating with or to another area.
The radio has been installed too close to equipment that cause an interference (televisions, computers, etc.)
Increase the distance between the radio and this equipment.
VOX causes the radio to acci-dentally enable transmission
The sensitivity and/or environmental noise are too high.
Reduce the VOX sen-sitivity
The VOX feature requires speaking in a loud voice
The sensitivity is too low. If the environmental noise is not high, increase the sensitivity or use an optional microphone

Midland G5 C user manual | 21
Technical specificationsChannels .................................................................................................... 1~8 PMRFrequency generation ....................................................................PLL synthesizer Frequency range ................................... 446.00625 - 446.09375MHz (PMR) Aerial ........................................................................................................... 12.5 KHzRated power supply .......................................3x 1.2 V 800 mAh (Rechargeable) .......................... (model: LR3, NiMH, rechargeable, manufactured by Midland)! Do not try to charge alkaline batteries or non rechargeable batteries. Make
sure that when you charge the radio, only rechargeable NI-MH batteries should be contained in the battery compartment! It is very dangerous at-tempting to recharge other types of batteries (for example alkaline or man-ganese batteries). Batteries which are not suitable to be recharged may leak, explode or even burn and cause damage!
Operating temperature .............................................................from -20° to +55°! while charging, be sure the environmental temperature is lower than 40°CSize (without antenna) ..................................................................51 x 31 x 99 mmWeight (without batteries) ................................................................................80 gOperation cycle (% on 1 h) ...................................TX 5%, RX 5%, stand-by 90%Category .................................................................................................................. BTransmitterOutput power (ERP) ..............................................................................≤500 mWType of circuit .......................................................................................................FMSuppression of spurious signals ......................................Compliant with ETSI lawReceiverSensitivity at 20dB Sinad .........................................................................<-117dBmAudio output power (10% THD) ....................................... 300mW @ 10% THDConnection for external microphone and recharge .............2,5 mm jack stereo Connector for external speaker ...............................................3.5 mm jack mono
Specifications are subject to change without notice
WARNING: Direct plug-in ac/dc power supply must be used for disconnecting the transceiver from the mains; the desktop charger must be positioned close to the unit and easily accessible.

22 | Midland G5 C user manual

Midland G5 C user manual | 23
All articles displaying this symbol on the body, packaging or instruction ma-nual of same, must not be thrown away into normal disposal bins but brought to specialised waste disposal centres. Here, the various materials will be divi-ded by characteristics and recycles, thus making an important contribution to environmental protection.

Prodotto o importato da: CTE INTERNATIONAL s.r.l. Via. R.Sevardi 7- 42124 Reggio Emilia Italia www.cte.it - www.midlandeurope.com L’uso di questo apparato può essere soggetto a restrizioni nazionali (per l’uso in Italia in modalità PMR446, è richiesta una dichiarazione di possesso) . Prima dell’uso leggere attentamente le istruzioni.
Produced or imported by: CTE INTERNATIONAL s.r.l. Via. R.Sevardi 7 42124 Mancasale Reggio Emilia Italy
Imported by: ALAN - NEVADA UK Unit 1 Fitzherbert Spur Farlington Portsmouth Hants. P06 1TT - United Kingdom www.nevada.co.uk The use of this transceiver can be subject to national restrictions. Read the instructions carefully before installation and use.
Importado por: MIDLAND IBERIA, SA C/Cobalt, 48 - 08940 Cornellà de Llobregat (Barcelona - España) www.midland.es El uso de este equipo puede estar sujeto a la obtención de la correspondiente autorización administrativa. Lea atentamente las instrucciones antes de usar el equipo.
Vertrieb durch: ALAN ELECTRONICS GmbH Daimlerstraße 1K - D-63303 Dreieich Deutschland www.alan-electronics.de Die Benutzung dieses Funkgerätes ist von den landesspezifischen Bestimmungen abhängig. Vor Benutzung Bedienungsanleitung beachten.


