Operating instructions for condenser tumble dryer T 442 C It is essential to read these opera- ting instructions before installing or Q using the machine to avoid the risk of accident, or damage to the machine. M.-Nr. 04 784 940
Transcript
Operating instructions
for condenser tumble dryer T 442 C
It is essential to read these opera-ting instructions before installing or Qusing the machine to avoid the riskof accident, or damage to themachine. M.-Nr. 04 784 940
Help to protect our environmentDisposal of the packing material
The packaging used to protect the machine during transport largely consists ofthe following recyclable materials:- Corrugated paper/card - Polystyrene - CFC-free - Polyethylene foil - transparent - Fibreboard (solvent free)- Untreated wood- Packaging straps: olyamide (blue); Polypropylene (black)Rather than just throwing these materials away please take them to the nearest col-lection point for specific waste.Disposal of your old appliance
Old appliances contain materials which can be recycled. Please contact yourlocal authorities or scrap merchant about potential recycling schemes, before dis-posing of the appliance.
2
Guide to the appliance
1 connection cable (2 m long)
2 Condensed water container
3 Drum door
4 Control panel
5 Drain hose for condensed water
6 Four height-adjustable screw feet
3
Guide to the appliance
Pushbuttons
Dooropens the door
On/Offfor switching the appliance on and off.
Low temperaturelow temperatures for delicate fabrics,e.g. acrylics.
Buzzersounds when the drum turns during theintermittent anti-crease action period.
Startstarts a drying programme
Indicator light “Empty out container”
Programme sequence indicator lights
On
Drying
Cooling down
Anti-crease/Finish
Programme selector switch
Cottons
Extra dryNormal+NormalHand iron rHand iron rrMachine iron
Minimum iron
Normal+NormalHand iron
Timed drying
15 mins cool air20 mins warm air
Drying stage display
This shows the stage of dryingreached. For programmes “Normal +”and “Extra dry” the indicator light re-mains at the “Normal” position.
4
Guide to the appliance
Environmentally conscious drying
The sensitive system automatically ad-justs drying to suit the water quality.The water conductivity is measured,and registered by the control whichthen compensates to achieve a uniformresidual moisture level. The Novotroniccontrol offers 9 programmes with elec-tronic moisture measuring and 2 timedprogrammes. The automatic reversingaction turns the drum clockwise andanti-clockwise to loosen the laundryand prevent damp patches and thus toensure even drying results.
Energy saving tips
Make sure that your laundry is thor-oughly spun before drying. You willsave up to 35% energy and time iflaundry is spun at full spin speed in-stead of at 600 rpm. Load according tothe optimum amount of washing for theprogramme to be selected. Underload-ing is uneconomical. Overloading givesa poorer quality of drying and maycause unnecessary creasing.
Before using for the first time
Important: The appliance must beproperly installed and connected tothe electricity supply.
Warning and safety instructions
Please read the operating instruc-tions before using the tumble dryerfor the first time. They contain im-portant information about the safety,use and maintenance of the ma-chine. This will avoid the risk of acci-dents and damage to the machine.Keep these operating instructions ina safe place and ensure that newusers are familiar with the content.Pass them on any future owner ofthe machine.
Correct usage
The tumble dryer is only intendedfor drying fabrics, which have
been washed in a water solution,marked on the manufacturer’s washcare label as being suitable for tumbledrying. Any other applications may bedangerous. The manufacturer is not
liable for damage resulting from im-proper use or operation.
Do not let small children play withthe machine and its controls or
operate it. Please supervise its use bythe elderly or infirm.
Technical safety
Before connecting the machine, en-sure that the connection data on
the data plate (fusing, voltage and fre-quency) matches the mains electricitysupply. If in any doubt, consult a quali-fied electrician.
Faulty components must only beexchanged for Miele original spare
parts. Only when these parts are fittedcan the safety standards of the ma-chine be guaranteed.
5
Warning and safety instructions
The electrical safety of this ma-chine can only be guaranteed
when continuity is complete betweenthe appliance and an effective earthingsystem which complies with local andnational regulations. It is most import-ant that this basic safety requirement isregularly tested by a qualified electri-cian. The manufacturer can not be heldresponsible for the consequences of aninadequate earthing system.
The machine is built in accordancewith current safety requirements.
Unauthorised repairs could result in un-foreseen dangers for the user, forwhich the manufacturer can not acceptresponsibility. Repairs should only beundertaken by a Miele approved engin-eer.
In the event of a fault or for clean-ing purposes, the machine is only
completely isolated from the electricitysupply either when:
– the plug is withdrawn, or:– it is switched off at the mains– the mains fuse is withdrawn.
Use
There is a danger of fire with fab-rics, which:
– contain rubber, foam rubber or rub-ber-like materials
– have been treated with inflammablecleaning agents
– have been splashed with hair lac-quer, hair spray, nail varnish removeror similar.
Always close the door after use.This way you will avoid the danger
of anyone sitting or leaning on the door,which can cause the machine to tip up.
Do not install the machine in a roomwhere the temperature may drop
below freezing. At very cold tempera-tures the machine may be difficult tostart. At very cold temperatures the ma-chine may be difficult to start. Laundrywill not dry and the “anti-crease” indica-tor light will flash to indicate there is aproblem. Freezing condensed water inthe pump, hoses and in the condensedwater container can lead to damage.
Make sure the drain hose is se-curely attached if you hang it in a
sink or basin (external drainage of con-densed water) to avoid the hose slip-ping and the water causing damage.
Condensed water is not drinkingwater. It can cause health prob-
lems in people and animals.
Using accessories
Accessory parts may only be fittedwhen expressly approved by
Miele. If other parts are used, guaran-tee, performance and product liabilityclaims may be invalidated.
Disposal of your old machine
Before discarding an old machineunplug it. Render the plug useless.
Cut off the cable directly behind the ap-pliance to prevent misuse.
6
Notes on laundry care
Before drying, check the drying symbolon the textile care label.
Significance of symbols:
q = Dry at normal temperaturer = Dry at low temperatures = Do not tumble dry
If no symbol is featured dry at your ownrisk applying the following principles:
– Cottons and minimum iron itemsshould be dried at a normal tempera-ture at the appropriate programmesetting.
– For delicate fabrics, e.g. acrylicfibres, the low temperature settingshould be selected.
The following fabrics should not bedried in a tumble dryer:
– Woollens and wool blendsThese fabrics tend to become mattedand shrink.
– Items filled with downThe fine fabric interior tends to shrink,depending on the quality involved.
– Pure linenThese items should only be machine-dried if specified as suitable by themanufacturer on the textile care label,as the surface of the fabric may other-wise tend to “roughen”.
Note
Some woven and loopknit materialstend to shrink to varying extents de-pending on their quality. This tendencyis exaggerated by over-drying.
When purchasing woven materials, it isadvisable to take their shrinkageproperties into account.
Starched washing can also be dried inthe tumble dryer. In order to achievethe usual finish, double the amount ofstarch should be used.
Select the most suitable programme forhand or machine ironing.
Minimum iron items should be spun for10 to 30 seconds before being tumbledried. Such fabrics tend to crease ifoverdried. These items should be givenonly a short period in the dryer, andtaken out slightly damp. The “Minimumiron Normal” programme is recom-mended.
Minimum iron shirts in 100 % cottonmay crease during tumble drying de-pending on the quality and weave.
Minimum iron fabrics tend to creasemore, the greater the load. This is par-ticularly true of very delicate fabrics.The load should be reduced to 1.5 kgor, if necessary, to 1 kg. The “Handiron” setting is recommended for thesetypes of garment. In extreme cases donot tumble dry these garments.
Dark-coloured garments should bedried separately from light-colouredgarments.
7
Loading the machine Unloading the machine
Load the laundry very loosely into thedrum.
Duvet covers and pillowcases shouldbe fastened before drying in order toprevent small items from being rolled in-side them.
Important: Please check that itemsof laundry cannot be trapped by thedoor as this will cause damage tothe fabric.
At the end of the programme removethe washing from the machine. If this isnot done, the machine automaticallyproceeds into an intermittent anti-crease action for 60 minutes. This en-tails the drum being rotated at short in-tervals in order to reduce the possibilityof the formation of creases.
Once the laundry has been removed,check that the drum is empty. Anyitems left in the drum could be dam-aged through overdrying in the nextprogramme.
Clean the fluff filter after each dryingcycle to prevent excessive energy con-sumption and longer programme run-ning times.
The door should always be closed afteruse.
8
Programme selection
Selecting a programme
This tumble dryer is fitted with an elec-tronic sensor system. The required de-gree of dryness is measured and moni-tored electronically so that the heatingelement is switched off as soon as it isreached. The drying cycle automati-cally finishes with a cooling downperiod. This may be followed by theanti-crease action cycle.
The following drying programmes areavailable:
Cottons
six drying levels from “Extra dry” to“Machine iron”
Minimum iron
three drying levels from “Normal+” to“Hand iron”
Timed drying
15 mins cool air and 20 mins warm air
Low temperature
By selecting “Low temperature” thetemperature can be lowered for deli-cate fabrics (e.g. acrylic).
Correct procedure:
Load the drumClose the doorSwitch on the machineSelect a programme by turning theselector switch clockwise or anti-clockwise.Select “Low temperature” if required.Press “Start”.
After drying:
Turn the programme selector switchto “Finish”.Switch the machine off.Clean the fluff filter.
Opening the door during a pro-gramme
If the door is opened during a pro-gramme the programme will have to bestarted again:
Close the door.Press “Start”.
The selected programme restarts.
The programme is not continued if:
- There is a power failure lasting morethan 30 minutes.
- The programme has already reachedthe “Cooling down” or “Anti-crease”stage.
To reselect a different programmeduring drying:
Set the programme selector switchto the required programme.
The new programme starts from the be-ginning.
To cancel a programme
Turn the programme selector switchto “Finish”.
9
Programmes - Cottons
Extra dry
Multi-layer fabrics which would not bethoroughly dried using the “Normal +”programme.
max. 5 kg
Note:
Jerseywear tends to shrink dependingon the quality and type of manufactur-ing involved. The “Extra dry” pro-gramme should therefore not be se-lected for these fabrics.
Normal+
Mixed load of cotton fabrics, e.g. towell-ing and jerseywear, i.e. single-layerand multi-layer fabrics.
max. 5 kg
Normal *
Homogeneous loads of cotton fabrics(jerseywear, flannelette sheets, towel-ling).
max. 5 kg
Note:
Should certain items still be slightlydamp, select the “Normal + pro-gramme”.
Hand iron rr *
Cotton or linen fabrics, e.g. table linen,bedding, starched laundry, etc.
max. 5 kg
Note:
If fabrics are too damp for hand-iron-ing, please select the “Hand iron r” pro-gramme.
Machine iron
Cotton or linen fabrics, including star-ched laundry, for machine-ironing.
max. 5 kg
Note:
The laundry should be rolled up to pre-vent it from drying out until it can beironed.
*Note for Testing Institutes:
Programme settings for testing in ac-cordance with EN 61121/A11 standard
10
Programmes - Minimum iron and timed drying
Normal +
Minimum iron items made of syntheticsor blended fabrics, e.g. pullovers,dresses, trousers, etc., which are notdried adequately in the “Normal” pro-gramme.
max. 2,5 kg
Normal *
Minimum iron shirts, table cloths, etc.,made of blended woven or knitted fab-rics, e.g. cotton/synthetics.
max. 2,5 kg
*Note for Testing Institutes:
Programme setting for testing in ac-cordance with EN 61121/A11 standard
Hand iron
Minimum iron shirts, table cloths, etc.made of blended woven or knitted fab-rics, e.g. cotton/synthetics, which arestill to be hand-ironed.
max. 2,5 kg
Note for all three programmes:
With blended fabrics consisting of wooland synthetics, consult the manufac-turer’s instructions, as the wool compo-nent may become matted.
15 minutes cool air
Items which are only to be aired.
max. 5 kg
20 minutes warm air
Individual items, e.g. bathing towels,bathing trunks.
11
Programmes - Consumption data
Capacity Final spin speed ina domestic
washing machine
Electricityconsumption
Drying time incl. cooling down time
kg rpm kWh mins
Cottons
Extra dry 5 120014001550
3.443.283.17
878381
Normal + 5 120014001550
3.173.022.91
817775
Normal * 5 800 3,60 92
Normal 5 120014001550
2.822.682.58
747169
Hand iron rr 5 800 2,80 74
Hand iron rr * 5 120014001550
2.051.911.82
565351
Machine iron 5 120014001550
1.651.511.41
474341
Minimum iron
Normal + 2.5 1000 1.68 50
Normal * 2.5 1000 1.38 45
Hand iron 2.5 1000 1.21 37
All values obtained in accordance with standard test EN 61121/A11* Test programme in accordance with EN 61121/A11Different types of fabrics, the load and residual moisture after spinning may affect the figuresgiven.
12
Emptying the condensed water container
During the programme, water is con-densed and collected in a container onthe left behind the fascia panel. Thecontainer holds approx. 4 litres andshould be emptied after each dryingprogramme.
Pull out the container
Pull forward the cap of the spout asindicated by the arrow and holdopen while emptying the container.
When the container is empty, releasethe cap. The spout closes automati-cally.
Push in the container until it clicksinto place.
Should the container be inadvertentlyfull when the tumble dryer is started orif it becomes full during operation:
The “Empty out container” indicatorlight comes on
Note:
The water collected in the containerhas been distilled by evaporation andcan be used in a steam iron or humidi-fier, for example.
The following points should be remem-bered:
The laundry should be thoroughlyrinsed before it is loaded in the tumbledryer.
As a precautionary measure, the watershould be passed through a fine sieveor coffee filter in order to strain out anyvery small particles of fluff from thewater which might otherwise causedamage.
13
Cleaning and care
The fluff which occurs during drying iscollected in the fluff filter in the door.
Clean the filter after every programmeto save time and energy.
Grip the filter by the recessedhandle and pull upwards to clean.
Remove any remaining fluff from thehollow part of the door through thewide slit at the bottom.
Remove fluff from the filters in thedoor opening. These filters can betaken out and rinsed if necessary.
Dry the filters before putting themback in place.
Before cleaning the tumble dryer: Al-ways disconnect the machine fromthe power supply.
The dryer can be cleaned with acloth using soapy water or a milddetergent (not scouring powder) anddried with a soft cloth.
The drum may be cleaned using asuitable proprietary stainless steelcleaner following the manufactu-rer’s instructions.
The machine must never be hoseddown. Do not use any abrasive sub-stances or scouring pads to clean the machine.
14
Cleaning and care
Heat exchanger
The heat exchanger should be cleanedonce or twice a year.
Before cleaning, disconnect the ma-chine from the mains supply.
Open the door
Turn the flap lever so that it is vertical
Remove the flap
Turn both levers on the heat ex-changer so that they are vertical
15
Cleaning and care
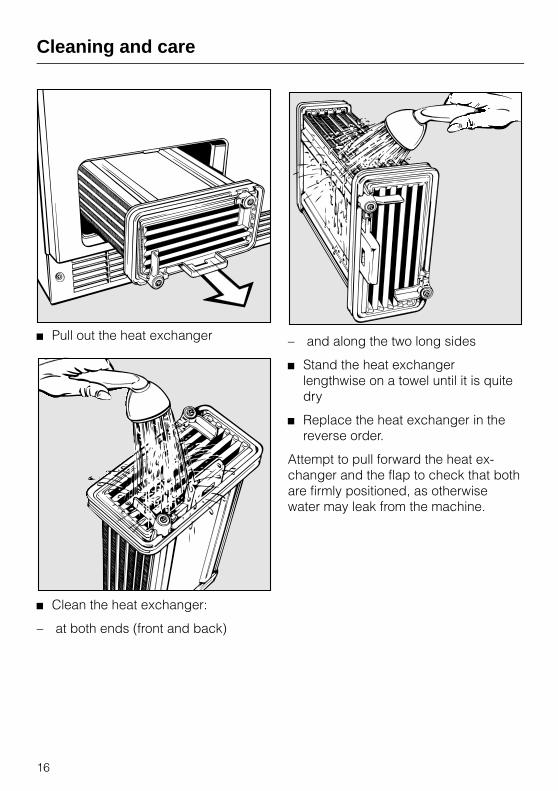
Pull out the heat exchanger
Clean the heat exchanger:
– at both ends (front and back)
– and along the two long sides
Stand the heat exchangerlengthwise on a towel until it is quitedry
Replace the heat exchanger in thereverse order.
Attempt to pull forward the heat ex-changer and the flap to check that bothare firmly positioned, as otherwisewater may leak from the machine.
16
Problem solving guide
Electrical appliances should only berepaired by qualified personnel. In-correctly repaired machines maypose a considerable risk to theuser.
There are, however, minor faults whichcan be corrected without contactingthe Service Department.
The tumble dryer fails to start whenswitched on.
Check whether the “On” indicator lamplights up. If so, failure to start may bedue to an incorrect selection proceduresequence when switching on the ma-chine.
Repeat the switch-on procedure inthe correct sequence (see P. 9).
If the “On” indicator lamp does not lightup, check that
the “On/Off” button is depressedthe door is properly closedthe mains plug is plugged in and thefuse or circuit breaker has nottripped.
Laundry is not sufficiently dry.
The load consists of dissimilar items interms of size and fabric.
Select a longer drying programmenext time.
Small loads or individual items maycause the programme to terminate pre-maturely.
Small loads should therefore be“time-dried”.
Drying times are too long.
Clean the fluff filter in the door.The laundry was not spun for a suffi-ciently long time.
The grille under the drum door isblocked, preventing any intake of coolair.
Ventilation is inadequate (e.g. in a smallroom).
When the machine is in operation,open a door or the window.
After cleaning the heat exchanger,water leaks from the machine
- Check that the heat exchanger flaphas ben replaced correctly. If necess-ary, remove and replace.
Items made of synthetic fibres arecharged with static electricity afterdrying.
Static charge can be reduced by ad-ding fabric conditioner during the finalrinse cycle in the washing machine, ora fabric conditioner sheet in the tumbledryer.
Formation of fluff
Fluff is principally the result of frictionwhen items are worn and washed. Ma-chine-drying hardly causes any fluff toform and, as has been established byresearch institutes, has no effect on thelifetime of fabrics.
17
Problem solving guide
To open the door in the event ofpower failure
Using the spatula provided lever thedoor open.
Water droplets appear at the upperedge of the drum aperture.
A double filter system with double sealprevents fluff from being deposited inthe heat exchanger.
This means that the heat exchangerdoes not need to be cleaned so often.
The double seal may lead to the build-up of condensate. Laundry beingremoved from the machine may comeinto contact with these water droplets.They will, however, dry off in a matter ofminutes.
The “Anti-crease” indicator lamp inthe sequence indicator display startsflashing.
Release the “On/Off” button andthen press it in again.Press the“Start” button.
If the indicator lamp starts flashingagain, this indicates a fault in the ma-chine. Please then contact your MieleDealer or the Miele Service Dept.
The drum door opens during thedrying cycle.
The machine has overheated. The tem-perature limiter opens the drum doorand thus causes the machine to switchoff automatically.
Possible reasons for overheating:
The fluff filters in the door and in thedoor opening are clogged.The heat exchanger is blocked.
Before restarting the programme, pro-ceed as follows:
Clean the affected part of the ma-chine.Press the “Start” button.
Should the drum door open again, thismust be due to a technical fault andthe Service Dept. should be contacted.
18
Problem solving guide After-sales service
The interior drum lighting fails tofunction.
The bulb may be defective.Replace it as follows:
Switch off the machine or disconnectfrom the mains supply.
Open the door.
Use a 19 mm spanner to unscrewthe plastic cover inside the drumabove the door.
The light bulb must not exceed themaximum wattage quoted on thedata plate and the plastic light cover.
Replace the bulb and the plasticcover.
The cover must be fixed securely, asotherwise moisture may seep in andcause a short-circuit.
The temperature-resistant bulb shouldonly be ordered from your Miele Dealeror the Service Dept.
In the event of any faults which cannotbe remedied, or if the appliance isunder guarantee, please contact:
– your Miele Dealer or
– the nearest Miele Service Depart-ment (see back cover for the ad-dress).
When contacting the Service Depart-ment, please quote the Model and Ser-ial nos. of your appliance, both ofwhich are shown on the data plate onthe right hand side below the openingto the drum.
Example:
19
Installation
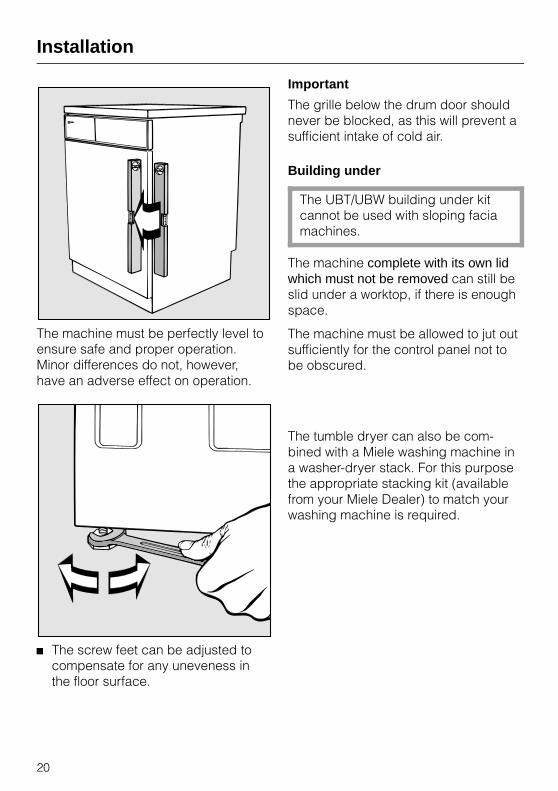
The machine must be perfectly level toensure safe and proper operation.Minor differences do not, however,have an adverse effect on operation.
The screw feet can be adjusted tocompensate for any uneveness inthe floor surface.
Important
The grille below the drum door shouldnever be blocked, as this will prevent asufficient intake of cold air.
Building under
The UBT/UBW building under kitcannot be used with sloping faciamachines.
The machine complete with its own lidwhich must not be removed can still beslid under a worktop, if there is enoughspace.
The machine must be allowed to jut outsufficiently for the control panel not tobe obscured.
The tumble dryer can also be com-bined with a Miele washing machine ina washer-dryer stack. For this purposethe appropriate stacking kit (availablefrom your Miele Dealer) to match yourwashing machine is required.
20
Electrical connection
Electrical connection U.K.
This tumble dryer is supplied ready forconnection to an a.c. single phase 230 V,50 Hz supply. The machine is suppliedwith a 2 m long mains cable withmoulded plug and the fuse rating is 13 A.All electrical work should only be carriedout by a suitably competent person, inaccordance with national and localsafety regulations.Connection should be made via afused plug and a suitable switchedsocket which is easily accessible.For extra safety it is advisable to installa residual current device (RCD) with atrip current of 30 mA. The voltage, rated load and fuse ratingare given on the data plate. Please en-sure that these match the householdmains supply.
Important
The wires in the mains lead are col-oured in accordance with the followingcode:
Green/yellow = earthBlue = neutralBrown = live
As the colours of the wires in the mainslead of this appliance may not corre-spond with the coloured markings ident-ifying the terminals in your plug, pro-ceed as follows:
The wire which is coloured green andyellow must be connected to the termi-nal in the plug which is marked with theletter E or by the earth symbol zor col-oured green or green and yellow.Thewire which is coloured blue must beconnected to the terminal which is
marked with the letter N or colouredblack.The wire which is coloured brown mustbe connected to the terminal which ismarked with the letter L or coloured red.
WARNINGTHIS APPLIANCE MUST BE EARTHED.
Non-rewireable plugs BS 1363
If this machine or appliance is fittedwith a non-rewireable plug, the follow-ing information applies:
If the socket outlets are not suitable forthe plug supplied with this product, itmust be cut off and an appropriateplug fitted.
The plug cut from the flexible cordshould be disposed of and on no ac-count be inserted into a 13 A socketelsewhere in the house (electric shockhazard).
The fuse cover must be refitted whenchanging the fuse, and if the fusecover is lost, the plug must not be useduntil a suitable replacement is ob-tained. The colour of the correct re-placement cover is that of the colouredinsert in the base of the plug, or the col-our that is embossed in words in thebase of the plug (as applicable to thedesign of plug fitted).
The correct fuse rating of the replace-ment fuses that are ASTA approved toBS 1362 should be fitted. Replacementfuse covers may be purchased fromyour local electrical suppliers, elec-tricity showroom, or Miele ServiceAgent.
21
External drainage of condensed water
The condensed water can be drainedoff directly if the machine is installednear a sink, drain outlet, etc.
Accessories supplied:
- 2 m drain hose
- Hose clamp
- Rubber connection sleeve
- Hose clip
Installation:
Detach the hose clip from the drainoutlet at the back of the machineand remove the rubber plug.
Push the drain hose onto the drainoutlet. Make sure that the hose isfirmly secured by the clip and notkinked.
Max. drain hose length: 3.0 m
Max. delivery head: 1.0 m
22
External drainage of condensed water
The machine is fitted with a non-returnvalve as standard to prevent water fromflowing back into the machine (eg. ifthe machine is connected to a siphon).
Close the water inlet port above thecondensed water container with thebottom part of the rubber plug. Theplug must face towards the interiorof the machine so that the con-densed water container can easilybe inserted.
Connection to wash basin drain outlet
Push the hose clip (1) and knurlednut connector (2) (from the sink drainoutlet) over the drain hose.
Put the adapter sleeve (3) suppliedinto the hose.
Screw the drain hose to the drain out-let with the knurled nut connector.


![Miele a...Miele aEU - Konformitätserklärung EU - Declaration of Conformity de en (2] Diese EU-Konformitätserklärung wurde in alleiniger Verantwortung von MIELE & Cie. KG ausgestellt.](https://static.documents.pub/doc/80x56/60c5b3644efe2014e4263df4/miele-a-miele-aeu-konformittserklrung-eu-declaration-of-conformity-de.jpg)


