142
Oracle® Analytics Migrating and Upgrading to Oracle Analytics Server 5.5.0 F27231-02 February 2020
Oracle® AnalyticsMigrating and Upgrading to Oracle AnalyticsServer
5.5.0F27231-02February 2020

Oracle Analytics Migrating and Upgrading to Oracle Analytics Server, 5.5.0
F27231-02
Copyright © 2020, Oracle and/or its affiliates. All rights reserved.
Primary Author: Pavithra Mendon
Contributing Authors: Rosie Harvey, Christine Jacobs, Hemala Vivek
Contributors: Oracle Analytics Server development, product management, and quality assurance teams.
This software and related documentation are provided under a license agreement containing restrictions onuse and disclosure and are protected by intellectual property laws. Except as expressly permitted in yourlicense agreement or allowed by law, you may not use, copy, reproduce, translate, broadcast, modify,license, transmit, distribute, exhibit, perform, publish, or display any part, in any form, or by any means.Reverse engineering, disassembly, or decompilation of this software, unless required by law forinteroperability, is prohibited.
The information contained herein is subject to change without notice and is not warranted to be error-free. Ifyou find any errors, please report them to us in writing.
If this is software or related documentation that is delivered to the U.S. Government or anyone licensing it onbehalf of the U.S. Government, then the following notice is applicable:
U.S. GOVERNMENT END USERS: Oracle programs, including any operating system, integrated software,any programs installed on the hardware, and/or documentation, delivered to U.S. Government end users are"commercial computer software" pursuant to the applicable Federal Acquisition Regulation and agency-specific supplemental regulations. As such, use, duplication, disclosure, modification, and adaptation of theprograms, including any operating system, integrated software, any programs installed on the hardware,and/or documentation, shall be subject to license terms and license restrictions applicable to the programs.No other rights are granted to the U.S. Government.
This software or hardware is developed for general use in a variety of information management applications.It is not developed or intended for use in any inherently dangerous applications, including applications thatmay create a risk of personal injury. If you use this software or hardware in dangerous applications, then youshall be responsible to take all appropriate fail-safe, backup, redundancy, and other measures to ensure itssafe use. Oracle Corporation and its affiliates disclaim any liability for any damages caused by use of thissoftware or hardware in dangerous applications.
Oracle and Java are registered trademarks of Oracle and/or its affiliates. Other names may be trademarks oftheir respective owners.
Intel and Intel Xeon are trademarks or registered trademarks of Intel Corporation. All SPARC trademarks areused under license and are trademarks or registered trademarks of SPARC International, Inc. AMD, Opteron,the AMD logo, and the AMD Opteron logo are trademarks or registered trademarks of Advanced MicroDevices. UNIX is a registered trademark of The Open Group.
This software or hardware and documentation may provide access to or information about content, products,and services from third parties. Oracle Corporation and its affiliates are not responsible for and expresslydisclaim all warranties of any kind with respect to third-party content, products, and services unless otherwiseset forth in an applicable agreement between you and Oracle. Oracle Corporation and its affiliates will not beresponsible for any loss, costs, or damages incurred due to your access to or use of third-party content,products, or services, except as set forth in an applicable agreement between you and Oracle.
Contents
Preface
Audience viii
Documentation Accessibility viii
Conventions viii
Videos and Images ix
1 Introduction to Upgrading from Oracle Business Intelligence toOracle Analytics Server
About the Starting Points for Upgrade 1-1
About the Oracle Analytics Server Standard Topology 1-2
About Upgrade Restrictions 1-2
2 Pre-Upgrade Requirements
Pre-Upgrade Checklist 2-1
Creating a Complete Backup 2-3
Backing Up the Schema Version Registry Table 2-3
Maintaining Customized Domain and Environment Settings 2-3
Cloning Your Production Environment for Testing 2-4
Verifying Certification and System Requirements 2-5
Verify Your Environment Meets Certification Requirements 2-6
Verify System Requirements and Specifications 2-6
Migrating from a 32-Bit to a 64-Bit Operating System 2-6
Verify that the Database Hosting Oracle Fusion Middleware is Supported 2-8
Verify that the JDK Is Certified for This Release of Oracle Fusion Middleware 2-9
Updating Policy Files when Using Enhanced Encryption (AES 256) 2-9
Purging Unused Data 2-10
Creating a Non-SYSDBA User to Run the Upgrade Assistant 2-10
Disabling Internal SSL 2-12
iii
3 Upgrading Oracle Business Intelligence 12.2.1.4.0 to OracleAnalytics Server
About the Upgrade Process 3-1
Installing the Product Distributions 3-3
Running a Pre-Upgrade Readiness Check 3-5
About Running a Pre-Upgrade Readiness Check 3-5
Starting the Upgrade Assistant in Readiness Mode 3-5
Upgrade Assistant Parameters 3-6
Performing a Readiness Check with the Upgrade Assistant 3-7
Understanding the Readiness Report 3-9
Stopping Servers and Processes 3-10
Upgrading Product Schemas 3-11
Starting the Upgrade Assistant 3-11
Upgrade Assistant Parameters 3-11
Upgrading Product Schemas Using the Upgrade Assistant 3-13
Verifying the Schema Upgrade 3-16
Backing Up the mapViewerConfig.xml File 3-17
Backing Up the mapViewerConfig.xml File on UNIX Operating Systems 3-17
About Reconfiguring the Domain 3-18
Backing Up the Domain 3-20
Starting the Reconfiguration Wizard 3-21
Reconfiguring the Oracle BI Domain with the Reconfiguration Wizard 3-21
Restoring the mapViewerConfig.xml File 3-24
Restoring the mapViewerConfig.xml File on UNIX Operating Systems 3-24
Upgrading Domain Component Configurations 3-25
Starting the Upgrade Assistant 3-25
Upgrade Assistant Parameters 3-25
Upgrading Domain Components Using the Upgrade Assistant 3-27
Verifying the Domain-Specific-Component Configurations Upgrade 3-29
Starting Servers and Processes 3-30
4 Upgrading Scaled-Out Systems from Oracle Business Intelligence
About the Multi-Node Upgrade Process 4-1
Checking the Status of the Servers in the Oracle Analytics Server Instance 4-4
Installing the Product Distributions on Node1 and Node2 4-4
Running a Pre-Upgrade Readiness Check 4-6
About Running a Pre-Upgrade Readiness Check 4-6
Starting the Upgrade Assistant in Readiness Mode 4-7
Upgrade Assistant Parameters 4-7
iv

Performing a Readiness Check with the Upgrade Assistant 4-8
Understanding the Readiness Report 4-10
Stopping Servers and Processes 4-12
Upgrading Product Schemas 4-12
Starting the Upgrade Assistant 4-12
Upgrade Assistant Parameters 4-13
Upgrading Product Schemas Using the Upgrade Assistant 4-14
Verifying the Schema Upgrade 4-18
Backing Up the mapViewerConfig.xml File 4-19
Backing Up the mapViewerConfig.xml File on UNIX Operating Systems 4-19
About Reconfiguring the Domain 4-19
Backing Up the Domain 4-21
Starting the Reconfiguration Wizard 4-22
Reconfiguring the Oracle BI Domain with the Reconfiguration Wizard 4-22
Restoring the mapViewerConfig.xml File 4-25
Restoring the mapViewerConfig.xml File on UNIX Operating Systems 4-25
Upgrading Domain Component Configurations 4-26
Starting the Upgrade Assistant 4-26
Upgrade Assistant Parameters 4-26
Upgrading Domain Components Using the Upgrade Assistant 4-28
Verifying the Domain-Specific-Component Configurations Upgrade 4-30
Packing the Upgraded Domain on Node1 4-31
Unpacking the Upgraded Domain on Node2 4-32
Synchronizing Connection Details to the Mid-Tier Database 4-32
Starting the Node Manager on Node2 4-33
Starting Servers and Processes 4-33
Checking the Status of the Servers in the Oracle Analytics server Instance 4-34
5 Post-Upgrade Tasks
Enabling Internal SSL 5-1
Migrating Catalog Groups 5-1
Allowing Content Developers to Include HTML Markup 5-1
6 Migrating from Oracle Business Intelligence 11g
About the Migration Process 6-1
Migration Prerequisites 6-4
Optimizing the 11g System 6-5
Installing the Product Distributions 6-5
Creating the Required Oracle Analytics Server Schemas 6-7
v
Configuring Oracle BI Domain with the Configuration Assistant 6-11
Stopping Servers and Processes 6-14
Migrating using the Console 6-14
Migrating using the Command Line 6-16
Generating the BI Migration Tool (bi-migration-tool.jar) 6-16
Creating the Export Bundle 6-17
Importing with the BI Migration Script (migration-tool.sh|cmd) 6-18
Starting Servers and Processes 6-19
7 Post-Migration Tasks
Migrating Catalog Groups 7-1
Migrating Configuration 7-1
Migrating the Security Configuration with Oracle WebLogic Server 7-1
Migrating the Oracle Enterprise Manager Fusion Middleware Control SecurityConfiguration 7-1
Migrating the Oracle Enterprise Manager Fusion Middleware Control ManagedBusiness Intelligence Configurations 7-2
Migrating the Oracle Enterprise Manager Fusion Middleware Control ManagedBusiness Intelligence Log Configuration 7-2
Migrating the Oracle BI Server Configuration 7-2
Migrating the Oracle BI Presentation Server Configuration 7-3
Configuring the Database to Use DataDirect Drivers 7-3
Configuring Usage Tracking 7-4
Configuring the SQL Server 7-5
Adding Roles and Permissions 7-6
Configuring MySQL 7-6
Checking JavaHost Configuration 7-7
Enabling Clusters 7-8
Enabling Oracle Hardware Acceleration and Compatibility Mode 7-8
Setting the Compatibility Framework 7-9
Migrating the Fusion Middleware MapViewer Configuration 7-10
Resolving Authentication Issues After Migration 7-11
Copying Configuration Files 7-12
Removing the Display of HTML Codes in a Customized "No Results" Message 7-13
8 Post-Migration Tasks for Oracle Analytics Publisher
Migrating Scheduler Jobs and Job History 8-1
Removing the BISystemUser Policy from the JMSResource Security Configuration 8-2
Manually Removing the BISystemUser Policy 8-2
vi

Removing the BISystemUser Policy using a WLST Script 8-3
A Migrating Security Certificates when Using Secure LDAP
Creating an Oracle Wallet A-1
Specifying the Wallet Directory A-1
B Updating the JDK After Installing and Configuring an OracleAnalytics Server
About Updating the JDK Location After Installing an Oracle Fusion MiddlewareProduct B-1
Updating the JDK Location in an Existing Oracle Home B-2
Updating the JDK Location in an Existing Domain Home B-2
C Stopping Servers and Processes
D Troubleshooting Migrated Oracle Analytics Server
Configuration Failure with TRANSFORMBAREXCEPTION D-1
Regenerating User GUIDs D-1
Updating Oracle BI Presentation Services Catalog D-2
Multiple Y-Axis Highcharts Graphs Not Displayed D-3
Setting the Evaluate Parameter in the NQSConfig.INI File D-4
Error: java.lang.NoClassDefFoundError: Could not initialize classsun.awt.X11GraphicsEnvironment D-4
Verifying File Data Sources in Publisher D-4
Error on checkSoftLimit Failed D-5
Replacing Custom Links in the Global Header D-6
Migrating WebLogic Users D-7
Exporting the Security Data from a Security Provider D-7
Importing the Security Data into a Security Provider D-8
View Display Error: Invalid Column Encountered in Orders Outstanding Report D-8
vii
Preface
This document describes how to upgrade your Oracle Analytics Server environment.
AudienceIdentify the target audience for your book and learn more about this documentintended for.
This document is intended for system administrators who are responsible for installing,maintaining, and upgrading Oracle Analytics Server. It is assumed that readers haveknowledge of the following:
• Oracle Fusion Middleware system administration and configuration
• Configuration parameters and expected behavior of the system being upgraded
Documentation AccessibilityFor information about Oracle's commitment to accessibility, visit the OracleAccessibility Program website at http://www.oracle.com/pls/topic/lookup?ctx=acc&id=docacc.
Access to Oracle Support
Oracle customers that have purchased support have access to electronic supportthrough My Oracle Support. For information, visit http://www.oracle.com/pls/topic/lookup?ctx=acc&id=info or visit http://www.oracle.com/pls/topic/lookup?ctx=acc&id=trsif you are hearing impaired.
ConventionsThe following text conventions are used in this document:
Convention Meaning
boldface Boldface type indicates graphical user interface elements associatedwith an action, or terms defined in text or the glossary.
italic Italic type indicates book titles, emphasis, or placeholder variables forwhich you supply particular values.
monospace Monospace type indicates commands within a paragraph, URLs, codein examples, text that appears on the screen, or text that you enter.
Preface
viii

Videos and ImagesYour company can use skins and styles to customize the look of the application,dashboards, reports, and other objects. It is possible that the videos and imagesincluded in the product documentation look different than the skins and styles yourcompany uses.
Even if your skins and styles are different than those shown in the videos and images,the product behavior and techniques shown and demonstrated are the same.
Preface
ix

1Introduction to Upgrading from OracleBusiness Intelligence to Oracle AnalyticsServer
Upgrading from Oracle Business Intelligence to Oracle Analytics Server 5.5.0 requirescareful preparation, planning, and testing. Oracle provides tools and technology for theupgrade process.
Migrating the metadata and configuration from Oracle Business Intelligence 11.1.1.9 toOracle Analytics Server is performed using the BI Migration Tool. This tool creates anOracle BI 11g metadata archive which contains system security configurationinformation, the Oracle BI repository, and the Oracle BI Presentation Services Catalogof the 11g system.
Upgrading Oracle Business Intelligence 12.2.1.4.0 to Oracle Analytics Server is an in-place upgrade performed by using the Upgrade Assistant. You install the OracleAnalytics Server product distribution in a new Oracle home and then use the UpgradeAssistant to upgrade the existing 12.2.1.4.0 schemas and domain configuration. Youalso use the Reconfiguration Wizard to reconfigure the existing 12.2.1.4.0 domain.
Note:
For general information about Fusion Middleware upgrade planning andother upgrade concepts and resources, see the following sections inPlanning an Upgrade of Oracle Fusion Middleware:
• Planning an Upgrade to Oracle Fusion Middleware
• About In-Place versus Out-of-Place Upgrades
• About the Basic 12c Upgrade Procedures
About the Starting Points for UpgradeYou can upgrade to Oracle Analytics Server from Oracle Business Intelligence 12c(12.2.1.4.0).
If your existing version of Oracle Business Intelligence is earlier than 12c (12.2.1.4.0),you must first upgrade your software to the 12c (12.2.1.4.0) release before youupgrade to Oracle Analytics Server.
Note:
Python is included in the installation of Oracle Analytics Server and is usedwhen executing Machine Learning algorithms.
1-1

About the Oracle Analytics Server Standard TopologyThe steps to upgrade depend on your existing production topology.
As a result, it is difficult to provide exact upgrade instructions. This upgradedocumentation provides detailed instructions for upgrading and is referred toas standard upgrade topology.
Your actual topology may vary, but the topology described in this guide provides anexample that can be used as a guide to upgrade.
Figure 1-1 shows the standard upgrade topology for Oracle Analytics Server.
Figure 1-1 Oracle Analytics Server Standard Upgrade Topology
About Upgrade RestrictionsIf you are using two or more Oracle Fusion Middleware products of the same ordifferent versions in a single, supported, Oracle Fusion Middleware configuration, you
Chapter 1About the Oracle Analytics Server Standard Topology
1-2

must consider the interoperability and compatibility factors before planning theupgrade.
Interoperability
In the context of Oracle Fusion Middleware products, interoperability is defined as theability of two Oracle Fusion Middleware products or components of the same version(or release) to work together (interoperate) in a supported Oracle Fusion Middlewareconfiguration. Specifically, interoperability applies when the first 4 digits of the releaseor version number are the same. For example, Oracle Fusion Middleware12c (12.2.1.0) components are generally interoperable with other 12c (12.2.1.4.0)components.
Compatibility
In the context of Oracle Fusion Middleware products, compatibility is defined as theability of two Oracle Fusion Middleware components of different versions (or releases)to interoperate.
For a list of products and features available in Oracle Fusion Middleware Release12.2.1.4.0, see Products and Features Available in Oracle Fusion Middleware inUnderstanding Interoperability and Compatibility.
When performing the upgrade of your hardware or software, verify that your OracleFusion Middleware software is certified to support the new operating system orcomputer hardware. For more information, refer to the following resources:
• Oracle Fusion Middleware Supported System Configurations
• Oracle® Fusion Middleware System Requirements and Specifications
Note:
After you upgrade your system using a snapshot that was created in anearlier release, Oracle Analytics Server automatically grants newpermissions or permission sets to existing application roles to make featuresavailable to users. To change any of these default assignments, see Grant orRevoke Permissions to Perform Tasks in Oracle Analytics Server inAdministering Oracle Analytics Server.
Chapter 1About Upgrade Restrictions
1-3
2Pre-Upgrade Requirements
Before you begin the upgrade to Oracle Analytics Server, you must perform pre-upgrade tasks such as backing up, cloning your current environment, and verifyingthat your system meets certified requirements.
Upgrade is performed while the servers are down. The pre-upgrade tasks are oftentime-consuming. Oracle recommends that you plan and prepare your environment forupgrade by completing these pre-upgrade tasks, so that you have a successfulupgrade and a limited downtime.
Pre-Upgrade ChecklistThe Pre-Upgrade Checklist identifies tasks that can be performed before you beginany upgrade to ensure you have a successful upgrade and limited downtime.
Upgrades are performed while the servers are down. This checklist is meant to identifyimportant — and often time-consuming — pre-upgrade tasks that you can performbefore the upgrade to limit your downtime. The more preparation you can do beforeyou begin the upgrade process, the less time you will spend offline.
Note:
If the DISPLAY environment variable is not set up properly to allow for GUImode, you may encounter the following error:
Xlib: connection to ":1.0" refused by serverXlib: No protocol specified
To resolve this issue, set the DISPLAY environment variable to the systemname or IP address of your local workstation, and rerun Upgrade Assistant.
If you continue to receive these errors after setting DISPLAY, try launchinganother GUI tool, such as vncconfig. If you see the same errors, yourDISPLAY environment variable may still not be set correctly.
The pre-upgrade procedures you perform depend on the configuration ofyour existing system, the components you are upgrading, and theenvironment you want to create at the end of the upgrade and configurationprocess. Complete only those tasks that apply to your configurations or usecases.
2-1

Table 2-1 Tasks to Perform Before You Upgrade
Task Description
RequiredCreate a complete backup of your existingenvironment.
Back up all system-critical files and databases that containany schemas that are to be upgraded. If the upgrade fails,you must restore your pre-upgrade environment and beginthe upgrade again.
See Creating a Complete Backup.
• Make sure that your backup includes the schemaversion registry table. See Backing Up the SchemaVersion Registry Table.
• If you modified any of the startup scripts in your existingdomain, you must copy them to temporary directorylocation (outside of the existing domain) during theupgrade and redeploy them after the upgrade. See Maintaining Custom Domain Environment Settings.
OptionalClone your production environment to use as anupgrade testing platform.
In addition to creating a complete backup of your systemfiles, Oracle strongly recommends that you clone yourproduction environment. This environment can be used totest the upgrade.
See Cloning Your Production Environment for Testing.
RequiredVerify that you are installing and upgrading yourproduct on a supported hardware and softwareconfiguration.
Warning: Do not attempt an upgrade if you areunable to use the latest supported operating system.As with all supported configurations, failure tocomply with these requirements may cause yourupgrade to fail.
Verify that your hardware and software configurations(including operating systems) are supported by the latestcertifications and requirements documents. Also make sureto use a supported JDK version before you install the OracleAnalytics Server product distributions.
Oracle recommends that you verify this information rightbefore you start the upgrade as the certificationrequirements are frequently updated.
Make sure that you have applied the latest patches toyour components before you upgrade.See Verifying Certification and System Requirements.
Required for 32–bit Operating Systems OnlyMigrate to a 64-bit operating system before you canupgrade.
For more information, see Migrating from a 32-Bit to a 64-BitOperating System.
OptionalUpdate security policy files if you are usingenhanced encryption (AES 256).
Some of the security algorithms used in Fusion Middleware12c require additional policy files for the JDK.
If you plan to use enhanced encryption, such as AES 256,Oracle recommends that you apply the latest required policyfiles to the JDK before you upgrade.
See Updating Policy Files when Using Enhanced Encryption(AES 256).
OptionalPurge any outdated or unused data before youupgrade.
To optimize performance, consider purging data and objectsthat will not be used in the upgraded environment.
Use the purge scripts before you start the instance upgradeto purge the closed BI instances that you do not need in thelatest Oracle Analytics Server environment.
See Purging Unused Data.
Chapter 2Pre-Upgrade Checklist
2-2
Table 2-1 (Cont.) Tasks to Perform Before You Upgrade
Task Description
OptionalCreate a Non-SYSDBA user to run the UpgradeAssistant.
Oracle recommends that you create the FMW user to runUpgrade Assistant. User FMW can run the UpgradeAssistant without system administration privileges.
See Creating a Non-SYSDBA User to Run the UpgradeAssistant
RequiredDisable internal SSL.
It is important that you disable SSL on the internalcommunication links before you start the upgrade process.
See Disabling Internal SSL.
Creating a Complete BackupBefore you start an upgrade, back up all system-critical files, including the databasesthat host your Oracle Fusion Middleware schemas.
The backup must include the SYSTEM.SCHEMA_VERSION_REGISTRY$ table so that youcan restore the contents back to its pre-upgrade state if the upgrade fails.
The Upgrade Assistant Prerequisites screen prompts you to acknowledge thatbackups have been performed before you proceed with the actual upgrade. However,note that the Upgrade Assistant does not verify that a backup has been created.
Backing Up the Schema Version Registry TableYour system backup must include the SYSTEM.SCHEMA_VERSION_REGISTRY$ table or theFMWREGISTRY.SCHEMA_VERSION_REGISTRY$ table.
Each Fusion Middleware schema has a row in the SYSTEM.SCHEMA_VERSION_REGISTRY$table. If you run the Upgrade Assistant to update an existing schema and it does notsucceed, you must restore the original schema before you can try again. Before yourun the Upgrade Assistant, make sure you back up your existing database schemasand the schema version registry.
Note:
Before you upgrade a schema using the Upgrade Assistant, you mustperform a complete database backup. During the upgrade, you are requiredto acknowledge that backups have been performed.
Maintaining Customized Domain and Environment SettingsAny domain-generated, server startup scripts, or configuration files that you havemodified in your pre-upgrade environment are overwritten during the installation,domain upgrade, and reconfiguration operations. Save your customized files to ashared library location so that you can continue to use them after the upgrade.
Every domain installation includes dynamically-generated domain and server startupscripts, such as setDomainEnv. These files are replaced by newer versions during the
Chapter 2Creating a Complete Backup
2-3

installation and upgrade process. To maintain your custom domain-level environmentsettings, Oracle recommends that you create a separate file to store the customdomain information before you upgrade, instead of modifying the scripts directly.
For example, if you want to customize server startup parameters that apply to allservers in a domain, you can create a file called setUserOverrides.sh (UNIX) andconfigure it to add custom libraries to the WebLogic Server classpath, specifyadditional command-line options for running the servers, or specify additionalenvironment variables. When using the pack and unpack commands, any customsettings that you add to this file are preserved during the domain upgrade operationand are carried over to the remote servers.
The following example illustrates startup customizations in a setUserOverrides file:
# add custom libraries to the WebLogic Server system claspath if [ "${POST_CLASSPATH}" != "" ] ; then POST_CLASSPATH="${POST_CLASSPATH}${CLASSPATHSEP}${HOME}/foo/fooBar.jar" export POST_CLASSPATH else POST_CLASSPATH="${HOME}/foo/fooBar.jar" export POST_CLASSPATH fi # specify additional java command-line options for serversJAVA_OPTIONS="${JAVA_OPTIONS} -Dcustom.property.key=custom.value"
If the setUserOverrides file exists during a server startup, the file is included in thestartup sequence and any overrides contained within this file take effect. You muststore the setUserOverrides file in the EXISTING_DOMAIN_HOME/bin directory.
Note:
If you cannot create the setUserOverrides script before an upgrade, youneed to reapply your settings as described in Re-apply Customizations toStartup Scripts in Upgrading Oracle WebLogic Server.
Cloning Your Production Environment for TestingCreate a copy of your actual production environment, upgrade the clonedenvironment, verify that the upgraded components work as expected, and then (andonly then) upgrade your production environment.
Cloning your production environment for testing is recommended, but not required.
Chapter 2Cloning Your Production Environment for Testing
2-4

Note:
Upgrades cannot be reversed. In most cases, if an error occurs, you muststop the upgrade and restore the entire environment from backup and beginthe upgrade process from the beginning. Identifying potential upgrade issuesin a development environment can eliminate unnecessary downtime. It isbeyond the scope of this document to describe the cloning procedures for allcomponents and operating systems. Cloning procedures are component andoperating system-specific. At a high level, you install the pre-upgrade versionof your component domain on a test machine, create the required schemasusing the Repository Creation Utility (RCU), and perform the upgrade.
Additional benefits of running an upgrade in a cloned production environment includethe following:
• Uncover and correct any upgrade issues.
• Practice completing an end-to-end upgrade.
• Understand the upgrade performance and how purge scripts can help.
• Understand the time required to complete the upgrade.
• Understand the database resource usage (such as temporary tablespace; PGA,and so on).
Note:
You can run the pre-upgrade Readiness Check on the cloned productionenvironment to help identify potential upgrade issues with your data, but youmust perform a complete test upgrade on a cloned environment to ensure asuccessful upgrade.
Verifying Certification and System RequirementsReview the certification matrix and system requirements documents to verify that yourenvironment meets the necessary requirements for installation.
Note:
When checking the certification, system requirements, and interoperabilityinformation, be sure to check specifically for any 32-bit or 64-bit systemrequirements. It is important for you to download software specificallydesigned for the 64-bit environment, explicitly. Make sure that your currentenvironment has been patched to the latest patch set before you begin theupgrade. Certifications are based on fully patched environments, unlessstated otherwise.
Chapter 2Verifying Certification and System Requirements
2-5
Verify Your Environment Meets Certification RequirementsOracle has tested and verified the performance of your product on all certified systemsand environments. Make sure that you are installing your product on a supportedhardware or software configuration.
Whenever new certifications occur, they are added to the appropriate certificationdocument right away. New certifications can occur at any time. See the CertificationInformation in Administering Oracle Analytics Server.
Verify System Requirements and SpecificationsIt is important to meet and verify system requirements such as disk space, availablememory, specific platform packages and patches, and other operating system-specificitems.
To verify the requirements of the certification are met, see the Oracle FusionMiddleware System Requirements and Specifications document. For example, if the Certification Information indicates that your product is certified for installation on 64-BitOracle Linux 7, you must use System Requirements and Specifications document toverify that your Oracle Linux 7 system meets the required minimum specifications suchas disk space, available memory, specific platform packages and patches, and otheroperating system-specific items.
Note:
When you install the Oracle Analytics Server software in preparation forupgrade, you should use the same user account that you used to install andconfigure the existing, pre-upgrade Oracle Fusion Middleware software. OnUNIX operating systems, this ensures that the proper owner and group isapplied to new Oracle Analytics Server files and directories.
If you are running a 32–bit environment, you must perform an additional set of steps:
Migrating from a 32-Bit to a 64-Bit Operating SystemIf you have a 32–bit operating system, then you must migrate your 32-bit environmentto a 64-bit software environment before you upgrade.
Make sure to validate the migration to ensure all your Oracle Fusion Middleware 12c(12.2.1.4.0) software is working properly on the 64-bit machine, and only then performthe upgrade to Oracle Analytics Server.
Note:
These steps assume that your database is located on a separate host andwill not be moved.
Upgrading an operating system typically involves the following:
Chapter 2Verifying Certification and System Requirements
2-6
WARNING:
These steps are provided as an example of the operating system upgradeprocess and may or may not include all of the procedures you must performto update your specific operating system. Consult your operating system'supgrade documentation for more information.
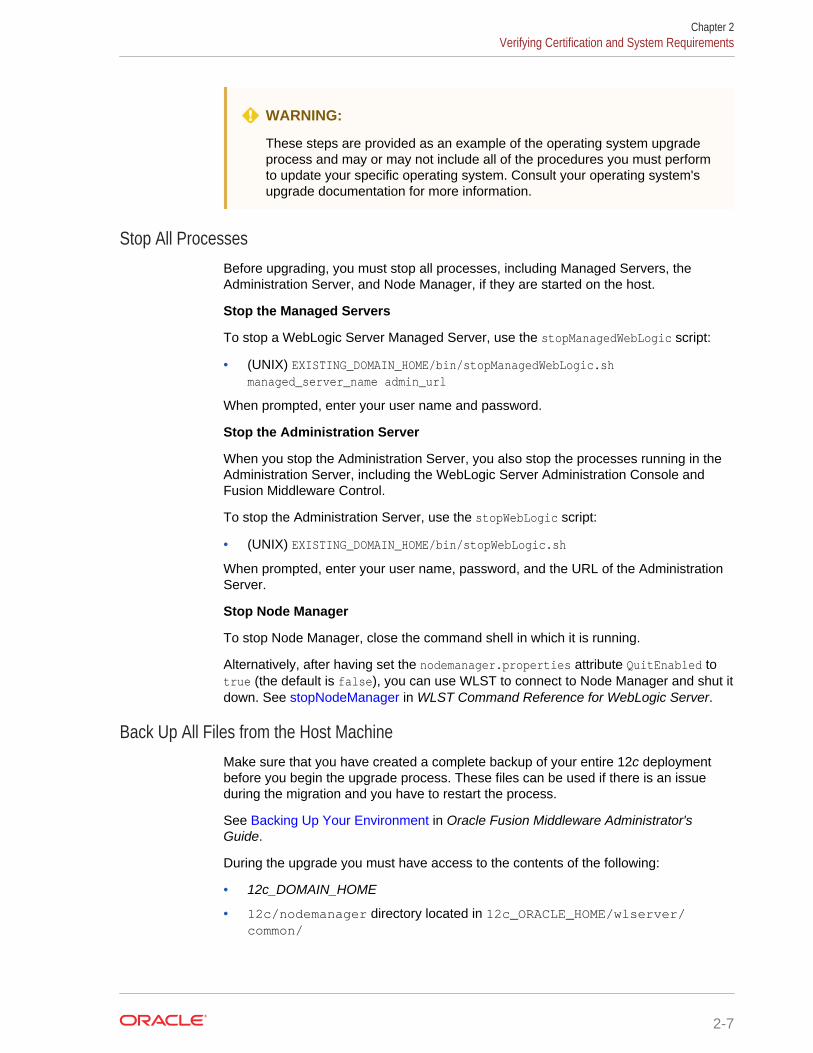
Stop All ProcessesBefore upgrading, you must stop all processes, including Managed Servers, theAdministration Server, and Node Manager, if they are started on the host.
Stop the Managed Servers
To stop a WebLogic Server Managed Server, use the stopManagedWebLogic script:
• (UNIX) EXISTING_DOMAIN_HOME/bin/stopManagedWebLogic.shmanaged_server_name admin_url
When prompted, enter your user name and password.
Stop the Administration Server
When you stop the Administration Server, you also stop the processes running in theAdministration Server, including the WebLogic Server Administration Console andFusion Middleware Control.
To stop the Administration Server, use the stopWebLogic script:
• (UNIX) EXISTING_DOMAIN_HOME/bin/stopWebLogic.sh
When prompted, enter your user name, password, and the URL of the AdministrationServer.
Stop Node Manager
To stop Node Manager, close the command shell in which it is running.
Alternatively, after having set the nodemanager.properties attribute QuitEnabled totrue (the default is false), you can use WLST to connect to Node Manager and shut itdown. See stopNodeManager in WLST Command Reference for WebLogic Server.
Back Up All Files from the Host MachineMake sure that you have created a complete backup of your entire 12c deploymentbefore you begin the upgrade process. These files can be used if there is an issueduring the migration and you have to restart the process.
See Backing Up Your Environment in Oracle Fusion Middleware Administrator'sGuide.
During the upgrade you must have access to the contents of the following:
• 12c_DOMAIN_HOME
• 12c/nodemanager directory located in 12c_ORACLE_HOME/wlserver/common/
Chapter 2Verifying Certification and System Requirements
2-7

Some of the backup and recovery procedures described in Backing Up YourEnvironment in Oracle Fusion Middleware Administrator's Guide are product-specific.Do not proceed with the upgrade until you have a complete backup.
Set Up the Target 64-bit Machine with the Host Name and IP AddressThe host name and IP address of the target machine must be made identical to thehost. This requires you to change the IP address and name of the source machine ordecommission the source machine to avoid conflicts in the network.
The process of changing an IP address and host name vary by operating system.Consult your operating system's administration documentation for more information.
Restore the 12c Backup from Host to 64-bit HostRestore the files that you backed up from the host machine using the same directorystructure that was used in 12c. The directory structure on the target machine must beidentical to the structure of the host machine.
See Recovering Your Environment in Oracle Fusion Middleware Administrator'sGuide.
Install the Oracle Analytics Server Product Distributions on the Target MachineYou must install the Oracle Analytics Server product distributions in a new Oraclehome on the target machine.
Refer to the component-specific installation guides for the component(s) you areinstalling.
Upgrade the Target 64-bit Environment Using the Standard Upgrade ProcedureAfter installing the product on the target machine, you must upgrade each productcomponent individually using an Upgrade Utility specified in the component-specificupgrade guide and complete any post-upgrade tasks.
If you are upgrading additional components, see the component-specific upgradeguide.
Note:
The Node Manager upgrade procedure requires access to the original NodeManager files. Use the 12c Node Manger files that you backed up from the32-bit source machine.
Verify that the Database Hosting Oracle Fusion Middleware isSupported
You must have a supported Oracle database configured with the required schemasbefore you run Oracle Analytics Server.
Chapter 2Verifying Certification and System Requirements
2-8

Review the Fusion Middleware database requirements before starting the upgrade toensure that the database hosting Oracle Fusion Middleware is supported and hassufficient space to perform an upgrade. See the Certification Matrix.
Note:
If your database version is no longer supported, you must upgrade to asupported version before starting an upgrade. See Upgrading and PreparingYour Oracle Databases for 12c (12.2.1.4.0) in Planning an Upgrade ofOracle Fusion Middleware.
Verify that the JDK Is Certified for This Release of Oracle FusionMiddleware
At the time this document was published, the certified JDK was 1.8.0_221.
Refer to the Oracle Fusion Middleware Supported System Configurations informationon the Oracle Technology Network (OTN) to verify that the JDK you are using issupported.
If your JDK is not supported, or you do not have a JDK installed, you must downloadthe required Java SE JDK, from the following website:
http://www.oracle.com/technetwork/java/javase/downloads/index.html
Make sure that the JDK is installed outside of the Oracle home. The Oracle UniversalInstaller validates that the designated Oracle home directory is empty, and theinstallion does not progress until an empty directory is specified. If you install JDKunder Oracle home, you may experience issues in future operations. Therefore,Oracle recommends that you install the JDK in the following directory (UNIX): /usr/java.
For more information on the difference between generic and platform-specificinstallers, see Understanding the Difference Between Generic and Platform-SpecificDistributions in the Oracle Fusion Middleware Download, Installation, andConfiguration Readme Files.
Updating Policy Files when Using Enhanced Encryption(AES 256)
If you plan to use enhanced encryption, such as Advanced Encryption Standard (AES)256, in your upgraded environment, Oracle recommends that you apply the latestrequired policy files to the JDK before you upgrade.
The Java platform defines a set of APIs spanning major security areas, includingcryptography, public key infrastructure, authentication, secure communication, andaccess control. These APIs allow developers to easily integrate security mechanismsinto their application code.
Some of the security algorithms used in Fusion Middleware 12c require additionalpolicy files for the JDK. See Java Cryptography Architecture Oracle ProvidersDocumentation.
Chapter 2Updating Policy Files when Using Enhanced Encryption (AES 256)
2-9

Note:
If you attempt to use enhanced encryption without applying these policy filesto the JDK before you begin the upgrade, the upgrade can fail and you mustrestore the entire pre-upgrade environment and start the upgrade from thebeginning.
Purging Unused DataPurging unused data and maintaining a purging methodology before an upgrade canoptimize the upgrade process.
Some components have automated purge scripts. If you are using purge scripts, waituntil the purge is complete before starting the upgrade process. The upgrade may failif the purge scripts are running while using the Upgrade Assistant to upgrade yourschemas.
Creating a Non-SYSDBA User to Run the UpgradeAssistant
Oracle recommends that you create a non-SYSDBA user called FMW to run theUpgrade Assistant. This user has the privileges required to modify schemas, but doesnot have full administrator privileges.
SYSDBA is an administrative privilege that is required to perform high-leveladministrative operations such as creating, starting up, shutting down, backing up, orrecovering the database. The SYSDBA system privilege is for a fully empowereddatabase administrator. When you connect with the SYSDBA privilege, you connectwith a default schema and not with the schema that is generally associated with youruser name. For SYSDBA, this schema is SYS. Access to a default schema can be avery powerful privilege. For example, when you connect as user SYS, you haveunlimited privileges on data dictionary tables. Therefore, Oracle recommends that youcreate a non-SYSDBA user to upgrade the schemas. The privileges listed below mustbe granted to user FMW before starting the Upgrade Assistant.
Chapter 2Purging Unused Data
2-10

Notes:
The non-SYSDBA user FMW is created solely for the purpose of runningthe Upgrade Assistant. After this step is complete, drop the FMW user. Notethat privileges required for running the Upgrade Assistant may change fromrelease to release. By default, the v$xatrans$ table does not exist. You must runthe XAVIEW.SQL script to create this table before creating the user. Moreover,the grant select privilege on thev$xatrans$ table is required only byOracle Identity Governance . If you do not require Oracle IdentityGovernance for configuration, or if you do not have the v$xatrans$ table,then remove the following line from the script:
grant select on v$xatrans$ to FMW with grant option;
In the example below, password is the password that you set for the FMW user. Whengranting privileges, make sure that you specify your actual password.
create user FMW identified by password;grant dba to FMW;grant execute on DBMS_LOB to FMW with grant option;grant execute on DBMS_OUTPUT to FMW with grant option;grant execute on DBMS_STATS to FMW with grant option;grant execute on sys.dbms_aqadm to FMW with grant option;grant execute on sys.dbms_aqin to FMW with grant option;grant execute on sys.dbms_aqjms to FMW with grant option;grant execute on sys.dbms_aq to FMW with grant option;grant execute on utl_file to FMW with grant option;grant execute on dbms_lock to FMW with grant option;grant select on sys.V_$INSTANCE to FMW with grant option;grant select on sys.GV_$INSTANCE to FMW with grant option;grant select on sys.V_$SESSION to FMW with grant option;grant select on sys.GV_$SESSION to FMW with grant option;grant select on dba_scheduler_jobs to FMW with grant option;grant select on dba_scheduler_job_run_details to FMW with grant option;grant select on dba_scheduler_running_jobs to FMW with grant option;grant select on dba_aq_agents to FMW with grant option;grant execute on sys.DBMS_SHARED_POOL to FMW with grant option;grant select on dba_2pc_pending to FMW with grant option;grant select on dba_pending_transactions to FMW with grant option;grant execute on DBMS_FLASHBACK to FMW with grant option;grant execute on dbms_crypto to FMW with grant option;grant execute on DBMS_REPUTIL to FMW with grant option;grant execute on dbms_job to FMW with grant option;grant select on pending_trans$ to FMW with grant option;grant select on dba_scheduler_job_classes to fmw with grant option;grant select on SYS.DBA_DATA_FILES to FMW with grant option;grant select on SYS.V_$ASM_DISKGROUP to FMW with grant option;grant select on v$xatrans$ to FMW with grant option;grant execute on sys.dbms_system to FMW with grant option;grant execute on DBMS_SCHEDULER to FMW with grant option;
Chapter 2Creating a Non-SYSDBA User to Run the Upgrade Assistant
2-11

grant select on dba_data_files to FMW with grant option;grant execute on UTL_RAW to FMW with grant option;grant execute on DBMS_XMLDOM to FMW with grant option;grant execute on DBMS_APPLICATION_INFO to FMW with grant option;grant execute on DBMS_UTILITY to FMW with grant option;grant execute on DBMS_SESSION to FMW with grant option;grant execute on DBMS_METADATA to FMW with grant option;grant execute on DBMS_XMLGEN to FMW with grant option;grant execute on DBMS_DATAPUMP to FMW with grant option;grant execute on DBMS_MVIEW to FMW with grant option;grant select on ALL_ENCRYPTED_COLUMNS to FMW with grant option;grant select on dba_queue_subscribers to FMW with grant option; grant execute on SYS.DBMS_ASSERT to FMW with grant option;grant select on dba_subscr_registrations to FMW with grant option;grant manage scheduler to FMW;
If you are upgrading Oracle Identity Manager (OIM) schema, ensure that the FMWuser has the following additional privileges:
grant execute on SYS.DBMS_FLASHBACK to fmw with grant option;grant execute on sys.DBMS_SHARED_POOL to fmw with grant option;grant execute on SYS.DBMS_XMLGEN to FMW with grant option;grant execute on SYS.DBMS_DB_VERSION to FMW with grant option;grant execute on SYS.DBMS_SCHEDULER to FMW with grant option;grant execute on SYS.DBMS_SQL to FMW with grant option;grant execute on SYS.DBMS_UTILITY to FMW with grant option;grant ctxapp to FMW with admin option;grant execute on SYS.DBMS_FLASHBACK TO FMW with grant option;grant create MATERIALIZED VIEW to FMW with admin option;grant all on SCHEMA_VERSION_REGISTRY TO FMW with grant option;grant create SYNONYM to FMW with admin option;grant execute on CTXSYS.CTX_ADM to FMW with grant option;grant execute on CTXSYS.CTX_CLS TO FMW with grant option;grant execute on CTXSYS.CTX_DDL TO FMW with grant option;grant execute on CTXSYS.CTX_DOC TO FMW with grant option;grant execute on CTXSYS.CTX_OUTPUT TO FMW with grant option;grant execute on CTXSYS.CTX_QUERY TO FMW with grant option;grant execute on CTXSYS.CTX_REPORT TO FMW with grant option;grant execute on CTXSYS.CTX_THES TO FMW with grant option;grant execute on CTXSYS.CTX_ULEXER TO FMW with grant option;grant create JOB to FMW with admin option;
Disabling Internal SSLYou must disable SSL on the internal communication links before you start theupgrade process.
To disable internal SSL:
1. Stop the system by entering the following command:
(UNIX) EXISTING_DOMAIN_HOME/bitools/bin/stop.sh
2. Enter the following command to disable SSL on WebLogic internal channels andinternal components:
Chapter 2Disabling Internal SSL
2-12

(UNIX) EXISTING_DOMAIN_HOME/bitools/bin/ssl.sh internalsslfalse
3. Restart the system by entering the following command:
(UNIX) EXISTING_DOMAIN_HOME/bitools/bin/start.sh
Chapter 2Disabling Internal SSL
2-13

3Upgrading Oracle Business Intelligence12.2.1.4.0 to Oracle Analytics Server
This chapter contains the procedure to upgrade Oracle Business Intelligence12.2.1.4.0 to Oracle Analytics Server. The upgrade operations are performed on theexisting 12.2.1.x domain.
About the Upgrade ProcessTable 3-1 lists the high-level steps that you need to perform to upgrade to OracleAnalytics Server:
Table 3-1 Tasks for Upgrading Oracle Business Intelligence 12.2.1.4.0 to Oracle AnalyticsServer
Task Description
OptionalLearn about the interoperability and compatibility factorsthat could affect how you upgrade to Oracle AnalyticsServer.
It is important to understand how two or more OracleFusion Middleware products of the same version ordifferent versions work together (interoperate) in asupported Oracle Fusion Middleware configuration.
You can learn more about interoperability andcompatibility in Oracle® Fusion MiddlewareUnderstanding Interoperability and Compatibility.
RequiredIf you have not done so already, review the introductorytopics in this guide and complete the required pre-upgrade tasks.
The pre-upgrade tasks include cloning your productionenvironment, verifying system requirements andcertifications, purging unused data, and creating a non-SYSDBA user.
For a complete list of pre-upgrade tasks, see Pre-Upgrade Requirements
RequiredDownload and install the 12.2.1.4.0 Fusion MiddlewareInfrastructure and Oracle Analytics Server distributions.
The Infrastructure distribution combines the WebLogicServer and the Java Required Files (JRF) that arerequired to set up the foundation to install other FusionMiddleware products.
As per the upgrade topology defined in this guide, youmust install the Infrastructure in a new Oracle home.
You must install Oracle Analytics Server in the Oraclehome that is created when you installed the OracleAnalytics Server Infrastructure. To install the productdistributions, follow the procedure described in Installingthe Product Distributions.
OptionalRun the Readiness Check.
See Running a Pre-Upgrade Readiness Check.
3-1
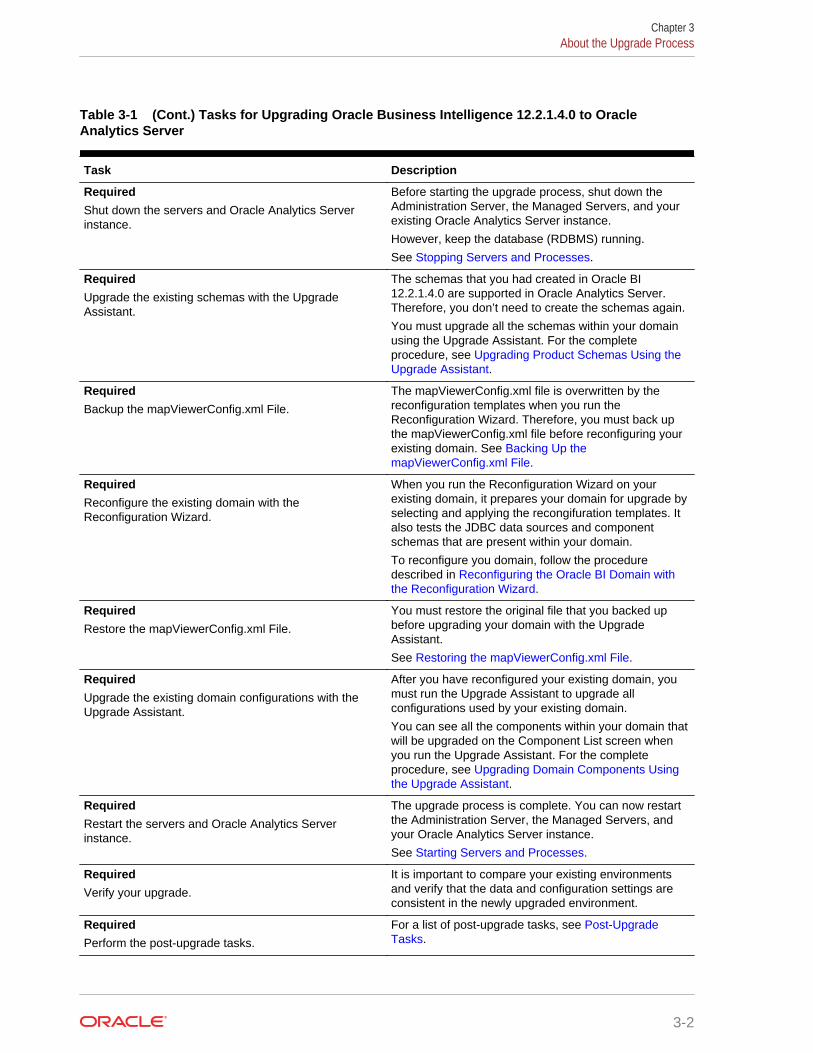
Table 3-1 (Cont.) Tasks for Upgrading Oracle Business Intelligence 12.2.1.4.0 to OracleAnalytics Server
Task Description
RequiredShut down the servers and Oracle Analytics Serverinstance.
Before starting the upgrade process, shut down theAdministration Server, the Managed Servers, and yourexisting Oracle Analytics Server instance.
However, keep the database (RDBMS) running.
See Stopping Servers and Processes.
RequiredUpgrade the existing schemas with the UpgradeAssistant.
The schemas that you had created in Oracle BI12.2.1.4.0 are supported in Oracle Analytics Server.Therefore, you don’t need to create the schemas again.
You must upgrade all the schemas within your domainusing the Upgrade Assistant. For the completeprocedure, see Upgrading Product Schemas Using theUpgrade Assistant.
RequiredBackup the mapViewerConfig.xml File.
The mapViewerConfig.xml file is overwritten by thereconfiguration templates when you run theReconfiguration Wizard. Therefore, you must back upthe mapViewerConfig.xml file before reconfiguring yourexisting domain. See Backing Up themapViewerConfig.xml File.
RequiredReconfigure the existing domain with theReconfiguration Wizard.
When you run the Reconfiguration Wizard on yourexisting domain, it prepares your domain for upgrade byselecting and applying the recongifuration templates. Italso tests the JDBC data sources and componentschemas that are present within your domain.
To reconfigure you domain, follow the proceduredescribed in Reconfiguring the Oracle BI Domain withthe Reconfiguration Wizard.
RequiredRestore the mapViewerConfig.xml File.
You must restore the original file that you backed upbefore upgrading your domain with the UpgradeAssistant.
See Restoring the mapViewerConfig.xml File.
RequiredUpgrade the existing domain configurations with theUpgrade Assistant.
After you have reconfigured your existing domain, youmust run the Upgrade Assistant to upgrade allconfigurations used by your existing domain.
You can see all the components within your domain thatwill be upgraded on the Component List screen whenyou run the Upgrade Assistant. For the completeprocedure, see Upgrading Domain Components Usingthe Upgrade Assistant.
RequiredRestart the servers and Oracle Analytics Serverinstance.
The upgrade process is complete. You can now restartthe Administration Server, the Managed Servers, andyour Oracle Analytics Server instance.
See Starting Servers and Processes.
RequiredVerify your upgrade.
It is important to compare your existing environmentsand verify that the data and configuration settings areconsistent in the newly upgraded environment.
RequiredPerform the post-upgrade tasks.
For a list of post-upgrade tasks, see Post-UpgradeTasks.
Chapter 3About the Upgrade Process
3-2

Installing the Product DistributionsBefore you begin your upgrade, download Oracle Fusion Middleware infrastructure12.2.1.4 and Oracle Analytics Server distributions on the target system and installthem by using Oracle Universal Installer.
Note:
When Infrastructure is required for the upgrade, you must install the OracleFusion Middleware distribution first before you install other FusionMiddleware products.
To install the Oracle Analytics Server distributions:
1. Sign in to the target system.
2. Download the following from Oracle Technology Network or Oracle SoftwareDelivery Cloud to your target system:
• Oracle Fusion Middleware Infrastructure(fmw_12.2.1.4.0_infrastructure_generic.jar)
• Oracle Analytics Server (Linux: Oracle_Analytics_Server_5.5.0.jar)
• Oracle WebLogic Server 12.2.1.4 Patch 30657796(p30657796_122140_Generic.zip)
3. Change to the directory where you downloaded the Oracle Analytics Serverproduct distribution.
4. Start the installation program for Oracle Fusion Middleware infrastructure
(UNIX) JDK_HOME/bin/java -jar fmw_12.2.1.4.0_infrastructure.jar
This initiates the Graphical User Interface (GUI) mode installer.
5. On UNIX operating systems, the Installation Inventory Setup screen appears if thisis the first time you are installing an Oracle product on this host.
Specify the location where you want to create your central inventory. Make surethat the operating system group name selected on this screen has writepermissions to the central inventory location, and click Next.
Note:
The Installation Inventory Setup screen does not appear on Windowsoperating systems.
6. On the Welcome screen, review the information to make sure that you have metall the prerequisites. Click Next.
7. On the Auto Updates screen, select an option:
• Skip Auto Updates: To avoid checking for software updates at this time.
• Select patches from directory: To navigate to a local directory if youdownloaded patch files.
Chapter 3Installing the Product Distributions
3-3

• Search My Oracle Support for Updates: To automatically download softwareupdates if you have a My Oracle Support account. You must enter OracleSupport credentials then click Search. To configure a proxy server for theinstaller to access My Oracle Support, click Proxy Settings. Click TestConnection to test the connection.
Click Next.
8. On the Installation Location screen, specify the location for the Oracle homedirectory and click Next.
For more information about Oracle Fusion Middleware directory structure, see Understanding Directories for Installation and Configuration in Oracle FusionMiddleware Planning an Installation of Oracle Fusion Middleware.
9. On the Installation Type screen, select the following:
• For Infrastructure, select Fusion Middleware Infrastructure.
• For Oracle Analytics Server, select Oracle Analytics.
Click Next.
10. The Prerequisite Checks screen analyzes the host computer to ensure that thespecific operating system prerequisites have been met.
To view the list of tasks that are verified, select View Successful Tasks. To viewlog details, select View Log. If any prerequisite check fails, then an error messageappears at the bottom of the screen. Fix the error and click Rerun to try again. Toignore the error or the warning message and continue with the installation, clickSkip (not recommended).
11. On the Installation Summary screen, verify the installation options that youselected.
If you want to save these options to a response file, click Save Response File andenter the response file location and name. The response file collects and stores allthe information that you have entered, and enables you to perform a silentinstallation (from the command line) at a later time.Click Install to begin the installation.
12. On the Installation Progress screen, when the progress bar displays 100%, clickFinish to dismiss the installer, or click Next to see a summary.
13. The Installation Complete screen displays the Installation Location and theFeature Sets that are installed. Review this information and click Finish to closethe installer.
14. Install the WebLogic Server 12.2.1.4 Patch.
• Extract p30657796_122140_Generic.zip.
• To apply the patch, follow the instructions in the readme file that you extractedfrom the p30657796_122140_Generic.zip file.
15. After you have installed Oracle Fusion Middleware Infrastructure, enter thefollowing command to start the installer for your product distribution and repeat thesteps above to navigate through the installer screens:
(UNIX) JDK_HOME/bin/java -jar Oracle_Analytics_Server_5.5.0.jar
Chapter 3Installing the Product Distributions
3-4

Running a Pre-Upgrade Readiness CheckTo identify potential issues with the upgrade, Oracle recommends that you run areadiness check before you start the upgrade process. Be aware that the readinesscheck may not be able to discover all potential issues with your upgrade. An upgrademay still fail, even if the readiness check reports success.
About Running a Pre-Upgrade Readiness CheckYou can run the Upgrade Assistant in -readiness mode to detect issues before youperform the actual upgrade. You can run the readiness check in GUI mode using theUpgrade Assistant or in silent mode using a response file.
The Upgrade Assistant readiness check performs a read-only, pre-upgrade review ofyour Fusion Middleware schemas and WebLogic domain configurations that are at asupported starting point. The review is a read-only operation.
The readiness check generates a formatted, time-stamped readiness report so youcan address potential issues before you attempt the actual upgrade. If no issues aredetected, you can begin the upgrade process. Oracle recommends that you read thisreport thoroughly before performing an upgrade.
You can run the readiness check while your existing Oracle Fusion Middlewaredomain is online (while other users are actively using it) or offline.
You can run the readiness check any number of times before performing any actualupgrade. However, do not run the readiness check after an upgrade has beenperformed, as the report results may differ from the result of pre-upgrade readinesschecks.
Note:
To prevent performance from being affected, Oracle recommends that yourun the readiness check during off-peak hours.
Starting the Upgrade Assistant in Readiness ModeUse the -readiness parameter to start the Upgrade Assistant in readiness mode.
To perform a readiness check on your pre-upgrade environment with the UpgradeAssistant:
1. Go to the oracle_common/upgrade/bin directory:
• (UNIX) ORACLE_HOME/oracle_common/upgrade/bin
2. Start the Upgrade Assistant.
• (UNIX) ./ua -readiness
For information about other parameters that you can specify on the command line,see Upgrade Assistant Parameters
Chapter 3Running a Pre-Upgrade Readiness Check
3-5
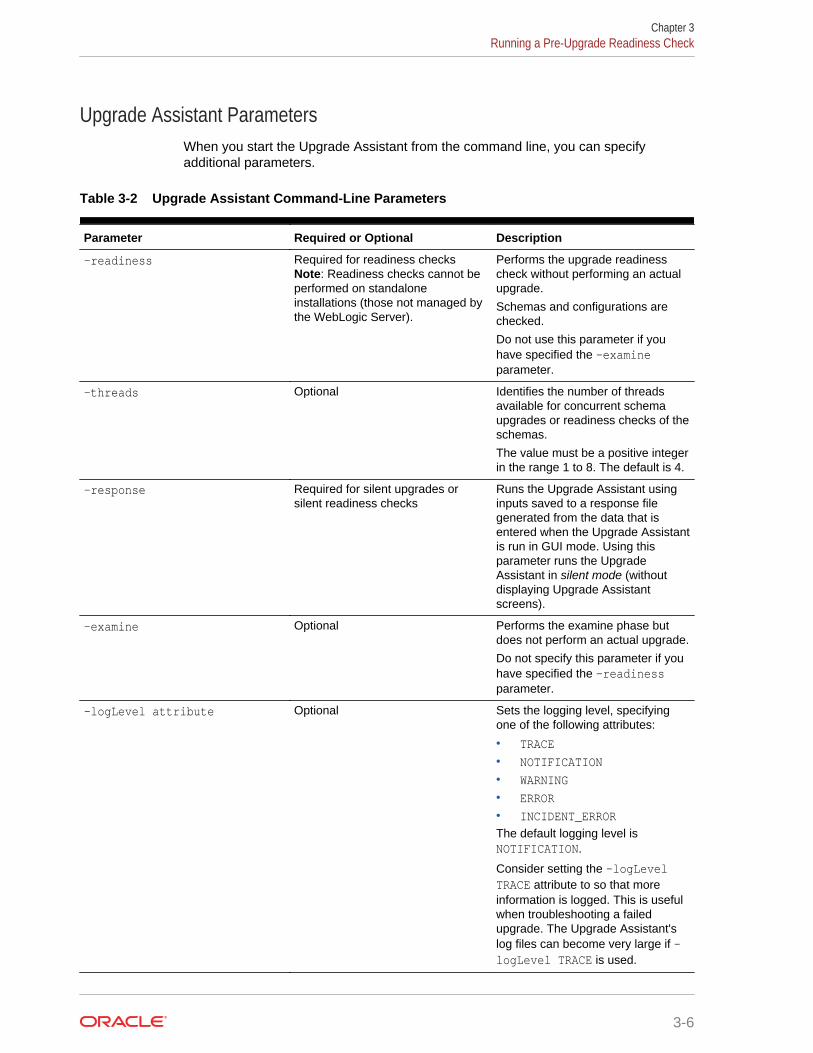
Upgrade Assistant ParametersWhen you start the Upgrade Assistant from the command line, you can specifyadditional parameters.
Table 3-2 Upgrade Assistant Command-Line Parameters
Parameter Required or Optional Description
-readiness Required for readiness checksNote: Readiness checks cannot beperformed on standaloneinstallations (those not managed bythe WebLogic Server).
Performs the upgrade readinesscheck without performing an actualupgrade.
Schemas and configurations arechecked.
Do not use this parameter if youhave specified the -examineparameter.
-threads Optional Identifies the number of threadsavailable for concurrent schemaupgrades or readiness checks of theschemas.
The value must be a positive integerin the range 1 to 8. The default is 4.
-response Required for silent upgrades orsilent readiness checks
Runs the Upgrade Assistant usinginputs saved to a response filegenerated from the data that isentered when the Upgrade Assistantis run in GUI mode. Using thisparameter runs the UpgradeAssistant in silent mode (withoutdisplaying Upgrade Assistantscreens).
-examine Optional Performs the examine phase butdoes not perform an actual upgrade.
Do not specify this parameter if youhave specified the -readinessparameter.
-logLevel attribute Optional Sets the logging level, specifyingone of the following attributes:
• TRACE• NOTIFICATION• WARNING• ERROR• INCIDENT_ERRORThe default logging level isNOTIFICATION.
Consider setting the -logLevelTRACE attribute to so that moreinformation is logged. This is usefulwhen troubleshooting a failedupgrade. The Upgrade Assistant'slog files can become very large if -logLevel TRACE is used.
Chapter 3Running a Pre-Upgrade Readiness Check
3-6

Table 3-2 (Cont.) Upgrade Assistant Command-Line Parameters
Parameter Required or Optional Description
-logDir location Optional Sets the default location of upgradelog files and temporary files. Youmust specify an existing, writabledirectory where the UpgradeAssistant creates log files andtemporary files.
The default locations are:
(UNIX)
ORACLE_HOME/oracle_common/upgrade/logs ORACLE_HOME/oracle_common/upgrade/temp
-help Optional Displays all of the command-lineoptions.
Performing a Readiness Check with the Upgrade AssistantNavigate through the screens in the Upgrade Assistant to complete the pre-upgradereadiness check.
Readiness checks are performed only on schemas or component configurations thatare at a supported upgrade starting point.
To complete the readiness check:
1. On the Welcome screen, review information about the readiness check. ClickNext.
2. On the Readiness Check Type screen, select the readiness check that you want toperform:
• Individually Selected Schemas allows you to select individual schemas forreview before upgrade. The readiness check reports whether a schema issupported for an upgrade or where an upgrade is needed.When you select this option, the screen name changes to Selected Schemas.
• Domain Based allows the Upgrade Assistant to discover and select allupgrade-eligible schemas or component configurations in the domain specifiedin the Domain Directory field.When you select this option, the screen name changes to Schemas andConfiguration.
Leave the default selection if you want the Upgrade Assistant to check allschemas and component configurations at the same time, or select a specificoption:
– Include checks for all schemas to discover and review all componentsthat have a schema available to upgrade.
Chapter 3Running a Pre-Upgrade Readiness Check
3-7

– Include checks for all configurations to review componentconfigurations for a managed WebLogic Server domain.
Click Next.
3. If you selected Individually Selected Schemas: On the Available Componentsscreen, select the components that have a schema available to upgrade for whichyou want to perform a readiness check.
If you selected Domain Based: On the Component List screen, review the list ofcomponents that are present in your domain for which you want to perform areadiness check.
If you select a component that has dependent components, those components areautomatically selected. For example, if you select Oracle Platform SecurityServices, Oracle Audit Services is automatically selected.
Depending on the components you select, additional screens may display. Forexample, you may need to:
• Specify the domain directory.
Ensure that you specify the 12c (12.2.1.4.0) domain directory.
• Specify schema credentials to connect to the selected schema: DatabaseType, DBA User Name, and DBA Password. Then click Connect.
Note:
Oracle database is the default database type. Make sure that youselect the correct database type before you continue. If you discoverthat you selected the wrong database type, do not go back to thisscreen to change it to the correct type. Instead, close the UpgradeAssistant and restart the readiness check with the correct databasetype selected to ensure that the correct database type is applied toall schemas.
• Select the Schema User Name option and specify the Schema Password.
Note:
The Upgrade Assistant automatically enables default credentials. Ifyou are unable to connect, make sure that you manually enter thecredentials for your schema before you continue.
Click Next to start the readiness check.
4. On the Readiness Summary screen, review the summary of the readiness checksthat will be performed based on your selections.
If you want to save your selections to a response file to run the Upgrade Assistantagain later in response (or silent) mode, click Save Response File and providethe location and name of the response file. A silent upgrade performs exactly thesame function that the Upgrade Assistant performs, but you do not have tomanually enter the data again.
For a detailed report, click View Log.
Chapter 3Running a Pre-Upgrade Readiness Check
3-8
Click Next.
5. On the Readiness Check screen, review the status of the readiness check. Theprocess can take several minutes.
If you are checking multiple components, the progress of each componentdisplays in its own progress bar in parallel.
When the readiness check is complete, click Continue.
6. On the End of Readiness screen, review the results of the readiness check(Readiness Success or Readiness Failure):
• If the readiness check is successful, click View Readiness Report to reviewthe complete report. Oracle recommends that you review the ReadinessReport before you perform the actual upgrade even when the readiness checkis successful. Use the Find option to search for a particular word or phrasewithin the report. The report also indicates where the completed ReadinessCheck Report file is located.
• If the readiness check encounters an issue or error, click View Log to reviewthe log file, identify and correct the issues, and then restart the readinesscheck. The log file is managed by the command-line options you set.
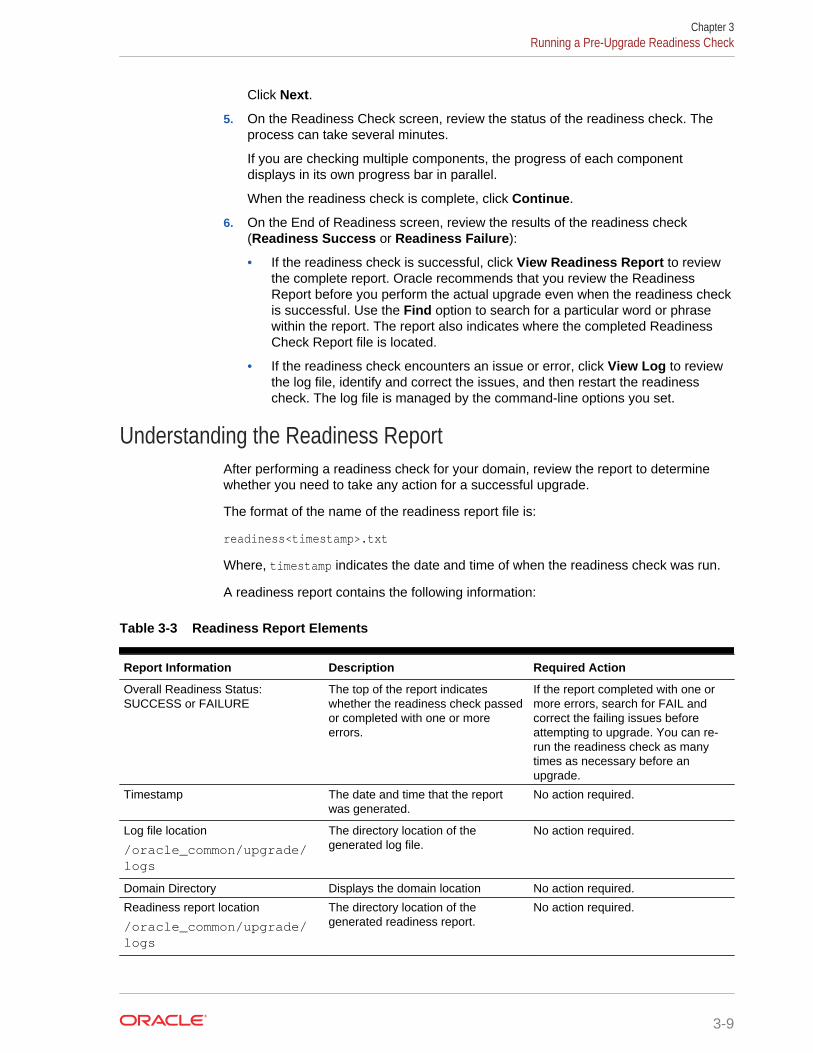
Understanding the Readiness ReportAfter performing a readiness check for your domain, review the report to determinewhether you need to take any action for a successful upgrade.
The format of the name of the readiness report file is:
readiness<timestamp>.txt
Where, timestamp indicates the date and time of when the readiness check was run.
A readiness report contains the following information:
Table 3-3 Readiness Report Elements
Report Information Description Required Action
Overall Readiness Status:SUCCESS or FAILURE
The top of the report indicateswhether the readiness check passedor completed with one or moreerrors.
If the report completed with one ormore errors, search for FAIL andcorrect the failing issues beforeattempting to upgrade. You can re-run the readiness check as manytimes as necessary before anupgrade.
Timestamp The date and time that the reportwas generated.
No action required.
Log file location
/oracle_common/upgrade/logs
The directory location of thegenerated log file.
No action required.
Domain Directory Displays the domain location No action required.
Readiness report location
/oracle_common/upgrade/logs
The directory location of thegenerated readiness report.
No action required.
Chapter 3Running a Pre-Upgrade Readiness Check
3-9
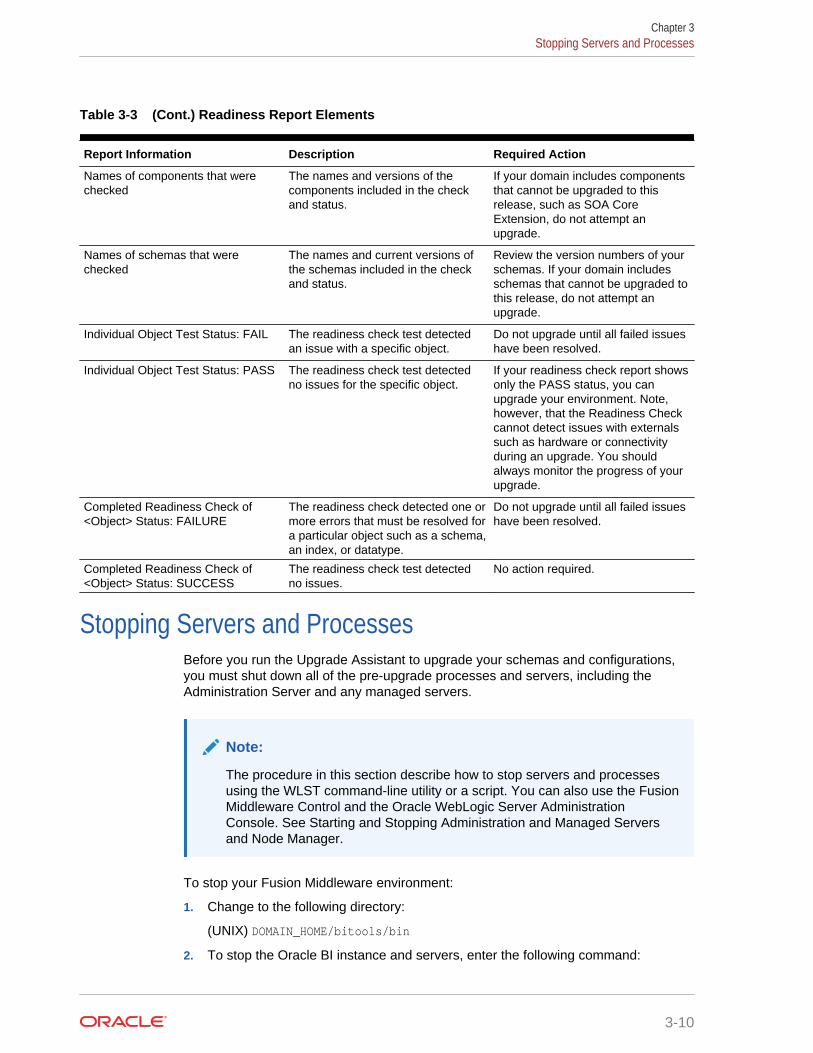
Table 3-3 (Cont.) Readiness Report Elements
Report Information Description Required Action
Names of components that werechecked
The names and versions of thecomponents included in the checkand status.
If your domain includes componentsthat cannot be upgraded to thisrelease, such as SOA CoreExtension, do not attempt anupgrade.
Names of schemas that werechecked
The names and current versions ofthe schemas included in the checkand status.
Review the version numbers of yourschemas. If your domain includesschemas that cannot be upgraded tothis release, do not attempt anupgrade.
Individual Object Test Status: FAIL The readiness check test detectedan issue with a specific object.
Do not upgrade until all failed issueshave been resolved.
Individual Object Test Status: PASS The readiness check test detectedno issues for the specific object.
If your readiness check report showsonly the PASS status, you canupgrade your environment. Note,however, that the Readiness Checkcannot detect issues with externalssuch as hardware or connectivityduring an upgrade. You shouldalways monitor the progress of yourupgrade.
Completed Readiness Check of<Object> Status: FAILURE
The readiness check detected one ormore errors that must be resolved fora particular object such as a schema,an index, or datatype.
Do not upgrade until all failed issueshave been resolved.
Completed Readiness Check of<Object> Status: SUCCESS
The readiness check test detectedno issues.
No action required.
Stopping Servers and ProcessesBefore you run the Upgrade Assistant to upgrade your schemas and configurations,you must shut down all of the pre-upgrade processes and servers, including theAdministration Server and any managed servers.
Note:
The procedure in this section describe how to stop servers and processesusing the WLST command-line utility or a script. You can also use the FusionMiddleware Control and the Oracle WebLogic Server AdministrationConsole. See Starting and Stopping Administration and Managed Serversand Node Manager.
To stop your Fusion Middleware environment:
1. Change to the following directory:
(UNIX) DOMAIN_HOME/bitools/bin
2. To stop the Oracle BI instance and servers, enter the following command:
Chapter 3Stopping Servers and Processes
3-10
(UNIX) stop.sh
Note:
When prompted to enter the password, specify the Node Managerpassword that you entered while configuring the Oracle Analytics Serverdomain.
Upgrading Product SchemasAfter stopping servers and processes, use the Upgrade Assistant to upgradesupported product schemas to the current release of Oracle Fusion Middleware.
The Upgrade Assistant allows you to upgrade individually selected schemas or allschemas associated with a domain. The option you select determines which UpgradeAssistant screens you will use.
Starting the Upgrade AssistantRun the Upgrade Assistant to upgrade product schemas, domain componentconfigurations, or standalone system components to Oracle Analytics Server.
To start the Upgrade Assistant:
Note:
Before you start the Upgrade Assistant, make sure that the JVM characterencoding is set to UTF-8 for the platform on which the Upgrade Assistant isrunning. If the character encoding is not set to UTF-8, then you will not beable to download files containing Unicode characters in their names. Thiscan cause the upgrade to fail.
1. Go to the oracle_common/upgrade/bin directory:
• (UNIX) ORACLE_HOME/oracle_common/upgrade/bin
2. Start the Upgrade Assistant:
• (UNIX) ./ua
Upgrade Assistant ParametersWhen you start the Upgrade Assistant from the command line, you can specifyadditional parameters.
Chapter 3Upgrading Product Schemas
3-11

Table 3-4 Upgrade Assistant Command-Line Parameters
Parameter Required or Optional Description
-readiness Required for readiness checksNote: Readiness checks cannot beperformed on standaloneinstallations (those not managed bythe WebLogic Server).
Performs the upgrade readinesscheck without performing an actualupgrade.
Schemas and configurations arechecked.
Do not use this parameter if youhave specified the -examineparameter.
-threads Optional Identifies the number of threadsavailable for concurrent schemaupgrades or readiness checks of theschemas.
The value must be a positive integerin the range 1 to 8. The default is 4.
-response Required for silent upgrades orsilent readiness checks
Runs the Upgrade Assistant usinginputs saved to a response filegenerated from the data that isentered when the Upgrade Assistantis run in GUI mode. Using thisparameter runs the UpgradeAssistant in silent mode (withoutdisplaying Upgrade Assistantscreens).
-examine Optional Performs the examine phase butdoes not perform an actual upgrade.
Do not specify this parameter if youhave specified the -readinessparameter.
-logLevel attribute Optional Sets the logging level, specifyingone of the following attributes:
• TRACE• NOTIFICATION• WARNING• ERROR• INCIDENT_ERRORThe default logging level isNOTIFICATION.
Consider setting the -logLevelTRACE attribute to so that moreinformation is logged. This is usefulwhen troubleshooting a failedupgrade. The Upgrade Assistant'slog files can become very large if -logLevel TRACE is used.
Chapter 3Upgrading Product Schemas
3-12

Table 3-4 (Cont.) Upgrade Assistant Command-Line Parameters
Parameter Required or Optional Description
-logDir location Optional Sets the default location of upgradelog files and temporary files. Youmust specify an existing, writabledirectory where the UpgradeAssistant creates log files andtemporary files.
The default locations are:
(UNIX)
ORACLE_HOME/oracle_common/upgrade/logs ORACLE_HOME/oracle_common/upgrade/temp
-help Optional Displays all of the command-lineoptions.
Upgrading Product Schemas Using the Upgrade AssistantNavigate through the screens in the Upgrade Assistant to upgrade the productschemas.
If you are using DB2 in your existing BI instance, then perform the following beforestarting the upgrade process:
1. Sign in to the WebLogic Console.
2. Go to Datasources under Services and select wlsservices_datasource.
3. Change the user for data source 'wlsservices_datasource' from<PREFIX>_WLS_RUNTIME to <PREFIX>_WLS.
For example: Change the user from L1_WLS_RUNTIME to L1_WLS.
You can now proceed with the upgrade process.
To upgrade product schemas with the Upgrade Assistant:
1. On the Welcome screen, review an introduction to the Upgrade Assistant andinformation about important pre-upgrade tasks. Click Next.
Note:
For more information about any Upgrade Assistant screen, click Help onthe screen.
2. On the Selected Schemas screen, select All Schemas Used by a Domain.
• All Schemas Used by a Domain to allow the Upgrade Assistant to discoverand select all components that have a schema available to upgrade in the
Chapter 3Upgrading Product Schemas
3-13

domain specified in the Domain Directory field. This is also known as adomain assisted schema upgrade. Additionally, the Upgrade Assistant pre-populates connection information on the schema input screens.
Note:
Oracle recommends that you select All Schemas Used by aDomain for most upgrades to ensure all of the required schemas areincluded in the upgrade.
Click Next.
3. If you selected All Schemas Used by a Domain: On the Component List screenyou will see two lists of schemas. The first list shows the components whoseschemas are present in the domain and will be upgraded. The second list showsthe list of missing schemas that may need to be created. If none of the requiredschemas are missing, you will only see the first list. Review both lists and clickNext.
The Upgrade Assistant will attempt to create any missing schemas using theschema credentials used to create the existing domain schemas. You do not needto launch the Repository Creation Utility.
If you want to exclude some components or schemas from the list, navigate backto the All Schemas screen and select Individually Selected Schemas. Thisoption allows you to select only those schemas you want included in the upgrade.
4. On the Prerequisites screen, acknowledge that the prerequisites have been metby selecting all the check boxes. Click Next.
Note:
The Upgrade Assistant does not verify whether the prerequisites havebeen met.
5. On the BIPLATFORM Schema [BIEE_PLATFORM] screen, the systemautomatically populates data in the other fields from the existing 12c schema.
Enter the database administrator account: DBA username and password for thedatabase containing the BIEE_PLATFORM schema and click Connect.
When you see the message “Connection to database successfully completed”,click Next.
6. On the IAU Schema [BIEE_IAU] screen, the system automatically populates datain the other fields from the existing 12c schema.
Enter the database administrator account: DBA username and password for thedatabase containing the BIEE_IAU schema and click Connect.
When you see the message “Connection to database successfully completed”,click Next.
7. On the OPSS Schema [BIEE_OPSS] screen, the system automatically populatesdata in the other fields from the existing 12c schema.
Enter the database administrator account: DBA username and password for thedatabase containing the BIEE_OPSS schema and click Connect.
Chapter 3Upgrading Product Schemas
3-14

When you see the message “Connection to database successfully completed”,click Next.
8. On the MDS Schema [BIEE_MDS] screen, the system automatically populatesdata in the other fields from the existing 12c schema.
Enter the database administrator account: DBA username and password for thedatabase containing the BIEE_MDS schema and click Connect.
When you see the message “Connection to database successfully completed”,click Next.
9. On the STB Schema [BIEE_STB] screen, the system automatically populates datain the other fields from the existing 12c schema.
Enter the database administrator account: DBA username and password for thedatabase containing the BIEE_STB schema and click Connect.
When you see the message “Connection to database successfully completed”,click Next.
10. On the WLS Schema [BIEE_WLS_RUNTIME] screen, the system automaticallypopulates data in the other fields from the existing 12c schema.
Enter the database administrator account: DBA username and password for thedatabase containing the BIEE_WLS_RUNTIME schema and click Connect.
When you see the message “Connection to database successfully completed”,click Next.
11. On the Examine screen, review the status of the Upgrade Assistant as it examineseach schema, verifying that the schema is ready for upgrade. If the status isExamine finished, click Next.
If the examine phase fails, Oracle recommends that you cancel the upgrade byclicking No in the Examination Failure dialog. Click View Log to see what causedthe error and refer to Troubleshooting Your Upgrade in Upgrading with theUpgrade Assistant for information on resolving common upgrade errors.
Note:
• If you resolve any issues detected during the examine phase withoutproceeding with the upgrade, you can start the Upgrade Assistantagain without restoring from backup. However, if you proceed byclicking Yes in the Examination Failure dialog box, you need torestore your pre-upgrade environment from backup before startingthe Upgrade Assistant again.
• Canceling the examination process has no effect on the schemas orconfiguration data; the only consequence is that the information theUpgrade Assistant has collected must be collected again in a futureupgrade session.
12. On the Upgrade Summary screen, review the summary of the schemas that will beupgraded and/or created.
Verify that the correct Source and Target Versions are listed for each schema youintend to upgrade.
Chapter 3Upgrading Product Schemas
3-15

If you want to save these options to a response file to run the Upgrade Assistantagain later in response (or silent) mode, click Save Response File and providethe location and name of the response file. A silent upgrade performs exactly thesame function that the Upgrade Assistant performs, but you do not have tomanually enter the data again.
Click Next .
13. On the Upgrade Progress screen, monitor the status of the upgrade.
Caution:
Allow the Upgrade Assistant enough time to perform the upgrade. Do notcancel the upgrade operation unless absolutely necessary. Doing somay result in an unstable environment.
If any schemas are not upgraded successfully, refer to the Upgrade Assistant logfiles for more information.
Note:
The progress bar on this screen displays the progress of the currentupgrade procedure. It does not indicate the time remaining for theupgrade.
Click Next.
14. If the upgrade is successful: On the Upgrade Success screen, click Close tocomplete the upgrade and close the wizard.
If the upgrade fails: On the Upgrade Failure screen, click View Log to view andtroubleshoot the errors. The logs are available at NEW_ORACLE_HOME/oracle_common/upgrade/logs.
Note:
If the upgrade fails, you must restore your pre-upgrade environment frombackup, fix the issues, then restart the Upgrade Assistant.
Verifying the Schema UpgradeAfter completing all the upgrade steps, verify that the upgrade was successful bychecking that the schema version in schema_version_registry has been properlyupdated.
If you are using an Oracle database, connect to the database as a user having OracleDBA privileges, and run the following from SQL*Plus to get the current versionnumbers:
SET LINE 120COLUMN MRC_NAME FORMAT A14COLUMN COMP_ID FORMAT A20
Chapter 3Upgrading Product Schemas
3-16

COLUMN VERSION FORMAT A12COLUMN STATUS FORMAT A9COLUMN UPGRADED FORMAT A8SELECT MRC_NAME, COMP_ID, OWNER, VERSION, STATUS, UPGRADED FROM SCHEMA_VERSION_REGISTRY ORDER BY MRC_NAME, COMP_ID ;
In the query result:
• Check that the number in the VERSION column matches the latest version numberfor that schema. For example, verify that the schema version number is 5.5.0.
Note:
However, that not all schema versions will be updated. Some schemasdo not require an upgrade to this release and will retain their pre-upgrade version number.
• The STATUS field will be either UPGRADING or UPGRADED during the schema patchingoperation, and will become VALID when the operation is completed.
• If the status appears as INVALID, the schema update failed. You should examinethe logs files to determine the reason for the failure.
• Synonym objects owned by IAU_APPEND and IAU_VIEWER will appear as INVALID,but that does not indicate a failure.
They become invalid because the target object changes after the creation of thesynonym. The synonyms objects will become valid when they are accessed. Youcan safely ignore these INVALID objects.
Backing Up the mapViewerConfig.xml FileThe mapViewerConfig.xml file is overwritten by the reconfiguration templates whenyou run the Reconfiguration Wizard. Therefore, you must back up themapViewerConfig.xml file before reconfiguring your existing domain.
Backing Up the mapViewerConfig.xml File on UNIX OperatingSystems
To back up the mapViewerConfig.xml file on UNIX systems:
1. The mapViewerConfig.xml file is present in the following location on your system.Use the list command: ls -ltr to check its file size.
EXISTING_DOMAIN_HOME/config/fmwconfig/mapviewer/conf/mapViewerConfig.xml
-rw-r----- 1 mwport svrtech 2xxx7 May 5 18:45 EXISTING_DOMAIN_HOME/config/fmwconfig/mapviewer/conf/mapViewerConfig.xml
2. Copy the mapViewerConfig.xml file as shown in the following example:
cp EXISTING_DOMAIN_HOME/config/fmwconfig/mapviewer/conf/mapViewerConfig.xml EXISTING_DOMAIN_HOME/config/fmwconfig/mapviewer/conf/mapViewerConfig_orig.xml
Chapter 3Backing Up the mapViewerConfig.xml File
3-17

A copy of the mapViewerConfig.xml file is created with the file namemapViewerConfig_orig.xml.
About Reconfiguring the DomainRun the Reconfiguration Wizard to reconfigure your domain component configurationsto Oracle Analytics Server.
When you reconfigure a WebLogic Server domain, the following items areautomatically updated, depending on the applications in the domain:
• WebLogic Server core infrastructure
• Domain version
Chapter 3About Reconfiguring the Domain
3-18

Note:
Before you begin the domain reconfiguration, note the following limitations:
• The Reconfiguration Wizard does not update any of your ownapplications that are included in the domain.
• Transforming a non-dynamic cluster domain to a dynamic cluster domainduring the upgrade process is not supported.
The dynamic cluster feature is available when running theReconfiguration Wizard, but Oracle only supports upgrading a non-dynamic cluster upgrade and then adding dynamic clusters. You cannotadd dynamic cluster during the upgrade process.
• If the installation that you’re upgrading does not use Oracle AccessManagement (OAM), then you must edit two files to prevent theReconfiguration Wizard from attempting to update the nonexistent OAMInfrastructure schema, which causes the upgrade to fail.
Comment out the lines in your $DOMAIN/init-info/domain-info.xmlthat are similar to this example:
<!--extention-template-ref name="Oracle Identity Navigator" version="11.1.1.3.0" location="/u01/app/oracle/product/fmw/iam111130/common/templates/applications/yourcomany.oinav_11.1.1.3.0_template.jar" symbol=""/-->
<!--install-comp-ref name="oracle.idm.oinav" version="11.1.1.3.0" symbol="yourcompany.idm.oinav_11.1.1.3.0_iam111130_ORACLE_HOME" product_home="/u01/app/oracle/product/fmw/iam111130"/-->
and similarly comment out the lines in $DOMAIN/config/config.xml thatare similar to this example:
<!--app-deployment> <name>oinav#11.1.1.3.0</name> <target>AdminServer</target> <module-type>ear</module-type>
<source-path>/u01/app/oracle/product/fmw/iam111130/oinav/modules/oinav.ear_11.1.1.3.0/oinav.ear</source-path> <deployment-order>500</deployment-order> <security-dd-model>DDOnly</security-dd-model> <staging-mode>nostage</staging-mode></app-deployment-->
Specifically, when you reconfigure a domain, the following occurs:
Chapter 3About Reconfiguring the Domain
3-19
• The domain version number in the config.xml file for the domain is updated to theAdministration Server's installed WebLogic Server version.
• Reconfiguration templates for all installed Oracle products are automaticallyselected and applied to the domain. These templates define any reconfigurationtasks that are required to make the WebLogic domain compatible with the currentWebLogic Server version.
• Start scripts are updated.
If you want to preserve your modified start scripts, be sure to back them up beforestarting the Reconfiguration Wizard.
Note:
When the domain reconfiguration process starts, you can’t undo the changesthat it makes. Before running the Reconfiguration Wizard, ensure that youhave backed up the domain as covered in the pre-upgrade checklist. If anerror or other interruption occurs while running the Reconfiguration Wizard,you must restore the domain by copying the files and directories from thebackup location to the original domain directory. This is the only way toensure that the domain has been returned to its original state beforereconfiguration.
Follow these instructions to reconfigure the existing domain using the ReconfigurationWizard. See Reconfiguring WebLogic Domains in Upgrading Oracle WebLogic Server.
Backing Up the DomainBefore running the Reconfiguration Wizard, create a backup copy of the domaindirectory.
To create a backup of the domain directory:
1. Copy the source domain to a separate location to preserve the contents.
(UNIX) cp -rf mydomain mydomain_backup
2. Before updating the domain on each remote Managed Server, create a backupcopy of the domain directory on each remote machine.
3. Verify that the backed up versions of the domain are complete.
If domain reconfiguration fails for any reason, you must copy all files and directoriesfrom the backup directory into the original domain directory to ensure that the domainis returned entirely to its original state before reconfiguration.
Chapter 3About Reconfiguring the Domain
3-20
Starting the Reconfiguration Wizard
Note:
Shut down the administration server and all collocated managed serversbefore starting the reconfiguration process. See Stopping Servers andProcesses .
To start the Reconfiguration Wizard in graphical mode:
1. Sign in to the system on which the domain resides.
2. Open the command shell (on UNIX operating systems) or open a commandprompt window (on Windows operating systems).
3. Edition Based Database Users Only: If your schemas are configured with EBRdatabase, a default edition name must be manually supplied before you run theReconfiguration Wizard.
Run the following SQL command to set the default edition:ALTER DATABASE DEFAULT EDITION = edition_name;
where edition_name is the child edition name.
4. Go to the oracle_common/common/bin directory:
• (UNIX) NEW_ORACLE_HOME/oracle_common/common/bin
5. Start the Reconfiguration Wizard with the following logging options:
• (UNIX) ./reconfig.sh -log=log_file -log_priority=ALL
where log_file is the absolute path of the log file you'd like to create for thedomain reconfiguration session. This can be helpful if you need to troubleshoot thereconfiguration process.
The parameter -log_priority=ALL ensures that logs are logged in fine mode.
When you run this command, the following error message might appear to indicatethat the default cache directory is not valid:
*sys-package-mgr*: can't create package cache dir
You can change the cache directory by setting the environment variableCONFIG_JVM_ARGS. For example:
CONFIG_JVM_ARGS=-Dpython.cachedir=valid_directory
In this section, NEW_ORACLE_HOME refers to the 12c Oracle Home.
Reconfiguring the Oracle BI Domain with the Reconfiguration WizardNavigate through the screens in the Reconfiguration Wizard to reconfigure yourexisting domain.
To reconfigure the domain:
1. On the Select Domain screen, specify the location of the domain you want toupgrade or click Browse to navigate and select the domain directory. Click Next.
Chapter 3About Reconfiguring the Domain
3-21

2. On the Reconfiguration Setup Progress screen, view the progress of the setupprocess. When complete, click Next.
During this process:
• The reconfiguration templates for your installed products, including FusionMiddleware products, are automatically applied. This updates various domainconfiguration files such as config.xml, config-groups.xml,and security.xml (among others).
• Schemas, scripts, and other such files that support your Fusion Middlewareproducts are updated.
• The domain upgrade is validated.
3. On the Domain Mode and JDK screen, select the JDK to use in the domain or clickBrowse to navigate to the JDK you want to use. The supported JDK version for12c (12.2.1.4.0) is 1.8.0_221 and later. Click Next.
Note:
You cannot change the Domain Mode at this stage.
For a list of JDKs that are supported for a specific platform, see Oracle FusionMiddleware Supported System Configurations.
4. On the JDBC Data Sources screen, configure the JDBC data sources defined inyour domain source.
The JDBC data sources associated with the products for which you are creatingthe domain are listed in the lower half of the screen. A JDBC data source containsa pool of database connections that are created when the data source instance iscreated, deployed or targeted, or at server startup. Applications look up a datasource on the JNDI tree, and then request a connection. When the applications nolonger need the connections, they return the connections to the connection pool inthe data source.
From the Data Source Name drop-down list, select the data source(s) for whichyou want to specify the settings. The values that you specify are displayed in theappropriate columns in the data source list, for the selected data source.
For Oracle RAC Configuration for data sources, you can select one of the threeoptions:
• Convert to GridLink
• Convert to RAC multi data source
• Don’t convert
For more information about each option, click Help.
After specifying the details, click Next.
If you do not select any data sources on the JDBC Data Sources screen, thefollowing warning displays:
Missing Driver
Click Ok to proceed without verification, click Cancel toreturn to the JDBC Data Sources page.
Chapter 3About Reconfiguring the Domain
3-22

In this case, if you click Ok, the data sources are not verified.
5. On the JDBC Data Sources Test screen, select the check box for the data sourceconnection you configured on the JDBC Data Sources screen and click TestSelected Connections to test the data source connection.
To test the database connections, the database to which you are connecting mustbe running. If you do not want to test the connections at this time, do not selectany data sources. Click Next to continue.
6. On the Database Configuration Type screen, select RCU Data to connect to theServer Table (_STB) schema.
Enter the database connection details using the RCU service table (_STB)schema credentials and click Get RCU Configuration.
The Reconfiguration Wizard uses this connection to automatically configure thedata sources required for components in your domain.
Note:
By default Oracle’s Driver (Thin) for Service connections; Versions:Any is the selected driver. If you specified an instance name in yourconnection details — instead of the service name — you must selectOracle’s Driver (Thin) for pooled instance connections; Versions:Any If you do not change the driver type, then the connection will fail.For any existing 12c (12.2.1.4.0) datasource, the reconfiguration willpreserve the existing values. For new datasources where the schemawas created for 12c (12.2.1.4.0) by the RCU, the default connection datawill be retrieved from the _STB schema. If no connection data for a givenschema is found in the _STB schema, then the default connection datais used.
If the check is successful, click Next. If the check fails, reenter the connectiondetails correctly and try again
.
If you are upgrading from 12c (12.2.1.4.0), and your database has _OPSS or _IAU12c (12.2.1.4.0) database schemas, you must manually enter databaseconnection details for those schemas. These schemas were not required in 12cand had to be created manually. Users could assign any name to these schemas,therefore the Reconfiguration Wizard does not recognize them. When providingconnection information for _IAU, use the IAU_APPEND user information.
7. On the JDBC Component Schema Test screen, select all the component schemasand click Test Selected Connections to test the connection for each schema.The result of the test is indicated in the Status column.
When the check is complete, click Next.
8. On the Advanced Configuration screen, you can select all categories for which youwant to perform advanced configuration. For each category you select, theappropriate configuration screen is displayed to allow you to perform advancedconfiguration.
The categories that are listed on the Advanced Configuration screen depend onthe resources defined in the templates you selected for the domain.
Chapter 3About Reconfiguring the Domain
3-23

For this upgrade, select none of the options and click Next.
9. On the Configuration Summary screen, review the detailed configuration settingsof the domain before continuing.
You can limit the items that are displayed in the right-most panel by selecting afilter option from the View drop-down list.
To change the configuration, click Back to return to the appropriate screen. Toreconfigure the domain, click Reconfig.
Note:
The location of the domain does not change when you reconfigure it.
10. The Reconfiguration Progress screen displays the progress of the reconfigurationprocess.
During this process:
• Domain information is extracted, saved, and updated.
• Schemas, scripts, and other such files that support your Fusion Middlewareproducts are updated.
When the progress bar shows 100%, click Next.
11. The End of Configuration screen indicates whether the reconfiguration processcompleted successfully or failed. It also displays the location of the domain thatwas reconfigured as well as the Administration Server URL (including the listenport). If the reconfiguration is successful, it displays Oracle WebLogic ServerReconfiguration Succeeded.
If the reconfiguration process did not complete successfully, an error message isdisplayed indicates the reason. Take appropriate action to resolve the issue. If youcannot resolve the issue, contact My Oracle Support.
Note the Domain Location and the Admin Server URL for further operations.
Restoring the mapViewerConfig.xml FileThe mapViewerConfig.xml file is overwritten when you run the Reconfiguration Wizardon your domain. You can confirm that the mapViewerConfig.xml file is overwritten bychecking its file size. You must restore the original file that you backed up beforeupgrading your domain with the Upgrade Assistant.
Restoring the mapViewerConfig.xml File on UNIX Operating SystemsTo restore the original mapViewerConfig.xml file:
1. Change to the following directory:
EXISTING_DOMAIN_HOME/config/fmwconfig/mapviewer/conf
2. Enter the following command to list the files within this directory and check the filesize of the mapViewerConfig.xml file:
ls -ltr
Following is a sample output:
Chapter 3Restoring the mapViewerConfig.xml File
3-24

-rw-r----- 1 mwport svrtech 2xxx2 May 5 19:07 EXISTING_DOMAIN_HOME/config/fmwconfig/mapviewer/conf/mapViewerConfig.xml
Note:
The change in the file size implies that the mapViewerConfig.xml file isoverwritten by the reconfiguration template.
3. Restore the original file by renaming the mapViewerConfig_original.xml tomapViewerConfig.xml.
4. Enter the following command to list the files again and check the file size of themapViewerConfig.xml file:
ls -ltr
The file size of the mapViewerConfig.xml file should now match with the file sizeyou obtained while backing up the mapViewerConfig.xml file.
In this example, 2xxx7.
Upgrading Domain Component ConfigurationsUse the Upgrade Assistant to upgrade the domain component configurations insidethe domain to match the updated domain configuration.
Starting the Upgrade AssistantRun the Upgrade Assistant to upgrade product schemas, domain componentconfigurations, or standalone system components to Oracle Analytics Server.
To start the Upgrade Assistant:
Note:
Before you start the Upgrade Assistant, make sure that the JVM characterencoding is set to UTF-8 for the platform on which the Upgrade Assistant isrunning. If the character encoding is not set to UTF-8, then you will not beable to download files containing Unicode characters in their names. Thiscan cause the upgrade to fail.
1. Go to the oracle_common/upgrade/bin directory:
• (UNIX) ORACLE_HOME/oracle_common/upgrade/bin
2. Start the Upgrade Assistant:
• (UNIX) ./ua
Upgrade Assistant ParametersWhen you start the Upgrade Assistant from the command line, you can specifyadditional parameters.
Chapter 3Upgrading Domain Component Configurations
3-25

Table 3-5 Upgrade Assistant Command-Line Parameters
Parameter Required or Optional Description
-readiness Required for readiness checksNote: Readiness checks cannot beperformed on standaloneinstallations (those not managed bythe WebLogic Server).
Performs the upgrade readinesscheck without performing an actualupgrade.
Schemas and configurations arechecked.
Do not use this parameter if youhave specified the -examineparameter.
-threads Optional Identifies the number of threadsavailable for concurrent schemaupgrades or readiness checks of theschemas.
The value must be a positive integerin the range 1 to 8. The default is 4.
-response Required for silent upgrades orsilent readiness checks
Runs the Upgrade Assistant usinginputs saved to a response filegenerated from the data that isentered when the Upgrade Assistantis run in GUI mode. Using thisparameter runs the UpgradeAssistant in silent mode (withoutdisplaying Upgrade Assistantscreens).
-examine Optional Performs the examine phase butdoes not perform an actual upgrade.
Do not specify this parameter if youhave specified the -readinessparameter.
-logLevel attribute Optional Sets the logging level, specifyingone of the following attributes:
• TRACE• NOTIFICATION• WARNING• ERROR• INCIDENT_ERRORThe default logging level isNOTIFICATION.
Consider setting the -logLevelTRACE attribute to so that moreinformation is logged. This is usefulwhen troubleshooting a failedupgrade. The Upgrade Assistant'slog files can become very large if -logLevel TRACE is used.
Chapter 3Upgrading Domain Component Configurations
3-26
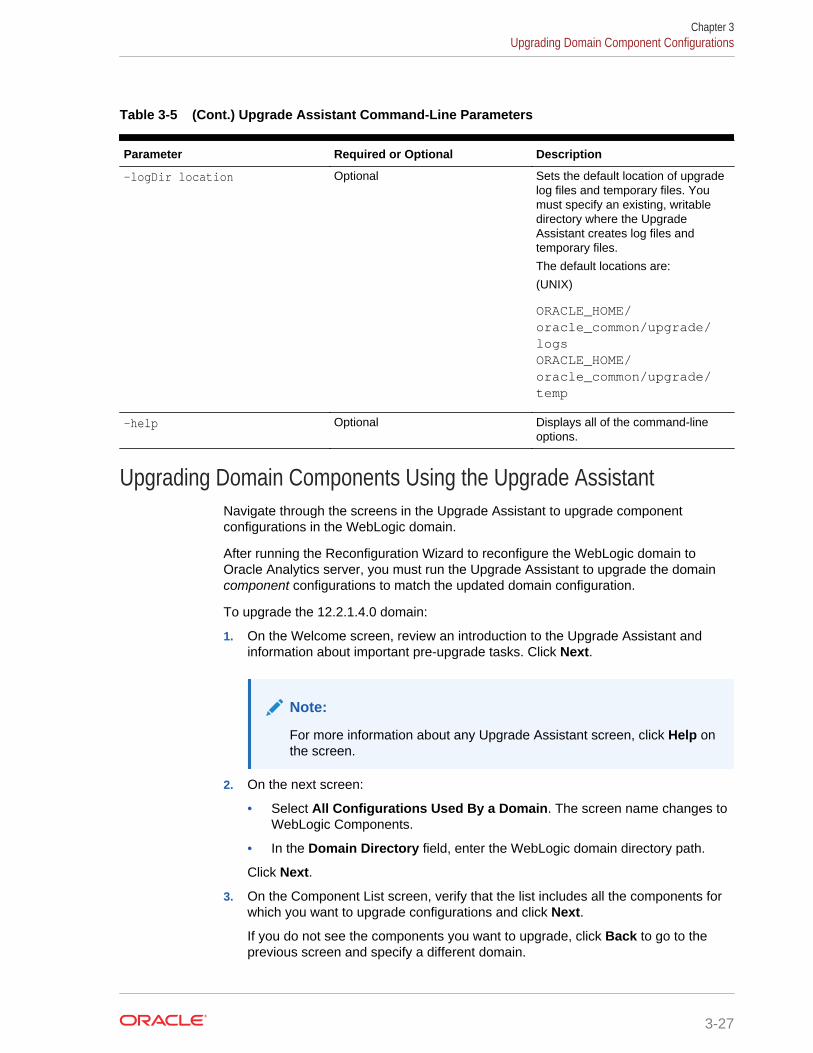
Table 3-5 (Cont.) Upgrade Assistant Command-Line Parameters
Parameter Required or Optional Description
-logDir location Optional Sets the default location of upgradelog files and temporary files. Youmust specify an existing, writabledirectory where the UpgradeAssistant creates log files andtemporary files.
The default locations are:
(UNIX)
ORACLE_HOME/oracle_common/upgrade/logs ORACLE_HOME/oracle_common/upgrade/temp
-help Optional Displays all of the command-lineoptions.
Upgrading Domain Components Using the Upgrade AssistantNavigate through the screens in the Upgrade Assistant to upgrade componentconfigurations in the WebLogic domain.
After running the Reconfiguration Wizard to reconfigure the WebLogic domain toOracle Analytics server, you must run the Upgrade Assistant to upgrade the domaincomponent configurations to match the updated domain configuration.
To upgrade the 12.2.1.4.0 domain:
1. On the Welcome screen, review an introduction to the Upgrade Assistant andinformation about important pre-upgrade tasks. Click Next.
Note:
For more information about any Upgrade Assistant screen, click Help onthe screen.
2. On the next screen:
• Select All Configurations Used By a Domain. The screen name changes toWebLogic Components.
• In the Domain Directory field, enter the WebLogic domain directory path.
Click Next.
3. On the Component List screen, verify that the list includes all the components forwhich you want to upgrade configurations and click Next.
If you do not see the components you want to upgrade, click Back to go to theprevious screen and specify a different domain.
Chapter 3Upgrading Domain Component Configurations
3-27
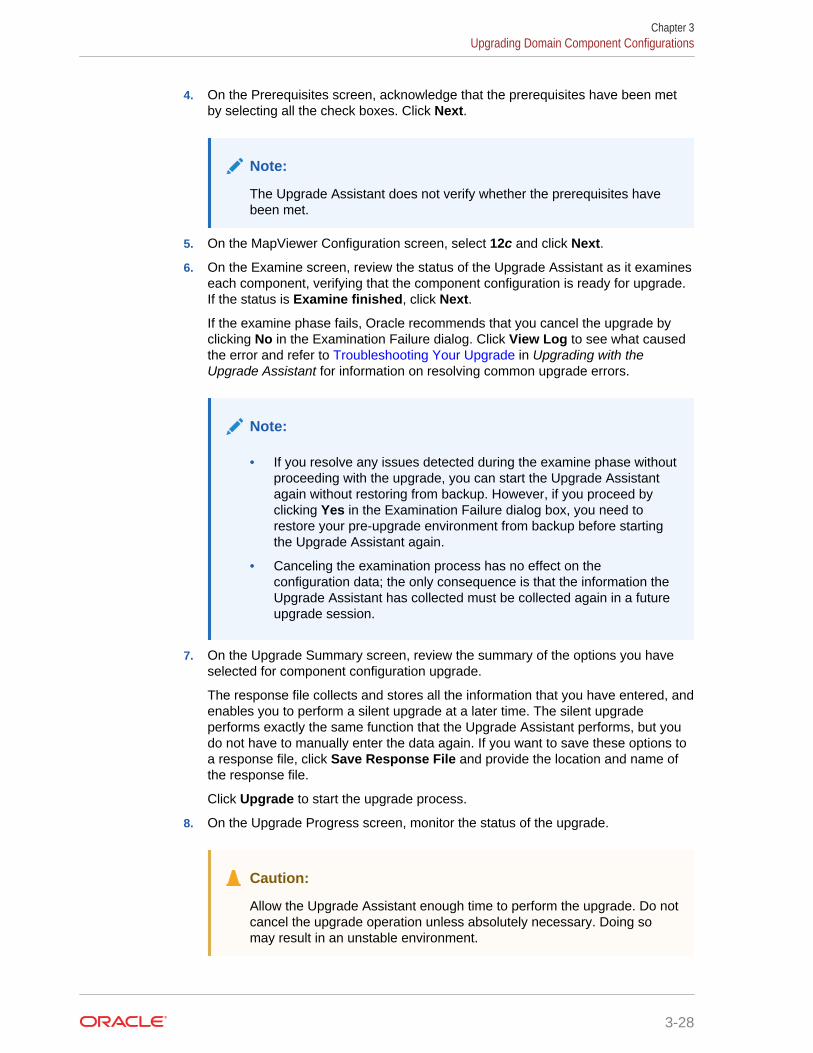
4. On the Prerequisites screen, acknowledge that the prerequisites have been metby selecting all the check boxes. Click Next.
Note:
The Upgrade Assistant does not verify whether the prerequisites havebeen met.
5. On the MapViewer Configuration screen, select 12c and click Next.
6. On the Examine screen, review the status of the Upgrade Assistant as it examineseach component, verifying that the component configuration is ready for upgrade.If the status is Examine finished, click Next.
If the examine phase fails, Oracle recommends that you cancel the upgrade byclicking No in the Examination Failure dialog. Click View Log to see what causedthe error and refer to Troubleshooting Your Upgrade in Upgrading with theUpgrade Assistant for information on resolving common upgrade errors.
Note:
• If you resolve any issues detected during the examine phase withoutproceeding with the upgrade, you can start the Upgrade Assistantagain without restoring from backup. However, if you proceed byclicking Yes in the Examination Failure dialog box, you need torestore your pre-upgrade environment from backup before startingthe Upgrade Assistant again.
• Canceling the examination process has no effect on theconfiguration data; the only consequence is that the information theUpgrade Assistant has collected must be collected again in a futureupgrade session.
7. On the Upgrade Summary screen, review the summary of the options you haveselected for component configuration upgrade.
The response file collects and stores all the information that you have entered, andenables you to perform a silent upgrade at a later time. The silent upgradeperforms exactly the same function that the Upgrade Assistant performs, but youdo not have to manually enter the data again. If you want to save these options toa response file, click Save Response File and provide the location and name ofthe response file.
Click Upgrade to start the upgrade process.
8. On the Upgrade Progress screen, monitor the status of the upgrade.
Caution:
Allow the Upgrade Assistant enough time to perform the upgrade. Do notcancel the upgrade operation unless absolutely necessary. Doing somay result in an unstable environment.
Chapter 3Upgrading Domain Component Configurations
3-28

If any components are not upgraded successfully, refer to the Upgrade Assistantlog files for more information.
Note:
The progress bar on this screen displays the progress of the currentupgrade procedure. It does not indicate the time remaining for theupgrade.
Click Next.
9. If the upgrade is successful: On the Upgrade Success screen, click Close tocomplete the upgrade and close the wizard. The Post-Upgrade Actions windowdescribes the manual tasks you must perform to make components functional inthe new installation. This window appears only if a component has post-upgradesteps.
If the upgrade fails: On the Upgrade Failure screen, click View Log to view andtroubleshoot the errors. The logs are available at ORACLE_HOME/oracle_common/upgrade/logs.
Note:
If the upgrade fails you must restore your pre-upgrade environment frombackup, fix the issues, then restart the Upgrade Assistant.
Verifying the Domain-Specific-Component ConfigurationsUpgrade
To verify that the domain-specific-component configurations upgrade was successful,sign in to the Administration console and the Oracle Enterprise Manager FusionMiddleware Control and verify that the version numbers for each component is 5.5.0.
To sign in to the Administration Console, go to: http://administration_server_host:administration_server_port/console
To sign in to Oracle Enterprise Manager Fusion Middleware Control Console, go to:http://administration_server_host:administration_server_port/em
Chapter 3Verifying the Domain-Specific-Component Configurations Upgrade
3-29

Note:
After upgrade, make sure you run the administration tools from the newOracle home directory and not from the previous Oracle home directory.
During the upgrade process, some OWSM documents, including policy setsand predefined documents such as policies and assertion templates, mayneed to be upgraded. If a policy set or a predefined document is upgraded,its version number is incremented by 1.
If you created the FMW user to run the Upgrade Assistant, ensure that youdelete the account after verifying your upgrade was successful.
Starting Servers and ProcessesAfter a successful upgrade, restart all processes and servers, including theAdministration Server and any Managed Servers.
Note:
The procedure in this section describe how to start servers and processesusing the WLST command-line utility or a script. You can also use the FusionMiddleware Control and the Oracle WebLogic Server AdministrationConsole. See Starting and Stopping Administration and Managed Serversand Node Manager
To start your Fusion Middleware environment:
1. Change to the following directory:
(UNIX) DOMAIN_HOME/bitools/bin
2. To start the Oracle BI instance and servers, enter the following command:
(UNIX) start.sh
Note:
When prompted to enter the password, specify the Node Managerpassword that you entered while configuring the Oracle BI domain.
Chapter 3Starting Servers and Processes
3-30

4Upgrading Scaled-Out Systems fromOracle Business Intelligence
This chapter contains the procedure to upgrade a multi-node, scaled-out OracleBusiness Intelligence deployment to Oracle Analytics Server.
About the Multi-Node Upgrade ProcessTable 4-1 lists the high-level steps that you need to perform to upgrade a multi-nodeOracle BI deployment to Oracle Analytics Server.
Table 4-1 Tasks for Upgrading Multi-Node Oracle Business Intelligence 12.2.1.4.0 Deploymentto Oracle Analytics Server
Task Description
OptionalLearn about the interoperability and compatibility factorsthat could affect how you upgrade to Oracle AnalyticsServer.
It is important to understand how two or more OracleFusion Middleware products of the same version ordifferent versions work together (interoperate) in asupported Oracle Fusion Middleware configuration.
You can learn more about interoperability andcompatibility in Oracle® Fusion MiddlewareUnderstanding Interoperability and Compatibility.
RequiredIf you have not done so already, review the introductorytopics in this guide and complete the required pre-upgrade tasks.
The pre-upgrade tasks include cloning your productionenvironment, verifying system requirements andcertifications, purging unused data, and creating non-SYSDBA user.
For a complete list of pre-upgrade tasks, see Pre-Upgrade Requirements
RequiredValidate whether all the servers in the existing Oracle BIstack are running
The following servers must be in the running state onboth the nodes:• Administration Server (available only on the primary
node)• Servers hosting Oracle BI instance (bi_server)• OBIPS• OBIJH• OBICCS• OBICH• OBIS
See Checking the Status of the Servers in the OracleAnalytics Server Instance.
4-1

Table 4-1 (Cont.) Tasks for Upgrading Multi-Node Oracle Business Intelligence 12.2.1.4.0Deployment to Oracle Analytics Server
Task Description
RequiredDownload and install the 12.2.1.4.0 Fusion MiddlewareInfrastructure and Oracle Analytics server distributionson Node1 and Node2.
The Infrastructure distribution combines the WebLogicServer and the Java Required Files (JRF) that arerequired to set up the foundation to install other FusionMiddleware products.
As per the upgrade topology defined in this guide, youmust install the Infrastructure in a new Oracle home.
The Oracle Analytics Server distribution packs OracleAnalytics Server and Oracle Analytics Publisher.
You must install Oracle Analytics Server in the Oraclehome that is created when you installed the 12.2.1.4.0Infrastructure. To install the product distributions, followthe procedure described in Installing the ProductDistributions.
OptionalRun the Readiness Check on Node1.
Run the domain-based pre-upgrade readiness check onNode1 to identify potential issues before you upgrade.See Running a Pre-Upgrade Readiness Check.
RequiredStop the Oracle BI instance and system componentsexcept the database on Node1.
Before starting the upgrade process, shut down theAdministration Server, the Managed Servers, and yourexisting Oracle BI instance on Node1.
However, keep the database (RDBMS) running.
See Stopping Servers and Processes.
RequiredUpgrade the existing 12.2.1.4.0 schemas with theUpgrade Assistant on Node1.
The schemas you created during the 12.2.1.4.0installation are supported in Oracle Analytics Server.Therefore, you don’t need to create the schemas again.
You must upgrade all the schemas within your domainusing the Upgrade Assistant. For the completeprocedure, see Upgrading Product Schemas Using theUpgrade Assistant.
RequiredBackup the mapViewerConfig.xml File.
The mapViewerConfig.xml file is overwritten by thereconfiguration templates when you run theReconfiguration Wizard. Therefore, you must back upthe mapViewerConfig.xml file before reconfiguring yourexisting domain. See Backing Up themapViewerConfig.xml File.
RequiredReconfigure the existing 12.2.1.4.0 domain with theReconfiguration Wizard on Node1.
When you run the Reconfiguration Wizard on yourexisting domain, it prepares your domain for upgrade byselecting and applying the recongifuration templates. Italso tests the JDBC data sources and componentschemas that are present within your domain.
To reconfigure you domain, follow the proceduredescribed in Reconfiguring the Oracle BI Domain withthe Reconfiguration Wizard.
RequiredRestore the mapViewerConfig.xml File.
You must restore the original file that you backed upbefore upgrading your domain with the UpgradeAssistant.
See Restoring the mapViewerConfig.xml File.
Chapter 4About the Multi-Node Upgrade Process
4-2

Table 4-1 (Cont.) Tasks for Upgrading Multi-Node Oracle Business Intelligence 12.2.1.4.0Deployment to Oracle Analytics Server
Task Description
RequiredUpgrade the existing 12.2.1.4.0 domain configurationswith the Upgrade Assistant on Node1.
After you have reconfigured your existing 12.2.1.4.0domain, you must run the Upgrade Assistant to upgradeall configurations used by your domain.
You can see all the components within your domain thatwill be upgraded on the Component List screen whenyou run the Upgrade Assistant. For the completeprocedure, see Upgrading Domain Components Usingthe Upgrade Assistant.
RequiredPack the upgraded domain on Node1.
See Packing the Upgraded Domain on Node1.
RequiredUnpack the domain on Node2.
See Unpacking the Upgraded Domain on Node2.
RequiredSynchronize connection details to the mid-tier database.
See Synchronizing Connection Details to the Mid-TierDatabase.
RequiredStart the Node Manager on Node2.
See Starting the Node Manager on Node2.
RequiredStart the Oracle Analytics Server instance and systemcomponents Node1.
The upgrade process is complete. You can now restartthe Administration Server, the Managed Servers, andyourOracle Analytics Server instance.
See Starting Servers and Processes.
RequiredValidate whether all the servers in the newly scaled-outOracle BI stack are running.
The following servers must be in the running state onboth the nodes:• Administration Server (available only on the primary
node)• Servers hosting Oracle BI instance (bi_server)• OBIPS• OBIJH• OBICCS• OBICH• OBIS
See Checking the Status of the Servers in the OracleAnalytics Server Instance.
RequiredVerify your upgrade.
It is important to compare your existing 12.2.1.4.0 andthe Oracle Analytics Server environments and verify thatthe data and configuration settings are consistent in thenewly upgraded environment.
RequiredPerform the post-upgrade tasks.
For a list of post-upgrade tasks, see Post-UpgradeTasks.
Chapter 4About the Multi-Node Upgrade Process
4-3

Checking the Status of the Servers in the Oracle AnalyticsServer Instance
The following servers must be in the running state on both the nodes: Servers hostingOracle Analytics Server instance (bi_server), OBIPS, OBIJH, OBICCS, OBICH, andOBIS.
To check the status of the servers:
1. Change to the following directory:
(UNIX) EXISTING_DOMAIN_HOME/bitools/bin
2. Run the status script by entering the following command:
(UNIX) status.sh
Following is a sample output:
Name Type Machine Status ---- ---- ------- ------ AdminServer Server machine_name RUNNINGbi_server1 Server machine_name.example.com RUNNINGbi_server2 Server machine_name.example.com RUNNINGobips1 OBIPS machine_name.example.com RUNNINGobijh1 OBIJH machine_name.example.com RUNNINGobiccs1 OBICCS machine_name.example.com RUNNINGobisch1 OBISCH machine_name.example.com RUNNINGobis1 OBIS machine_name.example.com RUNNINGobips2 OBIPS machine_name.example.com RUNNINGobijh2 OBIJH machine_name.example.com RUNNINGobiccs2 OBICCS machine_name.example.com RUNNINGobisch2 OBISCH machine_name.example.com RUNNINGobis2 OBIS machine_name.example.com RUNNING
Installing the Product Distributions on Node1 and Node2Before beginning your upgrade, download Oracle Fusion Middleware Infrastructure12.2.1.4.0 and Oracle Analytics Server distributions on the target system and installthem on both the nodes using Oracle Universal Installer.
Note:
When Infrastructure is required for the upgrade, you must install the OracleFusion Middleware distribution first before you install other FusionMiddleware products.
To install the Oracle Analytics Server distributions:
1. Sign in to the target system.
Chapter 4Checking the Status of the Servers in the Oracle Analytics Server Instance
4-4

2. Download the following from Oracle Technology Network or Oracle SoftwareDelivery Cloud to your target system:
• Oracle Fusion Middleware Infrastructure(fmw_12.2.1.4.0_infrastructure_generic.jar)
• Oracle Analytics Server (UNIX: fmw_12.2.1.4.0_bi_platform_linux64.bin)
3. Change to the directory where you downloaded the Oracle Analytics Serverproduct distribution.
4. Start the installation program for Oracle Fusion Middleware Infrastructure:
• (UNIX) JDK_HOME/bin/java -jarfmw_12.2.1.4.0_infrastructure_generic.jar
5. On UNIX operating systems, the Installation Inventory Setup screen appears if thisis the first time you are installing an Oracle product on this host.
Specify the location where you want to create your central inventory. Make surethat the operating system group name selected on this screen has writepermissions to the central inventory location, and click Next.
Note:
The Installation Inventory Setup screen does not appear on Windowsoperating systems.
6. On the Welcome screen, review the information to make sure that you have metall the prerequisites. Click Next.
7. On the Auto Updates screen, select an option:
• Skip Auto Updates: To avoid checking for software updates at this time.
• Select patches from directory: To navigate to a local directory if youdownloaded patch files.
• Search My Oracle Support for Updates: To automatically download softwareupdates if you have a My Oracle Support account. You must enter OracleSupport credentials then click Search. To configure a proxy server for theinstaller to access My Oracle Support, click Proxy Settings. Click TestConnection to test the connection.
Click Next.
8. On the Installation Location screen, specify the location for the Oracle homedirectory and click Next.
For more information about Oracle Fusion Middleware directory structure, see Understanding Directories for Installation and Configuration in Oracle FusionMiddleware Planning an Installation of Oracle Fusion Middleware.
9. On the Installation Type screen, select the following:
• For Infrastructure, select Fusion Middleware Infrastructure
• For Oracle Analytics Server, select Oracle Analytics
Click Next.
10. The Prerequisite Checks screen analyzes the host computer to ensure that thespecific operating system prerequisites have been met.
Chapter 4Installing the Product Distributions on Node1 and Node2
4-5

To view the list of tasks that are verified, select View Successful Tasks. To viewlog details, select View Log. If any prerequisite check fails, then an error messageappears at the bottom of the screen. Fix the error and click Rerun to try again. Toignore the error or the warning message and continue with the installation, clickSkip (not recommended).
11. On the Installation Summary screen, verify the installation options that youselected.
If you want to save these options to a response file, click Save Response File andenter the response file location and name. The response file collects and stores allthe information that you have entered, and enables you to perform a silentinstallation (from the command line) at a later time.Click Install to begin the installation.
12. On the Installation Progress screen, when the progress bar displays 100%, clickFinish to dismiss the installer, or click Next to see a summary.
13. The Installation Complete screen displays the Installation Location and theFeature Sets that are installed. Review this information and click Finish to closethe installer.
14. After you have installed Oracle Fusion Middleware Infrastructure, enter thefollowing command to start the installer for your product distribution and repeat thesteps above to navigate through the installer screens:
(UNIX) ./fmw_12.2.1.4.0_bi_platform_linux64.bin
Running a Pre-Upgrade Readiness CheckTo identify potential issues with the upgrade, Oracle recommends that you run areadiness check before you start the upgrade process. Be aware that the readinesscheck may not be able to discover all potential issues with your upgrade. An upgrademay still fail, even if the readiness check reports success.
About Running a Pre-Upgrade Readiness CheckYou can run the Upgrade Assistant in -readiness mode to detect issues before youperform the actual upgrade. You can run the readiness check in GUI mode using theUpgrade Assistant or in silent mode using a response file.
The Upgrade Assistant readiness check performs a read-only, pre-upgrade review ofyour Fusion Middleware schemas and WebLogic domain configurations that are at asupported starting point. The review is a read-only operation.
The readiness check generates a formatted, time-stamped readiness report so youcan address potential issues before you attempt the actual upgrade. If no issues aredetected, you can begin the upgrade process. Oracle recommends that you read thisreport thoroughly before performing an upgrade.
You can run the readiness check while your existing Oracle Fusion Middlewaredomain is online (while other users are actively using it) or offline.
You can run the readiness check any number of times before performing any actualupgrade. However, do not run the readiness check after an upgrade has beenperformed, as the report results may differ from the result of pre-upgrade readinesschecks.
Chapter 4Running a Pre-Upgrade Readiness Check
4-6

Note:
To prevent performance from being affected, Oracle recommends that yourun the readiness check during off-peak hours.
Starting the Upgrade Assistant in Readiness ModeUse the -readiness parameter to start the Upgrade Assistant in readiness mode.
To perform a readiness check on your pre-upgrade environment with the UpgradeAssistant:
1. Go to the oracle_common/upgrade/bin directory:
• (UNIX) ORACLE_HOME/oracle_common/upgrade/bin
2. Start the Upgrade Assistant.
• (UNIX) ./ua -readiness
For information about other parameters that you can specify on the command line,see Upgrade Assistant Parameters
Upgrade Assistant ParametersWhen you start the Upgrade Assistant from the command line, you can specifyadditional parameters.
Table 4-2 Upgrade Assistant Command-Line Parameters
Parameter Required or Optional Description
-readiness Required for readiness checksNote: Readiness checks cannot beperformed on standaloneinstallations (those not managed bythe WebLogic Server).
Performs the upgrade readinesscheck without performing an actualupgrade.
Schemas and configurations arechecked.
Do not use this parameter if youhave specified the -examineparameter.
-threads Optional Identifies the number of threadsavailable for concurrent schemaupgrades or readiness checks of theschemas.
The value must be a positive integerin the range 1 to 8. The default is 4.
-response Required for silent upgrades orsilent readiness checks
Runs the Upgrade Assistant usinginputs saved to a response filegenerated from the data that isentered when the Upgrade Assistantis run in GUI mode. Using thisparameter runs the UpgradeAssistant in silent mode (withoutdisplaying Upgrade Assistantscreens).
Chapter 4Running a Pre-Upgrade Readiness Check
4-7

Table 4-2 (Cont.) Upgrade Assistant Command-Line Parameters
Parameter Required or Optional Description
-examine Optional Performs the examine phase butdoes not perform an actual upgrade.
Do not specify this parameter if youhave specified the -readinessparameter.
-logLevel attribute Optional Sets the logging level, specifyingone of the following attributes:
• TRACE• NOTIFICATION• WARNING• ERROR• INCIDENT_ERRORThe default logging level isNOTIFICATION.
Consider setting the -logLevelTRACE attribute to so that moreinformation is logged. This is usefulwhen troubleshooting a failedupgrade. The Upgrade Assistant'slog files can become very large if -logLevel TRACE is used.
-logDir location Optional Sets the default location of upgradelog files and temporary files. Youmust specify an existing, writabledirectory where the UpgradeAssistant creates log files andtemporary files.
The default locations are:
(UNIX)
ORACLE_HOME/oracle_common/upgrade/logs ORACLE_HOME/oracle_common/upgrade/temp
-help Optional Displays all of the command-lineoptions.
Performing a Readiness Check with the Upgrade AssistantNavigate through the screens in the Upgrade Assistant to complete the pre-upgradereadiness check.
Readiness checks are performed only on schemas or component configurations thatare at a supported upgrade starting point.
To complete the readiness check:
Chapter 4Running a Pre-Upgrade Readiness Check
4-8

1. On the Welcome screen, review information about the readiness check. ClickNext.
2. On the Readiness Check Type screen, select the readiness check that you want toperform:
• Individually Selected Schemas allows you to select individual schemas forreview before upgrade. The readiness check reports whether a schema issupported for an upgrade or where an upgrade is needed.When you select this option, the screen name changes to Selected Schemas.
• Domain Based allows the Upgrade Assistant to discover and select allupgrade-eligible schemas or component configurations in the domain specifiedin the Domain Directory field.When you select this option, the screen name changes to Schemas andConfiguration.
Leave the default selection if you want the Upgrade Assistant to check allschemas and component configurations at the same time, or select a specificoption:
– Include checks for all schemas to discover and review all componentsthat have a schema available to upgrade.
– Include checks for all configurations to review componentconfigurations for a managed WebLogic Server domain.
Click Next.
3. If you selected Individually Selected Schemas: On the Available Componentsscreen, select the components that have a schema available to upgrade for whichyou want to perform a readiness check.
If you selected Domain Based: On the Component List screen, review the list ofcomponents that are present in your domain for which you want to perform areadiness check.
If you select a component that has dependent components, those components areautomatically selected. For example, if you select Oracle Platform SecurityServices, Oracle Audit Services is automatically selected.
Depending on the components you select, additional screens may display. Forexample, you may need to:
• Specify the domain directory.
Ensure that you specify the 12c (12.2.1.4.0) domain directory.
• Specify schema credentials to connect to the selected schema: DatabaseType, DBA User Name, and DBA Password. Then click Connect.
Note:
Oracle database is the default database type. Make sure that youselect the correct database type before you continue. If you discoverthat you selected the wrong database type, do not go back to thisscreen to change it to the correct type. Instead, close the UpgradeAssistant and restart the readiness check with the correct databasetype selected to ensure that the correct database type is applied toall schemas.
Chapter 4Running a Pre-Upgrade Readiness Check
4-9

• Select the Schema User Name option and specify the Schema Password.
Note:
The Upgrade Assistant automatically enables default credentials. Ifyou are unable to connect, make sure that you manually enter thecredentials for your schema before you continue.
Click Next to start the readiness check.
4. On the Readiness Summary screen, review the summary of the readiness checksthat will be performed based on your selections.
If you want to save your selections to a response file to run the Upgrade Assistantagain later in response (or silent) mode, click Save Response File and providethe location and name of the response file. A silent upgrade performs exactly thesame function that the Upgrade Assistant performs, but you do not have tomanually enter the data again.
For a detailed report, click View Log.
Click Next.
5. On the Readiness Check screen, review the status of the readiness check. Theprocess can take several minutes.
If you are checking multiple components, the progress of each componentdisplays in its own progress bar in parallel.
When the readiness check is complete, click Continue.
6. On the End of Readiness screen, review the results of the readiness check(Readiness Success or Readiness Failure):
• If the readiness check is successful, click View Readiness Report to reviewthe complete report. Oracle recommends that you review the ReadinessReport before you perform the actual upgrade even when the readiness checkis successful. Use the Find option to search for a particular word or phrasewithin the report. The report also indicates where the completed ReadinessCheck Report file is located.
• If the readiness check encounters an issue or error, click View Log to reviewthe log file, identify and correct the issues, and then restart the readinesscheck. The log file is managed by the command-line options you set.
Understanding the Readiness ReportAfter performing a readiness check for your domain, review the report to determinewhether you need to take any action for a successful upgrade.
The format of the name of the readiness report file is:
readiness<timestamp>.txt
Where, timestamp indicates the date and time of when the readiness check was run.
A readiness report contains the following information:
Chapter 4Running a Pre-Upgrade Readiness Check
4-10
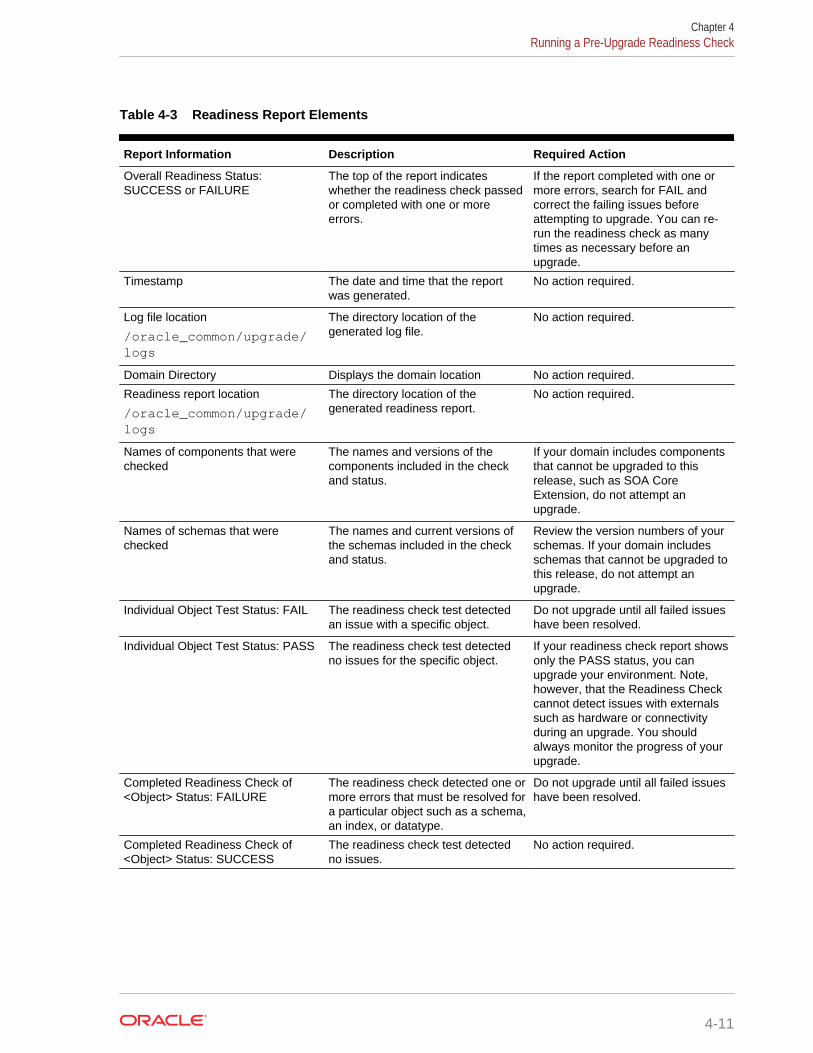
Table 4-3 Readiness Report Elements
Report Information Description Required Action
Overall Readiness Status:SUCCESS or FAILURE
The top of the report indicateswhether the readiness check passedor completed with one or moreerrors.
If the report completed with one ormore errors, search for FAIL andcorrect the failing issues beforeattempting to upgrade. You can re-run the readiness check as manytimes as necessary before anupgrade.
Timestamp The date and time that the reportwas generated.
No action required.
Log file location
/oracle_common/upgrade/logs
The directory location of thegenerated log file.
No action required.
Domain Directory Displays the domain location No action required.
Readiness report location
/oracle_common/upgrade/logs
The directory location of thegenerated readiness report.
No action required.
Names of components that werechecked
The names and versions of thecomponents included in the checkand status.
If your domain includes componentsthat cannot be upgraded to thisrelease, such as SOA CoreExtension, do not attempt anupgrade.
Names of schemas that werechecked
The names and current versions ofthe schemas included in the checkand status.
Review the version numbers of yourschemas. If your domain includesschemas that cannot be upgraded tothis release, do not attempt anupgrade.
Individual Object Test Status: FAIL The readiness check test detectedan issue with a specific object.
Do not upgrade until all failed issueshave been resolved.
Individual Object Test Status: PASS The readiness check test detectedno issues for the specific object.
If your readiness check report showsonly the PASS status, you canupgrade your environment. Note,however, that the Readiness Checkcannot detect issues with externalssuch as hardware or connectivityduring an upgrade. You shouldalways monitor the progress of yourupgrade.
Completed Readiness Check of<Object> Status: FAILURE
The readiness check detected one ormore errors that must be resolved fora particular object such as a schema,an index, or datatype.
Do not upgrade until all failed issueshave been resolved.
Completed Readiness Check of<Object> Status: SUCCESS
The readiness check test detectedno issues.
No action required.
Chapter 4Running a Pre-Upgrade Readiness Check
4-11

Stopping Servers and ProcessesStop the Oracle Analytics server instance and the system components on Node1.
Note:
The procedure in this section describe how to stop servers and processesusing the WLST command-line utility or a script. You can also use the FusionMiddleware Control and the Oracle WebLogic Server AdministrationConsole. See Starting and Stopping Administration and Managed Serversand Node Manager
To stop your Oracle BI instance:
1. Change to the following directory:
(UNIX) NEW_DOMAIN_HOME/bitools/bin
2. To stop the Oracle BI instance and servers, enter the following command:
(UNIX) stop.sh -r
Note:
When prompted to enter the password, specify the Node Managerpassword that you entered while configuring the Oracle BI domain.
Upgrading Product SchemasAfter stopping servers and processes, use the Upgrade Assistant to upgradesupported product schemas to the current release of Oracle Fusion Middleware.
The Upgrade Assistant allows you to upgrade individually selected schemas or allschemas associated with a domain. The option you select determines which UpgradeAssistant screens you will use.
Starting the Upgrade AssistantRun the Upgrade Assistant to upgrade product schemas, domain componentconfigurations, or standalone system components to Oracle Analytics Server.
To start the Upgrade Assistant:
Chapter 4Stopping Servers and Processes
4-12
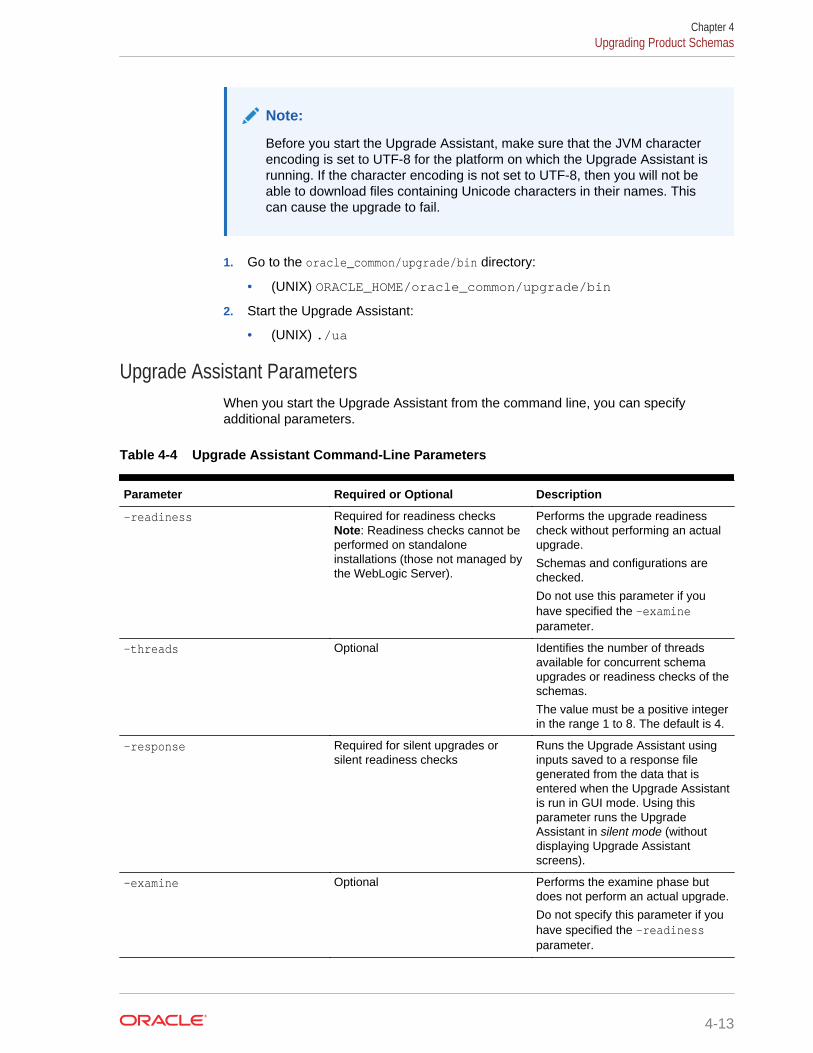
Note:
Before you start the Upgrade Assistant, make sure that the JVM characterencoding is set to UTF-8 for the platform on which the Upgrade Assistant isrunning. If the character encoding is not set to UTF-8, then you will not beable to download files containing Unicode characters in their names. Thiscan cause the upgrade to fail.
1. Go to the oracle_common/upgrade/bin directory:
• (UNIX) ORACLE_HOME/oracle_common/upgrade/bin
2. Start the Upgrade Assistant:
• (UNIX) ./ua
Upgrade Assistant ParametersWhen you start the Upgrade Assistant from the command line, you can specifyadditional parameters.
Table 4-4 Upgrade Assistant Command-Line Parameters
Parameter Required or Optional Description
-readiness Required for readiness checksNote: Readiness checks cannot beperformed on standaloneinstallations (those not managed bythe WebLogic Server).
Performs the upgrade readinesscheck without performing an actualupgrade.
Schemas and configurations arechecked.
Do not use this parameter if youhave specified the -examineparameter.
-threads Optional Identifies the number of threadsavailable for concurrent schemaupgrades or readiness checks of theschemas.
The value must be a positive integerin the range 1 to 8. The default is 4.
-response Required for silent upgrades orsilent readiness checks
Runs the Upgrade Assistant usinginputs saved to a response filegenerated from the data that isentered when the Upgrade Assistantis run in GUI mode. Using thisparameter runs the UpgradeAssistant in silent mode (withoutdisplaying Upgrade Assistantscreens).
-examine Optional Performs the examine phase butdoes not perform an actual upgrade.
Do not specify this parameter if youhave specified the -readinessparameter.
Chapter 4Upgrading Product Schemas
4-13

Table 4-4 (Cont.) Upgrade Assistant Command-Line Parameters
Parameter Required or Optional Description
-logLevel attribute Optional Sets the logging level, specifyingone of the following attributes:
• TRACE• NOTIFICATION• WARNING• ERROR• INCIDENT_ERRORThe default logging level isNOTIFICATION.
Consider setting the -logLevelTRACE attribute to so that moreinformation is logged. This is usefulwhen troubleshooting a failedupgrade. The Upgrade Assistant'slog files can become very large if -logLevel TRACE is used.
-logDir location Optional Sets the default location of upgradelog files and temporary files. Youmust specify an existing, writabledirectory where the UpgradeAssistant creates log files andtemporary files.
The default locations are:
(UNIX)
ORACLE_HOME/oracle_common/upgrade/logs ORACLE_HOME/oracle_common/upgrade/temp
-help Optional Displays all of the command-lineoptions.
Upgrading Product Schemas Using the Upgrade AssistantNavigate through the screens in the Upgrade Assistant to upgrade the productschemas.
If you are using DB2 in your existing BI instance, then perform the following beforestarting the upgrade process:
1. Sign in to the WebLogic Console.
2. Go to Datasources under Services and select wlsservices_datasource.
3. Change the user for data source 'wlsservices_datasource' from<PREFIX>_WLS_RUNTIME to <PREFIX>_WLS.
For example: Change the user from L1_WLS_RUNTIME to L1_WLS.
Chapter 4Upgrading Product Schemas
4-14

You can now proceed with the upgrade process.
To upgrade product schemas with the Upgrade Assistant:
1. On the Welcome screen, review an introduction to the Upgrade Assistant andinformation about important pre-upgrade tasks. Click Next.
Note:
For more information about any Upgrade Assistant screen, click Help onthe screen.
2. On the Selected Schemas screen, select All Schemas Used by a Domain.
• All Schemas Used by a Domain to allow the Upgrade Assistant to discoverand select all components that have a schema available to upgrade in thedomain specified in the Domain Directory field. This is also known as adomain assisted schema upgrade. Additionally, the Upgrade Assistant pre-populates connection information on the schema input screens.
Note:
Oracle recommends that you select All Schemas Used by aDomain for most upgrades to ensure all of the required schemas areincluded in the upgrade.
Click Next.
3. If you selected All Schemas Used by a Domain: On the Component List screenyou will see two lists of schemas. The first list shows the components whoseschemas are present in the domain and will be upgraded. The second list showsthe list of missing schemas that may need to be created. If none of the requiredschemas are missing, you will only see the first list. Review both lists and clickNext.
The Upgrade Assistant will attempt to create any missing schemas using theschema credentials used to create the existing domain schemas. You do not needto launch the Repository Creation Utility.
If you want to exclude some components or schemas from the list, navigate backto the All Schemas screen and select Individually Selected Schemas. Thisoption allows you to select only those schemas you want included in the upgrade.
4. On the Prerequisites screen, acknowledge that the prerequisites have been metby selecting all the check boxes. Click Next.
Note:
The Upgrade Assistant does not verify whether the prerequisites havebeen met.
5. On the BIPLATFORM Schema [BIEE_PLATFORM] screen, the systemautomatically populates data in the other fields from the existing 12c schema.
Chapter 4Upgrading Product Schemas
4-15

Enter the database administrator account: DBA username and password for thedatabase containing the BIEE_PLATFORM schema and click Connect.
When you see the message “Connection to database successfully completed”,click Next.
6. On the IAU Schema [BIEE_IAU] screen, the system automatically populates datain the other fields from the existing 12c schema.
Enter the database administrator account: DBA username and password for thedatabase containing the BIEE_IAU schema and click Connect.
When you see the message “Connection to database successfully completed”,click Next.
7. On the OPSS Schema [BIEE_OPSS] screen, the system automatically populatesdata in the other fields from the existing 12c schema.
Enter the database administrator account: DBA username and password for thedatabase containing the BIEE_OPSS schema and click Connect.
When you see the message “Connection to database successfully completed”,click Next.
8. On the MDS Schema [BIEE_MDS] screen, the system automatically populatesdata in the other fields from the existing 12c schema.
Enter the database administrator account: DBA username and password for thedatabase containing the BIEE_MDS schema and click Connect.
When you see the message “Connection to database successfully completed”,click Next.
9. On the STB Schema [BIEE_STB] screen, the system automatically populates datain the other fields from the existing 12c schema.
Enter the database administrator account: DBA username and password for thedatabase containing the BIEE_STB schema and click Connect.
When you see the message “Connection to database successfully completed”,click Next.
10. On the WLS Schema [BIEE_WLS_RUNTIME] screen, the system automaticallypopulates data in the other fields from the existing 12c schema.
Enter the database administrator account: DBA username and password for thedatabase containing the BIEE_WLS_RUNTIME schema and click Connect.
When you see the message “Connection to database successfully completed”,click Next.
11. On the Examine screen, review the status of the Upgrade Assistant as it examineseach schema, verifying that the schema is ready for upgrade. If the status isExamine finished, click Next.
If the examine phase fails, Oracle recommends that you cancel the upgrade byclicking No in the Examination Failure dialog. Click View Log to see what causedthe error and refer to Troubleshooting Your Upgrade in Upgrading with theUpgrade Assistant for information on resolving common upgrade errors.
Chapter 4Upgrading Product Schemas
4-16
Note:
• If you resolve any issues detected during the examine phase withoutproceeding with the upgrade, you can start the Upgrade Assistantagain without restoring from backup. However, if you proceed byclicking Yes in the Examination Failure dialog box, you need torestore your pre-upgrade environment from backup before startingthe Upgrade Assistant again.
• Canceling the examination process has no effect on the schemas orconfiguration data; the only consequence is that the information theUpgrade Assistant has collected must be collected again in a futureupgrade session.
12. On the Upgrade Summary screen, review the summary of the schemas that will beupgraded and/or created.
Verify that the correct Source and Target Versions are listed for each schema youintend to upgrade.
If you want to save these options to a response file to run the Upgrade Assistantagain later in response (or silent) mode, click Save Response File and providethe location and name of the response file. A silent upgrade performs exactly thesame function that the Upgrade Assistant performs, but you do not have tomanually enter the data again.
Click Next .
13. On the Upgrade Progress screen, monitor the status of the upgrade.
Caution:
Allow the Upgrade Assistant enough time to perform the upgrade. Do notcancel the upgrade operation unless absolutely necessary. Doing somay result in an unstable environment.
If any schemas are not upgraded successfully, refer to the Upgrade Assistant logfiles for more information.
Note:
The progress bar on this screen displays the progress of the currentupgrade procedure. It does not indicate the time remaining for theupgrade.
Click Next.
14. If the upgrade is successful: On the Upgrade Success screen, click Close tocomplete the upgrade and close the wizard.
Chapter 4Upgrading Product Schemas
4-17

If the upgrade fails: On the Upgrade Failure screen, click View Log to view andtroubleshoot the errors. The logs are available at NEW_ORACLE_HOME/oracle_common/upgrade/logs.
Note:
If the upgrade fails, you must restore your pre-upgrade environment frombackup, fix the issues, then restart the Upgrade Assistant.
Verifying the Schema UpgradeAfter completing all the upgrade steps, verify that the upgrade was successful bychecking that the schema version in schema_version_registry has been properlyupdated.
If you are using an Oracle database, connect to the database as a user having OracleDBA privileges, and run the following from SQL*Plus to get the current versionnumbers:
SET LINE 120COLUMN MRC_NAME FORMAT A14COLUMN COMP_ID FORMAT A20COLUMN VERSION FORMAT A12COLUMN STATUS FORMAT A9COLUMN UPGRADED FORMAT A8SELECT MRC_NAME, COMP_ID, OWNER, VERSION, STATUS, UPGRADED FROM SCHEMA_VERSION_REGISTRY ORDER BY MRC_NAME, COMP_ID ;
In the query result:
• Check that the number in the VERSION column matches the latest version numberfor that schema. For example, verify that the schema version number is 5.5.0.
Note:
However, that not all schema versions will be updated. Some schemasdo not require an upgrade to this release and will retain their pre-upgrade version number.
• The STATUS field will be either UPGRADING or UPGRADED during the schema patchingoperation, and will become VALID when the operation is completed.
• If the status appears as INVALID, the schema update failed. You should examinethe logs files to determine the reason for the failure.
• Synonym objects owned by IAU_APPEND and IAU_VIEWER will appear as INVALID,but that does not indicate a failure.
They become invalid because the target object changes after the creation of thesynonym. The synonyms objects will become valid when they are accessed. Youcan safely ignore these INVALID objects.
Chapter 4Upgrading Product Schemas
4-18

Backing Up the mapViewerConfig.xml FileThe mapViewerConfig.xml file is overwritten by the reconfiguration templates whenyou run the Reconfiguration Wizard. Therefore, you must back up themapViewerConfig.xml file before reconfiguring your existing domain.
Backing Up the mapViewerConfig.xml File on UNIX OperatingSystems
To back up the mapViewerConfig.xml file on UNIX systems:
1. The mapViewerConfig.xml file is present in the following location on your system.Use the list command: ls -ltr to check its file size.
EXISTING_DOMAIN_HOME/config/fmwconfig/mapviewer/conf/mapViewerConfig.xml
-rw-r----- 1 mwport svrtech 2xxx7 May 5 18:45 EXISTING_DOMAIN_HOME/config/fmwconfig/mapviewer/conf/mapViewerConfig.xml
2. Copy the mapViewerConfig.xml file as shown in the following example:
cp EXISTING_DOMAIN_HOME/config/fmwconfig/mapviewer/conf/mapViewerConfig.xml EXISTING_DOMAIN_HOME/config/fmwconfig/mapviewer/conf/mapViewerConfig_orig.xml
A copy of the mapViewerConfig.xml file is created with the file namemapViewerConfig_orig.xml.
About Reconfiguring the DomainRun the Reconfiguration Wizard to reconfigure your domain component configurationsto Oracle Analytics Server.
When you reconfigure a WebLogic Server domain, the following items areautomatically updated, depending on the applications in the domain:
• WebLogic Server core infrastructure
• Domain version
Chapter 4Backing Up the mapViewerConfig.xml File
4-19

Note:
Before you begin the domain reconfiguration, note the following limitations:
• The Reconfiguration Wizard does not update any of your ownapplications that are included in the domain.
• Transforming a non-dynamic cluster domain to a dynamic cluster domainduring the upgrade process is not supported.
The dynamic cluster feature is available when running theReconfiguration Wizard, but Oracle only supports upgrading a non-dynamic cluster upgrade and then adding dynamic clusters. You cannotadd dynamic cluster during the upgrade process.
• If the installation that you’re upgrading does not use Oracle AccessManagement (OAM), then you must edit two files to prevent theReconfiguration Wizard from attempting to update the nonexistent OAMInfrastructure schema, which causes the upgrade to fail.
Comment out the lines in your $DOMAIN/init-info/domain-info.xmlthat are similar to this example:
<!--extention-template-ref name="Oracle Identity Navigator" version="11.1.1.3.0" location="/u01/app/oracle/product/fmw/iam111130/common/templates/applications/yourcomany.oinav_11.1.1.3.0_template.jar" symbol=""/-->
<!--install-comp-ref name="oracle.idm.oinav" version="11.1.1.3.0" symbol="yourcompany.idm.oinav_11.1.1.3.0_iam111130_ORACLE_HOME" product_home="/u01/app/oracle/product/fmw/iam111130"/-->
and similarly comment out the lines in $DOMAIN/config/config.xml thatare similar to this example:
<!--app-deployment> <name>oinav#11.1.1.3.0</name> <target>AdminServer</target> <module-type>ear</module-type>
<source-path>/u01/app/oracle/product/fmw/iam111130/oinav/modules/oinav.ear_11.1.1.3.0/oinav.ear</source-path> <deployment-order>500</deployment-order> <security-dd-model>DDOnly</security-dd-model> <staging-mode>nostage</staging-mode></app-deployment-->
Specifically, when you reconfigure a domain, the following occurs:
Chapter 4About Reconfiguring the Domain
4-20

• The domain version number in the config.xml file for the domain is updated to theAdministration Server's installed WebLogic Server version.
• Reconfiguration templates for all installed Oracle products are automaticallyselected and applied to the domain. These templates define any reconfigurationtasks that are required to make the WebLogic domain compatible with the currentWebLogic Server version.
• Start scripts are updated.
If you want to preserve your modified start scripts, be sure to back them up beforestarting the Reconfiguration Wizard.
Note:
When the domain reconfiguration process starts, you can’t undo the changesthat it makes. Before running the Reconfiguration Wizard, ensure that youhave backed up the domain as covered in the pre-upgrade checklist. If anerror or other interruption occurs while running the Reconfiguration Wizard,you must restore the domain by copying the files and directories from thebackup location to the original domain directory. This is the only way toensure that the domain has been returned to its original state beforereconfiguration.
Follow these instructions to reconfigure the existing domain using the ReconfigurationWizard. See Reconfiguring WebLogic Domains in Upgrading Oracle WebLogic Server.
Backing Up the DomainBefore running the Reconfiguration Wizard, create a backup copy of the domaindirectory.
To create a backup of the domain directory:
1. Copy the source domain to a separate location to preserve the contents.
(UNIX) cp -rf mydomain mydomain_backup
2. Before updating the domain on each remote Managed Server, create a backupcopy of the domain directory on each remote machine.
3. Verify that the backed up versions of the domain are complete.
If domain reconfiguration fails for any reason, you must copy all files and directoriesfrom the backup directory into the original domain directory to ensure that the domainis returned entirely to its original state before reconfiguration.
Chapter 4About Reconfiguring the Domain
4-21

Starting the Reconfiguration Wizard
Note:
Shut down the administration server and all collocated managed serversbefore starting the reconfiguration process. See Stopping Servers andProcesses .
To start the Reconfiguration Wizard in graphical mode:
1. Sign in to the system on which the domain resides.
2. Open the command shell (on UNIX operating systems) or open a commandprompt window (on Windows operating systems).
3. Edition Based Database Users Only: If your schemas are configured with EBRdatabase, a default edition name must be manually supplied before you run theReconfiguration Wizard.
Run the following SQL command to set the default edition:ALTER DATABASE DEFAULT EDITION = edition_name;
where edition_name is the child edition name.
4. Go to the oracle_common/common/bin directory:
• (UNIX) NEW_ORACLE_HOME/oracle_common/common/bin
5. Start the Reconfiguration Wizard with the following logging options:
• (UNIX) ./reconfig.sh -log=log_file -log_priority=ALL
where log_file is the absolute path of the log file you'd like to create for thedomain reconfiguration session. This can be helpful if you need to troubleshoot thereconfiguration process.
The parameter -log_priority=ALL ensures that logs are logged in fine mode.
When you run this command, the following error message might appear to indicatethat the default cache directory is not valid:
*sys-package-mgr*: can't create package cache dir
You can change the cache directory by setting the environment variableCONFIG_JVM_ARGS. For example:
CONFIG_JVM_ARGS=-Dpython.cachedir=valid_directory
In this section, NEW_ORACLE_HOME refers to the 12c Oracle Home.
Reconfiguring the Oracle BI Domain with the Reconfiguration WizardNavigate through the screens in the Reconfiguration Wizard to reconfigure yourexisting domain.
To reconfigure the domain:
1. On the Select Domain screen, specify the location of the domain you want toupgrade or click Browse to navigate and select the domain directory. Click Next.
Chapter 4About Reconfiguring the Domain
4-22

2. On the Reconfiguration Setup Progress screen, view the progress of the setupprocess. When complete, click Next.
During this process:
• The reconfiguration templates for your installed products, including FusionMiddleware products, are automatically applied. This updates various domainconfiguration files such as config.xml, config-groups.xml,and security.xml (among others).
• Schemas, scripts, and other such files that support your Fusion Middlewareproducts are updated.
• The domain upgrade is validated.
3. On the Domain Mode and JDK screen, select the JDK to use in the domain or clickBrowse to navigate to the JDK you want to use. The supported JDK version for12c (12.2.1.4.0) is 1.8.0_221 and later. Click Next.
Note:
You cannot change the Domain Mode at this stage.
For a list of JDKs that are supported for a specific platform, see Oracle FusionMiddleware Supported System Configurations.
4. On the JDBC Data Sources screen, configure the JDBC data sources defined inyour domain source.
The JDBC data sources associated with the products for which you are creatingthe domain are listed in the lower half of the screen. A JDBC data source containsa pool of database connections that are created when the data source instance iscreated, deployed or targeted, or at server startup. Applications look up a datasource on the JNDI tree, and then request a connection. When the applications nolonger need the connections, they return the connections to the connection pool inthe data source.
From the Data Source Name drop-down list, select the data source(s) for whichyou want to specify the settings. The values that you specify are displayed in theappropriate columns in the data source list, for the selected data source.
For Oracle RAC Configuration for data sources, you can select one of the threeoptions:
• Convert to GridLink
• Convert to RAC multi data source
• Don’t convert
For more information about each option, click Help.
After specifying the details, click Next.
If you do not select any data sources on the JDBC Data Sources screen, thefollowing warning displays:
Missing Driver
Click Ok to proceed without verification, click Cancel toreturn to the JDBC Data Sources page.
Chapter 4About Reconfiguring the Domain
4-23

In this case, if you click Ok, the data sources are not verified.
5. On the JDBC Data Sources Test screen, select the check box for the data sourceconnection you configured on the JDBC Data Sources screen and click TestSelected Connections to test the data source connection.
To test the database connections, the database to which you are connecting mustbe running. If you do not want to test the connections at this time, do not selectany data sources. Click Next to continue.
6. On the Database Configuration Type screen, select RCU Data to connect to theServer Table (_STB) schema.
Enter the database connection details using the RCU service table (_STB)schema credentials and click Get RCU Configuration.
The Reconfiguration Wizard uses this connection to automatically configure thedata sources required for components in your domain.
Note:
By default Oracle’s Driver (Thin) for Service connections; Versions:Any is the selected driver. If you specified an instance name in yourconnection details — instead of the service name — you must selectOracle’s Driver (Thin) for pooled instance connections; Versions:Any If you do not change the driver type, then the connection will fail.For any existing 12c (12.2.1.4.0) datasource, the reconfiguration willpreserve the existing values. For new datasources where the schemawas created for 12c (12.2.1.4.0) by the RCU, the default connection datawill be retrieved from the _STB schema. If no connection data for a givenschema is found in the _STB schema, then the default connection datais used.
If the check is successful, click Next. If the check fails, reenter the connectiondetails correctly and try again
.
If you are upgrading from 12c (12.2.1.4.0), and your database has _OPSS or _IAU12c (12.2.1.4.0) database schemas, you must manually enter databaseconnection details for those schemas. These schemas were not required in 12cand had to be created manually. Users could assign any name to these schemas,therefore the Reconfiguration Wizard does not recognize them. When providingconnection information for _IAU, use the IAU_APPEND user information.
7. On the JDBC Component Schema Test screen, select all the component schemasand click Test Selected Connections to test the connection for each schema.The result of the test is indicated in the Status column.
When the check is complete, click Next.
8. On the Advanced Configuration screen, you can select all categories for which youwant to perform advanced configuration. For each category you select, theappropriate configuration screen is displayed to allow you to perform advancedconfiguration.
The categories that are listed on the Advanced Configuration screen depend onthe resources defined in the templates you selected for the domain.
Chapter 4About Reconfiguring the Domain
4-24

For this upgrade, select none of the options and click Next.
9. On the Configuration Summary screen, review the detailed configuration settingsof the domain before continuing.
You can limit the items that are displayed in the right-most panel by selecting afilter option from the View drop-down list.
To change the configuration, click Back to return to the appropriate screen. Toreconfigure the domain, click Reconfig.
Note:
The location of the domain does not change when you reconfigure it.
10. The Reconfiguration Progress screen displays the progress of the reconfigurationprocess.
During this process:
• Domain information is extracted, saved, and updated.
• Schemas, scripts, and other such files that support your Fusion Middlewareproducts are updated.
When the progress bar shows 100%, click Next.
11. The End of Configuration screen indicates whether the reconfiguration processcompleted successfully or failed. It also displays the location of the domain thatwas reconfigured as well as the Administration Server URL (including the listenport). If the reconfiguration is successful, it displays Oracle WebLogic ServerReconfiguration Succeeded.
If the reconfiguration process did not complete successfully, an error message isdisplayed indicates the reason. Take appropriate action to resolve the issue. If youcannot resolve the issue, contact My Oracle Support.
Note the Domain Location and the Admin Server URL for further operations.
Restoring the mapViewerConfig.xml FileThe mapViewerConfig.xml file is overwritten when you run the Reconfiguration Wizardon your domain. You can confirm that the mapViewerConfig.xml file is overwritten bychecking its file size. You must restore the original file that you backed up beforeupgrading your domain with the Upgrade Assistant.
Restoring the mapViewerConfig.xml File on UNIX Operating SystemsTo restore the original mapViewerConfig.xml file:
1. Change to the following directory:
EXISTING_DOMAIN_HOME/config/fmwconfig/mapviewer/conf
2. Enter the following command to list the files within this directory and check the filesize of the mapViewerConfig.xml file:
ls -ltr
Following is a sample output:
Chapter 4Restoring the mapViewerConfig.xml File
4-25

-rw-r----- 1 mwport svrtech 2xxx2 May 5 19:07 EXISTING_DOMAIN_HOME/config/fmwconfig/mapviewer/conf/mapViewerConfig.xml
Note:
The change in the file size implies that the mapViewerConfig.xml file isoverwritten by the reconfiguration template.
3. Restore the original file by renaming the mapViewerConfig_original.xml tomapViewerConfig.xml.
4. Enter the following command to list the files again and check the file size of themapViewerConfig.xml file:
ls -ltr
The file size of the mapViewerConfig.xml file should now match with the file sizeyou obtained while backing up the mapViewerConfig.xml file.
In this example, 2xxx7.
Upgrading Domain Component ConfigurationsUse the Upgrade Assistant to upgrade the domain component configurations insidethe domain to match the updated domain configuration.
Starting the Upgrade AssistantRun the Upgrade Assistant to upgrade product schemas, domain componentconfigurations, or standalone system components to Oracle Analytics Server.
To start the Upgrade Assistant:
Note:
Before you start the Upgrade Assistant, make sure that the JVM characterencoding is set to UTF-8 for the platform on which the Upgrade Assistant isrunning. If the character encoding is not set to UTF-8, then you will not beable to download files containing Unicode characters in their names. Thiscan cause the upgrade to fail.
1. Go to the oracle_common/upgrade/bin directory:
• (UNIX) ORACLE_HOME/oracle_common/upgrade/bin
2. Start the Upgrade Assistant:
• (UNIX) ./ua
Upgrade Assistant ParametersWhen you start the Upgrade Assistant from the command line, you can specifyadditional parameters.
Chapter 4Upgrading Domain Component Configurations
4-26

Table 4-5 Upgrade Assistant Command-Line Parameters
Parameter Required or Optional Description
-readiness Required for readiness checksNote: Readiness checks cannot beperformed on standaloneinstallations (those not managed bythe WebLogic Server).
Performs the upgrade readinesscheck without performing an actualupgrade.
Schemas and configurations arechecked.
Do not use this parameter if youhave specified the -examineparameter.
-threads Optional Identifies the number of threadsavailable for concurrent schemaupgrades or readiness checks of theschemas.
The value must be a positive integerin the range 1 to 8. The default is 4.
-response Required for silent upgrades orsilent readiness checks
Runs the Upgrade Assistant usinginputs saved to a response filegenerated from the data that isentered when the Upgrade Assistantis run in GUI mode. Using thisparameter runs the UpgradeAssistant in silent mode (withoutdisplaying Upgrade Assistantscreens).
-examine Optional Performs the examine phase butdoes not perform an actual upgrade.
Do not specify this parameter if youhave specified the -readinessparameter.
-logLevel attribute Optional Sets the logging level, specifyingone of the following attributes:
• TRACE• NOTIFICATION• WARNING• ERROR• INCIDENT_ERRORThe default logging level isNOTIFICATION.
Consider setting the -logLevelTRACE attribute to so that moreinformation is logged. This is usefulwhen troubleshooting a failedupgrade. The Upgrade Assistant'slog files can become very large if -logLevel TRACE is used.
Chapter 4Upgrading Domain Component Configurations
4-27

Table 4-5 (Cont.) Upgrade Assistant Command-Line Parameters
Parameter Required or Optional Description
-logDir location Optional Sets the default location of upgradelog files and temporary files. Youmust specify an existing, writabledirectory where the UpgradeAssistant creates log files andtemporary files.
The default locations are:
(UNIX)
ORACLE_HOME/oracle_common/upgrade/logs ORACLE_HOME/oracle_common/upgrade/temp
-help Optional Displays all of the command-lineoptions.
Upgrading Domain Components Using the Upgrade AssistantNavigate through the screens in the Upgrade Assistant to upgrade componentconfigurations in the WebLogic domain.
After running the Reconfiguration Wizard to reconfigure the WebLogic domain toOracle Analytics server, you must run the Upgrade Assistant to upgrade the domaincomponent configurations to match the updated domain configuration.
To upgrade the 12.2.1.4.0 domain:
1. On the Welcome screen, review an introduction to the Upgrade Assistant andinformation about important pre-upgrade tasks. Click Next.
Note:
For more information about any Upgrade Assistant screen, click Help onthe screen.
2. On the next screen:
• Select All Configurations Used By a Domain. The screen name changes toWebLogic Components.
• In the Domain Directory field, enter the WebLogic domain directory path.
Click Next.
3. On the Component List screen, verify that the list includes all the components forwhich you want to upgrade configurations and click Next.
If you do not see the components you want to upgrade, click Back to go to theprevious screen and specify a different domain.
Chapter 4Upgrading Domain Component Configurations
4-28

4. On the Prerequisites screen, acknowledge that the prerequisites have been metby selecting all the check boxes. Click Next.
Note:
The Upgrade Assistant does not verify whether the prerequisites havebeen met.
5. On the MapViewer Configuration screen, select 12c and click Next.
6. On the Examine screen, review the status of the Upgrade Assistant as it examineseach component, verifying that the component configuration is ready for upgrade.If the status is Examine finished, click Next.
If the examine phase fails, Oracle recommends that you cancel the upgrade byclicking No in the Examination Failure dialog. Click View Log to see what causedthe error and refer to Troubleshooting Your Upgrade in Upgrading with theUpgrade Assistant for information on resolving common upgrade errors.
Note:
• If you resolve any issues detected during the examine phase withoutproceeding with the upgrade, you can start the Upgrade Assistantagain without restoring from backup. However, if you proceed byclicking Yes in the Examination Failure dialog box, you need torestore your pre-upgrade environment from backup before startingthe Upgrade Assistant again.
• Canceling the examination process has no effect on theconfiguration data; the only consequence is that the information theUpgrade Assistant has collected must be collected again in a futureupgrade session.
7. On the Upgrade Summary screen, review the summary of the options you haveselected for component configuration upgrade.
The response file collects and stores all the information that you have entered, andenables you to perform a silent upgrade at a later time. The silent upgradeperforms exactly the same function that the Upgrade Assistant performs, but youdo not have to manually enter the data again. If you want to save these options toa response file, click Save Response File and provide the location and name ofthe response file.
Click Upgrade to start the upgrade process.
8. On the Upgrade Progress screen, monitor the status of the upgrade.
Caution:
Allow the Upgrade Assistant enough time to perform the upgrade. Do notcancel the upgrade operation unless absolutely necessary. Doing somay result in an unstable environment.
Chapter 4Upgrading Domain Component Configurations
4-29
If any components are not upgraded successfully, refer to the Upgrade Assistantlog files for more information.
Note:
The progress bar on this screen displays the progress of the currentupgrade procedure. It does not indicate the time remaining for theupgrade.
Click Next.
9. If the upgrade is successful: On the Upgrade Success screen, click Close tocomplete the upgrade and close the wizard. The Post-Upgrade Actions windowdescribes the manual tasks you must perform to make components functional inthe new installation. This window appears only if a component has post-upgradesteps.
If the upgrade fails: On the Upgrade Failure screen, click View Log to view andtroubleshoot the errors. The logs are available at ORACLE_HOME/oracle_common/upgrade/logs.
Note:
If the upgrade fails you must restore your pre-upgrade environment frombackup, fix the issues, then restart the Upgrade Assistant.
Verifying the Domain-Specific-Component ConfigurationsUpgrade
To verify that the domain-specific-component configurations upgrade was successful,sign in to the Administration console and the Oracle Enterprise Manager FusionMiddleware Control and verify that the version numbers for each component is 5.5.0.
To sign in to the Administration Console, go to: http://administration_server_host:administration_server_port/console
To sign in to Oracle Enterprise Manager Fusion Middleware Control Console, go to:http://administration_server_host:administration_server_port/em
Chapter 4Verifying the Domain-Specific-Component Configurations Upgrade
4-30

Note:
After upgrade, make sure you run the administration tools from the newOracle home directory and not from the previous Oracle home directory.
During the upgrade process, some OWSM documents, including policy setsand predefined documents such as policies and assertion templates, mayneed to be upgraded. If a policy set or a predefined document is upgraded,its version number is incremented by 1.
If you created the FMW user to run the Upgrade Assistant, ensure that youdelete the account after verifying your upgrade was successful.
Packing the Upgraded Domain on Node1After upgrading the existing domain to Oracle Analytics Server, pack the upgradeddomain on Node1.
To pack the domain:
1. Sign in to the Node1.
2. Change to the following directory:
(UNIX) NEW_ORACLE_HOME/oracle_common/common/bin
3. Enter the following command to pack the domain:
(UNIX) ./pack.sh -domain=path to domain -template=path totemplate -template_name=name -managed=true
Example:
pack.cmd -domain=C:\Oracle\Middleware\Oracle_Home\user_projects\domains\bi\ -template=C:\aaa\12.2.1.4.0_template_managed.jar -template_name=Node1_Upgrade-managed=true
Sample output:
<< read domain from "C:\Oracle\Middleware\Oracle_Home\user_projects\domains\bi">> succeed: read domain from "C:\Oracle\Middleware\Oracle_Home\user_projects\domains\bi"<< set config option Managed to "true">> succeed: set config option Managed to "true"<< write template to "C:\aaa\12.2.1.4.0_template_managed.jar"..............................>> succeed: write template to "C:\aaa\12.2.1.4.0_template_managed.jar"<< close template>> succeed: close template
Chapter 4Packing the Upgraded Domain on Node1
4-31
Unpacking the Upgraded Domain on Node2You must unpack the domain that you packed on Node1 to Node2, which is theremote node.
To unpack the domain:
1. Sign in to the Node2.
2. Copy the template file that you created from Node1 to Node2 using the followingcommand.
scp template_filename username@remote_host:/directory
Example:
scp 12.2.1.4.0_template_managed.jarcompany@Node2:$12c_ORACLE_HOME/oracle_common/common/bin
3. Change to the following directory:
(UNIX) NEW_ORACLE_HOME/oracle_common/common/bin
4. Enter the following command to unpack the domain:
(UNIX) ./unpack.sh -domain=path to domain -template=path totemplate -overwrite_domain=true
Example:
unpack.cmd -domain=C:\Oracle\Middleware\Oracle_Home\user_projects\domains\bi -template=c:\aaa\12.2.1.4.0_template_managed.jar -overwrite_domain=true
Sample output:
<< read template from "C:\aaa\12.2.1.4.0_template_managed.jar">> succeed: read template from "C:\aaa\12.2.1.4.0_template_managed.jar"<< set config option OverwriteDomain to "true">> succeed: set config option OverwriteDomain to "true"<< set config option DomainName to "bi">> succeed: set config option DomainName to "bi"<< write Domain to "C:\Oracle\Middleware\Oracle_Home\user_projects\domains\bi"...............................................................................................>> succeed: write Domain to "C:\Oracle\Middleware\Oracle_Home\user_projects\domains\bi"<< close template>> succeed: close template
Synchronizing Connection Details to the Mid-Tier DatabaseSynchronizing connection details to the mid-tier database ensures that the OracleAnalytics server components can access the mid-tier database when connectiondetails, including credentials, are changed.
Supported mid-tier database types are DB2, SQLServer, MSSQL, and Oracle.
Chapter 4Unpacking the Upgraded Domain on Node2
4-32

On UNIX, perform this task on the master host.
To synchronize connection details:
1. Change to the following directory:
(UNIX) NEW_DOMAIN_HOME/bitools/bin
2. Run the synchronization script:
(UNIX) sync_midtier_db.sh
Starting the Node Manager on Node2After you have upgraded the Oracle BI domain on Node1, start the Node Manager onNode2.
To start the Node Manager:
1. Change to the following directory on Node2:
(UNIX) NEW_DOMAIN_HOME/bin
2. Enter the following command:.
startNodeManager.sh
startNodeManager.cmd
Starting Servers and ProcessesStart the Oracle Analytics Server instance and the system components on Node1.
Note:
The procedure in this section describe how to start servers and processesusing the WLST command-line utility or a script. You can also use the OracleFusion Middleware Control and the Oracle WebLogic Server AdministrationConsole. See Starting and Stopping Administration and Managed Serversand Node Manager
To start the Oracle BI instance:
1. Change directory to the following:
(UNIX) NEW_DOMAIN_HOME/bitools/bin
2. To start the Oracle BI instance and servers, enter the following command:
(UNIX) start.sh
Note:
When prompted to enter the password, specify the Node Managerpassword that you entered while configuring the Oracle BI domain.
Chapter 4Starting the Node Manager on Node2
4-33

Checking the Status of the Servers in the Oracle Analyticsserver Instance
The following servers must be in the running state on both the nodes: Servers hostingOracle Analytics Server instance (bi_server), OBIPS, OBIJH, OBICCS, OBICH, andOBIS.
To check the status of the servers:
1. Change to the following directory:
(UNIX) NEW_DOMAIN_HOME/bitools/bin
2. Run the status script by entering the following command:
(UNIX) status.sh
Following is a sample output:
Name Type Machine Status ---- ---- ------- ------ AdminServer Server machine_name RUNNINGbi_server1 Server machine_name.example.com RUNNINGbi_server2 Server machine_name.example.com RUNNINGobips1 OBIPS machine_name.example.com RUNNINGobijh1 OBIJH machine_name.example.com RUNNINGobiccs1 OBICCS machine_name.example.com RUNNINGobisch1 OBISCH machine_name.example.com RUNNINGobis1 OBIS machine_name.example.com RUNNINGobips2 OBIPS machine_name.example.com RUNNINGobijh2 OBIJH machine_name.example.com RUNNINGobiccs2 OBICCS machine_name.example.com RUNNINGobisch2 OBISCH machine_name.example.com RUNNINGobis2 OBIS machine_name.example.com RUNNING
Chapter 4Checking the Status of the Servers in the Oracle Analytics server Instance
4-34

5Post-Upgrade Tasks
After completing the upgrade process, perform the tasks listed in this chapter to startthe instance and validate the upgrade.
Enabling Internal SSLEnable SSL on internal communication links after you complete the upgrade process.
To enable internal SSL:
1. Stop the system by entering the following command:
(UNIX) EXISTING_DOMAIN_HOME/bitools/bin/stop.sh
2. Enter the following command to ensable SSL on WebLogic internal channels andinternal components:
(UNIX) EXISTING_DOMAIN_HOME/bitools/bin/ssl.sh internalssltrue
3. Restart the system by entering the following command:
(UNIX) EXISTING_DOMAIN_HOME/bitools/bin/start.sh
Migrating Catalog GroupsCatalog groups were a feature of Oracle BI EE that allowed administrators to organizeusers and application roles for security administration purposes.
In Oracle BI Release 12c (12.2.1.1 and higher), catalog groups are obsolete. Thecatalog groups are migrated by the upgrade process to application roles.
Allowing Content Developers to Include HTML MarkupOracle BI EE features an option that allows content developers to include HTMLmarkup such as Javascript in various catalog objects. Various properties dialogs in BIEE include the Contains HTML Markup option. By default, when you install orupgrade to Oracle Analytics Server, this option is turned off for security reasons.
To allow content developers to include HTML markup, use Console to enable theContains HTML Markup option, and specify the appropriate privileges for contentdevelopers. See Set Advanced Options for the Service in Administering OracleAnalytics Server.
5-1

6Migrating from Oracle BusinessIntelligence 11g
Oracle has introduced many enhancements to existing features in Oracle AnalyticsServer. Sometimes, these enhancements replace the existing functionality orreimplement it in a different way. Wherever possible, the existing 11g functionality andconfiguration is migrated to the corresponding Oracle Analytics Server system.Although the appearance and behavior of the Oracle Analytics Server system can bedifferent, the end result is expected to be functionally equivalent. Review the flowchartand roadmap for an overview of the migration process for Oracle Analytics Server fromOracle Business Intelligence 11g release.
An efficient migration strategy allows you to migrate your metadata and configurationfrom Oracle Business Intelligence environment. The goal of this process is to notexactly replicate the appearance and behavior of the original 11g system in the OracleAnalytics Server environment. Replicating the 11g appearance and behavior is time-consuming and sometimes difficult, if not impossible. For example, the dashboardsand prompts are represented differently in Oracle Analytics Server and would requiresignificant manual intervention to recreate the 11g appearance. It also undermines therationale behind moving on to Oracle Analytics Server; namely, to take advantage ofthe enhancements that are introduced in Oracle Analytics Server.
About the Migration ProcessDuring migration, you migrate your 11g metadata and configuration of the BIcomponents that you have installed on your system. Migration is a two-step process.In the first step, you create an export bundle from a read-only 11g certified Release(11.1.1.9.0 or later) by using the BI Migration Tool (bi-migration-tool.jar). In the secondstep, you import the export bundle in to the Oracle Analytics Server system by usingthe BI Migration Script (migration-tool.sh).
6-1

Note:
The export process is read-only. Data, configuration, or existing binaries arenot modified or deleted on the source system. During export, the metadataand configuration (specifically the data model and connection pools), thecatalog content, and the security store authorization policy are retained. Youmust reconfigure the following:
• The WebLogic authentication configuration
WebLogic does not support migration from 11g to Oracle AnalyticsServer. Therefore, you must reconfigure the security realm in OracleAnalytics Server as it is not a part of the 11g to Oracle Analytics Servermigration. If your users and groups are in an external LDAP, you mustconfigure your Oracle Analytics Server to point to the external LDAP. Ifyour Oracle BI 11g users were hosted in the WebLogic LDAP, you canuse the WebLogic Server to export users from 11g in to Oracle AnalyticsServer WebLogic LDAP. However, Oracle Analytics Server does notsupport a BI System User. Therefore, you must delete the BI SystemUser after you import it in to the Oracle Analytics Server system.
• Mid-tier database content (such as Publisher schedules, the job historyof agents, scorecard annotations, and usage tracking tables)
The Agents are migrated from 11g to Oracle Analytics Server in adisabled state. You must reenable them after the migration. Reenablingthe agents recreates the entries in the scheduler database. However, theAgent history is not migrated from 11g to Oracle Analytics Server. Youmust also reconfigure Usage Tracking.
• Application-specific data such as TimesTen aggregates, the globalcache, required database schemas, data, outlines, rules, andcalculations
The import process is offline. During import, metadata content is deployed tocustomize the specified service instance and it overwrites the existingconfiguration settings.
The following components are migrated:
• Oracle BI Server: This includes the NQSConfig.INI and the opmn.xml files.
• Oracle BI Presentation Services: This includes the instanceconfig.xml file.
• Oracle Analytics Publisher: This includes the scanner.xml, xdo.cfg, xmlp-server-config.xml, datasources.xml, xdodelivery.cfg, cupsprinters.cfg files, the Mapdirectory, and the Plugins directory.
The following metadata is migrated:
• Content (Oracle BI Presentation Services Catalog), data model (the .RPD file),and the authorization policy securing it (Java AuthoriZatioN (JAZN).
The following OPMN properties contained in the opmn.xml file are not migrated toOracle Analytics Server during configuration migration:
• obips
• obiccs
Chapter 6About the Migration Process
6-2

• obijh
• obisch
However, the OBIS property is migrated.
Note:
The 11g system is left unchanged during and after the migration process iscomplete.
Table 6-1 provides a high-level summary of the steps that you must perform to migratefrom Oracle BI 11g to Oracle Analytics Server.
Table 6-1 Tasks for Migrating to Oracle Analytics Server from the Oracle BI 11gRelease
Task Description
RequiredIf you have not done so already, review theintroductory topics in this guide and completethe required pre-upgrade tasks.
The pre-upgrade tasks include cloning yourproduction environment, verifying systemrequirements and certifications, purgingunused data, and creating a non-SYSDBAuser.
For a complete list of pre-upgrade tasks, see Pre-Upgrade Requirements.
RequiredReview the prerequisites for 11g to OracleAnalytics Server migration.
Make sure that you meet the necessaryrequirements before you migrate yourmetadata and configuration to Oracle AnalyticsServer. Additionally, analyze and optimizeyour 11g system by removing redundantcontent and merging and consolidating similarcontent. For more information, see MigrationPrerequisites.
RequiredDownload and install the Fusion MiddlewareInfrastructure and Oracle Analytics Serverdistributions.
The Infrastructure distribution combines theWebLogic Server and the Java Required Files(JRF) that are required to set up thefoundation to install other Fusion Middlewareproducts.
As per the upgrade topology defined in thisguide, you must install the Infrastructure in anew Oracle home.
To install the product distributions, follow theprocedure that is described in Installing theProduct Distributions.
RequiredCreate the required Oracle Analytics Serverschemas.
The schemas that you create will varydepending on your existing schemaconfiguration.
To create schemas with the RepositoryCreation Utility (RCU), see Creating theRequired Oracle Analytics Server Schemas.
Chapter 6About the Migration Process
6-3

Table 6-1 (Cont.) Tasks for Migrating to Oracle Analytics Server from theOracle BI 11g Release
Task Description
RequiredConfigure the Oracle Analytics Server domain.
To configure the Oracle Analytics Serverdomain with the Configuration Assistant, see Configuring Oracle BI Domain with theConfiguration Assistant.
RequiredStop the servers and processes.
You must stop the Oracle Analytics Serverinstance, OBIS1, OBIPS1, AdministrationServer, Managed Servers, and the NodeManager before you start the migration. Forthe complete procedure, see Stopping Serversand Processes.
RequiredGenerate the BI Migration Tool (bi-migration-tool.jar) and copy it from the Oracle AnalyticsServer home to the 11g system.
You must generate the BI Migration Tool jarfile by using the BI Migration Script (migration-tool.sh|cmd). For the complete procedure, see Generating the BI Migration Tool (bi-migration-tool.jar).
RequiredCreate an export bundle by using the BIMigration Tool on the 11g system.
The export bundle is a jar file and consists ofthe metadata information from the 11g Oraclehome. To create the export bundle, see Creating the Export Bundle.
RequiredImport the export bundle by using the BIMigration Script (migration-tool.sh|cmd).
You must import the export bundle by usingthe BI Migration Script (migration-tool.sh|cmd).The BI Migration Script automaticallydetermines the Oracle home and the Domainhome directories. To import the bundle, see Importing with the BI Migration Script(migration-tool.sh|cmd).
RequiredStart the servers and processes.
To start the Oracle Analytics Server, OBIS1,OBIPS1, Administration Server, ManagedServers, and the Node Manager, see StartingServers and Processes.
RequiredComplete the post-migration steps.
For Oracle Analytics Server post-migrationsteps, see Post-Migration Tasks.
For Oracle Analytics Publisher post-migrationsteps, see Post-Migration Tasks for OracleAnalytics Publisher.
Migration PrerequisitesEnsure that you configure the environment as per Oracle recommendations inreadiness for the migration.
Make sure that you have met the following requirements before you proceed to themigration procedure:
• You have file system permission.
• You have configured the WebLogic authentication chain to enable the 11g users tosign in to the Oracle Analytics Server domain. See Configuring AuthenticationProviders in Administering Security for Oracle WebLogic Server.
Chapter 6Migration Prerequisites
6-4

Make sure that you analyze and optimize the existing 11g system by removingredundant content and merging and consolidating similar content.
While analyzing the 11g system, note the following details:
• Name and size of the repository
• Name and size of the Oracle BI Presentation Catalog
• Existing security model details
• Data sources
• Number of scheduled jobs
• Any links to external systems
Optimizing the 11g SystemMigrating metadata and configuration from an existing Oracle BI 11g system requirestime and resources. A poorly optimized 11g deployment can disrupt the migrationprocess and can affect the performance of the Oracle Analytics Server. Oraclerecommends that you analyze and optimize the existing 11g system by removingredundant content and merging and consolidating similar content.
To optimize the existing 11g system in readiness for migration:
1. Run the Consistency Checker to check the validity of the 11g repository, and toidentify and fix the syntax or semantic errors and warnings that can cause thequeries to fail on the Oracle Analytics Server Administration Tool. See Checkingthe Consistency of a Repository or a Business Model in Metadata RepositoryBuilder's Guide for Oracle Business Intelligence Enterprise Edition.
2. Disable the initialization blocks that are no longer being used.
3. Identify and remove users and groups that are no longer required, and thereforedo not need to be migrated.
4. Identify and remove objects in the repository and the Oracle BI PresentationCatalog that are no longer required, and therefore do not need to be upgraded.
5. If you have been using the Oracle BI Server usage tracking functionality, thenreview the usage tracking data to identify unused objects.
6. If you have been using the Oracle BI Server summary advisor functionality, thenreview the summary advisor for aggregated data and aggregation script.
Installing the Product DistributionsBefore you begin your upgrade, download Oracle Fusion Middleware infrastructure12.2.1.4 and Oracle Analytics Server distributions on the target system and installthem by using Oracle Universal Installer.
Note:
When Infrastructure is required for the upgrade, you must install the OracleFusion Middleware distribution first before you install other FusionMiddleware products.
Chapter 6Installing the Product Distributions
6-5

To install the Oracle Analytics Server distributions:
1. Sign in to the target system.
2. Download the following from Oracle Technology Network or Oracle SoftwareDelivery Cloud to your target system:
• Oracle Fusion Middleware Infrastructure(fmw_12.2.1.4.0_infrastructure_generic.jar)
• Oracle Analytics Server (Linux: Oracle_Analytics_Server_5.5.0.jar)
• Oracle WebLogic Server 12.2.1.4 Patch 30657796(p30657796_122140_Generic.zip)
3. Change to the directory where you downloaded the Oracle Analytics Serverproduct distribution.
4. Start the installation program for Oracle Fusion Middleware infrastructure
(UNIX) JDK_HOME/bin/java -jar fmw_12.2.1.4.0_infrastructure.jar
This initiates the Graphical User Interface (GUI) mode installer.
5. On UNIX operating systems, the Installation Inventory Setup screen appears if thisis the first time you are installing an Oracle product on this host.
Specify the location where you want to create your central inventory. Make surethat the operating system group name selected on this screen has writepermissions to the central inventory location, and click Next.
Note:
The Installation Inventory Setup screen does not appear on Windowsoperating systems.
6. On the Welcome screen, review the information to make sure that you have metall the prerequisites. Click Next.
7. On the Auto Updates screen, select an option:
• Skip Auto Updates: To avoid checking for software updates at this time.
• Select patches from directory: To navigate to a local directory if youdownloaded patch files.
• Search My Oracle Support for Updates: To automatically download softwareupdates if you have a My Oracle Support account. You must enter OracleSupport credentials then click Search. To configure a proxy server for theinstaller to access My Oracle Support, click Proxy Settings. Click TestConnection to test the connection.
Click Next.
8. On the Installation Location screen, specify the location for the Oracle homedirectory and click Next.
For more information about Oracle Fusion Middleware directory structure, see Understanding Directories for Installation and Configuration in Oracle FusionMiddleware Planning an Installation of Oracle Fusion Middleware.
9. On the Installation Type screen, select the following:
• For Infrastructure, select Fusion Middleware Infrastructure.
Chapter 6Installing the Product Distributions
6-6

• For Oracle Analytics Server, select Oracle Analytics.
Click Next.
10. The Prerequisite Checks screen analyzes the host computer to ensure that thespecific operating system prerequisites have been met.
To view the list of tasks that are verified, select View Successful Tasks. To viewlog details, select View Log. If any prerequisite check fails, then an error messageappears at the bottom of the screen. Fix the error and click Rerun to try again. Toignore the error or the warning message and continue with the installation, clickSkip (not recommended).
11. On the Installation Summary screen, verify the installation options that youselected.
If you want to save these options to a response file, click Save Response File andenter the response file location and name. The response file collects and stores allthe information that you have entered, and enables you to perform a silentinstallation (from the command line) at a later time.Click Install to begin the installation.
12. On the Installation Progress screen, when the progress bar displays 100%, clickFinish to dismiss the installer, or click Next to see a summary.
13. The Installation Complete screen displays the Installation Location and theFeature Sets that are installed. Review this information and click Finish to closethe installer.
14. Install the WebLogic Server 12.2.1.4 Patch.
• Extract p30657796_122140_Generic.zip.
• To apply the patch, follow the instructions in the readme file that you extractedfrom the p30657796_122140_Generic.zip file.
15. After you have installed Oracle Fusion Middleware Infrastructure, enter thefollowing command to start the installer for your product distribution and repeat thesteps above to navigate through the installer screens:
(UNIX) JDK_HOME/bin/java -jar Oracle_Analytics_Server_5.5.0.jar
Creating the Required Oracle Analytics Server SchemasWhen upgrading, you must create the required schemas. You can use the RepositoryCreation Utility (RCU) to create customized schemas or, optionally, you can use theUpgrade Assistant to create schemas using the default schema settings. Thisprocedure describes how to create schemas using the RCU. Information about usingthe Upgrade Assistant to create schemas is covered in the upgrade procedures.
To create the required schemas:
1. (Optional) If you are upgrading from 12c, and you wish to confirm the schemaswhich are present in your existing domain, then connect to the database as a userwith DBA privileges, and run the following code from SQL*Plus:
SET LINE 120COLUMN MRC_NAME FORMAT A14COLUMN COMP_ID FORMAT A20COLUMN VERSION FORMAT A12COLUMN STATUS FORMAT A9
Chapter 6Creating the Required Oracle Analytics Server Schemas
6-7

COLUMN UPGRADED FORMAT A8SELECT MRC_NAME, COMP_ID, OWNER, VERSION, STATUS, UPGRADED FROM SCHEMA_VERSION_REGISTRY ORDER BY MRC_NAME, COMP_ID ;
2. Verify that a certified JDK already exists on your system by running java -version from the command line. For Oracle Analytics Server, the certified JDK is1.8.0_221 and later.
Ensure that the JAVA_HOME environment variable is set to the location of thecertified JDK. For example:
• (UNIX) setenv JAVA_HOME=/home/Oracle/Java/jdk1.8.0_221
Add $JAVA_HOME/bin to $PATH.
3. Go to the oracle_common/bin directory:
• (UNIX) NEW_ORACLE_HOME/oracle_common/bin
4. Start the RCU:
• (UNIX) ./rcu
5. On the Welcome screen, click Next.
6. On the Create Repository screen, select Create Repository and then selectSystem Load and Product Load.
If you do not have DBA privileges, select Prepare Scripts for System Load. Thiswill generate a SQL script containing all the same SQL statements and blocks thatwould have been called if the RCU were to execute the actions for the selectedcomponents. After the script is generated, a user with the necessary SYS orSYSDBA privileges can execute the script to complete the system load phase.Click Next.
7. On the Database Connection Details screen, select the Database Type and enterthe connection information for the database that hosts the 12c schemas. See thepertinent table below.
Table 6-2 Connection Credentials for Oracle Databases and Oracle Databases with Edition-Based Redefinition
Option Description and Example
Host Name Specify the name of the server where your database isrunning in the following format:
examplehost.exampledomain.com
For Oracle RAC databases, specify the VIP name orone of the node names in this field.
Port Specify the port number for your database. The defaultport number for Oracle databases is 1521.
Service Name Specify the service name for the database. Typically, theservice name is the same as the global database name.
For Oracle RAC databases, specify the service name ofone of the nodes in this field. For example:
examplehost.exampledomain.com
Username Enter the user name for your database. The default username is SYS.
Password Enter the password for your database user.
Chapter 6Creating the Required Oracle Analytics Server Schemas
6-8

Table 6-2 (Cont.) Connection Credentials for Oracle Databases and Oracle Databases withEdition-Based Redefinition
Option Description and Example
Role Select the database user's role from the drop-down list:
Normal or SYSDBA
Table 6-3 Connection Credentials for MySQL Databases
Option Description and Example
Host Name Specify the host name, IP address, or complete servername in host\server format of the server where yourdatabase is running.
Port Specify the port number for your database.
Database Name Specify the name of your database.
Username Specify the name of a user with administrator privileges.
Password Enter the password for your database user.
Table 6-4 Connection Credentials for Microsoft SQL Server Databases
Option Description and Example
Unicode Support Select Yes or No from the drop-down list.
Server Name Specify the host name, IP address, or complete servername in host\server format of the server where yourdatabase is running.MSSQL named instances: A named instance isidentified by the network name of the computer and theinstance name that you specify during installation. Theclient must specify both the server name and theinstance name when connecting.
Port Specify the port number for your database.
Database Name Specify the name of your database.
Username Specify the name of a user with administrator privileges.
Password Enter the password for your database user.
Table 6-5 Connection Credentials for IBM DB2 Databases
Option Description and Example
Server Name Specify the host name, IP address, or complete servername in host\server format of the server where yourdatabase is running.
Port Specify the port number for your database.
Database Name Specify the name of your database.
Username Specify the name of a user with DB Owner privileges.The default user name for IBM DB2 databasesis db2inst1.
Password Enter the password for your database user.
Chapter 6Creating the Required Oracle Analytics Server Schemas
6-9

If the prerequisite check is successful, click OK to continue to the next screen. Ifthe check fails, review the details you entered and try again.
8. On the Select Components screen:
a. Specify the custom prefix you want to use to identify the Oracle FusionMiddleware schemas.
The custom prefix is used to logically group these schemas together for use inthis domain. For the purposes of this guide, use the prefix FMW12213.
Note the custom prefix that you have specified on this screen. You will needthis later, during the domain creation process.
b. Select AS Common Schemas and BIPLATFORM.
When you select AS Common Schemas and BIPLATFORM, all of theschemas in this section are automatically selected. If the schemas in thissection are not automatically selected, then select the required schemas.
Common Infrastructure Services schema, also known as STB schema, isautomatically created. You cannot select or deselect an STB schema. STBschema enables you to retrieve information from the RCU during domainconfiguration. For more information about the Service Table schema, see Understanding the Service Table Schema in Creating Schemas with theRepository Creation Utility.
For more information about how to organize your schemas in a multi-domainenvironment, see Planning Your Schema Creation in Creating Schemas withthe Repository Creation Utility.
9. In the Checking Prerequisites dialog, verify that the prerequisites check issuccessful, then click OK.
10. On the Schema Passwords screen, specify the passwords for your schemaowners.
Make a note of the passwords you enter on this screen as you will need thisinformation while configuring your product installation.
11. On the Map Tablespaces screen, configure the required tablespace mapping forthe schemas you want to create.
Click Next, then click OK in the confirmation dialog. When the progress dialogshows the tablespace creation is complete, click OK.
You see the Encrypt Tablespace check box only if you have enabled TransparentData Encryption (TDE) in the database (Oracle or Oracle EBR) when you start theRCU. Select the Encrypt Tablespace check box on the Map Tablespaces screento encrypt all new tablespaces that the RCU creates.
12. Verify the information on the Summary screen and click Create to begin schemacreation.
This screen contains information about the log files that were created from thisRCU operation. Click on the name of a particular log file to view the contents ofthat file.
13. Review the information on the Completion Summary screen to verify that theoperation is completed successfully. Click Close to complete the schema creation.
Chapter 6Creating the Required Oracle Analytics Server Schemas
6-10

Configuring Oracle BI Domain with the ConfigurationAssistant
The Oracle Analytics Server Configuration Assistant is a .sh (UNIX) file. Start theConfiguration Assistant by starting the configuration executable file from the bi/bindirectory inside the Oracle home. Follow the procedure in this topic to complete theconfiguration step-by-step.
Note:
If you are extending the WebLogic domain with Oracle Analytics Server byusing the Configuration Assistant, make sure that the Administration Serverfor the domain is named AdminServer. Other names for the AdministrationServer are not supported.
To configure the BI standard topology:
1. Change to the following directory:
(UNIX) ORACLE_HOME/bi/bin
2. Start the Configuration Assistant by entering the following command:
(UNIX) ./config.sh
3. Select the components to install and click Next.
Note:
To ensure that a consistent set of suites are deployed, the ConfigurationAssistant automatically adjusts your selection.
• Oracle Analytics Enterprise Edition: Includes components such asPresentation Services, BI Composer, web services, proactive intelligence(Delivers and Actions), and Web Services for SOA (WS4SOA).
• Oracle Analytics Publisher: Includes Oracle Analytics Publisher.
4. On the Prerequisite Checks screen, after the prerequisite checks conclude with noerrors, click Next.
If any of the prerequisite checks fail, then a short error message appears at thebottom of the screen. Fix the error and click Rerun to try again. To ignore the erroror warning messages and continue with the installation, click Skip, although thisapproach is not recommended.
Chapter 6Configuring Oracle BI Domain with the Configuration Assistant
6-11

Note:
The configuration might not function normally if you continue withoutresolving the issue that caused an error or warning message during theprerequisite checks.
5. On the Define New Domain screen, specify the following, and click Next:
Table 6-6 Field-name descriptions for the Define New Domain screen
Field Description
Domains Directory Specify the path where you want to set up the domaindirectory.
Domain Name Specify domain.
Username Specify a username for the System Administrator.
Note:
This user is created in the embedded LDAPand is granted WebLogic Administratorpermissions.
Password Specify a password for the System Administrator.
Confirm Password Confirm the password by reentering it.
6. On the Database Schema screen, either create a new schema or use an existingschema by clicking the appropriate option.
If you select to create a new schema, the Configuration Assistant creates aschema for you. Specify the following and click Next.
Table 6-7 Field-name descriptions for the Database Schema screen
Field Description
Schema prefix Specify a unique schema prefix.
Schema password Specify a password for your schema.
Confirm password Confirm the password by reentering it.
Database type Select the database that you are using from the list ofvalues.
Username Enter the privileged username to create the schema.
Password Enter the password for the above username.
Simple connect string The connect string that you specify varies depending onthe type of database you are using.(Oracle Database) host:port/service orhost:port:SID or TNS connect string
If you select to use an existing schema, you must create STB, BIPLATFORM, IAU,MDS, OPSS, and WLS schemas using the RCU. Specify the following and clickNext.
Chapter 6Configuring Oracle BI Domain with the Configuration Assistant
6-12

Note:
If you are using Oracle Database version 12.2.0.1 or higher, you mustcreate a pluggable database within a container database to createrepository schemas. You cannot create schemas within a containerdatabase without using a pluggable database.
7. On the Port Range screen, specify the port range and click Next.
Note:
The default, allocated port range is from 9500 to 9999, both inclusive.You can keep the default values or specify different values within thisrange.
8. On the Initial Application screen, select one of the following options as per yourrequirement, and click Next:
• Your own existing BI Application from export bundle (.jar).
Note:
This option is applicable if you are migrating from Oracle BI 11g toOracle Analytics Server.
• Clean Slate (no predefined application).
9. On the Summary screen, verify the values that you specified on each screen.
Click Save to generate a response file used for silent installation (optional).
Click Configure.
The configuration process starts and the Configuration Progress screen isdisplayed.
10. After the configuration concludes without any errors, click Next to go to theConfiguration Complete screen.
11. On the Configuration Complete screen, review the configuration summary.
Click Save to save the information displayed on this screen in a file.
Click Finish to close the Configuration Assistant.
Oracle Analytics Server opens in the browser. Use the login credentials that youspecified while configuring to sign into Oracle Analytics Server.
You have configured the standard BI topology. The Configuration Assistantautomatically starts the newly configured BI instance after successful completion.However, if you want to restart a domain that has been shut down manually, see Starting Servers and Processes.
Chapter 6Configuring Oracle BI Domain with the Configuration Assistant
6-13

Stopping Servers and ProcessesBefore you migrate your 11g metadata and configuration to Oracle Analytics Server,stop the Oracle Analytics Server instance, OBIS1, OBIPS1, Administration Servers,Managed Servers, and the Node Manager.
Note:
The procedure in this section describe how to stop servers and processesusing the WLST command-line utility or a script. You can also use the FusionMiddleware Control and the Oracle WebLogic Server AdministrationConsole. See Starting and Stopping Administration and Managed Serversand Node Manager
To stop your Fusion Middleware environment:
1. Change to the following directory:
(UNIX) DOMAIN_HOME/bitools/bin
2. To stop the Oracle Analytics Server instance and servers, enter the followingcommand:
(UNIX) stop.sh
Note:
When prompted to enter the password, specify the Node Managerpassword that you entered while configuring the Oracle BI domain.
Migrating using the ConsoleYou use the Console in Oracle Analytics Server to migrate the content you created inOracle BI Enterprise Edition 11g to Oracle Analytics Server. Before you start,download the migration utility.
1. Download the migration utility.
a. In Oracle Analytics Server, click Console and then click Snapshots.
b. Click the Page menu , select Migrate, and then click Download BI EE11g Migration Utility. Follow the instructions to save the migration-tool.jarfile locally.
2. Copy the migration utility JAR file to your Oracle BI Enterprise Edition 11genvironment.
3. Run the migration-tool.jar file in your Oracle BI Enterprise Edition 11genvironment.
Chapter 6Stopping Servers and Processes
6-14
Note:
The JDK version must be JDK 1.8.0_131 or higher. You must verify thata certified JDK already exists on your system by running java -versionfrom the command line.
Usage:
java -jar migration-tool.jar out oracle_home domain_home instance_home_optional export_jar_location
For example:
java -jar migration-tool.jar out /u01/app/oracle/bi /u01/app/instance/domains/example.com/myDomain /u01/app/instance/BIInstance /tmp/myBIEE11gContentBundle.jar
The tool exports your content to a file. In this example, the file is namedmyBIEE11gContentBundle.jar.
4. Upload your Oracle BI Enterprise Edition 11g bundle and restore the content onOracle Analytics Server.
a. In Oracle Analytics Server, click Console and then click Snapshots.
b. Click the Page menu , select Migrate, and then click Upload andRestore BI EE11g Migration Bundle.
c. Click Select to navigate to the migration bundle (JAR file) containing thecontent you want to migrate.
d. Enter the password for the metadata repository (RPD file) included in the JARfile.
It's important to enter the correct password here. Content migration fails if thepassword you enter doesn’t match the password required to access themetadata repository.
e. Click Upload and Restore.
Allow a few minutes for the content to upload and refresh through your system.The time it takes depends on the size of your content bundle. Sign out, then signback in after approximately 15 to 20 minutes to see new content and to inherit anynewly restored application roles.
5. Verify that your subject areas, analyses, and dashboards are available asexpected.
6. If your migration bundle included deliveries, you must restore them and activatethem.
See Restore and Enable Delivery Schedules.
Chapter 6Migrating using the Console
6-15

Migrating using the Command LineYou can migrate the content you created in Oracle BI Enterprise Edition 11g to OracleAnalytics Server using the command line.
• Generating the BI Migration Tool (bi-migration-tool.jar)
• Creating the Export Bundle
• Importing with the BI Migration Script (migration-tool.sh|cmd)
Generating the BI Migration Tool (bi-migration-tool.jar)The BI Migration Tool (bi-migration-tool.jar) is self-executing and self-contained. Youmust generate the BI Migration Tool jar file by using the BI Migration Script (migration-tool.sh|cmd). The BI Migration Script is made available after you configure the OracleAnalytics Server domain. This step packages the components of the BI Migration Toolinto a single, self-executing jar file, so that it can be easily transported on to an 11gsystem. To do this, you must have access to a Oracle Analytics Server with aconfigured domain. You must set up the Oracle Analytics Server domain to providesufficient infrastructure to run the BI Migration Tool and allow it to repackage itself. TheOracle Analytics Server domain can be empty at this stage.
To generate the BI Migration Tool jar:
1. The BI Migration Script (migration-tool.sh|cmd) is available at the followinglocation:
(UNIX) DOMAIN_HOME/bitools/bin/
2. Run the following command to generate the BI Migration Tool:
(UNIX) DOMAIN_HOME/bitools/bin/migration-tool.sh package bi-migration-tool.jar
Where,
Table 6-8 Command Description
Option Description
DOMAIN_HOME/bitools/bin Specifies the location of the BI Migration Script.
package Specifies the BI Migration Script to perform thepackaging operation.
bi-migration-tool.jar Specifies the file name of the migration tool jar file wherethe output is written. In this documentation, the bi-migration-tool.jar file is referred as the "BI MigrationTool" and the migration-tool.sh script is referred as the"BI Migration Script".
3. Copy the BI Migration Tool to the host system from where you want to export data.
Chapter 6Migrating using the Command Line
6-16

Creating the Export BundleThe export bundle is a ".jar " file and consists of the metadata information from the 11gOracle home.
To create an export bundle:
1. Change to the directory where you created the bi-migration-tool.jar file.
2. Run the BI Migration Tool without passing parameters. Enter the followingcommand:
(UNIX) JDK_HOME/bin/java -jar bi-migration-tool.jar
Note:
The JDK version must be JDK 1.8.0_131 or higher. You must verify thata certified JDK already exists on your system by running java -versionfrom the command line.
This command displays the list of parameters that you can include for the BIMigration Tool to locate various parts of the 11g system.
3. Run the BI Migration Tool with the following parameters this time to create anexport bundle.
Table 6-9 Parameter Description: Creating Export Bundle
Parameter Description
out Indicates the BI Migration Tool to run in Export mode.
<oracle 11g home> Specifies the Oracle home directory. This is typically thedirectory Oracle_BI inside Middleware home.
DOMAIN_HOME Specify the Domain home directory. This is typically thedirectory user_projects/domains/bi/ insidethe Middleware home.
<output export bundle path> Specifies the file name of the export bundle where theoutput is written. The output is not a BAR file. The filename of the export bundle must include the "jar"extension.
Following is a sample command for creating an export bundle:
(UNIX) JDK_HOME/bin/java -jar bi-migration-tool.jar outORACLE_HOME/Oracle_BI1 DOMAIN_HOME/tmp/migration-tool-test/test_export.jar
Where,
Table 6-10 Parameter Values: Creating Export Bundle
Parameter Description
ORACLE_HOME/Oracle_BI1 The path where the Oracle home directory is located.
Chapter 6Migrating using the Command Line
6-17
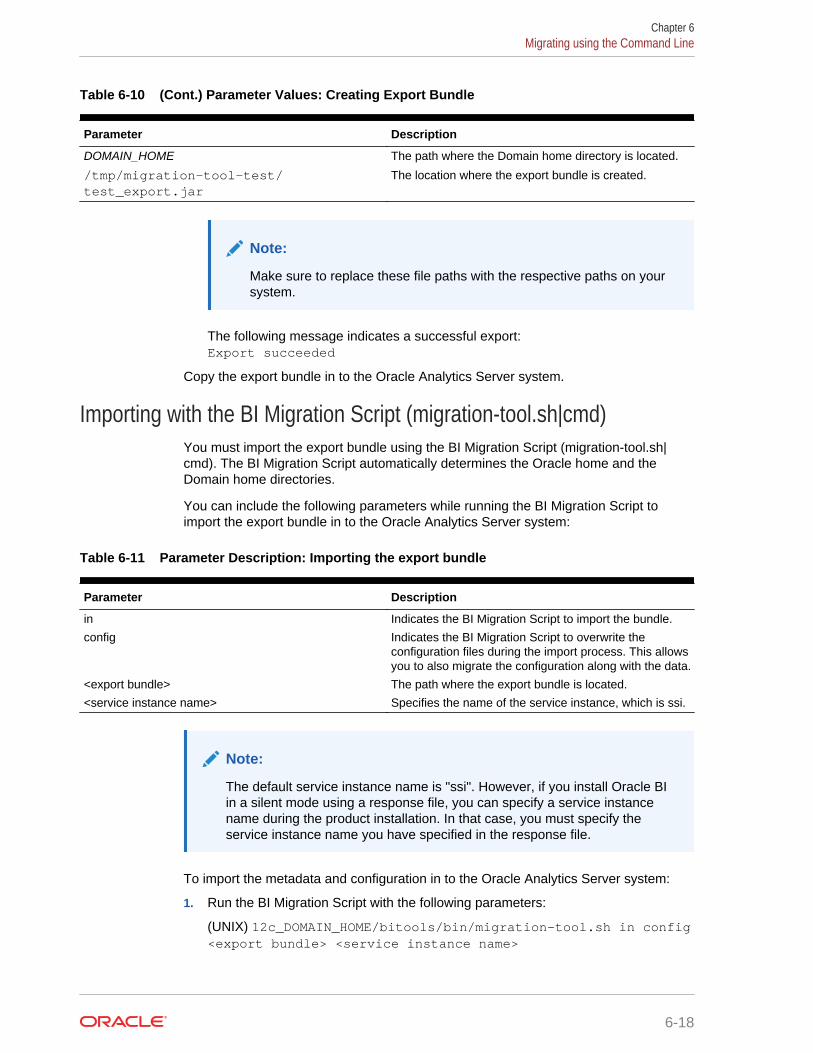
Table 6-10 (Cont.) Parameter Values: Creating Export Bundle
Parameter Description
DOMAIN_HOME The path where the Domain home directory is located.
/tmp/migration-tool-test/test_export.jar
The location where the export bundle is created.
Note:
Make sure to replace these file paths with the respective paths on yoursystem.
The following message indicates a successful export:Export succeeded
Copy the export bundle in to the Oracle Analytics Server system.
Importing with the BI Migration Script (migration-tool.sh|cmd)You must import the export bundle using the BI Migration Script (migration-tool.sh|cmd). The BI Migration Script automatically determines the Oracle home and theDomain home directories.
You can include the following parameters while running the BI Migration Script toimport the export bundle in to the Oracle Analytics Server system:
Table 6-11 Parameter Description: Importing the export bundle
Parameter Description
in Indicates the BI Migration Script to import the bundle.
config Indicates the BI Migration Script to overwrite theconfiguration files during the import process. This allowsyou to also migrate the configuration along with the data.
<export bundle> The path where the export bundle is located.
<service instance name> Specifies the name of the service instance, which is ssi.
Note:
The default service instance name is "ssi". However, if you install Oracle BIin a silent mode using a response file, you can specify a service instancename during the product installation. In that case, you must specify theservice instance name you have specified in the response file.
To import the metadata and configuration in to the Oracle Analytics Server system:
1. Run the BI Migration Script with the following parameters:
(UNIX) 12c_DOMAIN_HOME/bitools/bin/migration-tool.sh in config<export bundle> <service instance name>
Chapter 6Migrating using the Command Line
6-18

For example,
12c_DOMAIN_HOME/bitools/bin/migration-tool.sh in config /tmp/migration-tool-test/test_export.jar ssi
Where,
Table 6-12 Parameter Values: Importing the export bundle
Parameter Description
in Indicates the BI Migration Script to import the bundle.
config Indicates the BI Migration Script to overwrite theconfiguration files during the import process.
/tmp/migration-tool-test/test_export.jar
The path where the export bundle is located.
ssi Specifies the name of the service instance.
2. If the migration is successful, you see the output such as the following:
Import succeededAbout to close down logging to: DOMAIN_HOME/bilogs/migration/migration-2016-05-05-06-13-05.logThis is so that the log file can be archived into the diagnostics zipAny remaining log entries will go to '/tmp/migration.log', and will not appear in the diagnostics zipMigration action succeeded
You can now start the Oracle Analytics Server system. For more information aboutstarting the Oracle Analytics Server system, see Administering Oracle AnalyticsServer.
Note:
It takes about 10 more minutes for the application roles and policies tomigrate after the migration process is complete.
After completing the import process, you must start OBIS1 and OBIPS1 which youstopped before beginning the migration process.
Starting Servers and ProcessesAfter you migrate your 11g metadata and configuration to Oracle Analytics Server,start the Oracle Analytics Server instance, OBIS1, OBIPS1, Administration Servers,Managed Servers, and the Node Manager.
Note:
The procedure in this section describe how to start servers and processesusing the WLST command-line utility or a script. You can also use the FusionMiddleware Control and the Oracle WebLogic Server AdministrationConsole. See Starting and Stopping Administration and Managed Serversand Node Manager.
Chapter 6Starting Servers and Processes
6-19

To start your Fusion Middleware environment:
1. Change to the following directory:
(UNIX) DOMAIN_HOME/bitools/bin
2. To start the Oracle Analytics Server instance and servers, enter the followingcommand:
(UNIX) start.sh
Note:
When prompted to enter the password, specify the Node Managerpassword that you entered while configuring the Oracle BI domain.
Chapter 6Starting Servers and Processes
6-20

7Post-Migration Tasks
After migrating the Oracle BI metadata, manually migrate the configuration settings forcomponents such as security for WebLogic and Enterprise Manager, BI Server, and BIPresentation Services.
Migrating Catalog GroupsCatalog groups were a feature of Oracle BI EE that allowed administrators to organizeusers and application roles for security administration purposes.
In Oracle BI Release 12c (12.2.1.1 and higher), catalog groups are obsolete. Thecatalog groups are migrated by the upgrade process to application roles.
Migrating ConfigurationAfter migrating the data, manually migrate the configuration information from the 11gsystem to Oracle Analytics Server, which includes WebLogic security, EnterpriseManager security, the managed BI configurations, BI logs, BI Server, and BIPresentation Server configuration settings.
Migrating the Security Configuration with Oracle WebLogic ServerOracle Analytics Server is tightly integrated with the Oracle Fusion MiddlewareSecurity architecture and delegates core security functionality to components of thatarchitecture. By default, an Oracle BI installation is configured with an authenticationprovider that uses the Oracle WebLogic Server embedded LDAP server for user andgroup information. The Oracle BI default policy store provider and credential storeprovider stores credentials, application roles, and application policies in files in thedomain. You must manually migrate the security configuration for Oracle BI from the11g system to Oracle Analytics Server with Oracle WebLogic Server.
To migrate the security configurations:
1. Examine your Oracle BI 11g WebLogic security configuration by accessing theOracle BI 11g WebLogic Console to examine the current security configuration forsecurity providers.
2. Manually configure the same security configuration in WebLogic Console of OracleAnalytics Server.
Migrating the Oracle Enterprise Manager Fusion Middleware ControlSecurity Configuration
Most of the security configuration related to application roles, security grants, andapplication policies are migrated to the Oracle Enterprise Manager Fusion Middleware
7-1
Control during the migration process. You must examine and manually apply anyspecial Security Provider configuration in the Fusion Middleware Control.
To migrate the Oracle Enterprise Manager Fusion Middleware Control securityconfiguration:
1. Examine the Security Provider configuration in the Oracle Enterprise ManagerFusion Middleware Control 11g.
2. Validate the Oracle Enterprise Manager Fusion Middleware Control security setupby searching application policies and appropriate users.
3. Apply any special Security Provider configuration in the Oracle EnterpriseManager Fusion Middleware Control.
4. Ensure that the user, group, and application roles appear correctly in OracleAnalytics Server.
Migrating the Oracle Enterprise Manager Fusion Middleware ControlManaged Business Intelligence Configurations
The Fusion Middleware Control is used to manage some of the importantconfigurations for Oracle BI. You must manually examine the configuration of theGeneral, Presentation, Performance, and Mail sections of the Fusion MiddlewareControl 11g and apply the same settings to the Oracle Analytics Server system.
To migrate the Fusion Middleware Control managed BI configurations:
1. In the Fusion Middleware Control 11g, navigate to the Business IntelligenceConfiguration link and examine the Configuration tab.
2. Apply the same configuration settings in the Oracle Analytics ServerConfiguration tab of the Fusion Middleware Control.
Ensure that the configuration settings of the General, Presentation, Performance,and Mail sections are applied correctly to the Fusion Middleware Control.
Migrating the Oracle Enterprise Manager Fusion Middleware ControlManaged Business Intelligence Log Configuration
The Oracle Enterprise Manager Fusion Middleware Control is used to manage the logconfiguration for the Oracle BI components. You must manually examine the logconfiguration settings in the 11g system and apply the same settings to your OracleAnalytics Server system.
To migrate the Fusion Middleware Control managed Oracle BI log configuration:
1. In the Fusion Middleware Control 11g, navigate to the Business Intelligence linkand examine the settings in the Diagnostics tab.
2. Note the configuration settings and apply the Oracle BI component logconfiguration and component log levels in the Oracle Analytics Server.
Migrating the Oracle BI Server ConfigurationVarious files for the BI Server contain configuration information: odbc.ini andtnsnames.ora. The odbc.ini file contains non-Oracle data source (DSN) connectioninformation. The tnsnames.ora file contains network service names mapped to
Chapter 7Migrating Configuration
7-2

connect descriptors for the local naming method, or net service names mapped tolistener protocol addresses. You must examine these 11g files and manually copy theconfiguration information to the respective Oracle Analytics Server files.
To migrate the BI Server configuration details:
1. View the BI Server information in the 11g odbc.ini file present at the followinglocation:
(UNIX) 11g_DOMAIN_HOME/config/fmwconfig/bienv/core
2. Copy the BI Server configuration from the 11g odbc.ini file to the Oracle AnalyticsServer file.
3. In the existing Oracle Analytics Server odbc.ini file. integrate the ODBC entriesfrom 11g.
Migrating the Oracle BI Presentation Server ConfigurationThe Oracle BI Presentation Services process hosts most of the business logic of theWeb server and provides the framework and interface for the presentation of businessintelligence data to web clients. The userpref_currencies.xml file defines the currencyoptions that are displayed in the Currency box of the Preferences tab of the MyAccount dialog. The bridgeconfig.properties file contains the Presentation ServicesPlug-in information. Examine these 11g files and manually copy the configurationinformation to the respective Oracle Analytics Server files.
To migrate the Oracle BI Presentation Server configuration:
1. View the configuration information in the userpref_currencies.xml file present atthe following location:
(UNIX) 11g_DOMAIN_HOME/config/fmwconfig/biconfig/OBIPS/
2. Copy the appropriate configuration information from the 11guserpref_currencies.xml file to the Oracle Analytics Server file.
3. View the configuration information in the bridgeconfig.properties file present at thefollowing location:
(UNIX) 11g_DOMAIN_HOME/config/fmwconfig/biconfig
4. Copy the appropriate configuration information from the 11gbridgeconfig.properties file to the Oracle Analytics Server file.
Configuring the Database to Use DataDirect DriversYou must configure the database to use the appropriate DataDirect drivers. If you areusing a database that is already configured to use the DataDirect drivers, modify thedatabase configuration's odbc.ini file to use the correct DataDirect drivers.
To configure the database to use the DataDirect drivers:
1. Open the odbc.ini file located at the following location:
(UNIX) 12c_DOMAIN_HOME/config/fmwconfig/bienv/core/odbc.ini
Replace the value of DOMAIN_HOME with the actual path to the Oracle AnalyticsServer Domain home you created when you installed the Oracle Analytics Serversoftware.
Chapter 7Configuring the Database to Use DataDirect Drivers
7-3

2. Update the ODBC entry to use the DataDirect drivers, as shown in the followingexample:
[DSN name in RPD] Driver=MW_HOME/bi/common/ODBC/Merant/8.0.2/lib/<8.0.2.so> Description=DataDirect 8.0.2 Sybase Wire Protocol LogonID=DB usernamePassword=DB passwordNetworkAddress=DB hostname, DB portDatabase=DB name
Where, RPD indicates rapidfile database. RPD is a binary file used by the BIServer to retrieve data from a source database.
3. Update all existing data source names (DSNs) that are configured with the 11gDataDirect version. For example, the data source name for SYBASE should pointto DataDirect 8.0.2 as shown in the following example:
[ODBC Data Sources] AnalyticsWeb = Oracle BI Server Cluster = Oracle BI Server SSL_Sample = Oracle BI Server DSN name in RPD = DataDirect 8.0.2
4. Save and close the odbc.ini file.
Configuring Usage TrackingThe Oracle BI Server supports the collection of usage tracking data. When usagetracking is enabled, the BI Server collects usage tracking data for each query. Thestatistics are then written to a usage tracking log file or are inserted directly in to adatabase table. After you complete migrating and configuring the Oracle AnalyticsServer system, you must enable usage tracking in the NQSConfig.INI file.
To configure usage tracking:
1. Open the repository in online mode.
2. Import the S_NQ_ACCT and the S_NQ_DB_ACCT table from the RCU schema.
3. In the NQSConfig.INI file, set USAGE_TRACKING=YES and update thePHYSICAL_TABLE_NAME and the CONNECTION_POOL.
4. Import the following tables to track query statistics related to the initialization blockexecution and the summary advisor feature:
• S_NQ_INITBLOCK
• S_NQ_SUMMARY_ADVISOR
5. To enable initialization block logging, update the INIT_BLOCK_TABLE_NAMEandINIT_BLOCK_CONNECTION_POOL in the NQSConfig.INI file.
6. To enable summary advisor logging, set SUMMARY_STATISTICS_LOGGING=YESand update the SUMMARY_ADVISOR_TABLE_NAME in the NQSConfig.INI file.
7. Restart the Oracle Analytics Server.
Chapter 7Configuring Usage Tracking
7-4

For more information about usage tracking, see Managing Usage Tracking inAdministering Oracle Analytics Server.
Note:
Ensure that the queries of the BI Server are being tracked in the table byview data.
Configuring the SQL ServerAfter configuring the Oracle Analytics Server, you must configure the SQL Serversettings in the odbc.ini file.
To configure the SQL Server:
1. Open the odbc.ini file located at the following location:
(UNIX) 12c_DOMAIN_HOME/config/fmwconfig/bienv/core/odbc.ini
Replace the value of DOMAIN_HOME with the actual path to the Oracle AnalyticsServer Domain home you created when you installed the Oracle Analytics Serversoftware.
2. Update the ODBC entry to use the DataDirect drivers, as shown in the followingexample:
[DSN name in RPD] Driver=$ORACLE_HOME/bi/common/ODBC/Merant/8.0.2/lib/<8.0.2.so> Description=DataDirect 8.0.2 SQL Server Wire Protocol Address=DB HOST\SQLSERVER NAMEPort=PORT NUMBERAlternateServers= AnsiNPW=Yes ConnectionRetryCount=0 ConnectionRetryDelay=3 Database=DB name LoadBalancing=0 LogonID=DB usernamePassword=DB passwordQuotedId=Yes SnapshotSerializable=0 ReportCodePageConversionErrors=
3. Update all existing data source names (DSNs) that are configured with the 11gDataDirect version. For example, the data source name for SQL Server shouldpoint to DataDirect 8.0.2 as shown in the following example:
[ODBC Data Sources] AnalyticsWeb = Oracle BI Server Cluster = Oracle BI Server SSL_Sample = Oracle BI Server DSN name in RPD = DataDirect 8.0.2
4. Save and close the odbc.ini file.
Chapter 7Configuring the SQL Server
7-5

Adding Roles and PermissionsAfter migrating the data, you must add roles and permissions for BI Administrator, BIAuthor, and BI Consumer groups.
To add roles and permissions:
1. Sign in to the WebLogic Console.
2. Go to Myrealm under Security Realms and click Users and Groups.
3. Create the following groups:
On the Groups tab, create the BIAdministrators group.
On the Membership tab, create the BIAuthors and the BIConsumers groups.
4. Assign the BIAdministrators group to the Administrator or the WebLogic user.
Configuring MySQLYou must configure the MySQL database to use the DataDirect driver. If you are usinga database that is already configured to use the DataDirect drivers, modify thedatabase configuration's odbc.ini file to use the correct DataDirect drivers.
To configure MySQL:
1. Open the odbc.ini file located at the following location:
(UNIX) 12c_DOMAIN_HOME/config/fmwconfig/bienv/core/odbc.ini
Replace the value of DOMAIN_HOME with the actual path to the Oracle AnalyticsServer Domain home you created when you installed the Oracle Analytics Server.
2. Update the ODBC entry to use the DataDirect drivers, as shown in the followingexample:
[DSN name in RPD] Driver=NEW_ORACLE_HOME/bi/common/ODBC/Merant/8.0.2/lib/<8.0.2.so> Description=DataDirect 8.0.2 MySQL Wire Protocol ApplicationUsingThreads=1 ConnectionRetryCount=0 ConnectionRetryDelay=3Database=DB nameDefaultLongDataBuffLen=1024 EnableDescribeParam=0InteractiveClient=0 LoadBalancing=0LogonID=DB usernamePassword=DB passwordPortNumbeR=DB PORTReportCodepageConversionErrors=0 TreatBinaryAsChar=0
Chapter 7Adding Roles and Permissions
7-6

3. Update all existing data source names (DSNs) that are configured with the 11gDataDirect version. For example, the data source name for MySQL should point toDataDirect 8.0.2 as shown in the following example:
[ODBC Data Sources] AnalyticsWeb = Oracle BI Server Cluster = Oracle BI Server SSL_Sample = Oracle BI Server DSN name in RPD = DataDirect 8.0.2
4. Save and close the odbc.ini file.
Checking JavaHost ConfigurationMake sure that the XMLP and Oracle BI JavaHost settings match with the settingsspecified for the configuration of the 11g system.
To check the XMLP and the BI JavaHost configuration:
1. View the config.xml file on the 11g and Oracle Analytics Server.
The file is present at the following location on the 11g system:
(UNIX) EXISTING_DOMAIN_HOME/config/OracleBIJavaHostComponent/coreapplication_obijh1/config .xml
The file is present at the following location on the Oracle Analytics Server:
(UNIX) NEW_DOMAIN_HOME/config/fmwconfig/biconfig/OBIJH/config.xml
2. Verify that the XMLP configuration on both the 11g and the Oracle AnalyticsServer systems is as shown in the following code block:
<XMLP> <InputStreamLimitInKB>8192</InputStreamLimitInKB> <ReadRequestBeforeProcessing>true</ReadRequestBeforeProcessing></XMLP>
3. Verify that the OBIJH_ARGS="-server -Xmx1024M -Xrs" parameter in the12c setOBIJHEnv.sh file matches with the "start-args" value="-server -Xmx1024M -Xrs parameter in the 11g opmn.xml file.
The opmn.xml file is located at the following location on the 11g system:
MW_HOME/instances/config/OPMN/opmn/opmn.xml
<process-type id="OracleBIJavaHostComponent" module-id="CUSTOM"> <module-data> <category id="start-parameters"> <data id="start-executable" value="$ORACLE_HOME/jdk/bin/java"/> <data id="start-args" value="-server -Xmx1024M -Xrs ...
Chapter 7Checking JavaHost Configuration
7-7

The setOBIJHEnv.sh file is located at the following location on the OracleAnalytics Server system:
(UNIX) NEW_ORACLE_HOME/bi/modules/oracle.bi.cam.obijh/setOBIJHEnv.sh
Enabling ClustersAfter migrating the data, you must manually enable the ClusterEnabled parameter inthe ClusterConfig.xml file to turn on the cluster instances on the Oracle AnalyticsServer.
To enable the clusters:
1. Open the ClusterConfig.xml file for editing, located at the following location:
On UNIX operating system:
DOMAIN_HOME/config/fmwconfig/biconfig/core
2. Locate the following:
<ClusterEnabled>false</ClusterEnabled>
Change it to the following:
<ClusterEnabled>true</ClusterEnabled>
3. Save and close the file.
Enabling Oracle Hardware Acceleration and CompatibilityMode
Hardware acceleration affects the autocompletion of features such as dashboardprompts, trellis charts and microcharts, Summary Advisor functionality, and aggregatepersistence for the TimesTen In-Memory database. Therefore, you must manuallyenable the bi:hw-acceleration flag in the Oracle Analytics Server bi-config.xml file post-migration. You must also enable the bi:compat-mode-11g flag, so that the state of the11g system is preserved at run time.
To enable the bi:hw-acceleration flag:
1. Locate the bi-config.xml, available at the following location:
(UNIX) OAS_DOMAIN_HOME/config/fmwconfig/biconfig/core/bi-config.xml
Replace the value of DOMAIN_HOME with the path of the Oracle BI domain onOracle Analytics Server.
2. Locate the following:
<bi:hw-acceleration>false</bi:hw-acceleration>
Chapter 7Enabling Clusters
7-8

Replace it with the following:
<bi:hw-acceleration>true</bi:hw-acceleration>
3. Locate the following:
<bi:compat-mode-11g>false</bi:compat-mode-11g>
Replace it with the following:
<bi:compat-mode-11g>true</bi:compat-mode-11g>
4. Save and close the file.
Setting the Compatibility FrameworkThe compatibility framework allows the BI Server to add new features that are notcompatible with the Oracle BI 11g releases while providing a flexible framework thatenables the BI Server to operate in a compatibility mode with the earlier major release.Individual features and bug fixes can be enabled or disabled independently usingcompatibility flags. Alternatively, you can set all the compatibility flags to the defaultvalues using a single COMPATIBLE_RELEASE flag for the Oracle BI system to becompatible with the earlier release, which is 11.1.1.9. Add theCOMPATIBLE_RELEASE parameter to the NQSConfig.INI file to ensure that themigrated Oracle Analytics Server environment behaves as closely as possible toOracle Business Intelligence 11g Release (11.1.1.9) environment.
Note:
If the COMPATIBLE_RELEASE parameter is not set, then the systemdefaults to the behavior of the current release, such as Oracle AnalyticsServer.
The framework does not distinguish individual bundle patches (only the first four digitsof the version number are significant for determining compatibility).
When applying new features, enhancements, or bug fixes that are not inherentlybackward-compatible, ensure that you specify a compatibility flag using the guidelinesdescribed in this topic.
Chapter 7Setting the Compatibility Framework
7-9
Note:
The NQSConfig.INI file does not contain the COMPATIBLE_RELEASEparameter by default. The global bi:compat-mode-11g is the default flag andit applies to all Oracle Analytics Server components. When the bi:compat-mode-11g element in the bi-config.xml file is set to true, the BI Servercompatibility framework behaves as if the COMPATIBLE_RELEASE wereset to 11.1.1.9 and it disables any features or bug fixes that would causemajor compatibility issues during migration from 11g to Oracle AnalyticsServer. However, if you explicitly edit the NQSConfig.INI file to setthe COMPATIBLE_RELEASE parameter or any other compatibility flag, thenthe setting in the NQSConfig.INI file takes precedence over theglobal bi:compat-mode-11g flag specified in the bi-config.xml file.
In addition to setting the general COMPATIBLE_RELEASE parameter, you can setcompatibility flags for specific features or bug fixes, which begin with the prefix"OBIS_". Instructions to set these specific compatibility flags are provided by thesupport team to solve certain issues on a need basis. For example,
[ COMPATIBILITY ]COMPATIBLE_RELEASE=11.1.1.9;OBIS_ENABLE_DIMENSIONALITY=0;
Setting the COMPATIBLE_RELEASE parameter or specific compatibility flags in theNQSConfig.INI file applies the changes to the entire system. You can also set theCOMPATIBLE_RELEASE parameter or the specific feature flag as a session variableor an environment variable so that the compatibility mode is set to specific reports ordashboards. You can do this by adding a query prefix to an analysis request. Thefollowing is an example of a variable setting:
set variable COMPATIBLE_RELEASE='11.1.1.9':
Migrating the Fusion Middleware MapViewer ConfigurationOracle Fusion Middleware Mapviewer (MapViewer) is a programmable tool forrendering maps using spatial data managed by Oracle Spatial and Graph or OracleLocator (also referred to as Locator). MapViewer provides tools that hide thecomplexity of spatial data queries and cartographic rendering, while providingcustomizable options for more advanced users. These tools can be deployed in aplatform-independent manner and are designed to integrate with map-renderingapplications. After migrating the data, you must manually modify the Oracle AnalyticsServer MapViewer configuration file to contain the same contents as the 11g fileexcept the Logging section.
To migrate the MapViewer configuration:
1. Go to the Oracle Analytics Server Fusion Middleware MapViewer AdministrationConsole.
2. Create a copy of the default Oracle Analytics Server MapViewer configuration file.
Chapter 7Migrating the Fusion Middleware MapViewer Configuration
7-10

3. Overwrite the contents in the copy of the Oracle Analytics Server MapViewerconfiguration file with the content from the mapViewerConfig.xml file from the 11gMapViewer install.
4. Replace the logging section of the MapViewer configuration file copy with thesettings from the default Oracle Analytics Server MapViewer configuration file.
5. Update the logging settings log levels of the MapViewer configuration file asneeded for Oracle Analytics Server.
6. Click Save on the Oracle Analytics Server MapViewer Administration Console andthen click Restart.
Resolving Authentication Issues After MigrationTo avoid authentication issues post-migration, you must uncheck the Required forAuthentication option in the DYNAMIC_OLAP_LOGIN initialization block.
Note:
Follow this procedure only if you are migrating from Oracle BI to OracleAnalytics Server.
To resolve the authentication issues after migration:
1. Open the repository in offline mode.
a. Change to the following directory on Oracle Analytics Server:
(UNIX) DOMAIN_HOME/bitools/bin/
Replace the value of DOMAIN_HOME with the actual Domain home on yourOracle Analytics Server.
b. Run the following command:
sh data-model-cmd.sh downloadrpd –u uname –p pwd –odownloaded.rpd –w rpd_password
Where,
-o is the output RPD-w rpd_password is the RPD password, say Admin123
c. Open the downloaded repository offline in the BI Administration Tool, whichyou installed with the client installer.
2. Complete the following steps:
a. From the Manage menu in the BI Administration Tool, select Variables.
b. In the Variable Manager dialog, from the Action menu, select Session, thenInitialization Blocks.
c. In the Variable Initialization Block dialog, locate DYNAMIC_OLAP_LOGIN.
d. Open the DYNAMIC_OLAP_LOGIN properties, and uncheck the Required forAuthentication checkbox.
e. Click Apply and save the repository.
3. Open the repository in online mode using the uploadrpd command.
Chapter 7Resolving Authentication Issues After Migration
7-11
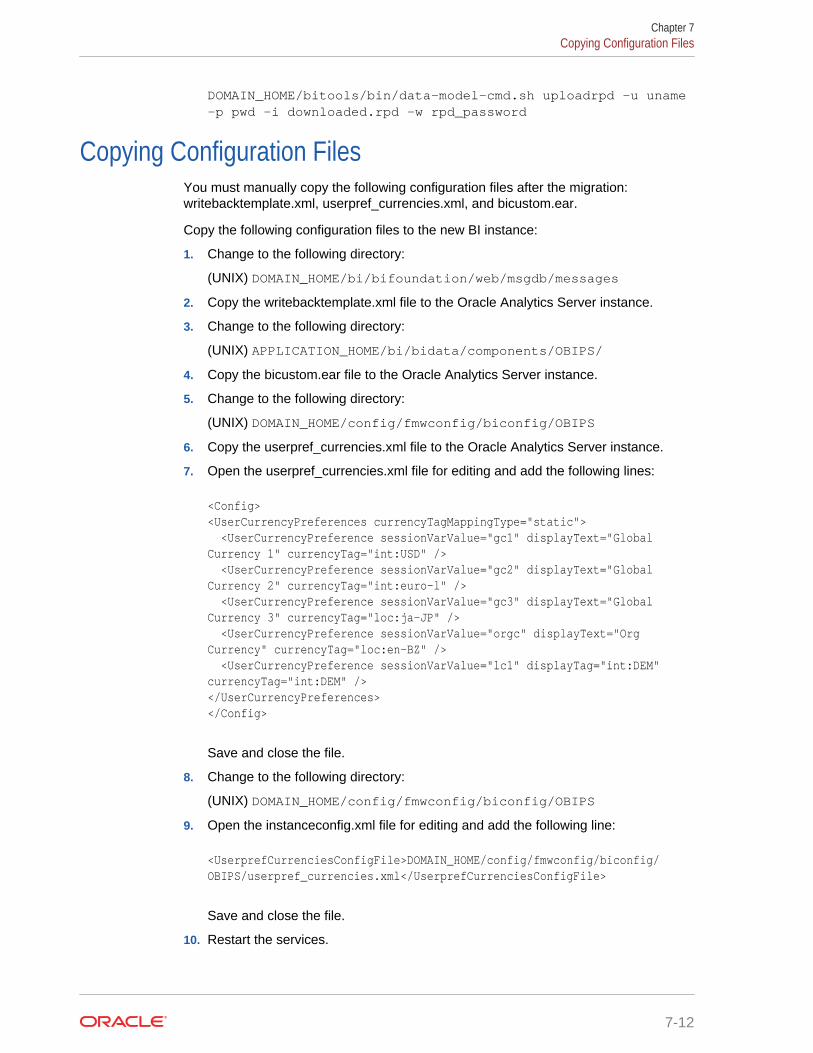
DOMAIN_HOME/bitools/bin/data-model-cmd.sh uploadrpd –u uname–p pwd –i downloaded.rpd –w rpd_password
Copying Configuration FilesYou must manually copy the following configuration files after the migration:writebacktemplate.xml, userpref_currencies.xml, and bicustom.ear.
Copy the following configuration files to the new BI instance:
1. Change to the following directory:
(UNIX) DOMAIN_HOME/bi/bifoundation/web/msgdb/messages
2. Copy the writebacktemplate.xml file to the Oracle Analytics Server instance.
3. Change to the following directory:
(UNIX) APPLICATION_HOME/bi/bidata/components/OBIPS/
4. Copy the bicustom.ear file to the Oracle Analytics Server instance.
5. Change to the following directory:
(UNIX) DOMAIN_HOME/config/fmwconfig/biconfig/OBIPS
6. Copy the userpref_currencies.xml file to the Oracle Analytics Server instance.
7. Open the userpref_currencies.xml file for editing and add the following lines:
<Config><UserCurrencyPreferences currencyTagMappingType="static"> <UserCurrencyPreference sessionVarValue="gc1" displayText="Global Currency 1" currencyTag="int:USD" /> <UserCurrencyPreference sessionVarValue="gc2" displayText="Global Currency 2" currencyTag="int:euro-l" /> <UserCurrencyPreference sessionVarValue="gc3" displayText="Global Currency 3" currencyTag="loc:ja-JP" /> <UserCurrencyPreference sessionVarValue="orgc" displayText="Org Currency" currencyTag="loc:en-BZ" /> <UserCurrencyPreference sessionVarValue="lc1" displayTag="int:DEM" currencyTag="int:DEM" /></UserCurrencyPreferences></Config>
Save and close the file.
8. Change to the following directory:
(UNIX) DOMAIN_HOME/config/fmwconfig/biconfig/OBIPS
9. Open the instanceconfig.xml file for editing and add the following line:
<UserprefCurrenciesConfigFile>DOMAIN_HOME/config/fmwconfig/biconfig/OBIPS/userpref_currencies.xml</UserprefCurrenciesConfigFile>
Save and close the file.
10. Restart the services.
Chapter 7Copying Configuration Files
7-12

Removing the Display of HTML Codes in a Customized "NoResults" Message
In an analysis, content developers can control the text that is displayed when theresults of the analysis return no data. Content developers can accept the defaultmessage, or they can customize the text of the message, including by inserting HTMLformatting codes in the message.
If content developers customized the message and included HTML codes in Release11g, then the message is displayed with the codes showing as readable text in OracleAnalytics Server, rather than performing their functions to format the message. Towork around this issue, open the Analysis Properties dialog for each analysis whosecustom message includes HTML codes and select the Contains HTML Markupoption.
For information on the use of the Contains HTML Markup option, see EnableSavingContentWithHTML in Managing Security for Oracle Analytics Server.
Chapter 7Removing the Display of HTML Codes in a Customized "No Results" Message
7-13

8Post-Migration Tasks for Oracle AnalyticsPublisher
After completing the data migration, you must migrate the Publisher configuration,scheduler jobs, and job history. You must also remove the BISystemUser policy fromthe JMSResource security configuration.
Migrating Scheduler Jobs and Job HistoryAfter migrating the 11g configuration to a new Oracle Analytics Server environment,you must migrate the scheduler jobs and the job history data from the 11gBIPLATFORM schema to a BIPLATFORM schema. You can connect to BIPLATFROMschema through SQL*PLUS or any other tool and execute the script.
The bip_12c_scheduler_migration.sql script requires the user ID, the password, andthe connection string for 11g BIPLATFROM schema. The script creates a databaselink called BIP11g_DBLINK and imports all schedule objects using that link. You musthave Database Administrator privileges to run the script.
Note:
You cannot migrate scheduler data from DB2 and SQL Server databases.You can migrate scheduler data only from Oracle databases.
To migrate scheduler jobs and job history:
1. Change to the directory appropriate for your platform:
(UNIX) NEW_ORACLE_HOME/bi/modules/oracle.bi.publisher/upgradeutil
Replace NEW_ORACLE_HOME with the actual path to the Oracle AnalyticsServer home you created when you installed the Oracle Analytics Server.
2. Connect to the target Oracle Analytics Server BIPLATFORM schema fromSQLPLUS or SQL Developer by entering the following command:
sqlplus userid/password@connectionString -- for 12c RCUSchema
For example:
sqlplus username/[email protected]:1521/pdborcl.yourcompany.com
3. Run the bip_12c_scheduler_migration.sql script, passing the command-lineparameters 11g_RCU_SCHEMA, 11G_PASSWORD, 11G_CONNECTION_STRING,and 12C_BIPLATFORM_SCHEMA.
Usage:
8-1

SQL> @bip_12c_scheduler_migrationg.sql 11g_userid11g_password 11g_connection_string
Sample command:
SQL> bip_12c_scheduler_migration.sql 11g_RCU_USERNAME11g_PASSSWORD 11G_hostname.yourcompany.com:1521/orcl.yourcompany.com 12C_BIPLATFROM_SCHEMA_NAMESystem output:old 1: &&1new 1: adc00ccq_biplatformold 2: &&2new 2: your_passwordold 3: '&&3'new 3: 'bipdev4.yourcompany.com:1521/ora11g.yourcompany.com'old 4: '&&4'new 4: 12C_BIPLATFROM_SCHEMA_NAMEDatabase link created.9979 rows created.9769 rows created.9739 rows created.4159 rows created.6 rows created.6 rows created.6 rows created.Commit complete.Database link dropped.SQL>
After the import operation completes, the database link is deleted.
Removing the BISystemUser Policy from the JMSResourceSecurity Configuration
BISystemUser is not supported in the Oracle Analytics Server environment. When theusers and policies are migrated from an 11g instance, the JMSResource policy blocksthe scheduled jobs. Therefore, you must remove this policy from the JMSResourcesecurity configuration. You can manually remove the BISystemUser policy fromWebLogic console. Alternatively, you can execute a WLST (Python) script toaccomplish this task.
Manually Removing the BISystemUser PolicyThis topic describes the procedure to remove the BISystemUser policy from theWebLogic Console.
To manually remove the BISystemUser policy:
1. Sign in to the WebLogic Console.
2. Under Services, click Messaging and then JMSModules, and selectBipJmsResource.
Chapter 8Removing the BISystemUser Policy from the JMSResource Security Configuration
8-2

Figure 8-1 JMS Modules
3. Under the Security tab, click Policies.
4. Under Policy Conditions, select the User: BISystemUser checkbox and clickRemove.
Figure 8-2 Settings for BipJmsResource
5. Restart Oracle Analytics Publisher and check the scheduled jobs.
Removing the BISystemUser Policy using a WLST ScriptThis topic describes the procedure to remove the BISystemUser policy using a WLSTscript.
To remove the BISystemUser policy:
1. Copy the BIPRemoveJMSResourcePolicy.py script from the following location:
(UNIX) NEW_ORACLE_HOME/bi/modules/oracle.bi.publisher
2. Go to NEW_ORACLE_HOME/server/bin directory.
3. Set the WLS environment. Enter
source ./setWLSEnv.sh
4. Run the script to remove JMS Resource policy. Enter
Chapter 8Removing the BISystemUser Policy from the JMSResource Security Configuration
8-3

java weblogic.WLST BIPRemoveJMSResourcePolicy.py <WL AdminUsername> <WL Admin Password> <Admin Server URL: t3://localhost:port>
5. Sign in to the WebLogic Console and verify whether the policy is removed.
Chapter 8Removing the BISystemUser Policy from the JMSResource Security Configuration
8-4

AMigrating Security Certificates when UsingSecure LDAP
From 12c (12.2.1.4.0) onwards, the IBM LDAP client libraries used in previousversions of the product have been replaced with Oracle LDAP libraries. If you areusing secure LDAP in your Oracle Analytics Server deployment, you need to create anOracle wallet to manage your security credentials, and migrate your existing CAcertificate to the wallet.
To check whether you are using secure LDAP:
1. On the Oracle BI Administration Tool, click Manage and then Identity to open theIdentity Manager.
2. On the Identity Manager window, click Directory Servers on the left pane.
The right pane displays the available LDAP objects.
3. Select and open the LDAP object to open the LDAP Server dialog.
4. On the LDAP Server dialog, click Advanced.
If the SSL option is selected, then secure LDAP is in use.
If you are using secure LDAP, then you must first create an Oracle wallet and thenspecify the Oracle wallet directory on the Repository tab using the Oracle BIAdministration Tool.
Creating an Oracle WalletTo create an Oracle Wallet:
1. Export the CA certificate from the key database file using the IBM keymanagement utility (iKeyman) and save it in a .kdb file.
2. Run the Oracle Wallet Manager.
3. Create a new wallet and specify a password.
4. From the Operations window, click Import Trusted Certificate.
5. On the Import Trusted Certificate dialog, select the Select a file that contains thecertificate option and click OK.
6. Browse and select the file that you exported in step 1.
7. Save the wallet and note its location.
Specifying the Wallet DirectoryTo specify the Oracle wallet directory:
1. In the Oracle BI Administration Tool, click Tools.
2. In the Options dialog, select the Repository tab.
A-1

3. In the Wallet directory field, specify the location of the Oracle wallet that youcreated.
4. Specify and confirm the password for this wallet and click OK.
Appendix ASpecifying the Wallet Directory
A-2

BUpdating the JDK After Installing andConfiguring an Oracle Analytics Server
Consider that you have a JDK version jdk1.8.0_121 installed on your machine. Whenyou install and configure an Oracle Fusion Middleware product, the utilities, such asConfiguration Wizard (config.sh|exe), OPatch, or RCU point to a default JDK, forexample, jdk1.8.0_121. After some time, Oracle releases a new version of the JDK,say jdk1.8.0_221 that carries security enhancements and bug fixes. You can upgradethe existing JDK to a newer version, and can have the complete product stack point tothe newer version of the JDK.
You can maintain multiple versions of JDK and switch to the required version on needbasis.
About Updating the JDK Location After Installing an OracleFusion Middleware Product
The binaries and other metadata and utility scripts in the Oracle home and Domainhome, such as RCU or Configuration Wizard, use a JDK version that was used whileinstalling the software and continue to refer to the same version of the JDK. The JDKpath is stored in a variable called JAVA_HOME which is centrally locatedin .globalEnv.properties file inside the ORACLE_HOME/oui directory.
The utility scripts such as config.sh|cmd, launch.sh, or opatch reside in theORACLE_HOME, and when you invoke them, they refer to the JAVA_HOME variablelocated in .globalEnv.properties file. To point these scripts and utilities to the newerversion of JDK, you must update the value of the JAVA_HOME variable inthe .globalEnv.properties file by following the directions listed in Updating the JDKLocation in an Existing Oracle Home .
To make the scripts and files in your Domain home directory point to the newer versionof the JDK, you can follow one of the following approaches:
• Specify the path to the newer JDK on the Domain Mode and JDK screen whilerunning the Configuration Wizard.
For example, consider that you installed Oracle Fusion Middleware Infrastructurewith the JDK version 8u191. So while configuring the WebLogic domain with theConfiguration Assistant, you can select the path to the newer JDK on the DomainMode and JDK screen of the Configuration Wizard. Example: /scratch/jdk/jdk1.8.0_221.
• Manually locate the files that have references to the JDK using grep (UNIX) orfindstr (Windows) commands and update each reference. See Updating theJDK Location in an Existing Oracle Home .
B-1
Note:
If you install the newer version of the JDK in the same location as theexisting JDK by overwriting the files, then you don’t need to take any action.
Updating the JDK Location in an Existing Oracle HomeThe getProperty.sh|cmd script displays the value of a variable, such asJAVA_HOME, from the .globalEnv.properties file. The setProperty.sh|cmd script isused to set the value of variables, such as OLD_JAVA_HOME or JAVA_HOME thatcontain the locations of old and new JDKs in the .globalEnv.properties file.
The getProperty.sh|cmd and setProperty.sh|cmd scripts are located in the followinglocation:
(UNIX) ORACLE_HOME/oui/binWhere, ORACLE_HOME is the directory that contains the products using the currentversion of the JDK, such as jdk1.8.0_121.
To update the JDK location in the .globalEnv.properties file:
1. Use the getProperty.sh|cmd script to display the path of the current JDK from theJAVA_HOME variable. For example:
(UNIX) ORACLE_HOME/oui/bin/getProperty.sh JAVA_HOMEWhere JAVA_HOME is the variable in the .globalEnv.properties file that containsthe location of the JDK.
2. Back up the path of the current JDK to another variable such asOLD_JAVA_HOME in the .globalEnv.properties file by entering the followingcommands:
(UNIX) ORACLE_HOME/oui/bin/setProperty.sh -name OLD_JAVA_HOME-value specify_the_path_of_current_JDK
This command creates a new variable called OLD_JAVA_HOME inthe .globalEnv.properties file, with a value that you have specified.
3. Set the new location of the JDK in the JAVA_HOME variable ofthe .globalEnv.properties file, by entering the following commands:
(UNIX) ORACLE_HOME/oui/bin/setProperty.sh -name JAVA_HOME -value specify_the_location_of_new_JDK
After you run this command, the JAVA_HOME variable inthe .globalEnv.properties file now contains the path to the new JDK, such asjdk1.8.0_131.
Updating the JDK Location in an Existing Domain HomeYou must search the references to the current JDK, for example jdk1.8.0_121manually, and replace those instances with the location of the new JDK.
You can use the grep (UNIX) or findstr (Windows) commands to search for thejdk-related references.
Appendix BAbout Updating the JDK Location After Installing an Oracle Fusion Middleware Product
B-2

You’ll likely be required to update the location of JDK in the following three files:
(UNIX) DOMAIN_HOME/bin/setNMJavaHome.sh
(UNIX) DOMAIN_HOME/nodemanager/nodemanager.properties
(UNIX) DOMAIN_HOME/bin/setDomainEnv.sh
Appendix BAbout Updating the JDK Location After Installing an Oracle Fusion Middleware Product
B-3
CStopping Servers and Processes
Before you run the Upgrade Assistant to upgrade your schemas and configurations,you must shut down all of the pre-upgrade processes and servers, including theAdministration Server and any managed servers.
An Oracle Fusion Middleware environment can consist of an Oracle WebLogic Serverdomain, an Administration Server, multiple managed servers, Java components,system components such as Identity Management components, and a database usedas a repository for metadata. The components may be dependent on each other, sothey must be stopped in the correct order.
Note:
The procedures in this section describe how to stop the existing, pre-upgradeservers and processes using the WLST command-line utility or a script. Youcan also use the Oracle Fusion Middleware Control and the OracleWebLogic Server Administration Console. See Starting and StoppingAdministration and Managed Servers and Node Manager.
To stop your pre-upgrade Fusion Middleware environment, navigate to the pre-upgrade domain and follow the steps below:
Step 1: Stop System Components
To stop system components, such as Oracle HTTP Server, use the stopComponentscript:
• (UNIX) EXISTING_DOMAIN_HOME/bin/stopComponent.sh component_name
You can stop system components in any order.
Step 2: Stop the Managed Servers
To stop a WebLogic Server Managed Server, use the stopManagedWebLogic script:
• (UNIX) EXISTING_DOMAIN_HOME/bin/stopManagedWebLogic.shmanaged_server_name admin_url
When prompted, enter your user name and password.
Step 3: Stop Oracle Identity Management Components
Stop any Oracle Identity Management components, such as Oracle Internet Directory:
• (UNIX) EXISTING_DOMAIN_HOME/bin/stopComponent.sh component_name
C-1

Step 4: Stop the Administration Server
When you stop the Administration Server, you also stop the processes running in theAdministration Server, including the WebLogic Server Administration Console andFusion Middleware Control.
To stop the Administration Server, use the stopWebLogic script:
• (UNIX) EXISTING_DOMAIN_HOME/bin/stopWebLogic.sh
When prompted, enter your user name, password, and the URL of the AdministrationServer.
Step 5: Stop Node Manager
To stop Node Manager, close the command shell in which it is running.
Alternatively, after setting the nodemanager.properties attribute QuitEnabled to true(the default is false), you can use WLST to connect to Node Manager and shut itdown. See stopNodeManager in WLST Command Reference for WebLogic Server.
Appendix C
C-2
DTroubleshooting Migrated Oracle AnalyticsServer
This appendix provides procedures to troubleshoot a migrated Oracle Analytics Serversystem.
Configuration Failure with TRANSFORMBAREXCEPTIONThe Oracle Analytics Server configuration might fail with aTRANSFORMBAREEXCEPTION error, if any objects in the catalog are older thanRelease 11.1.1.9. You can confirm the need to update the catalog items by viewingthe metrics in Oracle Enterprise Manager Fusion Middleware Control. In the Catalogfolder, find a metric called Reads Needing Upgrade with the description "Thenumber of objects read that required upgrading." If the number is large, then you canresolve this issue by updating objects in the catalog using the Administration page inPresentation Services.
To update the catalog:
1. Sign in to Oracle Analytics Server with administration credentials.
2. In the global header, click Administration.
3. Click the Scan and Update Catalog Objects That Require Updates link.
4. Click Update Catalog Objects to begin the update process.
Click the other links on the page to see which objects were updated and whichwere not. You can view the log files for details on objects that were not updated.
Restart Oracle BI Presentation Services using Oracle Enterprise Manager FusionMiddleware Control.
Regenerating User GUIDsThis task requires that you manually edit the configuration files to instruct Oracle BIServer and Oracle BI Presentation Server to regenerate the GUIDs on restart. Oncecompleted, you edit these files again to remove the modification.
For information about locating the Oracle Business Intelligence configuration files, see Configuration Files in System Administrator's Guide for Oracle Business IntelligenceEnterprise Edition.
To regenerate user GUIDs:
1. Update the FMW_UPDATE_ROLE_AND_USER_REF_GUIDS parameter in the 11gNQSConfig.INI file.
a. Open the 11g NQSConfig.INI file for editing present at these locations:
(UNIX) 11g_DOMAIN_HOME/config/OracleBIServerComponent/coreapplication_obisn
D-1

b. Locate the FMW_UPDATE_ROLE_AND_USER_REF_GUIDS parameter and set itto YES, as follows
FMW_UPDATE_ROLE_AND_USER_REF_GUIDS = YES;
c. Save and close the file.
2. Update the Catalog element in the 11g instanceconfig.xml file present at theselocations:
(UNIX) 11g_DOMAIN_HOME/config/OracleBIPresentationServicesComponent/coreapplication_obipsn
a. Open the instanceconfig.xml file for editing:
b. Locate the Catalog element and update it as follows:
<Catalog><UpgradeAndExit>false</UpgradeAndExit><UpdateAccountGUIDs>UpdateAndExit</UpdateAccountGUIDs></Catalog>
c. Save and close the file.
3. Restart the Oracle BI system components using opmnctl:
cd ORACLE_HOME/admin/instancen/bin./opmnctl stopall./opmnctl startall
4. Set the FMW_UPDATE_ROLE_AND_USER_REF_GUIDS parameter in theNQSConfig.INI file back to NO.
Important:
You must perform this step to ensure that your system is secure.
5. Update the Catalog element in the 11g instanceconfig.xml file to remove theUpdateAccount GUIDs entry.
6. Restart the Oracle BI system components using opmnctl:
cd ORACLE_HOME/admin/instancen/bin./opmnctl stopall./opmnctl startall
Updating Oracle BI Presentation Services CatalogWhen migrating from 11g, you must manually update your Oracle BI PresentationServices Catalog.
To update the Oracle BI Presentation Services Catalog:
1. Shut down Oracle BI Presentation Services using Oracle Enterprise ManagerFusion Middleware Control.
Appendix DConfiguration Failure with TRANSFORMBAREXCEPTION
D-2

See Using Fusion Middleware Control to Start and Stop BI System ComponentProcesses in Administering Oracle Analytics Server.
2. Back up your existing Oracle BI Presentation Services Catalog by using the 7-Ziputility to create a compressed file.
3. Create a backup copy of the instanceconfig.xml file present at these locations:
(UNIX) 11g_DOMAIN_HOME/config/OracleBIPresentationServicesComponent/coreapplication_obipsn
4. Change the UpgradeAndExit option to true in the instanceconfig.xml file.
Find the following code:
<ps:Catalog xmlns:ps="oracle.bi.presentation.services/config/v1.1"> <ps:UpgradeAndExit>false</ps:UpgradeAndExit></ps:Catalog>
Change it to the following:
<ps:Catalog xmlns:ps="oracle.bi.presentation.services/config/v1.1"> <ps:UpgradeAndExit>true</ps:UpgradeAndExit></ps:Catalog>
5. Start Oracle BI Presentation Services using the following OPMN command toupdate the Oracle BI Presentation Services Catalog:
opmnctl startproc ias-component=coreapplication_obipsn
Where, n is the instance.
For example:
(UNIX) cd ORACLE_INSTANCE/bin
(UNIX) ./opmnctl startproc ias-component=coreapplication_obips1
6. After catalog is updated, edit the instanceconfig.xml file again and change theUpgradeAndExit option back to false.
7. Restart Oracle BI Presentation Services using Oracle Enterprise Manager FusionMiddleware Control.
Multiple Y-Axis Highcharts Graphs Not DisplayedMultiple Y-axis highchart graphs likely don't render after migration, because the OracleAnalytics Server instance does not include the required JavaScript (.js) files. You mustcopy the files to the instance manually.
To copy the JavaScript files to the Oracle Analytics Server instance:
1. Change to the \AnalyticsRes directory on the 11g system.
2. Copy the following files from the 11g \AnalyticsRes directory to the OracleAnalytics Server\AnalyticsRes directory:
• highcharts.js
• exporting.js
Appendix DMultiple Y-Axis Highcharts Graphs Not Displayed
D-3

• jquery-1.8.2.min.js
Setting the Evaluate Parameter in the NQSConfig.INI FileThe EVALUATE function in your analyses is not enabled by default in Logical SQLqueries because it exposes the database to SQL injection attacks. If you encounterany error while generating any views after migrating to Oracle Analytics Server, thenyou must set the value of the EVALUATE_SUPPORT_LEVEL parameter appropriatelyin the NQSConfig.INI file.
The default value of the EVALUATE_SUPPORT_LEVEL parameter is "0", whichmeans that evaluate is not supported.
# EVALUATE_SUPPORT_LEVEL:# 1: evaluate is supported for users with manageRepositories permission# 2: evaluate is supported for any user.# other: evaluate is not supported if the value is anything else.EVALUATE_SUPPORT_LEVEL = 0;
Manually set the value of the EVALUATE_SUPPORT_LEVEL parameter same as it isin the 11g NQSConfig.INI file or as required by your organization.
The NQSConfig.INI file is located at the following location:
(UNIX) DOMAIN_HOME/config/fmwconfig/biconfig/OBISn
Error: java.lang.NoClassDefFoundError: Could not initializeclass sun.awt.X11GraphicsEnvironment
If you have set the value of the DISPLAY variable manually or the system hasmanipulated it automatically, you can encounter the java.lang.NoClassDefFoundError:Could not initialize class sun.awt.X11GraphicsEnvironment error. In case you changethe value of the DISPLAY variable to a Windows-client system IP, to run the 64-bitLinux installer through a Windows client, reset it to its original value after theinstallation is complete. If you generate an analysis that contains graphs withoutresetting the value of the DISPLAY variable, you can get this error.
To fix this error:
1. Reset the value of the DISPLAY variable.
2. Restart the JavaHost process.
Verifying File Data Sources in PublisherWhile generating reports, if you encounter an error statingoracle.xdo.XDOException: File does not exist or is notreadable:..., you might not have copied the supporting XML files to OracleAnalytics Server. To solve this issue, manually validate that the path for each datasource points to the appropriate directory on Oracle Analytics Server.
To validate paths for the data source names:
1. Sign in to Oracle Analytics Publisher.
2. Go to File under Data Source on the Administration page.
Appendix DSetting the Evaluate Parameter in the NQSConfig.INI File
D-4

On the File page, you can see the directory path for each DSN.
3. Check whether the file is pointing to the correct Oracle Analytics Server directory.
4. To change the directory path, click the DSN.
You see the Update Data Source page.
5. Enter the correct and the complete path of the top-level directory and click Apply.
Error on checkSoftLimit FailedYou see the [nQSError: 43119] Query Failed: [nQSError: 46168]Operation RawFile::checkSoftLimit failed, it'll exceed thecurrent limitation. 1073758528 error if the query requires more temporaryspace to complete than the BI Administrator has allocated.
To resolve this issue:
1. Modify the query to reduce the volume of data that is processed by the BI Serverby:
a. Adding additional filters to the query.
b. Replacing the most detailed attribute columns with less detailed columns toreduce the overall level of detail of the query.
c. Removing attribute columns containing long text values.
d. Avoiding the use of SQL functions that are not supported by the backend datasource.
e. Removing certain attribute or measure columns that cause more complexinternal processing in the BI Server.
2. If you cannot resolve the issue by modifying or restructuring the query and if thesystem is capable of handling more load, request the BI Administrator to increasethe maximum size allowed for temporary files by modifying the followingparameters in the NQSConfig.INI file:
• WORK_DIRECTORY_SIZE_GLOBAL_LIMIT or
• MAX_WORK_FILE_SIZE_PERCENT
For example:
[General]WORK_DIRECTORY_SIZE_GLOBAL_LIMIT = 100 GB;# No temporary file will be allowed to exceed this percentage of the global work# directory limit.MAX_WORK_FILE_SIZE_PERCENT = 5;
Appendix DError on checkSoftLimit Failed
D-5

Note:
• The maximum size allowed for any single temporary file isdetermined by multiplying the total size limit of the temporarydirectory set in the WORK_DIRECTORY_SIZE_GLOBAL_LIMITparameter by the percentage specified inMAX_WORK_FILE_SIZE_PERCENT. By default the temporary filesize limit is 100 GB * 5% = 5 GB. This per-file limit applies to eachtemporary file individually, while the totalWORK_DIRECTORY_SIZE_GLOBAL_LIMIT applies collectively to allthe temporary files created by the BI Server.
• You must increase the MAX_WORK_FILE_SIZE_PERCENTparameter cautiously. Setting a large percentage can allow a singlerequest to consume a large portion of the total temporary space,possibly causing the system and other BI requests to run out oftemporary space and fail. Increasing theWORK_DIRECTORY_SIZE_GLOBAL_LIMIT is safer as long as thereis sufficient disk space. However, you must observe caution whileincreasing the value of theWORK_DIRECTORY_SIZE_GLOBAL_LIMIT parameter. Setting alarge value can cause the system to run out of disk space or allow BIrequests to consume too many system resources.
Replacing Custom Links in the Global HeaderAfter migrating to Oracle Analytics Server, you might notice that links that you hadadded to the global header in the 11g instance are no longer available. The links aremissing because the customlinks.xml file isn't migrated from the 11g to the OracleAnalytics Server instance. You must manually copy the file to the Oracle AnalyticsServer instance and enable the Custom Links functionality in the instanceconfig.xmlfile.
See Providing Custom Links in Presentation Services in Administering OracleAnalytics Server.
To enable custom links functionality:
1. Copy the customlinks.xml file to the following directory on the Oracle AnalyticsServer instance:
(UNIX) DOMAIN_HOME/bidata/components/OBIPS/customMessages
2. Open the instanceconfig.xml file for editing from the following location:
(UNIX) DOMAIN_HOME/config/fmwconfig/biconfig/OBIPS
3. Enable the custom links as shown in the following example:
<CustomLinks><Enabled>true</Enabled></CustomLinks>
4. Save your changes and close the file.
Appendix DReplacing Custom Links in the Global Header
D-6

5. Restart Presentation Services.
Migrating WebLogic UsersAfter migrating from 11g to Oracle Analytics Server, you must manually migrate theWebLogic users in to your Oracle Analytics Server domain. You can do this byexporting the security data from a security realm and importing it in to another securityrealm. Security data includes authentication, authorization, credential map, and roledata.
Understand when you would want to migrate security data. See Overview of SecurityData Migration.
Understand the concepts associated with importing and exporting security data. See Migration Concepts.
Understand which formats and constraints are supported by the WebLogic Securityproviders. See Formats and Constraints Supported by WebLogic Security Providers.
Note:
You can only export and import security data between security realms in thesame WebLogic Server release.
Exporting the Security Data from a Security ProviderTo export security data from a security provider to a file:
1. In the left pane of the Administration Console, select Security Realms and thenselect the name of the realm you are configuring (for example, myrealm).
2. Select the type of provider from which you want to export security data (forexample, Authentication).
3. Select the security provider from which you want to export security data.
4. Select Export under Migration.
5. Specify the directory and filename in which to export the security data in theExport File on Server field. The directory must exist.
Note:
The directory and file into which you export the security data should becarefully protected with operating system security as they contain secureinformation about your deployment.
6. (Optional) Define a specific set of security data to be exported in the ExportConstraints box.
7. Click Save.
After you export the data from the security provider, you can import it any time.
Appendix DMigrating WebLogic Users
D-7

Importing the Security Data into a Security ProviderTo import security data into a security provider:
1. In the left pane of the Administration Console, select Security Realms.
2. Select the name of the security realm into which the security data is to be imported(for example, myrealm).
3. Select Providers and then the type of provider into which security data is to beimported (for example, Authentication under Providers).
4. Select the security provider in which the security data is to be imported andselect Import under Migration.
5. Specify the directory and file name of the file that contains the exported securitydata in the Import File on Server field.
6. Click Save.
View Display Error: Invalid Column Encountered in OrdersOutstanding Report
You might see a View Display Error message that states that an invalid column wasencountered when loading the Orders Outstanding Report in Oracle Analytics Server.This error is displayed because the ID of the column that causes the error exists in theXML definition of the report, but not in the subject area table. You must manually editthe XML definition and remove the invalid column.
Appendix DView Display Error: Invalid Column Encountered in Orders Outstanding Report
D-8


