Migrating from 3-DNS to Global Traffic Manager • Introducing the 3-DNS to Global Traffic Manager migration process • Preparing the 3-DNS for migration • Running the OTCU remotely • Upgrading the 3-DNS Controller to Global Traffic Manager • Verifying the BIND configuration • Starting ZoneRunner • Verifying the wideip.conf file • Defining a listener • Applying the new configuration to additional systems • Re-adding NS records • Cleaning up • Tips and Tricks
Transcript
Migrating from 3-DNS to Global Traffic Manager
• Introducing the 3-DNS to Global Traffic Manager migration process
• Preparing the 3-DNS for migration
• Running the OTCU remotely
• Upgrading the 3-DNS Controller to Global Traffic Manager
• Verifying the BIND configuration
• Starting ZoneRunner
• Verifying the wideip.conf file
• Defining a listener
• Applying the new configuration to additional systems
• Re-adding NS records
• Cleaning up
• Tips and Tricks
Migrating from 3-DNS to Global Traffic Manager
Introducing the 3-DNS to Global Traffic Manager migration process
Migrating a 3-DNS Controller to a Global Traffic Manager requires a more detailed process than a standard upgrade. This is because the transition between 3-DNS and Global Traffic Manager involves some very significant changes to the system, including: completely replacing the underlying operating system; replacing the third-party utility, NameSurfer, with a ZoneRunner, a utility specifically designed to handle DNS record management for Global Traffic Manager systems; and replacing the 3dnsd daemon with the gtmd daemon. The Global Traffic Manager also employs different ways of managing familiar features, such as wide IPs, and requires that you configure additional settings that were previously unavailable, such as a listener. As result, it is highly likely that, when you migrate from 3-DNS to Global Traffic Manager, you must take extra care to ensure that all of the configuration settings that existed in the 3-DNS Controller import successfully into the new system.
Note
For the purposes of this document, the term migrating refers to upgrading a 3-DNS Controller to Global Traffic Manager software and importing the existing 3-DNS settings into the new system. The term upgrading refers to upgrading the 3-DNS software only; without concern for retaining the existing settings on the 3-DNS unit.
Given the wide variety of configurations for 3-DNS, it is nearly impossible to anticipate every potential issue that might arise while migrating from 3-DNS to Global Traffic Manager. However, with this document, you can identify the primary issues that you must address as you migrate to the Global Traffic Manager. When possible, this document provides detailed steps on how to address these issues; however, it is recommended that you do not move on to the next step of the migration process until you are sure you have addressed the previous issue successfully. Once you successfully migrate one 3-DNS Controller to Global Traffic Manager, you do not need to perform the migration on your other 3-DNS systems; instead, you can simply upgrade the systems with the Global Traffic Manager software and synchronize these systems with the unit that contains your wide IP and BIND configuration settings.
Migration optionsWhile the migration process between 3-DNS and Global Traffic Manager can be challenging, you only need to perform the process once. After a successful migration, you can synchronize the settings to other systems on which you have upgraded the software to Global Traffic Manager.
When you want to migrate a 3-DNS controller to Global Traffic Manager, it is important to consider the following options:
BIG-IP® Migration Guide 1
Migration Guide
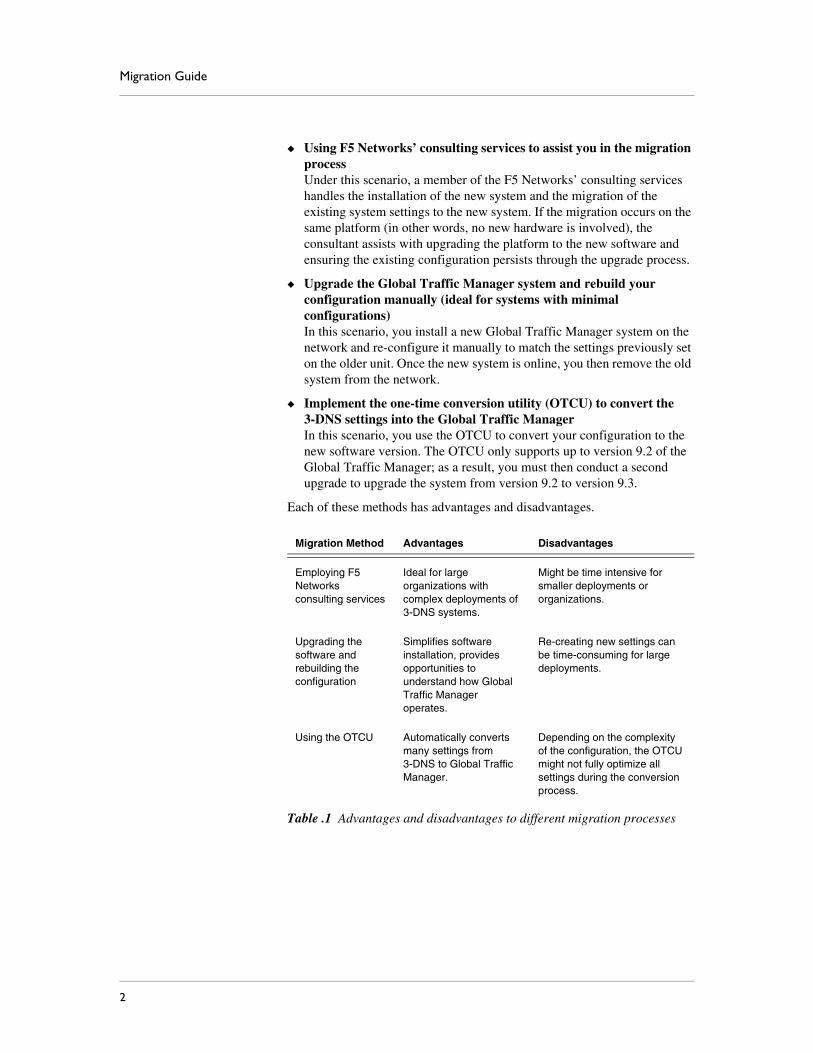
◆ Using F5 Networks’ consulting services to assist you in the migration processUnder this scenario, a member of the F5 Networks’ consulting services handles the installation of the new system and the migration of the existing system settings to the new system. If the migration occurs on the same platform (in other words, no new hardware is involved), the consultant assists with upgrading the platform to the new software and ensuring the existing configuration persists through the upgrade process.
◆ Upgrade the Global Traffic Manager system and rebuild your configuration manually (ideal for systems with minimal configurations)In this scenario, you install a new Global Traffic Manager system on the network and re-configure it manually to match the settings previously set on the older unit. Once the new system is online, you then remove the old system from the network.
◆ Implement the one-time conversion utility (OTCU) to convert the 3-DNS settings into the Global Traffic ManagerIn this scenario, you use the OTCU to convert your configuration to the new software version. The OTCU only supports up to version 9.2 of the Global Traffic Manager; as a result, you must then conduct a second upgrade to upgrade the system from version 9.2 to version 9.3.
Each of these methods has advantages and disadvantages.
Migration Method Advantages Disadvantages
Employing F5 Networks consulting services
Ideal for large organizations with complex deployments of 3-DNS systems.
Might be time intensive for smaller deployments or organizations.
Upgrading the software and rebuilding the configuration
Simplifies software installation, provides opportunities to understand how Global Traffic Manager operates.
Re-creating new settings can be time-consuming for large deployments.
Using the OTCU Automatically converts many settings from 3-DNS to Global Traffic Manager.
Depending on the complexity of the configuration, the OTCU might not fully optimize all settings during the conversion process.
Table .1 Advantages and disadvantages to different migration processes
2
Migrating from 3-DNS to Global Traffic Manager
Special considerationsAs you assess the steps you need to complete to migrate a 3-DNS Controller to Global Traffic Manager, it is recommended that you consider the following:
◆ Using 3-DNS and Global Traffic Manager systems simultaneouslyIf you elect to upgrade only certain systems from 3-DNS to Global Traffic Manager, it is important to remember you cannot synchronize configuration and persistence data between the two products. As a result, you must ensure that your configurations for each product do not include any data on the other system type. For example, you must not define a 3-DNS as a server in a Global Traffic Manager configuration.
◆ Migration on 520/540 platformsIf you migrate to Global Traffic Manager on a 520/540 platform, one interface becomes the management interface by default. As a result, the interface that actually handles DNS requests is likely to change.
◆ Keyboard and video portsAfter you migrate to Global Traffic Manager, there is a chance that keyboard and video ports might not function on older platforms.
◆ Version 9.3 recommendationFor the Global Traffic Manager, we highly recommend you migrate to version 9.3, as this version more fully supports BIND zone files during the migration process.
Additional resourcesBefore you migrate a 3-DNS Controller to Global Traffic Manager, it is recommended that you have reviewed the following additional documents:
◆ Global Traffic Manager release notesThe release notes for the Global Traffic Manager have the latest information on how to download and install the software. Release notes for Global Traffic Manager are available at http//support.f5.com.
◆ Configuration Guide for BIG-IP® Global Traffic ManagementThis guide contains detailed information the various features and capabilities of the Global Traffic Manager.
◆ BIG-IP® Global Traffic Manager and BIG-IP Link Controller: ImplementationsThis guide describes how to configure the Global Traffic Manager to comply with specific installation scenarios.
◆ SOL7176: F5 Networks support for ZoneRunner, BIND, and the named daemonThis solution is available on http://support.f5.com, and provides information on F5 Networks’ support for BIND and named.
BIG-IP® Migration Guide 3
Migration Guide
◆ RFC 952This RFC, available at http://www.rfc-archive.org/getrfc.php?rfc=952, describes the legal host names.
◆ DNS and BIND (fourth or fifth edition)This book is the definitive reference guide for DNS and BIND. Available from O’Reilly Media, Inc.
4
Migrating from 3-DNS to Global Traffic Manager
Preparing the 3-DNS for migrationThe differences between 3-DNS and Global Traffic Manager is quite significant; consequently, before you migrate to Global Traffic Manager you must ensure that the current configuration for the 3-DNS Controller meets specific conditions. These pre-migration tasks include:
• Removing NS records
• Removing the 3-DNS Controller from the Sync Group
• Disabling NameSurfer
• Validating the wideip.conf file
• Removing production rules
• Validating BIND and zone file configurations
• Optimizing the named.conf file for the one time conversion utility
Removing NS recordsOne of the first steps involved with preparing the 3-DNS Controller for migration to Global Traffic Manager is to remove its NS records from the name server that hosts the parent zone for your own DNS zones. This step ensures that the parent server does not send DNS requests to the 3-DNS Controller during the migration process.
Typically, you cannot remove these records yourself; instead, you must contact your DNS registrar to have the records removed.
Removing the 3-DNS Controller from the sync groupDuring the migration process, it is beneficial if the 3-DNS Controller does not belong to a sync group. This ensures that the changes you make to the 3-DNS Controller in preparation for the migration do not get sent to other 3-DNS Controllers on the network.
To remove the 3-DNS controller from the sync group
1. From the user interface of the 3-DNS Controller, click the System hyperlink.The System screen opens.
2. Clear the Sync Enabled check box.
3. Click Update.You have now disabled synchronization for the 3-DNS Controller. Next, you must remove the system from the sync group.
4. Navigate to the 3-DNS Sync section of the user interface.
5. Select the 3-DNS Controller and then click the Trash icon.This ensure that other 3-DNS Controllers on the network recognize that this unit is not part of the sync group.
BIG-IP® Migration Guide 5
Migration Guide
Disabling NameSurferWhen you migrate the 3-DNS Controller to Global Traffic Manager, you must disable the NameSurfer utility on the system.
WARNING
Do not disable NameSurfer until after you have removed the unit from its sync group.
To disable NameSurfer
1. On the command line for the 3-DNS Controller, type setup to run the setup utility.
2. Select the N option to configure NameSurfer.
3. Locate and select the Disable NameSurfer option, and then press Enter.
4. Select the Reuse the pre-NameSurfer BIND zone files option.
After you disable NameSurfer, open the /etc/named.conf file and verify that all references to NameSurfer have been removed. Zones previously managed by NameSurfer should be listed now as primary (or "master") zones. In addition, the file should contain no references to port 8054.
You must also verify that the zone files were successfully renamed without the .bk extension. If these zone files still retain the .bk extension, re-open the named.conf file and modify its contents to refer to the correct file name. It is easier to modify the named.conf file than it is to rename all of the zone files; however, you can rename the zone files if you prefer.
Important
Before continuing with the migration, you must ensure that you have removed all references to NameSurfer and port 8054 from your named.conf file.
Validating the wideip.conf fileAnother task associated with the migration process is validating the wideip.conf file. By ensuring the wideip.conf file is free of any parsing errors, you ensure that the onetime conversion utility can process the file correctly.
To validate the widep.conf file, run the command 3dparse -picky on the 3-DNS Controller. If any errors occur, locate and resolve the errors before you continue the migration process.
6
Migrating from 3-DNS to Global Traffic Manager
Removing production rulesOne of the difference between 3-DNS and Global Traffic Manager is that the production rules available in 3-DNS have been replaced with iRules. Consequently, you must remove any production rules from the wideip.conf file before you continue with the migration process. The one time conversion utility does not convert or remove production rules during the migration process.
Validating BIND and zone file configurationsIn addition to validating the wideip.conf file, you must also verify that the BIND configuration and zone files are error-free. To verify these files, run the command ndc restart and then view the /var/log/messages log file using the command tail -f /var/log/messages. If any errors occur, locate and resolve them before you continue the migration process.
You can confirm that the named configuration loaded correctly when the following log message appears:
Feb 13 15:28:08 default named[11504]: Ready to answer queries.
Note
BIND 9 and ZoneRunner both enforce a much more strict syntax for the named.conf file, as well as for SOA and Resource Records. Ensuring that your 3-DNS configuration is error free ensures a smoother migration process as you load the Global Traffic Manager.
Optimizing the named.conf fileAnother step associated with migrating to Global Traffic Manager involves optimizing the named.conf file for the one time conversion utility. This step helps ensure that the one time conversion utility converts the 3-DNS settings into Global Traffic Manager settings as accurately as possible.
The best way to optimize the named.conf file is to ensure that each code block in the named.conf file starts on its own line. For example:
zone "245.168.192.inaddr.arpa" {
type master;
file "245.168.192.in-addr.arpa";
}; zone "test.example.com" {
type master;
file "test.example.com";
}
The above section of a fictional named.conf file contains the zone, test.example.com, which is defined on the same line as the end of the code defining the zone, 245.168.192.in-addr.arpa. While this is an acceptable
BIG-IP® Migration Guide 7
Migration Guide
BIND configuration, the one time conversion utility might have issues processing it. Instead, move the test.example.com statement to its own line, as depicted in the following example:
zone "245.168.192.inaddr.arpa" {
type master;
file "245.168.192.in-addr.arpa";
};
zone "test.example.com" {
type master;
file "test.example.com";
}
Verifying Wide IPs and BIND resource recordsThe last step in preparing for the upgrade is to verify that all of the wide IPs and BIND resource records resolve correctly on the 3-DNS Controller. If they do not resolve correctly, identify the issues and resolve them before continuing.
8
Migrating from 3-DNS to Global Traffic Manager
Running the OTCU remotelyWhile the OTCU is intended to run on the same system and platform in which the original source UCS file was created on, it is possible to take a UCS file from the 3-DNS system and run the OTCU on a 9.x BIG-IP, like a BIG-IP 1500 system. Doing so almost assuredly results in a problem loading the bigip_base.conf as the interface and VLAN orientation is likely different from one platform from the next. However you can minimize the impact of this by completing the base configuration on the new system before running the OTCU.
Using this method still requires that you follow the migration process as outlined in this document. This method simply allows you to run the OTCU on a different system.
To run the OTCU on a different system
1. On the new system configure the base network components (VLANS, Self IPs, Management port, and so on).
2. Verify network settings and connectivity then backup the bigip.conf and bigip_base.conf:
8. Verify that bigip.conf and bigip_base.conf load properly:
b load
9. Begin the process of addressing any BIND and wideip.conf configuration issues.
BIG-IP® Migration Guide 9
Migration Guide
Upgrading the 3-DNS Controller to Global Traffic Manager
Once you have prepared the 3-DNS Controller for migrating to Global Traffic Manager, verifying that all configuration files are valid and optimized for conversion, you can install the Global Traffic Manager on the system. During this phase of the migration, you accomplish two tasks:
• you install the Global Traffic Manager software
• you convert the 3-DNS configuration settings into a format the Global Traffic Manager supports
Installing the Global Traffic Manager softwareYou can find detailed instructions on how to install Global Traffic Manager software in the Global Traffic Manager release notes, available from the Ask F5sm web site, http://tech.f5.com.
The following procedure provides general information on installing the Global Traffic Manager; however, it is highly recommended you refer to the release notes for your version of Global Traffic Manager before you start the installation process.
To install the Global Traffic Manager software
1. Acquire a registration key for your version of Global Traffic Manager. You cannot complete the installation without this key.
2. Download the ISO image of Global Traffic Manager from the following location:http://downloads.f5.com
3. Setup a BIG-IP PXE install environment.You can find detailed information on this process in the release notes for Global Traffic Manager.
4. Create a backup of your configuration using the following command:b config save /config.ucs
5. Leave the original config.ucs file on the 3-DNS Controller and store a copy of it on a remote host.
6. Back up the zone files.To back up the zone files, you must:
a) Change directories to /config/3dns/namedb using the following command:cd /config/3dns/namedb
b) Create an archive file of the zone files.tar cvzf /var/tmp/bind_zones.tgz *
c) Copy /var/tmp/bind_zones.tgz to a remote host.
10
Migrating from 3-DNS to Global Traffic Manager
d) Verify that the tar file contains all zones for the 3-DNS Controller using the following command:tar tvzf /var/tmp/bind_zones.tgz
Note: The conversion process rolls forward zone files automatically. However, this backup procedure is a precaution in case the upgrade process exits unexpectedly.
7. Perform a net reboot on the system that receives the upgrade.To perform a net reboot, press the Reset button and then immediately press the Netboot button.
8. As the installation completes, supply the registration key for the installation.
9. After the installation completes, press the Enter key to reboot the system.The first reboot after installation can take several minutes.
Note
It is recommended that you install the Global Traffic Manager on all available installation slots.
Setting up the Global Traffic ManagerWhen you have installed the Global Traffic Manager software is installed on the system, you can acquire the settings saved from the 3-DNS Controller and import them into the Global Traffic Manager. To use the 3-DNS settings, you use the one time conversion utility, or OTCU.
To set up the Global Traffic Manager
1. Establish the IP address for the system.When you complete the installation, only the management interface (formerly interface 1.1) has an IP address, which has a default value of 192.168.1.245. To change the IP address, run the config command on the system and follow the prompts.
2. Verify that you have activated the license for the new system.If the license is active, the Configuration utility opens to the General Properties screen.
3. In the General Properties screen, specify the fully-qualified domain name that the system previously used when it was a 3-DNS Controller.
4. Supply the passwords for the root and admin accounts.
7. Reboot the system.Until the system reboots, it does not recognize itself as a Global Traffic Manager.
Important
If, before you reboot, you see a prompt to run the OTCU, select N. You run the OTCU in the next section.
Running the OTCUAfter you convert the configuration settings and reboot the system as described in Setting up the Global Traffic Manager, on page -11, the system prompts you to run the one time conversion utility, or OTCU. This utility converts the configuration from 3-DNS into a configuration that the Global Traffic Manager can support.
To run the OTCU
1. Log on to the command line of the Global Traffic Manager using the root account.At this point, the system asks if you want to run the OTCU.
2. Type y to run the OTCU.The OTCU begins with a message warning you that it might not convert all objects correctly into the Global Traffic Manager. Read this message carefully, then press y to proceed.The OTCU then asks if you want to configure the management port.
3. If you have already configured the management port, press c to keep the current settings; otherwise, press n to enter new network settings.
4. Follow the prompts the OTCU provides.It is recommended that, when prompted, you consolidate profiles. In addition, when prompted, it is recommended that you do not rename configuration objects.
5. Select the appropriate time zone settings for the system.When the OTCU prompts you to configure the time zone, you configure two settings: the first setting sets the appropriate country or region, while the second sets the time zone within that region.
6. Select whether you want to keep the current root password or create a new password.
At this point, the OTCU attempts to load the bigip.conf and bigip_base.conf files. If these files fail because of errors, the system backs them out and renames them bigip.conf.otcu and bigip_base.conf.otcu, respectively.
12
Migrating from 3-DNS to Global Traffic Manager
In the event that the OTCU cannot load these files, copy them back into place and run the command b load. This command outputs information that you can use to identify the configuration problem. Once you identify the problems, fix them in the configuration files using a standard text editor. You can then run the b load command again until the files load successfully.
Once the bigip.conf and bigip_base.conf files load, reboot the system. The system initializes itself as a Global Traffic Manager. You can now begin to verify the BIND configuration of the new system, and ensure that the wideip.conf and named.conf files contain the correct information.
Verifying the BIND configurationWhen the OTCU has completed uploading the bigip.conf and bigip_base.conf files, the next step is to verify the BIND configuration. This process includes verifying file changes and becoming familiar with some of the changes incorporated in BIND 9, which is included with the Global Traffic Manager.
Locating BIND filesIn Global Traffic Manager, BIND files reside in new locations from 3-DNS. The files specific to bind include:
• named.conf, located in /var/named/config/named.conf
• zone files, located in /var/named/config/namedb
Starting and stopping namedIn Global Traffic Manager, you can use two commands to start and stop named. These commands are:
• Starting named: bigstart start named
• Stopping named: bigstart stop named
Note
These commands apply only to BIND. If the gtmd utility is still running on the system, the Global Traffic Manager responds to requests for any fully-qualified domain name that matches a configured wide IP, even if you have disabled BIND.
BIG-IP® Migration Guide 13
Migration Guide
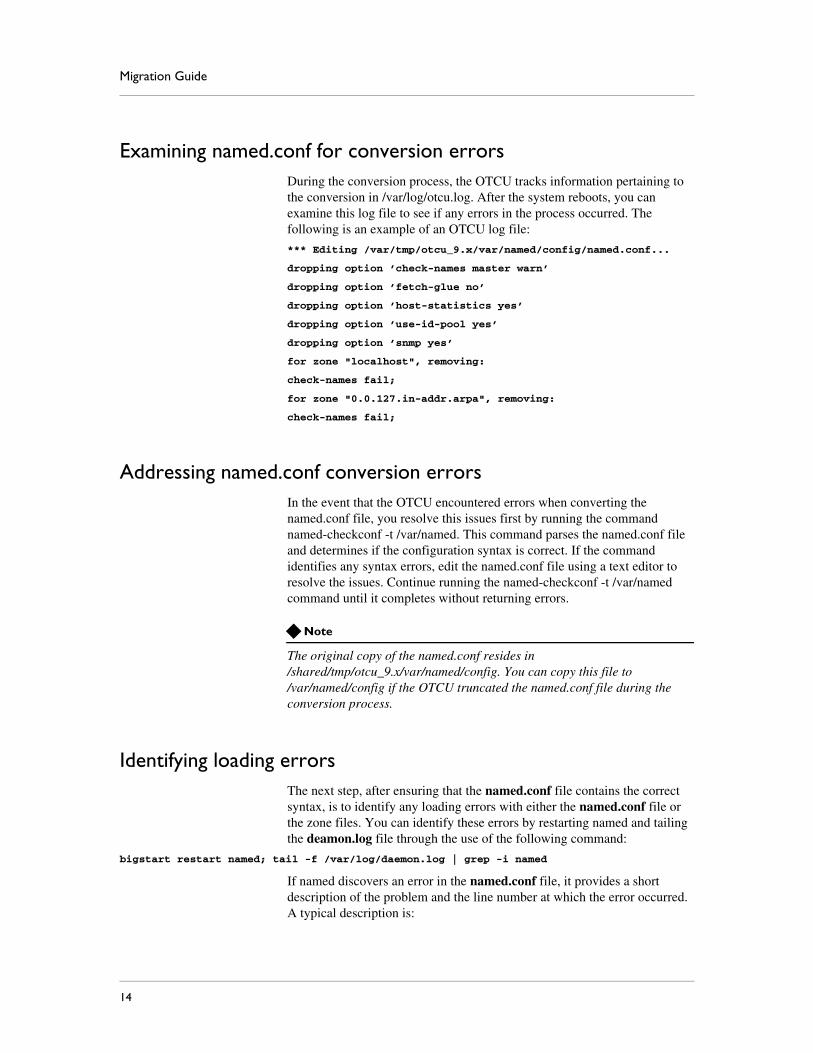
Examining named.conf for conversion errorsDuring the conversion process, the OTCU tracks information pertaining to the conversion in /var/log/otcu.log. After the system reboots, you can examine this log file to see if any errors in the process occurred. The following is an example of an OTCU log file:
Addressing named.conf conversion errorsIn the event that the OTCU encountered errors when converting the named.conf file, you resolve this issues first by running the command named-checkconf -t /var/named. This command parses the named.conf file and determines if the configuration syntax is correct. If the command identifies any syntax errors, edit the named.conf file using a text editor to resolve the issues. Continue running the named-checkconf -t /var/named command until it completes without returning errors.
Note
The original copy of the named.conf resides in /shared/tmp/otcu_9.x/var/named/config. You can copy this file to /var/named/config if the OTCU truncated the named.conf file during the conversion process.
Identifying loading errorsThe next step, after ensuring that the named.conf file contains the correct syntax, is to identify any loading errors with either the named.conf file or the zone files. You can identify these errors by restarting named and tailing the deamon.log file through the use of the following command:
bigstart restart named; tail -f /var/log/daemon.log | grep -i named
If named discovers an error in the named.conf file, it provides a short description of the problem and the line number at which the error occurred. A typical description is:
14
Migrating from 3-DNS to Global Traffic Manager
Feb 26 14:49:29 test named[2215]: /config/named.conf:101:undefined ACL ’test’
Note
The path, /config/named.conf is a relative path from the chroot directory, /var/named.
Address these issues and restart named until it ceases to list any errors during the loading process.
Note
When identifying loading errors, we recommend reviewing Solution 7176, available at http://support.f5.com, and RFC 952, available at http://www.rfc-archive.org/getrfc.php?rfc=952. Review these two documents to ensure that your configuration complies with their contents.
Configuring the external viewBIND 9 introduced a new aspect of DNS management, called views. When you convert the 3-DNS configuration to Global Traffic Manager, the OTCU creates a default view, named external.
It is important that this view is configured correctly. Specifically, this view must include a match-clients statement with a value of any. The following is an example of a correctly configured external view within the named.conf file:
view "external" {
match-clients {
any;
};
...
<zone file statements>
...
};
Note
The view is not closed with the final }; until all of the zone files within the external view are specified. By default, all zone files are placed within the external view.
BIG-IP® Migration Guide 15
Migration Guide
Starting ZoneRunnerAfter you have verified that the named.conf file is free of errors and that BIND 9 runs correctly, you can start ZoneRunner. ZoneRunner is a BIND zone and resource management graphical user interface that makes use of BIND’s dynamic DNS functionality to manage zone and resource records.
Important
Once you configure ZoneRunner, do not edit zone files and resource records through a text editor. Use the ZoneRunner utility only.
ZoneRunner is responsible for allowing the gtmd and named utilities to work together. When you create a wide IP, ZoneRunner automatically creates a corresponding BIND zone and resource records for that wide IP. If ZoneRunner is not running, the system does not automatically write out the wide IP records into BIND.
Verifying ZoneRunner statusThe first step in implementing ZoneRunner is to verify its current status on the system. You can get the status of ZoneRunner by running the following command:
bigstart status zrd
If bigstart does not currently manage the zrd daemon, you can add the daemon to bigstart through the command:
bigstart add zrd
Once you add the zrd daemon to bigstart, you can restart all services through the command:
bigstart restart
After you run bigstart restart, run the command, bigstart status zrd again to see if ZoneRunner has started successfully.
Troubleshooting ZoneRunner
If ZoneRunner does not run, or continually restarts, it is likely that the named.conf or a zone file requires additional verification for correct syntax and configuration. Restart named as described in Examining named.conf for conversion errors, on page -14 and address any issues within the named.conf file or zone files. ZoneRunner does not operate if there are any issues with these files; however, it should display error messages in /var/log/gtm that describe what errors ZoneRunner encountered.
16
Migrating from 3-DNS to Global Traffic Manager
Note
When troubleshooting ZoneRunner, we recommend reviewing RFC 952, available at http://www.rfc-archive.org/getrfc.php?rfc=952. Review this documents to ensure that your configuration complies with their contents.
Viewing zones in ZoneRunnerWhen you have confirmed that the zrd utility is operating on the system, you can view your zone files in ZoneRunner to ensure that they contain the correct information.
To view zones in ZoneRunner
1. Open the Configuration utility.
2. From the Main tab of the navigation pane, expand Global Traffic and then click ZoneRunner.The main ZoneRunner screen opens.
3. Using the options available on this screen, view the zones and named.conf files.
While you examine the zones in ZoneRunner, verify that the following statements exist: allow-update, which is required for each zone, and, if the zone includes an allow-transfer statement, it contains the value, localhost, in addition to any other zones.
allow-update statement
Each zone must specify an allow-update statement with a value of localhost. The following example illustrates a zone with a correctly implemented allow-update statement:
zone "test.example.com" {
type master;
file "test.example.com";
allow-update { localhost };
};
allow-transfer statement
A global allow-transfer statement must reside in the options section of the named.conf file. Specific allow-transfer statements that you specify for a zone can override the global statement; however, it is important that any zone with a specific allow-transfer statement contains the value, localhost.
The following example illustrates a zone with a correctly implemented allow-transfer statement:
zone "staging.example.com" {
BIG-IP® Migration Guide 17
Migration Guide
type master;
file "staging.example.com";
allow-update { localhost };
allow-query { any };
allow-transfer { localhost };
};
Changes in named.confWhen ZoneRunner successfully starts, it populates the named.conf file with some necessary configuration changes that it requires to operate correctly.
The following is an example of a section of named.conf. This section contains the changes that ZoneRunner makes when it starts.
options {
directory "/config/named"
database 256M;
allow-transfer { localhost }
allow-query { "any" };
version "[Null]";
forwarders { };
listen-on port 53 { 127.0.0.1; "zrd-acl-000-000" }:
listen-on-v6 port 53 { ::1; };
};
In addition, the access control list for zrd is created:
acl "zrd-acl-000-000" {
127.10.0.0;
};
If the match-clients statement exists in the external view, the access control list for zrd is added to it. Otherwise, ZoneRunner creates the match-clients statement:
view "external" {
match-clients {
"zrd-acl-000-000";
any;
};
18
Migrating from 3-DNS to Global Traffic Manager
Verifying the wideip.conf fileAfter you have successfully prepared the system for migration, installed the new software, and validated that BIND and ZoneRunner operate correctly you can verify that the conversion process successful migrated the wideip.conf file.
In general, a 3-DNS wideip.conf file works on a Global Traffic Manager without requiring any additional modification. The gtmd and mpcd agents, which are responsible for working with the wideip.conf file, can appropriately parse and load a 3-DNS wideip.conf file. If you followed the steps outlined in Validating the wideip.conf file, on page -6, you should not need to make any additional changes to the wideip.conf for migration purposes.
Using the Global Traffic Manager parserWhen you install Global Traffic Manager, the 3-DNS parser is replaced with the Global Traffic Manager parser. This parser is more strict than the 3-DNS parser. In 3-DNS, the parser only warned you about pools referenced in topology records that did not exist in the wideip.conf file. In Global Traffic Manager, if a topology record references a pool that does not exist in the wideip.conf file, the gtmd agent returns an error and exits. When this situation occurs, the parser prints out the pool names that generated the error to the console. This allows you to either remove the pools from the wideip.conf or comment them out.
The following is an example of a validation error:
Validation Error in validateRegionItem: Couldn’t find pool fake_pool1.
Validation Error in validateRegionItem: Couldn’t find pool fake_pool2(USA).
If the gtmd agent exists unexpectedly, it generates an error message similar to the following:
gtmload: FAILED with code = 0x1000
To resolve these issues, remove any references to the pools from the topology.inc file and then reload the wideip.conf file.
Ignoring prober errors
One error that can occur when running the Global Traffic Manager parser is the prober error. These errors resemble the following:
Validation Warning in prober_def: Prober 192.168.245.1 not previously declared
This error states that the wideip.conf file invoked the prober before invoking the server object for that prober. You can resolve these issues by moving the server objects of these probers to the top of the Server Definitions section of the wideip.conf file.
BIG-IP® Migration Guide 19
Migration Guide
Defining a listenerOne of the most crucial aspects of integrating the Global Traffic Manager into your network is providing it with a listener. A listener is a resource for the Global Traffic Manager that identifies the network traffic for which the Global Traffic Manager is responsible. Listeners accomplish this task by listening for traffic on a specified IP address. Listening is a process in which a component, such as a listener, passively checks incoming traffic and initiates an action only if a packet matches a set of criteria. Each listener that you define listens for DNS packets on port 53.
The Global Traffic Manager then handles only network traffic sent to that IP address. The IP address that you supply for a listener typically is the IP address you assigned to the Global Traffic Manager. If the Global Traffic Manager must manage traffic across several VLANs, you can select each VLAN through the VLAN Traffic list.
Note
You must define a listener to a self IP address for BIND resolution to operate.
To configure a listener
1. On the Main tab of the navigation pane, expand Global Traffic and then click Listeners.The main listener screen opens.
2. Click the Create button.The New Listener screen opens.
3. In the Destination box, type the IP address on which the Global Traffic Manager will listen for network traffic.The Global Traffic Manager will handle only network traffic sent to this IP address. In typical configurations, the IP address for a listener is the IP address assigned to the Global Traffic Manager.
4. From the VLAN Traffic list, select a VLAN setting appropriate for this listener.For additional assistance with this setting, please see the online help.
5. Click the Finished button to save the new listener.
For more information on managing and maintaining listeners, see Chapter 4, Working with Listeners, in the Configuration Guide for BIG-IP® Global Traffic Management.
Once you define a listener, the Global Traffic Manager is ready to test name resolution for both wide IP records and BIND resource records. To test name resolution, specify the listener IP address as the destination for the DNS queries.
20
Migrating from 3-DNS to Global Traffic Manager
Applying the new configuration to additional systemsOnce you have successfully migrated from a 3-DNS Controller to a Global Traffic Manager, it is a straightforward process to distribute the new configuration to other Global Traffic Managers on the network through the use of synchronization groups.
As a precaution, it is recommended that you create a backup of the configuration on the newly-migrated Global Traffic Manager. To back up the configuration, use the command:
b config save /var/tmp/gtm_migrated.ucs
After the system saves the configuration file, add a server object for each additional Global Traffic Manager on which you want to use the new configuration. If the new system replaces an existing Global Traffic Manager server object already defined in the wideip.conf file, edit the object to reflect the new system’s self IP address.
With the migrated system ready to distribute its configuration, you can prepare any new systems to receive the configuration. On each new system, you must upgrade and license the software to your version of Global Traffic Manager and add basic network configuration data, such as VLANs and self IP addresses.
To distribute a configuration from one Global Traffic Manager to another, it is recommended that you follow the procedures outlined in Adding New Global Traffic Managers to a Synchronization Group, located in BIG-IP® Global Traffic Manager and BIG-IP Link Controller: Implementations.
As you add more Global Traffic Manager systems to the synchronization group, test each system to ensure that the synchronization process operates correctly and that each system process DNS requests as expected.
Note
You must test wide IPs from an external device, as you cannot test them on the Global Traffic Manager directory or from the command line.
Important
It is important to test new systems to the synchronization group to ensure not only that wide IPs and BIND requests resolve correctly, but that each Global Traffic Manager can monitor any server object defined in the wideip.conf file. You must also ensure that global load balancing operates as expected.
BIG-IP® Migration Guide 21
Migration Guide
Re-adding NS recordsAt this point, the Global Traffic Manager systems on the network have been installed, configured, and tested. They are now ready to begin receiving DNS requests and processing them.
On the nameserver hosting the parent zone for your DNS zones, update the information so that the nameserver sends request for the zones to the appropriate Global Traffic Manager systems. If the hosting nameserver is your DNS registrar, contact the registrar to implement these changes.
Cleaning upWhen you have upgraded all systems to Global Traffic Manager and distributed the migrated configuration, you can remove the files related to the one time conversion utility.
It is recommended that you do not remove these files until the system is running without issue for a reasonable period of time.
To remove OTCU files
1. From the command prompt on the system, run the following command:otcu_cleanupA prompt opens, asking if you want to remove the directory, /var/tmp/otcu_4.x.
2. Type y to remove the directory.A prompt opens, asking if you want to remove the directory, /var/tmp/otcu_9.x.
3. Type y to remove the directory.
Note: The script then asks if you want to remove the /usr/bin/otcu.bin directory. Removing this directory is optional. If you choose to do so, the script removes the file /otcu.ucs.
22
Migrating from 3-DNS to Global Traffic Manager
Tips and TricksThe OTCU can be re-run at any time. The original UCS file is available as /renamed_otcu.ucs. It is possible to re-run the OTCU at any time by copying the renamed_otcu.ucs file to /otcu.ucs and running the OTCU scrip manually.
To run the OTCU manually
1. Copy /renamed_otcu.ucs to /otcu.ucs
cp -p /renamed_otcu.ucs /otcu.ucs
2. Run OTCU:
otcu
After OTCU is run for the first time, the 4.x UCS file is extracted to directory /var/tmp/otcu_4.x. This makes it possible for the administrator to make any number of changes to any of the original 3-DNS configuration files, create a new otcu.ucs file and re-run the OTCU against modified files.
This process can be helpful if the syntax of a particular file, like named.conf, causes the OTCU to truncate the converted the file prematurely. It is possible to modify the original 4.x named.conf located in the /var/tmp/otcu_4.x/etc/ directory, create a new otcu.ucs file and re-run the OTCU.
To run the OTCU with modified files
1. Copy the /renamed_otcu.ucs:
cp -p /renamed_otcu.ucs /var/tmp/otcu.ucs.orig
2. Make any changes to the original 4.x 3-DNS files located off of the /var/tmp/otcu_4.x/ directory tree.
vi /var/tmp/otcu_4.x/etc/named.conf
3. Create a compressed tarball of all the contents in the /var/tmp/otcu_4.x/ directory.
cd /var/tmp/otcu_4.x/
tar cvzf /var/tmp/otcu.ucs *
cd /var/tmp
4. Run otcu_cleanup, but do not delete the otcu.bin executable when prompted.
otcu_cleanup
5. Copy the new compressed tarball, named otcu.ucs to the / directory.