ITEM #0156452 MODEL #MFW784BDP DUAL FUEL VERTICAL SMOKER 1 Français p. 28 Español p. 55 ATTACH YOUR RECEIPT HERE Serial Number Purchase Date Questions, problems, missing parts? Before returning to your retailer, call our customer service department at 1-800-963-0211, 8:00 a.m. – 6:00 p.m., EST, Monday – Thursday, 8:00 a.m. – 5:00 p.m., EST, Friday. ANS Z21.89a-2008 CSA 1.18a-2008 Rev. 10/2011 Master Forge & M Design® is a registered trademark of LF, LLC. All rights reserved. ®
Transcript
13
G
2
TABLE OF CONTENTS
Safety Information ......................................................................................................................... 3
Replacement Parts List ................................................................................................................ 26
ITEM #0156452
MODEL #MFW784BDP
DUAL FUELVERTICAL SMOKER
Français p. XX
Español p. XX
1
Français p. 28
Español p. 55
SAFETY INFORMATION
3
Please read and understand this entire manual before attempting to assemble, operate or install the product. If you have any questions regarding the product, please call customer service at 1-800-963-0211, 8:00 a.m. – 6:00 p.m., EST, Monday – Thursday, 8:00 a.m. – 5:00 p.m., EST, Friday.
PACKAGE CONTENTS
6
PART DESCRIPTION QUANTITY A Leg - standard 3 B Leg - with holes 1 C Burner & Control Unit 1 D Wood Chip Box 1 E Charcoal Grate 1 F Wood Chip Box Lid 1 G Water Bowl 1 H Cooking Grate 4 I Smoker Body 1 J Lifting Handle 2 K Door Locking Bracket 2
L Square Smoke Stack 1 M Temperature Gauge & Bezel 1 N Upper Door (pre-assembled) 1 O Bottom Door (pre-assembled) 1 P Side Table 1 Q Door Handle 2 R Table Front Support 1 S Table Back Support 1 T Cooking Grate Support 12 U “AAA” Battery (1.5 V) 1 V Hose Retention 1
PART DESCRIPTION QUANTITY
ASSEMBLY INSTRUCTIONS
8
24
WARRANTY
25
This vertical gas smoker is warranted against broken or damaged parts at the time of purchase. The stainless steel burner is warranted for 3 years. All other parts carry a one (1) year limited warranty except the water bowl, which is warranted to be free of defects for 90 days. Paint is warranted to be free of defects for 90 days except for rust, which may appear after repeated use.
This warranty does not cover damage or issues related to neglect, abuse or modifications to the appliance. Repair labor is not covered.
All parts that meet the warranty requirements will be shipped at no charge via the discretion of GHP Group Inc. (ground shipments, US Mail or Parcel Post ONLY). Any special handling charges (i.e. Second Day, Overnight, etc.) will be the responsibility of the consumer.
All warranty claims apply only to the original purchaser and require a proof of purchase verifying purchase date. Do not return parts to GHP address without first obtaining a return authorization number from our customer service. This service is available by calling toll free 1-800-963-0211, 8:00 a.m. – 6:00 p.m., EST, Monday – Thursday 8:00 a.m. – 5:00 p.m., EST, Friday.
Some states do not allow the exclusion or limitation of incidental or consequential damages orlimitations on how long an implied warranty lasts, so the above limitations or exclusions may not apply to you. This warranty gives you specific legal rights, and you may have other rights that vary from state to state.
GHP Group Inc.8280 Austin AvenueMorton Grove, IL, USA60053-3207
The burner will not light using the igniter procedure.
1. The igniter electrode may be covered with grease or residue.
2. The igniter electrode may have a loose or disconnected wire.
3. No spark is being generated.
4. No gas flow or cylinder valve not open.
5. Vapor lock at coupling nut to LP cylinder.
1. Clean the igniter electrode.
2. Check the connection and reconnect any loose or disconnected wires.
3. Replace the AAA size battery inside the igniter.
4. Make sure LP cylinder is not empty or open cylinder valve.
5. Turn off knob and LP cylinder valve. Disconnect coupling nut from LP cylinder. Reconnect and retry.
The burner will not light with a match.
1. No gas flow or an obstructed gas flow.
1. Check the fuel level. Clean the venturi tube and burner.
HARDWARE CONTENTS (shown actual size)
M6 x 12Bolt
Qty. 32
7
AA BB
Before beginning assembly of product, make sure all parts are present. Compare parts with package contents list and hardware contents list. If any part is missing or damaged, do not attempt to assemble the product.
Estimated Assembly Time: 25 minutes
Tools Required for Assembly (not included): Phillips Screwdriver, Wrench, Pliers.
PREPARATION
M5 Nut
Qty. 2
1. Align the legs - standard (A) with the mounting holes on the bottom left front, right front and left rear of the smoker body (I). Thread bolts (AA) through the holes from the outside of the unit. Tighten all bolts (AA) with a Phillips screwdriver.
Hardware Used
AA x 9M6 x 12 Bolt
2. Align the leg - with holes (B) with the mounting holes on the bottom right rear of the smoker. Thread bolts (AA) through the holes from the outside of the unit. Tighten all bolts (AA) with a Phillips screwdriver.
3. Open the bottom door of the smoker body (I). Turn the burner and control unit (C) upside down and place it on the bottom of the smoker body (I), making sure the 4 mounting holes on the burner and control unit (C) are aligned with the holes on the smoker body (I). Note: The control knob should be on the same side as the door. Check that the burner is properly installed on the orifice before attaching the burner and control unit (C). Thread bolts (AA) through holes from outside of unit. Securely tighten the unit to the bottom with a Phillips screwdriver.
5. CAUTION: This unit is HEAVY! Do not attempt this step without assistance! Close the two doors. With the assistance of a helper, stand the unit upright on its legs on a firm and level surface. (Make sure that the burner/control unit and legs are attached). Open the upper door. Position the square smoke stack (L) with control arm to the left as shown. Using 4 bolts (AA), attach square smoke stack (L) to the top of smoker body (I). Securely tighten with a Phillips screwdriver.
Hardware Used
6. Insert the cooking grate supports (T) into the corresponding holes on rack of the shelf inside the smoker body (I) from the bottom up. NOTE: There are 8 positions to install the cooking grate supports. The cooking grate supports can be installed into positions according to the need of the owner.
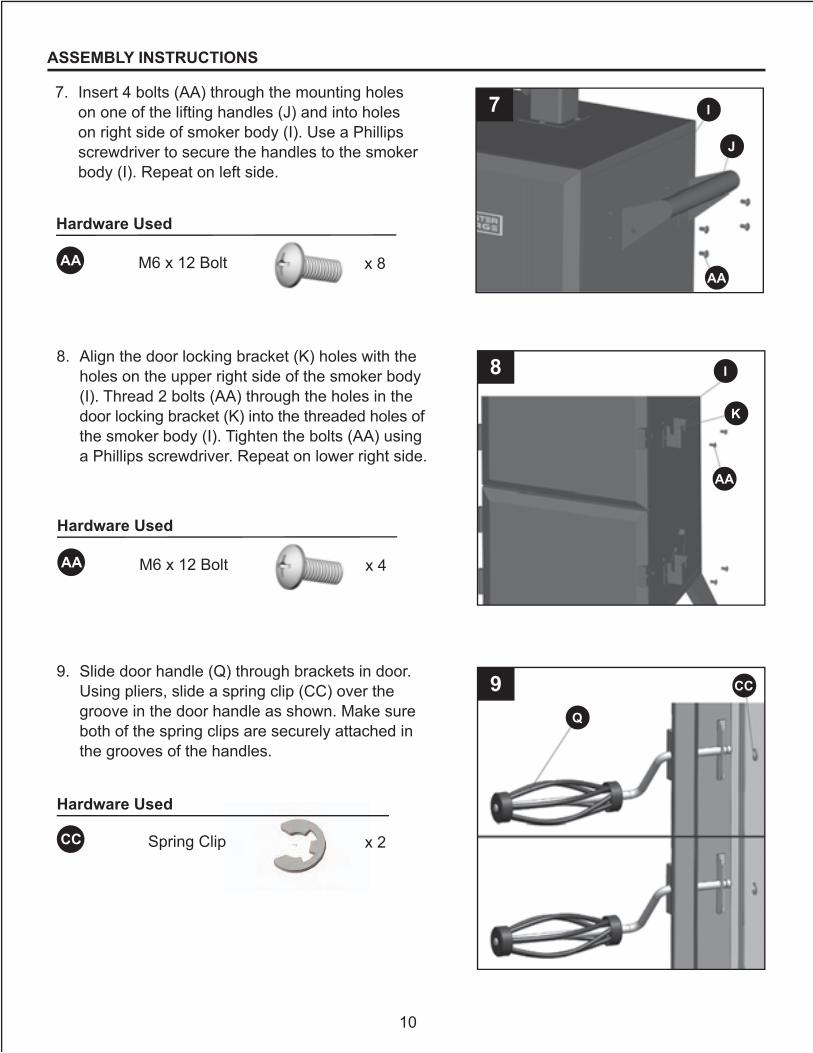
8. Align the door locking bracket (K) holes with the holes on the upper right side of the smoker body (I). Thread 2 bolts (AA) through the holes in the door locking bracket (K) into the threaded holes of the smoker body (I). Tighten the bolts (AA) using a Phillips screwdriver. Repeat on lower right side.
9. Slide door handle (Q) through brackets in door. Using pliers, slide a spring clip (CC) over the groove in the door handle as shown. Make sure both of the spring clips are securely attached in the grooves of the handles.
10. Install the table back support (S) and table front support (R) on the side of the smoker body (I) with screws (BB). Arrows pointing up indicate the correct position of the brackets when fastened to the smoker body (I).
11. With the side table (P) in a parallel position, align the slots in the side table with the table supports (R & S) and insert. To lock the side table (P) in the upright position, swing the side table (P) up, push toward the smoker body (I), and press down on the side table (P) near the body until it is fully fastened in place.
If you have any questions regarding the product, please call customer service at 1-800-963-0211, 8:00 a.m. – 6:00 p.m., EST, Monday – Thursday, 8:00 a.m. – 5:00 p.m., EST, Friday.
2
6
5
8
9
10
11
ATTACH YOUR RECEIPT HERE
Serial Number Purchase Date
Questions, problems, missing parts? Before returning to your retailer, call our customer service department at 1-800-963-0211, 8:00 a.m. – 6:00 p.m., EST, Monday – Thursday, 8:00 a.m. – 5:00 p.m., EST, Friday.
ANS Z21.89a-2008 CSA 1.18a-2008
• DO NOT use this product for anything other than its intended purpose. It is NOT intended for commercial use. It is NOT intended to be installed or used in or on a recreational vehicle and/or boat. • Keep a fire extinguisher near this product at all times.• This appliance is for outdoor use only in well-ventilated areas. DO NOT operate it in a building, garage or any other enclosed area, or under overhead construction.• A minimum clearance of 36 inches (92 cm) to combustible material is required on the front, sides and back. It is very important to always maintain proper clearances to combustibles.• The cylinder must be at least 24 inches (61 cm) from the appliance.• DO NOT obstruct the flow of combustion air or ventilation air for the appliance.• When cooking, the smoker must be on a level, stable noncombustible surface in an area clear of combustible material, including tall or dry grass. • Care should be taken to protect the fuel supply hose from damage from either pedestrian or vehicle traffic.• Clean and inspect the hose before each use of the appliance. If there is evidence of abrasion, wear, cuts or leaks, the hose must be replaced prior to the appliance being used. The replacement hose assembly shall be that specified by the manufacturer.• Before each use check that no dead leaves or debris are under the appliance.• Store this appliance in a dry, protected location.• The use of alcohol, prescription or nonprescription drugs may impair the user’s ability to properly assemble and safely operate this appliance.• Allow the smoker to cool to 115°F (45°C) before moving or storing. Use caution when lifting and moving the appliance to avoid back strain or back injury. DO NOT move the appliance while it is in use.• Always hang the regulator on the hose retention wire while not in use or disconnected with the LP (liquid propane) tank. KEEP the fuel supply hose away from any heated surface(s).
SAFETY INFORMATION
4
• DO NOT store and use this appliance near gasoline or other combustible liquids or where other combustible vapors may be present.• DO NOT use this appliance as a heater.• DO NOT leave the appliance unattended while in use. Keep children and pets away from the appliance at all times.• NEVER close the damper completely while cooking. • If you must dispose of ashes in less time than it takes for the ashes to completely cool down, remove the ashes from the appliance, keeping them in the heavy-duty foil, and soak them completely with water before disposing of them in a noncombustible container.• This appliance will be hot during and after use. Use insulated oven mitts or gloves for protection from hot surfaces or splatter from cooking liquids.• Make sure that the orifice of the control valve properly mates with the burner mixing tube by visual observation. Please refer to maintenance section.• Use caution when opening the door of the smoker while in operation. Keep hands, face and body safe from hot steam or flare-ups. DO NOT inhale smoke.• DO NOT wear loose clothing while operating the smoker. Tie back long hair while operating the smoker. ALWAYS wear shoes that fully cover your feet while operating the smoker.• Allow the smoker and its components to cool completely before conducting any routine cleaning or maintenance.• NEVER use glassware, plastic or ceramic cookware on or in your smoker. Use metallic cookware only.• NEVER operate the smoker without water in the water bowl. NEVER allow the water to completely evaporate. Check the water level at least every 2 hours. A sizzling sound may indicate a low water level. Follow instructions in this manual for adding water while operating (see the Operating Instructions section).• When using flavoring wood, add a sufficient amount prior to operation to avoid having to add wood while operating. Adding wood while operating may splash hot water and cause serious injury.• Use of accessories not intended for this smoker is not recommended and may lead to injury or property damage.• An LP cylinder not connected for use should not be stored in the vicinity of the smoker or any other appliance. DO NOT store spare LP cylinders within 10 feet of the smoker. LP cylinders must be stored outdoors, out of reach of children. DO NOT store LP cylinders in a building, garage or any other enclosed area.• DO NOT store LP gas cylinders inside or on top of the smoker. Improper storage of cylinders could lead to explosion, fire and/or personal injury. Cylinders are to be stored outdoors, out of reach of children and must not be stored in a building, garage or any other enclosed area.• While the smoker is not in use, the gas must be turned off at the supply cylinder.• LP gases are heavier than air, tend to pool and collect in low-lying areas, are easily ignited and are highly flammable. Proper care and caution should be employed when dealing with any such fuels.• The smoker should be turned off and all supply valves (on piping or on fuel cylinders) should be closed in the event that the odor of unburned gas is detected. Do not attempt to use the appliance until any gas leaks are fixed and/or the source of the unburned gas odor is accounted for.
SAFETY INFORMATION
5
A
B
C
D
E
F
G
I
S K
LM
NP
O
J
A
I
AA
I
AA
Hardware Used
AA x 3M6 x 12 Bolt
1
3C
AA
Hardware Used
AA x 4M6 x 12 Bolt
Controlarm
I
AAL
AA x 8M6 x 12 Bolt
I
T
AA
K
Q
I
CC
I
R
OPERATING INSTRUCTIONS
CONNECTING THE LP TANK
WARNING
ALL INSTRUCTIONS AND SAFEGUARDS ON THIS PAGE MUST BE FOLLOWED TO PREVENT FIRE, DAMAGE AND/OR INJURY.
1. The knob on the LP tank must be closed. Make sure that the knob is turned clockwise to a full stop. The cylinder supply system must be arranged for vapor withdrawal.
2. Check that the control knob on the control unit is turned off.
3. Remove the protective cap from the LP tank valve and coupling nut.
4. Hold the regulator in one hand and insert the nipple into the valve outlet. Be sure the nipple is centered in the valve outlet. The coupling connects to the large outside threads on the valve outlet. Use care – do not cross thread the connection.
5. Hand tighten the coupling clockwise until it comes to a full stop. Firmly tighten by hand only. Do not use tools.
P
Straight
CAUTION: In the connection process, make sure the regulator inlet connector mates with the cylinder valve outlet properly, safely and firmly.
15
OPERATING INSTRUCTIONS
Any fuel supply cylinder used must be constructed and marked in accordance with specifications for propane cylinders of the U.S. Department of Transportation (DOT) CFR 49, or the Standard for Cylinders, Spheres and Tubes for the Transportation of Dangerous Goods, CAN/CSA B339. The appliance is to be used only with the 20-pound, vertical standing vapor withdrawal type tank and must include a collar to protect the cylinder valve.(A) DO NOT store spare LP cylinders under or near the smoker.(B) NEVER fill cylinder more than 80% full.(C) Do not store cylinder indoors.
WARNINGIf instructions A, B and C above are not followed exactly, a fire causing death or serious injury may occur.
This smoker is designed to operate on LP gas only. The gas cylinder used must include a collar to protect the cylinder valve. The cylinder supply system must be arranged for vapor withdrawal. Do not allow dirt or foreign material to get into or onto tank connection when it is not attached to the fuel supply system. Use the protective cap provided.
WARNINGALL INSTRUCTIONS AND SAFEGUARDS ON THIS PAGE MUST BE FOLLOWED TO PREVENT FIRE, DAMAGE AND/OR INJURY.
The cylinder outlet must have Type 1 gas connection termination in order to mate with gas hose provided with smoker. The pressure regulator and hose assembly supplied by the manufacturer with the appliance must be used. Replacement pressure regulators and hose assemblies must be those specified by the appliance manufacturer.This unit is not to be utilized with a non-self-contained LP-gas supply system.
Valve/pressure regulators are factory set to the correct operating pressures. No attempts should be made to adjust these settings.
DISCONNECT THE LP TANK
Make sure that the knob on the LP tank is turned clockwise to a full stop (CLOSED).
Hold the regulator in one hand, turn the coupling to the valve outlet counterclockwise and unthread the connection by hand only. Do not use tools.
Place dust cap on cylinder valve outlet whenever the cylinder is not in use. Only install the type of dust cap on the cylinder valve outlet that is provided with the cylinder valve. Other types of caps or plugs may result in leakage of propane.
Always hang the regulator on the lifting handles while not in use, disconnected fromthe LP tank, and when the unit has cooled down.
STORE THE TANK IN A PROPER PLACE AS INDICATED IN THIS MANUAL.
16
OPERATING INSTRUCTIONS
CHECKING FOR LEAKS
After connections are made, check all connections and fittings for leaks with a soap solution. 1. With all valves closed, apply the leak check solution (50/50 mix of dishwashing soap and water) to all gas carrying connections and fittings. 2. Open tank valve.Presence of bubbles at areas of wet solution indicates a gas leak. If leaks are detected or you smell or hear gas, shut off the valve and repair the leak or replace the defective part. Do not use the smoker until all leaks are corrected.
The gas hose/regulator assembly should be totally extended to the maximum distance so that the hose is straight and the tank is as far from the smoker as it can be (minimum 24 inches).
For vapor withdrawal, LP tanks are intended to be operated in the upright position only.
If the product is not in use, the gas must be turned off at the supply cylinder and the cylinder should be disconnected from the appliance.
Storage of the appliance indoors is only permissible if the cylinder is disconnected and removed from the appliance. Do not store cylinder indoors.
BEFORE FIRST USE
Remove all hangings or plastic straps, if present.
Before you cook food in your smoker, it is important to “season” your smoker. Seasoning seals the paint and interior of your smoker to enhance flavoring, durability and overall performance.To season your smoker, simply use it as you normally would only do not cook any food. You will need to follow all of the operating procedures in the next few sections of this manual.
Using your desired flavoring woods and marinades, burn your smoker at low temperature (around 175°F) for 45 – 60 minutes. Let the smoker cool and clean out the water and wood.
Once seasoning is complete, your smoker’s interior will have a durable, seasoned coating.
ADDING WATER
To add water before cooking, simply remove the water bowl and fill it with water slightly below the rim. Place the bowl back into the smoker. Adding water before cooking is recommended. To add water while cooking, if a sizzling sound indicating lack of water is heard, or there is a need to add water, open the bottom door with care and avoid taking in the smoke. Use a long nose kettle-like water can, stand as far from the smoker as you can, fill the water bowl up to 1 inch below the rim.
CAUTION: DO NOT pull the water bowl out beyond the rack when the smoker is hot.
17
OPERATING INSTRUCTIONS
COOKING TIP
Line the water bowl with aluminum foil before each use. This will make it easy to clean and help your water bowl last longer.
To make adding water easier and safer, use a clean watering can with a long spout.
ADDING WOOD CHIPS
To add wood chips before cooking, simply fill the wood chip box with your choice of flavoring hardwood chips. The amount and type of wood you use is entirely dependent on the desired amount of flavor. Once the box is filled, place the lid on top of the box and set the box in the smoker.
To add wood chips while cooking, we recommend using tongs or long handled pliers to removethe box lid and to place the pieces into the wood chip box without removing the box. It is not recommended to remove the wood chip box while the smoker is in operation.
CAUTION: The wood chip box and lid get very hot. Avoid handling them while in use. Always wear protective oven mitts when handling hot components.
COOKING TIP: FLAVORING WOOD
• Small wood chips work best inside the wood chip box.• Use dry hardwoods such as hickory, pecan, apple, cherry or mesquite.• To produce more smoke and prevent fast burning, pre-soak the wood chips in a separate bowl of water for at least 20 minutes, or wrap the chips in perforated aluminum foil.• Most smoke flavoring occurs within the first hour of cooking. Adding wood chips after the first hour is typically not necessary unless extra smoke flavoring is desired.
18
OPERATING INSTRUCTIONS
19
OPERATING INSTRUCTIONS
Match Lighting Procedure - LP Gas
1. Repeat Steps 1 through 5 of the igniter lighting system.
2. Open both doors. Place a lit match on to the burner as shown below. Quickly turn the control knob to the position. If the burner does not light in 5 seconds, turn the control knob to O, wait at least 5 minutes and for the gas to clear. Repeat the process.
20
OPERATING INSTRUCTIONS
Cooking Tip: Damper Adjustments
WARNING: The dampers on the smoker body and the handle on the smoke stack may become very hot while cooking. Always wear a heat resistant glove when adjusting.
• For best performance, rotate the smoker so that the front or back of the body is facing the wind. This allows the adjustment of the dampers to be more effective and accurate.• The two dampers on smoker body should never be fully closed.• Opening the damper of the smoke stack helps to exhaust both the heat and smoke.• The key to effective smoking is to watch your heat indicator on the door and adjust the damper accordingly.• Temperature maintenance is best controlled by different damper adjustment configurations.
Turning off the Smoker
CAUTION: The smoker can become very hot while in use.Do not touch any portion of the smoker except for the door handle and burner control knob. It may be necessary to use protective gloves.
1. Turn the burner control knob off by pushing in and rotating to “OFF”. The burner flame should go out.
2. Turn off the LP cylinder valve by turning the knob clockwise until it cannot go any farther.
Follow all warnings and safety precautions before removing meat from smoker or preparing the unit for storage.
Lighting Instructions – Charcoal
When using charcoal, DO NOT USE PRETREATED, MATCH-LIGHT CHARCOAL with this smoker. Only use standard, untreated briquettes or lump charcoal and ONLY use charcoal lighting fluid approved for lighting charcoal. Do not use lighter fluid, paint thinners, gasoline, kerosene, alcohol or other flammable material for lighting charcoal. Damage to the smoker may occur with the use of match-light charcoal. DO NOT USE THE LP GAS BURNER WHEN LIGHTING CHARCOAL. Step 1Place the charcoal grate inside the woodchip/charcoal tray and add 1.5 pounds of charcoal on charcoal grate (approximately 26 briquettes).
Step 2Note: Please refer to the manufacturer’s recommended amount of lighter fluid before applying fluid to the briquettes. With the charcoal tray outside the firebox, saturate charcoal with the amount of lighting
22
CARE AND MAINTENANCE
AFTER USE SAFETY AND MAINTENANCE
WARNING• Use caution when lifting and moving the smoker to avoid strain injuries. Two people are recommended to lift or move the smoker.
• DO NOT store the smoker near gasoline or other combustible liquids or where combustible vapors may be present. Keep the area around the smoker clear and free of combustible materials and vapors.
• DO NOT store this smoker in an area accessible to children or pets. Store the smoker in a dry, protected location. Disconnect cylinder from smoker.
• DO NOT allow anyone to conduct activities around the smoker following use until it has cooled. It is hot during operation and remains hot for a period of time following use.
• DO NOT leave hot ashes unattended until the smoker cools completely.
• The smoker becomes extremely hot – allow the smoker to cool completely before handling. If you must handle the smoker while it is hot, ALWAYS wear protective oven mitts or heat-resistant gloves. Allow the smoker to cool before removing and cleaning the grease pan.
• Dispose of cold ashes by wrapping them in heavy-duty aluminum foil and putting them in a noncombustible container.
• If you must dispose of the ashes in less time than it takes for them to completely cool. Remove the ashes from the smoker, keeping them in heavy-duty foil, and soak them completely with water before disposing of them in a noncombustible container.
GENERAL CARE AND MAINTENANCE CAUTION: All care and maintenance procedures are to be performed while the smoker is turned off and cooled. Always perform maintenance by a qualified service person.
Clean the water bowl and cooking grate with hot, soapy water. Rinse and dry thoroughly. You may prefer to coat the water bowl and cooking grid lightly with cooking oil or cooking spray.
Frequently check and clean the venturi and burner tubes for insects and insect nests. A clogged tube can lead to fire beneath the smoker. Also make sure the smoker does not have any foreign objects obstructing the flow of combustion and ventilation air.
To clean the inside and outside of the smoker cabinet, simply use a damp cloth. Spray-washing with a water hose is not recommended. Moisture should be wiped away and not allowed to stand inside or on top of the smoker. Once cleaned, you may prefer to lightly coat the interior of the smoker cabinet with cooking oil or cooking spray.
If rust is present on the exterior surface of the smoker, clean the area with steel wool or emery cloth and use heavy-duty, heat-resistant paint.
NEVER apply additional paint to the interior of the smoker. If rust is present on the interior of the smoker, clean it thoroughly with steel wool or emery cloth and lightly coat the area with cooking oil or cooking spray to help minimize recurring rust.
When an LP tank is not connected, and to help prevent dirt or other foreign particles from clogging the regulator connector, hang the end of the hose and regulator assembly on the lifting handle.
Keep the ventilation opening(s) of the cylinder enclosure free and clear of debris.
23
CARE AND MAINTENANCE
Inspect the flames at the burner by looking through the observing hole on left side of the burner and control unit. A good flame should be blue with a yellow tip 1 to 2 inch high. If flames are excessively yellow and irregular, oil residue and food deposits may be collecting on the burner. Try cleaning the burner surface with hot, soapy water and cleaning the holes with a pipe cleaner to improve the flames.
Bad flames may also be caused by poor venturi attachment to the orifice. Turn off the control knob and cylinder valve. Always let the smoker cool before cleaning or checking the assembly. Make sure the orifice of the control valve properly mates with the burner mixing tube by visual observation from the bottom of the appliance. The burner venturi tube should overlap the orifice and they should form a straight line as shown in Figure A. Figures B & C show incorrect alignment.
WARNING: If the instructions above are not followed, an explosion may result, possibly causing serious bodily injury or death.
To protect your smoker from weather conditions, always keep it covered while not in use.
2”
Yellow
Light Blue
Blue
Good Flame Bad Flame
! ! !
Figure A Figure B Figure C
Correct Wrong Wrong
The flame goes out. 1. Disconnected gas supply hose. 2. High or gusting winds.
For replacement parts, call our customer service department at 1-800-963-0211, 8:00 a.m. – 6:00 p.m., EST, Monday – Thursday, 8:00 a.m. – 5:00 p.m., EST, Friday.
Owner’s Manual - Part #312-02025-00Printed in China
SpringClip
Qty. 2
CC
BB x21/4-20 FlangedWasher Nut
Hardware Used
R
Q
7. Insert 4 bolts (AA) through the mounting holes on one of the lifting handles (J) and into holes on right side of smoker body (I). Use a Phillips screwdriver to secure the handles to the smoker body (I). Repeat on left side.
7
Hardware Used
CC x 2Spring Clip
I
AA
J
ASSEMBLY INSTRUCTIONS
4. Thread bolts (EE) through holes on the leg - with holes (B) from outside of unit. Secure using 2 nuts (FF) from inside leg by using wrench. Tighten all bolts (AA) with a Phillips screwdriver. Insert the regulator hose attached to the burner and control unit (C) into the hose retention (V).
4
I
V
12. Slide the wood chip box (D) onto the lowest cooking grate supports (T) inside the smoker body (I) and put the wood chip box lid (F) on top. Note: For charcoal, refer to Step 17.
12
DANGER:
Failure to follow these instructions could result in fire, explosion, or burn hazard which could cause property damage, personal injury or death.
DANGER: If you smell gas:1. Shut off gas to the appliance.
3. Open lid.4. If odor continues, keep away from the appliance and immediately call your gas supplier or your fire department.
Assembler/Installer: This instruction manual contains important information necessary for the proper assembly and safe use of this appliance. Read and follow all warnings and instructions before assembling and using this appliance. Leave these instructions with the consumer.
Consumer/User: Follow all warnings and instructions when using this appliance. Keep these instructions for future reference.
1. Never operate this appliance unattended.2. Never operate this appliance within 10 feet (3 m) of any structure, combustible material or other gas cylinder.3. Never operate this appliance within 25 feet (7.5 m) of any flammable liquid.4. Never allow oil or grease to get hotter than 400°F or 200°C. If the temperature exceeds 400°F (200°C) or if oil begins to smoke, immediately turn the burner or gas supply OFF.5. Heated liquids remain at scalding temperatures long after the cooking process. Never touch cooking appliance until liquids have cooled to 115°F (45°C) or less.6. If a fire should occur, keep away from the appliance and immediately call your fire department. Do not attempt to extinguish an oil or grease fire with water. Failure to follow these instructions could result in fire, explosion, or burn hazard which could cause property damage, personal injury or death.
DANGER
DANGER:
Rev. 10/2011
M4 x 10Bolt
Qty. 2
DD EE
M4 Nut
Qty. 2
FF
M5 x 12Screw
Qty. 8
H
J
T
T
U
V
front of smoker
B
front of smoker
M4 x 10 BoltEE
M4 NutFF
Hardware Used
x 2
x 2
B
EE
FF
Hardware Used
AA x 4M6 x 12 Bolt
Hardware Used
AA x 4M6 x 12 Bolt
M5 x 12 ScrewBB x 8
Hardware UsedBB
S
I
R
S
D
FI
I13. Slide the water bowl (G) onto the cooking grate supports (T) inside the smoker body (I) above the wood chip box (D) as shown.
ASSEMBLY INSTRUCTIONS
13
15. Insert the probe of the temperature gauge assembly (M) through hole of the smoker door from the outside. Secure using 2 nuts (DD) from inside panel by using wrench.
16. To install the “AAA” battery (U), remove the igniter button by turning it counterclockwise and insert the “AAA” battery (U) with the positive end facing out. Reinstall the igniter button by turning it clockwise and hand tightening.
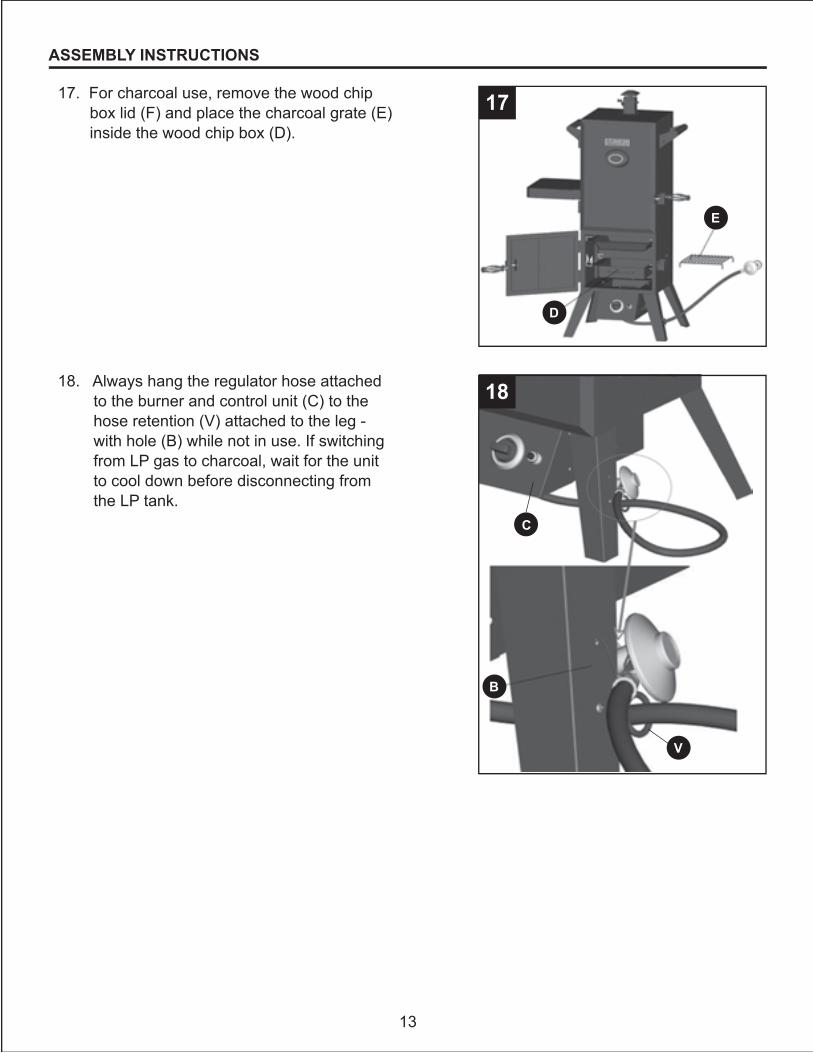
17. For charcoal use, remove the wood chip box lid (F) and place the charcoal grate (E) inside the wood chip box (D).
18. Always hang the regulator hose attached to the burner and control unit (C) to the hose retention (V) attached to the leg - with hole (B) while not in use. If switching from LP gas to charcoal, wait for the unit to cool down before disconnecting from the LP tank.
15
16
17
18
DD
M
U
E
B
12
14. Slide the 4 cooking grates (H) onto the top cooking grate supports (T) inside the smoker body (I).
14 I
H
ASSEMBLY INSTRUCTIONS
Hardware Used
DD x 2
D
S
V
M5 Nut
igniter button
21
OPERATING INSTRUCTIONS
fluid as recommended by the lighter fluid manufacturer. Allow the fluid to soak into the charcoal for 3 minutes before placing the tray back into the firebox (refer to assembly instructions for proper tray placement). After soaking the charcoal, place the lighting fluid at a safe distance away from the smoker.
Step 3With both doors open, stand back and carefully light charcoal and allow to burn until covered with a light ash (approximately 20 minutes). Charcoal lighting fluid must be allowed to completely burn off prior to closing the doors. (Fumes will tend to collect in the upper cavity if the door is closed).
DANGER: Closing the firebox doors during the lighting procedure could trap fumes from the charcoal lighting fluid in the smoker box and may result in a flash-fire or explosion when door is opened, resulting in property loss, personal injury or death. Never attempt to add more lighting fluid to the charcoal once it has been lit.
Step 4After 25 - 30 minutes, charcoal should be ready for cooking and/or adding woodchips. Carefully add wood chunks using long cooking tongs.
Adding Charcoal and/or Wood Chips
Additional charcoal and/or wood may be required to maintain or increase cooking temperature.
WARNING: Use caution since flames can flare-up when fresh air suddenly comes in contact with fire. When opening the door, keep hands, face and body a safe distance from hot steam and flame flare-ups.
Step 1Stand back and carefully open smoker box door allowing heat and steam to escape away from your face. Use caution since flames can flare-up when fresh air suddenly comes in contact with fire. Inspect the charcoal level in pan.
Step 2Wearing flame retardant oven mitts/gloves, stand back a safe distance and use long cooking tongs to lightly brush aside ashes on hot coals. Use cooking tongs to add charcoal and/or wood to charcoal pan, being careful not to stir-up ashes and sparks
WARNING: Never add charcoal lighting fluid to hot or even warm coals as flashback may occur causing severe burns.
Step 3Close smoker box door and allow food to continue cooking.
Allow the ashes to completely cool before reusing or cleaning the smoker.
26
REPLACEMENT PARTS LIST
For replacement parts, call our customer service department at 1-800-963-0211, 8:00 a.m. – 6:00 p.m., EST, Monday – Thursday, 8:00 a.m. – 5:00 p.m., EST, Friday.
PART DESCRIPTION PART # 1 Leg – Standard 301-01016-00 2 Leg – with Holes 312-01016-00 3 Burner and Control Unit 312-01015-00 4 Wood Chip Box (MFW only) 312-01028-00 5 Charcoal Grate 312-01030-00 6 Wood Chip Box Lid 301-01029-00 7 Wood Chip Box Handle and 301-01028-02 Lid Handle 8 Water Bowl 301-02017-00 9 Cooking Grate 312-01014-00 10 Door Locking Bracket 302-01008-00 11 Cooking Grate Support 302-01030-00 12 Smoker Body 312-12001-00 13 Square Smoke Stack 312-02009-00 14 Lifting Handle 301-01010-00 15 Logo Plate 302-03002-01 16 Temperature Gauge Bezel 301-01034-00 17 Temperature Gauge 301-01003-00
PART DESCRIPTION PART # 18 Upper Door 302-02002-00 19 Side Table 312-02008-00 20 Door Handle Crank 302-02007-02 21 Door Handle Grip 302-02007-01 22 Bottom Door without Handle 302-02102-00 23 Table Front Support Bracket 312-02008-01 24 Table Back Support Bracket 312-02008-02 25 Side Damper Plate (round) 301-01001-04 26 Igniter Ground Wire 301-01015-08 27 Push Button 301-01015-03 28 Electronic Ignitor 301-01015-06 29 Ignition Cap 301-01015-05 30 Control Knob 301-01015-01 31 Control Knob Bezel 301-01015-02 32 Igniter Electrode and Ignition Wire 301-01015-07 33 Hose Retention 312-01016-01 N/A Hardware Bag 312-02026-00 N/A Owner’s/Instruction Manual 312-02025-00
11
14
21
17
1918
20
22
2324
25
2627
32
30
2928
3331
ANS Z21.89a-2008 CSA 1.18a-2008
• Do not use the smoker if the burner fails to light or fails to remain lit. Under such conditions, gas should be turned off and the fuel cylinder should be disconnected.• Use in high wind conditions that result in poor burner operation such as blowing out and flaring should be avoided. If repositioning the appliance does not improve operation under such wind conditions, the appliance should be turned off.• Install the smoker with the hose regulator assembly extended the full length of the hose (24 in. minimum) directly away from the appliance. When so configured, placement results in maximum tank to smoker distance. When the smoker is operated, the hose/regulator and gas tank should be perpendicular to wind direction. Placing tank closer than 24 inches to the smoker can overheat the tank and cause release of propane through relief openings and can result in tank fire or explosion. • Read and follow all warnings and instructions before assembling and using the appliance.• Follow all warnings and instructions when using the appliance.
NOTE: The installation must confirm with local codes or, in the absence of local codes, with eitherthe National Fuel Gas Code, ANSI Z223.1/NFPA 54, Natural Gas and Propane Installation Code,CSA B149.1, or Propane Storage and Handling Code, B149.2, or the Standard for RecreationalVehicles, ANSI A 119.2/ NFPA 1192, and CSA Z240 RV Series, Recreational Vehicle Code, asapplicable.
WARNINGDO NOT mix old and new batteries.DO NOT mix alkaline, standard (Carbon-Zinc), or rechargeable (Nickel-Cadmium) batteries.DO NOT dispose of batteries in fire. Improper disposal may cause batteries to leak or explode.
The electronic ignition requires 1 “AAA” alkaline battery, which is included.
WARNING:The hose to tank attachment creates a potential trip hazard for user and pedestrians - use caution.Do not allow or cause the gas tank or applianceto tip.
MINIMUM 24 IN. (610 MM)
(Tank not included)
I
C
V
T
T
T
C
Master Forge & M Design® is a registered trademarkof LF, LLC. All rights reserved.
®
D
LIGHTING INSTRUCTIONS
CAUTION: If the flame extinguishes accidentally during ignition or operation, immediately TURN OFF the cylinder valve and then TURN OFF the control knob.Igniter Lighting System
1. Check all connections for leaks using the “soap water” test as explained on page 16 for “checking for leaks.”
2. Open both of the smoker cabinet doors. Always keep the doors open during lighting.
3. Check for any blockage to the venturi tube or burner, damper setting, ventilation setting. Remove any foreign objects or matter.
4. Be sure the burner control knob is in the O position.
5. Open the LP cylinder valve by turning counterclockwise .
6. Push igniter on the control unit down 1 to 2 seconds then push and turn control knob to while still holding the ignitor button down. At this point the burner should ignite.
7. If ignition does not take place within 5 seconds, immediately turn the control knob to O. Wait 5 minutes and repeat above steps 6 and 7.
8. If burner still fails to light, try match lighting using the instructions on page 19.
9. Once the burner is lit, close the doors to allow heat to accumulate. The smoke stack on the top of the smoker can be adjusted to the desired setting to allow proper ventilation and combustion. NEVER CLOSE THE SMOKE STACK COMPLETELY.
Warning: Always light your smoker with both doors open.
CALIFORNIA PROPOSITION 65
Fuels used in gas or oil fired appliances and the products of combustion of such fuels containchemicals known to the State of California to cause cancer, birth defects or other reproductiveharm. This product contains chemicals, including lead and lead compounds, known to the State ofCalifornia to cause cancer, birth defects or other reproductive harm. Wash hands after handling.
13
G
2
TABLE OF CONTENTS
Safety Information ......................................................................................................................... 3
Replacement Parts List ................................................................................................................ 26
ITEM #0190449
MODEL #MFW784BDP
DUAL FUELVERTICAL SMOKER
Français p. XX
Español p. XX
1
Français p. 28
Español p. 58
SAFETY INFORMATION
3
Please read and understand this entire manual before attempting to assemble, operate or install the product. If you have any questions regarding the product, please call customer service at 1-800-963-0211, 8:00 a.m. – 6:00 p.m., EST, Monday – Thursday, 8:00 a.m. – 5:00 p.m., EST, Friday.
PACKAGE CONTENTS
6
PART DESCRIPTION QUANTITY A Leg - standard 3 B Leg - with holes 1 C Burner & Control Unit 1 D Wood Chip Box 1 E Charcoal Grate 1 F Wood Chip Box Lid 1 G Water Bowl 1 H Cooking Grate 4 I Smoker Body 1 J Lifting Handle 2 K Door Locking Bracket 2
L Square Smoke Stack 1 M Temperature Gauge & Bezel 1 N Upper Door (pre-assembled) 1 O Bottom Door (pre-assembled) 1 P Side Table 1 Q Door Handle 2 R Table Front Support 1 S Table Back Support 1 T Cooking Grate Support 12 U “AAA” Battery (1.5 V) 1 V Hose Retention 1
PART DESCRIPTION QUANTITY
ASSEMBLY INSTRUCTIONS
8
24
WARRANTY
25
This vertical gas smoker is warranted against broken or damaged parts at the time of purchase. The stainless steel burner is warranted for 3 years. All other parts carry a one (1) year limited warranty except the water bowl, which is warranted to be free of defects for 90 days. Paint is warranted to be free of defects for 90 days except for rust, which may appear after repeated use.
This warranty does not cover damage or issues related to neglect, abuse or modifications to the appliance. Repair labor is not covered.
All parts that meet the warranty requirements will be shipped at no charge via the discretion of GHP Group Inc. (ground shipments, US Mail or Parcel Post ONLY). Any special handling charges (i.e. Second Day, Overnight, etc.) will be the responsibility of the consumer.
All warranty claims apply only to the original purchaser and require a proof of purchase verifying purchase date. Do not return parts to GHP address without first obtaining a return authorization number from our customer service. This service is available by calling toll free 1-800-963-0211, 8:00 a.m. – 6:00 p.m., EST, Monday – Thursday 8:00 a.m. – 5:00 p.m., EST, Friday.
Some states do not allow the exclusion or limitation of incidental or consequential damages orlimitations on how long an implied warranty lasts, so the above limitations or exclusions may not apply to you. This warranty gives you specific legal rights, and you may have other rights that vary from state to state.
GHP Group Inc.8280 Austin AvenueMorton Grove, IL, USA60053-3207
The burner will not light using the igniter procedure.
1. The igniter electrode may be covered with grease or residue.
2. The igniter electrode may have a loose or disconnected wire.
3. No spark is being generated.
4. No gas flow or cylinder valve not open.
5. Vapor lock at coupling nut to LP cylinder.
1. Clean the igniter electrode.
2. Check the connection and reconnect any loose or disconnected wires.
3. Replace the AAA size battery inside the igniter.
4. Make sure LP cylinder is not empty or open cylinder valve.
5. Turn off knob and LP cylinder valve. Disconnect coupling nut from LP cylinder. Reconnect and retry.
The burner will not light with a match.
1. No gas flow or an obstructed gas flow.
1. Check the fuel level. Clean the venturi tube and burner.
HARDWARE CONTENTS (shown actual size)
M6 x 12Bolt
Qty. 32
7
AA BB
Before beginning assembly of product, make sure all parts are present. Compare parts with package contents list and hardware contents list. If any part is missing or damaged, do not attempt to assemble the product.
Estimated Assembly Time: 25 minutes
Tools Required for Assembly (not included): Phillips Screwdriver, 1/2 in. Wrench, Pliers.
PREPARATION
M5 Nut
Qty. 2
1. Align the legs - standard (A) with the mounting holes on the bottom left front, right front and left rear of the smoker body (I). Thread bolts (AA) through the holes from the outside of the unit. Tighten all bolts (AA) with a Phillips screwdriver.
Hardware Used
AA x 9M6 x 12 Bolt
2. Align the leg - with holes (B) with the mounting holes on the bottom right rear of the smoker. Thread bolts (AA) through the holes from the outside of the unit. Tighten all bolts (AA) with a Phillips screwdriver.
3. Open the bottom door of the smoker body (I). Turn the burner and control unit (C) upside down and place it on the bottom of the smoker body (I), making sure the 4 mounting holes on the burner and control unit (C) are aligned with the holes on the smoker body (I). Note: The control knob should be on the same side as the door. Check that the burner is properly installed on the orifice before attaching the burner and control unit (C). Thread bolts (AA) through holes from outside of unit. Securely tighten the unit to the bottom with a Phillips screwdriver.
5. CAUTION: This unit is HEAVY! Do not attempt this step without assistance! Close the two doors. With the assistance of a helper, stand the unit upright on its legs on a firm and level surface. (Make sure that the burner/control unit and legs are attached). Open the upper door. Position the square smoke stack (L) with control arm to the left as shown. Using 4 bolts (AA), attach square smoke stack (L) to the top of smoker body (I). Securely tighten with a Phillips screwdriver.
Hardware Used
6. Insert the cooking grate supports (T) into the corresponding holes on rack of the shelf inside the smoker body (I) from the bottom up. NOTE: There are 8 positions to install the cooking grate supports. The cooking grate supports can be installed into positions according to the need of the owner.
8. Align the door locking bracket (K) holes with the holes on the upper right side of the smoker body (I). Thread 2 bolts (AA) through the holes in the door locking bracket (K) into the threaded holes of the smoker body (I). Tighten the bolts (AA) using a Phillips screwdriver. Repeat on lower right side.
9. Slide door handle (Q) through brackets in door. Using pliers, slide a spring clip (CC) over the groove in the door handle as shown. Make sure both of the spring clips are securely attached in the grooves of the handles.
10. Install the table back support (S) and table front support (R) on the side of the smoker body (I) with screws (BB). Arrows pointing up indicate the correct position of the brackets when fastened to the smoker body (I).
11. With the side table (P) in a parallel position, align the slots in the side table with the table supports (R & S) and insert. To lock the side table (P) in the upright position, swing the side table (P) up, push toward the smoker body (I), and press down on the side table (P) near the body until it is fully fastened in place.
If you have any questions regarding the product, please call customer service at 1-800-963-0211, 8:00 a.m. – 6:00 p.m., EST, Monday – Thursday, 8:00 a.m. – 5:00 p.m., EST, Friday.
2
6
5
8
9
10
11
ATTACH YOUR RECEIPT HERE
Serial Number Purchase Date
Questions, problems, missing parts? Before returning to your retailer, call our customer service department at 1-800-963-0211, 8:00 a.m. – 6:00 p.m., EST, Monday – Thursday, 8:00 a.m. – 5:00 p.m., EST, Friday.
ANS Z21.89a-2008 CSA 1.18a-2008
CALIFORNIA PROPOSITION 65
1. Fuels used in wood, charcoal, gas or oil fired appliances and the products of combustion of such fuels contain chemicals known to the State of California to cause cancer, birth defects or other reproductive harm. 2. This product contains chemicals, including lead and lead compounds, known to the State of California to cause cancer, birth defects or other reproductive harm.
• DO NOT use this product for anything other than its intended purpose. It is NOT intended for commercial use. It is NOT intended to be installed or used in or on a recreational vehicle and/or boat. • Keep a fire extinguisher near this product at all times.• This appliance is for outdoor use only in well-ventilated areas. DO NOT operate it in a building, garage or any other enclosed area, or under overhead construction.• A minimum clearance of 36 inches (92 cm) to combustible material is required on the front, sides and back. It is very important to always maintain proper clearances to combustibles.• The cylinder must be at least 24 inches (61 cm) from the appliance.• DO NOT obstruct the flow of combustion air or ventilation air for the appliance.• When cooking, the smoker must be on a level, stable noncombustible surface in an area clear of combustible material, including tall or dry grass. • Care should be taken to protect the fuel supply hose from damage from either pedestrian or vehicle traffic.• Clean and inspect the hose before each use of the appliance. If there is evidence of abrasion, wear, cuts or leaks, the hose must be replaced prior to the appliance being used. The replacement hose assembly shall be that specified by the manufacturer.• Before each use check that no dead leaves or debris are under the appliance.• Store this appliance in a dry, protected location.• The use of alcohol, prescription or nonprescription drugs may impair the user’s ability to properly assemble and safely operate this appliance.• Allow the smoker to cool to 115°F (45°C) before moving or storing. Use caution when lifting and moving the appliance to avoid back strain or back injury. DO NOT move the appliance while it is in use.• Always hang the regulator on the hose retention wire while not in use or disconnected with the LP (liquid propane) tank. KEEP the fuel supply hose away from any heated surface(s).
SAFETY INFORMATION
4
• DO NOT store and use this appliance near gasoline or other combustible liquids or where other combustible vapors may be present.• DO NOT use this appliance as a heater.• DO NOT leave the appliance unattended while in use. Keep children and pets away from the appliance at all times.• NEVER close the damper completely while cooking. • If you must dispose of ashes in less time than it takes for the ashes to completely cool down, remove the ashes from the appliance, keeping them in the heavy-duty foil, and soak them completely with water before disposing of them in a noncombustible container.• This appliance will be hot during and after use. Use insulated oven mitts or gloves for protection from hot surfaces or splatter from cooking liquids.• Make sure that the orifice of the control valve properly mates with the burner mixing tube by visual observation. Please refer to maintenance section.• Use caution when opening the door of the smoker while in operation. Keep hands, face and body safe from hot steam or flare-ups. DO NOT inhale smoke.• DO NOT wear loose clothing while operating the smoker. Tie back long hair while operating the smoker. ALWAYS wear shoes that fully cover your feet while operating the smoker.• Allow the smoker and its components to cool completely before conducting any routine cleaning or maintenance.• NEVER use glassware, plastic or ceramic cookware on or in your smoker. Use metallic cookware only.• NEVER operate the smoker without water in the water bowl. NEVER allow the water to completely evaporate. Check the water level at least every 2 hours. A sizzling sound may indicate a low water level. Follow instructions in this manual for adding water while operating (see the Operating Instructions section).• When using flavoring wood, add a sufficient amount prior to operation to avoid having to add wood while operating. Adding wood while operating may splash hot water and cause serious injury.• Use of accessories not intended for this smoker is not recommended and may lead to injury or property damage.• An LP cylinder not connected for use should not be stored in the vicinity of the smoker or any other appliance. DO NOT store spare LP cylinders within 10 feet of the smoker. LP cylinders must be stored outdoors, out of reach of children. DO NOT store LP cylinders in a building, garage or any other enclosed area.• DO NOT store LP gas cylinders inside or on top of the smoker. Improper storage of cylinders could lead to explosion, fire and/or personal injury. Cylinders are to be stored outdoors, out of reach of children and must not be stored in a building, garage or any other enclosed area.• While the smoker is not in use, the gas must be turned off at the supply cylinder.• LP gases are heavier than air, tend to pool and collect in low-lying areas, are easily ignited and are highly flammable. Proper care and caution should be employed when dealing with any such fuels.• The smoker should be turned off and all supply valves (on piping or on fuel cylinders) should be closed in the event that the odor of unburned gas is detected. Do not attempt to use the appliance until any gas leaks are fixed and/or the source of the unburned gas odor is accounted for.
SAFETY INFORMATION
5
A
B
C
D
E
F
G
I
S K
LM
NP
O
J
A
I
AA
I
AA
Hardware Used
AA x 3M6 x 12 Bolt
1
3C
AA
Hardware Used
AA x 4M6 x 12 Bolt
Controlarm
I
AAL
AA x 8M6 x 12 Bolt
I
T
AA
K
Q
I
CC
I
R
OPERATING INSTRUCTIONS
CONNECTING THE LP TANK
WARNING
ALL INSTRUCTIONS AND SAFEGUARDS ON THIS PAGE MUST BE FOLLOWED TO PREVENT FIRE, DAMAGE AND/OR INJURY.
1. The knob on the LP tank must be closed. Make sure that the knob is turned clockwise to a full stop. The cylinder supply system must be arranged for vapor withdrawal.
2. Check that the control knob on the control unit is turned off.
3. Remove the protective cap from the LP tank valve and coupling nut.
4. Hold the regulator in one hand and insert the nipple into the valve outlet. Be sure the nipple is centered in the valve outlet. The coupling connects to the large outside threads on the valve outlet. Use care – do not cross thread the connection.
5. Hand tighten the coupling clockwise until it comes to a full stop. Firmly tighten by hand only. Do not use tools.
P
Straight
CAUTION: In the connection process, make sure the regulator inlet connector mates with the cylinder valve outlet properly, safely and firmly.
15
OPERATING INSTRUCTIONS
Any fuel supply cylinder used must be constructed and marked in accordance with specifications for propane cylinders of the U.S. Department of Transportation (DOT) CFR 49, or the Standard for Cylinders, Spheres and Tubes for the Transportation of Dangerous Goods, CAN/CSA B339. The appliance is to be used only with the 20-pound, vertical standing vapor withdrawal type tank and must include a collar to protect the cylinder valve.(A) DO NOT store spare LP cylinders under or near the smoker.(B) NEVER fill cylinder more than 80% full.(C) Do not store cylinder indoors.
WARNINGIf instructions A, B and C above are not followed exactly, a fire causing death or serious injury may occur.
This smoker is designed to operate on LP gas only. The gas cylinder used must include a collar to protect the cylinder valve. The cylinder supply system must be arranged for vapor withdrawal. Do not allow dirt or foreign material to get into or onto tank connection when it is not attached to the fuel supply system. Use the protective cap provided.
WARNINGALL INSTRUCTIONS AND SAFEGUARDS ON THIS PAGE MUST BE FOLLOWED TO PREVENT FIRE, DAMAGE AND/OR INJURY.
The cylinder outlet must have Type 1 gas connection termination in order to mate with gas hose provided with smoker. The pressure regulator and hose assembly supplied by the manufacturer with the appliance must be used. Replacement pressure regulators and hose assemblies must be those specified by the appliance manufacturer.This unit is not to be utilized with a non-self-contained LP-gas supply system.
Valve/pressure regulators are factory set to the correct operating pressures. No attempts should be made to adjust these settings.
DISCONNECT THE LP TANK
Make sure that the knob on the LP tank is turned clockwise to a full stop (CLOSED).
Hold the regulator in one hand, turn the coupling to the valve outlet counterclockwise and unthread the connection by hand only. Do not use tools.
Place dust cap on cylinder valve outlet whenever the cylinder is not in use. Only install the type of dust cap on the cylinder valve outlet that is provided with the cylinder valve. Other types of caps or plugs may result in leakage of propane.
Always hang the regulator on the lifting handles while not in use, disconnected fromthe LP tank, and when the unit has cooled down.
STORE THE TANK IN A PROPER PLACE AS INDICATED IN THIS MANUAL.
16
OPERATING INSTRUCTIONS
CHECKING FOR LEAKS
After connections are made, check all connections and fittings for leaks with a soap solution. 1. With all valves closed, apply the leak check solution (50/50 mix of dishwashing soap and water) to all gas carrying connections and fittings. 2. Open tank valve.Presence of bubbles at areas of wet solution indicates a gas leak. If leaks are detected or you smell or hear gas, shut off the valve and repair the leak or replace the defective part. Do not use the smoker until all leaks are corrected.
The gas hose/regulator assembly should be totally extended to the maximum distance so that the hose is straight and the tank is as far from the smoker as it can be (minimum 24 inches).
For vapor withdrawal, LP tanks are intended to be operated in the upright position only.
If the product is not in use, the gas must be turned off at the supply cylinder and the cylinder should be disconnected from the appliance.
Storage of the appliance indoors is only permissible if the cylinder is disconnected and removed from the appliance. Do not store cylinder indoors.
BEFORE FIRST USE
Remove all hangings or plastic straps, if present.
Before you cook food in your smoker, it is important to “season” your smoker. Seasoning seals the paint and interior of your smoker to enhance flavoring, durability and overall performance.To season your smoker, simply use it as you normally would only do not cook any food. You will need to follow all of the operating procedures in the next few sections of this manual.
Using your desired flavoring woods and marinades, burn your smoker at low temperature (around 175°F) for 45 – 60 minutes. Let the smoker cool and clean out the water and wood.
Once seasoning is complete, your smoker’s interior will have a durable, seasoned coating.
ADDING WATER
To add water before cooking, simply remove the water bowl and fill it with water slightly below the rim. Place the bowl back into the smoker. Adding water before cooking is recommended. To add water while cooking, if a sizzling sound indicating lack of water is heard, or there is a need to add water, open the bottom door with care and avoid taking in the smoke. Use a long nose kettle-like water can, stand as far from the smoker as you can, fill the water bowl up to 1 inch below the rim.
CAUTION: DO NOT pull the water bowl out beyond the rack when the smoker is hot.
17
OPERATING INSTRUCTIONS
COOKING TIP
Line the water bowl with aluminum foil before each use. This will make it easy to clean and help your water bowl last longer.
To make adding water easier and safer, use a clean watering can with a long spout.
ADDING WOOD CHIPS
To add wood chips before cooking, simply fill the wood chip box with your choice of flavoring hardwood chips. The amount and type of wood you use is entirely dependent on the desired amount of flavor. Once the box is filled, place the lid on top of the box and set the box in the smoker.
To add wood chips while cooking, we recommend using tongs or long handled pliers to removethe box lid and to place the pieces into the wood chip box without removing the box. It is not recommended to remove the wood chip box while the smoker is in operation.
CAUTION: The wood chip box and lid get very hot. Avoid handling them while in use. Always wear protective oven mitts when handling hot components.
COOKING TIP: FLAVORING WOOD
• Small wood chips work best inside the wood chip box.• Use dry hardwoods such as hickory, pecan, apple, cherry or mesquite.• To produce more smoke and prevent fast burning, pre-soak the wood chips in a separate bowl of water for at least 20 minutes, or wrap the chips in perforated aluminum foil.• Most smoke flavoring occurs within the first hour of cooking. Adding wood chips after the first hour is typically not necessary unless extra smoke flavoring is desired.
18
OPERATING INSTRUCTIONS
19
OPERATING INSTRUCTIONS
Match Lighting Procedure - LP Gas
1. Repeat Steps 1 through 5 of the igniter lighting system.
2. Open both doors. Place a lit match on to the burner as shown below. Quickly turn the control knob to the “HIGH” position. If the burner does not light in 5 seconds, turn the control knob off, wait at least 5 minutes and for the gas to clear. Repeat the process.
20
OPERATING INSTRUCTIONS
Cooking Tip: Damper Adjustments
WARNING: The dampers on the smoker body and the handle on the smoke stack may become very hot while cooking. Always wear a heat resistant glove when adjusting.
• For best performance, rotate the smoker so that the front or back of the body is facing the wind. This allows the adjustment of the dampers to be more effective and accurate.• The two dampers on smoker body should never be fully closed.• Opening the damper of the smoke stack helps to exhaust both the heat and smoke.• The key to effective smoking is to watch your heat indicator on the door and adjust the damper accordingly.• Temperature maintenance is best controlled by different damper adjustment configurations.
Turning off the Smoker
CAUTION: The smoker can become very hot while in use.Do not touch any portion of the smoker except for the door handle and burner control knob. It may be necessary to use protective gloves.
1. Turn the burner control knob off by pushing in and rotating to “OFF”. The burner flame should go out.
2. Turn off the LP cylinder valve by turning the knob clockwise until it cannot go any farther.
Follow all warnings and safety precautions before removing meat from smoker or preparing the unit for storage.
Lighting Instructions – Charcoal
When using charcoal, DO NOT USE PRETREATED, MATCH-LIGHT CHARCOAL with this smoker. Only use standard, untreated briquettes or lump charcoal and ONLY use charcoal lighting fluid approved for lighting charcoal. Do not use lighter fluid, paint thinners, gasoline, kerosene, alcohol or other flammable material for lighting charcoal. Damage to the smoker may occur with the use of match-light charcoal. DO NOT USE THE LP GAS BURNER WHEN LIGHTING CHARCOAL. Step 1Place the charcoal grate inside the woodchip/charcoal tray and add 1.5 pounds of charcoal on charcoal grate (approximately 26 briquettes).
Step 2Note: Please refer to the manufacturer’s recommended amount of lighter fluid before applying fluid to the briquettes. With the charcoal tray outside the firebox, saturate charcoal with the amount of lighting
LIGHTING INSTRUCTIONS
CAUTION: If the flame extinguishes accidentally during ignition or operation, immediately TURN OFF the cylinder valve and then TURN OFF the control knob.
Igniter Lighting System
1. Check all connections for leaks using the “soap water” test as explained on page 16.
2. Open both of the smoker cabinet doors. Always keep the doors open during lighting.
3. Check for any blockage to the venturi tube or burner, damper setting, ventilation setting. Remove any foreign objects or matter.
4. Be sure the burner control knob is in the “OFF” position.
5. Open the LP cylinder valve by turning counterclockwise.
6. Push igniter on the control unit down 1 to 2 seconds then push and turn control knob to “HIGH,” while still holding the ignitor button down. At this point the burner should ignite.
7. If ignition does not take place within 5 seconds, immediately turn the control knob to OFF. Wait 5 minutes and repeat above Steps 6 and 7.
8. If burner still fails to light, try match lighting using the instructions on page 19.
9. Once the burner is lit, close the doors to allow heat to accumulate. The smoke stack on the top of the smoker can be adjusted to the desired setting to allow proper ventilation and combustion. NEVER CLOSE THE SMOKE STACK COMPLETELY.
WARNING: Always light your smoker with both doors open.
22
CARE AND MAINTENANCE
AFTER USE SAFETY AND MAINTENANCE
WARNING• Use caution when lifting and moving the smoker to avoid strain injuries. Two people are recommended to lift or move the smoker.
• DO NOT store the smoker near gasoline or other combustible liquids or where combustible vapors may be present. Keep the area around the smoker clear and free of combustible materials and vapors.
• DO NOT store this smoker in an area accessible to children or pets. Store the smoker in a dry, protected location. Disconnect cylinder from smoker.
• DO NOT allow anyone to conduct activities around the smoker following use until it has cooled. It is hot during operation and remains hot for a period of time following use.
• DO NOT leave hot ashes unattended until the smoker cools completely.
• The smoker becomes extremely hot – allow the smoker to cool completely before handling. If you must handle the smoker while it is hot, ALWAYS wear protective oven mitts or heat-resistant gloves. Allow the smoker to cool before removing and cleaning the grease pan.
• Dispose of cold ashes by wrapping them in heavy-duty aluminum foil and putting them in a noncombustible container.
• If you must dispose of the ashes in less time than it takes for them to completely cool. Remove the ashes from the smoker, keeping them in heavy-duty foil, and soak them completely with water before disposing of them in a noncombustible container.
GENERAL CARE AND MAINTENANCE CAUTION: All care and maintenance procedures are to be performed while the smoker is turned off and cooled. Always perform maintenance by a qualified service person.
Clean the water bowl and cooking grate with hot, soapy water. Rinse and dry thoroughly. You may prefer to coat the water bowl and cooking grid lightly with cooking oil or cooking spray.
Frequently check and clean the venturi and burner tubes for insects and insect nests. A clogged tube can lead to fire beneath the smoker. Also make sure the smoker does not have any foreign objects obstructing the flow of combustion and ventilation air.
To clean the inside and outside of the smoker cabinet, simply use a damp cloth. Spray-washing with a water hose is not recommended. Moisture should be wiped away and not allowed to stand inside or on top of the smoker. Once cleaned, you may prefer to lightly coat the interior of the smoker cabinet with cooking oil or cooking spray.
If rust is present on the exterior surface of the smoker, clean the area with steel wool or emery cloth and use heavy-duty, heat-resistant paint.
NEVER apply additional paint to the interior of the smoker. If rust is present on the interior of the smoker, clean it thoroughly with steel wool or emery cloth and lightly coat the area with cooking oil or cooking spray to help minimize recurring rust.
When an LP tank is not connected, and to help prevent dirt or other foreign particles from clogging the regulator connector, hang the end of the hose and regulator assembly on the lifting handle.
Keep the ventilation opening(s) of the cylinder enclosure free and clear of debris.
23
CARE AND MAINTENANCE
Inspect the flames at the burner by looking through the observing hole on left side of the burner and control unit. A good flame should be blue with a yellow tip 1 to 2 inch high. If flames are excessively yellow and irregular, oil residue and food deposits may be collecting on the burner. Try cleaning the burner surface with hot, soapy water and cleaning the holes with a pipe cleaner to improve the flames.
Bad flames may also be caused by poor venturi attachment to the orifice. Turn off the control knob and cylinder valve. Always let the smoker cool before cleaning or checking the assembly. Make sure the orifice of the control valve properly mates with the burner mixing tube by visual observation from the bottom of the appliance. The burner venturi tube should overlap the orifice and they should form a straight line as shown in Figure A. Figures B & C show incorrect alignment.
WARNING: If the instructions above are not followed, an explosion may result, possibly causing serious bodily injury or death.
To protect your smoker from weather conditions, always keep it covered while not in use.
2”
Yellow
Light Blue
Blue
Good Flame Bad Flame
! ! !
Figure A Figure B Figure C
Correct Wrong Wrong
The flame goes out. 1. Disconnected gas supply hose. 2. High or gusting winds.
For replacement parts, call our customer service department at 1-800-963-0211, 8:00 a.m. – 6:00 p.m., EST, Monday – Thursday, 8:00 a.m. – 5:00 p.m., EST, Friday.
Owner’s Manual - Part #312-02025-00Printed in China
SpringClip
Qty. 2
CC
BB x21/4-20 FlangedWasher Nut
Hardware Used
R
Q
7. Insert 4 bolts (AA) through the mounting holes on one of the lifting handles (J) and into holes on right side of smoker body (I). Use a Phillips screwdriver to secure the handles to the smoker body (I). Repeat on left side.
7
Hardware Used
CC x 2Spring Clip
I
AA
J
ASSEMBLY INSTRUCTIONS
4. Thread bolts (EE) through holes on the leg - with holes (B) from outside of unit. Secure using 2 nuts (FF) from inside leg by using wrench. Tighten all bolts (AA) with a Phillips screwdriver. Insert the regulator hose attached to the burner and control unit (C) into the hose retention (V).
4
I
V
12. Slide the wood chip box (D) onto the lowest cooking grate supports (T) inside the smoker body (I) and put the wood chip box lid (F) on top. Note: For charcoal, refer to Step 17.
12
DANGER:
Failure to follow these instructions could result in fire, explosion, or burn hazard which could cause property damage, personal injury or death.
DANGER: If you smell gas:1. Shut off gas to the appliance.
3. Open lid.4. If odor continues, keep away from the appliance and immediately call your gas supplier or your fire department.
Assembler/Installer: This instruction manual contains important information necessary for the proper assembly and safe use of this appliance. Read and follow all warnings and instructions before assembling and using this appliance. Leave these instructions with the consumer.
Consumer/User: Follow all warnings and instructions when using this appliance. Keep these instructions for future reference.
1. Never operate this appliance unattended.2. Never operate this appliance within 10 feet (3 m) of any structure, combustible material or other gas cylinder.3. Never operate this appliance within 25 feet (7.5 m) of any flammable liquid.4. Never allow oil or grease to get hotter than 400°F or 200°C. If the temperature exceeds 400°F (200°C) or if oil begins to smoke, immediately turn the burner or gas supply OFF.5. Heated liquids remain at scalding temperatures long after the cooking process. Never touch cooking appliance until liquids have cooled to 115°F (45°C) or less.6. If a fire should occur, keep away from the appliance and immediately call your fire department. Do not attempt to extinguish an oil or grease fire with water. Failure to follow these instructions could result in fire, explosion, or burn hazard which could cause property damage, personal injury or death.
DANGER
DANGER:
Rev. 9/2011
M4 x 10Bolt
Qty. 2
DD EE
M4 Nut
Qty. 2
FF
M5 x 12Screw
Qty. 8
H
J
T
T
U
V
front of smoker
B
front of smoker
M4 x 10 BoltEE
M4 NutFF
Hardware Used
x 2
x 2
B
EE
FF
Hardware Used
AA x 4M6 x 12 Bolt
Hardware Used
AA x 4M6 x 12 Bolt
M5 x 12 ScrewBB x 8
Hardware UsedBB
S
I
R
S
D
FI
I13. Slide the water bowl (G) onto the cooking grate supports (T) inside the smoker body (I) above the wood chip box (D) as shown.
ASSEMBLY INSTRUCTIONS
13
15. Insert the probe of the temperature gauge assembly (M) through hole of the smoker door from the outside. Secure using 2 nuts (DD) from inside panel by using wrench.
16. To install the “AAA” battery (U), remove the igniter button by turning it counterclockwise and insert the “AAA” battery (U) with the positive end facing out. Reinstall the igniter button by turning it clockwise and hand tightening.
17. For charcoal use, remove the wood chip box lid (F) and place the charcoal grate (E) inside the wood chip box (D).
18. Always hang the regulator hose attached to the burner and control unit (C) to the hose retention (V) attached to the leg - with hole (B) while not in use. If switching from LP gas to charcoal, wait for the unit to cool down before disconnecting from the LP tank.
15
16
17
18
DD
M
U
E
B
12
14. Slide the 4 cooking grates (H) onto the top cooking grate supports (T) inside the smoker body (I).
14 I
H
ASSEMBLY INSTRUCTIONS
Hardware Used
DD x 2
D
S
V
M5 Nut
igniter button
21
OPERATING INSTRUCTIONS
fluid as recommended by the lighter fluid manufacturer. Allow the fluid to soak into the charcoal for 3 minutes before placing the tray back into the firebox (refer to assembly instructions for proper tray placement). After soaking the charcoal, place the lighting fluid at a safe distance away from the smoker.
Step 3With both doors open, stand back and carefully light charcoal and allow to burn until covered with a light ash (approximately 20 minutes). Charcoal lighting fluid must be allowed to completely burn off prior to closing the doors. (Fumes will tend to collect in the upper cavity if the door is closed).
DANGER: Closing the firebox doors during the lighting procedure could trap fumes from the charcoal lighting fluid in the smoker box and may result in a flash-fire or explosion when door is opened, resulting in property loss, personal injury or death. Never attempt to add more lighting fluid to the charcoal once it has been lit.
Step 4After 25 - 30 minutes, charcoal should be ready for cooking and/or adding woodchips. Carefully add wood chunks using long cooking tongs.
Adding Charcoal and/or Wood Chips
Additional charcoal and/or wood may be required to maintain or increase cooking temperature.
WARNING: Use caution since flames can flare-up when fresh air suddenly comes in contact with fire. When opening the door, keep hands, face and body a safe distance from hot steam and flame flare-ups.
Step 1Stand back and carefully open smoker box door allowing heat and steam to escape away from your face. Use caution since flames can flare-up when fresh air suddenly comes in contact with fire. Inspect the charcoal level in pan.
Step 2Wearing flame retardant oven mitts/gloves, stand back a safe distance and use long cooking tongs to lightly brush aside ashes on hot coals. Use cooking tongs to add charcoal and/or wood to charcoal pan, being careful not to stir-up ashes and sparks
WARNING: Never add charcoal lighting fluid to hot or even warm coals as flashback may occur causing severe burns.
Step 3Close smoker box door and allow food to continue cooking.
Allow the ashes to completely cool before reusing or cleaning the smoker.
26
REPLACEMENT PARTS LIST
For replacement parts, call our customer service department at 1-800-963-0211, 8:00 a.m. – 6:00 p.m., EST, Monday – Thursday, 8:00 a.m. – 5:00 p.m., EST, Friday.
PART DESCRIPTION PART # 1 Leg – Standard 301-01016-00 2 Leg – with Holes 312-01016-00 3 Burner and Control Unit 312-01015-00 4 Wood Chip Box (MFW only) 312-01028-00 5 Charcoal Grate 312-01030-00 6 Wood Chip Box Lid 301-01029-00 7 Wood Chip Box Handle and 301-01028-02 Lid Handle 8 Water Bowl 301-02017-00 9 Cooking Grate 312-01014-00 10 Door Locking Bracket 302-01008-00 11 Cooking Grate Support 302-01030-00 12 Smoker Body 312-12001-00 13 Square Smoke Stack 312-02009-00 14 Lifting Handle 301-01010-00 15 Logo Plate 302-03002-01 16 Temperature Gauge Bezel 301-01034-00 17 Temperature Gauge 301-01003-00
PART DESCRIPTION PART # 18 Upper Door 302-02002-00 19 Side Table 312-02008-00 20 Door Handle Crank 302-02007-02 21 Door Handle Grip 302-02007-01 22 Bottom Door without Handle 302-02102-00 23 Table Front Support Bracket 312-02008-01 24 Table Back Support Bracket 312-02008-02 25 Side Damper Plate (round) 301-01001-04 26 Igniter Ground Wire 301-01015-08 27 Push Button 301-01015-03 28 Electronic Ignitor 301-01015-06 29 Ignition Cap 301-01015-05 30 Control Knob 301-01015-01 31 Control Knob Bezel 301-01015-02 32 Igniter Electrode and Ignition Wire 301-01015-07 33 Hose Retention 312-01016-01 N/A Hardware Bag 312-02026-00 N/A Owner’s/Instruction Manual 312-02025-00
11
14
21
17
1918
20
22
2324
25
2627
32
30
2928
3331
ANS Z21.89a-2008 CSA 1.18a-2008
• Do not use the smoker if the burner fails to light or fails to remain lit. Under such conditions, gas should be turned off and the fuel cylinder should be disconnected.• Use in high wind conditions that result in poor burner operation such as blowing out and flaring should be avoided. If repositioning the appliance does not improve operation under such wind conditions, the appliance should be turned off.• Install the smoker with the hose regulator assembly extended the full length of the hose (24 in. minimum) directly away from the appliance. When so configured, placement results in maximum tank to smoker distance. When the smoker is operated, the hose/regulator and gas tank should be perpendicular to wind direction. Placing tank closer than 24 inches to the smoker can overheat the tank and cause release of propane through relief openings and can result in tank fire or explosion. • Read and follow all warnings and instructions before assembling and using the appliance.• Follow all warnings and instructions when using the appliance.
NOTE: The installation must confirm with local codes or, in the absence of local codes, with eitherthe National Fuel Gas Code, ANSI Z223.1/NFPA 54, Natural Gas and Propane Installation Code,CSA B149.1, or Propane Storage and Handling Code, B149.2, or the Standard for RecreationalVehicles, ANSI A 119.2/ NFPA 1192, and CSA Z240 RV Series, Recreational Vehicle Code, asapplicable.
WARNINGDO NOT mix old and new batteries.DO NOT mix alkaline, standard (Carbon-Zinc), or rechargeable (Nickel-Cadmium) batteries.DO NOT dispose of batteries in fire. Improper disposal may cause batteries to leak or explode.
The electronic ignition requires 1 “AAA” alkaline battery, which is included.
WARNING:The hose to tank attachment creates a potential trip hazard for user and pedestrians - use caution.Do not allow or cause the gas tank or applianceto tip.
MINIMUM 24 IN. (610 MM)
(Tank not included)
HIGH
LOW OFF
I
C
V
T
T
T
C
Master Forge & M Design® is a registered trademarkof LF, LLC. All rights reserved.
®
D
13
G
2
TABLE OF CONTENTS
Safety Information ......................................................................................................................... 3
Replacement Parts List ................................................................................................................ 26
ITEM #0156452
MODEL #MFW784BDP
DUAL FUELVERTICAL SMOKER
Français p. XX
Español p. XX
1
Français p. 28
Español p. 55
SAFETY INFORMATION
3
Please read and understand this entire manual before attempting to assemble, operate or install the product. If you have any questions regarding the product, please call customer service at 1-800-963-0211, 8:00 a.m. – 6:00 p.m., EST, Monday – Thursday, 8:00 a.m. – 5:00 p.m., EST, Friday.
PACKAGE CONTENTS
6
PART DESCRIPTION QUANTITY A Leg - standard 3 B Leg - with holes 1 C Burner & Control Unit 1 D Wood Chip Box 1 E Charcoal Grate 1 F Wood Chip Box Lid 1 G Water Bowl 1 H Cooking Grate 4 I Smoker Body 1 J Lifting Handle 2 K Door Locking Bracket 2
L Square Smoke Stack 1 M Temperature Gauge & Bezel 1 N Upper Door (pre-assembled) 1 O Bottom Door (pre-assembled) 1 P Side Table 1 Q Door Handle 2 R Table Front Support 1 S Table Back Support 1 T Cooking Grate Support 12 U “AAA” Battery (1.5 V) 1 V Hose Retention 1
PART DESCRIPTION QUANTITY
ASSEMBLY INSTRUCTIONS
8
24
WARRANTY
25
This vertical gas smoker is warranted against broken or damaged parts at the time of purchase. The stainless steel burner is warranted for 3 years. All other parts carry a one (1) year limited warranty except the water bowl, which is warranted to be free of defects for 90 days. Paint is warranted to be free of defects for 90 days except for rust, which may appear after repeated use.
This warranty does not cover damage or issues related to neglect, abuse or modifications to the appliance. Repair labor is not covered.
All parts that meet the warranty requirements will be shipped at no charge via the discretion of GHP Group Inc. (ground shipments, US Mail or Parcel Post ONLY). Any special handling charges (i.e. Second Day, Overnight, etc.) will be the responsibility of the consumer.
All warranty claims apply only to the original purchaser and require a proof of purchase verifying purchase date. Do not return parts to GHP address without first obtaining a return authorization number from our customer service. This service is available by calling toll free 1-800-963-0211, 8:00 a.m. – 6:00 p.m., EST, Monday – Thursday 8:00 a.m. – 5:00 p.m., EST, Friday.
Some states do not allow the exclusion or limitation of incidental or consequential damages orlimitations on how long an implied warranty lasts, so the above limitations or exclusions may not apply to you. This warranty gives you specific legal rights, and you may have other rights that vary from state to state.
GHP Group Inc.8280 Austin AvenueMorton Grove, IL, USA60053-3207
The burner will not light using the igniter procedure.
1. The igniter electrode may be covered with grease or residue.
2. The igniter electrode may have a loose or disconnected wire.
3. No spark is being generated.
4. No gas flow or cylinder valve not open.
5. Vapor lock at coupling nut to LP cylinder.
1. Clean the igniter electrode.
2. Check the connection and reconnect any loose or disconnected wires.
3. Replace the AAA size battery inside the igniter.
4. Make sure LP cylinder is not empty or open cylinder valve.
5. Turn off knob and LP cylinder valve. Disconnect coupling nut from LP cylinder. Reconnect and retry.
The burner will not light with a match.
1. No gas flow or an obstructed gas flow.
1. Check the fuel level. Clean the venturi tube and burner.
HARDWARE CONTENTS (shown actual size)
M6 x 12Bolt
Qty. 32
7
AA BB
Before beginning assembly of product, make sure all parts are present. Compare parts with package contents list and hardware contents list. If any part is missing or damaged, do not attempt to assemble the product.
Estimated Assembly Time: 25 minutes
Tools Required for Assembly (not included): Phillips Screwdriver, Wrench, Pliers.
PREPARATION
M5 Nut
Qty. 2
1. Align the legs - standard (A) with the mounting holes on the bottom left front, right front and left rear of the smoker body (I). Thread bolts (AA) through the holes from the outside of the unit. Tighten all bolts (AA) with a Phillips screwdriver.
Hardware Used
AA x 9M6 x 12 Bolt
2. Align the leg - with holes (B) with the mounting holes on the bottom right rear of the smoker. Thread bolts (AA) through the holes from the outside of the unit. Tighten all bolts (AA) with a Phillips screwdriver.
3. Open the bottom door of the smoker body (I). Turn the burner and control unit (C) upside down and place it on the bottom of the smoker body (I), making sure the 4 mounting holes on the burner and control unit (C) are aligned with the holes on the smoker body (I). Note: The control knob should be on the same side as the door. Check that the burner is properly installed on the orifice before attaching the burner and control unit (C). Thread bolts (AA) through holes from outside of unit. Securely tighten the unit to the bottom with a Phillips screwdriver.
5. CAUTION: This unit is HEAVY! Do not attempt this step without assistance! Close the two doors. With the assistance of a helper, stand the unit upright on its legs on a firm and level surface. (Make sure that the burner/control unit and legs are attached). Open the upper door. Position the square smoke stack (L) with control arm to the left as shown. Using 4 bolts (AA), attach square smoke stack (L) to the top of smoker body (I). Securely tighten with a Phillips screwdriver.
Hardware Used
6. Insert the cooking grate supports (T) into the corresponding holes on rack of the shelf inside the smoker body (I) from the bottom up. NOTE: There are 8 positions to install the cooking grate supports. The cooking grate supports can be installed into positions according to the need of the owner.
8. Align the door locking bracket (K) holes with the holes on the upper right side of the smoker body (I). Thread 2 bolts (AA) through the holes in the door locking bracket (K) into the threaded holes of the smoker body (I). Tighten the bolts (AA) using a Phillips screwdriver. Repeat on lower right side.
9. Slide door handle (Q) through brackets in door. Using pliers, slide a spring clip (CC) over the groove in the door handle as shown. Make sure both of the spring clips are securely attached in the grooves of the handles.
10. Install the table back support (S) and table front support (R) on the side of the smoker body (I) with screws (BB). Arrows pointing up indicate the correct position of the brackets when fastened to the smoker body (I).
11. With the side table (P) in a parallel position, align the slots in the side table with the table supports (R & S) and insert. To lock the side table (P) in the upright position, swing the side table (P) up, push toward the smoker body (I), and press down on the side table (P) near the body until it is fully fastened in place.
If you have any questions regarding the product, please call customer service at 1-800-963-0211, 8:00 a.m. – 6:00 p.m., EST, Monday – Thursday, 8:00 a.m. – 5:00 p.m., EST, Friday.
2
6
5
8
9
10
11
ATTACH YOUR RECEIPT HERE
Serial Number Purchase Date
Questions, problems, missing parts? Before returning to your retailer, call our customer service department at 1-800-963-0211, 8:00 a.m. – 6:00 p.m., EST, Monday – Thursday, 8:00 a.m. – 5:00 p.m., EST, Friday.
ANS Z21.89a-2008 CSA 1.18a-2008
• DO NOT use this product for anything other than its intended purpose. It is NOT intended for commercial use. It is NOT intended to be installed or used in or on a recreational vehicle and/or boat. • Keep a fire extinguisher near this product at all times.• This appliance is for outdoor use only in well-ventilated areas. DO NOT operate it in a building, garage or any other enclosed area, or under overhead construction.• A minimum clearance of 36 inches (92 cm) to combustible material is required on the front, sides and back. It is very important to always maintain proper clearances to combustibles.• The cylinder must be at least 24 inches (61 cm) from the appliance.• DO NOT obstruct the flow of combustion air or ventilation air for the appliance.• When cooking, the smoker must be on a level, stable noncombustible surface in an area clear of combustible material, including tall or dry grass. • Care should be taken to protect the fuel supply hose from damage from either pedestrian or vehicle traffic.• Clean and inspect the hose before each use of the appliance. If there is evidence of abrasion, wear, cuts or leaks, the hose must be replaced prior to the appliance being used. The replacement hose assembly shall be that specified by the manufacturer.• Before each use check that no dead leaves or debris are under the appliance.• Store this appliance in a dry, protected location.• The use of alcohol, prescription or nonprescription drugs may impair the user’s ability to properly assemble and safely operate this appliance.• Allow the smoker to cool to 115°F (45°C) before moving or storing. Use caution when lifting and moving the appliance to avoid back strain or back injury. DO NOT move the appliance while it is in use.• Always hang the regulator on the hose retention wire while not in use or disconnected with the LP (liquid propane) tank. KEEP the fuel supply hose away from any heated surface(s).
SAFETY INFORMATION
4
• DO NOT store and use this appliance near gasoline or other combustible liquids or where other combustible vapors may be present.• DO NOT use this appliance as a heater.• DO NOT leave the appliance unattended while in use. Keep children and pets away from the appliance at all times.• NEVER close the damper completely while cooking. • If you must dispose of ashes in less time than it takes for the ashes to completely cool down, remove the ashes from the appliance, keeping them in the heavy-duty foil, and soak them completely with water before disposing of them in a noncombustible container.• This appliance will be hot during and after use. Use insulated oven mitts or gloves for protection from hot surfaces or splatter from cooking liquids.• Make sure that the orifice of the control valve properly mates with the burner mixing tube by visual observation. Please refer to maintenance section.• Use caution when opening the door of the smoker while in operation. Keep hands, face and body safe from hot steam or flare-ups. DO NOT inhale smoke.• DO NOT wear loose clothing while operating the smoker. Tie back long hair while operating the smoker. ALWAYS wear shoes that fully cover your feet while operating the smoker.• Allow the smoker and its components to cool completely before conducting any routine cleaning or maintenance.• NEVER use glassware, plastic or ceramic cookware on or in your smoker. Use metallic cookware only.• NEVER operate the smoker without water in the water bowl. NEVER allow the water to completely evaporate. Check the water level at least every 2 hours. A sizzling sound may indicate a low water level. Follow instructions in this manual for adding water while operating (see the Operating Instructions section).• When using flavoring wood, add a sufficient amount prior to operation to avoid having to add wood while operating. Adding wood while operating may splash hot water and cause serious injury.• Use of accessories not intended for this smoker is not recommended and may lead to injury or property damage.• An LP cylinder not connected for use should not be stored in the vicinity of the smoker or any other appliance. DO NOT store spare LP cylinders within 10 feet of the smoker. LP cylinders must be stored outdoors, out of reach of children. DO NOT store LP cylinders in a building, garage or any other enclosed area.• DO NOT store LP gas cylinders inside or on top of the smoker. Improper storage of cylinders could lead to explosion, fire and/or personal injury. Cylinders are to be stored outdoors, out of reach of children and must not be stored in a building, garage or any other enclosed area.• While the smoker is not in use, the gas must be turned off at the supply cylinder.• LP gases are heavier than air, tend to pool and collect in low-lying areas, are easily ignited and are highly flammable. Proper care and caution should be employed when dealing with any such fuels.• The smoker should be turned off and all supply valves (on piping or on fuel cylinders) should be closed in the event that the odor of unburned gas is detected. Do not attempt to use the appliance until any gas leaks are fixed and/or the source of the unburned gas odor is accounted for.
SAFETY INFORMATION
5
A
B
C
D
E
F
G
I
S K
LM
NP
O
J
A
I
AA
I
AA
Hardware Used
AA x 3M6 x 12 Bolt
1
3C
AA
Hardware Used
AA x 4M6 x 12 Bolt
Controlarm
I
AAL
AA x 8M6 x 12 Bolt
I
T
AA
K
Q
I
CC
I
R
OPERATING INSTRUCTIONS
CONNECTING THE LP TANK
WARNING
ALL INSTRUCTIONS AND SAFEGUARDS ON THIS PAGE MUST BE FOLLOWED TO PREVENT FIRE, DAMAGE AND/OR INJURY.
1. The knob on the LP tank must be closed. Make sure that the knob is turned clockwise to a full stop. The cylinder supply system must be arranged for vapor withdrawal.
2. Check that the control knob on the control unit is turned off.
3. Remove the protective cap from the LP tank valve and coupling nut.
4. Hold the regulator in one hand and insert the nipple into the valve outlet. Be sure the nipple is centered in the valve outlet. The coupling connects to the large outside threads on the valve outlet. Use care – do not cross thread the connection.
5. Hand tighten the coupling clockwise until it comes to a full stop. Firmly tighten by hand only. Do not use tools.
P
Straight
CAUTION: In the connection process, make sure the regulator inlet connector mates with the cylinder valve outlet properly, safely and firmly.
15
OPERATING INSTRUCTIONS
Any fuel supply cylinder used must be constructed and marked in accordance with specifications for propane cylinders of the U.S. Department of Transportation (DOT) CFR 49, or the Standard for Cylinders, Spheres and Tubes for the Transportation of Dangerous Goods, CAN/CSA B339. The appliance is to be used only with the 20-pound, vertical standing vapor withdrawal type tank and must include a collar to protect the cylinder valve.(A) DO NOT store spare LP cylinders under or near the smoker.(B) NEVER fill cylinder more than 80% full.(C) Do not store cylinder indoors.
WARNINGIf instructions A, B and C above are not followed exactly, a fire causing death or serious injury may occur.
This smoker is designed to operate on LP gas only. The gas cylinder used must include a collar to protect the cylinder valve. The cylinder supply system must be arranged for vapor withdrawal. Do not allow dirt or foreign material to get into or onto tank connection when it is not attached to the fuel supply system. Use the protective cap provided.
WARNINGALL INSTRUCTIONS AND SAFEGUARDS ON THIS PAGE MUST BE FOLLOWED TO PREVENT FIRE, DAMAGE AND/OR INJURY.
The cylinder outlet must have Type 1 gas connection termination in order to mate with gas hose provided with smoker. The pressure regulator and hose assembly supplied by the manufacturer with the appliance must be used. Replacement pressure regulators and hose assemblies must be those specified by the appliance manufacturer.This unit is not to be utilized with a non-self-contained LP-gas supply system.
Valve/pressure regulators are factory set to the correct operating pressures. No attempts should be made to adjust these settings.
DISCONNECT THE LP TANK
Make sure that the knob on the LP tank is turned clockwise to a full stop (CLOSED).
Hold the regulator in one hand, turn the coupling to the valve outlet counterclockwise and unthread the connection by hand only. Do not use tools.
Place dust cap on cylinder valve outlet whenever the cylinder is not in use. Only install the type of dust cap on the cylinder valve outlet that is provided with the cylinder valve. Other types of caps or plugs may result in leakage of propane.
Always hang the regulator on the lifting handles while not in use, disconnected fromthe LP tank, and when the unit has cooled down.
STORE THE TANK IN A PROPER PLACE AS INDICATED IN THIS MANUAL.
16
OPERATING INSTRUCTIONS
CHECKING FOR LEAKS
After connections are made, check all connections and fittings for leaks with a soap solution. 1. With all valves closed, apply the leak check solution (50/50 mix of dishwashing soap and water) to all gas carrying connections and fittings. 2. Open tank valve.Presence of bubbles at areas of wet solution indicates a gas leak. If leaks are detected or you smell or hear gas, shut off the valve and repair the leak or replace the defective part. Do not use the smoker until all leaks are corrected.
The gas hose/regulator assembly should be totally extended to the maximum distance so that the hose is straight and the tank is as far from the smoker as it can be (minimum 24 inches).
For vapor withdrawal, LP tanks are intended to be operated in the upright position only.
If the product is not in use, the gas must be turned off at the supply cylinder and the cylinder should be disconnected from the appliance.
Storage of the appliance indoors is only permissible if the cylinder is disconnected and removed from the appliance. Do not store cylinder indoors.
BEFORE FIRST USE
Remove all hangings or plastic straps, if present.
Before you cook food in your smoker, it is important to “season” your smoker. Seasoning seals the paint and interior of your smoker to enhance flavoring, durability and overall performance.To season your smoker, simply use it as you normally would only do not cook any food. You will need to follow all of the operating procedures in the next few sections of this manual.
Using your desired flavoring woods and marinades, burn your smoker at low temperature (around 175°F) for 45 – 60 minutes. Let the smoker cool and clean out the water and wood.
Once seasoning is complete, your smoker’s interior will have a durable, seasoned coating.
ADDING WATER
To add water before cooking, simply remove the water bowl and fill it with water slightly below the rim. Place the bowl back into the smoker. Adding water before cooking is recommended. To add water while cooking, if a sizzling sound indicating lack of water is heard, or there is a need to add water, open the bottom door with care and avoid taking in the smoke. Use a long nose kettle-like water can, stand as far from the smoker as you can, fill the water bowl up to 1 inch below the rim.
CAUTION: DO NOT pull the water bowl out beyond the rack when the smoker is hot.
17
OPERATING INSTRUCTIONS
COOKING TIP
Line the water bowl with aluminum foil before each use. This will make it easy to clean and help your water bowl last longer.
To make adding water easier and safer, use a clean watering can with a long spout.
ADDING WOOD CHIPS
To add wood chips before cooking, simply fill the wood chip box with your choice of flavoring hardwood chips. The amount and type of wood you use is entirely dependent on the desired amount of flavor. Once the box is filled, place the lid on top of the box and set the box in the smoker.
To add wood chips while cooking, we recommend using tongs or long handled pliers to removethe box lid and to place the pieces into the wood chip box without removing the box. It is not recommended to remove the wood chip box while the smoker is in operation.
CAUTION: The wood chip box and lid get very hot. Avoid handling them while in use. Always wear protective oven mitts when handling hot components.
COOKING TIP: FLAVORING WOOD
• Small wood chips work best inside the wood chip box.• Use dry hardwoods such as hickory, pecan, apple, cherry or mesquite.• To produce more smoke and prevent fast burning, pre-soak the wood chips in a separate bowl of water for at least 20 minutes, or wrap the chips in perforated aluminum foil.• Most smoke flavoring occurs within the first hour of cooking. Adding wood chips after the first hour is typically not necessary unless extra smoke flavoring is desired.
18
OPERATING INSTRUCTIONS
19
OPERATING INSTRUCTIONS
Match Lighting Procedure - LP Gas
1. Repeat Steps 1 through 5 of the igniter lighting system.
2. Open both doors. Place a lit match on to the burner as shown below. Quickly turn the control knob to the “HIGH” position. If the burner does not light in 5 seconds, turn the control knob to OFF O, wait at least 5 minutes and for the gas to clear. Repeat the process.
20
OPERATING INSTRUCTIONS
Cooking Tip: Damper Adjustments
WARNING: The dampers on the smoker body and the handle on the smoke stack may become very hot while cooking. Always wear a heat resistant glove when adjusting.
• For best performance, rotate the smoker so that the front or back of the body is facing the wind. This allows the adjustment of the dampers to be more effective and accurate.• The two dampers on smoker body should never be fully closed.• Opening the damper of the smoke stack helps to exhaust both the heat and smoke.• The key to effective smoking is to watch your heat indicator on the door and adjust the damper accordingly.• Temperature maintenance is best controlled by different damper adjustment configurations.
Turning off the Smoker
CAUTION: The smoker can become very hot while in use.Do not touch any portion of the smoker except for the door handle and burner control knob. It may be necessary to use protective gloves.
1. Turn the burner control knob off by pushing in and rotating to “OFF”. The burner flame should go out.
2. Turn off the LP cylinder valve by turning the knob clockwise until it cannot go any farther.
Follow all warnings and safety precautions before removing meat from smoker or preparing the unit for storage.
Lighting Instructions – Charcoal
When using charcoal, DO NOT USE PRETREATED, MATCH-LIGHT CHARCOAL with this smoker. Only use standard, untreated briquettes or lump charcoal and ONLY use charcoal lighting fluid approved for lighting charcoal. Do not use lighter fluid, paint thinners, gasoline, kerosene, alcohol or other flammable material for lighting charcoal. Damage to the smoker may occur with the use of match-light charcoal. DO NOT USE THE LP GAS BURNER WHEN LIGHTING CHARCOAL. Step 1Place the charcoal grate inside the woodchip/charcoal tray and add 1.5 pounds of charcoal on charcoal grate (approximately 26 briquettes).
Step 2Note: Please refer to the manufacturer’s recommended amount of lighter fluid before applying fluid to the briquettes. With the charcoal tray outside the firebox, saturate charcoal with the amount of lighting
22
CARE AND MAINTENANCE
AFTER USE SAFETY AND MAINTENANCE
WARNING• Use caution when lifting and moving the smoker to avoid strain injuries. Two people are recommended to lift or move the smoker.
• DO NOT store the smoker near gasoline or other combustible liquids or where combustible vapors may be present. Keep the area around the smoker clear and free of combustible materials and vapors.
• DO NOT store this smoker in an area accessible to children or pets. Store the smoker in a dry, protected location. Disconnect cylinder from smoker.
• DO NOT allow anyone to conduct activities around the smoker following use until it has cooled. It is hot during operation and remains hot for a period of time following use.
• DO NOT leave hot ashes unattended until the smoker cools completely.
• The smoker becomes extremely hot – allow the smoker to cool completely before handling. If you must handle the smoker while it is hot, ALWAYS wear protective oven mitts or heat-resistant gloves. Allow the smoker to cool before removing and cleaning the grease pan.
• Dispose of cold ashes by wrapping them in heavy-duty aluminum foil and putting them in a noncombustible container.
• If you must dispose of the ashes in less time than it takes for them to completely cool. Remove the ashes from the smoker, keeping them in heavy-duty foil, and soak them completely with water before disposing of them in a noncombustible container.
GENERAL CARE AND MAINTENANCE CAUTION: All care and maintenance procedures are to be performed while the smoker is turned off and cooled. Always perform maintenance by a qualified service person.
Clean the water bowl and cooking grate with hot, soapy water. Rinse and dry thoroughly. You may prefer to coat the water bowl and cooking grid lightly with cooking oil or cooking spray.
Frequently check and clean the venturi and burner tubes for insects and insect nests. A clogged tube can lead to fire beneath the smoker. Also make sure the smoker does not have any foreign objects obstructing the flow of combustion and ventilation air.
To clean the inside and outside of the smoker cabinet, simply use a damp cloth. Spray-washing with a water hose is not recommended. Moisture should be wiped away and not allowed to stand inside or on top of the smoker. Once cleaned, you may prefer to lightly coat the interior of the smoker cabinet with cooking oil or cooking spray.
If rust is present on the exterior surface of the smoker, clean the area with steel wool or emery cloth and use heavy-duty, heat-resistant paint.
NEVER apply additional paint to the interior of the smoker. If rust is present on the interior of the smoker, clean it thoroughly with steel wool or emery cloth and lightly coat the area with cooking oil or cooking spray to help minimize recurring rust.
When an LP tank is not connected, and to help prevent dirt or other foreign particles from clogging the regulator connector, hang the end of the hose and regulator assembly on the lifting handle.
Keep the ventilation opening(s) of the cylinder enclosure free and clear of debris.
23
CARE AND MAINTENANCE
Inspect the flames at the burner by looking through the observing hole on left side of the burner and control unit. A good flame should be blue with a yellow tip 1 to 2 inch high. If flames are excessively yellow and irregular, oil residue and food deposits may be collecting on the burner. Try cleaning the burner surface with hot, soapy water and cleaning the holes with a pipe cleaner to improve the flames.
Bad flames may also be caused by poor venturi attachment to the orifice. Turn off the control knob and cylinder valve. Always let the smoker cool before cleaning or checking the assembly. Make sure the orifice of the control valve properly mates with the burner mixing tube by visual observation from the bottom of the appliance. The burner venturi tube should overlap the orifice and they should form a straight line as shown in Figure A. Figures B & C show incorrect alignment.
WARNING: If the instructions above are not followed, an explosion may result, possibly causing serious bodily injury or death.
To protect your smoker from weather conditions, always keep it covered while not in use.
2”
Yellow
Light Blue
Blue
Good Flame Bad Flame
! ! !
Figure A Figure B Figure C
Correct Wrong Wrong
The flame goes out. 1. Disconnected gas supply hose. 2. High or gusting winds.
For replacement parts, call our customer service department at 1-800-963-0211, 8:00 a.m. – 6:00 p.m., EST, Monday – Thursday, 8:00 a.m. – 5:00 p.m., EST, Friday.
Owner’s Manual - Part #312-02025-00Printed in China
SpringClip
Qty. 2
CC
BB x21/4-20 FlangedWasher Nut
Hardware Used
R
Q
7. Insert 4 bolts (AA) through the mounting holes on one of the lifting handles (J) and into holes on right side of smoker body (I). Use a Phillips screwdriver to secure the handles to the smoker body (I). Repeat on left side.
7
Hardware Used
CC x 2Spring Clip
I
AA
J
ASSEMBLY INSTRUCTIONS
4. Thread bolts (EE) through holes on the leg - with holes (B) from outside of unit. Secure using 2 nuts (FF) from inside leg by using wrench. Tighten all bolts (AA) with a Phillips screwdriver. Insert the regulator hose attached to the burner and control unit (C) into the hose retention (V).
4
I
V
12. Slide the wood chip box (D) onto the lowest cooking grate supports (T) inside the smoker body (I) and put the wood chip box lid (F) on top. Note: For charcoal, refer to Step 17.
12
DANGER:
Failure to follow these instructions could result in fire, explosion, or burn hazard which could cause property damage, personal injury or death.
DANGER: If you smell gas:1. Shut off gas to the appliance.
3. Open lid.4. If odor continues, keep away from the appliance and immediately call your gas supplier or your fire department.
Assembler/Installer: This instruction manual contains important information necessary for the proper assembly and safe use of this appliance. Read and follow all warnings and instructions before assembling and using this appliance. Leave these instructions with the consumer.
Consumer/User: Follow all warnings and instructions when using this appliance. Keep these instructions for future reference.
1. Never operate this appliance unattended.2. Never operate this appliance within 10 feet (3 m) of any structure, combustible material or other gas cylinder.3. Never operate this appliance within 25 feet (7.5 m) of any flammable liquid.4. Never allow oil or grease to get hotter than 400°F or 200°C. If the temperature exceeds 400°F (200°C) or if oil begins to smoke, immediately turn the burner or gas supply OFF.5. Heated liquids remain at scalding temperatures long after the cooking process. Never touch cooking appliance until liquids have cooled to 115°F (45°C) or less.6. If a fire should occur, keep away from the appliance and immediately call your fire department. Do not attempt to extinguish an oil or grease fire with water. Failure to follow these instructions could result in fire, explosion, or burn hazard which could cause property damage, personal injury or death.
DANGER
DANGER:
Rev. 9/2011
M4 x 10Bolt
Qty. 2
DD EE
M4 Nut
Qty. 2
FF
M5 x 12Screw
Qty. 8
H
J
T
T
U
V
front of smoker
B
front of smoker
M4 x 10 BoltEE
M4 NutFF
Hardware Used
x 2
x 2
B
EE
FF
Hardware Used
AA x 4M6 x 12 Bolt
Hardware Used
AA x 4M6 x 12 Bolt
M5 x 12 ScrewBB x 8
Hardware UsedBB
S
I
R
S
D
FI
I13. Slide the water bowl (G) onto the cooking grate supports (T) inside the smoker body (I) above the wood chip box (D) as shown.
ASSEMBLY INSTRUCTIONS
13
15. Insert the probe of the temperature gauge assembly (M) through hole of the smoker door from the outside. Secure using 2 nuts (DD) from inside panel by using wrench.
16. To install the “AAA” battery (U), remove the igniter button by turning it counterclockwise and insert the “AAA” battery (U) with the positive end facing out. Reinstall the igniter button by turning it clockwise and hand tightening.
17. For charcoal use, remove the wood chip box lid (F) and place the charcoal grate (E) inside the wood chip box (D).
18. Always hang the regulator hose attached to the burner and control unit (C) to the hose retention (V) attached to the leg - with hole (B) while not in use. If switching from LP gas to charcoal, wait for the unit to cool down before disconnecting from the LP tank.
15
16
17
18
DD
M
U
E
B
12
14. Slide the 4 cooking grates (H) onto the top cooking grate supports (T) inside the smoker body (I).
14 I
H
ASSEMBLY INSTRUCTIONS
Hardware Used
DD x 2
D
S
V
M5 Nut
igniter button
21
OPERATING INSTRUCTIONS
fluid as recommended by the lighter fluid manufacturer. Allow the fluid to soak into the charcoal for 3 minutes before placing the tray back into the firebox (refer to assembly instructions for proper tray placement). After soaking the charcoal, place the lighting fluid at a safe distance away from the smoker.
Step 3With both doors open, stand back and carefully light charcoal and allow to burn until covered with a light ash (approximately 20 minutes). Charcoal lighting fluid must be allowed to completely burn off prior to closing the doors. (Fumes will tend to collect in the upper cavity if the door is closed).
DANGER: Closing the firebox doors during the lighting procedure could trap fumes from the charcoal lighting fluid in the smoker box and may result in a flash-fire or explosion when door is opened, resulting in property loss, personal injury or death. Never attempt to add more lighting fluid to the charcoal once it has been lit.
Step 4After 25 - 30 minutes, charcoal should be ready for cooking and/or adding woodchips. Carefully add wood chunks using long cooking tongs.
Adding Charcoal and/or Wood Chips
Additional charcoal and/or wood may be required to maintain or increase cooking temperature.
WARNING: Use caution since flames can flare-up when fresh air suddenly comes in contact with fire. When opening the door, keep hands, face and body a safe distance from hot steam and flame flare-ups.
Step 1Stand back and carefully open smoker box door allowing heat and steam to escape away from your face. Use caution since flames can flare-up when fresh air suddenly comes in contact with fire. Inspect the charcoal level in pan.
Step 2Wearing flame retardant oven mitts/gloves, stand back a safe distance and use long cooking tongs to lightly brush aside ashes on hot coals. Use cooking tongs to add charcoal and/or wood to charcoal pan, being careful not to stir-up ashes and sparks
WARNING: Never add charcoal lighting fluid to hot or even warm coals as flashback may occur causing severe burns.
Step 3Close smoker box door and allow food to continue cooking.
Allow the ashes to completely cool before reusing or cleaning the smoker.
26
REPLACEMENT PARTS LIST
For replacement parts, call our customer service department at 1-800-963-0211, 8:00 a.m. – 6:00 p.m., EST, Monday – Thursday, 8:00 a.m. – 5:00 p.m., EST, Friday.
PART DESCRIPTION PART # 1 Leg – Standard 301-01016-00 2 Leg – with Holes 312-01016-00 3 Burner and Control Unit 312-01015-00 4 Wood Chip Box (MFW only) 312-01028-00 5 Charcoal Grate 312-01030-00 6 Wood Chip Box Lid 301-01029-00 7 Wood Chip Box Handle and 301-01028-02 Lid Handle 8 Water Bowl 301-02017-00 9 Cooking Grate 312-01014-00 10 Door Locking Bracket 302-01008-00 11 Cooking Grate Support 302-01030-00 12 Smoker Body 312-12001-00 13 Square Smoke Stack 312-02009-00 14 Lifting Handle 301-01010-00 15 Logo Plate 302-03002-01 16 Temperature Gauge Bezel 301-01034-00 17 Temperature Gauge 301-01003-00
PART DESCRIPTION PART # 18 Upper Door 302-02002-00 19 Side Table 312-02008-00 20 Door Handle Crank 302-02007-02 21 Door Handle Grip 302-02007-01 22 Bottom Door without Handle 302-02102-00 23 Table Front Support Bracket 312-02008-01 24 Table Back Support Bracket 312-02008-02 25 Side Damper Plate (round) 301-01001-04 26 Igniter Ground Wire 301-01015-08 27 Push Button 301-01015-03 28 Electronic Ignitor 301-01015-06 29 Ignition Cap 301-01015-05 30 Control Knob 301-01015-01 31 Control Knob Bezel 301-01015-02 32 Igniter Electrode and Ignition Wire 301-01015-07 33 Hose Retention 312-01016-01 N/A Hardware Bag 312-02026-00 N/A Owner’s/Instruction Manual 312-02025-00
11
14
21
17
1918
20
22
2324
25
2627
32
30
2928
3331
ANS Z21.89a-2008 CSA 1.18a-2008
• Do not use the smoker if the burner fails to light or fails to remain lit. Under such conditions, gas should be turned off and the fuel cylinder should be disconnected.• Use in high wind conditions that result in poor burner operation such as blowing out and flaring should be avoided. If repositioning the appliance does not improve operation under such wind conditions, the appliance should be turned off.• Install the smoker with the hose regulator assembly extended the full length of the hose (24 in. minimum) directly away from the appliance. When so configured, placement results in maximum tank to smoker distance. When the smoker is operated, the hose/regulator and gas tank should be perpendicular to wind direction. Placing tank closer than 24 inches to the smoker can overheat the tank and cause release of propane through relief openings and can result in tank fire or explosion. • Read and follow all warnings and instructions before assembling and using the appliance.• Follow all warnings and instructions when using the appliance.
NOTE: The installation must confirm with local codes or, in the absence of local codes, with eitherthe National Fuel Gas Code, ANSI Z223.1/NFPA 54, Natural Gas and Propane Installation Code,CSA B149.1, or Propane Storage and Handling Code, B149.2, or the Standard for RecreationalVehicles, ANSI A 119.2/ NFPA 1192, and CSA Z240 RV Series, Recreational Vehicle Code, asapplicable.
WARNINGDO NOT mix old and new batteries.DO NOT mix alkaline, standard (Carbon-Zinc), or rechargeable (Nickel-Cadmium) batteries.DO NOT dispose of batteries in fire. Improper disposal may cause batteries to leak or explode.
The electronic ignition requires 1 “AAA” alkaline battery, which is included.
WARNING:The hose to tank attachment creates a potential trip hazard for user and pedestrians - use caution.Do not allow or cause the gas tank or applianceto tip.
MINIMUM 24 IN. (610 MM)
(Tank not included)
I
C
V
T
T
T
C
Master Forge & M Design® is a registered trademarkof LF, LLC. All rights reserved.
®
D
LIGHTING INSTRUCTIONS
CAUTION: If the flame extinguishes accidentally during ignition or operation, immediately TURN OFF the cylinder valve and then TURN OFF the control knob.Igniter Lighting System
1. Check all connections for leaks using the “soap water” test as explained on page 16 for “checking for leaks.”
2. Open both of the smoker cabinet doors. Always keep the doors open during lighting.
3. Check for any blockage to the venturi tube or burner, damper setting, ventilation setting. Remove any foreign objects or matter.
4. Be sure the burner control knob is in the “OFF” O position.
5. Open the LP cylinder valve by turning counterclockwise .
6. Push igniter on the control unit down 1 to 2 seconds then push and turn control knob to “HIGH” , while still holding the ignitor button down. At this point the burner should ignite.
7. If ignition does not take place within 5 seconds, immediately turn the control knob to OFF O. Wait 5 minutes and repeat above steps 6 and 7.
8. If burner still fails to light, try match lighting using the instructions on page 19.
9. Once the burner is lit, close the doors to allow heat to accumulate. The smoke stack on the top of the smoker can be adjusted to the desired setting to allow proper ventilation and combustion. NEVER CLOSE THE SMOKE STACK COMPLETELY.
Warning: Always light your smoker with both doors open.
HIGH
LOW OFF
CALIFORNIA PROPOSITION 65
Fuels used in gas or oil fired appliances and the products of combustion of such fuels containchemicals known to the State of California to cause cancer, birth defects or other reproductiveharm. This product contains chemicals, including lead and lead compounds, known to the State ofCalifornia to cause cancer, birth defects or other reproductive harm. Wash hands after handling.
13
G
2
TABLE OF CONTENTS
Safety Information ......................................................................................................................... 3
Replacement Parts List ................................................................................................................ 26
ITEM #0190449
MODEL #MFW784BDP
DUAL FUELVERTICAL SMOKER
Français p. XX
Español p. XX
1
Français p. 28
Español p. 58
SAFETY INFORMATION
3
Please read and understand this entire manual before attempting to assemble, operate or install the product. If you have any questions regarding the product, please call customer service at 1-800-963-0211, 8:00 a.m. – 6:00 p.m., EST, Monday – Thursday, 8:00 a.m. – 5:00 p.m., EST, Friday.
PACKAGE CONTENTS
6
PART DESCRIPTION QUANTITY A Leg - standard 3 B Leg - with holes 1 C Burner & Control Unit 1 D Wood Chip Box 1 E Charcoal Grate 1 F Wood Chip Box Lid 1 G Water Bowl 1 H Cooking Grate 4 I Smoker Body 1 J Lifting Handle 2 K Door Locking Bracket 2
L Square Smoke Stack 1 M Temperature Gauge & Bezel 1 N Upper Door (pre-assembled) 1 O Bottom Door (pre-assembled) 1 P Side Table 1 Q Door Handle 2 R Table Front Support 1 S Table Back Support 1 T Cooking Grate Support 12 U “AAA” Battery (1.5 V) 1 V Hose Retention 1
PART DESCRIPTION QUANTITY
ASSEMBLY INSTRUCTIONS
8
24
WARRANTY
25
This vertical gas smoker is warranted against broken or damaged parts at the time of purchase. The stainless steel burner is warranted for 3 years. All other parts carry a one (1) year limited warranty except the water bowl, which is warranted to be free of defects for 90 days. Paint is warranted to be free of defects for 90 days except for rust, which may appear after repeated use.
This warranty does not cover damage or issues related to neglect, abuse or modifications to the appliance. Repair labor is not covered.
All parts that meet the warranty requirements will be shipped at no charge via the discretion of GHP Group Inc. (ground shipments, US Mail or Parcel Post ONLY). Any special handling charges (i.e. Second Day, Overnight, etc.) will be the responsibility of the consumer.
All warranty claims apply only to the original purchaser and require a proof of purchase verifying purchase date. Do not return parts to GHP address without first obtaining a return authorization number from our customer service. This service is available by calling toll free 1-800-963-0211, 8:00 a.m. – 6:00 p.m., EST, Monday – Thursday 8:00 a.m. – 5:00 p.m., EST, Friday.
Some states do not allow the exclusion or limitation of incidental or consequential damages orlimitations on how long an implied warranty lasts, so the above limitations or exclusions may not apply to you. This warranty gives you specific legal rights, and you may have other rights that vary from state to state.
GHP Group Inc.8280 Austin AvenueMorton Grove, IL, USA60053-3207
The burner will not light using the igniter procedure.
1. The igniter electrode may be covered with grease or residue.
2. The igniter electrode may have a loose or disconnected wire.
3. No spark is being generated.
4. No gas flow or cylinder valve not open.
5. Vapor lock at coupling nut to LP cylinder.
1.Clean the igniter electrode.
2. Check the connection and reconnect any loose or disconnected wires.
3.Replace the AAA size battery inside the igniter.
4. Make sure LP cylinder is not empty or open cylinder valve.
5. Turn off knob and LP cylinder valve. Disconnect coupling nut from LP cylinder. Reconnect and retry.
The burner will not light with a match.
1. No gas flow or an obstructed gas flow.
1. Check the fuel level. Clean the venturi tube and burner.
HARDWARE CONTENTS (shown actual size)
M6 x 12Bolt
Qty. 32
7
AA BB
Before beginning assembly of product, make sure all parts are present. Compare parts with package contents list and hardware contents list. If any part is missing or damaged, do not attempt to assemble the product.
Estimated Assembly Time: 25 minutes
Tools Required for Assembly (not included): Phillips Head Screwdriver, 1/2 in. Wrench, Pliers.
PREPARATION
M5 Nut
Qty. 2
1. Align the legs - standard (A) with the mounting holes on the bottom left front, right front and left rear of the smoker body (I). Thread bolts (AA) through the holes from the outside of the unit. Tighten all bolts (AA) with a Phillips screwdriver.
Hardware Used
AA x 9M6 x 12 Bolt
2. Align the leg - with holes (B) with the mounting holes on the bottom right rear of the smoker. Thread bolts (AA) through the holes from the outside of the unit. Tighten all bolts (AA) with a Phillips screwdriver.
3. Open the bottom door of the smoker body (I). Turn the burner and control unit (C) upside down and place it on the bottom of the smoker body (I), making sure the 4 mounting holes on the burner and control unit (C) are aligned with the holes on the smoker body (I). Note: The control knob should be on the same side as the door. Check that the burner is properly installed on the orifice before attaching the burner and control unit (C). Thread bolts (AA) through holes from outside of unit. Securely tighten the unit to the bottom with a Phillips screwdriver.
5. CAUTION: This unit is HEAVY! Do not attempt this step without assistance! Close the two doors. With the assistance of a helper, stand the unit upright on its legs on a firm and level surface. (Make sure that the burner/control unit and legs are attached). Open the upper door. Position the square smoke stack (L) with control arm to the left as shown. Using 4 bolts (AA), attach square smoke stack (L) to the top of smoker body (I). Securely tighten with a Phillips screwdriver.
Hardware Used
6. Insert the cooking grate supports (T) into the corresponding holes on rack of the shelf inside the smoker body (I) from the bottom up. NOTE: There are 8 positions to install the cooking grate supports. The cooking grate supports can be installed into positions according to the need of the owner.
8. Align the door locking bracket (K) holes with the holes on the upper right side of the smoker body (I). Thread 2 bolts (AA) through the holes in the door locking bracket (K) into the threaded holes of the smoker body (I). Tighten the bolts (AA) using a Phillips screwdriver. Repeat on lower right side.
9. Slide door handle (Q) through brackets in door. Using pliers, slide a spring clip (CC) over the groove in the door handle as shown. Make sure both of the spring clips are securely attached in the grooves of the handles.
10. Install the side table back support (S) and table front support (R) on the side of the smoker body (I) with screws (BB). Arrows pointing up indicate the correct position of the brackets when fastened to the smoker body (I).
11. With the side table (P) in a parallel position, align the slots in the side table with the table supports (R & S) and insert. To lock the side table (P) in the upright position, swing the side table (P) up, push toward the smoker body (I), and press down on the side table (P) near the body until it is fully fastened in place.
If you have any questions regarding the product, please call customer service at 1-800-963-0211, 8:00 a.m. – 6:00 p.m., EST, Monday – Thursday, 8:00 a.m. – 5:00 p.m., EST, Friday.
2
6
5
8
9
10
11
ATTACH YOUR RECEIPT HERE
Serial Number Purchase Date
Questions, problems, missing parts? Before returning to your retailer, call our customer service department at 1-800-963-0211, 8:00 a.m. – 6:00 p.m., EST, Monday – Thursday, 8:00 a.m. – 5:00 p.m., EST, Friday.
ANS Z21.89a-2008 CSA 1.18a-2008
CALIFORNIA PROPOSITION 65
1. Fuels used in wood, charcoal, gas or oil fired appliances and the products of combustion of such fuels contain chemicals known to the State of California to cause cancer, birth defects or other reproductive harm. 2. This product contains chemicals, including lead and lead compounds, known to the State of California to cause cancer, birth defects or other reproductive harm.
• DO NOT use this product for anything other than its intended purpose. It is NOT intended for commercial use. It is NOT intended to be installed or used in or on a recreational vehicle and/or boat. • Keep a fire extinguisher near this product at all times.• This appliance is for outdoor use only in well-ventilated areas. DO NOT operate it in a building, garage or any other enclosed area, or under overhead construction.• A minimum clearance of 36 inches (92 cm) to combustible material is required on the front, sides and back. It is very important to always maintain proper clearances to combustibles.• The cylinder must be at least 24 inches (61 cm) from the appliance.• DO NOT obstruct the flow of combustion air or ventilation air for the appliance.• When cooking, the smoker must be on a level, stable noncombustible surface in an area clear of combustible material, including tall or dry grass. • Care should be taken to protect the fuel supply hose from damage from either pedestrian or vehicle traffic.• Clean and inspect the hose before each use of the appliance. If there is evidence of abrasion, wear, cuts or leaks, the hose must be replaced prior to the appliance being used. The replacement hose assembly shall be that specified by the manufacturer.• Before each use check that no dead leaves or debris are under the appliance.• Store this appliance in a dry, protected location.• The use of alcohol, prescription or nonprescription drugs may impair the user’s ability to properly assemble and safely operate this appliance.• Allow the smoker to cool to 115°F (45°C) before moving or storing. Use caution when lifting and moving the appliance to avoid back strain or back injury. DO NOT move the appliance while it is in use.• Always hang the regulator on the hose retention wire while not in use or disconnected with the LP (liquid propane) tank. KEEP the fuel supply hose away from any heated surface(s).
SAFETY INFORMATION
4
• DO NOT store and use this appliance near gasoline or other combustible liquids or where other combustible vapors may be present.• DO NOT use this appliance as a heater.• DO NOT leave the appliance unattended while in use. Keep children and pets away from the appliance at all times.• NEVER close the damper completely while cooking. • If you must dispose of ashes in less time than it takes for the ashes to completely cool down, remove the ashes from the appliance, keeping them in the heavy-duty foil, and soak them completely with water before disposing of them in a noncombustible container.• This appliance will be hot during and after use. Use insulated oven mitts or gloves for protection from hot surfaces or splatter from cooking liquids.• Make sure that the orifice of the control valve properly mates with the burner mixing tube by visual observation. Please refer to maintenance section.• Use caution when opening the door of the smoker while in operation. Keep hands, face and body safe from hot steam or flare-ups. DO NOT inhale smoke.• DO NOT wear loose clothing while operating the smoker. Tie back long hair while operating the smoker. ALWAYS wear shoes that fully cover your feet while operating the smoker.• Allow the smoker and its components to cool completely before conducting any routine cleaning or maintenance.• NEVER use glassware, plastic or ceramic cookware on or in your smoker. Use metallic cookware only.• NEVER operate the smoker without water in the water bowl. NEVER allow the water to completely evaporate. Check the water level at least every 2 hours. A sizzling sound may indicate a low water level. Follow instructions in this manual for adding water while operating (see the Operating Instructions section).• When using flavoring wood, add a sufficient amount prior to operation to avoid having to add wood while operating. Adding wood while operating may splash hot water and cause serious injury.• Use of accessories not intended for this smoker is not recommended and may lead to injury or property damage.• An LP cylinder not connected for use should not be stored in the vicinity of the smoker or any other appliance. DO NOT store spare LP cylinders within 10 feet of the smoker. LP cylinders must be stored outdoors, out of reach of children. DO NOT store LP cylinders in a building, garage or any other enclosed area.• DO NOT store LP gas cylinders inside or on top of the smoker. Improper storage of cylinders could lead to explosion, fire and/or personal injury. Cylinders are to be stored outdoors, out of reach of children and must not be stored in a building, garage or any other enclosed area.• While the smoker is not in use, the gas must be turned off at the supply cylinder.• LP gases are heavier than air, tend to pool and collect in low-lying areas, are easily ignited and are highly flammable. Proper care and caution should be employed when dealing with any such fuels.• The smoker should be turned off and all supply valves (on piping or on fuel cylinders) should be closed in the event that the odor of unburned gas is detected. Do not attempt to use the appliance until any gas leaks are fixed and/or the source of the unburned gas odor is accounted for.
SAFETY INFORMATION
5
A
B
C
D
E
F
G
I
S K
LM
NP
O
J
A
I
AA
I
AA
Hardware Used
AA x 3M6 x 12 Bolt
1
3C
AA
Hardware Used
AA x 4M6 x 12 Bolt
Controlarm
I
AAL
AA x 8M6 x 12 Bolt
I
T
AA
K
Q
I
CC
I
R
OPERATING INSTRUCTIONS
CONNECTING THE LP TANK
WARNING
ALL INSTRUCTIONS AND SAFEGUARDS ON THIS PAGE MUST BE FOLLOWED TO PREVENT FIRE, DAMAGE AND/OR INJURY.
1. The knob on the LP tank must be closed. Make sure that the knob is turned clockwise to a full stop. The cylinder supply system must be arranged for vapor withdrawal.
2. Check that the control knob on the control unit is turned off.
3. Remove the protective cap from the LP tank valve and coupling nut.
4. Hold the regulator in one hand and insert the nipple into the valve outlet. Be sure the nipple is centered in the valve outlet. The coupling connects to the large outside threads on the valve outlet. Use care – do not cross thread the connection.
5. Hand tighten the coupling clockwise until it comes to a full stop. Firmly tighten by hand only. Do not use tools.
P
Straight
CAUTION: In the connection process, make sure the regulator inlet connector mates with the cylinder valve outlet properly, safely and firmly.
15
OPERATING INSTRUCTIONS
Any fuel supply cylinder used must be constructed and marked in accordance with specifications for propane cylinders of the U.S. Department of Transportation (DOT) CFR 49, or the Standard for Cylinders, Spheres and Tubes for the Transportation of Dangerous Goods, CAN/CSA B339. The appliance is to be used only with the 20-pound, vertical standing vapor withdrawal type tank and must include a collar to protect the cylinder valve.(A) DO NOT store spare LP cylinders under or near the smoker.(B) NEVER fill cylinder more than 80% full.(C) Do not store cylinder indoors.
WARNINGIf instructions A, B, C above are not followed exactly, a fire causing death or serious injury may occur.
This smoker is designed to operate on LP gas only. The gas cylinder used must include a collar to protect the cylinder valve. The cylinder supply system must be arranged for vapor withdrawal. Do not allow dirt or foreign material to get into or onto tank connection when it is not attached to the fuel supply system. Use the protective cap provided.
WARNINGALL INSTRUCTIONS AND SAFEGUARDS ON THIS PAGE MUST BE FOLLOWED TO PREVENT FIRE, DAMAGE AND/OR INJURY.
The cylinder outlet must have Type 1 gas connection termination in order to mate with gas hose provided with smoker. The pressure regulator and hose assembly supplied by the manufacturer with the appliance must be used. Replacement pressure regulators and hose assemblies must be those specified by the appliance manufacturer.This unit is not to be utilized with a non-self-contained LP-gas supply system.
Valve/pressure regulators are factory set to the correct operating pressures. No attempts should be made to adjust these settings.
DISCONNECT THE LP TANK
Make sure that the knob on the LP tank is turned clockwise to a full stop (CLOSED).
Hold the regulator in one hand, turn the coupling to the valve outlet counterclockwise and unthread the connection by hand only. Do not use tools.
Place dust cap on cylinder valve outlet whenever the cylinder is not in use. Only install the type of dust cap on the cylinder valve outlet that is provided with the cylinder valve. Other types of caps or plugs may result in leakage of propane.
Always hang the regulator on the lifting handles while not in use, disconnected fromthe LP tank, and when the unit has cooled down.
STORE THE TANK IN A PROPER PLACE AS INDICATED IN THIS MANUAL.
16
OPERATING INSTRUCTIONS
CHECKING FOR LEAKS
After connections are made, check all connections and fittings for leaks with a soap solution. 1. With all valves closed, apply the leak check solution (50/50 mix of dishwashing soap and water) to all gas carrying connections and fittings. 2. Open tank valve.Presence of bubbles at areas of wet solution indicates a gas leak. If leaks are detected or you smell or hear gas, shut off the valve and repair the leak or replace the defective part. Do not use the smoker until all leaks are corrected.
The gas hose/regulator assembly should be totally extended to the maximum distance so that the hose is straight and the tank is as far from the smoker as it can be (minimum 24 inches).
For vapor withdrawal, LP tanks are intended to be operated in the upright position only.
If the product is not in use, the gas must be turned off at the supply cylinder and the cylinder should be disconnected from the appliance.
Storage of the appliance indoors is only permissible if the cylinder is disconnected and removed from the appliance. Do not store cylinder indoors.
BEFORE FIRST USE
Remove all hangings or plastic straps, if present.
Before you cook food in your smoker, it is important to “season” your smoker. Seasoning seals the paint and interior of your smoker to enhance flavoring, durability and overall performance.To season your smoker, simply use it as you normally would only do not cook any food. You will need to follow all of the operating procedures in the next few sections of this manual.
Using your desired flavoring woods and marinades, burn your smoker at low temperature (around 175°F) for 45 – 60 minutes. Let the smoker cool and clean out the water and wood.
Once seasoning is complete, your smoker’s interior will have a durable, seasoned coating.
ADDING WATER
To add water before cooking, simply remove the water bowl and fill it with water slightly below the rim. Place the bowl back into the smoker. Adding water before cooking is recommended. To add water while cooking, if a sizzling sound indicating lack of water is heard, or there is a need to add water, open the bottom door with care and avoid taking in the smoke. Use a long nose kettle-like water can, stand as far from the smoker as you can, fill the water bowl up to 1 inch below the rim.
CAUTION: DO NOT pull the water bowl out beyond the rack when the smoker is hot.
17
OPERATING INSTRUCTIONS
COOKING TIP
Line the water bowl with aluminum foil before each use. This will make it easy to clean and help your water bowl last longer.
To make adding water easier and safer, use a clean watering can with a long spout.
ADDING WOOD CHIPS
To add wood chips before cooking, simply fill the wood chip box with your choice of flavoring hardwood chips. The amount and type of wood you use is entirely dependent on the desired amount of flavor. Once the box is filled, place the lid on top of the box and set the box in the smoker.
To add wood chips while cooking, we recommend using tongs or long handled pliers to removethe box lid and to place the pieces into the wood chip box without removing the box. It is not recommended to remove the wood chip box while the smoker is in operation.
CAUTION: The wood chip box and lid get very hot. Avoid handling them while in use. Always wear protective oven mitts when handling hot components.
COOKING TIP: FLAVORING WOOD
• Small wood chips work best inside the wood chip box.• Use dry hardwoods such as hickory, pecan, apple, cherry or mesquite.• To produce more smoke and prevent fast burning, pre-soak the wood chips in a separate bowl of water for at least 20 minutes, or wrap the chips in perforated aluminum foil.• Most smoke flavoring occurs within the first hour of cooking. Adding wood chips after the first hour is typically not necessary unless extra smoke flavoring is desired.
18
OPERATING INSTRUCTIONS
19
OPERATING INSTRUCTIONS
Match Lighting Procedure - LP Gas
1. Repeat steps 1 through 5 of the igniter lighting system.
2. Open both doors. Place a lit match on to the burner as shown below. Quickly turn the control knob to the “HIGH” position. If the burner does not light in 5 seconds, turn the control knob off, wait at least 5 minutes and for the gas to clear. Repeat the process.
20
OPERATING INSTRUCTIONS
Cooking Tip: Damper Adjustments
WARNING: The dampers on the smoker body and the handle on the smoke stack may become very hot while cooking. Always wear a heat resistant glove when adjusting.
• For best performance, rotate the smoker so that the front or back of the body is facing the wind. This allows the adjustment of the dampers to be more effective and accurate.• The two dampers on smoker body should never be fully closed.• Opening the damper of the smoke stack helps to exhaust both the heat and smoke.• The key to effective smoking is to watch your heat indicator on the door and adjust the damper accordingly.• Temperature maintenance is best controlled by different damper adjustment configurations.
Turning off the Smoker
CAUTION: The smoker can become very hot while in use.Do not touch any portion of the smoker except for the door handle and burner control knob. It may be necessary to use protective gloves.
1. Turn the burner control knob off by pushing in and rotating to “OFF”. The burner flame should go out.
2. Turn off the LP cylinder valve by turning the knob clockwise until it cannot go any farther.
Follow all warnings and safety precautions before removing meat from smoker or preparing the unit for storage.
Lighting Instructions – Charcoal
When using charcoal, DO NOT USE PRETREATED, MATCH-LIGHT CHARCOAL with this smoker. Only use standard, untreated briquettes or lump charcoal and ONLY use charcoal lighting fluid approved for lighting charcoal. Do not use lighter fluid, paint thinners, gasoline, kerosene, alcohol or other flammable material for lighting charcoal. Damage to the smoker may occur with the use of match-light charcoal. DO NOT USE THE LP GAS BURNER WHEN LIGHTING CHARCOAL. Step 1Place the charcoal grate inside the woodchip/charcoal tray and add 1.5 pounds of charcoal on charcoal grate (approximately 26 briquettes).
Step 2Note: Please refer to the manufacturer’s recommended amount of lighter fluid before applying fluid to the briquettes. With the charcoal tray outside the firebox, saturate charcoal with the amount of lighting
LIGHTING INSTRUCTIONS
CAUTION: If the flame extinguishes accidentally during ignition or operation, immediately TURN OFF the cylinder valve and then TURN OFF the control knob.
Igniter Lighting System
1. Check all connections for leaks using the “soap water” test as explained on page 16.
2. Open both of the smoker cabinet doors. Always keep the doors open during lighting.
3. Check for any blockage to the venturi tube or burner, damper setting, ventilation setting. Remove any foreign objects or matter.
4. Be sure the burner control knob is in the “OFF” position.
5. Open the LP cylinder valve by turning counterclockwise.
6. Push igniter on the control unit down 1 to 2 seconds then push and turn control knob to “HIGH,” while still holding the ignitor button down. At this point the burner should ignite.
7. If ignition does not take place within 5 seconds, immediately turn the control knob to OFF. Wait 5 minutes and repeat above Steps 6 and 7.
8. If burner still fails to light, try match lighting using the instructions on page 19.
9. Once the burner is lit, close the doors to allow heat to accumulate. The smoke stack on the top of the smoker can be adjusted to the desired setting to allow proper ventilation and combustion. NEVER CLOSE THE SMOKE STACK COMPLETELY.
Warning: Always light your smoker with both doors open.
22
CARE AND MAINTENANCE
AFTER USE SAFETY AND MAINTENANCE
WARNING• Use caution when lifting and moving the smoker to avoid strain injuries. Two people are recommended to lift or move the smoker.
• DO NOT store the smoker near gasoline or other combustible liquids or where combustible vapors may be present. Keep the area around the smoker clear and free of combustible materials and vapors.
• DO NOT store this smoker in an area accessible to children or pets. Store the smoker in a dry, protected location. Disconnect cylinder from smoker.
• DO NOT allow anyone to conduct activities around the smoker following use until it has cooled. It is hot during operation and remains hot for a period of time following use.
• DO NOT leave hot ashes unattended until the smoker cools completely.
• The smoker becomes extremely hot – allow the smoker to cool completely before handling. If you must handle the smoker while it is hot, ALWAYS wear protective oven mitts or heat-resistant gloves. Allow the smoker to cool before removing and cleaning the grease pan.
• Dispose of cold ashes by wrapping them in heavy-duty aluminum foil and putting them in a noncombustible container.
• If you must dispose of the ashes in less time than it takes for them to completely cool. Remove the ashes from the smoker, keeping them in heavy-duty foil, and soak them completely with water before disposing of them in a noncombustible container.
GENERAL CARE AND MAINTENANCE CAUTION: All care and maintenance procedures are to be performed while the smoker is turned off and cooled. Always perform maintenance by a qualified service person.
Clean the water bowl and cooking grate with hot, soapy water. Rinse and dry thoroughly. You may prefer to coat the water bowl and cooking grid lightly with cooking oil or cooking spray.
Frequently check and clean the venturi and burner tubes for insects and insect nests. A clogged tube can lead to fire beneath the smoker. Also make sure the smoker does not have any foreign objects obstructing the flow of combustion and ventilation air.
To clean the inside and outside of the smoker cabinet, simply use a damp cloth. Spray-washing with a water hose is not recommended. Moisture should be wiped away and not allowed to stand inside or on top of the smoker. Once cleaned, you may prefer to lightly coat the interior of the smoker cabinet with cooking oil or cooking spray.
If rust is present on the exterior surface of the smoker, clean the area with steel wool or emery cloth and use heavy-duty, heat-resistant paint.
NEVER apply additional paint to the interior of the smoker. If rust is present on the interior of the smoker, clean it thoroughly with steel wool or emery cloth and lightly coat the area with cooking oil or cooking spray to help minimize recurring rust.
When an LP tank is not connected, and to help prevent dirt or other foreign particles from clogging the regulator connector, hang the end of the hose and regulator assembly on the lifting handle.
Keep the ventilation opening(s) of the cylinder enclosure free and clear of debris.
23
CARE AND MAINTENANCE
Inspect the flames at the burner by looking through the observing hole on left side of the burner and control unit. A good flame should be blue with a yellow tip 1 to 2 inch high. If flames are excessively yellow and irregular, oil residue and food deposits may be collecting on the burner. Try cleaning the burner surface with hot, soapy water and cleaning the holes with a pipe cleaner to improve the flames.
Bad flames may also be caused by poor venturi attachment to the orifice. Turn off the control knob and cylinder valve. Always let the smoker cool before cleaning or checking the assembly. Make sure the orifice of the control valve properly mates with the burner mixing tube by visual observation from the bottom of the appliance. The burner venturi tube should overlap the orifice and they should form a straight line as shown in Figure A. Figures B & C show incorrect alignment.
WARNING: If the instructions above are not followed, an explosion may result, possibly causing serious bodily injury or death.
To protect your smoker from weather conditions, always keep it covered while not in use.
2”
Yellow
Light Blue
Blue
Good Flame Bad Flame
! ! !
Figure A Figure B Figure C
Correct Wrong Wrong
The flame goes out. 1. Disconnected gas supply hose. 2. High or gusting winds.
For replacement parts, call our customer service department at 1-800-963-0211, 8:00 a.m. – 6:00 p.m., EST, Monday – Thursday, 8:00 a.m. – 5:00 p.m., EST, Friday.
Owner’s Manual - Part #312-02025-00Printed in China
SpringClip
Qty. 2
CC
BB x21/4-20 FlangedWasher Nut
Hardware Used
R
Q
7. Insert 4 bolts (AA) through the mounting holes on one of the lifting handles (J) and into holes on right side of smoker body (I). Use a Phillips screwdriver to secure the handles to the smoker body (I). Repeat on left side.
7
Hardware Used
CC x 2Spring Clip
I
AA
J
ASSEMBLY INSTRUCTIONS
4. Thread bolts (EE) through holes on the leg - with holes (B) from outside of unit. Secure using 2 nuts (FF) from inside leg by using wrench. Tighten all bolts (AA) with a Phillips screwdriver. Insert the regulator hose attached to the burner and control unit (C) into the hose retention (V).
4
I
V
12. Slide the wood chip box (D) onto the lowest cooking grate supports (T) inside the smoker body (I) and put the wood chip box lid (F) on top. Note: For charcoal, refer to Step 17.
12
DANGER:
Failure to follow these instructions could result in fire, explosion, or burn hazard which could cause property damage, personal injury or death.
DANGER: If you smell gas:1. Shut off gas to the appliance.
3. Open lid.4. If odor continues, keep away from the appliance and immediately call your gas supplier or your fire department.
Assembler/Installer: This instruction manual contains important information necessary for the proper assembly and safe use of this appliance. Read and follow all warnings and instructions before assembling and using this appliance. Leave these instructions with the consumer.
Consumer/User: Follow all warnings and instructions when using this appliance. Keep these instructions for future reference.
1. Never operate this appliance unattended.2. Never operate this appliance within 10 feet (3 m) of any structure, combustible material or other gas cylinder3. Never operate this appliance within 25 feet (7.5 m) of any flammable liquid.4. Never allow oil or grease to get hotter than 400°F or 200°C. If the temperature exceeds 400°F (200°C) or if oil begins to smoke, immediately turn the burner or gas supply OFF.5. Heated liquids remain at scalding temperatures long after the cooking process. Never touch cooking appliance until liquids have cooled to 115°F (45°C) or less.6. If a fire should occur, keep away from the appliance and immediately call your fire department. Do not attempt to extinguish an oil or grease fire with water. Failure to follow these instructions could result in fire, explosion, or burn hazard which could cause property damage, personal injury or death.
DANGER
DANGER:
Rev. 9/2011
M4 x 10Bolt
Qty. 2
DD EE
M4 Nut
Qty. 2
FF
M5 x 12Screw
Qty. 8
H
J
T
T
U
V
front of smoker
B
front of smoker
M4 x 10 BoltEE
M4 NutFF
Hardware Used
x 2
x 2
B
EE
FF
Hardware Used
AA x 4M6 x 12 Bolt
Hardware Used
AA x 4M6 x 12 Bolt
M5 x 12 ScrewBB x 8
Hardware UsedBB
S
I
R
S
D
FI
I13. Slide the water bowl (G) onto the cooking grate supports (T) inside the smoker body (I) above the wood chip box (D) as shown.
ASSEMBLY INSTRUCTIONS
13
15. Insert the probe of the temperature gauge assembly (M) through hole of the smoker door from the outside. Secure using 2 nuts (DD) from inside panel by using wrench.
16. To install the “AAA” battery (U), remove the igniter button by turning it counterclockwise and insert the “AAA” battery (U) with the positive end facing out. Reinstall the igniter button by turning it clockwise and hand tightening.
17. For charcoal use, remove the wood chip box lid (F) and place the charcoal grate (E) inside the wood chip box (D).
18. Always hang the regulator hose attached to the burner and control unit (C) to the hose retention (V) attached to the leg - with hole (B) while not in use. If switching from LP gas to charcoal, wait for the unit to cool down before disconnecting from the LP tank.
15
16
17
18
DD
M
U
E
B
12
14. Slide the 4 cooking grates (H) onto the top cooking grate supports (T) inside the smoker body (I).
14 I
H
ASSEMBLY INSTRUCTIONS
Hardware Used
DD x 2
D
S
V
M5 Nut
igniter button
21
OPERATING INSTRUCTIONS
fluid as recommended by the lighter fluid manufacturer. Allow the fluid to soak into the charcoal for 3 minutes before placing the tray back into the firebox (refer to assembly instructions for proper tray placement). After soaking the charcoal, place the lighting fluid at a safe distance away from the smoker.
Step 3With both doors open, stand back and carefully light charcoal and allow to burn until covered with a light ash (approximately 20 minutes). Charcoal lighting fluid must be allowed to completely burn off prior to closing the doors. (Fumes will tend to collect in the upper cavity if the door is closed).
DANGER: Closing the firebox doors during the lighting procedure could trap fumes from the charcoal lighting fluid in the smoker box and may result in a flash-fire or explosion when door is opened, resulting in property loss, personal injury or death. Never attempt to add more lighting fluid to the charcoal once it has been lit.
Step 4After 25 - 30 minutes, charcoal should be ready for cooking and/or adding woodchips. Carefully add wood chunks using long cooking tongs.
Adding Charcoal and/or Woodchips
Additional charcoal and/or wood may be required to maintain or increase cooking temperature.
WARNING: Use caution since flames can flare-up when fresh air suddenly comes in contact with fire. When opening the door, keep hands, face and body a safe distance from hot steam and flame flare-ups.
Step 1Stand back and carefully open smoker box door allowing heat and steam to escape away from your face. Use caution since flames can flare-up when fresh air suddenly comes in contact with fire. Inspect the charcoal level in pan.
Step 2Wearing flame retardant oven mitts/gloves, stand back a safe distance and use long cooking tongs to lightly brush aside ashes on hot coals. Use cooking tongs to add charcoal and/or wood to charcoal pan, being careful not to stir-up ashes and sparks
WARNING: Never add charcoal lighting fluid to hot or even warm coals as flashback may occur causing severe burns.
Step 3Close smoker box door and allow food to continue cooking.
Allow the ashes to completely cool before reusing or cleaning the smoker.
26
REPLACEMENT PARTS LIST
For replacement parts, call our customer service department at 1-800-963-0211, 8:00 a.m. – 6:00 p.m. EST, Monday – Thursday, 8:00 a.m. – 5:00 p.m. EST, Friday.
PART DESCRIPTION PART # 1 Leg – Standard 301-01016-00 2 Leg - with holes 312-01016-00 3 Burner and Control Unit 312-01015-00 4 Wood Chip Box (MFW only) 312-01028-00 5 Charcoal Grate 312-01030-00 6 Wood Chip Box Lid 301-01029-00 7 Wood Chip Box Handle and 301-01028-02 Lid Handle 8 Water Bowl 301-02017-00 9 Cooking Grate 312-01014-00 10 Door Locking Bracket 302-01008-00 11 Cooking Grate Support 302-01030-00 12 Smoker Body 312-12001-00 13 Square Smoke Stack 312-02009-00 14 Lifting Handle 301-01010-00 15 Logo Plate 302-03002-01 16 Temperature Gauge Bezel 301-01034-00 17 Temperature Gauge 301-01003-00
PART DESCRIPTION PART # 18 Upper Door 302-02002-00 19 Side Table 312-02008-00 20 Door Handle Crank 302-02007-02 21 Door Handle Grip 302-02007-01 22 Bottom Door without handle 302-02102-00 23 Table Front Support Bracket 312-02008-01 24 Table Back Support Bracket 312-02008-02 25 Side Damper Plate (round) 301-01001-04 26 Igniter Ground Wire 301-01015-08 27 Push Button 301-01015-03 28 Electronic Ignitor 301-01015-06 29 Ignition Cap 301-01015-05 30 Control Knob 301-01015-01 31 Control Knob Bezel 301-01015-02 32 Igniter Electrode and Ignition Wire 301-01015-07 33 Hose Retention 312-01016-01 N/A Hardware Bag 312-02026-00 N/A Owner’s/Instruction Manual 312-02025-00
11
14
21
17
1918
20
22
2324
25
2627
32
30
2928
3331
ANS Z21.89a-2008 CSA 1.18a-2008
• Do not use the smoker if the burner fails to light or fails to remain lit. Under such conditions, gas should be turned off and the fuel cylinder should be disconnected.• Use in high wind conditions that result in poor burner operation such as blowing out and flaring should be avoided. If repositioning the appliance does not improve operation under such wind conditions, the appliance should be turned off.• Install the smoker with the hose regulator assembly extended the full length of the hose (24 in. minimum) directly away from the appliance. When so configured, placement results in maximum tank to smoker distance. When the smoker is operated, the hose/regulator and gas tank should be perpendicular to wind direction. Placing tank closer than 24 inches to the smoker can overheat the tank and cause release of propane through relief openings and can result in tank fire or explosion. • Read and follow all warnings and instructions before assembling and using the appliance.• Follow all warnings and instructions when using the appliance.
NOTE: The installation must confirm with local codes or, in the absence of local codes, with eitherthe National Fuel Gas Code, ANSI Z223.1/NFPA 54, Natural Gas and Propane Installation Code,CSA B149.1, or Propane Storage and Handling Code, B149.2, or the Standard for RecreationalVehicles, ANSI A 119.2/ NFPA 1192, and CSA Z240 RV Series, Recreational Vehicle Code, asapplicable.
WARNINGDO NOT mix old and new batteries.DO NOT mix alkaline, standard (Carbon-Zinc), or rechargeable (Nickel-Cadmium) batteries.DO NOT dispose of batteries in fire. Improper disposal may cause batteries to leak or explode.
The electronic ignition requires 1 “AAA” alkaline battery, which is included.
WARNING:The hose to tank attachment creates a potential trip hazard for user and pedestrians - use caution.Do not allow or cause the gas tank or applianceto tip.
MINIMUM 24 IN. (610 MM)
(Tank not included)
HIGH
LOW OFF
®
I
C
V
T
T
T
C
13
G
2
TABLE OF CONTENTS
Safety Information ......................................................................................................................... 3
Replacement Parts List ................................................................................................................ 26
ITEM #0190449
MODEL #MFW784BDP
DUAL FUELVERTICAL SMOKER
Français p. XX
Español p. XX
1
Français p. 28
Español p. 55
SAFETY INFORMATION
3
Please read and understand this entire manual before attempting to assemble, operate or install the product. If you have any questions regarding the product, please call customer service at 1-800-963-0211, 8:00 a.m. – 6:00 p.m., EST, Monday – Thursday, 8:00 a.m. – 5:00 p.m., EST, Friday.
PACKAGE CONTENTS
6
PART DESCRIPTION QUANTITY A Leg - standard 3 B Leg - with holes 1 C Burner & Control Unit 1 D Wood Chip Box 1 E Charcoal Grate 1 F Wood Chip Box Lid 1 G Water Bowl 1 H Cooking Grate 4 I Smoker Body 1 J Lifting Handle 2 K Door Locking Bracket 2
L Square Smoke Stack 1 M Temperature Gauge & Bezel 1 N Upper Door (pre-assembled) 1 O Bottom Door (pre-assembled) 1 P Side Table 1 Q Door Handle 2 R Table Front Support 1 S Table Back Support 1 T Cooking Grate Support 12 U “AAA” Battery (1.5 V) 1 V Hose Retention 1
PART DESCRIPTION QUANTITY
ASSEMBLY INSTRUCTIONS
8
24
WARRANTY
25
This vertical gas smoker is warranted against broken or damaged parts at the time of purchase. The stainless steel burner is warranted for 3 years. All other parts carry a one (1) year limited warranty except the water bowl, which is warranted to be free of defects for 90 days. Paint is warranted to be free of defects for 90 days except for rust, which may appear after repeated use.
This warranty does not cover damage or issues related to neglect, abuse or modifications to the appliance. Repair labor is not covered.
All parts that meet the warranty requirements will be shipped at no charge via the discretion of GHP Group Inc. (ground shipments, US Mail or Parcel Post ONLY). Any special handling charges (i.e. Second Day, Overnight, etc.) will be the responsibility of the consumer.
All warranty claims apply only to the original purchaser and require a proof of purchase verifying purchase date. Do not return parts to GHP address without first obtaining a return authorization number from our customer service. This service is available by calling toll free 1-800-963-0211, 8:00 a.m. – 6:00 p.m., EST, Monday – Thursday 8:00 a.m. – 5:00 p.m., EST, Friday.
Some states do not allow the exclusion or limitation of incidental or consequential damages orlimitations on how long an implied warranty lasts, so the above limitations or exclusions may not apply to you. This warranty gives you specific legal rights, and you may have other rights that vary from state to state.
GHP Group Inc.8280 Austin AvenueMorton Grove, IL, USA60053-3207
The burner will not light using the igniter procedure.
1. The igniter electrode may be covered with grease or residue.
2. The igniter electrode may have a loose or disconnected wire.
3. No spark is being generated.
4. No gas flow or cylinder valve not open.
5. Vapor lock at coupling nut to LP cylinder.
1. Clean the igniter electrode.
2. Check the connection and reconnect any loose or disconnected wires.
3. Replace the AAA size battery inside the igniter.
4. Make sure LP cylinder is not empty or open cylinder valve.
5. Turn off knob and LP cylinder valve. Disconnect coupling nut from LP cylinder. Reconnect and retry.
The burner will not light with a match.
1. No gas flow or an obstructed gas flow.
1. Check the fuel level. Clean the venturi tube and burner.
HARDWARE CONTENTS (shown actual size)
M6 x 12Bolt
Qty. 32
7
AA BB
Before beginning assembly of product, make sure all parts are present. Compare parts with package contents list and hardware contents list. If any part is missing or damaged, do not attempt to assemble the product.
Estimated Assembly Time: 25 minutes
Tools Required for Assembly (not included): Phillips Screwdriver, Wrench, Pliers.
PREPARATION
M5 Nut
Qty. 2
1. Align the legs - standard (A) with the mounting holes on the bottom left front, right front and left rear of the smoker body (I). Thread bolts (AA) through the holes from the outside of the unit. Tighten all bolts (AA) with a Phillips screwdriver.
Hardware Used
AA x 9M6 x 12 Bolt
2. Align the leg - with holes (B) with the mounting holes on the bottom right rear of the smoker. Thread bolts (AA) through the holes from the outside of the unit. Tighten all bolts (AA) with a Phillips screwdriver.
3. Open the bottom door of the smoker body (I). Turn the burner and control unit (C) upside down and place it on the bottom of the smoker body (I), making sure the 4 mounting holes on the burner and control unit (C) are aligned with the holes on the smoker body (I). Note: The control knob should be on the same side as the door. Check that the burner is properly installed on the orifice before attaching the burner and control unit (C). Thread bolts (AA) through holes from outside of unit. Securely tighten the unit to the bottom with a Phillips screwdriver.
5. CAUTION: This unit is HEAVY! Do not attempt this step without assistance! Close the two doors. With the assistance of a helper, stand the unit upright on its legs on a firm and level surface. (Make sure that the burner/control unit and legs are attached). Open the upper door. Position the square smoke stack (L) with control arm to the left as shown. Using 4 bolts (AA), attach square smoke stack (L) to the top of smoker body (I). Securely tighten with a Phillips screwdriver.
Hardware Used
6. Insert the cooking grate supports (T) into the corresponding holes on rack of the shelf inside the smoker body (I) from the bottom up. NOTE: There are 8 positions to install the cooking grate supports. The cooking grate supports can be installed into positions according to the need of the owner.
8. Align the door locking bracket (K) holes with the holes on the upper right side of the smoker body (I). Thread 2 bolts (AA) through the holes in the door locking bracket (K) into the threaded holes of the smoker body (I). Tighten the bolts (AA) using a Phillips screwdriver. Repeat on lower right side.
9. Slide door handle (Q) through brackets in door. Using pliers, slide a spring clip (CC) over the groove in the door handle as shown. Make sure both of the spring clips are securely attached in the grooves of the handles.
10. Install the table back support (S) and table front support (R) on the side of the smoker body (I) with screws (BB). Arrows pointing up indicate the correct position of the brackets when fastened to the smoker body (I).
11. With the side table (P) in a parallel position, align the slots in the side table with the table supports (R & S) and insert. To lock the side table (P) in the upright position, swing the side table (P) up, push toward the smoker body (I), and press down on the side table (P) near the body until it is fully fastened in place.
If you have any questions regarding the product, please call customer service at 1-800-963-0211, 8:00 a.m. – 6:00 p.m., EST, Monday – Thursday, 8:00 a.m. – 5:00 p.m., EST, Friday.
2
6
5
8
9
10
11
ATTACH YOUR RECEIPT HERE
Serial Number Purchase Date
Questions, problems, missing parts? Before returning to your retailer, call our customer service department at 1-800-963-0211, 8:00 a.m. – 6:00 p.m., EST, Monday – Thursday, 8:00 a.m. – 5:00 p.m., EST, Friday.
ANS Z21.89a-2008 CSA 1.18a-2008
CALIFORNIA PROPOSITION 65
1. Fuels used in wood, charcoal, gas or oil fired appliances and the products of combustion of such fuels contain chemicals known to the State of California to cause cancer, birth defects or other reproductive harm. 2. This product contains chemicals, including lead and lead compounds, known to the State of California to cause cancer, birth defects or other reproductive harm.
• DO NOT use this product for anything other than its intended purpose. It is NOT intended for commercial use. It is NOT intended to be installed or used in or on a recreational vehicle and/or boat. • Keep a fire extinguisher near this product at all times.• This appliance is for outdoor use only in well-ventilated areas. DO NOT operate it in a building, garage or any other enclosed area, or under overhead construction.• A minimum clearance of 36 inches (92 cm) to combustible material is required on the front, sides and back. It is very important to always maintain proper clearances to combustibles.• The cylinder must be at least 24 inches (61 cm) from the appliance.• DO NOT obstruct the flow of combustion air or ventilation air for the appliance.• When cooking, the smoker must be on a level, stable noncombustible surface in an area clear of combustible material, including tall or dry grass. • Care should be taken to protect the fuel supply hose from damage from either pedestrian or vehicle traffic.• Clean and inspect the hose before each use of the appliance. If there is evidence of abrasion, wear, cuts or leaks, the hose must be replaced prior to the appliance being used. The replacement hose assembly shall be that specified by the manufacturer.• Before each use check that no dead leaves or debris are under the appliance.• Store this appliance in a dry, protected location.• The use of alcohol, prescription or nonprescription drugs may impair the user’s ability to properly assemble and safely operate this appliance.• Allow the smoker to cool to 115°F (45°C) before moving or storing. Use caution when lifting and moving the appliance to avoid back strain or back injury. DO NOT move the appliance while it is in use.• Always hang the regulator on the hose retention wire while not in use or disconnected with the LP (liquid propane) tank. KEEP the fuel supply hose away from any heated surface(s).
SAFETY INFORMATION
4
• DO NOT store and use this appliance near gasoline or other combustible liquids or where other combustible vapors may be present.• DO NOT use this appliance as a heater.• DO NOT leave the appliance unattended while in use. Keep children and pets away from the appliance at all times.• NEVER close the damper completely while cooking. • If you must dispose of ashes in less time than it takes for the ashes to completely cool down, remove the ashes from the appliance, keeping them in the heavy-duty foil, and soak them completely with water before disposing of them in a noncombustible container.• This appliance will be hot during and after use. Use insulated oven mitts or gloves for protection from hot surfaces or splatter from cooking liquids.• Make sure that the orifice of the control valve properly mates with the burner mixing tube by visual observation. Please refer to maintenance section.• Use caution when opening the door of the smoker while in operation. Keep hands, face and body safe from hot steam or flare-ups. DO NOT inhale smoke.• DO NOT wear loose clothing while operating the smoker. Tie back long hair while operating the smoker. ALWAYS wear shoes that fully cover your feet while operating the smoker.• Allow the smoker and its components to cool completely before conducting any routine cleaning or maintenance.• NEVER use glassware, plastic or ceramic cookware on or in your smoker. Use metallic cookware only.• NEVER operate the smoker without water in the water bowl. NEVER allow the water to completely evaporate. Check the water level at least every 2 hours. A sizzling sound may indicate a low water level. Follow instructions in this manual for adding water while operating (see the Operating Instructions section).• When using flavoring wood, add a sufficient amount prior to operation to avoid having to add wood while operating. Adding wood while operating may splash hot water and cause serious injury.• Use of accessories not intended for this smoker is not recommended and may lead to injury or property damage.• An LP cylinder not connected for use should not be stored in the vicinity of the smoker or any other appliance. DO NOT store spare LP cylinders within 10 feet of the smoker. LP cylinders must be stored outdoors, out of reach of children. DO NOT store LP cylinders in a building, garage or any other enclosed area.• DO NOT store LP gas cylinders inside or on top of the smoker. Improper storage of cylinders could lead to explosion, fire and/or personal injury. Cylinders are to be stored outdoors, out of reach of children and must not be stored in a building, garage or any other enclosed area.• While the smoker is not in use, the gas must be turned off at the supply cylinder.• LP gases are heavier than air, tend to pool and collect in low-lying areas, are easily ignited and are highly flammable. Proper care and caution should be employed when dealing with any such fuels.• The smoker should be turned off and all supply valves (on piping or on fuel cylinders) should be closed in the event that the odor of unburned gas is detected. Do not attempt to use the appliance until any gas leaks are fixed and/or the source of the unburned gas odor is accounted for.
SAFETY INFORMATION
5
A
B
C
D
E
F
G
I
S K
LM
NP
O
J
A
I
AA
I
AA
Hardware Used
AA x 3M6 x 12 Bolt
1
3C
AA
Hardware Used
AA x 4M6 x 12 Bolt
Controlarm
I
AAL
AA x 8M6 x 12 Bolt
I
T
AA
K
Q
I
CC
I
R
OPERATING INSTRUCTIONS
CONNECTING THE LP TANK
WARNING
ALL INSTRUCTIONS AND SAFEGUARDS ON THIS PAGE MUST BE FOLLOWED TO PREVENT FIRE, DAMAGE AND/OR INJURY.
1. The knob on the LP tank must be closed. Make sure that the knob is turned clockwise to a full stop. The cylinder supply system must be arranged for vapor withdrawal.
2. Check that the control knob on the control unit is turned off.
3. Remove the protective cap from the LP tank valve and coupling nut.
4. Hold the regulator in one hand and insert the nipple into the valve outlet. Be sure the nipple is centered in the valve outlet. The coupling connects to the large outside threads on the valve outlet. Use care – do not cross thread the connection.
5. Hand tighten the coupling clockwise until it comes to a full stop. Firmly tighten by hand only. Do not use tools.
P
Straight
CAUTION: In the connection process, make sure the regulator inlet connector mates with the cylinder valve outlet properly, safely and firmly.
15
OPERATING INSTRUCTIONS
Any fuel supply cylinder used must be constructed and marked in accordance with specifications for propane cylinders of the U.S. Department of Transportation (DOT) CFR 49, or the Standard for Cylinders, Spheres and Tubes for the Transportation of Dangerous Goods, CAN/CSA B339. The appliance is to be used only with the 20-pound, vertical standing vapor withdrawal type tank and must include a collar to protect the cylinder valve.(A) DO NOT store spare LP cylinders under or near the smoker.(B) NEVER fill cylinder more than 80% full.(C) Do not store cylinder indoors.
WARNINGIf instructions A, B and C above are not followed exactly, a fire causing death or serious injury may occur.
This smoker is designed to operate on LP gas only. The gas cylinder used must include a collar to protect the cylinder valve. The cylinder supply system must be arranged for vapor withdrawal. Do not allow dirt or foreign material to get into or onto tank connection when it is not attached to the fuel supply system. Use the protective cap provided.
WARNINGALL INSTRUCTIONS AND SAFEGUARDS ON THIS PAGE MUST BE FOLLOWED TO PREVENT FIRE, DAMAGE AND/OR INJURY.
The cylinder outlet must have Type 1 gas connection termination in order to mate with gas hose provided with smoker. The pressure regulator and hose assembly supplied by the manufacturer with the appliance must be used. Replacement pressure regulators and hose assemblies must be those specified by the appliance manufacturer.This unit is not to be utilized with a non-self-contained LP-gas supply system.
Valve/pressure regulators are factory set to the correct operating pressures. No attempts should be made to adjust these settings.
DISCONNECT THE LP TANK
Make sure that the knob on the LP tank is turned clockwise to a full stop (CLOSED).
Hold the regulator in one hand, turn the coupling to the valve outlet counterclockwise and unthread the connection by hand only. Do not use tools.
Place dust cap on cylinder valve outlet whenever the cylinder is not in use. Only install the type of dust cap on the cylinder valve outlet that is provided with the cylinder valve. Other types of caps or plugs may result in leakage of propane.
Always hang the regulator on the lifting handles while not in use, disconnected fromthe LP tank, and when the unit has cooled down.
STORE THE TANK IN A PROPER PLACE AS INDICATED IN THIS MANUAL.
16
OPERATING INSTRUCTIONS
CHECKING FOR LEAKS
After connections are made, check all connections and fittings for leaks with a soap solution. 1. With all valves closed, apply the leak check solution (50/50 mix of dishwashing soap and water) to all gas carrying connections and fittings. 2. Open tank valve.Presence of bubbles at areas of wet solution indicates a gas leak. If leaks are detected or you smell or hear gas, shut off the valve and repair the leak or replace the defective part. Do not use the smoker until all leaks are corrected.
The gas hose/regulator assembly should be totally extended to the maximum distance so that the hose is straight and the tank is as far from the smoker as it can be (minimum 24 inches).
For vapor withdrawal, LP tanks are intended to be operated in the upright position only.
If the product is not in use, the gas must be turned off at the supply cylinder and the cylinder should be disconnected from the appliance.
Storage of the appliance indoors is only permissible if the cylinder is disconnected and removed from the appliance. Do not store cylinder indoors.
BEFORE FIRST USE
Remove all hangings or plastic straps, if present.
Before you cook food in your smoker, it is important to “season” your smoker. Seasoning seals the paint and interior of your smoker to enhance flavoring, durability and overall performance.To season your smoker, simply use it as you normally would only do not cook any food. You will need to follow all of the operating procedures in the next few sections of this manual.
Using your desired flavoring woods and marinades, burn your smoker at low temperature (around 175°F) for 45 – 60 minutes. Let the smoker cool and clean out the water and wood.
Once seasoning is complete, your smoker’s interior will have a durable, seasoned coating.
ADDING WATER
To add water before cooking, simply remove the water bowl and fill it with water slightly below the rim. Place the bowl back into the smoker. Adding water before cooking is recommended. To add water while cooking, if a sizzling sound indicating lack of water is heard, or there is a need to add water, open the bottom door with care and avoid taking in the smoke. Use a long nose kettle-like water can, stand as far from the smoker as you can, fill the water bowl up to 1 inch below the rim.
CAUTION: DO NOT pull the water bowl out beyond the rack when the smoker is hot.
17
OPERATING INSTRUCTIONS
COOKING TIP
Line the water bowl with aluminum foil before each use. This will make it easy to clean and help your water bowl last longer.
To make adding water easier and safer, use a clean watering can with a long spout.
ADDING WOOD CHIPS
To add wood chips before cooking, simply fill the wood chip box with your choice of flavoring hardwood chips. The amount and type of wood you use is entirely dependent on the desired amount of flavor. Once the box is filled, place the lid on top of the box and set the box in the smoker.
To add wood chips while cooking, we recommend using tongs or long handled pliers to removethe box lid and to place the pieces into the wood chip box without removing the box. It is not recommended to remove the wood chip box while the smoker is in operation.
CAUTION: The wood chip box and lid get very hot. Avoid handling them while in use. Always wear protective oven mitts when handling hot components.
COOKING TIP: FLAVORING WOOD
• Small wood chips work best inside the wood chip box.• Use dry hardwoods such as hickory, pecan, apple, cherry or mesquite.• To produce more smoke and prevent fast burning, pre-soak the wood chips in a separate bowl of water for at least 20 minutes, or wrap the chips in perforated aluminum foil.• Most smoke flavoring occurs within the first hour of cooking. Adding wood chips after the first hour is typically not necessary unless extra smoke flavoring is desired.
18
OPERATING INSTRUCTIONS
19
OPERATING INSTRUCTIONS
Match Lighting Procedure - LP Gas
1. Repeat Steps 1 through 5 of the igniter lighting system.
2. Open both doors. Place a lit match on to the burner as shown below. Quickly turn the control knob to the “HIGH” position. If the burner does not light in 5 seconds, turn the control knob off, wait at least 5 minutes and for the gas to clear. Repeat the process.
20
OPERATING INSTRUCTIONS
Cooking Tip: Damper Adjustments
WARNING: The dampers on the smoker body and the handle on the smoke stack may become very hot while cooking. Always wear a heat resistant glove when adjusting.
• For best performance, rotate the smoker so that the front or back of the body is facing the wind. This allows the adjustment of the dampers to be more effective and accurate.• The two dampers on smoker body should never be fully closed.• Opening the damper of the smoke stack helps to exhaust both the heat and smoke.• The key to effective smoking is to watch your heat indicator on the door and adjust the damper accordingly.• Temperature maintenance is best controlled by different damper adjustment configurations.
Turning off the Smoker
CAUTION: The smoker can become very hot while in use.Do not touch any portion of the smoker except for the door handle and burner control knob. It may be necessary to use protective gloves.
1. Turn the burner control knob off by pushing in and rotating to “OFF”. The burner flame should go out.
2. Turn off the LP cylinder valve by turning the knob clockwise until it cannot go any farther.
Follow all warnings and safety precautions before removing meat from smoker or preparing the unit for storage.
Lighting Instructions – Charcoal
When using charcoal, DO NOT USE PRETREATED, MATCH-LIGHT CHARCOAL with this smoker. Only use standard, untreated briquettes or lump charcoal and ONLY use charcoal lighting fluid approved for lighting charcoal. Do not use lighter fluid, paint thinners, gasoline, kerosene, alcohol or other flammable material for lighting charcoal. Damage to the smoker may occur with the use of match-light charcoal. DO NOT USE THE LP GAS BURNER WHEN LIGHTING CHARCOAL. Step 1Place the charcoal grate inside the woodchip/charcoal tray and add 1.5 pounds of charcoal on charcoal grate (approximately 26 briquettes).
Step 2Note: Please refer to the manufacturer’s recommended amount of lighter fluid before applying fluid to the briquettes. With the charcoal tray outside the firebox, saturate charcoal with the amount of lighting
22
CARE AND MAINTENANCE
AFTER USE SAFETY AND MAINTENANCE
WARNING• Use caution when lifting and moving the smoker to avoid strain injuries. Two people are recommended to lift or move the smoker.
• DO NOT store the smoker near gasoline or other combustible liquids or where combustible vapors may be present. Keep the area around the smoker clear and free of combustible materials and vapors.
• DO NOT store this smoker in an area accessible to children or pets. Store the smoker in a dry, protected location. Disconnect cylinder from smoker.
• DO NOT allow anyone to conduct activities around the smoker following use until it has cooled. It is hot during operation and remains hot for a period of time following use.
• DO NOT leave hot ashes unattended until the smoker cools completely.
• The smoker becomes extremely hot – allow the smoker to cool completely before handling. If you must handle the smoker while it is hot, ALWAYS wear protective oven mitts or heat-resistant gloves. Allow the smoker to cool before removing and cleaning the grease pan.
• Dispose of cold ashes by wrapping them in heavy-duty aluminum foil and putting them in a noncombustible container.
• If you must dispose of the ashes in less time than it takes for them to completely cool. Remove the ashes from the smoker, keeping them in heavy-duty foil, and soak them completely with water before disposing of them in a noncombustible container.
GENERAL CARE AND MAINTENANCE CAUTION: All care and maintenance procedures are to be performed while the smoker is turned off and cooled. Always perform maintenance by a qualified service person.
Clean the water bowl and cooking grate with hot, soapy water. Rinse and dry thoroughly. You may prefer to coat the water bowl and cooking grid lightly with cooking oil or cooking spray.
Frequently check and clean the venturi and burner tubes for insects and insect nests. A clogged tube can lead to fire beneath the smoker. Also make sure the smoker does not have any foreign objects obstructing the flow of combustion and ventilation air.
To clean the inside and outside of the smoker cabinet, simply use a damp cloth. Spray-washing with a water hose is not recommended. Moisture should be wiped away and not allowed to stand inside or on top of the smoker. Once cleaned, you may prefer to lightly coat the interior of the smoker cabinet with cooking oil or cooking spray.
If rust is present on the exterior surface of the smoker, clean the area with steel wool or emery cloth and use heavy-duty, heat-resistant paint.
NEVER apply additional paint to the interior of the smoker. If rust is present on the interior of the smoker, clean it thoroughly with steel wool or emery cloth and lightly coat the area with cooking oil or cooking spray to help minimize recurring rust.
When an LP tank is not connected, and to help prevent dirt or other foreign particles from clogging the regulator connector, hang the end of the hose and regulator assembly on the lifting handle.
Keep the ventilation opening(s) of the cylinder enclosure free and clear of debris.
23
CARE AND MAINTENANCE
Inspect the flames at the burner by looking through the observing hole on left side of the burner and control unit. A good flame should be blue with a yellow tip 1 to 2 inch high. If flames are excessively yellow and irregular, oil residue and food deposits may be collecting on the burner. Try cleaning the burner surface with hot, soapy water and cleaning the holes with a pipe cleaner to improve the flames.
Bad flames may also be caused by poor venturi attachment to the orifice. Turn off the control knob and cylinder valve. Always let the smoker cool before cleaning or checking the assembly. Make sure the orifice of the control valve properly mates with the burner mixing tube by visual observation from the bottom of the appliance. The burner venturi tube should overlap the orifice and they should form a straight line as shown in Figure A. Figures B & C show incorrect alignment.
WARNING: If the instructions above are not followed, an explosion may result, possibly causing serious bodily injury or death.
To protect your smoker from weather conditions, always keep it covered while not in use.
2”
Yellow
Light Blue
Blue
Good Flame Bad Flame
! ! !
Figure A Figure B Figure C
Correct Wrong Wrong
The flame goes out. 1. Disconnected gas supply hose. 2. High or gusting winds.
For replacement parts, call our customer service department at 1-800-963-0211, 8:00 a.m. – 6:00 p.m., EST, Monday – Thursday, 8:00 a.m. – 5:00 p.m., EST, Friday.
Owner’s Manual - Part #312-02025-00Printed in China
SpringClip
Qty. 2
CC
BB x21/4-20 FlangedWasher Nut
Hardware Used
R
Q
7. Insert 4 bolts (AA) through the mounting holes on one of the lifting handles (J) and into holes on right side of smoker body (I). Use a Phillips screwdriver to secure the handles to the smoker body (I). Repeat on left side.
7
Hardware Used
CC x 2Spring Clip
I
AA
J
ASSEMBLY INSTRUCTIONS
4. Thread bolts (EE) through holes on the leg - with holes (B) from outside of unit. Secure using 2 nuts (FF) from inside leg by using wrench. Tighten all bolts (AA) with a Phillips screwdriver. Insert the regulator hose attached to the burner and control unit (C) into the hose retention (V).
4
I
V
12. Slide the wood chip box (D) onto the lowest cooking grate supports (T) inside the smoker body (I) and put the wood chip box lid (F) on top. Note: For charcoal, refer to Step 17.
12
DANGER:
Failure to follow these instructions could result in fire, explosion, or burn hazard which could cause property damage, personal injury or death.
DANGER: If you smell gas:1. Shut off gas to the appliance.
3. Open lid.4. If odor continues, keep away from the appliance and immediately call your gas supplier or your fire department.
Assembler/Installer: This instruction manual contains important information necessary for the proper assembly and safe use of this appliance. Read and follow all warnings and instructions before assembling and using this appliance. Leave these instructions with the consumer.
Consumer/User: Follow all warnings and instructions when using this appliance. Keep these instructions for future reference.
1. Never operate this appliance unattended.2. Never operate this appliance within 10 feet (3 m) of any structure, combustible material or other gas cylinder.3. Never operate this appliance within 25 feet (7.5 m) of any flammable liquid.4. Never allow oil or grease to get hotter than 400°F or 200°C. If the temperature exceeds 400°F (200°C) or if oil begins to smoke, immediately turn the burner or gas supply OFF.5. Heated liquids remain at scalding temperatures long after the cooking process. Never touch cooking appliance until liquids have cooled to 115°F (45°C) or less.6. If a fire should occur, keep away from the appliance and immediately call your fire department. Do not attempt to extinguish an oil or grease fire with water. Failure to follow these instructions could result in fire, explosion, or burn hazard which could cause property damage, personal injury or death.
DANGER
DANGER:
Rev. 9/2011
M4 x 10Bolt
Qty. 2
DD EE
M4 Nut
Qty. 2
FF
M5 x 12Screw
Qty. 8
H
J
T
T
U
V
front of smoker
B
front of smoker
M4 x 10 BoltEE
M4 NutFF
Hardware Used
x 2
x 2
B
EE
FF
Hardware Used
AA x 4M6 x 12 Bolt
Hardware Used
AA x 4M6 x 12 Bolt
M5 x 12 ScrewBB x 8
Hardware UsedBB
S
I
R
S
D
FI
I13. Slide the water bowl (G) onto the cooking grate supports (T) inside the smoker body (I) above the wood chip box (D) as shown.
ASSEMBLY INSTRUCTIONS
13
15. Insert the probe of the temperature gauge assembly (M) through hole of the smoker door from the outside. Secure using 2 nuts (DD) from inside panel by using wrench.
16. To install the “AAA” battery (U), remove the igniter button by turning it counterclockwise and insert the “AAA” battery (U) with the positive end facing out. Reinstall the igniter button by turning it clockwise and hand tightening.
17. For charcoal use, remove the wood chip box lid (F) and place the charcoal grate (E) inside the wood chip box (D).
18. Always hang the regulator hose attached to the burner and control unit (C) to the hose retention (V) attached to the leg - with hole (B) while not in use. If switching from LP gas to charcoal, wait for the unit to cool down before disconnecting from the LP tank.
15
16
17
18
DD
M
U
E
B
12
14. Slide the 4 cooking grates (H) onto the top cooking grate supports (T) inside the smoker body (I).
14 I
H
ASSEMBLY INSTRUCTIONS
Hardware Used
DD x 2
D
S
V
M5 Nut
igniter button
21
OPERATING INSTRUCTIONS
fluid as recommended by the lighter fluid manufacturer. Allow the fluid to soak into the charcoal for 3 minutes before placing the tray back into the firebox (refer to assembly instructions for proper tray placement). After soaking the charcoal, place the lighting fluid at a safe distance away from the smoker.
Step 3With both doors open, stand back and carefully light charcoal and allow to burn until covered with a light ash (approximately 20 minutes). Charcoal lighting fluid must be allowed to completely burn off prior to closing the doors. (Fumes will tend to collect in the upper cavity if the door is closed).
DANGER: Closing the firebox doors during the lighting procedure could trap fumes from the charcoal lighting fluid in the smoker box and may result in a flash-fire or explosion when door is opened, resulting in property loss, personal injury or death. Never attempt to add more lighting fluid to the charcoal once it has been lit.
Step 4After 25 - 30 minutes, charcoal should be ready for cooking and/or adding woodchips. Carefully add wood chunks using long cooking tongs.
Adding Charcoal and/or Wood Chips
Additional charcoal and/or wood may be required to maintain or increase cooking temperature.
WARNING: Use caution since flames can flare-up when fresh air suddenly comes in contact with fire. When opening the door, keep hands, face and body a safe distance from hot steam and flame flare-ups.
Step 1Stand back and carefully open smoker box door allowing heat and steam to escape away from your face. Use caution since flames can flare-up when fresh air suddenly comes in contact with fire. Inspect the charcoal level in pan.
Step 2Wearing flame retardant oven mitts/gloves, stand back a safe distance and use long cooking tongs to lightly brush aside ashes on hot coals. Use cooking tongs to add charcoal and/or wood to charcoal pan, being careful not to stir-up ashes and sparks
WARNING: Never add charcoal lighting fluid to hot or even warm coals as flashback may occur causing severe burns.
Step 3Close smoker box door and allow food to continue cooking.
Allow the ashes to completely cool before reusing or cleaning the smoker.
26
REPLACEMENT PARTS LIST
For replacement parts, call our customer service department at 1-800-963-0211, 8:00 a.m. – 6:00 p.m., EST, Monday – Thursday, 8:00 a.m. – 5:00 p.m., EST, Friday.
PART DESCRIPTION PART # 1 Leg – Standard 301-01016-00 2 Leg – with Holes 312-01016-00 3 Burner and Control Unit 312-01015-00 4 Wood Chip Box (MFW only) 312-01028-00 5 Charcoal Grate 312-01030-00 6 Wood Chip Box Lid 301-01029-00 7 Wood Chip Box Handle and 301-01028-02 Lid Handle 8 Water Bowl 301-02017-00 9 Cooking Grate 312-01014-00 10 Door Locking Bracket 302-01008-00 11 Cooking Grate Support 302-01030-00 12 Smoker Body 312-12001-00 13 Square Smoke Stack 312-02009-00 14 Lifting Handle 301-01010-00 15 Logo Plate 302-03002-01 16 Temperature Gauge Bezel 301-01034-00 17 Temperature Gauge 301-01003-00
PART DESCRIPTION PART # 18 Upper Door 302-02002-00 19 Side Table 312-02008-00 20 Door Handle Crank 302-02007-02 21 Door Handle Grip 302-02007-01 22 Bottom Door without Handle 302-02102-00 23 Table Front Support Bracket 312-02008-01 24 Table Back Support Bracket 312-02008-02 25 Side Damper Plate (round) 301-01001-04 26 Igniter Ground Wire 301-01015-08 27 Push Button 301-01015-03 28 Electronic Ignitor 301-01015-06 29 Ignition Cap 301-01015-05 30 Control Knob 301-01015-01 31 Control Knob Bezel 301-01015-02 32 Igniter Electrode and Ignition Wire 301-01015-07 33 Hose Retention 312-01016-01 N/A Hardware Bag 312-02026-00 N/A Owner’s/Instruction Manual 312-02025-00
11
14
21
17
1918
20
22
2324
25
2627
32
30
2928
3331
ANS Z21.89a-2008 CSA 1.18a-2008
• Do not use the smoker if the burner fails to light or fails to remain lit. Under such conditions, gas should be turned off and the fuel cylinder should be disconnected.• Use in high wind conditions that result in poor burner operation such as blowing out and flaring should be avoided. If repositioning the appliance does not improve operation under such wind conditions, the appliance should be turned off.• Install the smoker with the hose regulator assembly extended the full length of the hose (24 in. minimum) directly away from the appliance. When so configured, placement results in maximum tank to smoker distance. When the smoker is operated, the hose/regulator and gas tank should be perpendicular to wind direction. Placing tank closer than 24 inches to the smoker can overheat the tank and cause release of propane through relief openings and can result in tank fire or explosion. • Read and follow all warnings and instructions before assembling and using the appliance.• Follow all warnings and instructions when using the appliance.
NOTE: The installation must confirm with local codes or, in the absence of local codes, with eitherthe National Fuel Gas Code, ANSI Z223.1/NFPA 54, Natural Gas and Propane Installation Code,CSA B149.1, or Propane Storage and Handling Code, B149.2, or the Standard for RecreationalVehicles, ANSI A 119.2/ NFPA 1192, and CSA Z240 RV Series, Recreational Vehicle Code, asapplicable.
WARNINGDO NOT mix old and new batteries.DO NOT mix alkaline, standard (Carbon-Zinc), or rechargeable (Nickel-Cadmium) batteries.DO NOT dispose of batteries in fire. Improper disposal may cause batteries to leak or explode.
The electronic ignition requires 1 “AAA” alkaline battery, which is included.
WARNING:The hose to tank attachment creates a potential trip hazard for user and pedestrians - use caution.Do not allow or cause the gas tank or applianceto tip.
MINIMUM 24 IN. (610 MM)
(Tank not included)
I
C
V
T
T
T
C
Master Forge & M Design® is a registered trademarkof LF, LLC. All rights reserved.
®
D
LIGHTING INSTRUCTIONS
CAUTION: If the flame extinguishes accidentally during ignition or operation, immediately TURN OFF the cylinder valve and then TURN OFF the control knob.Igniter Lighting System
1. Check all connections for leaks using the “soap water” test as explained on page 16 for “checking for leaks.”
2. Open both of the smoker cabinet doors. Always keep the doors open during lighting.
3. Check for any blockage to the venturi tube or burner, damper setting, ventilation setting. Remove any foreign objects or matter.
4. Be sure the burner control knob is in the “OFF” O position.
5. Open the LP cylinder valve by turning counterclockwise .
6. Push igniter on the control unit down 1 to 2 seconds then push and turn control knob to “HIGH” , while still holding the ignitor button down. At this point the burner should ignite.
7. If ignition does not take place within 5 seconds, immediately turn the control knob to OFF O. Wait 5 minutes and repeat above steps 6 and 7.
8. If burner still fails to light, try match lighting using the instructions on page 19.
9. Once the burner is lit, close the doors to allow heat to accumulate. The smoke stack on the top of the smoker can be adjusted to the desired setting to allow proper ventilation and combustion. NEVER CLOSE THE SMOKE STACK COMPLETELY.
Warning: Always light your smoker with both doors open.
13
G
2
TABLE OF CONTENTS
Safety Information ......................................................................................................................... 3
Replacement Parts List ................................................................................................................ 26
ITEM #0190449
MODEL #MFW784BDP
DUAL FUELVERTICAL SMOKER
Français p. XX
Español p. XX
1
Français p. 28
Español p. 58
SAFETY INFORMATION
3
Please read and understand this entire manual before attempting to assemble, operate or install the product. If you have any questions regarding the product, please call customer service at 1-800-963-0211, 8:00 a.m. – 6:00 p.m., EST, Monday – Thursday, 8:00 a.m. – 5:00 p.m., EST, Friday.
PACKAGE CONTENTS
6
PART DESCRIPTION QUANTITY A Leg - standard 3 B Leg - with holes 1 C Burner & Control Unit 1 D Wood Chip Box 1 E Charcoal Grate 1 F Wood Chip Box Lid 1 G Water Bowl 1 H Cooking Grate 4 I Smoker Body 1 J Lifting Handle 2 K Door Locking Bracket 2
L Square Smoke Stack 1 M Temperature Gauge & Bezel 1 N Upper Door (pre-assembled) 1 O Bottom Door (pre-assembled) 1 P Side Table 1 Q Door Handle 2 R Table Front Support 1 S Table Back Support 1 T Cooking Grate Support 12 U “AAA” Battery (1.5 V) 1 V Hose Retention 1
PART DESCRIPTION QUANTITY
ASSEMBLY INSTRUCTIONS
8
24
WARRANTY
25
This vertical gas smoker is warranted against broken or damaged parts at the time of purchase. The stainless steel burner is warranted for 3 years. All other parts carry a one (1) year limited warranty except the water bowl, which is warranted to be free of defects for 90 days. Paint is warranted to be free of defects for 90 days except for rust, which may appear after repeated use.
This warranty does not cover damage or issues related to neglect, abuse or modifications to the appliance. Repair labor is not covered.
All parts that meet the warranty requirements will be shipped at no charge via the discretion of GHP Group Inc. (ground shipments, US Mail or Parcel Post ONLY). Any special handling charges (i.e. Second Day, Overnight, etc.) will be the responsibility of the consumer.
All warranty claims apply only to the original purchaser and require a proof of purchase verifying purchase date. Do not return parts to GHP address without first obtaining a return authorization number from our customer service. This service is available by calling toll free 1-800-963-0211, 8:00 a.m. – 6:00 p.m., EST, Monday – Thursday 8:00 a.m. – 5:00 p.m., EST, Friday.
Some states do not allow the exclusion or limitation of incidental or consequential damages orlimitations on how long an implied warranty lasts, so the above limitations or exclusions may not apply to you. This warranty gives you specific legal rights, and you may have other rights that vary from state to state.
GHP Group Inc.8280 Austin AvenueMorton Grove, IL, USA60053-3207
The burner will not light using the igniter procedure.
1. The igniter electrode may be covered with grease or residue.
2. The igniter electrode may have a loose or disconnected wire.
3. No spark is being generated.
4. No gas flow or cylinder valve not open.
5. Vapor lock at coupling nut to LP cylinder.
1.Clean the igniter electrode.
2. Check the connection and reconnect any loose or disconnected wires.
3.Replace the AAA size battery inside the igniter.
4. Make sure LP cylinder is not empty or open cylinder valve.
5. Turn off knob and LP cylinder valve. Disconnect coupling nut from LP cylinder. Reconnect and retry.
The burner will not light with a match.
1. No gas flow or an obstructed gas flow.
1. Check the fuel level. Clean the venturi tube and burner.
HARDWARE CONTENTS (shown actual size)
M6 x 12Bolt
Qty. 32
7
AA BB
Before beginning assembly of product, make sure all parts are present. Compare parts with package contents list and hardware contents list. If any part is missing or damaged, do not attempt to assemble the product.
Estimated Assembly Time: 25 minutes
Tools Required for Assembly (not included): Phillips Head Screwdriver, 1/2 in. Wrench, Pliers.
PREPARATION
M5 Nut
Qty. 2
1. Align the legs - standard (A) with the mounting holes on the bottom left front, right front and left rear of the smoker body (I). Thread bolts (AA) through the holes from the outside of the unit. Tighten all bolts (AA) with a Phillips screwdriver.
Hardware Used
AA x 9M6 x 12 Bolt
2. Align the leg - with holes (B) with the mounting holes on the bottom right rear of the smoker. Thread bolts (AA) through the holes from the outside of the unit. Tighten all bolts (AA) with a Phillips screwdriver.
3. Open the bottom door of the smoker body (I). Turn the burner and control unit (C) upside down and place it on the bottom of the smoker body (I), making sure the 4 mounting holes on the burner and control unit (C) are aligned with the holes on the smoker body (I). Note: The control knob should be on the same side as the door. Check that the burner is properly installed on the orifice before attaching the burner and control unit (C). Thread bolts (AA) through holes from outside of unit. Securely tighten the unit to the bottom with a Phillips screwdriver.
5. CAUTION: This unit is HEAVY! Do not attempt this step without assistance! Close the two doors. With the assistance of a helper, stand the unit upright on its legs on a firm and level surface. (Make sure that the burner/control unit and legs are attached). Open the upper door. Position the square smoke stack (L) with control arm to the left as shown. Using 4 bolts (AA), attach square smoke stack (L) to the top of smoker body (I). Securely tighten with a Phillips screwdriver.
Hardware Used
6. Insert the cooking grate supports (T) into the corresponding holes on rack of the shelf inside the smoker body (I) from the bottom up. NOTE: There are 8 positions to install the cooking grate supports. The cooking grate supports can be installed into positions according to the need of the owner.
8. Align the door locking bracket (K) holes with the holes on the upper right side of the smoker body (I). Thread 2 bolts (AA) through the holes in the door locking bracket (K) into the threaded holes of the smoker body (I). Tighten the bolts (AA) using a Phillips screwdriver. Repeat on lower right side.
9. Slide door handle (Q) through brackets in door. Using pliers, slide a spring clip (CC) over the groove in the door handle as shown. Make sure both of the spring clips are securely attached in the grooves of the handles.
10. Install the side table back support (S) and table front support (R) on the side of the smoker body (I) with screws (BB). Arrows pointing up indicate the correct position of the brackets when fastened to the smoker body (I).
11. With the side table (P) in a parallel position, align the slots in the side table with the table supports (R & S) and insert. To lock the side table (P) in the upright position, swing the side table (P) up, push toward the smoker body (I), and press down on the side table (P) near the body until it is fully fastened in place.
If you have any questions regarding the product, please call customer service at 1-800-963-0211, 8:00 a.m. – 6:00 p.m., EST, Monday – Thursday, 8:00 a.m. – 5:00 p.m., EST, Friday.
2
6
5
8
9
10
11
ATTACH YOUR RECEIPT HERE
Serial Number Purchase Date
Questions, problems, missing parts? Before returning to your retailer, call our customer service department at 1-800-963-0211, 8:00 a.m. – 6:00 p.m., EST, Monday – Thursday, 8:00 a.m. – 5:00 p.m., EST, Friday.
ANS Z21.89a-2008 CSA 1.18a-2008
CALIFORNIA PROPOSITION 65
1. Fuels used in wood, charcoal, gas or oil fired appliances and the products of combustion of such fuels contain chemicals known to the State of California to cause cancer, birth defects or other reproductive harm. 2. This product contains chemicals, including lead and lead compounds, known to the State of California to cause cancer, birth defects or other reproductive harm.
• DO NOT use this product for anything other than its intended purpose. It is NOT intended for commercial use. It is NOT intended to be installed or used in or on a recreational vehicle and/or boat. • Keep a fire extinguisher near this product at all times.• This appliance is for outdoor use only in well-ventilated areas. DO NOT operate it in a building, garage or any other enclosed area, or under overhead construction.• A minimum clearance of 36 inches (92 cm) to combustible material is required on the front, sides and back. It is very important to always maintain proper clearances to combustibles.• The cylinder must be at least 24 inches (61 cm) from the appliance.• DO NOT obstruct the flow of combustion air or ventilation air for the appliance.• When cooking, the smoker must be on a level, stable noncombustible surface in an area clear of combustible material, including tall or dry grass. • Care should be taken to protect the fuel supply hose from damage from either pedestrian or vehicle traffic.• Clean and inspect the hose before each use of the appliance. If there is evidence of abrasion, wear, cuts or leaks, the hose must be replaced prior to the appliance being used. The replacement hose assembly shall be that specified by the manufacturer.• Before each use check that no dead leaves or debris are under the appliance.• Store this appliance in a dry, protected location.• The use of alcohol, prescription or nonprescription drugs may impair the user’s ability to properly assemble and safely operate this appliance.• Allow the smoker to cool to 115°F (45°C) before moving or storing. Use caution when lifting and moving the appliance to avoid back strain or back injury. DO NOT move the appliance while it is in use.• Always hang the regulator on the hose retention wire while not in use or disconnected with the LP (liquid propane) tank. KEEP the fuel supply hose away from any heated surface(s).
SAFETY INFORMATION
4
• DO NOT store and use this appliance near gasoline or other combustible liquids or where other combustible vapors may be present.• DO NOT use this appliance as a heater.• DO NOT leave the appliance unattended while in use. Keep children and pets away from the appliance at all times.• NEVER close the damper completely while cooking. • If you must dispose of ashes in less time than it takes for the ashes to completely cool down, remove the ashes from the appliance, keeping them in the heavy-duty foil, and soak them completely with water before disposing of them in a noncombustible container.• This appliance will be hot during and after use. Use insulated oven mitts or gloves for protection from hot surfaces or splatter from cooking liquids.• Make sure that the orifice of the control valve properly mates with the burner mixing tube by visual observation. Please refer to maintenance section.• Use caution when opening the door of the smoker while in operation. Keep hands, face and body safe from hot steam or flare-ups. DO NOT inhale smoke.• DO NOT wear loose clothing while operating the smoker. Tie back long hair while operating the smoker. ALWAYS wear shoes that fully cover your feet while operating the smoker.• Allow the smoker and its components to cool completely before conducting any routine cleaning or maintenance.• NEVER use glassware, plastic or ceramic cookware on or in your smoker. Use metallic cookware only.• NEVER operate the smoker without water in the water bowl. NEVER allow the water to completely evaporate. Check the water level at least every 2 hours. A sizzling sound may indicate a low water level. Follow instructions in this manual for adding water while operating (see the Operating Instructions section).• When using flavoring wood, add a sufficient amount prior to operation to avoid having to add wood while operating. Adding wood while operating may splash hot water and cause serious injury.• Use of accessories not intended for this smoker is not recommended and may lead to injury or property damage.• An LP cylinder not connected for use should not be stored in the vicinity of the smoker or any other appliance. DO NOT store spare LP cylinders within 10 feet of the smoker. LP cylinders must be stored outdoors, out of reach of children. DO NOT store LP cylinders in a building, garage or any other enclosed area.• DO NOT store LP gas cylinders inside or on top of the smoker. Improper storage of cylinders could lead to explosion, fire and/or personal injury. Cylinders are to be stored outdoors, out of reach of children and must not be stored in a building, garage or any other enclosed area.• While the smoker is not in use, the gas must be turned off at the supply cylinder.• LP gases are heavier than air, tend to pool and collect in low-lying areas, are easily ignited and are highly flammable. Proper care and caution should be employed when dealing with any such fuels.• The smoker should be turned off and all supply valves (on piping or on fuel cylinders) should be closed in the event that the odor of unburned gas is detected. Do not attempt to use the appliance until any gas leaks are fixed and/or the source of the unburned gas odor is accounted for.
SAFETY INFORMATION
5
A
B
C
D
E
F
G
I
S K
LM
NP
O
J
A
I
AA
I
AA
Hardware Used
AA x 3M6 x 12 Bolt
1
3C
AA
Hardware Used
AA x 4M6 x 12 Bolt
Controlarm
I
AAL
AA x 8M6 x 12 Bolt
I
T
AA
K
Q
I
CC
I
R
OPERATING INSTRUCTIONS
CONNECTING THE LP TANK
WARNING
ALL INSTRUCTIONS AND SAFEGUARDS ON THIS PAGE MUST BE FOLLOWED TO PREVENT FIRE, DAMAGE AND/OR INJURY.
1. The knob on the LP tank must be closed. Make sure that the knob is turned clockwise to a full stop. The cylinder supply system must be arranged for vapor withdrawal.
2. Check that the control knob on the control unit is turned off.
3. Remove the protective cap from the LP tank valve and coupling nut.
4. Hold the regulator in one hand and insert the nipple into the valve outlet. Be sure the nipple is centered in the valve outlet. The coupling connects to the large outside threads on the valve outlet. Use care – do not cross thread the connection.
5. Hand tighten the coupling clockwise until it comes to a full stop. Firmly tighten by hand only. Do not use tools.
P
Straight
CAUTION: In the connection process, make sure the regulator inlet connector mates with the cylinder valve outlet properly, safely and firmly.
15
OPERATING INSTRUCTIONS
Any fuel supply cylinder used must be constructed and marked in accordance with specifications for propane cylinders of the U.S. Department of Transportation (DOT) CFR 49, or the Standard for Cylinders, Spheres and Tubes for the Transportation of Dangerous Goods, CAN/CSA B339. The appliance is to be used only with the 20-pound, vertical standing vapor withdrawal type tank and must include a collar to protect the cylinder valve.(A) DO NOT store spare LP cylinders under or near the smoker.(B) NEVER fill cylinder more than 80% full.(C) Do not store cylinder indoors.
WARNINGIf instructions A, B, C above are not followed exactly, a fire causing death or serious injury may occur.
This smoker is designed to operate on LP gas only. The gas cylinder used must include a collar to protect the cylinder valve. The cylinder supply system must be arranged for vapor withdrawal. Do not allow dirt or foreign material to get into or onto tank connection when it is not attached to the fuel supply system. Use the protective cap provided.
WARNINGALL INSTRUCTIONS AND SAFEGUARDS ON THIS PAGE MUST BE FOLLOWED TO PREVENT FIRE, DAMAGE AND/OR INJURY.
The cylinder outlet must have Type 1 gas connection termination in order to mate with gas hose provided with smoker. The pressure regulator and hose assembly supplied by the manufacturer with the appliance must be used. Replacement pressure regulators and hose assemblies must be those specified by the appliance manufacturer.This unit is not to be utilized with a non-self-contained LP-gas supply system.
Valve/pressure regulators are factory set to the correct operating pressures. No attempts should be made to adjust these settings.
DISCONNECT THE LP TANK
Make sure that the knob on the LP tank is turned clockwise to a full stop (CLOSED).
Hold the regulator in one hand, turn the coupling to the valve outlet counterclockwise and unthread the connection by hand only. Do not use tools.
Place dust cap on cylinder valve outlet whenever the cylinder is not in use. Only install the type of dust cap on the cylinder valve outlet that is provided with the cylinder valve. Other types of caps or plugs may result in leakage of propane.
Always hang the regulator on the lifting handles while not in use, disconnected fromthe LP tank, and when the unit has cooled down.
STORE THE TANK IN A PROPER PLACE AS INDICATED IN THIS MANUAL.
16
OPERATING INSTRUCTIONS
CHECKING FOR LEAKS
After connections are made, check all connections and fittings for leaks with a soap solution. 1. With all valves closed, apply the leak check solution (50/50 mix of dishwashing soap and water) to all gas carrying connections and fittings. 2. Open tank valve.Presence of bubbles at areas of wet solution indicates a gas leak. If leaks are detected or you smell or hear gas, shut off the valve and repair the leak or replace the defective part. Do not use the smoker until all leaks are corrected.
The gas hose/regulator assembly should be totally extended to the maximum distance so that the hose is straight and the tank is as far from the smoker as it can be (minimum 24 inches).
For vapor withdrawal, LP tanks are intended to be operated in the upright position only.
If the product is not in use, the gas must be turned off at the supply cylinder and the cylinder should be disconnected from the appliance.
Storage of the appliance indoors is only permissible if the cylinder is disconnected and removed from the appliance. Do not store cylinder indoors.
BEFORE FIRST USE
Remove all hangings or plastic straps, if present.
Before you cook food in your smoker, it is important to “season” your smoker. Seasoning seals the paint and interior of your smoker to enhance flavoring, durability and overall performance.To season your smoker, simply use it as you normally would only do not cook any food. You will need to follow all of the operating procedures in the next few sections of this manual.
Using your desired flavoring woods and marinades, burn your smoker at low temperature (around 175°F) for 45 – 60 minutes. Let the smoker cool and clean out the water and wood.
Once seasoning is complete, your smoker’s interior will have a durable, seasoned coating.
ADDING WATER
To add water before cooking, simply remove the water bowl and fill it with water slightly below the rim. Place the bowl back into the smoker. Adding water before cooking is recommended. To add water while cooking, if a sizzling sound indicating lack of water is heard, or there is a need to add water, open the bottom door with care and avoid taking in the smoke. Use a long nose kettle-like water can, stand as far from the smoker as you can, fill the water bowl up to 1 inch below the rim.
CAUTION: DO NOT pull the water bowl out beyond the rack when the smoker is hot.
17
OPERATING INSTRUCTIONS
COOKING TIP
Line the water bowl with aluminum foil before each use. This will make it easy to clean and help your water bowl last longer.
To make adding water easier and safer, use a clean watering can with a long spout.
ADDING WOOD CHIPS
To add wood chips before cooking, simply fill the wood chip box with your choice of flavoring hardwood chips. The amount and type of wood you use is entirely dependent on the desired amount of flavor. Once the box is filled, place the lid on top of the box and set the box in the smoker.
To add wood chips while cooking, we recommend using tongs or long handled pliers to removethe box lid and to place the pieces into the wood chip box without removing the box. It is not recommended to remove the wood chip box while the smoker is in operation.
CAUTION: The wood chip box and lid get very hot. Avoid handling them while in use. Always wear protective oven mitts when handling hot components.
COOKING TIP: FLAVORING WOOD
• Small wood chips work best inside the wood chip box.• Use dry hardwoods such as hickory, pecan, apple, cherry or mesquite.• To produce more smoke and prevent fast burning, pre-soak the wood chips in a separate bowl of water for at least 20 minutes, or wrap the chips in perforated aluminum foil.• Most smoke flavoring occurs within the first hour of cooking. Adding wood chips after the first hour is typically not necessary unless extra smoke flavoring is desired.
18
OPERATING INSTRUCTIONS
19
OPERATING INSTRUCTIONS
Match Lighting Procedure - LP Gas
1. Repeat steps 1 through 5 of the igniter lighting system.
2. Open both doors. Place a lit match on to the burner as shown below. Quickly turn the control knob to the “HIGH” position. If the burner does not light in 5 seconds, turn the control knob off, wait at least 5 minutes and for the gas to clear. Repeat the process.
20
OPERATING INSTRUCTIONS
Cooking Tip: Damper Adjustments
WARNING: The dampers on the smoker body and the handle on the smoke stack may become very hot while cooking. Always wear a heat resistant glove when adjusting.
• For best performance, rotate the smoker so that the front or back of the body is facing the wind. This allows the adjustment of the dampers to be more effective and accurate.• The two dampers on smoker body should never be fully closed.• Opening the damper of the smoke stack helps to exhaust both the heat and smoke.• The key to effective smoking is to watch your heat indicator on the door and adjust the damper accordingly.• Temperature maintenance is best controlled by different damper adjustment configurations.
Turning off the Smoker
CAUTION: The smoker can become very hot while in use.Do not touch any portion of the smoker except for the door handle and burner control knob. It may be necessary to use protective gloves.
1. Turn the burner control knob off by pushing in and rotating to “OFF”. The burner flame should go out.
2. Turn off the LP cylinder valve by turning the knob clockwise until it cannot go any farther.
Follow all warnings and safety precautions before removing meat from smoker or preparing the unit for storage.
Lighting Instructions – Charcoal
When using charcoal, DO NOT USE PRETREATED, MATCH-LIGHT CHARCOAL with this smoker. Only use standard, untreated briquettes or lump charcoal and ONLY use charcoal lighting fluid approved for lighting charcoal. Do not use lighter fluid, paint thinners, gasoline, kerosene, alcohol or other flammable material for lighting charcoal. Damage to the smoker may occur with the use of match-light charcoal. DO NOT USE THE LP GAS BURNER WHEN LIGHTING CHARCOAL. Step 1Place the charcoal grate inside the woodchip/charcoal tray and add 1.5 pounds of charcoal on charcoal grate (approximately 26 briquettes).
Step 2Note: Please refer to the manufacturer’s recommended amount of lighter fluid before applying fluid to the briquettes. With the charcoal tray outside the firebox, saturate charcoal with the amount of lighting
LIGHTING INSTRUCTIONS
CAUTION: If the flame extinguishes accidentally during ignition or operation, immediately TURN OFF the cylinder valve and then TURN OFF the control knob.
Igniter Lighting System
1. Check all connections for leaks using the “soap water” test as explained on page 16.
2. Open both of the smoker cabinet doors. Always keep the doors open during lighting.
3. Check for any blockage to the venturi tube or burner, damper setting, ventilation setting. Remove any foreign objects or matter.
4. Be sure the burner control knob is in the “OFF” position.
5. Open the LP cylinder valve by turning counterclockwise.
6. Push igniter on the control unit down 1 to 2 seconds then push and turn control knob to “HIGH,” while still holding the ignitor button down. At this point the burner should ignite.
7. If ignition does not take place within 5 seconds, immediately turn the control knob to OFF. Wait 5 minutes and repeat above Steps 6 and 7.
8. If burner still fails to light, try match lighting using the instructions on page 19.
9. Once the burner is lit, close the doors to allow heat to accumulate. The smoke stack on the top of the smoker can be adjusted to the desired setting to allow proper ventilation and combustion. NEVER CLOSE THE SMOKE STACK COMPLETELY.
Warning: Always light your smoker with both doors open.
22
CARE AND MAINTENANCE
AFTER USE SAFETY AND MAINTENANCE
WARNING• Use caution when lifting and moving the smoker to avoid strain injuries. Two people are recommended to lift or move the smoker.
• DO NOT store the smoker near gasoline or other combustible liquids or where combustible vapors may be present. Keep the area around the smoker clear and free of combustible materials and vapors.
• DO NOT store this smoker in an area accessible to children or pets. Store the smoker in a dry, protected location. Disconnect cylinder from smoker.
• DO NOT allow anyone to conduct activities around the smoker following use until it has cooled. It is hot during operation and remains hot for a period of time following use.
• DO NOT leave hot ashes unattended until the smoker cools completely.
• The smoker becomes extremely hot – allow the smoker to cool completely before handling. If you must handle the smoker while it is hot, ALWAYS wear protective oven mitts or heat-resistant gloves. Allow the smoker to cool before removing and cleaning the grease pan.
• Dispose of cold ashes by wrapping them in heavy-duty aluminum foil and putting them in a noncombustible container.
• If you must dispose of the ashes in less time than it takes for them to completely cool. Remove the ashes from the smoker, keeping them in heavy-duty foil, and soak them completely with water before disposing of them in a noncombustible container.
GENERAL CARE AND MAINTENANCE CAUTION: All care and maintenance procedures are to be performed while the smoker is turned off and cooled. Always perform maintenance by a qualified service person.
Clean the water bowl and cooking grate with hot, soapy water. Rinse and dry thoroughly. You may prefer to coat the water bowl and cooking grid lightly with cooking oil or cooking spray.
Frequently check and clean the venturi and burner tubes for insects and insect nests. A clogged tube can lead to fire beneath the smoker. Also make sure the smoker does not have any foreign objects obstructing the flow of combustion and ventilation air.
To clean the inside and outside of the smoker cabinet, simply use a damp cloth. Spray-washing with a water hose is not recommended. Moisture should be wiped away and not allowed to stand inside or on top of the smoker. Once cleaned, you may prefer to lightly coat the interior of the smoker cabinet with cooking oil or cooking spray.
If rust is present on the exterior surface of the smoker, clean the area with steel wool or emery cloth and use heavy-duty, heat-resistant paint.
NEVER apply additional paint to the interior of the smoker. If rust is present on the interior of the smoker, clean it thoroughly with steel wool or emery cloth and lightly coat the area with cooking oil or cooking spray to help minimize recurring rust.
When an LP tank is not connected, and to help prevent dirt or other foreign particles from clogging the regulator connector, hang the end of the hose and regulator assembly on the lifting handle.
Keep the ventilation opening(s) of the cylinder enclosure free and clear of debris.
23
CARE AND MAINTENANCE
Inspect the flames at the burner by looking through the observing hole on left side of the burner and control unit. A good flame should be blue with a yellow tip 1 to 2 inch high. If flames are excessively yellow and irregular, oil residue and food deposits may be collecting on the burner. Try cleaning the burner surface with hot, soapy water and cleaning the holes with a pipe cleaner to improve the flames.
Bad flames may also be caused by poor venturi attachment to the orifice. Turn off the control knob and cylinder valve. Always let the smoker cool before cleaning or checking the assembly. Make sure the orifice of the control valve properly mates with the burner mixing tube by visual observation from the bottom of the appliance. The burner venturi tube should overlap the orifice and they should form a straight line as shown in Figure A. Figures B & C show incorrect alignment.
WARNING: If the instructions above are not followed, an explosion may result, possibly causing serious bodily injury or death.
To protect your smoker from weather conditions, always keep it covered while not in use.
2”
Yellow
Light Blue
Blue
Good Flame Bad Flame
! ! !
Figure A Figure B Figure C
Correct Wrong Wrong
The flame goes out. 1. Disconnected gas supply hose. 2. High or gusting winds.
For replacement parts, call our customer service department at 1-800-963-0211, 8:00 a.m. – 6:00 p.m., EST, Monday – Thursday, 8:00 a.m. – 5:00 p.m., EST, Friday.
Owner’s Manual - Part #312-02025-00Printed in China
SpringClip
Qty. 2
CC
BB x21/4-20 FlangedWasher Nut
Hardware Used
R
Q
7. Insert 4 bolts (AA) through the mounting holes on one of the lifting handles (J) and into holes on right side of smoker body (I). Use a Phillips screwdriver to secure the handles to the smoker body (I). Repeat on left side.
7
Hardware Used
CC x 2Spring Clip
I
AA
J
ASSEMBLY INSTRUCTIONS
4. Thread bolts (EE) through holes on the leg - with holes (B) from outside of unit. Secure using 2 nuts (FF) from inside leg by using wrench. Tighten all bolts (AA) with a Phillips screwdriver. Insert the regulator hose attached to the burner and control unit (C) into the hose retention (V).
4
I
V
12. Slide the wood chip box (D) onto the lowest cooking grate supports (T) inside the smoker body (I) and put the wood chip box lid (F) on top. Note: For charcoal, refer to Step 17.
12
DANGER:
Failure to follow these instructions could result in fire, explosion, or burn hazard which could cause property damage, personal injury or death.
DANGER: If you smell gas:1. Shut off gas to the appliance.
3. Open lid.4. If odor continues, keep away from the appliance and immediately call your gas supplier or your fire department.
Assembler/Installer: This instruction manual contains important information necessary for the proper assembly and safe use of this appliance. Read and follow all warnings and instructions before assembling and using this appliance. Leave these instructions with the consumer.
Consumer/User: Follow all warnings and instructions when using this appliance. Keep these instructions for future reference.
1. Never operate this appliance unattended.2. Never operate this appliance within 10 feet (3 m) of any structure, combustible material or other gas cylinder3. Never operate this appliance within 25 feet (7.5 m) of any flammable liquid.4. Never allow oil or grease to get hotter than 400°F or 200°C. If the temperature exceeds 400°F (200°C) or if oil begins to smoke, immediately turn the burner or gas supply OFF.5. Heated liquids remain at scalding temperatures long after the cooking process. Never touch cooking appliance until liquids have cooled to 115°F (45°C) or less.6. If a fire should occur, keep away from the appliance and immediately call your fire department. Do not attempt to extinguish an oil or grease fire with water. Failure to follow these instructions could result in fire, explosion, or burn hazard which could cause property damage, personal injury or death.
DANGER
DANGER:
Rev. 9/2011
M4 x 10Bolt
Qty. 2
DD EE
M4 Nut
Qty. 2
FF
M5 x 12Screw
Qty. 8
H
J
T
T
U
V
front of smoker
B
front of smoker
M4 x 10 BoltEE
M4 NutFF
Hardware Used
x 2
x 2
B
EE
FF
Hardware Used
AA x 4M6 x 12 Bolt
Hardware Used
AA x 4M6 x 12 Bolt
M5 x 12 ScrewBB x 8
Hardware UsedBB
S
I
R
S
D
FI
I13. Slide the water bowl (G) onto the cooking grate supports (T) inside the smoker body (I) above the wood chip box (D) as shown.
ASSEMBLY INSTRUCTIONS
13
15. Insert the probe of the temperature gauge assembly (M) through hole of the smoker door from the outside. Secure using 2 nuts (DD) from inside panel by using wrench.
16. To install the “AAA” battery (U), remove the igniter button by turning it counterclockwise and insert the “AAA” battery (U) with the positive end facing out. Reinstall the igniter button by turning it clockwise and hand tightening.
17. For charcoal use, remove the wood chip box lid (F) and place the charcoal grate (E) inside the wood chip box (D).
18. Always hang the regulator hose attached to the burner and control unit (C) to the hose retention (V) attached to the leg - with hole (B) while not in use. If switching from LP gas to charcoal, wait for the unit to cool down before disconnecting from the LP tank.
15
16
17
18
DD
M
U
E
B
12
14. Slide the 4 cooking grates (H) onto the top cooking grate supports (T) inside the smoker body (I).
14 I
H
ASSEMBLY INSTRUCTIONS
Hardware Used
DD x 2
D
S
V
M5 Nut
igniter button
21
OPERATING INSTRUCTIONS
fluid as recommended by the lighter fluid manufacturer. Allow the fluid to soak into the charcoal for 3 minutes before placing the tray back into the firebox (refer to assembly instructions for proper tray placement). After soaking the charcoal, place the lighting fluid at a safe distance away from the smoker.
Step 3With both doors open, stand back and carefully light charcoal and allow to burn until covered with a light ash (approximately 20 minutes). Charcoal lighting fluid must be allowed to completely burn off prior to closing the doors. (Fumes will tend to collect in the upper cavity if the door is closed).
DANGER: Closing the firebox doors during the lighting procedure could trap fumes from the charcoal lighting fluid in the smoker box and may result in a flash-fire or explosion when door is opened, resulting in property loss, personal injury or death. Never attempt to add more lighting fluid to the charcoal once it has been lit.
Step 4After 25 - 30 minutes, charcoal should be ready for cooking and/or adding woodchips. Carefully add wood chunks using long cooking tongs.
Adding Charcoal and/or Woodchips
Additional charcoal and/or wood may be required to maintain or increase cooking temperature.
WARNING: Use caution since flames can flare-up when fresh air suddenly comes in contact with fire. When opening the door, keep hands, face and body a safe distance from hot steam and flame flare-ups.
Step 1Stand back and carefully open smoker box door allowing heat and steam to escape away from your face. Use caution since flames can flare-up when fresh air suddenly comes in contact with fire. Inspect the charcoal level in pan.
Step 2Wearing flame retardant oven mitts/gloves, stand back a safe distance and use long cooking tongs to lightly brush aside ashes on hot coals. Use cooking tongs to add charcoal and/or wood to charcoal pan, being careful not to stir-up ashes and sparks
WARNING: Never add charcoal lighting fluid to hot or even warm coals as flashback may occur causing severe burns.
Step 3Close smoker box door and allow food to continue cooking.
Allow the ashes to completely cool before reusing or cleaning the smoker.
26
REPLACEMENT PARTS LIST
For replacement parts, call our customer service department at 1-800-963-0211, 8:00 a.m. – 6:00 p.m. EST, Monday – Thursday, 8:00 a.m. – 5:00 p.m. EST, Friday.
PART DESCRIPTION PART # 1 Leg – Standard 301-01016-00 2 Leg - with holes 312-01016-00 3 Burner and Control Unit 312-01015-00 4 Wood Chip Box (MFW only) 312-01028-00 5 Charcoal Grate 312-01030-00 6 Wood Chip Box Lid 301-01029-00 7 Wood Chip Box Handle and 301-01028-02 Lid Handle 8 Water Bowl 301-02017-00 9 Cooking Grate 312-01014-00 10 Door Locking Bracket 302-01008-00 11 Cooking Grate Support 302-01030-00 12 Smoker Body 312-12001-00 13 Square Smoke Stack 312-02009-00 14 Lifting Handle 301-01010-00 15 Logo Plate 302-03002-01 16 Temperature Gauge Bezel 301-01034-00 17 Temperature Gauge 301-01003-00
PART DESCRIPTION PART # 18 Upper Door 302-02002-00 19 Side Table 312-02008-00 20 Door Handle Crank 302-02007-02 21 Door Handle Grip 302-02007-01 22 Bottom Door without handle 302-02102-00 23 Table Front Support Bracket 312-02008-01 24 Table Back Support Bracket 312-02008-02 25 Side Damper Plate (round) 301-01001-04 26 Igniter Ground Wire 301-01015-08 27 Push Button 301-01015-03 28 Electronic Ignitor 301-01015-06 29 Ignition Cap 301-01015-05 30 Control Knob 301-01015-01 31 Control Knob Bezel 301-01015-02 32 Igniter Electrode and Ignition Wire 301-01015-07 33 Hose Retention 312-01016-01 N/A Hardware Bag 312-02026-00 N/A Owner’s/Instruction Manual 312-02025-00
11
14
21
17
1918
20
22
2324
25
2627
32
30
2928
3331
ANS Z21.89a-2008 CSA 1.18a-2008
• Do not use the smoker if the burner fails to light or fails to remain lit. Under such conditions, gas should be turned off and the fuel cylinder should be disconnected.• Use in high wind conditions that result in poor burner operation such as blowing out and flaring should be avoided. If repositioning the appliance does not improve operation under such wind conditions, the appliance should be turned off.• Install the smoker with the hose regulator assembly extended the full length of the hose (24 in. minimum) directly away from the appliance. When so configured, placement results in maximum tank to smoker distance. When the smoker is operated, the hose/regulator and gas tank should be perpendicular to wind direction. Placing tank closer than 24 inches to the smoker can overheat the tank and cause release of propane through relief openings and can result in tank fire or explosion. • Read and follow all warnings and instructions before assembling and using the appliance.• Follow all warnings and instructions when using the appliance.
NOTE: The installation must confirm with local codes or, in the absence of local codes, with eitherthe National Fuel Gas Code, ANSI Z223.1/NFPA 54, Natural Gas and Propane Installation Code,CSA B149.1, or Propane Storage and Handling Code, B149.2, or the Standard for RecreationalVehicles, ANSI A 119.2/ NFPA 1192, and CSA Z240 RV Series, Recreational Vehicle Code, asapplicable.
WARNINGDO NOT mix old and new batteries.DO NOT mix alkaline, standard (Carbon-Zinc), or rechargeable (Nickel-Cadmium) batteries.DO NOT dispose of batteries in fire. Improper disposal may cause batteries to leak or explode.
The electronic ignition requires 1 “AAA” alkaline battery, which is included.
WARNING:The hose to tank attachment creates a potential trip hazard for user and pedestrians - use caution.Do not allow or cause the gas tank or applianceto tip.
MINIMUM 24 IN. (610 MM)
(Tank not included)
HIGH
LOW OFF
®
I
C
V
T
T
T
C
13
G
2
TABLE OF CONTENTS
Safety Information ......................................................................................................................... 3
Replacement Parts List ................................................................................................................ 26
ITEM #0190449
MODEL #MFW784BDP
DUAL FUELVERTICAL SMOKER
Français p. XX
Español p. XX
1
Français p. 28
Español p. 58
SAFETY INFORMATION
3
Please read and understand this entire manual before attempting to assemble, operate or install the product. If you have any questions regarding the product, please call customer service at 1-800-963-0211, 8:00 a.m. – 6:00 p.m., EST, Monday – Thursday, 8:00 a.m. – 5:00 p.m., EST, Friday.
PACKAGE CONTENTS
6
PART DESCRIPTION QUANTITY A Leg - standard 3 B Leg - with holes 1 C Burner & Control Unit 1 D Wood Chip Box 1 E Charcoal Grate 1 F Wood Chip Box Lid 1 G Water Bowl 1 H Cooking Grate 4 I Smoker Body 1 J Lifting Handle 2 K Door Locking Bracket 2
L Square Smoke Stack 1 M Temperature Gauge & Bezel 1 N Upper Door (pre-assembled) 1 O Bottom Door (pre-assembled) 1 P Side Table 1 Q Door Handle 2 R Table Front Support 1 S Table Back Support 1 T Cooking Grate Support 12 U “AAA” Battery (1.5 V) 1 V Hose Retention 1
PART DESCRIPTION QUANTITY
ASSEMBLY INSTRUCTIONS
8
24
WARRANTY
25
This vertical gas smoker is warranted against broken or damaged parts at the time of purchase. The stainless steel burner is warranted for 3 years. All other parts carry a one (1) year limited warranty except the water bowl, which is warranted to be free of defects for 90 days. Paint is warranted to be free of defects for 90 days except for rust, which may appear after repeated use.
This warranty does not cover damage or issues related to neglect, abuse or modifications to the appliance. Repair labor is not covered.
All parts that meet the warranty requirements will be shipped at no charge via the discretion of GHP Group Inc. (ground shipments, US Mail or Parcel Post ONLY). Any special handling charges (i.e. Second Day, Overnight, etc.) will be the responsibility of the consumer.
All warranty claims apply only to the original purchaser and require a proof of purchase verifying purchase date. Do not return parts to GHP address without first obtaining a return authorization number from our customer service. This service is available by calling toll free 1-800-963-0211, 8:00 a.m. – 6:00 p.m., EST, Monday – Thursday 8:00 a.m. – 5:00 p.m., EST, Friday.
Some states do not allow the exclusion or limitation of incidental or consequential damages orlimitations on how long an implied warranty lasts, so the above limitations or exclusions may not apply to you. This warranty gives you specific legal rights, and you may have other rights that vary from state to state.
GHP Group Inc.8280 Austin AvenueMorton Grove, IL, USA60053-3207
The burner will not light using the igniter procedure.
1. The igniter electrode may be covered with grease or residue.
2. The igniter electrode may have a loose or disconnected wire.
3. No spark is being generated.
4. No gas flow or cylinder valve not open.
5. Vapor lock at coupling nut to LP cylinder.
1.Clean the igniter electrode.
2. Check the connection and reconnect any loose or disconnected wires.
3.Replace the AAA size battery inside the igniter.
4. Make sure LP cylinder is not empty or open cylinder valve.
5. Turn off knob and LP cylinder valve. Disconnect coupling nut from LP cylinder. Reconnect and retry.
The burner will not light with a match.
1. No gas flow or an obstructed gas flow.
1. Check the fuel level. Clean the venturi tube and burner.
HARDWARE CONTENTS (shown actual size)
M6 x 12Bolt
Qty. 32
7
AA BB
Before beginning assembly of product, make sure all parts are present. Compare parts with package contents list and hardware contents list. If any part is missing or damaged, do not attempt to assemble the product.
Estimated Assembly Time: 25 minutes
Tools Required for Assembly (not included): Phillips Head Screwdriver, 1/2 in. Wrench, Pliers.
PREPARATION
M5 Nut
Qty. 2
1. Align the legs - standard (A) with the mounting holes on the bottom left front, right front and left rear of the smoker body (I). Thread bolts (AA) through the holes from the outside of the unit. Tighten all bolts (AA) with a Phillips screwdriver.
Hardware Used
AA x 9M6 x 12 Bolt
2. Align the leg - with holes (B) with the mounting holes on the bottom right rear of the smoker. Thread bolts (AA) through the holes from the outside of the unit. Tighten all bolts (AA) with a Phillips screwdriver.
3. Open the bottom door of the smoker body (I). Turn the burner and control unit (C) upside down and place it on the bottom of the smoker body (I), making sure the 4 mounting holes on the burner and control unit (C) are aligned with the holes on the smoker body (I). Note: The control knob should be on the same side as the door. Check that the burner is properly installed on the orifice before attaching the burner and control unit (C). Thread bolts (AA) through holes from outside of unit. Securely tighten the unit to the bottom with a Phillips screwdriver.
5. CAUTION: This unit is HEAVY! Do not attempt this step without assistance! Close the two doors. With the assistance of a helper, stand the unit upright on its legs on a firm and level surface. (Make sure that the burner/control unit and legs are attached). Open the upper door. Position the square smoke stack (L) with control arm to the left as shown. Using 4 bolts (AA), attach square smoke stack (L) to the top of smoker body (I). Securely tighten with a Phillips screwdriver.
Hardware Used
6. Insert the cooking grate supports (T) into the corresponding holes on rack of the shelf inside the smoker body (I) from the bottom up. NOTE: There are 8 positions to install the cooking grate supports. The cooking grate supports can be installed into positions according to the need of the owner.
8. Align the door locking bracket (K) holes with the holes on the upper right side of the smoker body (I). Thread 2 bolts (AA) through the holes in the door locking bracket (K) into the threaded holes of the smoker body (I). Tighten the bolts (AA) using a Phillips screwdriver. Repeat on lower right side.
9. Slide door handle (Q) through brackets in door. Using pliers, slide a spring clip (CC) over the groove in the door handle as shown. Make sure both of the spring clips are securely attached in the grooves of the handles.
10. Install the side table back support (S) and table front support (R) on the side of the smoker body (I) with screws (BB). Arrows pointing up indicate the correct position of the brackets when fastened to the smoker body (I).
11. With the side table (P) in a parallel position, align the slots in the side table with the table supports (R & S) and insert. To lock the side table (P) in the upright position, swing the side table (P) up, push toward the smoker body (I), and press down on the side table (P) near the body until it is fully fastened in place.
If you have any questions regarding the product, please call customer service at 1-800-963-0211, 8:00 a.m. – 6:00 p.m., EST, Monday – Thursday, 8:00 a.m. – 5:00 p.m., EST, Friday.
2
6
5
8
9
10
11
ATTACH YOUR RECEIPT HERE
Serial Number Purchase Date
Questions, problems, missing parts? Before returning to your retailer, call our customer service department at 1-800-963-0211, 8:00 a.m. – 6:00 p.m., EST, Monday – Thursday, 8:00 a.m. – 5:00 p.m., EST, Friday.
ANS Z21.89a-2008 CSA 1.18a-2008
CALIFORNIA PROPOSITION 65
1. Fuels used in wood, charcoal, gas or oil fired appliances and the products of combustion of such fuels contain chemicals known to the State of California to cause cancer, birth defects or other reproductive harm. 2. This product contains chemicals, including lead and lead compounds, known to the State of California to cause cancer, birth defects or other reproductive harm.
• DO NOT use this product for anything other than its intended purpose. It is NOT intended for commercial use. It is NOT intended to be installed or used in or on a recreational vehicle and/or boat. • Keep a fire extinguisher near this product at all times.• This appliance is for outdoor use only in well-ventilated areas. DO NOT operate it in a building, garage or any other enclosed area, or under overhead construction.• A minimum clearance of 36 inches (92 cm) to combustible material is required on the front, sides and back. It is very important to always maintain proper clearances to combustibles.• The cylinder must be at least 24 inches (61 cm) from the appliance.• DO NOT obstruct the flow of combustion air or ventilation air for the appliance.• When cooking, the smoker must be on a level, stable noncombustible surface in an area clear of combustible material, including tall or dry grass. • Care should be taken to protect the fuel supply hose from damage from either pedestrian or vehicle traffic.• Clean and inspect the hose before each use of the appliance. If there is evidence of abrasion, wear, cuts or leaks, the hose must be replaced prior to the appliance being used. The replacement hose assembly shall be that specified by the manufacturer.• Before each use check that no dead leaves or debris are under the appliance.• Store this appliance in a dry, protected location.• The use of alcohol, prescription or nonprescription drugs may impair the user’s ability to properly assemble and safely operate this appliance.• Allow the smoker to cool to 115°F (45°C) before moving or storing. Use caution when lifting and moving the appliance to avoid back strain or back injury. DO NOT move the appliance while it is in use.• Always hang the regulator on the hose retention wire while not in use or disconnected with the LP (liquid propane) tank. KEEP the fuel supply hose away from any heated surface(s).
SAFETY INFORMATION
4
• DO NOT store and use this appliance near gasoline or other combustible liquids or where other combustible vapors may be present.• DO NOT use this appliance as a heater.• DO NOT leave the appliance unattended while in use. Keep children and pets away from the appliance at all times.• NEVER close the damper completely while cooking. • If you must dispose of ashes in less time than it takes for the ashes to completely cool down, remove the ashes from the appliance, keeping them in the heavy-duty foil, and soak them completely with water before disposing of them in a noncombustible container.• This appliance will be hot during and after use. Use insulated oven mitts or gloves for protection from hot surfaces or splatter from cooking liquids.• Make sure that the orifice of the control valve properly mates with the burner mixing tube by visual observation. Please refer to maintenance section.• Use caution when opening the door of the smoker while in operation. Keep hands, face and body safe from hot steam or flare-ups. DO NOT inhale smoke.• DO NOT wear loose clothing while operating the smoker. Tie back long hair while operating the smoker. ALWAYS wear shoes that fully cover your feet while operating the smoker.• Allow the smoker and its components to cool completely before conducting any routine cleaning or maintenance.• NEVER use glassware, plastic or ceramic cookware on or in your smoker. Use metallic cookware only.• NEVER operate the smoker without water in the water bowl. NEVER allow the water to completely evaporate. Check the water level at least every 2 hours. A sizzling sound may indicate a low water level. Follow instructions in this manual for adding water while operating (see the Operating Instructions section).• When using flavoring wood, add a sufficient amount prior to operation to avoid having to add wood while operating. Adding wood while operating may splash hot water and cause serious injury.• Use of accessories not intended for this smoker is not recommended and may lead to injury or property damage.• An LP cylinder not connected for use should not be stored in the vicinity of the smoker or any other appliance. DO NOT store spare LP cylinders within 10 feet of the smoker. LP cylinders must be stored outdoors, out of reach of children. DO NOT store LP cylinders in a building, garage or any other enclosed area.• DO NOT store LP gas cylinders inside or on top of the smoker. Improper storage of cylinders could lead to explosion, fire and/or personal injury. Cylinders are to be stored outdoors, out of reach of children and must not be stored in a building, garage or any other enclosed area.• While the smoker is not in use, the gas must be turned off at the supply cylinder.• LP gases are heavier than air, tend to pool and collect in low-lying areas, are easily ignited and are highly flammable. Proper care and caution should be employed when dealing with any such fuels.• The smoker should be turned off and all supply valves (on piping or on fuel cylinders) should be closed in the event that the odor of unburned gas is detected. Do not attempt to use the appliance until any gas leaks are fixed and/or the source of the unburned gas odor is accounted for.
SAFETY INFORMATION
5
A
B
C
D
E
F
G
I
S K
LM
NP
O
J
A
I
AA
I
AA
Hardware Used
AA x 3M6 x 12 Bolt
1
3C
AA
Hardware Used
AA x 4M6 x 12 Bolt
Controlarm
I
AAL
AA x 8M6 x 12 Bolt
I
T
AA
K
Q
I
CC
I
R
OPERATING INSTRUCTIONS
CONNECTING THE LP TANK
WARNING
ALL INSTRUCTIONS AND SAFEGUARDS ON THIS PAGE MUST BE FOLLOWED TO PREVENT FIRE, DAMAGE AND/OR INJURY.
1. The knob on the LP tank must be closed. Make sure that the knob is turned clockwise to a full stop. The cylinder supply system must be arranged for vapor withdrawal.
2. Check that the control knob on the control unit is turned off.
3. Remove the protective cap from the LP tank valve and coupling nut.
4. Hold the regulator in one hand and insert the nipple into the valve outlet. Be sure the nipple is centered in the valve outlet. The coupling connects to the large outside threads on the valve outlet. Use care – do not cross thread the connection.
5. Hand tighten the coupling clockwise until it comes to a full stop. Firmly tighten by hand only. Do not use tools.
P
Straight
CAUTION: In the connection process, make sure the regulator inlet connector mates with the cylinder valve outlet properly, safely and firmly.
15
OPERATING INSTRUCTIONS
Any fuel supply cylinder used must be constructed and marked in accordance with specifications for propane cylinders of the U.S. Department of Transportation (DOT) CFR 49, or the Standard for Cylinders, Spheres and Tubes for the Transportation of Dangerous Goods, CAN/CSA B339. The appliance is to be used only with the 20-pound, vertical standing vapor withdrawal type tank and must include a collar to protect the cylinder valve.(A) DO NOT store spare LP cylinders under or near the smoker.(B) NEVER fill cylinder more than 80% full.(C) Do not store cylinder indoors.
WARNINGIf instructions A, B, C above are not followed exactly, a fire causing death or serious injury may occur.
This smoker is designed to operate on LP gas only. The gas cylinder used must include a collar to protect the cylinder valve. The cylinder supply system must be arranged for vapor withdrawal. Do not allow dirt or foreign material to get into or onto tank connection when it is not attached to the fuel supply system. Use the protective cap provided.
WARNINGALL INSTRUCTIONS AND SAFEGUARDS ON THIS PAGE MUST BE FOLLOWED TO PREVENT FIRE, DAMAGE AND/OR INJURY.
The cylinder outlet must have Type 1 gas connection termination in order to mate with gas hose provided with smoker. The pressure regulator and hose assembly supplied by the manufacturer with the appliance must be used. Replacement pressure regulators and hose assemblies must be those specified by the appliance manufacturer.This unit is not to be utilized with a non-self-contained LP-gas supply system.
Valve/pressure regulators are factory set to the correct operating pressures. No attempts should be made to adjust these settings.
DISCONNECT THE LP TANK
Make sure that the knob on the LP tank is turned clockwise to a full stop (CLOSED).
Hold the regulator in one hand, turn the coupling to the valve outlet counterclockwise and unthread the connection by hand only. Do not use tools.
Place dust cap on cylinder valve outlet whenever the cylinder is not in use. Only install the type of dust cap on the cylinder valve outlet that is provided with the cylinder valve. Other types of caps or plugs may result in leakage of propane.
Always hang the regulator on the lifting handles while not in use, disconnected fromthe LP tank, and when the unit has cooled down.
STORE THE TANK IN A PROPER PLACE AS INDICATED IN THIS MANUAL.
16
OPERATING INSTRUCTIONS
CHECKING FOR LEAKS
After connections are made, check all connections and fittings for leaks with a soap solution. 1. With all valves closed, apply the leak check solution (50/50 mix of dishwashing soap and water) to all gas carrying connections and fittings. 2. Open tank valve.Presence of bubbles at areas of wet solution indicates a gas leak. If leaks are detected or you smell or hear gas, shut off the valve and repair the leak or replace the defective part. Do not use the smoker until all leaks are corrected.
The gas hose/regulator assembly should be totally extended to the maximum distance so that the hose is straight and the tank is as far from the smoker as it can be (minimum 24 inches).
For vapor withdrawal, LP tanks are intended to be operated in the upright position only.
If the product is not in use, the gas must be turned off at the supply cylinder and the cylinder should be disconnected from the appliance.
Storage of the appliance indoors is only permissible if the cylinder is disconnected and removed from the appliance. Do not store cylinder indoors.
BEFORE FIRST USE
Remove all hangings or plastic straps, if present.
Before you cook food in your smoker, it is important to “season” your smoker. Seasoning seals the paint and interior of your smoker to enhance flavoring, durability and overall performance.To season your smoker, simply use it as you normally would only do not cook any food. You will need to follow all of the operating procedures in the next few sections of this manual.
Using your desired flavoring woods and marinades, burn your smoker at low temperature (around 175°F) for 45 – 60 minutes. Let the smoker cool and clean out the water and wood.
Once seasoning is complete, your smoker’s interior will have a durable, seasoned coating.
ADDING WATER
To add water before cooking, simply remove the water bowl and fill it with water slightly below the rim. Place the bowl back into the smoker. Adding water before cooking is recommended. To add water while cooking, if a sizzling sound indicating lack of water is heard, or there is a need to add water, open the bottom door with care and avoid taking in the smoke. Use a long nose kettle-like water can, stand as far from the smoker as you can, fill the water bowl up to 1 inch below the rim.
CAUTION: DO NOT pull the water bowl out beyond the rack when the smoker is hot.
17
OPERATING INSTRUCTIONS
COOKING TIP
Line the water bowl with aluminum foil before each use. This will make it easy to clean and help your water bowl last longer.
To make adding water easier and safer, use a clean watering can with a long spout.
ADDING WOOD CHIPS
To add wood chips before cooking, simply fill the wood chip box with your choice of flavoring hardwood chips. The amount and type of wood you use is entirely dependent on the desired amount of flavor. Once the box is filled, place the lid on top of the box and set the box in the smoker.
To add wood chips while cooking, we recommend using tongs or long handled pliers to removethe box lid and to place the pieces into the wood chip box without removing the box. It is not recommended to remove the wood chip box while the smoker is in operation.
CAUTION: The wood chip box and lid get very hot. Avoid handling them while in use. Always wear protective oven mitts when handling hot components.
COOKING TIP: FLAVORING WOOD
• Small wood chips work best inside the wood chip box.• Use dry hardwoods such as hickory, pecan, apple, cherry or mesquite.• To produce more smoke and prevent fast burning, pre-soak the wood chips in a separate bowl of water for at least 20 minutes, or wrap the chips in perforated aluminum foil.• Most smoke flavoring occurs within the first hour of cooking. Adding wood chips after the first hour is typically not necessary unless extra smoke flavoring is desired.
18
OPERATING INSTRUCTIONS
19
OPERATING INSTRUCTIONS
Match Lighting Procedure - LP Gas
1. Repeat steps 1 through 5 of the igniter lighting system.
2. Open both doors. Place a lit match on to the burner as shown below. Quickly turn the control knob to the “HIGH” position. If the burner does not light in 5 seconds, turn the control knob off, wait at least 5 minutes and for the gas to clear. Repeat the process.
20
OPERATING INSTRUCTIONS
Cooking Tip: Damper Adjustments
WARNING: The dampers on the smoker body and the handle on the smoke stack may become very hot while cooking. Always wear a heat resistant glove when adjusting.
• For best performance, rotate the smoker so that the front or back of the body is facing the wind. This allows the adjustment of the dampers to be more effective and accurate.• The two dampers on smoker body should never be fully closed.• Opening the damper of the smoke stack helps to exhaust both the heat and smoke.• The key to effective smoking is to watch your heat indicator on the door and adjust the damper accordingly.• Temperature maintenance is best controlled by different damper adjustment configurations.
Turning off the Smoker
CAUTION: The smoker can become very hot while in use.Do not touch any portion of the smoker except for the door handle and burner control knob. It may be necessary to use protective gloves.
1. Turn the burner control knob off by pushing in and rotating to “OFF”. The burner flame should go out.
2. Turn off the LP cylinder valve by turning the knob clockwise until it cannot go any farther.
Follow all warnings and safety precautions before removing meat from smoker or preparing the unit for storage.
Lighting Instructions – Charcoal
When using charcoal, DO NOT USE PRETREATED, MATCH-LIGHT CHARCOAL with this smoker. Only use standard, untreated briquettes or lump charcoal and ONLY use charcoal lighting fluid approved for lighting charcoal. Do not use lighter fluid, paint thinners, gasoline, kerosene, alcohol or other flammable material for lighting charcoal. Damage to the smoker may occur with the use of match-light charcoal. DO NOT USE THE LP GAS BURNER WHEN LIGHTING CHARCOAL. Step 1Place the charcoal grate inside the woodchip/charcoal tray and add 1.5 pounds of charcoal on charcoal grate (approximately 26 briquettes).
Step 2Note: Please refer to the manufacturer’s recommended amount of lighter fluid before applying fluid to the briquettes. With the charcoal tray outside the firebox, saturate charcoal with the amount of lighting
LIGHTING INSTRUCTIONS
CAUTION: If the flame extinguishes accidentally during ignition or operation, immediately TURN OFF the cylinder valve and then TURN OFF the control knob.
Igniter Lighting System
1. Check all connections for leaks using the “soap water” test as explained on page 16.
2. Open both of the smoker cabinet doors. Always keep the doors open during lighting.
3. Check for any blockage to the venturi tube or burner, damper setting, ventilation setting. Remove any foreign objects or matter.
4. Be sure the burner control knob is in the “OFF” position.
5. Open the LP cylinder valve by turning counterclockwise.
6. Push igniter on the control unit down 1 to 2 seconds then push and turn control knob to “HIGH,” while still holding the ignitor button down. At this point the burner should ignite.
7. If ignition does not take place within 5 seconds, immediately turn the control knob to OFF. Wait 5 minutes and repeat above Steps 6 and 7.
8. If burner still fails to light, try match lighting using the instructions on page 19.
9. Once the burner is lit, close the doors to allow heat to accumulate. The smoke stack on the top of the smoker can be adjusted to the desired setting to allow proper ventilation and combustion. NEVER CLOSE THE SMOKE STACK COMPLETELY.
Warning: Always light your smoker with both doors open.
22
CARE AND MAINTENANCE
AFTER USE SAFETY AND MAINTENANCE
WARNING• Use caution when lifting and moving the smoker to avoid strain injuries. Two people are recommended to lift or move the smoker.
• DO NOT store the smoker near gasoline or other combustible liquids or where combustible vapors may be present. Keep the area around the smoker clear and free of combustible materials and vapors.
• DO NOT store this smoker in an area accessible to children or pets. Store the smoker in a dry, protected location. Disconnect cylinder from smoker.
• DO NOT allow anyone to conduct activities around the smoker following use until it has cooled. It is hot during operation and remains hot for a period of time following use.
• DO NOT leave hot ashes unattended until the smoker cools completely.
• The smoker becomes extremely hot – allow the smoker to cool completely before handling. If you must handle the smoker while it is hot, ALWAYS wear protective oven mitts or heat-resistant gloves. Allow the smoker to cool before removing and cleaning the grease pan.
• Dispose of cold ashes by wrapping them in heavy-duty aluminum foil and putting them in a noncombustible container.
• If you must dispose of the ashes in less time than it takes for them to completely cool. Remove the ashes from the smoker, keeping them in heavy-duty foil, and soak them completely with water before disposing of them in a noncombustible container.
GENERAL CARE AND MAINTENANCE CAUTION: All care and maintenance procedures are to be performed while the smoker is turned off and cooled. Always perform maintenance by a qualified service person.
Clean the water bowl and cooking grate with hot, soapy water. Rinse and dry thoroughly. You may prefer to coat the water bowl and cooking grid lightly with cooking oil or cooking spray.
Frequently check and clean the venturi and burner tubes for insects and insect nests. A clogged tube can lead to fire beneath the smoker. Also make sure the smoker does not have any foreign objects obstructing the flow of combustion and ventilation air.
To clean the inside and outside of the smoker cabinet, simply use a damp cloth. Spray-washing with a water hose is not recommended. Moisture should be wiped away and not allowed to stand inside or on top of the smoker. Once cleaned, you may prefer to lightly coat the interior of the smoker cabinet with cooking oil or cooking spray.
If rust is present on the exterior surface of the smoker, clean the area with steel wool or emery cloth and use heavy-duty, heat-resistant paint.
NEVER apply additional paint to the interior of the smoker. If rust is present on the interior of the smoker, clean it thoroughly with steel wool or emery cloth and lightly coat the area with cooking oil or cooking spray to help minimize recurring rust.
When an LP tank is not connected, and to help prevent dirt or other foreign particles from clogging the regulator connector, hang the end of the hose and regulator assembly on the lifting handle.
Keep the ventilation opening(s) of the cylinder enclosure free and clear of debris.
23
CARE AND MAINTENANCE
Inspect the flames at the burner by looking through the observing hole on left side of the burner and control unit. A good flame should be blue with a yellow tip 1 to 2 inch high. If flames are excessively yellow and irregular, oil residue and food deposits may be collecting on the burner. Try cleaning the burner surface with hot, soapy water and cleaning the holes with a pipe cleaner to improve the flames.
Bad flames may also be caused by poor venturi attachment to the orifice. Turn off the control knob and cylinder valve. Always let the smoker cool before cleaning or checking the assembly. Make sure the orifice of the control valve properly mates with the burner mixing tube by visual observation from the bottom of the appliance. The burner venturi tube should overlap the orifice and they should form a straight line as shown in Figure A. Figures B & C show incorrect alignment.
WARNING: If the instructions above are not followed, an explosion may result, possibly causing serious bodily injury or death.
To protect your smoker from weather conditions, always keep it covered while not in use.
2”
Yellow
Light Blue
Blue
Good Flame Bad Flame
! ! !
Figure A Figure B Figure C
Correct Wrong Wrong
The flame goes out. 1. Disconnected gas supply hose. 2. High or gusting winds.
For replacement parts, call our customer service department at 1-800-963-0211, 8:00 a.m. – 6:00 p.m., EST, Monday – Thursday, 8:00 a.m. – 5:00 p.m., EST, Friday.
Owner’s Manual - Part #312-02025-00Printed in China
SpringClip
Qty. 2
CC
BB x21/4-20 FlangedWasher Nut
Hardware Used
R
Q
7. Insert 4 bolts (AA) through the mounting holes on one of the lifting handles (J) and into holes on right side of smoker body (I). Use a Phillips screwdriver to secure the handles to the smoker body (I). Repeat on left side.
7
Hardware Used
CC x 2Spring Clip
I
AA
J
ASSEMBLY INSTRUCTIONS
4. Thread bolts (EE) through holes on the leg - with holes (B) from outside of unit. Secure using 2 nuts (FF) from inside leg by using wrench. Tighten all bolts (AA) with a Phillips screwdriver. Insert the regulator hose attached to the burner and control unit (C) into the hose retention (V).
4
I
V
12. Slide the wood chip box (D) onto the lowest cooking grate supports (T) inside the smoker body (I) and put the wood chip box lid (F) on top. Note: For charcoal, refer to Step 17.
12
DANGER:
Failure to follow these instructions could result in fire, explosion, or burn hazard which could cause property damage, personal injury or death.
DANGER: If you smell gas:1. Shut off gas to the appliance.
3. Open lid.4. If odor continues, keep away from the appliance and immediately call your gas supplier or your fire department.
Assembler/Installer: This instruction manual contains important information necessary for the proper assembly and safe use of this appliance. Read and follow all warnings and instructions before assembling and using this appliance. Leave these instructions with the consumer.
Consumer/User: Follow all warnings and instructions when using this appliance. Keep these instructions for future reference.
1. Never operate this appliance unattended.2. Never operate this appliance within 10 feet (3 m) of any structure, combustible material or other gas cylinder3. Never operate this appliance within 25 feet (7.5 m) of any flammable liquid.4. Never allow oil or grease to get hotter than 400°F or 200°C. If the temperature exceeds 400°F (200°C) or if oil begins to smoke, immediately turn the burner or gas supply OFF.5. Heated liquids remain at scalding temperatures long after the cooking process. Never touch cooking appliance until liquids have cooled to 115°F (45°C) or less.6. If a fire should occur, keep away from the appliance and immediately call your fire department. Do not attempt to extinguish an oil or grease fire with water. Failure to follow these instructions could result in fire, explosion, or burn hazard which could cause property damage, personal injury or death.
DANGER
DANGER:
Rev. 9/2011
M4 x 10Bolt
Qty. 2
DD EE
M4 Nut
Qty. 2
FF
M5 x 12Screw
Qty. 8
H
J
T
T
U
V
front of smoker
B
front of smoker
M4 x 10 BoltEE
M4 NutFF
Hardware Used
x 2
x 2
B
EE
FF
Hardware Used
AA x 4M6 x 12 Bolt
Hardware Used
AA x 4M6 x 12 Bolt
M5 x 12 ScrewBB x 8
Hardware UsedBB
S
I
R
S
D
FI
I13. Slide the water bowl (G) onto the cooking grate supports (T) inside the smoker body (I) above the wood chip box (D) as shown.
ASSEMBLY INSTRUCTIONS
13
15. Insert the probe of the temperature gauge assembly (M) through hole of the smoker door from the outside. Secure using 2 nuts (DD) from inside panel by using wrench.
16. To install the “AAA” battery (U), remove the igniter button by turning it counterclockwise and insert the “AAA” battery (U) with the positive end facing out. Reinstall the igniter button by turning it clockwise and hand tightening.
17. For charcoal use, remove the wood chip box lid (F) and place the charcoal grate (E) inside the wood chip box (D).
18. Always hang the regulator hose attached to the burner and control unit (C) to the hose retention (V) attached to the leg - with hole (B) while not in use. If switching from LP gas to charcoal, wait for the unit to cool down before disconnecting from the LP tank.
15
16
17
18
DD
M
U
E
B
12
14. Slide the 4 cooking grates (H) onto the top cooking grate supports (T) inside the smoker body (I).
14 I
H
ASSEMBLY INSTRUCTIONS
Hardware Used
DD x 2
D
S
V
M5 Nut
igniter button
21
OPERATING INSTRUCTIONS
fluid as recommended by the lighter fluid manufacturer. Allow the fluid to soak into the charcoal for 3 minutes before placing the tray back into the firebox (refer to assembly instructions for proper tray placement). After soaking the charcoal, place the lighting fluid at a safe distance away from the smoker.
Step 3With both doors open, stand back and carefully light charcoal and allow to burn until covered with a light ash (approximately 20 minutes). Charcoal lighting fluid must be allowed to completely burn off prior to closing the doors. (Fumes will tend to collect in the upper cavity if the door is closed).
DANGER: Closing the firebox doors during the lighting procedure could trap fumes from the charcoal lighting fluid in the smoker box and may result in a flash-fire or explosion when door is opened, resulting in property loss, personal injury or death. Never attempt to add more lighting fluid to the charcoal once it has been lit.
Step 4After 25 - 30 minutes, charcoal should be ready for cooking and/or adding woodchips. Carefully add wood chunks using long cooking tongs.
Adding Charcoal and/or Woodchips
Additional charcoal and/or wood may be required to maintain or increase cooking temperature.
WARNING: Use caution since flames can flare-up when fresh air suddenly comes in contact with fire. When opening the door, keep hands, face and body a safe distance from hot steam and flame flare-ups.
Step 1Stand back and carefully open smoker box door allowing heat and steam to escape away from your face. Use caution since flames can flare-up when fresh air suddenly comes in contact with fire. Inspect the charcoal level in pan.
Step 2Wearing flame retardant oven mitts/gloves, stand back a safe distance and use long cooking tongs to lightly brush aside ashes on hot coals. Use cooking tongs to add charcoal and/or wood to charcoal pan, being careful not to stir-up ashes and sparks
WARNING: Never add charcoal lighting fluid to hot or even warm coals as flashback may occur causing severe burns.
Step 3Close smoker box door and allow food to continue cooking.
Allow the ashes to completely cool before reusing or cleaning the smoker.
26
REPLACEMENT PARTS LIST
For replacement parts, call our customer service department at 1-800-963-0211, 8:00 a.m. – 6:00 p.m. EST, Monday – Thursday, 8:00 a.m. – 5:00 p.m. EST, Friday.
PART DESCRIPTION PART # 1 Leg – Standard 301-01016-00 2 Leg - with holes 312-01016-00 3 Burner and Control Unit 312-01015-00 4 Wood Chip Box (MFW only) 312-01028-00 5 Charcoal Grate 312-01030-00 6 Wood Chip Box Lid 301-01029-00 7 Wood Chip Box Handle and 301-01028-02 Lid Handle 8 Water Bowl 301-02017-00 9 Cooking Grate 312-01014-00 10 Door Locking Bracket 302-01008-00 11 Cooking Grate Support 302-01030-00 12 Smoker Body 312-12001-00 13 Square Smoke Stack 312-02009-00 14 Lifting Handle 301-01010-00 15 Logo Plate 302-03002-01 16 Temperature Gauge Bezel 301-01034-00 17 Temperature Gauge 301-01003-00
PART DESCRIPTION PART # 18 Upper Door 302-02002-00 19 Side Table 312-02008-00 20 Door Handle Crank 302-02007-02 21 Door Handle Grip 302-02007-01 22 Bottom Door without handle 302-02102-00 23 Table Front Support Bracket 312-02008-01 24 Table Back Support Bracket 312-02008-02 25 Side Damper Plate (round) 301-01001-04 26 Igniter Ground Wire 301-01015-08 27 Push Button 301-01015-03 28 Electronic Ignitor 301-01015-06 29 Ignition Cap 301-01015-05 30 Control Knob 301-01015-01 31 Control Knob Bezel 301-01015-02 32 Igniter Electrode and Ignition Wire 301-01015-07 33 Hose Retention 312-01016-01 N/A Hardware Bag 312-02026-00 N/A Owner’s/Instruction Manual 312-02025-00
11
14
21
17
1918
20
22
2324
25
2627
32
30
2928
3331
ANS Z21.89a-2008 CSA 1.18a-2008
• Do not use the smoker if the burner fails to light or fails to remain lit. Under such conditions, gas should be turned off and the fuel cylinder should be disconnected.• Use in high wind conditions that result in poor burner operation such as blowing out and flaring should be avoided. If repositioning the appliance does not improve operation under such wind conditions, the appliance should be turned off.• Install the smoker with the hose regulator assembly extended the full length of the hose (24 in. minimum) directly away from the appliance. When so configured, placement results in maximum tank to smoker distance. When the smoker is operated, the hose/regulator and gas tank should be perpendicular to wind direction. Placing tank closer than 24 inches to the smoker can overheat the tank and cause release of propane through relief openings and can result in tank fire or explosion. • Read and follow all warnings and instructions before assembling and using the appliance.• Follow all warnings and instructions when using the appliance.
NOTE: The installation must confirm with local codes or, in the absence of local codes, with eitherthe National Fuel Gas Code, ANSI Z223.1/NFPA 54, Natural Gas and Propane Installation Code,CSA B149.1, or Propane Storage and Handling Code, B149.2, or the Standard for RecreationalVehicles, ANSI A 119.2/ NFPA 1192, and CSA Z240 RV Series, Recreational Vehicle Code, asapplicable.
WARNINGDO NOT mix old and new batteries.DO NOT mix alkaline, standard (Carbon-Zinc), or rechargeable (Nickel-Cadmium) batteries.DO NOT dispose of batteries in fire. Improper disposal may cause batteries to leak or explode.
The electronic ignition requires 1 “AAA” alkaline battery, which is included.
WARNING:The hose to tank attachment creates a potential trip hazard for user and pedestrians - use caution.Do not allow or cause the gas tank or applianceto tip.
MINIMUM 24 IN. (610 MM)
(Tank not included)
HIGH
LOW OFF
I
C
V
T
T
T
C
Master Forge & M Design® is a registered trademarkof LF, LLC. All rights reserved.
®
13
G
2
TABLE OF CONTENTS
Safety Information ......................................................................................................................... 3
Replacement Parts List ................................................................................................................ 26
ITEM #0190449
MODEL #MFW784BDP
DUAL FUELVERTICAL SMOKER
Français p. XX
Español p. XX
1
Français p. 28
Español p. 58
SAFETY INFORMATION
3
Please read and understand this entire manual before attempting to assemble, operate or install the product. If you have any questions regarding the product, please call customer service at 1-800-963-0211, 8:00 a.m. – 6:00 p.m., EST, Monday – Thursday, 8:00 a.m. – 5:00 p.m., EST, Friday.
PACKAGE CONTENTS
6
PART DESCRIPTION QUANTITY A Leg - standard 3 B Leg - with holes 1 C Burner & Control Unit 1 D Wood Chip Box 1 E Charcoal Grate 1 F Wood Chip Box Lid 1 G Water Bowl 1 H Cooking Grate 4 I Smoker Body 1 J Lifting Handle 2 K Door Locking Bracket 2
L Square Smoke Stack 1 M Temperature Gauge & Bezel 1 N Upper Door (pre-assembled) 1 O Bottom Door (pre-assembled) 1 P Side Table 1 Q Door Handle 2 R Table Front Support 1 S Table Back Support 1 T Cooking Grate Support 12 U “AAA” Battery (1.5 V) 1 V Hose Retention 1
PART DESCRIPTION QUANTITY
ASSEMBLY INSTRUCTIONS
8
24
WARRANTY
25
This vertical gas smoker is warranted against broken or damaged parts at the time of purchase. The stainless steel burner is warranted for 3 years. All other parts carry a one (1) year limited warranty except the water bowl, which is warranted to be free of defects for 90 days. Paint is warranted to be free of defects for 90 days except for rust, which may appear after repeated use.
This warranty does not cover damage or issues related to neglect, abuse or modifications to the appliance. Repair labor is not covered.
All parts that meet the warranty requirements will be shipped at no charge via the discretion of GHP Group Inc. (ground shipments, US Mail or Parcel Post ONLY). Any special handling charges (i.e. Second Day, Overnight, etc.) will be the responsibility of the consumer.
All warranty claims apply only to the original purchaser and require a proof of purchase verifying purchase date. Do not return parts to GHP address without first obtaining a return authorization number from our customer service. This service is available by calling toll free 1-800-963-0211, 8:00 a.m. – 6:00 p.m., EST, Monday – Thursday 8:00 a.m. – 5:00 p.m., EST, Friday.
Some states do not allow the exclusion or limitation of incidental or consequential damages orlimitations on how long an implied warranty lasts, so the above limitations or exclusions may not apply to you. This warranty gives you specific legal rights, and you may have other rights that vary from state to state.
GHP Group Inc.8280 Austin AvenueMorton Grove, IL, USA60053-3207
The burner will not light using the igniter procedure.
1. The igniter electrode may be covered with grease or residue.
2. The igniter electrode may have a loose or disconnected wire.
3. No spark is being generated.
4. No gas flow or cylinder valve not open.
5. Vapor lock at coupling nut to LP cylinder.
1. Clean the igniter electrode.
2. Check the connection and reconnect any loose or disconnected wires.
3. Replace the AAA size battery inside the igniter.
4. Make sure LP cylinder is not empty or open cylinder valve.
5. Turn off knob and LP cylinder valve. Disconnect coupling nut from LP cylinder. Reconnect and retry.
The burner will not light with a match.
1. No gas flow or an obstructed gas flow.
1. Check the fuel level. Clean the venturi tube and burner.
HARDWARE CONTENTS (shown actual size)
M6 x 12Bolt
Qty. 32
7
AA BB
Before beginning assembly of product, make sure all parts are present. Compare parts with package contents list and hardware contents list. If any part is missing or damaged, do not attempt to assemble the product.
Estimated Assembly Time: 25 minutes
Tools Required for Assembly (not included): Phillips Screwdriver, 1/2 in. Wrench, Pliers.
PREPARATION
M5 Nut
Qty. 2
1. Align the legs - standard (A) with the mounting holes on the bottom left front, right front and left rear of the smoker body (I). Thread bolts (AA) through the holes from the outside of the unit. Tighten all bolts (AA) with a Phillips screwdriver.
Hardware Used
AA x 9M6 x 12 Bolt
2. Align the leg - with holes (B) with the mounting holes on the bottom right rear of the smoker. Thread bolts (AA) through the holes from the outside of the unit. Tighten all bolts (AA) with a Phillips screwdriver.
3. Open the bottom door of the smoker body (I). Turn the burner and control unit (C) upside down and place it on the bottom of the smoker body (I), making sure the 4 mounting holes on the burner and control unit (C) are aligned with the holes on the smoker body (I). Note: The control knob should be on the same side as the door. Check that the burner is properly installed on the orifice before attaching the burner and control unit (C). Thread bolts (AA) through holes from outside of unit. Securely tighten the unit to the bottom with a Phillips screwdriver.
5. CAUTION: This unit is HEAVY! Do not attempt this step without assistance! Close the two doors. With the assistance of a helper, stand the unit upright on its legs on a firm and level surface. (Make sure that the burner/control unit and legs are attached). Open the upper door. Position the square smoke stack (L) with control arm to the left as shown. Using 4 bolts (AA), attach square smoke stack (L) to the top of smoker body (I). Securely tighten with a Phillips screwdriver.
Hardware Used
6. Insert the cooking grate supports (T) into the corresponding holes on rack of the shelf inside the smoker body (I) from the bottom up. NOTE: There are 8 positions to install the cooking grate supports. The cooking grate supports can be installed into positions according to the need of the owner.
8. Align the door locking bracket (K) holes with the holes on the upper right side of the smoker body (I). Thread 2 bolts (AA) through the holes in the door locking bracket (K) into the threaded holes of the smoker body (I). Tighten the bolts (AA) using a Phillips screwdriver. Repeat on lower right side.
9. Slide door handle (Q) through brackets in door. Using pliers, slide a spring clip (CC) over the groove in the door handle as shown. Make sure both of the spring clips are securely attached in the grooves of the handles.
10. Install the table back support (S) and table front support (R) on the side of the smoker body (I) with screws (BB). Arrows pointing up indicate the correct position of the brackets when fastened to the smoker body (I).
11. With the side table (P) in a parallel position, align the slots in the side table with the table supports (R & S) and insert. To lock the side table (P) in the upright position, swing the side table (P) up, push toward the smoker body (I), and press down on the side table (P) near the body until it is fully fastened in place.
If you have any questions regarding the product, please call customer service at 1-800-963-0211, 8:00 a.m. – 6:00 p.m., EST, Monday – Thursday, 8:00 a.m. – 5:00 p.m., EST, Friday.
2
6
5
8
9
10
11
ATTACH YOUR RECEIPT HERE
Serial Number Purchase Date
Questions, problems, missing parts? Before returning to your retailer, call our customer service department at 1-800-963-0211, 8:00 a.m. – 6:00 p.m., EST, Monday – Thursday, 8:00 a.m. – 5:00 p.m., EST, Friday.
ANS Z21.89a-2008 CSA 1.18a-2008
CALIFORNIA PROPOSITION 65
1. Fuels used in wood, charcoal, gas or oil fired appliances and the products of combustion of such fuels contain chemicals known to the State of California to cause cancer, birth defects or other reproductive harm. 2. This product contains chemicals, including lead and lead compounds, known to the State of California to cause cancer, birth defects or other reproductive harm.
• DO NOT use this product for anything other than its intended purpose. It is NOT intended for commercial use. It is NOT intended to be installed or used in or on a recreational vehicle and/or boat. • Keep a fire extinguisher near this product at all times.• This appliance is for outdoor use only in well-ventilated areas. DO NOT operate it in a building, garage or any other enclosed area, or under overhead construction.• A minimum clearance of 36 inches (92 cm) to combustible material is required on the front, sides and back. It is very important to always maintain proper clearances to combustibles.• The cylinder must be at least 24 inches (61 cm) from the appliance.• DO NOT obstruct the flow of combustion air or ventilation air for the appliance.• When cooking, the smoker must be on a level, stable noncombustible surface in an area clear of combustible material, including tall or dry grass. • Care should be taken to protect the fuel supply hose from damage from either pedestrian or vehicle traffic.• Clean and inspect the hose before each use of the appliance. If there is evidence of abrasion, wear, cuts or leaks, the hose must be replaced prior to the appliance being used. The replacement hose assembly shall be that specified by the manufacturer.• Before each use check that no dead leaves or debris are under the appliance.• Store this appliance in a dry, protected location.• The use of alcohol, prescription or nonprescription drugs may impair the user’s ability to properly assemble and safely operate this appliance.• Allow the smoker to cool to 115°F (45°C) before moving or storing. Use caution when lifting and moving the appliance to avoid back strain or back injury. DO NOT move the appliance while it is in use.• Always hang the regulator on the hose retention wire while not in use or disconnected with the LP (liquid propane) tank. KEEP the fuel supply hose away from any heated surface(s).
SAFETY INFORMATION
4
• DO NOT store and use this appliance near gasoline or other combustible liquids or where other combustible vapors may be present.• DO NOT use this appliance as a heater.• DO NOT leave the appliance unattended while in use. Keep children and pets away from the appliance at all times.• NEVER close the damper completely while cooking. • If you must dispose of ashes in less time than it takes for the ashes to completely cool down, remove the ashes from the appliance, keeping them in the heavy-duty foil, and soak them completely with water before disposing of them in a noncombustible container.• This appliance will be hot during and after use. Use insulated oven mitts or gloves for protection from hot surfaces or splatter from cooking liquids.• Make sure that the orifice of the control valve properly mates with the burner mixing tube by visual observation. Please refer to maintenance section.• Use caution when opening the door of the smoker while in operation. Keep hands, face and body safe from hot steam or flare-ups. DO NOT inhale smoke.• DO NOT wear loose clothing while operating the smoker. Tie back long hair while operating the smoker. ALWAYS wear shoes that fully cover your feet while operating the smoker.• Allow the smoker and its components to cool completely before conducting any routine cleaning or maintenance.• NEVER use glassware, plastic or ceramic cookware on or in your smoker. Use metallic cookware only.• NEVER operate the smoker without water in the water bowl. NEVER allow the water to completely evaporate. Check the water level at least every 2 hours. A sizzling sound may indicate a low water level. Follow instructions in this manual for adding water while operating (see the Operating Instructions section).• When using flavoring wood, add a sufficient amount prior to operation to avoid having to add wood while operating. Adding wood while operating may splash hot water and cause serious injury.• Use of accessories not intended for this smoker is not recommended and may lead to injury or property damage.• An LP cylinder not connected for use should not be stored in the vicinity of the smoker or any other appliance. DO NOT store spare LP cylinders within 10 feet of the smoker. LP cylinders must be stored outdoors, out of reach of children. DO NOT store LP cylinders in a building, garage or any other enclosed area.• DO NOT store LP gas cylinders inside or on top of the smoker. Improper storage of cylinders could lead to explosion, fire and/or personal injury. Cylinders are to be stored outdoors, out of reach of children and must not be stored in a building, garage or any other enclosed area.• While the smoker is not in use, the gas must be turned off at the supply cylinder.• LP gases are heavier than air, tend to pool and collect in low-lying areas, are easily ignited and are highly flammable. Proper care and caution should be employed when dealing with any such fuels.• The smoker should be turned off and all supply valves (on piping or on fuel cylinders) should be closed in the event that the odor of unburned gas is detected. Do not attempt to use the appliance until any gas leaks are fixed and/or the source of the unburned gas odor is accounted for.
SAFETY INFORMATION
5
A
B
C
D
E
F
G
I
S K
LM
NP
O
J
A
I
AA
I
AA
Hardware Used
AA x 3M6 x 12 Bolt
1
3C
AA
Hardware Used
AA x 4M6 x 12 Bolt
Controlarm
I
AAL
AA x 8M6 x 12 Bolt
I
T
AA
K
Q
I
CC
I
R
OPERATING INSTRUCTIONS
CONNECTING THE LP TANK
WARNING
ALL INSTRUCTIONS AND SAFEGUARDS ON THIS PAGE MUST BE FOLLOWED TO PREVENT FIRE, DAMAGE AND/OR INJURY.
1. The knob on the LP tank must be closed. Make sure that the knob is turned clockwise to a full stop. The cylinder supply system must be arranged for vapor withdrawal.
2. Check that the control knob on the control unit is turned off.
3. Remove the protective cap from the LP tank valve and coupling nut.
4. Hold the regulator in one hand and insert the nipple into the valve outlet. Be sure the nipple is centered in the valve outlet. The coupling connects to the large outside threads on the valve outlet. Use care – do not cross thread the connection.
5. Hand tighten the coupling clockwise until it comes to a full stop. Firmly tighten by hand only. Do not use tools.
P
Straight
CAUTION: In the connection process, make sure the regulator inlet connector mates with the cylinder valve outlet properly, safely and firmly.
15
OPERATING INSTRUCTIONS
Any fuel supply cylinder used must be constructed and marked in accordance with specifications for propane cylinders of the U.S. Department of Transportation (DOT) CFR 49, or the Standard for Cylinders, Spheres and Tubes for the Transportation of Dangerous Goods, CAN/CSA B339. The appliance is to be used only with the 20-pound, vertical standing vapor withdrawal type tank and must include a collar to protect the cylinder valve.(A) DO NOT store spare LP cylinders under or near the smoker.(B) NEVER fill cylinder more than 80% full.(C) Do not store cylinder indoors.
WARNINGIf instructions A, B and C above are not followed exactly, a fire causing death or serious injury may occur.
This smoker is designed to operate on LP gas only. The gas cylinder used must include a collar to protect the cylinder valve. The cylinder supply system must be arranged for vapor withdrawal. Do not allow dirt or foreign material to get into or onto tank connection when it is not attached to the fuel supply system. Use the protective cap provided.
WARNINGALL INSTRUCTIONS AND SAFEGUARDS ON THIS PAGE MUST BE FOLLOWED TO PREVENT FIRE, DAMAGE AND/OR INJURY.
The cylinder outlet must have Type 1 gas connection termination in order to mate with gas hose provided with smoker. The pressure regulator and hose assembly supplied by the manufacturer with the appliance must be used. Replacement pressure regulators and hose assemblies must be those specified by the appliance manufacturer.This unit is not to be utilized with a non-self-contained LP-gas supply system.
Valve/pressure regulators are factory set to the correct operating pressures. No attempts should be made to adjust these settings.
DISCONNECT THE LP TANK
Make sure that the knob on the LP tank is turned clockwise to a full stop (CLOSED).
Hold the regulator in one hand, turn the coupling to the valve outlet counterclockwise and unthread the connection by hand only. Do not use tools.
Place dust cap on cylinder valve outlet whenever the cylinder is not in use. Only install the type of dust cap on the cylinder valve outlet that is provided with the cylinder valve. Other types of caps or plugs may result in leakage of propane.
Always hang the regulator on the lifting handles while not in use, disconnected fromthe LP tank, and when the unit has cooled down.
STORE THE TANK IN A PROPER PLACE AS INDICATED IN THIS MANUAL.
16
OPERATING INSTRUCTIONS
CHECKING FOR LEAKS
After connections are made, check all connections and fittings for leaks with a soap solution. 1. With all valves closed, apply the leak check solution (50/50 mix of dishwashing soap and water) to all gas carrying connections and fittings. 2. Open tank valve.Presence of bubbles at areas of wet solution indicates a gas leak. If leaks are detected or you smell or hear gas, shut off the valve and repair the leak or replace the defective part. Do not use the smoker until all leaks are corrected.
The gas hose/regulator assembly should be totally extended to the maximum distance so that the hose is straight and the tank is as far from the smoker as it can be (minimum 24 inches).
For vapor withdrawal, LP tanks are intended to be operated in the upright position only.
If the product is not in use, the gas must be turned off at the supply cylinder and the cylinder should be disconnected from the appliance.
Storage of the appliance indoors is only permissible if the cylinder is disconnected and removed from the appliance. Do not store cylinder indoors.
BEFORE FIRST USE
Remove all hangings or plastic straps, if present.
Before you cook food in your smoker, it is important to “season” your smoker. Seasoning seals the paint and interior of your smoker to enhance flavoring, durability and overall performance.To season your smoker, simply use it as you normally would only do not cook any food. You will need to follow all of the operating procedures in the next few sections of this manual.
Using your desired flavoring woods and marinades, burn your smoker at low temperature (around 175°F) for 45 – 60 minutes. Let the smoker cool and clean out the water and wood.
Once seasoning is complete, your smoker’s interior will have a durable, seasoned coating.
ADDING WATER
To add water before cooking, simply remove the water bowl and fill it with water slightly below the rim. Place the bowl back into the smoker. Adding water before cooking is recommended. To add water while cooking, if a sizzling sound indicating lack of water is heard, or there is a need to add water, open the bottom door with care and avoid taking in the smoke. Use a long nose kettle-like water can, stand as far from the smoker as you can, fill the water bowl up to 1 inch below the rim.
CAUTION: DO NOT pull the water bowl out beyond the rack when the smoker is hot.
17
OPERATING INSTRUCTIONS
COOKING TIP
Line the water bowl with aluminum foil before each use. This will make it easy to clean and help your water bowl last longer.
To make adding water easier and safer, use a clean watering can with a long spout.
ADDING WOOD CHIPS
To add wood chips before cooking, simply fill the wood chip box with your choice of flavoring hardwood chips. The amount and type of wood you use is entirely dependent on the desired amount of flavor. Once the box is filled, place the lid on top of the box and set the box in the smoker.
To add wood chips while cooking, we recommend using tongs or long handled pliers to removethe box lid and to place the pieces into the wood chip box without removing the box. It is not recommended to remove the wood chip box while the smoker is in operation.
CAUTION: The wood chip box and lid get very hot. Avoid handling them while in use. Always wear protective oven mitts when handling hot components.
COOKING TIP: FLAVORING WOOD
• Small wood chips work best inside the wood chip box.• Use dry hardwoods such as hickory, pecan, apple, cherry or mesquite.• To produce more smoke and prevent fast burning, pre-soak the wood chips in a separate bowl of water for at least 20 minutes, or wrap the chips in perforated aluminum foil.• Most smoke flavoring occurs within the first hour of cooking. Adding wood chips after the first hour is typically not necessary unless extra smoke flavoring is desired.
18
OPERATING INSTRUCTIONS
19
OPERATING INSTRUCTIONS
Match Lighting Procedure - LP Gas
1. Repeat Steps 1 through 5 of the igniter lighting system.
2. Open both doors. Place a lit match on to the burner as shown below. Quickly turn the control knob to the “HIGH” position. If the burner does not light in 5 seconds, turn the control knob off, wait at least 5 minutes and for the gas to clear. Repeat the process.
20
OPERATING INSTRUCTIONS
Cooking Tip: Damper Adjustments
WARNING: The dampers on the smoker body and the handle on the smoke stack may become very hot while cooking. Always wear a heat resistant glove when adjusting.
• For best performance, rotate the smoker so that the front or back of the body is facing the wind. This allows the adjustment of the dampers to be more effective and accurate.• The two dampers on smoker body should never be fully closed.• Opening the damper of the smoke stack helps to exhaust both the heat and smoke.• The key to effective smoking is to watch your heat indicator on the door and adjust the damper accordingly.• Temperature maintenance is best controlled by different damper adjustment configurations.
Turning off the Smoker
CAUTION: The smoker can become very hot while in use.Do not touch any portion of the smoker except for the door handle and burner control knob. It may be necessary to use protective gloves.
1. Turn the burner control knob off by pushing in and rotating to “OFF”. The burner flame should go out.
2. Turn off the LP cylinder valve by turning the knob clockwise until it cannot go any farther.
Follow all warnings and safety precautions before removing meat from smoker or preparing the unit for storage.
Lighting Instructions – Charcoal
When using charcoal, DO NOT USE PRETREATED, MATCH-LIGHT CHARCOAL with this smoker. Only use standard, untreated briquettes or lump charcoal and ONLY use charcoal lighting fluid approved for lighting charcoal. Do not use lighter fluid, paint thinners, gasoline, kerosene, alcohol or other flammable material for lighting charcoal. Damage to the smoker may occur with the use of match-light charcoal. DO NOT USE THE LP GAS BURNER WHEN LIGHTING CHARCOAL. Step 1Place the charcoal grate inside the woodchip/charcoal tray and add 1.5 pounds of charcoal on charcoal grate (approximately 26 briquettes).
Step 2Note: Please refer to the manufacturer’s recommended amount of lighter fluid before applying fluid to the briquettes. With the charcoal tray outside the firebox, saturate charcoal with the amount of lighting
LIGHTING INSTRUCTIONS
CAUTION: If the flame extinguishes accidentally during ignition or operation, immediately TURN OFF the cylinder valve and then TURN OFF the control knob.
Igniter Lighting System
1. Check all connections for leaks using the “soap water” test as explained on page 16.
2. Open both of the smoker cabinet doors. Always keep the doors open during lighting.
3. Check for any blockage to the venturi tube or burner, damper setting, ventilation setting. Remove any foreign objects or matter.
4. Be sure the burner control knob is in the “OFF” position.
5. Open the LP cylinder valve by turning counterclockwise.
6. Push igniter on the control unit down 1 to 2 seconds then push and turn control knob to “HIGH,” while still holding the ignitor button down. At this point the burner should ignite.
7. If ignition does not take place within 5 seconds, immediately turn the control knob to OFF. Wait 5 minutes and repeat above Steps 6 and 7.
8. If burner still fails to light, try match lighting using the instructions on page 19.
9. Once the burner is lit, close the doors to allow heat to accumulate. The smoke stack on the top of the smoker can be adjusted to the desired setting to allow proper ventilation and combustion. NEVER CLOSE THE SMOKE STACK COMPLETELY.
WARNING: Always light your smoker with both doors open.
22
CARE AND MAINTENANCE
AFTER USE SAFETY AND MAINTENANCE
WARNING• Use caution when lifting and moving the smoker to avoid strain injuries. Two people are recommended to lift or move the smoker.
• DO NOT store the smoker near gasoline or other combustible liquids or where combustible vapors may be present. Keep the area around the smoker clear and free of combustible materials and vapors.
• DO NOT store this smoker in an area accessible to children or pets. Store the smoker in a dry, protected location. Disconnect cylinder from smoker.
• DO NOT allow anyone to conduct activities around the smoker following use until it has cooled. It is hot during operation and remains hot for a period of time following use.
• DO NOT leave hot ashes unattended until the smoker cools completely.
• The smoker becomes extremely hot – allow the smoker to cool completely before handling. If you must handle the smoker while it is hot, ALWAYS wear protective oven mitts or heat-resistant gloves. Allow the smoker to cool before removing and cleaning the grease pan.
• Dispose of cold ashes by wrapping them in heavy-duty aluminum foil and putting them in a noncombustible container.
• If you must dispose of the ashes in less time than it takes for them to completely cool. Remove the ashes from the smoker, keeping them in heavy-duty foil, and soak them completely with water before disposing of them in a noncombustible container.
GENERAL CARE AND MAINTENANCE CAUTION: All care and maintenance procedures are to be performed while the smoker is turned off and cooled. Always perform maintenance by a qualified service person.
Clean the water bowl and cooking grate with hot, soapy water. Rinse and dry thoroughly. You may prefer to coat the water bowl and cooking grid lightly with cooking oil or cooking spray.
Frequently check and clean the venturi and burner tubes for insects and insect nests. A clogged tube can lead to fire beneath the smoker. Also make sure the smoker does not have any foreign objects obstructing the flow of combustion and ventilation air.
To clean the inside and outside of the smoker cabinet, simply use a damp cloth. Spray-washing with a water hose is not recommended. Moisture should be wiped away and not allowed to stand inside or on top of the smoker. Once cleaned, you may prefer to lightly coat the interior of the smoker cabinet with cooking oil or cooking spray.
If rust is present on the exterior surface of the smoker, clean the area with steel wool or emery cloth and use heavy-duty, heat-resistant paint.
NEVER apply additional paint to the interior of the smoker. If rust is present on the interior of the smoker, clean it thoroughly with steel wool or emery cloth and lightly coat the area with cooking oil or cooking spray to help minimize recurring rust.
When an LP tank is not connected, and to help prevent dirt or other foreign particles from clogging the regulator connector, hang the end of the hose and regulator assembly on the lifting handle.
Keep the ventilation opening(s) of the cylinder enclosure free and clear of debris.
23
CARE AND MAINTENANCE
Inspect the flames at the burner by looking through the observing hole on left side of the burner and control unit. A good flame should be blue with a yellow tip 1 to 2 inch high. If flames are excessively yellow and irregular, oil residue and food deposits may be collecting on the burner. Try cleaning the burner surface with hot, soapy water and cleaning the holes with a pipe cleaner to improve the flames.
Bad flames may also be caused by poor venturi attachment to the orifice. Turn off the control knob and cylinder valve. Always let the smoker cool before cleaning or checking the assembly. Make sure the orifice of the control valve properly mates with the burner mixing tube by visual observation from the bottom of the appliance. The burner venturi tube should overlap the orifice and they should form a straight line as shown in Figure A. Figures B & C show incorrect alignment.
WARNING: If the instructions above are not followed, an explosion may result, possibly causing serious bodily injury or death.
To protect your smoker from weather conditions, always keep it covered while not in use.
2”
Yellow
Light Blue
Blue
Good Flame Bad Flame
! ! !
Figure A Figure B Figure C
Correct Wrong Wrong
The flame goes out. 1. Disconnected gas supply hose. 2. High or gusting winds.
For replacement parts, call our customer service department at 1-800-963-0211, 8:00 a.m. – 6:00 p.m., EST, Monday – Thursday, 8:00 a.m. – 5:00 p.m., EST, Friday.
Owner’s Manual - Part #312-02025-00Printed in China
SpringClip
Qty. 2
CC
BB x21/4-20 FlangedWasher Nut
Hardware Used
R
Q
7. Insert 4 bolts (AA) through the mounting holes on one of the lifting handles (J) and into holes on right side of smoker body (I). Use a Phillips screwdriver to secure the handles to the smoker body (I). Repeat on left side.
7
Hardware Used
CC x 2Spring Clip
I
AA
J
ASSEMBLY INSTRUCTIONS
4. Thread bolts (EE) through holes on the leg - with holes (B) from outside of unit. Secure using 2 nuts (FF) from inside leg by using wrench. Tighten all bolts (AA) with a Phillips screwdriver. Insert the regulator hose attached to the burner and control unit (C) into the hose retention (V).
4
I
V
12. Slide the wood chip box (D) onto the lowest cooking grate supports (T) inside the smoker body (I) and put the wood chip box lid (F) on top. Note: For charcoal, refer to Step 17.
12
DANGER:
Failure to follow these instructions could result in fire, explosion, or burn hazard which could cause property damage, personal injury or death.
DANGER: If you smell gas:1. Shut off gas to the appliance.
3. Open lid.4. If odor continues, keep away from the appliance and immediately call your gas supplier or your fire department.
Assembler/Installer: This instruction manual contains important information necessary for the proper assembly and safe use of this appliance. Read and follow all warnings and instructions before assembling and using this appliance. Leave these instructions with the consumer.
Consumer/User: Follow all warnings and instructions when using this appliance. Keep these instructions for future reference.
1. Never operate this appliance unattended.2. Never operate this appliance within 10 feet (3 m) of any structure, combustible material or other gas cylinder.3. Never operate this appliance within 25 feet (7.5 m) of any flammable liquid.4. Never allow oil or grease to get hotter than 400°F or 200°C. If the temperature exceeds 400°F (200°C) or if oil begins to smoke, immediately turn the burner or gas supply OFF.5. Heated liquids remain at scalding temperatures long after the cooking process. Never touch cooking appliance until liquids have cooled to 115°F (45°C) or less.6. If a fire should occur, keep away from the appliance and immediately call your fire department. Do not attempt to extinguish an oil or grease fire with water. Failure to follow these instructions could result in fire, explosion, or burn hazard which could cause property damage, personal injury or death.
DANGER
DANGER:
Rev. 9/2011
M4 x 10Bolt
Qty. 2
DD EE
M4 Nut
Qty. 2
FF
M5 x 12Screw
Qty. 8
H
J
T
T
U
V
front of smoker
B
front of smoker
M4 x 10 BoltEE
M4 NutFF
Hardware Used
x 2
x 2
B
EE
FF
Hardware Used
AA x 4M6 x 12 Bolt
Hardware Used
AA x 4M6 x 12 Bolt
M5 x 12 ScrewBB x 8
Hardware UsedBB
S
I
R
S
D
FI
I13. Slide the water bowl (G) onto the cooking grate supports (T) inside the smoker body (I) above the wood chip box (D) as shown.
ASSEMBLY INSTRUCTIONS
13
15. Insert the probe of the temperature gauge assembly (M) through hole of the smoker door from the outside. Secure using 2 nuts (DD) from inside panel by using wrench.
16. To install the “AAA” battery (U), remove the igniter button by turning it counterclockwise and insert the “AAA” battery (U) with the positive end facing out. Reinstall the igniter button by turning it clockwise and hand tightening.
17. For charcoal use, remove the wood chip box lid (F) and place the charcoal grate (E) inside the wood chip box (D).
18. Always hang the regulator hose attached to the burner and control unit (C) to the hose retention (V) attached to the leg - with hole (B) while not in use. If switching from LP gas to charcoal, wait for the unit to cool down before disconnecting from the LP tank.
15
16
17
18
DD
M
U
E
B
12
14. Slide the 4 cooking grates (H) onto the top cooking grate supports (T) inside the smoker body (I).
14 I
H
ASSEMBLY INSTRUCTIONS
Hardware Used
DD x 2
D
S
V
M5 Nut
igniter button
21
OPERATING INSTRUCTIONS
fluid as recommended by the lighter fluid manufacturer. Allow the fluid to soak into the charcoal for 3 minutes before placing the tray back into the firebox (refer to assembly instructions for proper tray placement). After soaking the charcoal, place the lighting fluid at a safe distance away from the smoker.
Step 3With both doors open, stand back and carefully light charcoal and allow to burn until covered with a light ash (approximately 20 minutes). Charcoal lighting fluid must be allowed to completely burn off prior to closing the doors. (Fumes will tend to collect in the upper cavity if the door is closed).
DANGER: Closing the firebox doors during the lighting procedure could trap fumes from the charcoal lighting fluid in the smoker box and may result in a flash-fire or explosion when door is opened, resulting in property loss, personal injury or death. Never attempt to add more lighting fluid to the charcoal once it has been lit.
Step 4After 25 - 30 minutes, charcoal should be ready for cooking and/or adding woodchips. Carefully add wood chunks using long cooking tongs.
Adding Charcoal and/or Wood Chips
Additional charcoal and/or wood may be required to maintain or increase cooking temperature.
WARNING: Use caution since flames can flare-up when fresh air suddenly comes in contact with fire. When opening the door, keep hands, face and body a safe distance from hot steam and flame flare-ups.
Step 1Stand back and carefully open smoker box door allowing heat and steam to escape away from your face. Use caution since flames can flare-up when fresh air suddenly comes in contact with fire. Inspect the charcoal level in pan.
Step 2Wearing flame retardant oven mitts/gloves, stand back a safe distance and use long cooking tongs to lightly brush aside ashes on hot coals. Use cooking tongs to add charcoal and/or wood to charcoal pan, being careful not to stir-up ashes and sparks
WARNING: Never add charcoal lighting fluid to hot or even warm coals as flashback may occur causing severe burns.
Step 3Close smoker box door and allow food to continue cooking.
Allow the ashes to completely cool before reusing or cleaning the smoker.
26
REPLACEMENT PARTS LIST
For replacement parts, call our customer service department at 1-800-963-0211, 8:00 a.m. – 6:00 p.m., EST, Monday – Thursday, 8:00 a.m. – 5:00 p.m., EST, Friday.
PART DESCRIPTION PART # 1 Leg – Standard 301-01016-00 2 Leg – with Holes 312-01016-00 3 Burner and Control Unit 312-01015-00 4 Wood Chip Box (MFW only) 312-01028-00 5 Charcoal Grate 312-01030-00 6 Wood Chip Box Lid 301-01029-00 7 Wood Chip Box Handle and 301-01028-02 Lid Handle 8 Water Bowl 301-02017-00 9 Cooking Grate 312-01014-00 10 Door Locking Bracket 302-01008-00 11 Cooking Grate Support 302-01030-00 12 Smoker Body 312-12001-00 13 Square Smoke Stack 312-02009-00 14 Lifting Handle 301-01010-00 15 Logo Plate 302-03002-01 16 Temperature Gauge Bezel 301-01034-00 17 Temperature Gauge 301-01003-00
PART DESCRIPTION PART # 18 Upper Door 302-02002-00 19 Side Table 312-02008-00 20 Door Handle Crank 302-02007-02 21 Door Handle Grip 302-02007-01 22 Bottom Door without Handle 302-02102-00 23 Table Front Support Bracket 312-02008-01 24 Table Back Support Bracket 312-02008-02 25 Side Damper Plate (round) 301-01001-04 26 Igniter Ground Wire 301-01015-08 27 Push Button 301-01015-03 28 Electronic Ignitor 301-01015-06 29 Ignition Cap 301-01015-05 30 Control Knob 301-01015-01 31 Control Knob Bezel 301-01015-02 32 Igniter Electrode and Ignition Wire 301-01015-07 33 Hose Retention 312-01016-01 N/A Hardware Bag 312-02026-00 N/A Owner’s/Instruction Manual 312-02025-00
11
14
21
17
1918
20
22
2324
25
2627
32
30
2928
3331
ANS Z21.89a-2008 CSA 1.18a-2008
• Do not use the smoker if the burner fails to light or fails to remain lit. Under such conditions, gas should be turned off and the fuel cylinder should be disconnected.• Use in high wind conditions that result in poor burner operation such as blowing out and flaring should be avoided. If repositioning the appliance does not improve operation under such wind conditions, the appliance should be turned off.• Install the smoker with the hose regulator assembly extended the full length of the hose (24 in. minimum) directly away from the appliance. When so configured, placement results in maximum tank to smoker distance. When the smoker is operated, the hose/regulator and gas tank should be perpendicular to wind direction. Placing tank closer than 24 inches to the smoker can overheat the tank and cause release of propane through relief openings and can result in tank fire or explosion. • Read and follow all warnings and instructions before assembling and using the appliance.• Follow all warnings and instructions when using the appliance.
NOTE: The installation must confirm with local codes or, in the absence of local codes, with eitherthe National Fuel Gas Code, ANSI Z223.1/NFPA 54, Natural Gas and Propane Installation Code,CSA B149.1, or Propane Storage and Handling Code, B149.2, or the Standard for RecreationalVehicles, ANSI A 119.2/ NFPA 1192, and CSA Z240 RV Series, Recreational Vehicle Code, asapplicable.
WARNINGDO NOT mix old and new batteries.DO NOT mix alkaline, standard (Carbon-Zinc), or rechargeable (Nickel-Cadmium) batteries.DO NOT dispose of batteries in fire. Improper disposal may cause batteries to leak or explode.
The electronic ignition requires 1 “AAA” alkaline battery, which is included.
WARNING:The hose to tank attachment creates a potential trip hazard for user and pedestrians - use caution.Do not allow or cause the gas tank or applianceto tip.
MINIMUM 24 IN. (610 MM)
(Tank not included)
HIGH
LOW OFF
I
C
V
T
T
T
C
Master Forge & M Design® is a registered trademarkof LF, LLC. All rights reserved.
®
D
13
G
2
TABLE OF CONTENTS
Safety Information ......................................................................................................................... 3
Replacement Parts List ................................................................................................................ 26
ITEM #0190449
MODEL #MFW784BDP
DUAL FUELVERTICAL SMOKER
Français p. XX
Español p. XX
1
Français p. 28
Español p. 58
SAFETY INFORMATION
3
Please read and understand this entire manual before attempting to assemble, operate or install the product. If you have any questions regarding the product, please call customer service at 1-800-963-0211, 8:00 a.m. – 6:00 p.m., EST, Monday – Thursday, 8:00 a.m. – 5:00 p.m., EST, Friday.
PACKAGE CONTENTS
6
PART DESCRIPTION QUANTITY A Leg - standard 3 B Leg - with holes 1 C Burner & Control Unit 1 D Wood Chip Box 1 E Charcoal Grate 1 F Wood Chip Box Lid 1 G Water Bowl 1 H Cooking Grate 4 I Smoker Body 1 J Lifting Handle 2 K Door Locking Bracket 2
L Square Smoke Stack 1 M Temperature Gauge & Bezel 1 N Upper Door (pre-assembled) 1 O Bottom Door (pre-assembled) 1 P Side Table 1 Q Door Handle 2 R Table Front Support 1 S Table Back Support 1 T Cooking Grate Support 12 U “AAA” Battery (1.5 V) 1 V Hose Retention 1
PART DESCRIPTION QUANTITY
ASSEMBLY INSTRUCTIONS
8
24
WARRANTY
25
This vertical gas smoker is warranted against broken or damaged parts at the time of purchase. The stainless steel burner is warranted for 3 years. All other parts carry a one (1) year limited warranty except the water bowl, which is warranted to be free of defects for 90 days. Paint is warranted to be free of defects for 90 days except for rust, which may appear after repeated use.
This warranty does not cover damage or issues related to neglect, abuse or modifications to the appliance. Repair labor is not covered.
All parts that meet the warranty requirements will be shipped at no charge via the discretion of GHP Group Inc. (ground shipments, US Mail or Parcel Post ONLY). Any special handling charges (i.e. Second Day, Overnight, etc.) will be the responsibility of the consumer.
All warranty claims apply only to the original purchaser and require a proof of purchase verifying purchase date. Do not return parts to GHP address without first obtaining a return authorization number from our customer service. This service is available by calling toll free 1-800-963-0211, 8:00 a.m. – 6:00 p.m., EST, Monday – Thursday 8:00 a.m. – 5:00 p.m., EST, Friday.
Some states do not allow the exclusion or limitation of incidental or consequential damages orlimitations on how long an implied warranty lasts, so the above limitations or exclusions may not apply to you. This warranty gives you specific legal rights, and you may have other rights that vary from state to state.
GHP Group Inc.8280 Austin AvenueMorton Grove, IL, USA60053-3207
The burner will not light using the igniter procedure.
1. The igniter electrode may be covered with grease or residue.
2. The igniter electrode may have a loose or disconnected wire.
3. No spark is being generated.
4. No gas flow or cylinder valve not open.
5. Vapor lock at coupling nut to LP cylinder.
1.Clean the igniter electrode.
2. Check the connection and reconnect any loose or disconnected wires.
3.Replace the AAA size battery inside the igniter.
4. Make sure LP cylinder is not empty or open cylinder valve.
5. Turn off knob and LP cylinder valve. Disconnect coupling nut from LP cylinder. Reconnect and retry.
The burner will not light with a match.
1. No gas flow or an obstructed gas flow.
1. Check the fuel level. Clean the venturi tube and burner.
HARDWARE CONTENTS (shown actual size)
M6 x 12Bolt
Qty. 32
7
AA BB
Before beginning assembly of product, make sure all parts are present. Compare parts with package contents list and hardware contents list. If any part is missing or damaged, do not attempt to assemble the product.
Estimated Assembly Time: 25 minutes
Tools Required for Assembly (not included): Phillips Head Screwdriver, 1/2 in. Wrench, Pliers.
PREPARATION
M5 Nut
Qty. 2
1. Align the legs - standard (A) with the mounting holes on the bottom left front, right front and left rear of the smoker body (I). Thread bolts (AA) through the holes from the outside of the unit. Tighten all bolts (AA) with a Phillips screwdriver.
Hardware Used
AA x 9M6 x 12 Bolt
2. Align the leg - with holes (B) with the mounting holes on the bottom right rear of the smoker. Thread bolts (AA) through the holes from the outside of the unit. Tighten all bolts (AA) with a Phillips screwdriver.
3. Open the bottom door of the smoker body (I). Turn the burner and control unit (C) upside down and place it on the bottom of the smoker body (I), making sure the 4 mounting holes on the burner and control unit (C) are aligned with the holes on the smoker body (I). Note: The control knob should be on the same side as the door. Check that the burner is properly installed on the orifice before attaching the burner and control unit (C). Thread bolts (AA) through holes from outside of unit. Securely tighten the unit to the bottom with a Phillips screwdriver.
5. CAUTION: This unit is HEAVY! Do not attempt this step without assistance! Close the two doors. With the assistance of a helper, stand the unit upright on its legs on a firm and level surface. (Make sure that the burner/control unit and legs are attached). Open the upper door. Position the square smoke stack (L) with control arm to the left as shown. Using 4 bolts (AA), attach square smoke stack (L) to the top of smoker body (I). Securely tighten with a Phillips screwdriver.
Hardware Used
6. Insert the cooking grate supports (T) into the corresponding holes on rack of the shelf inside the smoker body (I) from the bottom up. NOTE: There are 8 positions to install the cooking grate supports. The cooking grate supports can be installed into positions according to the need of the owner.
8. Align the door locking bracket (K) holes with the holes on the upper right side of the smoker body (I). Thread 2 bolts (AA) through the holes in the door locking bracket (K) into the threaded holes of the smoker body (I). Tighten the bolts (AA) using a Phillips screwdriver. Repeat on lower right side.
9. Slide door handle (Q) through brackets in door. Using pliers, slide a spring clip (CC) over the groove in the door handle as shown. Make sure both of the spring clips are securely attached in the grooves of the handles.
10. Install the side table back support (S) and table front support (R) on the side of the smoker body (I) with screws (BB). Arrows pointing up indicate the correct position of the brackets when fastened to the smoker body (I).
11. With the side table (P) in a parallel position, align the slots in the side table with the table supports (R & S) and insert. To lock the side table (P) in the upright position, swing the side table (P) up, push toward the smoker body (I), and press down on the side table (P) near the body until it is fully fastened in place.
If you have any questions regarding the product, please call customer service at 1-800-963-0211, 8:00 a.m. – 6:00 p.m., EST, Monday – Thursday, 8:00 a.m. – 5:00 p.m., EST, Friday.
2
6
5
8
9
10
11
ATTACH YOUR RECEIPT HERE
Serial Number Purchase Date
Questions, problems, missing parts? Before returning to your retailer, call our customer service department at 1-800-963-0211, 8:00 a.m. – 6:00 p.m., EST, Monday – Thursday, 8:00 a.m. – 5:00 p.m., EST, Friday.
ANS Z21.89a-2008 CSA 1.18a-2008
CALIFORNIA PROPOSITION 65
1. Fuels used in wood, charcoal, gas or oil fired appliances and the products of combustion of such fuels contain chemicals known to the State of California to cause cancer, birth defects or other reproductive harm. 2. This product contains chemicals, including lead and lead compounds, known to the State of California to cause cancer, birth defects or other reproductive harm.
• DO NOT use this product for anything other than its intended purpose. It is NOT intended for commercial use. It is NOT intended to be installed or used in or on a recreational vehicle and/or boat. • Keep a fire extinguisher near this product at all times.• This appliance is for outdoor use only in well-ventilated areas. DO NOT operate it in a building, garage or any other enclosed area, or under overhead construction.• A minimum clearance of 36 inches (92 cm) to combustible material is required on the front, sides and back. It is very important to always maintain proper clearances to combustibles.• The cylinder must be at least 24 inches (61 cm) from the appliance.• DO NOT obstruct the flow of combustion air or ventilation air for the appliance.• When cooking, the smoker must be on a level, stable noncombustible surface in an area clear of combustible material, including tall or dry grass. • Care should be taken to protect the fuel supply hose from damage from either pedestrian or vehicle traffic.• Clean and inspect the hose before each use of the appliance. If there is evidence of abrasion, wear, cuts or leaks, the hose must be replaced prior to the appliance being used. The replacement hose assembly shall be that specified by the manufacturer.• Before each use check that no dead leaves or debris are under the appliance.• Store this appliance in a dry, protected location.• The use of alcohol, prescription or nonprescription drugs may impair the user’s ability to properly assemble and safely operate this appliance.• Allow the smoker to cool to 115°F (45°C) before moving or storing. Use caution when lifting and moving the appliance to avoid back strain or back injury. DO NOT move the appliance while it is in use.• Always hang the regulator on the hose retention wire while not in use or disconnected with the LP (liquid propane) tank. KEEP the fuel supply hose away from any heated surface(s).
SAFETY INFORMATION
4
• DO NOT store and use this appliance near gasoline or other combustible liquids or where other combustible vapors may be present.• DO NOT use this appliance as a heater.• DO NOT leave the appliance unattended while in use. Keep children and pets away from the appliance at all times.• NEVER close the damper completely while cooking. • If you must dispose of ashes in less time than it takes for the ashes to completely cool down, remove the ashes from the appliance, keeping them in the heavy-duty foil, and soak them completely with water before disposing of them in a noncombustible container.• This appliance will be hot during and after use. Use insulated oven mitts or gloves for protection from hot surfaces or splatter from cooking liquids.• Make sure that the orifice of the control valve properly mates with the burner mixing tube by visual observation. Please refer to maintenance section.• Use caution when opening the door of the smoker while in operation. Keep hands, face and body safe from hot steam or flare-ups. DO NOT inhale smoke.• DO NOT wear loose clothing while operating the smoker. Tie back long hair while operating the smoker. ALWAYS wear shoes that fully cover your feet while operating the smoker.• Allow the smoker and its components to cool completely before conducting any routine cleaning or maintenance.• NEVER use glassware, plastic or ceramic cookware on or in your smoker. Use metallic cookware only.• NEVER operate the smoker without water in the water bowl. NEVER allow the water to completely evaporate. Check the water level at least every 2 hours. A sizzling sound may indicate a low water level. Follow instructions in this manual for adding water while operating (see the Operating Instructions section).• When using flavoring wood, add a sufficient amount prior to operation to avoid having to add wood while operating. Adding wood while operating may splash hot water and cause serious injury.• Use of accessories not intended for this smoker is not recommended and may lead to injury or property damage.• An LP cylinder not connected for use should not be stored in the vicinity of the smoker or any other appliance. DO NOT store spare LP cylinders within 10 feet of the smoker. LP cylinders must be stored outdoors, out of reach of children. DO NOT store LP cylinders in a building, garage or any other enclosed area.• DO NOT store LP gas cylinders inside or on top of the smoker. Improper storage of cylinders could lead to explosion, fire and/or personal injury. Cylinders are to be stored outdoors, out of reach of children and must not be stored in a building, garage or any other enclosed area.• While the smoker is not in use, the gas must be turned off at the supply cylinder.• LP gases are heavier than air, tend to pool and collect in low-lying areas, are easily ignited and are highly flammable. Proper care and caution should be employed when dealing with any such fuels.• The smoker should be turned off and all supply valves (on piping or on fuel cylinders) should be closed in the event that the odor of unburned gas is detected. Do not attempt to use the appliance until any gas leaks are fixed and/or the source of the unburned gas odor is accounted for.
SAFETY INFORMATION
5
A
B
C
D
E
F
G
I
S K
LM
NP
O
J
A
I
AA
I
AA
Hardware Used
AA x 3M6 x 12 Bolt
1
3C
AA
Hardware Used
AA x 4M6 x 12 Bolt
Controlarm
I
AAL
AA x 8M6 x 12 Bolt
I
T
AA
K
Q
I
CC
I
R
OPERATING INSTRUCTIONS
CONNECTING THE LP TANK
WARNING
ALL INSTRUCTIONS AND SAFEGUARDS ON THIS PAGE MUST BE FOLLOWED TO PREVENT FIRE, DAMAGE AND/OR INJURY.
1. The knob on the LP tank must be closed. Make sure that the knob is turned clockwise to a full stop. The cylinder supply system must be arranged for vapor withdrawal.
2. Check that the control knob on the control unit is turned off.
3. Remove the protective cap from the LP tank valve and coupling nut.
4. Hold the regulator in one hand and insert the nipple into the valve outlet. Be sure the nipple is centered in the valve outlet. The coupling connects to the large outside threads on the valve outlet. Use care – do not cross thread the connection.
5. Hand tighten the coupling clockwise until it comes to a full stop. Firmly tighten by hand only. Do not use tools.
P
Straight
CAUTION: In the connection process, make sure the regulator inlet connector mates with the cylinder valve outlet properly, safely and firmly.
15
OPERATING INSTRUCTIONS
Any fuel supply cylinder used must be constructed and marked in accordance with specifications for propane cylinders of the U.S. Department of Transportation (DOT) CFR 49, or the Standard for Cylinders, Spheres and Tubes for the Transportation of Dangerous Goods, CAN/CSA B339. The appliance is to be used only with the 20-pound, vertical standing vapor withdrawal type tank and must include a collar to protect the cylinder valve.(A) DO NOT store spare LP cylinders under or near the smoker.(B) NEVER fill cylinder more than 80% full.(C) Do not store cylinder indoors.
WARNINGIf instructions A, B, C above are not followed exactly, a fire causing death or serious injury may occur.
This smoker is designed to operate on LP gas only. The gas cylinder used must include a collar to protect the cylinder valve. The cylinder supply system must be arranged for vapor withdrawal. Do not allow dirt or foreign material to get into or onto tank connection when it is not attached to the fuel supply system. Use the protective cap provided.
WARNINGALL INSTRUCTIONS AND SAFEGUARDS ON THIS PAGE MUST BE FOLLOWED TO PREVENT FIRE, DAMAGE AND/OR INJURY.
The cylinder outlet must have Type 1 gas connection termination in order to mate with gas hose provided with smoker. The pressure regulator and hose assembly supplied by the manufacturer with the appliance must be used. Replacement pressure regulators and hose assemblies must be those specified by the appliance manufacturer.This unit is not to be utilized with a non-self-contained LP-gas supply system.
Valve/pressure regulators are factory set to the correct operating pressures. No attempts should be made to adjust these settings.
DISCONNECT THE LP TANK
Make sure that the knob on the LP tank is turned clockwise to a full stop (CLOSED).
Hold the regulator in one hand, turn the coupling to the valve outlet counterclockwise and unthread the connection by hand only. Do not use tools.
Place dust cap on cylinder valve outlet whenever the cylinder is not in use. Only install the type of dust cap on the cylinder valve outlet that is provided with the cylinder valve. Other types of caps or plugs may result in leakage of propane.
Always hang the regulator on the lifting handles while not in use, disconnected fromthe LP tank, and when the unit has cooled down.
STORE THE TANK IN A PROPER PLACE AS INDICATED IN THIS MANUAL.
16
OPERATING INSTRUCTIONS
CHECKING FOR LEAKS
After connections are made, check all connections and fittings for leaks with a soap solution. 1. With all valves closed, apply the leak check solution (50/50 mix of dishwashing soap and water) to all gas carrying connections and fittings. 2. Open tank valve.Presence of bubbles at areas of wet solution indicates a gas leak. If leaks are detected or you smell or hear gas, shut off the valve and repair the leak or replace the defective part. Do not use the smoker until all leaks are corrected.
The gas hose/regulator assembly should be totally extended to the maximum distance so that the hose is straight and the tank is as far from the smoker as it can be (minimum 24 inches).
For vapor withdrawal, LP tanks are intended to be operated in the upright position only.
If the product is not in use, the gas must be turned off at the supply cylinder and the cylinder should be disconnected from the appliance.
Storage of the appliance indoors is only permissible if the cylinder is disconnected and removed from the appliance. Do not store cylinder indoors.
BEFORE FIRST USE
Remove all hangings or plastic straps, if present.
Before you cook food in your smoker, it is important to “season” your smoker. Seasoning seals the paint and interior of your smoker to enhance flavoring, durability and overall performance.To season your smoker, simply use it as you normally would only do not cook any food. You will need to follow all of the operating procedures in the next few sections of this manual.
Using your desired flavoring woods and marinades, burn your smoker at low temperature (around 175°F) for 45 – 60 minutes. Let the smoker cool and clean out the water and wood.
Once seasoning is complete, your smoker’s interior will have a durable, seasoned coating.
ADDING WATER
To add water before cooking, simply remove the water bowl and fill it with water slightly below the rim. Place the bowl back into the smoker. Adding water before cooking is recommended. To add water while cooking, if a sizzling sound indicating lack of water is heard, or there is a need to add water, open the bottom door with care and avoid taking in the smoke. Use a long nose kettle-like water can, stand as far from the smoker as you can, fill the water bowl up to 1 inch below the rim.
CAUTION: DO NOT pull the water bowl out beyond the rack when the smoker is hot.
17
OPERATING INSTRUCTIONS
COOKING TIP
Line the water bowl with aluminum foil before each use. This will make it easy to clean and help your water bowl last longer.
To make adding water easier and safer, use a clean watering can with a long spout.
ADDING WOOD CHIPS
To add wood chips before cooking, simply fill the wood chip box with your choice of flavoring hardwood chips. The amount and type of wood you use is entirely dependent on the desired amount of flavor. Once the box is filled, place the lid on top of the box and set the box in the smoker.
To add wood chips while cooking, we recommend using tongs or long handled pliers to removethe box lid and to place the pieces into the wood chip box without removing the box. It is not recommended to remove the wood chip box while the smoker is in operation.
CAUTION: The wood chip box and lid get very hot. Avoid handling them while in use. Always wear protective oven mitts when handling hot components.
COOKING TIP: FLAVORING WOOD
• Small wood chips work best inside the wood chip box.• Use dry hardwoods such as hickory, pecan, apple, cherry or mesquite.• To produce more smoke and prevent fast burning, pre-soak the wood chips in a separate bowl of water for at least 20 minutes, or wrap the chips in perforated aluminum foil.• Most smoke flavoring occurs within the first hour of cooking. Adding wood chips after the first hour is typically not necessary unless extra smoke flavoring is desired.
18
OPERATING INSTRUCTIONS
19
OPERATING INSTRUCTIONS
Match Lighting Procedure - LP Gas
1. Repeat steps 1 through 5 of the igniter lighting system.
2. Open both doors. Place a lit match on to the burner as shown below. Quickly turn the control knob to the “HIGH” position. If the burner does not light in 5 seconds, turn the control knob off, wait at least 5 minutes and for the gas to clear. Repeat the process.
20
OPERATING INSTRUCTIONS
Cooking Tip: Damper Adjustments
WARNING: The dampers on the smoker body and the handle on the smoke stack may become very hot while cooking. Always wear a heat resistant glove when adjusting.
• For best performance, rotate the smoker so that the front or back of the body is facing the wind. This allows the adjustment of the dampers to be more effective and accurate.• The two dampers on smoker body should never be fully closed.• Opening the damper of the smoke stack helps to exhaust both the heat and smoke.• The key to effective smoking is to watch your heat indicator on the door and adjust the damper accordingly.• Temperature maintenance is best controlled by different damper adjustment configurations.
Turning off the Smoker
CAUTION: The smoker can become very hot while in use.Do not touch any portion of the smoker except for the door handle and burner control knob. It may be necessary to use protective gloves.
1. Turn the burner control knob off by pushing in and rotating to “OFF”. The burner flame should go out.
2. Turn off the LP cylinder valve by turning the knob clockwise until it cannot go any farther.
Follow all warnings and safety precautions before removing meat from smoker or preparing the unit for storage.
Lighting Instructions – Charcoal
When using charcoal, DO NOT USE PRETREATED, MATCH-LIGHT CHARCOAL with this smoker. Only use standard, untreated briquettes or lump charcoal and ONLY use charcoal lighting fluid approved for lighting charcoal. Do not use lighter fluid, paint thinners, gasoline, kerosene, alcohol or other flammable material for lighting charcoal. Damage to the smoker may occur with the use of match-light charcoal. DO NOT USE THE LP GAS BURNER WHEN LIGHTING CHARCOAL. Step 1Place the charcoal grate inside the woodchip/charcoal tray and add 1.5 pounds of charcoal on charcoal grate (approximately 26 briquettes).
Step 2Note: Please refer to the manufacturer’s recommended amount of lighter fluid before applying fluid to the briquettes. With the charcoal tray outside the firebox, saturate charcoal with the amount of lighting
LIGHTING INSTRUCTIONS
CAUTION: If the flame extinguishes accidentally during ignition or operation, immediately TURN OFF the cylinder valve and then TURN OFF the control knob.
Igniter Lighting System
1. Check all connections for leaks using the “soap water” test as explained on page 16.
2. Open both of the smoker cabinet doors. Always keep the doors open during lighting.
3. Check for any blockage to the venturi tube or burner, damper setting, ventilation setting. Remove any foreign objects or matter.
4. Be sure the burner control knob is in the “OFF” position.
5. Open the LP cylinder valve by turning counterclockwise.
6. Push igniter on the control unit down 1 to 2 seconds then push and turn control knob to “HIGH,” while still holding the ignitor button down. At this point the burner should ignite.
7. If ignition does not take place within 5 seconds, immediately turn the control knob to OFF. Wait 5 minutes and repeat above Steps 6 and 7.
8. If burner still fails to light, try match lighting using the instructions on page 19.
9. Once the burner is lit, close the doors to allow heat to accumulate. The smoke stack on the top of the smoker can be adjusted to the desired setting to allow proper ventilation and combustion. NEVER CLOSE THE SMOKE STACK COMPLETELY.
Warning: Always light your smoker with both doors open.
22
CARE AND MAINTENANCE
AFTER USE SAFETY AND MAINTENANCE
WARNING• Use caution when lifting and moving the smoker to avoid strain injuries. Two people are recommended to lift or move the smoker.
• DO NOT store the smoker near gasoline or other combustible liquids or where combustible vapors may be present. Keep the area around the smoker clear and free of combustible materials and vapors.
• DO NOT store this smoker in an area accessible to children or pets. Store the smoker in a dry, protected location. Disconnect cylinder from smoker.
• DO NOT allow anyone to conduct activities around the smoker following use until it has cooled. It is hot during operation and remains hot for a period of time following use.
• DO NOT leave hot ashes unattended until the smoker cools completely.
• The smoker becomes extremely hot – allow the smoker to cool completely before handling. If you must handle the smoker while it is hot, ALWAYS wear protective oven mitts or heat-resistant gloves. Allow the smoker to cool before removing and cleaning the grease pan.
• Dispose of cold ashes by wrapping them in heavy-duty aluminum foil and putting them in a noncombustible container.
• If you must dispose of the ashes in less time than it takes for them to completely cool. Remove the ashes from the smoker, keeping them in heavy-duty foil, and soak them completely with water before disposing of them in a noncombustible container.
GENERAL CARE AND MAINTENANCE CAUTION: All care and maintenance procedures are to be performed while the smoker is turned off and cooled. Always perform maintenance by a qualified service person.
Clean the water bowl and cooking grate with hot, soapy water. Rinse and dry thoroughly. You may prefer to coat the water bowl and cooking grid lightly with cooking oil or cooking spray.
Frequently check and clean the venturi and burner tubes for insects and insect nests. A clogged tube can lead to fire beneath the smoker. Also make sure the smoker does not have any foreign objects obstructing the flow of combustion and ventilation air.
To clean the inside and outside of the smoker cabinet, simply use a damp cloth. Spray-washing with a water hose is not recommended. Moisture should be wiped away and not allowed to stand inside or on top of the smoker. Once cleaned, you may prefer to lightly coat the interior of the smoker cabinet with cooking oil or cooking spray.
If rust is present on the exterior surface of the smoker, clean the area with steel wool or emery cloth and use heavy-duty, heat-resistant paint.
NEVER apply additional paint to the interior of the smoker. If rust is present on the interior of the smoker, clean it thoroughly with steel wool or emery cloth and lightly coat the area with cooking oil or cooking spray to help minimize recurring rust.
When an LP tank is not connected, and to help prevent dirt or other foreign particles from clogging the regulator connector, hang the end of the hose and regulator assembly on the lifting handle.
Keep the ventilation opening(s) of the cylinder enclosure free and clear of debris.
23
CARE AND MAINTENANCE
Inspect the flames at the burner by looking through the observing hole on left side of the burner and control unit. A good flame should be blue with a yellow tip 1 to 2 inch high. If flames are excessively yellow and irregular, oil residue and food deposits may be collecting on the burner. Try cleaning the burner surface with hot, soapy water and cleaning the holes with a pipe cleaner to improve the flames.
Bad flames may also be caused by poor venturi attachment to the orifice. Turn off the control knob and cylinder valve. Always let the smoker cool before cleaning or checking the assembly. Make sure the orifice of the control valve properly mates with the burner mixing tube by visual observation from the bottom of the appliance. The burner venturi tube should overlap the orifice and they should form a straight line as shown in Figure A. Figures B & C show incorrect alignment.
WARNING: If the instructions above are not followed, an explosion may result, possibly causing serious bodily injury or death.
To protect your smoker from weather conditions, always keep it covered while not in use.
2”
Yellow
Light Blue
Blue
Good Flame Bad Flame
! ! !
Figure A Figure B Figure C
Correct Wrong Wrong
The flame goes out. 1. Disconnected gas supply hose. 2. High or gusting winds.
For replacement parts, call our customer service department at 1-800-963-0211, 8:00 a.m. – 6:00 p.m., EST, Monday – Thursday, 8:00 a.m. – 5:00 p.m., EST, Friday.
Owner’s Manual - Part #312-02025-00Printed in China
SpringClip
Qty. 2
CC
BB x21/4-20 FlangedWasher Nut
Hardware Used
R
Q
7. Insert 4 bolts (AA) through the mounting holes on one of the lifting handles (J) and into holes on right side of smoker body (I). Use a Phillips screwdriver to secure the handles to the smoker body (I). Repeat on left side.
7
Hardware Used
CC x 2Spring Clip
I
AA
J
ASSEMBLY INSTRUCTIONS
4. Thread bolts (EE) through holes on the leg - with holes (B) from outside of unit. Secure using 2 nuts (FF) from inside leg by using wrench. Tighten all bolts (AA) with a Phillips screwdriver. Insert the regulator hose attached to the burner and control unit (C) into the hose retention (V).
4
I
V
12. Slide the wood chip box (D) onto the lowest cooking grate supports (T) inside the smoker body (I) and put the wood chip box lid (F) on top. Note: For charcoal, refer to Step 17.
12
DANGER:
Failure to follow these instructions could result in fire, explosion, or burn hazard which could cause property damage, personal injury or death.
DANGER: If you smell gas:1. Shut off gas to the appliance.
3. Open lid.4. If odor continues, keep away from the appliance and immediately call your gas supplier or your fire department.
Assembler/Installer: This instruction manual contains important information necessary for the proper assembly and safe use of this appliance. Read and follow all warnings and instructions before assembling and using this appliance. Leave these instructions with the consumer.
Consumer/User: Follow all warnings and instructions when using this appliance. Keep these instructions for future reference.
1. Never operate this appliance unattended.2. Never operate this appliance within 10 feet (3 m) of any structure, combustible material or other gas cylinder3. Never operate this appliance within 25 feet (7.5 m) of any flammable liquid.4. Never allow oil or grease to get hotter than 400°F or 200°C. If the temperature exceeds 400°F (200°C) or if oil begins to smoke, immediately turn the burner or gas supply OFF.5. Heated liquids remain at scalding temperatures long after the cooking process. Never touch cooking appliance until liquids have cooled to 115°F (45°C) or less.6. If a fire should occur, keep away from the appliance and immediately call your fire department. Do not attempt to extinguish an oil or grease fire with water. Failure to follow these instructions could result in fire, explosion, or burn hazard which could cause property damage, personal injury or death.
DANGER
DANGER:
Rev. 9/2011
M4 x 10Bolt
Qty. 2
DD EE
M4 Nut
Qty. 2
FF
M5 x 12Screw
Qty. 8
H
J
T
T
U
V
front of smoker
B
front of smoker
M4 x 10 BoltEE
M4 NutFF
Hardware Used
x 2
x 2
B
EE
FF
Hardware Used
AA x 4M6 x 12 Bolt
Hardware Used
AA x 4M6 x 12 Bolt
M5 x 12 ScrewBB x 8
Hardware UsedBB
S
I
R
S
D
FI
I13. Slide the water bowl (G) onto the cooking grate supports (T) inside the smoker body (I) above the wood chip box (D) as shown.
ASSEMBLY INSTRUCTIONS
13
15. Insert the probe of the temperature gauge assembly (M) through hole of the smoker door from the outside. Secure using 2 nuts (DD) from inside panel by using wrench.
16. To install the “AAA” battery (U), remove the igniter button by turning it counterclockwise and insert the “AAA” battery (U) with the positive end facing out. Reinstall the igniter button by turning it clockwise and hand tightening.
17. For charcoal use, remove the wood chip box lid (F) and place the charcoal grate (E) inside the wood chip box (D).
18. Always hang the regulator hose attached to the burner and control unit (C) to the hose retention (V) attached to the leg - with hole (B) while not in use. If switching from LP gas to charcoal, wait for the unit to cool down before disconnecting from the LP tank.
15
16
17
18
DD
M
U
E
B
12
14. Slide the 4 cooking grates (H) onto the top cooking grate supports (T) inside the smoker body (I).
14 I
H
ASSEMBLY INSTRUCTIONS
Hardware Used
DD x 2
D
S
V
M5 Nut
igniter button
21
OPERATING INSTRUCTIONS
fluid as recommended by the lighter fluid manufacturer. Allow the fluid to soak into the charcoal for 3 minutes before placing the tray back into the firebox (refer to assembly instructions for proper tray placement). After soaking the charcoal, place the lighting fluid at a safe distance away from the smoker.
Step 3With both doors open, stand back and carefully light charcoal and allow to burn until covered with a light ash (approximately 20 minutes). Charcoal lighting fluid must be allowed to completely burn off prior to closing the doors. (Fumes will tend to collect in the upper cavity if the door is closed).
DANGER: Closing the firebox doors during the lighting procedure could trap fumes from the charcoal lighting fluid in the smoker box and may result in a flash-fire or explosion when door is opened, resulting in property loss, personal injury or death. Never attempt to add more lighting fluid to the charcoal once it has been lit.
Step 4After 25 - 30 minutes, charcoal should be ready for cooking and/or adding woodchips. Carefully add wood chunks using long cooking tongs.
Adding Charcoal and/or Woodchips
Additional charcoal and/or wood may be required to maintain or increase cooking temperature.
WARNING: Use caution since flames can flare-up when fresh air suddenly comes in contact with fire. When opening the door, keep hands, face and body a safe distance from hot steam and flame flare-ups.
Step 1Stand back and carefully open smoker box door allowing heat and steam to escape away from your face. Use caution since flames can flare-up when fresh air suddenly comes in contact with fire. Inspect the charcoal level in pan.
Step 2Wearing flame retardant oven mitts/gloves, stand back a safe distance and use long cooking tongs to lightly brush aside ashes on hot coals. Use cooking tongs to add charcoal and/or wood to charcoal pan, being careful not to stir-up ashes and sparks
WARNING: Never add charcoal lighting fluid to hot or even warm coals as flashback may occur causing severe burns.
Step 3Close smoker box door and allow food to continue cooking.
Allow the ashes to completely cool before reusing or cleaning the smoker.
26
REPLACEMENT PARTS LIST
For replacement parts, call our customer service department at 1-800-963-0211, 8:00 a.m. – 6:00 p.m. EST, Monday – Thursday, 8:00 a.m. – 5:00 p.m. EST, Friday.
PART DESCRIPTION PART # 1 Leg – Standard 301-01016-00 2 Leg - with holes 312-01016-00 3 Burner and Control Unit 312-01015-00 4 Wood Chip Box (MFW only) 312-01028-00 5 Charcoal Grate 312-01030-00 6 Wood Chip Box Lid 301-01029-00 7 Wood Chip Box Handle and 301-01028-02 Lid Handle 8 Water Bowl 301-02017-00 9 Cooking Grate 312-01014-00 10 Door Locking Bracket 302-01008-00 11 Cooking Grate Support 302-01030-00 12 Smoker Body 312-12001-00 13 Square Smoke Stack 312-02009-00 14 Lifting Handle 301-01010-00 15 Logo Plate 302-03002-01 16 Temperature Gauge Bezel 301-01034-00 17 Temperature Gauge 301-01003-00
PART DESCRIPTION PART # 18 Upper Door 302-02002-00 19 Side Table 312-02008-00 20 Door Handle Crank 302-02007-02 21 Door Handle Grip 302-02007-01 22 Bottom Door without handle 302-02102-00 23 Table Front Support Bracket 312-02008-01 24 Table Back Support Bracket 312-02008-02 25 Side Damper Plate (round) 301-01001-04 26 Igniter Ground Wire 301-01015-08 27 Push Button 301-01015-03 28 Electronic Ignitor 301-01015-06 29 Ignition Cap 301-01015-05 30 Control Knob 301-01015-01 31 Control Knob Bezel 301-01015-02 32 Igniter Electrode and Ignition Wire 301-01015-07 33 Hose Retention 312-01016-01 N/A Hardware Bag 312-02026-00 N/A Owner’s/Instruction Manual 312-02025-00
11
14
21
17
1918
20
22
2324
25
2627
32
30
2928
3331
ANS Z21.89a-2008 CSA 1.18a-2008
• Do not use the smoker if the burner fails to light or fails to remain lit. Under such conditions, gas should be turned off and the fuel cylinder should be disconnected.• Use in high wind conditions that result in poor burner operation such as blowing out and flaring should be avoided. If repositioning the appliance does not improve operation under such wind conditions, the appliance should be turned off.• Install the smoker with the hose regulator assembly extended the full length of the hose (24 in. minimum) directly away from the appliance. When so configured, placement results in maximum tank to smoker distance. When the smoker is operated, the hose/regulator and gas tank should be perpendicular to wind direction. Placing tank closer than 24 inches to the smoker can overheat the tank and cause release of propane through relief openings and can result in tank fire or explosion. • Read and follow all warnings and instructions before assembling and using the appliance.• Follow all warnings and instructions when using the appliance.
NOTE: The installation must confirm with local codes or, in the absence of local codes, with eitherthe National Fuel Gas Code, ANSI Z223.1/NFPA 54, Natural Gas and Propane Installation Code,CSA B149.1, or Propane Storage and Handling Code, B149.2, or the Standard for RecreationalVehicles, ANSI A 119.2/ NFPA 1192, and CSA Z240 RV Series, Recreational Vehicle Code, asapplicable.
WARNINGDO NOT mix old and new batteries.DO NOT mix alkaline, standard (Carbon-Zinc), or rechargeable (Nickel-Cadmium) batteries.DO NOT dispose of batteries in fire. Improper disposal may cause batteries to leak or explode.
The electronic ignition requires 1 “AAA” alkaline battery, which is included.
WARNING:The hose to tank attachment creates a potential trip hazard for user and pedestrians - use caution.Do not allow or cause the gas tank or applianceto tip.
MINIMUM 24 IN. (610 MM)
(Tank not included)
HIGH
LOW OFF
I
C
V
T
T
T
C
Master Forge & M Design® is a registered trademarkof LF, LLC. All rights reserved.
®
13
G
2
TABLE OF CONTENTS
Safety Information ......................................................................................................................... 3
Replacement Parts List ................................................................................................................ 26
ITEM #0190449
MODEL #MFW784BDP
DUAL FUELVERTICAL SMOKER
Français p. XX
Español p. XX
1
Français p. 28
Español p. 58
SAFETY INFORMATION
3
Please read and understand this entire manual before attempting to assemble, operate or install the product. If you have any questions regarding the product, please call customer service at 1-800-963-0211, 8:00 a.m. – 6:00 p.m., EST, Monday – Thursday, 8:00 a.m. – 5:00 p.m., EST, Friday.
PACKAGE CONTENTS
6
PART DESCRIPTION QUANTITY A Leg - standard 3 B Leg - with holes 1 C Burner & Control Unit 1 D Wood Chip Box 1 E Charcoal Grate 1 F Wood Chip Box Lid 1 G Water Bowl 1 H Cooking Grate 4 I Smoker Body 1 J Lifting Handle 2 K Door Locking Bracket 2
L Square Smoke Stack 1 M Temperature Gauge & Bezel 1 N Upper Door (pre-assembled) 1 O Bottom Door (pre-assembled) 1 P Side Table 1 Q Door Handle 2 R Table Front Support 1 S Table Back Support 1 T Cooking Grate Support 12 U “AAA” Battery (1.5 V) 1 V Hose Retention 1
PART DESCRIPTION QUANTITY
ASSEMBLY INSTRUCTIONS
8
24
WARRANTY
25
This vertical gas smoker is warranted against broken or damaged parts at the time of purchase. The stainless steel burner is warranted for 3 years. All other parts carry a one (1) year limited warranty except the water bowl, which is warranted to be free of defects for 90 days. Paint is warranted to be free of defects for 90 days except for rust, which may appear after repeated use.
This warranty does not cover damage or issues related to neglect, abuse or modifications to the appliance. Repair labor is not covered.
All parts that meet the warranty requirements will be shipped at no charge via the discretion of GHP Group Inc. (ground shipments, US Mail or Parcel Post ONLY). Any special handling charges (i.e. Second Day, Overnight, etc.) will be the responsibility of the consumer.
All warranty claims apply only to the original purchaser and require a proof of purchase verifying purchase date. Do not return parts to GHP address without first obtaining a return authorization number from our customer service. This service is available by calling toll free 1-800-963-0211, 8:00 a.m. – 6:00 p.m., EST, Monday – Thursday 8:00 a.m. – 5:00 p.m., EST, Friday.
Some states do not allow the exclusion or limitation of incidental or consequential damages orlimitations on how long an implied warranty lasts, so the above limitations or exclusions may not apply to you. This warranty gives you specific legal rights, and you may have other rights that vary from state to state.
GHP Group Inc.8280 Austin AvenueMorton Grove, IL, USA60053-3207
The burner will not light using the igniter procedure.
1. The igniter electrode may be covered with grease or residue.
2. The igniter electrode may have a loose or disconnected wire.
3. No spark is being generated.
4. No gas flow or cylinder valve not open.
5. Vapor lock at coupling nut to LP cylinder.
1. Clean the igniter electrode.
2. Check the connection and reconnect any loose or disconnected wires.
3. Replace the AAA size battery inside the igniter.
4. Make sure LP cylinder is not empty or open cylinder valve.
5. Turn off knob and LP cylinder valve. Disconnect coupling nut from LP cylinder. Reconnect and retry.
The burner will not light with a match.
1. No gas flow or an obstructed gas flow.
1. Check the fuel level. Clean the venturi tube and burner.
HARDWARE CONTENTS (shown actual size)
M6 x 12Bolt
Qty. 32
7
AA BB
Before beginning assembly of product, make sure all parts are present. Compare parts with package contents list and hardware contents list. If any part is missing or damaged, do not attempt to assemble the product.
Estimated Assembly Time: 25 minutes
Tools Required for Assembly (not included): Phillips Screwdriver, 1/2 in. Wrench, Pliers.
PREPARATION
M5 Nut
Qty. 2
1. Align the legs - standard (A) with the mounting holes on the bottom left front, right front and left rear of the smoker body (I). Thread bolts (AA) through the holes from the outside of the unit. Tighten all bolts (AA) with a Phillips screwdriver.
Hardware Used
AA x 9M6 x 12 Bolt
2. Align the leg - with holes (B) with the mounting holes on the bottom right rear of the smoker. Thread bolts (AA) through the holes from the outside of the unit. Tighten all bolts (AA) with a Phillips screwdriver.
3. Open the bottom door of the smoker body (I). Turn the burner and control unit (C) upside down and place it on the bottom of the smoker body (I), making sure the 4 mounting holes on the burner and control unit (C) are aligned with the holes on the smoker body (I). Note: The control knob should be on the same side as the door. Check that the burner is properly installed on the orifice before attaching the burner and control unit (C). Thread bolts (AA) through holes from outside of unit. Securely tighten the unit to the bottom with a Phillips screwdriver.
5. CAUTION: This unit is HEAVY! Do not attempt this step without assistance! Close the two doors. With the assistance of a helper, stand the unit upright on its legs on a firm and level surface. (Make sure that the burner/control unit and legs are attached). Open the upper door. Position the square smoke stack (L) with control arm to the left as shown. Using 4 bolts (AA), attach square smoke stack (L) to the top of smoker body (I). Securely tighten with a Phillips screwdriver.
Hardware Used
6. Insert the cooking grate supports (T) into the corresponding holes on rack of the shelf inside the smoker body (I) from the bottom up. NOTE: There are 8 positions to install the cooking grate supports. The cooking grate supports can be installed into positions according to the need of the owner.
8. Align the door locking bracket (K) holes with the holes on the upper right side of the smoker body (I). Thread 2 bolts (AA) through the holes in the door locking bracket (K) into the threaded holes of the smoker body (I). Tighten the bolts (AA) using a Phillips screwdriver. Repeat on lower right side.
9. Slide door handle (Q) through brackets in door. Using pliers, slide a spring clip (CC) over the groove in the door handle as shown. Make sure both of the spring clips are securely attached in the grooves of the handles.
10. Install the table back support (S) and table front support (R) on the side of the smoker body (I) with screws (BB). Arrows pointing up indicate the correct position of the brackets when fastened to the smoker body (I).
11. With the side table (P) in a parallel position, align the slots in the side table with the table supports (R & S) and insert. To lock the side table (P) in the upright position, swing the side table (P) up, push toward the smoker body (I), and press down on the side table (P) near the body until it is fully fastened in place.
If you have any questions regarding the product, please call customer service at 1-800-963-0211, 8:00 a.m. – 6:00 p.m., EST, Monday – Thursday, 8:00 a.m. – 5:00 p.m., EST, Friday.
2
6
5
8
9
10
11
ATTACH YOUR RECEIPT HERE
Serial Number Purchase Date
Questions, problems, missing parts? Before returning to your retailer, call our customer service department at 1-800-963-0211, 8:00 a.m. – 6:00 p.m., EST, Monday – Thursday, 8:00 a.m. – 5:00 p.m., EST, Friday.
ANS Z21.89a-2008 CSA 1.18a-2008
CALIFORNIA PROPOSITION 65
1. Fuels used in wood, charcoal, gas or oil fired appliances and the products of combustion of such fuels contain chemicals known to the State of California to cause cancer, birth defects or other reproductive harm. 2. This product contains chemicals, including lead and lead compounds, known to the State of California to cause cancer, birth defects or other reproductive harm.
• DO NOT use this product for anything other than its intended purpose. It is NOT intended for commercial use. It is NOT intended to be installed or used in or on a recreational vehicle and/or boat. • Keep a fire extinguisher near this product at all times.• This appliance is for outdoor use only in well-ventilated areas. DO NOT operate it in a building, garage or any other enclosed area, or under overhead construction.• A minimum clearance of 36 inches (92 cm) to combustible material is required on the front, sides and back. It is very important to always maintain proper clearances to combustibles.• The cylinder must be at least 24 inches (61 cm) from the appliance.• DO NOT obstruct the flow of combustion air or ventilation air for the appliance.• When cooking, the smoker must be on a level, stable noncombustible surface in an area clear of combustible material, including tall or dry grass. • Care should be taken to protect the fuel supply hose from damage from either pedestrian or vehicle traffic.• Clean and inspect the hose before each use of the appliance. If there is evidence of abrasion, wear, cuts or leaks, the hose must be replaced prior to the appliance being used. The replacement hose assembly shall be that specified by the manufacturer.• Before each use check that no dead leaves or debris are under the appliance.• Store this appliance in a dry, protected location.• The use of alcohol, prescription or nonprescription drugs may impair the user’s ability to properly assemble and safely operate this appliance.• Allow the smoker to cool to 115°F (45°C) before moving or storing. Use caution when lifting and moving the appliance to avoid back strain or back injury. DO NOT move the appliance while it is in use.• Always hang the regulator on the hose retention wire while not in use or disconnected with the LP (liquid propane) tank. KEEP the fuel supply hose away from any heated surface(s).
SAFETY INFORMATION
4
• DO NOT store and use this appliance near gasoline or other combustible liquids or where other combustible vapors may be present.• DO NOT use this appliance as a heater.• DO NOT leave the appliance unattended while in use. Keep children and pets away from the appliance at all times.• NEVER close the damper completely while cooking. • If you must dispose of ashes in less time than it takes for the ashes to completely cool down, remove the ashes from the appliance, keeping them in the heavy-duty foil, and soak them completely with water before disposing of them in a noncombustible container.• This appliance will be hot during and after use. Use insulated oven mitts or gloves for protection from hot surfaces or splatter from cooking liquids.• Make sure that the orifice of the control valve properly mates with the burner mixing tube by visual observation. Please refer to maintenance section.• Use caution when opening the door of the smoker while in operation. Keep hands, face and body safe from hot steam or flare-ups. DO NOT inhale smoke.• DO NOT wear loose clothing while operating the smoker. Tie back long hair while operating the smoker. ALWAYS wear shoes that fully cover your feet while operating the smoker.• Allow the smoker and its components to cool completely before conducting any routine cleaning or maintenance.• NEVER use glassware, plastic or ceramic cookware on or in your smoker. Use metallic cookware only.• NEVER operate the smoker without water in the water bowl. NEVER allow the water to completely evaporate. Check the water level at least every 2 hours. A sizzling sound may indicate a low water level. Follow instructions in this manual for adding water while operating (see the Operating Instructions section).• When using flavoring wood, add a sufficient amount prior to operation to avoid having to add wood while operating. Adding wood while operating may splash hot water and cause serious injury.• Use of accessories not intended for this smoker is not recommended and may lead to injury or property damage.• An LP cylinder not connected for use should not be stored in the vicinity of the smoker or any other appliance. DO NOT store spare LP cylinders within 10 feet of the smoker. LP cylinders must be stored outdoors, out of reach of children. DO NOT store LP cylinders in a building, garage or any other enclosed area.• DO NOT store LP gas cylinders inside or on top of the smoker. Improper storage of cylinders could lead to explosion, fire and/or personal injury. Cylinders are to be stored outdoors, out of reach of children and must not be stored in a building, garage or any other enclosed area.• While the smoker is not in use, the gas must be turned off at the supply cylinder.• LP gases are heavier than air, tend to pool and collect in low-lying areas, are easily ignited and are highly flammable. Proper care and caution should be employed when dealing with any such fuels.• The smoker should be turned off and all supply valves (on piping or on fuel cylinders) should be closed in the event that the odor of unburned gas is detected. Do not attempt to use the appliance until any gas leaks are fixed and/or the source of the unburned gas odor is accounted for.
SAFETY INFORMATION
5
A
B
C
D
E
F
G
I
S K
LM
NP
O
J
A
I
AA
I
AA
Hardware Used
AA x 3M6 x 12 Bolt
1
3C
AA
Hardware Used
AA x 4M6 x 12 Bolt
Controlarm
I
AAL
AA x 8M6 x 12 Bolt
I
T
AA
K
Q
I
CC
I
R
OPERATING INSTRUCTIONS
CONNECTING THE LP TANK
WARNING
ALL INSTRUCTIONS AND SAFEGUARDS ON THIS PAGE MUST BE FOLLOWED TO PREVENT FIRE, DAMAGE AND/OR INJURY.
1. The knob on the LP tank must be closed. Make sure that the knob is turned clockwise to a full stop. The cylinder supply system must be arranged for vapor withdrawal.
2. Check that the control knob on the control unit is turned off.
3. Remove the protective cap from the LP tank valve and coupling nut.
4. Hold the regulator in one hand and insert the nipple into the valve outlet. Be sure the nipple is centered in the valve outlet. The coupling connects to the large outside threads on the valve outlet. Use care – do not cross thread the connection.
5. Hand tighten the coupling clockwise until it comes to a full stop. Firmly tighten by hand only. Do not use tools.
P
Straight
CAUTION: In the connection process, make sure the regulator inlet connector mates with the cylinder valve outlet properly, safely and firmly.
15
OPERATING INSTRUCTIONS
Any fuel supply cylinder used must be constructed and marked in accordance with specifications for propane cylinders of the U.S. Department of Transportation (DOT) CFR 49, or the Standard for Cylinders, Spheres and Tubes for the Transportation of Dangerous Goods, CAN/CSA B339. The appliance is to be used only with the 20-pound, vertical standing vapor withdrawal type tank and must include a collar to protect the cylinder valve.(A) DO NOT store spare LP cylinders under or near the smoker.(B) NEVER fill cylinder more than 80% full.(C) Do not store cylinder indoors.
WARNINGIf instructions A, B and C above are not followed exactly, a fire causing death or serious injury may occur.
This smoker is designed to operate on LP gas only. The gas cylinder used must include a collar to protect the cylinder valve. The cylinder supply system must be arranged for vapor withdrawal. Do not allow dirt or foreign material to get into or onto tank connection when it is not attached to the fuel supply system. Use the protective cap provided.
WARNINGALL INSTRUCTIONS AND SAFEGUARDS ON THIS PAGE MUST BE FOLLOWED TO PREVENT FIRE, DAMAGE AND/OR INJURY.
The cylinder outlet must have Type 1 gas connection termination in order to mate with gas hose provided with smoker. The pressure regulator and hose assembly supplied by the manufacturer with the appliance must be used. Replacement pressure regulators and hose assemblies must be those specified by the appliance manufacturer.This unit is not to be utilized with a non-self-contained LP-gas supply system.
Valve/pressure regulators are factory set to the correct operating pressures. No attempts should be made to adjust these settings.
DISCONNECT THE LP TANK
Make sure that the knob on the LP tank is turned clockwise to a full stop (CLOSED).
Hold the regulator in one hand, turn the coupling to the valve outlet counterclockwise and unthread the connection by hand only. Do not use tools.
Place dust cap on cylinder valve outlet whenever the cylinder is not in use. Only install the type of dust cap on the cylinder valve outlet that is provided with the cylinder valve. Other types of caps or plugs may result in leakage of propane.
Always hang the regulator on the lifting handles while not in use, disconnected fromthe LP tank, and when the unit has cooled down.
STORE THE TANK IN A PROPER PLACE AS INDICATED IN THIS MANUAL.
16
OPERATING INSTRUCTIONS
CHECKING FOR LEAKS
After connections are made, check all connections and fittings for leaks with a soap solution. 1. With all valves closed, apply the leak check solution (50/50 mix of dishwashing soap and water) to all gas carrying connections and fittings. 2. Open tank valve.Presence of bubbles at areas of wet solution indicates a gas leak. If leaks are detected or you smell or hear gas, shut off the valve and repair the leak or replace the defective part. Do not use the smoker until all leaks are corrected.
The gas hose/regulator assembly should be totally extended to the maximum distance so that the hose is straight and the tank is as far from the smoker as it can be (minimum 24 inches).
For vapor withdrawal, LP tanks are intended to be operated in the upright position only.
If the product is not in use, the gas must be turned off at the supply cylinder and the cylinder should be disconnected from the appliance.
Storage of the appliance indoors is only permissible if the cylinder is disconnected and removed from the appliance. Do not store cylinder indoors.
BEFORE FIRST USE
Remove all hangings or plastic straps, if present.
Before you cook food in your smoker, it is important to “season” your smoker. Seasoning seals the paint and interior of your smoker to enhance flavoring, durability and overall performance.To season your smoker, simply use it as you normally would only do not cook any food. You will need to follow all of the operating procedures in the next few sections of this manual.
Using your desired flavoring woods and marinades, burn your smoker at low temperature (around 175°F) for 45 – 60 minutes. Let the smoker cool and clean out the water and wood.
Once seasoning is complete, your smoker’s interior will have a durable, seasoned coating.
ADDING WATER
To add water before cooking, simply remove the water bowl and fill it with water slightly below the rim. Place the bowl back into the smoker. Adding water before cooking is recommended. To add water while cooking, if a sizzling sound indicating lack of water is heard, or there is a need to add water, open the bottom door with care and avoid taking in the smoke. Use a long nose kettle-like water can, stand as far from the smoker as you can, fill the water bowl up to 1 inch below the rim.
CAUTION: DO NOT pull the water bowl out beyond the rack when the smoker is hot.
17
OPERATING INSTRUCTIONS
COOKING TIP
Line the water bowl with aluminum foil before each use. This will make it easy to clean and help your water bowl last longer.
To make adding water easier and safer, use a clean watering can with a long spout.
ADDING WOOD CHIPS
To add wood chips before cooking, simply fill the wood chip box with your choice of flavoring hardwood chips. The amount and type of wood you use is entirely dependent on the desired amount of flavor. Once the box is filled, place the lid on top of the box and set the box in the smoker.
To add wood chips while cooking, we recommend using tongs or long handled pliers to removethe box lid and to place the pieces into the wood chip box without removing the box. It is not recommended to remove the wood chip box while the smoker is in operation.
CAUTION: The wood chip box and lid get very hot. Avoid handling them while in use. Always wear protective oven mitts when handling hot components.
COOKING TIP: FLAVORING WOOD
• Small wood chips work best inside the wood chip box.• Use dry hardwoods such as hickory, pecan, apple, cherry or mesquite.• To produce more smoke and prevent fast burning, pre-soak the wood chips in a separate bowl of water for at least 20 minutes, or wrap the chips in perforated aluminum foil.• Most smoke flavoring occurs within the first hour of cooking. Adding wood chips after the first hour is typically not necessary unless extra smoke flavoring is desired.
18
OPERATING INSTRUCTIONS
19
OPERATING INSTRUCTIONS
Match Lighting Procedure - LP Gas
1. Repeat Steps 1 through 5 of the igniter lighting system.
2. Open both doors. Place a lit match on to the burner as shown below. Quickly turn the control knob to the “HIGH” position. If the burner does not light in 5 seconds, turn the control knob off, wait at least 5 minutes and for the gas to clear. Repeat the process.
20
OPERATING INSTRUCTIONS
Cooking Tip: Damper Adjustments
WARNING: The dampers on the smoker body and the handle on the smoke stack may become very hot while cooking. Always wear a heat resistant glove when adjusting.
• For best performance, rotate the smoker so that the front or back of the body is facing the wind. This allows the adjustment of the dampers to be more effective and accurate.• The two dampers on smoker body should never be fully closed.• Opening the damper of the smoke stack helps to exhaust both the heat and smoke.• The key to effective smoking is to watch your heat indicator on the door and adjust the damper accordingly.• Temperature maintenance is best controlled by different damper adjustment configurations.
Turning off the Smoker
CAUTION: The smoker can become very hot while in use.Do not touch any portion of the smoker except for the door handle and burner control knob. It may be necessary to use protective gloves.
1. Turn the burner control knob off by pushing in and rotating to “OFF”. The burner flame should go out.
2. Turn off the LP cylinder valve by turning the knob clockwise until it cannot go any farther.
Follow all warnings and safety precautions before removing meat from smoker or preparing the unit for storage.
Lighting Instructions – Charcoal
When using charcoal, DO NOT USE PRETREATED, MATCH-LIGHT CHARCOAL with this smoker. Only use standard, untreated briquettes or lump charcoal and ONLY use charcoal lighting fluid approved for lighting charcoal. Do not use lighter fluid, paint thinners, gasoline, kerosene, alcohol or other flammable material for lighting charcoal. Damage to the smoker may occur with the use of match-light charcoal. DO NOT USE THE LP GAS BURNER WHEN LIGHTING CHARCOAL. Step 1Place the charcoal grate inside the woodchip/charcoal tray and add 1.5 pounds of charcoal on charcoal grate (approximately 26 briquettes).
Step 2Note: Please refer to the manufacturer’s recommended amount of lighter fluid before applying fluid to the briquettes. With the charcoal tray outside the firebox, saturate charcoal with the amount of lighting
LIGHTING INSTRUCTIONS
CAUTION: If the flame extinguishes accidentally during ignition or operation, immediately TURN OFF the cylinder valve and then TURN OFF the control knob.
Igniter Lighting System
1. Check all connections for leaks using the “soap water” test as explained on page 16.
2. Open both of the smoker cabinet doors. Always keep the doors open during lighting.
3. Check for any blockage to the venturi tube or burner, damper setting, ventilation setting. Remove any foreign objects or matter.
4. Be sure the burner control knob is in the “OFF” position.
5. Open the LP cylinder valve by turning counterclockwise.
6. Push igniter on the control unit down 1 to 2 seconds then push and turn control knob to “HIGH,” while still holding the ignitor button down. At this point the burner should ignite.
7. If ignition does not take place within 5 seconds, immediately turn the control knob to OFF. Wait 5 minutes and repeat above Steps 6 and 7.
8. If burner still fails to light, try match lighting using the instructions on page 19.
9. Once the burner is lit, close the doors to allow heat to accumulate. The smoke stack on the top of the smoker can be adjusted to the desired setting to allow proper ventilation and combustion. NEVER CLOSE THE SMOKE STACK COMPLETELY.
WARNING: Always light your smoker with both doors open.
22
CARE AND MAINTENANCE
AFTER USE SAFETY AND MAINTENANCE
WARNING• Use caution when lifting and moving the smoker to avoid strain injuries. Two people are recommended to lift or move the smoker.
• DO NOT store the smoker near gasoline or other combustible liquids or where combustible vapors may be present. Keep the area around the smoker clear and free of combustible materials and vapors.
• DO NOT store this smoker in an area accessible to children or pets. Store the smoker in a dry, protected location. Disconnect cylinder from smoker.
• DO NOT allow anyone to conduct activities around the smoker following use until it has cooled. It is hot during operation and remains hot for a period of time following use.
• DO NOT leave hot ashes unattended until the smoker cools completely.
• The smoker becomes extremely hot – allow the smoker to cool completely before handling. If you must handle the smoker while it is hot, ALWAYS wear protective oven mitts or heat-resistant gloves. Allow the smoker to cool before removing and cleaning the grease pan.
• Dispose of cold ashes by wrapping them in heavy-duty aluminum foil and putting them in a noncombustible container.
• If you must dispose of the ashes in less time than it takes for them to completely cool. Remove the ashes from the smoker, keeping them in heavy-duty foil, and soak them completely with water before disposing of them in a noncombustible container.
GENERAL CARE AND MAINTENANCE CAUTION: All care and maintenance procedures are to be performed while the smoker is turned off and cooled. Always perform maintenance by a qualified service person.
Clean the water bowl and cooking grate with hot, soapy water. Rinse and dry thoroughly. You may prefer to coat the water bowl and cooking grid lightly with cooking oil or cooking spray.
Frequently check and clean the venturi and burner tubes for insects and insect nests. A clogged tube can lead to fire beneath the smoker. Also make sure the smoker does not have any foreign objects obstructing the flow of combustion and ventilation air.
To clean the inside and outside of the smoker cabinet, simply use a damp cloth. Spray-washing with a water hose is not recommended. Moisture should be wiped away and not allowed to stand inside or on top of the smoker. Once cleaned, you may prefer to lightly coat the interior of the smoker cabinet with cooking oil or cooking spray.
If rust is present on the exterior surface of the smoker, clean the area with steel wool or emery cloth and use heavy-duty, heat-resistant paint.
NEVER apply additional paint to the interior of the smoker. If rust is present on the interior of the smoker, clean it thoroughly with steel wool or emery cloth and lightly coat the area with cooking oil or cooking spray to help minimize recurring rust.
When an LP tank is not connected, and to help prevent dirt or other foreign particles from clogging the regulator connector, hang the end of the hose and regulator assembly on the lifting handle.
Keep the ventilation opening(s) of the cylinder enclosure free and clear of debris.
23
CARE AND MAINTENANCE
Inspect the flames at the burner by looking through the observing hole on left side of the burner and control unit. A good flame should be blue with a yellow tip 1 to 2 inch high. If flames are excessively yellow and irregular, oil residue and food deposits may be collecting on the burner. Try cleaning the burner surface with hot, soapy water and cleaning the holes with a pipe cleaner to improve the flames.
Bad flames may also be caused by poor venturi attachment to the orifice. Turn off the control knob and cylinder valve. Always let the smoker cool before cleaning or checking the assembly. Make sure the orifice of the control valve properly mates with the burner mixing tube by visual observation from the bottom of the appliance. The burner venturi tube should overlap the orifice and they should form a straight line as shown in Figure A. Figures B & C show incorrect alignment.
WARNING: If the instructions above are not followed, an explosion may result, possibly causing serious bodily injury or death.
To protect your smoker from weather conditions, always keep it covered while not in use.
2”
Yellow
Light Blue
Blue
Good Flame Bad Flame
! ! !
Figure A Figure B Figure C
Correct Wrong Wrong
The flame goes out. 1. Disconnected gas supply hose. 2. High or gusting winds.
For replacement parts, call our customer service department at 1-800-963-0211, 8:00 a.m. – 6:00 p.m., EST, Monday – Thursday, 8:00 a.m. – 5:00 p.m., EST, Friday.
Owner’s Manual - Part #312-02025-00Printed in China
SpringClip
Qty. 2
CC
BB x21/4-20 FlangedWasher Nut
Hardware Used
R
Q
7. Insert 4 bolts (AA) through the mounting holes on one of the lifting handles (J) and into holes on right side of smoker body (I). Use a Phillips screwdriver to secure the handles to the smoker body (I). Repeat on left side.
7
Hardware Used
CC x 2Spring Clip
I
AA
J
ASSEMBLY INSTRUCTIONS
4. Thread bolts (EE) through holes on the leg - with holes (B) from outside of unit. Secure using 2 nuts (FF) from inside leg by using wrench. Tighten all bolts (AA) with a Phillips screwdriver. Insert the regulator hose attached to the burner and control unit (C) into the hose retention (V).
4
I
V
12. Slide the wood chip box (D) onto the lowest cooking grate supports (T) inside the smoker body (I) and put the wood chip box lid (F) on top. Note: For charcoal, refer to Step 17.
12
DANGER:
Failure to follow these instructions could result in fire, explosion, or burn hazard which could cause property damage, personal injury or death.
DANGER: If you smell gas:1. Shut off gas to the appliance.
3. Open lid.4. If odor continues, keep away from the appliance and immediately call your gas supplier or your fire department.
Assembler/Installer: This instruction manual contains important information necessary for the proper assembly and safe use of this appliance. Read and follow all warnings and instructions before assembling and using this appliance. Leave these instructions with the consumer.
Consumer/User: Follow all warnings and instructions when using this appliance. Keep these instructions for future reference.
1. Never operate this appliance unattended.2. Never operate this appliance within 10 feet (3 m) of any structure, combustible material or other gas cylinder.3. Never operate this appliance within 25 feet (7.5 m) of any flammable liquid.4. Never allow oil or grease to get hotter than 400°F or 200°C. If the temperature exceeds 400°F (200°C) or if oil begins to smoke, immediately turn the burner or gas supply OFF.5. Heated liquids remain at scalding temperatures long after the cooking process. Never touch cooking appliance until liquids have cooled to 115°F (45°C) or less.6. If a fire should occur, keep away from the appliance and immediately call your fire department. Do not attempt to extinguish an oil or grease fire with water. Failure to follow these instructions could result in fire, explosion, or burn hazard which could cause property damage, personal injury or death.
DANGER
DANGER:
Rev. 9/2011
M4 x 10Bolt
Qty. 2
DD EE
M4 Nut
Qty. 2
FF
M5 x 12Screw
Qty. 8
H
J
T
T
U
V
front of smoker
B
front of smoker
M4 x 10 BoltEE
M4 NutFF
Hardware Used
x 2
x 2
B
EE
FF
Hardware Used
AA x 4M6 x 12 Bolt
Hardware Used
AA x 4M6 x 12 Bolt
M5 x 12 ScrewBB x 8
Hardware UsedBB
S
I
R
S
D
FI
I13. Slide the water bowl (G) onto the cooking grate supports (T) inside the smoker body (I) above the wood chip box (D) as shown.
ASSEMBLY INSTRUCTIONS
13
15. Insert the probe of the temperature gauge assembly (M) through hole of the smoker door from the outside. Secure using 2 nuts (DD) from inside panel by using wrench.
16. To install the “AAA” battery (U), remove the igniter button by turning it counterclockwise and insert the “AAA” battery (U) with the positive end facing out. Reinstall the igniter button by turning it clockwise and hand tightening.
17. For charcoal use, remove the wood chip box lid (F) and place the charcoal grate (E) inside the wood chip box (D).
18. Always hang the regulator hose attached to the burner and control unit (C) to the hose retention (V) attached to the leg - with hole (B) while not in use. If switching from LP gas to charcoal, wait for the unit to cool down before disconnecting from the LP tank.
15
16
17
18
DD
M
U
E
B
12
14. Slide the 4 cooking grates (H) onto the top cooking grate supports (T) inside the smoker body (I).
14 I
H
ASSEMBLY INSTRUCTIONS
Hardware Used
DD x 2
D
S
V
M5 Nut
igniter button
21
OPERATING INSTRUCTIONS
fluid as recommended by the lighter fluid manufacturer. Allow the fluid to soak into the charcoal for 3 minutes before placing the tray back into the firebox (refer to assembly instructions for proper tray placement). After soaking the charcoal, place the lighting fluid at a safe distance away from the smoker.
Step 3With both doors open, stand back and carefully light charcoal and allow to burn until covered with a light ash (approximately 20 minutes). Charcoal lighting fluid must be allowed to completely burn off prior to closing the doors. (Fumes will tend to collect in the upper cavity if the door is closed).
DANGER: Closing the firebox doors during the lighting procedure could trap fumes from the charcoal lighting fluid in the smoker box and may result in a flash-fire or explosion when door is opened, resulting in property loss, personal injury or death. Never attempt to add more lighting fluid to the charcoal once it has been lit.
Step 4After 25 - 30 minutes, charcoal should be ready for cooking and/or adding woodchips. Carefully add wood chunks using long cooking tongs.
Adding Charcoal and/or Wood Chips
Additional charcoal and/or wood may be required to maintain or increase cooking temperature.
WARNING: Use caution since flames can flare-up when fresh air suddenly comes in contact with fire. When opening the door, keep hands, face and body a safe distance from hot steam and flame flare-ups.
Step 1Stand back and carefully open smoker box door allowing heat and steam to escape away from your face. Use caution since flames can flare-up when fresh air suddenly comes in contact with fire. Inspect the charcoal level in pan.
Step 2Wearing flame retardant oven mitts/gloves, stand back a safe distance and use long cooking tongs to lightly brush aside ashes on hot coals. Use cooking tongs to add charcoal and/or wood to charcoal pan, being careful not to stir-up ashes and sparks
WARNING: Never add charcoal lighting fluid to hot or even warm coals as flashback may occur causing severe burns.
Step 3Close smoker box door and allow food to continue cooking.
Allow the ashes to completely cool before reusing or cleaning the smoker.
26
REPLACEMENT PARTS LIST
For replacement parts, call our customer service department at 1-800-963-0211, 8:00 a.m. – 6:00 p.m., EST, Monday – Thursday, 8:00 a.m. – 5:00 p.m., EST, Friday.
PART DESCRIPTION PART # 1 Leg – Standard 301-01016-00 2 Leg – with Holes 312-01016-00 3 Burner and Control Unit 312-01015-00 4 Wood Chip Box (MFW only) 312-01028-00 5 Charcoal Grate 312-01030-00 6 Wood Chip Box Lid 301-01029-00 7 Wood Chip Box Handle and 301-01028-02 Lid Handle 8 Water Bowl 301-02017-00 9 Cooking Grate 312-01014-00 10 Door Locking Bracket 302-01008-00 11 Cooking Grate Support 302-01030-00 12 Smoker Body 312-12001-00 13 Square Smoke Stack 312-02009-00 14 Lifting Handle 301-01010-00 15 Logo Plate 302-03002-01 16 Temperature Gauge Bezel 301-01034-00 17 Temperature Gauge 301-01003-00
PART DESCRIPTION PART # 18 Upper Door 302-02002-00 19 Side Table 312-02008-00 20 Door Handle Crank 302-02007-02 21 Door Handle Grip 302-02007-01 22 Bottom Door without Handle 302-02102-00 23 Table Front Support Bracket 312-02008-01 24 Table Back Support Bracket 312-02008-02 25 Side Damper Plate (round) 301-01001-04 26 Igniter Ground Wire 301-01015-08 27 Push Button 301-01015-03 28 Electronic Ignitor 301-01015-06 29 Ignition Cap 301-01015-05 30 Control Knob 301-01015-01 31 Control Knob Bezel 301-01015-02 32 Igniter Electrode and Ignition Wire 301-01015-07 33 Hose Retention 312-01016-01 N/A Hardware Bag 312-02026-00 N/A Owner’s/Instruction Manual 312-02025-00
11
14
21
17
1918
20
22
2324
25
2627
32
30
2928
3331
ANS Z21.89a-2008 CSA 1.18a-2008
• Do not use the smoker if the burner fails to light or fails to remain lit. Under such conditions, gas should be turned off and the fuel cylinder should be disconnected.• Use in high wind conditions that result in poor burner operation such as blowing out and flaring should be avoided. If repositioning the appliance does not improve operation under such wind conditions, the appliance should be turned off.• Install the smoker with the hose regulator assembly extended the full length of the hose (24 in. minimum) directly away from the appliance. When so configured, placement results in maximum tank to smoker distance. When the smoker is operated, the hose/regulator and gas tank should be perpendicular to wind direction. Placing tank closer than 24 inches to the smoker can overheat the tank and cause release of propane through relief openings and can result in tank fire or explosion. • Read and follow all warnings and instructions before assembling and using the appliance.• Follow all warnings and instructions when using the appliance.
NOTE: The installation must confirm with local codes or, in the absence of local codes, with eitherthe National Fuel Gas Code, ANSI Z223.1/NFPA 54, Natural Gas and Propane Installation Code,CSA B149.1, or Propane Storage and Handling Code, B149.2, or the Standard for RecreationalVehicles, ANSI A 119.2/ NFPA 1192, and CSA Z240 RV Series, Recreational Vehicle Code, asapplicable.
WARNINGDO NOT mix old and new batteries.DO NOT mix alkaline, standard (Carbon-Zinc), or rechargeable (Nickel-Cadmium) batteries.DO NOT dispose of batteries in fire. Improper disposal may cause batteries to leak or explode.
The electronic ignition requires 1 “AAA” alkaline battery, which is included.
WARNING:The hose to tank attachment creates a potential trip hazard for user and pedestrians - use caution.Do not allow or cause the gas tank or applianceto tip.
MINIMUM 24 IN. (610 MM)
(Tank not included)
HIGH
LOW OFF
I
C
V
T
T
T
C
Master Forge & M Design® is a registered trademarkof LF, LLC. All rights reserved.
®
D
13
G
2
TABLE OF CONTENTS
Safety Information ......................................................................................................................... 3
Replacement Parts List ................................................................................................................ 26
ITEM #0190449
MODEL #MFW784BDP
DUAL FUELVERTICAL SMOKER
Français p. XX
Español p. XX
1
Français p. 28
Español p. 58
SAFETY INFORMATION
3
Please read and understand this entire manual before attempting to assemble, operate or install the product. If you have any questions regarding the product, please call customer service at 1-800-963-0211, 8:00 a.m. – 6:00 p.m., EST, Monday – Thursday, 8:00 a.m. – 5:00 p.m., EST, Friday.
PACKAGE CONTENTS
6
PART DESCRIPTION QUANTITY A Leg - standard 3 B Leg - with holes 1 C Burner & Control Unit 1 D Wood Chip Box 1 E Charcoal Grate 1 F Wood Chip Box Lid 1 G Water Bowl 1 H Cooking Grate 4 I Smoker Body 1 J Lifting Handle 2 K Door Locking Bracket 2
L Square Smoke Stack 1 M Temperature Gauge & Bezel 1 N Upper Door (pre-assembled) 1 O Bottom Door (pre-assembled) 1 P Side Table 1 Q Door Handle 2 R Table Front Support 1 S Table Back Support 1 T Cooking Grate Support 12 U “AAA” Battery (1.5 V) 1 V Hose Retention 1
PART DESCRIPTION QUANTITY
ASSEMBLY INSTRUCTIONS
8
24
WARRANTY
25
This vertical gas smoker is warranted against broken or damaged parts at the time of purchase. The stainless steel burner is warranted for 3 years. All other parts carry a one (1) year limited warranty except the water bowl, which is warranted to be free of defects for 90 days. Paint is warranted to be free of defects for 90 days except for rust, which may appear after repeated use.
This warranty does not cover damage or issues related to neglect, abuse or modifications to the appliance. Repair labor is not covered.
All parts that meet the warranty requirements will be shipped at no charge via the discretion of GHP Group Inc. (ground shipments, US Mail or Parcel Post ONLY). Any special handling charges (i.e. Second Day, Overnight, etc.) will be the responsibility of the consumer.
All warranty claims apply only to the original purchaser and require a proof of purchase verifying purchase date. Do not return parts to GHP address without first obtaining a return authorization number from our customer service. This service is available by calling toll free 1-800-963-0211, 8:00 a.m. – 6:00 p.m., EST, Monday – Thursday 8:00 a.m. – 5:00 p.m., EST, Friday.
Some states do not allow the exclusion or limitation of incidental or consequential damages orlimitations on how long an implied warranty lasts, so the above limitations or exclusions may not apply to you. This warranty gives you specific legal rights, and you may have other rights that vary from state to state.
GHP Group Inc.8280 Austin AvenueMorton Grove, IL, USA60053-3207
The burner will not light using the igniter procedure.
1. The igniter electrode may be covered with grease or residue.
2. The igniter electrode may have a loose or disconnected wire.
3. No spark is being generated.
4. No gas flow or cylinder valve not open.
5. Vapor lock at coupling nut to LP cylinder.
1.Clean the igniter electrode.
2. Check the connection and reconnect any loose or disconnected wires.
3.Replace the AAA size battery inside the igniter.
4. Make sure LP cylinder is not empty or open cylinder valve.
5. Turn off knob and LP cylinder valve. Disconnect coupling nut from LP cylinder. Reconnect and retry.
The burner will not light with a match.
1. No gas flow or an obstructed gas flow.
1. Check the fuel level. Clean the venturi tube and burner.
HARDWARE CONTENTS (shown actual size)
M6 x 12Bolt
Qty. 32
7
AA BB
Before beginning assembly of product, make sure all parts are present. Compare parts with package contents list and hardware contents list. If any part is missing or damaged, do not attempt to assemble the product.
Estimated Assembly Time: 25 minutes
Tools Required for Assembly (not included): Phillips Head Screwdriver, 1/2 in. Wrench, Pliers.
PREPARATION
M5 Nut
Qty. 2
1. Align the legs - standard (A) with the mounting holes on the bottom left front, right front and left rear of the smoker body (I). Thread bolts (AA) through the holes from the outside of the unit. Tighten all bolts (AA) with a Phillips screwdriver.
Hardware Used
AA x 9M6 x 12 Bolt
2. Align the leg - with holes (B) with the mounting holes on the bottom right rear of the smoker. Thread bolts (AA) through the holes from the outside of the unit. Tighten all bolts (AA) with a Phillips screwdriver.
3. Open the bottom door of the smoker body (I). Turn the burner and control unit (C) upside down and place it on the bottom of the smoker body (I), making sure the 4 mounting holes on the burner and control unit (C) are aligned with the holes on the smoker body (I). Note: The control knob should be on the same side as the door. Check that the burner is properly installed on the orifice before attaching the burner and control unit (C). Thread bolts (AA) through holes from outside of unit. Securely tighten the unit to the bottom with a Phillips screwdriver.
5. CAUTION: This unit is HEAVY! Do not attempt this step without assistance! Close the two doors. With the assistance of a helper, stand the unit upright on its legs on a firm and level surface. (Make sure that the burner/control unit and legs are attached). Open the upper door. Position the square smoke stack (L) with control arm to the left as shown. Using 4 bolts (AA), attach square smoke stack (L) to the top of smoker body (I). Securely tighten with a Phillips screwdriver.
Hardware Used
6. Insert the cooking grate supports (T) into the corresponding holes on rack of the shelf inside the smoker body (I) from the bottom up. NOTE: There are 8 positions to install the cooking grate supports. The cooking grate supports can be installed into positions according to the need of the owner.
8. Align the door locking bracket (K) holes with the holes on the upper right side of the smoker body (I). Thread 2 bolts (AA) through the holes in the door locking bracket (K) into the threaded holes of the smoker body (I). Tighten the bolts (AA) using a Phillips screwdriver. Repeat on lower right side.
9. Slide door handle (Q) through brackets in door. Using pliers, slide a spring clip (CC) over the groove in the door handle as shown. Make sure both of the spring clips are securely attached in the grooves of the handles.
10. Install the side table back support (S) and table front support (R) on the side of the smoker body (I) with screws (BB). Arrows pointing up indicate the correct position of the brackets when fastened to the smoker body (I).
11. With the side table (P) in a parallel position, align the slots in the side table with the table supports (R & S) and insert. To lock the side table (P) in the upright position, swing the side table (P) up, push toward the smoker body (I), and press down on the side table (P) near the body until it is fully fastened in place.
If you have any questions regarding the product, please call customer service at 1-800-963-0211, 8:00 a.m. – 6:00 p.m., EST, Monday – Thursday, 8:00 a.m. – 5:00 p.m., EST, Friday.
2
6
5
8
9
10
11
ATTACH YOUR RECEIPT HERE
Serial Number Purchase Date
Questions, problems, missing parts? Before returning to your retailer, call our customer service department at 1-800-963-0211, 8:00 a.m. – 6:00 p.m., EST, Monday – Thursday, 8:00 a.m. – 5:00 p.m., EST, Friday.
ANS Z21.89a-2008 CSA 1.18a-2008
CALIFORNIA PROPOSITION 65
1. Fuels used in wood, charcoal, gas or oil fired appliances and the products of combustion of such fuels contain chemicals known to the State of California to cause cancer, birth defects or other reproductive harm. 2. This product contains chemicals, including lead and lead compounds, known to the State of California to cause cancer, birth defects or other reproductive harm.
• DO NOT use this product for anything other than its intended purpose. It is NOT intended for commercial use. It is NOT intended to be installed or used in or on a recreational vehicle and/or boat. • Keep a fire extinguisher near this product at all times.• This appliance is for outdoor use only in well-ventilated areas. DO NOT operate it in a building, garage or any other enclosed area, or under overhead construction.• A minimum clearance of 36 inches (92 cm) to combustible material is required on the front, sides and back. It is very important to always maintain proper clearances to combustibles.• The cylinder must be at least 24 inches (61 cm) from the appliance.• DO NOT obstruct the flow of combustion air or ventilation air for the appliance.• When cooking, the smoker must be on a level, stable noncombustible surface in an area clear of combustible material, including tall or dry grass. • Care should be taken to protect the fuel supply hose from damage from either pedestrian or vehicle traffic.• Clean and inspect the hose before each use of the appliance. If there is evidence of abrasion, wear, cuts or leaks, the hose must be replaced prior to the appliance being used. The replacement hose assembly shall be that specified by the manufacturer.• Before each use check that no dead leaves or debris are under the appliance.• Store this appliance in a dry, protected location.• The use of alcohol, prescription or nonprescription drugs may impair the user’s ability to properly assemble and safely operate this appliance.• Allow the smoker to cool to 115°F (45°C) before moving or storing. Use caution when lifting and moving the appliance to avoid back strain or back injury. DO NOT move the appliance while it is in use.• Always hang the regulator on the hose retention wire while not in use or disconnected with the LP (liquid propane) tank. KEEP the fuel supply hose away from any heated surface(s).
SAFETY INFORMATION
4
• DO NOT store and use this appliance near gasoline or other combustible liquids or where other combustible vapors may be present.• DO NOT use this appliance as a heater.• DO NOT leave the appliance unattended while in use. Keep children and pets away from the appliance at all times.• NEVER close the damper completely while cooking. • If you must dispose of ashes in less time than it takes for the ashes to completely cool down, remove the ashes from the appliance, keeping them in the heavy-duty foil, and soak them completely with water before disposing of them in a noncombustible container.• This appliance will be hot during and after use. Use insulated oven mitts or gloves for protection from hot surfaces or splatter from cooking liquids.• Make sure that the orifice of the control valve properly mates with the burner mixing tube by visual observation. Please refer to maintenance section.• Use caution when opening the door of the smoker while in operation. Keep hands, face and body safe from hot steam or flare-ups. DO NOT inhale smoke.• DO NOT wear loose clothing while operating the smoker. Tie back long hair while operating the smoker. ALWAYS wear shoes that fully cover your feet while operating the smoker.• Allow the smoker and its components to cool completely before conducting any routine cleaning or maintenance.• NEVER use glassware, plastic or ceramic cookware on or in your smoker. Use metallic cookware only.• NEVER operate the smoker without water in the water bowl. NEVER allow the water to completely evaporate. Check the water level at least every 2 hours. A sizzling sound may indicate a low water level. Follow instructions in this manual for adding water while operating (see the Operating Instructions section).• When using flavoring wood, add a sufficient amount prior to operation to avoid having to add wood while operating. Adding wood while operating may splash hot water and cause serious injury.• Use of accessories not intended for this smoker is not recommended and may lead to injury or property damage.• An LP cylinder not connected for use should not be stored in the vicinity of the smoker or any other appliance. DO NOT store spare LP cylinders within 10 feet of the smoker. LP cylinders must be stored outdoors, out of reach of children. DO NOT store LP cylinders in a building, garage or any other enclosed area.• DO NOT store LP gas cylinders inside or on top of the smoker. Improper storage of cylinders could lead to explosion, fire and/or personal injury. Cylinders are to be stored outdoors, out of reach of children and must not be stored in a building, garage or any other enclosed area.• While the smoker is not in use, the gas must be turned off at the supply cylinder.• LP gases are heavier than air, tend to pool and collect in low-lying areas, are easily ignited and are highly flammable. Proper care and caution should be employed when dealing with any such fuels.• The smoker should be turned off and all supply valves (on piping or on fuel cylinders) should be closed in the event that the odor of unburned gas is detected. Do not attempt to use the appliance until any gas leaks are fixed and/or the source of the unburned gas odor is accounted for.
SAFETY INFORMATION
5
A
B
C
D
E
F
G
I
S K
LM
NP
O
J
A
I
AA
I
AA
Hardware Used
AA x 3M6 x 12 Bolt
1
3C
AA
Hardware Used
AA x 4M6 x 12 Bolt
Controlarm
I
AAL
AA x 8M6 x 12 Bolt
I
T
AA
K
Q
I
CC
I
R
OPERATING INSTRUCTIONS
CONNECTING THE LP TANK
WARNING
ALL INSTRUCTIONS AND SAFEGUARDS ON THIS PAGE MUST BE FOLLOWED TO PREVENT FIRE, DAMAGE AND/OR INJURY.
1. The knob on the LP tank must be closed. Make sure that the knob is turned clockwise to a full stop. The cylinder supply system must be arranged for vapor withdrawal.
2. Check that the control knob on the control unit is turned off.
3. Remove the protective cap from the LP tank valve and coupling nut.
4. Hold the regulator in one hand and insert the nipple into the valve outlet. Be sure the nipple is centered in the valve outlet. The coupling connects to the large outside threads on the valve outlet. Use care – do not cross thread the connection.
5. Hand tighten the coupling clockwise until it comes to a full stop. Firmly tighten by hand only. Do not use tools.
P
Straight
CAUTION: In the connection process, make sure the regulator inlet connector mates with the cylinder valve outlet properly, safely and firmly.
15
OPERATING INSTRUCTIONS
Any fuel supply cylinder used must be constructed and marked in accordance with specifications for propane cylinders of the U.S. Department of Transportation (DOT) CFR 49, or the Standard for Cylinders, Spheres and Tubes for the Transportation of Dangerous Goods, CAN/CSA B339. The appliance is to be used only with the 20-pound, vertical standing vapor withdrawal type tank and must include a collar to protect the cylinder valve.(A) DO NOT store spare LP cylinders under or near the smoker.(B) NEVER fill cylinder more than 80% full.(C) Do not store cylinder indoors.
WARNINGIf instructions A, B, C above are not followed exactly, a fire causing death or serious injury may occur.
This smoker is designed to operate on LP gas only. The gas cylinder used must include a collar to protect the cylinder valve. The cylinder supply system must be arranged for vapor withdrawal. Do not allow dirt or foreign material to get into or onto tank connection when it is not attached to the fuel supply system. Use the protective cap provided.
WARNINGALL INSTRUCTIONS AND SAFEGUARDS ON THIS PAGE MUST BE FOLLOWED TO PREVENT FIRE, DAMAGE AND/OR INJURY.
The cylinder outlet must have Type 1 gas connection termination in order to mate with gas hose provided with smoker. The pressure regulator and hose assembly supplied by the manufacturer with the appliance must be used. Replacement pressure regulators and hose assemblies must be those specified by the appliance manufacturer.This unit is not to be utilized with a non-self-contained LP-gas supply system.
Valve/pressure regulators are factory set to the correct operating pressures. No attempts should be made to adjust these settings.
DISCONNECT THE LP TANK
Make sure that the knob on the LP tank is turned clockwise to a full stop (CLOSED).
Hold the regulator in one hand, turn the coupling to the valve outlet counterclockwise and unthread the connection by hand only. Do not use tools.
Place dust cap on cylinder valve outlet whenever the cylinder is not in use. Only install the type of dust cap on the cylinder valve outlet that is provided with the cylinder valve. Other types of caps or plugs may result in leakage of propane.
Always hang the regulator on the lifting handles while not in use, disconnected fromthe LP tank, and when the unit has cooled down.
STORE THE TANK IN A PROPER PLACE AS INDICATED IN THIS MANUAL.
16
OPERATING INSTRUCTIONS
CHECKING FOR LEAKS
After connections are made, check all connections and fittings for leaks with a soap solution. 1. With all valves closed, apply the leak check solution (50/50 mix of dishwashing soap and water) to all gas carrying connections and fittings. 2. Open tank valve.Presence of bubbles at areas of wet solution indicates a gas leak. If leaks are detected or you smell or hear gas, shut off the valve and repair the leak or replace the defective part. Do not use the smoker until all leaks are corrected.
The gas hose/regulator assembly should be totally extended to the maximum distance so that the hose is straight and the tank is as far from the smoker as it can be (minimum 24 inches).
For vapor withdrawal, LP tanks are intended to be operated in the upright position only.
If the product is not in use, the gas must be turned off at the supply cylinder and the cylinder should be disconnected from the appliance.
Storage of the appliance indoors is only permissible if the cylinder is disconnected and removed from the appliance. Do not store cylinder indoors.
BEFORE FIRST USE
Remove all hangings or plastic straps, if present.
Before you cook food in your smoker, it is important to “season” your smoker. Seasoning seals the paint and interior of your smoker to enhance flavoring, durability and overall performance.To season your smoker, simply use it as you normally would only do not cook any food. You will need to follow all of the operating procedures in the next few sections of this manual.
Using your desired flavoring woods and marinades, burn your smoker at low temperature (around 175°F) for 45 – 60 minutes. Let the smoker cool and clean out the water and wood.
Once seasoning is complete, your smoker’s interior will have a durable, seasoned coating.
ADDING WATER
To add water before cooking, simply remove the water bowl and fill it with water slightly below the rim. Place the bowl back into the smoker. Adding water before cooking is recommended. To add water while cooking, if a sizzling sound indicating lack of water is heard, or there is a need to add water, open the bottom door with care and avoid taking in the smoke. Use a long nose kettle-like water can, stand as far from the smoker as you can, fill the water bowl up to 1 inch below the rim.
CAUTION: DO NOT pull the water bowl out beyond the rack when the smoker is hot.
17
OPERATING INSTRUCTIONS
COOKING TIP
Line the water bowl with aluminum foil before each use. This will make it easy to clean and help your water bowl last longer.
To make adding water easier and safer, use a clean watering can with a long spout.
ADDING WOOD CHIPS
To add wood chips before cooking, simply fill the wood chip box with your choice of flavoring hardwood chips. The amount and type of wood you use is entirely dependent on the desired amount of flavor. Once the box is filled, place the lid on top of the box and set the box in the smoker.
To add wood chips while cooking, we recommend using tongs or long handled pliers to removethe box lid and to place the pieces into the wood chip box without removing the box. It is not recommended to remove the wood chip box while the smoker is in operation.
CAUTION: The wood chip box and lid get very hot. Avoid handling them while in use. Always wear protective oven mitts when handling hot components.
COOKING TIP: FLAVORING WOOD
• Small wood chips work best inside the wood chip box.• Use dry hardwoods such as hickory, pecan, apple, cherry or mesquite.• To produce more smoke and prevent fast burning, pre-soak the wood chips in a separate bowl of water for at least 20 minutes, or wrap the chips in perforated aluminum foil.• Most smoke flavoring occurs within the first hour of cooking. Adding wood chips after the first hour is typically not necessary unless extra smoke flavoring is desired.
18
OPERATING INSTRUCTIONS
19
OPERATING INSTRUCTIONS
Match Lighting Procedure - LP Gas
1. Repeat steps 1 through 5 of the igniter lighting system.
2. Open both doors. Place a lit match on to the burner as shown below. Quickly turn the control knob to the “HIGH” position. If the burner does not light in 5 seconds, turn the control knob off, wait at least 5 minutes and for the gas to clear. Repeat the process.
20
OPERATING INSTRUCTIONS
Cooking Tip: Damper Adjustments
WARNING: The dampers on the smoker body and the handle on the smoke stack may become very hot while cooking. Always wear a heat resistant glove when adjusting.
• For best performance, rotate the smoker so that the front or back of the body is facing the wind. This allows the adjustment of the dampers to be more effective and accurate.• The two dampers on smoker body should never be fully closed.• Opening the damper of the smoke stack helps to exhaust both the heat and smoke.• The key to effective smoking is to watch your heat indicator on the door and adjust the damper accordingly.• Temperature maintenance is best controlled by different damper adjustment configurations.
Turning off the Smoker
CAUTION: The smoker can become very hot while in use.Do not touch any portion of the smoker except for the door handle and burner control knob. It may be necessary to use protective gloves.
1. Turn the burner control knob off by pushing in and rotating to “OFF”. The burner flame should go out.
2. Turn off the LP cylinder valve by turning the knob clockwise until it cannot go any farther.
Follow all warnings and safety precautions before removing meat from smoker or preparing the unit for storage.
Lighting Instructions – Charcoal
When using charcoal, DO NOT USE PRETREATED, MATCH-LIGHT CHARCOAL with this smoker. Only use standard, untreated briquettes or lump charcoal and ONLY use charcoal lighting fluid approved for lighting charcoal. Do not use lighter fluid, paint thinners, gasoline, kerosene, alcohol or other flammable material for lighting charcoal. Damage to the smoker may occur with the use of match-light charcoal. DO NOT USE THE LP GAS BURNER WHEN LIGHTING CHARCOAL. Step 1Place the charcoal grate inside the woodchip/charcoal tray and add 1.5 pounds of charcoal on charcoal grate (approximately 26 briquettes).
Step 2Note: Please refer to the manufacturer’s recommended amount of lighter fluid before applying fluid to the briquettes. With the charcoal tray outside the firebox, saturate charcoal with the amount of lighting
LIGHTING INSTRUCTIONS
CAUTION: If the flame extinguishes accidentally during ignition or operation, immediately TURN OFF the cylinder valve and then TURN OFF the control knob.
Igniter Lighting System
1. Check all connections for leaks using the “soap water” test as explained on page 16.
2. Open both of the smoker cabinet doors. Always keep the doors open during lighting.
3. Check for any blockage to the venturi tube or burner, damper setting, ventilation setting. Remove any foreign objects or matter.
4. Be sure the burner control knob is in the “OFF” position.
5. Open the LP cylinder valve by turning counterclockwise.
6. Push igniter on the control unit down 1 to 2 seconds then push and turn control knob to “HIGH,” while still holding the ignitor button down. At this point the burner should ignite.
7. If ignition does not take place within 5 seconds, immediately turn the control knob to OFF. Wait 5 minutes and repeat above Steps 6 and 7.
8. If burner still fails to light, try match lighting using the instructions on page 19.
9. Once the burner is lit, close the doors to allow heat to accumulate. The smoke stack on the top of the smoker can be adjusted to the desired setting to allow proper ventilation and combustion. NEVER CLOSE THE SMOKE STACK COMPLETELY.
Warning: Always light your smoker with both doors open.
22
CARE AND MAINTENANCE
AFTER USE SAFETY AND MAINTENANCE
WARNING• Use caution when lifting and moving the smoker to avoid strain injuries. Two people are recommended to lift or move the smoker.
• DO NOT store the smoker near gasoline or other combustible liquids or where combustible vapors may be present. Keep the area around the smoker clear and free of combustible materials and vapors.
• DO NOT store this smoker in an area accessible to children or pets. Store the smoker in a dry, protected location. Disconnect cylinder from smoker.
• DO NOT allow anyone to conduct activities around the smoker following use until it has cooled. It is hot during operation and remains hot for a period of time following use.
• DO NOT leave hot ashes unattended until the smoker cools completely.
• The smoker becomes extremely hot – allow the smoker to cool completely before handling. If you must handle the smoker while it is hot, ALWAYS wear protective oven mitts or heat-resistant gloves. Allow the smoker to cool before removing and cleaning the grease pan.
• Dispose of cold ashes by wrapping them in heavy-duty aluminum foil and putting them in a noncombustible container.
• If you must dispose of the ashes in less time than it takes for them to completely cool. Remove the ashes from the smoker, keeping them in heavy-duty foil, and soak them completely with water before disposing of them in a noncombustible container.
GENERAL CARE AND MAINTENANCE CAUTION: All care and maintenance procedures are to be performed while the smoker is turned off and cooled. Always perform maintenance by a qualified service person.
Clean the water bowl and cooking grate with hot, soapy water. Rinse and dry thoroughly. You may prefer to coat the water bowl and cooking grid lightly with cooking oil or cooking spray.
Frequently check and clean the venturi and burner tubes for insects and insect nests. A clogged tube can lead to fire beneath the smoker. Also make sure the smoker does not have any foreign objects obstructing the flow of combustion and ventilation air.
To clean the inside and outside of the smoker cabinet, simply use a damp cloth. Spray-washing with a water hose is not recommended. Moisture should be wiped away and not allowed to stand inside or on top of the smoker. Once cleaned, you may prefer to lightly coat the interior of the smoker cabinet with cooking oil or cooking spray.
If rust is present on the exterior surface of the smoker, clean the area with steel wool or emery cloth and use heavy-duty, heat-resistant paint.
NEVER apply additional paint to the interior of the smoker. If rust is present on the interior of the smoker, clean it thoroughly with steel wool or emery cloth and lightly coat the area with cooking oil or cooking spray to help minimize recurring rust.
When an LP tank is not connected, and to help prevent dirt or other foreign particles from clogging the regulator connector, hang the end of the hose and regulator assembly on the lifting handle.
Keep the ventilation opening(s) of the cylinder enclosure free and clear of debris.
23
CARE AND MAINTENANCE
Inspect the flames at the burner by looking through the observing hole on left side of the burner and control unit. A good flame should be blue with a yellow tip 1 to 2 inch high. If flames are excessively yellow and irregular, oil residue and food deposits may be collecting on the burner. Try cleaning the burner surface with hot, soapy water and cleaning the holes with a pipe cleaner to improve the flames.
Bad flames may also be caused by poor venturi attachment to the orifice. Turn off the control knob and cylinder valve. Always let the smoker cool before cleaning or checking the assembly. Make sure the orifice of the control valve properly mates with the burner mixing tube by visual observation from the bottom of the appliance. The burner venturi tube should overlap the orifice and they should form a straight line as shown in Figure A. Figures B & C show incorrect alignment.
WARNING: If the instructions above are not followed, an explosion may result, possibly causing serious bodily injury or death.
To protect your smoker from weather conditions, always keep it covered while not in use.
2”
Yellow
Light Blue
Blue
Good Flame Bad Flame
! ! !
Figure A Figure B Figure C
Correct Wrong Wrong
The flame goes out. 1. Disconnected gas supply hose. 2. High or gusting winds.
For replacement parts, call our customer service department at 1-800-963-0211, 8:00 a.m. – 6:00 p.m., EST, Monday – Thursday, 8:00 a.m. – 5:00 p.m., EST, Friday.
Owner’s Manual - Part #312-02025-00Printed in China
SpringClip
Qty. 2
CC
BB x21/4-20 FlangedWasher Nut
Hardware Used
R
Q
7. Insert 4 bolts (AA) through the mounting holes on one of the lifting handles (J) and into holes on right side of smoker body (I). Use a Phillips screwdriver to secure the handles to the smoker body (I). Repeat on left side.
7
Hardware Used
CC x 2Spring Clip
I
AA
J
ASSEMBLY INSTRUCTIONS
4. Thread bolts (EE) through holes on the leg - with holes (B) from outside of unit. Secure using 2 nuts (FF) from inside leg by using wrench. Tighten all bolts (AA) with a Phillips screwdriver. Insert the regulator hose attached to the burner and control unit (C) into the hose retention (V).
4
I
V
12. Slide the wood chip box (D) onto the lowest cooking grate supports (T) inside the smoker body (I) and put the wood chip box lid (F) on top. Note: For charcoal, refer to Step 17.
12
DANGER:
Failure to follow these instructions could result in fire, explosion, or burn hazard which could cause property damage, personal injury or death.
DANGER: If you smell gas:1. Shut off gas to the appliance.
3. Open lid.4. If odor continues, keep away from the appliance and immediately call your gas supplier or your fire department.
Assembler/Installer: This instruction manual contains important information necessary for the proper assembly and safe use of this appliance. Read and follow all warnings and instructions before assembling and using this appliance. Leave these instructions with the consumer.
Consumer/User: Follow all warnings and instructions when using this appliance. Keep these instructions for future reference.
1. Never operate this appliance unattended.2. Never operate this appliance within 10 feet (3 m) of any structure, combustible material or other gas cylinder3. Never operate this appliance within 25 feet (7.5 m) of any flammable liquid.4. Never allow oil or grease to get hotter than 400°F or 200°C. If the temperature exceeds 400°F (200°C) or if oil begins to smoke, immediately turn the burner or gas supply OFF.5. Heated liquids remain at scalding temperatures long after the cooking process. Never touch cooking appliance until liquids have cooled to 115°F (45°C) or less.6. If a fire should occur, keep away from the appliance and immediately call your fire department. Do not attempt to extinguish an oil or grease fire with water. Failure to follow these instructions could result in fire, explosion, or burn hazard which could cause property damage, personal injury or death.
DANGER
DANGER:
Rev. 9/2011
M4 x 10Bolt
Qty. 2
DD EE
M4 Nut
Qty. 2
FF
M5 x 12Screw
Qty. 8
H
J
T
T
U
V
front of smoker
B
front of smoker
M4 x 10 BoltEE
M4 NutFF
Hardware Used
x 2
x 2
B
EE
FF
Hardware Used
AA x 4M6 x 12 Bolt
Hardware Used
AA x 4M6 x 12 Bolt
M5 x 12 ScrewBB x 8
Hardware UsedBB
S
I
R
S
D
FI
I13. Slide the water bowl (G) onto the cooking grate supports (T) inside the smoker body (I) above the wood chip box (D) as shown.
ASSEMBLY INSTRUCTIONS
13
15. Insert the probe of the temperature gauge assembly (M) through hole of the smoker door from the outside. Secure using 2 nuts (DD) from inside panel by using wrench.
16. To install the “AAA” battery (U), remove the igniter button by turning it counterclockwise and insert the “AAA” battery (U) with the positive end facing out. Reinstall the igniter button by turning it clockwise and hand tightening.
17. For charcoal use, remove the wood chip box lid (F) and place the charcoal grate (E) inside the wood chip box (D).
18. Always hang the regulator hose attached to the burner and control unit (C) to the hose retention (V) attached to the leg - with hole (B) while not in use. If switching from LP gas to charcoal, wait for the unit to cool down before disconnecting from the LP tank.
15
16
17
18
DD
M
U
E
B
12
14. Slide the 4 cooking grates (H) onto the top cooking grate supports (T) inside the smoker body (I).
14 I
H
ASSEMBLY INSTRUCTIONS
Hardware Used
DD x 2
D
S
V
M5 Nut
igniter button
21
OPERATING INSTRUCTIONS
fluid as recommended by the lighter fluid manufacturer. Allow the fluid to soak into the charcoal for 3 minutes before placing the tray back into the firebox (refer to assembly instructions for proper tray placement). After soaking the charcoal, place the lighting fluid at a safe distance away from the smoker.
Step 3With both doors open, stand back and carefully light charcoal and allow to burn until covered with a light ash (approximately 20 minutes). Charcoal lighting fluid must be allowed to completely burn off prior to closing the doors. (Fumes will tend to collect in the upper cavity if the door is closed).
DANGER: Closing the firebox doors during the lighting procedure could trap fumes from the charcoal lighting fluid in the smoker box and may result in a flash-fire or explosion when door is opened, resulting in property loss, personal injury or death. Never attempt to add more lighting fluid to the charcoal once it has been lit.
Step 4After 25 - 30 minutes, charcoal should be ready for cooking and/or adding woodchips. Carefully add wood chunks using long cooking tongs.
Adding Charcoal and/or Woodchips
Additional charcoal and/or wood may be required to maintain or increase cooking temperature.
WARNING: Use caution since flames can flare-up when fresh air suddenly comes in contact with fire. When opening the door, keep hands, face and body a safe distance from hot steam and flame flare-ups.
Step 1Stand back and carefully open smoker box door allowing heat and steam to escape away from your face. Use caution since flames can flare-up when fresh air suddenly comes in contact with fire. Inspect the charcoal level in pan.
Step 2Wearing flame retardant oven mitts/gloves, stand back a safe distance and use long cooking tongs to lightly brush aside ashes on hot coals. Use cooking tongs to add charcoal and/or wood to charcoal pan, being careful not to stir-up ashes and sparks
WARNING: Never add charcoal lighting fluid to hot or even warm coals as flashback may occur causing severe burns.
Step 3Close smoker box door and allow food to continue cooking.
Allow the ashes to completely cool before reusing or cleaning the smoker.
26
REPLACEMENT PARTS LIST
For replacement parts, call our customer service department at 1-800-963-0211, 8:00 a.m. – 6:00 p.m. EST, Monday – Thursday, 8:00 a.m. – 5:00 p.m. EST, Friday.
PART DESCRIPTION PART # 1 Leg – Standard 301-01016-00 2 Leg - with holes 312-01016-00 3 Burner and Control Unit 312-01015-00 4 Wood Chip Box (MFW only) 312-01028-00 5 Charcoal Grate 312-01030-00 6 Wood Chip Box Lid 301-01029-00 7 Wood Chip Box Handle and 301-01028-02 Lid Handle 8 Water Bowl 301-02017-00 9 Cooking Grate 312-01014-00 10 Door Locking Bracket 302-01008-00 11 Cooking Grate Support 302-01030-00 12 Smoker Body 312-12001-00 13 Square Smoke Stack 312-02009-00 14 Lifting Handle 301-01010-00 15 Logo Plate 302-03002-01 16 Temperature Gauge Bezel 301-01034-00 17 Temperature Gauge 301-01003-00
PART DESCRIPTION PART # 18 Upper Door 302-02002-00 19 Side Table 312-02008-00 20 Door Handle Crank 302-02007-02 21 Door Handle Grip 302-02007-01 22 Bottom Door without handle 302-02102-00 23 Table Front Support Bracket 312-02008-01 24 Table Back Support Bracket 312-02008-02 25 Side Damper Plate (round) 301-01001-04 26 Igniter Ground Wire 301-01015-08 27 Push Button 301-01015-03 28 Electronic Ignitor 301-01015-06 29 Ignition Cap 301-01015-05 30 Control Knob 301-01015-01 31 Control Knob Bezel 301-01015-02 32 Igniter Electrode and Ignition Wire 301-01015-07 33 Hose Retention 312-01016-01 N/A Hardware Bag 312-02026-00 N/A Owner’s/Instruction Manual 312-02025-00
11
14
21
17
1918
20
22
2324
25
2627
32
30
2928
3331
ANS Z21.89a-2008 CSA 1.18a-2008
• Do not use the smoker if the burner fails to light or fails to remain lit. Under such conditions, gas should be turned off and the fuel cylinder should be disconnected.• Use in high wind conditions that result in poor burner operation such as blowing out and flaring should be avoided. If repositioning the appliance does not improve operation under such wind conditions, the appliance should be turned off.• Install the smoker with the hose regulator assembly extended the full length of the hose (24 in. minimum) directly away from the appliance. When so configured, placement results in maximum tank to smoker distance. When the smoker is operated, the hose/regulator and gas tank should be perpendicular to wind direction. Placing tank closer than 24 inches to the smoker can overheat the tank and cause release of propane through relief openings and can result in tank fire or explosion. • Read and follow all warnings and instructions before assembling and using the appliance.• Follow all warnings and instructions when using the appliance.
NOTE: The installation must confirm with local codes or, in the absence of local codes, with eitherthe National Fuel Gas Code, ANSI Z223.1/NFPA 54, Natural Gas and Propane Installation Code,CSA B149.1, or Propane Storage and Handling Code, B149.2, or the Standard for RecreationalVehicles, ANSI A 119.2/ NFPA 1192, and CSA Z240 RV Series, Recreational Vehicle Code, asapplicable.
WARNINGDO NOT mix old and new batteries.DO NOT mix alkaline, standard (Carbon-Zinc), or rechargeable (Nickel-Cadmium) batteries.DO NOT dispose of batteries in fire. Improper disposal may cause batteries to leak or explode.
The electronic ignition requires 1 “AAA” alkaline battery, which is included.
WARNING:The hose to tank attachment creates a potential trip hazard for user and pedestrians - use caution.Do not allow or cause the gas tank or applianceto tip.
MINIMUM 24 IN. (610 MM)
(Tank not included)
HIGH
LOW OFF
I
C
V
T
T
T
C
Master Forge & M Design® is a registered trademarkof LF, LLC. All rights reserved.
®
13
G
2
TABLE OF CONTENTS
Safety Information ......................................................................................................................... 3
Replacement Parts List ................................................................................................................ 26
ITEM #0156452
MODEL #MFW784BDP
DUAL FUELVERTICAL SMOKER
Français p. XX
Español p. XX
1
Français p. 28
Español p. 55
SAFETY INFORMATION
3
Please read and understand this entire manual before attempting to assemble, operate or install the product. If you have any questions regarding the product, please call customer service at 1-800-963-0211, 8:00 a.m. – 6:00 p.m., EST, Monday – Thursday, 8:00 a.m. – 5:00 p.m., EST, Friday.
PACKAGE CONTENTS
6
PART DESCRIPTION QUANTITY A Leg - standard 3 B Leg - with holes 1 C Burner & Control Unit 1 D Wood Chip Box 1 E Charcoal Grate 1 F Wood Chip Box Lid 1 G Water Bowl 1 H Cooking Grate 4 I Smoker Body 1 J Lifting Handle 2 K Door Locking Bracket 2
L Square Smoke Stack 1 M Temperature Gauge & Bezel 1 N Upper Door (pre-assembled) 1 O Bottom Door (pre-assembled) 1 P Side Table 1 Q Door Handle 2 R Table Front Support 1 S Table Back Support 1 T Cooking Grate Support 12 U “AAA” Battery (1.5 V) 1 V Hose Retention 1
PART DESCRIPTION QUANTITY
ASSEMBLY INSTRUCTIONS
8
24
WARRANTY
25
This vertical gas smoker is warranted against broken or damaged parts at the time of purchase. The stainless steel burner is warranted for 3 years. All other parts carry a one (1) year limited warranty except the water bowl, which is warranted to be free of defects for 90 days. Paint is warranted to be free of defects for 90 days except for rust, which may appear after repeated use.
This warranty does not cover damage or issues related to neglect, abuse or modifications to the appliance. Repair labor is not covered.
All parts that meet the warranty requirements will be shipped at no charge via the discretion of GHP Group Inc. (ground shipments, US Mail or Parcel Post ONLY). Any special handling charges (i.e. Second Day, Overnight, etc.) will be the responsibility of the consumer.
All warranty claims apply only to the original purchaser and require a proof of purchase verifying purchase date. Do not return parts to GHP address without first obtaining a return authorization number from our customer service. This service is available by calling toll free 1-800-963-0211, 8:00 a.m. – 6:00 p.m., EST, Monday – Thursday 8:00 a.m. – 5:00 p.m., EST, Friday.
Some states do not allow the exclusion or limitation of incidental or consequential damages orlimitations on how long an implied warranty lasts, so the above limitations or exclusions may not apply to you. This warranty gives you specific legal rights, and you may have other rights that vary from state to state.
GHP Group Inc.8280 Austin AvenueMorton Grove, IL, USA60053-3207
The burner will not light using the igniter procedure.
1. The igniter electrode may be covered with grease or residue.
2. The igniter electrode may have a loose or disconnected wire.
3. No spark is being generated.
4. No gas flow or cylinder valve not open.
5. Vapor lock at coupling nut to LP cylinder.
1. Clean the igniter electrode.
2. Check the connection and reconnect any loose or disconnected wires.
3. Replace the AAA size battery inside the igniter.
4. Make sure LP cylinder is not empty or open cylinder valve.
5. Turn off knob and LP cylinder valve. Disconnect coupling nut from LP cylinder. Reconnect and retry.
The burner will not light with a match.
1. No gas flow or an obstructed gas flow.
1. Check the fuel level. Clean the venturi tube and burner.
HARDWARE CONTENTS (shown actual size)
M6 x 12Bolt
Qty. 32
7
AA BB
Before beginning assembly of product, make sure all parts are present. Compare parts with package contents list and hardware contents list. If any part is missing or damaged, do not attempt to assemble the product.
Estimated Assembly Time: 25 minutes
Tools Required for Assembly (not included): Phillips Screwdriver, Wrench, Pliers.
PREPARATION
M5 Nut
Qty. 2
1. Align the legs - standard (A) with the mounting holes on the bottom left front, right front and left rear of the smoker body (I). Thread bolts (AA) through the holes from the outside of the unit. Tighten all bolts (AA) with a Phillips screwdriver.
Hardware Used
AA x 9M6 x 12 Bolt
2. Align the leg - with holes (B) with the mounting holes on the bottom right rear of the smoker. Thread bolts (AA) through the holes from the outside of the unit. Tighten all bolts (AA) with a Phillips screwdriver.
3. Open the bottom door of the smoker body (I). Turn the burner and control unit (C) upside down and place it on the bottom of the smoker body (I), making sure the 4 mounting holes on the burner and control unit (C) are aligned with the holes on the smoker body (I). Note: The control knob should be on the same side as the door. Check that the burner is properly installed on the orifice before attaching the burner and control unit (C). Thread bolts (AA) through holes from outside of unit. Securely tighten the unit to the bottom with a Phillips screwdriver.
5. CAUTION: This unit is HEAVY! Do not attempt this step without assistance! Close the two doors. With the assistance of a helper, stand the unit upright on its legs on a firm and level surface. (Make sure that the burner/control unit and legs are attached). Open the upper door. Position the square smoke stack (L) with control arm to the left as shown. Using 4 bolts (AA), attach square smoke stack (L) to the top of smoker body (I). Securely tighten with a Phillips screwdriver.
Hardware Used
6. Insert the cooking grate supports (T) into the corresponding holes on rack of the shelf inside the smoker body (I) from the bottom up. NOTE: There are 8 positions to install the cooking grate supports. The cooking grate supports can be installed into positions according to the need of the owner.
8. Align the door locking bracket (K) holes with the holes on the upper right side of the smoker body (I). Thread 2 bolts (AA) through the holes in the door locking bracket (K) into the threaded holes of the smoker body (I). Tighten the bolts (AA) using a Phillips screwdriver. Repeat on lower right side.
9. Slide door handle (Q) through brackets in door. Using pliers, slide a spring clip (CC) over the groove in the door handle as shown. Make sure both of the spring clips are securely attached in the grooves of the handles.
10. Install the table back support (S) and table front support (R) on the side of the smoker body (I) with screws (BB). Arrows pointing up indicate the correct position of the brackets when fastened to the smoker body (I).
11. With the side table (P) in a parallel position, align the slots in the side table with the table supports (R & S) and insert. To lock the side table (P) in the upright position, swing the side table (P) up, push toward the smoker body (I), and press down on the side table (P) near the body until it is fully fastened in place.
If you have any questions regarding the product, please call customer service at 1-800-963-0211, 8:00 a.m. – 6:00 p.m., EST, Monday – Thursday, 8:00 a.m. – 5:00 p.m., EST, Friday.
2
6
5
8
9
10
11
ATTACH YOUR RECEIPT HERE
Serial Number Purchase Date
Questions, problems, missing parts? Before returning to your retailer, call our customer service department at 1-800-963-0211, 8:00 a.m. – 6:00 p.m., EST, Monday – Thursday, 8:00 a.m. – 5:00 p.m., EST, Friday.
ANS Z21.89a-2008 CSA 1.18a-2008
• DO NOT use this product for anything other than its intended purpose. It is NOT intended for commercial use. It is NOT intended to be installed or used in or on a recreational vehicle and/or boat. • Keep a fire extinguisher near this product at all times.• This appliance is for outdoor use only in well-ventilated areas. DO NOT operate it in a building, garage or any other enclosed area, or under overhead construction.• A minimum clearance of 36 inches (92 cm) to combustible material is required on the front, sides and back. It is very important to always maintain proper clearances to combustibles.• The cylinder must be at least 24 inches (61 cm) from the appliance.• DO NOT obstruct the flow of combustion air or ventilation air for the appliance.• When cooking, the smoker must be on a level, stable noncombustible surface in an area clear of combustible material, including tall or dry grass. • Care should be taken to protect the fuel supply hose from damage from either pedestrian or vehicle traffic.• Clean and inspect the hose before each use of the appliance. If there is evidence of abrasion, wear, cuts or leaks, the hose must be replaced prior to the appliance being used. The replacement hose assembly shall be that specified by the manufacturer.• Before each use check that no dead leaves or debris are under the appliance.• Store this appliance in a dry, protected location.• The use of alcohol, prescription or nonprescription drugs may impair the user’s ability to properly assemble and safely operate this appliance.• Allow the smoker to cool to 115°F (45°C) before moving or storing. Use caution when lifting and moving the appliance to avoid back strain or back injury. DO NOT move the appliance while it is in use.• Always hang the regulator on the hose retention wire while not in use or disconnected with the LP (liquid propane) tank. KEEP the fuel supply hose away from any heated surface(s).
SAFETY INFORMATION
4
• DO NOT store and use this appliance near gasoline or other combustible liquids or where other combustible vapors may be present.• DO NOT use this appliance as a heater.• DO NOT leave the appliance unattended while in use. Keep children and pets away from the appliance at all times.• NEVER close the damper completely while cooking. • If you must dispose of ashes in less time than it takes for the ashes to completely cool down, remove the ashes from the appliance, keeping them in the heavy-duty foil, and soak them completely with water before disposing of them in a noncombustible container.• This appliance will be hot during and after use. Use insulated oven mitts or gloves for protection from hot surfaces or splatter from cooking liquids.• Make sure that the orifice of the control valve properly mates with the burner mixing tube by visual observation. Please refer to maintenance section.• Use caution when opening the door of the smoker while in operation. Keep hands, face and body safe from hot steam or flare-ups. DO NOT inhale smoke.• DO NOT wear loose clothing while operating the smoker. Tie back long hair while operating the smoker. ALWAYS wear shoes that fully cover your feet while operating the smoker.• Allow the smoker and its components to cool completely before conducting any routine cleaning or maintenance.• NEVER use glassware, plastic or ceramic cookware on or in your smoker. Use metallic cookware only.• NEVER operate the smoker without water in the water bowl. NEVER allow the water to completely evaporate. Check the water level at least every 2 hours. A sizzling sound may indicate a low water level. Follow instructions in this manual for adding water while operating (see the Operating Instructions section).• When using flavoring wood, add a sufficient amount prior to operation to avoid having to add wood while operating. Adding wood while operating may splash hot water and cause serious injury.• Use of accessories not intended for this smoker is not recommended and may lead to injury or property damage.• An LP cylinder not connected for use should not be stored in the vicinity of the smoker or any other appliance. DO NOT store spare LP cylinders within 10 feet of the smoker. LP cylinders must be stored outdoors, out of reach of children. DO NOT store LP cylinders in a building, garage or any other enclosed area.• DO NOT store LP gas cylinders inside or on top of the smoker. Improper storage of cylinders could lead to explosion, fire and/or personal injury. Cylinders are to be stored outdoors, out of reach of children and must not be stored in a building, garage or any other enclosed area.• While the smoker is not in use, the gas must be turned off at the supply cylinder.• LP gases are heavier than air, tend to pool and collect in low-lying areas, are easily ignited and are highly flammable. Proper care and caution should be employed when dealing with any such fuels.• The smoker should be turned off and all supply valves (on piping or on fuel cylinders) should be closed in the event that the odor of unburned gas is detected. Do not attempt to use the appliance until any gas leaks are fixed and/or the source of the unburned gas odor is accounted for.
SAFETY INFORMATION
5
A
B
C
D
E
F
G
I
S K
LM
NP
O
J
A
I
AA
I
AA
Hardware Used
AA x 3M6 x 12 Bolt
1
3C
AA
Hardware Used
AA x 4M6 x 12 Bolt
Controlarm
I
AAL
AA x 8M6 x 12 Bolt
I
T
AA
K
Q
I
CC
I
R
OPERATING INSTRUCTIONS
CONNECTING THE LP TANK
WARNING
ALL INSTRUCTIONS AND SAFEGUARDS ON THIS PAGE MUST BE FOLLOWED TO PREVENT FIRE, DAMAGE AND/OR INJURY.
1. The knob on the LP tank must be closed. Make sure that the knob is turned clockwise to a full stop. The cylinder supply system must be arranged for vapor withdrawal.
2. Check that the control knob on the control unit is turned off.
3. Remove the protective cap from the LP tank valve and coupling nut.
4. Hold the regulator in one hand and insert the nipple into the valve outlet. Be sure the nipple is centered in the valve outlet. The coupling connects to the large outside threads on the valve outlet. Use care – do not cross thread the connection.
5. Hand tighten the coupling clockwise until it comes to a full stop. Firmly tighten by hand only. Do not use tools.
P
Straight
CAUTION: In the connection process, make sure the regulator inlet connector mates with the cylinder valve outlet properly, safely and firmly.
15
OPERATING INSTRUCTIONS
Any fuel supply cylinder used must be constructed and marked in accordance with specifications for propane cylinders of the U.S. Department of Transportation (DOT) CFR 49, or the Standard for Cylinders, Spheres and Tubes for the Transportation of Dangerous Goods, CAN/CSA B339. The appliance is to be used only with the 20-pound, vertical standing vapor withdrawal type tank and must include a collar to protect the cylinder valve.(A) DO NOT store spare LP cylinders under or near the smoker.(B) NEVER fill cylinder more than 80% full.(C) Do not store cylinder indoors.
WARNINGIf instructions A, B and C above are not followed exactly, a fire causing death or serious injury may occur.
This smoker is designed to operate on LP gas only. The gas cylinder used must include a collar to protect the cylinder valve. The cylinder supply system must be arranged for vapor withdrawal. Do not allow dirt or foreign material to get into or onto tank connection when it is not attached to the fuel supply system. Use the protective cap provided.
WARNINGALL INSTRUCTIONS AND SAFEGUARDS ON THIS PAGE MUST BE FOLLOWED TO PREVENT FIRE, DAMAGE AND/OR INJURY.
The cylinder outlet must have Type 1 gas connection termination in order to mate with gas hose provided with smoker. The pressure regulator and hose assembly supplied by the manufacturer with the appliance must be used. Replacement pressure regulators and hose assemblies must be those specified by the appliance manufacturer.This unit is not to be utilized with a non-self-contained LP-gas supply system.
Valve/pressure regulators are factory set to the correct operating pressures. No attempts should be made to adjust these settings.
DISCONNECT THE LP TANK
Make sure that the knob on the LP tank is turned clockwise to a full stop (CLOSED).
Hold the regulator in one hand, turn the coupling to the valve outlet counterclockwise and unthread the connection by hand only. Do not use tools.
Place dust cap on cylinder valve outlet whenever the cylinder is not in use. Only install the type of dust cap on the cylinder valve outlet that is provided with the cylinder valve. Other types of caps or plugs may result in leakage of propane.
Always hang the regulator on the lifting handles while not in use, disconnected fromthe LP tank, and when the unit has cooled down.
STORE THE TANK IN A PROPER PLACE AS INDICATED IN THIS MANUAL.
16
OPERATING INSTRUCTIONS
CHECKING FOR LEAKS
After connections are made, check all connections and fittings for leaks with a soap solution. 1. With all valves closed, apply the leak check solution (50/50 mix of dishwashing soap and water) to all gas carrying connections and fittings. 2. Open tank valve.Presence of bubbles at areas of wet solution indicates a gas leak. If leaks are detected or you smell or hear gas, shut off the valve and repair the leak or replace the defective part. Do not use the smoker until all leaks are corrected.
The gas hose/regulator assembly should be totally extended to the maximum distance so that the hose is straight and the tank is as far from the smoker as it can be (minimum 24 inches).
For vapor withdrawal, LP tanks are intended to be operated in the upright position only.
If the product is not in use, the gas must be turned off at the supply cylinder and the cylinder should be disconnected from the appliance.
Storage of the appliance indoors is only permissible if the cylinder is disconnected and removed from the appliance. Do not store cylinder indoors.
BEFORE FIRST USE
Remove all hangings or plastic straps, if present.
Before you cook food in your smoker, it is important to “season” your smoker. Seasoning seals the paint and interior of your smoker to enhance flavoring, durability and overall performance.To season your smoker, simply use it as you normally would only do not cook any food. You will need to follow all of the operating procedures in the next few sections of this manual.
Using your desired flavoring woods and marinades, burn your smoker at low temperature (around 175°F) for 45 – 60 minutes. Let the smoker cool and clean out the water and wood.
Once seasoning is complete, your smoker’s interior will have a durable, seasoned coating.
ADDING WATER
To add water before cooking, simply remove the water bowl and fill it with water slightly below the rim. Place the bowl back into the smoker. Adding water before cooking is recommended. To add water while cooking, if a sizzling sound indicating lack of water is heard, or there is a need to add water, open the bottom door with care and avoid taking in the smoke. Use a long nose kettle-like water can, stand as far from the smoker as you can, fill the water bowl up to 1 inch below the rim.
CAUTION: DO NOT pull the water bowl out beyond the rack when the smoker is hot.
17
OPERATING INSTRUCTIONS
COOKING TIP
Line the water bowl with aluminum foil before each use. This will make it easy to clean and help your water bowl last longer.
To make adding water easier and safer, use a clean watering can with a long spout.
ADDING WOOD CHIPS
To add wood chips before cooking, simply fill the wood chip box with your choice of flavoring hardwood chips. The amount and type of wood you use is entirely dependent on the desired amount of flavor. Once the box is filled, place the lid on top of the box and set the box in the smoker.
To add wood chips while cooking, we recommend using tongs or long handled pliers to removethe box lid and to place the pieces into the wood chip box without removing the box. It is not recommended to remove the wood chip box while the smoker is in operation.
CAUTION: The wood chip box and lid get very hot. Avoid handling them while in use. Always wear protective oven mitts when handling hot components.
COOKING TIP: FLAVORING WOOD
• Small wood chips work best inside the wood chip box.• Use dry hardwoods such as hickory, pecan, apple, cherry or mesquite.• To produce more smoke and prevent fast burning, pre-soak the wood chips in a separate bowl of water for at least 20 minutes, or wrap the chips in perforated aluminum foil.• Most smoke flavoring occurs within the first hour of cooking. Adding wood chips after the first hour is typically not necessary unless extra smoke flavoring is desired.
18
OPERATING INSTRUCTIONS
19
OPERATING INSTRUCTIONS
Match Lighting Procedure - LP Gas
1. Repeat Steps 1 through 5 of the igniter lighting system.
2. Open both doors. Place a lit match on to the burner as shown below. Quickly turn the control knob to the position. If the burner does not light in 5 seconds, turn the control knob to O, wait at least 5 minutes and for the gas to clear. Repeat the process.
20
OPERATING INSTRUCTIONS
Cooking Tip: Damper Adjustments
WARNING: The dampers on the smoker body and the handle on the smoke stack may become very hot while cooking. Always wear a heat resistant glove when adjusting.
• For best performance, rotate the smoker so that the front or back of the body is facing the wind. This allows the adjustment of the dampers to be more effective and accurate.• The two dampers on smoker body should never be fully closed.• Opening the damper of the smoke stack helps to exhaust both the heat and smoke.• The key to effective smoking is to watch your heat indicator on the door and adjust the damper accordingly.• Temperature maintenance is best controlled by different damper adjustment configurations.
Turning off the Smoker
CAUTION: The smoker can become very hot while in use.Do not touch any portion of the smoker except for the door handle and burner control knob. It may be necessary to use protective gloves.
1. Turn the burner control knob off by pushing in and rotating to “OFF”. The burner flame should go out.
2. Turn off the LP cylinder valve by turning the knob clockwise until it cannot go any farther.
Follow all warnings and safety precautions before removing meat from smoker or preparing the unit for storage.
Lighting Instructions – Charcoal
When using charcoal, DO NOT USE PRETREATED, MATCH-LIGHT CHARCOAL with this smoker. Only use standard, untreated briquettes or lump charcoal and ONLY use charcoal lighting fluid approved for lighting charcoal. Do not use lighter fluid, paint thinners, gasoline, kerosene, alcohol or other flammable material for lighting charcoal. Damage to the smoker may occur with the use of match-light charcoal. DO NOT USE THE LP GAS BURNER WHEN LIGHTING CHARCOAL. Step 1Place the charcoal grate inside the woodchip/charcoal tray and add 1.5 pounds of charcoal on charcoal grate (approximately 26 briquettes).
Step 2Note: Please refer to the manufacturer’s recommended amount of lighter fluid before applying fluid to the briquettes. With the charcoal tray outside the firebox, saturate charcoal with the amount of lighting
22
CARE AND MAINTENANCE
AFTER USE SAFETY AND MAINTENANCE
WARNING• Use caution when lifting and moving the smoker to avoid strain injuries. Two people are recommended to lift or move the smoker.
• DO NOT store the smoker near gasoline or other combustible liquids or where combustible vapors may be present. Keep the area around the smoker clear and free of combustible materials and vapors.
• DO NOT store this smoker in an area accessible to children or pets. Store the smoker in a dry, protected location. Disconnect cylinder from smoker.
• DO NOT allow anyone to conduct activities around the smoker following use until it has cooled. It is hot during operation and remains hot for a period of time following use.
• DO NOT leave hot ashes unattended until the smoker cools completely.
• The smoker becomes extremely hot – allow the smoker to cool completely before handling. If you must handle the smoker while it is hot, ALWAYS wear protective oven mitts or heat-resistant gloves. Allow the smoker to cool before removing and cleaning the grease pan.
• Dispose of cold ashes by wrapping them in heavy-duty aluminum foil and putting them in a noncombustible container.
• If you must dispose of the ashes in less time than it takes for them to completely cool. Remove the ashes from the smoker, keeping them in heavy-duty foil, and soak them completely with water before disposing of them in a noncombustible container.
GENERAL CARE AND MAINTENANCE CAUTION: All care and maintenance procedures are to be performed while the smoker is turned off and cooled. Always perform maintenance by a qualified service person.
Clean the water bowl and cooking grate with hot, soapy water. Rinse and dry thoroughly. You may prefer to coat the water bowl and cooking grid lightly with cooking oil or cooking spray.
Frequently check and clean the venturi and burner tubes for insects and insect nests. A clogged tube can lead to fire beneath the smoker. Also make sure the smoker does not have any foreign objects obstructing the flow of combustion and ventilation air.
To clean the inside and outside of the smoker cabinet, simply use a damp cloth. Spray-washing with a water hose is not recommended. Moisture should be wiped away and not allowed to stand inside or on top of the smoker. Once cleaned, you may prefer to lightly coat the interior of the smoker cabinet with cooking oil or cooking spray.
If rust is present on the exterior surface of the smoker, clean the area with steel wool or emery cloth and use heavy-duty, heat-resistant paint.
NEVER apply additional paint to the interior of the smoker. If rust is present on the interior of the smoker, clean it thoroughly with steel wool or emery cloth and lightly coat the area with cooking oil or cooking spray to help minimize recurring rust.
When an LP tank is not connected, and to help prevent dirt or other foreign particles from clogging the regulator connector, hang the end of the hose and regulator assembly on the lifting handle.
Keep the ventilation opening(s) of the cylinder enclosure free and clear of debris.
23
CARE AND MAINTENANCE
Inspect the flames at the burner by looking through the observing hole on left side of the burner and control unit. A good flame should be blue with a yellow tip 1 to 2 inch high. If flames are excessively yellow and irregular, oil residue and food deposits may be collecting on the burner. Try cleaning the burner surface with hot, soapy water and cleaning the holes with a pipe cleaner to improve the flames.
Bad flames may also be caused by poor venturi attachment to the orifice. Turn off the control knob and cylinder valve. Always let the smoker cool before cleaning or checking the assembly. Make sure the orifice of the control valve properly mates with the burner mixing tube by visual observation from the bottom of the appliance. The burner venturi tube should overlap the orifice and they should form a straight line as shown in Figure A. Figures B & C show incorrect alignment.
WARNING: If the instructions above are not followed, an explosion may result, possibly causing serious bodily injury or death.
To protect your smoker from weather conditions, always keep it covered while not in use.
2”
Yellow
Light Blue
Blue
Good Flame Bad Flame
! ! !
Figure A Figure B Figure C
Correct Wrong Wrong
The flame goes out. 1. Disconnected gas supply hose. 2. High or gusting winds.
For replacement parts, call our customer service department at 1-800-963-0211, 8:00 a.m. – 6:00 p.m., EST, Monday – Thursday, 8:00 a.m. – 5:00 p.m., EST, Friday.
Owner’s Manual - Part #312-02025-00Printed in China
SpringClip
Qty. 2
CC
BB x21/4-20 FlangedWasher Nut
Hardware Used
R
Q
7. Insert 4 bolts (AA) through the mounting holes on one of the lifting handles (J) and into holes on right side of smoker body (I). Use a Phillips screwdriver to secure the handles to the smoker body (I). Repeat on left side.
7
Hardware Used
CC x 2Spring Clip
I
AA
J
ASSEMBLY INSTRUCTIONS
4. Thread bolts (EE) through holes on the leg - with holes (B) from outside of unit. Secure using 2 nuts (FF) from inside leg by using wrench. Tighten all bolts (AA) with a Phillips screwdriver. Insert the regulator hose attached to the burner and control unit (C) into the hose retention (V).
4
I
V
12. Slide the wood chip box (D) onto the lowest cooking grate supports (T) inside the smoker body (I) and put the wood chip box lid (F) on top. Note: For charcoal, refer to Step 17.
12
DANGER:
Failure to follow these instructions could result in fire, explosion, or burn hazard which could cause property damage, personal injury or death.
DANGER: If you smell gas:1. Shut off gas to the appliance.
3. Open lid.4. If odor continues, keep away from the appliance and immediately call your gas supplier or your fire department.
Assembler/Installer: This instruction manual contains important information necessary for the proper assembly and safe use of this appliance. Read and follow all warnings and instructions before assembling and using this appliance. Leave these instructions with the consumer.
Consumer/User: Follow all warnings and instructions when using this appliance. Keep these instructions for future reference.
1. Never operate this appliance unattended.2. Never operate this appliance within 10 feet (3 m) of any structure, combustible material or other gas cylinder.3. Never operate this appliance within 25 feet (7.5 m) of any flammable liquid.4. Never allow oil or grease to get hotter than 400°F or 200°C. If the temperature exceeds 400°F (200°C) or if oil begins to smoke, immediately turn the burner or gas supply OFF.5. Heated liquids remain at scalding temperatures long after the cooking process. Never touch cooking appliance until liquids have cooled to 115°F (45°C) or less.6. If a fire should occur, keep away from the appliance and immediately call your fire department. Do not attempt to extinguish an oil or grease fire with water. Failure to follow these instructions could result in fire, explosion, or burn hazard which could cause property damage, personal injury or death.
DANGER
DANGER:
Rev. 10/2011
M4 x 10Bolt
Qty. 2
DD EE
M4 Nut
Qty. 2
FF
M5 x 12Screw
Qty. 8
H
J
T
T
U
V
front of smoker
B
front of smoker
M4 x 10 BoltEE
M4 NutFF
Hardware Used
x 2
x 2
B
EE
FF
Hardware Used
AA x 4M6 x 12 Bolt
Hardware Used
AA x 4M6 x 12 Bolt
M5 x 12 ScrewBB x 8
Hardware UsedBB
S
I
R
S
D
FI
I13. Slide the water bowl (G) onto the cooking grate supports (T) inside the smoker body (I) above the wood chip box (D) as shown.
ASSEMBLY INSTRUCTIONS
13
15. Insert the probe of the temperature gauge assembly (M) through hole of the smoker door from the outside. Secure using 2 nuts (DD) from inside panel by using wrench.
16. To install the “AAA” battery (U), remove the igniter button by turning it counterclockwise and insert the “AAA” battery (U) with the positive end facing out. Reinstall the igniter button by turning it clockwise and hand tightening.
17. For charcoal use, remove the wood chip box lid (F) and place the charcoal grate (E) inside the wood chip box (D).
18. Always hang the regulator hose attached to the burner and control unit (C) to the hose retention (V) attached to the leg - with hole (B) while not in use. If switching from LP gas to charcoal, wait for the unit to cool down before disconnecting from the LP tank.
15
16
17
18
DD
M
U
E
B
12
14. Slide the 4 cooking grates (H) onto the top cooking grate supports (T) inside the smoker body (I).
14 I
H
ASSEMBLY INSTRUCTIONS
Hardware Used
DD x 2
D
S
V
M5 Nut
igniter button
21
OPERATING INSTRUCTIONS
fluid as recommended by the lighter fluid manufacturer. Allow the fluid to soak into the charcoal for 3 minutes before placing the tray back into the firebox (refer to assembly instructions for proper tray placement). After soaking the charcoal, place the lighting fluid at a safe distance away from the smoker.
Step 3With both doors open, stand back and carefully light charcoal and allow to burn until covered with a light ash (approximately 20 minutes). Charcoal lighting fluid must be allowed to completely burn off prior to closing the doors. (Fumes will tend to collect in the upper cavity if the door is closed).
DANGER: Closing the firebox doors during the lighting procedure could trap fumes from the charcoal lighting fluid in the smoker box and may result in a flash-fire or explosion when door is opened, resulting in property loss, personal injury or death. Never attempt to add more lighting fluid to the charcoal once it has been lit.
Step 4After 25 - 30 minutes, charcoal should be ready for cooking and/or adding woodchips. Carefully add wood chunks using long cooking tongs.
Adding Charcoal and/or Wood Chips
Additional charcoal and/or wood may be required to maintain or increase cooking temperature.
WARNING: Use caution since flames can flare-up when fresh air suddenly comes in contact with fire. When opening the door, keep hands, face and body a safe distance from hot steam and flame flare-ups.
Step 1Stand back and carefully open smoker box door allowing heat and steam to escape away from your face. Use caution since flames can flare-up when fresh air suddenly comes in contact with fire. Inspect the charcoal level in pan.
Step 2Wearing flame retardant oven mitts/gloves, stand back a safe distance and use long cooking tongs to lightly brush aside ashes on hot coals. Use cooking tongs to add charcoal and/or wood to charcoal pan, being careful not to stir-up ashes and sparks
WARNING: Never add charcoal lighting fluid to hot or even warm coals as flashback may occur causing severe burns.
Step 3Close smoker box door and allow food to continue cooking.
Allow the ashes to completely cool before reusing or cleaning the smoker.
26
REPLACEMENT PARTS LIST
For replacement parts, call our customer service department at 1-800-963-0211, 8:00 a.m. – 6:00 p.m., EST, Monday – Thursday, 8:00 a.m. – 5:00 p.m., EST, Friday.
PART DESCRIPTION PART # 1 Leg – Standard 301-01016-00 2 Leg – with Holes 312-01016-00 3 Burner and Control Unit 312-01015-00 4 Wood Chip Box (MFW only) 312-01028-00 5 Charcoal Grate 312-01030-00 6 Wood Chip Box Lid 301-01029-00 7 Wood Chip Box Handle and 301-01028-02 Lid Handle 8 Water Bowl 301-02017-00 9 Cooking Grate 312-01014-00 10 Door Locking Bracket 302-01008-00 11 Cooking Grate Support 302-01030-00 12 Smoker Body 312-12001-00 13 Square Smoke Stack 312-02009-00 14 Lifting Handle 301-01010-00 15 Logo Plate 302-03002-01 16 Temperature Gauge Bezel 301-01034-00 17 Temperature Gauge 301-01003-00
PART DESCRIPTION PART # 18 Upper Door 302-02002-00 19 Side Table 312-02008-00 20 Door Handle Crank 302-02007-02 21 Door Handle Grip 302-02007-01 22 Bottom Door without Handle 302-02102-00 23 Table Front Support Bracket 312-02008-01 24 Table Back Support Bracket 312-02008-02 25 Side Damper Plate (round) 301-01001-04 26 Igniter Ground Wire 301-01015-08 27 Push Button 301-01015-03 28 Electronic Ignitor 301-01015-06 29 Ignition Cap 301-01015-05 30 Control Knob 301-01015-01 31 Control Knob Bezel 301-01015-02 32 Igniter Electrode and Ignition Wire 301-01015-07 33 Hose Retention 312-01016-01 N/A Hardware Bag 312-02026-00 N/A Owner’s/Instruction Manual 312-02025-00
11
14
21
17
1918
20
22
2324
25
2627
32
30
2928
3331
ANS Z21.89a-2008 CSA 1.18a-2008
• Do not use the smoker if the burner fails to light or fails to remain lit. Under such conditions, gas should be turned off and the fuel cylinder should be disconnected.• Use in high wind conditions that result in poor burner operation such as blowing out and flaring should be avoided. If repositioning the appliance does not improve operation under such wind conditions, the appliance should be turned off.• Install the smoker with the hose regulator assembly extended the full length of the hose (24 in. minimum) directly away from the appliance. When so configured, placement results in maximum tank to smoker distance. When the smoker is operated, the hose/regulator and gas tank should be perpendicular to wind direction. Placing tank closer than 24 inches to the smoker can overheat the tank and cause release of propane through relief openings and can result in tank fire or explosion. • Read and follow all warnings and instructions before assembling and using the appliance.• Follow all warnings and instructions when using the appliance.
NOTE: The installation must confirm with local codes or, in the absence of local codes, with eitherthe National Fuel Gas Code, ANSI Z223.1/NFPA 54, Natural Gas and Propane Installation Code,CSA B149.1, or Propane Storage and Handling Code, B149.2, or the Standard for RecreationalVehicles, ANSI A 119.2/ NFPA 1192, and CSA Z240 RV Series, Recreational Vehicle Code, asapplicable.
WARNINGDO NOT mix old and new batteries.DO NOT mix alkaline, standard (Carbon-Zinc), or rechargeable (Nickel-Cadmium) batteries.DO NOT dispose of batteries in fire. Improper disposal may cause batteries to leak or explode.
The electronic ignition requires 1 “AAA” alkaline battery, which is included.
WARNING:The hose to tank attachment creates a potential trip hazard for user and pedestrians - use caution.Do not allow or cause the gas tank or applianceto tip.
MINIMUM 24 IN. (610 MM)
(Tank not included)
I
C
V
T
T
T
C
Master Forge & M Design® is a registered trademarkof LF, LLC. All rights reserved.
®
D
LIGHTING INSTRUCTIONS
CAUTION: If the flame extinguishes accidentally during ignition or operation, immediately TURN OFF the cylinder valve and then TURN OFF the control knob.Igniter Lighting System
1. Check all connections for leaks using the “soap water” test as explained on page 16 for “checking for leaks.”
2. Open both of the smoker cabinet doors. Always keep the doors open during lighting.
3. Check for any blockage to the venturi tube or burner, damper setting, ventilation setting. Remove any foreign objects or matter.
4. Be sure the burner control knob is in the O position.
5. Open the LP cylinder valve by turning counterclockwise .
6. Push igniter on the control unit down 1 to 2 seconds then push and turn control knob to while still holding the ignitor button down. At this point the burner should ignite.
7. If ignition does not take place within 5 seconds, immediately turn the control knob to O. Wait 5 minutes and repeat above steps 6 and 7.
8. If burner still fails to light, try match lighting using the instructions on page 19.
9. Once the burner is lit, close the doors to allow heat to accumulate. The smoke stack on the top of the smoker can be adjusted to the desired setting to allow proper ventilation and combustion. NEVER CLOSE THE SMOKE STACK COMPLETELY.
Warning: Always light your smoker with both doors open.
CALIFORNIA PROPOSITION 65
Fuels used in gas or oil fired appliances and the products of combustion of such fuels containchemicals known to the State of California to cause cancer, birth defects or other reproductiveharm. This product contains chemicals, including lead and lead compounds, known to the State ofCalifornia to cause cancer, birth defects or other reproductive harm. Wash hands after handling.
13
G
2
TABLE OF CONTENTS
Safety Information ......................................................................................................................... 3
Replacement Parts List ................................................................................................................ 26
ITEM #0190449
MODEL #MFW784BDP
DUAL FUELVERTICAL SMOKER
Français p. XX
Español p. XX
1
Français p. 28
Español p. 58
SAFETY INFORMATION
3
Please read and understand this entire manual before attempting to assemble, operate or install the product. If you have any questions regarding the product, please call customer service at 1-800-963-0211, 8:00 a.m. – 6:00 p.m., EST, Monday – Thursday, 8:00 a.m. – 5:00 p.m., EST, Friday.
PACKAGE CONTENTS
6
PART DESCRIPTION QUANTITY A Leg - standard 3 B Leg - with holes 1 C Burner & Control Unit 1 D Wood Chip Box 1 E Charcoal Grate 1 F Wood Chip Box Lid 1 G Water Bowl 1 H Cooking Grate 4 I Smoker Body 1 J Lifting Handle 2 K Door Locking Bracket 2
L Square Smoke Stack 1 M Temperature Gauge & Bezel 1 N Upper Door (pre-assembled) 1 O Bottom Door (pre-assembled) 1 P Side Table 1 Q Door Handle 2 R Table Front Support 1 S Table Back Support 1 T Cooking Grate Support 12 U “AAA” Battery (1.5 V) 1 V Hose Retention 1
PART DESCRIPTION QUANTITY
ASSEMBLY INSTRUCTIONS
8
24
WARRANTY
25
This vertical gas smoker is warranted against broken or damaged parts at the time of purchase. The stainless steel burner is warranted for 3 years. All other parts carry a one (1) year limited warranty except the water bowl, which is warranted to be free of defects for 90 days. Paint is warranted to be free of defects for 90 days except for rust, which may appear after repeated use.
This warranty does not cover damage or issues related to neglect, abuse or modifications to the appliance. Repair labor is not covered.
All parts that meet the warranty requirements will be shipped at no charge via the discretion of GHP Group Inc. (ground shipments, US Mail or Parcel Post ONLY). Any special handling charges (i.e. Second Day, Overnight, etc.) will be the responsibility of the consumer.
All warranty claims apply only to the original purchaser and require a proof of purchase verifying purchase date. Do not return parts to GHP address without first obtaining a return authorization number from our customer service. This service is available by calling toll free 1-800-963-0211, 8:00 a.m. – 6:00 p.m., EST, Monday – Thursday 8:00 a.m. – 5:00 p.m., EST, Friday.
Some states do not allow the exclusion or limitation of incidental or consequential damages orlimitations on how long an implied warranty lasts, so the above limitations or exclusions may not apply to you. This warranty gives you specific legal rights, and you may have other rights that vary from state to state.
GHP Group Inc.8280 Austin AvenueMorton Grove, IL, USA60053-3207
The burner will not light using the igniter procedure.
1. The igniter electrode may be covered with grease or residue.
2. The igniter electrode may have a loose or disconnected wire.
3. No spark is being generated.
4. No gas flow or cylinder valve not open.
5. Vapor lock at coupling nut to LP cylinder.
1.Clean the igniter electrode.
2. Check the connection and reconnect any loose or disconnected wires.
3.Replace the AAA size battery inside the igniter.
4. Make sure LP cylinder is not empty or open cylinder valve.
5. Turn off knob and LP cylinder valve. Disconnect coupling nut from LP cylinder. Reconnect and retry.
The burner will not light with a match.
1. No gas flow or an obstructed gas flow.
1. Check the fuel level. Clean the venturi tube and burner.
HARDWARE CONTENTS (shown actual size)
M6 x 12Bolt
Qty. 32
7
AA BB
Before beginning assembly of product, make sure all parts are present. Compare parts with package contents list and hardware contents list. If any part is missing or damaged, do not attempt to assemble the product.
Estimated Assembly Time: 25 minutes
Tools Required for Assembly (not included): Phillips Head Screwdriver, 1/2 in. Wrench, Pliers.
PREPARATION
M5 Nut
Qty. 2
1. Align the legs - standard (A) with the mounting holes on the bottom left front, right front and left rear of the smoker body (I). Thread bolts (AA) through the holes from the outside of the unit. Tighten all bolts (AA) with a Phillips screwdriver.
Hardware Used
AA x 9M6 x 12 Bolt
2. Align the leg - with holes (B) with the mounting holes on the bottom right rear of the smoker. Thread bolts (AA) through the holes from the outside of the unit. Tighten all bolts (AA) with a Phillips screwdriver.
3. Open the bottom door of the smoker body (I). Turn the burner and control unit (C) upside down and place it on the bottom of the smoker body (I), making sure the 4 mounting holes on the burner and control unit (C) are aligned with the holes on the smoker body (I). Note: The control knob should be on the same side as the door. Check that the burner is properly installed on the orifice before attaching the burner and control unit (C). Thread bolts (AA) through holes from outside of unit. Securely tighten the unit to the bottom with a Phillips screwdriver.
5. CAUTION: This unit is HEAVY! Do not attempt this step without assistance! Close the two doors. With the assistance of a helper, stand the unit upright on its legs on a firm and level surface. (Make sure that the burner/control unit and legs are attached). Open the upper door. Position the square smoke stack (L) with control arm to the left as shown. Using 4 bolts (AA), attach square smoke stack (L) to the top of smoker body (I). Securely tighten with a Phillips screwdriver.
Hardware Used
6. Insert the cooking grate supports (T) into the corresponding holes on rack of the shelf inside the smoker body (I) from the bottom up. NOTE: There are 8 positions to install the cooking grate supports. The cooking grate supports can be installed into positions according to the need of the owner.
8. Align the door locking bracket (K) holes with the holes on the upper right side of the smoker body (I). Thread 2 bolts (AA) through the holes in the door locking bracket (K) into the threaded holes of the smoker body (I). Tighten the bolts (AA) using a Phillips screwdriver. Repeat on lower right side.
9. Slide door handle (Q) through brackets in door. Using pliers, slide a spring clip (CC) over the groove in the door handle as shown. Make sure both of the spring clips are securely attached in the grooves of the handles.
10. Install the side table back support (S) and table front support (R) on the side of the smoker body (I) with screws (BB). Arrows pointing up indicate the correct position of the brackets when fastened to the smoker body (I).
11. With the side table (P) in a parallel position, align the slots in the side table with the table supports (R & S) and insert. To lock the side table (P) in the upright position, swing the side table (P) up, push toward the smoker body (I), and press down on the side table (P) near the body until it is fully fastened in place.
If you have any questions regarding the product, please call customer service at 1-800-963-0211, 8:00 a.m. – 6:00 p.m., EST, Monday – Thursday, 8:00 a.m. – 5:00 p.m., EST, Friday.
2
6
5
8
9
10
11
ATTACH YOUR RECEIPT HERE
Serial Number Purchase Date
Questions, problems, missing parts? Before returning to your retailer, call our customer service department at 1-800-963-0211, 8:00 a.m. – 6:00 p.m., EST, Monday – Thursday, 8:00 a.m. – 5:00 p.m., EST, Friday.
ANS Z21.89a-2008 CSA 1.18a-2008
CALIFORNIA PROPOSITION 65
1. Fuels used in wood, charcoal, gas or oil fired appliances and the products of combustion of such fuels contain chemicals known to the State of California to cause cancer, birth defects or other reproductive harm. 2. This product contains chemicals, including lead and lead compounds, known to the State of California to cause cancer, birth defects or other reproductive harm.
• DO NOT use this product for anything other than its intended purpose. It is NOT intended for commercial use. It is NOT intended to be installed or used in or on a recreational vehicle and/or boat. • Keep a fire extinguisher near this product at all times.• This appliance is for outdoor use only in well-ventilated areas. DO NOT operate it in a building, garage or any other enclosed area, or under overhead construction.• A minimum clearance of 36 inches (92 cm) to combustible material is required on the front, sides and back. It is very important to always maintain proper clearances to combustibles.• The cylinder must be at least 24 inches (61 cm) from the appliance.• DO NOT obstruct the flow of combustion air or ventilation air for the appliance.• When cooking, the smoker must be on a level, stable noncombustible surface in an area clear of combustible material, including tall or dry grass. • Care should be taken to protect the fuel supply hose from damage from either pedestrian or vehicle traffic.• Clean and inspect the hose before each use of the appliance. If there is evidence of abrasion, wear, cuts or leaks, the hose must be replaced prior to the appliance being used. The replacement hose assembly shall be that specified by the manufacturer.• Before each use check that no dead leaves or debris are under the appliance.• Store this appliance in a dry, protected location.• The use of alcohol, prescription or nonprescription drugs may impair the user’s ability to properly assemble and safely operate this appliance.• Allow the smoker to cool to 115°F (45°C) before moving or storing. Use caution when lifting and moving the appliance to avoid back strain or back injury. DO NOT move the appliance while it is in use.• Always hang the regulator on the hose retention wire while not in use or disconnected with the LP (liquid propane) tank. KEEP the fuel supply hose away from any heated surface(s).
SAFETY INFORMATION
4
• DO NOT store and use this appliance near gasoline or other combustible liquids or where other combustible vapors may be present.• DO NOT use this appliance as a heater.• DO NOT leave the appliance unattended while in use. Keep children and pets away from the appliance at all times.• NEVER close the damper completely while cooking. • If you must dispose of ashes in less time than it takes for the ashes to completely cool down, remove the ashes from the appliance, keeping them in the heavy-duty foil, and soak them completely with water before disposing of them in a noncombustible container.• This appliance will be hot during and after use. Use insulated oven mitts or gloves for protection from hot surfaces or splatter from cooking liquids.• Make sure that the orifice of the control valve properly mates with the burner mixing tube by visual observation. Please refer to maintenance section.• Use caution when opening the door of the smoker while in operation. Keep hands, face and body safe from hot steam or flare-ups. DO NOT inhale smoke.• DO NOT wear loose clothing while operating the smoker. Tie back long hair while operating the smoker. ALWAYS wear shoes that fully cover your feet while operating the smoker.• Allow the smoker and its components to cool completely before conducting any routine cleaning or maintenance.• NEVER use glassware, plastic or ceramic cookware on or in your smoker. Use metallic cookware only.• NEVER operate the smoker without water in the water bowl. NEVER allow the water to completely evaporate. Check the water level at least every 2 hours. A sizzling sound may indicate a low water level. Follow instructions in this manual for adding water while operating (see the Operating Instructions section).• When using flavoring wood, add a sufficient amount prior to operation to avoid having to add wood while operating. Adding wood while operating may splash hot water and cause serious injury.• Use of accessories not intended for this smoker is not recommended and may lead to injury or property damage.• An LP cylinder not connected for use should not be stored in the vicinity of the smoker or any other appliance. DO NOT store spare LP cylinders within 10 feet of the smoker. LP cylinders must be stored outdoors, out of reach of children. DO NOT store LP cylinders in a building, garage or any other enclosed area.• DO NOT store LP gas cylinders inside or on top of the smoker. Improper storage of cylinders could lead to explosion, fire and/or personal injury. Cylinders are to be stored outdoors, out of reach of children and must not be stored in a building, garage or any other enclosed area.• While the smoker is not in use, the gas must be turned off at the supply cylinder.• LP gases are heavier than air, tend to pool and collect in low-lying areas, are easily ignited and are highly flammable. Proper care and caution should be employed when dealing with any such fuels.• The smoker should be turned off and all supply valves (on piping or on fuel cylinders) should be closed in the event that the odor of unburned gas is detected. Do not attempt to use the appliance until any gas leaks are fixed and/or the source of the unburned gas odor is accounted for.
SAFETY INFORMATION
5
A
B
C
D
E
F
G
I
S K
LM
NP
O
J
A
I
AA
I
AA
Hardware Used
AA x 3M6 x 12 Bolt
1
3C
AA
Hardware Used
AA x 4M6 x 12 Bolt
Controlarm
I
AAL
AA x 8M6 x 12 Bolt
I
T
AA
K
Q
I
CC
I
R
OPERATING INSTRUCTIONS
CONNECTING THE LP TANK
WARNING
ALL INSTRUCTIONS AND SAFEGUARDS ON THIS PAGE MUST BE FOLLOWED TO PREVENT FIRE, DAMAGE AND/OR INJURY.
1. The knob on the LP tank must be closed. Make sure that the knob is turned clockwise to a full stop. The cylinder supply system must be arranged for vapor withdrawal.
2. Check that the control knob on the control unit is turned off.
3. Remove the protective cap from the LP tank valve and coupling nut.
4. Hold the regulator in one hand and insert the nipple into the valve outlet. Be sure the nipple is centered in the valve outlet. The coupling connects to the large outside threads on the valve outlet. Use care – do not cross thread the connection.
5. Hand tighten the coupling clockwise until it comes to a full stop. Firmly tighten by hand only. Do not use tools.
P
Straight
CAUTION: In the connection process, make sure the regulator inlet connector mates with the cylinder valve outlet properly, safely and firmly.
15
OPERATING INSTRUCTIONS
Any fuel supply cylinder used must be constructed and marked in accordance with specifications for propane cylinders of the U.S. Department of Transportation (DOT) CFR 49, or the Standard for Cylinders, Spheres and Tubes for the Transportation of Dangerous Goods, CAN/CSA B339. The appliance is to be used only with the 20-pound, vertical standing vapor withdrawal type tank and must include a collar to protect the cylinder valve.(A) DO NOT store spare LP cylinders under or near the smoker.(B) NEVER fill cylinder more than 80% full.(C) Do not store cylinder indoors.
WARNINGIf instructions A, B, C above are not followed exactly, a fire causing death or serious injury may occur.
This smoker is designed to operate on LP gas only. The gas cylinder used must include a collar to protect the cylinder valve. The cylinder supply system must be arranged for vapor withdrawal. Do not allow dirt or foreign material to get into or onto tank connection when it is not attached to the fuel supply system. Use the protective cap provided.
WARNINGALL INSTRUCTIONS AND SAFEGUARDS ON THIS PAGE MUST BE FOLLOWED TO PREVENT FIRE, DAMAGE AND/OR INJURY.
The cylinder outlet must have Type 1 gas connection termination in order to mate with gas hose provided with smoker. The pressure regulator and hose assembly supplied by the manufacturer with the appliance must be used. Replacement pressure regulators and hose assemblies must be those specified by the appliance manufacturer.This unit is not to be utilized with a non-self-contained LP-gas supply system.
Valve/pressure regulators are factory set to the correct operating pressures. No attempts should be made to adjust these settings.
DISCONNECT THE LP TANK
Make sure that the knob on the LP tank is turned clockwise to a full stop (CLOSED).
Hold the regulator in one hand, turn the coupling to the valve outlet counterclockwise and unthread the connection by hand only. Do not use tools.
Place dust cap on cylinder valve outlet whenever the cylinder is not in use. Only install the type of dust cap on the cylinder valve outlet that is provided with the cylinder valve. Other types of caps or plugs may result in leakage of propane.
Always hang the regulator on the lifting handles while not in use, disconnected fromthe LP tank, and when the unit has cooled down.
STORE THE TANK IN A PROPER PLACE AS INDICATED IN THIS MANUAL.
16
OPERATING INSTRUCTIONS
CHECKING FOR LEAKS
After connections are made, check all connections and fittings for leaks with a soap solution. 1. With all valves closed, apply the leak check solution (50/50 mix of dishwashing soap and water) to all gas carrying connections and fittings. 2. Open tank valve.Presence of bubbles at areas of wet solution indicates a gas leak. If leaks are detected or you smell or hear gas, shut off the valve and repair the leak or replace the defective part. Do not use the smoker until all leaks are corrected.
The gas hose/regulator assembly should be totally extended to the maximum distance so that the hose is straight and the tank is as far from the smoker as it can be (minimum 24 inches).
For vapor withdrawal, LP tanks are intended to be operated in the upright position only.
If the product is not in use, the gas must be turned off at the supply cylinder and the cylinder should be disconnected from the appliance.
Storage of the appliance indoors is only permissible if the cylinder is disconnected and removed from the appliance. Do not store cylinder indoors.
BEFORE FIRST USE
Remove all hangings or plastic straps, if present.
Before you cook food in your smoker, it is important to “season” your smoker. Seasoning seals the paint and interior of your smoker to enhance flavoring, durability and overall performance.To season your smoker, simply use it as you normally would only do not cook any food. You will need to follow all of the operating procedures in the next few sections of this manual.
Using your desired flavoring woods and marinades, burn your smoker at low temperature (around 175°F) for 45 – 60 minutes. Let the smoker cool and clean out the water and wood.
Once seasoning is complete, your smoker’s interior will have a durable, seasoned coating.
ADDING WATER
To add water before cooking, simply remove the water bowl and fill it with water slightly below the rim. Place the bowl back into the smoker. Adding water before cooking is recommended. To add water while cooking, if a sizzling sound indicating lack of water is heard, or there is a need to add water, open the bottom door with care and avoid taking in the smoke. Use a long nose kettle-like water can, stand as far from the smoker as you can, fill the water bowl up to 1 inch below the rim.
CAUTION: DO NOT pull the water bowl out beyond the rack when the smoker is hot.
17
OPERATING INSTRUCTIONS
COOKING TIP
Line the water bowl with aluminum foil before each use. This will make it easy to clean and help your water bowl last longer.
To make adding water easier and safer, use a clean watering can with a long spout.
ADDING WOOD CHIPS
To add wood chips before cooking, simply fill the wood chip box with your choice of flavoring hardwood chips. The amount and type of wood you use is entirely dependent on the desired amount of flavor. Once the box is filled, place the lid on top of the box and set the box in the smoker.
To add wood chips while cooking, we recommend using tongs or long handled pliers to removethe box lid and to place the pieces into the wood chip box without removing the box. It is not recommended to remove the wood chip box while the smoker is in operation.
CAUTION: The wood chip box and lid get very hot. Avoid handling them while in use. Always wear protective oven mitts when handling hot components.
COOKING TIP: FLAVORING WOOD
• Small wood chips work best inside the wood chip box.• Use dry hardwoods such as hickory, pecan, apple, cherry or mesquite.• To produce more smoke and prevent fast burning, pre-soak the wood chips in a separate bowl of water for at least 20 minutes, or wrap the chips in perforated aluminum foil.• Most smoke flavoring occurs within the first hour of cooking. Adding wood chips after the first hour is typically not necessary unless extra smoke flavoring is desired.
18
OPERATING INSTRUCTIONS
19
OPERATING INSTRUCTIONS
Match Lighting Procedure - LP Gas
1. Repeat steps 1 through 5 of the igniter lighting system.
2. Open both doors. Place a lit match on to the burner as shown below. Quickly turn the control knob to the “HIGH” position. If the burner does not light in 5 seconds, turn the control knob off, wait at least 5 minutes and for the gas to clear. Repeat the process.
20
OPERATING INSTRUCTIONS
Cooking Tip: Damper Adjustments
WARNING: The dampers on the smoker body and the handle on the smoke stack may become very hot while cooking. Always wear a heat resistant glove when adjusting.
• For best performance, rotate the smoker so that the front or back of the body is facing the wind. This allows the adjustment of the dampers to be more effective and accurate.• The two dampers on smoker body should never be fully closed.• Opening the damper of the smoke stack helps to exhaust both the heat and smoke.• The key to effective smoking is to watch your heat indicator on the door and adjust the damper accordingly.• Temperature maintenance is best controlled by different damper adjustment configurations.
Turning off the Smoker
CAUTION: The smoker can become very hot while in use.Do not touch any portion of the smoker except for the door handle and burner control knob. It may be necessary to use protective gloves.
1. Turn the burner control knob off by pushing in and rotating to “OFF”. The burner flame should go out.
2. Turn off the LP cylinder valve by turning the knob clockwise until it cannot go any farther.
Follow all warnings and safety precautions before removing meat from smoker or preparing the unit for storage.
Lighting Instructions – Charcoal
When using charcoal, DO NOT USE PRETREATED, MATCH-LIGHT CHARCOAL with this smoker. Only use standard, untreated briquettes or lump charcoal and ONLY use charcoal lighting fluid approved for lighting charcoal. Do not use lighter fluid, paint thinners, gasoline, kerosene, alcohol or other flammable material for lighting charcoal. Damage to the smoker may occur with the use of match-light charcoal. DO NOT USE THE LP GAS BURNER WHEN LIGHTING CHARCOAL. Step 1Place the charcoal grate inside the woodchip/charcoal tray and add 1.5 pounds of charcoal on charcoal grate (approximately 26 briquettes).
Step 2Note: Please refer to the manufacturer’s recommended amount of lighter fluid before applying fluid to the briquettes. With the charcoal tray outside the firebox, saturate charcoal with the amount of lighting
LIGHTING INSTRUCTIONS
CAUTION: If the flame extinguishes accidentally during ignition or operation, immediately TURN OFF the cylinder valve and then TURN OFF the control knob.
Igniter Lighting System
1. Check all connections for leaks using the “soap water” test as explained on page 16.
2. Open both of the smoker cabinet doors. Always keep the doors open during lighting.
3. Check for any blockage to the venturi tube or burner, damper setting, ventilation setting. Remove any foreign objects or matter.
4. Be sure the burner control knob is in the “OFF” position.
5. Open the LP cylinder valve by turning counterclockwise.
6. Push igniter on the control unit down 1 to 2 seconds then push and turn control knob to “HIGH,” while still holding the ignitor button down. At this point the burner should ignite.
7. If ignition does not take place within 5 seconds, immediately turn the control knob to OFF. Wait 5 minutes and repeat above Steps 6 and 7.
8. If burner still fails to light, try match lighting using the instructions on page 19.
9. Once the burner is lit, close the doors to allow heat to accumulate. The smoke stack on the top of the smoker can be adjusted to the desired setting to allow proper ventilation and combustion. NEVER CLOSE THE SMOKE STACK COMPLETELY.
Warning: Always light your smoker with both doors open.
22
CARE AND MAINTENANCE
AFTER USE SAFETY AND MAINTENANCE
WARNING• Use caution when lifting and moving the smoker to avoid strain injuries. Two people are recommended to lift or move the smoker.
• DO NOT store the smoker near gasoline or other combustible liquids or where combustible vapors may be present. Keep the area around the smoker clear and free of combustible materials and vapors.
• DO NOT store this smoker in an area accessible to children or pets. Store the smoker in a dry, protected location. Disconnect cylinder from smoker.
• DO NOT allow anyone to conduct activities around the smoker following use until it has cooled. It is hot during operation and remains hot for a period of time following use.
• DO NOT leave hot ashes unattended until the smoker cools completely.
• The smoker becomes extremely hot – allow the smoker to cool completely before handling. If you must handle the smoker while it is hot, ALWAYS wear protective oven mitts or heat-resistant gloves. Allow the smoker to cool before removing and cleaning the grease pan.
• Dispose of cold ashes by wrapping them in heavy-duty aluminum foil and putting them in a noncombustible container.
• If you must dispose of the ashes in less time than it takes for them to completely cool. Remove the ashes from the smoker, keeping them in heavy-duty foil, and soak them completely with water before disposing of them in a noncombustible container.
GENERAL CARE AND MAINTENANCE CAUTION: All care and maintenance procedures are to be performed while the smoker is turned off and cooled. Always perform maintenance by a qualified service person.
Clean the water bowl and cooking grate with hot, soapy water. Rinse and dry thoroughly. You may prefer to coat the water bowl and cooking grid lightly with cooking oil or cooking spray.
Frequently check and clean the venturi and burner tubes for insects and insect nests. A clogged tube can lead to fire beneath the smoker. Also make sure the smoker does not have any foreign objects obstructing the flow of combustion and ventilation air.
To clean the inside and outside of the smoker cabinet, simply use a damp cloth. Spray-washing with a water hose is not recommended. Moisture should be wiped away and not allowed to stand inside or on top of the smoker. Once cleaned, you may prefer to lightly coat the interior of the smoker cabinet with cooking oil or cooking spray.
If rust is present on the exterior surface of the smoker, clean the area with steel wool or emery cloth and use heavy-duty, heat-resistant paint.
NEVER apply additional paint to the interior of the smoker. If rust is present on the interior of the smoker, clean it thoroughly with steel wool or emery cloth and lightly coat the area with cooking oil or cooking spray to help minimize recurring rust.
When an LP tank is not connected, and to help prevent dirt or other foreign particles from clogging the regulator connector, hang the end of the hose and regulator assembly on the lifting handle.
Keep the ventilation opening(s) of the cylinder enclosure free and clear of debris.
23
CARE AND MAINTENANCE
Inspect the flames at the burner by looking through the observing hole on left side of the burner and control unit. A good flame should be blue with a yellow tip 1 to 2 inch high. If flames are excessively yellow and irregular, oil residue and food deposits may be collecting on the burner. Try cleaning the burner surface with hot, soapy water and cleaning the holes with a pipe cleaner to improve the flames.
Bad flames may also be caused by poor venturi attachment to the orifice. Turn off the control knob and cylinder valve. Always let the smoker cool before cleaning or checking the assembly. Make sure the orifice of the control valve properly mates with the burner mixing tube by visual observation from the bottom of the appliance. The burner venturi tube should overlap the orifice and they should form a straight line as shown in Figure A. Figures B & C show incorrect alignment.
WARNING: If the instructions above are not followed, an explosion may result, possibly causing serious bodily injury or death.
To protect your smoker from weather conditions, always keep it covered while not in use.
2”
Yellow
Light Blue
Blue
Good Flame Bad Flame
! ! !
Figure A Figure B Figure C
Correct Wrong Wrong
The flame goes out. 1. Disconnected gas supply hose. 2. High or gusting winds.
For replacement parts, call our customer service department at 1-800-963-0211, 8:00 a.m. – 6:00 p.m., EST, Monday – Thursday, 8:00 a.m. – 5:00 p.m., EST, Friday.
Owner’s Manual - Part #312-02025-00Printed in China
SpringClip
Qty. 2
CC
BB x21/4-20 FlangedWasher Nut
Hardware Used
R
Q
7. Insert 4 bolts (AA) through the mounting holes on one of the lifting handles (J) and into holes on right side of smoker body (I). Use a Phillips screwdriver to secure the handles to the smoker body (I). Repeat on left side.
7
Hardware Used
CC x 2Spring Clip
I
AA
J
ASSEMBLY INSTRUCTIONS
4. Thread bolts (EE) through holes on the leg - with holes (B) from outside of unit. Secure using 2 nuts (FF) from inside leg by using wrench. Tighten all bolts (AA) with a Phillips screwdriver. Insert the regulator hose attached to the burner and control unit (C) into the hose retention (V).
4
I
V
12. Slide the wood chip box (D) onto the lowest cooking grate supports (T) inside the smoker body (I) and put the wood chip box lid (F) on top. Note: For charcoal, refer to Step 17.
12
DANGER:
Failure to follow these instructions could result in fire, explosion, or burn hazard which could cause property damage, personal injury or death.
DANGER: If you smell gas:1. Shut off gas to the appliance.
3. Open lid.4. If odor continues, keep away from the appliance and immediately call your gas supplier or your fire department.
Assembler/Installer: This instruction manual contains important information necessary for the proper assembly and safe use of this appliance. Read and follow all warnings and instructions before assembling and using this appliance. Leave these instructions with the consumer.
Consumer/User: Follow all warnings and instructions when using this appliance. Keep these instructions for future reference.
1. Never operate this appliance unattended.2. Never operate this appliance within 10 feet (3 m) of any structure, combustible material or other gas cylinder3. Never operate this appliance within 25 feet (7.5 m) of any flammable liquid.4. Never allow oil or grease to get hotter than 400°F or 200°C. If the temperature exceeds 400°F (200°C) or if oil begins to smoke, immediately turn the burner or gas supply OFF.5. Heated liquids remain at scalding temperatures long after the cooking process. Never touch cooking appliance until liquids have cooled to 115°F (45°C) or less.6. If a fire should occur, keep away from the appliance and immediately call your fire department. Do not attempt to extinguish an oil or grease fire with water. Failure to follow these instructions could result in fire, explosion, or burn hazard which could cause property damage, personal injury or death.
DANGER
DANGER:
Rev. 9/2011
M4 x 10Bolt
Qty. 2
DD EE
M4 Nut
Qty. 2
FF
M5 x 12Screw
Qty. 8
H
J
T
T
U
V
front of smoker
B
front of smoker
M4 x 10 BoltEE
M4 NutFF
Hardware Used
x 2
x 2
B
EE
FF
Hardware Used
AA x 4M6 x 12 Bolt
Hardware Used
AA x 4M6 x 12 Bolt
M5 x 12 ScrewBB x 8
Hardware UsedBB
S
I
R
S
D
FI
I13. Slide the water bowl (G) onto the cooking grate supports (T) inside the smoker body (I) above the wood chip box (D) as shown.
ASSEMBLY INSTRUCTIONS
13
15. Insert the probe of the temperature gauge assembly (M) through hole of the smoker door from the outside. Secure using 2 nuts (DD) from inside panel by using wrench.
16. To install the “AAA” battery (U), remove the igniter button by turning it counterclockwise and insert the “AAA” battery (U) with the positive end facing out. Reinstall the igniter button by turning it clockwise and hand tightening.
17. For charcoal use, remove the wood chip box lid (F) and place the charcoal grate (E) inside the wood chip box (D).
18. Always hang the regulator hose attached to the burner and control unit (C) to the hose retention (V) attached to the leg - with hole (B) while not in use. If switching from LP gas to charcoal, wait for the unit to cool down before disconnecting from the LP tank.
15
16
17
18
DD
M
U
E
B
12
14. Slide the 4 cooking grates (H) onto the top cooking grate supports (T) inside the smoker body (I).
14 I
H
ASSEMBLY INSTRUCTIONS
Hardware Used
DD x 2
D
S
V
M5 Nut
igniter button
21
OPERATING INSTRUCTIONS
fluid as recommended by the lighter fluid manufacturer. Allow the fluid to soak into the charcoal for 3 minutes before placing the tray back into the firebox (refer to assembly instructions for proper tray placement). After soaking the charcoal, place the lighting fluid at a safe distance away from the smoker.
Step 3With both doors open, stand back and carefully light charcoal and allow to burn until covered with a light ash (approximately 20 minutes). Charcoal lighting fluid must be allowed to completely burn off prior to closing the doors. (Fumes will tend to collect in the upper cavity if the door is closed).
DANGER: Closing the firebox doors during the lighting procedure could trap fumes from the charcoal lighting fluid in the smoker box and may result in a flash-fire or explosion when door is opened, resulting in property loss, personal injury or death. Never attempt to add more lighting fluid to the charcoal once it has been lit.
Step 4After 25 - 30 minutes, charcoal should be ready for cooking and/or adding woodchips. Carefully add wood chunks using long cooking tongs.
Adding Charcoal and/or Woodchips
Additional charcoal and/or wood may be required to maintain or increase cooking temperature.
WARNING: Use caution since flames can flare-up when fresh air suddenly comes in contact with fire. When opening the door, keep hands, face and body a safe distance from hot steam and flame flare-ups.
Step 1Stand back and carefully open smoker box door allowing heat and steam to escape away from your face. Use caution since flames can flare-up when fresh air suddenly comes in contact with fire. Inspect the charcoal level in pan.
Step 2Wearing flame retardant oven mitts/gloves, stand back a safe distance and use long cooking tongs to lightly brush aside ashes on hot coals. Use cooking tongs to add charcoal and/or wood to charcoal pan, being careful not to stir-up ashes and sparks
WARNING: Never add charcoal lighting fluid to hot or even warm coals as flashback may occur causing severe burns.
Step 3Close smoker box door and allow food to continue cooking.
Allow the ashes to completely cool before reusing or cleaning the smoker.
26
REPLACEMENT PARTS LIST
For replacement parts, call our customer service department at 1-800-963-0211, 8:00 a.m. – 6:00 p.m. EST, Monday – Thursday, 8:00 a.m. – 5:00 p.m. EST, Friday.
PART DESCRIPTION PART # 1 Leg – Standard 301-01016-00 2 Leg - with holes 312-01016-00 3 Burner and Control Unit 312-01015-00 4 Wood Chip Box (MFW only) 312-01028-00 5 Charcoal Grate 312-01030-00 6 Wood Chip Box Lid 301-01029-00 7 Wood Chip Box Handle and 301-01028-02 Lid Handle 8 Water Bowl 301-02017-00 9 Cooking Grate 312-01014-00 10 Door Locking Bracket 302-01008-00 11 Cooking Grate Support 302-01030-00 12 Smoker Body 312-12001-00 13 Square Smoke Stack 312-02009-00 14 Lifting Handle 301-01010-00 15 Logo Plate 302-03002-01 16 Temperature Gauge Bezel 301-01034-00 17 Temperature Gauge 301-01003-00
PART DESCRIPTION PART # 18 Upper Door 302-02002-00 19 Side Table 312-02008-00 20 Door Handle Crank 302-02007-02 21 Door Handle Grip 302-02007-01 22 Bottom Door without handle 302-02102-00 23 Table Front Support Bracket 312-02008-01 24 Table Back Support Bracket 312-02008-02 25 Side Damper Plate (round) 301-01001-04 26 Igniter Ground Wire 301-01015-08 27 Push Button 301-01015-03 28 Electronic Ignitor 301-01015-06 29 Ignition Cap 301-01015-05 30 Control Knob 301-01015-01 31 Control Knob Bezel 301-01015-02 32 Igniter Electrode and Ignition Wire 301-01015-07 33 Hose Retention 312-01016-01 N/A Hardware Bag 312-02026-00 N/A Owner’s/Instruction Manual 312-02025-00
11
14
21
17
1918
20
22
2324
25
2627
32
30
2928
3331
ANS Z21.89a-2008 CSA 1.18a-2008
• Do not use the smoker if the burner fails to light or fails to remain lit. Under such conditions, gas should be turned off and the fuel cylinder should be disconnected.• Use in high wind conditions that result in poor burner operation such as blowing out and flaring should be avoided. If repositioning the appliance does not improve operation under such wind conditions, the appliance should be turned off.• Install the smoker with the hose regulator assembly extended the full length of the hose (24 in. minimum) directly away from the appliance. When so configured, placement results in maximum tank to smoker distance. When the smoker is operated, the hose/regulator and gas tank should be perpendicular to wind direction. Placing tank closer than 24 inches to the smoker can overheat the tank and cause release of propane through relief openings and can result in tank fire or explosion. • Read and follow all warnings and instructions before assembling and using the appliance.• Follow all warnings and instructions when using the appliance.
NOTE: The installation must confirm with local codes or, in the absence of local codes, with eitherthe National Fuel Gas Code, ANSI Z223.1/NFPA 54, Natural Gas and Propane Installation Code,CSA B149.1, or Propane Storage and Handling Code, B149.2, or the Standard for RecreationalVehicles, ANSI A 119.2/ NFPA 1192, and CSA Z240 RV Series, Recreational Vehicle Code, asapplicable.
WARNINGDO NOT mix old and new batteries.DO NOT mix alkaline, standard (Carbon-Zinc), or rechargeable (Nickel-Cadmium) batteries.DO NOT dispose of batteries in fire. Improper disposal may cause batteries to leak or explode.
The electronic ignition requires 1 “AAA” alkaline battery, which is included.
WARNING:The hose to tank attachment creates a potential trip hazard for user and pedestrians - use caution.Do not allow or cause the gas tank or applianceto tip.
MINIMUM 24 IN. (610 MM)
(Tank not included)
HIGH
LOW OFF
I
C
V
T
T
T
C
Master Forge & M Design® is a registered trademarkof LF, LLC. All rights reserved.
®
13
G
2
TABLE OF CONTENTS
Safety Information ......................................................................................................................... 3
Replacement Parts List ................................................................................................................ 26
ITEM #0156452
MODEL #MFW784BDP
DUAL FUELVERTICAL SMOKER
Français p. XX
Español p. XX
1
Français p. 28
Español p. 55
SAFETY INFORMATION
3
Please read and understand this entire manual before attempting to assemble, operate or install the product. If you have any questions regarding the product, please call customer service at 1-800-963-0211, 8:00 a.m. – 6:00 p.m., EST, Monday – Thursday, 8:00 a.m. – 5:00 p.m., EST, Friday.
PACKAGE CONTENTS
6
PART DESCRIPTION QUANTITY A Leg - standard 3 B Leg - with holes 1 C Burner & Control Unit 1 D Wood Chip Box 1 E Charcoal Grate 1 F Wood Chip Box Lid 1 G Water Bowl 1 H Cooking Grate 4 I Smoker Body 1 J Lifting Handle 2 K Door Locking Bracket 2
L Square Smoke Stack 1 M Temperature Gauge & Bezel 1 N Upper Door (pre-assembled) 1 O Bottom Door (pre-assembled) 1 P Side Table 1 Q Door Handle 2 R Table Front Support 1 S Table Back Support 1 T Cooking Grate Support 12 U “AAA” Battery (1.5 V) 1 V Hose Retention 1
PART DESCRIPTION QUANTITY
ASSEMBLY INSTRUCTIONS
8
24
WARRANTY
25
This vertical gas smoker is warranted against broken or damaged parts at the time of purchase. The stainless steel burner is warranted for 3 years. All other parts carry a one (1) year limited warranty except the water bowl, which is warranted to be free of defects for 90 days. Paint is warranted to be free of defects for 90 days except for rust, which may appear after repeated use.
This warranty does not cover damage or issues related to neglect, abuse or modifications to the appliance. Repair labor is not covered.
All parts that meet the warranty requirements will be shipped at no charge via the discretion of GHP Group Inc. (ground shipments, US Mail or Parcel Post ONLY). Any special handling charges (i.e. Second Day, Overnight, etc.) will be the responsibility of the consumer.
All warranty claims apply only to the original purchaser and require a proof of purchase verifying purchase date. Do not return parts to GHP address without first obtaining a return authorization number from our customer service. This service is available by calling toll free 1-800-963-0211, 8:00 a.m. – 6:00 p.m., EST, Monday – Thursday 8:00 a.m. – 5:00 p.m., EST, Friday.
Some states do not allow the exclusion or limitation of incidental or consequential damages orlimitations on how long an implied warranty lasts, so the above limitations or exclusions may not apply to you. This warranty gives you specific legal rights, and you may have other rights that vary from state to state.
GHP Group Inc.8280 Austin AvenueMorton Grove, IL, USA60053-3207
The burner will not light using the igniter procedure.
1. The igniter electrode may be covered with grease or residue.
2. The igniter electrode may have a loose or disconnected wire.
3. No spark is being generated.
4. No gas flow or cylinder valve not open.
5. Vapor lock at coupling nut to LP cylinder.
1. Clean the igniter electrode.
2. Check the connection and reconnect any loose or disconnected wires.
3. Replace the AAA size battery inside the igniter.
4. Make sure LP cylinder is not empty or open cylinder valve.
5. Turn off knob and LP cylinder valve. Disconnect coupling nut from LP cylinder. Reconnect and retry.
The burner will not light with a match.
1. No gas flow or an obstructed gas flow.
1. Check the fuel level. Clean the venturi tube and burner.
HARDWARE CONTENTS (shown actual size)
M6 x 12Bolt
Qty. 32
7
AA BB
Before beginning assembly of product, make sure all parts are present. Compare parts with package contents list and hardware contents list. If any part is missing or damaged, do not attempt to assemble the product.
Estimated Assembly Time: 25 minutes
Tools Required for Assembly (not included): Phillips Screwdriver, Wrench, Pliers.
PREPARATION
M5 Nut
Qty. 2
1. Align the legs - standard (A) with the mounting holes on the bottom left front, right front and left rear of the smoker body (I). Thread bolts (AA) through the holes from the outside of the unit. Tighten all bolts (AA) with a Phillips screwdriver.
Hardware Used
AA x 9M6 x 12 Bolt
2. Align the leg - with holes (B) with the mounting holes on the bottom right rear of the smoker. Thread bolts (AA) through the holes from the outside of the unit. Tighten all bolts (AA) with a Phillips screwdriver.
3. Open the bottom door of the smoker body (I). Turn the burner and control unit (C) upside down and place it on the bottom of the smoker body (I), making sure the 4 mounting holes on the burner and control unit (C) are aligned with the holes on the smoker body (I). Note: The control knob should be on the same side as the door. Check that the burner is properly installed on the orifice before attaching the burner and control unit (C). Thread bolts (AA) through holes from outside of unit. Securely tighten the unit to the bottom with a Phillips screwdriver.
5. CAUTION: This unit is HEAVY! Do not attempt this step without assistance! Close the two doors. With the assistance of a helper, stand the unit upright on its legs on a firm and level surface. (Make sure that the burner/control unit and legs are attached). Open the upper door. Position the square smoke stack (L) with control arm to the left as shown. Using 4 bolts (AA), attach square smoke stack (L) to the top of smoker body (I). Securely tighten with a Phillips screwdriver.
Hardware Used
6. Insert the cooking grate supports (T) into the corresponding holes on rack of the shelf inside the smoker body (I) from the bottom up. NOTE: There are 8 positions to install the cooking grate supports. The cooking grate supports can be installed into positions according to the need of the owner.
8. Align the door locking bracket (K) holes with the holes on the upper right side of the smoker body (I). Thread 2 bolts (AA) through the holes in the door locking bracket (K) into the threaded holes of the smoker body (I). Tighten the bolts (AA) using a Phillips screwdriver. Repeat on lower right side.
9. Slide door handle (Q) through brackets in door. Using pliers, slide a spring clip (CC) over the groove in the door handle as shown. Make sure both of the spring clips are securely attached in the grooves of the handles.
10. Install the table back support (S) and table front support (R) on the side of the smoker body (I) with screws (BB). Arrows pointing up indicate the correct position of the brackets when fastened to the smoker body (I).
11. With the side table (P) in a parallel position, align the slots in the side table with the table supports (R & S) and insert. To lock the side table (P) in the upright position, swing the side table (P) up, push toward the smoker body (I), and press down on the side table (P) near the body until it is fully fastened in place.
If you have any questions regarding the product, please call customer service at 1-800-963-0211, 8:00 a.m. – 6:00 p.m., EST, Monday – Thursday, 8:00 a.m. – 5:00 p.m., EST, Friday.
2
6
5
8
9
10
11
ATTACH YOUR RECEIPT HERE
Serial Number Purchase Date
Questions, problems, missing parts? Before returning to your retailer, call our customer service department at 1-800-963-0211, 8:00 a.m. – 6:00 p.m., EST, Monday – Thursday, 8:00 a.m. – 5:00 p.m., EST, Friday.
ANS Z21.89a-2008 CSA 1.18a-2008
• DO NOT use this product for anything other than its intended purpose. It is NOT intended for commercial use. It is NOT intended to be installed or used in or on a recreational vehicle and/or boat. • Keep a fire extinguisher near this product at all times.• This appliance is for outdoor use only in well-ventilated areas. DO NOT operate it in a building, garage or any other enclosed area, or under overhead construction.• A minimum clearance of 36 inches (92 cm) to combustible material is required on the front, sides and back. It is very important to always maintain proper clearances to combustibles.• The cylinder must be at least 24 inches (61 cm) from the appliance.• DO NOT obstruct the flow of combustion air or ventilation air for the appliance.• When cooking, the smoker must be on a level, stable noncombustible surface in an area clear of combustible material, including tall or dry grass. • Care should be taken to protect the fuel supply hose from damage from either pedestrian or vehicle traffic.• Clean and inspect the hose before each use of the appliance. If there is evidence of abrasion, wear, cuts or leaks, the hose must be replaced prior to the appliance being used. The replacement hose assembly shall be that specified by the manufacturer.• Before each use check that no dead leaves or debris are under the appliance.• Store this appliance in a dry, protected location.• The use of alcohol, prescription or nonprescription drugs may impair the user’s ability to properly assemble and safely operate this appliance.• Allow the smoker to cool to 115°F (45°C) before moving or storing. Use caution when lifting and moving the appliance to avoid back strain or back injury. DO NOT move the appliance while it is in use.• Always hang the regulator on the hose retention wire while not in use or disconnected with the LP (liquid propane) tank. KEEP the fuel supply hose away from any heated surface(s).
SAFETY INFORMATION
4
• DO NOT store and use this appliance near gasoline or other combustible liquids or where other combustible vapors may be present.• DO NOT use this appliance as a heater.• DO NOT leave the appliance unattended while in use. Keep children and pets away from the appliance at all times.• NEVER close the damper completely while cooking. • If you must dispose of ashes in less time than it takes for the ashes to completely cool down, remove the ashes from the appliance, keeping them in the heavy-duty foil, and soak them completely with water before disposing of them in a noncombustible container.• This appliance will be hot during and after use. Use insulated oven mitts or gloves for protection from hot surfaces or splatter from cooking liquids.• Make sure that the orifice of the control valve properly mates with the burner mixing tube by visual observation. Please refer to maintenance section.• Use caution when opening the door of the smoker while in operation. Keep hands, face and body safe from hot steam or flare-ups. DO NOT inhale smoke.• DO NOT wear loose clothing while operating the smoker. Tie back long hair while operating the smoker. ALWAYS wear shoes that fully cover your feet while operating the smoker.• Allow the smoker and its components to cool completely before conducting any routine cleaning or maintenance.• NEVER use glassware, plastic or ceramic cookware on or in your smoker. Use metallic cookware only.• NEVER operate the smoker without water in the water bowl. NEVER allow the water to completely evaporate. Check the water level at least every 2 hours. A sizzling sound may indicate a low water level. Follow instructions in this manual for adding water while operating (see the Operating Instructions section).• When using flavoring wood, add a sufficient amount prior to operation to avoid having to add wood while operating. Adding wood while operating may splash hot water and cause serious injury.• Use of accessories not intended for this smoker is not recommended and may lead to injury or property damage.• An LP cylinder not connected for use should not be stored in the vicinity of the smoker or any other appliance. DO NOT store spare LP cylinders within 10 feet of the smoker. LP cylinders must be stored outdoors, out of reach of children. DO NOT store LP cylinders in a building, garage or any other enclosed area.• DO NOT store LP gas cylinders inside or on top of the smoker. Improper storage of cylinders could lead to explosion, fire and/or personal injury. Cylinders are to be stored outdoors, out of reach of children and must not be stored in a building, garage or any other enclosed area.• While the smoker is not in use, the gas must be turned off at the supply cylinder.• LP gases are heavier than air, tend to pool and collect in low-lying areas, are easily ignited and are highly flammable. Proper care and caution should be employed when dealing with any such fuels.• The smoker should be turned off and all supply valves (on piping or on fuel cylinders) should be closed in the event that the odor of unburned gas is detected. Do not attempt to use the appliance until any gas leaks are fixed and/or the source of the unburned gas odor is accounted for.
SAFETY INFORMATION
5
A
B
C
D
E
F
G
I
S K
LM
NP
O
J
A
I
AA
I
AA
Hardware Used
AA x 3M6 x 12 Bolt
1
3C
AA
Hardware Used
AA x 4M6 x 12 Bolt
Controlarm
I
AAL
AA x 8M6 x 12 Bolt
I
T
AA
K
Q
I
CC
I
R
OPERATING INSTRUCTIONS
CONNECTING THE LP TANK
WARNING
ALL INSTRUCTIONS AND SAFEGUARDS ON THIS PAGE MUST BE FOLLOWED TO PREVENT FIRE, DAMAGE AND/OR INJURY.
1. The knob on the LP tank must be closed. Make sure that the knob is turned clockwise to a full stop. The cylinder supply system must be arranged for vapor withdrawal.
2. Check that the control knob on the control unit is turned off.
3. Remove the protective cap from the LP tank valve and coupling nut.
4. Hold the regulator in one hand and insert the nipple into the valve outlet. Be sure the nipple is centered in the valve outlet. The coupling connects to the large outside threads on the valve outlet. Use care – do not cross thread the connection.
5. Hand tighten the coupling clockwise until it comes to a full stop. Firmly tighten by hand only. Do not use tools.
P
Straight
CAUTION: In the connection process, make sure the regulator inlet connector mates with the cylinder valve outlet properly, safely and firmly.
15
OPERATING INSTRUCTIONS
Any fuel supply cylinder used must be constructed and marked in accordance with specifications for propane cylinders of the U.S. Department of Transportation (DOT) CFR 49, or the Standard for Cylinders, Spheres and Tubes for the Transportation of Dangerous Goods, CAN/CSA B339. The appliance is to be used only with the 20-pound, vertical standing vapor withdrawal type tank and must include a collar to protect the cylinder valve.(A) DO NOT store spare LP cylinders under or near the smoker.(B) NEVER fill cylinder more than 80% full.(C) Do not store cylinder indoors.
WARNINGIf instructions A, B and C above are not followed exactly, a fire causing death or serious injury may occur.
This smoker is designed to operate on LP gas only. The gas cylinder used must include a collar to protect the cylinder valve. The cylinder supply system must be arranged for vapor withdrawal. Do not allow dirt or foreign material to get into or onto tank connection when it is not attached to the fuel supply system. Use the protective cap provided.
WARNINGALL INSTRUCTIONS AND SAFEGUARDS ON THIS PAGE MUST BE FOLLOWED TO PREVENT FIRE, DAMAGE AND/OR INJURY.
The cylinder outlet must have Type 1 gas connection termination in order to mate with gas hose provided with smoker. The pressure regulator and hose assembly supplied by the manufacturer with the appliance must be used. Replacement pressure regulators and hose assemblies must be those specified by the appliance manufacturer.This unit is not to be utilized with a non-self-contained LP-gas supply system.
Valve/pressure regulators are factory set to the correct operating pressures. No attempts should be made to adjust these settings.
DISCONNECT THE LP TANK
Make sure that the knob on the LP tank is turned clockwise to a full stop (CLOSED).
Hold the regulator in one hand, turn the coupling to the valve outlet counterclockwise and unthread the connection by hand only. Do not use tools.
Place dust cap on cylinder valve outlet whenever the cylinder is not in use. Only install the type of dust cap on the cylinder valve outlet that is provided with the cylinder valve. Other types of caps or plugs may result in leakage of propane.
Always hang the regulator on the lifting handles while not in use, disconnected fromthe LP tank, and when the unit has cooled down.
STORE THE TANK IN A PROPER PLACE AS INDICATED IN THIS MANUAL.
16
OPERATING INSTRUCTIONS
CHECKING FOR LEAKS
After connections are made, check all connections and fittings for leaks with a soap solution. 1. With all valves closed, apply the leak check solution (50/50 mix of dishwashing soap and water) to all gas carrying connections and fittings. 2. Open tank valve.Presence of bubbles at areas of wet solution indicates a gas leak. If leaks are detected or you smell or hear gas, shut off the valve and repair the leak or replace the defective part. Do not use the smoker until all leaks are corrected.
The gas hose/regulator assembly should be totally extended to the maximum distance so that the hose is straight and the tank is as far from the smoker as it can be (minimum 24 inches).
For vapor withdrawal, LP tanks are intended to be operated in the upright position only.
If the product is not in use, the gas must be turned off at the supply cylinder and the cylinder should be disconnected from the appliance.
Storage of the appliance indoors is only permissible if the cylinder is disconnected and removed from the appliance. Do not store cylinder indoors.
BEFORE FIRST USE
Remove all hangings or plastic straps, if present.
Before you cook food in your smoker, it is important to “season” your smoker. Seasoning seals the paint and interior of your smoker to enhance flavoring, durability and overall performance.To season your smoker, simply use it as you normally would only do not cook any food. You will need to follow all of the operating procedures in the next few sections of this manual.
Using your desired flavoring woods and marinades, burn your smoker at low temperature (around 175°F) for 45 – 60 minutes. Let the smoker cool and clean out the water and wood.
Once seasoning is complete, your smoker’s interior will have a durable, seasoned coating.
ADDING WATER
To add water before cooking, simply remove the water bowl and fill it with water slightly below the rim. Place the bowl back into the smoker. Adding water before cooking is recommended. To add water while cooking, if a sizzling sound indicating lack of water is heard, or there is a need to add water, open the bottom door with care and avoid taking in the smoke. Use a long nose kettle-like water can, stand as far from the smoker as you can, fill the water bowl up to 1 inch below the rim.
CAUTION: DO NOT pull the water bowl out beyond the rack when the smoker is hot.
17
OPERATING INSTRUCTIONS
COOKING TIP
Line the water bowl with aluminum foil before each use. This will make it easy to clean and help your water bowl last longer.
To make adding water easier and safer, use a clean watering can with a long spout.
ADDING WOOD CHIPS
To add wood chips before cooking, simply fill the wood chip box with your choice of flavoring hardwood chips. The amount and type of wood you use is entirely dependent on the desired amount of flavor. Once the box is filled, place the lid on top of the box and set the box in the smoker.
To add wood chips while cooking, we recommend using tongs or long handled pliers to removethe box lid and to place the pieces into the wood chip box without removing the box. It is not recommended to remove the wood chip box while the smoker is in operation.
CAUTION: The wood chip box and lid get very hot. Avoid handling them while in use. Always wear protective oven mitts when handling hot components.
COOKING TIP: FLAVORING WOOD
• Small wood chips work best inside the wood chip box.• Use dry hardwoods such as hickory, pecan, apple, cherry or mesquite.• To produce more smoke and prevent fast burning, pre-soak the wood chips in a separate bowl of water for at least 20 minutes, or wrap the chips in perforated aluminum foil.• Most smoke flavoring occurs within the first hour of cooking. Adding wood chips after the first hour is typically not necessary unless extra smoke flavoring is desired.
18
OPERATING INSTRUCTIONS
19
OPERATING INSTRUCTIONS
Match Lighting Procedure - LP Gas
1. Repeat Steps 1 through 5 of the igniter lighting system.
2. Open both doors. Place a lit match on to the burner as shown below. Quickly turn the control knob to the position. If the burner does not light in 5 seconds, turn the control knob to O, wait at least 5 minutes and for the gas to clear. Repeat the process.
20
OPERATING INSTRUCTIONS
Cooking Tip: Damper Adjustments
WARNING: The dampers on the smoker body and the handle on the smoke stack may become very hot while cooking. Always wear a heat resistant glove when adjusting.
• For best performance, rotate the smoker so that the front or back of the body is facing the wind. This allows the adjustment of the dampers to be more effective and accurate.• The two dampers on smoker body should never be fully closed.• Opening the damper of the smoke stack helps to exhaust both the heat and smoke.• The key to effective smoking is to watch your heat indicator on the door and adjust the damper accordingly.• Temperature maintenance is best controlled by different damper adjustment configurations.
Turning off the Smoker
CAUTION: The smoker can become very hot while in use.Do not touch any portion of the smoker except for the door handle and burner control knob. It may be necessary to use protective gloves.
1. Turn the burner control knob off by pushing in and rotating to “OFF”. The burner flame should go out.
2. Turn off the LP cylinder valve by turning the knob clockwise until it cannot go any farther.
Follow all warnings and safety precautions before removing meat from smoker or preparing the unit for storage.
Lighting Instructions – Charcoal
When using charcoal, DO NOT USE PRETREATED, MATCH-LIGHT CHARCOAL with this smoker. Only use standard, untreated briquettes or lump charcoal and ONLY use charcoal lighting fluid approved for lighting charcoal. Do not use lighter fluid, paint thinners, gasoline, kerosene, alcohol or other flammable material for lighting charcoal. Damage to the smoker may occur with the use of match-light charcoal. DO NOT USE THE LP GAS BURNER WHEN LIGHTING CHARCOAL. Step 1Place the charcoal grate inside the woodchip/charcoal tray and add 1.5 pounds of charcoal on charcoal grate (approximately 26 briquettes).
Step 2Note: Please refer to the manufacturer’s recommended amount of lighter fluid before applying fluid to the briquettes. With the charcoal tray outside the firebox, saturate charcoal with the amount of lighting
22
CARE AND MAINTENANCE
AFTER USE SAFETY AND MAINTENANCE
WARNING• Use caution when lifting and moving the smoker to avoid strain injuries. Two people are recommended to lift or move the smoker.
• DO NOT store the smoker near gasoline or other combustible liquids or where combustible vapors may be present. Keep the area around the smoker clear and free of combustible materials and vapors.
• DO NOT store this smoker in an area accessible to children or pets. Store the smoker in a dry, protected location. Disconnect cylinder from smoker.
• DO NOT allow anyone to conduct activities around the smoker following use until it has cooled. It is hot during operation and remains hot for a period of time following use.
• DO NOT leave hot ashes unattended until the smoker cools completely.
• The smoker becomes extremely hot – allow the smoker to cool completely before handling. If you must handle the smoker while it is hot, ALWAYS wear protective oven mitts or heat-resistant gloves. Allow the smoker to cool before removing and cleaning the grease pan.
• Dispose of cold ashes by wrapping them in heavy-duty aluminum foil and putting them in a noncombustible container.
• If you must dispose of the ashes in less time than it takes for them to completely cool. Remove the ashes from the smoker, keeping them in heavy-duty foil, and soak them completely with water before disposing of them in a noncombustible container.
GENERAL CARE AND MAINTENANCE CAUTION: All care and maintenance procedures are to be performed while the smoker is turned off and cooled. Always perform maintenance by a qualified service person.
Clean the water bowl and cooking grate with hot, soapy water. Rinse and dry thoroughly. You may prefer to coat the water bowl and cooking grid lightly with cooking oil or cooking spray.
Frequently check and clean the venturi and burner tubes for insects and insect nests. A clogged tube can lead to fire beneath the smoker. Also make sure the smoker does not have any foreign objects obstructing the flow of combustion and ventilation air.
To clean the inside and outside of the smoker cabinet, simply use a damp cloth. Spray-washing with a water hose is not recommended. Moisture should be wiped away and not allowed to stand inside or on top of the smoker. Once cleaned, you may prefer to lightly coat the interior of the smoker cabinet with cooking oil or cooking spray.
If rust is present on the exterior surface of the smoker, clean the area with steel wool or emery cloth and use heavy-duty, heat-resistant paint.
NEVER apply additional paint to the interior of the smoker. If rust is present on the interior of the smoker, clean it thoroughly with steel wool or emery cloth and lightly coat the area with cooking oil or cooking spray to help minimize recurring rust.
When an LP tank is not connected, and to help prevent dirt or other foreign particles from clogging the regulator connector, hang the end of the hose and regulator assembly on the lifting handle.
Keep the ventilation opening(s) of the cylinder enclosure free and clear of debris.
23
CARE AND MAINTENANCE
Inspect the flames at the burner by looking through the observing hole on left side of the burner and control unit. A good flame should be blue with a yellow tip 1 to 2 inch high. If flames are excessively yellow and irregular, oil residue and food deposits may be collecting on the burner. Try cleaning the burner surface with hot, soapy water and cleaning the holes with a pipe cleaner to improve the flames.
Bad flames may also be caused by poor venturi attachment to the orifice. Turn off the control knob and cylinder valve. Always let the smoker cool before cleaning or checking the assembly. Make sure the orifice of the control valve properly mates with the burner mixing tube by visual observation from the bottom of the appliance. The burner venturi tube should overlap the orifice and they should form a straight line as shown in Figure A. Figures B & C show incorrect alignment.
WARNING: If the instructions above are not followed, an explosion may result, possibly causing serious bodily injury or death.
To protect your smoker from weather conditions, always keep it covered while not in use.
2”
Yellow
Light Blue
Blue
Good Flame Bad Flame
! ! !
Figure A Figure B Figure C
Correct Wrong Wrong
The flame goes out. 1. Disconnected gas supply hose. 2. High or gusting winds.
For replacement parts, call our customer service department at 1-800-963-0211, 8:00 a.m. – 6:00 p.m., EST, Monday – Thursday, 8:00 a.m. – 5:00 p.m., EST, Friday.
Owner’s Manual - Part #312-02025-00Printed in China
SpringClip
Qty. 2
CC
BB x21/4-20 FlangedWasher Nut
Hardware Used
R
Q
7. Insert 4 bolts (AA) through the mounting holes on one of the lifting handles (J) and into holes on right side of smoker body (I). Use a Phillips screwdriver to secure the handles to the smoker body (I). Repeat on left side.
7
Hardware Used
CC x 2Spring Clip
I
AA
J
ASSEMBLY INSTRUCTIONS
4. Thread bolts (EE) through holes on the leg - with holes (B) from outside of unit. Secure using 2 nuts (FF) from inside leg by using wrench. Tighten all bolts (AA) with a Phillips screwdriver. Insert the regulator hose attached to the burner and control unit (C) into the hose retention (V).
4
I
V
12. Slide the wood chip box (D) onto the lowest cooking grate supports (T) inside the smoker body (I) and put the wood chip box lid (F) on top. Note: For charcoal, refer to Step 17.
12
DANGER:
Failure to follow these instructions could result in fire, explosion, or burn hazard which could cause property damage, personal injury or death.
DANGER: If you smell gas:1. Shut off gas to the appliance.
3. Open lid.4. If odor continues, keep away from the appliance and immediately call your gas supplier or your fire department.
Assembler/Installer: This instruction manual contains important information necessary for the proper assembly and safe use of this appliance. Read and follow all warnings and instructions before assembling and using this appliance. Leave these instructions with the consumer.
Consumer/User: Follow all warnings and instructions when using this appliance. Keep these instructions for future reference.
1. Never operate this appliance unattended.2. Never operate this appliance within 10 feet (3 m) of any structure, combustible material or other gas cylinder.3. Never operate this appliance within 25 feet (7.5 m) of any flammable liquid.4. Never allow oil or grease to get hotter than 400°F or 200°C. If the temperature exceeds 400°F (200°C) or if oil begins to smoke, immediately turn the burner or gas supply OFF.5. Heated liquids remain at scalding temperatures long after the cooking process. Never touch cooking appliance until liquids have cooled to 115°F (45°C) or less.6. If a fire should occur, keep away from the appliance and immediately call your fire department. Do not attempt to extinguish an oil or grease fire with water. Failure to follow these instructions could result in fire, explosion, or burn hazard which could cause property damage, personal injury or death.
DANGER
DANGER:
Rev. 10/2011
M4 x 10Bolt
Qty. 2
DD EE
M4 Nut
Qty. 2
FF
M5 x 12Screw
Qty. 8
H
J
T
T
U
V
front of smoker
B
front of smoker
M4 x 10 BoltEE
M4 NutFF
Hardware Used
x 2
x 2
B
EE
FF
Hardware Used
AA x 4M6 x 12 Bolt
Hardware Used
AA x 4M6 x 12 Bolt
M5 x 12 ScrewBB x 8
Hardware UsedBB
S
I
R
S
D
FI
I13. Slide the water bowl (G) onto the cooking grate supports (T) inside the smoker body (I) above the wood chip box (D) as shown.
ASSEMBLY INSTRUCTIONS
13
15. Insert the probe of the temperature gauge assembly (M) through hole of the smoker door from the outside. Secure using 2 nuts (DD) from inside panel by using wrench.
16. To install the “AAA” battery (U), remove the igniter button by turning it counterclockwise and insert the “AAA” battery (U) with the positive end facing out. Reinstall the igniter button by turning it clockwise and hand tightening.
17. For charcoal use, remove the wood chip box lid (F) and place the charcoal grate (E) inside the wood chip box (D).
18. Always hang the regulator hose attached to the burner and control unit (C) to the hose retention (V) attached to the leg - with hole (B) while not in use. If switching from LP gas to charcoal, wait for the unit to cool down before disconnecting from the LP tank.
15
16
17
18
DD
M
U
E
B
12
14. Slide the 4 cooking grates (H) onto the top cooking grate supports (T) inside the smoker body (I).
14 I
H
ASSEMBLY INSTRUCTIONS
Hardware Used
DD x 2
D
S
V
M5 Nut
igniter button
21
OPERATING INSTRUCTIONS
fluid as recommended by the lighter fluid manufacturer. Allow the fluid to soak into the charcoal for 3 minutes before placing the tray back into the firebox (refer to assembly instructions for proper tray placement). After soaking the charcoal, place the lighting fluid at a safe distance away from the smoker.
Step 3With both doors open, stand back and carefully light charcoal and allow to burn until covered with a light ash (approximately 20 minutes). Charcoal lighting fluid must be allowed to completely burn off prior to closing the doors. (Fumes will tend to collect in the upper cavity if the door is closed).
DANGER: Closing the firebox doors during the lighting procedure could trap fumes from the charcoal lighting fluid in the smoker box and may result in a flash-fire or explosion when door is opened, resulting in property loss, personal injury or death. Never attempt to add more lighting fluid to the charcoal once it has been lit.
Step 4After 25 - 30 minutes, charcoal should be ready for cooking and/or adding woodchips. Carefully add wood chunks using long cooking tongs.
Adding Charcoal and/or Wood Chips
Additional charcoal and/or wood may be required to maintain or increase cooking temperature.
WARNING: Use caution since flames can flare-up when fresh air suddenly comes in contact with fire. When opening the door, keep hands, face and body a safe distance from hot steam and flame flare-ups.
Step 1Stand back and carefully open smoker box door allowing heat and steam to escape away from your face. Use caution since flames can flare-up when fresh air suddenly comes in contact with fire. Inspect the charcoal level in pan.
Step 2Wearing flame retardant oven mitts/gloves, stand back a safe distance and use long cooking tongs to lightly brush aside ashes on hot coals. Use cooking tongs to add charcoal and/or wood to charcoal pan, being careful not to stir-up ashes and sparks
WARNING: Never add charcoal lighting fluid to hot or even warm coals as flashback may occur causing severe burns.
Step 3Close smoker box door and allow food to continue cooking.
Allow the ashes to completely cool before reusing or cleaning the smoker.
26
REPLACEMENT PARTS LIST
For replacement parts, call our customer service department at 1-800-963-0211, 8:00 a.m. – 6:00 p.m., EST, Monday – Thursday, 8:00 a.m. – 5:00 p.m., EST, Friday.
PART DESCRIPTION PART # 1 Leg – Standard 301-01016-00 2 Leg – with Holes 312-01016-00 3 Burner and Control Unit 312-01015-00 4 Wood Chip Box (MFW only) 312-01028-00 5 Charcoal Grate 312-01030-00 6 Wood Chip Box Lid 301-01029-00 7 Wood Chip Box Handle and 301-01028-02 Lid Handle 8 Water Bowl 301-02017-00 9 Cooking Grate 312-01014-00 10 Door Locking Bracket 302-01008-00 11 Cooking Grate Support 302-01030-00 12 Smoker Body 312-12001-00 13 Square Smoke Stack 312-02009-00 14 Lifting Handle 301-01010-00 15 Logo Plate 302-03002-01 16 Temperature Gauge Bezel 301-01034-00 17 Temperature Gauge 301-01003-00
PART DESCRIPTION PART # 18 Upper Door 302-02002-00 19 Side Table 312-02008-00 20 Door Handle Crank 302-02007-02 21 Door Handle Grip 302-02007-01 22 Bottom Door without Handle 302-02102-00 23 Table Front Support Bracket 312-02008-01 24 Table Back Support Bracket 312-02008-02 25 Side Damper Plate (round) 301-01001-04 26 Igniter Ground Wire 301-01015-08 27 Push Button 301-01015-03 28 Electronic Ignitor 301-01015-06 29 Ignition Cap 301-01015-05 30 Control Knob 301-01015-01 31 Control Knob Bezel 301-01015-02 32 Igniter Electrode and Ignition Wire 301-01015-07 33 Hose Retention 312-01016-01 N/A Hardware Bag 312-02026-00 N/A Owner’s/Instruction Manual 312-02025-00
11
14
21
17
1918
20
22
2324
25
2627
32
30
2928
3331
ANS Z21.89a-2008 CSA 1.18a-2008
• Do not use the smoker if the burner fails to light or fails to remain lit. Under such conditions, gas should be turned off and the fuel cylinder should be disconnected.• Use in high wind conditions that result in poor burner operation such as blowing out and flaring should be avoided. If repositioning the appliance does not improve operation under such wind conditions, the appliance should be turned off.• Install the smoker with the hose regulator assembly extended the full length of the hose (24 in. minimum) directly away from the appliance. When so configured, placement results in maximum tank to smoker distance. When the smoker is operated, the hose/regulator and gas tank should be perpendicular to wind direction. Placing tank closer than 24 inches to the smoker can overheat the tank and cause release of propane through relief openings and can result in tank fire or explosion. • Read and follow all warnings and instructions before assembling and using the appliance.• Follow all warnings and instructions when using the appliance.
NOTE: The installation must confirm with local codes or, in the absence of local codes, with eitherthe National Fuel Gas Code, ANSI Z223.1/NFPA 54, Natural Gas and Propane Installation Code,CSA B149.1, or Propane Storage and Handling Code, B149.2, or the Standard for RecreationalVehicles, ANSI A 119.2/ NFPA 1192, and CSA Z240 RV Series, Recreational Vehicle Code, asapplicable.
WARNINGDO NOT mix old and new batteries.DO NOT mix alkaline, standard (Carbon-Zinc), or rechargeable (Nickel-Cadmium) batteries.DO NOT dispose of batteries in fire. Improper disposal may cause batteries to leak or explode.
The electronic ignition requires 1 “AAA” alkaline battery, which is included.
WARNING:The hose to tank attachment creates a potential trip hazard for user and pedestrians - use caution.Do not allow or cause the gas tank or applianceto tip.
MINIMUM 24 IN. (610 MM)
(Tank not included)
I
C
V
T
T
T
C
Master Forge & M Design® is a registered trademarkof LF, LLC. All rights reserved.
®
D
LIGHTING INSTRUCTIONS
CAUTION: If the flame extinguishes accidentally during ignition or operation, immediately TURN OFF the cylinder valve and then TURN OFF the control knob.Igniter Lighting System
1. Check all connections for leaks using the “soap water” test as explained on page 16 for “checking for leaks.”
2. Open both of the smoker cabinet doors. Always keep the doors open during lighting.
3. Check for any blockage to the venturi tube or burner, damper setting, ventilation setting. Remove any foreign objects or matter.
4. Be sure the burner control knob is in the O position.
5. Open the LP cylinder valve by turning counterclockwise .
6. Push igniter on the control unit down 1 to 2 seconds then push and turn control knob to while still holding the ignitor button down. At this point the burner should ignite.
7. If ignition does not take place within 5 seconds, immediately turn the control knob to O. Wait 5 minutes and repeat above steps 6 and 7.
8. If burner still fails to light, try match lighting using the instructions on page 19.
9. Once the burner is lit, close the doors to allow heat to accumulate. The smoke stack on the top of the smoker can be adjusted to the desired setting to allow proper ventilation and combustion. NEVER CLOSE THE SMOKE STACK COMPLETELY.
Warning: Always light your smoker with both doors open.
CALIFORNIA PROPOSITION 65
Fuels used in gas or oil fired appliances and the products of combustion of such fuels containchemicals known to the State of California to cause cancer, birth defects or other reproductiveharm. This product contains chemicals, including lead and lead compounds, known to the State ofCalifornia to cause cancer, birth defects or other reproductive harm. Wash hands after handling.
13
G
2
TABLE OF CONTENTS
Safety Information ......................................................................................................................... 3
Replacement Parts List ................................................................................................................ 26
ITEM #0190449
MODEL #MFW784BDP
DUAL FUELVERTICAL SMOKER
Français p. XX
Español p. XX
1
Français p. 28
Español p. 58
SAFETY INFORMATION
3
Please read and understand this entire manual before attempting to assemble, operate or install the product. If you have any questions regarding the product, please call customer service at 1-800-963-0211, 8:00 a.m. – 6:00 p.m., EST, Monday – Thursday, 8:00 a.m. – 5:00 p.m., EST, Friday.
PACKAGE CONTENTS
6
PART DESCRIPTION QUANTITY A Leg - standard 3 B Leg - with holes 1 C Burner & Control Unit 1 D Wood Chip Box 1 E Charcoal Grate 1 F Wood Chip Box Lid 1 G Water Bowl 1 H Cooking Grate 4 I Smoker Body 1 J Lifting Handle 2 K Door Locking Bracket 2
L Square Smoke Stack 1 M Temperature Gauge & Bezel 1 N Upper Door (pre-assembled) 1 O Bottom Door (pre-assembled) 1 P Side Table 1 Q Door Handle 2 R Table Front Support 1 S Table Back Support 1 T Cooking Grate Support 12 U “AAA” Battery (1.5 V) 1 V Hose Retention 1
PART DESCRIPTION QUANTITY
ASSEMBLY INSTRUCTIONS
8
24
WARRANTY
25
This vertical gas smoker is warranted against broken or damaged parts at the time of purchase. The stainless steel burner is warranted for 3 years. All other parts carry a one (1) year limited warranty except the water bowl, which is warranted to be free of defects for 90 days. Paint is warranted to be free of defects for 90 days except for rust, which may appear after repeated use.
This warranty does not cover damage or issues related to neglect, abuse or modifications to the appliance. Repair labor is not covered.
All parts that meet the warranty requirements will be shipped at no charge via the discretion of GHP Group Inc. (ground shipments, US Mail or Parcel Post ONLY). Any special handling charges (i.e. Second Day, Overnight, etc.) will be the responsibility of the consumer.
All warranty claims apply only to the original purchaser and require a proof of purchase verifying purchase date. Do not return parts to GHP address without first obtaining a return authorization number from our customer service. This service is available by calling toll free 1-800-963-0211, 8:00 a.m. – 6:00 p.m., EST, Monday – Thursday 8:00 a.m. – 5:00 p.m., EST, Friday.
Some states do not allow the exclusion or limitation of incidental or consequential damages orlimitations on how long an implied warranty lasts, so the above limitations or exclusions may not apply to you. This warranty gives you specific legal rights, and you may have other rights that vary from state to state.
GHP Group Inc.8280 Austin AvenueMorton Grove, IL, USA60053-3207
The burner will not light using the igniter procedure.
1. The igniter electrode may be covered with grease or residue.
2. The igniter electrode may have a loose or disconnected wire.
3. No spark is being generated.
4. No gas flow or cylinder valve not open.
5. Vapor lock at coupling nut to LP cylinder.
1.Clean the igniter electrode.
2. Check the connection and reconnect any loose or disconnected wires.
3.Replace the AAA size battery inside the igniter.
4. Make sure LP cylinder is not empty or open cylinder valve.
5. Turn off knob and LP cylinder valve. Disconnect coupling nut from LP cylinder. Reconnect and retry.
The burner will not light with a match.
1. No gas flow or an obstructed gas flow.
1. Check the fuel level. Clean the venturi tube and burner.
HARDWARE CONTENTS (shown actual size)
M6 x 12Bolt
Qty. 32
7
AA BB
Before beginning assembly of product, make sure all parts are present. Compare parts with package contents list and hardware contents list. If any part is missing or damaged, do not attempt to assemble the product.
Estimated Assembly Time: 25 minutes
Tools Required for Assembly (not included): Phillips Head Screwdriver, 1/2 in. Wrench, Pliers.
PREPARATION
M5 Nut
Qty. 2
1. Align the legs - standard (A) with the mounting holes on the bottom left front, right front and left rear of the smoker body (I). Thread bolts (AA) through the holes from the outside of the unit. Tighten all bolts (AA) with a Phillips screwdriver.
Hardware Used
AA x 9M6 x 12 Bolt
2. Align the leg - with holes (B) with the mounting holes on the bottom right rear of the smoker. Thread bolts (AA) through the holes from the outside of the unit. Tighten all bolts (AA) with a Phillips screwdriver.
3. Open the bottom door of the smoker body (I). Turn the burner and control unit (C) upside down and place it on the bottom of the smoker body (I), making sure the 4 mounting holes on the burner and control unit (C) are aligned with the holes on the smoker body (I). Note: The control knob should be on the same side as the door. Check that the burner is properly installed on the orifice before attaching the burner and control unit (C). Thread bolts (AA) through holes from outside of unit. Securely tighten the unit to the bottom with a Phillips screwdriver.
5. CAUTION: This unit is HEAVY! Do not attempt this step without assistance! Close the two doors. With the assistance of a helper, stand the unit upright on its legs on a firm and level surface. (Make sure that the burner/control unit and legs are attached). Open the upper door. Position the square smoke stack (L) with control arm to the left as shown. Using 4 bolts (AA), attach square smoke stack (L) to the top of smoker body (I). Securely tighten with a Phillips screwdriver.
Hardware Used
6. Insert the cooking grate supports (T) into the corresponding holes on rack of the shelf inside the smoker body (I) from the bottom up. NOTE: There are 8 positions to install the cooking grate supports. The cooking grate supports can be installed into positions according to the need of the owner.
8. Align the door locking bracket (K) holes with the holes on the upper right side of the smoker body (I). Thread 2 bolts (AA) through the holes in the door locking bracket (K) into the threaded holes of the smoker body (I). Tighten the bolts (AA) using a Phillips screwdriver. Repeat on lower right side.
9. Slide door handle (Q) through brackets in door. Using pliers, slide a spring clip (CC) over the groove in the door handle as shown. Make sure both of the spring clips are securely attached in the grooves of the handles.
10. Install the side table back support (S) and table front support (R) on the side of the smoker body (I) with screws (BB). Arrows pointing up indicate the correct position of the brackets when fastened to the smoker body (I).
11. With the side table (P) in a parallel position, align the slots in the side table with the table supports (R & S) and insert. To lock the side table (P) in the upright position, swing the side table (P) up, push toward the smoker body (I), and press down on the side table (P) near the body until it is fully fastened in place.
If you have any questions regarding the product, please call customer service at 1-800-963-0211, 8:00 a.m. – 6:00 p.m., EST, Monday – Thursday, 8:00 a.m. – 5:00 p.m., EST, Friday.
2
6
5
8
9
10
11
ATTACH YOUR RECEIPT HERE
Serial Number Purchase Date
Questions, problems, missing parts? Before returning to your retailer, call our customer service department at 1-800-963-0211, 8:00 a.m. – 6:00 p.m., EST, Monday – Thursday, 8:00 a.m. – 5:00 p.m., EST, Friday.
ANS Z21.89a-2008 CSA 1.18a-2008
CALIFORNIA PROPOSITION 65
1. Fuels used in wood, charcoal, gas or oil fired appliances and the products of combustion of such fuels contain chemicals known to the State of California to cause cancer, birth defects or other reproductive harm. 2. This product contains chemicals, including lead and lead compounds, known to the State of California to cause cancer, birth defects or other reproductive harm.
• DO NOT use this product for anything other than its intended purpose. It is NOT intended for commercial use. It is NOT intended to be installed or used in or on a recreational vehicle and/or boat. • Keep a fire extinguisher near this product at all times.• This appliance is for outdoor use only in well-ventilated areas. DO NOT operate it in a building, garage or any other enclosed area, or under overhead construction.• A minimum clearance of 36 inches (92 cm) to combustible material is required on the front, sides and back. It is very important to always maintain proper clearances to combustibles.• The cylinder must be at least 24 inches (61 cm) from the appliance.• DO NOT obstruct the flow of combustion air or ventilation air for the appliance.• When cooking, the smoker must be on a level, stable noncombustible surface in an area clear of combustible material, including tall or dry grass. • Care should be taken to protect the fuel supply hose from damage from either pedestrian or vehicle traffic.• Clean and inspect the hose before each use of the appliance. If there is evidence of abrasion, wear, cuts or leaks, the hose must be replaced prior to the appliance being used. The replacement hose assembly shall be that specified by the manufacturer.• Before each use check that no dead leaves or debris are under the appliance.• Store this appliance in a dry, protected location.• The use of alcohol, prescription or nonprescription drugs may impair the user’s ability to properly assemble and safely operate this appliance.• Allow the smoker to cool to 115°F (45°C) before moving or storing. Use caution when lifting and moving the appliance to avoid back strain or back injury. DO NOT move the appliance while it is in use.• Always hang the regulator on the hose retention wire while not in use or disconnected with the LP (liquid propane) tank. KEEP the fuel supply hose away from any heated surface(s).
SAFETY INFORMATION
4
• DO NOT store and use this appliance near gasoline or other combustible liquids or where other combustible vapors may be present.• DO NOT use this appliance as a heater.• DO NOT leave the appliance unattended while in use. Keep children and pets away from the appliance at all times.• NEVER close the damper completely while cooking. • If you must dispose of ashes in less time than it takes for the ashes to completely cool down, remove the ashes from the appliance, keeping them in the heavy-duty foil, and soak them completely with water before disposing of them in a noncombustible container.• This appliance will be hot during and after use. Use insulated oven mitts or gloves for protection from hot surfaces or splatter from cooking liquids.• Make sure that the orifice of the control valve properly mates with the burner mixing tube by visual observation. Please refer to maintenance section.• Use caution when opening the door of the smoker while in operation. Keep hands, face and body safe from hot steam or flare-ups. DO NOT inhale smoke.• DO NOT wear loose clothing while operating the smoker. Tie back long hair while operating the smoker. ALWAYS wear shoes that fully cover your feet while operating the smoker.• Allow the smoker and its components to cool completely before conducting any routine cleaning or maintenance.• NEVER use glassware, plastic or ceramic cookware on or in your smoker. Use metallic cookware only.• NEVER operate the smoker without water in the water bowl. NEVER allow the water to completely evaporate. Check the water level at least every 2 hours. A sizzling sound may indicate a low water level. Follow instructions in this manual for adding water while operating (see the Operating Instructions section).• When using flavoring wood, add a sufficient amount prior to operation to avoid having to add wood while operating. Adding wood while operating may splash hot water and cause serious injury.• Use of accessories not intended for this smoker is not recommended and may lead to injury or property damage.• An LP cylinder not connected for use should not be stored in the vicinity of the smoker or any other appliance. DO NOT store spare LP cylinders within 10 feet of the smoker. LP cylinders must be stored outdoors, out of reach of children. DO NOT store LP cylinders in a building, garage or any other enclosed area.• DO NOT store LP gas cylinders inside or on top of the smoker. Improper storage of cylinders could lead to explosion, fire and/or personal injury. Cylinders are to be stored outdoors, out of reach of children and must not be stored in a building, garage or any other enclosed area.• While the smoker is not in use, the gas must be turned off at the supply cylinder.• LP gases are heavier than air, tend to pool and collect in low-lying areas, are easily ignited and are highly flammable. Proper care and caution should be employed when dealing with any such fuels.• The smoker should be turned off and all supply valves (on piping or on fuel cylinders) should be closed in the event that the odor of unburned gas is detected. Do not attempt to use the appliance until any gas leaks are fixed and/or the source of the unburned gas odor is accounted for.
SAFETY INFORMATION
5
A
B
C
D
E
F
G
I
S K
LM
NP
O
J
A
I
AA
I
AA
Hardware Used
AA x 3M6 x 12 Bolt
1
3C
AA
Hardware Used
AA x 4M6 x 12 Bolt
Controlarm
I
AAL
AA x 8M6 x 12 Bolt
I
T
AA
K
Q
I
CC
I
R
OPERATING INSTRUCTIONS
CONNECTING THE LP TANK
WARNING
ALL INSTRUCTIONS AND SAFEGUARDS ON THIS PAGE MUST BE FOLLOWED TO PREVENT FIRE, DAMAGE AND/OR INJURY.
1. The knob on the LP tank must be closed. Make sure that the knob is turned clockwise to a full stop. The cylinder supply system must be arranged for vapor withdrawal.
2. Check that the control knob on the control unit is turned off.
3. Remove the protective cap from the LP tank valve and coupling nut.
4. Hold the regulator in one hand and insert the nipple into the valve outlet. Be sure the nipple is centered in the valve outlet. The coupling connects to the large outside threads on the valve outlet. Use care – do not cross thread the connection.
5. Hand tighten the coupling clockwise until it comes to a full stop. Firmly tighten by hand only. Do not use tools.
P
Straight
CAUTION: In the connection process, make sure the regulator inlet connector mates with the cylinder valve outlet properly, safely and firmly.
15
OPERATING INSTRUCTIONS
Any fuel supply cylinder used must be constructed and marked in accordance with specifications for propane cylinders of the U.S. Department of Transportation (DOT) CFR 49, or the Standard for Cylinders, Spheres and Tubes for the Transportation of Dangerous Goods, CAN/CSA B339. The appliance is to be used only with the 20-pound, vertical standing vapor withdrawal type tank and must include a collar to protect the cylinder valve.(A) DO NOT store spare LP cylinders under or near the smoker.(B) NEVER fill cylinder more than 80% full.(C) Do not store cylinder indoors.
WARNINGIf instructions A, B, C above are not followed exactly, a fire causing death or serious injury may occur.
This smoker is designed to operate on LP gas only. The gas cylinder used must include a collar to protect the cylinder valve. The cylinder supply system must be arranged for vapor withdrawal. Do not allow dirt or foreign material to get into or onto tank connection when it is not attached to the fuel supply system. Use the protective cap provided.
WARNINGALL INSTRUCTIONS AND SAFEGUARDS ON THIS PAGE MUST BE FOLLOWED TO PREVENT FIRE, DAMAGE AND/OR INJURY.
The cylinder outlet must have Type 1 gas connection termination in order to mate with gas hose provided with smoker. The pressure regulator and hose assembly supplied by the manufacturer with the appliance must be used. Replacement pressure regulators and hose assemblies must be those specified by the appliance manufacturer.This unit is not to be utilized with a non-self-contained LP-gas supply system.
Valve/pressure regulators are factory set to the correct operating pressures. No attempts should be made to adjust these settings.
DISCONNECT THE LP TANK
Make sure that the knob on the LP tank is turned clockwise to a full stop (CLOSED).
Hold the regulator in one hand, turn the coupling to the valve outlet counterclockwise and unthread the connection by hand only. Do not use tools.
Place dust cap on cylinder valve outlet whenever the cylinder is not in use. Only install the type of dust cap on the cylinder valve outlet that is provided with the cylinder valve. Other types of caps or plugs may result in leakage of propane.
Always hang the regulator on the lifting handles while not in use, disconnected fromthe LP tank, and when the unit has cooled down.
STORE THE TANK IN A PROPER PLACE AS INDICATED IN THIS MANUAL.
16
OPERATING INSTRUCTIONS
CHECKING FOR LEAKS
After connections are made, check all connections and fittings for leaks with a soap solution. 1. With all valves closed, apply the leak check solution (50/50 mix of dishwashing soap and water) to all gas carrying connections and fittings. 2. Open tank valve.Presence of bubbles at areas of wet solution indicates a gas leak. If leaks are detected or you smell or hear gas, shut off the valve and repair the leak or replace the defective part. Do not use the smoker until all leaks are corrected.
The gas hose/regulator assembly should be totally extended to the maximum distance so that the hose is straight and the tank is as far from the smoker as it can be (minimum 24 inches).
For vapor withdrawal, LP tanks are intended to be operated in the upright position only.
If the product is not in use, the gas must be turned off at the supply cylinder and the cylinder should be disconnected from the appliance.
Storage of the appliance indoors is only permissible if the cylinder is disconnected and removed from the appliance. Do not store cylinder indoors.
BEFORE FIRST USE
Remove all hangings or plastic straps, if present.
Before you cook food in your smoker, it is important to “season” your smoker. Seasoning seals the paint and interior of your smoker to enhance flavoring, durability and overall performance.To season your smoker, simply use it as you normally would only do not cook any food. You will need to follow all of the operating procedures in the next few sections of this manual.
Using your desired flavoring woods and marinades, burn your smoker at low temperature (around 175°F) for 45 – 60 minutes. Let the smoker cool and clean out the water and wood.
Once seasoning is complete, your smoker’s interior will have a durable, seasoned coating.
ADDING WATER
To add water before cooking, simply remove the water bowl and fill it with water slightly below the rim. Place the bowl back into the smoker. Adding water before cooking is recommended. To add water while cooking, if a sizzling sound indicating lack of water is heard, or there is a need to add water, open the bottom door with care and avoid taking in the smoke. Use a long nose kettle-like water can, stand as far from the smoker as you can, fill the water bowl up to 1 inch below the rim.
CAUTION: DO NOT pull the water bowl out beyond the rack when the smoker is hot.
17
OPERATING INSTRUCTIONS
COOKING TIP
Line the water bowl with aluminum foil before each use. This will make it easy to clean and help your water bowl last longer.
To make adding water easier and safer, use a clean watering can with a long spout.
ADDING WOOD CHIPS
To add wood chips before cooking, simply fill the wood chip box with your choice of flavoring hardwood chips. The amount and type of wood you use is entirely dependent on the desired amount of flavor. Once the box is filled, place the lid on top of the box and set the box in the smoker.
To add wood chips while cooking, we recommend using tongs or long handled pliers to removethe box lid and to place the pieces into the wood chip box without removing the box. It is not recommended to remove the wood chip box while the smoker is in operation.
CAUTION: The wood chip box and lid get very hot. Avoid handling them while in use. Always wear protective oven mitts when handling hot components.
COOKING TIP: FLAVORING WOOD
• Small wood chips work best inside the wood chip box.• Use dry hardwoods such as hickory, pecan, apple, cherry or mesquite.• To produce more smoke and prevent fast burning, pre-soak the wood chips in a separate bowl of water for at least 20 minutes, or wrap the chips in perforated aluminum foil.• Most smoke flavoring occurs within the first hour of cooking. Adding wood chips after the first hour is typically not necessary unless extra smoke flavoring is desired.
18
OPERATING INSTRUCTIONS
19
OPERATING INSTRUCTIONS
Match Lighting Procedure - LP Gas
1. Repeat steps 1 through 5 of the igniter lighting system.
2. Open both doors. Place a lit match on to the burner as shown below. Quickly turn the control knob to the “HIGH” position. If the burner does not light in 5 seconds, turn the control knob off, wait at least 5 minutes and for the gas to clear. Repeat the process.
20
OPERATING INSTRUCTIONS
Cooking Tip: Damper Adjustments
WARNING: The dampers on the smoker body and the handle on the smoke stack may become very hot while cooking. Always wear a heat resistant glove when adjusting.
• For best performance, rotate the smoker so that the front or back of the body is facing the wind. This allows the adjustment of the dampers to be more effective and accurate.• The two dampers on smoker body should never be fully closed.• Opening the damper of the smoke stack helps to exhaust both the heat and smoke.• The key to effective smoking is to watch your heat indicator on the door and adjust the damper accordingly.• Temperature maintenance is best controlled by different damper adjustment configurations.
Turning off the Smoker
CAUTION: The smoker can become very hot while in use.Do not touch any portion of the smoker except for the door handle and burner control knob. It may be necessary to use protective gloves.
1. Turn the burner control knob off by pushing in and rotating to “OFF”. The burner flame should go out.
2. Turn off the LP cylinder valve by turning the knob clockwise until it cannot go any farther.
Follow all warnings and safety precautions before removing meat from smoker or preparing the unit for storage.
Lighting Instructions – Charcoal
When using charcoal, DO NOT USE PRETREATED, MATCH-LIGHT CHARCOAL with this smoker. Only use standard, untreated briquettes or lump charcoal and ONLY use charcoal lighting fluid approved for lighting charcoal. Do not use lighter fluid, paint thinners, gasoline, kerosene, alcohol or other flammable material for lighting charcoal. Damage to the smoker may occur with the use of match-light charcoal. DO NOT USE THE LP GAS BURNER WHEN LIGHTING CHARCOAL. Step 1Place the charcoal grate inside the woodchip/charcoal tray and add 1.5 pounds of charcoal on charcoal grate (approximately 26 briquettes).
Step 2Note: Please refer to the manufacturer’s recommended amount of lighter fluid before applying fluid to the briquettes. With the charcoal tray outside the firebox, saturate charcoal with the amount of lighting
LIGHTING INSTRUCTIONS
CAUTION: If the flame extinguishes accidentally during ignition or operation, immediately TURN OFF the cylinder valve and then TURN OFF the control knob.
Igniter Lighting System
1. Check all connections for leaks using the “soap water” test as explained on page 16.
2. Open both of the smoker cabinet doors. Always keep the doors open during lighting.
3. Check for any blockage to the venturi tube or burner, damper setting, ventilation setting. Remove any foreign objects or matter.
4. Be sure the burner control knob is in the “OFF” position.
5. Open the LP cylinder valve by turning counterclockwise.
6. Push igniter on the control unit down 1 to 2 seconds then push and turn control knob to “HIGH,” while still holding the ignitor button down. At this point the burner should ignite.
7. If ignition does not take place within 5 seconds, immediately turn the control knob to OFF. Wait 5 minutes and repeat above Steps 6 and 7.
8. If burner still fails to light, try match lighting using the instructions on page 19.
9. Once the burner is lit, close the doors to allow heat to accumulate. The smoke stack on the top of the smoker can be adjusted to the desired setting to allow proper ventilation and combustion. NEVER CLOSE THE SMOKE STACK COMPLETELY.
Warning: Always light your smoker with both doors open.
22
CARE AND MAINTENANCE
AFTER USE SAFETY AND MAINTENANCE
WARNING• Use caution when lifting and moving the smoker to avoid strain injuries. Two people are recommended to lift or move the smoker.
• DO NOT store the smoker near gasoline or other combustible liquids or where combustible vapors may be present. Keep the area around the smoker clear and free of combustible materials and vapors.
• DO NOT store this smoker in an area accessible to children or pets. Store the smoker in a dry, protected location. Disconnect cylinder from smoker.
• DO NOT allow anyone to conduct activities around the smoker following use until it has cooled. It is hot during operation and remains hot for a period of time following use.
• DO NOT leave hot ashes unattended until the smoker cools completely.
• The smoker becomes extremely hot – allow the smoker to cool completely before handling. If you must handle the smoker while it is hot, ALWAYS wear protective oven mitts or heat-resistant gloves. Allow the smoker to cool before removing and cleaning the grease pan.
• Dispose of cold ashes by wrapping them in heavy-duty aluminum foil and putting them in a noncombustible container.
• If you must dispose of the ashes in less time than it takes for them to completely cool. Remove the ashes from the smoker, keeping them in heavy-duty foil, and soak them completely with water before disposing of them in a noncombustible container.
GENERAL CARE AND MAINTENANCE CAUTION: All care and maintenance procedures are to be performed while the smoker is turned off and cooled. Always perform maintenance by a qualified service person.
Clean the water bowl and cooking grate with hot, soapy water. Rinse and dry thoroughly. You may prefer to coat the water bowl and cooking grid lightly with cooking oil or cooking spray.
Frequently check and clean the venturi and burner tubes for insects and insect nests. A clogged tube can lead to fire beneath the smoker. Also make sure the smoker does not have any foreign objects obstructing the flow of combustion and ventilation air.
To clean the inside and outside of the smoker cabinet, simply use a damp cloth. Spray-washing with a water hose is not recommended. Moisture should be wiped away and not allowed to stand inside or on top of the smoker. Once cleaned, you may prefer to lightly coat the interior of the smoker cabinet with cooking oil or cooking spray.
If rust is present on the exterior surface of the smoker, clean the area with steel wool or emery cloth and use heavy-duty, heat-resistant paint.
NEVER apply additional paint to the interior of the smoker. If rust is present on the interior of the smoker, clean it thoroughly with steel wool or emery cloth and lightly coat the area with cooking oil or cooking spray to help minimize recurring rust.
When an LP tank is not connected, and to help prevent dirt or other foreign particles from clogging the regulator connector, hang the end of the hose and regulator assembly on the lifting handle.
Keep the ventilation opening(s) of the cylinder enclosure free and clear of debris.
23
CARE AND MAINTENANCE
Inspect the flames at the burner by looking through the observing hole on left side of the burner and control unit. A good flame should be blue with a yellow tip 1 to 2 inch high. If flames are excessively yellow and irregular, oil residue and food deposits may be collecting on the burner. Try cleaning the burner surface with hot, soapy water and cleaning the holes with a pipe cleaner to improve the flames.
Bad flames may also be caused by poor venturi attachment to the orifice. Turn off the control knob and cylinder valve. Always let the smoker cool before cleaning or checking the assembly. Make sure the orifice of the control valve properly mates with the burner mixing tube by visual observation from the bottom of the appliance. The burner venturi tube should overlap the orifice and they should form a straight line as shown in Figure A. Figures B & C show incorrect alignment.
WARNING: If the instructions above are not followed, an explosion may result, possibly causing serious bodily injury or death.
To protect your smoker from weather conditions, always keep it covered while not in use.
2”
Yellow
Light Blue
Blue
Good Flame Bad Flame
! ! !
Figure A Figure B Figure C
Correct Wrong Wrong
The flame goes out. 1. Disconnected gas supply hose. 2. High or gusting winds.
For replacement parts, call our customer service department at 1-800-963-0211, 8:00 a.m. – 6:00 p.m., EST, Monday – Thursday, 8:00 a.m. – 5:00 p.m., EST, Friday.
Owner’s Manual - Part #312-02025-00Printed in China
SpringClip
Qty. 2
CC
BB x21/4-20 FlangedWasher Nut
Hardware Used
R
Q
7. Insert 4 bolts (AA) through the mounting holes on one of the lifting handles (J) and into holes on right side of smoker body (I). Use a Phillips screwdriver to secure the handles to the smoker body (I). Repeat on left side.
7
Hardware Used
CC x 2Spring Clip
I
AA
J
ASSEMBLY INSTRUCTIONS
4. Thread bolts (EE) through holes on the leg - with holes (B) from outside of unit. Secure using 2 nuts (FF) from inside leg by using wrench. Tighten all bolts (AA) with a Phillips screwdriver. Insert the regulator hose attached to the burner and control unit (C) into the hose retention (V).
4
I
V
12. Slide the wood chip box (D) onto the lowest cooking grate supports (T) inside the smoker body (I) and put the wood chip box lid (F) on top. Note: For charcoal, refer to Step 17.
12
DANGER:
Failure to follow these instructions could result in fire, explosion, or burn hazard which could cause property damage, personal injury or death.
DANGER: If you smell gas:1. Shut off gas to the appliance.
3. Open lid.4. If odor continues, keep away from the appliance and immediately call your gas supplier or your fire department.
Assembler/Installer: This instruction manual contains important information necessary for the proper assembly and safe use of this appliance. Read and follow all warnings and instructions before assembling and using this appliance. Leave these instructions with the consumer.
Consumer/User: Follow all warnings and instructions when using this appliance. Keep these instructions for future reference.
1. Never operate this appliance unattended.2. Never operate this appliance within 10 feet (3 m) of any structure, combustible material or other gas cylinder3. Never operate this appliance within 25 feet (7.5 m) of any flammable liquid.4. Never allow oil or grease to get hotter than 400°F or 200°C. If the temperature exceeds 400°F (200°C) or if oil begins to smoke, immediately turn the burner or gas supply OFF.5. Heated liquids remain at scalding temperatures long after the cooking process. Never touch cooking appliance until liquids have cooled to 115°F (45°C) or less.6. If a fire should occur, keep away from the appliance and immediately call your fire department. Do not attempt to extinguish an oil or grease fire with water. Failure to follow these instructions could result in fire, explosion, or burn hazard which could cause property damage, personal injury or death.
DANGER
DANGER:
Rev. 9/2011
M4 x 10Bolt
Qty. 2
DD EE
M4 Nut
Qty. 2
FF
M5 x 12Screw
Qty. 8
H
J
T
T
U
V
front of smoker
B
front of smoker
M4 x 10 BoltEE
M4 NutFF
Hardware Used
x 2
x 2
B
EE
FF
Hardware Used
AA x 4M6 x 12 Bolt
Hardware Used
AA x 4M6 x 12 Bolt
M5 x 12 ScrewBB x 8
Hardware UsedBB
S
I
R
S
D
FI
I13. Slide the water bowl (G) onto the cooking grate supports (T) inside the smoker body (I) above the wood chip box (D) as shown.
ASSEMBLY INSTRUCTIONS
13
15. Insert the probe of the temperature gauge assembly (M) through hole of the smoker door from the outside. Secure using 2 nuts (DD) from inside panel by using wrench.
16. To install the “AAA” battery (U), remove the igniter button by turning it counterclockwise and insert the “AAA” battery (U) with the positive end facing out. Reinstall the igniter button by turning it clockwise and hand tightening.
17. For charcoal use, remove the wood chip box lid (F) and place the charcoal grate (E) inside the wood chip box (D).
18. Always hang the regulator hose attached to the burner and control unit (C) to the hose retention (V) attached to the leg - with hole (B) while not in use. If switching from LP gas to charcoal, wait for the unit to cool down before disconnecting from the LP tank.
15
16
17
18
DD
M
U
E
B
12
14. Slide the 4 cooking grates (H) onto the top cooking grate supports (T) inside the smoker body (I).
14 I
H
ASSEMBLY INSTRUCTIONS
Hardware Used
DD x 2
D
S
V
M5 Nut
igniter button
21
OPERATING INSTRUCTIONS
fluid as recommended by the lighter fluid manufacturer. Allow the fluid to soak into the charcoal for 3 minutes before placing the tray back into the firebox (refer to assembly instructions for proper tray placement). After soaking the charcoal, place the lighting fluid at a safe distance away from the smoker.
Step 3With both doors open, stand back and carefully light charcoal and allow to burn until covered with a light ash (approximately 20 minutes). Charcoal lighting fluid must be allowed to completely burn off prior to closing the doors. (Fumes will tend to collect in the upper cavity if the door is closed).
DANGER: Closing the firebox doors during the lighting procedure could trap fumes from the charcoal lighting fluid in the smoker box and may result in a flash-fire or explosion when door is opened, resulting in property loss, personal injury or death. Never attempt to add more lighting fluid to the charcoal once it has been lit.
Step 4After 25 - 30 minutes, charcoal should be ready for cooking and/or adding woodchips. Carefully add wood chunks using long cooking tongs.
Adding Charcoal and/or Woodchips
Additional charcoal and/or wood may be required to maintain or increase cooking temperature.
WARNING: Use caution since flames can flare-up when fresh air suddenly comes in contact with fire. When opening the door, keep hands, face and body a safe distance from hot steam and flame flare-ups.
Step 1Stand back and carefully open smoker box door allowing heat and steam to escape away from your face. Use caution since flames can flare-up when fresh air suddenly comes in contact with fire. Inspect the charcoal level in pan.
Step 2Wearing flame retardant oven mitts/gloves, stand back a safe distance and use long cooking tongs to lightly brush aside ashes on hot coals. Use cooking tongs to add charcoal and/or wood to charcoal pan, being careful not to stir-up ashes and sparks
WARNING: Never add charcoal lighting fluid to hot or even warm coals as flashback may occur causing severe burns.
Step 3Close smoker box door and allow food to continue cooking.
Allow the ashes to completely cool before reusing or cleaning the smoker.
26
REPLACEMENT PARTS LIST
For replacement parts, call our customer service department at 1-800-963-0211, 8:00 a.m. – 6:00 p.m. EST, Monday – Thursday, 8:00 a.m. – 5:00 p.m. EST, Friday.
PART DESCRIPTION PART # 1 Leg – Standard 301-01016-00 2 Leg - with holes 312-01016-00 3 Burner and Control Unit 312-01015-00 4 Wood Chip Box (MFW only) 312-01028-00 5 Charcoal Grate 312-01030-00 6 Wood Chip Box Lid 301-01029-00 7 Wood Chip Box Handle and 301-01028-02 Lid Handle 8 Water Bowl 301-02017-00 9 Cooking Grate 312-01014-00 10 Door Locking Bracket 302-01008-00 11 Cooking Grate Support 302-01030-00 12 Smoker Body 312-12001-00 13 Square Smoke Stack 312-02009-00 14 Lifting Handle 301-01010-00 15 Logo Plate 302-03002-01 16 Temperature Gauge Bezel 301-01034-00 17 Temperature Gauge 301-01003-00
PART DESCRIPTION PART # 18 Upper Door 302-02002-00 19 Side Table 312-02008-00 20 Door Handle Crank 302-02007-02 21 Door Handle Grip 302-02007-01 22 Bottom Door without handle 302-02102-00 23 Table Front Support Bracket 312-02008-01 24 Table Back Support Bracket 312-02008-02 25 Side Damper Plate (round) 301-01001-04 26 Igniter Ground Wire 301-01015-08 27 Push Button 301-01015-03 28 Electronic Ignitor 301-01015-06 29 Ignition Cap 301-01015-05 30 Control Knob 301-01015-01 31 Control Knob Bezel 301-01015-02 32 Igniter Electrode and Ignition Wire 301-01015-07 33 Hose Retention 312-01016-01 N/A Hardware Bag 312-02026-00 N/A Owner’s/Instruction Manual 312-02025-00
11
14
21
17
1918
20
22
2324
25
2627
32
30
2928
3331
ANS Z21.89a-2008 CSA 1.18a-2008
• Do not use the smoker if the burner fails to light or fails to remain lit. Under such conditions, gas should be turned off and the fuel cylinder should be disconnected.• Use in high wind conditions that result in poor burner operation such as blowing out and flaring should be avoided. If repositioning the appliance does not improve operation under such wind conditions, the appliance should be turned off.• Install the smoker with the hose regulator assembly extended the full length of the hose (24 in. minimum) directly away from the appliance. When so configured, placement results in maximum tank to smoker distance. When the smoker is operated, the hose/regulator and gas tank should be perpendicular to wind direction. Placing tank closer than 24 inches to the smoker can overheat the tank and cause release of propane through relief openings and can result in tank fire or explosion. • Read and follow all warnings and instructions before assembling and using the appliance.• Follow all warnings and instructions when using the appliance.
NOTE: The installation must confirm with local codes or, in the absence of local codes, with eitherthe National Fuel Gas Code, ANSI Z223.1/NFPA 54, Natural Gas and Propane Installation Code,CSA B149.1, or Propane Storage and Handling Code, B149.2, or the Standard for RecreationalVehicles, ANSI A 119.2/ NFPA 1192, and CSA Z240 RV Series, Recreational Vehicle Code, asapplicable.
WARNINGDO NOT mix old and new batteries.DO NOT mix alkaline, standard (Carbon-Zinc), or rechargeable (Nickel-Cadmium) batteries.DO NOT dispose of batteries in fire. Improper disposal may cause batteries to leak or explode.
The electronic ignition requires 1 “AAA” alkaline battery, which is included.
WARNING:The hose to tank attachment creates a potential trip hazard for user and pedestrians - use caution.Do not allow or cause the gas tank or applianceto tip.
MINIMUM 24 IN. (610 MM)
(Tank not included)
HIGH
LOW OFF
I
C
V
T
T
T
C
Master Forge & M Design® is a registered trademarkof LF, LLC. All rights reserved.
®
13
G
2
TABLE OF CONTENTS
Safety Information ......................................................................................................................... 3
Replacement Parts List ................................................................................................................ 26
ITEM #0190449
MODEL #MFW784BDP
DUAL FUELVERTICAL SMOKER
Français p. XX
Español p. XX
1
Français p. 28
Español p. 58
SAFETY INFORMATION
3
Please read and understand this entire manual before attempting to assemble, operate or install the product. If you have any questions regarding the product, please call customer service at 1-800-963-0211, 8:00 a.m. – 6:00 p.m., EST, Monday – Thursday, 8:00 a.m. – 5:00 p.m., EST, Friday.
PACKAGE CONTENTS
6
PART DESCRIPTION QUANTITY A Leg - standard 3 B Leg - with holes 1 C Burner & Control Unit 1 D Wood Chip Box 1 E Charcoal Grate 1 F Wood Chip Box Lid 1 G Water Bowl 1 H Cooking Grate 4 I Smoker Body 1 J Lifting Handle 2 K Door Locking Bracket 2
L Square Smoke Stack 1 M Temperature Gauge & Bezel 1 N Upper Door (pre-assembled) 1 O Bottom Door (pre-assembled) 1 P Side Table 1 Q Door Handle 2 R Table Front Support 1 S Table Back Support 1 T Cooking Grate Support 12 U “AAA” Battery (1.5 V) 1 V Hose Retention 1
PART DESCRIPTION QUANTITY
ASSEMBLY INSTRUCTIONS
8
24
WARRANTY
25
This vertical gas smoker is warranted against broken or damaged parts at the time of purchase. The stainless steel burner is warranted for 3 years. All other parts carry a one (1) year limited warranty except the water bowl, which is warranted to be free of defects for 90 days. Paint is warranted to be free of defects for 90 days except for rust, which may appear after repeated use.
This warranty does not cover damage or issues related to neglect, abuse or modifications to the appliance. Repair labor is not covered.
All parts that meet the warranty requirements will be shipped at no charge via the discretion of GHP Group Inc. (ground shipments, US Mail or Parcel Post ONLY). Any special handling charges (i.e. Second Day, Overnight, etc.) will be the responsibility of the consumer.
All warranty claims apply only to the original purchaser and require a proof of purchase verifying purchase date. Do not return parts to GHP address without first obtaining a return authorization number from our customer service. This service is available by calling toll free 1-800-963-0211, 8:00 a.m. – 6:00 p.m., EST, Monday – Thursday 8:00 a.m. – 5:00 p.m., EST, Friday.
Some states do not allow the exclusion or limitation of incidental or consequential damages orlimitations on how long an implied warranty lasts, so the above limitations or exclusions may not apply to you. This warranty gives you specific legal rights, and you may have other rights that vary from state to state.
GHP Group Inc.8280 Austin AvenueMorton Grove, IL, USA60053-3207
The burner will not light using the igniter procedure.
1. The igniter electrode may be covered with grease or residue.
2. The igniter electrode may have a loose or disconnected wire.
3. No spark is being generated.
4. No gas flow or cylinder valve not open.
5. Vapor lock at coupling nut to LP cylinder.
1.Clean the igniter electrode.
2. Check the connection and reconnect any loose or disconnected wires.
3.Replace the AAA size battery inside the igniter.
4. Make sure LP cylinder is not empty or open cylinder valve.
5. Turn off knob and LP cylinder valve. Disconnect coupling nut from LP cylinder. Reconnect and retry.
The burner will not light with a match.
1. No gas flow or an obstructed gas flow.
1. Check the fuel level. Clean the venturi tube and burner.
HARDWARE CONTENTS (shown actual size)
M6 x 12Bolt
Qty. 32
7
AA BB
Before beginning assembly of product, make sure all parts are present. Compare parts with package contents list and hardware contents list. If any part is missing or damaged, do not attempt to assemble the product.
Estimated Assembly Time: 25 minutes
Tools Required for Assembly (not included): Phillips Head Screwdriver, 1/2 in. Wrench, Pliers.
PREPARATION
M5 Nut
Qty. 2
1. Align the legs - standard (A) with the mounting holes on the bottom left front, right front and left rear of the smoker body (I). Thread bolts (AA) through the holes from the outside of the unit. Tighten all bolts (AA) with a Phillips screwdriver.
Hardware Used
AA x 9M6 x 12 Bolt
2. Align the leg - with holes (B) with the mounting holes on the bottom right rear of the smoker. Thread bolts (AA) through the holes from the outside of the unit. Tighten all bolts (AA) with a Phillips screwdriver.
3. Open the bottom door of the smoker body (I). Turn the burner and control unit (C) upside down and place it on the bottom of the smoker body (I), making sure the 4 mounting holes on the burner and control unit (C) are aligned with the holes on the smoker body (I). Note: The control knob should be on the same side as the door. Check that the burner is properly installed on the orifice before attaching the burner and control unit (C). Thread bolts (AA) through holes from outside of unit. Securely tighten the unit to the bottom with a Phillips screwdriver.
5. CAUTION: This unit is HEAVY! Do not attempt this step without assistance! Close the two doors. With the assistance of a helper, stand the unit upright on its legs on a firm and level surface. (Make sure that the burner/control unit and legs are attached). Open the upper door. Position the square smoke stack (L) with control arm to the left as shown. Using 4 bolts (AA), attach square smoke stack (L) to the top of smoker body (I). Securely tighten with a Phillips screwdriver.
Hardware Used
6. Insert the cooking grate supports (T) into the corresponding holes on rack of the shelf inside the smoker body (I) from the bottom up. NOTE: There are 8 positions to install the cooking grate supports. The cooking grate supports can be installed into positions according to the need of the owner.
8. Align the door locking bracket (K) holes with the holes on the upper right side of the smoker body (I). Thread 2 bolts (AA) through the holes in the door locking bracket (K) into the threaded holes of the smoker body (I). Tighten the bolts (AA) using a Phillips screwdriver. Repeat on lower right side.
9. Slide door handle (Q) through brackets in door. Using pliers, slide a spring clip (CC) over the groove in the door handle as shown. Make sure both of the spring clips are securely attached in the grooves of the handles.
10. Install the side table back support (S) and table front support (R) on the side of the smoker body (I) with screws (BB). Arrows pointing up indicate the correct position of the brackets when fastened to the smoker body (I).
11. With the side table (P) in a parallel position, align the slots in the side table with the table supports (R & S) and insert. To lock the side table (P) in the upright position, swing the side table (P) up, push toward the smoker body (I), and press down on the side table (P) near the body until it is fully fastened in place.
If you have any questions regarding the product, please call customer service at 1-800-963-0211, 8:00 a.m. – 6:00 p.m., EST, Monday – Thursday, 8:00 a.m. – 5:00 p.m., EST, Friday.
2
6
5
8
9
10
11
ATTACH YOUR RECEIPT HERE
Serial Number Purchase Date
Questions, problems, missing parts? Before returning to your retailer, call our customer service department at 1-800-963-0211, 8:00 a.m. – 6:00 p.m., EST, Monday – Thursday, 8:00 a.m. – 5:00 p.m., EST, Friday.
ANS Z21.89a-2008 CSA 1.18a-2008
CALIFORNIA PROPOSITION 65
1. Fuels used in wood, charcoal, gas or oil fired appliances and the products of combustion of such fuels contain chemicals known to the State of California to cause cancer, birth defects or other reproductive harm. 2. This product contains chemicals, including lead and lead compounds, known to the State of California to cause cancer, birth defects or other reproductive harm.
• DO NOT use this product for anything other than its intended purpose. It is NOT intended for commercial use. It is NOT intended to be installed or used in or on a recreational vehicle and/or boat. • Keep a fire extinguisher near this product at all times.• This appliance is for outdoor use only in well-ventilated areas. DO NOT operate it in a building, garage or any other enclosed area, or under overhead construction.• A minimum clearance of 36 inches (92 cm) to combustible material is required on the front, sides and back. It is very important to always maintain proper clearances to combustibles.• The cylinder must be at least 24 inches (61 cm) from the appliance.• DO NOT obstruct the flow of combustion air or ventilation air for the appliance.• When cooking, the smoker must be on a level, stable noncombustible surface in an area clear of combustible material, including tall or dry grass. • Care should be taken to protect the fuel supply hose from damage from either pedestrian or vehicle traffic.• Clean and inspect the hose before each use of the appliance. If there is evidence of abrasion, wear, cuts or leaks, the hose must be replaced prior to the appliance being used. The replacement hose assembly shall be that specified by the manufacturer.• Before each use check that no dead leaves or debris are under the appliance.• Store this appliance in a dry, protected location.• The use of alcohol, prescription or nonprescription drugs may impair the user’s ability to properly assemble and safely operate this appliance.• Allow the smoker to cool to 115°F (45°C) before moving or storing. Use caution when lifting and moving the appliance to avoid back strain or back injury. DO NOT move the appliance while it is in use.• Always hang the regulator on the hose retention wire while not in use or disconnected with the LP (liquid propane) tank. KEEP the fuel supply hose away from any heated surface(s).
SAFETY INFORMATION
4
• DO NOT store and use this appliance near gasoline or other combustible liquids or where other combustible vapors may be present.• DO NOT use this appliance as a heater.• DO NOT leave the appliance unattended while in use. Keep children and pets away from the appliance at all times.• NEVER close the damper completely while cooking. • If you must dispose of ashes in less time than it takes for the ashes to completely cool down, remove the ashes from the appliance, keeping them in the heavy-duty foil, and soak them completely with water before disposing of them in a noncombustible container.• This appliance will be hot during and after use. Use insulated oven mitts or gloves for protection from hot surfaces or splatter from cooking liquids.• Make sure that the orifice of the control valve properly mates with the burner mixing tube by visual observation. Please refer to maintenance section.• Use caution when opening the door of the smoker while in operation. Keep hands, face and body safe from hot steam or flare-ups. DO NOT inhale smoke.• DO NOT wear loose clothing while operating the smoker. Tie back long hair while operating the smoker. ALWAYS wear shoes that fully cover your feet while operating the smoker.• Allow the smoker and its components to cool completely before conducting any routine cleaning or maintenance.• NEVER use glassware, plastic or ceramic cookware on or in your smoker. Use metallic cookware only.• NEVER operate the smoker without water in the water bowl. NEVER allow the water to completely evaporate. Check the water level at least every 2 hours. A sizzling sound may indicate a low water level. Follow instructions in this manual for adding water while operating (see the Operating Instructions section).• When using flavoring wood, add a sufficient amount prior to operation to avoid having to add wood while operating. Adding wood while operating may splash hot water and cause serious injury.• Use of accessories not intended for this smoker is not recommended and may lead to injury or property damage.• An LP cylinder not connected for use should not be stored in the vicinity of the smoker or any other appliance. DO NOT store spare LP cylinders within 10 feet of the smoker. LP cylinders must be stored outdoors, out of reach of children. DO NOT store LP cylinders in a building, garage or any other enclosed area.• DO NOT store LP gas cylinders inside or on top of the smoker. Improper storage of cylinders could lead to explosion, fire and/or personal injury. Cylinders are to be stored outdoors, out of reach of children and must not be stored in a building, garage or any other enclosed area.• While the smoker is not in use, the gas must be turned off at the supply cylinder.• LP gases are heavier than air, tend to pool and collect in low-lying areas, are easily ignited and are highly flammable. Proper care and caution should be employed when dealing with any such fuels.• The smoker should be turned off and all supply valves (on piping or on fuel cylinders) should be closed in the event that the odor of unburned gas is detected. Do not attempt to use the appliance until any gas leaks are fixed and/or the source of the unburned gas odor is accounted for.
SAFETY INFORMATION
5
A
B
C
D
E
F
G
I
S K
LM
NP
O
J
A
I
AA
I
AA
Hardware Used
AA x 3M6 x 12 Bolt
1
3C
AA
Hardware Used
AA x 4M6 x 12 Bolt
Controlarm
I
AAL
AA x 8M6 x 12 Bolt
I
T
AA
K
Q
I
CC
I
R
OPERATING INSTRUCTIONS
CONNECTING THE LP TANK
WARNING
ALL INSTRUCTIONS AND SAFEGUARDS ON THIS PAGE MUST BE FOLLOWED TO PREVENT FIRE, DAMAGE AND/OR INJURY.
1. The knob on the LP tank must be closed. Make sure that the knob is turned clockwise to a full stop. The cylinder supply system must be arranged for vapor withdrawal.
2. Check that the control knob on the control unit is turned off.
3. Remove the protective cap from the LP tank valve and coupling nut.
4. Hold the regulator in one hand and insert the nipple into the valve outlet. Be sure the nipple is centered in the valve outlet. The coupling connects to the large outside threads on the valve outlet. Use care – do not cross thread the connection.
5. Hand tighten the coupling clockwise until it comes to a full stop. Firmly tighten by hand only. Do not use tools.
P
Straight
CAUTION: In the connection process, make sure the regulator inlet connector mates with the cylinder valve outlet properly, safely and firmly.
15
OPERATING INSTRUCTIONS
Any fuel supply cylinder used must be constructed and marked in accordance with specifications for propane cylinders of the U.S. Department of Transportation (DOT) CFR 49, or the Standard for Cylinders, Spheres and Tubes for the Transportation of Dangerous Goods, CAN/CSA B339. The appliance is to be used only with the 20-pound, vertical standing vapor withdrawal type tank and must include a collar to protect the cylinder valve.(A) DO NOT store spare LP cylinders under or near the smoker.(B) NEVER fill cylinder more than 80% full.(C) Do not store cylinder indoors.
WARNINGIf instructions A, B, C above are not followed exactly, a fire causing death or serious injury may occur.
This smoker is designed to operate on LP gas only. The gas cylinder used must include a collar to protect the cylinder valve. The cylinder supply system must be arranged for vapor withdrawal. Do not allow dirt or foreign material to get into or onto tank connection when it is not attached to the fuel supply system. Use the protective cap provided.
WARNINGALL INSTRUCTIONS AND SAFEGUARDS ON THIS PAGE MUST BE FOLLOWED TO PREVENT FIRE, DAMAGE AND/OR INJURY.
The cylinder outlet must have Type 1 gas connection termination in order to mate with gas hose provided with smoker. The pressure regulator and hose assembly supplied by the manufacturer with the appliance must be used. Replacement pressure regulators and hose assemblies must be those specified by the appliance manufacturer.This unit is not to be utilized with a non-self-contained LP-gas supply system.
Valve/pressure regulators are factory set to the correct operating pressures. No attempts should be made to adjust these settings.
DISCONNECT THE LP TANK
Make sure that the knob on the LP tank is turned clockwise to a full stop (CLOSED).
Hold the regulator in one hand, turn the coupling to the valve outlet counterclockwise and unthread the connection by hand only. Do not use tools.
Place dust cap on cylinder valve outlet whenever the cylinder is not in use. Only install the type of dust cap on the cylinder valve outlet that is provided with the cylinder valve. Other types of caps or plugs may result in leakage of propane.
Always hang the regulator on the lifting handles while not in use, disconnected fromthe LP tank, and when the unit has cooled down.
STORE THE TANK IN A PROPER PLACE AS INDICATED IN THIS MANUAL.
16
OPERATING INSTRUCTIONS
CHECKING FOR LEAKS
After connections are made, check all connections and fittings for leaks with a soap solution. 1. With all valves closed, apply the leak check solution (50/50 mix of dishwashing soap and water) to all gas carrying connections and fittings. 2. Open tank valve.Presence of bubbles at areas of wet solution indicates a gas leak. If leaks are detected or you smell or hear gas, shut off the valve and repair the leak or replace the defective part. Do not use the smoker until all leaks are corrected.
The gas hose/regulator assembly should be totally extended to the maximum distance so that the hose is straight and the tank is as far from the smoker as it can be (minimum 24 inches).
For vapor withdrawal, LP tanks are intended to be operated in the upright position only.
If the product is not in use, the gas must be turned off at the supply cylinder and the cylinder should be disconnected from the appliance.
Storage of the appliance indoors is only permissible if the cylinder is disconnected and removed from the appliance. Do not store cylinder indoors.
BEFORE FIRST USE
Remove all hangings or plastic straps, if present.
Before you cook food in your smoker, it is important to “season” your smoker. Seasoning seals the paint and interior of your smoker to enhance flavoring, durability and overall performance.To season your smoker, simply use it as you normally would only do not cook any food. You will need to follow all of the operating procedures in the next few sections of this manual.
Using your desired flavoring woods and marinades, burn your smoker at low temperature (around 175°F) for 45 – 60 minutes. Let the smoker cool and clean out the water and wood.
Once seasoning is complete, your smoker’s interior will have a durable, seasoned coating.
ADDING WATER
To add water before cooking, simply remove the water bowl and fill it with water slightly below the rim. Place the bowl back into the smoker. Adding water before cooking is recommended. To add water while cooking, if a sizzling sound indicating lack of water is heard, or there is a need to add water, open the bottom door with care and avoid taking in the smoke. Use a long nose kettle-like water can, stand as far from the smoker as you can, fill the water bowl up to 1 inch below the rim.
CAUTION: DO NOT pull the water bowl out beyond the rack when the smoker is hot.
17
OPERATING INSTRUCTIONS
COOKING TIP
Line the water bowl with aluminum foil before each use. This will make it easy to clean and help your water bowl last longer.
To make adding water easier and safer, use a clean watering can with a long spout.
ADDING WOOD CHIPS
To add wood chips before cooking, simply fill the wood chip box with your choice of flavoring hardwood chips. The amount and type of wood you use is entirely dependent on the desired amount of flavor. Once the box is filled, place the lid on top of the box and set the box in the smoker.
To add wood chips while cooking, we recommend using tongs or long handled pliers to removethe box lid and to place the pieces into the wood chip box without removing the box. It is not recommended to remove the wood chip box while the smoker is in operation.
CAUTION: The wood chip box and lid get very hot. Avoid handling them while in use. Always wear protective oven mitts when handling hot components.
COOKING TIP: FLAVORING WOOD
• Small wood chips work best inside the wood chip box.• Use dry hardwoods such as hickory, pecan, apple, cherry or mesquite.• To produce more smoke and prevent fast burning, pre-soak the wood chips in a separate bowl of water for at least 20 minutes, or wrap the chips in perforated aluminum foil.• Most smoke flavoring occurs within the first hour of cooking. Adding wood chips after the first hour is typically not necessary unless extra smoke flavoring is desired.
18
OPERATING INSTRUCTIONS
19
OPERATING INSTRUCTIONS
Match Lighting Procedure - LP Gas
1. Repeat steps 1 through 5 of the igniter lighting system.
2. Open both doors. Place a lit match on to the burner as shown below. Quickly turn the control knob to the “HIGH” position. If the burner does not light in 5 seconds, turn the control knob off, wait at least 5 minutes and for the gas to clear. Repeat the process.
20
OPERATING INSTRUCTIONS
Cooking Tip: Damper Adjustments
WARNING: The dampers on the smoker body and the handle on the smoke stack may become very hot while cooking. Always wear a heat resistant glove when adjusting.
• For best performance, rotate the smoker so that the front or back of the body is facing the wind. This allows the adjustment of the dampers to be more effective and accurate.• The two dampers on smoker body should never be fully closed.• Opening the damper of the smoke stack helps to exhaust both the heat and smoke.• The key to effective smoking is to watch your heat indicator on the door and adjust the damper accordingly.• Temperature maintenance is best controlled by different damper adjustment configurations.
Turning off the Smoker
CAUTION: The smoker can become very hot while in use.Do not touch any portion of the smoker except for the door handle and burner control knob. It may be necessary to use protective gloves.
1. Turn the burner control knob off by pushing in and rotating to “OFF”. The burner flame should go out.
2. Turn off the LP cylinder valve by turning the knob clockwise until it cannot go any farther.
Follow all warnings and safety precautions before removing meat from smoker or preparing the unit for storage.
Lighting Instructions – Charcoal
When using charcoal, DO NOT USE PRETREATED, MATCH-LIGHT CHARCOAL with this smoker. Only use standard, untreated briquettes or lump charcoal and ONLY use charcoal lighting fluid approved for lighting charcoal. Do not use lighter fluid, paint thinners, gasoline, kerosene, alcohol or other flammable material for lighting charcoal. Damage to the smoker may occur with the use of match-light charcoal. DO NOT USE THE LP GAS BURNER WHEN LIGHTING CHARCOAL. Step 1Place the charcoal grate inside the woodchip/charcoal tray and add 1.5 pounds of charcoal on charcoal grate (approximately 26 briquettes).
Step 2Note: Please refer to the manufacturer’s recommended amount of lighter fluid before applying fluid to the briquettes. With the charcoal tray outside the firebox, saturate charcoal with the amount of lighting
LIGHTING INSTRUCTIONS
CAUTION: If the flame extinguishes accidentally during ignition or operation, immediately TURN OFF the cylinder valve and then TURN OFF the control knob.
Igniter Lighting System
1. Check all connections for leaks using the “soap water” test as explained on page 16.
2. Open both of the smoker cabinet doors. Always keep the doors open during lighting.
3. Check for any blockage to the venturi tube or burner, damper setting, ventilation setting. Remove any foreign objects or matter.
4. Be sure the burner control knob is in the “OFF” position.
5. Open the LP cylinder valve by turning counterclockwise.
6. Push igniter on the control unit down 1 to 2 seconds then push and turn control knob to “HIGH,” while still holding the ignitor button down. At this point the burner should ignite.
7. If ignition does not take place within 5 seconds, immediately turn the control knob to OFF. Wait 5 minutes and repeat above Steps 6 and 7.
8. If burner still fails to light, try match lighting using the instructions on page 19.
9. Once the burner is lit, close the doors to allow heat to accumulate. The smoke stack on the top of the smoker can be adjusted to the desired setting to allow proper ventilation and combustion. NEVER CLOSE THE SMOKE STACK COMPLETELY.
Warning: Always light your smoker with both doors open.
22
CARE AND MAINTENANCE
AFTER USE SAFETY AND MAINTENANCE
WARNING• Use caution when lifting and moving the smoker to avoid strain injuries. Two people are recommended to lift or move the smoker.
• DO NOT store the smoker near gasoline or other combustible liquids or where combustible vapors may be present. Keep the area around the smoker clear and free of combustible materials and vapors.
• DO NOT store this smoker in an area accessible to children or pets. Store the smoker in a dry, protected location. Disconnect cylinder from smoker.
• DO NOT allow anyone to conduct activities around the smoker following use until it has cooled. It is hot during operation and remains hot for a period of time following use.
• DO NOT leave hot ashes unattended until the smoker cools completely.
• The smoker becomes extremely hot – allow the smoker to cool completely before handling. If you must handle the smoker while it is hot, ALWAYS wear protective oven mitts or heat-resistant gloves. Allow the smoker to cool before removing and cleaning the grease pan.
• Dispose of cold ashes by wrapping them in heavy-duty aluminum foil and putting them in a noncombustible container.
• If you must dispose of the ashes in less time than it takes for them to completely cool. Remove the ashes from the smoker, keeping them in heavy-duty foil, and soak them completely with water before disposing of them in a noncombustible container.
GENERAL CARE AND MAINTENANCE CAUTION: All care and maintenance procedures are to be performed while the smoker is turned off and cooled. Always perform maintenance by a qualified service person.
Clean the water bowl and cooking grate with hot, soapy water. Rinse and dry thoroughly. You may prefer to coat the water bowl and cooking grid lightly with cooking oil or cooking spray.
Frequently check and clean the venturi and burner tubes for insects and insect nests. A clogged tube can lead to fire beneath the smoker. Also make sure the smoker does not have any foreign objects obstructing the flow of combustion and ventilation air.
To clean the inside and outside of the smoker cabinet, simply use a damp cloth. Spray-washing with a water hose is not recommended. Moisture should be wiped away and not allowed to stand inside or on top of the smoker. Once cleaned, you may prefer to lightly coat the interior of the smoker cabinet with cooking oil or cooking spray.
If rust is present on the exterior surface of the smoker, clean the area with steel wool or emery cloth and use heavy-duty, heat-resistant paint.
NEVER apply additional paint to the interior of the smoker. If rust is present on the interior of the smoker, clean it thoroughly with steel wool or emery cloth and lightly coat the area with cooking oil or cooking spray to help minimize recurring rust.
When an LP tank is not connected, and to help prevent dirt or other foreign particles from clogging the regulator connector, hang the end of the hose and regulator assembly on the lifting handle.
Keep the ventilation opening(s) of the cylinder enclosure free and clear of debris.
23
CARE AND MAINTENANCE
Inspect the flames at the burner by looking through the observing hole on left side of the burner and control unit. A good flame should be blue with a yellow tip 1 to 2 inch high. If flames are excessively yellow and irregular, oil residue and food deposits may be collecting on the burner. Try cleaning the burner surface with hot, soapy water and cleaning the holes with a pipe cleaner to improve the flames.
Bad flames may also be caused by poor venturi attachment to the orifice. Turn off the control knob and cylinder valve. Always let the smoker cool before cleaning or checking the assembly. Make sure the orifice of the control valve properly mates with the burner mixing tube by visual observation from the bottom of the appliance. The burner venturi tube should overlap the orifice and they should form a straight line as shown in Figure A. Figures B & C show incorrect alignment.
WARNING: If the instructions above are not followed, an explosion may result, possibly causing serious bodily injury or death.
To protect your smoker from weather conditions, always keep it covered while not in use.
2”
Yellow
Light Blue
Blue
Good Flame Bad Flame
!! !! !!
Figure A Figure B Figure C
Correct Wrong Wrong
The flame goes out. 1. Disconnected gas supply hose. 2. High or gusting winds.
For replacement parts, call our customer service department at 1-800-963-0211, 8:00 a.m. – 6:00 p.m., EST, Monday – Thursday, 8:00 a.m. – 5:00 p.m., EST, Friday.
Owner’s Manual - Part #312-02025-00Printed in China
SpringClip
Qty. 2
CC
BB x21/4-20 FlangedWasher Nut
Hardware Used
R
Q
7. Insert 4 bolts (AA) through the mounting holes on one of the lifting handles (J) and into holes on right side of smoker body (I). Use a Phillips screwdriver to secure the handles to the smoker body (I). Repeat on left side.
7
Hardware Used
CC x 2Spring Clip
I
AA
J
ASSEMBLY INSTRUCTIONS
4. Thread bolts (EE) through holes on the leg - with holes (B) from outside of unit. Secure using 2 nuts (FF) from inside leg by using wrench. Tighten all bolts (AA) with a Phillips screwdriver. Insert the regulator hose attached to the burner and control unit (C) into the hose retention (V).
4
I
V
12. Slide the wood chip box (D) onto the lowest cooking grate supports (T) inside the smoker body (I) and put the wood chip box lid (F) on top. Note: For charcoal, refer to Step 17.
12
DANGER:
Failure to follow these instructions could result in fire, explosion, or burn hazard which could cause property damage, personal injury or death.
DANGER: If you smell gas:1. Shut off gas to the appliance.
3. Open lid.4. If odor continues, keep away from the appliance and immediately call your gas supplier or your fire department.
Assembler/Installer: This instruction manual contains important information necessary for the proper assembly and safe use of this appliance. Read and follow all warnings and instructions before assembling and using this appliance. Leave these instructions with the consumer.
Consumer/User: Follow all warnings and instructions when using this appliance. Keep these instructions for future reference.
1. Never operate this appliance unattended.2. Never operate this appliance within 10 feet (3 m) of any structure, combustible material or other gas cylinder3. Never operate this appliance within 25 feet (7.5 m) of any flammable liquid.4. Never allow oil or grease to get hotter than 400°F or 200°C. If the temperature exceeds 400°F (200°C) or if oil begins to smoke, immediately turn the burner or gas supply OFF.5. Heated liquids remain at scalding temperatures long after the cooking process. Never touch cooking appliance until liquids have cooled to 115°F (45°C) or less.6. If a fire should occur, keep away from the appliance and immediately call your fire department. Do not attempt to extinguish an oil or grease fire with water. Failure to follow these instructions could result in fire, explosion, or burn hazard which could cause property damage, personal injury or death.
DANGER
DANGER:
Rev. 9/2011
M4 x 10Bolt
Qty. 2
DD EE
M4 Nut
Qty. 2
FF
M5 x 12Screw
Qty. 8
H
J
T
T
U
V
front of smoker
B
front of smoker
M4 x 10 BoltEE
M4 NutFF
Hardware Used
x 2
x 2
B
EE
FF
Hardware Used
AA x 4M6 x 12 Bolt
Hardware Used
AA x 4M6 x 12 Bolt
M5 x 12 ScrewBB x 8
Hardware UsedBB
S
I
R
S
D
FI
I13. Slide the water bowl (G) onto the cooking grate supports (T) inside the smoker body (I) above the wood chip box (D) as shown.
ASSEMBLY INSTRUCTIONS
13
15. Insert the probe of the temperature gauge assembly (M) through hole of the smoker door from the outside. Secure using 2 nuts (DD) from inside panel by using wrench.
16. To install the “AAA” battery (U), remove the igniter button by turning it counterclockwise and insert the “AAA” battery (U) with the positive end facing out. Reinstall the igniter button by turning it clockwise and hand tightening.
17. For charcoal use, remove the wood chip box lid (F) and place the charcoal grate (E) inside the wood chip box (D).
18. Always hang the regulator hose attached to the burner and control unit (C) to the hose retention (V) attached to the leg - with hole (B) while not in use. If switching from LP gas to charcoal, wait for the unit to cool down before disconnecting from the LP tank.
15
16
17
18
DD
M
U
E
B
12
14. Slide the 4 cooking grates (H) onto the top cooking grate supports (T) inside the smoker body (I).
14 I
H
ASSEMBLY INSTRUCTIONS
Hardware Used
DD x 2
D
S
V
M5 Nut
igniter button
21
OPERATING INSTRUCTIONS
fluid as recommended by the lighter fluid manufacturer. Allow the fluid to soak into the charcoal for 3 minutes before placing the tray back into the firebox (refer to assembly instructions for proper tray placement). After soaking the charcoal, place the lighting fluid at a safe distance away from the smoker.
Step 3With both doors open, stand back and carefully light charcoal and allow to burn until covered with a light ash (approximately 20 minutes). Charcoal lighting fluid must be allowed to completely burn off prior to closing the doors. (Fumes will tend to collect in the upper cavity if the door is closed).
DANGER: Closing the firebox doors during the lighting procedure could trap fumes from the charcoal lighting fluid in the smoker box and may result in a flash-fire or explosion when door is opened, resulting in property loss, personal injury or death. Never attempt to add more lighting fluid to the charcoal once it has been lit.
Step 4After 25 - 30 minutes, charcoal should be ready for cooking and/or adding woodchips. Carefully add wood chunks using long cooking tongs.
Adding Charcoal and/or Woodchips
Additional charcoal and/or wood may be required to maintain or increase cooking temperature.
WARNING: Use caution since flames can flare-up when fresh air suddenly comes in contact with fire. When opening the door, keep hands, face and body a safe distance from hot steam and flame flare-ups.
Step 1Stand back and carefully open smoker box door allowing heat and steam to escape away from your face. Use caution since flames can flare-up when fresh air suddenly comes in contact with fire. Inspect the charcoal level in pan.
Step 2Wearing flame retardant oven mitts/gloves, stand back a safe distance and use long cooking tongs to lightly brush aside ashes on hot coals. Use cooking tongs to add charcoal and/or wood to charcoal pan, being careful not to stir-up ashes and sparks
WARNING: Never add charcoal lighting fluid to hot or even warm coals as flashback may occur causing severe burns.
Step 3Close smoker box door and allow food to continue cooking.
Allow the ashes to completely cool before reusing or cleaning the smoker.
26
REPLACEMENT PARTS LIST
For replacement parts, call our customer service department at 1-800-963-0211, 8:00 a.m. – 6:00 p.m. EST, Monday – Thursday, 8:00 a.m. – 5:00 p.m. EST, Friday.
PART DESCRIPTION PART # 1 Leg – Standard 301-01016-00 2 Leg - with holes 312-01016-00 3 Burner and Control Unit 312-01015-00 4 Wood Chip Box (MFW only) 312-01028-00 5 Charcoal Grate 312-01030-00 6 Wood Chip Box Lid 301-01029-00 7 Wood Chip Box Handle and 301-01028-02 Lid Handle 8 Water Bowl 301-02017-00 9 Cooking Grate 312-01014-00 10 Door Locking Bracket 302-01008-00 11 Cooking Grate Support 302-01030-00 12 Smoker Body 312-12001-00 13 Square Smoke Stack 312-02009-00 14 Lifting Handle 301-01010-00 15 Logo Plate 302-03002-01 16 Temperature Gauge Bezel 301-01034-00 17 Temperature Gauge 301-01003-00
PART DESCRIPTION PART # 18 Upper Door 302-02002-00 19 Side Table 312-02008-00 20 Door Handle Crank 302-02007-02 21 Door Handle Grip 302-02007-01 22 Bottom Door without handle 302-02102-00 23 Table Front Support Bracket 312-02008-01 24 Table Back Support Bracket 312-02008-02 25 Side Damper Plate (round) 301-01001-04 26 Igniter Ground Wire 301-01015-08 27 Push Button 301-01015-03 28 Electronic Ignitor 301-01015-06 29 Ignition Cap 301-01015-05 30 Control Knob 301-01015-01 31 Control Knob Bezel 301-01015-02 32 Igniter Electrode and Ignition Wire 301-01015-07 33 Hose Retention 312-01016-01 N/A Hardware Bag 312-02026-00 N/A Owner’s/Instruction Manual 312-02025-00
11
14
21
17
1918
20
22
2324
25
2627
32
30
2928
3331
ANS Z21.89a-2008 CSA 1.18a-2008
• Do not use the smoker if the burner fails to light or fails to remain lit. Under such conditions, gas should be turned off and the fuel cylinder should be disconnected.• Use in high wind conditions that result in poor burner operation such as blowing out and flaring should be avoided. If repositioning the appliance does not improve operation under such wind conditions, the appliance should be turned off.• Install the smoker with the hose regulator assembly extended the full length of the hose (24 in. minimum) directly away from the appliance. When so configured, placement results in maximum tank to smoker distance. When the smoker is operated, the hose/regulator and gas tank should be perpendicular to wind direction. Placing tank closer than 24 inches to the smoker can overheat the tank and cause release of propane through relief openings and can result in tank fire or explosion. • Read and follow all warnings and instructions before assembling and using the appliance.• Follow all warnings and instructions when using the appliance.
NOTE: The installation must confirm with local codes or, in the absence of local codes, with eitherthe National Fuel Gas Code, ANSI Z223.1/NFPA 54, Natural Gas and Propane Installation Code,CSA B149.1, or Propane Storage and Handling Code, B149.2, or the Standard for RecreationalVehicles, ANSI A 119.2/ NFPA 1192, and CSA Z240 RV Series, Recreational Vehicle Code, asapplicable.
WARNINGDO NOT mix old and new batteries.DO NOT mix alkaline, standard (Carbon-Zinc), or rechargeable (Nickel-Cadmium) batteries.DO NOT dispose of batteries in fire. Improper disposal may cause batteries to leak or explode.
The electronic ignition requires 1 “AAA” alkaline battery, which is included.
WARNING:The hose to tank attachment creates a potential trip hazard for user and pedestrians - use caution.Do not allow or cause the gas tank or applianceto tip.
MINIMUM 24 IN. (610 MM)
(Tank not included)
HIGH
LOW OFF
I
C
V
T
T
T
C
Master Forge & M Design® is a registered trademarkof LF, LLC. All rights reserved.
®
13
G
2
TABLE OF CONTENTS
Safety Information ......................................................................................................................... 3
Replacement Parts List ................................................................................................................ 26
ITEM #0190449
MODEL #MFW784BDP
DUAL FUELVERTICAL SMOKER
Français p. XX
Español p. XX
1
Français p. 28
Español p. 58
SAFETY INFORMATION
3
Please read and understand this entire manual before attempting to assemble, operate or install the product. If you have any questions regarding the product, please call customer service at 1-800-963-0211, 8:00 a.m. – 6:00 p.m., EST, Monday – Thursday, 8:00 a.m. – 5:00 p.m., EST, Friday.
PACKAGE CONTENTS
6
PART DESCRIPTION QUANTITY A Leg - standard 3 B Leg - with holes 1 C Burner & Control Unit 1 D Wood Chip Box 1 E Charcoal Grate 1 F Wood Chip Box Lid 1 G Water Bowl 1 H Cooking Grate 4 I Smoker Body 1 J Lifting Handle 2 K Door Locking Bracket 2
L Square Smoke Stack 1 M Temperature Gauge & Bezel 1 N Upper Door (pre-assembled) 1 O Bottom Door (pre-assembled) 1 P Side Table 1 Q Door Handle 2 R Table Front Support 1 S Table Back Support 1 T Cooking Grate Support 12 U “AAA” Battery (1.5 V) 1 V Hose Retention 1
PART DESCRIPTION QUANTITY
ASSEMBLY INSTRUCTIONS
8
24
WARRANTY
25
This vertical gas smoker is warranted against broken or damaged parts at the time of purchase. The stainless steel burner is warranted for 3 years. All other parts carry a one (1) year limited warranty except the water bowl, which is warranted to be free of defects for 90 days. Paint is warranted to be free of defects for 90 days except for rust, which may appear after repeated use.
This warranty does not cover damage or issues related to neglect, abuse or modifications to the appliance. Repair labor is not covered.
All parts that meet the warranty requirements will be shipped at no charge via the discretion of GHP Group Inc. (ground shipments, US Mail or Parcel Post ONLY). Any special handling charges (i.e. Second Day, Overnight, etc.) will be the responsibility of the consumer.
All warranty claims apply only to the original purchaser and require a proof of purchase verifying purchase date. Do not return parts to GHP address without first obtaining a return authorization number from our customer service. This service is available by calling toll free 1-800-963-0211, 8:00 a.m. – 6:00 p.m., EST, Monday – Thursday 8:00 a.m. – 5:00 p.m., EST, Friday.
Some states do not allow the exclusion or limitation of incidental or consequential damages orlimitations on how long an implied warranty lasts, so the above limitations or exclusions may not apply to you. This warranty gives you specific legal rights, and you may have other rights that vary from state to state.
GHP Group Inc.8280 Austin AvenueMorton Grove, IL, USA60053-3207
The burner will not light using the igniter procedure.
1. The igniter electrode may be covered with grease or residue.
2. The igniter electrode may have a loose or disconnected wire.
3. No spark is being generated.
4. No gas flow or cylinder valve not open.
5. Vapor lock at coupling nut to LP cylinder.
1. Clean the igniter electrode.
2. Check the connection and reconnect any loose or disconnected wires.
3. Replace the AAA size battery inside the igniter.
4. Make sure LP cylinder is not empty or open cylinder valve.
5. Turn off knob and LP cylinder valve. Disconnect coupling nut from LP cylinder. Reconnect and retry.
The burner will not light with a match.
1. No gas flow or an obstructed gas flow.
1. Check the fuel level. Clean the venturi tube and burner.
HARDWARE CONTENTS (shown actual size)
M6 x 12Bolt
Qty. 32
7
AA BB
Before beginning assembly of product, make sure all parts are present. Compare parts with package contents list and hardware contents list. If any part is missing or damaged, do not attempt to assemble the product.
Estimated Assembly Time: 25 minutes
Tools Required for Assembly (not included): Phillips Screwdriver, 1/2 in. Wrench, Pliers.
PREPARATION
M5 Nut
Qty. 2
1. Align the legs - standard (A) with the mounting holes on the bottom left front, right front and left rear of the smoker body (I). Thread bolts (AA) through the holes from the outside of the unit. Tighten all bolts (AA) with a Phillips screwdriver.
Hardware Used
AA x 9M6 x 12 Bolt
2. Align the leg - with holes (B) with the mounting holes on the bottom right rear of the smoker. Thread bolts (AA) through the holes from the outside of the unit. Tighten all bolts (AA) with a Phillips screwdriver.
3. Open the bottom door of the smoker body (I). Turn the burner and control unit (C) upside down and place it on the bottom of the smoker body (I), making sure the 4 mounting holes on the burner and control unit (C) are aligned with the holes on the smoker body (I). Note: The control knob should be on the same side as the door. Check that the burner is properly installed on the orifice before attaching the burner and control unit (C). Thread bolts (AA) through holes from outside of unit. Securely tighten the unit to the bottom with a Phillips screwdriver.
5. CAUTION: This unit is HEAVY! Do not attempt this step without assistance! Close the two doors. With the assistance of a helper, stand the unit upright on its legs on a firm and level surface. (Make sure that the burner/control unit and legs are attached). Open the upper door. Position the square smoke stack (L) with control arm to the left as shown. Using 4 bolts (AA), attach square smoke stack (L) to the top of smoker body (I). Securely tighten with a Phillips screwdriver.
Hardware Used
6. Insert the cooking grate supports (T) into the corresponding holes on rack of the shelf inside the smoker body (I) from the bottom up. NOTE: There are 8 positions to install the cooking grate supports. The cooking grate supports can be installed into positions according to the need of the owner.
8. Align the door locking bracket (K) holes with the holes on the upper right side of the smoker body (I). Thread 2 bolts (AA) through the holes in the door locking bracket (K) into the threaded holes of the smoker body (I). Tighten the bolts (AA) using a Phillips screwdriver. Repeat on lower right side.
9. Slide door handle (Q) through brackets in door. Using pliers, slide a spring clip (CC) over the groove in the door handle as shown. Make sure both of the spring clips are securely attached in the grooves of the handles.
10. Install the table back support (S) and table front support (R) on the side of the smoker body (I) with screws (BB). Arrows pointing up indicate the correct position of the brackets when fastened to the smoker body (I).
11. With the side table (P) in a parallel position, align the slots in the side table with the table supports (R & S) and insert. To lock the side table (P) in the upright position, swing the side table (P) up, push toward the smoker body (I), and press down on the side table (P) near the body until it is fully fastened in place.
If you have any questions regarding the product, please call customer service at 1-800-963-0211, 8:00 a.m. – 6:00 p.m., EST, Monday – Thursday, 8:00 a.m. – 5:00 p.m., EST, Friday.
2
6
5
8
9
10
11
ATTACH YOUR RECEIPT HERE
Serial Number Purchase Date
Questions, problems, missing parts? Before returning to your retailer, call our customer service department at 1-800-963-0211, 8:00 a.m. – 6:00 p.m., EST, Monday – Thursday, 8:00 a.m. – 5:00 p.m., EST, Friday.
ANS Z21.89a-2008 CSA 1.18a-2008
CALIFORNIA PROPOSITION 65
1. Fuels used in wood, charcoal, gas or oil fired appliances and the products of combustion of such fuels contain chemicals known to the State of California to cause cancer, birth defects or other reproductive harm. 2. This product contains chemicals, including lead and lead compounds, known to the State of California to cause cancer, birth defects or other reproductive harm.
• DO NOT use this product for anything other than its intended purpose. It is NOT intended for commercial use. It is NOT intended to be installed or used in or on a recreational vehicle and/or boat. • Keep a fire extinguisher near this product at all times.• This appliance is for outdoor use only in well-ventilated areas. DO NOT operate it in a building, garage or any other enclosed area, or under overhead construction.• A minimum clearance of 36 inches (92 cm) to combustible material is required on the front, sides and back. It is very important to always maintain proper clearances to combustibles.• The cylinder must be at least 24 inches (61 cm) from the appliance.• DO NOT obstruct the flow of combustion air or ventilation air for the appliance.• When cooking, the smoker must be on a level, stable noncombustible surface in an area clear of combustible material, including tall or dry grass. • Care should be taken to protect the fuel supply hose from damage from either pedestrian or vehicle traffic.• Clean and inspect the hose before each use of the appliance. If there is evidence of abrasion, wear, cuts or leaks, the hose must be replaced prior to the appliance being used. The replacement hose assembly shall be that specified by the manufacturer.• Before each use check that no dead leaves or debris are under the appliance.• Store this appliance in a dry, protected location.• The use of alcohol, prescription or nonprescription drugs may impair the user’s ability to properly assemble and safely operate this appliance.• Allow the smoker to cool to 115°F (45°C) before moving or storing. Use caution when lifting and moving the appliance to avoid back strain or back injury. DO NOT move the appliance while it is in use.• Always hang the regulator on the hose retention wire while not in use or disconnected with the LP (liquid propane) tank. KEEP the fuel supply hose away from any heated surface(s).
SAFETY INFORMATION
4
• DO NOT store and use this appliance near gasoline or other combustible liquids or where other combustible vapors may be present.• DO NOT use this appliance as a heater.• DO NOT leave the appliance unattended while in use. Keep children and pets away from the appliance at all times.• NEVER close the damper completely while cooking. • If you must dispose of ashes in less time than it takes for the ashes to completely cool down, remove the ashes from the appliance, keeping them in the heavy-duty foil, and soak them completely with water before disposing of them in a noncombustible container.• This appliance will be hot during and after use. Use insulated oven mitts or gloves for protection from hot surfaces or splatter from cooking liquids.• Make sure that the orifice of the control valve properly mates with the burner mixing tube by visual observation. Please refer to maintenance section.• Use caution when opening the door of the smoker while in operation. Keep hands, face and body safe from hot steam or flare-ups. DO NOT inhale smoke.• DO NOT wear loose clothing while operating the smoker. Tie back long hair while operating the smoker. ALWAYS wear shoes that fully cover your feet while operating the smoker.• Allow the smoker and its components to cool completely before conducting any routine cleaning or maintenance.• NEVER use glassware, plastic or ceramic cookware on or in your smoker. Use metallic cookware only.• NEVER operate the smoker without water in the water bowl. NEVER allow the water to completely evaporate. Check the water level at least every 2 hours. A sizzling sound may indicate a low water level. Follow instructions in this manual for adding water while operating (see the Operating Instructions section).• When using flavoring wood, add a sufficient amount prior to operation to avoid having to add wood while operating. Adding wood while operating may splash hot water and cause serious injury.• Use of accessories not intended for this smoker is not recommended and may lead to injury or property damage.• An LP cylinder not connected for use should not be stored in the vicinity of the smoker or any other appliance. DO NOT store spare LP cylinders within 10 feet of the smoker. LP cylinders must be stored outdoors, out of reach of children. DO NOT store LP cylinders in a building, garage or any other enclosed area.• DO NOT store LP gas cylinders inside or on top of the smoker. Improper storage of cylinders could lead to explosion, fire and/or personal injury. Cylinders are to be stored outdoors, out of reach of children and must not be stored in a building, garage or any other enclosed area.• While the smoker is not in use, the gas must be turned off at the supply cylinder.• LP gases are heavier than air, tend to pool and collect in low-lying areas, are easily ignited and are highly flammable. Proper care and caution should be employed when dealing with any such fuels.• The smoker should be turned off and all supply valves (on piping or on fuel cylinders) should be closed in the event that the odor of unburned gas is detected. Do not attempt to use the appliance until any gas leaks are fixed and/or the source of the unburned gas odor is accounted for.
SAFETY INFORMATION
5
A
B
C
D
E
F
G
I
S K
LM
NP
O
J
A
I
AA
I
AA
Hardware Used
AA x 3M6 x 12 Bolt
1
3C
AA
Hardware Used
AA x 4M6 x 12 Bolt
Controlarm
I
AAL
AA x 8M6 x 12 Bolt
I
T
AA
K
Q
I
CC
I
R
OPERATING INSTRUCTIONS
CONNECTING THE LP TANK
WARNING
ALL INSTRUCTIONS AND SAFEGUARDS ON THIS PAGE MUST BE FOLLOWED TO PREVENT FIRE, DAMAGE AND/OR INJURY.
1. The knob on the LP tank must be closed. Make sure that the knob is turned clockwise to a full stop. The cylinder supply system must be arranged for vapor withdrawal.
2. Check that the control knob on the control unit is turned off.
3. Remove the protective cap from the LP tank valve and coupling nut.
4. Hold the regulator in one hand and insert the nipple into the valve outlet. Be sure the nipple is centered in the valve outlet. The coupling connects to the large outside threads on the valve outlet. Use care – do not cross thread the connection.
5. Hand tighten the coupling clockwise until it comes to a full stop. Firmly tighten by hand only. Do not use tools.
P
Straight
CAUTION: In the connection process, make sure the regulator inlet connector mates with the cylinder valve outlet properly, safely and firmly.
15
OPERATING INSTRUCTIONS
Any fuel supply cylinder used must be constructed and marked in accordance with specifications for propane cylinders of the U.S. Department of Transportation (DOT) CFR 49, or the Standard for Cylinders, Spheres and Tubes for the Transportation of Dangerous Goods, CAN/CSA B339. The appliance is to be used only with the 20-pound, vertical standing vapor withdrawal type tank and must include a collar to protect the cylinder valve.(A) DO NOT store spare LP cylinders under or near the smoker.(B) NEVER fill cylinder more than 80% full.(C) Do not store cylinder indoors.
WARNINGIf instructions A, B and C above are not followed exactly, a fire causing death or serious injury may occur.
This smoker is designed to operate on LP gas only. The gas cylinder used must include a collar to protect the cylinder valve. The cylinder supply system must be arranged for vapor withdrawal. Do not allow dirt or foreign material to get into or onto tank connection when it is not attached to the fuel supply system. Use the protective cap provided.
WARNINGALL INSTRUCTIONS AND SAFEGUARDS ON THIS PAGE MUST BE FOLLOWED TO PREVENT FIRE, DAMAGE AND/OR INJURY.
The cylinder outlet must have Type 1 gas connection termination in order to mate with gas hose provided with smoker. The pressure regulator and hose assembly supplied by the manufacturer with the appliance must be used. Replacement pressure regulators and hose assemblies must be those specified by the appliance manufacturer.This unit is not to be utilized with a non-self-contained LP-gas supply system.
Valve/pressure regulators are factory set to the correct operating pressures. No attempts should be made to adjust these settings.
DISCONNECT THE LP TANK
Make sure that the knob on the LP tank is turned clockwise to a full stop (CLOSED).
Hold the regulator in one hand, turn the coupling to the valve outlet counterclockwise and unthread the connection by hand only. Do not use tools.
Place dust cap on cylinder valve outlet whenever the cylinder is not in use. Only install the type of dust cap on the cylinder valve outlet that is provided with the cylinder valve. Other types of caps or plugs may result in leakage of propane.
Always hang the regulator on the lifting handles while not in use, disconnected fromthe LP tank, and when the unit has cooled down.
STORE THE TANK IN A PROPER PLACE AS INDICATED IN THIS MANUAL.
16
OPERATING INSTRUCTIONS
CHECKING FOR LEAKS
After connections are made, check all connections and fittings for leaks with a soap solution. 1. With all valves closed, apply the leak check solution (50/50 mix of dishwashing soap and water) to all gas carrying connections and fittings. 2. Open tank valve.Presence of bubbles at areas of wet solution indicates a gas leak. If leaks are detected or you smell or hear gas, shut off the valve and repair the leak or replace the defective part. Do not use the smoker until all leaks are corrected.
The gas hose/regulator assembly should be totally extended to the maximum distance so that the hose is straight and the tank is as far from the smoker as it can be (minimum 24 inches).
For vapor withdrawal, LP tanks are intended to be operated in the upright position only.
If the product is not in use, the gas must be turned off at the supply cylinder and the cylinder should be disconnected from the appliance.
Storage of the appliance indoors is only permissible if the cylinder is disconnected and removed from the appliance. Do not store cylinder indoors.
BEFORE FIRST USE
Remove all hangings or plastic straps, if present.
Before you cook food in your smoker, it is important to “season” your smoker. Seasoning seals the paint and interior of your smoker to enhance flavoring, durability and overall performance.To season your smoker, simply use it as you normally would only do not cook any food. You will need to follow all of the operating procedures in the next few sections of this manual.
Using your desired flavoring woods and marinades, burn your smoker at low temperature (around 175°F) for 45 – 60 minutes. Let the smoker cool and clean out the water and wood.
Once seasoning is complete, your smoker’s interior will have a durable, seasoned coating.
ADDING WATER
To add water before cooking, simply remove the water bowl and fill it with water slightly below the rim. Place the bowl back into the smoker. Adding water before cooking is recommended. To add water while cooking, if a sizzling sound indicating lack of water is heard, or there is a need to add water, open the bottom door with care and avoid taking in the smoke. Use a long nose kettle-like water can, stand as far from the smoker as you can, fill the water bowl up to 1 inch below the rim.
CAUTION: DO NOT pull the water bowl out beyond the rack when the smoker is hot.
17
OPERATING INSTRUCTIONS
COOKING TIP
Line the water bowl with aluminum foil before each use. This will make it easy to clean and help your water bowl last longer.
To make adding water easier and safer, use a clean watering can with a long spout.
ADDING WOOD CHIPS
To add wood chips before cooking, simply fill the wood chip box with your choice of flavoring hardwood chips. The amount and type of wood you use is entirely dependent on the desired amount of flavor. Once the box is filled, place the lid on top of the box and set the box in the smoker.
To add wood chips while cooking, we recommend using tongs or long handled pliers to removethe box lid and to place the pieces into the wood chip box without removing the box. It is not recommended to remove the wood chip box while the smoker is in operation.
CAUTION: The wood chip box and lid get very hot. Avoid handling them while in use. Always wear protective oven mitts when handling hot components.
COOKING TIP: FLAVORING WOOD
• Small wood chips work best inside the wood chip box.• Use dry hardwoods such as hickory, pecan, apple, cherry or mesquite.• To produce more smoke and prevent fast burning, pre-soak the wood chips in a separate bowl of water for at least 20 minutes, or wrap the chips in perforated aluminum foil.• Most smoke flavoring occurs within the first hour of cooking. Adding wood chips after the first hour is typically not necessary unless extra smoke flavoring is desired.
18
OPERATING INSTRUCTIONS
19
OPERATING INSTRUCTIONS
Match Lighting Procedure - LP Gas
1. Repeat Steps 1 through 5 of the igniter lighting system.
2. Open both doors. Place a lit match on to the burner as shown below. Quickly turn the control knob to the “HIGH” position. If the burner does not light in 5 seconds, turn the control knob off, wait at least 5 minutes and for the gas to clear. Repeat the process.
20
OPERATING INSTRUCTIONS
Cooking Tip: Damper Adjustments
WARNING: The dampers on the smoker body and the handle on the smoke stack may become very hot while cooking. Always wear a heat resistant glove when adjusting.
• For best performance, rotate the smoker so that the front or back of the body is facing the wind. This allows the adjustment of the dampers to be more effective and accurate.• The two dampers on smoker body should never be fully closed.• Opening the damper of the smoke stack helps to exhaust both the heat and smoke.• The key to effective smoking is to watch your heat indicator on the door and adjust the damper accordingly.• Temperature maintenance is best controlled by different damper adjustment configurations.
Turning off the Smoker
CAUTION: The smoker can become very hot while in use.Do not touch any portion of the smoker except for the door handle and burner control knob. It may be necessary to use protective gloves.
1. Turn the burner control knob off by pushing in and rotating to “OFF”. The burner flame should go out.
2. Turn off the LP cylinder valve by turning the knob clockwise until it cannot go any farther.
Follow all warnings and safety precautions before removing meat from smoker or preparing the unit for storage.
Lighting Instructions – Charcoal
When using charcoal, DO NOT USE PRETREATED, MATCH-LIGHT CHARCOAL with this smoker. Only use standard, untreated briquettes or lump charcoal and ONLY use charcoal lighting fluid approved for lighting charcoal. Do not use lighter fluid, paint thinners, gasoline, kerosene, alcohol or other flammable material for lighting charcoal. Damage to the smoker may occur with the use of match-light charcoal. DO NOT USE THE LP GAS BURNER WHEN LIGHTING CHARCOAL. Step 1Place the charcoal grate inside the woodchip/charcoal tray and add 1.5 pounds of charcoal on charcoal grate (approximately 26 briquettes).
Step 2Note: Please refer to the manufacturer’s recommended amount of lighter fluid before applying fluid to the briquettes. With the charcoal tray outside the firebox, saturate charcoal with the amount of lighting
LIGHTING INSTRUCTIONS
CAUTION: If the flame extinguishes accidentally during ignition or operation, immediately TURN OFF the cylinder valve and then TURN OFF the control knob.
Igniter Lighting System
1. Check all connections for leaks using the “soap water” test as explained on page 16.
2. Open both of the smoker cabinet doors. Always keep the doors open during lighting.
3. Check for any blockage to the venturi tube or burner, damper setting, ventilation setting. Remove any foreign objects or matter.
4. Be sure the burner control knob is in the “OFF” position.
5. Open the LP cylinder valve by turning counterclockwise.
6. Push igniter on the control unit down 1 to 2 seconds then push and turn control knob to “HIGH,” while still holding the ignitor button down. At this point the burner should ignite.
7. If ignition does not take place within 5 seconds, immediately turn the control knob to OFF. Wait 5 minutes and repeat above Steps 6 and 7.
8. If burner still fails to light, try match lighting using the instructions on page 19.
9. Once the burner is lit, close the doors to allow heat to accumulate. The smoke stack on the top of the smoker can be adjusted to the desired setting to allow proper ventilation and combustion. NEVER CLOSE THE SMOKE STACK COMPLETELY.
WARNING: Always light your smoker with both doors open.
22
CARE AND MAINTENANCE
AFTER USE SAFETY AND MAINTENANCE
WARNING• Use caution when lifting and moving the smoker to avoid strain injuries. Two people are recommended to lift or move the smoker.
• DO NOT store the smoker near gasoline or other combustible liquids or where combustible vapors may be present. Keep the area around the smoker clear and free of combustible materials and vapors.
• DO NOT store this smoker in an area accessible to children or pets. Store the smoker in a dry, protected location. Disconnect cylinder from smoker.
• DO NOT allow anyone to conduct activities around the smoker following use until it has cooled. It is hot during operation and remains hot for a period of time following use.
• DO NOT leave hot ashes unattended until the smoker cools completely.
• The smoker becomes extremely hot – allow the smoker to cool completely before handling. If you must handle the smoker while it is hot, ALWAYS wear protective oven mitts or heat-resistant gloves. Allow the smoker to cool before removing and cleaning the grease pan.
• Dispose of cold ashes by wrapping them in heavy-duty aluminum foil and putting them in a noncombustible container.
• If you must dispose of the ashes in less time than it takes for them to completely cool. Remove the ashes from the smoker, keeping them in heavy-duty foil, and soak them completely with water before disposing of them in a noncombustible container.
GENERAL CARE AND MAINTENANCE CAUTION: All care and maintenance procedures are to be performed while the smoker is turned off and cooled. Always perform maintenance by a qualified service person.
Clean the water bowl and cooking grate with hot, soapy water. Rinse and dry thoroughly. You may prefer to coat the water bowl and cooking grid lightly with cooking oil or cooking spray.
Frequently check and clean the venturi and burner tubes for insects and insect nests. A clogged tube can lead to fire beneath the smoker. Also make sure the smoker does not have any foreign objects obstructing the flow of combustion and ventilation air.
To clean the inside and outside of the smoker cabinet, simply use a damp cloth. Spray-washing with a water hose is not recommended. Moisture should be wiped away and not allowed to stand inside or on top of the smoker. Once cleaned, you may prefer to lightly coat the interior of the smoker cabinet with cooking oil or cooking spray.
If rust is present on the exterior surface of the smoker, clean the area with steel wool or emery cloth and use heavy-duty, heat-resistant paint.
NEVER apply additional paint to the interior of the smoker. If rust is present on the interior of the smoker, clean it thoroughly with steel wool or emery cloth and lightly coat the area with cooking oil or cooking spray to help minimize recurring rust.
When an LP tank is not connected, and to help prevent dirt or other foreign particles from clogging the regulator connector, hang the end of the hose and regulator assembly on the lifting handle.
Keep the ventilation opening(s) of the cylinder enclosure free and clear of debris.
23
CARE AND MAINTENANCE
Inspect the flames at the burner by looking through the observing hole on left side of the burner and control unit. A good flame should be blue with a yellow tip 1 to 2 inch high. If flames are excessively yellow and irregular, oil residue and food deposits may be collecting on the burner. Try cleaning the burner surface with hot, soapy water and cleaning the holes with a pipe cleaner to improve the flames.
Bad flames may also be caused by poor venturi attachment to the orifice. Turn off the control knob and cylinder valve. Always let the smoker cool before cleaning or checking the assembly. Make sure the orifice of the control valve properly mates with the burner mixing tube by visual observation from the bottom of the appliance. The burner venturi tube should overlap the orifice and they should form a straight line as shown in Figure A. Figures B & C show incorrect alignment.
WARNING: If the instructions above are not followed, an explosion may result, possibly causing serious bodily injury or death.
To protect your smoker from weather conditions, always keep it covered while not in use.
2”
Yellow
Light Blue
Blue
Good Flame Bad Flame
! ! !
Figure A Figure B Figure C
Correct Wrong Wrong
The flame goes out. 1. Disconnected gas supply hose. 2. High or gusting winds.
For replacement parts, call our customer service department at 1-800-963-0211, 8:00 a.m. – 6:00 p.m., EST, Monday – Thursday, 8:00 a.m. – 5:00 p.m., EST, Friday.
Owner’s Manual - Part #312-02025-00Printed in China
SpringClip
Qty. 2
CC
BB x21/4-20 FlangedWasher Nut
Hardware Used
R
Q
7. Insert 4 bolts (AA) through the mounting holes on one of the lifting handles (J) and into holes on right side of smoker body (I). Use a Phillips screwdriver to secure the handles to the smoker body (I). Repeat on left side.
7
Hardware Used
CC x 2Spring Clip
I
AA
J
ASSEMBLY INSTRUCTIONS
4. Thread bolts (EE) through holes on the leg - with holes (B) from outside of unit. Secure using 2 nuts (FF) from inside leg by using wrench. Tighten all bolts (AA) with a Phillips screwdriver. Insert the regulator hose attached to the burner and control unit (C) into the hose retention (V).
4
I
V
12. Slide the wood chip box (D) onto the lowest cooking grate supports (T) inside the smoker body (I) and put the wood chip box lid (F) on top. Note: For charcoal, refer to Step 17.
12
DANGER:
Failure to follow these instructions could result in fire, explosion, or burn hazard which could cause property damage, personal injury or death.
DANGER: If you smell gas:1. Shut off gas to the appliance.
3. Open lid.4. If odor continues, keep away from the appliance and immediately call your gas supplier or your fire department.
Assembler/Installer: This instruction manual contains important information necessary for the proper assembly and safe use of this appliance. Read and follow all warnings and instructions before assembling and using this appliance. Leave these instructions with the consumer.
Consumer/User: Follow all warnings and instructions when using this appliance. Keep these instructions for future reference.
1. Never operate this appliance unattended.2. Never operate this appliance within 10 feet (3 m) of any structure, combustible material or other gas cylinder.3. Never operate this appliance within 25 feet (7.5 m) of any flammable liquid.4. Never allow oil or grease to get hotter than 400°F or 200°C. If the temperature exceeds 400°F (200°C) or if oil begins to smoke, immediately turn the burner or gas supply OFF.5. Heated liquids remain at scalding temperatures long after the cooking process. Never touch cooking appliance until liquids have cooled to 115°F (45°C) or less.6. If a fire should occur, keep away from the appliance and immediately call your fire department. Do not attempt to extinguish an oil or grease fire with water. Failure to follow these instructions could result in fire, explosion, or burn hazard which could cause property damage, personal injury or death.
DANGER
DANGER:
Rev. 9/2011
M4 x 10Bolt
Qty. 2
DD EE
M4 Nut
Qty. 2
FF
M5 x 12Screw
Qty. 8
H
J
T
T
U
V
front of smoker
B
front of smoker
M4 x 10 BoltEE
M4 NutFF
Hardware Used
x 2
x 2
B
EE
FF
Hardware Used
AA x 4M6 x 12 Bolt
Hardware Used
AA x 4M6 x 12 Bolt
M5 x 12 ScrewBB x 8
Hardware UsedBB
S
I
R
S
D
FI
I13. Slide the water bowl (G) onto the cooking grate supports (T) inside the smoker body (I) above the wood chip box (D) as shown.
ASSEMBLY INSTRUCTIONS
13
15. Insert the probe of the temperature gauge assembly (M) through hole of the smoker door from the outside. Secure using 2 nuts (DD) from inside panel by using wrench.
16. To install the “AAA” battery (U), remove the igniter button by turning it counterclockwise and insert the “AAA” battery (U) with the positive end facing out. Reinstall the igniter button by turning it clockwise and hand tightening.
17. For charcoal use, remove the wood chip box lid (F) and place the charcoal grate (E) inside the wood chip box (D).
18. Always hang the regulator hose attached to the burner and control unit (C) to the hose retention (V) attached to the leg - with hole (B) while not in use. If switching from LP gas to charcoal, wait for the unit to cool down before disconnecting from the LP tank.
15
16
17
18
DD
M
U
E
B
12
14. Slide the 4 cooking grates (H) onto the top cooking grate supports (T) inside the smoker body (I).
14 I
H
ASSEMBLY INSTRUCTIONS
Hardware Used
DD x 2
D
S
V
M5 Nut
igniter button
21
OPERATING INSTRUCTIONS
fluid as recommended by the lighter fluid manufacturer. Allow the fluid to soak into the charcoal for 3 minutes before placing the tray back into the firebox (refer to assembly instructions for proper tray placement). After soaking the charcoal, place the lighting fluid at a safe distance away from the smoker.
Step 3With both doors open, stand back and carefully light charcoal and allow to burn until covered with a light ash (approximately 20 minutes). Charcoal lighting fluid must be allowed to completely burn off prior to closing the doors. (Fumes will tend to collect in the upper cavity if the door is closed).
DANGER: Closing the firebox doors during the lighting procedure could trap fumes from the charcoal lighting fluid in the smoker box and may result in a flash-fire or explosion when door is opened, resulting in property loss, personal injury or death. Never attempt to add more lighting fluid to the charcoal once it has been lit.
Step 4After 25 - 30 minutes, charcoal should be ready for cooking and/or adding woodchips. Carefully add wood chunks using long cooking tongs.
Adding Charcoal and/or Wood Chips
Additional charcoal and/or wood may be required to maintain or increase cooking temperature.
WARNING: Use caution since flames can flare-up when fresh air suddenly comes in contact with fire. When opening the door, keep hands, face and body a safe distance from hot steam and flame flare-ups.
Step 1Stand back and carefully open smoker box door allowing heat and steam to escape away from your face. Use caution since flames can flare-up when fresh air suddenly comes in contact with fire. Inspect the charcoal level in pan.
Step 2Wearing flame retardant oven mitts/gloves, stand back a safe distance and use long cooking tongs to lightly brush aside ashes on hot coals. Use cooking tongs to add charcoal and/or wood to charcoal pan, being careful not to stir-up ashes and sparks
WARNING: Never add charcoal lighting fluid to hot or even warm coals as flashback may occur causing severe burns.
Step 3Close smoker box door and allow food to continue cooking.
Allow the ashes to completely cool before reusing or cleaning the smoker.
26
REPLACEMENT PARTS LIST
For replacement parts, call our customer service department at 1-800-963-0211, 8:00 a.m. – 6:00 p.m., EST, Monday – Thursday, 8:00 a.m. – 5:00 p.m., EST, Friday.
PART DESCRIPTION PART # 1 Leg – Standard 301-01016-00 2 Leg – with Holes 312-01016-00 3 Burner and Control Unit 312-01015-00 4 Wood Chip Box (MFW only) 312-01028-00 5 Charcoal Grate 312-01030-00 6 Wood Chip Box Lid 301-01029-00 7 Wood Chip Box Handle and 301-01028-02 Lid Handle 8 Water Bowl 301-02017-00 9 Cooking Grate 312-01014-00 10 Door Locking Bracket 302-01008-00 11 Cooking Grate Support 302-01030-00 12 Smoker Body 312-12001-00 13 Square Smoke Stack 312-02009-00 14 Lifting Handle 301-01010-00 15 Logo Plate 302-03002-01 16 Temperature Gauge Bezel 301-01034-00 17 Temperature Gauge 301-01003-00
PART DESCRIPTION PART # 18 Upper Door 302-02002-00 19 Side Table 312-02008-00 20 Door Handle Crank 302-02007-02 21 Door Handle Grip 302-02007-01 22 Bottom Door without Handle 302-02102-00 23 Table Front Support Bracket 312-02008-01 24 Table Back Support Bracket 312-02008-02 25 Side Damper Plate (round) 301-01001-04 26 Igniter Ground Wire 301-01015-08 27 Push Button 301-01015-03 28 Electronic Ignitor 301-01015-06 29 Ignition Cap 301-01015-05 30 Control Knob 301-01015-01 31 Control Knob Bezel 301-01015-02 32 Igniter Electrode and Ignition Wire 301-01015-07 33 Hose Retention 312-01016-01 N/A Hardware Bag 312-02026-00 N/A Owner’s/Instruction Manual 312-02025-00
11
14
21
17
1918
20
22
2324
25
2627
32
30
2928
3331
ANS Z21.89a-2008 CSA 1.18a-2008
• Do not use the smoker if the burner fails to light or fails to remain lit. Under such conditions, gas should be turned off and the fuel cylinder should be disconnected.• Use in high wind conditions that result in poor burner operation such as blowing out and flaring should be avoided. If repositioning the appliance does not improve operation under such wind conditions, the appliance should be turned off.• Install the smoker with the hose regulator assembly extended the full length of the hose (24 in. minimum) directly away from the appliance. When so configured, placement results in maximum tank to smoker distance. When the smoker is operated, the hose/regulator and gas tank should be perpendicular to wind direction. Placing tank closer than 24 inches to the smoker can overheat the tank and cause release of propane through relief openings and can result in tank fire or explosion. • Read and follow all warnings and instructions before assembling and using the appliance.• Follow all warnings and instructions when using the appliance.
NOTE: The installation must confirm with local codes or, in the absence of local codes, with eitherthe National Fuel Gas Code, ANSI Z223.1/NFPA 54, Natural Gas and Propane Installation Code,CSA B149.1, or Propane Storage and Handling Code, B149.2, or the Standard for RecreationalVehicles, ANSI A 119.2/ NFPA 1192, and CSA Z240 RV Series, Recreational Vehicle Code, asapplicable.
WARNINGDO NOT mix old and new batteries.DO NOT mix alkaline, standard (Carbon-Zinc), or rechargeable (Nickel-Cadmium) batteries.DO NOT dispose of batteries in fire. Improper disposal may cause batteries to leak or explode.
The electronic ignition requires 1 “AAA” alkaline battery, which is included.
WARNING:The hose to tank attachment creates a potential trip hazard for user and pedestrians - use caution.Do not allow or cause the gas tank or applianceto tip.
MINIMUM 24 IN. (610 MM)
(Tank not included)
HIGH
LOW OFF
I
C
V
T
T
T
C
Master Forge & M Design® is a registered trademarkof LF, LLC. All rights reserved.
®
D
13
G
2
TABLE OF CONTENTS
Safety Information ......................................................................................................................... 3
Replacement Parts List ................................................................................................................ 26
ITEM #0156452
MODEL #MFW784BDP
DUAL FUELVERTICAL SMOKER
Français p. XX
Español p. XX
1
Français p. 28
Español p. 55
SAFETY INFORMATION
3
Please read and understand this entire manual before attempting to assemble, operate or install the product. If you have any questions regarding the product, please call customer service at 1-800-963-0211, 8:00 a.m. – 6:00 p.m., EST, Monday – Thursday, 8:00 a.m. – 5:00 p.m., EST, Friday.
PACKAGE CONTENTS
6
PART DESCRIPTION QUANTITY A Leg - standard 3 B Leg - with holes 1 C Burner & Control Unit 1 D Wood Chip Box 1 E Charcoal Grate 1 F Wood Chip Box Lid 1 G Water Bowl 1 H Cooking Grate 4 I Smoker Body 1 J Lifting Handle 2 K Door Locking Bracket 2
L Square Smoke Stack 1 M Temperature Gauge & Bezel 1 N Upper Door (pre-assembled) 1 O Bottom Door (pre-assembled) 1 P Side Table 1 Q Door Handle 2 R Table Front Support 1 S Table Back Support 1 T Cooking Grate Support 12 U “AAA” Battery (1.5 V) 1 V Hose Retention 1
PART DESCRIPTION QUANTITY
ASSEMBLY INSTRUCTIONS
8
24
WARRANTY
25
This vertical gas smoker is warranted against broken or damaged parts at the time of purchase. The stainless steel burner is warranted for 3 years. All other parts carry a one (1) year limited warranty except the water bowl, which is warranted to be free of defects for 90 days. Paint is warranted to be free of defects for 90 days except for rust, which may appear after repeated use.
This warranty does not cover damage or issues related to neglect, abuse or modifications to the appliance. Repair labor is not covered.
All parts that meet the warranty requirements will be shipped at no charge via the discretion of GHP Group Inc. (ground shipments, US Mail or Parcel Post ONLY). Any special handling charges (i.e. Second Day, Overnight, etc.) will be the responsibility of the consumer.
All warranty claims apply only to the original purchaser and require a proof of purchase verifying purchase date. Do not return parts to GHP address without first obtaining a return authorization number from our customer service. This service is available by calling toll free 1-800-963-0211, 8:00 a.m. – 6:00 p.m., EST, Monday – Thursday 8:00 a.m. – 5:00 p.m., EST, Friday.
Some states do not allow the exclusion or limitation of incidental or consequential damages orlimitations on how long an implied warranty lasts, so the above limitations or exclusions may not apply to you. This warranty gives you specific legal rights, and you may have other rights that vary from state to state.
GHP Group Inc.8280 Austin AvenueMorton Grove, IL, USA60053-3207
The burner will not light using the igniter procedure.
1. The igniter electrode may be covered with grease or residue.
2. The igniter electrode may have a loose or disconnected wire.
3. No spark is being generated.
4. No gas flow or cylinder valve not open.
5. Vapor lock at coupling nut to LP cylinder.
1. Clean the igniter electrode.
2. Check the connection and reconnect any loose or disconnected wires.
3. Replace the AAA size battery inside the igniter.
4. Make sure LP cylinder is not empty or open cylinder valve.
5. Turn off knob and LP cylinder valve. Disconnect coupling nut from LP cylinder. Reconnect and retry.
The burner will not light with a match.
1. No gas flow or an obstructed gas flow.
1. Check the fuel level. Clean the venturi tube and burner.
HARDWARE CONTENTS (shown actual size)
M6 x 12Bolt
Qty. 32
7
AA BB
Before beginning assembly of product, make sure all parts are present. Compare parts with package contents list and hardware contents list. If any part is missing or damaged, do not attempt to assemble the product.
Estimated Assembly Time: 25 minutes
Tools Required for Assembly (not included): Phillips Screwdriver, Wrench, Pliers.
PREPARATION
M5 Nut
Qty. 2
1. Align the legs - standard (A) with the mounting holes on the bottom left front, right front and left rear of the smoker body (I). Thread bolts (AA) through the holes from the outside of the unit. Tighten all bolts (AA) with a Phillips screwdriver.
Hardware Used
AA x 9M6 x 12 Bolt
2. Align the leg - with holes (B) with the mounting holes on the bottom right rear of the smoker. Thread bolts (AA) through the holes from the outside of the unit. Tighten all bolts (AA) with a Phillips screwdriver.
3. Open the bottom door of the smoker body (I). Turn the burner and control unit (C) upside down and place it on the bottom of the smoker body (I), making sure the 4 mounting holes on the burner and control unit (C) are aligned with the holes on the smoker body (I). Note: The control knob should be on the same side as the door. Check that the burner is properly installed on the orifice before attaching the burner and control unit (C). Thread bolts (AA) through holes from outside of unit. Securely tighten the unit to the bottom with a Phillips screwdriver.
5. CAUTION: This unit is HEAVY! Do not attempt this step without assistance! Close the two doors. With the assistance of a helper, stand the unit upright on its legs on a firm and level surface. (Make sure that the burner/control unit and legs are attached). Open the upper door. Position the square smoke stack (L) with control arm to the left as shown. Using 4 bolts (AA), attach square smoke stack (L) to the top of smoker body (I). Securely tighten with a Phillips screwdriver.
Hardware Used
6. Insert the cooking grate supports (T) into the corresponding holes on rack of the shelf inside the smoker body (I) from the bottom up. NOTE: There are 8 positions to install the cooking grate supports. The cooking grate supports can be installed into positions according to the need of the owner.
8. Align the door locking bracket (K) holes with the holes on the upper right side of the smoker body (I). Thread 2 bolts (AA) through the holes in the door locking bracket (K) into the threaded holes of the smoker body (I). Tighten the bolts (AA) using a Phillips screwdriver. Repeat on lower right side.
9. Slide door handle (Q) through brackets in door. Using pliers, slide a spring clip (CC) over the groove in the door handle as shown. Make sure both of the spring clips are securely attached in the grooves of the handles.
10. Install the table back support (S) and table front support (R) on the side of the smoker body (I) with screws (BB). Arrows pointing up indicate the correct position of the brackets when fastened to the smoker body (I).
11. With the side table (P) in a parallel position, align the slots in the side table with the table supports (R & S) and insert. To lock the side table (P) in the upright position, swing the side table (P) up, push toward the smoker body (I), and press down on the side table (P) near the body until it is fully fastened in place.
If you have any questions regarding the product, please call customer service at 1-800-963-0211, 8:00 a.m. – 6:00 p.m., EST, Monday – Thursday, 8:00 a.m. – 5:00 p.m., EST, Friday.
2
6
5
8
9
10
11
ATTACH YOUR RECEIPT HERE
Serial Number Purchase Date
Questions, problems, missing parts? Before returning to your retailer, call our customer service department at 1-800-963-0211, 8:00 a.m. – 6:00 p.m., EST, Monday – Thursday, 8:00 a.m. – 5:00 p.m., EST, Friday.
ANS Z21.89a-2008 CSA 1.18a-2008
• DO NOT use this product for anything other than its intended purpose. It is NOT intended for commercial use. It is NOT intended to be installed or used in or on a recreational vehicle and/or boat. • Keep a fire extinguisher near this product at all times.• This appliance is for outdoor use only in well-ventilated areas. DO NOT operate it in a building, garage or any other enclosed area, or under overhead construction.• A minimum clearance of 36 inches (92 cm) to combustible material is required on the front, sides and back. It is very important to always maintain proper clearances to combustibles.• The cylinder must be at least 24 inches (61 cm) from the appliance.• DO NOT obstruct the flow of combustion air or ventilation air for the appliance.• When cooking, the smoker must be on a level, stable noncombustible surface in an area clear of combustible material, including tall or dry grass. • Care should be taken to protect the fuel supply hose from damage from either pedestrian or vehicle traffic.• Clean and inspect the hose before each use of the appliance. If there is evidence of abrasion, wear, cuts or leaks, the hose must be replaced prior to the appliance being used. The replacement hose assembly shall be that specified by the manufacturer.• Before each use check that no dead leaves or debris are under the appliance.• Store this appliance in a dry, protected location.• The use of alcohol, prescription or nonprescription drugs may impair the user’s ability to properly assemble and safely operate this appliance.• Allow the smoker to cool to 115°F (45°C) before moving or storing. Use caution when lifting and moving the appliance to avoid back strain or back injury. DO NOT move the appliance while it is in use.• Always hang the regulator on the hose retention wire while not in use or disconnected with the LP (liquid propane) tank. KEEP the fuel supply hose away from any heated surface(s).
SAFETY INFORMATION
4
• DO NOT store and use this appliance near gasoline or other combustible liquids or where other combustible vapors may be present.• DO NOT use this appliance as a heater.• DO NOT leave the appliance unattended while in use. Keep children and pets away from the appliance at all times.• NEVER close the damper completely while cooking. • If you must dispose of ashes in less time than it takes for the ashes to completely cool down, remove the ashes from the appliance, keeping them in the heavy-duty foil, and soak them completely with water before disposing of them in a noncombustible container.• This appliance will be hot during and after use. Use insulated oven mitts or gloves for protection from hot surfaces or splatter from cooking liquids.• Make sure that the orifice of the control valve properly mates with the burner mixing tube by visual observation. Please refer to maintenance section.• Use caution when opening the door of the smoker while in operation. Keep hands, face and body safe from hot steam or flare-ups. DO NOT inhale smoke.• DO NOT wear loose clothing while operating the smoker. Tie back long hair while operating the smoker. ALWAYS wear shoes that fully cover your feet while operating the smoker.• Allow the smoker and its components to cool completely before conducting any routine cleaning or maintenance.• NEVER use glassware, plastic or ceramic cookware on or in your smoker. Use metallic cookware only.• NEVER operate the smoker without water in the water bowl. NEVER allow the water to completely evaporate. Check the water level at least every 2 hours. A sizzling sound may indicate a low water level. Follow instructions in this manual for adding water while operating (see the Operating Instructions section).• When using flavoring wood, add a sufficient amount prior to operation to avoid having to add wood while operating. Adding wood while operating may splash hot water and cause serious injury.• Use of accessories not intended for this smoker is not recommended and may lead to injury or property damage.• An LP cylinder not connected for use should not be stored in the vicinity of the smoker or any other appliance. DO NOT store spare LP cylinders within 10 feet of the smoker. LP cylinders must be stored outdoors, out of reach of children. DO NOT store LP cylinders in a building, garage or any other enclosed area.• DO NOT store LP gas cylinders inside or on top of the smoker. Improper storage of cylinders could lead to explosion, fire and/or personal injury. Cylinders are to be stored outdoors, out of reach of children and must not be stored in a building, garage or any other enclosed area.• While the smoker is not in use, the gas must be turned off at the supply cylinder.• LP gases are heavier than air, tend to pool and collect in low-lying areas, are easily ignited and are highly flammable. Proper care and caution should be employed when dealing with any such fuels.• The smoker should be turned off and all supply valves (on piping or on fuel cylinders) should be closed in the event that the odor of unburned gas is detected. Do not attempt to use the appliance until any gas leaks are fixed and/or the source of the unburned gas odor is accounted for.
SAFETY INFORMATION
5
A
B
C
D
E
F
G
I
S K
LM
NP
O
J
A
I
AA
I
AA
Hardware Used
AA x 3M6 x 12 Bolt
1
3C
AA
Hardware Used
AA x 4M6 x 12 Bolt
Controlarm
I
AAL
AA x 8M6 x 12 Bolt
I
T
AA
K
Q
I
CC
I
R
OPERATING INSTRUCTIONS
CONNECTING THE LP TANK
WARNING
ALL INSTRUCTIONS AND SAFEGUARDS ON THIS PAGE MUST BE FOLLOWED TO PREVENT FIRE, DAMAGE AND/OR INJURY.
1. The knob on the LP tank must be closed. Make sure that the knob is turned clockwise to a full stop. The cylinder supply system must be arranged for vapor withdrawal.
2. Check that the control knob on the control unit is turned off.
3. Remove the protective cap from the LP tank valve and coupling nut.
4. Hold the regulator in one hand and insert the nipple into the valve outlet. Be sure the nipple is centered in the valve outlet. The coupling connects to the large outside threads on the valve outlet. Use care – do not cross thread the connection.
5. Hand tighten the coupling clockwise until it comes to a full stop. Firmly tighten by hand only. Do not use tools.
P
Straight
CAUTION: In the connection process, make sure the regulator inlet connector mates with the cylinder valve outlet properly, safely and firmly.
15
OPERATING INSTRUCTIONS
Any fuel supply cylinder used must be constructed and marked in accordance with specifications for propane cylinders of the U.S. Department of Transportation (DOT) CFR 49, or the Standard for Cylinders, Spheres and Tubes for the Transportation of Dangerous Goods, CAN/CSA B339. The appliance is to be used only with the 20-pound, vertical standing vapor withdrawal type tank and must include a collar to protect the cylinder valve.(A) DO NOT store spare LP cylinders under or near the smoker.(B) NEVER fill cylinder more than 80% full.(C) Do not store cylinder indoors.
WARNINGIf instructions A, B and C above are not followed exactly, a fire causing death or serious injury may occur.
This smoker is designed to operate on LP gas only. The gas cylinder used must include a collar to protect the cylinder valve. The cylinder supply system must be arranged for vapor withdrawal. Do not allow dirt or foreign material to get into or onto tank connection when it is not attached to the fuel supply system. Use the protective cap provided.
WARNINGALL INSTRUCTIONS AND SAFEGUARDS ON THIS PAGE MUST BE FOLLOWED TO PREVENT FIRE, DAMAGE AND/OR INJURY.
The cylinder outlet must have Type 1 gas connection termination in order to mate with gas hose provided with smoker. The pressure regulator and hose assembly supplied by the manufacturer with the appliance must be used. Replacement pressure regulators and hose assemblies must be those specified by the appliance manufacturer.This unit is not to be utilized with a non-self-contained LP-gas supply system.
Valve/pressure regulators are factory set to the correct operating pressures. No attempts should be made to adjust these settings.
DISCONNECT THE LP TANK
Make sure that the knob on the LP tank is turned clockwise to a full stop (CLOSED).
Hold the regulator in one hand, turn the coupling to the valve outlet counterclockwise and unthread the connection by hand only. Do not use tools.
Place dust cap on cylinder valve outlet whenever the cylinder is not in use. Only install the type of dust cap on the cylinder valve outlet that is provided with the cylinder valve. Other types of caps or plugs may result in leakage of propane.
Always hang the regulator on the lifting handles while not in use, disconnected fromthe LP tank, and when the unit has cooled down.
STORE THE TANK IN A PROPER PLACE AS INDICATED IN THIS MANUAL.
16
OPERATING INSTRUCTIONS
CHECKING FOR LEAKS
After connections are made, check all connections and fittings for leaks with a soap solution. 1. With all valves closed, apply the leak check solution (50/50 mix of dishwashing soap and water) to all gas carrying connections and fittings. 2. Open tank valve.Presence of bubbles at areas of wet solution indicates a gas leak. If leaks are detected or you smell or hear gas, shut off the valve and repair the leak or replace the defective part. Do not use the smoker until all leaks are corrected.
The gas hose/regulator assembly should be totally extended to the maximum distance so that the hose is straight and the tank is as far from the smoker as it can be (minimum 24 inches).
For vapor withdrawal, LP tanks are intended to be operated in the upright position only.
If the product is not in use, the gas must be turned off at the supply cylinder and the cylinder should be disconnected from the appliance.
Storage of the appliance indoors is only permissible if the cylinder is disconnected and removed from the appliance. Do not store cylinder indoors.
BEFORE FIRST USE
Remove all hangings or plastic straps, if present.
Before you cook food in your smoker, it is important to “season” your smoker. Seasoning seals the paint and interior of your smoker to enhance flavoring, durability and overall performance.To season your smoker, simply use it as you normally would only do not cook any food. You will need to follow all of the operating procedures in the next few sections of this manual.
Using your desired flavoring woods and marinades, burn your smoker at low temperature (around 175°F) for 45 – 60 minutes. Let the smoker cool and clean out the water and wood.
Once seasoning is complete, your smoker’s interior will have a durable, seasoned coating.
ADDING WATER
To add water before cooking, simply remove the water bowl and fill it with water slightly below the rim. Place the bowl back into the smoker. Adding water before cooking is recommended. To add water while cooking, if a sizzling sound indicating lack of water is heard, or there is a need to add water, open the bottom door with care and avoid taking in the smoke. Use a long nose kettle-like water can, stand as far from the smoker as you can, fill the water bowl up to 1 inch below the rim.
CAUTION: DO NOT pull the water bowl out beyond the rack when the smoker is hot.
17
OPERATING INSTRUCTIONS
COOKING TIP
Line the water bowl with aluminum foil before each use. This will make it easy to clean and help your water bowl last longer.
To make adding water easier and safer, use a clean watering can with a long spout.
ADDING WOOD CHIPS
To add wood chips before cooking, simply fill the wood chip box with your choice of flavoring hardwood chips. The amount and type of wood you use is entirely dependent on the desired amount of flavor. Once the box is filled, place the lid on top of the box and set the box in the smoker.
To add wood chips while cooking, we recommend using tongs or long handled pliers to removethe box lid and to place the pieces into the wood chip box without removing the box. It is not recommended to remove the wood chip box while the smoker is in operation.
CAUTION: The wood chip box and lid get very hot. Avoid handling them while in use. Always wear protective oven mitts when handling hot components.
COOKING TIP: FLAVORING WOOD
• Small wood chips work best inside the wood chip box.• Use dry hardwoods such as hickory, pecan, apple, cherry or mesquite.• To produce more smoke and prevent fast burning, pre-soak the wood chips in a separate bowl of water for at least 20 minutes, or wrap the chips in perforated aluminum foil.• Most smoke flavoring occurs within the first hour of cooking. Adding wood chips after the first hour is typically not necessary unless extra smoke flavoring is desired.
18
OPERATING INSTRUCTIONS
19
OPERATING INSTRUCTIONS
Match Lighting Procedure - LP Gas
1. Repeat Steps 1 through 5 of the igniter lighting system.
2. Open both doors. Place a lit match on to the burner as shown below. Quickly turn the control knob to the “HIGH” position. If the burner does not light in 5 seconds, turn the control knob to OFF O, wait at least 5 minutes and for the gas to clear. Repeat the process.
20
OPERATING INSTRUCTIONS
Cooking Tip: Damper Adjustments
WARNING: The dampers on the smoker body and the handle on the smoke stack may become very hot while cooking. Always wear a heat resistant glove when adjusting.
• For best performance, rotate the smoker so that the front or back of the body is facing the wind. This allows the adjustment of the dampers to be more effective and accurate.• The two dampers on smoker body should never be fully closed.• Opening the damper of the smoke stack helps to exhaust both the heat and smoke.• The key to effective smoking is to watch your heat indicator on the door and adjust the damper accordingly.• Temperature maintenance is best controlled by different damper adjustment configurations.
Turning off the Smoker
CAUTION: The smoker can become very hot while in use.Do not touch any portion of the smoker except for the door handle and burner control knob. It may be necessary to use protective gloves.
1. Turn the burner control knob off by pushing in and rotating to “OFF”. The burner flame should go out.
2. Turn off the LP cylinder valve by turning the knob clockwise until it cannot go any farther.
Follow all warnings and safety precautions before removing meat from smoker or preparing the unit for storage.
Lighting Instructions – Charcoal
When using charcoal, DO NOT USE PRETREATED, MATCH-LIGHT CHARCOAL with this smoker. Only use standard, untreated briquettes or lump charcoal and ONLY use charcoal lighting fluid approved for lighting charcoal. Do not use lighter fluid, paint thinners, gasoline, kerosene, alcohol or other flammable material for lighting charcoal. Damage to the smoker may occur with the use of match-light charcoal. DO NOT USE THE LP GAS BURNER WHEN LIGHTING CHARCOAL. Step 1Place the charcoal grate inside the woodchip/charcoal tray and add 1.5 pounds of charcoal on charcoal grate (approximately 26 briquettes).
Step 2Note: Please refer to the manufacturer’s recommended amount of lighter fluid before applying fluid to the briquettes. With the charcoal tray outside the firebox, saturate charcoal with the amount of lighting
22
CARE AND MAINTENANCE
AFTER USE SAFETY AND MAINTENANCE
WARNING• Use caution when lifting and moving the smoker to avoid strain injuries. Two people are recommended to lift or move the smoker.
• DO NOT store the smoker near gasoline or other combustible liquids or where combustible vapors may be present. Keep the area around the smoker clear and free of combustible materials and vapors.
• DO NOT store this smoker in an area accessible to children or pets. Store the smoker in a dry, protected location. Disconnect cylinder from smoker.
• DO NOT allow anyone to conduct activities around the smoker following use until it has cooled. It is hot during operation and remains hot for a period of time following use.
• DO NOT leave hot ashes unattended until the smoker cools completely.
• The smoker becomes extremely hot – allow the smoker to cool completely before handling. If you must handle the smoker while it is hot, ALWAYS wear protective oven mitts or heat-resistant gloves. Allow the smoker to cool before removing and cleaning the grease pan.
• Dispose of cold ashes by wrapping them in heavy-duty aluminum foil and putting them in a noncombustible container.
• If you must dispose of the ashes in less time than it takes for them to completely cool. Remove the ashes from the smoker, keeping them in heavy-duty foil, and soak them completely with water before disposing of them in a noncombustible container.
GENERAL CARE AND MAINTENANCE CAUTION: All care and maintenance procedures are to be performed while the smoker is turned off and cooled. Always perform maintenance by a qualified service person.
Clean the water bowl and cooking grate with hot, soapy water. Rinse and dry thoroughly. You may prefer to coat the water bowl and cooking grid lightly with cooking oil or cooking spray.
Frequently check and clean the venturi and burner tubes for insects and insect nests. A clogged tube can lead to fire beneath the smoker. Also make sure the smoker does not have any foreign objects obstructing the flow of combustion and ventilation air.
To clean the inside and outside of the smoker cabinet, simply use a damp cloth. Spray-washing with a water hose is not recommended. Moisture should be wiped away and not allowed to stand inside or on top of the smoker. Once cleaned, you may prefer to lightly coat the interior of the smoker cabinet with cooking oil or cooking spray.
If rust is present on the exterior surface of the smoker, clean the area with steel wool or emery cloth and use heavy-duty, heat-resistant paint.
NEVER apply additional paint to the interior of the smoker. If rust is present on the interior of the smoker, clean it thoroughly with steel wool or emery cloth and lightly coat the area with cooking oil or cooking spray to help minimize recurring rust.
When an LP tank is not connected, and to help prevent dirt or other foreign particles from clogging the regulator connector, hang the end of the hose and regulator assembly on the lifting handle.
Keep the ventilation opening(s) of the cylinder enclosure free and clear of debris.
23
CARE AND MAINTENANCE
Inspect the flames at the burner by looking through the observing hole on left side of the burner and control unit. A good flame should be blue with a yellow tip 1 to 2 inch high. If flames are excessively yellow and irregular, oil residue and food deposits may be collecting on the burner. Try cleaning the burner surface with hot, soapy water and cleaning the holes with a pipe cleaner to improve the flames.
Bad flames may also be caused by poor venturi attachment to the orifice. Turn off the control knob and cylinder valve. Always let the smoker cool before cleaning or checking the assembly. Make sure the orifice of the control valve properly mates with the burner mixing tube by visual observation from the bottom of the appliance. The burner venturi tube should overlap the orifice and they should form a straight line as shown in Figure A. Figures B & C show incorrect alignment.
WARNING: If the instructions above are not followed, an explosion may result, possibly causing serious bodily injury or death.
To protect your smoker from weather conditions, always keep it covered while not in use.
2”
Yellow
Light Blue
Blue
Good Flame Bad Flame
! ! !
Figure A Figure B Figure C
Correct Wrong Wrong
The flame goes out. 1. Disconnected gas supply hose. 2. High or gusting winds.
For replacement parts, call our customer service department at 1-800-963-0211, 8:00 a.m. – 6:00 p.m., EST, Monday – Thursday, 8:00 a.m. – 5:00 p.m., EST, Friday.
Owner’s Manual - Part #312-02025-00Printed in China
SpringClip
Qty. 2
CC
BB x21/4-20 FlangedWasher Nut
Hardware Used
R
Q
7. Insert 4 bolts (AA) through the mounting holes on one of the lifting handles (J) and into holes on right side of smoker body (I). Use a Phillips screwdriver to secure the handles to the smoker body (I). Repeat on left side.
7
Hardware Used
CC x 2Spring Clip
I
AA
J
ASSEMBLY INSTRUCTIONS
4. Thread bolts (EE) through holes on the leg - with holes (B) from outside of unit. Secure using 2 nuts (FF) from inside leg by using wrench. Tighten all bolts (AA) with a Phillips screwdriver. Insert the regulator hose attached to the burner and control unit (C) into the hose retention (V).
4
I
V
12. Slide the wood chip box (D) onto the lowest cooking grate supports (T) inside the smoker body (I) and put the wood chip box lid (F) on top. Note: For charcoal, refer to Step 17.
12
DANGER:
Failure to follow these instructions could result in fire, explosion, or burn hazard which could cause property damage, personal injury or death.
DANGER: If you smell gas:1. Shut off gas to the appliance.
3. Open lid.4. If odor continues, keep away from the appliance and immediately call your gas supplier or your fire department.
Assembler/Installer: This instruction manual contains important information necessary for the proper assembly and safe use of this appliance. Read and follow all warnings and instructions before assembling and using this appliance. Leave these instructions with the consumer.
Consumer/User: Follow all warnings and instructions when using this appliance. Keep these instructions for future reference.
1. Never operate this appliance unattended.2. Never operate this appliance within 10 feet (3 m) of any structure, combustible material or other gas cylinder.3. Never operate this appliance within 25 feet (7.5 m) of any flammable liquid.4. Never allow oil or grease to get hotter than 400°F or 200°C. If the temperature exceeds 400°F (200°C) or if oil begins to smoke, immediately turn the burner or gas supply OFF.5. Heated liquids remain at scalding temperatures long after the cooking process. Never touch cooking appliance until liquids have cooled to 115°F (45°C) or less.6. If a fire should occur, keep away from the appliance and immediately call your fire department. Do not attempt to extinguish an oil or grease fire with water. Failure to follow these instructions could result in fire, explosion, or burn hazard which could cause property damage, personal injury or death.
DANGER
DANGER:
Rev. 9/2011
M4 x 10Bolt
Qty. 2
DD EE
M4 Nut
Qty. 2
FF
M5 x 12Screw
Qty. 8
H
J
T
T
U
V
front of smoker
B
front of smoker
M4 x 10 BoltEE
M4 NutFF
Hardware Used
x 2
x 2
B
EE
FF
Hardware Used
AA x 4M6 x 12 Bolt
Hardware Used
AA x 4M6 x 12 Bolt
M5 x 12 ScrewBB x 8
Hardware UsedBB
S
I
R
S
D
FI
I13. Slide the water bowl (G) onto the cooking grate supports (T) inside the smoker body (I) above the wood chip box (D) as shown.
ASSEMBLY INSTRUCTIONS
13
15. Insert the probe of the temperature gauge assembly (M) through hole of the smoker door from the outside. Secure using 2 nuts (DD) from inside panel by using wrench.
16. To install the “AAA” battery (U), remove the igniter button by turning it counterclockwise and insert the “AAA” battery (U) with the positive end facing out. Reinstall the igniter button by turning it clockwise and hand tightening.
17. For charcoal use, remove the wood chip box lid (F) and place the charcoal grate (E) inside the wood chip box (D).
18. Always hang the regulator hose attached to the burner and control unit (C) to the hose retention (V) attached to the leg - with hole (B) while not in use. If switching from LP gas to charcoal, wait for the unit to cool down before disconnecting from the LP tank.
15
16
17
18
DD
M
U
E
B
12
14. Slide the 4 cooking grates (H) onto the top cooking grate supports (T) inside the smoker body (I).
14 I
H
ASSEMBLY INSTRUCTIONS
Hardware Used
DD x 2
D
S
V
M5 Nut
igniter button
21
OPERATING INSTRUCTIONS
fluid as recommended by the lighter fluid manufacturer. Allow the fluid to soak into the charcoal for 3 minutes before placing the tray back into the firebox (refer to assembly instructions for proper tray placement). After soaking the charcoal, place the lighting fluid at a safe distance away from the smoker.
Step 3With both doors open, stand back and carefully light charcoal and allow to burn until covered with a light ash (approximately 20 minutes). Charcoal lighting fluid must be allowed to completely burn off prior to closing the doors. (Fumes will tend to collect in the upper cavity if the door is closed).
DANGER: Closing the firebox doors during the lighting procedure could trap fumes from the charcoal lighting fluid in the smoker box and may result in a flash-fire or explosion when door is opened, resulting in property loss, personal injury or death. Never attempt to add more lighting fluid to the charcoal once it has been lit.
Step 4After 25 - 30 minutes, charcoal should be ready for cooking and/or adding woodchips. Carefully add wood chunks using long cooking tongs.
Adding Charcoal and/or Wood Chips
Additional charcoal and/or wood may be required to maintain or increase cooking temperature.
WARNING: Use caution since flames can flare-up when fresh air suddenly comes in contact with fire. When opening the door, keep hands, face and body a safe distance from hot steam and flame flare-ups.
Step 1Stand back and carefully open smoker box door allowing heat and steam to escape away from your face. Use caution since flames can flare-up when fresh air suddenly comes in contact with fire. Inspect the charcoal level in pan.
Step 2Wearing flame retardant oven mitts/gloves, stand back a safe distance and use long cooking tongs to lightly brush aside ashes on hot coals. Use cooking tongs to add charcoal and/or wood to charcoal pan, being careful not to stir-up ashes and sparks
WARNING: Never add charcoal lighting fluid to hot or even warm coals as flashback may occur causing severe burns.
Step 3Close smoker box door and allow food to continue cooking.
Allow the ashes to completely cool before reusing or cleaning the smoker.
26
REPLACEMENT PARTS LIST
For replacement parts, call our customer service department at 1-800-963-0211, 8:00 a.m. – 6:00 p.m., EST, Monday – Thursday, 8:00 a.m. – 5:00 p.m., EST, Friday.
PART DESCRIPTION PART # 1 Leg – Standard 301-01016-00 2 Leg – with Holes 312-01016-00 3 Burner and Control Unit 312-01015-00 4 Wood Chip Box (MFW only) 312-01028-00 5 Charcoal Grate 312-01030-00 6 Wood Chip Box Lid 301-01029-00 7 Wood Chip Box Handle and 301-01028-02 Lid Handle 8 Water Bowl 301-02017-00 9 Cooking Grate 312-01014-00 10 Door Locking Bracket 302-01008-00 11 Cooking Grate Support 302-01030-00 12 Smoker Body 312-12001-00 13 Square Smoke Stack 312-02009-00 14 Lifting Handle 301-01010-00 15 Logo Plate 302-03002-01 16 Temperature Gauge Bezel 301-01034-00 17 Temperature Gauge 301-01003-00
PART DESCRIPTION PART # 18 Upper Door 302-02002-00 19 Side Table 312-02008-00 20 Door Handle Crank 302-02007-02 21 Door Handle Grip 302-02007-01 22 Bottom Door without Handle 302-02102-00 23 Table Front Support Bracket 312-02008-01 24 Table Back Support Bracket 312-02008-02 25 Side Damper Plate (round) 301-01001-04 26 Igniter Ground Wire 301-01015-08 27 Push Button 301-01015-03 28 Electronic Ignitor 301-01015-06 29 Ignition Cap 301-01015-05 30 Control Knob 301-01015-01 31 Control Knob Bezel 301-01015-02 32 Igniter Electrode and Ignition Wire 301-01015-07 33 Hose Retention 312-01016-01 N/A Hardware Bag 312-02026-00 N/A Owner’s/Instruction Manual 312-02025-00
11
14
21
17
1918
20
22
2324
25
2627
32
30
2928
3331
ANS Z21.89a-2008 CSA 1.18a-2008
• Do not use the smoker if the burner fails to light or fails to remain lit. Under such conditions, gas should be turned off and the fuel cylinder should be disconnected.• Use in high wind conditions that result in poor burner operation such as blowing out and flaring should be avoided. If repositioning the appliance does not improve operation under such wind conditions, the appliance should be turned off.• Install the smoker with the hose regulator assembly extended the full length of the hose (24 in. minimum) directly away from the appliance. When so configured, placement results in maximum tank to smoker distance. When the smoker is operated, the hose/regulator and gas tank should be perpendicular to wind direction. Placing tank closer than 24 inches to the smoker can overheat the tank and cause release of propane through relief openings and can result in tank fire or explosion. • Read and follow all warnings and instructions before assembling and using the appliance.• Follow all warnings and instructions when using the appliance.
NOTE: The installation must confirm with local codes or, in the absence of local codes, with eitherthe National Fuel Gas Code, ANSI Z223.1/NFPA 54, Natural Gas and Propane Installation Code,CSA B149.1, or Propane Storage and Handling Code, B149.2, or the Standard for RecreationalVehicles, ANSI A 119.2/ NFPA 1192, and CSA Z240 RV Series, Recreational Vehicle Code, asapplicable.
WARNINGDO NOT mix old and new batteries.DO NOT mix alkaline, standard (Carbon-Zinc), or rechargeable (Nickel-Cadmium) batteries.DO NOT dispose of batteries in fire. Improper disposal may cause batteries to leak or explode.
The electronic ignition requires 1 “AAA” alkaline battery, which is included.
WARNING:The hose to tank attachment creates a potential trip hazard for user and pedestrians - use caution.Do not allow or cause the gas tank or applianceto tip.
MINIMUM 24 IN. (610 MM)
(Tank not included)
I
C
V
T
T
T
C
Master Forge & M Design® is a registered trademarkof LF, LLC. All rights reserved.
®
D
LIGHTING INSTRUCTIONS
CAUTION: If the flame extinguishes accidentally during ignition or operation, immediately TURN OFF the cylinder valve and then TURN OFF the control knob.Igniter Lighting System
1. Check all connections for leaks using the “soap water” test as explained on page 16 for “checking for leaks.”
2. Open both of the smoker cabinet doors. Always keep the doors open during lighting.
3. Check for any blockage to the venturi tube or burner, damper setting, ventilation setting. Remove any foreign objects or matter.
4. Be sure the burner control knob is in the “OFF” O position.
5. Open the LP cylinder valve by turning counterclockwise .
6. Push igniter on the control unit down 1 to 2 seconds then push and turn control knob to “HIGH” , while still holding the ignitor button down. At this point the burner should ignite.
7. If ignition does not take place within 5 seconds, immediately turn the control knob to OFF O. Wait 5 minutes and repeat above steps 6 and 7.
8. If burner still fails to light, try match lighting using the instructions on page 19.
9. Once the burner is lit, close the doors to allow heat to accumulate. The smoke stack on the top of the smoker can be adjusted to the desired setting to allow proper ventilation and combustion. NEVER CLOSE THE SMOKE STACK COMPLETELY.
Warning: Always light your smoker with both doors open.
HIGH
LOW OFF
CALIFORNIA PROPOSITION 65
Fuels used in gas or oil fired appliances and the products of combustion of such fuels containchemicals known to the State of California to cause cancer, birth defects or other reproductiveharm. This product contains chemicals, including lead and lead compounds, known to the State ofCalifornia to cause cancer, birth defects or other reproductive harm. Wash hands after handling.
13
G
2
TABLE OF CONTENTS
Safety Information ......................................................................................................................... 3
Replacement Parts List ................................................................................................................ 26
ITEM #0190449
MODEL #MFW784BDP
DUAL FUELVERTICAL SMOKER
Français p. XX
Español p. XX
1
Français p. 28
Español p. 58
SAFETY INFORMATION
3
Please read and understand this entire manual before attempting to assemble, operate or install the product. If you have any questions regarding the product, please call customer service at 1-800-963-0211, 8:00 a.m. – 6:00 p.m., EST, Monday – Thursday, 8:00 a.m. – 5:00 p.m., EST, Friday.
PACKAGE CONTENTS
6
PART DESCRIPTION QUANTITY A Leg - standard 3 B Leg - with holes 1 C Burner & Control Unit 1 D Wood Chip Box 1 E Charcoal Grate 1 F Wood Chip Box Lid 1 G Water Bowl 1 H Cooking Grate 4 I Smoker Body 1 J Lifting Handle 2 K Door Locking Bracket 2
L Square Smoke Stack 1 M Temperature Gauge & Bezel 1 N Upper Door (pre-assembled) 1 O Bottom Door (pre-assembled) 1 P Side Table 1 Q Door Handle 2 R Table Front Support 1 S Table Back Support 1 T Cooking Grate Support 12 U “AAA” Battery (1.5 V) 1 V Hose Retention 1
PART DESCRIPTION QUANTITY
ASSEMBLY INSTRUCTIONS
8
24
WARRANTY
25
This vertical gas smoker is warranted against broken or damaged parts at the time of purchase. The stainless steel burner is warranted for 3 years. All other parts carry a one (1) year limited warranty except the water bowl, which is warranted to be free of defects for 90 days. Paint is warranted to be free of defects for 90 days except for rust, which may appear after repeated use.
This warranty does not cover damage or issues related to neglect, abuse or modifications to the appliance. Repair labor is not covered.
All parts that meet the warranty requirements will be shipped at no charge via the discretion of GHP Group Inc. (ground shipments, US Mail or Parcel Post ONLY). Any special handling charges (i.e. Second Day, Overnight, etc.) will be the responsibility of the consumer.
All warranty claims apply only to the original purchaser and require a proof of purchase verifying purchase date. Do not return parts to GHP address without first obtaining a return authorization number from our customer service. This service is available by calling toll free 1-800-963-0211, 8:00 a.m. – 6:00 p.m., EST, Monday – Thursday 8:00 a.m. – 5:00 p.m., EST, Friday.
Some states do not allow the exclusion or limitation of incidental or consequential damages orlimitations on how long an implied warranty lasts, so the above limitations or exclusions may not apply to you. This warranty gives you specific legal rights, and you may have other rights that vary from state to state.
GHP Group Inc.8280 Austin AvenueMorton Grove, IL, USA60053-3207
The burner will not light using the igniter procedure.
1. The igniter electrode may be covered with grease or residue.
2. The igniter electrode may have a loose or disconnected wire.
3. No spark is being generated.
4. No gas flow or cylinder valve not open.
5. Vapor lock at coupling nut to LP cylinder.
1. Clean the igniter electrode.
2. Check the connection and reconnect any loose or disconnected wires.
3. Replace the AAA size battery inside the igniter.
4. Make sure LP cylinder is not empty or open cylinder valve.
5. Turn off knob and LP cylinder valve. Disconnect coupling nut from LP cylinder. Reconnect and retry.
The burner will not light with a match.
1. No gas flow or an obstructed gas flow.
1. Check the fuel level. Clean the venturi tube and burner.
HARDWARE CONTENTS (shown actual size)
M6 x 12Bolt
Qty. 32
7
AA BB
Before beginning assembly of product, make sure all parts are present. Compare parts with package contents list and hardware contents list. If any part is missing or damaged, do not attempt to assemble the product.
Estimated Assembly Time: 25 minutes
Tools Required for Assembly (not included): Phillips Screwdriver, 1/2 in. Wrench, Pliers.
PREPARATION
M5 Nut
Qty. 2
1. Align the legs - standard (A) with the mounting holes on the bottom left front, right front and left rear of the smoker body (I). Thread bolts (AA) through the holes from the outside of the unit. Tighten all bolts (AA) with a Phillips screwdriver.
Hardware Used
AA x 9M6 x 12 Bolt
2. Align the leg - with holes (B) with the mounting holes on the bottom right rear of the smoker. Thread bolts (AA) through the holes from the outside of the unit. Tighten all bolts (AA) with a Phillips screwdriver.
3. Open the bottom door of the smoker body (I). Turn the burner and control unit (C) upside down and place it on the bottom of the smoker body (I), making sure the 4 mounting holes on the burner and control unit (C) are aligned with the holes on the smoker body (I). Note: The control knob should be on the same side as the door. Check that the burner is properly installed on the orifice before attaching the burner and control unit (C). Thread bolts (AA) through holes from outside of unit. Securely tighten the unit to the bottom with a Phillips screwdriver.
5. CAUTION: This unit is HEAVY! Do not attempt this step without assistance! Close the two doors. With the assistance of a helper, stand the unit upright on its legs on a firm and level surface. (Make sure that the burner/control unit and legs are attached). Open the upper door. Position the square smoke stack (L) with control arm to the left as shown. Using 4 bolts (AA), attach square smoke stack (L) to the top of smoker body (I). Securely tighten with a Phillips screwdriver.
Hardware Used
6. Insert the cooking grate supports (T) into the corresponding holes on rack of the shelf inside the smoker body (I) from the bottom up. NOTE: There are 8 positions to install the cooking grate supports. The cooking grate supports can be installed into positions according to the need of the owner.
8. Align the door locking bracket (K) holes with the holes on the upper right side of the smoker body (I). Thread 2 bolts (AA) through the holes in the door locking bracket (K) into the threaded holes of the smoker body (I). Tighten the bolts (AA) using a Phillips screwdriver. Repeat on lower right side.
9. Slide door handle (Q) through brackets in door. Using pliers, slide a spring clip (CC) over the groove in the door handle as shown. Make sure both of the spring clips are securely attached in the grooves of the handles.
10. Install the table back support (S) and table front support (R) on the side of the smoker body (I) with screws (BB). Arrows pointing up indicate the correct position of the brackets when fastened to the smoker body (I).
11. With the side table (P) in a parallel position, align the slots in the side table with the table supports (R & S) and insert. To lock the side table (P) in the upright position, swing the side table (P) up, push toward the smoker body (I), and press down on the side table (P) near the body until it is fully fastened in place.
If you have any questions regarding the product, please call customer service at 1-800-963-0211, 8:00 a.m. – 6:00 p.m., EST, Monday – Thursday, 8:00 a.m. – 5:00 p.m., EST, Friday.
2
6
5
8
9
10
11
ATTACH YOUR RECEIPT HERE
Serial Number Purchase Date
Questions, problems, missing parts? Before returning to your retailer, call our customer service department at 1-800-963-0211, 8:00 a.m. – 6:00 p.m., EST, Monday – Thursday, 8:00 a.m. – 5:00 p.m., EST, Friday.
ANS Z21.89a-2008 CSA 1.18a-2008
CALIFORNIA PROPOSITION 65
1. Fuels used in wood, charcoal, gas or oil fired appliances and the products of combustion of such fuels contain chemicals known to the State of California to cause cancer, birth defects or other reproductive harm. 2. This product contains chemicals, including lead and lead compounds, known to the State of California to cause cancer, birth defects or other reproductive harm.
• DO NOT use this product for anything other than its intended purpose. It is NOT intended for commercial use. It is NOT intended to be installed or used in or on a recreational vehicle and/or boat. • Keep a fire extinguisher near this product at all times.• This appliance is for outdoor use only in well-ventilated areas. DO NOT operate it in a building, garage or any other enclosed area, or under overhead construction.• A minimum clearance of 36 inches (92 cm) to combustible material is required on the front, sides and back. It is very important to always maintain proper clearances to combustibles.• The cylinder must be at least 24 inches (61 cm) from the appliance.• DO NOT obstruct the flow of combustion air or ventilation air for the appliance.• When cooking, the smoker must be on a level, stable noncombustible surface in an area clear of combustible material, including tall or dry grass. • Care should be taken to protect the fuel supply hose from damage from either pedestrian or vehicle traffic.• Clean and inspect the hose before each use of the appliance. If there is evidence of abrasion, wear, cuts or leaks, the hose must be replaced prior to the appliance being used. The replacement hose assembly shall be that specified by the manufacturer.• Before each use check that no dead leaves or debris are under the appliance.• Store this appliance in a dry, protected location.• The use of alcohol, prescription or nonprescription drugs may impair the user’s ability to properly assemble and safely operate this appliance.• Allow the smoker to cool to 115°F (45°C) before moving or storing. Use caution when lifting and moving the appliance to avoid back strain or back injury. DO NOT move the appliance while it is in use.• Always hang the regulator on the hose retention wire while not in use or disconnected with the LP (liquid propane) tank. KEEP the fuel supply hose away from any heated surface(s).
SAFETY INFORMATION
4
• DO NOT store and use this appliance near gasoline or other combustible liquids or where other combustible vapors may be present.• DO NOT use this appliance as a heater.• DO NOT leave the appliance unattended while in use. Keep children and pets away from the appliance at all times.• NEVER close the damper completely while cooking. • If you must dispose of ashes in less time than it takes for the ashes to completely cool down, remove the ashes from the appliance, keeping them in the heavy-duty foil, and soak them completely with water before disposing of them in a noncombustible container.• This appliance will be hot during and after use. Use insulated oven mitts or gloves for protection from hot surfaces or splatter from cooking liquids.• Make sure that the orifice of the control valve properly mates with the burner mixing tube by visual observation. Please refer to maintenance section.• Use caution when opening the door of the smoker while in operation. Keep hands, face and body safe from hot steam or flare-ups. DO NOT inhale smoke.• DO NOT wear loose clothing while operating the smoker. Tie back long hair while operating the smoker. ALWAYS wear shoes that fully cover your feet while operating the smoker.• Allow the smoker and its components to cool completely before conducting any routine cleaning or maintenance.• NEVER use glassware, plastic or ceramic cookware on or in your smoker. Use metallic cookware only.• NEVER operate the smoker without water in the water bowl. NEVER allow the water to completely evaporate. Check the water level at least every 2 hours. A sizzling sound may indicate a low water level. Follow instructions in this manual for adding water while operating (see the Operating Instructions section).• When using flavoring wood, add a sufficient amount prior to operation to avoid having to add wood while operating. Adding wood while operating may splash hot water and cause serious injury.• Use of accessories not intended for this smoker is not recommended and may lead to injury or property damage.• An LP cylinder not connected for use should not be stored in the vicinity of the smoker or any other appliance. DO NOT store spare LP cylinders within 10 feet of the smoker. LP cylinders must be stored outdoors, out of reach of children. DO NOT store LP cylinders in a building, garage or any other enclosed area.• DO NOT store LP gas cylinders inside or on top of the smoker. Improper storage of cylinders could lead to explosion, fire and/or personal injury. Cylinders are to be stored outdoors, out of reach of children and must not be stored in a building, garage or any other enclosed area.• While the smoker is not in use, the gas must be turned off at the supply cylinder.• LP gases are heavier than air, tend to pool and collect in low-lying areas, are easily ignited and are highly flammable. Proper care and caution should be employed when dealing with any such fuels.• The smoker should be turned off and all supply valves (on piping or on fuel cylinders) should be closed in the event that the odor of unburned gas is detected. Do not attempt to use the appliance until any gas leaks are fixed and/or the source of the unburned gas odor is accounted for.
SAFETY INFORMATION
5
A
B
C
D
E
F
G
I
S K
LM
NP
O
J
A
I
AA
I
AA
Hardware Used
AA x 3M6 x 12 Bolt
1
3C
AA
Hardware Used
AA x 4M6 x 12 Bolt
Controlarm
I
AAL
AA x 8M6 x 12 Bolt
I
T
AA
K
Q
I
CC
I
R
OPERATING INSTRUCTIONS
CONNECTING THE LP TANK
WARNING
ALL INSTRUCTIONS AND SAFEGUARDS ON THIS PAGE MUST BE FOLLOWED TO PREVENT FIRE, DAMAGE AND/OR INJURY.
1. The knob on the LP tank must be closed. Make sure that the knob is turned clockwise to a full stop. The cylinder supply system must be arranged for vapor withdrawal.
2. Check that the control knob on the control unit is turned off.
3. Remove the protective cap from the LP tank valve and coupling nut.
4. Hold the regulator in one hand and insert the nipple into the valve outlet. Be sure the nipple is centered in the valve outlet. The coupling connects to the large outside threads on the valve outlet. Use care – do not cross thread the connection.
5. Hand tighten the coupling clockwise until it comes to a full stop. Firmly tighten by hand only. Do not use tools.
P
Straight
CAUTION: In the connection process, make sure the regulator inlet connector mates with the cylinder valve outlet properly, safely and firmly.
15
OPERATING INSTRUCTIONS
Any fuel supply cylinder used must be constructed and marked in accordance with specifications for propane cylinders of the U.S. Department of Transportation (DOT) CFR 49, or the Standard for Cylinders, Spheres and Tubes for the Transportation of Dangerous Goods, CAN/CSA B339. The appliance is to be used only with the 20-pound, vertical standing vapor withdrawal type tank and must include a collar to protect the cylinder valve.(A) DO NOT store spare LP cylinders under or near the smoker.(B) NEVER fill cylinder more than 80% full.(C) Do not store cylinder indoors.
WARNINGIf instructions A, B and C above are not followed exactly, a fire causing death or serious injury may occur.
This smoker is designed to operate on LP gas only. The gas cylinder used must include a collar to protect the cylinder valve. The cylinder supply system must be arranged for vapor withdrawal. Do not allow dirt or foreign material to get into or onto tank connection when it is not attached to the fuel supply system. Use the protective cap provided.
WARNINGALL INSTRUCTIONS AND SAFEGUARDS ON THIS PAGE MUST BE FOLLOWED TO PREVENT FIRE, DAMAGE AND/OR INJURY.
The cylinder outlet must have Type 1 gas connection termination in order to mate with gas hose provided with smoker. The pressure regulator and hose assembly supplied by the manufacturer with the appliance must be used. Replacement pressure regulators and hose assemblies must be those specified by the appliance manufacturer.This unit is not to be utilized with a non-self-contained LP-gas supply system.
Valve/pressure regulators are factory set to the correct operating pressures. No attempts should be made to adjust these settings.
DISCONNECT THE LP TANK
Make sure that the knob on the LP tank is turned clockwise to a full stop (CLOSED).
Hold the regulator in one hand, turn the coupling to the valve outlet counterclockwise and unthread the connection by hand only. Do not use tools.
Place dust cap on cylinder valve outlet whenever the cylinder is not in use. Only install the type of dust cap on the cylinder valve outlet that is provided with the cylinder valve. Other types of caps or plugs may result in leakage of propane.
Always hang the regulator on the lifting handles while not in use, disconnected fromthe LP tank, and when the unit has cooled down.
STORE THE TANK IN A PROPER PLACE AS INDICATED IN THIS MANUAL.
16
OPERATING INSTRUCTIONS
CHECKING FOR LEAKS
After connections are made, check all connections and fittings for leaks with a soap solution. 1. With all valves closed, apply the leak check solution (50/50 mix of dishwashing soap and water) to all gas carrying connections and fittings. 2. Open tank valve.Presence of bubbles at areas of wet solution indicates a gas leak. If leaks are detected or you smell or hear gas, shut off the valve and repair the leak or replace the defective part. Do not use the smoker until all leaks are corrected.
The gas hose/regulator assembly should be totally extended to the maximum distance so that the hose is straight and the tank is as far from the smoker as it can be (minimum 24 inches).
For vapor withdrawal, LP tanks are intended to be operated in the upright position only.
If the product is not in use, the gas must be turned off at the supply cylinder and the cylinder should be disconnected from the appliance.
Storage of the appliance indoors is only permissible if the cylinder is disconnected and removed from the appliance. Do not store cylinder indoors.
BEFORE FIRST USE
Remove all hangings or plastic straps, if present.
Before you cook food in your smoker, it is important to “season” your smoker. Seasoning seals the paint and interior of your smoker to enhance flavoring, durability and overall performance.To season your smoker, simply use it as you normally would only do not cook any food. You will need to follow all of the operating procedures in the next few sections of this manual.
Using your desired flavoring woods and marinades, burn your smoker at low temperature (around 175°F) for 45 – 60 minutes. Let the smoker cool and clean out the water and wood.
Once seasoning is complete, your smoker’s interior will have a durable, seasoned coating.
ADDING WATER
To add water before cooking, simply remove the water bowl and fill it with water slightly below the rim. Place the bowl back into the smoker. Adding water before cooking is recommended. To add water while cooking, if a sizzling sound indicating lack of water is heard, or there is a need to add water, open the bottom door with care and avoid taking in the smoke. Use a long nose kettle-like water can, stand as far from the smoker as you can, fill the water bowl up to 1 inch below the rim.
CAUTION: DO NOT pull the water bowl out beyond the rack when the smoker is hot.
17
OPERATING INSTRUCTIONS
COOKING TIP
Line the water bowl with aluminum foil before each use. This will make it easy to clean and help your water bowl last longer.
To make adding water easier and safer, use a clean watering can with a long spout.
ADDING WOOD CHIPS
To add wood chips before cooking, simply fill the wood chip box with your choice of flavoring hardwood chips. The amount and type of wood you use is entirely dependent on the desired amount of flavor. Once the box is filled, place the lid on top of the box and set the box in the smoker.
To add wood chips while cooking, we recommend using tongs or long handled pliers to removethe box lid and to place the pieces into the wood chip box without removing the box. It is not recommended to remove the wood chip box while the smoker is in operation.
CAUTION: The wood chip box and lid get very hot. Avoid handling them while in use. Always wear protective oven mitts when handling hot components.
COOKING TIP: FLAVORING WOOD
• Small wood chips work best inside the wood chip box.• Use dry hardwoods such as hickory, pecan, apple, cherry or mesquite.• To produce more smoke and prevent fast burning, pre-soak the wood chips in a separate bowl of water for at least 20 minutes, or wrap the chips in perforated aluminum foil.• Most smoke flavoring occurs within the first hour of cooking. Adding wood chips after the first hour is typically not necessary unless extra smoke flavoring is desired.
18
OPERATING INSTRUCTIONS
19
OPERATING INSTRUCTIONS
Match Lighting Procedure - LP Gas
1. Repeat Steps 1 through 5 of the igniter lighting system.
2. Open both doors. Place a lit match on to the burner as shown below. Quickly turn the control knob to the “HIGH” position. If the burner does not light in 5 seconds, turn the control knob off, wait at least 5 minutes and for the gas to clear. Repeat the process.
20
OPERATING INSTRUCTIONS
Cooking Tip: Damper Adjustments
WARNING: The dampers on the smoker body and the handle on the smoke stack may become very hot while cooking. Always wear a heat resistant glove when adjusting.
• For best performance, rotate the smoker so that the front or back of the body is facing the wind. This allows the adjustment of the dampers to be more effective and accurate.• The two dampers on smoker body should never be fully closed.• Opening the damper of the smoke stack helps to exhaust both the heat and smoke.• The key to effective smoking is to watch your heat indicator on the door and adjust the damper accordingly.• Temperature maintenance is best controlled by different damper adjustment configurations.
Turning off the Smoker
CAUTION: The smoker can become very hot while in use.Do not touch any portion of the smoker except for the door handle and burner control knob. It may be necessary to use protective gloves.
1. Turn the burner control knob off by pushing in and rotating to “OFF”. The burner flame should go out.
2. Turn off the LP cylinder valve by turning the knob clockwise until it cannot go any farther.
Follow all warnings and safety precautions before removing meat from smoker or preparing the unit for storage.
Lighting Instructions – Charcoal
When using charcoal, DO NOT USE PRETREATED, MATCH-LIGHT CHARCOAL with this smoker. Only use standard, untreated briquettes or lump charcoal and ONLY use charcoal lighting fluid approved for lighting charcoal. Do not use lighter fluid, paint thinners, gasoline, kerosene, alcohol or other flammable material for lighting charcoal. Damage to the smoker may occur with the use of match-light charcoal. DO NOT USE THE LP GAS BURNER WHEN LIGHTING CHARCOAL. Step 1Place the charcoal grate inside the woodchip/charcoal tray and add 1.5 pounds of charcoal on charcoal grate (approximately 26 briquettes).
Step 2Note: Please refer to the manufacturer’s recommended amount of lighter fluid before applying fluid to the briquettes. With the charcoal tray outside the firebox, saturate charcoal with the amount of lighting
LIGHTING INSTRUCTIONS
CAUTION: If the flame extinguishes accidentally during ignition or operation, immediately TURN OFF the cylinder valve and then TURN OFF the control knob.
Igniter Lighting System
1. Check all connections for leaks using the “soap water” test as explained on page 16.
2. Open both of the smoker cabinet doors. Always keep the doors open during lighting.
3. Check for any blockage to the venturi tube or burner, damper setting, ventilation setting. Remove any foreign objects or matter.
4. Be sure the burner control knob is in the “OFF” position.
5. Open the LP cylinder valve by turning counterclockwise.
6. Push igniter on the control unit down 1 to 2 seconds then push and turn control knob to “HIGH,” while still holding the ignitor button down. At this point the burner should ignite.
7. If ignition does not take place within 5 seconds, immediately turn the control knob to OFF. Wait 5 minutes and repeat above Steps 6 and 7.
8. If burner still fails to light, try match lighting using the instructions on page 19.
9. Once the burner is lit, close the doors to allow heat to accumulate. The smoke stack on the top of the smoker can be adjusted to the desired setting to allow proper ventilation and combustion. NEVER CLOSE THE SMOKE STACK COMPLETELY.
WARNING: Always light your smoker with both doors open.
22
CARE AND MAINTENANCE
AFTER USE SAFETY AND MAINTENANCE
WARNING• Use caution when lifting and moving the smoker to avoid strain injuries. Two people are recommended to lift or move the smoker.
• DO NOT store the smoker near gasoline or other combustible liquids or where combustible vapors may be present. Keep the area around the smoker clear and free of combustible materials and vapors.
• DO NOT store this smoker in an area accessible to children or pets. Store the smoker in a dry, protected location. Disconnect cylinder from smoker.
• DO NOT allow anyone to conduct activities around the smoker following use until it has cooled. It is hot during operation and remains hot for a period of time following use.
• DO NOT leave hot ashes unattended until the smoker cools completely.
• The smoker becomes extremely hot – allow the smoker to cool completely before handling. If you must handle the smoker while it is hot, ALWAYS wear protective oven mitts or heat-resistant gloves. Allow the smoker to cool before removing and cleaning the grease pan.
• Dispose of cold ashes by wrapping them in heavy-duty aluminum foil and putting them in a noncombustible container.
• If you must dispose of the ashes in less time than it takes for them to completely cool. Remove the ashes from the smoker, keeping them in heavy-duty foil, and soak them completely with water before disposing of them in a noncombustible container.
GENERAL CARE AND MAINTENANCE CAUTION: All care and maintenance procedures are to be performed while the smoker is turned off and cooled. Always perform maintenance by a qualified service person.
Clean the water bowl and cooking grate with hot, soapy water. Rinse and dry thoroughly. You may prefer to coat the water bowl and cooking grid lightly with cooking oil or cooking spray.
Frequently check and clean the venturi and burner tubes for insects and insect nests. A clogged tube can lead to fire beneath the smoker. Also make sure the smoker does not have any foreign objects obstructing the flow of combustion and ventilation air.
To clean the inside and outside of the smoker cabinet, simply use a damp cloth. Spray-washing with a water hose is not recommended. Moisture should be wiped away and not allowed to stand inside or on top of the smoker. Once cleaned, you may prefer to lightly coat the interior of the smoker cabinet with cooking oil or cooking spray.
If rust is present on the exterior surface of the smoker, clean the area with steel wool or emery cloth and use heavy-duty, heat-resistant paint.
NEVER apply additional paint to the interior of the smoker. If rust is present on the interior of the smoker, clean it thoroughly with steel wool or emery cloth and lightly coat the area with cooking oil or cooking spray to help minimize recurring rust.
When an LP tank is not connected, and to help prevent dirt or other foreign particles from clogging the regulator connector, hang the end of the hose and regulator assembly on the lifting handle.
Keep the ventilation opening(s) of the cylinder enclosure free and clear of debris.
23
CARE AND MAINTENANCE
Inspect the flames at the burner by looking through the observing hole on left side of the burner and control unit. A good flame should be blue with a yellow tip 1 to 2 inch high. If flames are excessively yellow and irregular, oil residue and food deposits may be collecting on the burner. Try cleaning the burner surface with hot, soapy water and cleaning the holes with a pipe cleaner to improve the flames.
Bad flames may also be caused by poor venturi attachment to the orifice. Turn off the control knob and cylinder valve. Always let the smoker cool before cleaning or checking the assembly. Make sure the orifice of the control valve properly mates with the burner mixing tube by visual observation from the bottom of the appliance. The burner venturi tube should overlap the orifice and they should form a straight line as shown in Figure A. Figures B & C show incorrect alignment.
WARNING: If the instructions above are not followed, an explosion may result, possibly causing serious bodily injury or death.
To protect your smoker from weather conditions, always keep it covered while not in use.
2”
Yellow
Light Blue
Blue
Good Flame Bad Flame
! ! !
Figure A Figure B Figure C
Correct Wrong Wrong
The flame goes out. 1. Disconnected gas supply hose. 2. High or gusting winds.
For replacement parts, call our customer service department at 1-800-963-0211, 8:00 a.m. – 6:00 p.m., EST, Monday – Thursday, 8:00 a.m. – 5:00 p.m., EST, Friday.
Owner’s Manual - Part #312-02025-00Printed in China
SpringClip
Qty. 2
CC
BB x21/4-20 FlangedWasher Nut
Hardware Used
R
Q
7. Insert 4 bolts (AA) through the mounting holes on one of the lifting handles (J) and into holes on right side of smoker body (I). Use a Phillips screwdriver to secure the handles to the smoker body (I). Repeat on left side.
7
Hardware Used
CC x 2Spring Clip
I
AA
J
ASSEMBLY INSTRUCTIONS
4. Thread bolts (EE) through holes on the leg - with holes (B) from outside of unit. Secure using 2 nuts (FF) from inside leg by using wrench. Tighten all bolts (AA) with a Phillips screwdriver. Insert the regulator hose attached to the burner and control unit (C) into the hose retention (V).
4
I
V
12. Slide the wood chip box (D) onto the lowest cooking grate supports (T) inside the smoker body (I) and put the wood chip box lid (F) on top. Note: For charcoal, refer to Step 17.
12
DANGER:
Failure to follow these instructions could result in fire, explosion, or burn hazard which could cause property damage, personal injury or death.
DANGER: If you smell gas:1. Shut off gas to the appliance.
3. Open lid.4. If odor continues, keep away from the appliance and immediately call your gas supplier or your fire department.
Assembler/Installer: This instruction manual contains important information necessary for the proper assembly and safe use of this appliance. Read and follow all warnings and instructions before assembling and using this appliance. Leave these instructions with the consumer.
Consumer/User: Follow all warnings and instructions when using this appliance. Keep these instructions for future reference.
1. Never operate this appliance unattended.2. Never operate this appliance within 10 feet (3 m) of any structure, combustible material or other gas cylinder.3. Never operate this appliance within 25 feet (7.5 m) of any flammable liquid.4. Never allow oil or grease to get hotter than 400°F or 200°C. If the temperature exceeds 400°F (200°C) or if oil begins to smoke, immediately turn the burner or gas supply OFF.5. Heated liquids remain at scalding temperatures long after the cooking process. Never touch cooking appliance until liquids have cooled to 115°F (45°C) or less.6. If a fire should occur, keep away from the appliance and immediately call your fire department. Do not attempt to extinguish an oil or grease fire with water. Failure to follow these instructions could result in fire, explosion, or burn hazard which could cause property damage, personal injury or death.
DANGER
DANGER:
Rev. 9/2011
M4 x 10Bolt
Qty. 2
DD EE
M4 Nut
Qty. 2
FF
M5 x 12Screw
Qty. 8
H
J
T
T
U
V
front of smoker
B
front of smoker
M4 x 10 BoltEE
M4 NutFF
Hardware Used
x 2
x 2
B
EE
FF
Hardware Used
AA x 4M6 x 12 Bolt
Hardware Used
AA x 4M6 x 12 Bolt
M5 x 12 ScrewBB x 8
Hardware UsedBB
S
I
R
S
D
FI
I13. Slide the water bowl (G) onto the cooking grate supports (T) inside the smoker body (I) above the wood chip box (D) as shown.
ASSEMBLY INSTRUCTIONS
13
15. Insert the probe of the temperature gauge assembly (M) through hole of the smoker door from the outside. Secure using 2 nuts (DD) from inside panel by using wrench.
16. To install the “AAA” battery (U), remove the igniter button by turning it counterclockwise and insert the “AAA” battery (U) with the positive end facing out. Reinstall the igniter button by turning it clockwise and hand tightening.
17. For charcoal use, remove the wood chip box lid (F) and place the charcoal grate (E) inside the wood chip box (D).
18. Always hang the regulator hose attached to the burner and control unit (C) to the hose retention (V) attached to the leg - with hole (B) while not in use. If switching from LP gas to charcoal, wait for the unit to cool down before disconnecting from the LP tank.
15
16
17
18
DD
M
U
E
B
12
14. Slide the 4 cooking grates (H) onto the top cooking grate supports (T) inside the smoker body (I).
14 I
H
ASSEMBLY INSTRUCTIONS
Hardware Used
DD x 2
D
S
V
M5 Nut
igniter button
21
OPERATING INSTRUCTIONS
fluid as recommended by the lighter fluid manufacturer. Allow the fluid to soak into the charcoal for 3 minutes before placing the tray back into the firebox (refer to assembly instructions for proper tray placement). After soaking the charcoal, place the lighting fluid at a safe distance away from the smoker.
Step 3With both doors open, stand back and carefully light charcoal and allow to burn until covered with a light ash (approximately 20 minutes). Charcoal lighting fluid must be allowed to completely burn off prior to closing the doors. (Fumes will tend to collect in the upper cavity if the door is closed).
DANGER: Closing the firebox doors during the lighting procedure could trap fumes from the charcoal lighting fluid in the smoker box and may result in a flash-fire or explosion when door is opened, resulting in property loss, personal injury or death. Never attempt to add more lighting fluid to the charcoal once it has been lit.
Step 4After 25 - 30 minutes, charcoal should be ready for cooking and/or adding woodchips. Carefully add wood chunks using long cooking tongs.
Adding Charcoal and/or Wood Chips
Additional charcoal and/or wood may be required to maintain or increase cooking temperature.
WARNING: Use caution since flames can flare-up when fresh air suddenly comes in contact with fire. When opening the door, keep hands, face and body a safe distance from hot steam and flame flare-ups.
Step 1Stand back and carefully open smoker box door allowing heat and steam to escape away from your face. Use caution since flames can flare-up when fresh air suddenly comes in contact with fire. Inspect the charcoal level in pan.
Step 2Wearing flame retardant oven mitts/gloves, stand back a safe distance and use long cooking tongs to lightly brush aside ashes on hot coals. Use cooking tongs to add charcoal and/or wood to charcoal pan, being careful not to stir-up ashes and sparks
WARNING: Never add charcoal lighting fluid to hot or even warm coals as flashback may occur causing severe burns.
Step 3Close smoker box door and allow food to continue cooking.
Allow the ashes to completely cool before reusing or cleaning the smoker.
26
REPLACEMENT PARTS LIST
For replacement parts, call our customer service department at 1-800-963-0211, 8:00 a.m. – 6:00 p.m., EST, Monday – Thursday, 8:00 a.m. – 5:00 p.m., EST, Friday.
PART DESCRIPTION PART # 1 Leg – Standard 301-01016-00 2 Leg – with Holes 312-01016-00 3 Burner and Control Unit 312-01015-00 4 Wood Chip Box (MFW only) 312-01028-00 5 Charcoal Grate 312-01030-00 6 Wood Chip Box Lid 301-01029-00 7 Wood Chip Box Handle and 301-01028-02 Lid Handle 8 Water Bowl 301-02017-00 9 Cooking Grate 312-01014-00 10 Door Locking Bracket 302-01008-00 11 Cooking Grate Support 302-01030-00 12 Smoker Body 312-12001-00 13 Square Smoke Stack 312-02009-00 14 Lifting Handle 301-01010-00 15 Logo Plate 302-03002-01 16 Temperature Gauge Bezel 301-01034-00 17 Temperature Gauge 301-01003-00
PART DESCRIPTION PART # 18 Upper Door 302-02002-00 19 Side Table 312-02008-00 20 Door Handle Crank 302-02007-02 21 Door Handle Grip 302-02007-01 22 Bottom Door without Handle 302-02102-00 23 Table Front Support Bracket 312-02008-01 24 Table Back Support Bracket 312-02008-02 25 Side Damper Plate (round) 301-01001-04 26 Igniter Ground Wire 301-01015-08 27 Push Button 301-01015-03 28 Electronic Ignitor 301-01015-06 29 Ignition Cap 301-01015-05 30 Control Knob 301-01015-01 31 Control Knob Bezel 301-01015-02 32 Igniter Electrode and Ignition Wire 301-01015-07 33 Hose Retention 312-01016-01 N/A Hardware Bag 312-02026-00 N/A Owner’s/Instruction Manual 312-02025-00
11
14
21
17
1918
20
22
2324
25
2627
32
30
2928
3331
ANS Z21.89a-2008 CSA 1.18a-2008
• Do not use the smoker if the burner fails to light or fails to remain lit. Under such conditions, gas should be turned off and the fuel cylinder should be disconnected.• Use in high wind conditions that result in poor burner operation such as blowing out and flaring should be avoided. If repositioning the appliance does not improve operation under such wind conditions, the appliance should be turned off.• Install the smoker with the hose regulator assembly extended the full length of the hose (24 in. minimum) directly away from the appliance. When so configured, placement results in maximum tank to smoker distance. When the smoker is operated, the hose/regulator and gas tank should be perpendicular to wind direction. Placing tank closer than 24 inches to the smoker can overheat the tank and cause release of propane through relief openings and can result in tank fire or explosion. • Read and follow all warnings and instructions before assembling and using the appliance.• Follow all warnings and instructions when using the appliance.
NOTE: The installation must confirm with local codes or, in the absence of local codes, with eitherthe National Fuel Gas Code, ANSI Z223.1/NFPA 54, Natural Gas and Propane Installation Code,CSA B149.1, or Propane Storage and Handling Code, B149.2, or the Standard for RecreationalVehicles, ANSI A 119.2/ NFPA 1192, and CSA Z240 RV Series, Recreational Vehicle Code, asapplicable.
WARNINGDO NOT mix old and new batteries.DO NOT mix alkaline, standard (Carbon-Zinc), or rechargeable (Nickel-Cadmium) batteries.DO NOT dispose of batteries in fire. Improper disposal may cause batteries to leak or explode.
The electronic ignition requires 1 “AAA” alkaline battery, which is included.
WARNING:The hose to tank attachment creates a potential trip hazard for user and pedestrians - use caution.Do not allow or cause the gas tank or applianceto tip.
MINIMUM 24 IN. (610 MM)
(Tank not included)
HIGH
LOW OFF
I
C
V
T
T
T
C
Master Forge & M Design® is a registered trademarkof LF, LLC. All rights reserved.
®
D
13
G
2
TABLE OF CONTENTS
Safety Information ......................................................................................................................... 3
Replacement Parts List ................................................................................................................ 26
ITEM #0190449
MODEL #MFW784BDP
DUAL FUELVERTICAL SMOKER
Français p. XX
Español p. XX
1
Français p. 28
Español p. 58
SAFETY INFORMATION
3
Please read and understand this entire manual before attempting to assemble, operate or install the product. If you have any questions regarding the product, please call customer service at 1-800-963-0211, 8:00 a.m. – 6:00 p.m., EST, Monday – Thursday, 8:00 a.m. – 5:00 p.m., EST, Friday.
PACKAGE CONTENTS
6
PART DESCRIPTION QUANTITY A Leg - standard 3 B Leg - with holes 1 C Burner & Control Unit 1 D Wood Chip Box 1 E Charcoal Grate 1 F Wood Chip Box Lid 1 G Water Bowl 1 H Cooking Grate 4 I Smoker Body 1 J Lifting Handle 2 K Door Locking Bracket 2
L Square Smoke Stack 1 M Temperature Gauge & Bezel 1 N Upper Door (pre-assembled) 1 O Bottom Door (pre-assembled) 1 P Side Table 1 Q Door Handle 2 R Table Front Support 1 S Table Back Support 1 T Cooking Grate Support 12 U “AAA” Battery (1.5 V) 1 V Hose Retention 1
PART DESCRIPTION QUANTITY
ASSEMBLY INSTRUCTIONS
8
24
WARRANTY
25
This vertical gas smoker is warranted against broken or damaged parts at the time of purchase. The stainless steel burner is warranted for 3 years. All other parts carry a one (1) year limited warranty except the water bowl, which is warranted to be free of defects for 90 days. Paint is warranted to be free of defects for 90 days except for rust, which may appear after repeated use.
This warranty does not cover damage or issues related to neglect, abuse or modifications to the appliance. Repair labor is not covered.
All parts that meet the warranty requirements will be shipped at no charge via the discretion of GHP Group Inc. (ground shipments, US Mail or Parcel Post ONLY). Any special handling charges (i.e. Second Day, Overnight, etc.) will be the responsibility of the consumer.
All warranty claims apply only to the original purchaser and require a proof of purchase verifying purchase date. Do not return parts to GHP address without first obtaining a return authorization number from our customer service. This service is available by calling toll free 1-800-963-0211, 8:00 a.m. – 6:00 p.m., EST, Monday – Thursday 8:00 a.m. – 5:00 p.m., EST, Friday.
Some states do not allow the exclusion or limitation of incidental or consequential damages orlimitations on how long an implied warranty lasts, so the above limitations or exclusions may not apply to you. This warranty gives you specific legal rights, and you may have other rights that vary from state to state.
GHP Group Inc.8280 Austin AvenueMorton Grove, IL, USA60053-3207
The burner will not light using the igniter procedure.
1. The igniter electrode may be covered with grease or residue.
2. The igniter electrode may have a loose or disconnected wire.
3. No spark is being generated.
4. No gas flow or cylinder valve not open.
5. Vapor lock at coupling nut to LP cylinder.
1.Clean the igniter electrode.
2. Check the connection and reconnect any loose or disconnected wires.
3.Replace the AAA size battery inside the igniter.
4. Make sure LP cylinder is not empty or open cylinder valve.
5. Turn off knob and LP cylinder valve. Disconnect coupling nut from LP cylinder. Reconnect and retry.
The burner will not light with a match.
1. No gas flow or an obstructed gas flow.
1. Check the fuel level. Clean the venturi tube and burner.
HARDWARE CONTENTS (shown actual size)
M6 x 12Bolt
Qty. 32
7
AA BB
Before beginning assembly of product, make sure all parts are present. Compare parts with package contents list and hardware contents list. If any part is missing or damaged, do not attempt to assemble the product.
Estimated Assembly Time: 25 minutes
Tools Required for Assembly (not included): Phillips Head Screwdriver, 1/2 in. Wrench, Pliers.
PREPARATION
M5 Nut
Qty. 2
1. Align the legs - standard (A) with the mounting holes on the bottom left front, right front and left rear of the smoker body (I). Thread bolts (AA) through the holes from the outside of the unit. Tighten all bolts (AA) with a Phillips screwdriver.
Hardware Used
AA x 9M6 x 12 Bolt
2. Align the leg - with holes (B) with the mounting holes on the bottom right rear of the smoker. Thread bolts (AA) through the holes from the outside of the unit. Tighten all bolts (AA) with a Phillips screwdriver.
3. Open the bottom door of the smoker body (I). Turn the burner and control unit (C) upside down and place it on the bottom of the smoker body (I), making sure the 4 mounting holes on the burner and control unit (C) are aligned with the holes on the smoker body (I). Note: The control knob should be on the same side as the door. Check that the burner is properly installed on the orifice before attaching the burner and control unit (C). Thread bolts (AA) through holes from outside of unit. Securely tighten the unit to the bottom with a Phillips screwdriver.
5. CAUTION: This unit is HEAVY! Do not attempt this step without assistance! Close the two doors. With the assistance of a helper, stand the unit upright on its legs on a firm and level surface. (Make sure that the burner/control unit and legs are attached). Open the upper door. Position the square smoke stack (L) with control arm to the left as shown. Using 4 bolts (AA), attach square smoke stack (L) to the top of smoker body (I). Securely tighten with a Phillips screwdriver.
Hardware Used
6. Insert the cooking grate supports (T) into the corresponding holes on rack of the shelf inside the smoker body (I) from the bottom up. NOTE: There are 8 positions to install the cooking grate supports. The cooking grate supports can be installed into positions according to the need of the owner.
8. Align the door locking bracket (K) holes with the holes on the upper right side of the smoker body (I). Thread 2 bolts (AA) through the holes in the door locking bracket (K) into the threaded holes of the smoker body (I). Tighten the bolts (AA) using a Phillips screwdriver. Repeat on lower right side.
9. Slide door handle (Q) through brackets in door. Using pliers, slide a spring clip (CC) over the groove in the door handle as shown. Make sure both of the spring clips are securely attached in the grooves of the handles.
10. Install the side table back support (S) and table front support (R) on the side of the smoker body (I) with screws (BB). Arrows pointing up indicate the correct position of the brackets when fastened to the smoker body (I).
11. With the side table (P) in a parallel position, align the slots in the side table with the table supports (R & S) and insert. To lock the side table (P) in the upright position, swing the side table (P) up, push toward the smoker body (I), and press down on the side table (P) near the body until it is fully fastened in place.
If you have any questions regarding the product, please call customer service at 1-800-963-0211, 8:00 a.m. – 6:00 p.m., EST, Monday – Thursday, 8:00 a.m. – 5:00 p.m., EST, Friday.
2
6
5
8
9
10
11
ATTACH YOUR RECEIPT HERE
Serial Number Purchase Date
Questions, problems, missing parts? Before returning to your retailer, call our customer service department at 1-800-963-0211, 8:00 a.m. – 6:00 p.m., EST, Monday – Thursday, 8:00 a.m. – 5:00 p.m., EST, Friday.
ANS Z21.89a-2008 CSA 1.18a-2008
CALIFORNIA PROPOSITION 65
1. Fuels used in wood, charcoal, gas or oil fired appliances and the products of combustion of such fuels contain chemicals known to the State of California to cause cancer, birth defects or other reproductive harm. 2. This product contains chemicals, including lead and lead compounds, known to the State of California to cause cancer, birth defects or other reproductive harm.
• DO NOT use this product for anything other than its intended purpose. It is NOT intended for commercial use. It is NOT intended to be installed or used in or on a recreational vehicle and/or boat. • Keep a fire extinguisher near this product at all times.• This appliance is for outdoor use only in well-ventilated areas. DO NOT operate it in a building, garage or any other enclosed area, or under overhead construction.• A minimum clearance of 36 inches (92 cm) to combustible material is required on the front, sides and back. It is very important to always maintain proper clearances to combustibles.• The cylinder must be at least 24 inches (61 cm) from the appliance.• DO NOT obstruct the flow of combustion air or ventilation air for the appliance.• When cooking, the smoker must be on a level, stable noncombustible surface in an area clear of combustible material, including tall or dry grass. • Care should be taken to protect the fuel supply hose from damage from either pedestrian or vehicle traffic.• Clean and inspect the hose before each use of the appliance. If there is evidence of abrasion, wear, cuts or leaks, the hose must be replaced prior to the appliance being used. The replacement hose assembly shall be that specified by the manufacturer.• Before each use check that no dead leaves or debris are under the appliance.• Store this appliance in a dry, protected location.• The use of alcohol, prescription or nonprescription drugs may impair the user’s ability to properly assemble and safely operate this appliance.• Allow the smoker to cool to 115°F (45°C) before moving or storing. Use caution when lifting and moving the appliance to avoid back strain or back injury. DO NOT move the appliance while it is in use.• Always hang the regulator on the hose retention wire while not in use or disconnected with the LP (liquid propane) tank. KEEP the fuel supply hose away from any heated surface(s).
SAFETY INFORMATION
4
• DO NOT store and use this appliance near gasoline or other combustible liquids or where other combustible vapors may be present.• DO NOT use this appliance as a heater.• DO NOT leave the appliance unattended while in use. Keep children and pets away from the appliance at all times.• NEVER close the damper completely while cooking. • If you must dispose of ashes in less time than it takes for the ashes to completely cool down, remove the ashes from the appliance, keeping them in the heavy-duty foil, and soak them completely with water before disposing of them in a noncombustible container.• This appliance will be hot during and after use. Use insulated oven mitts or gloves for protection from hot surfaces or splatter from cooking liquids.• Make sure that the orifice of the control valve properly mates with the burner mixing tube by visual observation. Please refer to maintenance section.• Use caution when opening the door of the smoker while in operation. Keep hands, face and body safe from hot steam or flare-ups. DO NOT inhale smoke.• DO NOT wear loose clothing while operating the smoker. Tie back long hair while operating the smoker. ALWAYS wear shoes that fully cover your feet while operating the smoker.• Allow the smoker and its components to cool completely before conducting any routine cleaning or maintenance.• NEVER use glassware, plastic or ceramic cookware on or in your smoker. Use metallic cookware only.• NEVER operate the smoker without water in the water bowl. NEVER allow the water to completely evaporate. Check the water level at least every 2 hours. A sizzling sound may indicate a low water level. Follow instructions in this manual for adding water while operating (see the Operating Instructions section).• When using flavoring wood, add a sufficient amount prior to operation to avoid having to add wood while operating. Adding wood while operating may splash hot water and cause serious injury.• Use of accessories not intended for this smoker is not recommended and may lead to injury or property damage.• An LP cylinder not connected for use should not be stored in the vicinity of the smoker or any other appliance. DO NOT store spare LP cylinders within 10 feet of the smoker. LP cylinders must be stored outdoors, out of reach of children. DO NOT store LP cylinders in a building, garage or any other enclosed area.• DO NOT store LP gas cylinders inside or on top of the smoker. Improper storage of cylinders could lead to explosion, fire and/or personal injury. Cylinders are to be stored outdoors, out of reach of children and must not be stored in a building, garage or any other enclosed area.• While the smoker is not in use, the gas must be turned off at the supply cylinder.• LP gases are heavier than air, tend to pool and collect in low-lying areas, are easily ignited and are highly flammable. Proper care and caution should be employed when dealing with any such fuels.• The smoker should be turned off and all supply valves (on piping or on fuel cylinders) should be closed in the event that the odor of unburned gas is detected. Do not attempt to use the appliance until any gas leaks are fixed and/or the source of the unburned gas odor is accounted for.
SAFETY INFORMATION
5
A
B
C
D
E
F
G
I
S K
LM
NP
O
J
A
I
AA
I
AA
Hardware Used
AA x 3M6 x 12 Bolt
1
3C
AA
Hardware Used
AA x 4M6 x 12 Bolt
Controlarm
I
AAL
AA x 8M6 x 12 Bolt
I
T
AA
K
Q
I
CC
I
R
OPERATING INSTRUCTIONS
CONNECTING THE LP TANK
WARNING
ALL INSTRUCTIONS AND SAFEGUARDS ON THIS PAGE MUST BE FOLLOWED TO PREVENT FIRE, DAMAGE AND/OR INJURY.
1. The knob on the LP tank must be closed. Make sure that the knob is turned clockwise to a full stop. The cylinder supply system must be arranged for vapor withdrawal.
2. Check that the control knob on the control unit is turned off.
3. Remove the protective cap from the LP tank valve and coupling nut.
4. Hold the regulator in one hand and insert the nipple into the valve outlet. Be sure the nipple is centered in the valve outlet. The coupling connects to the large outside threads on the valve outlet. Use care – do not cross thread the connection.
5. Hand tighten the coupling clockwise until it comes to a full stop. Firmly tighten by hand only. Do not use tools.
P
Straight
CAUTION: In the connection process, make sure the regulator inlet connector mates with the cylinder valve outlet properly, safely and firmly.
15
OPERATING INSTRUCTIONS
Any fuel supply cylinder used must be constructed and marked in accordance with specifications for propane cylinders of the U.S. Department of Transportation (DOT) CFR 49, or the Standard for Cylinders, Spheres and Tubes for the Transportation of Dangerous Goods, CAN/CSA B339. The appliance is to be used only with the 20-pound, vertical standing vapor withdrawal type tank and must include a collar to protect the cylinder valve.(A) DO NOT store spare LP cylinders under or near the smoker.(B) NEVER fill cylinder more than 80% full.(C) Do not store cylinder indoors.
WARNINGIf instructions A, B, C above are not followed exactly, a fire causing death or serious injury may occur.
This smoker is designed to operate on LP gas only. The gas cylinder used must include a collar to protect the cylinder valve. The cylinder supply system must be arranged for vapor withdrawal. Do not allow dirt or foreign material to get into or onto tank connection when it is not attached to the fuel supply system. Use the protective cap provided.
WARNINGALL INSTRUCTIONS AND SAFEGUARDS ON THIS PAGE MUST BE FOLLOWED TO PREVENT FIRE, DAMAGE AND/OR INJURY.
The cylinder outlet must have Type 1 gas connection termination in order to mate with gas hose provided with smoker. The pressure regulator and hose assembly supplied by the manufacturer with the appliance must be used. Replacement pressure regulators and hose assemblies must be those specified by the appliance manufacturer.This unit is not to be utilized with a non-self-contained LP-gas supply system.
Valve/pressure regulators are factory set to the correct operating pressures. No attempts should be made to adjust these settings.
DISCONNECT THE LP TANK
Make sure that the knob on the LP tank is turned clockwise to a full stop (CLOSED).
Hold the regulator in one hand, turn the coupling to the valve outlet counterclockwise and unthread the connection by hand only. Do not use tools.
Place dust cap on cylinder valve outlet whenever the cylinder is not in use. Only install the type of dust cap on the cylinder valve outlet that is provided with the cylinder valve. Other types of caps or plugs may result in leakage of propane.
Always hang the regulator on the lifting handles while not in use, disconnected fromthe LP tank, and when the unit has cooled down.
STORE THE TANK IN A PROPER PLACE AS INDICATED IN THIS MANUAL.
16
OPERATING INSTRUCTIONS
CHECKING FOR LEAKS
After connections are made, check all connections and fittings for leaks with a soap solution. 1. With all valves closed, apply the leak check solution (50/50 mix of dishwashing soap and water) to all gas carrying connections and fittings. 2. Open tank valve.Presence of bubbles at areas of wet solution indicates a gas leak. If leaks are detected or you smell or hear gas, shut off the valve and repair the leak or replace the defective part. Do not use the smoker until all leaks are corrected.
The gas hose/regulator assembly should be totally extended to the maximum distance so that the hose is straight and the tank is as far from the smoker as it can be (minimum 24 inches).
For vapor withdrawal, LP tanks are intended to be operated in the upright position only.
If the product is not in use, the gas must be turned off at the supply cylinder and the cylinder should be disconnected from the appliance.
Storage of the appliance indoors is only permissible if the cylinder is disconnected and removed from the appliance. Do not store cylinder indoors.
BEFORE FIRST USE
Remove all hangings or plastic straps, if present.
Before you cook food in your smoker, it is important to “season” your smoker. Seasoning seals the paint and interior of your smoker to enhance flavoring, durability and overall performance.To season your smoker, simply use it as you normally would only do not cook any food. You will need to follow all of the operating procedures in the next few sections of this manual.
Using your desired flavoring woods and marinades, burn your smoker at low temperature (around 175°F) for 45 – 60 minutes. Let the smoker cool and clean out the water and wood.
Once seasoning is complete, your smoker’s interior will have a durable, seasoned coating.
ADDING WATER
To add water before cooking, simply remove the water bowl and fill it with water slightly below the rim. Place the bowl back into the smoker. Adding water before cooking is recommended. To add water while cooking, if a sizzling sound indicating lack of water is heard, or there is a need to add water, open the bottom door with care and avoid taking in the smoke. Use a long nose kettle-like water can, stand as far from the smoker as you can, fill the water bowl up to 1 inch below the rim.
CAUTION: DO NOT pull the water bowl out beyond the rack when the smoker is hot.
17
OPERATING INSTRUCTIONS
COOKING TIP
Line the water bowl with aluminum foil before each use. This will make it easy to clean and help your water bowl last longer.
To make adding water easier and safer, use a clean watering can with a long spout.
ADDING WOOD CHIPS
To add wood chips before cooking, simply fill the wood chip box with your choice of flavoring hardwood chips. The amount and type of wood you use is entirely dependent on the desired amount of flavor. Once the box is filled, place the lid on top of the box and set the box in the smoker.
To add wood chips while cooking, we recommend using tongs or long handled pliers to removethe box lid and to place the pieces into the wood chip box without removing the box. It is not recommended to remove the wood chip box while the smoker is in operation.
CAUTION: The wood chip box and lid get very hot. Avoid handling them while in use. Always wear protective oven mitts when handling hot components.
COOKING TIP: FLAVORING WOOD
• Small wood chips work best inside the wood chip box.• Use dry hardwoods such as hickory, pecan, apple, cherry or mesquite.• To produce more smoke and prevent fast burning, pre-soak the wood chips in a separate bowl of water for at least 20 minutes, or wrap the chips in perforated aluminum foil.• Most smoke flavoring occurs within the first hour of cooking. Adding wood chips after the first hour is typically not necessary unless extra smoke flavoring is desired.
18
OPERATING INSTRUCTIONS
19
OPERATING INSTRUCTIONS
Match Lighting Procedure - LP Gas
1. Repeat steps 1 through 5 of the igniter lighting system.
2. Open both doors. Place a lit match on to the burner as shown below. Quickly turn the control knob to the “HIGH” position. If the burner does not light in 5 seconds, turn the control knob off, wait at least 5 minutes and for the gas to clear. Repeat the process.
20
OPERATING INSTRUCTIONS
Cooking Tip: Damper Adjustments
WARNING: The dampers on the smoker body and the handle on the smoke stack may become very hot while cooking. Always wear a heat resistant glove when adjusting.
• For best performance, rotate the smoker so that the front or back of the body is facing the wind. This allows the adjustment of the dampers to be more effective and accurate.• The two dampers on smoker body should never be fully closed.• Opening the damper of the smoke stack helps to exhaust both the heat and smoke.• The key to effective smoking is to watch your heat indicator on the door and adjust the damper accordingly.• Temperature maintenance is best controlled by different damper adjustment configurations.
Turning off the Smoker
CAUTION: The smoker can become very hot while in use.Do not touch any portion of the smoker except for the door handle and burner control knob. It may be necessary to use protective gloves.
1. Turn the burner control knob off by pushing in and rotating to “OFF”. The burner flame should go out.
2. Turn off the LP cylinder valve by turning the knob clockwise until it cannot go any farther.
Follow all warnings and safety precautions before removing meat from smoker or preparing the unit for storage.
Lighting Instructions – Charcoal
When using charcoal, DO NOT USE PRETREATED, MATCH-LIGHT CHARCOAL with this smoker. Only use standard, untreated briquettes or lump charcoal and ONLY use charcoal lighting fluid approved for lighting charcoal. Do not use lighter fluid, paint thinners, gasoline, kerosene, alcohol or other flammable material for lighting charcoal. Damage to the smoker may occur with the use of match-light charcoal. DO NOT USE THE LP GAS BURNER WHEN LIGHTING CHARCOAL. Step 1Place the charcoal grate inside the woodchip/charcoal tray and add 1.5 pounds of charcoal on charcoal grate (approximately 26 briquettes).
Step 2Note: Please refer to the manufacturer’s recommended amount of lighter fluid before applying fluid to the briquettes. With the charcoal tray outside the firebox, saturate charcoal with the amount of lighting
LIGHTING INSTRUCTIONS
CAUTION: If the flame extinguishes accidentally during ignition or operation, immediately TURN OFF the cylinder valve and then TURN OFF the control knob.
Igniter Lighting System
1. Check all connections for leaks using the “soap water” test as explained on page 16.
2. Open both of the smoker cabinet doors. Always keep the doors open during lighting.
3. Check for any blockage to the venturi tube or burner, damper setting, ventilation setting. Remove any foreign objects or matter.
4. Be sure the burner control knob is in the “OFF” position.
5. Open the LP cylinder valve by turning counterclockwise.
6. Push igniter on the control unit down 1 to 2 seconds then push and turn control knob to “HIGH,” while still holding the ignitor button down. At this point the burner should ignite.
7. If ignition does not take place within 5 seconds, immediately turn the control knob to OFF. Wait 5 minutes and repeat above Steps 6 and 7.
8. If burner still fails to light, try match lighting using the instructions on page 19.
9. Once the burner is lit, close the doors to allow heat to accumulate. The smoke stack on the top of the smoker can be adjusted to the desired setting to allow proper ventilation and combustion. NEVER CLOSE THE SMOKE STACK COMPLETELY.
Warning: Always light your smoker with both doors open.
22
CARE AND MAINTENANCE
AFTER USE SAFETY AND MAINTENANCE
WARNING• Use caution when lifting and moving the smoker to avoid strain injuries. Two people are recommended to lift or move the smoker.
• DO NOT store the smoker near gasoline or other combustible liquids or where combustible vapors may be present. Keep the area around the smoker clear and free of combustible materials and vapors.
• DO NOT store this smoker in an area accessible to children or pets. Store the smoker in a dry, protected location. Disconnect cylinder from smoker.
• DO NOT allow anyone to conduct activities around the smoker following use until it has cooled. It is hot during operation and remains hot for a period of time following use.
• DO NOT leave hot ashes unattended until the smoker cools completely.
• The smoker becomes extremely hot – allow the smoker to cool completely before handling. If you must handle the smoker while it is hot, ALWAYS wear protective oven mitts or heat-resistant gloves. Allow the smoker to cool before removing and cleaning the grease pan.
• Dispose of cold ashes by wrapping them in heavy-duty aluminum foil and putting them in a noncombustible container.
• If you must dispose of the ashes in less time than it takes for them to completely cool. Remove the ashes from the smoker, keeping them in heavy-duty foil, and soak them completely with water before disposing of them in a noncombustible container.
GENERAL CARE AND MAINTENANCE CAUTION: All care and maintenance procedures are to be performed while the smoker is turned off and cooled. Always perform maintenance by a qualified service person.
Clean the water bowl and cooking grate with hot, soapy water. Rinse and dry thoroughly. You may prefer to coat the water bowl and cooking grid lightly with cooking oil or cooking spray.
Frequently check and clean the venturi and burner tubes for insects and insect nests. A clogged tube can lead to fire beneath the smoker. Also make sure the smoker does not have any foreign objects obstructing the flow of combustion and ventilation air.
To clean the inside and outside of the smoker cabinet, simply use a damp cloth. Spray-washing with a water hose is not recommended. Moisture should be wiped away and not allowed to stand inside or on top of the smoker. Once cleaned, you may prefer to lightly coat the interior of the smoker cabinet with cooking oil or cooking spray.
If rust is present on the exterior surface of the smoker, clean the area with steel wool or emery cloth and use heavy-duty, heat-resistant paint.
NEVER apply additional paint to the interior of the smoker. If rust is present on the interior of the smoker, clean it thoroughly with steel wool or emery cloth and lightly coat the area with cooking oil or cooking spray to help minimize recurring rust.
When an LP tank is not connected, and to help prevent dirt or other foreign particles from clogging the regulator connector, hang the end of the hose and regulator assembly on the lifting handle.
Keep the ventilation opening(s) of the cylinder enclosure free and clear of debris.
23
CARE AND MAINTENANCE
Inspect the flames at the burner by looking through the observing hole on left side of the burner and control unit. A good flame should be blue with a yellow tip 1 to 2 inch high. If flames are excessively yellow and irregular, oil residue and food deposits may be collecting on the burner. Try cleaning the burner surface with hot, soapy water and cleaning the holes with a pipe cleaner to improve the flames.
Bad flames may also be caused by poor venturi attachment to the orifice. Turn off the control knob and cylinder valve. Always let the smoker cool before cleaning or checking the assembly. Make sure the orifice of the control valve properly mates with the burner mixing tube by visual observation from the bottom of the appliance. The burner venturi tube should overlap the orifice and they should form a straight line as shown in Figure A. Figures B & C show incorrect alignment.
WARNING: If the instructions above are not followed, an explosion may result, possibly causing serious bodily injury or death.
To protect your smoker from weather conditions, always keep it covered while not in use.
2”
Yellow
Light Blue
Blue
Good Flame Bad Flame
! ! !
Figure A Figure B Figure C
Correct Wrong Wrong
The flame goes out. 1. Disconnected gas supply hose. 2. High or gusting winds.
For replacement parts, call our customer service department at 1-800-963-0211, 8:00 a.m. – 6:00 p.m., EST, Monday – Thursday, 8:00 a.m. – 5:00 p.m., EST, Friday.
Owner’s Manual - Part #312-02025-00Printed in China
SpringClip
Qty. 2
CC
BB x21/4-20 FlangedWasher Nut
Hardware Used
R
Q
7. Insert 4 bolts (AA) through the mounting holes on one of the lifting handles (J) and into holes on right side of smoker body (I). Use a Phillips screwdriver to secure the handles to the smoker body (I). Repeat on left side.
7
Hardware Used
CC x 2Spring Clip
I
AA
J
ASSEMBLY INSTRUCTIONS
4. Thread bolts (EE) through holes on the leg - with holes (B) from outside of unit. Secure using 2 nuts (FF) from inside leg by using wrench. Tighten all bolts (AA) with a Phillips screwdriver. Insert the regulator hose attached to the burner and control unit (C) into the hose retention (V).
4
I
V
12. Slide the wood chip box (D) onto the lowest cooking grate supports (T) inside the smoker body (I) and put the wood chip box lid (F) on top. Note: For charcoal, refer to Step 17.
12
DANGER:
Failure to follow these instructions could result in fire, explosion, or burn hazard which could cause property damage, personal injury or death.
DANGER: If you smell gas:1. Shut off gas to the appliance.
3. Open lid.4. If odor continues, keep away from the appliance and immediately call your gas supplier or your fire department.
Assembler/Installer: This instruction manual contains important information necessary for the proper assembly and safe use of this appliance. Read and follow all warnings and instructions before assembling and using this appliance. Leave these instructions with the consumer.
Consumer/User: Follow all warnings and instructions when using this appliance. Keep these instructions for future reference.
1. Never operate this appliance unattended.2. Never operate this appliance within 10 feet (3 m) of any structure, combustible material or other gas cylinder3. Never operate this appliance within 25 feet (7.5 m) of any flammable liquid.4. Never allow oil or grease to get hotter than 400°F or 200°C. If the temperature exceeds 400°F (200°C) or if oil begins to smoke, immediately turn the burner or gas supply OFF.5. Heated liquids remain at scalding temperatures long after the cooking process. Never touch cooking appliance until liquids have cooled to 115°F (45°C) or less.6. If a fire should occur, keep away from the appliance and immediately call your fire department. Do not attempt to extinguish an oil or grease fire with water. Failure to follow these instructions could result in fire, explosion, or burn hazard which could cause property damage, personal injury or death.
DANGER
DANGER:
Rev. 9/2011
M4 x 10Bolt
Qty. 2
DD EE
M4 Nut
Qty. 2
FF
M5 x 12Screw
Qty. 8
H
J
T
T
U
V
front of smoker
B
front of smoker
M4 x 10 BoltEE
M4 NutFF
Hardware Used
x 2
x 2
B
EE
FF
Hardware Used
AA x 4M6 x 12 Bolt
Hardware Used
AA x 4M6 x 12 Bolt
M5 x 12 ScrewBB x 8
Hardware UsedBB
S
I
R
S
D
FI
I13. Slide the water bowl (G) onto the cooking grate supports (T) inside the smoker body (I) above the wood chip box (D) as shown.
ASSEMBLY INSTRUCTIONS
13
15. Insert the probe of the temperature gauge assembly (M) through hole of the smoker door from the outside. Secure using 2 nuts (DD) from inside panel by using wrench.
16. To install the “AAA” battery (U), remove the igniter button by turning it counterclockwise and insert the “AAA” battery (U) with the positive end facing out. Reinstall the igniter button by turning it clockwise and hand tightening.
17. For charcoal use, remove the wood chip box lid (F) and place the charcoal grate (E) inside the wood chip box (D).
18. Always hang the regulator hose attached to the burner and control unit (C) to the hose retention (V) attached to the leg - with hole (B) while not in use. If switching from LP gas to charcoal, wait for the unit to cool down before disconnecting from the LP tank.
15
16
17
18
DD
M
U
E
B
12
14. Slide the 4 cooking grates (H) onto the top cooking grate supports (T) inside the smoker body (I).
14 I
H
ASSEMBLY INSTRUCTIONS
Hardware Used
DD x 2
D
S
V
M5 Nut
igniter button
21
OPERATING INSTRUCTIONS
fluid as recommended by the lighter fluid manufacturer. Allow the fluid to soak into the charcoal for 3 minutes before placing the tray back into the firebox (refer to assembly instructions for proper tray placement). After soaking the charcoal, place the lighting fluid at a safe distance away from the smoker.
Step 3With both doors open, stand back and carefully light charcoal and allow to burn until covered with a light ash (approximately 20 minutes). Charcoal lighting fluid must be allowed to completely burn off prior to closing the doors. (Fumes will tend to collect in the upper cavity if the door is closed).
DANGER: Closing the firebox doors during the lighting procedure could trap fumes from the charcoal lighting fluid in the smoker box and may result in a flash-fire or explosion when door is opened, resulting in property loss, personal injury or death. Never attempt to add more lighting fluid to the charcoal once it has been lit.
Step 4After 25 - 30 minutes, charcoal should be ready for cooking and/or adding woodchips. Carefully add wood chunks using long cooking tongs.
Adding Charcoal and/or Woodchips
Additional charcoal and/or wood may be required to maintain or increase cooking temperature.
WARNING: Use caution since flames can flare-up when fresh air suddenly comes in contact with fire. When opening the door, keep hands, face and body a safe distance from hot steam and flame flare-ups.
Step 1Stand back and carefully open smoker box door allowing heat and steam to escape away from your face. Use caution since flames can flare-up when fresh air suddenly comes in contact with fire. Inspect the charcoal level in pan.
Step 2Wearing flame retardant oven mitts/gloves, stand back a safe distance and use long cooking tongs to lightly brush aside ashes on hot coals. Use cooking tongs to add charcoal and/or wood to charcoal pan, being careful not to stir-up ashes and sparks
WARNING: Never add charcoal lighting fluid to hot or even warm coals as flashback may occur causing severe burns.
Step 3Close smoker box door and allow food to continue cooking.
Allow the ashes to completely cool before reusing or cleaning the smoker.
26
REPLACEMENT PARTS LIST
For replacement parts, call our customer service department at 1-800-963-0211, 8:00 a.m. – 6:00 p.m. EST, Monday – Thursday, 8:00 a.m. – 5:00 p.m. EST, Friday.
PART DESCRIPTION PART # 1 Leg – Standard 301-01016-00 2 Leg - with holes 312-01016-00 3 Burner and Control Unit 312-01015-00 4 Wood Chip Box (MFW only) 312-01028-00 5 Charcoal Grate 312-01030-00 6 Wood Chip Box Lid 301-01029-00 7 Wood Chip Box Handle and 301-01028-02 Lid Handle 8 Water Bowl 301-02017-00 9 Cooking Grate 312-01014-00 10 Door Locking Bracket 302-01008-00 11 Cooking Grate Support 302-01030-00 12 Smoker Body 312-12001-00 13 Square Smoke Stack 312-02009-00 14 Lifting Handle 301-01010-00 15 Logo Plate 302-03002-01 16 Temperature Gauge Bezel 301-01034-00 17 Temperature Gauge 301-01003-00
PART DESCRIPTION PART # 18 Upper Door 302-02002-00 19 Side Table 312-02008-00 20 Door Handle Crank 302-02007-02 21 Door Handle Grip 302-02007-01 22 Bottom Door without handle 302-02102-00 23 Table Front Support Bracket 312-02008-01 24 Table Back Support Bracket 312-02008-02 25 Side Damper Plate (round) 301-01001-04 26 Igniter Ground Wire 301-01015-08 27 Push Button 301-01015-03 28 Electronic Ignitor 301-01015-06 29 Ignition Cap 301-01015-05 30 Control Knob 301-01015-01 31 Control Knob Bezel 301-01015-02 32 Igniter Electrode and Ignition Wire 301-01015-07 33 Hose Retention 312-01016-01 N/A Hardware Bag 312-02026-00 N/A Owner’s/Instruction Manual 312-02025-00
11
14
21
17
1918
20
22
2324
25
2627
32
30
2928
3331
ANS Z21.89a-2008 CSA 1.18a-2008
• Do not use the smoker if the burner fails to light or fails to remain lit. Under such conditions, gas should be turned off and the fuel cylinder should be disconnected.• Use in high wind conditions that result in poor burner operation such as blowing out and flaring should be avoided. If repositioning the appliance does not improve operation under such wind conditions, the appliance should be turned off.• Install the smoker with the hose regulator assembly extended the full length of the hose (24 in. minimum) directly away from the appliance. When so configured, placement results in maximum tank to smoker distance. When the smoker is operated, the hose/regulator and gas tank should be perpendicular to wind direction. Placing tank closer than 24 inches to the smoker can overheat the tank and cause release of propane through relief openings and can result in tank fire or explosion. • Read and follow all warnings and instructions before assembling and using the appliance.• Follow all warnings and instructions when using the appliance.
NOTE: The installation must confirm with local codes or, in the absence of local codes, with eitherthe National Fuel Gas Code, ANSI Z223.1/NFPA 54, Natural Gas and Propane Installation Code,CSA B149.1, or Propane Storage and Handling Code, B149.2, or the Standard for RecreationalVehicles, ANSI A 119.2/ NFPA 1192, and CSA Z240 RV Series, Recreational Vehicle Code, asapplicable.
WARNINGDO NOT mix old and new batteries.DO NOT mix alkaline, standard (Carbon-Zinc), or rechargeable (Nickel-Cadmium) batteries.DO NOT dispose of batteries in fire. Improper disposal may cause batteries to leak or explode.
The electronic ignition requires 1 “AAA” alkaline battery, which is included.
WARNING:The hose to tank attachment creates a potential trip hazard for user and pedestrians - use caution.Do not allow or cause the gas tank or applianceto tip.
MINIMUM 24 IN. (610 MM)
(Tank not included)
HIGH
LOW OFF
I
C
V
T
T
T
C
Master Forge & M Design® is a registered trademarkof LF, LLC. All rights reserved.