52
Minor Home Repairs November 5, 2016 County of Henrico Department of Community Revitalization 1
| Date post: | 28-Mar-2018 |
| Category: |
Documents |
| Upload: | truongkien |
| View: | 223 times |
| Download: | 5 times |

Minor Home Repairs
November 5, 2016
County of Henrico
Department of Community Revitalization
1

Henrico County
Dept. of Community Revitalization in partnership with
Environmental Green Solutions, LLC
Presented by Monique Johnson, President
Environmental Green Solutions, LLC
2

• Educate homeowners on basic technical skills
that will help the homeowner understand daily
operations of different functionalities around the
home.
• Basic technical skills include:
• Minor Plumbing
• Minor Electrical
3

4

• The objective is to help homeowners understand how plumbing equipment functions in addition to learning how to install, repair, and maintain plumbing.
• Identify tools needed for minor repairs.
5

• Before taking on any plumbing repair, or in the event of an emergency, turn off
the water to your house.
• Shutoff valves are typically located:
• in crawl spaces or basements - on an interior wall near the front of the house
where the water comes in from the meter
• utility rooms - near the hot water heater
• outside near the water meter.
• Only use your hand to turn water valves on or off. Using a tool might result in
breaking the valve. Call a plumber if you cannot turn your valves off by hand.
6
Shut Off
Valve
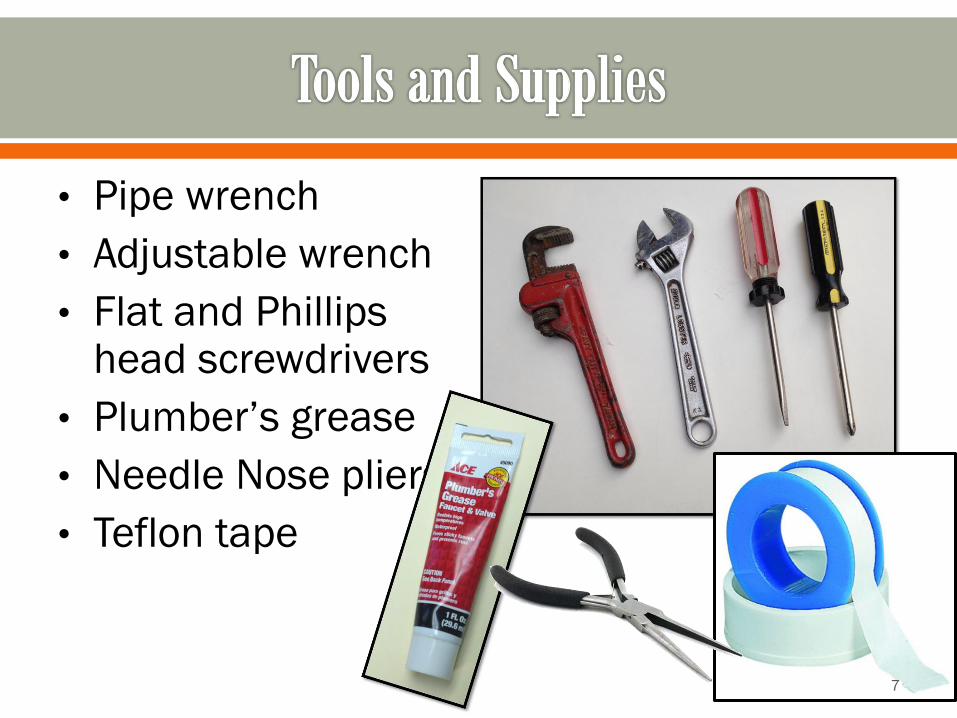
• Pipe wrench
• Adjustable wrench
• Flat and Phillips head screwdrivers
• Plumber’s grease
• Needle Nose pliers
• Teflon tape
7

1. Push the handle to release the flush valve. This opens the connection between the tank and the bowl.
2. Water is “poured” quickly from the tank into the bowl.
3. Allowing the water in creates a siphon effect.
4. The siphon effect empties the bowl from the suction created.
5. Fresh water begins to fill the tank because the level indicator (or float) turns the supply valve on
6. When float reaches the predetermined level, it triggers the supply valve to shut off.
8

(Older Style) Float ball (Newer Style) Fill Valve
9

• Water spills into overflow tube
• Toilet does not flush
completely
• Tank is leaking
• Water runs after flushing or
continuously
• Base of toilet is leaking
• Toilet clogged
10

Solutions:
1. Check fill valve or float ball;
if bad replace it
2. Check the lift chain to see if
the handle is properly
connected
3. Adjust the water level in the
tank if water is running into
the overflow pipe
4. If the tank ball or flapper
ball is worn replace it
Note: Before you start tank repairs, turn the shut off valve off and flush the
toilet. This will drain the water from the tank.
11

1. Adjust the float arm clamp (by bending downward or
upward) so that the water level is about ½” to 1”
below the top of the over flow tube.
2. Replace the float
ball or fill valve if
it has filled with
water
12

Solutions:
1. Adjust the lift chain to make sure there is not too much slack.
2. Raise the level ½” to 1” below the top of the overflow tube by bending the float arm upward.
3. Check flush handle to see if handle nut is tight 13

Solutions:
1. Make sure the connections to the water supply line are tight.
2. Make sure shut-off valve is open.
3. Check for leaks around shut-off valve. (Washer could be bad or water outlet line damaged).
4. Check tank bolts to ensure proper seating of rubber washer and bolts where they attach to the bowl.
14

Solutions:
1. Check tank flapper to make sure that it is properly seated on flush valve. If flapper is worn replace it.
2. Adjust fill valve or float ball.
3. Check the tank water level.
15

Solutions:
1. Tighten the bolts at the base of the bowl.
2. Replace wax ring gasket under the bowl.
3. Toilet bowl needs to be realigned.(If you notice the bathroom floor is not level spacers will be required for proper alignment.)
Note: Always replace the wax ring when reinstalling a toilet. 16

Solutions:
Only use a flange plunger.
A flange plunger is designed to seal the opening of a toilet bowl and maintain the required vacuum and pressure as you plunge.
17

Sink Plungers
Toilet Plunger
18

• The pop-up assembly body
on the sink basin (the part
that you can see in the sink)
is the rubber gasket and
locknut.
• These connect to the strainer
sleeve which connects to a
tailpiece. All this leads to the
p-trap.
• The p-trap is removable to
clean out accumulations that
slow drainage. It connects to
the pipe that takes the water
out to the septic or sewer.
19

• The pop-up assembly body
on the sink basin (the part
that you can see in the sink)
is the rubber gasket and
locknut.
• These connect to the strainer
sleeve which connects to a
tailpiece. All this leads to the
p-trap.
• The p-trap is removable to
clean out accumulations that
slow drainage. It connects to
the pipe that takes the water
out to the septic or sewer.
20

• Faucets leaking
• Clogged p-traps
• Missing or worn slip
nut gasket
• Shut-off valve leaking
• Worn or damaged pop-
up assembly
• Drain pipe leaking
• Supply lines leaking
21

Solutions:
• Replace stem or
cartridge
• Replace faucet stem
• Replace O-ring gasket
• Replace faucet
22

Solutions:
• Remove p-trap and
clean out trap
• Replace it
• Install a pressure p-trap
23

Solutions:
• Replace gasket
• Tighten slip nut
• Replace slip nut
24

Solutions:
• Tighten packing nut
• Replace packing nut
• Check water supply line
25

Solutions:
• Always check
your
connections
• Tighten any line
that feels loose
• Replace it
26

Solutions:
• Replace gasket
• Replace tailpipe
• Replace or repair
pivot rod
• Replace pop-up
assembly
• Replace spring clip
• Replace clevis strap
27

Solutions:
• Tighten slip nut
• Replace or repair gasket
• Replace piping
28

29
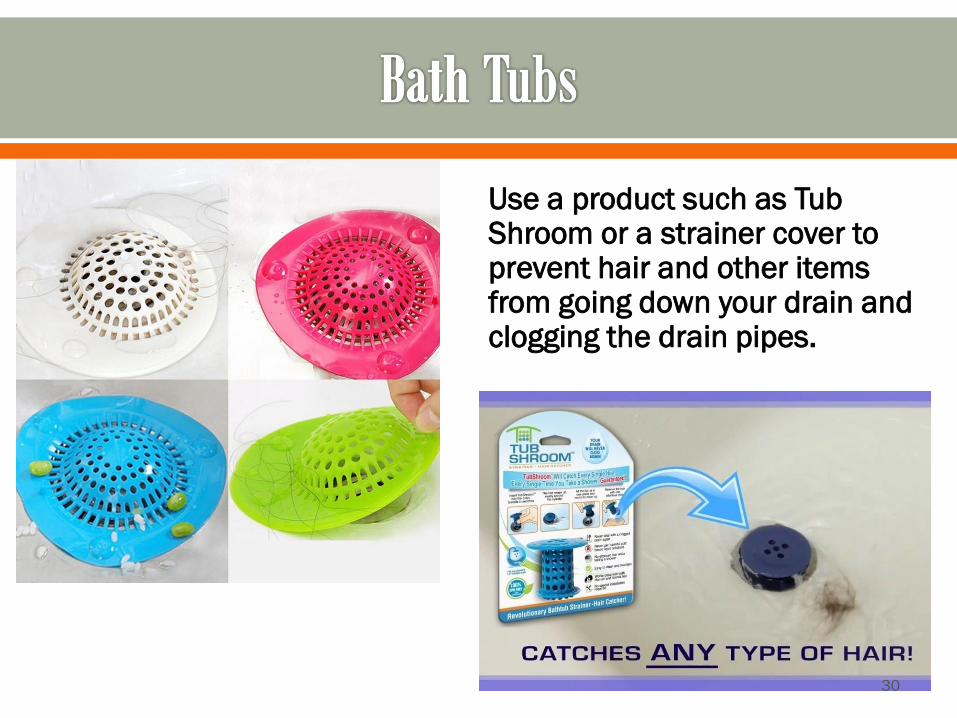
Use a product such as Tub Shroom or a strainer cover to prevent hair and other items from going down your drain and clogging the drain pipes.
30

Tomorrow is the end of Daylight
Savings Time. Remember to change
the batteries in your smoke
detectors. Visit the Henrico Fire
table to talk more about smoke
detectors and fire prevention.
31

• Exhaust fans provide
ventilation to your
bathroom, helping to
remove moisture and
prevent problems
such as fogged
mirrors, odors, mold,
and mildew.
• It is important to keep
exhaust fan clean
32


Moisture is the key cause to mold and mildew. Poor ventilation will cause
wet surfaces to dry out more slowly. Ventilation is very important in rooms
with a lot of moisture such as the bathroom and kitchen. 34

Conditions Mold Needs to Grow:
• Mold spores
• A food source (wood, drywall,
cotton)
• Darkness (mold can’t grow
under ultraviolet light)
• Warmth (mold can’t grow in
freezing temperatures)
• Oxygen
• Moisture (water leak,
humidity)
• Enough time (most mold can
begin to grow in 24-48 hours
if the conditions are right.)
35
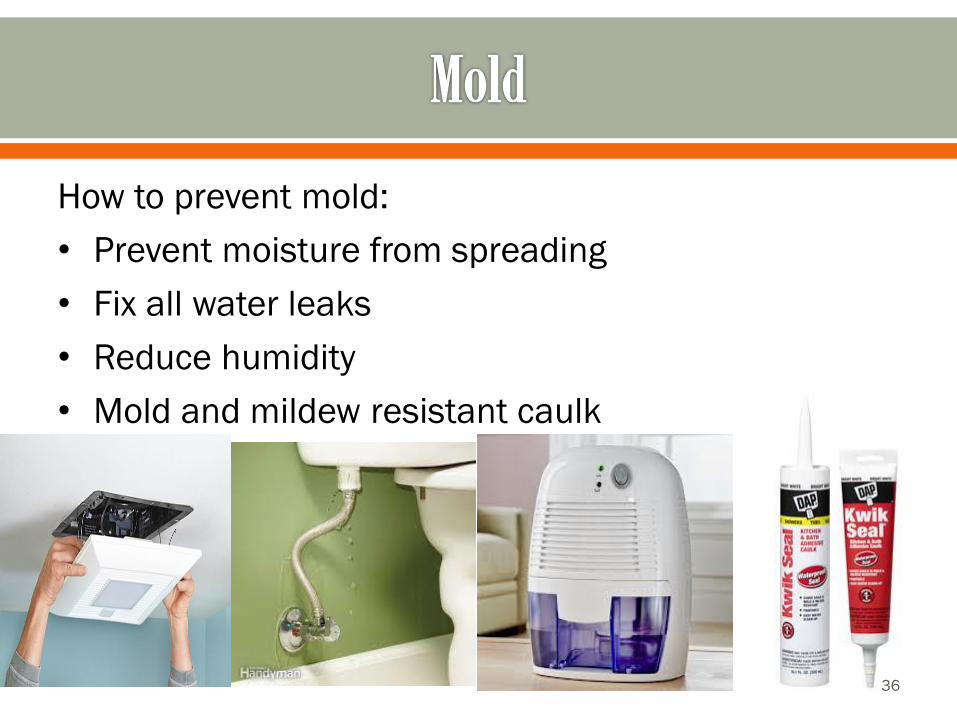
How to prevent mold:
• Prevent moisture from spreading
• Fix all water leaks
• Reduce humidity
• Mold and mildew resistant caulk
36


• This objective will help homeowners understand the functionality of their electrical equipment as well as how to properly fix, install, and maintain minor electrical issues.
• Identify tools needed to fix minor repairs.
Safety: Always disconnect power before starting ANY electrical repairs 38
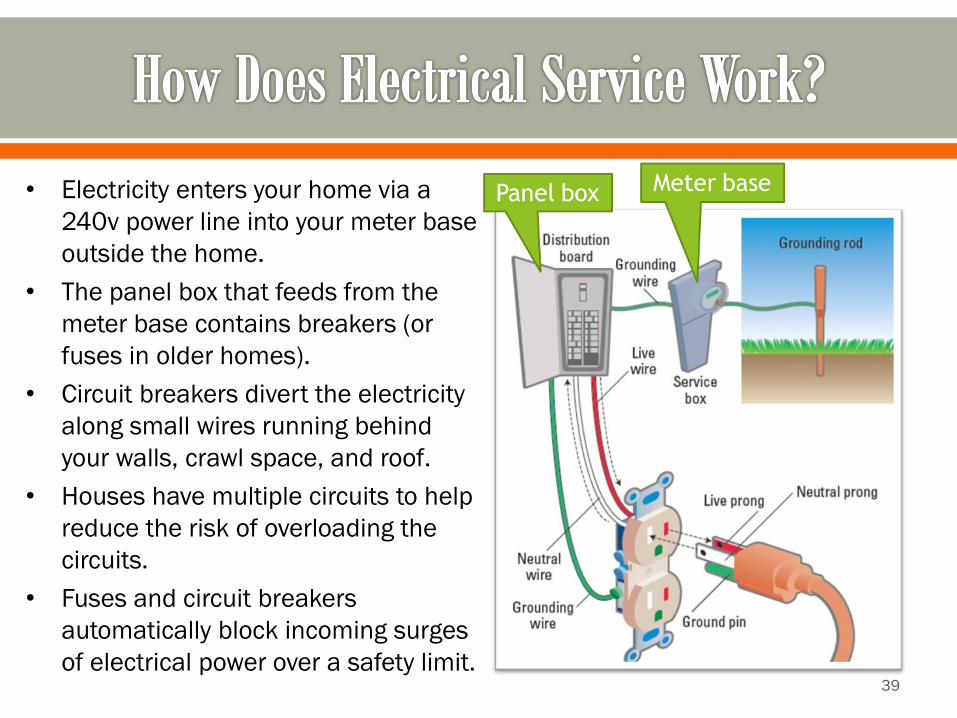
• Electricity enters your home via a
240v power line into your meter base
outside the home.
• The panel box that feeds from the
meter base contains breakers (or
fuses in older homes).
• Circuit breakers divert the electricity
along small wires running behind
your walls, crawl space, and roof.
• Houses have multiple circuits to help
reduce the risk of overloading the
circuits.
• Fuses and circuit breakers
automatically block incoming surges
of electrical power over a safety limit. 39

• Tripped GFCI (Ground Fault Circuit Interrupter)
• Tripped breaker
• No power to wall outlet
• Lights flickering
• Broken bulb in fixture
• Broken or missing outlet plate cover
• Broken or burnt outlet
40

1. Reset set GFCI by pushing the reset button
2. Check breakers in your home panel box.
3. Replace it
41

Solutions:
• Reset breaker
• Figure out what's plugged in – this will help you predetermine what is pulling some amps.
• If a breaker trips frequently have a certified electrician come to inspect the problem.
42

• Go through panel box to figure out which breaker is connected to electrical aspects of your house
• Each breaker controls the different parts of the home’s electricity
• Important to shut appropriate breaker off of electrical item being repaired, replaced, or installed
43

Solutions:
Install new outlet plate
44

Solutions:
• Turn power off at the breaker
• Replace outlet
• Make sure you wire the outlet the same way it is currently wired
• Use outlet tester to check if outlet is properly wired.
45

• Tape around the damaged section of vinyl flooring.
• Remove damaged section of flooring with a utility knife.
• Use the removed piece as a template to cut the exact same shape from the new flooring material, making sure to align the pattern of the vinyl.
• Use putty knife to spread adhesive on area of the floor where the vinyl was removed.
• Let stand for 10-20 minutes so adhesive can settle and get sticky
• Place new cut out vinyl on opening with adhesive
46

Laying Tile
• Mix up thin-set mortar.
• Use a notched trowel to spread
thin-set mortar evenly on a small
area where you will start laying the
tile.
• Use spacers to keep joints
uniform.
47

Cut Tile
• Once tile is laid and safe to walk
on, cut tiles to border wall.
• To do this, measure the distance
to the wall, minus the width of the
grout line, and mark each tile.
• A scoring cutter can be used to
make straight cuts or use a wet
saw.
• Both types of tile cutting tools
can be rented at tool rental
outlets like Home Depot or
Lowes
48

Applying Grout
• After the tiles are laid and the mortar has set, the joints are filled with grout.
• Clean the joints to remove any dust and debris before filling.
• Apply the grout with a rubber float, dragging it across joints at a 45 degree angle.
• Allow the grout to set up for a few minutes, then wipe off any excess using a sponge and bucket of clean water, working at an angle to the tiles. 49

• Very important
• Repels stains and
water
• Keeps longevity
• Can be easily done
• Apply to grout lines
once grout is dry-
normally 24 hours
50

By Hand:
• Cost approximately $5
• Very labor intensive
• Good for small grout issues
Electric:
• Cost $50-$100
• Less effort than by hand
• Good for bigger jobs
• Come in different types
51

Spring workshops at Eastern Henrico Recreation Center:
Saturday, February 4 - Home Improvements
Saturday, March 4 – Outdoor Improvements
County of Henrico
Department of Community Revitalization


