22
mlvpn Documentation Release HEAD-c5fd65c-dirty Laurent COUSTET September 30, 2015

mlvpn DocumentationRelease HEAD-c5fd65c-dirty
Laurent COUSTET
September 30, 2015


Contents
1 User guide 31.1 What is mlvpn . . . . . . . . . . . . . . . . . . . . . . . . . . . . . . . . . . . . . . . . . . . . . . 31.2 Getting started in mlvpn . . . . . . . . . . . . . . . . . . . . . . . . . . . . . . . . . . . . . . . . . 41.3 Security in mlvpn . . . . . . . . . . . . . . . . . . . . . . . . . . . . . . . . . . . . . . . . . . . . 61.4 Fequently Asked Questions . . . . . . . . . . . . . . . . . . . . . . . . . . . . . . . . . . . . . . . 7
2 Example scenarios 92.1 Linux with two ADSL uplinks for agregation and failover . . . . . . . . . . . . . . . . . . . . . . . 9
3 Developer guide 173.1 Building debian packages for mlvpn . . . . . . . . . . . . . . . . . . . . . . . . . . . . . . . . . . . 173.2 Building mlvpn on OpenBSD . . . . . . . . . . . . . . . . . . . . . . . . . . . . . . . . . . . . . . 183.3 Indices and tables . . . . . . . . . . . . . . . . . . . . . . . . . . . . . . . . . . . . . . . . . . . . 18
i

ii

mlvpn Documentation, Release HEAD-c5fd65c-dirty
MLVPN is Open Source software, licensed under the BSD License.
Source code is available on github https://github.com/zehome/MLVPN/
Contents 1

mlvpn Documentation, Release HEAD-c5fd65c-dirty
2 Contents

CHAPTER 1
User guide
1.1 What is mlvpn
mlvpn is a piece of software, similar to OpenVPN, which can create a network tunnel between two computers.
mlvpn encapsulates network packets, using UDP and send them encrypted over the internet to another location.
The primary use of mlvpn is to create bonded/aggregated network links in order to benefit from the bandwidth ofmultiple links.
Still, mlvpn can be used as a regular secure tunnel daemon, capable of handling failover scenarios.
1.1.1 Features
• Bandwidth agregation of multiple internet connections
• Automatic failover, without changing IP addresses or interrupting TCP connections in case of a failure
• Encrypt and authenticate connections using libsodium.
• Hot configuration reload (by signaling SIGHUP)
• Scriptable monitoring
• Remote monitoring through UNIX socket or TCP/HTTP socket. (JSON API)
1.1.2 Limitations
1.1.3 3G/4G and ADSL
mlvpn can’t aggregate links too dis-similar. For example, you can’t aggregate 3G link and an ADSL link properly.You can do failover scenarios however.
Aggregating links too different is difficult because mlvpn does not do re-ordering of packets sent over the links. TheTCP connection inside the mlvpn tunnel will then see very dis-ordered packets and will cap the bandwidth to theslowest’s link.
Another problem is that 3G connections tends to drop packets a lot. TCP connection will suffer a LOT from this andthe bandwidth can’t be agregated properly.
3
mlvpn Documentation, Release HEAD-c5fd65c-dirty
1.1.4 Wifi and ADSL
The same applies as when using 3G and ADSL. This time, it’s the network latency jitter which will work against theagregation.
You can try it anyway, as the results may differ, based on the quality of your wifi link.
1.2 Getting started in mlvpn
1.2.1 Introduction
If you haven’t, read What is mlvpn.
1.2.2 Installation
Debian wheezy
If you trust me, you can use the mlvpn debian repository for Debian wheezy:
# Add the mlvpn repository signaturesudo apt-key adv --keyserver pgp.mit.edu --recv 3324C952echo "deb http://debian.mlvpn.fr wheezy/" >/etc/apt/sources.list.d/mlvpn.listsudo apt-get updatesudo apt-get install mlvpn
Warning: PLEASE DO NOT USE THIS REPOSITORY YET.
Debian jessie/sid
If you trust me, you can use the mlvpn debian repository for Debian sid:
# Add the mlvpn repository signaturesudo apt-key adv --keyserver pgp.mit.edu --recv 3324C952echo "deb http://debian.mlvpn.fr unstable/" >/etc/apt/sources.list.d/mlvpn.listsudo apt-get updatesudo apt-get install mlvpn
OpenBSD
Refer to the README.OpenBSD file inside the mlvpn repository for OpenBSD build instructions.
# Install dependencies# DO NOT install libsodium from package on OpenBSD 5.6 or olderpkg_add git autoconf automake libev libsodium# Adjust to your needsexport AUTOCONF_VERSION=2.69export AUTOMAKE_VERSION=1.15export CPPFLAGS="-I/usr/local/include $CPPFLAGS"export LDFLAGS="-L/usr/local/lib $LDFLAGS"git clone https://github.com/zehome/MLVPN mlvpncd mlvpn
4 Chapter 1. User guide

mlvpn Documentation, Release HEAD-c5fd65c-dirty
./autogen.sh
./configuremake# Installsudo make installsudo mkdir /etc/mlvpnsudo cp /usr/local/share/doc/mlvpn/mlvpn.conf /etc/mlvpn/sudo cp /usr/local/share/doc/mlvpn/mlvpn_updown.sh /etc/mlvpn/sudo chown -R root /etc/mlvpnsudo chmod 660 /etc/mlvpn/mlvpn.confsudo chmod 700 /etc/mlvpn/mlvpn_updown.sh# Create a system user for mlvpn (unprivileged)sudo groupadd _mlvpnsudo useradd -c "mlvpn Daemon" -d /var/empty -s /sbin/nologin -L daemon -g _mlvpn _mlvpn
FreeBSD
pkg install git libev libsodiumgit clone --branch freebsd https://github.com/zehome/MLVPN mlvpncd mlvpnmake
Note: This port is not tested often and may break.
Install from source
Please refer to the README.md file inside the mlvpn repository for source build instructions.
1.2.3 Configuration
mlvpn is using two configuration files for every tunnel you want to make.
mlvpn.conf
mlvpn.conf(1) is an ini-style configuration. It’s used to set the interface name, the secret-key, network configurationof the multiple links and path to the second configration script.
Please refer the the mlvpn.conf(1) manpage for further informations.
Note: access the manpage using: man mlvpn.conf
mlvpn_updown.sh
mlvpn_updown.sh is a script called by mlvpn when status change occurs in mlvpn.
For example, when mlvpn is launched and a link is activated, mlvpn_updown.sh is called in order to bring the tunneldevice up and ready for communication.
1.2. Getting started in mlvpn 5

mlvpn Documentation, Release HEAD-c5fd65c-dirty
1.3 Security in mlvpn
Security is a very strong focus for the mlvpn project.
mlvpn tries it’s best to protect your systems and your datas by using privilege separation, strong cryptography, andcontinuous integration.
1.3.1 Privilege separation
mlvpn needs to access the kernel in order to create a tunnel device, and in order to configure the device. (needs root)
In order to limit the scope of privileges, mlvpn spawns a small process, called the [priv] process, then another one.
The priv process only performs the tasks where it needs privileges:
• tunnel interface creation
• tunnel interface configuration
• open the mlvpn configuration file
• name resolution (requires to be out of the chroot)
The other process is run as an unprivileged used (usually _mlvpn or mlvpn), in a chroot. It handles all the hard workexposed to the outside world.
This is the same technique used in OpenSSH.
1.3.2 Cryptography
mlvpn uses libsodium for all the cryptographic needs.
In particular, mlvpn uses secret-key authenticated encryption.
Cryptography is used for two purposes:
• Authentication
• Data protection
Authentication
mlvpn just uses a very simple protocol in order to make sure it communicates only if the two sides share the samesecret key.
The secret key is stored as plain text in the mlvpn configuration file.
This configuration file must be owned by root, and chmoded to 0600 to prevent any other user from reading / writingto it.
Every control packet sent by mlvpn is encrypted and authenticated by both sides.
Authentication is done using Poly1305 MAC.
6 Chapter 1. User guide

mlvpn Documentation, Release HEAD-c5fd65c-dirty
Encryption
Data packets can be encrypted/authenticated as well, but this can be disabled by using the cleartext_data configurationflag.
This can be usefull if your on a budget, with lack of CPU.
If your data are going to the internet anyway, there is no point in trying to cipher them another time using mlvpn.(encrypting an ssh or https connections does not give you much benefit)
Encryption is done using the XSalsa20 algorithm.
1.4 Fequently Asked Questions
1.4.1 How much mlvpn costs
Free. mlvpn is licenced under the open source BSD licence.
1.4.2 Troubleshooting
mlvpn does not launch
Launch mlvpn manually. Check your permissions on mlvpn.conf (0600) and mlvpn_updown.sh (0700), owned by root
bandwidth agregation is terribad
TODO
1.4. Fequently Asked Questions 7

mlvpn Documentation, Release HEAD-c5fd65c-dirty
8 Chapter 1. User guide

CHAPTER 2
Example scenarios
2.1 Linux with two ADSL uplinks for agregation and failover
2.1.1 Introduction
This short guide will try to help you configure linux for policyrouting in order to automatically use the two adsl linksat the same time.
2.1.2 Example case
128.128.128.128+---------------+
+----------->| Fast internet |--> OUT| +---------------+
mlvpn0: 10.42.42.1 |+------------+-+
+-------->| MLVPN server |<--------+| +--------------+ || ^ ^ || | T A | |
+-----+------+ | U G | +------+-----+| ADSL 1 | | N G | | ADSL 2 |+------------+ | / R | +------------+192.168.1.1/24 | T E | 192.168.2.1/24
^ | A G | ^| | P A | || | T | || | E | |
internet 1 | | D | | internet 2| v v || +---+------+---+ |+---------| MLVPN client |---------+
+--------------+mlvpn0: 10.42.42.2 eth0: 192.168.0.1
^+------+ || LAN |------------------------++------+
192.168.0.0/24
In this setup we have multiple machines:
9

mlvpn Documentation, Release HEAD-c5fd65c-dirty
• MLVPN server which has a fast internet connection (100Mbps)
– Public IP Address: 128.128.128.128/32
– Private mlvpn IP address: 10.42.42.1/30
• ADSL 1 router LOCAL IP address 192.168.1.1/24
• ADSL 2 router LOCAL IP address 192.168.2.1/24
• Local AREA network (where your standard “clients” are) on 192.168.0.0/24
• And finally our MLVPN client router:
– Private IP address 192.168.1.2/24 to join ADSL1
– Private IP address 192.168.2.2/24 to join ADSL2
– Private IP address 192.168.0.1/24 for LAN clients
– Private IP address 10.42.42.2/30 on mlvpn0.
Yeah seems a bit complicated, but that’s not that hard after all, we just have 4 routers.
2.1.3 Testing the basic configuration
At this time from “MLVPN client” you should be able to ping 192.168.2.1 and 192.168.1.1.
You should be able to access the internet using both links.
You can test it using standard routing.
Before we do anything: (Note: you may require installing iproute2)
root@mlvpnclient:~# ip route showdefault via 192.168.1.1 dev eth0192.168.0.0/24 dev eth0 proto kernel scope link src 192.168.0.1192.168.1.0/24 dev eth0 proto kernel scope link src 192.168.1.2192.168.2.0/24 dev eth0 proto kernel scope link src 192.168.2.2
This routing table means every packet to the internet will go thru 192.168.1.1. We can test it:
root@mlvpnclient:~# ping -n -c2 -I192.168.1.2 ping.ovh.netPING ping.ovh.net (213.186.33.13) 56(84) bytes of data.64 bytes from 213.186.33.13: icmp_req=1 ttl=51 time=42.1 ms64 bytes from 213.186.33.13: icmp_req=2 ttl=51 time=41.7 ms
Ok I started to use “-I192.168.1.2” here. That’s not mandatory in this example, but this will become handy later.
“-I” means we tell the ping command to use 192.168.1.2 as source address of the packets we are sending toping.ovh.net.
Now, we know our ADSL1 link is working properly.
Testing the second link will need us to modify the routing table.
root@mlvpnclient:~# ip route add 213.186.33.13 via 192.168.2.1root@mlvpnclient:~# ip route showdefault via 192.168.1.1 dev eth0213.186.33.13 via 192.168.2.2 dev eth0192.168.0.0/24 dev eth0 proto kernel scope link src 192.168.0.1192.168.1.0/24 dev eth0 proto kernel scope link src 192.168.1.2192.168.2.0/24 dev eth0 proto kernel scope link src 192.168.2.2
10 Chapter 2. Example scenarios

mlvpn Documentation, Release HEAD-c5fd65c-dirty
Notice the new 213.186.33.13 (ping.ovh.net) added to the routing table.
Again, we can test the link:
root@mlvpnclient:~# ping -n -c2 -I192.168.2.2 ping.ovh.netPING ping.ovh.net (213.186.33.13) 56(84) bytes of data.64 bytes from 213.186.33.13: icmp_req=1 ttl=51 time=62.4 ms64 bytes from 213.186.33.13: icmp_req=2 ttl=51 time=61.1 ms
Noticed we changed the source address, and the latency is higher on ADSL2 by ~ 20ms.
Everything is fine, let’s cleanup the routing table:
root@mlvpnclient:~# ip route del 213.186.33.13
2.1.4 Configuring the source routing
Concepts
Now you have two internet access, one fast internet access on the server side, but you have only one IP address on thisserver... How can you use your multiple ADSL links at the same time ?
That’s fairly simple, but a bit complicated to setup. It’s called “source routing”.
Source routing means the kernel will take the decision to route a packet not only based on it’s destination (like wehave done just before), but also from where it came.
In our example, we want a packet coming from 192.168.2.2 to go thru ADSL 2 and a packet from 192.168.1.2 to gothru ADSL1. Simple yah?
Let’s configure it
First, you need to create multiple routing tables in the kernel.
That’s better to name them, so yo do it by modifing /etc/iproute2/rt_tables.
root@mlvpnclient:~# echo 101 adsl1 >> /etc/iproute2/rt_tablesroot@mlvpnclient:~# echo 102 adsl2 >> /etc/iproute2/rt_tables
Your configuration file should now look like this
root@mlvpnclient:~# cat /etc/iproute2/rt_tables## reserved values#255 local254 main253 default0 unspec## local##1 inr.ruhep101 adsl1102 adsl2
We have “named” two new routing tables, but we did not create them. /etc/iproute2/rt_tables file is optional.
We must add some routes to each table to activate them.
2.1. Linux with two ADSL uplinks for agregation and failover 11

mlvpn Documentation, Release HEAD-c5fd65c-dirty
# Inserting routes in the adsl1 tableip route add 192.168.1.0/24 dev eth0 scope link table adsl1ip route add default via 192.168.1.1 dev eth0 table adsl1
# Inserting routes in the adsl2 tableip route add 192.168.2.0/24 dev eth0 scope link table adsl2ip route add default via 192.168.2.1 dev eth0 table adsl2
# ip rule is the source routing magic. This will redirect# packets coming from source "X" to table "adsl1", "adsl2" or "default".ip rule add from 192.168.1.0/24 table adsl1ip rule add from 192.168.2.0/24 table adsl2
I’ve stripped root@machine for you, so you can copy paste ;-)
Testing
First, show me your configuration! The first thing you should always do is displaying ip rules. (Which routing tablewill be used when ?)
(Please note rules are applied in order from 0 to 32767)
root@mlvpnclient:~# ip rule list0: from all lookup local32764: from 192.168.1.0/24 lookup adsl132765: from 192.168.2.0/24 lookup adsl232766: from all lookup main32767: from all lookup default
Then the routing tables:
root@mlvpnclient:~# ip route show table adsl1192.168.1.0/24 dev eth0 scope linkdefault via 192.168.1.1 dev eth0
root@mlvpnclient:~# ip route show table adsl2192.168.2.0/24 dev eth0 scope linkdefault via 192.168.2.1 dev eth0
root@mlvpnclient:~# ip route show table maindefault via 192.168.1.1 dev eth0213.186.33.13 via 192.168.2.2 dev eth0192.168.0.0/24 dev eth0 proto kernel scope link src 192.168.0.1192.168.1.0/24 dev eth0 proto kernel scope link src 192.168.1.2192.168.2.0/24 dev eth0 proto kernel scope link src 192.168.2.2
Ping test
root@mlvpnclient:~# ping -c2 -n -I192.168.1.1 ping.ovh.netPING ping.ovh.net (213.186.33.13) 56(84) bytes of data.64 bytes from 213.186.33.13: icmp_req=1 ttl=51 time=40.6 ms64 bytes from 213.186.33.13: icmp_req=2 ttl=51 time=41.5 ms
root@mlvpnclient:~# ping -c2 -n -I192.168.2.1 ping.ovh.netPING ping.ovh.net (213.186.33.13) 56(84) bytes of data.64 bytes from 213.186.33.13: icmp_req=1 ttl=51 time=62.0 ms64 bytes from 213.186.33.13: icmp_req=2 ttl=51 time=64.1 ms
Hey that’s working fine !
12 Chapter 2. Example scenarios

mlvpn Documentation, Release HEAD-c5fd65c-dirty
Scripting for startup ?
On Debian GNU/Linux that’s pretty easy, just copy this script to /usr/local/sbin/source_routing:
#!/bin/sh
# Inserting routes in the adsl1 table/sbin/ip route add 192.168.1.0/24 dev eth0 scope link table adsl1/sbin/ip route add default via 192.168.1.1 dev eth0 table adsl1
# Inserting routes in the adsl2 table/sbin/ip route add 192.168.2.0/24 dev eth0 scope link table adsl2/sbin/ip route add default via 192.168.2.1 dev eth0 table adsl2
# ip rule is the source routing magic. This will redirect# packets coming from source "X" to table "adsl1", "adsl2" or "default"./sbin/ip rule add from 192.168.1.0/24 table adsl1/sbin/ip rule add from 192.168.2.0/24 table adsl2
Verify permissions: chmod +x /usr/local/sbin/source_routing
You can use post-up scripts of /etc/network/interfaces to run this script.
/etc/network/interfaces
auto eth0iface eth0 inet static
address 192.168.0.1netmask 255.255.255.0post-up /usr/local/sbin/source_routing
auto eth0:adsl1iface eth0:adsl1 inet static
address 192.168.1.2netmask 255.255.255.0gateway 192.168.1.1
auto eth0:adsl2iface eth0:adsl2 inet static
address 192.168.2.2netmask 255.255.255.0
Don’t forget to execute the script once by hand or thru service networking restart.
2.1.5 Configuring MLVPN
MLVPN have two configuration files on each side.
Client side
mlvpn0.conf
I’ve made the configuration file as small as possible to have a good overview.
Take a look at example config files for more details. (man mlvpn.conf can be usefull)
/etc/mlvpn/mlvpn0.conf
2.1. Linux with two ADSL uplinks for agregation and failover 13
mlvpn Documentation, Release HEAD-c5fd65c-dirty
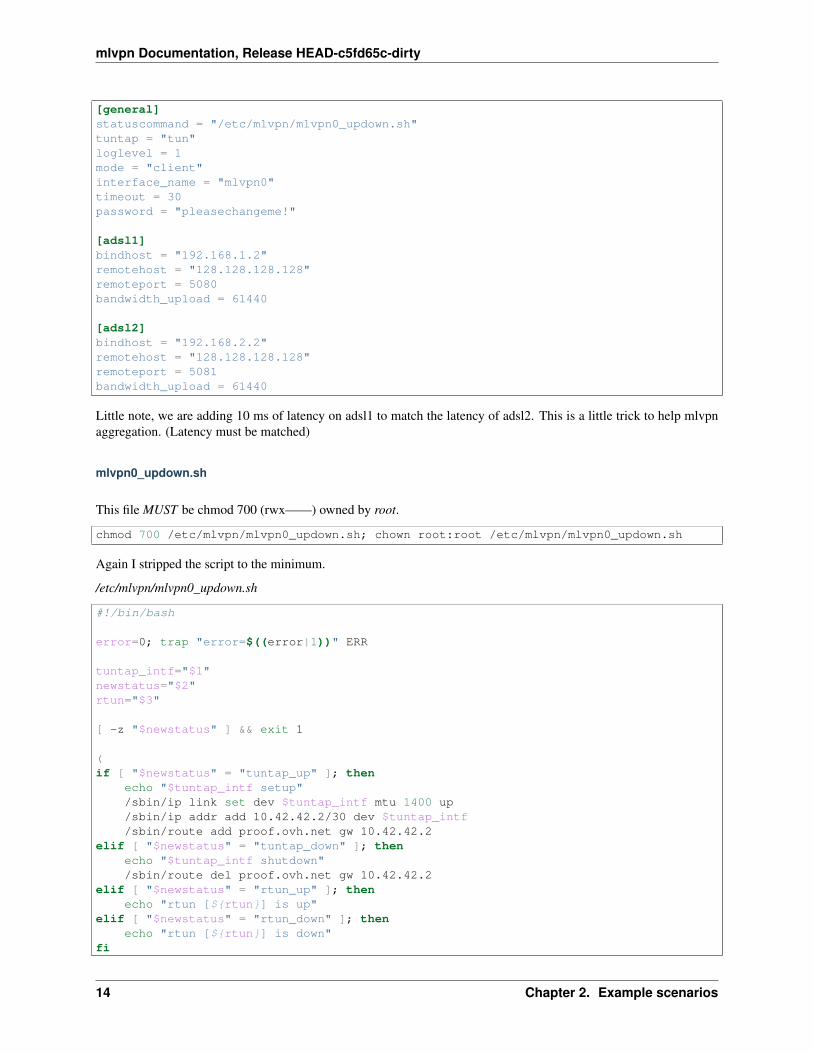
[general]statuscommand = "/etc/mlvpn/mlvpn0_updown.sh"tuntap = "tun"loglevel = 1mode = "client"interface_name = "mlvpn0"timeout = 30password = "pleasechangeme!"
[adsl1]bindhost = "192.168.1.2"remotehost = "128.128.128.128"remoteport = 5080bandwidth_upload = 61440
[adsl2]bindhost = "192.168.2.2"remotehost = "128.128.128.128"remoteport = 5081bandwidth_upload = 61440
Little note, we are adding 10 ms of latency on adsl1 to match the latency of adsl2. This is a little trick to help mlvpnaggregation. (Latency must be matched)
mlvpn0_updown.sh
This file MUST be chmod 700 (rwx——) owned by root.
chmod 700 /etc/mlvpn/mlvpn0_updown.sh; chown root:root /etc/mlvpn/mlvpn0_updown.sh
Again I stripped the script to the minimum.
/etc/mlvpn/mlvpn0_updown.sh
#!/bin/bash
error=0; trap "error=$((error|1))" ERR
tuntap_intf="$1"newstatus="$2"rtun="$3"
[ -z "$newstatus" ] && exit 1
(if [ "$newstatus" = "tuntap_up" ]; then
echo "$tuntap_intf setup"/sbin/ip link set dev $tuntap_intf mtu 1400 up/sbin/ip addr add 10.42.42.2/30 dev $tuntap_intf/sbin/route add proof.ovh.net gw 10.42.42.2
elif [ "$newstatus" = "tuntap_down" ]; thenecho "$tuntap_intf shutdown"/sbin/route del proof.ovh.net gw 10.42.42.2
elif [ "$newstatus" = "rtun_up" ]; thenecho "rtun [${rtun}] is up"
elif [ "$newstatus" = "rtun_down" ]; thenecho "rtun [${rtun}] is down"
fi
14 Chapter 2. Example scenarios

mlvpn Documentation, Release HEAD-c5fd65c-dirty
) >> /var/log/mlvpn_commands.log 2>&1
exit $errors
Again ensure permissions are correct or mlvpn will NOT execute the script.
Server side
mlvpn0.conf
[general]statuscommand = "/etc/mlvpn/mlvpn0_updown.sh"tuntap = "tun"loglevel = 1mode = "server"interface_name = "mlvpn0"timeout = 30password = "pleasechangeme!"
[adsl1]bindport = 5080bandwidth_upload = 512000
[adsl2]bindport = 5081bandwidth_upload = 512000
mlvpn0_updown.sh
#!/bin/bash
error=0; trap "error=$((error|1))" ERRtuntap_intf="$1"newstatus="$2"rtun="$3"[ -z "$newstatus" ] && exit 1(if [ "$newstatus" = "tuntap_up" ]; then
echo "$tuntap_intf setup"/sbin/ip link set dev $tuntap_intf mtu 1400 up/sbin/ip addr add 10.42.42.1/30 dev $tuntap_intf# NAT thru our server (eth0 is our output interface on the server)# mlvpn0 link/sbin/iptables -t nat -A POSTROUTING -o eth0 -s 10.42.42.0/30 -j MASQUERADE# LAN 192.168.0.0/24 from "client"/sbin/ip route add 192.168.0.0/24 via 10.42.42.2/sbin/iptables -t nat -A POSTROUTING -o eth0 -s 192.168.0.0/24 -j MASQUERADE
elif [ "$newstatus" = "tuntap_down" ]; then/sbin/ip route del 192.168.0.0/24 via 10.42.42.2/sbin/iptables -t nat -D POSTROUTING -o eth0 -s 10.42.42.0/30 -j MASQUERADE/sbin/iptables -t nat -D POSTROUTING -o eth0 -s 192.168.0.0/24 -j MASQUERADE
fi) >> /var/log/mlvpn_commands.log 2>&1exit $errors
2.1. Linux with two ADSL uplinks for agregation and failover 15

mlvpn Documentation, Release HEAD-c5fd65c-dirty
2.1.6 Testing
Double check permissions of /etc/mlvpn/*.sh (chmod 700 owned by root)
Don’t forget to accept UDP 5080 and 5081 on your firewall, server side.
root@server:~ # iptables -I INPUT -i eth0 -p udp --dport 5080 -s [ADSL1_PUBLICIP] -j ACCEPTroot@server:~ # iptables -I INPUT -i eth0 -p udp --dport 5081 -s [ADSL2_PUBLICIP] -j ACCEPT
Start mlvpn on server side manually
root@server:~ # mlvpn --user mlvpn -c /etc/mlvpn/mlvpn0.conf
Start mlvpn on client side manually
root@client:~ # mlvpn --user mlvpn -c /etc/mlvpn/mlvpn0.conf
Check logfiles on client
root@client:~ # cat /var/log/mlvpn_commands.logmlvpn0 setuprtun [adsl1] is uprtun [adsl2] is up
Seems good. Let’s test the ICMP echo reply. (ping)
# Testing connectivity to the server (tunnel address space)root@client:~ # ping -n -c2 -I10.42.42.2 10.42.42.1# Testing connectivity to the server (LAN address space)root@client:~ # ping -n -c1 -I192.168.0.1 10.42.42.1# Testing connectivity to the internetroot@client:~ # ping -n -c1 -I192.168.0.1 proof.ovh.net# Download speed testingroot@client:~ # wget -O/dev/null http://proof.ovh.net/files/10Gio.dat
16 Chapter 2. Example scenarios

CHAPTER 3
Developer guide
3.1 Building debian packages for mlvpn
3.1.1 Requirements
sudo apt-get install pbuilder cowbuilder git-buildpackage
3.1.2 Prepare build environments
Configure pbuilder
.pbuilderrc:
# Template loosely taken from http://www.kirya.net/articles/build-i386-packages-on-amd64/# do not specify variables when running cowbuilder --create or --updateif [ -f debian/changelog ]; then
[ -z "$ARCH" ] && ARCH=$(dpkg --print-architecture)[ -z "$DIST" ] && DIST=$(dpkg-parsechangelog | sed -n 's/^Distribution: //p')
fiPDEBUILD_PBUILDER="cowbuilder --build --basepath /var/cache/pbuilder/base-${DIST}_${ARCH}.cow"DEBBUILDOPTS="-d ${OPTS}"ARCHITECTURE=${ARCH}BUILDRESULT=~/build-areaMIRRORSITE=http://ftp.fr.debian.org/debianEXTRAPACKAGES="$EXTRAPACKAGES lintian apt-utils"AUTO_DEBSIGN=yesHOOKDIR=${HOME}/.pbuilder/hooks/PKGNAME_LOGFILE_EXTENTION="_${ARCH}.build"# Allow a local repository for external backported dependencies.OTHERMIRROR="deb [trusted=yes] file://${HOME}/build-area ./"BINDMOUNTS="${HOME}/build-area"
Generate base images for pbuilder
for arch in i386 amd64; dosudo cowbuilder --config ~/.pbuilderrc --create --distribution wheezy --architecture $arch --basepath /var/cache/pbuilder/base-wheezy_$arch.cowsudo cowbuilder --config ~/.pbuilderrc --update --distribution wheezy --architecture $arch --basepath /var/cache/pbuilder/base-wheezy_$arch.cow
done
17

mlvpn Documentation, Release HEAD-c5fd65c-dirty
3.1.3 Build packages
libsodium13 (for wheezy)
dget -x http://ftp.fr.debian.org/debian/pool/main/libs/libsodium/libsodium_1.0.0-1.dsccd libsodium_1.0.0for dist in wheezy; do
for arch in amd64 i386; doDIST=$dist ARCH=$arch pdebuild --debbuildopts -b
donedone
mlvpn
git clone [email protected]:zehome/MLVPN.git mlvpncd mlvpngit checkout debian-unstablefor dist in wheezy; do
for arch in amd64 i386; doDIST=$dist ARCH=$arch git-buildpackage --git-builder="pdebuild --debbuildopts -b"
donedone
3.2 Building mlvpn on OpenBSD
3.2.1 Installing requirements
pkg_add git autoconf automake libev libsodium
3.2.2 Building mlvpn
export AUTOCONF_VERSION=2.69export AUTOMAKE_VERSION=1.14export CPPFLAGS="-I/usr/local/include $CPPFLAGS"export LDFLAGS="-L/usr/local/lib $LDFLAGS"git clone https://github.com/zehome/MLVPN mlvpncd mlvpn./autogen.sh./configuremake
3.2.3 Configuration
Example configuration files for OpenBSD are located in examples/mlvpn_updown.sh.
3.3 Indices and tables
• search
18 Chapter 3. Developer guide


