12
Mobile Viewer’s Access Instruction 0 Mobile Viewer’s Access Instruction

Mobile Viewer’s Access Instruction
0
Mobile Viewer’s Access Instruction

Mobile Viewer’s Access Instruction
1
Mobile Viewer’s Access Instruction
The DVR is currently compatible with mobile phones running Windows Mobile, Symbian, Iphone, Blackberry and Androids operating systems. Below are these Mobile Viewer’s installation procedures. 1. Windows Mobile :
1) First you need to copy a program named as “Aseesetup.CAB” that is included on the CD provided by the DVR to the mobile phone.
Picture 1 Picture 2 Picture 3
2) Click the program “Aseesetup” shown as Picture 1 and choose an installation location shown as Picture 3 after the initialization. 3) Click [Install] button to start the installation processing shown as Picture 2. 4) After finishing the installation, click the icon named “Asee” shown as Picture 4 to run the program. 5) Now you are allowed to enter into the program screen shown as Picture 5.
Picture 4 Picture 5
【CH】click [Pull-down] menu to select the channel you need to monitor. 【Connect】click the button to enter into the live image of the channel you selected 【Setup】click the button to allow you set parameter of the mobile viewer. Function buttons in the bottom from Left to right in turn are::【PTZ Direction ( left, right,
up, down)】;【Area Selection(ZOOM+、ZOOM-)】;【Focus(focus +, focus-)】;【Iris(I+,I -)】;【Snapshot】。
Note: Please firstly make sure you have right PTZ parameter setting (details please refer to User Manual-Section 5.2.6.3) on DVR, then you could control PTZ camera through your mobile phone.

Mobile Viewer’s Access Instruction
2
The captured images will be saved to the defaulted path (Explorer Program Files Moveeye Photo file). If you use this program first time or need to change parameter settings, please click [Setup] button to enter into the window shown as Picture 6.
Picture 6
Auto-connect: When tick-selecting [Auto-Connect] option, the mobile phone will be auto-connected to the DVR.
History: Clicking the button will allow you auto-record all the log histories. Click any area of screen to toggle display modes between normal view and full screen. 2.Symbian System Mobiles:
1 ) First you need to copy a program named as “ASee_AL_3rd _0723.sisx” or “See_AL_5th_0723.sisx” that is included on the CD provided by the DVR to the mobile phone (shown as Picture 7). Generally the program is defaulted to save into mobile storage card. Note: “See_AL_3rd_0723.sisx” apply to S60 - The 3rd edition operate system Mobile, and “See_AL_5th_0723.sisx” to S60 - The 5th edition operate system Mobile
Picture 7 Picture 8 Picture 9
2) Click the program “ASee_AL_3rd _0723.sisx” to start the installation shown as Picture 8 3) Choose Phone memory or SD card as an installation location shown as Picture 9. 4) Click [Continue] button to make sure the application program you installed may visit network or dial phone when popping-up the dialog box shown as Picture 10. 5) After successful installation system will prompt you “Installation finished” shown as Picture 11. 6) If the program is installed into SD card, please enter into 【Application】 menu to find [Asee] icon shown as Picture 12.
User’s Name:herein indicate the user name which have been set on DVR-[Mobile Set] menu.
Password: herein indicate the password which has been set on DVR-[Mobile set] menu.
Server: indicate public IP address connected to DVR or dynamic domain name used by DVR
Port: indicate the server port which has been set to your DVR.
Notes: enter one channel number you want to monitor Click【ok】to confirm the above setting , and system will return back the previous menu.

Mobile Viewer’s Access Instruction
3
Picture 10 Picture 11 Picture 12 7) Click [Asee] icon to run the program, and then you will enter into the interface shown as Picture 13.
Picture 13
8) For first time using or Need some change on the Parameters, click the【Setup】button,you will enter into the window shown as Picture 14; or, Click [Play] button to enter into live display.
3.Iphone:
1) Visit Apple website http://www.apple.com/itunes/ to download & install the iTunes program. 2) Run the iTunes program, and then click the Menu- [Store Search] to enter into its sub-menu. 3) On the [Search] mode, enter the characters “ASee” to search the program “ASee”.
图14
(Function buttons in the bottom in turn are:) 1 CH 1;CH 2 ;CH3;CH 4 2 PTZ Direction :left, right, up, down
3 PTZ Lens control: Focus+/-, Zoom+/- and Iris+/- from left to right in turn.
4 Play Bar: Play/Pause, Full screen, Snapshot, Setup, Next CHs Group and Quit button from left to right in turn
Note: The snapshot images will be saved to the defaulted path-“File manager\Images”.
Address: herein indicate public IP address connected to DVR or dynamic domain name used by DVR.
Port: indicate the server port which has been set to your DVR. User’s Name:herein input the user name which has been set on
DVR-[Mobile Set] menu. Password: herein input the password which has been set on
DVR-[Mobile Set] menu. Channel: select one channel you want to monitor User Defined: Enter channel title named by you. Option: include playback list and history list

Mobile Viewer’s Access Instruction
4
4) Download and install the “ASee” program. 5) After finishing installation, [ASee] icon will be displayed to mobile phone interface shown as Picture 15.
Picture 15
Picture 16 (3)We have introduced Monitor point setting in the previous Sybian and Windows system setting. The setting method for Iphone is same as the Sybian and Windows system. Please refer to the previous section.
图16
图17
① Channel select ② PTZ Direction ( left, right, up, down) ③ Area Selection(ZOOM+、ZOOM- ④ Focus(focus +, focus-) ⑤ Aperture(I+,I -),). ⑥ Function buttons from left to right in turn are: Play/Pause,
Snapshot, setup, Next CHs Group and help.
① Enter device title ② Enter IP address of the DVR ③ Enter DVR web port ④ Enter user name of DVR ⑤ Enter password of DVR ⑥ Click the button to preview History
record
Mobile Viewer’s Access Instruction
5
Picture 17
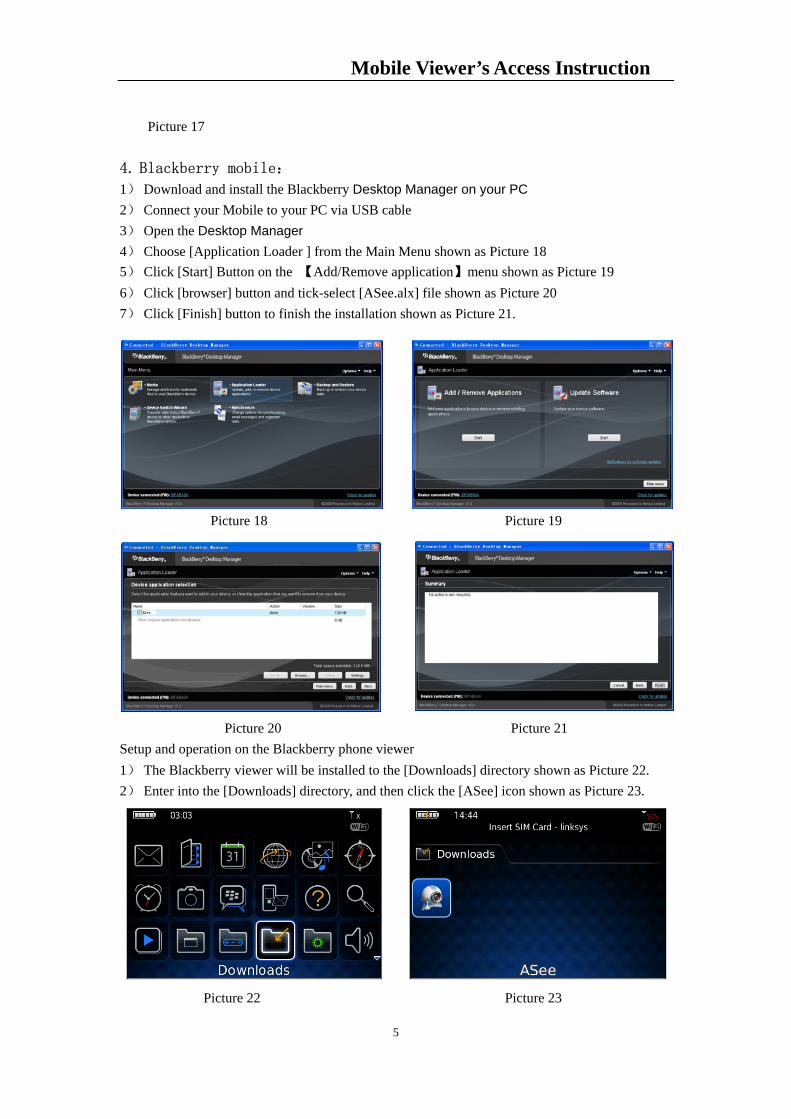
4. Blackberry mobile:
1) Download and install the Blackberry Desktop Manager on your PC 2) Connect your Mobile to your PC via USB cable 3) Open the Desktop Manager 4) Choose [Application Loader ] from the Main Menu shown as Picture 18 5) Click [Start] Button on the 【Add/Remove application】menu shown as Picture 19 6) Click [browser] button and tick-select [ASee.alx] file shown as Picture 20 7) Click [Finish] button to finish the installation shown as Picture 21.
Picture 18 Picture 19
Picture 20 Picture 21 Setup and operation on the Blackberry phone viewer 1) The Blackberry viewer will be installed to the [Downloads] directory shown as Picture 22. 2) Enter into the [Downloads] directory, and then click the [ASee] icon shown as Picture 23.
Picture 22 Picture 23
Mobile Viewer’s Access Instruction
6
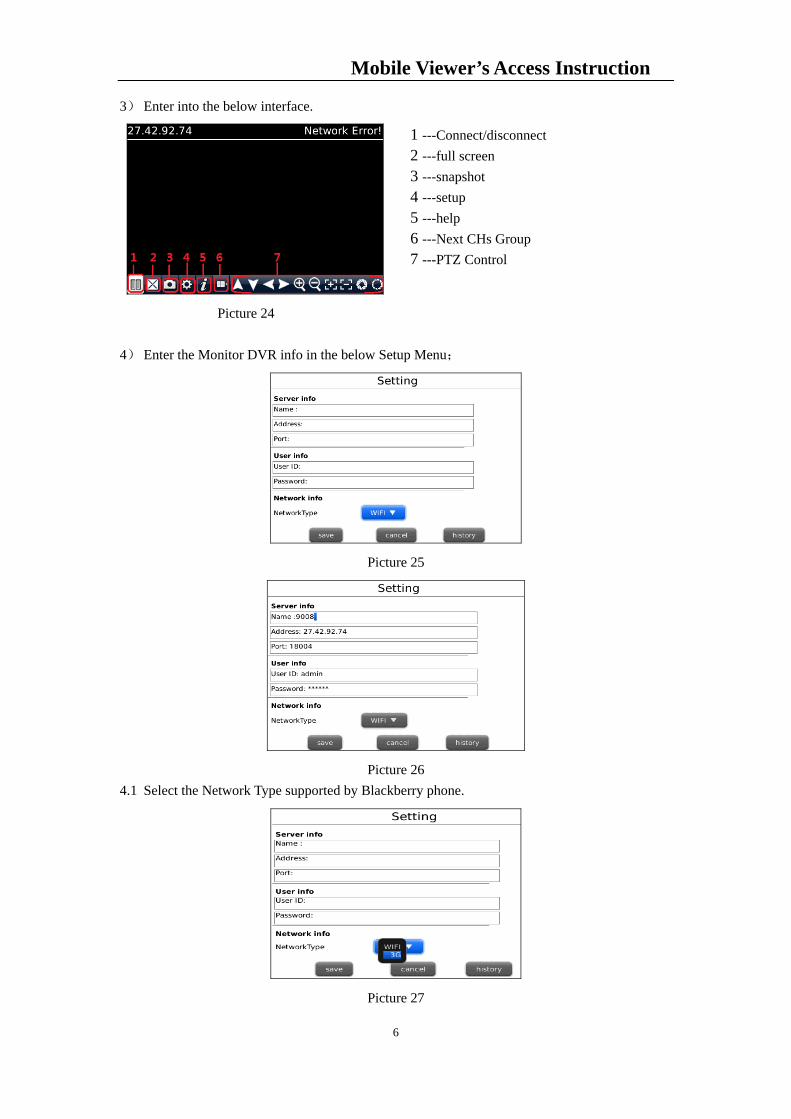
3) Enter into the below interface.
Picture 24 4) Enter the Monitor DVR info in the below Setup Menu;
Picture 25
Picture 26 4.1 Select the Network Type supported by Blackberry phone.
Picture 27
1 ---Connect/disconnect 2 ---full screen 3 ---snapshot 4 ---setup 5 ---help 6 ---Next CHs Group 7 ---PTZ Control

Mobile Viewer’s Access Instruction
7
4.2 Click [Save] button to save the above setting, and system will return back to Live display. 4.3 Click the [History] button to enter into the History List shown as Picture 28. 4.4 Highlight one record and click [Enter] button to enter into pop up menu. When selecting
[Open] option, system will directly be connected to the DVR and defaulted to display the CH1.
Picture 28
Picture 29 4.5 When selecting [Edit] option, system will allow you edit the history record. 4.6 When selecting [Delete] option, the history record will be deleted.
Picture 30 Picture 31 5) Click [Next Page] icon to search [Channel] option shown as Picture 32 and Picture 33, and then choose the channel you want to display.

Mobile Viewer’s Access Instruction
8
Picture 35
Picture 32 Picture 33 6) Click [Full screen] icon to enter into full screen display mode, again click the [Trackball] button of mobile to quit the full screen mode. 7) Click [Next page] button to find the [PTZ Control] icon and enter into the mode. Now you could freely control your PTZ camera through your Mobile phone.
Picture 34 8) Click [Help] button to view the software’s Help instruction. 9) Click [Close] button to exit the program shown as Picture 35. 5. Androids Mobile Please make sure the software environment support on your Android Mobile, such as Apkinstaller. 1. Make sure your mobile have been connected to network and could download the software.

Mobile Viewer’s Access Instruction
9
Picture 36 Picture 37 Picture 38 Picture 39
2. Enter into [Program] option and highlight [E-market] icon shown as Picture 37. 3. Enter into the [E-market] interface shown as Picture 38. 4. Click [Search] icon on the upper right corner and input “Apkinstaller” shown as Picture
39, to search the Apkinstaller program.
Picture 40 Picture 41 Picture 42 Picture 43
5. Highlight and install the program you searched shown as Picture 40 and Picture 41 6. Follow up the installation steps shown as Picture 42 and Picture 43
Picture 44 Picture 45 Picture 46 Picture 47
7. Enter into [Program] file and click [Apkinstaller] icon shown as Picture 44 8. Find the ASee.apk file you want to install shown as Picture 45 9. Click the software to install to your phone shown as Picture 46 and Picture 47. 10. Enter into [Program] option to click [ASee] icon shown as Picture 48. 11. Enter into [ASee] main interface shown as Picture 49.

Mobile Viewer’s Access Instruction
10
Picture 48 Picture 49
12. Setting Menu
Picture 50 Enter the testing device infos 13. Help Instructions. 14. History Record and auto-record info
1 CHs Select 2 PTZ Direction 3 Zoom+/- 4 Focus+ - 5 Iris +/- 6 Function buttons from left to right in turn are: Play/Pause, Snapshot, setup,
Next CHs Group and help.
Address: Enter the IP address of the DVR Port: Enter the Mobile Port No. Of the DVR Device Name: Enter DVR name (User defined) User ID: Enter the User’s Name Password: Enter the User’s Password History: Click the [History] button to preview History record

Mobile Viewer’s Access Instruction
11
The material in this document is the intellectual property of our department .
No part of this manual may be reproduced, copied, translated, transmitted, or published in any form or by any means without our department prior written permission.
Our products are under continual improvement and we reserve the right to make changes without notice. But no guarantee is given as to the correctness of its contents.
We do not undertake any responsibility for the harms cause by using our product.
The model of the products in the user's manual only for recognition, but these names also perhaps are belong to other company's registered trademark or the copyright.
The product picture may differ from the actual product, only for your reference. The accessories will probably be different according to the different selling areas. For details of accessories, please refer to your local distributor.
Copyright reserved


