16
Model: 18-0832 LIT. #: 98-0377/01-04 Instruction Manual • Manuel D’instructions Manual de Instrucciones • Bedienungsanleitung Manuale di Istruzioni • Manual de Instruções
Model: 18-0832LIT. #: 98-0377/01-04
Instruction Manual • Manuel D’instructionsManual de Instrucciones • BedienungsanleitungManuale di Istruzioni • Manual de Instruções

2
Congratulations on your purchase of a Bushnell® ImageView® binocular. Before using the product, please read the instructions contained in this manual and take time to familiarize yourself with the different parts and features of the product.
PARTS AND NAMES
3
Battery Cover
Strap Buckle
FocusAdjustmentKnob LCD Monitor
OperationPanel
Display Button
Enter Button
Terminal Cover
PowerOn/Off Button
OptionSelectSwitch
DC IN 3V (Battery)
Eject Button
Memory Card Slot
Video Output
USB Port
ShutterButton
Status LCD
Eyecups
Power On
Capture Movie Capture Playback - Still Playback-Movie
Push the optionselect switch to
still camera mode.
Open theLCD monitor.
Adjust thefocus knob.
Push the optionselect switch to movie mode.
Open theLCD monitor.
Press theshutter button
to start recording.
Open theLCD monitor.
Push the optionselect switch to
still camera mode.
Open theLCD monitor.
Push the optionselect switch to movie mode.
You can record upto a 30 second
movie clip. If over30 seconds, thebinocular willkeep the last 30 seconds.
Press theenter button
(display function mode)
Press the shutter button.
Use the operationpanel to select
an image.
Use the operationpanel to select
a movie.
Press the shutterbutton again
to stop recording.
1. Thumbnail 2. Magnify 3. Management 4. Set Up 5. Exit
Press thedisplay button.
Press thedisplay button.
Press theenter button
(display function mode)
1. Thumbnail 2. Management 3. Set Up 4. Exit
Power OnAC adaptor/AA Battery
Open theterminal cover.
Use the USB cableto connect.
On this mode,the binocularbecomes the external harddisk. Edit the
movie or image(s)directly.
Exit
Image/Movie Export
SYSTEM OPERATIONENGLISH
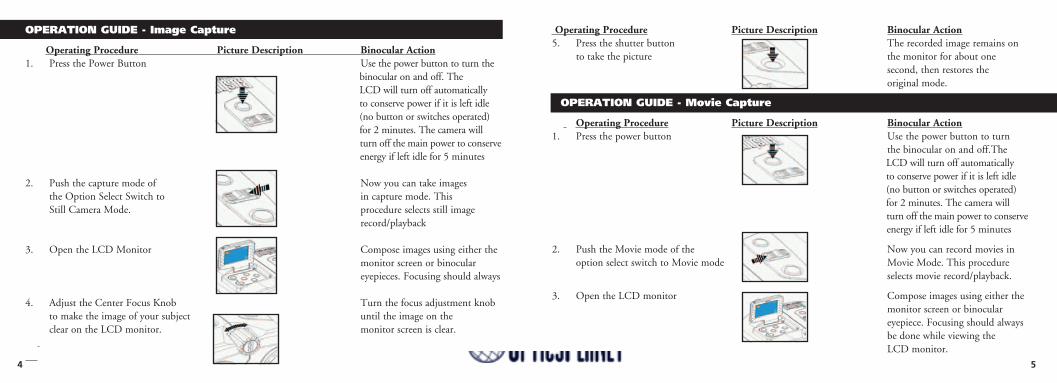
Operating Procedure Picture Description Binocular Action5. Press the shutter button The recorded image remains on to take the picture the monitor for about one second, then restores the original mode. OPERATION GUIDE - Movie Capture
Operating Procedure Picture Description Binocular Action1. Press the power button Use the power button to turn the binocular on and off.The LCD will turn off automatically to conserve power if it is left idle (no button or switches operated) for 2 minutes. The camera will
turn off the main power to conserve energy if left idle for 5 minutes
2. Push the Movie mode of the Now you can record movies in option select switch to Movie mode Movie Mode. This procedure selects movie record/playback.
3. Open the LCD monitor Compose images using either the monitor screen or binocular eyepiece. Focusing should always be done while viewing the LCD monitor.
4 5
OPERATION GUIDE - Image Capture
UTIOperating Procedure Picture Description Binocular Action1. Press the Power Button Use the power button to turn the binocular on and off. The LCD will turn off automatically to conserve power if it is left idle (no button or switches operated) for 2 minutes. The camera will
turn off the main power to conserve energy if left idle for 5 minutes
2. Push the capture mode of Now you can take images the Option Select Switch to in capture mode. This Still Camera Mode. procedure selects still image record/playback 3. Open the LCD Monitor Compose images using either the monitor screen or binocular eyepieces. Focusing should always 4. Adjust the Center Focus Knob Turn the focus adjustment knob to make the image of your subject until the image on the clear on the LCD monitor. monitor screen is clear.

Operating Procedure Picture Description Binocular Action2. Push the capture mode of the Selects still image record/playback option select switch to Still Camera Mode
3. Open the LCD monitor View images using the monitor screen.
4. Press display button The recorded image is displayed on the monitor
5. Use the buttons on the Display the previous or next image operation panel to select the stored in the binocular.
image to be played.
6. Press the enter button for additional Playback Function items appear playback functions on the right of the screen
7. Use the buttons on the Select the function on the screen. operation panel to select the desired function
6 7
Operating Procedure Picture Description Binocular Action4. Adjust the Center Focus Knob Turn the focus adjustment knob to make the image of your subject until the image on the monitor clear on the LCD monitor. screen is clear.
5. Press the shutter button. Start to record movies.
6. Press the shutter button again. Finish recording movie. (The movie length is 30 seconds maximum. The Instant Replay will continue to record over the previous movie until the shutter button is pressed for a second time
to stop recording. Therefore, the internal memory will always contain the most recent 30 seconds of action recorded.)
OPERATION GUIDE - Playback Recorded Images
Operating Procedure Picture Description Binocular Action1. Press the power button Us e the power button to turn the binocular on and off.The LCD will turn off automatically to conserve power if it is left idle (no button or switches operated) for 2 minutes. The camera will
turn off the main power to conserve energy if left idle for 5 minutes

Operating Procedure Picture Description Binocular ActionMagnify Function Display the recorded image.
1. Press the enter button Display the enlarged image currently.
2. Use the buttons of the panel Zoom in on the image: to move the display area “Up Arrow”: The image moves up
vertically or horizontally “Down Arrow”: Image moves down “Left Arrow”: Image moves left
“Right Arrow”: Image moves right
3. Press the enter button Restore playback images mode
8
8. Press the enter button Display Function items appear on the right of the screen.
OPERATION GUIDE - Functions (Playback Recorded Images) Operating Procedure Picture Description Binocular ActionThumbnail Function This displays 9 images on the monitor at the same time.
1. Use the buttons of the operation The currently selected image panel to select a specific image. will be framed (highlighted).
2. Press the enter button The specific image file is displayed on the monitor screen.
3. Press the enter button Restore playback images mode
9
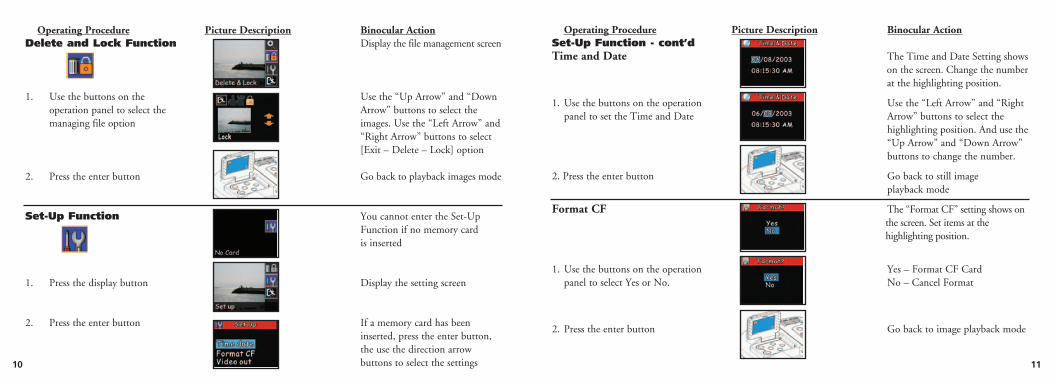
Operating Procedure Picture Description Binocular ActionSet-Up Function - cont’dTime and Date The Time and Date Setting shows on the screen. Change the number
at the highlighting position.
1. Use the buttons on the operation Use the “Left Arrow” and “Right panel to set the Time and Date Arrow” buttons to select the highlighting position. And use the
“Up Arrow” and “Down Arrow” buttons to change the number. 2. Press the enter button Go back to still image playback mode
Format CF The “Format CF” setting shows on the screen. Set items at the highlighting position.
1. Use the buttons on the operation Yes – Format CF Card panel to select Yes or No. No – Cancel Format
2. Press the enter button Go back to image playback mode
1110
Operating Procedure Picture Description Binocular ActionDelete and Lock Function Display the file management screen
1. Use the buttons on the Use the “Up Arrow” and “Down operation panel to select the Arrow” buttons to select the managing file option images. Use the “Left Arrow” and “Right Arrow” buttons to select [Exit – Delete – Lock] option 2. Press the enter button Go back to playback images mode
Set-Up Function You cannot enter the Set-Up Function if no memory card
is inserted
1. Press the display button Display the setting screen
2. Press the enter button If a memory card has been inserted, press the enter button, the use the direction arrow buttons to select the settings
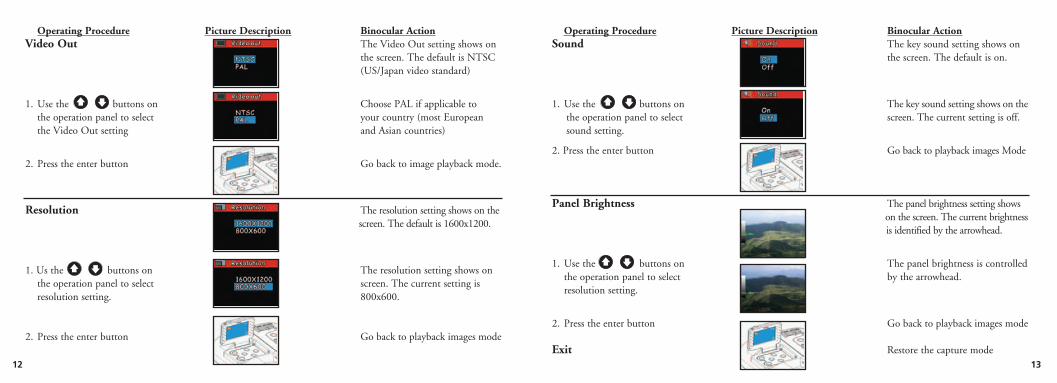
Operating Procedure Picture Description Binocular ActionSound The key sound setting shows on the screen. The default is on.
1. Use the buttons on The key sound setting shows on thethe operation panel to select screen. The current setting is off.
sound setting.
2. Press the enter button Go back to playback images Mode
Panel Brightness The panel brightness setting shows on the screen. The current brightness
is identified by the arrowhead.
1. Use the buttons on The panel brightness is controlled the operation panel to select by the arrowhead. resolution setting.
2. Press the enter button Go back to playback images mode
Exit Restore the capture mode13
Operating Procedure Picture Description Binocular ActionVideo Out The Video Out setting shows on the screen. The default is NTSC (US/Japan video standard)
1. Use the buttons on Choose PAL if applicable to the operation panel to select your country (most European the Video Out setting and Asian countries)
2. Press the enter button Go back to image playback mode.
Resolution The resolution setting shows on the screen. The default is 1600x1200.
1. Us the buttons on The resolution setting shows on the operation panel to select screen. The current setting is resolution setting. 800x600.
2. Press the enter button Go back to playback images mode
12

Operating Procedure Picture Description Binocular Action
5. Use the “Right Arrow” button on Monitor screen is playing. When the operation panel to play the movie the movie is finished it will return
to the last scene.
6. Press the enter button Display Function items appear on the right of the screen
OPERATION GUIDE - Functions (Playback Recorded Movies)
Thumbnail Function This displays 9 movies on the monitor at the same time.
1. Use the buttons of the operation The currently selected movie panel to select the movie. will be framed (highlighted).
2. Press the enter button The recorded movie is displayed on the monitor screen.
15
OPERATION GUIDE - Playback Recorded Movies Operating Procedure Picture Description Binocular Action1. Press the power button Use the power button to turn the binocular on and off.The LCD will turn off automatically to conserve power if it is left idle (no button or switches operated) for 2 minutes. The camera will
turn off the main power to conserve energy if left idle for 5 minutes.
2. Push the Movie mode of the Selects Movie record/playback option select switch to Movie Mode
3. Open the LCD monitor View movie using the monitor screen.
4. Press display button The recorded movie is displayed on the monitor
14

Operating Procedure Picture Description Binocular ActionDelete and Lock Function Display the file management screen
1. Use the buttons on the operation panel Use the buttons to selectto select the managing file option the movie. Use the buttons to select [Exit–Delete–Lock] option
2. Press the enter button Go back to movie playback mode
Set-Up Function You can’t enter the Set-Up Function if no memory card is inserted
1. Press the display button Display the setting screen
2. Press the enter button If a memory card has been inserted, press the enter button, then use the direction arrow buttons to select the settings
17
Operating Procedure Picture Description Binocular Action
3. Use the button on the The monitor displays “Loading operation panel to play the movie. Movie” for about 1 second and then plays the movie
4. Use the buttons to The recorded movie is displayed select the movie on the monitor
5. Use the button on the The monitor displays “Loading operation panel to play the movie Movie” for about 1 second and then plays the movie
6. Press the enter button Go back to movie playback mode
16
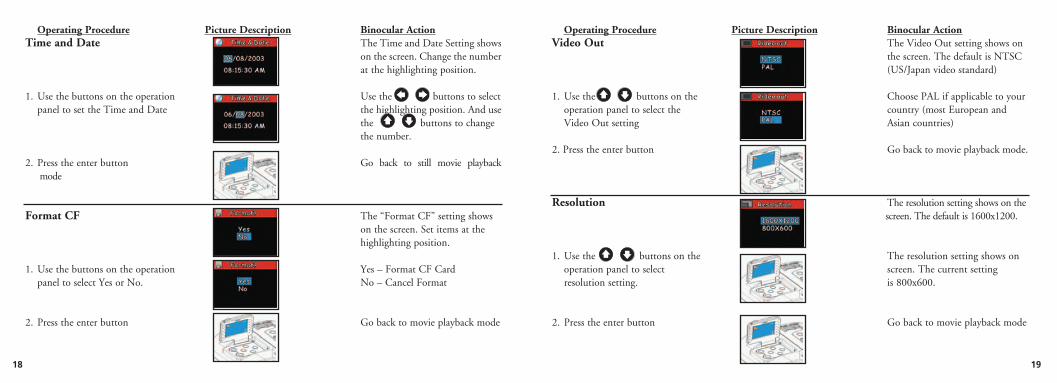
Operating Procedure Picture Description Binocular ActionVideo Out The Video Out setting shows on the screen. The default is NTSC (US/Japan video standard)
1. Use the buttons on the Choose PAL if applicable to your operation panel to select the country (most European and Video Out setting Asian countries)
2. Press the enter button Go back to movie playback mode.
Resolution The resolution setting shows on the screen. The default is 1600x1200.
1. Use the buttons on the The resolution setting shows on operation panel to select screen. The current setting resolution setting. is 800x600.
2. Press the enter button Go back to movie playback mode
19
Operating Procedure Picture Description Binocular ActionTime and Date The Time and Date Setting shows
on the screen. Change the number at the highlighting position.
1. Use the buttons on the operation Use the buttons to select panel to set the Time and Date the highlighting position. And use
the buttons to change the number. 2. Press the enter button Go back to still movie playback
mode
Format CF The “Format CF” setting shows on the screen. Set items at the highlighting position.
1. Use the buttons on the operation Yes – Format CF Card panel to select Yes or No. No – Cancel Format
2. Press the enter button Go back to movie playback mode
18

Operating Procedure Picture Description Binocular Action
Panel Brightness The panel brightness setting shows on the screen. The current brightness
is identified by the arrowhead.
1. Use the buttons on the The panel brightness is controlled operation panel to select by the arrowhead. resolution setting.
2. Press the enter button Go back to movie playback Mode
Exit Restore the movie capture mode
21
Operating Procedure Picture Description Binocular Action
Sound The key sound setting shows on the screen. The default is on.
1. Use the buttons on the The key sound setting shows on theoperation panel to select sound setting. screen. The current setting is off.
2. Press the enter button Go back to movie playback Mode
20
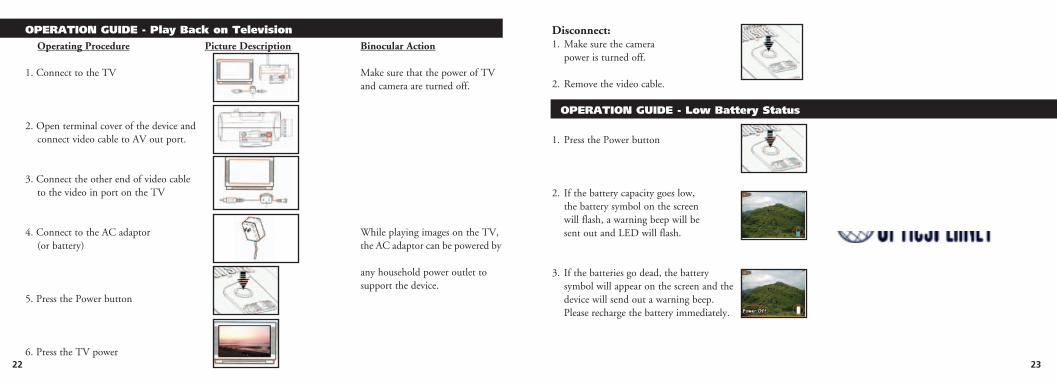
Disconnect: 1. Make sure the camera power is turned off.
2. Remove the video cable.
OPERATION GUIDE - Low Battery Status
1. Press the Power button
2. If the battery capacity goes low, the battery symbol on the screen will flash, a warning beep will be sent out and LED will flash.
3. If the batteries go dead, the battery symbol will appear on the screen and the device will send out a warning beep. Please recharge the battery immediately.
23
OPERATION GUIDE - Play Back on Television
Operating Procedure Picture Description Binocular Action
1. Connect to the TV Make sure that the power of TV and camera are turned off.
2. Open terminal cover of the device and connect video cable to AV out port.
3. Connect the other end of video cable to the video in port on the TV
4. Connect to the AC adaptor While playing images on the TV, (or battery) the AC adaptor can be powered by
any household power outlet to support the device.5. Press the Power button
6. Press the TV power 22

Operating Procedure Picture Description Binocular Actiona. Press the power button Use the power button to turn the binocular on and off. The binocular
will turn off automatically to conserve power if it is left idle (no button or switches operated) for 2 minutes.
b. Adjust the interpupillary distance According to the user’s interpupillary distance, adjust for distance between your eyes
c. Open the LCD monitor Compose images using wither the monitor screen or the
binocular eyepieces
d. Adjust the Focus adjustment knob Turn the focus adjustment knob to make the image clear until the image on the monitor screen is clear.e. Look through binocular at the same object that the camera is focused on. If the object is clear for you left eye proceed to step g and then h. If object is not clear in the left eye proceed to step f and then g and h. 25
BINOCULAR INSTRUCTIONS - IPD Adjustment (Eye Spacing Adjustment)
Operating Procedure Picture Description Binocular Action
How to Adjust for Distance Between Your Eyes – The distance between the eyes, called Interpupillary Distance (IPD), varies from person to person. To achieve perfect alignment of the lens to the eye, follow these simple steps.
1. Hold your binocular in the According to the user’s interpupillarynormal viewing position distance, adjust for the distance
between your eyes
2. Grasping your binocular firmly, Your binocular is fitted with eyecupsmove it horizontally until you designed for your comfort and
see a single circular field. to exclude extraneous light.
BINOCULAR INSTRUCTIONS - Diopter Adjustment (Focusing) How to Adjust for Individual Eye Strength – As individual eyesight varies from one person to another, most
binoculars have a diopter setting feature which allows you to fine-tune the binoculars to your vision. The camera and binocular are set up to be in focus for people with 20/20 vision or corrected vision. You may need to adjust the left eye to match the camera as well as the right eye as you would do with most binoculars. Follow the focusing instructions below for your type of binocular.
24
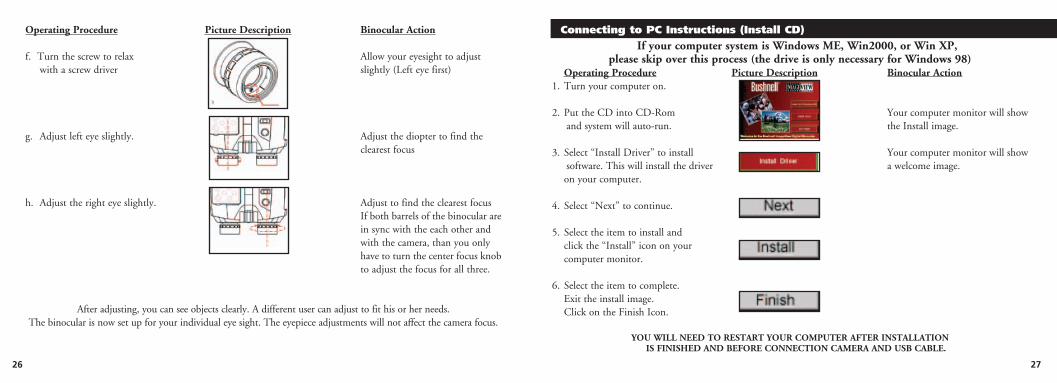
Connecting to PC Instructions (Install CD)
If your computer system is Windows ME, Win2000, or Win XP, please skip over this process (the drive is only necessary for Windows 98)
Operating Procedure Picture Description Binocular Action1. Turn your computer on.
2. Put the CD into CD-Rom Your computer monitor will showand system will auto-run. the Install image.
3. Select “Install Driver” to install Your computer monitor will showsoftware. This will install the driver a welcome image.
on your computer.
4. Select “Next” to continue.
5. Select the item to install and click the “Install” icon on your computer monitor.
6. Select the item to complete. Exit the install image. Click on the Finish Icon.
YOU WILL NEED TO RESTART YOUR COMPUTER AFTER INSTALLATION IS FINISHED AND BEFORE CONNECTION CAMERA AND USB CABLE.
27
Operating Procedure Picture Description Binocular Action
f. Turn the screw to relax Allow your eyesight to adjust with a screw driver slightly (Left eye first)
g. Adjust left eye slightly. Adjust the diopter to find the clearest focus
h. Adjust the right eye slightly. Adjust to find the clearest focus If both barrels of the binocular are
in sync with the each other and with the camera, than you only have to turn the center focus knob
to adjust the focus for all three.
After adjusting, you can see objects clearly. A different user can adjust to fit his or her needs.The binocular is now set up for your individual eye sight. The eyepiece adjustments will not affect the camera focus.
26
Operating Procedure Picture Description Binocular Action
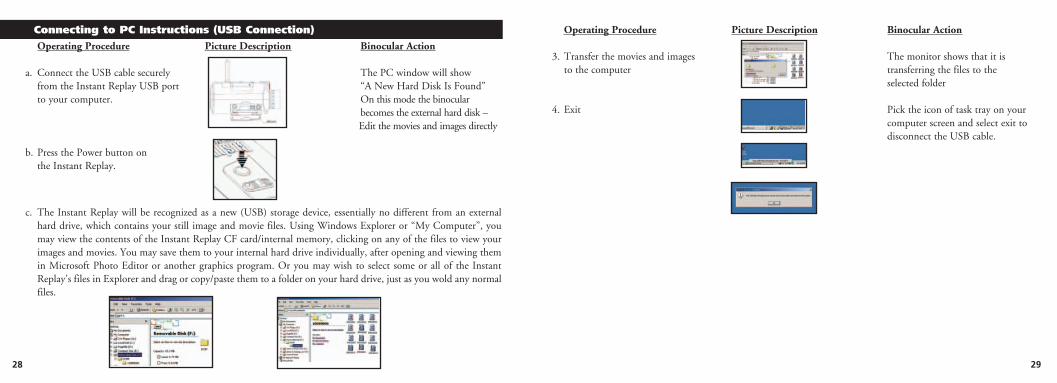
3. Transfer the movies and images The monitor shows that it is to the computer transferring the files to the selected folder
4. Exit Pick the icon of task tray on your computer screen and select exit to disconnect the USB cable.
29
Connecting to PC Instructions (USB Connection)
Operating Procedure Picture Description Binocular Action
a. Connect the USB cable securely The PC window will show from the Instant Replay USB port “A New Hard Disk Is Found” to your computer. On this mode the binocular becomes the external hard disk – Edit the movies and images directly
b. Press the Power button on the Instant Replay.
c. The Instant Replay will be recognized as a new (USB) storage device, essentially no different from an external hard drive, which contains your still image and movie files. Using Windows Explorer or “My Computer”, you may view the contents of the Instant Replay CF card/internal memory, clicking on any of the files to view your images and movies. You may save them to your internal hard drive individually, after opening and viewing them in Microsoft Photo Editor or another graphics program. Or you may wish to select some or all of the Instant Replay’s files in Explorer and drag or copy/paste them to a folder on your hard drive, just as you wold any normal files.
28

30
TWO-YEAR LIMITED WARRANTYYour Bushnell® product is warranted to be free of defects in materials and workmanship for two years after the date of purchase. In the event of a defect under this warranty, we will, at our option, repair or replace the product, provided that you return the product postage prepaid. This warranty does not cover damages caused by misuse, improper handling, installation, or maintenance provided by someone other than a Bushnell Authorized Service Department.
Any return made under this warranty must be accompanied by the items listed below:
1) A check/money order in the amount of $10.00 to cover the cost of postage and handling 2) Name and address for product return 3) An explanation of the defect 4) Proof of Date Purchased 5) Product should be well packed in a sturdy outside shipping carton, to prevent damage in transit, with return postage prepaid to the address listed below:
IN U.S.A. SEND TO: IN CANADA SEND TO: Bushnell Performance Optics Bushnell Performance Optics Attn.: Repairs Attn.: Repairs 8500 Marshall Drive 25A East Pearce Street, Unit 1 Lenexa, Kansas 66214 Richmond Hill, Ontario L4B 2M9
For products purchased outside the United States or Canada please contact your local dealer for applicable warranty information. In Europe you may also contact Bushnell at: BUSHNELL Performance Optics Gmbh European Service Centre MORSESTRASSE 4 D- 50769 KÖLN GERMANY Tél: +49 (0) 221 709 939 3 Fax: +49 (0) 221 709 939 8
This warranty gives you specific legal rights. You may have other rights which vary from country to country.
©2004 Bushnell Performance Optics
31
Model: 18-0832LIT. #: 98-0377/01-04
Manuel D’instructions
FRANÇAIS


![Welcome [lib.store.yahoo.net]lib.store.yahoo.net/lib/classic-motoring/BestofBest.pdf · random, swirl-free polishing action that will not scratch or burn the paint or clear coat.An](https://static.documents.pub/doc/80x56/60617323a83b262349417c78/welcome-libstoreyahoonetlibstoreyahoonetlibclassic-motoring-random.jpg)


