Verify eligibility using VIP in K-Dealer before starting the repair.
Please check VIP (Vehicle Information Portal) in K-Dealer for other possible repair campaigns for eligible units.
Subject
On eligible units, the rear suspension tie rod frame mount holes can become elongated if the rear shock absorber bottoms out. This can prevent the rear suspension from operating properly and could cause a crash resulting in injury or death.
Kawasaki Action
Initiate Campaign:Kawasaki has initiated a Recall campaign to
repair all eligible units. The repair consists of installing brackets or replacing the frame based on the results of inspecting the frame.
Notify Registered Owners:Kawasaki is sending a Recall letter to all registered
owners of eligible units. A copy of the letter is printed on page 12 of this bulletin.
Dealer Action
Repair Eligible Units:Repair all eligible units including sold units in the
field and unsold units in your dealership inventory prior to delivery to the retail purchaser. It is the obligation of authorized Kawasaki retail Dealers to repair eligible units in Dealer‘s possession prior to retail sale. Failure to comply with this obligation to repair all units eligible for Recall or FDM campaigns by the Dealer constitutes a breach of the Dealer Sales and Service Agreement. Refer to Service Policies bulletin SP 08-01. Refer to the Inspection & Repair Procedure sections of this bulletin for details.
IMPORTANT NOTE: o It’s the law! Under the National Traffic and Motor
Vehicle Safety Act, 49 U.S.C. Section 30120(i), dealers are required to perform Recall repairs before delivering any vehicle affected by the Recall to a purchaser.
Document Completed Repairs: Federal law requires manufacturers to maintain
accurate follow-up records on repairs performed on eligible units. Dealers MUST submit a Warranty Claim for each repair. Refer to the Warranty Information section of this bulletin for details.
NOTE: o If you fail to submit a Warranty Claim for a new unit
that is subsequently sold and registered, the new owner will receive the Recall letter requesting the return of the vehicle to you for repair.
THIS BULLETIN IS OF THE HIGHEST PRIORITY AND MUST BE ACTED UPON IMMEDIATELY TO ENSURE CUSTOMER SAFETY.
RECALL
FRAME INSPECTION & REPAIR
Page 2
Submit Product Registration:Submit the product registration to Kawasaki via
K-Dealer immediately after retail sale of any eligible unit. Be sure to supply the correct customer name and mailing address. Kawasaki uses the product registration information for customer notification. Also, if you know that the customer has moved, please submit a Customer Update via K-Dealer.
Parts Information
Repair kit 99999-0648 must be installed on all eligible units that do not require a frame replacement based on the inspection criteria outlined in this bulletin.
Order parts to complete the Recall through K-Dealer as outlined in Service Bulletin SP15-03.
KIT, BRACKET: 99999-0648Ref # Qty Description
1 1 Bracket, Left
2 1 Bracket, Right
3 1 Washer, Left
4 1 Washer, Right
5 2 Bolt, Flanged
6 2 Nut
7 1 Bolt
8 1 Nut
9 4 Gasket
NOTE: o Use VIP in K-Dealer to identify affected units in
your dealership inventory to order repair kits for unsold units
Parts Availability:
To ensure parts availability across the dealer network, Kawasaki initially requests that parts are ordered based on immediate demand:
• For retailed units, order parts as customers schedule repairs or for repairs expected to take place within the next two weeks.
• For unsold units, use VIP in K-Dealer to identify the number of affected units in your dealership inventory. Order repair parts only for units that will be repaired for retail sale within the next two weeks.
12
3
4
5 6
7
8
9
Page 3
Inspection and Repair Procedure
Refer to the appropriate sections of Service Manual 99924-1525-03 for information and procedures related to parts removal and installation.
Frame Inspection Preparation
• Support the front and rear of the motorcycle with suitable stands.
• Remove the right front footpeg bracket bolts [A] to access the rear shock absorber tie rod.
• Loosen the tie rod nut [A] but do not remove it at this time.
SWARNINGWhen raising the rear wheel off the ground
and removing part(s) from the motorcycle, be sure to support the front of the motorcycle, or the motorcycle may fall over and cause an injury.
A
A
LEFT
RIGHT
Page 4
• Raise the rear of the frame slightly with suitable straps [A] passed through the rear footpeg brackets [B] to unload the weight on the rear suspension in order to remove the bolt easily.
NOTE: o Protect the vehicle from the straps with suitable
soft cloth [C].
Frame Inspection
• Remove and discard the tie rod nut, bolt and washer
• Measure the elongation length [A] of the left or right tie rod installation hole in the frame along the same line as the centerline of the tie rod.
� If the hole measures 16mm or less in diameter, proceed to the “Install Brackets” section of this bulletin.
� If the hole measures over 16mm in diameter or has visible cracks, proceed to the “Replace Frame” section of this bulletin.
Install Brackets
• Remove and retain the premuffler chamber mounting bolt [A].
• Remove and retain the eight exhaust pipe [A] holder nuts [B].
SWARNINGThe exhaust pipe or muffler body can become
extremely hot during normal operation and cause severe burns. Do not remove the exhaust pipe or muffler body while it is hot.
!
A
A
C
B BC
A
A
A
B
RIGHTSIDE
SHOWN
Page 5
• Lower the exhaust pipe approximately one inch and support the exhaust pipe from underneath.
NOTE: o While lowering the exhaust pipe, work carefully
to prevent contact between the exhaust pipe and radiator, and oxygen sensor and cover.
o The wiring harness connected to the oxygen sensor will become tight and could break if the exhaust is not supported.
• Position the left and right brackets on top of the frame on each side of the tie rod
• Install the bolt from the left side of the vehicle through the brackets, frame and tie rod.
• Lightly tighten the nut and bolt temporarily.
LOWER APPROXIMATELY ONE INCH
SUPPORT FROMUNDERNEATH
LEFT BRACKET
RIGHT BRACKET
RIGHT
Page 6
• Position the special left washer from the repair kit along the bottom of the frame bracket as shown.
NOTE: o The tab on the special washer should touch the
edge of the frame.
• Install a new bolt from the bottom.• Install a nut on the bolt and lightly tighten
temporarily.
• Install the special right washer from the repair kit
NOTE: o The tab on the special washer should touch the
inside edge of the frame hole.
• Install a new bolt from the bottom.• Install a nut on the bolt and lightly tighten
temporarily.
• Align the right bracket projections with the frame edge as shown.
• Align the left bracket projections with the frame edge as shown.
• Verify that the tabs on the left and right special washers remained aligned as shown.
ALIGNTABS
ALIGNPROJECTION
ALIGNPROJECTION
RIGHTBRACKET
LEFTBRACKET
RIGHTLEFT
SPECIALLEFT
WASHER
TAB
SPECIALRIGHT
WASHER
TAB
Page 7
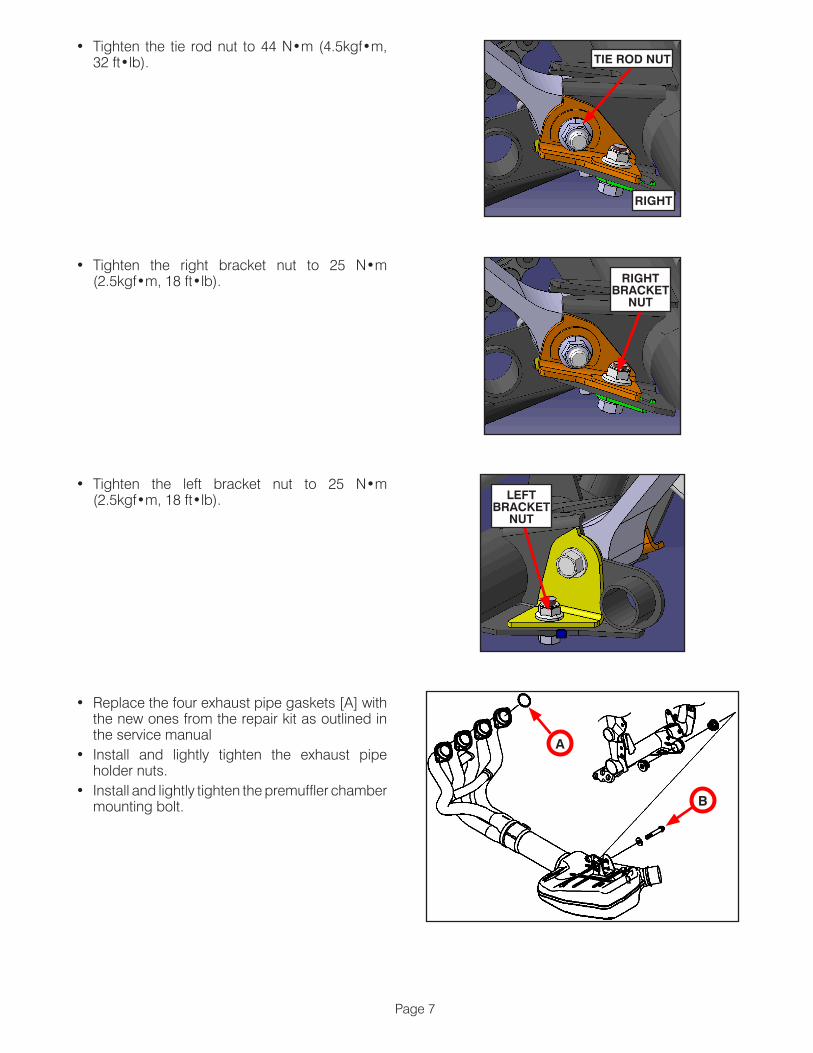
• Tighten the tie rod nut to 44 N•m (4.5kgf•m, 32 ft•lb).
• Tighten the right bracket nut to 25 N•m (2.5kgf•m, 18 ft•lb).
• Tighten the left bracket nut to 25 N•m (2.5kgf•m, 18 ft•lb).
• Replace the four exhaust pipe gaskets [A] with the new ones from the repair kit as outlined in the service manual
• Install and lightly tighten the exhaust pipe holder nuts.
• Install and lightly tighten the premuffler chamber mounting bolt.
TIE ROD NUT
RIGHTBRACKET
NUT
LEFTBRACKET
NUT
A
B
RIGHT
Page 8
• Tighten the eight exhaust pipe [A] holder nuts [B] to 20 N•m (2.0kgf•m, 15 ft•lb).
• Tighten the premuffler chamber mounting bolt to 34 N•m (3.5kgf•m, 25 ft•lb).
• Install the right front footpeg bracket and tighten the bolts to 25 N•m (2.5kgf•m, 18 ft•lb).
Tighten Engine Mount Nuts
• Remove and retain the left and right frame cover bolts [A] and washers.
• Remove the left and right frame covers outward to clear the projections [B] on the back of the covers.
NOTE: o Left side shown. Right side similar.
• Remove and retain the engine sprocket cover bolts [A].
• Remove the engine sprocket cover.
B
A
B
A
FOOTPEGBRACKET
BOLTS
A
B
B
ENGINE SPROCKET
COVER
A
BEHIND WIRE
HARNESS
RIGHT
LEFT
LEFT
Page 9
• Tighten the middle rear engine mounting nut [A] and lower rear engine mounting nut [B] to 44 N•m (4.5 kgf•m, 32 ft•lb).
• Install the engine sprocket cover.• Verify that the pad is in place on the frame.
Install only if it is missing.• Tighten the engine sprocket cover bolts to
9.8 N•m (1.0 kgf•m, 87 in•lb).
• Install the left frame cover by inserting the projections [A] of the frame covers into the grommets [B] on the frame.
• Tighten the frame cover bolts to 2.2 N•m (.22 kgf•m, 20 in•lb)
NOTE: o Left side shown. Right side similar.
• Thoroughly warm up the engine, wait until the engine cools down, retighten the exhaust pipe [A] holder nuts [B] to 20 N•m(2.0 kgf•m, 15 ft•lb).
• Proceed to the “Warranty Information” section in this bulletin.
A
B
A
B
PAD
B
A
LEFT
RIGHT
LEFT
Page 10
Replace Frame
IMPORTANT NOTE: o Only replace the frame if the hole [A] in the
frame bracket measures over 16mm in diameter or has visible cracks.
IMPORTANT NOTE: o Refer to service manual 99924-1525-03 for
information and procedures related to parts removal and installation.
IMPORTANT NOTE: o If the frame requires replacement, contact the
Product Support Hot Line at (800) 854-3800. The Hot Line will prepare the replacement frame by stamping the VIN and installing all required labels.
• Replace the frame with a new one.• After installing all components on the
replacement frame, use an appropriate cutting tool to remove the steering head with the VIN from the old frame. Ensure the VIN is not damaged during removal.
• Dispose of the remainder of the frame in accordance with all local laws and regulations. Return the “VIN” portion of the frame with a copy of your work order and the warranty claim to the following address:
Kawasaki Motors Corp., U.S.A.ATTN: Warranty Administration26972 BurbankFoothill Ranch, CA 92610
A
RIGHT
Page 11
Warranty Information
This is a safety Recall campaign. Repair is authorized regardless of ownership or warranty status.
Repairs MUST BE PERFORMED IMMEDIATELY ON ALL ELIGIBLE UNITS in the field and during initial assembly and preparation.
See the Warranty Policies and Procedures Manual (claim type 3 information) for detailed instructions when submitting the Warranty Claim.
Inspect & Install Brackets
Inspect & Replace Frame
Job Code 22498 22499
Flat Rate Time 0.9 hr 12.1 hr
Claim Type 3 3
Part Number 99999-0648 99999-0648
Description Kit, Bracket Kit, Bracket
Qty 1 0
Additional Parts N/A
Frame, Black 32160-0957-18R
Qty=1
Frame, Green 32160-0957-54S
Qty=1
Repair Verification
The installed brackets will serve as repair verification.
OR
Vehicles that required frame replacement can be identified by a punch mark on the upper left side of the tie rod bracket on the frame.
NOTE: o Repair verification is an essential part of the
repair procedure. Along with the physical repair verification, check VIP (Vehicle Information Portal) in K-Dealer for other possible repair campaigns for eligible units.
This notice is sent to you in accordance with the National Traffic and Motor Vehicle Safety Act. Kawasaki Motors Corp., U.S.A., has decided that a defect which relates to motor vehicle safety exists in certain 2017 & 2018 Z900 & 900 ABS motorcycles (ZR900AHFL, ZR900BHFL, ZR900BJF/BJFL models).
The reason for this notice:The rear suspension tie rod frame mount holes can become elongated if the rear shock absorber bottoms out. This can prevent the rear suspension from operating properly and could cause a crash resulting in injury or death.
What Kawasaki and your dealer will do:In the interest of your continued satisfaction, Kawasaki has authorized your dealer to install brackets or replace the frame based on the results of inspecting the frame, free of charge. The actual repair will take up to one hour but may take longer due to scheduling at the dealership and the time needed to obtain required parts.
What should you do to ensure your safety?
Please call your Kawasaki dealer to schedule an appointment to have your motorcycle inspected and repaired. Please have your Vehicle Identification Number (VIN) ready when calling. To locate the nearest authorized Kawasaki motorcycle dealer, please visit www.kawasaki.com and click on the “LOCATE DEALER” link.
DO NOT RIDE YOUR MOTORCYCLE UNTIL THE REPAIR HAS BEEN COMPLETED.
If you need help:If you have questions or concerns that your dealer is not able to resolve, please contact Kawasaki’s Consumer Services Department at (866) 802-9381 (toll-free) between 7:30 a.m. and 4:30 p.m. PT Monday through Friday. Please have your Vehicle Identification Number ready when calling.
If your dealer fails or is unable to remedy this defect without charge within a reasonable amount of time (60 days after your first attempt to obtain remedy), you may submit a written complaint to the Administrator, National Highway Traffic Safety Administration, 1200 New Jersey Ave. S.E., Washington, D.C. 20590, or call the toll-free Vehicle Safety Hotline at 1(888) 327-4236 (TTY: 1-800-424-9153); or go to http://www.safercar.gov.
If you received this notice in error:Our records indicate you are the current owner of the 2017 & 2018 Z900 & 900 ABS motorcycle described in this letter. If you no longer have the vehicle described in this letter, please help us to update our records at www.kawasaki.com by clicking on “OWNER CENTER => OWNER SUPPORT => UPDATE OWNER INFO” or by calling Kawasaki toll free at (866) 802-9381. Federal regulation requires that any vehicle lessor receiving this recall notice must forward a copy of this notice to the lessee within ten days.
Reimbursement:If you have experienced the failure described above prior to receiving this letter and have paid to have it corrected, you may be eligible for full or partial reimbursement for your documented cost of repair(s). To apply for reimbursement, please send copies of current owner and VIN information along with copies of repair orders and payment confirmation to the following address:
Kawasaki Motors Corp., U.S.A. ATTN: Consumer Services Department P.O. Box 25252 Santa Ana, California 92799-5252
Please note the following conditions for reimbursement:• Only repairs specifically related to this recall are eligible for reimbursement. Other expenses such as towing, rental,
and accommodations will not be refunded.• Claims may be excluded if proper documentation is not included. Current owner and VIN information along with
copies of repair orders and payment confirmation must be provided.
We are sorry for any inconvenience this may cause, but we have taken this action in the interest of your safety and your continued satisfaction with your Kawasaki motorcycle.


![INDEX [housewares.blob.core.windows.net] · 1524-EMERALD-GREEN 1524-LIGHT-GREEN 1525-BERBER 1525-BLACK-BROWN 1525-BROWN 1525-BURGUNDY 1525-EMERALD-GREEN 1525-LIGHT-GREEN 1526-BROWN](https://static.documents.pub/doc/80x56/5f82d2e19f012e44495be61c/index-1524-emerald-green-1524-light-green-1525-berber-1525-black-brown-1525-brown.jpg)


