224
Model 8900 Series Printer Technical Reference Manual 5321 Buffalo Road • Erie, PA 16510 800-570-4533 • www.fastprinters.com

Model 8900 Series PrinterTechnical Reference Manual
5321 Buffalo Road • Erie, PA 16510800-570-4533 • www.fastprinters.com

Preface ............................................................................................... v
1 General InformationIntroduction .................................................................................... 1-2Paper-Handling System .................................................................. 1-2Printer Features ............................................................................... 1-3Printer Quality ................................................................................ 1-4Raster Graphics .............................................................................. 1-6
2 Printer SetupIntroduction .................................................................................... 2-3Model 8900 Series Emulation Modes ............................................ 2-5Miscellaneous Setup Parameters .................................................. 2-14Test Features ................................................................................. 2-18
3 Character Sets and Global CommandsIntroduction .................................................................................... 3-2Character Code Table ..................................................................... 3-2Character Sets ................................................................................. 3-3Control Characters ........................................................................ 3-16Printer Commands ........................................................................ 3-18Global Command Set .................................................................... 3-19Global Command Descriptions .................................................... 3-19
4 TI Model 880 Printer EmulationIntroduction .................................................................................... 4-4Model 880 Printer Emulation Commands ...................................... 4-6Model 880 Command Descriptions .............................................. 4-10
5 TI Model 855 Printer WP EmulationIntroduction .................................................................................... 5-4Motion Indexes ............................................................................... 5-5Model 855 WP Commands............................................................. 5-6Model 855 WP Command Descriptions ......................................... 5-9
ii
Contents
6 Tl Model 855 Printer DP EmulationIntroduction .................................................................................... 6-3Model 855 DP Command Descriptions .......................................... 6-7
7 IBM Proprinter XL EmulationIntroduction .................................................................................... 7-4IBM Proprinter XL Emulation Commands .................................... 7-5IBM Proprinter XL Command Descriptions .................................. 7-7
8 Epson FX Printer EmulationIntroduction .................................................................................... 8-5Epson FX Printer Emulation Commands ....................................... 8-7Epson FX Emulation Command Descriptions ............................. 8-10
9 Optional Emulation CommandsIntroduction .................................................................................... 9-2DEC LA120 Emulation Commands ............................................... 9-2Answerback Memory Function ...................................................... 9-5New Line Mode .............................................................................. 9-5Auto Wrap ...................................................................................... 9-6Answerback Memory Message Load ............................................. 9-6
10 Communication InterfacesIntroduction .................................................................................. 10-3Data-Transfer Operations ............................................................. 10-4Parallel Communication Interface ................................................ 10-6Serial Communication Interface ................................................. 10-14Optional Communication Interfaces ........................................... 10-21
AppendixApplication Instructions ................................................................ A-1
Index
iii
Contents

Copyright © 2001 by Lake Erie SystemsAll Rights Reserved — Printed In U.S.A.
Model 8900 Series PrintersTechnical Reference ManualPart No. 2557824-0002Original Issue: August 1989Revision F: January 2001
Changes may be periodically made to the information in this publication.Such changes will be incorporated in new editions of this manual.
Record the serial number, purchase date, and firmware revisionnumber in the spaces provided below. The serial number and firmwarerevision are recorded on the label affixed to the rear of the unit. Allcorrespondence concerning your unit should include the serialnumber, firmware revision, and date of purchase.
Serial Number: ____________ Purchase Date: ____________
Firmware Revision: ___________________________________
No part of this publication may be reproduced, stored in a retrieval system, ortransmitted in any form or by any means, electronic, mechanical, photocopy,recording, or otherwise, without the prior written permission of Lake Erie Systems.
This printer, as well as the programs that Lake Erie Systems has created to use withit, are tools that can help people better manage the information used in theirbusiness: but tools—including Lake Erie Systems products—cannot replace soundjudgment nor make the manager’s business decisions.
Consequently, Lake Erie Systems cannot warrant that its products are suitable forany specific customer application. The manager must rely on judgment of what isbest for his or her business.
Page Finder, Z-Axis control, and Rapid Print are trademarks of Lake Erie Systems.Epson is a registered trademark of Seiko Epson Corporation.IBM is a registered trademark and Proprinter is a trademark of International Business Machines Corporation.
iv

This manual contains technical information about the Model 8900Series Printers. This information supplements the informationcontained in the Model 8900 Series Printer User’s Manual Part No.2557785-0002 and is essential to programmers, system managers,and other technically oriented people.
The information in this manual is presented in individual sections soyou can skip pages with information you already know or that doesnot apply to your particular application.
Symbols Used in This ManualTwo international symbols are used throughout this manual to adviseyou of important information.
This symbol indicates a Note concerning operating proceduresor information you should know to help you operate yourprinter.
This symbol alerts you to a Warning or Caution whichcan prevent you from causing a hazard to yourself or toyour printer.
ContentsChapter 1 — General Information provides a general descriptionof the Model 8900 Series Printer and brief information about someof the principals of dot-matrix printing.
Chapter 2 — Printer Setup provides information about printerconfiguration. Specifically, this chapter describes the control panelswitch functions and the setup/test menu. This information supplementsthe information contained in Chapter 4 of the Model 8900 SeriesPrinter User’s Manual, Part No. 2557785-0002.
Preface
v
!

vi
Chapter 3 — Character Sets and Global Commands providesgeneral information about character sets and their use in the Model8900 Series Printer and describes the commands that are valid for allemulation modes, both standard and optional. These commandsprovide control of the basic features of the Model 8900 SeriesPrinter.
Chapter 4 — Texas Instruments Model 880 Printer Emulationdescribes the commands of the Model 880 Printer command set andprovides information about operating the Model 8900 Series Printerin the Model 880 Printer emulation mode.
Chapter 5 — Texas Instruments Model 855 Printer WP Emulationdescribes the commands of the Model 855 Printer WP emulationcommand set and provides information about operating the Model8900 Series Printer in the Model 855 Printer WP emulation mode.
Chapter 6 — Texas Instruments Model 855 Printer DP Emulationdescribes the commands of the Model 855 Printer DP emulationcommand set and provides information about operating the Model8900 Series Printer in the Model 855 Printer DP emulation mode.
Chapter 7 — IBM Proprinter XL Emulation describes thecommands of the IBM Proprinter XL command set and providesinformation about operating the Model 8900 Series Printer in theIBM Proprinter XL emulation mode.
Chapter 8 — Epson FX Printer Emulation describes the commandsof an Epson FX printer command set and provides information aboutoperating the Model 8900 Series Printer in the Epson FX printeremulation mode.
Chapter 9 — Optional Emulation Commands describes optionalemulation commands available for the Model 8900 Series Printer.
Chapter 10 — Communication Interfaces describes the standardparallel and serial communication interfaces used with the Model8900 Series Printer.

Appendix — Application Instructions explains how to use the Z-axisprinthead adjustment escape sequence and how to clean the automaticpage finder sensor.
Other Manuals About the PrinterThe following manuals are available to help you learn more aboutyour printer and to help you operate and maintain the printer.
Title Part Number
Model 8900 Series Printer Quick Reference Guide 2557786-0002
Model 8900 Series Printer User’s Manual 2557785-0002
Model 8900 Series Printer Maintenance Manual 2557788-0001
Model 8900 Series Printer Safety Instructions 2557807-0002
Supplies2551152-0011 Ribbon Cartridge, Black2551152-0014 Ribbon Cartridge, Color
You can order the Model 8900 Series Printers, manuals, ribbons andspare parts from LAKE ERIE SYSTEMS AND SERVICES bycalling toll free: 1-800-570-4533
or online at www.fastprinters.com
Purchase Orders can be sent to:
LAKE ERIE SYSTEMS5321 Buffalo RoadErie PA 16510
or may be faxed to: 814-899-1384
vii

Introduction .................................................................................... 1-2Paper-Handling System .................................................................. 1-2Printer Features ............................................................................... 1-3Print Quality ................................................................................... 1-4Raster Graphics .............................................................................. 1-6
1General Information
General Information 1-1

IntroductionThe Model 8900 Series Printer is one of a family of rugged, high-performance, dot-matrix impact printers, which forms letters,numbers, and other symbols by printing dot patterns. The printer offersa variety of common and unique features, such as multiple paperpaths and paper-feed methods, selectable print-quality settings, zeropaper tear-off to prevent waste of paper and forms, and color printing.
This chapter provides general information about the printer.
Paper-Handling SystemBoth models (8930 and 8920) of the Model 8900 Series Printer canprint heavy-duty multipart continuous forms. In addition, the 8930can accept hand-inserted cut-sheet paper. Upon completion of aprinting operation, the printer automatically positions the tear-offperforation even with the tear-off bar to allow removal of the printeddocument.
A useful feature of the printer is its ability to park continuous paperout of the print station area for unloading the paper supply or forswitching to another paper-handling mode. This feature lets youswitch instantly from continuous paper operation to cut-sheet paperinsertion (Model 8930).
Each time you load continuous paper or insert cut-sheet paper, theprinter automatically positions the paper and adjusts the printhead.The Page Finder™ sensor (located on the printhead carriage) detectsthe top, left, and right edges of the paper and sends this informationto the printer electronics. The printer uses this information to adjustthe paper to the top-of-form position and to adjust the printhead tooperate within the left and right boundaries of the paper, regardlessof the paper width. The Z-Axis Control™ motor adjusts the printhead-to-paper (z-axis) clearance to its optimum value, regardless of thethickness of the paper or form set.
General Information 1-2

All paper-handling operations are accessible through the controlpanel and via the host computer using global commands.
Printer FeaturesThe Model 8900 Series Printer includes the following features.
q Print quality choices — letter-quality (LQ), text, normal draft,and Rapid Print™ draft
q Standard character sets — US ASCII (with 13 internationalsubstitution tables), IBM® PC1, IBM PC2, IBM Multinational,ISO 8859/1 Multinational and Nordic PC
q Character spacing (pitch) — 5.0, 6.0, 7.5, 8.6, 10.0, 12.0, 15.0,16.7 and 17.1 characters per inch (cpi), depending on theemulation mode in effect
q Line length — 13.6 inches (345.44 mm) maximum
q Maximum character columns — 136 at 10.0 cpi, 163 at 12.0 cpi,204 at 15 cpi, and 227 at 16.7 cpi
q Line spacing — 3, 4, 6 and 8 lines per inch (lpi)
q Line feed modes — forward and reverse full or one-half line (forsuperscript and subscript characters)
q Print enhancements — bold, emphasized, underlined, andexpanded with true descenders (for lowercase characters such asg, j, and y)
q Standard fonts — Courier and Gothic
q Optional fonts — Prestige Elite, Presenter, Barcode 3 of 9,Interleave 2 of 5, OCRA, OCRB and PostNet
General Information 1-3

q Graphics capabilities — vertical raster graphics (all pointsaddressable)
q Color printing — up to seven colors, including black, for bothtext and graphics (standard on Model 8930 and optional onModel 8920)
q Resident emulation modes — TI 880, TI 855, Epson® FX andIBM Proprinter XL
q Standard communication interfaces — serial (RS-232 or RS-423specified by customer when purchasing the printer) and parallel
q Optional communication interfaces — RS-422 serial and currentloop (TTY)
Print QualityThe dot-matrix impact printhead forms a character by printing dotsin a rectangular arrangement of dot cells called a dot matrix.
The following figure shows some examples of dot-matrix characters.Each character is printed in a 7-dot by 9-dot matrix. Three columnsof blank dots at the right side of each character, the intercharacterspace, provide the proper horizontal spacing between characters.
General Information 1-4

Quality can be improved by increasing the dot density (resolution),as shown in the following figure. Dot density is expressed in dots perinch (dpi).
The Model 8900 Series Printer offers four levels of print quality,based on the dot density and the placement of dots on the matrix.The increased dot density at higher print-quality levels decreases theprint speed.
General Information 1-5
typical dot-matrix characters
effect of increasing dot density
low-resolutioncharacter
medium-resolutioncharacter
high-resolutioncharacter

General Information 1-6
The printer offers the following print-quality levels and speeds.
q Letter quality (LQ) — high-resolution, 32-dot by 18-dot charactersat 100 characters per second (cps).
q Text quality — medium-resolution, 15-dot by 9-dot characters at240 cps.
q Normal draft quality — low-resolution, 9-dot by 9-dot charactersat 400 cps.
q Rapid Print draft quality — low-resolution, 7-dot by 9-dotcharacters. This mode is only valid for character spacings(pitches) of 12 characters per inch (cpi) and 15 cpi. Thesecharacter pitches allow the printer to print at speeds of 480 cpsand 600 cps, respectively.
Raster GraphicsThe all-points-addressable raster graphics mode lets you use yourprinter to produce pictorial material, such as charts, graphs, specialcharacters, or almost any design you can devise. Special commandsallow you to design images of any shape by causing the printhead toprint dots in the appropriate places. (See Chapters 4 through 8 forinformation about raster graphics commands.)
The best way to print graphics is to use one of the many commerciallyavailable application programs. These programs let you designimages by drawing them on your computer monitor and then issuinga command to send them to your printer.

Introduction .................................................................................... 2-3Model 8900 Series Emulation Modes ............................................ 2-5
TI 880 Emulation ....................................................................... 2-6Execute Commands .............................................................. 2-6Line Feed and Carriage Return Upon Receipt of LF............ 2-6Line Feed and Carriage Return Upon Receipt of CR ........... 2-7Carriage Return Upon Receipt of LF, VT, or DC2 ............... 2-7Graphics ................................................................................ 2-7Shift Out Equals Expanded Print .......................................... 2-7
TI 855 Emulation ....................................................................... 2-8Processing Mode................................................................... 2-8Automatic Line Feed ............................................................ 2-8
IBM Proprinter XL and Epson FX Emulations ......................... 2-8Automatic Line Feed ............................................................ 2-8Automatic Carriage Return ................................................... 2-9Slashed Zeros ........................................................................ 2-9
Hexadecimal Dump Mode ......................................................... 2-9Interface Parameters ................................................................ 2-10Port .......................................................................................... 2-10Buffer Size ............................................................................... 2-10Baud Rate ................................................................................ 2-11Data Bits .................................................................................. 2-11Parity ....................................................................................... 2-11Flow Control ............................................................................ 2-11XON/XOFF (transmit-on/transmit-off) ................................... 2-12Robust XON/XOFF ................................................................. 2-12
ETX/ACK (end-of-text/acknowledge) ............................... 2-13Connection ............................................................................... 2-13
DTR (Pin 20) ...................................................................... 2-13PIN 11 ................................................................................. 2-13
2Printer Setup
Printer Setup 2-1

Miscellaneous Setup Parameters .................................................. 2-14Character Set ........................................................................... 2-14Z-Axis Control ......................................................................... 2-15Ribbon Type ............................................................................ 2-15Ribbon Adjust .......................................................................... 2-15Idle Delay................................................................................. 2-16Power-Up Online ..................................................................... 2-16Paper Pull-Down Warning ....................................................... 2-16Graphics Printing Mode ......................................................... 2-17LCD Language......................................................................... 2-17Paper Out Equals Busy ............................................................ 2-17Limiting Control Panel Operation ........................................... 2-17
Test Features ................................................................................. 2-18
Printer Setup 2-2

Printer Setup 2-3
IntroductionThe Model 8900 Series Printers are compatible with a wide range ofcomputers and application software. The printer menu structureenables you to select and alter the fundamental printer operatingparameters to fit the requirements of your computer, its communicationinterface, and its application software. You can set these parametersvia the operator control panel (see the following figure).
To set up the printer, you set the various printer parameters to meetthe requirements of your computer system. (Refer to your computeroperator’s manual for more information.) After you set the parametersto the required values, the printer stores these settings in its nonvolatilerandom-access memory (NVRAM). Because the NVRAM retainsinformation even when the printer is without power, the printerretains these settings until you change them.
operator control panel
function switch associated with messagesand symbols shown at the left end of thedisplay (loads form on 8930)
selects one of ten presetform formats or formssettings report
allows you to select theprimary paper path or analternate paper path
selects one of fourcharacter spacingchoices
selects one of three printquality choices
allows you to get a reportof current printer settings,test basic printerfunctions, and changeprinter features
function switch associated withmessages and symbols shown at the
right end of the display
allows you to changeform format values
selects online oroffline operation
clears error messagesfrom the display
selects one of thestandard fonts or an
optional font
advances paper to thetop of the next form
invokes the form align screenwhich lets you move the paper up
or down in the print station
causes the display toshow a brief summaryof printer status andcurrent printer settings
select itemsshown on thedisplay (loadsform on 8920)
display
F1
Config.
F2Select
PaperPath
On LineForm
Pitch
Setup/Test
FormFeed
Status FormAlign
Quality Font ClearError
Select

Printer Setup 2-4
Note: The Model 8900 Series Printers User’s Manual (Part No.2557785-0002) explains the basic use of the operator control paneland its associated menu structure.
The Setup/Test switch on the control panel lets you enter the setup/test menu. This menu consists of the following submenus containingmost of the printer setup parameters and test features.
q Emulation mode — The emulation mode submenu lets youselect an emulation mode and set its parameters. This submenualso lets you select the hexadecimal dump mode.
q Interface parameters — The interface parameters submenu letsyou set the serial communication parameters to the valuesrequired by the host computer and by the communication interface.
q Miscellaneous parameters — The miscellaneous parameterssubmenu lets you select various printer features, both standardand optional.
q Test mode — The test mode submenu lets you select the printertest features.
The following figure shows the setup/test menu and the followingparagraphs describe the setup/test submenus.
Setup/Test
setup/test menu
Emulation Interface Misc Test Mode
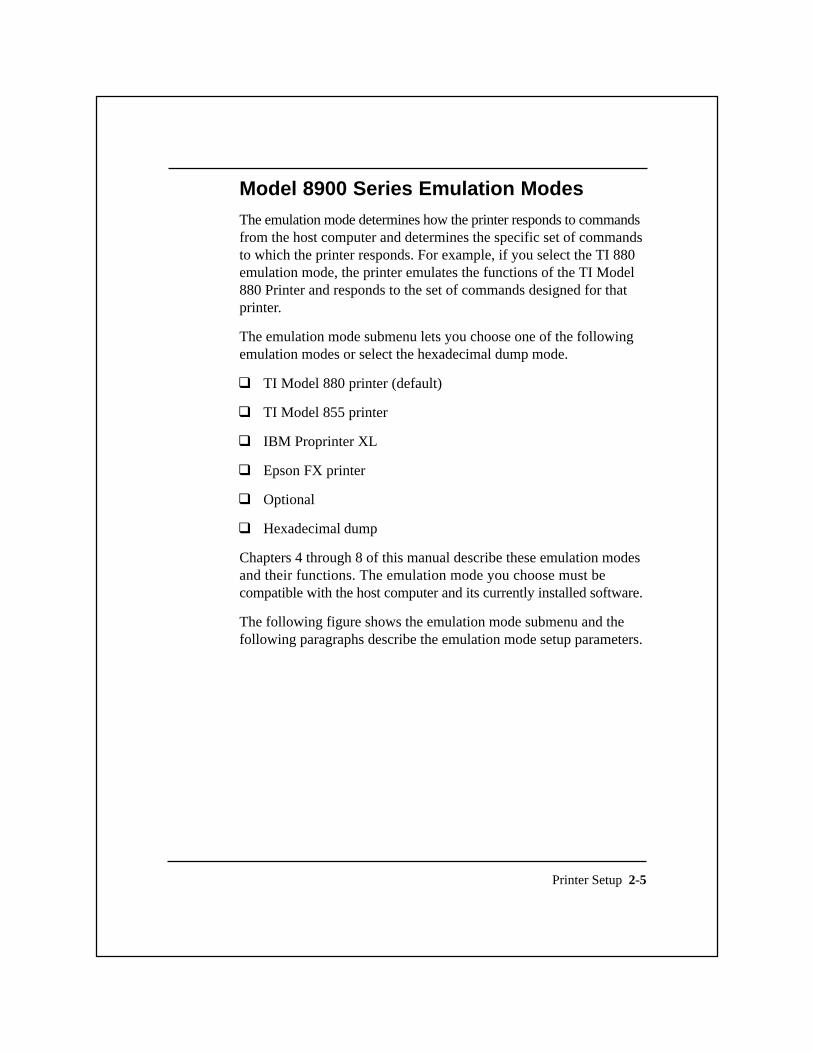
Model 8900 Series Emulation ModesThe emulation mode determines how the printer responds to commandsfrom the host computer and determines the specific set of commandsto which the printer responds. For example, if you select the TI 880emulation mode, the printer emulates the functions of the TI Model880 Printer and responds to the set of commands designed for thatprinter.
The emulation mode submenu lets you choose one of the followingemulation modes or select the hexadecimal dump mode.
q TI Model 880 printer (default)
q TI Model 855 printer
q IBM Proprinter XL
q Epson FX printer
q Optional
q Hexadecimal dump
Chapters 4 through 8 of this manual describe these emulation modesand their functions. The emulation mode you choose must becompatible with the host computer and its currently installed software.
The following figure shows the emulation mode submenu and thefollowing paragraphs describe the emulation mode setup parameters.
Printer Setup 2-5

Printer Setup 2-6
TI 880 Emulation
The TI 880 emulation submenu contains a group of setup parametersthat can be set to either on or off. These parameters determine howyour printer responds to certain commands from the host computer.
Execute Commands
When on, this parameter enables the printer to respond to escapesequence commands from the host computer. The default setting is ON.
Line Feed and Carriage Return Upon Receipt of LF
When on, this parameter causes the printer to perform both a linefeed (LF) operation and a carriage return (CR) operation uponreceiving an LF command from the host computer. The defaultsetting is OFF.
ProPrinterTI855TI880 Epson optional Hexdump
ExecuteCommands
LF/CRON LF
LF/CRON CR
CR W/LFVT DC2
SO=Expand
Proc Mode Auto LF Auto LF
Auto LF Auto CR
Graphics
Slashed 0’s
Auto CR
Slashed 0’s
ONDP
NO
NO
NO
NO NO
NO
NO
OFF
OFF YES
WP
YES
YES
YES
YES
YES
YES
Emulation
OFF
ON
ON
ON
OFF
ON
emulation mode submenu
OFF
OFF
OFF
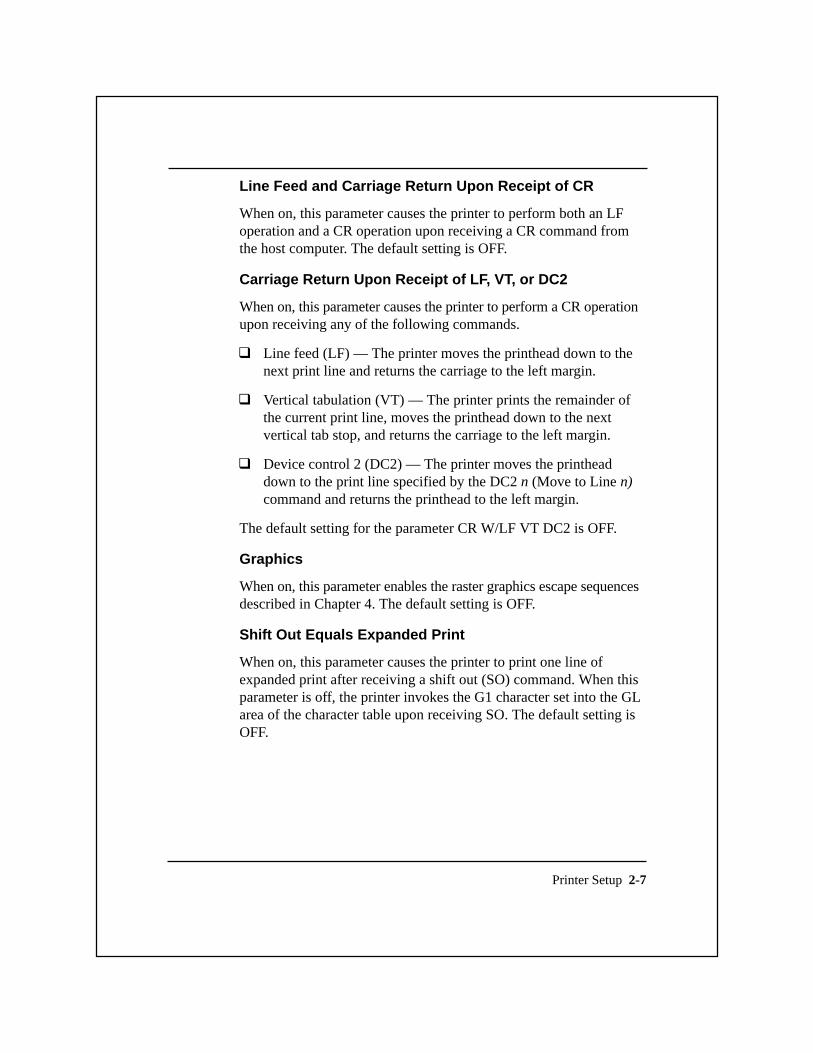
Line Feed and Carriage Return Upon Receipt of CR
When on, this parameter causes the printer to perform both an LFoperation and a CR operation upon receiving a CR command fromthe host computer. The default setting is OFF.
Carriage Return Upon Receipt of LF, VT, or DC2
When on, this parameter causes the printer to perform a CR operationupon receiving any of the following commands.
q Line feed (LF) — The printer moves the printhead down to thenext print line and returns the carriage to the left margin.
q Vertical tabulation (VT) — The printer prints the remainder ofthe current print line, moves the printhead down to the nextvertical tab stop, and returns the carriage to the left margin.
q Device control 2 (DC2) — The printer moves the printheaddown to the print line specified by the DC2 n (Move to Line n)command and returns the printhead to the left margin.
The default setting for the parameter CR W/LF VT DC2 is OFF.
Graphics
When on, this parameter enables the raster graphics escape sequencesdescribed in Chapter 4. The default setting is OFF.
Shift Out Equals Expanded Print
When on, this parameter causes the printer to print one line ofexpanded print after receiving a shift out (SO) command. When thisparameter is off, the printer invokes the G1 character set into the GLarea of the character table upon receiving SO. The default setting isOFF.
Printer Setup 2-7
Printer Setup 2-8
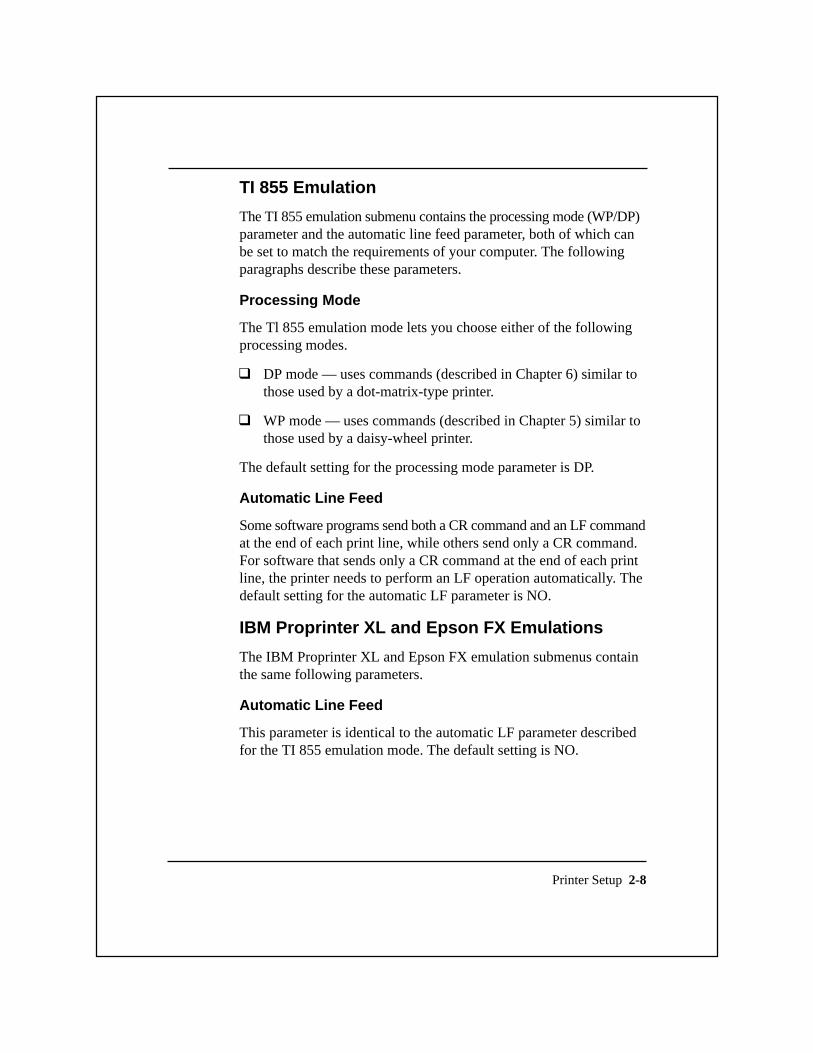
TI 855 Emulation
The TI 855 emulation submenu contains the processing mode (WP/DP)parameter and the automatic line feed parameter, both of which canbe set to match the requirements of your computer. The followingparagraphs describe these parameters.
Processing Mode
The Tl 855 emulation mode lets you choose either of the followingprocessing modes.
q DP mode — uses commands (described in Chapter 6) similar tothose used by a dot-matrix-type printer.
q WP mode — uses commands (described in Chapter 5) similar tothose used by a daisy-wheel printer.
The default setting for the processing mode parameter is DP.
Automatic Line Feed
Some software programs send both a CR command and an LF commandat the end of each print line, while others send only a CR command.For software that sends only a CR command at the end of each printline, the printer needs to perform an LF operation automatically. Thedefault setting for the automatic LF parameter is NO.
IBM Proprinter XL and Epson FX Emulations
The IBM Proprinter XL and Epson FX emulation submenus containthe same following parameters.
Automatic Line Feed
This parameter is identical to the automatic LF parameter describedfor the TI 855 emulation mode. The default setting is NO.

Printer Setup 2-9
Automatic Carriage Return
This parameter is similar to the automatic LF parameter but is turnedon for software that does not send a CR command at the end of eachprint line. If the printer advances from print line to print line but failsto perform a carriage return operation, you need to turn on theautomatic CR parameter. The default setting is NO.
Slashed Zeros
When on, this parameter causes the printer to print slashes over allzeros to distinguish them from the letter O. The default setting is NO.
Hexadecimal Dump Mode
The hexadecimal dump (HEXDUMP) mode causes the printer toprint the ASCII (hexadecimal) codes for all text characters, controlcharacters, and escape-sequence commands it receives. The resultingprintout can be useful as a troubleshooting device or in analyzing ablock of data and commands sent from the host computer.
The printer does not respond to any control characters or commandsexcept when the printer is using the serial or option port and FLOWCONTROL is set to ETX/ACK; in such a case, the printer interpretsand responds to an ETX control character as an end-of-text command.The ETX character is also included as part of the hex dump.
Note: Chapter 3 describes ASCII codes and control characters;Chapters 5 and 6 describe the escape-sequence commands for theTI 855 emulation mode.

Printer Setup 2-10
Interface Parameters
The interface parameters are values associated with serial communi-cation interfaces. When using a serial interface, these parametersmust be set to correspond to the capabilities of the host computer andthe interface.
The following figure shows the interface submenu and the followingparagraphs describe the interface setup parameters.
Port
The port submenu lets you choose the correct communicationinterface port, depending on whether you are using a serial, parallel,or optional interface. The default setting is SERIAL.
Buffer Size
The buffer size specifies the number of data bytes that the printer’sreceive buffer can store. The buffer size parameter can be set to 256,4000, or 32,000 bytes. The default setting is 32,000.

Baud Rate
The baud rate is the rate (in bits per second) at which the interfacetransfers data. This parameters are 300, 600, 1200, 2400, 4800, 9600,or 19,200 bits per second. The default setting is 9600.
Note: Data transferred over a serial interface consists of either 7- or8-bit data bytes, each of which is accompanied by a start bit, a stopbit, and a parity bit. The values chosen for the data bits and parityparameters depend upon the requirements of the host. (See Chapters3 and 10.)
Data Bits
The data bits parameter specifies whether the printer is to print 7- or8-bit character codes. The default setting is 8. (Refer to Chapters 3and 10 for information about 7- and 8-bit data.)
Parity
Parity checking (often called simply parity) is a method of verifyingthat data is not changed in the transfer process. This parameters areNone, Odd, Even, Mark, or Space, depending upon the requirementsand capabilities of your computer. The default setting is NONE. Ifthe parity bit is selected, it is in addition to the 7 or 8 data bits.
Flow Control
To ensure the orderly flow of data between the host and printer, thehost computer establishes a set of rules commonly known as theready/busy protocol. This protocol allows the printer to notify thehost that it is either ready to receive data or that it is busy and cannotreceive data. The following paragraphs describe the flow-controlparameters.
Printer Setup 2-11
Printer Setup 2-12
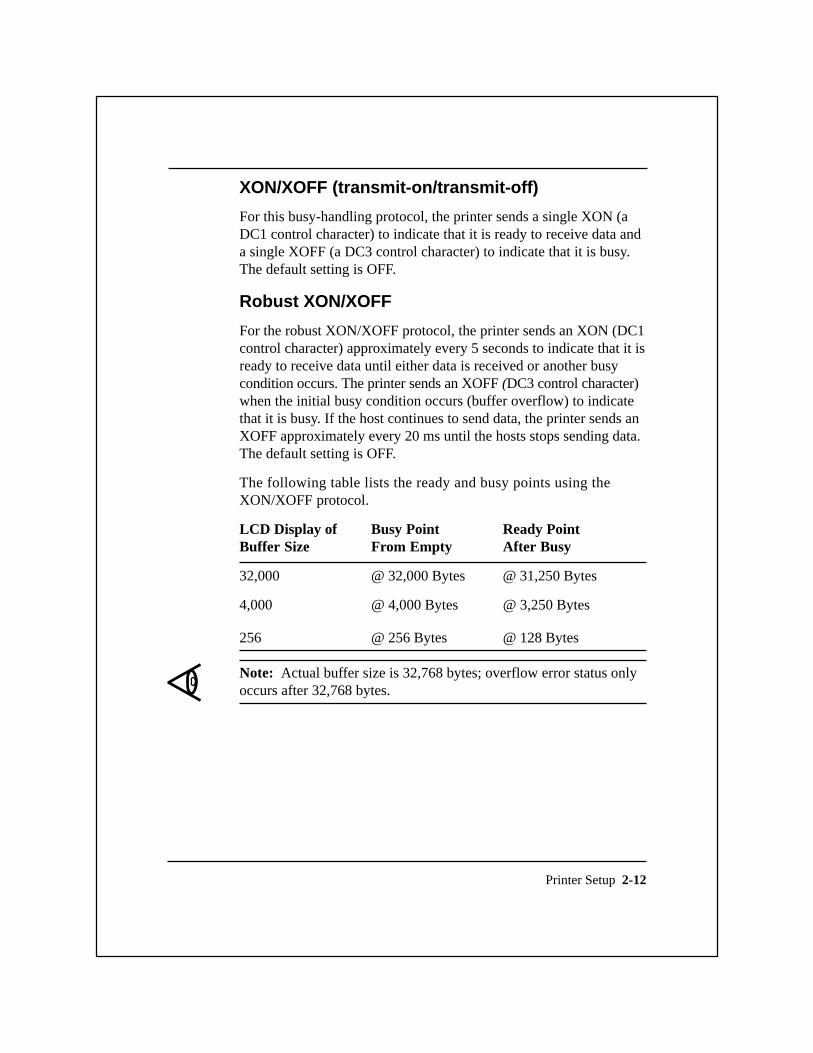
XON/XOFF (transmit-on/transmit-off)
For this busy-handling protocol, the printer sends a single XON (aDC1 control character) to indicate that it is ready to receive data anda single XOFF (a DC3 control character) to indicate that it is busy.The default setting is OFF.
Robust XON/XOFF
For the robust XON/XOFF protocol, the printer sends an XON (DC1control character) approximately every 5 seconds to indicate that it isready to receive data until either data is received or another busycondition occurs. The printer sends an XOFF (DC3 control character)when the initial busy condition occurs (buffer overflow) to indicatethat it is busy. If the host continues to send data, the printer sends anXOFF approximately every 20 ms until the hosts stops sending data.The default setting is OFF.
The following table lists the ready and busy points using theXON/XOFF protocol.
LCD Display of Busy Point Ready PointBuffer Size From Empty After Busy
32,000 @ 32,000 Bytes @ 31,250 Bytes
4,000 @ 4,000 Bytes @ 3,250 Bytes
256 @ 256 Bytes @ 128 Bytes
Note: Actual buffer size is 32,768 bytes; overflow error status onlyoccurs after 32,768 bytes.

Printer Setup 2-13
ETX/ACK (end-of-text/acknowledge)
For this busy-handling protocol, the host sends an ETX controlcharacter at the end of each data transmission, and the printerresponds with an ACK control character to indicate that it is ready toreceive additional data. If the printer is busy when it receives theETX control character, it delays sending the ACK control characteruntil the busy condition is cleared. The default setting is OFF.
Connection
This feature provides selections for use when connecting the printerdirectly to the host computer or indirectly via a modem. When youconnect the printer to a modem, set the connection parameter toMODEM. When you connect the printer directly to the host computeror a terminal, select DIRECT and set the busy-handling parametersto conform to the requirements of the computer. The default settingis DIRECT. The following paragraphs describe the direct connection,ready/busy protocol.
DTR (Pin 20)
For this parameter you can choose either READY HIGH or ALWAYSHIGH. For the READY HIGH setting, the printer sets interface pin20 high to indicate that it is ready to receive data and low to indicatethat it is busy. For the ALWAYS HIGH setting, pin 20 is not used forbusy notification; one of the other busy-handling options must bechosen. The default setting is READY HIGH.
PIN 11
For this parameter, you can choose either READY HIGH or READYLOW. For the READY HIGH setting, the printer sets interface pin 11high to indicate that it is ready to receive data and low to indicatethat it is busy. For the READY LOW setting the printer sets interfacepin 11 low to indicate that it is ready to receive data and high toindicate that it is busy. The default setting is READY LOW.

Printer Setup 2-14
Miscellaneous Setup ParametersThe miscellaneous setup parameters are mechanical and operationalfeatures that do not fit logically into the other setup categories.
The following figure shows the miscellaneous setup parameterssubmenu and the following paragraphs describe these parameters.
Character Set
The Model 8900 Series Printers character set repertoire includes 6standard character sets and 11 international language versions. Thedefault character set is IBM PC1 and the default internationallanguage version is U.S. English.

Printer Setup 2-15
Z-Axis Control
The printer adjusts the printhead-to-paper clearance (z-axis) auto-matically when you load paper into the printer. In addition, the Z-AXISparameter provides a manual z-axis adjustment. This selectioninvokes a display that lets you adjust the printhead in or out.
You also can adjust the z-axis using an escape sequence described inthe Appendix to this manual.
Ribbon Type
The RIBBON TYPE parameter lets you choose between colorprinting and black printing. The default setting is COLOR.
Ribbon Adjust
If the printer appears to be printing mixed colors or missing the upperor lower parts of the characters, the ribbon may need adjustment.The RIBBON ADJ parameter invokes a display that lets you adjustthe ribbon up or down.

Idle Delay
At the end of a printing operation, if the paper is at top of form, theprinter waits for more data and then, after a short delay (idle delay),moves the paper to the tear-off position. The IDLE DELAY parameterinvokes a display that lets you adjust the idle delay to a value in therange of 300 milliseconds to 90 seconds.
You can disable the idle delay feature by selecting a value above 90seconds, in which case the LCD displays DISABLE. When youdisable this feature, the printhead “relaxes” (moves away from thepaper) after 91 seconds of idle time and the paper is not moved to thetear-off position.
Power-Up Online
The PWRUP ONLINE parameter lets you set the printer to power-upin either its online or offline condition. The default setting is YES(power-up online).
Paper Pull-Down Warning
This parameter lets you select the type of warning that occurs whenthe printer is about to pull down tractor-fed paper from its tear-offposition to the normal printing position.
The COUNTDOWN option (factory default) causes the printer LCDto display the numerals 9, 8, 7... down to 1, visually warning thatpaper pull-down is imminent. The pull-down time delay is increasedabout 3 to 4 seconds.
The BELL option causes a series of nine beeps of increasing durationto indicate paper pull-down. The pull-down time delay is increasedabout 3 to 4 seconds.
The BOTH option causes the COUNTDOWN and BELL options tooccur simultaneously.
The NONE option turns off the pull-down warning.
Printer Setup 2-16

Printer Setup 2-17
Graphics Printing Mode
The BI-DIR GRAPHIC parameter lets you choose whether theprinter prints graphics bidirectionally or from left to right only. Thedefault setting is NO (print graphics from left to right only).
LCD Language
The LCD LANG parameter lets you set the control panel LCD todisplay its messages in English, French, German, or Spanish. Thedefault setting is ENGLISH.
Paper Out Equals Busy
The PAPER OUT = BUSY parameter, when set to YES, lets theprinter send a busy condition signal to the communication interfacewhen the printer runs out of paper. The default setting is YES.
Limiting Control Panel Operation
This parameter enables you to select three levels of control panelfunctioning, intended to limit operator access to certain printerfunction. This effectively prevents operator error resulting fromincorrect control panel operation. The menu offers four choices fromLevel 0 (factory default) to Level 3.
Level 0 is conventional, full control panel operation.
Level 1 permits full offline control panel operation, but when theprinter is online only the Online and Clear Error keys function.
Level 2 limits online operation to the Online and Clear Error keysand, when offline, disables the Form Config, Pitch, Quality , Font,and Setup/Test keys.
Level 3 limits online operation to the Online and Clear Error keysand, when offline, disables the Form Select, Form Config, Pitch,Quality , Font, and Setup/Test, and Form Feed keys.

Access the menu to select the four available options as follows.
1. Press and hold the Clear Error switch, then press and hold theStatus switch.
2. Release the Clear Error switch, continue to hold the Statusswitch, then press and hold the Setup/Test switch.
3. Release the Status switch, continue to hold the Setup/Testswitch. The LCD displays Key Access.
4. Press the F2 switch until the level you want is displayed, thenpress the On Line switch to return the printer to its previousmode.
Test FeaturesThe test mode submenu lets you use the built-in printer testfeatures. The Model 8900 Series Printers User’s Manual, Part No.2557785-0001, describes the status report and the barberpole test.
Printer Setup 2-18
KeyAccess
Level 0
Level 1
Level 2
Level 3
press & hold press & holdStatusClear
ErrorSetup/Test
▲
limiting control panel operation menu
▲

Character Sets and Global Commands 3-1
Introduction .................................................................................... 3-2Character Code Table ..................................................................... 3-2Character Sets ................................................................................. 3-3
The US ASCII Character Set ..................................................... 3-3International ASCII Character Sets ........................................... 3-5The IBM PC1 Character Set ...................................................... 3-6The IBM PC2 Character Set ...................................................... 3-8The Nordic PC Character Set .................................................. 3-10ISO 8859/1 Multinational Character Set ................................. 3-12IBM Multinational Character Set ............................................ 3-14
Control Characters ........................................................................ 3-16Printer Commands ........................................................................ 3-19Global Command Set .................................................................... 3-20Global Command Descriptions .................................................... 3-20
Barcode Operations ................................................................. 3-21Set Barcode Parameters ...................................................... 3-21Print Barcode Text .............................................................. 3-22
Oversize Characters Feature .................................................... 3-22Set Oversize Character Scale Factor .................................. 3-22Print Oversize Character ..................................................... 3-22
Color Printing .......................................................................... 3-23Selecting an Automatic Sheet Feeder Bin ............................... 3-24Selecting a Form Format ......................................................... 3-24Defining Raster Graphics ........................................................ 3-25Selecting a Font’s HMI ............................................................ 3-25Selecting Characters Per Inch (cpi) ......................................... 3-26Selecting Print Quality ............................................................ 3-26Selecting an International Character Set ................................. 3-27Selecting an Emulator .............................................................. 3-28Adjusting the Printhead Z-Axis Position ................................. 3-29Writing to the Printer Display ................................................. 3-29Paper-Handling Operations ..................................................... 3-29
3Character Sets and Global Commands

Character Sets and Global Commands 3-2
IntroductionThis chapter describes the standard character sets and providesinformation about their use in the Model 8900 Series Printers.
The printer can use any of several standard or optional character setsthat can be selected via the operator control panel switches or via thehost computer. These character sets provide all control charactersand graphic characters necessary to implement the various printeremulation modes.
The standard character sets reside in the printer read-only memory(ROM), and the optional character sets can be plugged into one ofthe option ROM sockets on the printer logic board.
Character Code TableThe following figure shows the printer character code table. Thecharacter code table is an area in the printer memory in which one8-bit character set or two 7-bit character sets reside.

Character SetsYour printer can use any of the following character sets.
q US ASCII (default character set)
q IBM PC1
q IBM PC2
q Nordic PC
q ISO 8859/1 Multinational
q IBM Multinational
Note: The option ROM sockets on the printer logic board let youinstall additional character sets.
Character Sets and Global Commands 3-3

The US ASCII Character Set
The following table shows the U.S.A. Standard Code for InformationInterchange (US ASCII) character set. This 7-bit character set isdefined by the American National Standards Institute documentANSI X3.4 and is a variant of the ISO 646 character set.
US ASCII Character Set
Character Sets and Global Commands 3-4

Character Sets and Global Commands 3-5
International ASCII Character Sets
With a few exceptions, the international versions of the ASCIIcharacter set are identical to the US ASCII character set. Theseinternational versions can be selected via the operator control panelor via the host computer. The following table lists the variationsbetween the US ASCII character set and the international versions.
Variations Between US ASCII and International ASCII

Character Sets and Global Commands 3-6
The IBM PC1 Character Set
The following two tables show, respectively, the left half and righthalf of the the IBM PC 1 character set.
IBM PC1 Character Set, Left Half

Character Sets and Global Commands 3-7
IBM PC1 Character Set, Right Half
Character Sets and Global Commands 3-8
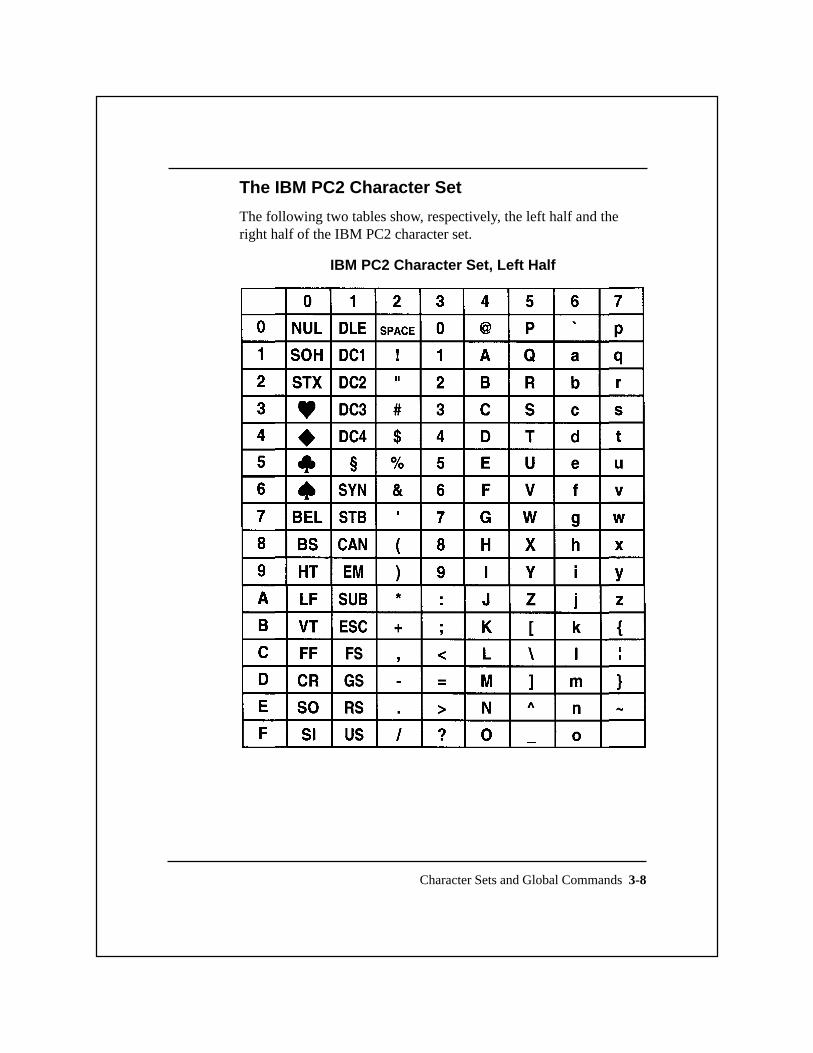
The IBM PC2 Character Set
The following two tables show, respectively, the left half and theright half of the IBM PC2 character set.
IBM PC2 Character Set, Left Half

Character Sets and Global Commands 3-9
IBM PC2 Character Set, Right Half

Character Sets and Global Commands 3-10
The Nordic PC Character Set
The following two tables show, respectively, the left half and righthalf of the Nordic PC character set.
Nordic PC Character Set, Left Half

Nordic PC Character Set, Right Half
Character Sets and Global Commands 3-11

Character Sets and Global Commands 3-12
ISO 8859/1 Multinational Character Set
The following two tables show, respectively, the left half and righthalf of the ISO 8859/1 Multinational character set. The shadedcharacter positions (128-159) represent the Cl control characterswhich are not implemented in the Model 8900 Series Printers.
ISO 8859/1 Multinational Character Set, Left Half

ISO 8859/1 Multinational Character Set, Right Half
Character Sets and Global Commands 3-13

Character Sets and Global Commands 3-14
IBM Multinational Character Set
The following two tables show, respectively, the left half and righthalf of the IBM Multinational character set.
IBM Multinational Character Set, Left Half

Character Sets and Global Commands 3-15
IBM Multinational Character Set, Right Half

Character Sets and Global Commands 3-16
Control CharactersAny character that causes the printer to perform a function is classifiedas a control character. Note that, although the Cl control characters areavailable in one of the standard character sets (ISO 8859/Multinational),your printer does not implement them.
American National Standard ANSI X3.4 and International StandardISO 646 define the C0 control characters based on the specificfunction performed by the character. The C0 control characters aredivided into the following categories.
q Communication controls - Control characters intended to controlor enable data transmissions over communication networks.
q Format effectors - Control characters that control the layout orposition of information on the printed page.
q Information separators - Control characters that separate andqualify information in a logical sense.
q Miscellaneous control characters - Control characters whosedefinitions preclude their inclusion in the preceding categories.
The following table lists and defines the original use of the C0control characters.
Note: The functions of the control characters can vary from oneemulation mode to another. Therefore, these descriptions are includedin Chapters 4 through 9.
Character Sets and Global Commands 3-17
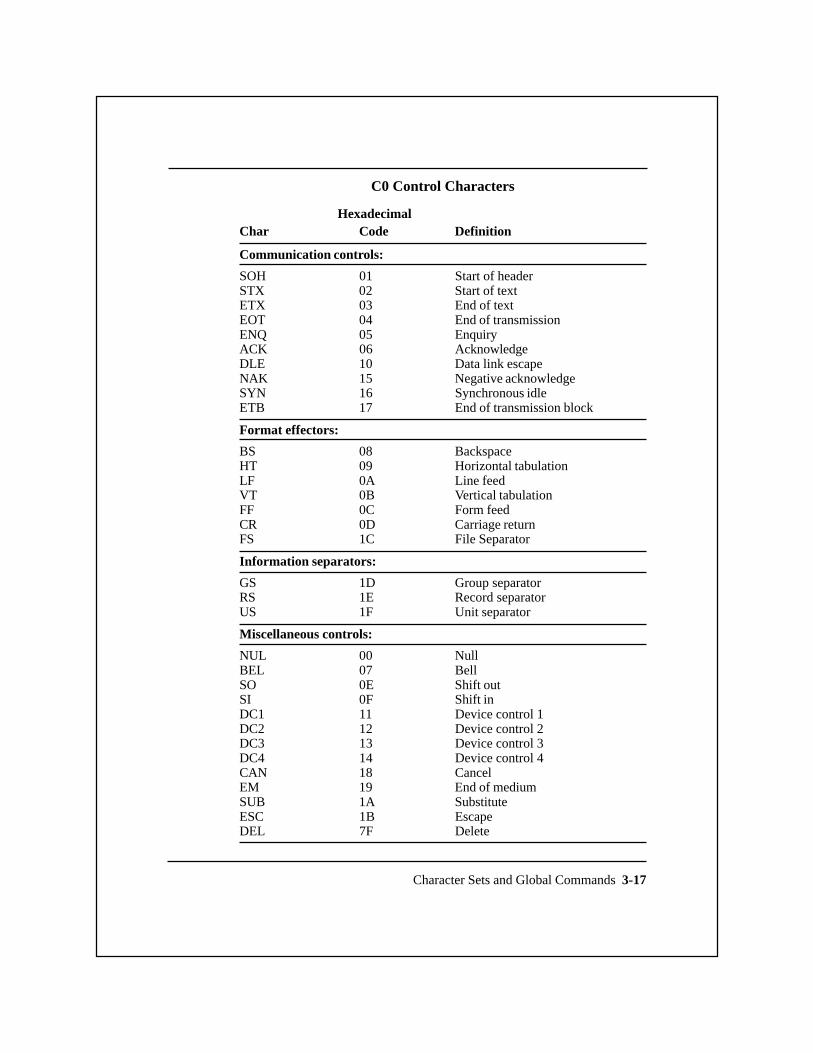
C0 Control Characters
HexadecimalChar Code Definition
Communication controls:
SOH 01 Start of headerSTX 02 Start of textETX 03 End of textEOT 04 End of transmissionENQ 05 EnquiryACK 06 AcknowledgeDLE 10 Data link escapeNAK 15 Negative acknowledgeSYN 16 Synchronous idleETB 17 End of transmission block
Format effectors:
BS 08 BackspaceHT 09 Horizontal tabulationLF 0A Line feedVT 0B Vertical tabulationFF 0C Form feedCR 0D Carriage returnFS 1C File Separator
Information separators:
GS 1D Group separatorRS 1E Record separatorUS 1F Unit separator
Miscellaneous controls:
NUL 00 NullBEL 07 BellSO 0E Shift outSI 0F Shift inDC1 11 Device control 1DC2 12 Device control 2DC3 13 Device control 3DC4 14 Device control 4CAN 18 CancelEM 19 End of mediumSUB 1A SubstituteESC 1B EscapeDEL 7F Delete
Printer Commands
The Model 8900 Series Printers receive commands from the hostcomputer in the form of ASCII control character codes and escape-sequence codes. In response to these commands, the printer performsone or more operations defined by the command set of the currentlyselected emulation mode. Chapters 4 through 8 describe the standardemulation modes.
An example of a control character command common to all charactersets and all emulation modes is the line feed (LF) character. Thiscontrol character (designated by hexadecimal code 0A or decimalcode 10) causes the printer to advance the paper or form to the nextprint line. To invoke the line feed operation, the host computer sendsthe 8-bit code (00001010) identified as the LF character.
An escape-sequence command is a sequence of two or more charactersthat always begins with the ASCII escape (ESC) control characterdesignated by hexadecimal code 1B. The ESC control charactersignals the printer that one or more succeeding characters are anescape-sequence command.
An example of an escape-sequence command common to all standardemulation modes is the Set Form Length command ESC C n. Thiscommand contains the following elements.
q ESC — the ASCII control character that signals the start of anescape sequence
q C — an ASCII character that identifies the escape sequence as aform length command
q n — a decimal variable that can be set to a range of values tospecify the form length in number lines
Note: Decimal values of variables are designated by lowercase italicletters. ASCII characters and number values of variables aredesignated by uppercase italic letters.
Character Sets and Global Commands 3-18
Character Sets and Global Commands 3-19
Some escape sequence commands, valid for all emulation modes, arecalled global commands. These are special commands that select orcontrol some basic or specially defined printer operation.
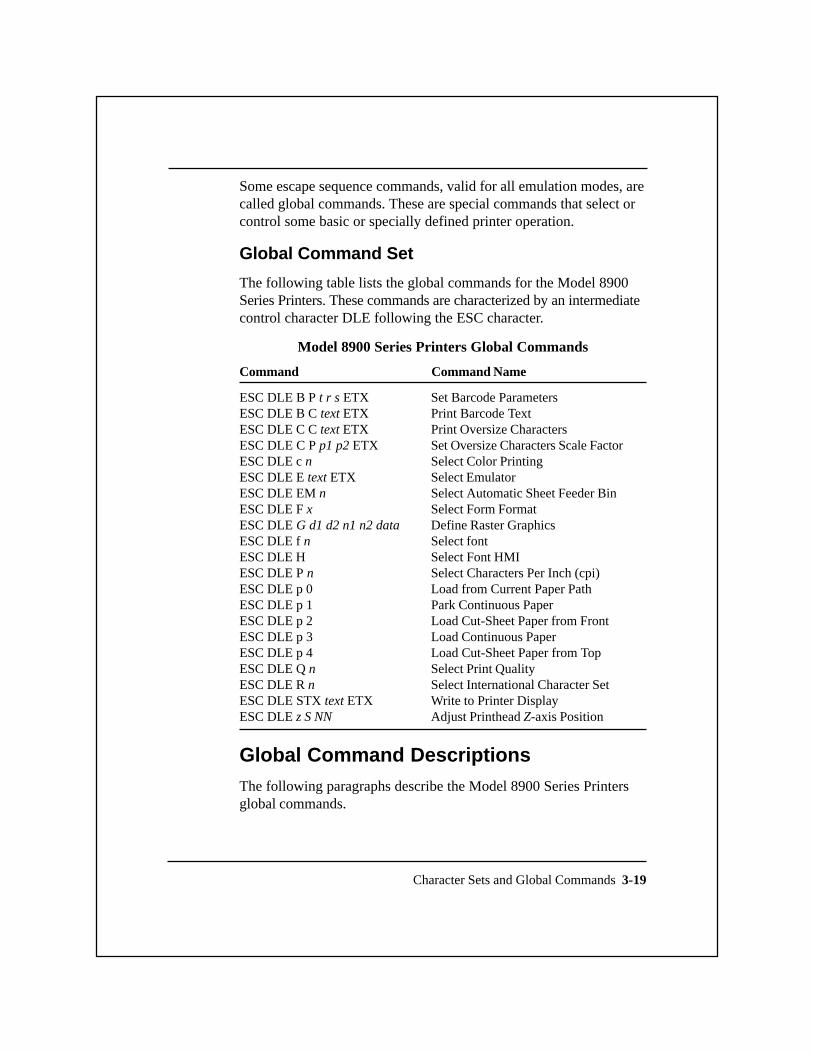
Global Command Set
The following table lists the global commands for the Model 8900Series Printers. These commands are characterized by an intermediatecontrol character DLE following the ESC character.
Model 8900 Series Printers Global Commands
Command Command Name
ESC DLE B P t r s ETX Set Barcode ParametersESC DLE B C text ETX Print Barcode TextESC DLE C C text ETX Print Oversize CharactersESC DLE C P p1 p2 ETX Set Oversize Characters Scale FactorESC DLE c n Select Color PrintingESC DLE E text ETX Select EmulatorESC DLE EM n Select Automatic Sheet Feeder BinESC DLE F x Select Form FormatESC DLE G d1 d2 n1 n2 data Define Raster GraphicsESC DLE f n Select fontESC DLE H Select Font HMIESC DLE P n Select Characters Per Inch (cpi)ESC DLE p 0 Load from Current Paper PathESC DLE p 1 Park Continuous PaperESC DLE p 2 Load Cut-Sheet Paper from FrontESC DLE p 3 Load Continuous PaperESC DLE p 4 Load Cut-Sheet Paper from TopESC DLE Q n Select Print QualityESC DLE R n Select International Character SetESC DLE STX text ETX Write to Printer DisplayESC DLE z S NN Adjust Printhead Z-axis Position
Global Command DescriptionsThe following paragraphs describe the Model 8900 Series Printersglobal commands.

Barcode Operations
The barcode commands let you select a barcode font, set itsparameters, and print any specified character in the equivalentbarcode font.
Note: If the barcode option is not installed, using this ESC sequencecauses an ESC SEQ error.
Set Barcode Parameters
Escape sequence:ESC DLE B P t r s ETXHexadecimal: 1B 10 42 50 t r s 03
This command, where t = type, r = readability, and s = size, lets youselect a barcode font and set its associated parameters. The followingvalues are valid for the command variables.
q Type:
0 — Barcode 3 of 9 (default)
1 — Interleaved 2 of 5
3 — Codabar
q Readability:
0 — Not human readable (default)
1 — Human readable characters on top
2 — Human readable characters on bottom
3 — Human readable characters on top and bottom
q Size:
Vertical height in 8/72 inch increments (default 8/72")
Note: PostNet barcode is available as a font; see “Selecting a Font.”
Character Sets and Global Commands 3-20

Character Sets and Global Commands 3-21
Print Barcode Text
Escape sequence:ESC DLE B C text ETXHexadecimal: 1B 10 42 43 text 03
This command lets you print a character or string of charactersspecified by the variable text. For example, to print the barcodeequivalents of the numerals 0, 1, and 2 from the barcode font setselected by the Set Barcode Parameters command, enter the sequenceESC DLE B C 0 1 2 ETX.
Oversize Characters Feature
Using this feature, you can increase the size of your selected fontfrom 1 times to 127 times the original size. One global commanddetermines the character size; a second global command prints theoversize characters.
Set Oversize Character Scale Factor
Escape sequence:ESC DLE C P p1 p2 ETXHexadecimal: 1B 10 43 50 p1 p2 03
This command defines the horizontal and vertical scale factors whichdetermine the size of the characters printed by the Print OversizeCharacter command.
The p1 variable is the vertical scale factor (1 byte), from 1 to 127;the default is 2. The p2 variable is the horizontal scale factor (1 byte),from 1 to 127; the default is 2. If either variable is set to less than 1or more than 127, the value defaults to 2.

Character Sets and Global Commands 3-22
Print Oversize Character
Escape sequence:ESC DLE C C text ETXHexadecimal: 1B 10 43 43 text 03
This command prints the text contained within the command usingthe horizontal and vertical scale factors selected by the Set OversizeCharacters command. The text variable is the character string to beprinted in oversize characters.
You can use a maximum of 200 characters in a text string; excesscharacters are treated as normal characters, and the command islimited to printing from the logical start position to the logical endposition of a single line of text. Text extending beyond the end of theline is truncated at the logical end position.
Because the ETX control character is used as the command sequencedelimiter, if your text string requires an ETX character you must usetwo consecutive ETX characters within the text string to be recognized.
The printer uses the bit patterns dictated by the print quality selected;draft quality bit patterns in draft mode, text quality bit patterns intext and quality modes.
Color Printing
Escape sequence:ESC DLE c nHexadecimal: 1B 10 63 n
The Model 8900 Series Printers can print up to seven different colors(including black). This feature is standard on the Model 8930 andoptional on the Model 8920.
This command selects the color specified by the variable n, where ncan be any of the following values.
0 — black 4 — green
1 — cyan 5 — purple
2 — magenta 6 — orange
3 — yellow

Character Sets and Global Commands 3-23
Selecting an Automatic Sheet Feeder Bin
Escape sequence:ESC DLE EM nHexadecimal: 1B 10 19 n
This command selects the ASF bin designated by the variable n,where n can range from 30 through 33 hex as follows:
0 (30H) = Load from current bin
1 (31H) = Select & load from bin 1
2 (32H) = Select & load from bin 2
3 (33H) = Load from current bin
If the command is received with paper loaded from a friction feedpath, the currently loaded form is ejected, and a form is loaded asdefined by this command. If the command is received with paperloaded from the tractor feed path, this command is accepted butignored.
The ASF option on the Miscellaneous Menu of the printer controlpanel must be set to “YES” for this function to operate.
Selecting a Form Format
Escape sequence:ESC DLE F xHexadecimal: 1B 10 46 x
The Model 8900 Series Printers offer a set of ten predefined formformats. Each of these form formats, designated as A through J, has anassociated set of values that defines the parameters of the form. Althoughthese form format parameters are preset at the factory to their defaultvalues, the user can select any of the form formats and alter itsparameters to fit any specific application. The Model 8900 SeriesPrinters User’s Manual, Part No. 2557785-0002, describes the presetform format parameters and explains how to select and change them.The Select Form Format command selects the form format designatedby the variable x, where the value of x can be any of the ten predefinedform formats A through J.

Character Sets and Global Commands 3-24
Defining Raster Graphics
Escape sequence:ESC DLE G d1 d2 n1 n2 dataHexadecimal: 1B 10 47 d1 d2 n1 n2 data
This command defines the dots-per-inch (DPI) density, the bytecount of bit-image data, and bit-image data of those emulations thatcurrently support raster graphics.
The variable d1 d2 is DPI density, where d1 is LSB and d2 is MSB.The variable nl n2 is the byte count, where n1 is the LSB and n2 isthe MSB. And data is bit-image data. All variables can range from 0through 255.
DPI density defines the horizontal dots per inch at which the bitimage data is printed. Valid DPI values are 60, 72, 80, 90, 100, 120,135, 144, 150, 180, 200, 240, and 300 dots per inch. Any other valuecauses an escape sequence error. The DPI density format is d1 + (d2* 256) = DPI.
The byte count variable indicates the number of bit-image data bytesto follow. The byte count format is n1 + (n2 * 256) = byte count.
A bit-image data byte defines a column of 8-pin raster graphics. Thebits of each byte have valid values of 1, 2, 4, 8, 16, 32, 64, and 128.In a vertical column of dots, the dots are arranged so that the MSB(bit value = 128) is at the top, and the LSB (bit value = 1) is at thebottom.

Character Sets and Global Commands 3-25
Selecting a Font
Escape Sequence:ESC DLE f nHexadecimal: 1B 10 66 n
This command allows you to access type styles not specificallysupported by an emulation.
This command selects the font designated by the variable n, where ncan range from 0 through 254 decimal as follows:
Font ID No.
Courier 0
Prestige Elite 1
OCR A 3
OCR B 4
Gothic 5
Presentor 6
PostNet 7
Note: Using any value other than the valid font ID number for n,causes the printer to accept and ignore the command, and cause aFONT NOT AVAILABLE ERROR.
Selecting a Font’s HMI
Escape sequence:ESC DLE HHexadecimal: 1B 10 48
This command enables you to access natural pitches of a font that maynot be specifically supported by an emulation. The command setshorizontal motion index (HMI) to the currently selected font’s HMI.
The command cancels the double-width print mode, but does notcancel the oversize-character (scalable characters) command. Thiscommand resets the Epson variable spacing to zero.

Character Sets and Global Commands 3-26
Selecting Characters Per Inch (cpi)
Escape sequence:ESC DLE P nHexadecimal: 1B 10 50 n
This command enables you to access natural pitches of a font thatmay not be specifically supported by an emulation. The commandsets pitch according to the variable n, which can range from 30through 33 hex.
Unless specified otherwise, the emulation’s default HMI is used.
Character pitch commands are effective immediately upon receipt,thus causing a pitch change within a line.
This command cancels double-wide print mode and compressed printmode. The values of n for cpi selection are listed in the followingtable.
Value of n Hex Value Pitch*
1 30 102 31 123 32 154 33 16.7
*for standard fonts and emulations
Selecting Print Quality
Escape sequence:ESC DLE Q nHexadecimal: 1B 10 51 n
This command enables you to access print quality modes notspecifically supported by an emulation. The command selects theprint quality mode according the the variable n, which can rangefrom 30 through 33 hex.
This command does not affect the forms configuration draft/rapid-draft setting. However, the fast draft mode setting is valid only in 12and 15 cpi. If 10 cpi is set, draft mode is selected.

Character Sets and Global Commands 3-27
The values of n for print mode selection are listed in the following table.
Mode Hex Value
Draft 30Text 31Letter 32Fast Draft 33
Selecting an International Character Set
Escape sequence:ESC DLE R nHexadecimal: 1B 10 52 n
The ASCII character set contains the C0 control codes, the uppercaseand lowercase elements of the Latin alphabet, punctuation symbols,and other commonly used symbols. The international versions of theASCII character set are identical to the standard US ASCII versionwith a few exceptions. (See the paragraph entitled “InternationalASCII Character Sets” in Chapter 3.)
This command selects the international ASCII character set designatedby the variable n, where the value of n can be any of the hexadecimalvalues shown in the following table.
Character Set Hex Character Set Hex
United States English 00 not used 0CFrench 01 PC No. l, LH 0DGerman 02 PC No. 1, RH 0EUnited Kingdom English 03 PC No. 2, LH 0FItalian 04 PC No. 2, RH 10Spanish 05 Multinational LH 11Japanese 06 Multinational RH 12Norwegian 07 Nordic No. 2, LH 13Swiss 08 Nordic No. 2, RH 14Swedish 09 ISO 8859/1 LH 15French Canadian 0A ISO 8859/1 RH 16All Characters 0B

Character Sets and Global Commands 3-28
A character set is defined as 128 character positions. If more than128 character positions are required, the set is divided in two and isdesignated left half (LH) for positions 1 through 127 and right half(RH) for positions 128 through 255. The MSB determines if thecharacter set is placed in the left half (0 through 7F) or the right half(80 through FF) of the 8-bit character set table. An MSB of zeroplaces the character set in the left half, MSB of one, in the right half.
Note: The hex value 1B (left half) is reserved for use as the ASCIIescape control character (ESC). Any graphic defined at this locationis not printed.
The error message FONT NOT AVAILABLE occurs if the value of nis not specified or is out of range.
Selecting an Emulator
Escape sequence:ESC DLE E text ETXHexadecimal: 1B 10 45 text 03
The Select Emulator command selects the emulation mode specifiedby the variable text. To use this command, substitute the name of theemulator for text that appears on the control panel display. If thename does not exactly match one of the following resident emulationmodes (or an installed optional emulation mode), the printer ignoresthis command.
q TI880
q TI855
q PROPRINTER
q EPSON
q HEXDUMP
Note: When the printer is in the hexadecimal dump mode, the SelectEmulator command is not functional.

Character Sets and Global Commands 3-29
Adjusting the Print head Z-Axis Position
Escape sequence:ESC DLE z S NNHexadecimal: 1B 10 7A S NN
The Adjust Printhead Z-Axis Position command adjusts theprinthead in or out by the number of steps specified by the variableNN, which is a two-digit ASCII value ranging from 00 through 99.
See Appendix A for Application Instructions.
Writing to the Printer Display
Escape sequence:ESC DLE STX text ETXHexadecimal: 1B 10 02 text 03
The Write to Printer Display command lets you write a message ofup to 16 characters to the second line of the printer display. Forexample, to write THIS IS TEXT to the display, enter the sequenceESC DLE STX THIS IS TEXT ETX. The display then shows themessage THIS IS TEXT on the second line. A message is terminatedby either ETX or upon reaching the sixteenth character.
Paper-Handling Operations
Escape sequence:ESC DLE p nHexadecimal: 1B 10 70 n
The paper-handling commands enable you to clear the current paperpath or select various paper-loading options, where n is a valueranging from 30 through 33 hex. The value of n selects the followingpaper-handling options:
0 (30H) = Load from current paper path1 (31H) = Clear current paper path2 (32H) = Load from front friction-feed path3 (33H) = Load from tractor-feed path4 (34H) = Load from top friction-feed path
Character Sets and Global Commands 3-30
If the paper is not at the top-of-form position when the printerreceives the clear current path command, the printer executes a formfeed operation before attempting to park tractor-fed paper anddisplays a prompt to PLEASE TEAR paper.
If the PAPEROUT=BUSY option in the Setup/Test menu is set toYES, clearing (parking) the paper causes the printer to send a BUSYsignal to the host, which may suspend communication.
The clear-current-paper-path command (n = 1) is executed as follows:
q With tractor-fed paper loaded, the printer parks the paper.
q With friction-fed paper loaded, the printer ejects any cut sheets.
q With no paper loaded, the printer accepts but ignores the command.
If tractor-fed paper is currently loaded, only the clear/park command(n = 1) is executed; any other paper path command is ignored.
If friction-fed paper (cut sheet) is currently selected and loaded, thecommand functions as follows:
q Any command option to select another paper path causes ejectionof the current paper before execution of the command.
q A friction-feed command for the currently selected paper path isaccepted but ignored.
q A clear/park command (n = 1) causes ejection of the cut sheet.

Introduction .................................................................................... 4-4TI 880 Answer Message Function ............................................. 4-5TI 880 Response Format Selection ............................................ 4-5
Model 880 Printer Emulation Commands ...................................... 4-6Model 880 Command Descriptions .............................................. 4-10
The Variables N and n..............................................................4-10Printer Operation Commands .................................................. 4-11
Sound Bell .......................................................................... 4-11Transmit Configuration Report ........................................... 4-11Transmit Status Report ....................................................... 4-13Select Unidirectional Printing ............................................ 4-14Cancel Unidirectional Printing ........................................... 4-14
Form Format Selection Commands ......................................... 4-14Set Form Length to N Lines................................................ 4-14Set Form Length to n Lines ................................................ 4-15Load Default Form Parameters ........................................... 4-15
Margin Control Commands ..................................................... 4-17Set Top Margin at Line N ...................................................4-17Set Bottom Margin at Line N..............................................4-17Set Top and Bottom Margins at Lines N1 and N2 ..............4-17Set Left Margin at Column N .............................................4-18Set Right Margin at Column N ...........................................4-18Set Left and Right Margins at Columns N1 and N2 ...........4-18Set Line Width to n Columns ............................................. 4-18Restore Default Line Width ................................................ 4-18
Horizontal Motion Commands ................................................ 4-19Backspace ........................................................................... 4-19Tab Horizontally ................................................................. 4-19
TI Model 880 Printer Emulation 4-1
4Texas Instruments Model 880
Printer Emulation

TI Model 880 Printer Emulation 4-2
Move to Column n ..............................................................4-19Carriage Return ................................................................... 4-19Tab Right to Column N .......................................................4-20Tab Right N Columns ......................................................... 4-20Set Horizontal Tab Stops .................................................... 4-20Clear All Horizontal Tab Stops .......................................... 4-20Set Horizontal Tab Stop at Current Position ...................... 4-21Clear Horizontal Tab Stop at Current Position ................... 4-21
Vertical Motion Commands ..................................................... 4-21Line Feed ............................................................................ 4-21Form Feed ........................................................................... 4-21Tab Vertically ...................................................................... 4-22Move to Line n....................................................................4-22Tab Vertically to Line N......................................................4-22Tab Vertically N Lines ........................................................ 4-22Set Vertical Tab Stops ......................................................... 4-23Set Vertical Tab Stop at Current Position ........................... 4-23Clear All Vertical Tab Stops ............................................... 4-23Clear Vertical Tab Stop at Current Position ....................... 4-23
Character Pitch Commands ..................................................... 4-23Set Character Pitch to 5 cpi ................................................ 4-23Set Character Pitch to 8.3 cpi ............................................. 4-23Set Character Pitch to 10 cpi .............................................. 4-24Set Character Pitch to 12 cpi .............................................. 4-24Set Character Pitch to 16.7 cpi ........................................... 4-24
Line Spacing Commands ......................................................... 4-24Set Line Spacing to 3 lpi ..................................................... 4-24Set Line Spacing to 4 lpi ..................................................... 4-24Set Line Spacing to 6 lpi ..................................................... 4-24Set Line Spacing to 8 lpi ..................................................... 4-25Set Line Spacing to n/72 Inch ............................................. 4-25Set Line Spacing to N/ 144 Inch ......................................... 4-25Set Line Spacing to n/2 16 Inch .......................................... 4-25Select Double Line Spacing ............................................... 4-25

TI Model 880 Printer Emulation 4-3
Cancel Double Line Spacing .............................................. 4-26Print Enhancement Commands................................................ 4-26
Select Expanded (Double-Wide) Print ............................... 4-26Cancel Expanded (Double-Wide) Print .............................. 4-26Select Letter-Quality Print .................................................. 4-26Cancel Letter-Quality Print ................................................ 4-26
Raster Graphics Commands .................................................... 4-27Set Up Graphics Parameters ............................................... 4-27Select 60 dpi Graphics ........................................................ 4-28Select 120 dpi Graphics ...................................................... 4-28
Font Selection Commands ....................................................... 4-29Select Font N ......................................................................4-29Font Invocation ................................................................... 4-29Designate G0 Font by ROM Identifier N ...........................4-29Designate Gl Font by ROM Identifier N ............................4-29Designate G2 Font by ROM Identifier N ...........................4-30Designate G3 Font by ROM Identifier N ...........................4-30Select Designated Character From G2 Font ....................... 4-30Select Designated Character From G3 Font ....................... 4-30Invoke G0 Font as GL ........................................................ 4-30Invoke Gl Font as GL ......................................................... 4-30Invoke G2 Font as GL ........................................................ 4-30Invoke G3 Font as GL ........................................................ 4-30Invoke Gl Font as GR ......................................................... 4-30Invoke G2 Font as GR ........................................................ 4-31Invoke G3 Font as GR ........................................................ 4-31

TI Model 880 Printer Emulation 4-4
IntroductionThe Texas Instruments Model 880 Printer emulation mode is thedefault emulation mode of your printer. If your printer includes colorprinting and the automatic sheet feeder, this mode lets you use theglobal commands described in Chapter 3 for operating these options.This mode also lets you use the global commands to select theinternational versions of the ASCII character set. While operating inthis mode, the printer can perform all the functions of the Model 880Printer with the following considerations:
q The escape sequence for font selection is ESC f N.
q The Model 880 emulation supports all Model 8900 globalcommands.
q Factory selected power-up defaults for the Model 880 emulationare:
— LF/CR on CR — OFF
— CR with LF, VT, or DC2 — OFF
— Graphics — OFF
— SO = expanded print (1 line) — OFF
— The last selected form setting change made either via thecontrol panel or the host (escape sequence) is retained andrestored at power-up.
q Horizontal graphics is not supported.
q The escape sequence ESC P n ESC / to invoke a character set isnot supported.

TI Model 880 Printer Emulation 4-5
Tl 880 Answer Message Function
The TI 880 emulation provides, as a TI 880 feature, an answerbackmessage (ABM) that can be programmed with a message of up to 20characters. If a message is programmed, it is transmitted when theASCII character ENQ is received. The ABM is stored in the printer’snonvolatile memory and is programmable with an escape sequencewhen the ABM load setup parameter (ABM MSG LOAD) of theTI 880 emulation is turned on.
Escape sequence:ESC [ Q text NULHexadecimal: 1B 5B 51 text 00
where text can contain up to 20 ASCII characters, and the NULcharacter is used as the string terminator.
TI 880 Response Format Selection
The TI 880 emulation provides a response format selection feature(RESP FMT) allowing the user to select whether the responseformats for configuration and status inquiries are preceded by anASCII ESC character and if the string terminator is to be precededby a semicolon. The default selection is W/O ESC.
q When the RESP FMT selection is W/O ESC the format of theresponses to the configuration and status requests are not precededby the ASCII ESC character.
Response Examples:
Config: [880;14;27;36;41cStatus: [880;24;2Cn
q When the RESP FMT selection is W/ ESC the format of theresponses to the configuration and status requests are precededby the ASCII ESC character.
Response Examples:
Config: ESC[880;14;27;36;41cStatus: ESC[880;24;2Cn
TI Model 880 Printer Emulation 4-6
q When the RESP FMT selection is W/ ESC; the format of theresponses to the configuration and status requests are precededby the ASCII ESC character and the string terminator is precededby a semicolon.
Response Examples:
Config: ESC[880;14;27;36;41;cStatus: ESC[880;24;2C;n
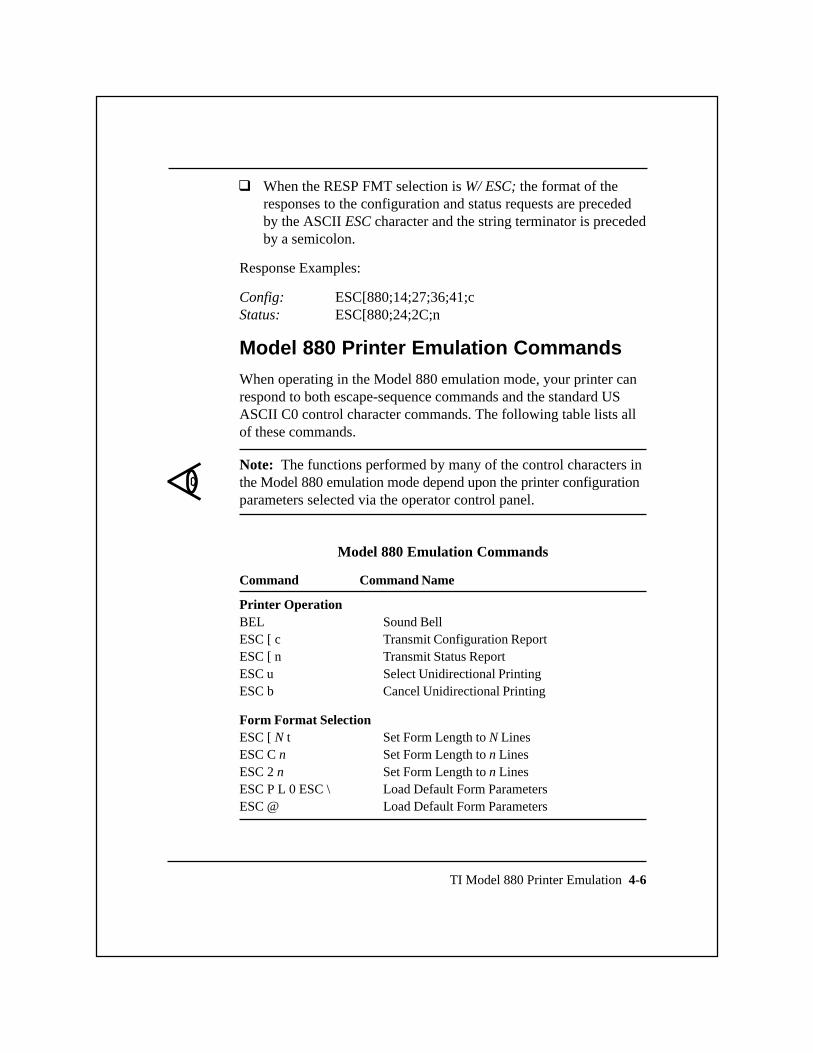
Model 880 Printer Emulation CommandsWhen operating in the Model 880 emulation mode, your printer canrespond to both escape-sequence commands and the standard USASCII C0 control character commands. The following table lists allof these commands.
Note: The functions performed by many of the control characters inthe Model 880 emulation mode depend upon the printer configurationparameters selected via the operator control panel.
Model 880 Emulation Commands
Command Command Name
Printer OperationBEL Sound BellESC [ c Transmit Configuration ReportESC [ n Transmit Status ReportESC u Select Unidirectional PrintingESC b Cancel Unidirectional Printing
Form Format SelectionESC [ N t Set Form Length to N LinesESC C n Set Form Length to n LinesESC 2 n Set Form Length to n LinesESC P L 0 ESC \ Load Default Form ParametersESC @ Load Default Form Parameters
TI Model 880 Printer Emulation 4-7
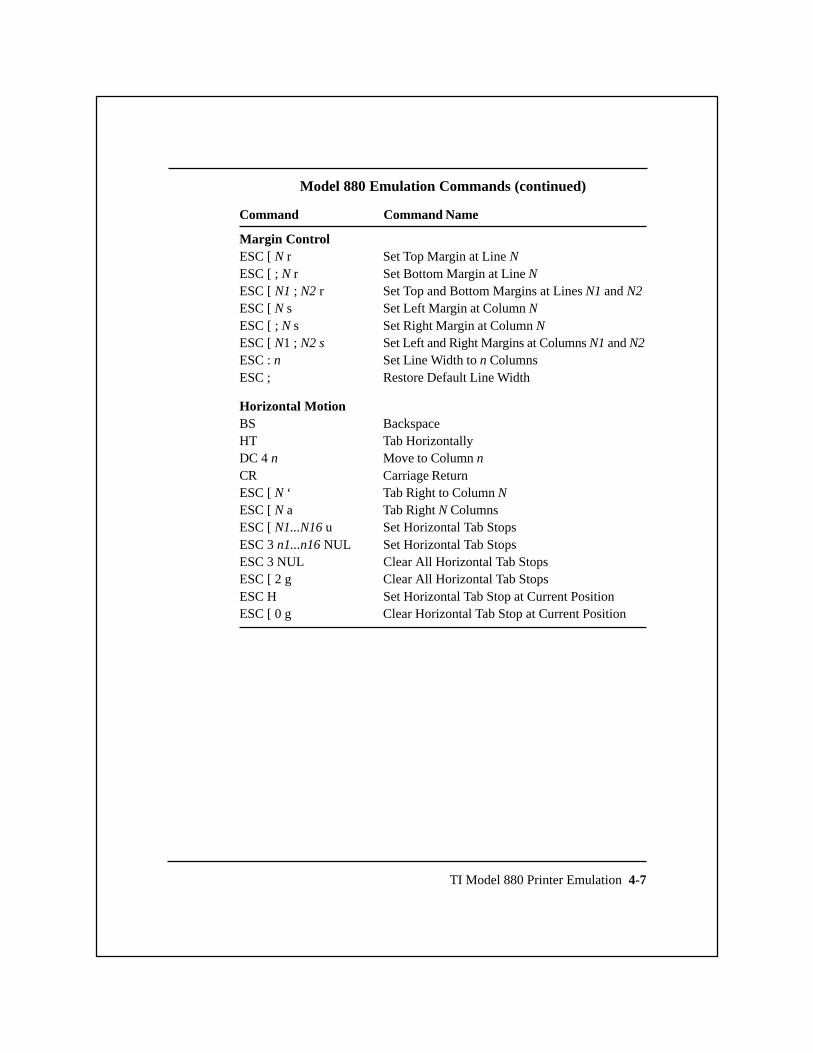
Model 880 Emulation Commands (continued)
Command Command Name
Margin ControlESC [ N r Set Top Margin at Line NESC [ ; N r Set Bottom Margin at Line NESC [ N1 ; N2 r Set Top and Bottom Margins at Lines N1 and N2ESC [ N s Set Left Margin at Column NESC [ ; N s Set Right Margin at Column NESC [ N1 ; N2 s Set Left and Right Margins at Columns N1 and N2ESC : n Set Line Width to n ColumnsESC ; Restore Default Line Width
Horizontal MotionBS BackspaceHT Tab HorizontallyDC 4 n Move to Column nCR Carriage ReturnESC [ N ‘ Tab Right to Column NESC [ N a Tab Right N ColumnsESC [ N1...N16 u Set Horizontal Tab StopsESC 3 n1...n16 NUL Set Horizontal Tab StopsESC 3 NUL Clear All Horizontal Tab StopsESC [ 2 g Clear All Horizontal Tab StopsESC H Set Horizontal Tab Stop at Current PositionESC [ 0 g Clear Horizontal Tab Stop at Current Position

TI Model 880 Printer Emulation 4-8
Model 880 Emulation Commands (continued)
Command Command Name
Vertical MotionLF Line FeedFF Form FeedVT Tab VerticallyDC2 n Move to Line nESC [ N d Tab Vertically to Line NESC [ N e Tab Vertically N LinesESC [ N1...N16 v Set Vertical Tab StopsESC 1 n1...n16 NUL Set Vertical Tab StopsESC J Set Vertical Tab Stop at Current PositionESC [ 4 g Clear All Vertical Tab StopsESC [ l g Clear Vertical Tab Stop at Current Position
Character PitchESC P I ESC \ Set Character Pitch to 5 cpiESC P J ESC \ Set Character Pitch to 8.3 cpiESC P C ESC \ Set Character Pitch to 10 cpiESC 6 Set Character Pitch to 10 cpiESC P K ESC \ Set Character Pitch to 12 cpiESC P D ESC \ Set Character Pitch to 16.7 cpiESC 7 Set Character Pitch to 16.7 cpi
Line SpacingESC P B ESC \ Set Line Spacing to 3 lpiESC P G ESC \ Set Line Spacing to 4 lpiESC P A ESC \ Set Line Spacing to 6 lpiESC 4 Set Line Spacing to 6 lpiESC 2 Set Line Spacing to 6 lpiESC P H ESC \ Set Line Spacing to 8 lpiESC 5 Set Line Spacing to 8 lpiESC 0 Set Line Spacing to 8 lpiESC A n Set Line Spacing to n/72 InchESC [ N # q Set Line Spacing to N/ 144 InchESC 3 n Set Line Spacing to n/216 InchESC P S ESC \ Select Double Line SpacingESC P T ESC \ Cancel Double Line Spacing

TI Model 880 Printer Emulation 4-9
Model 880 Emulation Commands (concluded)
Command Command Name
Print EnhancementSO Select Expanded Print (1)ESC P M ESC \ Select Expanded PrintESC P N ESC \ Cancel Expanded PrintESC P O ESC \ Select Letter-Quality PrintESC P P ESC \ Cancel Letter-Quality Print
Raster GraphicsESC [ H ; B ; V q Set Up Graphics ParametersESC K n1 n2 Select 60 dpi Raster GraphicsESC L n1 n2 Select 120 dpi Raster Graphics
Font SelectionESC f N Select Font NESC ( N Designate G0 FontESC ) N Designate Gl FontESC * N Designate G2 FontESC + N Designate G3 FontEM y Select Designated G2 CharacterGS y Select Designated G3 CharacterSI Invoke G0 Font as GLSO Invoke Gl Font as GL (2)ESC n Invoke G2 Font as GLESC o Invoke G3 Font as GLESC k Invoke Gl Font as GRESC l Invoke G2 Font as GRESC m Invoke G3 Font as GR
(1) SO = Expand set to ON.(2) SO = Expand set to OFF.

Model 880 Command DescriptionsThe following paragraphs describe the Model 880 emulation modecommands. Many of the escape-sequence commands contain one ormore variables to specify various command parameters. Thesevariables are italicized in the command formats to indicate that theycan be set to more than one value.
Note: For clarity, the individual terms of each escape-sequence areseparated by spaces throughout this chapter. When you enter thesecommands, you must omit these spaces.
The Variables N and n
Many of the Model 880 commands contain variables, represented bythe uppercase letter N or the lowercase letter n. The uppercase letterN represents an ordinary decimal value, consisting of one or morenumerals. The lowercase letter n represents a single ASCII characterwhose value is equivalent to the decimal value from the US ASCIIcharacter table.
The following examples illustrate the use of the variables N and n.
Example 1. Use the escape sequence ESC [ N t to set the formlength to 50 lines.
Escape sequence:ESC [ 5 0 tHexadecimal: 1B 5B 35 30 74
In this example, the variable N (50) is represented by the two ASCIIcharacters 5 and 0. From the US ASCII character table, the hexadecimalvalues of these characters are, respectively, 35 and 30. Thus, to setthe value of N to 50, the computer sends the hexadecimal values 35and 30.
Example 2. Use the escape sequence ESC C n to set the form lengthto 50 lines.
Escape sequence:ESC C 2Hexadecimal: 1B 43 32
TI Model 880 Printer Emulation 4-10

TI Model 880 Printer Emulation 4-11
From the US ASCII character table, the ASCII character whosedecimal value is 50 is the ASCII character 2. Thus, in this example,you set the value of n to 2.
Printer Operation Commands
These commands allow the host computer to control some basicprinter functions.
Sound Bell
Control character: BELHexadecimal: 07
This command causes the printer to sound a short tone.
Transmit Configuration Report
Escape sequence:ESC [ cHexadecimal: 1B 5B 63
The host computer sends this command to request a report of thecurrent printer configuration. A configuration report containshexadecimal codes that inform the host of the current printer configu-ration.
Example. The following is a typical configuration report.
[880;14;27;36;41c
Each of the two-digit numbers is a hexadecimal configuration codethat indicates the following.
Code Configuration
14 The current printer communication mode is direct-connectionwith pin 11 of the serial interface active for ready.
27 The current baud rate setting is 4800 bits per second.
36 The printer is set for 7-bit operation with even paritychecking.
41 The current ASCII language version is U.S.

TI Model 880 Printer Emulation 4-12
The following table provides a complete list of Model 880 configurationcodes.
Model 880 Configuration Codes
Code Description
Communication Mode13 Full-duplex modem connect14 Direct connection, pin 11 high for ready15 Direct connection, pin 11 low for ready16 Optional communication interface17 Parallel communication interface
Baud Rate23 300 bps24 600 bps25 1200 bps26 2400 bps27 4800 bps28 9600 bps2A 19,200 bps
Parity Checking Mode (7-bit Data Format)31 Odd, received bits not checked32 Even, received bits not checked35 Odd, received bits checked36 Even, received bits checked37 Mark, received bits not checked38 Space, received bits not checked
Parity Checking Mode (8-bit Data Format)39 No parity checking3A Odd, received bits checked3B Even, received bits checked
International Language Version41 US ASCII42 France43 United Kingdom44 Germany /Austria45 Sweden/Finland46 Denmark/Norway47 Spain/Latin America48 Switzerland49 Canadian French

TI Model 880 Printer Emulation 4-13
Model 880 Configuration Codes
Code Description
Miscellaneous Configuration Codes81 Escape sequence execution enabled83 X-on/X-off control (DC1 = ready, DC3 = busy)84 LF and CR on receipt of LF85 LF and CR on receipt of CR8A Pin 20 ready/busy protocol enabled8B CR on receipt of LF, VT, or DC29A SO selects expanded print9B Power-up online selected9C 256-byte receive buffer selected
Transmit Status Report
Escape sequence:ESC [ nHexadecimal: 1B 5B 6E
The host computer sends this command to request a report of thecurrent printer status. A status report contains either hexadecimalerror codes to indicate a current printer error or no error codes toindicate that the printer is online and ready to receive data.
Example. The following is a typical status report
[880;24;2Cn
Each of the two-digit numbers is a hexadecimal error code thatindicates the following.
Code Error
24 Parity error
2C Character set not installed
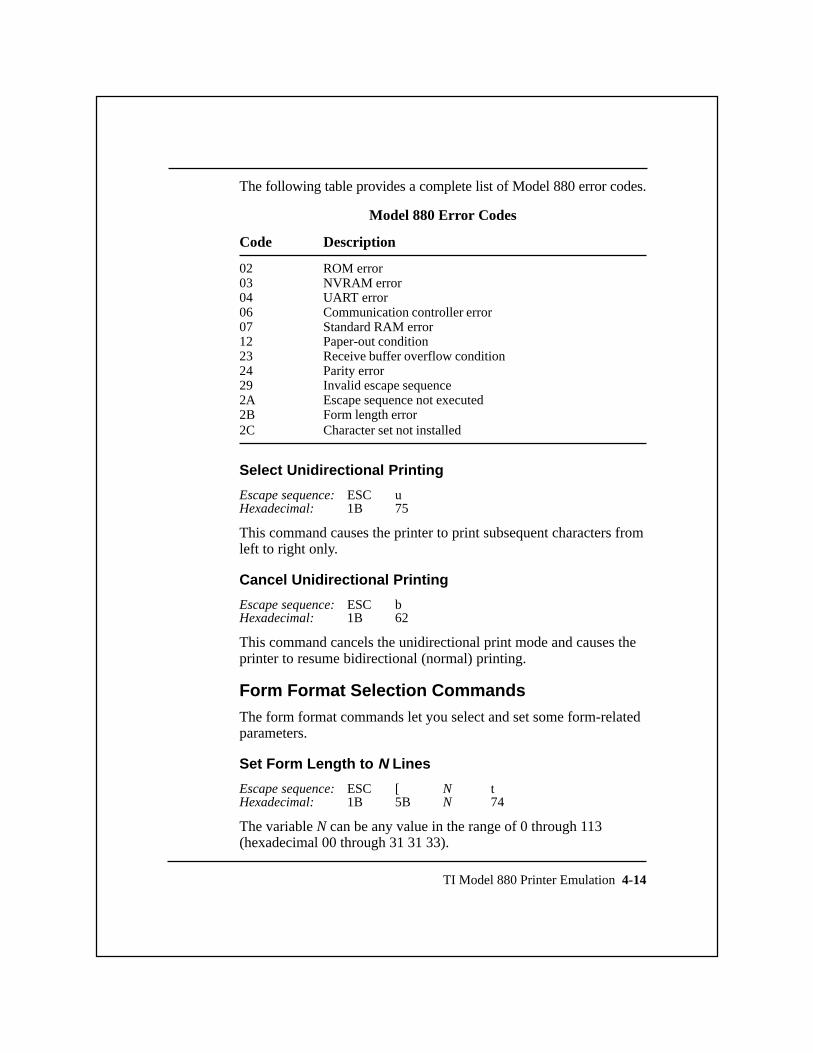
TI Model 880 Printer Emulation 4-14
The following table provides a complete list of Model 880 error codes.
Model 880 Error Codes
Code Description
02 ROM error03 NVRAM error04 UART error06 Communication controller error07 Standard RAM error12 Paper-out condition23 Receive buffer overflow condition24 Parity error29 Invalid escape sequence2A Escape sequence not executed2B Form length error2C Character set not installed
Select Unidirectional Printing
Escape sequence:ESC uHexadecimal: 1B 75
This command causes the printer to print subsequent characters fromleft to right only.
Cancel Unidirectional Printing
Escape sequence:ESC bHexadecimal: 1B 62
This command cancels the unidirectional print mode and causes theprinter to resume bidirectional (normal) printing.
Form Format Selection CommandsThe form format commands let you select and set some form-relatedparameters.
Set Form Length to N Lines
Escape sequence:ESC [ N tHexadecimal: 1B 5B N 74
The variable N can be any value in the range of 0 through 113(hexadecimal 00 through 31 31 33).

Set Form Length to n Lines
Escape sequence:ESC C nHexadecimal: 1B 43 n
Escape sequence:ESC 2 nHexadecimal: 1B 32 n
The variable n can be any value in the range of 0 through 113(hexadecimal 30 through 71).
Note: The command ESC 2 n is not valid when raster graphics isenabled.
Load Default Form Parameters
Escape sequence:ESC P L 0 ESC \Hexadecimal: 1B 50 4C 30 1B 5C
Escape sequence:ESC @Hexadecimal: 1B 40
These commands reset the print quality, character pitch, line spacing,form length, margins, and perforation skip parameters to their defaultvalues (see the following figure for a listing of the defaults).
TI Model 880 Printer Emulation 4-15
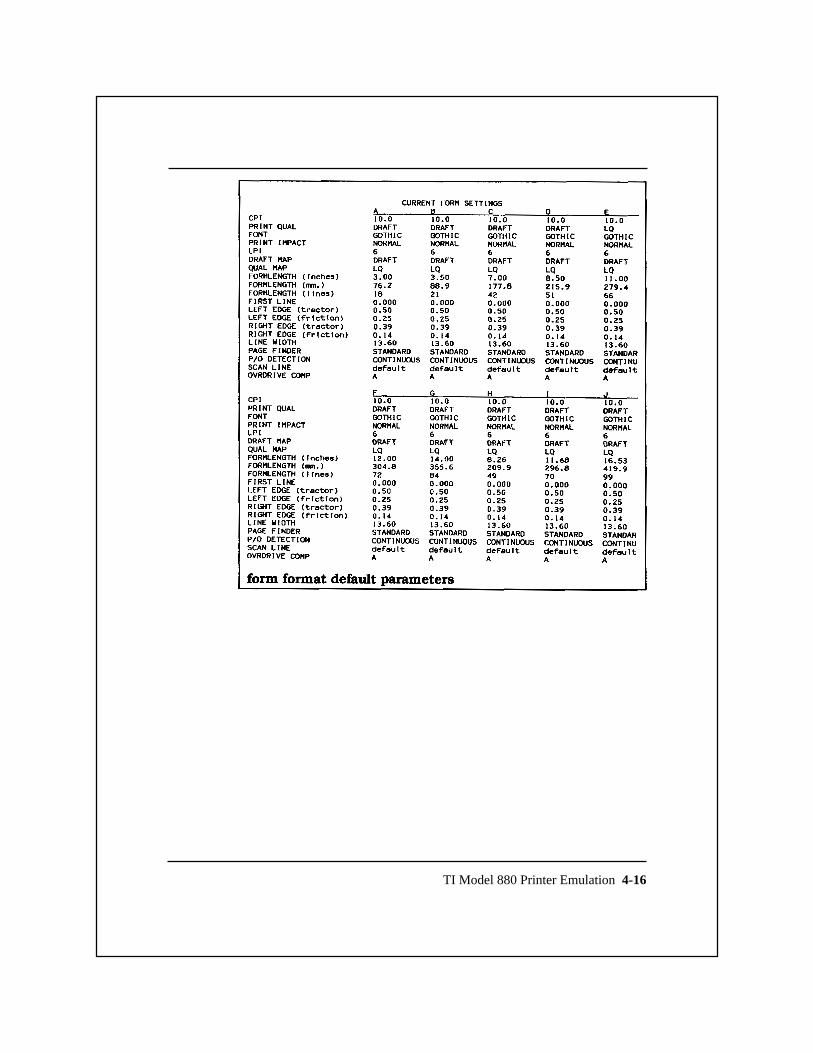
TI Model 880 Printer Emulation 4-16

TI Model 880 Printer Emulation 4-17
Margin Control Commands
After the margins have been set, changing the line spacing does notaffect the top and bottom margins. However, changing the characterpitch shifts the left margin to the nearest column of the new pitchvalue. The right margin shifts in proportion to the change in pitch.
Set Top Margin at Line N
Escape sequence:ESC [ N rHexadecimal: 1B 5B N 72
This command sets the top margin to the line specified by N, whereN can be any value in the range of 1 through the currently selectedform length value. For example, if the currently selected form lengthvalue is 66 lines, N can be any value in the range of 1 through 66(hexadecimal 31 through 36 36). If N equals 0, the top margin equalsthe default value (line 1).
Set Bottom Margin at Line N
Escape sequence:ESC [ ; N rHexadecimal: 1B 5B 3B N 72
This command sets the bottom margin to the line specified by N,where N can be any value in the range of 1 through the currentlyselected form length value. For example, if the currently selectedform length value is 66 lines, N can be any value in the range of 1through 66 (hexadecimal 31 through 36 36). If N equals 0, thebottom margin equals the current form length value.
Set Top and Bottom Margins at Lines N1 and N2
Escape sequence:ESC [ N1 ; N2 rHexadecimal: 1B 5B N1 3B N2 72
This command sets the top and bottom margins to the lines specifiedby N1 and N2, respectively, where N1 can be any value in the rangeof 1 through the current bottom margin value and N2 can be anyvalue in the range of 1 through the current form length value. If N1equals 0, the top margin equals the default value; if N2 equals 0, thebottom margin equals the default value.

TI Model 880 Printer Emulation 4-18
Set Left Margin at Column N
Escape sequence:ESC [ N sHexadecimal: 1B 5B N 73
The variable N can be any value in the range of 1 through, thecolumn immediately to the left of the current right margin value, asdetermined by the line width setting. For example, if the current rightmargin is at column 80, the valid range of N is 1 through 79. If Nequals 0, the left margin equals the default value.
Set Right Margin at Column N
Escape sequence:ESC [ ; N sHexadecimal: 1B 5B 3B N 73
The variable N can be any value in the range of the current left marginvalue through the value of the right-most column, as determined bythe current line width setting. If N equals 0, the right margin equalsthe default value.
Set Left and Right Margins at Columns N1 and N2
Escape sequence:ESC [ N1 ; N2 sHexadecimal: 1B 5B N1 3B N2 73
This command sets the left and right margins to the columns specifiedby N1 and N2, respectively. The N1 and N2 limits are, respectively,the same as for the Set Left Margin at Column N and the Set RightMargin at Column N commands.
Set Line Width to n Columns
Escape sequence:ESC : nHexadecimal: 1B 3A n
The variable n can be any value in the range of 0 through 127 for 7-bitsor 0 through 227 for 8-bits.
Restore Default Line Width
Escape sequence:ESC ;Hexadecimal: 1B 3B
This command sets the line width to the value currently selected bythe Form Select switch.

TI Model 880 Printer Emulation 4-19
Horizontal Motion Commands
After the horizontal tab stops have been set, changing from standardprint to expanded print does not affect the tab stop positions. However,changing the character pitch alters the tab stop positions in proportionto the change in pitch.
Backspace
Control character: BSHexadecimal: 08
This command causes the printer to move the printhead one space tothe left within the limits of the current left margin.
Tab Horizontally
Control character: HTHexadecimal: 09
This command moves the printhead right, to the next tab stop. If nohorizontal tab stops are set between the current logical print positionand the right margin, the printer prints the next character at the firstcolumn of the next line.
Move to Column n
Control character: DC4 nHexadecimal: 14 n
The variable n can be any value within the range of 0 through 255and within the current line width.
Carriage Return
Control character: CRHexadecimal: 0D
If the printer is configured to perform both a line feed and a carriagereturn upon receiving CR, the printer prints the current line, and thenperforms a line feed and a carriage return. If the printer is notconfigured to perform both a line feed and a carriage return uponreceiving CR, the printer prints the current line and moves the logicalprint position to the left margin of the current line.
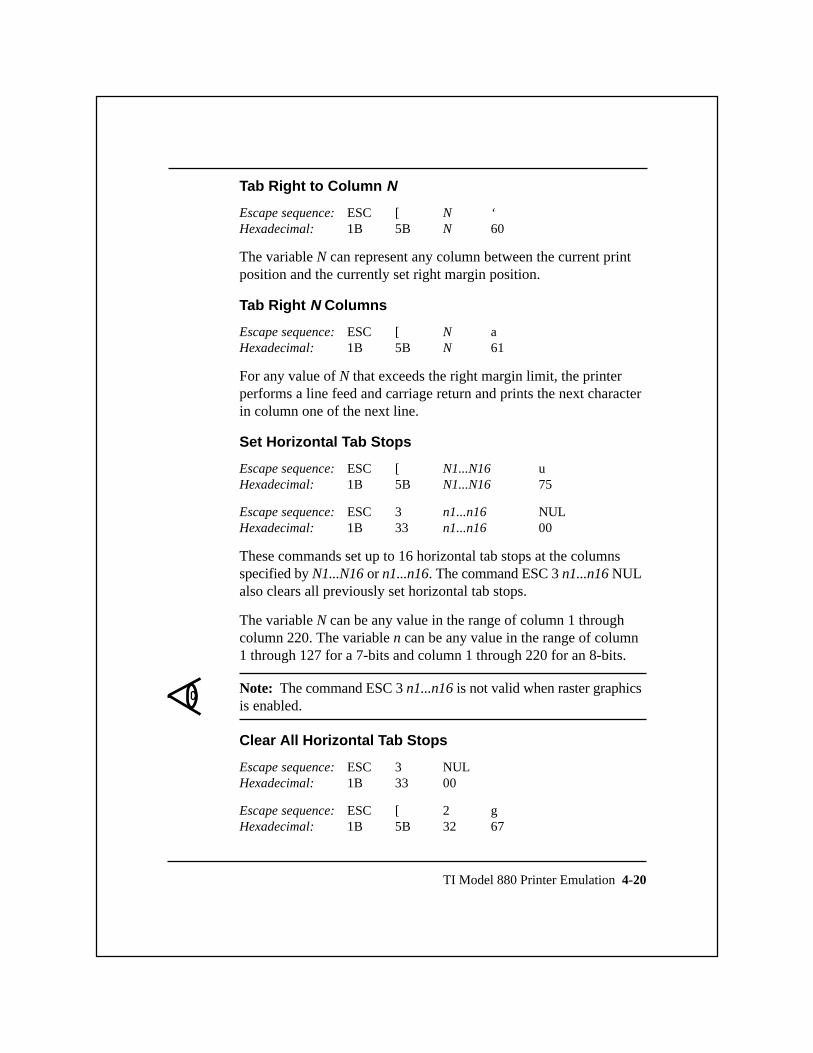
TI Model 880 Printer Emulation 4-20
Tab Right to Column N
Escape sequence:ESC [ N ‘Hexadecimal: 1B 5B N 60
The variable N can represent any column between the current printposition and the currently set right margin position.
Tab Right N Columns
Escape sequence:ESC [ N aHexadecimal: 1B 5B N 61
For any value of N that exceeds the right margin limit, the printerperforms a line feed and carriage return and prints the next characterin column one of the next line.
Set Horizontal Tab Stops
Escape sequence:ESC [ N1...N16 uHexadecimal: 1B 5B N1...N16 75
Escape sequence:ESC 3 n1...n16 NULHexadecimal: 1B 33 n1...n16 00
These commands set up to 16 horizontal tab stops at the columnsspecified by N1...N16 or n1...n16. The command ESC 3 n1...n16 NULalso clears all previously set horizontal tab stops.
The variable N can be any value in the range of column 1 throughcolumn 220. The variable n can be any value in the range of column1 through 127 for a 7-bits and column 1 through 220 for an 8-bits.
Note: The command ESC 3 n1...n16 is not valid when raster graphicsis enabled.
Clear All Horizontal Tab Stops
Escape sequence:ESC 3 NULHexadecimal: 1B 33 00
Escape sequence:ESC [ 2 gHexadecimal: 1B 5B 32 67

TI Model 880 Printer Emulation 4-21
Set Horizontal Tab Stop at Current Position
Escape sequence:ESC HHexadecimal: 1B 48
Clear Horizontal Tab Stop at Current Position
Escape sequence:ESC [ 0 gHexadecimal: 1B 5B 30 67
Vertical Motion Commands
Vertical tab stops define the line numbers at which the paper stopswhen performing vertical tab operations. After vertical tab stopshave been set, any change of the vertical pitch causes a proportionalchange in the vertical tab stop positions.
Line Feed
Control character: LFHexadecimal: 0A
For either of the following conditions, this command causes theprinter to print the current line, advance the paper one print line, andperform a carriage return.
q The printer is configured to perform a carriage return uponreceiving an LF control character.
q If the printer is not configured to comply with this condition, LFcauses the printer to print the current line and advance the paperone print line without performing a carriage return.
Form Feed
Control character: FFHexadecimal: 0C
This command causes the printer to print the current line, advancethe paper to the first print line of the next form, and position theprinthead at the left margin.
TI Model 880 Printer Emulation 4-22
Tab Vertically
Control character: VTHexadecimal: 0B
If the printer is configured to perform a carriage return upon receivinga VT control character, this command causes the printer to print thecurrent line, advance the paper to the next vertical tab stop, andperform a carriage return. If the printer is not configured to performa carriage return upon receiving VT, the printer prints the currentline and advances the paper to the next vertical tab stop withoutperforming a carriage return.
Move to Line n
Control character: DC2 nHexadecimal: 12 n
If the printer is configured to perform a carriage return upon receivinga DC2 control character, this command causes the printer to positionthe printhead at the left margin of the print line specified by n. If theprinter is not configured to perform a carriage return upon receivingDC2, the printer advances the printhead vertically to the specifiedprint line without performing a carriage return. The variable n can beany value in the range of 0 through the current form length setting orthrough line 113, whichever is less.
Tab Vertically to Line N
Escape sequence:ESC [ N dHexadecimal: 1B 5B N 64
The variable N can be any value in the range of 0 through 113(hexadecimal 30 through 31 31 33) but must be between the currentprint position and the bottom margin.
Tab Vertically N Lines
Escape sequence:ESC [ N eHexadecimal: 1B 5B N 65
The variable N can be any value in the range of 0 through 113(hexadecimal 30 through 31 31 33).
TI Model 880 Printer Emulation 4-23
Set Vertical Tab Stops
Escape sequence:ESC [ N1...N16 vHexadecimal: 1B 5B N1...N16 76
Escape sequence:ESC 1 n1...n16 NULHexadecimal: 1B 31 n1...n16 00
These commands set vertical tab stops at the lines specified by thevariables N1 through N16 or n1 through n16, where each of thevariables N1 through N16 or n1 through n16 can be any value in therange of 0 through 113. The command ESC 1 n1...n16 NUL alsoclears all previously set tab stops.
Set Vertical Tab Stop at Current Position
Escape sequence:ESC JHexadecimal: 1B 4A
Clear All Vertical Tab Stops
Escape sequence:ESC [ 4 gHexadecimal: 1B 5B 34 67
Clear Vertical Tab Stop at Current Position
Escape sequence:ESC [ 1 gHexadecimal: 1B 5B 31 67
Character Pitch Commands
Character pitches of 5, 8.3, 10, 12, and 16.7 characters per inch (cpi)are available in the Model 880 emulation mode.
Set Character Pitch to 5 cpi
Escape sequence:ESC P I ESC \Hexadecimal: 1B 50 49 1B 5C
Set Character Pitch to 8.3 cpi
Escape sequence:ESC P J ESC \Hexadecimal: 1B 50 4A 1B 5C

TI Model 880 Printer Emulation 4-24
Set Character Pitch to 10 cpi
Escape sequence:ESC P C ESC \Hexadecimal: 1B 50 43 1B 5C
Escape sequence:ESC 6Hexadecimal: 1B 36
Set Character Pitch to 12 cpi
Escape sequence:ESC P K ESC \Hexadecimal: 1B 50 4B 1B 5C
Set Character Pitch to 16.7 cpi
Escape sequence:ESC P D ESC \Hexadecimal: 1B 50 44 1B 5C
Escape sequence:ESC 7Hexadecimal: 1B 37
Line Spacing Commands
The Model 880 emulation mode provides line spacing values of 3, 4,6, and 8 lpi.
Set Line Spacing to 3 lpi
Escape sequence:ESC P B ESC \Hexadecimal: 1B 50 42 1B 5C
Set Line Spacing to 4 lpi
Escape sequence:ESC P G ESC \Hexadecimal: 1B 50 47 1B 5C
Set Line Spacing to 6 lpi
Escape sequence:ESC P A ESC \Hexadecimal: 1B 50 41 1B 5C
Escape sequence:ESC 4Hexadecimal: 1B 34
Escape sequence:ESC 2Hexadecimal: 1B 32

Note: The command ESC 2 is valid only when raster graphics isenabled.
Set Line Spacing to 8 lpi
Escape sequence:ESC P H ESC \Hexadecimal: 1B 50 48 1B 5C
Escape sequence:ESC 5Hexadecimal: 1B 35
Escape sequence:ESC 0Hexadecimal: 1B 30
Set Line Spacing to n/72 Inch
Escape sequence:ESC A nHexadecimal: 1B 41 n
This sequence is valid only if raster graphics is enabled. The validrange of n is 0 through 85.
Set Line Spacing to N/144 Inch
Escape sequence:ESC [ N # qHexadecimal: 1B 5B N 23 71
The valid range of N is 0 through 255 (hexadecimal 30 through 32 3535).
Set Line Spacing to n/216 Inch
Escape sequence:ESC 3 nHexadecimal: 1B 33 n
This sequence is valid only if raster graphics is enabled. The validrange of n is 0 through 127 for 7-bits and 0 through 255 for 8-bits.
Select Double Line Spacing
Escape sequence:ESC P S ESC \Hexadecimal: 1B 50 53 1B 5C
TI Model 880 Printer Emulation 4-25

TI Model 880 Printer Emulation 4-26
Cancel Double Line Spacing
Escape sequence:ESC P T ESC \Hexadecimal: 1B 50 54 1B 5C
Print Enhancement Commands
The print enhancement commands enable your printer to improve orenhance print quality. Print enhancements include expanded andletter quality print.
Select Expanded (Double-Wide) Print
Escape sequence:ESC P M ESC \Hexadecimal: 1B 50 4D 1B 5C
Control character: SOHexadecimal: 0E
The SO control character functions in this manner only if SO =EXPAND is entered from the control panel (set to ON).
Cancel Expanded (Double-Wide) Print
Escape sequence:ESC P N ESC \Hexadecimal: 1B 50 4E 1B 5C
Select Letter-Quality Print
Escape sequence:ESC P O ESC \Hexadecimal: 1B 50 4F 1B 5C
Cancel Letter-Quality Print
Escape sequence:ESC P P ESC \Hexadecimal: 1B 50 50 1B 5C

TI Model 880 Printer Emulation 4-27
Raster Graphics Commands
In the Model 880 raster graphics mode, the printer alternates betweenthe left and right printhead pins and uses only the top eight pins ofeach column. The graphics feature enables you to create drawings bysending dot patterns (in the form of hexadecimal codes) to the printer.
When the printer receives a hexadecimal code from the host computer,it maps the individual code bits to the individual printhead pins.
Set Up Graphics Parameters
Escape sequence:ESC [ H ; B ; V qHexadecimal: 1B 5B H 3B B 5B V 71
This command sets the horizontal dot density (H) and the verticalline spacing (V) and specifies the number of hexadecimal code bytes(B) to print. The variables H, V, and B are as follows.
q Horizontal dot density (H) — 60, 72, 120, or 144 dpi. The defaultvalue is 60 dpi. If the horizontal dot density is omitted, theprinter defaults to the last value selected since the last power-upoperation.
q Number of hexadecimal code bytes (B) to print — can be set toany value in the range of 0 to 1958 (for a line width of 13.6inches and a horizontal dot density of 144 dpi). If this parameteris omitted or set to 0, the printer prints no raster graphics.
q Vertical line spacing (V) — N/144 inch, where the range of N is0 through 255. A value of 0 indicates that no line feed operationis to occur.

TI Model 880 Printer Emulation 4-28
Select 60 dpi Graphics
Escape sequence:ESC K n1 n2Hexadecimal: 1B 4B n1 n2
The variables n1 and n2 specify the number of bytes to print.
Use the following steps to find the values of n1 and n2 for a horizontalline of graphics of a given length in inches.
1. Multiply by 60 the length of the line (in inches) to be printed.This operation yields the number of bytes (n) required at 60 dotsper inch.
2. Divide the number of bytes by 256 (n/256); the quotient and theremainder of n/256 are, respectively, the decimal values of n2and n1.
3. Convert the decimal values of n2 and n1 obtained in step 1 totheir hexadecimal equivalents.
Note: This procedure can be applied to any of the graphics selectioncommands in this chapter as well as those in Chapters 5 through 8.
Select 120 dpi Graphics
Escape sequence:ESC L n1 n2Hexadecimal: 1B 4C n1 n2
The variables n1 and n2 specify the number of bytes to print. Modifythe procedure described for the Select 60 dpi Graphics command todetermine the values of n1 and n2. In step 1 of this procedure,multiply the line length by 120 instead of 60 to determine thenumber of bytes required.
Note: ESC K nl n2 and ESC L nl n2 are valid only when rastergraphics is enabled.
TI Model 880 Printer Emulation 4-29
Font Selection Commands
Select Font N
Escape sequence:ESC f NHexadecimal: 1B 66 N
The printer can have a maximum of 10 fonts, including the twostandard fonts (Gothic and Courier) and up to eight optional fonts.
The variable N can be any value in the range of 0 through 9, where 0designates Gothic, 1 designates Courier, 2 designates the first font inoption ROM 1, 3 designates the second font in option ROM 1, andso on. The range of N for either option ROM depends upon thenumber of fonts contained in each ROM.
Examples. If option ROM 1 has two fonts and option ROM 2 hasthree fonts, then the range of N is 2 through 3 for option ROM 1 and4 through 7 for option ROM 2. If option ROM 1 has four fonts andoption ROM 2 has three fonts, then the range of N is 2 through 5 foroption ROM 1 and 6 through 8 for option ROM 2.
Font Invocation
The Model 880 Printer emulation enables you to define the contentsof the “in-use” font table. The in-use table defines the font currentlybeing printed. The contents of the in-use table can be replacedentirely by an alternate font, or individual characters in the in-usetable can be replaced by individual characters invoked from analternate font. There are four possible alternate sets, called G0, G1,G2, and G3.
Designate G0 Font by ROM Identifier N
Escape sequence:ESC ( NHexadecimal: 1B 28 N
Designate G1 Font by ROM Identifier N
Escape sequence:ESC ) NHexadecimal: 1B 29 N

TI Model 880 Printer Emulation 4-30
Designate G2 Font by ROM Identifier N
Escape sequence:ESC * NHexadecimal: 1B 2A N
Designate G3 Font by ROM Identifier N
Escape sequence:ESC + NHexadecimal: 1B 2B N
Valid values for N are G for Gothic and C for Courier.
Select Designated Character From G2 Font
Control Character: EM NHexadecimal: 19 N
Select Designated Character From G3 Font
Control Character: GS NHexadecimal: 1D N
Valid values for N are any font character.
Invoke G0 Font as GL
Control Character: SIHexadecimal: 1F
Invoke G1 Font as GL
Control Character: SOHexadecimal: 1E
Note: You must set SO to Expand OFF using the control panelbefore using this command.
Invoke G2 Font as GL
Escape sequence:ESC nHexadecimal: 1B 6E
Invoke G3 Font as GL
Escape sequence:ESC oHexadecimal: 1B 6F

TI Model 880 Printer Emulation 4-31
Invoke G1 Font as GR
Escape sequence:ESC kHexadecimal: 1B 6B
Invoke G2 Font as GR
Escape sequence:ESC 1Hexadecimal: 1B 6C
Invoke G3 Font as GR
Escape sequence:ESC mHexadecimal: 1B 6D

5Texas Instruments
Model 855 Printer WP Emulation
Introduction .................................................................................... 5-4Motion Indexes ............................................................................... 5-5Model 855 WP Commands............................................................. 5-6Model 855 WP Command Descriptions ......................................... 5-9
Printer Operation Commands .................................................... 5-9Select DP Mode .................................................................... 5-9Select WP Mode ................................................................... 5-9Suspend Printing ................................................................... 5-9Select Unidirectional Printing ............................................ 5-10Cancel Unidirectional Printing ........................................... 5-10Select Reverse Printing ....................................................... 5-10Cancel Reverse Printing ..................................................... 5-10Set Most Significant Bit ..................................................... 5-10Reset Most Significant Bit .................................................. 5-10
Form Format and Font Selection Commands .......................... 5-11Set Form Length to nl n2 Lines .......................................... 5-11Select Font n .......................................................................5-12
Margin Control Commands ..................................................... 5-12Select Right Margin Justification ....................................... 5-12Cancel Right Margin Justification ...................................... 5-13Set Top Margin at Current Position .................................... 5-13Set Bottom Margin at Current Position .............................. 5-13Set Left Margin at Current Position ................................... 5-13Set Right Margin at Current Position ................................. 5-13
Horizontal Motion Commands ................................................ 5-14Backspace ........................................................................... 5-14Tab Horizontally ................................................................. 5-14Carriage Return ................................................................... 5-14Move Back 1/120 Inch ........................................................ 5-15
TI Model 855 Printer WP Emulation 5-1

Tab Horizontally Absolute .................................................. 5-15Set Horizontal Tab Stop at Current Position ...................... 5-15Clear All Horizontal Tab Stops .......................................... 5-15Clear Horizontal Tab Stop at Current Position ................... 5-15
Vertical Motion Commands ..................................................... 5-16Line Feed ............................................................................ 5-16Form Feed ........................................................................... 5-16Tab Vertically ...................................................................... 5-16Tab Vertically Absolute ...................................................... 5-16Move Up One Line ............................................................. 5-17Move Up One-Half Line ..................................................... 5-17Move Down One-Half Line ................................................ 5-17
Character Pitch Commands ..................................................... 5-17Set Horizontal Motion Index to (n-l)/120 Inch ................... 5-17Set Character Pitch to 10 cpi .............................................. 5-17Set Character Pitch to 12 cpi .............................................. 5-18
Line Spacing Commands ......................................................... 5-18Set Vertical Motion Index to (n-l)/48 Inch ......................... 5-18Set Vertical Motion Index to (n-l)/144 Inch ....................... 5-18
Character Set Commands ........................................................ 5-18Print Special Character ....................................................... 5-18
Print Enhancement Commands................................................ 5-19Select Expanded Print ......................................................... 5-19Cancel Expanded Print ....................................................... 5-19Select Compressed Print ..................................................... 5-19Cancel Compressed Print .................................................... 5-19Select Letter-Quality Print .................................................. 5-19Cancel Letter-Quality Print ................................................ 5-20Select Text-Underline Print ................................................ 5-20Cancel Text-Underline Print ............................................... 5-20Select Boldface Print .......................................................... 5-20Cancel Boldface Print ......................................................... 5-20Select Shadow Print ............................................................ 5-20Cancel Shadow Print .......................................................... 5-20
Raster Graphics Commands .................................................... 5-21
TI Model 855 Printer WP Emulation 5-2

TI Model 855 Printer WP Emulation 5-3
Select 60 dpi Graphics ........................................................ 5-21Select 72 dpi Graphics ........................................................ 5-21Select 120 dpi Graphics ...................................................... 5-21Select 144 dpi Graphics ...................................................... 5-21

IntroductionThis chapter describes the Texas Instruments Model 855 wordprocessing (WP) emulation mode. The Model 855 WP emulationmode allows the Model 8900 Series Printer to accept and respond tocommands similar to those for a daisy-wheel printer. This modeallows the printer to emulate most functions of the Model 855 Printeroperating in its WP mode with the following considerations.
q The Model 855 WP emulation supports all Model 8900 globalcommands.
q You can select ribbon color with the command sequence ESC c nor ESC r n.
q Factory selected power-up defaults for the Model 855 WPemulation are:
— Processing mode — DP (The WP mode must be selectedafter power-up.)
— Auto LF — NO
— The last form setting change made via the control panel isretained and restored at power-up.
q The Model 855 WP emulation uses standard pitch and point forsuperscript and subscript characters.
q The standard character set is the IBM PC2 Character Set.
q The escape sequence to select mosaic graphics by setting theMSDB to 1 is ESC v.
q The escape sequence to cancel mosaic graphics by setting theMSDB to 1 is ESC =.
TI Model 855 Printer WP Emulation 5-4

q The escape sequence for font selection is ESC f N.
q Selecting or canceling proportional spacing is not supported.
q Disabling the paper-out detection is not supported.
Motion IndexesThe Model 855 WP emulation mode uses motion indexes to specifycertain horizontal and vertical parameters. These motion indexes areestablished by character pitch and line spacing commands describedlater in this chapter.
The horizontal motion index and vertical motion index are abbreviated,respectively, as HMI and VMI. Their definitions are as follows.
q HMI — The horizontal distance between two adjacent characters.The HMI range is 0 through 254/120 (0 through 2.12) inches inincrements of 1/120 inch.
q VMI — The vertical distance between two adjacent print lines.The VMI range can be either of the following, depending uponthe escape sequence used to establish the VMI.
— 0 through 84/48 (0 through 1.75) inches in increments of1/48 inch
— 0 through 254/144 (0 through 1.62) inches in increments of1/144 inch
TI Model 855 Printer WP Emulation 5-5

Model 855 WP CommandsThe following table lists the Model 855 WP commands. The para-graphs that follow the table describe these commands.
Model 855 WP Commands
Command Command Name
Printer Operation
ESC @ Select DP Mode
ESC CR P Select WP Mode
ESC SUB I Select WP Mode
ESC w Suspend Printing
ESC > Select Unidirectional Printing
ESC < Cancel Unidirectional Printing
ESC 6 Select Reverse Printing
ESC 5 Cancel Reverse Printing
ESC v Set Most Significant Bit
ESC = Reset Most Significant Bit
Form Format and Font Selection
ESC F n1 n2 Set Form Length to n1 n2 Lines
ESC f n Select Font n
Margin Control
ESC ] Select Right Margin Justification
ESC [ Cancel Right Margin Justification
ESC + Set Top Margin at Current Position
ESC - Set Bottom Margin at Current Position
ESC 9 Set Left Margin at Current Position
ESC 0 Set Right Margin at Current Position
TI Model 855 Printer WP Emulation 5-6

Model 855 WP Commands (continued)
Command Name Command Name
Horizontal MotionBS Backspace
HT Tab Horizontally
CR Carriage ReturnESC BS Move Back 1/120 Inch
ESC HT n Tab Horizontally Absolute
ESC 1 Set Horizontal Tab Stop at Current PositionESC 2 Clear All Horizontal Tab Stops
ESC 8 Clear Horizontal Tab Stops at Current Position
Vertical MotionLF Line Feed
FF Form Feed
VT Tab VerticallyESC VT n Tab Vertically Absolute
ESC LF Move Up One Line
ESC D Move Up One-Half LineESC U Move Down One-Half Line
Character PitchESC US n Set Horizontal Motion Index to (n-1)/120 InchESC y Set Character Pitch to 10 cpi
ESC z Set Character Pitch to 12 cpi
Line SpacingESC RS n Set Vertical Motion Index to (n-l)/48 Inch
ESC FS n Set Vertical Motion Index to (n-1)/144 Inch
TI Model 855 Printer WP Emulation 5-7

Model 855 WP Commands (concluded)
Command Name Command Name
Horizontal MotionESC SP Print Special Character
ESC / Print Special Character
Print EnhancementSO Select Expanded Print
DC4 Cancel Expanded Print
SI Select Compressed PrintDC2 Cancel Compressed Print
ESC q Select Letter-Quality Print
ESC e Select Letter-Quality PrintESC d Cancel Letter-Quality Print
ESC I Select Text-Underline Print
ESC J Cancel Text-Underline PrintESC K n Select Boldface Print
ESC M Cancel Boldface Print
ESC Q Select Shadow PrintESC R Cancel Shadow Print
Raster GraphicsESC k n1 n2 Select 60 dpi GraphicsESC n n1 r2 Select 72 dpi Graphics
ESC j n1 n2 Select 120 dpi Graphics
ESC o n1 n2 Select 144 dpi Graphics
TI Model 855 Printer WP Emulation 5-8
TI Model 855 Printer WP Emulation 5-9
Model 855 WP Command DescriptionsThe following paragraphs describe the Model 855 WP emulationcommands. The command formats are listed following each commanddescription. Many of the escape-sequence commands contain one ormore variables to specify various command parameters. Thesevariables are italicized in the command formats to indicate that theycan be set to more than one value.
Printer Operation Commands
These commands allow the host computer to control some basicprinter functions.
Select DP Mode
Escape sequence:ESC @Hexadecimal: 1B 40
This command disables the 855 WP emulation mode and enables the855 data processing (DP) emulation mode.
Select WP Mode
Escape sequence:ESC CR PHexadecimal: 1B 0D 50
Escape sequence:ESC SUB IHexadecimal: 1B 1A 49
These commands enable the 855 WP emulation mode.
Suspend Printing
Escape sequence:ESC wHexadecimal: 1B 77
This command causes the printer to print the current print line fromthe print buffer, to suspend printing, and to go to its offline condition.

TI Model 855 Printer WP Emulation 5-10
Select Unidirectional Printing
Escape sequence:ESC >Hexadecimal: 1B 3E
This command causes the printer to print all subsequent characters inthe forward (left-to-right) direction only.
Cancel Unidirectional Printing
Escape sequence:ESC <Hexadecimal: 1B 3C
This command causes the printer to resume normal bidirectional printing.
Select Reverse Printing
Escape sequence:ESC 6Hexadecimal: 1B 36
This command causes characters received from the host to be printedin reverse order. For example, if the host sends the characters abcde,the printer prints them as edcba.
Cancel Reverse Printing
Escape sequence:ESC 5Hexadecimal: 1B 35
Set Most Significant Bit
Escape sequence:ESC vHexadecimal: 1B 76
This command sets the most significant bit of all received characters to one.
Reset Most Significant Bit
Escape sequence:ESC =Hexadecimal: 1B 3D
This command cancels the mode set by ESC v.
Form Format and Font Selection Commands
The form format commands let you select and set some form-relatedparameters. The font selection command lets you choose between thetwo standard fonts and any installed optional fonts.
The standard fonts for the Model 8900 Series Printer are Courier andGothic. Residing in printer ROM, these fonts can be selected via thecontrol panel or by the host computer. Optional fonts include PrestigeElite and Presentor. These optional fonts are available as ROMs thatplug into sockets on the printer logic board. When installed, thesefonts can also be selected via the control panel or by the host computer.
Set Form Length to n1 n2 Lines
Escape sequence:ESC F n1 n2Hexadecimal: 1B 46 n1 n2
The terms n1 and n2 represent a two-digit form-length value expressedas the number of lines that can be printed at 6 lpi.
If the current bottom margin value is less than the new form lengthvalue set by this command, the bottom margin position does notchange. If the current bottom margin value is greater than the newform length value, the bottom margin position moves to the newform length value.
When using the set form length command, any form-length value of1 through 99 lines is expressed as two decimal values (n1 and n2).For example, for a form length value of 8 lines, n1 = 0 and n2 = 8;for a form-length value of 29 lines, n1 = 2 and n2 = 9. For any form-length value greater than 99 lines, the value of n1 is expressed as ahexadecimal number and the value of n2 is limited to the decimalvalues 1 through 9.
TI Model 855 Printer WP Emulation 5-11
Select Font n
Escape sequence:ESC f nHexadecimal: 1B 66 n
The printer can have a maximum of 10 fonts, including the twostandard fonts (Gothic and Courier) and up to eight optional fonts.
The variable n can be any value in the range of 0 through 9, where 0designates Gothic, 1 designates Courier, 2 designates the first font inoption ROM 1, 3 designates the second font in option ROM 1, andso on. The range of n for either option ROM depends upon thenumber of fonts contained in each ROM.
Examples. If option ROM 1 has two fonts and option ROM 2 hasthree fonts, then the range of n is 2 through 3 for option ROM 1 and4 through 7 for option ROM 2. If option ROM 1 has four fonts andoption ROM 2 has three fonts, then the range of n is 2 through 5 foroption ROM 1 and 6 through 8 for option ROM 2.
Margin Control Commands
After the left and right margins are set, subsequent character pitchchanges do not affect them. The bottom margin must always be setbelow the top margin, and both margins must be within the formboundaries. Once the top and bottom margins are set, subsequent linespacing changes do not affect them.
For any line feed operation that advances the print position beyondthe bottom page margin, the printer automatically positions theprinthead at the top margin of the following page.
Select Right Margin Justification
Escape sequence:ESC ]Hexadecimal: 1B 5D
This command causes the printer to insert enough space betweencharacters to cause each line to occupy the entire space between theleft and right margins.
TI Model 855 Printer WP Emulation 5-12

Cancel Right Margin Justification
Escape sequence:ESC [Hexadecimal: 1B 5B
Set Top Margin at Current Position
Escape sequence:ESC +Hexadecimal: 1B 2B
Changing the form length setting overrides this command and resetsthe top margin to the top-of-form position.
Set Bottom Margin at Current Position
Escape sequence:ESC -Hexadecimal: 1B 2D
If the form length does not exceed the bottom margin, the bottom ofthe form is the same as the bottom margin setting. If the form lengthexceeds the bottom margin, the bottom margin is unchanged.
Set Left Margin at Current Position
Escape sequence:ESC 9Hexadecimal: 1B 39
For any left margin setting greater than 1, the BS control character orthe absolute tabulation escape sequence (ESC HT n) permits printingto the left of the margin.
Set Right Margin at Current Position
Escape sequence:ESC 0Hexadecimal: 1B 30
TI Model 855 Printer WP Emulation 5-13

Horizontal Motion Commands
The following paragraphs describe the commands for horizontalmotion and horizontal tab functions in the Model 855 WP emulationmode.
Backspace
Control character: BSHexadecimal: 08
This command causes the printer to move the printhead one HMIposition to the left. The next character printed following a BScommand overstrikes the most recently printed character. In thebackward print mode, each BS control character moves the printheadto the right one HMI position.
Tab Horizontally
Control character: HTHexadecimal: 09
This command moves the printhead to the next horizontal tab stop. Ifthe printer receives an HT command following the last horizontal tabstop on a line, the printer performs a carriage return and a line feedand starts the next print operation at the left margin.
Carriage Return
Control character: CRHexadecimal: 0D
This command causes the printer to perform the following functions.
q The printer prints the current line of data from the print bufferand begins the next line at the left margin.
q If right margin justification is active, the CR command causeseach line of print to occupy the entire space between the left andright margins.
TI Model 855 Printer WP Emulation 5-14

TI Model 855 Printer WP Emulation 5-15
q If the expanded print mode is active, the CR command resets theprinter to the normal print mode.
q If the automatic line feed function is active, the CR commandcauses the paper to advance one print line.
Move Back 1/120 inch
Escape sequence:ESC BSHexadecimal: 1B 08
This command moves the print position 1/120 inch to the left.
Tab Horizontally Absolute
Escape sequence:ESC HT nHexadecimal: 1B 09 n
This command moves the printhead horizontally (left or right) to thecolumn specified by the variable n where n can be any value in therange of 1 through 127. When n equals zero or the number of acolumn beyond the right margin, the printer ignores the command. Ifthe value of n is greater than the right-most column, the printerpositions the printhead to the right-most column.
Set Horizontal Tab Stop at Current Position
Escape sequence:ESC 1Hexadecimal: 1B 31
Clear All Horizontal Tab Stops
Escape sequence:ESC 2Hexadecimal: 1B 32
Clear Horizontal Tab Stop at Current Position
Escape sequence:ESC 8Hexadecimal: 1B 38
TI Model 855 Printer WP Emulation 5-16
Vertical Motion Commands
Vertical tab stops define the line numbers at which the paper stopswhen performing vertical tab operations. After vertical tab stopshave been set, any change of the vertical pitch causes a proportionalchange in the vertical tab stop positions.
Line Feed
Control character: LFHexadecimal: 0A
This command moves the paper forward one line position withoutperforming a carriage return. The VMI determines the distance fromone line to the next.
Form Feed
Control character: FFHexadecimal: 0C
This command advances the paper to the top margin of the next pageand causes the printer to perform a carriage return to the left margin.
Tab Vertically
Control character: VTHexadecimal: 0B
This command advances the paper to the next print line withoutperforming a carriage return.
Tab Vertically Absolute
Escape sequence:ESC VT nHexadecimal: 1B 0B n
This command moves the paper vertically (up or down) to the linespecified by the variable n. The line space is the distance defined bythe VMI or the distance set by the operator via the Form Configswitch. The valid range of n is 1 through 126.

Move Up One Line
Escape sequence:ESC LFHexadecimal: 1B 0A
The line space is the distance defined by the VMI or the distance setvia the Form Config switch on the control panel.
Move Up One-Half Line
Escape sequence:ESC DHexadecimal: 1B 40
When one-half line space is a fractional number of 1/144 inch steps,the printer truncates the number of steps to a whole number.
Move Down One-Half Line
Escape sequence:ESC UHexadecimal: 1B 55
When one-half line space is a fractional number of 1/144 inch steps,the printer truncates the number of steps to a whole number.
Character Pitch Commands
The following paragraphs describe the commands for character pitchoperations in the Model 855 WP emulation mode.
Set Horizontal Motion Index to ( n-1)/120 Inch
Escape sequence:ESC US nHexadecimal: 1B 1F n
This command sets the HMI to (n-1)/120 inch, where the variable nis valid for any value in the range of 1 through 255.
Set Character Pitch to 10 cpi
Escape sequence:ESC yHexadecimal: 1B 79
TI Model 855 Printer WP Emulation 5-17

Set Character Pitch to 12 cpi
Escape sequence:ESC zHexadecimal: 1B 7A
This command sets the character pitch to 12 cpi.
Line Spacing Commands
The following paragraphs describe the commands for line spacingoperations in the Model 855 WP emulation mode.
Set Vertical Motion Index to ( n-1)/48 Inch
Escape sequence:ESC RS nHexadecimal: 1B 1E n
The variable n can be any value in the range of 1 through 85, resultingin a VMI range of 0 through 84/48 (0 through 1.75) inches.
Set Vertical Motion Index to ( n-1)/144 Inch
Escape sequence:ESC FS nHexadecimal: 1B 1C n
The variable n can be any value in the range of 1 through 255,resulting in a VMI range of 0 through 254/144 (0 through 1.76)inches.
Character Set Commands
The character set commands for the 855 WP mode are limited to thefollowing commands that cause the printer to print special characterssimilar to those printed by daisy-wheel printers.
Print Special Character
Escape sequence: ESC SPHexadecimal: 1B 20
Escape sequence:ESC /Hexadecimal: 1B 2F
TI Model 855 Printer WP Emulation 5-18

TI Model 855 Printer WP Emulation 5-19
Print Enhancement Commands
The print enhancement commands enable your printer to improve orenhance the print quality. Print enhancements include such things asexpanded, compressed, LQ, and underlined text as well as boldfaceand shadow printing.
Select Expanded Print
Control character: SOHexadecimal: 0E
This command causes the printer to double the horizontal dotspacing and then make a second pass to fill in the dots for one lineonly. This mode is terminated by a carriage return.
Cancel Expanded Print
Control character: DC4Hexadecimal: 14
Select Compressed Print
Control character: SIHexadecimal: 0F
This command reduces the width of all subsequently printed charactersto about 60 percent of their normal widths.
Cancel Compressed Print
Control character: DC2Hexadecimal: 12
Select Letter-Quality Print
Escape sequence:ESC qHexadecimal: 1B 71
Escape sequence:ESC eHexadecimal: 1B 65

Cancel Letter-Quality Print
Escape sequence:ESC dHexadecimal: 1B 64
This command cancels LQ print and returns the printer to the draftprint mode.
Select Text-Underline Print
Escape sequence:ESC IHexadecimal: 1B 49
Cancel Text-Underline Print
Escape sequence:ESC JHexadecimal: 1B 4A
Select Boldface Print
Escape sequence:ESC K nHexadecimal: 1B 4B n
The variable n is valid for any of the following values.
q 0 and 1 — turn boldface printing off
q 2 through 4 — turn boldface printing on
Cancel Boldface Print
Escape sequence:ESC MHexadecimal: 1B 4D
Select Shadow Print
Escape sequence:ESC QHexadecimal: 1B 51
In the shadow print mode, the printer prints each line twice withsecond-pass dots offset by 1/120 inch.
Cancel Shadow Print
Escape sequence:ESC RHexadecimal: 1B 52
TI Model 855 Printer WP Emulation 5-20

TI Model 855 Printer WP Emulation 5-21
Raster Graphics Commands
The following paragraphs describe the commands that control theraster graphics feature In the TI 855 WP emulation mode. To find thevalues of n1 and n2 for any of the following commands, modify theprocedure described for the Select 60 dpi Graphics command inChapter 4. In step 1 of the procedure, substitute the appropriate dotdensity value for 60.
Select 60 dpi Graphics
Escape sequence:ESC k n1 n2Hexadecimal: 1B 6B n1 n2
Select 72 dpi Graphics
Escape sequence:ESC n n1 n2Hexadecimal: 1B 6E n1 n2
Select 120 dpi Graphics
Escape sequence:ESC j n1 n2Hexadecimal: 1B 6A n1 n2
Select 144 dpi Graphics
Escape sequence:ESC o n1 n2Hexadecimal: 1B 6F n1 n2
TI Model 855 Printer DP Emulation 6-1
Printer Operation Commands ......................................................... 6-7Select DP Mode ......................................................................... 6-7Select WP Mode ........................................................................ 6-7Suspend Printing ........................................................................ 6-7Select Unidirectional Printing ................................................... 6-8Cancel Unidirectional Printing .................................................. 6-8Set Most Significant Bit ............................................................ 6-8Reset Most Significant Bit ......................................................... 6-8
Form Format and Font Selection Commands ................................. 6-8Set Form Length to n Lines ....................................................... 6-9Select Font n ..............................................................................6-9
Horizontal Motion Commands ....................................................... 6-9Backspace .................................................................................. 6-9Tab Horizontally ...................................................................... 6-10Carriage Return........................................................................ 6-10Move Print Position to Left Margin ........................................ 6-11Set Horizontal Tab Stops ......................................................... 6-11Clear All Horizontal Tab Stops ............................................... 6-11
Vertical Motion Commands.......................................................... 6-11Line Feed ................................................................................. 6-11Form Feed ................................................................................ 6-11Tab Vertically ........................................................................... 6-12Move Up One-Half Line .......................................................... 6-12Move Down One-Half Line ..................................................... 6-12Set Vertical Tab Stops .............................................................. 6-13Clear All Vertical Tab Stops .................................................... 6-13
6Texas Instruments Model 855 Printer
DP Emulation

TI Model 855 Printer DP Emulation 6-2
Character Pitch Commands .......................................................... 6-13Set Character Pitch to 10 cpi ................................................... 6-13Set Character Pitch to 12 cpi ................................................... 6-13
Line Spacing Commands .............................................................. 6-13Set Line Spacing to 6 lpi ......................................................... 6-13Set Line Spacing to 8 lpi ......................................................... 6-14Set Line Spacing to 7/72 Inch.................................................. 6-14Set Line Spacing to n/72 Inch.................................................. 6-14Set Line Spacing to n/216Inch................................................. 6-14
Print Enhancement Commands .................................................... 6-14Select Expanded Print .............................................................. 6-14Cancel Expanded Print ............................................................ 6-14Select Compressed Print .......................................................... 6-15Cancel Compressed Print ......................................................... 6-15Select Letter-Quality Print ....................................................... 6-15Cancel Letter-Quality Print ..................................................... 6-15Select Boldface Print ............................................................... 6-15Cancel Boldface Print .............................................................. 6-16Select Shadow Print ................................................................. 6-16Cancel Shadow Print ............................................................... 6-16
Color Emulation ........................................................................... 6-16Select Epson-JX Compatible Color Mode .............................. 6-16Select TI 857 Compatible Color Mode ................................... 6-16
Raster Graphics Commands ......................................................... 6-17Select 60 dpi Graphics ............................................................. 6-17Select 72 dpi Graphics ............................................................. 6-17Select 120 dpi Graphics ........................................................... 6-17Select 144 dpi Graphics ........................................................... 6-17

TI Model 855 Printer DP Emulation 6-3
IntroductionThis chapter describes the Texas Instruments Model 855 Printer dataprocessing (DP) emulation mode. The Model 855 DP emulationmode allows the Model 8900 Series Printer to accept and respond tocommands similar to those for common dot-matrix printers. Thismode allows the printer to emulate most of the functions of theModel 855 Printer operating in its DP mode with the followingconsiderations:
q The Model 855 DP emulation supports all Model 8900 globalcommands.
q You can select ribbon color with the command sequence ESC c nor ESC r n.
q Factory selected power-up defaults for the Model 855 DPemulation are:
— Processing mode — DP
— Auto LF — NO
— The last form setting change made via the control panel isretained and restored at power-up.
q The Model 855 DP emulation uses standard pitch and point forsuperscript and subscript characters.
q The standard character set is the IBM PC2 Character Set.
q The escape sequence to select mosaic graphics by setting theMSDB to 1 is ESC v.
q The escape sequence to cancel mosaic graphics by setting theMSDB to 1 is ESC =.
TI Model 855 Printer DP Emulation 6-4
q Disabling the paper-out detection is not supported.
q The escape sequence for font selection is ESC f N.
The following table lists the Model 855 DP commands.
Model 855 DP Commands
Command Name Command Name
Printer OperationESC@ Select DP ModeESC CR P Select WP Mode
ESC SUB I Select WP Mode
ESC w Suspend PrintingESC u Select Unidirectional Printing
ESC b Cancel Unidirectional Printing
ESC > Set Most Significant BitESC = Reset Most Significant Bit
Form Format and Font SelectionESC C n Set Form Length to n LinesESC f n Select Font n
Horizontal MotionBS BackspaceHT Tab Horizontally
CR Carriage Return
ESC < Move Print Position to Left MarginESC D n1...n16 NUL Set Horizontal Tab Stops
ESC D NUL Clear All Horizontal Tab Stops

TI Model 855 Printer DP Emulation 6-5
Model 855 DP Commands (continued)
Command Name Command Name
Vertical MotionLF Line Feed
FF Form Feed
VT Tab VerticallyESC ^ Move Up One-Half Line
ESC v Move Down One-Half Line
ESC B n1...n16 NUL Set Vertical Tab StopsESC B NUL Clear All Vertical Tab Stops
Character PitchESC y Set Character Pitch to 10 cpiESC z Set Character Pitch to 12 cpi
Line SpacingESC 2 Set Line Spacing to 6 lpiESC 0 Set Line Spacing to 8 lpi
ESC 1 Set Line Spacing to 7/72 Inch
ESC A n Set Line Spacing to n/72 InchESC 3 n Set Line Spacing to n/216 Inch
Print EnhancementSO Select Expanded PrintESC S Select Expanded Print
DC4 Cancel Expanded Print
ESC T Cancel Expanded PrintSI Select Compressed Print
ESC P Select Compressed Print
DC2 Cancel Compressed PrintESC Q Cancel Compressed Print
ESC q Select Letter-Quality Print
ESC e Select Letter-Quality PrintESC d Cancel Letter-Quality Print

TI Model 855 Printer DP Emulation 6-6
Model 855DP Commands (concluded)
Command Command Name
Print Enhancement (continued)ESC G Select Boldface Print
ESC H Select Boldface Print
ESC E Select Shadow PrintESC F Cancel Shadow Print
Color EmulationESC r n Select color (Epson-JX compatible)ESC c n Select color (TI 857 compatible)
Raster GraphicsESC K n1 n2 Select 60 dpi GraphicsESC N n1 n2 Select 72 dpi Graphics
ESC L n1 n2 Select 120 dpi Graphics
ESC J n1 n2 Select 120 dpi GraphicsESC O n1 n2 Select 144 dpi Graphics

TI Model 855 Printer DP Emulation 6-7
Model 855 DP Command DescriptionsThe following paragraphs describe the TI 855 DP emulation commands.The command formats are listed following each commanddescription. Many of the escape-sequence commands contain one ormore variables to specify various command parameters. Thesevariables are italicized in the command formats to indicate that theycan be set to more than one value.
Printer Operation Commands
These commands allow the host computer to control some basicprinter functions.
Select DP Mode
Escape sequence:ESC @Hexadecimal: 1B 40
Select WP Mode
Escape sequence:ESC CR PHexadecimal: 1B 0D 50
Escape sequence:ESC SUB IHexadecimal: 1B 1A 49
These commands cause the printer to function in the Model 855 WPmode.
Suspend Printing
Escape sequence:ESC wHexadecimal: 1B 77
This command prints the current print line from the print buffer andsuspends printing operations until the suspension is released by theOn Line switch.

TI Model 855 Printer DP Emulation 6-8
Select Unidirectional Printing
Escape sequence:ESC uHexadecimal: 1B 75
This command causes the printer to print subsequent characters inthe forward (left-to-right) direction only.
Cancel Unidirectional Printing
Escape sequence:ESC bHexadecimal: 1B 62
Set Most Significant Bit
Escape sequence:ESC >Hexadecimal: 1B 3E
This command sets the most significant bit of all received charactersto one. This allows a host that can send only 7-bit data to access theGR side of an 8-bit character set.
Reset Most Significant Bit
Escape sequence:ESC =Hexadecimal: 1B 3D
Form Format and Font Selection Commands
The form format commands let you select and set some form-relatedparameters. The font selection command lets you choose between thetwo standard fonts and any installed optional fonts.
The standard fonts for the Model 8900 Series Printer are Courier andGothic. Residing in printer ROM, these fonts can be selected via thecontrol panel or by the host computer. Optional fonts include PrestigeElite and Presentor. These optional fonts are available as ROMs thatplug into sockets on the printer logic board. When installed, thesefonts can also be selected via the control panel or by the host computer.

TI Model 855 Printer DP Emulation 6-9
Set Form Length to n Lines
Escape sequence:ESC C nHexadecimal: 1B 43 n
The variable n is valid for any value in range of 1 through 127 for 7-bitcharacter sets and 1 through 255 for 8-bit character sets.
Example. To set the form length to 60 lines, send the sequenceESC C < (1B 43 3C).
Select Font n
Escape sequence:ESC f nHexadecimal: 1B 66 n
The printer can have a maximum of 10 fonts, including two standardfonts (Gothic and Courier) and up to eight optional fonts.
The variable n can be any value in the range of 0 through 9, where 0designates Gothic, 1 designates Courier, 2 designates the first font inoption ROM 1, 3 designates the second font in option ROM 1, andso on. The range of n for either option ROM depends on the numberof fonts contained in each ROM.
Examples. If option ROM 1 has two fonts and option ROM 2 hasthree fonts, then the range of n is 2 through 3 for option ROM 1 and4 through 7 for option ROM 2. If option ROM 1 has four fonts andoption ROM 2 has three fonts, then the range of n is 2 through 5 foroption ROM 1 and 6 through 8 for option ROM 2.
Horizontal Motion Commands
The following paragraphs describe the commands for horizontalmotion and tabulation functions in the Model 855 DP emulation mode.
Backspace
Control character. BSHexadecimal: 08
This command causes the printer to move the printhead one space tothe left.

TI Model 855 Printer DP Emulation 6-10
The next character printed following a BS command over-strikes themost recently printed character. In the backward print mode, each BScontrol character moves the printhead to the right one space.
The BS command can cause characters to be printed to the left of theleft margin in the forward print mode or to the right of the rightmargin in the backward print mode.
Tab Horizontally
Control character: HTHexadecimal: 09
This command advances the printhead to the next horizontal tab stopand the printer starts the next print operation at that position. If theprinter receives an HT command following the last horizontal tabstop on a line, the printer performs a carriage return and a line feedand starts the next print operation at the left margin.
Carriage Return
Control character: CRHexadecimal: 0D
This command causes the printer to perform the following functions.
q The printer prints the current line of data from the print bufferand begins the next line at the left edge (column 1), set via theform configuration menu.
q If right margin justification is active, the CR command causeseach line of print to occupy the entire space between the left andright margins
q If the expanded print mode is active, the CR command resets theprinter to the normal print mode.
q If the automatic line feed function is active, the CR commandcauses the paper to advance one print line.

TI Model 855 Printer DP Emulation 6-11
Move Print Position to Left Margin
Escape sequence:ESC <Hexadecimal: 1B 3C
This command moves the printhead to the left margin and causes thenext print operation to be in the forward direction.
Set Horizontal Tab Stops
Escape sequence:ESC D n1...n16 NULHexadecimal: 1B 44 n1...n16 00
This command clears all previously set horizontal tab stops and setsa new stop at each of the columns specified by the variables n1...n16.Each of the variables n1 through n16 can range from 1 through 255.However, the printer ignores any setting to the right of the right margin.
Clear All Horizontal Tab Stops
Escape sequence:ESC D NULHexadecimal: 1B 44 00
Vertical Motion Commands
Vertical tab stops define the line numbers at which the paper stopswhen performing vertical tab operations. After vertical tab stopshave been set, any change of the vertical pitch causes a proportionalchange in the vertical tab stop positions.
Line Feed
Control character: LFHexadecimal: 0A
This command moves the paper forward one line position andperforms a carriage return to the left edge (column 1), as set via theform configuration menu.
Form Feed
Control character: FFHexadecimal: 0C

TI Model 855 Printer DP Emulation 6-12
This command advances the paper to the top margin of the next pageand causes the printer to perform a carriage return to the left edge(column 1), as set via the form configuration menu.
Tab Vertically
Control character: VTHexadecimal: 0B
This command advances the paper to the next vertical tab stop. If novertical tab stops have been set, the VT command causes the printerto perform a line feed operation. If the printer receives a VT commandfollowing the last vertical tab stop on a page, the printer performs aform feed operation.
Move Up One-Half Line
Escape sequence:ESC ^Hexadecimal: 1B 5E
This command moves the paper in reverse one-half of one line space.The line space is the space defined by the LPI menu item of thecontrol panel Form Config switch. This sequence can be used forsuperscripts or to return to the normal print line after invoking theESC v (move down ½ line) sequence.
Move Down One-Half Line
Escape sequence:ESC vHexadecimal: 1B 76
This command moves the paper forward one-half of one line space.The line space is that defined by the LPI menu item of the controlpanel Form Config switch. This sequence can be used for subscriptsor to return to the normal print line after invoking the ESC ^ (moveup ½ line) sequence.

TI Model 855 Printer DP Emulation 6-13
Set Vertical Tab Stops
Escape sequence:ESC B n1...n16 NULHexadecimal: 1B 42 n1...n16 00
This command clears all previously set vertical tabulation stops andsets a new stop at each of the lines specified by the variablesn1...n16. Each of the variables n1 through n16 can range from 1through 127 for 7-bit character sets and 1 through 255 for 8-bitcharacter sets. However, the printer ignores any setting below thebottom print line.
Clear All Vertical Tab Stops
Escape sequence:ESC B NULHexadecimal: 1B 42 00
Character Pitch Commands
The following paragraphs describe the commands for character pitchoperations in the Model 855 DP emulation mode.
Set Character Pitch to 10 cpi
Escape sequence:ESC yHexadecimal: 1B 79
Set Character Pitch to 12 cpi
Escape sequence:ESC zHexadecimal: 1B 7A
This command sets the character pitch to 12 cpi.
Line Spacing Commands
The following paragraphs describe the commands for line spacingoperations in the Model 855 DP emulation mode.
Set Line Spacing to 6 lpi
Escape sequence:ESC 2Hexadecimal: 1B 32

TI Model 855 Printer DP Emulation 6-14
Set Line Spacing to 8 lpi
Escape sequence:ESC 0Hexadecimal: 1B 30
Set Line Spacing to 7/72 Inch
Escape sequence:ESC 1Hexadecimal: 1B 31
Set Line Spacing to n/72 Inch
Escape sequence:ESC A nHexadecimal: 1B 41 n
The variable n can be any value in the range of 1 through 127.
Set Line Spacing to n/216 Inch
Escape sequence:ESC 3 nHexadecimal: 1B 33 n
The valid range of n is 1 through 127 for 7-bit character sets and 1through 255 for 8-bit character sets.
Print Enhancement Commands
The print enhancement commands enable your printer to improve orenhance the print quality.
Select Expanded Print
Control character: SOHexadecimal: 0E
Escape sequence:ESC SHexadecimal: 1B 53
These commands cause the printer to double the horizontal dotspacing of each character and then make a second pass to fill in the dots.
Cancel Expanded Print
Control character: DC4Hexadecimal: 14
TI Model 855 Printer DP Emulation 6-15
Escape sequence:ESC THexadecimal: 1B 54
Select Compressed Print
Control character: SIHexadecimal: 0F
Escape sequence:ESC PHexadecimal: 1B 50
These commands reduce the width of subsequently printed charactersto about 60 percent of their normal size.
Cancel Compressed Print
Control character: DC2Hexadecimal: 12
Escape sequence:ESC QHexadecimal: 1B 51
Select Letter-Quality Print
Escape sequence:ESC qHexadecimal: 1B 71
Escape sequence:ESC eHexadecimal: 1B 65
Cancel Letter-Quality Print
Escape sequence:ESC dHexadecimal: 1B 64
This command cancels LQ print and returns the printer to the draftprint mode.
Select Boldface Print
Escape sequence:ESC GHexadecimal: 1B 47
In the boldface print mode, the printer double strikes all characterswith no physical offset.

TI Model 855 Printer DP Emulation 6-16
Cancel Boldface Print
Escape sequence:ESC HHexadecimal: 1B 48
Select Shadow Print
Escape sequence:ESC EHexadecimal: 1B 45
In the shadow print mode, the printer double strikes all characterswith a 1/120-inch horizontal offset.
Cancel Shadow Print
Escape sequence:ESC FHexadecimal: 1B 46
Color Emulation
Select Epson-JX Compatible Color Mode
Escape sequence:ESC r nHexadecimal: 1B 72 n
To provide compatibility with Epson-JX where n is an ASCII valueNUL through ACK (hexadecimal value 00 through 06 or decimalvalue 0 through 6).
n = 0 for blackn = 1 for redn = 2 for bluen = 3 for purplen = 4 for yellown = 5 for orangen = 6 for green
Select TI 857 Compatible Color Mode
Escape sequence:ESC c nHexadecimal: 1B 63 n

TI Model 855 Printer DP Emulation 6-17
To provide compatibility with TI 857 where n is an ASCII valueNUL through ACK (hexadecimal value 00 through 06 or decimalvalue 0 through 6).
n = 0 for blackn = 1 for bluen = 2 for redn = 3 for yellown = 4 for greenn = 5 for purplen = 6 for orange
Raster Graphics Commands
The following paragraphs describe the commands that control theraster graphics feature in the Model 855 DP emulation mode. To findthe values of n1 and n2 for any of the following commands, modifythe procedure described for the Select 60 dpi Graphics command inChapter 4. In step 1 of the procedure, substitute the appropriate dotdensity value for 60.
Select 60 dpi Graphics
Escape sequence:ESC K n1 n2Hexadecimal: 1B 4B n1 n2
Select 72 dpi Graphics
Escape sequence:ESC N n1 n2Hexadecimal: 1B 4E n1 n2
Select 120 dpi Graphics
Escape sequence:ESC L n1 n2Hexadecimal: 1B 4C n1 n2
Escape sequence:ESC J n1 n2Hexadecimal: 1B 4A n1 n2
Select 144 dpi Graphics
Escape sequence:ESC O n1 n2Hexadecimal: 1B 4F n1 n2
IBM Proprinter XL Emulation 7-1
7IBM Proprinter XL Emulation
Introduction .................................................................................... 7-4IBM Proprinter XL Emulation Commands .................................... 7-5IBM Proprinter XL Command Descriptions .................................. 7-7
Printer Operation Commands .................................................... 7-7Select Printer......................................................................... 7-8Deselect Printer ..................................................................... 7-8Sound Bell ............................................................................ 7-8Cancel Line ........................................................................... 7-8Select Unidirectional Printing .............................................. 7-8Cancel Unidirectional Printing ............................................. 7-9
Form Format and Margin Control Commands .......................... 7-9Set Form Length to n Lines .................................................. 7-9Set Form Length to n Inches ................................................. 7-9Set Top of Form Position ...................................................... 7-9Select Automatic Perforation Skip ..................................... 7-10Cancel Automatic Perforation Skip .................................... 7-10Set Left and Right Margins at Columns nl and n2 ............. 7-10
Horizontal Motion Commands ................................................ 7-11Backspace ........................................................................... 7-11Tab Horizontally ................................................................. 7-11Carriage Return ................................................................... 7-11Set Horizontal Tab Stops .................................................... 7-12Restore Default Tab Stops .................................................. 7-12
Vertical Motion Commands ..................................................... 7-12Line Feed ............................................................................ 7-12Form Feed ........................................................................... 7-13Tab Vertically ...................................................................... 7-13Perform n/216-Inch Line Feed ............................................ 7-13Perform Reverse Line Feed ................................................ 7-13Enable Automatic Line Feed .............................................. 7-13

IBM Proprinter XL Emulation 7-2
Disable Automatic Line Feed ............................................. 7-14Reverse Line Feed .............................................................. 7-14Set Vertical Tab Stops ......................................................... 7-14Clear Vertical Tab Stops ..................................................... 7-14
Character Pitch and Line Spacing Commands ........................ 7-14Set Character Pitch to 10 cpi .............................................. 7-14Set Character Pitch to 12 cpi .............................................. 7-15Select Programmable Line Spacing .................................... 7-15Set Line Spacing to 8 lpi ..................................................... 7-15Set Line Spacing to 7/72 Inch ............................................. 7-15Set Line Spacing to n/72 Inch ............................................. 7-15Set Line Spacing to n/216 Inch ........................................... 7-15
Character Set Commands ........................................................ 7-16Select PC1 Character Set .................................................... 7-16Select PC2 Character Set .................................................... 7-16Print Single Specified Character......................................... 7-16Print Multiple Specified Characters ................................... 7-16
Print Enhancement Commands................................................ 7-17Select Expanded Print ......................................................... 7-17Cancel Expanded Print ....................................................... 7-17Select Compressed Print ..................................................... 7-17Cancel Compressed Print .................................................... 7-18Select Letter-Quality Print .................................................. 7-18Cancel Letter-Quality Print ................................................ 7-18Select Text-Underline Print ................................................ 7-18Cancel Text-Underline Print ............................................... 7-18Select Text-Overscore Print ................................................ 7-18Cancel Text-Overscore Print ............................................... 7-18Select Boldface Print .......................................................... 7-18Cancel Boldface Print ......................................................... 7-19Select Shadow Print ............................................................ 7-19Cancel Shadow Print .......................................................... 7-19Select Superscript Print ...................................................... 7-19Cancel Superscript Print ..................................................... 7-19Select Subscript Print .......................................................... 7-19
IBM Proprinter XL Emulation 7-3
Cancel Subscript Print ........................................................ 7-19Enable/Disable Double-High Double-Wide Print .............. 7-20Considerations for Using Enable/Diasble Double-High Double-Wide Print ...................................... 7-20
Raster Graphics Commands .................................................... 7-21Select 60 dpi Graphics ........................................................ 7-22Select 120 dpi Graphics ...................................................... 7-22Select High-Speed 120 dpi Graphics .................................. 7-22Select 240 dpi Graphics Mode............................................ 7-22
IBM Proprinter XL Emulation 7-4
IntroductionThis chapter describes the IBM Proprinter XL emulation mode. Thisemulation mode is selectable from the printer setup menu describedin Chapter 2. This mode enables your printer to emulate most of thefunctions of the IBM Proprinter XL with the following considerations:
q The Proprinter XL emulation supports all Model 8900 globalcommands.
q Factory selected power-up defaults for the IBM Proprinter XLemulation are:
— Auto LF — NO
— Auto CR — NO
— Slashed zeros — NO
— The last form setting change made via the control panel isretained and restored at power-up.
q Selecting or canceling proportional spacing is not supported.
q Downloading characters (ESC = nl n2 data) is not supported.
The IBM Proprinter XL is a nine-pin dot-matrix impact printer thatcan print draft-quality or near-letter-quality (NLQ) text charactersand dot graphics.

IBM Proprinter XL Emulation 7-5
IBM Proprinter XL Emulation CommandsYour printer, when operating in the IBM Proprinter XL emulationmode, can respond to both escape-sequence commands and thestandard US ASCII control characters. The following table lists theIBM Proprinter XL printer commands.
IBM Proprinter XL Commands
Command Command Name
Printer OperationDC1 Select Printer
ESC Q SYN Deselect Printer
BEL Sound BellCAN Cancel Line
ESC U SOH Select Unidirectional Printing
ESC U NUL Cancel Unidirectional Printing
Form Format and Margin ControlESC C n Set Form Length to n Lines
ESC C NUL n Set Form Length to n InchesESC 4 Set Top of Form Position
ESC N n Set Automatic Perforation Skip to n Lines
ESC O Cancel Automatic Perforation SkipESC X n1 n2 Set Left and Right Margins at Columns n1
and n2
Horizontal Motion
BS Backspace
HT Tab Horizontally
CR Carriage ReturnESC D n1...n28 NUL Set Horizontal Tab Stops
ESC R Restore Default Tab Stops

IBM Proprinter XL Emulation 7-6
IBM Proprinter XL Commands (continued)
Command Command NameVertical MotionLF Line FeedFF Form FeedVT Tab VerticallyESC J n Perform n/216 Inch Line FeedESC 5 SOH Enable Automatic Line FeedESC 5 NUL Disable Automatic Line FeedESC ] Reverse Line FeedESC B n1...n64 NUL Set Vertical Tab StopsESC B NUL Clear All Vertical Tab Stops
Character Pitch and Line SpacingDC2 Set Character Pitch to 10 cpiESC : Set Character Pitch to 12 cpiESC 2 Select Programmable Line SpacingESC 0 Set Line Spacing to 8 lpiESC 1 Set Line Spacing to 7/72 InchESC A n Set Line Spacing to n/72 InchESC 3 n Set Line Spacing to n/216 Inch
Character SetESC 7 Select PC1 Character SetESC 6 Select PC2 Character SetESC ^ c Print Single Specified CharacterESC \ n1 n2 data Print Multiple Specified Characters
Print EnhancementSO Select Expanded PrintESC SO Select Expanded PrintESC W SOH Select Expanded PrintDC4 Cancel Expanded PrintESC W NUL Cancel Expanded PrintSI Select Compressed PrintESC SI Select Compressed PrintDC2 Cancel Compressed PrintESC I STX Select Letter-Quality PrintESC I ACK Select Letter-Quality PrintESC I NUL Cancel Letter-Quality PrintESC I EOT Cancel Letter-Quality PrintESC - SOH Select Text-Underline Print

IBM Proprinter XL Emulation 7-7
IBM Proprinter XL Commands (concluded)
Command Command
Name Print Enhancement (continued)ESC - NUL Cancel Text-Underline Print
ESC _ SOH Select Text-Overscore Print
ESC _ NUL Cancel Text-Overscore PrintESC G Select Boldface Print
ESC H Cancel Boldface Print
ESC E Select Shadow PrintESC F Cancel Shadow Print
ESC S NUL Select Superscript Print
ESC T Cancel Superscript PrintESC S SOH Select Subscript Print
ESC T Cancel Subscript Print
ESC [ @ n1 n2 Enable/Disable Double-High n3 n4 m1 m2 Double-Wide Print
Raster GraphicsESC K n1 n2 Select 60 dpi GraphicsESC L n1 n2 Select 120 dpi Graphics
ESC Y n1 n2 Select High-Speed 120 dpi Graphics
ESC Z n1 n2 Select 240 dpi Graphics
IBM Proprinter XL Command DescriptionsThe following paragraphs describe the IBM Proprinter XL emulationcommands. Many of the escape-sequence commands contain one ormore variables to specify various command parameters. Thesevariables are italicized in the command formats to indicate that theycan be set to more than one value.
Printer Operation Commands
The printer operation commands provide printer control functionsincluding printer selection and initialization. These commands allowthe host computer to control the basic printer functions.

Select Printer
Control character: DC1Hexadecimal: 11
This command reselects the printer after it has received a DeselectPrinter command, unless the printer has been placed offline via thecontrol panel On Line switch.
Note: Some IBM computers and IBM-compatible computers setparallel interface pin 36 low; this condition disables the DC1 command.
Deselect Printer
Escape sequence:ESC Q 22Hexadecimal: 1B 51 16
This command sets the printer to its deselected state until it receivesa Select Printer (DC1) command from the host. After the printer hasreceived the Deselect Printer command, it cannot be placed onlinevia the control panel On Line switch.
Sound Bell
Control character: BELHexadecimal: 07
This command causes the printer to sound a short tone.
Cancel Line
Control character: CANHexadecimal: 18
This command removes all characters except control characters fromthe current contents of the print buffer.
Select Unidirectional Printing
Escape sequence:ESC U SOHHexadecimal: 1B 55 01
This command causes the printer to print subsequent text in theforward (left-to-right) direction only.
IBM Proprinter XL Emulation 7-8

IBM Proprinter XL Emulation 7-9
Cancel Unidirectional Printing
Escape sequence:ESC U NULHexadecimal: 1B 55 00
Form Format and Margin Control Commands
The form format commands let you select and set some form-relatedparameters. A single margin control command lets you set the leftand right margin positions.
Set Form Length to n Lines
Escape sequence:ESC C nHexadecimal: 1B 43 n
The variable n can be any value in the range of 1 through 127.
Set Form Length to n Inches
Escape sequence:ESC C NUL nHexadecimal: 1B 43 00 n
The variable n can be any value in the range of 1 through 21.
Set Top of Form Position
Escape sequence:ESC 4Hexadecimal: 1B 34
This command sets the top of form position to the current print line.

IBM Proprinter XL Emulation 7-10
Select Automatic Perforation Skip
Escape Sequence:ESC N nHexadecimal: 1B 4E n
This command causes the printer to perform the following actions.
1. Skip the number of lines specified by the variable n and thecurrent form parameter settings.
2. Print the next line at the first print line position of the followingform.
The variable n can be any value in the range of 1 through 255.
Cancel Automatic Perforation Skip
Escape sequence:ESC OHexadecimal: 1B 4F
Set Left and Right Margins at Columns n1 and n2
Escape sequence:ESC X n1 n2Hexadecimal: 1B 58 n1 n2
This command sets the left and right margins at the positions specifiedby the variables n1 and n2, respectively. The left margin position(n1) can be at any column in the range of 1 through the columnimmediately to the left of the current right margin. The right margin(n2) can be at any column in the range of the column immediately tothe right of the left margin through 255. If n1 or n2 equals 0, the leftmargin or right margin, respectively, equals the default value. Theminimum allowable distance between the left and right margin isone-half inch.

IBM Proprinter XL Emulation 7-11
Horizontal Motion Commands
The horizontal motion commands control the horizontal motion ofthe printhead, including the direction and distance of each movement.
Backspace
Control character: BSHexadecimal: 08
This command causes the printer to print the current contents of theprint buffer and then move the printhead one character to the left. Thiscommand is valid at any point to the right of the left margin but notat or to the left of the left margin. The printer ignores the Backspacecommand if either full or right margin justification has been selected.
Tab Horizontally
Control character: HTHexadecimal: 09
This command moves the printhead horizontally to the next horizontaltab stop. These tab stops can be the ones set by the Set HorizontalTab Stops command (ESC D n1...n32) or the default horizontal tabstops. The default tab stops are at 8-character intervals (in the defaultcharacter size) between the left and right margins.
Carriage Return
Control character. CRHexadecimal: 0D
This command causes the printer to print the current contents of theprint buffer and then return the printhead to the left margin. Thiscommand may be accompanied by a Line Feed command to movethe printhead to the next print line position.

IBM Proprinter XL Emulation 7-12
Set Horizontal Tab Stops
Escape sequence:ESC D n1...n28 NULHexadecimal: 1B 44 n1...n28 00
This command clears all previously set horizontal tab stops and setsa new tab stop at each of the columns specified by the variablesn1...n28. These variables must be listed in ascending order; that is,the value of each variable must be greater than the one preceding it.Any n value of 0 or less than that of the one preceding it terminatesthe command.
At power-up or upon receiving the Initialize Printer command, theprinter automatically sets a horizontal tab stop at every eighthcolumn. These are the default positions.
If you change the character pitch after the horizontal tab stops havebeen set, the tab stop positions change accordingly. However, theexpanded print mode does not affect the horizontal tab settings.
Restore Default Tab Stops
Escape sequence:ESC RHexadecimal: 1B 52
This command resets all tab stops (both vertical and horizontal) totheir default values.
Vertical Motion Commands
The vertical motion commands are those that control forward orreverse movement of the paper within the printer.
Line Feed
Control character: LFHexadecimal: 0A
This command causes the printer to print the current contents of theprint buffer and then position the printhead at the next print line.

IBM Proprinter XL Emulation 7-13
Form Feed
Control character: FFHexadecimal: 0C
The Form Feed command causes the printer to print the currentcontents of the print buffer and then move the print-head to the firstprint line of the next form.
Tab Vertically
Control character: VTHexadecimal: 0B
This command advances the print position vertically to the nextvertical tab stop.
Perform n/216 Inch Line Feed
Escape sequence:ESC J nHexadecimal: 1B 4A n
This command advances the print position vertically by a value inthe range of 0/216 through 255/216 (0 through 1.18) inches. Thiscommand causes an immediate line feed operation but does notproduce a carriage return unless the printer is set to perform anautomatic carriage return upon receiving an LF control character.
Perform Reverse Line Feed
Escape Sequence:ESC ]Hexadecimal: 1B 5D
This command executes an immediate reverse line feed. Printable datain the line print buffer is printed, then a reverse line feed is executed.
Enable Automatic Line Feed
Escape sequence:ESC 5 SOHHexadecimal: 1B 35 01
This command enables the automatic line feed mode. With this modeenabled, the printer automatically performs a line feed with everycarriage return.

IBM Proprinter XL Emulation 7-14
Disable Automatic Line Feed
Escape sequence:ESC 5 NULHexadecimal: 1B 35 00
Reverse Line Feed
Escape sequence:ESC ]Hexadecimal: 1B 5D
Set Vertical Tab Stops
Escape sequence:ESC B nl...n64 NULHexadecimal: 1B 42 n1...n64 00
This command sets up to 64 vertical tab stops (in the current linespacing). Subsequent line spacing changes do not affect thesesettings. The tab settings must be entered in ascending order (n1, n2,and so on); that is, the value of each succeeding n variable must begreater than the one preceding it. Any n variable with a value of 0(00) terminates the command.
Clear Vertical Tab Stops
Escape sequence:ESC B NULHexadecimal: 1B 42 00
Character Pitch and Line Spacing Commands
The character pitch is the horizontal distance from the center of onecharacter to the center of an adjacent character. The line spacing isthe vertical distance between print lines.
Set Character Pitch to 10 cpi
Control character: DC2Hexadecimal: 12

IBM Proprinter XL Emulation 7-15
Set Character Pitch to 12 cpi
Escape sequence:ESC :Hexadecimal: 1B 3A
This command selects 12 cpi character pitch for either draft or LQprinting.
Select Programmable Line Spacing
Escape sequence:ESC 2Hexadecimal: 1B 32
This command invokes the line spacing value stored in memory bythe Set Line Spacing to n/72 Inch command (ESC A n). If no ESC A ncommand has been received, this command sets the line spacing to 6 lpi.
Set Line Spacing to 8 lpi
Escape sequence:ESC 0Hexadecimal: 1B 30
Set Line Spacing to 7/72 Inch
Escape sequence:ESC 1Hexadecimal: 1B 31
Set Line Spacing to n/72 Inch
Escape sequence:ESC A nHexadecimal: 1B 32 n
The line spacing value can be any value in the range of 1/72 through85/72 (0.014 through 1.181) inches, depending upon the value of thevariable n.
Set Line Spacing to n/216 Inch
Escape sequence:ESC 3 nHexadecimal: 1B 32 n
This command sets the line spacing to a value in the range of 0/216through 255/216 (0 through 1.18) inches for subsequent line feedoperations.

IBM Proprinter XL Emulation 7-16
Character Set Commands
The character set commands let you choose between the IBM PC1and IBM PC2 character sets and print specified characters fromeither of these character sets.
Select PC1 Character Set
Escape sequence:ESC 7Hexadecimal: 1B 37
Select PC2 Character Set
Escape sequence: ESC 6Hexadecimal: 1B 36
Print Single Specified Character
Escape sequence:ESC ^ cHexadecimal: 1B 5E c
This command causes the printer to print from the All Characterscharacter set the single character specified by the variable c. Thevariable c can be any hexadecimal code from the character set,including those from columns 0, 1, 8, and 9.
Print Multiple Specified Characters
Escape sequence:ESC \ n1 n2 dataHexadecimal: 1B 5C n1 n2 data
This command causes the printer to print from the All Characterscharacter set the number of characters indicated by the variables n1and n2 and specified by the data term. The total number of charactersto be printed following this command is equal to n1 + (n2 x 256),where the valid ranges of both nl and n2 are 0 through 255. Thus themaximum number of characters that can be specified by this commandis 255 + (255 x 256) equals 65,535. The data term is a list of thehexadecimal codes of the characters to be printed, including thecharacters from columns 0, 1, 8, and 9 of the All Characterscharacter set.

IBM Proprinter XL Emulation 7-17
Print Enhancement Commands
The print enhancement commands enable your printer to improve orenhance the print quality. Print enhancements include such things assuperscript and subscript text, text underlining and overscoring, andemphasized print to make the print appear bolder. The followingparagraphs describe the print enhancement commands.
Select Expanded Print
Control character: SOHexadecimal: 0E
Escape sequence:ESC SOHexadecimal: 1B 0E
Escape sequence:ESC W SOHHexadecimal: 1B 57 01
These commands select the expanded (double-wide) print mode foreither draft or LQ printing. A Carriage Return command (CR)cancels the expanded print mode; therefore, for two or moreconsecutive lines of expanded print you must invoke the SelectExpanded Print command for each line.
Cancel Expanded Print
Control character. DC4Hexadecimal: 14
Escape sequence:ESC W NULHexadecimal: 1B 57 00
Select Compressed Print
Control character: SIHexadecimal: 0F
Escape sequence:ESC SIHexadecimal: 1B 0F
These commands cause the printer to print characters at about 60percent of their normal widths. For example, for a character pitch of10 cpi, one inch of text contains about 17 characters instead of thenormal 10.
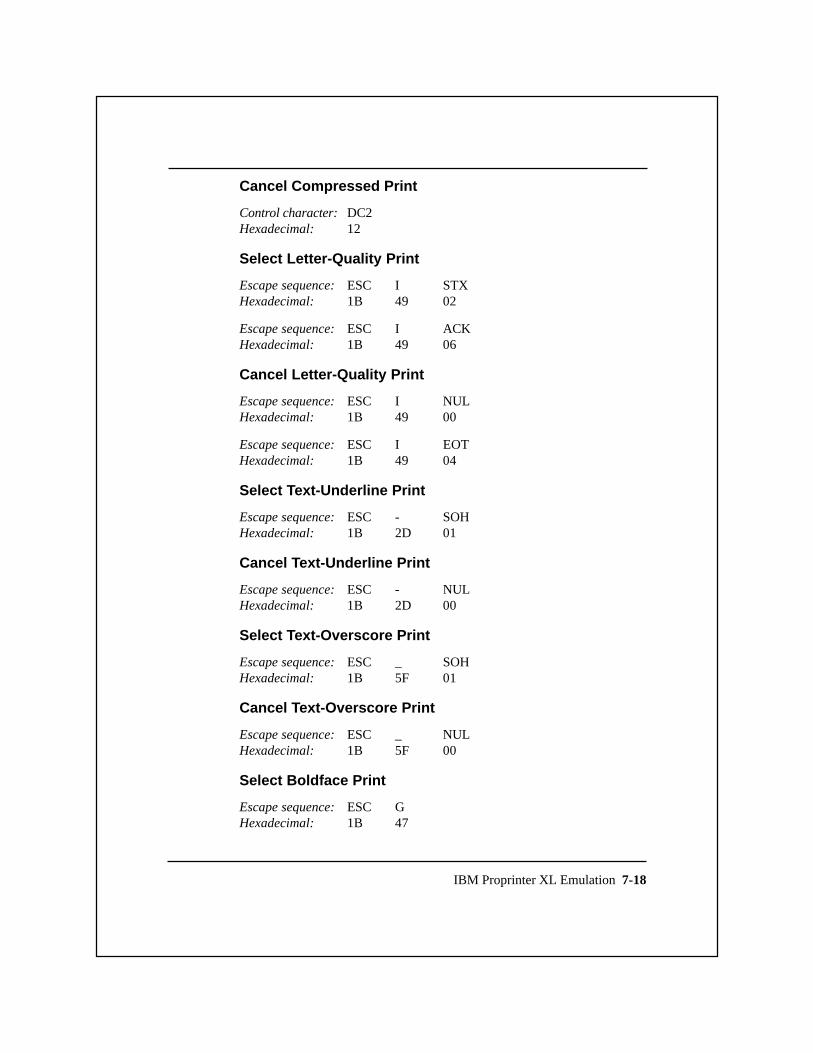
IBM Proprinter XL Emulation 7-18
Cancel Compressed Print
Control character: DC2Hexadecimal: 12
Select Letter-Quality Print
Escape sequence:ESC I STXHexadecimal: 1B 49 02
Escape sequence:ESC I ACKHexadecimal: 1B 49 06
Cancel Letter-Quality Print
Escape sequence:ESC I NULHexadecimal: 1B 49 00
Escape sequence:ESC I EOTHexadecimal: 1B 49 04
Select Text-Underline Print
Escape sequence:ESC - SOHHexadecimal: 1B 2D 01
Cancel Text-Underline Print
Escape sequence:ESC - NULHexadecimal: 1B 2D 00
Select Text-Overscore Print
Escape sequence:ESC _ SOHHexadecimal: 1B 5F 01
Cancel Text-Overscore Print
Escape sequence:ESC _ NULHexadecimal: 1B 5F 00
Select Boldface Print
Escape sequence:ESC GHexadecimal: 1B 47

IBM Proprinter XL Emulation 7-19
Cancel Boldface Print
Escape sequence:ESC HHexadecimal: 1B 48
Select Shadow Print
Escape sequence:ESC EHexadecimal: 1B 45
Cancel Shadow Print
Escape sequence:ESC FHexadecimal: 1B 46
Select Superscript Print
Escape sequence:ESC S NULHexadecimal: 1B 53 00
After receiving this command the printer prints each subsequentcharacter in the upper part of the character space at about two-thirdsits normal height.
Cancel Superscript Print
Escape sequence:ESC THexadecimal: 1B 54
Select Subscript Print
Escape sequence:ESC S SOHHexadecimal: 1B 53 01
After receiving this command the printer prints each subsequentcharacter in the lower part of the character space at about two-thirdsits normal height.
Cancel Subscript Print
Escape sequence:ESC THexadecimal: 1B 54

IBM Proprinter XL Emulation 7-20
Enable/Disable Double-High Double-Wide Print
Escape sequence:ESC [ @ n1 n2 n3 n4 m1 m2Hexadecimal: 1B 5B 40 n1 n2 n3 n4 m1 m2
where:
n1 n2 = byte count; format is (n1 + (n2 * 256))n3 n4 = no function, ignoredm1 = line spacing and character heightm2 = character width
This command selects double-high printing in either the standard orexpanded width. The variable m2 specifies the character width, andm1 specifies the character height and line feed distance as follows.
Considerations for Using Enable/Diasble Double-HighDouble-Wide Print
Considerations for using the Enable/Disable Double-HighDouble-Wide command sequence are:
q The byte count is usually four (4), when the count is greater than4, the command is executed as per m1 and m2 and the additionalbytes are accepted and ignored.
q When the byte count is three (3), the command is executed as perm1 only.
No m2 byte is provided, the character width remains unchanged.m1 is the last byte of the count.
q When the byte count is less than three (3) the command isaccepted and ignored as follows:
byte count = 2 n4 is the last byte of the sequence1 n3 is the last byte of the sequence0 n2 is the last byte of the sequence

IBM Proprinter XL Emulation 7-21
m1 data byte, bit 0 is least significantbits 0 and 1 = 00 current character height
01 standard character height10 double character height11 current character height
bits 2 and 3 = XX don’t care
bits 4 and 5 = 00 current line spacing01 single line spacing10 double line spacing11 current line spacing
bits 6 and 7 = XX don’t care
m2 data byte, bit 0 is least significantbits 0 and 1 = 00 current character width
01 standard character width10 double character width11 current character width
bits 2 through 7 = XX don’t care
Raster Graphics Commands
The graphics feature provides commands that enable you to designyour own images in any shape you desire. These commands allowyou to create and adjust the density of various lines and patterns invarious combinations.
Note: The allowed ranges of n1 and n2 in the following commandsare determined by the line length and limited by the width of theinstalled paper.
To find the values of n1 and n2 for any of the following commands,modify the procedure described for the Select 60 dpi Graphicscommand in Chapter 4. In step 1 of the procedure, substitute theappropriate dot density value for 60.

IBM Proprinter XL Emulation 7-22
Select 60 dpi Graphics
Escape sequence:ESC K n1 n2Hexadecimal: 1B 4B n1 n2
This command selects the 8-pin, 60 dpi graphics mode for thehorizontal line length specified by the two-byte variable n1 n2.
Select 120 dpi Graphics
Escape sequence:ESC L n1 n2Hexadecimal: 1B 4C n1 n2
This command selects the 8-pin, 120 dpi graphics mode for thehorizontal distance specified by the two-byte variable n1 n2.
Select High-Speed 120 dpi Graphics
Escape sequence:ESC Y n1 n2Hexadectmal: 1B 59 n1 n2
This command selects the 8-pin, high-speed 120 dpi graphics modefor the horizontal distance specified by the two-byte variable n1 n2.This is identical to the double-density graphics mode except that theprinting speed is doubled.
Select 240 dpi Graphics Mode
Escape sequence:ESC Z n1 n2Hexadecimal: 1B 5A n1 n2
This command selects the 8-pin, 240 dpi graphics mode for thehorizontal distance specified by the two-byte variable n1 n2.
Epson FX Printer Emulation Mode 8-1
8Epson FX Printer Emulation Mode
Introduction .................................................................................... 8-4Epson FX Printer Emulation Commands ....................................... 8-6Epson FX Emulation Command Descriptions ............................... 8-9
Printer Operation Commands .................................................... 8-9Select Printer....................................................................... 8-10Deselect Printer ................................................................... 8-10Sound Bell .......................................................................... 8-10Cancel Line ......................................................................... 8-10Delete Character ................................................................. 8-10Initialize Printer .................................................................. 8-11Set Most Significant Bit to Zero ......................................... 8-11Set Most Significant Bit to One.......................................... 8-11Cancel Most Significant Bit Control .................................. 8-12Select Unidirectional Printing for One Line Only .............. 8-12Select Unidirectional Printing ............................................ 8-12Cancel Unidirectional Printing ........................................... 8-12
Form Format Commands ......................................................... 8-13Set Form Length to n Lines ................................................ 8-13Set Form Length to n Inches ............................................... 8-13Select Automatic Perforation Skip ..................................... 8-13Cancel Automatic Perforation Skip .................................... 8-14
Font Selection Commands ....................................................... 8-14Select Letter-Quality Gothic Font ...................................... 8-14Select Letter-Quality Courier Font ..................................... 8-14
Margin Control Commands ..................................................... 8-15Select Left Margin Justification ......................................... 8-15Select Right Margin Justification ....................................... 8-15Select Full Justification ...................................................... 8-15Select Text Centering.......................................................... 8-15Set Left Margin at Column n ..............................................8-16Set Right Margin at Column n ............................................8-16

Epson FX Printer Emulation Mode 8-2
Horizontal Motion Commands ................................................ 8-17Backspace ........................................................................... 8-17Tab Horizontally ................................................................. 8-17Carriage Return ................................................................... 8-17Set Absolute Print Position ................................................. 8-18Set Relative Print Position .................................................. 8-18Set Horizontal Tab Stops .................................................... 8-19Clear All Horizontal Tab Stops .......................................... 8-19
Vertical Motion Commands ..................................................... 8-19Line Feed ............................................................................ 8-19Form Feed ........................................................................... 8-20Tab Vertically ...................................................................... 8-20Perform n/216 Inch Line Feed ............................................ 8-20Set Vertical Tab Stops ......................................................... 8-20Select Vertical Tab Channel ................................................ 8-21Set VTC Tab Stops ............................................................. 8-21Clear All VTC Tab Stops.................................................... 8-21Clear All Vertical Tab Stops ............................................... 8-21
Character Pitch Commands ..................................................... 8-22Set Character Pitch to 10 cpi .............................................. 8-22Set Character Pitch to 12 cpi .............................................. 8-22Set Intercharacter Space ..................................................... 8-22
Line Spacing Commands ......................................................... 8-23Set Line Spacing to 6 lpi ..................................................... 8-23Set Line Spacing to 8 lpi ..................................................... 8-23Set Line Spacing to 7/72 Inch ............................................. 8-23Set Line Spacing to n/72 Inch ............................................. 8-23Set Line Spacing to n/216 Inch ........................................... 8-24
Character Set Commands ........................................................ 8-24Select Italic Character Set ................................................... 8-24Select Extended Graphics Character Set ............................ 8-24Select International Character Set ...................................... 8-25Enable Character Positions 128-159 as Printable Characters .......................................................... 8-25Disable Character Positions 128-159 as Printable Characters .......................................................... 8-25

Epson FX Printer Emulation Mode 8-3
Enable Character Positions 0-31 and 128-159 as Printable Characters ......................................................... 8-26Disable Character Positions 0-31 and 128-159 as Printable Characters ......................................................... 8-26
Print Enhancement Commands................................................ 8-26Select Expanded Print for One Line ................................... 8-26Cancel Expanded Print ....................................................... 8-27Select Expanded Print Until Canceled by ESC W NUL .... 8-27Cancel Expanded Print ....................................................... 8-27Select Double-High Print .................................................... 8-27Cancel Double-High Print .................................................. 8-27Select Compressed Print ..................................................... 8-27Cancel Compressed Print .................................................... 8-28Select Letter-Quality Print .................................................. 8-28Cancel Letter-Quality Print ................................................ 8-28Select Text-Underline Print ................................................ 8-28Cancel Text-Underline Print ............................................... 8-28Select Boldface Print .......................................................... 8-28Cancel Boldface Print ......................................................... 8-29Select Shadow Print ............................................................ 8-29Cancel Shadow Print .......................................................... 8-29Select Superscript Print ...................................................... 8-29Cancel Superscript Print ..................................................... 8-29Select Subscript Print .......................................................... 8-29Cancel Subscript Print ........................................................ 8-29Select Italic Print ................................................................ 8-30Cancel Italic Print ............................................................... 8-30Select Master Print Mode ................................................... 8-30
Graphics Commands................................................................ 8-31Select 60 dpi Graphics ........................................................ 8-31Select 9-Pin 60 dpi Graphics .............................................. 8-32Select 120 dpi Graphics ...................................................... 8-32Select 9-Pin 120 dpi Graphics ............................................ 8-32Select High-Speed 120 dpi Graphics .................................. 8-32Select 240 dpi Graphics ...................................................... 8-32Select Graphics Mode m .....................................................8-33Reassign Graphics Mode .................................................... 8-33
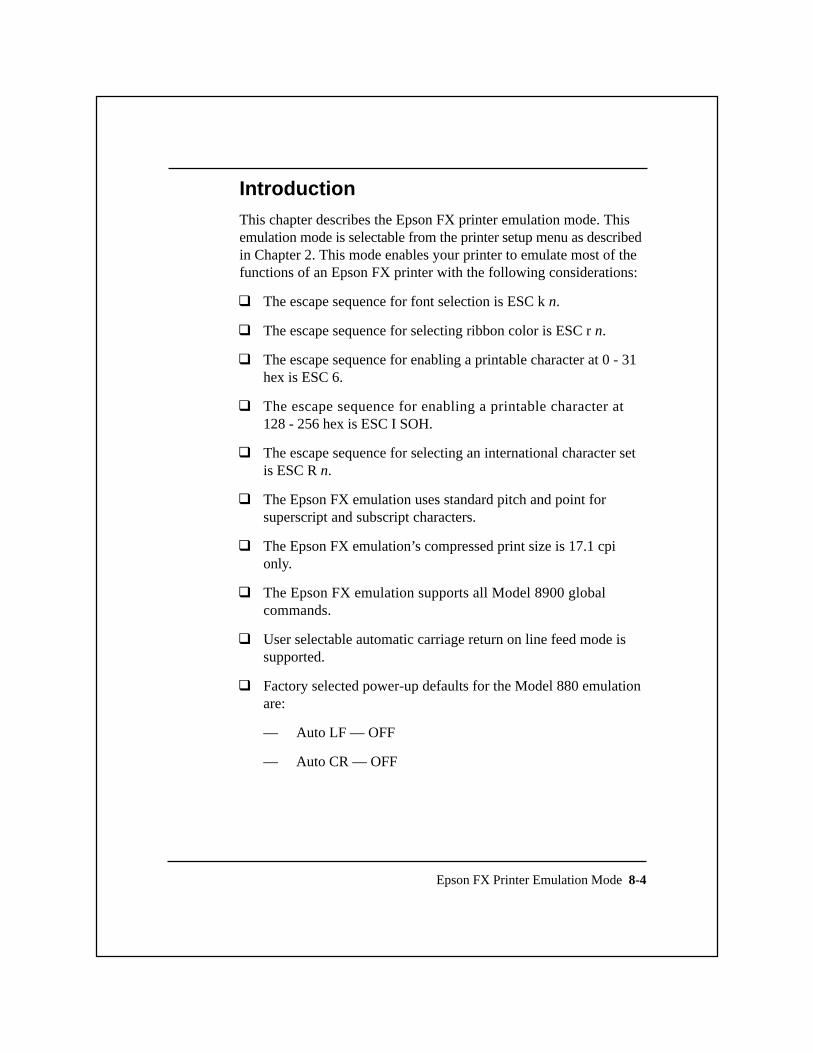
Epson FX Printer Emulation Mode 8-4
IntroductionThis chapter describes the Epson FX printer emulation mode. Thisemulation mode is selectable from the printer setup menu as describedin Chapter 2. This mode enables your printer to emulate most of thefunctions of an Epson FX printer with the following considerations:
q The escape sequence for font selection is ESC k n.
q The escape sequence for selecting ribbon color is ESC r n.
q The escape sequence for enabling a printable character at 0 - 31hex is ESC 6.
q The escape sequence for enabling a printable character at128 - 256 hex is ESC I SOH.
q The escape sequence for selecting an international character setis ESC R n.
q The Epson FX emulation uses standard pitch and point forsuperscript and subscript characters.
q The Epson FX emulation’s compressed print size is 17.1 cpionly.
q The Epson FX emulation supports all Model 8900 globalcommands.
q User selectable automatic carriage return on line feed mode issupported.
q Factory selected power-up defaults for the Model 880 emulationare:
— Auto LF — OFF
— Auto CR — OFF

Epson FX Printer Emulation Mode 8-5
— Slashed zeros — OFF
— The last form setting change made via the control panel isretained and restored at power -up.
— The right-half character set defaults to PC1 at power-up.
q The following escape sequences are not supported:
— The download characters command sequence ESC & NULdata
— The copy ROM character set to RAM Roman commandsequence ESC : 0 0 0
— The copy ROM character set to RAM San Serif commandsequence ESC : 0 1 0
— The select normal character set comand sequence ESC % 0
— The select user-defined character set command sequenceESC % 1
— The select cut-sheet feeder mode command sequenceESC EM 0
— The disable cut-sheet feeder mode command sequenceESC EM 4
— The set one-half print speed mode to on or off commandsequence ESC s n

Epson FX Printer Emulation Mode 8-6
Epson FX Printer Emulation CommandsYour printer, when operating in the Epson FX emulation mode, canrespond to both escape-sequence commands and the standard USASCII control characters. The following table lists the FX printercommands.
Epson FX Emulation Commands
Command Command NamePrinter OperationDC1 Select PrinterDC3 Deselect PrinterBEL Sound BellCAN Cancel LineDEL Delete CharacterESC @ Initialize PrinterESC = Set MSB to 0ESC > Set MSB to 1ESC # Cancel MSB ControlESC < Select Unidirectional Printing for One
Line OnlyESC U SOH Select Unidirectional PrintingESC U NUL Cancel Unidirectional Printing
Form FormatESC C n Set Form Length to n LinesESC C NUL n Set Form Length to n InchesESC N n Select Automatic Perforation SkipESC O Cancel Automatic Perforation Skip
Font SelectionESC k SOH Select LQ Gothic FontESC k NUL Select LQ Courier Font
Margin ControlESC a NUL Select Left Margin JustificationESC a STX Select Right Margin JustificationESC a ETX Select Full JustificationESC a SOH Select Text CenteringESC 1 n Set Left Margin at Column nESC Q n Set Right Margin at Column n

Epson FX Printer Emulation Mode 8-7
Epson FX Emulation Commands (continued)
Command Command NameHorizontal MotionBS BackspaceHT Tab HorizontallyCR Carriage ReturnESC $ n1 n2 Set Absolute Print PositionESC \ n1 n2 Set Relative Print PositionESC D nl...n32 NUL Set Horizontal Tab StopsESC D NUL Clear All Horizontal Tab Stops
Vertical MotionLF Line FeedFF Form FeedVT Tab VerticallyESC J n Perform n/216-Inch Line FeedESC B n1...n16 NUL Set Vertical Tab StopsESC / c Select Vertical Tab ChannelESC b c n1...n16 NUL Set VTC Tab StopsESC b c NUL Clear All VTC Tab StopsESC B NUL Clear All Vertical Tab Stops
Character PitchESC P Set Character Pitch to 10 cpiESC M Set Character Pitch to 12 cpiESC SP n Set Intercharacter Space
Line SpacingESC 2 Set Line Spacing to 6 lpiESC 0 Set Line Spacing to 8 lpiESC 1 Set Line Spacing to 7/72 InchESC A n Set Line Spacing to n/72 InchESC 3 n Set Line Spacing to n/216 Inch
Character SetESC t NUL Select Italic Character SetESC t SOH Select Extended Graphics Character SetESC R n Select International Character SetESC 6 Enable Character Positions 128-159 as
Printable CharactersESC 7 Disable Character Positions 128-159 as
Printable Characters

Epson FX Emulation Commands (continued)Command Command NameCharacter Set (continued)ESC I SOH Enable Character Positions 0-31 and
128-159 as Printable CharactersESC I NUL Disable Character Positions 0-31 and
128-159 as Printable CharactersPrint EnhancementSO Select Expanded Print for One LineESC SO Select Expanded Print for One LineDC4 Cancel Expanded PrintESC W SOH Select Expanded Print Until Canceled by
ESC W NULESC W NUL Cancel Expanded PrintESC w SOH Select Double-High PrintESC w NUL Cancel Double-High PrintSI Select Compressed PrintESC SI Select Compressed PrintDC2 Cancel Compressed PrintESC x SOH Select Letter-Quality PrintESC x NUL Cancel Letter-Quality PrintESC - SOH Select Text-Underline PrintESC - NUL Cancel Text-Underline PrintESC G Select Boldface PrintESC H Cancel Boldface PrintESC E Select Shadow PrintESC F Cancel Shadow PrintESC S NUL Select Superscript PrintESC T Cancel Superscript PrintESC S SOH Select Subscript PrintESC T Cancel Subscript PrintESC 4 Select Italic PrintESC 5 Cancel Italic PrintESC ! n Select Master Print
Epson FX Printer Emulation Mode 8-8

Epson FX Printer Emulation Mode 8-9
Epson FX Emulation Commands (concluded)
Command Command Name
Raster GraphicsESC K n1 n2 Select 60 dpi GraphicsESC ^ NUL n1 n2 Select 9-Pin 60 dpi GraphicsESC L n1 n2 Select 120 dpi GraphicsESC ^ SOH n1 n2 Select 9-Pin 120 dpi GraphicsESC Y nl n2 Select High-Speed, 120 dpi GraphicsESC Z n1 n2 Select 240 dpi GraphicsESC * m n1 n2 Select Graphics Mode mESC ? s n Reassign Graphics Mode
Epson FX Emulation CommandDescriptionsThe following paragraphs describe the Epson FX emulation commands.The command formats are listed following each command description.Many of the escape-sequence commands contain one or morevariables to specify various command parameters. These variablesare italicized in the command formats to indicate that they can be setto more than one value.
Printer Operation Commands
The printer operation commands provide printer control functionsincluding printer selection and initialization. These commands allowthe host computer to control the basic printer functions.
Note: For clarity, the individual terms of each escape sequence areseparated by spaces throughout this chapter. When you enter thesecommands, you must omit these spaces.

Epson FX Printer Emulation Mode 8-10
Select Printer
Control character: DC1Hexadecimal: 11
This command reselects the printer after it has received a Deselectcommand, unless the printer has been placed offline via the controlpanel On Line switch.
Deselect Printer
Control character: DC3Hexadecimal: 13
This command sets the printer to its deselected state until it receivesa Select Printer command from the host. After the printer has receivedthis command, it cannot be placed online via the control panel OnLine switch.
Sound Bell
Control character: BELHexadecimal: 07
This command causes the printer to sound a short tone.
Cancel Line
Control character: CANHexadecimal: 18
This command removes all characters except control characters fromthe current print buffer contents.
Delete Character
Control character: DELHexadecimal: 7F
This command removes the last text character from the current printbuffer contents, but does not affect any control character.

Epson FX Printer Emulation Mode 8-11
Initialize Printer
Escape sequence:ESC @Hexadecimal: 1B 40
This command resets the printer to its initial state and clears the printbuffer of all printable data from the last line printed before thecommand was received.
Set Most Significant Bit to Zero
Escape sequence:ESC =Hexadecimal: 1B 3D
Some computers, when sending characters from 7-bit character sets,automatically set the most significant bit (MSB) of each character to 1.This causes the printer to print all received characters as italics orcharacter graphics. To prevent this, the Set Most Significant Bit toZero command sets the MSB of each subsequently received characterto 0.
Set Most Significant Bit to One
Escape sequence:ESC >Hexadecimal: 1B 3E
This command sets the MSB of all subsequently received charactersto 1. This enables the printer to select characters from either theitalics character set or the extended graphics character set.

Epson FX Printer Emulation Mode 8-12
Cancel Most Significant Bit Control
Escape sequence:ESC #Hexadecimal: 1B 23
This command cancels printer control of the received character MSBand returns control to the computer. This enables the computer toselect characters from either the GL half or the GR half of theselected printer character set.
Select Unidirectional Printing for One Line Only
Escape sequence:ESC <Hexadecimal: 1B 3C
This command selects unidirectional printing for one line only. Uponreceiving this command, the printer moves its printhead to the leftmargin and begins printing. A CR control character cancels thiscommand and returns the printer to the bidirectional print mode.
Select Unidirectional Printing
Escape sequence:ESC U SOHHexadecimal: 1B 55 01
This command selects unidirectional printing. Upon receiving thiscommand, the printer moves its printhead to the left margin andbegins printing.
Cancel Unidirectional Printing
Escape sequence:ESC U NULHexadecimal: 1B 55 00
This command cancels the unidirectional print mode selected by theSelect Unidirectional Printing command and returns the printer tonormal bidirectional printing.

Epson FX Printer Emulation Mode 8-13
Form Format Commands
The form format commands let you set the form length in either linesor inches. These commands also let you enable or disable the automaticperforation skip feature.
Set Form Length to n Lines
Escape sequence:ESC C nHexadecimal: 1B 43 n
This command sets the form length to the number of lines specifiedby the variable n in the current line spacing. This command also setsthe top-of-form position to the current line. The variable n can beany value in the range of 1 through 127.
Set Form Length to n Inches
Escape sequence:ESC C NUL nHexadecimal: 1B 43 00 n
This command sets the form length to the number of inches specifiedby the variable n. The variable n can be any value in the range of1 through 22.
Select Automatic Perforation Skip
Escape sequence:ESC N nHexadecimal: 1B 43 n
This command causes the printer to perform the following actions.
1. Skip the number of lines specified by the variable n and thecurrent form parameter settings.
2. Print the next line at the first print line position of the followingform.

Epson FX Printer Emulation Mode 8-14
Example. If the current form length setting is 66 lines and thecurrent line spacing is 6 lpi, setting the value of n to 6 causes theprinter to do the following.
1. Print 60 lines on the current form.
2. Skip 6 lines at the bottom of the current form.
3. Print the next text line at the first print line position of thefollowing page.
Invoking any of the commands ESC O, ESC C n, or ESC C NUL ncancels the Select Automatic Perforation Skip command.
Cancel Automatic Perforation Skip
Escape sequence:ESC OHexadecimal: 1B 4F
This command cancels the functions set by the Select AutomaticPerforation Skip command.
Font Selection Commands
The font selection commands let you choose between the twoprinter-resident standard fonts.
Select Letter-Quality Gothic Font
Escape sequence:ESC k SOHHexadecimal: 1B 6B 01
This command selects the printer-resident Gothic font and places theprinter in the LQ print mode.
Select Letter-Quality Courier Font
Escape sequence:ESC k NULHexadecimal: 1B 6B 00
This command selects the printer-resident Courier font and placesthe printer in the LQ print mode.

Epson FX Printer Emulation Mode 8-15
Margin Control Commands
The margin control commands let you set parameters related to theleft, right, bottom, and top margins and control print justification andtext centering.
Select Left Margin Justification
Escape sequence:ESC a NULHexadecimal: 1B 61 00
This command causes the printer to justify any subsequent text to theleft margin.
Select Right Margin Justification
Escape sequence:ESC a STXHexadecimal: 1B 61 02
This command causes the printer to justify any subsequent text to theright margin.
Select Full Justification
Escape sequence:ESC a ETXHexadecimal: 1B 61 03
This command causes the printer to add sufficient space to causeeach print line to occupy the entire space between the left and rightmargins.
Select Text Centering
Escape sequence:ESC a SOHHexadecimal: 1B 61 01
This command causes the printer to center each print line betweenthe left and right margins.
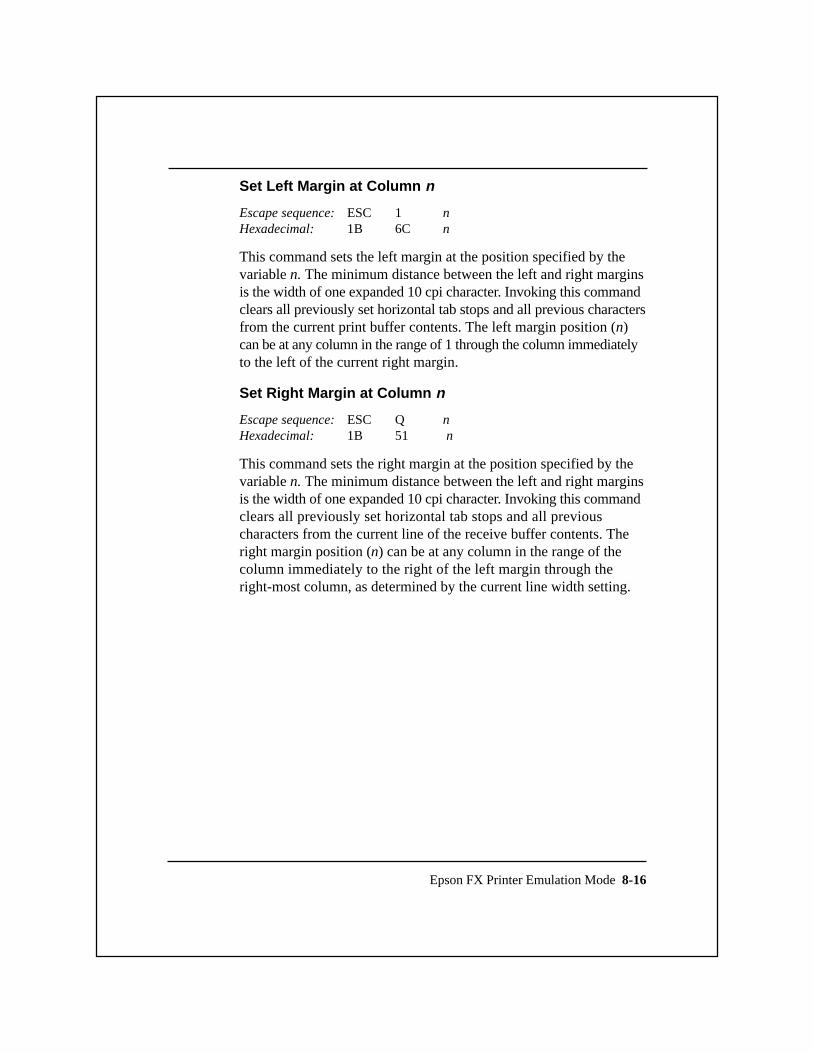
Epson FX Printer Emulation Mode 8-16
Set Left Margin at Column n
Escape sequence:ESC 1 nHexadecimal: 1B 6C n
This command sets the left margin at the position specified by thevariable n. The minimum distance between the left and right marginsis the width of one expanded 10 cpi character. Invoking this commandclears all previously set horizontal tab stops and all previous charactersfrom the current print buffer contents. The left margin position (n)can be at any column in the range of 1 through the column immediatelyto the left of the current right margin.
Set Right Margin at Column n
Escape sequence:ESC Q nHexadecimal: 1B 51 n
This command sets the right margin at the position specified by thevariable n. The minimum distance between the left and right marginsis the width of one expanded 10 cpi character. Invoking this commandclears all previously set horizontal tab stops and all previouscharacters from the current line of the receive buffer contents. Theright margin position (n) can be at any column in the range of thecolumn immediately to the right of the left margin through theright-most column, as determined by the current line width setting.
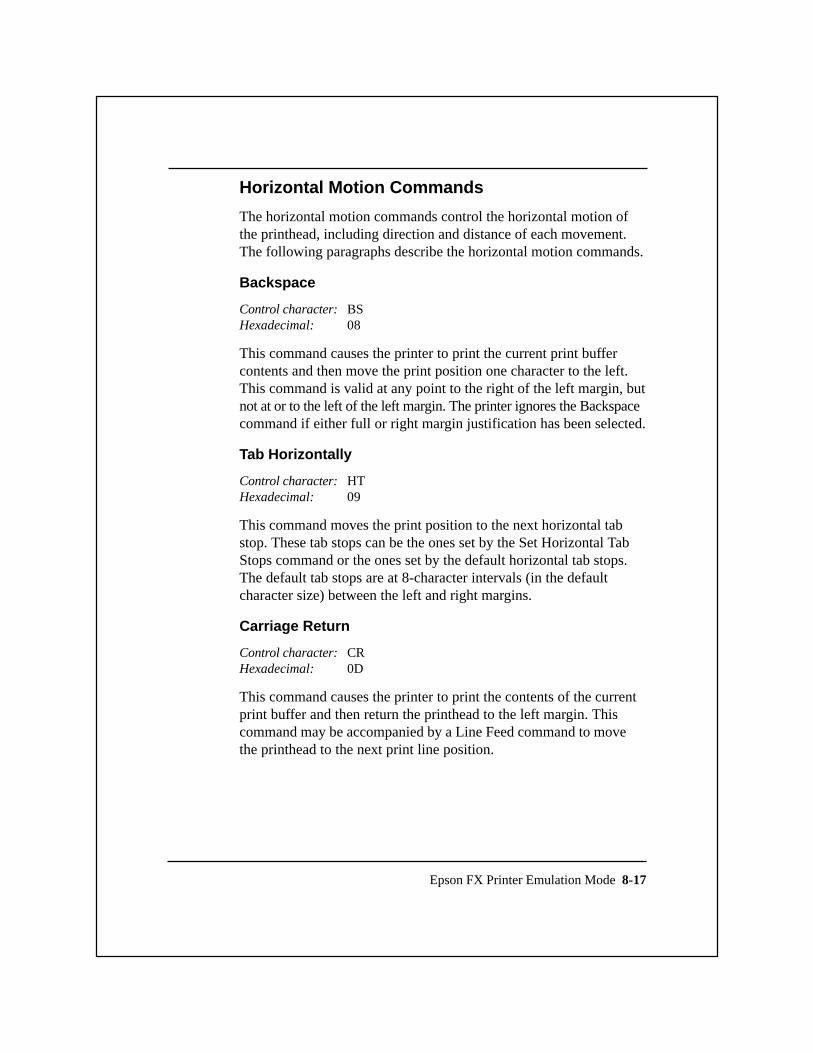
Epson FX Printer Emulation Mode 8-17
Horizontal Motion Commands
The horizontal motion commands control the horizontal motion ofthe printhead, including direction and distance of each movement.The following paragraphs describe the horizontal motion commands.
Backspace
Control character: BSHexadecimal: 08
This command causes the printer to print the current print buffercontents and then move the print position one character to the left.This command is valid at any point to the right of the left margin, butnot at or to the left of the left margin. The printer ignores the Backspacecommand if either full or right margin justification has been selected.
Tab Horizontally
Control character: HTHexadecimal: 09
This command moves the print position to the next horizontal tabstop. These tab stops can be the ones set by the Set Horizontal TabStops command or the ones set by the default horizontal tab stops.The default tab stops are at 8-character intervals (in the defaultcharacter size) between the left and right margins.
Carriage Return
Control character: CRHexadecimal: 0D
This command causes the printer to print the contents of the currentprint buffer and then return the printhead to the left margin. Thiscommand may be accompanied by a Line Feed command to movethe printhead to the next print line position.

Epson FX Printer Emulation Mode 8-18
Set Absolute Print Position
Escape sequence:ESC $ n1 n2Hexadecimal: 1B 24 n1 n2
This command sets the first character position of subsequentlyprinted text at 1/60 inch or some multiple of 1/60 inch from thecurrently set left margin. The variables n1 and n2 form a two-bytehexadecimal value that specifies the absolute print position in 1/60inch increments. After you decide the distance in inches from the leftmargin to a desired absolute print position, follow these steps to findthe values of n1 and n2.
1. Multiply by 60 the absolute distance in inches from the leftmargin to the first character position to determine the distance(d) in l/60 inch increments.
2. Divide the value determined in step 1 by 256 (d/256); thequotient and the remainder of d/256 are, respectively, the decimalvalues of n2 and n1.
3. Convert the decimal values of n2 and n1 to their hexadecimalequivalents.
Any setting beyond the right margin is ignored.
Set Relative Print Position
Escape sequence:ESC \ n1 n2Hexadecimal: 1B 5C n1 n2
This command sets the distance from the current print position to thefirst character of all subsequent text. The variables n1 and n2 form atwo-byte hexadecimal value which specifies the relative position in1/120 inch increments.
To determine the values of n1 and n2, modify the proceduredescribed for the Set Absolute Print Position command. In step 1 ofthis procedure, multiply the absolute distance by 120 instead of 60 todetermine the distance (d) in 1/120 inch increments. For displacementto the left subtract d from 65,536. The printer ignores this commandfor values of n1 and n2 that would move the printhead outside thecurrent margin boundaries.

Epson FX Printer Emulation Mode 8-19
Set Horizontal Tab Stops
Escape sequence:ESC D n1...n32 NULHexadecimal: 1B 44 n1...n32 00
This command clears all previously set horizontal tab stops and setsa new tab stop at each of the columns specified by the variablesn1...n32. Each of the variables n1 and n2 can be any value in therange of 1 through 127 for a 7-bit character set and 1 through 232 foran 8-bit character set. These variables must be listed in ascendingorder; that is, the value of each variable must be greater than the onepreceding it. Any n value of 0 or less than that of the one preceding itterminates the command.
At power-up or upon receiving the Initialize Printer command, theprinter automatically sets a horizontal tab stop at every eighthcolumn. These are the default positions.
Clear All Horizontal Tab Stops
Escape sequence:ESC D NULHexadecimal: 1B 44 00
Vertical Motion Commands
The vertical motion commands are those that control the verticalmovement of paper within the printer. This set of commands includescommands that allow you to select any of eight vertical tabulationchannels (VTCs) and set up to 16 vertical tabs for each channel.
Line Feed
Control character: LFHexadecimal: 0A
This command causes the printer to print the current receive buffercontents and then position the printhead at the next print line.

Epson FX Printer Emulation Mode 8-20
Form Feed
Control character: FFHexadecimal: 0C
This command causes the printer to print the current print buffercontents and then move the printhead to the first print line of thenext form.
Tab Vertically
Control character: VTHexadecimal: 0B
This command advances the print position vertically to the nextvertical tab stop in the currently selected vertical tab channel (VTC).If no VTC has been previously selected, the printer automaticallyuses VTC 0. If no tab stops have been set for the selected VTC, theprinter advances the print position to the next print line.
Perform n/216 Inch Line Feed
Escape sequence:ESC J nHexadecimal: 1B 4A n
This command advances the print position vertically by a value inthe range of 0/216 through 255/216 (0 through 1.18) inches.
Set Vertical Tab Stops
Escape sequence:ESC B n1...n16 NULHexadecimal: 1B 42 n1...n16 00
This command sets up to 16 vertical tab stops (in the current linespacing) for VTC 0. Subsequent line spacing changes do not affectthese settings. Each of the variables (n1 through n16) can be anyvalue in the range of 0 through 255.
The tab settings must be entered in ascending order (n1, n2, and soon); that is, the value of each succeeding n variable must be greaterthan the one preceding it. Any n variable with a value of 0 (00)terminates the command.

Epson FX Printer Emulation Mode 8-21
Select Vertical Tab Channel
Escape sequence:ESC / cHexadecimal: 1B 2F c
This command selects one of the eight preset VTCs. The printersubsequently uses this VTC for all vertical tab operations. Thevariable c specifies the VTC number (0 through 7).
Set VTC Tab Stops
Escape sequence:ESC b c n1...n16 NULHexadecimal: 1B 42 c n1...n16 00
This command sets up to 16 vertical tab stops (in the current linespacing) for the VTC specified by the variable c. Subsequent linespacing changes do not affect these settings. Each of the variables(n1 through n16) can be any value in the range of 0 through 255.
The tab settings must be entered in ascending order (n1, n2, and soon), that is, the value of each, succeeding, a variable must be greaterthan the one preceding it. Any n variable with a value of 0 (00)terminates the command. The command ESC b c 0 clears all tabstops for the VTC specified by the variable c.
Clear All VTC Tab Stops
Escape sequence:ESC b c NULHexadecimal: 1B 62 c 00
This command clears all vertical tab stops from the VTC, specifiedby the variable c.
Clear All Vertical Tab Stops
Escape sequence:ESC B NULHexadecimal: 1B 42 00
This command clears all previously set vertical tab stops from VTC 0.

Epson FX Printer Emulation Mode 8-22
Character Pitch Commands
The character pitch commands let you choose between 10 and 12 cpior adjust the horizontal spacing between characters. The characterpitch is the horizontal distance from the center of one character tothe center of the next character.
Set Character Pitch to 10 cpi
Escape sequence:ESC PHexadecimal: 1B 50
This command selects 10 cpi character pitch and cancels 12 cpicharacter pitch if it has been previously selected.
Set Character Pitch to 12 cpi
Escape sequence:ESC MHexadecimal: 1B 4D
This command selects 12 cpi character pitch for either draft or LQprinting.
Set Intercharacter Space
Escape sequence:ESC SP nHexadecimal: 1B 20 n
This command adjusts the space between text characters (for bothdraft and LQ printing) by an amount specified by the variable nwhere n can be any value in the range of 0 through 128. The designof each character of the standard character sets allows a certainamount of space to the right of the character. The Set IntercharacterSpace command can add one or more 1/120 inch units of space to theexisting character space, depending upon the value of n. For example,if the variable n is set to 12, the printer adds 12/120 (0.1) inch ofspace to the existing space.

Epson FX Printer Emulation Mode 8-23
Line Spacing Commands
The line spacing commands let you choose between line spacingvalues of 6 or 8 lpi or any of several fractional line spacing values.The line spacing is the vertical distance between print lines.
Set Line Spacing to 6 lpi
Escape sequence:ESC 2Hexadecimal: 1B 32
This command sets the line spacing to 6 lpi (the default value) for allsubsequent line feed operations.
Set Line Spacing to 8 lpi
Escape sequence:ESC 0Hexadecimal: 1B 30
This command sets the line spacing to 8 lpi for all subsequent linefeed operations.
Set Line Spacing to 7/72 Inch
Escape sequence:ESC 1Hexadecimal: 1B 31
This command sets the line spacing to 7/72 inch for all subsequentline feed operations.
Set Line Spacing to n/72 Inch
Escape sequence:ESC A nHexadecimal: 1B 41 n
This command sets the line spacing, for subsequent line feed operations,to the value specified by n. The variable n can be any value in therange of 0 through 85.

Epson FX Printer Emulation Mode 8-24
Set Line Spacing to n/216 Inch
Escape sequence:ESC 3 nHexadecimal: 1B 33 n
This command sets the line spacing to a value in the range of 0/216through 255/216 (0 through 1.18) inches for subsequent line feedoperations.
Character Set Commands
The character set commands enable you to select and use the standardEpson FX character sets or international versions of these charactersets. The following paragraphs describe the character set commands.
Select Italic Character Set
Escape sequence:ESC t NULHexadecimal: 1B 74 00
This command selects the Epson italic character set.
Select Extended Graphics Character Set
Escape sequence:ESC t SOHHexadecimal: 1B 74 01
This command selects the Epson extended graphics character set.

Epson FX Printer Emulation Mode 8-25
Select International Character Set
Escape sequence:ESC R nHexadecimal: 1B 52 n
This command selects, for either draft or LQ printing, the internationalversion of the ASCII character set specified by the variable n. Thevariable n can be any of the following values.
0 USA 7 Spain I
1 France 8 Japan
2 Germany 9 Norway
3 United Kingdom 10 Denmark II
4 Denmark I 11 Spain II
5 Sweden 12 Latin America
6 Italy
Enable Character Positions 128-159 as Printable Characters
Escape sequence:ESC 6Hexadecimal: 1B 36
This command enables the printer to treat the characters in characterpositions 128-159 (C1 control characters) as printable characters.
Disable Character Positions 128-159 as Printable Characters
Escape sequence:ESC 7Hexadecimal: 1B 37

Epson FX Printer Emulation Mode 8-26
Enable Character Positions 0-31 and 128-159 as PrintableCharacters
Escape sequence:ESC I SOHHexadecimal: 1B 49 01
This command enables the printer to treat the characters in characterpositions 0-31 (C0 control characters) and 128-159 (C1 controlcharacters) as printable characters.
Disable Character Positions 0-31 and 128-159 as PrintableCharacters
Escape sequence:ESC I NULHexadecimal: 1B 49 00
Print Enhancement Commands
The print enhancement commands enable your printer to improve orenhance the print quality. Print enhancements include such things assuperscript and subscript text, text underlining, expanded, compressed,double-high, LQ, shadow, and emphasized print to make the printappear bolder. The following paragraphs describe the print enhancementcommands.
Select Expanded Print for One Line
Control character: SOHexadecimal: 0E
Escape Sequence:ESC SOHexadecimal: 1B 0E
These commands select the expanded (double-wide) print mode foreither draft or LQ printing. Either a Carriage Return or a CancelExpanded Print command cancels the expanded print mode; therefore,for two or more consecutive lines of expanded print you must invokethe command for each line.

Epson FX Printer Emulation Mode 8-27
Cancel Expanded Print
Control character: DC4Hexadecimal: 14
This command cancels the expanded print mode previously selectedby the Select Expanded Print for One Line commands (SO or ESCSO). However, this command does not affect the expanded printmode invoked by the Select Expanded Print command ESC W SOHor the Select Master Print Mode command (ESC ! n).
Select Expanded Print Until Canceled by ESC W NUL
Escape sequence:ESC W SOHHexadecimal: 1B 57 01
Cancel Expanded Print
Escape sequence:ESC W NULHexadecimal: 1B 57 00
This command disables the expanded print mode previously invokedby the Select Expanded Print command ESC W SOH.
Select Double-High Print
Escape sequence:ESC w SOHHexadecimal: 1B 77 01
This command selects the double-high print mode for either draft orLQ printing.
Cancel Double-High Print
Escape sequence:ESC w NULHexadecimal: 1B 77 00
Select Compressed Print
Control character: SIHexadecimal: 0F
Escape sequence:ESC SIHexadecimal: 1B 0F

Epson FX Printer Emulation Mode 8-28
These commands cause the printer to print characters at about 60percent of their normal widths. For example, for a character pitch of10 cpi, one inch of text contains about 17 characters instead of thenormal 10. These commands are valid for either draft or LQ printing.
Cancel Compressed Print
Control character: DC2Hexadecimal: 12
Select Letter-Quality Print
Escape sequence:ESC x SOHHexadecimal: 1B 78 01
Cancel Letter-Quality Print
Escape sequence:ESC x NULHexadecimal: 1B 78 00
This command cancels LQ print and returns the printer to the draftprint mode.
Select Text-Underline Print
Escape sequence:ESC - SOHHexadecimal: 1B 2D 01
After receiving this command, the printer underlines all subsequenttext characters (including the space character) until it receives aCancel Text-Underline Print command.
Cancel Text-Underline Print
Escape sequence:ESC - NULHexadecimal: 1B 2D 00
Select Boldface Print
Escape sequence:ESC GHexadecimal: 1B 47

Epson FX Printer Emulation Mode 8-29
Cancel Boldface Print
Escape sequence:ESC HHexadecimal: 1B 48
Select Shadow Print
Escape sequence:ESC EHexadecimal: 1B 45
Cancel Shadow Print
Escape sequence:ESC FHexadecimal: 1B 46
Select Superscript Print
Escape sequence:ESC S NULHexadecimal: 1B 53 00
This command selects the superscript print mode for either draft orLQ printing. After receiving this command the printer prints eachsubsequent character in the upper part of the character space at abouttwo-thirds its normal height.
Cancel Superscript Print
Escape sequence:ESC THexadecimal: 1B 54
Select Subscript Print
Escape sequence:ESC S SOHHexadecimal: 1B 53 01
This command selects the subscript print mode for either draft or LQprinting. After receiving this command the printer prints eachsubsequent character in the lower part of the character space at abouttwo-thirds its normal height.
Cancel Subscript Print
Escape sequence:ESC THexadecimal: 1B 54
Select Italic Print
Escape sequence:ESC 4Hexadecimal: 1B 34
This command causes the printer to print characters from the Epson italiccharacter set for either draft or LQ printing. This command is valid even ifthe printer has received an ESC t SOH command to invoke the Epsonextended graphics character set; however, character graphics cannot beitalicized.
Cancel Italic Print
Escape sequence:ESC 5Hexadecimal: 1B 35
Select Master Print Mode
Escape sequence:ESC ! nHexadecimal: 1B 6B n
This command selects a type style for LQ and draft-quality printing.The variable n (a hexadecimal value) can be any valid combinationof the following character pitches and print modes.
q 10 cpi — decimal 0, hexadecimal 00
q 12 cpi — decimal 1, hexidecimal 01
q Compressed — decimal 4, hexadecimal 04
q Shadow — decimal 8, hexadecimal 08
q Boldface — decimal 16, hexadecimal 10
q Expanded — decimal 32, hexadecimal 20
q Italic — decimal 64, hexadecimal 40
q Underline — decimal 128, hexadecimal 80
Epson FX Printer Emulation Mode 8-30

Epson FX Printer Emulation Mode 8-31
To select a valid combination of the listed character pitches andprint modes, choose the items you wish to combine and add theirvalues to find the correct value of n. After finding the decimal valueof n, convert this value to its hexadecimal equivalent for use in theescape sequence.
For example, to select 12 cpi, expanded, underlined text characters,add the decimal values 1, 32, and 128 to obtain the sum, 161 (thevalue of n). The hexadecimal equivalent of 161 is A1 (from an 8-bitcharacter table).
The following combinations are invalid.
q 10 cpi and 12 cpi
q Boldface and LQ print
Graphics Commands
The Epson FX graphics feature provides commands that enable youto design your own images in any shape you desire. These commandsallow you to create and adjust the density of various lines andpatterns in various combinations. The following paragraphs describethe graphics commands.
To find the values of n1 and n2 for any of the following commands,modify the procedure described for the Select 60 dpi Graphicscommand in Chapter 4. In step 1 of the procedure, substitute theappropriate dot density value for 60.
Select 60 dpi Graphics
Escape sequence:ESC K n1 n2Hexadecimal: 1B 4B n1 n2
This command selects the 8-pin, 60 dpi graphics mode for thehorizontal line length specified by the variable n1 n2.

Epson FX Printer Emulation Mode 8-32
Select 9-Pin 60 dpi Graphics
Escape sequence:ESC ^ NUL n1 n2Hexadecimal: 1B 5E 00 n1 n2
This command causes the printer to print 9-pin graphics at 60 dpi.
Select 120 dpi Graphics
Escape sequence:ESC L n1 n2Hexadecimal: 1B 4C n1 n2
This command selects the 8-pin, 120 dpi graphics mode for thehorizontal distance specified by the two-byte variable n1 n2.
Select 9-Pin 120 dpi Graphics
Escape sequence:ESC ^ SOH n1 n2Hexadecimal: 1B 5E 01 n1 n2
This command causes the printer to print 9-pin graphics at 120 dpi.
Select High-Speed 120 dpi Graphics
Escape sequence:ESC Y n1 n2Hexadecimal: 1B 59 n1 n2
This command selects the 8-pin, high-speed 120 dpi graphics modefor the horizontal distance specified by the two-byte variable n1 n2.This is identical to the 120 dpi graphics mode except that the printingspeed is doubled.
Select 240 dpi Graphics
Escape sequence:ESC Z n1 n2Hexadecimal: 1B 5A n1 n2
This command selects the 8-pin, 240 dpi graphics mode for thehorizontal distance specified by the two-byte variable n1 n2.

Epson FX Printer Emulation Mode 8-33
Select Graphics Mode m
Escape sequence:ESC * m n1 n2Hexadecimal: 1B 2A m n1 n2
This command selects the graphics mode specified by the variable mfor the horizontal distance specified by the two-byte variable n1 n2.The variable m can be any of the following values.
q NUL — 60 dpi normal speed
q SOH — 120 dpi normal speed
q STX — 120 dpi high speed
q ETX — 240 dpi normal speed
Reassign Graphics Mode
Escape sequence:ESC ? s nHexadecimal: 1B 3F s n
This command allows the computer to switch between graphicsmodes. The variable s specifies the currently selected mode K, L, Y,or Z from the standard graphics escape sequences. The variable nspecifies the new mode (0 through 3) specified in the ESC * commands.
Example. If the current mode is single-density and you wish tochange to high-speed double density, use the escape sequenceESC ? K 2, where K indicates single-density and 2 indicates high-speeddouble density.

Optional Emulation Commands 9-1
9Optional DEC LA 120 Emulation
Introduction .................................................................................... 9-2DEC LA120 Emulation Commands ............................................... 9-2Answerback Memory Function ...................................................... 9-5New Line Mode .............................................................................. 9-5Auto Wrap ...................................................................................... 9-6Answerback Memory Message Load ............................................. 9-6
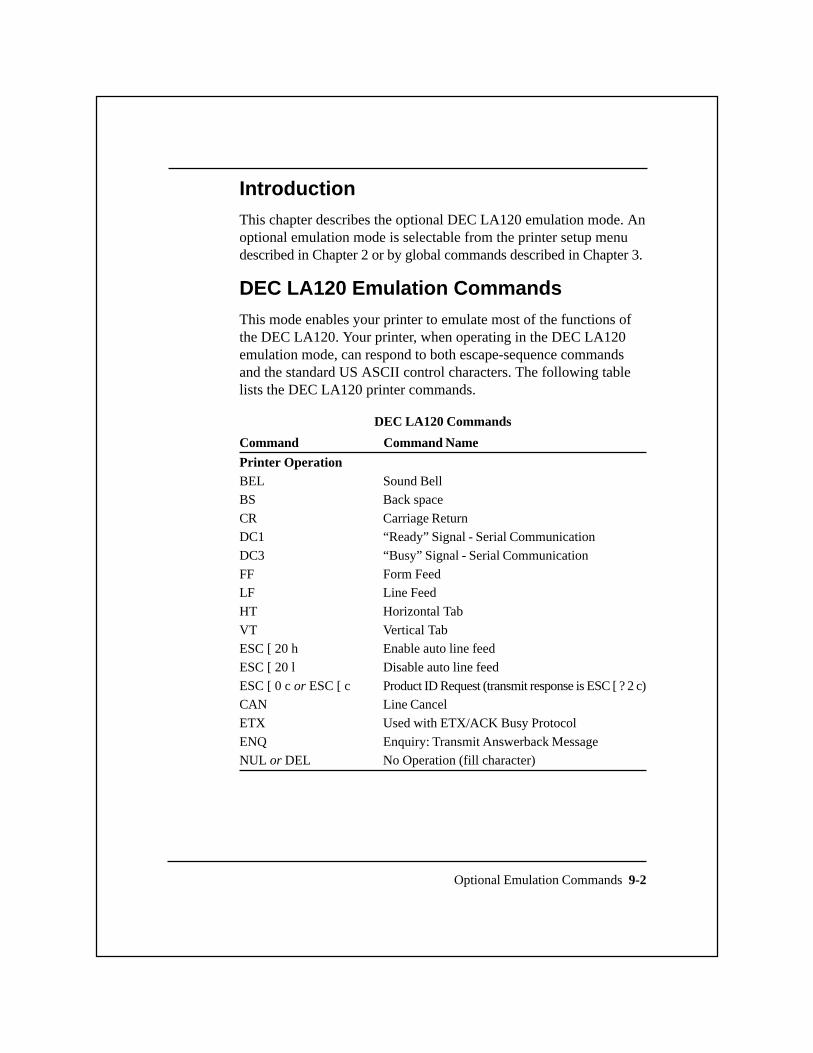
Optional Emulation Commands 9-2
IntroductionThis chapter describes the optional DEC LA120 emulation mode. Anoptional emulation mode is selectable from the printer setup menudescribed in Chapter 2 or by global commands described in Chapter 3.
DEC LA120 Emulation CommandsThis mode enables your printer to emulate most of the functions ofthe DEC LA120. Your printer, when operating in the DEC LA120emulation mode, can respond to both escape-sequence commandsand the standard US ASCII control characters. The following tablelists the DEC LA120 printer commands.
DEC LA120 Commands
Command Command Name
Printer OperationBEL Sound BellBS Back space
CR Carriage ReturnDC1 “Ready” Signal - Serial Communication
DC3 “Busy” Signal - Serial Communication
FF Form FeedLF Line Feed
HT Horizontal Tab
VT Vertical TabESC [ 20 h Enable auto line feed
ESC [ 20 l Disable auto line feed
ESC [ 0 c or ESC [ c Product ID Request (transmit response is ESC [ ? 2 c)CAN Line Cancel
ETX Used with ETX/ACK Busy Protocol
ENQ Enquiry: Transmit Answerback MessageNUL or DEL No Operation (fill character)

Optional Emulation Commands 9-3
DEC LA120 Commands (continued)
Command Command Name
Form Format and Margin ControlESC [ N t Set Form Length to N Lines
ESC [ N r Set Top Margin to Line N
ESC [ ; N r Set Bottom Margin to Line N
ESC [ N1; N2 r Set Top and Bottom Margins to Line N1 and Line N2
ESC [ N s
ESC [ N ; 0 s
ESC [ ; N s
ESC [ 0 ; N s
ESC [ N1; N2 s Set Left and Right Margins to Column N1 and Column N2
Horizontal Tab SequencesESC [ N ’ Advance Active Column Absolute to
Column N
ESC [ N a Advance Active Column Forward to
Column NESC H or ESC 1 Set Horizontal Tab at Active Column
ESC [ N1; N2;...Nk u Set Horizontal Tab Stops at Columns
N1, N2, ... Nk (k<l6)ESC [ 2 g
ESC [ 3 g Clear All Horizontal Tabs
ESC 2
ESC [ g or ESC [ 0 g Clear Horizontal Tab at Active Column
Horizontal Pitch SequencesESC [ 5 w Set Character Pitch to 5 cpiESC [ 6 w Set Character Pitch to 6 cpi
ESC [ 7 w Set Character Pitch to 6.6 cpi
ESC [ 8 w Set Character Pitch to 8.25 cpiESC [ w
ESC [ 0 w Set Character Pitch to 10 cpi
ESC [ 1 w
}}
Set Left Margin to Column N
Set Right Margin to Column N
_
}
}

Optional Emulation Commands 9-4
DEC LA120 Commands (concluded)
Command Command NameHorizontal Pitch Sequences (continued)ESC [ 2 w Set Character Pitch to 12 cpiESC [ 3 w Set Character Pitch to 13.2 cpiESC [ 4 w Set Character Pitch to 16.7 cpi
Vertical Tab SequencesESC [ N d Set Active Line to Line NESC [ N e Advance Active Line Forward to Line NESC J or ESC 3 Set Vertical Tab at Active LineESC [ N1 v Set Vertical Tab at Line N1ESC [ N1; N2 v Set Vertical Tab at Line N1 and Line N2ESC [ N1; N2;...Nk v Set Vertical Tab Stops at Lines N1, N2, ... Nk (k<l6)ESC [ 4 g or ESC 4 Clear All Vertical TabsESC [ 1 g Clear Vertical Tab at Active LineESC E Set Active Column to Left Margin and Increment
Active LineESC D Increment Active Line
Vertical Pitch SequencesESC 4 z Set Vertical Pitch to 2 lpiESC 5 z Set Vertical Pitch to 3 lpiESC 6 z Set Vertical Pitch to 4 lpiESC zESC 0 z Set Vertical Pitch to 6 lpiESC 1 zESC 2 z Set Vertical Pitch to 8 lpiESC 3 z Set Vertical Pitch to 12 lpi
Character Set Selection SequencesESC ( B Select U.S.A Character SetESC ( A Select United Kingdom Character SetESC ( C Select Finland Character SetESC ( E Select Norway/Denmark Character SetESC ( H Select Sweden Character SetESC ( K Select German Character SetESC ( R Select France Character SetSI Select Primary Character SetSO Select Secondary Character Set
_
}

DEC LA120 Commands Not Recognized in
DEC LA120 Emulation
Command Command Name
ESC = Enable Alternate Keyboard
ESC > Disable Alternate KeyboardEOT End of Transmission
SUB Substitute
DLE Data Link Escape
Answerback Memory FunctionThe DEC LA120 emulation provides, as an LA120 feature, ananswerback memory (ABM) that can be programmed with a messageof up to 30 characters. If a message is programmed, it is transmittedwhen the ASCII character ENQ is received. The ABM is stored inthe printer’s nonvolatile memory and is programmable with anescape sequence when the ABM load setup parameter (ABM MSGLOAD) of the LA120 emulation is turned on.
Escape sequence:ESC [ Q text NULHexadecimal: 1B 5B 51 text 00
where: text can contain up to 30 ASCII characters, and the NULcharacter is used as the string terminator.
Note: The printer displays an escape sequence error message if textexceeds 30 ASCII characters. The default message ESC [ ? 2 c is setto the Product Identification Response.
New Line ModeThis parameter controls how the DEC LA120 emulation responds toline feed and carriage return commands.
For the CR NEW LINE selection, a line feed is performed in additionto a carriage return when a carriage return control code is received.
Optional Emulation Commands 9-5

When LF NEW LINE is selected and a line feed command is received, acarriage return is performed in addition to the line feed. Carriagereturns are also performed with vertical tabs and form feeds when LFNEW LINE is selected.
For the NO NEW LINE selection, a carriage return only is performedupon receipt of a carriage return control code, and a line feed only isperformed upon receipt of a line feed control code.
Note: Selection of CR NEW LINE, LF NEW LINE, or NO NEWLINE, deselects or disables the previous selection.
Auto WrapThis parameter, when turned on, performs an automatic new line atthe right margin if the line length of the line to be printed causes theDEC LA120 emulation to attempt to print beyond the right margin.
When the parameter is turned off, attempts to print beyond the rightmargin will cause characters to be lost.
Answerback Memory Message LoadThis parameter, when turned on, allows the answerback memory tobe programmed. When turned off, answerback memory programmingis inhibited.
Optional Emulation Commands 9-6

Communication Interfaces 10-1
Introduction .................................................................................. 10-3Data-Transfer Operations ............................................................. 10-4Parallel Communication Interface ................................................ 10-6
Parallel Interface Signal Descriptions ..................................... 10-7Data Signals ........................................................................ 10-8Data Strobe Signal .............................................................. 10-8Acknowledge Signal ........................................................... 10-8Busy Signal ......................................................................... 10-9Fault Signal ......................................................................... 10-9Initialize Signal ................................................................... 10-9Paper-Empty Signal .......................................................... 10-10Select Signal ..................................................................... 10-10Verify Signal ..................................................................... 10-10Ground Signals ................................................................. 10-10
Parallel Interface Communication Protocol .......................... 10-10Data-Transfer Timing ....................................................... 10-10Initialize Sequence ............................................................ 10-13Error Conditions ............................................................... 10-14
Serial Communication Interface ................................................. 10-14Serial Interface Connector ..................................................... 10-15Interface Connection.............................................................. 10-15Interface Signal Descriptions ................................................ 10-16
Protective Ground ............................................................. 10-16Signal Ground ................................................................... 10-16Transmit Data Signal ........................................................ 10-16Receive Data Signal .......................................................... 10-16Request to Send Signal ..................................................... 10-16Clear to Send Signal ......................................................... 10-17Data Set Ready Signal ...................................................... 10-17Data Carrier Detect Signal ................................................ 10-17Data Terminal Ready Signal ............................................. 10-17
10Communication Interfaces

Communication Interfaces 10-2
Interface Data Transmission Rate .......................................... 10-18Serial Data Format ................................................................. 10-18Serial Interface Busy-Handling Protocols ............................. 10-20
Flow-Control Busy-Handling Protocols ........................... 10-20Direct-Connect Busy-Handling Protocols ........................ 10-21
Optional Communication Interfaces ........................................... 10-21RS-422 Communication Interface ......................................... 10-22Current Loop Communication Interface................................ 10-22

Communication Interfaces 10-3
IntroductionThis chapter describes the communication interfaces and providesinformation about their use with your printer.
The communication interface transfers data in a fixed and orderlymanner between the host and the printer. Communication interfacesare of two general types: parallel and serial. Parallel interfaces transferall bits of a data byte simultaneously. Serial interfaces transfer datain bit-serial fashion, one bit at a time.
To provide communication compatibility with a wide range ofsystems, your printer offers a choice of any of the following standardand optional communication interfaces.
q Parallel interface, standard.
q RS-232 or RS-423 serial interface, standard.
q RS-422-A serial interface, optional.
q Current loop (TTY) interface, optional.

Communication Interfaces 10-4
The following figure shows simplified block diagrams of twotypes of data-communication systems and their associatedcommunication interfaces.
The long-distance system typically uses telephone lines to transferdata from the host to the printer. Because this system is limited tobit-serial data-transfer operations, it is necessary that the host-to-modeminterface at one end and the modem-to-printer interface at the otherend be serial interfaces. The local system uses a parallel interface toconnect a local printer directly to the host.
Data-Transfer OperationsThe data-transfer rate can vary from one system to another, dependingon such factors as the host data-transfer rate, the type of communicationinterface used, and the distance over which the data is transferred. Tocompensate for these transfer-rate variations, the printer provides areceive buffer to temporarily store received data prior to printing it.
long-distance system
telephonelines
RS-232-Cserial
interface
RS-232-Cserial
interface
modemhost printermodem
local system
parallelinterface
host localprinter
communication interfaces (simplified block diagrams)

Communication Interfaces 10-5
The following figure shows a simplified block diagram of the printerreceive buffer and the data path between the host and the printmechanism.
The host transfers characters in the form of 7-bit or 8-bit data bytes,depending on which character set is selected. To ensure that no datais lost between the host and the printer, all data-transfer operationsinvolve the following steps.
1. The host transfers characters via the communication interfaceinto the printer receive buffer and then the printer transfers themat a fixed rate from the receive buffer to the print mechanism.
2. If the host-to-receive buffer transfer rate exceeds the buffer-to-printmechanism transfer rate, the receive buffer eventually approachesits capacity.
3. The printer signals the host to suspend data transfer operationsas the printer continues to transfer characters at a fixed rate fromthe receive buffer to the print mechanism.
4. When the supply of characters in the receive buffer is sufficientlydepleted, the printer signals the host that it is ready to receiveadditional data.
host communicationinterface
printer receive buffer and associated data path
printer
receivebuffer
printmech.

Communication Interfaces 10-6
Parallel Communication Interface
The parallel communication interface uses a 36-pin connector(shown in the following figure) that transfers both data and controlsignals between the printer and the host computer. The parallelinterface connector is located at the rear of the printer and providesbail latches to secure the interface cable connector. The table on thefollowing page lists the parallel interface signals, their names, theirpin assignments, and their sources (host or printer). The paragraphsthat follow the table describe these signals.
The parallel interface can only transfer data from the host to thecomputer and is limited to a distance of approximately 6 feet (1.8meters). However, because the parallel interface provides separatelines for each character bit, it can transfer an entire character in asingle data-transfer operation. Thus, the parallel interface is muchfaster than a serial interface and is ideally suited for connecting localprinters in a computer system.

Communication Interfaces 10-7
Parallel Interface Signals
Signal Name Pin Return Source
STROBE- Data strobe 1 19 Host
DATA1 Data bit 1 2 20 HostDATA2 Data bit 2 3 21 HostDATA3 Data bit 3 4 22 HostDATA4 Data bit 4 5 23 HostDATA5 Data bit 5 6 24 HostDATA6 Data bit 6 7 25 HostDATA7 Data bit 7 8 26 HostDATA8 Data bit 8 9 27 HostACK- Acknowledge 10 28 PrinterBUSY Printer busy 11 29 PrinterPE Paper empty 12 30 PrinterSLCT Select 13 PrinterLGND Logic ground 16CGND Chassis ground 17PARVCC +5 volts dc* 18 PrinterINIT- Initialize 31 HostFAULT- Fault 32 PrinterGND Ground 33VFIN Verify in 34 HostVFOUT Verify out 35 Printer
Notes: Pins 14, 15, and 36 are not used.*+5vdc supplied through 51 ohm resistor.
Parallel Interface Signal Descriptions
As indicated in the preceding table, the data signals and some of thecontrol signals require both a signal line and a return line. Thisarrangement provides efficient, trouble-free operation and minimizeselectrical noise on the signal lines.
Some parallel interface signals are active when low, as indicated by ahyphen (-) attached as a suffix to the signal name. All other signals(except the data signals) are active when high. Since the data transferredover the data lines consists of binary ones and zeros (highs and lows),the state of these lines depends on the data being sent. The followingparagraphs describe the parallel interface signals.
Communication Interfaces 10-8
Data Signals
Character transfers from the host to the receiver consist of 8-bit databytes (DATAl through DATA8) traveling in parallel over the eightdata lines. DATAl is the least significant bit and DATA8 is the mostsignificant bit. If a 7-bit character set has been selected, the DATA8line remains low for all data transfer operations.
Data Strobe Signal
The data strobe (STROBE-) is a host-generated pulse that clocksdata into the printer receive buffer. After writing data to the parallelinterface data lines (DATAl through DATA8), the host monitors thebusy line, and if BUSY is not active (low), the host places a strobepulse on the interface. This strobe pulse must not occur before thedata has had time to stabilize on the data lines (approximately 0.5microseconds). The leading (negative-going) edge of STROBE-clocks the data into the printer receive buffer and activates BUSY.
Acknowledge Signal
The acknowledge (ACK-) signal from the printer indicates to thehost that the printer has received the last character sent and is readyto accept another character. Unless the printer is busy, as describedin the following paragraph, the printer activates ACK- (sets it low)under any of the following conditions.
q After receiving a character from the host
q Each time the printer is placed online
q At the completion of a host-generated initialization cycle

Communication Interfaces 10-9
Busy Signal
This active-high signal from the printer indicates that the printer isbusy and cannot accept additional data. During data-transferoperations, the leading edge of the host-generated strobe signalactivates BUSY for each character-transfer cycle. The printer sends anacknowledge pulse and deactivates BUSY at the completion of eachcharacter-transfer operation (unless the printer is otherwise busy).BUSY is active (high) under any of the following conditions.
q The host has clocked a character into the receive buffer, but theprinter has not yet acknowledged it.
q The receive buffer is filled to capacity.
q The printer is in its offline state.
q The printer is out of paper or a printer error condition exists.
q One of the control panel menus has been invoked and the printerhas not been returned to its online state.
Fault Signal
The fault (FAULT-) signal from the printer indicates to the host thatan error condition (such as a mechanical failure or a receive bufferoverflow) exists in the printer. A paper-out condition activates bothFAULT- and PE to indicate the condition to the host
Initialize Signal
The initialize (INIT-) signal from the host causes the printer toexecute a power-up reset sequence. During this sequence, the printerperforms its normal self-tests and then assumes its online condition.Since INIT- is a host-generated signal, the conditions under which itis generated depend on the type of computer serving as host.

Communication Interfaces 10-10
Paper-Empty Signal
The paper-empty (PE) signal from the printer indicates that the papersupply is empty. The printer activates this signal in combination withthe fault signal to indicate the paper-empty condition to the host.
Select Signal
The select (SLCT) signal from the printer indicates to the host thatthe printer is online and ready to receive data. The completion ofeither a normal power-up operation or a host-generated initializationcycle activates SLCT.
Verify Signal
The verify signal confirms proper connection of the parallel interfacecable between the host and the printer. The verify in (VFIN) and verifyout (VFOUT) pins are connected together inside the printer to form aloopback circuit. The host sends VFIN to the printer and, if the cableis connected properly, the printer returns the signal as VFOUT.
Ground Signals
The logic ground (LGND) connects to the printer power supply logicground to provide a common reference point for all interface signals.The chassis ground (CGND) connects to the ac power cord safetyground to provide protection for the printer and personnel.
Parallel Interface Communication Protocol
The parallel interface communication protocol is a set of conventionsthat ensures compatibility between the printer and the host computer.The following paragraphs describe these conventions.
Data-Transfer Timing
Because the parallel interface transfers all bits of a charactersimultaneously, correct timing is important to prevent data loss orcorruption. When the host senses that BUSY is inactive (low), thehost can initiate a character-transfer cycle on the interface.
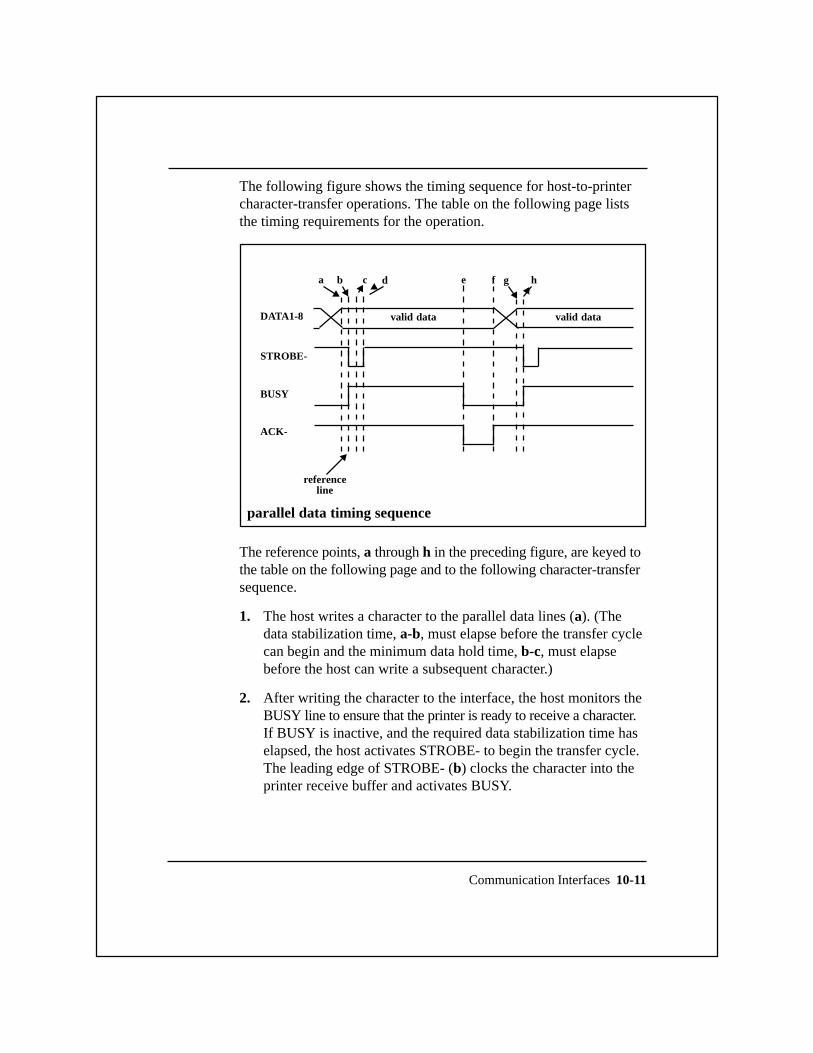
Communication Interfaces 10-11
The following figure shows the timing sequence for host-to-printercharacter-transfer operations. The table on the following page liststhe timing requirements for the operation.
The reference points, a through h in the preceding figure, are keyed tothe table on the following page and to the following character-transfersequence.
1. The host writes a character to the parallel data lines (a). (Thedata stabilization time, a-b, must elapse before the transfer cyclecan begin and the minimum data hold time, b-c, must elapsebefore the host can write a subsequent character.)
2. After writing the character to the interface, the host monitors theBUSY line to ensure that the printer is ready to receive a character.If BUSY is inactive, and the required data stabilization time haselapsed, the host activates STROBE- to begin the transfer cycle.The leading edge of STROBE- (b) clocks the character into theprinter receive buffer and activates BUSY.
▲
▲▲ ▲▲ ▲▲
BUSY
DATA1-8
STROBE-
ACK-
referenceline
valid data valid data
parallel data timing sequence
a b c d e f g h

Communication Interfaces 10-12
3. The printer activates ACK- (e) to signal the host that the receivebuffer has received the character.
4. If the character does not fill the receive buffer, the printerdeactivates BUSY and ACK- (f) to notify the host that thetransfer operation is complete. The host can then initiate anotherdata-transfer cycle.
If a character-transfer cycle fills the printer receive buffer, BUSYremains active until the buffer empties to the ready point. The printerthen deactivates BUSY to allow the host to initiate anothercharacter-transfer cycle.
Parallel Interface Timing Requirements
Item Ref. Timing RequirementsDATA1-8 a The host writes a character to the
interface.a-b Data stabilization time, 0.5 µs min.b-c Data hold time, 0.5 µs min.
STROBE- b Leading edge must not occur in less than0.5 µs after the character has beenwritten to the interface. This allows timefor the data to stabilize.
b-d Minimum pulse width, 1.0 µs.b-h Minimum time between pulses, 1.0 µs.
BUSY b Leading edge occurs within 100 nsafter the leading edge of STROBE-.
f Trailing edge must occur before the hostcan strobe the next character into thereceive buffer. For normal write cycles(receive buffer not full), this occurs at10 µs min., 500 µs nom., and 1000 µsmax. after the leading edge of STROBE-.
ACK- e-f Pulsewidth: 2.0 µs min., 3.0 µs nom.,and 6.0 µs max.

Communication Interfaces 10-13
Parallel Interface Timing Requirements (continued)Item Ref. Timing Requirements
f Trailing edge must occur before the hostcan strobe the next character into thereceive buffer. For normal write cycles(receive buffer not full), this occurs at 10 µsmin., 500 µs nom., and 1000 µs max. afterthe leading edge of STROBE-.
DATA1-8 g The host writes the next character to theinterface. This can occur at any timeafter the data stabilization time and holdtime of the previous character haveelapsed. (See Reference items a-b andb-c on the preceding page.)
STROBE- h The host places the next strobe pulse onthe interface to initiate the next character-transfer operation.
Initialize Sequence
The initialize sequence is a host-generated power-up reset sequence.When the host activates INIT-, the printer performs the followingsequence.
1. Interrupts any ongoing operation.
2. Assumes the offline state.
3. Executes the normal power-up self-test routine.
4. Returns to the online state.

Communication Interfaces 10-14
Error Conditions
FAULT- and PE are printer status lines. The printer activates FAULT-to indicate a mechanism failure, such as a paper jam, and deactivatesit when the error is corrected. After the paper supply is depleted, theprinter activates both PE (paper empty) and FAULT- to indicate thepaper-empty condition. Reloading paper causes the printer to deactivatethe signals.
Activation of either FAULT- or PE also activates BUSY to indicatethat the printer cannot receive data. If the host attempts to transfer asingle character during this time, the byte remains on the interfacedata lines until the error condition is cleared. The printer neitherprints the character nor activates ACK-. If the host attempts to sendmultiple characters during this time, the printer accepts only onecharacter.
Note: The information in the following paragraph entitled “SerialCommunication Interface” is valid for either the RS-232 or theRS-423 serial interface.
Serial Communication InterfaceYour printer provides a 25-pin serial interface connector (shown inthe following figure) at the rear of the printer. This connector carriesboth control and data information between the printer and the interfacecable. The table on the following page lists the serial communicationinterface signals, their names, their interface connector pinassignments, and their sources.
13 12 11 10 9 8 7 6 5 4 3 2 1
25 24 23 22 21 20 19 18 17 16 15 14
serial interface connector
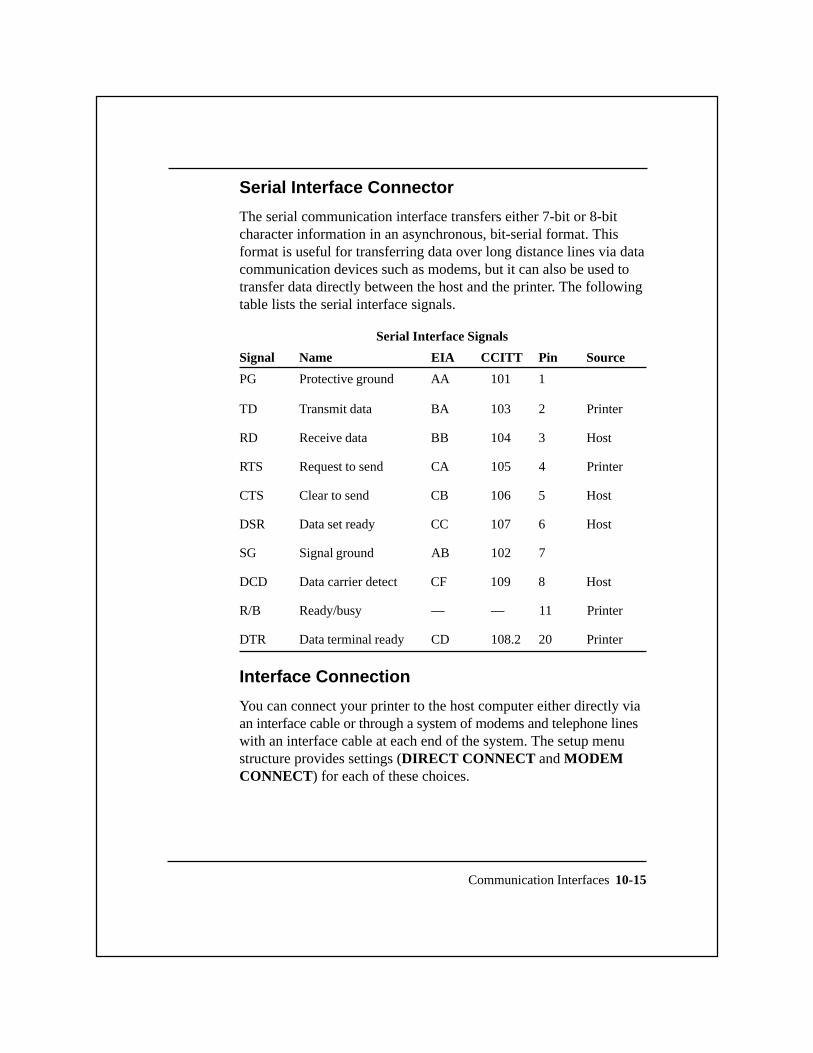
Serial Interface Connector
The serial communication interface transfers either 7-bit or 8-bitcharacter information in an asynchronous, bit-serial format. Thisformat is useful for transferring data over long distance lines via datacommunication devices such as modems, but it can also be used totransfer data directly between the host and the printer. The followingtable lists the serial interface signals.
Serial Interface Signals
Signal Name EIA CCITT Pin Source
PG Protective ground AA 101 1
TD Transmit data BA 103 2 Printer
RD Receive data BB 104 3 Host
RTS Request to send CA 105 4 Printer
CTS Clear to send CB 106 5 Host
DSR Data set ready CC 107 6 Host
SG Signal ground AB 102 7
DCD Data carrier detect CF 109 8 Host
R/B Ready/busy — — 11 Printer
DTR Data terminal ready CD 108.2 20 Printer
Interface Connection
You can connect your printer to the host computer either directly viaan interface cable or through a system of modems and telephone lineswith an interface cable at each end of the system. The setup menustructure provides settings (DIRECT CONNECT and MODEMCONNECT) for each of these choices.
Communication Interfaces 10-15

Communication Interfaces 10-16
Interface Signal Descriptions
The following paragraphs describe the serial interface signals.
Protective Ground
The protective ground (PG) line is connected directly to the powercord ground to provide protection for the equipment and personnel.
Signal Ground
The signal ground (SG) line is connected to the printer power supplyground to provide a common reference level for all interface signalsexcept protective ground.
Transmit Data Signal
The transmit data (TD) line transfers bit-serial data from the printerto the host via the data communication equipment. During times whenno data appears on the TD line, the line is held in a mark condition.
Receive Data Signal
The receive data (RD) line transfers bit-serial data from the host tothe printer via the data communication equipment. During timeswhen no data appears on the RD line, the line should be held in amark condition.
Request to Send Signal
The printer generates the request to send (RTS) signal to conditionthe data communication equipment to transmit data. When theprinter is in the DIRECT CONNECT mode, this control signal is onat all times following printer power-up and self-test completion.When the printer is in the MODEM CONNECT mode, the printeronline state holds RTS on and the printer offline state holds RTSinactive. (The DIRECT CONNECT and MODEM CONNECTmodes are selected during printer setup via the Setup/Test switch.)

Communication Interfaces 10-17
Clear to Send Signal
The host computer generates the clear to send (CTS) signal toindicate that it can receive data from the printer. In the DIRECTCONNECT mode, the printer ignores this signal. In the MODEMCONNECT mode, CTS must be on for the printer to send data. Ifthe interface cable does not provide a connection to this pin, theprinter holds CTS in its on state.
Data Set Ready Signal
The host activates the data set ready (DSR) signal to enable theprinter to send and receive data. If the interface cable does notprovide a connection to this pin, the printer holds DSR in its activestate.
Data Carrier Detect Signal
The host activates the data carrier detect (DCD) signal to enable theprinter to send data when operating in the MODEM CONNECTmode. When the printer is in the DIRECT CONNECT mode, itignores this signal. If the interface cable does not provide a connectionto this pin, the printer holds DCD in its on state.
Data Terminal Ready Signal
If the PIN 20 H:READY (pin 20 high on ready) parameter wasselected during printer setup and the printer is operating in theDIRECT CONNECT mode, the printer activates DTR to indicatethat it is ready to receive data and deactivates DTR to indicate that itis busy. Otherwise, the printer activates DTR following self-testcompletion at power-up to indicate that it is online and ready toreceive data.

Communication Interfaces 10-18
Interface Data Transmission Rate
Because data-transfer operations on the serial interface occur in abit-serial fashion, the data transmission rate is measured in bits persecond, commonly called the baud rate. To provide compatibilitywith a variety of systems, your printer offers the following range ofbaud rates.
q 300 bits per second
q 600 bits per second
q 1200 bits per second
q 2400 bits per second
q 4800 bits per second (the default value)
q 9600 bits per second
q 19,200 bits per second
The control panel setup menu (described in Chapter 2) allows you toselect the appropriate baud rate for your system.
Serial Data Format
The following figure shows the data format for 7-bit and 8-bitcharacters. The serial interface can transfer (and the printer canaccept) either 7-bit characters or 8-bit characters, depending onwhich character set is in use. In either case, data bit 1 is the leastsignificant bit (lsb) and the last bit is the most significant bit (msb).

Communication Interfaces 10-19
In addition to the data bits, each character contains the following bits.
q Start bit — A bit immediately preceding the character bits thatsignals the start of the asynchronous data transmission.
q Parity bit — A bit immediately following the character bits thatallows the printer to check the integrity of the received data. Thesetup menu allows you to select even, odd, mark, space, or noparity checking.
q Stop bit — A bit immediately following the parity bit thatsignals the end of the asynchronous data transmission.
lsb msb
transfer direction
paritybit
startbit
stopbit1 2 3 4 5 6 7 8
▲
▲
lsb msb
transfer direction
paritybit
startbit
stopbit1 2 3 4 5 6 7 9
▲
▲
serial data structures
8

Communication Interfaces 10-20
Serial Interface Busy-Handling Protocols
The serial interface provides several methods for the printer toindicate its ready and busy conditions. The communication interfacemenu, described in Chapter 2 of this manual, allows you to selectany of these methods during printer setup. The following paragraphsdescribe the serial interface busy-handling protocols.
Flow-Control Busy-Handling Protocols
These protocols are busy-handling protocols determined by the hostthat can be selected via the printer setup menu. The menu structureallows you to select either of the following flow-control busy-handlingprotocols or to set both protocols inactive.
q Transmit-On/Transmit-Off Protocol — When you select thisbusy-handling protocol, the printer sends a transmit-off (X-off)signal to indicate that its receive buffer is full or some other busycondition exists. When the printer is again ready to receive data,it sends a transmit-on (X-on) signal.
These signals (X-on and X-off) are equivalent to the devicecontrol characters DC1 and DCS, respectively, of the ASCIIcharacter set. Thus, the printer sends the DC3 control characterto indicate that it is busy, and the DC1 control character toindicate that it is ready to receive data.
q End-of-Text/Acknowledge Protocol — When you select thisbusy-handling protocol, the host sends data in blocks of 256characters or less. At the end of each block transfer operation,the host sends the end-of-text (ETX) control character to indicatethat the operation is complete. The printer responds by sendingthe acknowledge (ACK) control character to indicate that it isready to receive any subsequent data.
If the receive buffer is full (or some other busy condition exists),the printer delays sending the ACK control character until thebusy condition is cleared.

Communication Interfaces 10-21
This busy-handling protocol should not be selected for anemulator that requires that ETX be used as a graphics characteror as part of a printer command.
Direct-Connect Busy-Handling Protocols
The control panel menu structure offers the following choices ofbusy-handling protocols for use with a serial interface connecteddirectly to the host.
q PIN 20 H:READY (pin 20 high on ready) — When you selectthis parameter, the printer activates DTR (interface pin 20) toindicate that it is ready to receive data and deactivates DTR toindicate a busy condition. This busy-handling protocol is alsoknown as the busy-on-DTR protocol.
q PIN 20 H:ALWAYS (pin 20 high always) — This parameterdisables the busy-on-DTR protocol.
q PIN 11 H:READY (pin 11 high on ready) — When you selectthis parameter, the printer activates B/R (interface pin 11) toindicate that it is ready to receive data and deactivates B/R toindicate a busy condition.
q PIN 11 H:BUSY (pin 11 high on busy) — When you select thisparameter, the printer activates B/R to indicate a busy conditionand deactivates B/R to indicate that it is ready to receive data.
Optional Communication InterfacesA printed wiring board connector on the printer mother boardprovides for the installation of optional communication interfaces.These include the RS-422 serial communication interface and thecurrent loop (TTY) communication interface.

RS-422 Communication Interface
The RS-422 serial communication interface handles data structuresof the same format as those for the serial communication interface.However, the RS-422 interface can transfer data over distances of upto 4000 feet (1219 meters) with minimal noise interference.
Current Loop Communication Interface
The current loop (TTY) interface uses a four-wire, passive, neutralcurrent loop which does not interfere with the standard serial interface.The printer can receive data via either interface, provided the otherinterface is in a spacing condition or its cable is disconnected.
WARNING: Interface cables installed as part of the buildingwiring must conform to the requirements of the U.S. NationalElectrical Code. Contact your local inspector to determine thatthe correct materials have been chosen for your installation.
Communication Interfaces 10-22

Application Instructions A-1
Z-Axis Adjustment Escape Sequence
Introduction
The Model 8900 Series Printers sense top, left, and right edges plusthickness when a form is loaded. These settings provide the locationof printout on the form such as top, bottom, left, and right marginsand locations of labels or uneven edges.
Caution: Some forms or form sets may have isolated stick-onlabels or some areas that contain more copies than others asillustrated in the following figure. These conditions, if notproperly handled, can cause the printhead pins to snag on theuneven edges and result in damage to your printhead. To preventthis type of damage, avoid any situation in which the printheadprints across an uneven edge.
If your applications require the use of the types of forms shown inthe following figure, you should use Z-axis adjustment escapesequences to handle them.
Note: The 8900 Series Printers make Z-axis adjustments automaticallyonly when forms are initially loaded, power is cycled, or the power-ondefaults are reset.
AApplication Instructions
!

Application Instructions A-2
Considerations for Z-Axis Adjustments
The following considerations (plus DOs and DON’Ts) should begiven for Z-axis adjustments.
Caution: This escape sequence is designed for use by technicallyoriented software users to print on forms with multiplethicknesses and is not intended for the casual user. Damage to theprinter can occur by misuse of this command.
q Do not print across any boundary of a label or uneven edge (top,bottom, left, or right).
q Allow space (not used for printing) that is the width or height ofseveral characters on all sides of the label or uneven edge ofyour form.
q Know exactly where a label or uneven edge is located by linesand columns on your form.
q The printhead can approach the label or uneven edge from eitherdirection in bidirectional (normal) printing and therefore requiresa complete description of Z-axis adjustments.
!
isolated labels
uneven edges

Application Instructions A-3
q Valid Z-axis adjustment values are 00 through 99 from theautomatic Z-axis initialization adjustment (00) in positive ornegative directions (-99 through +99).
q Note the location of the Z-axis initialization whenever paperstock is changed or tractors are moved, to determine the 00calibration and corresponding number of sheets and formthickness.
q Z-axis adjustments are not cumulative; each Z-axis adjustmentescape sequence is independent from previous adjustments in theescape sequences referenced only to the 00 automatic calibration.
q Positive displacement moves the printhead away from the platen.
q The direction of printhead initialization displacement is positive.To clear backlash, this requires that a negative displacement befollowed by positive displacement unless the adjustment for Z-axisis reinitialization.
q The range of the printhead Z-axis adjustment from the controlpanel is -5 through +20 from the Z-axis initialization adjustment.
q Each Z-axis adjustment requires that the printhead stop andtherefore acts to decrease throughput. Forms format and printingformat are both considerations to maximize throughput.
q Avoid a format that prints columns on either side of a label. Ifprinting a column is required, print the column first (but only tothe bottom of the label), adjust the printhead Z-axis whilereversing paper motion, and then print the label.
Caution: Care must be taken that a label is not peeled whenpaper motion is reversed.!
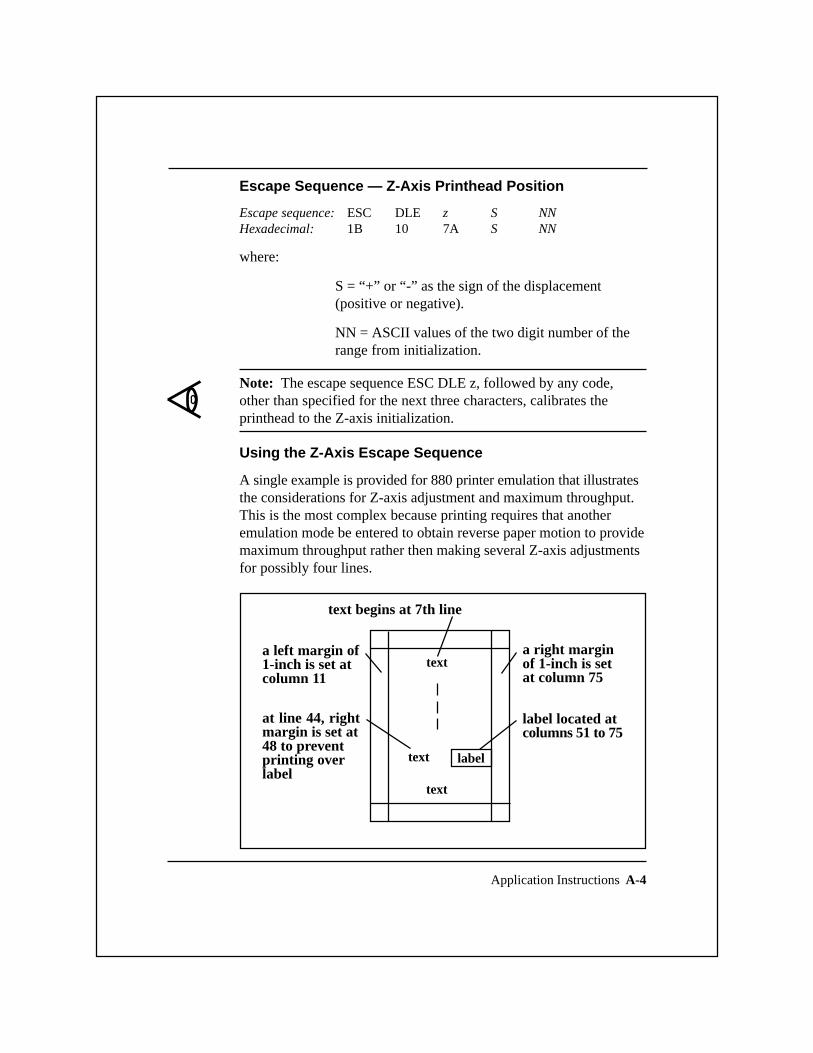
Application Instructions A-4
Escape Sequence — Z-Axis Printhead Position
Escape sequence:ESC DLE z S NNHexadecimal: 1B 10 7A S NN
where:
S = “+” or “-” as the sign of the displacement(positive or negative).
NN = ASCII values of the two digit number of therange from initialization.
Note: The escape sequence ESC DLE z, followed by any code,other than specified for the next three characters, calibrates theprinthead to the Z-axis initialization.
Using the Z-Axis Escape Sequence
A single example is provided for 880 printer emulation that illustratesthe considerations for Z-axis adjustment and maximum throughput.This is the most complex because printing requires that anotheremulation mode be entered to obtain reverse paper motion to providemaximum throughput rather then making several Z-axis adjustmentsfor possibly four lines.
text label
text
texta right marginof 1-inch is setat column 75
label located atcolumns 51 to 75
a left margin of1-inch is set atcolumn 11
at line 44, rightmargin is set at48 to preventprinting overlabel
text begins at 7th line

Application Instructions A-5
880 Emulation Commands
For 880 emulation, send the following code and text.
Note: For this example, printing can be continuous, within themargins, on every line of the page.
ESC [ 7 ; 54 r — prints first print line on line 7, last print line at line 54.
ESC [ 11 ; 75 s — sets first print column at column 11, and last printcolumn at column 75.
Send text, then at the end of line 43 send
ESC [ ; 48 s — sets the right print column to column 48.
Send text, then at the end of line 49 send the following sequences.
ESC DLE z + 12 — sets Z-axis to +12.
ESC DLE E TI855 EXT ESC CR P — changes to TI855 WPemulation.
ESC VT - LF — tabs vertically to line 45 then line feeds one line.
ESC DLE E TI880 EXT — changes to TI880 emulation.
ESC [ 57 ; 73 s — sets left print column to column 53, and rightprint column to column 73.
Send text, then at the end of line 49 send
ESC [ 11 ; 48 s —sets column left and right margins.
CR LF ESC DLE z X X X — sets Z-axis to 00.
Send text, then at the end of line 51 send
ESC [ 11 ; 75 s —sets original left and right margins.

Index 1
aadjusting the Z-axis position .................... 3-29answerback memory
DEC LA120 emulation ...................... 9-5answerback memory
message load ...................................... 9-6auto wrap .................................................... 9-6
bbarcode operations .................................... 3-20baud rate ................................................... 2-11bidirectional printing ...................... 4-14, 8-12bit
parity ..............................................10-19start ................................................. 10-19stop ................................................. 10-19
bits, data .................................................... 2-11boldface print ................................. 5-20, 6-15,
....................................... 6-16, 7-18, 8-28buffer size ................................................. 2-10busy .......................................................... 2-17busy-handling protocol ................... 2-12, 2-13
cchannel, vertical tab .................................. 8-21character columns, maximum ..................... 1-3character pitch ............................................ 1-3character sets ..................... 1-3, 2-14, 3-2, 3-3
IBM Multinational ........................... 3-14IBM PC1 ............................................ 3-6IBM PC2 ............................................ 3-8International ASCII ............................ 3-5ISO 8859/1 Multinational ................ 3-12Nordic PC ........................................ 3-10US ASCII ........................................... 3-4
characterscontrol .............................................. 3-16graphic ................................................ 3-2oversize, printing .............................. 3-21
clearance, printhead-to-paper ................... 2-15color printing .................................... 1-4, 3-22
Index
commandscharacter pitch .................. 4-8, 4-23, 5-7,....................... 5-17, 6-5, 6-13, 7-6, 7-14,................................... 8-7, 8-22, 9-3, 9-4character set ............ 5-8, 5-18, 7-6, 7-16,................................... 8-7, 8-8, 8-24, 9-4control character ............................... 3-18DEC LA120 ................ 9-2, 9-3, 9-4, 9-5Epson FX Printer ............................... 8-6escape sequence ............................... 3-18font selection .................... 4-6, 4-9, 4-14,................. 4-29, 5-6, 5-11, 6-4, 6-8, 8-14form format ...................... 4-6, 4-9, 4-14,.................. 4-29, 5-6, 5-11, 6-4, 6-8, 7-5,................................... 7-9, 8-6, 8-13, 9-3global ................................................ 3-19graphics ............................................ 8-31horizontal motion .................... 4-7, 4-19,........................... 5-7, 5-14, 6-4, 6-9, 7-5,..................................7-11, 8-7, 8-17, 9-3IBM Proprinter XL ............................ 7-5line spacing ...................... 4-8, 4-24, 5-7,............. 5-18, 6-5, 6-13, 7-6, 7-14, 8-23,.................................................... 9-3, 9-4margin control .................. 4-7, 4-17, 5-6,...................5-12, 7-5, 7-9, 8-6, 8-15, 9-3Model 855 DP ............................ 6-4, 6-5Model 855 WP ................................... 5-6Model 880 Printer .............................. 4-6print enhancement ................... 4-9, 4-26,......................... 5-8, 5-19, 6-5, 6-6, 6-14,................................. 7-6, 7-17, 8-8, 8-26printer ............................................... 3-18printer operation ............... 4-6, 4-11, 5-6,......................5-9, 6-4, 6-7, 7-5, 7-7, 8-6,.................................................... 8-9, 9-2raster graphics .................. 4-9, 4-27, 5-8,................ 5-21, 6-6, 6-17, 7-7, 7-21, 8-9vertical motion ....... 4-8, 4-21, 5-7, 5-16,......... 6-5, 6-11, 7-6, 7-12, 8-7, 8-19, 9-4DEC LA120 emulation ...................... 9-2global ................................................ 3-19

communication interfaceoptional .................................. 1-4, 10-21parallel .............................................. 10-6serial ............................................... 10-14standard .............................................. 1-4
compressed print .......... 5-19, 6-15, 7-17, 8-27conditions, error ..................................... 10-14configuration report .................................. 4-11connection
direct ................................................ 2-13indirect ............................................. 2-13serial interface ................................ 10-15
connectorparallel interface ............................... 10-6serial interface ................................ 10-15
controlautomatic sheet feeder ...................... 2-15z-axis ................................................ 2-15
control characters ............................ 3-16, 3-17communication ....................... 3-16, 3-17format effectors ...................... 3-16, 3-17information separators ........... 3-16, 3-17miscellaneous ......................... 3-16, 3-17
control panellimit setup option ............................. 2-17
control panel, operator ................................ 2-3control, flow ............................................. 2-11
ddata bits ..................................................... 2-11data structures, serial .............................. 10-19data-transfer operations ............................ 10-4DEC ABM function .................................... 9-5DEC emulation commands ......................... 9-2delay, idle .................................................. 2-16density, horizontal dot .............................. 4-27double-high double wide print ................. 7-20double-high print ...................................... 8-27draft-quality print ........................................ 1-6
eemulation mode
Epson FX ........................................... 8-4submenu ............................................. 2-4TI 855 DP........................................... 6-3TI 855 WP .................................. 5-4, 6-3TI 880 ................................................. 4-4
emulation mode submenu ........................... 2-5emulation modes ................................. 1-4, 2-5
Index 2
emulator, selecting an ............................... 3-28enhancements, print .................................... 1-3error conditions ...................................... 10-14ETX/ACK flow control ............................ 2-13execute commands parameter ..................... 2-6expanded print ...................... 4-26, 5-19, 6-14,
................................................ 7-17, 8-26
ffeatures
printer ................................................. 1-3test .................................................... 2-18
flow control .............................................. 2-11fonts
Courier ............................................. 8-14Gothic ............................................... 8-14optional ...................................... 1-3, 6-9standard ...................................... 1-3, 6-9
form format, selecting a ............................ 3-23form length ..................................... 4-14, 5-11format, serial data ................................... 10-18
gglobal command set .................................. 3-19graphic characters ....................................... 3-2graphics
printing ............................................... 1-6raster ................................................... 1-6
graphics capabilities ................................... 1-4graphics printing mode ............................. 2-17ground
protective ........................................ 10-16signal .............................................. 10-16
hhexadecimal dump mode ............................ 2-9horizontal dot density ............................... 4-27horizontal motion index (HMI) ........ 5-5, 5-17
iidle delay .................................................. 2-16indexes, motion .......................................... 5-5intercharacter space .................................. 8-22interface
communication ................................. 10-3serial ................................................. 2-10
interface parameters submenu .................... 2-4international character set, selecting an .... 3-27italic print ................................................. 8-30
Index 3
jjustification
full .................................................... 8-15left margin ........................................ 8-15right margin ................... 5-12, 5-14, 8-15
llanguage, LCD .......................................... 2-17length, form .................................... 4-14, 5-11letter-quality print ................... 1-6, 4-26, 5-19,
....................................... 6-15, 7-18, 8-28limiting control panel operation ............... 2-17line feed modes ........................................... 1-3line length ................................................... 1-3line spacing ................................................. 1-3line width .................................................. 4-18
mmargin
bottom .................................... 4-17, 5-13left ....................... 4-18, 5-13, 7-10, 8-16right ..................... 4-18, 5-13, 7-10, 8-16top .................................. 4-17, 5-13, A-4
master print mode ..................................... 8-30menus, printer ............................................. 2-3miscellaneous parameters, submenu........... 2-4mode
data processing ................................... 2-8emulation .................................... 1-4, 2-5graphics printing .............................. 2-17hexadecimal dump ............................. 2-9master print ...................................... 8-30word processing ................................. 2-8
modem ......................................................2-13motion index
horizontal (HMI) ...................... 5-5, 5-17vertical (VMI) .......................... 5-5, 5-18
nnew line mode ............................................. 9-5NVRAM ..................................................... 2-3
ooffline ........................................................ 2-16online ........................................................ 2-16operations
barcode ............................................. 3-20data-transfer ..................................... 10-4paper-handling ................................. 3-29
oversize characters feature ........................ 3-21
ppaper pull-down warning .......................... 2-16paper out ................................................... 2-17paper-handling operations ........................ 3-29paper-handling system ................................ 1-2parameters
automatic carriage return ................... 2-9automatic line feed ............................. 2-8busy-handling ................................... 2-13carriage return .................................... 2-7execute commands ............................. 2-6form ..................................................4-15graphics .................................... 2-7, 4-27interface ............................................2-10line feed and carriage return ...... 2-6, 2-7miscellaneous setup ......................... 2-14operating ............................................ 2-3processing .......................................... 2-8setup ................................................... 2-4shift out .............................................. 2-7slashed zeros ...................................... 2-9
parity ......................................................... 2-11parity bit .................................................. 10-19pitch, character ........................................... 1-3port submenu ............................................ 2-10power-up ................................................... 2-16print
boldface ............... 5-20, 6-15, 7-18, 8-28compressed .......... 5-19, 6-15, 7-17, 8-27double-high ...................................... 8-27double-high double-wide ................. 7-20expanded ............. 4-26, 5-19, 7-17, 8-26italic .................................................. 8-30letter-quality ................... 1-6, 4-26, 5-19,....................................... 6-15, 7-18, 8-28shadow ................ 5-20, 6-16, 7-19, 8-29subscript ................................. 7-19, 8-29superscript .............................. 7-19, 8-29text-overscore ................................... 7-18text-quality ......................................... 1-6text-underline ................ 5-20, 7-18, 8-28
print enhancements ..................................... 1-3print quality ........................................ 1-3, 1-4
selecting ........................................... 3-26print, expanded ......................................... 6-14printer commands ..................................... 3-18printer display, writing to ........................ .3-29

Index 4
printer features ............................................ 1-3printing
bidirectional ..................................... 8-12color ......................................... 1-4, 3-22reverse .............................................. 5-10unidirectional ........................ 4-14, 5-10,........................................... 6-8, 7-8, 8-12
protocolsbusy-handling .............. 2-12, 2-13, 10-20direct-connect, busy-handling ........ 10-21end-of-text/acknowledge ................ 10-20flow-control, busy-handling ........... 10-20parallel interface, communication .. 10-10transmlt-on/transmit-off ................. 10-20
pull down warning, paper ......................... 2-16
qquality, print ........................................ 1-3, 1-4
rraster graphics ............................................. 1-6rate, baud .................................................. 2-11report
configuration .................................... 4-11status ................................................ 4-13
requirements, parallel interface timing ... 10-12reverse printing ......................................... 5-10ribbon adjust ............................................. 2-15ribbon type ................................................ 2-15
sselect, Font n ................................... 4-29, 4-30selecting a form format ............................. 3-23selecting an emulator ................................ 3-28selecting an international
character set ...................................... 3-27selecting print quality ............................... 3-26sequence
initialize .......................................... 10-13parallel data timing......................... 10-11
setup parametersEpson FX ........................................... 2-8IBM Proprinter XL ............................ 2-8TI 855 ................................................. 2-8TI 880 ................................................. 2-6
shadow print ................ 5-20, 6-16, 7-19, 8-29sheet feeder, automatic ..................... 1-4, 3-23
signalsacknowledge .....................................10-8busy .................................................. 10-9clear to send ................................... 10-17data ................................................... 10-8data carrier detect ........................... 10-17data set ready .................................. 10-17data strobe ........................................ 10-8data terminal ready ......................... 10-17fault .................................................. 10-9ground ............................................ 10-10initialize ............................................ 10-9paper-empty ...................................10-10parallel interface ............................... 10-7receive data .................................... 10-16request to send ............................... 10-16select .............................................. 10-10serial interface .................... 10-15, 10-16transmit data ................................... 10-16verify ..............................................10-10
size, buffer ................................................ 2-10space, intercharacter ................................. 8-22spacing, line ................................................ 1-3spacing, vertical line ................................. 4-27start bit .................................................... 10-19status report .................................... 2-18, 4-13stop bit .................................................... 10-19submenu
emulation mode .......................... 2-4, 2-5interface parameters ........................... 2-4miscellaneous parameters ................... 2-4port ................................................... 2-10test mode .................................. 2-4, 2-18
subscript print ................................. 7-19, 8-29superscript print .............................. 7-19, 8-29switch, Setup/Test ....................................... 2-4system, paper-handling ............................... 1-2
ttest mode submenu ..................................... 2-4text-overscore print ................................... 7-18text-quality print ......................................... 1-6text-underline print ................ 5-20, 7-18, 8-28TI 855 setup parameters ............................. 2-8
TI 855 emulation ................................ 2-8TI 880 setup parameters ............................. 2-6
TI 880 emulation ................................ 2-6timing, data-transfer ............................... 10-10transmission rate, serial interface ........... 10-18
Index 5
uunidirectional printing ................... 4-14, 5-10,
........................................... 6-8, 7-8, 8-12
vvariables .................................................... 4-10vertical line spacing .................................. 4-27vertical motion index (VMI) ............ 5-5, 5-18vertical tab channel ................................... 8-21
wwarning paper pull-down .......................... 2-16width, line ................................................. 4-18
xXON/XOFF flow control ......................... 2-12
zz-axis control ............................................ 2-15Z-axis position, adjusting ......................... 3-29
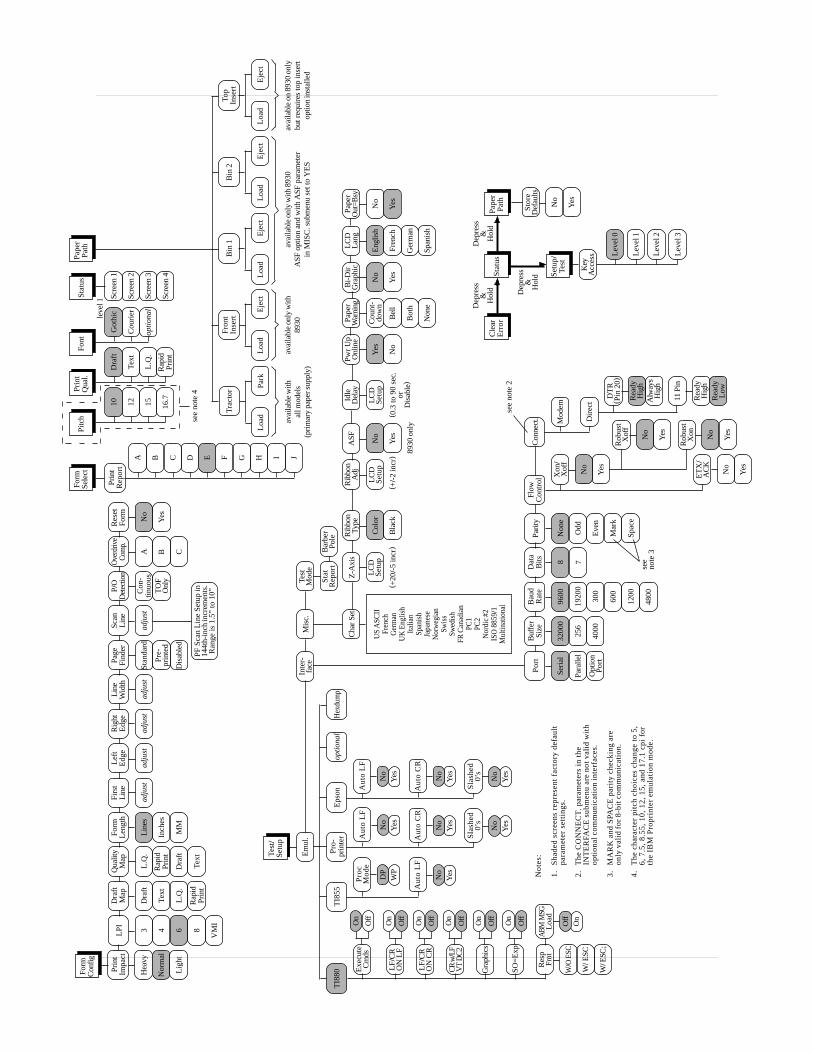
PF
Sca
n L
ine
Se
tup
in14
4th-
inch
incr
emen
ts.
Ra
ng
e is
1.5
” to
10
”
Rig
htE
dg
eLi
neW
idth
Pag
eF
inde
rS
can
Line
P/O
Det
ectio
nO
verd
rive
Com
p.R
eset
For
m
adju
stadju
stS
tand
ard
adju
stC
on-
tinuo
usA
No
TO
FO
nly
BY
es
Dis
able
dC
Pre
-pr
inte
d
For
mC
onfig
For
mS
elec
tP
rint
Qua
l.P
aper
Pat
h
A B C D F G H I J
Prin
tR
ep
ort
E
12 15 16
.7
10
Tex
t
L.Q
.
Dra
ft
Rap
idP
rint
Pitc
h
Got
hic
Cou
rier
op
tion
al
Fo
nt
Scr
een
2
Scr
een
3
Scr
een
1
Scr
een
4
leve
l 1
Tra
cto
rF
ron
tIn
sert
Bin
1To
pIn
sert
Bin
2
Lo
ad
Pa
rk
avai
labl
e w
ithal
l mod
els
(prim
ary
pape
r sup
ply)
Lo
ad
Eje
ct
avai
labl
e on
ly w
ith89
30
Lo
ad
Eje
ctL
oa
dE
ject
avai
labl
e on
ly w
ith 8
930
AS
F o
ptio
n an
d w
ith A
SF
par
amet
erin
MIS
C. s
ubm
enu
set t
o Y
ES
Lo
ad
Eje
ct
avai
labl
e on
893
0 on
lybu
t req
uire
s to
p in
sert
optio
n in
stal
led
Te
st/
Se
tup
Em
ul.
Pro
-pr
inte
rT
I88
0T
I85
5E
pso
no
ptio
na
lH
exdu
mp
Off
On
Off
On
Off
On
Off
On
Off
SO
=E
xpO
n
Off
Exe
cute
Cm
ds
LF/C
RO
N L
F
LF/C
RO
N C
R
CR
w/L
FV
T D
C2
Res
pF
mt
W/O
ES
C
W/ E
SC
W/ E
SC
;
On
ABM
MSG
Lo
ad
On
Off
Pro
cM
od
e
WP
DP
Au
to L
F
YesNo
Au
to L
F
YesNo
Au
to C
R
YesNo
Sla
she
d0
’s
YesNo
YesNo
Au
to C
R
YesNo
Sla
she
d0
’s
YesNo
Au
to L
F
Inte
r-fa
ce
Gra
phic
s
No
tes:
1.
Sh
ad
ed
scr
ee
ns
rep
rese
nt
fact
ory
de
fau
ltp
ara
me
ter
sett
ing
s.
2.
Th
e C
ON
NE
CT
. p
ara
me
ters
in
th
eIN
TE
RF
AC
E s
ub
me
nu
are
no
t va
lid w
ith
op
tio
na
l co
mm
un
ica
tio
n in
terf
ace
s.
3.
MA
RK
an
d S
PA
CE
pa
rity
ch
eck
ing
are
on
ly v
alid
fo
r 8
-bit
co
mm
un
ica
tio
n.
4.
Th
e c
ha
ract
er
pit
ch c
ho
ice
s ch
an
ge
to
5,
6,
7.5
, 8
.55
, 1
0,
12
, 1
5,
an
d 1
7.1
cp
i fo
rth
e I
BM
Pro
pri
nte
r e
mu
lati
on
mo
de
.
LPI
Dra
ftM
apQ
ualit
yM
apF
orm
Leng
thF
irst
Line
Left
Ed
ge
Hea
vy3
Dra
ftL.
Q.
Line
sadju
stadju
st
Nor
mal
4T
ext
Inch
es
Ligh
t6
L.Q
.D
raft
MM
8T
ext
VM
I
Rap
idP
rint
Rap
idP
rint
Prin
tIm
pact
Bau
dR
ate
Da
taB
its
Ser
ial
3200
096
008
Non
e
256
1920
0O
dd
Opt
ion
Po
rt40
0030
0E
ven
7
Po
rtB
uffe
rS
ize
Par
ity
Par
alle
l
600
1200
4800
Mar
k
Spa
ce
see
note
3
ET
X/
AC
K
No
Yes
Flo
wC
ontr
olC
onne
ct.se
e no
te 2
Xon
/X
off
No
Yes
see
note
4
Rob
ust
Xof
f
No
Yes
Rob
ust
Xon No
Yes
Dire
ct
Mod
em
11 P
in
DT
R( P
in 2
0)
Rea
dyH
igh
Alw
ays
Hig
h
Rea
dyH
igh
Rea
dyL
ow
Mis
c.Te
stM
od
e
Cha
r S
et
US
AS
CII
Fren
chG
erm
anU
K E
nglis
hIta
lian
Spa
nish
Japa
nese
Nor
weg
ian
Sw
iss
Sw
edis
hFR
Can
adia
nP
C1
PC
2N
ordi
c #2
ISO
885
9/1M
ultin
atio
nal
Sta
tR
ep
ort
Bar
ber
Pol
e
Z-A
xis
LCD
Se
tup
Col
or
Bla
ck
Rib
bon
Type
Rib
bon
Adj
( +20
/-5
incr
)
LCD
Se
tup
( +/-
2 in
cr)
No
Yes
AS
F
8930
onl
y
Idle
Del
ay
LCD
Se
tup
( 0.3
to
90 s
ec.
or
Dis
able)
Yes No
Pw
r U
pO
nlin
e
Bel
l
Pap
erW
arni
ng
Bo
th
Non
e
Co
un
t-do
wn
No
Yes
Bi-D
irG
raph
ic
Fre
nch
LCD
Lang
Ger
man
Spa
nish
Eng
lish
Yes
Pap
erO
ut=B
sy
No
Pap
erP
ath
Cle
arE
rro
r
Dep
ress
&H
old
Dep
ress
&H
old
Dep
ress
&H
old S
etu
p/T
est
Leve
l 1
Leve
l 2
Leve
l 0
Leve
l 3
Key
Acc
ess
Sto
reD
efau
lts
No
Yes
Sta
tus
Sta
tus


