59
MODEL RAILROADING WITH ARDUINO Dave Falkenburg Silicon Valley Lines Model Railroad Club

MODEL RAILROADINGWITH ARDUINO
Dave FalkenburgSilicon Valley Lines Model Railroad Club

WHAT IS AN ARDUINO?

WHAT IS AN ARDUINO?
• Arduino is an open-source electronics prototyping platform based on flexible, easy-to-use hardware and software.
• It's intended for artists, designers, hobbyists, and anyone interested in creating interactive objects or environments.
• A little programmable computer platform designed help people “make things go.”
http://www.arduino.cc/


WHAT IS OPEN SOURCE?
• Source Code is Publicly Available
•No Secrets Hidden from Developers
• License Controls How Code Can Be Used
•Different Code & Projects Use Different Licenses
• “Like Playing Poker With Everyone’s Cards Face Up”

http://vimeo.com/18539129
THERE IS EVEN A MOVIE…

HARDWARE
• Based upon widely available 8-bit Micro-controllers
• Single-chip Computers as powerful as the early PCs
• Open Hardware
• Schematics available under various licensing terms
• Kits and Built-up Boards from $15 to $80
• Expand with “Shields” (Stackable Boards)


HARDWARE
• 13 digital I/O pins
• 6 can be PWMed (digital dimmer)
• 6 Analog Inputs
• Can also be used as extra digital I/O pins
• 6V-12V Power Supply or 5V from USB
• Easily Expandable & Customizable to add features

SOFTWARE

SOFTWARE
•Works with Windows, Mac OS X, and Linux
• Open Source
• Free to Download & Use
• Source Code Available
• Program Hardware via USB or Serial Port

SOFTWARE
• C-like Language
• Programs for the Arduino are called “Sketches”
• Ideal for Hobbyists, Artists, and Explorers
• Rapid Prototyping of small projects is the goal
• Easy to use “Libraries” developed by others
•DCC, Communications, LED etc.

SOFTWARE
• All the “grunt work” is done for you by Arduino
•Only two functions to create
• setup() : initialize inputs & outputs
• loop() : run over and over again until power is removed
• Sketchbook and examples to build upon, too.

“BLINKY” SKETCH

/* Blink: Turns on an LED on for one second, then off for one second, repeatedly. * LED connected from digital pin 13 to ground. * Note: On most Arduino boards, there is already an LED on the board connected to pin 13, so you don't need any extra components for this example. Created 1 June 2005 By David Cuartielles http://arduino.cc/en/Tutorial/Blink based on an orginal by H. Barragan for the Wiring i/o board */
int ledPin = 13; // LED connected to digital pin 13
// The setup() method runs once, when the sketch starts
void setup(){ pinMode(ledPin, OUTPUT); // initialize the digital pin as an output:}
// the loop() method runs over and over again, as long as the Arduino has power
void loop(){ digitalWrite(ledPin, HIGH); // turn the LED on delay(100); digitalWrite(ledPin, LOW); // turn the LED off delay(100);}

ARDUINO “SHIELDS”

SOUND EFFECTS
WAV Shield MP3 Player Shield
http://www.adafruit.com/ http://www.sparkfun.com/

RELAY SHIELD
http://shop.evilmadscientist.com/

CONNECTING WIRES
Adafruit Proto-screwshieldhttp://www.adafruit.com/

“PATCH SHIELD”
http://info.yawp.com/kits/patch-shield-v04/index.html

NEED MORE I/O?
http://macetech.com http://mayhewlabs.com/
Centipede Shield (64-GPIO) MuxShield II

ETHERNET
http://www.arduino.cc/
Ethernet Shield Arduino Ethernet*

MESH NETWORKING
XBee ShieldArduino Wireless Shield

WIFI
$69.95!!!$84.95!!!

MICROCHIP RN-XV WIFI
$34.95
XBee Form-Factor WiFi Module
$24.95

“ELECTRIC IMP” WIFI
$29.95$19.95 +(The “Imp” is actually a cloud-programmed WiFi Micro)

SPECIAL EFFECTS

SPECIAL EFFECTS
NOTE: This is an mbed, not an Arduino; probably should re-shoot the video.

EFFECTS YOU CANNOT BUY
Sperry Rail Service Inspection Vehicle

ARDUINO & YOUR LAYOUT

MIX AND MATCH
• An Arduino can connect to existing Model Railroad Electronics
• Chubb SMC12 for using digital output to control Tortoise
•DCCOD, TeamDigital DBD22, and NCE BD20 Detectors

LED SIGNALS

CONNECTING LEDS• Anode (+, long leg) of LED to +5V (or 3.3V)• Cathode (-, short leg, flat side) of LED to DIGITAL I/O Pin
through a 470Ω resistor (330Ω for 3.3V)
I/O
I/O
5V470Ω
470Ω
• Anode (+, long leg) to DIGITAL I/O Pin through a 470Ω resistor (330Ω for 3.3V)• Cathode (-, short leg, flat side) to Ground

SWITCHING 12V CIRCUITS
NPN Transistor as Low Side Switch
I/O
I/O

LOTS MORE HERE
http://www.arduino.cc/playground/Main/InterfacingWithHardware

DIVING INTO CODE

MAKING FIREint ledPin = 13; // LED connected to digital pin 13
void setup() { pinMode(ledPin, OUTPUT); }
void loop() { int dark; for (dark=0;dark<1000;dark++) { if (dark<500) { digitalWrite(ledPin, HIGH); // set the LED on delay(random(10-10*(dark/500))); } digitalWrite(ledPin, LOW); // set the LED off delay(random(10+dark,50+dark)); }}

AN ARC WELDERint ledPin = 13; // LED connected to digital pin 13
void setup() { pinMode(ledPin, OUTPUT); }
void loop() { int i,count;
count=random(10,60); for (i=0;i<count;i++) { digitalWrite(ledPin, HIGH); // set the LED on delay(random(60)); digitalWrite(ledPin, LOW); // set the LED off delay(random(200)); } delay(random(800,2000)); // wait a random bit of time}

A GRADE CROSSING

BUILDING THE HARDWARE
• Arduino Uno
•WAV Shield + SDCard
• Adafruit Proto-screwshield
•Optical Detectors (e.g., IRDOT or NightScope™)
•Walthers Crossing Signal

BASIC STRATEGY
• If Train Detected (IRDOTs connected to Digital Inputs):
• Play Bell Sound Loop & Blink Crossing Lights (LEDs)
• If Train No Longer Detected:
• Lights Off; Stop Bell Sound Loop
• Source Code Available Here:
https://github.com/railnerd/grade-crossing/

STATE MACHINE SIDEBAR
• Simple If… Then… Sequences are Easy
• Doing Complex, or Multiple Things at Once is Harder
• (Blinking, Playing Sound, Reading Detectors)
• Requires Breaking Up the Work you Do
• Computer Folks Do This With “State Machines”
• If you are a non-programmer, this can be mind blowing
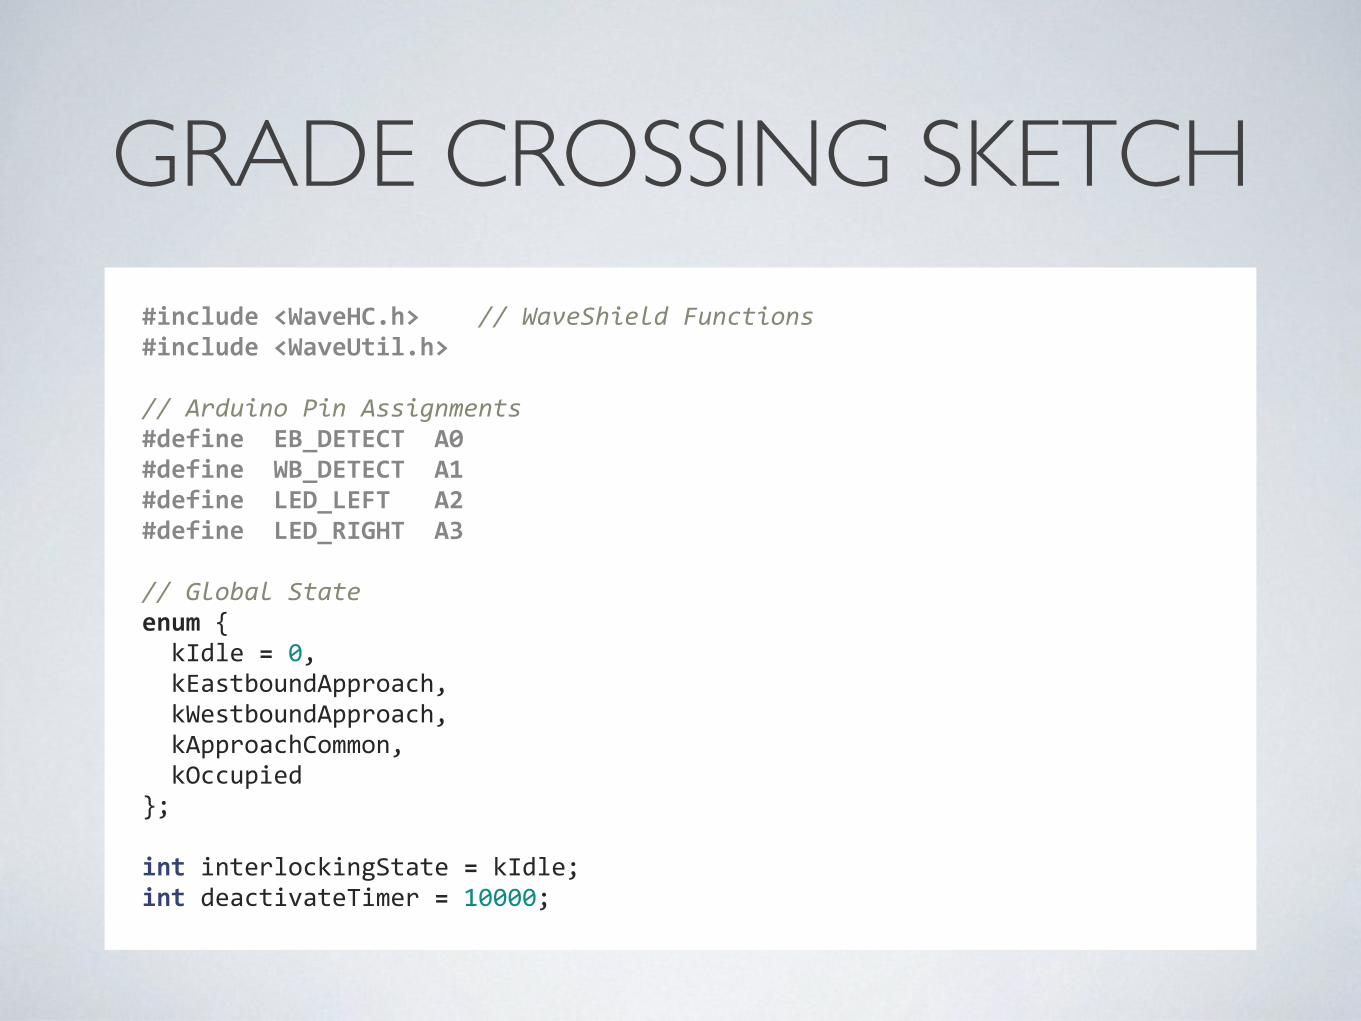
GRADE CROSSING SKETCH#include <WaveHC.h> // WaveShield Functions#include <WaveUtil.h>
// Arduino Pin Assignments#define EB_DETECT A0#define WB_DETECT A1#define LED_LEFT A2#define LED_RIGHT A3
// Global Stateenum { kIdle = 0, kEastboundApproach, kWestboundApproach, kApproachCommon, kOccupied};
int interlockingState = kIdle;int deactivateTimer = 10000;

SETUP()void setup(){ Serial.begin(9600); // for debugging
// Set up detector inputs, and enable on-‐chip ~20K pullup resistors pinMode(EB_DETECT,INPUT); pinMode(WB_DETECT,INPUT); digitalWrite(EB_DETECT,HIGH); digitalWrite(WB_DETECT,HIGH); // Could also implement “center” detector if road is fouled
// Set up LED outputs pinMode(LED_LEFT,OUTPUT); pinMode(LED_RIGHT,OUTPUT);
// Get ready to play audio files from the SD Card setupSDCard(); turnOffLEDs();}

LOOP()void loop(){ switch (interlockingState) { case kIdle: if ((digitalRead(EB_DETECT) == LOW) && (digitalRead(WB_DETECT) == HIGH)) { interlockingState = kEastboundApproach; } else if ((digitalRead(WB_DETECT) == LOW) && (digitalRead(EB_DETECT) == HIGH)) { interlockingState = kWestboundApproach; } break;
case kEastboundApproach: interlockingState = kApproachCommon; break;
case kWestboundApproach: interlockingState = kApproachCommon; break;
....
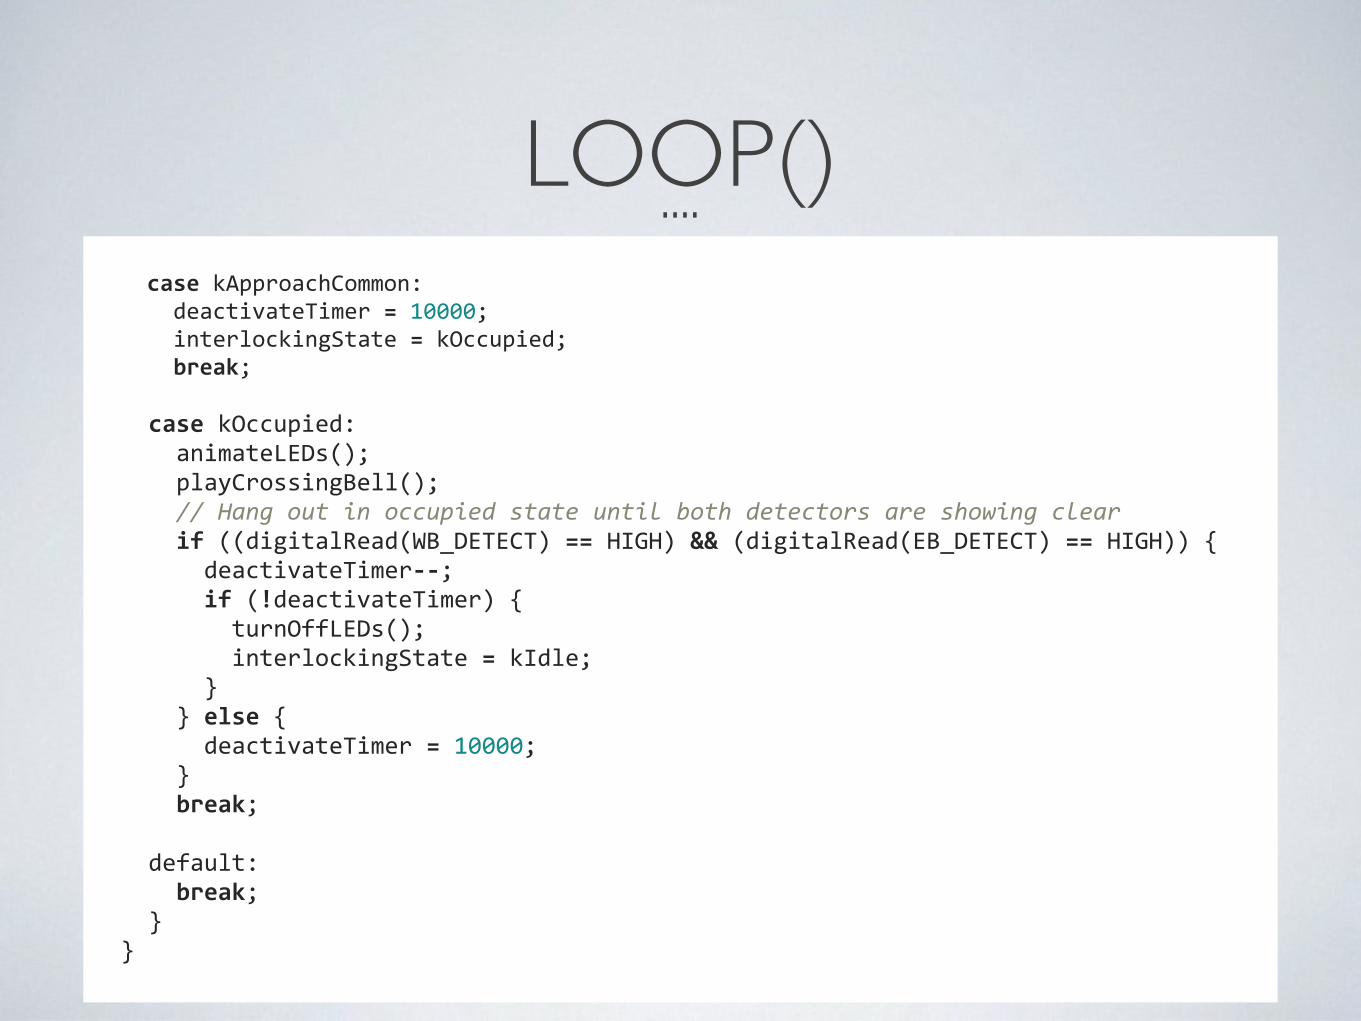
LOOP() case kApproachCommon: deactivateTimer = 10000; interlockingState = kOccupied; break;
case kOccupied: animateLEDs(); playCrossingBell(); // Hang out in occupied state until both detectors are showing clear if ((digitalRead(WB_DETECT) == HIGH) && (digitalRead(EB_DETECT) == HIGH)) { deactivateTimer-‐-‐; if (!deactivateTimer) { turnOffLEDs(); interlockingState = kIdle; } } else { deactivateTimer = 10000; } break;
default: break; }}
....

LED ROUTINESvoid animateLEDs(void) {
if (ledTimer) ledTimer-‐-‐;
switch (ledState) {
case kLEDsOff: ledTimer = 0; // fall through
case kLEDRightOn: if (!ledTimer) { ledState = kLEDLeftOn; ledTimer = 10000; digitalWrite(LED_LEFT,LOW); digitalWrite(LED_RIGHT,HIGH); } break;
case kLEDLeftOn: if (!ledTimer) { ledState = kLEDRightOn; ledTimer = 10000; digitalWrite(LED_LEFT,HIGH); digitalWrite(LED_RIGHT,LOW); } break; }}
//////////////////////////////// LED Animation Routines//
enum { kLEDsOff = 0, kLEDLeftOn, kLEDRightOn};
int ledState = kLEDsOff;int ledTimer = 0;
void turnOffLEDs(void) { digitalWrite(LED_RIGHT,HIGH); digitalWrite(LED_LEFT,HIGH); ledState = kLEDsOff;}

WHAT ELSE CAN YOU DO?
• Push Buttons
• Photocells
• Current Detectors
• Servo Motors
• Stepper Motors
•MP3 Playback Chips
• RFID Readers
•Other Computers
•WiFi
• Ethernet

COOL STUFF
• Seth Neumann’s RFID Work:• http://www.pcrnmra.org/pcr/clinics/RFID-in-Model-Railroading-20130123.pdf
• Chuck Catania: Simple Signals With Arduino
•DCC Sniffer : http://www.mynabay.com/arduino
•DCC Throttle: http://www.oscale.net/en/arduino
•DC Control:http://modelrail.otenko.com/electronics/controlling-your-trains-with-an-arduino
http://dawson-station.blogspot.com/2010/01/wii-nunchuk-train-control.html

NEW THINGS

NEW STUFF
•More powerful boards with ARM processors now available
•Due: http://arduino.cc/en/Main/ArduinoBoardDue
• Teensy 3.0: http://www.pjrc.com/store/teensy3.html

OPENLCB, TOO.
http://railstars.com/hardware/io/io-duino/

RASPBERRY PI• Another Game Changing
Device
• 700MHz ARM Linux Computer for $25/$35!
• Full Linux System with GPIO, I2C, SPI, etc.
• Look for a Clinic Soon

WRAP UP

GETTING MORE HELP
•Online Resources:
http://arduino.cc
• Arduini Yahoo Group:
• TechShop Classes
• Books

USEFUL LINKS
• http://www.arduino.cc/
• http://www.sparkfun.com/
• http://www.adafruit.com/
• http://learn.adafruit.com/category/learn-arduino
• http://moderndevice.com/
• http://spikenzielabs.com/
• http://techshop.ws/
Just Google/Bing/Yahoo for “Arduino” in your favorite web browser!

Q&A


