+ All Categories
Home > Documents > Model ZRO-4 Installation Instructions

Model ZRO-4 Installation Instructions

Date post: 10-Apr-2018
Category:
Upload: watts
View: 228 times
Download: 0 times
Share this document with a friend
16
IOM-ZRO-4 Installation, Operation and Maintenance Manual for  Model ZRO-4  Wa r nin g Please read carefully before proceed ing with installation. Y our failure to follow any attached instructions or operating parameters may lead to the product's failure and possible damage to property. System Tested and certified by NSF International Against ANSI/NSF Standard 58 for the reduction of claims specified on performance data sheet. R NSF Refer to enclosed warranty for operating parameters to ensure proper use with your water supply. Watts Pure Water, Inc. 1725 W. Williams Dr. #C-20 Phoenix, AZ 85027 Phone: 888-774-7405 Fax: 602-588-0356 www.wattspurewater.com
Transcript

8/8/2019 Model ZRO-4 Installation Instructions

http://slidepdf.com/reader/full/model-zro-4-installation-instructions 1/16

IOM-ZRO-4

Installation, Operation and Maintenance Manual for 

Model ZRO-4

 Warning

Please read carefully before proceeding with installation. Your failure to follow any attached instructions or operatingparameters may lead to the product's failure and possible damage to property.

System Tested and certified by NSF International Against ANSI/NSF Standard 58 for the reduction of claims specified on performance data sheet.RNSF

Refer to enclosed warranty for operating parameters to ensure proper use with your water supply.

Watts Pure Water, Inc.1725 W. Williams Dr. #C-20Phoenix, AZ 85027Phone: 888-774-7405Fax: 602-588-0356www.wattspurewater.com

8/8/2019 Model ZRO-4 Installation Instructions

http://slidepdf.com/reader/full/model-zro-4-installation-instructions 2/16

Table of ContentsOperational Parameters . . . . . . . . . . . . . . . . . . . . . . . . . . . . . . . . . . . . . . . . . . . . . . . . . . . . . . . . . . . . . . . . . . . . . . . . . . .3ZRO-4 System . . . . . . . . . . . . . . . . . . . . . . . . . . . . . . . . . . . . . . . . . . . . . . . . . . . . . . . . . . . . . . . . . . . . . . . . . . . . . . . . . .3Tools recommended for Installation . . . . . . . . . . . . . . . . . . . . . . . . . . . . . . . . . . . . . . . . . . . . . . . . . . . . . . . . . . . . . . . . . . .3Installation of faucet . . . . . . . . . . . . . . . . . . . . . . . . . . . . . . . . . . . . . . . . . . . . . . . . . . . . . . . . . . . . . . . . . . . . . . . . . . . . . .4Installation of hot and cold water line valves . . . . . . . . . . . . . . . . . . . . . . . . . . . . . . . . . . . . . . . . . . . . . . . . . . . . . . . . . . . .5Mounting the RO module . . . . . . . . . . . . . . . . . . . . . . . . . . . . . . . . . . . . . . . . . . . . . . . . . . . . . . . . . . . . . . . . . . . . . . . . . .6Connecting to the faucet . . . . . . . . . . . . . . . . . . . . . . . . . . . . . . . . . . . . . . . . . . . . . . . . . . . . . . . . . . . . . . . . . . . . . . . . . . .6Connecting hot & cold water supply lines. . . . . . . . . . . . . . . . . . . . . . . . . . . . . . . . . . . . . . . . . . . . . . . . . . . . . . . . . . . . . . .6Installation of storage tank . . . . . . . . . . . . . . . . . . . . . . . . . . . . . . . . . . . . . . . . . . . . . . . . . . . . . . . . . . . . . . . . . . . . . . . . .7Connecting the tank . . . . . . . . . . . . . . . . . . . . . . . . . . . . . . . . . . . . . . . . . . . . . . . . . . . . . . . . . . . . . . . . . . . . . . . . . . . . . .7Start up instructions . . . . . . . . . . . . . . . . . . . . . . . . . . . . . . . . . . . . . . . . . . . . . . . . . . . . . . . . . . . . . . . . . . . . . . . . . . . . . .8Semi-annual Maintenance . . . . . . . . . . . . . . . . . . . . . . . . . . . . . . . . . . . . . . . . . . . . . . . . . . . . . . . . . . . . . . . . . . . . . . . . .8Annual Maintenance . . . . . . . . . . . . . . . . . . . . . . . . . . . . . . . . . . . . . . . . . . . . . . . . . . . . . . . . . . . . . . . . . . . . . . . . . . . . . .9

Membrane Maintenance . . . . . . . . . . . . . . . . . . . . . . . . . . . . . . . . . . . . . . . . . . . . . . . . . . . . . . . . . . . . . . . . . . . . . . . . . .10Troubleshooting . . . . . . . . . . . . . . . . . . . . . . . . . . . . . . . . . . . . . . . . . . . . . . . . . . . . . . . . . . . . . . . . . . . . . . . . . . . . . . . .11Check air pressure in the tank . . . . . . . . . . . . . . . . . . . . . . . . . . . . . . . . . . . . . . . . . . . . . . . . . . . . . . . . . . . . . . . . . . . . .11Adjust faucet . . . . . . . . . . . . . . . . . . . . . . . . . . . . . . . . . . . . . . . . . . . . . . . . . . . . . . . . . . . . . . . . . . . . . . . . . . . . . . . . . .12Service Record . . . . . . . . . . . . . . . . . . . . . . . . . . . . . . . . . . . . . . . . . . . . . . . . . . . . . . . . . . . . . . . . . . . . . . . . . . . . . . . .13Replacement Filter Kits . . . . . . . . . . . . . . . . . . . . . . . . . . . . . . . . . . . . . . . . . . . . . . . . . . . . . . . . . . . . . . . . . . . . . . . . . .14Warranty . . . . . . . . . . . . . . . . . . . . . . . . . . . . . . . . . . . . . . . . . . . . . . . . . . . . . . . . . . . . . . . . . . . . . . . . . . . . . . . . . . . . .14Drawing and Parts list . . . . . . . . . . . . . . . . . . . . . . . . . . . . . . . . . . . . . . . . . . . . . . . . . . . . . . . . . . . . . . . . . . . . . . . . . . . .15Authorized Agent list . . . . . . . . . . . . . . . . . . . . . . . . . . . . . . . . . . . . . . . . . . . . . . . . . . . . . . . . . . . . . . . . . . . . . .Back cover

2

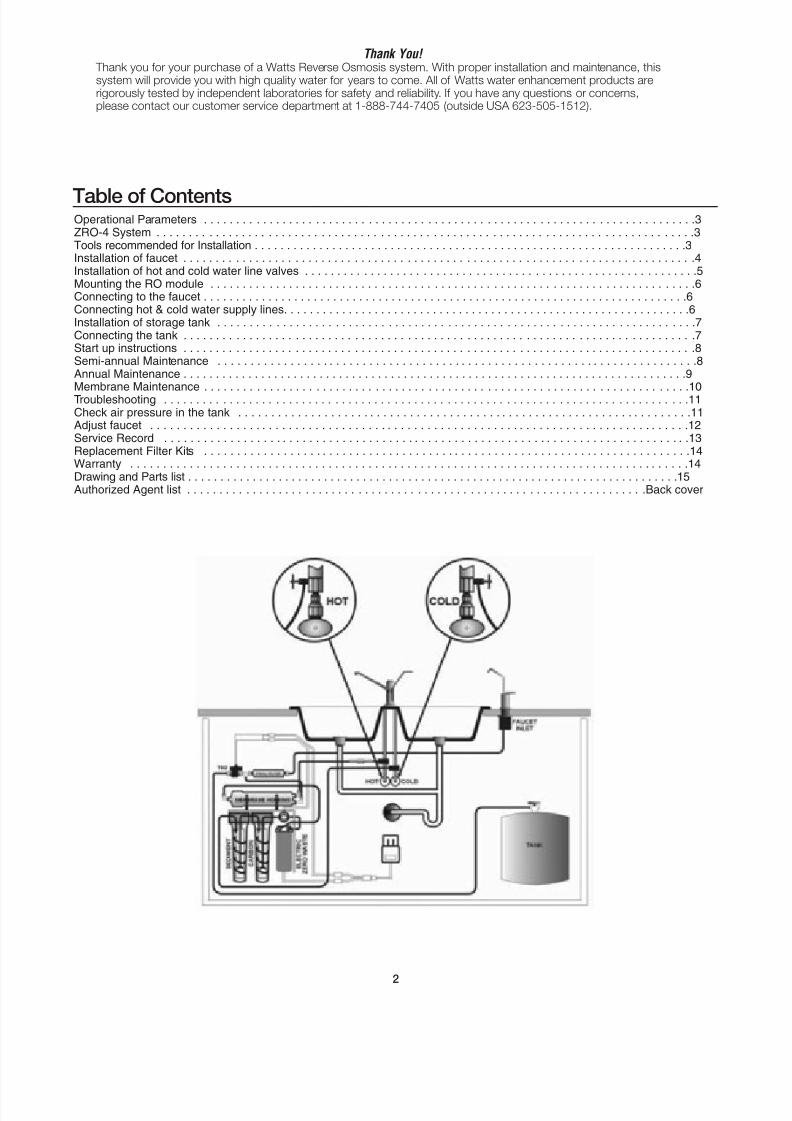
Thank You!  Thank you for your purchase of a Watts Reverse Osmosis system. With proper installation and maintenance, thissystem will provide you with high quality water for years to come. All of Watts water enhancement products arerigorously tested by independent laboratories for safety and reliability. If you have any questions or concerns,please contact our customer service department at 1-888-744-7405 (outside USA 623-505-1512).

8/8/2019 Model ZRO-4 Installation Instructions

http://slidepdf.com/reader/full/model-zro-4-installation-instructions 3/16

System includes:

RO module, 24 volt Pump, 3 gal Storage tank,Long reach faucet, Manual, Warranty Card, Parts

Bags, (2 Water line fitting valves, 2 Washers,Transformer,2 Mounting screws, 1 Teflon® tape roll, 2 Brass inserts,

2 Plastic sleeves, 1 Ball valve, one 1 / 4" Connector)

If any of the items are missing please contact Watts at 1-888-774-7405 prior to installing 

Tools Recommended for InstallationZRO-4 System

3

Operational Parameters

Do not use with water that is microbio logica l ly unsafe or of unknown qual i ty wi thoutadequate d is infect ion before or a f ter the system.

Operating Temperatures

Maximum 100°F (37.8°C)

Minimum 40°F (4.4°C)

Total Dissolved Solids

 TDS < 1000 ppm

Iron

Iron in incoming water: Maximum 0.2 ppm

Hardness

Not to exceed 7 grains per gallon or 120 ppm.

Note: System will operate over 7 grains but membrane life

may be shortened.

 Addition of a water softener may lengthen membrane life.

Operating Pressure

Maximum 100psi (7.43 g/cm2)

Minimum 40psi (2.80 kg/cm2)

If water pressure is over 80psi, Watts Pure Water

recommends the installation of a pressure regulator.

pH Parameters

Maximum 11

Minimum 3

Turbidity

 Turbidity < 5NTU

7/ 16" Drill bit for faucetChannel lock piers

Phillips Screw Driver1 / 2" - 5 / 8" Open End Wrench

 Adjustable WrenchSharp knife, Electric Drill

8/8/2019 Model ZRO-4 Installation Instructions

http://slidepdf.com/reader/full/model-zro-4-installation-instructions 4/16

Step 1 Determine desired location to drill a hole for the faucet on your sink.

Step 2 Using a variable speed drill on the slowest speed, drill a 7 / 16" hole for the faucet. Use water to keep the drill bitcool while drilling. (If the drill bit gets hot it may cause the porcelain to crack or chip).

Step 3 Place the escutcheon chrome plate and the black rubber washer on the faucet shank. (Parts found in faucetparts bag).

Step 5 From the underside of the sink slide on the locating washer, lock washer and brass nut onto the shank. Check orien-tation of faucet then tighten brass nut securely.

Installation of Faucet

Caution: Porcelain sink surface material is extremely hard and may crack or chip. Use extreme caution when drilling.Watts accepts no responsibility for damage resulting from the installation of the faucet.

Black Locating Washer

(used where a 1 / 2" hole is

available, reverse whenmounting on stainless steel

or when using drilled hole)

Escutcheon Plate

Black Rubber Washer

Brass Insert (sleeve)

Plastic Sleeve

1 / 4" Compression Nut

1 / 4" Tube

Shank

Nut

Lock Washer

Counter Top/Sink

4

8/8/2019 Model ZRO-4 Installation Instructions

http://slidepdf.com/reader/full/model-zro-4-installation-instructions 5/16

Installation of hot and cold water supply line valves

Step 6  Turn off the hot and cold water supply to the faucet by turning the angle stop valves off.

Step 7 Remove water supply line at faucet to the angle stop valves.

Step 8  Attach the water supply line valves as illustrated in the drawings above.

Step 9 Re-attach the water supply line to the fittings attached to the angle stop valves.

RO Tubes will be connected on page 6.

For 3 / 8" plumbing For 1 / 2" plumbing

Hand tighten brass nuts then apply 1/4 turn with a wrench.

To Sink Faucet To Sink Faucet

To RO SystemTo RO System

1 / 4" Compression Nut

Plastic Sleeve

Brass Insert

Angle Stop Valve(not included)

3

 / 8"M X1

 / 2"FAdapter

RubberWasher

1 / 4" Compression Nut

Plastic Sleeve

Brass Insert

Supply Hose(not included)

Supply Hose(not included)

3 / 8"M X 1 / 2"FAdapter

1 / 2"M X 3 / 8"F

X 1 / 4” Compwith needle valve

Rubber

Washer

Angle Stop Valve(not included)

1 / 2"M X 3 / 8"F X 1 / 4"Comp.with needle valve

5

8/8/2019 Model ZRO-4 Installation Instructions

http://slidepdf.com/reader/full/model-zro-4-installation-instructions 6/16

Mounting the RO module

Connecting to the faucet

Connecting hot and cold water supply lines

6

Step 12

Insert the blue tube intothe end of the faucetshank and use a wrenchto tighten the brass nutsecurely.

Step 11

Connect blue tube from in-linefilter to faucet shank. Placethe brass nut onto the tube,followed by the plastic sleeve(tapered end pointing to theend of tube) and then placethe brass insert into the endof the tube.

Step 10 Determine the best location for the RO Module to be mounted andallow for future system maintenance. Use a Phillips screwdriverand secure the screws 5 3 / 4" apart and 16" from the bottom of the cabinet.

Note: There will be (2) Blue, (1) Green and (1) Black coming

from the module. Do not cut these tubes at this time.

Step 13 Insert the Green tube into the Cold water needle valve fitting 1 / 4" tube compressionfitting until it stops. Slide the Nut and Plastic Sleeve down to where you can threadthem onto the male pipe threads. Use a 1 / 2" wrench to securely tighten.

Step 14 Insert the Black tube into the Hot water needle valve f itting 1 / 4" tube compressionfitting until it stops. Slide the Nut and the Plastic Sleeve down to where you canthread them onto the male pipe threads. Use a 1 / 2" wrench to securely tighten.

8/8/2019 Model ZRO-4 Installation Instructions

http://slidepdf.com/reader/full/model-zro-4-installation-instructions 7/16

Installation of Storage Tank 

Connecting the Tank 

7

Step 15

 Apply Teflon® tape in a clockwisedirection around the male pipethreads on the tank.

Step 16

 Thread the ball valve (sup-plied in the parts bag) ontothe stainless steel connectoron the tank.

Note: Do not over tightenplastics connections.

Step 17  Thread 1 / 4" plastic connector fitting (supplied in the parts bag)into the ball valve attached to the tank.

Step 18 Postion the tank in the desired location. Standit upright or using black plastic stand lay it onit’s side. Connect remaining blue tube from theRO module to the tank ball valve connector.

Step 19 Push blue tube into the connector on the end of ball valve until it stops.Use a wrench to securely tighten the nut on the connector.

8/8/2019 Model ZRO-4 Installation Instructions

http://slidepdf.com/reader/full/model-zro-4-installation-instructions 8/16

Step 2 Plug the (24 volt) transformer power cord connector into the RO system wire harnessconnector (labeled transformer.)

Step 3 Plug the transformer into the electrical outlet under the sink.

Step 4 Ensure ball valve on tank is open.

Step 5 Open the RO faucet and leave it open until water begins to drip. Then close the faucet. The tank will take 2 to 4 hours to fill completely.

Note: Water may be cloudy or milky due to air and carbon particles in the system. This conditions will resolve itself after a couple of tanks of water.

Step 6  After the tank has filled once, open the RO faucet and drain the tank.

Step 7 Close RO faucet and allow the tank to fill, (2-4 hours). System is now ready to use.

Note: This system may be connected up to an ice maker. Connect a tee between thefinal filter and faucet. It is recommended to install a ball valve on the ice maker line.

8

 Warning

To prevent the possibility of electrical shock, clean up any wateron cabinet floor and dry all water from outside of RO unit.

Start up Instructions

Semi-annual maintenence

Step 1  Turn off the water supply line needle valves.

Step 2 Close the ball valve on the tank.

Step 3 Open the RO faucet to allow the system to depressurize for 20-30 seconds before

attempting to remove housings.Step 4 Unplug transformer from electrical outlet.

Step 5 Carefully remove the filter housings and pour water out of the housings. Disposeof the used filters.

Step 6 Wash housings with mild soap and rinse thoroughly with water.

Step 1  Turn on the incoming hot and cold water angle stop valves. Turn on the waterline needle valves by turning counter clockwise. Check the system for leaksand tighten fittings as necessary.

Note: Check daily over the next week to ensure no leaks are present.

8/8/2019 Model ZRO-4 Installation Instructions

http://slidepdf.com/reader/full/model-zro-4-installation-instructions 9/16

Step 7 Inspect O-rings for wear and replace them if needed (order part no.WP113029 from Watts.) Lubricate O-rings with a water soluble lubricant suchas KY Jelly®, (petroleum based lubricants such as Vaseline® must not beused.) Be sure to properly seat the O-ring in the housing before threading thehousings onto the lid assembly.

Note: Keeping the RO module in an upright position while re-attaching thehousings will help ensure the O-ring stays properly seated and reduces thepossibility of leaks.

9

Semi-annual maintenence continued

 Annual maintenence

Step 1 Perform Semi-annual Preventive Maintenance Steps on page 8.Note: For the annual maintenance drain the tank.

Step 2 Replace the final filter by removing the white nuts from both ends of the filter.Remove the connectors from both ends (keep and reuse). Discard the old f inalfilter and replace with new filter reusing the connectors

Note: Flow arrow on final filter must be pointing in the direction of waterflow to the faucet.

Step 3  The tank shut off switch has quick-disconnect connectors. Remove the bluetube from the tank side of the tank shut-off switch. Depress the gray ring withthe tip of your finger and pull the tube straight out.

Step 4 Use a clean eye dropper to insert a teaspoon of 3% hydrogen peroxide or com-mon household bleach into the blue tube. (This will flow into the tank once wateris turned back on to unit.)

Step 5  To reconnect insert tube into the connector and push firmly.Step 6 Follow Start Up procedure on page 8

Step 8  The sediment filter has a cloth like appearance. It must be laced in the 1sthousing on the left where the water inlet connects.

Step 9  The carbon bock filter has a mesh covering and has a gasket on each end.Replace the filter in the 2nd housing with the carbon block filter.

Step 10  Visually inspect O-ring to be sure they are properly seated before threading thehousing onto the lid assembly and hand tighten securely.

8/8/2019 Model ZRO-4 Installation Instructions

http://slidepdf.com/reader/full/model-zro-4-installation-instructions 10/16

Membranes have a life expectancy of between 2 and 5 years, depending on the incoming water conditions and the amountof use of the RO system.

If at any time you notice a reduction in water production or a change in the taste of the RO water, it could be time to replace themembrane. A sample of water may be sent to Watts for a free test or a monitor can be purchased from Watts to test RO water.

 To send a water sample include cup of tap water and cup of RO water in water tight clean containers. Clearly mark each con-tainer. Watts will test the water for TDS rejection and hardnes and contact you with the results.

10

Membrane Maintenence

Step 1  To change the membrane, use a 5 / 8" wrench to remove the nut fromthe cap side of the membrane housing (the end with only oneelbow). Remove the cap from the white horizontalmembrane housing.

Note: To assist with the removal of cap a double sided wrench(part no. WP 164002) can be purchased from Watts.

Step 3 Unwrap new membrane filter and lubricate the O-rings with water solublelubrication such as KY Jelly® . Insert the end with the two black O-rings into themembrane housing

Step 4 Once membrane filter has been inserted into the housing you must take your thumbsand give a firm push to properly seat the membrane. Replace membrane housingcap and tighten.

Note: To be properly seated the tip of the membrane filter must be below the hous-ing edge.

Step 5 Screw the membrane filter housing cap back on securely.

Step 6 Connect the green tube back to the membrane cap fitting.

Step 7  You must change the flow restrictor each time you change the Membranefilter. Replace the existing flow restrictor with the new one by removing theWhite compression nuts. Make sure the arrow is pointing toward the check valves and hot water line fitting.

Step 8 Follow Start Up procedures on page 8.

Step 2 Using a pair of pliers, grip and pull firmly on the membrane filter to remove it from thehousing and discard the membrane.

8/8/2019 Model ZRO-4 Installation Instructions

http://slidepdf.com/reader/full/model-zro-4-installation-instructions 11/16

Troubleshooting

Problem Cause Solutions

Low/slow production Excessive air pressure in tank Relieve pressure at schrader valve on tank

(set to 7psi with the tank empty)

Pump not operating Wiring connection broken (plug 110 AC wall

plug back in at wall and/or reconnect the 24

VAC wire harness connectors)

Replace pump if needed

Fouled membrane Replace membrane

Plugged pre-filters Replace filters

Crimped tubing Check tubes to make sure they are

not kinked

Angle stop or water line valve Ensure valves are opened by turning valve

not fully opened handle counter clockwise until it stops

Milky colored water Air in the system Air in the system is a normal occurrence

with initial start up of the RO system. This

milky look will disappear during normal use

within 1-2 weeks. If condition reoccurs after

filter changes, drain tank 1 to 2 times.

Faucet Dripping Needs adjustment see page 12

Pump short cycles Ball valve on tank closed Open the ball valve on the top of the tank

Blue tube blocked between Remove kinked/damaged section andthe tank and RO system replace if necessary Call for

Faulty pressure switch technical support

Bowl leaks at the top after Damaged/Dry O-ring Lubricate with water soluble lubricant

changing the filters or replace O-ring as necessary(Do not use Vaseline ®  or other

petroleum based lubricants)

Pump constantly running Electrical fault Call for technical support. Close faucetFaucet left on and let tank fill for 2 to 3 hours.

Plugged pre-filters Replace filters

11

Checking air pressure in tank 

Note: Check air pressure when tank is empty.

Step 1 Open faucet and drain the tank.

Step 2 Using a digital air gauge check the air pressure in the tank. There shouldalways be between 5-7psi.

Step 3 If you have more than 7psi release air and recheck. If you have less than5psi, add air. Air can be added with a bicycle pump.

8/8/2019 Model ZRO-4 Installation Instructions

http://slidepdf.com/reader/full/model-zro-4-installation-instructions 12/16

If the faucet has developed a drip it can be corrected by following the steps outlined below.
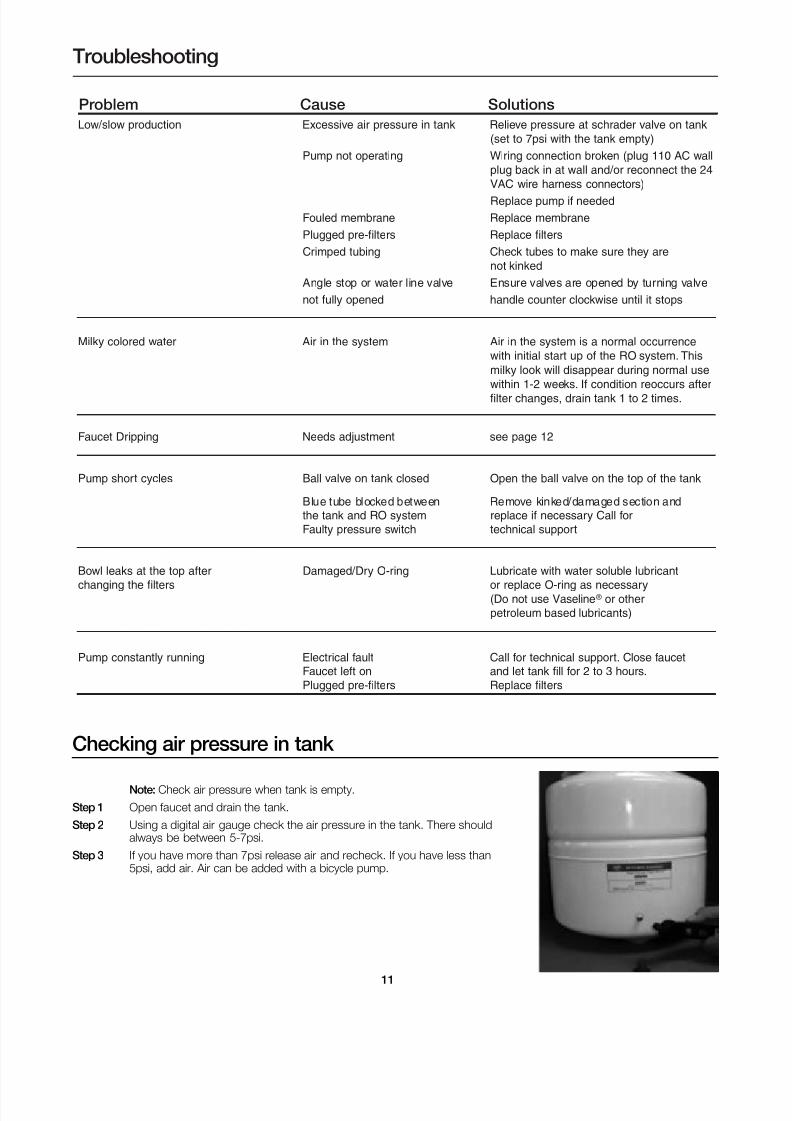
12

 Adjust Faucet

Remove faucet Spout first. Positionboth thumbs on the back edge of 

the lever and push forward.

Lever will slide forward and com-pletely off of the faucet base.

Small brass tee can be turned 1 / 2turn counterclockwise, to adjust thetension on the black lever. Thisadjustment may be necessary tostop slow drips from tip of faucet.

 You may need to repeat the processuntil the faucet does not drip. Brass

tee must always end up facingacross body of faucet in order toslide black lever on.

Step 1

Step 2

Step 3

8/8/2019 Model ZRO-4 Installation Instructions

http://slidepdf.com/reader/full/model-zro-4-installation-instructions 13/16

13

Service Record

DATE OF PURCHASE_____________DATE OF INSTALL______________INSTALLED BY_______________SERIAL#________________

Date of Maintenance 1st stage 2nd stage Final Filter TFM

Sediment Carbon Block Carbon Membrane Other

(6 mos.) (6 mos.) (1 yr.) (2-5 yrs.)

Notes:

8/8/2019 Model ZRO-4 Installation Instructions

http://slidepdf.com/reader/full/model-zro-4-installation-instructions 14/16

Ordering Code Description Case Qty/Wt.

WP500342 ZRO-4 (2 pack) 2 lbs

• (1) 10" 5 micron sediment filter

• (1) 10" carbon block filter

WP500340 ZRO-4 (4 pack) 4 lbs• (1) 10" 5 micron sediment filter

• (1) 10" carbon block filter

• (1) 10" Inline final filter

• (1) 25 GPD thin film membrane

14

Limited Warranty

What your Warranty Covers:If any part of your WATTS PURE WATER Reverse Osmosis System is defective in workmanship (excluding replaceable filters andmembranes), return unit after obtaining a return authorization (see below), less tank, within 3 years of original retail purchase.

WATTS PURE WATER will repair or, at WATTS PURE WATER'S option, replace the system at no charge.

How to obtain Warranty Service:For warranty service, call 1-800-752-5582 for a return authorization number. Then, ship your Reverse Osmosis unit (less tank) toour factory, freight and insurance prepaid, with proof of date of original purchase. Please include a note stating the problem.WATTS PURE WATER will repair it, or replace it, and ship it back to you prepaid.

What this warranty does not cover: This warranty does not cover defects resulting from improper installation, (contrary to WATTS PURE WATER'S printed instruc-tions), from abuse, misuse, misapplication, improper maintenance, neglect, alteration, accidents, casualties, fire, flood, freezing,environmental factors, or other such acts of God.

 This warranty will be void if defects occur due to failure to observe the following conditions:

1. The Reverse Osmosis System must be hooked up to a potable municipal or well cold water supply.

2. The hardness of the water should not exceed 7 grains per gallon, or 120 ppm.

3. Maximum incoming iron must be less than 0.2 ppm.

4. The pH of the water must not be lower than 3 or higher than 11.

5. The incoming water pressure must be between 40 and 100 pounds per square inch.

6. Incoming water to the RO cannot exceed 105 degrees F (40 degrees C.)

7. Incoming TDS/Total Dissolved Solids not to exceed 1800 ppm.

8. Do not use with water that is micro-biologically unsafe or of unknown quality without adequate disinfection before or afterthe system.

 This warranty does not cover any equipment that is relocated from the site of its original installation.

 This warranty does not cover any equipment that is installed or used outside the United States of America.

LIMITATIONS AND EXCLUSIONS:WATTS PURE WATER WILL NOT BE RESPONSIBLE FOR ANY IMPLIED WARRANTIES, INCLUDING THOSE OFMERCHANTABILITY AND FITNESS FOR A PARTICULAR PURPOSE. WATTS PURE WATER WILL NOT BE RESPONSIBLE

FOR ANY INCIDENTAL OR CONSEQUENTIAL DAMAGES, INCLUDING TRAVEL EXPENSE, TELEPHONE CHARGES, LOSSOF REVENUE, LOSS OF TIME, INCONVENIENCE, LOSS OF USE OF THE EQUIPMENT, AND DAMAGE CAUSED BY THISEQUIPMENT AND ITS FAILURE TO FUNCTION PROPERLY. THIS WARRANTY SETS FORTH ALL OF WATTS PURE WATER'SRESPONSIBILITIES REGARDING THIS EQUIPMENT.

OTHER CONDITIONS:If WATTS PURE WATER chooses to replace the equipment, WATTS PURE WATER may replace it with reconditioned equipment.Parts used in repairing or replacing the equipment will be warranteed for 90 days from the date the equipment is returned to youor for the remainder of the original warranty period, whichever is longer. This warranty is not assignable or transferable.

 YOUR RIGHTS UNDER STATE LAW:Some states do not allow limitations on how long an implied warranty lasts, and some states do not allow the exclusion orlimitation of incidental or consequential damages, so the above limitations or exclusions may not apply. This warranty givesyou specific legal rights, and you may have other legal rights which vary from state to state.

Replacement Filter Kits

8/8/2019 Model ZRO-4 Installation Instructions

http://slidepdf.com/reader/full/model-zro-4-installation-instructions 15/16

15

       B       L       U       E

       B       L       U       E

       G       R       E       E       N

       G       R       E       E       N

    S   e   r    i   a    l    #

    N    S    F

    P   r   e   m    i   e   r

       1

       6

       3

       9 1       0

       1       1

       1       2

       1       1

       1       5

       1       4

       2

       3

       4

       2       3

2       4

       2       0

       2       1

       2       2

       4       2

       5

       2       0

       2       1

       2       2

       2       5

       2       6       2

       7

       2       8

       2       9

       2       9

       2       8

       2       7

       3       0

       3

       3       3

       3       4

       4       3

       4       3

       3       1

       3       2

       3       1

       3       5

       3       3

       3       5

       3       7

       3       6

       4       0

       3       9

       4       1

       4       1

       3

       7

       8

       1       0

       1       9

       1       4

       1       8

       1       2

       1       3

       1       7

       1       6

       4       3

       4       3

       2       3 2

       4

       4       5

       4       6

       4       7

       4       8

       4       9

       5       0

       5       1

       5       2

       5       3

       5       4

       5       6

       B       L       U       E

       B       L       U

       E

       B       L       U       E

       B       L       A       C       K

   D   i  s  p  o  s  a   b   l  e  r  e   d  c  a  p  p   l  u  g  s

   M  a  n  u  a   l

   B  o  x

   I  n  s  e  r   t   f  o  r   b  o  x

   P  o   l  y   b  a  g   f  o  r  p  a  r   t  s

   T  e   f   l  o  n   t  a  p  e

   R  e  g   i  s   t  r  a   t   i  o  n   /  w  a  r  r  a  n   t  y  c  a  r   d

   M  o  u  n   t   i  n  g  s  c  r  e  w  s

   B   l  a  c   k   t  u   b  e   1   /   4   ”   X   3  -   1   /   2   ”

   B   l  a  c   k   t  u   b  e   1   /   4   ”   X   4   ”

   B   l  u  e   t  u   b  e   1   /   4   ”   X   4   ”

   G  r  e  e  n   t  u   b  e   1   /   4   ”   X   4   ”

   B  r  a  c   k  e   t   l  a   b  e   l

   *   T   h  e  r  e  v  e  r  s  e  o  s  m  o  s   i  s  s  y  s   t  e  m  c  o  n   t  a   i  n  s  a  r  e  p   l  a  c  e  a   b   l  e   t  r  e  a   t  m  e  n   t

  c  o  m  p  o  n  e  n   t ,  c  r   i   t   i  c  a   l   f  o  r   t   h  e  e   f   f  e  c   t   i  v  e  r  e   d  u  c   t   i  o  n  o   f   t  o   t  a   l   d   i  s  s

  o   l  v  e   d  s  o   l   i   d  s

  a  n   d   t   h  a   t   t   h  e  p  r  o   d  u  c   t  w  a   t  e  r  s   h  a   l   l   b  e   t  e  s   t  e   d  p  e  r   i  o   d   i  c  a   l   l  y   t  o  v

  e  r   i   f  y   t   h  a   t   t   h  e

  s  y  s   t  e  m   i  s  p  e  r   f  o  r  m   i  n  g  p  r  o  p  e  r   l  y

   4   S   t  a  g  e   Z  e  r  o   W  a  s   t  e   R  e  v  e  r  s  e   O  s  m  o  s   i  s   S  y  s   t  e  m

   I   t  e  m

   N  o .

   P  a  r   t   N  o .   I   t  e  m

   D  e  s  c  r   i  p   t   i  o  n

      1

   1   1   6   0   2   3

   F   A   U   C   E

   T  -   N   O   N   A   G  -   C   H   R   O   M   E   (   T   F   )

      2

   1   3   4   0   2   9

   V   A   L   V   E

  -   B   A   L   L  -   P   L   A   S  -   E   L   B  -   1   /   4   F   X   1   /   4   F

      3

   1   2   5   0   8   2

   C   O   N  -   1

   /   4   T   X   1   /   4   M  -   J   G

      3

   1   2   5   0   8   3

   C   O   N  -   J

   G  -   1   /   4   J   G   X   1   /   4   M  -   W   H

      4

   1   1   9   0   0   7

   T   A   N   K  -   P   R   E   S  -   3   G   A   L   W   H   I   T   E

      5

   1   1   9   0   2   8

   T   A   N   K   S   T   A   N   D

      6

   1   2   5   0   1   7

   C   O   N  -   P

   L  -   1   /   4   C   X   1   /   4   M

      7

   1   0   0   0   1   7

   G   A   C  -   I   L  -   1   0   "  -   1   /   4   F

      8

   1   2   5   0   6   4

   T   E   E   M

   A   L   E   R   U   N   1   /   4   T  x   1   /   4   M   D   M   T   W   H   T

      9

   1   5   2   0   3   2

   S   W   I   T   C

   H ,   P   R   E   S   S   U   R   E   6   0  p  s   i  g  -   T   S   O

      1      0

   1   6   4   0   1   0

   C   L   I   P  -   D

   O   U   B   L   E  -   M   E   M   T   O   I   L

      1      1

   2   3   4   0   1   4

   V   A   L   V   E

  -   C   H   E   C   K   Q   U   I   C   K   C   O   N   (   0   W   A   S   T   E   )

      1      2

   1   2   5   0   0   2

   N   U   T  -   P

   L  -   1   /   4   C  -   W   H   I   T   E  -   C   E   L   C   O   N

      1      3

   2   2   2   0   1   0

   F   L   O   W    R

   E   S   T   R   I   C   T   O   R   5   5   0   M   L

      1      4

   1   2   5   0   3   1

   E   L   B  -   P   L  -   1   /   4   C   X   1   /   8   M  -   9   0

      1      5

   1   1   3   0   3   8

   O  -   R   I   N   G   S   E   T   F   O   R   V   E   S   S   E   L

      1      6

   1   1   0   0   0   5

   M   E   M  -   T   F   M  -   2   5   G   P   D  -   D   R   Y

      1      7

   1   1   3   0   3   8

   O  -   R   I   N   G   S   E   T   F   O   R   V   E   S   S   E   L

      1      8

   1   1   3   0   3   2

   V   E   S   S   E   L  -   M   E   M  -   H   O   U   S   I   N   G  -   R   E   S

      1      9

   1   3   4   0   1   1

   V   A   L   V   E

  -   C   H   E   C   K  -   P   L   A  -   E   L   B   O   W   1   /   4   C   X   1   /   8   M

      2      0

   1   4   6   0   3   2

   N   U   T  -   8   /   3   2   S   T   E   E   L

      2      1

   1   3   1   0   1   2

   D   E   L   R   I   N   S   L   E   E   V   E  -   P   L   A   S   T   I   C

      2      2

   1   3   1   0   1   7

   I   N   S   E   R

   T

      2      3

   1   4   6   0   2   5

   A   D   A   P   T   A  -   V   A   L   V   E   W   A   S   H   E   R

      2      4

   1   3   4   0   0   7

   V   A   L   V   E

 ,   A   D   A   P   T   A   P   R   E   M   I   E   R

      2      5

   1   2   5   0   3   4

   E   L   B  -   P   L  -   1   /   4   C   X   1   /   4   M  -   9   0

      2      6

   1   3   7   0   1   3

   B   R   A   C   K   E   T  -   4   S   V  -   S   T   E   E   L  -   W   H   I   T   E

      2      7

   1   4   6   0   0   1

   S   C   R   E   W  -   #   1   0  -   3   /   4   "   P   H   I   L   P   A   N   H   E   A   D

      2      8

   1   4   6   0   0   4

   S   C   R   E   W  -   #   1   0  -   1   "   P   H   I   L   P   A   N   H   E   A   D

      2      9

   1   6   4   0   0   6

   C   L   I   P  -   M

   T   G  -   M   E   M  -   V   E   S   S   E   L

      3      0

   3   3   7   0   0   2

   B   R   A   C   K   E   T   1   6   G   A   U   G   E   C   R   S   (   0   W   A   S   T   E   )

      3      1

   1   1   3   0   0   7

   L   I   D  -   W   H   I   T   E   1   /   4   "   F   P   T   U   N   A   S   S   E   M   B   L   E   D

      3      2

   1   3   1   0   2   1

   H   E   X   N

   I   P   P   L   E  -   B   R  -   1   /   4   H   E   A   V   Y   D   U   T   Y

      3      3

   1   2   5   0   8   8

   E   L   B  -   9   0   °  -   1   /   4   T  x   1   /   8   M  -   (   D   M   T   )   W   h   i   t  e

      3      4

   1   5   2   0   3   5

   V   A   L   V   E

  -   S   O   L   E   N   O   I   D   E   L   E   C   1   /   8   "   E   S   O

      3      5

   1   2   5   0   8   9

   E   L   B  -   9   0  -   1   /   4   T  x   1   /   4   I   N   S   E   R   T   D   M   T   W   H   T

      3      6

   1   5   2   0   0   8

   P   U   M   P

   B   O   O   S   T   E   R   L   O   W    F

   L   O   W    1

   /   4   "

      3      7

   1   5   2   0   4   4

   W   I   R   E

   H   A   R   N   E   S   S   F   O   R   E   S   O

      3      8

   1   1   3   0   2   9

   O   R   I   N   G

  -   F   I   L   T   E   R   H   O   U   S   I   N   G

      3      9

   1   0   4   0   1   7

   S   E   D  -   S

   P   U   N  -   1   0   "  -   5   M  -   C   T   G   (   5   M  -   1   0   )

      4      0

   1   0   1   0   0   9

   C   A   R   B   O   N   B   L   O   C   K  -   1   0   "  -   5   M  -   C   T   G

      4      1

   1   1   3   0   2   4

   H   O   U   S   I   N   G  -   F   I   L   T   E   R   1   0   "   W   H   I   T   E

      4      2

   2   5   2   0   0   4

   T   R   A   N   S   F   O   R   M   E   R   1   1   5   V   /   6   0   H   Z   2   A   M   P   F   O   R

      4      3

   1   4   6   0   2   4

   S   C   R   E   W    8

   /   3   2   X   1   1   /   4   P   A   N   H   E   A   D  -   M   O   U   N   T   I   N   G

      4      4

   1   9   9   3   4   8

   M   A   N   U

   A   L ,   U   N   I   V   E   R   S   A   L

      4      5

   1   9   9   1   3   4

   B   O   X   M

   A   S   T   E   R

      4      6

   1   9   9   1   2   0

   B   O   X   I   N

   S   E   R   T

      4      7

   1   9   9   0   4   2

   P   O   L   Y   B   A   G   7   "   X   1   5   " .   0   0   2   1   0   0   0   /   C   S

      4      8

   1   9   9   0   5   5

   T   A   P   E   T   E   F   L   O   N   1   /   2   "   X   6   0   "   S   P   O   O   L

      4      8

   1   9   9   0   4   8

   T   A   P   E   T   E   F   L   O   N   1   /   4   "   X .   0   0   3   5   X   9   5   Y   D

      4      8

   1   9   9   0   5   4

   T   A   P   E  -   T   E   F   L   O   N   3   /   1   6   "   X .   0   0   3   5   X   5   0   Y   D

      4      9

   1   9   9   3   5   3

   W   A   R   R

   A   N   T   Y   C   A   R   D   P   I   N   K   P   R  -   6

      5      0

   1   4   0   0   3   1

   C   A   P   P

   L   U   G   1   /   4   R   E   D

      5      1

   6   1   0   1   1   5

   T   U   B   I   N

   G   1   /   4   "   B   L   A   C   K   3  -   1   /   2   "  -   F   R

      5      2

   6   1   0   1   1   7

   T   U   B   I   N

   G   1   /   4   "   B   L   A   C   K   4   '  -   F   R

      5      3

   6   1   0   1   1   3

   T   U   B   I   N

   G   1   /   4   "   B   L   U   E   4   '

      5      4

   6   1   0   1   0   9

   T   U   B   I   N

   G   1   /   4   "   G   R   E   E   N   4   '

      5      5

   2   9   9   0   0   7

   L   A   B   E   L

   W   A   T   T   S   P   U   R   E   W   A   T   E   R   R   O   S   E   R   #

8/8/2019 Model ZRO-4 Installation Instructions

http://slidepdf.com/reader/full/model-zro-4-installation-instructions 16/16

WATTS PURE WATER 1725 West William Drive, Suite C20, Phoenix, AZ 85027 623 505-1511 602 588-0356

Edwards, Platt & Deely, Inc. 271 Royal Ave., Hawthorne, NJ 07506 973 427-2898 973 427-4246Edwards, Platt & Deely, Inc. 368 Wyandanch Ave., North Babylon, NY 11703 631 253-0600 631 253-0303W. P. Haney Co., Inc. 51 Norfolk Ave., South Easton, MA 02375 508 238-2030 508 238-8353

J. B. O’Connor Company, Inc. P.O. Box 12927, Pittsburgh, PA 15241 724 745-5300 724 745-7420RMI Glenfield Bus. Ctr., 2535 Mechanicsville Tpk., Richmond, VA 23223 804 643-7355 804 643-7380

The Joyce Agency, Inc. 8442 Alban Rd., Springfield, VA 22150 703 866-3111 703 866-2332Vernon Bitzer Associates, Inc. 980 Thomas Drive, Warminster, PA 18974 215 443-7500 215 443-7573WMS Sales, Inc. (Main office) 9580 County Rd., Clarence Center, NY 14032 716 741-9575 716 741-4810

Billingsley & Associates, Inc. 2728 Crestview Ave., Kenner, LA 70062-4829 504 602-8100 504 602-8106Billingsley & Associates, Inc. 478 Cheyenne Lane, Madison, MS 39110 601 856-7565 601 856-8390Francisco J. Ortiz & Co., Inc. Charlyn Industrial Pk., Road 190 KM1.9 - Lot #8, Carolina, Puerto Rico 00983 787 769-0085 787 750-5120Mid-America Marketing, Inc. 2776 B.M. Montgomery St., Birmingham, AL 35209 205 879-3469 205 870-5027Mid-America Marketing, Inc. 1364 Foster Avenue, Nashville, TN 37210 615 259-9944 615 259-5111Mid-America Marketing, Inc. 5466 Old Hwy. 78, Memphis, TN 38118 901 795-0045 901 795-0394Smith & Stevenson Co., Inc. 4935 Chastain Ave., Charlotte, NC 28217 704 525-3388 704 525-6749Spotswood Associates, Inc. 6235 Atlantic Blvd., Norcross, GA 30071 770 447-1227 770 263-6899Target Marketing Enterprises, Inc. 118 West Grant St., Building M, Orlando, FL 32806 407 245-7838 407 245-7833

Aspinall Associates, Inc. 6840 Hillsdale Court, Indianapolis, IN 46250 317 849-5757 317 845-7967Dave Watson Associates 1325 West Beecher, Adrian, MI 49221 517 263-8988 517 263-2328

Disney-McLane-Woodcock, Inc. 428 McGregor Ave., Cincinnati, OH 45206 800 542-1682 877 476-1682Disney-McLane-Woodcock, Inc. 17610 S. Waterloo Rd., Cleveland, OH 44119 216 486-1010 216 486-2860Mid-Continent Marketing Services Ltd. 1724 Armitage Ct., Addison, IL 60101 630 953-1211 630 953-1067Soderholm & Associates, Inc. 7150 143rd Ave. N.W., Anoka, MN 55303 763 427-9635 763 427-5665Stickler & Associates 333 North 121 St., Milwaukee, WI 53226 414-771-0400 414-771-3607

Hugh M. Cunningham, Inc. 13755 Benchmark, Dallas, TX 75234 972 888-3808 972 888-3838Mack McClain & Associates 11132 South Towne Square, Suite 202, St. Louis, MO 63123 314 894-8188 314 894-8388Mack McClain & Associates, Inc. 1450 NE 69th Place, Ste. 56 Ankeny, IA 50021 515 288-0184 515 288-5049Mack McClain & Associates, Inc. 15090 West 116th St., Olathe, KS 66062 913 339-6677 913 339-9518Phoenix Marketing, Ltd. 2416 Candelaria N.E., Albuquerque, NM 87107 505 883-7100 505 883-7101

Delco Sales, Inc. 1930 Raymer Ave., Fullerton, CA 92833 714 888-2444 714 888-2448Delco Sales, Inc. 111 Sand Island Access Rd., Unit I-10, Honolulu, HI 96819 808 842-7900 808 842-9625Fanning & Associates, Inc. 6765 Franklin St., Denver, CO 80229-7111 303 289-4191 303 286-9069Hollabaugh Brothers & Associates 6915 South 194th St., Kent, WA 98032 253 867-5040 253 867-5055

Hollabaugh Brothers & Associates 3028 S.E. 17th Ave., Portland, OR 97202 503 238-0313 503 235-2824P I R Sales, Inc. 3050 North San Marcos Place, Chandler, AZ 85225 480 892-6000 480 892-6096R. E. Fitzpatrick Sales, Inc. 4109 West Nike Dr. (8250 South), West Jordan, UT 84088 801 282-0700 801 282-0600Zurier Company 6147 Industrial Way Unit A, Livermore, CA 94550 925 449-5858 925 449-7878

Watts Industries (Canada) Inc.(Watts Regulator Co. Division) 5435 North Service Road, Burlington, Ontario L7L 5H7 905 332-4090 905 332-7068

Allan Forrest Sales Ltd. #10, 4980 – 12A Street S.E., Calgary, Alberta T2G 5K9 403 243-7001 403 243-7353Allan Forrest Sales Ltd. 12514B - 128th St., Edmonton, Alberta T5L 1C8 780 452-8551 780 452-3486Hy-Line Sales Ltd. 1 – 19661-96th Ave., Langley, British Columbia V1M 3C9 604 888-3114 604 888-3070Hydro-Mechanical Sales, Ltd. 3700 Joseph Howe Dr., Ste. 1 Halifax, Nova Scotia B3L 4H7 902 443-2274 902 443-2275Hydro-Mechanical Sales, Ltd. 297 Coll ishaw St., Ste. 7 (shipping) Moncton, New Brunswick E1C 9R2 506 859-1107 506 859-2424Hydro-Mechanical Sales, Ltd. 85 Tolt Rd., St. Phillips, Newfoundland A1B 3M7 709 895-0090 709 895-0091Le Groupe B.G.T., Inc. 2800 Rue Dalton Ste. 3, Ste-Foy, Quebec G1P 3S4 418 657-2800 418 657-2700Le Groupe B.G.T., Inc. 86 des Enterprises #208, Boisbriand, Quebec J7G 2T3 450 434-9010 450 434-9848Mar-Win Agencies, Ltd. 1123 Empress St., Winnipeg, Manitoba R3E 3H1 204 775-8194 204 786-8016Palser Enterprises, Ltd. 1885 Blue Heron Dr., #4, London, Ontario N6H 5L9 519 471-9382 519 471-1049

Palser Enterprises, Ltd. 160 Pennsylvania Avenue, Concord, Ontario L4K 4A9 905 738-5200 905 738-6111Mech-Tech Sales 1069 Gordon Ave., Sudbury, Ontario P3A 2V5 705 525-2543 705 525-0432RAM Mechanical Marketing 441 Quebec St., Regina, Saskatchewan S4R 1K8 306 525-1986 306 525-0809RAM Mechanical Marketing #13 – 1100 7th. Avenue North, Saskatoon, Saskatchewan S7K 2V9 306 244-6622 306 244-0807Walmar Mechanical Sales 24 Gurdwara Rd., Nepean, Ontario K2E 8B5 613 225-9774 613 225-0673

EXPORT Hdqtrs.: Watts Regulator Co. 815 Chestnut St., North Andover, MA 01845-6098 U.S.A. 978 688-1811 978 794-1848

IOM-ZRO-4 0346 © Watts Regulator Co 2003 Printed in U S A

Fax #For Technical Assistance Call Your Authorized Watts Agent.

    C   a   n   a    d   a

Telephone #

    S   o   u    t    h

    C   e   n    t   r   a    l

0344

    N   o   r    t    h

    E   a   s    t

    S   o   u    t    h

    E   a   s    t

Watts USA website: www.wattspurewater.com

Watts Canada website: www.wattscanada.ca

    M

    i    d

    A    t    l   a

   n    t    i   c

    N   o   r    t    h

    C   e   n    t   r   a    l

    W   e   s    t   e   r   n


Recommended