The Universe at Your Fingertips • Astronomical Society of the Pacific
The Sun in the Sky and the Seasons • B9
Page 1
What’s This Activity About?Explaining the full set of reasons for the seasons is one of the most challenging and rewarding of all astronomy activities in the curriculum. When done successfully, it leaves students with a deep understanding of day-to-day phenomena and with much insight into how sci-ence works. This multipart activity is perhaps the best sequence for giving students a deep understanding of the seasons in a reasonable amount of time.
What Will Students Do?This lesson will take about four regular class periods to complete. Students first discuss possible reasons for the seasons, coming up with a list of factors that may con-tribute to the warmth of summer and the cold of win-ter. They are then assigned to research groups to test the importance of some of these factors. The groups report back to the class about their results. In an all-class sym-posium (modeled on the way scientist groups discuss their work at symposia), students have a chance to dis-cuss and refine their ideas, based on the experiments the groups have done.
Tips and Suggestions• This is one of the most complex activities in Universe
at Your Fingertips. No one part is so hard, but there are lots of parts to it. We recommend you go through the set up and procedure on your own, making sure you are comfortable with the instructions, before you have to explain it to a demanding group of students.
• You will want to have all the materials at hand and set up before you start. Since students will be working on different experiments in small groups, they will have lots of questions for you. This is a good time to have another adult volunteer in the classroom to help.
• If you don’t have time to do all the activities in this suite, you may want to just do the ones most relevant to your curriculum. Also, compare the activities here with B7 and B8 on the disk.
The Universe at Your Fingertips • Astronomical Society of the Pacific
The Sun in the Sky and the Seasons B9 • Exploring the Reasons for the Seasons
Page 2
89
Lesson 2: Symposium
Reasons for SeasonsLesson 2: Symposium
Surveys reveal that not just children but most adult Americans are not familiar with the realreasons for the seasons. The most common conception is that seasons are caused by thedistance of Earth from the Sun; that it is farther away in winter and closer in summer. Evenwhen students are told the true reason (in textbooks or lectures), they soon return to theirpre-conception that distance is the main cause. The best way for them to learn the reasonsfor the seasons is to experiment with the factors themselves and then to discuss their resultswith their peers.
This lesson will take about four regular class days to complete. Students first discuss possiblereasons for the seasons, coming up with a list of suggested factors. They are then assigned toresearch groups to test the importance of some of these factors. The groups report back tothe whole class about their results. In an all-class symposium, all the students have a chanceto discuss and refine their ideas, based on the experiments the groups have done. This modelsthe way groups of scientists often approach problem solving.
Teacher’s Note• This is one of the most complex activities in the Astro Adventures II curriculum. No one
part is so hard, but there are a lot of parts to it. We strongly recommend that you gothrough the set up and procedure on your own, making sure you are comfortable with theinstructions before you have to explain it all to a demanding group of students.
• You also will want to make sure you have all of the materials needed and prepared beforepresenting the lesson to the students. Classroom management will be a key to success.Let students know what their responsibilities are and what your expectations are for theirbehavior when they are doing their independent research.
• You may decide after reading through this activity that you will need to modify this lesson.You will need to judge the make-up of your class, look at the materials you can gatherand look at the constraints for having students work independently in darkened rooms.There are a few options you can consider, although none of them are as rich, engagingand student-oriented as carrying out the lesson as written. One option would be to dothe first Research Team Activity as a demonstration. Then allow student groups to do theother two research activities. Another option might be to do all of the activities asdemonstrations and have students collect data as a group. You will need to decide whatworks best for you in your situation, but the more work students can do, the better.
ConceptsEarth’s seasons are a result of various factors including its axial tilt, the altitude the Sunreaches above the horizon each day and the amount of time the Sun is above the horizoneach day.
Scientists use a systematical approach to solving problems. They often confirm results bydoing the same experiment other scientists have done and then share results to draw conclusions.
The Universe at Your Fingertips • Astronomical Society of the Pacific
The Sun in the Sky and the Seasons B9 • Exploring the Reasons for the Seasons
Page 3
90
ObjectivesStudents will:• understand the process scientists use to study a problem (identify the problem, design
experiments, conduct experiments, interpret data and present results);• understand that the changing distance of Earth to the Sun is not a significant factor in
causing Earth’s seasons;• understand that the amount of daylight and the Sun’s height above the horizon both vary
with the seasons;• understand that the tilt of Earth’s axis relative to the direction of the Sun is the cause of
the changing amount of daylight and the Sun’s changing height above the horizon atnoon, and that this is what causes our seasons.
A. Problem IntroductionIt is best to begin by posing a real-world problem that will require students to understand thenature of the seasons in order to find a solution. Ideally, it hooks the students into wanting tolearn more about seasons because they want to answer an intriguing question.
Materials NeededThe following list assumes 6 research groups of students, 2 groups for each area of investigation:• Student Astronomy Notebooks• 4 short lamps (ceramic light bulb holders work well if the electrical connection are well
insulated from students)• 2 250 W light bulbs• 2 40 W light bulbs• 2 6ft. (or longer) measuring tapes (preferred) or meter sticks• 2 light meters*
• 4 2-inch styrofoam balls• 4 3/8-inch x 4 1/2-inch dowel• 4 2-in x 2-in styrofoam blocks (size is flexible as long as they are large enough to hold
2-in styrofoam balls on dowels without flipping over)• chalk or non-permanent markers (for marking on floor)• 2 Penlight style flashlights• 1/4-inch graph paper (numerous sheets)• 2 copies of Angle Indicator Sheet (see page 107)
*There are many sources for light meters. Professional photographers and serious amateur photographers usethem. Some photographic equipment stores will rent them. The easiest kind for students to use has a digitalreadout, giving numbers that indicate light intensity. There are relatively inexpensive ($30 –40) models of analogmeters (needle slides along a scale) that work well and measure in foot-candles. You can possibly find these inindustrial lighting stores or Frey Scientific has a Plant Light meter for ~$25. “Stick-and-lollipop” analog meterscan be used, but the teacher will need to help the students interpret the meter readings. You can also use CBLs(calculator based labs) or other interface devices that have photometer probes. Some high school chemistry orphysics teachers have these.
The Universe at Your Fingertips • Astronomical Society of the Pacific
The Sun in the Sky and the Seasons B9 • Exploring the Reasons for the Seasons
Page 491
• 2 manila file folders• 4 large paperclips• black paper (enough to produce 2 56-inch x 56-inch squares)• markers to write on black roll paper (gold or silver broad-point pens work well)• 6 stick pins of 3 different colors (need all of these if optional activities are done)• 2 safety pins that fit snugly around 3/8-inch dowel• 4 extension cords• Copies of each group’s assignment sheets• Cheap black plastic tablecloths or other material for covering windows to darken the
room for the groups doing Activity 1 (Effect of Earth’s Changing Distance to the Sun.) Ifstudents will be working in more than one classroom, you will need enough to darken allwindows. Research Activities 2 and 3 do not need totally darkened rooms.
ProcedureAdvanced PreparationWrite the following question at the top of the poster paper: “You just received research fundsfrom the National Institute of Health to study how the number of hours of daylight affect thehuman body. You want to find another place on Earth that experiences roughly the samenumber of hours of darkness as we do daylight on today’s date. Is this possible to find and, ifso, where on Earth would it be?”
1. Place the poster paper on the wall where students can easily get to it.
2. As students enter the room, ask them to consider the question on the poster paper. Askthem to copy the question into their Astronomy Notebooks and then write down theirthoughts about the answer.
3. Once students have completed writing, ask them to summarize their response on theposter paper.
4. Have the group discuss the various answers, encouraging debate among individuals.
5. Use the discussion of how Earth’s seasons relate to this question as a lead-in to thepre-assessment activity that follows.
6. At the conclusion of the entire Symposium lesson, students will return to thisquestion for further discussion and as an assessment of how well they understand theconcepts covered.
7. (Optional) This is an excellent time to ask students to look in the newspaper or on theInternet to find the time of sunset and sunrise. Interested students also may want tomake their own observations of sunrise and/or sunset to share with the class. You maywish to start a graph that plots the changing times during your astronomy unit.
Reasons for SeasonsLesson 2: Symposium
The Universe at Your Fingertips • Astronomical Society of the Pacific
The Sun in the Sky and the Seasons B9 • Exploring the Reasons for the Seasons
Page 5
92
Ideally this graph should be brought up to date on a weekly basis and continued for asmuch of the year as possible. Alternatively, the graph can be completed using anobservational astronomy software program (e.g. Sky Gazer, Starry Night or Redshift).
B. Identifying Possible Factors Causing the Seasons and Organizing ResearchTeams to Study Several of the FactorsThis activity allows you to assess students’ present understanding and pre-conceptionsregarding what causes Earth’s seasons and compile a list of factors that may indeed cause theseasons. At the end you identify teams of students to investigate several of the factors.
Materials Needed• Astronomy Notebooks• Poster paper or clear space on blackboard
Procedure1. Have students pretend they are writing a book explaining Earth’s seasons for students
two years younger than they are. Ask them to write the explanation in their AstronomyNotebooks, including any diagrams that will help the reader understand what they aresaying.
2. Ask various individuals to present their explanations and encourage discussion of thevarious ideas. Let students know that there is more than one factor that contributes toEarth having seasons.
3. Conclude the discussion by summarizing on poster paper or the blackboard all thefactors they suggest might cause the seasons. The discussion will most likely include thefollowing factors:
• Varying distance of Earth from the Sun• The Sun’s height above the horizon during the day• The varying number of hours of sunlight on different days of the year• Tilt of Earth’s axis• Orbit (revolution) of Earth around the Sun• Spin (rotation) of Earth on its axis• Local geography• Weather and clouds
If the first four factors have not been suggested, use the discussion to make sure they areincluded.
4. Organize the class into research teams of four to five students. The teams will conductexperiments to understand the effect of the first six factors in the list compiled in Procedure 3.
The Universe at Your Fingertips • Astronomical Society of the Pacific
The Sun in the Sky and the Seasons B9 • Exploring the Reasons for the Seasons
Page 693
Since several of these factors are inter-related, some of the teams will examine more than onefactor. Ideally there should be six teams so that two teams are conducting the sameresearch. This will allow for an appropriate comparison of results and for more effectivediscussion.
5. Provide each team with the equipment and assignment sheets for conducting their studyas noted in each research activity that follows. This is a critical point in this problemsolving approach to studying the seasons. Some students may not feel they have all theinformation they need, especially if they are used to a more directed approach to study-ing science. Some will have difficulty understanding the Sun and Earth model used in theactivities. Assure them that this feeling is reasonable and expected, and is much like thediscomfort many scientists feel when they explore a new subject. Tell them to discussquestions they have with their team members to see if the group can resolve them with-out assistance. If they still have lingering questions, ask them to write these down intheir Astronomy Notebooks and begin doing the experiments to the best of their abilities.
6. Give the students some time to begin doing the experiments and then move among thegroups to answer questions and help them understand how the equipment and processworks. Students should keep a log of activities, questions and observations during theirresearch.
C. Research Team Procedures
Activity 1: Effect of Earth’s Changing Distance to the Sun
In this activity, a research team makes a scale model of Earth orbiting the Sun, in order tounderstand how Earth’s orbit is almost a circle and, thus, cannot be a factor in what causesEarth’s seasons.
Materials Needed• Short lamp with 250-watt light bulb with shade removed• Measuring tape (preferred) or yardstick• Chalk, masking tape or a non-permanent marker (to mark the floor)• Photographic light meter• Model Earth set up as shown on page 94 (2-inch styrofoam ball on 3/
8 x 4 1/
2-inch
dowel placed in 2-inch Styrofoam cube at 23-degree angle from perpendicular, onestraight pin)
• Earth’s Changing Distance Research Team Assignment Sheet• Timing Circle (cut from copied template)• Room that can be completely darkened
Reasons for SeasonsLesson 2: Symposium
The Universe at Your Fingertips • Astronomical Society of the Pacific
The Sun in the Sky and the Seasons B9 • Exploring the Reasons for the Seasons
Page 7
94
ProcedureAdvanced PreparationYou will need to identify a space approximately 15 x 15 feet in size that can be darkened forthis activity. (It can be done in a smaller space, but the larger the area, the better the modelworks.)
You also will need to locate a photographic light meter. The best source for this is to askfriends, or perhaps a photography teacher — or purchase an inexpensive one at your localcamera store. See notes on light meters in the whole lesson materials list.
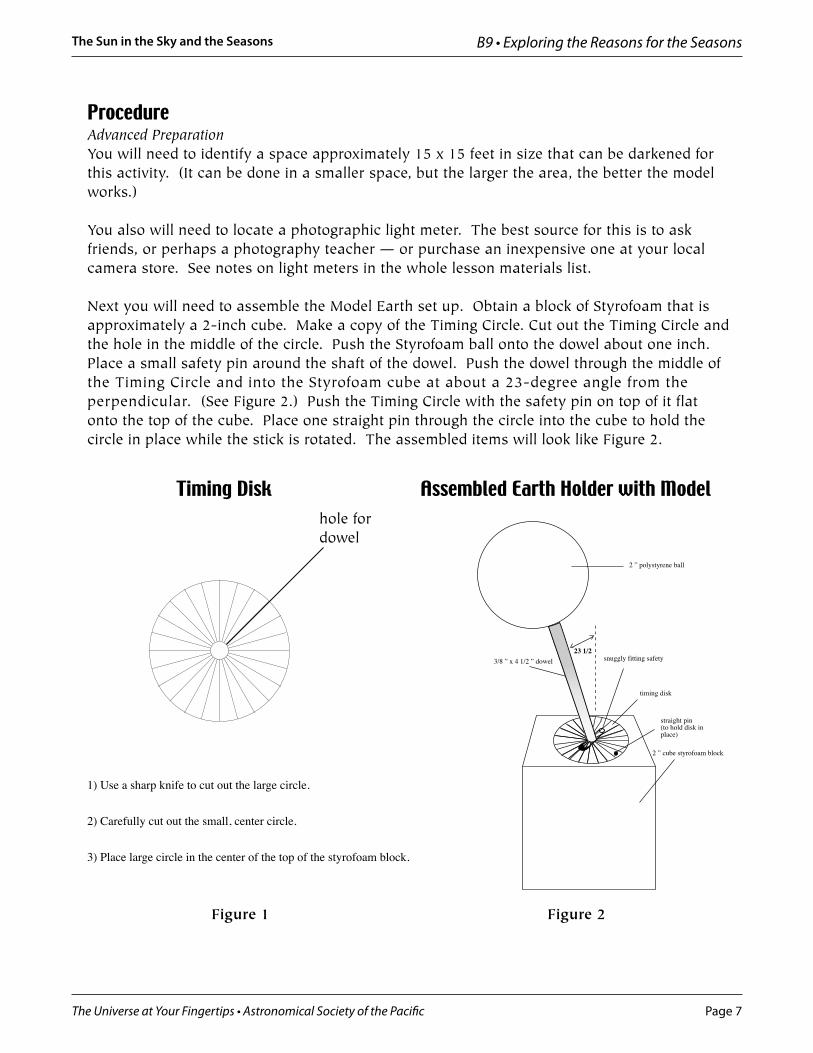
Next you will need to assemble the Model Earth set up. Obtain a block of Styrofoam that isapproximately a 2-inch cube. Make a copy of the Timing Circle. Cut out the Timing Circle andthe hole in the middle of the circle. Push the Styrofoam ball onto the dowel about one inch.Place a small safety pin around the shaft of the dowel. Push the dowel through the middle ofthe Timing Circle and into the Styrofoam cube at about a 23-degree angle from theperpendicular. (See Figure 2.) Push the Timing Circle with the safety pin on top of it flatonto the top of the cube. Place one straight pin through the circle into the cube to hold thecircle in place while the stick is rotated. The assembled items will look like Figure 2.
1) Use a sharp knife to cut out the large circle.
2) Carefully cut out the small, center circle.
3) Place large circle in the center of the top of the styrofoam block.
Figure 1 Figure 2
Timing Disk Assembled Earth Holder with Modelhole fordowel
The Universe at Your Fingertips • Astronomical Society of the Pacific
The Sun in the Sky and the Seasons B9 • Exploring the Reasons for the Seasons
Page 895
Place all equipment for each research team in an appropriate container (Ziplock bags workwell) and make copies of Research Team Assignment Sheet for each team member
1. Give each team a container of equipment and identify the team’s research space.
2. Have students read the research instructions, discuss among themselves what they are todo and list any questions they have in their Astronomy Notebooks.
3. When they are done, have them review their research plans with you so you can clarifyany issues and answer any of their questions. If the operation of the light meter is notobvious, show them how to use it.
4. Let the research group proceed as independently as possible to work through the activityusing the research instructions on the assignment sheet.
Activity 2: Effect of the Sun’s Height Above the Horizon
In this activity a research team explores the effect of the Sun’s height above the horizon onthe amount of energy received by a given location on Earth. They then infer what influencethis might have on Earth’s seasons.
Materials• Penlight style flashlight• 1/4 x 1/4 -inch graph paper• Angle Indicator Sheet with Height of Sun at Noon Chart (with student Assignment
Sheet)• Manila Folder• Two large paper clips• Room with lights off that is relatively dark• Sun’s Height Above the Horizon Assignment Sheet
ProcedureAdvanced Preparation
• Place all equipment for research team in appropriate container (Ziplock bagworks well).
• Make copies of Research Team Assignment Sheet for each team member.
1. Give each team a container of equipment and identify their research space.
2. Have students read the research instructions, discuss among themselves what they are todo and list any questions they have in their Astronomy Notebooks.
Reasons for SeasonsLesson 2: Symposium
The Universe at Your Fingertips • Astronomical Society of the Pacific
The Sun in the Sky and the Seasons B9 • Exploring the Reasons for the Seasons
Page 9
96
3. When they are done, have them review their research plans with you, so you can clarifyany issues and answer any of their questions.
4. Let the research group proceed as independently as possible to work through the activityusing the instructions on the assignment sheet.
The Universe at Your Fingertips • Astronomical Society of the Pacific
The Sun in the Sky and the Seasons B9 • Exploring the Reasons for the Seasons
Page 1097
Activity 3: Effect of the Direction of Earth’s Axis on the Seasons
In this activity, a research team makes a scale model of Earth orbiting the Sun in order tostudy how the direction of Earth’s axis of rotation affects the number of hours of daylight thatdifferent parts of Earth experience during different seasons. They then predict what effectthis might have on Earth’s seasons.
Materials• 40-watt light bulb in short desk lamp with shade removed• Black “butcher” paper showing orbit of Earth around Sun• Model Earth set up shown on page 94 (2-inch Styrofoam ball on 3/
8 x 4 1/
2-inch stick
placed in 2-inch Styrofoam cube at 23-degree angle from perpendicular;one straight pin)
• Three map pins of different colors• Direction of Earth’s Axis Research Team Assignment sheet
ProcedureAdvanced PreparationThe first time you do this activity, you will need to copy the drawing of Earth’s orbit shownbelow on to pieces of black “butcher” paper taped together on the back to make an areaapproximately 56 by 56 inches. MOST ART STORES HAVE ROLLS OF BLACK PAPER ANDSILVER OR GOLD BROAD-POINT ROLLER BALL PENS THAT WORK WELL TO REPRODUCETHE DRAWING. After the first use, store the drawing with the other materials for later use.Consider laminating the drawing if possible. You also will need to assemble the Model Earthset up – see detail assembly instructions on page 94. The Styrofoam ball and stick are easilyfound in craft stores.
Reasons for SeasonsLesson 2: Symposium
The Universe at Your Fingertips • Astronomical Society of the Pacific
The Sun in the Sky and the Seasons B9 • Exploring the Reasons for the Seasons
Page 11
98
Be sure to use a short enough lamp or place the model Earth on a stand so that the lamp andEarth are at the same level when in use.
Identify a workspace that can be somewhat darkened. Place all equipment for each researchteam in appropriate container and make copies of the Research Team Assignment Sheet foreach team member.
1. Give each team a container of equipment and identify its research space.
2. Have students read the research instructions, discuss among themselves what theyare to do and list any questions they have in their Astronomy Notebooks.
3. When they are done, have them review their research plans with you, so you canclarify any issues and answer any of their questions.
4. Let each research group proceed as independently as possible to work through theactivity using the instructions on the Assignment Sheet.
D. Scientific SymposiumJust as scientists meet regularly to share their latest observations, data and discoveries, thispart of the activity allows students to share the results of their research activities with theirpeers. Each team should have a presentation prepared that describes the:
• problem they were exploring• procedure they followed• data they collected, including a graph of their data• conclusions they reached
Have each group present its findings to the rest of the class. After each presentation, theposter papers prepared by each group should be left posted around the room for use in laterdiscussion.
It works best to leave questions and discussion until all groups have presented their results.Have each student take notes in his/her Astronomy Notebook about each group’s presenta-tion and to write down any questions they have, which can be asked later during the wholeclass discussion.
Once every group has presented, let students ask any questions they have. Encourage asmuch student-to-student discussion as possible without your taking a leadership role in theinteraction. The discussion usually will lead to identifying which factors affect Earth’sseasons. If not, ask the question of the class after the discussion of results is well underway.
The Universe at Your Fingertips • Astronomical Society of the Pacific
The Sun in the Sky and the Seasons B9 • Exploring the Reasons for the Seasons
Page 12
99
At the end of the all-class discussion, summarize the conclusions you reached, which willusually include the following:
• The yearly change in the distance of Earth to the Sun is such a small percentage of thedistance that it does not have an influence on Earth’s seasons.
• The tilt of Earth’s axis causes Earth to have longer days in the summer and shorterdays in the winter.
• The higher the Sun gets in the sky at noon, the more concentrated the sunlight is thatfalls on one particular location on Earth. This occurs during the summer.
Conclude by reinforcing the simple concept that it is the tilt of Earth’s axis that causes boththe longer day and more concentrated sunlight during the summer — and vice versa forthe winter.
As a post-assessment activity, have students write an answer to the original question thatwas posed at the beginning of this lesson: “You just received research funds from the NationalInstitute of Health to study how the number of hours of daylight affect the human body.
Reasons for SeasonsLesson 2: Symposium
The Universe at Your Fingertips • Astronomical Society of the Pacific
The Sun in the Sky and the Seasons B9 • Exploring the Reasons for the Seasons
Page 13
100
You want to find another place on Earth that experiences roughly the same number of hoursof darkness as we do daylight on today’s date. Is this possible and, if so, where on Earth wouldyou go?” Their answers should include their reasoning. Since the answer to this question isnot addressed directly in the student research, they will need to extrapolate from what theyhave learned. Small group discussions may facilitate learning before individual writing takesplace. Writings can be shared in class and/or collected and graded.
E. Extension ActivitiesResearching the Seasons at Other Locations Using the Internet
Use the Internet to contact teachers and students at other locations to compare the amount ofdaylight and the height of the Sun above the horizon at noon on different days of the year. Ifpossible, work with four other groups: one group near the equator, a second group in theSouthern Hemisphere at about the same distance from the equator as your location, a thirdgroup at your latitude and a fourth group at a much higher latitude in the Northern Hemisphere.
An alternative to working with other classrooms is to collect the data for these locations froma sky observing software program (e.g. SkyGazer, Starry Night or Redshift) and plot the com-parisons for discussion by the class. This makes an ideal project for a small group of highlymotivated students.
The Universe at Your Fingertips • Astronomical Society of the Pacific
The Sun in the Sky and the Seasons B9 • Exploring the Reasons for the Seasons
Page 14
101
Reasons for SeasonsEarth’s Changing Distance to the Sun
Research Team Assignment Sheet
Research GoalYour goal is to determine what effect the changing distance of Earth from the Sun has onEarth’s seasons.
Materials• Short lamp with 250-watt light bulb and with shade removed (SAFETY NOTE: This
light bulb will get very hot. Be careful not to touch it.)• Measuring tape• Photographic light meter• Chalk, masking tape or non-permanent marker to mark the floor• Model Earth set up as shown on page 102 (Styrofoam ball on stick placed in
Styrofoam cube at an angle of 23.5 degress)• This “Changing Distance to the Sun” Assignment Sheet• Room that can be completely darkened
BackgroundYou will be making a scale model of Earth’s orbit around the Sun and measuring how muchthe intensity of the Sun’s light changes from Earth’s closest approach to the Sun compared towhen Earth is farthest from the Sun.
Be sure to keep a log in your Astronomy Notebook, noting the steps you follow throughoutthe activity, including any results and conclusions.
Procedure1. Use the information below to construct a scale model of Earth orbiting the Sun. Use the
lamp as the Sun and the Styrofoam ball and holder as Earth.
Reasons for SeasonsLesson 2: Symposium
The Universe at Your Fingertips • Astronomical Society of the Pacific
The Sun in the Sky and the Seasons B9 • Exploring the Reasons for the Seasons
Page 15
102
Mark on the floor where Earth is located for each of the dates listed. Also mark on thefloor which direction north is in your model. North can be any direction in this modelsince the north being discussed here is the direction in space that the axis of Earth pointstoward. In other words, Earth’s axis points toward the North Star, so if you always haveyour model Earth always pointing in the same direction in space, you will have the properorientation in your model for all of the seasons. See Figure 1.
Distance to the Sun from the EarthMake the model using a scale of 2,000,000 miles = one inch
Date Distance (miles) Distance (model—inches)
July 4 94,550,000
October 4 92,970,000
January 4 91,390,000
April 4 92,970,000
Figure 1
The Universe at Your Fingertips • Astronomical Society of the Pacific
The Sun in the Sky and the Seasons B9 • Exploring the Reasons for the Seasons
Page 16
103
Reasons for SeasonsLesson 2: Symposium
2. Now that your model is built, place the model Earth in each of the four positions, and usethe light meter to measure the brightness of the Sun. Be sure the model’s North Pole isalways pointing in the north direction when you place “Earth” at each location and besure the light meter is pointing directly at the “Sun” when you take the reading. Recordthe results in your Astronomy Notebook.
3. To get a sense of how large of an effect Earth’s changing distance from the Sun really ison the seasons, it is useful to look at the percent change in Earth’s distance when it isclosest versus when it is farthest from the Sun. This percent change is:
% (Percentage) change = farthest distance to the Sun - closest distance to the Sunfarthest distance to the Sun
Include this information in your presentation to the class.
3. Based on the results from your experiment, have a discussion among members of yourresearch team to predict what effect the changing distance of Earth from the Sun has onEarth’s seasons. Write your conclusions in your Astronomy Notebook.
4. Prepare a presentation for the rest of the class, using appropriate visual aids, thatexplains the research activity you performed and what conclusions you reached. Be sureto include:
• problem you explored• procedure you followed• data you collected, including any graphs of your data• conclusions you reached
(Optional) At certain times of the year, people who live in the Northern Hemisphere areslightly closer to the Sun than people who live in the Southern Hemisphere. Six months later,people in the Southern Hemisphere are slightly closer to the Sun than people in the NorthernHemisphere. Use the percentage change equation to determine how large this difference isand discuss whether you think this will have an effect on Earth’s seasons.
The Universe at Your Fingertips • Astronomical Society of the Pacific
The Sun in the Sky and the Seasons B9 • Exploring the Reasons for the Seasons
Page 17
104
Reasons for SeasonsSun’s Height Above the Horizon
Research Team Assignment Sheet
Research GoalYour assignment is to determine what effect the changing height of the Sun above the horizonwill have on Earth’s seasons.
BackgroundAs you may have noticed, each morning the Sun is near the horizon when it rises and thenclimbs higher in the sky. It reaches its highest point above the horizon around noon and thengets lower in the sky until it is again low on the horizon at sunset. The highest point that theSun reaches above the horizon around noon changes throughout the year. In the UnitedStates and other countries at the same latitude, the Sun is highest in the sky around noon ona date astronomers call the Summer Solstice (June 20 - 22). The Sun is lowest in the skyaround noon on the Winter Solstice (December 20 - 22).
In this research activity, you will simulate the Sun’s changing height above the horizon atnoon using a flashlight to represent the Sun. You will then use the data you collect to determinewhat effect this may have on Earth’s seasons.Be sure to keep a log in your Astronomy Notebook of the steps you follow throughout theactivity, including any results and conclusions.
Materials• Penlight style flashlight• 1/4 x 1/4 -inch graph paper• Angle Indicator Sheet with Height of Sun at Noon Chart• Manila folder• Two large paper clips• Space to work that is relatively dark• The “Sun’s Height Above the Horizon” Assignment Sheet• Tape or glue• Several thick books
Procedure1. Find a table in a darkened space where you can lay out your materials.
2. Open the manila folder and paper clip the graph paper to the inside of the right half ofthe manila folder as shown in the diagram on page 105.
The Universe at Your Fingertips • Astronomical Society of the Pacific
The Sun in the Sky and the Seasons B9 • Exploring the Reasons for the Seasons
Page 18105
3. Tape or glue the Angle Indicator Sheet to the inside of the left half of your folder as shownin the diagram. The Angle Indicator sheet should be folded at the bottom so the 0-degreeline is on the fold of the manila folder.
4. Set up the folder so the right half is flat on the table and the left half is at 90-degree angleas shown in the diagram. Someone can hold the folder open so it forms a 90-degreeangle or a few stacked books can be used to hold the left side in place — a small piece oftape can help to keep the left side of the folder next to the books.
5. Identify the latitude of your location by looking on a world map. Then find the closestlatitude listed on the “Angle of Sun Above the Horizon” chart on the Angle Indicator Sheet.This chart gives the height of the Sun above the horizon for your latitude at different timesof the year in the Northern Hemisphere.
6. To simulate the Sun shining on Earth, place the lit flashlight at the end of the angle line forthe height of the Sun above the horizon at noon on the Summer Solstice, as shown in thediagram. You will need to develop a way to be sure the flashlight is always:
• held pointing straight along the angle line• the same distance out from the Angle Indicator Sheet, so that the entire flashlight beam
falls on the graph paper
Reasons for SeasonsLesson 2: Symposium
The Universe at Your Fingertips • Astronomical Society of the Pacific
The Sun in the Sky and the Seasons B9 • Exploring the Reasons for the Seasons
Page 19
106
Draw an outline of the flashlight beam on the graph paper.
7. Remove the graph paper, being sure to record what date the outline represents (e.g.Summer Solstice).
8. Have one team member count the number of squares covered by the flashlight beam. Besure to develop a scheme to account for partially covered squares. Record the results inyour Astronomy Notebook.
9. Repeat the process for other times of the year and produce a graph in your AstronomyNotebook that represents the area covered by the flashlight beam at different times of the year.
10. [Optional] If possible record the percentage change in area covered by the flashlight beambetween the first date and each of the rest of the dates. Record this in your AstronomyNotebook. This can be calculated using the following formula:
% (Percentage) change = first date area – other date area first date area
11. Remembering that the flashlight represents the Sun, have a discussion among members ofyour group to predict what effect the changing height of the Sun at noon will have onEarth’s seasons.
12. Using appropriate visual aids, prepare a presentation for the rest of the class that explainsthe research activity you performed and what conclusions you reached. Be sure to include:
• problem you explored• procedure you followed• data you collected, including graph of data• conclusions you reached
The Universe at Your Fingertips • Astronomical Society of the Pacific
The Sun in the Sky and the Seasons B9 • Exploring the Reasons for the Seasons
The Universe at Your Fingertips • Astronomical Society of the Pacific
The Sun in the Sky and the Seasons B9 • Exploring the Reasons for the Seasons
Page 21
108
Reasons for SeasonsDirection of Earth’s Axis
Research Team Assignment Sheet
Research GoalYour goal is to determine what effect the direction of Earth’s axis has on the number of hoursof daylight received at different locations on Earth and how this might affect Earth’s seasons.
BackgroundAs you may already know, Earth spins on its axis every 24 hours, as if someone pushed alarge needle through Earth from the North Pole to the South Pole and then made Earth spin onthe needle. The direction of Earth’s axis is tilted compared to the direction of the Sun. In thisactivity you will make a model of the Sun, Earth and how Earth orbits the Sun. This will letyou determine how much daylight shines on different parts of Earth at different times of theyear. You will then use this information to predict what effect this may have on Earth’s seasons.
Be sure to keep a log in your Astronomy Notebook of the steps you follow throughout theactivity, including any results and conclusions.
Materials• 40-watt light bulb in short desk lamp with shade removed (SAFETY NOTE: This light
bulb will get very hot. Be careful not to touch it.)• Black “butcher” paper showing orbit of Earth around Sun• Model Earth set up (Styrofoam ball on dowel, 2 x 2-inch Styrofoam block, timing
circle, safety pin that just fits around dowel)• Three map pins of different colors• The “Direction of Earth’s Axis” Assignment sheet• Space to work that is relatively dark
Procedure1. Find a darkened space where you can carry out your research.
2. Lay out the black paper showing Earth’s orbit. Be sure to leave room around all sides foryour team to work.
3. Place the lamp with light bulb in the Sun’s location on the black paper and turn onthe lamp.
4. Be sure the model Earth set up is assembled as shown on page 109. Be sure the safety pinfits snugly on the wood stick. Make sure the model Earth and the light bulb are at thesame height.
The Universe at Your Fingertips • Astronomical Society of the Pacific
The Sun in the Sky and the Seasons B9 • Exploring the Reasons for the Seasons
Page 22109
5. Find the latitude of your location on a globe and place one of the map pins in about yourlatitude on your model Earth. Push the pin in so the head is close to the surface of theStyrofoam ball.
6. Set the model Earth on the poster paper at the location marked Summer Solstice. Be sureEarth’s axis (the stick) is tilted toward the direction north shown on the poster paper (asshown in the left side drawing below).
7. Earth rotates counter-clockwise on its axis once every 24 hours. Practice turning Earth inthe proper direction and note that the safety pin also makes one complete turn and passesacross all 24 hour indicators with each complete rotation.
North Star
Reasons for SeasonsLesson 2: Symposium
Assembled Earth Holder with Model
The Universe at Your Fingertips • Astronomical Society of the Pacific
The Sun in the Sky and the Seasons B9 • Exploring the Reasons for the Seasons
Page 23
110
8. You are now ready to use your model Sun and Earth to determine the number of hours ofdaylight at your location on Earth at different times of the year.
9. Turn Earth counter-clockwise until the map pin marking your location is just moving fromthe nighttime side (dark side) of your model Earth into the daylight side (lighted side).This is when the Sun would rise for a model person riding along with the pin. Hold themodel Earth in place while one team member moves the safety pin so it is over one of thehour lines.
10. Now rotate Earth until the map pin is at sunset (where the pin goes from the lit side of themodel Earth into the dark side). Count the number of hours the safety pin has passedover (including an estimate of any fraction of an hour at the time of sunset). This is thenumber of hours of sunlight you experience at your location on the Summer Solstice.
11. Record this information in your Astronomy Notebook.
12. Move the model Earth to the other three locations marked on the poster paper and repeatthe observations. BE SURE THAT EARTH’S AXIS IS ALWAYS POINTED TOWARD THENORTH AT EACH LOCATION. Record the data in your Astronomy Notebook. Then preparea graph of the data you collected that shows how the amount of daylight varies duringdifferent times of year.
13. Use the data to have a discussion among the members of your research group to predictwhat effect the tilt of Earth’s axis will have on Earth’s seasons.
14. Using appropriate visual aids, prepare a presentation for the rest of the class that explainsthe research activity you performed and what conclusions you reached. Be sure to include:
1) problem you explored2) procedure you followed3) data you collected, including graph of data4) conclusions you reached
15. (Optional) repeat your observations, but with no tilt of Earth’s axis toward or away fromthe Sun.
16. (Optional) Place a new map pin at the equator and repeat your observations at all four positionsin Earth’s orbit around the Sun. Record these observations in your Astronomy Notebook.
17. (Optional) Place a new map pin at a location on the other side of the equator that is thesame distance away from the equator as your home location. Repeat your observations atall four positions in Earth’s orbit around the Sun. Record these observations in yourAstronomy Notebook.