Modifying the Pro Mag .223 and Bulgarian 5.56mm Magazines To Function Reliably in a SAR-3 The following tutorial concerns the Pro Mag .223 and Bulgarian 5.56mm magazines. What started this was the high cost and limited availability of Wieger metal .223 magazines, which from my understanding/experience have always worked reliably in the SAR-3. PRO MAG .223 MAGAZINE The first magazine that we will deal with is the Pro Mag .223 magazine. As I received mine, it fit into the SAR- 3 easily. There was some side to side wobble and fore/aft movement also, but this had happened on my Wieger magazines also. The problem I discovered was that the Pro Mag .223 magazine would not feed the last 2 rounds (bolt over cartridge) when manually operating the bolt/carrier assembly. Some have stated that I should have test fired the magazine before attempting any modification. To me this is like saying that when testing the FCG (Fire Control Group) for correct operation, and the hammer is not captured by the disconnector, to go and test fire the rifle before making any corrections. It just doesn’t make any sense. I have never had a firearm that I couldn’t load and eject all rounds from the clip/magazine by manually operating the carrier/slide. Before we start, I want to emphasize that the modifications outlined here are what I needed to accomplish to ensure the Pro Mag .223 magazine functioned correctly and reliably. For some, additional work may be needed. Apply all safety measures when performing any checks using live ammunition. With that said, let’s start… 1. First, to ensure that modification to the magazine is necessary, load the Pro Mag .223 magazine with 30 dummy cartridges, which are available from Brownell’s (if you can’t make your own).
Transcript
Modifying the Pro Mag .223 and Bulgarian 5.56mm Magazines
To Function Reliably in a SAR-3 The following tutorial concerns the Pro Mag .223 and Bulgarian 5.56mm magazines. What started this was the high cost and limited availability of Wieger metal .223 magazines, which from my understanding/experience have always worked reliably in the SAR-3. PRO MAG .223 MAGAZINE The first magazine that we will deal with is the Pro Mag .223 magazine. As I received mine, it fit into the SAR-3 easily. There was some side to side wobble and fore/aft movement also, but this had happened on my Wieger magazines also. The problem I discovered was that the Pro Mag .223 magazine would not feed the last 2 rounds (bolt over cartridge) when manually operating the bolt/carrier assembly. Some have stated that I should have test fired the magazine before attempting any modification. To me this is like saying that when testing the FCG (Fire Control Group) for correct operation, and the hammer is not captured by the disconnector, to go and test fire the rifle before making any corrections. It just doesn’t make any sense. I have never had a firearm that I couldn’t load and eject all rounds from the clip/magazine by manually operating the carrier/slide. Before we start, I want to emphasize that the modifications outlined here are what I needed to accomplish to ensure the Pro Mag .223 magazine functioned correctly and reliably. For some, additional work may be needed. Apply all safety measures when performing any checks using live ammunition. With that said, let’s start… 1. First, to ensure that modification to the magazine is necessary, load the Pro Mag .223 magazine with 30 dummy cartridges, which are available from Brownell’s (if you can’t make your own).
2. If dummy cartridges are not available, live ammunition can be used but is not recommended. Remove the firing pin from the bolt assembly. Refer to AK-47 Build CD, file #22, Fire Control Group Removal and file #27, AK Bolt Disassembly. Ensure that you have a clear area (outdoors) to perform this test. 3. Insert the magazine into the rifle. With a consistent smooth action, operate the carrier charging handle back and forth to feed and eject all 30 rounds. If all 30 rounds feed and eject successfully, modification to the magazine is unnecessary. Go to Step #13 for live fire testing of the magazine. If cartridges fail to feed and eject, proceed to Step #4.
4. If a failure to feed occurs (bolt over cartridge), perform the steps below. The pictures below are the result of unmodified .223 Pro Mag magazines. All .223 Pro Mag Magazines tested resulted in the last two (2) rounds failing to feed.
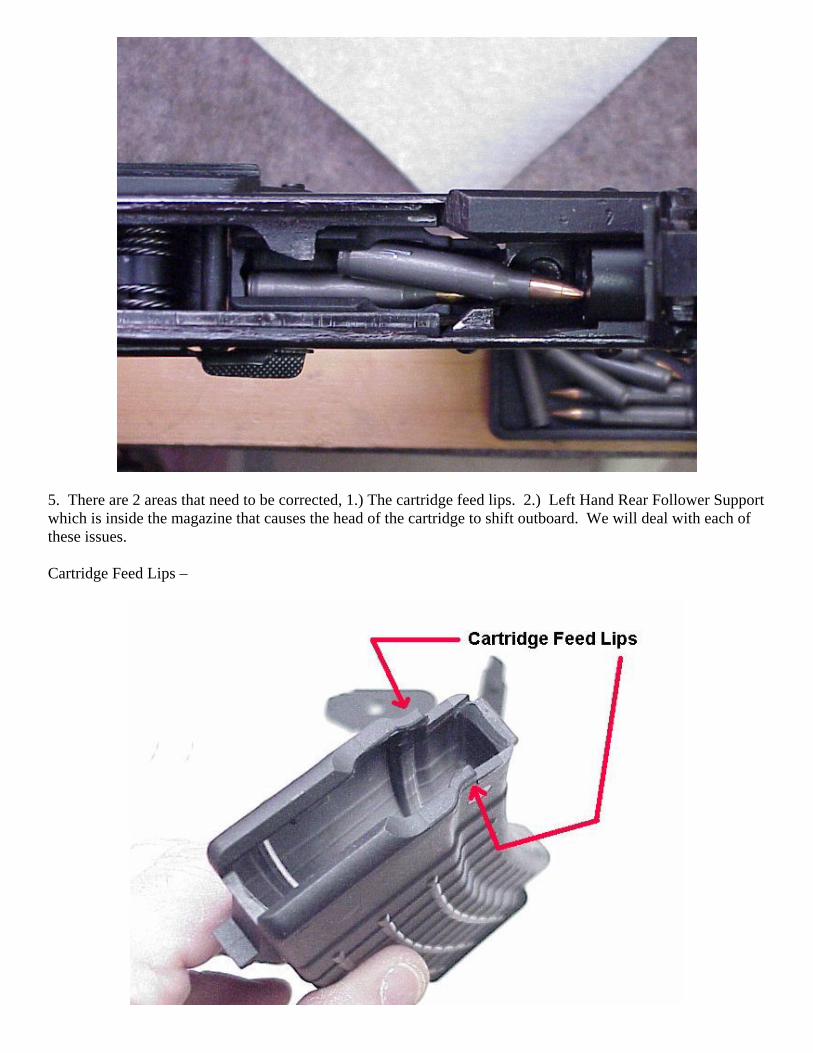
5. There are 2 areas that need to be corrected, 1.) The cartridge feed lips. 2.) Left Hand Rear Follower Support which is inside the magazine that causes the head of the cartridge to shift outboard. We will deal with each of these issues. Cartridge Feed Lips –
Left Hand Rear Follower Support –
6. Modifying the cartridge feed lips: This requires the use of a Dremel tool and a rotary file. You will be reducing the thickness of both left and right cartridge feed lips. The first measurement on the unmodified feed lips was approximately .105”.
7. The modified feed lips measured .074”.
8. Modifying the Left Hand Rear Follower Support: This also requires the use of a Dremel tool and rotary file. The follower support must be filed flush with the magazine wall and have an OAH of .350”
9. With both areas modified the angle of departure for the un-modified and modified magazine is easily seen.
10. Functional checkout of the magazine. There are 3 ways to perform a functional check of the “now” modified magazine. Functional Check Using Action Proving Cartridges Functional Check Using Live Ammunition (not recommended) Functional Check Live Fire Testing Each method will be addressed separately. 11. Functional Check Using Action Proving Cartridges: Load the magazine to capacity (30 rounds) with Action Proving Cartridges (available from Brownell’s) or dummy cartridges. Insert the magazine into the rifle. Place the selector lever to the “Fire” position. Pull back the charging handle on the bolt carrier and release (do not ride the carrier forward). This has loaded one dummy round into the chamber. Pull back on the charging handle (this will eject the chambered dummy round) and release the handle again (this will have chambered another dummy round). Continue doing this until all dummy rounds have been chambered and ejected (see picture in Step #3). 12. Functional Check Using Live Ammunition (not recommended): Removal of the firing pin is necessary to perform this operation. Refer to the AK-47 Build CD file #22 Fire Control Group Removal and #27 AK Bolt Disassembly. Load the magazine to capacity, insert the magazine into the rifle. Move the selector lever to the fire position and pull back the charging handle on the bolt carrier and release (do not ride the carrier forward). This has loaded one round into the chamber. Pull back on the charging handle (this will eject the chambered round) and release the handle again (this will have chambered another round). Continue doing this until all rounds have been chambered and ejected (see picture in Step #3).
13. Functional Check Live Fire Testing: This is what I do only after Step #11 or #12 have been completed successfully. Load the magazine with 2 rounds, insert the magazine into the rifle. Move the selector lever to the fire position. Pull back the charging handle on the bolt carrier and release (do not ride the carrier forward). This will have chambered one live round. Select your target and fire, the empty case should have been ejected and the second round chambered. Again, select your target and fire. Pull the charging handle to the rear and check for an empty magazine and chamber. Release the carrier charging handle, place the selector lever to safe. Load the magazine to capacity, insert the magazine into the rifle. Move the selector lever to the fire position and pull the bolt carrier charging handle to the rear. Release the carrier (do not ride the carrier forward) which will load one round into the chamber. Select your target and fire until the magazine is empty. 10. This completes the modification and functional testing of the .223 Pro Mag magazine. ****************************************************************************************** BULGARIAN 5.56MM MAGAZINE The work required to have the Bulgarian 5.56mm magazines function correctly is by far, easier than what was needed to have the Pro Mag .223 magazine operate. The information below is applicable to all Bulgarian 5.56mm magazines, regardless of capacity. 1. Make the rifle safe for maintenance, remove the top cover, recoil spring assembly, carrier and bolt. This information can be found in the AK-47 Build CD file #22, Step #1 through #10. 2. Try to install the magazine into the rifle, you will notice that the magazine will not fully install and that the back of the magazine hits the center support.
3. Remove the magazine from the rifle and using a fine tooth file, carefully remove material from the back of the magazine. It’s easier to start with a 45 degree file cut, then round off the angles. Only remove material that is needed to allow the magazine to fit into the rifle. Remove a little material test fit, remove a little more material, test fit.
4. These pictures show the difference between the unmodified and modified magazine. Not much material is needed to be removed.
5. After removing what material is needed the magazine will snap into place.
6. Once the magazine is capable of being snapped into place, remove the magazine and re-install the bolt/carrier assembly, the recoil spring assembly and the top cover. Information concerning this can be found in the AK-47 Build CD file #22. 7. Functional checkout of the magazine. There are 3 ways to perform a functional check of the “now” modified magazine. Functional Check Using Action Proving Cartridges Functional Check Using Live Ammunition (not recommended) Functional Check Live Fire Testing Each method will be addressed separately. 7. Functional Check Using Action Proving Cartridges: Load the magazine to capacity (20 or 30 rounds) with Action Proving Cartridges (available from Brownell’s) or dummy cartridges. Insert the magazine into the rifle. Place the selector lever to the “Fire” position. Pull back the charging handle on the bolt carrier and release (do not ride the carrier forward). This has loaded one dummy round into the chamber. Pull back on the charging handle (this will eject the chambered dummy round) and release the handle again (this will have chambered another dummy round). Continue doing this until all dummy rounds have been chambered and ejected.
8. Functional Check Using Live Ammunition (not recommended): Removal of the firing pin is necessary to perform this operation. Refer to the AK-47 Build CD file #22 Fire Control Group Removal and #27 AK Bolt Disassembly. Load the magazine to capacity, insert the magazine into the rifle. Move the selector lever to the fire position and pull back the charging handle on the bolt carrier and release (do not ride the carrier forward). This has loaded one round into the chamber. Pull back on the charging handle (this will eject the chambered round) and release the handle again (this will have chambered another round). Continue doing this until all rounds have been chambered and ejected (see pictures in Step #7). 9. Functional Check Live Fire Testing: This is what I do only after Step #7 or #8 have been completed successfully. Load the magazine with 2 rounds, insert the magazine into the rifle. Move the selector lever to the fire position. Pull back the charging handle on the bolt carrier and release (do not ride the carrier forward). This will have chambered one live round. Select your target and fire, the empty case should have been ejected and the second round chambered. Again, select your target and fire. Pull the charging handle to the rear and check for an empty magazine and chamber. Release the carrier charging handle, place the selector lever to safe. Load the magazine to capacity, insert the magazine into the rifle. Move the selector lever to the fire position and pull the bolt carrier charging handle to the rear. Release the carrier (do not ride the carrier forward) which will load one round into the chamber. Select your target and fire until the magazine is empty. 10. This completes the modification and functional testing of the Bulgarian 5.56mm magazines.