Contents Overview 1 Lesson: Introduction to .NET and the .NET Framework 2 Lesson: Exploring Visual Studio .NET 11 Lesson: Creating a Windows Application Project 21 Review 29 Module 1: Getting Started
Transcript
Contents
Overview 1
Lesson: Introduction to .NET and the .NET Framework 2
Lesson: Exploring Visual Studio .NET 11
Lesson: Creating a Windows Application Project 21
Review 29
Module 1: Getting Started
Information in this document, including URL and other Internet Web site references, is subject to change without notice. Unless otherwise noted, the example companies, organizations, products, domain names, e-mail addresses, logos, people, places, and events depicted herein are fictitious, and no association with any real company, organization, product, domain name, e-mail address, logo, person, place or event is intended or should be inferred. Complying with all applicable copyright laws is the responsibility of the user. Without limiting the rights under copyright, no part of this document may be reproduced, stored in or introduced into a retrieval system, or transmitted in any form or by any means (electronic, mechanical, photocopying, recording, or otherwise), or for any purpose, without the express written permission of Microsoft Corporation. Microsoft may have patents, patent applications, trademarks, copyrights, or other intellectual property rights covering subject matter in this document. Except as expressly provided in any written license agreement from Microsoft, the furnishing of this document does not give you any license to these patents, trademarks, copyrights, or other intellectual property. 2002 Microsoft Corporation. All rights reserved. Microsoft, MS-DOS, Windows, Windows NT, ActiveX, BizTalk, FrontPage, IntelliSense, JScript, Microsoft Press, MSDN, PowerPoint, Visual Basic, Visual C++, Visual C#, Visual Studio, Win32, Windows Media are either registered trademarks or trademarks of Microsoft Corporation in the United States and/or other countries. The names of actual companies and products mentioned herein may be the trademarks of their respective owners.
Module 1: Getting Started 1
Overview
� Introduction to .NET and the .NET Framework
� Exploring Visual Studio .NET
� Creating a Windows Application Project
Use Visual Studio .NET
Access Data
Write Code
Create Interface
Debugand Deploy
*****************************illegal for non-trainer use******************************
This module presents the concepts that are central to the Microsoft® .NET Framework and platform and the Microsoft Visual Studio® .NET integrated development environment (IDE). This module also describes how to work in the development environment and explains how to use Visual Studio .NET to create and build applications based on Microsoft .NET.
Although you can use Microsoft Notepad to write applications and compile the applications separately by using the command line, the development environment increases your productivity by centralizing all application development tasks in one tool that provides you with many features, including Microsoft IntelliSense® and Dynamic Help.
After completing this module, you will be able to:
� Identify components of the .NET platform and the .NET Framework by their function.
� Explore the Visual Studio development environment. � Create an application based on Microsoft Windows®.
Introduction
Objectives
2 Module 1: Getting Started
Lesson: Introduction to .NET and the .NET Framework
� What Is the .NET Platform?
� What Is the .NET Framework?
� How the .NET Framework Works
*****************************illegal for non-trainer use******************************
In this lesson, a multimedia presentation introduces the concepts that are fundamental to your knowledge of the .NET platform and the .NET Framework.
After completing this lesson, you will be able to:
� Identify the components of the .NET platform and the .NET Framework by their functions.
� Explain the function of the NET Framework class library and the common language runtime.
This lesson includes the following topics and activities:
� What Is the .NET Platform? � Multimedia: Introduction to .NET � What Is the .NET Framework? � How the .NET Framework Works � Multimedia: Introduction to the .NET Framework � Practice: Defining the Elements of .NET
Introduction
Lesson objectives
Lesson agenda
Module 1: Getting Started 3
What Is the .NET Platform?
XML Web Services
Devices
Servers
User Experiences
Developer Tools
*****************************illegal for non-trainer use******************************
The .NET platform provides several core technologies and services that simplify the development of Web-based applications.
� Developer tools Microsoft Visual Studio .NET and the .NET Framework supply a complete solution for developers. Visual Studio .NET provides the development environment for building applications on the .NET Framework. The development environment provides tools that simplify the creation, deployment, and ongoing evolution of secure, scalable, highly available Web applications and XML Web services.
� Devices Devices are personal computers, laptops, workstations, phones, handheld computers, Tablet PCs, game consoles, and others. A smart device can access XML Web services and enable access to data regardless of the location, type, and number of devices in use.
� User experiences .NET experiences are applications that use XML Web services to allow users to access information across the Internet and from stand-alone applications in an integrated and efficient way.
Introduction
.NET platform components
4 Module 1: Getting Started
� Servers The .NET Enterprise Server family accelerates the integration of systems, applications, and partners by supporting XML Web services. Support of XML allows enterprises to build on earlier systems rather than replacing them. For example, Microsoft Host Integration Server provides simple access to mainframes and Microsoft BizTalk® Server offers automatic conversions of existing data formats to and from XML.
For information about the .NET Enterprise Server family, see http://www.microsoft.com/net/products/servers.asp.
� XML Web services By using XML Web services, applications can share data and invoke capabilities from other applications without regard to how those applications were built, what operating system or platform they run on, and what devices are used to access them.
The .NET platform provides several benefits for developers, including:
� Faster application development Developers can create applications by using one of many modern programming languages, greatly increasing the pool of available developer resources in addition to allowing developers the freedom to use the programming language that is most suitable for solving a specific problem.
� Greater reliability
• The .NET platform takes advantage of the power of distributed computing.
• The common language runtime provides for a managed execution environment, which eliminates memory leaks, access violations, and versioning problems.
• The .NET Framework enforces type safety, explicit code sharing, and application isolation, guaranteeing that no application can affect or illegally call another.
� Based on Web standards The use of XML removes barriers to data sharing and software integration. The Simple Object Access Protocol, an XML-based messaging technology standardized by the World Wide Web Consortium (W3C), specifies all the necessary rules for using XML Web services, integrating them into applications and communicating between them.
• .NET has database access capabilities, allowing developers to bring open database connectivity (ODBC)-compliant data stores into their application architecture.
Tip
.NET platform benefits for developers
Module 1: Getting Started 5
Multimedia: Introduction to Microsoft.NET
*****************************illegal for non-trainer use******************************
This multimedia presentation introduces the concepts that are fundamental to the .NET platform and covers the following topics:
� Traditional client desktop and server communication � .NET platform use of XML Web services � .NET platform components
• XML Web services
• .NET experiences
• .NET Devices
• .NET Servers
• .NET Developer Tools
• Visual Studio .NET
• .NET Framework
For your reference, the Introduction to Microsoft .NET.htm multimedia presentation file is located on your student compact disc in the Media folder.
Introduction
Note
6 Module 1: Getting Started
What Is the .NET Framework?
Operating SystemOperating System
Common Language RuntimeCommon Language Runtime
.NET Framework Class Library.NET Framework Class Library
ADO.NET, Windows forms, ADO.NET, Windows forms, ASP.NET, Globalization, SecurityASP.NET, Globalization, Security
Programming LanguagesProgramming Languages
*****************************illegal for non-trainer use******************************
The .NET Framework provides the foundation for building and running .NET-based applications. The .NET Framework consists of two components, the common language runtime and the .NET Framework class library, which run on an operating system. Any language that conforms to the common language specification (CLS) can run on the common language runtime. In the .NET Framework, Microsoft provides support for Microsoft Visual Basic®, Microsoft Visual C++®, Microsoft Visual C#™ (pronounced C sharp), and Microsoft JScript®. Third parties can provide additional languages.
Currently, the .NET Framework is built to run on the Microsoft Win32® operating systems.
The common language runtime manages the execution of code and provides services to simplify the development process. The common language runtime provides a robust and secure execution environment, support for multiple languages, and a managed environment where common services, such as garbage collection and security, are automatically provided.
Introduction
Note
The common language runtime
Module 1: Getting Started 7
The .NET Framework class library exposes features of the runtime and provides a library of classes that are accessed by all Web, Windows-based, and XML Web service applications.
In addition to base classes, the .NET Framework class library includes:
Element Description ADO.NET Microsoft ADO.NET is the next generation of Microsoft
ActiveX® Data Objects (ADO) technology. ADO.NET provides improved support for the disconnected programming model. It also provides rich XML support.
ASP.NET Microsoft ASP.NET is a programming framework that is built on the common language runtime. ASP.NET can be used on a server to build Web applications. ASP.NET Web Forms provide an easy and powerful way to build dynamic Web user interfaces (UI).
XML Web services XML Web services are programmable Web components that can be shared among applications on the Internet or the intranet. The .NET Framework provides tools and classes for building, testing, and distributing XML Web services.
User interfaces The .NET Framework supports three types of user interfaces:
• Web Forms, which work by using ASP.NET.
• Windows Forms, which run on Win32 client computers.
• Console applications.
The .NET Framework class library
8 Module 1: Getting Started
How the .NET Framework Works
.NET Framework.NET Framework
Common Language Common Language RuntimeRuntime
Class LibraryClass Library
Windows
Web Services
ADO.NETData Types
Visual Basic Applications
Visual C# Applications
Visual C++ Applications
Programming Services
.NET Platform
Code
.NET Platform
Code
Source code compiles as MSIL
Source code compiles as MSIL
JIT compiler producesmachine language
JIT compiler producesmachine language
*****************************illegal for non-trainer use******************************
The common language runtime is the foundation of the .NET Framework.
When you compile an application in Visual Studio .NET, it is translated into the runtime’s common language, Microsoft Intermediate Language (MSIL). After the application is compiled, the runtime manages the execution of the application.
The runtime includes a feature called just-in-time (JIT) compilation that translates the MSIL code into the machine language of the system on which the application will run. When a client device on the .NET platform launches the .NET-based application, it starts running in the machine language of the client system and can fully integrate and interact with other .NET-based applications and services regardless of the language in which it was developed.
Introduction
MSIL
JIT compilation
Module 1: Getting Started 9
Multimedia: Introduction to the .NET Framework
*****************************illegal for non-trainer use******************************
This multimedia presentation covers key concepts of the .NET Framework, including:
� .NET Framework components
• .NET Framework class library
• .NET Framework common language runtime � Objects in the .NET Framework class library
• XML Web services
• User interface classes
• ASP.NET
• ADO.NET � .NET Framework security � The common language runtime manages the execution of code and provides
services to simplify the development process. The multimedia presentation covers the function of the common language runtime in more depth, explaining how the .NET Framework works with the common language runtime.
For your reference, the Introduction to the .NET Framework.htm multimedia presentation file is located on your student compact disc in the Media folder.
Introduction
Note
10 Module 1: Getting Started
Practice: Defining the Elements of .NET
� In this practice, you will match .NET terms and definitions
� In this practice, you will match .NET terms and definitions
Matching PracticeMatching PracticeMatching Practice
10 min
*****************************illegal for non-trainer use******************************
Match the following terms with the appropriate definition by drawing a line that connects the term and definition.
Term Definition XML Web services A. Component that periodically checks for objects that
are ready to be released from a computer’s memory.
Devices B. CPU-independent set of instructions than can be efficiently turned into CPU-specific code.
.NET experiences C. Programmable entity that provides a particular element of functionality, such as application logic and is accessible to any number of potentially disparate systems.
.NET Framework D. Component that contains a collection of reusable types that you can use to develop applications.
.NET Framework class library
E. Programming model of the .NET platform for building, deploying, and running XML Web services and all types of applications—both desktop and Web-based.
Common language runtime F. Refers to a hand held computer or mobile telephone that can use .NET-based applications.
Garbage collection G. Component that manages the execution of code and provides services to make the development process easier.
MSIL H. Services, .NET-based applications, and Web sites that rely on XML Web services to enhance the user experience.
Module 1: Getting Started 11
Lesson: Exploring Visual Studio .NET
� Programming Features of Visual Studio .NET
� Structure of Visual Studio Solutions and Projects
� The Development Process
*****************************illegal for non-trainer use******************************
This lesson uses an instructor-led demonstration to present some of the most commonly performed tasks and features of the development environment of Visual Studio .NET and explains the file structure and development cycle of the development environment.
After completing this lesson, you will be able to:
� Identify the programming features of Visual Studio .NET by their functions. � Describe the structure of solutions and projects in the development
environment. � Determine which programming feature to use to perform a development
task.
This lesson includes the following topics and activity:
� Demonstration: Working in the Development Environment � Programming Features of Visual Studio .NET � Structure of Visual Studio Solutions and Projects � The Development Process
Introduction
Lesson objectives
Lesson agenda
12 Module 1: Getting Started
Demonstration: Working in the Development Environment
� This instructor-led demonstration uses the example of creating a simple C# application in Visual Studio .NET to demonstrate many of the commonly used features of the development environment
*****************************illegal for non-trainer use******************************
This instructor-led demonstration uses the example of creating a simple C# application in Visual Studio .NET to demonstrate many of the commonly used features of the development environment.
Your instructor will demonstrate the following procedures:
� Open Visual Studio .NET and use the Start Page 1. Start Visual Studio .NET. 2. Click Online Community. 3. Click Search Online. 4. Click Get Started.
� Create a new project 1. On the Projects tab, click New Project. 2. In the New Project dialog box, in the Templates pane, click Windows
Application. 3. In the Name box, type DemoApplication and then click OK.
� Examine Solution Explorer 1. In Solution Explorer, click Form1.cs. 2. Right-click Solution ‘DemoApplication’ (1 project). 3. Right-click DemoApplication under the Solution node.
Module 1: Getting Started 13
� Add a new class file to the project 1. Right-click the project DemoApplication, point to Add, and then click Add
Class. 2. In the Add New Item window, in the Name box, type Animals.cs and then
click Open. 3. Close the Animals.cs Code Editor window.
� Change the size of the form • Drag the bottom-right resize handle on the form to make the form
rectangular.
� Add buttons to the form 1. In the Toolbox, click a Button control, and then use a drag-and-drop
operation to place a button onto the form. 2. Place a second button onto the form.
� Add code to a button 1. Double-click Button1 on the form. 2. In the Code Editor, between Private Sub Button1_Click and End Sub,
where the pointer should be located, type the following code: MessageBox.Show("Visual C# is awesome!");
� Use Dynamic Help and IntelliSense 1. On the Help menu, click Dynamic Help.
This step ensures that the Dynamic Help window is visible. 2. Choose Design view for Form1.cs. 3. Double-click Button2 on the form. 4. In the Code Editor, between Private Sub Button2_Click and End Sub,
where the pointer should be located, type the following code, and observe the Dynamic Help window as you type: MessageBox.Show ("Visual Studio .NET makes it all easy!"); Notice that the Dynamic Help contents change as you type the line.
5. Delete the line of code that you entered in the preceding step and then enter the code again. This time, notice how IntelliSense functions as you type the code.
14 Module 1: Getting Started
� Run and test the application
1. On the standard toolbar, click the Start button . 2. In the Form1 dialog box, click Button1. 3. In the message box, click OK. 4. In the Form1 dialog box, click Button2. 5. In the message box, click OK. 6. Close Form1.
� Use the Auto Hide feature • On the Output window title bar, click the pushpin icon.
� Undock a window 1. On the Toolbox title bar, click the pushpin icon. 2. Click the Toolbox title bar and drag the window into the middle of the
screen.
� Dock a window 1. Click the title bar of the Toolbox, and then drag the window to the left side
of the Visual Studio application window until the pointer is almost at the left edge of the screen.
2. Click the pushpin icon in the Toolbox title bar to enable the Auto Hide feature again.
� Save a project • On the standard toolbar, click the Save All button.
The location of the solution is set when the solution is created.
� Close a solution • On the File menu, click Close Solution.
The Projects tab of the Start Page will display DemoApplication in the list of recent projects when you restart Visual Studio .NET.
� Quit Visual Studio • On the File menu, click Exit.
*****************************illegal for non-trainer use******************************
Visual Studio .NET is an integrated development environment that helps you to quickly design, develop, debug, and deploy .NET-based applications. You can access a common set of tools, designers, and editors from any Visual Studio .NET programming language. You can create Windows Forms and Web Forms applications that integrate data and business logic.
Visual Studio .NET includes the programming features described in the following table.
Feature Description Windows Forms Designer A graphical design surface enables you to quickly
create the user interface for an application. You can drag or draw controls onto this surface.
Tools for Windows Forms A Windows Forms Designer, a Windows Application template, essential project references, and starter code are provided to help you create standard Windows Forms applications.
Tools for Web Forms A Web Forms Designer, an ASP.NET Web Application template, essential project references, and starter code are provided to help you build Web Forms applications in which the primary user interface is a browser.
Introduction
Programming features
16 Module 1: Getting Started
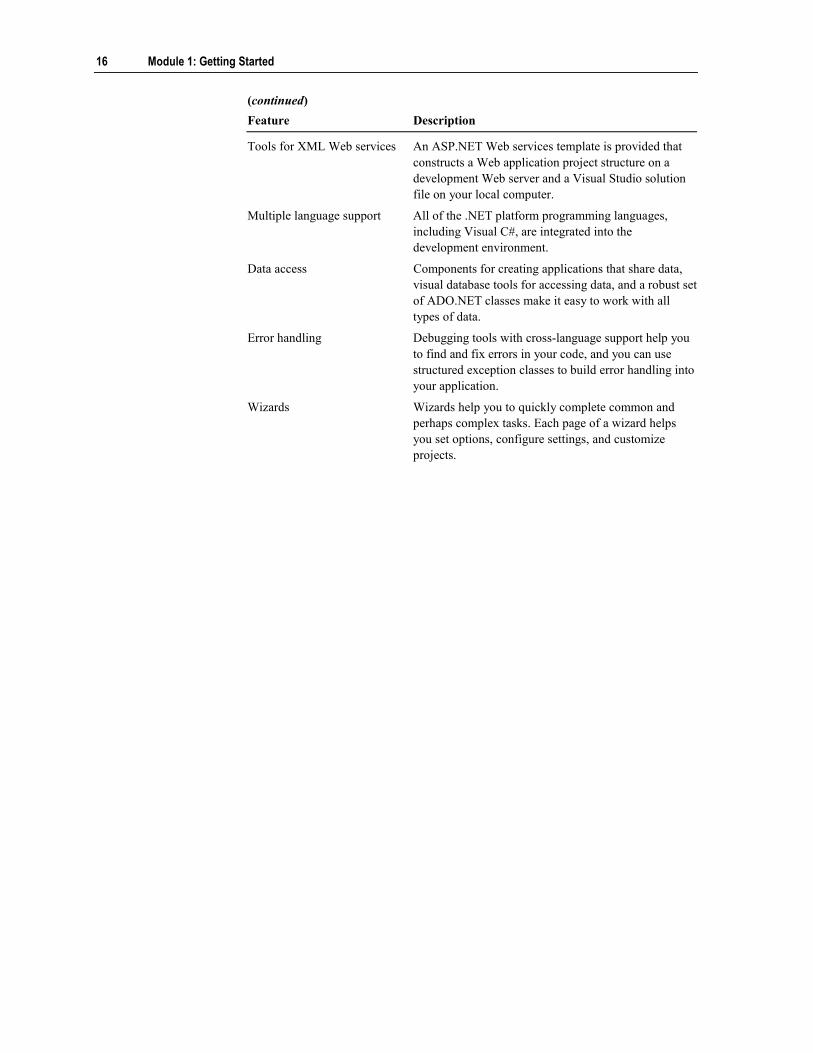
(continued) Feature Description Tools for XML Web services An ASP.NET Web services template is provided that
constructs a Web application project structure on a development Web server and a Visual Studio solution file on your local computer.
Multiple language support All of the .NET platform programming languages, including Visual C#, are integrated into the development environment.
Data access Components for creating applications that share data, visual database tools for accessing data, and a robust set of ADO.NET classes make it easy to work with all types of data.
Error handling Debugging tools with cross-language support help you to find and fix errors in your code, and you can use structured exception classes to build error handling into your application.
Wizards Wizards help you to quickly complete common and perhaps complex tasks. Each page of a wizard helps you set options, configure settings, and customize projects.
Module 1: Getting Started 17
Structure of Visual Studio Solutions and Projects
� Solution
� A container for the projects and solution items that can be built into an application
� A solution usually contains one or more related projects
� Project
� A container within a solution to logically manage, build, and debug the project items that make up your application
*****************************illegal for non-trainer use******************************
Solution Explorer allows you to view files and perform file management tasks in a solution or a project. A single Visual Basic .NET solution and its projects appear in a hierarchical list that provides updated information about the status of your solution, projects, and files.
When you create a project in Visual Studio .NET, project files are organized in a larger container called a solution. A solution usually contains one or more related projects.
A project is a container in a solution that you can use to logically manage, build, and debug the project items that make up your application.
Solutions allow you to concentrate on the project or set of projects that are required to develop and deploy your application, instead of having to focus on the details of managing the objects and files that define them.
A solution allows you to:
� Work on multiple projects in the same instance of the development environment.
� Work on items, settings, and options that apply to a group of projects. � Manage miscellaneous files that are opened outside the context of a solution
or project. � Use Solution Explorer, which is a graphical view of your solution, to
organize and manage all of the projects and files that are required to design, develop, and deploy an application.
Introduction
Terms and definitions
Solution benefits
18 Module 1: Getting Started
Visual Studio .NET supports many file types and their associated file extensions. The following table describes some common file types that are specific to .NET-based applications.
Extension Name Description .sln Visual Studio solution Organizes projects, project items, and
solution items in the solution by giving the environment references to their locations on disk.
.suo Solution user options Records all of the options that you may associate with your solution so that each time you open the solution, it includes any customizations that you made.
.cs Visual C# project Represents forms, user controls, classes, and module files that belong to a single-project solution. Any files that are not based on a programming language have their own extension. For example, a Crystal Report file has the extension .rpt, and a text file has the extension .txt.
.csproj Visual C# projects Represents forms, user controls, classes, and module files that belong to a multiple-project solution. This extension allows you to differentiate between files written in Visual C# and other .NET-compatible languages.
.aspx
.asmx
.asax
Web project items Web project items include Web-specific files such as .aspx for Web Forms, .asmx for XML Web services, and .asax for global application classes. Web projects also use the .cs file extension for classes and modules.
Solution and project files
Module 1: Getting Started 19
The Development Process
Create a design specification
Create the user interface
Set properties for the user interface objects
Write code to add functionality
Test and debug the application
Make an executable file
Create a setup application
*****************************illegal for non-trainer use******************************
Visual Studio .NET contains everything you need to build your own applications from start to finish. To create the user interface, you place controls from the Toolbox on a form, then you customize the controls by setting properties. After that, you write code to define what your program will do. Finally, you can save, run, and compile your program so others can use it.
Creating an application in Visual Studio .NET involves seven basic steps:
1. Create a design specification. The design specification is the blueprint that you use when you create an application. Before writing any code, take time to design the application you will create. Although Visual Studio .NET provides tools to help you quickly develop an application, having a clear understanding of the user needs and initial feature set will help you be more efficient in your development efforts. Planning the design will also help you save time by minimizing the potential for rewriting code because of a poor or nonexistent design specification.
2. Create the user interface. To create the interface for your application, first place controls and objects on a form by drawing or painting them in the Windows Forms Designer. You can look at other applications, such as Microsoft Excel or Microsoft Word, for ideas on how to design the interface. For information about interface design, see Microsoft Windows User Experience published by Microsoft Press®.
3. Set properties for the user interface objects. After you add objects to a form, you can set their properties in the Properties window or in the Code Editor.
Introduction
Creating an application in Visual Studio .NET
20 Module 1: Getting Started
4. Write code to add functionality. After you set the initial properties for the form and its objects, you can add code that runs in response to events. Events occur when various actions are performed on a control or object. For example, the Click event of a command button occurs when the user clicks it with the mouse. For most applications, you must also write code to add business logic and to access data.
5. Test and debug the application. Testing and debugging is not a one-time step but something that you do iteratively throughout the development process. Each time you make a major change in steps 2, 3, or 4, you must run a debug build of the application and ensure that it is working as expected. Visual Studio .NET provides debugging tools for finding and fixing errors in your application.
6. Make an executable file. After completing the project, create a release build of the project. Creating a release build compiles the various files that make up the program into a stand-alone executable file called an assembly.
7. Create a setup application. To run your application, the user usually needs other files, such as any dynamic-link library (DLL) files that you used to create your application. Visual Studio provides the Setup Wizard, which automates the creation of the setup program and ensures that the user has all of the necessary files.
Module 1: Getting Started 21
Lesson: Creating a Windows Application Project
� What Is an Application Template?
� How to Use the Windows Forms Designer
� How to Use the Properties Window
*****************************illegal for non-trainer use******************************
This lesson prepares you for creating your first basic Windows application.
After completing this lesson, you will be able to:
� Start a Visual C# project based on the Windows Application template. � Explore Windows Forms Designer. � Explore the Properties window. � Create a basic Windows application.
This lesson includes the following topics and activity:
� What Is an Application Template? � How to Use the Windows Forms Designer � How to Use the Properties Window � Practice: Creating a Basic Windows Application
Introduction
Lesson objectives
Lesson agenda
22 Module 1: Getting Started
What Is an Application Template?
Provides starter files, project structure, and environment settings
Provides starter files, project structure, and environment settings
*****************************illegal for non-trainer use******************************
Visual Studio .NET offers several application templates to support the development of different kinds of applications and components. Before you start a new project, you must choose the type of template that you want to use.
An application template provides starter files and a project structure and contains the basic project objects and the environment settings you need to create the type of application that you want to build.
Two of the most commonly used templates are the Windows Application and the ASP.NET Web Application templates.
� Windows Application template This template provides the tools, structure, and starter code for a standard Windows-based application. It automatically adds the essential project references and files to use as a starting point for your application.
� ASP.NET Web Application template This template is used to create an ASP.NET Web application on a computer that has Microsoft Internet Information Services (IIS) version 5.0 or later installed. The template creates the basic files that the server requires to help you start designing your application.
Introduction
Definition
Examples of application templates
Module 1: Getting Started 23
When you start a new Microsoft Visual C# .NET project, one of the first steps is to choose an application template.
To create a Windows Application project in Visual Studio .NET:
1. Start Visual Studio .NET. 2. On the Get Started pane, click New Project.
– or – On the File menu, point to New, and then click Project.
3. In the Project Types pane, click Visual C# Projects. In the Templates pane, click Windows Application.
4. In the Name field, type a unique project name that indicates the purpose of the application.
5. In the Location field, type the directory in which you want to save your project, or click the Browse button to browse to it.
6. Click OK. The Windows Forms Designer opens and displays Form1 of the project that you created.
Creating a Windows Application project
24 Module 1: Getting Started
How to Use the Windows Forms Designer
Controls to createthe user interface
Controls to createthe user interface
Windows Forms Designer
Windows Forms Designer
*****************************illegal for non-trainer use******************************
When you start a project in Visual C# .NET, the Windows Forms Designer opens in Design view, showing Form1 of the project. You place controls from the Toolbox on the form to create the user interface for a window used in your application.
The default form contains the basic elements that most forms use: a title bar, a control box, and Minimize, Maximize, and Close buttons.
To view a form in Design view:
• In Solution Explorer, double-click the form. – or – In Solution Explorer, click the form, and then, on the toolbar, click View Designer.
You create the user interface objects for your application by adding controls from the Toolbox to a form. The Toolbox is initially located on the left side of the development environment. There are several tabs for different categories of controls, such as Windows Forms and Data.
The Toolbox contains a variety of controls that you can use to add images labels, buttons, list boxes, scroll bars, menus, and geometric shapes to a user interface. Each control that you add to a form becomes a programmable user interface object in your application. These objects are visible to the user when the application runs and operate like the standard objects in any Windows-based application.
Introduction
Elements of a form
Viewing a form
Creating the user interface
Toolbox controls
Module 1: Getting Started 25
To close and open the Toolbox:
1. To close the Toolbox, in the upper-right corner of the Toolbox, click Close. 2. To open the Toolbox, on the View menu, click Toolbox. 3. To keep the Toolbox open, on the Toolbox title bar, click the pushpin.
To hide and reopen the Toolbox:
1. To hide the Toolbox, on the Toolbox title bar, click the pushpin. 2. To reopen the Toolbox when it is hidden, on the View menu, click Toolbox.
To move the Toolbox:
1. Right-click the Toolbox title bar, and then click Floating. 2. Drag the Toolbox to the desired location.
Closing and opening the Toolbox
Hiding and reopening the Toolbox
Moving the Toolbox
26 Module 1: Getting Started
How to Use the Properties Window
Set properties suchas size, caption,and color
Set properties suchas size, caption,and color
*****************************illegal for non-trainer use******************************
The Properties window lists the property settings for the selected form or control that you can modify while you create or edit the application. A property describes a characteristic of an object, such as size, caption, or color.
A form is made up of various controls. You can modify the style and function of forms and controls by changing various attributes of these controls. These attributes are referred to as properties.
To open the Properties window:
• If the Properties window is not visible, click Properties Window on the View menu, or press F4.
Some controls, documents, and forms display a large number of properties in the Properties window. This can make it difficult to locate the property that you want to set. The Properties window allows you to view the properties for a form or control in a categorized view instead of an alphabetic view.
To view properties:
1. To view the properties by category, click the Categorized button in the Properties window. The properties for the selected form or control will be separated into the categories that are defined by the control.
2. To view the properties in a category, expand the category node. To hide the properties in a category, collapse the category node.
3. To view the properties alphabetically, click the Alphabetic button in the Properties window.
Introduction
Terms and definitions
Opening the Properties window
Viewing properties
Module 1: Getting Started 27
Practice: Creating a Basic Windows Application
� In this practice, you will create a basic Windows application
� In this practice, you will create a basic Windows application
Hands-on PracticeHandsHands--on Practiceon Practice
10 min
*****************************illegal for non-trainer use******************************
In this practice, you will create a basic Windows application.
Tasks Detailed steps
1. Start Visual Studio .NET. � Start a new instance of Visual Studio .NET.
2. Create a new project. Project Type: Visual C# Template: Windows Application Name: SimpleWindowsApplication
a. On the Start Page, click New Project.
b. In the New Project window, under Project Types, click Visual C# Projects.
c. Under Templates, click Windows Application.
d. In the Name box, type SimpleWindowsApplication and then click OK.
3. Change the Text property of Form1 to SimpleApplication and then change the size of the form. Width = 400 pixels Height = 200 pixels
a. On the View menu, click Properties Window.
b. In the Properties window, in the Text property box, type SimpleApplication
c. In the Size property box, type 400,200 and then press ENTER.
4. Add a Label control to Form1. Locate this label on the form at position 20,20. Change this label to be 350 pixels wide and 130 pixels high.
a. Click the Toolbox.
b. Drag a Label control from the Toolbox to the Form.
c. In the Properties window, in the Location property box type 20,20 and then press ENTER.
d. In the Size box, type 350,130 and then press ENTER.
28 Module 1: Getting Started
Tasks Detailed steps
5. Change the Text property of the label to Hello World and then change the font size to 40 points.
a. In the Text property field, type Hello World
b. Expand the Font property, in the Size field type 40 and then press ENTER.
6. Change the TextAlign property of the label to MiddleCenter.
� Change the TextAlign property to MiddleCenter.
7. Run the application. � On the standard toolbar, click the Start button.
8. Close the application, save all changes, and then quit Visual Studio .NET.
a. Close the SimpleApplication window.
b. On the standard toolbar, click the Save All button.
c. On the File menu, click Exit.
Module 1: Getting Started 29
Review
� Introduction to .NET and the .NET Framework
� Exploring Visual Studio .NET
� Creating a Windows Application Project
*****************************illegal for non-trainer use******************************
1. Complete the following statement: When you create a project in Visual Studio .NET, files are organized in a larger container called a .
2. Draw a line to match the following file extensions with the correct description.
Extension Description .cs A. Organizes projects, project items, and solution
items in the solution.
.sln B. Records all of the options that you may associate with your solution.
.aspx C. Represents forms, user controls, classes, and module files that belong to a single-project solution.
.suo D. Represents forms, user controls, classes, and module files that belong to a multiple-project solution.
.csproj E. Represents a Web project item.
30 Module 1: Getting Started
3. Complete the following statement: An provides starter files and a project structure and contains the basic project objects and the environment settings that you need to create the type of application that you want to build.
4. What must be installed on a client computer to run .NET-based applications?
5. What is one advantage of programming by using the .NET Framework versus using a traditional development environment?