5 - 1 MODULE 5: MASTER DATA FOR THE SALES AND PURCHASE PROCESS Module Overview The financial core of a company is its chart of accounts, a list of the general ledger (G/L) accounts where G/L entries accumulate during a fiscal period. General Ledger entries are automatically created through different business documents, such as purchase invoices, as a result of business transactions. Before these documents can be used correctly, different master data - such as customers, vendors, and items - must be created and maintained. As one of the central elements of a financial management system, the purpose and functions of the chart of accounts, in addition to the use of master data, is prerequisite knowledge for anyone training to work with Microsoft Dynamics ® NAV 2013 at any level. Objectives The objectives are: • Explain how to use G/L account cards. • Outline the purpose and functions of the Chart of Accounts page. • Explain how to use customer cards. • Explain how to use vendor cards. • Explain how to use item cards. Microsoft Official Training Materials for Microsoft Dynamics ® Your use of this content is subject to your current services agreement
Transcript
5 - 1
MODULE 5: MASTER DATA FOR THE SALES AND PURCHASE PROCESS
Module Overview The financial core of a company is its chart of accounts, a list of the general ledger (G/L) accounts where G/L entries accumulate during a fiscal period. General Ledger entries are automatically created through different business documents, such as purchase invoices, as a result of business transactions. Before these documents can be used correctly, different master data - such as customers, vendors, and items - must be created and maintained.
As one of the central elements of a financial management system, the purpose and functions of the chart of accounts, in addition to the use of master data, is prerequisite knowledge for anyone training to work with Microsoft Dynamics® NAV 2013 at any level.
Objectives
The objectives are:
• Explain how to use G/L account cards.
• Outline the purpose and functions of the Chart of Accounts page.
• Explain how to use customer cards.
• Explain how to use vendor cards.
• Explain how to use item cards.
Microsoft Official Training Materials for Microsoft Dynamics ® Your use of this content is subject to your current services agreement
Introduction in Microsoft Dynamics® NAV 2013
5 - 2
G/L Account Cards Each line in the chart of accounts is represented by a G/L account card where you define how the related G/L entries for that account are managed.
Note: For running companies where a posting setup is in place and a chart of accounts already exists, you might have to create additional G/L accounts occasionally, for example, for transactions from a new type of revenue. To learn how to create new G/L accounts, refer to the Finance Essentials in Microsoft Dynamics NAV 2013 course.
This lesson introduces the most important fields and buttons on the G/L Account Card page.
You can reach G/L account cards from the Chart of Accounts page. This is explained in the next lesson.
To open a G/L account card, follow these steps:
1. On the navigation pane, click Departments. 2. Click Financial Management > General Ledger > Chart of
Accounts.
3. Select the desired G/L account, and then click Edit or View.
Microsoft Official Training Materials for Microsoft Dynamics ® Your use of this content is subject to your current services agreement
Module 5: Master Data for the Sales and Purchase Process
5 - 3
General FastTabs
The General FastTab contains various fields that define what and how G/L entries are handled in the G/L account.
Field Description
No. The number of the G/L account. Notice that number series are not used for G/L accounts so this number is entered manually.
Name A short description of the G/L account.
Income/Balance Indicates whether the account is an income or balance sheet account. This field is important in determining what accounts are closed at the fiscal year end.
Debit/Credit The type of entries that are usually posted to this account. The selection made does not restrict the type of transactions posted to the account. It only enhances the reporting capabilities.
Account Type The purpose of the account. The options are as follows: • Posting - Used to accumulate transactions.
• Heading - Used for descriptive purposes only.
• Total - Used to total a range of accounts, as specified in the Totaling field. (This option is useful for totaling groups of accounts that are not in the same classification, such as gross income.)
• Begin-Total - Used to mark the beginning of an account range.
• End-Total - Used to mark the end of the range. Each End-Total account has an account range in the Totaling field. The range can be calculated or entered manually.
Note: Entries can be posted only on a G/L account of account type Posting.
Totaling Determines which accounts go into a Total or an End-Total account type.
Microsoft Official Training Materials for Microsoft Dynamics ® Your use of this content is subject to your current services agreement
Introduction in Microsoft Dynamics® NAV 2013
5 - 4
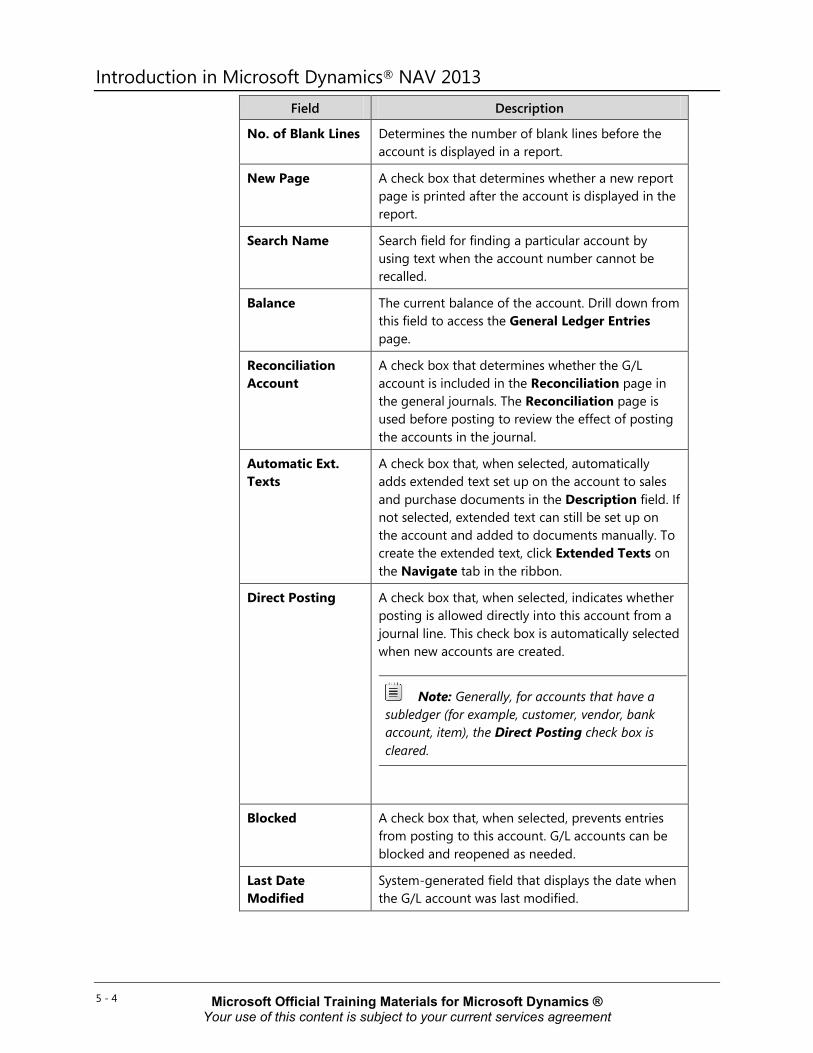
Field Description
No. of Blank Lines Determines the number of blank lines before the account is displayed in a report.
New Page A check box that determines whether a new report page is printed after the account is displayed in the report.
Search Name Search field for finding a particular account by using text when the account number cannot be recalled.
Balance The current balance of the account. Drill down from this field to access the General Ledger Entries page.
Reconciliation Account
A check box that determines whether the G/L account is included in the Reconciliation page in the general journals. The Reconciliation page is used before posting to review the effect of posting the accounts in the journal.
Automatic Ext. Texts
A check box that, when selected, automatically adds extended text set up on the account to sales and purchase documents in the Description field. If not selected, extended text can still be set up on the account and added to documents manually. To create the extended text, click Extended Texts on the Navigate tab in the ribbon.
Direct Posting A check box that, when selected, indicates whether posting is allowed directly into this account from a journal line. This check box is automatically selected when new accounts are created.
Note: Generally, for accounts that have a subledger (for example, customer, vendor, bank account, item), the Direct Posting check box is cleared.
Blocked A check box that, when selected, prevents entries from posting to this account. G/L accounts can be blocked and reopened as needed.
Last Date Modified
System-generated field that displays the date when the G/L account was last modified.
Microsoft Official Training Materials for Microsoft Dynamics ® Your use of this content is subject to your current services agreement
Module 5: Master Data for the Sales and Purchase Process
5 - 5
Posting FastTabs
The Posting FastTab contains the fields that determine how the G/L and VAT entries are recorded.
The following table briefly describes the purpose of each field.
Field Description
Gen. Posting Type Defines whether the account is used only with a sale or purchase transaction or with both types of transactions. This field is used together with the VAT Bus. Posting Group and VAT Prod. Posting Group fields to find the account that the program posts VAT to. It is only filled in for revenue and expense accounts where VAT is involved.
Gen. Bus. Posting Group
Identifies the default general business posting group for the account. This field indicates whom you sell to or buy from. It is used with the Gen. Prod. Posting Group and Gen. Posting Type fields to find the G/L accounts to post to for sales, purchases, discount amounts, cost of goods sold (COGS), and inventory adjustments.
Gen Prod. Posting Group
Identifies the default general product posting group for the account. This field indicates the type of item sold or purchased. It is used with the Gen. Bus. Posting Group and Gen. Posting Type fields to find the G/L accounts to post to for sales, purchases, discount amounts, COGS, and inventory adjustments.
VAT Bus. Posting Group
Identifies the default VAT business posting group for the account. This field is used with the VAT Prod. Posting Group and Gen. Posting Type fields to determine VAT percent and VAT calculation type and to find the G/L accounts where the program posts VAT.
VAT Prod. Posting Group
Identifies the default VAT product posting group for the account. This field is used with the VAT Bus. Posting Group and Gen. Posting Type fields to determine VAT percent and VAT calculation type and to find the G/L accounts where the program posts VAT.
Microsoft Official Training Materials for Microsoft Dynamics ® Your use of this content is subject to your current services agreement
Introduction in Microsoft Dynamics® NAV 2013
5 - 6
Field Description
Default IC Partner G/L Acc. No.
Identifies the default intercompany G/L account number for this G/L account. When you enter this G/L account in the intercompany general journal, the IC G/L account specified in this field is used as the default balancing account number.
After the posting types and the posting group codes are assigned to a G/L account, these codes are automatically inserted in a journal, sales, or purchase line when the G/L account is selected.
Actions Tab
On the Actions tab in the ribbon, you can access the Apply Template function. This function is available when master templates are prepared with RapidStart Services.
Note: Setting up a company by using RapidStart Services is covered in the module "Rapid Start" of the course Application Setup in Microsoft Dynamics NAV 2013.
With master templates for G/L accounts you can do the following:
• Create multiple default G/L account setups for accounts that are frequently created, such as expenses.
• Use these templates as a basis when you create accounts of this type.
• Eliminate repetitive data entry for similar account creation.
When a new G/L account is created in the G/L Account Card page, the Indent Chart of Accounts function can be run.
Note: The Apply Template function is also available for the other master data discussed in this module: customers, vendors and items.
Microsoft Official Training Materials for Microsoft Dynamics ® Your use of this content is subject to your current services agreement
Module 5: Master Data for the Sales and Purchase Process
5 - 7
Navigate Tab
The Navigate tab in the ribbon contains the options shown in the following table.
Account Group
The Account Group of the Navigate tab is used to enter and review account related information.
Option Description
Ledger Entries (CTRL+F7)
Displays all ledger entries for the account.
Comments Displays or provides a field in which you can enter comments that relate to the account.
Dimensions (CTRL+SHIFT+D)
Displays or provides a field in which you can enter default dimensions for the account.
Extended Texts Displays or provides a field in which you can enter extended text for the account.
Receivables-Payables
Provides a summary of the following:
• Expected net operational cash flow from customers and vendors over time.
• Open customer and vendor ledger entries sorted by their Due Date instead of Posting Date.
View this summary by one of the following:
• Period, such as daily, monthly, or quarterly.
• Expected cash flow movement for a period by clicking the Net Change option.
• Expected net balance of outstanding customer and vendor balances at any date by clicking the Balance at Date option.
Where-Used List Displays a list of tables where this G/L account is used.
Microsoft Official Training Materials for Microsoft Dynamics ® Your use of this content is subject to your current services agreement
Introduction in Microsoft Dynamics® NAV 2013
5 - 8
Balance Group
The Balance group of the Navigate tab displays information about the balances and transaction amounts for one or all G/L accounts. Each page accessed from this tab contains filters to help you view the information more specifically.
Option Description
G/L Account Balance
Displays the balance or net change for the G/L account over time.
G/L Balance Displays the balance or net change for all G/L accounts for a specific time period.
G/L Balance by Dimensions
Displays balance or net change information for all accounts. The information displayed in columns and lines can be set to one of the following views: • G/L account
• Period
• Global Dimensions 1 and 2
Chart of Accounts Page The Chart of Accounts page contains the same fields as those in the G/L Account Card page - only displayed in table format. In addition to the information on the individual account cards, the Chart of Accounts page displays current net change and balance figures for each G/L account. In this manner, the page provides continuous and direct insight into the status of company finances.
To view the chart of accounts, follow these steps:
1. On the navigation pane, click Departments. 2. Click Financial Management > General Ledger > Chart of
Accounts.
Microsoft Official Training Materials for Microsoft Dynamics ® Your use of this content is subject to your current services agreement
Module 5: Master Data for the Sales and Purchase Process
5 - 9
FIGURE 5.2: CHART OF ACCOUNTS PAGE
The ribbon on the Chart of Accounts page resembles the ribbon on the G/L Account Card page, but with slightly different options.
Actions Tab
The Actions tab contains one function: Indent Chart of Accounts. This function is used to perform the following:
• Format fields for Begin-Total and End-Total account types.
• Indent accounts according to a defined hierarchy.
Establish the hierarchy by using the account types Begin-Total and End-Total. When the Indent Chart of Accounts function is executed, the Totaling field of End-Total accounts is updated with the range of account numbers in the related Begin-Total and End-Total section.
It is considered best practices to run the Indent Chart of Accounts function to indent it according to a hierarchy and recalculate the totals every time that you create a new G/L account.
Microsoft Official Training Materials for Microsoft Dynamics ® Your use of this content is subject to your current services agreement
Introduction in Microsoft Dynamics® NAV 2013
5 - 10
Navigate Tab
The Navigate tab contains the options shown in the following table.
Account Group
Options Description
Dimensions - Single Functions exactly like the Dimensions function on the account card.
Dimensions - Multiple Assigns the same default dimensions to multiple accounts. Because the Chart of Accounts page is a list of accounts, you can assign the same default dimensions to several accounts by selecting the relevant account lines. This reduces the entry time that you need to set up default dimensions.
Ledger Entries, Comments, Extended Texts, Receivables-Payables, Where-Used List
Functions exactly like similarly named options described in the "G/L Account Cards" lesson.
Balance Group
Options Description
G/L Account Balance, G/L Balance, G/L Balance by Dimension
Functions exactly like similarly named options described in the "G/L Account Cards" lesson.
G/L Account Balance/Budget
Displays the actual and budgeted balance or net change for the G/L account over time.
G/L Balance/Budget Displays the actual and budgeted balances or net change for all G/L accounts for a specific time period.
Chart of Accounts Overview
Displays the chart of accounts with different levels of detail. Use the Expand and Collapse feature to view only header and footer accounts or all the accounts in between.
Microsoft Official Training Materials for Microsoft Dynamics ® Your use of this content is subject to your current services agreement
Module 5: Master Data for the Sales and Purchase Process
5 - 11
Customer Cards At first, the customers are migrated from pre-existing databases, by using RapidStart Services. However, new customers must also be created. Depending on the different application areas and functions therein that a company is using, different fields of the customer card will become important. This lesson provides an introduction to the most important fields on the Customer Card page, that is, those fields necessary for a simple sales process.
Demonstration: Create a Customer
Scenario: As the order processor at CRONUS International Ltd., you are responsible for setting up new customers. A new customer, Paint Outlet, has contacted your company and requested to buy a special paint color, Sunflower Yellow. You must create a card for the customer in the database so that a quote and sale process can start.
To fill in the minimum required fields, follow these steps:
Demonstration Steps
1. Create the new customer in the database. a. On the navigation pane, click Home and then click Customers. b. Click New to open a new Customer Card page. c. Expand the General FastTab.
d. Press ENTER to automatically fill in the next number of the default number series for customers in the No. field.
e. In the Name field, type "Paint Outlet".
f. In the Address field, type "21 Bahnhofstrasse". g. In the Post Code field, type "DE-27624". h. In the City field, type "Bederkesa”.
Note: Notice that the City field did not automatically populate with the city name. This is because the Post Code field lets users enter a post code that does not have an assigned city. In this case, users must manually type the city name.
Microsoft Official Training Materials for Microsoft Dynamics ® Your use of this content is subject to your current services agreement
Introduction in Microsoft Dynamics® NAV 2013
5 - 12
i. In the Country/Region Code field, enter DE. j. In the Contact field, enter Martin Illum Lotz.
FIGURE 5.3: CUSTOMER CARD PAGE – GENERAL FASTTAB
k. Expand the Invoicing FastTab. l. Click the drop-down arrow in the Gen. Bus. Posting Group field
and select EU. The business posting group specifies who is sold to, and will, in combination with the product posting group (determined by the item on the sales document), determine the income statement account to post to.
m. Click the drop-down arrow in the VAT Bus. Posting Group field, and select EU. In combination with the VAT product posting group, the VAT business posting group will determine how VAT is calculated and on which account it is posted.
n. Click the drop-down arrow in the Customer Posting Group field, and select EU. The customer posting group maps the accounts receivable account, payment discount accounts, invoice and application rounding accounts, and interest and fee accounts that relate to customers.
Microsoft Official Training Materials for Microsoft Dynamics ® Your use of this content is subject to your current services agreement
Module 5: Master Data for the Sales and Purchase Process
t. The Shipping FastTab must be filled only if you have special needs for warehouse location or shipping method.
u. Click OK to close the Customer Card page.
The new customer, Paint outlet, is now created and ready for business.
Note: You do not have to look up and select data from the setup pages. If you know the value to be filled in, you can type it directly.
Vendor Cards At first, the vendors are migrated from pre-existing databases, by using RapidStart Services. However, new vendors must also be created. Depending on the different application areas and functions therein that a company is using, different fields of the vendor card will become important. This lesson provides an introduction to the most important fields on the Vendor Card page, that is, those fields necessary for a simple purchase process.
Microsoft Official Training Materials for Microsoft Dynamics ® Your use of this content is subject to your current services agreement
Module 5: Master Data for the Sales and Purchase Process
5 - 15
Demonstration: Create a Vendor
Scenario: As the purchasing agent at CRONUS International Ltd., you are responsible for setting up new vendors. A new customer has asked for a special paint that the company does not sell. You have to add a new vendor to the database from whom you can purchase the color Sunflower Yellow. (This new item will be created in the next lesson of this module.)
Demonstration Steps
1. Create the new vendor in the database. a. On the navigation pane, click Departments. b. Click Purchase > Planning > Vendors.
c. Click New to open a new Vendor Card page. d. Expand the General FastTab. e. Press ENTER to automatically fill in the next number of the
default number series for vendors in the No. field.
f. In the Name field, type "XY Paint Supply". g. In the Address field, type "200 Bay Drive". h. In the Post Code field, type "NL-1009 AG".
Note: Notice that the city field is now filled with Amsterdam. A combination of post code and city is predefined in the system so that you can type (or lookup and select) either in the Post Code or City field, and the other field is then filled in automatically.
i. In the Country/Region field, type "NL". j. In the Contact field, type "Laura Owen".
Note: A code is automatically set up in the Primary Contact No. field.
Microsoft Official Training Materials for Microsoft Dynamics ® Your use of this content is subject to your current services agreement
Introduction in Microsoft Dynamics® NAV 2013
5 - 16
FIGURE 5.7: VENDOR CARD PAGE – GENERAL FASTTAB
k. Expand the Invoicing FastTab. l. Click the drop-down arrow in the Gen. Bus. Posting Group field,
and select EU.
The business posting group specifies who is sold from, and will, in combination with the product posting group (determined by the item on the sales document), determine the income statement account to post to.
m. Click the drop-down arrow in the VAT Bus. Posting Group field, and select EU. In combination with the VAT product posting group, the VAT business posting group will determine how VAT is calculated and on which account it is posted.
n. Click the drop-down arrow in the Vendor Posting Group field, and select EU. The vendor posting group maps the accounts payable account, payment discount accounts, invoice and application rounding accounts, and interest and fee accounts that relate to vendors.
o. Expand the Payments FastTab.
Microsoft Official Training Materials for Microsoft Dynamics ® Your use of this content is subject to your current services agreement
Module 5: Master Data for the Sales and Purchase Process
5 - 17
p. In the Application Method field, leave the default of Manual. This is where you select how the program applies entries for this vendor. Manual means that the program applies payments only if a document is specified. The other option, Apply to Oldest, means that if a document is not specified for the payment to be applied to, the program applies the payment to the oldest of the vendor’s open entries.
q. Click the drop-down arrow in the Payment Terms Code field, and select 7 DAYS. The payment terms code, combined with the document date of a purchase document, determines when the vendor expects payment.
r. The Receiving and Foreign Trade FastTabs must be filled only if you have special needs for warehouse location or shipping method, or if this vendor has a currency or language different than your company.
s. Click OK to close the Vendor Card page.
The new vendor, XY Paint Supply, is now created and ready for business.
Microsoft Official Training Materials for Microsoft Dynamics ® Your use of this content is subject to your current services agreement
Introduction in Microsoft Dynamics® NAV 2013
5 - 18
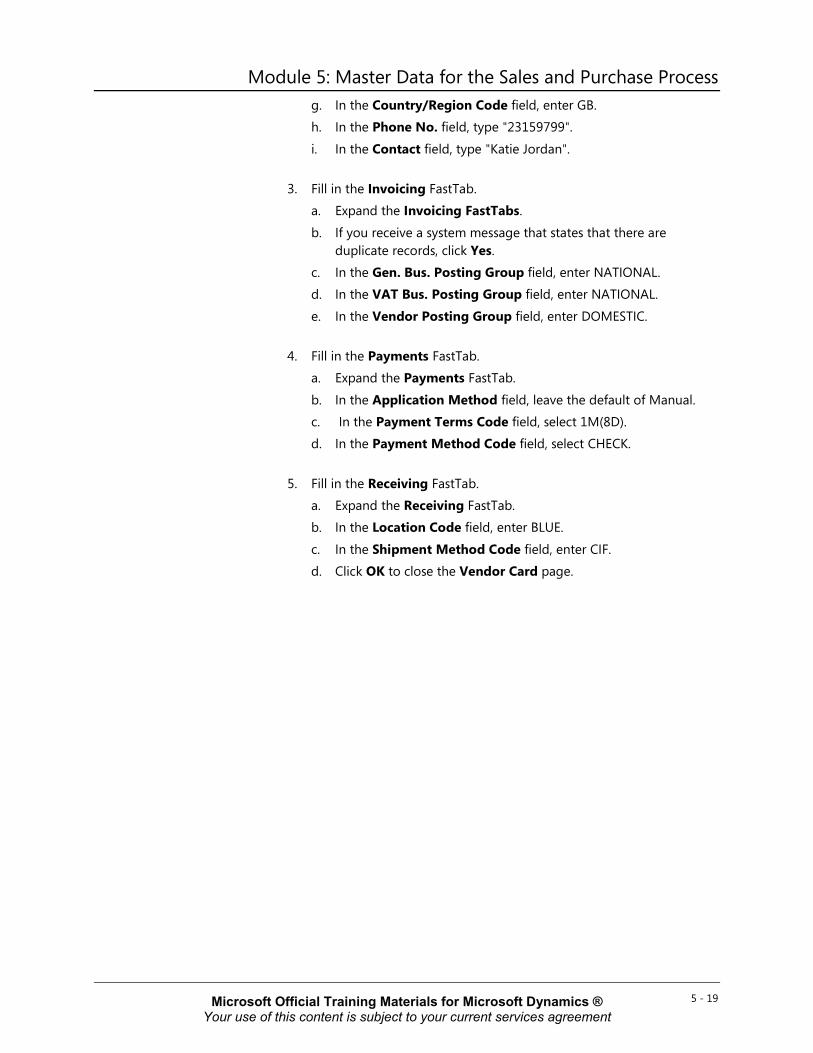
Lab 5.1: Create a New Office Furniture Vendor Scenario
Your company is preparing to resell item 70062, Antwerp Conference Chairs. Create a new vendor with the following information:
• Lewis Home Furniture XY, Ltd.
89 Radcroft Road
GB-IB7 7VN Gainsborough
• Phone number: 23159799
• Contact person: Katie Jordan
• Payment must be completed within 1 month, but a payment discount is given when paid within 8 days.
• Payment is performed through checks.
• All items sold from this vendor will be delivered in the BLUE warehouse.
• All items are delivered according to the CIF (Cost, Insurance, and Freight) shipment method .
High Level Steps 1. Create a new vendor card.
2. Fill in the General FastTab. 3. Fill in the Invoicing FastTab. 4. Fill in the Payments FastTab. 5. Fill in the Receiving FastTab.
Detailed Steps 1. Create a new vendor card.
a. On the navigation pane, click Departments.
b. Click Purchase > Planning > Vendors. c. Click New to create a new Vendor Card page.
2. Fill in the General FastTab. a. Expand the General FastTab. b. Press ENTER so that the No. field is automatically populated. c. In the Name field, type "Lewis Home Furniture XY, LTD".
d. In the Address field, type "89 Radcroft Road". e. In the Post Code field, type "GB-IB7 7VN". f. In the City field, enter Gainsborough.
Microsoft Official Training Materials for Microsoft Dynamics ® Your use of this content is subject to your current services agreement
Module 5: Master Data for the Sales and Purchase Process
5 - 19
g. In the Country/Region Code field, enter GB. h. In the Phone No. field, type "23159799".
i. In the Contact field, type "Katie Jordan".
3. Fill in the Invoicing FastTab. a. Expand the Invoicing FastTabs.
b. If you receive a system message that states that there are duplicate records, click Yes.
c. In the Gen. Bus. Posting Group field, enter NATIONAL. d. In the VAT Bus. Posting Group field, enter NATIONAL.
e. In the Vendor Posting Group field, enter DOMESTIC.
4. Fill in the Payments FastTab. a. Expand the Payments FastTab.
b. In the Application Method field, leave the default of Manual. c. In the Payment Terms Code field, select 1M(8D). d. In the Payment Method Code field, select CHECK.
5. Fill in the Receiving FastTab. a. Expand the Receiving FastTab. b. In the Location Code field, enter BLUE.
c. In the Shipment Method Code field, enter CIF. d. Click OK to close the Vendor Card page.
Microsoft Official Training Materials for Microsoft Dynamics ® Your use of this content is subject to your current services agreement
Introduction in Microsoft Dynamics® NAV 2013
5 - 20
Item Cards Before buying and selling items, you must set up information and policies that the program uses in item transactions. All this item-specific information is entered and maintained in one central place: the item card.
When you create document lines for a specific item, the relevant information from the item card is entered in most of the fields on the lines and the line amount is calculated according to the quantity you enter.
To open the Item Card page, follow these steps:
1. On the navigation pane, click Home and then click Items. 2. Click New to open a new Item Card page.
When you set up a new item on an item card, there are fields that must always be filled in, fields that can be filled in as needed, and fields in which you cannot enter anything because they are maintained by the program.
The tables in the following topics explain all the fields on each item card FastTab to give you direction on how to fill in the fields. The following codes in the Fill In column indicate whether the field must be filled in:
man = Mandatory
opt = Optional
aut = Automatic
General FastTab
The following table explains every field on the General FastTab and gives directions on how to fill it in.
Field Fill in Instruction
No. man The program is predefined with automatic numbering using generic number series. You should use this predefined setup.
Description opt Enter the name of the item.
Microsoft Official Training Materials for Microsoft Dynamics ® Your use of this content is subject to your current services agreement
Module 5: Master Data for the Sales and Purchase Process
5 - 21
Field Fill in Instruction
Base Unit of Measure
man Drill-down to the Item Units of Measure page and select the unit type in which you want to keep the item. You may have to create a base unit of measure if what you want is not included on the default list.
Assembly BOM aut This field indicates if the item has the function of a sales bill of material (BOM).
Note: The assembly BOM is not related to the production BOM.
For detailed information on the sales BOM, refer to the course Trade in Microsoft Dynamics NAV 2013.
Shelf No. opt Enter a text value to name the place in inventory where you keep the item. However, this field is not dynamically updated by the system. The shelf number is displayed in the Picking List report.
Automatic Ext. Text
opt Select this field to make sure that any extended text will be added automatically on sales or purchase documents for this item.
Microsoft Official Training Materials for Microsoft Dynamics ® Your use of this content is subject to your current services agreement
Introduction in Microsoft Dynamics® NAV 2013
5 - 22
Field Fill in Instruction
Created from Nonstock Item
aut This field indicates that the item card was originally a nonstock item.
Note: For more information about nonstock items, refer to the course Trade in Microsoft Dynamics NAV 2013.
Item Category Code
opt Look up and select from the predefined codes (or define new codes). Item category codes consist of a combination of posting groups (the three fields in the upper-right corner of the Invoicing FastTabs). When you use an item category code, you do not have to enter posting groups every time that you set up an item card.
Product Group Code
opt Enter the name of a product group to indicate the group of product to which this item belongs, for example, paint, tools, and batteries.
Search Description
opt The item name that you wrote in the Description field is entered here as a default. However, you can change it if you want to use a different name when you search for the item.
Inventory aut This field shows how many units (in the base unit of measure) of the item are on inventory.
Qty. on Purch. Order
aut This field shows how many units are on purchase orders but are not yet received.
Microsoft Official Training Materials for Microsoft Dynamics ® Your use of this content is subject to your current services agreement
Module 5: Master Data for the Sales and Purchase Process
5 - 23
Field Fill in Instruction
Qty. on Sales Order
aut This field shows how many units are on sales orders but are not yet shipped.
Blocked opt Select this field to prevent the program from posting transactions with this item.
Last Date Modified
aut This field is filled in automatically with the date that a change was last made to any information on the item card.
Invoicing FastTab
The Invoicing FastTab holds various figures and options that relate to cost, price, and posting of the item.
FIGURE 5.8: ITEM CARD 70000 – INVOICING FASTTAB
Microsoft Official Training Materials for Microsoft Dynamics ® Your use of this content is subject to your current services agreement
Introduction in Microsoft Dynamics® NAV 2013
5 - 24
The following table explains every field on the Invoicing FastTab and gives directions on how to fill it in.
Field Fill in Instruction
Costing Method man Select the way that the item's cost flow is managed. The most common method is FIFO, which means First-in-First-out. With this method, the items that were purchased first are always sold first. The FIFO costing method values the inventory decrease by using the value of the first inventory increase. The costing method determines how costs are calculated and how inventory is valued. Other options are LIFO, specific, average, and standard.
Cost is adjusted aut Select this check box to indicate if the item's unit cost is adjusted for different unit costs between inbound and outbound item transactions over time.
Cost is Posted to G/L
aut This status field relates to the concept of cost reconciliation.
Standard Cost opt For items where the selected Costing Method is Standard, enter the manually calculated standard cost.
Microsoft Official Training Materials for Microsoft Dynamics ® Your use of this content is subject to your current services agreement
Module 5: Master Data for the Sales and Purchase Process
5 - 25
Field Fill in Instruction
Unit Cost aut When you create a new item, enter the cost for each unit that you expect to pay for the item. Later, the program updates the field so that it contains the item's current (possibly adjusted) cost. This field always reflects the most recent direct unit cost of the item on inbound transactions and related outbound transactions.
Overhead Rate man Enter an amount to cover the indirect costs for the item.
Indirect Cost % man Enter a percentage that corresponds to the indirect costs (freight and warehouse handling, for example) associated with the purchase of the item.
Last Direct Cost aut/opt When you create a new item, enter the cost for each unit that you expect to pay for the item. The value is then automatically inserted in, for example, the Direct Unit Cost Excl. VAT field on a new purchase line.
Microsoft Official Training Materials for Microsoft Dynamics ® Your use of this content is subject to your current services agreement
Introduction in Microsoft Dynamics® NAV 2013
5 - 26
Field Fill in Instruction
Price/Profit Calculation
man Select one of the profit calculation options: Profit = Price - Cost: If you have fixed unit prices, select this option. Profit is calculated as the difference between the unit price and the unit cost. Price = Cost + Profit: If you price your resources according to a certain profit margin, select this option. Price is calculated by adding the profit to the unit cost. Profit is calculated from the unit price with the profit percentage you enter. No Relationship: Select this feature if you do not want to use the automatic profit calculation features.
Profit % opt/man Depending on your choice in the Price/Profit Calculation field, you can enter a percentage (and the program calculates the unit price). Or, you can see the percentage the program has calculated: Profit% = 1 - (Unit Cost : Unit Price) x 100.
Microsoft Official Training Materials for Microsoft Dynamics ® Your use of this content is subject to your current services agreement
Module 5: Master Data for the Sales and Purchase Process
5 - 27
Field Fill in Instruction
Unit Price opt/man Depending on the option that you selected in the Price/Profit Calculation field, you can enter a percentage (and the program calculates the Profit %). Or, you can see the percentage the program has calculated: Unit Price = Unit Cost : (1 - Profit).
The value in this field is carried to sales lines as the Unit Price Excl. VAT field. However, you can always overwrite it if you want to sell at another price.
Gen. Prod. Posting Group
man Unless you use an item category code, you must look up from this field and select a posting group from the predefined posting groups.
When you post transactions that involve this item, the program uses this code in combination with a general business posting group code in the General Posting Setup page to determine the income statement account to post to.
VAT Prod. Posting Group
man Unless you use an item category code, you must look up from this field and select a posting group from the predefined posting groups.
When you post transactions that involve this item, the program uses this code in combination with a VAT business posting group code in the VAT Posting Setup page to determine VAT calculation and which VAT account to post to.
Microsoft Official Training Materials for Microsoft Dynamics ® Your use of this content is subject to your current services agreement
Introduction in Microsoft Dynamics® NAV 2013
5 - 28
Field Fill in Instruction
Inventory Posting Group
man Unless you use an item category code, you must look up from this field and select a posting group from the predefined posting groups. Inventory posting groups specify the type of inventory and are then combined with location codes in the Inventory Posting Setup page. Each combination is then mapped to the inventory accounts, WIP account, and other variance accounts that relate to inventory in the chart of accounts.
Net Invoiced Qty. aut This field shows the quantity of invoiced purchases minus the quantity of invoiced sales.
Allow Invoice Disc. opt Select this check box if you want the program to allow an invoice discount when the item is sold.
Item Discount Group
opt This field relates to the Sales Line Pricing functionality.
Note: For detailed information, refer to the course Trade in Microsoft Dynamics NAV 2013.
Microsoft Official Training Materials for Microsoft Dynamics ® Your use of this content is subject to your current services agreement
Module 5: Master Data for the Sales and Purchase Process
5 - 29
Field Fill in Instruction
Sales Unit of Measure
aut/opt This field contains the unit of measure code the program must use when you sell the item. It is automatically filled in when you fill in the Base Unit of Measure field.
Change this field only if you sell the item in units that differ from the code in the Base Unit of Measure field.
Note: If you do not use the base unit of measure, or if you delete the sales unit of measure on the item card, the Unit of Measure Code field will not be filled in on the sales line.
Replenishment FastTab
The Replenishment FastTab holds information that the system uses when supplying items, whether by purchase or production.
Note: For detailed information on most of the fields on this tab, refer to the Manufacturing I in Microsoft Dynamics NAV 2013 course.
Microsoft Official Training Materials for Microsoft Dynamics ® Your use of this content is subject to your current services agreement
The following table explains every field on the Replenishment FastTab and gives directions on how to fill it in.
Field Fill in Instruction
Replenishment System man Select whether your standard way of supplying the item is to buy it (Purchase), produce it (Prod. Order), or assemble it (Assembly).
Vendor No. opt For purchased items, select a default supplier of the item. That vendor is then suggested when planning for the item.
Vendor Item No. opt For purchased items, select the vendor's own item identification (if different from yours).
Microsoft Official Training Materials for Microsoft Dynamics ® Your use of this content is subject to your current services agreement
Module 5: Master Data for the Sales and Purchase Process
5 - 31
Field Fill in Instruction
Purchase Unit of Measure
opt This field contains the unit of measure code that the program must use when you purchase the item. It is automatically filled in when you fill in the Base Unit of Measure field. Change this field only if you purchase the item in units that differ from the code in the Base Unit of Measure field.
Note: If you do not use the base unit of measure, or if you delete the purchase unit of measure on the item card, the Unit of Measure Code field will not be filled in on the purchase line.
Lead Time Calculation opt Enter a date formula in the Lead Time Calculation field to specify the time that is required to replenish this purchased item, such as 1W. The program uses this field in date calculations as follows: Order Date + Default Safety Lead Time + Lead Time Calculation = Planned Receipt Date.
Microsoft Official Training Materials for Microsoft Dynamics ® Your use of this content is subject to your current services agreement
Introduction in Microsoft Dynamics® NAV 2013
5 - 32
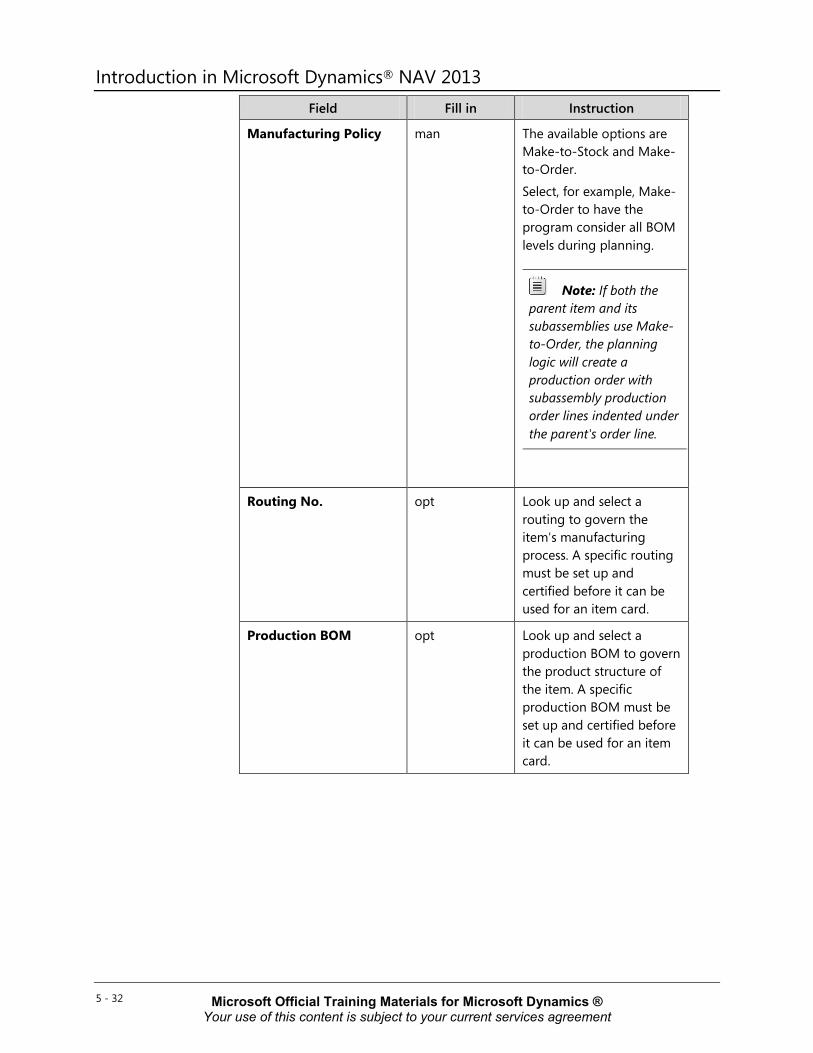
Field Fill in Instruction
Manufacturing Policy man The available options are Make-to-Stock and Make-to-Order.
Select, for example, Make-to-Order to have the program consider all BOM levels during planning.
Note: If both the parent item and its subassemblies use Make-to-Order, the planning logic will create a production order with subassembly production order lines indented under the parent's order line.
Routing No. opt Look up and select a routing to govern the item's manufacturing process. A specific routing must be set up and certified before it can be used for an item card.
Production BOM opt Look up and select a production BOM to govern the product structure of the item. A specific production BOM must be set up and certified before it can be used for an item card.
Microsoft Official Training Materials for Microsoft Dynamics ® Your use of this content is subject to your current services agreement
Module 5: Master Data for the Sales and Purchase Process
5 - 33
Field Fill in Instruction
Flushing Method opt Select whether consumption of this item in production must be calculated and posted manually, by selecting Manual, or automatically, by selecting one of the following: · Forward - the program automatically calculates and posts consumption when the production order is released. · Backward - the program automatically calculates and posts consumption when the released production order is finished.
Scrap % opt Specify the percentage of the item that you expect to be scrapped in the production process. The program uses this percentage when it calculates unit prices and net requirements.
Lot Size opt Specify how many units of the item are usually produced in one production lot (but you can still create orders of a different quantity). The program uses this number to calculate the item's standard cost and to distribute the fixed costs of manufacturing the lot.
Assembly Policy opt Specify which default order flow is used to supply this assembly item.
Microsoft Official Training Materials for Microsoft Dynamics ® Your use of this content is subject to your current services agreement
Introduction in Microsoft Dynamics® NAV 2013
5 - 34
Planning FastTab
The Planning FastTab holds information that is used by the automatic materials requirement planning (MRP) system.
FIGURE 5.10: ITEM CARD 10000 – PLANNING FASTTAB
Microsoft Official Training Materials for Microsoft Dynamics ® Your use of this content is subject to your current services agreement
Module 5: Master Data for the Sales and Purchase Process
5 - 35
The following table explains some fields on the Planning FastTab and gives directions on how to fill it in.
Field Fill in Instruction
Reordering Policy
man – if you use planning opt – if you do not use planning
Select the planning method to be used by the MRP engine.
Reserve man Select whether the program will allow reservation for this item. The option that you select here is carried to sales lines for the item and will override a reservation option on the sales header (carried from the customer card). However, if you select Optional in this field and you enter the item on a sales line where the sales header contains Always, the sales line will be assigned the option Always.
Order Tracking Policy
man Select whether the program must create order tracking links between matching supply and demand. Available options are Tracking Only, Tracking & Action Msg., and None. Select Tracking Only to have the program create order-tracking entries in two circumstances: • Dynamically, when it creates any
order that can be matched by an existing order directly.
• When it creates a supply order specifically for the demand.
Select None if the program does not have to create order-tracking entries at all.
Stockkeeping Unit Exists
aut This field is filled in if the item card has one or more corresponding stock-keeping units (SKUs) for different locations.
Microsoft Official Training Materials for Microsoft Dynamics ® Your use of this content is subject to your current services agreement
Introduction in Microsoft Dynamics® NAV 2013
5 - 36
Field Fill in Instruction
Critical opt Select this check box to indicate that the item must be included in the available-to-promise (ATP) calculations of its parent item.
Foreign Trade FastTab
The Foreign Trade FastTab holds information that relates to a company's trade with other countries or regions.
Microsoft Official Training Materials for Microsoft Dynamics ® Your use of this content is subject to your current services agreement
Module 5: Master Data for the Sales and Purchase Process
5 - 37
The following table explains the fields on the Foreign Trade FastTab and gives directions on how to fill it in.
Field Fill in Instruction
Tariff No. opt Enter a code for the item's tariff number. This number is required if you do Intrastat reporting when you make out export and other statements.
Note: For detailed information about Intrastat, refer to the Finance Advanced in Microsoft Dynamics NAV 2013 course.
Country/Region of Origin Code
opt Enter a code for the country/region in which the item was produced or processed. The field is used for reporting to Intrastat.
Net Weight opt Enter the net weight of the item if you want it to complete customs documents, waybills, and so on.
Gross Weight opt Enter the gross weight of the item, if you need it to complete, for example, customs documents, waybills.
Item Tracking and Warehouse FastTabs
The last two FastTabs on the item card are for special purposes and are not covered in this training manual, except for the following short overview:
• The Item Tracking FastTab governs the use of serial and lot numbers assigned to the item for tracking purposes.
• The Warehouse FastTab holds information about how the item is received, stored, and shipped in special warehouse activities.
As soon as an item card is created, the item is ready to be purchased or sold on document lines.
Microsoft Official Training Materials for Microsoft Dynamics ® Your use of this content is subject to your current services agreement
Introduction in Microsoft Dynamics® NAV 2013
5 - 38
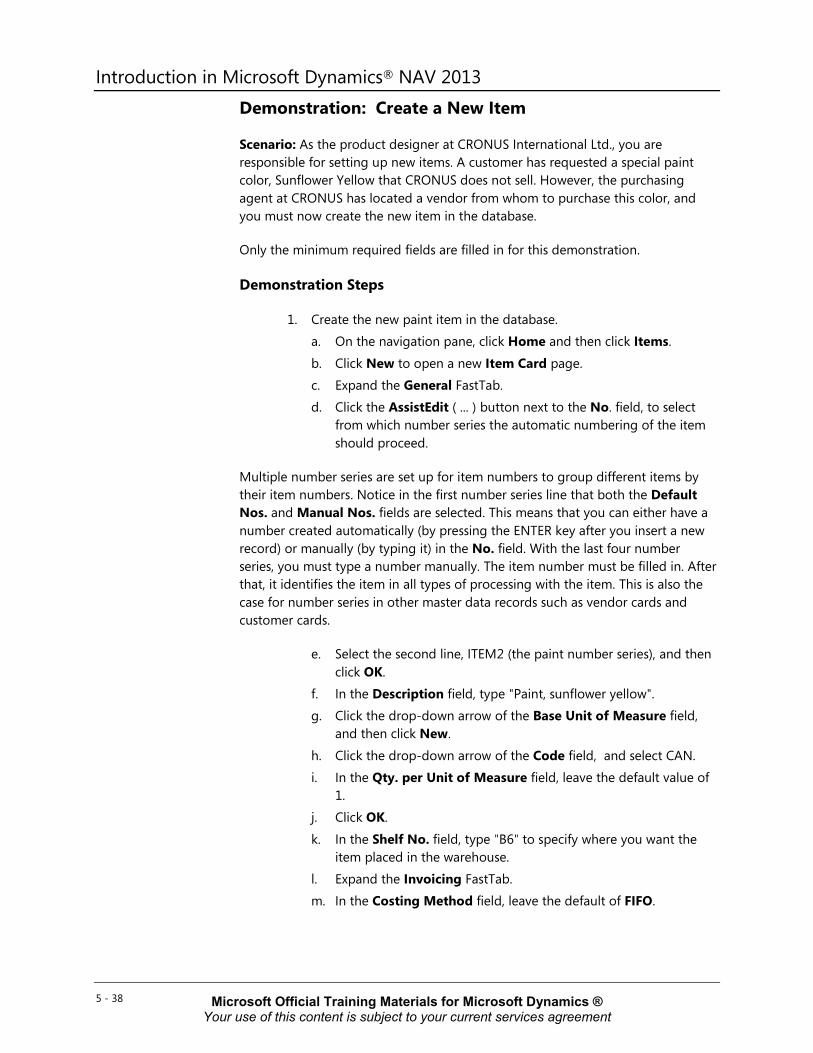
Demonstration: Create a New Item
Scenario: As the product designer at CRONUS International Ltd., you are responsible for setting up new items. A customer has requested a special paint color, Sunflower Yellow that CRONUS does not sell. However, the purchasing agent at CRONUS has located a vendor from whom to purchase this color, and you must now create the new item in the database.
Only the minimum required fields are filled in for this demonstration.
Demonstration Steps
1. Create the new paint item in the database. a. On the navigation pane, click Home and then click Items.
b. Click New to open a new Item Card page. c. Expand the General FastTab. d. Click the AssistEdit ( ... ) button next to the No. field, to select
from which number series the automatic numbering of the item should proceed.
Multiple number series are set up for item numbers to group different items by their item numbers. Notice in the first number series line that both the Default Nos. and Manual Nos. fields are selected. This means that you can either have a number created automatically (by pressing the ENTER key after you insert a new record) or manually (by typing it) in the No. field. With the last four number series, you must type a number manually. The item number must be filled in. After that, it identifies the item in all types of processing with the item. This is also the case for number series in other master data records such as vendor cards and customer cards.
e. Select the second line, ITEM2 (the paint number series), and then click OK.
f. In the Description field, type "Paint, sunflower yellow". g. Click the drop-down arrow of the Base Unit of Measure field,
and then click New.
h. Click the drop-down arrow of the Code field, and select CAN. i. In the Qty. per Unit of Measure field, leave the default value of
1. j. Click OK.
k. In the Shelf No. field, type "B6" to specify where you want the item placed in the warehouse.
l. Expand the Invoicing FastTab. m. In the Costing Method field, leave the default of FIFO.
Microsoft Official Training Materials for Microsoft Dynamics ® Your use of this content is subject to your current services agreement
Module 5: Master Data for the Sales and Purchase Process
5 - 39
n. In the Unit Cost field, type "1.40". o. In the Last Direct Cost field, type "1.40".
p. In the Unit Price field, type "2.70".
Note: Notice that the Profit % field now shows a calculated profit of approximately 48 percent.
q. In the Gen. Prod. Posting Group field, enter RETAIL. r. Notice that the VAT Prod. Posting Group field is automatically
set to VAT25 percent because of the existing posting setup. s. In the Inventory Posting Group field, enter RESALE. t. Click OK to close the Item Card page.
You do not have to fill in the remaining FastTabs and fields now. The new item, 70105, Paint, sunflower yellow, is ready for further processing.
Microsoft Official Training Materials for Microsoft Dynamics ® Your use of this content is subject to your current services agreement
Introduction in Microsoft Dynamics® NAV 2013
5 - 40
Lab 5.2: Create a New Office Furniture Item Scenario
As the product designer at CRONUS, you are responsible for setting up new items. The vendor of the ANTWERP conference tables has informed you that the matching chairs are now available. CRONUS has decided to take this item into their arrangement.
The new item must be set up, according to the following conditions:
• An automatic item number will be generated according to the same number series as the other furniture (ITEM4 number series).
• The ANTWERP, Conference Chairs will be purchased by pcs at 150,00 LCY.
• The item belongs to the category FURNITURE.
• The costing method must be set to FIFO.
High Level Steps 1. Create the new item card. 2. Fill in the General FastTab. 3. Expand the Invoicing FastTab.
Detailed Steps 1. Create the new item card.
a. On the navigation pane, click Home and then click Items. b. Click New to open a new Item Card page.
2. Fill in the General FastTab.
a. Click the AssistEdit (…) button next to the No. field, and then select ITEM4.
b. In the Description field, type "ANTWERP, Conference Chair". c. Click the drop-down arrow of the Base Unit of Measure field,
and then click New. d. Click the drop-down arrow of the Code field, and then select PCS. e. In the Qty. per Unit of Measure field, leave the default value of
1.
f. Click OK. g. In the Item Category Code field, enter FURNITURE.
Microsoft Official Training Materials for Microsoft Dynamics ® Your use of this content is subject to your current services agreement
Module 5: Master Data for the Sales and Purchase Process
5 - 41
3. Expand the Invoicing FastTab. a. In the Costing Method field, enter FIFO.
b. In the Unit Cost field, enter 150.00 LCY. c. In the Last Direct Cost field, enter 150.00 LCY. d. Notice the Gen. Prod. Posting Group, VAT Prod. Posting
Group, and Inventory Posting Group fields were automatically populated when you filled in the Item Category Code field. Leave the provided defaults.
e. Click OK to close the Item Card page.
Microsoft Official Training Materials for Microsoft Dynamics ® Your use of this content is subject to your current services agreement
Introduction in Microsoft Dynamics® NAV 2013
5 - 42
Module Review Module Review and Takeaways
Each G/L account can be managed in a G/L Account Card page that holds the setup information and links to related entry details. The list of all existing G/L accounts is displayed in the Chart of Accounts page, which is the central interface to the company's financial records.
As one of the central elements of a financial management system, the purpose and functions of the chart of accounts and the management of master data is prerequisite knowledge for anyone training to work with Microsoft Dynamics® NAV 2013 at any level.
Microsoft Official Training Materials for Microsoft Dynamics ® Your use of this content is subject to your current services agreement