Page 1
Technical Report
MongoDB Best Practices on
NetApp SolidFire SolidFire Tech Solutions Group, NetApp
June 2017 | TR-4600
Abstract
This document outlines the guidelines to create a stable, high-performance MongoDB
instance on NetApp® SolidFire® storage. SolidFire storage offers a compelling advantage for
a wide range of database application use cases. This document introduces SolidFire storage
to the database administrator and provides important system-design paradigms to consider
when using SolidFire storage for MongoDB. From these design points, you can learn about
application profiles that are best suited for SolidFire storage and how to identify those types
of applications.
Page 2
2 MongoDB Best Practices on NetApp SolidFire © 2017 NetApp, Inc. All Rights Reserved. © 2016 NetApp, Inc. All rights reserved.
TABLE OF CONTENTS
1 Introduction ........................................................................................................................................... 4
1.1 Thin Provisioning ............................................................................................................................................ 4
1.2 Compression and Deduplication ..................................................................................................................... 4
1.3 Quality of Service (QoS) ................................................................................................................................. 5
2 Application Use Cases ......................................................................................................................... 5
2.1 Database Consolidation .................................................................................................................................. 5
2.2 Data Protection and Disaster Recovery .......................................................................................................... 5
2.3 Development and Testing ............................................................................................................................... 5
3 Storage Configuration .......................................................................................................................... 6
3.1 Create an Account .......................................................................................................................................... 6
3.2 Create a Volume ............................................................................................................................................. 7
3.3 Create Volume Access Groups ....................................................................................................................... 7
4 Operating System Configuration ........................................................................................................ 9
4.1 Add MongoDB Packages ................................................................................................................................ 9
4.2 Update Kernel Parameters.............................................................................................................................. 9
4.3 Optimize Network Performance .................................................................................................................... 10
4.4 Optimize iSCSI Parameters .......................................................................................................................... 10
4.5 Tune the I/O Scheduler ................................................................................................................................. 10
4.6 Configure the Multipath Driver ...................................................................................................................... 11
4.7 Enable Multipathing ...................................................................................................................................... 11
4.8 Set Up a Logical Volume Manager (LVM) ..................................................................................................... 11
4.9 Set Ulimits ..................................................................................................................................................... 12
5 MongoDB Configuration .................................................................................................................... 12
5.1 Install MongoDB Enterprise .......................................................................................................................... 12
6 Backup and Recovery by Using Storage Snapshots ...................................................................... 14
6.1 Create Snapshots (Backup) .......................................................................................................................... 14
6.2 Restore Snapshots (Recovery) ..................................................................................................................... 15
7 MongoDB Database Cloning ............................................................................................................. 16
7.1 Clone a Volume ............................................................................................................................................ 16
8 Workload Testing ................................................................................................................................ 18
9 Summary ............................................................................................................................................. 18
Page 3
3 MongoDB Best Practices on NetApp SolidFire © 2017 NetApp, Inc. All Rights Reserved. © 2016 NetApp, Inc. All rights reserved.
Appendix A: mongod.conf File ................................................................................................................ 18
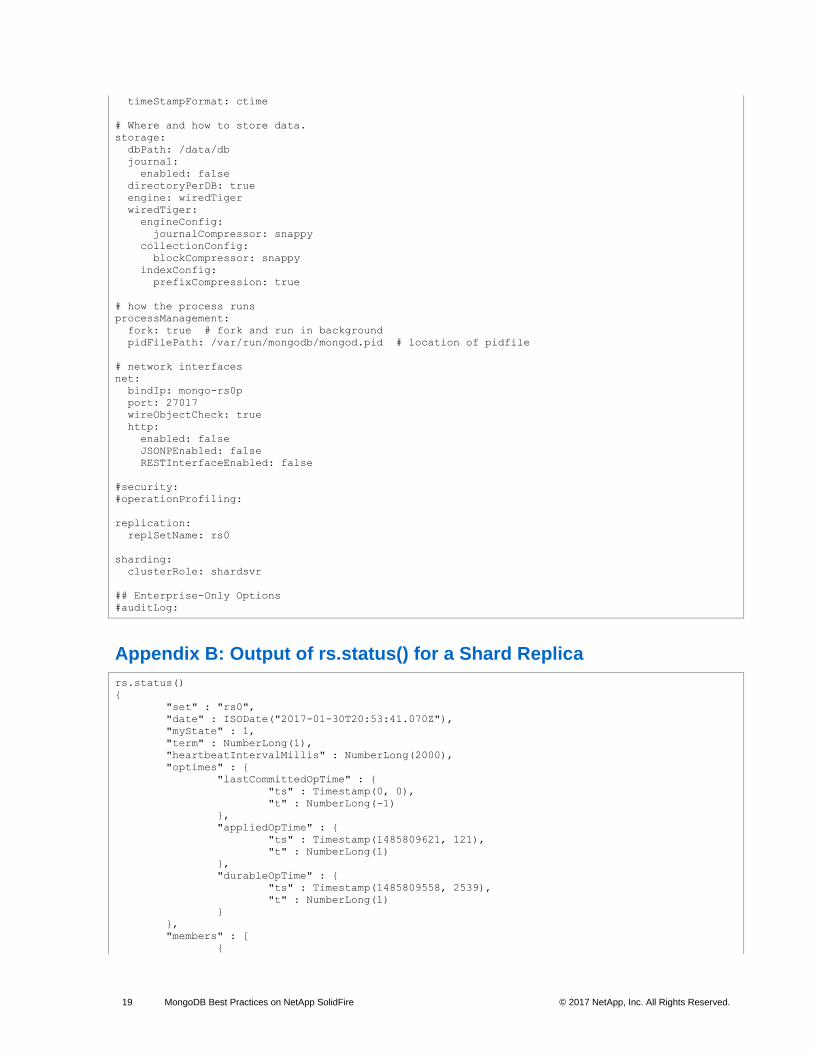
Appendix B: Output of rs.status() for a Shard Replica ......................................................................... 19
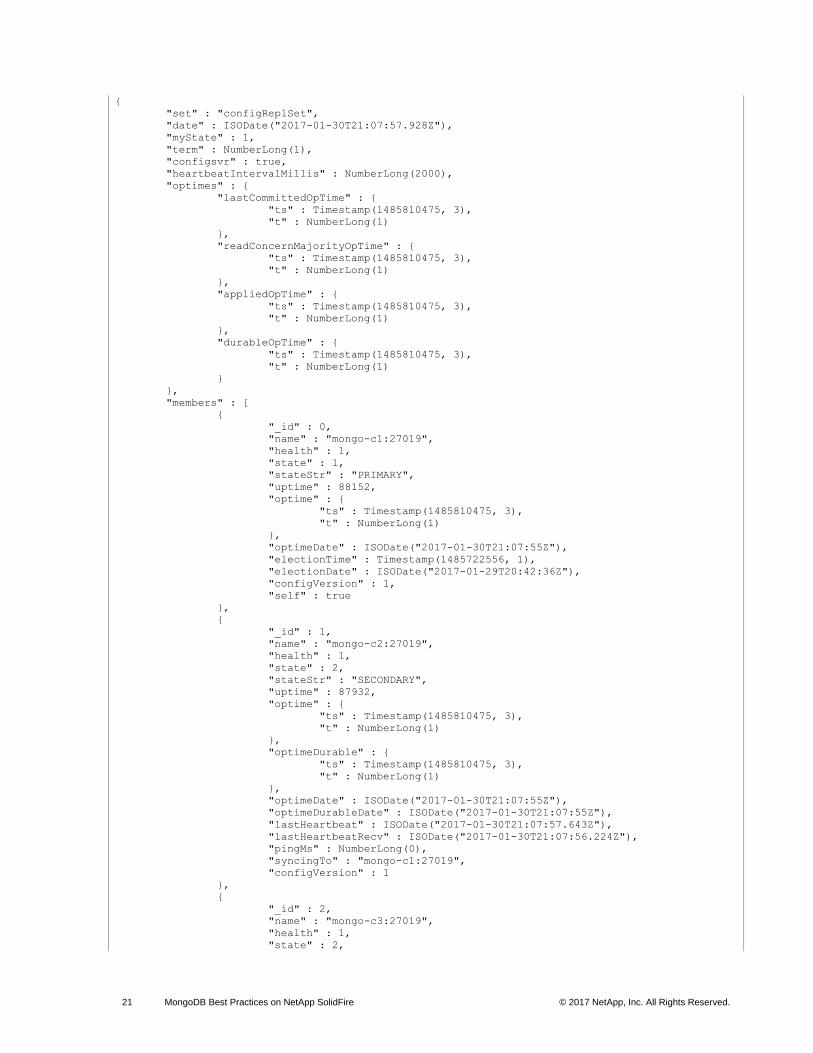
Appendix C: Output of rs.status() for a Config Replica ........................................................................ 20
Sample mongod.conf for the configReplSet ......................................................................................................... 22
Appendix D: Output of sh.status() for a mongos Instance ................................................................... 22
mongos Config File ............................................................................................................................................... 23
References ................................................................................................................................................. 23
Version History ......................................................................................................................................... 23
LIST OF FIGURES
Figure 1) YCSB workload. ............................................................................................................................................ 18
Page 4
4 MongoDB Best Practices on NetApp SolidFire © 2017 NetApp, Inc. All Rights Reserved. © 2016 NetApp, Inc. All rights reserved.
1 Introduction
NetApp SolidFire storage systems were born out of some of the largest cloud infrastructures in the world.
They are designed to serve next-generation data center needs, including scaling with multitenancy, set-
and-forget management, and guaranteed performance. Adopting the SolidFire architecture provides you
with greater predictability for your shared storage infrastructure. SolidFire storage optimizes solid-state
drive (SSD) capacity to create high utilization and volume performance.
Because of the innovative quality-of-service (QoS) properties that are inherent in SolidFire systems,
running MongoDB on SolidFire simplifies deployment and maintenance. When combined with the
available throughput and low-latency characteristics that SolidFire technology provides, this configuration
offers an optimal storage solution for nearly any type of MongoDB use case. This guide gives you the
basic steps and best practices for setting up a high-performing MongoDB instance on SolidFire storage
volumes. NetApp SolidFire storage systems have the following capabilities to support your next-
generation data center needs:
• Thin provisioning
• Compression and deduplication
• QoS
These features reduce the amount of storage space that is required without affecting performance. You
can use these features with various database use cases.
1.1 Thin Provisioning
SolidFire uses granular 4K thin provisioning that does not require any reserve space, which increases
effective capacity by consuming less space. This feature increases efficiency and reduces overhead by
using the smallest allocation possible and by maintaining alignment with the native 4KB allocation format
that modern operating systems use.
Because SolidFire volumes do not use any reserve space, you can deploy a volume capacity for the
estimated maximum size of the database. You can therefore purchase just enough physical hardware to
support the actual space that is consumed by the database. As database space consumption approaches
the physical limits of the installed cluster, you can dynamically add nodes to the cluster to increase its
physical capacity. This process is completely transparent to the database and does not require downtime
or reconfiguration of the operating system or the database.
Furthermore, SolidFire Helix® replication automatically redistributes existing data over the added nodes to
create optimal load balancing of both existing and new data. With this deployment paradigm, you can
configure logical storage capacity once for the lifetime of the supported databases rather than using
incremental updates that depend on the needs of the database.
1.2 Compression and Deduplication
Each SolidFire node includes a PCIe NVRAM card that serves as a write cache. When a host sends
writes, they are divided into 4KB blocks that are immediately compressed, hashed, and stored in the
NVRAM of the two storage nodes before an acknowledgment is returned. The resulting value serves as a
BlockID that determines block placement and that is randomly distributed across all nodes to create an
even load distribution.
The SolidFire Deduplication Block Service identifies blocks that have previously been written based on
the BlockID. If a block already exists, metadata is updated accordingly and the duplicate is discarded.
The whole process is inline and global to the storage cluster.
The combination of inline compression and global deduplication has the following advantages:
• Reduced repetitive writes to media, prolonging drive life
Page 5
5 MongoDB Best Practices on NetApp SolidFire © 2017 NetApp, Inc. All Rights Reserved. © 2016 NetApp, Inc. All rights reserved.
• Increased system performance by minimizing system resources
• Evenly distributed capacity and performance loads across the system, eliminating hot spots
1.3 Quality of Service (QoS)
NetApp SolidFire storage arrays present performance and capacity as dynamic, independent pools. This
feature enables administrators to set the performance requirements for all the databases or tenants that
are hosted on the same cluster. The minimum, maximum, and burst control settings in the QoS policy
guarantee the required performance and can be dynamically changed anytime. If the SolidFire hardware
resources are pushed to their physical limits, more nodes can be added to the existing cluster. SolidFire
Helix data distribution automatically redistributes data for optimal load balancing over all hardware
resources. This process is transparent to upstream applications.
2 Application Use Cases
NetApp SolidFire can support a wide range of database application use cases, including OLTP, decision
support systems (DSS), database consolidation, data protection, disaster recovery, development, testing,
and quality assurance. This section shows how to identify when applications are a good fit for SolidFire. It
also reviews the innovative benefits of SolidFire to these applications.
2.1 Database Consolidation
NetApp SolidFire provides an optimal storage system for database consolidation. The per-volume QoS
controls of SolidFire help individual databases get the I/O throughput that they need without being
affected by other databases that run in parallel on the same storage system. With QoS and data
reduction efficiencies, you can achieve higher database density within the shared storage infrastructure.
The use case of deploying hundreds of individual databases is an excellent fit for SolidFire.
With SolidFire, you can use a single LUN to provision all the data files. Because the maximum size of a
SolidFire LUN is 8TB, however, the size of the database must be under 7TB. This configuration can
achieve the required performance levels without spreading datafiles across multiple volumes, controllers,
and arrays. SolidFire QoS provides guaranteed performance for each database. You do not need to use
complex logical volume manager (LVM) configurations to consolidate multiple LUNs or volumes to meet
the performance needs of your business.
2.2 Data Protection and Disaster Recovery
SolidFire Helix data protection is a distributed replication algorithm that spreads two redundant copies of
data across all drives within the entire cluster. The shared-nothing architecture of SolidFire creates no
single point of failure and can absorb multiple failures. The combined storage efficiency and QoS of
SolidFire provides a compelling disaster recovery solution that enables the sharing of the same storage
resources for disaster recovery and testing and development without performance penalties.
2.3 Development and Testing
Storage snapshots provide a point-in-time view of the contents of an active file system or storage volume.
You can use these snapshots for rapid recovery of corrupted datasets and to create space-efficient
copies of datasets for development and testing use cases. The cloning process can be coupled with
SolidFire QoS control so that database clones can coexist with the production copies without any
performance effects on upstream applications.
The CopyVolume feature of NetApp SolidFire allows you to refresh an existing cloned copy of a database
without performing any file system remount operations. In this use case, you frequently refresh a copy of
the database by only taking changes from the production copy.
Page 6
6 MongoDB Best Practices on NetApp SolidFire © 2017 NetApp, Inc. All Rights Reserved. © 2016 NetApp, Inc. All rights reserved.
3 Storage Configuration
This section shows how to configure NetApp SolidFire volumes to support a MongoDB application.
NetApp recommends that you have all the MongoDB data files, configuration files, and journal files on the
SolidFire storage array. NetApp supports presenting the storage in a 4K sector size (native mode) and in
a 512-byte sector size (512e). Testing shows no performance effect from choosing emulation mode as
long as there is no partition misalignment at the host level.
3.1 Create an Account
To create an account, complete the following steps:
1. Log in to the NetApp SolidFire Element® OS web UI.
2. Select Management Accounts. The Account List window opens.
3. Click Create Account. The Create a New Account window opens.
4. Enter a user name.
5. In the CHAP Settings section, fill in the following fields:
Initiator Secret for CHAP node session authentication
Target Secret for CHAP node session authentication
Page 7
7 MongoDB Best Practices on NetApp SolidFire © 2017 NetApp, Inc. All Rights Reserved. © 2016 NetApp, Inc. All rights reserved.
Note: Leave the credentials field blank if you want passwords to be generated automatically.
6. Click Create Account.
Note: If an account with the same name exists, you get an error message.
3.2 Create a Volume
To create a volume, complete the following steps:
1. Log in to the Element OS web UI.
2. Select Management Volumes. The Volumes List window opens.
3. Click Create Volume. The Create a New Volume window opens.
4. Enter the volume name (1 to 64 characters in length). For example, enter the name Mongo-rs0p.
5. Enter the size of the volume.
6. Click the Account drop-down list and select the account that should have access to the volume. In this case, select mongo.
7. Set the Quality of Service values according to your requirements.
Note: The sliders can be used to adjust the IOPS values, or you can click the number field to enter the desired IOPS values. For Mongo-rs0p, the following values were chosen for the QoS settings: maximum = 100,000, minimum = 15,000, and burst = 100,000.
8. Click Create Volume.
9. Repeat steps 1 through 7 for all volumes that are part of the MongoDB.
3.3 Create Volume Access Groups
Volume access groups limit connectivity from designated host servers based on a unique identifier,
whereas CHAP authentication uses secret keys for unidirectional or bidirectional authentication. In this
document, initiator iSCSI Qualified Names (IQNs) are used to access the volumes.
Page 8
8 MongoDB Best Practices on NetApp SolidFire © 2017 NetApp, Inc. All Rights Reserved. © 2016 NetApp, Inc. All rights reserved.
Volume access groups have the following system limits:
• They can have a maximum of 64 IQNs.
• An IQN can belong to only one access group.
• A single volume can belong to a maximum of four access groups.
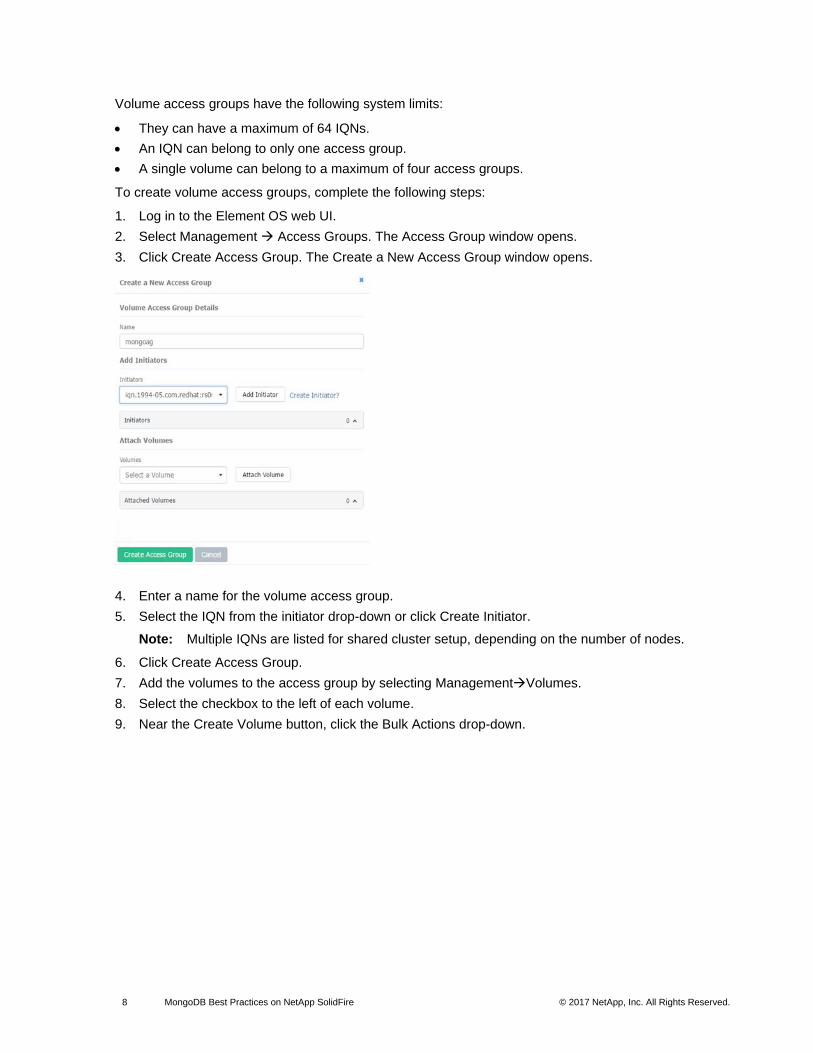
To create volume access groups, complete the following steps:
1. Log in to the Element OS web UI.
2. Select Management Access Groups. The Access Group window opens.
3. Click Create Access Group. The Create a New Access Group window opens.
4. Enter a name for the volume access group.
5. Select the IQN from the initiator drop-down or click Create Initiator.
Note: Multiple IQNs are listed for shared cluster setup, depending on the number of nodes.
6. Click Create Access Group.
7. Add the volumes to the access group by selecting ManagementVolumes.
8. Select the checkbox to the left of each volume.
9. Near the Create Volume button, click the Bulk Actions drop-down.
Page 9
9 MongoDB Best Practices on NetApp SolidFire © 2017 NetApp, Inc. All Rights Reserved. © 2016 NetApp, Inc. All rights reserved.
10. Click Add to Volume Access Group. The Add to Volume Access Group window opens.
11. Select the previously created volume access group from the drop-down list.
12. Click Add to join the selected volumes to the target group.
The MongoDB volumes are now listed as part of the selected volume access group and are ready to be
mapped to the host operating system.
Note: For this configuration, two SolidFire volumes were chosen for each MongoDB replica and an LVM configuration was used to stripe data across both volumes. For a web-scale deployment with hundreds of databases, NetApp recommends that you configure one volume for an individual MongoDB replica and that you control performance with the QoS settings.
4 Operating System Configuration
The guidelines in this document apply to Red Hat Enterprise Linux 7.x distributions of the MongoDB
Enterprise edition. Alternate distributions can be used, assuming that they have full compatibility with the
MongoDB software.
4.1 Add MongoDB Packages
After installing the base operating system, you might need to add more packages to update the operating
system to meet MongoDB installation requirements. For information about how to meet these
requirements, see the latest MongoDB documentation.
4.2 Update Kernel Parameters
Update the kernel parameters for your host operating system to the following values:
vm.dirty_ratio = 15
vm.dirty_background_ratio = 5
vm.swappiness = 1
net.core.somaxconn = 4096
net.ipv4.tcp_fin_timeout = 30
net.ipv4.tcp_keepalive_intvl = 30
net.ipv4.tcp_keepalive_time = 120
Page 10
10 MongoDB Best Practices on NetApp SolidFire © 2017 NetApp, Inc. All Rights Reserved. © 2016 NetApp, Inc. All rights reserved.
net.ipv4.tcp_max_syn_backlog = 4096
4.3 Optimize Network Performance
Consider the following guidelines for optimal network performance:
• Enable jumbo frames for all host network interfaces.
• To isolate the data traffic, configure the interface that is used for the MongoDB data traffic with a different subnet from the public network.
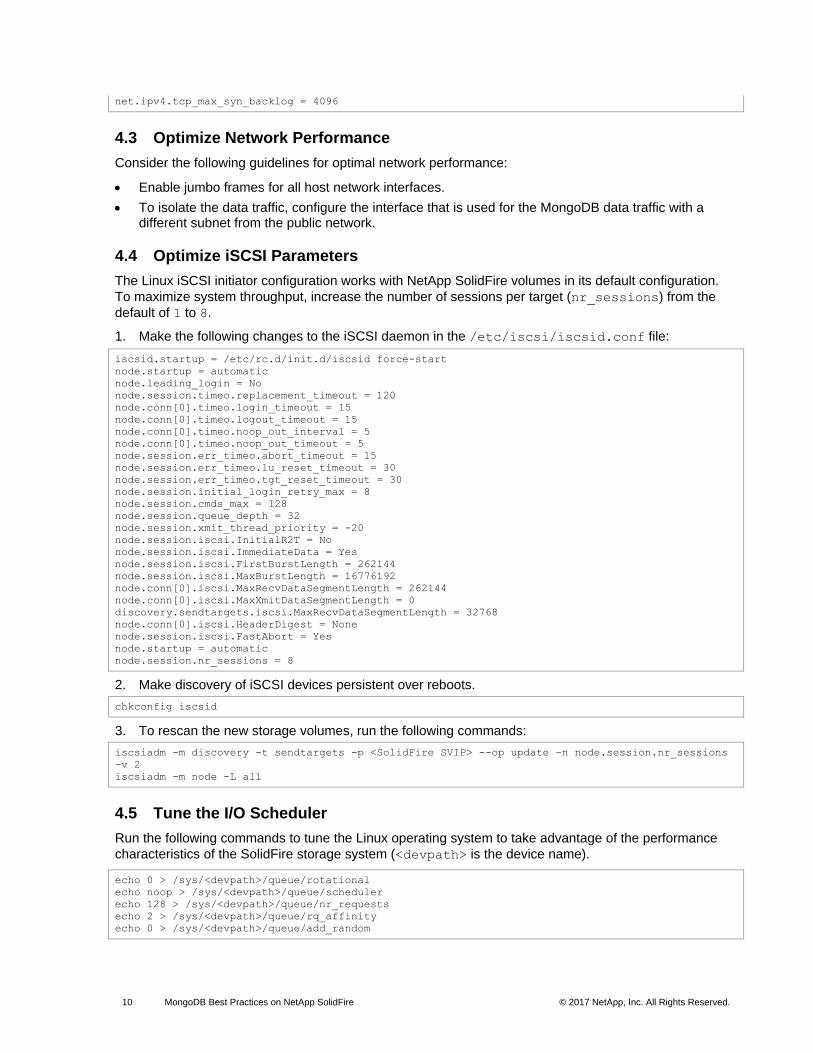
4.4 Optimize iSCSI Parameters
The Linux iSCSI initiator configuration works with NetApp SolidFire volumes in its default configuration.
To maximize system throughput, increase the number of sessions per target (nr_sessions) from the
default of 1 to 8.
1. Make the following changes to the iSCSI daemon in the /etc/iscsi/iscsid.conf file:
iscsid.startup = /etc/rc.d/init.d/iscsid force-start
node.startup = automatic
node.leading_login = No
node.session.timeo.replacement_timeout = 120
node.conn[0].timeo.login_timeout = 15
node.conn[0].timeo.logout_timeout = 15
node.conn[0].timeo.noop_out_interval = 5
node.conn[0].timeo.noop_out_timeout = 5
node.session.err_timeo.abort_timeout = 15
node.session.err_timeo.lu_reset_timeout = 30
node.session.err_timeo.tgt_reset_timeout = 30
node.session.initial_login_retry_max = 8
node.session.cmds_max = 128
node.session.queue_depth = 32
node.session.xmit_thread_priority = -20
node.session.iscsi.InitialR2T = No
node.session.iscsi.ImmediateData = Yes
node.session.iscsi.FirstBurstLength = 262144
node.session.iscsi.MaxBurstLength = 16776192
node.conn[0].iscsi.MaxRecvDataSegmentLength = 262144
node.conn[0].iscsi.MaxXmitDataSegmentLength = 0
discovery.sendtargets.iscsi.MaxRecvDataSegmentLength = 32768
node.conn[0].iscsi.HeaderDigest = None
node.session.iscsi.FastAbort = Yes
node.startup = automatic
node.session.nr_sessions = 8
2. Make discovery of iSCSI devices persistent over reboots.
chkconfig iscsid
3. To rescan the new storage volumes, run the following commands:
iscsiadm -m discovery -t sendtargets -p <SolidFire SVIP> --op update –n node.session.nr_sessions
–v 2
iscsiadm -m node -L all
4.5 Tune the I/O Scheduler
Run the following commands to tune the Linux operating system to take advantage of the performance
characteristics of the SolidFire storage system (<devpath> is the device name).
echo 0 > /sys/<devpath>/queue/rotational
echo noop > /sys/<devpath>/queue/scheduler
echo 128 > /sys/<devpath>/queue/nr_requests
echo 2 > /sys/<devpath>/queue/rq_affinity
echo 0 > /sys/<devpath>/queue/add_random
Page 11
11 MongoDB Best Practices on NetApp SolidFire © 2017 NetApp, Inc. All Rights Reserved. © 2016 NetApp, Inc. All rights reserved.
4.6 Configure the Multipath Driver
Configure the Linux multipath driver (multipathd) by making the following changes to the
/etc/multipath.conf file.
defaults {
user_friendly_names yes
}
devices {
device {
vendor "SolidFir"
product "SSD SAN"
path_grouping_policy multibus
path_checker tur
hardware_handler "0"
failback immediate
rr_weight uniform
rr_min_io 10
rr_min_io_rq 10
features "0"
no_path_retry 24
prio const
}
}
Optionally, you can enable persistent mapping of /dev/mapper entries by associating the NetApp
SolidFire storage system device's worldwide identifier (WWID) with a specific operating system alias. For
this option, make the following additions to the /etc/multipath.conf file:
multipaths {
multipath {
wwid 36f47acc100000000707a646c000003b1
alias mongo-rs0p-disk1
}
multipath {
wwid 36f47acc100000000707a646c00000003
alias mongo-rs0p-disk2
}
}
4.7 Enable Multipathing
To enable multipathing, run the following command:
systemctl enable multipathd.service
You can check the status of the multipath daemon with the following command:
systemctl list-unit-files|grep multipath
multipathd.service enabled
4.8 Set Up a Logical Volume Manager (LVM)
To set up an LVM to stripe the data across multiple SolidFire volume devices, complete the following
steps:
1. Create a volume group by using the multipath devices mpatha and mpathb.
vgcreate mongovg /dev/mapper/mpatha /dev/mapper/mpathb
2. Create a logical volume on this volume group.
lvcreate -l 100%FREE -n mongolv mongovg
Page 12
12 MongoDB Best Practices on NetApp SolidFire © 2017 NetApp, Inc. All Rights Reserved. © 2016 NetApp, Inc. All rights reserved.
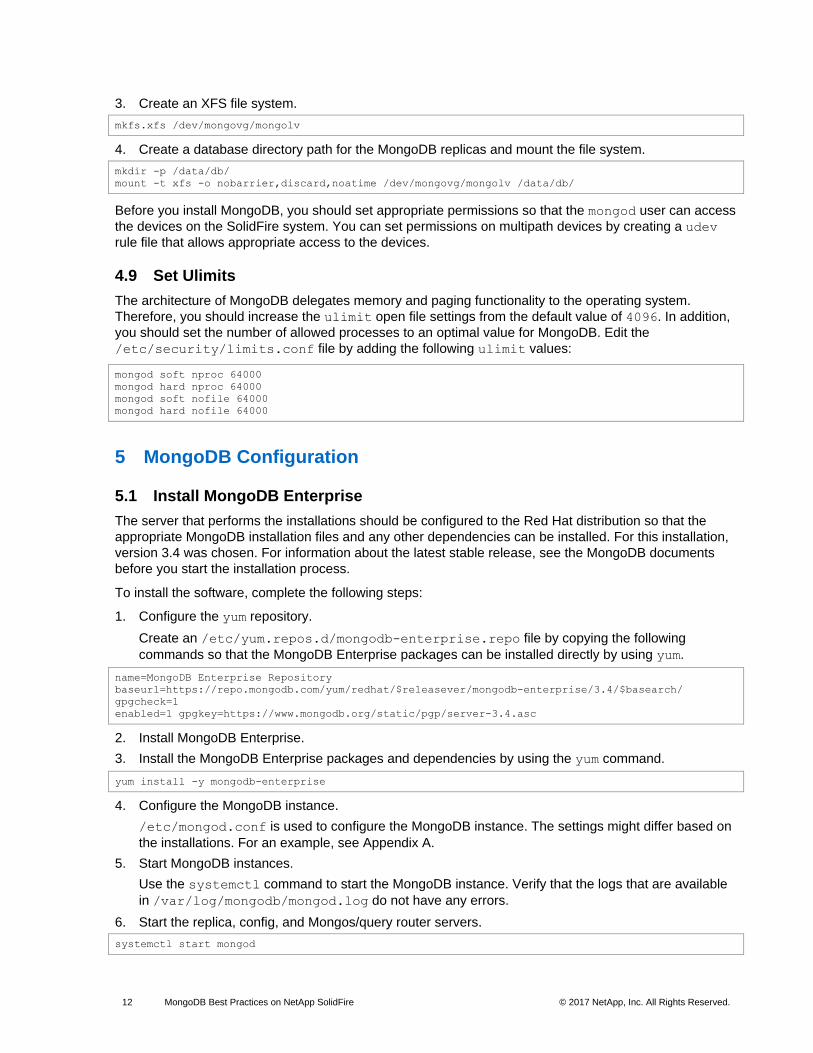
3. Create an XFS file system.
mkfs.xfs /dev/mongovg/mongolv
4. Create a database directory path for the MongoDB replicas and mount the file system.
mkdir -p /data/db/
mount -t xfs -o nobarrier,discard,noatime /dev/mongovg/mongolv /data/db/
Before you install MongoDB, you should set appropriate permissions so that the mongod user can access
the devices on the SolidFire system. You can set permissions on multipath devices by creating a udev
rule file that allows appropriate access to the devices.
4.9 Set Ulimits
The architecture of MongoDB delegates memory and paging functionality to the operating system.
Therefore, you should increase the ulimit open file settings from the default value of 4096. In addition,
you should set the number of allowed processes to an optimal value for MongoDB. Edit the
/etc/security/limits.conf file by adding the following ulimit values:
mongod soft nproc 64000
mongod hard nproc 64000
mongod soft nofile 64000
mongod hard nofile 64000
5 MongoDB Configuration
5.1 Install MongoDB Enterprise
The server that performs the installations should be configured to the Red Hat distribution so that the
appropriate MongoDB installation files and any other dependencies can be installed. For this installation,
version 3.4 was chosen. For information about the latest stable release, see the MongoDB documents
before you start the installation process.
To install the software, complete the following steps:
1. Configure the yum repository.
Create an /etc/yum.repos.d/mongodb-enterprise.repo file by copying the following
commands so that the MongoDB Enterprise packages can be installed directly by using yum.
name=MongoDB Enterprise Repository
baseurl=https://repo.mongodb.com/yum/redhat/$releasever/mongodb-enterprise/3.4/$basearch/
gpgcheck=1
enabled=1 gpgkey=https://www.mongodb.org/static/pgp/server-3.4.asc
2. Install MongoDB Enterprise.
3. Install the MongoDB Enterprise packages and dependencies by using the yum command.
yum install -y mongodb-enterprise
4. Configure the MongoDB instance.
/etc/mongod.conf is used to configure the MongoDB instance. The settings might differ based on
the installations. For an example, see Appendix A.
5. Start MongoDB instances.
Use the systemctl command to start the MongoDB instance. Verify that the logs that are available
in /var/log/mongodb/mongod.log do not have any errors.
6. Start the replica, config, and Mongos/query router servers.
systemctl start mongod
Page 13
13 MongoDB Best Practices on NetApp SolidFire © 2017 NetApp, Inc. All Rights Reserved. © 2016 NetApp, Inc. All rights reserved.
7. Set up all the remaining replica servers, the config servers, and the Mongos/query router servers that are part of the shared cluster by following section 4 and section 5.1 (steps 1 through 8) of this report.
8. Start the mongo Shell.
After the MongoDB instance is up and running, you can create replica sets for each shard. For this setup, three replica sets (one primary and two secondary) were configured on each shard, and a total of four shards were configured. To create the replica rs0p, run the mongo Shell with the following
command:
mongo --host mongo-rs0p
9. Create a replica set.
To create the replica set rs0, run the following commands in the mongo Shell. You can check the
status of the replica set by running the rs.status() command in the mongo Shell. A sample output
is given in Appendix B.
rs.initiate()
rs.add("mongo-rs0s1")
rs.add("mongo-rs0s2")
10. Set up MongoDB shards.
Repeat steps 8 and 9 in this section to create the other replicas that are part of the shards. After you have created all the replicas for the shards, you should set up config servers and the query router, which are needed only during sharding.
11. Start mongo shell on the config server.
Configure the replica set on the config servers. For this setup, three config servers were used to create the replica set with one primary and two secondary. To execute the mongo Shell, run the following command:
mongo --host mongo-c1
12. Create a replica set on the config servers.
To create the replica set rs0, run the following command in the mongo Shell. You can check the
status of the replica set by running the command rs.status() in the mongo Shell. A sample output
is given in Appendix C. Also, a sample mongod.conf is also given in Appendix C for the
configReplSet.
rs.initiate( {
_id: "configReplSet", configsvr: true, members: [
{ _id: 0, host: "mongo-c1:27019" },
{ _id: 1, host: "mongo-c2:27019" },
{ _id: 2, host: "mongo-c3:27019" }
]
} )
13. Start the mongo shell on the Mongos server.
For this setup, two Mongos servers were used to run the workload. To start the mongo Shell, run the following command:
mongo --host mongo-q1:27107
14. Add the shard replica set.
To add the shard replica sets to the Mongos instance, run the following commands in the mongo Shell. You can check the status of the replica set by running the sh.status() command in the
Mongo Shell. Adding any one of the servers in a replica set adds all instances in that replica set. For this setup, the primary replica set name was used to add the shards. A sample output is provided in Appendix D. Also, a sample mongod.conf is provided in Appendix D for the Mongos instance.
sh.addShard("rs0/mongo-rs0p:27017")
sh.addShard("rs1/mongo-rs1p:27017")
Page 14
14 MongoDB Best Practices on NetApp SolidFire © 2017 NetApp, Inc. All Rights Reserved. © 2016 NetApp, Inc. All rights reserved.
sh.addShard("rs2/mongo-rs2p:27017")
sh.addShard("rs3/mongo-rs3p:27017")
6 Backup and Recovery by Using Storage Snapshots
You can take point-in-time (PIT) snapshots of the volumes that are part of the MongoDB cluster. You can
use the snapshots to recover the database if data corruption or media failure occurs. Both data and
journal files can be in the same NetApp SolidFire volume for the PIT recovery to work. SolidFire supports
having multiple volumes for the MongoDB database, and all volumes that are part of the database have
the same consistency point during the group snapshot.
6.1 Create Snapshots (Backup)
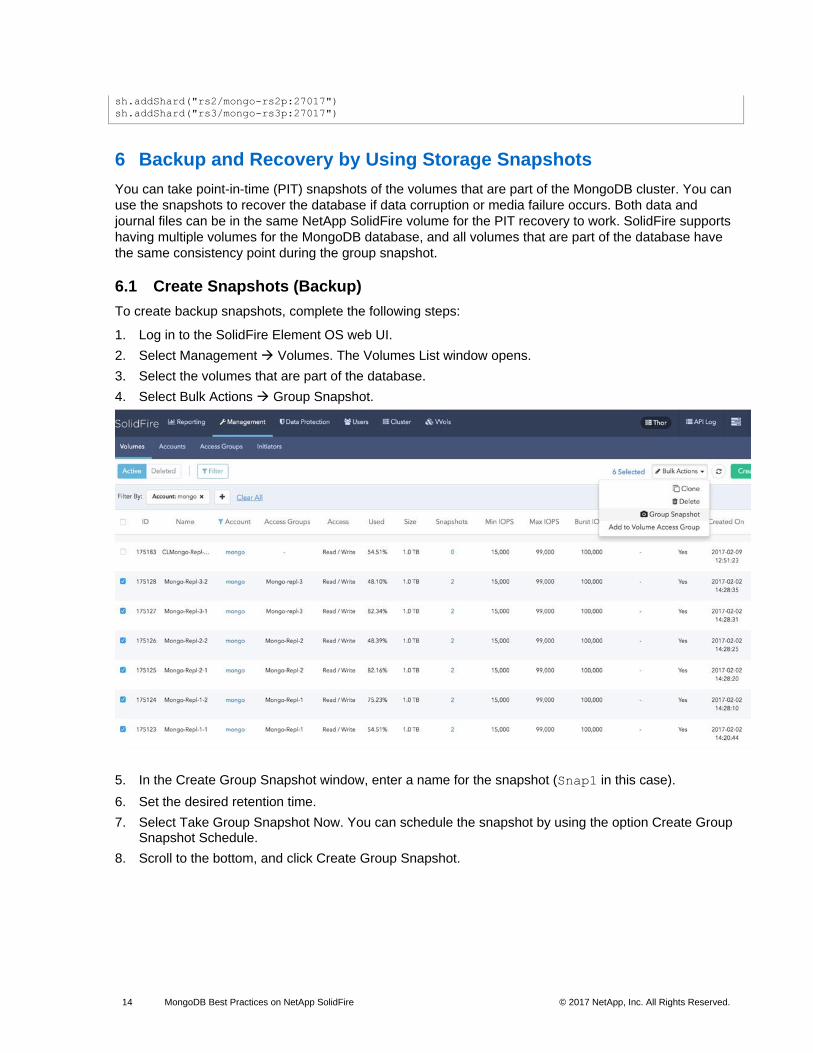
To create backup snapshots, complete the following steps:
1. Log in to the SolidFire Element OS web UI.
2. Select Management Volumes. The Volumes List window opens.
3. Select the volumes that are part of the database.
4. Select Bulk Actions Group Snapshot.
5. In the Create Group Snapshot window, enter a name for the snapshot (Snap1 in this case).
6. Set the desired retention time.
7. Select Take Group Snapshot Now. You can schedule the snapshot by using the option Create Group Snapshot Schedule.
8. Scroll to the bottom, and click Create Group Snapshot.
Page 15
15 MongoDB Best Practices on NetApp SolidFire © 2017 NetApp, Inc. All Rights Reserved. © 2016 NetApp, Inc. All rights reserved.
6.2 Restore Snapshots (Recovery)
You can perform database recovery by reverting the volumes on the SolidFire system with a snapshot. To
recover the database, complete the following steps:
1. Log in to the MongoDB cluster, stop all the mongod instances, and unmount the file systems that are
part of the database.
systemctl stop mongod
unmount /data/db
a. Log in to the SolidFire Element OS UI.
b. Select Data Protection Group Snapshots. The Group Snapshot list opens.
Page 16
16 MongoDB Best Practices on NetApp SolidFire © 2017 NetApp, Inc. All Rights Reserved. © 2016 NetApp, Inc. All rights reserved.
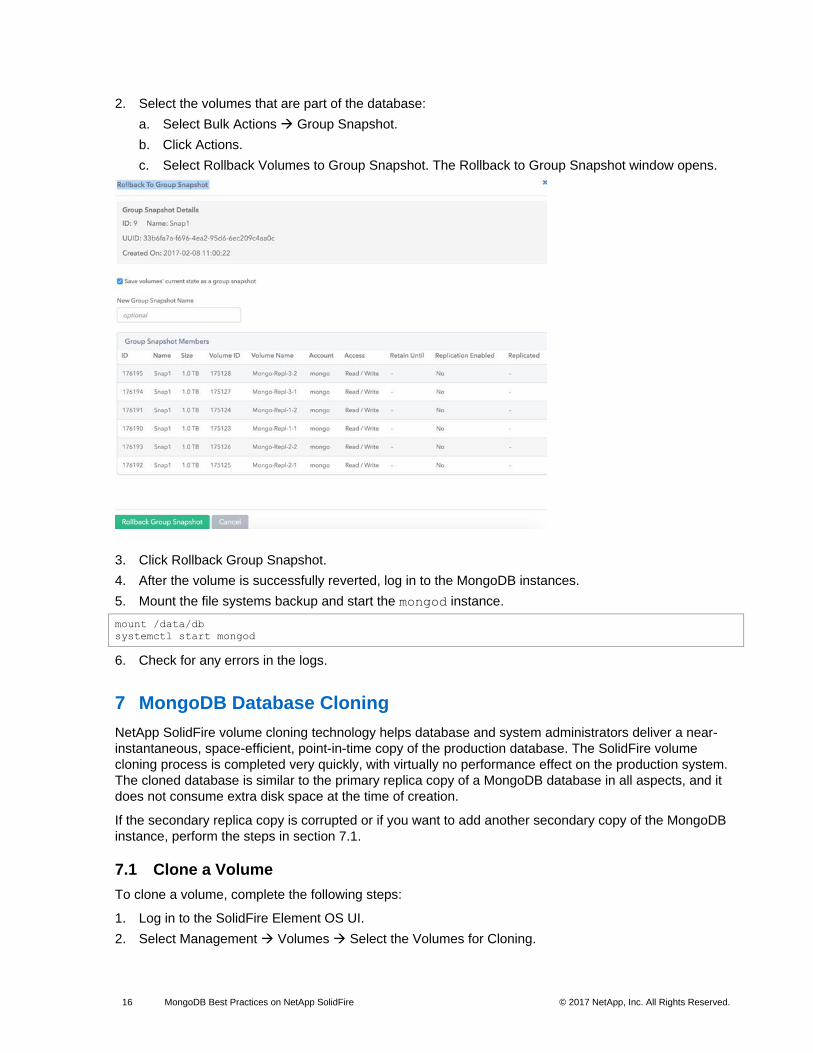
2. Select the volumes that are part of the database:
a. Select Bulk Actions Group Snapshot.
b. Click Actions.
c. Select Rollback Volumes to Group Snapshot. The Rollback to Group Snapshot window opens.
3. Click Rollback Group Snapshot.
4. After the volume is successfully reverted, log in to the MongoDB instances.
5. Mount the file systems backup and start the mongod instance.
mount /data/db
systemctl start mongod
6. Check for any errors in the logs.
7 MongoDB Database Cloning
NetApp SolidFire volume cloning technology helps database and system administrators deliver a near-
instantaneous, space-efficient, point-in-time copy of the production database. The SolidFire volume
cloning process is completed very quickly, with virtually no performance effect on the production system.
The cloned database is similar to the primary replica copy of a MongoDB database in all aspects, and it
does not consume extra disk space at the time of creation.
If the secondary replica copy is corrupted or if you want to add another secondary copy of the MongoDB
instance, perform the steps in section 7.1.
7.1 Clone a Volume
To clone a volume, complete the following steps:
1. Log in to the SolidFire Element OS UI.
2. Select Management Volumes Select the Volumes for Cloning.
Page 17
17 MongoDB Best Practices on NetApp SolidFire © 2017 NetApp, Inc. All Rights Reserved. © 2016 NetApp, Inc. All rights reserved.
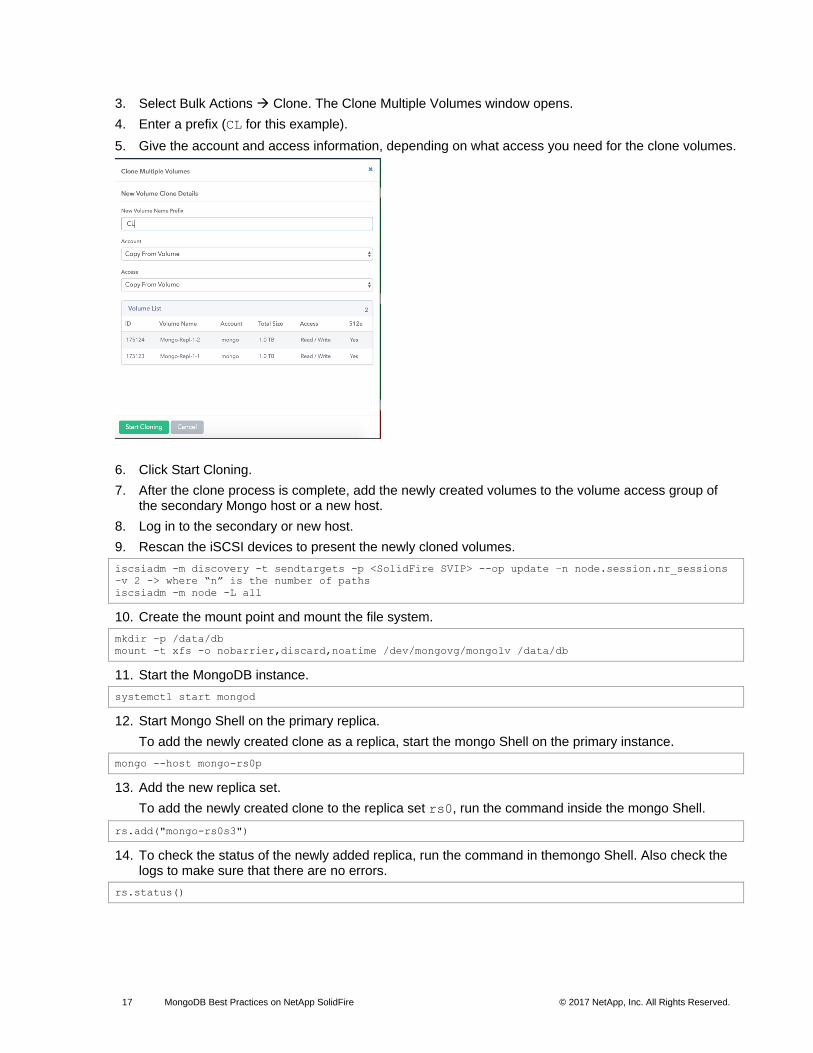
3. Select Bulk Actions Clone. The Clone Multiple Volumes window opens.
4. Enter a prefix (CL for this example).
5. Give the account and access information, depending on what access you need for the clone volumes.
6. Click Start Cloning.
7. After the clone process is complete, add the newly created volumes to the volume access group of the secondary Mongo host or a new host.
8. Log in to the secondary or new host.
9. Rescan the iSCSI devices to present the newly cloned volumes.
iscsiadm -m discovery -t sendtargets -p <SolidFire SVIP> --op update –n node.session.nr_sessions
–v 2 -> where “n” is the number of paths
iscsiadm -m node -L all
10. Create the mount point and mount the file system.
mkdir –p /data/db
mount -t xfs -o nobarrier,discard,noatime /dev/mongovg/mongolv /data/db
11. Start the MongoDB instance.
systemctl start mongod
12. Start Mongo Shell on the primary replica.
To add the newly created clone as a replica, start the mongo Shell on the primary instance.
mongo --host mongo-rs0p
13. Add the new replica set.
To add the newly created clone to the replica set rs0, run the command inside the mongo Shell.
rs.add("mongo-rs0s3")
14. To check the status of the newly added replica, run the command in themongo Shell. Also check the logs to make sure that there are no errors.
rs.status()
Page 18
18 MongoDB Best Practices on NetApp SolidFire © 2017 NetApp, Inc. All Rights Reserved. © 2016 NetApp, Inc. All rights reserved.
8 Workload Testing
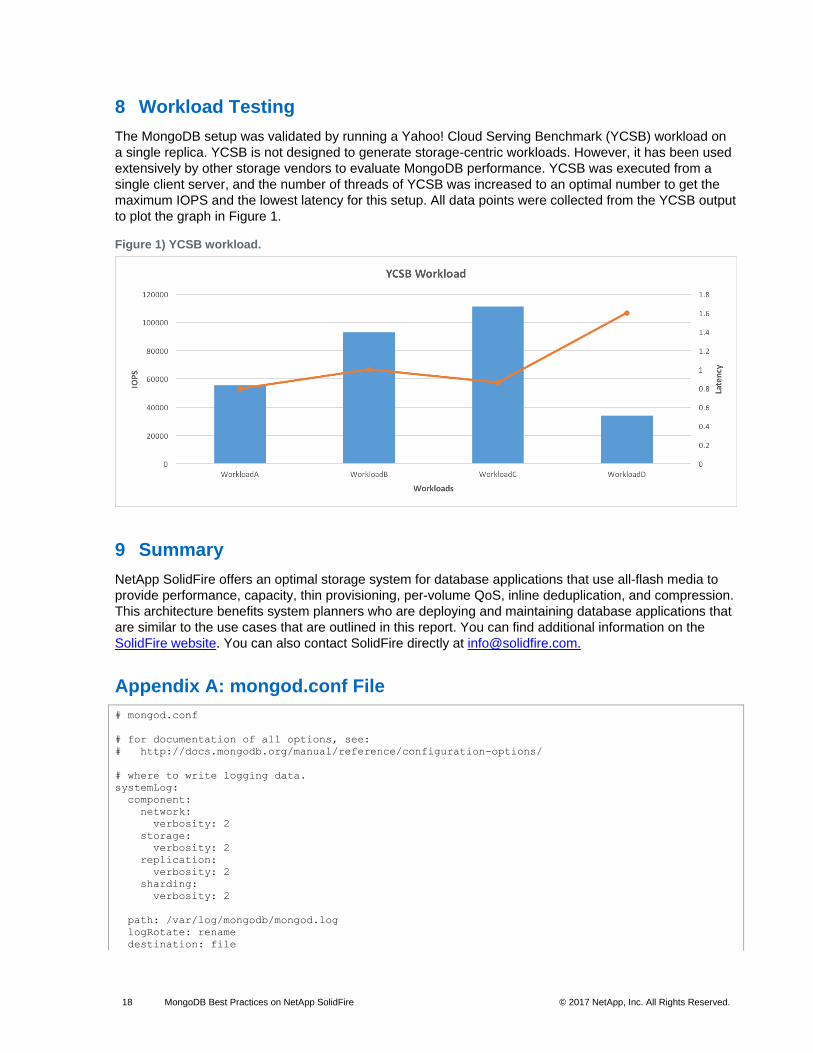
The MongoDB setup was validated by running a Yahoo! Cloud Serving Benchmark (YCSB) workload on
a single replica. YCSB is not designed to generate storage-centric workloads. However, it has been used
extensively by other storage vendors to evaluate MongoDB performance. YCSB was executed from a
single client server, and the number of threads of YCSB was increased to an optimal number to get the
maximum IOPS and the lowest latency for this setup. All data points were collected from the YCSB output
to plot the graph in Figure 1.
Figure 1) YCSB workload.
9 Summary
NetApp SolidFire offers an optimal storage system for database applications that use all-flash media to
provide performance, capacity, thin provisioning, per-volume QoS, inline deduplication, and compression.
This architecture benefits system planners who are deploying and maintaining database applications that
are similar to the use cases that are outlined in this report. You can find additional information on the
SolidFire website. You can also contact SolidFire directly at [email protected] .
Appendix A: mongod.conf File
# mongod.conf
# for documentation of all options, see:
# http://docs.mongodb.org/manual/reference/configuration-options/
# where to write logging data.
systemLog:
component:
network:
verbosity: 2
storage:
verbosity: 2
replication:
verbosity: 2
sharding:
verbosity: 2
path: /var/log/mongodb/mongod.log
logRotate: rename
destination: file
Page 19
19 MongoDB Best Practices on NetApp SolidFire © 2017 NetApp, Inc. All Rights Reserved. © 2016 NetApp, Inc. All rights reserved.
timeStampFormat: ctime
# Where and how to store data.
storage:
dbPath: /data/db
journal:
enabled: false
directoryPerDB: true
engine: wiredTiger
wiredTiger:
engineConfig:
journalCompressor: snappy
collectionConfig:
blockCompressor: snappy
indexConfig:
prefixCompression: true
# how the process runs
processManagement:
fork: true # fork and run in background
pidFilePath: /var/run/mongodb/mongod.pid # location of pidfile
# network interfaces
net:
bindIp: mongo-rs0p
port: 27017
wireObjectCheck: true
http:
enabled: false
JSONPEnabled: false
RESTInterfaceEnabled: false
#security:
#operationProfiling:
replication:
replSetName: rs0
sharding:
clusterRole: shardsvr
## Enterprise-Only Options
#auditLog:
Appendix B: Output of rs.status() for a Shard Replica
rs.status()
{
"set" : "rs0",
"date" : ISODate("2017-01-30T20:53:41.070Z"),
"myState" : 1,
"term" : NumberLong(1),
"heartbeatIntervalMillis" : NumberLong(2000),
"optimes" : {
"lastCommittedOpTime" : {
"ts" : Timestamp(0, 0),
"t" : NumberLong(-1)
},
"appliedOpTime" : {
"ts" : Timestamp(1485809621, 121),
"t" : NumberLong(1)
},
"durableOpTime" : {
"ts" : Timestamp(1485809558, 2539),
"t" : NumberLong(1)
}
},
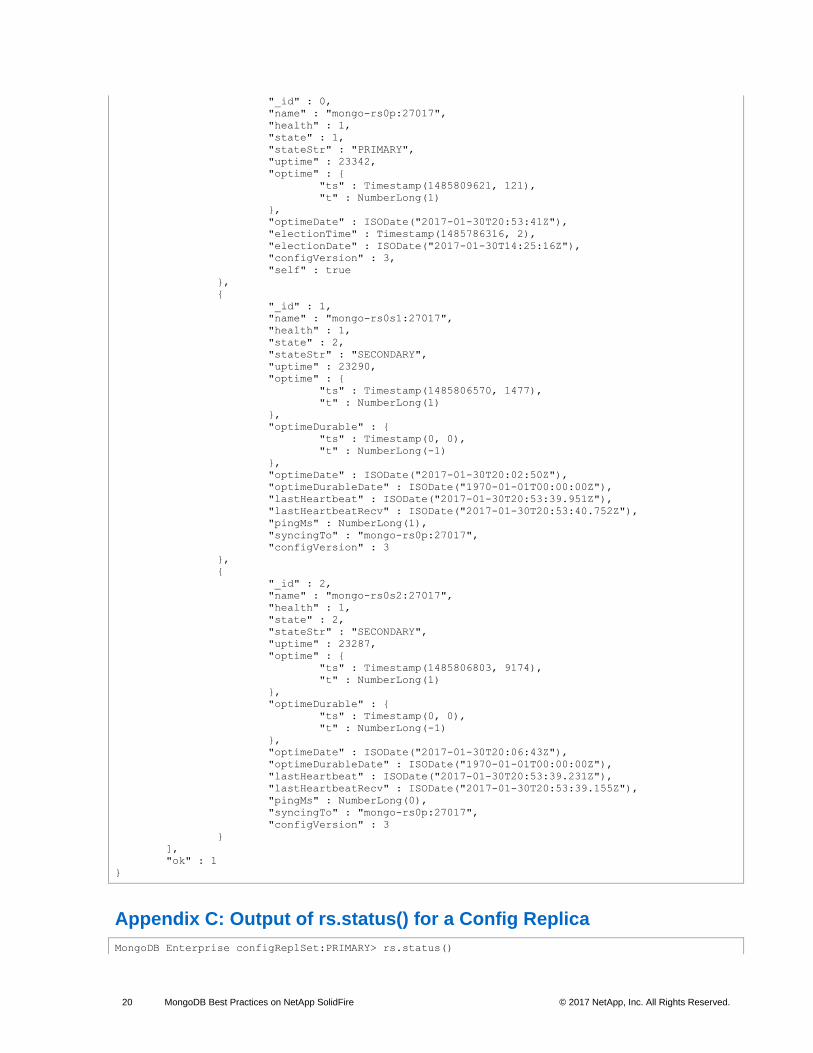
"members" : [
{
Page 20
20 MongoDB Best Practices on NetApp SolidFire © 2017 NetApp, Inc. All Rights Reserved. © 2016 NetApp, Inc. All rights reserved.
"_id" : 0,
"name" : "mongo-rs0p:27017",
"health" : 1,
"state" : 1,
"stateStr" : "PRIMARY",
"uptime" : 23342,
"optime" : {
"ts" : Timestamp(1485809621, 121),
"t" : NumberLong(1)
},
"optimeDate" : ISODate("2017-01-30T20:53:41Z"),
"electionTime" : Timestamp(1485786316, 2),
"electionDate" : ISODate("2017-01-30T14:25:16Z"),
"configVersion" : 3,
"self" : true
},
{
"_id" : 1,
"name" : "mongo-rs0s1:27017",
"health" : 1,
"state" : 2,
"stateStr" : "SECONDARY",
"uptime" : 23290,
"optime" : {
"ts" : Timestamp(1485806570, 1477),
"t" : NumberLong(1)
},
"optimeDurable" : {
"ts" : Timestamp(0, 0),
"t" : NumberLong(-1)
},
"optimeDate" : ISODate("2017-01-30T20:02:50Z"),
"optimeDurableDate" : ISODate("1970-01-01T00:00:00Z"),
"lastHeartbeat" : ISODate("2017-01-30T20:53:39.951Z"),
"lastHeartbeatRecv" : ISODate("2017-01-30T20:53:40.752Z"),
"pingMs" : NumberLong(1),
"syncingTo" : "mongo-rs0p:27017",
"configVersion" : 3
},
{
"_id" : 2,
"name" : "mongo-rs0s2:27017",
"health" : 1,
"state" : 2,
"stateStr" : "SECONDARY",
"uptime" : 23287,
"optime" : {
"ts" : Timestamp(1485806803, 9174),
"t" : NumberLong(1)
},
"optimeDurable" : {
"ts" : Timestamp(0, 0),
"t" : NumberLong(-1)
},
"optimeDate" : ISODate("2017-01-30T20:06:43Z"),
"optimeDurableDate" : ISODate("1970-01-01T00:00:00Z"),
"lastHeartbeat" : ISODate("2017-01-30T20:53:39.231Z"),
"lastHeartbeatRecv" : ISODate("2017-01-30T20:53:39.155Z"),
"pingMs" : NumberLong(0),
"syncingTo" : "mongo-rs0p:27017",
"configVersion" : 3
}
],
"ok" : 1
}
Appendix C: Output of rs.status() for a Config Replica
MongoDB Enterprise configReplSet:PRIMARY> rs.status()
Page 21
21 MongoDB Best Practices on NetApp SolidFire © 2017 NetApp, Inc. All Rights Reserved. © 2016 NetApp, Inc. All rights reserved.
{
"set" : "configReplSet",
"date" : ISODate("2017-01-30T21:07:57.928Z"),
"myState" : 1,
"term" : NumberLong(1),
"configsvr" : true,
"heartbeatIntervalMillis" : NumberLong(2000),
"optimes" : {
"lastCommittedOpTime" : {
"ts" : Timestamp(1485810475, 3),
"t" : NumberLong(1)
},
"readConcernMajorityOpTime" : {
"ts" : Timestamp(1485810475, 3),
"t" : NumberLong(1)
},
"appliedOpTime" : {
"ts" : Timestamp(1485810475, 3),
"t" : NumberLong(1)
},
"durableOpTime" : {
"ts" : Timestamp(1485810475, 3),
"t" : NumberLong(1)
}
},
"members" : [
{
"_id" : 0,
"name" : "mongo-c1:27019",
"health" : 1,
"state" : 1,
"stateStr" : "PRIMARY",
"uptime" : 88152,
"optime" : {
"ts" : Timestamp(1485810475, 3),
"t" : NumberLong(1)
},
"optimeDate" : ISODate("2017-01-30T21:07:55Z"),
"electionTime" : Timestamp(1485722556, 1),
"electionDate" : ISODate("2017-01-29T20:42:36Z"),
"configVersion" : 1,
"self" : true
},
{
"_id" : 1,
"name" : "mongo-c2:27019",
"health" : 1,
"state" : 2,
"stateStr" : "SECONDARY",
"uptime" : 87932,
"optime" : {
"ts" : Timestamp(1485810475, 3),
"t" : NumberLong(1)
},
"optimeDurable" : {
"ts" : Timestamp(1485810475, 3),
"t" : NumberLong(1)
},
"optimeDate" : ISODate("2017-01-30T21:07:55Z"),
"optimeDurableDate" : ISODate("2017-01-30T21:07:55Z"),
"lastHeartbeat" : ISODate("2017-01-30T21:07:57.643Z"),
"lastHeartbeatRecv" : ISODate("2017-01-30T21:07:56.224Z"),
"pingMs" : NumberLong(0),
"syncingTo" : "mongo-c1:27019",
"configVersion" : 1
},
{
"_id" : 2,
"name" : "mongo-c3:27019",
"health" : 1,
"state" : 2,
Page 22
22 MongoDB Best Practices on NetApp SolidFire © 2017 NetApp, Inc. All Rights Reserved. © 2016 NetApp, Inc. All rights reserved.
"stateStr" : "SECONDARY",
"uptime" : 87932,
"optime" : {
"ts" : Timestamp(1485810475, 3),
"t" : NumberLong(1)
},
"optimeDurable" : {
"ts" : Timestamp(1485810475, 3),
"t" : NumberLong(1)
},
"optimeDate" : ISODate("2017-01-30T21:07:55Z"),
"optimeDurableDate" : ISODate("2017-01-30T21:07:55Z"),
"lastHeartbeat" : ISODate("2017-01-30T21:07:57.643Z"),
"lastHeartbeatRecv" : ISODate("2017-01-30T21:07:57.169Z"),
"pingMs" : NumberLong(0),
"syncingTo" : "mongo-c1:27019",
"configVersion" : 1
}
],
"ok" : 1
}
Sample mongod.conf for the configReplSet
# mongod.conf
# for documentation of all options, see:
# http://docs.mongodb.org/manual/reference/configuration-options/
# where to write logging data.
systemLog:
destination: file
logAppend: true
path: /var/log/mongodb/mongod.log
# Where and how to store data.
storage:
dbPath: /mongo-metadata
journal:
enabled: true
# how the process runs
processManagement:
fork: true # fork and run in background
pidFilePath: /var/run/mongodb/mongod.pid # location of pidfile
# network interfaces
net:
port: 27019
bindIp: mongo-c1
replication:
replSetName: configReplSet
sharding:
clusterRole: "configsvr"
Appendix D: Output of sh.status() for a mongos Instance
MongoDB Enterprise mongos> sh.status()
--- Sharding Status ---
sharding version: {
"_id" : 1,
"minCompatibleVersion" : 5,
"currentVersion" : 6,
"clusterId" : ObjectId("588e53bdeb523d881aba55a6")
}
Page 23
23 MongoDB Best Practices on NetApp SolidFire © 2017 NetApp, Inc. All Rights Reserved. © 2016 NetApp, Inc. All rights reserved.
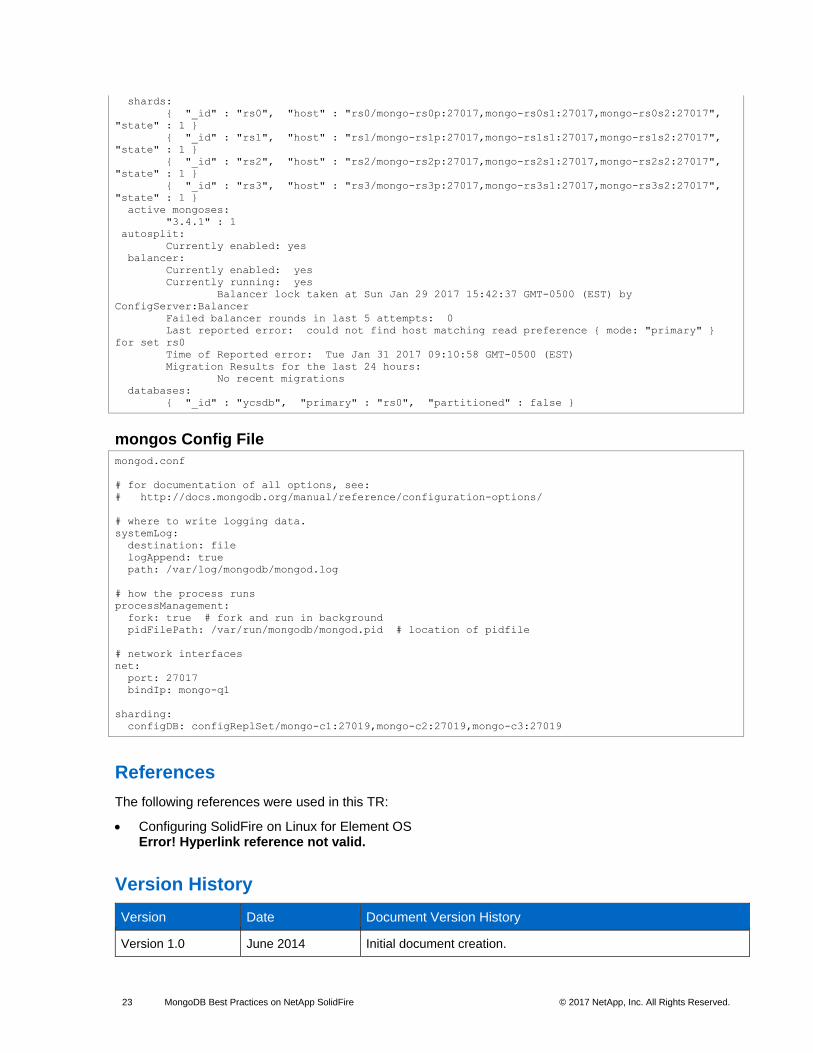
shards:
{ "_id" : "rs0", "host" : "rs0/mongo-rs0p:27017,mongo-rs0s1:27017,mongo-rs0s2:27017",
"state" : 1 }
{ "_id" : "rs1", "host" : "rs1/mongo-rs1p:27017,mongo-rs1s1:27017,mongo-rs1s2:27017",
"state" : 1 }
{ "_id" : "rs2", "host" : "rs2/mongo-rs2p:27017,mongo-rs2s1:27017,mongo-rs2s2:27017",
"state" : 1 }
{ "_id" : "rs3", "host" : "rs3/mongo-rs3p:27017,mongo-rs3s1:27017,mongo-rs3s2:27017",
"state" : 1 }
active mongoses:
"3.4.1" : 1
autosplit:
Currently enabled: yes
balancer:
Currently enabled: yes
Currently running: yes
Balancer lock taken at Sun Jan 29 2017 15:42:37 GMT-0500 (EST) by
ConfigServer:Balancer
Failed balancer rounds in last 5 attempts: 0
Last reported error: could not find host matching read preference { mode: "primary" }
for set rs0
Time of Reported error: Tue Jan 31 2017 09:10:58 GMT-0500 (EST)
Migration Results for the last 24 hours:
No recent migrations
databases:
{ "_id" : "ycsdb", "primary" : "rs0", "partitioned" : false }
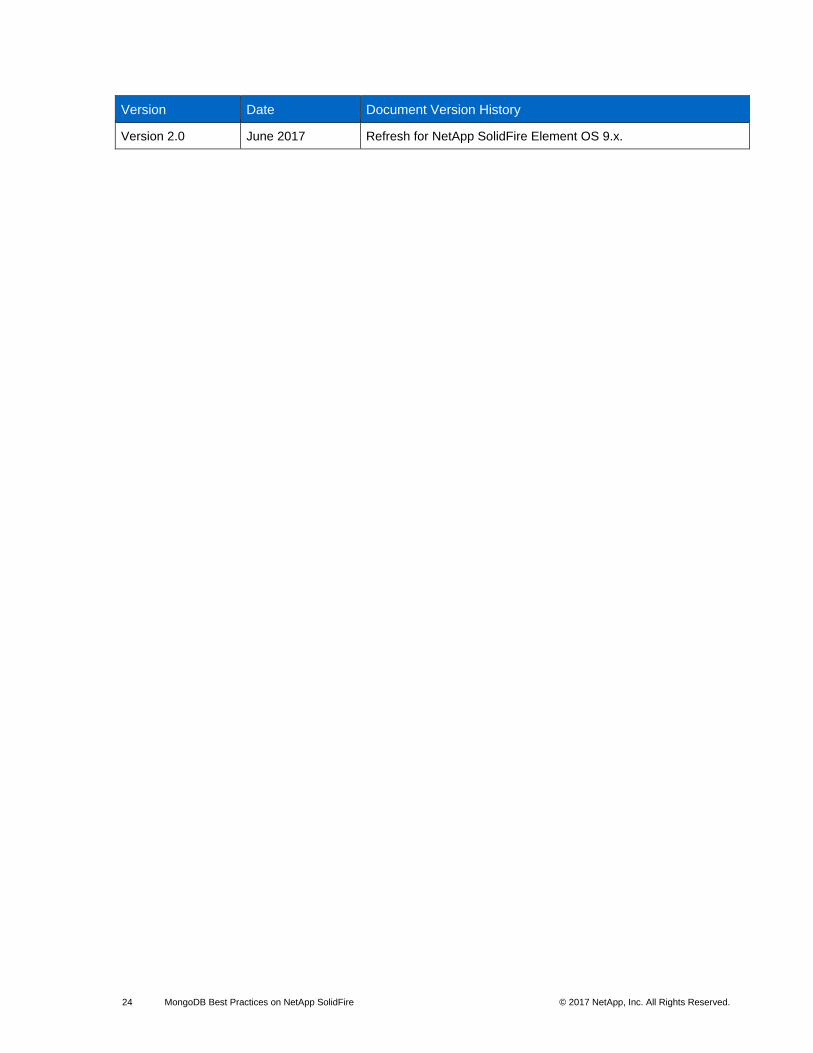
mongos Config File
mongod.conf
# for documentation of all options, see:
# http://docs.mongodb.org/manual/reference/configuration-options/
# where to write logging data.
systemLog:
destination: file
logAppend: true
path: /var/log/mongodb/mongod.log
# how the process runs
processManagement:
fork: true # fork and run in background
pidFilePath: /var/run/mongodb/mongod.pid # location of pidfile
# network interfaces
net:
port: 27017
bindIp: mongo-q1
sharding:
configDB: configReplSet/mongo-c1:27019,mongo-c2:27019,mongo-c3:27019
References
The following references were used in this TR:
• Configuring SolidFire on Linux for Element OS Error! Hyperlink reference not valid.
Version History
Version Date Document Version History
Version 1.0 June 2014 Initial document creation.
Page 24
24 MongoDB Best Practices on NetApp SolidFire © 2017 NetApp, Inc. All Rights Reserved. © 2016 NetApp, Inc. All rights reserved.
Version Date Document Version History
Version 2.0 June 2017 Refresh for NetApp SolidFire Element OS 9.x.
Page 25
25 MongoDB Best Practices on NetApp SolidFire © 2017 NetApp, Inc. All Rights Reserved. © 2016 NetApp, Inc. All rights reserved.
Refer to the Interoperability Matrix Tool (IMT) on the NetApp Support site to validate that the exact product and feature versions described in this document are supported for your specific environment. The NetApp IMT defines the product components and versions that can be used to construct configurations that are supported by NetApp. Specific results depend on each customer’s installation in accordance with published specifications.
Copyright Information
Copyright © 1994–2017 NetApp, Inc. All rights reserved. Printed in the U.S. No part of this document covered by copyright may be reproduced in any form or by any means—graphic, electronic, or mechanical, including photocopying, recording, taping, or storage in an electronic retrieval system—without prior written permission of the copyright owner.
Software derived from copyrighted NetApp material is subject to the following license and disclaimer:
THIS SOFTWARE IS PROVIDED BY NETAPP “AS IS” AND WITHOUT ANY EXPRESS OR IMPLIED WARRANTIES, INCLUDING, BUT NOT LIMITED TO, THE IMPLIED WARRANTIES OF MERCHANTABILITY AND FITNESS FOR A PARTICULAR PURPOSE, WHICH ARE HEREBY DISCLAIMED. IN NO EVENT SHALL NETAPP BE LIABLE FOR ANY DIRECT, INDIRECT, INCIDENTAL, SPECIAL, EXEMPLARY, OR CONSEQUENTIAL DAMAGES (INCLUDING, BUT NOT LIMITED TO, PROCUREMENT OF SUBSTITUTE GOODS OR SERVICES; LOSS OF USE, DATA, OR PROFITS; OR BUSINESS INTERRUPTION) HOWEVER CAUSED AND ON ANY THEORY OF LIABILITY, WHETHER IN CONTRACT, STRICT LIABILITY, OR TORT (INCLUDING NEGLIGENCE OR OTHERWISE) ARISING IN ANY WAY OUT OF THE USE OF THIS SOFTWARE, EVEN IF ADVISED OF THE POSSIBILITY OF SUCH DAMAGE.
NetApp reserves the right to change any products described herein at any time, and without notice. NetApp assumes no responsibility or liability arising from the use of products described herein, except as expressly agreed to in writing by NetApp. The use or purchase of this product does not convey a license under any patent rights, trademark rights, or any other intellectual property rights of NetApp.
The product described in this manual may be protected by one or more U.S. patents, foreign patents, or pending applications.
RESTRICTED RIGHTS LEGEND: Use, duplication, or disclosure by the government is subject to restrictions as set forth in subparagraph (c)(1)(ii) of the Rights in Technical Data and Computer Software clause at DFARS 252.277-7103 (October 1988) and FAR 52-227-19 (June 1987).
Trademark Information
NETAPP, the NETAPP logo, and the marks listed at http://www.netapp.com/TM are trademarks of NetApp, Inc. Other company and product names may be trademarks of their respective owners. TR-4600-0617