36
Monitoring Oracle Oracle: Database PowerPack version 102

Monitoring OracleOracle: Database PowerPack version 102

Table of Contents
Introduction 3What is Oracle Database? 3What Does the Oracle: Database PowerPack Monitor? 3What Operating Systems Does the Oracle: Database PowerPack Monitor? 4Installing the Oracle: Database PowerPack 4
Configuring Oracle Monitoring 6Prerequisites for Monitoring Oracle Database Instances 7Configuring Oracle Credentials 8
Creating an SSH/Key Credential (Linux Users) 8Creating a PowerShell Credential (Windows Users) 9Creating a SOAP/XML Credential 11
Enabling PEM on a Linux Machine 13Discovering Oracle Database Instances 13
Discovering Oracle Database Instances in the SL1 Classic User Interface 16Verifying Discovery and Dynamic Application Alignment 18Snippet and Snippet Argument Configuration for New Oracle Dynamic Applications 25
Running SQL Queries from Snippet Arguments 26Running Raw SQL Queries from the Snippet 26Indexed Raw SQL Query 27Running Combined Raw SQL Queries and Snippet Arguments 28Running SSH Commands from a Snippet 28
Viewing Oracle Component Devices 29Viewing Oracle Component Devices in the Classic SL1 User Interface 30
Troubleshooting Discovery Issues 32Oracle: Database Dashboards 33
Device Dashboard 33Oracle Database: Instance 34

What is Oracle Database?
Chapter
1Introduction
Overview
This manual describes how to configure SL1 to monitor Oracle Database instances.
NOTE: ScienceLogic provides this documentation for the convenience of ScienceLogic customers. Some of the configuration information contained herein pertains to third-party vendor software that is subject to change without notice to ScienceLogic. ScienceLogic makes every attempt to maintain accurate technical information and cannot be held responsible for defects or changes in third-party vendor software. There is no written or implied guarantee that information contained herein will work for all third-party variants. See the End User License Agreement (EULA) for more information.
What is Oracle Database?
Oracle Database is a multi-model database management system used for running online transaction processing, data warehousing, and mixed database workloads.
What Does the Oracle: Database PowerPack Monitor?
The Oracle: Database PowerPack includes Dynamic Applications that can monitor performance metrics and collect configuration data for Oracle databases and their instances.
In addition to Dynamic Applications, the PowerPack includes the following features:
l Dynamic Applications to discover, model, and monitor performance metrics and collect configuration data for Oracle Database instances
l Event Policies and corresponding alerts that are triggered when Oracle devices meet certain status criteria
3

4
l Device Classes for each of the Oracle devices monitored
l Sample Credentials for discovering Oracle devices
l A Device Dashboard to display summary information about an Oracle Database instance
What Operating Systems Does the Oracle: Database PowerPack Monitor?
The Oracle: Database PowerPack supports operating system discovery for a variety of operating systems. The following operating systems can be monitored by the Oracle: Database PowerPack:
l AIX
l CentOS
l HP-UX
l Oracle Linux
l Red Hat Enterprise Linux
l Solaris
l SUSE Linux
l Ubuntu
l Windows
Installing the Oracle: Database PowerPack
Before completing the steps in this manual, you must import and install the latest version of the Oracle: Database PowerPack.
NOTE: If you are using PEM key to connect to a Unix server on Oracle Database v101 and you upgrade your SL1 version to 8.14.11+, 10.1.6+, 10.2.1+ or 11.1.0+, the PowerPack will not work. If this applies to you, try to upgrade to v102 or enter your username/password to access the SSH key.
If you have the SLPS: Oracle DB PowerPack or the Oracle DB PowerPack installed, you must remove them from your SL1 system.
You must also remove any pre-existing discovered Oracle Database device trees and all Oracle device classes before installing.
NOTE: If you are upgrading from an earlier version of the PowerPack, see the Release Notes for the version you are installing for upgrade instructions.
What Operating Systems Does the Oracle: Database PowerPack Monitor?

Installing the Oracle: Database PowerPack
TIP: By default, installing a new version of a PowerPack overwrites all content from a previous version of that PowerPack that has already been installed on the target system. You can use the Enable Selective PowerPack Field Protection setting in the Behavior Settings page (System > Settings > Behavior) to prevent new PowerPacks from overwriting local changes for some commonly customized fields. (For more information, see the System Administration manual.)
To download and install a PowerPack:
1. Download the PowerPack from the ScienceLogic Support Site.
2. Go to the PowerPack Manager page (System > Manage > PowerPacks).
3. In the PowerPack Manager page, click the [Actions] button, then select Import PowerPack.
4. The Import PowerPack dialog box appears:
5. Click the [Browse] button and navigate to the PowerPack file.
6. When the PowerPack Installer modal appears, click the [Install] button to install the PowerPack.
NOTE: If you exit the PowerPack Installer modal without installing the imported PowerPack, the imported PowerPack will not appear in the PowerPack Manager page. However, the imported PowerPack will appear in the Imported PowerPacks modal. This page appears when you click the [Actions] menu and select Install PowerPack.
5

Chapter
2Configuring Oracle Monitoring
Overview
The following sections describe how to configure your Oracle Database instances for monitoring by SL1 using the Oracle: Database PowerPack:
Prerequisites for Monitoring Oracle Database Instances 7
Configuring Oracle Credentials 8
Creating an SSH/Key Credential (Linux Users) 8
Creating a PowerShell Credential (Windows Users) 9
Creating a SOAP/XML Credential 11
Enabling PEM on a Linux Machine 13
Discovering Oracle Database Instances 13
Discovering Oracle Database Instances in the SL1 Classic User Interface 16
Verifying Discovery and Dynamic Application Alignment 18
Snippet and Snippet Argument Configuration for New Oracle Dynamic Applications 25
Running SQL Queries from Snippet Arguments 26
Running Raw SQL Queries from the Snippet 26
Indexed Raw SQL Query 27
Running Combined Raw SQL Queries and Snippet Arguments 28
Running SSH Commands from a Snippet 28
Viewing Oracle Component Devices 29
Viewing Oracle Component Devices in the Classic SL1 User Interface 30
Troubleshooting Discovery Issues 32
6

7
Prerequisites for Monitoring Oracle Database Instances
To configure the SL1 system to monitor Oracle Database instances using the Oracle: Database PowerPack, you must first have the following prerequisites and permissions:
l The Oracle database user must have access the following privileges:
o sys_privileges: GRANT CREATE SESSION
o role_privileges: GRANT SELECT_CATALOG_ROLE
o tan_privileges: GRANT SELECT ON SYS.V_$DIAG_ALERT_EXT, GRANT SELECT ON SYS.TS$
l The Oracle database user must have access to the following tables:
o all_tables
o dba_data_files
o dba_free_space
o dba_registry
o dba_scheduler_jobs_broken
o dba_scheduler_jobs_failed
o dba_tablespaces
o dba_temp_files
o gv$sort_segment
o sessions_info
o sys.dba_ind_partitions
o sys.dba_ind_subpartitions
o sys.dba_indexes
o sys.dba_objects
o sys.v_$database_block_corruption
o v$archive_dest
o v$archived_log
o v$block_change_tracking
o v$controlfile
o v$database
o v$datafile
o v$datafile_header
o v$diag_alert_ext
o v$dispatcher
o v$latch
Prerequisites for Monitoring Oracle Database Instances

Configuring Oracle Credentials
o v$librarycache
o v$log
o v$log_history
o v$logfile
o v$open_cursor
o v$parameter
o v$resource_limit
o v$rollstat
o v$rowcache
o v$session
o v$sesstat
o v$statname
o v$sysstat
o v$tablespace
o v$tempfile
o v$version
l If you are monitoring an RAC system, the user must have access to the following:
o v$asm_diskgroup
o v$recovery_file_dest
l The Oracle database user must have permission to alter sessions.
Configuring Oracle Credentials
To monitor Oracle Database instances using SL1, you must create two credentials. The types of credentials that are required for monitoring depend on the type of server that is hosting the Oracle Database:
l Linux and Unix users must use an SSH/Key credential and a SOAP/XML credential
l Windows users must use a PowerShell credential and a SOAP/XML credential
Creating an SSH/Key Credential (Linux Users)
Linux and Unix users must create an SSH/Key credential.
To create an SSH/Key credential :
1. Go to the Credential Management page (System > Manage > Credentials).
2. Click the wrench icon ( ) for the "Oracle: DB SSH Server Example" credential. The Credential Editor modal page appears:
8

9
3. Supply values in the following fields:
l Credential Name. Type a new name for the credential.
l Hostname/IP. Type "%D" or the IP address of the server that is hosting the Oracle Database.
l Port. Type 22.
l Username. Type the username for the Linux server that is hosting the Oracle Database.
l Password. Type the password for the Linux server that is hosting the Oracle Database.
l Private Key (PEM Format). Optional. Use if required for SSH authentication. For information on gathering a private key, see the section on Enabling PEM on a Linux Machine.
4. Click the [Save As] button.
5. When the confirmation message appears, click [OK].
NOTE: The credential ID will appear at the top of the window after it has been saved. Take note of the ID as you will need it when creating the SOAP/XML credential.
Creating a PowerShell Credential (Windows Users)
Windows users must create a PowerShell credential.
To create a PowerShell credential:
Configuring Oracle Credentials

Configuring Oracle Credentials
1. Go to the Credential Management page (System > Manage > Credentials).
2. Click the wrench icon ( ) for the "Oracle: DB Powershell Example" credential. The Credential Editor modal page appears:
3. Supply values in the following fields:
l Profile Name. Type a new name for the credential.
l Account Type. Select Local. Servers that are part of an Active Directory are not supported.
l Hostname/IP. Type "%D" or the IP address of the server that is hosting the Oracle Database.
l Timeout (ms). Type the time, in milliseconds, after which SL1 will stop trying to collect data from the authenticating server. For collection to be successful, SL1 must connect to the authenticating server, execute the PowerShell command, and receive a response within the amount of time specified in this field.
l Username. Type the username for the Windows server that is hosting the Oracle Database.
l Password. Type the password for the Windows server that is hosting the Oracle Database.
l Encrypted. Select whether SL1 will communicate with the device using an encrypted connection. Choices are:
o yes. When communicating with the Windows server, SL1 will use a local user account with authentication of type "Basic Auth". You must then use HTTPS and can use a Microsoft Certificate or a self-signed certificate.
o no. When communicating with the Windows server, SL1 will not encrypt the connection.
l Port. Type 5985 (http) or 5986 (https).
l PowerShell Proxy Hostname/IP. Leave this field blank.
10
11
4. Click the [Save As] button.
NOTE: The credential ID will appear at the top of the window after it has been saved. Take note of the ID as you will need it when creating the SOAP/XML credential.
Creating a SOAP/XML Credential
To create the SOAP/XML credential:
1. Go to the Credential Management page (System > Manage > Credentials).
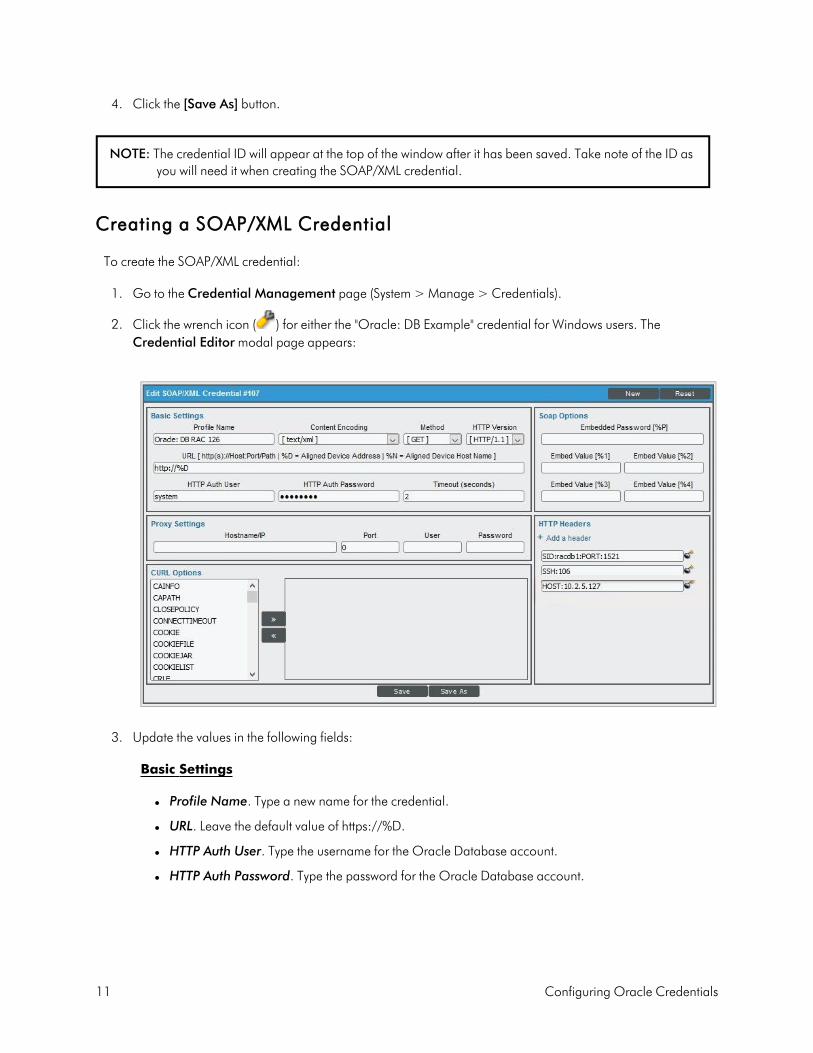
2. Click the wrench icon ( ) for either the "Oracle: DB Example" credential for Windows users. The Credential Editor modal page appears:
3. Update the values in the following fields:
Basic Settings
l Profile Name. Type a new name for the credential.
l URL. Leave the default value of https://%D.
l HTTP Auth User. Type the username for the Oracle Database account.
l HTTP Auth Password. Type the password for the Oracle Database account.
Configuring Oracle Credentials

Configuring Oracle Credentials
NOTE: Discovering multiple instances on a single database server is supported, but all instances must share the same credentials entered in the SOAP/XML credential's HTTP Auth User and HTTP Auth Password fields.
HTTP Headers
l HTTP Headers. Add the following headers by clicking + Add a header. A header should be added for each Oracle Database instance you are monitoring:
o SID: <Oracle Instance SID>:PORT<Oracle Instance Port that is listening for DB requests>. For example:
SID:SL121:PORT:22
For ASM instances, add "ASM" as the SID value. The entire ASM name must be added as the SID value. For example, if +ASM1 is the name, the header will be:
SID:+ASM:PORT:1521
If a host, or IP address, for the Oracle: Database is assigned to a different IP address from the server, you must add an additional header to the SOAP credential. For example:
HOST:<host_address> (i.e. HOST:10.2.5.95)ORHOST:FROM_LISTENER
NOTE: Only the SIDs listed in the credential will be discovered.
NOTE: For ASM instances, all Dynamic Applications (except the RAC Dynamic Applications) will be aligned to the instance but will show "NO DATA".
o <OS_TYPE>:<CRED_ID>. The OS type and ID of the SSH/Key credential or PowerShell credential you created. For OS type, enter SSH for Linux or PSH for Windows. For example:
SSH:152 or
PSH:153
NOTE: Only one OS type per credential is supported.
12

13
4. Click the [Save As] button.
Enabling PEM on a Linux Machine
Linux and Unix users can create an SSH/Key credential in order to monitor Oracle Database instances in SL1. The Private Key (PEM Format) field may be filled when creating an SSH/Key credential. To enable PEM on a Linux machine, perform the following steps:
1. Create a PEM folder to place the identity keys.
NOTE: ScienceLogic suggests that you create a PEM folder inside the .ssh folder of the user that will use the PEM authentication.
2. Run the following command on your Linux machine to create the SSH key. This command will create public and private keys:
ssh-keygen -b 2048 -f identity - t rsa
NOTE: The value "identity" in the command above will be the name of the file that is generated. This value can be replaced with any file name.
3. The private key generated from this command is the .pem file needed for the SSH/Key credential. Copy the contents of the file to input into the SL1 credential.
4. Add the generated public key to the authorized_keys file that is found in ~/.ssh/authorized_keys manually or by using the following command:
cat identity.pub >> ~/.ssh/authorized_keys
5. Restart the SSH service by running the following command:
sudo service ssh restart
Following the steps above, you can create an SSH/Key credential in SL1 by supplying your Linux server username, Linux server password, and private key. If you would like to create an SSH/Key credential by supplying only your Linux server username and private key, perform the following steps on your Linux machine:
1. Find the sshd_config file.
2. Find the PasswordAuthentication command line, delete yes, and input no.
3. Restart the SSH service by running the following command:
sudo service ssh restart
Discovering Oracle Database Instances
To create and run a discovery session that will discover an Oracle instance, perform the following steps:
Enabling PEM on a Linux Machine

Discovering Oracle Database Instances
1. On the Devices page ( ) or the Discovery Sessions page (Devices > Discovery Sessions), click the [Add Devices] button. The Select page appears:
2. Click the [Unguided Network Discovery] button. Additional information about the requirements for discovery appears in the General Information pane to the right.
3. Click [Select]. The Add Devices page appears:
14

15
4. Complete the following fields:
l Name. Type a unique name for this discovery session. This name is displayed in the list of discovery sessions on the [Discovery Sessions] tab.
l Description. Optional. Type a short description of the discovery session. You can use the text in this description to search for the discovery session on the [Discovery Sessions] tab.
l Select the organization to add discovered devices to. Select the name of the organization to which you want to add the discovered devices.
5. Click [Next]. The Credentials page of the Add Devices wizard appears:
6. On the Credentials page, select the SOAP/XML credential you created.
7. Click [Next]. The Discovery Session Details page of the Add Devices wizard appears:
Discovering Oracle Database Instances

Discovering Oracle Database Instances
8. Complete the following fields:
l List of IPs/Hostnames. Type the IP address for the server that is hosting your Oracle Database.
l Which collector will monitor these devices?. Select an existing collector to monitor the discovered devices. Required.
l Run after save. Select this option to run this discovery session as soon as you click [Save and Close].
In the Advanced options section, click the down arrow icon ( ) to complete the following fields:
o Discover Non-SNMP. Enable this setting.
o Model Devices. Enable this setting.
9. Click [Save and Close] to save the discovery session. The Discovery Sessions page (Devices > Discovery Sessions) displays the new discovery session.
10. If you selected the Run after save option on this page, the discovery session runs, and the Discovery Logs page displays any relevant log messages. If the discovery session locates and adds any devices, the Discovery Logs page includes a link to the Device Investigator page for the discovered device.
Discovering Oracle Database Instances in the SL1 Classic User Interface
To model and monitor your Oracle Database instances, you must run a discovery session. To create and run a discovery session that will discover your Oracle Database instances, perform the following steps:
1. Go to the Discovery Control Panel page (System > Manage > Classic Discovery).
16

17
2. Click the [Create] button to create a new discovery session. The Discovery Session Editor window appears:
3. Enter values in the following fields:
l IP Address Discovery List. Type the IP address for the server that is hosting your Oracle Database. One discovery session per server is supported. The IP address can be assigned to a different IP address than the server.
l Other Credentials. Select the SOAP/XML credential that you configured in the previous section.
l Discover Non-SNMP. Select this checkbox.
l Model Devices. Select this checkbox.
4. You can enter values in the other fields on this page, but are not required to and can simply accept the default values. For more information about the other fields on this page, see the Discovery & Credentials manual.
5. Click the [Save] button and then close the Discovery Session Editor window.
6. The discovery session you created will appear at the top of the Discovery Control Panel page. Click its
lightning-bolt icon ( ) to run the discovery session.
7. The Discovery Session window will be displayed.
Discovering Oracle Database Instances

Verifying Discovery and Dynamic Application Alignment
8. When the server that is hosting the Oracle Database is discovered, click its device icon ( ) to view the Device Properties page for that device.
9. After the server hosting the Oracle Database is discovered, the "Oracle: DB Instance Discovery" Dynamic Application will automatically be aligned. This Dynamic Application will discover the Oracle Database instances which will appear in the Device Manager page.
NOTE: If you are on a Windows system and are having issues with discovery, please see the Monitoring Windows Systems with PowerShell manual section.
Verifying Discovery and Dynamic Application Alignment
During discovery, SL1 will discover the root device then the Database instance. All applicable Dynamic Applications will be aligned to the component as follows:
18

19
To verify alignment of the Oracle Database Dynamic Applications:
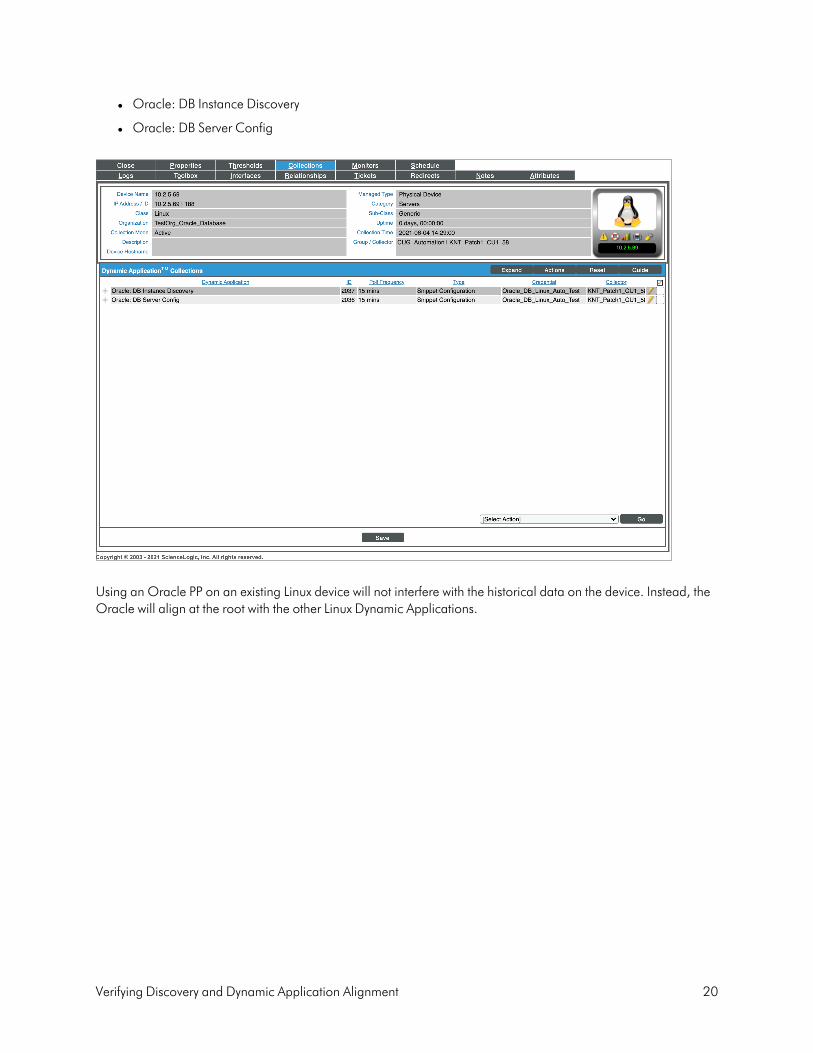
1. After discovery has completed, click the device icon for the Oracle device ( ). From the Device Properties page for the Oracle device, click the [Collections] tab. The Dynamic Application Collections page appears.
NOTE: It can take two to three polling cycles after the discovery session has completed for Dynamic Applications to appear in the Dynamic Application Collections page.
2. All applicable Dynamic Applications are automatically aligned to the root device and component devices during discovery:
You should see the following Dynamic Applications aligned to the root device:
Verifying Discovery and Dynamic Application Alignment
Verifying Discovery and Dynamic Application Alignment
l Oracle: DB Instance Discovery
l Oracle: DB Server Config
Using an Oracle PP on an existing Linux device will not interfere with the historical data on the device. Instead, the Oracle will align at the root with the other Linux Dynamic Applications.
20

21
You should see the following Dynamic Applications aligned to non-RAC Oracle Database instances on Linux Systems:
Verifying Discovery and Dynamic Application Alignment

Verifying Discovery and Dynamic Application Alignment
l Oracle: DB Archived File System Stats
l Oracle: DB Chained Rows Stats
l Oracle: DB Components Status Config
l Oracle: DB Data Guard Gap Stats
l Oracle: DB Database Size Stats
l Oracle: DB Instance Config
l Oracle: DB Integrity Metrics Stats
NOTE: The Oracle: DB Integrity Metrics Stats Dynamic Application uses the prior() function which requires SL1 version 8.14.2 or newer.
l Oracle: DB Log Alerts Config
NOTE: The Oracle: DB Log Alerts Config Dynamic Application requires that the database administrator grant SELECT privileges in the v$diag_alert_text to the monitoring user.
l Oracle: DB Logswitch Rate Stats
l Oracle: DB Non-Archived File System Stats
l Oracle: DB Open Cursors per Session Stats
l Oracle: DB Performance Stats
l Oracle: DB Resource Stats
l Oracle: DB Session Stats
l Oracle: DB Tablespace Stats
l Oracle: DB Tablespace Temp Stats
l Oracle: DB Tablespaces and Datafiles Status Config
You should see the following Dynamic Applications aligned to non-RAC Oracle Database instances on Windows and Solaris Systems:
22

23
l Oracle: DB Chained Rows Stats
l Oracle: DB Components Status Config
l Oracle: DB Data Guard Gap Stats
l Oracle: DB Database Size Stats
l Oracle: DB Instance Config
l Oracle: DB Integrity Metrics Stats
NOTE: The Oracle: DB Integrity Metrics Stats Dynamic Application uses the prior() function which requires SL1 version 8.14.2 or newer.
l Oracle: DB Log Alerts Config
NOTE: The Oracle: DB Log Alerts Config Dynamic Application requires that the database administrator grant SELECT privileges in the v$diag_alert_text to the monitoring user.
l Oracle: DB Logswitch Rate Stats
l Oracle: DB Open Cursors per Session Stats
l Oracle: DB Performance Stats
l Oracle: DB Resource Stats
l Oracle: DB Session Stats
l Oracle: DB Tablespace Stats
l Oracle: DB Tablespace Temp Stats
l Oracle: DB Tablespaces and Datafiles Status Config
You should see the following Dynamic Applications aligned to RAC Oracle Database instances on Linux Systems:
Verifying Discovery and Dynamic Application Alignment

Verifying Discovery and Dynamic Application Alignment
l Oracle: DB Archived File System Stats
l Oracle: DB Chained Rows Stats
l Oracle: DB Components Status Config
l Oracle: DB Data Guard Gap Stats
l Oracle: DB Database Size Stats
l Oracle: DB Instance Config
l Oracle: DB Integrity Metrics Stats
NOTE: The Oracle: DB Integrity Metrics Stats Dynamic Application uses the prior() function which requires SL1 version 8.14.2 or newer.
l Oracle: DB Log Alerts Config
NOTE: The Oracle: DB Log Alerts Config Dynamic Application requires that the database administrator grant SELECT privileges in the v$diag_alert_text to the monitoring user.
l Oracle: DB Logswitch Rate Stats
l Oracle: DB Non-Archived File System Stats
l Oracle: DB Open Cursors per Session Stats
l Oracle: DB Performance Stats
l Oracle: DB RAC Disk Group Space Stats
l Oracle: DB RAC Flash Recovery Stats
l Oracle: DB RAC Global Cache Stats
NOTE: The Oracle RAC Dynamic Applications will only be aligned on RAC systems.
l Oracle: DB Resource Stats
l Oracle: DB Session Stats
l Oracle: DB Tablespace Stats
l Oracle: DB Tablespace Temp Stats
l Oracle: DB Tablespaces and Datafiles Status Config
You should see the following Dynamic Applications aligned to RAC Oracle Database instances on Windows and Solaris Systems:
24

25
l Oracle: DB Chained Rows Stats
l Oracle: DB Components Status Config
l Oracle: DB Data Guard Gap Stats
l Oracle: DB Database Size Stats
l Oracle: DB Instance Config
l Oracle: DB Integrity Metrics Stats
NOTE: The Oracle: DB Integrity Metrics Stats Dynamic Application uses the prior() function which requires SL1 version 8.14.2 or newer.
l Oracle: DB Log Alerts Config
NOTE: The Oracle: DB Log Alerts Config Dynamic Application requires that the database administrator grant SELECT privileges in the v$diag_alert_text to the monitoring user.
l Oracle: DB Logswitch Rate Stats
l Oracle: DB Open Cursors per Session Stats
l Oracle: DB Performance Stats
l Oracle: DB RAC Disk Group Space Stats
l Oracle: DB RAC Flash Recovery Stats
l Oracle: DB RAC Global Cache Stats
NOTE: The Oracle RAC Dynamic Applications will only be aligned on RAC systems.
l Oracle: DB Resource Stats
l Oracle: DB Session Stats
l Oracle: DB Tablespace Stats
l Oracle: DB Tablespace Temp Stats
l Oracle: DB Tablespaces and Datafiles Status Config
Snippet and Snippet Argument Configuration for New Oracle Dynamic Applications
You can configure snippets and snippet arguments in Oracle: Database Dynamic Applications to run SQL queries.
Snippet and Snippet Argument Configuration for New Oracle Dynamic Applications
Snippet and Snippet Argument Configuration for New Oracle Dynamic Applications
Snippet arguments can be used for simple queries consisting of only SELECT and WHERE. Complex queries must be defined in the snippet.
Running SQL Queries from Snippet Arguments
In the [Collections] tab of the a Dynamic Application, you can select a collection object in the Collection Object Registry and edit the argument in the Snippet Arguments field.
For example, using the collection objects from the "Oracle: DB Performance Stats" Dynamic Application:
Snippet argument without a filter:
oracle://&silo_args=column=<column_name>&table=<table_name>
Snippet argument with a filter:
oracle://&silo_args=column=<column_name>&table=<table_name>&filter=<where clause>
Example:
oracle://&silo_args=column=name&table=my_table&filter=name LIKE '%abc%' AND id != 0
NOTE: Spaces can be used in any of the arguments if necessary. Column should name a single column only.
Queries are consolidated into a single SQL query for each table. If you want to separate the queries, use the following format:
oracle://&silo_args=column=name&table=my_table a_names&filter=name LIKE 'a%' oracle://&silo_args=column=name&table=my_table b_names&filter=name LIKE 'b%'
Running Raw SQL Queries from the Snippet
You can run raw SQL queries in the snippets in Dynamic Applications by going to the [Snippets] tab and selecting the snippet from the Snippet Registry:
26

27
In the "Oracle: DB Chained Rows Stats" Dynamic Application, you can edit the snippet to include a raw SQL query in the following way:
from silo.oracle_db.OracleDB_sql_collector import OracleDBSQLCollectorfrom silo.apps.errors import ErrorManagerimport logging query = """SELECT X, Y FROM table""" with ErrorManager(self):
collector = OracleDBSQLCollector(self)results = collector.collect_raw(query)if results:
query_order = ["X", "Y"] # collector.handle_raw_results(self.oids, query_order, results)
X and Y are collection object OIDs, in the order corresponding to the query column names.
Indexed Raw SQL Query
You can run indexed SQL queries in the snippets in Dynamic Applications by going to the [Snippets] tab and selecting the snippet from the Snippet Registry.
For example, in the "Oracle: DB Tablespaces and Datafiles Status Config" Dynamic Application, you can edit the snippet to include an indexed SQL query in the following way:
from silo.oracle_db.OracleDB_sql_collector import OracleDBSQLCollectorfrom silo.apps.errors import ErrorManager
Snippet and Snippet Argument Configuration for New Oracle Dynamic Applications

Snippet and Snippet Argument Configuration for New Oracle Dynamic Applications
import logging query = """SELECT x, x, y FROM table""" #<-The first column is the index; it is ok to repeat a column with ErrorManager(self):
collector = OracleDBSQLCollector(self)results = collector.collect_raw(query)if results:
query_order = ["X", "Y"] collector.handle_raw_results(self.oids, query_order, results, indexed=True)
X and Y are collection object OIDs, in the order corresponding to the query column names, not including the index column.
Running Combined Raw SQL Queries and Snippet Arguments
If snippet arguments and raw queries are combined in a single Dynamic Application, the snippet argument code must be executed first. The following example was added to the snippet in the "Oracle: DB Session Stats" Dynamic Application:
with ErrorManager(self):collector = OracleDBSQLCollector(self)
# Collect snippet arg resultscollector.collect()collector.handle_results() # Collect raw query resultsresults = collector.collect_raw(query)if results:
collector.handle_raw_results(self.oids, query_order, results)
Running SSH Commands from a Snippet
You can run SSH commands the snippets in Dynamic Applications by going to the [Snippets] tab and selecting the snippet from the Snippet Registry.
For example, in the "Oracle: DB Non-Archived File System Stats" Dynamic Application, you can edit the snippet to include an SSH command in the following way:
ssh.append("your_ssh_command")ssh_results = ssh_collector.run_commands(ssh)
28

29
Viewing Oracle Component Devices
In addition to the Devices page, you can view the Oracle Database and all associated component devices in the following places in the user interface:
l The Device Investigator Map page (click Map in the Device Investigator page) displays a map of a particular device and all of the devices with which it has parent-child relationships. Double-clicking any of the listed devices reloads the page to make the selected device the primary device.
l The Device Components page (Devices > Device Components) displays a list of all root devices and component devices discovered by SL1. The Device Components page displays all root devices and component devices in an indented view, so you can easily view the hierarchy and relationships between child devices, parent devices, and root devices. To view the component devices associated with an Oracle Database, find the Oracle Database and click its plus icon (+).
l The Component Map page (Classic Maps > Device Maps > Components) allows you to view devices by root node and view the relationships between root nodes, parent components, and child components in a map. This makes it easy to visualize and manage root nodes and their components. SL1 automatically updates the Component Map as new component devices are discovered. The platform also updates each map with the latest status and event information. To view the map for an Oracle Database, go to the Component Map page and select the map from the list in the left NavBar. To learn more about the Component Map page, see the Views manual.
Viewing Oracle Component Devices

Viewing Oracle Component Devices
Viewing Oracle Component Devices in the Classic SL1 User Interface
In addition to the Device Manager page (Registry > Devices > Device Manager), you can view the Oracle Database instances and all associated component devices in the following places in the user interface:
l The Device View modal page (click the bar-graph icon [ ] for a device, then click the Topology tab) displays a map of a particular device and all of the devices with which it has parent-child relationships. Double-clicking any of the devices listed reloads the page to make the selected device the primary device:
30

31
l The Device Components page (Registry > Devices > Device Components) displays a list of all root devices and component devices discovered by SL1 in an indented view, so you can easily view the hierarchy and relationships between child devices, parent devices, and root devices. To view the component devices associated with an Oracle Database instance, find the Oracle device and click its plus icon (+):
l The Component Map page (Classic Maps > Device Maps > Components) allows you to view devices by root node and view the relationships between root nodes, parent components, and child components in a map. This makes it easy to visualize and manage root nodes and their components. SL1 automatically updates the Component Map as new component devices are discovered. The platform also updates each map with the latest status and event information. To view the map for an Oracle Database instance, go to the Component Map page and select the map from the list in the left NavBar. To learn more about the Component Map page, see the Views manual.
Viewing Oracle Component Devices

Troubleshooting Discovery Issues
Troubleshooting Discovery Issues
Oracle: Database v102 includes a check_oracle script for Discovery troubleshooting purposes. The script details information about any Discovery/Alignment issues that appear once a Support Escalation is opened. To run the included check_oracle script for the PowerPack:
1. Ensure the script has executable permissions:>sudo chmod 744 /opt/em7/envs/2BF4A4FD8DC2BA5EDDD565F9CF373156/lib/python2.7/site-packages/silo/oracle_db/check_oracle.py
2. Execute the script as user s-em7-core: >sudo -u s-em7-core /opt/em7/envs/2BF4A4FD8DC2BA5EDDD565F9CF373156/lib/python2.7/site-packages/silo/oracle_db/check_oracle.py
3. When the script has finished, provide the results file:/tmp/Oracle_results_10.1.2.3_1622740963
32
Device Dashboard
Chapter
3Oracle: Database Dashboards
Overview
The following section describes the device dashboard that is included in the Oracle: Database PowerPack:
Device Dashboard 33
Oracle Database: Instance 34
Device Dashboard
The Oracle: Database PowerPack includes a device dashboard that provides summary information for an Oracle Database instance. The device dashboard is aligned as the default device dashboard for the Oracle Database instance.
33

34
Oracle Database: Instance
The Oracle Database: Instance device dashboard displays the following information:
l Six gauges that display the following metrics:
o Chained Rows
o Data Size
o Tablespace Max Files
o Login Count
o Logswitch Counter
o Session Locks
l A bar graph that displays the Top 5 Oracle: DB Tablespace Stats Space Percent Used
l Four line graphs that display the following information:
o Oracle: DB Tablespace Stats | Space Percent Used | UNDOTBS (%)
o Performance Stats
o Utilization Percent
o Active Users
Device Dashboard

© 2003 - 2021, ScienceLogic, Inc.
All rights reserved.
LIMITATION OF LIABILITY AND GENERAL DISCLAIMER
ALL INFORMATION AVAILABLE IN THIS GUIDE IS PROVIDED "AS IS," WITHOUT WARRANTY OF ANY KIND, EITHER EXPRESS OR IMPLIED. SCIENCELOGIC™ AND ITS SUPPLIERS DISCLAIM ALL WARRANTIES, EXPRESS OR IMPLIED, INCLUDING, BUT NOT LIMITED TO, THE IMPLIED WARRANTIES OF MERCHANTABILITY, FITNESS FOR A PARTICULAR PURPOSE OR NON-INFRINGEMENT.
Although ScienceLogic™ has attempted to provide accurate information on this Site, information on this Site may contain inadvertent technical inaccuracies or typographical errors, and ScienceLogic™ assumes no responsibility for the accuracy of the information. Information may be changed or updated without notice. ScienceLogic™ may also make improvements and / or changes in the products or services described in this Site at any time without notice.
Copyrights and Trademarks
ScienceLogic, the ScienceLogic logo, and EM7 are trademarks of ScienceLogic, Inc. in the United States, other countries, or both.
Below is a list of trademarks and service marks that should be credited to ScienceLogic, Inc. The ® and ™ symbols reflect the trademark registration status in the U.S. Patent and Trademark Office and may not be appropriate for materials to be distributed outside the United States.
l ScienceLogic™ l EM7™ and em7™ l Simplify IT™ l Dynamic Application™ l Relational Infrastructure Management™
The absence of a product or service name, slogan or logo from this list does not constitute a waiver of ScienceLogic’s trademark or other intellectual property rights concerning that name, slogan, or logo.
Please note that laws concerning use of trademarks or product names vary by country. Always consult a local attorney for additional guidance.
Other
If any provision of this agreement shall be unlawful, void, or for any reason unenforceable, then that provision shall be deemed severable from this agreement and shall not affect the validity and enforceability of any remaining provisions. This is the entire agreement between the parties relating to the matters contained herein.
In the U.S. and other jurisdictions, trademark owners have a duty to police the use of their marks. Therefore, if you become aware of any improper use of ScienceLogic Trademarks, including infringement or counterfeiting by third parties, report them to Science Logic’s legal department immediately. Report as much detail as possible about the misuse, including the name of the party, contact information, and copies or photographs of the potential misuse to: [email protected]

800-SCI-LOGIC (1-800-724-5644)
International: +1-703-354-1010


