28
MOTOBRIDGE™ IP Interoperable Solution Dispatcher Training July 2009 MOTOBRIDGE Dispatch Application Overview

MOTOBRIDGE™ IP Interoperable Solution Dispatcher Training July 2009
MOTOBRIDGE Dispatch ApplicationOverview

6-2
Topic 6-2: Getting Started with the MOTOBRIDGE Dispatch Application
Starting the Local Dispatch Application
Enter the user name and password. Click the OK button. If the user name/password are not valid, the user can reenter.
After a valid login, the Dispatch Application opens and receives data from the OMC server or uploads data from a local profile.
6-3
Topic 6-2: Getting Started with the MOTOBRIDGE Dispatch Application
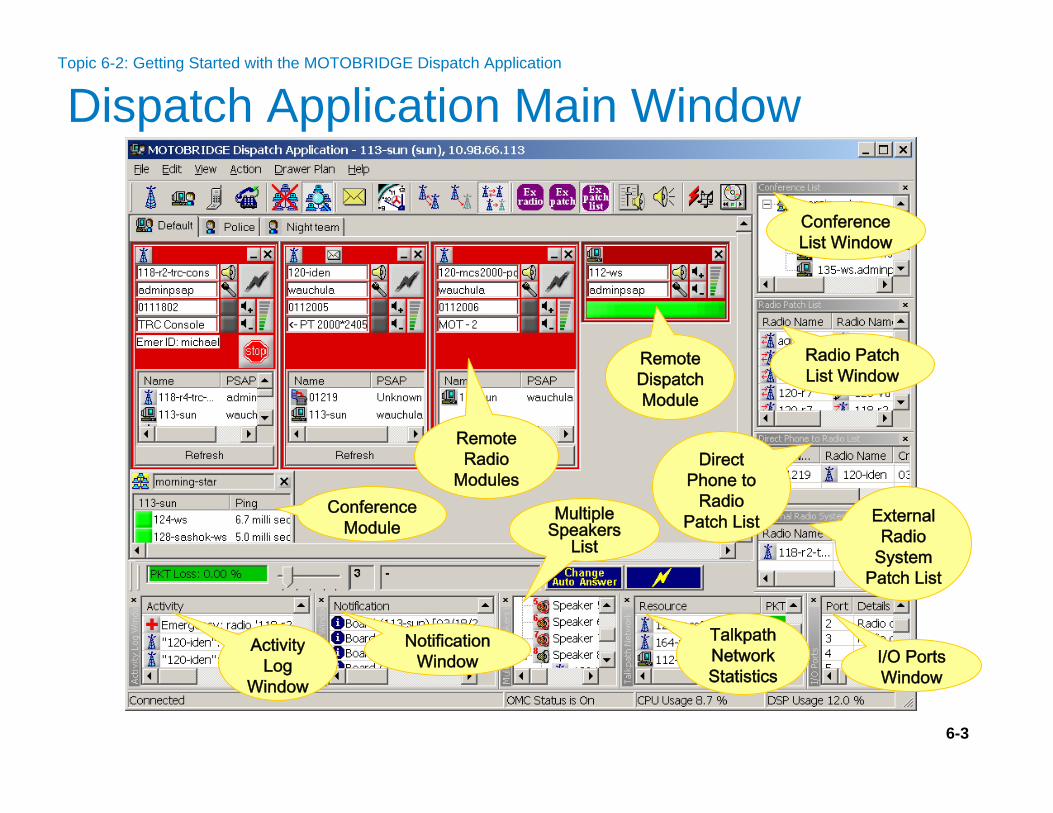
Dispatch Application Main Window
Notification Window
Talkpath Network Statistics
Conference Module
Multiple Speakers
List
Remote Radio
Modules
ActivityLog
Window
Conference List Window
Direct Phone to
Radio Patch List
Radio Patch List Window
External Radio
System Patch List
I/O Ports Window
Remote Dispatch Module

6-4
Notification Window
Talkpath Network Statistics
Conference Module Multiple
Speakers List
ActivityLog
Window
Conference List Window
Direct Phone to
Radio Patch List
Radio Patch List Window
External Radio
System Patch List
I/O Ports Window
Main Window: Screen ComponentsTopic 6-3: Navigating in the MOTOBRIDGE Dispatch Application
Status Bar
Tool Bar

6-5
Adding Radio/Dispatch TalkpathTopic 6-2: Getting Started with the MOTOBRIDGE Dispatch Application
From Menu Bar:
From Tool Bar:
6-6
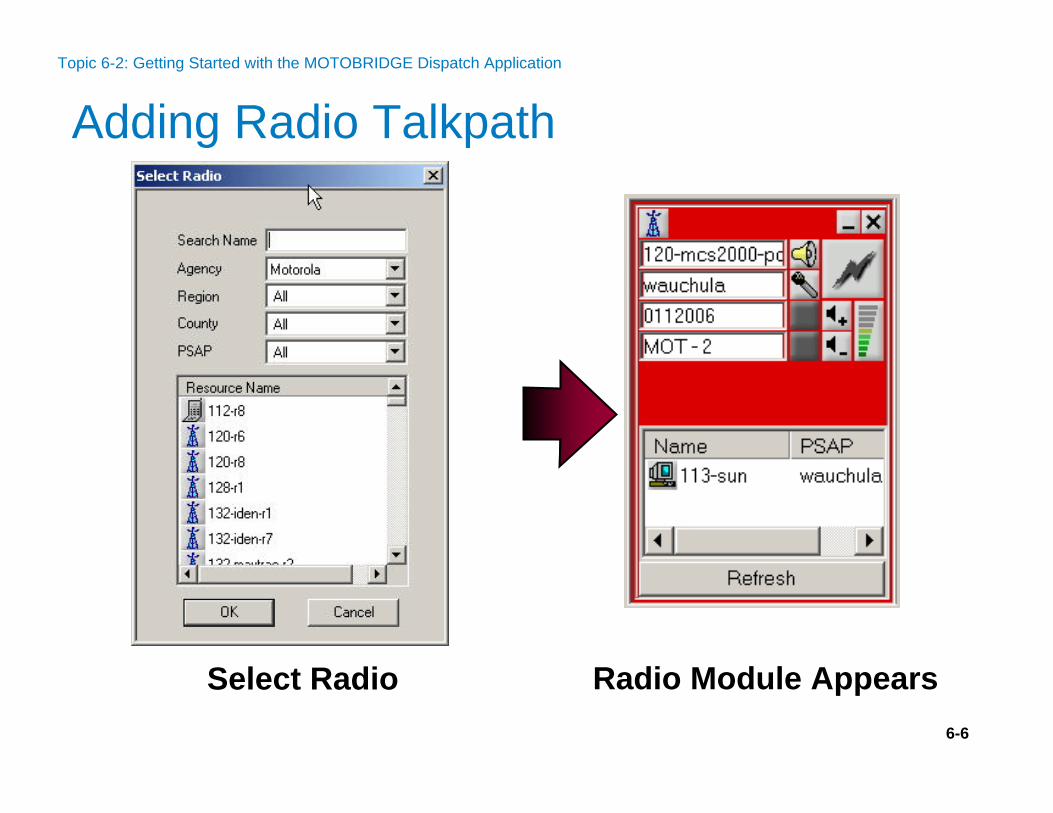
Adding Radio TalkpathTopic 6-2: Getting Started with the MOTOBRIDGE Dispatch Application
Select Radio Radio Module Appears

6-7
Adding Dispatch TalkpathTopic 6-2: Getting Started with the MOTOBRIDGE Dispatch Application
Select Dispatch Dispatch Module Appears

6-8
Adding Voter Talkpath
Select Voter Voter Module Appears
Topic 6-2: Getting Started with the MOTOBRIDGE Dispatch Application

6-9
Voting nodes
Voter Module Extension
Monitor ButtonOpens TRC monitor on TRC radios. To close the monitor press PTT or press the Monitor button.
Sub-modes SelectorAvailable sub modes:
• Auto - transmitting to broadcast group or best receiving node• Mix - transmitting to selected group or best receiving node• Manual - transmitting to selected group cell
Note: The Retransmission and Donor Redundant modes has no sub modes available (except Auto), thus the sub modes selector is disabled.
Topic 6-2: Getting Started with the MOTOBRIDGE Dispatch Application

6-10
Radio Names• White background - regular node.• Yellow - broadcasting node.• Orange - muted node (check mark also appears in the Mute column).• Red - disabled node (the radio is not responding).• Maroon - node in failure mode.
Node private PTT LEDsTX : The radio is in transmit mode; : the radio is not in transmit mode.RX : The radio is in receive mode; : the radio is not in receive mode.SQM Values: The number in this field signifies the incoming signal quality. The range is 1-5
where 5 signifies best quality.
RX button : Force Receiving. This button is displayed for all receiving voting nodes. When this button is pressed, the voter will receive the audio via the selected node.
TX Checkbox: This checkbox affects transmission depending on the selected TX mode.• In Automatic Mode the checkbox is disabled.• In Mix TX Mode the checked box is used as a broadcast transmitter group.• In Manual TX Mode the voter transmits via all TX selected nodes without any
conditions.Mute Checkbox: Checking this box excludes the voting node from the voter.Frequency Combo: Available only for TRC console Nodes. Changes TRC frequency of the
node.
Voter Module Extension (Voter Nodes)Topic 6-2: Getting Started with the MOTOBRIDGE Dispatch Application

6-11
Adding Radio-to-Radio TalkpathTopic 6-2: Getting Started with the MOTOBRIDGE Dispatch Application
2 - From Menu Bar:
1 - From Tool Bar: 3 - From Radio Module:Right-click for popup menu

6-12
Adding Radio-to-Radio Talkpath (contd.,)Topic 6-2: Getting Started with the MOTOBRIDGE Dispatch Application
Select Radio/s
Radio-to-Radio Talkpath Appears

6-13
Disconnecting Radio-to-Radio TalkpathTopic 6-2: Getting Started with the MOTOBRIDGE Dispatch Application
Double-click either radio/s to disconnect talkpath/s

6-14
Viewing Radio-to-Radio ConnectionsTopic 6-2: Getting Started with the MOTOBRIDGE Dispatch Application
From Menu Bar:
Patch List
From Tool Bar:

6-15
Creating a Conference
From Menu Bar:
From Tool Bar:
Topic 6-2: Getting Started with the MOTOBRIDGE Dispatch Application
6-16
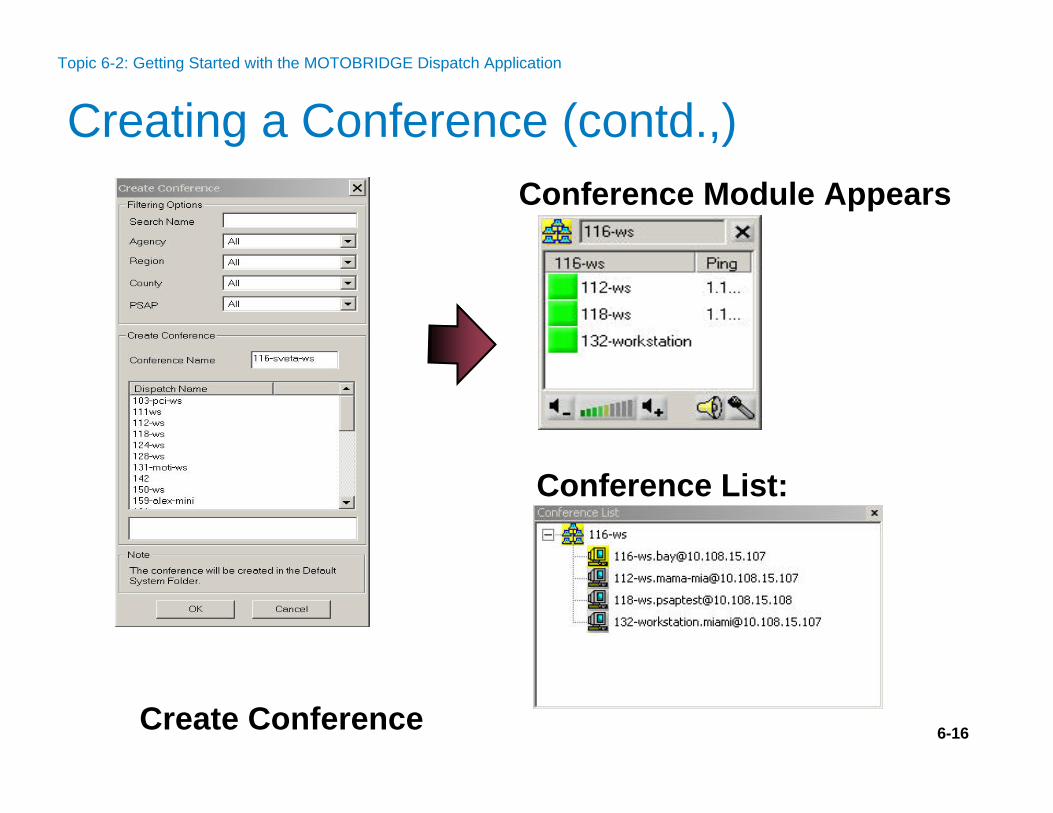
Creating a Conference (contd.,)
Conference List:
Create Conference
Conference Module Appears
Topic 6-2: Getting Started with the MOTOBRIDGE Dispatch Application

6-17
Viewing Conference ListFrom Menu Bar:
From Tool Bar:
Topic 6-2: Getting Started with the MOTOBRIDGE Dispatch Application

6-18
Conference Module and ListTopic 6-2: Getting Started with the MOTOBRIDGE Dispatch Application

6-19
Adding a Resource to a ConferenceTopic 6-2: Getting Started with the MOTOBRIDGE Dispatch Application
Right-click on Conference Module:
6-20
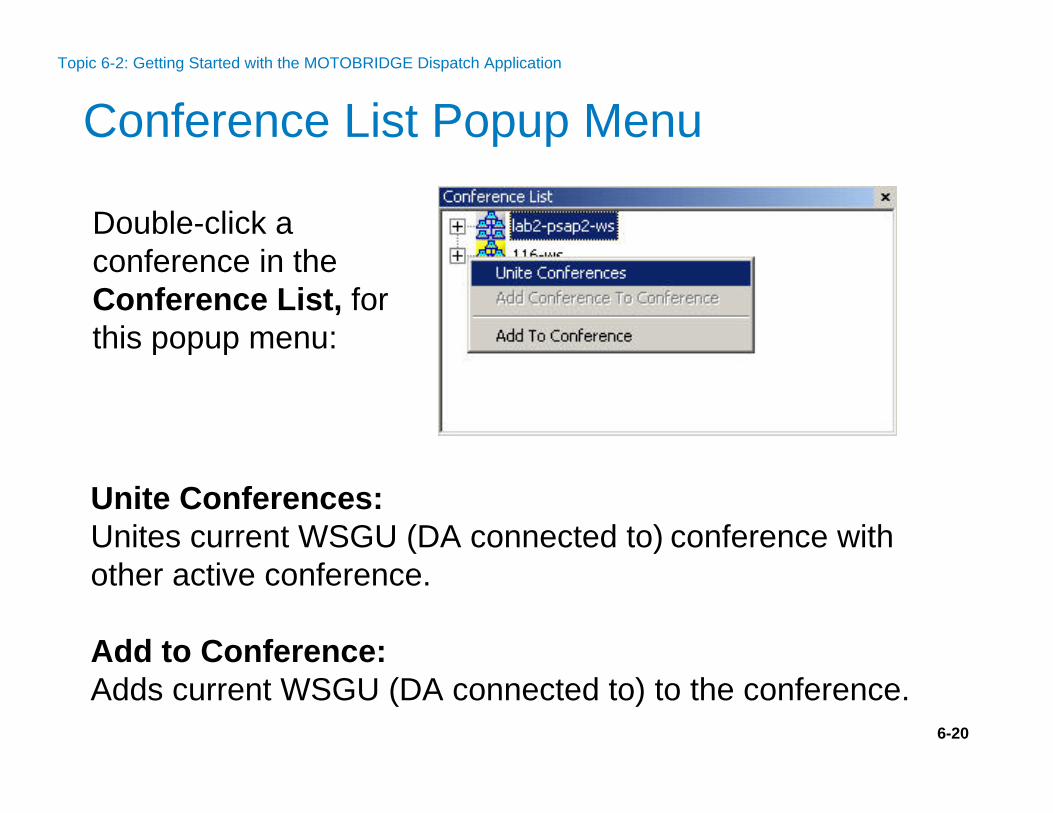
Conference List Popup Menu
Unite Conferences:Unites current WSGU (DA connected to) conference with other active conference.
Add to Conference:Adds current WSGU (DA connected to) to the conference.
Double-click a conference in theConference List, for this popup menu:
Topic 6-2: Getting Started with the MOTOBRIDGE Dispatch Application

6-21
External Radio System
With MOTOBRIDGE-DA you can:• Create Dispatcher-to-External Radio System Talkpath• Create Radio-to-External Radio System Talkpath• View Radio-to-External Talkpath in MOTOBRIDGE
system• Disconnect Radio-to-External Radio System Talkpath
External Radio System feature is a hardware or software platform that enables radio system or radio gateway interoperability.
Topic 6-2: Getting Started with the MOTOBRIDGE Dispatch Application

6-22
External Radio System: Create External Radio System Talkpath
2 - From Menu Bar:
1 - From Tool Bar:
Topic 6-2: Getting Started with the MOTOBRIDGE Dispatch Application

6-23
External Radio System: Create External Radio System Patch
From Tool Bar:
Topic 6-2: Getting Started with the MOTOBRIDGE Dispatch Application

6-24
External Radio System: View and Disconnect External Radio System Patch
From Tool Bar:
Disconnect:
Topic 6-2: Getting Started with the MOTOBRIDGE Dispatch Application

6-25
Main Window: FoldersDispatcher can assign the resources to different folders.Dispatcher can define up to 9 folders.
Topic 6-3: Navigating in the MOTOBRIDGE Dispatch Application

6-26
Equalizer for WS-GU
• Headset Equalizer
• GU Speaker Equalizer
Equalizer can be used to adjust the frequency response of a WS-GU’s headset or speaker.
Topic 6-3: Navigating in the MOTOBRIDGE Dispatch Application

6-27
Multiple Speakers AssignmentThis options permit assignment of the connected resources to vacant port.
Topic 6-3: Navigating in the MOTOBRIDGE Dispatch Application

6-28
Radio Module Popup MenuTopic 6-3: Navigating in the MOTOBRIDGE Dispatch Application
iDEN Popup Menu Other Radios Popup Menu


