379
Movie Magic Screenwriter 6 Help for Mac OS X Version by Write Brothers, Inc.
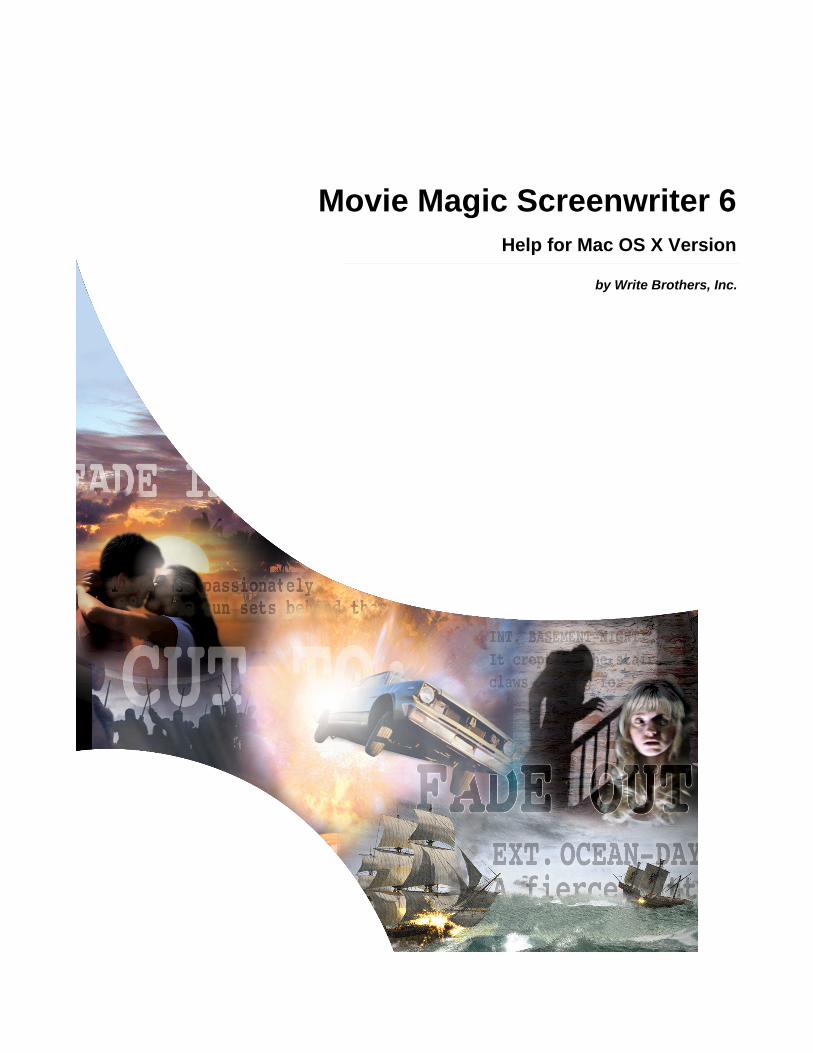
Movie Magic Screenwriter 6Help for Mac OS X Version
by Write Brothers, Inc.
Movie Magic Screenwriter2
Table of Contents
Foreword 0
Part I Movie Magic® Screenwriter 6 Help 13
................................................................................................................................... 141 Welcome to Movie Magic Screenwriter 6
................................................................................................................................... 152 Copyright & Trademark Notice
................................................................................................................................... 163 Running Movie Magic Screenwriter 6
................................................................................................................................... 174 New Features in Screenwriter 6.0
.......................................................................................................................................................... 18New Screenwriter 6.0 Icons (Mac OSX)
.......................................................................................................................................................... 19Screenwriter 6.0 Menu Changes
.......................................................................................................................................................... 23New File Format—.MMSW
......................................................................................................................................................... 23Opening Existing Documents
......................................................................................................................................................... 23Saving Documents in 6.0 (MMSW) Format
......................................................................................................................................................... 23Saving Documents as SCW Files
.......................................................................................................................................................... 24Undo Levels
.......................................................................................................................................................... 24Shortcut Key Changes in 6.0
................................................................................................................................... 285 Tutorials
.......................................................................................................................................................... 28Basic Overview
......................................................................................................................................................... 2910-Minute Tutorial
......................................................................................................................................... 30Open the Program
......................................................................................................................................... 31How to Write
................................................................................................................................... 311) Add Fade In
................................................................................................................................... 312) Add Scene Heading
................................................................................................................................... 323) Add Location
................................................................................................................................... 324) Add Time of Day
................................................................................................................................... 335) Type First Line of Action
................................................................................................................................... 336) Add Character Name
................................................................................................................................... 347) Add Character Extension
................................................................................................................................... 348) Add Dialogue
................................................................................................................................... 359) Add Another Character
................................................................................................................................... 3510) Add Dialogue
................................................................................................................................... 3511) Add Another Location
................................................................................................................................... 3612) Add Continuous
................................................................................................................................... 3613) Add Action
................................................................................................................................... 3714) Add Character Name
................................................................................................................................... 3715) Add Dialogue
................................................................................................................................... 3716) Add Character Name
................................................................................................................................... 3817) Add Dialogue
................................................................................................................................... 3818) Add Action
................................................................................................................................... 3919) Add Transition
................................................................................................................................... 3920) Add Scene Heading
................................................................................................................................... 3921) Add Location
................................................................................................................................... 4022) Add time of Day
................................................................................................................................... 4023) Add Action
................................................................................................................................... 4024) Add Character Name and Dialogue
................................................................................................................................... 4125) Add Character Name
................................................................................................................................... 4126) Add Parenthetical
................................................................................................................................... 4127) Add Dialogue
................................................................................................................................... 4228) Add Shot

3Contents
3
................................................................................................................................... 4229) Add Action
................................................................................................................................... 4230) Add Contued Dialogue
................................................................................................................................... 4331) Add Action.
................................................................................................................................... 4332) Add More Action
................................................................................................................................... 4333) Fade Out
......................................................................................................................................... 44That's It
......................................................................................................................................................... 44Exporting to PDF
......................................................................................................................................... 45Steps to Export to PDF (export only)
......................................................................................................................................... 45E-mailing a PDF File
......................................................................................................................................................... 46Tutorials
.......................................................................................................................................................... 46NaviDoc
......................................................................................................................................................... 46Opening and Closing the NaviDoc
......................................................................................................................................................... 47Common Controls
......................................................................................................................................................... 48Outline Panel
......................................................................................................................................... 49Outline Panel Controls
......................................................................................................................................... 49Setting up Outline hierarchy and styles
......................................................................................................................................... 51Creating an Outline
......................................................................................................................................... 52Navigating
......................................................................................................................................... 53Selecting Multiple Elements
......................................................................................................................................... 53Moving Outline Elements
......................................................................................................................................... 54Copying Outline Elements
......................................................................................................................................... 54Promoting and Demoting Elements
......................................................................................................................................................... 56Scenes Panel
......................................................................................................................................... 56Scenes Panel Controls
......................................................................................................................................... 57Navigating the Document
......................................................................................................................................... 57Sorting Scenes
......................................................................................................................................... 58Hide and Show Scene Heading Fields
......................................................................................................................................................... 58Notes Panel
......................................................................................................................................... 59Note Panel Controls
......................................................................................................................................... 59Creating and Deleting Note Categories
......................................................................................................................................... 60Adding and Removing Notes in the Document
......................................................................................................................................................... 62Bookmarks Panel
......................................................................................................................................... 62Adding and Removing Bookmarks
......................................................................................................................................... 62Editing Bookmarks
......................................................................................................................................... 63Navigating the Document
.......................................................................................................................................................... 63Templates
......................................................................................................................................................... 64Screenplay
......................................................................................................................................... 64Industry standards and conventions
......................................................................................................................................... 66The different elements of a Screenplay
................................................................................................................................... 66Scene Heading
................................................................................................................................... 67Action
................................................................................................................................... 68Character Name
................................................................................................................................... 68Dialogue
................................................................................................................................... 69Parenthetical
................................................................................................................................... 69Shot
................................................................................................................................... 70Transition
................................................................................................................................... 71Other Formatting Elements
................................................................................................................................... 71Character Extensions
................................................................................................................................... 72CONT'D (Character Name)
................................................................................................................................... 73MORE and CONT'D
......................................................................................................................................................... 73Sitcom
......................................................................................................................................... 73Industry standards and conventions
......................................................................................................................................... 76The different elements of a Sitcom
................................................................................................................................... 77Act Break

Movie Magic Screenwriter4
................................................................................................................................... 77Scene Label
................................................................................................................................... 77Scene Heading
................................................................................................................................... 78Action
................................................................................................................................... 79Character Name
................................................................................................................................... 80Dialogue
................................................................................................................................... 80Parenthetical
................................................................................................................................... 81Transition
................................................................................................................................... 82Other Formatting Elements
................................................................................................................................... 83Character Extensions
................................................................................................................................... 83CONT'D (Character Name)
................................................................................................................................... 84MORE and CONT'D
......................................................................................................................................... 85Sitcom format - Step-by-step Basics
................................................................................................................................... 86Load the Template
................................................................................................................................... 876 Basic Information
.......................................................................................................................................................... 87Using OS X
.......................................................................................................................................................... 87Selecting Screenwriter Commands
.......................................................................................................................................................... 88On-Line Help
.......................................................................................................................................................... 88Menus
......................................................................................................................................................... 89Pull Down Menu
......................................................................................................................................................... 89List Menu
......................................................................................................................................................... 89Options Menu
.......................................................................................................................................................... 90Push Buttons
.......................................................................................................................................................... 90Checkboxes
.......................................................................................................................................................... 91Radio Buttons
.......................................................................................................................................................... 91Text or Numerical Input Fields
.......................................................................................................................................................... 91Editing Screen
......................................................................................................................................................... 92Main Menu Bar
......................................................................................................................................................... 93Top Toolbar
......................................................................................................................................................... 93Right Toolbar
......................................................................................................................................................... 93Bottom Status Bar
......................................................................................................................................................... 94The View Toolbar
.......................................................................................................................................................... 94Opening a Document
......................................................................................................................................................... 95Opening Multiple Documents
......................................................................................................................................................... 95Displaying Multiple Windows
......................................................................................................................................................... 95Switching between Windows
......................................................................................................................................................... 95Opening a Previously Saved Version
......................................................................................................................................................... 96Opening a Document automatically at Startup
......................................................................................................................................................... 96Opening a Timed Backup
......................................................................................................................................................... 96Options for Loading Element Styles
.......................................................................................................................................................... 96Saving a Document
......................................................................................................................................................... 97Saving Portions of a Document
.......................................................................................................................................................... 98Merging Documents
................................................................................................................................... 997 Title Page
.......................................................................................................................................................... 99Opening a Title Page
.......................................................................................................................................................... 100Creating Text Boxes
.......................................................................................................................................................... 100Moving a Text Box
.......................................................................................................................................................... 102Exporting a Title Page
.......................................................................................................................................................... 102Importing a Title Page
.......................................................................................................................................................... 102Printing a Title Page
................................................................................................................................... 1038 Templates
.......................................................................................................................................................... 103Create a New Frile from a Template
.......................................................................................................................................................... 103Loading a Template
.......................................................................................................................................................... 105Television Templates

5Contents
5
.......................................................................................................................................................... 105Creating Your Own Template
.......................................................................................................................................................... 105Restoring an Overwritten Template
................................................................................................................................... 1079 Index Cards
.......................................................................................................................................................... 107Index Card View
.......................................................................................................................................................... 108Index Card Toolbar
......................................................................................................................................................... 109Number of Index Cards on screne
......................................................................................................................................................... 109Horizontal Index Cards
......................................................................................................................................................... 109Vertical Index Cards
......................................................................................................................................................... 109Add an Index Card
.......................................................................................................................................................... 109Write an Index Card
.......................................................................................................................................................... 111Edit an Index Card
.......................................................................................................................................................... 111Shuffle an Index Card
.......................................................................................................................................................... 112Shuffle Multiple Index Cards
.......................................................................................................................................................... 112Printing Index Cards
................................................................................................................................... 11510 Writing a Script
.......................................................................................................................................................... 115Inserting Elements
.......................................................................................................................................................... 116Tab & Return
.......................................................................................................................................................... 117FADE IN
.......................................................................................................................................................... 117Scene Heading
.......................................................................................................................................................... 118Location
.......................................................................................................................................................... 118Time-of-Day
.......................................................................................................................................................... 119Action
.......................................................................................................................................................... 119Character Name
......................................................................................................................................................... 120Inserting Character Names
......................................................................................................................................................... 120Character Extension
......................................................................................................................................................... 121Deleting a Character Extension
.......................................................................................................................................................... 121Dialogue
.......................................................................................................................................................... 122Parenthetical
.......................................................................................................................................................... 123Transition
.......................................................................................................................................................... 123Shot
.......................................................................................................................................................... 124Title
.......................................................................................................................................................... 124Act Break
......................................................................................................................................................... 124Prologue Text
......................................................................................................................................................... 124New Act
......................................................................................................................................................... 124Same Act
......................................................................................................................................................... 124End of Act
......................................................................................................................................................... 125New Scene
.......................................................................................................................................................... 125Notes
......................................................................................................................................................... 125Add a Note
......................................................................................................................................................... 126Type a Note
......................................................................................................................................................... 126Hide/Show a Note
......................................................................................................................................................... 126Print a Note
......................................................................................................................................................... 127Note Options
.......................................................................................................................................................... 128Switch Elements
.......................................................................................................................................................... 129Moving Between Elements
.......................................................................................................................................................... 130Character Name in Dialogue or Action
.......................................................................................................................................................... 131Add Forced Page Break
.......................................................................................................................................................... 131Remove a Forced Page Break
.......................................................................................................................................................... 131Soft-Hyphen
.......................................................................................................................................................... 131Hard-Dash
.......................................................................................................................................................... 131Hard-Space
.......................................................................................................................................................... 132Hard Return
.......................................................................................................................................................... 132Dual-Column (Simultaneous) Dialogue
Movie Magic Screenwriter6
......................................................................................................................................................... 132Dual Columns Menu
......................................................................................................................................................... 133Dual Column Submenus and Icons
......................................................................................................................................................... 133Dual Columns Instructions
......................................................................................................................................................... 134Dual Column Margins
.......................................................................................................................................................... 135Cheating
......................................................................................................................................................... 135Cheat an Element
......................................................................................................................................................... 135Cheat Page Breaks
......................................................................................................................................................... 136Cheat a Page
......................................................................................................................................................... 136Cheat the Whole Document
......................................................................................................................................................... 136Cheat the Page’s Header
.......................................................................................................................................................... 136User Lists
......................................................................................................................................................... 138Act/Scene Text
......................................................................................................................................................... 138Editing User Lists
......................................................................................................................................................... 139Loading User Lists
......................................................................................................................................................... 139Loading Locations, Character Names or Transitions from Screenwriterscripts
......................................................................................................................................................... 140Saving Lists as the Default Lists for all New Documents
......................................................................................................................................................... 140Default User Lists
......................................................................................................................................................... 142Reloading Default User Lists
.......................................................................................................................................................... 142Alias Text
......................................................................................................................................................... 142Creating Alias Text
......................................................................................................................................................... 143Capitalization of Alias Text
................................................................................................................................... 14511 Text Editing
.......................................................................................................................................................... 145Moving the Cursor
.......................................................................................................................................................... 146Selecting Text
.......................................................................................................................................................... 147Adjusting the Selection
.......................................................................................................................................................... 147De-Selecting Text
.......................................................................................................................................................... 147Moving Text
......................................................................................................................................................... 147Cutting and Pasting with the Mouse
......................................................................................................................................................... 147Copying and Pasting with the Mouse
......................................................................................................................................................... 148Cutting/Copying/Pasting with the Keyboard
......................................................................................................................................................... 148Dragging and Dropping
.......................................................................................................................................................... 149Deleting Text
.......................................................................................................................................................... 149Undo
.......................................................................................................................................................... 149Redo
.......................................................................................................................................................... 149Formatting Text
......................................................................................................................................................... 150Bolding Text
......................................................................................................................................................... 150Underlining Text
......................................................................................................................................................... 150Italicizing Text
......................................................................................................................................................... 150Striking Out Text
......................................................................................................................................................... 150Removing Text Formatting
......................................................................................................................................................... 151Applying Multiple Text Formats
......................................................................................................................................................... 151Changing Case
......................................................................................................................................................... 151Typing Accented Characters
.......................................................................................................................................................... 152Spell Check
......................................................................................................................................................... 153Start Spell Check
......................................................................................................................................................... 154Auto-Correct Typos
......................................................................................................................................................... 155User Dictionaries
.......................................................................................................................................................... 156Find and Replace Text
......................................................................................................................................................... 157Find and Replace Window
......................................................................................................................................................... 158Change Character Name
.......................................................................................................................................................... 158Thesaurus
................................................................................................................................... 16012 The NaviDoc
.......................................................................................................................................................... 160Opening and Closing the NaviDoc

7Contents
7
.......................................................................................................................................................... 161Resizing the NaviDoc Panel
.......................................................................................................................................................... 161Navigation Pointer and the NaviDoc Panel
.......................................................................................................................................................... 162NaviDoc Keyboard Commands
.......................................................................................................................................................... 162The NaviDoc Menu
.......................................................................................................................................................... 163NaviDoc Options
.......................................................................................................................................................... 164General NaviDoc Options
.......................................................................................................................................................... 164Notes Panel
......................................................................................................................................................... 165Notes List
......................................................................................................................................................... 166Notes Controls
......................................................................................................................................................... 166Notes Command Buttons
......................................................................................................................................................... 166Notes Category Controls
......................................................................................................................................................... 167Note Category Drop-Down List Control
......................................................................................................................................................... 168Show/Hide Category View in NaviDoc
......................................................................................................................................................... 168Show/Hide Note Categories in Document
......................................................................................................................................................... 169Print Notes Control
......................................................................................................................................................... 169Notes Options Control
......................................................................................................................................................... 169Notes Panel Options
......................................................................................................................................................... 170Sync Control (On/Off)
......................................................................................................................................................... 170Note Display Controls
.......................................................................................................................................................... 170Bookmarks Panel
......................................................................................................................................................... 171Bookmarks List
......................................................................................................................................................... 172Bookmarks Controls
......................................................................................................................................................... 172Bookmarks Panel Options
.......................................................................................................................................................... 173Scenes Panel
......................................................................................................................................................... 174Scene Controls
......................................................................................................................................................... 174Sort Scenes Control
......................................................................................................................................................... 175Scene Header View Control
......................................................................................................................................................... 175Scene Element Spacing Control
......................................................................................................................................................... 175Sync Control (On/Off)
......................................................................................................................................................... 175Scenes Panel Options
......................................................................................................................................................... 176Scene List View Controls
.......................................................................................................................................................... 176Outline Panel
......................................................................................................................................................... 177Outline List
......................................................................................................................................................... 177Outline Controls
......................................................................................................................................................... 178Outline Levels Control
......................................................................................................................................................... 178Style View Control
......................................................................................................................................................... 178Outline Spacing Control
......................................................................................................................................................... 179Outline Options Control
......................................................................................................................................................... 179Outline Panel Options
......................................................................................................................................................... 180Scene Heading Field View Control
......................................................................................................................................................... 180Sync Control (On/Off)
......................................................................................................................................................... 181Outline View Controls
......................................................................................................................................................... 182Current Element Drop-Down List
......................................................................................................................................................... 182Outline Style Management Control
......................................................................................................................................................... 183NaviDoc Outline Styles Format Options
......................................................................................................................................................... 184Delete Outline Style Control
......................................................................................................................................................... 185Add Outline Element Control
......................................................................................................................................................... 186Outline Styles Format Options
......................................................................................................................................................... 186Using the NaviDoc Outline Panel to Move Outline Elements in theDocument
......................................................................................................................................................... 187Using the NaviDoc Outline Panel to Reassign Outline Element Styles in theDocument
......................................................................................................................................................... 188A Note About Copying Styles Between Documents
......................................................................................................................................................... 189Outlining Features
......................................................................................................................................... 190Outline Tools in the Document View

Movie Magic Screenwriter8
......................................................................................................................................... 190Adding and Removing Outline Elements in the Document
......................................................................................................................................... 190Reassigning Outline Elements in the Document
......................................................................................................................................... 191Promoting and Demoting Outline Elements
................................................................................................................................... 19213 Printing the Document
.......................................................................................................................................................... 192Page Setup
.......................................................................................................................................................... 193Document Layout
.......................................................................................................................................................... 194Header and Footer...
......................................................................................................................................................... 195Header and Footer Text
......................................................................................................................................................... 196Put in Date As...
......................................................................................................................................................... 196Put In Act Break As...
......................................................................................................................................................... 196Put In Scene Label As...
......................................................................................................................................................... 197Print Headers On...
......................................................................................................................................................... 197Align Headers/Footers
......................................................................................................................................................... 197Blank Lines following Header
......................................................................................................................................................... 197Preview
.......................................................................................................................................................... 198Printing the Document
.......................................................................................................................................................... 201Production Breakdowns Print Window
......................................................................................................................................................... 202Production Breakdowns Print Options
......................................................................................................................................................... 203Secondary Sort by... Example
......................................................................................................................................................... 204Secondary Sort by... Production Breakdown Print Options
......................................................................................................................................................... 205Miscellaneous Production Breakdown Print Options...
................................................................................................................................... 20614 Other Screenwriter Features
.......................................................................................................................................................... 206iPartner
......................................................................................................................................................... 206Connecting to iPartner
......................................................................................................................................................... 208The Chat Window
......................................................................................................................................................... 209Editing in Slave view
......................................................................................................................................................... 209Slave view editing capabilities
......................................................................................................................................................... 210Editing Keys in iPartner
......................................................................................................................................................... 211Revoking Slave's editing privileges
......................................................................................................................................................... 211Ending the session
......................................................................................................................................................... 211Using the Voice feature to talk to your partner
......................................................................................................................................................... 211iPartner - Trouble Shooting - Known Issues
......................................................................................................................................................... 211Firewall Configuration Information
.......................................................................................................................................................... 212Speak Text
......................................................................................................................................................... 212Setup Voices
......................................................................................................................................................... 215Speak Selection
.......................................................................................................................................................... 215Voice Commands
......................................................................................................................................................... 216Setting Up Mac OS X for Voice Recognition
.......................................................................................................................................................... 219Send As Email Attachment Command
......................................................................................................................................................... 220Attach Document As:
......................................................................................................................................................... 220Compose Message In:
.......................................................................................................................................................... 220Name Bank
................................................................................................................................... 22215 Customizing Screenwriter
.......................................................................................................................................................... 223View Menu
......................................................................................................................................................... 223Ruler
......................................................................................................................................................... 223Show Format Codes
......................................................................................................................................................... 224Zoom Screen Text...
......................................................................................................................................... 225Fit Width
......................................................................................................................................... 225Fixed Text Size
.......................................................................................................................................................... 226Toolbar Icons Menu
......................................................................................................................................................... 227Customize Toolbar...
.......................................................................................................................................................... 229Editing Preferences
......................................................................................................................................................... 229QuickType Preferences

9Contents
9
......................................................................................................................................... 230Auto Pop-Up
......................................................................................................................................... 230Enable QuickType Entry
......................................................................................................................................... 232Use SmartTab
......................................................................................................................................... 232Running Lists
......................................................................................................................................................... 233Pressing the ENTER key...
......................................................................................................................................................... 233Other Editing Preferences
.......................................................................................................................................................... 234Startup/Files Options
......................................................................................................................................................... 234Document Settings
......................................................................................................................................... 235Restore the Main Window's Size
......................................................................................................................................................... 235Retain Previous Versions Options
.......................................................................................................................................................... 236Files Preferences
......................................................................................................................................................... 237When Screenwriter starts it should...
......................................................................................................................................................... 237Default Document Folder
......................................................................................................................................................... 238Retain Previous Versions
......................................................................................................................................................... 239Automatic Timed Backups
......................................................................................................................................................... 239Password Protect Documents
......................................................................................................................................................... 239When Opening Existing Documents...
.......................................................................................................................................................... 240SmartCheck Options
......................................................................................................................................................... 241Automatically Run SmartCheck Before Printing
......................................................................................................................................................... 241Beep When Formatting Is Found
......................................................................................................................................................... 241Delete WITHOUT prompting...
......................................................................................................................................................... 242Ignore Blank Lines which have Revision Marks
......................................................................................................................................................... 242Ignore the same Name speaking twice in a row when Extensions do NOTmatch
......................................................................................................................................................... 242Combine OMITTEDs that are Widowed on page
......................................................................................................................................................... 242SmartCheck Prompts
.......................................................................................................................................................... 243Spelling Options
......................................................................................................................................................... 243Correct Double Capitals (e.g. “MIstake”)
......................................................................................................................................................... 243SpellCheck as you Type
......................................................................................................................................................... 244Auto-Correct Typos as you Type
......................................................................................................................................................... 244Beep on Unknown Words
......................................................................................................................................................... 245AutoCapitalize
.......................................................................................................................................................... 246Misc. Preferences
......................................................................................................................................................... 246Miscellaneious Options
......................................................................................................................................................... 247Chat Sound
......................................................................................................................................................... 247Voice Commands
......................................................................................................................................................... 247Diskette Button on Tollbar...
......................................................................................................................................................... 248After a Search...
......................................................................................................................................................... 248Pagination
.......................................................................................................................................................... 249Revisions Preferences
......................................................................................................................................................... 249After ?? Revision Marks on the Page, put a Revision Mark on the Header
......................................................................................................................................................... 249Use an Asterisk on the Header instead of the Normally Defined RevisionMark
......................................................................................................................................................... 250Put the Header Revision mark on the line under the header rather than tothe right of it
......................................................................................................................................................... 250Don’t print Revision Marks on each line...
......................................................................................................................................................... 250Asterisk Headers of NEW A-Pages that don’t have any revisions on them
......................................................................................................................................................... 250Print Separate full “PAGE OMITTED” pages
......................................................................................................................................................... 250Mark Element following Complete Deletion
......................................................................................................................................................... 250Auto-Update Locked Headers on Revision
.......................................................................................................................................................... 251Printer Preferences
......................................................................................................................................................... 251Print Bottom Continueds
......................................................................................................................................................... 252Print Color Text
......................................................................................................................................................... 252Production Sides
......................................................................................................................................................... 252When printing to PDF, prompt user with (COPY)

Movie Magic Screenwriter10
......................................................................................................................................................... 252Print Using Fractional Widths
.......................................................................................................................................................... 252Keyboard Preferences
......................................................................................................................................................... 253Keyboard Preferences Buttons
......................................................................................................................................................... 254Edit Keyboard Preference
.......................................................................................................................................................... 254Animation Dialog Preferences
......................................................................................................................................................... 255Speech Number
......................................................................................................................................................... 255Character Name Position
......................................................................................................................................................... 256Dialogue Spacing
......................................................................................................................................................... 256Dialogue Capitalization
......................................................................................................................................................... 256Blank Lines Before Printed Speeches
......................................................................................................................................................... 257Print Script Notes
......................................................................................................................................................... 257Misc. Animation Dialog Preferences
.......................................................................................................................................................... 258NaviDoc Preferences
.......................................................................................................................................................... 259Outline Preferences
.......................................................................................................................................................... 259Script Format Options
......................................................................................................................................................... 260Element Styles...
......................................................................................................................................... 261Options common to all script elements
......................................................................................................................................... 263Character Names
......................................................................................................................................... 264Dialogue
......................................................................................................................................... 264Parentheticals
......................................................................................................................................... 265Scene Headings
......................................................................................................................................... 266Shots
......................................................................................................................................... 266Action
......................................................................................................................................... 266Transitions
......................................................................................................................................... 267Act Breaks
......................................................................................................................................... 268Scene Labels
......................................................................................................................................... 269Notes
......................................................................................................................................... 269Centered Title
......................................................................................................................................... 269Page Breaks
................................................................................................................................... 270Break Action
................................................................................................................................... 270Break Dialogue
................................................................................................................................... 271Transitions
................................................................................................................................... 271Miscellaneous
......................................................................................................................................... 272Locked Scripts
................................................................................................................................... 27316 Production Features
.......................................................................................................................................................... 273Production Rewrites
.......................................................................................................................................................... 274The Production Cycle
......................................................................................................................................................... 274Shooting Script
......................................................................................................................................................... 277Perform Revisions
......................................................................................................................................................... 277Issue Revised Pages
......................................................................................................................................................... 277Start Next Revision
.......................................................................................................................................................... 278Revision Marks
......................................................................................................................................................... 278Manual Revision Marks
......................................................................................................................................................... 279Auto-Revision Marks
......................................................................................................................................................... 279Enabling Auto-Revision Marks
......................................................................................................................................................... 279Removing All Current Revision Marks
.......................................................................................................................................................... 279Locked Scripts Options
......................................................................................................................................................... 280Locked Scene Headings
......................................................................................................................................................... 281Locked Page Breaks
......................................................................................................................................................... 282Omitted Text
......................................................................................................................................................... 282A-Scene Numbering Scheme
......................................................................................................................................................... 283Multi-Lock
......................................................................................................................................................... 283Multi-Lock Scenes
......................................................................................................................................................... 284Multi-Lock Pages

11Contents
11
......................................................................................................................................................... 284Revision Mark
......................................................................................................................................................... 285Use Alternate Scene Numbering
......................................................................................................................................................... 285Locked Letter Skip List
.......................................................................................................................................................... 286Advanced Locking Features
......................................................................................................................................................... 286Changing the Level of Locking
......................................................................................................................................................... 287Overriding a Scene Number
......................................................................................................................................................... 288Fix or Flex A-Pages
......................................................................................................................................................... 288Converting A-Pages
......................................................................................................................................................... 289Combining Short Pages
......................................................................................................................................................... 290Set Revision Draft Color Order
.......................................................................................................................................................... 291Production Breakdowns
......................................................................................................................................................... 291Print Standard Breakdowns
......................................................................................................................................... 292Sort Breakdown Primarily by...
......................................................................................................................................... 293Secondary Sort by...
......................................................................................................................................... 294Calculating Eighths by...
......................................................................................................................................... 295Display Eighth Totals by...
......................................................................................................................................... 295Miscellaneous Options...
.......................................................................................................................................................... 296Breakdown Tagging
......................................................................................................................................................... 296Tagging Mode
......................................................................................................................................................... 296Tagging Items
......................................................................................................................................................... 297Untagging Items
......................................................................................................................................................... 297Tag Items Globally
......................................................................................................................................................... 297Ignore Selection for Breakdowns
......................................................................................................................................................... 297Untag All Items
......................................................................................................................................................... 298Edit Breakdown Categories
.......................................................................................................................................................... 299Breakdown Sheets
......................................................................................................................................................... 299Layout Breakdown Sheets
.......................................................................................................................................................... 300Export to Movie Magic Scheduling
.......................................................................................................................................................... 301Animation Production
......................................................................................................................................................... 301Multiple Revision Marks
......................................................................................................................................................... 301Locking Current Revision Marks
......................................................................................................................................................... 302Assigning Numbers to Speeches
.......................................................................................................................................................... 302Animation Recording Scripts
......................................................................................................................................................... 303Printing Animation Recording Scripts
......................................................................................................................................................... 304Changing the Animation Recording Script layout
......................................................................................................................................................... 304Displaying Numbered Dialogue
......................................................................................................................................................... 304Locking Dialogue Numbering
......................................................................................................................................................... 304Multi-Locking Dialogue Numbering
......................................................................................................................................................... 304Unlocking Dialogue Numbering
......................................................................................................................................................... 304Overriding Dialogue Numbering
.......................................................................................................................................................... 305Watermarks
................................................................................................................................... 31017 Appendices
.......................................................................................................................................................... 310Menus
......................................................................................................................................................... 311Screenwriter Menu
......................................................................................................................................................... 312File Menu
......................................................................................................................................................... 314Edit Menu
......................................................................................................................................................... 318View Menu
......................................................................................................................................... 320Normal
......................................................................................................................................... 320Full Page
......................................................................................................................................................... 321Format Menu
......................................................................................................................................................... 324Search Menu
......................................................................................................................................................... 324Find Menu
......................................................................................................................................................... 324Goto Menu
......................................................................................................................................................... 325NaviDoc Menu

Movie Magic Screenwriter12
......................................................................................................................................................... 327Tools Menu
......................................................................................................................................................... 329Production Menu
......................................................................................................................................... 330Fix or Flex...
......................................................................................................................................... 330Auto-Revision...
......................................................................................................................................... 331Remove...
......................................................................................................................................... 332Override...
......................................................................................................................................... 332Breakdown...
......................................................................................................................................... 333TV Breakdowns
................................................................................................................................... 333Generate Rundown Sheet
................................................................................................................................... 335Generate Set List (COPY)
................................................................................................................................... 337Scene Character Lists
......................................................................................................................................... 338Animation Locking
......................................................................................................................................................... 339Window Menu
......................................................................................................................................................... 339Help Menu
.......................................................................................................................................................... 340Key Assignments
......................................................................................................................................................... 341Shortcut Keys for Editing
......................................................................................................................................................... 342Shortcut Keys for Inserting and Manipulating Elements
......................................................................................................................................................... 343Shortcut Keys for File Operations
......................................................................................................................................................... 343Shortcut Keys for Formatting
......................................................................................................................................................... 344Shortcut Keys for NaviDoc
......................................................................................................................................................... 345Shortcut Keys for Navigation
......................................................................................................................................................... 346Shortcut Keys for Selection
......................................................................................................................................................... 347Miscellaneous Shortcut Keys
......................................................................................................................................................... 347Function Keys
.......................................................................................................................................................... 347Troubleshooting
......................................................................................................................................................... 348Known Hardware/Software Problems
......................................................................................................................................................... 348Common Technical Support Questions and Answers
......................................................................................................................................................... 350Production Problems and Solutions
.......................................................................................................................................................... 351Importing Documents
......................................................................................................................................................... 351Preparing Documents for Importing
......................................................................................................................................................... 352Direct Import
......................................................................................................................................................... 353Cut and Paste Import
......................................................................................................................................................... 355Importing a Macintosh Word Processor script
......................................................................................................................................................... 355Importing a Scriptware for Windows script
......................................................................................................................................................... 355Cleaning up Imported Scripts
.......................................................................................................................................................... 356Exporting Documents
......................................................................................................................................................... 356Export
......................................................................................................................................................... 357Importing a Screenwriter Export script
......................................................................................................................................................... 357Cut and Paste Exporting
.......................................................................................................................................................... 358Format Codes
.......................................................................................................................................................... 359Files Installed
......................................................................................................................................................... 359Sample Scripts and Templates
Index 362
Movie Magic® Screenwriter 6 Help 13
Movie Magic® Screenwriter 6 Help
Movie Magic® Screenwriter™
Software for Writing Screenplays, Teleplays, Stage Plays, Novels, Animation Scripts, Comic Book scripts,
Multimedia Scripts, & more…
User's Manual for Mac OS X
24-hour Web Technical Support: http://support.screenplay.com/_redir/supporthome.html
Contact Technical Support: http://support.screenplay.com/_redir/contactsupport.html
Sales Contact - http://support.screenplay.com/_redir/contactCS.html
Fax Technical Support: (818) 843-8364
Phone Technical Support: (818) 843-7819 • 8:30 am—5:00 pm PST
Write Brothers® Inc.
138 N. Brand Blvd. • Suite 201 Glendale, CA 91203 • (818) 843-6557
Movie Magic Screenwriter14
1 Welcome to Movie Magic Screenwriter 6
Movie Magic® Screenwriter™ is an all-in-one package for any story you want to write.Screenwriter handles script formats for motion pictures, theater, television, novels, comicbooks, and more. It formats while you write so you can focus on what you are writing, notwhere it goes on the page. Screenwriter's massive set of features makes writing andrewriting fast and simple.
Copyright Notice
Things Every Movie Magic® Screenwriter User Should Know
· New Features in Screenwriter 6.0
· Tutorials
· Basic Information
· Running Movie Magic Screenwriter
· Choosing a Script Format
· Writing the Document
· Editing a Document
· Saving a Document
· Opening a Document
· Printing the Script
· Importing Scripts
· The Main Menu Bar
· The NaviDoc Panel
Advanced Movie Magic Screenwriter Features
· Customizing Screenwriter
· Outlining in Screenwriter
· Using User Lists
· Setting Script Options
· Exporting the Script
· Production Scripts
· Animation Production
· Appendices
15
17
28
87
16
103
115
91
96
94
192
351
310
160
222
176
136
259
356
273
301
310

Movie Magic® Screenwriter 6 Help 15
2 Copyright & Trademark Notice
The software described in this book is furnished under license and may be used only inaccordance with the terms of such license.
Disclaimer
Write Brothers Incorporated, Ken Schafer and ScriptPerfection Enterprises make norepresentation or warranties with respect to the contents hereof and specifically disclaim anyimplied warranties of merchantability or fitness for any particular purpose. Movie MagicScreenwriter™ for Mac OS X is provided “as is” without warranty of any kind, eitherexpressed or implied.
Write Brothers Incorporated, Ken Schafer and ScriptPerfection Enterprises shall have noliability or responsibility to you or any other person or entity with respect to any loss ordamage caused by Movie Magic Screenwriter™ for Mac OS X including, but not limited to,any loss of profits, interruption of service, loss of business or consequential damagesresulting from the use of such programs.
Copyright Notice
Manual written by Kevin Hindley, with contributions by Chris Huntley, Stephen Greenfield,Ken Haberman, Kynan Jones, and Richard McClelland.
Copyright © Write Brothers, Inc. 1997, 2003, 2007. Portions © Ken Schafer 1993-2000.
All rights reserved. No part of this publication may be transmitted, reproduced, stored in anyretrieval system or translated into any language or computer language in any form or by anymeans, mechanical, electronic, magnetic, optical, chemical, manual, or otherwise withoutprior written consent by Write Brothers, Inc.
Trademarks
Screenwriter and the Screenwriter Logo are trademarks of Write Brothers Incorporated. Movie Magic is a registered trademark of Entertainment Partners, Inc. Dramatica is aregistered trademark of Write Brothers Incorporated. SmartCheck, SmartTab, ZapSave,QuickType, iPartner, and PrintThing are trademarks of ScriptPerfection Enterprises;WordPerfect is a registered trademark of the WordPerfect Corporation; Microsoft Word is aregistered trademark of Microsoft Corporation; Movie Master is a registered trademark ofComprehensive Video Software; Scriptware is a registered trademark of Cinovation, Inc.;Collaborator is a registered trademark of Collaborator Systems; all others are registeredtrademarks of their respective holders.
082207001

Movie Magic Screenwriter16
3 Running Movie Magic Screenwriter 6
To run the program in Mac OS X simply double-click on the Movie Magic Screenwriter Icon.
Main Menu Bar - Movie Magic Screenwriter's Pull-Down menus can be accessed from theMain Menu Bar by single-clicking on any of the menu items or by pressing <ALT> + theunderlined letter in the menu item.
NOTE: To use Alt-keys to access Main Menu Bar you must have Enable Alt-keys forCharacter Name Entry box unchecked in the Program Options.
Top Toolbar - the optional Top Toolbar has several Push buttons that allow quick accessto frequently used program functions for editing and file management, the Current ElementWindow with Change Element drop-down menu, and the Right-Left Scroll Bar. The TopToolbar--when visible--is located just under the Main Menu Bar.
Right Toolbar - has an Up-Down Scroll bar and Push buttons for Page Up/Down, andoptionally has Element Buttons for element entry with the mouse. The Right Toolbar isdisplayed at the right side of your screen.
The Status Bar - contains a Hint Line,the current Line and Position of your cursor, and thecurrent Page Number followed by the Total Number of Pages.
310
93
93
93

Movie Magic® Screenwriter 6 Help 17
4 New Features in Screenwriter 6.0
The NaviDoc -- The NaviDoc technology lets you navigate through your documenteffortlessly and has four panels:
· The Notes Panel -- The Notes panel lets you create and sort color-coded notes ¬e categories
· The Bookmarks Panel -- The Bookmarks panel lets you set bookmarks to jump toany place in your document
· The Scenes Panel -- The Scenes panel lets you navigate and sort your scenes atthe click of a button
· The Outline Panel -- The Outline panel lets you add, remove, and rearrangeoutline elements
· Outlining Features -- Integrated outlining lets you create and manipulate outlines up tothirty levels deep
· The Outline Panel
· Moving Outline items via Drag & Drop in the NaviDoc
· Send As Email Attachment… Command - Send documents as email attachments inRTF or Adobe Acrobat PDF formats
* Over 30 new templates for a total 104 templates and 12 sample files
· 25 new TV show templates for a total of 86 TV templates
· 2 new sample files (comic story arc & radio play) and 2 updated sample files(screenplay and stage play) for a total of 12 sample files
· 3 new Instructional templates (classic film structure outline, screenplay, & sitcomstructure) for a total of 8 instructional templates.
· 4 new blank templates (generic comic, Gossett-Kayle comic, radio play, & radioshow) and 1 modified template (stage play) for a total of 10 blank templates
· New Document Icons
· New File Format
· The View Toolbar -- Improved tool bars & context menus
· View Menu
· Menu Changes -- Menus reorganized for easier use
· Modified Keyboard Commands
· Shortcut Key Changes in 6.0
· Fit width zoom automatically adjusts the text size of your script as you resize thewindow
160
164
170
173
176
189
176
186
219
63
23
94
318
310
24
224

Movie Magic Screenwriter18
· Redesigned look and feel to accommodate the latest versions of Windows and Mac.
· Retain previous versions of documents
· Makes Automatic back up copies of documents
· Automatically checks for Updates
· [****]
4.1 New Screenwriter 6.0 Icons (Mac OSX)
Movie Magic Screenwriter 6.0 has new program, document, and other file icons.
Application Icon
This is the icon for the Movie Magic Screenwriter 6.0 program.
Document Icon
This is the icon for Movie Magic Screenwriter 6.0 documents.
Backup Icon
This is the icon for the Movie Magic Screenwriter 6.0 backup files.
Timed Backup Icon
This is the icon for the Movie Magic Screenwriter 6.0 timed backup files.
Template Icon
This is the icon for the Movie Magic Screenwriter 6.0 template files.
Title Page Icon
This is the icon for the Movie Magic Screenwriter 6.0 title page files.
Keyboard Commands Icon
This is the icon for the Movie Magic Screenwriter 6.0 keyboard commandsettings.
Dictionary Icon
This is the icon for the Movie Magic Screenwriter 6.0 dictionary files.
Preferences Icon
This is the icon for the Movie Magic Screenwriter 6.0 preferences settingsfiles.
238
239

Movie Magic® Screenwriter 6 Help 19
4.2 Screenwriter 6.0 Menu Changes
The menus in Screenwriter 6.0 have under gone a major reorganization. This was done fortwo reasons:
· To accommodate the NaviDoc and other new features in the menus.
· We felt that many of the menu items were either non-intuitively named or placed andbenefited from changing them.
We believe this makes the program easier to use and learn. There is a new NaviDoc menu,renamed commands, and rearrangement of the commands. The Search and Spell menushave been removed. The Production and Window menus remain unchanged.
For current Screenwriter users, the table below should help your transition to the newarrangement. The table lists the menu items that have changed and identifies their newlocations. After the table are screenshots of the new menus.
In the table below, new menu items are in BOLD ITALICS.
MENU ITEMOLD MENU LOCATION
NEW MENU LOCATION / NAME
Running Lists Screenwriter View
Display Options Screenwriter View
Hide Elements On Screen Screenwriter View
File MenuOLD MENU LOCATION
NEW MENU LOCATION / NAME
Send as E-Mail Attachment File
New>Using Default Template File
New>From Template .File
Reopen File
Save as Template File
Save a Copy File
Export to… File
Compare Two Open Scripts File Tools

Movie Magic Screenwriter20
Header/Footer Setup File Format > Header and Footer
Page Layout File Format > Document Layout
Title Page Publisher File View
Publish to Internet File Tools
Program Options File Tools: Options
Register with Writer's Guild File Tools
Backup to Floppy File REMOVED
Edit MenuOLD MENU LOCATION
NEW MENU LOCATION / NAME
Cut Element Edit
Insert Element Edit
Clear Edit
Paste into Current Element Paste Special > Edit
Paste From Paste Special > Edit
Change Text Color Edit Format: Font Color
Normal WP Mode EditFormat: Normal Word
Processor Mode
Paste Special Edit REMOVED
Turn Off Block Edit REMOVED
Convert Case Edit Format
Change Text Style Edit Format: Font Style
View MenuOLD MENU LOCATION
NEW MENU LOCATION / NAME
NaviDoc View
Scene Numbering View

Movie Magic® Screenwriter 6 Help 21
ToolbarsView > Display Options:
Toolbars
Normal View
Index Cards View Window View
NaviDocDisplay Options >
Toolbars > Scene PilotButton
View
Hide Names in Pop-Up List Format View
Hide Location in Pop-Up List Format View
Title Page Publisher Format View
Format MenuOLD MENU LOCATION
NEW MENU LOCATION / NAME
Edit Script Formats Format Format > Element Styles
Load Script Formats Format Format > Load Styles From
Save Script Formats FormatFormat > Make Default for All
New Documents
Edit User Lists Format Format > User Lists
Repaginate Now Format Tools
Run SmartCheck Format Tools
Change Element Type>Left Format Dual Columns > Left
Change Element Type>Right Format Dual Columns > Right
Change Element Type>SetMargins
Format Dual Columns > Set Margins
Search Menu Main Menu Edit
Find Search Edit
Find Next Search Edit
Replace Search Edit

Movie Magic Screenwriter22
Replace & Find Next Search Edit
Replace All Search Edit
Change Character Name Search Edit
Mark one Character's Search Format
NaviDoc MenuOLD MENU LOCATION
NEW MENU LOCATION / NAME
Scenes NaviDoc
Notes NaviDoc
Bookmarks NaviDoc
Outline NaviDoc
New Note NaviDoc
New Bookmark NaviDoc
Add Outline Element NaviDoc
Promote Outline Element NaviDoc
Demote Outline Element NaviDoc
Create / Edit Outline Styles NaviDoc
Top NaviDoc
Bottom NaviDoc
Page Up NaviDoc
Page Down NaviDoc
Previous Row NaviDoc
Next Row NaviDoc
Decrease NaviDoc Font NaviDoc
Increase NaviDoc Font NaviDoc

Movie Magic® Screenwriter 6 Help 23
NaviDoc Options NaviDoc
4.3 New File Format—.MMSW
Movie Magic Screenwriter 6.0 introduces a new file format and a new file name extension:.mmsw. This new file format accommodates the many new features found in 6.0 on bothMacintosh and Windows.
NOTE: .mmsw files are NOT compatible with pre-6.0 (.scw) versions of Movie MagicScreenwriter, but the Movie Magic Screenwriter 6.0 software is compatible with most allearlier document formats. To create pre-6.0 compatible documents, see “SavingDocuments as .SCW files ,” below.
4.3.1 Opening Existing Documents
Opening existing documents is done in the normal ways:
· Double-click on the document icon
· Use the File > Open command in Screenwriter
· Drag the document onto the Movie Magic Screenwriter icon
4.3.2 Saving Documents in 6.0 (MMSW) Format
For new documents created in 6.0 or later, the File > Save, File > Save As…, or File > Save A Copy… commands save the document withthe .mmsw extension.
When saving a document created in a pre-6.0 (.scw) version of Screenwriter forthe first time, Screenwriter creates a new copy of the document with the .mmswextension. This prevents the overwriting of original pre-6.0 versions of yourdocuments. After you have saved a document once, it remains a .mmsw fileand does not create new copies when you save it again.
4.3.3 Saving Documents as SCW Files
At times it is necessary to share documents with other Movie MagicScreenwriter owners using pre-6.0 versions of the software. To save your filein the pre-6.0 format (.SCW), use the Export to… submenu located in the Filemenu and choose “Screenwriter 4.x and 2000 (.scw)” from the list of fileformats. The .scw file format is compatible with Screenwriter versions 4.0 andlater. However, saving your file to the .scw format may cause loss of NaviDocinformation in the file such as outline styles.
23

Movie Magic Screenwriter24
4.4 Undo Levels
The Undo levels have been changed from a maximum of 20 to a maximum of 99.
4.5 Shortcut Key Changes in 6.0
Changes to Command Key Assignments for Movie MagicScreenwriter Macintosh
Command Name Old Shortcut New Shortcut
Start of Line CMD + Left Arrow Home
End of Line CMD + Right Arrow End
Extend Selection Start of Line CMD + Shift + Left Arrow Shift + Home
Extend Selection End of Line CMD + Shift + Right Arrow Shift + End
Old Shortcut New Shortcut
Delete to end of line Ctrl + EndCMD + Option + Delete
Forward
Delete Previous Word Ctrl + Delete CMD + Delete
Delete Next Word Ctrl + Delete Forward CMD + Delete Forward
Old Shortcut New Shortcut
Top (of document) Home CMD + Home
Bottom (of document) End CMD + End
Old Shortcut New Shortcut
Word Left Ctrl + Left Arrow CMD + Left Arrow
Word Right Ctrl + Right Arrow CMD + Right Arrow
Extend Selection Word Left Ctrl + Shift + Left Arrow Shift + CMD + Left Arrow
Extend Selection Word Right Ctrl + Shift + Right Arrow Shift + CMD + Right Arrow
Old Shortcut New Shortcut
Go To Previous PageCtrl + Page Up / CMD + Page Up
CMD + Page Up

Movie Magic® Screenwriter 6 Help 25
Go To Next PageCtrl + Page Down / CMD + Page Down
CMD + Page Down
Go To Previous Element Ctrl + Up Arrow CMD + Up Arrow
Go To Next Element Ctrl + Down Arrow CMD + Down Arrow
Old Shortcut New Shortcut
Normal (full width) Ctrl + 0 Ctrl + F
Left Column Ctrl + 1 Ctrl + L
Right Column Ctrl + 2 Ctrl + R
Redo Shift + CMD + Z
Insert Element Option + CMD + Return CMD + RETURN
Cut Element Option + CMD + Delete Ctrl + Delete
Old Shortcut New Shortcut
New Script Note Ctrl + F1 Ctrl + N
Element Styles CMD + E
Old Shortcut New Shortcut
Show / Hide NaviDoc Option + CMD + 0 Ctrl + 0
Outline Panel Option + CMD + 1 Ctrl + 1
Scenes Panel Option + CMD + 2 Ctrl + 2
Notes Panel Option + CMD + 3 Ctrl + 3
Bookmarks Panel Option + CMD + 4 Ctrl + 4
Old Shortcut New Shortcut
New Bookmark Ctrl + B
Promote Outline Element Option + CMD + Left Arrow Ctrl + Left Arrow
Demote Outline Element Option + CMD + Right Arrow Ctrl + Right Arrow
Top (of NaviDoc) Option + CMD + Home Ctrl + Home
Bottom (of NaviDoc) Option + CMD + End Ctrl + End
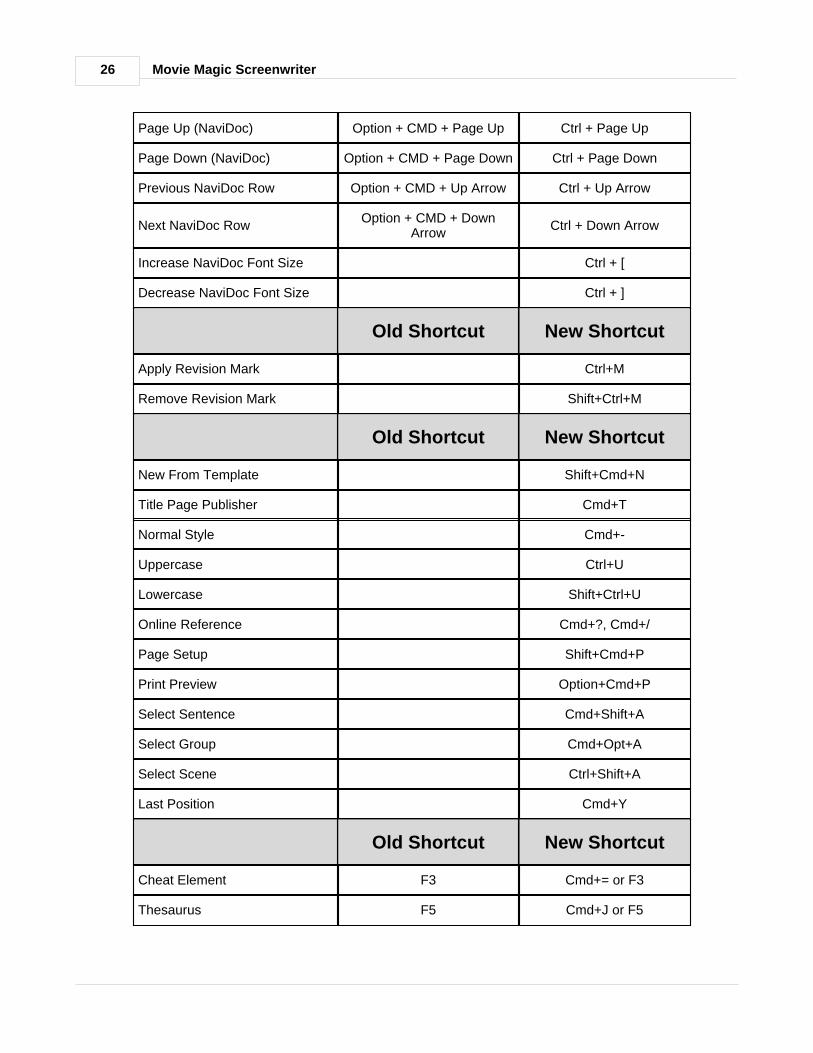
Movie Magic Screenwriter26
Page Up (NaviDoc) Option + CMD + Page Up Ctrl + Page Up
Page Down (NaviDoc) Option + CMD + Page Down Ctrl + Page Down
Previous NaviDoc Row Option + CMD + Up Arrow Ctrl + Up Arrow
Next NaviDoc RowOption + CMD + Down
ArrowCtrl + Down Arrow
Increase NaviDoc Font Size Ctrl + [
Decrease NaviDoc Font Size Ctrl + ]
Old Shortcut New Shortcut
Apply Revision Mark Ctrl+M
Remove Revision Mark Shift+Ctrl+M
Old Shortcut New Shortcut
New From Template Shift+Cmd+N
Title Page Publisher Cmd+T
Normal Style Cmd+-
Uppercase Ctrl+U
Lowercase Shift+Ctrl+U
Online Reference Cmd+?, Cmd+/
Page Setup Shift+Cmd+P
Print Preview Option+Cmd+P
Select Sentence Cmd+Shift+A
Select Group Cmd+Opt+A
Select Scene Ctrl+Shift+A
Last Position Cmd+Y
Old Shortcut New Shortcut
Cheat Element F3 Cmd+= or F3
Thesaurus F5 Cmd+J or F5
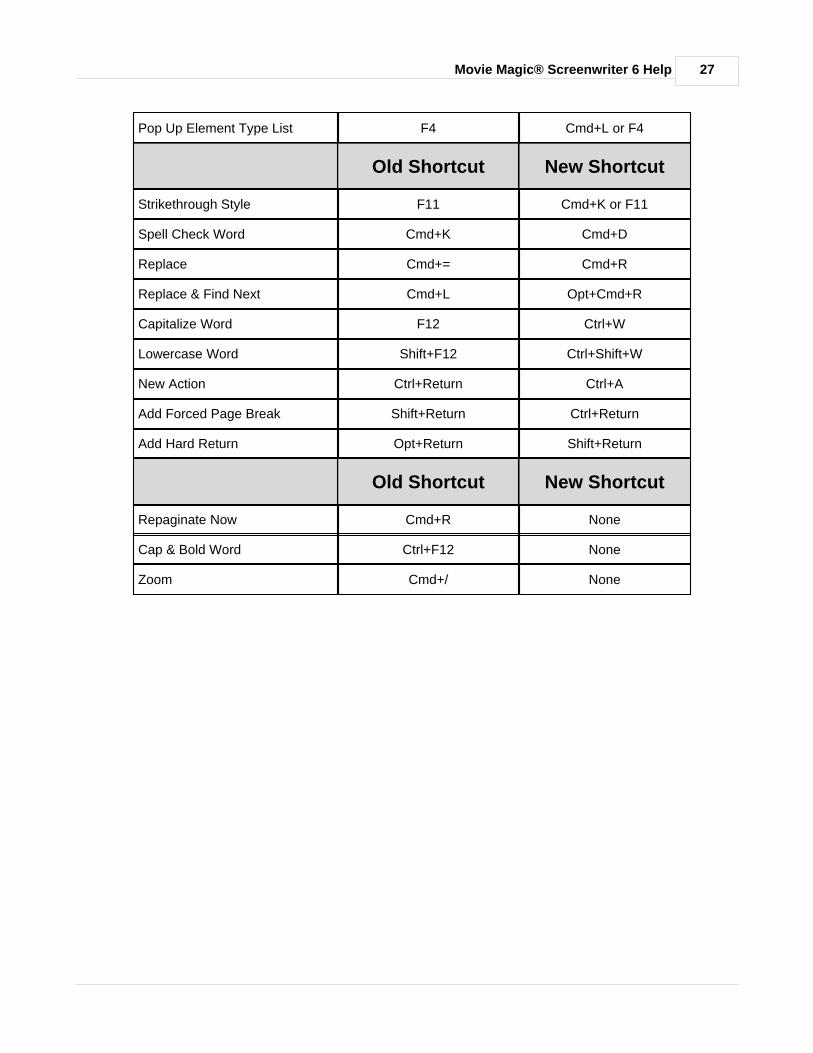
Movie Magic® Screenwriter 6 Help 27
Pop Up Element Type List F4 Cmd+L or F4
Old Shortcut New Shortcut
Strikethrough Style F11 Cmd+K or F11
Spell Check Word Cmd+K Cmd+D
Replace Cmd+= Cmd+R
Replace & Find Next Cmd+L Opt+Cmd+R
Capitalize Word F12 Ctrl+W
Lowercase Word Shift+F12 Ctrl+Shift+W
New Action Ctrl+Return Ctrl+A
Add Forced Page Break Shift+Return Ctrl+Return
Add Hard Return Opt+Return Shift+Return
Old Shortcut New Shortcut
Repaginate Now Cmd+R None
Cap & Bold Word Ctrl+F12 None
Zoom Cmd+/ None

Movie Magic Screenwriter28
5 Tutorials
Screenwriter 6 has several tutorial designed to get you acquainted with important features ofthe software.
Basic Overview Tutorials:
· 10-Minute Tutorial
· Opening the Program
· How to Write
· Exporting to PDF
NaviDoc Tutorials:
· Opening and Closing the NaviDoc
· Common Controls
· Using the Outline Panel
· Using the Scenes Panel
· Using the Notes Panel
· Using the Bookmarks Panel
Template Tutorials:
1. Screenplay Templates
2. Sitcom Templates
In addition to the tutorials in this document, more may be found at the Write Brotherstechnical support website: support.screenplay.com
5.1 Basic Overview
The Basic Overview tutorials include:
· 10-Minute Tutorial
· Opening the Program
· How to Write
· Exporting to PDF
29
30
31
44
46
47
48
56
58
62
64
73
29
30
31
44

Movie Magic® Screenwriter 6 Help 29
5.1.1 10-Minute Tutorial
Movie Magic Screenwriter for Macintosh
TEN MINUTE TUTORIAL
This tutorial gives you the basics necessary to start writing a professionally-formatted scriptwithin minutes of opening the box. Movie Magic Screenwriter also has many other featuresand is fully customizable to the way you prefer to work.
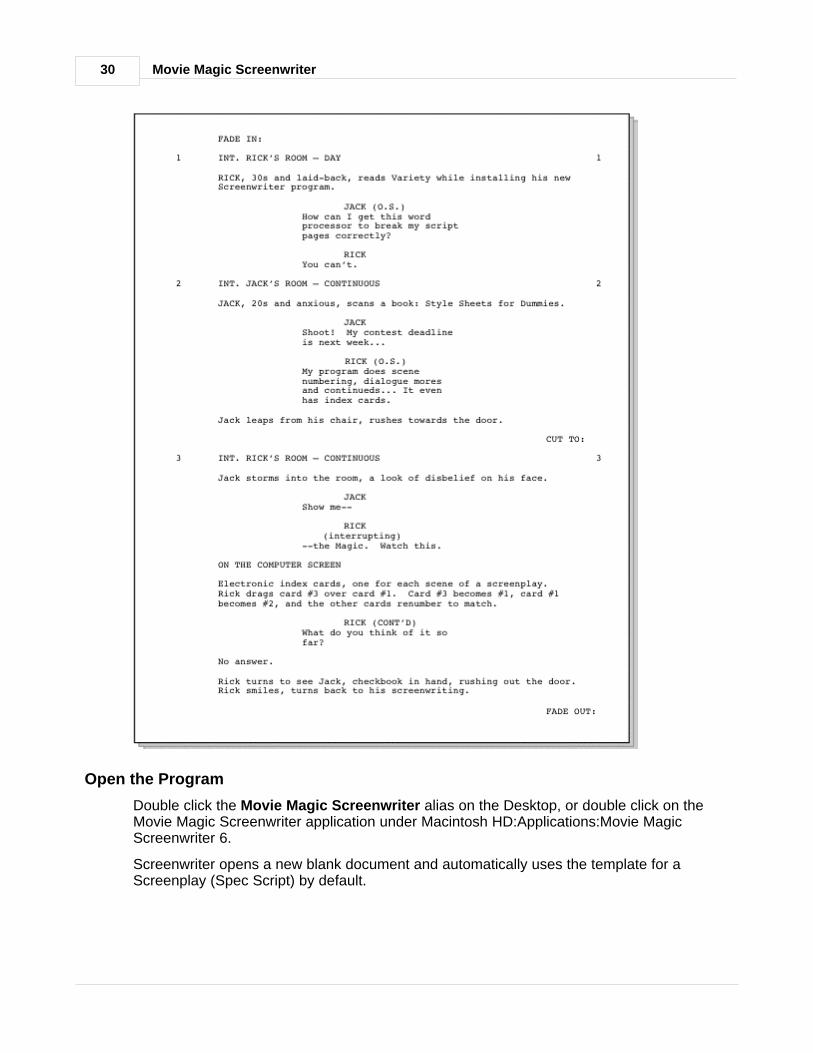
Movie Magic Screenwriter30
Open the Program
Double click the Movie Magic Screenwriter alias on the Desktop, or double click on theMovie Magic Screenwriter application under Macintosh HD:Applications:Movie MagicScreenwriter 6.
Screenwriter opens a new blank document and automatically uses the template for aScreenplay (Spec Script) by default.

Movie Magic® Screenwriter 6 Help 31
How to Write
The only special keys you need to write your script in Movie Magic Screenwriter are TAB,RETURN, and the Open Parenthese key-- ( -- if you use Parentheticals (wrylies).
Use the DELETE key to correct mistakes.
1) Add Fade In
· Before typing anything, press RETURN.
· To start your script with FADE IN:, click on the Yes button or press RETURN.
The cursor drops down to a new blank line of Action.
2) Add Scene Heading
Screenwriter knows you need a Scene Heading next, and pops up a list of available optionsto start the Scene Heading.

Movie Magic Screenwriter32
Shortcut keys are shown as the underlined letter on the list.
· Type the letter “i”.
INT. is entered for you, correctly formatted in UPPER CASE with the proper spacing.
3) Add Location
Next, you need to type in a location.
· Type “rick’s room”, Notice that Screenwriter automatically uppercases the text even ifyou write it in lower case.
4) Add Time of Day
· Press RETURN.
Scene Headings normally end with the time of day, so Screenwriter pops up a list ofavailable Times-of-Day.

Movie Magic® Screenwriter 6 Help 33
· Type the letter “d”.
One dash (with proper spacing) and the word DAY are entered for you. With the SceneHeading complete, the cursor drops down to a new blank line of Action.
5) Type First Line of Action
· Type the first paragraph of Action:
RICK, 30s and laid-back, reads Variety while installing his new Screenwriter program.
6) Add Character Name
· Press TAB.
Screenwriter moves the cursor into a Character Name element with the proper margins.
· Type in the character’s name: “jack”
The name will automatically be entered in ALL CAPS.
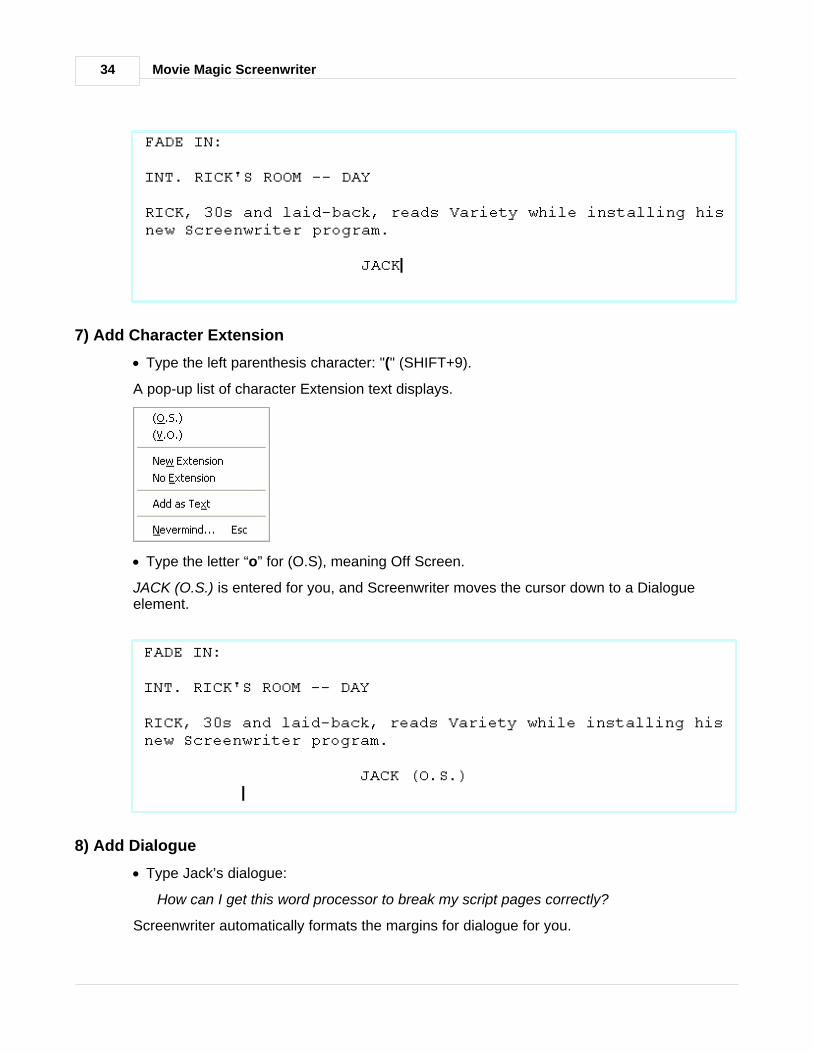
Movie Magic Screenwriter34
7) Add Character Extension
· Type the left parenthesis character: "(" (SHIFT+9).
A pop-up list of character Extension text displays.
· Type the letter “o” for (O.S), meaning Off Screen.
JACK (O.S.) is entered for you, and Screenwriter moves the cursor down to a Dialogueelement.
8) Add Dialogue
· Type Jack’s dialogue:
How can I get this word processor to break my script pages correctly?
Screenwriter automatically formats the margins for dialogue for you.

Movie Magic® Screenwriter 6 Help 35
9) Add Another Character
· Press TAB.
· Type in the character name: “rick”.
· Press RETURN.
Screenwriter moves the cursor down to a Dialogue element automatically.
10) Add Dialogue
· Type Rick’s dialogue:
You can’t.
11) Add Another Location
· Press RETURN.
· The cursor moves to a new blank Action element. Press RETURN again.
· Type the letter “i”.
INT. is entered for you, and a list Locations already being used in the script pops up. Itcontains one entry, RICK’S ROOM.

Movie Magic Screenwriter36
· Ignore it and type a new location instead: “jack’s room”.
NOTE: Only Locations (and Character Names) actually being used in the script show on thepop-up lists. If a Location (or Character Name) is completely removed from the script, it willno longer show on the pop-up lists.
12) Add Continuous
· Press RETURN.
A Time-of-Day list pops up.
· Type the letter “c”.
One dash and the Time-of-Day, CONTINUOUS, is entered for you. The cursor drops downto a new blank line.
13) Add Action
· Type the next paragraph of Action:
JACK, 20s and anxious, scans a book: Style Sheets for Dummies.

Movie Magic® Screenwriter 6 Help 37
14) Add Character Name
· Press TAB.
· Type the letter “j”.
Notice that "JACK" is automatically highlighted.
· Press RETURN.
The Character Name JACK is entered for you.
15) Add Dialogue
· Type Jack’s dialogue:
Shoot! My contest deadline is next week...
16) Add Character Name
· Press TAB.

Movie Magic Screenwriter38
· Type the letter “r” to select the name RICK, then type the left parenthesis character: " ( "(SHIFT+9).
· Type the letter “o”.
RICK (O.S.) is entered for you.
17) Add Dialogue
· Type Rick’s dialogue:
My program formats all the margins and page breaks for me. It can do scene numbering,dialogue mores and continueds... it even lets me do an outline.
18) Add Action
· Press RETURN.
· Type the next Action paragraph:
Jack leaps from his chair, rushes towards the door.
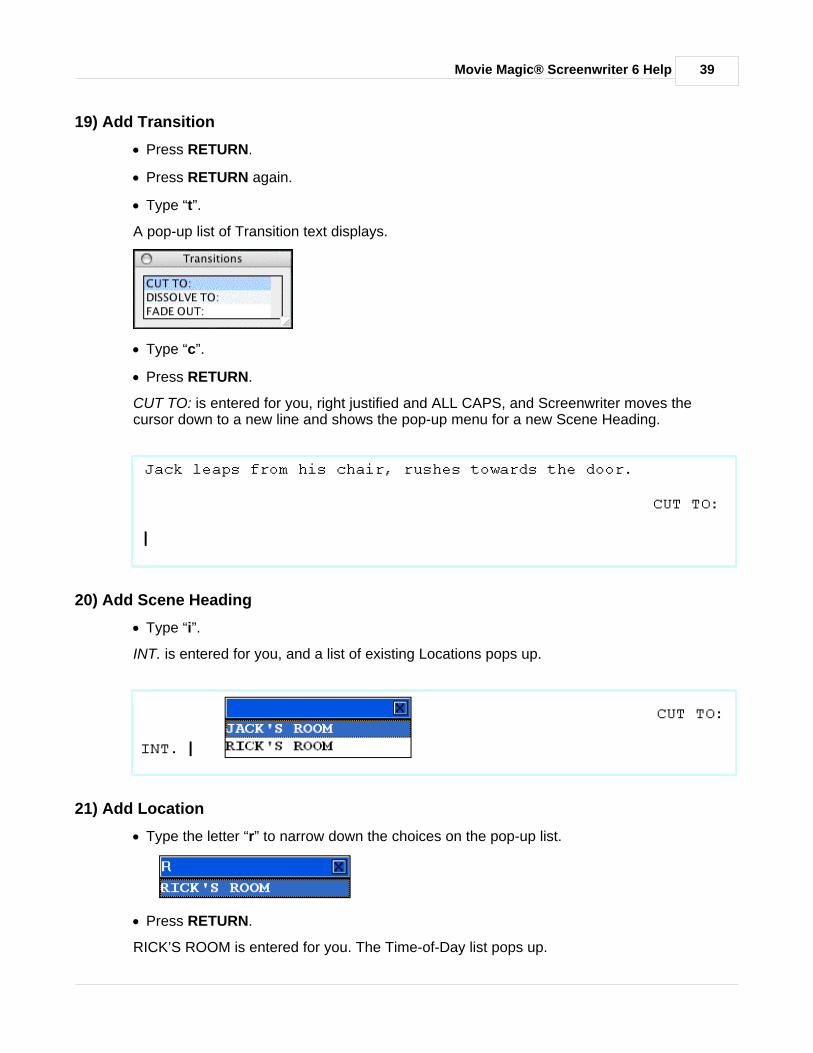
Movie Magic® Screenwriter 6 Help 39
19) Add Transition
· Press RETURN.
· Press RETURN again.
· Type “t”.
A pop-up list of Transition text displays.
· Type “c”.
· Press RETURN.
CUT TO: is entered for you, right justified and ALL CAPS, and Screenwriter moves thecursor down to a new line and shows the pop-up menu for a new Scene Heading.
20) Add Scene Heading
· Type “i”.
INT. is entered for you, and a list of existing Locations pops up.
21) Add Location
· Type the letter “r” to narrow down the choices on the pop-up list.
· Press RETURN.
RICK’S ROOM is entered for you. The Time-of-Day list pops up.

Movie Magic Screenwriter40
22) Add time of Day
· Type the letter “c”.
CONTINUOUS is entered for you.
23) Add Action
· Type the next Action paragraph:
Jack storms into the room, a look of disbelief on his face.
24) Add Character Name and Dialogue
· Press TAB.
· Type “j”.
· Press RETURN.
· Type Jack’s dialogue:
Show me--

Movie Magic® Screenwriter 6 Help 41
25) Add Character Name
· Press TAB.
· Type “r”
· Press RETURN.
RICK is entered for you.
26) Add Parenthetical
· Type the left parenthesis character: “( “ (SHIFT+9).
The cursor appears in a new Parenthetical, automatically surrounded by parentheses.
· Type the word: “interrupting”
27) Add Dialogue
· Press RETURN.
· Type Rick’s dialogue:
--the Magic. Watch this.
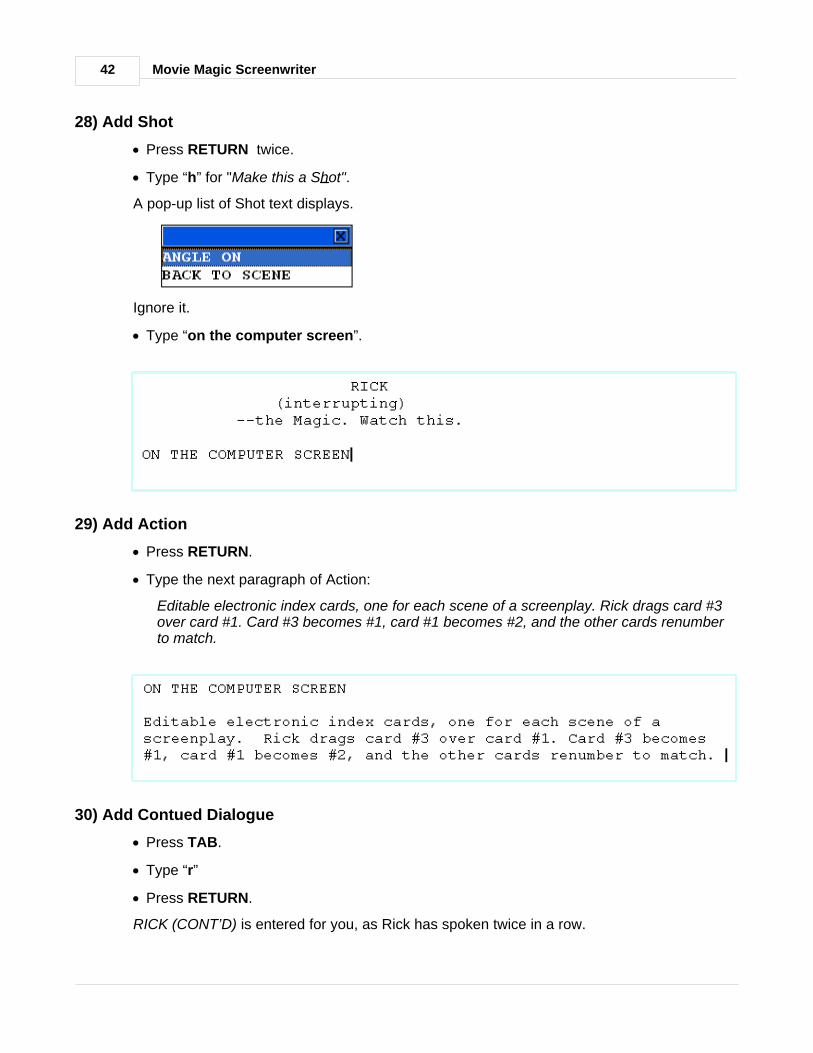
Movie Magic Screenwriter42
28) Add Shot
· Press RETURN twice.
· Type “h” for "Make this a Shot".
A pop-up list of Shot text displays.
Ignore it.
· Type “on the computer screen”.
29) Add Action
· Press RETURN.
· Type the next paragraph of Action:
Editable electronic index cards, one for each scene of a screenplay. Rick drags card #3over card #1. Card #3 becomes #1, card #1 becomes #2, and the other cards renumberto match.
30) Add Contued Dialogue
· Press TAB.
· Type “r”
· Press RETURN.
RICK (CONT’D) is entered for you, as Rick has spoken twice in a row.
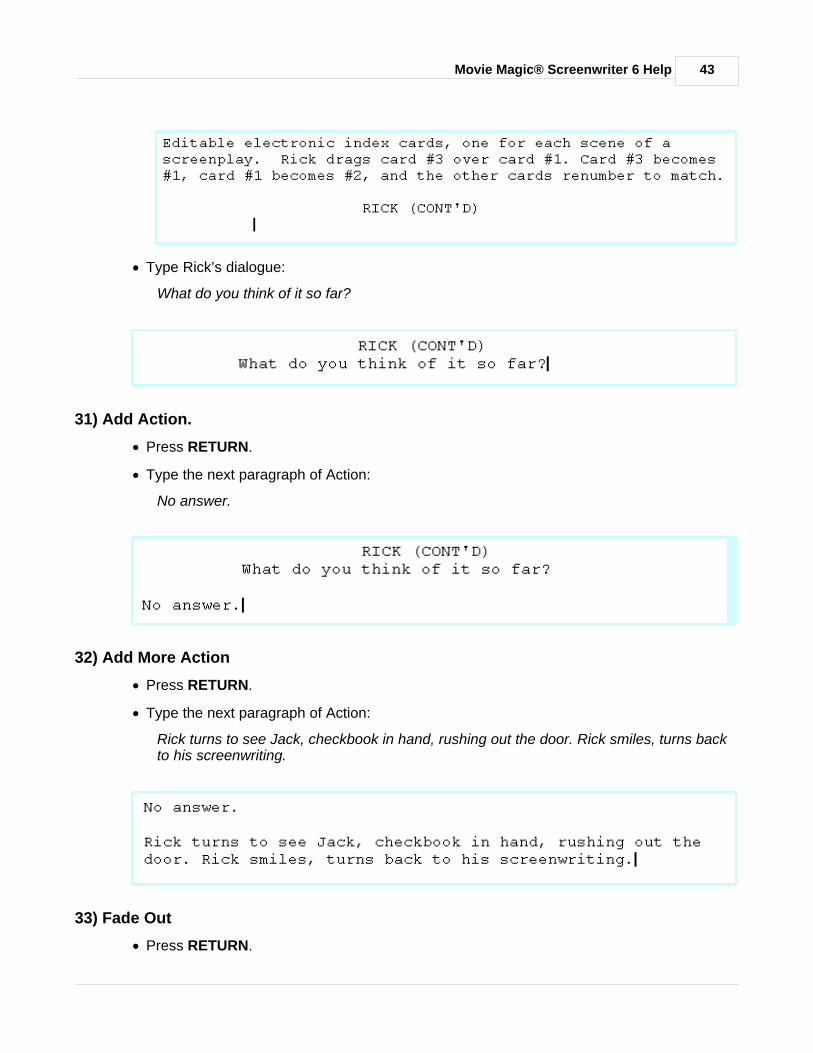
Movie Magic® Screenwriter 6 Help 43
· Type Rick’s dialogue:
What do you think of it so far?
31) Add Action.
· Press RETURN.
· Type the next paragraph of Action:
No answer.
32) Add More Action
· Press RETURN.
· Type the next paragraph of Action:
Rick turns to see Jack, checkbook in hand, rushing out the door. Rick smiles, turns backto his screenwriting.
33) Fade Out
· Press RETURN.

Movie Magic Screenwriter44
· Press RETURN again.
· Type “t” for Transition.
A pop-up list of Transition text displays.
· Type “f” .
· Press RETURN.
FADE OUT: is entered for you, right justified and in ALL CAPS.
· Press the Escape key to finish.
That's It
This sample script is finished, and you should be ready to start on your own.
· Here’s a shortcut tip: Press SHIFT+TAB (instead of TAB) to alternate between the lasttwo speaking character names.
This is the end of the Ten Minute Tutorial for Macintosh.
For the most current FAQs, Software Updates, Documentation, and online Tutorials, pleasevisit our Support website at: http://www.screenplay.com/support/
5.1.2 Exporting to PDF
EXPORTING TO (ADOBE ACROBAT) PDF
This tutorial gives you the step-by-step instructions for exporting and e-mailing your MovieMagic Screenwriter document to an Adobe Acrobat PDF file. The steps outlined below willlet you create a separate PDF (Portable Document File).
· Email your document to people (agents, producers, writing partners, etc.) who don't haveScreenwriter.
· Universal format that can be taken to a print shop.
· Good for uploading to most online contests.
· Keeps the proper margins and page breaks as you see it in Movie Magic Screenwriter.

Movie Magic® Screenwriter 6 Help 45
Steps to Export to PDF (export only)
Use these directions to export a PDF version of your document.
1. Open your .MMSW document in Movie Magic Screenwriter.
2. Click on File > Export to... > Adobe Acrobat PDF (.pdf).
3. An "Export" dialog appears with the "File name" field filled in automatically with "<thename of your document>.pdf". Change this if desired.
4. By default, Screenwriter saves to the "Movie Magic Screenwriter" folder inside of yourDocuments folder. If you wish, change this to another folder on your computer (e.g.,Desktop).
5. Click Save.
6. The print dialog box should come up with "Entire Document" automatically selected. If youwish, select something other than "Entire Document" (e.g., Selected Pages, SelectedScenes, etc.). You can also select any of the other PDF export options which include:
Export Which Notes:—This allows you to choose which notes get annotated in the PDFfile: None, Visible Notes Only or All Notes.
Create Production Sides in this PDF file—This option creates reduces sized pages,two copies printed twice (side-by-side) in Landscape orientation, for distribution.
Automatically display bookmarks when PDF opens in Acrobat Reader—This optioncontrols whether or not the Scene Heading bookmarks are displayed when the PDF fileis opened.
Export Title Page—If a title page exists for this document under View > Title PagePublisher, checking this box will include it as the first page of the PDF file.
7. Click the Export button..
E-mailing a PDF File
Use these directions to email a PDF version of your document from within Screenwriter.
1. Click on File > Send as E-mail Attachment... or click on the Send E-mail icon on the TopToolbar.
2. The Send as Email Attachment dialog opens. From the Attach As list choose PDF -Portable Document Format.
3. From the Compose Message In: list, choose which e-mail program you use.
4. Click OK.
5. The PDF Export Options dialog will come up. "Entire Document" will already be selected,as well as "Export Title Page" if one exists in the document.
6. Make any desired changes to the options and click Export.
The e-mail program you chose should open up with the PDF file attached and ready to send.
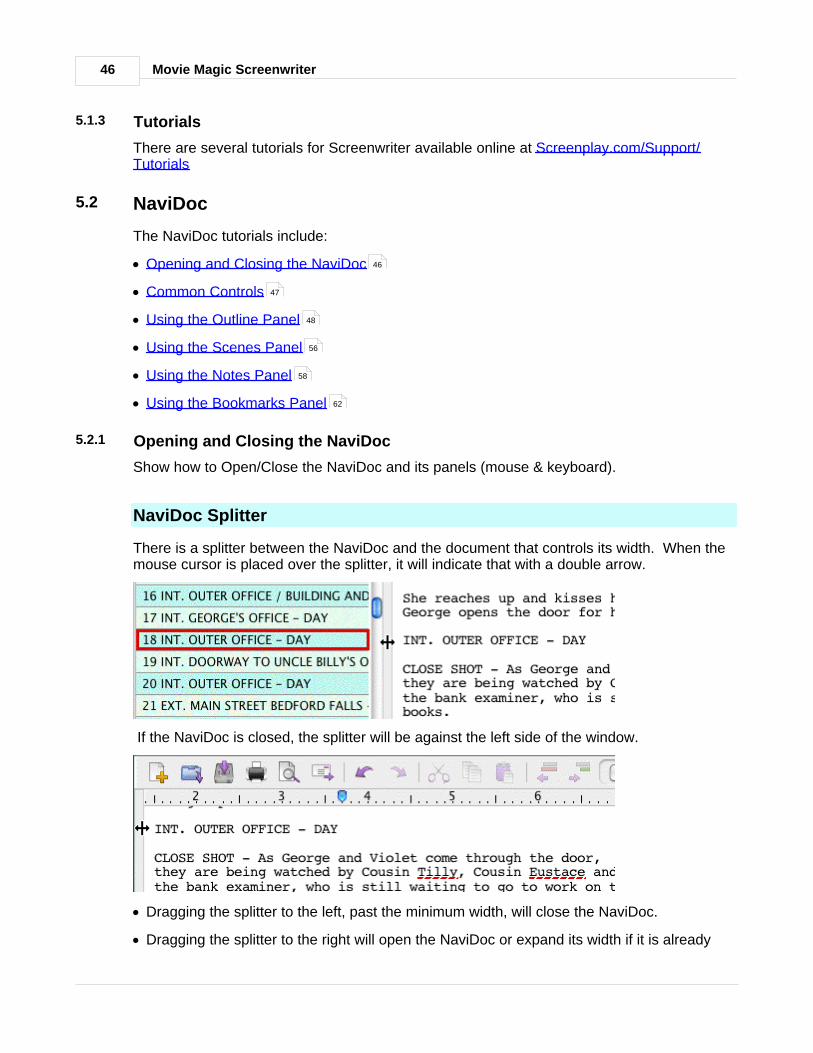
Movie Magic Screenwriter46
5.1.3 Tutorials
There are several tutorials for Screenwriter available online at Screenplay.com/Support/Tutorials
5.2 NaviDoc
The NaviDoc tutorials include:
· Opening and Closing the NaviDoc
· Common Controls
· Using the Outline Panel
· Using the Scenes Panel
· Using the Notes Panel
· Using the Bookmarks Panel
5.2.1 Opening and Closing the NaviDoc
Show how to Open/Close the NaviDoc and its panels (mouse & keyboard).
NaviDoc Splitter
There is a splitter between the NaviDoc and the document that controls its width. When themouse cursor is placed over the splitter, it will indicate that with a double arrow.
If the NaviDoc is closed, the splitter will be against the left side of the window.
· Dragging the splitter to the left, past the minimum width, will close the NaviDoc.
· Dragging the splitter to the right will open the NaviDoc or expand its width if it is already
46
47
48
56
58
62

Movie Magic® Screenwriter 6 Help 47
open.
Menus
You can open and close the NaviDoc via the menus by clicking on View > NaviDoc.
Keyboard
You can open/close the NaviDoc by pressing CTRL+0 on the keyboard. To open a specificpanel, use one of the key commands below.
Outline Panel = CTRL+1
Scenes Panel = CTRL+2
Notes Panel = CTRL+3
Bookmarks Panel = CTRL+4
5.2.2 Common Controls
There are certain controls that are common to two or more panels.
Preferences
This control appears on the Outline, Scenes and Notes panels. Clicking this will open thepreferences for the NaviDoc. NOTE: when in the Outline panel, this button opens theOutline preferences specifically.
Sync
ON OFF
This control appears on all four panels (Outline, Scenes, Notes and Bookmarks). Itdetermines whether or not the NaviDoc and the document are synchronized, and whether ornot the Sync Frame displays.
Show/Hide Scene Heading fields
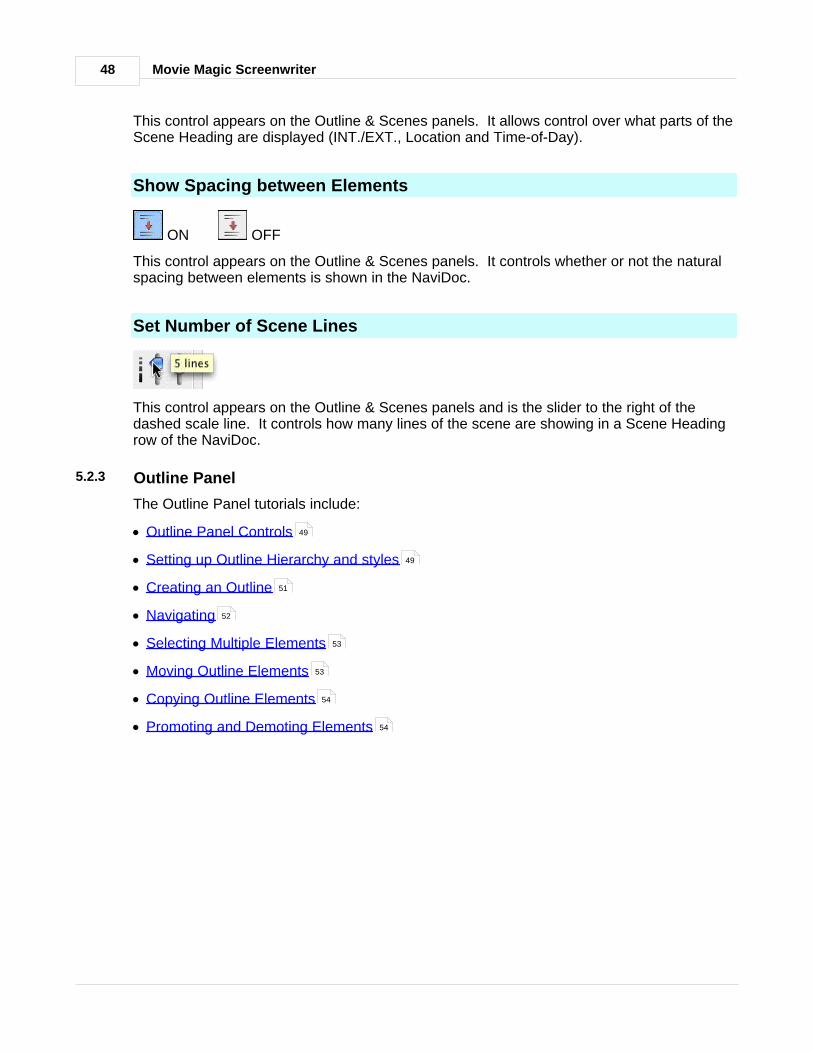
Movie Magic Screenwriter48
This control appears on the Outline & Scenes panels. It allows control over what parts of theScene Heading are displayed (INT./EXT., Location and Time-of-Day).
Show Spacing between Elements
ON OFF
This control appears on the Outline & Scenes panels. It controls whether or not the naturalspacing between elements is shown in the NaviDoc.
Set Number of Scene Lines
This control appears on the Outline & Scenes panels and is the slider to the right of thedashed scale line. It controls how many lines of the scene are showing in a Scene Headingrow of the NaviDoc.
5.2.3 Outline Panel
The Outline Panel tutorials include:
· Outline Panel Controls
· Setting up Outline Hierarchy and styles
· Creating an Outline
· Navigating
· Selecting Multiple Elements
· Moving Outline Elements
· Copying Outline Elements
· Promoting and Demoting Elements
49
49
51
52
53
53
54
54

Movie Magic® Screenwriter 6 Help 49
Outline Panel Controls
There are some controls specific to the Outline Panel.
Include/Exclude Outline Styles
This drop-down button controls which outline style rows are visible in the Outline panel.
Collapse All/Expand All
Expand Collapse
When clicked, this button expands or collapses all rows in the Outline panel. NOTE: If thereis a mixed state of rows (some collapsed, some expanded), it will expand all the rows.
Setting up Outline hierarchy and styles
The Default.def template (used to create a new file automatically) already containscommonly used outline elements for a screenplay (Sequence and Beat).
· To add, remove or change Outline styles, open up the Format > Element Styles (CMD+E)window and choose Outline from the list of buttons on the right.
Adding an Outline style
1. Click on the "+" button.
2. This will create a style called "New Style" that will be placed above the Scene Headinglevel, which is where outline elements are commonly used.
3. To change the name of the style, double click on the name "New Style", type in the newname and press RETURN.

Movie Magic Screenwriter50
Deleting an Outline style
1. Select the style you wish to delete.
2. Click on the "-" (Delete Outline Style) button.
3. If prompted, click Yes to confirm.
The style will be removed and any existing elements using that style will be converted toNotes.
Editing an Outline style
1. Select the Outline style in the list.
2. Next to the name of the Outline style, set how the Outline style displays in the NaviDocand in the document.
· Print—enabled or disabled; controls whether the element will print when the documentis printed.
· Frame—type of line drawn around that outline element in the document (None, Dotted,Gray, Thin Solid, Thick Solid, Groove)
· Text color
· Background color
3. At the top of the window, you can change the following formatting parameters for theselected Outline style:
· Left and Right margins (in inches)
· Justified text
· Line Spacing (# of lines before and within the Outline element)
· Style of text (ALL CAPS, Bold, Italicized, Underline)
· Font
Setting up Outline structure
The Outline style levels can be configured by dragging and dropping them into theappropriate place in the hierarchy or using the Up, Down, Left and Right buttons to move orpromote/demote them.
If Scene Headings are included in the outline, the lowest level at which an element can beset is a child of a Scene Heading. All outline styles that are children of Scene Headings areat the same level (siblings).
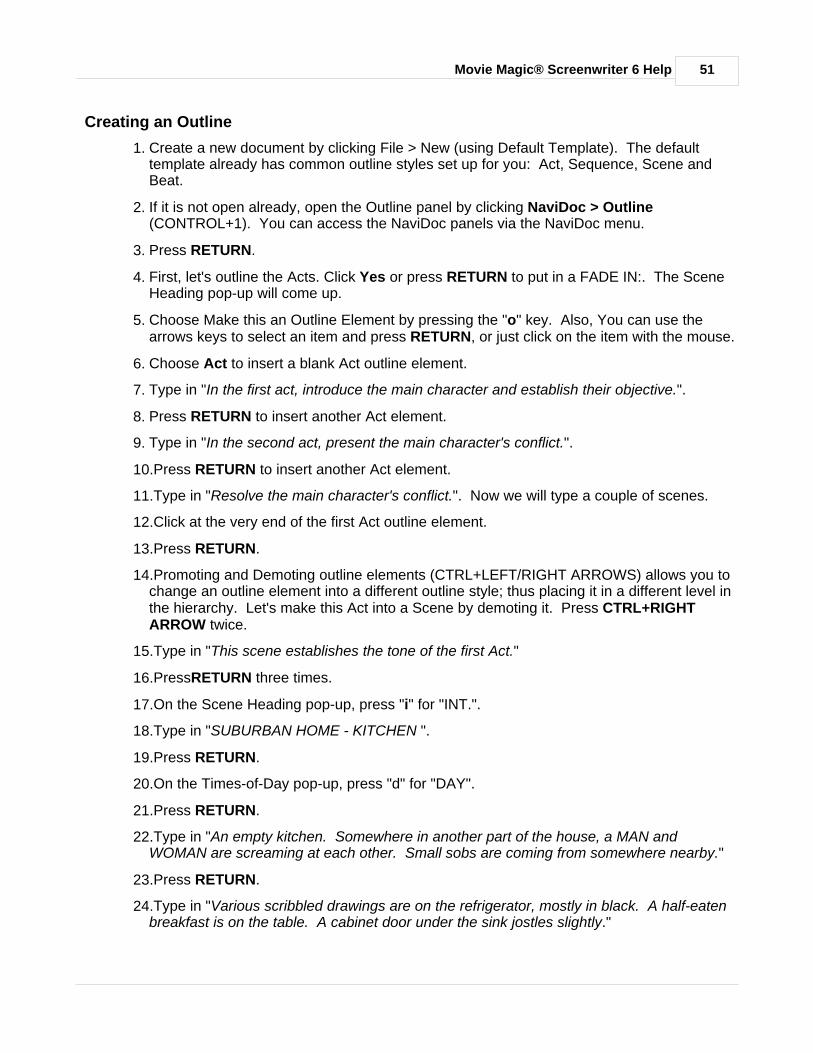
Movie Magic® Screenwriter 6 Help 51
Creating an Outline
1. Create a new document by clicking File > New (using Default Template). The defaulttemplate already has common outline styles set up for you: Act, Sequence, Scene andBeat.
2. If it is not open already, open the Outline panel by clicking NaviDoc > Outline(CONTROL+1). You can access the NaviDoc panels via the NaviDoc menu.
3. Press RETURN.
4. First, let's outline the Acts. Click Yes or press RETURN to put in a FADE IN:. The SceneHeading pop-up will come up.
5. Choose Make this an Outline Element by pressing the "o" key. Also, You can use thearrows keys to select an item and press RETURN, or just click on the item with the mouse.
6. Choose Act to insert a blank Act outline element.
7. Type in "In the first act, introduce the main character and establish their objective.".
8. Press RETURN to insert another Act element.
9. Type in "In the second act, present the main character's conflict.".
10.Press RETURN to insert another Act element.
11.Type in "Resolve the main character's conflict.". Now we will type a couple of scenes.
12.Click at the very end of the first Act outline element.
13.Press RETURN.
14.Promoting and Demoting outline elements (CTRL+LEFT/RIGHT ARROWS) allows you tochange an outline element into a different outline style; thus placing it in a different level inthe hierarchy. Let's make this Act into a Scene by demoting it. Press CTRL+RIGHTARROW twice.
15.Type in "This scene establishes the tone of the first Act."
16.PressRETURN three times.
17.On the Scene Heading pop-up, press "i" for "INT.".
18.Type in "SUBURBAN HOME - KITCHEN ".
19.Press RETURN.
20.On the Times-of-Day pop-up, press "d" for "DAY".
21.Press RETURN.
22.Type in "An empty kitchen. Somewhere in another part of the house, a MAN andWOMAN are screaming at each other. Small sobs are coming from somewhere nearby."
23.Press RETURN.
24.Type in "Various scribbled drawings are on the refrigerator, mostly in black. A half-eatenbreakfast is on the table. A cabinet door under the sink jostles slightly."

Movie Magic Screenwriter52
25.Press RETURN twice.
26.On the Scene Heading pop-up, press "i" for "INT.".
27.Type in "KITCHEN CABINET".
28.Press RETURN.
29.Press "d" for "DAY".
30.Press RETURN.
31.Type in "TOMMY (8) sits under the sink, knees-to-chest. Tears stream down his face,dripping off a scar on his left cheek. He winces at every burst of anger."
32.Now, let's label the first two scenes as a Sequence. Click at the end of the first Actoutline element.
33.Press RETURN.
34.Change this new Act into a Sequence by demoting it. Press CTRL+RIGHT ARROW.
35.Type in "Tommy's childhood trauma.".
You now have the basic skills to start creating your outline in Screenwriter.
Navigating
There are several ways to navigate through the NaviDoc and your document using theOutline panel.
Mouse
You can use the mouse to scroll the NaviDoc up and down. Clicking on a row in the Outlinepanel will take you to that place in the document. If enabled, the flash pointer will point tothat element in the document. The Sync button is on by default, so the NaviDoc will scroll asyou navigate.
Keyboard
You can move through the NaviDoc using the keyboard.
Top of NaviDoc = CTRL+HOME
Bottom of NaviDoc = CTRL+END
Scroll up one screen = CTRL+PAGEUP
Scroll down one screen = CTRL+PAGEDOWN
Previous Row = CTRL+UP ARROW*
Next Row = CTRL+DOWN ARROW*
*Since these key commands actually select the previous/next row, the document will bemoved to that element as well.

Movie Magic® Screenwriter 6 Help 53
Menus
You can also move through the NaviDoc using the menu items under the NaviDoc menu.
Selecting Multiple Elements
Open the tutorial template:
1. Click on File > New from Template...
2. Double-click the Tutorials folder and open the file called "Selecting Multiple Events".
Selecting a Range of Adjacent Outline Elements
Let's say you have a few outline elements (of the same style) next to each other and youwant to select them all.
1. Open the Outline panel on the left if it is not already open.
2. Click on the Scene called “Neal slips in the kitchen.”.
3. Hold down the SHIFT key on the keyboard.
4. Click on the Scene called “Valerie puts chocolate syrup on mashed potatoes.”.
Notice that it selects everything in the range of elements between (and including) “Nealslips…” and “Valerie puts chocolate syrup…”.
NOTE: you cannot select outline elements of different styles (e.g., Act & Scene, Sequence& Scene, etc.).
Selecting Nonadjacent Outline Elements
1. Open the Outline panel on the left if it is not already open.
2. Click on the Scene called “Neal slips in the kitchen.”.
3. Hold down the CMD key on the keyboard.
4. Click on the Scene called “Fiona gets the hot seat”.
Notice that it only selects those specific, nonadjacent outline elements.
NOTE: you cannot select outline elements of different styles (e.g., Act & Scene, Sequence& Scene, etc.).
Moving Outline Elements
Open the tutorial file:
1. Click on File > New from Template...

Movie Magic Screenwriter54
2. Double-click the Tutorials folder and open the file called "Moving Outline Elements".
If an outline element has child elements, the child elements will normally move with theparent. For example, if you have a Sequence (parent) that contains three Scenes (children),moving the Sequence will take the three Scenes with it.
To move selected outline elements, click and drag them up or down to a new location in theOutline panel. If the Outline is long, you can hold the mouse near the top or bottom of thelist while dragging an element in order to scroll the list.
1. Click and hold the left mouse button down on the ***Sequence*** in the First Act.
2. Still holding the mouse button down, drag the ***Sequence*** down into the Second Act.
3. Click down on the ***Sequence*** you just moved and, while still holding the mouse buttondown, drag it to the bottom of the list.
Notice, the list starts to scroll, which allows you move the element to parts of the Outlinepanel list that are not in view.
You can also use simple cut & paste in the document itself to move an outline element.
NOTE: holding down the CTRL key while dragging will allow the parent element to moveindependently, leaving its child elements where they are. The child elements will thenbecome a part of the nearest parent element.
Copying Outline Elements
Open the tutorial file:
1. Click on File > New from Template...
2. Double-click the Tutorials folder and open the file called "Moving and Copying OutlineElements".
To duplicate selected outline elements, click and drag them up or down to a new location inthe Outline panel while holding down the correct modifier key.
1. Click and hold the left mouse button down on the ***Sequence*** in the First Act.
2. Holding the mouse button down, drag the ***Sequence*** down into the Second Act.
3. Press and hold the OPTION key on the keyboard.
4. Release the mouse button.
Notice, it has duplicated the element (and any child elements) at the new location. This isknown as a “drag copy”.
You can also use simple copy & paste in the document itself to move an outline element.
NOTE: holding down CTRL+OPTION while dragging will make a copy of the parent element(only) at the new location.
Promoting and Demoting Elements
Outline elements (and some document elements) can be promoted or demoted in theOutline panel. What does this mean? Promoting/demoting is a term used to describe
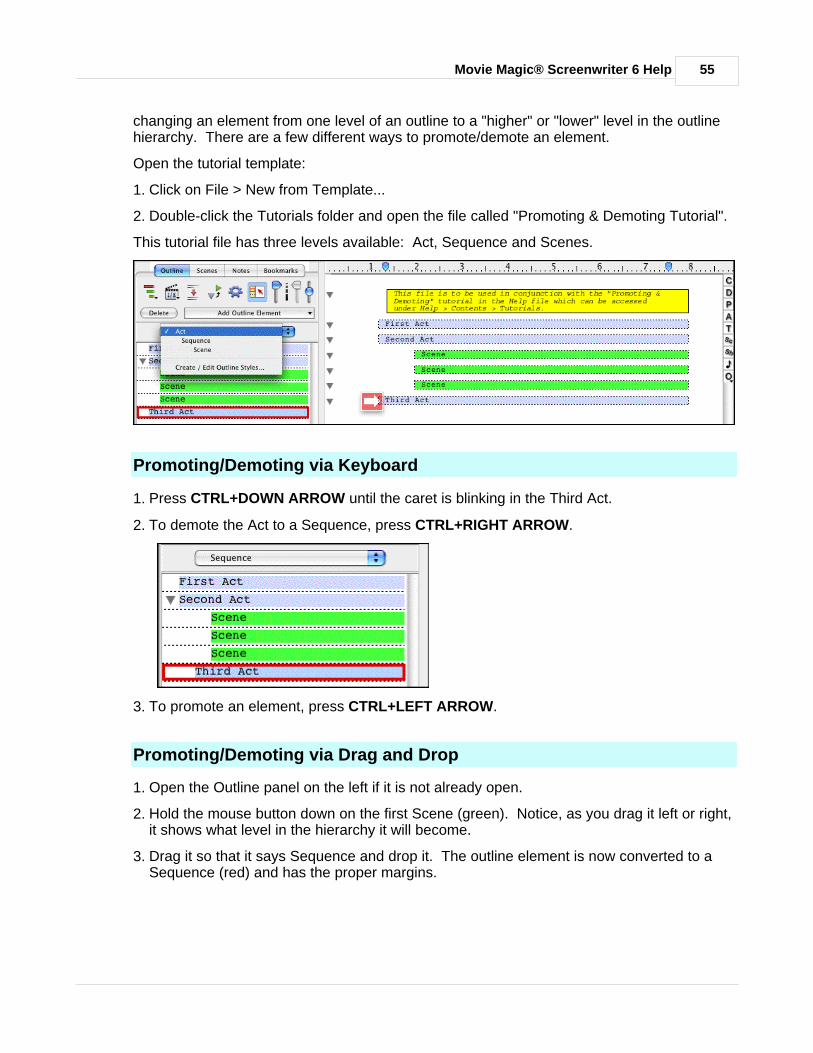
Movie Magic® Screenwriter 6 Help 55
changing an element from one level of an outline to a "higher" or "lower" level in the outlinehierarchy. There are a few different ways to promote/demote an element.
Open the tutorial template:
1. Click on File > New from Template...
2. Double-click the Tutorials folder and open the file called "Promoting & Demoting Tutorial".
This tutorial file has three levels available: Act, Sequence and Scenes.
Promoting/Demoting via Keyboard
1. Press CTRL+DOWN ARROW until the caret is blinking in the Third Act.
2. To demote the Act to a Sequence, press CTRL+RIGHT ARROW.
3. To promote an element, press CTRL+LEFT ARROW.
Promoting/Demoting via Drag and Drop
1. Open the Outline panel on the left if it is not already open.
2. Hold the mouse button down on the first Scene (green). Notice, as you drag it left or right,it shows what level in the hierarchy it will become.
3. Drag it so that it says Sequence and drop it. The outline element is now converted to aSequence (red) and has the proper margins.
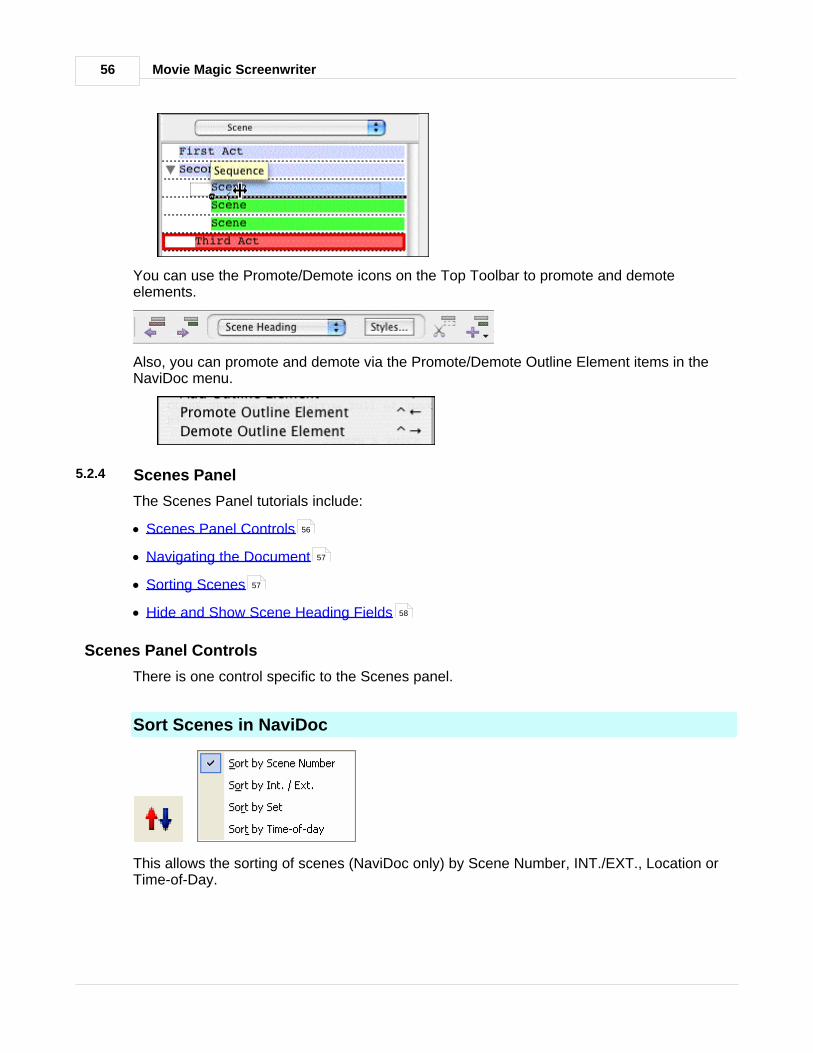
Movie Magic Screenwriter56
You can use the Promote/Demote icons on the Top Toolbar to promote and demoteelements.
Also, you can promote and demote via the Promote/Demote Outline Element items in theNaviDoc menu.
5.2.4 Scenes Panel
The Scenes Panel tutorials include:
· Scenes Panel Controls
· Navigating the Document
· Sorting Scenes
· Hide and Show Scene Heading Fields
Scenes Panel Controls
There is one control specific to the Scenes panel.
Sort Scenes in NaviDoc
This allows the sorting of scenes (NaviDoc only) by Scene Number, INT./EXT., Location orTime-of-Day.
56
57
57
58

Movie Magic® Screenwriter 6 Help 57
Navigating the Document
There are several ways to navigate through the NaviDoc and your document using theScenes panel.
Mouse
You can use the mouse to scroll the NaviDoc up and down. Clicking on a row in the Scenespanel will take you to that place in the document. If enabled, the flash pointer will point tothat element in the document. The Sync button is on by default, so the NaviDoc will scroll asyou navigate.
Keyboard
You can move through the NaviDoc using the keyboard.
Top of NaviDoc = CTRL+HOME
Bottom of NaviDoc = CTRL+END
Scroll up one screen = CTRL+PAGEUP
Scroll down one screen = CTRL+PAGEDOWN
Previous Row = CTRL+UP ARROW*
Next Row = CTRL+DOWN ARROW*
*Since these key commands actually select the previous/next row, the document will bemoved to that element as well.
Menus
You can also move through the NaviDoc using the menu items under the NaviDoc menu.
Sorting Scenes
In the Scenes panel, you can choose the order in which the scenes are displayed in theScenes panel. Sorting scenes does not affect the document.
Sorting Scenes
1. Click on File > Open and open “Screenplay Sample” in the Sample Files folder.
2. Click on the Scenes panel in the NaviDoc (CTRL+2).
3. Click on the Sort Scenes button on the Scenes panel.
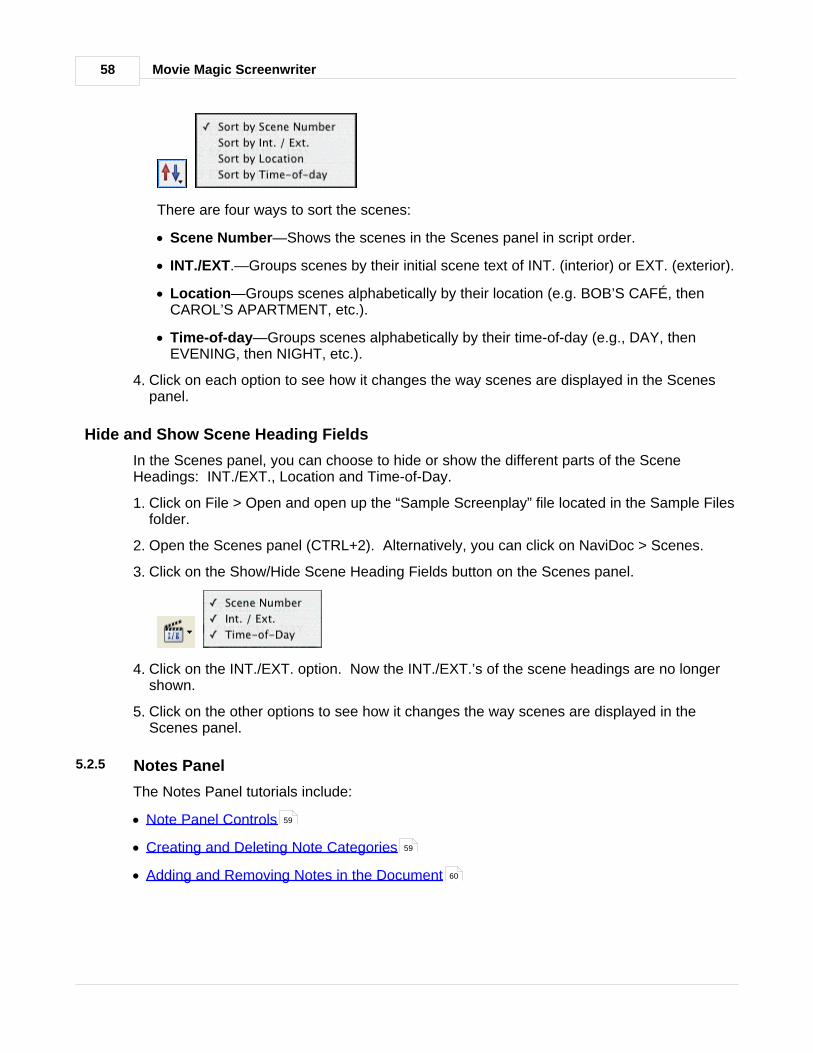
Movie Magic Screenwriter58
There are four ways to sort the scenes:
· Scene Number—Shows the scenes in the Scenes panel in script order.
· INT./EXT.—Groups scenes by their initial scene text of INT. (interior) or EXT. (exterior).
· Location—Groups scenes alphabetically by their location (e.g. BOB’S CAFÉ, thenCAROL’S APARTMENT, etc.).
· Time-of-day—Groups scenes alphabetically by their time-of-day (e.g., DAY, thenEVENING, then NIGHT, etc.).
4. Click on each option to see how it changes the way scenes are displayed in the Scenespanel.
Hide and Show Scene Heading Fields
In the Scenes panel, you can choose to hide or show the different parts of the SceneHeadings: INT./EXT., Location and Time-of-Day.
1. Click on File > Open and open up the “Sample Screenplay” file located in the Sample Filesfolder.
2. Open the Scenes panel (CTRL+2). Alternatively, you can click on NaviDoc > Scenes.
3. Click on the Show/Hide Scene Heading Fields button on the Scenes panel.
4. Click on the INT./EXT. option. Now the INT./EXT.’s of the scene headings are no longershown.
5. Click on the other options to see how it changes the way scenes are displayed in theScenes panel.
5.2.5 Notes Panel
The Notes Panel tutorials include:
· Note Panel Controls
· Creating and Deleting Note Categories
· Adding and Removing Notes in the Document
59
59
60
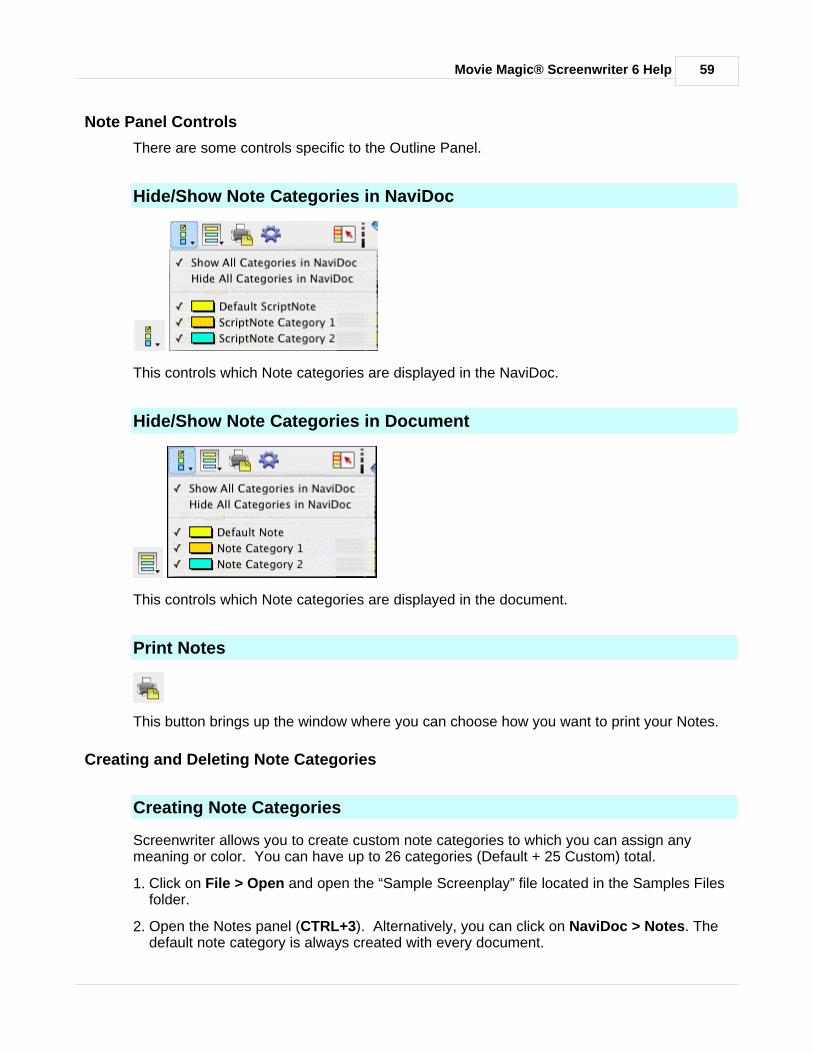
Movie Magic® Screenwriter 6 Help 59
Note Panel Controls
There are some controls specific to the Outline Panel.
Hide/Show Note Categories in NaviDoc
This controls which Note categories are displayed in the NaviDoc.
Hide/Show Note Categories in Document
This controls which Note categories are displayed in the document.
Print Notes
This button brings up the window where you can choose how you want to print your Notes.
Creating and Deleting Note Categories
Creating Note Categories
Screenwriter allows you to create custom note categories to which you can assign anymeaning or color. You can have up to 26 categories (Default + 25 Custom) total.
1. Click on File > Open and open the “Sample Screenplay” file located in the Samples Filesfolder.
2. Open the Notes panel (CTRL+3). Alternatively, you can click on NaviDoc > Notes. Thedefault note category is always created with every document.

Movie Magic Screenwriter60
3. To add a new category, click on the “Default Note Category” pop-up menu and choose New Category Color…“Color Category 2” is added (with a new color) and is in edit modeso you can change the name.
4. Type in “Theme” for the name of the new category and press RETURN to confirm.
5. Let’s add another category. This time, click on the "+" (Add) button.“Color Category 3” isadded with a new color.
6. Type in “Plot” for the name of the new category and press RETURN to confirm.
7. Add another category. Click on the "+" (Add) button.
8. Type in “Sub-plot” for the name of the category and press RETURN to confirm.
9. Add one final category called “Character”. Click on the "+" (Add) button.
Deleting Note Categories
Deleting a note category is very easy.
1. Select the “Character” category created on the last step above.
2. Click on the "-" (Delete) button.
3. Confirm the delete if prompted.
NOTE: while you can rename it, you cannot delete the Default note category, because theremust be at least one.
Adding and Removing Notes in the Document
Adding Notes in the Document
1. Click on File > Open and open the “Sample Screenplay” file in the Sample Files folder.
2. In the Outline panel, click on Scene 3 (INT. CAVERN -- NIGHT).
3. In that scene, find the sentence: “The dark figure doesn't move, staying in the shadows.But his voice is strained.”
4. Click at the beginning of that sentence.
5. Press SHIFT+CTRL+N to add a new note.
6. Type in “Find a different way to describe the Dark Figure’s voice.”
You can also add notes in the following ways:
· Top Menus—NaviDoc > New Note.
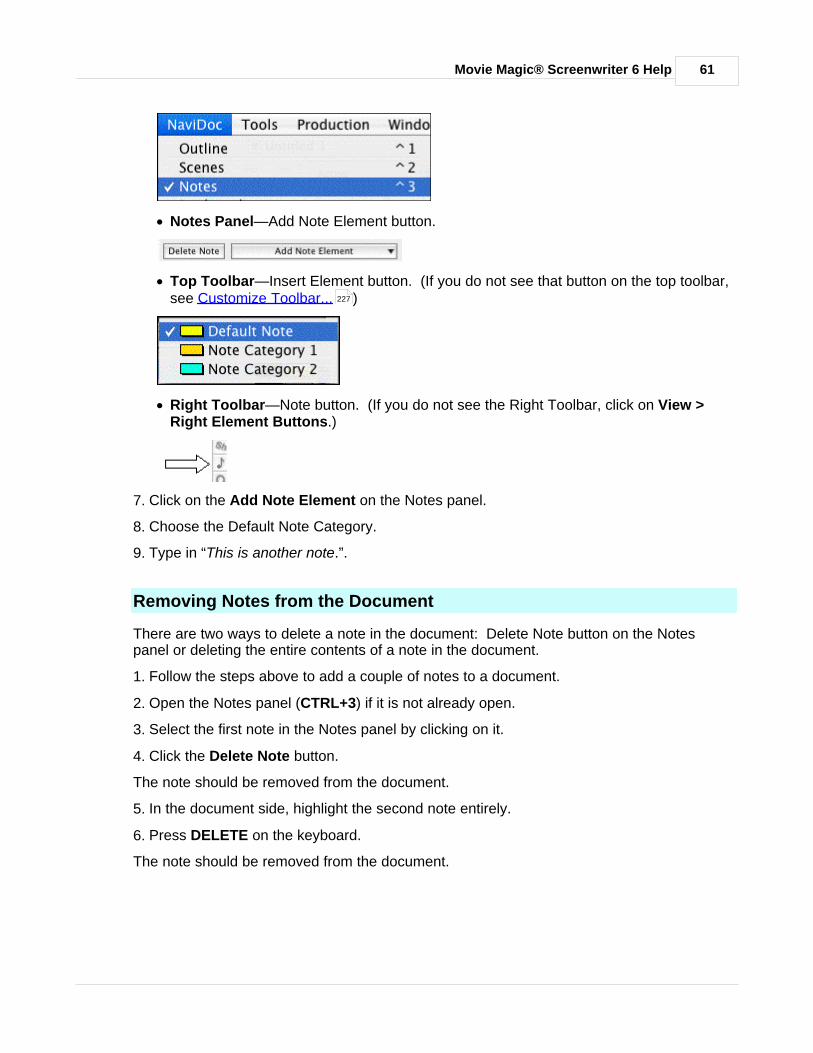
Movie Magic® Screenwriter 6 Help 61
· Notes Panel—Add Note Element button.
· Top Toolbar—Insert Element button. (If you do not see that button on the top toolbar,see Customize Toolbar... )
· Right Toolbar—Note button. (If you do not see the Right Toolbar, click on View >Right Element Buttons.)
7. Click on the Add Note Element on the Notes panel.
8. Choose the Default Note Category.
9. Type in “This is another note.”.
Removing Notes from the Document
There are two ways to delete a note in the document: Delete Note button on the Notespanel or deleting the entire contents of a note in the document.
1. Follow the steps above to add a couple of notes to a document.
2. Open the Notes panel (CTRL+3) if it is not already open.
3. Select the first note in the Notes panel by clicking on it.
4. Click the Delete Note button.
The note should be removed from the document.
5. In the document side, highlight the second note entirely.
6. Press DELETE on the keyboard.
The note should be removed from the document.
227
Movie Magic Screenwriter62
5.2.6 Bookmarks Panel
The Bookmarks Panel tutorials include:
· Adding and Removing Bookmarks
· Editing Bookmarks
· Navigating the Document
Adding and Removing Bookmarks
Bookmarks in Screenwriter serve much the same purpose a physical bookmark would: tohelp you get back to a particular place in the story.
Click on File > Open to open the "Screenplay Sample" file which is located in the SamplesFiles folder.
Adding a Bookmark
1. Switch to the Bookmarks panel (CTRL+4).
2. Scroll down to page two.
3. Click on the dialogue that says “Chameleon, you there?”
4. Press CTRL+B to make a new bookmark. Alternatively, you can click on NaviDoc > NewBookmark or the Add Bookmark button on the Bookmarks panel.
The name of the bookmark is automatically set to the line of text where the cursor is blinkingin the document.
Deleting a Bookmark
1. Make sure the “Chameleon, you there?” bookmark is selected.
2. Click the Remove button.
3. Click to confirm delete if prompted.
Editing Bookmarks
Editing Bookmark Name
1. Open the Sample Screenplay file.
2. Open the Bookmarks panel (CTRL+4).
3. Click on any line of text and press CTRL+B to add a bookmark.
4. To edit the name of the bookmark, make sure it is selected in the NaviDoc and click the Edit button. Alternatively, you can double click the bookmark to put it in edit mode.
62
62
63

Movie Magic® Screenwriter 6 Help 63
5. Type in a new name for the bookmark.
6. When you are finished, click the Done button or press RETURN to confirm the name.
Navigating the Document
There are several ways to navigate through the NaviDoc and your document using theBookmarks panel.
Mouse
Clicking on a row in the Bookmarks panel will take you to that place in the document. Ifenabled, the flash pointer will point to that element in the document. The Sync button is onby default, so the NaviDoc will scroll as you navigate.
Keyboard
You can move through the NaviDoc using the keyboard.
You can move through the NaviDoc using the keyboard.
Top of NaviDoc = CTRL+HOME
Bottom of NaviDoc = CTRL+END
Scroll up one screen = CTRL+PAGEUP
Scroll down one screen = CTRL+PAGEDOWN
Previous Row = CTRL+UP ARROW*
Next Row = CTRL+DOWN ARROW*
*Since these key commands actually select the previous/next row, the document will bemoved to that element as well.
Menus
You can also move through the NaviDoc using the menu items under the NaviDoc menu.
5.3 Templates
The Template tutorials include:
· Screenplay Template tutorials
· Industry Standards and Conventions tutorial
· The Different Elements of a Screenplay tutorial
· Sitcom Template tutorials:
· Industry Standards and Conventions
64
66
73

Movie Magic Screenwriter64
· The different Elements of a Sitcom
· Sitcom Format -- Step-by-Step Basics
5.3.1 Screenplay
This tutorial gives an overview of an industry standard screenplay, including formatconventions and usage.
· Industry Standards and Conventions tutorial
· The Different Elements of a Screenplay tutorial
For a step-by-step tutorial of writing a screenplay see the 10-Minute Tutorial .
Industry standards and conventions
The screenplay format is arranged so that one screenplay page translates to roughly oneminute of screen time. This can vary depending on the writing style and how much action ordialogue is in the script (dialogue tends to translate to a shorter run time than does action). The average length of a screenplay is 90-120 pages with dialogue-driven scripts generallybeing on the longer end, even though their run time may end up being the same or shorterthan action.
As a writer, it is your job to convey your story ideas, characters and images rather thanexplain how the film will be shot. Camera angles and transitions (for the most part) shouldbe left up to the director.
A Note about Formatting
It is important that your screenplay follows the generally accepted format. However, don'tworry about the minutia ("Should I use CONT'Ds after character names or not?", "Will myscript be thrown away if there are MOREs on the bottom when dialogue breaks across thepage?", etc.). A script would more likely to be passed up because of bad writing thanbecause of the use or non-use of CONT'Ds after the character names.
Remember, you can always configure the formatting to your personal writing style. SeeCustomizing Screenwriter > Script Format Options .
Title Page
The title (cover) page of a screenplay typically uses Courier (or Courier New) 12pt. The titleof the screenplay, the "Written by" line and the author's name should be centered verticallyand horizontally on the page, as well as double-spaced.
· The title is usually in ALL CAPS. It can be enclosed in quotes, underlined or bolded ifdesired, but it is not necessary.
· The next line can say "An original screenplay by", "Written by" or "by".
· The author's name should be in Initial Caps.
· The contact information is generally in the lower left corner, single-spaced and left justified.
76
85
64
66
29
259

Movie Magic® Screenwriter 6 Help 65
FADE IN:
A screenplay typically begins with the line FADE IN: which is in ALL CAPS and flush with theleft margin.
Margins
Screenplays should have a top and bottom margin of 1.0", although the bottom margin willvary from page-to-page because of the specific page breaking rules (handled automaticallyby Screenwriter). The left and right margins are specific to each element and are alsohandled automatically by the program.
Font
As of this writing, the industry standard font for screenplays is Courier 12 pt. This includesany form of Courier, such as Courier New, since it is a mono-spaced font and takes up 10
Movie Magic Screenwriter66
characters per inch on the page when at 12 pt. Do not use a proportional font like TimesNew Roman or Arial.
Header/Footer
A spec script should only have the page number followed by a period in the upper rightcorner of each page (except page one). Screenplays do not use a footer.
Line Spacing
Elements are separated by one blank line (double-spaced) with the exception being aCharacter Name/Parenthetical/Dialogue group which is single-spaced.
Page Breaks
Certain elements should never appear by themselves at the bottom of the page, such asScene Headings and Shots. Screenwriter automatically handles proper page breaking(including MOREs and CONT'Ds for dialogue) so you, as a writer, do not have to think aboutit as you are trying to get your ideas onto the page.
The different elements of a Screenplay
The elements in a screenplay are:
· Scene Heading (slugline)
· Action (description)
· Character Name
· Dialogue
· Parenthetical (wryly)
· Shot (secondary heading; sub-scene)
· Transition
· Other Formatting Elements
Screenwriter automatically uses the format for a spec screenplay by default. If you havechanged your Default.def template or you want to make sure you have loaded the originalSpec Script format, click on Format > Load Styles From > Template... and choose SpecScript from the Blank Templates folder.
Scene Heading
Scene Heading (also called a slugline)—This signifies the beginning of a new scene andtells the reader where and when it takes place.
Formatting
· Flush with the left margin (1.5").
66
67
68
68
69
69
70
71

Movie Magic® Screenwriter 6 Help 67
· Right margin is approximately 1.0" from the right edge of the page and staggered.
· ALL CAPS.
· One blank line (double-spaced) above each new Scene Heading; some writers prefer twoblank lines (triple-spaced).
· Never at the bottom of a page.
There are three components of a standard Scene Heading: the Start of Scene, Location andthe Time-of-Day.
· Start of Scene—A typical Scene Heading begins with INT. (interior) or EXT. (exterior).
· Location—This signifies where the scene actually takes place (e.g., GRANNY ALTHEA'SCAFE).
· Time-of-Day—Shows what time the scene takes place (typically DAY or NIGHT). TheTime-of-Day is separated from the Location commonly by one hyphen, although a dash(double hyphen) is also acceptable.
EXAMPLES:
INT. GRANNY ALTHEA'S CAFE - DAY
INT. GRANNY ALTHEA'S CAFE -- DAY
Action
Action (description)—This is the description of the action that is taking place in the scene.
Formatting
· Flush with the left margin (1.5").
· Right margin is approximately 1.0" from the right edge of the page and staggered.
· Sentence case.
· Single-spaced within the paragraph and double-spaced between paragraphs.
EXAMPLE:
INT. GRANNY ALTHEA'S CAFE - DAY
The diner is full to capacity, as is typical on a Saturday. The UNSHAVEN MAN sits at the counter staring into his coffeecup.
NOTE: The first instance of a character that is mentioned in Action is in ALL CAPS; allsubsequent occurrences are Initial Caps.

Movie Magic Screenwriter68
Character Name
Character Name—This element shows which character is about to speak.
Formatting
· Left margin is roughly 3.7" from the left edge of the page.
· Right margin is approximately 1.0" from the right edge of the page.
· Left justified (not centered)
· ALL CAPS.
· There is one blank line above each new Character Name.
· The first instance of the character name mentioned in Action is ALL CAPS.
EXAMPLE:
INT. GRANNY ALTHEA'S CAFE - DAY
The diner is full to capacity. The UNSHAVEN MAN sits at thecounter. Staring at the gold amulet in front of him, hiscoffee untouched.
WAITRESS
Dialogue
Dialogue—A speech by a character.
Formatting
· Left margin is roughly 2.5" from the left edge of the page.
· About 3.5" wide.
· Left justified.
· Sentence case.
· There are no blank lines above Dialogue.
EXAMPLE:
INT. GRANNY ALTHEA'S CAFE - DAY
The diner is full to capacity. The UNSHAVEN MAN sits at thecounter. Staring at the gold amulet in front of him, hiscoffee untouched.

Movie Magic® Screenwriter 6 Help 69
WAITRESS Anything else? Sir, can I get you anything else?
Parenthetical
Parenthetical (wryly)—This element is used to indicate how a character's dialogue is to bespoken, usually to emphasize subtext; occasionally, they can be used for Action if it is only afew words (e.g. "palming the coin"). It is generally accepted that they should be used verysparingly since they can be a sign of an amateur writer.
Formatting
· Left margin is about 3.0" from the left edge of the page
· About 1.5" wide.
· Left justified.
· Lower case.
· There are no blank lines above a Parenthetical.
EXAMPLE:
INT. GRANNY ALTHEA'S CAFE - DAY
The diner is full to capacity. The UNSHAVEN MAN sits at thecounter. Staring at the gold amulet in front of him, steamingcoffee untouched.
WAITRESS Anything else? Sir, can I get you anything else?
UNSHAVEN MAN (palming the amulet) No.
Shot
Shot (secondary heading or sub-scene)—This element can be used to break up a masterscene by emphasizing something specific, showing the passing of time or indicating anotherlocation within the main scene.
Formatting
· Flush with the left margin (1.5").
· Right margin is approximately 1.0" from the right edge of the page and staggered.

Movie Magic Screenwriter70
· ALL CAPS.
· One blank line (double-spaced) above each new Shot.
· Never at the bottom of a page.
EXAMPLE:
INT. GRANNY ALTHEA'S CAFE - DAY
The diner is full to capacity. The UNSHAVEN MAN sits at thecounter. Staring at the gold amulet in front of him, steamingcoffee untouched.
WAITRESS Anything else? Sir, can I get you anything else?
UNSHAVEN MAN (palming the amulet) No.
LATER
The Unshaven Man sits. Coffee no longer steaming, stilluntouched.
Transition
Transition—This element describes the shift between one scene and the next. Since it isimplied that one scene "cuts" to the next, these are generally avoided unless absolutelynecessary to convey clarity or emphasis to the reader.
Formatting
· Flush right.
· Right margin is approximately 1.0" from the right edge of the page.
· ALL CAPS.
· One blank line (double-spaced) above.
EXAMPLE:
INT. GRANNY ALTHEA'S CAFE - DAY
The diner is full to capacity. The UNSHAVEN MAN sits at thecounter. Staring at the gold amulet in front of him, steamingcoffee untouched.

Movie Magic® Screenwriter 6 Help 71
WAITRESS Anything else? Sir, can I get you anything else?
UNSHAVEN MAN (palming the amulet) No.
LATER
The Unshaven Man sits. Coffee no longer steaming, stilluntouched.
DISSOLVE TO:
EXT. GRANNY ALTHEA'S CAFE - NIGHT
The Unshaven Man leans against his beat up Chevy Nova,caressing the amulet in his fingers.
Other Formatting Elements
There are three other formatting elements worth mentioning:
· Character Extensions
· CONT'D (Character Name)
· MORE and CONT'D
Character Extensions—These are extensions that are used generally to tell the readerwhether or not a character is speaking in the scene and cannot be seen, or whether theirspeech is a narration, thoughts, over the phone, etc.
Formatting
· Placed on the same line but directly after the Character Name.
· Surrounded by parentheses.
· ALL CAPS.
There are two extensions that are usually used.
(O.S.)—Off Screen. Denotes a character that can be heard but is off camera.
EXAMPLE:
EXT. GRANNY ALTHEA'S CAFE - NIGHT
The Unshaven Man leans against his beat up Chevy Nova,caressing the amulet in his fingers.
71
72
73

Movie Magic Screenwriter72
WAITRESS (O.S.) Sir, you forgot your wallet!
The Unshaven Man jumps to his feet, pockets the amulet inhis jacket.
(V.O.)—Voice Over. Denotes a character's narration, thoughts, or dialogue heard in thesoundtrack that is not taking place in the actual scene.
EXAMPLE:
EXT. GRANNY ALTHEA'S CAFE - NIGHT
The Unshaven Man leans against his beat up Chevy Nova.Deep in thought, caressing the amulet in his fingers.
UNSHAVEN MAN (V.O.) If they only knew that this amulet--
WAITRESS (O.S.) Sir, you forgot your wallet!
The Unshaven Man jumps to his feet, pockets the amulet inhis jacket.
(CONT'D)—Continueds are used to show that the same character is speaking again, usuallywhen two speeches are separated by Action. They are perfectly acceptable to use, butsome writers prefer a cleaner page and turn them off.
NOTE: These continueds should not be confused with scene continueds that can appear atthe top/bottom of every page when a scene is continuing. Scene continueds should not beused in a spec script but rather are used in shooting scripts (in production).
EXAMPLE:
INT. GRANNY ALTHEA'S CAFE - DAY
The diner is full to capacity. The Unshaven Man sits at thecounter. Staring at the gold amulet in front of him, steamingcoffee untouched.
WAITRESS Anything else?
She leans in to try and look him in the eyes.
WAITRESS (CONT'D)
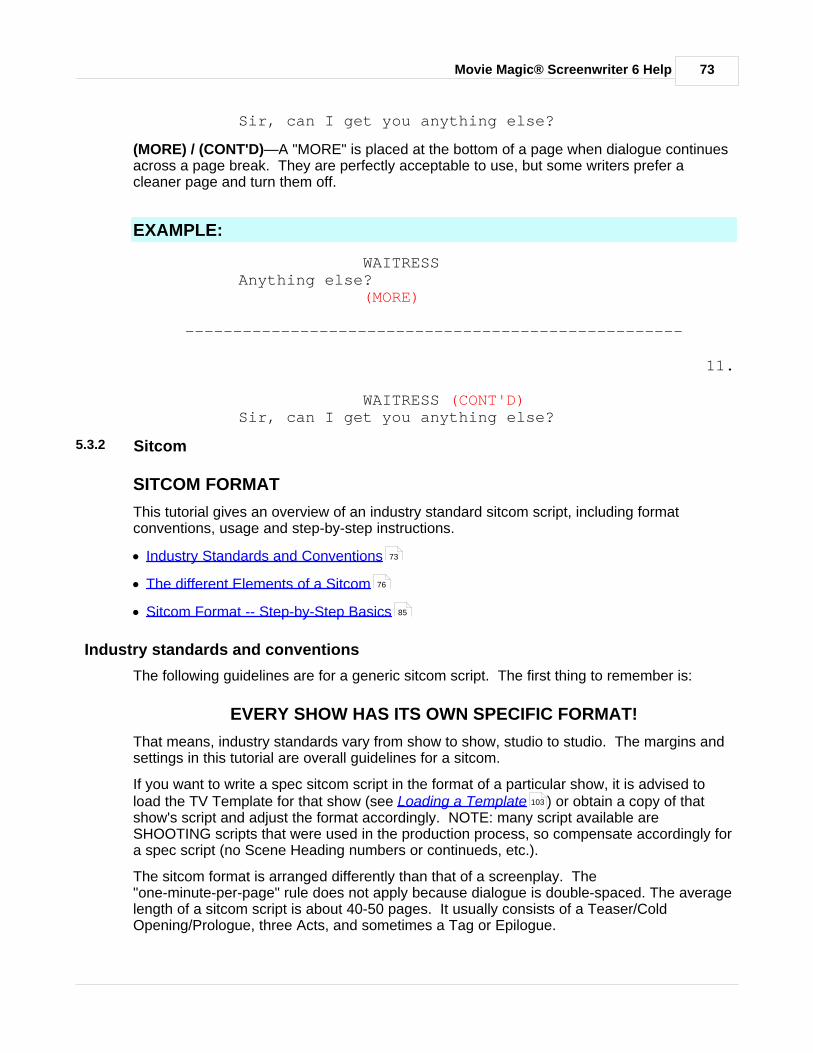
Movie Magic® Screenwriter 6 Help 73
Sir, can I get you anything else?
(MORE) / (CONT'D)—A "MORE" is placed at the bottom of a page when dialogue continuesacross a page break. They are perfectly acceptable to use, but some writers prefer acleaner page and turn them off.
EXAMPLE:
WAITRESS Anything else? (MORE)
----------------------------------------------------
11.
WAITRESS (CONT'D) Sir, can I get you anything else?
5.3.2 Sitcom
SITCOM FORMAT
This tutorial gives an overview of an industry standard sitcom script, including formatconventions, usage and step-by-step instructions.
· Industry Standards and Conventions
· The different Elements of a Sitcom
· Sitcom Format -- Step-by-Step Basics
Industry standards and conventions
The following guidelines are for a generic sitcom script. The first thing to remember is:
EVERY SHOW HAS ITS OWN SPECIFIC FORMAT!
That means, industry standards vary from show to show, studio to studio. The margins andsettings in this tutorial are overall guidelines for a sitcom.
If you want to write a spec sitcom script in the format of a particular show, it is advised toload the TV Template for that show (see Loading a Template ) or obtain a copy of thatshow's script and adjust the format accordingly. NOTE: many script available areSHOOTING scripts that were used in the production process, so compensate accordingly fora spec script (no Scene Heading numbers or continueds, etc.).
The sitcom format is arranged differently than that of a screenplay. The"one-minute-per-page" rule does not apply because dialogue is double-spaced. The averagelength of a sitcom script is about 40-50 pages. It usually consists of a Teaser/ColdOpening/Prologue, three Acts, and sometimes a Tag or Epilogue.
73
76
85
103
Movie Magic Screenwriter74
To configure the formatting to your personal writing style, see Customizing Screenwriter > Script Format Options .
Title Page
The title (cover) page of sitcom is identical to a screenplay with the addition of the episodetitle. It typically uses Courier (or Courier New) 12pt. The title of the series, the episodename and author's line should be centered vertically and horizontally on the page, as well asdouble- (or triple-) spaced.
· The series title is in ALL CAPS.
· The episode title is in ALL CAPS enclosed in quotes.
· The author's name appears in Intial Caps.
· The contact information is generally in the lower left corner, single-spaced and left justified.
259

Movie Magic® Screenwriter 6 Help 75
Margins
Sictom scripts should have a top and bottom margin of 1.0", although the bottom margin willvary from page-to-page because of the specific page breaking rules (handled automaticallyby Screenwriter). The left and right margins are specific to each element and are alsohandled automatically by the program.
Font
As of this writing, the industry standard font for screenplays is Courier 12 pt. This includesany form of Courier, such as Courier New, since it is a monospaced font and takes up 10

Movie Magic Screenwriter76
characters per inch on the page when at 12 pt. Do not use a proportional font like TimesNew Roman or Arial.
Header/Footer
A spec sitcom script should have the page number followed by a period in the upper rightcorner of each page (except page one). Additionally, you can have the Act Break and SceneLabel information on a second line under the page number, for example (I-A) would be Act I,Scene A. Sitcoms do not use a footer.
Line Spacing
Elements are separated by one blank line (double-spaced). The exceptions areParentheticals for actors' instructions.
Page Breaks
Each new Act or Scene of a sitcom should start on a new page. Certain elements shouldnever appear by themselves at the bottom of the page, such as Scene Headings and Shots. Screenwriter automatically handles proper page breaking (including MOREs and CONT'Dsfor dialogue) so you, as a writer, do not have to think about it as you are trying to get yourideas onto the page.
The different elements of a Sitcom
The elements in a sitcom are:
· Act Break
· Scene Label
· Scene Heading (slugline)
· Action (description)
· Character Name
· Dialogue
· Parenthetical (wryly)
· Transition
· Other Formatting Elements
To load a Sitcom template, click on Format > Load Styles From > Template..., and chooseSitcom I or Sitcom II from the Blank Templates folder, or choose a specific sitcom from theTV Templates folder.
77
77
77
78
79
80
80
81
82
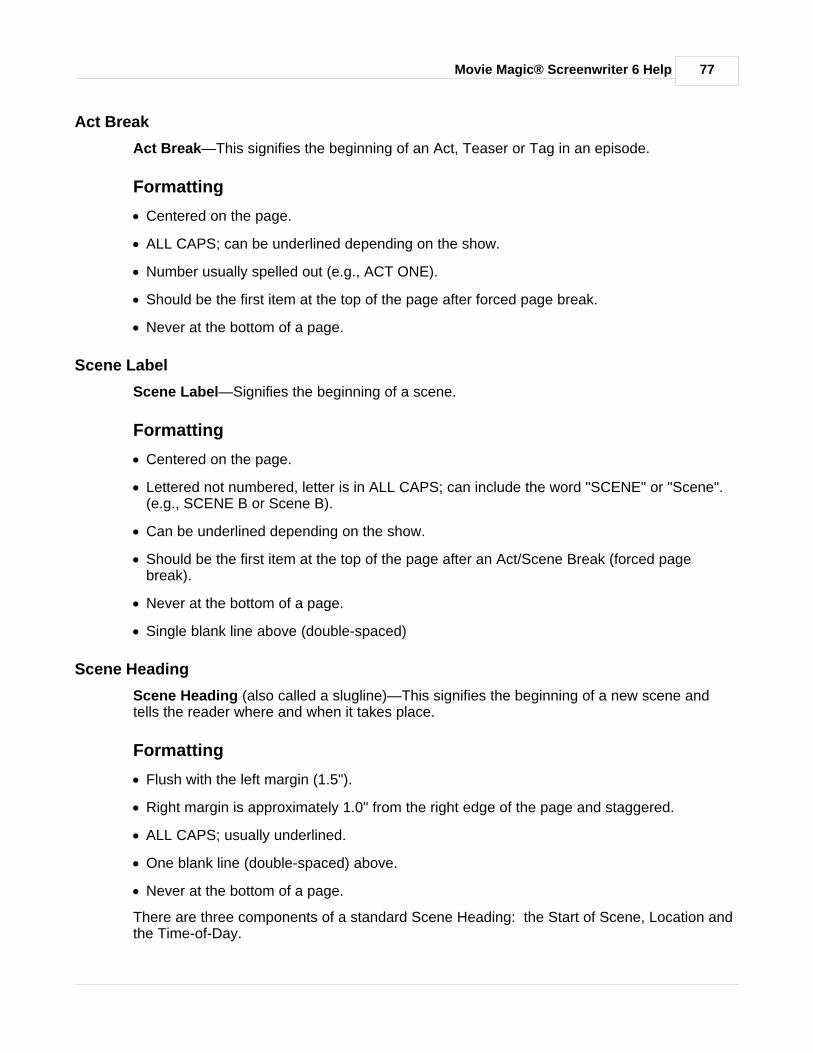
Movie Magic® Screenwriter 6 Help 77
Act Break
Act Break—This signifies the beginning of an Act, Teaser or Tag in an episode.
Formatting
· Centered on the page.
· ALL CAPS; can be underlined depending on the show.
· Number usually spelled out (e.g., ACT ONE).
· Should be the first item at the top of the page after forced page break.
· Never at the bottom of a page.
Scene Label
Scene Label—Signifies the beginning of a scene.
Formatting
· Centered on the page.
· Lettered not numbered, letter is in ALL CAPS; can include the word "SCENE" or "Scene".(e.g., SCENE B or Scene B).
· Can be underlined depending on the show.
· Should be the first item at the top of the page after an Act/Scene Break (forced pagebreak).
· Never at the bottom of a page.
· Single blank line above (double-spaced)
Scene Heading
Scene Heading (also called a slugline)—This signifies the beginning of a new scene andtells the reader where and when it takes place.
Formatting
· Flush with the left margin (1.5").
· Right margin is approximately 1.0" from the right edge of the page and staggered.
· ALL CAPS; usually underlined.
· One blank line (double-spaced) above.
· Never at the bottom of a page.
There are three components of a standard Scene Heading: the Start of Scene, Location andthe Time-of-Day.

Movie Magic Screenwriter78
· Start of Scene—A typical Scene Heading begins with INT. (interior) or EXT. (exterior).
· Location—This signifies where the scene actually takes place (e.g., MANHATTANHIGHRISE).
· Time-of-Day—Shows what time the scene takes place (typically DAY or NIGHT). TheTime-of-Day is separated from the Location commonly by one hyphen, although a dash(double hyphen) is also acceptable.
EXAMPLES:
INT. MANHATTAN HIGHRISE - DAY
INT. MANHATTAN HIGHRISE -- DAY
Action
Action (description)—This is the description of the action that is taking place in the scene.Generally more sparce than screenplay since sitcoms are dialogue-driven. Some sitcomsplace the Action in parentheses (as in the Sitcom II template).
Formatting
· Flush with the left margin (1.5").
· Right margin is approximately 1.0" from the right edge of the page and staggered.
· ALL CAPS.
· Single-spaced within the paragraph and double-spaced between paragraphs.
EXAMPLES:
Sitcom I
ACT ONE
A
FADE IN:
INT. MANHATTAN HIGHRISE - DAY
TINA SITS ON THE EDGE OF THE COUCH PLAYING SOLITAIRE JENGA. ASHAKY TOWER OF PIECES WOBBLES ON THE COFFEE TABLE.
AMIR BURSTS THROUGH THE FRONT DOOR. HE IS ALL SMILES.
NOTE: Certain items are underlined in Action: The first instance of a character's name;

Movie Magic® Screenwriter 6 Help 79
character entrances and exits; sounds or effects.
Sitcom II
ACT ONE
A
FADE IN:
INT. MANHATTAN HIGHRISE - DAY
(TINA SITS ON THE EDGE OF THE COUCH PLAYING SOLITAIRE JENGA. ASHAKY TOWER OF PIECES WOBBLES ON THE COFFEE TABLE.)
(AMIR BURSTS THROUGH THE FRONT DOOR. HE IS ALL SMILES.)
NOTE: Certain items are underlined in Action: The first instance of a character's name;character entrances and exits; sounds or effects.
Character Name
Character Name—This element shows which character is about to speak.
Formatting
· Left margin is roughly 3.7" from the left edge of the page.
· Right margin is approximately 1.0" from the right edge of the page.
· Left justified (not centered)
· ALL CAPS.
· There is one blank line above each new Character Name.
· The first instance of the character name mentioned in Action is underlined.
EXAMPLE:
ACT ONE
A
FADE IN:
INT. MANHATTAN HIGHRISE - DAY
TINA SITS ON THE EDGE OF THE COUCH PLAYING SOLITAIRE JENGA. ASHAKY TOWER OF PIECES WOBBLES ON THE COFFEE TABLE.
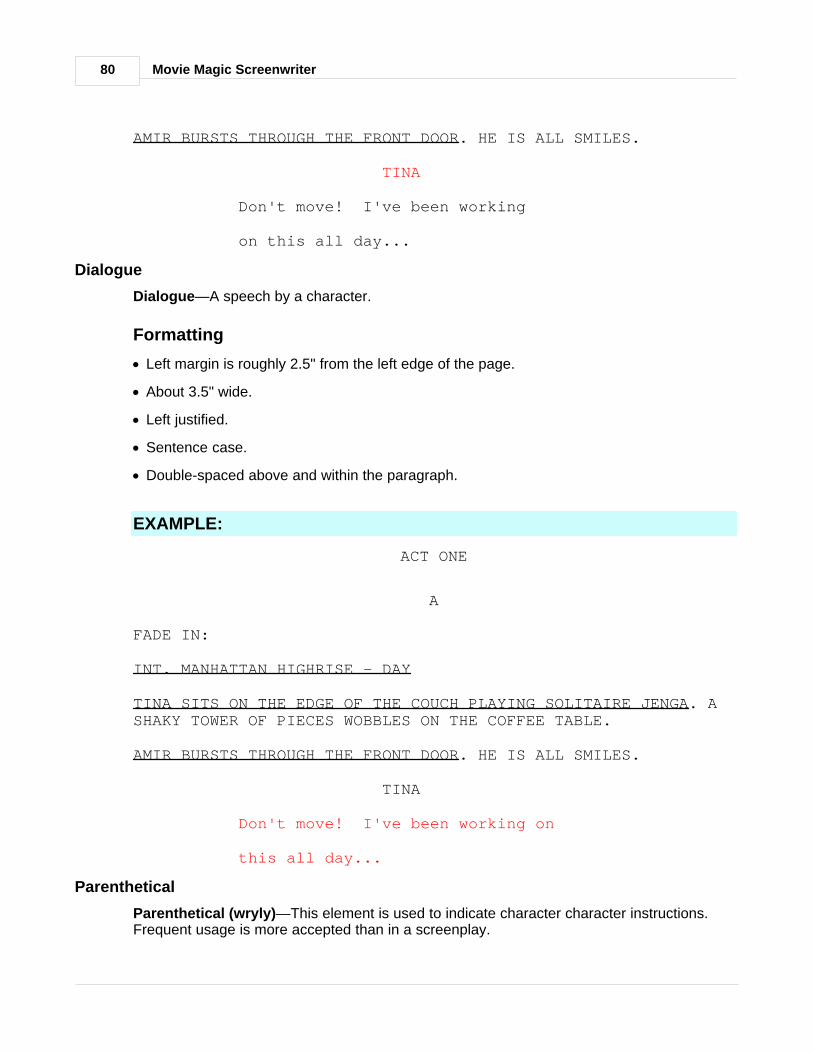
Movie Magic Screenwriter80
AMIR BURSTS THROUGH THE FRONT DOOR. HE IS ALL SMILES.
TINA
Don't move! I've been working
on this all day...
Dialogue
Dialogue—A speech by a character.
Formatting
· Left margin is roughly 2.5" from the left edge of the page.
· About 3.5" wide.
· Left justified.
· Sentence case.
· Double-spaced above and within the paragraph.
EXAMPLE:
ACT ONE
A
FADE IN:
INT. MANHATTAN HIGHRISE - DAY
TINA SITS ON THE EDGE OF THE COUCH PLAYING SOLITAIRE JENGA. ASHAKY TOWER OF PIECES WOBBLES ON THE COFFEE TABLE.
AMIR BURSTS THROUGH THE FRONT DOOR. HE IS ALL SMILES.
TINA
Don't move! I've been working on
this all day...
Parenthetical
Parenthetical (wryly)—This element is used to indicate character character instructions.Frequent usage is more accepted than in a screenplay.
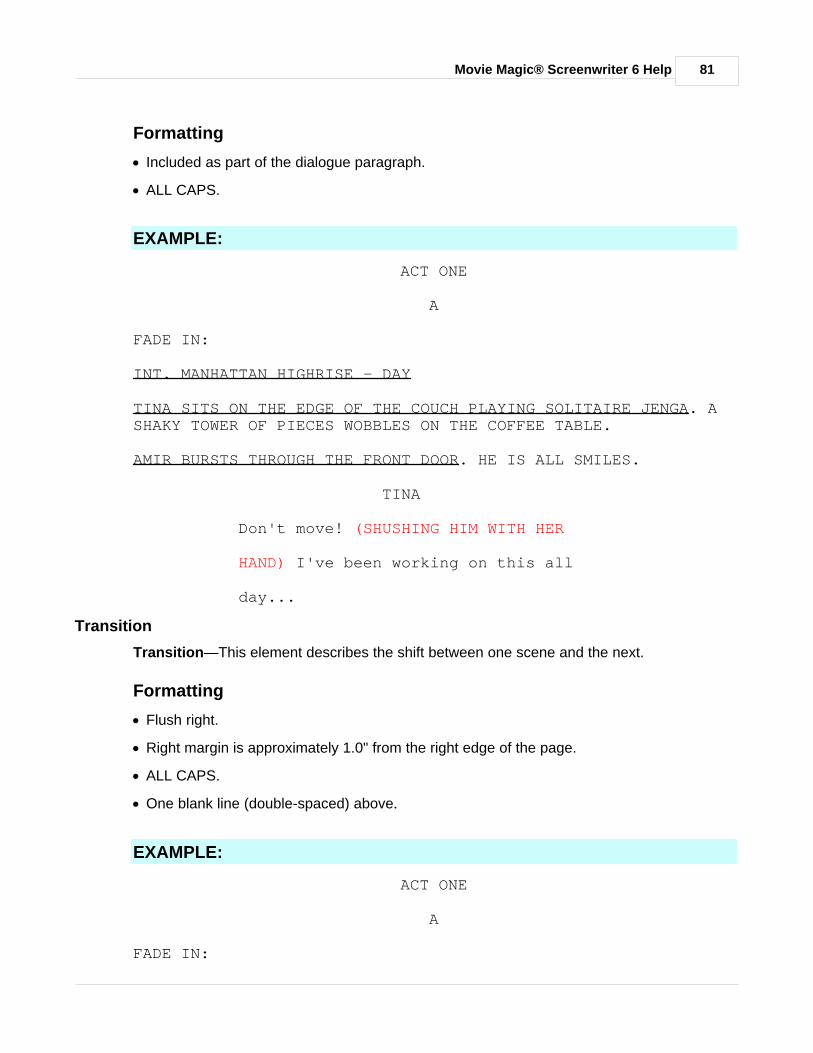
Movie Magic® Screenwriter 6 Help 81
Formatting
· Included as part of the dialogue paragraph.
· ALL CAPS.
EXAMPLE:
ACT ONE
A
FADE IN:
INT. MANHATTAN HIGHRISE - DAY
TINA SITS ON THE EDGE OF THE COUCH PLAYING SOLITAIRE JENGA. ASHAKY TOWER OF PIECES WOBBLES ON THE COFFEE TABLE.
AMIR BURSTS THROUGH THE FRONT DOOR. HE IS ALL SMILES.
TINA
Don't move! (SHUSHING HIM WITH HER
HAND) I've been working on this all
day...
Transition
Transition—This element describes the shift between one scene and the next.
Formatting
· Flush right.
· Right margin is approximately 1.0" from the right edge of the page.
· ALL CAPS.
· One blank line (double-spaced) above.
EXAMPLE:
ACT ONE
A
FADE IN:

Movie Magic Screenwriter82
INT. MANHATTAN HIGHRISE - DAY
TINA SITS ON THE EDGE OF THE COUCH PLAYING SOLITAIRE JENGA. ASHAKY TOWER OF PIECES WOBBLES ON THE COFFEE TABLE.
AMIR BURSTS THROUGH THE FRONT DOOR. HE IS ALL SMILES.
TINA
Don't move! (SHUSHING HIM WITH HER
HAND) I've been working on this all
day...
AMIR GINGERLY APPROACHES HER.
AMIR
(WHISPERING) I have some news to tell --
TINA GLARES UP AT HIM WITH AND POINTS A SCOLDING FINGER.
AMIR
(MOVES A BIT CLOSER) -- It's really --
TINA
(BURSTING) What!? What is SO important!?
THE JENGA TOWER COLLAPSES. TINA SINKS INTO THE COUCH.
AMIR It can wait.
FADE OUT
Other Formatting Elements
There are three other formatting elements worth mentioning:
· Character Extensions
· CONT'D (Character Name)
· MORE and CONT'D
83
83
84

Movie Magic® Screenwriter 6 Help 83
Character Extensions—These are extensions that are used generally to tell the readerwhether or not a character is speaking in the scene and cannot be seen, or whether theirspeech is a narration, thoughts, over the phone, etc.
Formatting
· Placed on the same line but directly after the Character Name.
· Surrounded by parentheses.
· ALL CAPS.
There are two extensions that are usually used.
· (O.S.)—Off Screen. Denotes a character that can be heard but is off camera.
· (V.O.)—Voice Over. Denotes a character's narration, thoughts, or dialogue heard in thesoundtrack that is not taking place in the actual scene.
EXAMPLE:
JAMIE PIPES IN FROM THE KITCHEN.
JAMIE (O.S.)
Don't even bother Amir.
AMIR TAKES A BREATH IN TO SPEAK.
TINA GLARES UP AT HIM WITH AND POINTS A SCOLDING FINGER.
AMIR (V.O.)
(ECHOEY THOUGHTS) She always does this to
me.
(CONT'D)—Continueds are used to show that the same character is speaking again, usuallywhen two speeches are separated by Action. They are perfectly acceptable to use, butsome writers prefer a cleaner page and turn them off.
NOTE: These continueds should not be confused with scene continueds that can appear atthe top/bottom of every page when a scene is continuing. Scene continueds should not beused in a spec script but rather are used in shooting scripts (in production).
EXAMPLE:
ACT ONE
A

Movie Magic Screenwriter84
FADE IN:
INT. MANHATTAN HIGHRISE - DAY
TINA IS SITS ON THE EDGE OF THE COUCH PLAYING SOLITAIRE JENGA.A SHAKY TOWER OF PIECES WOBBLES ON THE COFFEE TABLE.
AMIR BURSTS THROUGH THE FRONT DOOR. HE IS ALL SMILES.
TINA
Don't move! (SHUSHING HIM WITH HER
HAND) I've been working on this all
day...
AMIR GINGERLY APPROACHES HER.
JAMIE PIPES IN FROM THE KITCHEN.
JAMIE (O.S.)
Don't even bother, Amir. AMIR TAKES A BREATH IN TO SPEAK.
TINA GLARES UP AT HIM WITH A SCOLDING FINGER.
AMIR (V.O.)
(ECHOEY THOUGHTS) She always does this to
me.
TINA
(QUIETLY) Why do you always do this to me?
TINA SITS DOWN.
TINA (CONT'D)
It's not fair.
(MORE) / (CONT'D)—A "MORE" is placed at the bottom of a page when dialogue continuesacross a page break. They are perfectly acceptable to use, but some writers prefer acleaner page and turn them off.

Movie Magic® Screenwriter 6 Help 85
EXAMPLE:
Sitcom format - Step-by-step Basics
Load the Template
1) Click on File > New from Template and choose Sitcom I or II from the Blank Templatesfolder.
2) You should now be looking at a blank document.
Adding a Teaser, Cold Opening, Prologue or starting the first act
Since you don't want an Act/Scene Break before the Teaser (or first Act), you could type inone of the following aliases: "teaser", "cold opening", "prologue" or "newact" to have theprogram format it automatically.
1. Add a Teaser by typing "teaser" on the first blank line. Screenwriter should format it foryou in the middle of the page.
2. Press Enter and type "d" to put in FADE IN: from the pop-up list. Screenwriter willautomatically format it in ALL CAPS and bring up the pop-up list for a Scene Heading.
3. Press Return again to bring up the pop-up list and type "f" to choose FADE IN:. Screenwriter will automatically format it in ALL CAPS and bring up the pop-up list for aScene Heading.
Typing a scene
1. Type "i" for INT.
2. For the Location, type in "manhattan highrise".
3. Press RETURN and Screenwriter will pop-up the list for Times-of-Day.
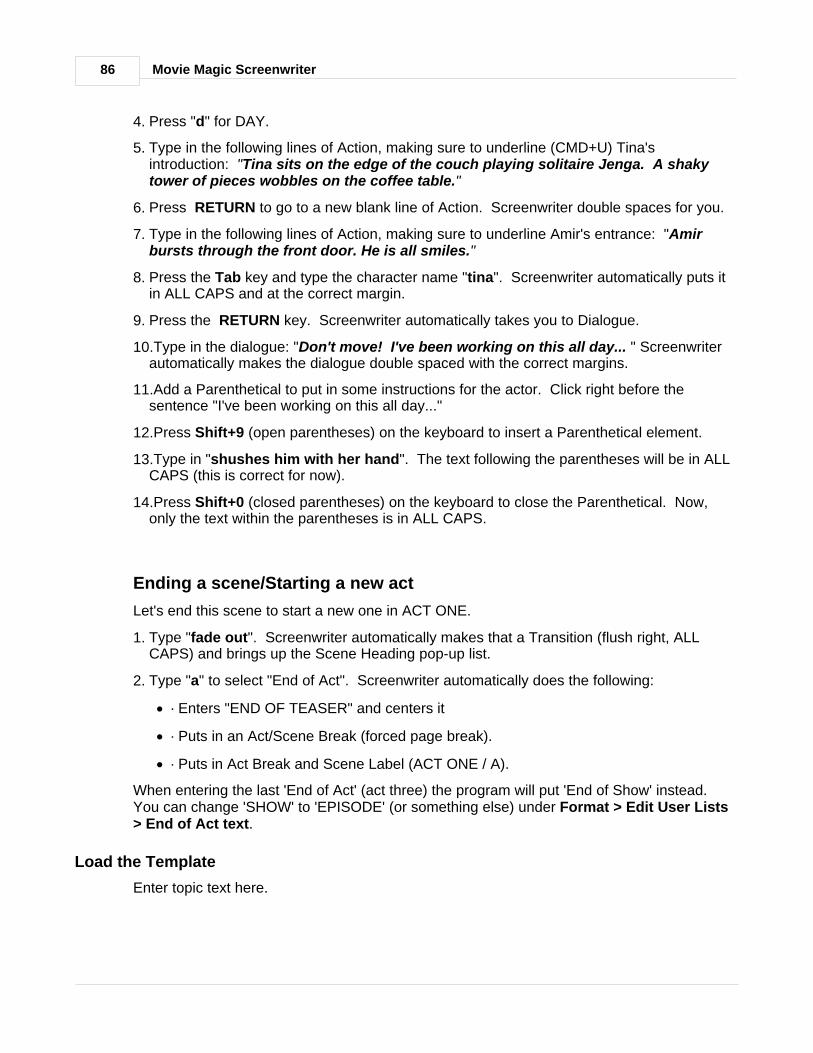
Movie Magic Screenwriter86
4. Press "d" for DAY.
5. Type in the following lines of Action, making sure to underline (CMD+U) Tina'sintroduction: "Tina sits on the edge of the couch playing solitaire Jenga. A shakytower of pieces wobbles on the coffee table."
6. Press RETURN to go to a new blank line of Action. Screenwriter double spaces for you.
7. Type in the following lines of Action, making sure to underline Amir's entrance: "Amirbursts through the front door. He is all smiles."
8. Press the Tab key and type the character name "tina". Screenwriter automatically puts itin ALL CAPS and at the correct margin.
9. Press the RETURN key. Screenwriter automatically takes you to Dialogue.
10.Type in the dialogue: "Don't move! I've been working on this all day... " Screenwriterautomatically makes the dialogue double spaced with the correct margins.
11.Add a Parenthetical to put in some instructions for the actor. Click right before thesentence "I've been working on this all day..."
12.Press Shift+9 (open parentheses) on the keyboard to insert a Parenthetical element.
13.Type in "shushes him with her hand". The text following the parentheses will be in ALLCAPS (this is correct for now).
14.Press Shift+0 (closed parentheses) on the keyboard to close the Parenthetical. Now,only the text within the parentheses is in ALL CAPS.
Ending a scene/Starting a new act
Let's end this scene to start a new one in ACT ONE.
1. Type "fade out". Screenwriter automatically makes that a Transition (flush right, ALLCAPS) and brings up the Scene Heading pop-up list.
2. Type "a" to select "End of Act". Screenwriter automatically does the following:
· · Enters "END OF TEASER" and centers it
· · Puts in an Act/Scene Break (forced page break).
· · Puts in Act Break and Scene Label (ACT ONE / A).
When entering the last 'End of Act' (act three) the program will put 'End of Show' instead. You can change 'SHOW' to 'EPISODE' (or something else) under Format > Edit User Lists> End of Act text.
Load the Template
Enter topic text here.
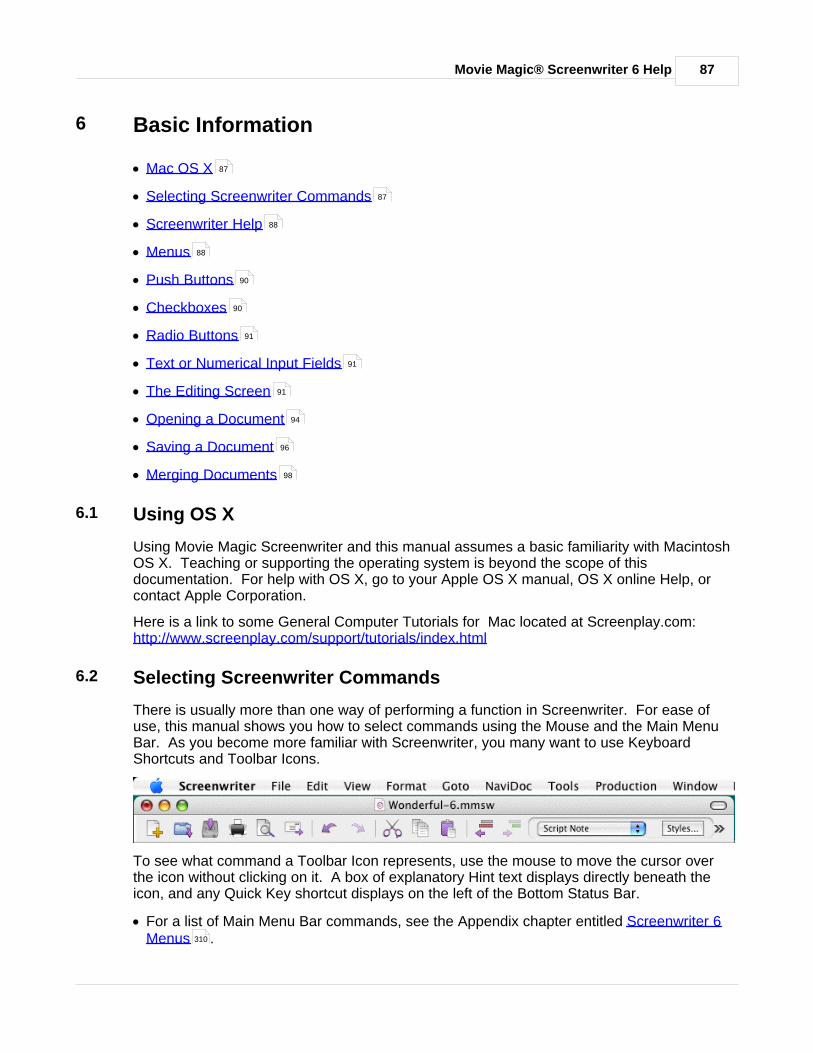
Movie Magic® Screenwriter 6 Help 87
6 Basic Information
· Mac OS X
· Selecting Screenwriter Commands
· Screenwriter Help
· Menus
· Push Buttons
· Checkboxes
· Radio Buttons
· Text or Numerical Input Fields
· The Editing Screen
· Opening a Document
· Saving a Document
· Merging Documents
6.1 Using OS X
Using Movie Magic Screenwriter and this manual assumes a basic familiarity with MacintoshOS X. Teaching or supporting the operating system is beyond the scope of thisdocumentation. For help with OS X, go to your Apple OS X manual, OS X online Help, orcontact Apple Corporation.
Here is a link to some General Computer Tutorials for Mac located at Screenplay.com: http://www.screenplay.com/support/tutorials/index.html
6.2 Selecting Screenwriter Commands
There is usually more than one way of performing a function in Screenwriter. For ease ofuse, this manual shows you how to select commands using the Mouse and the Main MenuBar. As you become more familiar with Screenwriter, you many want to use KeyboardShortcuts and Toolbar Icons.
To see what command a Toolbar Icon represents, use the mouse to move the cursor overthe icon without clicking on it. A box of explanatory Hint text displays directly beneath theicon, and any Quick Key shortcut displays on the left of the Bottom Status Bar.
· For a list of Main Menu Bar commands, see the Appendix chapter entitled Screenwriter 6Menus .
87
87
88
88
90
90
91
91
91
94
96
98
310
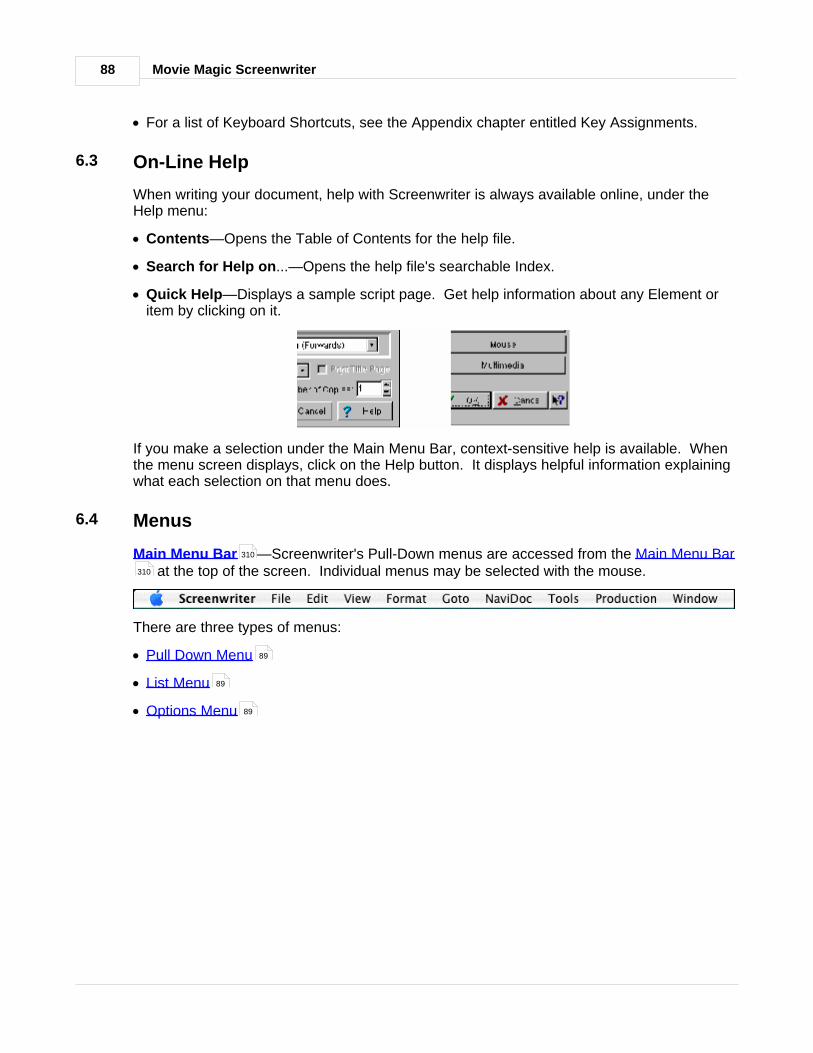
Movie Magic Screenwriter88
· For a list of Keyboard Shortcuts, see the Appendix chapter entitled Key Assignments.
6.3 On-Line Help
When writing your document, help with Screenwriter is always available online, under theHelp menu:
· Contents—Opens the Table of Contents for the help file.
· Search for Help on...—Opens the help file's searchable Index.
· Quick Help—Displays a sample script page. Get help information about any Element oritem by clicking on it.
If you make a selection under the Main Menu Bar, context-sensitive help is available. Whenthe menu screen displays, click on the Help button. It displays helpful information explainingwhat each selection on that menu does.
6.4 Menus
Main Menu Bar —Screenwriter's Pull-Down menus are accessed from the Main Menu Bar at the top of the screen. Individual menus may be selected with the mouse.
There are three types of menus:
· Pull Down Menu
· List Menu
· Options Menu
310
310
89
89
89

Movie Magic® Screenwriter 6 Help 89
6.4.1 Pull Down Menu
Pull-down menus pull down from the Main Menu Bar. With the menu displayed, use themouse to click on an option
NOTE: If there is a Mac OS X Quick-key equivalent for a menu option, it displays to the rightof the Menu Item (as in CMD+Q for "Quit Screenwriter" in the example above.)
6.4.2 List Menu
List Menus are scrollable menus with text items selectable for input into your documentwithout typing, such as the Character List in the example.
To select an item:
· Type enough letters to match the item you want (typing “c” highlights “CARTER” in theexample above, while typing “ch” highlights “CHARLIE”). Then press RETURN.
· Or, Click on the item you want, using the mouse
· Or, Scroll through the items with the arrow keys, and press RETURN to select thehighlighted item
More items can be viewed by clicking or dragging in the scroll bar on the right of the menu.
6.4.3 Options Menu
Option menus have different types of input options, including Push Buttons, Check Boxes,Radio Buttons, and Text & Numerical Input Fields. Select the option you want using any ofthese methods:
· Moving around in the menu by pressing TAB or SHIFT+TAB
· Clicking on it with the mouse

Movie Magic Screenwriter90
6.5 Push Buttons
There are two Push Buttons (displayed as rectangular boxes) in the File > Open window asshown in the example below: Open and Cancel. Select a Push Button using any of thesemethods:
· Moving to it with the arrow or TAB keys and pressing RETURN;
· Clicking on it with the mouse
Selecting OK (or Open in this case) always exits a window, accepting all of the currentsettings or selections. Selecting Cancel always cancels a menu without changing anything.
6.6 Checkboxes
An example of a CheckBox (displayed as a small box, either blank or with a Checkmark in it)is shown in the example above, titled Run SmartCheck before this Print Job. A CheckBoxcan be checked or unchecked using one of these methods:
· Moving to it with the arrow or TAB keys and pressing the Space Bar
· Clicking on it with the mouse
· Pressing the Underlined QuickSelect Letter from the keyboard (in this example, “r” for Run).

Movie Magic® Screenwriter 6 Help 91
6.7 Radio Buttons
There are several Radio Buttons (displayed as a small circle, either blank or with a dot in it)on the example above. The first two are: Current Page and Forwards. Radio Buttons aresimilar to Check Boxes, except that only one Radio button in any given group may bechecked at any one time
6.8 Text or Numerical Input Fields
Text or Numerical Input Fields (such as Header and Footer text, or Header/Footer Margins inthe examples above) allow you to enter text or numbers as appropriate. Depending on theparticular field, spaces may be allowed and text may be automatically capitalized for you.
6.9 Editing Screen
The default editing screen has several menu bars on screen.
· Main Menu Bar
· Top Toolbar
· Right Toolbar
· Bottom Status Bar
92
93
93
93
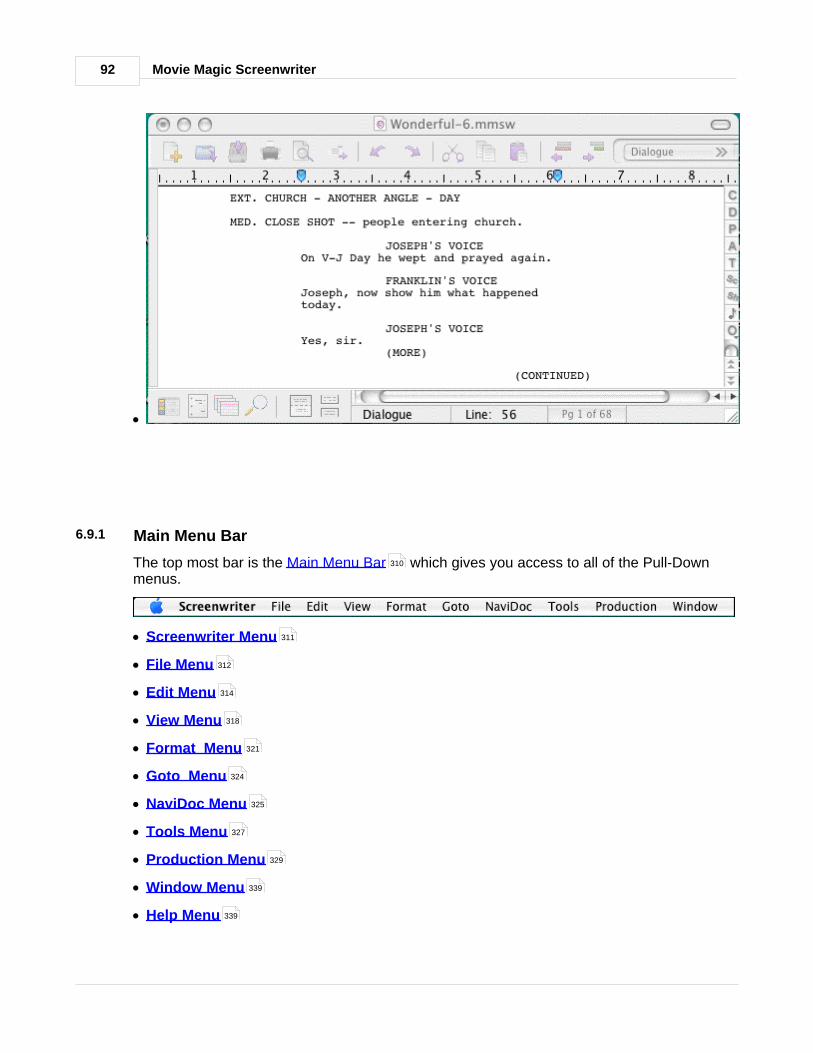
Movie Magic Screenwriter92
·
6.9.1 Main Menu Bar
The top most bar is the Main Menu Bar which gives you access to all of the Pull-Downmenus.
· Screenwriter Menu
· File Menu
· Edit Menu
· View Menu
· Format Menu
· Goto Menu
· NaviDoc Menu
· Tools Menu
· Production Menu
· Window Menu
· Help Menu
310
311
312
314
318
321
324
325
327
329
339
339

Movie Magic® Screenwriter 6 Help 93
6.9.2 Top Toolbar
Beneath that is the Top Toolbar with Speed Buttons for frequently used tasks. To seewhat any Speed Button does, move the mouse cursor arrow over it. A hint explaining itsfunction appears immediately underneath the button. Another explanation, often giving theQuick Key command, may also appear on the status bar at the bottom of the screen.
NOTE: You can customize the Top Toolbar by going to View >Display Options> Toolbar>Customize Toolbar. You can also access the Customize Toolbar Panel by right-clicking onthe Top Toolbar to bring up it's Context menu.
6.9.3 Right Toolbar
At the right of the main editing window is the Right Toolbar. A Right Toolbar icon buttoninserts an element at the cursor position.
To Show or Hide the Right Toolbar go to View> Display Options > Toolbars > Show RightToolbars
To change the way the Right Toolbar displays,go to Display Options under the View menu.
`
6.9.4 Bottom Status Bar
Across the bottom of the screen is the Bottom Status Bar. On its left side is the Viewtoolbar .
To the right of that is the Element Style identifier which tells you the type of element of thecurrent line.
Next to that is Line & Position, information, telling you where the cursor is located onscreen.
To the right of that is the Page Number Button which displays Current Page Numberinformation. Click on it to pop up the Goto Page menu. A box on the Goto Page menumarked Goto Scene Listings appears. This displays a list of Scene Headings to go to. Itcan also be displayed by right-clicking on the Page Number Button.
If you're writing a document with Act Breaks and Scene Labels, such as a Sitcom or StagePlay, this button displays a list of specific Acts/Scenes to go to.
94

Movie Magic Screenwriter94
6.9.5 The View Toolbar
The View toolbar is located in the lower left-hand corner of the document window. Thistoolbar controls the view of your document's contents and has six view icons.
The NaviDoc View Icon
Shows or hides the NaviDoc panel. The NaviDoc view has four panelsuseful for navigating through the document: Outline, Scenes, Notes, andBookmarks.
The Title Page Publisher Icon
Opens the Title Page Publisher for creating the document's title page.
The Index Card View Icon
Opens the Index Card view for viewing, editing, and rearranging thedocument scenes in an index card format.
The Zoom Screen Text Icon
Opens the Zoom Screen Text window for setting the screen magnificationof the document text without changing the printed font sizes in the document.
The Normal View Icon
Displays the document text as a continuous scroll of text. Page breaks showas dashed lines.
The Full Page Icon
Displays the document text with extra space around the edges to simulateactual pages.
6.10 Opening a Document
Under the File menu, select Open. Select from the list of available files, changing thesubdirectory, drive, or file type if necessary.
Click on OK to open the file.
To open a file you have recently saved, select one of the numbered files at the bottom of theFile menu.
160
99
107
224
320
320
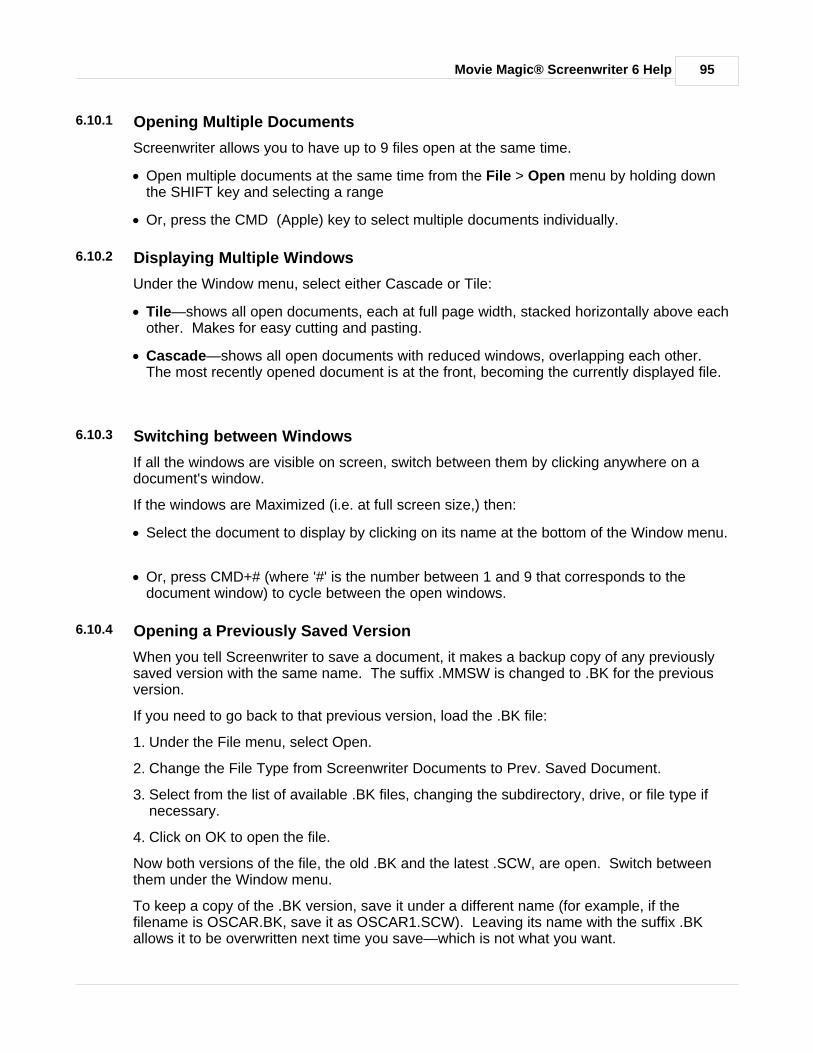
Movie Magic® Screenwriter 6 Help 95
6.10.1 Opening Multiple Documents
Screenwriter allows you to have up to 9 files open at the same time.
· Open multiple documents at the same time from the File > Open menu by holding downthe SHIFT key and selecting a range
· Or, press the CMD (Apple) key to select multiple documents individually.
6.10.2 Displaying Multiple Windows
Under the Window menu, select either Cascade or Tile:
· Tile—shows all open documents, each at full page width, stacked horizontally above eachother. Makes for easy cutting and pasting.
· Cascade—shows all open documents with reduced windows, overlapping each other.The most recently opened document is at the front, becoming the currently displayed file.
6.10.3 Switching between Windows
If all the windows are visible on screen, switch between them by clicking anywhere on adocument's window.
If the windows are Maximized (i.e. at full screen size,) then:
· Select the document to display by clicking on its name at the bottom of the Window menu.
· Or, press CMD+# (where '#' is the number between 1 and 9 that corresponds to thedocument window) to cycle between the open windows.
6.10.4 Opening a Previously Saved Version
When you tell Screenwriter to save a document, it makes a backup copy of any previouslysaved version with the same name. The suffix .MMSW is changed to .BK for the previousversion.
If you need to go back to that previous version, load the .BK file:
1. Under the File menu, select Open.
2. Change the File Type from Screenwriter Documents to Prev. Saved Document.
3. Select from the list of available .BK files, changing the subdirectory, drive, or file type ifnecessary.
4. Click on OK to open the file.
Now both versions of the file, the old .BK and the latest .SCW, are open. Switch betweenthem under the Window menu.
To keep a copy of the .BK version, save it under a different name (for example, if thefilename is OSCAR.BK, save it as OSCAR1.SCW). Leaving its name with the suffix .BKallows it to be overwritten next time you save—which is not what you want.

Movie Magic Screenwriter96
6.10.5 Opening a Document automatically at Startup
Screenwriter can be preset to automatically do one of four things each time it starts up, byclicking on one of the following radio buttons in the Files tab under Screenwriter >Preferences... menu.
· Create a new document—Opens a new file with the default Screenplay format.
· Display the File Open dialog—Displays a standard Open File menu, set to your defaultdocuments subdirectory.
· Restore the last document—Opens in the last document you saved in your previousScreenwriter session.
· Restore the last workspace—Opens all documents you had open at the time you Exitedyour previous Screenwriter session
6.10.6 Opening a Timed Backup
Screenwriter makes an emergency backup of the currently displayed document at timedintervals. This is in addition to the automatic .BK backup file created when you save adocument, and is saved separately. To open a Timed Backup file:
1. Under the File menu, select Open.
2. Change the File Type from Screenwriter documents to Timed Backup.
3. Select from the list of available .TMB files.
4. Click on OK to open the file.
To keep a copy of the .TMB version, save it under a different name (for example, if thefilename is SAVE2.TMB, save it as <FILENAME>.SCW.)
6.10.7 Options for Loading Element Styles
Options for Loading Element Styles
When loading element styles into an existing document, you can choose to keepsome existing formats, or load new formatting from the layout. This is done throughthe Format>Load Styles from… menu. Select either:
· Template: Loads styles from a Screenwriter template.
· From Screenwriter Document: Loads styles from any Screenwriter document.
6.11 Saving a Document
To save an open file, display it onscreen. (If you have multiple documents open, select thefile to display by clicking on its name at the bottom of the Window menu . A checkmarkappears next to its name, and it becomes the currently displayed file.)
Under the File menu, select a save option:
Movie Magic® Screenwriter 6 Help 97
Close—Exits the document, without exiting Screenwriter. If you have made changeswithout saving, it prompts you to save the file only if you have added something to yourdocument. If you remove portions of your document and never add anything to it theprogram will never ask you to save.
Save—Saves your document under its current name, or asks for a new name if youhaven't already named the file.
Save As...—Goes to the Save As... menu. You can change the document name, itssubdirectory, or file format.
Save All Open Documents—Saves all files you have open, if they have changes thatneed saving. Prompts you for save options for each file, if needed.
Exit—Closes all documents and exits Screenwriter. Prompts you to save any opendocuments with unsaved changes only if you have added something to your document. If you remove portions of your document and never add anything to it the program willnot prompt you to save.
6.11.1 Saving Portions of a Document
While you're rewriting, you may want to cut a scene from your document but not discard itcompletely. Screenwriter lets you save portions of your document to a new file.
1. Select the text.
2. Under the Edit menu, select either Copy To... or Cut To...
Copy To...—Copies the selected text, leaving it in your document and saving it in a newfile.
· New File—Creates a new file, puts the selected information within it, and allows you toname the file before the program saves it. Screenwriter keeps the original documentopen. To retrieve the new file you must go to File> Open.
· Existing File—Allows you to copy the selected text to a document that already exists.Choosing this option brings up a dialog box that allows you to navigate to the file thatyou would like this text to be pasted to. Select the file and click open. Screenwriterpastes the text to the end of the document and closes the file. Your current documentwill remain open.
· Scrap File—Creates a new file with the same name as your current document, but atthe end will have “-scrap”. You can find this document by going into the Window menu.At the bottom of this menu it lists all the open documents. Simply click on your scrapfile and the document will display. If you would like to keep the scrap file simply go tothe File menu and click Save.
Cut to...—Cuts the selected text, removing it from your document and saving it in a newfile.
· New File—Removes selected information from the original document, creates a newfile, puts the selected information within it, and allows you to name the file before theprogram saves it. Screenwriter keeps the original document open. To retrieve the newfile you must go to File> Open.
· Existing File—Removes the selected information from the original document and

Movie Magic Screenwriter98
copies it to a document that already exists. Choosing this option brings up a dialogbox that allows you to navigate to the file that you would like this text to be pasted to. Select the file and click open. Screenwriter pastes the text to the end of the documentand closes the file. Your current document will remain open.
· Scrap File—Creates a new file with the same name as your current document, but atthe end will have “-scrap”. The file that it creates will have the same name of yourcurrent document, but at the end will have “-scrap”. You can find this document bygoing into the Window menu. At the bottom of this menu it lists all the opendocuments. Simply click on your scrap file and the document will display. If you wouldlike to keep the scrap file simply go to the File menu and click Save.
3. Give the new file a different name. Click on OK to save it.
If you selected Copy To:, clicking on Cancel discards the new file and leaves your textintact in your original document.
If you selected Cut To:, clicking on Cancel discards the new file and leaves your text onthe Clipboard—but removed from your original document. You still need to Save it toanother file or Paste it back into your document—otherwise you have deleted the text.
6.12 Merging Documents
There may be occasions when you want to combine two documents into one file, such aswhen two writing partners are writing different scenes of the same document. To merge thedocuments:
1. Open the first document, the one you want to merge into.
2. Place the cursor at the position you want the second document to be added. The newPasted From text will appear after the Element the cursor is in.
3. Under the Edit menu, select Paste Special and then select Paste from...
4. At the menu of documents displayed, select the document to merge from. Click Open tocombine the two documents.
Screenwriter prompts you about how you'd like to format the incoming text.
The two documents are merged.
To Cancel the merge, close the merged file without saving it.
To keep a copy of the first file unchanged, save your merged file under a different nameusing Save As... under the File menu.
NOTE: If you merge a document that is tagged it will have squares on either side of thewords that are tagged. To correct this, simply go to the Production menu and clickBreakdown. In the cascading menu choose Tagging Mode. It will reveal all tags. Go backinto the Production menu, through Breakdown, and click Tagging Mode again to turn it off. This will hide all tags and cause the squares to disappear.
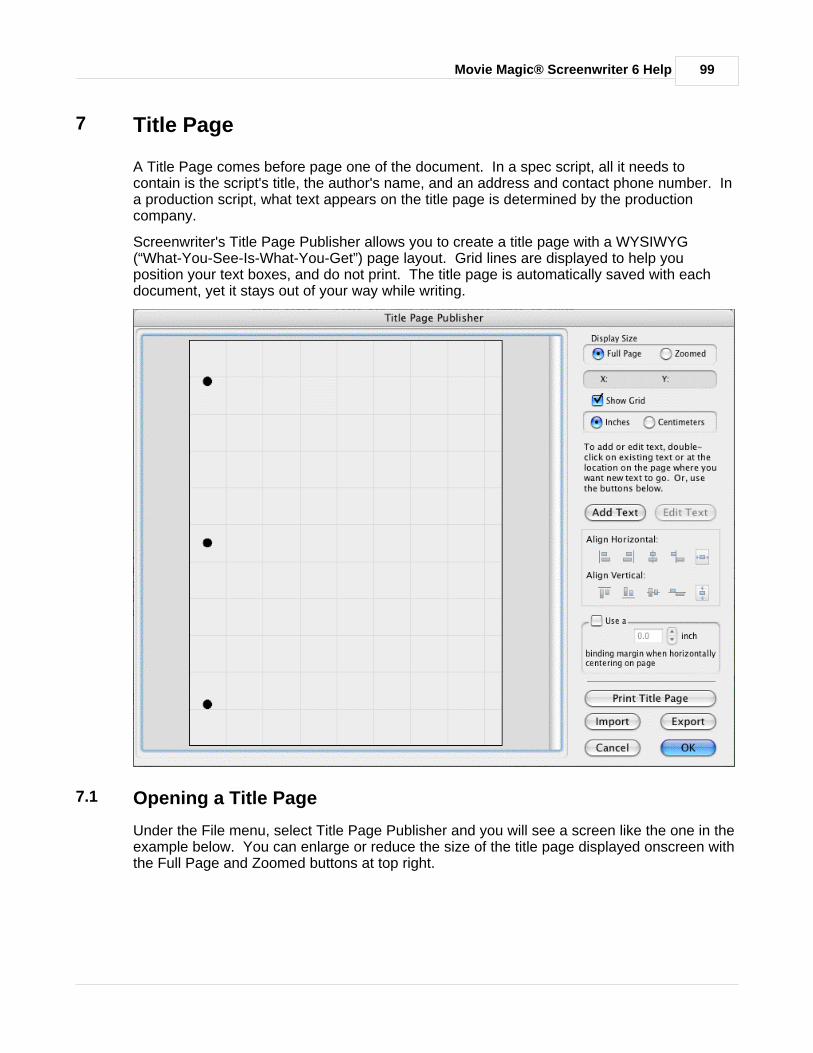
Movie Magic® Screenwriter 6 Help 99
7 Title Page
A Title Page comes before page one of the document. In a spec script, all it needs tocontain is the script's title, the author's name, and an address and contact phone number. Ina production script, what text appears on the title page is determined by the productioncompany.
Screenwriter's Title Page Publisher allows you to create a title page with a WYSIWYG(“What-You-See-Is-What-You-Get”) page layout. Grid lines are displayed to help youposition your text boxes, and do not print. The title page is automatically saved with eachdocument, yet it stays out of your way while writing.
7.1 Opening a Title Page
Under the File menu, select Title Page Publisher and you will see a screen like the one in theexample below. You can enlarge or reduce the size of the title page displayed onscreen withthe Full Page and Zoomed buttons at top right.

Movie Magic Screenwriter100
7.2 Creating Text Boxes
Double click anywhere on the title page to create a text box. The Edit Text window displays.
Type your text.
The Left three buttons allow you to select Bold, Underline and Italics respectively.
The next button lets you select the text's Font.
The next three buttons allow you to select Left Justified, Centered, or Right Justified text.
NOTE: All the text in any given text box has the same style (i.e. bold, underline, etc.),font, and justification. If you want the document's Title to appear differently from theAuthor's name (for example, underlined), a separate text box needs to be created andplaced underneath the Title.
Click OK and the Edit Text window disappears, placing your text in a text box on the TitlePage.
7.3 Moving a Text Box
Select the text box by single-clicking on it with the mouse. To select more than one text box,hold down the Shift key and single-click on each box.
You can now move/align them it using any of these methods:

Movie Magic® Screenwriter 6 Help 101
· Drag it where you want it to be placed.
· Press the arrow keys on the keyboard.
· Click on the Horizontal or Vertical text alignment buttons at on the right side of the TitlePage Publisher..
Align Horizontally
· Left—Aligns the left edges of all selected text boxes with the left edge of the first textbox that was selected.
· Right—Aligns the right edges of all selected text boxes with the right edge of the firsttext box that was selected.
· Centers—Horizontally centers all selected text boxes with the horizontal center of thefirst text box that was selected.
· Left to Right—Aligns the right-most box directly against the right edge of the left-mostof the two boxes. This option is ONLY available when you have exactly two text boxesselected.
· Center on page—Centers all selected text boxes with respect to the width of the page,taking into account the binding margin, if checked. If more than one text box is selectedthen they will be centered as a group that is to say that their total width (furthest left tofurthest right) is the value which will be used to center them rather than each one beingcentered individually.
· Undo Alignment—Cancels the last alignment option selected unless the text boxes inquestion have been otherwise dragged.
Align Vertically
· Tops—Aligns the top of all selected text boxes to the top of the first text box that wasselected.
· Bottoms—Aligns the bottom of all selected text boxes to the bottom of the first text boxthat was selected.
· Centers—Vertically centers all selected text boxes with respect to the vertical center ofthe first text box that was selected.
· Top to Bottom—Aligns the lower of the two boxes directly against the bottom of theupper of the two boxes. This option is ONLY available when you have exactly two textboxes selected.
· Center on page—Centers all selected text boxes with respect to the height of thepage. If more than one text box is selected then they will be centered as a group, thatis to say that their total height is the value which will be used to center them rather thaneach one being centered individually.
· Undo Alignment—Cancels the last alignment option selected unless the text boxes inquestion have been otherwise dragged.
The section that tracks where text is placed on the title page is the X and Y axis section. It islocated in the upper right of the screen. When text is being positioned on the title page, the

Movie Magic Screenwriter102
X and Y axis section shows how far from the left (X) and top (Y) margins of the page yourtext box starts. These measurements change as you move the text box, and are shown inInches or Centimeters.
The Grid helps you position text boxes on the page. Click on Show Grid to display or hide it.
7.4 Exporting a Title Page
When you click save from the main window of Screenwriter, the Title Page is saved as partof the document itself, so there is no need to save it separately.
To export the Title Page as a template for use with other documents, simply click on theExport button and give it a name. A file extension of .TPG is automatically added to a TitlePage Template file you export.
7.5 Importing a Title Page
You can import a title page that is part of another Screenwriter document, or was saved as aTitle Page Template file.
Click on the Import button In the Import Title Page window, to load an existing Title PageTemplate, select a file ending in .TPG and click on it.
To load a title page that is part of another Screenwriter document, click the Import button,then change the "Files of Type" drop-down list from Title Page to Screenwriter Documents.Select a Screenwriter 6.0 document (.MMSW) or a pre-6.0 document (.SCW) and click OK.
7.6 Printing a Title Page
From within Title Page Publisher, print the Title Page by clicking the Print button.
To print from outside Title Page Publisher, under the File menu, select Print. On the Printmenu, select pages or scenes to print, and check the Print Title Page check box. Selecting"Entire Document" automatically checks the Print Title Page box.

Movie Magic® Screenwriter 6 Help 103
8 Templates
Screenwriter has pre-set template files for the following formats:
· Screenplay
· Sitcom
· 60+ TV Shows
· Stage Play
· Radio Play
· Novel
· Comic Book (including Gosset & Kayle)
· Multimedia/Interactive
As a default template, Screenwriter loads the screenplay format each time you open a blankdocument. However, you can easily switch to one of the other formats by using the Format> Load Styles From.. . commands.
8.1 Create a New Frile from a Template
File > New From Template...
To create a new document based on a specific template, under the File menu, select Newfrom Template... An open dialog will appear where you can select from one of the followingtemplate folders:
Blank Templates—Choosing one of these templates will load only the margins andformatting settings but will not include any sample text or instructions.
Instructional Templates—Choosing one of these templates will load the margins andformatting settings and include instructional Notes and possibly some sample text.
TV Templates—Choosing one of these templates will load the margins and formattingsettings for that TV show and any sample text.
NOTE: when creating a new document from a template, instructional Notes or sample textwill be inserted into the new document. These can be removed if desired.
Choose a template and press the OPEN button to create a new document using the chosentemplate styles. Select Cancel to exit without creating a new document.
8.2 Loading a Template
To load the formatting of a template into an existing document, under the Format menu,select Load Styles From and choose one of the following:
103 103

Movie Magic Screenwriter104
· Template...—Clicking this displays a window where you can select from the providedtemplates.
Blank Templates—Choosing one of these templates will load only the margins andformatting settings but will not include any sample text or instructions.
Instructional Templates—Choosing one of these templates will load the margins andformatting settings and include instructional Notes and possibly some sample text.
TV Templates—Choosing one of these templates will load the margins and formattingsettings for that TV show and any sample text.
NOTE: when loading an Instructional or TV Template into an open document thatcontains text, the instructional Notes or sample text will not be inserted in order topreserve the existing document.
· Screenwriter Document...—Clicking this displays a window where you can select anexisting Screenwriter 6.0 (MMSW) or pre-6.0 (SCW) document.
Loading Element Styles options window
After selecting a template, the Loading Element Styles options windows displays. Thiswindow allows control over how certain formatting gets loaded (or not) from the template. The items that you can choose to Keep or Load are:
· User Lists (see User Lists )
· Title Page
136

Movie Magic® Screenwriter 6 Help 105
· Note Categories
· Outline Styles
NOTE: If you choose to load the Outline Styles and Note Categories from a Template, theywill be added on to any existing styles or categories in order to provide the most flexibility. Any unwanted styles or categories can be removed after the loading process has completed.
8.3 Television Templates
These templates have the pre-set formats for certain Sitcoms and Episodic Dramas.
Loading a Television Template is as easy as opening one of your document files:
1. Under the File menu, select Open. You will be in the default subdirectory (unless youchanged it).
2. Open the TV Templates folder (If you didn't install the templates, uninstall Screenwriterand re-install it.)
3. Select a Template file. Click on OK to open it.
For a list of Television Templates and the shows they correspond to, see the Appendixchapter entitled Files Installed.
8.4 Creating Your Own Template
Margins and formatting settings are saved as part of the document file itself, and don't needto be saved separately.
You can create a new template with your preferred settings by doing the following:
1. Open the document with your preferred settings and format.
2. Under the File menu, select Save As Template....
3. Enter a new filename, if necessary. Click on OK to save the format.
NOTE: If you wish to change the type of document that gets created (e.g., Screenplay,Stage Play, Novel, etc.) when using File > New (using Default Template), simplyreplace/overwrite Default.def when saving your template. It is not recommended to overwriteany of the other existing templates.
8.5 Restoring an Overwritten Template
There are two ways to restore a previously defined format you may have overwritten:
· Uninstall and then reinstall Screenwriter. This restores all the pre-set template formats totheir Screenwriter defaults.
Reinstall Screenwriter by doing the following:
Open the appropriate Example file and save its format over the template that wasoverwritten:
1. Click on File > Open.

Movie Magic Screenwriter106
2. Open the Sample Files folder.
3. In the Sample Files folder, select the sample file that contains the format of thetemplate that was overwritten and click Open..
4. Click on File > Save As Template...
5. Select the template (.def) file that was accidentally overwritten.
6. Click on Save.
7. A prompt should appear asking to replace the existing file.
8. Click on Replace to overwrite the file.
9. You should now be able to load that template again with the correct format (SeeLoading a Template )
This method will not correctly restore the format if you have modified the settings and formatof Stage Play.mmsw. In that case, use the re-install method above.
103
Movie Magic® Screenwriter 6 Help 107
9 Index Cards
Many writers use index cards, or 3 by 5 cards, as an organizing tool before writing theirscripts. Using a separate card for each scene, they jot down what happens in the scene,where it takes place, etc.
Numbering each card shows the flow of the story from scene to scene. Adding a scene is aseasy as inserting a new card between two others. Moving scenes is equally simple, thoughhaving to renumber the scenes each time is a chore.
When satisfied with the outline created with the index cards, the writer can expand on thatinformation to write the individual scenes that form the story.
Now Screenwriter brings you an easier way to work with index cards—on your computerscreen with Electronic Index Cards.
The information you write on each card transfers directly to a scene in your document. Thetop line on the card becomes a Scene Heading, and the description becomes Action. Moving an index card is performed using the familiar Drag and Drop method—andScreenwriter automatically moves the scenes in your script and renumbers them for you!
When you're satisfied with your index card outline, switch from Index Card View to normalDocument view. All the work you did on the index cards is there—an outline ready for you toexpand into a script.
9.1 Index Card View
To use the Electronic Index Cards, you need to enter Index Card View:
Under the View menu, select Index Cards.
Your document now looks something like the following, depending on the number of cards orscenes you've created:
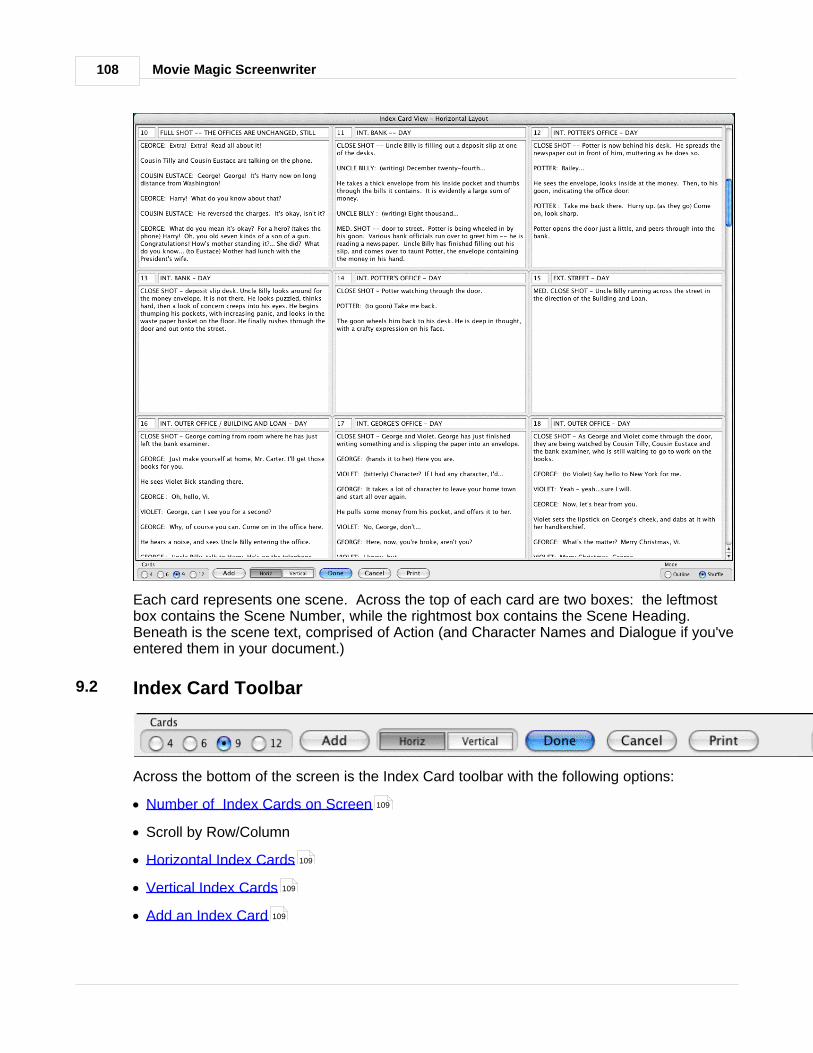
Movie Magic Screenwriter108
Each card represents one scene. Across the top of each card are two boxes: the leftmostbox contains the Scene Number, while the rightmost box contains the Scene Heading. Beneath is the scene text, comprised of Action (and Character Names and Dialogue if you'veentered them in your document.)
9.2 Index Card Toolbar
Across the bottom of the screen is the Index Card toolbar with the following options:
· Number of Index Cards on Screen
· Scroll by Row/Column
· Horizontal Index Cards
· Vertical Index Cards
· Add an Index Card
109
109
109
109
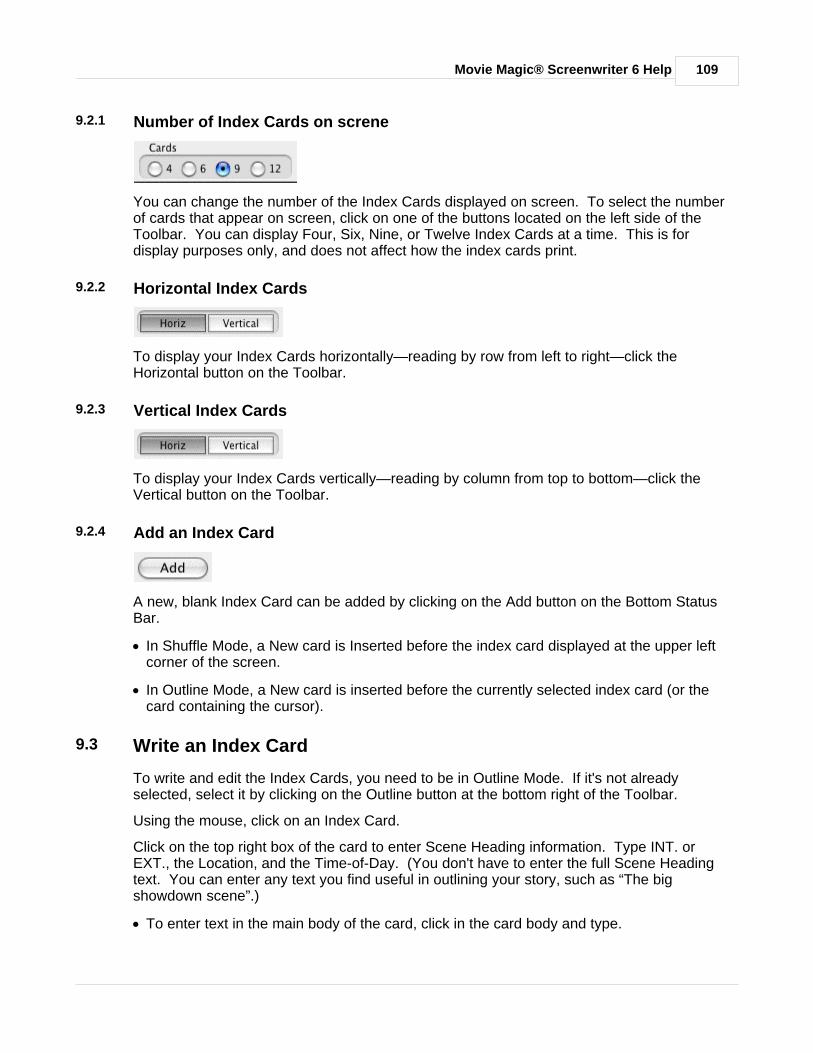
Movie Magic® Screenwriter 6 Help 109
9.2.1 Number of Index Cards on screne
You can change the number of the Index Cards displayed on screen. To select the numberof cards that appear on screen, click on one of the buttons located on the left side of theToolbar. You can display Four, Six, Nine, or Twelve Index Cards at a time. This is fordisplay purposes only, and does not affect how the index cards print.
9.2.2 Horizontal Index Cards
To display your Index Cards horizontally—reading by row from left to right—click theHorizontal button on the Toolbar.
9.2.3 Vertical Index Cards
To display your Index Cards vertically—reading by column from top to bottom—click theVertical button on the Toolbar.
9.2.4 Add an Index Card
A new, blank Index Card can be added by clicking on the Add button on the Bottom StatusBar.
· In Shuffle Mode, a New card is Inserted before the index card displayed at the upper leftcorner of the screen.
· In Outline Mode, a New card is inserted before the currently selected index card (or thecard containing the cursor).
9.3 Write an Index Card
To write and edit the Index Cards, you need to be in Outline Mode. If it's not alreadyselected, select it by clicking on the Outline button at the bottom right of the Toolbar.
Using the mouse, click on an Index Card.
Click on the top right box of the card to enter Scene Heading information. Type INT. orEXT., the Location, and the Time-of-Day. (You don't have to enter the full Scene Headingtext. You can enter any text you find useful in outlining your story, such as “The bigshowdown scene”.)
· To enter text in the main body of the card, click in the card body and type.

Movie Magic Screenwriter110
· To be recognized as elements in your document, text needs to be entered in Index Cardmode obeying the following guidelines:
· To move to another Index Card, press TAB.
Script Element Return in Index Card as:
Action Normal paragraph, with one blank linebefore and after it.
Character Name Formatted as ALL CAPS, and followed by acolon and 2 spaces.
Dialogue Immediately following the Character Name(after the colon and two spaces) and on thesame line. The text should wrap normally,without any special indentation. Example:
KAREN: Oh my love, you have returned tome!
Parenthetical Part of the dialogue (on the same line), buttext is enclosed in parentheses with aspace before and after as appropriate. Example:
KAREN: Oh my love you have returned tome! (sotto) At last!
Transition Formatted as ALL CAPS. Entered as anAction paragraph with one blank line beforeand one blank line after it. Transition textmust end in “TO:” Transition text should besurrounded by two carets, like thefollowing:
^^CUT TO:^^
Shot Formatted as ALL CAPS. Entered as anAction paragraph with one blank line beforeand one blank line after it. Shot text shouldbe surrounded by two square brackets, likethe following:
[[ANGLE ON SIGN]]
Centered Title Formatted as ALL CAPS. Entered as anAction paragraph with one blank line beforeand one blank line after it. Centered Titlesshould be surrounded by two equal signs,like the following:
==No Trespassing==
Note Formatted as ALL CAPS. Entered as an

Movie Magic® Screenwriter 6 Help 111
Action paragraph with one blank line beforeand one blank line after it. Notes should besurrounded by two angle brackets, like thefollowing:
<<Make sure we keep theages consistent!>>
Forced Page Break Entered as an Action paragraph with oneblank line before and one blank line after it. Contains exactly the following text:
##Forced Page Break##
9.4 Edit an Index Card
Scenes containing regular script elements such as Action, Dialogue, Notes, etc. can beedited in Index Card View.
To ensure that your changes translate correctly back to the script scenes, follow theguidelines in the Write an Index Card table .
Non-Editable Index Cards
You will not be able to edit the Index Cards if:
· The document contains Locked Page Breaks.
· The document contains Locked Scene Headings.
· The document contains Act Break/Scene Label information (TV or Stage Play formats).
· The document contains Outline elements on the same level or higher than the SceneHeading document style.
NOTE: If you have Cheated any elements in a scene, editing that scene's Index Cardcauses all cheating of all elements in that scene to be lost.
9.5 Shuffle an Index Card
Screenwriter allows you to move Index Cards around and change their order by Draggingand Dropping them. This is done in Shuffle Mode, entered by clicking on the Shuffle buttonon the bottom right of the Toolbar.
1. Select Shuffle Mode, if it's not already selected.
2. Click on the card you want to move.
3. Go to the Index Card you want to move your card in front of using the Scroll buttons ifnecessary. Click on that card, and your shuffled Index Card is inserted in front of it. All
109

Movie Magic Screenwriter112
other cards shuffle accordingly.
The Scenes in the document are not renumbered until you exit Index Card View by pressingthe Done button.
To go back to your document without moving any Index Cards or scenes in your document,click on the Cancel button.
9.6 Shuffle Multiple Index Cards
1. Select Shuffle Mode, if it's not already selected.
2. To shuffle more than one Index Card, make sure the first card is displayed onscreen.
3. Hold down the SHIFT key. Using the mouse, click anywhere on the Index Card you wantto move. The card turns a darker gray, and the cursor changes to the Shuffle Cursor—ahand holding a card.
4. Still holding down the SHIFT key, click on the other cards you want to shuffle. If youinadvertently select a card that you didn't want to, click on it again while still holding downthe SHIFT key and it becomes unselected.
5. Go to the Index Card you want to move your cards in front of using the Scroll buttons ifnecessary. Click on that card, and your shuffled Index Cards is inserted in front of it. Allother cards shuffle accordingly.
The shuffled cards are inserted in the same order they were selected. For example, if youselect card 5, then card 12, then card 8—and insert them before card 3—the new shuffledorder will be: cards 1, 2, 5, 12, 8, and then 3, 4, etc.
9.7 Printing Index Cards
To print your Index Cards, click the Print button on the bottom Toolbar. You will be taken tothe following window:

Movie Magic® Screenwriter 6 Help 113
The three large page icons across the top of the screen are pre-defined layouts. Select oneby clicking on its icon or radio button.
The layout at the top right of the screen, 3-3/4 x 2-1/2, is the default layout.
Create a new layout by clicking on the Define Your Own... button. Choose Portrait orLandscape, and enter the number of cards Across and Down for your page.
Several other settings are available:
· Draw Boxes—Prints a box around each Index Card. Recommended if you are notprinting onto plain paper.
· Bold Headlines—Prints the Scene Heading Line of each card in boldface.
· Page Margin Settings—Allows you to change the Top/Bottom, Left/Right, andInter-Card (between cards) margins.
· Font Button—Allows you to specify a different font for the Index Cards than for thedocument. Times New Roman 10 pt is often a good choice, as it gets more text oneach card than the standard Courier New 12pt.
· Save As—Saves Index Card layouts as separate files, automatically adding theextension .CRD for you.
· Open—Loads a previously saved Index Card layout.
· Save as the Default Layout—Loads the current settings every time you select PrintIndex Cards in the future.

Movie Magic Screenwriter114
To print all your Index Cards, click on the Print All Cards button.
To print certain cards only:
1. Click on the Select Range of Cards to Print button. You are returned to Index Card View.
2. The cursor changes to an arrow with a box saying “Select 1st Card to Print.” Click on thefirst card you want to print, and it turns a darker gray.
3. The cursor text changes to “Select last Card to Print.” Click on the last card you want toprint, and it also turns darker gray.
To print one index card only, select it as both the 1st and Last card to print.
The range of cards you selected are sent to the printer.

Movie Magic® Screenwriter 6 Help 115
10 Writing a Script
Each part of a document is formatted uniquely, with different margins, capitalization, andspacing. These are called Elements. Screenwriter uses these elements:
· Act Break
· Action
· Character Name
· Dialogue
· Parenthetical
· Scene Heading
· Scene Label
· Note
· Shot
· Title (Centered)
· Transition
10.1 Inserting Elements
You can insert Elements in a number of ways:
· Click on an element in the Current Element pop-up menu.
· Click on the element's icon on the Right Toolbar, if displayed.
· Press a Command-key shortcut for that element (See the Appendix chapter entitled Key Assignments for details).
124

Movie Magic Screenwriter116
· In certain formats, certain text is automatically formatted in certain elements. Examplesare::
· "int." or "ext." on a blank line of Action will convert it to in a new Scene Heading.
· "fade in:" on a blank line of Action will automatically capitalize it to "FADE IN:".
· any single word followed by "to:" (on a blank line of Action) will convert it to a Transitionand make it uppercase and flush right.
· "newact" will insert a Act Break element with the next consecutive numbering.
· "sameact" will insert a Act Break element with the current numbering.
· "newscene" will insert a Scene Label with the next consecutive numbering.
· Select the File > Insert Element... command or clicking on the Insert element button onthe Top Toolbar.
· Click the Add Outline Element pop-up menu on the Outline panel in the NaviDoc.
· Click the Add Note Element pop-up menu] on the Notes panel in the NaviDoc.
10.2 Tab & Return
You can easily go from element to element in Screenwriter by pressing just two keys—TABand RETURN. Your fingers need never leave the keyboard (unlike using a Control-keyshortcut, or using the mouse) enabling you to stay in the flow of writing your document.
Based on the current Element, Screenwriter makes an informed guess as to what you wouldlike to do next. It places you in the logical next Element and pops up a menu of possiblechoices. For example, if the cursor is located in a blank Character Name element and youpress RETURN, a list of all the Character Names in your script pops up for your selection.
For Tab & Return to work, QuickType must be enabled. To turn QuickType on:
1. Under the Screenwriter menu, select Preferences...
2. In the Preferences window, click on the Editing tab.
3. Place a check in the Enable QuickType Entry box.
The following element instructions use the Tab & Return method with QuickType enabled.
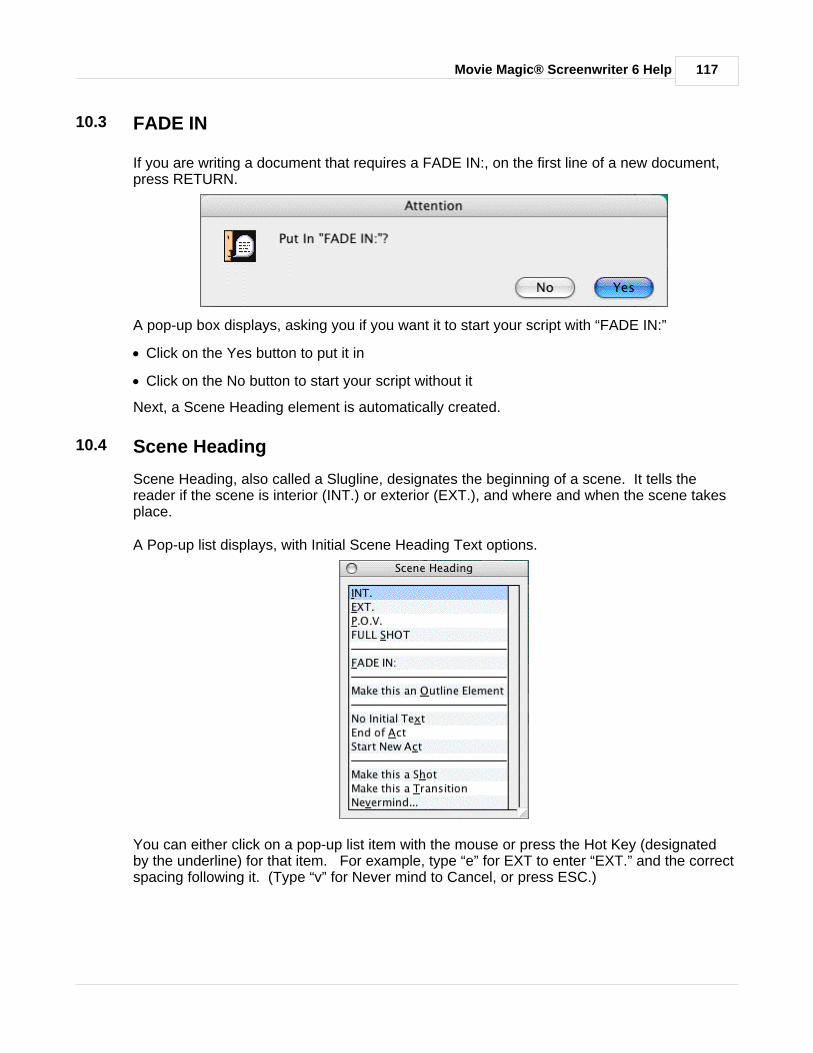
Movie Magic® Screenwriter 6 Help 117
10.3 FADE IN
If you are writing a document that requires a FADE IN:, on the first line of a new document,press RETURN.
A pop-up box displays, asking you if you want it to start your script with “FADE IN:”
· Click on the Yes button to put it in
· Click on the No button to start your script without it
Next, a Scene Heading element is automatically created.
10.4 Scene Heading
Scene Heading, also called a Slugline, designates the beginning of a scene. It tells thereader if the scene is interior (INT.) or exterior (EXT.), and where and when the scene takesplace.
A Pop-up list displays, with Initial Scene Heading Text options.
You can either click on a pop-up list item with the mouse or press the Hot Key (designatedby the underline) for that item. For example, type “e” for EXT to enter “EXT.” and the correctspacing following it. (Type “v” for Never mind to Cancel, or press ESC.)

Movie Magic Screenwriter118
Next, enter a Location.
10.5 Location
To enter a Location that's already been used in this script, press RETURN. If you do nothave any existing locations, simply type one in.
A Pop-up list displays, with your script's unique Location Text options.
Type the first letter of the Location (or if more than one have the same first letter, typeenough letters of the location until the location you want is highlighted) and press RETURN.
The Location is entered for you, complete with correct spacing.
Next, enter a Time-of-Day.
10.6 Time-of-Day
Enter a Time-of-Day by pressing RETURN after typing your Location.
A Pop-up list displays, with Time-of-Day options.
You can either click on a pop-up list item with the mouse or press the Hot Key (designatedby the underline) for that item. For example, type “d” for DAY to enter “DAY” and the correctspacing and dashes before it.

Movie Magic® Screenwriter 6 Help 119
The Time-of-Day is entered, and the cursor moves to a new Action element.
10.7 Action
The Action element is used for the description of what is happening in a scene.
· Press RETURN to go to a new paragraph of Action.
· Press RETURN twice to go to a new Scene Heading element.
· Press TAB to go to a Character Name element.
10.8 Character Name
The Character Name element (ALL CAPS) denotes which character is speaking.
To enter a Character Name that's already been used in this script:
1. Press RETURN. A Pop-up list of available Character Names displays.
2. Type the first letter of the character's name you want. The name becomes highlighted.
3. Press RETURN. The Character Name is entered, and a Dialogue element is created.
To enter an existing Character Name by first letter:
1. Type the first letter of the character's name. A Pop-up list of Character Names startingwith that letter displays.
2. Type enough letters until the name you want is highlighted and press RETURN. TheCharacter Name is entered, and a Dialogue element is created.
3. To enter a Character Extension, such as O.S. (off screen) or V.O. (voice over), pressShift+9 ( (left parenthesis) instead of RETURN. The Character Name is entered, and aCharacter Extension Pop-up List displays.

Movie Magic Screenwriter120
NOTE: To alternate between the Last Two Character Names used, press SHIFT+TAB. Forexample: Paul had a speech, then Maya. Pressing SHIFT+TAB enters the character namePaul again, and creates a dialogue element for him. After writing his speech, pressingSHIFT+TAB again would enter the character name Maya and create a dialogue element forher.
10.8.1 Inserting Character Names
Character Names can be entered while in any element in the document.
1. Press Control+C. A Pop-Up List of Character Names displays.
2. Select the name you want using the up and down arrows.
3. Press Return.
The name is inserted into the document.
10.8.2 Character Extension
An Extension is a modification to the Character Name, appearing directly after it inparentheses (or on the next line, if you prefer) and differs from a Parenthetical. It iscommonly used to indicate that the Character speaking cannot be seen speaking on screen. The two most common Extensions are:
· V.O. —Stands for Voice Over, which tells the reader that the character is commenting onthe onscreen action but is not part of it, or is narrating over the scene.
· O.S. —Stands for Off Screen, which tells the reader that the character is not visible onscreen but is nearby somewhere in the scene.
To enter a Character Extension:
1. Press Shift+9 (left parenthesis) while the cursor is anywhere in a Character Name and aCharacter Extension pop-up list displays.
2. You can either click on a menu item with the mouse or press the Hot Key (designated by

Movie Magic® Screenwriter 6 Help 121
the underline) for that item. For example, type “v” for (V.O.) and it is entered.
New Extension—Displays the Character Extension User List, where you can enter textand create a new extension.
Add as Text—Enters whatever you type as a Character Extension, without adding it tothe User List.
3. The cursor moves to a new Dialogue element.
(If you pressed RETURN and the cursor's already gone to a blank Dialogue element, pressBACKSPACE to return the cursor to the Character Name element. Then press Shift+9 (leftparenthesis).)
10.8.3 Deleting a Character Extension
With the cursor at the end of a Character Name element, press the Forward Delete key todelete the Character Extension.
Or, with the cursor anywhere in a Character Name element, press Shift+9 ( (leftparenthesis). A Character Extension Pop-up List displays. Type “e” for No Extension.
The cursor moves to the Dialogue element following the Character Name.
10.9 Dialogue
Dialogue is the element that indicates the spoken words of a character.
A Dialogue element can only be created immediately following a Character Name (or itsParenthetical) element.
1. With the cursor in a Character Name or Parenthetical element, press RETURN. Thecursor moves to a new Dialogue element.
2. Type your character's dialogue.
3. Press RETURN.
4. The cursor moves to a new Action element.
Second Dialogue Paragraph

Movie Magic Screenwriter122
To split up a long paragraph of Dialogue into two or more shorter paragraphs of Dialogue, orto enter a second paragraph of Dialogue, choose Edit > Add Dialogue Paragraph.
To use the keyboard to enter a second paragraph of Dialogue, press SHIFT+RETURN twiceto put in two hard returns.
10.10 Parenthetical
Parenthetical, also called a "wryly", indicates the way a line of dialogue is delivered or agesture that does not need its own line of Action; typically used sparingly, if at all.
With the cursor anywhere in a Dialogue element, press Shift+9 (left parenthesis).
NOTE: if "Tab in Dialogue goes to a Parenthetical" is checked under Screenwriter >Preferences... > Editing, press TAB.
A Parenthetical element is created at the cursor location.
If the cursor is at the beginning of a Dialogue element, the Parenthetical is placed betweenthe Character Name and the Dialogue.
If the cursor is in the middle of a Dialogue element, the Dialogue is broken by theParenthetical.
Type the Parenthetical text, and press RETURN.
The cursor moves to the Dialogue element following the Parenthetical.
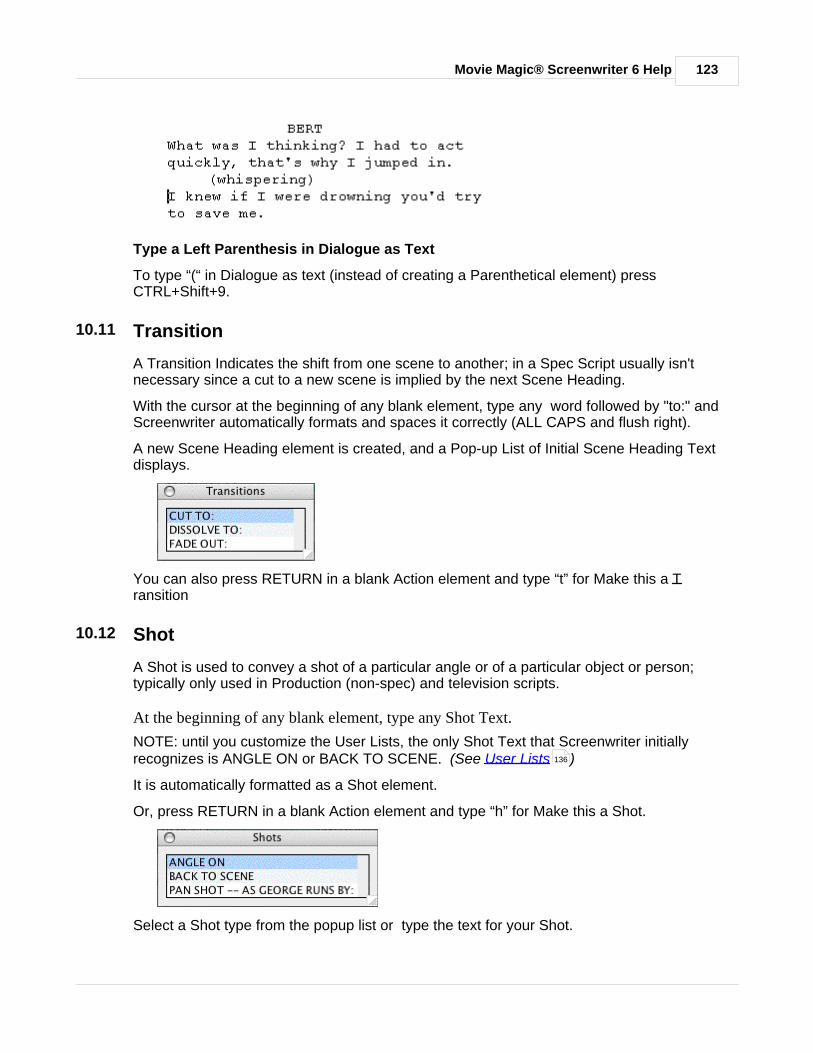
Movie Magic® Screenwriter 6 Help 123
Type a Left Parenthesis in Dialogue as Text
To type “(“ in Dialogue as text (instead of creating a Parenthetical element) pressCTRL+Shift+9.
10.11 Transition
A Transition Indicates the shift from one scene to another; in a Spec Script usually isn'tnecessary since a cut to a new scene is implied by the next Scene Heading.
With the cursor at the beginning of any blank element, type any word followed by "to:" andScreenwriter automatically formats and spaces it correctly (ALL CAPS and flush right).
A new Scene Heading element is created, and a Pop-up List of Initial Scene Heading Textdisplays.
You can also press RETURN in a blank Action element and type “t” for Make this a Transition
10.12 Shot
A Shot is used to convey a shot of a particular angle or of a particular object or person;typically only used in Production (non-spec) and television scripts.
At the beginning of any blank element, type any Shot Text.
NOTE: until you customize the User Lists, the only Shot Text that Screenwriter initiallyrecognizes is ANGLE ON or BACK TO SCENE. (See User Lists )
It is automatically formatted as a Shot element.
Or, press RETURN in a blank Action element and type “h” for Make this a Shot.
Select a Shot type from the popup list or type the text for your Shot.
136
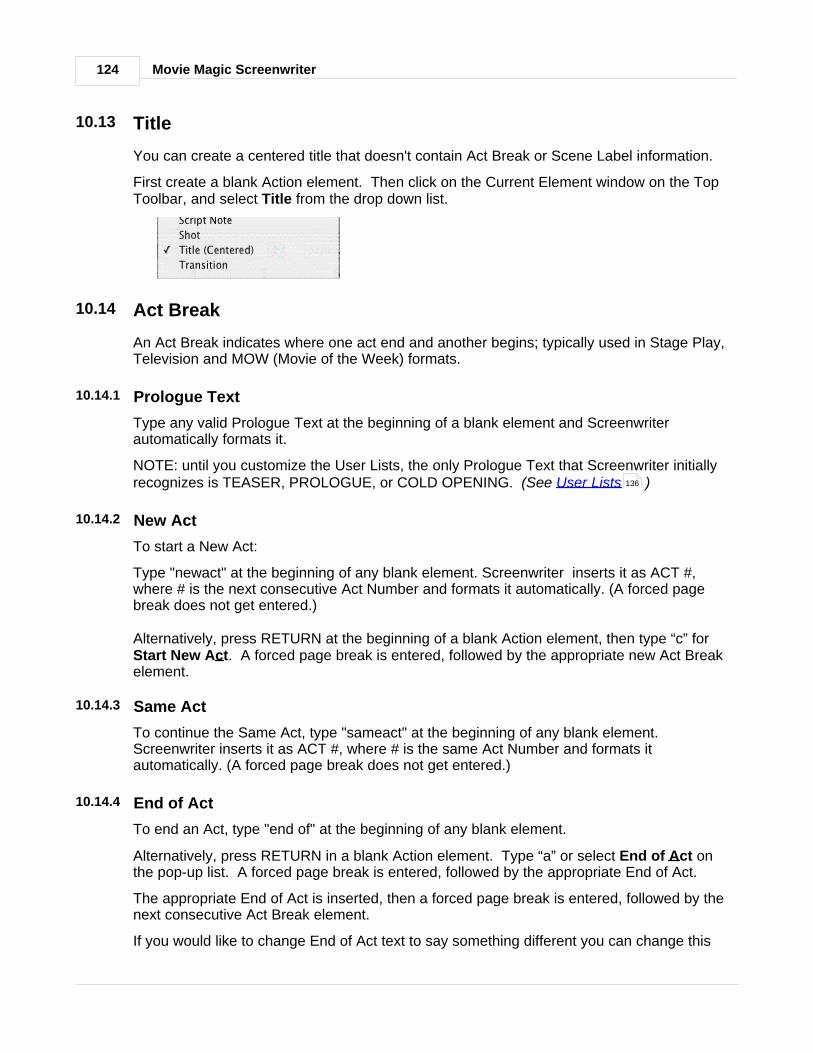
Movie Magic Screenwriter124
10.13 Title
You can create a centered title that doesn't contain Act Break or Scene Label information.
First create a blank Action element. Then click on the Current Element window on the TopToolbar, and select Title from the drop down list.
10.14 Act Break
An Act Break indicates where one act end and another begins; typically used in Stage Play,Television and MOW (Movie of the Week) formats.
10.14.1 Prologue Text
Type any valid Prologue Text at the beginning of a blank element and Screenwriterautomatically formats it.
NOTE: until you customize the User Lists, the only Prologue Text that Screenwriter initiallyrecognizes is TEASER, PROLOGUE, or COLD OPENING. (See User Lists )
10.14.2 New Act
To start a New Act:
Type "newact" at the beginning of any blank element. Screenwriter inserts it as ACT #,where # is the next consecutive Act Number and formats it automatically. (A forced pagebreak does not get entered.)
Alternatively, press RETURN at the beginning of a blank Action element, then type “c” for Start New Act. A forced page break is entered, followed by the appropriate new Act Breakelement.
10.14.3 Same Act
To continue the Same Act, type "sameact" at the beginning of any blank element.Screenwriter inserts it as ACT #, where # is the same Act Number and formats itautomatically. (A forced page break does not get entered.)
10.14.4 End of Act
To end an Act, type "end of" at the beginning of any blank element.
Alternatively, press RETURN in a blank Action element. Type “a” or select End of Act onthe pop-up list. A forced page break is entered, followed by the appropriate End of Act.
The appropriate End of Act is inserted, then a forced page break is entered, followed by thenext consecutive Act Break element.
If you would like to change End of Act text to say something different you can change this
136

Movie Magic® Screenwriter 6 Help 125
line by modifying the User Lists. (See User Lists )
NOTE: Screenwriter inserts "End of Show" in your document only if you have specified thelast act. You set the last act by selecting Format>Element Styles... to open the ElementStyles window, then click on the Act Breaks button. At the center of this window, towards thebottom, is a field called End of Show Follows Act #. Enter the number of the last Act in thisfield.
10.14.5 New Scene
To start a New Scene:
Type "newscene" at the beginning of any blank element. Screenwriter inserts it as SCENE#, where # is the new Scene Number, and formats it automatically. (A forced page does notget entered.)
Alternatively, press RETURN in a blank Action element. Type “r” or select Start NewScene/Same Act.
Or, press RETURN while in an Act Break and Screenwriter puts in the appropriate newScene Label for you. To use this feature, Automatically put in Scene Label after ActBreak must be checked under Format > Elements Styles, in the Scene Labels section.
10.15 Notes
A Note (or script note) provides you with a place in the document to jot down an idea for ascene or a comment on the story, or to put writing you have cut but are not sure aboutdiscarding. (See the section of the NaviDoc Note Panel for additional information onorganizing your notes.)
Notes are separate from the body text of your document, and don't affect the page breaks ordocument length. They can be displayed onscreen or hidden. They can be printedseparately with page references, or printed in the regular body of the document (in whichcase, they would affect the page breaks and document length).
· Add a Note
· Type a Note
· Hide/Show a Note
· Print a Note
· Note Options
10.15.1 Add a Note
To add a Note, position the cursor in the element you want a script note to follow.
Press CTRL+N on the keyboard.
Or, click on the Right Toolbar button with a musical Note icon.
A Note is added where the cursor is located.
136
125
126
126
126
127

Movie Magic Screenwriter126
10.15.2 Type a Note
Type and format text in a Note as you would in any other element. To force a new line, orput in a blank line, press SHIFT+RETURN.
10.15.3 Hide/Show a Note
Notes can be individually displayed onscreen or hidden. In the left margin next to the Note isa triangle that indicates the note's status.
When a Note displays, the triangle points downward, :
When a Note is hidden, the triangle points to the right, :
Single-click on the triangle to change the Note's display status.
· Single-clicking on “ ” Hides the note.
· Single-clicking on “ ” Shows the note.
(See also Show/Hide Categories in NaviDoc or Show/Hide Note Categories inDocument)
10.15.4 Print a Note
You can print Notes:
· As a sequential report
· On the reverse sides of the script pages they're facing (on a already-printed document)so the notes are opposite the pages they reference.
· As part of the document itself.
To print Notes as a report or on the reverse sides of the pages:
1. Under the File Menu, select Print.
2. A Print menu displays. Check the Notes radio button.
3. Click OK. A Notes Print window displays.
Print Notes Sequentially with Reference Page Numbers—Prints a separate Notesreport of all notes listed in sequence with the page numbers they refer to.
Print Notes on facing pages of script (already printed script)—Prints each
168 168
Movie Magic® Screenwriter 6 Help 127
Note opposite the page it refers to, on the back of the previous page.
Have it Prompt you to Insert Each Page as needed—Only asks you to insertthe page preceding a Note, so it can print the note for the following page. Requires you to insert pages one at a time.
Print without Prompting (requires you to insert entire document)—Requiresyou to insert the entire document, including a Title Page. Screenwriter only printson those pages that have a Note on the following page.
Select Which Color Notes to Print—If you have more than one color of Note in yourscript, check the colored boxes for the notes you want to print.
To print Notes as part of the document (this will affect the page breaks and documentlength):
1. Click on Format > Element Styles.
2. Click the Notes button on the right side.
3. Check the box labeled Print Notes in Document. (NOTE: 'Display Notes in Document'must be enabled to select this option)
4. Click OK.
5. Print the document as you would normally under File > Print and any Notes will printwhere they are located in the document.
10.15.5 Note Options
Formatting options for Notes can be set on the Notes page of the Element Styles...command.
1. Under the Format menu, select Element Styles....
2. Click on the Script Notes button on the right-hand side.
Display Notes in Document—If checked, displays Notes onscreen as you have set theirhide/show status individually. Unchecked, all Notes are collapsed to their hidden status.
Print Notes in Document—If checked, Notes are treated as part of the document whenprinting, changing the Page Breaks accordingly. Unchecked, they do not print orincrease the script length.
Select the color for Notes to be displayed in the document—Click this button todisplay a Color palette. Choose a color to display Notes with, or create a Custom color. Click OK to accept your choice, Cancel to exit without changing color. You are promptedto convert all Notes to the new color. Click on Yes to change all the notes, No to changeonly one Note.

Movie Magic Screenwriter128
3. Click OK to save your changes, Cancel to discard them.
See Element Styles... in the Customizing Screenwriter chapter for more details.
10.16 Switch Elements
There are several ways to convert an element from one type to another (for example, Actionto Note):
· Current Element pop-up menu.
· Current Outline Style pop-up menu. (Outline elements only)
· Change Element Type under the Format menu.
· Right-click context menu.
Current Element pop-up menu:
1. Put the cursor anywhere in the Element to be changed. (Or, select a portion of theelement to change.)
2. Click on the Current Element pop-up menu on the Top Toolbar to display the list ofelements. (Or, press F4 on the keyboard).
3. Select the element type to switch to by clicking on it.
Current Outline Style pop-up menu (Outline elements only):
1. Put the cursor anywhere in the Element to be changed. (Or, select a portion of theelement to change.)
2. In the Outline panel of the NaviDoc (Ctrl+1), click on the Current Outline Style pop-upmenu.
3. Select the Outline element style to switch to by clicking on it from the list.
Change Element Type menu:
1. Put the cursor anywhere in the Element to be changed. (Or, select a portion of theelement to change.)
2. Under the Format menu, select Change Element Type.
260

Movie Magic® Screenwriter 6 Help 129
3. Select the element type to switch to by clicking on it from the list.
10.17 Moving Between Elements
With QuickType enabled, pressing Tab or Return in one element either moves you to a newdefault element or displays a List menu of available options:
If you Type— QuickType will—
FADE IN: or any Transition
Display Scene Heading Initial Textmenu (INT., EXT., etc.).
If you Press RETURN whilein—
QuickType will—
Blank Action, Transition, blank Scene Heading, Scene Label, or End of Act
Display Scene Heading Initial Textmenu (INT., EXT., etc.).
Scene Heading without Location
Display a List Menu of all uniqueLocations already in the script.
Scene Heading with Location
Display a List Menu of Time-of-Day(DAY, NIGHT, etc.).
End of Action Add another Action Element.
Character Name Add a Dialogue Element(If the next element is Dialogue orParenthetical, it moves to thebeginning of that element).
End of Dialogue* Add an Action Element.
Middle of Dialogue* Break the Dialogue and insert anAction Element.
Parenthetical Add a Dialogue Element(if the next element is Dialogue, itmoves to the beginning of thatelement).
* If Return in Dialog takes you to Character is checked on the Editing page of theScreenwriter > Preferences... window, a Character Name element will be inserted instead.
If QuickType is not enabled, these popup lists can be displayed manually by pressing theappropriate Control key combination:
If you Press— While in— QuickType will—

Movie Magic Screenwriter130
CTRL+S Any element Add a Scene Headingelement.
CTRL+I Any element Add a Scene Headingelement beginning with"INT.".
CTRL+E Any element Add a Scene Headingelement beginning with"EXT.".
CTRL+O Any element Add a Shot element.
CTRL+O Blank Shot element Display a List Menu of Shots(ANGLE ON, etc.).
CMD+RETURN Any element Add an Action element.
SHIFT+CMD+C Action or Dialogueelement
Display a List Menu ofexisting Character Names.
TAB** Any element Add a Character Nameelement.
SHIFT+9 "(" Character Name element Display a List Menu ofCharacter Extensions (V.O.,O.S., etc.).
SHIFT+9 "(" Dialogue element Add a Parenthetical element.
SHIFT+CMD+T Any element Add a Transition element.
SHIFT+CMD+T Blank Transition element Display a List Menu ofTransitions (CUT TO:, etc.).
CTRL+N Any element Add a Note.
** If Tab in Dialogue takes you to Parenthetical is checked on the Text Entry/Editing page ofProgram Options under the File menu, Tab creates a Parenthetical element when in aDialogue element.
10.18 Character Name in Dialogue or Action
To put an existing Character Name into Dialogue or Action without typing it in again, pressSHIFT+CMD+C on the keyboard.
A pop-up list displays, with all the existing Character Names. Select one and it is entered astext at the cursor position.
Or, if you have assigned that name an Alias, type in the alias text and press the space bar. It is expanded to the full Character Name at the cursor position (See Aliases .)142
Movie Magic® Screenwriter 6 Help 131
10.19 Add Forced Page Break
To end a page short and start a new page, enter a Forced Page Break at the cursor position.
· Under the Edit menu, select Add Forced Page Break.
· Or, press SHIFT+RETURN.
10.20 Remove a Forced Page Break
Remove a Forced Page Break using one of these methods:
1. Put the cursor either before or after the forced page break. Under the Edit menu, selectRemove Forced Page Break.
2. Or, put the cursor at the beginning of the element immediately following the Forced PageBreak. Press the DELETE key.
3. Or, put the cursor at the end of the element immediately before the Forced Page Break. Press the FORWARD DELETE key.
10.21 Soft-Hyphen
A Soft-Hyphen can be used to break a word at the end of a line, to give the right margin asmoother look. If the text is subsequently edited so that the word is no longer broken, thesoft hyphen is ignored.
1. Put the cursor in the word, where you want the Soft-Hyphen to be inserted.
2. Press CTRL+- (Ctrl+Dash).
10.22 Hard-Dash
A Hard-Dash is similar to a regular dash, except that it keeps the two words either side of ittogether. For example, inserting a hard-dash between “set” and “up” in the word “set-up”ensures that the word won't be broken by the end of a line word-wrap feature.
1. Put the cursor in the word, where you want the Hard-Dash to be inserted.
2. Press CTRL+SHIFT+- (Ctrl+Shift+Dash).
10.23 Hard-Space
A Hard-Space is similar to a regular space, except that it keeps the two words either side ofit together. For example, inserting a Hard-Space between “Production” and “Studio” in thephrase “Production Studio” ensures that the word won't be broken by the end of a lineword-wrap feature.
· Put the cursor in the phrase, where you want the Hard-Space to be inserted. Or, selectthe regular space between the two words.
· Press SHIFT+CMD+SPACE.

Movie Magic Screenwriter132
10.24 Hard Return
To end a line short and start a new line (e.g., lyrics or poetry), enter a Hard Return at thecursor position.
· Under the Edit menu, select Add Hard Return.
· Or, press SHIFT+RETURN.
10.25 Dual-Column (Simultaneous) Dialogue
There may be occasions when you want two characters' Dialogue to appear side by side inthe script. For example, when two characters are speaking at the same time, with theirdialogue overlapping.
NOTE: While Screenwriter can print Dual-Column Dialogue lined up correctly, it displays itonscreen sequentially. The left column paragraph displays, then the right columnparagraph, and so on.
Example: Writing in dual column mode in Screenwriter looks like this on screen...
...but prints in the document like this:
10.25.1 Dual Columns Menu
Format > Dual Columns
From the Format menu select the Dual Columns menu and you'll see four choices:
· Left Column—Formats the selected element(s) as the left column of the dual column.Hitting RETURN ends the left column formatting.
· Right Column—Formats the selected element(s) as the right column of the dual column.

Movie Magic® Screenwriter 6 Help 133
Hitting RETURN ends the right column formatting.
· Normal (Full Width)—Resets the selected element(s) as normal, non-dual column text.
· Set Column Margins —Dual-Column margins can be customized to your preference.
10.25.2 Dual Column Submenus and Icons
Dual Columns submenus display check marks for Left Column, Right Column, and Normal(Full Width). If there are different column types in the selection, the “-” character is displayedto the left of the menu item, instead of the check (as is standard on the Mac).
If the user has displayed the column icons in the toolbar, then these show the STATE ofwhatever is selected. As with the character formats (bold, italics, underline) if there aremultiple column types in the selection then multiple icons are shown as toggled.
The textual (L) and (R) have a graphic icon next to the style popup. A (-) is displayed ifmultiple column types are in the selection (see images, below):
10.25.3 Dual Columns Instructions
To enter Dual-Column Dialogue or text:
1. Type the Left column text as you would normally.
For example, create a Character Name element then type the Character Name.
2. With the cursor in that element, press CTRL+L. The element is formatted as CharacterName (L), as displayed in the Current Element pop-up menu.
3. Press RETURN to go to the next element. In this example, it is a Dialogue element,already formatted as Dialogue (L).
4. Type the Dialogue. Press CTRL+L.
5. Press Tab and type in the next Character Name. .
6. With the cursor in that element, press CTRL+R. The element is formatted as CharacterName (R).
7. Press RETURN to go to the next element. It is a normal Dialogue element.
134

Movie Magic Screenwriter134
8. Type the Dialogue.
9. Repeat these Steps until all your Dual-Column Dialogue is entered.
NOTE: Dual-Columns are only for short pieces of simultaneous dialogue, text or shortsplit-screen scenes. This is not the same as two-column A/V format (used in somedocumentaries and commercials)! Currently, Movie Magic Screenwriter does not support thetwo-column A/V format.
To change an element from a Dual-Column element back to a normal element:
1. Put the cursor anywhere in the element.
2. Under the Format menu, select Dual Columns then Normal (Full Width).
Or, press CTRL+F.
10.25.4 Dual Column Margins
Dual-Column margins can be customized to your preference.
1. Under the Format menu, select Dual Columns then Set Column Margins.
2. The Set Column Margins window displays.
· Margins Settings for Element Types--The markers on the rulers represent the edges ofthe columns, are measured in inches, and can be adjusted by clicking and dragging. Thereare margin settings for the left/right columns of four element types:
· Character—Left and Right edges of the selected column for Character Nameelements.
· Dialogue—Left and Right edges of the selected column for Dialogue elements.
· Parenthetical—Left and Right edges of the selected column for Parentheticalelements.
· Other—Left and Right edges of the selected column for all other element types suchas Action, Scene Heading, Outline and Shot elements.

Movie Magic® Screenwriter 6 Help 135
10.26 Cheating
Cheating involves overriding the default settings as defined in Format > Element Styles.Cheating can affect a the single element, page, or document to which you apply it.
Cheating is used to change the look of a document. One reason for doing this is to try to“fool” the professional script reader who expects a screenplay to time out to one minute ofscreen time per script page.
As an example: if your script is a long 125 pages, you can cheat the line spacing, margins,etc. to have it print out closer to the standard maximum length of 120 pages.
Another use of cheating would be to “stretch” the text on a page, to fill up the extra blankwhite space left by a long Dialogue element you don't want broken by a page break.
· Cheat an Element
· Cheat Right Margins
· Cheat Page Breaks
· Cheat a Page
· Cheat the Whole Script
· Cheat the Page's Header
10.26.1 Cheat an Element
1. Put the cursor anywhere in the element to be cheated.
2. Under the Format menu, select Cheat then Element.
Or, press CMD+=.
3. Make the desired changes to:
· Left and Right Margins.
· Lines Before (the element).
· Line Spacing (spacing between lines of text in an element).
· Text Formatting (bold, italic, underline, etc.).
· Font Type and Size.
· Character Continueds.
10.26.2 Cheat Page Breaks
To keep text together instead of splitting it over a Page Break, you can cheat the PageBreak.
Put the cursor anywhere in the element to be cheated, on the first page of the two pages thatit appears on.
Under the Format menu, select Cheat then select one of the options:
135
135
136
136
136

Movie Magic Screenwriter136
· :Keep Element Together— prevents the Element that the cursor is in from being broken.
· Keep Group Together— keeps all elements in the current Group (for example, Dialogue +Character Name, or Scene Heading + Action) together over a page break.
· Keep With Following—Keeps all elements in the current Group (for example, Dialogue +Character Name, or Scene Heading + Action)—along with the Element that follows them—together over a page break.
A checkmark displays next to the selected cheat option.
To allow Screenwriter to break an element which you've previously told it not to, uncheck thecheat option by selecting it again.
10.26.3 Cheat a Page
1. Put the cursor anywhere on the Page to be cheated.
2. Under the Format menu, select Cheat then Page.
3. Increase or Decrease the page length by the number of lines desired, from 1 to 10.
10.26.4 Cheat the Whole Document
1. Put the cursor anywhere in the document to be cheated.
2. Under the Format menu, select Cheat then Document.
3. You're prompted to remove all previous Line Spacing Cheating.
Click Yes to remove the existing cheating, and start cheating afresh.
Click No to leave the existing cheating intact, and add any new cheating to it.
4. The Document Layout window displays. Change the document settings for this script asdesired.
10.26.5 Cheat the Page’s Header
This option is only available in a document with Locked Pages and Locked Headers.
1. Put the cursor anywhere on the Page to be cheated.
2. Under the Production menu, select Override then Page's Header/Draft Color.
3. The Header Setup screen displays. Change the Header settings for that page.
4. Click Preview to view the changes, OK to save the changes, or Cancel to discard thechanges.
10.27 User Lists
While you write, Screenwriter can recognize certain text you have typed as matching an itemin one of its User Lists, and format it as the appropriate element automatically.
To use User Lists, the QuickType feature and the individual Pop-Up lists must beenabled. See QuickType in the Customizing Screenwriter section for more information.

Movie Magic® Screenwriter 6 Help 137
For example, typing “ext.” on a blank line tells Screenwriter that you're starting a new SceneHeading. It automatically formats your entry as “EXT.” and pops up a Scene Body Text UserList showing previous Locations in this document.
These popup lists, or User Lists, contain text items that can be entered by typing the firstletter or two instead of typing the whole text, saving you time and effort.
Selecting a Location from the Scene Body Text User List enters it in your document andpops up the Time-of-Day User List. Typing the first letter (or underlined QuickLetter) of aTime-of-Day enters it in your document and moves the cursor to a new Action element.
NOTE: Transitions are an exception. Any text that ends with TO: is recognized as atransition, whether or not the text is in the Transition User List.
Screenwriter can also recognize abbreviations for text that you use often. Typing the firstletter or two of a word tells Screenwriter to enter the full text, complete with any element,formatting, margins, etc.
Entering an abbreviation, or Alias Text , in an element's User List lets Screenwriter knowit should auto-format that abbreviation using that element's settings.
As an example, you could assign “I.” as the alias text for the Scene Heading Initial Text“INT.” Typing “I.” on a blank line would tell Screenwriter to expand that abbreviation to “INT.”and format the line as a Scene Heading element (just as if you'd typed “INT.”)
The number of items in a User List is determined by Element, as follows:
Element Maximum Items
Character Names: 15*
Extensions: 10
Initial Scene Text: 10
Scene Body Text(Locations):
10*
Shot Text: 6
Time-of-Day: 12
Transitions: 8
Act Break/Scene Label: 3
Prologue Text: 5
Tag Text: 1
End of Act Text: 1
142
Movie Magic Screenwriter138
FADE IN Text: 1
Substitution Text: 15
*User Lists for Character Names & Scene Body Text (Locations) are only used tosupplement what Screenwriter puts on its popup list and uses in Auto Text Recognition. Before Screenwriter pops-up User List text for Character Name or Scene Body Text, it firstscans the document to find existing text in those elements. Then it adds text from the UserList and displays.
You only need to add to either of these User Lists if you.
· Write more than one document with the same Characters or Locations (for example, formultiple episodes of a TV series,) and want them to display automatically.
· Want Alias Text for specific Character Names (for example, typing “vk” to have theprogram enter “Von Karajan”).
· Already typed in lists of this text elsewhere (such as in an outline or a separate storydevelopment program) and want to re-use this work.
User Lists for Act Break/Scene Label and End of Act Text have Alias Text that is only usedfor auto text-recognition. The actual text is used for popup lists and for replacing the AliasText.
10.27.1 Act/Scene Text
The Alias for Item A is set to “NEWACT”. When you type NEWACT it starts a new ACT,changes the element to ACT BREAK, replaces the text with ACT, and increases the ActNumber.
The Alias for Item B is set to “SAMEACT”. When you type SAMEACT it changes theelement to ACT BREAK, replaces the text with ACT, but keeps the same Act Number.
The Alias for Item C is set to “NEWSCENE”. When you type NEWSCENE, it changes theelement to Scene Label, replaces the text with SCENE (if appropriate), and increases theScene Number (or not, depending on whether it follows a New Act and on your settings inthe Format > Element Styles... menu).
10.27.2 Editing User Lists
If you'd like Screenwriter to auto-format a text item that you type, put that text in the User Listof the Element it should be formatted as. Existing User List text can be changed or deleted.
Under the Format menu, select User Lists.
You will see the window below.
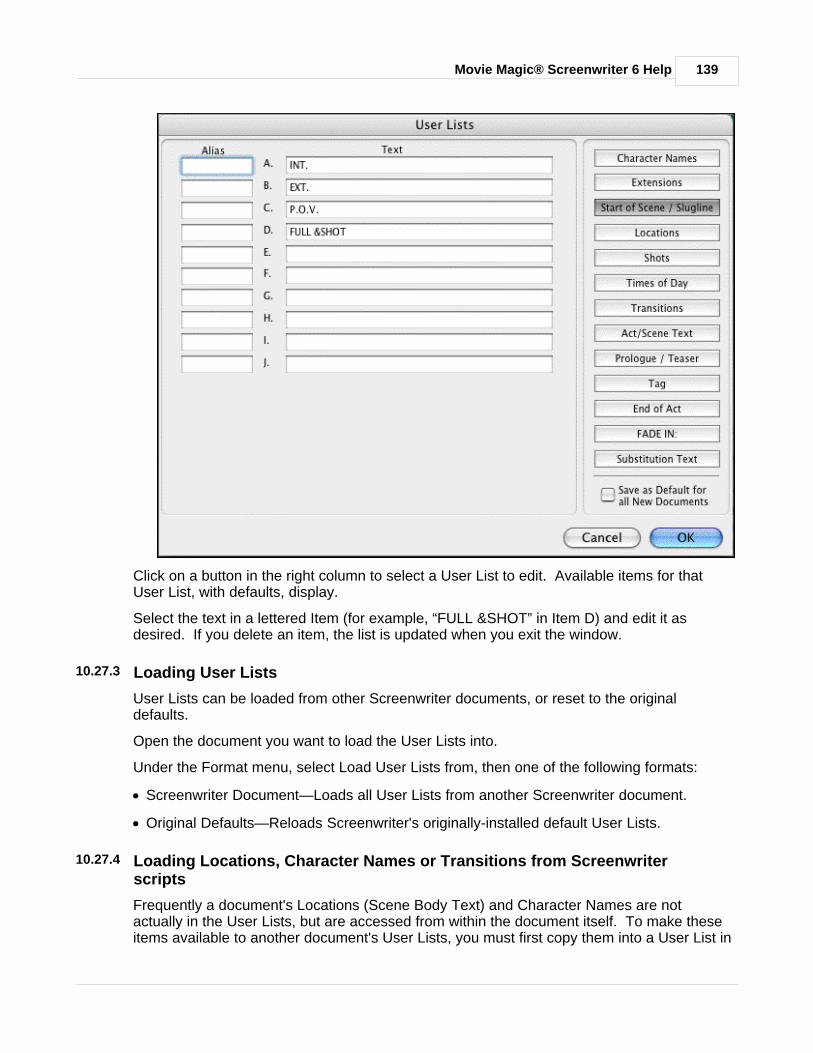
Movie Magic® Screenwriter 6 Help 139
Click on a button in the right column to select a User List to edit. Available items for thatUser List, with defaults, display.
Select the text in a lettered Item (for example, “FULL &SHOT” in Item D) and edit it asdesired. If you delete an item, the list is updated when you exit the window.
10.27.3 Loading User Lists
User Lists can be loaded from other Screenwriter documents, or reset to the originaldefaults.
Open the document you want to load the User Lists into.
Under the Format menu, select Load User Lists from, then one of the following formats:
· Screenwriter Document—Loads all User Lists from another Screenwriter document.
· Original Defaults—Reloads Screenwriter's originally-installed default User Lists.
10.27.4 Loading Locations, Character Names or Transitions from Screenwriterscripts
Frequently a document's Locations (Scene Body Text) and Character Names are notactually in the User Lists, but are accessed from within the document itself. To make theseitems available to another document's User Lists, you must first copy them into a User List in

Movie Magic Screenwriter140
their original document.
1. Open the document containing the User List items you want to load.
2. Under the Format menu, select User Lists...
3. Click on the button of the items to copy:
· Character Names
· Scene Body Text
· Transitions
4. At the bottom left of the screen a Copy from Script button displays. Click on it and a menuof the unique text items for that element displays.
5. Double-click on an item to copy it to the User List. Click on the Close button whenfinished.
6. Click OK to save the User List and exit editing, or Cancel to discard changes.
7. Save the changes to the document's User Lists by saving the document file.
8. Now you can load the items you've added to this document's User List into anotherdocument. See Loading User Lists , above.
10.27.5 Saving Lists as the Default Lists for all New Documents
To save User Lists you've made changes to as the default User Lists for new documents:
1. Under the Format menu, select User Lists.
2. Make changes to your User Lists as described in the sections above.
3. Click the Save as Defaults For all New Documents checkbox.
The new defaults do not affect any existing documents. To apply the new defaults to UserLists of existing documents, load them from a new document that contains them. See Loading User Lists , above.
10.27.6 Default User Lists
When you install Screenwriter, all User Lists except for Character Names, Scene Body Text,and Substitution Text have default items which are used for all new and importeddocuments:
User List Default Items
Character Names Empty
Extensions “O.S."
139
139

Movie Magic® Screenwriter 6 Help 141
“V.O.”
Scene Heading Text “INT.”
“EXT.”
“P.O.V.”
“FULL SHOT”
Scene Body Text(Locations)
Empty
Shot Text “BACK TO SCENE”
“ANGLE ON”
Time-of-Day
(The ampersand “&” tellsScreenwriter which letter tounderline when it displaysthe Time-of-Day menu, butis not put into thedocument.)
“MORNING”
“DAY”
“AFTERNOON”
“EVENING”
“NIGHT”
“LATER”
“CONTINUOUS”
“MOMENTS LATER
Transitions “CUT TO:”
“DISSOLVE TO:”
“FADE OUT:”
Act/Scene Text (“NEWACT” - Alias for) “ACT”
(“SAMEACT” - Alias for) “ACT”
(‘“NEWSCENE” - Alias for)“SCENE”
Prologue Text “TEASER”
“PROLOGUE”
“COLD OPENING”
Tag Text “TAG”
End of Act Text “END OF ACT”
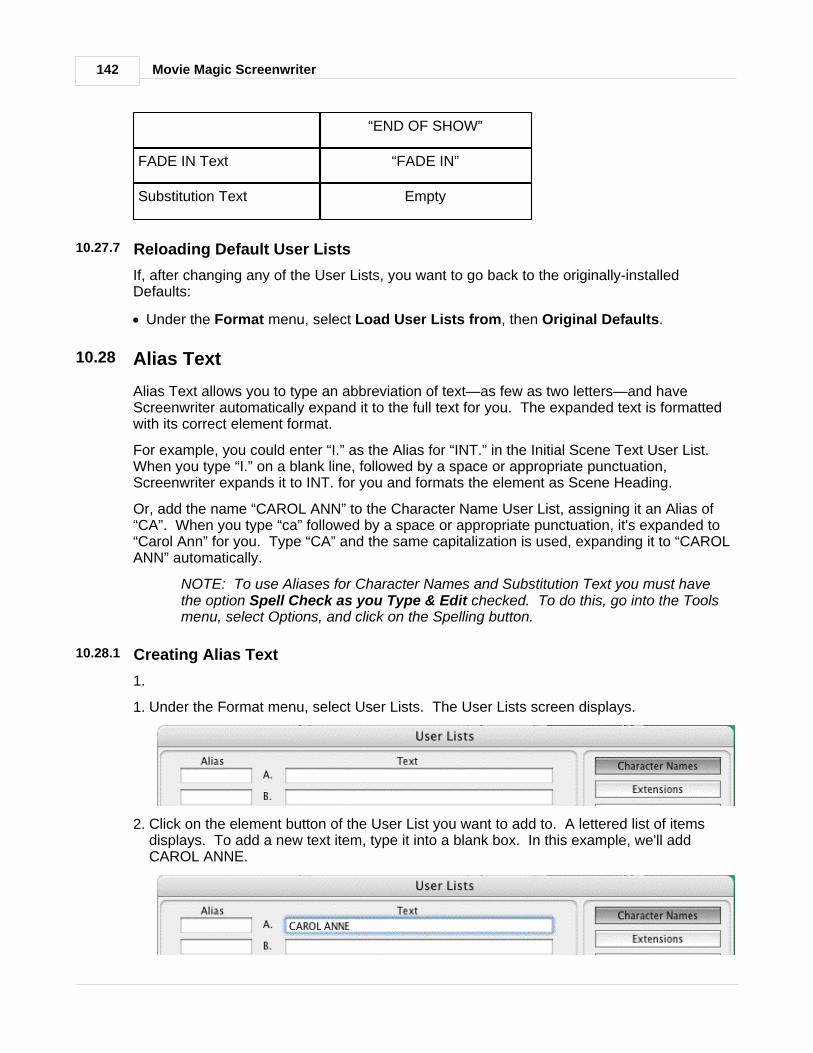
Movie Magic Screenwriter142
“END OF SHOW”
FADE IN Text “FADE IN”
Substitution Text Empty
10.27.7 Reloading Default User Lists
If, after changing any of the User Lists, you want to go back to the originally-installedDefaults:
· Under the Format menu, select Load User Lists from, then Original Defaults.
10.28 Alias Text
Alias Text allows you to type an abbreviation of text—as few as two letters—and haveScreenwriter automatically expand it to the full text for you. The expanded text is formattedwith its correct element format.
For example, you could enter “I.” as the Alias for “INT.” in the Initial Scene Text User List. When you type “I.” on a blank line, followed by a space or appropriate punctuation,Screenwriter expands it to INT. for you and formats the element as Scene Heading.
Or, add the name “CAROL ANN” to the Character Name User List, assigning it an Alias of“CA”. When you type “ca” followed by a space or appropriate punctuation, it's expanded to“Carol Ann” for you. Type “CA” and the same capitalization is used, expanding it to “CAROLANN” automatically.
NOTE: To use Aliases for Character Names and Substitution Text you must havethe option Spell Check as you Type & Edit checked. To do this, go into the Toolsmenu, select Options, and click on the Spelling button.
10.28.1 Creating Alias Text
1.
1. Under the Format menu, select User Lists. The User Lists screen displays.
2. Click on the element button of the User List you want to add to. A lettered list of itemsdisplays. To add a new text item, type it into a blank box. In this example, we'll addCAROL ANNE.

Movie Magic® Screenwriter 6 Help 143
3. Click in the Alias box located to the left of the Text box. Type the abbreviation for selectedUser List text, using at least 2 characters. For this example, type in CA as the alias text.
4. Click on OK to save your changes to the document's User Lists.
10.28.2 Capitalization of Alias Text
With two exceptions, expanded Alias Text takes its capitalization as defined by the Elementit belongs in.
Substitution Text
For capitalization purposes, the Alias Auto-Recognition Text window for Substitution Texthas three additional options:
A = Auto—Capitalization matches the way you type the Alias Text:
· If you type “coa”, it expands to “council on aging”.
· If you type in “Coa”, it expands to “Council On Aging”.
· If you type in “COA”, it expands to “COUNCIL ON AGING”.
E = As Entered—Capitalization matches the Substitution Text exactly as it appears in the

Movie Magic Screenwriter144
User List (unless you're in an element defined as all caps, in which case it is put in all caps).
C = ALL CAPS—Capitalization is ALL CAPS.
Character Name
Capitalization for Character Name Alias Text uses the Auto capitalization method:
Auto—Capitalization matches the way you type the Alias Text:
· If you type “coa”, it expands to “council on aging”.
· If you type in “Coa”, it expands to “Council On Aging”.
· If you type in “COA”, it expands to “COUNCIL ON AGING”.

Movie Magic® Screenwriter 6 Help 145
11 Text Editing
There is usually more than one way of performing any text selecting or editing command inScreenwriter. For ease of use, the method using the Mouse and the Main Menu Bar isemphasized. As you become more familiar with Screenwriter, you many want to useKeyboard Shortcuts and Toolbar Icons.
To see what command a Toolbar Icon represents, use the mouse to move the cursor overthe icon without clicking on it. A box of explanatory Hint text displays directly beneath theicon, and any Quick Key shortcut displays on the left of the Bottom Status Bar.
· For a list of Main Menu Bar commands, see the Appendix chapter entitled Screenwriter6 Menus .
· For a list of Keyboard Shortcuts, see the Appendix chapter entitled Key Assignments.
11.1 Moving the Cursor
Use the following keys to move the cursor around the document quickly:
CMD+UP ARROW ................................ Previous Element
CMD+DOWN ARROW .......................... Next Element
CTRL+OPTION+UP ARROW ............... Previous Scene or Outline Element
CTRL+OPTION+DOWN ARROW ......... Next Scene or Outline Element
CMD+Page Up ...................................... Previous Document Page
CMD+Page Down ................................. Next Document Page
CMD+HOME ......................................... Goto Top of Document
CMD+END ............................................ Goto End of Document
CTRL+G ................................................ Goto Page menu
RIGHT ARROW .................................... Next character
LEFT ARROW ....................................... Previous character
CMD+RIGHT ARROW .......................... Next Word
CMD+LEFT ARROW ............................ Previous Word
HOME ................................................... Beginning of current line
END ....................................................... End of current line
UP ARROW .......................................... Previous Line
DOWN ARROW .................................... Next Line
PAGE UP .............................................. Previous Screen
PAGE DOWN ........................................ Next Screen
NOTE: Keyboard commands can be altered in the Screenwriter > Preferences > Keyboard
310

Movie Magic Screenwriter146
window.
11.2 Selecting Text
Screenwriter uses the standard Mac OS X methods of text selection.
Menu Selection—Place the cursor on the word to be selected. Under the Edit menu,choose from:
Select All—Selects the entire document.
Select Special—Displays options for selecting by:
· Word—Selects the word where the cursor is located.
· Sentence—Selects the entire sentence where the cursor is located.
· Element—Selects the entire element where the cursor is located.
· Group—Selects a group of adjacent elements, including the one where the cursor islocated (for example, Character Name plus Parenthetical plus Dialogue.)
· Page—Selects the entire page where the cursor is located.
· Scene—Selects the entire scene where the cursor is located.
· Scene Range—Displays a list of your script's Scene Headings. Click on or drag the cursorover the ones you want to select, and click on OK.
· Extend Selection—Displays an Extend Block menu, with options for extending yourselection backwards or forwards in the document from the Current Cursor Position.
Mouse Selection—Screenwriter has a variety of options for selecting text with the mouse:
Left-Click—Using the mouse, Left-Click directly in front of the text to be selected. Whileholding the Left Button down, drag the mouse cursor across the text. Release the buttonwhen all the desired text is highlighted. (To continue selecting text that's off screen, movethe mouse cursor above or below the document window while still holding the button down—it continues scrolling and selecting in that direction.)
Double-Click—Place the cursor on the word to be selected.
Triple-Click—Triple clicking the Left mouse button on a word selects the entire Element inwhich that word is located.
CMD+Click—Pressing down the CMD key while clicking a word, selects the entire sentencein which that word is located.
Right Click—Place the cursor on the word/sentence/element to be selected. Right-Click orCTRL-CLICK the mouse to bring up the context menu, then use the Select Special submenuto make your selection.
Keyboard Selection—Place the cursor on the word/sentence/element to be selected.Press the SHIFT key and hold it down. Press other movement keys, such as an arrow orpage up/down key, to highlight the text. Release both keys when the desired text isselected.

Movie Magic® Screenwriter 6 Help 147
11.3 Adjusting the Selection
If you have selected some text and then realized that you need to select less or more text,you don't have to start over. Instead:
1. Press the SHIFT key and hold it down.
2. Use the Up and Down and Side to Side Arrow keys. This will allow you to extend orreduce the selection.
3. Release the SHIFT key.
11.4 De-Selecting Text
To de-select a selected block of text:
· Left-Click the mouse anywhere on the page.
· Or, press a movement key alone, without the SHIFT key.
11.5 Moving Text
Screenwriter offers these methods of moving text around in your document:
· Cut and Paste—A two-step method. Text is removed from one location and placed on theClipboard, then Pasted into a new location.
· Copy and Paste—A two-step method. Text is left in its original location and placed on theClipboard, then Pasted into a new location.
· Drag and Drop—A one-step method. Direct movement of text without cutting or copying.
11.5.1 Cutting and Pasting with the Mouse
To cut and paste text with the mouse:
1. Select the text using one of the methods described in Selecting Text .
2. Click on the Edit menu or right click (or Ctrl+Click) on the selected text.
3. Choose Cut.
4. Click where you want the text to be inserted.
5. Click on the Edit menu or right click (or Ctrl+Click) on the selected text.
6. Choose Paste.
NOTE: If you want to insert the text from an element into a different type of element (e.g.,Action into Dialogue), choose Edit > Paste into Current Element.
11.5.2 Copying and Pasting with the Mouse
To copy and paste text with the mouse:
1. Select the text using one of the methods described in Selecting Text .
146
146
Movie Magic Screenwriter148
2. Click on the Edit menu or right click (or Ctrl+Click) on the selected text.
3. Choose Copy.
4. Click where you want the text to be inserted.
5. Click on the Edit menu or right click (or Ctrl+Click) on the selected text.
6. Choose Paste.
NOTE: If you want to insert the text from an element into a different type of element (e.g.,Action into Dialogue), choose Edit > Paste into Current Element.
11.5.3 Cutting/Copying/Pasting with the Keyboard
To cut, copy or paste text with the keyboard:
1. Select the text using one of the methods described in Selecting Text [Make this a link].
2. To Copy the text, press CMD+C on the keyboard. To Cut (move) the text, press CMD+Xon the keyboard.
3. Click where you want the text to be inserted.
4. Press CMD+V on the keyboard to paste the text.
NOTE: If you want to insert the text from an element into a different type of element (e.g.,Action into Dialogue), press CMD+OPTION+V to use the 'Paste into Current Element'command.
11.5.4 Dragging and Dropping
Text can be moved by the Drag 'N' Drop method using the mouse.
1. Select the text to move, using your preferred selection method (See Selecting Text .
2. Using the mouse, move the cursor anywhere over the selected text and press the Leftmouse button down. Hold it down.
3. While holding the Left Mouse Button down, “drag” this block across the page to its newposition. With the arrow cursor at the place you want the text inserted, release the LeftMouse Button. The text block moves to the new position.
[WINDOWS ONLY]
Breaking Elements—Screenwriter can handle Drag and Drop text, inserted in the middle ofan Element, in two different ways. Choose your preference under Tools > Options... >Mouse.
Checking the option Drag'n'drop should break Elements in middle tells Screenwriter to letDrag and Drop text Break Elements.
· If the cursor is in the middle of an Element when you release the button, Screenwriterbreaks that Element at the cursor position. Dropped text is inserted between the brokenElements.
Unchecking the option Drag'n'drop should break Elements in middle tells Screenwriter not tolet Drag and Drop text Break Elements.
146

Movie Magic® Screenwriter 6 Help 149
· If you release the Left Mouse Button while the cursor's in the First half of the Element, textis dropped Before the Element.
· If you release the Left Mouse Button while the cursor's in the Last half of the Element, textis dropped After the Element.
11.6 Deleting Text
The following delete commands remove the selected text from your document, copying it tothe Clipboard. To un-delete text you have deleted, select Edit > Undo before selecting anyother editing command.
NOTE: Select Screenwriter... > Preferences... > Keyboard to enable or change the ShortcutKeys for the Delete command.
Delete Left of the cursor by character .............. DELETE
Delete Right of the cursor by character ............ FORWARD DELETE
Delete to End of Line ........................................ CMD+OPTION+FORWARD DELETE
Delete Next Word .............................................. CMD+ FORWARD DELETE
Delete Previous Word ....................................... CMD+DELETE
11.7 Undo
To Undo a text edit, select Undo before selecting any other editing command:
Under the Edit menu, select Undo, or press CMD+Z.
Screenwriter has a multi-level undo, capable of undoing up to the last 99 editing changesyou made. It can undo cutting & pasting blocks, search & replace, and more. Screenwriterrecognizes three basic types of editing:
· Adding text (including Pasting).
· Deleting text (including cutting/deleting blocks).
· Global processing (such as search/replace, formatting changes, etc.).
11.8 Redo
To restore a text edit you've just Undone:
Under the Edit menu, select Redo, or press SHIFT+CMD+Z.
11.9 Formatting Text
Screenwriter deals with text formatting—Bold/Underline/Italics /Strikethrough—by placinghidden format codes surrounding the formatted text. One code starts the format, anotherends it.

Movie Magic Screenwriter150
In normal use, you won't need to be aware of these codes. Screenwriter's default is to HideFormat Codes. To display or hide the codes, under the View menu, select Show FormatCodes (OPTION+F3).
A checkmark appears next to it, reminding you it's on.
11.9.1 Bolding Text
To format existing text as Bold, select the text. Then:
· Click on the Bold button (labeled with a B) on the Top Toolbar. Or,
· Or, press CMD+B.
11.9.2 Underlining Text
To format existing text as Underline, select the text. Then:
· Click on the Underline button (labeled with a U) on the top toolbar.
· Or, press CMD+U.
11.9.3 Italicizing Text
To format existing text as Italic, select the text. Then:
· Click on the Italics button (labeled with an I) on the top toolbar.
· Or, press CMD+I on the keyboard.
11.9.4 Striking Out Text
To format existing text as Strikethrough, select the text. Then:
Press CMD+K on the keyboard.
11.9.5 Removing Text Formatting
Select the text to remove formatting from.

Movie Magic® Screenwriter 6 Help 151
· Click on the Normal button (label with an N) on the top toolbar.
· Or, press CMD+DASH on the keyboard.
11.9.6 Applying Multiple Text Formats
You can apply multiple formats to existing text (e.g., make text both Bold and Italicized)without re-selecting it multiple times:
Hold down the SHIFT key while applying any of the text formats. The text remainshighlighted, ready for you to apply the next format.
11.9.7 Changing Case
You can change the case of existing text without re-typing it, using these options:
· Uppercase (CTRL+U)
· Lowercase (SHIFT+CTRL+U)
· Initial Capitals
· Capitalize Word (CTRL+W)
· Cap & Bold Word (CTRL+F12)
· Lowercase Word (SHIFT+F12) (SHIFT+CTRL+W)
When Screenwriter changes the case of existing text, it retains correct capitalization for:
· Sentence beginnings
· The personal pronoun “I”
· Speaking Characters with Initial Capitals
To change the case of selected text:
1. Select the text.
2. Under the Format menu, select Change Case, then choose the desired capitalization.
To change the case of an entire Element:
1. Put the cursor anywhere in the appropriate Element.
2. Under the Format menu, select Change Case, then choose the desired capitalization.
11.9.8 Typing Accented Characters
On Mac, pressing the Option key plus another key can give you certain accents. To find outwhich keys correspond to which accents, you need to open the utility that comes with Maccall KeyCaps or Keyboard Viewer.

Movie Magic Screenwriter152
In OS 10.2, it can be found under Macintosh HD : Applications : Utilities : KeyCaps.
In OS 10.3 and above, you must enable it under Apple > System Preferences >International > Input Menu > Keyboard Viewer. Then, you will see a flag icon next to thespeaker on the top menu bar (top-right). Click that, then Show Keyboard Viewer.
Once KeyCaps or the Keyboard Viewer is open, hold down the Option key. This will giveyou a guide to which key combinations make the accents.
Examples:
To enter in an Spanish "ñ":
1. On the keyboard, press Option + n.
2. Then, hit "n" to tell the program which letter to put the accent over.
To put in a French "ç":
1. Hit Option + c.
For other accents, make sure to consult KeyCaps or the Keyboard Viewer.
11.10 Spell Check
Screenwriter's built-in Spell Check system allows you to check the spelling of your documentby:
· Word
· Element
· Page
· Forwards from the cursor position
· Entire document
Spell Check can also:
· Auto-Correct common Typos as you write
· AutoCapitalize Sentences
· AutoCapitalize the Names of Characters
· Correct Double Capitals
· Spell Check in Foreign Languages
· Create User Dictionaries for each document
You can customize Spell Check options to suit the way you work. Under the Screenwritermenu, select Preferences..., then click on the Spelling tab.

Movie Magic® Screenwriter 6 Help 153
11.10.1 Start Spell Check
Spell Check begins checking relative to the cursor position, so it is not necessary to selectthe text in order to check it.
1. Position the cursor in the word or Element you'd like to check, or directly before the wordto check.
2. Under the Tools > Spell Check menu, select the checking method to use:
· Word—Spell checks the Word where the cursor is currently located.
· Element—Spell checks the Element where the cursor is currently located.
· Page—Spell checks the current Page where the cursor is located.
· Forwards—Spell checks from the current cursor position to the end of the document.
· Entire Document—Spell checks all text in the document.
When Spell Check finds a word it doesn't recognize, displays the Found Unknown Word...window. This shows the unknown word and offers a list of suggested alternatives. OptionButtons down the right side are:
· Replace—If you find the correct spelling in the Suggestion window, click on it and itappears in the Word window, replacing the unknown spelling. Click the Replace button toreplace it in your document.
· Auto-Correct—Adds the unknown word and its correct spelling to the User Dictionarywhich will be Auto-Corrected as you type in the future if the same typo is made.(Auto-Correct must be turned on to enable Typo correction.)
· Learn—Remember this spelling for future use by adding the word to the current UserDictionary unless you specify otherwise). All documents that use that User Dictionary willrecognize the word.
Movie Magic Screenwriter154
· Skip Once—Skip over this appearance of the word, but stop at the next one.
· Ignore All—Skip over this word and all future occurrences. Ignores the word in alldocuments you check for that session until you Exit Screenwriter, or Clear the Ignore List.
· Suggest—If none of the suggested spellings for your unknown word are correct, type adifferent spelling in the Word box and Click the Suggest button to have it checked.
· Add Words to—This field allows you to change the User Dictionary. The standard“generic” dictionary is USERDICT.LXA. All Learned and Auto-Corrected words will beadded to the dictionary that is displayed in this field. Note: If the spell check is set to use alanguage other than American English then the default User Dictionary will be changedappropriately.
· Setup Options—Click this button to go to the Spelling options window where you cansetup how the Spell Check functions.
· Select Language—Click this button to select among the available language dictionaries.
11.10.2 Auto-Correct Typos
As you are writing, Spell Check can correct the most commonly-made typos for you. Forexample, “teh” is corrected to “the”, “wnat” becomes “want”, etc. This saves you the time ofgoing back and manually correcting typos, and makes any Spell Check you run go faster.
NOTE: The options below only pertain to Auto-Correction. For descriptions of all theSpelling options: See Spelling Options .
To turn Auto-Correct on:
1. Under the Screenwriter menu, select Preferences.
2. Click the Spelling button.
3. Check the Spell Check as you Type & Edit box (this must be enabled for Auto-Correctto work).
4. Check the Auto-Correct Typos as you Type box.
5. Change these other Auto-Correct settings, if desired:
· Beep on Unknown Words—Alerts you to any suspected typos that Auto-Correct isunable to correct for you.
· Prompt on Multiple Words—Gives you a choice of words when the typo could havetwo or more correct spellings. If unchecked, Auto-Correct makes the decision for you.
· Maximum—Sets the maximum word-length of typos to auto-correct. If on a slowercomputer, set this to a lower number. Screenwriter uses a default word-length of 25letters.
· Auto-Capitalize Character Names—Capitalizes the first letter of all Character Namesin Dialogue, Action, Notes and Outline elements. To be capitalized by Auto-Correct acharacter name must either have been used previously in the document, or exist in theCharacter Name User List (See Users Lists ).
243
136
Movie Magic® Screenwriter 6 Help 155
(When using names such as “Mark “or “Art” in your script, Auto-Correct also capitalizesthe words “mark” and “art”. To avoid this, use Pause Autocorrection (CTRL+ALT+S)under the Tools menu. Type the word with your desired capitalization, move past theword, then resume Auto-Correct by clicking on Pause Autocorrection again.)
· All Caps—Makes Character Names ALL CAPS wherever they appear.
The following options work both during Auto-Correct, and when you run a manual SpellCheck.
· Correct Double Capitals (e.g. "Problem)—Corrects words that start with two capitalletters instead of one, such as “Scheduling”.
· Auto-Capitalize Sentences—Capitalizes the first letter in all Sentences in Dialogue,Action, and Notes.
· Except Immediately Following Shots—Shots (also known as secondary Sluglines)can be used to emphasize an object or person, with the following Action giving moredetail. To have the combined Shot and Action read as one sentence—with the Actionsentence not capitalized—check this box.
· Auto-Space Sentences to ?? Spaces—Ensures that every sentence has a consistentnumber of spaces after the period. Set the value from 1 to 9. If you hit the space baronce the program will automatically put the set amount of spaces. (To preventauto-spacing a particular sentence, enter Hard-Spaces after the period instead ofregular spaces. Enter a Hard-Space by pressing CTRL+ALT+SPACE.)
· Treat “)” as a Sentence End in Dialogue—Treats a right parenthesis in Dialogue asa sentence end, in order to format the next sentence correctly.
6. Click on OK to return to your document.
11.10.3 User Dictionaries
The User Dictionary Editor allows you to add, remove, or change words in any of your UserDictionaries. It can be selected under Tools > Edit User Dictionary.
Next, you're asked to Select User Dictionary. User Dictionary files in American English endwith the extension .lxa. Userdict.lxa is the default dictionary. Select a dictionary and click onOK.
The User Dictionary Editor screen displays. If opening a User Dictionary for the first time, thefile is empty and ready for you to add words. Buttons below the Dictionary list show youroptions:
Import—Add words from a plain text file. Each entry has to be on its own line.
Export—Exports the dictionary being edited to a text file. Each item on the list is exportedon its own line.
Delete—In the Dictionary list, select the word you want to Delete. Click on the Delete button.The Word is removed from the list.
Add—Opens a new window to allow you to add a new word to the Dictionary list. Type the

Movie Magic Screenwriter156
word the way you want it spelled (Note: if you enter an incorrect spelling here, Spell Checkuses it. In effect, you are telling Spell Check that this is the correct spelling.) Click on the AddWord button and the word you entered appears in the Dictionary window on the left.
To allow Screenwriter to Auto-Correct a word as you're typing in a document, enter theincorrect spelling in the Word: field and correct spelling in the Replacement: field. Forexample, to Auto-Correct “Dramatica” when it's spelled as “Darmatica”, type in “Darmatica” inthe Word: field and "Dramatica" in the Replacement: field. (Note: the Auto-Correct featuremust be turned on for this to have any effect on your typing. See Auto-Correct Typos )
Click OK to save the changes, Cancel to discard.
The User Dictionary Editor does not distinguish between UPPERCASE and lowercase,adding all words as lowercase.
Edit—In the list of Dictionary words on the left, select the word you want to edit. Click on theEdit Word button. The edit window opens to allow you to edit the entry. Make the desiredchanges, then click on Click OK to save the changes, Cancel to discard.
Click on OK to save and close the Dictionary, Cancel to discard changes and exit.
11.11 Find and Replace Text
There are six commands in the Edit menu for finding and replacing text. The first fivecommands have options controlled in the Find & Replace window . The last commandopens the Change Character Name window .
· Find —Displays the Search & Replace window, with the Replace parameters grayedout. Enter the text to Search for, and define the search parameters.
· Find Next —Searches for next instance that meets the same find criteria.
· Replace —Available only after a successful Find command. Replaces the currentinstance found text with the replacement text.
· Replace & Find Next —Displays the Search & Replace menu. Enter the text to Searchfor, the text to Replace it with, and define the Search & Replace parameters.
· Replace All —Available only after a successful Find command. Replaces ALLinstances of the found text with the replacement text. This command does NOT ask forconfirmation while replacing the text in the document.
· Change Character Name —Displays a Search & Replace menu, modified for CharacterNames only. The Search for: box contains a list of available Character Names to choosefrom. Choose one, enter the new Name in the Replace with: box, and define the Search &Replace parameters.
154
157
158
157
157
157
157
157
158
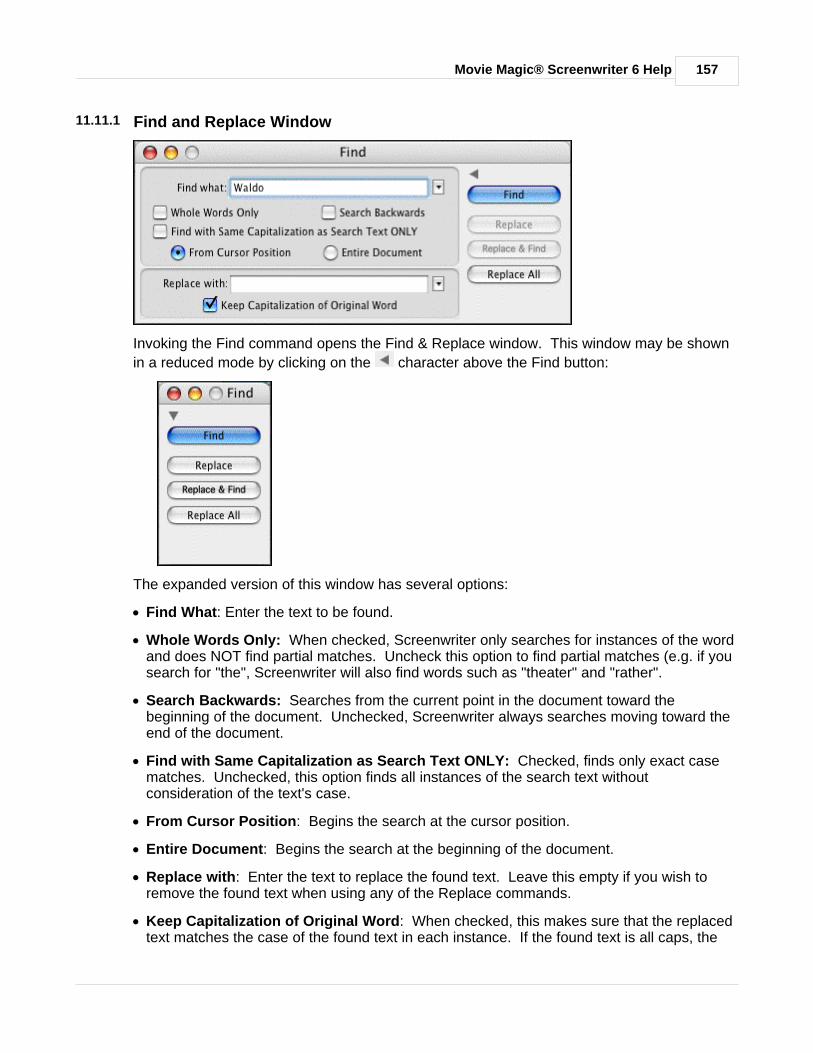
Movie Magic® Screenwriter 6 Help 157
11.11.1 Find and Replace Window
Invoking the Find command opens the Find & Replace window. This window may be shown
in a reduced mode by clicking on the character above the Find button:
The expanded version of this window has several options:
· Find What: Enter the text to be found.
· Whole Words Only: When checked, Screenwriter only searches for instances of the wordand does NOT find partial matches. Uncheck this option to find partial matches (e.g. if yousearch for "the", Screenwriter will also find words such as "theater" and "rather".
· Search Backwards: Searches from the current point in the document toward thebeginning of the document. Unchecked, Screenwriter always searches moving toward theend of the document.
· Find with Same Capitalization as Search Text ONLY: Checked, finds only exact casematches. Unchecked, this option finds all instances of the search text withoutconsideration of the text's case.
· From Cursor Position: Begins the search at the cursor position.
· Entire Document: Begins the search at the beginning of the document.
· Replace with: Enter the text to replace the found text. Leave this empty if you wish toremove the found text when using any of the Replace commands.
· Keep Capitalization of Original Word: When checked, this makes sure that the replacedtext matches the case of the found text in each instance. If the found text is all caps, the

Movie Magic Screenwriter158
replaced text will be all caps. If the found text is mixed case, the replaced text will bemixed case, etc. Unchecked, all replaced text is inserted in the case as it is typed in theReplace with: text box.
11.11.2 Change Character Name
Screenwriter handles character name elements different from normal text. Changing acharacter's name is simple. Note: When you change a character's name, it changes iteverywhere in your document.
· Search for: Pick the name you want to change from the popup menu of character names.
· Replace with: Type in a new character name. Do not worry about the case. Screenwritermatches the case wherever it replaces the old name with the new name.
· Search Backwards: When checked, Screenwriter starts the search and replace at thecurrent cursor position and moves back towards the beginning of the document. Unchecked it searches and replaces character names on its way to the end of thedocument.
· From Cursor Position: Begins the character name search and replace at the cursorposition.
· Entire Document: Begins the character name search and replace at the beginning of thedocument.
11.12 Thesaurus
Screenwriter's Thesaurus finds synonyms and related words for any word you select.
1. Select a word.
2. Under the Tools menu, select Thesaurus (CMD+J).
3. The Thesaurus window opens, with the selected word in the Head Word: field. Below, is ascrollable list of like words.
4. Double-click on the word you prefer and it appears in the Head Word: field, along with itsalternative words. Click on Replace to put the word in the Head Word: field in yourdocument in place of your original word.
You can also type a word in the Head Word: field and click on the Synonyms button to lookup like words. The <<More and More>> buttons will become available if there are more

Movie Magic® Screenwriter 6 Help 159
words than can fit in the window.

Movie Magic Screenwriter160
12 The NaviDoc
The NaviDoc
The single, biggest new feature in Movie Magic Screenwriter is the NaviDoc. The namecomes from its function: NAVI-gating the DOC-ument. Like its name implies, the NaviDoclets you move quickly around your document.
The NaviDoc has four primary panels:
· Outline Panel
· Scenes Panel
· Notes Panel
· Bookmarks Panel
Each NaviDoc panel is comprised of two parts. The top part of each panel holds theControls. The remainder of the panel is the Item List. The items in the Item List change witheach NaviDoc panel. For example, there is a scene list in the Scenes Panel, a bookmarklist in the Bookmarks Panel, a notes list in the Notes Panel, and an outline list in the OutlinePanel.
12.1 Opening and Closing the NaviDoc
There are several ways to show and hide the NaviDoc:
· Select the NaviDoc command from the View menu.
· Press CTRL+ZERO.
· Click on the NaviDoc icon located in the View toolbar located at the bottom left of thedocument window.
176
173
164
170
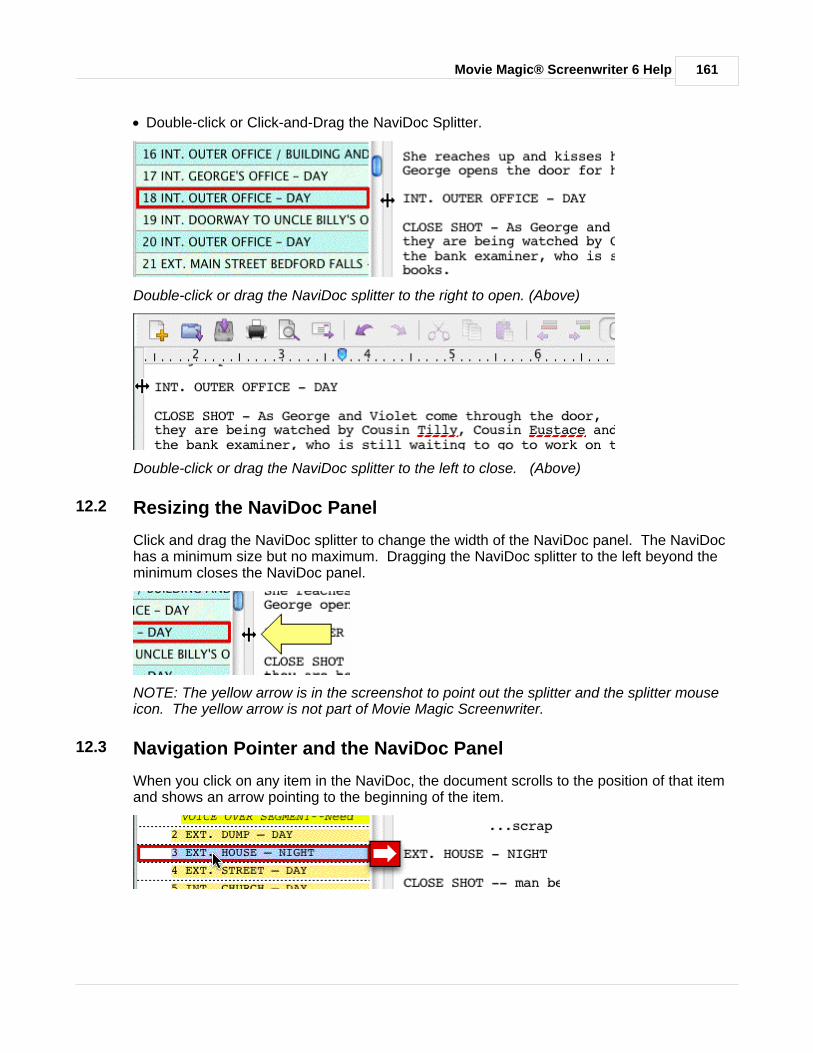
Movie Magic® Screenwriter 6 Help 161
· Double-click or Click-and-Drag the NaviDoc Splitter.
Double-click or drag the NaviDoc splitter to the right to open. (Above)
Double-click or drag the NaviDoc splitter to the left to close. (Above)
12.2 Resizing the NaviDoc Panel
Click and drag the NaviDoc splitter to change the width of the NaviDoc panel. The NaviDochas a minimum size but no maximum. Dragging the NaviDoc splitter to the left beyond theminimum closes the NaviDoc panel.
NOTE: The yellow arrow is in the screenshot to point out the splitter and the splitter mouseicon. The yellow arrow is not part of Movie Magic Screenwriter.
12.3 Navigation Pointer and the NaviDoc Panel
When you click on any item in the NaviDoc, the document scrolls to the position of that itemand shows an arrow pointing to the beginning of the item.

Movie Magic Screenwriter162
12.4 NaviDoc Keyboard Commands
Here are the six basic keyboard commands for moving around in the NaviDoc:
Top of the list ................ CTRL+HOME
Bottom of the list ........... CTRL+END
Page Up ........................ CTRL+PAGE UP
Page Down ................... CTRL+PAGE DOWN
Previous Row ................ CTRL+UP ARROW
Next Row ...................... CTRL+DOWN ARROW
12.5 The NaviDoc Menu
The NaviDoc menu contains the menu commands for working with the NaviDoc Panel. Keyboard commands for each command are listed in the menu as well. Note that most ofthe commands require using the CTRL key, such as CTRL+1 to show and hide the OutlinePanel in the NaviDoc. For more information on the specific menu commands, go to the NaviDoc menu description in the Appendices.325

Movie Magic® Screenwriter 6 Help 163
12.6 NaviDoc Options
In the Screenwriter menu select Preferences... Choose NaviDoc to bring up the options.
The NaviDoc Options are divided into four areas.
· NaviDoc Options : These options control the general appearance of the NaviDoc. Seethe General NaviDoc Options section below for details.
· Scenes Panel Options : These options control the general appearance of the ScenesPanel in the NaviDoc. See the Scenes Panel Options section for details.
· Notes Panel Options : These options control the general appearance of the Notes Panelin the NaviDoc. See the Notes Panel Options section for details.
· Bookmarks Panel Options : These options control the general appearance of theBookmarks Panel in the NaviDoc. See the Bookmarks Options section for details.
164
175
169
172

Movie Magic Screenwriter164
12.7 General NaviDoc Options
· Sync NaviDoc Row with Document: This option turns on the Sync Frame to highlightthe item in the NaviDoc list corresponding to the current location of the cursor in thedocument.
o Frame current row with this color: Sets the color of the Sync Frame.
o Use System Selection color for frame: Sets the color of the Sync Frame to the systemselection color.
· Point to Paragraph when Navigating: This option turns on the flashing pointer showingthe location of the cursor in the document after navigating in the NaviDoc.
o Flash Pointer: This option sets the number of times the pointer flashes.
o Flash Pointer “times”: This option sets the speed at which the pointer flashes—Don'tFlash, Slowly, Quickly, and Super Fast.
o Disappear after Flashing: This option sets the speed at which the pointer disappearsafter flashing—When I Type or Click, Very slow fade, Slow fade, Medium fade, Fastfade, Instantly.
· Row Height: This option controls whether the items in the NaviDoc list are uniform orvariable.
o Variable (less wasted space): This option allows varied item heights. The maximumheight is related to the item text and the number of visible lines allowed—whichever isless.
o Fixed (faster resizing on slow computers): This option sets a uniform item heightdependent on the maximum number of visible lines allowed. If an item's text is shorterthan the number of visible lines, the balance of the space is blank.
12.8 Notes Panel
The NaviDoc Notes Panel replaces the Note Commander feature in earlier versions of MovieMagic Screenwriter. The Notes Panel is used to add, remove, modify, and navigate to notesin your document. It is also used to create and control note categories (a new feature). TheNotes Panel can be displayed by clicking on the Notes tab in the NaviDoc.
The keyboard command for showing the Notes Panel is CTRL+3.

Movie Magic® Screenwriter 6 Help 165
Notes Panel Sync Frame
When you select a note in the NaviDoc, the document is scrolled to the note in the documentview. The Sync Frame, a frame drawn around the note in the NaviDoc, displays ONLY whenthe selection is within the note in the document.
The sync frame disappears if you move the text cursor out of the note in the document:
12.8.1 Notes List
The Notes List displays all notes in the document. Clicking on a note in the note list scrolls

Movie Magic Screenwriter166
the selection to that note in your document.
12.8.2 Notes Controls
The Notes Controls affect the display of notes and note text in the note list of the NotesPanel. These controls also affect the notes in the document view.
12.8.3 Notes Command Buttons
These controls are used to add and remove notes, as well as change the category of a note.
· Delete Note: Permanently removes the selected notes from the document and the noteslist.
· Add Note Element: Inserts a note in the document at the location of the cursor in thedocument and displays the note in the note list of the Notes Panel. The popup listdetermines the note style:
The keyboard command for adding a new note is CTRL+N.
12.8.4 Notes Category Controls
These controls add and remove note categories, as well as determine the note categorynames, text color, and background color. The top part of the notes category control lists theavailable note categories. The note category commands appear at the bottom of the control.
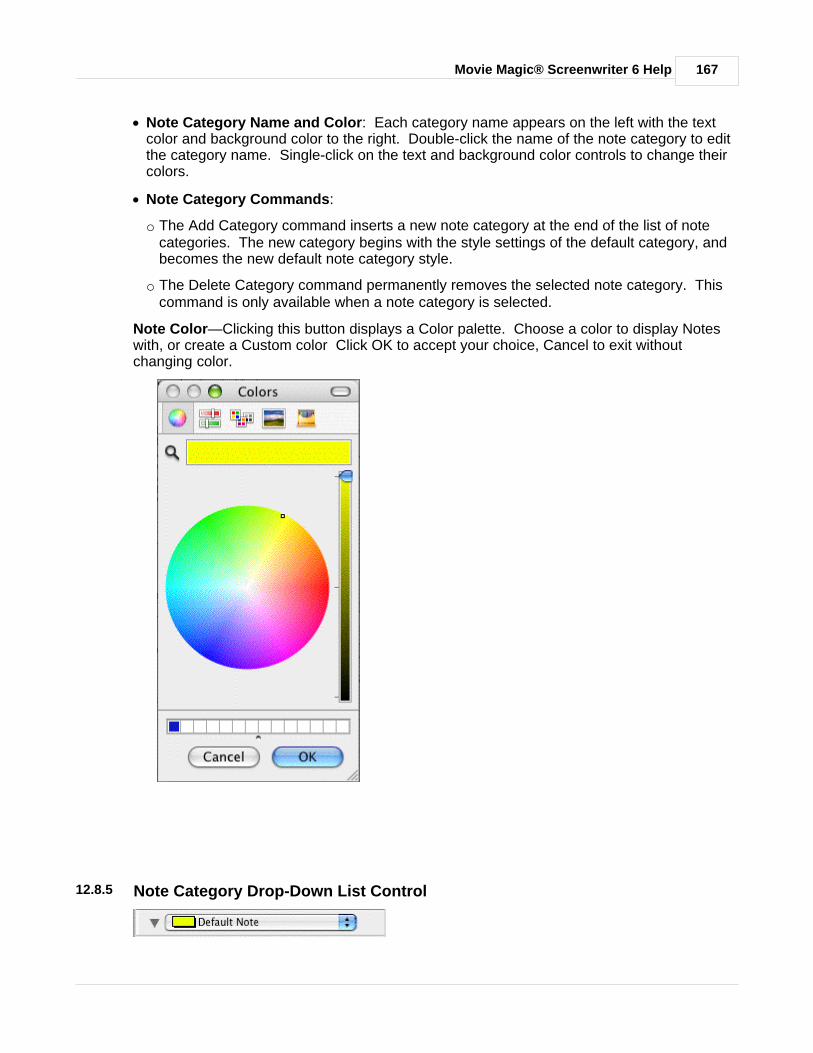
Movie Magic® Screenwriter 6 Help 167
· Note Category Name and Color: Each category name appears on the left with the textcolor and background color to the right. Double-click the name of the note category to editthe category name. Single-click on the text and background color controls to change theircolors.
· Note Category Commands:
o The Add Category command inserts a new note category at the end of the list of notecategories. The new category begins with the style settings of the default category, andbecomes the new default note category style.
o The Delete Category command permanently removes the selected note category. Thiscommand is only available when a note category is selected.
Note Color—Clicking this button displays a Color palette. Choose a color to display Noteswith, or create a Custom color Click OK to accept your choice, Cancel to exit withoutchanging color.
12.8.5 Note Category Drop-Down List Control

Movie Magic Screenwriter168
This control sets the default note category style for adding and modifying notes.
· Default Note Category: Selecting a note category in the Note Category drop-down listplaces a check mark to the left of the category and makes it the note category default. Thedefault note category style is used when new notes are added.
· New Color Category: Selecting the New Color Category option in the Note Categorydrop-down list creates a new notes category. Use the Notes Category controls to modifythe category style.
12.8.6 Show/Hide Category View in NaviDoc
This control shows or hides categories of notes in the Notes Panel. This control does notaffect the document view. Notes categories may be turned on or off individually by selectingthem from the popup list. Alternately, all categories may be shown or hidden by selectingthe appropriate option from the popup list. The default is to show all note categories in theNaviDoc Notes Panel.
12.8.7 Show/Hide Note Categories in Document
This control shows or hides categories of notes in the document. This control does not affectthe NaviDoc view. Note categories may be turned on or off individually by selecting themfrom the popup list. Alternatively, all categories may be shown or hidden by selecting theappropriate option from the popup list. The default is to show all note categories in thedocument.
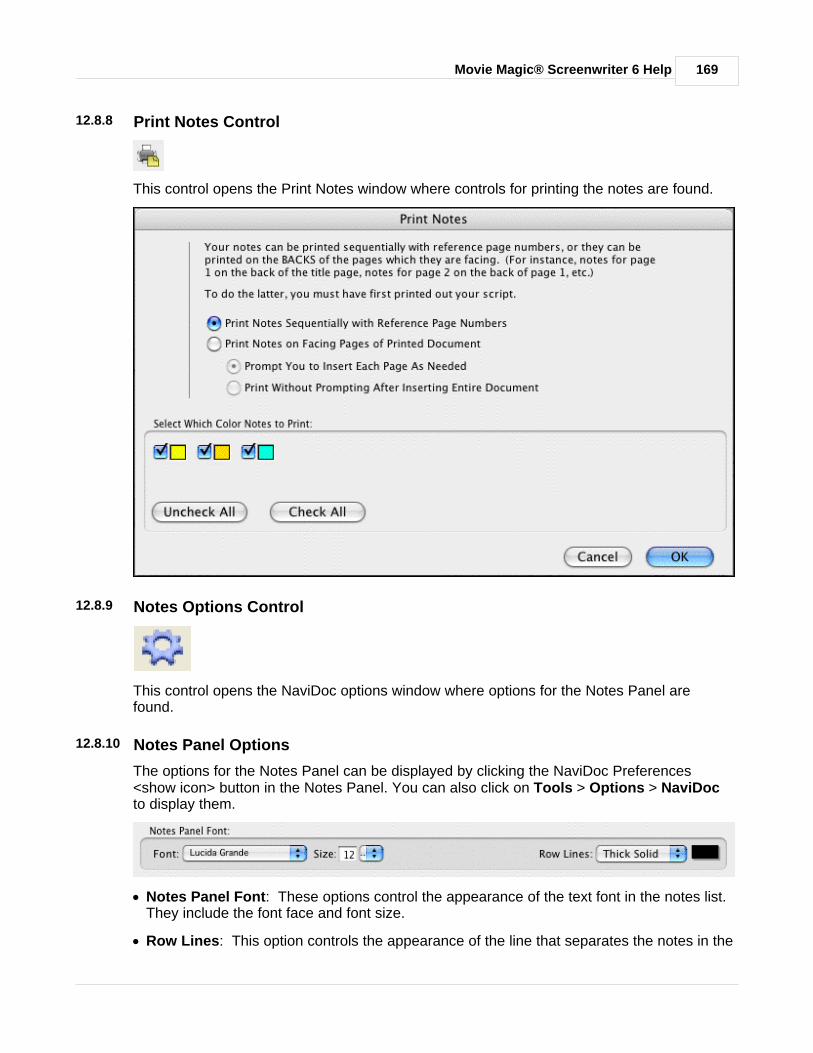
Movie Magic® Screenwriter 6 Help 169
12.8.8 Print Notes Control
This control opens the Print Notes window where controls for printing the notes are found.
12.8.9 Notes Options Control
This control opens the NaviDoc options window where options for the Notes Panel arefound.
12.8.10 Notes Panel Options
The options for the Notes Panel can be displayed by clicking the NaviDoc Preferences<show icon> button in the Notes Panel. You can also click on Tools > Options > NaviDocto display them.
· Notes Panel Font: These options control the appearance of the text font in the notes list.They include the font face and font size.
· Row Lines: This option controls the appearance of the line that separates the notes in the
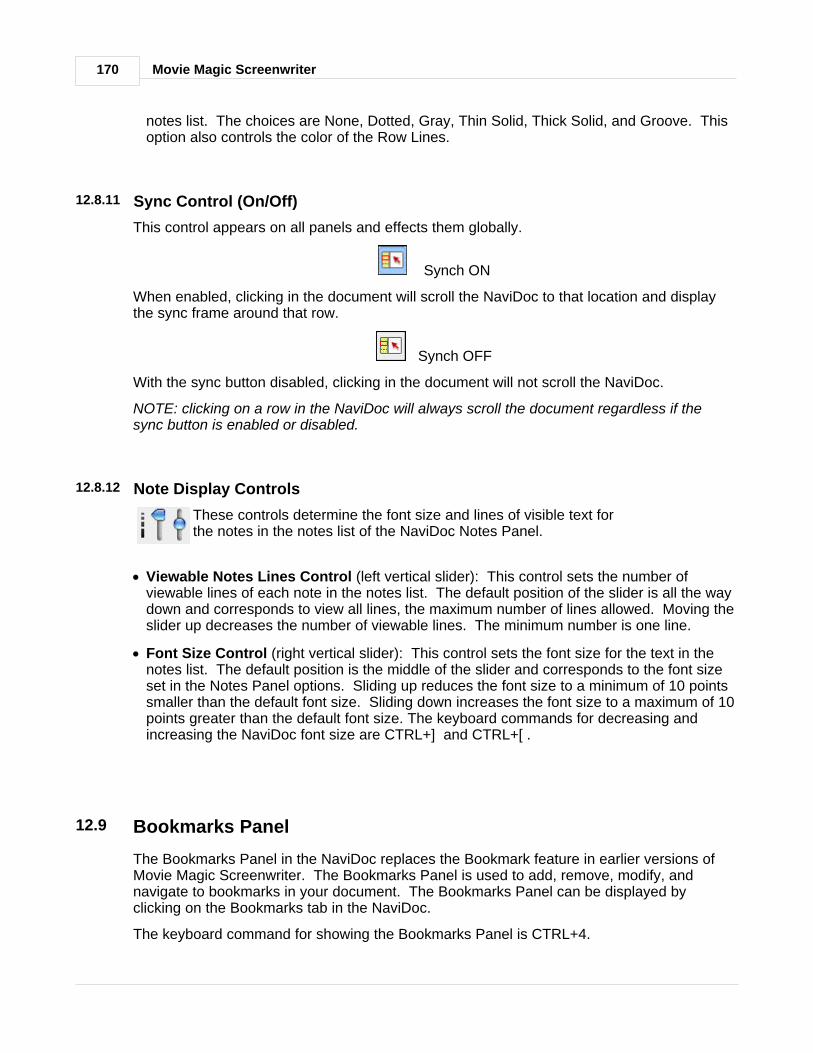
Movie Magic Screenwriter170
notes list. The choices are None, Dotted, Gray, Thin Solid, Thick Solid, and Groove. Thisoption also controls the color of the Row Lines.
12.8.11 Sync Control (On/Off)
This control appears on all panels and effects them globally.
Synch ON
When enabled, clicking in the document will scroll the NaviDoc to that location and displaythe sync frame around that row.
Synch OFF
With the sync button disabled, clicking in the document will not scroll the NaviDoc.
NOTE: clicking on a row in the NaviDoc will always scroll the document regardless if thesync button is enabled or disabled.
12.8.12 Note Display Controls
These controls determine the font size and lines of visible text forthe notes in the notes list of the NaviDoc Notes Panel.
· Viewable Notes Lines Control (left vertical slider): This control sets the number ofviewable lines of each note in the notes list. The default position of the slider is all the waydown and corresponds to view all lines, the maximum number of lines allowed. Moving theslider up decreases the number of viewable lines. The minimum number is one line.
· Font Size Control (right vertical slider): This control sets the font size for the text in thenotes list. The default position is the middle of the slider and corresponds to the font sizeset in the Notes Panel options. Sliding up reduces the font size to a minimum of 10 pointssmaller than the default font size. Sliding down increases the font size to a maximum of 10points greater than the default font size. The keyboard commands for decreasing andincreasing the NaviDoc font size are CTRL+] and CTRL+[ .
12.9 Bookmarks Panel
The Bookmarks Panel in the NaviDoc replaces the Bookmark feature in earlier versions ofMovie Magic Screenwriter. The Bookmarks Panel is used to add, remove, modify, andnavigate to bookmarks in your document. The Bookmarks Panel can be displayed byclicking on the Bookmarks tab in the NaviDoc.
The keyboard command for showing the Bookmarks Panel is CTRL+4.

Movie Magic® Screenwriter 6 Help 171
Bookmarks Panel Sync Frame
When you select a bookmark in the NaviDoc, the document is scrolled to the bookmark inthe document view. The Sync Frame, a frame drawn around the bookmark in the NaviDoc,displays ONLY when the selection is within the paragraph the bookmark points to in thedocument.
The sync frame disappears if you move the text cursor out of the paragraph in the documentpointed to by the bookmark:
12.9.1 Bookmarks List
The Bookmarks list shows a list of bookmarks you have added to your document. Clickingon a bookmark moves you to that point in your document. Double-click on a bookmark in thelist to edit its description.

Movie Magic Screenwriter172
12.9.2 Bookmarks Controls
There are several controls in the NaviDoc Bookmarks Panel.
· Add Bookmark: Adds a new bookmark to the list in the Bookmarks Panel. Whencreated, the bookmark grabs the first twenty-five characters of the element where thecursor is located in the document and allows the bookmark description to be edited. Ifdesired, change the bookmark description by typing the new text over the old. Otherwise,hit Return or click somewhere else to confirm the bookmark.
The keyboard command for adding a new bookmark is CTRL+B.
· Edit: Highlights the description text of the selected bookmark to allow it to be modified orcompletely changed. Double-clicking a bookmark also allows it to be edited.
· Remove: Permanently deletes the selected bookmark. This command does not affect thedocument text.
· Sync Control (On/Off): This control appears on all panels and effects them globally.
ONWhen enabled, clicking in the document will scroll the NaviDoc to that location and displaythe sync frame around that row.
OFFWith the sync button disabled, clicking in the document will not scroll the NaviDoc. NOTE:clicking on a row in the NaviDoc will always scroll the document regardless if the syncbutton is enabled or disabled.
12.9.3 Bookmarks Panel Options
The options for the Bookmarks Panel can be displayed by clicking the NaviDoc Preferences<show icon> button in the Bookmarks Panel. You can also click on Tools > Options >NaviDoc to display them.
· Bookmarks Panel Font: These options control the appearance of the text font in thebookmarks list. They include the font face, font size, font color, and font background color.
· Row Lines: This option controls the appearance of the line that separates the bookmarksin the bookmarks list. The choices are None, Dotted, Gray, Thin Solid, Thick Solid, andGroove. This option also has a control for the color of the Row Lines.

Movie Magic® Screenwriter 6 Help 173
12.10 Scenes Panel
The NaviDoc Scenes panel replaces the Scene Pilot feature in earlier versions. It is used tomove through your document quickly. The Scenes panel is reached by selecting the ScenesTab in the NaviDoc panel.
The keyboard command for showing the Scenes Panel in the NaviDoc is CTRL+2.
Scenes Panel Sync Frame
When you select a scene in the NaviDoc, the document is scrolled to the beginning of thescene in the document view. The Sync Frame, a frame drawn around the scene in theNaviDoc, displays always when the selection is anywhere within a scene in the document.
Scene List

Movie Magic Screenwriter174
The Scene List displays all items in the document designated as a Scene Heading. Clickingon a scene in the scene list scrolls the document to that scene heading. When the textselection is within the scene heading of the document, the scene heading in the scenes listis outlined and highlighted. When the text selection is anywhere else within the scene in thedocument, the scene heading in the scene list is outlined but not highlighted.
12.10.1 Scene Controls
The Scene Controls affect the display of the scene list in the Scenes Panel. These controlsdo not affect the document.
12.10.2 Sort Scenes Control
This control changes the display of the scene order in the Scenes Panel based on theparameters chosen. Scenes may be sorted by Scene Number, Interior/Exterior, Location, orTime-of-Day.

Movie Magic® Screenwriter 6 Help 175
12.10.3 Scene Header View Control
This control shows or hides scene heading elements in the scene list of the Scenes Panel.Scenes headings may show or hide scene numbers, interior and exterior designation, ortime-of-day.
12.10.4 Scene Element Spacing Control
ON OFF
This control shows spacing between scene elements. When ON it puts double-spacingbetween scene elements in the Outline Panel. When OFF it puts single-spacing betweenscene elements in the Outline Panel
Note: The effects of this control are visible only when multiple scene lines are visible. SeeViewable Scene Lines Control .
12.10.5 Sync Control (On/Off)
This control appears on all panels and effects them globally.
Synch ON
When enabled, clicking in the document will scroll the NaviDoc to that location and displaythe sync frame around that row.
Synch OFF
With the sync button disabled, clicking in the document will not scroll the NaviDoc.
NOTE: clicking on a row in the NaviDoc will always scroll the document regardless if thesync button is enabled or disabled.
12.10.6 Scenes Panel Options
· Scenes Panel Font: These options control the appearance of the text font in the scenelist. They include the font face, font size, font color, and font background color.
176
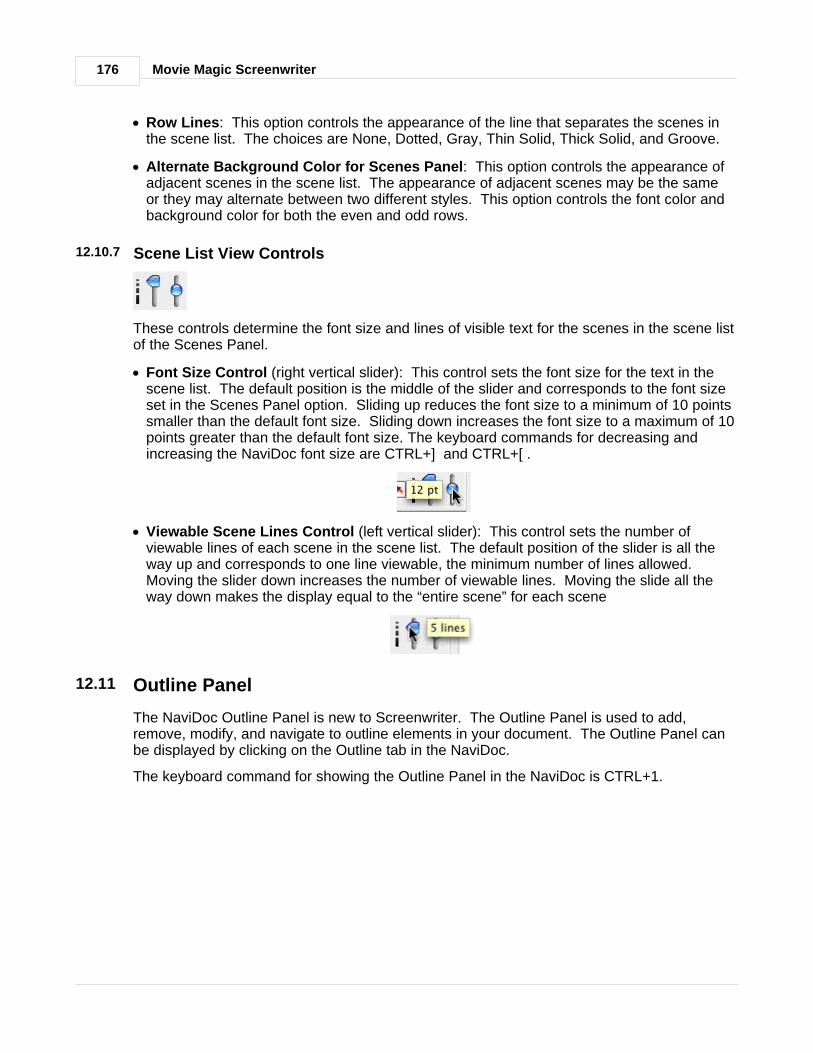
Movie Magic Screenwriter176
· Row Lines: This option controls the appearance of the line that separates the scenes inthe scene list. The choices are None, Dotted, Gray, Thin Solid, Thick Solid, and Groove.
· Alternate Background Color for Scenes Panel: This option controls the appearance ofadjacent scenes in the scene list. The appearance of adjacent scenes may be the sameor they may alternate between two different styles. This option controls the font color andbackground color for both the even and odd rows.
12.10.7 Scene List View Controls
These controls determine the font size and lines of visible text for the scenes in the scene listof the Scenes Panel.
· Font Size Control (right vertical slider): This control sets the font size for the text in thescene list. The default position is the middle of the slider and corresponds to the font sizeset in the Scenes Panel option. Sliding up reduces the font size to a minimum of 10 pointssmaller than the default font size. Sliding down increases the font size to a maximum of 10points greater than the default font size. The keyboard commands for decreasing andincreasing the NaviDoc font size are CTRL+] and CTRL+[ .
· Viewable Scene Lines Control (left vertical slider): This control sets the number ofviewable lines of each scene in the scene list. The default position of the slider is all theway up and corresponds to one line viewable, the minimum number of lines allowed. Moving the slider down increases the number of viewable lines. Moving the slide all theway down makes the display equal to the “entire scene” for each scene
12.11 Outline Panel
The NaviDoc Outline Panel is new to Screenwriter. The Outline Panel is used to add,remove, modify, and navigate to outline elements in your document. The Outline Panel canbe displayed by clicking on the Outline tab in the NaviDoc.
The keyboard command for showing the Outline Panel in the NaviDoc is CTRL+1.

Movie Magic® Screenwriter 6 Help 177
12.11.1 Outline List
The Outline List displays all outline elements and notes in the document. Clicking on anoutline element in the outline list scrolls the document to that outline element. Use themouse, NaviDoc menu, or keyboard commands to navigate the Outline List
12.11.2 Outline Controls
The Outline Controls affect the display and organization of the outline elements in theOutline Panel. These controls can affect the styles of outline elements in the document viewdepending on the setting of the Outline preferences (Tools > Options... > Outline).179

Movie Magic Screenwriter178
12.11.3 Outline Levels Control
This control Includes or Excludes outline levels in the Outline Panel. Outline levels may beturned on or off individually by selecting them in this control. Alternately, all outline levelsmay be Included or Excluded by selecting the appropriate option in this control. The defaultis to Include all outline levels in the Outline Panel.
· If outline and document elements are set to expand/collapse together (Tools > Options >Outline), this control will affect both the NaviDoc view and document view.
· If outline and document elements are set to expand/collapse independently (Tools >Options > Outline), this control will only affect the NaviDoc view.
See Outline Panel Options .
12.11.4 Style View Control
This control Expands or Collapses all outline elements and notes in the NaviDocview. This control does not affect the document view. Outline elements and notes may beexpanded or collapsed individually by clicking on their tree view control (plus box or minus
box ) in the outline list.
12.11.5 Outline Spacing Control
ON OFF
This control shows spacing between elements. When ON it puts double-spacing between
179

Movie Magic® Screenwriter 6 Help 179
scene elements in the Outline Panel. When OFF it puts single-spacing between sceneelements in the Outline Panel.
Note: The effects of this control are visible only when multiple Scene Lines are visible.
See Outline View Controls .
12.11.6 Outline Options Control
This control opens the Outline options window where options for the Outline Panel are found.
12.11.7 Outline Panel Options
· Expanding & Collapsing Outline Elements: These options control the conformity andvisibility of the outline list with the document (and vice versa).
· Outline Panel Font: These options control the appearance of the text font in the outlinelist. They include the font face, font size, font color, and font background color. Theseoptions only affect the outline list text if the “Use this Font for all Outline Items” box is
181

Movie Magic Screenwriter180
checked. When not checked, each outline item uses its own document font style.
· Row Lines: This option controls the appearance of the line that separates the outlineitems in the outline list. The choices are None, Dotted, Gray, Thin Solid, Thick Solid, andGroove.
· Note Colors in Outline View: This option controls the appearance of notes in the outlinelist. The choices are Same color as Note in document, and Single color based on OutlineStyle.
· Spaces to indent Outline Levels: This option controls the indent distance betweenoutline levels. The default is two spaces.
· Reduce Indention for Unused Levels: This option controls the overall indent of theoutline list based on the visibility of each outline style. When checked, hidden outlinestyles do not indent the outline list. When unchecked, outline styles are indented based ontheir placement in the outline hierarchy regardless of visibility. Hiding specific outlinestyles does not affect the visible outline elements in the outline list of the NaviDoc OutlinePanel.
· Allow Dragging Outline Rows: These options control moving outline items around viathe NaviDoc Outline Panel. It has two options:
o Up/Down moves rows—This option controls whether or not moving items is allowed inthe NaviDoc Outline list. Dragging a selected item up in the NaviDoc moves the itemabove other rows, earlier in the document. Dragging a selected outline item down in theNaviDoc moves the item below other rows, later in the document.
o Left Promotes row, Right Demotes row—This option controls whether or not reassigningoutline styles (by dragging) is allowed in the NaviDoc Outline list. Moving an outline itemto the left in the NaviDoc promotes the item to an outline element style higher up in theoutline hierarchy. Moving an outline item to the right in the NaviDoc demotes the item toan outline element style lower down in the outline hierarchy.
· Allow Sounds for Outline Drag & Drop: These options control sounds associated withvarious actions made within the NaviDoc Outline panel.
12.11.8 Scene Heading Field View Control
This control shows or hides parts of the Scene Heading elements (Scene Numbers, Interiorand Exterior, or Time-of-Day) in the outline list of the Outline Panel.
12.11.9 Sync Control (On/Off)
This control appears on all panels and effects them globally.
ON
When enabled, clicking in the document will scroll the NaviDoc to that location and display

Movie Magic® Screenwriter 6 Help 181
the sync frame around that row.
OFF
With the sync button disabled, clicking in the document will not scroll the NaviDoc.
NOTE: clicking on a row in the NaviDoc will always scroll the document regardless if thesync button is enabled or disabled.
12.11.10 Outline View Controls
These controls determine the font size and lines of visible text for the outline styles in theoutline list of the Outline Panel.
· Set number of Scene lines (left vertical slider): This control sets the number ofviewable lines of each Scene Heading in the outlines list. The default position of the slideris all the way up and corresponds to one line viewable, the minimum number of linesallowed. Moving the slider down increases the number of viewable lines. NOTE: Themaximum number of lines viewable is determined by the scene content.
· Set number of Outline item lines (middle vertical slider): This control setsthe number of viewable lines of each outline element in the outline list. The defaultposition of the slider is all the way up and corresponds to one line viewable, the minimumnumber of lines allowed. Moving the slider down increases the number of viewable lines.
· Scale font size (right vertical slider): This control sets the font size for thetext in the outline list. The default position is the middle of the slider and corresponds tothe default font size set in the Outline Panel options. Moving the slider up reduces the fontsize to a minimum of 10 points smaller than the default font size. Moving the slider downincreases the font size to a maximum of 10 points greater than the default font size.
The keyboard commands for decreasing and increasing the NaviDoc font size are CTRL+] and CTRL+[ .

Movie Magic Screenwriter182
12.11.11 Current Element Drop-Down List
This control located in the toolbar at the top of the document window sets the outline style ofthe current paragraph in the document view. It is an easy way to assign or reassign anoutline style. The current style is identified by a check mark. If the selection is not an outlinestyle, no check mark is shown. The NaviDoc menu also has commands for setting outlinestyle assignments.
12.11.12 Outline Style Management Control
Use the Format > Element Styles… command and select Outline Styles, or use theNaviDoc > Create / Edit Outline Styles... command to open the Outline Styles FormatTable. This table controls the list and format of all available outline styles.
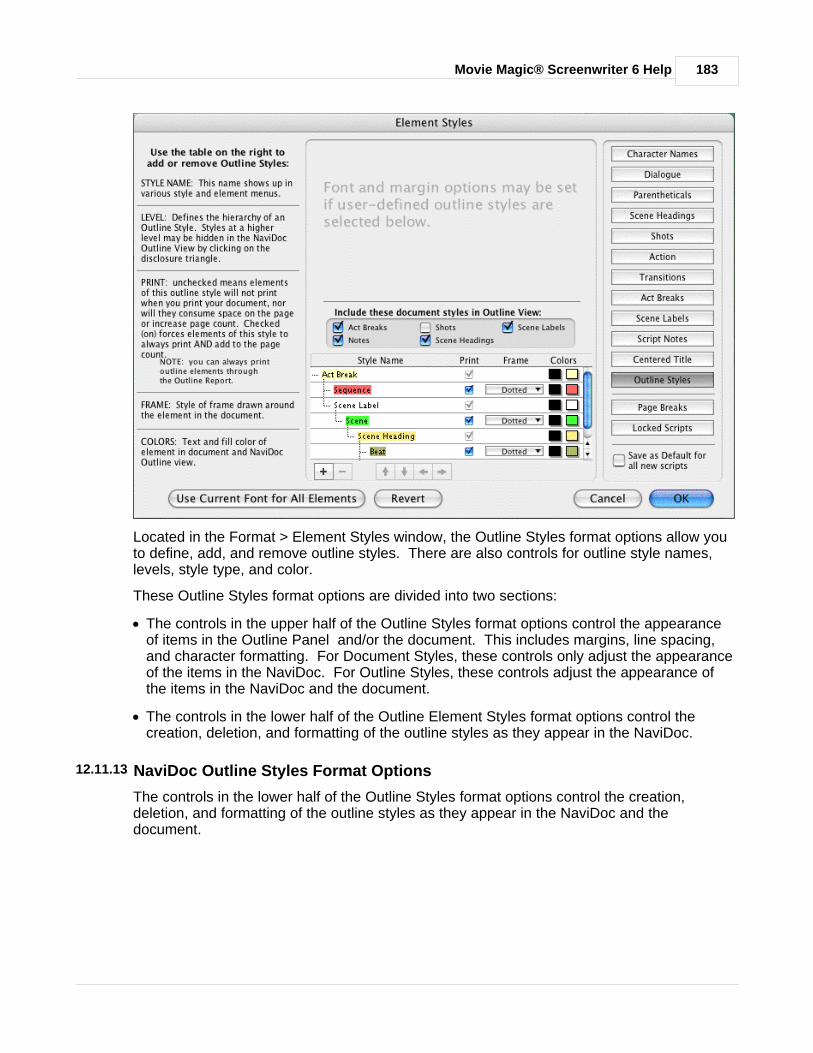
Movie Magic® Screenwriter 6 Help 183
Located in the Format > Element Styles window, the Outline Styles format options allow youto define, add, and remove outline styles. There are also controls for outline style names,levels, style type, and color.
These Outline Styles format options are divided into two sections:
· The controls in the upper half of the Outline Styles format options control the appearanceof items in the Outline Panel and/or the document. This includes margins, line spacing,and character formatting. For Document Styles, these controls only adjust the appearanceof the items in the NaviDoc. For Outline Styles, these controls adjust the appearance ofthe items in the NaviDoc and the document.
· The controls in the lower half of the Outline Element Styles format options control thecreation, deletion, and formatting of the outline styles as they appear in the NaviDoc.
12.11.13 NaviDoc Outline Styles Format Options
The controls in the lower half of the Outline Styles format options control the creation,deletion, and formatting of the outline styles as they appear in the NaviDoc and thedocument.
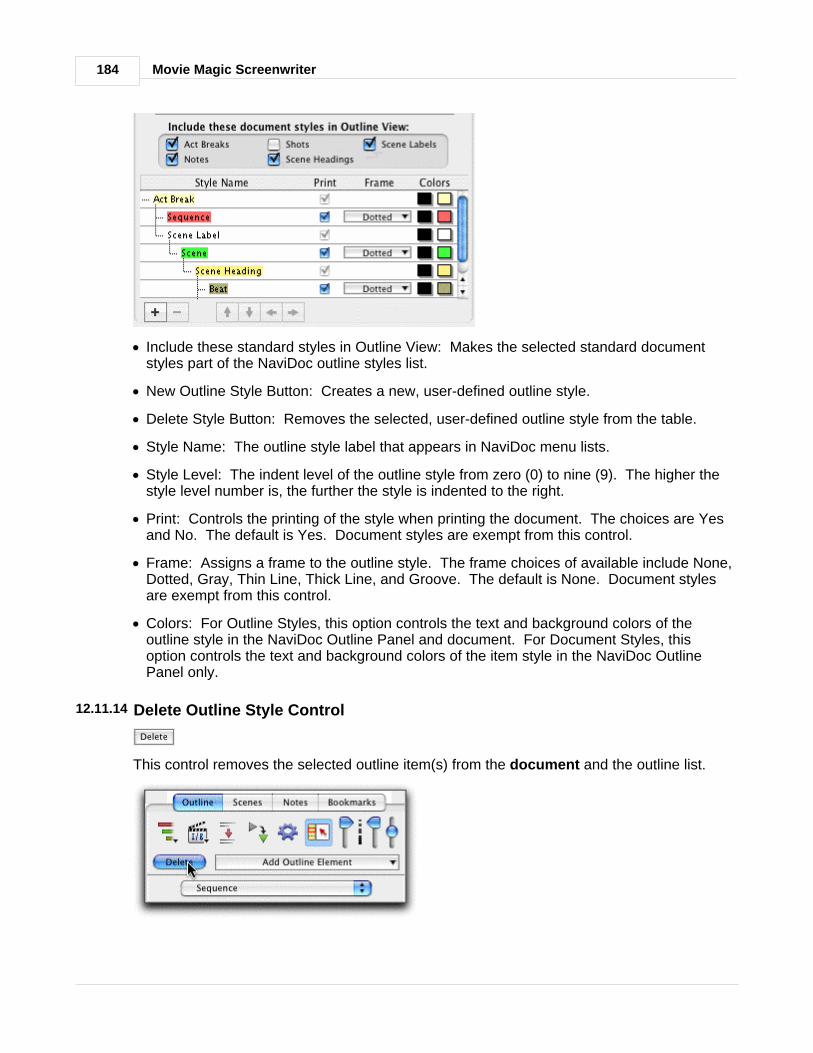
Movie Magic Screenwriter184
· Include these standard styles in Outline View: Makes the selected standard documentstyles part of the NaviDoc outline styles list.
· New Outline Style Button: Creates a new, user-defined outline style.
· Delete Style Button: Removes the selected, user-defined outline style from the table.
· Style Name: The outline style label that appears in NaviDoc menu lists.
· Style Level: The indent level of the outline style from zero (0) to nine (9). The higher thestyle level number is, the further the style is indented to the right.
· Print: Controls the printing of the style when printing the document. The choices are Yesand No. The default is Yes. Document styles are exempt from this control.
· Frame: Assigns a frame to the outline style. The frame choices of available include None,Dotted, Gray, Thin Line, Thick Line, and Groove. The default is None. Document stylesare exempt from this control.
· Colors: For Outline Styles, this option controls the text and background colors of theoutline style in the NaviDoc Outline Panel and document. For Document Styles, thisoption controls the text and background colors of the item style in the NaviDoc OutlinePanel only.
12.11.14 Delete Outline Style Control
This control removes the selected outline item(s) from the document and the outline list.

Movie Magic® Screenwriter 6 Help 185
When deleting an outline element, you are given two choices:
· Delete the entire scene, or Delete entire element and it's children: This option removes theoutline element and everything "contained" within the element.
· Delete the scene heading only, or Delete the parent element only: This option ONLYremoves the selected outline item and leaves all other material untouched.
12.11.15 Add Outline Element Control
This control inserts a new outline item into the document and the outline list. The outlinestyle, selected from the list of available styles, determines the type of outline item added tothe document. The NaviDoc menu also has commands for setting outline style assignments.
The keyboard command for adding elements—including outline items—is F4.

Movie Magic Screenwriter186
12.11.16 Outline Styles Format Options
The upper part of the Outline Styles format options controls how the styles appear in thedocument.
· Margins (in Inches): These controls adjust the left and right margin indent (measured indecimal inches), and whether the text is Justified.
· Line Spacing (in Lines): These controls adjust the line spacing before the outlineelement, and the space between lines within the element. The measurements are indecimal inches.
· Text Format Options. These controls set the outline style's font, font size, and font styles(all capitalized letters, bold, italics, and underline). The font name is displayed using thesettings chosen.
12.11.17 Using the NaviDoc Outline Panel to Move Outline Elements in the Document
The NaviDoc Outline Panel scene list may be used to move outline elements in the list viaDrag and Drop. When you move an outline element in the NaviDoc Outline Panel outline

Movie Magic® Screenwriter 6 Help 187
list, the corresponding material is moved in the document. The following example moves aNote outline element.
o Select the outline item to be moved.
o Click and drag your cursor UP or DOWN the list. In this example, the note is moved fromScene 6 to just before scene 8.
o Release the mouse button to drop the outline element at the position indicated by the boldline. The item is always moved in the document to the point immediately before the outlineelement below the bold line.
NOTE: The Outline Styles options have several options that control how you can moveoutline elements.
12.11.18 Using the NaviDoc Outline Panel to Reassign Outline Element Styles in theDocument
The NaviDoc Outline Panel scene list may be used to promote and demote outline elementsin the list via Drag and Drop. When you reassign an outline element's style via drag anddrop in the NaviDoc Outline Panel outline list, the style of the corresponding material isreassigned in the document. The following example promotes a Note outline element to aSequence.
o Select the outline item to be promoted or demoted.

Movie Magic Screenwriter188
o Click and drag your cursor LEFT (promote) or RIGHT (demote) in the list. In this example,the Note is promoted four levels to Sequence. The small tic-marks indicating the numberof style promotions.
o Release the mouse button to drop the outline element at the position indicated by theflyover text. The item in the document is automatically reassigned to the new style.
NOTE: The Outline Styles options have several options that control how you can moveoutline elements.
12.11.19 A Note About Copying Styles Between Documents
The rules for copying outline styles between documents are very simple: If the style name ofthe source Outline Elements (copied) matches the style name in the destination (pasted)EXACTLY, the destination's style will be used. If not, the entire style will be “copied” overfrom the source document and created in the destination document. This means if you copya “beat” from a document with ten Outline Styles to a document with one outline style, the“beat” style will be created. No other styles will be copied unless you actually copy overelements with that style (same as MS-Word).
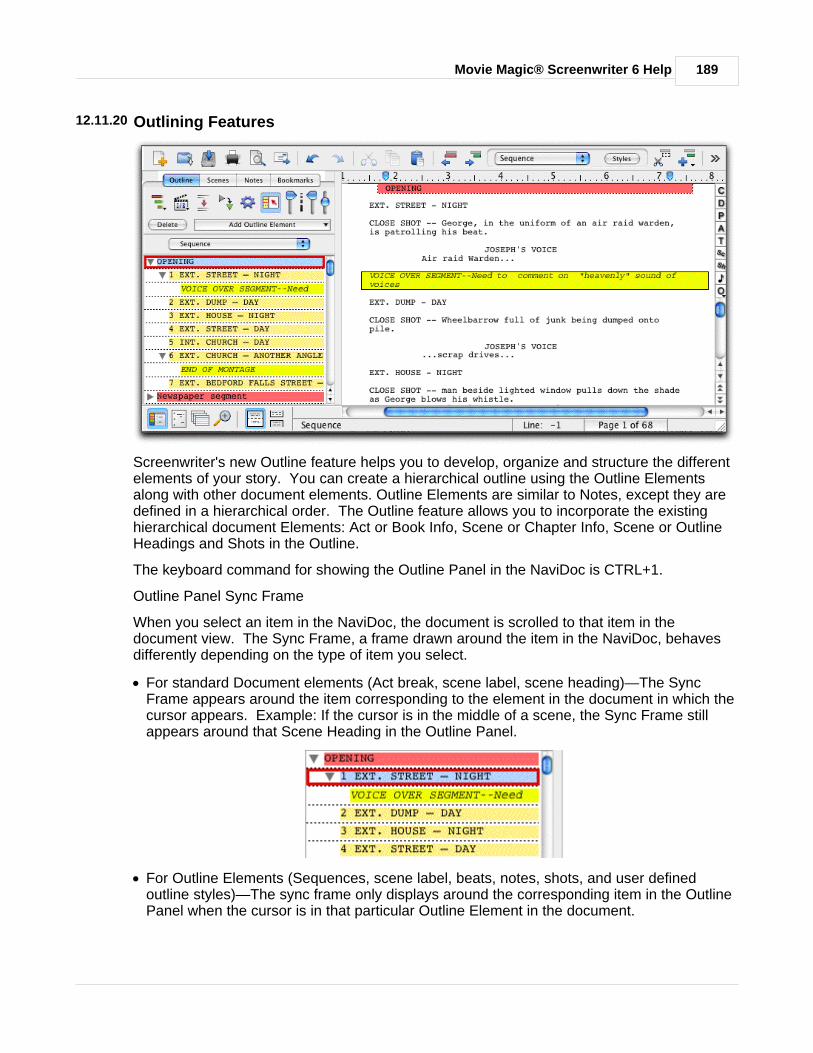
Movie Magic® Screenwriter 6 Help 189
12.11.20 Outlining Features
Screenwriter's new Outline feature helps you to develop, organize and structure the differentelements of your story. You can create a hierarchical outline using the Outline Elementsalong with other document elements. Outline Elements are similar to Notes, except they aredefined in a hierarchical order. The Outline feature allows you to incorporate the existinghierarchical document Elements: Act or Book Info, Scene or Chapter Info, Scene or OutlineHeadings and Shots in the Outline.
The keyboard command for showing the Outline Panel in the NaviDoc is CTRL+1.
Outline Panel Sync Frame
When you select an item in the NaviDoc, the document is scrolled to that item in thedocument view. The Sync Frame, a frame drawn around the item in the NaviDoc, behavesdifferently depending on the type of item you select.
· For standard Document elements (Act break, scene label, scene heading)—The SyncFrame appears around the item corresponding to the element in the document in which thecursor appears. Example: If the cursor is in the middle of a scene, the Sync Frame stillappears around that Scene Heading in the Outline Panel.
· For Outline Elements (Sequences, scene label, beats, notes, shots, and user definedoutline styles)—The sync frame only displays around the corresponding item in the OutlinePanel when the cursor is in that particular Outline Element in the document.
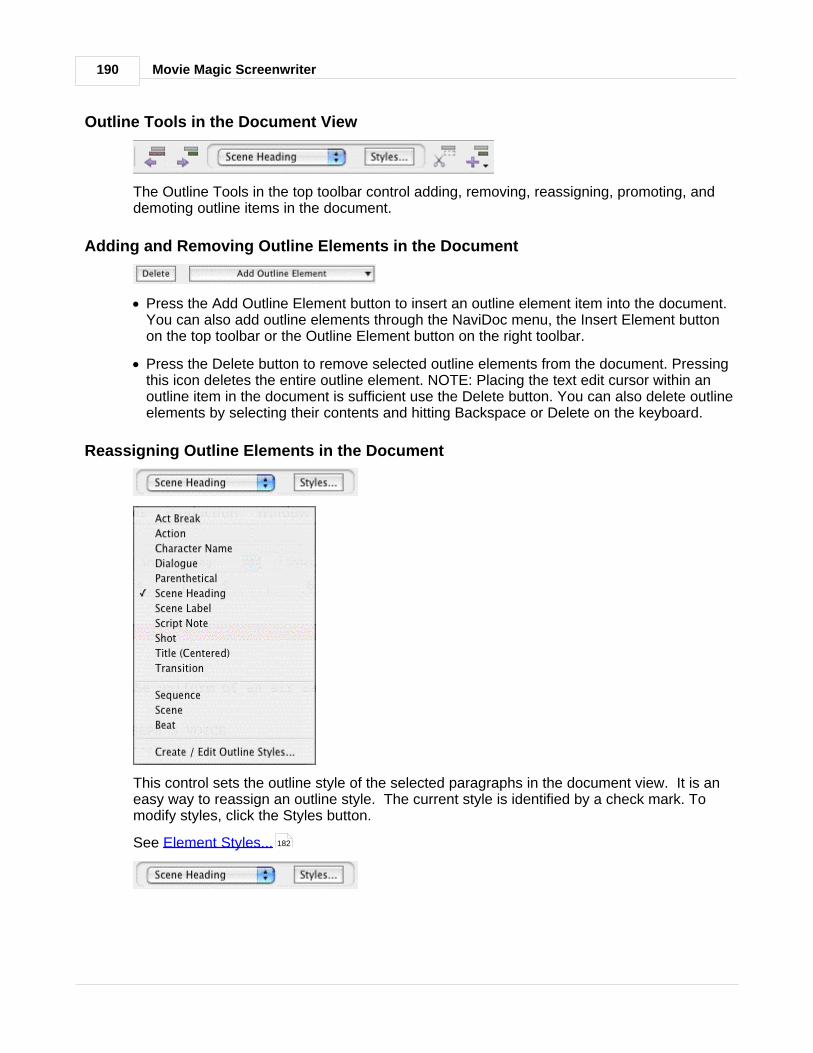
Movie Magic Screenwriter190
Outline Tools in the Document View
The Outline Tools in the top toolbar control adding, removing, reassigning, promoting, anddemoting outline items in the document.
Adding and Removing Outline Elements in the Document
· Press the Add Outline Element button to insert an outline element item into the document.You can also add outline elements through the NaviDoc menu, the Insert Element buttonon the top toolbar or the Outline Element button on the right toolbar.
· Press the Delete button to remove selected outline elements from the document. Pressingthis icon deletes the entire outline element. NOTE: Placing the text edit cursor within anoutline item in the document is sufficient use the Delete button. You can also delete outlineelements by selecting their contents and hitting Backspace or Delete on the keyboard.
Reassigning Outline Elements in the Document
This control sets the outline style of the selected paragraphs in the document view. It is aneasy way to reassign an outline style. The current style is identified by a check mark. Tomodify styles, click the Styles button.
See Element Styles... 182

Movie Magic® Screenwriter 6 Help 191
Promoting and Demoting Outline Elements
These icons change the outline style of selected outline items based on the style's position inthe Outline Styles table.
· Click on the Promote button (Left Arrow) to promote (move to a greater level in thehierarchy) the outline element by assigning the style above the current style in the OutlineStyles table. The keyboard command for promoting an outline element is ALT+LEFTARROW.
· Click on the Demote button (Right Arrow) to demote (move to a lesser level in thehierarchy) the outline element by assigning the style below the current style in the OutlineStyles table. The keyboard command for demoting an outline element is ALT+RIGHTARROW.

Movie Magic Screenwriter192
13 Printing the Document
Before printing a document, there needs to be at least one printer specified in the Mac OS Xcontrol panel. With only one printer connected, Mac OS X automatically selects it as thedefault.
13.1 Page Setup
Screenwriter uses Mac OS X's Page Setup screen to let you choose default settings for allyour printing in Screenwriter.
Under the File menu, select Page Setup.
The Print Setup screen displays, with the name of your currently selected printer in the"Format for:" popup list.
· To select another printer, scroll through the list of connected printers in the "Format for:"popup list and click on your choice.
· Select a Paper Size. US Letter is the standard 8-1/2" by 11" paper used for screenplaysin the United States. International paper size is generally A4 (210mm x 297mm).
· Select a Paper Orientation. Portrait is the standard orientation for printing 8-1/2 by 11screenplay pages.
· Click on OK to save your default settings or Cancel to exit and discard changes.

Movie Magic® Screenwriter 6 Help 193
13.2 Document Layout
Document Layout gives you control over how your document text displays onscreen andprints on the page. Changing margins and line spacing can increase or decrease the whitespace on your pages, shortening or lengthening your document's page count.
This practice is commonly known as “cheating.” Cheating your text by an amount thatdrastically changes the look of the page is not recommended. It will be obvious toexperienced readers that your document doesn't conform to the standard format they expect,which times out to 1 minute of screen time per page. For screenplays that times out to one(1) minute of screen time per page.
Choices you make here apply to the currently open document. You can also set them as thedefault for new documents.
Under the Format menu, select Document Layout.
The Setup Document Layout screen displays:
At the left of the screen is a Sample Page, showing how a typical page will look with thecurrent settings. Adjustments made to the Top Margin, Bottom Margin, or BindingAdjustment change the Sample Page display.
Top Margin—This is the fixed space between the top edge of the page and the first line ofthe Page Header . Adjustable in increments of 1/10 of an inch, from 0.3 to 5 inches.
Bottom Margin—This is the minimum amount of space between the last line of Text on thepage (not including Bottom Scene Continueds) and the bottom edge of the page. Adjustablein increments of 1/10 of an inch, from 0.3 to 5.0 inches.

Movie Magic Screenwriter194
Binding Adjustment—Left and Right Margins are determined by the Element Styles of thedocument template you're currently using. The Binding Adjustment allows you to add to orsubtract from the leftmost Margin, shifting all the pages' text left or right without changing thewidth of its elements. Adjustable in increments of 1/10 of an inch, from -0.5 to 5.0 inches.
Text Line Spacing—Sets the amount of white space between consecutive lines of text inthe same paragraph. Entering a value of less than 100%—for example, 95%—can fit 2 or 3extra lines of text on each page, and make your document perhaps 2 or 3 pages shorter. Adjustable in single percentage points, from 85% to 115%.
Blank Line Spacing—Sets the size of the blank line spacing that Screenwriter placesbetween elements. This can be set slightly lower than Text Line Spacing and still lookacceptable. Below 90%, it becomes noticeable to the reader. Adjustable in singlepercentage points, from 85% to 115%.
Macintosh Compatibility Mode—Used for moving a document back and forth betweenMovie Magic Screenwriter for PC and Movie Magic Screenwriter for Macintosh. This featureensures that you cannot use cheating functions that are not compatible across the twoplatforms.
Approximate # of Lines on Page—As you make changes to the Margins and Line Spacingitems above, this number recalculates the number of lines that can fit on your page. Itassumes you're using Courier 12 point font, and will be inaccurate if you mix fonts or sizes.
Current Total Page Count—As you make changes to the Margins and Line Spacing itemsabove, this number recalculates the number of pages in your document. It assumes you'reusing Courier 12 point font, and will be inaccurate if you mix fonts or sizes.
Stretch Short Pages to Fill—Screenwriter's rules for page breaking (as set on the PageBreak screen of Format > Element Styles) can result in pages with more white space at thebottom, known as short pages. Check this box to have Screenwriter “stretch” the text onshort pages to make them look more like regular pages.
· Short by a min. of ?? lines—Enter the minimum number of lines a page must be shortbefore it will be stretched. Accepts values between 1 and 10, with a default of 3.
· Stretch by a max. of ?? lines—Enter the maximum number of lines to stretch a page by.Accepts values between 1 and 10, with a default of 3.
Save as Defaults for New Documents—If checked, all new documents will have theseDocument Layout settings as the default.
Document Font Size—You can adjust the size of the printed text from 85% to 115%. Theinitial size of text is chosen in the Format > Element Styles... window. Changing the size willeffect how many lines fit on the page.
13.3 Header and Footer...
To print the same text across the top of each page—such as Page Numbers, Dates,Act/Scene Text—use Header lines 1 and 2. To print the same text across the bottom ofeach page, use the Footer line.
Under the Format menu, select Header and Footer....
The Header and Footer screen displays:
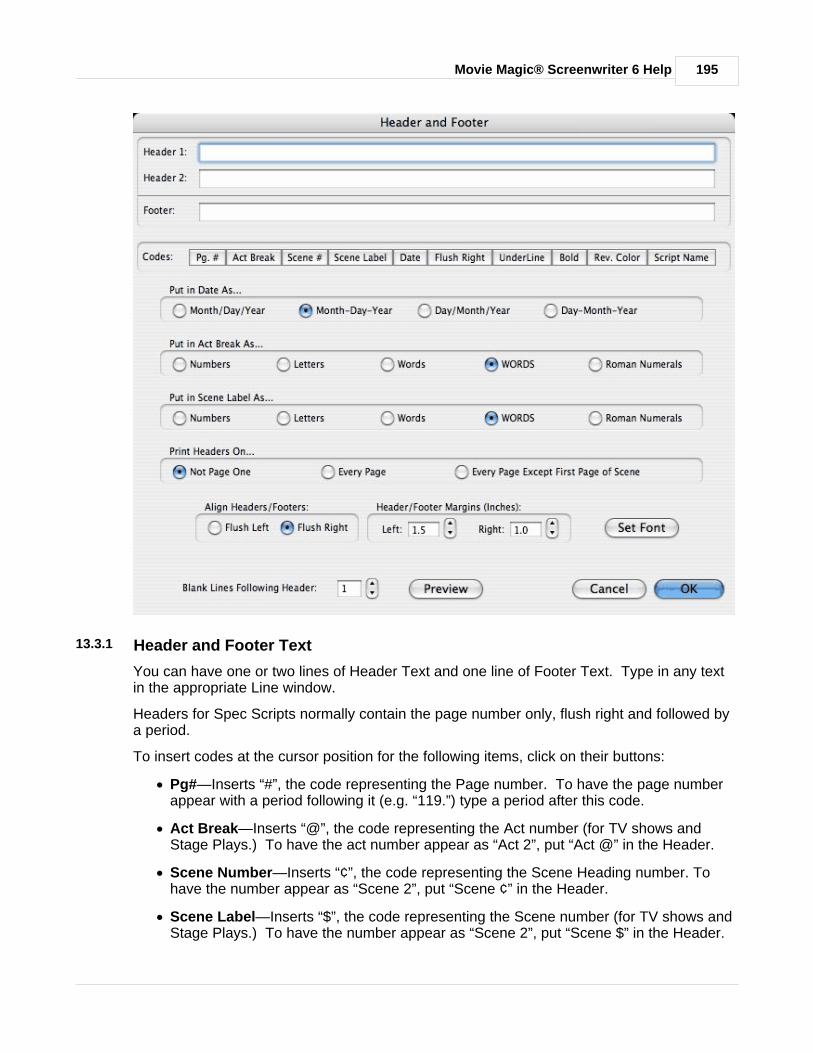
Movie Magic® Screenwriter 6 Help 195
13.3.1 Header and Footer Text
You can have one or two lines of Header Text and one line of Footer Text. Type in any textin the appropriate Line window.
Headers for Spec Scripts normally contain the page number only, flush right and followed bya period.
To insert codes at the cursor position for the following items, click on their buttons:
· Pg#—Inserts “#”, the code representing the Page number. To have the page numberappear with a period following it (e.g. “119.”) type a period after this code.
· Act Break—Inserts “@”, the code representing the Act number (for TV shows andStage Plays.) To have the act number appear as “Act 2”, put “Act @” in the Header.
· Scene Number—Inserts “¢”, the code representing the Scene Heading number. Tohave the number appear as “Scene 2”, put “Scene ¢” in the Header.
· Scene Label—Inserts “$”, the code representing the Scene number (for TV shows andStage Plays.) To have the number appear as “Scene 2”, put “Scene $” in the Header.

Movie Magic Screenwriter196
· Date—Inserts “%”, the code representing the current date.
· Rev. Color—Inserts “~”, the code representing the Revision Draft Color for revisedpages.
· Flush Right—Inserts “^”, the code telling Screenwriter to align the text following it flushwith the Right Margin. To have some items align flush left and others align flush right,insert this code between them (for example, “Act @^Page #.” would place “Act 2” flushleft and “Page 3.” flush right).
· Underline—Insert “{“ to start underlining, and “}” to end underlining.
· Bold—Insert “<“ to start underlining, and “>” to end underlining.
To enter the character that represents a code in the Header—such as the # sign to make itsay “Act # 6”—enter the code twice, as in “Act ## @”.
Screenwriter's default is to keep blank spaces in Header Line 2, and print it as a blank line.Text you enter in Line 2 replaces the spaces, and print accordingly.
13.3.2 Put in Date As...
Selects a format for the Date appearing in Header and/or Footer Text. Click on theappropriate radio button to select:
· Month/Day/Year—Standard American format (3/15/2009)
· Month-Day-Year—American with dashes (3-15-2009)
· Day/Month/Year —Standard International Format (15/3/2009)
· Day-Month-Year —Standard International with dashes (15-3-2009)
13.3.3 Put In Act Break As...
Selects a format for Act Break when it appears in the Header and/or Footer Text. Click onthe appropriate radio button to select:
· Numbers (1,2,3..)
· Letters (A, B, C...)
· Words (One, Two, Three...)
· WORDS (ONE, TWO, THREE...)
· Roman Numerals (I, II, III...)
13.3.4 Put In Scene Label As...
Selects a format for Scene Label when it appears in the Header and/or Footer Text. Clickon the appropriate radio button to select:
· Numbers (1,2,3..)
· Letters (A, B, C...)

Movie Magic® Screenwriter 6 Help 197
· Words (One, Two, Three...)
· WORDS (ONE, TWO, THREE...)
· Roman Numerals (I, II, III...)
13.3.5 Print Headers On...
Determines on which pages you want the Header and Footer Text to print. Click on theappropriate radio button to select:
· Not Page One—Header Text will be printed on every page except Page One. This is theaccepted standard for Screenplays.
· Every Page—Header Text will be printed on every page including Page One.
· Every Page Except first Page of Scene—Header Text will not be printed on the first pageof a new Scene or Act. Used in some TV shows, as the Act Break/Scene Label is alreadydisplayed.
13.3.6 Align Headers/Footers
Items in Header and Footer Text can be aligned flush with the right margin, flush with the leftmargin, or a combination of the two. Click on the appropriate radio button to select:
· Flush Left at Margin—Aligns Header and Footer Text flush with the Left margin, using thedefault Left margin selected in Document Layout. Enter a new Left margin for Header andFooter Text only, if desired. Accepts values in 1/10” increments, between 0.3 and 8.0.
· Flush Right at Margin—Aligns Header and Footer Text flush with the Right margin, usingthe default Right margin selected in Document Layout. Enter a new Right margin forHeader Text only, if desired. This is Screenwriter's default for Header and Footer Textalignment. Accepts values in 1/10” increments, between 0.3 and 8.0.
To have some items align flush left and others align flush right, insert a Flush Right code (^)between them. For example, “Act @^Page #.” would place “Act 2” flush left and “Page 3.”flush right on the same line.
13.3.7 Blank Lines following Header
Select the number of blank lines to insert between the Header Text and the page's first lineof documenttext (or Top Scene Continued). Default is 1 blank line.
13.3.8 Preview
Click this button to see a Print Preview of the current page, showing your Header and FooterText. Click on the appropriate button for:
· Print—Disabled when previewing from the Header/Footer window. (Normally, it sends theonscreen page to the printer, formatted exactly as it looks but at 100% size.).
· Prev.—Goes to the previous page in the document.
· Next—Goes to the next page in the document.

Movie Magic Screenwriter198
· Close—Exits the Print Preview screen.
· 1 Page—Displays one page at a time onscreen.
· 2 Pgs—Displays two pages at a time onscreen.
· Setup Document Layout—Disabled when previewing from the Header/Footer window.(Normally, it goes to the Document Layout screen (see above), displaying your actualdocument page instead of a non-printable sample page.
· Zoom In—Displays the sample page larger onscreen. You can also left-click on thesample page to zoom in.
· Zoom Out—Displays the sample page smaller onscreen. You can also right-click on thesample page to zoom out.
13.4 Printing the Document
Printing in Screenwriter is accessed through the Print Window.
Under the File menu, select Print.
You will see the following window. Check one of the print selection radio buttons on the tophalf of the screen. Screenwriter's default is to select Current Page.
· Current Page—If selected, prints the page that the cursor is currently on.
· Forwards—If selected, prints from the current page through to the end of the document.
· Entire Document—If selected, prints the entire document. If you have created a title pagein the Title Page Publisher, it is also printed.
· Selected Text—If checked, prints the text block you have selected in your document. Ifno text is selected, this option is grayed out and unselectable.

Movie Magic® Screenwriter 6 Help 199
· Selected Pages—If selected, prints the Pages you select. Enter the page numbers in thesame order they appear in the document (i.e. lower numbers first).
Enter individual page numbers separated by commas (1,3,32)
Enter a section of consecutive pages using a dash between the first and last page(45-78) or (89-end)
Or combine the two methods (1,3,32,45-78,89-end)
· Selected Scenes—If selected, prints the Scenes you select. Enter the scene numbers inthe same order they appear in the document (i.e. lower numbers first).
Enter individual scene numbers separated by commas (1,3,32)
Enter a section of consecutive scenes using a dash between the first and last scene(45-78) or (89-end)
Or combine the two methods (1,3,32,45-78,89-end)
List—Click on this button to see a List Menu of all the scenes in your document withtheir Scene Headings.
Select a scene by clicking on it.
De-select a scene by clicking on it again.
OK—Click OK when done to confirm your selections.
· Dialogue—If selected, displays a Dialogue Selection menu. Check a radio button toselect the kind of Dialogue to print, and select one or more Character Names.
Dialogue With Reference Page Numbers and Statistics—If checked, prints adialogue report with page number references and statistics about the number ofspeeches, words, sentences, and sentence length for each character.
NOTE: If you select all characters, a screen displays asking if you'd like to printcharacters' dialog in Script order rather than printing all of one character's dialogue at atime. If you click on Yes, your Dialogue report will not contain any statistics. If you clickon No, statistics will appear in your printed report.
Dialogue With Cues for Actors—If checked, prints all the dialogue for selectedcharacters along with—either a Dialogue Cue preceding the speech (if available), orthe preceding line of Action.
Entire Scenes that ANY of the Selected Character(s) is/are in...—If checked,scans the document and finds only those scenes where At Least One of yourselected characters is present. Those scenes are automatically placed in theSelected Scenes window, ready to be printed.
Entire Scenes that ALL of the Selected Character(s) is/are in...—If checked,scans the document and finds only those scenes where All of your selectedcharacters are present. Those scenes are automatically placed in the SelectedScenes window, ready to be printed.
Dialogue Numbered/Laid Out for Animation Recording Scripts—If checked,prints dialogue only with each speech numbered sequentially.

Movie Magic Screenwriter200
Animation Recording Script Format - Asterisked Speeches Only—If checked,prints dialogue only with each speech numbered sequentially—but only Reviseddialogue speeches, which have Asterisks in their right margin.
Select Names—Click on one or more Character Names in this window to print theirdialogue. Click on a name again to de-select it.
Select All—Click on this button to select all Character Names in your document.
Clear Selected—Click on this button to de-select all Character Names you haveselected.
Click on OK to save your Dialogue selection and return to the Print menu, or Cancelto discard your selection.
· Character List—If selected, prints an alphabetical list of all Character Names in thedocument.
· Scene List—If selected, prints a list of numbered scene headings in script order.
· Production Breakdowns—If selected, displays the Production Breakdown Print menuwhen you click on the OK button. See the Production Breakdown Print menu section,below.
· Notes—If selected, prints all Notes with the page numbers they appear on. When youclick on the OK button, a Notes Print menu displays:
Print Notes Sequentially with Reference Page Numbers—Prints a separate Notesreport of all notes listed in sequence with the page numbers they refer to.
Print Notes on facing pages of document (already printed document)—Printseach Note opposite the page it refers to, on the back of the previous page.
Have it Prompt you to Insert Each Page as needed—Only asks you to insertthe page preceding a Note, so it can print the note for the following page. Requires you to insert pages one at a time.
Print without Prompting (requires you to insert entire document)—Requiresyou to insert the entire document, including a Title Page. Screenwriter only printson those pages that have a Note on the following page.
Select Which Color Notes to Print—If you have more than one color of Note in yourdocument, check the colored boxes for the notes you want to print.
· Revision—If checked, prints pages based on your selection:
Asterisked Pages—If checked, prints only those pages which have Current RevisionMarks on them, and any A-Pages immediately following them.
NOTE: If you're working in a Locked script with Draft Revision Colors, this displays a list
Movie Magic® Screenwriter 6 Help 201
of Revision Colors, as in the pictured example.
· Print in Reverse Order—Prints your selection in reverse order, starting with the highestnumbered pages/scenes.
· Run SmartCheck before this Print Job—If checked, SmartCheck checks your documentfor common formatting errors before printing. (If you have set SmartCheck to always runbefore printing —in Options… under the Tools menu—it is checked here. Turn it off forthis print job only by unchecking the box.)
· Print Title Page—If checked, prints the title page at the head of the script. Only availableif you have created a Title Page in the Title Page Publisher. Selecting an Entire Documentto print automatically checks this box and prints the Title Page.
· Preview—Click this button to see a Print Preview of the current selection, in WYSIWYGformat. Click on the appropriate button for:
Print—Sends the onscreen page to the printer, formatted exactly as it looks (but at100% size).
Prev.—Goes to the previous page in the document.
Next—Goes to the next page in the document.
Close—Exits the Print Preview screen, back to the Print Selection menu.
Zoom In—Displays the document page larger onscreen. Cycles through 53%, 93%,133%, 173%, 213%, 253% of actual page size.
Zoom Out—Displays the document page smaller onscreen. Cycles through 53%,93%, 133%, 173%, 213%, 253% of actual page size.
13.5 Production Breakdowns Print Window
Selecting Print Standard Breakdowns... from the Production > Breakdowns... menu (or fromFile > Print > Production Breakdowns) displays the Production Breakdowns Print window,which looks like the following:

Movie Magic Screenwriter202
13.5.1 Production Breakdowns Print Options
Breakdowns can be sorted before printing, using Primary and Secondary Sort criteria:
Sort Breakdown Primarily by...
Script Order—Prints a breakdown of all scenes in the order they appear in the document(without any sorting).
Interior VS. Exterior—Lists all the EXT. scenes, followed by all the INT. scenes.
Location—Lists by Location in alphabetical order, grouping all scenes that take place in thesame Location.
Time-of-Day—Lists by Time-of-Day in alphabetical order, grouping all scenes that have thesame Time-of-Day.
Characters
· All—Lists Every Character Name in the document in alphabetical order, followed by thescenes they're in (whether they have dialogue or not).
· Some—Lists Selected Character Names in alphabetical order, followed by the scenes they're in (whether they have dialogue or not). Checking this radio button and pressing OKbrings up a Select Names screen. Click on a name to select it, and Double-Click on thetop bar of the Select Names screen to return to the Production Breakdowns menu.
NOTE: If you select any Primary sort other than Script Order, Time-of-Day

Movie Magic® Screenwriter 6 Help 203
Normalization is performed—any scene that ends with CONTINUOUS, LATER, orSAME TIME is automatically given the previous Scene Heading's Time-of-Day.
· Movie Magic Scheduling (File)—Prints a breakdown to disk, saving it as a Movie MagicScheduling import file. It contains the Scene Number, Scene Heading, and Starting PageNumber and page count in Eighths of a page. Options under Secondary Sort andMiscellaneous is grayed out and unselectable.
· Script Breakdown Sheets—Prints breakdown sheets that include any items you havetagged in Breakdown Tagging. Checking this radio button and clicking on the OK buttondisplays the:
Production Breakdowns scene selection screen—here you can enter the ProductionCompany name and Production Title/No. to print on the breakdown sheets, andselect which scene breakdowns to print:
· Selected Scenes ONLY—If checked, only breakdowns for the scenes youselect by clicking on them are printed.
· All Scenes—If checked, breakdowns for all scenes in the document areprinted.
· All Scenes except OMITTEDs—If checked, breakdowns for all scenes exceptthose deleted and marked with an OMITTED are printed.
· Setup Breakdown Sheet—Clicking on this button displays the BreakdownSheet Layout screen. Category headings on the windows can be renamed byhighlighting the name (CAST, STUNTS, etc.) and typing in your preferredname. Categories of tagged items (Cast Members, Greenery, Vehicles, etc.)can be moved between Category windows by dragging and dropping. Click onOK to exit and save your changes, Cancel to discard changes and exit.
13.5.2 Secondary Sort by... Example
Secondary sort order allows you to specify how you want the scenes sorted within thePrimary groupings of Interior VS. Exterior, Location, Time-of-Day, or Characters. Forexample, Interior VS. Exterior as the Primary sort and Script Order as a Secondary sortwould give this kind of breakdown:
EXTERIOR
1 HOSPITAL -- DAY 1-2 1 1/8
4 PARK -- DAY 4-4 2/8
5 HOSPITAL -- EVENING 4-5 6/8
--------
2 1/8
INTERIOR
2 HOSPITAL -- DAY 2-2 3/8
3 EMERGENCY ROOM -- DAY 2-3 5/8
6 EMERGENCY ROOM -- EVENING 5-5 2/8
--------

Movie Magic Screenwriter204
1 2/8
With Location as the Secondary sort, the same document would breakdown with thelocations grouped together alphabetically:
EXTERIOR
1 HOSPITAL -- DAY 1-2 1 1/8
5 HOSPITAL -- EVENING 4-5 6/8
4 PARK -- DAY 4-4 2/8
--------
2 1/8
INTERIOR
3 EMERGENCY ROOM -- DAY 2-3 5/8
6 EMERGENCY ROOM -- EVENING 5-5 2/8
2 HOSPITAL -- DAY 2-2 3/8
--------
1 2/8
13.5.3 Secondary Sort by... Production Breakdown Print Options
· Script Order—First groups all scenes in the Primary sort order, then in the order theyappear in the document (without any sorting).
· Interior VS. Exterior—First groups all scenes in the Primary sort order, then sorts allExterior scenes before Interiors within each group.
· Location—First groups all scenes in the Primary sort order, then sorts all Locationsalphabetically within each group.
· Time-of-Day—First groups all scenes in the Primary sort order, then sorts alphabeticallyby Time-of-Day within each group.
· Calculate Eighths by...—Specifies how Screenwriter should define an 1/8th of a page.Historically, an 1/8th of a page was one inch (6 lines). Nowadays writers are allowingmore than 48 lines on a page, so Screenwriter gives you a choice between the standard1/8th or a “truer” 1/8th.
Standard- 6 lines = 1/8th of a Page—If checked, defines an eighth of a page as 1”(6 lines). If you have more than 8” of text on a page, however, it's possible for a pageto calculate as longer than 8/8ths—giving inaccurate page counts.
Adjusted - 7 lines = 1/8th of a Page—If checked, defines an eighth of a page as thetotal allowable lines on a page divided by eight. When rounded, this equals 7 lines.
· Display Eighth Totals...—Specifies how Screenwriter should calculate the totals for eachSort grouping. If the displayed totals for each scene are added, their roundingaccumulates too—leading to an inaccurate total.
· Totals of All Rounded Eighths—If checked, rounds the displayed totals for each scene

Movie Magic® Screenwriter 6 Help 205
into eighths before adding them.
For example, a group has Scene 5 with 39 lines and Scene 7 with 50 lines in it. Youhave specified 6 lines per eighth. For Scene 5, it calculates 39 divided by 6 =6.5/8ths, which rounded upwards becomes 7/8ths. Scene 7 is calculated as 50divided by 6 = 8.33/8ths or 1 and 0.33/8ths, which rounded upwards becomes1-1/8ths. The total of Scenes 5 & 7 calculates as 7/8ths +1-1/8ths = 2-0/8ths.
· True Total of All Lines—If checked, the actual numbers of lines in each scene are added,then rounded into eighths to give a more accurate total.
In our previous example, the total of the lines from Scenes 5 & 7 is 89. And 89divided by 6 is 14.83/8ths—or 1-6.83/8ths—which rounded upwards comes out to1-7/8ths.
13.5.4 Miscellaneous Production Breakdown Print Options...
· List Characters in Each Scene—If checked, lists all the characters (whether they havedialogue or not) directly underneath each Scene Heading in the breakdown. Listingoptions are:
· Sorted Alphabetically—If checked, lists characters in each scene alphabetically.
· Script Order—If checked, lists characters in each scene in the order in which they appear.
· Speaking Characters First—If checked, lists characters in each scene in the order inwhich they speak in that scene, followed by character with no dialogue.
· User List Order—If checked, lists characters in each scene with those from User Listsfirst, then all others alphabetically.
· List Non-Speaking Characters—If checked, lists characters who are mentioned in Actionor Dialogue, but who have no dialogue of their own. Unchecked, only characters withdialogue are listed.
· Each Group on New Page—If checked, starts a new page for each new group.
· Print Tagged Items—If checked, prints—or exports—all tagged items along with the otherbreakdown information.

Movie Magic Screenwriter206
14 Other Screenwriter Features
Screenwriter has tow specialized features for working with your script. They are:
· iPartner
· Speak Text
· Send As Email Attachment
· Document Analysis
· Name Bank
14.1 iPartner
Whether you're across the building, or across the world, Movie Magic Screenwriter'siPartner™ feature lets you and a partner view, write, edit and chat over the same script as ifyou were in the same room together.
iPartner™ requires a standard internet connection through a non-proxy server on bothcomputers, and we highly recommend at least a high-speed Internet connection or directnetwork connection, although a 56k dial-up connection will work. See the sectionTrouble-Shooting iPartner for more technical details.
iPartner™ major features include:
· The ability to allow you to view and edit a document on your partner's computer and viceversa.
· The ability to communicate with your partner through a typing in a “chat” window.
· The ability to speak and hear your partner (requires compatible sound card andmicrophone; only available on Mac-to-Mac or PC-to-PC connections).
· The ability to transfer documents back and forth.
· The ability to “synchronize documents”.
14.1.1 Connecting to iPartner
Select the iPartner™ command from the Tools menu to use this powerful tool to collaboratewith a writing partner over the internet.
When you run iPartner™ you'll see the following screen, which displays your unique IPAddress and Port Number.
206
212
219
220

Movie Magic® Screenwriter 6 Help 207
IP Address
In order to connect with your partner one of you will need to know the other's IP. If you havea Static (fixed) IP address (if connected by network, or some high speed Internetconnections), you can give the IP address to your writing partner and they will be able to usethat address anytime they want to connect to you.
If you are connecting via a Dial-up connection, meaning your computer calls your InternetProvider every time you wish to connect to the internet, your IP will change each time youconnect to the Internet. This means one of you will need to communicate the other's IPaddress to the other person every time. You can do this by one of the following ways.
· Calling the person on the telephone.
· Sending the IP to them in a text message on their mobile phone.
· Sending the IP via an instant message service such as: AOL instant Messenger, YahooInstant Messenger, MSN Messenger, Google Talk, ICQ, etc..
· E-mailing the IP address. However, this can take as long as a day depending on youre-mail provider.
“Enter Partner's IP” or “Let Partner do it”—This allows you and your partner to enter eachother's IP address for iPartner to make a connection. Click “Enter Partner's IP” if you wish toenter your Partner's IP address to connect or if “Let Partner do it” if you wish to have yourpartner enter your IP address. Whichever one you choose, your partner will need to choosethe other one in order for a connection to be made. Who ever initiates the connection doesnot affect how iPartner performs, both people will have the same privileges and capabilities.
Trouble-Shooting—This button will bring up a text screen with known issues; helpful tips aswell information on problems with connecting and using iPartner
Cancel—This will close the iPartner window and return you to your document.
Connect on port number #—This is the TCP port that iPartner uses to connect with. Bydefault it should be 2200. For more info see Trouble-shooting iPartner [make this a link to

Movie Magic Screenwriter208
Movie Magic® Screenwriter 6 Help > Other Screenwriter Features > iPartner™ > iPartner -Trouble Shooting - Known Issues].
14.1.2 The Chat Window
Once you and your partner are connected, you both will see a Chat Window, which generallylooks like the following, though of course the exact text will vary.
The top area of the chat window is the message area where you will see messages fromyour partner and you as well as occasional system messages.
The bottom area of the chat window is a text entry window where you can type messages tosend to your partner.
The B U I N style Buttons between the two windows allow you to change the style of thetext you send to BOLD, Underline, Italics and Normal respectively.
The small window below the text entry window is where you specify your name as it willappear in your partner's Chat window. You can change the name by simply typing a newname in this window. All previous names are remembered and are accessible by clicking onthe down arrow to open the popup list.
Send Script / Document—Allows you to send the current active document in your programto your partner. Your partner will receive a request asking if he wants to accept thedocument.. If accepted, your partner's computer will begin receiving the document. Duringthis time, you and your partner will not be able to Chat with each other until your partnerreceives the document. iPartner will then automatically put you in Partner view (slave mode,see below) because the file is now on their computer. The document now resides on yourpartner's computer allowing him to save and print the file.

Movie Magic® Screenwriter 6 Help 209
Show partner—This is different then the “Send Document” feature since it does not actuallytransfer the document to your partner's computer. Instead, it opens a window on yourpartner's computer allowing your partner to view (and edit with permission) the document. .
Once you click on the "Show Partner" button, it will change to “Showing Partner” to indicatethat your partner is viewing your document. At this point you are considered in “Master view”since the document is on your computer and you control the editing and the viewing of thedocument.
When your partner is showing you a document, the Show Partner button will change to “ViewPartner” to indicate that you are viewing your partner's document. Since at this point youcan only view the document and cannot edit without the Master's permission you areconsidered in “Slave view”
14.1.3 Editing in Slave view
Normally in “Slave view” you are unable to have any control over what part of the documentyou are viewing or make changes in it. However, it is possible for the Master to grant youpermission to edit the document. While you can edit the document, it is important to realizeyou are viewing a document on another's computer. You will not be able to use any of yourmenu commands, function key's or quick entry features such as pop-up lists of CharacterNames or Locations.
This feature is mainly for the purpose of editing or rewriting existing text in a collaborativetype of environment. If the Slave needs to do major rewriting, it would probably be better touse the “Send Document” feature so they can have full use of their program.
You may also experience slow screen refreshes and typing rates since you are actuallyediting the document on the Master's computer.
A Slave can request control of the document by simply placing the mouse pointer anywhereover the document and clicking. The Master will then receive the following request.
Attention
Your partner wishes to type in the document.
This can cause problems if you both try to edit at once or if you move around in thedocument while your partner is trying to edit.
Allow your partner to type in the document?
Once the Master clicks Yes the Slave can now edit the document.
14.1.4 Slave view editing capabilities
Once you have permission to edit the document you can perform the following functions.
· Use the mouse to click in the document to edit.
· Use the Mouse to highlight text by holding the shift key and clicking where you want thetext selection to be extended.
· Edit by typing in the document.
· Scroll by using the Up and Down Arrows or Page up/Page Down.

Movie Magic Screenwriter210
You can also cut, copy and paste text as well by using whatever keys are set on thatcomputer to cut/copy/paste with in the Keyboard section of the Tools > Options… window.These commands are being executed on the Masters computer so the Slave will not be ableto paste text from another application on the Slave computer. Likewise, if the Slave invokesthe paste text before copying or cutting text from the document, the program will try andpaste whatever is in the Masters clipboard from a previous application into the documentwith unpredictable results.
IMPORTANT!!! While all of the keys listed below will work in slave mode some ofthem may cause popup list's to appear on the Master's computer if the Master hasQuickType text entry turned on. In order for the Slave to use the Quick Key's tochange elements efficiently, the Master must go into the Tools menu and change theOptions…. Clicking the QuickType button allows the master to turn off all AutoPop-up and Running List options. This enables the Slave to use the Quick Keys.
14.1.5 Editing Keys in iPartner
· Tab Key—Puts in Character Names regardless of where the cursor is in the document.
· Enter Key—Takes you from one element type to another (i.e. pressing <ENTER> while inCharacter Name will take you to dialogue; while in Transition will take you to SceneHeading, etc).
· Left Parenthesis Key—Puts you in a Parenthetical when pressed while in Dialogue. Thiskey adds a Character Extension if pressed while in a Character Name.
· CTRL+ B—Turns Bold on/off.
· CTRL+ E—Puts you into a Scene Heading with EXT. and a space already typed in foryou.
· CTRL+ I—Puts you into a Scene Heading with INT. and a space already typed in for you.
· CTRL+ O—If you aren't in a Shot, then it puts you into one.
· CTRL+ R—Forces a refreshing of the screen.
· CTRL+ S—If you aren't in a Scene Heading, then it puts you into one.
· CTRL+ T—If you aren't in a Transition, then it puts you into one.
· CTRL+ U—Turns Underlining on/off.
· CTRL+ Y—Turns Italics on/off.
· CTRL+ ENTER—Puts you into Action.
· SHIFT + ENTER—Puts in a Forced Page Break.
· ALT + ENTER—Puts in a Hard Return.
· CTRL+ - —Puts in a Soft-Hyphen.
· CTRL+ SHIFT - —Puts in a Hard-Dash.
· CTRL+ SHIFT ( —Puts in a "(" into Dialogue without making it a Parenthetical.

Movie Magic® Screenwriter 6 Help 211
· CTRL+ ALT+ SPACE—Puts in a Hard Space.
14.1.6 Revoking Slave's editing privileges
The Master can revoke the Slave's ability to edit the document only by clicking on the"Showing Partner" button. The Master can permit the Slave to still view the document bysimply clicking the "Show to Partner" button again.
14.1.7 Ending the session
Either side can end the iPartner session by clicking the Disconnect button. When youdisconnect, iPartner will ask if you wish to synchronize your document with the documentthat has been edited by your partner. If you select Yes, it overwrites the copy of thedocument you currently have open in your program with the edited changes in your partner'sprogram. If you choose No, then the document in your program will not reflect any of thechanges made since you sent the document to your partner.
14.1.8 Using the Voice feature to talk to your partner
iPartner allows you and your partner to actually speak to each other via the connection usinga microphone and speaker. This feature functions best if both you and your partner are onthe same LAN (Local Area Network), or if you both have high speed internet connections(DSL, Cable, etc.). Slower modem connections may produce undesirable results whenusing the Voice feature.
In order to enable speaking and listening you must have the microphone and speakerbuttons available. These buttons are only be available if both you and your partner are onthe same platform (Windows-to-Windows or Mac-to-Mac connections).
Speaking—To enable speaking to your partner, click on the microphone and iPartner willenable your microphone and send anything you say to your partner via Streaming Audio.
Listening—To enable listening to your partner, click on the speaker and iPartner will enableyour speaker so that you can hear anything your partner says via Streaming Audio.
14.1.9 iPartner - Trouble Shooting - Known Issues
Go to the online technical support site for known iPartner issues.
14.1.10 Firewall Configuration Information
iPartner can communicate over any of the following TCP port numbers:
2200, 2136, 2184 and 2245.
At a minimum, the firewall will need to allow outbound connection on at least one of theseports. The user can select the port number to use, so if you only open one port number, letthe users know which one has been opened.
iPartner can also accept incoming connections on these same port numbers. Although it isnot absolutely necessary to allow incoming connections, it will be more convenient for theusers to allow incoming connections on these ports.
The optimal configuration for iPartner would be:
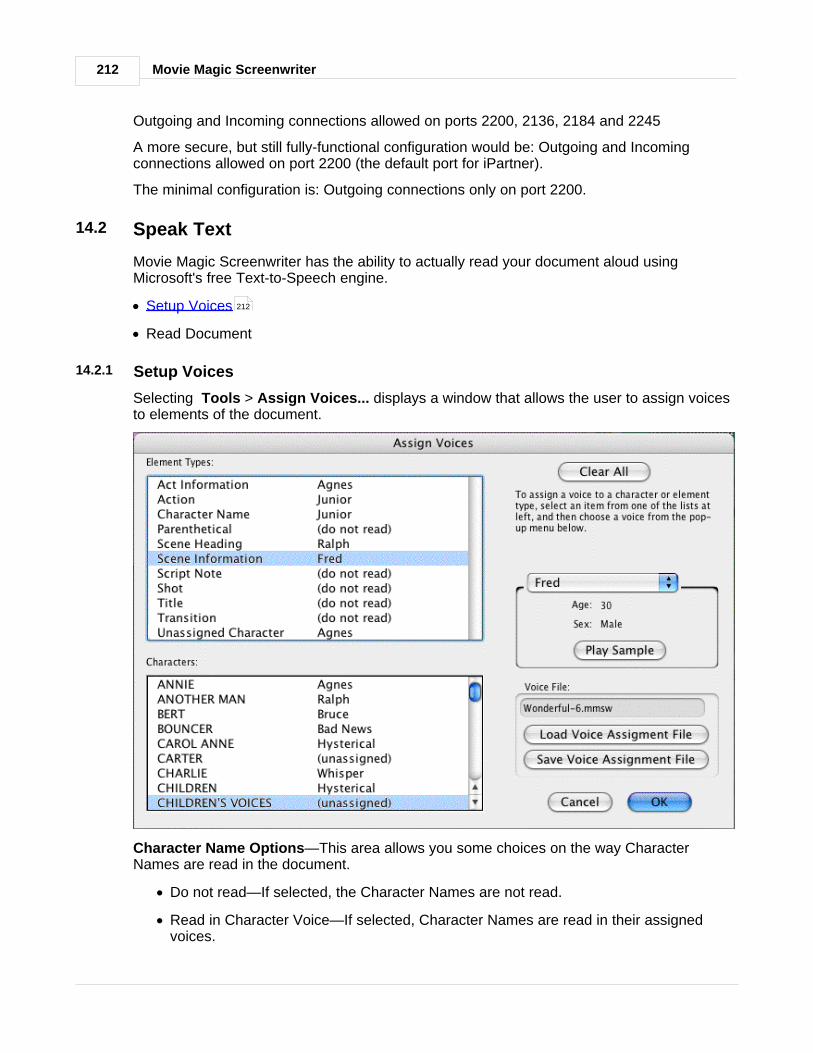
Movie Magic Screenwriter212
Outgoing and Incoming connections allowed on ports 2200, 2136, 2184 and 2245
A more secure, but still fully-functional configuration would be: Outgoing and Incomingconnections allowed on port 2200 (the default port for iPartner).
The minimal configuration is: Outgoing connections only on port 2200.
14.2 Speak Text
Movie Magic Screenwriter has the ability to actually read your document aloud usingMicrosoft's free Text-to-Speech engine.
· Setup Voices
· Read Document
14.2.1 Setup Voices
Selecting Tools > Assign Voices... displays a window that allows the user to assign voicesto elements of the document.
Character Name Options—This area allows you some choices on the way CharacterNames are read in the document.
· Do not read—If selected, the Character Names are not read.
· Read in Character Voice—If selected, Character Names are read in their assignedvoices.
212

Movie Magic® Screenwriter 6 Help 213
· Read in Action Voice—If selected, Character Names are read in the voice assigned tothe Action element.
Parenthetical Options—This area allows you some choices on the way Parentheticals areread in the document.
· Do not read—If selected, the Parentheticals are not read.
· Read in Character Voice—If selected, Parentheticals are read in their assignedCharacter Name voices.
· Read in Action Voice—If selected, Parentheticals are read in the voice assigned to theAction element.
Load Voice Association File—If you have assigned voices to a previous document andsaved them, you can load the voice association file (.vaf) and use it on your currentdocument.
Save Voice Association File—This option allows you to save your current voice allocationsettings. Clicking this button saves your voice settings to a voice association file (.vaf). Thevoices that are assigned to this document can now be used for other documents.
Clear All—Clicking this button removes all assigned voices to the elements.
OK—This saves all changes and returns you to your document.
Cancel—This removes all changes and returns you to your document.
Assign a voice by clicking on an element or Character Name and selecting a voice from thevoice popup list:

Movie Magic Screenwriter214
The window has voices that are divided into two categories: Female Voices and MaleVoices.
· Play Sample—Clicking this button plays the voice that you selected in the Voice window.The voice will say a brief introduction.
· Select Voice—Clicking this button will assign the selected voice to a particular elementshown at the top of the window.
· Speak Silently—Clicking this button will mute the voice of this character even thoughScreenwriter will still read it. This will create an appropriate pause to allow a humanactor/character to read that part aloud. The purpose of this feature is to allow a particularactor/character to read interactively with the program to help them rehearse and memorizetheir lines.
· Do NOT Read—Clicking this button will ignore reading the chosen element or CharacterName. The voice shows as "(do not read)" and does not create an appropriate pause asdoes "Speak Silently".
· Setup Available Voices—Clicking this button changes the configuration of the window byshowing options to add or modify existing voices.
· Edit Vocal Characteristics—Clicking this button displays a window that allows control ofthe Pitch and Speed of the voice the user selected from the Voice window.
· Edit Pronunciation—Clicking this button displays a window that allows alteration of thepronunciation of the voice that was chosen from the Voice window. Based on the wordentered in the blank field, the Edit Pronunciation window gives four choices: Add this wordto the dictionary, Change the pronunciation of this word, Remove this word from thedictionary, and Change capitalization or spelling.
Once a choice is made, clicking Next goes to the next stage of modification.
The "Change the Pronunciation of this word" feature is more extensive and allowsmodification of the way a voice says the word. To modify the way a word is pronounced,type in a spelling that sounds more like the word or the phonetic symbols.
· Add New Voice—Clicking this button allows the user to add a new voice based on anexisting voice. The gender of the new voice can be male or female. Whichever is chosen(male or female) determines the voice on which this new voice is based.
For example, the voice will defaults to Mary if you choose female.
You can change the default voice by clicking on the Edit Vocal Characteristics button.
· Delete Voice—Clicking this button deletes any user-defined voice selected on thelist. Voices that come with the program cannot be deleted.
· Edit Voice Name—Clicking this button allows the user to change the name of anyuser-defined voice.
· Return to Voice Assign—Clicking this button will return the window to its originalconfiguration by showing all original buttons.
· Cancel—Clicking this button removes any changes and returns you to the Setup

Movie Magic® Screenwriter 6 Help 215
Voices window.
14.2.2 Speak Selection
Tools > Speak Selection
This command uses the Mac's build in speech tools to read the selected text aloud. You'llknow it is running when you see the following window:
14.3 Voice Commands
In the application preferences dialog, a new checkbox has been added to the Misc panel:
· When "Enable Voice Commands in Screenwriter" is checked, Screenwriter uses Mac OSX's built-in speech recognition system to listen for and respond to spoken commands.
· The "Configure" button takes you to Screenwriter's Keyboard preference panel which nowhas a new column for voice commands.
· Double-clicking a row in this table now lets you change keyboard shortcuts and specifyspoken commands.
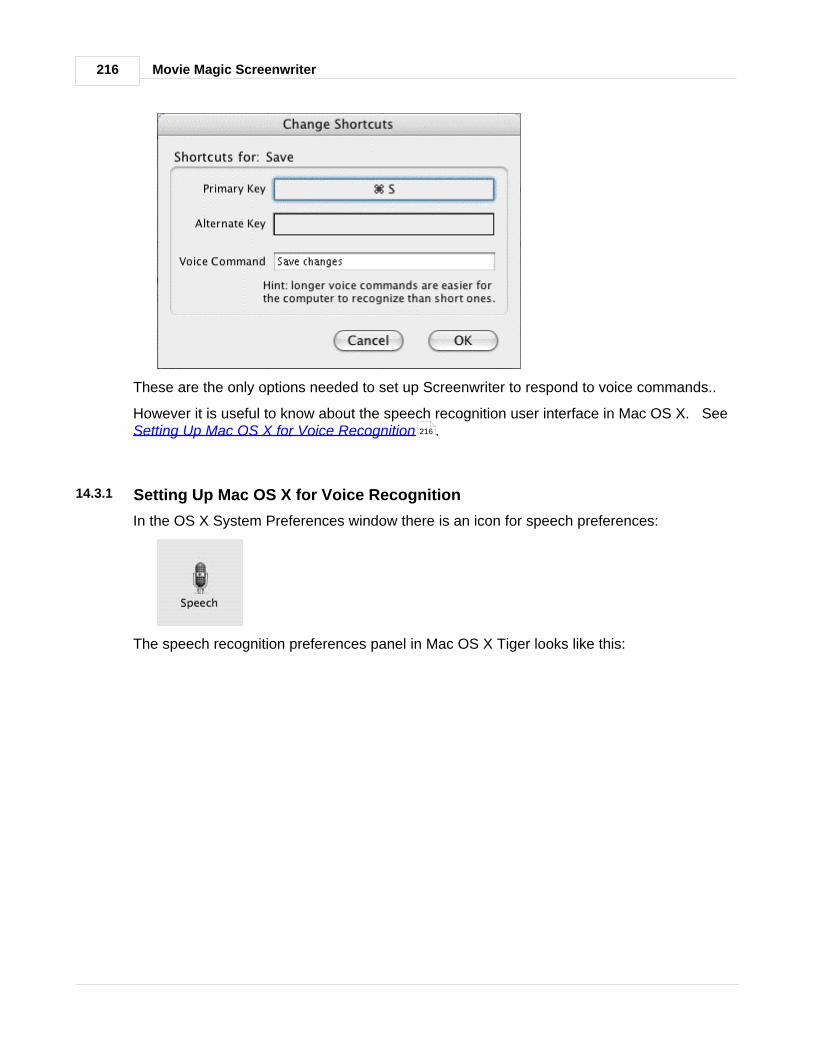
Movie Magic Screenwriter216
These are the only options needed to set up Screenwriter to respond to voice commands..
However it is useful to know about the speech recognition user interface in Mac OS X. See Setting Up Mac OS X for Voice Recognition .
14.3.1 Setting Up Mac OS X for Voice Recognition
In the OS X System Preferences window there is an icon for speech preferences:
The speech recognition preferences panel in Mac OS X Tiger looks like this:
216
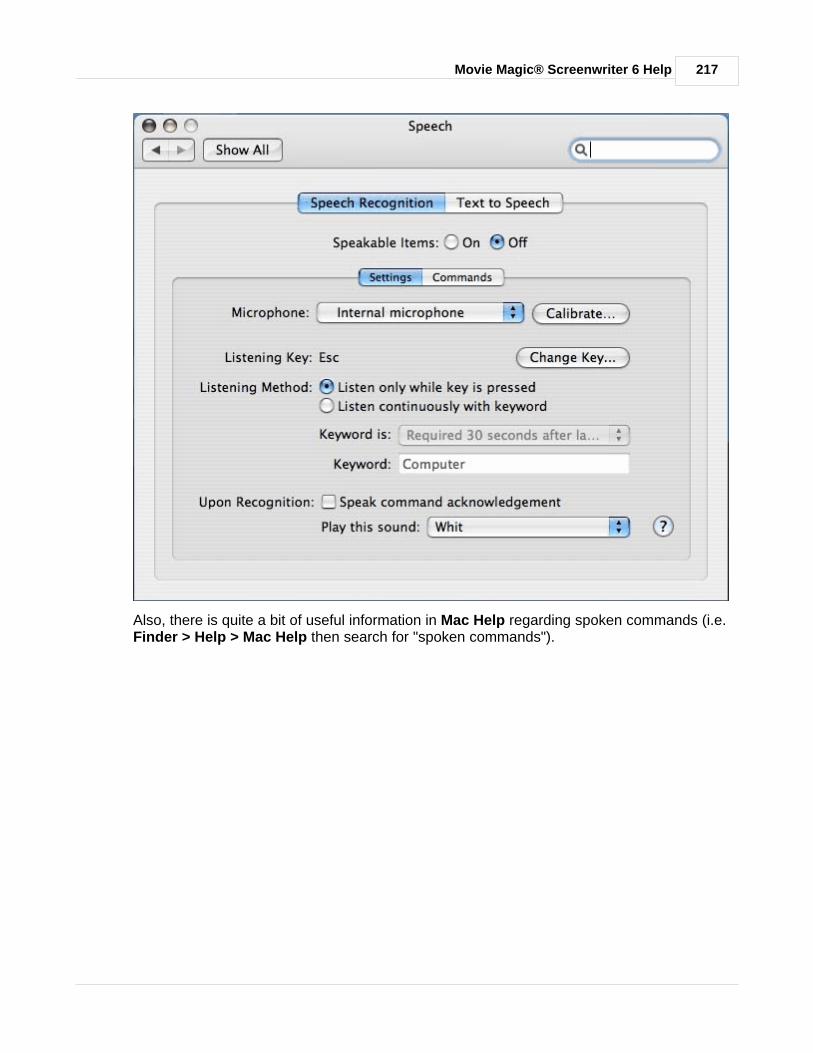
Movie Magic® Screenwriter 6 Help 217
Also, there is quite a bit of useful information in Mac Help regarding spoken commands (i.e.Finder > Help > Mac Help then search for "spoken commands").
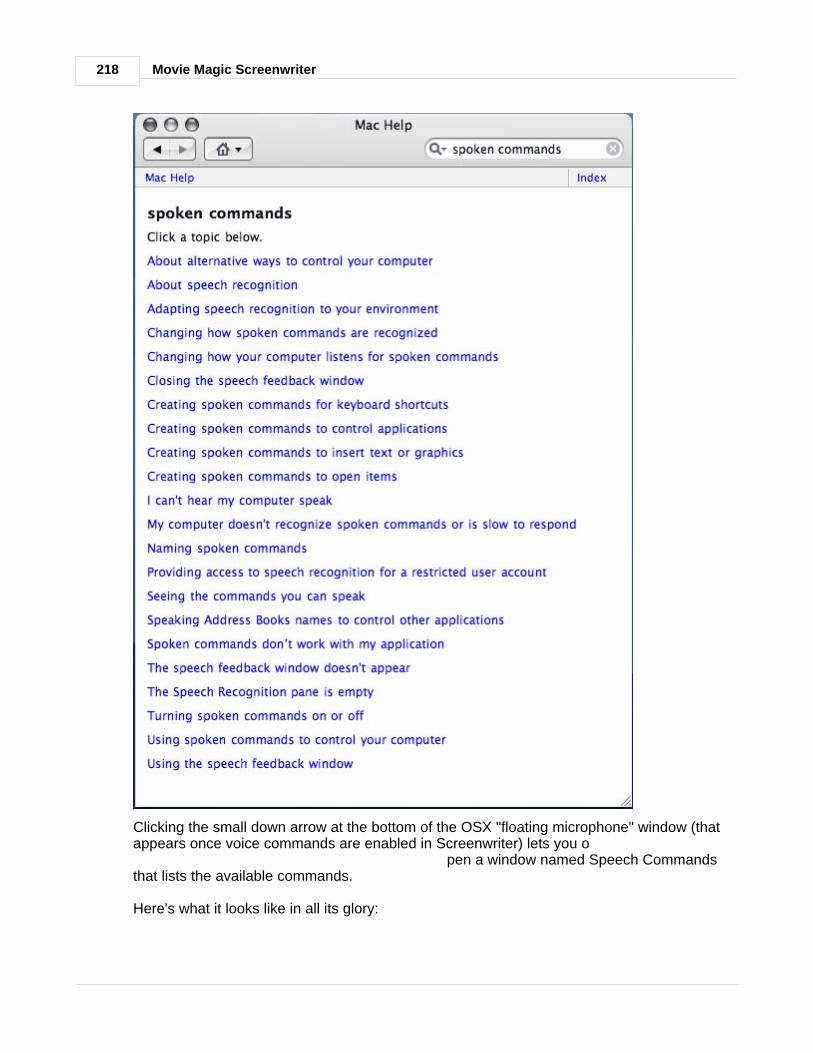
Movie Magic Screenwriter218
Clicking the small down arrow at the bottom of the OSX "floating microphone" window (thatappears once voice commands are enabled in Screenwriter) lets you o pen a window named Speech Commandsthat lists the available commands.
Here's what it looks like in all its glory:

Movie Magic® Screenwriter 6 Help 219
14.4 Send As Email Attachment Command
The File > Send As Email Attachment… menu command transmits the opendocument to a recipient via email. Use this feature to send MMSW files to otherScreenwriter users, or PDF and RTF files to non-Screenwriter users.
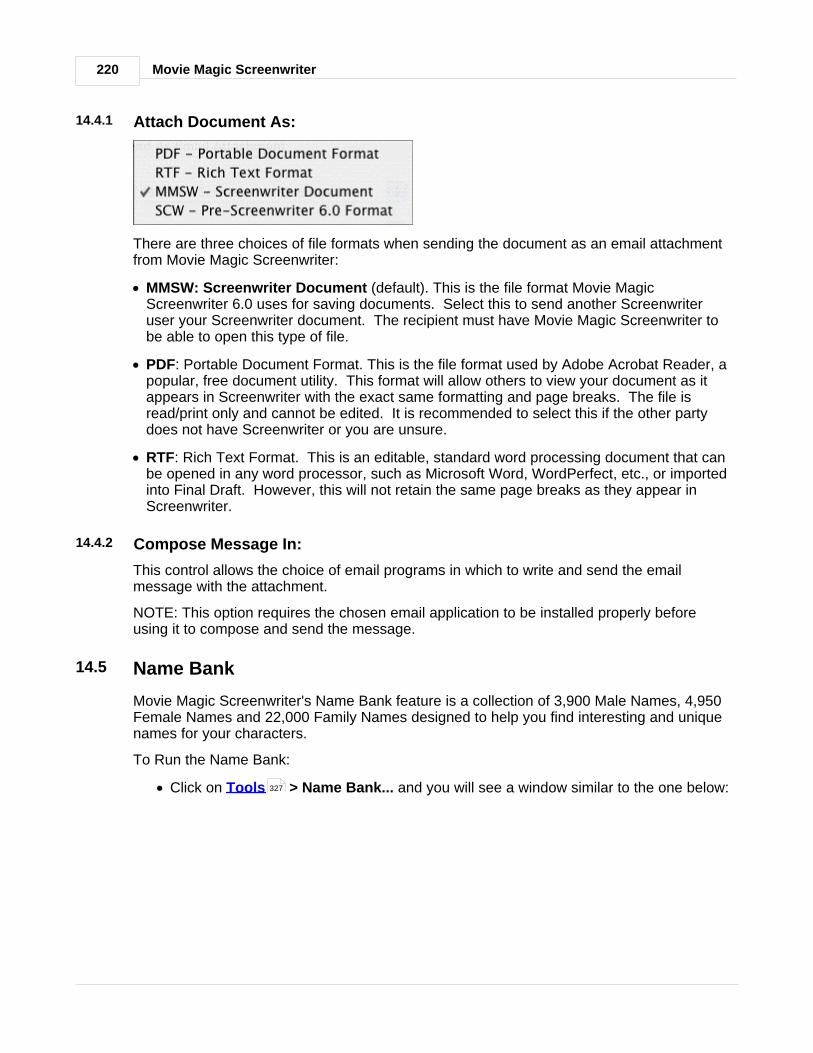
Movie Magic Screenwriter220
14.4.1 Attach Document As:
There are three choices of file formats when sending the document as an email attachmentfrom Movie Magic Screenwriter:
· MMSW: Screenwriter Document (default). This is the file format Movie MagicScreenwriter 6.0 uses for saving documents. Select this to send another Screenwriteruser your Screenwriter document. The recipient must have Movie Magic Screenwriter tobe able to open this type of file.
· PDF: Portable Document Format. This is the file format used by Adobe Acrobat Reader, apopular, free document utility. This format will allow others to view your document as itappears in Screenwriter with the exact same formatting and page breaks. The file isread/print only and cannot be edited. It is recommended to select this if the other partydoes not have Screenwriter or you are unsure.
· RTF: Rich Text Format. This is an editable, standard word processing document that canbe opened in any word processor, such as Microsoft Word, WordPerfect, etc., or importedinto Final Draft. However, this will not retain the same page breaks as they appear inScreenwriter.
14.4.2 Compose Message In:
This control allows the choice of email programs in which to write and send the emailmessage with the attachment.
NOTE: This option requires the chosen email application to be installed properly beforeusing it to compose and send the message.
14.5 Name Bank
Movie Magic Screenwriter's Name Bank feature is a collection of 3,900 Male Names, 4,950Female Names and 22,000 Family Names designed to help you find interesting and uniquenames for your characters.
To Run the Name Bank:
· Click on Tools > Name Bank... and you will see a window similar to the one below: 327

Movie Magic® Screenwriter 6 Help 221

Movie Magic Screenwriter222
15 Customizing Screenwriter
Screenwriter comes with a set of program option defaults. As you become more familiar withScreenwriter's features, you may want to customize these default settings to the way youwork.
Most of Screenwriter's program settings are found on the Screenwriter >Preferences…menu. Under the Screenwriter menu, select Preferences…. At the Preferences window, goto one of the following option screens by clicking on its tab:
You can make changes to:
· Editing Options (including QuickType )
· Files Options
· SmartCheck Options
· Spelling Options
· Miscellaneous Options
· Revisions Options
· Printer Options
· Keyboard Options
· Animation Dialog
· NaviDoc Options
· Outline Options
234
240
243

Movie Magic® Screenwriter 6 Help 223
15.1 View Menu
The View menu holds the display controls.
For a description of each of these commands, see Screenwriter 6 Menus in theAppendices.
15.1.1 Ruler
View > Ruler
If checked, displays the horizontal page Ruler, showing margin markers for the Element inwhich the cursor is located. Element margins can be cheated by moving the right and leftruler markers. Unchecked, the Ruler does not display.
15.1.2 Show Format Codes
If checked, displays the hidden format codes embedded in the text of your document byScreenwriter for such things as text styles (Bold, Italic, etc.), text color and other formattingcodes. In normal use, you won't need to be aware of these codes. Unchecked, the formatcodes are hidden and do not display onscreen.
318
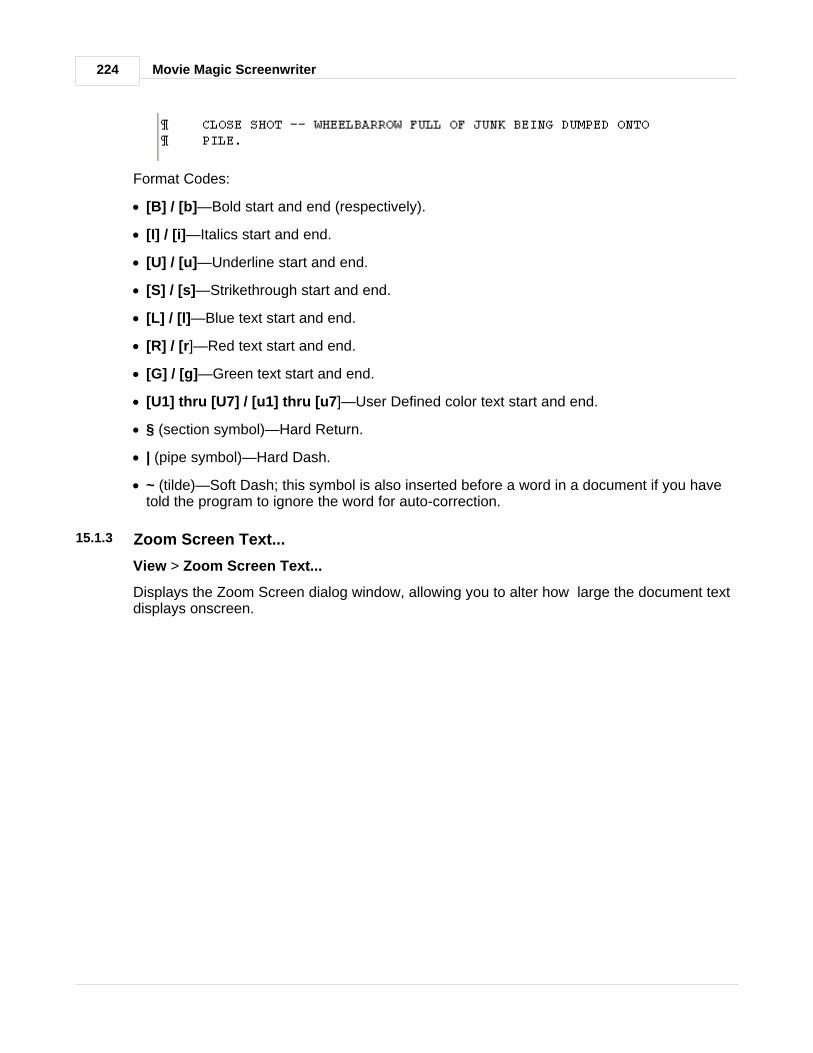
Movie Magic Screenwriter224
Format Codes:
· [B] / [b]—Bold start and end (respectively).
· [I] / [i]—Italics start and end.
· [U] / [u]—Underline start and end.
· [S] / [s]—Strikethrough start and end.
· [L] / [l]—Blue text start and end.
· [R] / [r]—Red text start and end.
· [G] / [g]—Green text start and end.
· [U1] thru [U7] / [u1] thru [u7]—User Defined color text start and end.
· § (section symbol)—Hard Return.
· | (pipe symbol)—Hard Dash.
· ~ (tilde)—Soft Dash; this symbol is also inserted before a word in a document if you havetold the program to ignore the word for auto-correction.
15.1.3 Zoom Screen Text...
View > Zoom Screen Text...
Displays the Zoom Screen dialog window, allowing you to alter how large the document textdisplays onscreen.

Movie Magic® Screenwriter 6 Help 225
Fit Width
This option makes Screenwriter automatically adjust the text size in the document portion ofthe window as you grow or shrink the document view horizontally (including opening/closingthe NaviDoc). Growing or shrinking the document view vertically does not change thedisplayed font's width.
· The minimum value controls how small the document text can be reduced as a percentageof the original font size.
· The maximum value controls how large the document text can be enlarged as apercentage of the original font size.
Fixed Text Size
This option lets you specify a fixed magnification factor for the document screen text as apercentage of the original font size.

Movie Magic Screenwriter226
15.2 Toolbar Icons Menu
View > Toolbar Icons Menu
The View > Toolbar Icons menu has options that control the display of the Toolbar andToolbar icons that appear at the top of the document window.
· Show Toolbar—Turns the Toolbar display on and off.
· Customize Toolbar... —Clicking this opens the Customize Toolbar window. This iswhere you can drag and drop specific icons from the palette to customize the icons in theTop Toolbar.
· Small / Large Icons—These options allow the user to choose between small or large sizeicons on the top Toolbar.
· Reset Toolbar to Defaults—Clicking this sets the Toolbar to the default set of visibleicons, icon positions, and icon size.
· Remove All Icons—Clicking this removes all icons from the Toolbar but still keeps theToolbar visible.
227

Movie Magic® Screenwriter 6 Help 227
· Default Toolbar—Clicking this sets the Toolbar to the default set of icons and iconpositions.
· Standard Large Icons—Selecting this sets the Toolbar to the default set of icons at thelarger size.
· Minimal Large Icons—Selecting this sets the Toolbar to a reduced set of large icons.
· All Toolbar Icons—Includes all Toolbar icons in the Top Toolbar. Note: Since theToolbar does not wrap, most of the icons are available by clicking on the >> icon on the farright of the Toolbar and selecting from the popup menu of icons. For example:
15.2.1 Customize Toolbar...
This command gives you complete control over what appears in the top toolbar. All youhave to do is drag the icons to and from the toolbar. It's that simple.

Movie Magic Screenwriter228

Movie Magic® Screenwriter 6 Help 229
15.3 Editing Preferences
Screenwriter > Preferences... > Editing
QuickType preferences are located in the QuickType section.
15.3.1 QuickType Preferences

Movie Magic Screenwriter230
Auto Pop-Up
Enable Quick Entry --When checked, QuickType is enabled. QuickType lets you speedtext entry by using many different keyboard shortcuts . Unchecked, QuickType isdisabled.
· Auto Pop-Up Locations—If checked, QuickType automatically pops up the UniqueLocations List after you enter Scene Heading Initial Text (e.g., INT.) Unchecked, youneed to press RETURN to display the list.
· Auto Pop-Up Time of Day—If checked, QuickType automatically pops up theTime-of-Day List after you enter Location text (e.g., LAURA'S APARTMENT) from apop-up Locations List. Unchecked, you need to press RETURN to display the list.
· Auto Pop-Up List of Character Names—If checked, pops up a List of all CharacterNames in the document when pressing RETURN is the first activity in a Character Nameelement.
Enable QuickType Entry
If checked, this allows the automatic display of pop-up lists of Character Names, Locations,Times of Day, etc.
If you Type— QuickType will—
FADE IN: or any Transition
Display Scene Heading Initial Text menu(INT., EXT., etc.).
If you Press RETURNwhile in—
QuickType will—
Blank Action, Transition, blank Scene Heading, Scene Label, or End of Act
Display Scene Heading Initial Text menu(INT., EXT., etc.).
Scene Heading without Location
Display a List Menu of all unique Locationsalready in the document.
Scene Heading with Location
Display a List Menu of Time-of-Day (DAY,NIGHT, etc.).
230
230

Movie Magic® Screenwriter 6 Help 231
End of Action Add another Action Element.
Character Name Add a Dialogue Element(If the next element is Dialogue orParenthetical, it moves to the beginning ofthat element).
End of Dialogue* Add an Action Element.
Middle of Dialogue* Break the Dialogue and insert an ActionElement.
Parenthetical Add a Dialogue Element(if the next element is Dialogue, it moves tothe beginning of that element).
* If Return in Dialog takes you to Character is checked on the Editing page of theOptions… menu (under the Tools menu), a Character Name element will be insertedinstead.
If QuickType is not enabled, these popup lists can be displayed manually by pressing theappropriate Control key combination:
If you Press— While in— QuickType will—
CTRL+S Any element Add a Scene Headingelement.
CTRL+S Blank Scene Heading Display Scene HeadingInitial Text menu (INT., EXT.,etc.).
CTRL+S Scene Heading withInitial Text
Display a List Menu of allunique Locations already inthe document.
CTRL+S Scene Heading withInitial Text and Location
Display a List Menu ofTime-of-Day (DAY, NIGHT,etc.).
CTRL+O Any element Add a Shot element.
CTRL+O Blank Shot element Display a List Menu of Shots(ANGLE ON, etc.).
CTRL+ENTER Any element Add an Action element.
SHIFT+CTRL+C Action or Dialogueelement
Display a List Menu ofexisting Character Names.
TAB** Any element Add a Character Nameelement.
( Character Name element Display a List Menu of

Movie Magic Screenwriter232
Character Extensions (V.O.,O.S., etc.).
( Dialogue element Add a Parenthetical element.
CTRL+T Any element Add a Transition element.
CTRL+T Blank Transition element Display a List Menu ofTransitions (CUT TO:, etc.).
CTRL+F1 Any element Add a Note.
** If Tab in Dialogue takes you to Parenthetical is checked on the Editing page ofOptions… under the Tools menu, Tab creates a Parenthetical element when in aDialogue element.
Use SmartTab
If checked, this option allows the quick entry of recently used Character Names using theTAB key. Press TAB followed by a letter, and the last Character Name you used startingwith that letter is highlighted in the pop-up Character Name pop-up list. Press ENTER toenter the name in your document.
For example, you have characters named MICHELLE, LARRY, LISA, and LAURA inyour document and the current scene features LAURA and MICHELLE. When youpress TAB then L the first time in this scene, the drop-down list might have the nameLARRY highlighted. Type A then U to highlight LAURA, then press ENTER to haveSmartTab finish entering the name for you.
Without SmartTab enabled, you will have to do that each time you want LAURA.
With SmartTab enabled, the next time you press TAB then L, the name LAURA isautomatically highlighted for you.
NOTE: Without SmartTab enabled, pressing TAB followed by a letter alwayshighlights the first name starting with that letter. If you've added a name starting withthat letter to the Character Name User List, the User List name always appearshighlighted. See User Lists below.
Running Lists
Running lists are lists of user-defined items (such as character names, shots, andtransitions) created and updated as you write in the document.
· Running Shot List—If checked, QuickType automatically pops up the Unique Shots List(plus any initial shot text defined in the User List) when you add a new Shot element. Unchecked, displays User List items only.
· Running Transition List—If checked, QuickType automatically pops up the UniqueTransitions List (plus any Transition text defined in the User List) when you add a newTransition. Unchecked, displays User List items only.

Movie Magic® Screenwriter 6 Help 233
15.3.2 Pressing the ENTER key...
Pressing the ENTER Key
· Enter in Dialogue takes you to a Character Name—If checked, QuickType creates anew Character Name element when you press ENTER in a Dialogue element. To goto an Action element instead, press ENTER twice or press CTRL+ENTER. Unchecked, pressing ENTER creates a new Action element.
· Pressing the ENTER key in Note adds a Hard Return—If checked, QuickType addsa Hard Return in a Note when you press ENTER, ending the line short and taking youto another line. Unchecked, pressing ENTER in a Note creates a new Action elementfollowing the Note.
· Pressing the ENTER Key in Transition takes you to Action—With this optionenabled, when you press ENTER in a transition element, then you will be taken to anAction element.
· Pressing the ENTER Key in (Action) with Hidden Names goes to Dialogue—Withthis option enabled, if you press ENTER after an action line that follows a Dialogueline, it will automatically put in the same name for you and drop you into dialogue. Thisis because Action in play format is the same as parentheticals but should be brokenover page breaks. With this option set, the ONLY way to put in two lines of action in arow is to press CTRL+ENTER to explicitly have it enter action.
NOTE: This option ONLY takes effect when you are in a document that has Action inParentheticals and has the option Cont'd Dialogue shouldn't have Character Names.These are typical settings for Play Format.
15.3.3 Other Editing Preferences
Keep Insertion Caret Above Window Bottom # Lines—Controls the number of linesabove the bottom of the window that the insertion caret (the blinking editing marker) can gobefore forcing the text to be scrolled vertically. The higher the number, the more lines of textis visible above the insertion caret.
Tab in Dialogue takes you to Parenthetical—If checked, QuickType creates a new

Movie Magic Screenwriter234
Parenthetical element when you press TAB in a Dialogue element. To go to a CharacterName element instead, press TAB again. Unchecked, pressing TAB creates a newCharacter Name element.
Drag and Drop should break elements in the Middle—If checked, dragging and droppingitems into the middle of text splits the text element and inserts the dropped material with it'soriginal element designation. Unchecked, it inserts the item after the current element.
15.4 Startup/Files Options
Tools > Options... > Startup/Files
15.4.1 Document Settings
· Default Document Folder
· Backup Folder

Movie Magic® Screenwriter 6 Help 235
· Restore the Main Window's Size
· Password Protect Documents
· When opening a document, start at the last saved position
· Timed Backup Frequency
· Re-register File Type Associations
Restore the Main Window's Size
When checked, this option opens Screenwriter's main window to the size it was when lastrunning. Unchecked, the main window opens to the default size.
15.4.2 Retain Previous Versions Options
When checked, these options control where previous versions of your document areautomatically stored when you use the File > Save command in Screenwriter. This optionretains versions of the file as they were BEFORE a save command is performed. Werecommend you do NOT consider these files backup files since they are temporary and canbe overwritten as you continue to save your document. RECOMMENDATION: MAKESEPARATE BACKUPS OF YOUR WORK. Use these .BK files as emergency file retrievalsonly.
· Retain up to # previous version of a document—This option sets the number ofprevious version files of a document Screenwriter keeps around. The number is from 1to 100. Each .bk file is a complete copy of the document file. The default number ofversions retained is 5. That means Screenwriter stores up to five additional copies ofeach document you work on. Setting the number higher can begin to take up a lot ofdisk space.
· Place previous version files in:—This option controls where the previous versions ofyour document are saved.
· A subfolder named, "Previous Versions"—Screenwriter places the .bk files forall documents in a folder called Previous Versions.
· The same folder as the document—Screenwriter places the .bk files for the
235

Movie Magic Screenwriter236
document being edited in the same folder as the document.
· C:\Documents and Settings\...\Previous Versions—This option lets you pick thesubfolder in which to save the previous versions. Click on the Change... button tochange the folder.
· Create a new previous version file—This option controls when the previous versionfiles are created.
· Only once per editing session—A .bk file is created the first time the document issaved during a single editing session. If the document is closed and reopened,Screenwriter considers it a new editing session and another .bk file is created if thedocument is saved while in the new editing session.
· Every time a document is saved—Screenwriter creates a .bk file every time adocument is saved.
15.5 Files Preferences
Screenwriter > Preferences... > Files

Movie Magic® Screenwriter 6 Help 237
15.5.1 When Screenwriter starts it should...
Screenwriter can be preset to automatically do one of five things each time it starts up, byclicking on one of the following radio buttons:
· Leave You in a Blank Document—Opens a new file with the default Screenplay format.
· Display the Open File Dialog—Displays a standard Open File dialog, set to your defaultdocuments subdirectory.
· Retrieve Last Document you worked on—Opens in the last document you saved in yourprevious Screenwriter session.
· Restore Last Workspace—Opens all documents you had open at the time you Exitedyour previous Screenwriter session.
· Automatically check for updates—When checked, Screenwriter automatically checks forupdates daily, weekly, or monthly.
15.5.2 Default Document Folder
This option allows you to change the folder that Screenwriter uses as the default foropening/saving documents (default folder is \My Documents\Screenwriter Documents\).
When you click on the Set... button, you'll get a standard OS X navigation dialog.
· Change the default folder to a different pre-existing directory by clicking on items in thedirectory tree.
· Create a new folder by pressing the New Folder button.
· Click on Choose to set your default folder, Cancel to keep the existing default.
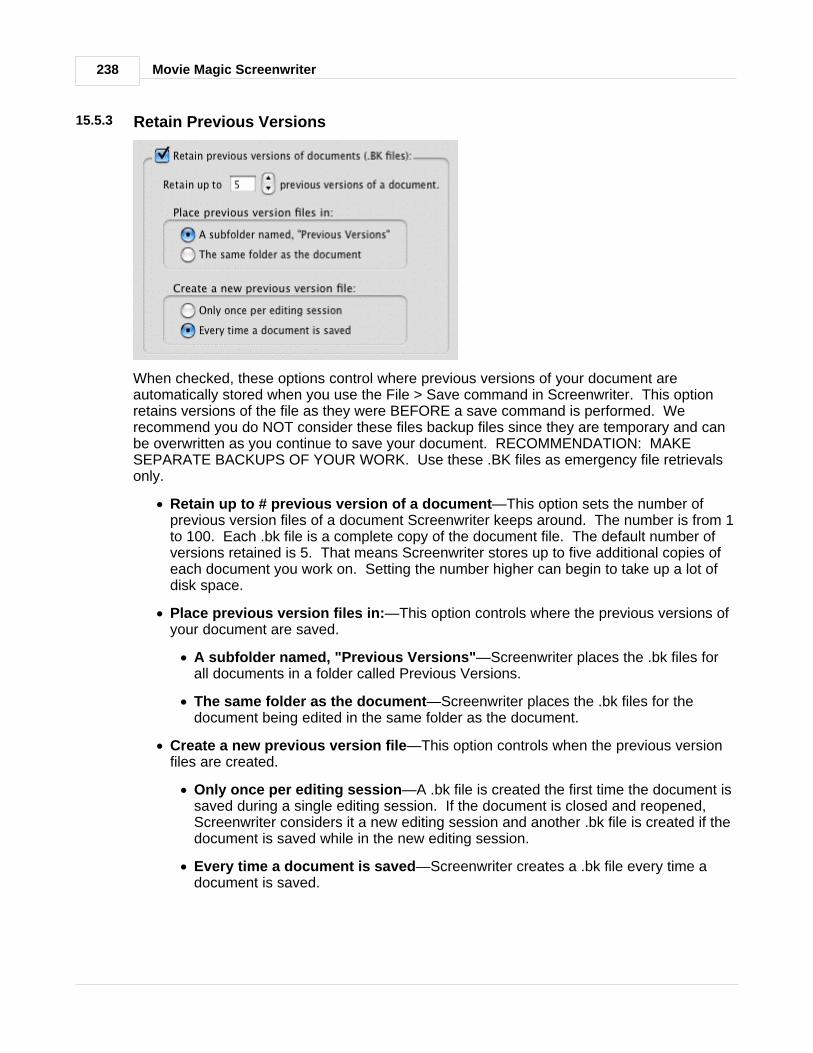
Movie Magic Screenwriter238
15.5.3 Retain Previous Versions
When checked, these options control where previous versions of your document areautomatically stored when you use the File > Save command in Screenwriter. This optionretains versions of the file as they were BEFORE a save command is performed. Werecommend you do NOT consider these files backup files since they are temporary and canbe overwritten as you continue to save your document. RECOMMENDATION: MAKESEPARATE BACKUPS OF YOUR WORK. Use these .BK files as emergency file retrievalsonly.
· Retain up to # previous version of a document—This option sets the number ofprevious version files of a document Screenwriter keeps around. The number is from 1to 100. Each .bk file is a complete copy of the document file. The default number ofversions retained is 5. That means Screenwriter stores up to five additional copies ofeach document you work on. Setting the number higher can begin to take up a lot ofdisk space.
· Place previous version files in:—This option controls where the previous versions ofyour document are saved.
· A subfolder named, "Previous Versions"—Screenwriter places the .bk files forall documents in a folder called Previous Versions.
· The same folder as the document—Screenwriter places the .bk files for thedocument being edited in the same folder as the document.
· Create a new previous version file—This option controls when the previous versionfiles are created.
· Only once per editing session—A .bk file is created the first time the document issaved during a single editing session. If the document is closed and reopened,Screenwriter considers it a new editing session and another .bk file is created if thedocument is saved while in the new editing session.
· Every time a document is saved—Screenwriter creates a .bk file every time adocument is saved.

Movie Magic® Screenwriter 6 Help 239
15.5.4 Automatic Timed Backups
Screenwriter has a data security function that makes a temporary Timed Backup of yourdocument at regular intervals. In an emergency situation, such as a power outage, you canretrieve the timed backup and use the data.
The timed backup is a separate process from regular file saving. It automatically backs upthe file you're working on when its timer activates.
Always save your documents separately before you exit Screenwriter.
Make Backups of your documents to another drive or medium, such as a floppy disk, tapedrive, CD, DVD, network server, etc.
· Timed Backup Frequency—Set this to between 1 and 60 minutes (15 is the default.) Ifyou try to set it to 0 or greater than 60 minutes, it changes to 60 minutes when you exit themenu.
· Timed Backup Sound—Use this sound to remind you that the .bk file has been createdwhen you save your document. The default is set to None.
15.5.5 Password Protect Documents
Password Protection keeps unauthorized people from reading your documents. Whensaving a document, you'll be asked to enter a password twice for confirmation. To open thedocument, you'll have to enter the correct password.
When checking this option, you'll be prompted to type the word YES to confirm your decisionto put passwords on all documents.
When saving, an Allow Viewing/Printing without Password option lets you make thedocument viewable and printable to anyone without the password, if checked. They won't beable to edit or save the document.
15.5.6 When Opening Existing Documents...
· Show NaviDoc—This option controls the NaviDoc display when documents are opened.It has the following options: Panel Last Used (default); Outline Panel; Scenes Panel; NotesPanel; Bookmarks Panel; or Hide NaviDoc.
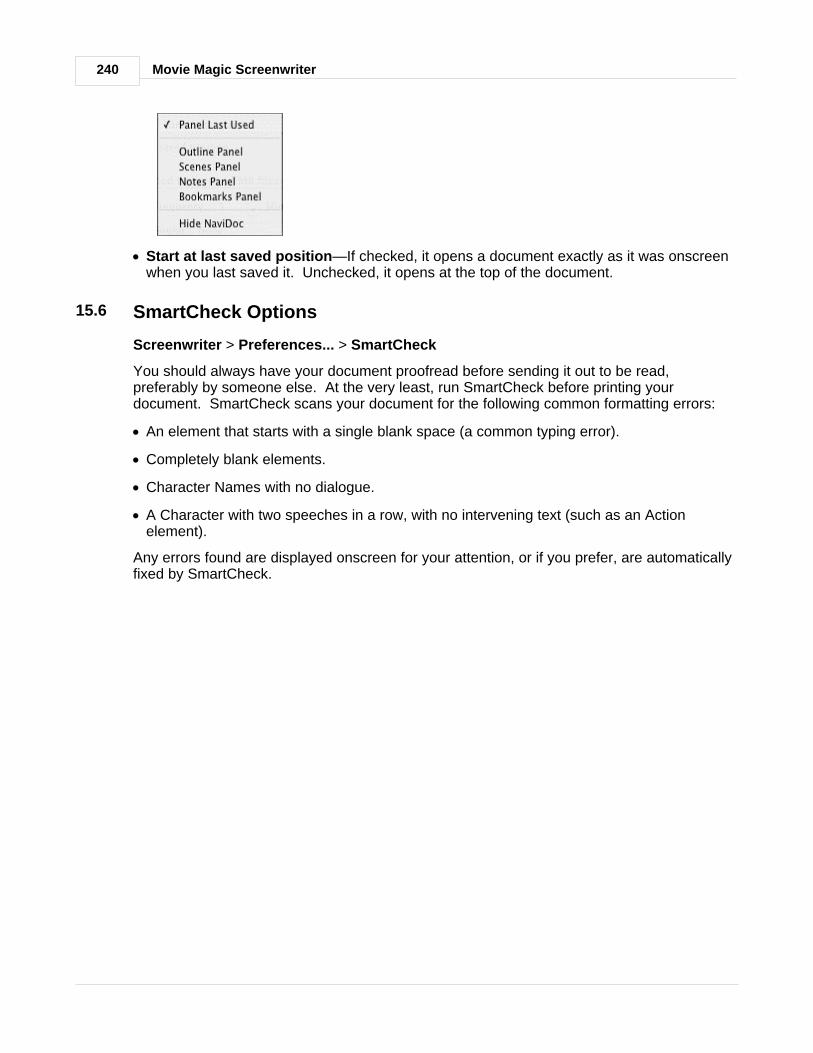
Movie Magic Screenwriter240
· Start at last saved position—If checked, it opens a document exactly as it was onscreenwhen you last saved it. Unchecked, it opens at the top of the document.
15.6 SmartCheck Options
Screenwriter > Preferences... > SmartCheck
You should always have your document proofread before sending it out to be read,preferably by someone else. At the very least, run SmartCheck before printing yourdocument. SmartCheck scans your document for the following common formatting errors:
· An element that starts with a single blank space (a common typing error).
· Completely blank elements.
· Character Names with no dialogue.
· A Character with two speeches in a row, with no intervening text (such as an Actionelement).
Any errors found are displayed onscreen for your attention, or if you prefer, are automaticallyfixed by SmartCheck.

Movie Magic® Screenwriter 6 Help 241
15.6.1 Automatically Run SmartCheck Before Printing
If checked, Screenwriter checks your document for errors each time you print. In the Printwindow, the Run SmartCheck before this Print Job box is also checked (you can printwithout running SmartCheck by unchecking the box, turning it off temporarily). Unchecked,no document checking is performed unless you manually run SmartCheck.
15.6.2 Beep When Formatting Is Found
If checked, SmartCheck beeps each time it finds an error in formatting.
15.6.3 Delete WITHOUT prompting...
These four options specify which formatting errors SmartCheck should fix without promptingfor your decision. This applies whether SmartCheck is running in manual or automaticmode.
· Single Starting Blank Space—If checked, deletes a single space at the beginning of aline. Unchecked, this error displays a prompt.
· Completely Blank Elements—If checked, deletes a line with no text. Unchecked, thiserror displays a prompt.

Movie Magic Screenwriter242
· Character Names without Dialogue—If checked, deletes orphaned Character Names.Unchecked, this error displays a prompt.
· Second Character Name when he/she speaks twice in a row with nothing betweenthe two speeches—If checked, deletes the second Character Name element and joinsthe two Dialogue elements when it finds two speeches in a row by the same character(without an intervening Action or other Element.) Unchecked, this error displays a prompt.
15.6.4 Ignore Blank Lines which have Revision Marks
If checked, SmartCheck accepts blank lines with Revision Marks as correct. Unchecked, ittreats such blank lines as Completely Blank Elements.
15.6.5 Ignore the same Name speaking twice in a row when Extensions do NOTmatch
If checked, treats the same Character Name speaking twice in a row as correct when theirExtensions differ (such as V.O. and O.S.) Unchecked, it flags this as an error.
15.6.6 Combine OMITTEDs that are Widowed on page
If checked, SmartCheck finds any page that contains only an OMITTED scene, and promptsyou to combine that OMITTED with any OMITTEDs that precede or follow it. Unchecked, thepage prints with only an OMITTED scene on it.
15.6.7 SmartCheck Prompts
If you select Yes to fix an error SmartCheck has prompted you about, it fixes the error andcontinue to check your document.
If you select No, it asks you whether YOU want to fix it.
If you reply Yes, it pauses at the format error to allow you to fix it.
If you reply No, it ignores the error and continues checking.
If you select Cancel, it stops the SmartCheck scan. If SmartCheck was run automaticallybefore a print job, printing begins. Otherwise, you'll be returned to your document.
When SmartCheck completes a manual scan, it informs you with a dialog box. When itfinishes an automatic scan before printing, it starts printing without any further message.

Movie Magic® Screenwriter 6 Help 243
15.7 Spelling Options
Screenwriter > Preferences... > Spelling
15.7.1 Correct Double Capitals (e.g. “MIstake”)
If checked, words that start with two capital letters are corrected by Auto-Correct and displayan error prompt in a manual Spell Check. Unchecked, these errors are ignored as correct. (The Spell Check as you Type and Edit option must also be checked for this function towork.)
15.7.2 SpellCheck as you Type
If checked, Auto-Correct, Character Name Aliases, and Substitution Text Aliases areallowed. Unchecked, they are disallowed and grayed out on this page.

Movie Magic Screenwriter244
15.7.3 Auto-Correct Typos as you Type
If checked, Auto-Correct corrects common letter inversion typos such as “teh” to “the” assoon as you type them. (The Spell Check as you Type and Edit option must also bechecked for this function to work.)
· Prompt on Multiple Words during Auto-Correction—Check this if you want to be askedwhat to do when a misspelled word can be corrected in more than one way. If checked, itgives you a choice of words when the typo could have two or more correct spellings. Ifunchecked, Auto-Correct makes the decision for you. (The Spell Check as you Type andEdit option must also be checked for this function to work.)
· Maximum—Sets the maximum word length of typos to auto-correct. If on a slowercomputer, set this to a lower number. Screenwriter uses a default word length of 25letters.
· Auto-Correct Sound—Sets the sound used when an auto-correction is made. Thedefault setting is None.
· Query when you fix Auto-Corrected Words—With this option enabled, if the real-timespell check erroneously ‘fixes' a word by inverting two of its letters, changing thecapitalization or spacing and then you immediately go back and change it back to what itwas before the program ‘fixed' it, will prompt you with a message asking you if it shouldlearn this word as you have restored it or whether it should simply ignore this one instance.This option will only be available if the option Spell Check as you Type and Edit hasalready been enabled.
With this option NOT enabled, assuming you have Auto-Correct Typos enabled, in thecase where you restore a fix that the program has just made, it will simply ignore this onecase without prompting you.
15.7.4 Beep on Unknown Words
Beep on Unknown Words—If checked, alerts you to any suspected typos that Auto-Correctis unable to correct for you. (The Spell Check as you Type and Edit option must also bechecked for this function to work.)
Highlight Unknown Words—If this is checked, the spelling checker draws red underlinesbeneath words in the current element it does not know. This option will only be available ifthe option Spell Check as you Type and Edit has already been enabled. With this optionNOT enabled, when the real-time spell checking routines find a word that it cannot correctand does not recognize, it will NOT give you a visual alert.

Movie Magic® Screenwriter 6 Help 245
Beep Sound—Use this popup menu to choose a sound that is played when you type a wordthat is not in the dictionary. The default is None.
15.7.5 AutoCapitalize
· Sentences—If checked, capitalizes the first letter in all Sentences in Dialogue, Action, andNotes.
Except immediately Following Shots—Shots (also known as secondary Sluglines)can be used to emphasize an object or person, with the following Action giving moredetail. To have the combined Shot and Action read as one sentence—with theAction sentence not capitalized—check this box.
· Character Names—If checked, capitalizes the first letter of all Character Names inDialogue, Action, and Notes. To be capitalized by Auto-Correct a character name musteither have been used previously in the document, or exist in the Character Name UserList.
(When using names such as “Mark “or “Art” in your document, Auto-Correct alsocapitalizes the words “mark” and “art”. To avoid this, Pause Autocorrection under the Spellmenu. Type the word with your desired capitalization, move past the word, then resumeAuto-Correct by clicking on Pause Autocorrection again.)
All Caps—Makes Character Names ALL CAPS wherever they appear.
· Correct Double Capitals (e.g. "Problem")—If checked, when Spell Check is run from theSpell menu it auto-corrects Sentence spacing and capitalization—without prompting youfirst. This way, sentence spacing and capitalization will be corrected even if Auto-Correctis off.
· Treat ")" as a Sentence End in dialogue for the purposes of auto-capitalization &spacing—If checked, treats a right parenthesis in Dialogue as a sentence end, in order toformat the next sentence correctly.
· Correct Capitalization/Spacing when Run Manually—If checked, when Spell Check isrun from the Spell menu it auto-corrects Sentence spacing and capitalization—withoutprompting you first. This way, sentence spacing and capitalization will be corrected even ifAuto-Correct is off.
· Ignore Capitalization when Checking Words—If checked, allows unusual Capitalizationof words and sentences when Spell Checking a document. Unchecked, Spell Checkexpects correct Capitalization of sentences, proper names, etc.
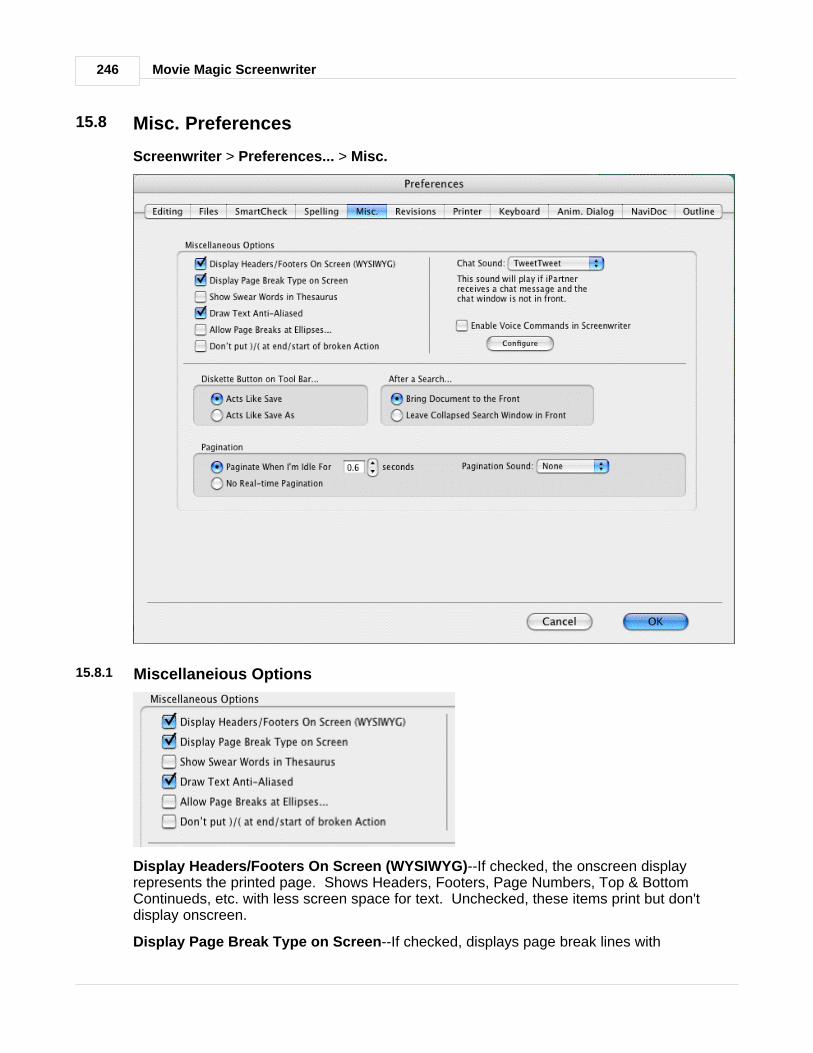
Movie Magic Screenwriter246
15.8 Misc. Preferences
Screenwriter > Preferences... > Misc.
15.8.1 Miscellaneious Options
Display Headers/Footers On Screen (WYSIWYG)--If checked, the onscreen displayrepresents the printed page. Shows Headers, Footers, Page Numbers, Top & BottomContinueds, etc. with less screen space for text. Unchecked, these items print but don'tdisplay onscreen.
Display Page Break Type on Screen--If checked, displays page break lines with
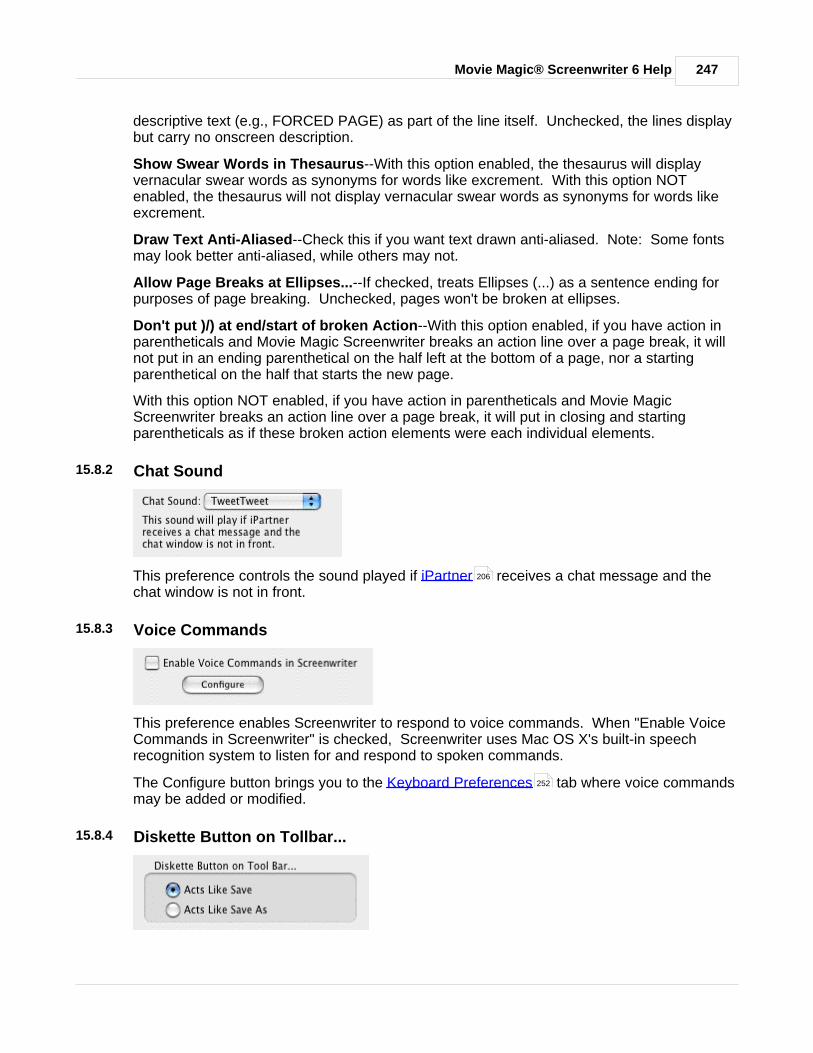
Movie Magic® Screenwriter 6 Help 247
descriptive text (e.g., FORCED PAGE) as part of the line itself. Unchecked, the lines displaybut carry no onscreen description.
Show Swear Words in Thesaurus--With this option enabled, the thesaurus will displayvernacular swear words as synonyms for words like excrement. With this option NOTenabled, the thesaurus will not display vernacular swear words as synonyms for words likeexcrement.
Draw Text Anti-Aliased--Check this if you want text drawn anti-aliased. Note: Some fontsmay look better anti-aliased, while others may not.
Allow Page Breaks at Ellipses...--If checked, treats Ellipses (...) as a sentence ending forpurposes of page breaking. Unchecked, pages won't be broken at ellipses.
Don't put )/) at end/start of broken Action--With this option enabled, if you have action inparentheticals and Movie Magic Screenwriter breaks an action line over a page break, it willnot put in an ending parenthetical on the half left at the bottom of a page, nor a startingparenthetical on the half that starts the new page.
With this option NOT enabled, if you have action in parentheticals and Movie MagicScreenwriter breaks an action line over a page break, it will put in closing and startingparentheticals as if these broken action elements were each individual elements.
15.8.2 Chat Sound
This preference controls the sound played if iPartner receives a chat message and thechat window is not in front.
15.8.3 Voice Commands
This preference enables Screenwriter to respond to voice commands. When "Enable VoiceCommands in Screenwriter" is checked, Screenwriter uses Mac OS X's built-in speechrecognition system to listen for and respond to spoken commands.
The Configure button brings you to the Keyboard Preferences tab where voice commandsmay be added or modified.
15.8.4 Diskette Button on Tollbar...
206
252

Movie Magic Screenwriter248
This option controls what happens when the diskette button on the tool bar is pressed.
· Acts Like Save--This saves the file as if you had chosen File > Save.
· Acts Like Save As--This brings up the Save As... window and lets you save the file undera different name or location.
15.8.5 After a Search...
After a Search...
· Bring Document to the Front--This option brings the document to the front and sends thesearch window to the back.
· Leave Collapsed Search Window in Front--This option leaves the focus in the searchwindow but collapses it into a smaller (and less obtrusive) version.
·
15.8.6 Pagination
· Paginate When I'm Idle For # seconds--Lets you specify how long Screenwriter shouldwait when there's a pause in your typing before automatically repaginating your document.If your writing is interrupted by the automatic repaginating, increase the pagination delay.
· No Real-time Pagination--This option turns off real-time pagination.
· Pagination Sound--This option controls the sound Screenwriter makes every time it runsthe real-time pagination. The default for this option is None.

Movie Magic® Screenwriter 6 Help 249
15.9 Revisions Preferences
Options on this page allow you to change certain Production Features. Revision Marksmentioned in the following section refer to Current Revision Marks, not Locked RevisionMarks. See the Production Features chapter for more details.
Screenwriter > Preferences... > Revisions
15.9.1 After ?? Revision Marks on the Page, put a Revision Mark on the Header
Lets you specify how many Current Revision Marks on a page are acceptable before puttinga Revision Mark on the Header also, to indicate a revised page.
15.9.2 Use an Asterisk on the Header instead of the Normally Defined Revision Mark
If checked, puts the default asterisk as the Header Revision Mark even when you havechanged the Current Revision Mark to be some other symbol. Unchecked, the Header getsthe same Revision Mark as the rest of your document.
Movie Magic Screenwriter250
15.9.3 Put the Header Revision mark on the line under the header rather than to theright of it
If checked, puts the Header Revision Mark on its own separate line below the Header. Unchecked, puts the Header Revision Mark on the Header line, at the right.
15.9.4 Don’t print Revision Marks on each line...
If checked, and there are enough Revision Marks on the page to warrant Screenwriterputting a Revision Mark on the Header (as determined by your setting in After ?? RevisionMarks..., above,) Current Revision Marks won't print on revised lines. The Header RevisionMark prints instead, indicating a revised page. This avoids having a cluttered look to thepage. Unchecked, Current Revision Marks prints on the Header and on each revised line.
15.9.5 Asterisk Headers of NEW A-Pages that don’t have any revisions on them
If checked, puts an asterisk on the Header of added A-pages to indicate that they're new(and are considered revisions.) Unchecked, new A-pages are identifiable by their pagenumbering scheme only.
15.9.6 Print Separate full “PAGE OMITTED” pages
If checked, a page in a locked script whose entire text has been omitted prints with thelegend PAGE OMITTED at its center. Unchecked, the omitted page won't print. Instead, theprevious page prints numbered as a run (119-120, for example.)
15.9.7 Mark Element following Complete Deletion
If checked, puts a Revision Mark on the following element when an element with CurrentRevision Marks is completely deleted. Unchecked, there is no indication of where thatdeleted revised element used to be.
15.9.8 Auto-Update Locked Headers on Revision
If checked, automatically changes an individual Locked header to the Current revisionheader when a new revision mark appears on its page. Unchecked, Locked headers are notupdated automatically. When printing, Screenwriter prompts you to Update the Headers ofall pages with revisions on them to the Current header? They can also be updated manuallyby issuing either a Fix Headers or Remove Current Revision Marks command.
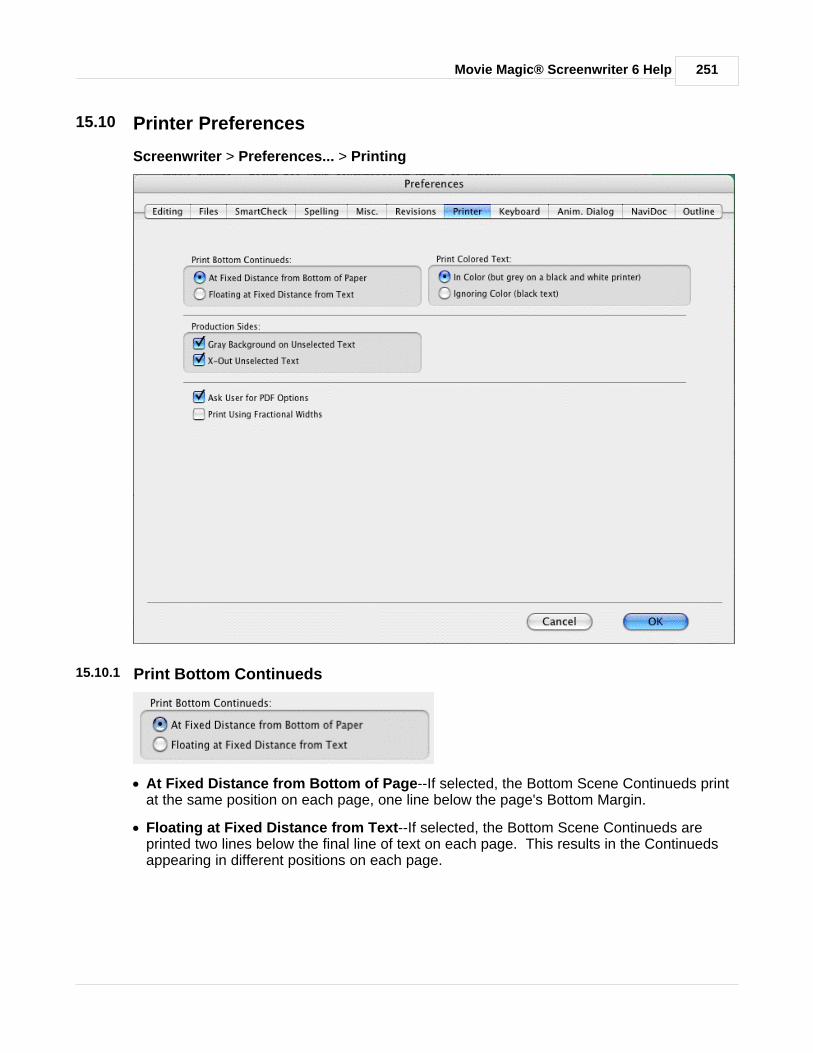
Movie Magic® Screenwriter 6 Help 251
15.10 Printer Preferences
Screenwriter > Preferences... > Printing
15.10.1 Print Bottom Continueds
· At Fixed Distance from Bottom of Page--If selected, the Bottom Scene Continueds printat the same position on each page, one line below the page's Bottom Margin.
· Floating at Fixed Distance from Text--If selected, the Bottom Scene Continueds areprinted two lines below the final line of text on each page. This results in the Continuedsappearing in different positions on each page.

Movie Magic Screenwriter252
15.10.2 Print Color Text
· In Color (but grey on a black and white printer)--If selected, prints color-highlighted textin color on color printers, and with a grayed background on black & white printers.
· Ignoring Color (black text)--If selected, ignores color-highlighted text and prints normally.
15.10.3 Production Sides
· Gray Background on Unselected Text--If checked, document material NOT selected isprinted over a gray background which makes the selected production sides material easierto see. Unchecked, all material is printed normally.
· X-Out Unselected Text--If checked, document material NOT selected is printed with alarge "X" across it. Unchecked, all material is printed normally.
15.10.4 When printing to PDF, prompt user with (COPY)
With this option enabled, when you create a PDF (Adobe Acrobat) file, it will ask you whetherit should automatically display the Scene Heading Bookmarks and which, if any non-printingNotes should it include. With this option NOT enabled, it will automatically use the last PDFPrinting Options that you had chosen.
15.10.5 Print Using Fractional Widths
When checked, Screenwriter prints using fractional width calculations. Most fonts look betterwhen printed using fractional widths but some fonts don't. Unchecked, Screenwriter printswithout using fractional width calculations.
15.11 Keyboard Preferences
Screenwriter > Preferences... > Keyboard
This page allows you to change Screenwriter's special editing keys. From the scrollablelists, choose your key preferences. .

Movie Magic® Screenwriter 6 Help 253
15.11.1 Keyboard Preferences Buttons
Reset--This button resets the keyboard shortcuts to the shipping defaults.
Clear--This button clears all of the keyboard shortcuts.
Export--Exports the current keyboard shortcuts to a keyboard shortcuts (.kbd) file.
Import--Imports .kbd keyboard shortcuts files to the current keyboard shortcuts.
Print--Prints the keyboard shortcuts.
Edit --This button lets you add, remove, and change keyboard shortcuts.254
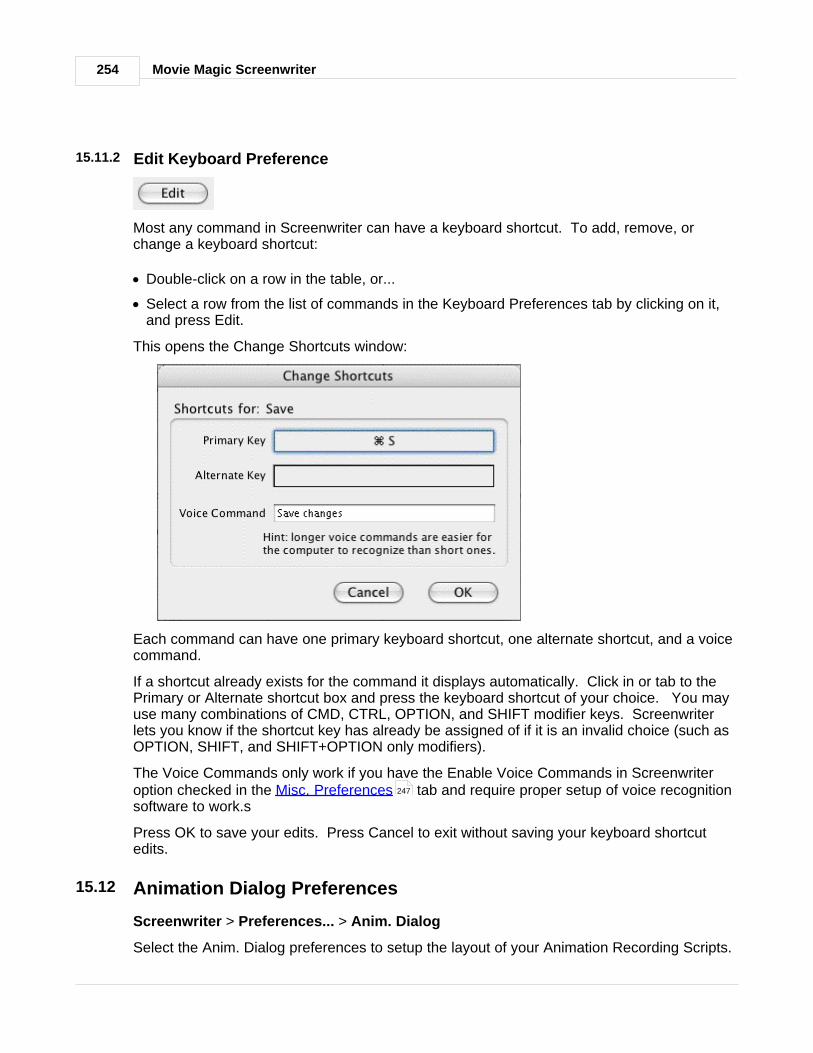
Movie Magic Screenwriter254
15.11.2 Edit Keyboard Preference
Most any command in Screenwriter can have a keyboard shortcut. To add, remove, orchange a keyboard shortcut:
· Double-click on a row in the table, or...
· Select a row from the list of commands in the Keyboard Preferences tab by clicking on it,and press Edit.
This opens the Change Shortcuts window:
Each command can have one primary keyboard shortcut, one alternate shortcut, and a voicecommand.
If a shortcut already exists for the command it displays automatically. Click in or tab to thePrimary or Alternate shortcut box and press the keyboard shortcut of your choice. You mayuse many combinations of CMD, CTRL, OPTION, and SHIFT modifier keys. Screenwriterlets you know if the shortcut key has already be assigned of if it is an invalid choice (such asOPTION, SHIFT, and SHIFT+OPTION only modifiers).
The Voice Commands only work if you have the Enable Voice Commands in Screenwriteroption checked in the Misc. Preferences tab and require proper setup of voice recognitionsoftware to work.s
Press OK to save your edits. Press Cancel to exit without saving your keyboard shortcutedits.
15.12 Animation Dialog Preferences
Screenwriter > Preferences... > Anim. Dialog
Select the Anim. Dialog preferences to setup the layout of your Animation Recording Scripts.
247

Movie Magic® Screenwriter 6 Help 255
These options change the way the a Recording Script prints without affecting the document.
15.12.1 Speech Number
Speech Numbering
· On Right Margin of Page—Prints dialogue numbers in the speech's right margin.
· On Left Margin of Page—Prints dialogue numbers in the speech's left margin.
15.12.2 Character Name Position
Character Name Position

Movie Magic Screenwriter256
· Above Dialogue—Prints the Character Name above the dialogue speech (normalposition).
· To Left of Dialogue—Prints the Character Name at the left of the dialogue speech.
15.12.3 Dialogue Spacing
Dialogue Spacing
· Use Spacing in Script—Prints the dialogue using the same spacing as in the originalscript.
· Use Double Spacing—Prints with the dialogue double-spaced.
15.12.4 Dialogue Capitalization
Dialogue Capitalization
· Use Capitalization in Script—Prints the dialogue using the same Capitalization as inthe original script.
· Always Capitalize Dialogue—Prints Dialogue speeches in ALL CAPS.
15.12.5 Blank Lines Before Printed Speeches
Blank Lines before Printed Speeches
· Use the Normal Character Name “Blank Lines Before”—Prints the dialogue usingthe same # of Blank Lines Before the Character Name as in the original document.
· Set Blank Lines Before to #—Allows you to set the number of Blank Lines Before theCharacter Name, from 1 to 5.

Movie Magic® Screenwriter 6 Help 257
15.12.6 Print Script Notes
Print Notes—If checked, prints Notes in the Animation Recording Script, with the followingoptions:
· Only Notes before selected Dialogue—Prints Notes only if they appear directlybefore a dialogue speech.
· Print Notes directly above Speeches—If checked, prints Notes on the lineimmediately above the Character Name. Unchecked, prints according to the linespacing set in Blank Lines Before Printed Speeches.
· Print Boxes around Notes—If checked, prints Notes as they appear in the originaldocument, with boxes around them. Unchecked, no boxes are printed.
15.12.7 Misc. Animation Dialog Preferences
Print <> around Numbering—If checked, displays and prints angle brackets around thedialogue numbers, to differentiate between them and page numbers, scene numbers, etc.
Substitute Font:—Lets you print the Animation Recording Script using a different font thanin the original document.

Movie Magic Screenwriter258
15.13 NaviDoc Preferences
Screenwriter > Preferences... > NaviDoc 163

Movie Magic® Screenwriter 6 Help 259
15.14 Outline Preferences
Screenwriter > Preferences... > Outline
15.15 Script Format Options
The script formats supplied with Screenwriter—for Screenplay, Sitcom I, Sitcom 2, StagePlay, or Multimedia—can be customized to your preference. The changes affect the currentscript, or can be saved as a default to affect all new scripts created using that format. Formats for the Television Templates can also be changed—to reflect the different format ofa new TV show, for example.
Change options for specific script formats by using the Element Styles... screen:
Under the Format menu, select Element Styles...
A screen similar to the following displays:

Movie Magic Screenwriter260
15.15.1 Element Styles...
Format > Element Styles...
Down the right side of the Element Styles window are buttons for displaying the uniquecharacteristics of individual Elements:
· Character Names
· Dialogue
· Parentheticals
· Scene Headings
· Shots
· Action
263
264
264
265
266
266

Movie Magic® Screenwriter 6 Help 261
· Transitions
· Act Breaks
· Scene Labels
· Notes
· Centered Title
and options for:
· Page Breaks
· Locked Scripts
· Outline Styles
Click on a button to display that element's options.
Options common to all script elements
Options common to all script elements (though with different values for each) are:
Margins—Left and Right, adjustable in units of 1/10th of an inch.
Justified—Justified is a feature that appears in the text formatting section of thefollowing menus: Dialogue, Parenthetical, Action, and Notes.
When this option is enabled all words along the right side of the script will be aligned andeven. Animation scripts are the only scripts that actually use this format. In addition, thejustified text will not display on screen but will print and display in Print Preview.
NOTE: The “Darken Courier New” function will not work when justified is selected. It willnormally print Courier New instead. You can find this function by going into the Toolsmenu, clicking Options…, and then clicking the Printing button.
Line Spacing—Lines Before and Interline (between lines within an element), adjustable inunits of 1/10th of a line.
All Capitals, Bold, Italicized, and Underlined text formatting check boxes.
A button to select a Font's Typeface, Style, and Size.
266
267
268
269
269
269
272
182

Movie Magic Screenwriter262
Allow Words that are five or more letters long to extend 1 or 2 letters beyond thenormal right-hand margin—If checked, allows a right margin “slop” for smoother-lookingright margins in all elements. Unchecked, maintains strict right margins.
BUTTONS
Use Current Font for All Elements—Applies the font type and size (but not formatting suchas bold, italic, etc.) to your choice of all elements except outline elements, outline elementsonly, all elements, and the header and footer.
Reset—The Reset button works as an Undo button for the changes you have made to anindividual Element. It restores the settings to the way they were before you made changes. Use the Reset button before clicking OK to exit the menu and save changes to ScriptFormats, or it will have no effect.
Save as Defaults for all New Scripts—If checked, applies any changes you have made toa script's elements to all new scripts.
OK—Exits and applies Script Format changes you have just made to the script.
Cancel—Exits and discards Script Format changes you have just made to the script.

Movie Magic® Screenwriter 6 Help 263
Character Names
Center Character Names—If checked, all Character Names are centered horizontallyacross the page (an unconventional choice). Unchecked, each Character Name starts at thesame left margin position.
Character Continueds as...—Allows you to choose one of these options for adding aContinued to a Character Name when dialogue is split by an Action element:
· No Automatic Character Continueds—If checked, Continued is not added to theCharacter Name on the second speech.
· Extension—If checked, Continued is placed in parentheses after the Character Name(for example, KATY (CONT'D)) on the second speech.
· Only when Extensions Match—If checked, adds a Continued to the Character Nameon the second speech only if both speeches are of the same type, e.g. (V.O.) Unchecked, adds a Continued even if the first speech was normal Dialogue and thesecond is (V.O.), for example.
· Parenthetical—If checked, Continued is placed in a Parenthetical element beneaththe Character Name on the second speech.
Continued Separator:—Allows you to enter a character to use to separate a CharacterName Extension from a Character Name Continued. Default is the semi-colon. The SetStyle option lets you determine how Character Name Extensions and Continueds areseparated: either by the Separator character or by parentheses.
Cont'd Text:—Lets you enter your choice of Character Name Continued text. For example,Cont'd, CONT'D, Continued, CONTINUED, etc.
More Cont'd:—Lets you enter your choice of Character Name Continued text to use at theend of a page's broken Dialogue when it's split by a Page Break. For example, Cont'd,CONT'D, Continued, CONTINUED, etc.
More Text:—Lets you enter your choice of Character Name Continued text to use at thebeginning of the next page's continued Dialogue when it's split by a Page Break. Forexample, Cont'd, CONT'D, Continued, CONTINUED, etc.

Movie Magic Screenwriter264
Dialogue
(Cont'd) Dialogue Shouldn't have Character—Select this option to have Movie MagicScreenwriter ‘hide' all Character Names to which it applies automatic Cont'ds. If you havethis option selected then these Continued Names will appear in the script in a GRAY color toidentify that they will not print, and they will be ignored by the pagination routines.
NOTE: The ONLY format in which this is used in the professional world is in playwriting, and we HIGHLY recommend that you do not use this setting in a screenplayor teleplay!
Put Dialogue on the same line as Character Names—Select this option to have MovieMagic Screenwriter put dialogue on the same line as the Character Names (i.e. Radio ScriptStyle) so that it will look like the following:
MARK: True, but despite the fact that you read many playsprinted in this format, it is not the one used in theprofessional play writing world!
NOTE: When you are in the Radio Script format, QuickType™ functions a little differently toaccommodate the text flow in this format. Typing in a known Character Name on a blankaction line and then pressing the colon (*.*) automatically takes you to Dialogue. In addition,pressing he TAB key following a colon in an action line automatically takes you to Dialogue.
Parentheticals
Outdent Parentheticals—If checked, wraps parenthetical text so that the second line textlines up under the first line text and not the parenthesis. Pushes wrapped text over by onecharacter space.
Parentheticals are Separate Element—If checked, puts Parenthetical text on its own lineabove the Dialogue and below the Character Name. Unchecked, puts Parenthetical text onthe same line as Dialogue.
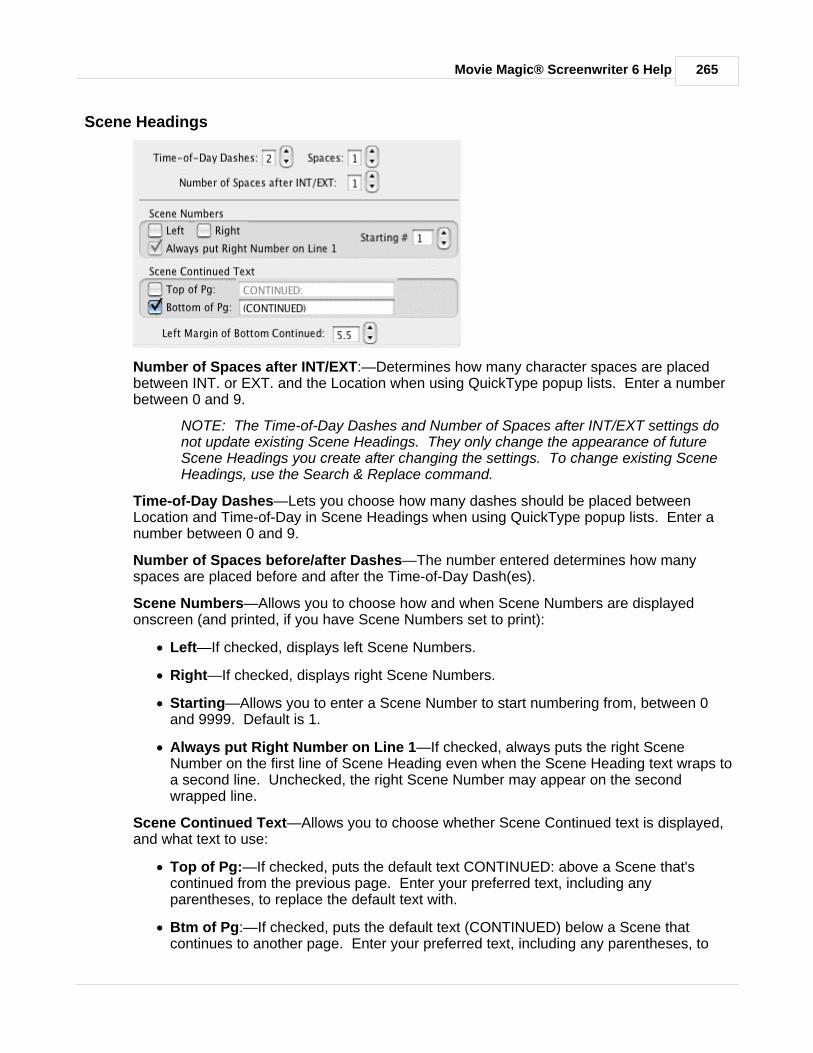
Movie Magic® Screenwriter 6 Help 265
Scene Headings
Number of Spaces after INT/EXT:—Determines how many character spaces are placedbetween INT. or EXT. and the Location when using QuickType popup lists. Enter a numberbetween 0 and 9.
NOTE: The Time-of-Day Dashes and Number of Spaces after INT/EXT settings donot update existing Scene Headings. They only change the appearance of futureScene Headings you create after changing the settings. To change existing SceneHeadings, use the Search & Replace command.
Time-of-Day Dashes—Lets you choose how many dashes should be placed betweenLocation and Time-of-Day in Scene Headings when using QuickType popup lists. Enter anumber between 0 and 9.
Number of Spaces before/after Dashes—The number entered determines how manyspaces are placed before and after the Time-of-Day Dash(es).
Scene Numbers—Allows you to choose how and when Scene Numbers are displayedonscreen (and printed, if you have Scene Numbers set to print):
· Left—If checked, displays left Scene Numbers.
· Right—If checked, displays right Scene Numbers.
· Starting—Allows you to enter a Scene Number to start numbering from, between 0and 9999. Default is 1.
· Always put Right Number on Line 1—If checked, always puts the right SceneNumber on the first line of Scene Heading even when the Scene Heading text wraps toa second line. Unchecked, the right Scene Number may appear on the secondwrapped line.
Scene Continued Text—Allows you to choose whether Scene Continued text is displayed,and what text to use:
· Top of Pg:—If checked, puts the default text CONTINUED: above a Scene that'scontinued from the previous page. Enter your preferred text, including anyparentheses, to replace the default text with.
· Btm of Pg:—If checked, puts the default text (CONTINUED) below a Scene thatcontinues to another page. Enter your preferred text, including any parentheses, to

Movie Magic Screenwriter266
replace the default text with.
· Left Margin of Bottom Cont'd:—Lets you choose how far, in 1/10 of an inchincrements, to indent the Bottom Continued from the left edge of the page.
Shots
Shots has no element-specific options.
Action
(Put Action in Parentheses)—If checked, puts Parentheses around the Action text (as isrequired in some Stage Play and TV Sitcom formats).
Action Indentation—This option allows you to change the starting indent of Action. Thesetting of -1 is only available when you have the option Put Action in Parenthesis selected,and setting it to -1 will automatically select that option for you if it is not already. This settingwill cause the left parenthesis to be outdented one position so that the first line of action willline up with all subsequent lines.
When you change this Action Indentation setting, you will see a sample action line which willdisplay how action will look with the current parenthetical and indentation settings.
Transitions
Transitions are FLUSH RIGHT—If checked, Transition text is aligned flush with the rightmargin. Unchecked, Transition text is aligned flush with the left margin.

Movie Magic® Screenwriter 6 Help 267
Act Breaks
(Put Act Break in Parenthesis)—If checked, puts Parentheses around the Act Break text(as is required in some TV Sitcom formats).
Center Act Break—If checked, all Act Break text is centered horizontally between the ActBreak margins. Unchecked, Act Break text starts at the Act Break left margin.
Don't use Act Break for a New Scene in the Same Act (e.g. Put in ONLY on first Scene ofan Act)—If checked, puts “Act #, Scene #” at the beginning of the first scene in an Act only.Subsequent scenes have the “Scene #” information only. Unchecked, each scene in an Acthas the full “Act #, Scene #” information.
NOTE: The Put in ONLY on 1st Scene of Act setting does not update existingAct/Scene Text—this will stay the way you entered it, unless you manually change it.It only changes the appearance of future Act/Scene Text you create after changingthe setting. To change existing Act/Scene Text, use the Search & Replacecommand.
Starting Number—Allows you to enter an Act Number to start numbering from, between 0and 9999. Default is 1.
End of Show is Act Number—Lets you specify how many acts are in the current script.Screenwriter enters “END OF SHOW” at the end of the Act Number you specify here,instead of “END OF ACT #”.
Numbering Scheme...—Lets you choose how Acts are numbered, from one of the followingschemes:
· ACT A—If checked, uses letters to number the acts.
· ACT 1 (NUMBERS)—If checked, uses numbers to number the acts.
· ACT ONE—If checked, uses words to number the acts.
· ACT I (ROMAN)—If checked, uses Roman numerals to number the acts.

Movie Magic Screenwriter268
Scene Labels
Automatically put in Scene Label after Act Break—If checked, Scene Labels areautomatically put in the script directly after Act Break (as in Sitcoms). Unchecked, SceneLabels are not added (as in MOWs).
NOTE: The Use Scene Labels in Script setting does not update existing Act/SceneText—this will stay the way you entered it, unless you manually change it. It onlychanges the appearance of future Act/Scene Label you create after changing thesetting. To change existing Act/Scene Label, use the Search & Replace command.
(Put Scene Labels in Parenthesis)—If checked, puts Parentheses around the Scene Labeltext (as is required in some TV Sitcom formats).
Center S-Info—If checked, all Scene Label text is centered horizontally between the SceneLabel margins. Unchecked, Scene Label text starts at the Scene Label left margin.
Put in “SCENE”—If checked, displays the word “SCENE” along with Scene Numbers.Unchecked, Scene Numbers display alone.
Number Scenes Continuously—If checked, Scenes are numbered continuously from firstto last. Unchecked, Scene Numbering restarts at 1 from each Act Break.
Starting Number:—Allows you to enter a Scene Number to start numbering from, between 0and 9999. Default is 1.
Numbering Scheme...—Lets you choose how Scenes are numbered, from one of thefollowing schemes:
· SCENE A—If checked, uses letters to number the scenes.
· SCENE 1 (NUMBERS)—If checked, uses numbers to number the scenes.
· SCENE ONE—If checked, uses words to number the scenes.
· SCENE I (ROMAN)—If checked, uses Roman numerals to number the scenes.

Movie Magic® Screenwriter 6 Help 269
Notes
Display Notes in Document—If checked, displays Notes onscreen. Unchecked, they arehidden. Unchecking Display Notes in Script automatically unchecks Print Notes in Script.
Print Notes in Document—If checked, Notes are treated as part of the script when printing,changing the Page Breaks accordingly. Checking Print Notes in Script automatically checksDisplay Notes in Script. Unchecked, Notes do not print or increase the script length.
Centered Title
Centered Title has no element-specific options.
Page Breaks

Movie Magic Screenwriter270
Break Action
Do Not Break Action—If checked, an Action element is never split by a page break.Unchecked, Action may be broken over the two pages.
Sentence Ends Only—If checked, Action is broken at the end of a sentence only.
Sentence Ends Preferred—If checked, Action is broken at the end of a sentence if oneexists in the 3 lines before the end of where the page break falls. If no sentence end isfound in the last 3 lines, Action may be broken in the middle of a sentence.
Maximum Lines on Page—If checked, Action may be broken in the middle of a sentence inorder to fit the maximum number of lines on a page.
Minimum Action Lines on a Page—Tells Screenwriter not to break an Action elementunless there are at least this number of Action lines both before and after the page break. The lower the number entered, the less blank white space at the bottom of a page. Acceptsa number between 1 and 10, with 2 as the default. (Not used when Sentence Ends Only isselected.)
Break Dialogue
Do Not Break Dialogue—If checked, a Dialogue element is never split by a page break.Unchecked, Dialogue may be broken over the two pages.
Sentence Ends Only—If checked, Dialogue is broken at the end of a sentence or betweenDialogue and Parenthetical only.
Sentence Ends Preferred—If checked, Dialogue is broken at the end of a sentence if oneexists in the 3 lines before the end of where the page break falls. If no sentence end isfound in the last 3 lines, Dialogue may be broken in the middle of a sentence.
Maximum Lines on Page—If checked, Dialogue may be broken in the middle of a sentencein order to fit the maximum number of lines on a page.
Minimum Dialogue Lines on a Page—Tells Screenwriter not to break a Dialogue elementunless there are at least this number of Dialogue lines both before and after the page break.

Movie Magic® Screenwriter 6 Help 271
The lower the number entered, the less blank white space at the bottom of a page. Acceptsa number between 1 and 10, with 2 as the default. (Not used when Sentence Ends Only isselected.)
Break After a Single Sentence—If checked, elements may be broken after a singlesentence that only takes up one line (does not word-wrap.) For Dialogue elements, thisoption only applies to a single sentence directly following the Character Name element. Dialogue elements following Parentheticals, or second paragraphs of Dialogue, may bebroken after a single sentence even if this option is not checked.
Break two One-line Sentences—If checked, elements consisting of only two one-linesentences may be broken. Unchecked, the element is not broken.
Transitions
Allow Transition as 1st Line on Page—If checked, a new page is allowed to start with aTransition element. This is unconventional, as Transitions are intended to bridge two otherelements. Unchecked, part of the element preceding the Transition is broken to appear atthe top of the new page. The previous page may have extra blank white space as a result.
Allow Transition on Bottom CONTINUED line—If checked, forces a Transition element tofit on the bottom of a page if the next element is Scene Heading or Act/Scene Text. Onlyapplies when Bottom Scene Continueds are turned on—the Transition takes the place ofthe Bottom Scene Continued.
Miscellaneous
Allow Scene on TOP CONTINUED line—If checked, a Scene Heading or Act/Scene Textthat is the first item on a page is placed where the Top Scene Continued would appear. Only applies when Top Scene Continueds are turned on. Unchecked, the first element texton a page appears in the same position on each page, regardless of the Top Continueds.
Count (More) Line in Page Breaking—If checked, the line containing (MORE) isconsidered part of the Dialogue element for page breaking purposes. Unchecked, only theactual Dialogue text is considered when deciding where to break the page.
Starting Page Number—Allows you to specify a different starting page number for thescript. Default is 1.
Start 1st/Forced Page on Line #—Allows text on the first page of the script and all pagesfollowing Forced Page Breaks to start further down the page than the first line. Enter the linenumber to start text on. Used in Sitcom formats to start each scene about a third of the waydown the page.
Movie Magic Screenwriter272
Locked Scripts
The options on this page are only used during production. Locked Scripts are covered inthe Production Features chapter.273
Movie Magic® Screenwriter 6 Help 273
16 Production Features
· Production Rewrites
· The Production Cycle
· Revision Marks
· Locked Script Options
· Advanced Locking Features
· Production Breakdowns
· Breakdown Sheets
· Export to Movie Magic Scheduling
· Animation Production
· Animation Recording Scripts
16.1 Production Rewrites
After the final draft of a script is turned in by the screenwriter, and the decision to go intoproduction is made, copies of what is now the shooting script are distributed to cast andcrew.
Each time a change is made to the script after that, everyone needs a copy of the changes. Instead of sending out the entire document to everyone again, only those pages withchanged text are sent—the revised pages.
Revised pages have revision marks next to those lines that have changed, or revision marksin the header if most of the page has changed. Added (A and B) and deleted (Omitted)scenes and pages are indicated also.
Each time a set of revised pages is distributed, they're copied on a different color of paper toinstantly distinguish them from other revisions.
Screenwriter can automatically generate all A-Pages, A-Scenes and revision marks for you,and gives you a lot of flexibility over how you'd like your revisions to appear. To begingenerating revised pages, you must first Lock the Page Breaks of the script. Otherwise, anyaddition or deletion to the script would change the page numbers of the pages following it—and everyone would no longer have the same text on the same pages. Subsequent pagesare added as A-Pages. Deleted pages become Omitted pages.
Similarly, Scene Headings (and numbers) can be locked, so that everyone's referring to thesame scene. New scenes become A-Scenes. Deleted scenes become Omitted scenes.
NOTE: If you place the mouse on Page Panel in a locked script, it displays a pop-upwindow with the total number of page, how many pages were revised and theapplicable percentage.
273
274
278
279
286
291
299
300
301
302

Movie Magic Screenwriter274
16.2 The Production Cycle
The Production Cycle involves the following steps:
· Issue the Shooting Script
then...
· Lock the Script
· Perform Revisions
· Issue Revised Pages
· Start Next Revision (Lock the script again)
· Perform Next Revisions
· Issue Next Revised Pages
...and so on. Here's how:
16.2.1 Shooting Script
Before issuing the shooting script for the first time, turn on and/or customize all theProduction Features you'd like to use (especially Top and Bottom Continueds!). Each ofthese options is described in detail elsewhere in the manual and in this Online Help.
1. Save the screenwriter's final draft , using File > Save As... Give it a different name toreflect the date and its status as the White shooting draft you're about to create (e.g.MyScript WHITE). Now you can save your work at regular intervals, using the Savecommand.
NOTE: To customize the Production Features for the way you or your productioncompany work, continue with Steps 2 and 3. To accept Screenwriter's defaultsettings, skip directly to Step 4.
2. Under the Format menu, select Element Styles....
· Click on the Scene Headings button and set the Scene Numbers and SceneContinued Text to your preference.
· Click on the Locked Scripts button and set the Scene Omitted Text, A-SceneNumbering Scheme, Revision Mark Text and Locked Letter Skip List to yourpreferences (Do not Lock Scene Headings and Page Breaks here. You'll do allLocking from the Production menu.)
· Once you have the settings customized to the way your production company works,click on Make Default for All New Documents if you want all new files to have thisformat.
· Click on the OK button to accept your changes.
3. Under the Tools menu, select Options….
· Click on the Revisions tab and set the Revision Marks options to your preference.
274
275
277
277
277
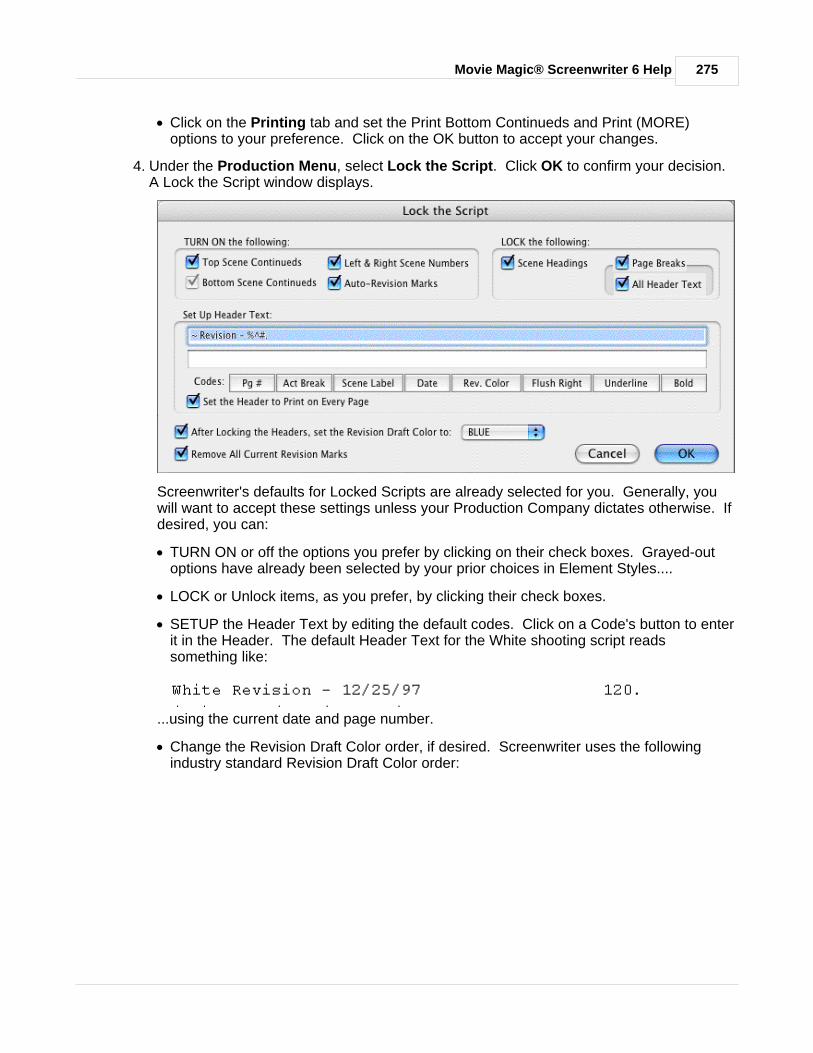
Movie Magic® Screenwriter 6 Help 275
· Click on the Printing tab and set the Print Bottom Continueds and Print (MORE)options to your preference. Click on the OK button to accept your changes.
4. Under the Production Menu, select Lock the Script. Click OK to confirm your decision.A Lock the Script window displays.
Screenwriter's defaults for Locked Scripts are already selected for you. Generally, youwill want to accept these settings unless your Production Company dictates otherwise. Ifdesired, you can:
· TURN ON or off the options you prefer by clicking on their check boxes. Grayed-outoptions have already been selected by your prior choices in Element Styles....
· LOCK or Unlock items, as you prefer, by clicking their check boxes.
· SETUP the Header Text by editing the default codes. Click on a Code's button to enterit in the Header. The default Header Text for the White shooting script readssomething like:
...using the current date and page number.
· Change the Revision Draft Color order, if desired. Screenwriter uses the followingindustry standard Revision Draft Color order:

Movie Magic Screenwriter276
White
Blue
Pink
Yellow
Green
Goldenrod
Salmon
Cherry
Buff
Tan
After you have locked this—the White shooting script—for the first time, Blue will beset as the next revision color.
Click on OK to accept your changes or the defaults and Lock the Script.
A prompt displays, telling you that you're ready to print the White draft and then startmaking Revisions that will appear in the Blue draft. Click on OK to continue.
Movie Magic® Screenwriter 6 Help 277
5. Next, update the Title Page. Under the View menu, select Title Page Publisher. Createa text box and start the Running List, with the current Date and Revision Draft Color. Clickon OK to save the changes.
6. Save the script under File > Save.
7. Print the White draft Shooting Script. Under the File menu, select Print. Copy anddistribute the script to all concerned parties.
16.2.2 Perform Revisions
1. Save the script under File > Save As. Give it a different name to reflect the Date and itsstatus as the next Revision Color draft (e.g. MyScript BLUE).
2. Make changes to the script—adding and deleting text as necessary—that will appear inthe next draft. Save the file as you go. Because the script is locked, Screenwriter doesthe following:
· Automatically puts Revision Marks on lines you make changes to.
· Puts appropriate OMITTED text in the place of omitted Scenes and Pages.
· Keeps existing Page and Scene numbers the same, while adding new ones asA-Pages and A-Scenes.
3. Update the Title Page. Under the View menu, select Title Page Publisher... Manuallychange the Running List, adding the current Date and Revision Draft Color. Click on OKto save the changes.
4. Check the Header Text to make sure it accurately reflects the current Date and RevisionDraft Color.
5. Save the script, using the Save command.
16.2.3 Issue Revised Pages
1. Print the Revised Pages only:
· Under the File menu, select Print.
· Click on the radio button for the displayed Revision Color (or click on the radio buttonfor Asterisked Pages if you're not using Revision Colors.) Screenwriter prints only thepages with Revision Marks and any A-Pages immediately following them.
2. Distribute the revised pages.
16.2.4 Start Next Revision
1. Under the Production menu, select Start Next Revision. From now on, Screenwriterautomatically takes you through the steps to get to the next revision. When you selectStart Next Revision, Screenwriter:
· Removes all Revision Marks.
· Fixes all A-Pages.

Movie Magic Screenwriter278
· Locks the Header Text.
· Advances to the next Revision Draft Color.
· Prompts for a mandatory Save.
· Displays the Title Page Publisher, so you can add the next Revision Draft Color to theRunning List and change the Date.
· Click YES to have Screenwriter start the automated process.
2. New drafts must be saved Save the script, using the Save As command. Give it a differentname to reflect the Date and its status as the next Revision Color draft (e.g. MyScriptPINK).
· Click on OK to go to the Title Page Publisher. Manually change the Running List,adding the current Date and Revision Draft Color. Click on OK to save thechanges.
3. Make changes to the script, adding and deleting text as necessary. Save the file as yougo.
4. Issue Revised Pages by printing and distributing them.
5. Go back to Step 1 of Start Next Revision. Repeat the process for each day's revisions.
6. That's the Production Cycle completed.
16.3 Revision Marks
A Revision Mark is a special character (usually an asterisk) usually appearing in the rightmargin of a line. It signifies that changes have been made to that line.
If you follow the Production Cycle sequence described above, Screenwriter will automaticallyhandle Revision Marks for you.
To work with Revision Marks manually , use the following instructions.
16.3.1 Manual Revision Marks
There are three ways to manually enter or remove revision marks:
· Asterisk Key—Pressing the Asterisk key (*) manually enters a revision mark on the linethe cursor is blinking. If the line already has a revision mark, pressing the asterisk keyremoves it.
NOTE: The Asterisk key is still used to type Manual Revision Marks, even if the RevisionMark has been re-defined as a different character.
· Apply Revision Marks—Applies revision mark to any currently selected line of text thatdoes not have one applied. If any lines already have revision marks, this will not affectthose lines.
· Remove Revision Marks—Removes revision mark from any currently selected line of textthat has one applied. If any lines already have revision marks, those will also beremoved.

Movie Magic® Screenwriter 6 Help 279
16.3.2 Auto-Revision Marks
Auto-Revision Marks are revision marks which are automatically entered for you as you edityour Locked script.
When you change a line, Screenwriter gives it a revision mark in the right margin. If youUndo the change, it will remove the mark. If you change it back the way it originally wasmanually, that is still considered a "change" so the revision mark will remain.
16.3.3 Enabling Auto-Revision Marks
To enable Auto-Revision marks:
This feature can be turned on or off under Production > Auto-Revision > Marks.
A checkmark displays next to Marks on the menu to indicate that Auto-Revision Marks areenabled.
16.3.4 Removing All Current Revision Marks
To remove all Current Revision Marks:
· Click on Production > Remove > Current Revision Marks.
NOTE: There are additional Revision Mark settings on both the Locked Scripts page of the Format > Element Styles window and on the Revisions section of the Tools > Optionswindow.
16.4 Locked Scripts Options
You can customize Screenwriter's Locked Script Options to work the way you work.
Under the Format menu, select Element Styles.... The Editing Script Formats screendisplays. Click on the Locked Scripts button. You'll see the following window
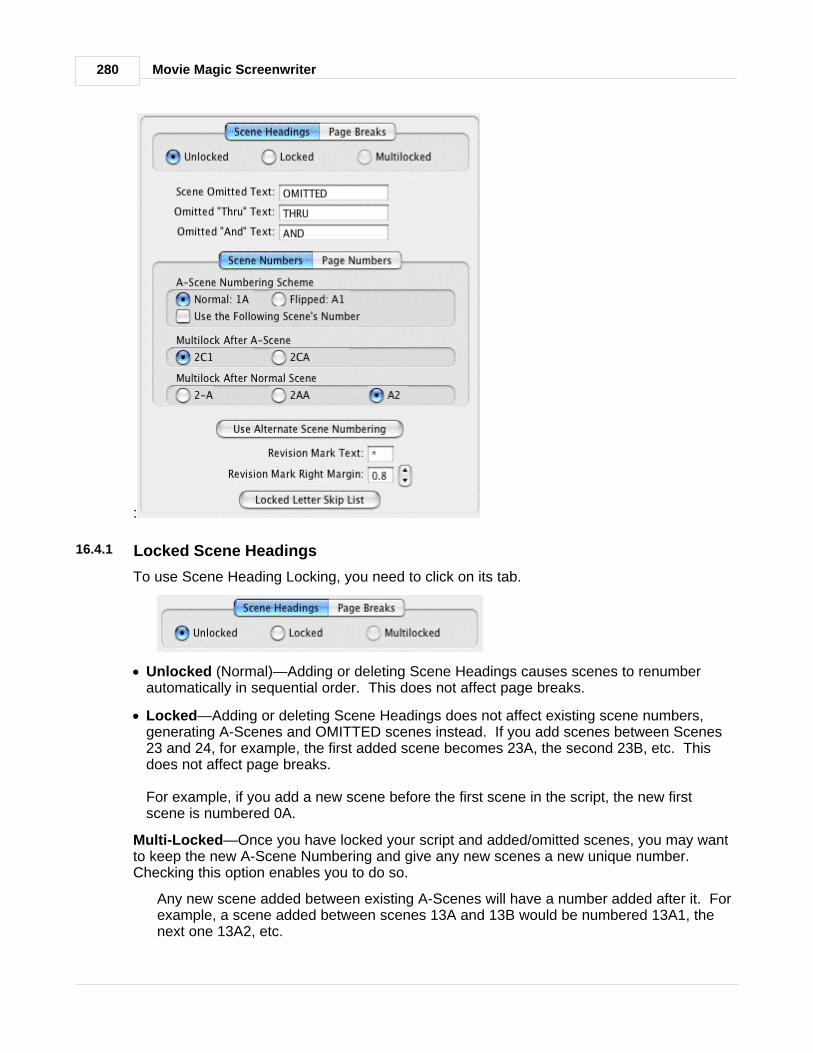
Movie Magic Screenwriter280
:
16.4.1 Locked Scene Headings
To use Scene Heading Locking, you need to click on its tab.
· Unlocked (Normal)—Adding or deleting Scene Headings causes scenes to renumberautomatically in sequential order. This does not affect page breaks.
· Locked—Adding or deleting Scene Headings does not affect existing scene numbers,generating A-Scenes and OMITTED scenes instead. If you add scenes between Scenes23 and 24, for example, the first added scene becomes 23A, the second 23B, etc. Thisdoes not affect page breaks.
For example, if you add a new scene before the first scene in the script, the new firstscene is numbered 0A.
Multi-Locked—Once you have locked your script and added/omitted scenes, you may wantto keep the new A-Scene Numbering and give any new scenes a new unique number. Checking this option enables you to do so.
Any new scene added between existing A-Scenes will have a number added after it. Forexample, a scene added between scenes 13A and 13B would be numbered 13A1, thenext one 13A2, etc.
Movie Magic® Screenwriter 6 Help 281
If you add a new scene between an existing A-Scene and a Normal Scene, it is enteredas a normal A-Scene. For example, a scene added between 25B and 26 would become25C.
If a new scene is added between a Normal Scene and an A-Scene, it is entered usingthe Multi-Lock Character. For example, a scene added between scenes 103 and 103Awould become A103 (using the default Multi-Lock Character).
Also see A-Scene Numbering Scheme .
NOTE: An individual Locked Scene Heading can be moved in the script withoutchanging the numbering by Dragging and Dropping it. Be careful to drag and droponly the Scene Heading. The text of the scene associated with the moved SceneHeading does not move with it.
16.4.2 Locked Page Breaks
To use Page Break Locking, you need to click on its tab.
Unlocked (Normal)—Adding or deleting enough text to create a new Page Break causespages to renumber automatically.
Locked—Adding or deleting enough text to create a new Page Break makes the existingpage numbers stay the same, and generates a new short A-Page.
If you add text to page 38, for example, the text flows over to a new page. This new shortpage becomes 38A. If the page 38 text flows over to two new pages, the second becomes38B.
NOTE: Screenwriter displays different page breaks differently:
Normal and A-Page Breaks display as a series of dashes, e.g.:
-----FLEXIBLE A-PAGE-----
Forced Page Breaks and Locked Page Breaks both display as a double dashed line, e.g.:
=====LOCKED PAGE=====
Fixed Page Breaks display as a single unbroken line, e.g.:
=====FIXED A-PAGE=====
The descriptive text contained within the page break line refers to the page following it. Itonly displays if Display Page Break Type on Screen is checked under Tools > Options >Miscellaneous.
Multi-Locked—Once you have locked your script and added A-Pages, you may want tokeep the new A-Page Numbering and give any new pages a new unique number. Checkingthis option enables you to do so.
Any new page added between existing A-Pages has a number added after it. For example,a page added after page 94B would be numbered 94B1, the next one 94B2, etc.
282
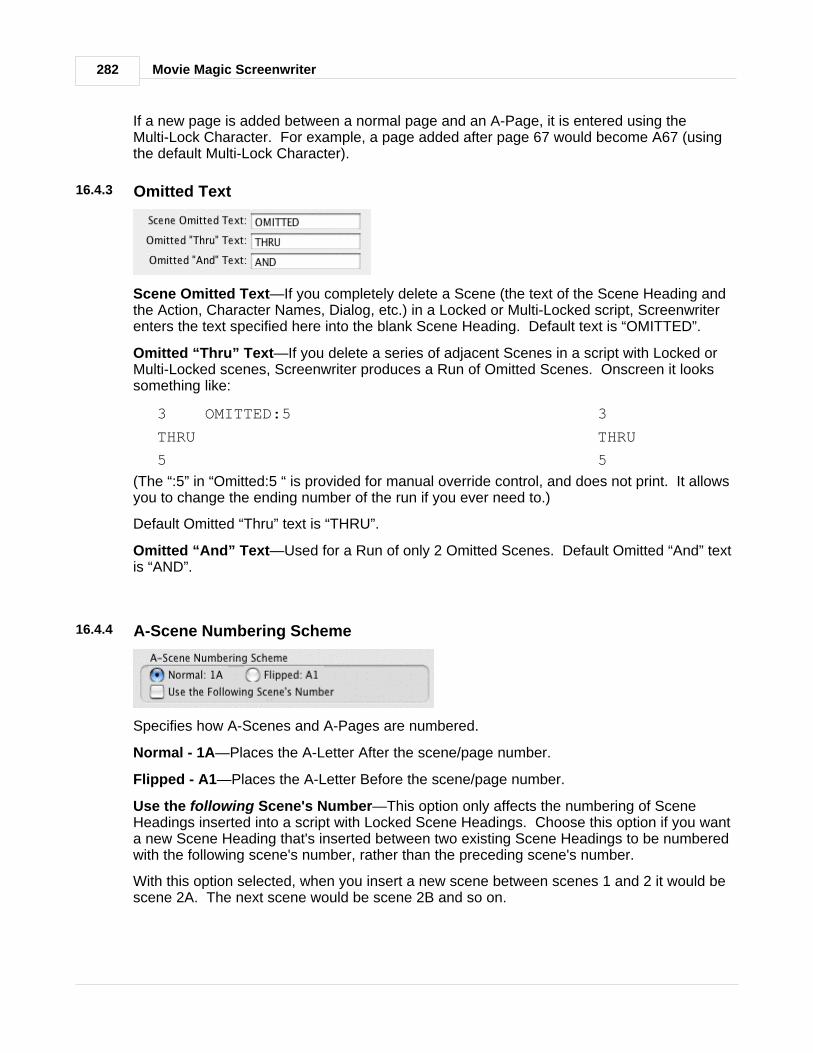
Movie Magic Screenwriter282
If a new page is added between a normal page and an A-Page, it is entered using theMulti-Lock Character. For example, a page added after page 67 would become A67 (usingthe default Multi-Lock Character).
16.4.3 Omitted Text
Scene Omitted Text—If you completely delete a Scene (the text of the Scene Heading andthe Action, Character Names, Dialog, etc.) in a Locked or Multi-Locked script, Screenwriterenters the text specified here into the blank Scene Heading. Default text is “OMITTED”.
Omitted “Thru” Text—If you delete a series of adjacent Scenes in a script with Locked orMulti-Locked scenes, Screenwriter produces a Run of Omitted Scenes. Onscreen it lookssomething like:
3 OMITTED:5 3
THRU THRU
5 5
(The “:5” in “Omitted:5 “ is provided for manual override control, and does not print. It allowsyou to change the ending number of the run if you ever need to.)
Default Omitted “Thru” text is “THRU”.
Omitted “And” Text—Used for a Run of only 2 Omitted Scenes. Default Omitted “And” textis “AND”.
16.4.4 A-Scene Numbering Scheme
Specifies how A-Scenes and A-Pages are numbered.
Normal - 1A—Places the A-Letter After the scene/page number.
Flipped - A1—Places the A-Letter Before the scene/page number.
Use the following Scene's Number—This option only affects the numbering of SceneHeadings inserted into a script with Locked Scene Headings. Choose this option if you wanta new Scene Heading that's inserted between two existing Scene Headings to be numberedwith the following scene's number, rather than the preceding scene's number.
With this option selected, when you insert a new scene between scenes 1 and 2 it would bescene 2A. The next scene would be scene 2B and so on.

Movie Magic® Screenwriter 6 Help 283
16.4.5 Multi-Lock
Production > Multi-Lock
This menu command is grayed out unless you are in a script that already has Locked SceneHeadings and/or Locked Pages, in which case selecting this item will take you to asub-menu with the following options:
1. Scenes : This option will be grayed out unless the script already has Locked SceneHeadings, in which case selecting it will turn on/off the Multi-Locking of Scenes.
2. Pages : This option will be grayed out unless the script already has Locked Pages, inwhich case selecting it will turn on/off the Multi-Locking of Pages.
NOTE: Multi-Locking is Movie Magic Screenwriter variable second locking level, used topreserve A-Scene and A-Page Numbering when new scene headings or pages are insertedbefore or between existing A-Scenes or A-Pages respectively. See the online help underMulti-Locking for more details.
16.4.6 Multi-Lock Scenes
To use Multi-Lock Scenes, you need to click on its' tab.
Multi-Lk: 1 A1—This option only affects the numbering of Scene Headings that are insertedinto a script with Multi-Locked Scene Headings and fall between two existing A-Scenes.
Choose this option if you want a new Scene Heading added in this case to be numbered asNumber-Letter-Number. For example, a scene inserted between scenes 12A and 12B wouldbe 12A1, the next one would be 12A2 and so on.
Multi-Lk: 1 AA—This option only affects the numbering of Scene Headings that are insertedinto a script with Multi-Locked Scene Headings and fall between two existing A-Scenes.
Choose this option if you want a new Scene Heading added in this case to be numbered asNumber-Letter-Letter. For example, a scene inserted between scenes 12A and 12B wouldbe 12AA, the next one would be 12AB and so on.
Multi-Lock Scene between 1 & 1A is:—Determines how a Multi-Lock Scene insertedbetween a Normal Scene and an A-Scene is numbered:
· 1-A—Adds a Dash plus the A-Letter after the scene number.
· 1AA—Adds the A-Letter plus the Multi-Lock Letter after the scene number.
· A1—Flips the normal A-Scene numbering order.
283
284
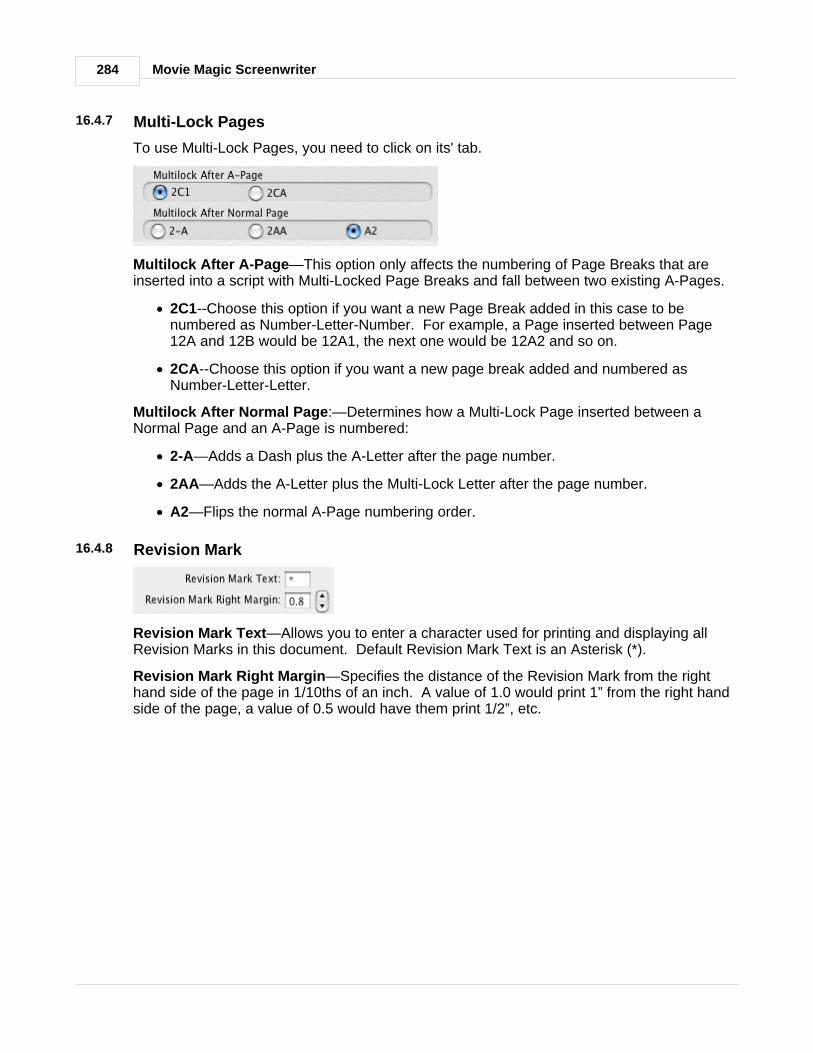
Movie Magic Screenwriter284
16.4.7 Multi-Lock Pages
To use Multi-Lock Pages, you need to click on its' tab.
Multilock After A-Page—This option only affects the numbering of Page Breaks that areinserted into a script with Multi-Locked Page Breaks and fall between two existing A-Pages.
· 2C1--Choose this option if you want a new Page Break added in this case to benumbered as Number-Letter-Number. For example, a Page inserted between Page12A and 12B would be 12A1, the next one would be 12A2 and so on.
· 2CA--Choose this option if you want a new page break added and numbered asNumber-Letter-Letter.
Multilock After Normal Page:—Determines how a Multi-Lock Page inserted between aNormal Page and an A-Page is numbered:
· 2-A—Adds a Dash plus the A-Letter after the page number.
· 2AA—Adds the A-Letter plus the Multi-Lock Letter after the page number.
· A2—Flips the normal A-Page numbering order.
16.4.8 Revision Mark
Revision Mark Text—Allows you to enter a character used for printing and displaying allRevision Marks in this document. Default Revision Mark Text is an Asterisk (*).
Revision Mark Right Margin—Specifies the distance of the Revision Mark from the righthand side of the page in 1/10ths of an inch. A value of 1.0 would print 1” from the right handside of the page, a value of 0.5 would have them print 1/2”, etc.

Movie Magic® Screenwriter 6 Help 285
16.4.9 Use Alternate Scene Numbering
16.4.10 Locked Letter Skip List
Certain letters are seldom used for Act, Scene, and Page numbering, due to the potential forconfusion. Common pairs skipped due to their similarity are:
the letter “I” and the number “1”
the letter “O” and the number “0”
the letters “E” and “F”
Clicking on the Locked Letter Skip List button displays a List of letters of the alphabet. Check those letters you don't want to use.
NOTE: Screenwriter also uses this skip list for use in its numbering of Act Breaks and SceneLabels, if they are set to use Letters.

Movie Magic Screenwriter286
16.5 Advanced Locking Features
In the normal day-to-day process of the Production Cycle, Screenwriter's automatedProduction Features will meet most people's needs. The following features give you an extralevel of manual control over Scene and Page Locking, should an unusual situation arise.
Be careful when altering Locking features, as some procedures are not reversible. Alwayssave a copy of the script before attempting any of the following procedures.
In a Locked script, many Locking options can be changed by selecting Unlock the Scriptunder the Production menu and unchecking the appropriate check boxes.
16.5.1 Changing the Level of Locking
When the script has too many revision marks, a production company may decide to send outthe entire document with all the numbers reverted to normal numbering.
To do this with Screenwriter, you need to step back, undo-ing one or more levels of Locking.
Under the Format menu, select Element Styles....
Click on the Locked Scripts button.
Select the level of locking lower than currently set.
For example, if you have Multi-Locked Scene Numbers but only want Locked SceneNumbers—with all the Multi-Locked A-Scenes (64A1, for example) renumbered to be normalA-Scenes—uncheck Multi-Locked Scene Numbers by checking Locked Scene Numbers.
NOTE: If you unlock either a script's Page Breaks or Scene Headings, all of theappropriate A-Numbering is completely and permanently lost. That's why it'simportant to make backup copies of your scripts at least daily.

Movie Magic® Screenwriter 6 Help 287
16.5.2 Overriding a Scene Number
To manually override the number of an individual Scene Heading (or Scene Label, or ActBreak):
· Put the cursor anywhere in that element.
· Under the Production menu, select Override then Element's Numbering.
A window displays showing your options for renumbering that element. Check the radiobutton of the numbering you'd like the scene to have:
· No Numbering—If checked, converts a Scene Heading to a Shot element. Scenenumbers are removed.
· Locked—If checked, converts a Scene Heading to normal numbering, without anyA-numbering scheme.
· A-Numbering—If checked, converts a Scene Heading to A-Scene numbering.
· Flipped A-Numbering—If checked, converts a Scene Heading to A-Scenenumbering with the number and A-letter reversed.
· Multi-Locked—If checked, converts a Scene Heading to a Multi-Locked SceneHeading, taking its numbering scheme from the scenes before and after it.
· Flipped Multi-Locked—If checked, converts a Scene Heading to a Multi-LockedScene Heading, taking its numbering scheme from the scenes before and after it,but with the number and A-letter reversed.
· User Defined—If checked, displays a box in which to enter the specific numberyou want the Scene Heading to have. Based on the number you enter,Screenwriter assigns the appropriate numbering scheme to the Scene Heading.
NOTE: Overriding a Scene Number may change all subsequent Scene Numbering. Checkthe scene numbers of scenes following the one you have overridden, and renumber them ifnecessary.

Movie Magic Screenwriter288
16.5.3 Fix or Flex A-Pages
When Screenwriter adds an A-Page (or B-Page etc.) to a script, it puts it in as a flexibleA-Page.
If you later add or delete text before the flexible A-Page, the A-Page adjusts its numberingaccordingly, just like a normal un-locked page.
After pages have been issued, you may want existing A-Page numbering to become fixed:
To do so, click on Production > Fix or Flex... > Fix All A-Pages.
All Flexible A-Pages are converted into Fixed A-Pages, becoming locked.
When you add text later, the new A-Pages generated are Flexible A-Pages. These can alsobe locked when necessary.
· Fix All A-Pages—Locks all A-Pages. Only available in a script with Locked Pages.Otherwise, it is grayed out.
· Flex All A-Pages—Unlocks all fixed A-Pages. Combines any short A-Pages that werelocked, and may combine any Double-Locked Pages in the script. Only available in ascript with Locked Pages. Otherwise, it is grayed out.
· Fix (Lock) All Headers—Locks the Headers of all pages, except Flexible A-Pages.Only available in a script with Locked Pages.
· Flex All Headers—Unlocks the Headers of all pages, converting them to the CurrentHeader. Only available in a script with Locked Pages.
· Unlock Headers—Unlocks the Headers of all pages, and turns Header Locking off forthis script. Only available in a script with Locked Pages.
16.5.4 Converting A-Pages
There may be times when you want to pull out a bunch of short A-Pages to combine the text,or convert an A-Page to a Locked Page.
To Remove a Locked or Fixed A-Page Break
· Put the cursor at the beginning of the Element following that Page Break.
· Press the BACKSPACE key [Delete key on Mac], or, under the Edit menu, selectRemove Forced Page Break.
· Screenwriter will display a dialog box that asks, “Delete this Locked Page Break?” Choose Yes.
Movie Magic® Screenwriter 6 Help 289
· The page becomes a Flexible A-Page.
To Insert a Locked or Fixed A-Page Break (in a script with locked page breaks)
· Put the cursor at the end of the Element that you want the page break to follow.
· Press CTRL+RETURN.
· Or, under the Edit menu, select Add Forced Page Break.
· At the Page Break screen that displays, select the type of page break.
NOTE: Adding or removing Locked Page Breaks changes the numbering of all followingpages. Adding a Fixed Page Break will only change the numbering of Fixed or Flexedpages.
16.5.5 Combining Short Pages
There may be a situation whereby, in a Locked production draft, you end up with a fewconsecutive short pages that need to be combined and show a hyphenated page number.
Example.: Pages 15, 16 and 17 are short pages that need to be combined into one 15-17page.
Combining the short pages.
The first step is to delete the page breaks that separate the short pages.
· Place the cursor at the Beginning of the Element following the first short page.
· Press the Backspace [Delete on Mac] key, or under the Edit menu, select RemoveForced Page Break.
· Screenwriter will display a dialog box that asks, “Delete this Locked Page Break?” ChooseYes.
· Repeat these steps until all short pages are combined.
Hyphenating the page numbering.
The next steps is to add Non-Printing Omitted pages at the end of the newly combined page.This will tell the program that there used to be multiple pages occupying the space of thenewly combined page.
· Place the cursor at the end of the newly combined page.
· Press Ctrl+Return on the keyboard to add a Non-Printing Omitted page. The page numberon the combined page should now be hyphenated (e.g. 15-16, from the example above). Repeat this step until the page number reads correctly (e.g., 15-17).
NOTE: You can also choose to add an A-Page as the last Non-Printing Omitted page if youwant the number after the hyphen to display as such (e.g., 15-17A).

Movie Magic Screenwriter290
16.5.6 Set Revision Draft Color Order
Tools > Set Revision Draft Color Order
This feature opens the Revision Draft Color window, showing the order in which revisioncolors will be used (the default is the industry standard.) Revision colors are displayed in aColor window on the left side of the screen. You can change these options:
Color Window—The Color Window has the name of the color and the actual color in thebackground. A color that is selected will have a black dot to the left of its name and will setthe current revision draft color.
Add New Color—Allows you to add a New color for Revisions (for example, when all theexisting Revision colors have been used). Clicking this button will bring up a prompt to typethe new color’s Name. Assign a color from the Color Palette that displays, or design aCustom color. The New Color displays after the currently selected color.
Delete Color—Allows you to remove a Color from the Color list. Click on the Color, then onthis button. When prompted, click Yes to remove the color, No to cancel.
Edit Color Name—Click this button to change the name of the currently selected revisioncolor.
Edit How Color Displays—This changes the way a particular draft color will appear on

Movie Magic® Screenwriter 6 Help 291
screen. Click on a color in the left window and then this button to change the look.
After the last color is used it should—There are two drop-down menus. The first allows youto choose the method the script will loop once it has been through all the Revision colors
· Don't Loop Colors—If you select this option and then try to increment the revisioncolor beyond the last color, it will tell you that it cannot. The next three options are allused in combination with the First Loop Color Selection to the right of this option (inthis menu, the color BLUE).
· Loop To DOUBLE—If you select this option, and then increment the revision colorbeyond the last color, it will call this new color DOUBLE BLUE (or whatever color isselected on the First Loop Color Selection) and will then start through the list again,adding the word DOUBLE before each color in turn, then TRIPLE etc.
· Loop To SECOND—This will function exactly the same as Loop to DOUBLE, but willuse the words SECOND, THIRD, FOURTH, etc.
· Loop To 2ND—This will function exactly the same as Loop to DOUBLE, but will usethe words 2ND, 3RD, 4TH, etc.
The second drop-down menu allows you to select which color the program should start withwhen it loops to a DOUBLE (or SECOND/2ND) color. You have the choice between the firstand second colors on the Revision Color List.
Display Page Colors On Screen—If checked, displays the Revision Colors in a SampleText Box to the right of the Colors window. Unchecked, clicking on a color’s Name does notshow its corresponding color. In 256-color mode on your monitor, only 16 colors areavailable for Revision Draft Colors. These may not be enough for a list with extensiveRevision Colors. Setting your monitor to display in more than 256 colors is recommended, ifpossible.
Set as Defaults for All New Documents—If checked, uses the Revision Draft Colors youset here to be the default colors in all New documents.
Help—Displays this page in the Help file.
16.6 Production Breakdowns
Screenwriter can automatically generate—and print or export—a variety of ProductionBreakdown sheets. To access these reports:
16.6.1 Print Standard Breakdowns
· Under the Production menu, select Breakdown, then Print Standard Breakdowns....The Production Breakdowns print window displays:

Movie Magic Screenwriter292
Sort Breakdown Primarily by...
Script Order—Prints a breakdown of all scenes in the order they appear in the script(without any sorting).
Interior VS. Exterior—Lists all the EXT. scenes, followed by all the INT. scenes.
Location—Lists by Location in alphabetical order, grouping all scenes that take place in thesame Location.
Time-of-Day—Lists by Time-of-Day in alphabetical order, grouping all scenes that have thesame Time-of-Day.
Characters
· All—Lists every Character Name in the script in alphabetical order, followed by thescenes they're in (whether they have dialogue or not).
Movie Magic® Screenwriter 6 Help 293
· Some—Lists selected Character Names in alphabetical order, followed by the scenesthey're in (whether they have dialogue or not). Checking this radio button and pressingOK brings up a Select Names screen. Click on one or more name(s) to select them,then Double-Click on the top bar of the Select Names screen to return to theProduction Breakdowns menu.
NOTE: If you select any Primary sort other than Script Order, Time-of-Day Normalization isperformed—any scene that ends with CONTINUOUS, LATER, or SAME TIME isautomatically given the previous Scene Heading's Time-of-Day.
Movie Magic Scheduling (File)—Prints a breakdown to disk, saving it as a Movie MagicScheduling import file with a file extension of .SEX. It contains the Scene Number, SceneHeading, Starting Page Number and page count in Eighths of a page, and all items Taggedwith Breakdown Tagging. Options under Secondary Sort and Miscellaneous are grayed outand unselectable.
Script Breakdown Sheets—Prints breakdown sheets that include any items you've taggedin Breakdown Tagging.
Secondary Sort by...
Secondary sort order allows you to specify how you want the scenes sorted within thePrimary groupings of Interior VS. Exterior, Location, Time-of-Day, or Characters. Forexample, Interior VS. Exterior as the Primary sort and Script Order as a Secondary sortwould give this kind of breakdown:
EXTERIOR
1 HOSPITAL -- DAY 1-2 1 1/8
4 PARK -- DAY 4-4 2/8
5 HOSPITAL -- EVENING 4-5 6/8
--------
2 1/8
INTERIOR
2 HOSPITAL -- DAY 2-2 3/8
3 EMERGENCY ROOM -- DAY 2-3 5/8
6 EMERGENCY ROOM -- EVENING 5-5 2/8
--------
1 2/8
With Location as the Secondary sort, the same script would breakdown with the locationsgrouped together alphabetically:
EXTERIOR
1 HOSPITAL -- DAY 1-2 1 1/8
5 HOSPITAL -- EVENING 4-5 6/8
4 PARK -- DAY 4-4 2/8

Movie Magic Screenwriter294
--------
2 1/8
INTERIOR
3 EMERGENCY ROOM -- DAY 2-3 5/8
6 EMERGENCY ROOM -- EVENING 5-5 2/8
2 HOSPITAL -- DAY 2-2 3/8
--------
1 2/8
· Script Order—First groups all scenes in the Primary sort order, then in the order theyappear in the script (without any sorting).
· Interior VS. Exterior—First groups all scenes in the Primary sort order, then sorts allExterior scenes before Interiors within each group.
· Location—First groups all scenes in the Primary sort order, then sorts all Locationsalphabetically within each group.
· Time-of-Day—First groups all scenes in the Primary sort order, then sorts alphabeticallyby Time-of-Day within each group.
Calculating Eighths by...
Calculate Eighths by...—Specifies how Screenwriter should define an 1/8th of a page.Historically, an 1/8th of a page was one inch (6 lines.) Nowadays writers are allowing morethan 48 lines on a page, so Screenwriter gives you a choice between the standard 1/8th or a“truer” 1/8th.
· Standard- 6 lines = 1/8th of a Page—If checked, defines an eighth of a page as 1” (6lines.) If you have more than 8” of text on a page, however, it's possible for a page tocalculate as longer than 8/8ths—giving inaccurate page counts.
· Adjusted - 7 lines = 1/8th of a Page—If checked, defines an eighth of a page as thetotal allowable lines on a page divided by eight. When rounded, this equals 7 lines.

Movie Magic® Screenwriter 6 Help 295
Display Eighth Totals by...
Display Eighth Totals by...—Specifies how Screenwriter should calculate the totals foreach Sort grouping. If the displayed totals for each scene are added, their roundingaccumulates too—leading to an inaccurate total.
· Totals of All Rounded Eighths—If checked, rounds the displayed totals for eachscene into eighths before adding them.
For example, a group has Scene 5 with 39 lines and Scene 7 with 50 lines in it. Youhave specified 6 lines per eighth. For Scene 5, it calculates 39 divided by 6 =6.5/8ths, which rounded upwards becomes 7/8ths. Scene 7 is calculated as 50divided by 6 = 8.33/8ths or 1 and 0.33/8ths, which rounded upwards becomes1-1/8ths. The total of Scenes 5 & 7 calculates as 7/8ths +1-1/8ths = 2-0/8ths.
· True Total of All Lines—If checked, the actual numbers of lines in each scene areadded, then rounded into eighths to give a more accurate total.
In our previous example, the total of the lines from Scenes 5 & 7 is 89. And 89divided by 6 is 14.83/8ths—or 1-6.83/8ths—which rounded upwards comes out to1-7/8ths.
Miscellaneous Options...
List Characters in Each Scene—If checked, lists all the characters (whether they havedialogue or not) directly underneath each Scene Heading in the breakdown. Listing optionsare:
· Sorted Alphabetically—If checked, lists characters in each scene alphabetically.
· Script Order—If checked, lists characters in each scene in the order in which theyappear.
· Speaking Characters First—If checked, lists characters in each scene in the order inwhich they speak in that scene, followed by character with no dialogue.

Movie Magic Screenwriter296
· User List Order—If checked, lists characters in each scene with those from User Listsfirst, then all others alphabetically.
List Non-Speaking Characters—If checked, gathers the names of non-speaking charactersfrom the Action element and uses them in Breakdowns and Movie Magic Scheduling exportfiles.
NOTE: The Breakdown may pick up the name of a Non-Speaking Character as being in theScene even when he's not (though the name appears in the Action element). Override this“error” by tagging the name to be ignored. Put the cursor immediately before the first letterof the name, and press CTRL+- (Control+hyphen).
Each Group on New Page—If checked, starts a new page for each new group.
Print Tagged Items—If checked, prints—or exports—all tagged items along with the otherbreakdown information.
16.7 Breakdown Tagging
Breakdown Tagging allows you to mark, or tag, items in your script—cast members, extras,makeup, props, stunts, vehicles, etc.—and assign them to certain Breakdown categories.
Screenwriter can output them to either printed Breakdown Sheets, or to an export file thatcan be read directly into Movie Magic Scheduling or EP Scheduling.
Breakdown Sheets give you breakdown information for each scene, categorized for transferto individual production strips.
16.7.1 Tagging Mode
To start tagging script items for breakdown, you need to turn Tagging Mode on:
· Under the Production menu, select Breakdown then Tagging Mode.
· A checkmark displays next to Tagging Mode, indicating that it's on. Selecting TaggingMode also makes Tagging Codes visible.
· To exit Tagging Mode, click on it again from the menu. The checkmark disappears, andTagging Codes are no longer visible.
16.7.2 Tagging Items
With Tagging Mode on, select a text item to be tagged (an “overcoat”, for example) bydouble-clicking on it with the mouse. Only text in Action, Note or Outline elements can betagged.
A Breakdown Category screen displays.
Click on a category to assign the item in which to assign the item (for the overcoat, Costumeis the appropriate category).
A Format Code is placed around the item, displaying an abbreviated code for the Breakdowncategory (for Costume, the code CS displays around the item to give “[CS overcoat]”).
NOTE: Tags are invisible and will not print.

Movie Magic® Screenwriter 6 Help 297
16.7.3 Untagging Items
Tagged items can be untagged by:
· Placing the cursor directly after the ending Format Code square bracket, and pressingBackspace [Delete on Mac] on the keyboard.
· Placing the cursor directly before the beginning Format Code square bracket and pressingthe Delete [Forward Delete on Mac] key on the keyboard.
· If no other editing has been performed since tagging the item: click Edit > Undo.
16.7.4 Tag Items Globally
Tagging an item globally tells Screenwriter to tag every occurrence of an item in the script,instead of manually tagging it each time you find it yourself. This saves you time, and thepossibility of missing an occurrence of an item. To tag an item globally:
Select the item by double-clicking on it.
Or, under the Production menu, select Breakdown then Tag Item Globally...
The Tag Item Globally menu displays. If you selected an item, it displays in the Item Tobe Tagged: field. If you didn't select an item, type the name of the item in the field here.
In the Tag Item as... section, select the radio button of the Category to which to assignthe item.
If you want to be prompted each time Screenwriter finds the item, check the Prompt oneach Tagging box. Although you can tag an item more than once in a scene (as GlobalTagging does), it's not necessary—an item only shows up once per scene in thebreakdowns or in Movie Magic Scheduling or EP Scheduling.
Click OK to tag the item globally, Cancel to exit without tagging.
16.7.5 Ignore Selection for Breakdowns
If your breakdown is recognizing an item in a scene as being tagged when you don't want itto, you can mark the text so it is ignored by breakdowns.
While in Tagging Mode, select the item by double-clicking on it.
A list of Breakdown Categories displays.
Click on Ignore Selection for Breakdowns.
16.7.6 Untag All Items
To remove breakdown tagging codes from all items in your entire document, select Untag AllItems:
Under the Production menu, select Production > Breakdown > Untag All Items.
Click the YES button [CONTINUE button on Mac] to Untag all items, No (Cancel buttonon Mac) to exit without making changes.

Movie Magic Screenwriter298
16.7.7 Edit Breakdown Categories
If you use different Breakdown Categories than the ones Screenwriter supplies, or would liketo add ones of your own design, use the Edit Categories feature.
Under the Production menu, select Breakdown then Edit Categories.
The Edit Tagging Categories window displays. The categories displayed are the defaultsfor exporting to Scheduling. Three User-Definable categories are available for your newcategories, or you can edit an existing category (Cast Members and Scene Descriptioncannot be edited). Grayed-out categories are Hidden, and do not display on the pop-upTagging menu. To Hide or Show a category, select it by clicking on it and click on theHide/Show Selected Category button.
Double-click on a Category to select it for editing.
An Edit screen displays. In the Category Name: field, type the new Category name. Type an ampersand (&) before the letter you'd like to appear underlined and selectableas the one-key QuickLetter on menus.
In the Display Code as: field, type in a unique abbreviation (up to 6 letters) that displaysas the category's Format Code in Tagging Mode.
Click on Replace (OK on Mac) to accept your new category, Cancel to discard thechanges.
If you make changes and later want to return to the original defaults, click on the Reset toDefaults button.

Movie Magic® Screenwriter 6 Help 299
Click on OK to accept your changes, or Cancel to discard them.
16.8 Breakdown Sheets
The Breakdown Sheet is the report showing all your tagged items in their respectivecategories, with a separate page for each scene.
If you're doing production strips by hand, you'll be transferring the information on eachbreakdown sheet to a separate strip.
If you're exporting to Movie Magic Scheduling or EP Scheduling, it's preferable to do thebreakdown sheets there, as you'll also be adding more detailed Crew information.
16.8.1 Layout Breakdown Sheets
To change the page layout of Screenwriter's Breakdown Sheet:
Under the Production menu, select Breakdowns then Layout Breakdown Sheets. Thiswindow displays each category/group box that appears on the breakdown sheets alongwith the categories that are in them.
Category/Group Titles—Click into a title area to change the title for the category/group

Movie Magic Screenwriter300
that appears for that box on the breakdown sheets. Title are ALL CAPS only.
Category/Group Titles—Click into a title area to change the title for the category/groupthat appears for that box on the breakdown sheets. Title are ALL CAPS only.
Category Items—Each box on the breakdown sheet contains one or more productionbreakdown categories. Click and drag the category items into the desiredcategory/group on the breakdown sheet.
NOTE: There must be at least one category in each box.
Click OK to confirm changes, Cancel to discard changes.
16.9 Export to Movie Magic Scheduling
Screenwriter can export all your tagged breakdown items, for every scene, to a ScreenwriterExport file (with the file extension .SEX.) This file can be imported directly into Movie MagicScheduling, EP Scheduling and Gorilla (by Jungle Software), where breakdown informationis automatically transferred to Breakdown Sheets and Production Strips—enabling you toeasily organize a production schedule and print strips for the Production Board.
To export:
Under the Production menu, select Breakdown then Movie Magic SchedulingExport....
The Export window displays, with a list of all your script's scene headings. Choose whichscenes to export using these options:
· Selected Scenes Only—Clicking on individual scenes to select them for export, willselect this radio button automatically. Only the scenes you select will have breakdowninformation exported.
· All Scenes—Exports breakdown information for all scenes in the script. This is thedefault, and the radio button is automatically checked unless you select a sceneheading by clicking on it.

Movie Magic® Screenwriter 6 Help 301
· All Scenes except OMITTEDs—Exports all scenes except those which have beendeleted, and designated OMITTED in the script. There is no breakdown information,apart from the scene number, to be exported for OMITTED scenes. If the scriptcontains no OMITTED scenes, this option is grayed-out and unselectable. Click OK toexport, Cancel to exit the menu without exporting.
If you click OK to start exporting, Screenwriter begins gathering breakdown data from eachscene in the script.
When it's finished, you're prompted to enter a filename for the Export file. The default is yourscript's filename, with the extension .SEX added instead of .MMSW.
Click on the Save button to create the export file. A message box tells you that the exportfile was saved, and under what filename.
16.10 Animation Production
Animation Production scripts have certain unique needs that Screenwriter addresses withthe following unique features. Movie Magic Screenwriter has some great features designedspecifically for Animation Production:
Assigning Each Speech a Unique Number
Locking the Speech Numbering
Multiple (or Locked) Revision Marks
Printing Just Dialogue
16.10.1 Multiple Revision Marks
With much animation being produced overseas, production companies are having to faxrevised script pages to their production studios. As fax machines transmit in black andwhite, the usual means of identifying sets of revisions by printing them on different coloredpages does not work.
To solve this problem, a multi-revision mark standard has been introduced: The first day'srevisions have a single asterisk (*), the second day's revisions have two asterisks (**), andso on.
Screenwriter handles this with a Revision Locking Count, which you increase by locking theCurrent Revision Marks.
16.10.2 Locking Current Revision Marks
Screenwriter produces two types of Revision Marks—Current Revision Marks and LockedRevision Marks.
Current Revision Marks
· Are either entered automatically by the Auto-Revision function, Apply Revision Mark(Ctrl+M), or by pressing the Asterisk key (*).
301

Movie Magic Screenwriter302
· Are the only revision marks removed by selecting Remove Current Revision Marksunder the Format menu.
· Are the only revision marks found when you select Next Current Revision Mark fromthe GoTo menu.
· Are the only revision marks used to select pages to print when you select AsteriskedPages under the Print menu.
To Lock Current Revision Marks:
Under the Production menu, select Animation Locking then Lock Current Rev. Marks
Once the Current Revision Marks are locked, they become Locked Revision Marks.
Locked Revision Marks
—Are former Current Revision Marks which have been Locked.
Animation Locking does the following:
· Converts all Current Revision Marks into a code appropriate for the Revision LockingLevel.
· Embeds this code in the text where the Current Revision Mark previously was located.
· Increases the Revision Locking Level.
To Display Locked Revision Marks:
Under the View menu, select Show Format Codes. Locking Level is indicated by thenumber of asterisks on the line that has been edited (e.g., Level 1 = *, Level 2 = **, Level3 = ***, etc.)..
To Decrease a Locking Level:
Under the Production menu, select Animation Locking then Unlock One Rev. MarkLevel.
16.10.3 Assigning Numbers to Speeches
Animation Scripts often have each Dialogue speech numbered for ease of identifying eachspeech for recording sessions, editing and so on.
Animation dialogue numbering preferences are found under Screenwriter > Preferences...> Anim. Dialog in the program.
Go to Animation Dialog Preferences for more on this topic.
16.11 Animation Recording Scripts
Many animation production companies want Recording Scripts—print-outs of dialogue only,with each speech numbered sequentially.
254

Movie Magic® Screenwriter 6 Help 303
16.11.1 Printing Animation Recording Scripts
Many animation production companies want print-outs of just dialogue with an incrementingnumber to the right of each speech.
Under the File menu, select Print. A Print window displays.
Select the Dialogue radio button. The Print window displays options for printing Dialogue:
Select the Animation Recording Script Format radio button.
Or, to print Revised speeches only, select the Animation Recording Script Format -Asterisked Speeches Only radio button.
In the Select Names window, click on a character's name to print his/her dialogue.
Or, push the Select All button to select all of the characters.
Click OK to go to the Print window with selected options, Cancel to go back without.

Movie Magic Screenwriter304
16.11.2 Changing the Animation Recording Script layout
Animation dialogue preferences are found under Screenwriter > Preferences... > Anim.Dialog in the program.
Go to Animation Dialog Preferences for more on this topic.
16.11.3 Displaying Numbered Dialogue
To Display and Print the dialogue speech numbering in the script (as well as in the AnimationRecording Script report):
Under the Production menu, select Animation Locking then Print Dialog Numberingin Script.
A checkmark displays next to Print Dialog Numbering in Script. To turn the display ofNumbering off, click on it again.
16.11.4 Locking Dialogue Numbering
Dialogue Numbering can be locked, numbering new speeches as A-Speeches—whilereordered speeches maintain their original numbers. You might want to do if you're usingthese numbers to relate to story boards or cells.
Under the Production menu, select Animation Locking, then Lock DialogueNumbering.
This causes a number for each speech to be displayed onscreen, to the right of theCharacter Name in angle brackets (e.g., <6>). (This number will not print unless you selectDialogue on the Print menu and check Dialogue Numbered/Laid Out for AnimationRecording Scripts, above.) It is displayed for reference, to show what's going to print in caseyou want to override a Dialogue Number.
16.11.5 Multi-Locking Dialogue Numbering
Dialogue Numbering can be Multi-Locked, numbering new speeches as AA Numbers (e.g., <6AA>).
To Multi-Lock Dialogue Numbering, repeat the method above for Locking the Numbering.
Under the Production menu, select Animation Locking, then Lock Dialogue Numbering.
16.11.6 Unlocking Dialogue Numbering
Dialogue Numbering can be Unlocked at any point—going from AA- Numbering toA-Numbering or from A-Numbering to non-locked numbering.
Under the Production menu, select Animation Locking, then Unlock DialogueNumbering.
16.11.7 Overriding Dialogue Numbering
Once Dialogue Numbering has been Locked or Multi-Locked, a single speech's numberingcan be manually overridden.
254

Movie Magic® Screenwriter 6 Help 305
· Put the cursor anywhere in the Dialogue speech whose numbering you want to adjust.
· Under the Production menu, select Animation Locking, then Adjust DialogueNumbering.
The Locked Dialogue Numbering screen displays. Choose an option:
· Set this Dialogue's numbering to Normal—Changes the current A- or AA-numbered Dialogue to Normally numbered Dialogue.
· Set this Dialogue's numbering to A-Numbering—Changes the current AA- orNormally numbered Dialogue to A-Numbering.
· Set this Dialogue's numbering to AA-Numbering—Changes the current A- orNormally numbered Dialogue to AA-Numbering. Only available in scripts where thedialogue numbering has been Multi-Locked. Otherwise, it's grayed out andunselectable.
· Override this Speech's Numbering—Specifies which Normal number this speechshould be given. Accepts a number between 1 and 4096. Only available when thecursor is in a Normally numbered speech, or in a script that has Locked orMulti-Locked Dialogue Numbering. Otherwise, it's grayed out and unselectable.
NOTE: If you change the Normal Dialogue Numbering order—either by switching a Normallynumbered speech to an A- or AA- speech, or vice-versa—you'll be given the option to adjustall following speeches, so that two speeches are not assigned the same number.
16.12 Watermarks
Watermarks are visible labels printed on the printed document pages. They are used to limitinappropriate distribution of the document. They do this by personalizing every page ofevery copy with the name of the person(s) to whom it is distributed. EXAMPLE:

Movie Magic Screenwriter306
The watermark can be large or small, light or dark, centered on the page or off to the edge. Screenwriter gives you a tremendous amount of control over watermarking your document.
There are two things are required to use watermarks: a Distribution List and a SerialNumber.
· The distribution list is the list of people to whom the watermarked document is to bedistributed. Each person on the list receives his or her own copy with his or her namewatermarked on it.
· The serial number is a number that is incremented on each copy as an additionalmethod of identifying the copy. You decide the structure of the serial number. It canbe as simple as "001."
Setting up Watermark:
Select Production > Watermark Setup... to open the watermark setup window:

Movie Magic® Screenwriter 6 Help 307
· In the "Text" field, type in the text of the watermark.
· In the "Distrib. List" field type in a NAME for the distribution list, or click on Set if you wishto use a pre-existing distribution list..
· The "Set" button will turn into "Edit".
· Click the "Edit" button.
· Type in the names that you want the distribution list to contain and make sure each nameis on its own line.

Movie Magic Screenwriter308
· Click OK.
· In the "Serial Number" field, make up a serial number (e.g., 001). The program willautomatically increment the number (or letter) on the end of the number for each personon the distrib. list.
· Choose any other options on the Watermark Setup page and click OK.
Printing with the Watermark:
· Select File > Print.
· Select what you wish to print (e.g., Entire Document).
· Uncheck "Run SmartCheck" unless you do want to run it.
· Click OK (and click Continue on the Exception error).
· Fill out all necessary fields and select to whom you wish to distribute the document.

Movie Magic® Screenwriter 6 Help 309
· Select any other desired options and click OK.
· In the Mac print window, click OK.
Screenwriter prints out individual copies for each person in the distribution list personalizedwith a custom watermark unique to each copy of the document.
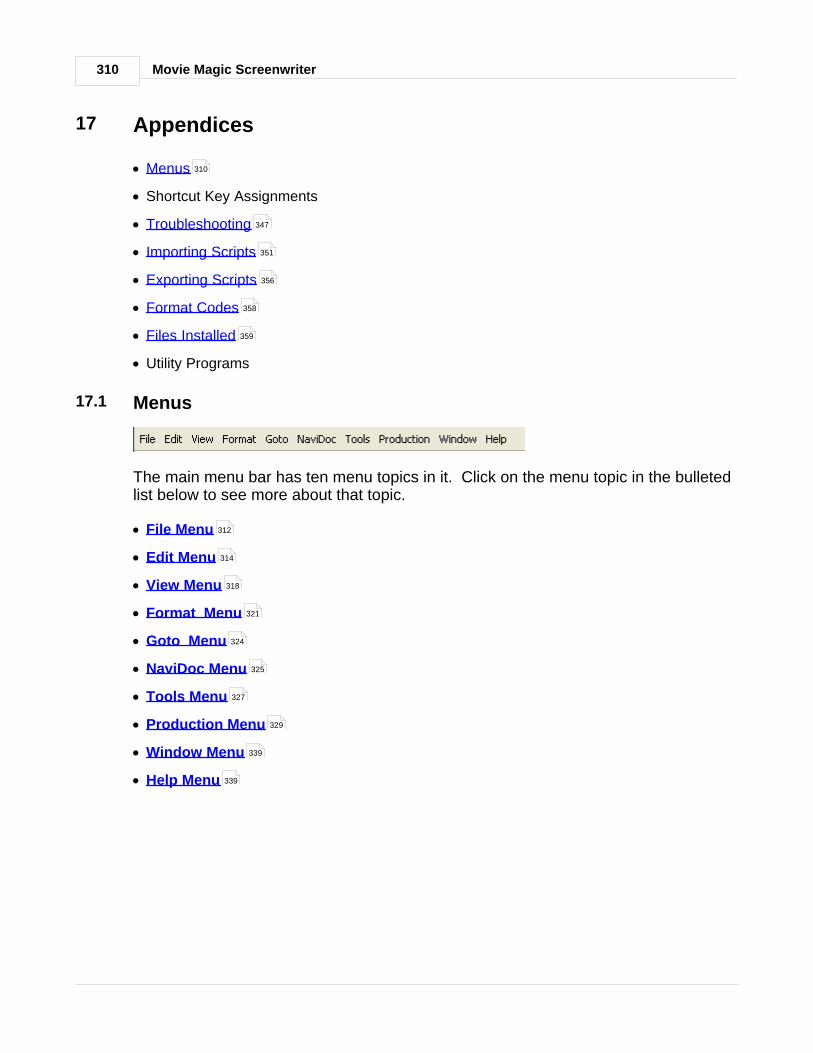
Movie Magic Screenwriter310
17 Appendices
· Menus
· Shortcut Key Assignments
· Troubleshooting
· Importing Scripts
· Exporting Scripts
· Format Codes
· Files Installed
· Utility Programs
17.1 Menus
The main menu bar has ten menu topics in it. Click on the menu topic in the bulletedlist below to see more about that topic.
· File Menu
· Edit Menu
· View Menu
· Format Menu
· Goto Menu
· NaviDoc Menu
· Tools Menu
· Production Menu
· Window Menu
· Help Menu
310
347
351
356
358
359
312
314
318
321
324
325
327
329
339
339

Movie Magic® Screenwriter 6 Help 311
17.1.1 Screenwriter Menu
· About Screenwriter—Opens Screenwriter's "About Screenwriter" window which showsthe serial number, version number, copyright and trademark notices, and credits.
· Preferences...—Opens a new document and lets you select a pre-existing documenttemplate.
· Services—Screenwriter supports the OSX Services menu, which provides a handful offeatures writers might find useful. For example, if a user selects a word in their document,they can do the following via. the Services menu:
· Look up the word in Word Menu via. Screenwriter > Services > Find in Word Menu.
· Look up the word in the OSX Dictionary via. Screenwriter > Services > Look Up inDictionary.
· Let the computer speak the selected text via. Screenwriter > Services > Speech >Start Speaking Text.
· Google the word via. Screenwriter > Services > Search With Google.
See OS X help for more information on this feature.
· Hide Screenwriter—Hides the Movie Magic Screenwriter program.
· Hide Others—Hides all programs except Movie Magic Screenwriter.
· Show All—Shows all active programs.
· Quit Screenwriter—Exits Screenwriter, prompting to you save any open documents.
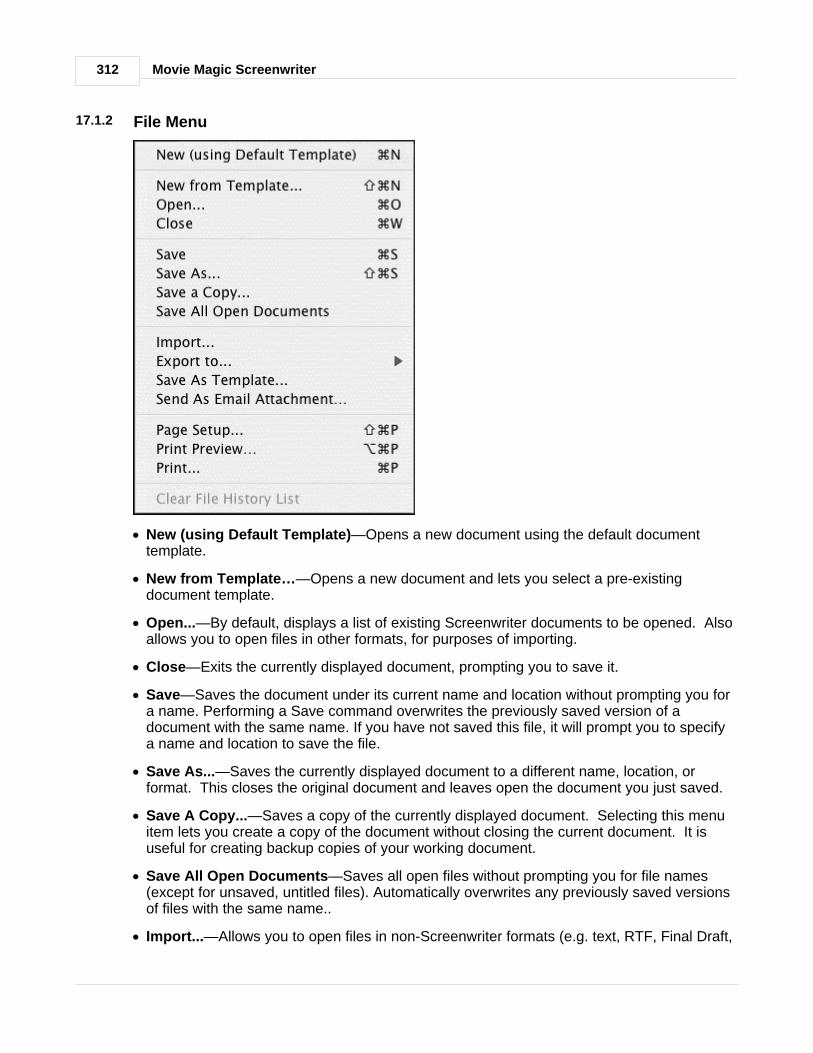
Movie Magic Screenwriter312
17.1.2 File Menu
· New (using Default Template)—Opens a new document using the default documenttemplate.
· New from Template…—Opens a new document and lets you select a pre-existingdocument template.
· Open...—By default, displays a list of existing Screenwriter documents to be opened. Alsoallows you to open files in other formats, for purposes of importing.
· Close—Exits the currently displayed document, prompting you to save it.
· Save—Saves the document under its current name and location without prompting you fora name. Performing a Save command overwrites the previously saved version of adocument with the same name. If you have not saved this file, it will prompt you to specifya name and location to save the file.
· Save As...—Saves the currently displayed document to a different name, location, orformat. This closes the original document and leaves open the document you just saved.
· Save A Copy...—Saves a copy of the currently displayed document. Selecting this menuitem lets you create a copy of the document without closing the current document. It isuseful for creating backup copies of your working document.
· Save All Open Documents—Saves all open files without prompting you for file names(except for unsaved, untitled files). Automatically overwrites any previously saved versionsof files with the same name..
· Import...—Allows you to open files in non-Screenwriter formats (e.g. text, RTF, Final Draft,
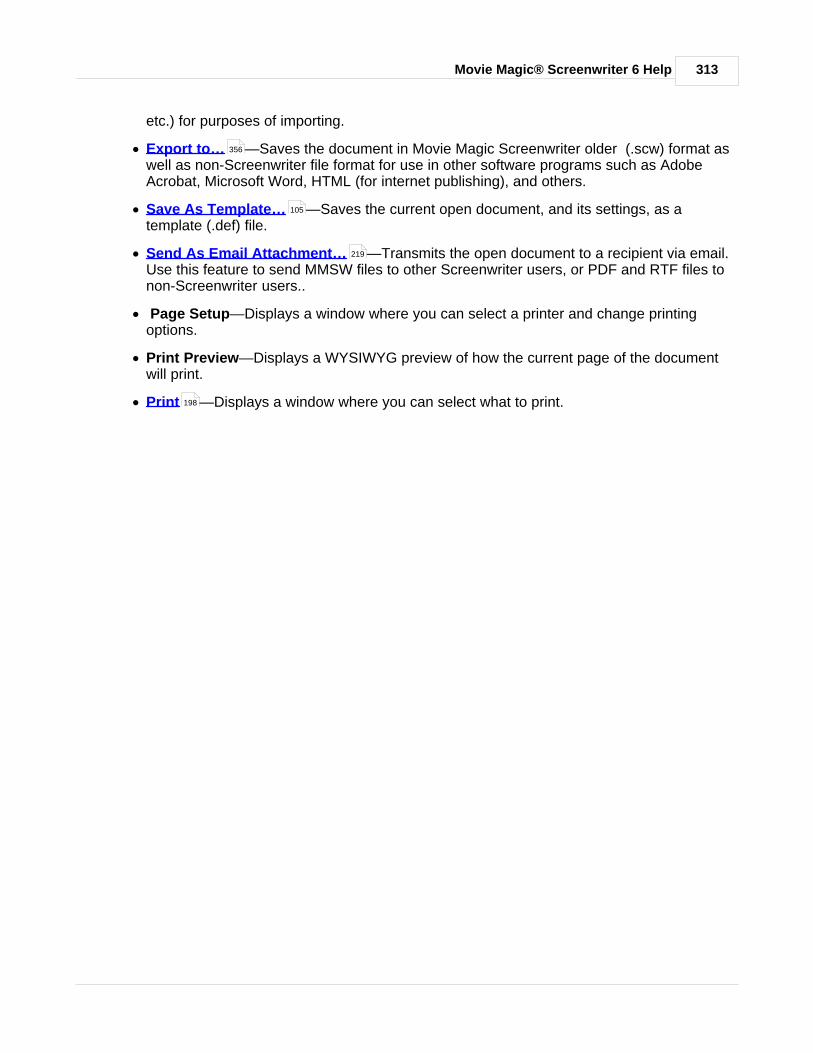
Movie Magic® Screenwriter 6 Help 313
etc.) for purposes of importing.
· Export to… —Saves the document in Movie Magic Screenwriter older (.scw) format aswell as non-Screenwriter file format for use in other software programs such as AdobeAcrobat, Microsoft Word, HTML (for internet publishing), and others.
· Save As Template… —Saves the current open document, and its settings, as atemplate (.def) file.
· Send As Email Attachment… —Transmits the open document to a recipient via email.Use this feature to send MMSW files to other Screenwriter users, or PDF and RTF files tonon-Screenwriter users..
· Page Setup—Displays a window where you can select a printer and change printingoptions.
· Print Preview—Displays a WYSIWYG preview of how the current page of the documentwill print.
· Print —Displays a window where you can select what to print.
356
105
219
198

Movie Magic Screenwriter314
17.1.3 Edit Menu
· Undo—Takes a step back, undoing the last text edit performed. This option is grayed-out(unselectable) if Screenwriter cannot Undo the changes.
· Redo—Restores what you just undid. Only available immediately after you've performedan Undo, prior to making any more changes.
· Cut—Removes selected text from the document, placing it on the clipboard.
· Copy—Copies selected text, leaving it in the document but also placing it on the clipboard.
· Paste—Places the contents of the clipboard into the document at the cursor position.
· Paste into Current Element—This menu item is ONLY available if you already have Cutor Copied text from a single Movie Magic Screenwriter element or are pasting from anexternal document. It allows you to paste that text into a different element type and have itbecome part of that element. You might use this, for example, if you wrote a parentheticallike (turning to John and pulling out a gun) and you decide you want to move that to an
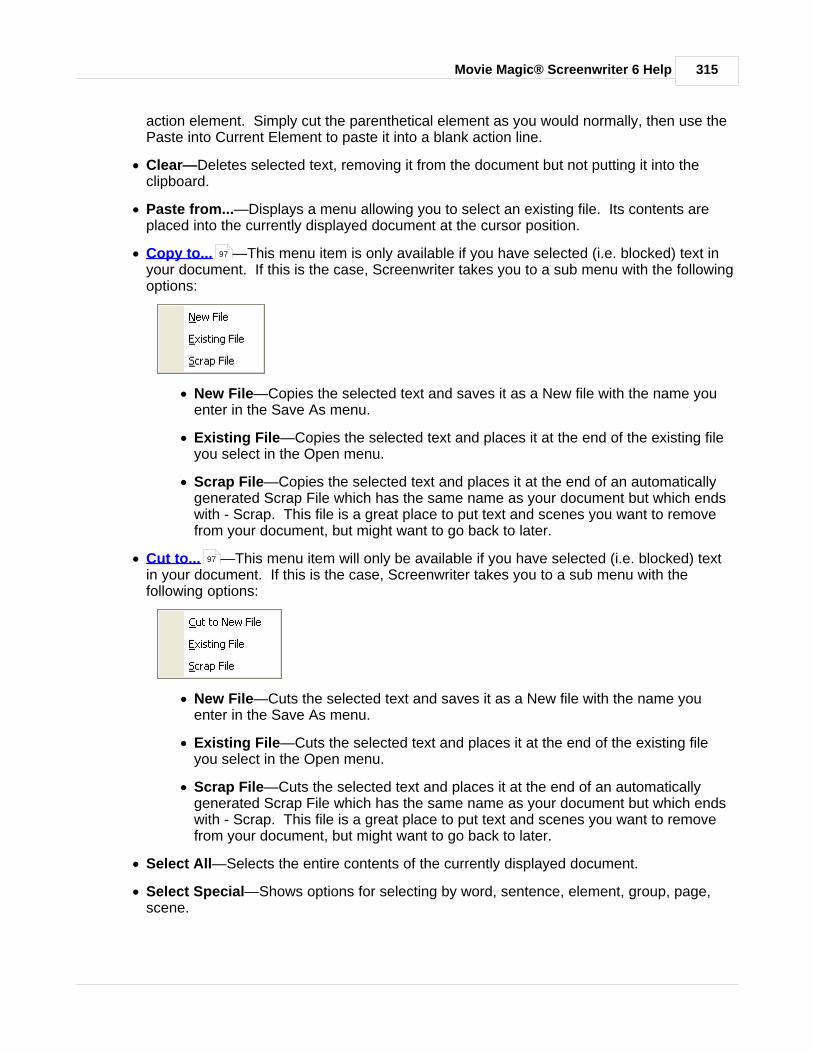
Movie Magic® Screenwriter 6 Help 315
action element. Simply cut the parenthetical element as you would normally, then use thePaste into Current Element to paste it into a blank action line.
· Clear—Deletes selected text, removing it from the document but not putting it into theclipboard.
· Paste from...—Displays a menu allowing you to select an existing file. Its contents areplaced into the currently displayed document at the cursor position.
· Copy to... —This menu item is only available if you have selected (i.e. blocked) text inyour document. If this is the case, Screenwriter takes you to a sub menu with the followingoptions:
· New File—Copies the selected text and saves it as a New file with the name youenter in the Save As menu.
· Existing File—Copies the selected text and places it at the end of the existing fileyou select in the Open menu.
· Scrap File—Copies the selected text and places it at the end of an automaticallygenerated Scrap File which has the same name as your document but which endswith - Scrap. This file is a great place to put text and scenes you want to removefrom your document, but might want to go back to later.
· Cut to... —This menu item will only be available if you have selected (i.e. blocked) textin your document. If this is the case, Screenwriter takes you to a sub menu with thefollowing options:
· New File—Cuts the selected text and saves it as a New file with the name youenter in the Save As menu.
· Existing File—Cuts the selected text and places it at the end of the existing fileyou select in the Open menu.
· Scrap File—Cuts the selected text and places it at the end of an automaticallygenerated Scrap File which has the same name as your document but which endswith - Scrap. This file is a great place to put text and scenes you want to removefrom your document, but might want to go back to later.
· Select All—Selects the entire contents of the currently displayed document.
· Select Special—Shows options for selecting by word, sentence, element, group, page,scene.
97
97

Movie Magic Screenwriter316
· Scene Range...—Lets you select a scene range from a list of scene headings.
· Extend Selection...—Lets you extend the selection beyond the current cursorposition.
· Insert Element—Inserts a new element at the current cursor position based on yourchoice from the element list.
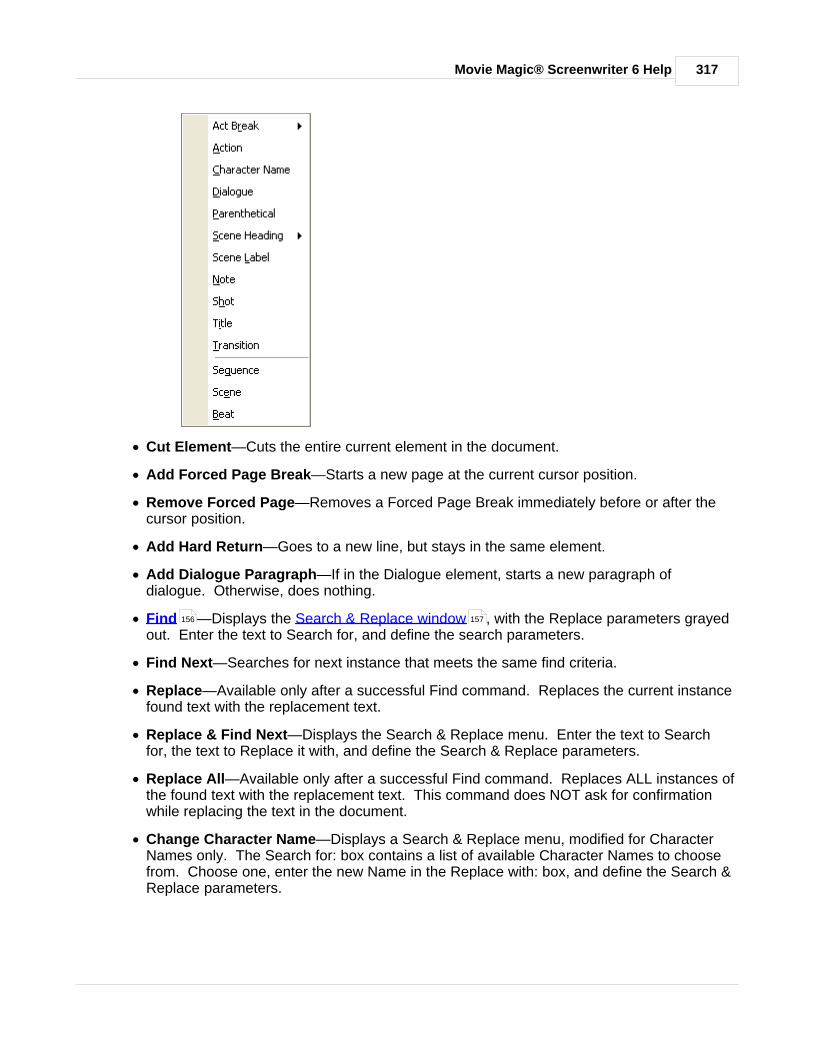
Movie Magic® Screenwriter 6 Help 317
· Cut Element—Cuts the entire current element in the document.
· Add Forced Page Break—Starts a new page at the current cursor position.
· Remove Forced Page—Removes a Forced Page Break immediately before or after thecursor position.
· Add Hard Return—Goes to a new line, but stays in the same element.
· Add Dialogue Paragraph—If in the Dialogue element, starts a new paragraph ofdialogue. Otherwise, does nothing.
· Find —Displays the Search & Replace window , with the Replace parameters grayedout. Enter the text to Search for, and define the search parameters.
· Find Next—Searches for next instance that meets the same find criteria.
· Replace—Available only after a successful Find command. Replaces the current instancefound text with the replacement text.
· Replace & Find Next—Displays the Search & Replace menu. Enter the text to Searchfor, the text to Replace it with, and define the Search & Replace parameters.
· Replace All—Available only after a successful Find command. Replaces ALL instances ofthe found text with the replacement text. This command does NOT ask for confirmationwhile replacing the text in the document.
· Change Character Name—Displays a Search & Replace menu, modified for CharacterNames only. The Search for: box contains a list of available Character Names to choosefrom. Choose one, enter the new Name in the Replace with: box, and define the Search &Replace parameters.
156 157

Movie Magic Screenwriter318
17.1.4 View Menu
The View menu controls the display of various windows and controls.
· Normal —Displays the document as a continuous flow of text. Page breaks areindicated by a dashed line. Example...
· Full Page —Displays the document as it will appear on the printed page. Page breaksappear as separate pages with headers and footers displayed. Example...
· NaviDoc —Displays a panel to the left of the document. Like its name implies, theNaviDoc lets you navigate quickly around your document. The NaviDoc has fourpanel tabs: Outline ; Scenes ; Notes ; and Bookmarks .
· Title Page Publisher —Displays the Title Page Publisher for WYSIWYG Drag’n’Dropcreation of Title Pages.
· Index Cards... —Switches to View as Index Card Mode.
· Toolbar Icons —Control the display of the Toolbar and Toolbar icons that appear at thetop of the document window.
· Ruler —If checked, displays the horizontal page Ruler, showing Element margins.
· Right Element Buttons—If checked, displays the insert element buttons found on theright side of the document window.
· Scene Numbering —Controls the display of scene numbers in the document. Scenenumbers are associated with Scene Heading elements. They can appear to the left of thescene heading, the right of the scene heading, or on both the left and right of the scene
320
320
320
320
160
176 173 164 170
99
107
226
223
273

Movie Magic® Screenwriter 6 Help 319
headings.
· Show Format Codes —If checked, displays the hidden format codes embedded in thetext of your document .
· Hide Names in Pop-Up List...—Displays a menu where you can hide/unhide a charactername. A hidden name does not appear on the Character Name pop-up list which appearswhen you press the TAB key. Use for a character who’s not in many scenes and whosename you don’t want to always appear on the Character List.
· Hide Locations in Pop-Up List…—This menu allows you to "hide" certain Locations sothat they don't appear on the automatic pop-up lists of Locations used when enteringScene Headings. You would generally use this function to remove locations you aren'tgoing to use again in the document.
· Hide Elements on Screen—Shows options which allow you to hide/unhide scriptElements, Notes by color or type, and Non-Printing text.
· Unhide Elements on Screen—Turns off the hidden attribute for specific elements such asnotes and non-printing text.
· Running Lists —Shows options which allow you to control automatic updating of lists ofuser-defined items (such as character names, shots, and transitions) created as you writein the document.
· Zoom Screen Text —Displays the Zoom Screen dialog window, allowing you to alterhow large the document text displays onscreen. Default is 90%.
223
232
224
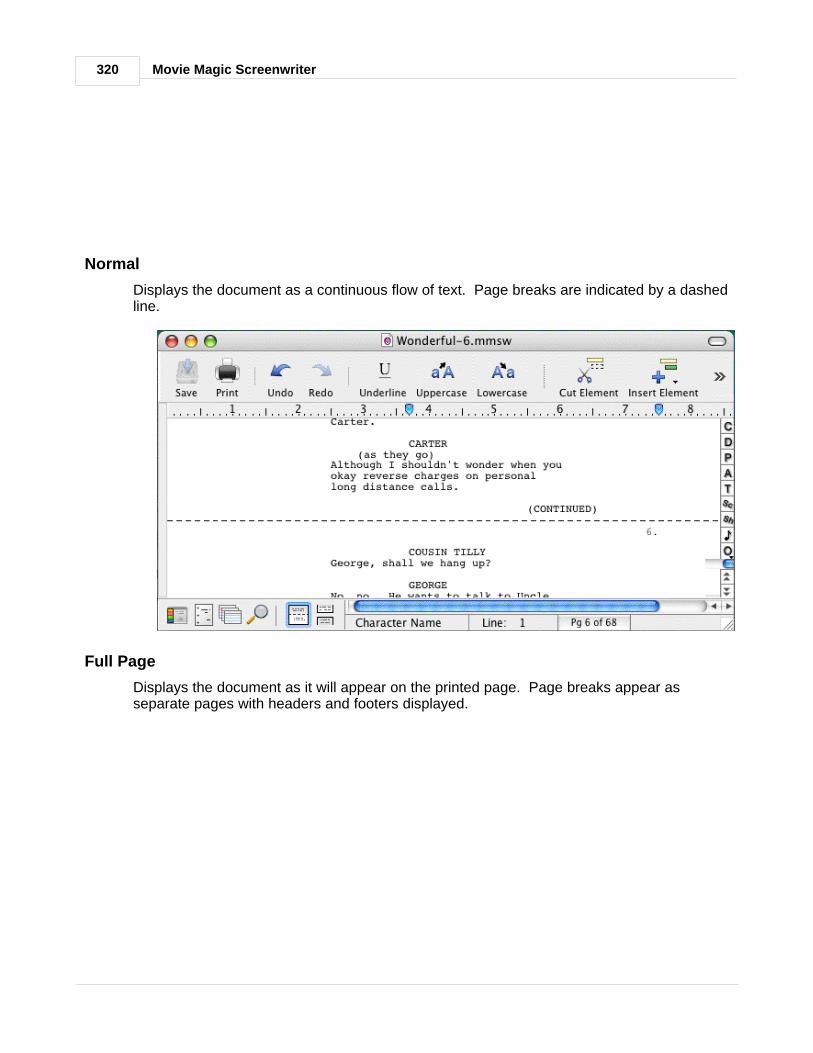
Movie Magic Screenwriter320
Normal
Displays the document as a continuous flow of text. Page breaks are indicated by a dashedline.
Full Page
Displays the document as it will appear on the printed page. Page breaks appear asseparate pages with headers and footers displayed.

Movie Magic® Screenwriter 6 Help 321
17.1.5 Format Menu
· Element Styles....—Displays a menu where you can change the way elements areformatted in the currently displayed document, and set the default formats for Newdocuments.

Movie Magic Screenwriter322
· Load Styles From...—Allows you to reformat your existing document by loading a formatfrom either a template or an existing Screenwriter document
· Make Default for All New Documents—Saves the format of the currently displayeddocument as the default template (default.def). for one of these available script formats. File > New (using Default Template) will now use this format.
· User Lists.. .—Displays a menu where you can edit the User Lists and Text Aliases forthe currently displayed document, and set the defaults for New documents.
· Load User Lists from —Allows you to retrieve User Lists from other Screenwriterdocuments, ASCII files, Collaborator files, or Screenwriter’s Original Defaults.
· Document Layout...—Displays a window where you can change the top, bottom, andbinding page margins. Also gives you the option to cheat the line spacing for the entiredocument.
· Header and Footer...—Displays a menu where you can define the header and footerformat and content for the currently displayed document.
· Font Color—Shows options for changing the color of selected text. If no text is selected,the text from the cursor position to the end of the element is changed.
· Font Style—Shows options for changing the style of selected text. If no text is selected,the text from the cursor position to the end of the element is changed.
· Change Case—Shows options for changing the case of selected text. If no text isselected, the entire element (except when in Scene Heading, Character Name, orTransition) that the cursor is in is changed.
136
139

Movie Magic® Screenwriter 6 Help 323
· Change Element Type—Shows options for changing the current element (from Action toShot, for example.
· Mark One Character’s Dialogue—Displays a list of your document’s Character Names foryour selection. A selected Character’s dialogue appears in red in your document and incolor printing, and with a gray background in black and white printing. Useful for printingout a document for an actor with his/her dialogue highlighted.
· Dual Columns —Allows changing selected text to Left or Right Column (as intwo-column simultaneous dialogue or AudioVisual format) and changing the margins forRight or Left Columns.
· Normal WP Mode—Toggles between the script format you’re using and Word Processingmode, where Tab and Return function as in other Mac OS X word processing programs.
· Cheat —Shows options for tweaking the margins of the selected element, the currentpage, the entire document, etc.
· Reset Cheated—Shows options for Undoing any previous cheating you've done.
132
135

Movie Magic Screenwriter324
17.1.6 Search Menu
17.1.7 Find Menu
Removed. All Find commands are now in the Edit menu. Mark OneCharacters Dialogue command is now in the Format menu.
17.1.8 Goto Menu
· Top—Takes you to the Top of the document.
· Bottom—Takes you to the End of the document.
· Page—Takes you to a specific Page Number or Scene Number.
· Scene—Displays a Scene Heading list, allowing you to select the one to go to.
· Previous Scene Heading—Takes you to the previous Scene Heading in the document.
· Next Scene Heading—Takes you to the next Scene Heading in the document.
· Next A-Page—Takes you to the next A-Page. Only available in locked scripts. Otherwise,it’s grayed out. (Pressing SHIFT+UP ARROW repeats this GoTo command withoutreturning to the menu.)
· Next Forced Page Break—In a Television or Stage Play format script, takes you to thenext Act Break or Scene Break.
· Next Speech By...—Displays a Character Name list, taking you to the next speech by thecharacter you select. (Pressing SHIFT+UP ARROW repeats this GoTo command withoutreturning to the menu.)
314
321

Movie Magic® Screenwriter 6 Help 325
· Next Note—Takes you to the next Note. (Pressing SHIFT+UP ARROW repeats this GoTocommand without returning to the menu.)
· Next Current Revision Mark—Takes you to the next Current Revision Mark. (PressingSHIFT+UP ARROW repeats this GoTo command without returning to the menu.)
· Next Strikethrough or Colored Text—Takes you to the next Strikethrough text orColored text.
· Last Position—Returns the cursor to the last position in the document where you wheretyping/editing.
17.1.9 NaviDoc Menu
· Outline —Shows or hides the Outline panel in the NaviDoc.
· Scenes —Shows or hides the Scenes panel in the NaviDoc.
· Notes —Shows or hides the Notes panel in the NaviDoc.
· Bookmarks —Shows or hides the Bookmarks panel in the NaviDoc.
· New Note—Inserts a new Note at the current cursor position in the document.
176
173
164
170
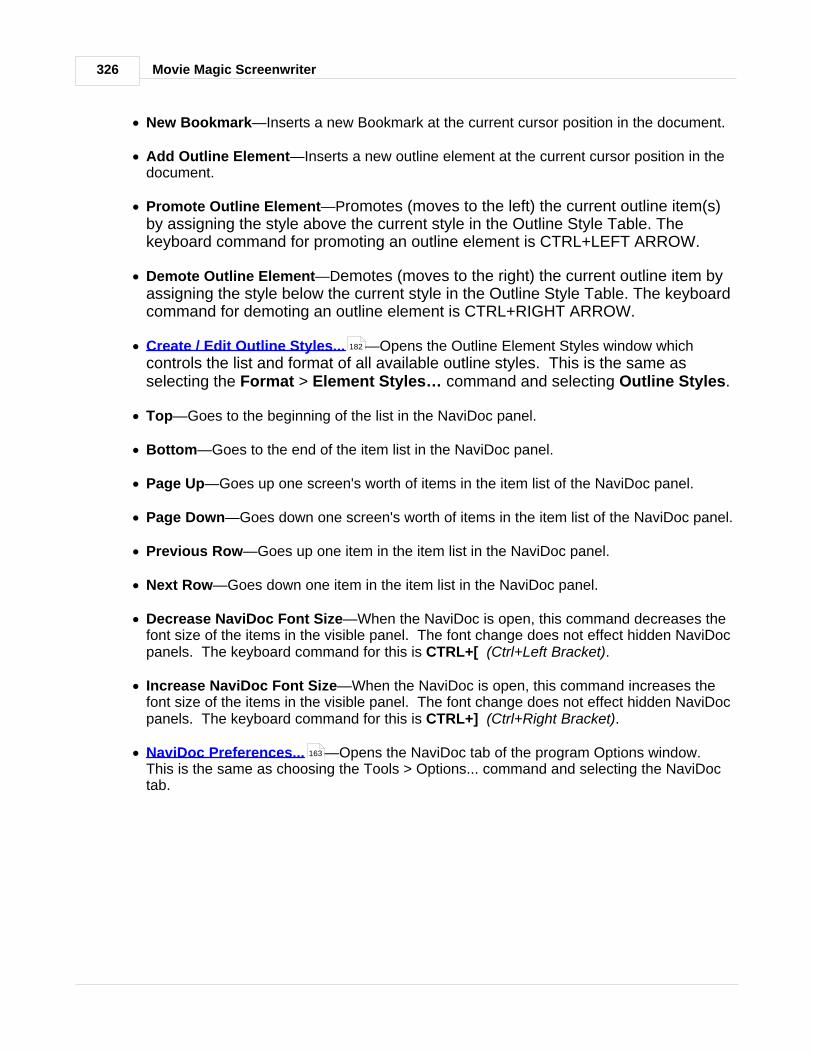
Movie Magic Screenwriter326
· New Bookmark—Inserts a new Bookmark at the current cursor position in the document.
· Add Outline Element—Inserts a new outline element at the current cursor position in thedocument.
· Promote Outline Element—Promotes (moves to the left) the current outline item(s)by assigning the style above the current style in the Outline Style Table. Thekeyboard command for promoting an outline element is CTRL+LEFT ARROW.
· Demote Outline Element—Demotes (moves to the right) the current outline item byassigning the style below the current style in the Outline Style Table. The keyboardcommand for demoting an outline element is CTRL+RIGHT ARROW.
· Create / Edit Outline Styles... —Opens the Outline Element Styles window whichcontrols the list and format of all available outline styles. This is the same asselecting the Format > Element Styles… command and selecting Outline Styles.
· Top—Goes to the beginning of the list in the NaviDoc panel.
· Bottom—Goes to the end of the item list in the NaviDoc panel.
· Page Up—Goes up one screen's worth of items in the item list of the NaviDoc panel.
· Page Down—Goes down one screen's worth of items in the item list of the NaviDoc panel.
· Previous Row—Goes up one item in the item list in the NaviDoc panel.
· Next Row—Goes down one item in the item list in the NaviDoc panel.
· Decrease NaviDoc Font Size—When the NaviDoc is open, this command decreases thefont size of the items in the visible panel. The font change does not effect hidden NaviDocpanels. The keyboard command for this is CTRL+[ (Ctrl+Left Bracket).
· Increase NaviDoc Font Size—When the NaviDoc is open, this command increases thefont size of the items in the visible panel. The font change does not effect hidden NaviDocpanels. The keyboard command for this is CTRL+] (Ctrl+Right Bracket).
· NaviDoc Preferences... —Opens the NaviDoc tab of the program Options window.This is the same as choosing the Tools > Options... command and selecting the NaviDoctab.
182
163

Movie Magic® Screenwriter 6 Help 327
17.1.10 Tools Menu
· iPartner —This feature allows two people to view and edit the same document over theInternet.
· Compare Two Documents—Compares the differences between two versions of the samedocument, when both are open in separate windows. Automatically generates a thirddocument with everything that’s been added in Red, and everything that’s been removedin Strikethrough.
· Run SmartCheck —The SmartCheck™ feature finds and corrects any commonformatting errors you may have made. Useful just before printing your document.
· Repaginate Now—Forces a complete repagination/screen redraw.
· Thesaurus —Displays Synonyms for the word that the cursor is currently in.
· Count Words—Counts the number of words in the document.
· Name Bank... —Displays the Name Bank screen, where you can select names for yourcharacters. Alphabetically displays lists of Female and Male first names, and Familysurnames.
· Spell Check...—Checks the spelling of the document and has a submenu with severaloptions:
· Word—Checks the spelling of the Word that the cursor is currently in.
· Selection—Checks the spelling of the highlighted test selection.
206
240
158
220

Movie Magic Screenwriter328
· Element—Checks the spelling of the Element that the cursor is currently in.
· Page—Checks the spelling of the current Page.
· Forwards—Checks the spelling from the cursor position to the end of the document.
· Entire Document—Checks the spelling of all text in the document.
· Correct Current Word—Checks the spelling of the Word that the cursor is currently in andgives you options to handle it without bringing up the Spell Check window includingsuggestions:
· Pause AutoCorrection—Pauses the real-time Spell Checking or AutoCorrection features,if they’re on. When paused, there will be a check mark next to this menu item.
· Clear Ignore List—Clears from memory all the words that you've told Spell Check toIgnore this writing session.
· Change Dictionary—Displays a menu where you can select a different user dictionary forthe currently displayed document.
· Select Language—Shows options for changing your Spell Checking to a differentlanguage. Use of this feature requires the installation of an optional Foreign LanguageDictionary.
· Edit User Dictionary—Takes you to Select Language, then to a menu to choose a UserDictionary to edit. Add, delete or edit words to be used by SpellCheck or Auto-Correct.
· Speak Selection—Movie Magic Screenwriter has the ability to actually read yourdocument aloud using the Macintosh's built-in text-to-speech engine. This menu itemreads the selected text aloud using the voices that are assigned to the document.
· Assign Voices—Clicking on this feature opens a window that allows you to assign voicesto elements of the document.

Movie Magic® Screenwriter 6 Help 329
17.1.11 Production Menu
· Lock The Script —Displays the Lock the Script menu, allowing you to change alldocument Locking options in one place. Default setting is to Lock all options. Uncheckthe items you don’t want locked. Only available in a document without Locked Pages.
· Unlock The Script—Displays the Unlocking the Script menu, allowing you to change allscript Locking options in one place. Uncheck Locked items individually to Unlock them. Only available in a script with Locked Pages.
· Multi-Lock —Allows you to keep the existing A-Page or A-Scene numbering andgive new pages or scenes a new unique numbering scheme. Only available in adocument with Locked Pages or Scenes.
· Start Next Revision—The Start Next Revision Command will start the next revisionautomatically by doing the following:
· Remove All Revision Marks
· Fix all A-Pages
· Lock the Header Text
· Increment the Revision Draft Color
· Run the Title Page Publisher so that you can add the new color to a list
· Set Revision Draft Color Order —Displays the Revision Draft Color window, showingthe order in which revision colors will be used (the default is the industry standard.)
· Apply Revision Mark—Adds a revision marks to the selected lines of text withoutmodifying the text.
274
283 284 283
290
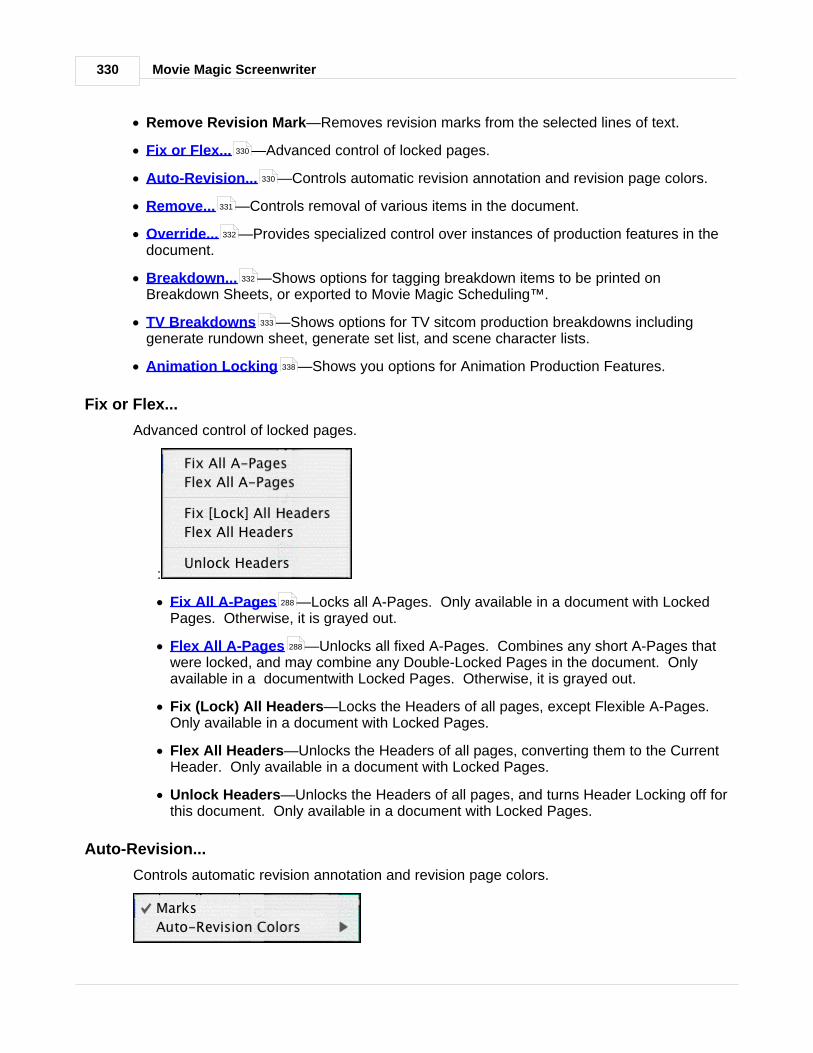
Movie Magic Screenwriter330
· Remove Revision Mark—Removes revision marks from the selected lines of text.
· Fix or Flex... —Advanced control of locked pages.
· Auto-Revision... —Controls automatic revision annotation and revision page colors.
· Remove... —Controls removal of various items in the document.
· Override... —Provides specialized control over instances of production features in thedocument.
· Breakdown... —Shows options for tagging breakdown items to be printed onBreakdown Sheets, or exported to Movie Magic Scheduling™.
· TV Breakdowns —Shows options for TV sitcom production breakdowns includinggenerate rundown sheet, generate set list, and scene character lists.
· Animation Locking —Shows you options for Animation Production Features.
Fix or Flex...
Advanced control of locked pages.
:
· Fix All A-Pages —Locks all A-Pages. Only available in a document with LockedPages. Otherwise, it is grayed out.
· Flex All A-Pages —Unlocks all fixed A-Pages. Combines any short A-Pages thatwere locked, and may combine any Double-Locked Pages in the document. Onlyavailable in a documentwith Locked Pages. Otherwise, it is grayed out.
· Fix (Lock) All Headers—Locks the Headers of all pages, except Flexible A-Pages.Only available in a document with Locked Pages.
· Flex All Headers—Unlocks the Headers of all pages, converting them to the CurrentHeader. Only available in a document with Locked Pages.
· Unlock Headers—Unlocks the Headers of all pages, and turns Header Locking off forthis document. Only available in a document with Locked Pages.
Auto-Revision...
Controls automatic revision annotation and revision page colors.
330
330
331
332
332
333
338
288
288

Movie Magic® Screenwriter 6 Help 331
· Marks —Toggles current Auto-Revision Marks on or off for the currently displayeddocument. A checkmark appears next to Auto-Revision Marks when they are on.
· Auto-Revision Colors—Shows options for Auto-Revision Colors. Any new text youadd is automatically highlighted in the color you select. Useful when you have differentpeople working on the document and you want to show who’s made what changes.
· Blue—Highlights new text in blue.
· Red—Highlights new text in red.
· Green—Highlights new text in green.
· User Defined Color—Highlights new text in a color of your choice. RequiresScreenwriter to convert certain characters (which may be in your document) tocodes first.
· Turn Revision Color Off—Turns your color selection off, displaying any new textyou add as normal.
Remove...
Controls removal of various items in the document.
· Current Revision Marks—Removes all current revision marks from the document.
· Strikethrough Style or Text—Removes all Strikethrough Text or just the StrikethroughCodes (leaving the text intact).
· Text Color:
278

Movie Magic Screenwriter332
· Red Style—Removes red highlighting from revised text, displaying it as normal.
· Blue Style—Removes blue highlighting from revised text, displaying it as normal.
· Green Style—Removes green highlighting from revised text, displaying it asnormal.
· User Defined—Removes User Defined highlighting from revised text, displaying itas normal.
· Remove Scene w/o OMITTED—Removes the Scene Heading that the cursor is in,without creating an OMITTED Scene Heading to indicate something was deleted. Maycause Scene Headings after the one removed to be renumbered.
Override...
Provides specialized control over instances of production features in the document.
· Page’s Header/Draft Color—Allows you to override the header of the page the cursor’s on. Displays the Header Setup screen for editing of the header text. Only availablein a Locked Script.
· Page Break Type—Allows you to override the type of page break directly before thecursor, converting it to your preference. Only available in a Locked Script.
· Element’s Numbering—Allows you to override the numbering of the Scene Headerthat the cursor’s currently in, renumbering it to your preference. Only available in aLocked Script.
Breakdown...
Shows options for tagging breakdown items to be printed on Breakdown Sheets, or exportedto Movie Magic Scheduling™.
· Tagging Mode—Toggles Tagging mode on or off. When turned on, a checkmarkappears next to Tagging Mode on the menu. Tagging mode allows you to tag items bydouble-clicking on them, then selecting categories from a list.

Movie Magic® Screenwriter 6 Help 333
· Edit Categories—Displays a screen where you can change the names or shortcutcodes of Breakdown Categories.
· Tag Item Globally—Displays a screen allowing you to tag every appearance of anitem in your document.
· Untag All Items—Removes all Breakdown tagging codes from your document.
· Movie Magic Scheduling Export—Exports your tagged items for import directly intoMovie Magic Scheduling. Allows you to choose from a list of scenes from yourdocument.
· Print Standard Breakdowns —Movie Magic Screenwriter has its own powerful,internal breakdown capabilities. Select this item to go to a Breakdown Sheet menuwhere you can select what and how you want your breakdowns printed.
· Layout Breakdown Sheets—Movie Magic Screenwriter has built-in industry standardBreakdown Sheets, and this menu item will let you layout which categories go whereon the breakdown sheets.
TV Breakdowns
Shows options for TV sitcom production breakdowns:
· Generate Rundown Sheet
· Generate Set List
· Scene Character Lists
Generate Rundown Sheet
Displays a menu where you can choose options for printing TV Sitcom Scene Rundowns. Can generate or regenerate Character Lists before printing. Allows you to enter:
291
333
333
337

Movie Magic Screenwriter334
· Script Title, Production, Episode #:, Draft Version, Date (auto-entered, buteditable), Director
Offers these printing options:
· Choice of Font and font Size
· Box-Width—Lets you choose the width of the blank boxes printed for timing/notes, etc.Accepts a value between 0.5 and 2 inches, in 1/10 inch increments.
· Box-Min. Height—Lets you choose the minimum height of the blank boxes printed fortiming/notes, etc. Boxes expand if more space than this value allows is needed. Accepts a value between 0.5 and 2 inches, in 1/10 inch increments.
· Print Separate Act/Scene Column—If checked, prints a separate far left column forAct Break/Scene Label. Unchecked, that information prints as the first line of eachbox.
· Print Separate Page Number Column—If checked, Page Numbers print in a separatecolumn. Unchecked, they print in the upper right corner of the main box.
· Print Separate Day/Night Count Column—If checked, prints a separate right handcolumn for “Day 1” type information at the end of each Scene Heading. Prints D or N,followed by the number.
· Underlining and Boldfacing of: Act Break/Scene Label, Scene Headings
· Print total boxes at end of pg—If checked, prints 3 Totals boxes at the foot of eachpage.
· Print Scene Description Text (if any)—If checked, prints the scene description text.

Movie Magic® Screenwriter 6 Help 335
· Specify Set List Settings —Brings up the Generate Set List window.
Generate Set List (COPY)
Prints the Set List on its own, without the need to also print Rundown Sheets.
Options: This tab controls on which pages the header and footer text and Act continued textappear.
· Page Numbers--This option controls which page numbers appear in the Set Lists:
· None—If selected, No page numbers are printed
· Starting Page—If selected, prints the Page Numbers that each Set is used on.
· Starting & End—If selected, prints the Page Numbers of the start and end of theset use.no page numbers, starting page number, or starting and end pagenumbers.
· Prefix for Page Numbers--This option controls text that appears in front of the pagenumbers, e.g. "Pg. " displays page six as. "Pg. 6"
· Text Between Each Act: This is the text inserted after the end of one act and before thenext act.
· Act Break: The act break text has a check box for Bold and a check box for Underlining.Checked is ON. Unchecked is OFF.
· Scene Headings: The scene heading text has a check box for Bold and a check box forUnderlining. Checked is ON. Unchecked is OFF.
335

Movie Magic Screenwriter336
· Final Text: This is the text inserted at the end of the Set List report.
· Final Text formatting check boxes: The final text has a check box for Bold and a checkbox for Underlining. Checked is ON. Unchecked is OFF.
· List Characters in Each Scene: When checked the characters are listed with eachscene within parentheses. Example:
10 INT. BANK -- DAY
(Potter, Teller, Uncle Billy)
· (In All Caps): When checked, the character names listed in each scene are capitalized.
· Font: Let's you select the printing font of the listed characters.
· Size: Let's you select the printing font size of the listed characters.
· Always Print Set List with Rundown Sheets—If checked, prints a list of Sets afterprinting the Rundown Sheets.
· Put in Clipboard Rather than Print: Sends the report to the clipboard. You may thenopen another program, e.g. a word processor, and paste the report into a document fromthe clipboard.
· Header: This tab displays the text that appears at top of the page.
Use the buttons to insert variable text in the Header. Press the Preview Text withReplacements to preview the substitution text:

Movie Magic® Screenwriter 6 Help 337
· Footer Text: This tab displays the text that appears at the bottom of the page.
Use the buttons to insert variable text in the Footer. Press the Preview Text withReplacements to preview the substitution text:
Scene Character Lists
Selecting this option will generate lists of all the characters in each scene and puts that listimmediately under each scene heading, a format used frequently in sitcom production.
There are two sub-options under the Scene Character Lists menu item:
· Generate—Displays the Scene Character List Generation menu.
· Remove—Removes any previously generated Scene Character Lists.

Movie Magic Screenwriter338
NOTE: When you have generated lists, each time you go to the Print menu, it willnormally ask you if you want to regenerate your lists. Select YES when you'veadded/removed characters from any scenes, otherwise you can select NO. If you don'twant it to prompt you in this manner then uncheck the option Prompt to Regenerate Listsbefore Printing which is found on the Scene Character List Generation menu.
Animation Locking
Shows you options for Animation Production Features.
· Print Numbering in Script —If checked, Displays and Prints the dialogue speechnumbering in the script (as well as in the Animation Recording Script report). Acheckmark displays next to Print Numbering in Script. To turn the display ofNumbering off, click on it again.
· Setup Numbering Layout—This setup window allows you to control the wayAnimation Dialogue is printed.
· Lock Current Rev. Marks—Locks the Current Revision Marks and increases theRevision Mark Level.
· Unlock One Rev. Mark Level—Removes the last Locked Revision Marks anddecreases the Revision Mark Level.
· Lock Dialogue Numbering—Locks the Dialogue Numbering so that any newspeeches are added as A- Numbers. If Dialogue is already Locked, it will Multi-Lockthe numbering so new speeches are added as AA- Numbers.
· Unlock Dialogue Numbering—Decreases Dialogue Locking from AA- Numbering toA- Numbering or from A- Numbering to Unlocked Dialogue Numbering.
· Adjust Dialogue Numbering—Adjusts (overrides) the numbering of the Dialoguespeech that the cursor is currently in.
303

Movie Magic® Screenwriter 6 Help 339
17.1.12 Window Menu
· Minimize All—Minimizes (shrinks to icons at the bottom of the window) all open documentwindows.
· Zoom—Expands the active document window to its largest, standard size.
· Bring All to Front—Brings all document windows in front of all other visible applicationwindows.
· Cascade—Cascades (shrinks and overlays at an offset) all open document windows.
· Tile—Tiles (shrinks and stacks) all open document windows.
· Cycle—Cycles through the open document windows.
· <FileName>—Lists the Names of all open document windows, with a checkmark by thecurrently displayed document. Select one to make it the active open window.
17.1.13 Help Menu
· Web Resources—Includes a list of useful World Wide Web links to assist you with usingScreenwriter and screenwriting in general. Edit User links command under the WebResources allows you to enter your own screenwriting links for easy access.
· Screenwriter Help / Manual—Displays the searchable Index of the Online Help.
· Automatic Help Balloons—When selected, Movie Magic Screenwriter displays a briefdescription of functionality when placing the mouse pointer over icons and features .
· Restore All Program Hints—Restores program hints to default settings.
Movie Magic Screenwriter340
· Check For Update...—Checks the internet for updates to Movie Magic Screenwriter.
17.2 Key Assignments
· Shortcut Keys for Editing· Shortcut Keys for Inserting and Manipulating Elements· Shortcut Key for File Operations· Shortcut Keys for Formatting · Shortcut Keys for Menus· Shortcut Keys for NaviDoc· Shortcut keys for Navigation· Shortcut Keys for Selection· Miscellaneous Shortcut Keys· Function Keys

Movie Magic® Screenwriter 6 Help 341
17.2.1 Shortcut Keys for Editing
Shortcut Keys for Editing
Copy CMD C
Cut selected text CMD X
Paste Text CMD V
Paste Text (alternate) SHIFT CMD V
Paste into Current Element CMD OPTION V
Open Find window CMD F
Find Next CMD G
Open Replace window CMD R
Continue Last Replace & Find Next... CMD OPTION R
Delete the character to the left of thecaret DELETE
Delete the word to the left of the caret CMD DELETE
Undo CMD Z
Redo SHIFT CMD Z
Delete the character to the right of thecaret
FORWARDDELETE
Delete the word to the right of the caret CMD FORWARD
DELETE
Delete to End of Line CMD OPTIONFORWARD
DELETE
Modifier key for “Preserve / ResetCheating on Paste/Drag.”. Two differenthint alerts explain the behavior ofholding down the SHIFT key during adrag or paste operation: one forpaste/drop within the same document,one for paste/drop into a differentdocument
SHIFT

Movie Magic Screenwriter342
17.2.2 Shortcut Keys for Inserting and Manipulating Elements
Shortcut Keys for InsertingManipulating Elements
Insert Action Element CONTROL A
Insert Character Element TAB
Shift Tab inserts the previously usedCharacter Name SHIFT TAB
Insert Character Name into text CONTROL OPTION C
Insert a Scene Heading starting withEXT. CONTROL E
Insert a Scene Heading starting withINT. CONTROL I
Insert a New Note CONTROL N
Insert a new Shot CONTROL O
Insert Scene CONTROL S
Insert a Transition CONTROL T
Insert Parenthetical Element (When inDialogue) SHIFT 9
Insert Character Extension (When inCharacter Element) SHIFT 9
Title Centers the current Element SHIFT F6
Drop down the Element menu F4
Set current element to Left Column CONTROL L
Set Current Element to Right Column CONTROL R
Set current element to Full Width CONTROL F
Insert Left Parenthesis (When inDialogue) SHIFT CONTROL 9
Cheat Element F3
Insert New Element after the cursor(element chosen contextually) ENTER

Movie Magic® Screenwriter 6 Help 343
17.2.3 Shortcut Keys for File Operations
Shortcut Key for File Operations
New Document using Default.def CMD N
New Document choose Template SHIFT CMD N
Open CMD O
Save CMD S
Save As..
Close CMD W
Page Setup... SHIFT CMD P
Print Preview... CMD OPTION P
Print... CMD P
Quit Screenwriter CMD Q
Switch Between Open Documents CONTROL F6
17.2.4 Shortcut Keys for Formatting
Shortcut Keys for Formatting
Toggle Bold CMD B
Toggle Italics CMD I
Toggle Underline CMD U
Toggle Strikethrough CMD K
Insert Soft Hyphen CONTR
OL -
Insert Hard Dash SHIFTCONTR
OL -
Capitalize Word CONTR
OL W
Lowercase Word SHIFTCONTR
OL U
Uppercase WordCONTR
OL U
Add Forced Page BreakCONTR
OL RETURN
Add Hard Return SHIFT RETURN
Insert a blank space SPACE
Insert a Hard Space CONTR
OL SPACE
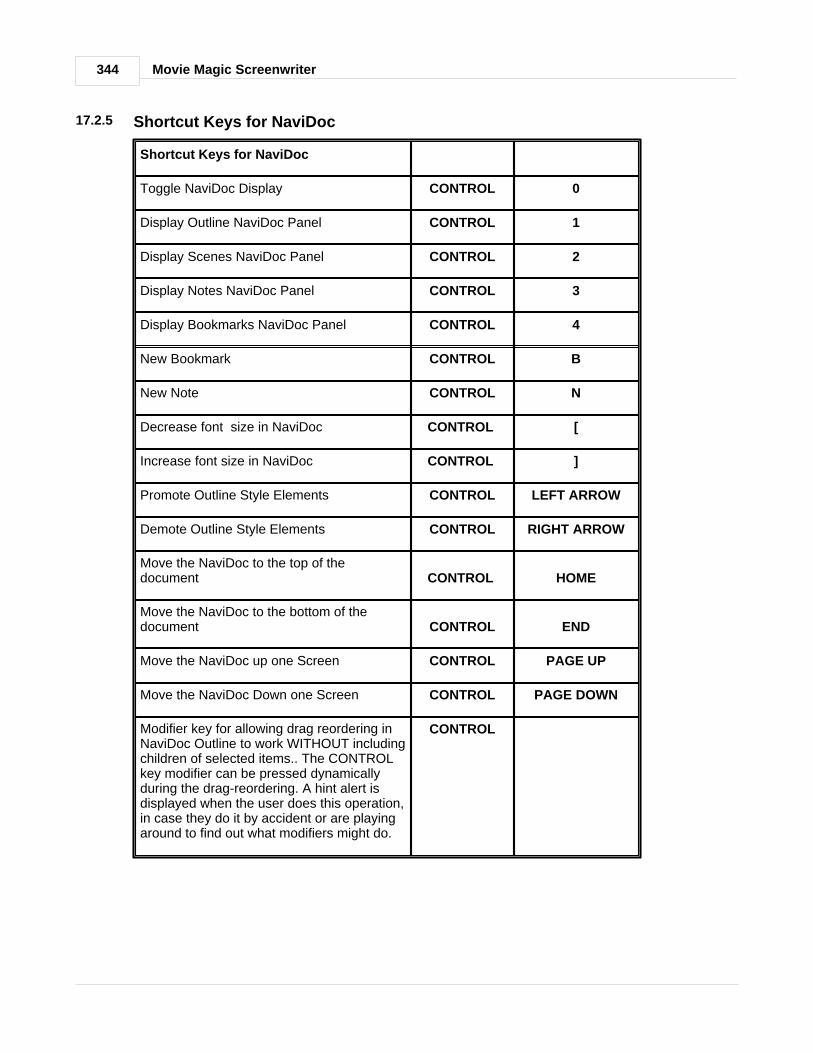
Movie Magic Screenwriter344
17.2.5 Shortcut Keys for NaviDoc
Shortcut Keys for NaviDoc
Toggle NaviDoc Display CONTROL 0
Display Outline NaviDoc Panel CONTROL 1
Display Scenes NaviDoc Panel CONTROL 2
Display Notes NaviDoc Panel CONTROL 3
Display Bookmarks NaviDoc Panel CONTROL 4
New Bookmark CONTROL B
New Note CONTROL N
Decrease font size in NaviDoc CONTROL [
Increase font size in NaviDoc CONTROL ]
Promote Outline Style Elements CONTROL LEFT ARROW
Demote Outline Style Elements CONTROL RIGHT ARROW
Move the NaviDoc to the top of thedocument CONTROL HOME
Move the NaviDoc to the bottom of thedocument CONTROL END
Move the NaviDoc up one Screen CONTROL PAGE UP
Move the NaviDoc Down one Screen CONTROL PAGE DOWN
Modifier key for allowing drag reordering inNaviDoc Outline to work WITHOUT includingchildren of selected items.. The CONTROLkey modifier can be pressed dynamicallyduring the drag-reordering. A hint alert isdisplayed when the user does this operation,in case they do it by accident or are playingaround to find out what modifiers might do.
CONTROL
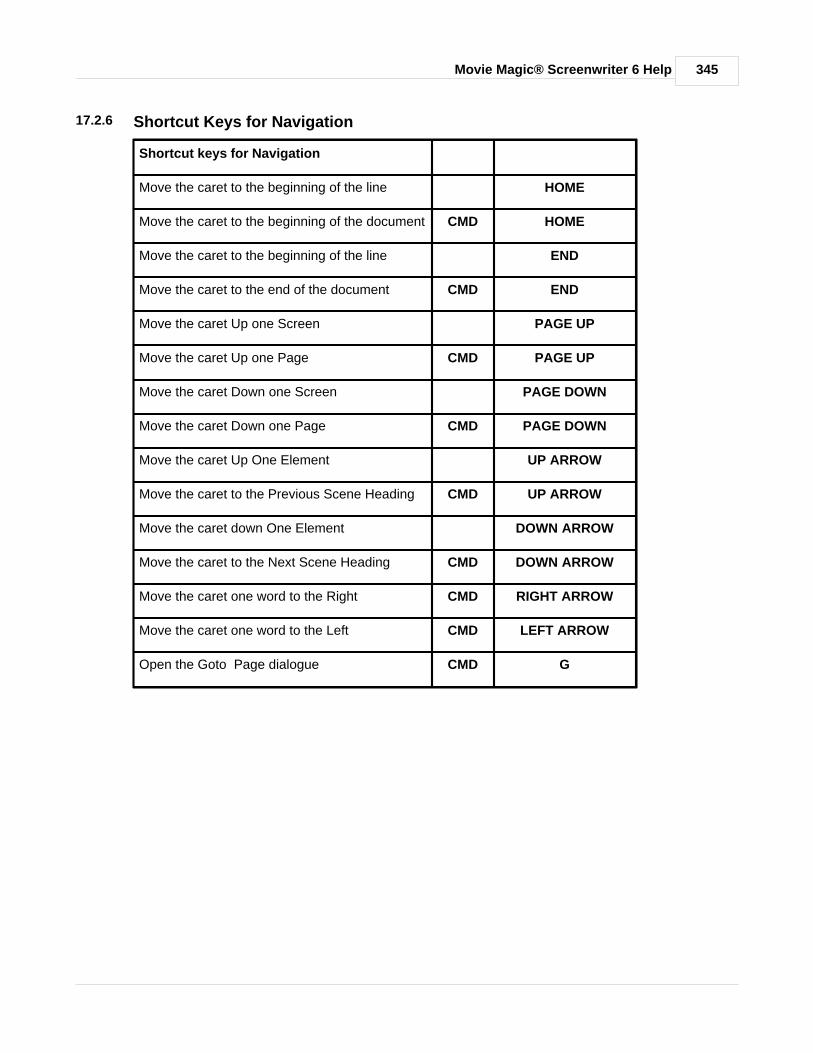
Movie Magic® Screenwriter 6 Help 345
17.2.6 Shortcut Keys for Navigation
Shortcut keys for Navigation
Move the caret to the beginning of the line HOME
Move the caret to the beginning of the document CMD HOME
Move the caret to the beginning of the line END
Move the caret to the end of the document CMD END
Move the caret Up one Screen PAGE UP
Move the caret Up one Page CMD PAGE UP
Move the caret Down one Screen PAGE DOWN
Move the caret Down one Page CMD PAGE DOWN
Move the caret Up One Element UP ARROW
Move the caret to the Previous Scene Heading CMD UP ARROW
Move the caret down One Element DOWN ARROW
Move the caret to the Next Scene Heading CMD DOWN ARROW
Move the caret one word to the Right CMD RIGHT ARROW
Move the caret one word to the Left CMD LEFT ARROW
Open the Goto Page dialogue CMD G

Movie Magic Screenwriter346
17.2.7 Shortcut Keys for Selection
Shortcut Keys for Selection
Select All CMD A
Select Sentence SHIFT CMD A
Select Group CMD OPTION A
Select Scene SHIFT CONTROL F12
Cut selected text SHIFT DELETE
Select to the Beginning of the Line SHIFT HOME
Select to the end of the Line SHIFT END
Select a screen of text above thecurrent carets position SHIFT PAGE UP
Select text to the next Page break SHIFT CMD PAGE UP
Select a screen of text above thecurrent carets position. SHIFT PAGE DOWN
Select text to the next Page break SHIFT CMD PAGE DOWN
Select text that is transversed bythe Up Arrow Key SHIFT UP ARROW
Select text that is transversed bythe Down Arrow KeyCombinations SHIFT DOWN ARROW
Select text that is transversed bythe Right Arrow KeyCombinations SHIFT RIGHT ARROW
Select text that is transversed bythe Left Arrow Key Combinations SHIFT LEFT ARROW

Movie Magic® Screenwriter 6 Help 347
17.2.8 Miscellaneous Shortcut Keys
Miscellaneous Shortcut Keys
Spell check the current word CMD D
Open Thesaurus CMD J
Bring Up Online Help SHIFT CMD /
Turn on Context Sensitive Help
Open Find window CMD F
Speak Selection SHIFT CMD S
Tagging Mode SHIFT CMD T
User Lists SHIFT CMD U
Reset Cheated Element SHIFT CMD =
Collapse All Hideable Elements CMD OPTIONUP
ARROW
Expand All Hideable Elements CMH OPTIONDOWN
ARROW
17.2.9 Function Keys
Function Keys
Cheat Element F3
GoTo Next Strikethrough or colored Text SHIFT F3
Show Format Codes OPTION F3
Open Thesaurus F5
Toggle Bold F6
17.3 Troubleshooting
· Known Hardware / Software Problems
· Common Technical Support Questions and Answers
· Production Problems and Solutions
348
348
350

Movie Magic Screenwriter348
17.3.1 Known Hardware/Software Problems
HP DeskJet printers—These printers have an unprintable bottom margin of 3/4 of an inch.Due to this anyone using this printer will probably get the top portion of the bottomcontinueds cut off in the print job. To correct this INCREASE the bottom margin by 1 or 2lines in the Document Layout option under the Format menu.
Font managers—The presence of some font managers can cause some minor problems.The problem will be easy to detect as your document will not print in the correct font(Courier). If your document appears in an unusual font or you are unable to get aWatermark to print you most likely have the problem. The screenwriter program is "set" tosubstitute Courier Old in printing because it looks better and has more stroke weight. Courier new is used to display onscreen. The problem is occurring because the programcannot access Courier old and is substituting something else instead. To correct this go toFILE\PROGRAM OPTIONS\PRINTERS and under substitute font choose Courier New.
17.3.2 Common Technical Support Questions and Answers
Q. I accidentally "learned" a wrong word while spell checking, how do I delete thisword from a supplemental dictionary?
A. Go to DOS Command Prompt and switch to Screenwriter for Windows subdirectory,type STUTIL to start the editor, select the dictionary you want to edit, find the word anddelete it.
Q. Screenwriter for Windows takes forever to print, how do I speed it up?
A. Pull down file menu in Screenwriter for Windows, select Tools> Options…, click onPrinter tab and Substitute for Courier Old font for printing. If this doesn't work, then tryturning off the print manager in the Main Control Panel, if this still doesn't work then try adifferent print driver (like HPII for HP4).
Q. I have a laptop computer with a touch pad. I have noticed that my cursor jumpsfrom one place to another by itself, why does this happen?
A. Most likely you accidentally tap on your touch pad which causes the cursor to jump.
Q. I decided to change a name of one of the characters in my script that I have justwritten, where can I find change character name feature?
A. Use Search & Replace under Search menu to change character names.
Q. Can I edit my pop-up character name list so that character that rarely speak do notclutter the menu?
A. Select Hide Names in Pop-Up List under Format menu.
Q. I accidentally put in a forced page break, how do I get rid of it?
A. Put your cursor under the forced page break and press Back Space key or selectRemove Forced Page under Edit menu.
Q. In a locked script I have deleted several pages in a row. Now Movie MagicScreenwriter prints blank pages. Is there a way to consolidate all the blank pages onone with the appropriate indication in the header?
A. First ensure that the option PRINT SEPARATE FULL "PAGE OMITTED" PAGES on
Movie Magic® Screenwriter 6 Help 349
the revision page of the Tools> Options… Menu is not checked, and then delete all thetext including the word "OMITTED" from the pages that you don't want to print("Non-printing omitted page" sign will appear), page numbering will change accordingly.
Q. The program is "correcting" a word that I'm typing in. What can I do about that?
A. Simply pause the AutoCorrection by going to the SPELL menu and choosing PauseAutocorrection and type in the word as desired and uncheck Pause Autocorrection. If itis a word that you'll be using elsewhere you may want to run the spell check and tell theprogram to learn it. OR, alternatively, put the cursor at the beginning of the word andpress <CTRL+DASH> which will put in a hidden code to tell the program not toautocorrect this word.
Q. Cut and paste is slow on my machine. Can I speed it up at all?
A. Yes. Go to the Tools menu, select Options… then click on the Misc. Page anduncheck Share Clipboard with Other Windows Programs. This will speed up cut andpasting by approximately 33% but will make it so that you cannot cut text in Screenwriterand paste it into another Windows program.
Q. I have Screenwriter for Windows on two different computers and when I loadexactly the same script on both of them, the page breaks are slightly different... what'sgoing on?
A. The computers have different printers selected and since Screenwriter bases thepage breaks on the selected printer's page size and printing resolution, different printerscan produce different results. Simply select the same printer driver on both machines(even if one or the other is not hooked up to that printer) and then they will match.
Q. I want to move my scenes around in a locked production script, is there an easyway to do it?
A. Switch to Index Card View mode and shuffle your scenes as desired.
Q. Our locked production script was broken into two parts, how do we merge it backtogether without creating unnecessary A-scenes and A-pages?
A. Open the first part of your script, place your cursor at the place where you want to addthe second part, select Paste From... under Edit menu and the file that contains thesecond part of your script.
Q. I have made some changes in the Top Toolbar Editor and than restored myScreenwriter for Windows from the Windows 95 Taskbar, but the changes were notthere, what did I do wrong?
A. You have to close and restart your Screenwriter for Windows for the changes to takeeffect.
Q. I have cut some of my text and than continued working on something else, when Iwanted to check that cut text in my Clipboard Viewer and got the message <Cannotdisplay Data in clipboard in an unknown format.>, why?
A. You have to check Share Clipboard with Other Windows programs under Misc. InTools>Options… menu.
Q. Yellow background in my Notes makes the text in them hard to read, can I changethe background color?

Movie Magic Screenwriter350
A. Go to Format menu, select Element Styles... and than Notes, change color as desired.
Q. I was trying to put some text in my dialogue in parentheses but as soon as I typedthe left parenthesis I was in Parenthetical element, is there a way around that?
A. Instead of pressing just the left parenthesis, type Ctrl+Shift+(
Q. Is there an easy way to move an element down the blank page?
A. Press F3 and specify the number of lines that you want to skip in Cheat Elementmenu.
Q. My character reads poetry in her speech, how do I go to the next line of thedialogue when I need to?
A. Press Alt+Enter or select Add Hard Return from Edit menu when you need to go to thenext line.
Q. I accidentally made a mistake in my registration information during installation,how do I change that?
A. In Notepad or WordPad (Win95) open the SCWRITER.INI file located in the Windowssubdirectory and edit the [Registration] section accordingly.
17.3.3 Production Problems and Solutions
Screenwriter's Online Help is available to help with common problems encountered in theProduction process.
Under the Production menu, select Production Solutions then one of the followingoptions:
· General Techniques—Walks you through the entire Production cycle, helping you toavoid problems by demonstrating the proper procedure.
· Scene Headings—Lists common problems encountered with Scene Numbers and SceneHeadings in a production script, and tells you how to solve them.
· Page Breaks—Lists common problems encountered with Page Breaks in a productionscript, and tells you how to solve them.
· Headers—Lists common problems encountered with Locked Headers in a productionscript, and tells you how to solve them.
· Manual Overrides—Displays the appropriate Help screens for the Manual Override of:

Movie Magic® Screenwriter 6 Help 351
Page Breaks
Scene Numbers
Locked Header Text
Individual Character Continued
Individual Page Length
Total Script Length
· Temporarily Disable:
· Locking of Pages—Enables you to cut and paste text as if the Pages are notlocked. Screenwriter will not keep track of OMITTEDs or perform any other LockedScript functions.
· Locking of Scenes—Enables you to cut and paste text as if the Scenes are notlocked. Screenwriter will not keep track of OMITTEDs or perform any other LockedScript functions.
17.4 Importing Documents
Screenwriter can Directly open documents saved in these formats:
· ASCII (text)
· RTF (Rich Text Format)
· Final Draft RTF (with Style Sheets in Rich Text Format)
· MS Word 2.0, 6.0 and 7.0 for Windows
· WordPerfect 5.1 & 6.x files (for Windows)
· Scriptware Tagged
· Movie Master
Screenwriter also supports Cut & Paste importing directly from other Windows programs.
17.4.1 Preparing Documents for Importing
No matter which format you import your document into Screenwriter from, there are twosimple rules which must be followed:
· In the original file, each script element (i.e. Character Name, Dialogue, Action, etc.)must start on its own line.
· The document must be in a general script format (i.e. Character Names beforeDialogue and so on).
NOTE: The following instructions assume that your Screenwriter document subdirectory isset to the Screenwriter default folder. If not, go to the correct subdirectory whereappropriate.

Movie Magic Screenwriter352
17.4.2 Direct Import
To open an MS Word, WordPerfect, ASCII, RTF, Final Draft RTF, Movie Master orScriptware Tagged file:
1. Open the Screenwriter program.
2. Under the File menu, select Open.
3. Select the File Type for the type of file you're opening.
If the file you want to import does not have the appropriate File Extension (i.e. “.RTF”for Rich Text Format, “.TAG” for Scriptware Tagged, etc.), selecting All Files as thefile type shows files with any extension.
4. Select the file you want to import to Screenwriter. (If necessary, change thesubdirectory.) Click on OK. The Text Interpretation window appears:
· To import a script file, Import in Script Format should be checked.

Movie Magic® Screenwriter 6 Help 353
· To import an outline or some other non-script text, check Import Text as ActionOnly.
· Text Only (Non-RTF)—Checking this CheckBox (if available) imports the fileslightly faster, and may improve the accuracy of the import. It also loses any bold,italic, or underline formatting.
· If you're importing a file with Embedded Style Sheets in Rich Text Format, such asa Final Draft script, a Use Style Sheets checkbox displays on the menu. Check itfor better interpretation of paragraph elements. If Screenwriter has difficultyinterpreting any style sheet, it prompts you to identify it.
· Use most aggressive interpretation of the source text—Causes Screenwriter tonormalize inconsistent line spacing and margins. In most cases this produces themost accurate import. However, it may cause Shots to be misinterpreted asCharacter Names, and vice versa.
· Don't use Capitalization Information for Element identification—Some wordprocessors lose Capitalization Information when exporting files. Checking this boxtells Screenwriter to ignore Capitalization when identifying Elements.
· Ignore Margins for Element identification—Some script files have their scriptelements defined by their margins, others by codes or Hard Returns. If a script fileis being imported incorrectly due to its margins not being what Screenwriterexpects, checking this feature may allow a more accurate import.
· Action is in Parentheticals “(“ + ”)”—Check this if your import file has the ActionElement in parentheses (such as certain TV or Stage Play scripts).
· Import this text with LOCKED Page breaks—Check this if the import file hasPage Breaks, and you want to keep them exactly the same in the resultingScreenwriter document.
5. Click on OK to import the file.
6. Under Screenwriter's File menu, Save your imported file under a new name.
If your script does not import successfully, try again with different options checked. You mayhave to experiment with these options to get the best results.
17.4.3 Cut and Paste Import
Use this method if none of the other methods imports your document successfully. Toimport a document from another Mac OS X program on the same computer as Screenwriter:
1. Open the other Mac OS X program, and open the file you want to import toScreenwriter.
2. Under that program's Edit menu, Select All (or select all the text in the file usinganother method).
3. Under the Edit menu, select Copy. Once the Copy command is complete, the text willbe on the Clipboard. Don't cut or copy anything else.
4. Open Screenwriter.

Movie Magic Screenwriter354
5. Under Screenwriter's File menu, open a New file. Under the Edit menu, select Paste.Instead of pasting the import text in your new empty document, Screenwriter presentsthe following Text Interpretation menu:
· To import a script file, Import in Script Format should be checked.
· To import an outline or some other non-script text, check Import Text as ActionOnly.
· Text Only (Non-RTF)—Checking this CheckBox (if available) imports the fileslightly faster, and may improve the accuracy of the import. It also loses any bold,italic, or underline formatting.
· Use most aggressive interpretation of the source text—Causes Screenwriter tonormalize inconsistent line spacing and margins. In most cases this produces themost accurate import. However, it may cause Shots to be misinterpreted asCharacter Names.
· Don't use Capitalization Information for Element identification—Some wordprocessors lose Capitalization Information when exporting files. Checking this boxtells Screenwriter to ignore Capitalization when identifying Elements.
· Ignore Margins for Element identification—Some script files have their scriptelements defined by their margins, others by codes or Hard Returns. If a script fileis being imported incorrectly due to its margins not being what Screenwriterexpects, checking this feature may allow a more accurate import.
· Action is in Parentheticals “(“ + ”)”—Check this if your import file has the ActionElement in parentheses (such as certain TV or Stage Play scripts).
Movie Magic® Screenwriter 6 Help 355
· Import this text with LOCKED Page breaks—Check this if the import file hasPage Breaks, and you want to keep them exactly the same in the resultingScreenwriter script.
6. Click on OK to paste the imported text.
7. Under Screenwriter's File menu, Save your imported file under a new name.
If your script does not import successfully, try again with different options checked. You mayhave to experiment with these options to get the best results.
17.4.4 Importing a Macintosh Word Processor script
If the Cut and Paste method does not import satisfactorily, try this method. Also, if the MacWord Processor script you want to import is on a different computer than Screenwriter, youcan’t use the Cut and Paste method. Instead:
1. Open the Mac Word Processor (e.g. Microsoft Word or TextEdit), and open the scriptfile you want to import to Screenwriter.
2. Under the File menu, choose Save As. Save the script under a different name.
3. In the Save As window there should be an option to save the script in a differentformat. Typically, it says something like Format or File Type or Save Type. Change itto Rich Text Format or RTF. If that’s not available, choose Text or ASCII Text (If Textor ASCII options like With Line Breaks or With Formatting are available, select them.)
4. Click on OK to save. When the file’s saved, exit the Windows Word Processor. (Ifimporting from a different computer, transfer the saved file to your Screenwritercomputer.)
Now follow the Direct Import instructions above.
17.4.5 Importing a Scriptware for Windows script
First, export the Scriptware script as a Scriptware Tagged file:
1. Open Scriptware for Windows and open the script you want to import to Screenwriter.
2. Under the File menu, select Export, then Scriptware Tagged.
3. In the file name field, Enter C:\Movie Magic Screenwriter\Scripts\<File Name>.TAG. Click on the Export button to save the Export file.
4. Exit Scriptware.
Now follow the Direct Import instructions above.
17.4.6 Cleaning up Imported Scripts
Screenwriter may require you to do some cleaning up after importing a script.
To correct a mis-recognized Element, place the cursor anywhere in the element. Click onthe Current Element Window in the center of the Top Toolbar, and select the desiredElement.
If the imported script was in TV format, you may have to reset the script’s formats (See

Movie Magic Screenwriter356
Choosing a Script Format for more details.) You'll also need to put back in the forced PageBreaks between scenes, and re-enter the Act Break and Scene Label. Unfortunately, due toa lack of standardization in TV formats, the import function is unable to recognize all possiblepermutations.
NOTE: Although the Import function is highly accurate, we recommend you check allimported scripts for errors before printing multiple copies. Running SmartCheck helps,though even it can’t catch all errors.
17.5 Exporting Documents
Exporting to other script writing or word processing programs is a matter of saving adocument in a different format.
A document exported from Screenwriter is designed to be an editable copy, not an exactduplicate. It will not have exactly the same margins, page breaks, or even number of pagesas it does in Screenwriter. Neither will it have MOREs or CONTINUEDs. However, it willretain all of the text in your document and will be in general script format.
17.5.1 Export
To export, open Screenwriter and open the document you want to export.
1. Under the File menu, select Export To...
2. Select a file type from the menu:
There are the export file types (formats) currently available:
· Screenwriter 4.x and 2000(.scw)—Normally used for saving for pre-6.0Screenwriter documents.
· Adobe Acrobat PDF (.pdf)—Used to export to Adobe Acrobat. This is a widelyused format that can be opened and printed by a wide variety of software programson both Windows and Macintosh.
· Rich Text Format (.rtf)—Compatible with most Microsoft programs such asMicrosoft Word.

Movie Magic® Screenwriter 6 Help 357
· Plain Text (.txt)—Used to export to programs which cannot handle any of the otherformat. A plain text format with all the text of the document indented correctly usingspaces.
· HTML Publishing (.html)—This feature saves your document as an HTML file andallows you to upload it to an FTP site. In order to upload your document you willneed to know the URL, user name, and password..
· Movie Magic Scheduling Export (.sex)—Screenwriter can export all your taggedbreakdown items, for every scene, to a Screenwriter Export file (with the fileextension .SEX.) This file can be imported directly into Movie Magic Scheduling,where breakdown information is automatically transferred to Breakdown Sheetsand Production Strips—enabling you to easily organize a production schedule andprint strips for the Production Board.
· Gorilla Scheduling (.sex)—Screenwriter can export tagged breakdown items to aScreenwriter Export file (with the file extension .SEX.) This file can be importeddirectly into Gorilla Scheduling, where breakdown information is automaticallytransferred to Breakdown Sheets and Production Strips—enabling you to easilyorganize a production schedule and print strips for the Production Board.
· CompanyMOVE Showplanner (.sex)—Screenwriter can export taggedbreakdown items to a file for CompanyMOVE Showplanner.
· FrameForge 3D Studio (.txt)—Used to export to the 3D storyboarding software byInnoventive Software, LLC.
· Avid Editor Format (.txt)—Used to export to the video editing software by Avid.
3. Enter a new File Name for the exported file. Screenwriter automatically adds thecorrect export file extension, according to your chosen export format.
4. Click on OK to save the export file.
17.5.2 Importing a Screenwriter Export script
To import a Screenwriter export file into another program, check that program’s manual forImporting instructions. If that does not help, call the program’s Technical Support numberand ask how best to do it.
The document must have been exported from Screenwriter in a format readable by the otherprogram.
Write Brothers is only able to provide technical support on the export side of this procedure. Unfortunately, we have no control over how another company’s programs deal withimporting.
17.5.3 Cut and Paste Exporting
You can export from Screenwriter to another Mac OS X program on the same computerusing Cut and Paste:
1. Open the Mac OS X program you want to export to. Open a file to export to, or open anew file.

Movie Magic Screenwriter358
2. Open Screenwriter and open the document you want to export from.
3. Using the mouse, select the text to export.
4. Under the Edit menu, select Copy.
5. Go to the other Mac OS X program.
6. Under the Edit menu, select Paste.
All of Screenwriter’s formatting may not transfer, but you should at least be able to export allthe text. Be warned that not all Mac OS X programs can handle Cut and Paste correctly.
NOTE: For this method to work, the option Share Clipboard with Other Mac OS X Programsmust be checked. To check/uncheck it, go to the Misc page of Options… under the Toolsmenu.
17.6 Format Codes
The following Format Codes are embedded in the text of your document by Screenwriter. Todisplay them:
· Under the View menu, select Show Format Codes.
(If your document is going into Production and you perform Breakdown Tagging on it,Tagging Codes are placed around each word you tag. See the Production Features chapterfor more details.)
Paired Codes
CODE ON OFF
Underline [U] [u]
Bold [B] [b]
Italics [I] [i]
Single Codes
Soft-Hyphen ~
Hard-Dash F3
Hard-Space F3
Locked Revision Mark [1], [2], [3], or [4]

Movie Magic® Screenwriter 6 Help 359
Hard Return F6
Keep Element Together ¶
17.7 Files Installed
The following files are installed with Movie Magic Screenwriter 6.0:
· Installed Contents
· Sample Scripts and Templates
· Start Menu Folder
17.7.1 Sample Scripts and Templates
My Documents\Screenwriter Documents
Sample ScriptsExport to Scheduling.mmswGeneric Comic Sample.mmswGosset&Kayle Comic Sample.mmswNovel.mmswRadio Show Sample.mmswScreen.mmswSitcom1.mmswSitcom2.mmswSpec Script.mmswStage Play.mmsw
Templates Defualt Template.Instructional Templates
Generic Comic Template.defGossetKayleComicTemp.defMulti-Media Template.defNovel Template .defRadio Show Template.defRadio Play.TemplatedefSpec Script.defStage Play.def
Blank Templates Generic Comic Template.defGossetKayleComicTemp.defMulti-Media Template.defNovel Template .defRadio Show Template.defRadio Play.Templatedef
359

Movie Magic Screenwriter360
Spec Script.defStage Play.def
TV TemplatesTV Templates3rd Rock from the Sun.defAlly McBeal.defBabylon5.defBay Watch.defBeverly Hills 91202.defBoy Meets World.defBuffyTheVampireSlayer.defCaroline in the City.defChicago Hope.defCSI.defCybil.defDawson Creek.defDays of Our Lives.defDharma and Greg.defDoctor Quinn.defDrew Carey Show.defEarly Edition.defEllen.defER.defFrasier.defFriends.defGrace Under Fire.defHercules.defHome Improvement.defHomicide.defJust Shoot Me.defKing of the Hill.defLarry Sanders.defLaw & Order.defLe Femme Nikita.defLiving Single.defMad About You.defMelrose Place.defMen Behaving Badly.defMillennium.defMurphy Brown.defMy Big Fat Greek Life.defNash Bridges.defNew York Undercover.defNews Radio.defNYPD Blue.defParty of 5.def

Movie Magic® Screenwriter 6 Help 361
Promised Land.defProvidence.defQueer as Folk.defSabrina.defScrubs.defSimpsons.defSliders.defSmartGuy.defSouth Park.defSpin City.defStar Trek Deep Space 9.defStar Trek Voyager.defStyle and Substance.defSuddenly Susan.defThe Nanny.defTouched By an Angel.defVeronicas Closet.defWalker, Texas Ranger.defX Files.defXena.defYoung and Restless.defBlank TemplatesGeneric Comic Template.defGosset&Kayle Comic Sample.defNovel Template.defRadio Show Template.defScreen.defSitcom1.defSitcom2.defSpec Script.defStage Play.def
Movie Magic Screenwriter362
Index- ( -( 129
- . -.BK files 235
.mmsw 23
.scw 23, 311, 312
.TPG 102
- “ -“Preserve / Reset Cheating on Paste/Drag 341
- 1 -1 Page 197
- 2 -2 Pgs 197
- A -A subfolder named, "Previous Versions" 235
Abobe Acrobat 198
About... 339
Accent Aigue 151
Accent Grave 151
Accented Characters 151
ACT 124, 140
Act Breaks 267
Act Info 195
Act Information 115, 196
Act/Scene Info 136, 138, 140, 324
Action 109, 115, 119, 129, 130, 266, 342
Action Indentation 266
Action is in Parentheticals 352
Add 109
Add a Note 125
Add an Index Card 108, 109
Add as Text 120
Add Bookmark 172
Add Category 166
Add Dialogue Paragraph 314
Add Forced Page Break 131, 314, 343
Add Hard Return 132, 314, 343
Add Note Element 166
Add Outline Element 19, 190, 325
Add Outline Style 185
Add Word 155
Add Words to 152
Adjust Dialogue Numbering 304, 338
Adjusted - 7 lines 204, 294
Adobe Acrobat PDF 356
Advanced Locking Features 286
AFTERNOON 140
Alias Auto-Recognition Text 142, 143
Alias Text 136, 142
Align Headers/Footers 197
Align Horizontally 100
Align Vertically 100
All Caps 154
All OMITTED Scene Headings 331
All or Some Notes 331
Allow Dragging Outline Rows 179
Allow Typeover 93, 229
ALT+[ 181
ALT+] 181
ALT+DOWN ARROW 145, 162
ALT+END 162
ALT+ENTER 121, 126, 132
ALT+HOME 162
ALT+LEFT ARROW 191
ALT+PAGE DOWN 162
ALT+PAGE UP 162
ALT+RIGHT ARROW 191
ALT+UP ARROW 145, 162
Alternate Background Color for Scenes Panel 175
alternate shortcut 254
Alt-Key Character Names 120
ANGLE ON 123, 140
Animation Locking 301, 304, 329, 338
Animation Numbering 302
Animation Production 301
Animation Recording Script 303
Animation Recording Scripts 198, 302
A-Page 288, 329
A-Pages 250, 288
Index 363
Application Icon 18
A-Scene 329
A-Scene Numbering 282
ASCII 352
Assigning Numbers to Speeches 302
Associate Items with Locations 332
Associate Items with Names 332
Asterisk 249, 278
Asterisk Headers 250
Asterisked Pages 198
Asterisked Speeches Only 198
Attach Script As 220
Auto Pop-Up 230
AutoCapitalize 154, 245
AutoCapitalize Sentences 152
AutoCapitalize the Names of Characters 152
AutoCapitalize/Sentences 154
Auto-Correct 153, 243
Auto-Correct Typos 154, 244
Auto-Revision Marks 279
Auto-Revision... 329, 330
Auto-Space Sentences 154
Auto-Update Locked Headers 250
Avid Editor Format 356
- B -BACK TO SCENE 123, 140
BACKSPACE 149
Backup Directory 238
Backup Icon 18
Basic Information 87
Beep on Unknown Words 154
Beginning of current line 145
beginning of the document 345
beginning of the line 345
Blank Document 237
Blank Elements 241
Blank Lines 197
Block Selection 147
Blocked Text 198
Blue 274, 330
Blue Highlights 331
Bold 149, 150, 195, 261, 343, 358
Bold Headlines 112
Bolding Text 150
Bookmark 170, 344
Bookmarks 19, 325
Bookmarks Controls 172
Bookmarks List 171
Bookmarks Panel 160, 170
Bookmarks Panel Options 172
Bottom 19, 324, 325
Bottoms 100
Box-Min. Height 333
Box-Width 333
Break Action 270
Break Dialogue 270
Breakdown Categories 298
Breakdown Sheets 292, 299
Breakdown Tagging 296, 298
Breakdown... 329, 332
Breakdowns 201
Breaking Elements 148
Bring Up Online Help 347
Buff 274
BUTTONS 261
- C -Calculate Eighths 294
Calculate Eighths by 204
Calendar 327
Cap & Bold Word 151
Capitalization 143
Capitalize Word 151, 343
Capitals 261
Cascade 95, 339
Case 151
Cedilla 151
Center Act Info 267
Center on page 100
Centered 124
Centered Title 109, 124, 269
Centers 100
Change Character Name 158, 314
Change Dictionary 327
Change Element Type 128, 321
Changing Case 151
Character 342
Character Continueds 135, 263
Character Extension 119, 120, 121, 342
Character Extensions 232
Character Format 186
Character List 198

Movie Magic Screenwriter364
Character Name 109, 115, 119, 121, 129, 130,143
Character Names 136, 139, 140, 154, 263
Character Names Box on Character Name Entry 230
Character Names without Dialogue 241
Character Set 327
Characters 202, 292
Chat Window 208
Cheat 135, 136, 321
Cheat a Page 135, 136
Cheat an Element 135
Cheat Element 150, 342
Cheat Page Breaks 135
Cheat Right Margins 135
Cheat the Page's Header 135, 136
Cheat the Whole Script 135
Cheating 135, 193
Cheating on Paste/Drag 341
Check For Update... 339
Check Homonyms 327
CheckBox 90
CheckBoxes 87, 91
Cherry 274
Circumflex 151
Cleaning up Imported Scripts 355
Clear 19, 314
Clear File History List 311, 312
Clear Ignore List 327
Clear Out List First 139
Click-and-Drag 160
Close 96, 197, 311, 312, 343
Close All 311, 312
COLD OPENING 124, 140
Collapse All Hideable Elements 347
Collapsing 179
Color 164, 290
Colors 183, 330
Combine OMITTEDs 242
CompanyMOVE Showplanner 356
Compare Two Scripts 327
Completely Blank Elements 241
Compose Message In 220
Cont'd Text 263
Contents 14, 339
Continue Last Replace & Find Next... 341
Continued 197
Continueds 263
Continues Last Search 341
CONTINUOUS 140
Convert Case 321
Converting A-Pages 288
Copy 147, 148, 314, 341
Copy and Paste 147
Copy to... 97, 314
copying outline styles 188
Copyright Notice 15
Correct Double Capitals 152, 154
Count Words 327
Create / Edit Outline Styles 19
Create / Edit Outline Styles... 325
Create a new previous version file 235
Create PDF 198
Create PrintThing File 198
Creating Alias Text 142
Creating Text Elements 100
CTRL+' 151
CTRL+ ALT+ K 135
CTRL+, 151
CTRL+: 151
CTRL+^ 151
CTRL+` 151
CTRL+~ 151
CTRL+1 133, 162, 176
CTRL+2 133, 173
CTRL+3 164
CTRL+4 170
CTRL+ALT+? 131
CTRL+ALT+DOWN ARROW 145
CTRL+ALT+END 145
CTRL+ALT+HOME 145
CTRL+ALT+UP ARROW 145
CTRL+B 150
CTRL+BACKSPACE 149
CTRL+C 148
Ctrl+Dash 131
CTRL+DELETE 149
CTRL+END 149
CTRL+ENTER 129
CTRL+F1 125, 129
CTRL+F6 95
CTRL+G 145
CTRL+INS 148
CTRL+LEFT ARROW 145
CTRL+N 150
CTRL+O 129

Index 365
CTRL+PgDn 145
CTRL+PgUp 145
CTRL+RIGHT ARROW 145
CTRL+S 129
CTRL+SHIFT+- 131
Ctrl+Shift+Dash 131
CTRL+T 129
CTRL+TAB 95
CTRL+U 150
CTRL+V 148
CTRL+X 148
CTRL+Y 150
CTRL+ZERO 160
Current Page 198
Current Revision Marks 301, 331
Cut 147, 148, 314
Cut and Paste 147
Cut and Paste Import 353
Cut Element 19, 314
Cut selected text 341, 346
CUT TO 140
Cut to... 97, 314
Cuts selected text 341
- D -Date 195, 196, 333
DAY 118, 140
Day/Month/Year 196
Day-Month-Year 196
Decrease font size in NaviDoc 344
Decrease NaviDoc Font 19
Decrease NaviDoc Font Size 325
Decreases Right Margin 342
Default Lists 140
Default Note Category 167
default.def 321
Defaults For all New Scripts 140
defaut.def 321
Delete 149, 190, 241
Delete Category 166
Delete Left 149
Delete Left Word 149
Delete Note 166
Delete Outline Style 184
Delete Right 149
Delete Style 183
Delete the character to the left of the caret 341
Delete the character to the right of the caret 341
Delete the word to the left of the caret 341
Delete the word to the right of the caret 341
Delete to End of Line 149, 341
Delete Word 149, 155
Demote Outline Element 19, 325
Demote Outline Style Elements 344
Demoting 191
De-Selecting Text 147
Dialog 130
Dialogue 109, 115, 121, 122, 129, 198, 264, 270
Dialogue Numbering 302
Dialogue With Cues for Actors 198
Dictionaries 152
Dictionary Icon 18
Direct Import 352
Director 333
Directory 237
Display ???? on screen 229
Display Bookmarks NaviDoc Panel 344
Display Eighth Totals 204, 295
Display Notes in Script 127, 269
Display Notes NaviDoc Panel 344
Display Open File Menu 96
Display Options 93, 149, 318
Display Outline NaviDoc Panel 344
Display Scenes NaviDoc Panel 344
Display Screen-Sized Retrieve List 96, 237
DISSOLVE TO 140
Distrib. List 305
Distribution List 305
Document Analysis 327
Document Icon 18
Document Layout 193
Document Layout... 321
Document Outline Styles 186
Don't use Capitalization Information for Elementidentification 352
Double Capitals 243
Double Sided 198
Double-Click 146
DOWN ARROW 145
down One Element 345
Down one Page 345
Down one Screen 345
Draft Color 136
Draft Version 333
Drag and Drop 147, 148, 187
Movie Magic Screenwriter366
Drag n' Drop 147
Dramatica 139
Draw Boxes 112
Drop down the Element menu 342
Dual Column Margins 134
Dual Columns 132, 321
Dual-Column 132
Dual-Column Dialogue 132, 133
- E -Edit 131
Edit an Index Card 111
Edit Breakdown Sheets 332
Edit Categories 298, 332
Edit Menu 92, 97, 147, 314
Edit User Dictionary 327
Edit User Lists 139
Edit Word 155
Editing 145
Editing Screen 87, 91
Editing User Lists 138
Electronic Index Cards 107
Element 135, 136, 145, 146, 153
Element Buttons 93
Element Styles 259, 260
Element Styles.... 321
Element Type 128
Element’s Numbering 332
Elements 115, 148
Enable Alt-Keys 229
Enable Voice Commands in Screenwriter 247
END 145
END OF ACT 124, 129, 140
End of Act Text 136, 140
End of Action 129
End of current line 145
END OF SHOW 140
end of the document 345
ENTER 116
ENTER Key 229
Entire Document 157, 158
Entire Scenes 198
Entire Script 153, 198
Episode # 333
European Format 196
EVENING 140
Every Page 197
Every Page Except first Page of Scene 197
Every time a document is saved 235
Except Following Shots 154
Existing File 97, 314
Exit 96, 311, 312
Exits Screenwriter 343
Expand All Hideable Elements 347
Expanding 179
Expanding & Collapsing Outline Elements 179
Export to Movie Magic Scheduling 300
Export to… 19, 311, 312
Exporting 356, 357
EXT 117, 129, 140, 202
ext. 115
Extend Selection 146
Extend Selection... 314
Extension 263
Extensions 136, 140
Exterior 202
- F -F3 135, 150
F4 128, 185
F6 150
FADE IN 93, 117, 129, 140
FADE IN Text 136, 140
fade in: 115
FADE OUT 140
Family Names 220
Fax 198
Female Names 220
File 94
File Menu 92, 96, 105, 311, 312
Files Installed 359
Filmed Sitcom 103
Final Act 267
Final Draft 356
Final Draft RTF 352
Final Text 335
Final Text formatting check boxes 335
Find 314, 341
Find command 157
Find Next 314, 341
Find What 157
Find with Same Capitalization as Search Text ONLY 157
Firewall 211
Index 367
Fit Width 225
Fix (Lock) All Headers 288, 330
Fix All A-Pages 288, 330
Fix or Flex 288
Fix or Flex... 329, 330
Fixed 164
Fixed Text Size 225
Flash Pointer 164
Flashing 164
Flex All A-Pages 288, 330
Flex All Headers 288, 330
Flipped 282
Flipped Locked 287
floating microphone 216
Flush Left at Margin 197
Flush Right 195
Flush Right at Margin 197
Font Button 112
Font Color 321
Font managers 348
Font Options 169, 172, 175
Font Size 181
Font Size Control 170, 176
Font Style 321
Footer 91, 194, 196, 197
Footer Text 195, 335
Forced Page Break 109, 131
Foreign Characters 151
Foreign Language Spell Check 154
Foreign Languages 152
Format Menu 92
Format Codes 358
Format Menu 103, 321
Format Options 186
Formatting Text 149
Forwards 153, 198
Frame 164, 183
FrameForge 3D Studio 356
From a Script 103
From Cursor Position 157, 158
From Template 19
Full Page 99, 318, 320
Full Page Icon 94
FULL SHOT 140
Function Keys 347
- G -General NaviDoc Options 164
General Techniques 350
Generate 337
Generate Rundown Sheet 333
Generate Set List 335
Goldenrod 274
Gorilla Scheduling 356
Goto Menu 92
Goto Page dialogue 345
Goto End of Script 145
Goto Menu 324
Goto Page 93
Goto Page Menu 145
Goto Scene Listings 93
Goto Top of Script 145
Graph Breakdown 205, 295
GRAY TEXT 229
Green 274, 330
Green Highlights 331
Group 146
- H -Hard Dash 343
Hard Return 132, 358
Hard-Dash 131, 358
Hard-Space 131, 358
Have it Prompt you to Insert Each Page as needed 126
Header 91, 194, 196, 197
Header and Footer Setup 194
Header and Footer... 321
Header Revision Mark 250
Header Text 195, 335
Headers 288, 350
Heading 280
Help Menu 92, 339
Hide 126
Hide Elements on Screen 318
Hide Format Codes 149
Hide Locations in Pop-Up List… 318
Hide Names in Pop-Up List... 318
Hide/Show a Note 125, 126
Hideable Elements 347

Movie Magic Screenwriter368
HOME 145
Horizontal 109
Horizontal Index Cards 108
HP DeskJet printers 348
HTML Publishing 356
- I -Icon 18
Ignore 153
Ignore Blank Lines 242
Ignore Margins for Element identification 352
Import 352, 353
Import in Script Format 352
Import this text with LOCKED Page breaks 352
Importing a Scriptware for Windows script 355
Importing a Windows Word Processor 355
Importing Scripts 351
In All Caps 335
Include Pg #’s in Set List 335
Increase font size in NaviDoc 344
Increase NaviDoc Font 19
Increase NaviDoc Font Size 325
Increases Right Margin 342
Index Card 94, 111
Index Card SpeedBar 108
Index Card View 107
Index Card View Icon 94
Index Cards 107, 108, 109, 112
Index Cards... 318
Initial Capitals 151
Initial Scene Text 136
Innoventive Software 356
Input Fields 91
Insert a blank space 343
Insert a Hard Space 343
Insert a New Note 342
Insert a new Shot 342
Insert a Scene Heading starting with EXT. 342
Insert a Scene Heading starting with INT. 342
Insert a Transition 342
Insert Action Element 342
Insert Character Element 342
Insert Character Extension 342
Insert Character Name into text 342
Insert Element 19, 115, 314
Insert Hard Dash 343
Insert Left Parenthesis 342
Insert New Element after the cursor 342
Insert Parenthetical Element 342
Insert Scene 342
Insert Soft Hyphen 343
Insert/Typeover Button 93
Inserts a New Note 342
Inserts a new Shot 342
Inserts a Scene Heading starting with EXT. 342
Inserts a Scene Heading starting with INT. 342
Inserts a Transition 342
Inserts Character Extension 342
Inserts Left Parenthesis 342
Inserts Parenthetical 342
INT 129, 140, 202
int. 115
Interactive 103
Interior 202
Interior VS. Exterior 202, 204, 292
iPartner 210, 211, 327
IP Address 206
Italicized 261
Italics 149, 150, 343, 358
- J -Justified 261
- K -Keep Capitalization of Original Word 157
Keep Element Together 135, 342, 358
Keep Group Together 342
Key Assignments 87, 340
Keyboard 252
Keyboard Commands Icon 18
Keyboard Options 222
Keyboard Selection 146
keyboard shortcut 254
Keyboard Shortcuts 87
- L -Last Position 324
last saved position 239
Last Workspace 237
LATER 140
Layout Breakdown Sheets 332

Index 369
Learn 153
Leave You in a Blank Script 96
Left 100, 265
LEFT ARROW 145
Left Column 132, 342
Left Parenthesis 342
Left Promotes row 179
Left to Right 100
left vertical slider 170
Left-Click 146
Letters (A, B, C...) 196
Line Spacing 135, 261
Line Spacing Format 186
Lines Before 135
List 198
List Characters in Each Scene 205, 295, 335
List Menu 88, 89
List Non-Speaking Characters 205
Listening 211
Lists 139
Load Script Format 103
Load Styles From... 321
Load User Lists from 142, 321
Loading Element Styles 96
Loading User Lists 140
Location 118, 129, 136, 202, 204, 292
Locations 139, 140
Locations after INT./EXT. selection 230
Locations List 198
Lock Current Rev. Marks 338
Lock Dialogue Numbering 304, 338
Lock The Script 274, 329
Locked 287
Locked Headers 136
Locked Letter Skip List 285
Locked Page Break 331
Locked Page Breaks 281
Locked Pages 136
Locked Revision Mark 358
Locked Scene Headings 280
Locked Scripts 272, 286
Locked Scripts Options 279
Locking Current Revision Marks 301
Locking Level 301
Lowercase 151
Lowercase Word 151, 343
- M -Main Menu Bar 16, 87, 88, 91, 92
Make Default for All New Documents 321
Male Names 220
Manual Overrides 350
Margins 261
Margins Format 186
Mark Element 250
Mark One Character’s Dialogue 321
Marks 330
Max. Length 154
Menu 147
Menu Changes 19
Menu Selection 146
Menus 87, 310
Merging Documents 87, 98
microphone 216
Microsoft Windows 87
Minimize All 339
Miscellaneous Options 222
Miscellaneous Shortcut Keys 347
MMSW 219, 220
MOMENTS LATER 140
Month/Day/Year 196
Month-Day-Year 196
More 271
More Cont'd 263
More Text 263
MORNING 140
Mouse Blocking 146
Mouse Options 222
Mouse Selection 146
Move the caret down One Element 345
Move the caret one word to the Left 345
Move the caret one word to the Right 345
Move the caret to the Next Scene Heading 345
Move the NaviDoc Down one Screen 344
Move the NaviDoc to the bottom of the document 344
Move the NaviDoc to the top of the document 344
Move the NaviDoc up one Screen 344
Movie Magic Scheduling 202, 292, 299
Movie Magic Scheduling Export 332, 356
Movie Master 352
Moving Text 147
MS Word 352

Movie Magic Screenwriter370
Multi-Lock 329
Multi-Lock Dialogue Numbering 304
Multi-Lock Pages 284
Multi-Lock Scenes 283
Multi-Locked 281, 287
Multimedia 103
Multimedia Options 222
Multiple Revision Marks 301
- N -Name Bank 220
Name Bank... 327
Names 220
NaviDoc 19, 94, 160, 161, 168, 173, 176, 186,258, 318, 344
NaviDoc Keyboard Commands 162
NaviDoc Menu 92, 162, 325
NaviDoc Options 19, 163, 222, 258
NaviDoc Outline Styles 183
NaviDoc panel 160, 161
NaviDoc Preferences... 325
NaviDoc splitter 160
NaviDoc View Icon 94
Navigation 345
Navigation Pointer 161
New (using Default Template) 311, 312
New Act 124
New Bookmark 19, 325, 344
New Color Category 167
New Document choose Template 343
New Document using Default.def 343
New Extension 120
New File 97, 314
New from Template… 311, 312
New Note 19, 325, 342, 344
New Outline Style 183
New Scene 125
NEWACT 124, 138, 140
NEWSCENE 125, 138, 140
Next 197
Next A-Page 324
Next character 145
Next Current Revision Mark 324
Next Element 145
Next Forced Page Break 324
Next Hidden Text 324
Next Line 145
Next Note 324
Next Row 19, 325
Next Scene 145
Next Scene Heading 324, 345
Next Screen 145
Next Script Page 145
Next Speech By... 324
Next Strikeout or Colored Text 324
Next Word 145
NIGHT 140
No Page #'s 335
Non-Editable Index Cards 111
Non-Speaking Characters 295
Normal 150, 282, 318, 320
Normal (Full Width 132
Normal Order 198
Normal View Icon 94
Normal WP Mode 321
Not Page One 197
Note 115, 126, 342, 344
Note Category 166, 167
Note Category Commands 166
Note Category View 168
Note Colors in Outline View 179
Note icon 125
Note Options 125, 127
Notes 19, 125, 126, 127, 198, 269, 325
Notes Category Controls 166
Notes Command 166
Notes Controls 166
Notes List 165
Notes Options 169
Notes Panel 160, 164, 168, 169
Novel 103
Number of Copies 198
Number of Spaces before/after Dashes 265
Numbering Dialogue for Animation 302
Numbering Scheme 267, 268
Numbers (1,2,3..) 196
Numerical Input Fields 91
- O -O.S. 120, 140
OMITTED 242
Omitted “And” Text 282
Omitted “Thru” Text 282
Omitted Text 282

Index 371
one word to the Left 345
one word to the Right 345
On-Line Help 87
Only once per editing session 235
Open 94, 112, 343
Open File Menu 237
Open Find window 341, 347
Open Replace window 341
Open the Goto Page dialogue 345
Open Thesaurus 347
Open... 311, 312
Opening a Document 87, 94
Opening a Title Page 99
Opening Multiple Documents 95
Opens Search Dialogue 341
Options 222
Options Menu 88, 89
Options... 327
Original Defaults 142
Outline 19, 325
Outline Controls 177
Outline Levels 178
Outline List 177
Outline Mode 109
Outline Options 179, 222, 259
Outline Panel 160, 176, 186
Outline Panel Font 179
Outline Panel Options 179
Outline Spacing 178
Outline Style 185
Outline Style Assignment 182
Outline Style Management 182
Outline Style Table 191
Outline Styles 182
Outline tab 176
Outline Tools 190
Outline View 183
Outlining Features 189
Override 136
Override... 329, 332
Overriding 287
Overriding Dialogue Numbering 304
- P -P.O.V. 140
Page 136, 146, 153, 324
Page Break Type 332
Page Breaking 271
Page Breaks 269, 350
Page Down 19, 325
Page Margin Settings 112
Page Number 271
PAGE OMITTED 250
Page Setup 192
Page Setup... 343
Page Up 19, 325
Page’s Header/Draft Color 332
Paper Orientation 192
Paper Size 192
Paper Source 192
Parenthetical 109, 115, 121, 122, 129, 263, 342
Parentheticals 264
Password Protection 239
Paste 147, 148, 314
Paste from... 314
Paste into Current Element 314, 341
Paste Text 341
Pause AutoCorrection 327
PDF 219, 220, 252
Pg# 195
PgDn 145
PgUp 145
Pink 274
Place previous version files in 235
Plain Text 356
Play Sample 212
port number 206
Preferences Icon 18
Preparing a Script for Importing 351
Prev 197
Preview 197, 198
Previous character 145
Previous Element 145
Previous Line 145
Previous Row 19, 325
Previous Scene 145
Previous Scene Heading 324, 345
Previous Screen 145
Previous Script Page 145
Previous Versions 235
Previous Word 145
Print 183, 197, 198, 311, 312, 343
Print a Note 125, 126
Print Act Info 335
Print Bottom Continued 251

Movie Magic Screenwriter372
Print Breakdown Sheets 332
Print Color Text Highlight 252
Print Headers 197
Print Notes 169
Print Notes in Script 127, 269
Print Notes on facing pages of script 126
Print Notes Sequentially with Reference PageNumbers 126
Print Numbering in Script 304, 338
Print Preview 197, 311, 312
Print Preview... 343
Print Scene Description Text 333
Print Scene Text 335
Print Selection 198
Print Separate Act/Scene Column 333
Print Separate Day/Night Count Column 333
Print Separate Page Number Column 333
Print Set List 335
Print Standard Breakdowns 201, 291, 332
Print Tagged Items 205, 295
Print the Set List Directly 335
Print Title Page 198
Print to Option Window 198
Print total boxes at end of pg 333
Print without Prompting 126
Print... 343
Printer Setup 311, 312
Printing 102, 112, 251
Printing a Title Page 102
Printing Animation Recording Scripts 303
Printing Index Cards 112
Printing Options 222, 251
Printing the Script 192, 198
Production 201, 294, 333
Production Breakdown Print Options 204, 205
Production Breakdown sheets 291
Production Breakdowns 198
Production Cycle 274
Production Features 273
Production Menu 92, 329
Production Problems 350
Production Rewrites 273
Production Sides 198
Production Solutions 329
PROLOGUE 124, 140
Prologue Text 124, 136, 140
Promote Outline Element 19, 325
Promote Outline Style Elements 344
Promoting 191
Prompt on Multiple Words 154
Pronunciation 212
Publish to Internet 327
Pull Down Menu 88, 89
Push Buttons 87, 90
Put Act Info in Parenthesis 267
Put Action in Parentheses 266
Put in Clipboard Rather than Print 335
- Q -Quick Key 93
Quick Keys 148
QuickSelect 89
QuickType 116, 136, 222, 230
Quit Screenwriter 343
- R -Radio Buttons 87, 91
Radio Play 103
Read Script 327
Reassign Outline Element Styles 187
Reassigning Outline Items 190
Red 330
Red Highlights 331
Redo 149, 314, 341
Redraw Screen 339
Reduce Indention for Unused Levels 179
Reference Page Numbers 198
Register with Writer's Guild... 327
Reloading Default User Lists 142
Remove 337
Remove Forced Page 314
Remove Forced Page Break 131
Remove... 329, 331
Reopen 19
Reopen... 311, 312
Repaginate Now 327
Replace 153, 341
Replace & Find Next 314
Replace with 157, 158
Reset Cheated 321
Reset Cheated Element 347
Resize 109
Resize the Index Cards 108, 109
Index 373
Restore Last Workspace 96
Retain up to # previous version of a document 235
Retrieve Last Script you worked on 96
Rev. Color 195
Reverse order 198
Revised Pages 277
Revision 250, 277
Revision Draft Color 274, 290
Revision Mark 249, 250, 278, 284
Revision Mark Right Margin 284
Revision Mark Text 284
Revision Marks 249, 250, 279, 301
Revisions 249
Revisions Options 222
Rich Text Format 352, 356
Right 100, 265
RIGHT ARROW 145
Right Click 146
Right Column 132, 342
Right Demotes row 179
Right Speed bar 16
Right SpeedBar 91, 93
Right Toolbar 125
right vertical slider 170
Roman Numerals (I, II, III...) 196
Rounded Eighths 295
Row Height 164
Row Lines Option 169, 172, 175, 179
RTF 219, 220, 352
Ruler 223, 318
Run SmartCheck 198, 327
Running Movie Magic Screenwriter 16
Running Movie Magic Screenwriter 6 16
Running Shot Lists 232
- S -Salmon 274
SAMEACT 124, 140
Sample Scripts and Templates 359
Save 96, 311, 312, 343
Save a Copy 19
Save A Copy... 311, 312
Save All Open Scripts 96, 311, 312
Save As 112
Save as Template 19
Save As Template... 105
Save As Template… 311, 312
Save as the Default Layout 112
Save As.. 343
Save As... 96, 98, 311, 312
Saving a Document 87
Saving Lists 140
Scene 125, 146, 324, 342
Scene Body Text 136, 139, 140
Scene Character Lists 337
Scene Continued Text 265
Scene Controls 174
Scene Element Spacing 175
Scene Header Field View 180
Scene Header View 175
Scene Heading 115, 117, 119, 125, 129
Scene Heading Text 140
Scene Heading w/o OMITTED 331
Scene Headings 265, 350
Scene Info 129, 195
Scene Information 115, 138, 196
Scene Labels 268
Scene List 173
Scene Number 125, 138, 174, 287
Scene Numbering 19, 318
Scene Numbers 265
Scene Omitted 282
Scene Range 146
Scene Range... 314
Scenes 19, 325
Scenes Panel 160, 173, 174, 175
Scrap File 97, 314
Screenplay 103
Screenwriter 6 Menus 310
Screenwriter Commands 87
Screenwriter Help / Manual 339
Script Breakdown Sheets 202, 292
Script Directory 237
script elements 261
Script Format Options 259
Script Formats 103
Script Formats Menu 138
Script Note 109
Script Order 202, 204, 205, 292
Script Title 333
Scriptware Tagged 352, 356
Scroll by Row 108
scw 311, 312
Search 314
Search & Replace 314

Movie Magic Screenwriter374
Search Again or Search & Replace Again 314
Search Backwards 157, 158
Search for 158
Search for Help On... 339
Second Character Name 241
Second Dialogue Paragraph 121
Secondary Sort 293
Secondary Sort by 203
Select a screen of text above 346
Select a screen of text above the current caretsposition 346
Select All 146, 314, 346
Select Group 346
Select Language 152, 327
Select Names 198
Select Scene 346
Select Sentence 346
Select Special 146, 314
Select text to the next Page break 346
Select to the Beginning of the Line 346
Select to the end of the Line 346
Select Voice 212
Select Which Color Notes to Print 126
Select Word 346
Selected Pages 198
Selected Scenes 198
Send As Email Attachment 219
Send as E-Mail Attachment 19
Send As Email Attachment… 311, 312
Send Script 208
Sentence 146
Serial Number 305
set 174
Set Column Margins 132, 134
Set current element to Full Width 342
Set current element to Left Column 342
Set Current Element to Right Column 342
Set Note Color 127
Set Revision Draft Color Order 290, 329
Sets current element to Full Width 342
Sets current element to Left Column 342
Setup Draft Information 329
Setup Duplicate Locations 332
Setup Duplicate Names 332
Setup Menu - Animation Dialogue Numbering 302
Setup Numbering Layout 338
Setup Options 152
Setup Page Layout 136, 197
Setup Set List Layout Options 333
Setup Voices 212, 327
Shift Tab inserts the previously used CharacterName 342
SHIFT+CTRL+C 129, 130
SHIFT+CTRL+F 133
Shift+CTRL+N 166
SHIFT+DELETE 148
SHIFT+ENTER 131
SHIFT+INS 148
SHIFT+TAB 119
Shooting Script 274
shortcut 254
Shortcut Key for File Operations 343
Shortcut Keys 149, 347
Shortcut Keys for Editing 341
Shortcut Keys for Formatting 343
Shortcut Keys for Inserting Manipulating Elements 342
Shortcut Keys for NaviDoc 344
Shortcut keys for Navigation 345
Shortcut Keys for Selection 346
Shot 109, 115, 123, 342
Shot Text 136, 140
Shots 232, 266
Show 126
Show Format Codes 149, 223, 318, 358
Show partner 208
shows spacing between elements 178
Shuffle 111
Shuffle Mode 109, 111, 112
Shuffle Multiple Index Cards 112
Single Starting Blank Space 241
Sitcom 103
Sitcom Version I 103
Sitcom Version II 103
Size 261
Skip Once 153
Slave view 209
slider 170
SmartCheck 240, 241
SmartCheck Options 222
SmartCheck Prompts 242
Soft Hyphen 343
Soft-Hyphen 131, 358
Sort Breakdown Primarily by 292
Sort Scenes 174
Sorted Alphabetically 205
Index 375
Spaces to indent Outline Levels Option 179
Speak Selection 347
Speak Silently 212
Speak Text 212, 327
Speaking 211
Speaking Characters First 205, 295
Speech Commands 216
speech recognition 215, 247
speech recognition preferences 216
Speed Buttons 93
Spell Check 152, 153
Spell Check as you Type & Edit 142
Spell Check Element 327
Spell Check Entire Script 327
Spell Check Forward 327
Spell Check Page 327
Spell Check Selection 327
Spell check the current word 347
Spell Check Word 327
Spelling 243
Spelling Options 222
splitter 160
spoken commands 215
Stage Play 103
Standard- 6 lines 204, 294
Standard American format 196
Standard Breakdowns 201
Start & End 335
Start New Scene 125
Start Next Revision 277
Starting Only 335
Starting Page Number 271
Startup/Files 234, 236
Startup/Files Options 222
Statistics 198
Status Bar 91, 93
Storyboard Linking... 329
Strikeout 149, 150
Strikeout Codes and/or Text 331
Strikethrough 343
Style 261
Style Level 183
Style Name 183
Style View 178
Substitution Text 136, 140, 143
Suggest 153
Switch Between Open Documents 343
Switch Elements 128
Sync Control 170, 172, 175, 180
Sync Frame 164, 173
Sync NaviDoc 164
synonyms 158
System Selection 164
- T -TAB 116, 129
TAG 140, 352
Tag Item Globally 332
Tag Items Globally 297
Tag Text 136, 140
Tagged Items 205, 295
Tagging 296
Tagging Items 296
Tagging Mode 332, 347
Tan 274
Taped Sitcom 103
TEASER 124, 140
Technical Support Questions 348
Television Templates 105
Template 96, 105
Template Icon 18
Templates 359
Temporarily Disable 350
Text 91
Text as Action Only 352
Text between Each Act 335
Text Editing 145
Text Entry/Editing 229
Text Entry/Editing Options 222
Text Only (Non-RTF) 352
Text or Numerical Input Fields 87
Text to Precede Pg Numbers 335
Text-to-Speech 212
The Bottom Bar 16
Thesaurus 158, 327
Thru 282
Tilde 151
Tile 95
Tile Horizontally 339
Tile Vertically 339
Timed Backup 96
Timed Backup Frequency 239
Timed Backup Icon 18
Time-of-Day 118, 136, 140, 174, 202, 204, 292
Time-of-Day Dashes 265

Movie Magic Screenwriter376
Time-of-Day List after Location Selection 230
Title 109, 124, 269
Title (Centered) 115
Title Centers the current Element 342
Title Page 99, 102, 198
Title Page Icon 18
Title Page Publisher 94, 99, 102, 318
Title Page Publisher Icon 94
Title Page Template 102
to: 123
Toggle NaviDoc Display 344
Toggles Word Processing Mode 341
Toolbar 108, 109, 111, 112
Toolbars Menu 226
Tools Menu 92, 327
Top 19, 324, 325
Top Scene Continued 197
Top to Bottom 100
Top Toolbar 16, 91, 93, 124
Tops 100
Totals of All Rounded Eighths 204
Trademarks 15
Transition 109, 115, 123, 129, 136, 271, 342
Transitions 136, 140, 232, 266
Treat “)” as a Sentence End in Dialogue 154
Troubleshooting 347
True Total of All Lines 204
Turn off Block 146
Turn Revision Color Off 330
TV Breakdowns 329, 333
TV Template 103
TV Templates 103
Type a Note 125, 126
Typeface 261
Typeover 229
Typing Foreign Characters 151
- U -Umlaut 151
Underline 149, 150, 195, 343, 358
Underlined 261
Underlining 150
Underlining and Boldfacing of 333
Underlining Text 150
Undo 149, 314, 341
Undo Alignment 100
Undo Levels 229
Unhide Elements on Screen 318
Unique Locations List 198
Unknown Words 244
Unlock Dialogue Numbering 304, 338
Unlock Headers 288, 330
Unlock One Rev. Mark Level 338
Unlock The Script 329
Untag All Items 297, 332
Untagging Items 297
UP ARROW 145
Up One Element 345
Up one Page 345
Up one Screen 345
Up/Down moves rows 179
Uppercase 151
Uppercase Word 343
Use most aggressive interpretation of the source text 352
Use Style Sheets 352
User Defined 103
User Defined Color 330
User Defined Color Highlights 331
User Dictionaries 152
User Dictionary 155
User List Order 205, 295
User Lists 124, 136, 138, 139, 142, 347
User Lists... 321
Using Default Template 19
Using Microsoft Windows 87
- V -V.O. 120, 140
Variable 164
Vertical Index Cards 108, 109
View Menu 19, 92, 93, 107, 318
Viewable Notes Lines Control 170
Viewable Outline Items Lines Control 181
Viewable Scene Lines Control 176, 181
Vocal Characteristics 212
Voice Association File 212
voice command 254
voice commands 247
- W -Watermarks 305

Index 377
Web Resources 339
What’s This? 339
White 274
Whole Words Only 157
Window Menu 92, 339
Word 146, 153
Word Web... 327
WordPerfect 352
Words (One, Two, Three...) 196
Workspace 237
Write Brothers 15
WYSIWYG 99
- Y -Yellow 274
- Z -Zoom In 197
Zoom Out 197
Zoom Screen Text 94, 224, 318
Zoom Screen Text Icon 94
Zoomed 99

Endnotes 2... (after index)
Movie Magic Screenwriter378
Back Cover


