13


MPD24 FACTORY PRESET LISTINGS
PRESET # PROGRAM
1 BFD Lite For use with the supplied BFD Lite software.
2 Reason Supports Reason Remote protocol with supplied codec files.
3 Guru Pads For use with Fxpansion’s Guru software.
4 Guru Patterns For use with Fxpansion’s Guru software.
5 Ableton Live For use with Ableton Live.
6 Stylus RMX For use with Stylus RMX in conjunction with the supplied “MIDI Learn” files.
7 Battery For use with Native Instruments Battery.
8 Arkaos VJ For use with Arkaos VJ. Controllers will need to be mapped within Arkaos VJ.
9 GM Drums Standard General MIDI drum and controller mapping. Good for general drum use.
10 GM Chromatic Standard General MIDI chromatic and controller mapping.
11 Cubase LE Use for mixing and panning channels in Cubase LE
12 MPC 2500 Pad mappings are set to the same note values as the MPC2500.
13-30 default
1. BFD Lite – See “Using the MPD24 with BFD Lite” section for mapping information and use. 2. Reason – To use Reason with the Remote protocol, you will need to install the supplied Reason codec
files. Each module in Reason will automatically map itself to the MPD24’s controllers. This is extremely powerful as it allows you to use one MPD24 preset to control all of the modules in Reason. See “Using the MPD24 with Propellerheads Reason” section for information on installing the Reason Remote codecs and mappings.
3. Guru Pads – See “Using the MPD24 with FXpansion Guru” section for mapping information and use. As of this writing, Guru does not respond to MMC controls.
4. Guru Patterns – See “Using the MPD24 with FXpansion Guru” section for mapping information and use. As of this writing, Guru does not respond to MMC controls.
5. Ableton Live – This preset is intended to be used with the Live template included on the CD-ROM. 6. Stylus RMX – See the supplied document “Using the MPD24 with Spectrasonics Stylus RMX” section for
mapping information and use. 7. Battery – This preset is laid out to make use of the default external modulation sources that are assigned
in Native Instruments Battery. Since there is no standard pad mapping in Battery, we have made a simple chromatic map that works with most of the factory presets.
8. Arkaos VJ – This preset is laid out to make use of the Arkaos VJ software. The Arkaos VJ software allows for triggering of video clips via MIDI note numbers and manipulating video FX via MIDI CC’s. These mappings and FX need to be assigned specifically to each effect and video clip. Try using the pads on the MPD24 in a Toggle mode. This will allow you to trigger multiple video clips straight from the MPD24.
9. GM Drums – This mapping follows the General MIDI specification for notes and controllers. This preset is a good starting point for setting up drum controls on software for which we have not supplied presets.
10. GM Chromatic – In this mapping, the pads are mapped chromatically and the controllers are set to some of the more popular GM controllers. This preset is a good starting point for creating your own chromatic presets.
11. Cubase LE – The pads in this preset are set up in a standard chromatic mapping. Faders 1-6 control volume on channels 1-6 and knobs 1-8 control pan on channels 1-8.
12. MPC2500 – The Akai MPC2500 pad mapping is a standard unto itself. This mapping will allow the MPC user to have the same pad layout as their MPC.
13. Default – This preset is a good generic chromatic mapping that is easily modified for whatever software or module you want to control.
The presets included are only intended to be a starting point for your use. All of these software programs allow incredible amounts of control and by using multiple MIDI channels, controllers, pad modes and program changes, you can easily create some incredible music. Enjoy.
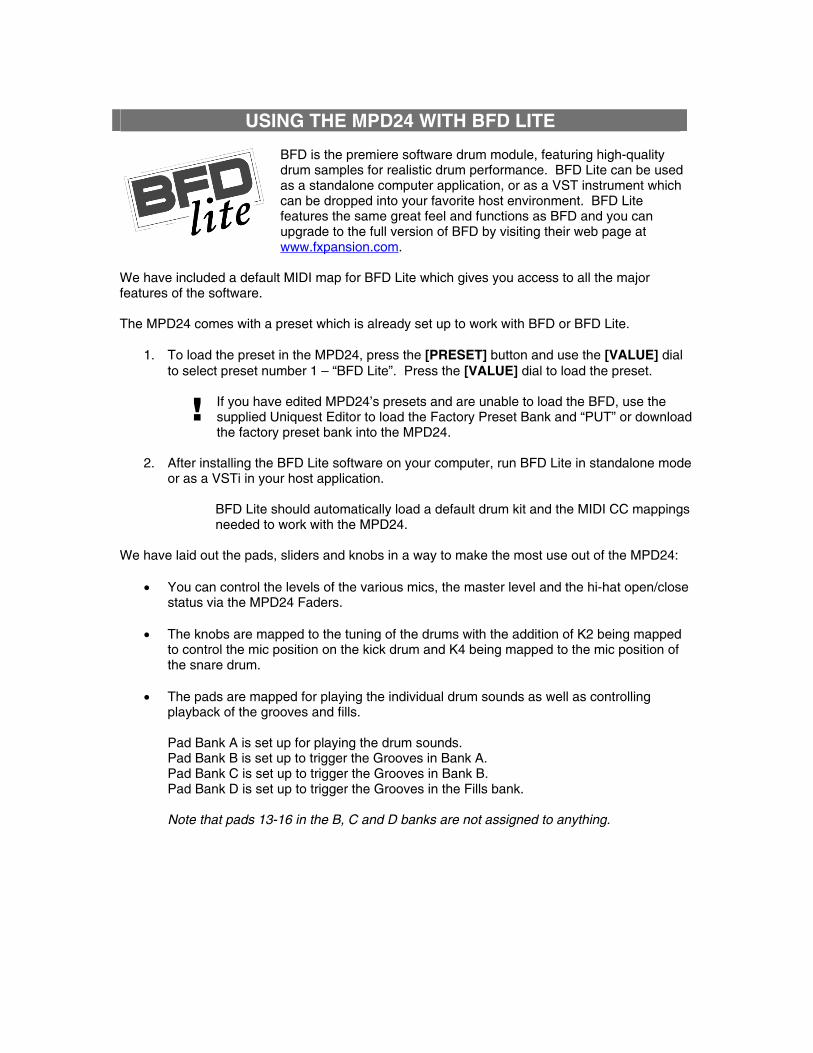
USING THE MPD24 WITH BFD LITE
BFD is the premiere software drum module, featuring high-quality drum samples for realistic drum performance. BFD Lite can be used as a standalone computer application, or as a VST instrument which can be dropped into your favorite host environment. BFD Lite features the same great feel and functions as BFD and you can upgrade to the full version of BFD by visiting their web page at www.fxpansion.com.
We have included a default MIDI map for BFD Lite which gives you access to all the major features of the software.
The MPD24 comes with a preset which is already set up to work with BFD or BFD Lite.
1. To load the preset in the MPD24, press the [PRESET] button and use the [VALUE] dial to select preset number 1 – “BFD Lite”. Press the [VALUE] dial to load the preset.
! If you have edited MPD24’s presets and are unable to load the BFD, use the supplied Uniquest Editor to load the Factory Preset Bank and “PUT” or download the factory preset bank into the MPD24.
2. After installing the BFD Lite software on your computer, run BFD Lite in standalone mode or as a VSTi in your host application.
BFD Lite should automatically load a default drum kit and the MIDI CC mappings needed to work with the MPD24.
We have laid out the pads, sliders and knobs in a way to make the most use out of the MPD24:
You can control the levels of the various mics, the master level and the hi-hat open/close status via the MPD24 Faders.
The knobs are mapped to the tuning of the drums with the addition of K2 being mapped to control the mic position on the kick drum and K4 being mapped to the mic position of the snare drum.
The pads are mapped for playing the individual drum sounds as well as controlling playback of the grooves and fills.
Pad Bank A is set up for playing the drum sounds. Pad Bank B is set up to trigger the Grooves in Bank A. Pad Bank C is set up to trigger the Grooves in Bank B. Pad Bank D is set up to trigger the Grooves in the Fills bank.
Note that pads 13-16 in the B, C and D banks are not assigned to anything.

Controller Mapping Table
Fader 1 Direct Master Fader 2 Overhead Mic Level Fader 3 Room Mic Level Fader 4 PZM Mic Level Fader 5 Hi Hat control Fader 6 Master Volume Knob 1 Kick 1 Tuning Knob 2 Kick 1 Mic In/Out Knob 3 Snare 1 Tuning Knob 4 Snare 1 Mic Top/Bottom Knob 5 Hi Hat Tuning Knob 6 Tom Floor Tuning Knob 7 Tom Mid Tuning Knob 8 Tom High Tuning
Below is a screen shot that shows the Pad Banks, Faders, and Knobs in relation to their mapping within BFD.
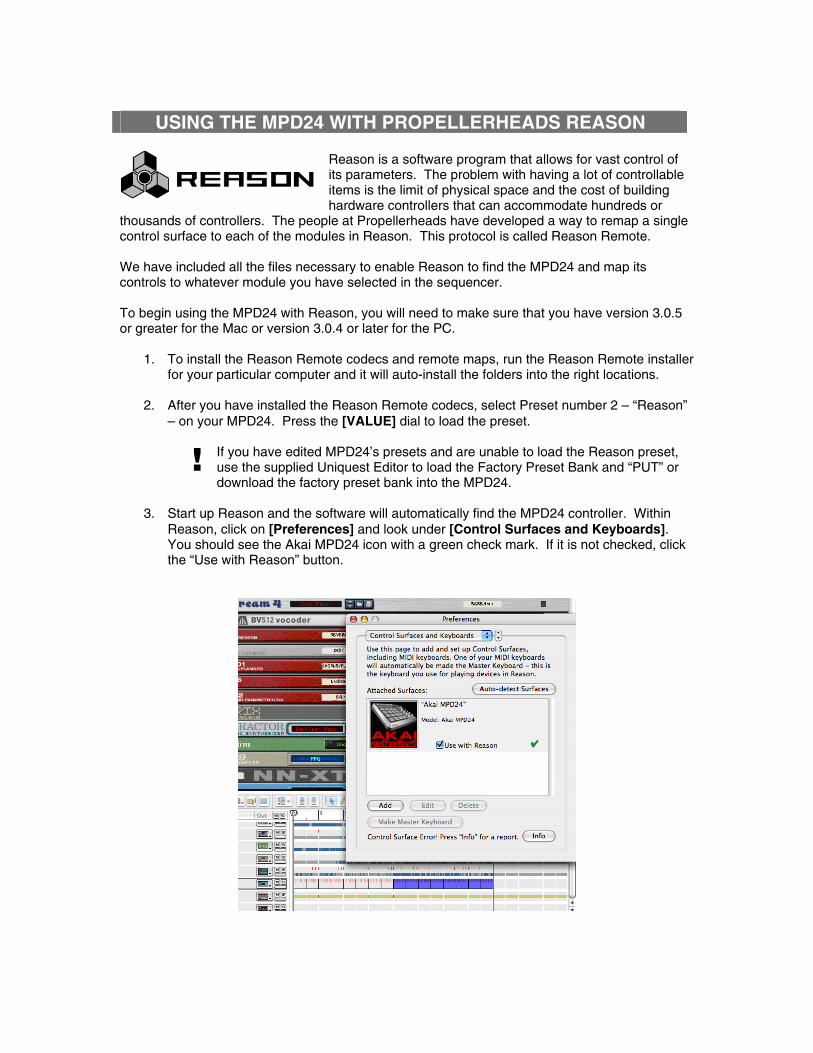
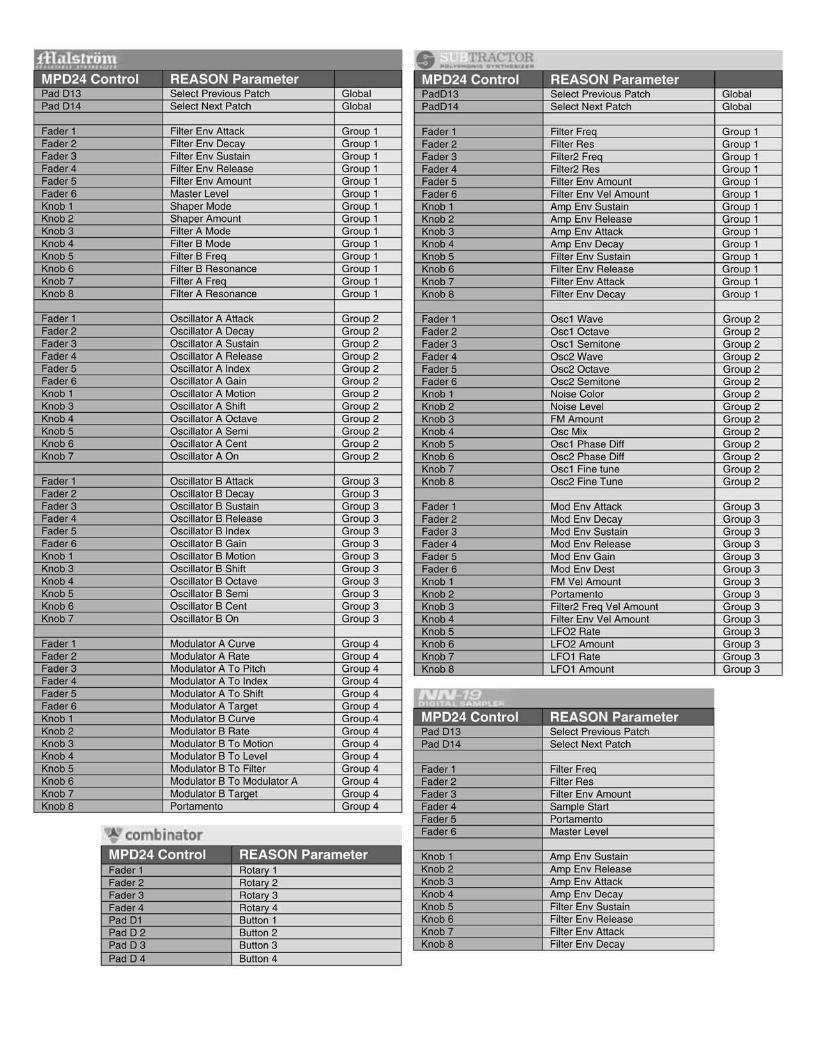
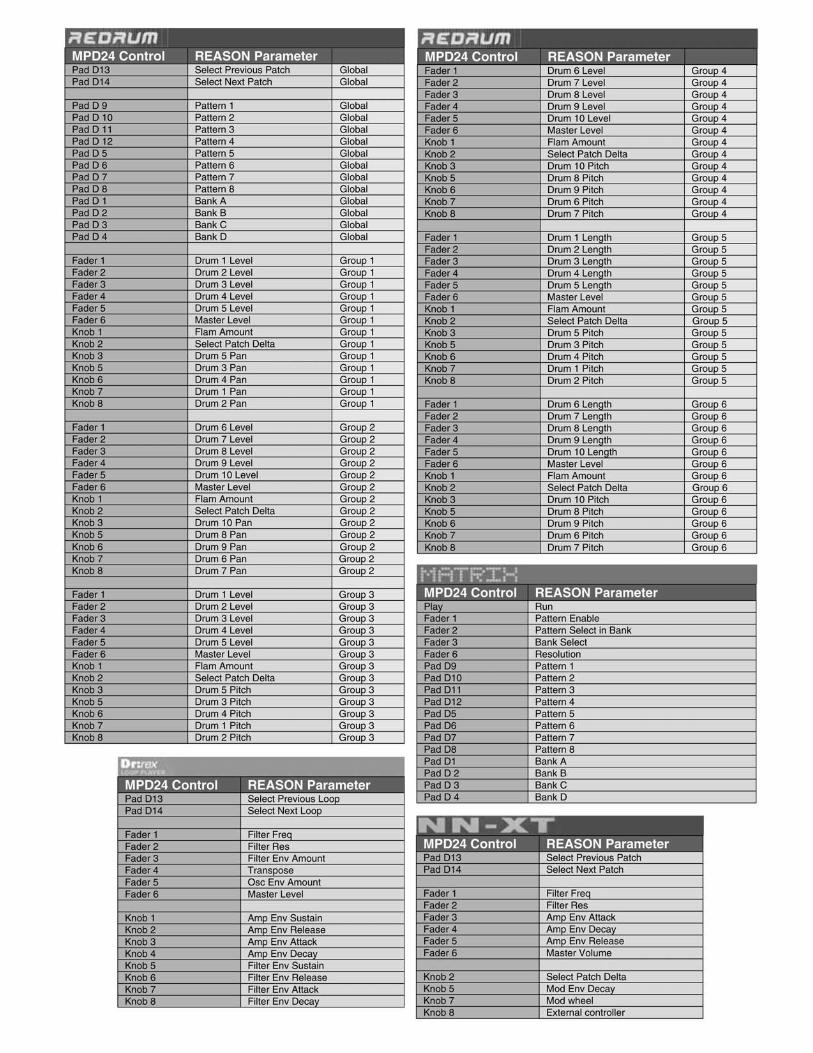
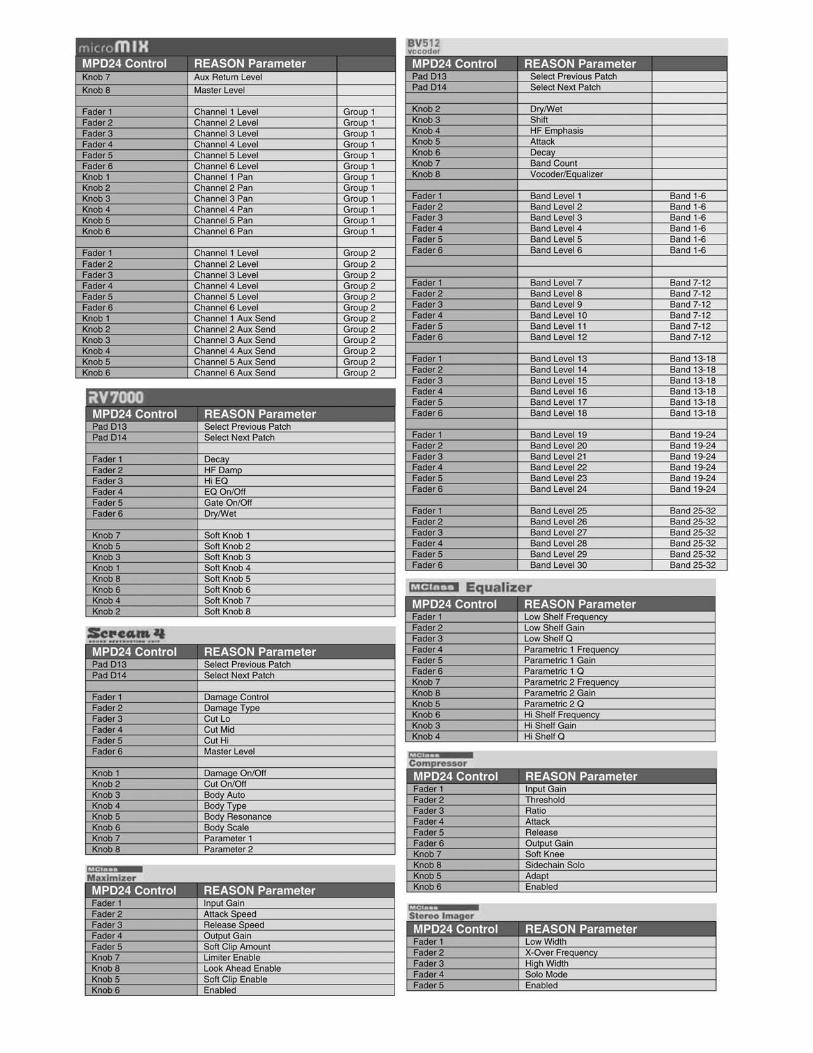
USING THE MPD24 WITH PROPELLERHEADS REASON
Reason is a software program that allows for vast control of its parameters. The problem with having a lot of controllable items is the limit of physical space and the cost of building hardware controllers that can accommodate hundreds or
thousands of controllers. The people at Propellerheads have developed a way to remap a single control surface to each of the modules in Reason. This protocol is called Reason Remote.
We have included all the files necessary to enable Reason to find the MPD24 and map its controls to whatever module you have selected in the sequencer.
To begin using the MPD24 with Reason, you will need to make sure that you have version 3.0.5 or greater for the Mac or version 3.0.4 or later for the PC.
1. To install the Reason Remote codecs and remote maps, run the Reason Remote installer for your particular computer and it will auto-install the folders into the right locations.
2. After you have installed the Reason Remote codecs, select Preset number 2 – “Reason” – on your MPD24. Press the [VALUE] dial to load the preset.
! If you have edited MPD24’s presets and are unable to load the Reason preset, use the supplied Uniquest Editor to load the Factory Preset Bank and “PUT” or download the factory preset bank into the MPD24.
3. Start up Reason and the software will automatically find the MPD24 controller. Within Reason, click on [Preferences] and look under [Control Surfaces and Keyboards].You should see the Akai MPD24 icon with a green check mark. If it is not checked, click the “Use with Reason” button.
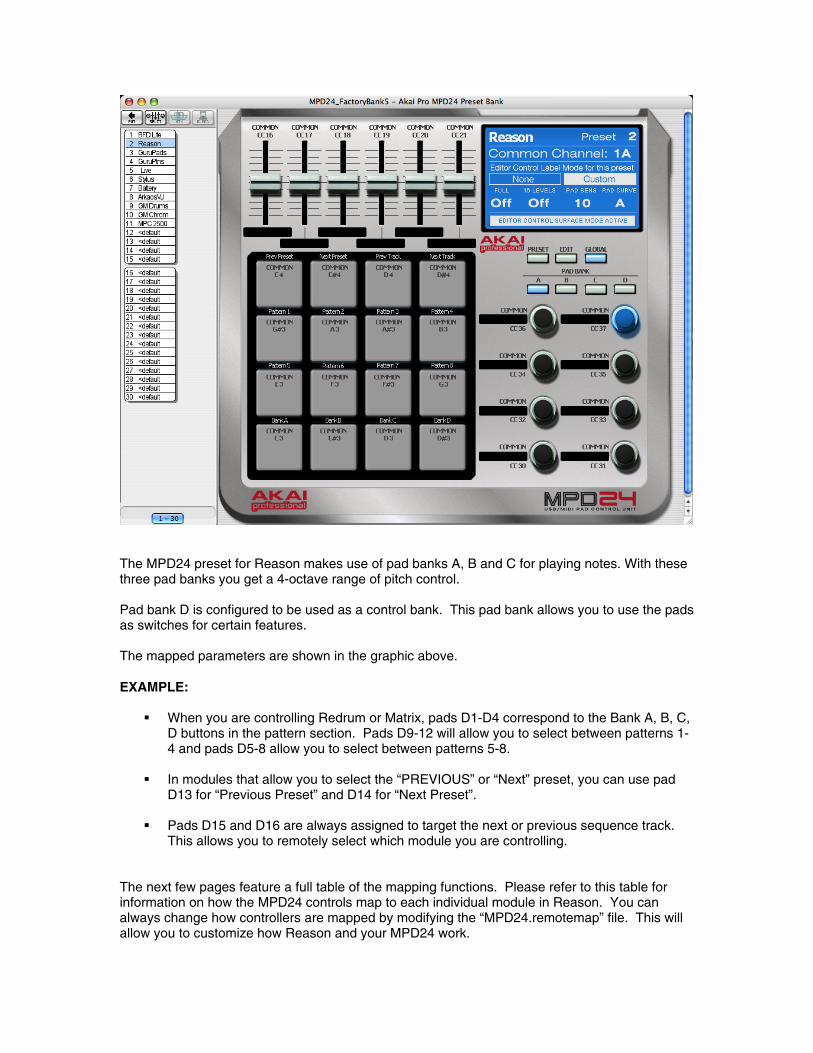
The MPD24 preset for Reason makes use of pad banks A, B and C for playing notes. With these three pad banks you get a 4-octave range of pitch control.
Pad bank D is configured to be used as a control bank. This pad bank allows you to use the pads as switches for certain features.
The mapped parameters are shown in the graphic above.
EXAMPLE:
When you are controlling Redrum or Matrix, pads D1-D4 correspond to the Bank A, B, C, D buttons in the pattern section. Pads D9-12 will allow you to select between patterns 1-4 and pads D5-8 allow you to select between patterns 5-8.
In modules that allow you to select the “PREVIOUS” or “Next” preset, you can use pad D13 for “Previous Preset” and D14 for “Next Preset”.
Pads D15 and D16 are always assigned to target the next or previous sequence track. This allows you to remotely select which module you are controlling.
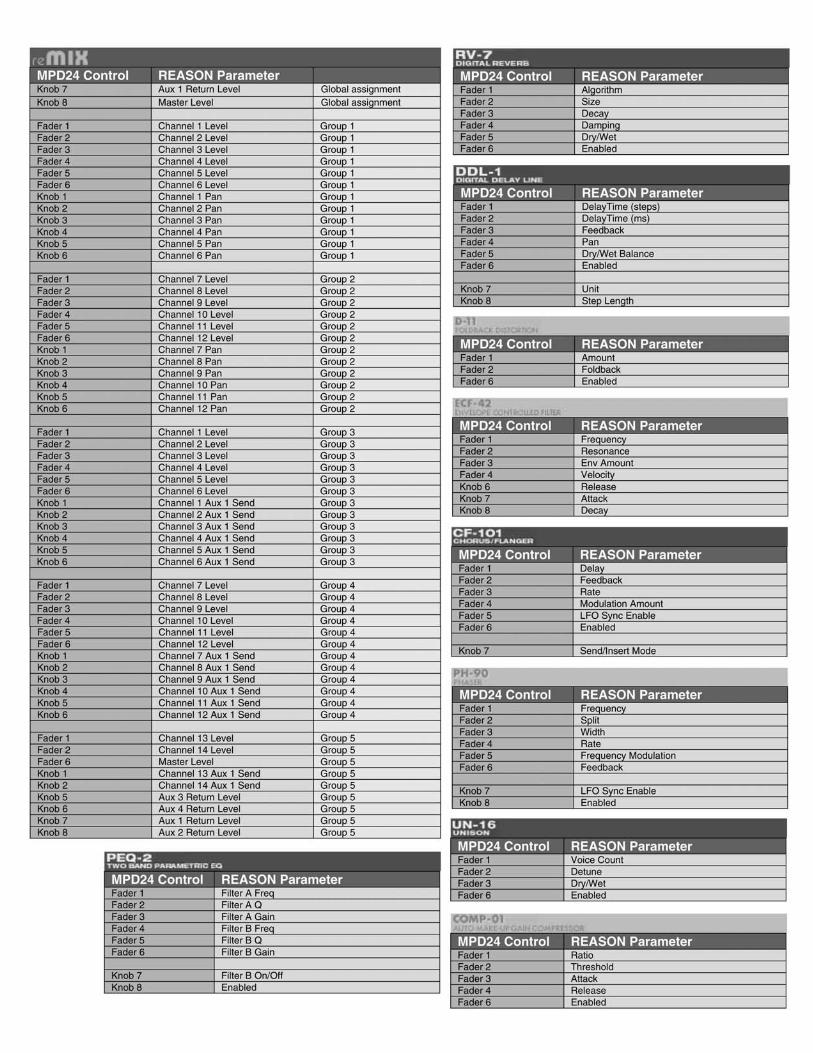
The next few pages feature a full table of the mapping functions. Please refer to this table for information on how the MPD24 controls map to each individual module in Reason. You can always change how controllers are mapped by modifying the “MPD24.remotemap” file. This will allow you to customize how Reason and your MPD24 work.
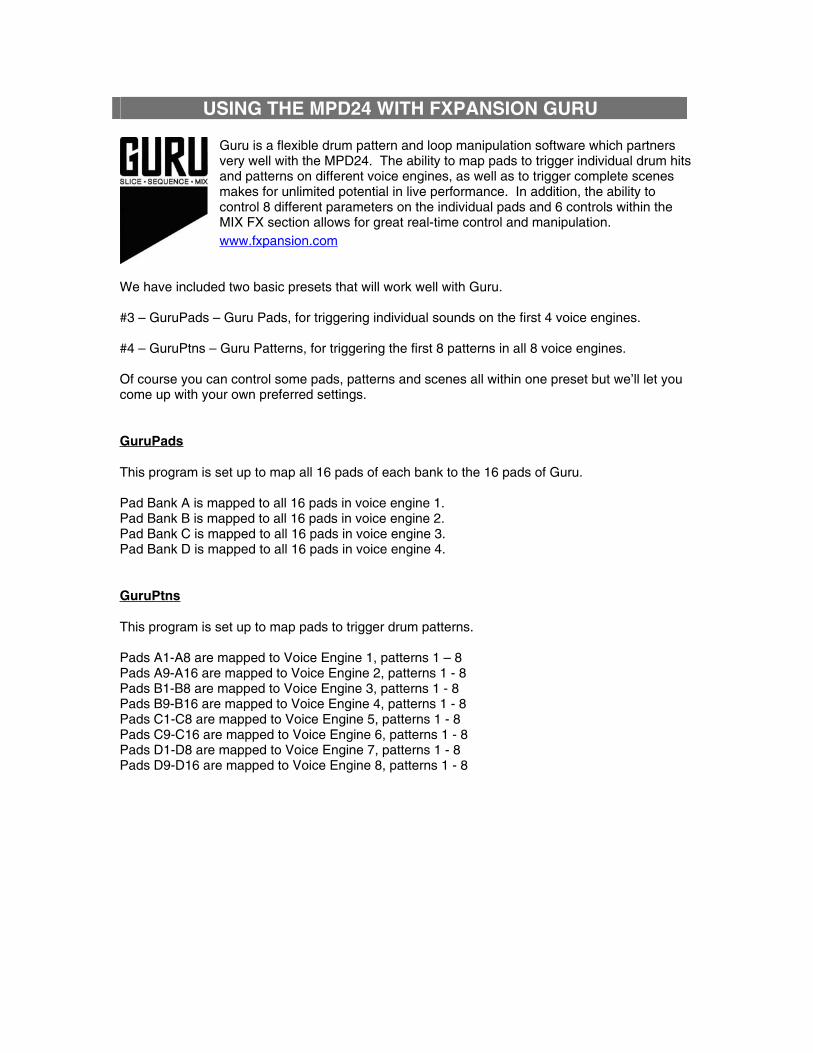
USING THE MPD24 WITH FXPANSION GURU
Guru is a flexible drum pattern and loop manipulation software which partners very well with the MPD24. The ability to map pads to trigger individual drum hits and patterns on different voice engines, as well as to trigger complete scenes makes for unlimited potential in live performance. In addition, the ability to control 8 different parameters on the individual pads and 6 controls within the MIX FX section allows for great real-time control and manipulation. www.fxpansion.com
We have included two basic presets that will work well with Guru.
#3 – GuruPads – Guru Pads, for triggering individual sounds on the first 4 voice engines.
#4 – GuruPtns – Guru Patterns, for triggering the first 8 patterns in all 8 voice engines.
Of course you can control some pads, patterns and scenes all within one preset but we’ll let you come up with your own preferred settings.
GuruPads
This program is set up to map all 16 pads of each bank to the 16 pads of Guru.
Pad Bank A is mapped to all 16 pads in voice engine 1. Pad Bank B is mapped to all 16 pads in voice engine 2. Pad Bank C is mapped to all 16 pads in voice engine 3. Pad Bank D is mapped to all 16 pads in voice engine 4.
GuruPtns
This program is set up to map pads to trigger drum patterns.
Pads A1-A8 are mapped to Voice Engine 1, patterns 1 – 8 Pads A9-A16 are mapped to Voice Engine 2, patterns 1 - 8 Pads B1-B8 are mapped to Voice Engine 3, patterns 1 - 8 Pads B9-B16 are mapped to Voice Engine 4, patterns 1 - 8 Pads C1-C8 are mapped to Voice Engine 5, patterns 1 - 8 Pads C9-C16 are mapped to Voice Engine 6, patterns 1 - 8 Pads D1-D8 are mapped to Voice Engine 7, patterns 1 - 8 Pads D9-D16 are mapped to Voice Engine 8, patterns 1 - 8
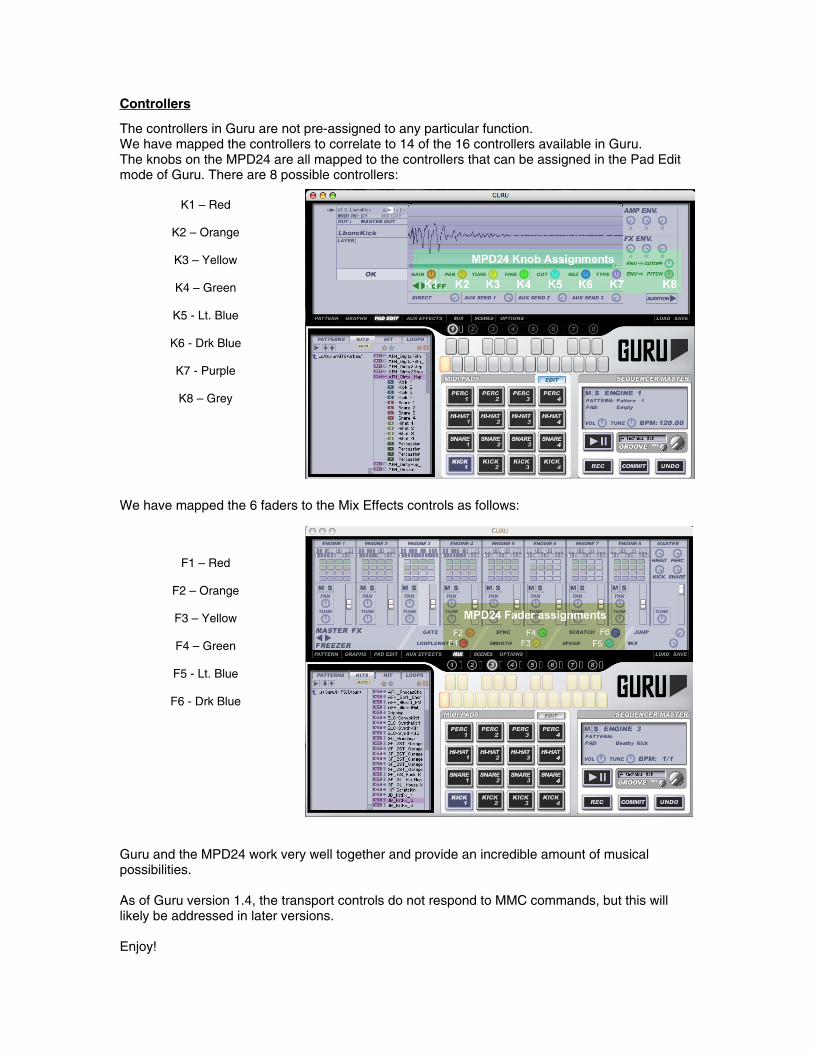
Controllers
The controllers in Guru are not pre-assigned to any particular function. We have mapped the controllers to correlate to 14 of the 16 controllers available in Guru. The knobs on the MPD24 are all mapped to the controllers that can be assigned in the Pad Edit mode of Guru. There are 8 possible controllers:
K1 – Red
K2 – Orange
K3 – Yellow
K4 – Green
K5 - Lt. Blue
K6 - Drk Blue
K7 - Purple
K8 – Grey
We have mapped the 6 faders to the Mix Effects controls as follows:
F1 – Red
F2 – Orange
F3 – Yellow
F4 – Green
F5 - Lt. Blue
F6 - Drk Blue
Guru and the MPD24 work very well together and provide an incredible amount of musical possibilities.
As of Guru version 1.4, the transport controls do not respond to MMC commands, but this will likely be addressed in later versions.
Enjoy!
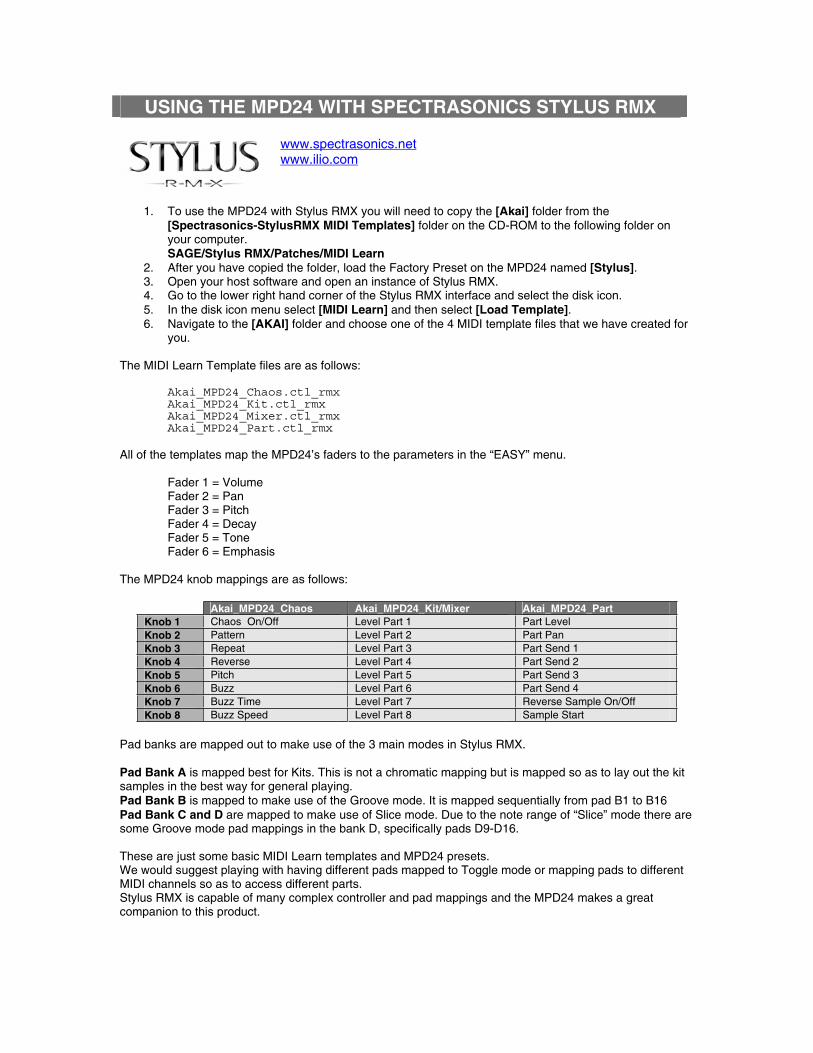
USING THE MPD24 WITH SPECTRASONICS STYLUS RMX
www.spectrasonics.netwww.ilio.com
1. To use the MPD24 with Stylus RMX you will need to copy the [Akai] folder from the [Spectrasonics-StylusRMX MIDI Templates] folder on the CD-ROM to the following folder on your computer. SAGE/Stylus RMX/Patches/MIDI Learn
2. After you have copied the folder, load the Factory Preset on the MPD24 named [Stylus].3. Open your host software and open an instance of Stylus RMX. 4. Go to the lower right hand corner of the Stylus RMX interface and select the disk icon. 5. In the disk icon menu select [MIDI Learn] and then select [Load Template].6. Navigate to the [AKAI] folder and choose one of the 4 MIDI template files that we have created for
you.
The MIDI Learn Template files are as follows:
Akai_MPD24_Chaos.ctl_rmxAkai_MPD24_Kit.ctl_rmxAkai_MPD24_Mixer.ctl_rmxAkai_MPD24_Part.ctl_rmx
All of the templates map the MPD24’s faders to the parameters in the “EASY” menu.
Fader 1 = Volume Fader 2 = Pan Fader 3 = Pitch Fader 4 = Decay Fader 5 = Tone Fader 6 = Emphasis
The MPD24 knob mappings are as follows:
Akai_MPD24_Chaos Akai_MPD24_Kit/Mixer Akai_MPD24_Part Knob 1 Chaos On/Off Level Part 1 Part Level Knob 2 Pattern Level Part 2 Part Pan Knob 3 Repeat Level Part 3 Part Send 1 Knob 4 Reverse Level Part 4 Part Send 2 Knob 5 Pitch Level Part 5 Part Send 3 Knob 6 Buzz Level Part 6 Part Send 4 Knob 7 Buzz Time Level Part 7 Reverse Sample On/Off Knob 8 Buzz Speed Level Part 8 Sample Start
Pad banks are mapped out to make use of the 3 main modes in Stylus RMX.
Pad Bank A is mapped best for Kits. This is not a chromatic mapping but is mapped so as to lay out the kit samples in the best way for general playing. Pad Bank B is mapped to make use of the Groove mode. It is mapped sequentially from pad B1 to B16 Pad Bank C and D are mapped to make use of Slice mode. Due to the note range of “Slice” mode there are some Groove mode pad mappings in the bank D, specifically pads D9-D16.
These are just some basic MIDI Learn templates and MPD24 presets. We would suggest playing with having different pads mapped to Toggle mode or mapping pads to different MIDI channels so as to access different parts. Stylus RMX is capable of many complex controller and pad mappings and the MPD24 makes a great companion to this product.


![VJ FADER sET & sTAGEbob158]VJ Fader-interview.pdf · 123 bob Backwoods Festival Intro Music Festival Shanghai 2016 VJ FADERsET & sTAGE Storm Festival 2014 VJ Fader : James Cui is](https://static.documents.pub/doc/80x56/5fa0e71c39d86057110d1b18/vj-fader-set-stage-bob158vj-fader-interviewpdf-123-bob-backwoods-festival.jpg)


