14
MQTT User Guide MQTT This guide walks through the MQTT usage. V2.00
MQTT User Guide
MQTT
This guide walks through the MQTT usage.
V2.00
Table of Contents
1. Overview ................................................................................................................. 1
2. EasyBuilder Pro Settings ......................................................................................... 3
Server Settings ........................................................................................................... 3
Default Messages ....................................................................................................... 5
Topic Publisher Settings ............................................................................................. 5
Subscriber Settings (cMT Series) ................................................................................ 7
Project and Application .............................................................................................. 9
3. Choosing a Broker ................................................................................................. 10
Using Built-in Broker in HMI .................................................................................... 10
Using External Broker ............................................................................................... 10
Using Self-build Broker ............................................................................................. 10
4. Getting MQTT Data ............................................................................................... 11
MQTT Client Program .............................................................................................. 11
5. References ............................................................................................................ 12
MQTT
1
1. Overview
Designed to be light weight, open, and simple, MQTT is a subscriber/publisher
messaging transport protocol that is considered a great solution for applications
where small code footprint is required and/or network bandwidth is scarce. It is
particularly suitable for continuous monitoring of sensory data such as temperature,
pressure, water level, energy monitoring…etc.
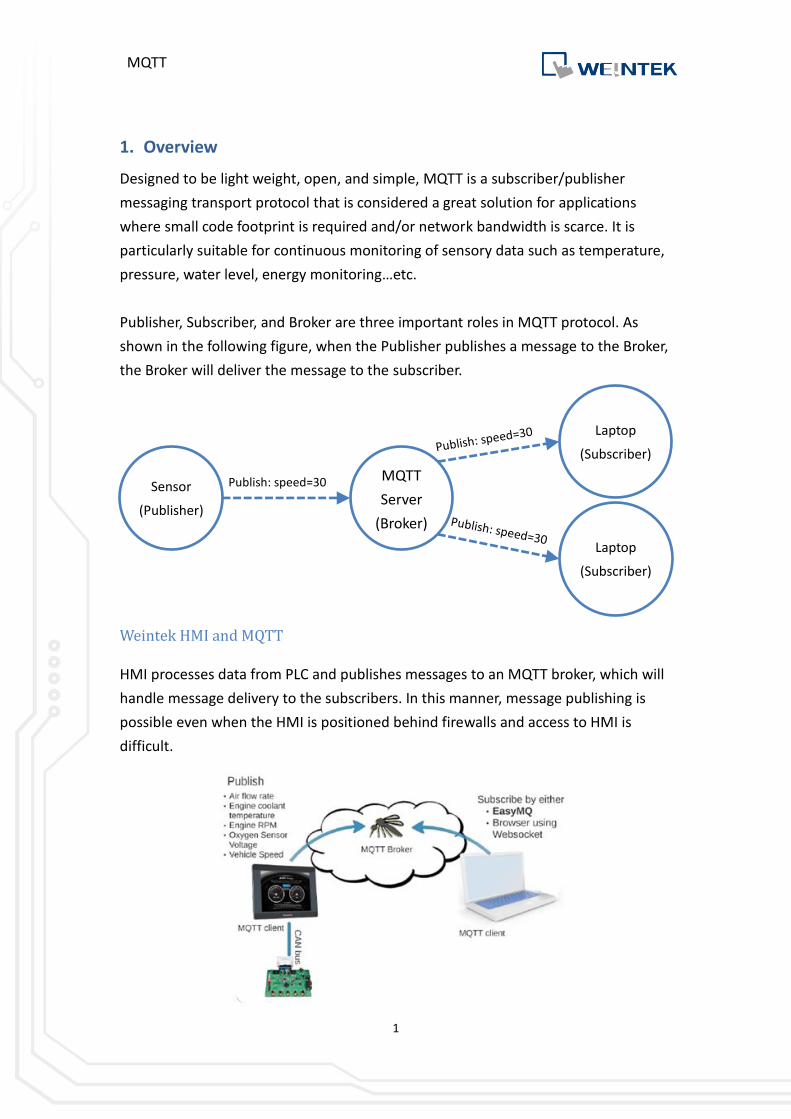
Publisher, Subscriber, and Broker are three important roles in MQTT protocol. As
shown in the following figure, when the Publisher publishes a message to the Broker,
the Broker will deliver the message to the subscriber.
Weintek HMI and MQTT
HMI processes data from PLC and publishes messages to an MQTT broker, which will
handle message delivery to the subscribers. In this manner, message publishing is
possible even when the HMI is positioned behind firewalls and access to HMI is
difficult.
Sensor
(Publisher)
MQTT
Server
(Broker)
Laptop
(Subscriber)
Laptop
(Subscriber)
Publish: speed=30
MQTT
2
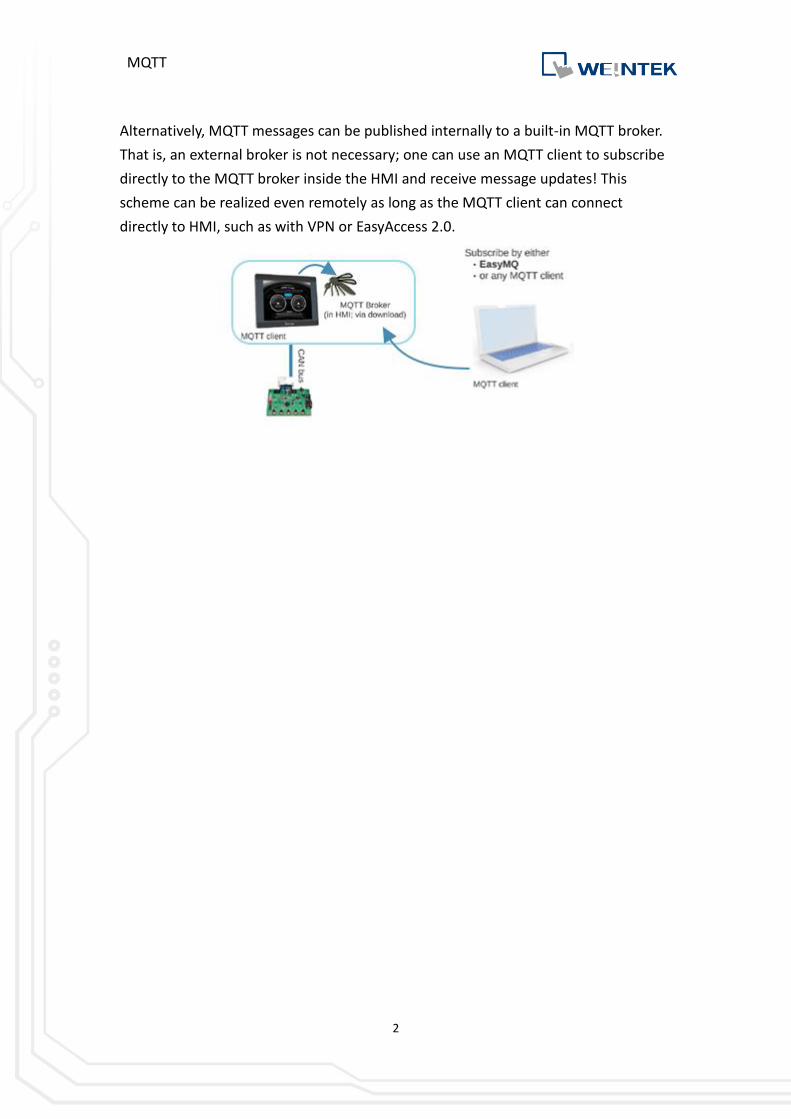
Alternatively, MQTT messages can be published internally to a built-in MQTT broker.
That is, an external broker is not necessary; one can use an MQTT client to subscribe
directly to the MQTT broker inside the HMI and receive message updates! This
scheme can be realized even remotely as long as the MQTT client can connect
directly to HMI, such as with VPN or EasyAccess 2.0.

MQTT
3
2. EasyBuilder Pro Settings
In EasyBuilder Pro, click [Objects] » [MQTT] to setup MQTT in the project.
Server Settings
Firstly and most importantly, MQTT server information must be entered. The IP
address or domain name of the server is the IP address or domain name of the
broker. When the local address (127.0.0.1) is used, the messages will be published to
the built-in broker in HMI. To designate a broker by a domain name, please select
[Use domain name] and then enter the domain name in IP field. To prevent
unauthorized subscriber from connecting to the server, select [Authentication]
checkbox. With this checkbox selected, connecting MQTT server will require
Username and Password. In [Auto-connection] mode, the connection will be
automatically terminated if there’s no data update for a specified period of time.
Topic list shows the topics that can be subscribed on current HMI. To avoid publishing
topic list every time when connecting the server, select [Publish topic list only at the
first time].
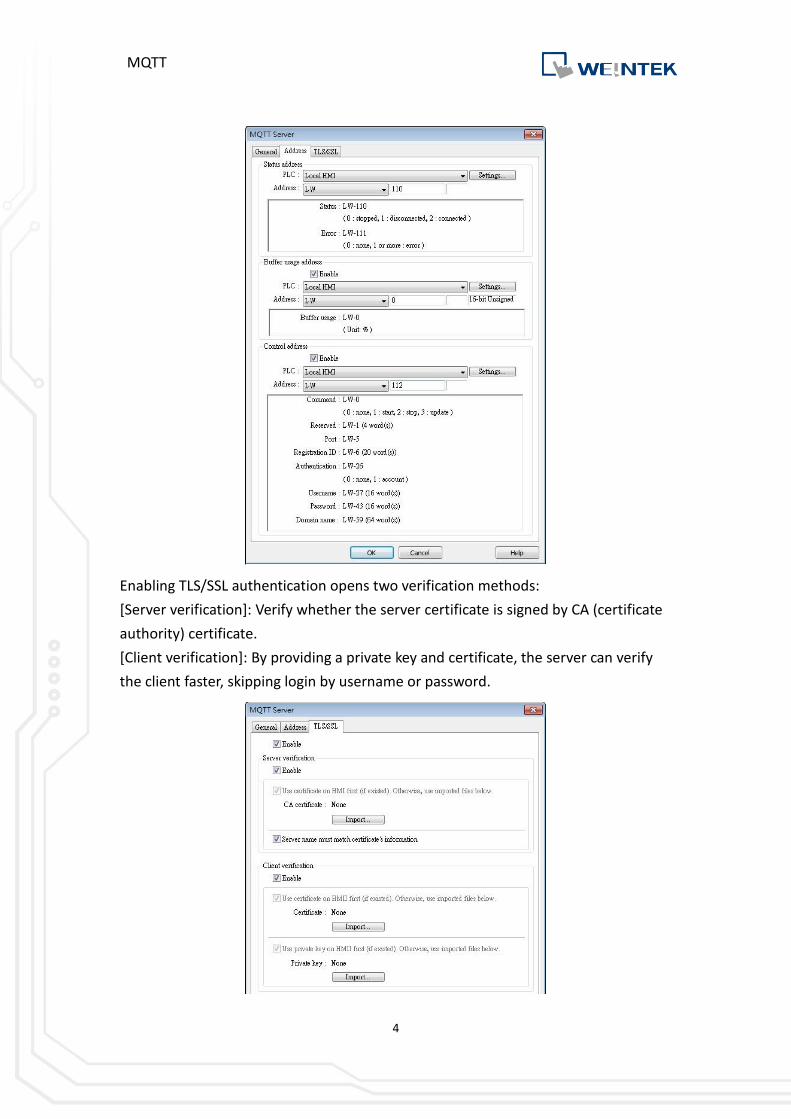
LW addresses can be designated to dynamically control MQTT or display MQTT status
during HMI run time. After designating an address, its relative addresses (+1, +2,
+3…etc.) will correspond to different attributes or parameters, as shown in the
following EasyBuilder Pro settings dialog box. For instance, if MQTT_STATUS is set to
LW-110, then LW-110 shows the status and LW-111 shows the error code.
Messages that have not been sent are stored in the buffer. The maximum buffer
capacity is 10000 messages. When the buffer is full, the earliest message will be
deleted.
MQTT
4
Enabling TLS/SSL authentication opens two verification methods:
[Server verification]: Verify whether the server certificate is signed by CA (certificate
authority) certificate.
[Client verification]: By providing a private key and certificate, the server can verify
the client faster, skipping login by username or password.
MQTT
5
Default Messages
When HMI is the publisher and is connected to the broker for the first time, two
default topics published at QoS2 will be sent from HMI.
1. iot-2/type/mt/id/<Registration ID>/evt/topics_update/fmt/json
This topic contains the messages sent from the HMI, and shows whether the
messages are compressed.
2. iot-2/type/mt/id/< Registration ID>/evt/status/fmt/json
This topic shows the connection status between HMI and broker.
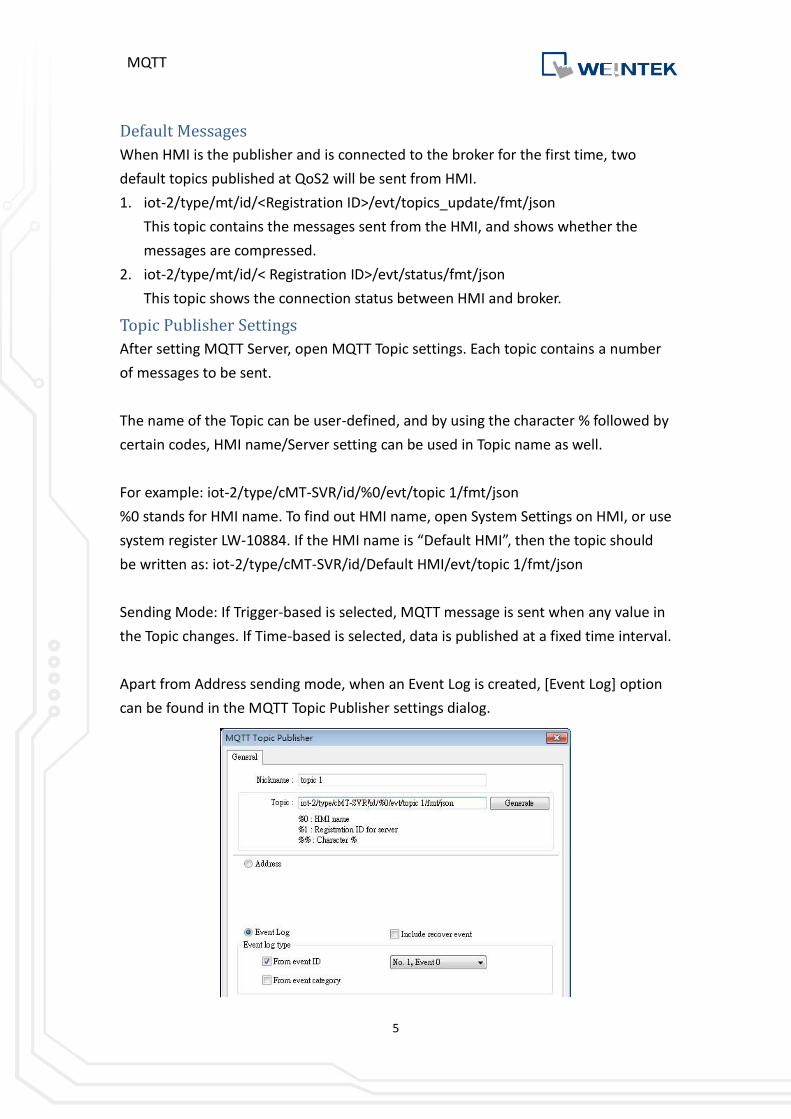
Topic Publisher Settings
After setting MQTT Server, open MQTT Topic settings. Each topic contains a number
of messages to be sent.
The name of the Topic can be user-defined, and by using the character % followed by
certain codes, HMI name/Server setting can be used in Topic name as well.
For example: iot-2/type/cMT-SVR/id/%0/evt/topic 1/fmt/json
%0 stands for HMI name. To find out HMI name, open System Settings on HMI, or use
system register LW-10884. If the HMI name is “Default HMI”, then the topic should
be written as: iot-2/type/cMT-SVR/id/Default HMI/evt/topic 1/fmt/json
Sending Mode: If Trigger-based is selected, MQTT message is sent when any value in
the Topic changes. If Time-based is selected, data is published at a fixed time interval.
Apart from Address sending mode, when an Event Log is created, [Event Log] option
can be found in the MQTT Topic Publisher settings dialog.
MQTT
6
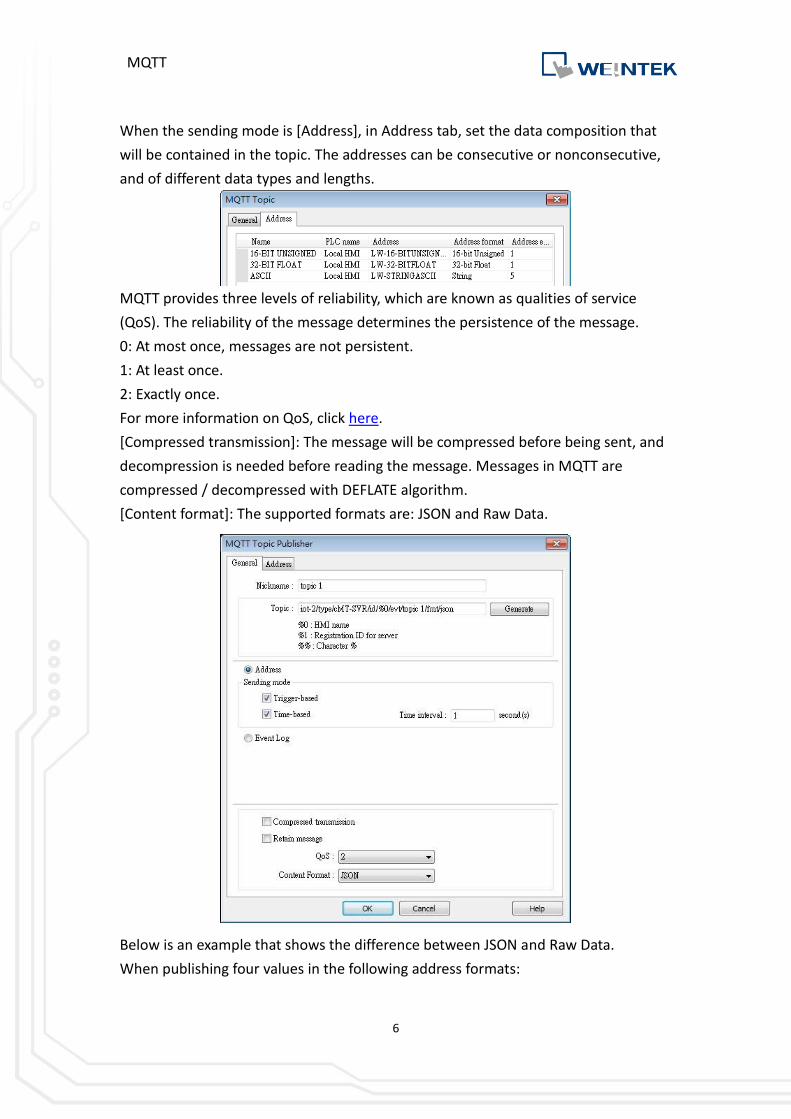
When the sending mode is [Address], in Address tab, set the data composition that
will be contained in the topic. The addresses can be consecutive or nonconsecutive,
and of different data types and lengths.
MQTT provides three levels of reliability, which are known as qualities of service
(QoS). The reliability of the message determines the persistence of the message.
0: At most once, messages are not persistent.
1: At least once.
2: Exactly once.
For more information on QoS, click here.
[Compressed transmission]: The message will be compressed before being sent, and
decompression is needed before reading the message. Messages in MQTT are
compressed / decompressed with DEFLATE algorithm.
[Content format]: The supported formats are: JSON and Raw Data.
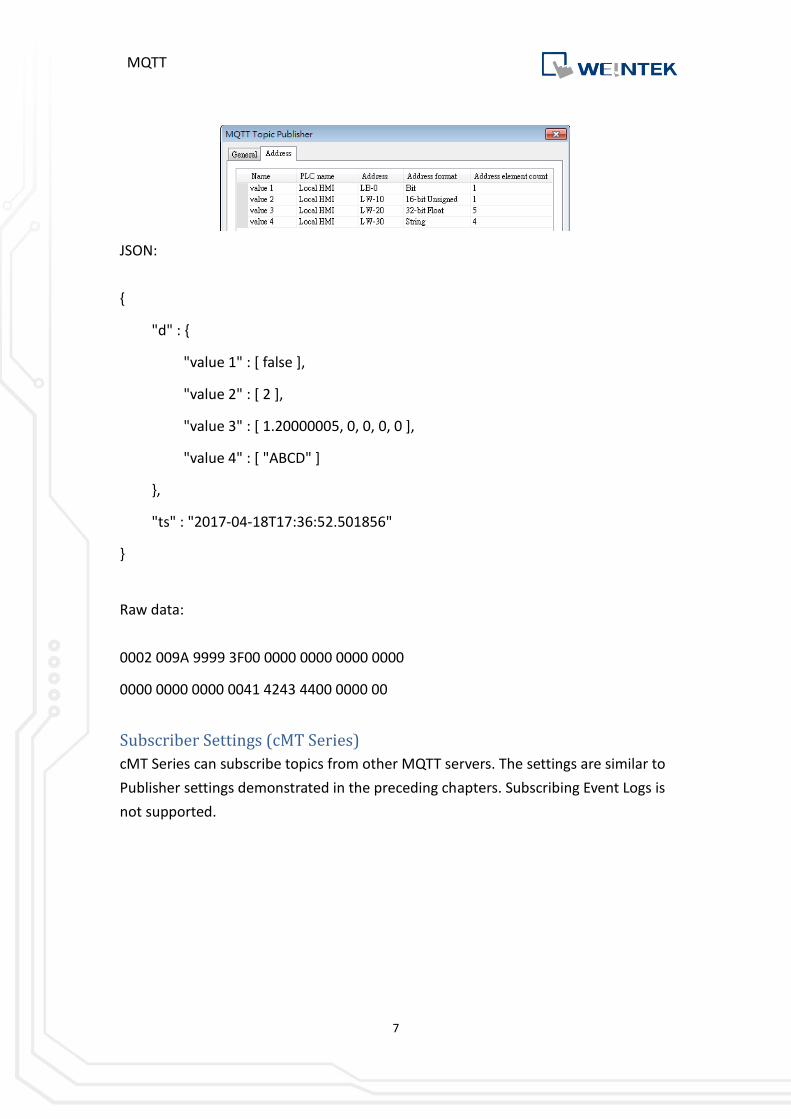
Below is an example that shows the difference between JSON and Raw Data.
When publishing four values in the following address formats:
MQTT
7
JSON:
{
"d" : {
"value 1" : [ false ],
"value 2" : [ 2 ],
"value 3" : [ 1.20000005, 0, 0, 0, 0 ],
"value 4" : [ "ABCD" ]
},
"ts" : "2017-04-18T17:36:52.501856"
}
Raw data:
0002 009A 9999 3F00 0000 0000 0000 0000
0000 0000 0000 0041 4243 4400 0000 00
Subscriber Settings (cMT Series)
cMT Series can subscribe topics from other MQTT servers. The settings are similar to
Publisher settings demonstrated in the preceding chapters. Subscribing Event Logs is
not supported.

MQTT
8
Content Format can be JSON or Raw Data, please select a format that is supported by
the publisher.
JSON:
{
"d" : {
"value 1" : [ false ],
},
"ts" : "2017-04-18T17:36:52.501856"
}
Please note that "ts" (time stamp) should be in ascending order.
Raw Data :
The address format should be specified according to the subscribed topic.
For example, if the topic contains the following address formats: Bit, 16bit-unsigned,
String (length 4). The address settings should be:
In this example, the order from value 1 to 3 should be: Bit, 16bit-unsigned, String.
The order cannot be changed, and the address element count should be identical.

MQTT
9
Project and Application
Two types of addresses can be found in the MQTT Server settings mentioned above:
MQTT_COMMAND (control address) and MQTT_STATUS (status address)
The control addresses can be designated to set control parameters, and the
corresponding addresses include MQTT_COMMAND+1 ~ MQTT_COMMAND+43…etc.
The status addresses can show connection status, and the corresponding addresses
include MQTT_STATUS and MQTT_STATUS+1.
The information of the addresses can be found in EasyBuilder Pro settings dialog box.
During HMI run time:
Setting MQTT_COMMAND to 1 connects HMI with the broker.
Setting MQTT_COMMAND to 2 disconnects HMI with the broker.
Setting MQTT_COMMAND to 3 after updating the control parameters will connect
HMI with the broker using the new parameters.
The MQTT settings can be changed dynamically during HMI run time by using the
control addresses mentioned above.
MQTT
10
3. Choosing a Broker
Using Built-in Broker in HMI
To use the built-in broker in HMI, select Localhost check box in MQTT Server settings
dialog box (Default IP address: 127.0.0.1), or alternatively set the IP address to
127.0.0.1 on HMI. MQTT will use the built-in broker in HMI, and the client program
can connect to the broker using the IP address of the HMI.
HMI’s MQTT Broker should be downloaded to HMI from EasyBuilder Pro. Please
select [Runtime] when downloading MQTT Broker.
Using External Broker
To use an external broker, enter the IP address of the external broker when
configuring MQTT server information.
For example, when using a public broker HiveMQ, the data of the broker is:
Host: broker.hivemq.com (212.72.74.21)
Port: 1883
Websocket Port: 8000
(http://www.hivemq.com/try-out/)
From EasyBuilder Pro V5.07.01, domain name is supported. Please enter the actual IP
address or domain name (broker.hivemq.com) of the broker.
Using Self-build Broker
The user can host an MQTT broker server. The following are some verified choices:
1. Mosquitto (http://mosquitto.org/download/)
2. HiveMQ (http://www.hivemq.com/downloads/) (test version provided)
3. EMQ (http://emqtt.io/)
Please visit their respective official websites for details on installation and
restrictions.
MQTT
11
4. Getting MQTT Data
Getting MQTT data updates requires an MQTT client program. The client program
connects to the broker and register to receive data updates from HMI. Many free
client programs can be found on the web. This chapter introduces one of the free
programs for PC: MQTT.fx.
MQTT Client Program
Many free MQTT client programs for PC and portable can be found on the web. The
following briefly walks through the steps to use MQTT.fx on PC to connect to the
broker in order to get message updates from HMI. For other programs, configuration
steps may be similar.
1. Suppose an HMI is running MQTT Demo project. It’s been configured to connect
to MQTT server at 212.72.74.21/port 1883. It has an MQTT topic called Data_Bit.
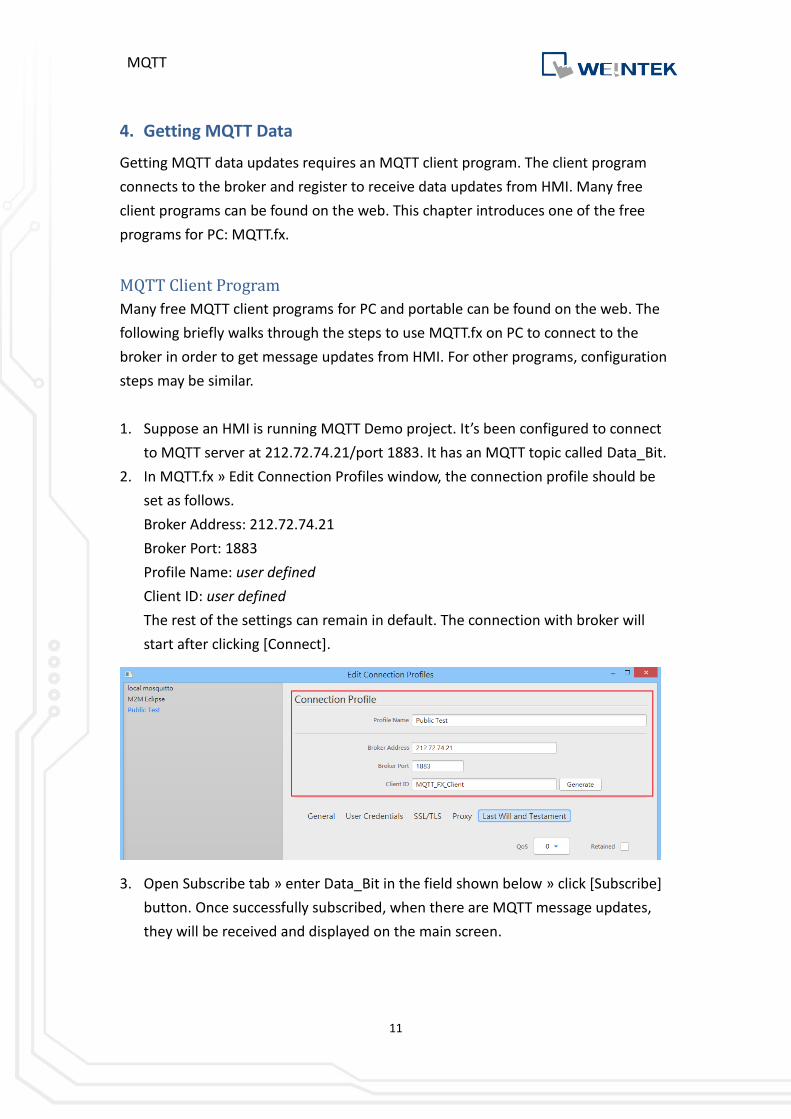
2. In MQTT.fx » Edit Connection Profiles window, the connection profile should be
set as follows.
Broker Address: 212.72.74.21
Broker Port: 1883
Profile Name: user defined
Client ID: user defined
The rest of the settings can remain in default. The connection with broker will
start after clicking [Connect].
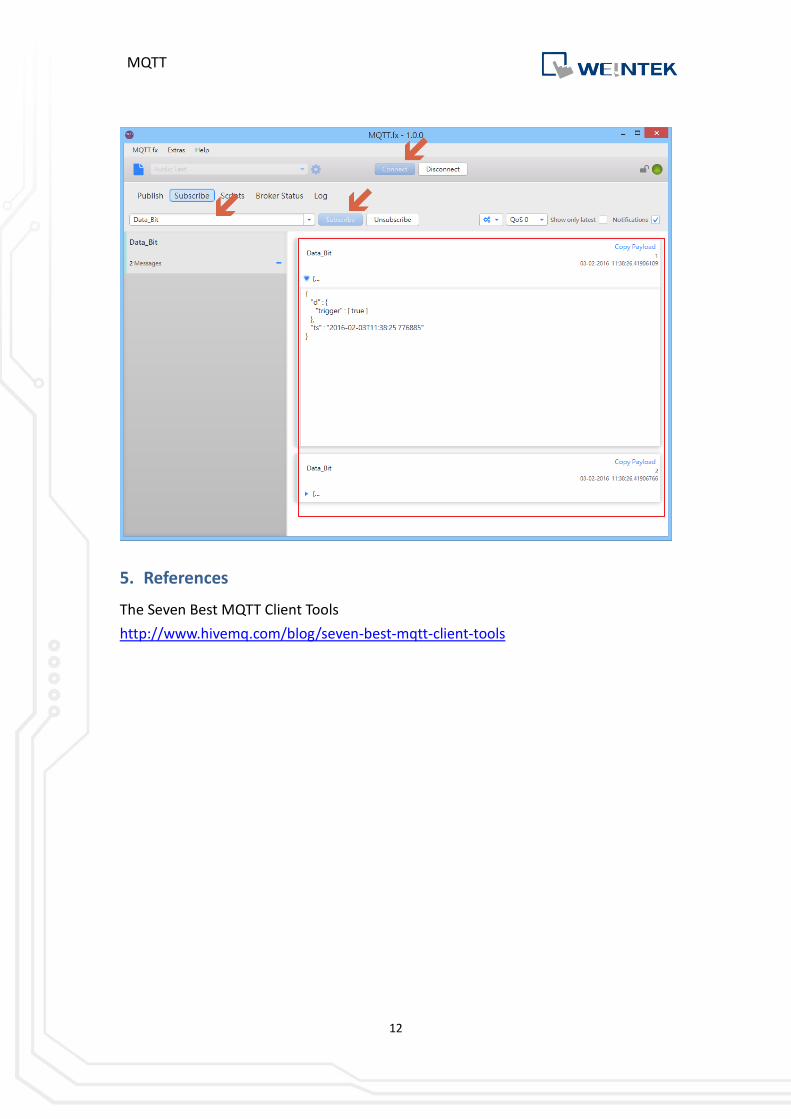
3. Open Subscribe tab » enter Data_Bit in the field shown below » click [Subscribe]
button. Once successfully subscribed, when there are MQTT message updates,
they will be received and displayed on the main screen.
MQTT
12
5. References
The Seven Best MQTT Client Tools
http://www.hivemq.com/blog/seven-best-mqtt-client-tools


