157
20 May 2014 Administration Guide Multi-Domain Security Management R77 Versions Classification: [Protected]
| Date post: | 29-May-2018 |
| Category: |
Documents |
| Upload: | nguyenphuc |
| View: | 219 times |
| Download: | 0 times |
20 May 2014
Administration Guide
Multi-Domain Security Management
R77 Versions
Classification: [Protected]
© 2014 Check Point Software Technologies Ltd.
All rights reserved. This product and related documentation are protected by copyright and distributed under licensing restricting their use, copying, distribution, and decompilation. No part of this product or related documentation may be reproduced in any form or by any means without prior written authorization of Check Point. While every precaution has been taken in the preparation of this book, Check Point assumes no responsibility for errors or omissions. This publication and features described herein are subject to change without notice.
RESTRICTED RIGHTS LEGEND:
Use, duplication, or disclosure by the government is subject to restrictions as set forth in subparagraph (c)(1)(ii) of the Rights in Technical Data and Computer Software clause at DFARS 252.227-7013 and FAR 52.227-19.
TRADEMARKS:
Refer to the Copyright page (http://www.checkpoint.com/copyright.html) for a list of our trademarks.
Refer to the Third Party copyright notices (http://www.checkpoint.com/3rd_party_copyright.html) for a list of relevant copyrights and third-party licenses.

Important Information Latest Software
We recommend that you install the most recent software release to stay up-to-date with the latest functional improvements, stability fixes, security enhancements and protection against new and evolving attacks.
Latest Documentation
The latest version of this document is at: (http://supportcontent.checkpoint.com/documentation_download?ID=24807)
To learn more, visit the Check Point Support Center (http://supportcenter.checkpoint.com).
For more about this release, see the R77 home page (http://supportcontent.checkpoint.com/solutions?id=sk92965).
Revision History
Date Description
11 May 2014 Updated for R77.20
Minor updates and corrections
Added Domain Management Server and Domain Log Server to the glossary (page 9).
Updated procedure for failure recovery ("Failure Recovery" on page 90) for and MDS in a HA deployment.
Updated Log Servers (on page 14)
10 December 2013 Updated Configuring Secondary Multi-Domain Server or a Multi-Domain Log Server (on page 31) Updated Deleting a Multi-Domain Server (on page 32) Removed IPS-1 sensor Added Running CLI Commands in Automation Scripts (on page 142) Updated Connecting to a Remaining Multi-Domain Server ("Connecting to a Secondary Multi-Domain Server" on page 90)
25 August 2013 First release of this document
Feedback
Check Point is engaged in a continuous effort to improve its documentation.
Please help us by sending your comments (mailto:[email protected]?subject=Feedback on Multi-Domain Security Management R77 Administration Guide).

Contents
Important Information ............................................................................................................ 3 Terms ...................................................................................................................................... 9 Multi-Domain Security Management Overview .................................................................. 10
Key Features ..................................................................................................................... 10 Basic Architecture ............................................................................................................. 11 The Multi-Domain Server ................................................................................................... 12 Domain Management Servers ........................................................................................... 13 Log Servers ....................................................................................................................... 14
Multi-Domain Log Server .............................................................................................. 15 Domain Log Server ....................................................................................................... 15
Security Policies ................................................................................................................ 15 Global Policies .............................................................................................................. 15
The Management Model .................................................................................................... 15 Introduction to the Management Model ......................................................................... 15 Management Tools ....................................................................................................... 16
High Availability ................................................................................................................. 17 Deployment Planning .......................................................................................................... 18
Multi-Domain Security Management Components Installed at the NOC ............................ 18 Using Multiple Multi-Domain Servers ................................................................................. 18
High Availability ............................................................................................................ 18 Multi-Domain Server Synchronization ........................................................................... 19 Clock Synchronization .................................................................................................. 19
Protecting Multi-Domain Security Management Networks ................................................. 19 Logging & Tracking............................................................................................................ 19 Routing Issues in a Distributed Environment ..................................................................... 19 Platform & Performance Issues ......................................................................................... 19 Enabling OPSEC ............................................................................................................... 20 IP Allocation & Routing ...................................................................................................... 20
Virtual IP Limitations and Multiple Interfaces on a Multi-Domain Server ........................ 20 Multiple Interfaces on a Multi-Domain Server ................................................................ 20
Deploying Multi-Domain Security Management ................................................................ 21 Deployment Overview ....................................................................................................... 21 Setting Up Your Network Topology .................................................................................... 21 Protecting the Multi-Domain Security Management Environment ...................................... 22
Standalone Security Gateway/Security Management Server ........................................ 22 Domain Management Server and SmartDomain Manager ............................................ 22 Security Gateways Protecting a Multi-Domain Server ................................................... 23 Making Connections Between Different Components of the System ............................. 24
The Multi-Domain Security Management Trust Model ....................................................... 24 Introduction to the Trust Model ..................................................................................... 24 Secure Internal Communication (SIC) ........................................................................... 25 Trust Between a Domain Management Server and its Domain Network ....................... 25 Trust Between a Domain Log Server and its Domain Network ...................................... 25 Multi-Domain Server Communication with Domain Management Servers ..................... 25 Trust Between Multi-Domain Server to Multi-Domain Server ........................................ 25 Using External Authentication Servers .......................................................................... 26 Re-authenticating when using SmartConsole Clients .................................................... 26 CPMI Protocol............................................................................................................... 27
Configuring the Primary Multi-Domain Server .................................................................... 28 Enabling IPv6 Support ....................................................................................................... 28 Disabling IPv6 Support ...................................................................................................... 29 Using SmartDomain Manager ........................................................................................... 30
Launching the SmartDomain Manager .......................................................................... 30 Multiple Multi-Domain Server Deployments ....................................................................... 30
Synchronizing Clocks .................................................................................................... 30 Configuring Secondary Multi-Domain Server or a Multi-Domain Log Server ................. 31 Changing an Existing Multi-Domain Server or Multi-Domain Log Server ....................... 32 Deleting a Multi-Domain Server .................................................................................... 32
Licensing ........................................................................................................................... 33 Licensing Overview ....................................................................................................... 33 The Trial Period ............................................................................................................ 33 License Types............................................................................................................... 33 Managing Licenses ....................................................................................................... 34
Administrator Management ................................................................................................. 36 Creating or Changing an Administrator Account ................................................................ 36
Administrator - General Properties ................................................................................ 36 Configuring Authentication ............................................................................................ 38 Configuring Certificates ................................................................................................. 38 Entering Administrator Properties ................................................................................. 39
Deleting an Administrator .................................................................................................. 39 Defining Administrator Properties ...................................................................................... 39 Defining Administrator Groups - Flow ................................................................................ 39
Creating a New Group .................................................................................................. 39 Changing or Deleting a Group ...................................................................................... 39
Managing Administrator Account Expiration ...................................................................... 40 Working with Expiration Warnings ................................................................................. 40 Configuring Default Expiration Settings ......................................................................... 42
Working with Permission Profiles ....................................................................................... 42 Configuring Permissions ............................................................................................... 43 Managing Permission Profiles ....................................................................................... 44
Showing Connected Administrators ................................................................................... 45 Global Policy Management ................................................................................................. 47
The Need for Global Policies ............................................................................................. 47 The Global Policy as a Template ....................................................................................... 48 Global Policies and the Global Rule Base ......................................................................... 48 Global SmartDashboard .................................................................................................... 49
Introduction to Global SmartDashboard ........................................................................ 49 Global Services ............................................................................................................. 49 Dynamic Objects and Dynamic Global Objects ............................................................. 49 Applying Global Rules to Security Gateways by Function ............................................. 50 Synchronizing the Global Policy Database .................................................................... 50
Creating a Global Policy Using Global SmartDashboard ................................................... 50 Global IPS ......................................................................................................................... 51
Introduction to Global IPS ............................................................................................. 51 IPS in Global SmartDashboard ..................................................................................... 51 IPS Profiles ................................................................................................................... 52 Subscribing Domains to IPS Service ............................................................................. 52 Managing IPS from a Domain Management Server ...................................................... 53 Managing Global IPS Sensors ...................................................................................... 54
Assigning Global Policy ..................................................................................................... 54 Assigning the First Global Policy ................................................................................... 54 Assigning Global Policies to VPN Communities ............................................................ 54 Re-assigning Global Policies ........................................................................................ 54 Viewing the Status of Global Policy Assignments ......................................................... 56 Global Policy History File .............................................................................................. 57
Configuration ..................................................................................................................... 57 Assigning or Installing a Global Policy .......................................................................... 57 Reassigning/Installing a Global Policy on Domains ....................................................... 58 Reinstalling a Domain Policy on Domain Gateways ...................................................... 58 Remove a Global Policy from Multiple Domains ............................................................ 59 Remove a Global Policy from a Single Domain ............................................................. 59
Viewing the Domain Global Policy History File .............................................................. 59 Setting Policy Management Options ............................................................................. 59 Global Names Format ................................................................................................... 60
Domain Management ........................................................................................................... 61 Creating a Domain - Wizard .............................................................................................. 61
Configuring General Properties ..................................................................................... 62 Domain Properties ........................................................................................................ 62 Assigning a Global Policy ............................................................................................. 62 Assigning Administrators .............................................................................................. 62 Assign GUI Clients ........................................................................................................ 63 Version and Blade Updates .......................................................................................... 63 Creating Domain Management Servers ........................................................................ 64
Creating a Domain - CLI .................................................................................................... 64 Configuring Domain Selection Groups ............................................................................... 65 Configuring Existing Domains ............................................................................................ 65
Defining General Properties .......................................................................................... 65 Defining Domain Properties .......................................................................................... 65 Assign Global Policy Tab .............................................................................................. 65 Assigning Administrators .............................................................................................. 66 Defining GUI Clients ..................................................................................................... 67 Version and Blade Updates .......................................................................................... 68
Deleting a Domain ............................................................................................................. 68 Creating a Domain Management Server - Wizard ............................................................. 69 Creating a Domain Management Server - CLI ................................................................... 70 Changing a Domain Management Server .......................................................................... 71 Deleting a Domain Management Server ............................................................................ 71
VPN with Multi-Domain Security Management .................................................................. 73 Overview ........................................................................................................................... 73
Authentication Between Security Gateways .................................................................. 73 VPN Connectivity .............................................................................................................. 73 Global VPN Communities .................................................................................................. 74
Security Gateway Global Names .................................................................................. 74 VPN Domains in Global VPN ........................................................................................ 75 Access Control at the Network Boundary ...................................................................... 75 Joining a Security Gateway to a Global VPN Community ............................................. 75
Configuring Global VPN Communities ............................................................................... 76 Enabling a Domain Gateway to Join a Global VPN Community ................................... 76
High Availability ................................................................................................................... 78 Overview ........................................................................................................................... 78 Multi-Domain Server High Availability ................................................................................ 78
Multiple Multi-Domain Server Deployments .................................................................. 78 Multi-Domain Server Status .......................................................................................... 79 Multi-Domain Server Clock Synchronization ................................................................. 80 The Multi-Domain Server Databases ............................................................................ 80 How Synchronization Works ......................................................................................... 81 Configuring Synchronization ......................................................................................... 82
Domain Management Server High Availability ................................................................... 83 Active versus Standby .................................................................................................. 84 Adding a Secondary Domain Management Server ....................................................... 85 Domain Management Server Backup Using a Security Management Server ................ 85
Configuration ..................................................................................................................... 87 Adding another Multi-Domain Server ............................................................................ 87 Creating a Mirror of an Existing Multi-Domain Server .................................................... 87 First Multi-Domain Server Synchronization ................................................................... 88 Restarting Multi-Domain Server Synchronization .......................................................... 88 Changing a Standby Multi-Domain Server to an Active Multi-Domain Server ................ 88 Automatic Synchronization for Global Policies Databases ............................................ 89 Add a Secondary Domain Management Server ............................................................ 89 Mirroring Domain Management Servers with mdscmd .................................................. 89

Automatic Domain Management Server Synchronization ............................................. 89 Synchronize ClusterXL Security Gateways ................................................................... 90
Failure Recovery ............................................................................................................... 90 Recovery with a Functional Multi-Domain Server .......................................................... 90
Logging in Multi-Domain Security Management................................................................ 93 Logging Domain Activity .................................................................................................... 93 Exporting Logs .................................................................................................................. 94
Log Export to Text ........................................................................................................ 94 Manual Log Export to Oracle Database ........................................................................ 94 Automatic Log Export to Oracle Database .................................................................... 94 Log Forwarding ............................................................................................................. 95 Cross Domain Logging ................................................................................................. 95
Logging Configuration ....................................................................................................... 95 Setting Up Logging ....................................................................................................... 96 Working with Log Servers ............................................................................................. 96 Setting up Domain Security Gateway to Send Logs to the Domain Log Server ............. 99 Synchronizing Domain Log Server and Domain Management Server ........................... 99 Configuring a Multi-Domain Server to Enable Log Export ............................................. 99 Configuring Log Export Profiles .................................................................................. 100 Choosing Log Export Fields ........................................................................................ 100 Log Export Troubleshooting ........................................................................................ 100 Using SmartReporter .................................................................................................. 101
Monitoring .......................................................................................................................... 102 Overview ......................................................................................................................... 102 Monitoring Components in the Multi-Domain Security Management System ................... 103
Exporting the List Pane's Information to an External File ............................................ 103 Working with the List Pane.......................................................................................... 103
Verifying Component Status ............................................................................................ 103 Viewing Status Details ................................................................................................ 104 Locating Components with Problems .......................................................................... 105
Monitoring Issues for Different Components and Features .............................................. 105 Multi-Domain Server ................................................................................................... 105 Global Policies ............................................................................................................ 106 Domain Policies .......................................................................................................... 106 Security Gateway Policies .......................................................................................... 106 High Availability .......................................................................................................... 106 Global VPN Communities ........................................................................................... 107 GUI Clients ................................................................................................................. 107
Using SmartConsole ........................................................................................................ 107 Log Tracking ............................................................................................................... 107 Tracking Logs using SmartView Tracker ..................................................................... 107 Real-Time Network Monitoring with SmartView Monitor .............................................. 108 SmartReporter Reports ............................................................................................... 109
Architecture and Processes .............................................................................................. 110 Packages in Multi-Domain Server Installation .................................................................. 110 Multi-Domain Server File System .................................................................................... 110
Multi-Domain Server Directories on /opt and /var File Systems ................................... 110 Structure of Domain Management Server Directory Trees .......................................... 111 Check Point Registry .................................................................................................. 111 Automatic Start of Multi-Domain Server Processes ..................................................... 112
Processes ....................................................................................................................... 112 Environment Variables ................................................................................................ 112 Multi-Domain Server Level Processes ........................................................................ 113 Domain Management Server Level Processes ........................................................... 113
Multi-Domain Server Configuration Databases ................................................................ 113 Global Policy Database ............................................................................................... 114 Multi-Domain Server Database ................................................................................... 114 Domain Management Server Database ...................................................................... 114
Connectivity Between Different Processes ...................................................................... 114
Multi-Domain Server Connection to Domain Management Servers ............................. 114 Status Collection ......................................................................................................... 115 Collection of Changes in Objects ................................................................................ 115 Connection Between Multi-Domain Servers ................................................................ 115 Large Scale Management Processes ......................................................................... 116 UTM-1 Edge Processes .............................................................................................. 116 Reporting Server Processes ....................................................................................... 116
Issues Relating to Different Platforms .............................................................................. 116 High Availability Scenarios .......................................................................................... 116 Migration Between Platforms ...................................................................................... 116
Multi-Domain Security Management Commands and Utilities ....................................... 118 Cross-Domain Management Server Search .................................................................... 118
Overview ..................................................................................................................... 118 Searching ................................................................................................................... 118 Copying Search Results ............................................................................................. 119 Performing a Search in CLI ......................................................................................... 119
P1Shell ............................................................................................................................ 120 Overview ..................................................................................................................... 120 Starting P1Shell .......................................................................................................... 120 File Constraints for P1Shell Commands...................................................................... 121 Multi-Domain Security Management Shell Commands ............................................... 121 Audit Logging .............................................................................................................. 124
Command Line Reference ............................................................................................... 124 cma_migrate ............................................................................................................... 124 cpmiquerybin .............................................................................................................. 125 dbedit .......................................................................................................................... 126 mcd bin | scripts | conf ................................................................................................ 127 mds_backup ............................................................................................................... 127 mds_restore ................................................................................................................ 128 mds_user_expdate ..................................................................................................... 128 mdscmd ...................................................................................................................... 128 mdsenv ....................................................................................................................... 138 mdsquerydb ................................................................................................................ 138 mdsstart ...................................................................................................................... 139 mdsstat ....................................................................................................................... 139 mdsstop ...................................................................................................................... 139 merge_plug-in_tables ................................................................................................. 140 migrate_global_policies .............................................................................................. 140 Configuration Procedures ........................................................................................... 141
Running CLI Commands in Automation Scripts .............................................................. 142 Introduction to Automation Scripts ................................................................................... 142
Creating a Domain Management Server ..................................................................... 142 Working with dbedit ......................................................................................................... 143
Introduction to dbedit .................................................................................................. 143 Using Automation Scripts ............................................................................................ 144 Create or Modify Policy Objects (Hosts, Networks) ..................................................... 145 Changing a Rule Base ................................................................................................ 148 Pushing the Security Policy to Security Gateways ...................................................... 151 Error Codes in dbedit .................................................................................................. 151
Using XML to Export Settings for a Domain Management Server .................................... 151 Index ................................................................................................................................... 153
Terms Active Domain Management Server
The only Domain Management Server in a High Availability deployment that can manage a specified Domain.
Active Multi-Domain Server
The one Multi-Domain Server in a High Availability deployment that can work with global objects and global policies.
Administrator
A SmartDashboard or SmartDomain Manager user with permissions to manage Check Point security products and the network environment.
Domain
1. A network or group of networks that is associated with a specified entity, such as a company, business unit or organization.
2. In Multi-Domain Security Management, a network managed by a Check Point Domain Management Server.
Doman Log Server
A log server for a specified Domain.
Domain Management Server
A virtual Security Management Server that manages one Domain in a Multi-Domain Security Management environment.
Gateway
A computer or appliance that controls communication between different networks.
Multi Domain Log Server
Physical server that contains the log database for all Domains.
Multi-Domain Security Management
A centralized management solution for large-scale, distributed environments with many different network Domain Management Servers.
Multi-Domain Server
A physical server that contains system information and policy databases for all Domains in an enterprise environment.
Permissions Profile
A predefined group of SmartConsole access permissions assigned to Domains and administrators. This feature lets you configure complex permissions for many administrators with one definition.
Primary Multi-Domain Server
The first Multi-Domain Server that you define and log into in a High Availability deployment.
Secondary Multi-Domain Server
All Multi-Domain Servers in a High Availability deployment created after the Primary Multi-Domain Server.
Standby Domain Management Server
All Domain Management Servers for a Domain that are not designated as the active Domain Management Server.
Standby Multi-Domain Server
All Multi-Domain Servers in a High Availability deployment that cannot manage global policies and objects. Standby Multi-Domain Servers are synchronized with the active Multi-Domain Server.

Multi-Domain Security Management Administration Guide R77 | 10
Chapter 1
Multi-Domain Security Management Overview
In This Section: Key Features ........................................................................................................... 10
Basic Architecture ................................................................................................... 11
The Multi-Domain Server ........................................................................................ 12
Domain Management Servers ................................................................................ 13
Log Servers ............................................................................................................. 14
Security Policies ...................................................................................................... 15
The Management Model ......................................................................................... 15
High Availability ....................................................................................................... 17
Multi-Domain Security Management is a centralized management solution for large-scale, distributed environments with many different network Domains. This best-of-breed solution is ideal for enterprises with many subsidiaries, branches, partners and networks. Multi-Domain Security Management is also an ideal solution for managed service providers, cloud computing providers, and data centers.
Centralized management gives administrators the flexibility to manage polices for many diverse entities. Security policies should be applicable to the requirements of different departments, business units, branches and partners, balanced with enterprise-wide requirements.
Key Features
Centralized Management Administrators with applicable permissions can manage multiple Domains from a central console. Global policies let administrators define security rules that apply to all Domains or to groups of Domains.
Domain Security Virtual IP addresses for each Domain Management Server make sure that there is total segregation of sensitive data for each Domain. Although many Domains are hosted by one server, access to data for each Domain is permitted only to administrators with applicable permissions.
High Availability Multi-Domain Security Management High Availability features make sure that there is uninterrupted service throughout all Domains. All Multiple Multi-Domain Servers are synchronized and can manage the deployment at any time. Multiple Domain Management Servers give Active/Standby redundancy for individual Domains.
Scalability The Multi-Domain Security Management modular architecture seamlessly adds new Domains, Domain Management Servers, Security Gateways, and network objects into the deployment. Each Multi-Domain Server supports up to 250 Domains.

Multi-Domain Security Management Overview
Multi-Domain Security Management Administration Guide R77 | 11
Basic Architecture Multi-Domain Security Management uses tiered architecture to manage Domain network deployments.
The Security Gateway enforces the security policy to protect network resources.
A Domain is a network or group of networks belonging to a specified entity, such as a company, business unit, department, branch, or organization. For a cloud computing provider, one Domain can be defined for each customer.
A Domain Management Server is a virtual Security Management Server that manages security policies and Security Gateways for a specified Domain.
The Multi-Domain Server is a physical server that hosts the Domain Management Server databases and Multi-Domain Security Management system databases.
The SmartDomain Manager is a management client that administrators use to manage domain security and the Multi-Domain Security Management system.
The Multi-Domain Servers and SmartDomain Manager are typically located at central Network Operation Centers (NOCs). Security Gateways are typically located together with protected network resources, often in another city or country.
Item Description
A USA Development Domain
B Headquarters Domain
C UK Development Domain
1 Security Gateway
2 Network Operation Center
3 Multi-Domain Server
4A USA Development Domain Management Server
4B Headquarters Domain Management Server
4C UK Development Domain Management Server

Multi-Domain Security Management Overview
Multi-Domain Security Management Administration Guide R77 | 12
The Multi-Domain Server The Multi-Domain Server is a physical computer that hosts Domain Management Servers, system databases, and the Multi-Domain Log Server. The system databases include Multi-Domain Security Management network data, administrators, Global Policies, and domain management information.
Item Description
A Domain Management Server database
B Global objects database
C Multi-Domain Security Management System database
1 Multi-Domain Server
2 Domain Management Servers
3 Administrators and permissions
4 GUI clients
5 Licenses
6 Software packages
7 Network objects
8 Multi-Domain Log Server
9 Global policies
10 Global IPS
11 Global VPN communities
12 Other Global objects
13 SmartDomain Manager in Network Operations Center
Multi-Domain Security Management Overview
Multi-Domain Security Management Administration Guide R77 | 13
A Multi-Domain Server can host a large amount of network and policy data on one server. To increase performance in large deployments, distribute traffic load, and configure high availability, you can use multiple Multi-Domain Servers.
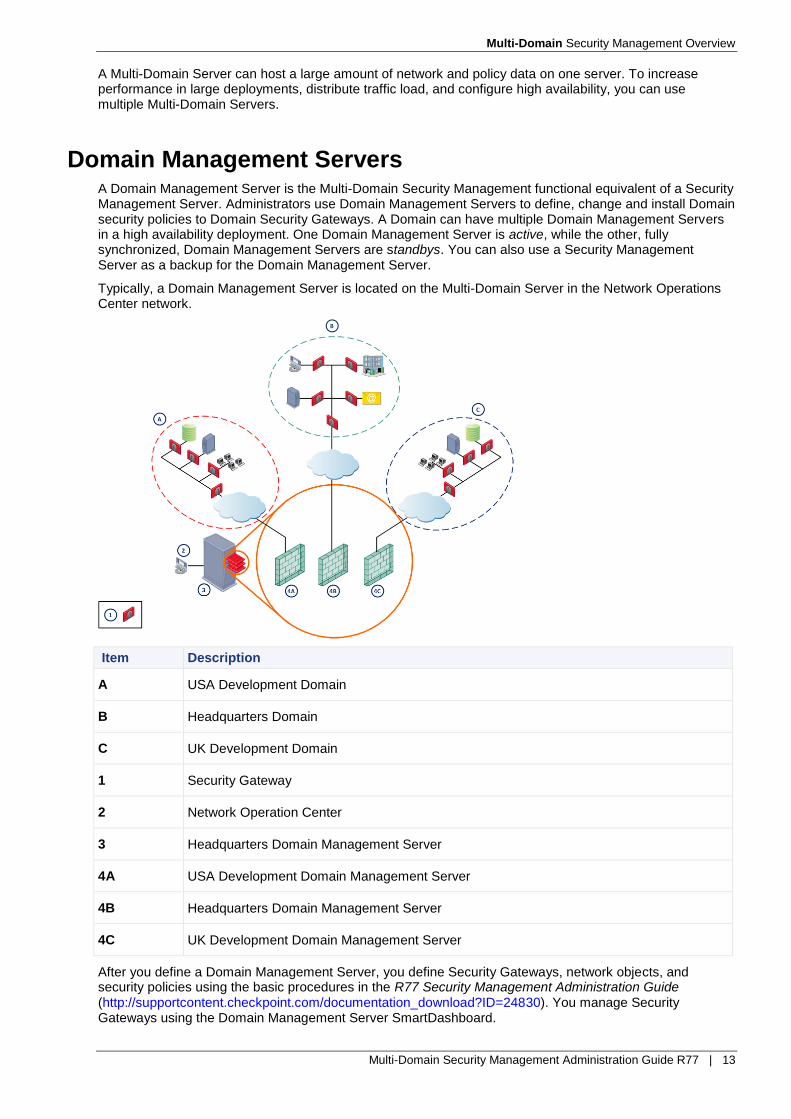
Domain Management Servers A Domain Management Server is the Multi-Domain Security Management functional equivalent of a Security Management Server. Administrators use Domain Management Servers to define, change and install Domain security policies to Domain Security Gateways. A Domain can have multiple Domain Management Servers in a high availability deployment. One Domain Management Server is active, while the other, fully synchronized, Domain Management Servers are standbys. You can also use a Security Management Server as a backup for the Domain Management Server.
Typically, a Domain Management Server is located on the Multi-Domain Server in the Network Operations Center network.
Item Description
A USA Development Domain
B Headquarters Domain
C UK Development Domain
1 Security Gateway
2 Network Operation Center
3 Headquarters Domain Management Server
4A USA Development Domain Management Server
4B Headquarters Domain Management Server
4C UK Development Domain Management Server
After you define a Domain Management Server, you define Security Gateways, network objects, and security policies using the basic procedures in the R77 Security Management Administration Guide (http://supportcontent.checkpoint.com/documentation_download?ID=24830). You manage Security Gateways using the Domain Management Server SmartDashboard.

Multi-Domain Security Management Overview
Multi-Domain Security Management Administration Guide R77 | 14
You must define routers to communicate between Domain Security Gateways and Domain Management Servers. Traffic must be allowed between the Multi-Domain Servers, network, Security Gateways and Domain Security Gateways. It should also be allowed for SmartConsole Client applications and Domain Management Server connections. Access rules must be set up as appropriate in Domain Security Gateway rule base.
If you are using Logging (see "Logging in Multi-Domain Security Management" on page 93) or High Availability (on page 78) Domain network, you must configure routing to support these functions.
Log Servers This section shows how log servers operate in a Multi-Domain Security Management deployment.
Item Description
A Domain A
B Domain B
1 Security Gateway
2 Multi-Domain Server
3 Multi-Domain Log Server
4A Domain Management Server - Domain A
4B Domain Management Server - Domain B
5A Domain Log Server - Domain A
5B Domain Log Server - Domain B

Multi-Domain Security Management Overview
Multi-Domain Security Management Administration Guide R77 | 15
Multi-Domain Log Server
A Multi-Domain Log Server hosts log files for multiple Domains. Typically, the Multi-Domain Log Server is hosted on a Multi-Domain Server dedicated for log traffic. This improves performance by isolating log traffic from management traffic.
You can optionally install a Multi-Domain Log Server on a Multi-Domain Server together with the Domain Management Servers and system databases. This option is appropriate for deployments with lighter traffic loads. You can also create a redundant log infrastructure by defining the Multi-Domain Log Server as the primary log server and the Multi-Domain Server as a backup.
You can have multiple Multi-Domain Log Servers in a Multi-Domain Security Management environment. You use the SmartDomain Manager to manage your Log Servers with a different log repository for each Domain.
Domain Log Server
A Domain Log Server is a virtual log server for a single Domain. Typically, Log Servers are virtual components installed on a Multi-Domain Log Server. You can also configure Log Servers to monitor specified Domain Security Gateways.
Security Policies A Security Policy is a set of rules that are enforced by Security Gateways. In a Multi-Domain Security Management deployment, administrators use Domain Management Servers to define and manage security policies for Security Gateways included in Domains.
Global Policies
Global policies are a collection of rules and objects that are assigned to all Domains, or to specified groups of Domains. This is an important time saver because it lets administrators assign rules to any or all Domain Security Gateways without having to configure them individually.
The Management Model
Introduction to the Management Model
The Multi-Domain Security Management model is granular and lets you assign a variety of different access privileges to administrators. These privileges let administrators do specified management tasks for the entire deployment or for specified Domains.

Multi-Domain Security Management Overview
Multi-Domain Security Management Administration Guide R77 | 16
Management Tools
The SmartDomain Manager
Administrators use the SmartDomain Manager to manage the Multi-Domain Security Management and to open the SmartConsole client applications for specific Domains. The SmartDomain Manager has many views to let administrators see information and do various tasks.
SmartConsole Client Applications
Administrators use SmartConsole clients to configure, manage and monitor security policies. SmartConsole clients include all the following:
SmartDashboard lets administrators define and manage security policies.
SmartView Tracker lets administrators see, manage and track log information.
SmartUpdate lets administrators manage and maintain the license repository, as well as to update Check Point software.
SmartView Monitor lets administrators monitor traffic on Multi-Domain Servers, Security Gateways, and QoS Security Gateways. They can also see alerts and test the status of various Check Point components throughout the system.
SmartReporter lets administrators generate reports for different aspects of network activity.
SmartProvisioning lets administrators manage many SmartProvisioning Security Gateways.
SmartDashboard Toolbar
You can use the SmartDashboard toolbar to do these actions:
Icon Description
Open the SmartDashboard menu. When instructed to select menu options, click this button to show the menu.
For example, if you are instructed to select Manage > Users and Administrators, click this button to open the Manage menu and then select the Users and Administrators option.
Save current policy and all system objects.

Multi-Domain Security Management Overview
Multi-Domain Security Management Administration Guide R77 | 17
Icon Description
Open a policy package, which is a collection of Policies saved together with the same name.
Refresh policy from the Security Management Server.
Open the Database Revision Control window.
Change global properties.
Verify Rule Base consistency.
Install the policy on Security Gateways or VSX Gateways.
Open SmartConsoles.
High Availability
Note - The current version supports multiple Domain Management Servers for each Domain.
Multi-Domain Security Management High Availability gives uninterrupted management redundancy for all Domains. Multi-Domain Security Management High Availability operates at these levels:
Multi-Domain Server High Availability - Multiple Multi-Domain Servers are, by default, automatically synchronized with each other. You can connect to any Multi-Domain Server to do Domain management tasks. One Multi-Domain Server is designated as the Active Multi-Domain Server. Other Multi-Domain Servers are designated as Standby Multi-Domain Servers.
You can only do Global policy and global object management tasks using the active Multi-Domain Server. In the event that the active Multi-Domain Server is unavailable, you must change one of the standby Multi-Domain Servers to active.
Domain Management Server High Availability - Multiple Domain Management Servers give Active/Standby redundancy for Domain management. One Domain Management Server for each Domain is Active. The other, fully synchronized Domain Management Servers for that Domain, are standbys. In the event that the Active Domain Management Server becomes unavailable, you must change one of the standby Domain Management Servers to active.
You can also use ClusterXL to give High Availability redundancy to your Domain Security Gateways. You use SmartDashboard to configure and manage Security Gateway High Availability for Domain Management Servers.
Multi-Domain Security Management Administration Guide R77 | 18
Chapter 2
Deployment Planning
In This Section: Multi-Domain Security Management Components Installed at the NOC ................ 18
Using Multiple Multi-Domain Servers ...................................................................... 18
Protecting Multi-Domain Security Management Networks ..................................... 19
Logging & Tracking ................................................................................................. 19
Routing Issues in a Distributed Environment .......................................................... 19
Platform & Performance Issues .............................................................................. 19
Enabling OPSEC..................................................................................................... 20
IP Allocation & Routing ........................................................................................... 20
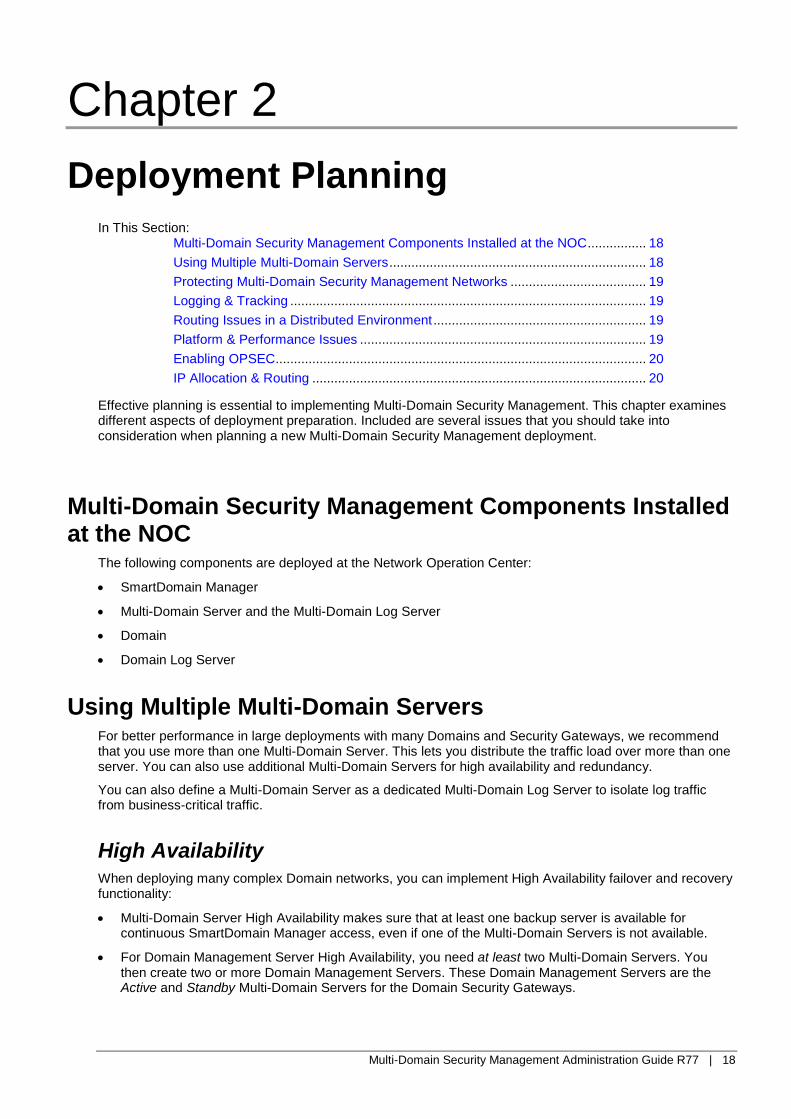
Effective planning is essential to implementing Multi-Domain Security Management. This chapter examines different aspects of deployment preparation. Included are several issues that you should take into consideration when planning a new Multi-Domain Security Management deployment.
Multi-Domain Security Management Components Installed at the NOC
The following components are deployed at the Network Operation Center:
SmartDomain Manager
Multi-Domain Server and the Multi-Domain Log Server
Domain
Domain Log Server
Using Multiple Multi-Domain Servers For better performance in large deployments with many Domains and Security Gateways, we recommend that you use more than one Multi-Domain Server. This lets you distribute the traffic load over more than one server. You can also use additional Multi-Domain Servers for high availability and redundancy.
You can also define a Multi-Domain Server as a dedicated Multi-Domain Log Server to isolate log traffic from business-critical traffic.
High Availability
When deploying many complex Domain networks, you can implement High Availability failover and recovery functionality:
Multi-Domain Server High Availability makes sure that at least one backup server is available for continuous SmartDomain Manager access, even if one of the Multi-Domain Servers is not available.
For Domain Management Server High Availability, you need at least two Multi-Domain Servers. You then create two or more Domain Management Servers. These Domain Management Servers are the Active and Standby Multi-Domain Servers for the Domain Security Gateways.

Deployment Planning
Multi-Domain Security Management Administration Guide R77 | 19
Multi-Domain Server Synchronization
If your deployment contains multiple Multi-Domain Servers, each Multi-Domain Server must be fully synchronized with all other Multi-Domain Servers. The Multi-Domain Security Management network and administrators databases are synchronized automatically whenever changes are made on one Multi-Domain Server. The Global Policy database is synchronized either at user-defined intervals and/or specified events. You can also synchronize the databases manually.
Multi-Domain Server synchronization does not back up Domain Management Servers or their data. Domain policies are included in the Domain Management Server database and are not synchronized by the Multi-Domain Server. You must configure your system for Domain Management Server High Availability to give redundancy at the Domain Management Server level. .
Clock Synchronization
Multi-Domain Server (including dedicated Multi-Domain Log Servers) system clocks must be synchronized to the nearest second. When adding another Multi-Domain Server to your deployment, synchronize its clock with the other Multi-Domain Server before installing the Multi-Domain Security Management package.
Use a synchronization utility to synchronize Multi-Domain Server clocks. We recommended that you automatically synchronize the clocks at least once a day to compensate for clock drift.
Protecting Multi-Domain Security Management Networks The Multi-Domain Security Management network and Network Operation Center (NOC) must be protected by a Security Gateway. You can manage this Security Gateway using a Domain Management Server or a Security Management Server.
This Security Gateway must have a security policy that adequately protects the NOC and allows secure communication between Multi-Domain Security Management components and external Domain networks. This is essential to make sure that there is continual open communication between all components. Multi-Domain Servers communicate with each other and with Domain networks. The Security Gateway routing must be correctly configured.
The Security Gateway security policy must also allow communication between Domain Management Servers and Domain Security Gateways. External Domain administrators must be able access Domain Management Servers.
Logging & Tracking If you are deploying a very large system where many different services and activities are being tracked, consider deploying one or more dedicated Multi-Domain Log Servers.
Routing Issues in a Distributed Environment If you have a distributed system, with Multi-Domain Servers located in remote locations, examine routing issues carefully. Routing must enable all Multi-Domain Server components to communicate with each other, and for Domain Management Servers to communicate with Domain networks. See IP Allocation & Routing (on page 20).
Platform & Performance Issues Examine your Multi-Domain Security Management system hardware and platform requirements. Make sure that you have the needed platform patches installed. If you have a Multi-Domain Server with multiple interfaces, ensure that the total load for each Multi-Domain Server computer conforms to performance load recommendations. See Hardware Requirements and Recommendations.

Deployment Planning
Multi-Domain Security Management Administration Guide R77 | 20
Enabling OPSEC Multi-Domain Security Management supports OPSEC APIs on the following levels:
Security Gateway level — Security Gateways managed by Multi-Domain Security Management support all OPSEC APIs (such as CVP, UFP, SAM etc.)
Domain Management Server level — Domain Management Servers support all OPSEC Management APIs. This includes CPMI, ELA, LEA and SAM.
Domain Log Server level— Log servers support all logging OPSEC APIs. This includes ELA and LEA.
IP Allocation & Routing Multi-Domain Security Management uses a single public IP interface address to implement many private, "virtual" IP addresses. The Multi-Domain Server assigns virtual IPs addresses to Domain Management Servers and Log Servers, which must be routable so that Security Gateways and SmartConsole clients can connect to the Domain Management Servers.
Each Multi-Domain Server has an interface with a routable IP address. The Domain Management Servers use virtual IP addresses. It is possible to use either public or private IPs.
When configuring routing tables, make sure that you define the following communication paths:
Domain Security Gateways to the Log Servers.
All Domain Management Servers to Log Servers.
Active Domain Management Servers to and from standby Domain Management Servers.
All Domain Management Servers to the Domain Security Gateways.
The Domain Security Gateways to all Domain Management Servers.
Virtual IP Limitations and Multiple Interfaces on a Multi-Domain Server
There is a limitation of 250 Virtual IP addresses per interface for Solaris-platform Multi-Domain Servers. Since each Domain Management Server and Domain Log Server receives its own Virtual IP address, there is a limit of 250 Domain Management Servers or Log Servers per Solaris Multi-Domain Server.
If you have more than one interface per Multi-Domain Server, you must specify which one is the leading interface. This interface will be used by Multi-Domain Servers to communicate with each other and perform database synchronization. During Multi-Domain Server installation, you will be prompted to choose the
leading interface by the mdsconfig configuration script.
Ensure that interfaces are routable. Domain Management Servers and Domain Management Server-HA must be able to communicate with their Domain Security Gateways, and Log Servers to their Domain Security Gateways.
Multiple Interfaces on a Multi-Domain Server
If you have more than one interface per Multi-Domain Server, you must specify which will be the leading interface. This interface will be used by Multi-Domain Servers to communicate with each other and perform database synchronization. During Multi-Domain Server installation, you will be prompted to choose the
leading interface by the configuration script mdsconfig.
Ensure that interfaces are routable. Domain Management Servers and Domain Management Server-HA must be able to communicate with their Domain Security Gateways, and Log Servers to their Domain Security Gateways.

Multi-Domain Security Management Administration Guide R77 | 21
Chapter 3
Deploying Multi-Domain Security Management
In This Section: Deployment Overview ............................................................................................. 21
Setting Up Your Network Topology......................................................................... 21
Protecting the Multi-Domain Security Management Environment .......................... 22
The Multi-Domain Security Management Trust Model ........................................... 24
Configuring the Primary Multi-Domain Server ........................................................ 28
Enabling IPv6 Support ............................................................................................ 28
Disabling IPv6 Support ........................................................................................... 29
Using SmartDomain Manager ................................................................................. 30
Multiple Multi-Domain Server Deployments ............................................................ 30
Licensing ................................................................................................................. 33
This chapter shows you how to deploy Multi-Domain Security Management in your environment.
Deployment Overview This topic summarizes the steps to deploy Multi-Domain Security Management.
1. Install and create the Primary Multi-Domain Server. You also configure Multi-Domain Server administrators and GUI Clients at this time. See the R77 Installation and Upgrade Guide for detailed procedures.
2. Install SmartDomain Manager and SmartConsole Clients.
3. Install the Multi-Domain Server license. You can postpone this step until the trial period ends after 15 days. See Licensing (on page 33) to learn more.
4. Install and configure Multi-Domain Log Servers and secondary Multi-Domain Servers as needed. See Multiple Multi-Domain Server Deployments (on page 30) to learn more.
5. Install and configure Security Gateways to protect your Multi-Domain Security Management network. Define and install the security Policy.
Setting Up Your Network Topology The Multi-Domain Server and Security Gateways should be TCP/IP ready. A Multi-Domain Server should contain at least one interface with a routable IP address and should be able to query a DNS server in order to resolve the IP addresses of other computer names.
Multi-Domain Security Management supports IPv4 and IPv6. You must always define an IPv4 address. The IPv6 address is optional.
Make sure that routing is configured to allow IP communication between:
The Domain Management Server and Domain Log Server and its managed Security Gateways.
A Multi-Domain Server and other Multi-Domain Servers in the system.
A Domain Management Server and Log Servers of the same Domain.
A Domain Management Server and its High Availability Domain Management Server peer.

Deploying Multi-Domain Security Management
Multi-Domain Security Management Administration Guide R77 | 22
A GUI client and Multi-Domain Servers.
A GUI client and Domain Management Servers and Log Servers.
Protecting the Multi-Domain Security Management Environment
You should always deploy a Check Point Security Gateway to protect your Multi-Domain Security Management network, including your Multi-Domain Server, Multi-Domain Log Server and management platforms. This section presents the procedures for installing and defining Check Point Security Gateways to protect your Multi-Domain Security Management network. You can manage your Security Gateway using either a Security Management Server (configured as a standalone Security Gateway/Security Management combination) or a Domain Management Server and the SmartDomain Manager.
Standalone Security Gateway/Security Management Server
In this scenario the Security Gateway that protects your Multi-Domain Security Management deployment and a Security Management Server are installed on a single Linux or SecurePlatform computer.
To deploy a Security Gateway/Security Management standalone installation:
1. Install and configure a Check Point Security Gateway and Security Management Server on a single computer as described in the R77 Installation and Upgrade Guide (http://supportcontent.checkpoint.com/documentation_download?ID=24831).
2. Verify connectivity between the Security Gateway/Security Management Server, the Multi-Domain Server, the SmartDashboard client and any other Multi-Domain Security Management network components.
3. Verify that SIC trust has been successfully established.
4. Log on to SmartDashboard.
5. Create and configure the Security Gateway object to protect your Multi-Domain Security Management deployment.
6. Define and install a Security Policy for the Security Gateway.
Domain Management Server and SmartDomain Manager
In this scenario, the Security Gateway that protects your Multi-Domain Security Management deployment is installed on a SecurePlatform or Linux computer and is managed by Domain Management Server on the Multi-Domain Server itself.
1. Install Check Point Security Gateway on a SecurePlatform or Linux computer, without the Security Management Server, as described in the R77 Installation and Upgrade Guide (http://supportcontent.checkpoint.com/documentation_download?ID=24831).
2. Verify connectivity with the Multi-Domain Server.
3. Launch the SmartDomain Manager and log into the Multi-Domain Server.
4. Define a Domain for the Security Gateway and create a Domain Management Server for this Domain. For more information, refer to Configuring a New Domain.
5. In the SmartDomain Manager, launch SmartDashboard from the Domain Management Server and create the network object representing the Security Gateway on the Domain Management Server.
a) Right-click the Network Objects icon, and from the drop-down menu select New > Check Point > Gateway .
b) Enter configuration details for the Security Gateway, including an IP address. The external Security Gateway should have a routable IP address.
c) The products installed on this computer should be Firewall and SVN Foundation. You can install additional products as required.
6. Establish SIC trust with the Security Gateway.
7. Define and install a Security Policy for the Security Gateway.

Deploying Multi-Domain Security Management
Multi-Domain Security Management Administration Guide R77 | 23
Security Gateways Protecting a Multi-Domain Server
A Security Gateway that protects a Multi-Domain Server must have an installed security policy that allows connections between:
The Active and Standby Domain Management Servers and their Domain Security Gateways.
Log transfers between Domain Security Gateways and Log Servers.
Domain Security Gateways and their specified Domain Management Servers (Active and Standby).
Item Description
A Primary Domain
B Mirror Domain
1 Active Domain Management Servers
2 Primary Multi-Domain Server
3 Mirror Multi-Domain Server
4 Mirror Domain Management Servers
5 Security Gateways
The Security Policy must also allow connections between:
The Multi-Domain Security Management network Domain Management Server and the Security Gateway.
Between Multi-Domain Servers, if they are distributed between several management networks.
GUI Clients and the Multi-Domain Server, according to which GUI Clients are allowed SmartDomain Manager access.
To learn more about creating Security Policies using SmartDashboard, see the R77 Security Management Administration Guide (http://supportcontent.checkpoint.com/documentation_download?ID=24830).

Deploying Multi-Domain Security Management
Multi-Domain Security Management Administration Guide R77 | 24
Making Connections Between Different Components of the System
To make secure communication and proper access between different system components:
1. Open SmartDashboard and connect to the Domain Management Server. Create objects to represent each Domain Management Server, Domain Management Server-HAs, Log Servers, and Domain Security Gateways.
2. Examine the implied rules for the Domain Management Server. These rules allow Domain Log Server and Domain Management Server communication with Security Gateways, for CPMI communication with management servers.
3. Use the implied rules as a template to create rules for each Domain, permitting services between the source Domain Management Servers/Log Servers and the Domain Security Gateways.
4. Examine your network deployment and decide which components should be used in rules to enable communications. Run status collections and push/pull certificates. For example, if the Multi-Domain Security Management network is distributed, with different Multi-Domain Servers in remote locations and Security Gateways protecting a remote Multi-Domain Security Management network, define rules to enable the Multi-Domain Servers to communicate with one another. In such a rule, the Multi-Domain Servers are in both the Source and Destination column of the rule.
Use this table to create rules that allow connections between specified components:
Description Source Destination
Enable connections between the SmartDomain Manager and the Multi-Domain Server.
GUI Client Multi-Domain Server
Enable connections between Multi-Domain Servers with the same ICA.
Multi-Domain Servers Multi-Domain Servers
Domain Management Server status collection. Each Domain Management Server collects status data from its Domain Security Gateways. If a Domain has two or more Domain Management Servers, the first Domain Management Server collects status from the peer ("Mirror") Domain Management Servers.
Domain Management Server, Domain Management Server-HA
Security Gateway
Domain Management Server-HA
With more than one Multi-Domain Server, enable each Multi-Domain Server to collect status data from the others.
Multi-Domain Servers Multi-Domain Servers
Enable passing a certificate to a Multi-Domain Server. A new Multi-Domain Server must have a SIC certificate created by the Primary Multi-Domain Server.
Multi-Domain Servers Multi-Domain Servers
Enable certificate push to a Domain Management Server. A Mirror Domain Management Server for a Domain must get a certificate.
Domain Management Server
Domain Management Server-HA
Enable Domain level High Availability synchronization protocol, for Mirror Domain Management Servers and for synchronizing Domain Management Servers of the same Domain.
Domain Management Server
Domain Management Server-HA
Domain Management Server-HA
Domain Management Server
The Multi-Domain Security Management Trust Model
Introduction to the Trust Model
Multi-Domain Servers and Domain Management Servers establish secure communication between system components with full data integrity. This is a critical component for making sure that system management commands and system information are delivered securely.
Deploying Multi-Domain Security Management
Multi-Domain Security Management Administration Guide R77 | 25
Multi-Domain Security Management systems must establish safe communication between the various components of the Multi-Domain Security Management deployment. Secure Internal Communication (SIC) makes sure that this communication is secure and private.
Secure Internal Communication (SIC)
Secure Internal Communication (SIC) defines trust between all Multi-Domain Security Management system components. A basic explanation of how SIC operates is in the R77 Security Management Administration Guide. (http://supportcontent.checkpoint.com/documentation_download?ID=24830)
Secure communication makes sure that the system can receive all the necessary information it needs to run correctly. Although information must be allowed to pass freely, it also has to pass securely. This means that all communication must be encrypted so that an imposter cannot send, receive or intercept communication meant for someone else, be authenticated, so there can be no doubt as to the identity of the communicating peers, and have data integrity, not have been altered or distorted in any way. Of course, it is helpful if it is also user-friendly.
Trust Between a Domain Management Server and its Domain Network
To ensure authenticated communication between Multi-Domain Security Management and Domain networks, each Domain Management Server has its own Internal Certificate Authority (ICA). The ICA issues certificates to the Domain Management Server Security Gateways. The Domain Management Server ICA is part of the Domain Management Server data hosted by Multi-Domain Server. Each Domain Management Server ICA is associated with a specific Domain. A high availability Domain secondary Domain Management Server shares the same Internal Certificate Authority with the primary Domain Management Server.
The Domain Management Server ICA issues certificates to Security Gateways. SIC trust can then be established between the Domain Management Server and each of its Security Gateways.
Different Domain Management Servers have different ICAs to ensure that a Domain Management Server establishes secure communication with its own Domain Security Gateways. Other Domain Management Servers cannot access the internal networks and establish communication with other Domain Security Gateways.
Trust Between a Domain Log Server and its Domain Network
The Domain Log Server also receives a certificate from the Domain Management Server ICA. This is so that the Security Gateways can establish communication with the Domain Log Server, for tracking and logging purposes. The Security Gateways and Log Servers must be able to trust their communication with each other, but only if they belong to the same Domain. Otherwise, different Domains could monitor each other, which would be a security breach.
Multi-Domain Server Communication with Domain Management Servers
Every Multi-Domain Server communicates with the Domain Management Servers that it hosts locally using the SIC local protocol. SIC local is managed by Multi-Domain Security Management and activates trusted Multi-Domain Server communication.
SIC is used for remote communication, whereas SIC local is used for a host's internal communication. SIC local communication does not make use of certificates.
Trust Between Multi-Domain Server to Multi-Domain Server
The primary Multi-Domain Server (the first Multi-Domain Server defined) has its own Internal Certificate Authority. This ICA issues certificates to all other Multi-Domain Servers, so that trusted communication can be authenticated and secure between Multi-Domain Servers. All Multi-Domain Servers share one Internal Certificate Authority.
Deploying Multi-Domain Security Management
Multi-Domain Security Management Administration Guide R77 | 26
The ICA creates certificates for all other Multi-Domain Servers, and for Multi-Domain Security Management administrators. Administrators also need to establish trusted communication with the Multi-Domain Servers.
Using External Authentication Servers
Multi-Domain Security Management supports external authentication methods. When an administrator authenticates all authentication requests are sent to the external authentication server. The external server authenticates the user and sends a reply to the Multi-Domain Server. Only authenticated administrators can connect to the Multi-Domain Server or the Domain Management Server.
Multi-Domain Security Management supports the following external authentication methods:
RADIUS
TACACS
RSA SecurID ACE/Server
TACACS and RADIUS authentication methods, when authenticating an administrator connecting to a Domain Management Server, use the Multi-Domain Server as a proxy between the Domain Management Server and the external authentication server. Therefore, each Multi-Domain Server must be defined on the authentication server, and the authentication server must be defined in the global database. In addition, if the Multi-Domain Server is down, the Domain Management Server will not be able to authenticate administrators.
Configuring External Authentication
To configure External Authentication:
1. Open the SmartDomain Manager and select Administrators.
2. Define a new administrator.
3. In the General tab, enter the same user name that was created on the authentication server.
4. Mark the administrator's permission.
5. On the Authentication tab, select the Authentication Scheme. If using RADIUS or TACACS, choose the appropriate server that was configured in Global SmartDashboard.
6. If using SecurID, do the following:
a) Generate the file sdconf.rec on the ACE/Server, and configure the user to use Tokencode only.
b) Copy sdconf.rec to /var/ace/ on each Multi-Domain Server.
c) Edit the file /etc/services and add the following lines:
securid 5500/udp
securidprop 5510/tcp
d) Reboot the Multi-Domain Server computers.
Alternatively, steps 3, 4, and 5 can be done from the command line interface (CLI):
mdscmd setadminauth <adminName>
<undefined | os | fw1 | securid | tacacs | radius> [authenticationServerName]
[-m serverName -u user -p password]
Re-authenticating when using SmartConsole Clients
When one SmartConsole client runs another SmartConsole client, Multi-Domain Security Management uses the credentials entered when the administrator logged into the first client.
However, there are cases where it is useful to require administrators to re-authenticate for each SmartConsole client they launch. When using RSA SecurID to authenticate Multi-Domain Security Management administrators, for instance, it is common to require re-authentication when SmartConsole Clients connect to Multi-Domain Servers or Domain Management Servers.
You can compel administrators to re-authenticate every time a new GUI client is launched and connects to:
a specific Domain Management Server

Deploying Multi-Domain Security Management
Multi-Domain Security Management Administration Guide R77 | 27
all Domain Management Servers created on this system in the future
this Multi-Domain Server or Multi-Domain Log Server
The instructions for each are listed below.
...When Connecting to a Specific Domain Management Server
Run these commands from a root shell on the Multi-Domain Server that hosts the specified Domain Management Server:
dbedit -s <Domain Management Server IP > -u <name of administrator with edit permissions for
this Domain Management Server> -p
< administrator password>
modify properties firewall_properties fwm_ticket_ttl 0
update properties firewall_properties
quit
If the relevant Domain has more than one Domain Management Server, synchronize the Domain Management Servers for the change to take effect on both. If the Domain owns one or more Log Servers, the Install Database operation should be performed on each Domain Log Server for the change to take effect.
...When Connecting to all Domain Management Servers Created on This System in the Future
Do these steps in the root directory of each Multi-Domain Server:
1. Run mdsenv.
2. Open $MDS_TEMPLATE/conf/objects_5_0.C in a text editor.
3. Find the line that contains: fwm_ticket_ttl.
4. Replace it with the line: fwm_ticket_ttl (0).
...When Connecting to this Multi-Domain Server or Multi-Domain Log Server
Run these command in a root shell on the Multi-Domain Server hosting the Domain Management Server:
dbedit -s <IP of the Multi-Domain Server or Multi-Domain Log Server> -u <name
of the administrator with edit permissions for the Global Policy of the
Multi-Domain Server> -p <password of the administrator>
modify properties firewall_properties fwm_ticket_ttl 0
update properties firewall_properties
quit
If the Multi-Domain Security Management configuration consists of more than one Multi-Domain Server or Multi-Domain Log Server, synchronize the Global Policy for this change to take effect on all Multi-Domain Server or Multi-Domain Log Server machines.
CPMI Protocol
The CPMI (Check Point Management Interface) protocol is a generic open protocol that allows third party vendors to interoperate with Check Point management products. The client side of CPMI is included in the OPSEC SDK documentation, so third-party products can integrate with the Domain Management Servers. See the CPMI guide in the OPSEC SDK documentation.

Deploying Multi-Domain Security Management
Multi-Domain Security Management Administration Guide R77 | 28
Configuring the Primary Multi-Domain Server This procedure assumes that you have already installed your new Primary MDS on Gaia or SecurePlatform. See the R77 Installation and Upgrade guide to learn more about the installation procedures.
To configure the Primary Multi-Domain Server:
1. Log into the SmartDomain Manager using the SmartDomain Manager management IP address.
2. Go to the General tab > Multi-Domain Server Contents.
The newly installed Primary MDS shows automatically under Multi-Domain Security Management.
3. Right-click the Primary Multi-Domain Server object and select Configure Multi-Domain Server.
4. In the Multi-Domain Server Configuration window > General tab, define these parameters:
Domain Management Server IPv4 Address Range - Enter a range of valid IPv4 addresses for automatic assignment to new Domain Management Servers.
Important - You must always assign an IPv4 address to a Multi-Domain Server, Multi-Domain Log Server or Domain Management Server. The IPv6 address is optional.
IPv6 Address - Enter the IPv6 address.
Domain Management Server IPv6 Address Range - Enter a range of valid IPv6 addresses for automatic assignment to new Domain Management Servers.
If your Multi-Domain Server is installed on Gaia, make sure that you also activate IPv6 with the Gaia WebUI or CLI. See the R77 Installation and Upgrade Guide (http://supportcontent.checkpoint.com/documentation_download?ID=24831) for instructions.
5. On the Licenses tab, add a valid license for this Multi-Domain Server.
6. On the Additional Information tab:
Optional: Change the Status Checking Interval.
Sets the interval for getting status information from Multi-Domain Servers, the Multi-Domain Log Server and Domain Management Servers (default = 300 seconds).
Optional: Click Enable SmartLog to enable the SmartLog feature for all Domains on this Multi-Domain Server.
Enabling IPv6 Support If your environment uses IPv6 addresses, you first must enable IPv6 support for the Multi-Domain Server and for any existing Domain Management Servers. It is not necessary to enable IPv6 support for Domain Management Servers that are created after IPv6 is enabled on the Multi-Domain Server, because this is done automatically.
Before enabling IPv6 support for the Multi-Domain Server:
1. Enable IPv6 on Gaia and assign an IPv6 address to the management interface.
2. Write down the Multi-Domain Server IPv6 address and the names and IPv6 address for all Domain Management Servers. This is necessary because the procedures disconnect the SmartDomain Manager.
To enable IPv6 support for the Multi-Domain Server:
1. From the Multi-Domain Server command line, run mdsconfig.
2. Select IPv6 Support for Domain Management Server.
3. Press y when asked to change the IPv6 preferences for the Multi-Domain Server.
Press y again to confirm.
4. Enter the management interface name (typically eth0).
5. Enter the Multi-Domain Server IPv6 address.
6. Press y to start Check Point services.
After a few moments, the mdsconfig menu shows.
To enable IPv6 support for all existing Domain Management Servers:
1. From the mdsconfig menu, select IPv6 Support for Existing Domain Management Servers.
2. Press y when asked to change the IPv6 preferences for Domain Management Servers.

Deploying Multi-Domain Security Management
Multi-Domain Security Management Administration Guide R77 | 29
3. Press a to add support to an existing Domain Management Server.
4. Press y to add Support to all Domain Management Servers at once.
5. Press m to manually add IPv6 addresses
Or
Press r to automatically assign IPv6 address from a specified range.
6. Do the instructions on the screen to enter the IPv6 address or a range of IPv6 addresses when prompted.
To manually enable IPv6 support for specified Domain Management Servers.
1. From the mdsconfig menu, select IPv6 Support for Existing Domain Management Servers.
2. At the prompt, press y to change the IPv6 preferences for Domain Management Servers.
3. Press a to add support to an existing Domain Management Server.
4. Press n when asked to enable IPv6 support for all Domain Management Servers at once.
Press y to confirm.
5. At the prompt, enter the Domain Management Server name.
The available Domain Management Servers show above prompt. You can copy and paste the name.
6. Enter the IPv6 address.
7. At the prompt, press y to enable another Domain Management Server or n to complete the procedure.
Disabling IPv6 Support The procedure for disabling IPv6 support includes these steps:
1. Disable IPv6 support for all Domain Management Servers.
2. Disable IPv6 support for the Multi-Domain Server.
You must disable IPv6 support for all Domain Management Servers before you can disable IPv6 support for the Multi-Domain Server.
To disable IPv6 support for all Domain Management Servers:
1. At the Multi-Domain Server CLI, run mdsconfig.
2. Select IPv6 Support for Existing Domain Management Domain Management Servers.
This command disables IPv6 for all currently defined Domain Management Servers on this Multi-Domain Server.
3. Press y at the prompt to disable IPv6 support for all Domain Management Servers.
Press y again to confirm.
To disable IPv6 support for a Multi-Domain Server:
1. From the mdsconfig menu, select IPv6 Support for Domain Management Server.
2. Press y at the prompt to change IPv6 preferences for Domain Management Servers.
3. Press r to disable IPv6 support for Domain Management Servers.
4. Press y disable IPv6 support for all Domain Management Servers.
Press y again to confirm.
5. Enter the interface name at the prompt.
You can also disable IPv6 support for some (but not all) Domain Management Servers. In this case, you cannot disable IPv6 support for the Multi-Domain Server.
To disable IPv6 for individual Domain Management Servers:
1. From the mdsconfig menu, select IPv6 Support for Domain Management Server.
2. Press y at the prompt to change IPv6 preferences for Domain Management Servers.
3. Press r to disable IPv6 support for Domain Management Servers.
4. Press n when asked to disable IPv6 support for all Domain Management Servers. Press y again to confirm.
5. Press y at the prompt to enable another Domain Management Server or n to complete the procedure.

Deploying Multi-Domain Security Management
Multi-Domain Security Management Administration Guide R77 | 30
Using SmartDomain Manager After you set up your primary Multi-Domain Server, use the SmartDomain Manager to configure and manage the Multi-Domain Security Management deployment. Ensure that you have installed the SmartDomain Manager software on your computer and that your computer is a trusted GUI Client. You must be an administrator with appropriate privileges (Superuser, Global Manager, or Domain Manager) to run the SmartDomain Manager.
Launching the SmartDomain Manager
To start the SmartDomain Manager:
1. Click Start > All Programs > Check Point SmartConsole R77 > SmartDomain Manager.
2. Optional: Select Demo mode.
3. If you are not using the Demo mode:
a) Enter the SmartDomain Manager host name or IP address.
b) Do one of these authentication steps:
Enter an administrator name and password.
Click Certificate and then select or navigate to the applicable certificate.
c) Optional: Enter a session description in the applicable field.
4. Click Login.
The SmartDomain Manager connects to the Multi-Domain Server.
The SmartDomain Manager opens, showing all network objects and menu commands that you have permission to work with.
5. If necessary, confirm the connection using the fingerprint generated during installation.
This only occurs the first time that you log in to a Security Management Server or SmartDomain Manager from a client computer.
Demo Mode
You can open the SmartDomain Manager in Demo mode. This mode does not require authentication or a connection to the Multi-Domain Server. Use the Demo mode to experiment with different objects, views, modes and features before you create a production system. The Demo mode includes several pre-configured sample Domains, Domain Management Servers, Security Gateways and policies.
Operations performed in Demo mode are stored in a local database. You can continue a Demo session from the point at which you left off in a previous session.
Multiple Multi-Domain Server Deployments In Multi-Domain Security Management systems where more than one Multi-Domain Server is installed, you need to take various configuration factors into account. The following section describes what in detail you need to know.
Synchronizing Clocks
All Multi-Domain Server system clocks must be synchronized to the second to ensure proper operation. Before creating a new Multi-Domain Server, you must first synchronize the new computer clock with other Multi-Domain Server platforms in the system.
You can synchronize Multi-Domain Server clocks using any synchronization utility. It is recommended that all the Multi-Domain Server clocks be synchronized automatically at least once a day to compensate for clock drift.

Deploying Multi-Domain Security Management
Multi-Domain Security Management Administration Guide R77 | 31
Configuring Secondary Multi-Domain Server or a Multi-Domain Log Server
The procedure for creating a Secondary Multi-Domain Server or a Multi-Domain Log Server is similar installing a new Multi-Domain Server, but with some additional steps. This procedure assumes that you already installed and configured the Primary Multi-Domain Server and installed the new Secondary Multi-Domain Server or Multi-Domain Log Server on a supported platform. See the R77 Installation and Upgrade guide to learn more about the installation procedures.
Important - You must synchronize existing Multi-Domain Server clocks with the newly installed Secondary Multi-Domain Server before starting this procedure.
To configure a secondary Multi-Domain Server or a Multi-Domain Log Server:
1. In the SmartDomain Manager go to the General tab > Multi-Domain Server Contents.
2. Right-click Multi-Domain Security Management and elect New Multi-Domain Server.
3. In the Multi-Domain Server Configuration window, enter the Multi-Domain Server computer name.
The computer name must match the computer name defined when you installed the Multi-Domain Server.
4. Define these IP address parameters:
Enter the IPv4 address or click Resolve IPv6 From Name to get the IPV4 address from the DHCP server.
Important - You must always assign an IPv4 address to a Multi-Domain Server, Multi-Domain Log Server or Domain Management Server. The IPv6 address is optional.
IPv6 Address - Enter the IPv6 address.
Domain Management Server IPv6 Address Range - Enter a range of valid IPv6 addresses for automatic assignment to new Domain Management Servers.
If your Multi-Domain Server is installed on Gaia, make sure that you also activate IPv6 with the Gaia WebUI or CLI. See the R77 Installation and Upgrade Guide (http://supportcontent.checkpoint.com/documentation_download?ID=24831) for instructions.
5. Click Communication to establish SIC trust. Enter the Activation Key that you defined while installing the Multi-Domain Server or Multi-Domain Log Server.
6. Click Initialize. If SIC trust succeeds, the Trust State field shows Trust established.
If you are setting up a High Availability deployment, a prompt appears asking you to do an Initial synchronization. This operation synchronizes the primary and secondary Multi-Domain Servers.
7. Optional: Click Enable SmartLog to enable the SmartLog feature for all Domains on this Multi-Domain Server.
8. Click Yes to start the synchronization. When the synchronization finishes, click OK to continue.
9. If you created a new Multi-Domain Server, you can now connect directly to it.
10. On the Licenses tab, add a valid license for this Multi-Domain Server.
11. On the Additional Information tab:
Optional: Change the Status Checking Interval.
Sets the interval for getting status information from Multi-Domain Servers, the Multi-Domain Log Server and Domain Management Servers (default = 300 seconds).
Optional: Click Enable SmartLog to enable the SmartLog feature for all Domains on this Multi-Domain Server.
Multi-Domain Log Server Configuration - Additional Step
If you created a Multi-Domain Log Server, set up your Log Servers for Domain activity logging. See Logging in Multi-Domain Security Management (on page 93).

Deploying Multi-Domain Security Management
Multi-Domain Security Management Administration Guide R77 | 32
Changing an Existing Multi-Domain Server or Multi-Domain Log Server
This procedure assumes that the Multi-Domain Server or Multi-Domain Log Server has already been installed and configured.
To change an existing Multi-Domain Server or Multi-Domain Log Server:
1. In the SmartDomain Manager General view Multi-Domain Server Contents mode, double-click the applicable Multi-Domain Server.
2. In the Multi-Domain Server Configuration window, define these IP address parameters as necessary:
Domain Management Server IPv4 Address Range - Enter a range of valid IPv4 addresses for automatic assignment to new Domain Management Servers.
IPv6 Address - Enter the IPv6 address.
Domain Management Server IPv6 Address Range - Enter a range of valid IPv6 addresses for automatic assignment to new Domain Management Servers.
If your Multi-Domain Server is installed on Gaia, make sure that you also activate IPv6 with the Gaia WebUI or CLI. See the R77 Installation and Upgrade Guide (http://supportcontent.checkpoint.com/documentation_download?ID=24831) for instructions.
3. If there is no SIC trust, do these steps to re-establish SIC trust:
a) From the Multi-Domain Server CLI, run the mdsconfig utility.
b) From the Configuration Options menu, do the instructions on the screen to re-initialize SIC communication.
c) In the SmartDomain Manager Multi-Domain Server Configuration window, click Communication.
d) In the Communication window, click Reset.
e) Enter the Activation Key that you specified with the mdsconfig utility.
f) Click Initialize.
If SIC trust succeeds, the Trust State field shows Trust established.
4. On the Licenses tab, add a valid license for this Multi-Domain Server.
5. On the Additional Information tab:
Optional: Change the Status Checking Interval.
Sets the interval for getting status information from Multi-Domain Servers, the Multi-Domain Log Server and Domain Management Servers (default = 300 seconds).
Optional: Click Enable SmartLog to enable the SmartLog feature for all Domains on this Multi-Domain Server.
Deleting a Multi-Domain Server
If you want to delete an Multi-Domain Server, do so only if you are certain that you no longer need it. If you delete a Multi-Domain Server in error, you will have to reconfigure it from the beginning (including its Domain Management Servers and Security Gateways).
To delete one Multi-Domain Server:
1. In the SmartDomain Manager General view Multi-Domain Server Contents mode, right click a Multi-Domain Server and select Delete Multi-Domain Server.
2. Confirm the deletion and click OK.
To delete more than one Multi-Domain Server or Multi-Domain Log Server:
1. In the SmartDomain Manager General view Multi-Domain Server Contents mode, right click each Multi-Domain Server or Multi-Domain Log Server and then select Delete Multi-Domain Server.
2. Confirm the deletions and click OK.
3. Open SmartDashboard for each Domain Management Server on the primary Multi-Domain Server on which you had a High Availability Domain Management Server or Multi-Domain Log Server installed.
4. Delete the applicable High Available Domain Management Servers and Domain Log Server.
Confirm license detach and that the fact that the object is still defined in the database.

Deploying Multi-Domain Security Management
Multi-Domain Security Management Administration Guide R77 | 33
5. Install the database on all defined Domain Management Servers and log servers.
6. Install policies on Security Gateways used as a source for getting policies or log receivers.
Licensing
Licensing Overview
This Multi-Domain Security Management version uses a simplified licensing model that matches its scalable architecture. This lets you purchase licenses according to the size and complexity of your deployment. You only purchase the management Software Blade licenses that you need. You can always add additional licenses as your deployment grows.
Multi-Domain Security Management uses the Check Point Software Blade architecture. You install and license management Blades on the Multi-Domain Server. For an environment that uses multiple Multi-Domain Servers, you must install the Blades on each Multi-Domain Server.
Dedicated log servers (Multi-Domain Log Servers and Log Servers) have their own special licenses.
The Trial Period
All Check Point products have a 15 day trial period. During this period the software is fully functional and all features are available without a license. After this period, you must obtain an extended evaluation license or a permanent license to continue using the software.
The Multi-Domain Security Management trial period begins as soon you install a Multi-Domain Server (regardless of its type). The trial license has a limit of 200 Domain Management Servers.
Each Domain Management Server has its own trial license for a primary Domain Management Server managing an unlimited number of Security Gateways. This license supports the Check Point SmartUpdate and SmartMap features. It expires on the same day as the Multi-Domain Server trial license.
License Types
This section includes details about the various license types in a Multi-Domain Security Management deployment. Refer to the User Center for current information about license types and bundles.
Multi-Domain Server Licenses
You must install a Global Policy Software Blade license on all Multi-Domain Servers. You can add blade licenses for other Check Point management features according to your requirements. In a high availability deployment, the same Blade licenses must be installed on all Multi-Domain Servers.
All Multi-Domain Servers in your deployment must have licenses attached for the same optional Software Blades. You cannot attach an optional software blade to one Multi-Domain Server and not the others.
If you are upgrading to R77 from an earlier version, you can attach a free Enabler license to your existing Multi-Domain Server licenses that lets you use the new functionality. You must still attach Software Blade licenses for optional features.
Domain Management Server Licenses
Each Domain Management Server requires a Domain Management Server license. In a High Availability deployment, you must attach a full license to the first Domain Management Server. You can then attach High Availability blade licensees to any additional Domain Management Servers. Each additional Domain Management Server must be maintained on a different Multi-Domain Server.
Domain Management Servers are licensed according to the number of Security Gateways they manage. Domain Management Server licenses are available in these bundles:
A Domain with up 2 Security Gateways.
A Domain with up to 10 Security Gateways.
Deploying Multi-Domain Security Management
Multi-Domain Security Management Administration Guide R77 | 34
A Domain with an unlimited number of Security Gateways.
Domain Management Server licenses are associated with their Multi-Domain Server. You can freely move licenses among Domain Management Servers on the same Multi-Domain Server, but you cannot move licenses to a different Multi-Domain Server.
The number of QoS Security Gateways managed by a Domain Management Server is unlimited and requires no special license.
VSX Licenses
VSX Virtual Systems can use Domain Management Server licenses without any additional licensing requirements. If you are managing only one Virtual System in a Domain, you can purchase a special one-Domain license.
Log Server Licenses
A Multi-Domain Log Server is a specialized Multi-Domain Server that can only host Log Servers. Each Domain Log Server requires its own Domain Log Server license, whether it is hosted by a Multi-Domain Log Server or a Multi-Domain Server.
Security Gateway Licenses
Each Domain Security Gateway requires the appropriate Software Blade licenses. Security Gateways are licensed according to the number of nodes at a site. A node is any computing device with an IP address connected to the protected network.
Multi-Domain Security Management also supports Quality of Service (QoS) Security Gateways.
Managing Licenses
You can use SmartUpdate to manage licenses for Multi-Domain Servers, Domain Management Servers, Domain Security Gateways, and Software Blades. SmartUpdate lets you add licenses to a central repository and assign them to components as necessary.
You can also manage Domain Management Server component and blade licenses directly from the Domain Management Server Configuration Window from the SmartDomain Manager General view. If you save your licenses in the SmartUpdate central repository, you can get these licenses from the repository by using this window.
License Violations
A license violation occurs when the trial license or an evaluation, or other time-limited license expires. When a license violation occurs, syslog messages are sent, pop-up alerts show in the SmartDomain Manager, and audit entries in SmartView Tracker show the nature of the violation. In addition, the status bar of the SmartDomain Manager shows a license violation message.
If a Multi-Domain Server is in the license violation state, you cannot define any new Domain Management Servers. Otherwise the system continues to function normally. Licenses are enforced separately for each Multi-Domain Server. This means that if there is a license violation for one Multi-Domain Server, all other Multi-Domain Servers will continue to operate normally if their licenses are valid.
Managing Licenses Using SmartUpdate
To manage licenses using SmartUpdate, select the SmartUpdate view in the SmartDomain Manager Selection Bar. If you loaded SmartUpdate, you can also right-click a Multi-Domain Server object and select Applications > SmartUpdate from the Options menu. Licenses for components and blades are stored in a central repository.
To view repository contents:
1. Select SmartUpdate from the SmartDomain Manager Main menu.

Deploying Multi-Domain Security Management
Multi-Domain Security Management Administration Guide R77 | 35
2. Select SmartUpdate > Network Objects License & Contract > View Repository. The repository pane shows in the SmartUpdate view.
To add new licenses to the repository:
1. Select SmartUpdate from the SmartDomain Manager Main menu.
2. Select SmartUpdate > Network Objects License & Contract > Add License.
3. Select a method for adding a license:
From User Center - Obtain a license file from the User Center.
From file - Import a license file to the repository.
Manually - Open the Add License window and enter licenses information manually. You can copy the license string from a file and click Past License to enter the data.
You can now see the license in the repository.
To attach a license to a component:
1. Select SmartUpdate from the SmartDomain Manager Main menu.
2. Select SmartUpdate > Network Objects License & Contract > Attach License.
3. Select a license from the Attach Licenses window. The license shows as attached in the repository.
You can manage other license tasks with SmartUpdate. See the R77 Security Management Administration Guide (http://supportcontent.checkpoint.com/documentation_download?ID=24830).
Adding Licenses from the Configure Domain Management Server Window
This section shows the procedure for adding Domain Management Server component and blade licenses from the Configure Domain Management Server Window.
To add a Multi-Domain Server/Multi-Domain Log Server license to a Multi-Domain Server:
1. In the SmartDomain Manager, go to the General view.
2. Double-click a Domain Management Server. The Configure Domain Management Server window opens.
3. Click Add License and select one of these options:
Add License Information Manually
a) Click Manually.
b) In the email message that you received from Check Point, select the entire license string (starting
with cplic putlic... and ending with the last SKU/Feature) and copy it to the clipboard.
c) In the Add License window, click Paste License to paste the license details you have saved on the clipboard into the Add License window.
d) Click Calculate to display your Validation Code. Compare this value with the validation code that you received in your email. If validation fails, contact the Check Point licensing center, providing them with both the validation code contained in the email and the one displayed in this window.
Import a License File
a) Click Fetch From File.
b) In the Open window, browse to and double-click the desired license file.
Get from the License Repository
a) Click From License Repository. This option is only available if you have valid, unattached licenses in the repository.
b) In the Select Domain License select, click a Domain Management Server license. The license automatically attaches to the Domain Management Server and the window closes.
Multi-Domain Security Management Administration Guide R77 | 36
Chapter 4
Administrator Management
In This Section: Creating or Changing an Administrator Account .................................................... 36
Deleting an Administrator ........................................................................................ 39
Defining Administrator Properties ........................................................................... 39
Defining Administrator Groups - Flow ..................................................................... 39
Managing Administrator Account Expiration ........................................................... 40
Working with Permission Profiles............................................................................ 42
Showing Connected Administrators ........................................................................ 45
Multi-Domain Security Management Administrators use SmartDomain Manager and SmartConsole clients to manage the Multi-Domain Security Management deployment. Each administrator has permissions to manage different aspects of the environment.
Creating or Changing an Administrator Account This procedure lets you add a new administrator account or change an existing administrator account.
To add a new administrator account:
1. In the SmartDomain Manager, go to the Administrators view.
2. Right-click an empty area in the Administrators pane. The Add Administrator window opens.
3. Continue to configure administrator properties as necessary.
To edit an existing new administrator account:
1. In the SmartDomain Manager, go to the Administrators view.
2. Double-click an existing administrator in the Administrators pane. The Edit Administrator window opens.
3. Continue to configure administrator properties as necessary.
Administrator - General Properties
The administrator general properties include basic information such as the administrator name, type and the administrator expiration date.
To configure administrator general properties:
1. In the Add or Edit Administrator window, go to the General Properties pane.
2. Enter a unique Administrator Name. The administrator name cannot contain spaces or special characters.
3. Select Launch Global SmartDashboard in Read Only mode if this administrator can see but not change settings in the Global SmartDashboard.
4. Optionally, add an email address or comment to this administrator definition.
Selecting an Administrator Type
Multi-Domain Security Management uses different administrator types, each with a different scope of administrative authority. This table shows the different administrator types:

Administrator Management
Multi-Domain Security Management Administration Guide R77 | 37
Administrator Permissions
Multi-Domain Superuser
Manages the Multi-Domain Security Management deployment, including all Domains, Multi-Domain Servers, Domain Management Servers, and administrator accounts.
Multi-Domain superusers can do these tasks for Multi-Domain Servers:
Add, edit or delete Multi-Domain Servers and Multi-Domain Log Servers.
Allow or block access the SmartDomain Manager.
Domain Superuser
Manages networks for all Domains using the SmartDomain Manager and SmartConsole clients. Domain superusers can create, edit and delete Domains as well as see all Domain network objects.
Domain superusers can manage Global Managers, Domain Managers and None administrators. They cannot configure the Multi-Domain Server environment or manage Multi-Domain Superusers.
Global Manager Manages global policies, global objects and specified Domain networks. Global managers can see information or do actions according to their permissions profile settings.
Global managers can manage Domain Managers and None administrators. Global managers can only see network objects in their assigned Domains. They cannot create new Domains.
Domain Manager
Manages specified Domain networks. Domain managers can use SmartConsole clients to see information or do actions according to their permissions profile settings.
Domain Managers can manage None administrators. They cannot access the Global SmartDashboard to manage global objects and global policies.
None Do not have permissions to manage Multi-Domain Security Management or use the SmartDomain Manager. None administrators can manage specified Domain networks, using the SmartConsole clients.
To select an administrator type:
1. In the Add or Edit Administrator window, go to the General Properties pane.
2. Select Launch Global SmartDashboard in Read Only mode to prevent this administrator from changing global properties.
3. Select an administrator type.
Configuring the Expiration Date
You can assign an expiration date to each administrator account. After this expiration date, the administrator cannot:
Log in to the SmartDomain Manager,
Do actions in the Multi-Domain Security Management environment.
Use the SmartConsole clients.
Note - Multi-Domain Security Management account expiration has no effect on operating system administrators. Operating system administrators, which are different from Multi-Domain Security Management administrators, can always access the Multi-Domain Server command line.
Multi-Domain Security Management includes tools for managing expiration dates and warning administrators of impending expirations. Administrators can manage expiration dates for other administrators with a lower level administrator type. Typically, Multi-Domain Security Management or Domain superusers do these management tasks.
To configure the expiration date:
1. In the Add or Edit Administrator window, go to the General Properties pane.
2. Do one of these steps to set the expiration date:

Administrator Management
Multi-Domain Security Management Administration Guide R77 | 38
Select Expire at and then select an expiration date using the calendar control.
OR
Select Never expires to prevent this administrator account from expiring.
You can configure the default expiration dates ("Configuring Default Expiration Settings" on page 42) that appear in this window in the Multi-Domain Security Management window.
Configuring Authentication
All administrators must authenticate to log in to the SmartDomain Manager and manage the Multi-Domain Security Management deployment. Select and configure an authentication method for this administrator.
To select and configure the authentication method:
1. In the SmartDomain Manager, create a new administrator or double-click an existing administrator.
2. In the Add or Edit Administrator window, go to the Authentication pane.
3. Select and configure one of these authentication methods:
Undefined - Administrators are not authenticated or are authenticated by a certificate created in the Certificates pane.
SecurID - Administrators enter a one-time password as displayed on the SecurID smart card.
Check Point Password - Administrators enter the Check Point products password. Enter and confirm the password.
OS Password - Administrators authenticate using their operating system password.
RADIUS - Administrators authenticate by a password defined on the specified RADIUS server.
TACACS - Administrators authenticate by a password defined on the specified TACACS server.
Configuring Certificates
You can create a certificate that let administrators connect to the Multi-Domain Server and Domain Management Servers. You can also revoke an existing certificate.
To create a certificate:
1. In SmartDomain Manager, create a new administrator or double-click an existing administrator.
2. In the Add or Edit Administrator window, go to the Authentication pane.
3. Click Generate and save.
4. In the message box, click OK to continue.
5. Enter and confirm the certificate password.
6. Save the certificate.
To revoke an existing certificate:
1. In SmartDomain Manager, create a new administrator or double-click an existing administrator.
2. In the Add or Edit Administrator window, go to the Authentication pane.
3. Click Revoke.
4. In the message box, click OK to confirm.
Administrator Management
Multi-Domain Security Management Administration Guide R77 | 39
Entering Administrator Properties
The Administrator Properties pane contains optional information, typically contact information or other descriptive data. Administrators with applicable permissions (typically superusers) define the fields ("Defining Administrator Properties" on page 39) that show in the Administrator Properties pane.
To enter administrator properties information:
1. In SmartDomain Manager, create a new administrator or double-click an existing administrator.
2. In the Add or Edit Administrator window, go to the Administrator Properties pane.
3. Enter information in the property fields as necessary.
Deleting an Administrator To delete an administrator:
1. In the SmartDomain Manager, go to the Administrators pane.
2. Right-click an existing administrator and then select Delete Administrator.
3. Click Yes in the confirmation window.
Defining Administrator Properties The Administrator Properties pane includes optional information fields, typically contact information or other descriptive data. Administrators, with applicable permissions, define the fields that show in the Administrator Properties pane.
To define the fields that show in the Administrator Properties pane:
1. Select Multi-Domain Security Management Properties from the SmartDomain Manager menu.
2. Go to the Administrator Fields pane.
3. Do one or more of these actions:
To add a new property field, click Add and then enter the field name in the pop-up window.
To delete a property field, select an existing field and then click Remove.
To change a property field name, click Edit and then enter a new field name.
To change the display order of a property field, select a field and then click the Up or Down arrow to move it.
Defining Administrator Groups - Flow Administrator groups are related collections of administrator accounts. This lets you manage and do operations on many administrators simultaneously.
Creating a New Group
To create a new administrator selection group:
1. In the SmartDomain Manager, select Manage > Selection Groups > Administrator Groups.
2. In the Administrator Selection Groups window, click Add.
3. In the Add Group window, enter a unique group name. Group names cannot contain spaces or special characters.
4. Select administrators from the Not in Group list and then click Add. The administrators show in the In Group list.
Changing or Deleting a Group
To change an administrator selection group:
1. In the SmartDomain Manager, select Manage > Selection Groups > Administrator Groups.
2. In the Administrator Selection Groups window, select a group and then click Edit.

Administrator Management
Multi-Domain Security Management Administration Guide R77 | 40
3. Select administrators from the Not in Group list and then click Add. The administrators show in the In Group list.
To delete an administrator selection group:
1. In the SmartDomain Manager, select Manage > Selection Groups > Administrator Groups.
2. In the Administrator Selection Groups window, select a group and click Edit.
3. In the confirmation window, click OK.
Managing Administrator Account Expiration You can assign an expiration date to each administrator. After this expiration date, the administrator cannot log in to the SmartConsole clients or do actions in the Security Management Server environment.
Note - Account expiration has no effect on operating system administrators. Operating system administrators are different from administrators defined in SmartDomain Manager and can continue access the command line.
SmartDomain Manager includes tools for managing expiration dates and warning administrators of impending expirations.
Working with Expiration Warnings
There are different methods to give warnings that administrator accounts will expire in a short time or have already expired. This section gives explanations for these warnings and procedures for correcting the issue.
Log In Warning
This warning message opens after you log in to the SmartDomain Manager if your administrator account is about to expire.
Speak to the administrator responsible for managing your administrator account to update the expiration date. If you have the applicable permissions, you can change the expiration date ("Configuring the Expiration Date" on page 37) in your own account.
The administrator can disable this warning message by selecting the Do not show this again option. She can re-enable the warning by selecting Enable administrator expiration warning from the SmartDomain Manager Manage menu.
Using the Expired Accounts Window
The Expired Accounts window shows all administrator accounts that have expired or are near their expiration date. If there are administrators in this condition, the Expired Accounts link shows in the SmartDomain Manager status bar.
To use the Expired Accounts window, you must activate this feature ("Configuring Default Expiration Settings" on page 42) in the Administrator Global Properties pane in the Multi-Domain Security Management Properties window. By default, the Expired Accounts window is activated.
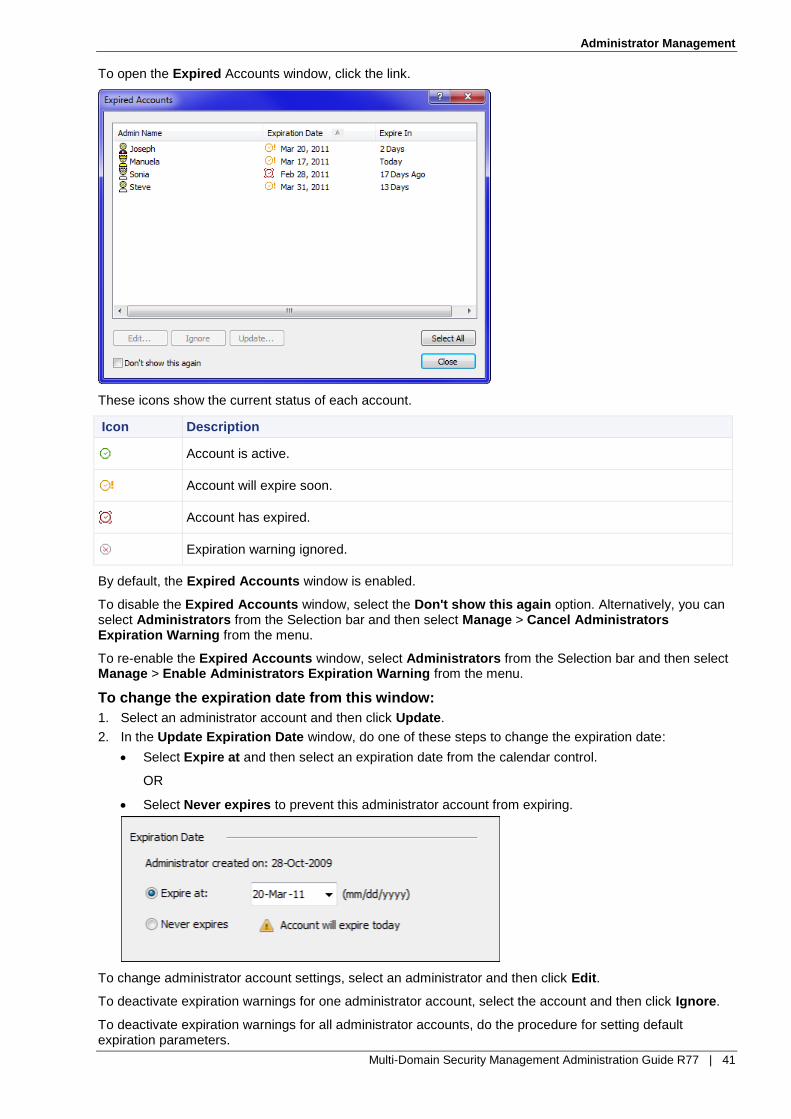
Administrator Management
Multi-Domain Security Management Administration Guide R77 | 41
To open the Expired Accounts window, click the link.
These icons show the current status of each account.
Icon Description
Account is active.
Account will expire soon.
Account has expired.
Expiration warning ignored.
By default, the Expired Accounts window is enabled.
To disable the Expired Accounts window, select the Don't show this again option. Alternatively, you can select Administrators from the Selection bar and then select Manage > Cancel Administrators Expiration Warning from the menu.
To re-enable the Expired Accounts window, select Administrators from the Selection bar and then select Manage > Enable Administrators Expiration Warning from the menu.
To change the expiration date from this window:
1. Select an administrator account and then click Update.
2. In the Update Expiration Date window, do one of these steps to change the expiration date:
Select Expire at and then select an expiration date from the calendar control.
OR
Select Never expires to prevent this administrator account from expiring.
To change administrator account settings, select an administrator and then click Edit.
To deactivate expiration warnings for one administrator account, select the account and then click Ignore.
To deactivate expiration warnings for all administrator accounts, do the procedure for setting default expiration parameters.

Administrator Management
Multi-Domain Security Management Administration Guide R77 | 42
Add or Change Administrator Window Warning
This warning shows in the administrator General Properties pane if the account is about to expire. Make sure that the expiration date is correct and update if necessary.
Configuring Default Expiration Settings
The default expiration settings show when you define a new administrator account. These settings include:
The default expiration date.
The number of days before expiration that warnings show after log in.
The number of days before expiration that the administrator account shows in the Expired Accounts window.
To configure the default expiration parameters:
1. In the SmartDomain Manager, select Manage > Multi-Domain Security Management Properties.
2. In the Multi-Domain Security Management Properties window, select Administrator Accounts.
3. In the Administrator Accounts window, set the expiration date using one of these options:
Never Expires - Select if this administrator account does not expire.
Expire at - Select and then click the arrow on the text box. Select the expiration date using the calendar control.
Expire after - Select and enter the number of days (from today) before this account expires.
4. Select Notify during login to show an expiration warning message when an administrator logs in. Enter the number of days before expiration that a warning shows.
5. Select Show indication on status bar to activate the Expired Accounts link. This link opens the Expired Accounts window.
6. Select Allow Global and Domain Managers to create/edit permission profiles to let these administrators create or change other administrator accounts. Global and Domain managers must have the Read_Write_All permission profile assigned to them to be able to edit an administrator with a lower permission level. For example:
A Global Manager can edit a Domain Manager and None administrators.
A Domain Manager can only edit None administrators.
Working with Permission Profiles A permissions profile is a predefined set of SmartConsole administrative permissions that you assign to administrators and Domains. This feature lets you manage complex, granular permissions for many administrators with one definition. Permission profiles do not apply to SmartDomain Manager activities.
When you assign an administrator account to a domain, you must assign a permissions profile ("Assigning Permission Profiles" on page 67). You can assign a predefined permissions profile or you can create a unique, Domain-specific permissions profile for the administrator.
Administrators with applicable permissions can create and manage permissions profiles. By default, only superusers can create or configure permissions profiles. You can change the global properties ("Configuring Permissions" on page 43) to let global and Domain managers create and configure permission profiles for their assigned Domains.
Multi-Domain Security Management includes default permissions profiles:

Administrator Management
Multi-Domain Security Management Administration Guide R77 | 43
None_All_Profile - Administrators cannot use SmartConsole applications to see or configure settings.
Read_Only_All_Profile - Administrators can use SmartConsole only to see information. They cannot configure settings.
Read_Write_All_Profile - Administrators can use SmartConsole applications to see and configure all settings.
Read_Write_All_Profile_no_dlp - Administrators can use SmartConsole applications to see and configure all settings with the exception of DLP.
You can assign one of the default permissions profiles to any administrator and domain.
Configuring Permissions
This section includes procedures for creating, changing and deleting permission profiles. Administrators with the applicable permissions can create, edit or delete permissions profiles.
To create or change a permissions profile:
1. Select the Menu icon > Manage > Manage Permissions Profiles.
2. In the Permissions Profile window, click New or select an existing Permissions Profile.
3. In the Permissions Profile Properties window, configure permissions profile settings.
Note - You can also create a new permissions profile while assigning a profile to an administrator in a Domain.
To delete an existing permissions profile:
1. In SmartDashboard, select Manage > Manage Permissions Profiles.
2. In the Permissions Profile window, click Delete.
3. Click Yes to confirm.
To configure permissions profile settings:
1. In the Allow access via section, select one of these options:
Management Portal and SmartConsole Applications - Permissions to use SmartConsole applications and the Management Portal to connect a Domain Management Server.
Management Portal only - Permissions to connect to a Domain Management Server only with the Management Portal.
2. In the Permissions section, select one of these options:
Read/Write All - Full access to all Check Point products.
Read DLP logs - Permissions to:
See all fields of DLP logs in SmartView Tracker.
See incident messages and captured data. User emails can be read if they violate corporate Data Loss Prevention rules.
Send or discard quarantined user emails from SmartView Tracker. With the Customized option you can assign a subset of these permissions as necessary. For example, administrators can see the field content in DLP logs but not see the actual content of incidents.
Read Only All - Read-only access to all Check Point products.
Customized - Configure access to specified Check Point products and select the access type for each product or blade.
Configuring Customized Permissions
If you select Customized Permissions, you can define permissions for each Security Management Server resource (object, Policy and feature) separately. The resources show on four different panes in the Administrators Permission Configuration window. Each pane contains a list of related resources.
To configure customized permissions:
1. In the Permissions section, select Customized and then click Edit.
2. Select a pane in the Administrator Permissions Configuration window:
General - Security Policy, blades and features

Administrator Management
Multi-Domain Security Management Administration Guide R77 | 44
Monitoring and Logging - Monitoring and logging options
Events and Reports - SmartEvent and SmartReporter features
Provisioning - SmartProvisioning features and scripting
Endpoint - Endpoint Security Policy management and Endpoint Security client deployment and management.
3. Set permissions for the resources:
To prevent an administrator from seeing or configuring a resource, clear its checkbox.
To let the administrator see a resource (but not change it), select its checkbox and then select Read only.
To let the administrator see and configure a resource, select its checkbox and then select Read/Write.
Notes:
You cannot prevent administrators from seeing some resources. These resources options are disabled.
Some resources do not have permission selections. You can only select or clear them.
Managing Permission Profiles
By default, only Global and Domain superusers can create and configure permissions profiles. You can optionally let Global and Domain managers create and configure permissions profiles. Administrators with None permissions cannot manage permission profiles.
To let Global and Domain administrators manage permissions profiles:
1. Select Manage > Multi-Domain Security Management properties from the SmartDomain Manager menu.
2. In the Multi-Domain Security Management Properties window, select Administrator Accounts.
3. In the Administrator Accounts pane, select the Allow Global and Domain Managers to create/edit permissions profiles option.
To See the Latest Changes to Permissions Profiles
To see information about the latest changes to a permissions profile:
1. In the SmartDomain Manager, select Administrators (in the Selection Bar) > Manage > Permissions Profiles.
2. Select a permissions profile.
3. In the Permissions Profiles window, click Actions > Last Modified. The Last Modification window opens.
This window shows:
Date of the last change
Administrator who made the change
GUI client used to make the change
Seeing Administrators Using a Permissions Profile
To see which administrators are using a permissions profile:
1. In SmartDomain Manager, select Administrators (in the Selection bar) > Manage > Manage Permissions Profiles.
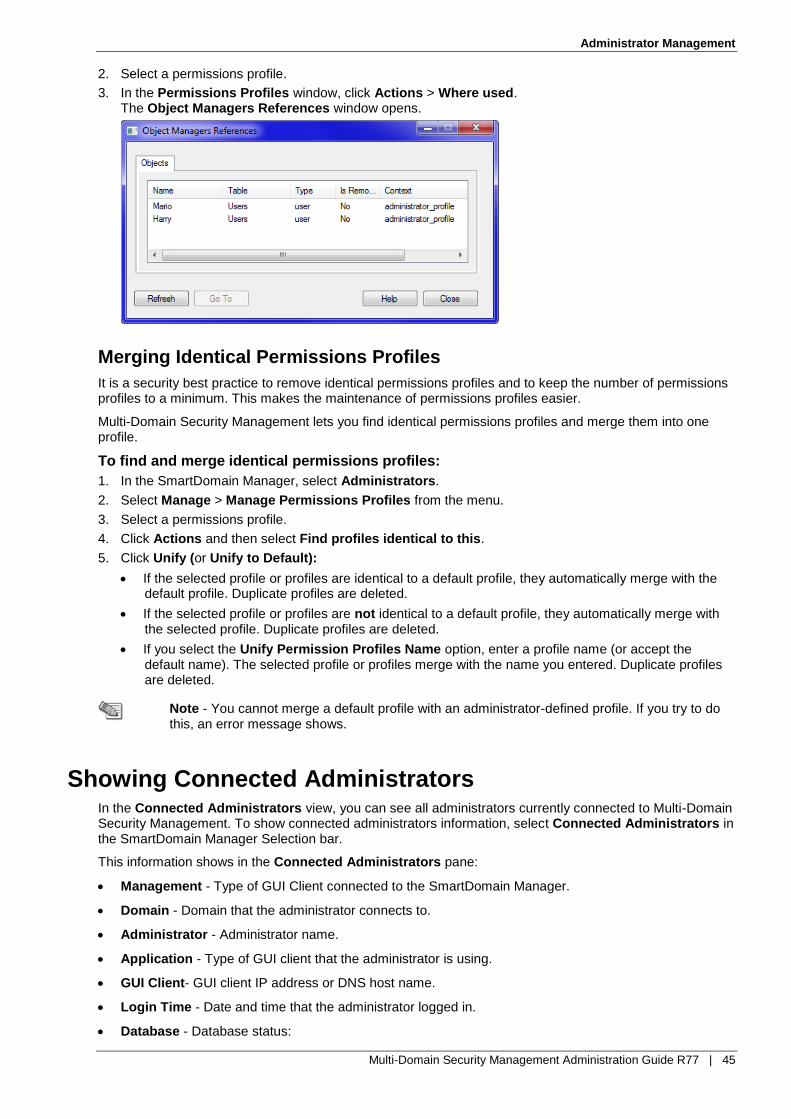
Administrator Management
Multi-Domain Security Management Administration Guide R77 | 45
2. Select a permissions profile.
3. In the Permissions Profiles window, click Actions > Where used. The Object Managers References window opens.
Merging Identical Permissions Profiles
It is a security best practice to remove identical permissions profiles and to keep the number of permissions profiles to a minimum. This makes the maintenance of permissions profiles easier.
Multi-Domain Security Management lets you find identical permissions profiles and merge them into one profile.
To find and merge identical permissions profiles:
1. In the SmartDomain Manager, select Administrators.
2. Select Manage > Manage Permissions Profiles from the menu.
3. Select a permissions profile.
4. Click Actions and then select Find profiles identical to this.
5. Click Unify (or Unify to Default):
If the selected profile or profiles are identical to a default profile, they automatically merge with the default profile. Duplicate profiles are deleted.
If the selected profile or profiles are not identical to a default profile, they automatically merge with the selected profile. Duplicate profiles are deleted.
If you select the Unify Permission Profiles Name option, enter a profile name (or accept the default name). The selected profile or profiles merge with the name you entered. Duplicate profiles are deleted.
Note - You cannot merge a default profile with an administrator-defined profile. If you try to do this, an error message shows.
Showing Connected Administrators In the Connected Administrators view, you can see all administrators currently connected to Multi-Domain Security Management. To show connected administrators information, select Connected Administrators in the SmartDomain Manager Selection bar.
This information shows in the Connected Administrators pane:
Management - Type of GUI Client connected to the SmartDomain Manager.
Domain - Domain that the administrator connects to.
Administrator - Administrator name.
Application - Type of GUI client that the administrator is using.
GUI Client- GUI client IP address or DNS host name.
Login Time - Date and time that the administrator logged in.
Database - Database status:

Administrator Management
Multi-Domain Security Management Administration Guide R77 | 46
Locked - The administrator is using SmartDashboard and has exclusive Read/Write access permissions to the Domain Management Server. The database is locked.
No Status - The administrator is using SmartDashboard with Read Only access permissions or is using a different GUI client.
Action Status - Status of requests to disconnect a GUI client:
Disconnection Request - Disconnection request is being processed. This status shows only to the user who is disconnecting.
Disconnect on - Shows the date and time when the GUI client is to be disconnected.
Cancellation Request - Request to cancel a disconnection request. The disconnection request can occur up to 60 minutes from the current time. Administrators can only disconnect connections for other administrators.
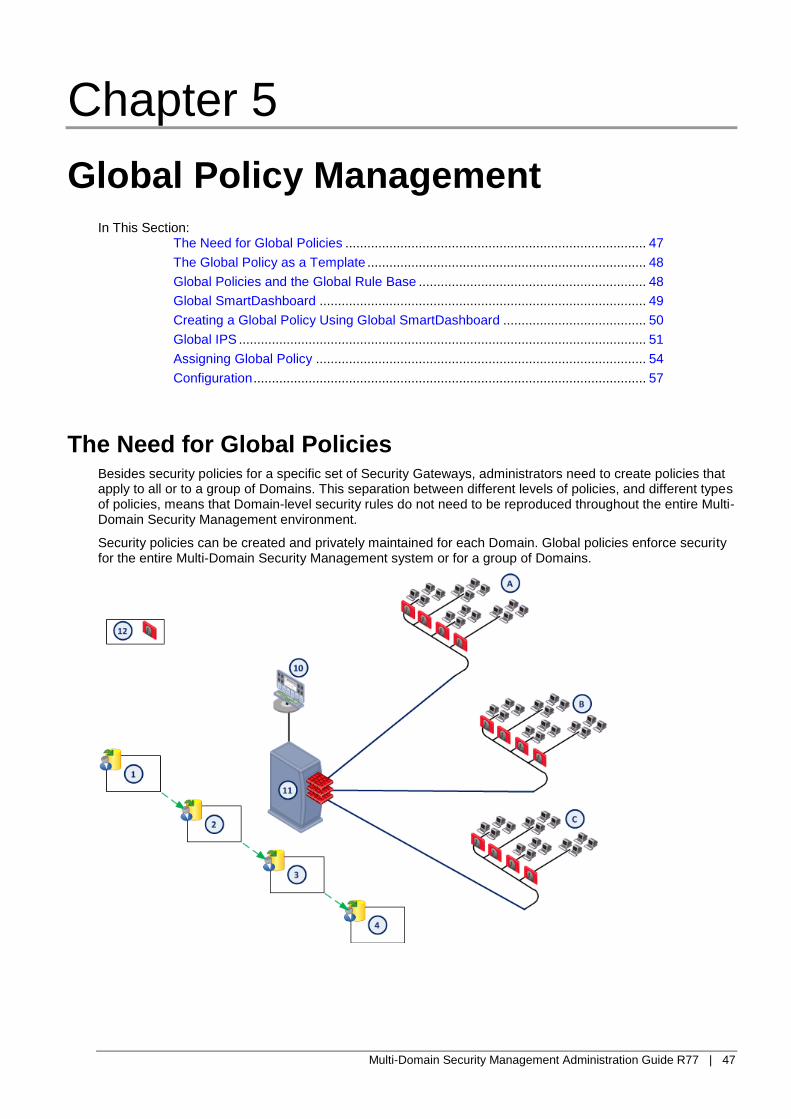
Multi-Domain Security Management Administration Guide R77 | 47
Chapter 5
Global Policy Management
In This Section: The Need for Global Policies .................................................................................. 47
The Global Policy as a Template ............................................................................ 48
Global Policies and the Global Rule Base .............................................................. 48
Global SmartDashboard ......................................................................................... 49
Creating a Global Policy Using Global SmartDashboard ....................................... 50
Global IPS ............................................................................................................... 51
Assigning Global Policy .......................................................................................... 54
Configuration ........................................................................................................... 57
The Need for Global Policies Besides security policies for a specific set of Security Gateways, administrators need to create policies that apply to all or to a group of Domains. This separation between different levels of policies, and different types of policies, means that Domain-level security rules do not need to be reproduced throughout the entire Multi-Domain Security Management environment.
Security policies can be created and privately maintained for each Domain. Global policies enforce security for the entire Multi-Domain Security Management system or for a group of Domains.
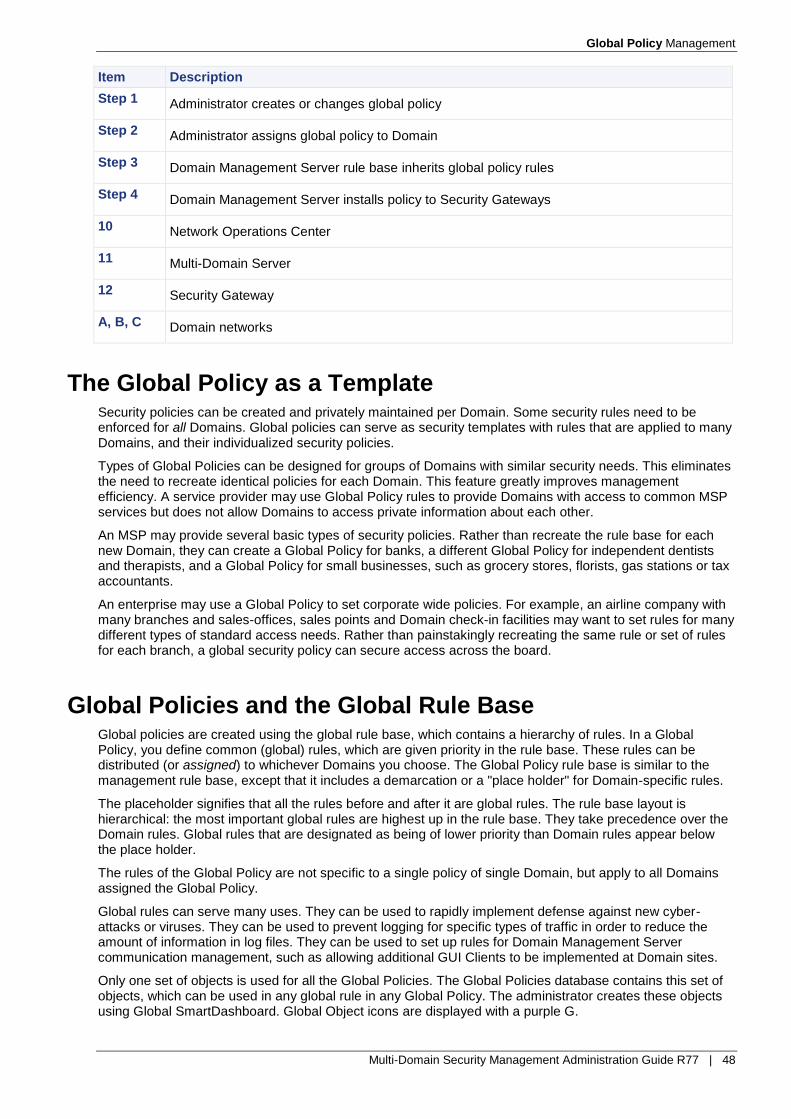
Global Policy Management
Multi-Domain Security Management Administration Guide R77 | 48
Item Description
Step 1 Administrator creates or changes global policy
Step 2 Administrator assigns global policy to Domain
Step 3 Domain Management Server rule base inherits global policy rules
Step 4 Domain Management Server installs policy to Security Gateways
10 Network Operations Center
11 Multi-Domain Server
12 Security Gateway
A, B, C Domain networks
The Global Policy as a Template Security policies can be created and privately maintained per Domain. Some security rules need to be enforced for all Domains. Global policies can serve as security templates with rules that are applied to many Domains, and their individualized security policies.
Types of Global Policies can be designed for groups of Domains with similar security needs. This eliminates the need to recreate identical policies for each Domain. This feature greatly improves management efficiency. A service provider may use Global Policy rules to provide Domains with access to common MSP services but does not allow Domains to access private information about each other.
An MSP may provide several basic types of security policies. Rather than recreate the rule base for each new Domain, they can create a Global Policy for banks, a different Global Policy for independent dentists and therapists, and a Global Policy for small businesses, such as grocery stores, florists, gas stations or tax accountants.
An enterprise may use a Global Policy to set corporate wide policies. For example, an airline company with many branches and sales-offices, sales points and Domain check-in facilities may want to set rules for many different types of standard access needs. Rather than painstakingly recreating the same rule or set of rules for each branch, a global security policy can secure access across the board.
Global Policies and the Global Rule Base Global policies are created using the global rule base, which contains a hierarchy of rules. In a Global Policy, you define common (global) rules, which are given priority in the rule base. These rules can be distributed (or assigned) to whichever Domains you choose. The Global Policy rule base is similar to the management rule base, except that it includes a demarcation or a "place holder" for Domain-specific rules.
The placeholder signifies that all the rules before and after it are global rules. The rule base layout is hierarchical: the most important global rules are highest up in the rule base. They take precedence over the Domain rules. Global rules that are designated as being of lower priority than Domain rules appear below the place holder.
The rules of the Global Policy are not specific to a single policy of single Domain, but apply to all Domains assigned the Global Policy.
Global rules can serve many uses. They can be used to rapidly implement defense against new cyber-attacks or viruses. They can be used to prevent logging for specific types of traffic in order to reduce the amount of information in log files. They can be used to set up rules for Domain Management Server communication management, such as allowing additional GUI Clients to be implemented at Domain sites.
Only one set of objects is used for all the Global Policies. The Global Policies database contains this set of objects, which can be used in any global rule in any Global Policy. The administrator creates these objects using Global SmartDashboard. Global Object icons are displayed with a purple G.

Global Policy Management
Multi-Domain Security Management Administration Guide R77 | 49
Global policies can be assigned to one or more Domains. Once Global Policies are assigned to a Domain Management Server, they become part of the Domain Management Server rule base. The entire Domain Management Server rule base, including assigned global rules, can then be installed onto selected Security Gateways.
Global SmartDashboard
Introduction to Global SmartDashboard
The Global SmartDashboard is used to maintain the Global Policy Rule Base. You use it to configure rules and network objects at the Multi-Domain Security Management system level.
SmartDashboard differs from Global SmartDashboard in that it operates only at the Domain level and below. After a Global Policy is assigned to a Domain, SmartDashboard for the Domain Management Server will show global rules automatically inserted either above or below editable Domain rules. The Domain administrator can create or edit Domain rules using SmartDashboard, and then install the Policy onto the Security Gateway.
When a Global Policy is assigned to a Domain, the global rules are read-only in the Domain SmartDashboard. Domain administrators cannot edit global rules or Global Objects from SmartDashboard.
Global Services
Default services defined by a Security Gateway are available for global use. Other services need to be defined. To avoid conflicts, make sure that you define services with unique names, which should not be the same as in the Domain Management Server databases.
Dynamic Objects and Dynamic Global Objects
Dynamic objects are generic network items such as a host or server object that has no IP specified. The administrator creates them in SmartDashboard, and uses them to create generic rules for Domain Security Gateways. At each Security Gateway, the dynamic object can be translated into a specific local computer, host or other network object, with an IP address.
Global rules may similarly use dynamic Global Objects, which are generic items (such as a web server) that can be applied to any network. Global objects are defined through the Global SmartDashboard and SmartDashboard are downloaded to the Domain Management Servers.
At the global level, an administrator defines dynamic Global Objects in addition to standard Global Objects which are available in the Global SmartDashboard. Once a Global Policy is assigned to a Domain, the dynamic global object is replaced by a corresponding Domain object. This makes it possible to create global rules without requiring that the rule use specific network objects. This allows the administrator to create rules that are "templates."
A dynamic global object serves as virtual place holder for a network element. The network element type can be anything that the administrator designates, including Security Gateways, hosts, or services, or even
groups. A dynamic global object is created in the Global SmartDashboard with the suffix _global (for
example, FTPserver_global). This object is applied to a global rule.
To "translate" the dynamic global object, the administrator creates an object in SmartDashboard with the same name, but with an IP address and other details. The Domain database substitutes the dynamic global object in the global rule with the local object from the Domain Management Server database. Alternatively, the dynamic global object is replaced with a Domain Management Server dynamic object, and the object is assigned an IP at the Security Gateway level.
To understand how the dynamic global object is used, let us consider an example. An administrator creates a global rule applying to a dynamic global object representing a generic ftp server. But instead of specifying exactly which ftp servers and their IP addresses will be affected by the rule, the servers are represented by
a dynamic global object (FTPserver_global).
In each Domain Management Server, the Domain administrator will define a host object with the same name. During the assignment of the Global Policy, the references to the global dynamic object in different rules will be replaced by the reference to the local host object with the same name. The _global syntax triggers the reference replacement mechanism.

Global Policy Management
Multi-Domain Security Management Administration Guide R77 | 50
Applying Global Rules to Security Gateways by Function
It is possible to create Security Rules in Global SmartDashboard that are installed on certain Security Gateways or groups of Security Gateways and not others. Thus Security Gateways with different functions on a single Domain Management Server can receive different security rules designed for a specific function or environment. When installing global policy to a number of similarly configured Domain Management Servers, the relevant global rules are installed to all of the relevant Security Gateways on each Domain Management Server.
This feature is particularly useful for enterprise deployments of Multi-Domain Security Management, where Domain Management Servers typically represent geographic subdivisions of an enterprise. For example, an enterprise deployment may have Domain Management Servers for business units in New York, Boston, and London, and each Domain Management Server will be similarly configured, with a Security Gateway (or Security Gateways) to protect a DMZ, and others to protect the perimeter. This capability allows an administrator to configure the global policy so that certain global security rules are installed to DMZ Security Gateways, wherever they exist, and different rules are installed to the perimeter Security Gateways.
Note - Global security rules can be installed on Security Gateways, Edge Security Gateways, SmartProvisioning Profiles, and Open Security Extension (OSE) devices.
To install a specific security rule on a certain Security Gateway or types of Security Gateways:
1. Launch Global SmartDashboard for the relevant Global Policy.
2. In the Objects Tree, right-click Dynamic Objects and select New Dynamic Object.
3. Name the dynamic object, and add the suffix _global to the end of the name.
4. On the Firewall tab, create rules to be installed on Security Gateways with this function, and drag the dynamic object you created into the Install On column for each rule.
5. Launch the SmartDashboard for each relevant Domain Management Server.
6. Create a group object with the name of the dynamic object you created, including the suffix _global.
Note - While you can name a Security Gateway with the name of the global Dynamic Object, it is recommended to create a group to preserve future scalability (for instance, to include another Security Gateway with this function). It is not recommended to change the name of an existing Security Gateway to the dynamic object name.
7. Add all Security Gateways on the Domain Management Server that you want to receive global security rules with this target to the group.
8. Select File > Save.
9. From the SmartDomain Manager, re-assign the global policy to the relevant Domains.
Synchronizing the Global Policy Database
The Global Policy database is synchronized on all Multi-Domain Servers automatically, or manually, depending on the settings. Global policies must be synchronized for the entire system, since they are system-wide security templates, and the entire system uses the same Global Objects. Synchronization is performed when the Global Policy is saved, or at a configurable interval.
Creating a Global Policy Using Global SmartDashboard Global policies are created using the Global SmartDashboard. Domain policies are made using SmartDashboard launched using the Domain Management Server. Let us consider an MSP that wants to implement a rule which blocks unwanted services at Domain sites. The Multi-Domain Security Management Superuser, Carol, wants to set up a rule which will allows Domain administrators discretion to decide which computers are allowed to access the Internet.
Source Destination VPN Service Action
gInternetAccessAllowed_Global Any Any Traffic
Any accept

Global Policy Management
Multi-Domain Security Management Administration Guide R77 | 51
Once she has created a Global Policy including this rule, she assigns/installs it for specific Domains and their Security Gateways. Each Domain administrator must create a group object with the same name as in the Domain Management Server database. This is done through SmartDashboard. In this way, local administrators translate the dynamic global object into sets of network object from the local database.
For details about using SmartDashboard, see the R77 Security Management Administration Guide (http://supportcontent.checkpoint.com/documentation_download?ID=24830). The differences between the SmartDashboard and the Global SmartDashboard are as follows:
Feature Domain SmartDashboard Global SmartDashboard
Rule Base Local, applying to the Domain network only.
Global, applying to multiple networks of all Domains assigned this Global Policy.
Domain Security Rules and Global Rules (in Read Only mode) if the Global Policy is assigned to the Domain.
Global Rules and a place holder for Domain rules.
Not associated with the Domain other security policies.
Automatically added to all of the assigned security policies of Domains.
Each Domain policy is independent, with its own rules.
All the assigned Domain policies share the global rules.
Network Objects Local to this network only. Global to multiple networks of all Domains assigned this Global Policy.
Global Properties Enabled. Disabled (manipulations is through the Domain SmartDashboard).
Saving a Security Policy
Adds the security policy to the list of Domain security policies.
Adds the Global Policy to the Global Policies database (and displays it in the Global Policies Tree of the SmartDomain Manager).
Note - Global SmartDashboard cannot be used to create Connectra or Security Gateway objects. Instead, use a SmartDashboard connected to a specific Domain Management Server to create these objects.
Global IPS
Introduction to Global IPS
You can manage IPS protections for multiple Domains by including IPS profiles in Global Policies. You then assign a global policy to each Domain Management Server. You can include multiple IPS Profiles in a global policy. Administrators can assign any of the IPS profiles included in the global policy to specified Security Gateways managed by a Domain Management Server. Administrators can also make some limited changes to IPS profiles using the Domain Management Server SmartDashboard.
The global nature of Global IPS refers to the ability to set IPS Profiles for all subscribed Domains from the Global SmartDashboard. However, the Domain Management Server administrator for each Domain can assign different profiles to each Security Gateway and modify the IPS protections in certain ways once they have been installed. So in this case, the term global does not imply read only, as it does in the case of the Global Security Policy.
IPS in Global SmartDashboard
The Global IPS Policy is configured on the IPS tab in the Global SmartDashboard.
IPS protections available in the Global SmartDashboard are identical to the default settings and protections for a Domain Management Server. Any changes made to the Global Profiles apply to all Domain Management Servers subscribed to the IPS service.

Global Policy Management
Multi-Domain Security Management Administration Guide R77 | 52
Note - You must have an Enterprise Software Subscription to update IPS protections. Enterprise Software Subscriptions are available for purchase at the User Center (http://usercenter.checkpoint.com).
IPS Profiles
An IPS Profile is a complete set of configured IPS protections that can be applied to multiple Security Gateways. On the Domain Management Server, multiple IPS Profiles can be assigned to suit Security Gateways that are exposed to different types of threats.
Global SmartDashboard supports multiple IPS Profiles. Changes made to IPS protections for a Global Profile are replicated when the Global Policy is assigned to Domain Management Servers that are subscribed to the IPS Service.
To learn more, see the R77 IPS Administration Guide (http://supportcontent.checkpoint.com/documentation_download?ID=24806).
Managing IPS Profiles
You manage IPS Profiles using the IPS tab in the Global SmartDashboard. Select Profiles from the Navigation Tree to view all Profiles and make changes.
Creating a New IPS Profile
To create a new IPS Profile:
1. In SmartDashboard (Global or Domain Management Server), select the IPS tab.
2. Select Profiles.
3. Select New and either Create New Profile or Clone Selected Profile (to clone a profile, one must be selected).
4. Enter a Profile Name and Comment. Select the IPS mode (Prevent or Detect) and a Protection Activation method.
Editing an IPS Profile
To edit an IPS Profile:
1. In SmartDashboard (Global or Domain Management Server), select the IPS tab.
2. Select Profiles.
3. Double-click a profile.
4. Edit parameters as required on any of the pages.
5. On the Networks Exceptions page, add and edit exception rules by clicking New or Edit.
Subscribing Domains to IPS Service
Any Domain that you want to include in the global IPS policy must be subscribed to the IPS service.
To subscribe an existing Domain to the IPS Service:
1. In the SmartDomain Manager, enable the Domain Contents Mode.
2. On the Selection Bar, select General.
3. Double-click a Domain name in the list.
4. In the Domain Configuration window, select the Assign Global Policy tab.
5. Enable the Subscribe Domain to IPS Service option.
Domains who subscribe to the IPS Service are automatically assigned to an Exclusive subscription. Once Domains are subscribed to the IPS service using the global policy, any changes made to the Global IPS Profiles are forwarded to the Domain Management Servers whenever Global Policy is assigned. See Assigning Global Policy (on page 54) for details.
Note - Merge and Override IPS subscriptions are no longer supported in Multi-Domain Security Management.
Global Policy Management
Multi-Domain Security Management Administration Guide R77 | 53
Managing IPS from a Domain Management Server
After Domains are assigned Global Policy, the IPS Profiles configured on the Global Dashboard are augmented to the local profiles list on the Domain Management Server. Domain administrators can assign IPS Profiles to Security Gateways and change these profiles in limited ways.
Protection settings for Global Profiles cannot be edited from the Domain Management Server. However, exceptions can be defined for specific traffic in the IPS tab of SmartDashboard.
Once a Profile has been downloaded to a Domain Management Server, there will be a 'G' prefix at the beginning of the Profile name and 'Global' appears in the activation column in the local SmartDashboard.
Any exceptions set globally for a specific Global Profile are indicated with a 'G' icon and cannot be changed from the Domain Management Server.
Assigning IPS Profiles to Security Gateways
IPS policy will not be activated on any Security Gateways until the Security Gateway is assigned a Profile.
To assign an IPS Profile to a Security Gateway:
1. Navigate to the Profile Assignment page in one of two ways:
a) From the Security Gateway object:
In the SmartDashboard of the Domain Management Server on which the Security Gateway is managed, right-click the Security Gateway and select Edit.
Select IPS from the navigation tree in the Security Gateway dialog box.
b) From the IPS tab:
In the SmartDashboard of the Domain Management Server on which the Security Gateway is managed, select the IPS tab and Enforcing Gateways from the navigation tree.
Select a Security Gateway from the list and click Edit.
2. Select Assign Profile and select a profile from the list, then click OK.
3. If you do not want to apply IPS on the Security Gateway, select Do not apply IPS on this gateway.
4. Select Policy > Install, and make sure the Security Gateway is selected in the Advanced Security column.
5. Click OK to install policy and activate the assigned IPS Profile
Removing Global IPS from a Domain Management Server
To remove Global IPS from a Domain Management Server:
1. In the IPS tab of the Domain Management Server SmartDashboard, make sure that Security Gateways on the Domain Management Server are not using Global Profiles.
2. In the Global Policy page of the SmartDomain Manager, select a Domain, right-click, and select Configure Domain.
3. In the Assign Global Policy tab, clear Subscribe to Domain IPS Service and click OK.
4. In the Global Policy page, select the Domain again, right-click, and select Reassign Global Policy. Click OK to confirm.
Note - If you select Remove Global Policy, Global IPS will be removed from the Domain Management Server regardless of the check box setting.
Making Changes to an IPS Profile
Domain administrators can make exceptions to protections in a Profile and can override actions of a protection. These changes are made from the IPS tab of the Domain Management Server SmartDashboard by clicking Edit. See the R77 IPS Administration Guide (http://supportcontent.checkpoint.com/documentation_download?ID=24806)to learn more.
If a Domain administrator makes changes to a profile, changes are saved in the Domain Management Server local policy. If the Profile is later altered in the Global SmartDashboard, the Domain administrator's changes will not be affected when Global Policy is reinstalled on the Domain Management Server.

Global Policy Management
Multi-Domain Security Management Administration Guide R77 | 54
Managing Global IPS Sensors
You can manage IPS sensors globally in a Multi-Domain Security Management deployment.
Assigning Global Policy Global Policy, which includes the Global Security Policy and Global IPS, should be assigned to Domains when it is first configured, and whenever you want to implement a change. All Global Policy assign operations are performed from the Global Policies - Security Policies and IPS view.
Assigning the First Global Policy
To assign a global policy for the first time:
1. From the SmartDomain Manager Global Policies view, select a Domain.
2. To select local policies that use the global policy, click Customize Global Policy Assignment.
The Select Policies that will receive Global Policy window opens.
To assign the global policy to a local policy:
a) Select the local policy in the Do not assign on list.
b) Click Assign. The local policy moves to the Assign on list.
To remove the global policy from a local policy:
a) Select the local policy in the Assign on list.
b) Click Remove. The local policy moves to the Do not assign on list.
Note - To configure a Domain for IPS, see Subscribing Domains to IPS Service (on page 52).
Assigning Global Policies to VPN Communities
When assigning and/or reassigning global polices to VPN Communities, you should perform the following procedure to ensure that all participating Security Gateway domains update each other correctly.
To assign global policies to VPN Communities:
1. Assign global policies to Domains.
2. Using the Domain Management Server SmartDashboard for active Domains, install policies and/or databases as required.
3. Reassign the global policy and install the most recent policy on all Security Gateways.
Re-assigning Global Policies
Whenever you make changes to a global policy, you must re-assign it to the appropriate Domain Management Servers. This ensures that global policy changes are reflected in individual Domain networks.
Automatic Security Gateway Policy Installation
When reassigning a global policy to Domain Management Servers, you can automatically re-install the last policy installed on individual Domain Management Server Security Gateways. This option ensures that changes made to the global policy are correctly updated at the Security Gateway level.
The term 'last policy installed' on a Security Gateway refers to the most recent version of the last policy installed on that Security Gateway using SmartDashboard.
Global Policy Management
Multi-Domain Security Management Administration Guide R77 | 55
Important - You cannot reassign global policies to any Security Gateway on which a policy was never installed (such as a new Security Gateway). Automatic policy installation will fail if no policy was previously installed on that Security Gateway.
To ensure that policy installation on a Security Gateway succeeds when re-assigning a global policy, you must first install a policy on that Security Gateway using the Domain Management Server SmartDashboard.
Re-assigning Global Policy to one Domain
To re-assign a Global Policy to an individual Domain Management Server:
Important Exception - If you reassign a global policy to a Domain that has one or more Security Gateways with no policy installed, global policy installation succeeds on those Security Gateways with an installed policy. The new global policy does not install on Security Gateways with no installed policy. This behavior occurs even when the Install Security Policy if it can be installed on all Security Gateways option is enabled.
This can result in some Security Gateways in a Domain enforcing the new global policy, while others continue to enforce the old (or no) global policy.
1. From the Global Policy page in the SmartDomain Manager, right-click a Domain and select Reassign/Install Global Policy.
2. In the Reassign/Install Global Policy window, enable the Reassign Global Policy option.
3. To automatically install policies on Domain Security Gateways, select one or more Security Gateways from the list.
4. Click OK to finish.
Re-assigning Global Policies to Many Different Domains
You can also reassign Global Policies to multiple Domains at the same time.
Important Exception - If you reassign a global policy to a Domain containing one or more Security Gateways with no installed policy, global policy installation succeeds on those Security Gateways with an installed policy. The new global policy does not install on Security Gateways with no installed policy. This occurs even when the Install Security Policy if it can be installed on all Security Gateways option is enabled.
This can result in some Security Gateways in a Domain enforcing the new global policy, while others continue to enforce the old (or no) global policy.
To reassign a policy to multiple Domains,
1. From the Manage menu, select Reassign Global Policy and IPS to Domains.
2. Select the Domains to receive this global policy.
3. Enable the Install last Policy on all gateways of assigned Domains option, if you wish to automatically re-install the last policy installed on all Security Gateways belonging to the selected Domains.
Considerations for Global Policy Assignment
Introduction
When assigning a Global Policy to one or more Domains, Global Objects are copied to the database of the Domain Management Server. Whether all the Global Objects in the database are copied, or only those related to the Global Policy, can be configured for each Domain in the Domain Configuration window, (which can be accessed by selecting Manage > Configure when selecting a Domain in the General-Domain Contents view).
Rules belonging to the Global Policy package being assigned are added above and below the rules inside ALL local policies defined in that Domain Management Server database.
When issuing the "install policy" command for Domain Management Server Security Gateways, the Security Gateways will receive the most updated Domain Management Server policy containing the latest updates

Global Policy Management
Multi-Domain Security Management Administration Guide R77 | 56
from the Global Policy. Changes may be made to a Global Policy, after which the Global Policy is reassigned to one of more Domains. When a Domain Management Server then installs the updated policy to the Domain Security Gateways, any modifications to global and local objects/ rules are updated on the selected Security Gateways.
The assign and install procedure are two different processes. The administrator can re-assign a Global Policy without installing a local policy to Domain Security Gateways.
Assigning Policy for the First Time
Once you create a Domain internal network, you will want to create a policy for the Domain. The first step may be creating a Global Policy template for general use by different types of Domain. This allows you a certain amount of flexibility in how you manage security policy assignment.
Global policies are designed in Global SmartDashboard, but the assign/install procedure is handled through the SmartDomain Manager. The SmartDomain Manager provides a Global Policy Mode which gives you a few options to handle the procedure of assigning Global Policies. The Global Policy is assigned to the Domain Management Server.
When You Change a Global Policy
If you change the Global Policy, you must reassign it to all Domains using this policy, and reinstall it onto the Domain Security Gateways.
Re-install a Domain policy to Security Gateways when:
You have made changes to a Global Policy and reassigned it to the Domain Management Server, without installing the updated policy to the Domain Security Gateways or,
When you have made changes to the Domain network policy.
If you have network load considerations, rather than install the Security Gateways all at once, it can be better to do the procedure in stages. You can re-install a current policy to Domain Security Gateways using the Install Last Policy command. You can also install on selected Security Gateways by right clicking a Domain and selecting Reassign/Install Global Policy.
Assigning a Different Global Policy
To assign a different Global Policy to a Domain, use the same procedure as for initially assigning a Global Policy to a Domain. The Global Policy is overwritten when a new one is assigned.
Global Object Transfer Method
During Domain configuration, you define for each Domain how the Global Policy database will transfer objects during global security policy assignment (this is located in the Add Domain Wizard — Assign Global Policy tab). When Global Policies are assigned to Domain Management Servers, two methods can be used to transfer all the information to the Domain Management Server database from the Global Policy database.
It is possible to assign all Global Objects when assigning the Global Policy to a Domain Management Server. Or it is possible to assign only objects required by the rule base of the Global Policy assigned to the Domain Management Server. This includes objects directly or indirectly referenced by rules, such as network objects contained in groups. Indirectly references objects will also be copied to the Domain Management Server database, and the administrator will see them in both group and individually.
You can decide to change settings later, but be careful when changing settings. Consider the following scenario: a Domain assigns a Global Policy and transfers all the Global Objects. All objects are copied to the global database. When a Global Policy is re-assigned with just those objects relevant to the Global Policy assigned, extraneous objects not used by the Global Policy will be removed from the Domain configuration database. However, if these objects are used by a Domain network security rules or objects, the assignment operation will terminate (an error message lists the objects that prevented the operation from proceeding).
Viewing the Status of Global Policy Assignments
You can view global policy assignments from the SmartDomain Manager while in the Security Policies and IPS mode in the Global Policies view.

Global Policy Management
Multi-Domain Security Management Administration Guide R77 | 57
In this window, each Domain is displayed under the Global Security Policy to which it is assigned, or under the category No Global Policy. The time and date at which the Global Policy was assigned to each Domain is reported, and a status indicator shows whether that assignment is the most up-to-date version of the Global Policy.
When a change is made in Global SmartDashboard, either to a Global Security Policy or to the Global IPS, the change will be reflected in the Global Policy state of each Domain assigned the relevant Policy. (A green check mark indicates that the Policy is up-to-date, while a red exclamation mark indicates that since the Policy was assigned, it has changed, and should be reassigned.)
Global Policy History File
Each Domain log directory includes a history file (named gpolicy.log) which maintains a summary of all
actions taken by the Global SmartDashboard that affect the Domain. It records all actions taken, including assigning Global Policies to a Domain Management Server and installation on a remote Security Gateway. The file includes time, operations performed, Global Objects added, and problems. To access this file, see Viewing the Domain Global Policy History File (on page 59).
Configuration
Assigning or Installing a Global Policy
To assign, reassign, install or remove policies for Domains, you must be a Superuser (either a Domain Superuser or a Multi-Domain Security Management Superuser. All these actions are performed in the SmartDomain Manager, using the Global Policies view.
You cannot assign a Global Policy to a Domain if a Read/Write SmartDashboard is logged in to the Domain Management Server. First, close SmartDashboard and then assign the Global Policy. You can, however, assign a Global Policy to a Domain if there is a Read Only SmartDashboard logged in to the Domain Management Server. The changes won't be displayed in SmartDashboard until it is disconnected from and then reconnected to the Domain Management Server.
Assign to Many Domains: How to Assign/Install from a Global Policy Object
To Assign/Install from a Global Policy Object
Use the following method to create a Global Policy, then assign it to several Domains at once. You can also install a policy to all Domain Security Gateways at the same time. If a Domain already has a different Global Policy, it is overwritten.
1. Select the desired Global Policy. Right-click the Global Policy and choose Assign/Install Global Policy from the options menu. Select the Global Policy Name of the Global Policy you want to install (for example, Standard_Global_Policy).
2. Select the Domains to which you want to assign this Global Policy from the Unassigned to selected Policy list. To install the policy on all the Security Gateways of the Domains to which the policy is assigned, check Install Policy on assigned Domains.
To install a policy on specific Security Gateways, perform the assign/install operation using the Domain object and select the specific Security Gateways on which to install the policy.
3. Click OK. A Global Policy Assignment progress window lets you follow each step of the procedure, as the Global Policy is enforced on the selected Domain Management Servers. You can track installation attempts using the History file.
Assign to One Domain: Assign/Install from a Domain Object
To Assign/Install from a Domain Object:
Select a Domain that does not have a Global Policy, and assign one of the Global Policies you have created. This method gives you more control over the installation procedure for particular Domain Security Gateways.

Global Policy Management
Multi-Domain Security Management Administration Guide R77 | 58
For Domains that already have a Global Policy, the option will be to Reassign/Install Global Policy.
1. Select a Domain, then choose Manage > Assign/Install Global Policy, or right-click the Domain and select Assign/Install Global Policy.
The Assign/Install Global Policy window lets you select a policy to be installed.
2. Select one or more Security Gateways. A policy must already have been installed on the Security Gateways, or the operation will not work.
3. Click OK.
The Global Policy is assigned to the Domain Management Server and the Domain policy is re-installed on the selected Security Gateways.
Reassigning/Installing a Global Policy on Domains
Once a Domain has been assigned a Global Policy, it is possible to update the policy by re-assigning it.
Reassigning/Installing a Global Policy to a Specified Domain
When performing a Reassign/Install the user does not choose the Policy. The Policy is already selected. You can also re-install the Domain Policy to the Security Gateways at the same time, but note that this is for all the Security Gateways at once and will only work if there is already a Domain Policy resident on the Security Gateway.
To reassign or install a global Policy to a specified Domain:
1. Select a Domain, then choose Manage > Reassign/Install Global Policy, or right-click the Domain and select Reassign/Install Global Policy.
The Reassign/Install Global Policy window will display the Policy currently installed.
2. Select the specific Security Gateways for which to re-install the Policy.
3. Click OK.
The Global Policy is assigned to the Domain Management Server and the resident Domain Policy is re-installed on the selected Security Gateways.
Reassigning/Installing a Global Policy to Many Different Domains
To reassign or install a global Policy to multiple Domains:
1. Right-click a Global Policy and select Reassign/Install Global Policy from the options menu.
2. In the Reassign/Install Global Policy window, select on or more Domains.
3. Enable the Install last Policy on all Gateways of assigned Domains option, if you wish to automatically reinstall the last Policy installed on all Security Gateways belonging to the selected Domains.
Reinstalling a Domain Policy on Domain Gateways
The Install Last Policy window allows you to select a group of Domains and re-install policies onto their Security Gateways. You can use this method only if the selected Security Gateways already have a policy installed.
To Reinstall a Domain Policy on Domain gateways:
1. From the Manage menu, click Reassign Global Policy and IPS to Domains. (Or click the Reassign Global Policy toolbar icon.)
2. In the Install Last Policy window, select the Domains to re-assign this global policy.

Global Policy Management
Multi-Domain Security Management Administration Guide R77 | 59
3. Click Install last Policy on all gateways of assigned Domains, to automatically re-install the last policy installed on all Security Gateways belonging to the selected Domains.
The policy is installed on all Security Gateways for selected Domains.
Remove a Global Policy from Multiple Domains
1. Select the Global Policy and choose Manage > Remove Global Policy from Domains..., or right-click the policy and select Remove Global Policy from Domains... from the right-click menu.
2. Check Domains in the Assigned to selected Policy list. To remove the policy from all Domains, click Select All. Domains from which the Global Policy has been removed are automatically assigned to the No Global Policy group.
Remove a Global Policy from a Single Domain
To remove a Global Policy from only single Domain:
1. Select the Domain and right-click and choose Manage > Remove Global Policy, or choose Remove Global Policy from the Manage.
2. You are asked whether you are sure you want to remove this Domain from the Global Policy. Click Yes to confirm. The Domain is automatically assigned to No_Global_Policy.
Viewing the Domain Global Policy History File
To view the Domain history file, select a Domain, right-click and choose View History File..., or from the Manage, select View History File.
Setting Policy Management Options
These options control system behavior when assigning global policies to Domain Management Servers and installing local policies on Domain network objects.
You can limit the number of Domains on which you do policy operations at the same time. This limit helps you prevent network congestion and excessive resource consumption during these operations. For example, if there are 5 Domains in your deployment and the defined maximum is 2, policy operations run in this sequence:
1. The policy operation runs on the first two Domain Management Servers.
2. The policy operation runs on the third and fourth Domain Management Servers.
3. The policy operation runs on the last Domain Management Server.

Global Policy Management
Multi-Domain Security Management Administration Guide R77 | 60
You can also define what occurs if policy installation is not successful on some network objects or Security Cluster members, but is successful on others. These options can make sure that all network objects and Security Cluster members enforce the correct policy.
Important Exception - If you assign a global policy to a Domain Management Server where one or more Security Gateways do not have an installed policy:
The local policy installation succeeds on those Security Gateways with an installed policy.
The global policy does not install on Security Gateways with no installed policy.
Some Security Gateways in this Domain will enforce the new local policy, while others enforce the old (or no) local policy.
This problem occurs if you select the Install Security Policy only if it can be installed on all Security Gateways option.
To configure policy management options:
1. From the Manage menu, select Multi-Domain Security Management Properties.
2. In the Multi-Domain Security Management Properties window, select Administrator Global Properties.
3. Set the maximum number of domains on which you can do policy operations at the same time.
4. Define what behavior occurs when policy installation fails on some Security Gateways and is successful on others:
Selected - Policy does not install on Security Gateways unless it successfully installs on all Security Gateways. Cleared (Default) - Policy installs successfully on some Security Gateways, but not on others.
5. Define what behavior occurs when policy installation fails on some Security Cluster members but is successful on others:
Selected (Default) - The policy does not install on members unless it successfully installs on all members. Cleared - The policy installs successfully on some members, but not on others.
Global Names Format
The Manage > Multi-Domain Security Management Properties menu > Global Names Format window lets users define a template for Gateway Global Names. This template is comprised of the original Security Gateway name, Domain name and other details. When defining Security Gateways for Global Use, the system gives you an automatic suggestion for a name, based on this template.
The properties are:
Global Name - You can use the default name. The default format is g<Gateway>_of_<Domain>,
where the Security Gateway name and the Domain are the variables. For example, a template defined
as g<Gateway>_of_<Domain> for Security Gateway MyGateway of Domain MyDomain, will result in
the suggested name gMyGateway_of_MyDomain.
The global name should be self-explanatory and easy to understand and therefore the template must consist of the Domain name and the Security Gateway original name. The administrator can later choose to override the template and create a Global Name which can be any unique legitimate string.
VPN Domains - The additional configurable part of the template is the suffix for the VPN domain object. The template for the domain object contains the Global Name and the suffix. For example, if the defined
suffix template is _Domain, the name of the VPN Domain will be
gMyGateway_of_MyDomain_Domain.

Multi-Domain Security Management Administration Guide R77 | 61
Chapter 6
Domain Management
In This Section: Creating a Domain - Wizard .................................................................................... 61
Creating a Domain - CLI ......................................................................................... 64
Configuring Domain Selection Groups ................................................................... 65
Configuring Existing Domains ................................................................................. 65
Deleting a Domain .................................................................................................. 68
Creating a Domain Management Server - Wizard .................................................. 69
Creating a Domain Management Server - CLI ....................................................... 70
Changing a Domain Management Server .............................................................. 71
Deleting a Domain Management Server ................................................................. 71
This chapter includes procedures for creating and configuring Multi-Domain Security Management objects.
Creating a Domain - Wizard This wizard contains several windows that let you configure Domain settings. You can use a simplified procedure or customize the procedure by selecting additional settings groups.
If you choose the Simplified option, you can configure any of the other settings at a later time.
To run the Add Domain wizard:
1. In the SmartDomain Manager, click General in the Selection bar.
2. Select the Domain Contents view.
3. In the Domain Contents pane, right-click Multi-Domain Security Management.
4. Select New Domain from the Options menu. The Domain Contents wizard opens.
5. In the Configure Domain Creation Mode window, select one of these options:
Simplified Domain Creation - Select this option and define these basic Domain settings:
General Definitions - Enter a unique Domain name.
Domain Assigned GUI Clients - Select one or more GUI clients that are authorized to manage this Domain.
First Domain Management Server - Define the first Domain Management Server included in this Domain. If you use the Simplified method, these default values are assigned automatically:
QoS: Deactivated
Customized Domain Creation - Select this option to configure any of these additional settings groups:
Domain Properties - Enter contact and other user-defined information.
Global Policy - Assign all Global Objects or assign only those Global Objects used in the currently assigned Global Policy. You can also subscribe to Domain level IPS services.
Administrators - Select one or more administrators authorized to manage the Domain.
Version and Blade Updates - Activate version and blade updates for the Domain.
Select settings groups to include in the wizard, or clear settings groups to remove from the wizard.
Don't Show Again - Automatically use these wizard settings when creating a new Domain. You can also configure this property on the Global Policies tab in the Multi-Domain Server window.

Domain Management
Multi-Domain Security Management Administration Guide R77 | 62
Configuring General Properties
In the General Properties window, enter a unique Domain name. You can optionally enable Check Point QoS.
Note - If you want to enable Check Point QoS, you must use Customized Domain Creation. This option is not available if you use the Simplified mode.
Domain Properties
You can enter information in Domain Properties fields. These fields typically contain contact information or other descriptive data about the Domain. Superusers can define the fields that show in the Administrator Properties window.
Assigning a Global Policy
You can include all Global Objects when assigning the Global Policy or assign only those global objects required by the Global Policy. This includes objects directly or indirectly referenced by rules, such as network objects contained in groups. Reference objects are also copied to the Domain Management Server databases. Administrators can see them individually or as members of a group.
Although you can change global settings later, we recommend that you do so carefully. Consider the following scenario:
A Domain assigns a Global Policy including all Global Objects. All objects are copied to the global database. If a Global Policy is re-assigned with only those objects applicable to the assigned Global Policy, extraneous objects not used by the Global Policy are removed from the database. In this case, if the removed objects are required by Domain security rules or objects, the assignment operation will terminate with an error message showing these missing objects.
This window only shows in the Customized Domain Creation wizard option. If you are using the Simplified option, you can define these properties later.
To assign a Global Policy:
1. Select one of these configuration settings:
Assign all Global Objects - Assigns all global objects to this Domain.
Assign only Global Objects that are used in the assigned Global Policy - Assigns only those Global Objects required by the Domain Global Policy.
2. Select one or more of these options:
Subscribe Domain to IPS service - Adds the global IPS profiles to the Domain IPS profiles list. IPS profiles defined for individual Domains are not affected.
Create a database version - If activated, saves a snapshot of settings before assigning a Global Policy. This allows you to go back to an earlier state.
Assigning Administrators
Superusers are automatically assigned to all Domains with full read/write privileges. You cannot remove or assign them, nor can you change their permission profiles.
You assign global manager and domain manager administrator accounts to specified Domains. You assign a permissions profile to administrators while assigning them to the new Domain. These administrators can manage the Domain according to their administrator type and permissions profile.
You can only assign administrators to new domains if you use the Customized Domain Creation wizard option. If you use the Simplified wizard option, only superusers are assigned to the new Domain. You can add more administrators later.
To assign a permissions profile to a new Domain:
1. Select one or more administrators.
2. Click Add to move the selected administrators from the Not Assigned list to the Assigned list.
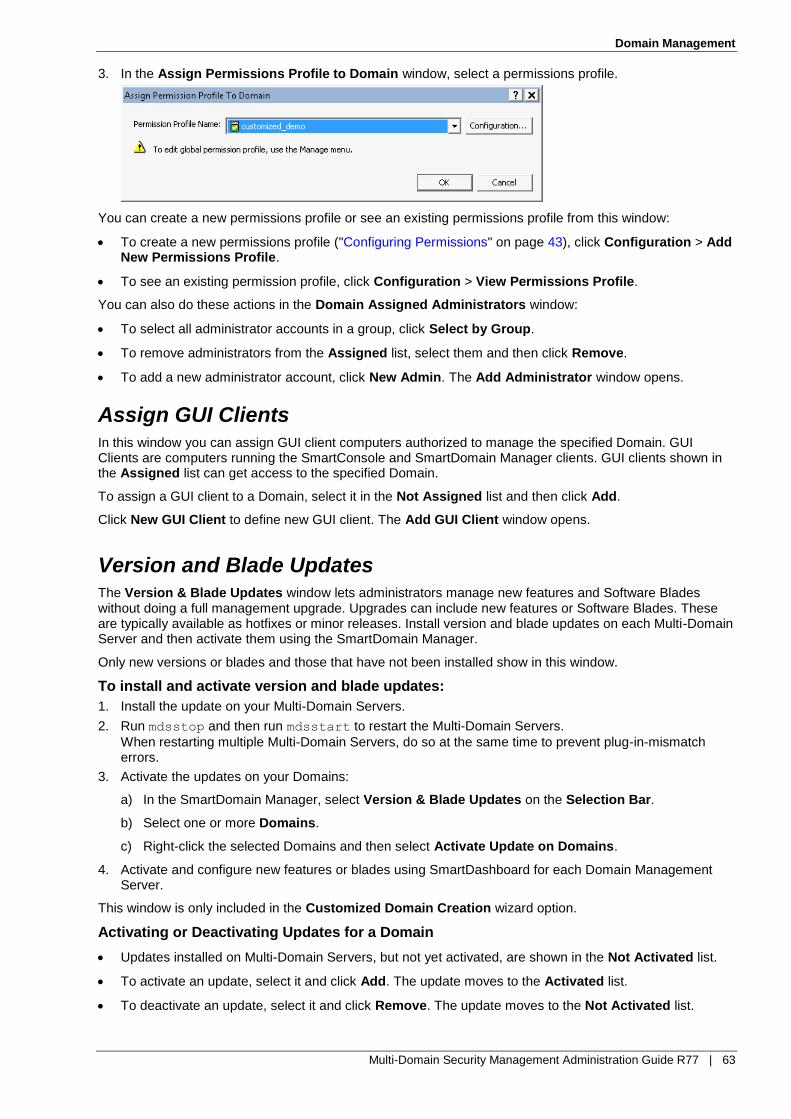
Domain Management
Multi-Domain Security Management Administration Guide R77 | 63
3. In the Assign Permissions Profile to Domain window, select a permissions profile.
You can create a new permissions profile or see an existing permissions profile from this window:
To create a new permissions profile ("Configuring Permissions" on page 43), click Configuration > Add New Permissions Profile.
To see an existing permission profile, click Configuration > View Permissions Profile.
You can also do these actions in the Domain Assigned Administrators window:
To select all administrator accounts in a group, click Select by Group.
To remove administrators from the Assigned list, select them and then click Remove.
To add a new administrator account, click New Admin. The Add Administrator window opens.
Assign GUI Clients
In this window you can assign GUI client computers authorized to manage the specified Domain. GUI Clients are computers running the SmartConsole and SmartDomain Manager clients. GUI clients shown in the Assigned list can get access to the specified Domain.
To assign a GUI client to a Domain, select it in the Not Assigned list and then click Add.
Click New GUI Client to define new GUI client. The Add GUI Client window opens.
Version and Blade Updates
The Version & Blade Updates window lets administrators manage new features and Software Blades without doing a full management upgrade. Upgrades can include new features or Software Blades. These are typically available as hotfixes or minor releases. Install version and blade updates on each Multi-Domain Server and then activate them using the SmartDomain Manager.
Only new versions or blades and those that have not been installed show in this window.
To install and activate version and blade updates:
1. Install the update on your Multi-Domain Servers.
2. Run mdsstop and then run mdsstart to restart the Multi-Domain Servers.
When restarting multiple Multi-Domain Servers, do so at the same time to prevent plug-in-mismatch errors.
3. Activate the updates on your Domains:
a) In the SmartDomain Manager, select Version & Blade Updates on the Selection Bar.
b) Select one or more Domains.
c) Right-click the selected Domains and then select Activate Update on Domains.
4. Activate and configure new features or blades using SmartDashboard for each Domain Management Server.
This window is only included in the Customized Domain Creation wizard option.
Activating or Deactivating Updates for a Domain
Updates installed on Multi-Domain Servers, but not yet activated, are shown in the Not Activated list.
To activate an update, select it and click Add. The update moves to the Activated list.
To deactivate an update, select it and click Remove. The update moves to the Not Activated list.
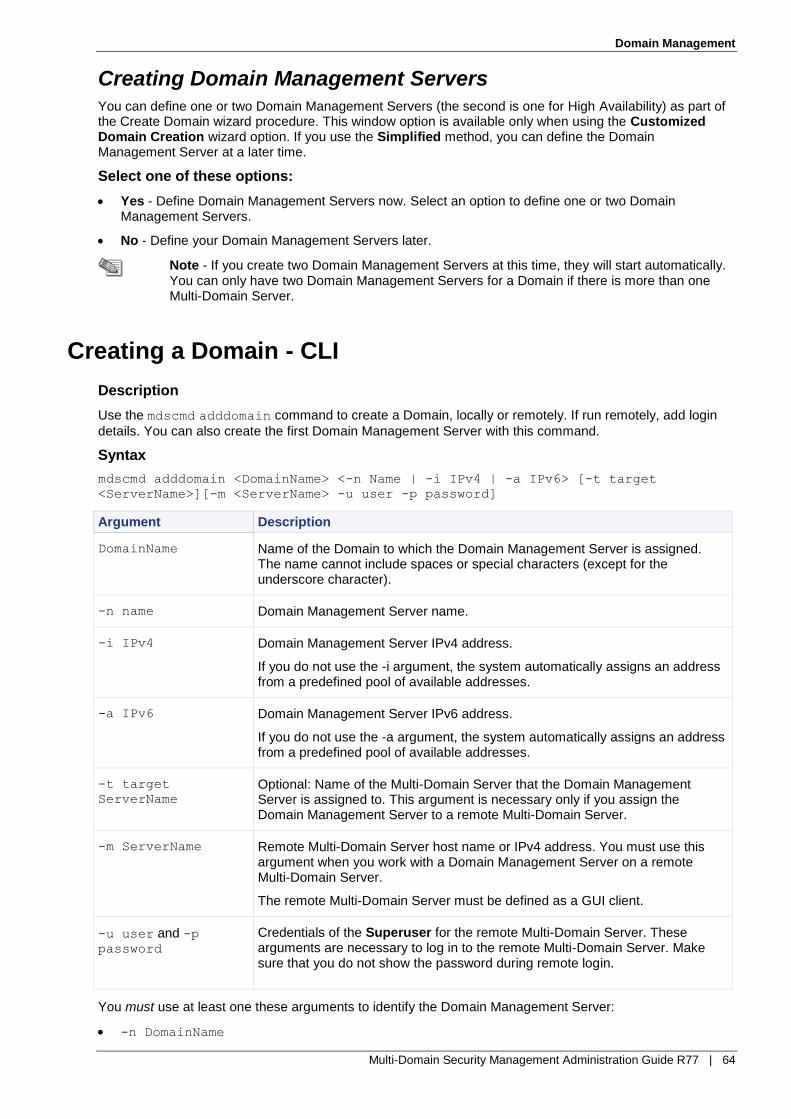
Domain Management
Multi-Domain Security Management Administration Guide R77 | 64
Creating Domain Management Servers
You can define one or two Domain Management Servers (the second is one for High Availability) as part of the Create Domain wizard procedure. This window option is available only when using the Customized Domain Creation wizard option. If you use the Simplified method, you can define the Domain Management Server at a later time.
Select one of these options:
Yes - Define Domain Management Servers now. Select an option to define one or two Domain Management Servers.
No - Define your Domain Management Servers later.
Note - If you create two Domain Management Servers at this time, they will start automatically. You can only have two Domain Management Servers for a Domain if there is more than one Multi-Domain Server.
Creating a Domain - CLI
Description
Use the mdscmd adddomain command to create a Domain, locally or remotely. If run remotely, add login
details. You can also create the first Domain Management Server with this command.
Syntax
mdscmd adddomain <DomainName> <-n Name | -i IPv4 | -a IPv6> [-t target
<ServerName>][-m <ServerName> -u user -p password]
Argument Description
DomainName Name of the Domain to which the Domain Management Server is assigned. The name cannot include spaces or special characters (except for the underscore character).
-n name Domain Management Server name.
-i IPv4 Domain Management Server IPv4 address.
If you do not use the -i argument, the system automatically assigns an address from a predefined pool of available addresses.
-a IPv6 Domain Management Server IPv6 address.
If you do not use the -a argument, the system automatically assigns an address from a predefined pool of available addresses.
-t target
ServerName Optional: Name of the Multi-Domain Server that the Domain Management Server is assigned to. This argument is necessary only if you assign the Domain Management Server to a remote Multi-Domain Server.
-m ServerName Remote Multi-Domain Server host name or IPv4 address. You must use this argument when you work with a Domain Management Server on a remote Multi-Domain Server.
The remote Multi-Domain Server must be defined as a GUI client.
-u user and -p password
Credentials of the Superuser for the remote Multi-Domain Server. These arguments are necessary to log in to the remote Multi-Domain Server. Make sure that you do not show the password during remote login.
You must use at least one these arguments to identify the Domain Management Server:
-n DomainName

Domain Management
Multi-Domain Security Management Administration Guide R77 | 65
-i IPv4
-a IPv6
When you create a new object, you can use one or more of these arguments to manually define the name or IP address.
You must configure ranges of IPv4 and IPv6 addresses on your Multi-Domain Server for automatic address assignment to work. If no ranges are defined or there are no available IP addresses available, the command will fail.
The -t, -m and -u arguments are necessary only when you assign a Domain Management Server to a
different, remote Multi-Domain Server (not the one on which you run the mdscmd command).
Note - The old form of this command (mdscmd addcustomer) is still supported in this
release.
Configuring Domain Selection Groups To create a Domain selection group:
1. In any SmartDomain Manager View, select Manage > Selection Groups > Domain Groups.
2. Click Add to add a group. The Domain selection Groups window opens.
3. In the Add Group window, enter a group name.
4. Select Domains from the Not in Group list and click Add. The Domains in this group now show in the In Group list.
Configuring Existing Domains This section includes procedures for changing existing Domain definitions.
To configure an existing Domain:
1. Double click the Domain in any General view. The Domain Configuration window opens.
2. Click a tab to define settings for that category.
Defining General Properties
In the general tab can change the Domain name and enable the QoS feature.
To configure general properties:
1. Click the General tab.
2. If necessary, enter a new Domain name.
3. Select to Enable QoS or clear to disable it.
Defining Domain Properties
You can enter information in Domain Properties fields. These fields typically contain contact information or other descriptive data about the Domain. Superusers can define the fields that show in the Administrator Properties window.
Assign Global Policy Tab
You can include all Global Objects when assigning the Global Policy or assign only those global objects required by the Global Policy. This includes objects directly or indirectly referenced by rules, such as network objects contained in groups. Reference objects are also copied to the Domain Management Server databases. Administrators can see them individually or as members of a group.
Domain Management
Multi-Domain Security Management Administration Guide R77 | 66
Although you can change global settings later, we recommend that you do so carefully. Consider the following scenario:
A Domain assigns a Global Policy including all Global Objects. All objects are copied to the global database. If a Global Policy is re-assigned with only those objects applicable to the assigned Global Policy, extraneous objects not used by the Global Policy are removed from the database. In this case, if the removed objects are required by Domain security rules or objects, the assignment operation will terminate with an error message showing these missing objects.
To assign a Global Policy, define these configuration settings:
Assign all Global Objects - Assigns all Global Objects to this Domain.
Assign only Global Objects that are used in the assigned Global Policy - Assigns only those Global Objects required by the Domain Global Policy.
Subscribe Domain to IPS service - Adds the global IPS profiles to the Domain IPS profiles list. IPS profiles defined for individual Domains are not affected.
Create a database version - If activated, saves a snapshot of settings before assigning a Global Policy. This allows you to go back to an earlier state.
Assigning Administrators
In this window, you assign administrators to, or remove administrators from Domains. Administrators assigned to a Domain can manage that Domain according to their permissions. Superusers are automatically assigned to new Domains with full read/write permissions. You cannot remove them or change their permissions.
Assigning Domains to an Administrator
Using the Administrators pane to assign multiple administrators to a Domain:
1. Select Administrators in the SmartDomain Manager Selection bar.
2. Click the Toggle View icon so that the Domains per Administrator pane shows.
3. In the Domains per Administrator pane, right-click a domain and then select Assign Administrators.
4. In the Assign Do one or more of these tasks:
Select one or more administrators and then click Add to move selected administrators from the Not Assigned list to the Assigned list. When you add an administrator to the Assigned list, the Assign Permissions Profile ("Working with Permission Profiles" on page 42) window opens.
Select one or more administrators and then click Remove to remove selected administrators from the Assigned list.
Click New Admin to define a new administrator. The Add Administrator window opens.
Click Permissions to change an administrator's permissions. The Permissions window opens.
Click Select by Group to assign or remove members of a specified group.
Assigning Administrators to a Domain
You can assign and remove administrators to a Domain using one of these procedures:
Using the Domain tab:
1. Select the administrators tab.
2. Do one or more of these tasks:
Select one or more administrators and then click Add to move selected administrators from the Not Assigned list to the Assigned list. When you add an administrator to the Assigned list, the Assign Permissions Profile ("Working with Permission Profiles" on page 42) window opens.
Select one or more administrators and then click Remove to remove selected administrators from the Assigned list.
Click New Admin to define a new administrator. The Add Administrator window opens.
Click Permissions to change an administrator's permissions. The Permissions window opens.
Click Select by Group to assign or remove members of a specified group.

Domain Management
Multi-Domain Security Management Administration Guide R77 | 67
Using the Administrators pane to assign multiple administrators to a domain:
1. Select Administrators in the SmartDomain Manager Selection bar.
2. Click the Toggle View icon so that the Administrators per Domain pane shows.
3. In the Administrators per Domain pane, right-click a domain and then select Assign Administrators.
4. In the Assign Do one or more of these tasks:
Select one or more administrators and then click Add to move selected administrators from the Not Assigned list to the Assigned list. When you add an administrator to the Assigned list, the Assign Permissions Profile ("Working with Permission Profiles" on page 42) window opens.
Select one or more administrators and then click Remove to remove selected administrators from the Assigned list.
Click New Admin to define a new administrator. The Add Administrator window opens.
Click Permissions to change an administrator's permissions. The Permissions window opens.
Click Select by Group to assign or remove members of a specified group.
Assigning Permission Profiles
A permissions profile is a predefined set of SmartConsole administrative permissions that you assign to administrators and Domains. This feature lets you manage complex, granular permissions for many administrators with one definition. Permission profiles do not apply to SmartDomain Manager activities.
When you assign an administrator account to a domain, you must assign a permissions profile ("Assigning Permission Profiles" on page 67). You can assign a predefined permissions profile or you can create a unique, Domain-specific permissions profile for the administrator.
Administrators with applicable permissions can create and manage permissions profiles. By default, only superusers can create or configure permissions profiles. You can change the global properties ("Configuring Permissions" on page 43) to let global and Domain managers create and configure permission profiles for their assigned Domains.
Multi-Domain Security Management includes default permissions profiles:
None_All_Profile - Administrators cannot use SmartConsole applications to see or configure settings.
Read_Only_All_Profile - Administrators can use SmartConsole only to see information. They cannot configure settings.
Read_Write_All_Profile - Administrators can use SmartConsole applications to see and configure all settings.
Read_Write_All_Profile_no_dlp - Administrators can use SmartConsole applications to see and configure all settings with the exception of DLP.
You can assign one of the default permissions profiles to any administrator and domain.
To assign a permissions profile:
1. Select a profile from the Permissions Profile list.
2. In the Assign Permissions Profile to Domain window, select a permissions profile form the list.
You can also do these actions here:
Click Configuration > Add New Permissions Profile to create a new permissions profile.
Click Configuration > Add Domain Specific Permissions Profile to create a unique permissions profile for the selected administrator and Domain. This option only shows for superusers and the permissions profile name is assigned automatically.
Click Configuration > View Permissions Profile to see the selected permissions profile definition.
Defining GUI Clients
To create a new GUI client:
1. Select a GUI clients view.
2. Right-click the Multi-Domain Security Management root and select New GUI client from the Options menu.
3. Select the Type of the GUI client from the drop-down list. Choose one of the following:
Domain Management
Multi-Domain Security Management Administration Guide R77 | 68
Any - Generic GUI client type that lets any client computer connect to Domain Management Servers. You can only have one GUI client of the 'Any' type in the deployment. The name must be AnyHost. This option is useful for system testing but is less secure.
Name - Identify the GUI client by resolving the specified Name.
IP Address - Identify the GUI client by a specified IPv4 or IPv6 Address.
IP Address Range - Identify the GUI client by a specified IPv4 and/or IPv6 Address Range. Any computer with an IP address within this specified range can connect to Domain Management Servers.
Domain - Identify the GUI client by a specified Domain. Any client located in the specified Domain can connect to the Domain Management Servers
4. Enter a Name for the new GUI client. If you selected the Any, the name is assigned automatically and you cannot change it. The name cannot include spaces or special characters (except for the underscore character).
5. Enter the applicable information according GUI client types:
IP Address - Enter an IPv4 and/or IPv6 address, or click Get Address to resolve the address from the DNS.
IP Address Range - Define the first and the last IP addresses in the range. You define a range for IPv4 or IPv6 addresses.
Domain - Enter the applicable Domain.
6. Select the Multi-Domain Server GUI client option to let this GUI client access the Multi-Domain Servers in your environment. Clear (default) this option to define this client as a Domain-level GUI client.
Version and Blade Updates
The Version & Blade Updates window lets administrators manage new features and Software Blades without doing a full management upgrade. Upgrades can include new features or Software Blades. These are typically available as hotfixes or minor releases. Install version and blade updates on each Multi-Domain Server and then activate them using the SmartDomain Manager.
Only new versions or blades and those that have not been installed show in this window.
To install and activate version and blade updates:
1. Install the update on your Multi-Domain Servers.
2. Run mdsstop and then run mdsstart to restart the Multi-Domain Servers.
When restarting multiple Multi-Domain Servers, do so at the same time to prevent plug-in-mismatch errors.
3. Activate the updates on your Domains:
a) In the SmartDomain Manager, select Version & Blade Updates on the Selection Bar.
b) Select one or more Domains.
c) Right-click the selected Domains and then select Activate Update on Domains.
Activate and configure new features or blades using SmartDashboard for each Domain Management Server.
Activating or Deactivating Updates for a Domain
Updates installed on Multi-Domain Servers, but not yet activated, are shown in the Not Activated list.
To activate an update, select it and click Add. The update moves to the Activated list.
To deactivate an update, select it and click Remove. The update moves to the Not Activated list.
Deleting a Domain When you delete a Domain, all Domain Management Servers assigned to this Domain are also deleted.
To delete a domain using the SmartDomain Manager:
1. In the General tab, click Domain Contents.
2. Right-click the applicable Domain and select Delete Domain.
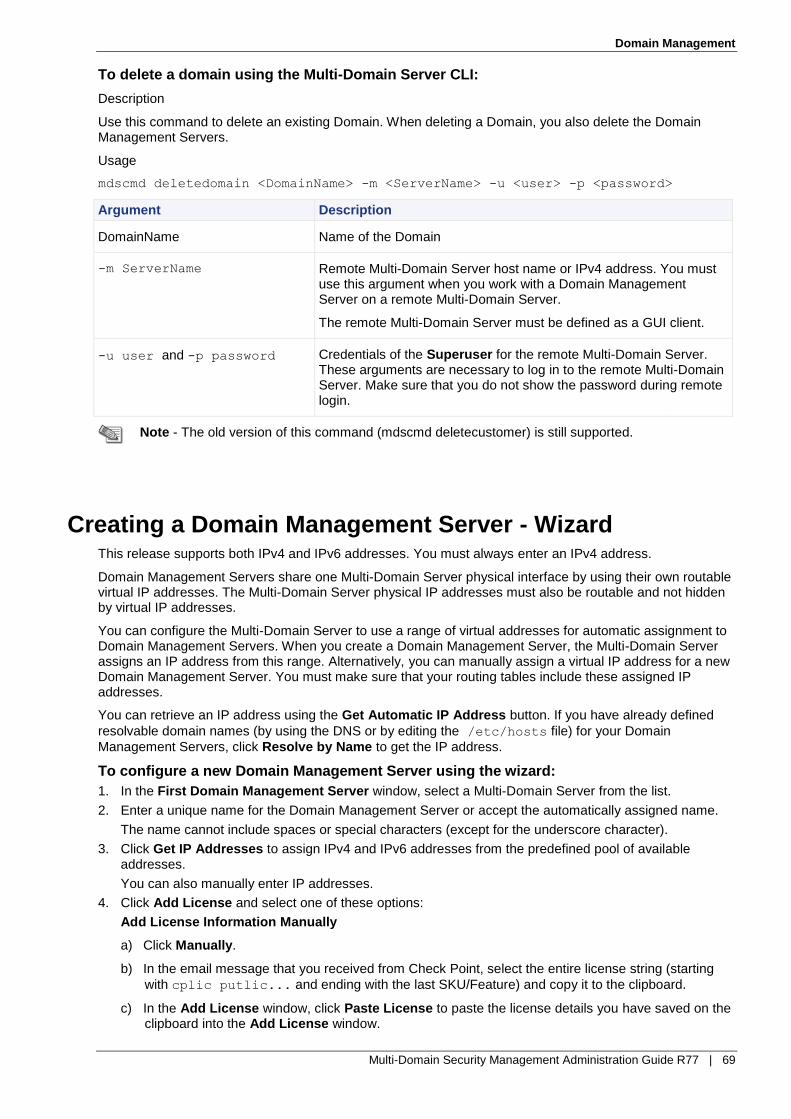
Domain Management
Multi-Domain Security Management Administration Guide R77 | 69
To delete a domain using the Multi-Domain Server CLI:
Description
Use this command to delete an existing Domain. When deleting a Domain, you also delete the Domain Management Servers.
Usage
mdscmd deletedomain <DomainName> -m <ServerName> -u <user> -p <password>
Argument Description
DomainName Name of the Domain
-m ServerName Remote Multi-Domain Server host name or IPv4 address. You must use this argument when you work with a Domain Management Server on a remote Multi-Domain Server.
The remote Multi-Domain Server must be defined as a GUI client.
-u user and -p password Credentials of the Superuser for the remote Multi-Domain Server. These arguments are necessary to log in to the remote Multi-Domain Server. Make sure that you do not show the password during remote login.
Note - The old version of this command (mdscmd deletecustomer) is still supported.
Creating a Domain Management Server - Wizard This release supports both IPv4 and IPv6 addresses. You must always enter an IPv4 address.
Domain Management Servers share one Multi-Domain Server physical interface by using their own routable virtual IP addresses. The Multi-Domain Server physical IP addresses must also be routable and not hidden by virtual IP addresses.
You can configure the Multi-Domain Server to use a range of virtual addresses for automatic assignment to Domain Management Servers. When you create a Domain Management Server, the Multi-Domain Server assigns an IP address from this range. Alternatively, you can manually assign a virtual IP address for a new Domain Management Server. You must make sure that your routing tables include these assigned IP addresses.
You can retrieve an IP address using the Get Automatic IP Address button. If you have already defined
resolvable domain names (by using the DNS or by editing the /etc/hosts file) for your Domain
Management Servers, click Resolve by Name to get the IP address.
To configure a new Domain Management Server using the wizard:
1. In the First Domain Management Server window, select a Multi-Domain Server from the list.
2. Enter a unique name for the Domain Management Server or accept the automatically assigned name.
The name cannot include spaces or special characters (except for the underscore character).
3. Click Get IP Addresses to assign IPv4 and IPv6 addresses from the predefined pool of available addresses.
You can also manually enter IP addresses.
4. Click Add License and select one of these options:
Add License Information Manually
a) Click Manually.
b) In the email message that you received from Check Point, select the entire license string (starting
with cplic putlic... and ending with the last SKU/Feature) and copy it to the clipboard.
c) In the Add License window, click Paste License to paste the license details you have saved on the clipboard into the Add License window.
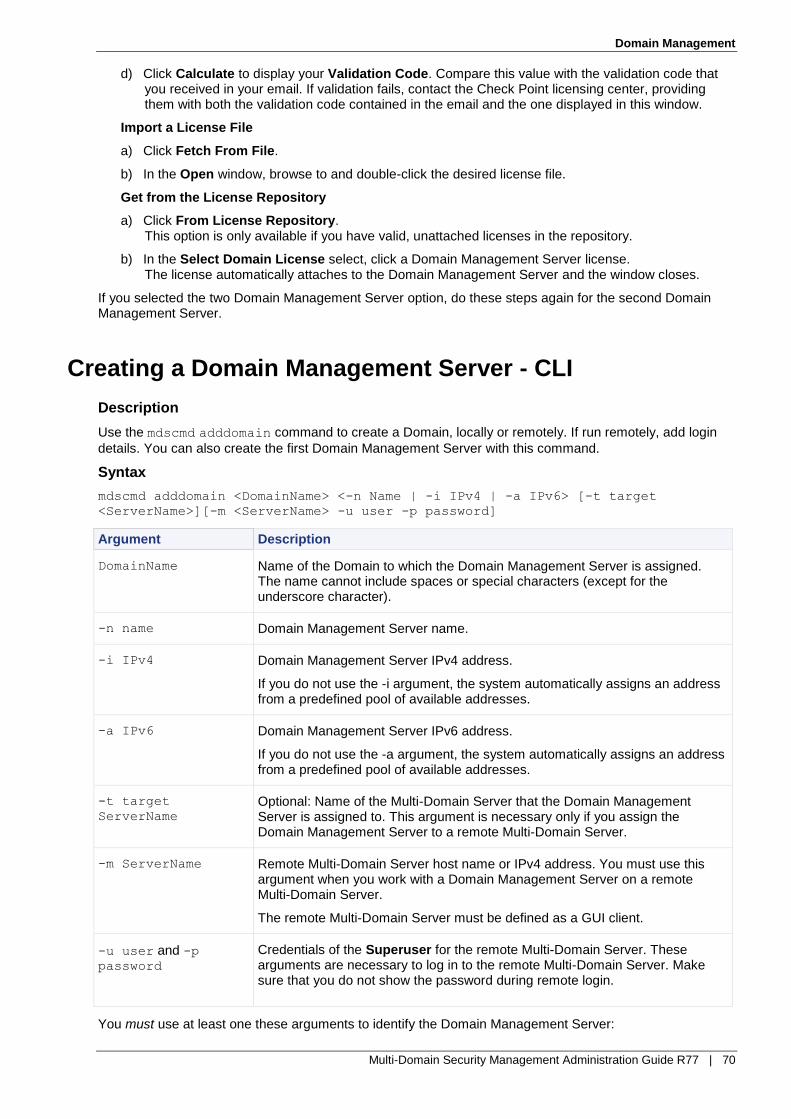
Domain Management
Multi-Domain Security Management Administration Guide R77 | 70
d) Click Calculate to display your Validation Code. Compare this value with the validation code that you received in your email. If validation fails, contact the Check Point licensing center, providing them with both the validation code contained in the email and the one displayed in this window.
Import a License File
a) Click Fetch From File.
b) In the Open window, browse to and double-click the desired license file.
Get from the License Repository
a) Click From License Repository. This option is only available if you have valid, unattached licenses in the repository.
b) In the Select Domain License select, click a Domain Management Server license. The license automatically attaches to the Domain Management Server and the window closes.
If you selected the two Domain Management Server option, do these steps again for the second Domain Management Server.
Creating a Domain Management Server - CLI
Description
Use the mdscmd adddomain command to create a Domain, locally or remotely. If run remotely, add login
details. You can also create the first Domain Management Server with this command.
Syntax
mdscmd adddomain <DomainName> <-n Name | -i IPv4 | -a IPv6> [-t target
<ServerName>][-m <ServerName> -u user -p password]
Argument Description
DomainName Name of the Domain to which the Domain Management Server is assigned. The name cannot include spaces or special characters (except for the underscore character).
-n name Domain Management Server name.
-i IPv4 Domain Management Server IPv4 address.
If you do not use the -i argument, the system automatically assigns an address from a predefined pool of available addresses.
-a IPv6 Domain Management Server IPv6 address.
If you do not use the -a argument, the system automatically assigns an address from a predefined pool of available addresses.
-t target
ServerName Optional: Name of the Multi-Domain Server that the Domain Management Server is assigned to. This argument is necessary only if you assign the Domain Management Server to a remote Multi-Domain Server.
-m ServerName Remote Multi-Domain Server host name or IPv4 address. You must use this argument when you work with a Domain Management Server on a remote Multi-Domain Server.
The remote Multi-Domain Server must be defined as a GUI client.
-u user and -p password
Credentials of the Superuser for the remote Multi-Domain Server. These arguments are necessary to log in to the remote Multi-Domain Server. Make sure that you do not show the password during remote login.
You must use at least one these arguments to identify the Domain Management Server:
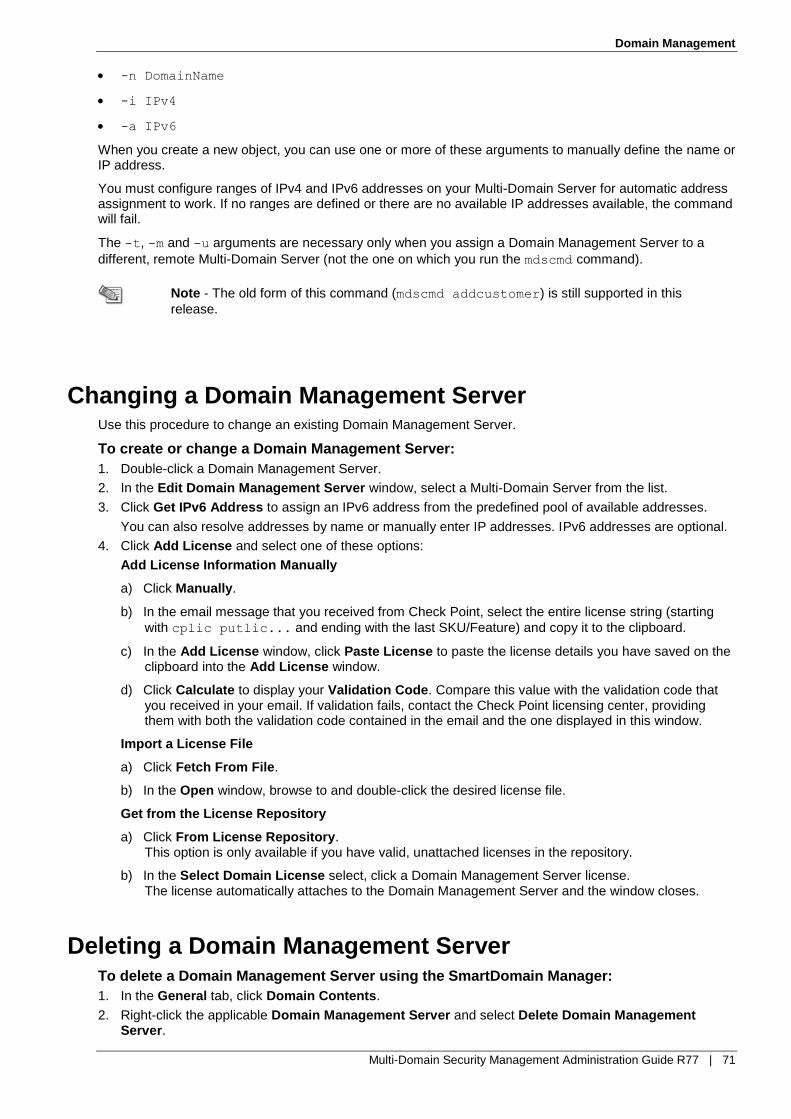
Domain Management
Multi-Domain Security Management Administration Guide R77 | 71
-n DomainName
-i IPv4
-a IPv6
When you create a new object, you can use one or more of these arguments to manually define the name or IP address.
You must configure ranges of IPv4 and IPv6 addresses on your Multi-Domain Server for automatic address assignment to work. If no ranges are defined or there are no available IP addresses available, the command will fail.
The -t, -m and -u arguments are necessary only when you assign a Domain Management Server to a
different, remote Multi-Domain Server (not the one on which you run the mdscmd command).
Note - The old form of this command (mdscmd addcustomer) is still supported in this
release.
Changing a Domain Management Server Use this procedure to change an existing Domain Management Server.
To create or change a Domain Management Server:
1. Double-click a Domain Management Server.
2. In the Edit Domain Management Server window, select a Multi-Domain Server from the list.
3. Click Get IPv6 Address to assign an IPv6 address from the predefined pool of available addresses.
You can also resolve addresses by name or manually enter IP addresses. IPv6 addresses are optional.
4. Click Add License and select one of these options:
Add License Information Manually
a) Click Manually.
b) In the email message that you received from Check Point, select the entire license string (starting
with cplic putlic... and ending with the last SKU/Feature) and copy it to the clipboard.
c) In the Add License window, click Paste License to paste the license details you have saved on the clipboard into the Add License window.
d) Click Calculate to display your Validation Code. Compare this value with the validation code that you received in your email. If validation fails, contact the Check Point licensing center, providing them with both the validation code contained in the email and the one displayed in this window.
Import a License File
a) Click Fetch From File.
b) In the Open window, browse to and double-click the desired license file.
Get from the License Repository
a) Click From License Repository. This option is only available if you have valid, unattached licenses in the repository.
b) In the Select Domain License select, click a Domain Management Server license. The license automatically attaches to the Domain Management Server and the window closes.
Deleting a Domain Management Server To delete a Domain Management Server using the SmartDomain Manager:
1. In the General tab, click Domain Contents.
2. Right-click the applicable Domain Management Server and select Delete Domain Management Server.

Domain Management
Multi-Domain Security Management Administration Guide R77 | 72
To delete a Domain Management Server using the Multi-Domain Server CLI:
Description
Use this command to delete an existing Domain Management Server.
Syntax
mdscmd deletemanagement <DomainName> <-n Name | -i IPv4 | -a IPv6> [-m
<SeverName> -u user -p password]
Argument Description
DomainName Domain that contains the Domain Management Server
-n Name Domain Management Server name
-i IPv4 Domain Management Server IPv4 address
-a IPv6 Domain Management Server IPv6 address
-m ServerName Remote Multi-Domain Server host name or IPv4 address. You must use this argument when you work with a Domain Management Server on a remote Multi-Domain Server.
The remote Multi-Domain Server must be defined as a GUI client.
-u user and -p password Credentials of the Superuser for the remote Multi-Domain Server. These arguments are necessary to log in to the remote Multi-Domain Server. Make sure that you do not show the password during remote login.
You must use at least one these arguments to identify the Domain Management Server:
-n DomainName
-i IPv4
-a IPv6
When you create a new object, you can use one or more of these arguments to manually define the name or IP address.
You must configure ranges of IPv4 and IPv6 addresses on your Multi-Domain Server for automatic address assignment to work. If no ranges are defined or there are no available IP addresses available, the command will fail.
The -t, -m and -u arguments are necessary only when you assign a Domain Management Server to a
different, remote Multi-Domain Server (not the one on which you run the mdscmd command).
Note - The old version of this command (mdscmd deletecma) is still supported.

Multi-Domain Security Management Administration Guide R77 | 73
Chapter 7
VPN with Multi-Domain Security Management
In This Section: Overview ................................................................................................................. 73
VPN Connectivity .................................................................................................... 73
Global VPN Communities ....................................................................................... 74
Configuring Global VPN Communities .................................................................... 76
Overview Branch offices need to connect with other branch offices. Partner sites also need to establish local and remote communication. Once connectivity has been established, the connections must be secure and have high levels of privacy, authentication, and integrity.
Only legitimate traffic must be allowed to enter a Domain internal network, and traffic must be inspected for potentially harmful content. Inside a Domain network, different levels of access must be defined so that sensitive data is only available to the right people.
Authentication Between Security Gateways
Before Security Gateways can exchange encryption keys and build VPN tunnels, they authenticate each other. Security Gateways authenticate sending one of these credential types:
Certificates. Each Security Gateway presents a certificate which contains identifying information of the Security Gateway itself, and the public key, both of which are signed by the Domain Management Server trusted CA.
Pre-shared secret. A pre-shared secret is shared a pair of Security Gateways. Each Security Gateway must prove that it knows the pre-shared secret. The pre-shared secret can be any combination of letters and numbers.
Certificates are the preferred means and considered more secure. The Domain Management Server Internal CA automatically gives a certificate to each Security Gateway it manages, so it is also more convenient to use this type of authentication.
VPN Connectivity These trusted entities create VPN trust in a Multi-Domain Security Management deployment:
Certificates issued by a Domain Management Server Internal Certificate Authority (ICA).
External third party Certificate Authority servers (using OPSEC connectivity).
Pre-shared secrets.
The Domain Management Server ICA issues certificates used by Domain Security Gateways to create SIC trust. The primary Multi-Domain Server issues certificates to authenticate administrators.
The procedure for establishing Global VPN Communities automates part of the step-by-step process of establishing Externally Managed Security Gateways for each Security Management Server and exchanging certificates manually.

VPN with Multi-Domain Security Management
Multi-Domain Security Management Administration Guide R77 | 74
Global VPN Communities Sometimes Domains need to establish VPN between Security Gateways that are managed by different Domain Management Servers. This might happen, for example, in large enterprises that have created different Domain Management Servers to manage corporate networks in different cities or countries. Or, an MSP deployment may require communication between partners, managed as different Domains.
Cross-Domain VPN is handled by establishing Global VPN Communities. This community is similar to the regular VPN community with the exception that it can deal with Security Gateways managed by different Domain Management Servers. An administrator creates a VPN connection between Domain Security Gateways using the Domain Management Server SmartDashboard. A Global VPN Community however is defined at the Multi-Domain Security Management level, using SmartDomain Manager and Global SmartDashboard.
Multi-Domain Security Management utilizes its knowledge about different Domain network environments to ease the definition of VPN for environments run by different Domain Management Servers. In the standalone model, cross-Domain VPN is established by creating Security Gateways that are defined as externally managed Security Gateway objects. Then certificates and network information are imported into the Security Management Server databases.
In Multi-Domain Security Management, during the Global VPN Community setup, the Multi-Domain Server automatically exports relevant ICA information (such as the CA certificate) for each Domain Management Server, so that both sides can trust the other's ICA.
Security Gateway Global Names
You can configure an existing Domain Security Gateway as a global Security Gateway. This action imports the Security Gateway into the global policy database, making it accessible by all other Domain Management Servers in your deployment.
Different Domains may coincidentally contain Security Gateways using the same name. Each global Security Gateway object must have its own unique Global Name. To resolve this issue, the Global Names Template automatically assigns a unique name for each global Security Gateway. The default global name
format is g<Security Gateway name>_of_<Domain name>.
For example:
Security Gateway name = MyGateway
Domain name = MyDomain
Global name = gMyGateway_of_MyDomain
Changing the Global Name Template
You can change the format of names generated by the global name template. To do so:
1. In the SmartDomain Manager, select Multi-Domain Security Management Properties from the Management menu.
2. Select the Global Names Format tab.
3. Enter a format string in the Global Name Format field. You can use the Variables button to insert variables for Security Gateway names and Domain names. The format string cannot contain spaces or special characters.
4. Optionally, enter a suffix format. We recommend that the suffix be preceded by the underscore character.
Note - Make sure that your format string will always generate a unique name for global Security Gateways.
Global or Neighbor VPN Security Gateway
For Global VPN Communities, VPN tunnels are created between Security Gateways in neighboring Domains. This is analogous to externally managed VPN Security Gateways in a Security Management deployment.
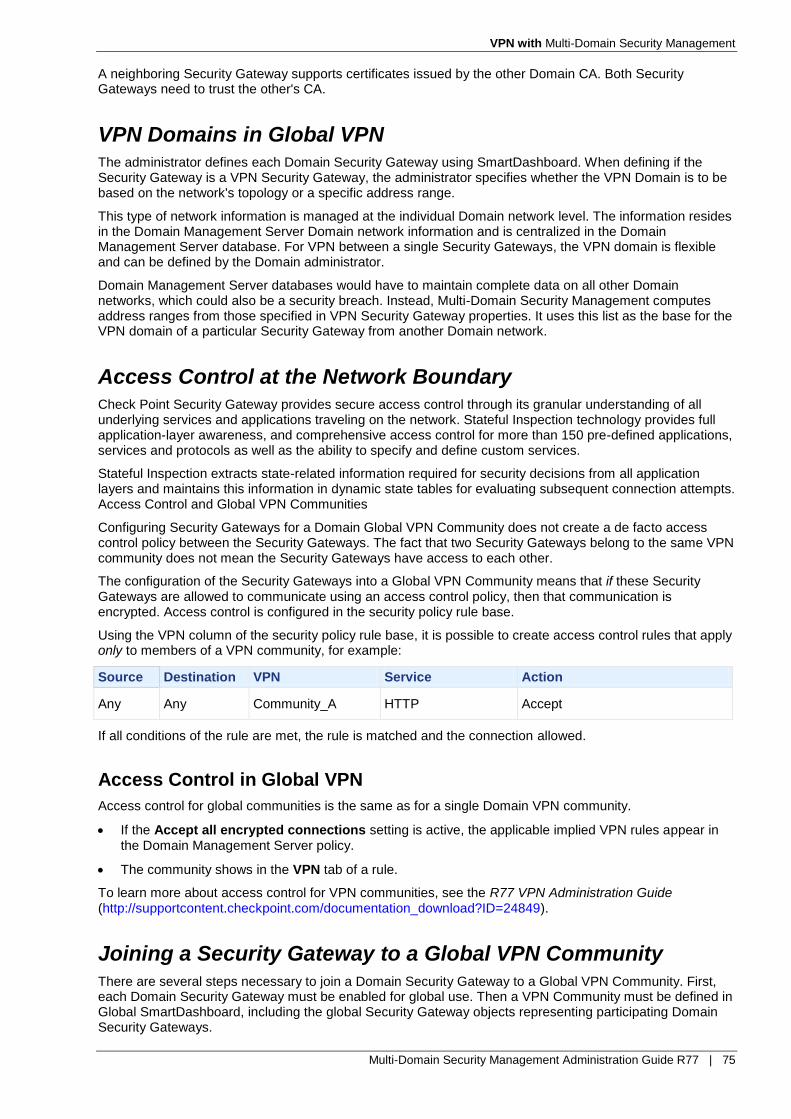
VPN with Multi-Domain Security Management
Multi-Domain Security Management Administration Guide R77 | 75
A neighboring Security Gateway supports certificates issued by the other Domain CA. Both Security Gateways need to trust the other's CA.
VPN Domains in Global VPN
The administrator defines each Domain Security Gateway using SmartDashboard. When defining if the Security Gateway is a VPN Security Gateway, the administrator specifies whether the VPN Domain is to be based on the network's topology or a specific address range.
This type of network information is managed at the individual Domain network level. The information resides in the Domain Management Server Domain network information and is centralized in the Domain Management Server database. For VPN between a single Security Gateways, the VPN domain is flexible and can be defined by the Domain administrator.
Domain Management Server databases would have to maintain complete data on all other Domain networks, which could also be a security breach. Instead, Multi-Domain Security Management computes address ranges from those specified in VPN Security Gateway properties. It uses this list as the base for the VPN domain of a particular Security Gateway from another Domain network.
Access Control at the Network Boundary
Check Point Security Gateway provides secure access control through its granular understanding of all underlying services and applications traveling on the network. Stateful Inspection technology provides full application-layer awareness, and comprehensive access control for more than 150 pre-defined applications, services and protocols as well as the ability to specify and define custom services.
Stateful Inspection extracts state-related information required for security decisions from all application layers and maintains this information in dynamic state tables for evaluating subsequent connection attempts. Access Control and Global VPN Communities
Configuring Security Gateways for a Domain Global VPN Community does not create a de facto access control policy between the Security Gateways. The fact that two Security Gateways belong to the same VPN community does not mean the Security Gateways have access to each other.
The configuration of the Security Gateways into a Global VPN Community means that if these Security Gateways are allowed to communicate using an access control policy, then that communication is encrypted. Access control is configured in the security policy rule base.
Using the VPN column of the security policy rule base, it is possible to create access control rules that apply only to members of a VPN community, for example:
Source Destination VPN Service Action
Any Any Community_A HTTP Accept
If all conditions of the rule are met, the rule is matched and the connection allowed.
Access Control in Global VPN
Access control for global communities is the same as for a single Domain VPN community.
If the Accept all encrypted connections setting is active, the applicable implied VPN rules appear in the Domain Management Server policy.
The community shows in the VPN tab of a rule.
To learn more about access control for VPN communities, see the R77 VPN Administration Guide (http://supportcontent.checkpoint.com/documentation_download?ID=24849).
Joining a Security Gateway to a Global VPN Community
There are several steps necessary to join a Domain Security Gateway to a Global VPN Community. First, each Domain Security Gateway must be enabled for global use. Then a VPN Community must be defined in Global SmartDashboard, including the global Security Gateway objects representing participating Domain Security Gateways.
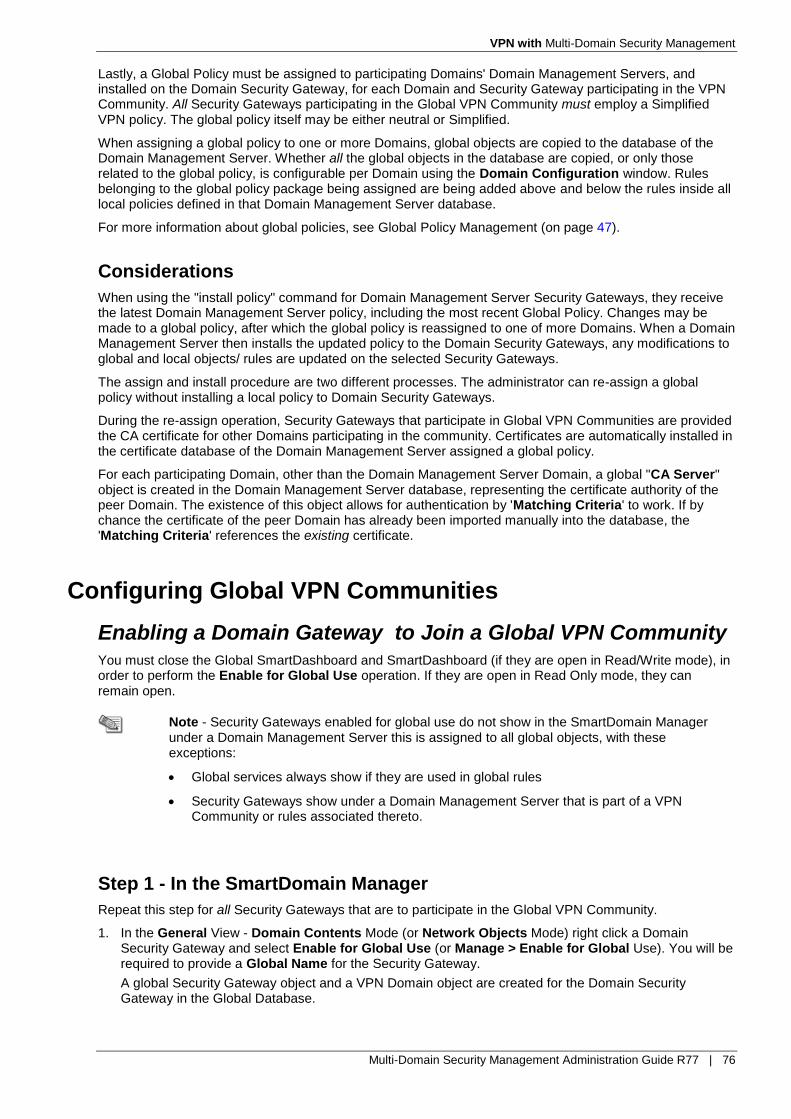
VPN with Multi-Domain Security Management
Multi-Domain Security Management Administration Guide R77 | 76
Lastly, a Global Policy must be assigned to participating Domains' Domain Management Servers, and installed on the Domain Security Gateway, for each Domain and Security Gateway participating in the VPN Community. All Security Gateways participating in the Global VPN Community must employ a Simplified VPN policy. The global policy itself may be either neutral or Simplified.
When assigning a global policy to one or more Domains, global objects are copied to the database of the Domain Management Server. Whether all the global objects in the database are copied, or only those related to the global policy, is configurable per Domain using the Domain Configuration window. Rules belonging to the global policy package being assigned are being added above and below the rules inside all local policies defined in that Domain Management Server database.
For more information about global policies, see Global Policy Management (on page 47).
Considerations
When using the "install policy" command for Domain Management Server Security Gateways, they receive the latest Domain Management Server policy, including the most recent Global Policy. Changes may be made to a global policy, after which the global policy is reassigned to one of more Domains. When a Domain Management Server then installs the updated policy to the Domain Security Gateways, any modifications to global and local objects/ rules are updated on the selected Security Gateways.
The assign and install procedure are two different processes. The administrator can re-assign a global policy without installing a local policy to Domain Security Gateways.
During the re-assign operation, Security Gateways that participate in Global VPN Communities are provided the CA certificate for other Domains participating in the community. Certificates are automatically installed in the certificate database of the Domain Management Server assigned a global policy.
For each participating Domain, other than the Domain Management Server Domain, a global "CA Server" object is created in the Domain Management Server database, representing the certificate authority of the peer Domain. The existence of this object allows for authentication by 'Matching Criteria' to work. If by chance the certificate of the peer Domain has already been imported manually into the database, the 'Matching Criteria' references the existing certificate.
Configuring Global VPN Communities
Enabling a Domain Gateway to Join a Global VPN Community
You must close the Global SmartDashboard and SmartDashboard (if they are open in Read/Write mode), in order to perform the Enable for Global Use operation. If they are open in Read Only mode, they can remain open.
Note - Security Gateways enabled for global use do not show in the SmartDomain Manager under a Domain Management Server this is assigned to all global objects, with these exceptions:
Global services always show if they are used in global rules
Security Gateways show under a Domain Management Server that is part of a VPN Community or rules associated thereto.
Step 1 - In the SmartDomain Manager
Repeat this step for all Security Gateways that are to participate in the Global VPN Community.
1. In the General View - Domain Contents Mode (or Network Objects Mode) right click a Domain Security Gateway and select Enable for Global Use (or Manage > Enable for Global Use). You will be required to provide a Global Name for the Security Gateway.
A global Security Gateway object and a VPN Domain object are created for the Domain Security Gateway in the Global Database.

VPN with Multi-Domain Security Management
Multi-Domain Security Management Administration Guide R77 | 77
2. Enabling clusters: The user can enable a VPN cluster for global use in the same way that a DomainSecurity Gateway is enabled. The cluster is exported to the Global Policy as a global Security Gateway object.
Step 2 - In Global SmartDashboard
1. Define a Global Site-to-Site VPN Community.
2. Add the global Security Gateway objects, defined in step 1, as participating Security Gateways in thiscommunity.
3. Define global rules as needed for the new Global VPN Community, the global Security Gateway objects,and the External Domains.
Step 3 - In the SmartDomain Manager
In the Global Policies View, assign and install the Global Policy to Domains and selected Domain Security Gateways. The Global Policies View has two modes which allow slightly different activities, the Security Policies Mode and the VPN Communities Mode.
Different SmartDomain Manager views allow you to perform this step in slightly different ways. You can assign the policy to one Domain at a time, for greater load management. Or you can assign the policy to all the Domains at once, if load management is not an issue.
To assign to one Domain at a time
Through the Security Policies Mode, select a global policy. Then choose Reassign/Install Global Policy... from the Manage menu, or right-click the Domain and select Reassign/Install Global Policy.... Select the Domain Security Gateways to which the policy should be installed. The policy is assigned to the Domain Management Server database, then to the selected Domain Security Gateways.
or
Use the VPN Communities Mode, but the procedure is much the same. Right click a Domain, then select Reassign/Install Global Policy... from the Manage menu, or select Reassign/Install Global Policy... from the mouse menu.
To assign to many Domains at one time
The procedure is through the Security Policies Mode, similar to the above. Select a Global Policy and right click, then select Manage > Assign/Install Global Policy or Reassign/Install Global Policy..., or right-click and select Assign/Install Global Policy...
This operation assigns the Policy to all selected Domains, and then installs the Policy to all Domain Security Gateways, in one step. It does not allow you to select specific Security Gateways to which to install the Policy. If chosen, the Policy will be installed to all of the Security Gateways for the selected Domains. Assigning the Policy to many Domains and all their Security Gateways may take some time. Use this option with caution.
You can now create security rules regarding VPN using SmartDashboard for a Domain Management Server. Security Gateways which are external to a Domain but are part of the Global VPN Community, will appear as global externally managed Security Gateway objects in the Domain Management Server SmartDashboard.
The Domain own participating Security Gateways will appear as they usually do. It is not necessary to define authentication for the external global Security Gateway objects. Matching criteria are automatically defined for the global Security Gateway objects referring to the other Domain Management Server Certificate Authority.
A Domain can be assigned a Global Policy which references a Global VPN Community, in which, however, none of the Domain Security Gateways participate. If this happens, the Domain Management Server database will have an empty community (without community members).
Multi-Domain Security Management Administration Guide R77 | 78
Chapter 8
High Availability
In This Section: Overview ................................................................................................................. 78
Multi-Domain Server High Availability ..................................................................... 78
Domain Management Server High Availability ....................................................... 83
Configuration ........................................................................................................... 87
Failure Recovery ..................................................................................................... 90
Overview
Note - The current version supports multiple Domain Management Servers for each Domain.
Multi-Domain Security Management High Availability gives uninterrupted management redundancy for all Domains. Multi-Domain Security Management High Availability operates at these levels:
Multi-Domain Server High Availability - Multiple Multi-Domain Servers are, by default, automatically synchronized with each other. You can connect to any Multi-Domain Server to do Domain management tasks. One Multi-Domain Server is designated as the Active Multi-Domain Server. Other Multi-Domain Servers are designated as Standby Multi-Domain Servers.
You can only do Global policy and global object management tasks using the active Multi-Domain Server. In the event that the active Multi-Domain Server is unavailable, you must change one of the standby Multi-Domain Servers to active.
Domain Management Server High Availability - Multiple Domain Management Servers give Active/Standby redundancy for Domain management. One Domain Management Server for each Domain is Active. The other, fully synchronized Domain Management Servers for that Domain, are standbys. In the event that the Active Domain Management Server becomes unavailable, you must change one of the standby Domain Management Servers to active.
You can also use ClusterXL to give High Availability redundancy to your Domain Security Gateways. You use SmartDashboard to configure and manage Security Gateway High Availability for Domain Management Servers.
Multi-Domain Server High Availability
Multiple Multi-Domain Server Deployments
You can create multiple backup Multi-Domain Servers on different computers. A Multi-Domain Server can host either active or standby Domain Management Servers.
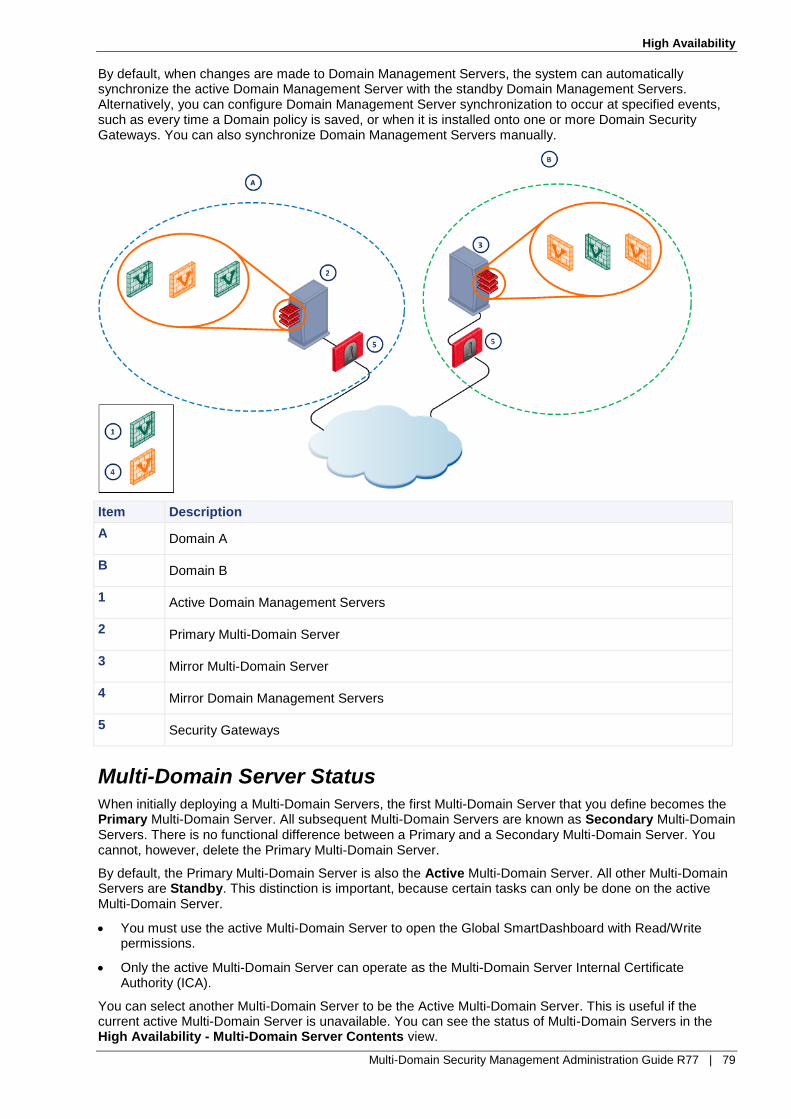
High Availability
Multi-Domain Security Management Administration Guide R77 | 79
By default, when changes are made to Domain Management Servers, the system can automatically synchronize the active Domain Management Server with the standby Domain Management Servers. Alternatively, you can configure Domain Management Server synchronization to occur at specified events, such as every time a Domain policy is saved, or when it is installed onto one or more Domain Security Gateways. You can also synchronize Domain Management Servers manually.
Item Description
A Domain A
B Domain B
1 Active Domain Management Servers
2 Primary Multi-Domain Server
3 Mirror Multi-Domain Server
4 Mirror Domain Management Servers
5 Security Gateways
Multi-Domain Server Status
When initially deploying a Multi-Domain Servers, the first Multi-Domain Server that you define becomes the Primary Multi-Domain Server. All subsequent Multi-Domain Servers are known as Secondary Multi-Domain Servers. There is no functional difference between a Primary and a Secondary Multi-Domain Server. You cannot, however, delete the Primary Multi-Domain Server.
By default, the Primary Multi-Domain Server is also the Active Multi-Domain Server. All other Multi-Domain Servers are Standby. This distinction is important, because certain tasks can only be done on the active Multi-Domain Server.
You must use the active Multi-Domain Server to open the Global SmartDashboard with Read/Write permissions.
Only the active Multi-Domain Server can operate as the Multi-Domain Server Internal Certificate Authority (ICA).
You can select another Multi-Domain Server to be the Active Multi-Domain Server. This is useful if the current active Multi-Domain Server is unavailable. You can see the status of Multi-Domain Servers in the High Availability - Multi-Domain Server Contents view.

High Availability
Multi-Domain Security Management Administration Guide R77 | 80
To change a Multi-Domain Server from Standby to Active:
1. In the SmartDomain Manager Selection Bar, select High Availability.
2. Right-click a standby Multi-Domain Server and select Change Over from the Options menu.
Multi-Domain Server Clock Synchronization
All Multi-Domain Server system clocks must be synchronized. This is because the database synchronization method uses the time that transactions are recorded to determine the most recent action.
The transaction times are recorded using UTC (Universal Time Coordinated) on Multi-Domain Servers system clocks. You can synchronize Multi-Domain Server clocks using synchronization utilities. We strongly recommend that you update system clocks frequently to compensate for clock drift. Database synchronization requires that the Multi-Domain Server clocks be synchronized to the nearest second.
Whenever a new Multi-Domain Server is defined, it must receive a certificate and communication must be established. The Multi-Domain Server also needs to be synchronized with the other Multi-Domain Servers. The SmartDomain Manager guides the user through the stages of performing this initial synchronization.
The Multi-Domain Server Databases
The Multi-Domain Server hosts these databases:
Domain Management Server databases
Multi-Domain Security Management System database
Global objects database
The content and synchronization method of each database is described below.
Multi-Domain Security Management System Database
The Multi-Domain Security Management system database contains data objects that define Multi-Domain Servers, Domains, Domain Management Servers, Security Gateways, licenses, administrators, GUI clients, and Global Policies. This database is automatically synchronized between Multi-Domain Servers.
This database architecture and automatic synchronization lets administrators use different Multi-Domain Servers to do their management tasks. Changes made to one Multi-Domain Server are synchronized automatically to all other Multi-Domain Servers.
If one Multi-Domain Server is down or disconnected from other Multi-Domain Servers, you can continue to use any other Multi-Domain Servers that are online. Once the Multi-Domain Server reconnects, it will synchronize automatically.
ICA Database for Multi-Domain Servers
This database holds certificates for Multi-Domain Servers, administrators and CRLs (certificate revocation lists). The Multi-Domain Server ICA is used for secure communication with other Multi-Domain Servers. This database is synchronized whenever the Global Policy database is synchronized. Only the Active Multi-Domain Server can issue and revoke certificates for other Multi-Domain Servers. When a Standby Multi-Domain Server becomes Active, its ICA also becomes "Active."
Domain Management Server Databases
Each Domain Management Server includes the following data:
1. Domain network objects
2. Domain Security Gateway definitions
3. Domain Security Policies
4. Domain Blade and feature configuration
5. Domain Certificate Authority (CA)
6. Other Domain-specific settings

High Availability
Multi-Domain Security Management Administration Guide R77 | 81
How Synchronization Works
Multi-Domain Server Database Synchronization
By default, Multi-Domain Server database synchronization occurs automatically whenever an object is changed. The Multi-Domain Server databases are synchronized for the specific object change. For example, if you add a new administrator to the system, all Multi-Domain Servers will be updated with this information.
Item Description
1 Multi-Domain Servers
2 System databases
3 Synchronization path
Multi-Domain Server ICA Database Synchronization
When a new Multi-Domain Server is added to the deployment, the active Multi-Domain Server ICA must issue it a certificate. If a new administrator is added to the system, the Multi-Domain Server ICA may issue a certificate to the new administrator, depending on the administrator's authentication method. The Multi-Domain Server ICA database is updated. If there is more than one Multi-Domain Server in the system, the Multi-Domain Server ICA databases must be synchronized to reflect these additions.
Global Policies Database Synchronization
Global Policies data synchronization occurs either when you save the global policy or after a specified event. See Automatic Synchronization for Global Policies Databases (on page 89) for details. Unlike the system database synchronization, which is per object, the entire contents of the Global Policies database are synchronized.
Domain Management Server Database Synchronization
Domain Management Server database synchronization occurs for each Domain separately. Domain Management Servers for each Domain are synchronized when a Domain policy is saved, or at another defined event (for details about synchronization settings, see Automatic Domain Management Server Synchronization (on page 89)). The entire contents of the Domain Management Server database are synchronized.
Different Domains may have different synchronization settings. This means that different Domain Management Servers synchronize according to the specific settings for that Domain only. When information is changed or updated for a Domain, all Domain Management Servers must receive the new information. For example, if a Security Gateway is added to a Domain network, and the Security Gateway receives a
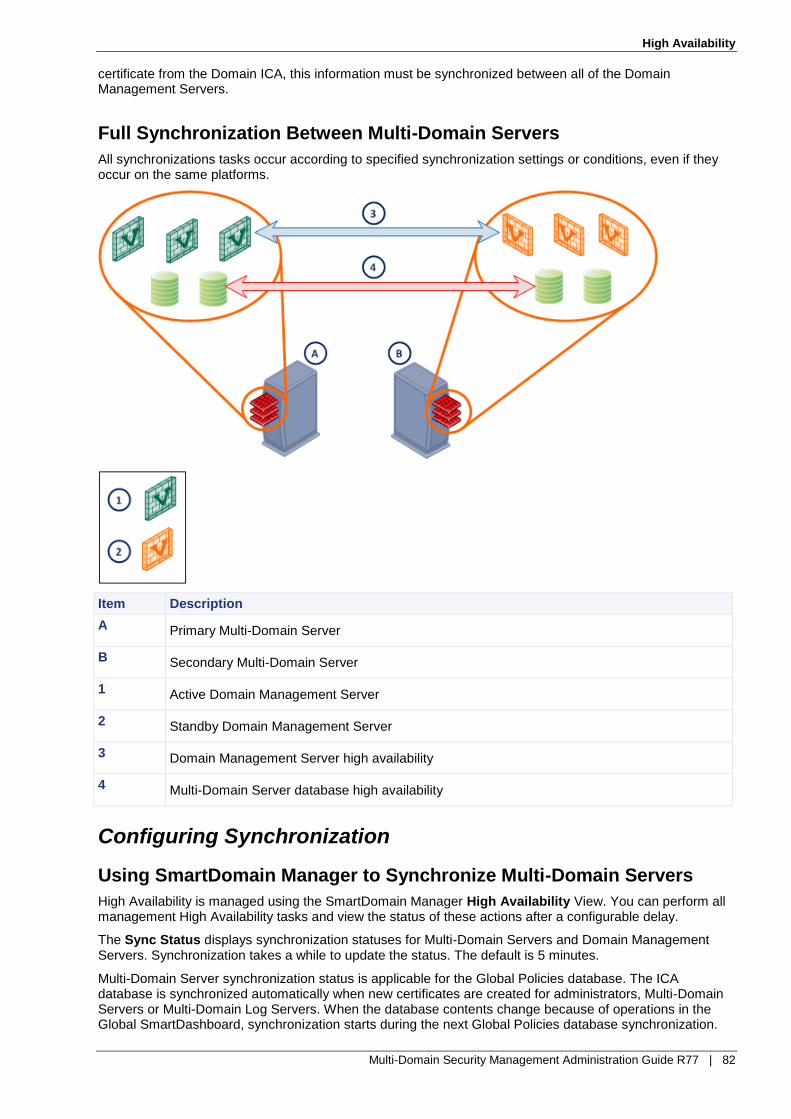
High Availability
Multi-Domain Security Management Administration Guide R77 | 82
certificate from the Domain ICA, this information must be synchronized between all of the Domain Management Servers.
Full Synchronization Between Multi-Domain Servers
All synchronizations tasks occur according to specified synchronization settings or conditions, even if they occur on the same platforms.
Item Description
A Primary Multi-Domain Server
B Secondary Multi-Domain Server
1 Active Domain Management Server
2 Standby Domain Management Server
3 Domain Management Server high availability
4 Multi-Domain Server database high availability
Configuring Synchronization
Using SmartDomain Manager to Synchronize Multi-Domain Servers
High Availability is managed using the SmartDomain Manager High Availability View. You can perform all management High Availability tasks and view the status of these actions after a configurable delay.
The Sync Status displays synchronization statuses for Multi-Domain Servers and Domain Management Servers. Synchronization takes a while to update the status. The default is 5 minutes.
Multi-Domain Server synchronization status is applicable for the Global Policies database. The ICA database is synchronized automatically when new certificates are created for administrators, Multi-Domain Servers or Multi-Domain Log Servers. When the database contents change because of operations in the Global SmartDashboard, synchronization starts during the next Global Policies database synchronization.
High Availability
Multi-Domain Security Management Administration Guide R77 | 83
Sync Status values:
Unknown — No information received about this Domain Management Server or Multi-Domain Server synchronization status. This is temporary status shows until the first synchronization is complete.
Never synced — This Domain Management Server or Multi-Domain Server was not synchronized with the other Domain Management Server/Multi-Domain Server to which the SmartDomain Manager is connected.
Synchronized — This Domain Management Server or Multi-Domain Server is synchronized with the other Domain Management Server/Multi-Domain Server to which the SmartDomain Manager is connected.
Lagging — The data of this Domain Management Server or Multi-Domain Server is less updated than the data of the other Domain Management Server/Multi-Domain Server to which the SmartDomain Manager is connected.
Advanced —The data of this Domain Management Server or Multi-Domain Server is more updated than the data of the other Domain Management Server/Multi-Domain Server to which the SmartDomain Manager is connected.
Collision — The data of this Domain Management Server or Multi-Domain Server conflicts with the data of the other Domain Management Server/Multi-Domain Server to which the SmartDomain Manager is connected.
Footnote
Multi-Domain Server synchronization status is relevant for the Global Policies database. The ICA database is synchronized automatically when new certificates are created for administrators, Multi-Domain Servers or Multi-Domain Log Servers. When the database contents change as a result of operations in the Global SmartDashboard, synchronization occurs during the next Global Policies database synchronization.
Domain Management Server High Availability Domain Management Server High Availability gives redundancy for a Domain network. At any given time, one Domain Management Server is active, while any one or more Domain Management Servers for the same Domain are in the standby mode. Data synchronization between these Domain Management Servers greatly improves fault tolerance and lets administrators seamlessly activate a standby Domain Management Server as needed. Active Domain Management Server and standby Domain Management Servers must be hosted on different Multi-Domain Servers.
Note - Redundant Multi-Domain Servers may use different operating systems. All Multi-Domain Servers, however, must use the same Multi-Domain Security Management version.
You can create all redundant Domain Management Servers at the same time, or add additional Domain Management Servers at a later time. Once the Domain Management Servers have been initialized and synchronized, there is no functional difference between them.
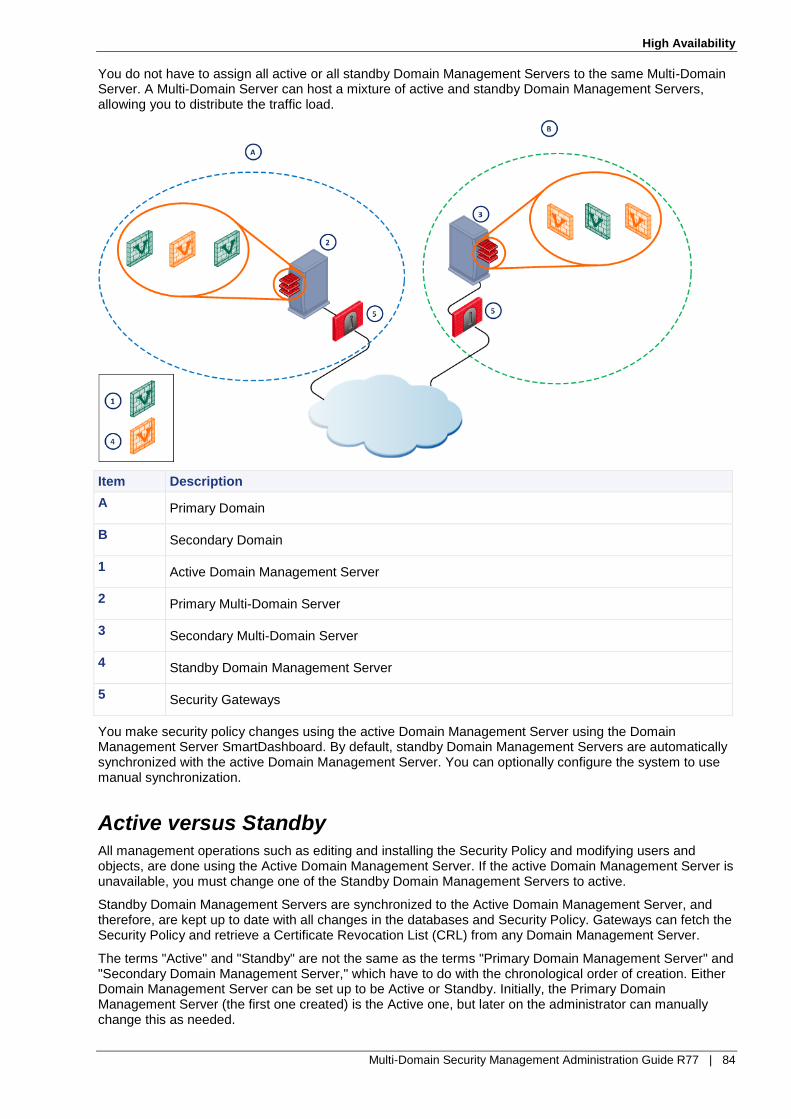
High Availability
Multi-Domain Security Management Administration Guide R77 | 84
You do not have to assign all active or all standby Domain Management Servers to the same Multi-Domain Server. A Multi-Domain Server can host a mixture of active and standby Domain Management Servers, allowing you to distribute the traffic load.
Item Description
A Primary Domain
B Secondary Domain
1 Active Domain Management Server
2 Primary Multi-Domain Server
3 Secondary Multi-Domain Server
4 Standby Domain Management Server
5 Security Gateways
You make security policy changes using the active Domain Management Server using the Domain Management Server SmartDashboard. By default, standby Domain Management Servers are automatically synchronized with the active Domain Management Server. You can optionally configure the system to use manual synchronization.
Active versus Standby
All management operations such as editing and installing the Security Policy and modifying users and objects, are done using the Active Domain Management Server. If the active Domain Management Server is unavailable, you must change one of the Standby Domain Management Servers to active.
Standby Domain Management Servers are synchronized to the Active Domain Management Server, and therefore, are kept up to date with all changes in the databases and Security Policy. Gateways can fetch the Security Policy and retrieve a Certificate Revocation List (CRL) from any Domain Management Server.
The terms "Active" and "Standby" are not the same as the terms "Primary Domain Management Server" and "Secondary Domain Management Server," which have to do with the chronological order of creation. Either Domain Management Server can be set up to be Active or Standby. Initially, the Primary Domain Management Server (the first one created) is the Active one, but later on the administrator can manually change this as needed.

High Availability
Multi-Domain Security Management Administration Guide R77 | 85
Adding a Secondary Domain Management Server
When you add a secondary Domain Management Server, the system does these tasks automatically:
1. Creates duplicate Domain Management Servers on another Multi-Domain Server.
2. Copies the Certificate Authority (CA) files from the primary Domain Management Server to the secondary Domain Management Servers.
3. Starts the secondary Domain Management Server.
4. Exchanges the activation key between the Domain Management Servers.
5. Initializes SIC communication between the Domain Management Servers.
6. Synchronizes the secondary Domain Management Server with the primary Domain Management Server. At this stage, both Domain Management Servers are running (if the primary Domain Management Server is down, the system will automatically try to start it).
If the operation fails at stage 3 or 4, the administrator can complete these stages manually.
See Mirroring Domain Management Servers with mdscmd (on page 89) for instructions on mirroring Domain
Management Servers using the CLI.
Domain Management Server Backup Using a Security Management Server
You can use a Security Management Server to backup Domain Management Servers in a high availability deployment. This Security Management Server can operate as an Active or Standby management.
You can only backup one Domain Management Server to a Security Management Server. If you need to backup multiple Domain Management Servers, you must back each one to a different Security Management Server.
For example:
A backup Security Management Server is the standby management server and the Domain Management Server is the active management server. If the Domain Management Server is unavailable, the Security Management Server becomes the Active management.
The Domain Management Server operates as the standby management and the backup Security Management Server is the Active management. If the backup Security Management Server is unavailable, the Domain Management Server becomes the Active management.
In either case, you must change one Domain Management Server to active to assign a global policy.
Note - A backup Security Management Server cannot be installed on Windows or IPSO platforms.

High Availability
Multi-Domain Security Management Administration Guide R77 | 86
You must define GUI clients and administrators locally on the Security Management Server. The backup process cannot export this data from a Domain Management Server to a Security Management Server.
Item Description
A Primary Multi-Domain Server
B Secondary Multi-Domain Server
C Security Management Server used for Domain Management Server backup
1 Active Domain Management Server
2 Standby Domain Management Server
3 Domain Management Server high availability
4 Multi-Domain Server database high availability
5 Domain Management Server high availability to Security Management Server backup
Creating a Backup Security Management Server
To create a backup Security Management Server from a fresh installation:
1. Do a fresh Security Management Server installation, defining the Security Management Server as a secondary Security Management Server.
2. Use cpconfig to configure the following:
a) Select an activation key that will be used to establish SIC trust between the Security Management Server and Domain Management Server.
b) Define GUI Clients and Administrators.

High Availability
Multi-Domain Security Management Administration Guide R77 | 87
3. In the Domain Management Server SmartDashboard, create a network object that will represent the secondary backup Security Management Server.
a) Select Manage > Network Objects > Check Point > New > Host
b) In the Check Point Host window, select Secondary Management Station under Check Point Products. This automatically selects the Log Server.
4. From the object created in step 3 establish secure communication with the secondary backup Security Management Server.
5. From SmartDashboard access the Policy menu, select Management High Availability and press the Synchronize button.
To setup a backup Security Management Server from an existing Security Management Server:
1. Migrate the existing Security Management Server to the Domain Management Server.
See "Upgrading Multi-Domain Security Management" in the R77 Installation and Upgrade Guide (http://supportcontent.checkpoint.com/documentation_download?ID=24831).
2. Perform a fresh Security Management Server installation as a secondary Security Management Server on an existing or new machine.
3. Using cpconfig to select an activation key that will be used to establish secure internal communication (SIC) between the Domain Management Server and Security Management.
4. Create a network object in the Domain Management Server that will represent the secondary backup Security Management Server.
a) Select Manage > Network Objects > Check Point > New > Host
b) In the Check Point Host window, check Secondary Management Station under Check Point Products. This automatically selects Log Server as well.
5. From the object created in step 4 establish secure communication with the secondary backup Security Management Server.
6. From SmartDashboard access the Policy menu, select Management High Availability and press the Synchronize button.
Configuration
Adding another Multi-Domain Server
These steps are described in greater detail in the section Creating a Primary Multi-Domain Server (see "Configuring the Primary Multi-Domain Server" on page 28).
1. Synchronize the system clock of the new Multi-Domain Server computer with all other Multi-Domain Servers computers' system clocks.
2. Run the Multi-Domain Server installation script to install the Multi-Domain Server.
3. When prompted if this is a primary Multi-Domain Server, enter No.
4. During the configuration phase, add a Multi-Domain Server license, and enter the SIC Activation Key. This Activation Key is required to send the SIC certificate to the new Multi-Domain Server from the primary Multi-Domain Server.
5. In the SmartDomain Manager connected to the first Multi-Domain Server, define a new Multi-Domain Server. Assign it the IP address of the Leading Interface you selected for it in the configuration phase. Send the new Multi-Domain Server a certificate by the Initialize Communication option. Use the same Activation Key you entered in the configuration of the new Multi-Domain Server.
6. Do an "Initial synchronization" for this Multi-Domain Server when prompted. Your new Multi-Domain Server is now ready for use.
Creating a Mirror of an Existing Multi-Domain Server
Mirroring an existing Multi-Domain Server creates an exact duplicate that Multi-Domain Server.
To mirror an existing Multi-Domain Server:
1. Set up route tables.

High Availability
Multi-Domain Security Management Administration Guide R77 | 88
2. Synchronize the system clock of the computer on which you will install the Multi-Domain Server with all other Multi-Domain Servers.
3. Install and create a new Multi-Domain Server. Define the new Multi-Domain Server using the SmartDomain Manager.
4. Do an initial synchronization. See Initializing Synchronization (see "First Multi-Domain Server Synchronization" on page 88).
5. To complete the synchronization, run this command:
mdscmd mirrormanagement <-s source_mds <-t target_mds>
[-m <ServerName> -u user -p password]
-s source_mds stands for the primary Multi-Domain Server name -t target_mds stands for the mirror Multi-Domain Server name -m ServerName stands for another Multi-Domain Server logged into to do this action,
and -u user -p password are the login user name and password. Note that -m, -u and -p are optional, but if used, must be used together.
This command synchronizes the data of all Domain Management Servers maintained by the source Multi-Domain Server. In fact, a duplicate (Mirror) Domain Management Server will be created for each Domain Management Server in the original Multi-Domain Server. For further details, review this command in Commands and Utilities (see "Multi-Domain Security Management Commands and Utilities" on page 118).
First Multi-Domain Server Synchronization
This step can be performed in the Multi-Domain Server Configuration window while creating the Multi-Domain Server. Or it can be done later after the Multi-Domain Server is created, through the SmartDomain Manager High Availability View, as follows:
1. Verify that the Multi-Domain Server Sync Status is Never synced.
2. Ensure that SIC has been established between the Multi-Domain Servers.
3. Right-click the Multi-Domain Server, then select Initialize Synchronization, or select Initialize Synchronization from the Manage menu. The Status Report window is displayed, showing whether synchronization initialization succeeded or failed.
Restarting Multi-Domain Server Synchronization
If you have already started Multi-Domain Server synchronization and it failed to complete successfully, you can restart the synchronization using the High Availability View - Multi-Domain Server Contents mode.
You can either select a single Multi-Domain Server and synchronize it with the Multi-Domain Server you logged into, or select a group of Multi-Domain Servers and synchronize all of them with each other.
To Synchronize a Single Multi-Domain Server with Another Multi-Domain Server
1. Select the Multi-Domain Server you want to synchronize with the Multi-Domain Server you logged into. Check that its Sync Status is other than Never synced or Unknown.
2. Right-click the Multi-Domain Server and select Synchronize, or select Synchronize from the Manage menu.
To Synchronize a Group of Multi-Domain Servers
Choose Select and Synchronize from the Manage menu. The Multi-Domain Server Synchronization window is displayed, in which you to select which Multi-Domain Servers are to be synchronized.
Changing a Standby Multi-Domain Server to an Active Multi-Domain Server
If the Multi-Domain Server status is Standby, you can use the Change Over command to change its status to Active. Once you change the status there is a delay (by default 5 minutes) until the status is updated.

High Availability
Multi-Domain Security Management Administration Guide R77 | 89
To Change the Active Multi-Domain Server
1. Male sure that you are not logged into the Global SmartDashboard (except in Read-only mode).
2. Select the Multi-Domain Server you want to make Active.
3. Select Change Over from the Manage menu.
4. The status will be changed to Active. The statuses of all other Multi-Domain Server in the system will be Standby.
Automatic Synchronization for Global Policies Databases
The Global Policies database synchronization method is selected in the Global SmartDashboard (Policy > Global properties > Management High Availability menu).
The following options are available:
On Save - after the Save operation in the Global SmartDashboard, the database is synchronized to other Multi-Domain Servers.
Scheduled - you can select a scheduled synchronization (for example, once a day at a certain time). Use local time for the scheduled event.
On Save and Scheduled can be selected simultaneously, or none of the options can be selected.
Add a Secondary Domain Management Server
Add a Domain Management Server through the SmartDomain Manager. A Domain must have at least one Domain Management Server before a secondary Domain Management Server can be added to it. The secondary Domain Management Server must be created on a different Multi-Domain Server. Ensure that the primary Domain Management Server SmartDashboard is closed.
To add a secondary Domain Management Server:
1. In the SmartDomain Manager Domain View, select a Domain, then select Add Domain Management Server or Domain Log Server from the Manage menu, or right-click the Domain and select Add Domain Management Server or Add Domain Log Server.
2. You are required to complete the fields shown. Enter a name for the Domain Management Server which does not contain any spaces. Select a Multi-Domain Server to host this Domain Management Server.
3. Enter the license information.
Mirroring Domain Management Servers with mdscmd
Use the mdscmd mirrormanagement command to mirror all Domain Management Servers on one Multi-
Domain Server to another Multi-Domain Server. In the current version, the new mirror Domain Management Servers will be created even for Domains that already have two or more Domain Management Servers.
If you want to limit mirror Domain Management Server creation to Domains that have only one Domain Management Server (or any other number of Domain Management Servers), use the new -c flag. The full command syntax is:
mdscmd mirrormanagement -s <source_server> -t <target_server>
[-c <max_total_number>] [-m Security Management Server
server -u user -p password]
where <max_total_number> is the maximum resulting total number of Domain Management Servers per
Domain. For example, to mirror Domain Management Servers only for Domains that have only one Domain Management Server, run:
mdscmd mirrormanagement -s FirstServer -t SecondServer -c 2
Automatic Domain Management Server Synchronization
When you create a secondary Domain Management Server it automatically synchronizes with the active Domain Management Server database. To keep these two Domain Management Servers regularly synchronized, we recommend that you configure automatic synchronization using SmartDashboard. You
High Availability
Multi-Domain Security Management Administration Guide R77 | 90
can select the synchronization method from the Policy > Management High Availability menu. For detailed instructions on synchronizing management stations, see ("High Availability" on page 78).
Synchronize ClusterXL Security Gateways
The Security Gateway synchronization feature provides the mechanism for synchronizing the states of two Security Gateways. High Availability for Security Gateways is described in the R77 ClusterXL Administration Guide (http://supportcontent.checkpoint.com/documentation_download?ID=24800). High Availability for encrypted connections is described in the R77 VPN Administration Guide (http://supportcontent.checkpoint.com/documentation_download?ID=24849).
Failure Recovery In many cases, you can recover a failed Multi-Domain Server in a High Availability deployment. To do this, you promote a Secondary Multi-Domain Server to become the Primary. You can also promote Secondary Domain Management Servers to become Primary Domain Management Servers.
Note - The use Domain Management Server promotion for other reasons is not supported by Check Point.
Recovery with a Functional Multi-Domain Server
Use these procedures to recover from a failed Multi-Domain Server.
Connecting to a Secondary Multi-Domain Server
To connect to a secondary Multi-Domain Server:
1. Make sure that all functional Multi-Domain Servers and Multi-Domain Log Servers are up and running.
2. Connect to a secondary Multi-Domain Server with the SmartDomain Manager.
3. If the Multi-Domain Server that to be promoted to Primary is not active, change it to active now:
a) Go to the High Availability > MDS Level HA view.
b) Right-click the secondary Multi-Domain Server and select Change Over to Active.
4. Run these commands on all functional Multi-Domain Servers and Multi-Domain Log Servers:
# mdsenv
# cp $MDSDIR/conf/mdsdb/Customers.C cp $MDSDIR/conf/mdsdb/Customers.prepromote
5. Run these commands on the Multi-Domain Server to be promoted to Primary:
# mdsenv # mcd # enable_mds_deletion <failed_MDS_object_name>
Promoting the Secondary Multi-Domain Server to Primary
This procedure is necessary because there are no automatic steps to promote a Secondary Multi-Domain Server when the Primary Multi-Domain Server fails.
To promote a Secondary Multi-Domain Server to Primary:
1. Run these commands on the Secondary Multi-Domain Server to be promoted:
# cpprod_util FwSetPrimary 1 # cpprod_util CPPROD_SetValue PROVIDER-1 Primary 4 1 1 # cpprod_util CPPROD_SetValue SIC ICAState 4 3 1 # ckp_regedit -d //SOFTWARE//CheckPoint//SIC OTP # ckp_regedit -d //SOFTWARE//CheckPoint//SIC ICAip
These commands update the Secondary Multi-Domain Server registry.

High Availability
Multi-Domain Security Management Administration Guide R77 | 91
2. Connect to the Check Point Database tool with the Secondary Multi-Domain Server IP address.
C:\Program Files (x86)\CheckPoint\SmartConsole\R77\ PROGRAM\GuiDBedit.exe /mds
3. On the Tables tab, select Other and then select (or search for) mdss.
4. Delete the failed Domain Management Server object from the Object Name column.
5. Select the Multi-Domain Server to be promoted.
6. Double-click the Primary field in the bottom pane.
7. Change the value to true.
8. Save the database (File > Save All or Ctl-s).
Restoring Domain Management Servers
Do these steps for each Domain on the failed Primary Domain Management Server.
To restore the Domain Management Servers:
1. Select a Domain Management Server to be the Primary Domain Management Server.
2. If the selected Domain Management Server is a standby, open it in SmartDashboard.
When prompted, change the Domain Management Server status to Active and then close SmartDashboard.
3. Change the active Domain Management Server from Secondary to Primary:
a) Run:
> mdsenv <domain_server_name>
b) Run:

High Availability
Multi-Domain Security Management Administration Guide R77 | 92
> promote_util
These steps set the Multi-Domain Server context to the specified Domain Management Server.
4. Open SmartDashboard for the newly promoted Domain Management Server.
5. Find (with Where Used) and delete all instances of the failed Domain Management Server, including the failed Domain Management Server itself.
6. Save the policy.
7. If necessary, manually synchronize the Domain Management Servers.
8. Re-assign Global Policies and install policies on all Security Gateways.
9. If the promoted Domain Management Server is using a HA Domain Management Server license, replace it with a regular Domain Management Server license.
Finishing the Promotion
When you delete the failed Multi-Domain Server, all of its Domain Management Servers, Global Policy assignments and many network objects no longer show in the SmartDomain Manager. To resolve this issue, do this procedure on all Multi-Domain Servers.
You can optionally install a new replacement Multi-Domain Server to replace the failed one.
To restore your High Availability deployment:
Run these commands:
# mdsstop
# mv $MDSDIR/conf/mdsdb/cp-deleted.C $MDSDIR/conf/mdsdb/ cp-deleted.C.prepromote
# cp $MDSDIR/conf/mdsdb/customers.C $MDSDIR/conf/mdsdb/ Domains.C.afterpromote
# cp $MDSDIR/conf/mdsdb/customers.C.prepromote $MDSDIR/ conf/mdsdb/Domains.C
# mdsstart

Multi-Domain Security Management Administration Guide R77 | 93
Chapter 9
Logging in Multi-Domain Security Management
In This Section: Logging Domain Activity ......................................................................................... 93
Exporting Logs ........................................................................................................ 94
Logging Configuration ............................................................................................. 95
Logging Domain Activity Logs are generated for different events occur and stored for future reference. Multi-Domain Security Management logs are generated by Domain Security Gateways, Domain Management Servers and the Multi-Domain Server. The Security Policy installed on each Security Gateway controls which events generate log entries. Instructions for log configuration are in the R77 Security Management Administration Guide (http://supportcontent.checkpoint.com/documentation_download?ID=24830).
Although you can save logs locally on Security Gateways, we recommend that large organizations use dedicated servers. In this scenario, the Security Gateway sends logs to a log server that collects and stores them. In Multi-Domain Security Management deployments the Domain Management Server operates as the default log server.
We also recommend that you deploy dedicated Log servers in these circumstances:
If your deployment has heavy logging traffic.
If the Multi-Domain Server or the Domain Management Server has heavy network traffic.
By default, each domain has its own log server, called a Domain Log Server. You can host a Domain Log Server on any Multi-Domain Server machine, as long as that Multi-Domain Server does not contain another Domain Management Server or Domain Log Server belonging to the same Domain.
You can also define a log server that saves log files for multiple Domains. This is known as a Multi-Domain Log Server. You can define one or more Multi-Domain Servers as dedicated Multi-Domain Log Server that do not host any Domain Management Servers. This is a cost-effective solution for deployments with heavy log traffic.
Logging can be deployed for a single Domain by:
Enabling local logging on the Domain Security Gateway.
Logging data to the Domain Management Server (the default setting).
Logging to a Log server set up on a dedicated machine for the Domain.
Logging to a Domain Log Server.
It is possible to have a combined logging setup, with the following two components:
Log Servers extracting information from the Multi-Domain Security Management environment,
A Log server in the Domain network receiving records.
In this case, logs are then maintained both in the Multi-Domain Security Management environment and in the Domain network environment.
The table below shows the similarities and differences between Domain Management Servers and Log Servers:
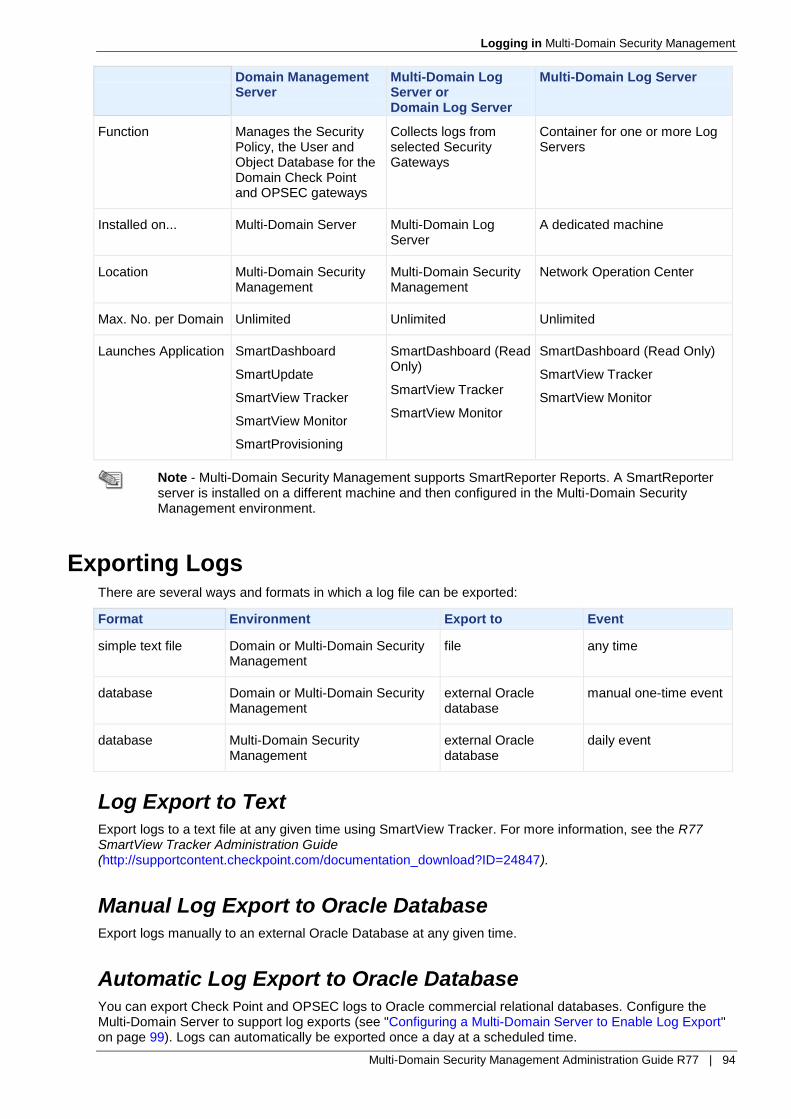
Logging in Multi-Domain Security Management
Multi-Domain Security Management Administration Guide R77 | 94
Domain Management Server
Multi-Domain Log Server or Domain Log Server
Multi-Domain Log Server
Function Manages the Security Policy, the User and Object Database for the Domain Check Point and OPSEC gateways
Collects logs from selected Security Gateways
Container for one or more Log Servers
Installed on... Multi-Domain Server Multi-Domain Log Server
A dedicated machine
Location Multi-Domain Security Management
Multi-Domain Security Management
Network Operation Center
Max. No. per Domain Unlimited Unlimited Unlimited
Launches Application SmartDashboard
SmartUpdate
SmartView Tracker
SmartView Monitor
SmartProvisioning
SmartDashboard (Read Only)
SmartView Tracker
SmartView Monitor
SmartDashboard (Read Only)
SmartView Tracker
SmartView Monitor
Note - Multi-Domain Security Management supports SmartReporter Reports. A SmartReporter server is installed on a different machine and then configured in the Multi-Domain Security Management environment.
Exporting Logs There are several ways and formats in which a log file can be exported:
Format Environment Export to Event
simple text file Domain or Multi-Domain Security Management
file any time
database Domain or Multi-Domain Security Management
external Oracle database
manual one-time event
database Multi-Domain Security Management
external Oracle database
daily event
Log Export to Text
Export logs to a text file at any given time using SmartView Tracker. For more information, see the R77 SmartView Tracker Administration Guide (http://supportcontent.checkpoint.com/documentation_download?ID=24847).
Manual Log Export to Oracle Database
Export logs manually to an external Oracle Database at any given time.
Automatic Log Export to Oracle Database
You can export Check Point and OPSEC logs to Oracle commercial relational databases. Configure the Multi-Domain Server to support log exports (see "Configuring a Multi-Domain Server to Enable Log Export" on page 99). Logs can automatically be exported once a day at a scheduled time.

Logging in Multi-Domain Security Management
Multi-Domain Security Management Administration Guide R77 | 95
Logs exports can only be done on log files that are not currently open and Active. The automatic log export will not take place in the following cases:
The Multi-Domain Server, Domain Management Server or Domain Log Server is down at the scheduled log export time.
The latest log file has not been closed and all previous logs were already exported.
Log Files
For each Domain Log Server, an Active log file, the fw.log file, is created. Logged data is stored to this file
for a scheduled period or until it reaches a certain size limit, after which the fw.log file is saved with a new
extension, say fw.log.109, and a new file is opened (this process is also known as log "switching"). Once
a log file is closed, it is possible to export the file, automatically or manually.
Export Profiles
Automatic log exports are performed according to a Log Export Profile. This profile defines log export parameters, such as the schedule and the log fields to be exported. Each Domain Management Server and Domain Log Server can be assigned a Log Export Profile. The same log profile can be applied to a number of Domain Management Servers and Log Servers that share the same logging needs.
Logs exports are performed on log files that are not currently open. The file must be inactive and not yet exported.
Choosing Fields to Export
As part of the Log Export Profile, a Multi-Domain Security Management Superuser designates a list of log fields to export. You can set Default fields to automatically be included in each new Log Export Profile, or modify the fields selection as needed. If you need to define a new profile that is similar to an existing Profile, you can duplicate an existing profile and modify its properties as needed.
Log Forwarding
You can use SmartView Tracker to forward a log file from one Multi-Domain Log Server to another computer. See the R77 SmartView Tracker Administration Guide (http://supportcontent.checkpoint.com/documentation_download?ID=24847).
Cross Domain Logging
By default, each Security Gateway managed by a Domain Management Server can send its logs either to the Domain Management Server (primary or secondary) or to a Log server (a physical machine or a Domain Log Server hosted on a Multi-Domain Log Server). When using Log servers or Log Servers, the Security Gateways can send logs only to Log servers defined in the same management Domain (i.e., belonging to the same Domain).
If required, a manual workaround can allow cross-Domain (cross-Domain) logging. The workaround is recommended in very limited cases, as it has scalability restrictions, and its setup requires manual intervention in the SIC (Secure Internal Communications) authentication process.
The procedure for setting this up is detailed in SecureKnowledge, see sk12882 (http://supportcontent.checkpoint.com/solutions?id=sk12882).
Logging Configuration This section outlines configuration issues of Multi-Domain Security Management logging.

Logging in Multi-Domain Security Management
Multi-Domain Security Management Administration Guide R77 | 96
Setting Up Logging
To create a Multi-Domain Log Server:
1. Use the same procedure as for creating a SmartDomain Manager (see "Deploying Multi-Domain Security Management" on page 21).
2. Using the SmartDomain Manager, create one or more Log Servers per Domain. Each must be on a different Multi-Domain Server.
Remember to allow communication between the Multi-Domain Security Management network and the Domain Security Gateways. Add appropriate rules permitting the Log Servers to communicate from the Multi-Domain Security Management network with the Domain gateways, and install the Policy on the applicable gateways.
3. Set up each applicable Security Gateway to the send its logs to the new Domain Log Server.
4. Synchronize the new Domain Log Server database with the Domain Management Server database: Install Database (see "Synchronizing Domain Log Server and Domain Management Server" on page 99).
This must be done so that logs are properly processed.
5. Configure the Multi-Domain Server for log export (see "Configuring a Multi-Domain Server to Enable Log Export" on page 99).
6. If you want to enable automatic log exporting, create a Log Export Profile (see "Configuring Log Export Profiles" on page 100) and assign it to the Log Servers and Domain Management Servers (see "Choosing Log Export Fields" on page 100).
If you experience difficulty, see Log Export Troubleshooting (on page 100).
Working with Log Servers
Defining a Domain Log Server Using the SmartDomain Manager
You can use the SmartDomain Manager or the Multi-Domain Server CLI to define Log Servers. Note the following:
A Domain must have at least one defined Domain Management Server before you can create a Domain Log Server.
You must define additional Log Servers for the same Domain on a different Multi-Domain Server.
You cannot install a Domain Log Server and a Domain Management Server on the same Multi-Domain Server.
To add a new Domain Log Server:
1. In the SmartDomain Manager General view, right-click a Domain and select Add Domain Log Server.
2. In the Multi-Domain Server field, select a Multi-Domain Log Server.
3. Enter an IPv4 and IPv6 address or click Get IP Addresses to assign address from a predefined pool of available addresses. IPv6 addresses are optional.
4. Click Add License and select one of these options:
Add License Information Manually
a) Click Manually.
b) In the email message that you received from Check Point, select the entire license string (starting
with cplic putlic... and ending with the last SKU/Feature) and copy it to the clipboard.
c) In the Add License window, click Paste License to paste the license details you have saved on the clipboard into the Add License window.
d) Click Calculate to display your Validation Code. Compare this value with the validation code that you received in your email. If validation fails, contact the Check Point licensing center, providing them with both the validation code contained in the email and the one displayed in this window.
Import a License File
a) Click Fetch From File.
b) In the Open window, browse to and double-click the desired license file.

Logging in Multi-Domain Security Management
Multi-Domain Security Management Administration Guide R77 | 97
Get from the License Repository
a) Click From License Repository. This option is only available if you have valid, unattached licenses in the repository.
b) In the Select Domain License select, click a Domain Management Server license. The license automatically attaches to the Domain Management Server and the window closes.
Defining a Domain Log Server Using the CLI
Description
Use the addlogserver command to add a Domain Log Server to an existing Domain. To add a Domain
Log Server to a Domain, you must define at least one Domain Management Server.
Syntax
mdscmd addlogserver <DomainName> [-n Name | -i IPv4 | -a IPv6] [-t target
<ServerName>] [-m <ServerName> -u user -p password]
Argument Description
DomainName Domain to which this Domain Log Server is assigned. The name cannot include spaces or special characters (except for the underscore character).
-n Name Domain Management Server name. If you do not use the -n
argument, the system automatically generates a Domain Management Server name with this format: Domain_Management_Server_<sequence number>.
-i IPv4 Domain Management Server IPv4 address.
If you do not use the -i argument, the system automatically assigns an address from a predefined pool of available addresses.
-a IPv6 Domain Management Server IPv6 address.
If you do not use the -a argument, the system automatically assigns an address from a predefined pool of available addresses.
-t target ServerName Optional: Name of the Multi-Domain Server that the Domain Management Server is assigned to. This argument is necessary only if you assign the Domain Management Server to a remote Multi-Domain Server.
-m ServerName Remote Multi-Domain Server host name or IPv4 address. You must use this argument when you work with a Domain Management Server on a remote Multi-Domain Server.
The remote Multi-Domain Server must be defined as a GUI client.
-u user and -p password Credentials of the Superuser for the remote Multi-Domain Server. These arguments are necessary to log in to the remote Multi-Domain Server. Make sure that you do not show the password during remote login.
You must use at least one these arguments to identify the Domain Management Server:
-n DomainName
-i IPv4
-a IPv6
When you create a new object, you can use one or more of these arguments to manually define the name or IP address.
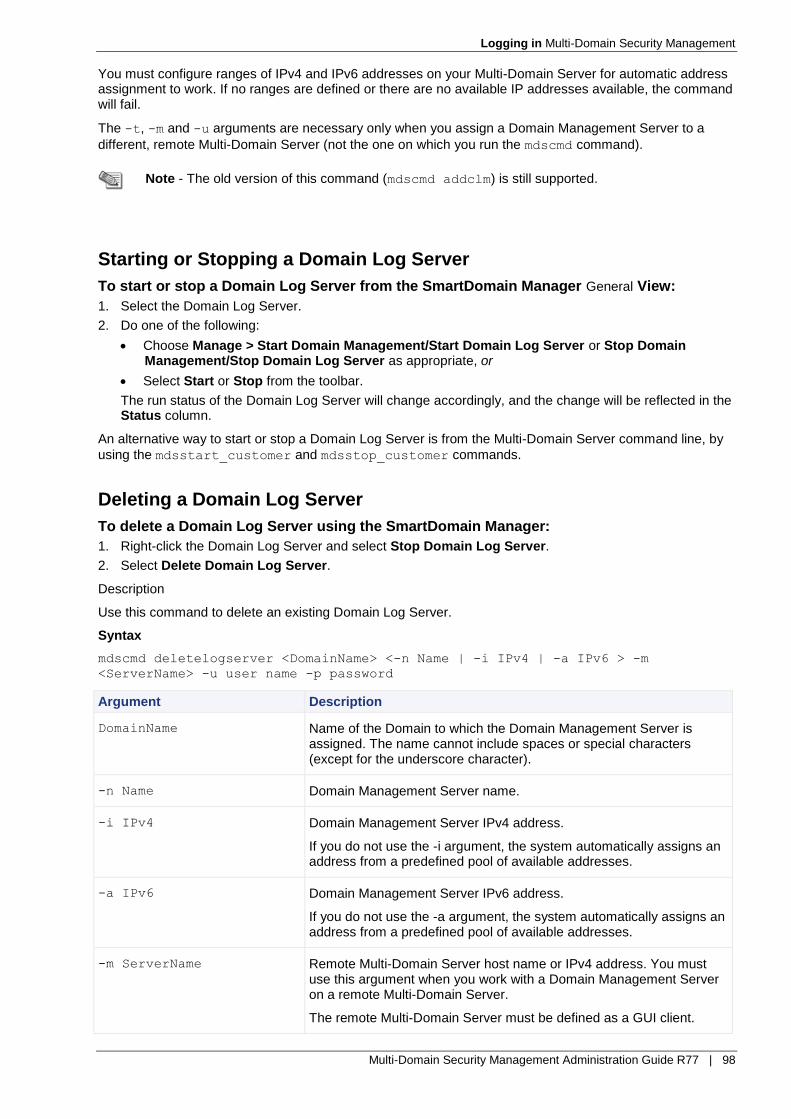
Logging in Multi-Domain Security Management
Multi-Domain Security Management Administration Guide R77 | 98
You must configure ranges of IPv4 and IPv6 addresses on your Multi-Domain Server for automatic address assignment to work. If no ranges are defined or there are no available IP addresses available, the command will fail.
The -t, -m and -u arguments are necessary only when you assign a Domain Management Server to a
different, remote Multi-Domain Server (not the one on which you run the mdscmd command).
Note - The old version of this command (mdscmd addclm) is still supported.
Starting or Stopping a Domain Log Server
To start or stop a Domain Log Server from the SmartDomain Manager General View:
1. Select the Domain Log Server.
2. Do one of the following:
Choose Manage > Start Domain Management/Start Domain Log Server or Stop Domain Management/Stop Domain Log Server as appropriate, or
Select Start or Stop from the toolbar.
The run status of the Domain Log Server will change accordingly, and the change will be reflected in the Status column.
An alternative way to start or stop a Domain Log Server is from the Multi-Domain Server command line, by
using the mdsstart_customer and mdsstop_customer commands.
Deleting a Domain Log Server
To delete a Domain Log Server using the SmartDomain Manager:
1. Right-click the Domain Log Server and select Stop Domain Log Server.
2. Select Delete Domain Log Server.
Description
Use this command to delete an existing Domain Log Server.
Syntax
mdscmd deletelogserver <DomainName> <-n Name | -i IPv4 | -a IPv6 > -m
<ServerName> -u user name -p password
Argument Description
DomainName Name of the Domain to which the Domain Management Server is assigned. The name cannot include spaces or special characters (except for the underscore character).
-n Name Domain Management Server name.
-i IPv4 Domain Management Server IPv4 address.
If you do not use the -i argument, the system automatically assigns an address from a predefined pool of available addresses.
-a IPv6 Domain Management Server IPv6 address.
If you do not use the -a argument, the system automatically assigns an address from a predefined pool of available addresses.
-m ServerName Remote Multi-Domain Server host name or IPv4 address. You must use this argument when you work with a Domain Management Server on a remote Multi-Domain Server.
The remote Multi-Domain Server must be defined as a GUI client.

Logging in Multi-Domain Security Management
Multi-Domain Security Management Administration Guide R77 | 99
Argument Description
-u user and -p password Credentials of the Superuser for the remote Multi-Domain Server. These arguments are necessary to log in to the remote Multi-Domain Server. Make sure that you do not show the password during remote login.
You must use at least one these arguments to identify the Domain Management Server:
-n DomainName
-i IPv4
-a IPv6
When you create a new object, you can use one or more of these arguments to manually define the name or IP address.
You must configure ranges of IPv4 and IPv6 addresses on your Multi-Domain Server for automatic address assignment to work. If no ranges are defined or there are no available IP addresses available, the command will fail.
The -t, -m and -u arguments are necessary only when you assign a Domain Management Server to a
different, remote Multi-Domain Server (not the one on which you run the mdscmd command).
Note - The old version of this command (mdscmd deleteclm) is still supported.
Setting up Domain Security Gateway to Send Logs to the Domain Log Server
Logs are not automatically forwarded to new a Domain Log Server. You must manually setup each relevant Security Gateway to send its logs to the new Domain Log Server.
To set up Domain gateways to send logs to the Domain Log Server:
1. Launch SmartDashboard for the Domain Management Server and double-click the Security Gateway object to display its Check Point Gateway window.
2. Display the Additional Logging page (under Logs and Masters) and check Forward log files to Security Management Server. The Security Management Servers drop-down list is enabled.
3. Select the new Domain Log Server from the Security Management Server drop-down list and click OK.
Synchronizing Domain Log Server and Domain Management Server
To process logs properly, the Domain Log Server database should be synchronized with the Domain Management Server database.
To process logs to synchronize the Domain Log Server Database with the Domain Management Server Database:
1. In SmartDashboard, select Policy > Install Database. The Install Database window is displayed.
2. Under Install Database on, check the Domain Log Server you have created and click OK. The Install Users Database status window is displayed. From this window you can follow the progress of the installation.
Configuring a Multi-Domain Server to Enable Log Export
To configure a Multi-Domain Server to Enable Log Export:
1. Stop the Multi-Domain Server processes.
2. Install and configure the Oracle Client.
3. Define the environment variable ORACLE_HOME according to the installation.

Logging in Multi-Domain Security Management
Multi-Domain Security Management Administration Guide R77 | 100
4. Add $ORACLE_HOME/lib to the $LD_LIBRARY_PATH.
5. Add $ORACLE_HOME/bin to the $PATH.
6. Restart the Multi-Domain Server processes.
Configuring Log Export Profiles
The first time you perform a Log Export, a log field table is created in the external database. The table is structured according to the log fields settings defined in the Log Export Profile. The table's naming
convention is <Domain Management Server Name>_<Domain Name>_CPLogs. For example, for
DMS1 of Domain1, the table will be named DMS1_Domain1_CPLogs.
To configure Log Export profiles:
1. Select Manage > Log Export > Profiles... from the menu.
2. To view the Domain Management Servers and Log Servers assigned a selected profile, click Show Assigned. To remove a specific Domain Management Server or Domain Log Server, click Remove.
3. In the General tab, specify basic export parameters, such as the Oracle server receiving the logs, the name and password of the administrator managing that Oracle server, the schedule etc.
4. In the Log Fields tab, select the fields to be exported. Some fields are checked by default. Change these settings as needed.
If you modify this list (for example, changing a field's length), once the data is exported, the list details will become incompatible with the target table and future Log Exports will fail. To avoid this, rename the current table.
Next time you perform a Log Export, the process will create a new table using the original table's name.
5. In the Assign tab, specify which Domain Management Servers and Log Servers are assigned this profile.
6. To find the profile assigned to a specific Domain Management Server or Domain Log Server, click Find in the Log Export Profiles window. The window will either display the Log Export Profile's name, or indicate that no profile has been assigned.
Choosing Log Export Fields
Use the Log Export Fields window to determine which log fields are exported. You can add, edit and delete fields as needed. Default fields can be selected in this window, to be automatically included in each new Log Export Profile.
Be aware that changing or removing log export fields affects all profiles using these fields.
To choose Log Export fields:
1. Select Manage > Log Export > Fields... from the menu.
2. Use the Add, Edit and Delete buttons to create a list of fields according to the logging data you want to export.
The Name of the field is as it appears in the Log File. The Exported Name is the name you give to the field you want to appear in the exported Oracle table. The Exported Name should follow Oracle naming restrictions.
Enter a Type, and Length. Check Export by default to have a field selected by default for all new Log Export Profiles.
3. These select fields to automatically include in each new Log Export Profile, check Export by default in the Add Log Export Field window (or double-click an existing field). You can later modify this selection as needed.
Log Export Troubleshooting
Log Export troubleshooting suggestions are shown below:
Error Message What to do
No connection with Domain Management Server.
Verify the following:
The Domain Management Server is running properly.
The Domain Management Server has a valid license.

Logging in Multi-Domain Security Management
Multi-Domain Security Management Administration Guide R77 | 101
Error Message What to do
Configuration file not found. Update the Log Export Profile using the SmartDomain Manager.
No data to export. Run two commands:
mdsenv <domain_management_server_name>
fw lslogs -e.
Failed to load dll. The external database's client is not configured properly.
Proceed as follows:
1. Stop the Multi-Domain Server.
2. Prepare the system for Log Export (see "Configuring a Multi-Domain Server to Enable Log Export" on page 99).
3. Start the Multi-Domain Server.
Failed to connect to the external database.
Verify the following:
The external database is accessible and running properly.
The external database's client is configured correctly.
The administrator name and password specified in the Log Export Profile can indeed be used to login to the database.
The Oracle Client and the SmartDomain Manager use the same Oracle server name.
Failed to create table in database.
Verify the following:
The administrator has been assigned the appropriate permissions.
The exported log field names conform to the external database's naming conventions.
Failed to read Check Point logs.
Verify the following:
The Domain Management Server is running properly.
The Domain Management Server has a valid license.
Failed to write to external database.
Verify that the external database's table structure (e.g. the log field names and the columns' width) conforms to its definition in the Log Fields tab of the Log Export Profile window.
If the two are incompatible, rename the table.
Using SmartReporter
SmartReporter can now produce both Log Based reports and Express reports for Security Gateways managed by Domain Management Servers. Use SmartReporter to create selected reports for specified Domains and Security Gateways. Reports can be scheduled at any time, and can be sent by email or uploaded to an FTP site. SmartReporter must be properly configured to work with Multi-Domain Security Management. See the "Getting Started" chapter of the R77 SmartReporter Administration Guide (http://supportcontent.checkpoint.com/documentation_download?ID=24813).

Multi-Domain Security Management Administration Guide R77 | 102
Chapter 10
Monitoring
In This Section: Overview ............................................................................................................... 102
Monitoring Components in the Multi-Domain Security Management System ...... 103
Verifying Component Status ................................................................................. 103
Monitoring Issues for Different Components and Features .................................. 105
Using SmartConsole ............................................................................................. 107
Overview The SmartDomain Manager supports monitoring and maintenance activities. It has a variety of SmartDomain Manager views that can be used by administrators to confirm that the system is running smoothly and that management activities are being successfully performed.
By default, management activities receive system confirmation within five minutes. Once confirmation has been received, Administrators can use status indicators to determine if management activities were performed successfully. The following status checks can be executed:
Components Status Check
Security Gateways Are they responding?
Domain Management Servers
Log Servers
Are they started or stopped?
High Availability Which Multi-Domain Server or Domain Management Server is Active?
Which Multi-Domain Server or Domain Management Server is Standby?
Global Policies Which Global Policies are available
When were the Global Policies assigned?
Was the Global Policy Assign operation a success?
Local Policies Which Policy is installed on the Security Gateway?
Global VPN Communities What Global VPN Communities are available?
Are the peer Policies updated?
Administrators Which Administrators are currently logged on?
GUI Clients Which GUI Clients are in use?
If a status check reveals that management activities were not successful, you can use the SmartDomain Manager views such as the Critical Notification window to yield further information for troubleshooting purposes.
It is also possible to use the SmartView Console clients (such as SmartView Tracker and SmartView Monitor) for monitoring, tracking and troubleshooting purposes.

Monitoring
Multi-Domain Security Management Administration Guide R77 | 103
Monitoring Components in the Multi-Domain Security Management System
The SmartDomain Manager General View provides a Domain Contents mode which lets you see at a glance all the components of the system, including Domains, Domain Management Servers and their Security Gateways.
The Domain Contents mode is divided into 2 sections or panes. The far right pane gives a statistical breakdown, or summary of the components in the system depending on what you have selected in the left pane.
For example, if you select the Multi-Domain Security Management root, a summary of Multi-Domain Security Management root Domain-related statistics is displayed: the number of Domains, Domain Management Servers, Security Gateways, Administrators and GUI Clients in the system. Another example, if you select a Domain in the left pane, Domain Properties are displayed, including: user-defined free field information (e.g. Contact Person), entered in the Properties tab of the Domain Configuration window.
The left pane provides a view of all the Domains in the system, their Domain Management Servers and Security Gateways. Information displayed in this pane includes:
The Multi-Domain Server which contains the Domain Management Server and Domain Log Server.
The IP addresses of all the components in the system
Whether the component is Active or Standby (for High Availability).
Whether the component has been enabled for global use, in this case the global name is displayed.
Exporting the List Pane's Information to an External File
You can save List Pane information to an external file (such as an Excel sheet) for future examination by selecting Manage > Export to File.
Working with the List Pane
You can change the way that the Network Objects mode List Pane looks in order to focus on specific components or networks in the system.
Filtering
To focus on a specific group of objects that share a certain common denominator (such as their IP address range, Domain name or the Multi-Domain Server they are installed on), filter any of the List pane's columns by right-clicking the column heading and selecting Column Filter... from the displayed menu. Additionally:
To view existing filters, select View > Filter Details.
To clear all filters, select View > Clear All.
Showing and Hiding Selected List Pane Columns
You can set the List pane to display only the columns you are interested in and hide all others. To hide a specific column, right-click its header and choose Hide Column from the menu. To hide or show more than one column at a time, select View > Show/Hide Columns.
Verifying Component Status Make sure that all system components (Security Gateways, UTM-1 Edge appliances, Log Servers, Domain Management Servers and Multi-Domain Servers) are in the Started status. Use the SmartDomain Manager General > Network Objects view to examine how system components are working.
The Network Objects mode shows general and status information for all components in the system. This information is displayed in the upper part of the window, or the List pane.

Monitoring
Multi-Domain Security Management Administration Guide R77 | 104
In the Network Objects mode List Pane you can right-click or double-click on a component and execute a command. For example, you can start, stop, configure or update a selected component. Additionally you can launch any of the SmartView Console clients and take advantage of their facilities. For example, if a Domain Security Gateway is behaving sluggishly, launch SmartView Monitor and/or SmartView Tracker from the said Security Gateway to check what activities are taking place at the Security Gateway so as to determine the root of the sluggishness.
Status symbols in the List pane include:
Status Applies to... Description
Waiting
All objects Displayed from the time the SmartDomain Manager starts running until the time the first status is received. This takes no more than 30 seconds.
Started Multi-Domain Server/Domain Management Server/Domain Log Server
The object has been started.
Stopped
Multi-Domain Server/Domain Management Server/Domain Log Server
The object has been stopped.
Disconnected Multi-Domain Server The object has been disconnected.
OK
Security Gateway An application is installed on this Security Gateway and is responding to status update requests from the Security Management Server.
Needs Attention Security Gateway At least one of the applications installed on this Security Gateway is not running properly.
Not Responding
Security Gateway There is either no application installed on this Security Gateway, or the application is installed, but cannot be reached.
Unknown Security Gateway A status has been received from the server, but the system does not recognize it.
N/A Clusters Cluster objects report the status N/A (Not
Available). However the status of each member of the cluster is displayed.
Viewing Status Details
To get more details about a network component, select it in and choose Get Status Details... from the Manage menu. The Status Details window provides hardware, policy and/or run status details according to the selected object. Status details include:
Object Status Details Available
Multi-Domain Server
Version
Operating System
CPU
Memory
Disk
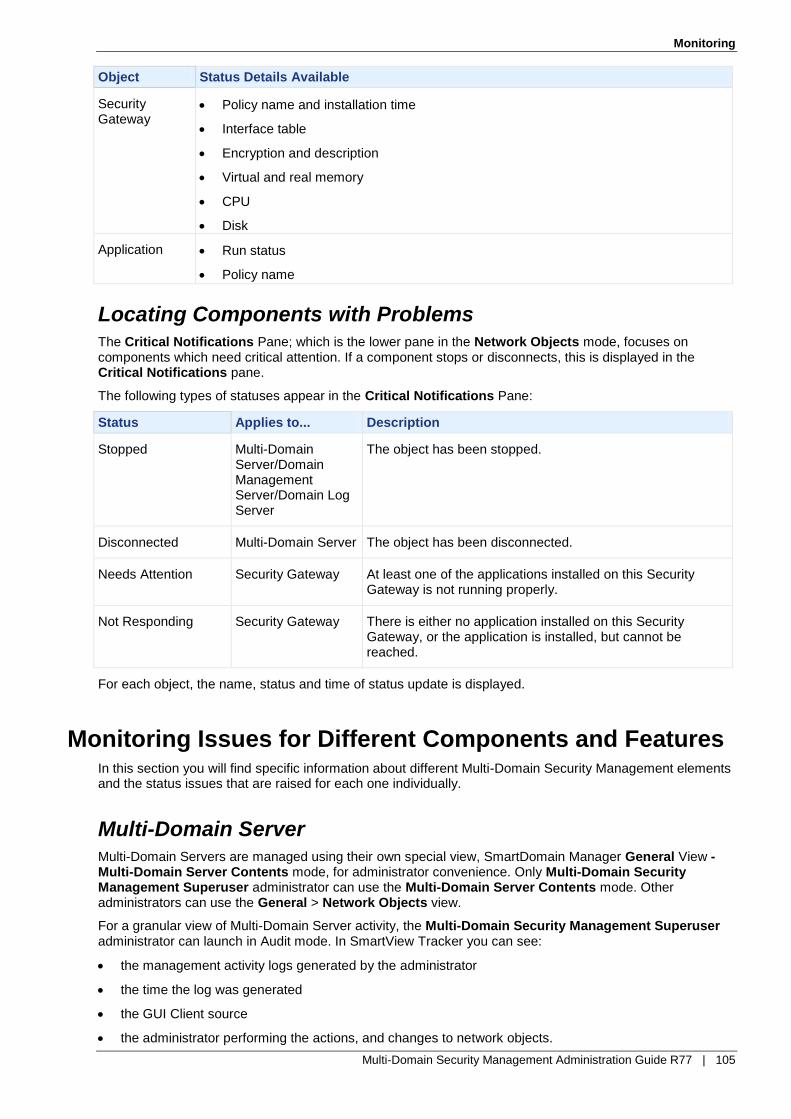
Monitoring
Multi-Domain Security Management Administration Guide R77 | 105
Object Status Details Available
Security Gateway
Policy name and installation time
Interface table
Encryption and description
Virtual and real memory
CPU
Disk
Application Run status
Policy name
Locating Components with Problems
The Critical Notifications Pane; which is the lower pane in the Network Objects mode, focuses on components which need critical attention. If a component stops or disconnects, this is displayed in the Critical Notifications pane.
The following types of statuses appear in the Critical Notifications Pane:
Status Applies to... Description
Stopped Multi-Domain Server/Domain Management Server/Domain Log Server
The object has been stopped.
Disconnected Multi-Domain Server The object has been disconnected.
Needs Attention Security Gateway At least one of the applications installed on this Security Gateway is not running properly.
Not Responding Security Gateway There is either no application installed on this Security Gateway, or the application is installed, but cannot be reached.
For each object, the name, status and time of status update is displayed.
Monitoring Issues for Different Components and Features In this section you will find specific information about different Multi-Domain Security Management elements and the status issues that are raised for each one individually.
Multi-Domain Server
Multi-Domain Servers are managed using their own special view, SmartDomain Manager General View - Multi-Domain Server Contents mode, for administrator convenience. Only Multi-Domain Security Management Superuser administrator can use the Multi-Domain Server Contents mode. Other administrators can use the General > Network Objects view.
For a granular view of Multi-Domain Server activity, the Multi-Domain Security Management Superuser administrator can launch in Audit mode. In SmartView Tracker you can see:
the management activity logs generated by the administrator
the time the log was generated
the GUI Client source
the administrator performing the actions, and changes to network objects.

Monitoring
Multi-Domain Security Management Administration Guide R77 | 106
The Multi-Domain Security Management Superuser administrator can also start, stop, add or delete a Multi-Domain Server.
Global Policies
Domain network systems operate according to the behavior specified in their Security and Global Policy rules. To see how Global Policies have been applied to Domains in the Multi-Domain Security Management system, use the Global Policies View - Security Policies mode. This mode displays:
the Global Policies in the system,
the Domains and Domain Management Servers that are assigned to these policies,
the time when the assignment took place,
the last time that the global policy was modified,
the status of the assignment operation (whether or not it was successful).
Domain Policies
Checking a Domain Management Server Policy
A Domain Management Server policy may or may not contain global rules, depending on whether a global policy was assigned to the Domain. Use the Global Policies View - Security Policies mode to check:
if a Domain Management Server has been assigned a global policy,
which Global Policy was assigned,
the time of the assignment,
the time that the Global Policy was last changed,
whether the assignment operation was successful.
You can also use the SmartDomain Manager General View - Network Objects mode to see which Domain policy is assigned to a Domain Management Server.
Security Gateway Policies
Checking a Security Gateway Current Policy
To see which policy is installed on a specific Security Gateway, you can use the General View - Network Objects mode. For each Security Gateway the following information is displayed:
the Policy Name,
the Gateway Local Installation Time,
the local date and time when the policy was installed.
If there are problems with the Security Gateway, they will be displayed in the Critical Notifications Pane, which focuses on components that need attention.
High Availability
Multi-Domain Security Management implements High Availability on the following levels:
The Security Gateway level.
The Domain Management Server level - multiple Domain Management Servers are supported, as well as an optional backup Security Management Server.
The Multi-Domain Server level.
Domain Management Server and Multi-Domain Server High Availability are managed through the SmartDomain Manager High Availability View. The administrator can do all management activities relating to Multi-Domain Server High Availability through this view, and examine the status of these actions.
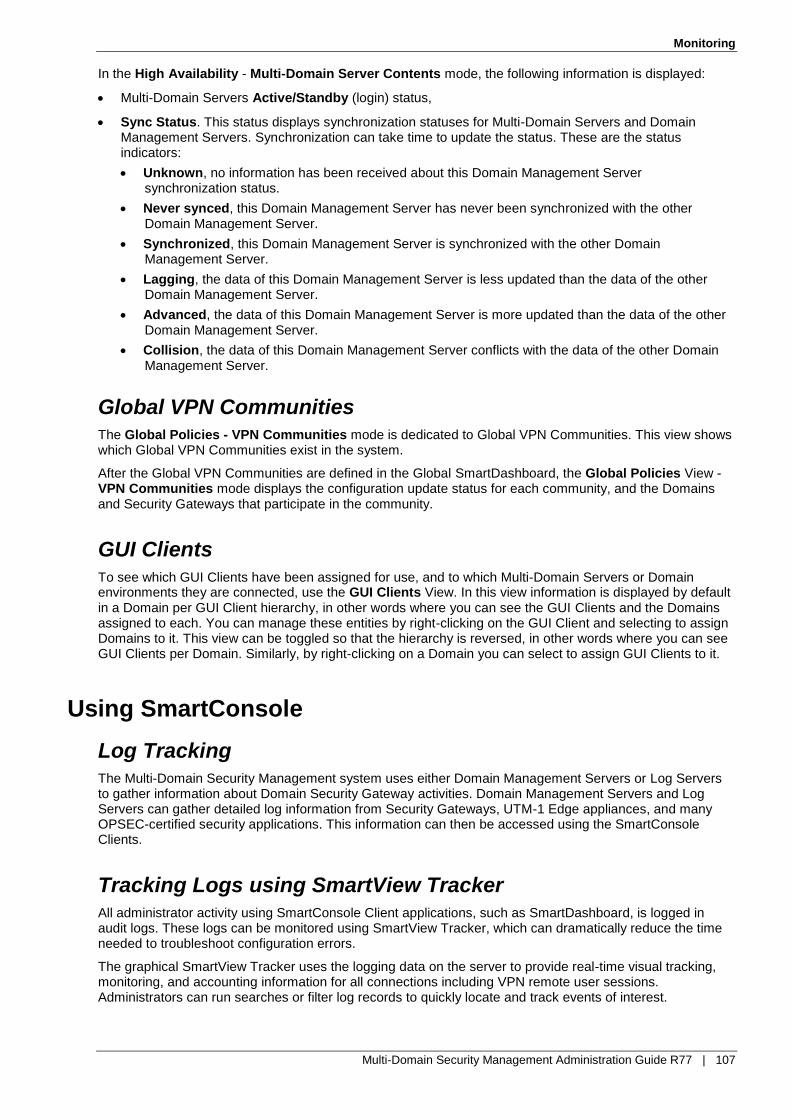
Monitoring
Multi-Domain Security Management Administration Guide R77 | 107
In the High Availability - Multi-Domain Server Contents mode, the following information is displayed:
Multi-Domain Servers Active/Standby (login) status,
Sync Status. This status displays synchronization statuses for Multi-Domain Servers and Domain Management Servers. Synchronization can take time to update the status. These are the status indicators:
Unknown, no information has been received about this Domain Management Server synchronization status.
Never synced, this Domain Management Server has never been synchronized with the other Domain Management Server.
Synchronized, this Domain Management Server is synchronized with the other Domain Management Server.
Lagging, the data of this Domain Management Server is less updated than the data of the other Domain Management Server.
Advanced, the data of this Domain Management Server is more updated than the data of the other Domain Management Server.
Collision, the data of this Domain Management Server conflicts with the data of the other Domain Management Server.
Global VPN Communities
The Global Policies - VPN Communities mode is dedicated to Global VPN Communities. This view shows which Global VPN Communities exist in the system.
After the Global VPN Communities are defined in the Global SmartDashboard, the Global Policies View - VPN Communities mode displays the configuration update status for each community, and the Domains and Security Gateways that participate in the community.
GUI Clients
To see which GUI Clients have been assigned for use, and to which Multi-Domain Servers or Domain environments they are connected, use the GUI Clients View. In this view information is displayed by default in a Domain per GUI Client hierarchy, in other words where you can see the GUI Clients and the Domains assigned to each. You can manage these entities by right-clicking on the GUI Client and selecting to assign Domains to it. This view can be toggled so that the hierarchy is reversed, in other words where you can see GUI Clients per Domain. Similarly, by right-clicking on a Domain you can select to assign GUI Clients to it.
Using SmartConsole
Log Tracking
The Multi-Domain Security Management system uses either Domain Management Servers or Log Servers to gather information about Domain Security Gateway activities. Domain Management Servers and Log Servers can gather detailed log information from Security Gateways, UTM-1 Edge appliances, and many OPSEC-certified security applications. This information can then be accessed using the SmartConsole Clients.
Tracking Logs using SmartView Tracker
All administrator activity using SmartConsole Client applications, such as SmartDashboard, is logged in audit logs. These logs can be monitored using SmartView Tracker, which can dramatically reduce the time needed to troubleshoot configuration errors.
The graphical SmartView Tracker uses the logging data on the server to provide real-time visual tracking, monitoring, and accounting information for all connections including VPN remote user sessions. Administrators can run searches or filter log records to quickly locate and track events of interest.

Monitoring
Multi-Domain Security Management Administration Guide R77 | 108
To use SmartView Tracker:
In the SmartDomain Manager, right-click a Domain Management Server and select Launch Application > SmartView Tracker.
If there is an attack or other suspicious network activity, administrators can use SmartView Tracker to temporarily or permanently terminate connections from specific IP addresses. To learn more about using SmartView Tracker, see the R77 SmartView Tracker Administration Guide (http://supportcontent.checkpoint.com/documentation_download?ID=24847).
Real-Time Network Monitoring with SmartView Monitor
SmartView Monitor is an easy-to-use monitoring tool that allows you to inspect network traffic and connectivity. In addition, it provides real-time information about the performance and security state of both Security Gateway and VPN operations.
Monitoring the Status of a Domain Management Server
To use SmartView Monitor, select a Domain Management Server from any view, then right click and choose Launch Application > SmartView Monitor.
If your network experiences problems such as sluggishness, loss of data or security related problems, it is important to immediately identify these phenomena. SmartView Monitor provides a real-time monitoring tool designed to help administrators find the cause of these problems, when and why they occur, and how to fix them. Use SmartView Monitor to examine traffic, requested services, and network load in the Domain network. See the R77 SmartView Monitor Administration Guide (http://supportcontent.checkpoint.com/documentation_download?ID=24848).
Check Point System Counters
SmartView Tracker uses Check Point System Counters to collect information about the status, activities, hardware and software usage of different Check Point products in real time. System Counters are used to plot graphs and to view reports of current or archived data collected by Counter Logs.
Traffic Flow and Virtual Link Monitoring
Traffic flow can be monitored per service or network object. SmartView Monitor also enables monitoring based on a variety of parameters, for example the QoS Policy rules installed on an interface, etc. Compliance to a Service Level Agreement (SLA) can be monitored, and alerts can be generated. Traffic can be monitored between two Check Point Security Gateways or two QoS Security Gateways for real time analysis of bandwidth and latency.
Blocking Suspicious Connections
Suspicious Activity rules are security rules that enable the administrator to instantly block suspicious connections not restricted by the currently enforced Security Policy.
Using Thresholds
SmartView Monitor can be used to configure predefined actions that are triggered when certain changes in status occur. For instance, a rule can be defined to send an email to a certain address if the load on a Security Gateway CPU surpasses a threshold that you set.
By default the engine responsible for triggering the events is disabled for Domain Management Servers, but it can be enabled per Domain Management Server by running the following commands from the root shell of the Multi-Domain Server machine:
1. Change to the Domain Management Server environment with the command mdsenv <Domain Management Server Name>
2. cpstat_monitor &
After running this command, thresholds are monitored until the Domain Management Server is stopped.
To permanently enable this functionality for a specific Domain Management Server, you must modify the
value of the registry key that sets whether the cpstat_monitor process auto-starts whenever the Domain
Monitoring
Multi-Domain Security Management Administration Guide R77 | 109
Management Server is started. You can do so by running the following command from the Domain Management Server environment:
cpprod_util CPPROD_SetValue mds RunCpstatMonitor 1 1 1
Note - To revert to the registry's original setting, enter the following on the Multi-Domain Server in the Domain Management Server environment:
cpprod_util CPPROD_SetValue mds RunCpstatMonitor 1 0 1
SmartReporter Reports
The SmartReporter delivers a user-friendly solution for auditing traffic and generating detailed or summarized reports in the format of your choice (list, vertical bar, pie chart etc.) for events logged by Domain Management Server-managed Security Gateways that are running SmartView Monitor. SmartReporter produces reports for these Security Gateways.
See the R77 SmartReporter Administration Guide (http://supportcontent.checkpoint.com/documentation_download?ID=24813).

Multi-Domain Security Management Administration Guide R77 | 110
Chapter 11
Architecture and Processes
In This Section: Packages in Multi-Domain Server Installation ...................................................... 110
Multi-Domain Server File System ......................................................................... 110
Processes ............................................................................................................. 112
Multi-Domain Server Configuration Databases .................................................... 113
Connectivity Between Different Processes ........................................................... 114
Issues Relating to Different Platforms .................................................................. 116
Packages in Multi-Domain Server Installation Multi-Domain Server installation consists of the following packages:
Package Description
CPCON62CMP-R77 Check Point Connectra CM Compatibility Package
CPEdgecmp-R77 Check Point UTM-1 Edge Compatibility Package
CPPIconnectra-R77 Check Point Connectra Version or Blade update
CPmds-R77 Check Point Multi-Domain Server
CPsuite-R77 Check Point Security Gateway
CPvsxngxcmp-R77 Check Point Power VSX
On Linux and SecurePlatform, package names contain the suffix "-00". For example, the full name of
CPsuite-75.20 package for these platforms is CPsuite-R77-00.
All of these packages have pre-defined dependencies between them. Under no circumstances should these packages be manually removed.
Important - Manually removing a package has negative implications on the Multi-Domain Server.
Multi-Domain Server File System
Multi-Domain Server Directories on /opt and /var File Systems
Multi-Domain Server Installation creates subdirectories under /opt and /var/opt directories.
Subdirectory Description
CPInstLog Contains installation and upgrade log files.
CPsuite-R77 Contains the installation of the CPsuite-R77 package.
CPshrd-R77 Contains information from the CPsuite-R77 package.
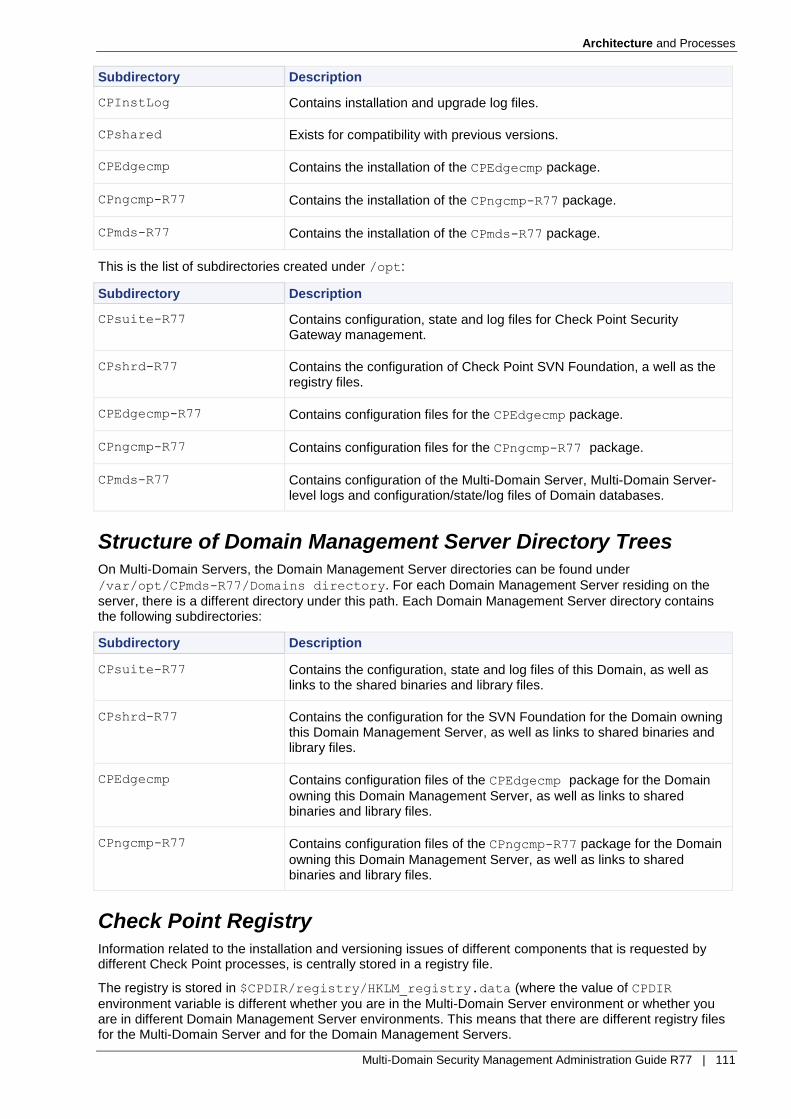
Architecture and Processes
Multi-Domain Security Management Administration Guide R77 | 111
Subdirectory Description
CPInstLog Contains installation and upgrade log files.
CPshared Exists for compatibility with previous versions.
CPEdgecmp Contains the installation of the CPEdgecmp package.
CPngcmp-R77 Contains the installation of the CPngcmp-R77 package.
CPmds-R77 Contains the installation of the CPmds-R77 package.
This is the list of subdirectories created under /opt:
Subdirectory Description
CPsuite-R77 Contains configuration, state and log files for Check Point Security Gateway management.
CPshrd-R77 Contains the configuration of Check Point SVN Foundation, a well as the registry files.
CPEdgecmp-R77 Contains configuration files for the CPEdgecmp package.
CPngcmp-R77 Contains configuration files for the CPngcmp-R77 package.
CPmds-R77 Contains configuration of the Multi-Domain Server, Multi-Domain Server-level logs and configuration/state/log files of Domain databases.
Structure of Domain Management Server Directory Trees
On Multi-Domain Servers, the Domain Management Server directories can be found under
/var/opt/CPmds-R77/Domains directory. For each Domain Management Server residing on the
server, there is a different directory under this path. Each Domain Management Server directory contains the following subdirectories:
Subdirectory Description
CPsuite-R77 Contains the configuration, state and log files of this Domain, as well as links to the shared binaries and library files.
CPshrd-R77 Contains the configuration for the SVN Foundation for the Domain owning this Domain Management Server, as well as links to shared binaries and library files.
CPEdgecmp Contains configuration files of the CPEdgecmp package for the Domain
owning this Domain Management Server, as well as links to shared binaries and library files.
CPngcmp-R77 Contains configuration files of the CPngcmp-R77 package for the Domain
owning this Domain Management Server, as well as links to shared binaries and library files.
Check Point Registry
Information related to the installation and versioning issues of different components that is requested by different Check Point processes, is centrally stored in a registry file.
The registry is stored in $CPDIR/registry/HKLM_registry.data (where the value of CPDIR
environment variable is different whether you are in the Multi-Domain Server environment or whether you are in different Domain Management Server environments. This means that there are different registry files for the Multi-Domain Server and for the Domain Management Servers.
Architecture and Processes
Multi-Domain Security Management Administration Guide R77 | 112
Automatic Start of Multi-Domain Server Processes
The script for the automatic start of Multi-Domain Server processes upon boot can be found in
/etc/init.d. The name of the file is firewall1. A link to this file appears in /etc/rc3.d directory
under the name S95firewall1.
Processes
Environment Variables
Different Multi-Domain Server processes require standard environment variables to be defined. The variables have the following functionality, they:
Point to the installation directories of different components.
Contain management IP addresses.
Hold data important for correct initialization and operation of the processes.
Additionally, specific environment variables control certain parameters of different functions of Multi-Domain Server.
Multi-Domain Server installation contains shell scripts for C-Shell and for Bourne Shell, which define the necessary environment variables:
The C-Shell version is /opt/CPshrd-R77/tmp/.CPprofile.csh
The Bourne Shell version is /opt/CPshrd-R77/tmp/.CPprofile.sh
Sourcing these files (or in other words, using "source" command in C-Shell or "." command in Bourne
Shell) will define the environment necessary for the Multi-Domain Server processes to run.
Standard Check Point Environment Variables
Variable Description
FWDIR Location of Check Point Security Gateway binary/configuration/library files.
In the Multi-Domain Server environment, this environment variable is equal to MDSDIR
In Domain Management Server environment, it contains /opt/CPmds-R77/Domains/<Domain Management Server Name>/CPsuite-R77/fw1
CPDIR Location of Check Point SVN Foundation binary/configuration/library files. It points to different directories in Multi-Domain Server and Domain Management Server environments.
MDSDIR Location of the Multi-Domain Server installation. In Multi-Domain Security
Management the path is /opt/CPmds-R77
SUROOT Points to the location of SmartUpdate packages
Parameters/Thresholds for Different Multi-Domain Server functions
Logging Cache Size
By default, the Domain Management Server reserves 1MB memory for log caching on the Management. In very intensive logging systems it is possible to raise the cache size. This requires more memory, but boosts the performance. To change the cache size, set:
LOGDB_CACHE_SIZE variable to the desired size in Kilobytes. For example, to set the cache to 4MB enter:
setenv LOGDB_CACHE_SIZE 4096 (in C-Shell syntax)
Architecture and Processes
Multi-Domain Security Management Administration Guide R77 | 113
Additional environment variables controlling such mechanism as statuses collection mechanism (like
MSP_SPACING_REG_CMAS_FOR_STATUSES) or connection retries (like MSP_RETRY_INTERVAL) are
described later in this chapter.
Multi-Domain Server Level Processes
Each Multi-Domain Server Level process has one instance on every Multi-Domain Server/Multi-Domain Log Server machine, when the Multi-Domain Server/Multi-Domain Log Server is running. The following processes run on the Multi-Domain Server level.
Process Description
cpd SVN Foundation infrastructure process.
cpca The Certificate Authority manager process. This process doesn't run on a Multi-Domain Log Server or Multi-Domain Server.
fwd Audit Log server process.
fwm mds Multi-Domain Server main process.
For proper operation of the Multi-Domain Server all four processes must be running, unless dealing with
configurations where cpca shouldn't be running.
Domain Management Server Level Processes
Each one of these processes has a different instance for each running Domain Management Server. The following processes run on the Domain Management Server level:
Process Description
cpd SVN Foundation infrastructure process.
cpca The Certificate Authority manager process. This process doesn't run on log servers and Multi-Domain Servers.
fwd Log server process.
fwm Security Management Server main process.
status_proxy Status collection of SmartLSM Security Gateways. This process runs only on Domain Management Servers that are activated for Large Scale Management.
sms Manages communication (status collection, logs collection, policy update, configuration update) with UTM-1 Edge Security Gateways. This process runs only on Domain Management Servers that manage UTM-1 Edge devices.
For proper operation of the Domain Management Server, at least cpd, cpca, fwd and fwm must be
running, unless dealing with configurations where cpca shouldn't be running. Other processes are required
only for Domain Management Servers using specific functionality for which these processes are responsible.
Multi-Domain Server Configuration Databases The Multi-Domain Server environment contains a number of configuration databases, as opposed to a single Security Management Server, that contains only one.
Each Multi-Domain Server contains:
One Global Database (located in /var/opt/CPmds-R77/conf directory)
One Multi-Domain Server Database (located in /var/opt/CPmds-R77/conf/mdsdb directory)

Architecture and Processes
Multi-Domain Security Management Administration Guide R77 | 114
A number of Domain Management Server databases.
Each Domain Management Server database is located in /var/opt/CPmds-R77/Domains/<Domain
Management Server Name>/CPsuite-R77/fw1/conf directory.
Global Policy Database
This database contains the definitions of global objects and global Security Policies. It can be viewed and edited using Global SmartDashboard client.
When the Assign Global Policy operation is invoked, the objects and policies defined in Global Policy database are copied to Domain Management Server databases, where they can be seen and used by SmartDashboard. These objects are editable only from Global SmartDashboard, Domain Management Server databases will contain read-only copies.
Multi-Domain Server Database
This database contains two kinds of objects:
Multi-Domain Server-level management objects – such as like administrators, Domains, Multi-Domain Servers and Domain Management Servers. These objects are defined either using the SmartDomain Manager or the Multi-Domain Server Command Line utilities.
Domain Management Server-level Check Point objects – in order to display all Domains' network objects in SmartDomain Manager, these are centrally collected in Multi-Domain Server Database. Each time the object is updated in SmartDashboard, the changes are automatically updated in Multi-Domain Server Database as well.
Domain Management Server Database
This database contains:
Definitions of objects and policies created and edited by SmartDashboard, when connecting to the Domain Management Server.
Global Objects (in read-only mode) copied by the Assign Global Policy operation.
SmartLSM Security Gateways definitions made by SmartProvisioning.
Different Domain Management Servers residing on the same Multi-Domain Server have different databases.
Connectivity Between Different Processes
Multi-Domain Server Connection to Domain Management Servers
The main Multi-Domain Server process (fwm mds) looks for Domain Management Servers which are up
and can be reached, but with which it has no CPMI connections. This connection is used for collecting statuses on the Domain Management Server and its Security Gateways, and for receiving changes in objects that are applicable to the Multi-Domain Server/SmartDomain Manager system.
Normally, a special task wakes up every 120 seconds and searches for "Domain Management Server connection candidates". If the task has found connection candidates previously, then by default it wakes up after only 90 seconds. This shorter interval boosts Domain Management Servers connections upon Multi-Domain Server startup.
You can change the values of the default intervals:
To change the Domain Management Server connection candidates search interval, set the
MSP_RETRY_INTERVAL variable to the desired number of seconds.
To change the status collection interval, set the MSP_RETRY_INIT_INTERVAL variable to the desired
number of seconds.

Architecture and Processes
Multi-Domain Security Management Administration Guide R77 | 115
Note - Changing these values (especially MSP_RETRY_INIT_INTERVAL) makes the Multi-
Domain Server-Domain Management Server connections faster during Multi-Domain Server startup, but may overload the connection if the value is set too low.
By default this task attempts to reconnect the Multi-Domain Server to no more than five Domain Management Servers per iteration. So, a system with 50 Domain Management Servers requires 10 iteration (of 90 seconds each, by default), so connecting to all the Domain Management Servers could take up to 15 minutes.
To change the maximum number of Domain Management Servers to which the Multi-Domain Server can
connect per cycle, set the MSP_RETRY_INIT_INTERVAL variable to the desired value.
Note - Raising this value makes the Multi-Domain Server connect to all Domain Management Servers faster during startup, but may overload if it is set too low.
Status Collection
Status collection begins when a SmartDomain Manager connects to a Multi-Domain Server. The Multi-Domain Server sends all Domain Management Servers a request to start collecting statuses. The Multi-Domain Server contacts the Domain Management Servers one by one, spacing these requests by one second, thus preventing the Multi-Domain Server load from peaking when multiple statuses arrive. You can change this default spacing and set the required spacing in milliseconds, with the environment variable
MSP_SPACING_REG_CMAS_FOR_STATUSES.
Changing the Status Collection Cycle
The default status collection cycle takes 300 seconds, i.e. each system entity is monitored once every 5 minutes. This value can be changed per Multi-Domain Server in the SmartDomain Manager as follows:
1. In the General View, display the Multi-Domain Server Contents Mode. Choose and double click a Multi-Domain Server. The Configure Multi-Domain Server - General window opens.
2. Under Status Checking Interval, specify the desired number of seconds in the Set to field (this value is
saved in the $MDSDIR/tmp/status_interval.dat file).
Once the Status Checking Interval is set in the SmartDomain Manager, it is effective immediately, with no need to restart the Multi-Domain Server. The higher you raise this value, the longer it takes to detect a change in a Security Gateway status.
Collection of Changes in Objects
Check Point objects defined in Domain Management Server databases are copied to the Multi-Domain Server database and presented in the Network Objects view of the SmartDomain Manager. Every time one of these objects is updated by SmartDashboard that is connected to the Domain Active Domain Management Server, this change is immediately propagated to the Multi-Domain Server database of the Multi-Domain Server hosting the Active Domain Management Server. From there it is distributed to the other Multi-Domain Servers participating in the High Availability environment.
Connection Between Multi-Domain Servers
Whenever Multi-Domain Servers and Multi-Domain Log Servers are connected in a High Availability deployment, they keep a constant network connection open between them. This connection is used to distribute:
The status of Domain Management Servers and Security Gateways between the Multi-Domain Servers.
The status of administrators connected to Multi-Domain Servers.
Latest updates of the objects propagated from Domain Management Servers.
Architecture and Processes
Multi-Domain Security Management Administration Guide R77 | 116
Large Scale Management Processes
The Status Proxy process runs for each Domain Management Server that is enabled for Large Scale
Management, and is constantly connected to the Domain Management Server to which it belongs. This process, amongst other functions, updates the Domain Management Server configuration database with such details as the last known IP address of the Dynamic IP address SmartLSM Security Gateway, as well as, the Security Gateway status.
UTM-1 Edge Processes
The SMS process runs for each Domain Management Server that manages UTM-1 Edge devices, and is
constantly connected to the Domain Management Server to which it belongs. UTM-1 Edge devices can be created either using SmartDashboard or using SmartProvisioning (where they are defined as UTM-1 Edge SmartLSM Security Gateways).
Reporting Server Processes
When the SmartReporter Blade for Multi-Domain Security Management is used, the SmartReporter server maintains a connection to the Multi-Domain Server. Whenever reports are generated, another component called SmartReporter Generator opens a connection to the Multi-Domain Server as well.
Issues Relating to Different Platforms The Multi-Domain Server supports the following platforms:
Check Point SecurePlatform
RedHat Enterprise Linux
Solaris
High Availability Scenarios
When creating High Availability environments with:
a number of Multi-Domain Servers
a number of Multi-Domain Log Servers
Multi-Domain Servers connected to a single environment can run on different platforms (for example, one Multi-Domain Server can be installed on Solaris and another on RedHat Enterprise Linux or SecurePlatform.
Migration Between Platforms
Use the existing Multi-Domain Security Management migration tools to move configuration databases (such as the Global Policies databases or the Domain Management Server databases) between different Multi-Domain Security Management platforms:
Action Use Script/Command Comment
Migrate the Global Policies Database
migrate_global_p
olicies script Run this script without any parameters to see its usage. The files required before executing this script are specified in the script's usage. The specified files should be copied manually to the destination Multi-Domain Server.
Export a Domain Management Server, Security Management, or Global Policy database from one computer to another.
migrate export
script This script exports the comprehensive database files into one .tgz file on the source machine that can be imported to a different Multi-Domain Server.

Architecture and Processes
Multi-Domain Security Management Administration Guide R77 | 117
Action Use Script/Command Comment
Migrate the Global Policies Database
migrate_global_p
olicies script Run this script without any parameters to see its usage. The files required before executing this script are specified in the script's usage. The specified files should be copied manually to the destination Multi-Domain Server.
Migrate the Domain Management Server into the destination environment.
Use any one of:
Import Domain Management Server command from the SmartDomain Manager
cma_migrate
script
mdscmd
migratemanagem
ent utility
Multi-Domain Security Management Administration Guide R77 | 118
Chapter 12
Multi-Domain Security Management Commands and Utilities
In This Section: Cross-Domain Management Server Search ......................................................... 118
P1Shell .................................................................................................................. 120
Command Line Reference .................................................................................... 124
Cross-Domain Management Server Search
Overview
The Cross-Domain Management Server Search feature lets you search across multiple Domain Management Server databases for specified network objects (including groups, dynamic objects and Global objects). You can also search for rules (including Global and implied rules) that contain or affect a specified object.
Cross-Domain Management Server Search is a powerful tool for analyzing the functioning of network components in the context of a Multi-Domain Security Management environment. The search function is similar to the Where Used feature in SmartDashboard.
Searching
You can access Cross-Domain Management Server search from the General - Domain Contents or from the General - Network Objects view of the SmartDomain Manager.
To open the Cross-Domain Management Server search window, select Cross-Domain Management Server Search from the Manage menu, or click the Cross-Domain Management Server Search icon.
Select a query, what you want to search for, and the Domain or Domains to search in. The following queries are available:
Specified Object query:
Find network objects by exact name - finds objects defined in the Domain Management Server database, where the object's name exactly matches the query entry.
Find network objects by partial name - finds objects defined in the Domain Management Server database, where the object's name contains the query entry.
Find network objects by IP address - finds objects defined in the Domain Management Server database, where the object's IP address matches the query entry.
Results for object queries include object and Domain information.
Find Policy rules that use a global object - the query entry is a global object name. The query finds rules in the Domain Management Server Policies, where the global object is part of the rule definition. This includes cases where the global object is not explicit in the rule definition, but is included in some object (such as a group or cluster) that appears in the rule.
Results include Domain, Policy and rule information, and the specific rule column where the global object appears. The first Results column, Object Name, indicates the applicable object as defined in the rule. This object may be one that includes, but is not identical to, the query entry.

Multi-Domain Security Management Commands and Utilities
Multi-Domain Security Management Administration Guide R77 | 119
Find Policy rules that use a global object explicitly - this query is the same as the previous query, except that the results are limited to rules where the global object is explicit. Rules where the global object is merely included in some object (such as a group or cluster) that appears in the rule are excluded.
Results include Domain, Policy and rule information, and the specific rule column where the global object appears. Two additional Results columns are:
Last in Cell? - Shows whether the object is the sole object in its rule column, so that removing it would cause the cell content to become Any.
Is Removable? - Show whether you can delete an object.
Find network objects that use a global object explicitly- the query entry is the name of a global object. The query finds network objects (such as groups or clusters), defined in the Domain Management Server database, that contain the global object explicitly.
Results include object and Domain information.
The Object Name Results column indicates the applicable object as defined in the rule. This object may be one that includes, but is not identical to, the query entry.
Is Removable? - Shows if you can delete the object.
Copying Search Results
You can copy search results to use them in other applications.
To copy search results to the clipboard, right-click in the Results pane and select Copy. The copied results are in Comma Separated Values (CSV) text format.
Performing a Search in CLI
You can do a cross-Domain Management Server search using the CLI. The search results will be sent to standard output in Comma Separated Values (CSV) format.
The command syntax is:
mdscmd runcrossdomainquery <find_in> <query_type> <entry_type> <entry>
where <find_in> is one of the following parameters:
Parameter Description
-f <filename> Searches in Domains listed in file <filename>.
-list <list> Searches in Domains in <list>. <list> should be Domain names separated by
commas (e.g. domain1, domain2).
-all Searches in all Domains.
<query_type> refers to one of the following parameters:
Parameter SmartDomain Manager version of the query
query_network_o
bj One of the Specified Object queries (according to <entry_type>)
query_rulebase Find Policy rules that use a global object
whereused_rules Find Policy rules that use a global object explicitly
whereused_objs Find network objects that use a global object explicitly
<entry_type> refers to one of the following parameters:
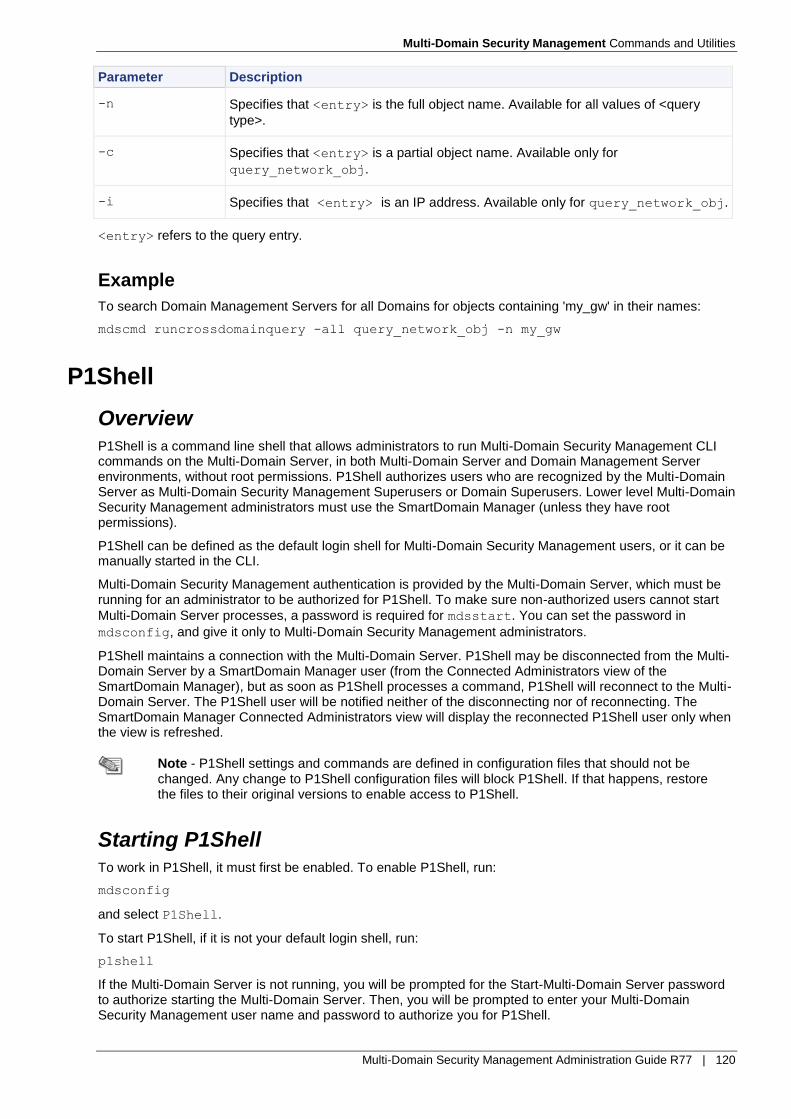
Multi-Domain Security Management Commands and Utilities
Multi-Domain Security Management Administration Guide R77 | 120
Parameter Description
-n Specifies that <entry> is the full object name. Available for all values of <query
type>.
-c Specifies that <entry> is a partial object name. Available only for
query_network_obj.
-i Specifies that <entry> is an IP address. Available only for query_network_obj.
<entry> refers to the query entry.
Example
To search Domain Management Servers for all Domains for objects containing 'my_gw' in their names:
mdscmd runcrossdomainquery -all query_network_obj -n my_gw
P1Shell
Overview
P1Shell is a command line shell that allows administrators to run Multi-Domain Security Management CLI commands on the Multi-Domain Server, in both Multi-Domain Server and Domain Management Server environments, without root permissions. P1Shell authorizes users who are recognized by the Multi-Domain Server as Multi-Domain Security Management Superusers or Domain Superusers. Lower level Multi-Domain Security Management administrators must use the SmartDomain Manager (unless they have root permissions).
P1Shell can be defined as the default login shell for Multi-Domain Security Management users, or it can be manually started in the CLI.
Multi-Domain Security Management authentication is provided by the Multi-Domain Server, which must be running for an administrator to be authorized for P1Shell. To make sure non-authorized users cannot start
Multi-Domain Server processes, a password is required for mdsstart. You can set the password in
mdsconfig, and give it only to Multi-Domain Security Management administrators.
P1Shell maintains a connection with the Multi-Domain Server. P1Shell may be disconnected from the Multi-Domain Server by a SmartDomain Manager user (from the Connected Administrators view of the SmartDomain Manager), but as soon as P1Shell processes a command, P1Shell will reconnect to the Multi-Domain Server. The P1Shell user will be notified neither of the disconnecting nor of reconnecting. The SmartDomain Manager Connected Administrators view will display the reconnected P1Shell user only when the view is refreshed.
Note - P1Shell settings and commands are defined in configuration files that should not be changed. Any change to P1Shell configuration files will block P1Shell. If that happens, restore the files to their original versions to enable access to P1Shell.
Starting P1Shell
To work in P1Shell, it must first be enabled. To enable P1Shell, run:
mdsconfig
and select P1Shell.
To start P1Shell, if it is not your default login shell, run:
p1shell
If the Multi-Domain Server is not running, you will be prompted for the Start-Multi-Domain Server password to authorize starting the Multi-Domain Server. Then, you will be prompted to enter your Multi-Domain Security Management user name and password to authorize you for P1Shell.

Multi-Domain Security Management Commands and Utilities
Multi-Domain Security Management Administration Guide R77 | 121
File Constraints for P1Shell Commands
For security reasons, commands that run in P1Shell can read files only from within a defined input directory. Commands can write only to a defined output directory.
Note - The mds_backup command is an exception to this rule. The output of the backup is
created at the path: /var/opt/<SeverName>_backups/<timestamp>, where <timestamp> is
the time that the backup started.
Upon starting, P1Shell defines both input and output directories as the user's home directory. They can be changed for the work session, only within the home directory. Change the directories with the following commands:
set_inputdir <path>
set_outputdir <path>
where <path> is an existing directory, defined relative to the user's home directory.
To view existing input and output directories, enter:
display_io_dirs
Filenames appearing in commands cannot be paths (/ will be considered an illegal character) and must be located in the defined input or output directory.
Note - For security reasons, the output directory cannot be soft linked.
Multi-Domain Security Management Shell Commands
P1Shell includes both general Multi-Domain Security Management commands and its own Native
P1Shell commands.
To view a list of available Multi-Domain Security Management commands, enter help or ? . When the
logged-in user is a Domain Superuser, commands that are available only to Multi-Domain Security Management Superusers, not to Domain Superusers, will not appear in the list.
General Multi-Domain Security Management Commands
Available commands are listed below. To learn more, see the R77 Command Line Interface Reference Guide (http://supportcontent.checkpoint.com/documentation_download?ID=24833).
Commands indicated as Limited are available only to Multi-Domain Security Management Superusers, not to Domain Superusers. All other listed commands are available to both Multi-Domain Security Management Superusers and to Domain Superusers.
Any commands listed in the Not Supported column are not currently supported in P1Shell. If the Available Command Options column says All, it should be understood as: All commands are available, except for those in the Not Supported column.
Command Limited ?
Not Supported
Available Command Options
cpca_dbutil print; convert; d2u; get_crl_mode
cpd_admin For Multi-Domain Security Management Superuser: All; for Domain
Superuser: debug on; list; ver
cpinfo All

Multi-Domain Security Management Commands and Utilities
Multi-Domain Security Management Administration Guide R77 | 122
Command Limited ?
Not Supported
Available Command Options
cpca_dbutil print; convert; d2u; get_crl_mode
cplic All with these commands specific to Multi-Domain Security Management:
cplic print shows all Domain Management
Server and Multi-Domain Server licenses.
cplic print -D shows only Domain
Management Server licenses.
CPperfmon hw; mdsconfig; procmem; monitor; off; summary
cppkg add; setroot; del; print; getroot; get
cpprod_util Limited All
cprinstall get; verify; install; transfer; uninstall; boot; cprestart; cpstart; cpstop; show; snapshot; revert; delete
cprlic All
cpstat All
cpstat_monitor All
cpvinfo All
cpwd_admin list
dbedit All
dbver -help; -s; -c; -u; -w; -m; -p
enable_mds_deletio
n Limited
fw fetch; log;
fetchlogs;
|monitor;
stat; tab;
mergefiles
For Multi-Domain Security Management Superuser: All
for Domain Superuser: logswitch; debug fwd; debug fwm
fwm dbimport;
logexport For Multi-Domain Security Management Superuser: All
for Domain Superuser: load; dbload; ver; unload; logexport; mds recalc_lics; mds fwmconnect rebuild_global_communities_status
LSMcli cpinstall;
snapshot;
delete;
revert
All

Multi-Domain Security Management Commands and Utilities
Multi-Domain Security Management Administration Guide R77 | 123
Command Limited ?
Not Supported
Available Command Options
cpca_dbutil print; convert; d2u; get_crl_mode
mds_backup Limited All
mds_user_expdate All
mdscmd Limited migrate
management All
mdsconfig Limited All
mdsenv All
mdsquerydb All
mdsstart Limited All
mdsstart_customer All
mdsstat All
mdsstop Limited All
mdsstop_customer All
promote_util All
sam_alert All
Native P1Shell Commands
Besides enabling Multi-Domain Security Management commands, P1Shell implements the following shell commands:

Multi-Domain Security Management Commands and Utilities
Multi-Domain Security Management Administration Guide R77 | 124
Command Description
help [<command>] Displays the command's help text, or (without arguments) lists available commands.
Idle [<minutes>] Sets idle time before automatic logout to <minutes>, or (without
arguments) displays current idle time (default is 10 minutes).
exit Exits P1Shell.
? [<command>] Same as help.
set_outputdir <path> Sets the output directory to be <path>, where <path> is relative to the
user's home directory.
set_inputdir <path> Sets the input directory to be <path>, where <path> is relative to the
user's home directory.
display_io_dirs Displays the input and output directories.
copy_logfiles -
<process_name> [<-l>] Copies the process's debug log files according to the environment context (Domain Management Server/Multi-Domain Server) to the output directory.
<process_name> is one of: fwm, fwd, cpd, cpca. If -l is used, only the
most recent log file is copied.
run <batch_file> Runs a batch of Multi-Domain Server commands in sequence. The batch file must be in the defined input directory.
scroll [on | off] Sets output scrolling on or off, or displays current scroll setting. Scrolling is similar to the 'more' command.
Audit Logging
P1Shell logs audits in two different ways.
P1Shell saves all audits to a text file:
$MDS_SYSTEM/p1shell/log/p1shell_cmd_audit.log
In addition, P1Shell sends audits to the Multi-Domain Server to be logged. These audits can be viewed in SmartView Tracker. If the Multi-Domain Server is not running at the time as the audited event, and the Multi-Domain Server later starts during the same P1Shell session, the audit is then sent to the Multi-Domain Server. If the Multi-Domain Server is down from the time of the event until the end of the P1Shell session, the Multi-Domain Server does not receive the audit.
Command Line Reference
cma_migrate
Description
This command imports an existing Security Management Server or Domain Management Server into a Multi-Domain Server so that it will become one of its Domain Management Servers. If the imported Security Management or Domain Management Server is of a version earlier than the Multi-Domain Server to which it is being imported, then the Upgrade process is performed as part of the import.
It is recommended that you run cma_migrate to import Domain Management Server or Security
Management Server database files created using the export_database tool.
It is important to note that the source and target platforms can be different. The source management to be imported can be Solaris, Linux, Windows, Gaia, SecurePlatform or IPSO.
Syntax

Multi-Domain Security Management Commands and Utilities
Multi-Domain Security Management Administration Guide R77 | 125
cma_migrate <source management directory path> <target Domain Management Server
FWDIR directory>
Argument Description
source database directory path The root of the original source database directory; the FWDIR
directory, or a copy of it.
target Domain Management Server
FWDIR directory The directory of the Domain Management Server that you are migrating to.
The target Domain Management Server cannot ever have been
started before running cma_migrate. There is no need to stop
the Multi-Domain Server before running cma_migrate
cpmiquerybin
Description cpmiquerybin utility is the binary core of the Database Query Tool.
(For the Database Query Tool, see mdsquerydb (on page 138).) This command-line CPMI client connects to the specified database, executes a query and displays results as either a collection of FW-1 Sets or tab-delimited list of requested fields from each retrieved object. The target database of the query tool depends on the environment settings of the shell being used by the user. Whenever the user desires to access one of Multi-Domain Server databases, he/she should execute the
mdsenv command, in order to define the environment variables necessary for database connection. In
order to connect to a database of a certain Domain Management Server, the user should execute mdsenv
command providing Domain Management Server name or IP address as a first parameter. (See also mdsenv (on page 138).)
Note - A MISSING_ATTR string is displayed when the user specifies an attribute name that does
not exist in one of the objects in query result. The MISSING_ATTR string indicates that that
attribute is missing.
Exit Code 0 when query succeeds, 1 if query fails, or query syntax is bad.
Usage cpmiquerybin <query_result_type> <database> <table> <query> [-a <attributes_list>]
Argument Description
query_result_type Requested format of the query result. Possible values:
attr – display values of specified (with –a parameter) field of each
retrieved object
object – display FW-1 sets containing data of each retrieved object.
database Name of the database to connect to, in quotes. For instance, "mdsdb" or
"".
table Table to retrieve the data from, for instance, network_objects
query Empty query ("") or a query specifying objects range for retrieval, for
instance name='a*'.
-a attributes_list If query_result_type was specified "attr", this field should contain a
comma delimited list of objects fields to display. Object name can be
accessed using a special "virtual" field called "__name__". Example: __name__,ipaddr
Example Print all network objects in the default database cpmiquerybin object "" network_objects ""

Multi-Domain Security Management Commands and Utilities
Multi-Domain Security Management Administration Guide R77 | 126
Print hosted_by_mds and ipaddr attributes of all network objects in database "mdsdb" mdsenv cpmiquerybin attr "mdsdb" network_objects "" -a hosted_by_mds,ipaddr
dbedit
Description This utility can be used in Multi-Domain Security Management configuration with the
mdsenv command. Particular commands for accessing the Multi-Domain Server and Domain Management
Server environment are included here.
Usage dbedit –mds dbedit –s <SeverIP> –d mdsdb -u <Admin> -p <password> dbedit –s <Domain Management Server_IP> -u <Domain Management Server_Admin> -p
<password>
Argument Description
–mds Access without user name and password. Use this command only for Domain Management Server or Multi-Domain Server configuration on the computer on which you run this command.
–s <SeverIP> IP address of the Multi-Domain Server to connect to.
-u <Admin> -p
<password> Credentials of Multi-Domain Security Management administrator with password for remote login, from a valid Multi-Domain Server GUI Client. Beware not to expose your administrator password during remote login.
–d mdsdb Edit the MDSDB - Multi-Domain Server database.
Examples:
To edit the database that resides on the Multi-Domain Server Global database, use the following commands:
mdsenv
dbedit -mds
To edit the database that resides on the Multi-Domain Server MDSDB database, use the following commands:
mdsenv
dbedit –mds –d mdsdb
To edit the Domain Management Server database, use the following command:
mdsenv Domain Management Server_Flower
dbedit 10.10.10.10 -mds
where 10.10.10.10 is the Domain Management Server IP.
To use dbedit on a remote Multi-Domain Server/Domain Management Server, the computer that you are
running the dbedit on must be defined as an authorized GUI Client. The user must be a Multi-Domain
Security Management administrator and provide a user name and password: dbedit –s 10.10.10.10 -u CANDACE -p ****
where 10.10.10.10 is the Multi-Domain Server or Domain Management Server IP, and **** is a password.
To edit the remote Multi-Domain Server MDSDB database:
dbedit –s 10.10.9.1 –d mdsdb -u ROGER -p ****
where 10.10.9.1 is the Multi-Domain Server IP, ROGER is an administrator and **** is a password.
To edit the remote Domain Management Server database:
dbedit –s 10.10.19.1 -u SAMANTHA -p ****

Multi-Domain Security Management Commands and Utilities
Multi-Domain Security Management Administration Guide R77 | 127
where 10.10.19.1 is the Domain Management Server IP, SAMANTHA is an administrator and **** is a password.
mcd bin | scripts | conf
Description This command provides a quick directory change to $FWDIR/<param>.
Example mdsenv MyDServer1 mcd conf
Brings you to: /opt/CPmds-R77/Domains/MyDServer1/CPsuite-R77/fw1/conf.
mds_backup
The mds_backup command backs up binaries and data from your Multi-Domain Server to the working
directory. This command requires Superuser privileges.
mds_backup executes the gtar command on product root directories containing data and binaries, and
backs up all files except those specified in mds_exclude.dat ($MDSDIR/conf) file. The collected
information is stored in a single .tgz file. This .tgz file name consists of the backup date and time, which is
saved in the current working directory. For example: 13Sep2002-141437.mdsbk.tgz
To perform a backup:
1. Execute mds_backup from any location outside the product directory tree to be backed up. This
becomes the working directory.
2. Upon completion of the backup process, copy the backup .tgz file, together with the mds_restore,
gtar and gzip command files, to your external backup location.
Usage mds_backup [-g -L {all|best} -b {-d <target dir name>} -v -l -h] mds_backup [-g -b {-d <target dir name>} -v -h]
Syntax
Argument Description
-g Executes without prompting to disconnect GUI clients.
-b Batch mode - executes without asking anything (-g is implied).
-d Specifies a directory store for the backup file. When not specified, the backup file is stored in the current directory. You cannot store the backup file in any location inside the product root directory tree.
-v "Dry run" - Show all files to be backed up, but does not perform the backup operation.
-l Exclude logs from the backup.
- L Lock databases on the computer being backed up so that SmartDashboard cannot connect in the Read/Write mode. You must use one of these argument options:
all - If a lock attempt fails on a database (global or local), the backup stops. best - If a lock attempt fails on a database, the command continues to back up the database, but does no lock it.
Note: The lock databases option has no effect on SmartDomain Manager clients because they can only connect in the Read/Write mode.
-h Help - displays help text.
Comments When using the -g or -b options, make sure that no GUI clients or SmartReporter servers
are connected. Otherwise, the backup file may contain inconsistencies due to database changes made during the backup process.

Multi-Domain Security Management Commands and Utilities
Multi-Domain Security Management Administration Guide R77 | 128
It is important not to run mds_backup from any of the directories that will be backed up. For example, when
backing up a Multi-Domain Server, do not run mds_backup from /opt/CPmds-<current releaese>
because it is a circular reference (backing up directory that you need to write into).
Active log files are not backed up, in order to avoid read-during-write inconsistencies. It is recommended to perform a log switch prior to the backup procedure.
Further Info. The Multi-Domain Server configuration can be backed up without backing up the log files. Such a backup will usually be significantly smaller in size than a full backup with logs. To back up without
log files, add the following line to the file $MDSDIR/conf/mds_exclude.dat: log/*
mds_restore
Description Restores a Multi-Domain Server that was previously backed up with mds_backup. For
correct operation, mds_restore should be restored onto a clean Multi-Domain Server installation.
Note - The mds_restore command must use the script that was created in the directory into which the backup file was created.
Syntax ./mds_restore <backup file>
Important - In Gaia, you have to run this command in expert mode and in the same directory as the backup file itself.
mds_user_expdate
Description - Changes multiple administrator expiration dates in one operation. You can do this for administrators on all Domain Management Servers or for users on one or more specified Domain Management Server.
Usage - mds_user_expdate
Important
Disconnect all GUI clients before running the mds_user_expdate command.
If you do not do this, the SmartDomain Manager will overwrite changes done by the command.
You can use the mds_user_expdate command only on an Active Multi-Domain Server in a
High Availability deployment. You must synchronize your servers and install policies on your Security
Gateways after using this command.
We recommend that you backup your Multi-Domain Servers before using the mds_user_expdate
command.
mdscmd
Description This command is used to execute different commands on the Multi-Domain Server system. It connects to a Multi-Domain Server as a CPMI client and causes it to execute one of the specified commands described below.
Connection parameters [-m serverName -u user -p password] are required to log into a remote
Multi-Domain Server. If these arguments are omitted, mdscmd connects to the local machine. The
command is a CPMI client and has an audit log.
Usage mdscmd <sub command and sub command parameters> [-m <serverName> -u user -p password] mdscmd help
Argument Description
-m ServerName Remote Multi-Domain Server host name or IPv4 address. You must use this argument when you work with a Domain Management Server on a remote Multi-Domain Server.
The remote Multi-Domain Server must be defined as a GUI client.
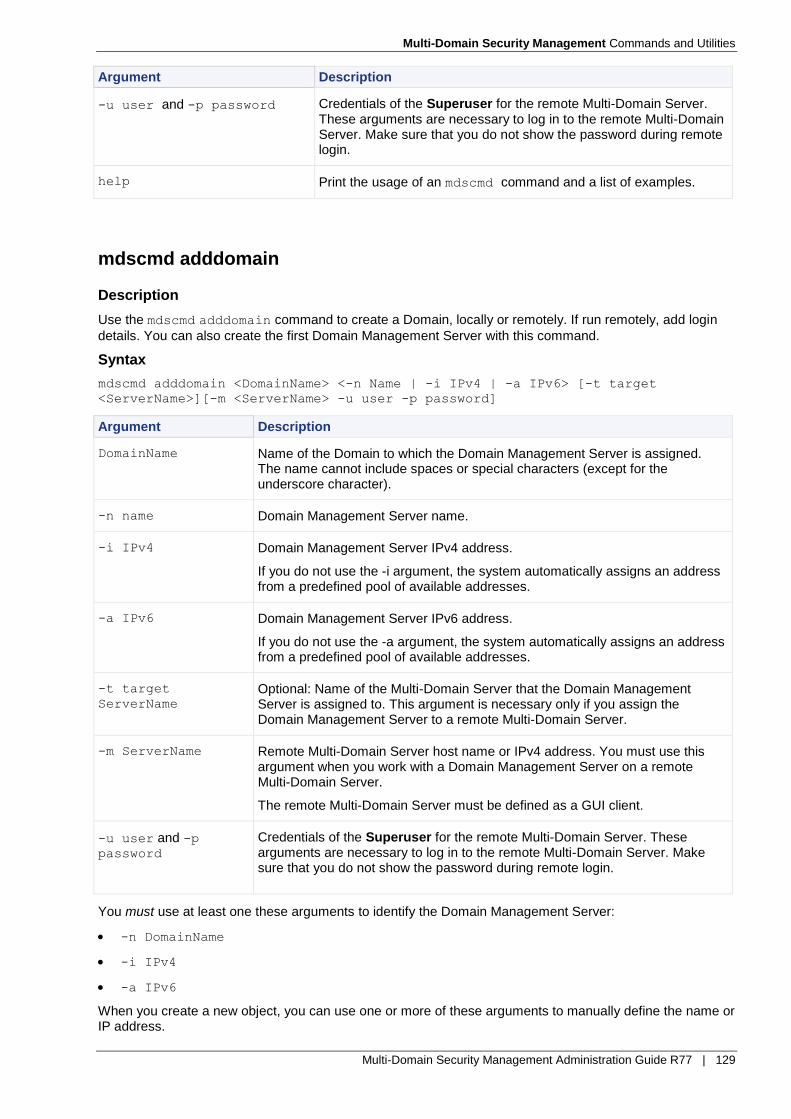
Multi-Domain Security Management Commands and Utilities
Multi-Domain Security Management Administration Guide R77 | 129
Argument Description
-u user and -p password Credentials of the Superuser for the remote Multi-Domain Server. These arguments are necessary to log in to the remote Multi-Domain Server. Make sure that you do not show the password during remote login.
help Print the usage of an mdscmd command and a list of examples.
mdscmd adddomain
Description
Use the mdscmd adddomain command to create a Domain, locally or remotely. If run remotely, add login
details. You can also create the first Domain Management Server with this command.
Syntax
mdscmd adddomain <DomainName> <-n Name | -i IPv4 | -a IPv6> [-t target
<ServerName>][-m <ServerName> -u user -p password]
Argument Description
DomainName Name of the Domain to which the Domain Management Server is assigned. The name cannot include spaces or special characters (except for the underscore character).
-n name Domain Management Server name.
-i IPv4 Domain Management Server IPv4 address.
If you do not use the -i argument, the system automatically assigns an address from a predefined pool of available addresses.
-a IPv6 Domain Management Server IPv6 address.
If you do not use the -a argument, the system automatically assigns an address from a predefined pool of available addresses.
-t target
ServerName Optional: Name of the Multi-Domain Server that the Domain Management Server is assigned to. This argument is necessary only if you assign the Domain Management Server to a remote Multi-Domain Server.
-m ServerName Remote Multi-Domain Server host name or IPv4 address. You must use this argument when you work with a Domain Management Server on a remote Multi-Domain Server.
The remote Multi-Domain Server must be defined as a GUI client.
-u user and -p password
Credentials of the Superuser for the remote Multi-Domain Server. These arguments are necessary to log in to the remote Multi-Domain Server. Make sure that you do not show the password during remote login.
You must use at least one these arguments to identify the Domain Management Server:
-n DomainName
-i IPv4
-a IPv6
When you create a new object, you can use one or more of these arguments to manually define the name or IP address.

Multi-Domain Security Management Commands and Utilities
Multi-Domain Security Management Administration Guide R77 | 130
You must configure ranges of IPv4 and IPv6 addresses on your Multi-Domain Server for automatic address assignment to work. If no ranges are defined or there are no available IP addresses available, the command will fail.
The -t, -m and -u arguments are necessary only when you assign a Domain Management Server to a
different, remote Multi-Domain Server (not the one on which you run the mdscmd command).
Note - The old form of this command (mdscmd addcustomer) is still supported in this
release.
mdscmd addmanagement
Description
This command creates a new Domain Management Server. You must first create at least one Domain before you can use this command. We recommend that you close SmartDomain Manager before running this command.
Syntax
mdscmd addmanagement <DomainName> [-n <Name> | -i <IPv4> | -a <IPv6>] [-t
target <ServerName>] [-m <ServerName> -u user -p password]
Argument Description
DomainName Name of the Domain to which the Domain Management Server is assigned.
-n Name Domain Management Server name. The name cannot include spaces or special characters (except for the underscore character).
-i IPv4 Domain Management Server IPv4 address.
If you do not use the -i argument, the system automatically assigns an address from a predefined pool of available addresses.
-a IPv6 Domain Management Server IPv6 address.
If you do not use the -a argument, the system automatically assigns an address from a predefined pool of available addresses.
-t ServerName Optional: Name of the Multi-Domain Server that the Domain Management Server is assigned to. This argument is necessary only if you assign the Domain Management Server to a remote Multi-Domain Server.
-m ServerName Remote Multi-Domain Server host name or IPv4 address. You must use this argument when you work with a Domain Management Server on a remote Multi-Domain Server.
The remote Multi-Domain Server must be defined as a GUI client.
-u user and -p password Credentials of the Superuser for the remote Multi-Domain Server. These arguments are necessary to log in to the remote Multi-Domain Server. Make sure that you do not show the password during remote login.
Note - The old form of this command (mdscmd addcma) is still supported.
mdscmd addlogserver
Description
Use the addlogserver command to add a Domain Log Server to an existing Domain. To add a Domain
Log Server to a Domain, you must define at least one Domain Management Server.
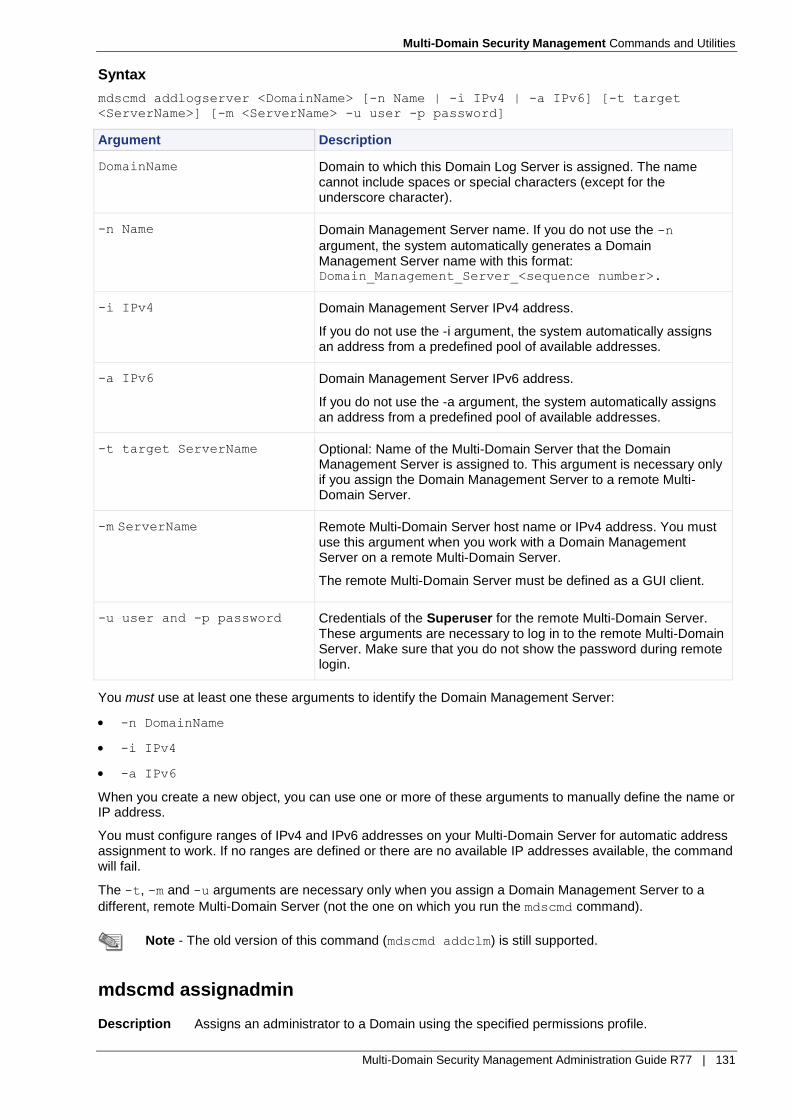
Multi-Domain Security Management Commands and Utilities
Multi-Domain Security Management Administration Guide R77 | 131
Syntax
mdscmd addlogserver <DomainName> [-n Name | -i IPv4 | -a IPv6] [-t target
<ServerName>] [-m <ServerName> -u user -p password]
Argument Description
DomainName Domain to which this Domain Log Server is assigned. The name cannot include spaces or special characters (except for the underscore character).
-n Name Domain Management Server name. If you do not use the -n
argument, the system automatically generates a Domain Management Server name with this format: Domain_Management_Server_<sequence number>.
-i IPv4 Domain Management Server IPv4 address.
If you do not use the -i argument, the system automatically assigns an address from a predefined pool of available addresses.
-a IPv6 Domain Management Server IPv6 address.
If you do not use the -a argument, the system automatically assigns an address from a predefined pool of available addresses.
-t target ServerName Optional: Name of the Multi-Domain Server that the Domain Management Server is assigned to. This argument is necessary only if you assign the Domain Management Server to a remote Multi-Domain Server.
-m ServerName Remote Multi-Domain Server host name or IPv4 address. You must use this argument when you work with a Domain Management Server on a remote Multi-Domain Server.
The remote Multi-Domain Server must be defined as a GUI client.
-u user and -p password Credentials of the Superuser for the remote Multi-Domain Server. These arguments are necessary to log in to the remote Multi-Domain Server. Make sure that you do not show the password during remote login.
You must use at least one these arguments to identify the Domain Management Server:
-n DomainName
-i IPv4
-a IPv6
When you create a new object, you can use one or more of these arguments to manually define the name or IP address.
You must configure ranges of IPv4 and IPv6 addresses on your Multi-Domain Server for automatic address assignment to work. If no ranges are defined or there are no available IP addresses available, the command will fail.
The -t, -m and -u arguments are necessary only when you assign a Domain Management Server to a
different, remote Multi-Domain Server (not the one on which you run the mdscmd command).
Note - The old version of this command (mdscmd addclm) is still supported.
mdscmd assignadmin
Description Assigns an administrator to a Domain using the specified permissions profile.
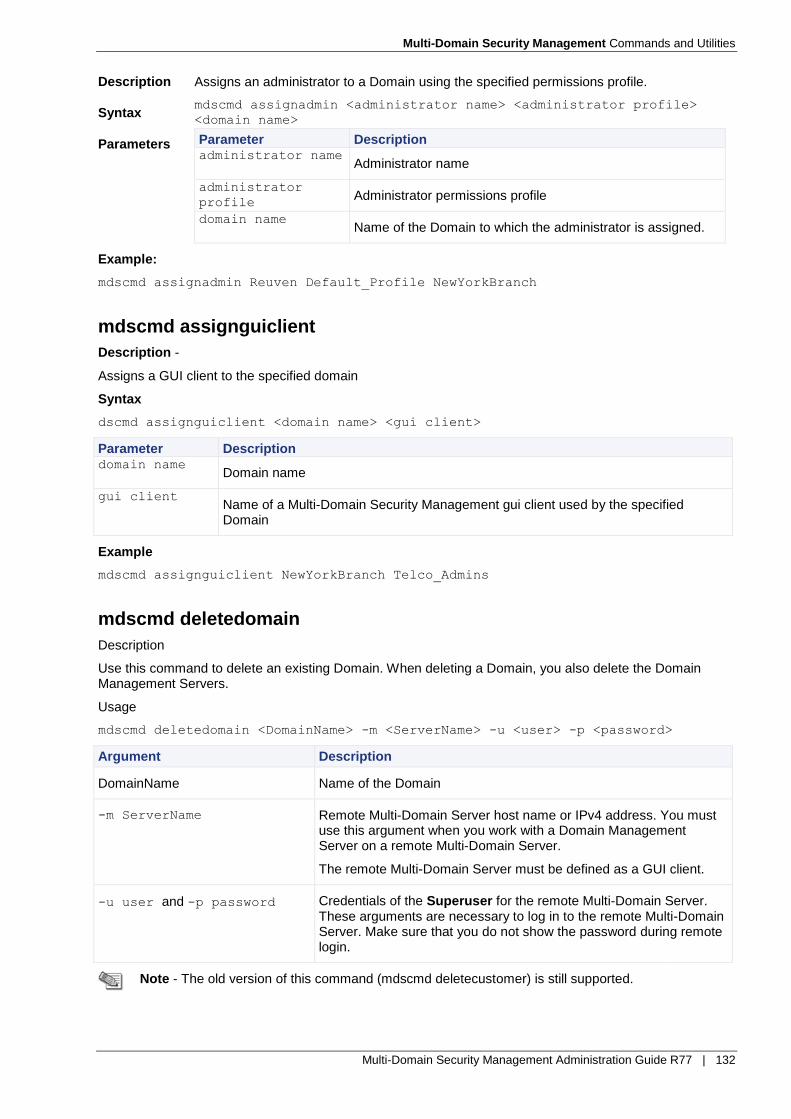
Multi-Domain Security Management Commands and Utilities
Multi-Domain Security Management Administration Guide R77 | 132
Description Assigns an administrator to a Domain using the specified permissions profile.
Syntax mdscmd assignadmin <administrator name> <administrator profile>
<domain name>
Parameters Parameter Description administrator name
Administrator name
administrator
profile Administrator permissions profile
domain name Name of the Domain to which the administrator is assigned.
Example:
mdscmd assignadmin Reuven Default_Profile NewYorkBranch
mdscmd assignguiclient
Description -
Assigns a GUI client to the specified domain
Syntax
dscmd assignguiclient <domain name> <gui client>
Parameter Description domain name
Domain name
gui client Name of a Multi-Domain Security Management gui client used by the specified Domain
Example
mdscmd assignguiclient NewYorkBranch Telco_Admins
mdscmd deletedomain
Description
Use this command to delete an existing Domain. When deleting a Domain, you also delete the Domain Management Servers.
Usage
mdscmd deletedomain <DomainName> -m <ServerName> -u <user> -p <password>
Argument Description
DomainName Name of the Domain
-m ServerName Remote Multi-Domain Server host name or IPv4 address. You must use this argument when you work with a Domain Management Server on a remote Multi-Domain Server.
The remote Multi-Domain Server must be defined as a GUI client.
-u user and -p password Credentials of the Superuser for the remote Multi-Domain Server. These arguments are necessary to log in to the remote Multi-Domain Server. Make sure that you do not show the password during remote login.
Note - The old version of this command (mdscmd deletecustomer) is still supported.
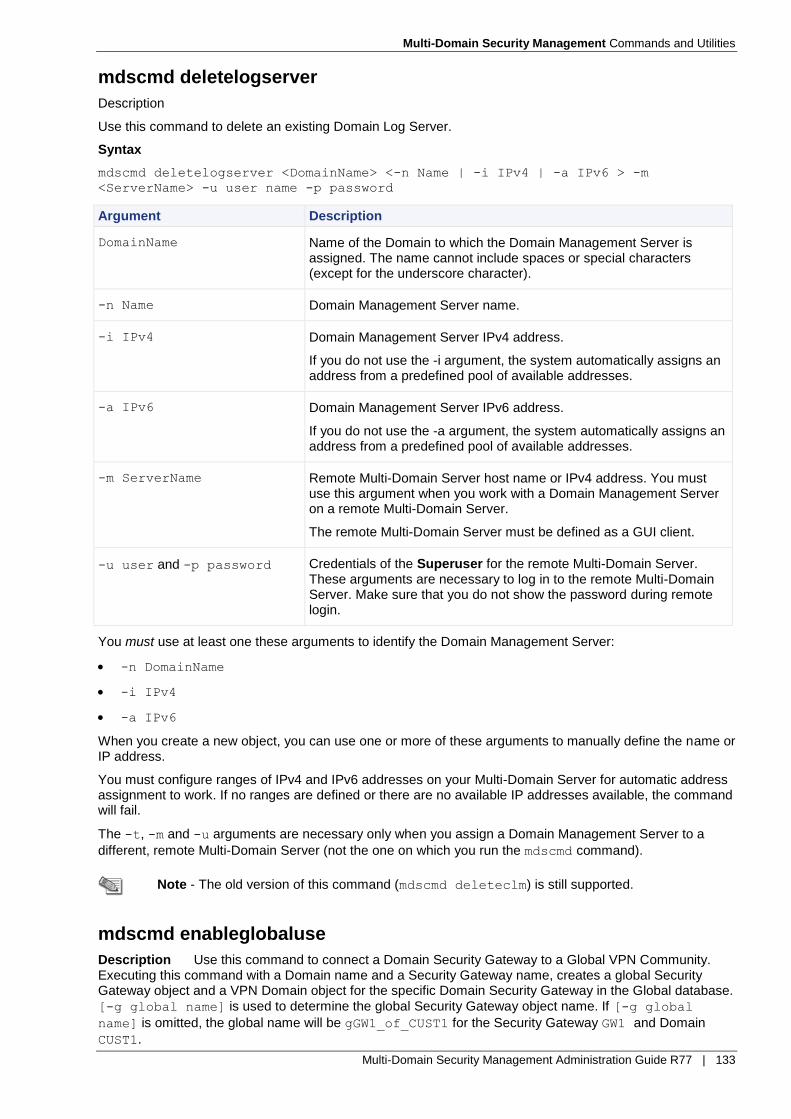
Multi-Domain Security Management Commands and Utilities
Multi-Domain Security Management Administration Guide R77 | 133
mdscmd deletelogserver
Description
Use this command to delete an existing Domain Log Server.
Syntax
mdscmd deletelogserver <DomainName> <-n Name | -i IPv4 | -a IPv6 > -m
<ServerName> -u user name -p password
Argument Description
DomainName Name of the Domain to which the Domain Management Server is assigned. The name cannot include spaces or special characters (except for the underscore character).
-n Name Domain Management Server name.
-i IPv4 Domain Management Server IPv4 address.
If you do not use the -i argument, the system automatically assigns an address from a predefined pool of available addresses.
-a IPv6 Domain Management Server IPv6 address.
If you do not use the -a argument, the system automatically assigns an address from a predefined pool of available addresses.
-m ServerName Remote Multi-Domain Server host name or IPv4 address. You must use this argument when you work with a Domain Management Server on a remote Multi-Domain Server.
The remote Multi-Domain Server must be defined as a GUI client.
-u user and -p password Credentials of the Superuser for the remote Multi-Domain Server. These arguments are necessary to log in to the remote Multi-Domain Server. Make sure that you do not show the password during remote login.
You must use at least one these arguments to identify the Domain Management Server:
-n DomainName
-i IPv4
-a IPv6
When you create a new object, you can use one or more of these arguments to manually define the name or IP address.
You must configure ranges of IPv4 and IPv6 addresses on your Multi-Domain Server for automatic address assignment to work. If no ranges are defined or there are no available IP addresses available, the command will fail.
The -t, -m and -u arguments are necessary only when you assign a Domain Management Server to a
different, remote Multi-Domain Server (not the one on which you run the mdscmd command).
Note - The old version of this command (mdscmd deleteclm) is still supported.
mdscmd enableglobaluse
Description Use this command to connect a Domain Security Gateway to a Global VPN Community. Executing this command with a Domain name and a Security Gateway name, creates a global Security Gateway object and a VPN Domain object for the specific Domain Security Gateway in the Global database.
[-g global name] is used to determine the global Security Gateway object name. If [-g global
name] is omitted, the global name will be gGW1_of_CUST1 for the Security Gateway GW1 and Domain
CUST1.

Multi-Domain Security Management Commands and Utilities
Multi-Domain Security Management Administration Guide R77 | 134
The VPN domain object will receive the same name as the global Security Gateway object with a
'_Domain' extension.
Usage mdscmd enableglobaluse <DomainName> <gatewayName> [-g <globalName>] [-m <ServerName> -u user -p password]
Syntax
Argument Description
DomainName Domain to which the Domain Management Server belongs.
gatewayName Gateway to connect to the VPN.
-g globalName The global Security Gateway object name. If omitted, the global
name will be gGW1_of_CUST1 for the Security Gateway GW1 and
Domain CUST1
-m ServerName Name or IP address of the Multi-Domain Server to connect to.
-u user and -p password Credentials of the Superuser for the remote Multi-Domain Server. These arguments are necessary to log in to the remote Multi-Domain Server. Make sure that you do not show the password during remote login.
Comments: mdscmd enableglobaluse is equivalent to enabling global use of a Security Gateway
from SmartDomain Manager.
mdscmd disableglobaluse
Description Use this command to remove a Domain global Security Gateway object and VPN Domain object from the global database.
Usage mdscmd disableglobaluse <DomainName> <gatewayName> [-m <ServerName> -u user -p password]
Syntax
Argument Description
DomainName Specifies the name of the Domain to which the Domain Management Server belongs.
gatewayName Specifies the name of the Security Gateway.
-m <ServerName> Specifies the name or IP of the Multi-Domain Server you want to connect to.
-u user and -p password Used as a pair, they must specify a valid Superuser administrator and password for remote login. In addition, the computer on which the command is executed must be a valid Multi-Domain Server GUI Client. Beware not to expose your administrator password during remote login.
Comments mdscmd disableglobaluse is equivalent to disabling the global use of a Security
Gateway from SmartDomain Manager.
mdscmd removeadmin
Description Remove an administrator from the specified domain.
Syntax mdscmd removeadmin <administratorName> <domainName>

Multi-Domain Security Management Commands and Utilities
Multi-Domain Security Management Administration Guide R77 | 135
Description Remove an administrator from the specified domain.
Parameters Parameter Description
administratorName Administrator name
domainName Domain name
Example mdscmd removeadmin George NewYorkBranch
mdscmd removeguiclient
Description Remove a GUI client from the specified domain
Syntax mdscmd assignguiclient <domainName> <guiClient>
Parameters Parameter Description domainName
Domain name
guiClient Name of a Multi-Domain Security Management gui client used by the specified Domain
Example mdscmd removeguiclient NewYorkBranch Telco_Admins
mdscmd startmanagement
Description
Use this command to start an existing Domain Management Server.
Syntax
mdscmd startmanagement <DomainName> <-n name | -i IPv4 | -a IPv6 > -m
<ServerName> -u user name -p password
Argument Description
DomainName Name of the Domain to which the Domain Management Server is assigned. The name cannot include spaces or special characters (except for the underscore character).
-n Name Domain Management Server name.
-i IPv4 Domain Management Server IPv4 address.
If you do not use the -i argument, the system automatically assigns an address from a predefined pool of available addresses.
-a IPv6 Domain Management Server IPv6 address.
If you do not use the -a argument, the system automatically assigns an address from a predefined pool of available addresses.
-m ServerName Remote Multi-Domain Server host name or IPv4 address. You must use this argument when you work with a Domain Management Server on a remote Multi-Domain Server.
The remote Multi-Domain Server must be defined as a GUI client.
-u user and -p password Credentials of the Superuser for the remote Multi-Domain Server. These arguments are necessary to log in to the remote Multi-Domain Server. Make sure that you do not show the password during remote login.
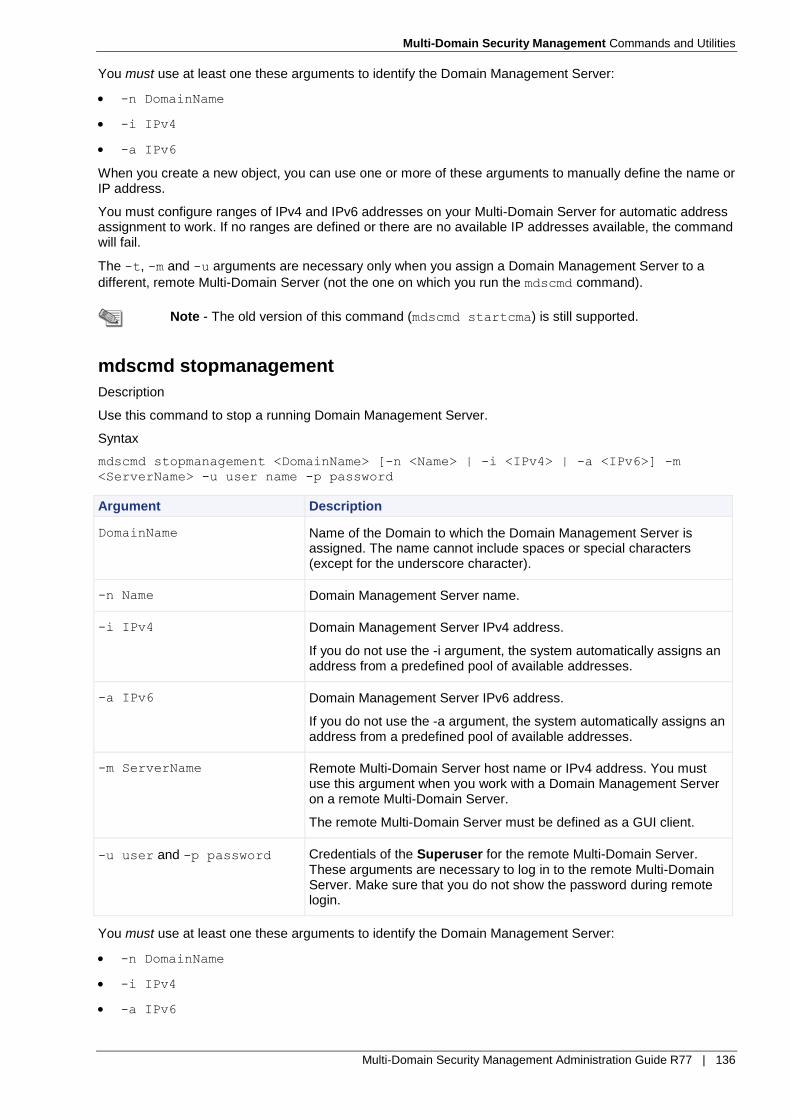
Multi-Domain Security Management Commands and Utilities
Multi-Domain Security Management Administration Guide R77 | 136
You must use at least one these arguments to identify the Domain Management Server:
-n DomainName
-i IPv4
-a IPv6
When you create a new object, you can use one or more of these arguments to manually define the name or IP address.
You must configure ranges of IPv4 and IPv6 addresses on your Multi-Domain Server for automatic address assignment to work. If no ranges are defined or there are no available IP addresses available, the command will fail.
The -t, -m and -u arguments are necessary only when you assign a Domain Management Server to a
different, remote Multi-Domain Server (not the one on which you run the mdscmd command).
Note - The old version of this command (mdscmd startcma) is still supported.
mdscmd stopmanagement
Description
Use this command to stop a running Domain Management Server.
Syntax
mdscmd stopmanagement <DomainName> [-n <Name> | -i <IPv4> | -a <IPv6>] -m
<ServerName> -u user name -p password
Argument Description
DomainName Name of the Domain to which the Domain Management Server is assigned. The name cannot include spaces or special characters (except for the underscore character).
-n Name Domain Management Server name.
-i IPv4 Domain Management Server IPv4 address.
If you do not use the -i argument, the system automatically assigns an address from a predefined pool of available addresses.
-a IPv6 Domain Management Server IPv6 address.
If you do not use the -a argument, the system automatically assigns an address from a predefined pool of available addresses.
-m ServerName Remote Multi-Domain Server host name or IPv4 address. You must use this argument when you work with a Domain Management Server on a remote Multi-Domain Server.
The remote Multi-Domain Server must be defined as a GUI client.
-u user and -p password Credentials of the Superuser for the remote Multi-Domain Server. These arguments are necessary to log in to the remote Multi-Domain Server. Make sure that you do not show the password during remote login.
You must use at least one these arguments to identify the Domain Management Server:
-n DomainName
-i IPv4
-a IPv6
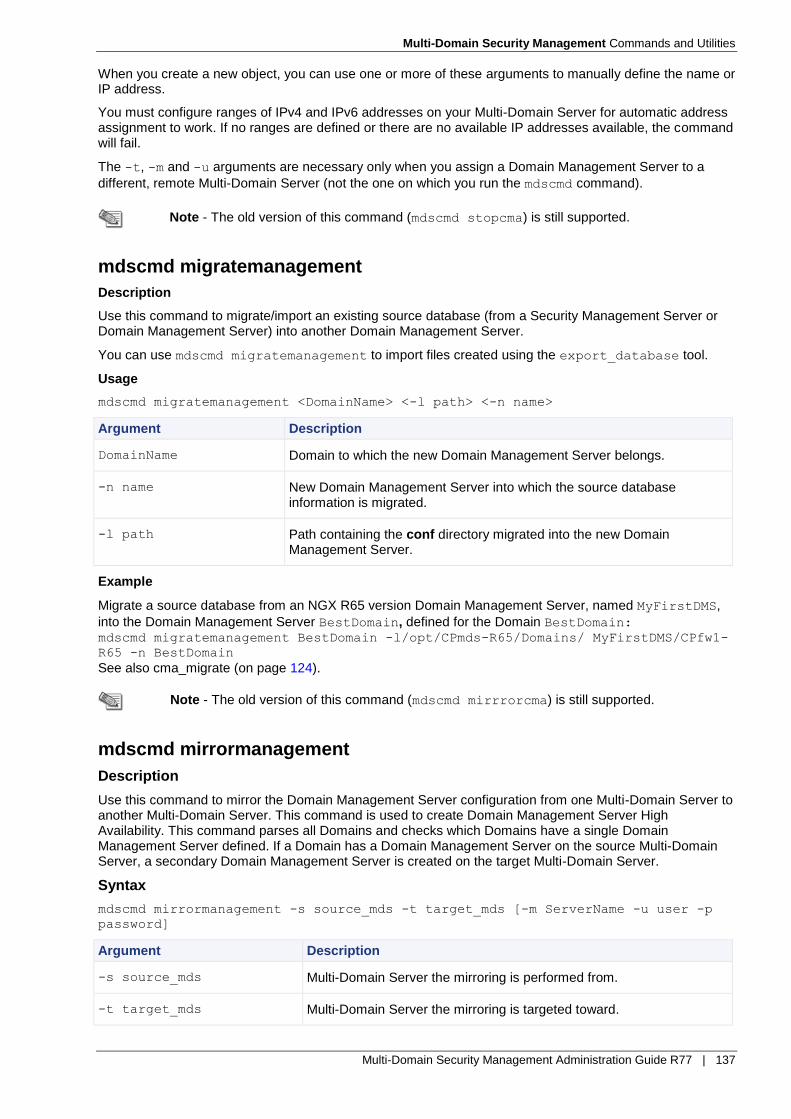
Multi-Domain Security Management Commands and Utilities
Multi-Domain Security Management Administration Guide R77 | 137
When you create a new object, you can use one or more of these arguments to manually define the name or IP address.
You must configure ranges of IPv4 and IPv6 addresses on your Multi-Domain Server for automatic address assignment to work. If no ranges are defined or there are no available IP addresses available, the command will fail.
The -t, -m and -u arguments are necessary only when you assign a Domain Management Server to a
different, remote Multi-Domain Server (not the one on which you run the mdscmd command).
Note - The old version of this command (mdscmd stopcma) is still supported.
mdscmd migratemanagement
Description
Use this command to migrate/import an existing source database (from a Security Management Server or Domain Management Server) into another Domain Management Server.
You can use mdscmd migratemanagement to import files created using the export_database tool.
Usage
mdscmd migratemanagement <DomainName> <-l path> <-n name>
Argument Description
DomainName Domain to which the new Domain Management Server belongs.
-n name New Domain Management Server into which the source database information is migrated.
-l path Path containing the conf directory migrated into the new Domain Management Server.
Example
Migrate a source database from an NGX R65 version Domain Management Server, named MyFirstDMS,
into the Domain Management Server BestDomain, defined for the Domain BestDomain: mdscmd migratemanagement BestDomain -l/opt/CPmds-R65/Domains/ MyFirstDMS/CPfw1-
R65 -n BestDomain
See also cma_migrate (on page 124).
Note - The old version of this command (mdscmd mirrrorcma) is still supported.
mdscmd mirrormanagement
Description
Use this command to mirror the Domain Management Server configuration from one Multi-Domain Server to another Multi-Domain Server. This command is used to create Domain Management Server High Availability. This command parses all Domains and checks which Domains have a single Domain Management Server defined. If a Domain has a Domain Management Server on the source Multi-Domain Server, a secondary Domain Management Server is created on the target Multi-Domain Server.
Syntax
mdscmd mirrormanagement -s source_mds -t target_mds [-m ServerName -u user -p
password]
Argument Description
-s source_mds Multi-Domain Server the mirroring is performed from.
-t target_mds Multi-Domain Server the mirroring is targeted toward.

Multi-Domain Security Management Commands and Utilities
Multi-Domain Security Management Administration Guide R77 | 138
Argument Description
-m ServerName Remote Multi-Domain Server host name or IPv4 address. You must use this argument when you work with a Domain Management Server on a remote Multi-Domain Server.
The remote Multi-Domain Server must be defined as a GUI client.
-u user and -p password Used as a pair, they must specify a valid Superuser administrator and password for remote login. In addition, the computer on which the command is executed must be a valid Multi-Domain Server GUI Client. Beware not to expose your administrator password during remote login.
Note - The old version of this command (mdscmd mirrorcma) is still supported.
mdsenv
Description This command prepares the shell environment variables for running Multi-Domain Server level command lines or specific Domain Management Server command lines. Without an argument, the
command sets the shell for Multi-Domain Server level commands (mdsstart, mdsstop, and so on).
Usage mdsenv [<Name>]
Argument Description
Name Domain Management Server name. If given, the command prepares the shell for the Domain Management Server command line.
mdsquerydb
Description The mdsquerydb command runs the Database Query Tool. The purpose of the Database
Query Tool is to allow advanced users to create UNIX shell scripts which can easily access information stored inside the Check Point Security Management Server databases. These include the Global Database (which are usually accessed from the Global SmartDashboard), Multi-Domain Server Database (usually accessed from the SmartDomain Manager) and the Domain Management Server databases (usually accessed from SmartDashboard).
Just as the mdscmd tool allows users to write UNIX shell scripts that add, remove or alter specified Multi-
Domain Security Management database objects, the Database Query Tool allows users to access the information related to these database objects. The command is used with specific arguments to perform various queries on Security Management Server databases.
Usage mdsquerydb key_name [-f output_file_name]
Argument Description
key_name Query key, which must be defined in the pre-defined queries configuration file.
-f output_file_nam Write query results to file with the specified file name, instead of to the standard output.
To retrieve list of all defined keys:
mdsquerydb
To send the list of Domains in the Multi-Domain Server database to the standard output:
mdsenv mdsquerydb Domains
To retrieve the list of network objects in the Global database and place the list in:
/tmp/gateways.txt: mdsenv mdsquerydb NetworkObjects –f /tmp/gateways.txt
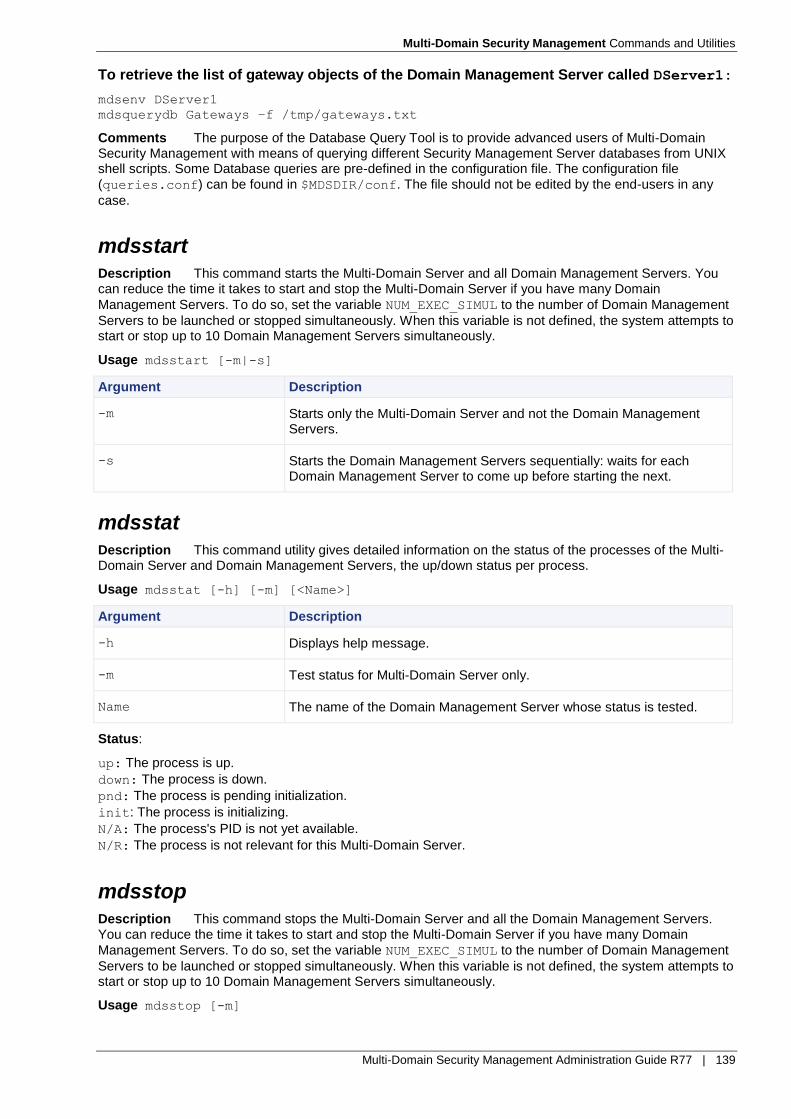
Multi-Domain Security Management Commands and Utilities
Multi-Domain Security Management Administration Guide R77 | 139
To retrieve the list of gateway objects of the Domain Management Server called DServer1:
mdsenv DServer1 mdsquerydb Gateways –f /tmp/gateways.txt
Comments The purpose of the Database Query Tool is to provide advanced users of Multi-Domain Security Management with means of querying different Security Management Server databases from UNIX shell scripts. Some Database queries are pre-defined in the configuration file. The configuration file
(queries.conf) can be found in $MDSDIR/conf. The file should not be edited by the end-users in any
case.
mdsstart
Description This command starts the Multi-Domain Server and all Domain Management Servers. You can reduce the time it takes to start and stop the Multi-Domain Server if you have many Domain
Management Servers. To do so, set the variable NUM_EXEC_SIMUL to the number of Domain Management
Servers to be launched or stopped simultaneously. When this variable is not defined, the system attempts to start or stop up to 10 Domain Management Servers simultaneously.
Usage mdsstart [-m|-s]
Argument Description
-m Starts only the Multi-Domain Server and not the Domain Management Servers.
-s Starts the Domain Management Servers sequentially: waits for each Domain Management Server to come up before starting the next.
mdsstat
Description This command utility gives detailed information on the status of the processes of the Multi-Domain Server and Domain Management Servers, the up/down status per process.
Usage mdsstat [-h] [-m] [<Name>]
Argument Description
-h Displays help message.
-m Test status for Multi-Domain Server only.
Name The name of the Domain Management Server whose status is tested.
Status:
up: The process is up.
down: The process is down.
pnd: The process is pending initialization.
init: The process is initializing.
N/A: The process's PID is not yet available.
N/R: The process is not relevant for this Multi-Domain Server.
mdsstop
Description This command stops the Multi-Domain Server and all the Domain Management Servers. You can reduce the time it takes to start and stop the Multi-Domain Server if you have many Domain
Management Servers. To do so, set the variable NUM_EXEC_SIMUL to the number of Domain Management
Servers to be launched or stopped simultaneously. When this variable is not defined, the system attempts to start or stop up to 10 Domain Management Servers simultaneously.
Usage mdsstop [-m]

Multi-Domain Security Management Commands and Utilities
Multi-Domain Security Management Administration Guide R77 | 140
Argument Description
-m Stop the Multi-Domain Server without stopping Domain Management Servers.
merge_plug-in_tables
Description The merge_plug-in_tables utility is included in the export_database utility. It
searches for all Domain Management Server or Version and Blade Updates and merges the plug-in tables with the Domain Management Server or Security Management tables.
In Linux and, the merge_plug-in_tables tool runs automatically when you run the export_database tool
and its output becomes part of the Domain Management Server database .tgz file.
If you have a Security Management running on FreeBSD, IPSO 6.x, or Windows, use merge_plug-
in_tables to consolidate plug-in data before migrating.
Before using the merge_plug-in_tables utility, you must:
1. Copy the export tool .tgz file for your operating system to the source Domain Management Server or
Security Management machine. The export tool files can be found on your installation DVD.
2. Extract the export tool .tgz file to some path in the source machine.
A directory called export_tools is extracted.
3. Run the merge_plug-in_tables command from the export_tools directory.
Usage merge_plug-in_tables <-p conf_dir> [-s] [-h]
where <-p conf_dir> is the path of $FWDIR directory of the Domain Management
Server/Security Management Server, -s performs the utility in silent mode (default is interactive mode), and -h displays usage.
Example To merge the plug-in tables of a Domain Management Server, DSERVER1, run: mdsenv DServer1 merge_plug-in_tables -p "$FWDIR"
migrate_global_policies
Description This utility transfers (and upgrades, if necessary) the global policies database from one Multi-Domain Server to the global policies database of another Multi-Domain Server.
migrate_global_policies replaces all existing Global Policies and Global Objects. Each of the existing
Global Policies is saved with a *.pre_migrate extension.
If you only migrate the global policies (without the Domain Management Servers) to a new Multi-Domain Server, you should disable any Security Gateways that are enabled for global use.
You can migrate global policies from these Multi-Domain Security Management versions:
R71.30 and later minor releases
R75.x
R76.x
R77.x
You can use migrate_global_policies to import files created using the export_database tool.
Usage migrate_global_policies <path>
Argument Description
path The fully qualified path to the directory where the global policies files, originally exported from the source Multi-Domain Server
($MDSDIR/conf), are located.
Example migrate_global_policies /tmp/exported_global_db.22Jul2007-
124547.tgz

Multi-Domain Security Management Commands and Utilities
Multi-Domain Security Management Administration Guide R77 | 141
Configuration Procedures
Description There is one primary command to configure the thresholds in the command line,
threshold_config. You must be in expert mode to run it. After you run threshold_config, follow the
on-screen instructions to make selections and configure the global settings and each threshold.
Usage threshold_config
When you run threshold_config, you get these options:
Show policy name - Shows you the name configured for the threshold policy.
Set policy name - Lets you set a name for the threshold policy.
Save policy- Lets you save the policy.
Save policy to file - Lets you export the policy to a file.
Load policy from file - Lets you import a threshold policy from a file.
Configure global alert settings - Lets you configure global settings for how frequently alerts are sent and how many alerts are sent.
Configure alert destinations - Lets you configure a location or locations where the SNMP alerts are sent.
View thresholds overview - Shows a list of all thresholds that you can set including: The category of the threshold, if it is active or disabled, the threshold point (if relevant), and a short description of what it monitors.
Configure thresholds - Open the list of threshold categories to let you select thresholds to configure.

Multi-Domain Security Management Administration Guide R77 | 142
Chapter 13
Running CLI Commands in Automation Scripts
In This Section: Introduction to Automation Scripts ........................................................................ 142
Working with dbedit ............................................................................................... 143
Using XML to Export Settings for a Domain Management Server ....................... 151
Introduction to Automation Scripts Use these CLI commands and tools to create automation scripts:
dbedit - Creates and configures objects and rules in the database for the Security Policy.
fwm load - Installs the specified Security Policy on Security Gateways. The Security Policy is validated,
and only valid Policies are installed.
send_command - Runs functions which are not included with standard Check Point CLI commands and
tools.
We recommend that you use a separate SmartConsole administrator account for automation scripts. This additional account lets you easily monitor automatic changes and ones made by system administrators.
Creating a Domain Management Server
Create a new Domain Management Server on the Multi-Domain Server. Make sure that you have this data before you start:
Name or Identifier of the domain, for example Cust_ID
Name or Identifier of the new Domain Management Server, for example Cust_CMA
IP address for the new Domain Management Server, for example 192.0.2.61
IP Address for the Multi-Domain Server, for example 192.0.2.50
The Multi-Domain Server username and password for a superuser that has permission to create the
new Domain Management Server. For example fwadmin and vpn123
To create a new Domain Management Server:
1. Open a terminal emulation program (such as PuTTY).
2. Open an SSH connection to the Multi-Domain Server.
3. Log in with the superuser credentials.
4. Enter expert mode.
5. Run these commands.
[Expert@mds]# mdscmd addcustomer Cust_ID -n
[Expert@mds]# mdscmd addcma Cust_ID -n Cust_CMA -i 192.0.2.61 -t 192.0.2.50 -m
192.0.2.50 -u admin -p vpn123
[Expert@mds]# mdscmd startcma Cust_ID -n Cust_CMA -m 192.0.2.50 -u fwadmin -p
vpn123
The Domain Management Server is created. Log in to 192.0.2.61 to configure the settings.

Running CLI Commands in Automation Scripts
Multi-Domain Security Management Administration Guide R77 | 143
Working with dbedit
Introduction to dbedit
dbedit is a CLI utility that lets you make changes to objects in the Check Point databases. Run dbedit
in these modes:
Interactive - For a few changes to the database
Batch - Import many changes at one time
We recommend that you use batch mode (dbedit -f) for automation scripts. You can write the script on
the Security Management Server or Multi-Domain Server with standard Linux commands, or import a text file with the script.
Launching the dbedit Utility
When the dbedit prompt is showing, you can run dbedit commands or scripts. Before you use the
dbedit utility, make sure that you can log in to Expert mode on the Security Management Server or Multi-
Domain Server.
To launch the dbedit utility:
1. Log in to the CLI of the Security Management Server or Multi-Domain Server.
2. Enter Expert mode, run expert
The Expert prompt is shown.
3. Run dbedit
4. Enter the name of the Security Management Server or Multi-Domain Server:
For localhost, press Enter
For a remote connection, enter the hostname or IP address
The dbedit prompt is shown.
Please enter a command, -h for help or -q to quit:
dbedit>
Using dbedit Commands in a Script
Use these dbedit commands to create and configure objects and rules:
create - Creates the object
modify - Changes the applicable object
update - Commits the most recent change to the Security Management Server database
update_all - Commits all the changes to the Security Management Server database
This table shows sample commands and the results.
Example Result
create network net-internal Creates the object for the network net-internal
modify network_objects gateway-
10 ipaddr 192.0.2.100 Changes the IP address of the gateway-10 object to 192.0.2.100
update network_objects net-
internal Saves the changes for the net-internal objects and
updates the Security Management Server database
Locking the Database
We recommend that you use the -globallock option when you use dbedit to make changes to the
Security Management Server database. dbedit partially locks the database, if a user configures objects
Running CLI Commands in Automation Scripts
Multi-Domain Security Management Administration Guide R77 | 144
with SmartDashboard, there can be problems in the database. The -globallock option does not let
SmartDashboard or a dbedit user make changes to the database.
When the -globallock option is enabled, dbedit commands run on a copy of the database. After you
change the database and run the savedb command, it is saved and committed on the actual database.
You can use the savedb command multiple times in a dbedit script.
At the end of a script, it is good practice to run these commands:
update_all
savedb
Showing Parameters for a Sample Object
You can create sample objects in SmartDashboard that have the parameters that you are using in a script or
dbedit command. Export these objects to help make sure that you are using the correct names for the
parameters. You can show the parameters in plain or XML format.
To show the parameters for a sample SmartDashboard object:
1. In SmartDashboard, create the object that uses the necessary parameters and settings.
2. From the dbedit prompt ("Launching the dbedit Utility" on page 143), run one of these commands:
print network_objects <object name>
printxml network_objects <object name>
Using Automation Scripts
You can use dbedit to configure the initial settings for a Security Gateway and the Security Policy, then
update and change the settings when necessary.
Note - Make sure that the script in the text files does not contain blank lines. Otherwise the script will stop with an error.
Initial Configuration
1. Create a text file with an automation script ("Create or Modify Policy Objects (Hosts, Networks)" on page 145). The script can create and configure the necessary objects and rules for the Security Policy.
2. Make a database revision of the management. Use this revision if there is a problem with the script and to identify unauthorized changes to the database.
3. Run fwm load and install the policy on one or more Security Gateways ("Pushing the Security Policy to
Security Gateways" on page 151).
Updating and Changing the Policy
1. Make sure that the automation administrator changed the database most recently.
a) Run send_command -s <domain_server> –u <admin> –p <password> –o db_change_since_last_save
The Last modifier field shows the administrator name.
b) If a different administrator changed the database, do not continue to use the automation script. A system administrator must do an analysis of the database.
2. Edit the automation script, create and configure objects and rules for the Security Policy ("Changing a Rule Base" on page 148).
3. Run fwm load and install the policy on one or more Security Gateways ("Installing Policy with a Multi-
Domain Server" on page 151).
To update and change the commands for a Domain Management Server:
This sample script installs the Standard policy from Domain Management Server Cust_CMA on the
Security Gateway examplegw.

Running CLI Commands in Automation Scripts
Multi-Domain Security Management Administration Guide R77 | 145
mdsenv Cust_CMA
send_command –s Cust_CMA –u admin –p adminpw –o db_change_since_last_save
dbedit –globallock -s Cust_CMA -u admin -p adminpw -f
dbedit_modifypolicy_objects.txt
fwm load Standard examplegw
Create or Modify Policy Objects (Hosts, Networks)
This section shows sample scripts that create one or more new network or service objects. You can combine one or more of these samples into one script file.
We recommend that you add the update_all command to the end of the script file.
Networks
You can use a script to manage database objects that include:
Networks
Hosts
Address Ranges
These are sample scripts that show how to create and configure the database objects.
Creating a Network
Create an object for the database that represents a network. This sample script creates the network net-
internal with the IP address 190.0.2.0.
# Create the object (of type network)
create network net-internal
# Configure the network IP address
modify network_objects net-internal ipaddr 192.0.2.0
# Configure the netmask (in dotted decimal notation) of the network
modify network_objects net-internal netmask 255.255.255.0
# Add a comment to describe what the object is for (optional)
modify network_objects net-internal comments "Created by fwadmin with dbedit"
Configuring Automatic NAT
If your network uses NAT (Network Address Translation), you can use dbedit to configure an Automatic
NAT rule. Add these lines to a script only for a network that uses Automatic NAT rules.
This sample script creates an Automatic NAT rule for the net-internal network that starts with the IP
address 190.0.2.100.
# The next four modify lines are optional and are only needed if you want
# to do an automatic NAT rule for this object.
modify network_objects net-internal add_adtr_rule true
modify network_objects net-internal NAT NAT
# Set the NAT type, adtr_static or adtr_hide
modify network_objects net-internal NAT:netobj_adtr_method adtr_hide
# Set the "valid" IP address for this object.
# For a static NAT on a network, the assumption is there is a 1-to-1 ratio
# between untranslated and translated addresses and the valid range is
# contiguous. This setting is the first IP address in this range.
modify network_objects net-internal NAT:valid_ipaddr 192.0.2.100
Creating a Host
This sample script creates the host host-10 with the IP address 192.0.2.10.

Running CLI Commands in Automation Scripts
Multi-Domain Security Management Administration Guide R77 | 146
# Create the actual object (of type host_plain)
create host_plain host-10
# Modify the host IP address
modify network_objects host-10 ipaddr 192.0.2.10
# Add a comment to describe what the object is for (optional)
modify network_objects host-10 comments "Created by fwadmin with dbedit"
You can also add the lines to this script to configure Automatic NAT for the host ("Configuring Automatic
NAT" on page 145). The modify commands for this sample rule starts with: modify network_objects host-10
Creating an Address Range
This sample script creates the address range object addr-range with the IP addresses 192.0.2.150 to
190.0.2.200.
# Create the actual object (of type address_range)
create address_range addr-range
# Modify the first IP address in the range
modify network_objects addr-range ipaddr_first 192.0.2.150
# Modify the last IP address in the range
modify network_objects addr-range ipaddr_last 192.0.2.200
# Add a comment to describe what the object is for (optional)
modify network_objects addr-range comments "Created by fwadmin with dbedit"
You can also add the lines to this script to configure Automatic NAT for the address range object
("Configuring Automatic NAT" on page 145). The modify commands for this sample rule starts with: modify network_objects addr-range
Renaming and Deleting Objects
You can change the name of an object or delete it from the database. When you change the name of an object the Security Policy is also updated with the new name.
# Rename the network object addr-range to IPv4-range
rename network_objects addr-range IPv4-range
When you delete an object, the references to it are also deleted from the Rule Base. The delete
command fails if there is a different object that is dependent on it.
# Delete the network object addr-range
delete network_objects addr-range
Network Groups
You can create and use a group object as a container for network and host objects.
Creating a Network Group
Create a network group that uses networks and hosts. Make sure that these objects are in the management database before you create a network group.
This sample script creates the object host-group for the hosts host-100 and host-101.
# Create a group object
create network_object_group host-group
# Add the individual elements to the group
addelement network_objects host-group '' network_objects:host-100
addelement network_objects host-group '' network_objects:host-101
Configuring and Deleting a Network Group
You can remove a network or host from a network group. This sample script removes host-100 from
host-group.

Running CLI Commands in Automation Scripts
Multi-Domain Security Management Administration Guide R77 | 147
# Remove individual elements from the group
rmelement network_objects host-group '' network_objects:host-100
You can rename or remove a network group almost the same as objects ("Renaming and Deleting Objects" on page 146).
# Rename the network object host-group to host-ipaddrs
Rename network_objects host-group host-ipaddrs
# Delete the network object host-ipaddrs
delete network_objects host-ipaddrs
Services
Services are objects that are used for network protocols.
Creating a Service
This sample script creates these services:
tcp_8081 - TCP protocol port 8081
udp_8082 - UDP protocol port 8082
inspect_svc - Inspect SVC protocol 6 and with an optional feature that uses the INSPECT expression
# Create a TCP service
create tcp_service tcp_8081
# Set port 8081 for TCP service
modify services tcp_8081 port 8081
# Create a UDP service
create udp_service udp_8082
# Set port 8082 for UDP service
modify services udp_8082 port 8082
# Create a service of type "other." This can be used for random IP protocols
# as well as services that require more complex INSPECT code for matching.
#
# Create the service of type other
create other_service inspect_svc
# Modify the IP Protocol that matches the service
modify services inspect_svc protocol 6
# (Optional) Modify the INSPECT expression that matches this service.
modify services inspect_svc exp "dport=123”
Renaming and Deleting a Service
You can rename or remove a service almost the same as objects ("Renaming and Deleting Objects" on page 146).
# Rename inspect_svc to inspect_tcp123
rename services inspect_svc inspect_tcp123
# Delete the network object inspect_tcp123
delete services inspect_tcp123
Service Groups
You can create and use a group object as a container for service objects.
Creating a Service Group
Create a service group for more than one service. Make sure that the service objects are in the management database before you create a service group.
This sample script creates the object mysvc-group for the services SSH and HTTPS.
# Create a group object
create service_group mysvc-group
# Add the individual elements to the group
addelement services mysvc-group '' services:ssh
addelement services mysvc-group '' services:https

Running CLI Commands in Automation Scripts
Multi-Domain Security Management Administration Guide R77 | 148
Configuring and Deleting a Service Group
You can remove a network or host from a network group. This sample script removes the SSH service from
mysvc-group.
# Remove individual elements from the group
rmelement services mysvc-group '' services:ssh
You can rename or remove a network group almost the same as objects ("Renaming and Deleting Objects" on page 146).
# Rename the service group mysvc-group to myservices
rename services mysvc-group myservices
# Delete the network object my services
delete services myservices
Object Naming Restrictions
These are some of the restrictions for object names:
Objects names can contain only ASCII letters, numbers, and dashes. Other characters such as a plus sign, asterisk, parenthesis, square brackets, and so on, are not supported.
Object names can have a maximum of 100 characters.
You cannot use reserved words for objects names and they include words that are policy elements. For example, names of colors, common networks terms (ipv6, nets, routers, servers, and so on).
To see a full list of the naming restrictions, go to sk40179 (http://supportcontent.checkpoint.com/solutions?id=sk40179).
Changing a Rule Base
This section shows sample scripts that change the Policy on a Domain Management Server named
Standard. We recommend that you write the scripts in a text file and then you import the file to dbedit.
Adding a Rule - End of Rule Base
When you use dbedit to add a rule, it is automatically added to the end of the Rule Base. Then run commands that configure the different fields of the new rule.
Note - Rules in SmartDashboard start with rule number 1. Rules in dbedit start with rule number 0.
This sample script adds this rule to the end of the Rule Base:
Source Destination Service Action
Any Any Any Accept

Running CLI Commands in Automation Scripts
Multi-Domain Security Management Administration Guide R77 | 149
#
# Add any any accept rule
#
addelement fw_policies ##Standard rule security_rule
modify fw_policies ##Standard rule:0:comments "Any any accept"
modify fw_policies ##Standard rule:0:disabled false
rmbyindex fw_policies ##Standard rule:0:track 0
addelement fw_policies ##Standard rule:0:track tracks:None
addelement fw_policies ##Standard rule:0:time globals:Any
addelement fw_policies ##Standard rule:0:install:'' globals:Any
rmbyindex fw_policies ##Standard rule:0:action 0
addelement fw_policies ##Standard rule:0:action accept_action:accept
addelement fw_policies ##Standard rule:0:src:'' globals:Any
modify fw_policies ##Standard rule:0:src:op ''
addelement fw_policies ##Standard rule:0:dst:'' globals:Any
modify fw_policies ##Standard rule:0:dst:op ''
addelement fw_policies ##Standard rule:0:services:'' globals:Any
modify fw_policies ##Standard rule:0:services:op ''
Changing a Rule
This sample script changes this rule:
Source Destination Service Action
Original rule 4 Any Any Any Accept
New rule 4 Any DMZ SSH Accept
#
# Modify Rule 4
# Previous rule was any any any accept, it will now be any dmz ssh accept
#
modify fw_policies ##Standard rule:3:comments "Allow SSH to firewall with
logging"
modify fw_policies ##Standard rule:3:disabled false
rmbyindex fw_policies ##Standard rule:3:track 0
addelement fw_policies ##Standard rule:3:track tracks:Log
rmbyindex fw_policies ##Standard rule:3:action 0
addelement fw_policies ##Standard rule:3:action accept_action:accept
rmelement fw_policies ##Standard rule:3:src:'' globals:Any
addelement fw_policies ##Standard rule:3:src:'' globals:Any
modify fw_policies ##Standard rule:3:src:op ''
rmelement fw_policies ##Standard rule:3:dst:'' globals:Any
addelement fw_policies ##Standard rule:3:dst:'' network_objects:DMZ
modify fw_policies ##Standard rule:3:dst:op ''
rmelement fw_policies ##Standard rule:3:services:'' globals:Any
addelement fw_policies ##Standard rule:3:services:'' services:ssh
modify fw_policies ##Standard rule:3:services:op ''
Adding a Rule - Middle of Rule Base
When it is necessary to add a rule to the middle of a Rule Base, you cannot use dbedit to simply insert a
rule.
1. Delete all the rules that are after the new rule you are adding.
2. Create one or more new rules.
3. Add again the rules that you deleted in step 1.
This sample script adds a new rule number 2 in a Rule Base that has three rules.
Note - Rules in SmartDashboard start with rule number 1. Rules in dbedit start with rule number 0.

Running CLI Commands in Automation Scripts
Multi-Domain Security Management Administration Guide R77 | 150
#
# Delete rule 2 and 3 (delete in reverse order)
#
rmbyindex fw_policies ##Standard rule 2
rmbyindex fw_policies ##Standard rule 1
#
# Add new rule 2
#
addelement fw_policies ##Standard rule security_rule
modify fw_policies ##Standard rule:1:comments "Firewall stealth rule"
modify fw_policies ##Standard rule:1:disabled false
rmbyindex fw_policies ##Standard rule:1:track 0
addelement fw_policies ##Standard rule:1:track tracks:Log
addelement fw_policies ##Standard rule:1:time globals:Any
addelement fw_policies ##Standard rule:1:install:'' globals:Any
rmbyindex fw_policies ##Standard rule:1:action 0
addelement fw_policies ##Standard rule:1:action drop_action:drop
addelement fw_policies ##Standard rule:1:src:'' network_objects:net-internal
modify fw_policies ##Standard rule:1:src:op 'not in'
addelement fw_policies ##Standard rule:1:dst:'' globals:Any
modify fw_policies ##Standard rule:1:dst:op ''
addelement fw_policies ##Standard rule:1:services:'' globals:Any
modify fw_policies ##Standard rule:1:services:op ''
#
# Add New Rule 3 (Old Rule 2)
#
addelement fw_policies ##Standard rule security_rule
modify fw_policies ##Standard rule:2:comments "Allow selected hosts outbound"
modify fw_policies ##Standard rule:2:disabled false
rmbyindex fw_policies ##Standard rule:2:track 0
addelement fw_policies ##Standard rule:2:track tracks:Log
addelement fw_policies ##Standard rule:2:time globals:Any
addelement fw_policies ##Standard rule:2:install:'' globals:Any
rmbyindex fw_policies ##Standard rule:2:action 0
addelement fw_policies ##Standard rule:2:action accept_action:accept
addelement fw_policies ##Standard rule:2:src:'' network_objects:flamer-100
addelement fw_policies ##Standard rule:2:src:'' network_objects:flamer-101
modify fw_policies ##Standard rule:2:src:op ''
addelement fw_policies ##Standard rule:2:dst:'' network_objects:net-internal
modify fw_policies ##Standard rule:2:dst:op 'not in'
addelement fw_policies ##Standard rule:2:services:'' globals:Any
modify fw_policies ##Standard rule:2:services:op ''
#
# Add New Rule 4 (Old Rule 3)
#
addelement fw_policies ##MyPolicy rule security_rule
modify fw_policies ##MyPolicy rule:3:comments "Drop all"
modify fw_policies ##MyPolicy rule:3:disabled false
rmbyindex fw_policies ##MyPolicy rule:3:track 0
addelement fw_policies ##MyPolicy rule:3:track tracks:Log
addelement fw_policies ##MyPolicy rule:3:time globals:Any
addelement fw_policies ##MyPolicy rule:3:install:'' globals:Any
rmbyindex fw_policies ##MyPolicy rule:3:action 0
addelement fw_policies ##MyPolicy rule:3:action drop_action:drop
addelement fw_policies ##MyPolicy rule:3:src:'' globals:Any
modify fw_policies ##MyPolicy rule:3:src:op ''
addelement fw_policies ##MyPolicy rule:3:dst:'' globals:Any
modify fw_policies ##MyPolicy rule:3:dst:op ''
addelement fw_policies ##MyPolicy rule:3:services:'' globals:Any
modify fw_policies ##MyPolicy rule:3:services:op ''
Running CLI Commands in Automation Scripts
Multi-Domain Security Management Administration Guide R77 | 151
Pushing the Security Policy to Security Gateways
After you change or update the Security policy, you can use fwm load command to push the configuration
to the Security Gateways. This command validates the policy and makes sure that rules agree with each other.
In this example, the fwm load command successfully pushes the policy (Standard) to the Security
Gateway (samplegw).
[Expert@mds]# fwm load Standard samplegw
Installing policy on R77 compatible targets:
Standard.W: Security Policy Script generated into CustomerPolicy.pf
Standard:
Compiled OK.
Installing Security Gateway policy on: examplegw ...
Security Gateway policy installed successfully on examplegw...
Security Gateway policy installation complete
Security Gateway policy installation succeeded for:
examplegw
If the policy did not install successfully, the output of the fwm load command shows an error message. The
Security Gateway continues to enforce the policy that was installed before you ran the script.
Installing Policy with a Multi-Domain Server
To install the policy for a Domain Management Server, run the necessary Multi-Domain Server CLI commands. You can run them individually or as part of a script.
This sample script installs the Standard policy from Domain Management Server Cust_CMA on the
Security Gateway examplegw.
[Expert@mds]# mdsenv Cust_CMA
[Expert@mds]# dbedit –globallock -s Cust_CMA -u admin -p adminpw -f
dbedit_createpolicy_objects.txt
[Expert@mds]# fwm load Standard examplegw
Error Codes in dbedit
If there is a syntax error in the dbedit script, this error is shown:
“syntax error in line 1 Aborting.”
The script stops running at the error.
When a script uses tables or objects that are not in the database, dbedit stops the script and shows
this message:
“Object Not Found”
“Error in line: 2”
You can use the parameter ignore_script_failure to continue running the script and ignore errors
You can use the parameter continue_updating to ignore errors and run the update_all command
at the end of the script
Using XML to Export Settings for a Domain Management Server
You can export the settings for a Domain Management Server to an XML file that you can use with external
automation systems. You can include the printxml commands in a script or run them individually from the
CLI.
This sample script exports these settings to XML:
Security policy Rule Base
Network objects

Running CLI Commands in Automation Scripts
Multi-Domain Security Management Administration Guide R77 | 152
Services printxml fw_policies ##Standard
printxml network_objects
printxml services

Index .
...When Connecting to a Specific Domain Management Server • 27
...When Connecting to all Domain Management Servers Created on This System in the Future • 27
...When Connecting to this Multi-Domain Server or Multi-Domain Log Server • 27
A
Access Control at the Network Boundary • 75 Access Control in Global VPN • 75 Active Domain Management Server • 9 Active Multi-Domain Server • 9 Active versus Standby • 84 Add a Secondary Domain Management Server
• 89 Add or Change Administrator Window Warning
• 42 Adding a Rule - End of Rule Base • 148 Adding a Rule - Middle of Rule Base • 149 Adding a Secondary Domain Management
Server • 85 Adding another Multi-Domain Server • 87 Adding Licenses from the Configure Domain
Management Server Window • 35 Administrator • 9 Administrator - General Properties • 36 Administrator Management • 36 Applying Global Rules to Security Gateways by
Function • 50 Architecture and Processes • 110 Assign Global Policy Tab • 65 Assign GUI Clients • 63 Assign to Many Domains
How to Assign/Install from a Global Policy Object • 57
Assign to One Domain Assign/Install from a Domain Object • 57
Assigning a Different Global Policy • 56 Assigning a Global Policy • 62 Assigning Administrators • 62, 66 Assigning Administrators to a Domain • 66 Assigning Domains to an Administrator • 66 Assigning Global Policies to VPN Communities
• 54 Assigning Global Policy • 54 Assigning IPS Profiles to Security Gateways •
53 Assigning or Installing a Global Policy • 57 Assigning Permission Profiles • 67 Assigning Policy for the First Time • 56 Assigning the First Global Policy • 54 Audit Logging • 124 Authentication Between Security Gateways • 73 Automatic Domain Management Server
Synchronization • 89 Automatic Log Export to Oracle Database • 94
Automatic Security Gateway Policy Installation • 54
Automatic Start of Multi-Domain Server Processes • 112
Automatic Synchronization for Global Policies Databases • 89
B
Basic Architecture • 11 Blocking Suspicious Connections • 108
C
Changing a Domain Management Server • 71 Changing a Rule • 149 Changing a Rule Base • 148 Changing a Standby Multi-Domain Server to an
Active Multi-Domain Server • 88 Changing an Existing Multi-Domain Server or
Multi-Domain Log Server • 32 Changing or Deleting a Group • 39 Changing the Global Name Template • 74 Changing the Status Collection Cycle • 115 Check Point Registry • 111 Check Point System Counters • 108 Checking a Domain Management Server Policy
• 106 Checking a Security Gateway Current Policy •
106 Choosing Fields to Export • 95 Choosing Log Export Fields • 100 Clock Synchronization • 19 cma_migrate • 124 Collection of Changes in Objects • 115 Command Line Reference • 124 Configuration • 57, 87 Configuration Procedures • 141 Configuring a Multi-Domain Server to Enable
Log Export • 99 Configuring and Deleting a Network Group •
146 Configuring and Deleting a Service Group • 148 Configuring Authentication • 38 Configuring Automatic NAT • 145 Configuring Certificates • 38 Configuring Customized Permissions • 43 Configuring Default Expiration Settings • 42 Configuring Domain Selection Groups • 65 Configuring Existing Domains • 65 Configuring External Authentication • 26 Configuring General Properties • 62 Configuring Global VPN Communities • 76 Configuring Log Export Profiles • 100 Configuring Permissions • 43 Configuring Secondary Multi-Domain Server or
a Multi-Domain Log Server • 31 Configuring Synchronization • 82 Configuring the Expiration Date • 37 Configuring the Primary Multi-Domain Server •
28 Connecting to a Secondary Multi-Domain
Server • 90 Connection Between Multi-Domain Servers •
115 Connectivity Between Different Processes • 114 Considerations • 76

Page 154
Considerations for Global Policy Assignment • 55
Copying Search Results • 119 CPMI Protocol • 27 cpmiquerybin • 125 Create or Modify Policy Objects (Hosts,
Networks) • 145 Creating a Backup Security Management
Server • 86 Creating a Domain - CLI • 64 Creating a Domain - Wizard • 61 Creating a Domain Management Server • 142 Creating a Domain Management Server - CLI •
70 Creating a Domain Management Server -
Wizard • 69 Creating a Global Policy Using Global
SmartDashboard • 50 Creating a Host • 145 Creating a Mirror of an Existing Multi-Domain
Server • 87 Creating a Network • 145 Creating a Network Group • 146 Creating a New Group • 39 Creating a New IPS Profile • 52 Creating a Service • 147 Creating a Service Group • 147 Creating an Address Range • 146 Creating Domain Management Servers • 64 Creating or Changing an Administrator Account
• 36 Cross Domain Logging • 95 Cross-Domain Management Server Search •
118
D
dbedit • 126 Defining a Domain Log Server Using the CLI •
97 Defining a Domain Log Server Using the
SmartDomain Manager • 96 Defining Administrator Groups - Flow • 39 Defining Administrator Properties • 39 Defining Domain Properties • 65 Defining General Properties • 65 Defining GUI Clients • 67 Deleting a Domain • 68 Deleting a Domain Log Server • 98 Deleting a Domain Management Server • 71 Deleting a Multi-Domain Server • 32 Deleting an Administrator • 39 Demo Mode • 30 Deploying Multi-Domain Security Management •
21 Deployment Overview • 21 Deployment Planning • 18 Disabling IPv6 Support • 29 Domain • 9 Domain Log Server • 15 Domain Management • 61 Domain Management Server and SmartDomain
Manager • 22 Domain Management Server Backup Using a
Security Management Server • 85
Domain Management Server Database • 114 Domain Management Server Database
Synchronization • 81 Domain Management Server Databases • 80 Domain Management Server High Availability •
83 Domain Management Server Level Processes •
113 Domain Management Server Licenses • 33 Domain Management Servers • 13 Domain Policies • 106 Domain Properties • 62 Dynamic Objects and Dynamic Global Objects •
49
E
Editing an IPS Profile • 52 Enabling a Domain Gateway to Join a Global
VPN Community • 76 Enabling IPv6 Support • 28 Enabling OPSEC • 20 Entering Administrator Properties • 38 Environment Variables • 112 Error Codes in dbedit • 151 Example • 120 Export Profiles • 95 Exporting Logs • 94 Exporting the List Pane's Information to an
External File • 103
F
Failure Recovery • 90 File Constraints for P1Shell Commands • 121 Filtering • 103 Finishing the Promotion • 92 First Multi-Domain Server Synchronization • 88 Footnote • 83 Full Synchronization Between Multi-Domain
Servers • 82
G
Gateway • 9 General Multi-Domain Security Management
Commands • 121 Global IPS • 51 Global Names Format • 60 Global Object Transfer Method • 56 Global or Neighbor VPN Security Gateway • 74 Global Policies • 15, 106 Global Policies and the Global Rule Base • 48 Global Policies Database Synchronization • 81 Global Policy Database • 114 Global Policy History File • 57 Global Policy Management • 47 Global Services • 49 Global SmartDashboard • 49 Global VPN Communities • 74, 107 GUI Clients • 107
H
High Availability • 17, 18, 78, 106 High Availability Scenarios • 116 How Synchronization Works • 81

Page 155
I
ICA Database for Multi-Domain Servers • 80 Important Information • 3 Installing Policy with a Multi-Domain Server •
151 Introduction • 55 Introduction to Automation Scripts • 142 Introduction to dbedit • 143 Introduction to Global IPS • 51 Introduction to Global SmartDashboard • 49 Introduction to the Management Model • 15 Introduction to the Trust Model • 24 IP Allocation & Routing • 20 IPS in Global SmartDashboard • 51 IPS Profiles • 52 Issues Relating to Different Platforms • 116
J
Joining a Security Gateway to a Global VPN Community • 75
K
Key Features • 10
L
Large Scale Management Processes • 116 Launching the dbedit Utility • 143 Launching the SmartDomain Manager • 30 License Types • 33 License Violations • 34 Licensing • 33 Licensing Overview • 33 Locating Components with Problems • 105 Locking the Database • 143 Log Export to Text • 94 Log Export Troubleshooting • 100 Log Files • 95 Log Forwarding • 95 Log In Warning • 40 Log Server Licenses • 34 Log Servers • 14 Log Tracking • 107 Logging & Tracking • 19 Logging Cache Size • 112 Logging Configuration • 95 Logging Domain Activity • 93 Logging in Multi-Domain Security Management
• 93
M
Making Connections Between Different Components of the System • 24
Management Tools • 16 Managing Administrator Account Expiration • 40 Managing Global IPS Sensors • 54 Managing IPS from a Domain Management
Server • 53 Managing IPS Profiles • 52 Managing Licenses • 34 Managing Licenses Using SmartUpdate • 34 Managing Permission Profiles • 44 Manual Log Export to Oracle Database • 94 mcd bin | scripts | conf • 127
mds_backup • 127 mds_restore • 128 mds_user_expdate • 128 mdscmd • 128 mdscmd adddomain • 129 mdscmd addlogserver • 130 mdscmd addmanagement • 130 mdscmd assignadmin • 131 mdscmd assignguiclient • 132 mdscmd deletedomain • 132 mdscmd deletelogserver • 133 mdscmd disableglobaluse • 134 mdscmd enableglobaluse • 133 mdscmd migratemanagement • 137 mdscmd mirrormanagement • 137 mdscmd removeadmin • 134 mdscmd removeguiclient • 135 mdscmd startmanagement • 135 mdscmd stopmanagement • 136 mdsenv • 138 mdsquerydb • 138 mdsstart • 139 mdsstat • 139 mdsstop • 139 merge_plug-in_tables • 140 Merging Identical Permissions Profiles • 45 migrate_global_policies • 140 Migration Between Platforms • 116 Mirroring Domain Management Servers with
mdscmd • 89 Monitoring • 102 Monitoring Components in the Multi-Domain
Security Management System • 103 Monitoring Issues for Different Components and
Features • 105 Monitoring the Status of a Domain Management
Server • 108 Multi Domain Log Server • 9 Multi-Domain Log Server • 15 Multi-Domain Log Server Configuration -
Additional Step • 31 Multi-Domain Security Management • 9 Multi-Domain Security Management Commands
and Utilities • 118 Multi-Domain Security Management
Components Installed at the NOC • 18 Multi-Domain Security Management Overview •
10 Multi-Domain Security Management Shell
Commands • 121 Multi-Domain Security Management System
Database • 80 Multi-Domain Server • 9, 105 Multi-Domain Server Clock Synchronization • 80 Multi-Domain Server Communication with
Domain Management Servers • 25 Multi-Domain Server Configuration Databases •
113 Multi-Domain Server Connection to Domain
Management Servers • 114 Multi-Domain Server Database • 114 Multi-Domain Server Database Synchronization
• 81 Multi-Domain Server Directories on /opt and
/var File Systems • 110
Page 156
Multi-Domain Server File System • 110 Multi-Domain Server High Availability • 78 Multi-Domain Server ICA Database
Synchronization • 81 Multi-Domain Server Level Processes • 113 Multi-Domain Server Licenses • 33 Multi-Domain Server Status • 79 Multi-Domain Server Synchronization • 19 Multiple Interfaces on a Multi-Domain Server •
20 Multiple Multi-Domain Server Deployments • 30,
78
N
Native P1Shell Commands • 123 Network Groups • 146 Networks • 145
O
Object Naming Restrictions • 148 Overview • 73, 78, 102, 118, 120
P
P1Shell • 120 Packages in Multi-Domain Server Installation •
110 Parameters/Thresholds for Different Multi-
Domain Server functions • 112 Performing a Search in CLI • 119 Permissions Profile • 9 Platform & Performance Issues • 19 Primary Multi-Domain Server • 9 Processes • 112 Promoting the Secondary Multi-Domain Server
to Primary • 90 Protecting Multi-Domain Security Management
Networks • 19 Protecting the Multi-Domain Security
Management Environment • 22 Pushing the Security Policy to Security
Gateways • 151
R
Real-Time Network Monitoring with SmartView Monitor • 108
Re-assigning Global Policies • 54 Re-assigning Global Policies to Many Different
Domains • 55 Re-assigning Global Policy to one Domain • 55 Reassigning/Installing a Global Policy on
Domains • 58 Reassigning/Installing a Global Policy to a
Specified Domain • 58 Reassigning/Installing a Global Policy to Many
Different Domains • 58 Re-authenticating when using SmartConsole
Clients • 26 Recovery with a Functional Multi-Domain
Server • 90 Reinstalling a Domain Policy on Domain
Gateways • 58 Remove a Global Policy from a Single Domain •
59
Remove a Global Policy from Multiple Domains • 59
Removing Global IPS from a Domain Management Server • 53
Renaming and Deleting a Service • 147 Renaming and Deleting Objects • 146 Reporting Server Processes • 116 Restarting Multi-Domain Server
Synchronization • 88 Restoring Domain Management Servers • 91 Routing Issues in a Distributed Environment •
19 Running CLI Commands in Automation Scripts •
142
S
Searching • 118 Secondary Multi-Domain Server • 9 Secure Internal Communication (SIC) • 25 Security Gateway Global Names • 74 Security Gateway Licenses • 34 Security Gateway Policies • 106 Security Gateways Protecting a Multi-Domain
Server • 23 Security Policies • 15 Seeing Administrators Using a Permissions
Profile • 44 Selecting an Administrator Type • 36 Service Groups • 147 Services • 147 Setting Policy Management Options • 59 Setting up Domain Security Gateway to Send
Logs to the Domain Log Server • 99 Setting Up Logging • 96 Setting Up Your Network Topology • 21 Showing and Hiding Selected List Pane
Columns • 103 Showing Connected Administrators • 45 Showing Parameters for a Sample Object • 144 SmartConsole Client Applications • 16 SmartDashboard Toolbar • 16 SmartReporter Reports • 109 Standalone Security Gateway/Security
Management Server • 22 Standard Check Point Environment Variables •
112 Standby Domain Management Server • 9 Standby Multi-Domain Server • 9 Starting or Stopping a Domain Log Server • 98 Starting P1Shell • 120 Status Collection • 115 Step 1 - In the SmartDomain Manager • 76 Step 2 - In Global SmartDashboard • 77 Step 3 - In the SmartDomain Manager • 77 Structure of Domain Management Server
Directory Trees • 111 Subscribing Domains to IPS Service • 52 Synchronize ClusterXL Security Gateways • 90 Synchronizing Clocks • 30 Synchronizing Domain Log Server and Domain
Management Server • 99 Synchronizing the Global Policy Database • 50

Page 157
T
The Global Policy as a Template • 48 The Management Model • 15 The Multi-Domain Security Management Trust
Model • 24 The Multi-Domain Server • 12 The Multi-Domain Server Databases • 80 The Need for Global Policies • 47 The SmartDomain Manager • 16 The Trial Period • 33 To assign to many Domains at one time • 77 To assign to one Domain at a time • 77 To Change the Active Multi-Domain Server • 89 To See the Latest Changes to Permissions
Profiles • 44 To Synchronize a Group of Multi-Domain
Servers • 88 To Synchronize a Single Multi-Domain Server
with Another Multi-Domain Server • 88 Tracking Logs using SmartView Tracker • 107 Traffic Flow and Virtual Link Monitoring • 108 Trust Between a Domain Log Server and its
Domain Network • 25 Trust Between a Domain Management Server
and its Domain Network • 25 Trust Between Multi-Domain Server to Multi-
Domain Server • 25
U
Using Automation Scripts • 144 Using dbedit Commands in a Script • 143 Using External Authentication Servers • 26 Using Multiple Multi-Domain Servers • 18 Using SmartConsole • 107 Using SmartDomain Manager • 30 Using SmartDomain Manager to Synchronize
Multi-Domain Servers • 82 Using SmartReporter • 101 Using the Expired Accounts Window • 40 Using Thresholds • 108 Using XML to Export Settings for a Domain
Management Server • 151 UTM-1 Edge Processes • 116
V
Verifying Component Status • 103 Version and Blade Updates • 63, 68 Viewing Status Details • 104 Viewing the Domain Global Policy History File •
59 Viewing the Status of Global Policy
Assignments • 56 Virtual IP Limitations and Multiple Interfaces on
a Multi-Domain Server • 20 VPN Connectivity • 73 VPN Domains in Global VPN • 75 VPN with Multi-Domain Security Management •
73 VSX Licenses • 34
W
When You Change a Global Policy • 56 Working with dbedit • 143
Working with Expiration Warnings • 40 Working with Log Servers • 96 Working with Permission Profiles • 42 Working with the List Pane • 103


