32
MULTIFUNCTION MICROWAVE OVEN - 45cm MODEL MW45-10
MULTIFUNCTION MICROWAVEOVEN - 45cm
MODEL MW45-10

2
GB
Dear Customer, We would like to thank you and congratulate you on your choice.This new product has been carefully designed and built using top quality materials, and meticulously tested to ensure that it meets all your culinary requirements.Please read and observe these simple instructions, which will enable you to achieve excellent results from the very first time you use it.
IMPORTANT INSTRUCTIONS AND SAFETY WARNINGS
READ CAREFULLY AND KEEPFOR FUTURE USE
3
GBATTENTION: If the door or the gasket seals of the door are damaged, the oven may not be used until it repaired by a qualified service technician;
ATTENTION: It dangerous for anyone other than a service technician to perform any maintenance or repairs that involve the removal of any cover that protects against exposure to microwaves;
ATTENTION: Liquids or other foods must not be heated in air-tight contains because they could explode;
ATTENTION: Children may not use the oven without supervision until they have been adequately instructed in its safe use and understand the dangers of using it incorrectly;
only use untensils that are appropriate for microwave ovens;
when heating food in plastic or paper containers, check the oven frequently because of the risks of fire;
if you see smoke coming out, turn off the appliance or remove its plug and keep the door closed to extinguish any flames;
heating beverages in the microwave oven can cause a delayed boil-over, so be careful when handling the container;
the contents of baby bottles and baby food in jars must be mixed or shaken and their temperature must be checked before feeding to avoid scalding;
eggs in the shell and whole hardboiled eggs must not be heated in microwave ovens because they could explode even after the end of heating in the microwave;
a detailed explanation for cleaning the gasket seals of the doors of the cavity and adjacent parts;
the oven must be cleaned periodically and all food residues must be removed;
failure to keep the oven clean could cause deterioration of the surfaces that could reduce the life of the appliance and cause dangerous conditions;
Do not use rough abrasives or sharp metal scrapers to clean the glass door of the oven because they could scratch the surface and cause the glass to shatter.
Do not use steam cleaners to clean the appliance.
WARNINGS FOR MICROWAVE OVENS
Food preparation Danger of fire!Only use the microwave function for the preparation of food to be eaten. Any other uses can be dangerous or cause damage.For example, heated slippers or pillows filled with grain or cereals can catch fire even after several hours.
THIS PRODUCT IS DESIGNED FOR DOMESTIC USE. THE MANUFACTURER DECLINES ALL RESPONSIBILITY FOR PERSONAL INJURY OR PROPERTY DAMAGE DERIVING FROM INCORRECT INSTALLATION OR IMPROPER, ERRONEOUS OR UNSUITABLE USE.THE APPLIANCE MUST NOT BE USED BY PEOPLE (INCLUDING CHILDREN) WITH PHYSICAL, SENSORIAL OR MENTAL IMPAIRMENTS, OR BY PEOPLE WITHOUT THE NECESSARY EXPERIENCE OR KNOWLEDGE, UNLESS THEY ARE SUPERVISED OR INSTRUCTED IN THE USE OF THE APPLIANCE BY A PERSON RESPONSIBLE FOR THEIR SAFETY. CHILDREN MUST BE SUPERVISED TO ENSURE THAT THEY DO NOT PLAY WITH THE APPLIANCE. DO NOT PLACE ALUMINIUM FOIL, POTS OR SIMILAR OBJECTS IN CONTACT WITH THE BASE INSIDE THE OVEN FOR COOKING. THE HEATING ACTION OF THE LOWER HEATING ELEMENT CAUSES OVERHEATING OF THE LOWER PART OF THE OVEN CAUSING DAMAGE AND SERIOUS CONSEQUENCES (RISK OF FIRE) EVEN TO THE COUNTER UNDER THE OVEN.THE APPLIANCE GETS VERY HOT DURING USE. WARNING: TOUCH THE HEATING ELEMENTS INSIDE THE OVEN.
4

GB
Pots and pans Danger of injury!Porcelain and ceramic crockery can have small holes in the handles and cover.There can be cavities hidden behind these holes. If water gets into these cavities, the crockery could break.Do not use crockery that is unsuitable for microwave ovens.Danger of burns!The heat of the food can heat the dish. Always use a pot holder to remove dishes and accessories from the cooking chamber.
Microwave power and duration Danger of fire!Never set values that are too high for the microwave power or the cooking time. The food could catch fire and damage the appliance. Follow the rules in these instructions.
Packaging Danger of fire!Never heat food in thermal packaging.Food in containers made of plastic, paper or other inflammable materials must be watched constantly.Danger of burns!Air-tight packaging can explode. Follow the instructions shown on the package. Always use a pot holder to remove dishes.
Beverages Danger of burns!When heating liquids, boiling can be delayed.This means that the boiling temperature has been reached without forming the typical little steam bubbles. Even a slight knock can cause the sudden overflow of liquid or sprays.When heating liquids, always put a spoon in the container to avoid delayed boiling.
Danger of explosion!
Never heat beverages or other types of food in covered containers.
Never heat alcoholic beverages excessively.
Foods for newborns Danger of burns!Never heat baby foods in a covered container. Always remove the cover or nipple.When finished heating, always carefully shake or mix so that the heat is evenly distributed.Test the temperature before giving the food to the baby.
5
Foods with skin or peel Danger of burns!Never cook eggs in the shell. Never heat hard-boiled eggs because they could explode even after the microwave is turned off. This also goes for molluscs and crustaceans.In the case of fried eggs, first pierce the yolk.In the case of foods with a hard peel or skin like apples, tomatoes, potatoes or sausage, the peel or skin could explode.Pierce the peel or skin before cooking.
Drying foods Danger of fire!Never dry food in the microwave.
Foods with low water content Danger of fire!Never defrost or heat foods with low water content, like bread, for too long or at an excessive power.
Oil Danger of fire!Never use the microwave to heat just oil.
CAUSES OF DAMAGE
Juice leaking from fruit When preparing sweets containing very juicy fruit, do not overfill the bak-ing dish. Fruit juices that overflow the baking dish can leave indelible stains.
Technical breakdown Never use enamelled baking dishes in the microwave because it could cause a technical breakdown.
Cooling with the door of the appliance open
The cooking chamber must only be cooled with the door closed. Check that nothing is stuck on the door of the appliance.Even if the door is only ajar, nearby cabinets can be damaged over time.
Very dirty gasket seal If the gasket seal is very dirty, the door of the appliance does not close correctly during operation. The surfaces of nearby cabinets can be dam-aged. Always keep the gasket seal clean.
Using the door of the appliance as a support surface
Do not rest or lean on the open door of the appliance and do not put dish-ware or accessories on it.
Using the microwave without food in the chamber
Only turn on the microwave after you have put the food in the cooking chamber. Without food inside, the appliance can become overloaded. The only exception allowed are brief tests of dishware (in this regard, see the warnings about pots and pans).
Moist foods Do not leave moist foods in the cooking chamber for extended periods of time.
6
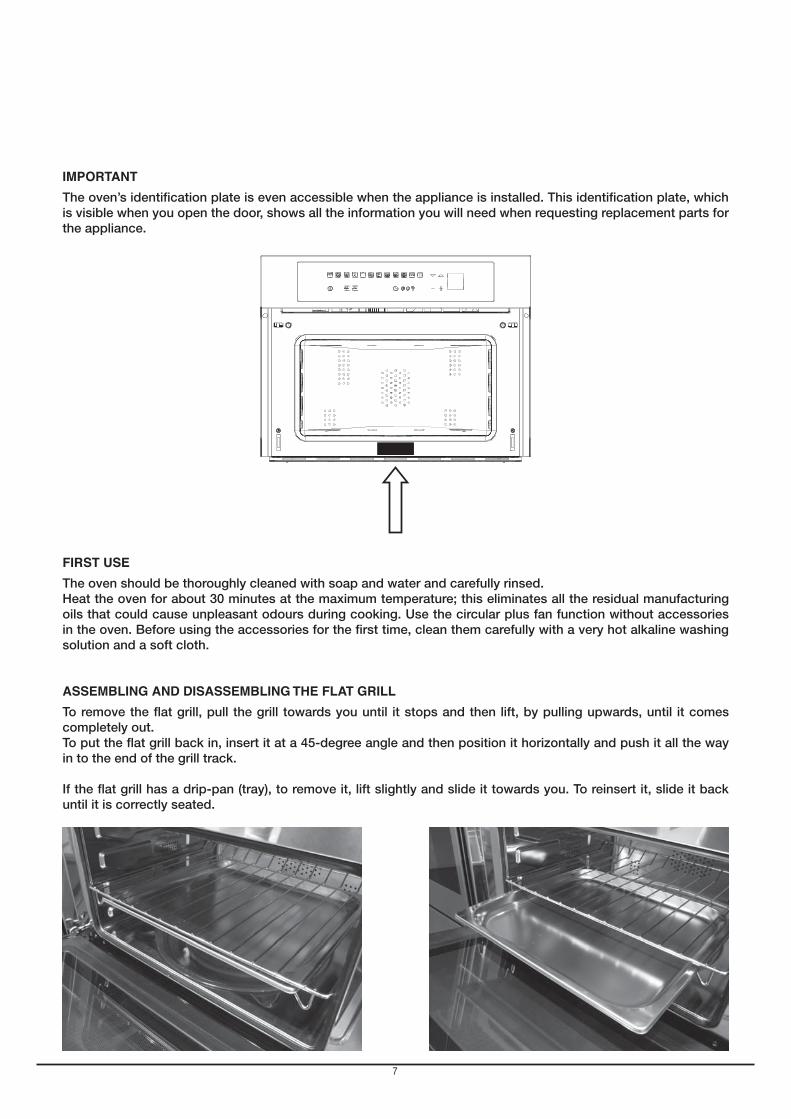
IMPORTANT
The oven’s identification plate is even accessible when the appliance is installed. This identification plate, which is visible when you open the door, shows all the information you will need when requesting replacement parts for the appliance.
FIRST USE
The oven should be thoroughly cleaned with soap and water and carefully rinsed.Heat the oven for about 30 minutes at the maximum temperature; this eliminates all the residual manufacturing oils that could cause unpleasant odours during cooking. Use the circular plus fan function without accessories in the oven. Before using the accessories for the first time, clean them carefully with a very hot alkaline washing solution and a soft cloth.
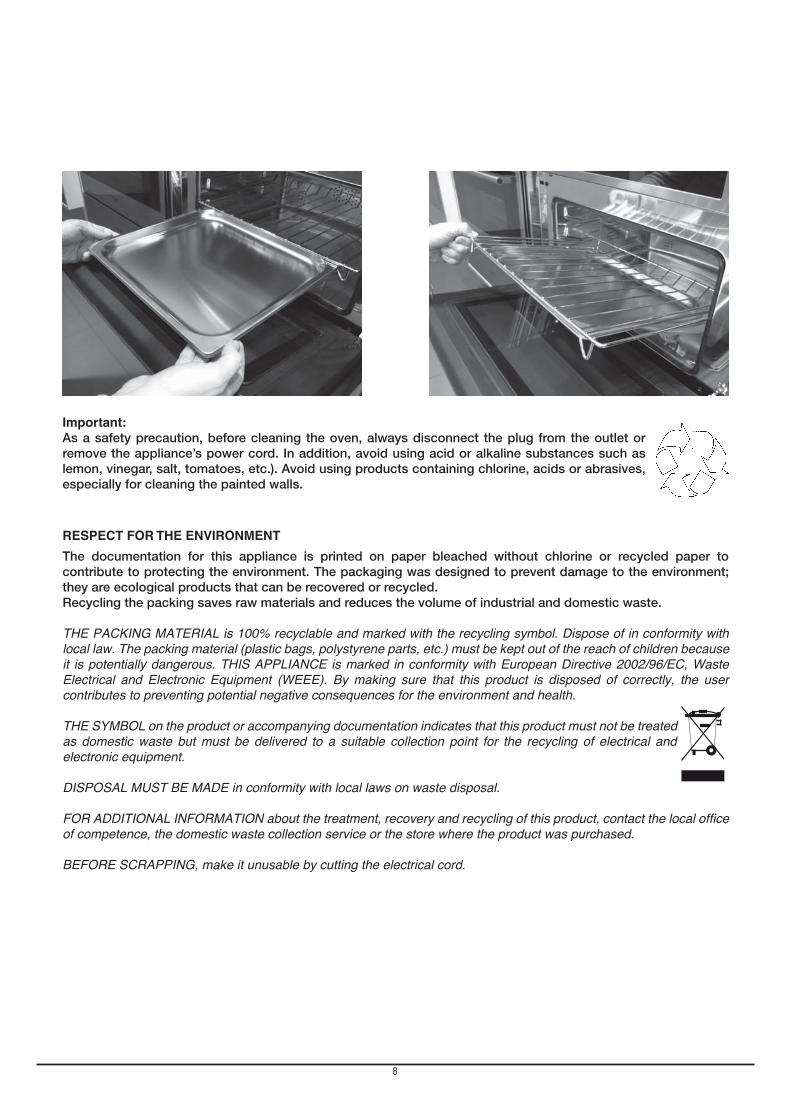
ASSEMBLING AND DISASSEMBLING THE FLAT GRILL
To remove the flat grill, pull the grill towards you until it stops and then lift, by pulling upwards, until it comes completely out.To put the flat grill back in, insert it at a 45-degree angle and then position it horizontally and push it all the way in to the end of the grill track.
If the flat grill has a drip-pan (tray), to remove it, lift slightly and slide it towards you. To reinsert it, slide it back until it is correctly seated.
7
Important:As a safety precaution, before cleaning the oven, always disconnect the plug from the outlet or remove the appliance’s power cord. In addition, avoid using acid or alkaline substances such as lemon, vinegar, salt, tomatoes, etc.). Avoid using products containing chlorine, acids or abrasives, especially for cleaning the painted walls.
RESPECT FOR THE ENVIRONMENT
The documentation for this appliance is printed on paper bleached without chlorine or recycled paper to contribute to protecting the environment. The packaging was designed to prevent damage to the environment; they are ecological products that can be recovered or recycled.Recycling the packing saves raw materials and reduces the volume of industrial and domestic waste.
THE PACKING MATERIAL is 100% recyclable and marked with the recycling symbol. Dispose of in conformity with local law. The packing material (plastic bags, polystyrene parts, etc.) must be kept out of the reach of children because it is potentially dangerous. THIS APPLIANCE is marked in conformity with European Directive 2002/96/EC, Waste Electrical and Electronic Equipment (WEEE). By making sure that this product is disposed of correctly, the user contributes to preventing potential negative consequences for the environment and health.
THE SYMBOL on the product or accompanying documentation indicates that this product must not be treated as domestic waste but must be delivered to a suitable collection point for the recycling of electrical and electronic equipment.
DISPOSAL MUST BE MADE in conformity with local laws on waste disposal.
FOR ADDITIONAL INFORMATION about the treatment, recovery and recycling of this product, contact the local of competence, the domestic waste collection service or the store where the product was purchased.
BEFORE SCRAPPING, make it unusable by cutting the electrical cord.
8
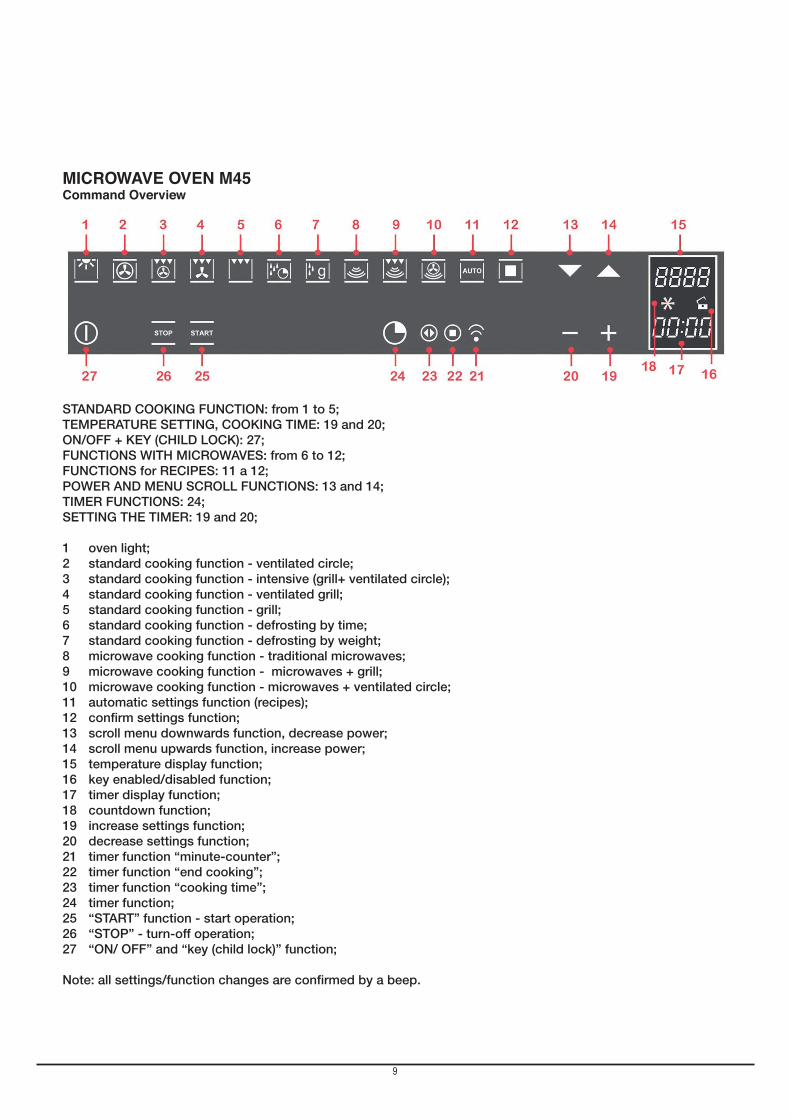
MICROWAVE OVEN M45Command Overview
STANDARD COOKING FUNCTION: from 1 to 5;TEMPERATURE SETTING, COOKING TIME: 19 and 20;ON/OFF + KEY (CHILD LOCK): 27;FUNCTIONS WITH MICROWAVES: from 6 to 12;FUNCTIONS for RECIPES: 11 a 12;POWER AND MENU SCROLL FUNCTIONS: 13 and 14;TIMER FUNCTIONS: 24;SETTING THE TIMER: 19 and 20;
1 oven light;2 standard cooking function - ventilated circle;3 standard cooking function - intensive (grill+ ventilated circle);4 standard cooking function - ventilated grill;5 standard cooking function - grill;6 standard cooking function - defrosting by time;7 standard cooking function - defrosting by weight;8 microwave cooking function - traditional microwaves;9 microwave cooking function - microwaves + grill;10 microwave cooking function - microwaves + ventilated circle;11 automatic settings function (recipes);12 confirm settings function;13 scroll menu downwards function, decrease power;14 scroll menu upwards function, increase power;15 temperature display function;16 key enabled/disabled function;17 timer display function;18 countdown function;19 increase settings function;20 decrease settings function;21 timer function “minute-counter”;22 timer function “end cooking”;23 timer function “cooking time”;24 timer function;25 “START” function - start operation;26 “STOP” - turn-off operation;27 “ON/ OFF” and “key (child lock)” function;
Note: all settings/function changes are confirmed by a beep.
9
GB
INTRODUCTION TO THE OVEN
Dear Customer, your new oven is controlled by an electronic board that constantly monitors its operation to improve its performance.The touch controls are state-of-the-art, precise and reliable.The interface is elegant, orderly and discrete, more intuitive than ever!A few buttons, many functions and no combination or sequence is difficult to enter, so you can concentrate on following the recipe and the oven is ready in two clicks!
Installation and hook-up
Dear Customer, this oven is a sophisticated electronic appliance, classified as a durable good. Its installation requires qualified professionals for both the hook-up of the power line and itsplacement in the kitchen counter.
(SEE ASSEMBLY INSTRUCTIONS ON PAGE 56)
Before hook-up
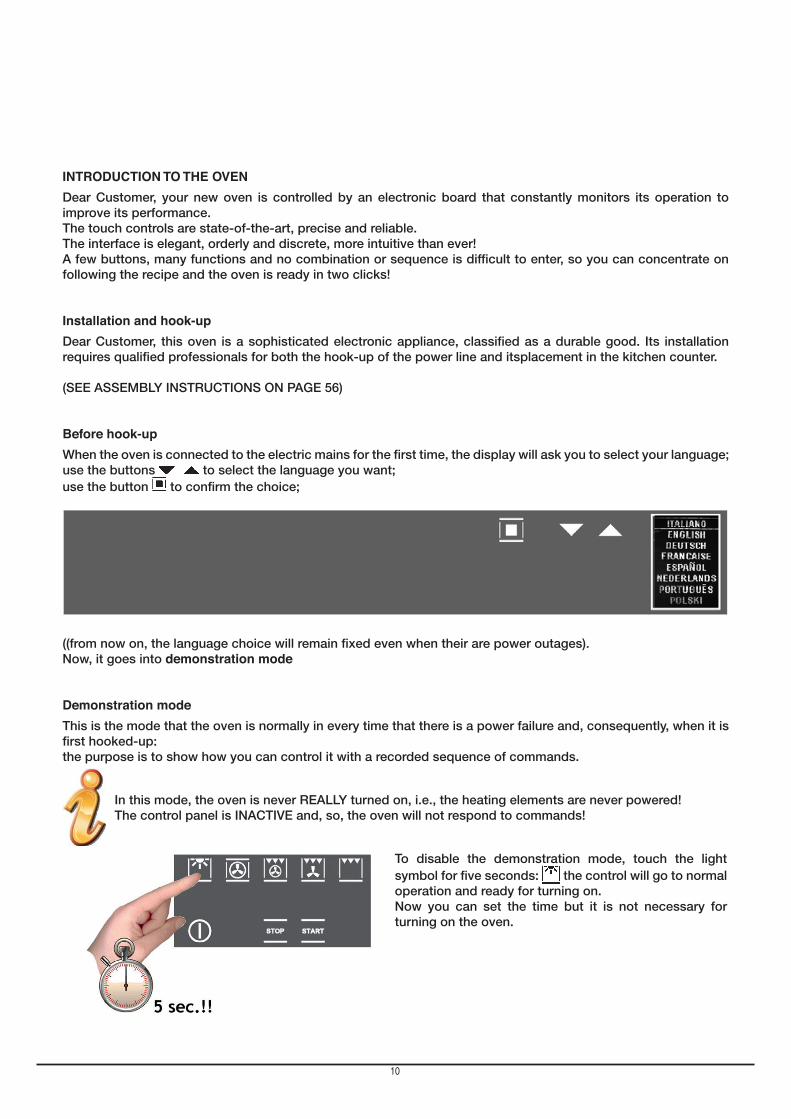
When the oven is connected to the electric mains for the first time, the display will ask you to select your language;use the buttons to select the language you want;use the button to confirm the choice;
((from now on, the language choice will remain fixed even when their are power outages).Now, it goes into demonstration mode
Demonstration mode
This is the mode that the oven is normally in every time that there is a power failure and, consequently, when it is first hooked-up:the purpose is to show how you can control it with a recorded sequence of commands.
In this mode, the oven is never REALLY turned on, i.e., the heating elements are never powered!The control panel is INACTIVE and, so, the oven will not respond to commands!
To disable the demonstration mode, touch the light symbol for five seconds: the control will go to normal operation and ready for turning on.Now you can set the time but it is not necessary for turning on the oven.
10
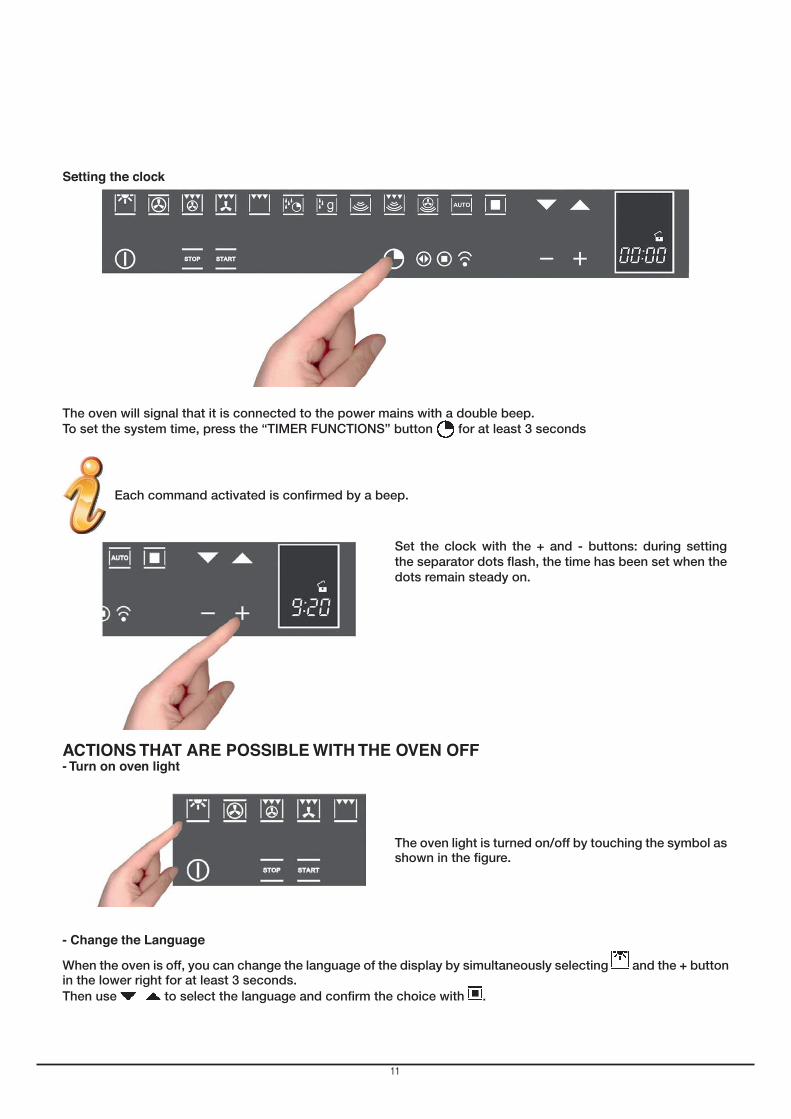
Setting the clock
The oven will signal that it is connected to the power mains with a double beep.To set the system time, press the “TIMER FUNCTIONS” button for at least 3 seconds
Each command activated is confirmed by a beep.
Set the clock with the + and - buttons: during setting the separator dots flash, the time has been set when the dots remain steady on.
ACTIONS THAT ARE POSSIBLE WITH THE OVEN OFF- Turn on oven light
The oven light is turned on/off by touching the symbol as shown in the figure.
- Change the Language
When the oven is off, you can change the language of the display by simultaneously selecting and the + button in the lower right for at least 3 seconds.Then use to select the language and confirm the choice with .
11
GB
- Setting the “minute-counter” timer function
See the appropriate section on page 48.
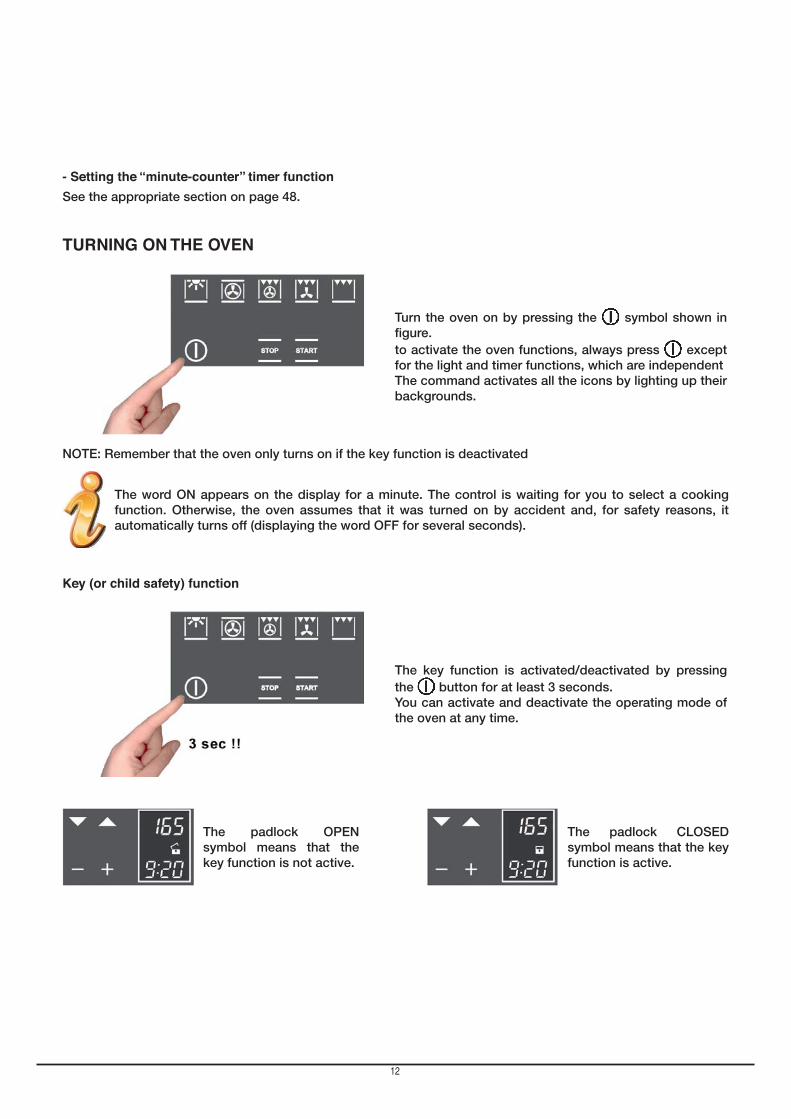
TURNING ON THE OVEN
Turn the oven on by pressing the symbol shown in figure.to activate the oven functions, always press except for the light and timer functions, which are independentThe command activates all the icons by lighting up their backgrounds.
NOTE: Remember that the oven only turns on if the key function is deactivated
The word ON appears on the display for a minute. The control is waiting for you to select a cooking function. Otherwise, the oven assumes that it was turned on by accident and, for safety reasons, it automatically turns off (displaying the word OFF for several seconds).
Key (or child safety) function
The key function is activated/deactivated by pressing the button for at least 3 seconds. You can activate and deactivate the operating mode of the oven at any time.
The padlock OPEN symbol means that the key function is not active.
The padlock CLOSED symbol means that the key function is active.
12
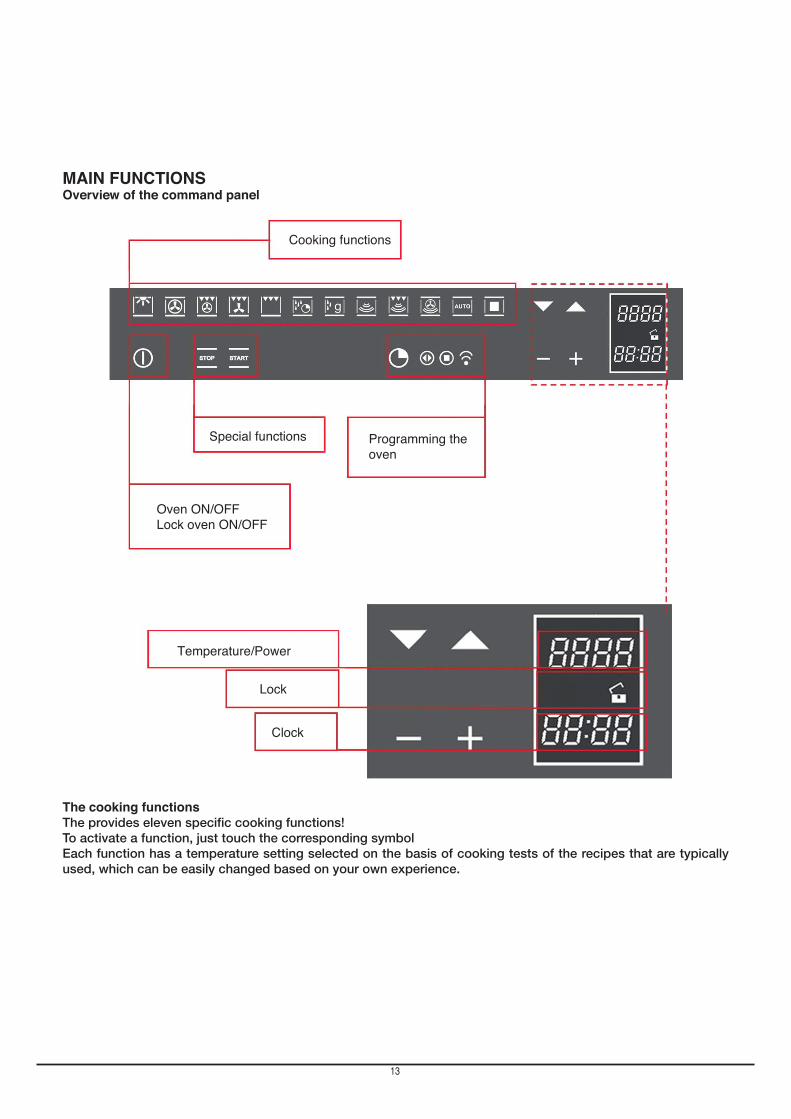
MAIN FUNCTIONSOverview of the command panel
Cooking functions
Special functions
Temperature/Power
Lock
Clock
Oven ON/OFFLock oven ON/OFF
Programming theoven
The cooking functionsThe provides eleven specific cooking functions!To activate a function, just touch the corresponding symbolEach function has a temperature setting selected on the basis of cooking tests of the recipes that are typically used, which can be easily changed based on your own experience.
13
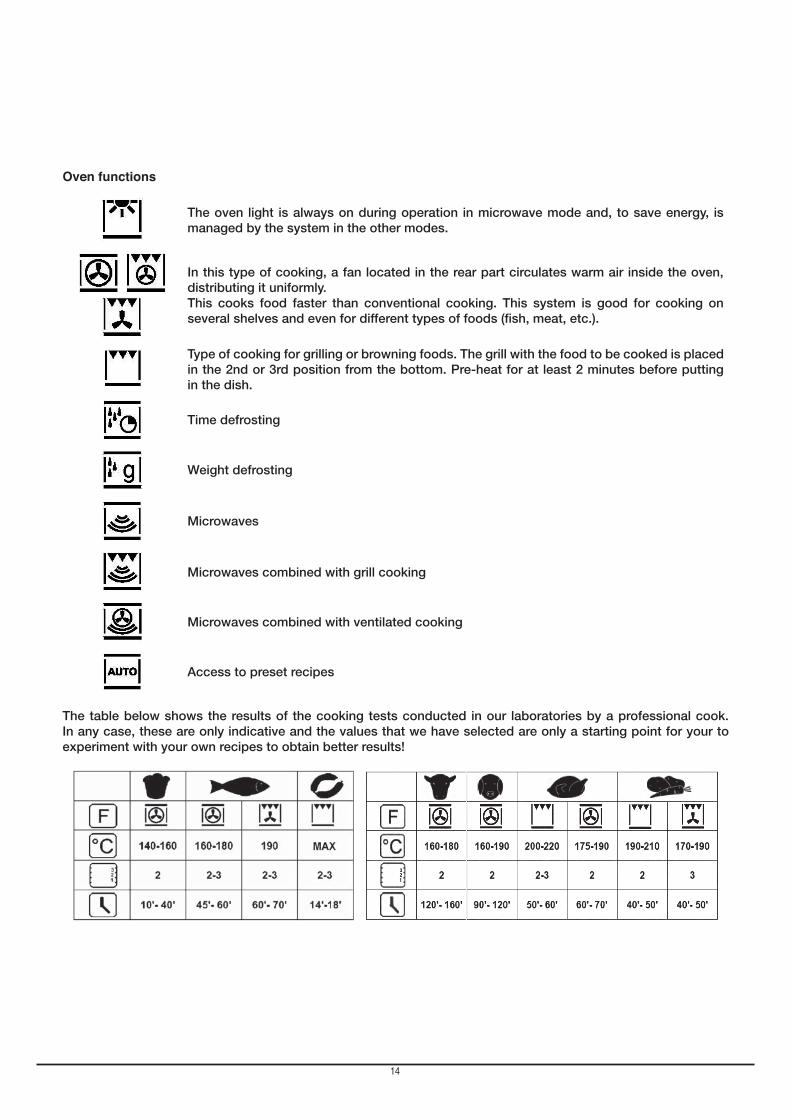
Oven functions
The oven light is always on during operation in microwave mode and, to save energy, is managed by the system in the other modes.
In this type of cooking, a fan located in the rear part circulates warm air inside the oven, distributing it uniformly. This cooks food faster than conventional cooking. This system is good for cooking on several shelves and even for different types of foods (fish, meat, etc.).
Type of cooking for grilling or browning foods. The grill with the food to be cooked is placed in the 2nd or 3rd position from the bottom. Pre-heat for at least 2 minutes before putting in the dish.
Time defrosting
Weight defrosting
Microwaves
Microwaves combined with grill cooking
Microwaves combined with ventilated cooking
Access to preset recipes
The table below shows the results of the cooking tests conducted in our laboratories by a professional cook. In any case, these are only indicative and the values that we have selected are only a starting point for your to experiment with your own recipes to obtain better results!
14
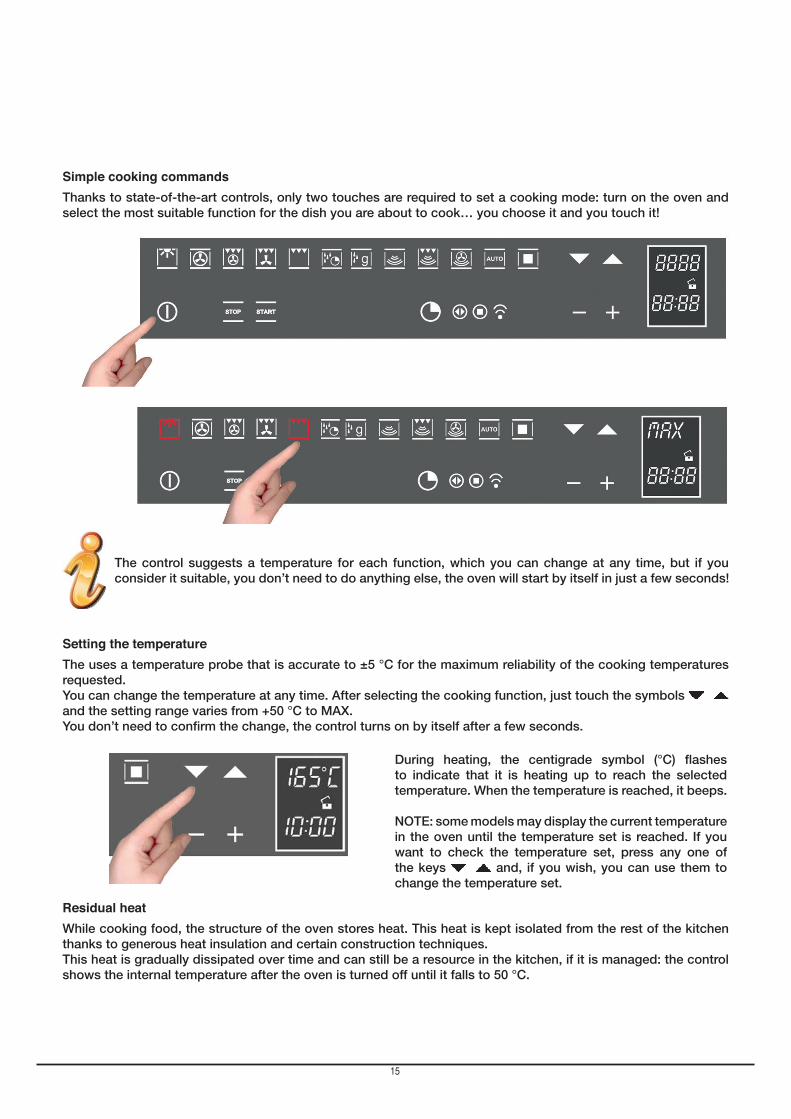
Simple cooking commands
Thanks to state-of-the-art controls, only two touches are required to set a cooking mode: turn on the oven and select the most suitable function for the dish you are about to cook… you choose it and you touch it!
The control suggests a temperature for each function, which you can change at any time, but if you consider it suitable, you don’t need to do anything else, the oven will start by itself in just a few seconds!
Setting the temperature
The uses a temperature probe that is accurate to ±5 °C for the maximum reliability of the cooking temperatures requested.You can change the temperature at any time. After selecting the cooking function, just touch the symbols and the setting range varies from +50 °C to MAX.You don’t need to confirm the change, the control turns on by itself after a few seconds.
During heating, the centigrade symbol (°C) flashes to indicate that it is heating up to reach the selected temperature. When the temperature is reached, it beeps.
NOTE: some models may display the current temperature in the oven until the temperature set is reached. If you want to check the temperature set, press any one of the keys and, if you wish, you can use them to change the temperature set.
Residual heat
While cooking food, the structure of the oven stores heat. This heat is kept isolated from the rest of the kitchen thanks to generous heat insulation and certain construction techniques.This heat is gradually dissipated over time and can still be a resource in the kitchen, if it is managed: the control shows the internal temperature after the oven is turned off until it falls to 50 °C.
15

GB
Use this characteristic to keep foods warm or to complete their cooking gently!
COven light controlThe oven light control is active in all cooking functions and is independent of them, i.e., it can be turned on or off depending on the need, whenever you want!The oven light is normally kept on during heating and, then, for three after the temperature setting is reached. After that time, the light is turned off to save energy.
To check how the food is cooking, you must turn on the inside light. To do this, just touch the light symbol: it will stay on for three minutes and then turn off by itself. Of course, you can turn it right away by touching the light symbol again. When you open the door, the light inside the oven always turns on.
PROGRAMMING THE OVEN(only for the functions )
The programming of the oven provides three modes for controlling the cooking time. They can be used in combination with normal cooking functions.
The functions can be selected in sequence, from left to right, by touching the clock symbol.At each touch, a symbol lights up in sequence.
16

Timer programming: cooking time
Touch the timer symbol once and the relative symbol will light up. Plus, the clock display will replace the current time:
The separator dots flash to indicate that you can program the cooking time.
Once the cooking time is entered, the display will flash the current time again and the “cooking time” symbol will be lit.
The countdown begins now. After the indicated time has elapsed, the oven will beep and the heating elements, and cooking, will be turned off. The following words will appear on the display: “Program finished remove the dish”: press any button to stop the beeping or open the door.After one minute, the oven will automatically turn off, if other cooking functions have not been set.
Timer programming: end-of-cooking time
Touch the timer symbol two times and the relative symbol will light up.
The separator does will flash to indicate that you can set the end-of-cooking time.
17
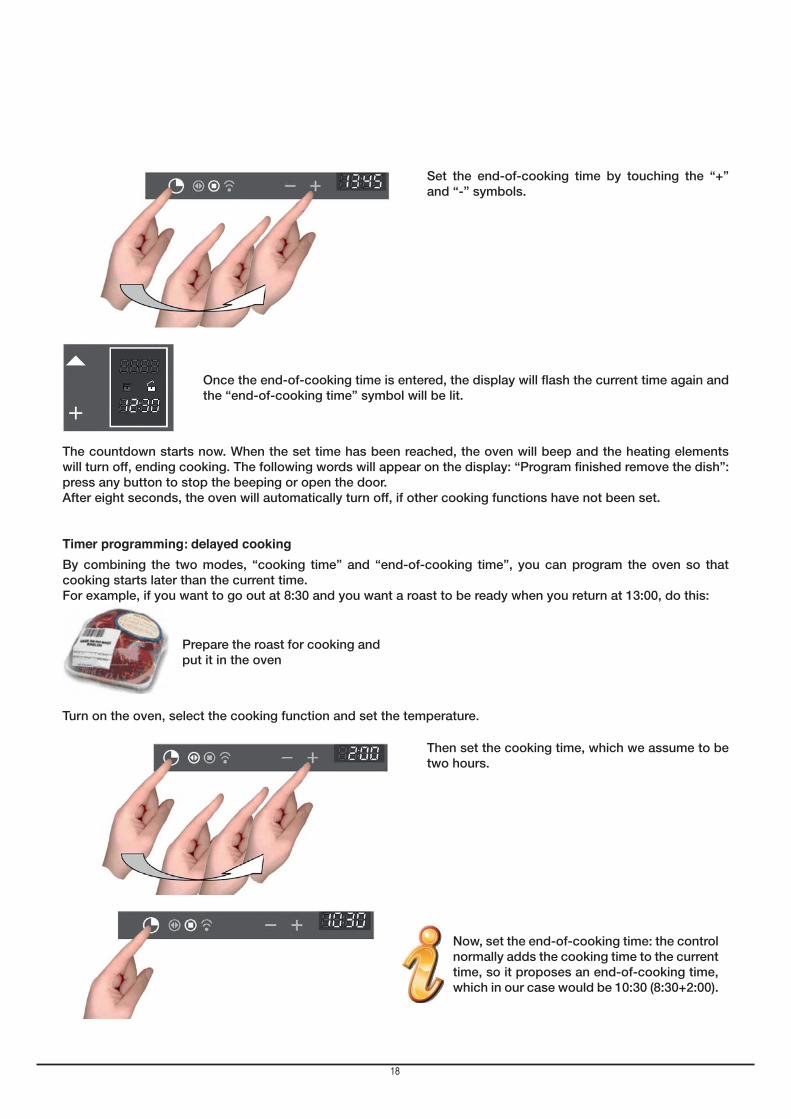
Set the end-of-cooking time by touching the “+” and “-” symbols.
Once the end-of-cooking time is entered, the display will flash the current time again and the “end-of-cooking time” symbol will be lit.
The countdown starts now. When the set time has been reached, the oven will beep and the heating elements will turn off, ending cooking. The following words will appear on the display: “Program finished remove the dish”: press any button to stop the beeping or open the door.After eight seconds, the oven will automatically turn off, if other cooking functions have not been set.
Timer programming: delayed cooking
By combining the two modes, “cooking time” and “end-of-cooking time”, you can program the oven so that cooking starts later than the current time.For example, if you want to go out at 8:30 and you want a roast to be ready when you return at 13:00, do this:
Prepare the roast for cooking and put it in the oven
Turn on the oven, select the cooking function and set the temperature.
Then set the cooking time, which we assume to be two hours.
Now, set the end-of-cooking time: the control normally adds the cooking time to the current time, so it proposes an end-of-cooking time, which in our case would be 10:30 (8:30+2:00).
18
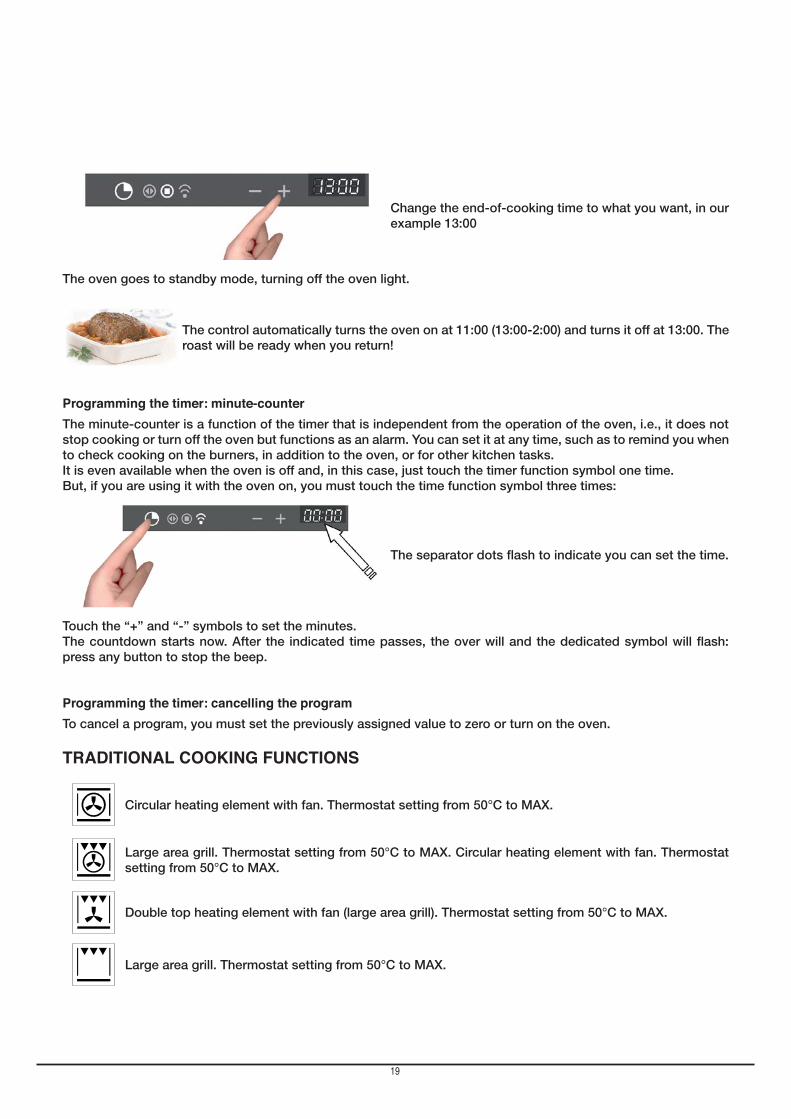
Change the end-of-cooking time to what you want, in our example 13:00
The oven goes to standby mode, turning off the oven light.
The control automatically turns the oven on at 11:00 (13:00-2:00) and turns it off at 13:00. The roast will be ready when you return!
Programming the timer: minute-counter
The minute-counter is a function of the timer that is independent from the operation of the oven, i.e., it does not stop cooking or turn off the oven but functions as an alarm. You can set it at any time, such as to remind you when to check cooking on the burners, in addition to the oven, or for other kitchen tasks.It is even available when the oven is off and, in this case, just touch the timer function symbol one time.But, if you are using it with the oven on, you must touch the time function symbol three times:
The separator dots flash to indicate you can set the time.
Touch the “+” and “-” symbols to set the minutes.The countdown starts now. After the indicated time passes, the over will and the dedicated symbol will flash: press any button to stop the beep.
Programming the timer: cancelling the program
To cancel a program, you must set the previously assigned value to zero or turn on the oven.
TRADITIONAL COOKING FUNCTIONS
Circular heating element with fan. Thermostat setting from 50°C to MAX.
Large area grill. Thermostat setting from 50°C to MAX. Circular heating element with fan. Thermostat setting from 50°C to MAX.
Double top heating element with fan (large area grill). Thermostat setting from 50°C to MAX.
Large area grill. Thermostat setting from 50°C to MAX.
19
GB
OPERATION WITH MICROWAVESThe microwaves are transformed into heat inside foods. The microwave oven can be used by itself or in combina-tion with other types of heating. This section contains information about the dishware and instructions for setting the microwave oven.
WARNINGS FOR DISHWARE
Suitable dishware You can use heat-resistant dishware made of glass, glass ceramic, porcelain, ceramic or refractory plastics. These materials are permeable to microwaves.
It is also possible to use normal plates. In this way, it won’t be necessary to transfer the food.
Dishware with gold or silver decorations can only be used if the manufacture guarantees that they can be used in microwave ovens.
Remember that, when using the oven in microwave mode, the dish must be placed on the rotating plate.
When using the oven in combination mode, it is preferable to place the dish to be cooked on the low, round grill, supported so that it is centred on the rotating plate.
Unsuitable dishware Metal dishware cannot be used.
Metal is not permeable to microwaves. Food in metal containers will remain cold.
Warning! Metal components, such as spoons in glasses, must stay at least 2 cm from the walls of the oven and the inside of the door. In fact, sparks could seriously damage the inside of the glass door.
Warning! The flat grill must be removed when using the microwave and combined modes. Use it only with traditional oven functions.
Testing dishware Never turn on the microwave oven before you have put in the food.The only exception allowed is testing dishware.
If you unsure if your dishware can be used in the microwave oven, we recommend performing the following test:place the empty pot in the appliance for ½ - 1 minute at the maximum power. Check the temperature. The pat must be cold or slightly warm. If it is hot or there are sparks, the pot is not suitable.
20

Time defrosting
Turn the oven on using the button;
Select the TIME DEFROSTING function ;Using the - + buttons, you can change the defrosting time in 5-second intervals. If you press - + for longer than 3 seconds, the time setting speeds up;When finished entering settings, select the function that is flashing, and defrosting begins with a countdown of the time on the display.The defrosting time must be set or it won’t work.The power of the microwave will be regulated automatically to obtain the best possible result.At a certain point, the oven will ask you to TURN OVER THE FOOD or, if you can’t, open and close the door of the oven to make it continue defrosting.The beep and the words PROGRAM FINISHED REMOVE THE DISH on the display signal that the program has finished.
Defrosting by weight
Turn on the oven with the button;Select the DEFROST BY WEIGHT function ;
The following screen appears:
After you have selected the dish with and confirmed with the display shows the weight to set, starting from an initial minimum of 50 g; using , you can increase or decrease the weight and then confirm the choice with .
When finished entering settings, select the A function that is flashing; this starts the defrost program and the
21
GB
countdown of the time.The beep and the words PROGRAM FINISHED REMOVE THE DISH on the display signal that the program has finished.The power of the microwave will be automatically adjusted for the best possible results. At a certain point, the oven will ask you to TURN OVER THE FOOD or, if you can’t, open and close the door of the oven to make it continue defrosting.The table below lists the main defrost programs for the main food categories:
Program Weight (g) Working time (min)
Rest time (min)
Bread 100 – 800 2 – 19 10 - 20
Vegetables 100 – 500 2 – 13 10 - 20
Meat 100 – 2000 2 – 43 20 - 30
Fish 100 – 2000 2 – 40 20 - 30
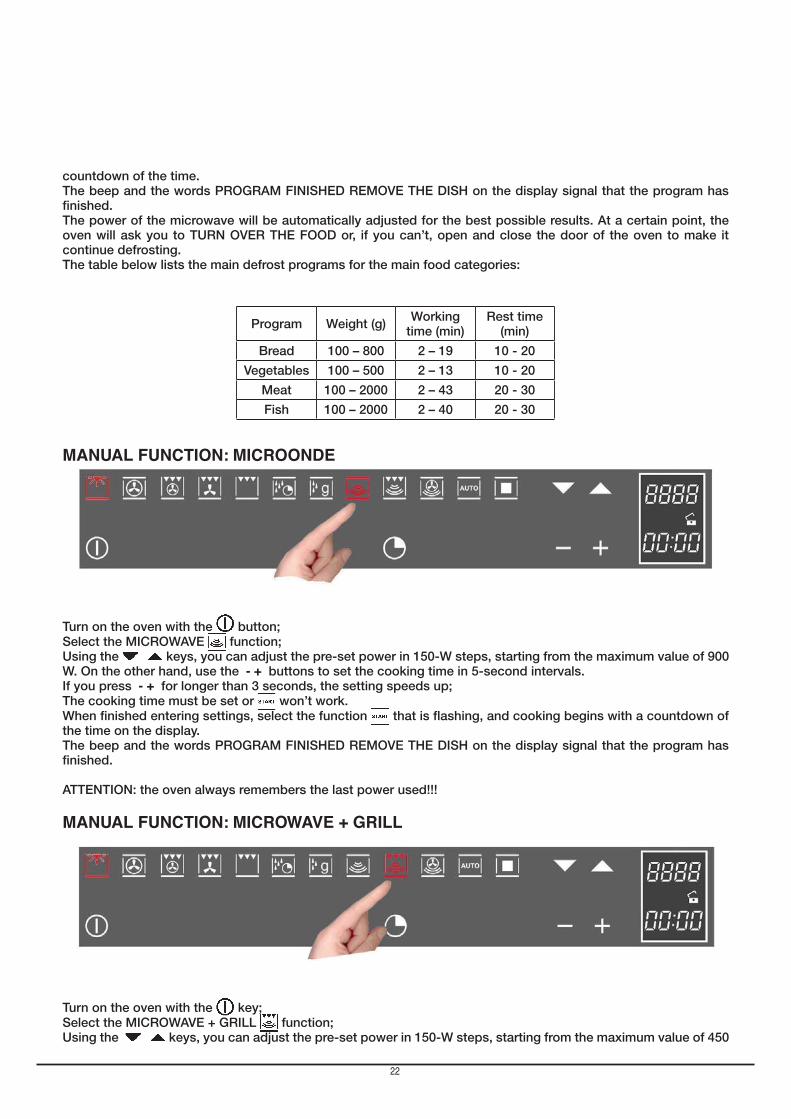
MANUAL FUNCTION: MICROONDE
Turn on the oven with the button;Select the MICROWAVE function;Using the keys, you can adjust the pre-set power in 150-W steps, starting from the maximum value of 900 W. On the other hand, use the - + buttons to set the cooking time in 5-second intervals.If you press - + for longer than 3 seconds, the setting speeds up;The cooking time must be set or won’t work.When finished entering settings, select the function that is flashing, and cooking begins with a countdown of the time on the display.The beep and the words PROGRAM FINISHED REMOVE THE DISH on the display signal that the program has finished.
ATTENTION: the oven always remembers the last power used!!!
MANUAL FUNCTION: MICROWAVE + GRILL
Turn on the oven with the key;Select the MICROWAVE + GRILL function;Using the keys, you can adjust the pre-set power in 150-W steps, starting from the maximum value of 450
22

W. On the other hand, use the - + buttons to set the cooking time in 5-second intervals.If you press - + for longer than 3 seconds, the setting speeds up;When finished entering settings, select the function that is flashing, and cooking begins with a countdown of the time on the display.The beep and the words PROGRAM FINISHED REMOVE THE DISH on the display signal that the program has
finished. Press any key or open the door to stop the beeping.
MANUAL FUNCTION: MICROWAVE + VENTILATED CIRCLE
Turn on the oven with the button;Select the MICROWAVE + VENTILATED CIRCLE function;Using the keys, you can adjust the pre-set power in 150-W steps, starting from the maximum value of 450 W;
- Confirm the selection with ;- Then, the upper display will change from the power value to
the temperature value. Use the buttons to regulate the temperature in 5 °C intervals, starting from a maximum value of 200 °C;
- Confirm the value selected with ;
When finished entering settings, select the function that is flashing, and cooking begins with a countdown of the time on the display.The cooking time must be set or will not work.
NOTE: when regulating and setting values, if you press - + for longer than 3 seconds, the regulation speeds up.The beep and the words PROGRAM FINISHED REMOVE THE DISH on the display signal that the program has finished. Press any key or open the door to stop the beeping.
AUTOMATIC MICROWAVE FUNCTION: RECIPES:
Follow this procedure to access the recipe function:Press ON/OFF ( );
Select the AUTOMATIC ( ) function;
23
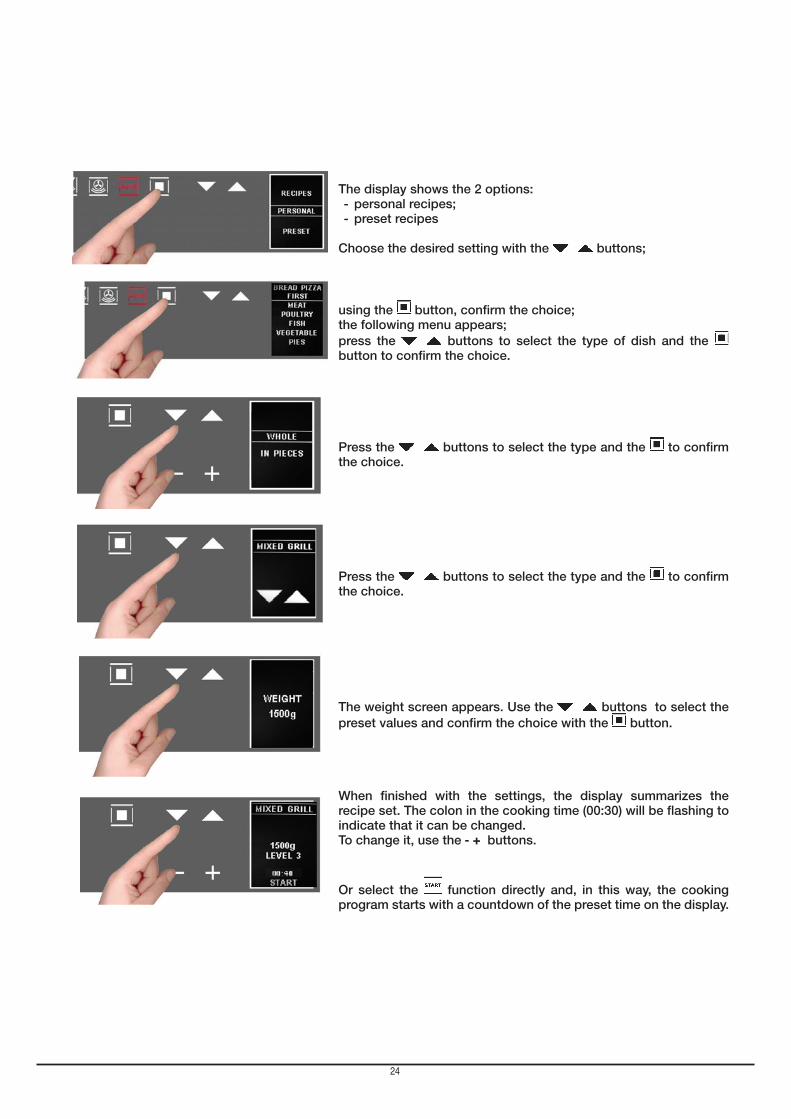
The display shows the 2 options:- personal recipes;- preset recipes
Choose the desired setting with the buttons;
using the button, confirm the choice;the following menu appears;press the buttons to select the type of dish and the button to confirm the choice.
Press the buttons to select the type and the to confirm the choice.
Press the buttons to select the type and the to confirm the choice.
The weight screen appears. Use the buttons to select the preset values and confirm the choice with the button.
When finished with the settings, the display summarizes the recipe set. The colon in the cooking time (00:30) will be flashing to indicate that it can be changed.To change it, use the - + buttons.
Or select the function directly and, in this way, the cooking program starts with a countdown of the preset time on the display.
24
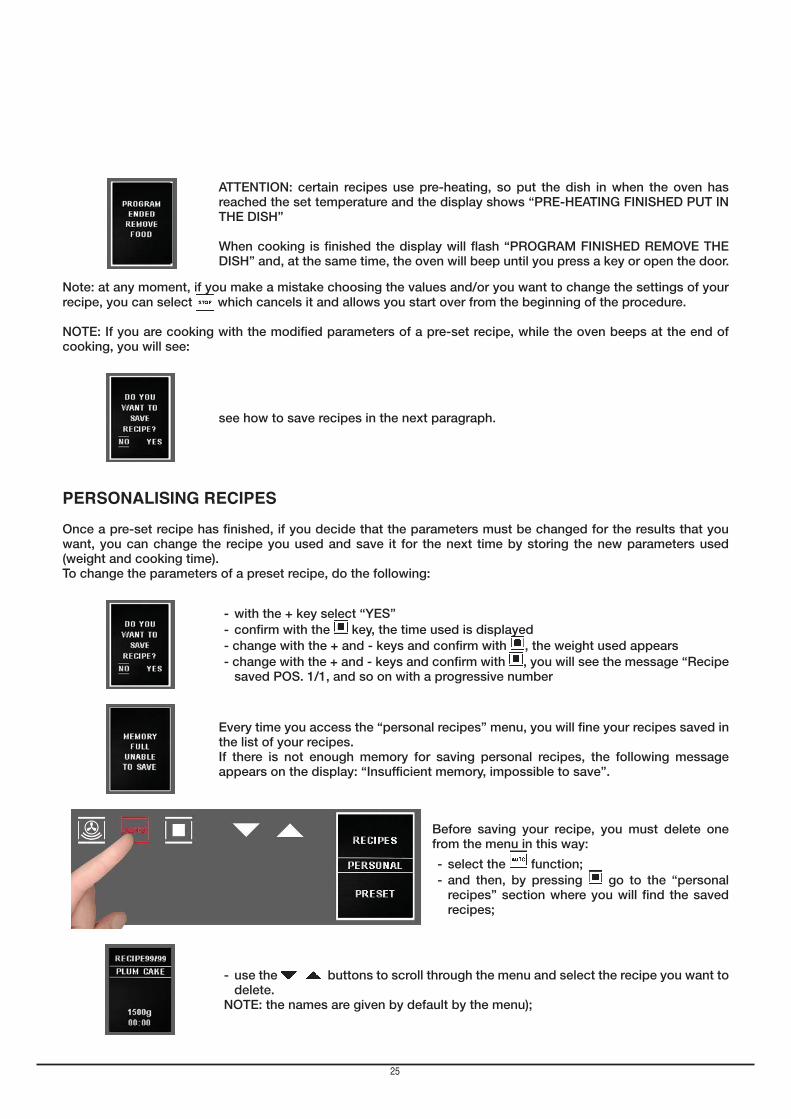
ATTENTION: certain recipes use pre-heating, so put the dish in when the oven has reached the set temperature and the display shows “PRE-HEATING FINISHED PUT IN THE DISH”
When cooking is finished the display will flash “PROGRAM FINISHED REMOVE THE DISH” and, at the same time, the oven will beep until you press a key or open the door.
Note: at any moment, if you make a mistake choosing the values and/or you want to change the settings of your recipe, you can select which cancels it and allows you start over from the beginning of the procedure.
NOTE: If you are cooking with the modified parameters of a pre-set recipe, while the oven beeps at the end of cooking, you will see:
see how to save recipes in the next paragraph.
PERSONALISING RECIPES
Once a pre-set recipe has finished, if you decide that the parameters must be changed for the results that you want, you can change the recipe you used and save it for the next time by storing the new parameters used (weight and cooking time). To change the parameters of a preset recipe, do the following:
- with the + key select “YES”- confirm with the key, the time used is displayed- change with the + and - keys and confirm with , the weight used appears- change with the + and - keys and confirm with , you will see the message “Recipe
saved POS. 1/1, and so on with a progressive number
Every time you access the “personal recipes” menu, you will fine your recipes saved in the list of your recipes.If there is not enough memory for saving personal recipes, the following message appears on the display: “Insufficient memory, impossible to save”.
Before saving your recipe, you must delete one from the menu in this way:
- select the function;- and then, by pressing go to the “personal
recipes” section where you will find the saved recipes;
- use the buttons to scroll through the menu and select the recipe you want to delete.
NOTE: the names are given by default by the menu);
25

GB
- then, after selecting the recipe to be deleted, press until the following screen appears:
By default, the selection will be set to NO, but, by pressing the + and - scroll keys, select YES and confirm with ;
- The display tells you that the recipe has been deleted
26
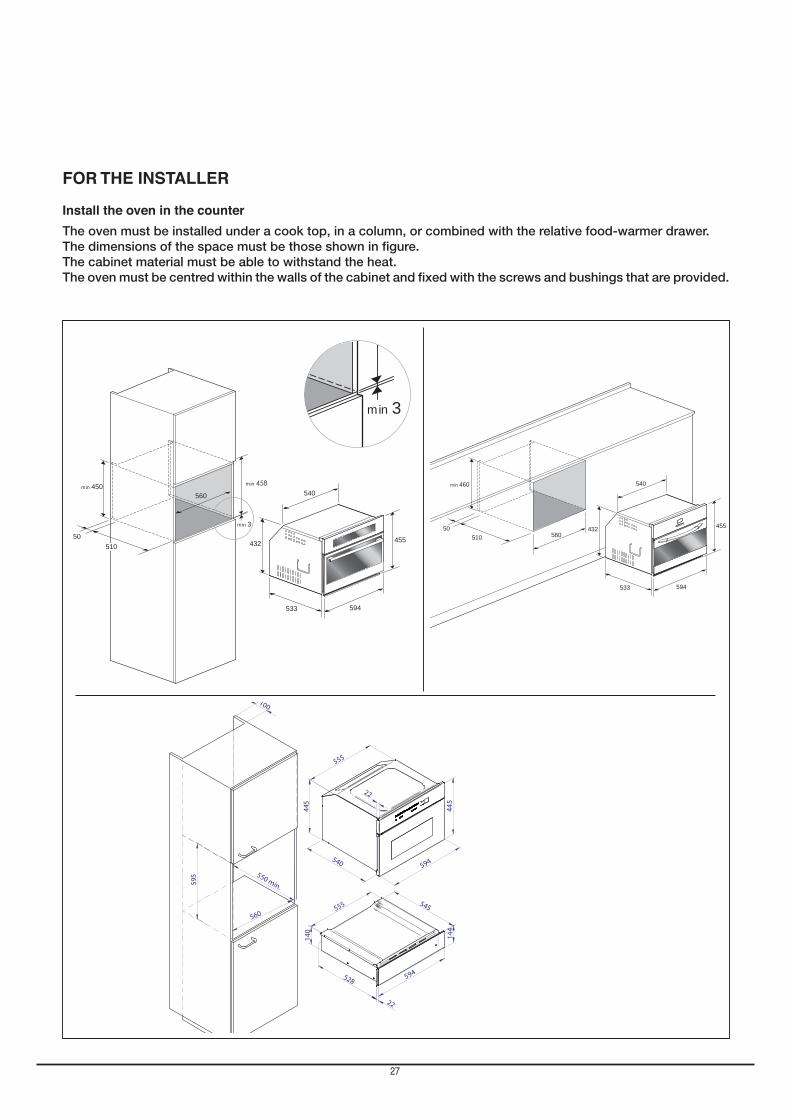
FOR THE INSTALLER
Install the oven in the counter
The oven must be installed under a cook top, in a column, or combined with the relative food-warmer drawer.The dimensions of the space must be those shown in figure.The cabinet material must be able to withstand the heat. The oven must be centred within the walls of the cabinet and fixed with the screws and bushings that are provided.
560min 450
50510
533
455
594
540
432
min
min 3
min 3
533
455
594
540
560
min 460
43250510
27
TECHNICAL DATA
Power supply 220-240 V~, 50Hz
Maximum absorbed power 3200 W
Microwave power 900 W
Grill 1500 W
Hot air 1500 W
Microwave frequency 2450 MHz
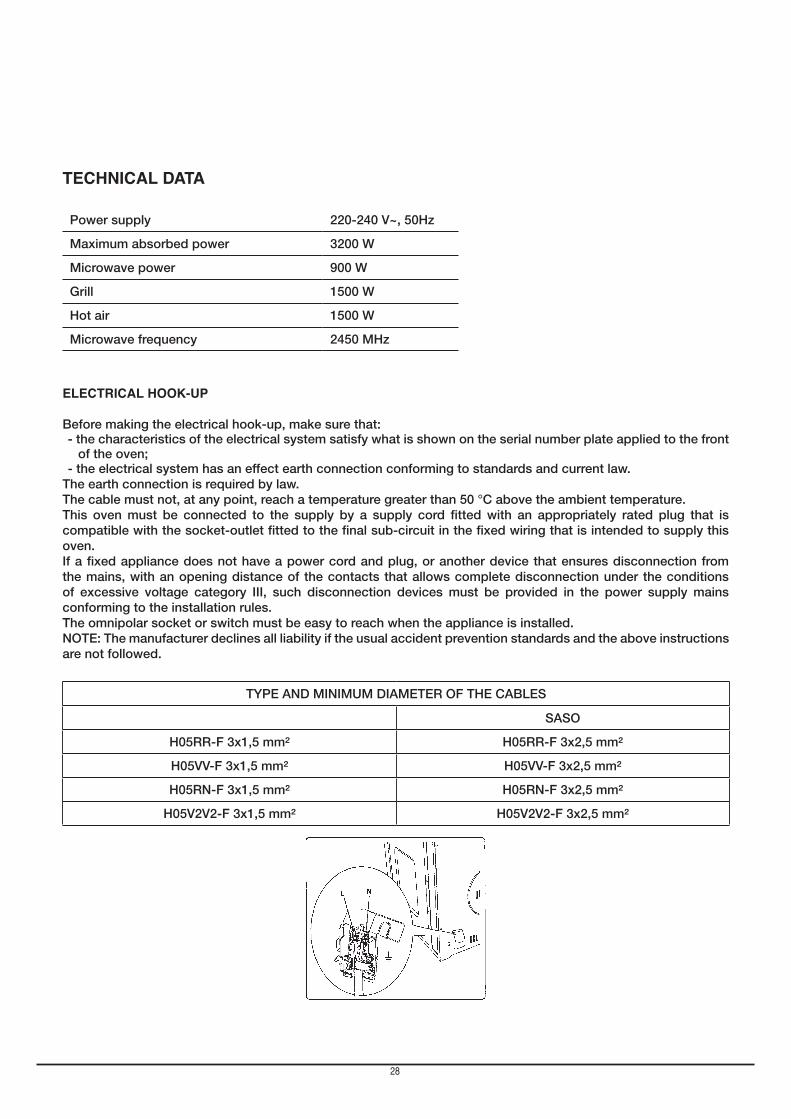
ELECTRICAL HOOK-UP
Before making the electrical hook-up, make sure that:- the characteristics of the electrical system satisfy what is shown on the serial number plate applied to the front
of the oven;- the electrical system has an effect earth connection conforming to standards and current law.
The earth connection is required by law.The cable must not, at any point, reach a temperature greater than 50 °C above the ambient temperature.This oven must be connected to the supply by a supply cord fitted with an appropriately rated plug that is compatible with the socket-outlet fitted to the final sub-circuit in the fixed wiring that is intended to supply this oven.If a fixed appliance does not have a power cord and plug, or another device that ensures disconnection from the mains, with an opening distance of the contacts that allows complete disconnection under the conditions of excessive voltage category III, such disconnection devices must be provided in the power supply mains conforming to the installation rules.The omnipolar socket or switch must be easy to reach when the appliance is installed. NOTE: The manufacturer declines all liability if the usual accident prevention standards and the above instructions are not followed.
TYPE AND MINIMUM DIAMETER OF THE CABLES
SASO
H05RR-F 3x1,5 mm² H05RR-F 3x2,5 mm²
H05VV-F 3x1,5 mm² H05VV-F 3x2,5 mm²
H05RN-F 3x1,5 mm² H05RN-F 3x2,5 mm²
H05V2V2-F 3x1,5 mm² H05V2V2-F 3x2,5 mm²
28

NOTES

NOTES

1. Warranty Period
1.1 Domestic Warranty
Fulgor Milano Australasia warrants that any Product purchased from it, and when used in accordance with the Instructions for
household or personal use, shall be delivered free from defects in workmanship and materials and will perform for a period of two
(2) years from the date of purchase.
1.2 Commercial Warranty
Fulgor Milano Australasia warrants that any Product purchased from it, and when used in accordance with the Instructions for
Commercial Use, shall be delivered free from defects in workmanship and materials and will perform for a period of one (1) year
from the date of purchase.
2. Exclusions from Warranty
2.1 This Warranty does not cover:
i. Abuse;
ii. Misuse;
iii. Any damage sustained by a product whilst being transported;
iv. Other defects not related to materials or workmanship;
v. Consumable items including, but not limited to, replacement of light globes, glass breakage due to impact;
vi. Damage or failure caused to the Product by unsuitable physical or operating environment.
3. Warranty Claim
3.1 To make a Claim you must:
a) Contact your nearest Local Servicing Agent, details of which are on Fulgor Milano Australasia’s website listed
above; and
b) Provide Proof of Purchase and this Warranty to the Local Servicing Agent.
3.2 Upon receipt of a valid Claim, a Local Servicing Agent will attend your premises to inspectthe Product.
3.3 Where a Product is found to be defective, Fulgor Milano Australasia will, at its option and expense, repair or replace the
Product or the defective material or part. If Fulgor Milano Australasia repairs or replaces a defective Product, the warranty
period for any Product repaired or replaced does not extend beyond the original Warranty Period.
3.4 Where the Product is located outside the Normal Servicing Area, You must pay for the cost of the nearest Local Servicing
Agent to attend your premises.
Warranty StatementThis warranty is provided by:
Product Name:
Model Number:
Date of Purchase:
Name: Fulgor Milano Australasia Pty Ltd ACN 164 163 982
Address: 14/24-32 Lexington Drive, Bella Vista
Telephone Number: 1300 FULGOR (1300 385 467)
Email Address: [email protected]
Website: www.fulgor.com.au
3.5 If You are unable to provide Proof of Purchase, Fulgor Milano Australasia will not be obliged to repair or replace the
defective Product.
3.6 Fulgor Milano Australasia will not be responsible for any costs or expenses, loss or damage, associated with:
a) Any transport of the Product to a Local Servicing Agent;
b) Any consequential damages from the use of the Product;
c) The de-installation and re-installation of the Product at Your premises to make the Product available for
inspection and servicing/repair, or any consequential damage caused by de-installation and re-installation of the
Product.
3.7 You may assign this Warranty. An assignee of this Warranty may only make a Claim where the following conditions are met:
a) You have provided to the assignee, and the assignee produces, Your Proof of Purchase; and
b) Any claim by an assignee is made within the original Warranty Period.
4. Statutory and Other Legal Rights
4.1. under any law which relates to the Product.
4.2. Our goods come with guarantees that cannot be excluded under the Australian Consumer Law. You are entitled to a
replacement or refund for a major failure and compensation for any other reasonably foreseeable loss or damage. You are
also entitled to have the goods repaired or replaced if the goods fail to be of acceptable quality and the failure does not
amount to a major failure.
5.
“Claim” means a claim made under this Warranty.
“Commercial Use” means use that is not household or personal use;
“Fulgor Milano Australasia” means Fulgor Milano Australasia Pty Ltd ACN 164 163 982;
“Instructions” means any instructions provided by Fulgor Milano Australasia for the use of the Product;
“Local Servicing Agent” means a servicing agent which has been appointed by Fulgor Milano Australasia, to service a
Product;
“Normal Servicing Area” means an area where a Local Servicing Agent has been appointed by Fulgor Milano Australasia
to service Products;
“Product” means the product of Fulgor Milano Australasia that this Warranty applies to;
“Proof of Purchase” means the receipt issued to You at the point of sale;
“Warranty” means this warranty statement;
“Warranty Period” means the applicable warranty period depending on whether it is commercial warranty or domestic
warranty;
“You” means you the purchaser of the Fulgor Milano Australasia Product.


