42
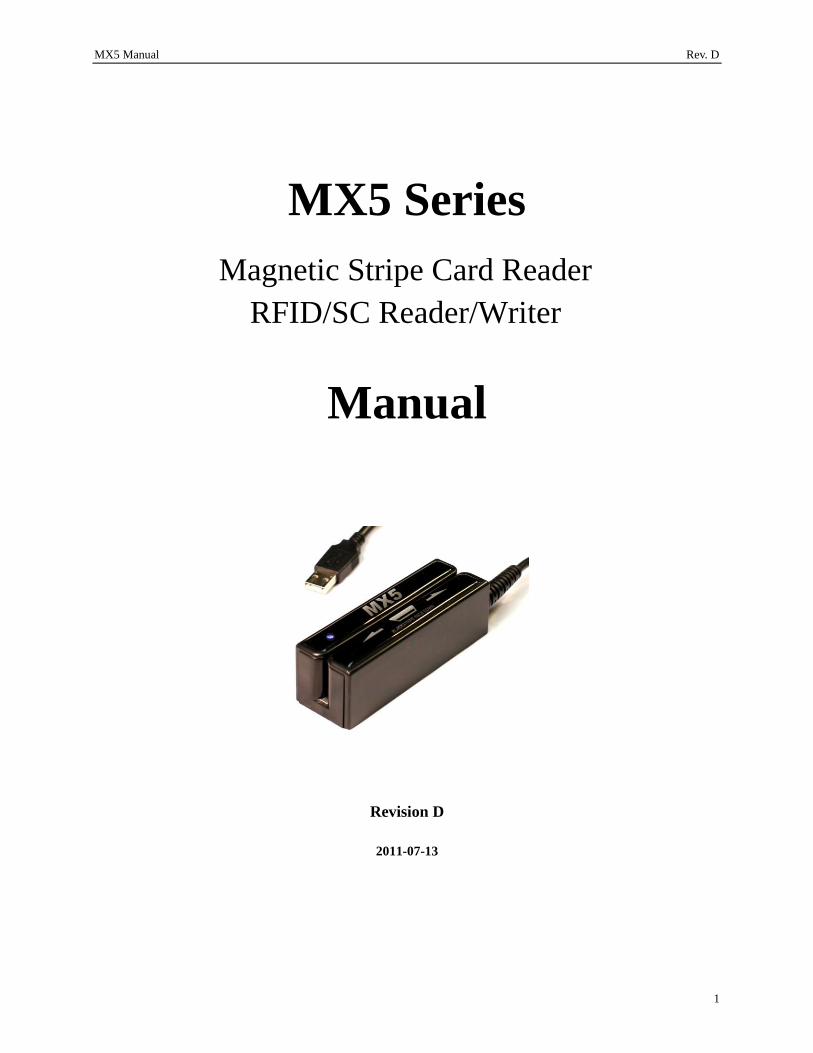
MX5 Manual Rev. D 1 MX5 Series Magnetic Stripe Card Reader RFID/SC Reader/Writer Manual Revision D 2011-07-13
MX5 Manual Rev. D
1
MX5 Series
Magnetic Stripe Card Reader
RFID/SC Reader/Writer
Manual
Revision D
2011-07-13

MX5 Manual Rev. D
2
Table of Content
INTRODUCTION .................................................................................................................................... 3 Accessories of MX5 .......................................................................................................................................... 3 Warranty ............................................................................................................................................................ 3 Disclaimer ......................................................................................................................................................... 3
GENERAL FEATURES .......................................................................................................................... 4 Technical Specifications .................................................................................................................................... 5 Dimension Views: ............................................................................................................................................. 9 Connection Views: ............................................................................................................................................ 9 MX5-CBL (Add-on Cable for MX5) .............................................................................................................. 10 Typical MX5 Device Setup ............................................................................................................................. 11
MX5 UTILITY SOFTWARE .................................................................................................................. 12 System Requirements ...................................................................................................................................... 12 MX5 Utility Installation .................................................................................................................................. 12 MX5 Utility General Information ................................................................................................................... 13 Definitions of Settings ..................................................................................................................................... 13 MX Device Firmware Upgrade Menu ............................................................................................................. 20 Creating a Setup Card ..................................................................................................................................... 22 Hardware Mounting ........................................................................................................................................ 23 Hardware Maintenance ................................................................................................................................... 23 Reading / Writing RFID .................................................................................................................................. 23 Reading/ Writing SC Smart IC Cards .............................................................................................................. 23
APPENDICES ...................................................................................................................................... 24 HID Software Developer Notes on Mag-Tek Compatible Report Format: ..................................................... 24 OPOS/POS.NET Information ......................................................................................................................... 26 Troubleshooting and FAQ ............................................................................................................................... 31 Firmware Listing ............................................................................................................................................. 36
MX5 Manual Rev. D
3
Introduction
Thank you for purchasing the MX5 Magnetic Swipe Card Reader and RFID/SC Reader/Writer. It is ideal for access
control, time keeping, banking, ID recognition & credit verification and related applications. In fact, wherever a
RFID/SC/Magnetic stripe ID or transaction card is used, one can find a related use for the versatile, user-friendly
MX5 device.
The MX5 is designed to offer a versatile and expandable solution that will attractively complement an existing
system for years to come. The MX5 units are the product of choice for versatility, expandability and productivity.
Accessories of MX5
The accessories content will vary based on the type of device purchased:
1. MX5 Unit
2. Velcro adhesive strip.
3. Quick Set Default Setup Card. (only with MX53 series)
4. CD ROM: Utility, Firmware, SDK, Manual(s) and Product specifications.
Warranty
All the MX5 products are backed by a two year parts and labour limited warranty. Should you have problems
with your MX5 device please contact the dealer from whom you purchased the product. Any alteration and/or
erasure or modification of the MX5 will void the warranty.
Disclaimer
The Manufacturer makes no claims or warranties with respect to the contents or accuracy of this publication or
the product it describes, including warranties of fitness or merchantability for a particular purpose. The
Manufacturer shall not be liable for any special, incidental or consequential damages, nor damages due to use or
misuse born from Integration into any mechanical, electrical or computer system. The Manufacturer is not
responsible for the accuracy of any device connected to the MX5. The Manufacturer reserves the right to make
any changes to this manual or product(s) without the obligation to notify any person of such changes. Any
alteration and/or erasure or modification of the MX5 will void the warranty.

MX5 Manual Rev. D
4
General Features
The MX5 series of devices communicates with a host computer or other terminal using a USB interface. Unlike any other reader on the market today, you will not need to stock different models to support USB Serial,
Keyboard, HID or Custom applications. Just plug in, download the desired firmware and your MX5 is ready to
meet your needs.
The MX5 series product offering is based on the core of MX5 Magnetic Card Readers which utilizes an Arms 7
(32 Bit Processor) CPU. By simply removing the side cover of the MX5 Magnetic card reader, you now can
add a variety of snap on modules designed to add combo Reading/Writing for RFID or IC Smart Cards. If you
do not require a Magnetic Card Reader, the Compact version - MX5C is also available for all the MX5 add on
modules. For the RFID power user, we have created our MX5T table top model which supports both Low
Frequency 125 KHz and High Frequency 13.56 MHz cards/tags; all in one Reader. All of our MX5 product line
is fully flash upgradeable, customizable and a wide range of firmware is available, making the MX5 product the
most versatile product currently on the market. The MX5 product is the One and only Card Device you will
ever need for many years to come.
MX53 MX5C-RFID/SC MX53-RFID/SC MX5T-RFID
The MX53 products currently supports all the ISO, ABA, ANSI, ISO magnetic card standards and AAMVA,
CADMV drivers license standards. We can also provide support for non standard magnetic decoding methods
and Cut & Paste of Magnetic data on the fly. Data encryption can also be performed inside the reader and
various data encryption standards are available for data output. Currently Triple DES, Advanced Security
Features, Masked Data is available and AES-128 encryption will also be available soon for your custom
application requirements. These features are specifically designed to Meet PCI DSS Requirements.
Custom firmware applications can be provided exclusively upon request. A unique feature built into all our
MX5 products will protect your custom firmware and guaranty exclusive hardware to all your clients.
Another exclusive feature only available on the MX53 magnetic card reader or MX53 Combo reader is the
QuickSet setup card. This feature is great when deploying large installations or if you just wish your client to
have a default card customized to their application. All your custom parameters and options for the MX53 can
be programmed in a simple swipe of this card. Custom QuickSet setup cards are available from your supplier.
This great little feature will save you technical support time, increase productivity and help improve hardware
deployment time.
System Development Kits (SDK) are available for all our MX5 series products. Our kits include a DLL, Demo
software, sample code, code description manual and protocol manual. Contact your MX5 device provider for a
listing and pricing.

MX5 Manual Rev. D
5
Technical Specifications
MX53-USB
Built-in Magnetic Card Decoder Yes
Supported Standard ABA, ANSI, ISO,AAMVA, CADMV
Communications USB port (RS232 – DB9, PS2 KB Wedge using MX5-CBL)
Power Via USB port
Current mA 35 mA
Connectors USB Type A
Cable Length 6 Ft (180 cm)(Default) also Available in
2 Ft ( 60 cm) and 15 Ft (450 cm)
Dimensions (LxWxH) 100 x 32 x 32 mm
Total Weight 130 g
Operating Temp. - 20 C to 55 C
Humidity 10% - 90% relative humidity
Quick Set® Factory Default Card Yes One step Default setup card, Customizable
Boot Load Flash Upgradable Memory Yes
Selectable Tracks Yes (Separate Track selection for both ISO & AAMVA)
Selectable Available Tracks 1, 2, 3
Track Swipe Rates 2 : 125 ips at 75 bpi
1, 3: 60 ips at 210 bpi
Head Life Over 1,000,000 passes
Programmable Sound On/Off Yes
Programmable Carriage Return Yes
Programmable Inter character Delay Yes
Programmable SS/ES Selectable Char. Yes
Parity and LRC Data Checking Built-in, audible and LED good read and error indicator
Certifications CE, FCC, UL, RoHS
Add-on Modules Smart IC Chip Card, EM RFID, Mifare RFID options
Support Operating Systems Win 7, Win 2008 ,Vista, Win 2003, Win 2000, XP, Win Ce,
Unix
Warranty 2 years
MX5 Manual Rev. D
6
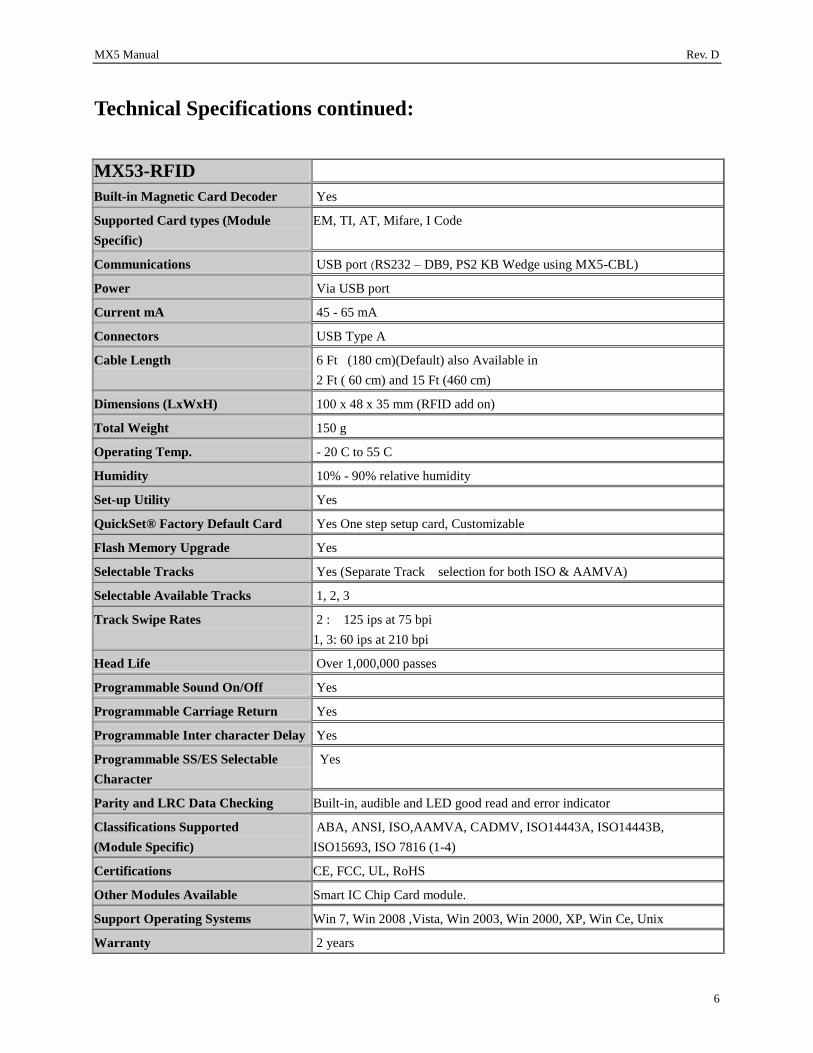
Technical Specifications continued:
MX53-RFID
Built-in Magnetic Card Decoder Yes
Supported Card types (Module
Specific)
EM, TI, AT, Mifare, I Code
Communications USB port (RS232 – DB9, PS2 KB Wedge using MX5-CBL)
Power Via USB port
Current mA 45 - 65 mA
Connectors USB Type A
Cable Length 6 Ft (180 cm)(Default) also Available in
2 Ft ( 60 cm) and 15 Ft (460 cm)
Dimensions (LxWxH) 100 x 48 x 35 mm (RFID add on)
Total Weight 150 g
Operating Temp. - 20 C to 55 C
Humidity 10% - 90% relative humidity
Set-up Utility Yes
QuickSet® Factory Default Card Yes One step setup card, Customizable
Flash Memory Upgrade Yes
Selectable Tracks Yes (Separate Track selection for both ISO & AAMVA)
Selectable Available Tracks 1, 2, 3
Track Swipe Rates 2 : 125 ips at 75 bpi
1, 3: 60 ips at 210 bpi
Head Life Over 1,000,000 passes
Programmable Sound On/Off Yes
Programmable Carriage Return Yes
Programmable Inter character Delay Yes
Programmable SS/ES Selectable
Character
Yes
Parity and LRC Data Checking Built-in, audible and LED good read and error indicator
Classifications Supported
(Module Specific)
ABA, ANSI, ISO,AAMVA, CADMV, ISO14443A, ISO14443B,
ISO15693, ISO 7816 (1-4)
Certifications CE, FCC, UL, RoHS
Other Modules Available Smart IC Chip Card module.
Support Operating Systems Win 7, Win 2008 ,Vista, Win 2003, Win 2000, XP, Win Ce, Unix
Warranty 2 years
MX5 Manual Rev. D
7
Technical Specifications continued:
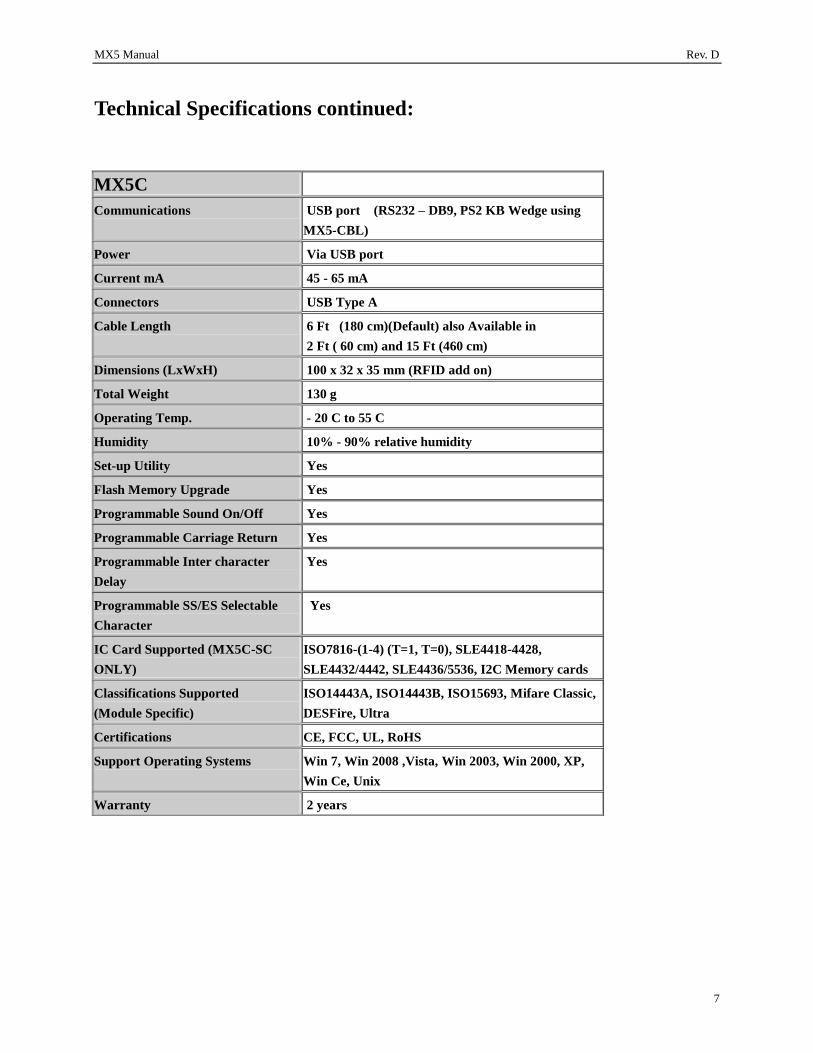
MX5C
Communications USB port (RS232 – DB9, PS2 KB Wedge using
MX5-CBL)
Power Via USB port
Current mA 45 - 65 mA
Connectors USB Type A
Cable Length 6 Ft (180 cm)(Default) also Available in
2 Ft ( 60 cm) and 15 Ft (460 cm)
Dimensions (LxWxH) 100 x 32 x 35 mm (RFID add on)
Total Weight 130 g
Operating Temp. - 20 C to 55 C
Humidity 10% - 90% relative humidity
Set-up Utility Yes
Flash Memory Upgrade Yes
Programmable Sound On/Off Yes
Programmable Carriage Return Yes
Programmable Inter character
Delay
Yes
Programmable SS/ES Selectable
Character
Yes
IC Card Supported (MX5C-SC
ONLY)
ISO7816-(1-4) (T=1, T=0), SLE4418-4428,
SLE4432/4442, SLE4436/5536, I2C Memory cards
Classifications Supported
(Module Specific)
ISO14443A, ISO14443B, ISO15693, Mifare Classic,
DESFire, Ultra
Certifications CE, FCC, UL, RoHS
Support Operating Systems Win 7, Win 2008 ,Vista, Win 2003, Win 2000, XP,
Win Ce, Unix
Warranty 2 years
MX5 Manual Rev. D
8
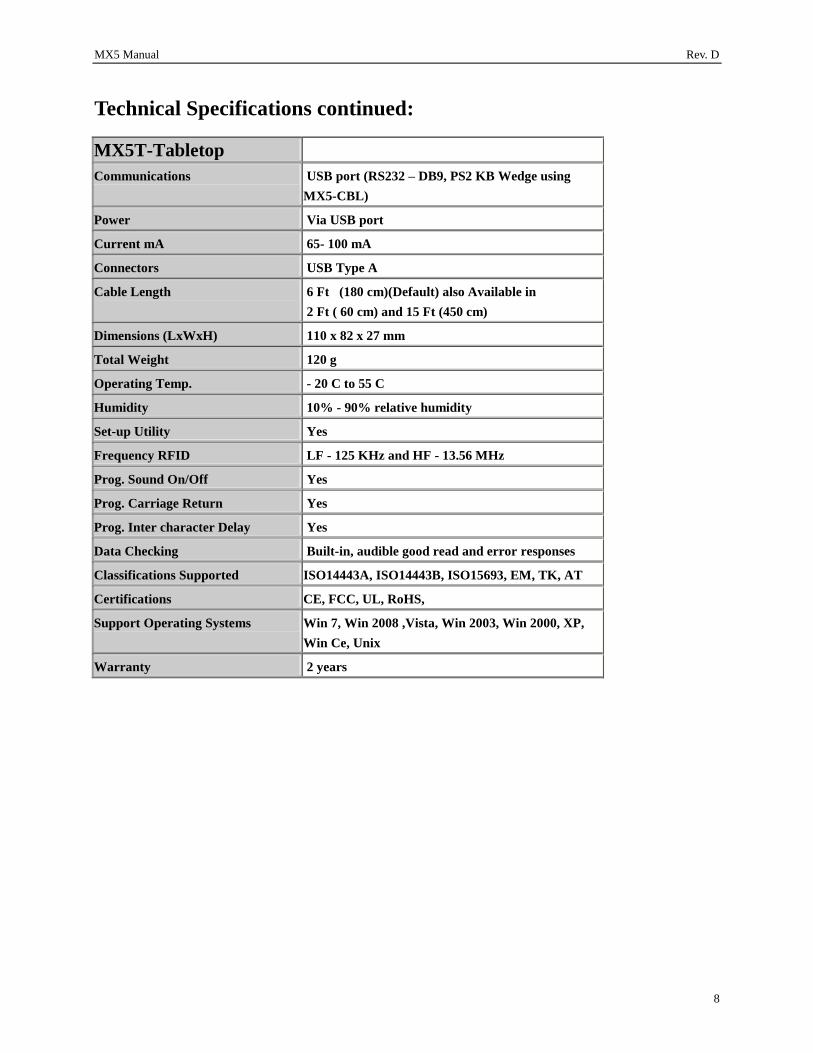
Technical Specifications continued:
MX5T-Tabletop
Communications USB port (RS232 – DB9, PS2 KB Wedge using
MX5-CBL)
Power Via USB port
Current mA 65- 100 mA
Connectors USB Type A
Cable Length 6 Ft (180 cm)(Default) also Available in
2 Ft ( 60 cm) and 15 Ft (450 cm)
Dimensions (LxWxH) 110 x 82 x 27 mm
Total Weight 120 g
Operating Temp. - 20 C to 55 C
Humidity 10% - 90% relative humidity
Set-up Utility Yes
Frequency RFID LF - 125 KHz and HF - 13.56 MHz
Prog. Sound On/Off Yes
Prog. Carriage Return Yes
Prog. Inter character Delay Yes
Data Checking Built-in, audible good read and error responses
Classifications Supported ISO14443A, ISO14443B, ISO15693, EM, TK, AT
Certifications CE, FCC, UL, RoHS,
Support Operating Systems Win 7, Win 2008 ,Vista, Win 2003, Win 2000, XP,
Win Ce, Unix
Warranty 2 years
MX5 Manual Rev. D
9
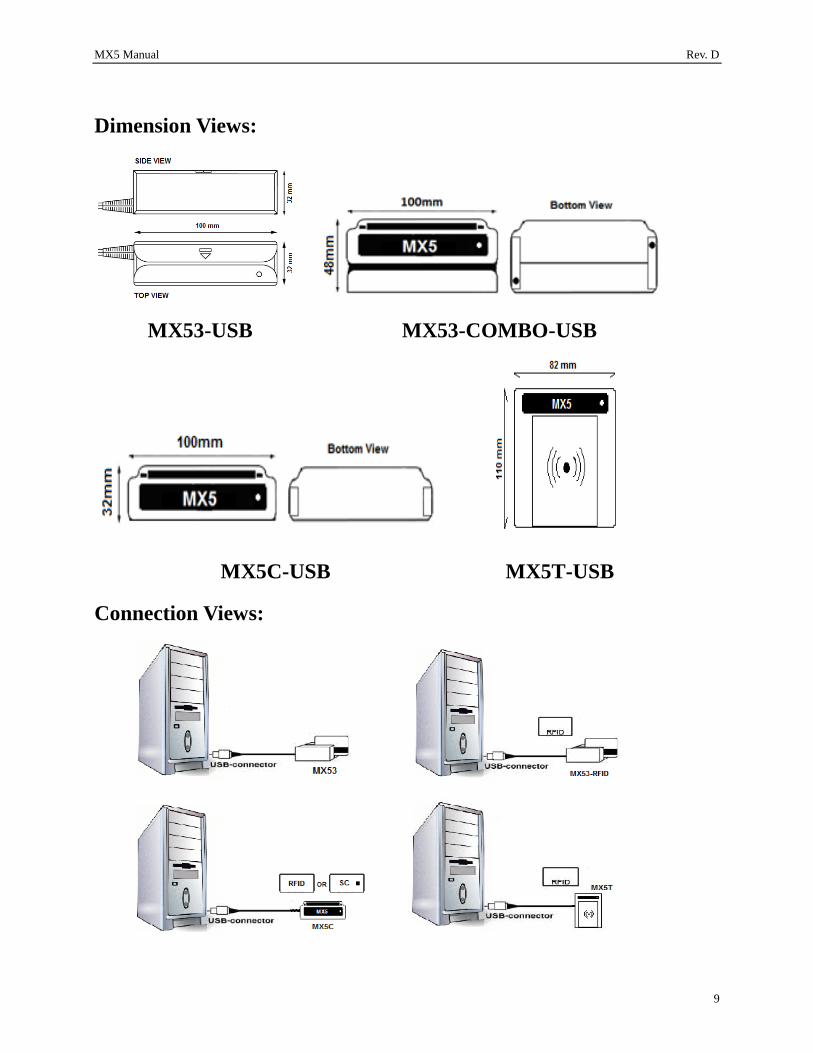
Dimension Views:
MX53-USB MX53-COMBO-USB
MX5C-USB MX5T-USB
Connection Views:
MX5 Manual Rev. D
10
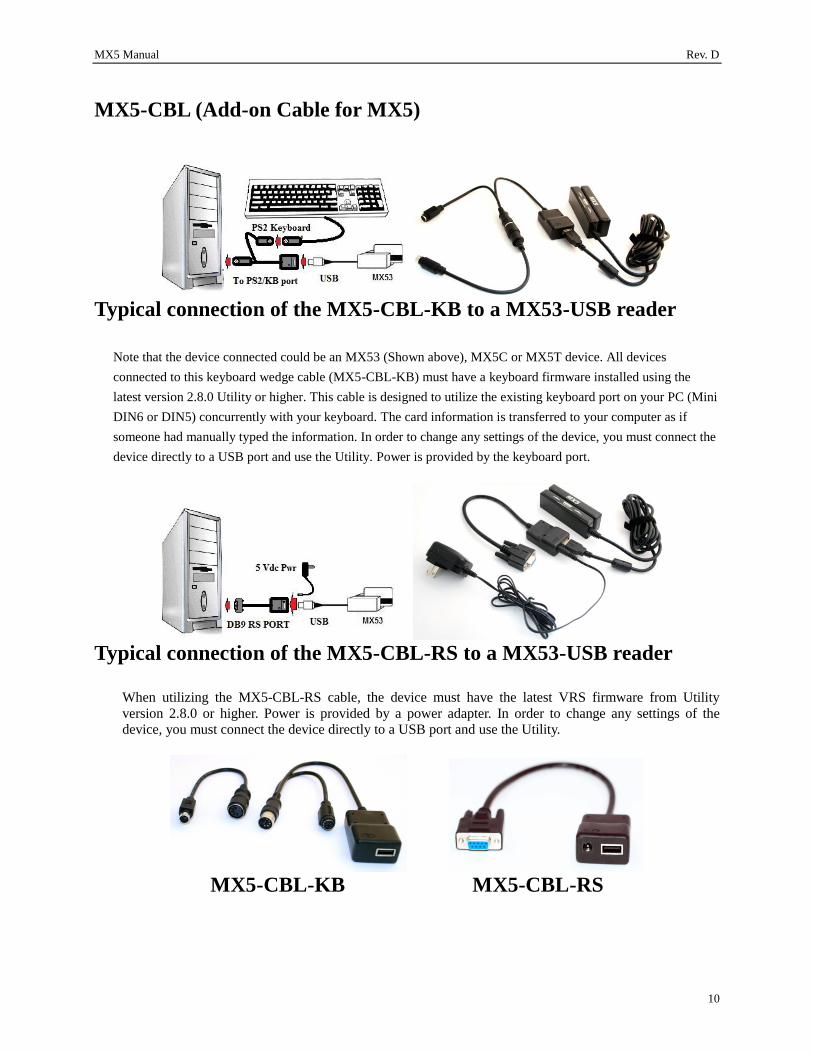
MX5-CBL (Add-on Cable for MX5)
Typical connection of the MX5-CBL-KB to a MX53-USB reader
Note that the device connected could be an MX53 (Shown above), MX5C or MX5T device. All devices
connected to this keyboard wedge cable (MX5-CBL-KB) must have a keyboard firmware installed using the
latest version 2.8.0 Utility or higher. This cable is designed to utilize the existing keyboard port on your PC (Mini
DIN6 or DIN5) concurrently with your keyboard. The card information is transferred to your computer as if
someone had manually typed the information. In order to change any settings of the device, you must connect the
device directly to a USB port and use the Utility. Power is provided by the keyboard port.
Typical connection of the MX5-CBL-RS to a MX53-USB reader
When utilizing the MX5-CBL-RS cable, the device must have the latest VRS firmware from Utility
version 2.8.0 or higher. Power is provided by a power adapter. In order to change any settings of the
device, you must connect the device directly to a USB port and use the Utility.
MX5-CBL-KB MX5-CBL-RS
MX5 Manual Rev. D
11
Typical MX5 Device Setup
1. Power on your system (PC).
2. Insert the MX-5 Utility CD into your system and install the MX5 Setup Utility.
3. Connect the USB cable of the MX5 to a free USB port .(See Connection Views)
4. Windows will automatically install the appropriate driver for the device. INF files for VRS firmware versions
maybe needed by Windows. These files are installed by the MX5 Utility and located in the default programs
directory MX5 Device. Select this directory when requested by Windows device manager auto installer.
5. You maybe requested to REBOOT your system.
6. You are now ready to configure your MX5 device using the MX5 Device Utility. Note that the MX53
magnetic card reader or Combo reader can be configures using the QuickSet setup card. All your custom
parameters can be programmed in a simple swipe of this card thru the MX53 reader. Custom QuickSet setup
card settings are available from your supplier. This feature is great when deploying large installations or if you
just wish your client to have a default card customized to their application. This will save you technical support
time and increase productivity.
7. If you require to Upgrade or Change the device characteristic eg: USB serial or HID or custom USB. You will
need to use the MX5 Device Utility to enable the Flash upgrade function of the device. See the MX5 Devise
utility software section for more details.
8. Once you have placed the MX5 Device in upgrade mode, you can select from an extensive list of various
firmware upgrades located on your CD. Select the upgrade based on the device type you are using. Each device
has specific firmware upgrades. See the Firmware list section for descriptions of the available firmware. Do not
worry should you install the wrong firmware, The Utility and MX5 hardware is intuitively designed to prevent
any damage or Lock up of your device. The Flash function of the MX5 Device is designed to be upgraded has
many times as desired to help keep your hardware up to date. All the MX5 Device settings and options are also
saved into the MX5 Device Flash memory. This allows you to move the hardware to any computer without
losing your custom settings.
9. Note that when the MX5 Device is upgraded, the MX5 Device will automatically restart. You do not need to
unplug the Device from the USB port to restart the Device. Windows will automatically install the new drivers
for the Device if required. Also note that each time you plug the MX5 Device into a new USB port on your
computer, Windows will install the drivers for that device for that port. Special care should be noted when
using VRS (USB Virtual Serial Port). Refer to the VRS section for hints on configuring your MX5 Device on
all your computer‟s USB ports.
10. System Development Kit (SDK) Utility located on the CD is designed for software developers who wish to
integrate the MX5 Device to their own application using our DLL and sample code. The SDK Utility is
available to demonstrate proper operation of the device using the DLL with the Hardware.
MX5 Manual Rev. D
12
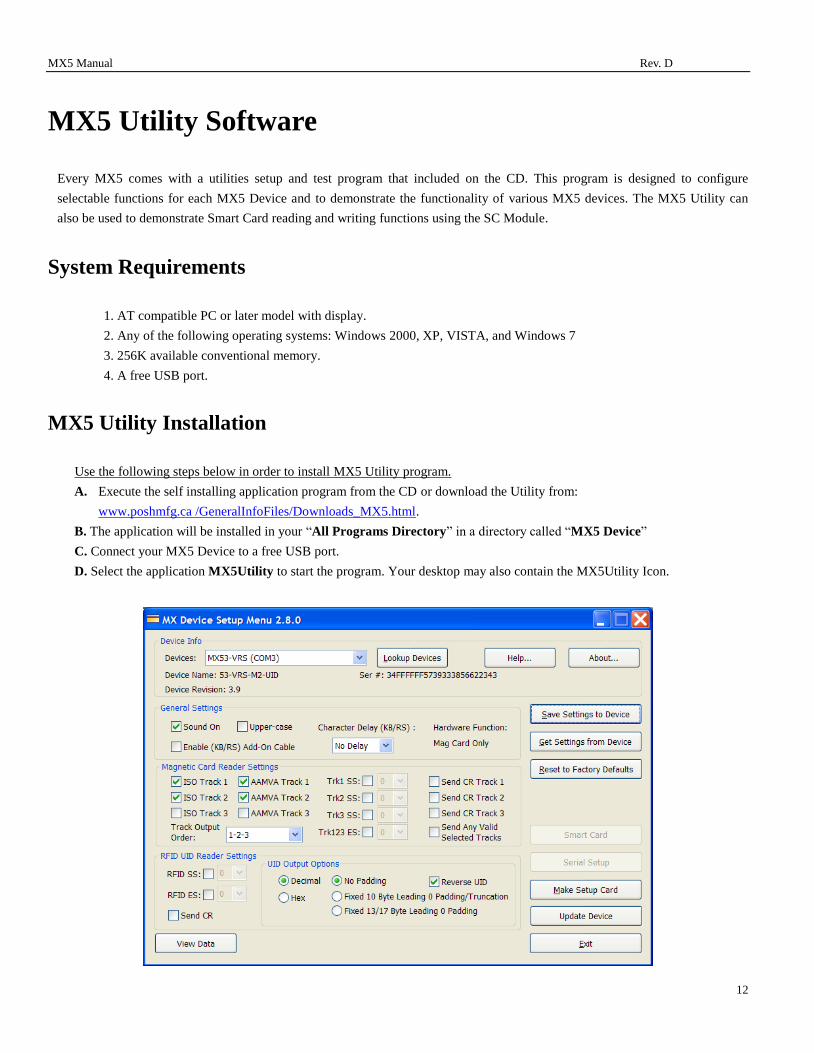
MX5 Utility Software
Every MX5 comes with a utilities setup and test program that included on the CD. This program is designed to configure
selectable functions for each MX5 Device and to demonstrate the functionality of various MX5 devices. The MX5 Utility can
also be used to demonstrate Smart Card reading and writing functions using the SC Module.
System Requirements
1. AT compatible PC or later model with display.
2. Any of the following operating systems: Windows 2000, XP, VISTA, and Windows 7
3. 256K available conventional memory.
4. A free USB port.
MX5 Utility Installation
Use the following steps below in order to install MX5 Utility program.
A. Execute the self installing application program from the CD or download the Utility from:
www.poshmfg.ca /GeneralInfoFiles/Downloads_MX5.html.
B. The application will be installed in your “All Programs Directory” in a directory called “MX5 Device”
C. Connect your MX5 Device to a free USB port.
D. Select the application MX5Utility to start the program. Your desktop may also contain the MX5Utility Icon.
MX5 Manual Rev. D
13
E. The MX5 Utility program will auto-detect the MX5 Device. If no device is listed press the Lookup Device dialog box.
F. If NO device appears in the information dialog box after pressing Lookup Device, check to see that the Device is plugged
into the USB port and the power LED of the MX5 device is ON. Exit the Utility and Repeat from step C.
G. If you are still unable to see the device in the dialog box, Exit the Utility and go to the Troubleshooting Section.
MX5 Utility General Information
The MX5 Utility is intuitive to the hardware configuration and will automatically read the MX5 Device settings and display
the selection in its appropriate dialog boxes. Dialog boxes which are not related to this firmware version will be grayed out
and disabled. Should you have more then one MX5 Device connected to your system, you can select a different MX5 Device
by using your mouse and selecting the pull down draw bar in the window of the Devices:. The Device Name and device
number will be listed in the pull down draw bar dialog box. After selecting a device, the screen will be automatically updated
and the dialog boxes will be updated with the selected device settings. The Device Info Section will display the internal
device serial number, the device name and the version installed in the device selected.
You may choose to enable or disable any available options which are not grayed out.
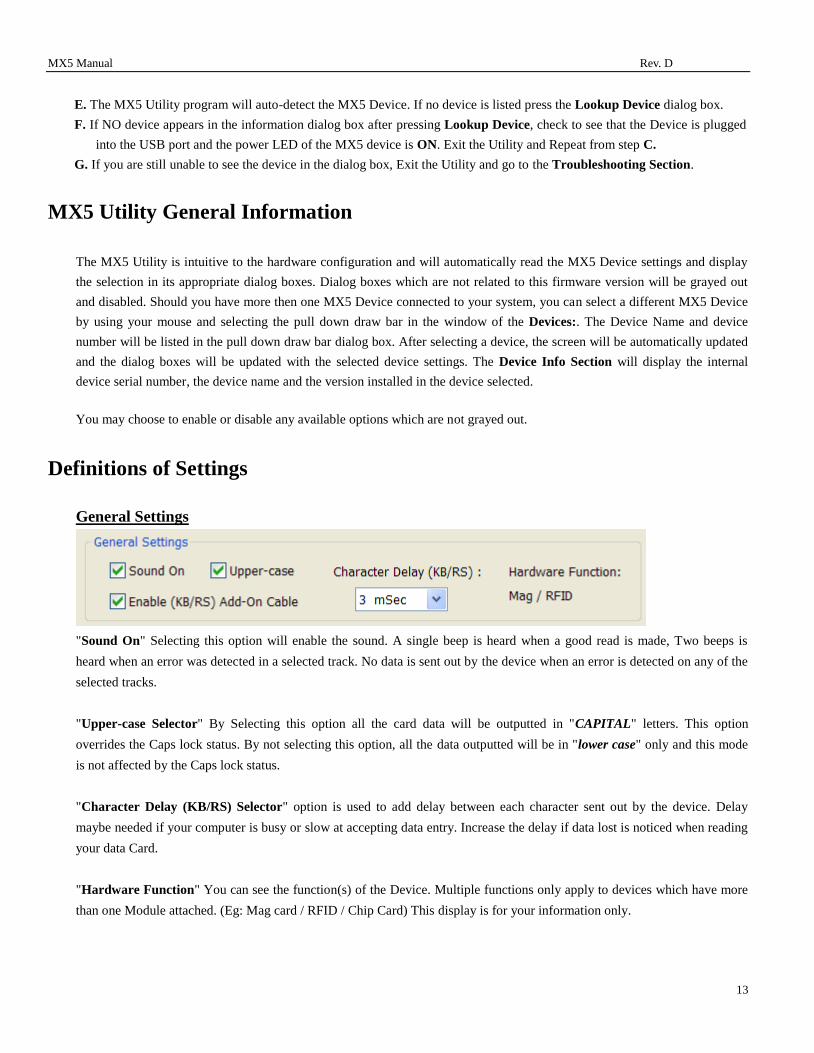
Definitions of Settings
General Settings
"Sound On" Selecting this option will enable the sound. A single beep is heard when a good read is made, Two beeps is
heard when an error was detected in a selected track. No data is sent out by the device when an error is detected on any of the
selected tracks.
"Upper-case Selector" By Selecting this option all the card data will be outputted in "CAPITAL" letters. This option
overrides the Caps lock status. By not selecting this option, all the data outputted will be in "lower case" only and this mode
is not affected by the Caps lock status.
"Character Delay (KB/RS) Selector" option is used to add delay between each character sent out by the device. Delay
maybe needed if your computer is busy or slow at accepting data entry. Increase the delay if data lost is noticed when reading
your data Card.
"Hardware Function" You can see the function(s) of the Device. Multiple functions only apply to devices which have more
than one Module attached. (Eg: Mag card / RFID / Chip Card) This display is for your information only.
MX5 Manual Rev. D
14
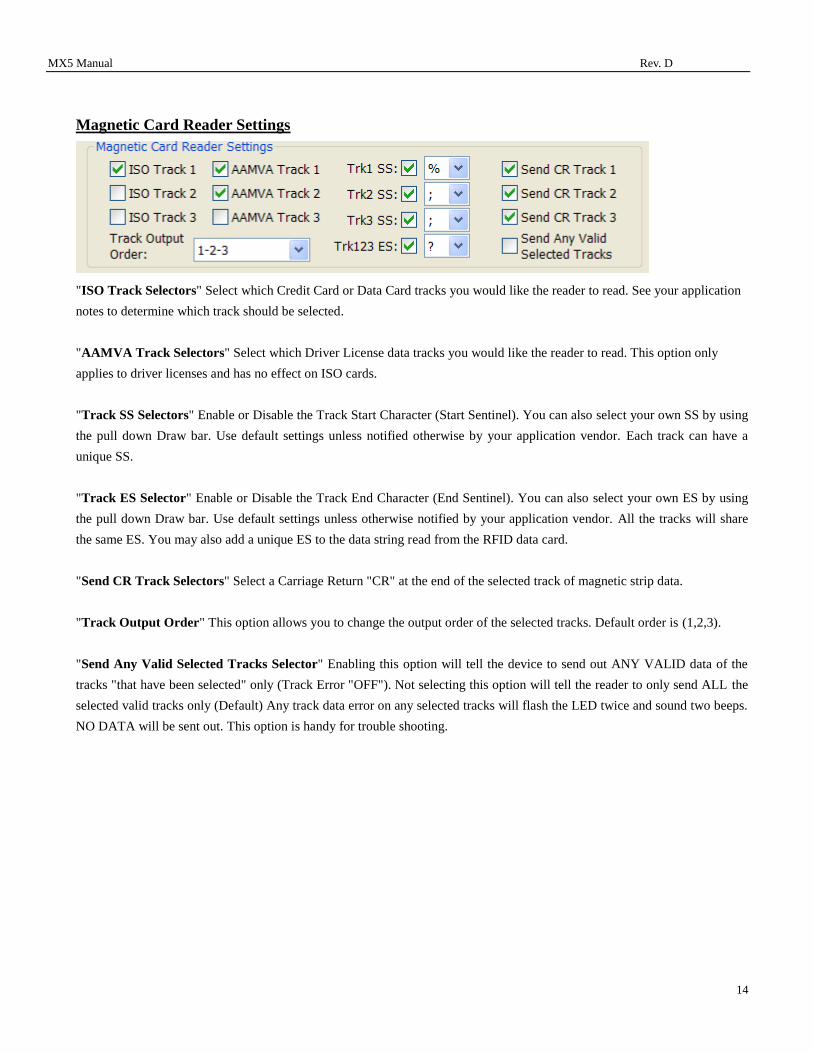
Magnetic Card Reader Settings
"ISO Track Selectors" Select which Credit Card or Data Card tracks you would like the reader to read. See your application
notes to determine which track should be selected.
"AAMVA Track Selectors" Select which Driver License data tracks you would like the reader to read. This option only
applies to driver licenses and has no effect on ISO cards.
"Track SS Selectors" Enable or Disable the Track Start Character (Start Sentinel). You can also select your own SS by using
the pull down Draw bar. Use default settings unless notified otherwise by your application vendor. Each track can have a
unique SS.
"Track ES Selector" Enable or Disable the Track End Character (End Sentinel). You can also select your own ES by using
the pull down Draw bar. Use default settings unless otherwise notified by your application vendor. All the tracks will share
the same ES. You may also add a unique ES to the data string read from the RFID data card.
"Send CR Track Selectors" Select a Carriage Return "CR" at the end of the selected track of magnetic strip data.
"Track Output Order" This option allows you to change the output order of the selected tracks. Default order is (1,2,3).
"Send Any Valid Selected Tracks Selector" Enabling this option will tell the device to send out ANY VALID data of the
tracks "that have been selected" only (Track Error "OFF"). Not selecting this option will tell the reader to only send ALL the
selected valid tracks only (Default) Any track data error on any selected tracks will flash the LED twice and sound two beeps.
NO DATA will be sent out. This option is handy for trouble shooting.
MX5 Manual Rev. D
15
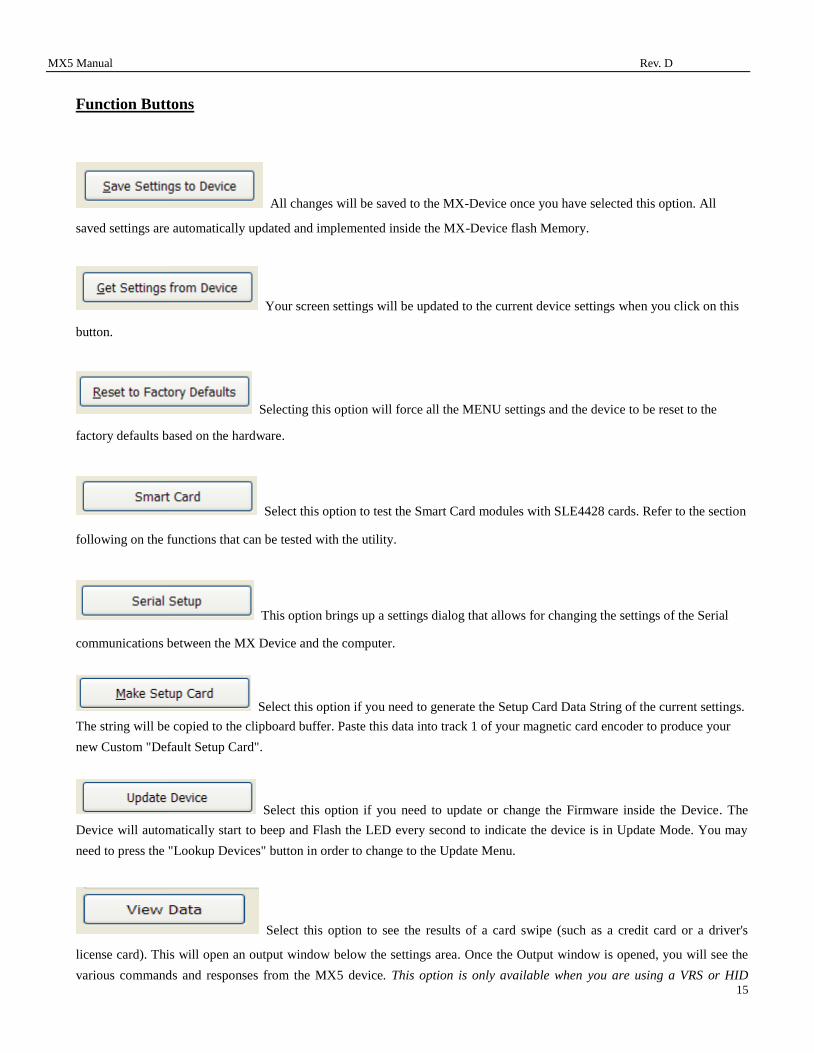
Function Buttons
All changes will be saved to the MX-Device once you have selected this option. All
saved settings are automatically updated and implemented inside the MX-Device flash Memory.
Your screen settings will be updated to the current device settings when you click on this
button.
Selecting this option will force all the MENU settings and the device to be reset to the
factory defaults based on the hardware.
Select this option to test the Smart Card modules with SLE4428 cards. Refer to the section
following on the functions that can be tested with the utility.
This option brings up a settings dialog that allows for changing the settings of the Serial
communications between the MX Device and the computer.
Select this option if you need to generate the Setup Card Data String of the current settings.
The string will be copied to the clipboard buffer. Paste this data into track 1 of your magnetic card encoder to produce your
new Custom "Default Setup Card".
Select this option if you need to update or change the Firmware inside the Device. The
Device will automatically start to beep and Flash the LED every second to indicate the device is in Update Mode. You may
need to press the "Lookup Devices" button in order to change to the Update Menu.
Select this option to see the results of a card swipe (such as a credit card or a driver's
license card). This will open an output window below the settings area. Once the Output window is opened, you will see the
various commands and responses from the MX5 device. This option is only available when you are using a VRS or HID
MX5 Manual Rev. D
16
version firmware for a reader. “Virtual Serial Port” on a USB port.
RFID UID Reader Settings
“RFID SS & ES” Enable or Disable the RFID Start & End Character (Start Sentinel). You can also select your own SS/ES by
using the pull down Draw bar. Use the default settings unless notified otherwise by your application vendor.
“Send CR” You may add a CR to the UID read from the RFID data card.
UID Output Options
“Decimal/Hex” The UID can optionally be output to any waiting software in either Decimal or Hexadecimal format.
“Padding” Sending the UID in Decimal output without any padding of zero characters is the default. Optionally, the UID can
be padded with leading zeroes to a length of 10 characters or to a maximum length of 17 characters (13 characters for EM
Cards).

MX5 Manual Rev. D
17
Card Testing Options
"Test Card" Selecting this option will put the program into read mode. The utility will wait until a valid card is read with the
MX-HID device. Note that none of the controls will work while the application is in read mode until a card is read or the
system times out at which point the controls will return. The "Test Card" option will put the application in wait for report
from the MX-HID reader mode. If you have read a card before the "Test Card" button is pressed the last card read report will
be sent to the application. This option is only available when you are using a HID version firmware for a reader.
"Display Swipe Strings" If you Check this box, then the card swipe tracks data will be displayed one line at a time in
printable characters. If this box is left unchecked, the card swipe is reported character by character from 0 - 336. This option
is only available when you are using a HID version firmware for a reader
"Hide Data" Select this option to close the Output window.
This option is only available when you are using a VRS or HID version firmware for a reader. “Virtual Serial Port” on a
USB port.

MX5 Manual Rev. D
18
Smart Card Testing
"Smart Card" Selecting this option will open a new window to test the Contact Smart Card Module using an SLE memory
card. SLE 4428 which is a 1 k byte memory card is a recommended or equivalent memory card from SLE. The Smart Card
utility is vary basic and only supports the basic commands for the purpose of TESTING the device only. Once the window is
open the following options become available:
“Card Reset” This option is the first command which needs to be selected once the SLE card has been inserted into the
contact card slot. Press the card down firmly until the RED Led is turned on. If the card contacts are inserted the wrong
way, the Device will sound two short Beeps to indicate an ERROR and the LED will not be turned on. Remove the SLE
card and rotate the card so that the gold contacts on the card face the opposite direction and then insert the card by
pressing the card down firmly. Once the Card is inserted properly the Red Led will be on and other options will be
un-grayed.
“Login” Once you have entered the two byte HEX password (Default is FF FF) press the Login button. If the password
is successful, the “Save Password” and “Data Write” option will be Un-grayed. If the wrong password is entered then an
error screen will pop up.
“Save Password” Once this option is un-grayed, the card is unlocked and the value of the “Password (2 Hex)” can be
changed to a new password. Pressing the Save Password will save the new value of the password onto the card. This can
be repeated many times until you log out. Removing the card performs an Auto Log out. The new password will need
to be entered in order to Login once the card is inserted back into the SC module.
“Data Read” and “Data Write” Before pressing these options, you should select the start address and the data length.
The start address is a two hex byte “FF FF” and should not exceed the memory size of the memory card. A 1 KB card
has an address range off “00 00” hex to “04 00” hex. A data length of “40” hex will fetch 64 bytes of data to be
displayed. Using the default values is recommended for first time user. The card data will be displayed in HEX on the
screen. Each data bytes comprise of two hex characters. “00” to “FF” Hex. You can edit the value of each character by
typing over the data bytes displayed. Care should be taken not to change the data length or use invalid characters. An

MX5 Manual Rev. D
19
error screen will pop up should the data length or data format be invalid once the Data Write option is pressed. The
data written to the card is not verified by this command and a Data Read should be performed to verify the data was
written to the card properly. If you did not login then the Data Write button will be grayed out and you will be unable to
save any data to the card. You can read any data from the card without logging in.
“Clear” This option will clear all the data in the data window. This will not affect or change the information on the
memory card. If you have not saved the data before pressing Clear, the data will be lost.
Special Note: All the Device settings are stored inside the individual device flash memory. This utility is not required
to be running or installed in order to operate the MX-Device. A special QuickSet "Default Card" is provided with our
entire MX5 Magnetic card device line, to setup the device to a known factory default settings.
MX5 Manual Rev. D
20
MX Device Firmware Upgrade Menu
The MX Device Firmware Update menu is automatically opened when the utility recognizes that the selected device has
been turned "ON" to update mode. In upgrade mode the MX-Device will be sounding a beep and flashing the LED every
second.
If no device is found, press the "Lookup Devices" button and the first device found will be listed. If you have more than one
device connected, use the draw down bar to list all the available devices on your system. Select the appropriate MX-Device to
be upgraded. Note that the MX-Device selected must be in Upgrade mode in order for this Menu to shown. Selecting a
MX-Device which is not in Upgrade mode will automatically change the menu selection according to the selected
MX-Device current settings.
The Device Info area will display the MX5 Device‟s current information stored in its flash memory. If you do not wish to
change the firmware, press the ReActivate button and the MX5 Device will restart with the current firmware.
The “Device Update” area lists all the features of each Firmware File that can be flashed into the MX5 Device. The Model,
Device Type, Module(s) and Product ID are listed in the various dropdown boxes.
"Reactivate" This button will Re-Activate the current firmware inside the MX-Device. The Device will automatically restart
once you have completed the "Upgrade" or "Reactivate" action to the MX-Device.
"Upgrade” You may choose to install New Firmware using the "Upgrade" button into the MX-Device. You must select a
valid MX-Device firmware file before the ""Upgrade " Button can be selected. The "Upgrade" button will be grayed out until
you have chosen a valid file. A valid file type will have an .FMW file name extension.

MX5 Manual Rev. D
21
“Device Files” This feature provides quick access to all firmware files. If it is known what file is needing to be loaded into the
Device by either Device Name or Product ID. Picking a firmware file from the list will select it for loading automatically.
Advanced Mode
If the Product ID number of the file selected has a different Product ID then the Device Info Product ID number, then the
Upgrade Button will be Grayed out. This safety feature is designed to prevent the accidental installation of firmware which
could damage or lock up the MX5 Device. An overide option is available. The password required for changing a MX
Device to a new Product ID within the Model’s Options is ‘MASTER’. This is Advanced Mode 1.
If for some reason there is a need to change the Model to be something other than what it was designated to be from the
factory, there is a password that provides the option to load any firmware file. This can render the product non-functional
after an incorrect firmware file is loaded. Using this mode will lock up an MX5 device and will void the warranty. The
ovverride password to load any firmware into a unit is „SUPER‟. This is Advanced Mode 2.
Once an Advanced Mode is entered, the utility stays in that mode until the utility is exited.

MX5 Manual Rev. D
22
Creating a Setup Card
In order to create a setup card you will require a magnetic card encoder and a blank track 1 magnetic card. Using the MX5
Utility you will need to install the desired firmware into the MX5 device. You will also need to configure all the desired
settings to meet your application requirements. Save the settings to the device by pressing the Save Settings to Device
Button. Now you can press the Make Setup Card Button to generate a special data string which represents your current
configuration on the screen. The Data string is automatically copied to your clipboard memory. Now using your Magnetic
card encoder and the encoder application, paste the data string into the data field for track 1. Encode the data to a blank
magnetic card. Your new setup card is now done. Mark the card using a permanent marker to identify it as your special
setup card. Now you are ready to test your new card.
Using the MX5 Utility and your MX5 Device, read your setup card. Your MX5 Device should respond with one long beep
(No Data will be seen when using a setup card). The MX5 Device has now accepted the settings saved on the setup card and
saved the settings into its flash memory. Open the MX5 Utility if you have not done so already and press the Get Settings
from Device Button. The screen will update with the device‟s current saved settings. Verify your settings and you are done.
You do not need to use the MX5 Utility to configure your MX53 Device. If the desired firmware is installed you simply need
to read the setup card and all your settings are automatically flashed into your MX53 device. This function is Ideal for
hardware deployment or returning your hardware to a known state. The window below shows the dialog box which is
opened once you press the Make Setup Card Button.
A factory default card is included with your MX53 Device. Use this card to restore your device back to factory default.
The settings will be automatically saved to the Flash memory of the MX53 device. Should you not have a default card
then using the MX5 Utility you can select press the Reset To Factory Defaults Button and the screen will be set to the
factory default. Note that each firmware has a different factory default. Make sure you have selected the desired
firmware before you save your defaults. Once the defaults are shown you will need to save the settings to the MX53
device by pressing Save Settings to Device Button. This will save your current settings to your MX53 device Flash
Memory. A long beep will be heard from your device indicating a successful save.

MX5 Manual Rev. D
23
Hardware Mounting
The MX5 compact, MX5 combo and MX5 stand alone unit can all be easily installed to any existing computer system
with the use of the double sided Velcro adhesive strip which is included with your unit. Various configurations are
possible for mounting your MX5 to your computer, see the illustrations below.
The MX5 can also be mounted to your table top or wall using the Velcro adhesive strip. Mounting lugs included on the
bottom of each MX5 reader makes it easy to mount and secure to your Kiosk or work area.
Hardware Maintenance
You can increase the life and maintain the performance of your MX5 magnetic head reader by periodically cleaning the
read head with a pre-saturated cleaning cards. It is recommended to clean the head once a week for heavy use and once a
month for light use. Cleaning the head will improve successful read rates and ensure long life of the reading head. The
same cleaning card can also be used to clean the chip card contacts of your Smart Card (SC) module. Cleaning cards
should be available from your MX5 vendor.
Reading / Writing RFID
To Read/Write RFID cards on the MX5 Combo or Compact RFID device, Place the card onto the side of the case
indicated by the RFID symbol (((o))). The card can be read from up to 3 cm from the device. For writing cards, it is best to
have the card closest to the device as possible. For table top models place the card directly over the RFID symbol (((o))).
Reading/ Writing SC Smart IC Cards
To Read/Write SC smart cards on the MX5-SC module, insert the card such that the chip on the card is facing the
device. Once inserted correctly, the Red LED will be turned on. If the card is incorrectly inserted, The Device will
beep and flash twice.
MX5 Manual Rev. D
24
Appendices
HID Software Developer Notes on Mag-Tek Compatible Report Format:
The MX-HID USB device decimal ID numbers are:
Vendor ID: 0x0980
Product ID: 0x9025
Revision ID: 0x0100
The HID card swipe reports 337 ASCII characters in the following format:
Data Report Format: <Count> - <ASCII number> - <character>

MX5 Manual Rev. D
25
Data Definition:
<Count> runs from 0 to 336.
<ASCII number> values range from 0 to 255 (displayed in decimal base).
<Character> is the character that corresponds to the ASCII number; you may see a square or some other odd
character if the value is not displayable as a character.
The values represented:
Offset --- Usage Name
0 --- Track 1 decode status („0‟ = Good Read, „1‟ = Read Error)
1 --- Track 2 decode status („0‟ = Good Read, „1‟ = Read Error)
2 --- Track 3 decode status („0‟ = Good Read, „1‟ = Read Error)
3 --- Track 1 data length (Up to 110 Characters)
4 --- Track 2 data length (Up to 110 Characters)
5 --- Track 3 data length (Up to 110 Characters)
6 --- Card encoding type (Type 00 = ISO/ABA card Type 01 = AAMVA card Type 02 = CADL
Type 04= RFID)
7 - 116 --- Track 1 ASCII data (Mag card data or RFID UID number)
117 - 226 --- Track 2 ASCII data
227 - 336 --- Track 3 ASCII data
Example Output for Magnetic Card read from MX5 Utility:
For a more detailed explanation of HID and coding examples, refer to the MX5 HID Programmers
Manual on the CD. That document can be found in the MX5-Manuals folder.

MX5 Manual Rev. D
26
OPOS/POS.NET Information
1. Download the "Microsoft Point of Service for .NET v1.12" (POS for .NET) library from the following link
http://www.microsoft.com/downloads/en/details.aspx?FamilyID=EAAE202A-0FCC-406A-8FDE-35713D7841CA&displ
aylang=en
2. Install POS for .NET by clicking on the setup.exe in the extracted folder. Insure install location is: C:\Program
Files\Microsoft Point Of Service\
MX5 Manual Rev. D
27
3. Copy MX5_MSR_SO.dll from the CDROM in this location: „CDdrive:/MX5/POS.NET‟ to the Microsoft UPOS folder
"C:\Program Files\Common Files\Microsoft Shared\Point Of Service\Control Assemblies"

MX5 Manual Rev. D
28
4. Run the test application to test POS on MX5-HID devices:
"CDdrive:\pos for.net install folder\PosFor.Net\Files\SDK\Samples\Sample Application\TestApp.exe"
MX5 Manual Rev. D
29
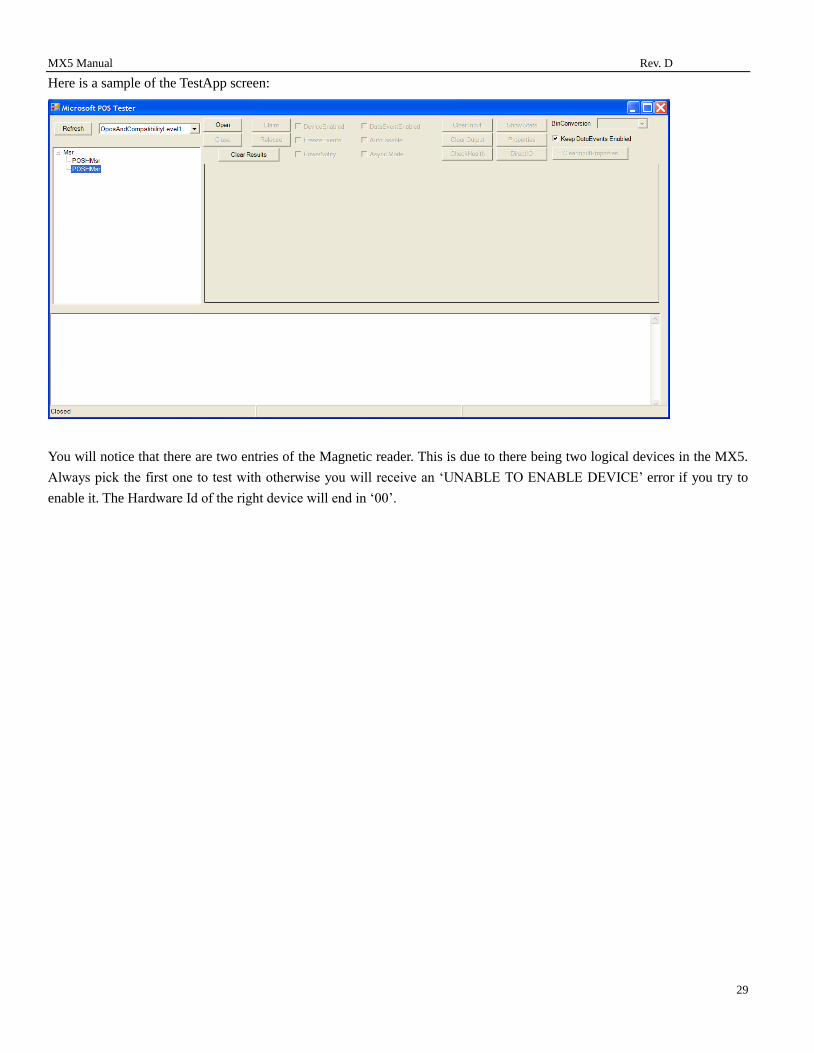
Here is a sample of the TestApp screen:
You will notice that there are two entries of the Magnetic reader. This is due to there being two logical devices in the MX5.
Always pick the first one to test with otherwise you will receive an „UNABLE TO ENABLE DEVICE‟ error if you try to
enable it. The Hardware Id of the right device will end in „00‟.

MX5 Manual Rev. D
30
Basic steps to see the MX5-HID device work with POS.NET –
1. Click on „Open‟.
2. Click on „Claim‟.
3. Click on the checkbox of „DeviceEnabled‟.
4. To see the report on a card, click on the „DataEventEnabled‟ checkbox and swipe a card through the reader.
5. Click on „Release‟ when finished with the testing.

MX5 Manual Rev. D
31
Troubleshooting and FAQ
For most instance and purposes, your MX5 product is a plug and play device and should operate trouble free. The drivers
for most of the MX5 firmware applications are included with your Windows operating system (OS). It is highly
recommended that your OS have all the latest service packs installed in order to insure proper operation of your MX5
device. Depending on the version of your OS, additional installation files (.INF) maybe required with the use of the
Virtual Serial firmware (VRS). These files are included as part of the installation for the MX5 Utility and can be found in
the MX Device subdirectory of your All Programs directory.
Below you will find a list of various Frequently Asked Questions (FAQ) and solutions which maybe helpful in resolving
your issue with your MX5 product.
My MX5 is not recognized by my Windows Operating System (OS)?
Solution: Unplug your MX5 from your computer and confirm you have installed the latest service pack and updates for
your OS. You may need to restart your computer to complete the updates. Try installing the MX5 after your
system has restarted. Windows should automatically install the appropriate drivers for your MX5. Your systems
may request driver info when using certain Firmware applications of the MX5. If this is the case, you can find
these files in the MX Device directory which is created when you install the MX5 Utility.
My System reports a Device error when I install my MX5?
Solution: Do Not unplug your MX5 from your computer. Open your device manager of your OS and list the device in
question. Right click on the device in question and select properties of the device. Select the option to remove
the device and click OK. Now unplug your MX5 from your computer and wait a few seconds before you plug
your MX5 back. Some older versions of OS need to reboot after removing the device. You may want to try this
option if you are still getting this error after removing the device.
My MX5 LED flashes and beeps every second?
Solution: Your MX5 is set in upgrade mode. Use the MX5 Utility to reactivate your existing firmware or install a
different Version of firmware into the MX5. By upgrading your firmware, your system may install different
drivers for your MX5 device. This is normal and you should let the process complete normally.
When using my MX5 as a Virtual Serial (VRS) device, my software application cannot see the MX5 when I
changed USB ports?
Solution: The MX5 is assigned a different COM port for each USB port. This is Normal and you will need to adjust
the COM port to be the same on each USB port for the MX5 device. You can adjust the COM port for each
USB by using your device manager and going to properties of the MX5 device. You will need to access the
Advanced settings to change the COM port number. Make sure that your applications software matches the
selected COM port number. You will need to change this option for every USB port you wish to connect the
MX5 device to.

MX5 Manual Rev. D
32
Troubleshooting Continued
After mounting my MX5 Device to my monitor, two beeps are randomly heard from the MX5?
Solution: Older CRT monitors emit electromagnetic fields and mounting the MX5 to this type of monitor is not
recommended. The CRT will interfere with the MX5 Magnetic Head and RFID device. Two beeps from the
MX5 indicate an error state was detected which was caused by the CRT electromagnetic fields.
After I upgraded my firmware on the MX5, I cannot see any data from the MX5 Device?
Solution: The default firmware installed into the MX5 device is commonly a keyboard device. When you read a card
using the MX5, data is automatically typed to your computer as if someone has entered the data manually. If you
have installed a new firmware application which is a Virtual Serial port (VRS) or HID Report device, the card
data will no longer be sent to your keyboard port. Your software application will determine which interface you
are required to use for your MX5 device. The MX5 Utility is designed to be used to upgrade, configure and test
your MX5 device. You may need to open the View Data window in the MX5 Utility in order to see card data
from your MX5 device if you have selected a VRS or HID firmware. If your MX5 is a Keyboard device, you can
view card data in any word processing or note pad document.
I have updated my firmware on my MX5 combo device and my RFID stopped working?
Solution: Check the hardware configuration setting using the MX5 Utility. You can enable or disable any portion of
your combo reader. You can turn off the Magnetic card option of the MX5 and only use the RFID or SC option of
the firmware. By doing so you will not be able to read any magnetic cards. Reversely you can also turn off the
RFID or SC of your MX5 device and only enable the Magnetic card option. The factory default setting for this
option is the Magnetic card option is enables only. You need to change this setting to enable both options and save
your changes.
I am using the MX5 and after I upgraded the firmware, the utility does no see any device?
Solution: As new firmware applications are created and released for the MX5 Series, upgrades are also done to the MX
Utility and the Config.XML file. Should you be downloading new firmware files from the Internet, also make
sure that you are using the latest MX Utility available. By downloading the latest MX Utility and installing it on
your system, all the required updated files are automatically installed and updated.
After I upgraded my MX5 firmware with a VRS (Virtual Serial Port) version, my computer failed to install the
device and returned an error message that the hardware did not install properly?
Solution: The MX5 only uses generic drivers which are included as part of your Microsoft Operating System(OS). We
recommend that you keep your OS up to date with the latest upgrades and service packs available for yoursystem.
Also make sure that you are using the latest MX Utility available. By downloading the latest MX Utility and
installing it on your system, all the required updated files are automatically installed and updated. The USB Virtual
serial Port (VRS) makes use of a driver called usbser.sys which is included with your OS. You will find an
Installation file located in the directory that you have selected during the install of the MX Utility. The default

MX5 Manual Rev. D
33
location is c:/program files/MX5 Device/ The file is a setup information file called MX5_EN.inf.
Use this file to update the drivers listing for the MX5 device. See the illustrations below on how to use this file.
Open your device Manager for your OS and locate the device which did not install properly. You will see and “!” or
“?” beside the device in question. Right Click your mouse cursor over the device and select “Update Driver
Software” option. See illustration below.
Once you have selected Update Driver Software, You will need to Select “Locate and install driver software
manually” option. See illustration below.

MX5 Manual Rev. D
34
You will them be asked to provide a search directory which contains the INF files for the MX5 Device. For this
illustration the files are saved in the “C:\Program Files\MX5 Device” by default when you install the MX5 Utility.
Use the Browse… option to select the location. See illustration below. Click “Next” once you have selected the
location.
The system will then install the INF file for the MX5 Device. The system may ask you if you want to install this
device driver, select Install. Once completed the installation your device will be automatically configured and a
COM port will be assigned to this device. (You can change this port number by going into Properties of the Device
and selecting advance options) See illustration below.

MX5 Manual Rev. D
35
You may need to close and re-open the MX5 Utility in order for the new device to appear in the selection pull down
menu. It is recommended to always keep your operating system updated with the latest service pack and updated. The
MX5 Device only uses the drivers which are supplied with your operating system. The INF file only contains the
information of which files the operating system will need to install for the selected MX5 Device.
Other Considerations
All the Device settings are stored inside each individual MX5 device flash memory. Moving the MX5 device to
another computer will not affect the MX5 settings.
All the configurable settings available thru the MX5 utility can be configured by using a special QuickSet "Default
Card". A factory default QuickSet card is provided with all our MX5 Magnetic card devices to setup the device to a
known factory default mode. You can have your own Custom versions of the QuickSet setup card to meet your
system and software requirements. This feature is ideal for hardware deployment and setting up your hardware. You
do not need to use the MX5 Utility to setup your MX5 magnetic device when you use the QuickSet setup card. Just
read the QuickSet card and all your settings are automatically saved into the flash memory of the MX5 device.
Your MX53 magnetic card readers are all designed to be easily upgraded with an RFID or SC solution. Just remove
the side cover from the MX53 card reader and attach one cable to your RFID or SC module. The module is designed
to snap on the MX53 reader. The MX53 combo unit is now ready to be flashed with the appropriate supporting
firmware.
Custom firmware applications installed on your MX5 device may be designed to disable utility and upgrade
functions. Contact your Device vendor for more details.
Data Encryption features are only available on Custom firmware applications. Contact your Device vendor for more
details.

MX5 Manual Rev. D
36
Firmware Listing
The following is a list of the various firmware versions available to be upgraded into the MX5 Devices. Each firmware
may require a specific hardware type in order to function properly. Some upgrades are hardware specific and can only
be installed on specific hardware of the MX5 Devices. Accidental loading of the wrong firmware is prevented by the
MX Device utility Version 2.8.0 or higher. Caution should be taken when using an older version of the utility. It is
recommended to always use the latest version of the MX Device Utility.
MX53 List:
53-KB-MR-MCR
Ver. 3.9 Product ID:10
Magnetic card reader,
Keyboard output
Use this firmware on any MX53 with a three track magnetic card reader.
Magnetic card data is typed out when a magnetic card is swiped on the reader.
This firmware creates a second HID keyboard attached to the system. No special
driver is required.
53-VRS-MR-MCR
Ver. 4.2 Product ID:11
Magnetic card reader,
Virtual USB Serial output,
ASCII Data
Use this firmware on any MX53 with a three track Magnetic card reader.
Magnetic card data is sent out to the virtual serial Com port when a magnetic card
is swiped on the reader. This firmware will create a Virtual serial device attached
to a Com port. Use the MX5.INF install file to automatically install the
appropriate Microsoft Drivers provided with the OS. The MX5 setup utility when
installed will provide this INF file. No additional drivers are required.
53-HID-MR-MCR
Ver. 3.9 Product ID:12
Magnetic card reader, HID
report format output
Use this firmware on any MX53 with a three track Magnetic card reader. The
three track Magnetic card data is sent out to a HID report when a magnetic card is
swiped on the reader. This reader will send an interrupt to the system and then
send a fixed report of characters from 0 - 336. This Report also includes Error
status of each track, data length and type of card read. The MX5 setup utility Help
File has more details on this report. No additional drivers are required.
( ISO7810) Product ID: 0x9025 HEX
MX53-EM List:
53-KB-EM-UID
Ver. 4.1 Product ID:20
Magnetic card reader with
EM ID# reader, Keyboard
output
Use this firmware on the MX5C or MX53 with an EM 125 KHz RFID “EM”
Module only. The three track magnetic card reader option can be turned off if
desired using the setup utility. The unique random serial number on the EM
RFID card is Read automatically and typed out as if someone manually typed
the number. Magnetic card data is also typed out when a magnetic card is
swiped on the reader. This firmware creates a second HID keyboard attached to
the system. No special driver is required. (EM4100, EM4102, TK4100,
ISO7810)

MX5 Manual Rev. D
37
53-VRS-EM-UID
Ver. 4.3 Product ID:21
Magnetic card reader with
EM ID# reader, Virtual USB
Serial output, ASCII Data
Use this firmware on the MX5C or MX53 with an EM 125 KHz RFID “EM”
Module only. The three track magnetic card reader option can be turned off if
desired using the setup utility. The unique random serial number on the EM
RFID card is Read automatically and sent out directly to the virtual serial Com
port. Magnetic card data is also sent out to the virtual serial Com port when a
magnetic card is swiped on the reader. This firmware will create a Virtual
serial device attached to a Com Port. Use the MX5.INF install file to
automatically install the appropriate Microsoft Drivers provided with the OS.
The MX5 setup utility when installed will provide this INF file. No additional
drivers are required. (EM4100, EM4102, TK4100, ISO7810)
53-HID-EM-UID
Ver. 4.2 Product ID:22
Magnetic card reader with
EM ID# reader, HID report
format output
Use this firmware on the MX53 with a 125 Khz RFID "EM" Module only. The
UID on the EM RFID card is Read automatically and sent to Track 1 of the HID
Device inMa g-Tek report format. This Report also includes Error status of each
track, data length and type of card read. The MX5 setup utility Help File has
more details on this report. Magnetic card data is also sent out to the HID device
when a magnetic card is swiped on the reader. An event flag is set by the HID
device when data is available in the buffer. No additional driver is required.
(EM4100, EM4102, TK4100,ISO7810)
MX53-M2 List:
53-KB-M2-UID
Ver. 4.6 Product ID:30
Magnetic card reader with
Mifare S50 ID# reader,
Keyboard output
Use this firmware on the MX53 with a Mifare 13.56 MHz RFID “M2” add on
Module only. The three track magnetic card reader option can be turned off if
desired using the setup utility. The unique random serial number on the RFID card
is Read automatically and typed out as if someone manually typed the number.
Magnetic card data is also typed out when a magnetic card is swiped on the reader.
This firmware creates a second HID keyboard attached to the system. No special
driver is required. (Mifare M50, M70, ISO-14443A)
53-VRS-M2-UID
Ver. 4.0 Product ID:31
Magnetic card reader with
Mifare S50 ID# reader,
Virtual USB Serial output,
ASCII Data
Use this firmware on the MX53 with a Mifare 13.56 MHz RFID “M2” add on
Module only. The three track magnetic card reader option can be turned off if
desired using the setup utility. The unique random serial number on the RFID card
is Read automatically and sent out directly to the virtual serial Com port. Magnetic
card data is also sent out to the virtual serial Com port when a magnetic card is
swiped on the reader. This firmware will create a serial device attached to a Com
port. Use the MX5.INF install file to automatically install the appropriate Microsoft
Drivers provided with the OS. The MX5 setup utility when installed will provide
this INF file. No additional drivers are required. (Mifare M50, M70, ISO-14443A)
53-HID-M2-UID
Ver. 1.0 Product ID:32
Magnetic card reader with
Mifare S50 ID# reader, HID
Use this firmware on the MX53 with a 13.56 Mhz RFID "M2" Module only. The UID
on the RFID card is Read automatically and sent to Track 1 of the HID Device in
Mag-Tek report format. This Report also includes Error status of each track, data
length and type of card read. The MX5 setup utility Help File has more details on this

MX5 Manual Rev. D
38
report format output report. Magnetic card data is also sent out to the HID device when a magnetic card is
swiped on the reader. An event flag is set by the HID device when data is available in
the buffer. No special driver is required.
(Mifare M50, M70, ISO-14443A)
53-VRS-M2-RW
Ver. 2.6 Product ID:33
Magnetic card reader with
Mifare S50/S70 Data Reader
/ Writer, Virtual USB Serial
output, Format ASCII Data,
SDK
Use this firmware Read / Write Mifare S50 Cards using the MX53 with a Mifare,
13.56 MHz RFID “M2” add on Module only. The three track magnetic card
reader option can be turned off if desired using the setup utility. This firmware is
designed to be used with the RFID SDK (System Development Kit) and the
MX5-RFID Utility. Using a DLL or a serial Protocol to Read and Write data to the
S50 Mifare Memory Card. Magnetic card data is also sent out to the virtual serial
Com port when a magnetic card is swiped on the reader. This firmware will create
a serial device attached to a Com port. Use the MX5.INF install file to
automatically install the appropriate Microsoft Drivers provided with the OS. The
MX5 setup utility when installed will provide this INF file. No additional drivers
are required. (Mifare M50, ISO-14443A) Use DLL or VRS Protocol Ver.
2.0-RFID
53-KB-M2-UID2
Ver. 4.4 Product ID:40
Magnetic card reader with
I-Code2 ID# reader,
Keyboard output
Use this firmware on the MX53 with an I-Code 2 (Mifare II) 13.56 MHz RFID
“M2” Module only. The three track magnetic card reader option can be turned off
if desired using the setup utility. The unique random serial number on the I-Code2
RFID card is Read automatically and typed out as if someone manually typed the
number. Magnetic card data is also typed out when a magnetic card is swiped on
the reader. This firmware creates a second HID keyboard attached to the system.
No special driver is required. I-CODE2 (ISO-15693)
53-VRS-M2-UID2
Ver. 4.0 Product ID:41
Magnetic card reader with
I-Code2 ID# reader, Virtual
USB Serial output, ASCII
Data
Use this firmware on the MX53 with an I-Code 2 (Mifare II) 13.56 MHz RFID
“M2” Module only. The three track magnetic card reader option can be turned off
if desired using the setup utility. The unique random serial number (UID) on the
I-Code2 RFID card is Read automatically and sent out directly to the virtual serial
Com port. Magnetic card data is also sent out to the virtual serial Com port when a
magnetic card is swiped on the reader. This firmware will create a serial device
attached to a Com port. Use the MX5.INF install file to automatically install the
appropriate Microsoft Drivers provided with the OS. The MX5 setup utility when
installed will provide this INF file. No additional drivers are required. I-CODE2
(ISO-15693)

MX5 Manual Rev. D
39
MX53-SC List:
53-KB-SC-CCID
Ver. 2.6 Product ID:50
Magnetic card reader
Keyboard output with CCID
Microsoft Class Driver for
Smart Cards
Use this firmware on the MX53 with an IC Smart Card (SC) add on Module. The
three track magnetic card reader option can be turned off if desired using the
setup utility. Magnetic card data is typed out when a magnetic card is swiped on
the reader. This firmware creates a second HID keyboard attached to the system.
This Firmware also creates a composite USB smart card class-device using
(Usbccid.sys) that is compliant with the USB Chip/Smart Card Interface Devices
(CCID) Specification.
53-VRS- SC-SLE
Ver. 2.3 Product ID:51
Magnetic card reader with
SLE 4428/5528 Reader /
Writer, Virtual USB Serial
output/input, ASCII Data
Use this firmware on the MX53 with an IC Smart Card (SC) add on Module for
the SLE 4428/5528 Memory Cards. The three track magnetic card reader
option can be turned off if desired using the setup utility. The SLE 4428/5528
Smart Card can be written or read thru the Com port using the POSH command
Set 1.0. Magnetic card data is also sent out to the virtual serial Com port when a
magnetic card is swiped on the reader. This firmware will create a serial device
attached to a USB Com port. Use the MX5.INF install file to automatically
install the appropriate Microsoft Drivers provided with the OS. The MX5 setup
utility when installed will provide this INF file. No additional drivers are
required. (SLE-4428) Use VRS Protocol Ver. 1.0-SLE
MX5C-EM List:
5C- KB -EM-UID
Ver. 4.1 Product ID:60
EM ID# reader, Keyboard
output
Use this firmware on the MX5C with an EM 125 KHz RFID “EM” Module
only. The unique random serial number (UID) on the EM RFID card is Read
automatically and typed out as if someone manually typed the number. This
firmware creates a second HID keyboard attached to the system. No special
driver is required. (EM4100, EM4102, TK4100, ISO7810)
5C-VRS-EM-UID
Ver. 4.3 Product ID:61
EM ID# reader, Virtual USB
Serial output, ASCII Data
Use this firmware on the MX5C with an EM 125 KHz RFID “EM” Module only.
The unique random serial number (UID) on the EM RFID card is Read
automatically and sent out directly to the virtual serial Com port. This firmware
will create a Virtual serial device attached to a Com Port. Use the MX5.INF
install file to automatically install the appropriate Microsoft Drivers provided
with the OS. The MX5 setup utility when installed will provide this INF file. No
additional drivers are required. (EM4100, EM4102, TK4100, ISO7810)
5C- HID-EM-UID
Ver. 4.2 Product ID:62
EM ID# reader, HID report
format output
UUse this firmware on the MX5C with a 125 Khz RFID "EM" Module only.
The UID on the EM RFID card is Read automatically and sent to Track 1 of the
HID Device in Mag-Tek report format. This Report also includes Error status of
each track, data length and type of card read. The MX5 setup utility Help File
has more details on this report. An event flag is set by the HID device when data
is available in the buffer. No additional driver is required. se this firmware on
the MX5C with an EM 125 KHz RFID “EM” Module only. The unique random
serial number (UID) on the EM RFID card is Read automatically and sent out as
track 1 data to the HID report. This reader will send an interrupt to the system

MX5 Manual Rev. D
40
and then send a fixed report of characters from 0 - 336. This Report also
includes Error status of each track, data length and type of card read. The MX5
setup utility Help File has more details on this report. No additional drivers are
required.
(EM4100, EM4102, TK4100, ISO7810)
MX5C-SC List:
5C-KB -SC-CCID
Ver. 2.6 Product ID:70
Keyboard output with CCID
Microsoft Class Driver for
Smart Cards
Use this firmware on the MX5C with an IC Smart Card (SC) add on Module. This
firmware creates a second HID keyboard attached to the system. This Firmware also
creates a composite USB smart card class-device using (Usbccid.sys) that is
compliant with the USB Chip/Smart Card Interface Devices (CCID) Specification.
5C-VRS-SC- SLE
Ver. 2.3 Product ID:71
SLE 4428/5528 Reader /
Writer, Virtual USB Serial
output/input, ASCII Data
Use this firmware on the MX5C with an IC Smart Card (SC) add on Module for the
SLE 4428/5528 Memory Cards. The SLE 4428/5528 Smart Card can be written or
read thru the Com port using the POSH command Set 1.0. This firmware will create
a serial device attached to a USB Com port. Use the MX5.INF install file to
automatically install the appropriate Microsoft Drivers provided with the OS. The
MX5 setup utility when installed will provide this INF file. No additional drivers
are required. (SLE-4428) Use VRS Protocol Ver. 1.0-SLE
MX5C-M2-List:
5C-KB -M2-UID
Ver. 4.6 Product ID:80
Mifare S50 ID# reader,
Keyboard output
Use this firmware on the MX5C with a Mifare 13.56 MHz RFID “M2” add on Module
only. The unique random serial number (UID) on the RFID card is Read
automatically and typed out as if someone manually typed the number. This firmware
creates a second HID keyboard attached to the system. No special driver is required.
(Mifare M50, M70, ISO-14443A)
5C-VRS -M2-UID
Ver. 4.0 Product ID:81
Mifare S50 ID# reader,
Virtual USB Serial output,
ASCII Data
Use this firmware on the MX5C with a Mifare 13.56 MHz RFID “M2” add on
Module only. The unique random serial number (UID) on the RFID card is Read
automatically and sent out directly to the virtual serial Com port. This firmware will
create a serial device attached to a Com port. Use the MX5.INF install file to
automatically install the appropriate Microsoft Drivers provided with the OS. The
MX5 setup utility when installed will provide this INF file. No additional drivers are
required. (Mifare M50, M70, ISO-14443A)
5C- HID-M2-UID
Ver. 1.0 Product ID:82
Mifare ID# reader, HID
report format output
Use this firmware on the MX5C with a 13.56 Mhz RFID "M2" Module only. The UID on
the RFID card is Read automatically and sent to Track 1 of the HID Device in Mag-Tek
report format. This Report also includes Error status of each track, data length and type of
card read. The MX5 setup utility Help File has more details on this report. An event flag is
set by the HID device when data is available in the buffer. No special driver is required.
(Mifare M50, M70, ISO-14443A)
5C-VRS -M2-RW
Ver. 2.6 Product ID:83
Mifare S50/S70 Data
Use this firmware Read / Write Mifare S50 Cards using the MX5C with a Mifare,
13.56 MHz RFID “M2” add on Module only. This firmware is designed to be used
with the RFID SDK (System Development Kit) and the MX5-RFID Utility. Using a
MX5 Manual Rev. D
41
Reader / Writer, Virtual
USB Serial output, Format
ASCII Data, SDK
DLL or a serial Protocol to Read and Write data to the S50 Mifare Memory Card. This
firmware will create a serial device attached to a Com port. Use the MX5.INF install
file to automatically install the appropriate Microsoft Drivers provided with the OS.
The MX5 setup utility when installed will provide this INF file. No additional drivers
are required. (Mifare S50, ISO-14443A) Use DLL or VRS Protocol Ver. 2.0-RFID
5C-KB-M2-UID2
Ver. 4.4 Product ID:90
I-Code2 ID# reader,
Keyboard output
Use this firmware on the MX5C with an I-Code 2 (Mifare II) 13.56 MHz RFID “M2”
Module only. The unique random serial number (UID) on the I-Code2 RFID card is
Read automatically and typed out as if someone manually typed the number. This
firmware creates a second HID keyboard attached to the system. No special driver is
required. I-CODE2 (ISO-15693)
5C-VRS-M2-UID2
Ver. 4.0 Product ID:91
I-Code2 ID# reader, Virtual
USB Serial output, ASCII
Data
Use this firmware on the MX5C with an I-Code 2 (Mifare II) 13.56 MHz RFID “M2”
Module only. The unique random serial number (UID) on the I-Code2 RFID card is
Read automatically and sent out directly to the virtual serial Com port. This firmware
will create a serial device attached to a Com port. Use the MX5.INF install file to
automatically install the appropriate Microsoft Drivers provided with the OS. The MX5
setup utility when installed will provide this INF file. No additional drivers are
required. I-CODE2 (ISO-15693)
MX5 Manual Rev. D
42
MX5T List:
5T-KB -EM-UID
Ver. 4.0 Product ID:100
EM ID# reader, Keyboard
output
Use this firmware on the MX5T EM 125 KHz RFID Reader ONLY. The unique
random serial number (UID) on the EM RFID card is Read automatically and
typed out as if someone manually typed the number. This firmware creates a
second HID keyboard attached to the system. No special driver is required.
(EM4100, EM4102, TK4100, ISO7810)
5T-KB -M2-UID
Ver. 4.2 Product ID:110
Mifare S50/S70 ID# reader,
Keyboard output
Use this firmware on the MX5T Mifare 13.56 MHz RFID Reader ONLY. The
unique random serial number (UID) on the M1 RFID card is Read automatically
and typed out as if someone manually typed the number. This firmware creates a
second HID keyboard attached to the system. No special driver is required.
(Mifare M50, M70, ISO-14443A)
5T-VRS -M2-RW
Ver. 2.3 Product ID:113
Mifare S50 Data Reader /
Writer, Virtual USB Serial
output, Format ASCII Data,
SDK
Use this firmware on the MX5T ONLY to Read / Write Mifare S50 Cards. Mifare
13.56 MHz RFID Reader/Writer. The unique random serial number (UID) of the
Mifare RFID card can also be Read automatically. This firmware is designed to
be used with the RFID SDK (System Development Kit) and the MX5-RFID
Utility. Using a DLL or a serial Protocol to Read and Write data to the S50 Mifare
Memory Card. This firmware will create a serial device attached to a Com port.
Use the MX5.INF install file to automatically install the appropriate Microsoft
Drivers provided with the OS. The MX5 setup utility when installed will provide
this INF file. No additional drivers are required. (Mifare M50, ISO-14443A) Use
DLL or VRS Protocol Ver. 2.0-RFID
5T-KB -M2-UID2
Ver. 4.2 Product ID:120
I-CODE2 ID# reader,
Keyboard output
Use this firmware on the MX5T ONLY. Mifare 13.56 MHz RFID Reader. The
unique random serial number (UID) on the I-CODE2 RFID card is Read
automatically and typed out as if someone manually typed the number. This
firmware creates a second HID keyboard attached to the system. No special driver
is required. I-CODE2 (ISO-15693)
5T-KB -EI-UID
Ver. 4.0 Product ID:130
EM ID# & Mifare S50/S70
ID# reader,
Keyboard output
Use this firmware on the MX5T ONLY. EM 125 KHz and Mifare 13.56 MHz
RFID Reader. The unique random serial number (UID) of the EM and Mifare
RFID cards are Read automatically and typed out as if someone manually typed
the number. This firmware creates a second HID keyboard attached to the system.
No special driver is required. (Mifare M50, M70, ISO-14443A) (EM4100,
EM4102, TK4100, ISO7810)
New firmware applications and updates are available off the manufacture‟s website. Custom applications, SDK (System
Development Kits) are available for all the MX5 series products. Contact your MX5 device supplier for more details.


