1 MyECC Gradebook is an online Gradebook for your classes that: Supports almost all calculation methods (points or percentages, dropping a low score, etc.) Allows students to monitor their own grades via the MyECC portal Can be used on a daily basis to perform such activities as taking attendance, recording assignment scores, sending email to students, and running reports. Provides one-step forecast and final grade submission. And, once Gradebook has been set up for a course section, that setup may be copied and used over again for future course sections. MyECC Gradebook Information Technology Services Revised by Paula Koch and Francine Vasilomanolakis June 2011
Transcript
1
MyECC Gradebook is an online Gradebook for your
classes that:
Supports almost all calculation methods (points or
percentages, dropping a low score, etc.)
Allows students to monitor their own grades via the
MyECC portal
Can be used on a daily basis to perform such
activities as taking attendance, recording
assignment scores, sending email to students, and
running reports.
Provides one-step forecast and final grade
submission.
And, once Gradebook has been set up for a course
section, that setup may be copied and used over
again for future course sections.
MyECC
Gradebook
Information Technology Services
Revised by Paula Koch and Francine Vasilomanolakis
June 2011
2
1. Getting Started .............................................................................................................. 3-7
Accessing Gradebook ................................................................................................................... 3 Gradebook Menu .......................................................................................................................... 4 Create a Gradebook...................................................................................................................... 5 Determining Calculation Method .............................................................................................. 6-7 Setup Wizard Menu ...................................................................................................................... 8
2. Setup for Assignment Points ....................................................................................... 9-13 Overall Calculation Method .......................................................................................................... 9 Display Options ..................................................................................................................... 10-11 Other Options, Extra Credit, Participation .................................................................................. 12 Assignment Categories, Dropping a Low Score .......................................................................... 13
3. Setup for Category Weighting ................................................................................... 14-17 Overall Calculation Method ........................................................................................................ 14 Assignment Categories, Dropping a Low Score .......................................................................... 15 Display Options, Other Options, Extra Credit ............................................................................. 16 Participation ............................................................................................................................... 17
4. Setup for Assignment Weighting .............................................................................. 18-20 Overall Calculation Method, Display Options, Other Options ..................................................... 18 Extra Credit, Participation .......................................................................................................... 19 Assignment Categories, Dropping a Low Score .......................................................................... 20
5. Other Setup ............................................................................................................... 21-24 Letter Grades ............................................................................................................................. 21 Creating Assignments in Quantity ......................................................................................... 22-23 Setup/Update Assignments ....................................................................................................... 24
10. Frequently Asked Questions .................................................................................... 39-40 Disclaimer: The authors have rigorously tested the Gradebook program. However, they do not claim to have tested
every possible grading method, combination of assignments, or distribution of scores. As such, this manual may contain errors. For technical issues, please contact the ITS Help Desk, extension 6571. For training in using Gradebook and for
some general assistance, please contact Staff Development.
Table of Contents
3
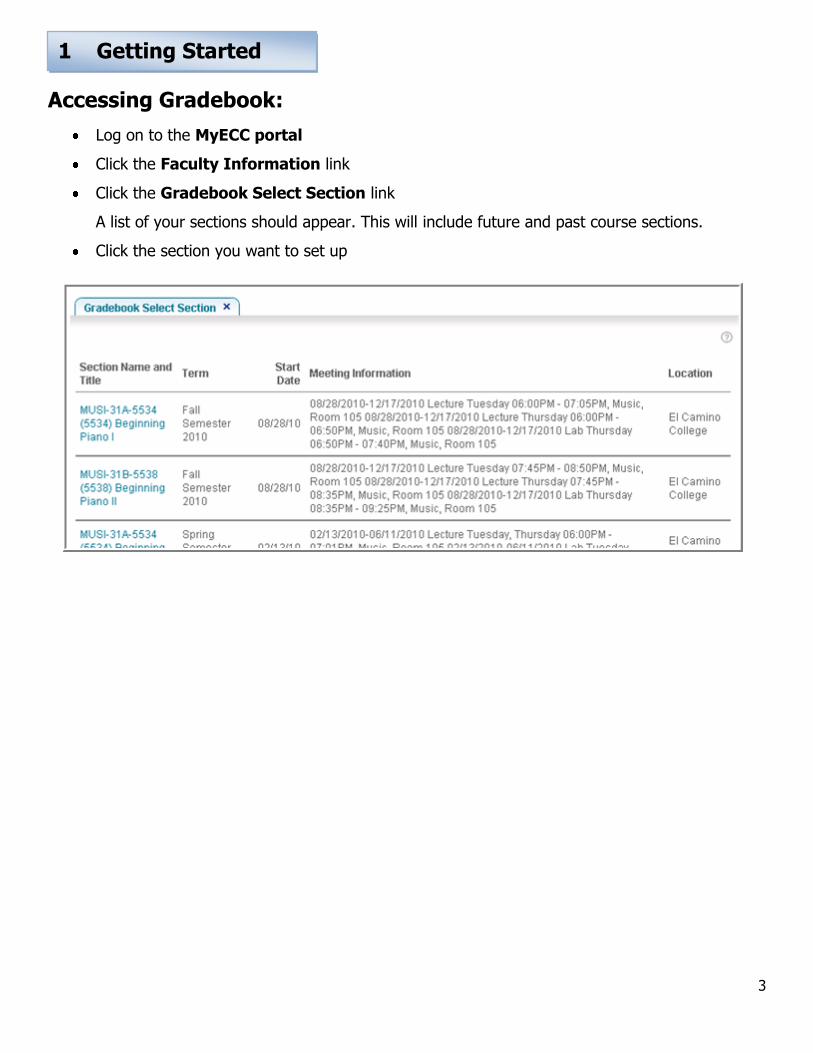
Accessing Gradebook:
Log on to the MyECC portal
Click the Faculty Information link
Click the Gradebook Select Section link
A list of your sections should appear. This will include future and past course sections.
Click the section you want to set up
1 Getting Started
4
Gradebook Menu
The screen changes to the Gradebook menu. A message directing you to Gradebook Setup Wizard should appear. Click the Setup Wizard link The Create Gradebook screen should appear next.
If you want to save information that you have entered, click Submit at the bottom of most Gradebook screens.
Caution: Do not hit the BACK arrow on your browser or you will be kicked out the Gradebook program! If you want to go back to a previous screen without saving entered information use the BACK link on the Gradebook screens instead.
1 Getting Started
5
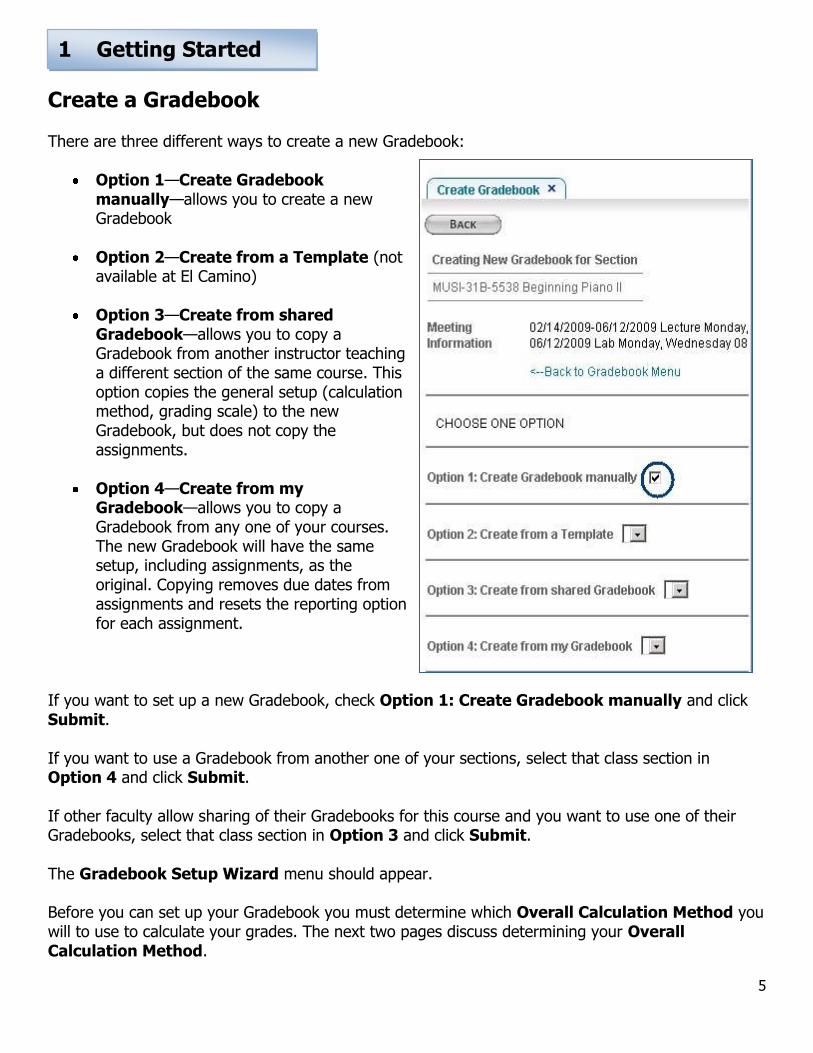
Create a Gradebook
There are three different ways to create a new Gradebook:
Option 1—Create Gradebook manually—allows you to create a new Gradebook
Option 2—Create from a Template (not available at El Camino)
Option 3—Create from shared
Gradebook—allows you to copy a Gradebook from another instructor teaching a different section of the same course. This option copies the general setup (calculation method, grading scale) to the new Gradebook, but does not copy the assignments.
Option 4—Create from my Gradebook—allows you to copy a Gradebook from any one of your courses. The new Gradebook will have the same setup, including assignments, as the original. Copying removes due dates from assignments and resets the reporting option for each assignment.
If you want to set up a new Gradebook, check Option 1: Create Gradebook manually and click Submit. If you want to use a Gradebook from another one of your sections, select that class section in Option 4 and click Submit. If other faculty allow sharing of their Gradebooks for this course and you want to use one of their Gradebooks, select that class section in Option 3 and click Submit. The Gradebook Setup Wizard menu should appear. Before you can set up your Gradebook you must determine which Overall Calculation Method you will to use to calculate your grades. The next two pages discuss determining your Overall Calculation Method.
1 Getting Started
6
Determining which Overall Calculation Method to use Gradebook provides you with a variety of ways to calculate your grades. Give careful consideration to the type of calculation method you want to use for your Gradebook. Different calculation methods can produce different overall grades. You can choose one of the following calculation methods:
Assignment Points
Category Weighting Assignment Weighting
For example, suppose you determine grades as follows:
2 tests: First test worth 100 points (the student in the example earns 50 points). Second test worth 200 points (the student earns 180 points).
2 quizzes: First quiz worth 20 points (the student earns 17 points). Second quiz worth 80 points (the student earns 73 points).
There are 400 total possible points. Although the student earned 320 out of 400 possible points, the overall grade assigned could be 82%, 80%, or 77%, depending on the calculation method selected. You most likely already have a method for grading your students. The following sections describe each of the common methods for calculating grades. Use the Overall Calculation Method that best matches your grading method.
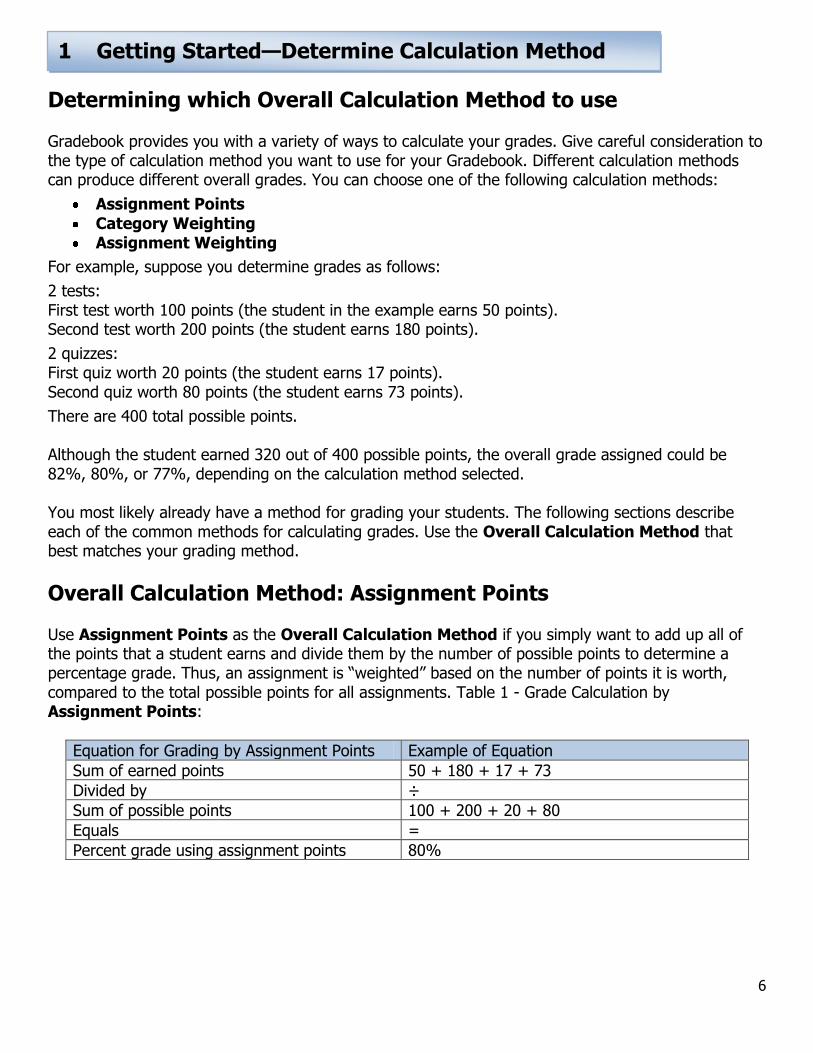
Overall Calculation Method: Assignment Points Use Assignment Points as the Overall Calculation Method if you simply want to add up all of the points that a student earns and divide them by the number of possible points to determine a percentage grade. Thus, an assignment is ―weighted‖ based on the number of points it is worth, compared to the total possible points for all assignments. Table 1 - Grade Calculation by Assignment Points:
Equation for Grading by Assignment Points Example of Equation
Sum of earned points 50 + 180 + 17 + 73
Divided by ÷
Sum of possible points 100 + 200 + 20 + 80
Equals =
Percent grade using assignment points 80%
1 Getting Started—Determine Calculation Method
7
Overall Calculation Method: Category Weighting
Use Category Weighting as the Overall Calculation Method if you want to group assignments together and want each assignment grouping (category) to contribute a certain percentage (weight) to the final grade. The category weights total 100. Within each category, you can use points (Assignment points) or percentages (Assignment weighting) to calculate the category percentage grade.
Using the scenario in the previous section, suppose you set up category weights as Tests 60%, Quizzes 40%. (This example uses points to calculate the category percentage grade.) Table 2 - Grade Calculation by Category Weighting:
Equation for Grading by Category Weight Example of Equation
(Total earned test points/Total possible test
points) * Test weight
((50+180)/(100+200))*60%
Plus + (Total earned quiz points/Total possible quiz
points)*Quiz weight
((17+73)/(20+80))*40%
Equals = Percent grade using category weighting 82%
Overall Calculation Method: Assignment Weighting
Use Assignment Weighting as the calculation method if you want each assignment to contribute a certain percentage weight to the total grade. The weight for an assignment is multiplied by the percentage earned for that assignment, and the results are added to get a total percentage grade. If the weights of all assignments total more or less than 100, a relative weight is calculated for each assignment so that the relative weights total 100.
Suppose you set up category weights as Test #1 30%, Test #2 30%, Quiz #1 20%, and Quiz #2 20%. Table 3 - Grade Calculation by Assignment Weighting:
Equation for Grading by Assignment Weight Example of Equation
(Test #1 earned points/Test #1 possible points) * Test #1 weight
(50/100)*30%
Plus +
(Test #2 earned points/Test #2 possible points) * Test #2 weight
Gradebook Setup Wizard Whichever calculation method you choose, you must complete Set Overall Calculation Method, under Step 1: Grade Calculation, and Set Display Options, under Step 5: Report and Display Options. Whether you use the other steps in Gradebook Setup Wizard depends on your Overall Calculation Method and other parts of your grading—for example, whether you drop a lowest quiz grade, whether you grade participation, etc.
Continuing with Step 1, click Set Overall Calculation Method. The Overall Calculation Method screen should appear. If your Overall Calculation Method is Assignments Points, go to the next page. If your Overall Calculation Method is Category Weighting, go to page 14. If your Overall Calculation Method is Assignment Weighting, go to page 18.
1 Getting Started
9
Step 1: Set Overall Calculation Method
On the Overall Calculation Method screen, select Assignment Points and click Submit. You should return to the Gradebook Setup Wizard menu. Set Overall Calculation Method should be followed by a ―Y‖, showing that it is complete. Click Set Display Options. The Display Options screen should appear.
Technical Tip: If you prefer to group assignments and then give that group of assignments a weight, select Category Weighting as the overall calculation method. Then, when you create your categories (groups of assignments), you can specify Assignment Points to calculate the grade within each category.
2 Setup for Assignment Points
10
Step 5: Set Display Options
On this screen you select your Report View (what you and the students see) and Assignment Sort (in what order the assignments are viewed). See the next page for explanations. If you don’t want to see scores of students who have dropped, uncheck the box after Show Dropped/Withdrawn Students. This screen also controls whether students can see their grades. If you do not want students to see their grades—for example, when you are setting up Gradebook, entering grades, or determining final grades—uncheck the last checkbox. Remember to go back to Set Display Options and recheck this box when you do want students to see their grades.
2 Setup for Assignment Points
11
Set Display Options, continued—Explanation of Report View Field
The Report View field determines the default Report View—which assignments are displayed in the Gradebook Grade Report (what you see) and Student Gradebook Report (what the students see). You can override the default Report View for any assignment at anytime during the semester. The usual default settings are:
When assignment created, set report view to:
Unreported - No information about that assignment will be displayed, or
Description Only - The assignment description, possible points, due date, and weight will be displayed, even if the students have not received the assignment. The score and letter grade are not displayed, even if a score has been entered for the student.
When scores are entered, set report view to:
Description and Score - All information about an assignment including the assignment score—raw score, calculated percentage, and letter grade will be displayed. (Letter grades are displayed only if you have defined the grading scale, see page 21)
Caution: Set the default view for ―When an assignment is created set report view to‖ Unreported or Description Only. Grades may be distorted if the Description and Score option is chosen.
Set Display Options, continued—Explanation of Assignment Sort
This option determines the order in which you and the students view the assignments.
If you select:
by Due Date - assignments will be ordered by due date
by Assignment Category - assignments will be ordered by category
by Description - assignments will ordered alphabetically
by Sequence Number - assignments will be ordered by the sequence numbers that you give to the assignments.
After you have selected the Report View and Assignment Sort, click Submit.
The Gradebook Setup Wizard menu should appear. Set Display Options should be followed by a ―Y,‖ showing that it is complete.
Note: You can change Assignment Sort and the default Report View at any time.
2 Setup for Assignment Points
12
Your Gradebook is ready to go!
You can click Back to Gradebook Menu to create assignments and enter assignment scores and attendance—see Daily Activities, page 25-30.
Or, you can continue with optional setup steps. Options for Assignment Points include:
Extra credit, see below Participation, see below Grouping assignments into categories—required if you want to drop one or more low scores,
view assignments in order by category, or create assignments in quantity, see Step 2: Define Assignment Categories on the next page
Letter grades, see page 21 Setting up your assignments for the semester, see pages 22-24
Extra Credit If you want to offer extra credit, create a new assignment that has .01 points, as in the example below. Any points earned for that assignment are added to the student’s total earned points. The percentage calculation will be very slightly ―off‖ because .01 > 0, but the difference should be immaterial. (See pages 26-27 for more information on creating assignments and entering scores.)
Participation To include participation points in the grade, you can:
Set up each day’s participation as a separate assignment (these assignments could be included in a category called participation),
Keep track of participation throughout the semester on records other than Gradebook and enter that participation score in Gradebook as an assignment, or
Complete the participation section of the Assignment Categories screen, as described under Step 2: Define Assignment Categories—Participation on page 17. You can then enter participation scores when you record attendance, page 29.
Note: if you use this last option, participation is calculated as a percentage of the grade, not a specific number of points. This works best if you know exactly how many points possible are allowed for the semester; otherwise, it is likely to be confusing.
2 Setup for Assignment Points
13
Step 2: Define Assignment Categories
If you are dropping one or more low scores of any assignment, if you want to use Assignment Builder to create assignments in quantity, or if you want to view the assignments in order by category, you must define assignment categories. Go to the Gradebook Setup Wizard menu, click Define Assignment Categories and you should see the following screen. Enter information as described below and click Submit. You should return to the Gradebook Setup Wizard menu.
Assignment Category Description: Use this field to enter a brief description for each assignment category. If you want to view assignments by category (Assignment Sort = By Assignment Category), enter categories for all types of assignments. (Note: A single assignment, such as a project, could be its own category.) Otherwise, categories are needed only for the assignments for which you are dropping low scores or for assignments you want to create in quantity.
Calculation Method: Select Assignment Points.
Category Weight: N/A.
Low Scores to Drop—Optional: Enter the number of scores in each category that you drop. Caution: Each assignment in these categories should have the same number of possible points or the grades could be distorted.
Excuse Blank Scores—Optional: If you want to excuse blank scores (not have them count in the final grade), select the Excuse Blank Scores checkbox. Blank scores are otherwise assumed to be zero. (Possible exception: if you enter due dates in Gradebook and the assignment due date is after the assignment cutoff date.) Note: If you drop a score and excuse blank scores, Gradebook does not drop the blank score as the lowest score; the lowest entered score is dropped. Note: Unexcused blank scores must be changed to zeros before you submit final grades.
Technical Tip: If you need more rows for additional categories, select the Add More Rows action at the bottom of this screen and click Submit. To safeguard against loss of data from system timeout, periodically select the Save and Stay action and click Submit. When finished, select the Save and Continue action and click Submit.
2 Setup for Assignment Points
14
Step 1: Set Overall Calculation Method
On the Gradebook Setup Wizard menu, click Set Overall Calculation Method and you should get the following screen. Choose Category Weighting and click Submit.
You should return to the Gradebook Setup Wizard menu. Set Overall Calculation Method should be followed by a ―Y‖, showing that it is complete.
Click Define Assignment Categories which should take you to Assignment Categories screen.
3 Setup for Category Weighting
15
Step 2: Define Assignment Categories Defining assignment categories is required if the Overall Calculation Method is Category Weighting. Enter information as described below and click Submit. You should return to the Gradebook Setup Wizard menu.
Assignment Category Description: Use this field to enter a brief description for each assignment category. (Note: A single assignment, such as a project, could be its own category.)
Calculation Method: This is the category Calculation Method, not the Overall Calculation Method. Specify how assignments are weighted within the category—based on the possible points you give to each assignment (Assignment Points) or based on weights (percentages) you give to each assignment (Assignment Weighting).
Category Weight: Specify what percentage each category contributes to the total grade. The percentages must total 100.
Low Scores to Drop—Optional: Enter the number of scores in each category that you drop. Caution: Each assignment in these categories should have the same number of points (if you select Assignment Points as your category Calculation Method) or the same weight (if you select Assignment Weighting as your category Calculation Method); otherwise, the grades could be distorted.
Excuse Blank Scores—Optional: If you want to excuse blank scores (not have them count in the final grade), select the Excuse Blank Scores checkbox. Blank scores are otherwise assumed to be zero. (Possible exception: if you enter due dates in Gradebook and the assignment due date is after the assignment cutoff date.) Note: If you drop a score and excuse blank scores, Gradebook does not drop the blank score as the lowest score; the lowest entered score is dropped. Note: Unexcused blank scores must be changed to zeros before you submit final grades.
Technical Tip: If you need more rows for additional categories, select the Add More Rows action at the bottom of this screen and click Submit. To safeguard against loss of data from system timeout, periodically select the Save and Stay action and click Submit. When finished, select the Save and Continue action and click Submit.
3 Setup for Category Weighting
16
Step 5: Set Display Options
On the Gradebook Setup Wizard menu, click Set Display Options and follow the directions on pages 10 and 11. (Note: You probably want to select By Assignment Category for Assignment Sort.)
Your Gradebook is ready to go!
You can click Back to Gradebook Menu to create assignments and enter assignment scores and attendance—see Daily Activities, page 25-30.
Or, you can continue with optional setup steps. Options for Category Weighting include:
Extra credit, see below Participation, see next page Letter grades, see page 21 Setting up your assignments for the semester, see pages 22-24
Extra Credit If you want to offer extra credit and you selected Assignment Points as your category Calculation Method, you can create a new assignment that has .01 points, as in the example below. Any points earned for that assignment will be added to the student’s total possible points in that category. The percentage calculation will be very slightly ―off‖ because .01 > 0, but the difference should be immaterial. (See pages 26-27 for more information on creating assignments and entering scores.)
If you want to offer extra credit and you selected Assignment Weighting as your category Calculation Method, the extra credit points must be counted as part of another assignment. For example, suppose the exam category is 80% of the total grade and you give four exams (Assignment Weight = 25% each). If you would like to offer extra credit that is worth 1.6% of the total grade and your exams are 100 points, then add two extra credit points to each exam. The highest possible score on each exam will be 102 points out 100 points.
3 Setup for Category Weighting
17
Participation To include participation points in the grade, you can:
Set up each day’s participation as a separate assignment (these assignments could be included in a category called participation),
Keep track of participation throughout the semester on records other than Gradebook and enter that participation score in Gradebook as an assignment, or
Complete the participation section of the Assignment Categories screen, as described below. You can then enter participation scores on the Gradebook Attendance screen when you record attendance, page 29.
Step 2: Define Assignment Categories—Participation: On the Gradebook Setup Wizard menu, click Define Assignment Categories. The Assignment Categories screen should appear.
In the example above, the number of participation points possible each day is one point and participation is five percent of the total grade. Enter information in the three Participation fields and click Submit. You should return to the Gradebook Setup Wizard menu.
3 Setup for Category Weighting
18
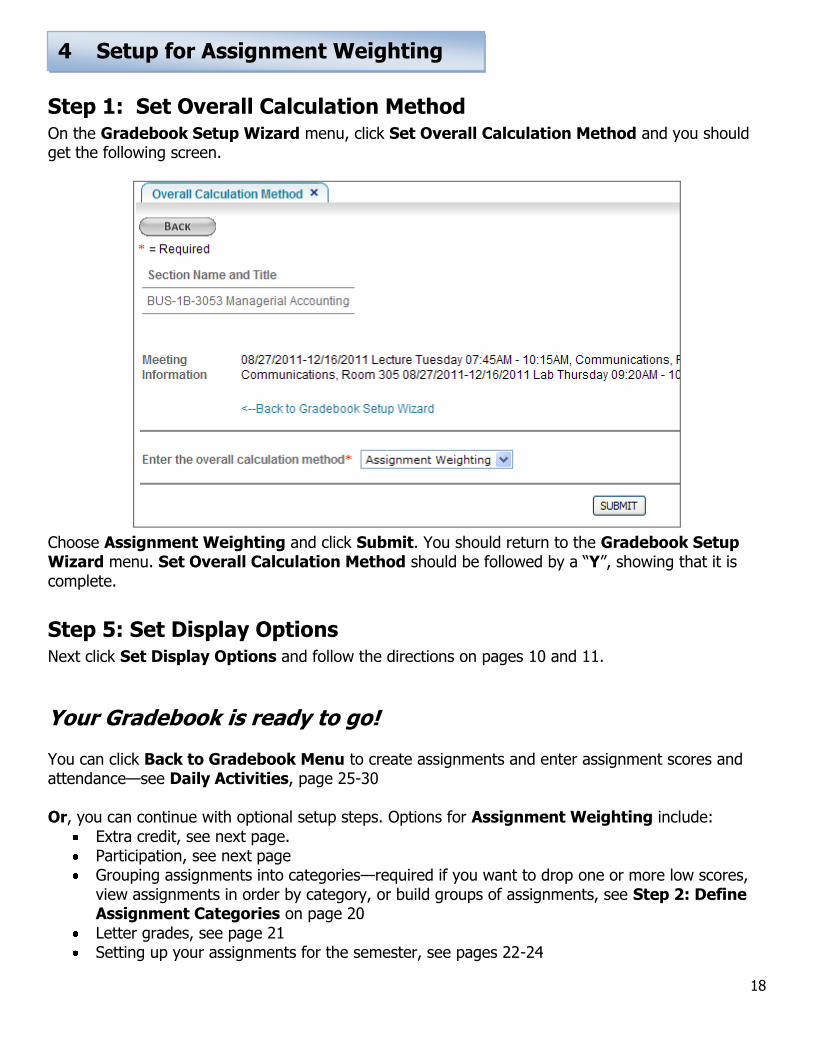
Step 1: Set Overall Calculation Method
On the Gradebook Setup Wizard menu, click Set Overall Calculation Method and you should get the following screen.
Choose Assignment Weighting and click Submit. You should return to the Gradebook Setup Wizard menu. Set Overall Calculation Method should be followed by a ―Y‖, showing that it is complete.
Step 5: Set Display Options
Next click Set Display Options and follow the directions on pages 10 and 11.
Your Gradebook is ready to go! You can click Back to Gradebook Menu to create assignments and enter assignment scores and attendance—see Daily Activities, page 25-30 Or, you can continue with optional setup steps. Options for Assignment Weighting include:
Extra credit, see next page. Participation, see next page Grouping assignments into categories—required if you want to drop one or more low scores,
view assignments in order by category, or build groups of assignments, see Step 2: Define Assignment Categories on page 20
Letter grades, see page 21 Setting up your assignments for the semester, see pages 22-24
4 Setup for Assignment Weighting
19
Extra Credit If you want to offer extra credit, the extra credit points must be counted as part of another assignment. For example, suppose your final exam is 100 possible points and worth 25% of the total grade. If you would like to offer extra credit that is worth 1% of the total grade, then add four extra credit points to the final exam. The highest possible score on the exam would be 104 points out of 100 possible points.
Participation To include participation points in the grade, you can:
Set up each day’s participation as a separate assignment (these assignments could be included in a category called participation),
Keep track of participation throughout the semester on records other than Gradebook and enter that participation score in Gradebook as an assignment, or
Complete the participation section of the Assignment Categories screen, as described under Step 2: Define Assignment Categories—Participation on page 17. You can then enter participation scores on the Gradebook Attendance screen when you record attendance, page 29.
Reminder If the weights of all assignments do not total 100, a relative weight is calculated for each assignment so that the relative weights total 100.
4 Setup for Assignment Weighting
20
Step 2: Define Assignment Categories
If you are dropping one or more low scores of any assignment, if you want to use Assignment Builder to create assignments in quantity, or if you want to view the assignments in order by category, you must define assignment categories. Go to the Gradebook Setup Wizard menu, click Define Assignment Categories and you should see the following screen. Enter information as described below and click Submit. You should return to the Gradebook Setup Wizard menu.
Assignment Category Description: Use this field to enter a brief description for each assignment category. If you want to view assignments by category (Assignment Sort = By Assignment Category), enter categories for all types of assignments. (Note: A single assignment, such as a project, could be its own category.) Otherwise, categories are needed only for the assignments for which you are dropping low scores or for assignments you want to create in quantity.
Calculation Method: Select Assignment Weighting.
Category Weight: N/A.
Low Scores to Drop—Optional: Enter the number of scores in each category that you drop. Caution: Each assignment in these categories should have the same percentage weight or the grades could be distorted.
Excuse Blank Scores—Optional: If you want to excuse blank scores (not have them count in the final grade), select the Excuse Blank Scores checkbox. Blank scores are otherwise assumed to be zero. (Possible exception: if you enter due dates in Gradebook and the assignment due date is after the assignment cutoff date.) Note: If you drop a score and excuse blank scores, Gradebook does not drop the blank score as the lowest score; the lowest entered score is dropped. Note: Unexcused blank scores must be changed to zeros before you submit final grades.
Technical Tip: If you need more rows for additional categories, select the Add More Rows action at the bottom of this screen and click Submit. To safeguard against loss of data from system timeout, periodically select the Save and Stay action and click Submit. When finished, select the Save and Continue action and click Submit.
4 Setup for Assignment Weighting
21
Step 1: Grade Calculation - Define Grading Scale
To assign default letter grades to percentages, click Setup Wizard, and then on the Gradebook Setup Wizard menu, under Step 1: Grade Calculation, click Define Grading Scale, and you should see the Grading Scale screen. Enter the minimum percentage that a student must earn to receive each letter grade. Enter a Minimum Calculated Percent of 0 for the lowest Letter Grade in the grade scheme. Click Submit. Letter grades will now be displayed for each assignment and for the total grade to date in your reports. The letter grade will also automatically appear on your Gradebook Final Grading screen, ready for submission at the end of the semester. Note: If you are using Assignment Points as your Overall Calculation Method, you must calculate a percentage for the minimum points for each letter grade. For example, if you have 1000 possible points and you require the student to earn 700 points for a ―C‖, 700 ÷ 1000 = .70, 70%, enter 70 after C. Note: If this is a Pass/No Pass class, enter 0 for NP and your minimum passing percentage for P. Note: You can override the default letter grade before you submit forecast or final grades. Note: If you don’t want students to see letter grades until the end of the semester, skip this step until then. Note: Defining the grading scale can be done at any time during the semester. The scale can also be changed at anytime (although your students might wonder what you are doing). You need not use this step at all, but can enter letter grades manually on the Gradebook Final Grading screen at the end of the semester.
5 Other Setup—Letter Grades
22
Step 3: Assignments—Build Groups of Assignments—optional
You can create assignments when you enter scores for your assignments, see Daily Activities, Gradebook Score Entry, page 27. Or, you can create assignments at the beginning of the semester (or any other time) using the Assignment Builder screen. (Note: You must define categories first, see page 13, 15, or 20, before you can use Assignment Builder.) Go to the Gradebook Setup Wizard menu, and under Step 3: Assignments, click Build Groups of Assignments.
You should get the Assignment Builder screen on the next page.
5 Other Setup—Create Assignments in Quantity
23
Step 3: Assignments—Build Groups of Assignments—continued
The Assignment Builder screen lists the categories you have defined. Enter the Default Assignment Possible Points, Default Assignment Weight (applies only if you set your category Calculation Method to Assignment Weighting), and Quantity to Create Now. Click Submit.
You should return to the Gradebook Setup Wizard menu. Click Update the Assignments and you should see the Assignment Setup screen with your assignments listed.
5 Other Setup—Create Assignments in Quantity
24
Step 3: Assignments—Update the Assignments/Assignment Setup
On the Gradebook Setup Wizard menu, under Step 3: Assignments, click Update Assignments. You should see the Assignment Setup screen. The Assignment Setup screen shows the assignments you have created.
You can use this screen as another way to create or add assignments. Enter information for the new assignments and click Submit.
You can also use this screen to change sequence number, description, category, possible points, assignment weight, due date, or report view for any assignment. Enter the appropriate changes and click Submit.
You can delete assignments. Check the Delete box and click Submit.
Note: If you have entered scores for an assignment, Gradebook will not allow you to delete it without first manually deleting all the scores.
Note: you can also change sequence number, description, category, possible points, assignment weight, due date, or report view for any assignment on the Gradebook Score Entry screen, see page 27.
Technical Tip: If you need more rows for additional categories, select the Add More Rows action at the bottom of this screen and click Submit. To safeguard against loss of data from system timeout, periodically select the Save and Stay action and click Submit. When finished, select the Save and Continue action and click Submit.
5 Other Setup—Update the Assignments
25
Daily Activities Overview After you’ve completed the Gradebook Setup, go back to the Gradebook menu. Use the Daily Activities links for creating assignments, entering assignment scores, entering attendance, and other activities.
6 Daily Activities
26
Assignment Scoring
Under Daily Activities, click on Assignment Scoring, and the Gradebook Assignment Scoring screen should appear. It displays a list of all assignments that have been created for this Gradebook. You can use this screen to:
View the status of each assignment in this course section, including whether scores have been entered for assignments.
View the average score and average percent for a given assignment.
Link to the Gradebook Score Entry Screen to enter scores for an existing assignment. Link to the Gradebook Score Entry Screen to create a new assignment and enter scores for
that assignment.
Designate whether assignments and the scores entered for the assignments are included in grade reports by changing the Report View.
Link to the Assignment Setup screen to add or delete assignments, see page 24.
If you have already created an assignment (for example, using Assignment Builder, pages 22-23), then your assignments should be listed here. Click the assignment to enter or change scores.
If you want to create a new assignment and enter scores for that assignment, click Score Entry (New Assignment).
The Gradebook Score Entry screen should appear as shown on the following page.
6 Daily Activities
27
Gradebook Score Entry
This screen allows you to create a new assignment and enter the scores. You can also use this screen to change information about an assignment and enter additional scores. Information to enter:
Assignment Description: Required Assignment Category: Required if your Overall Calculation Method is Category
Weighting or if you group assignments by category for other reasons
Possible Points: Required Assignment Weight: Required if your Overall Calculation Method is Assignment
Weighting or if your Overall Calculation Method is Category Weighting and your category Calculation Method is Assignment Weighting
Due Date: Required if you selected By Due Date for Assignment Sort under Display Options
Report View: Use only if you want to override your default Display Options Sequence: Required if you selected By Sequence for Assignment Sort under Display
Options
Group: Use only if you assign students to groups for the semester Score: Students’ scores on this assignment Report View Override: Use only if you want to override your default Display Options or
override the Report View specified on this screen for an individual student
Comments to Student: Optional
Clicking on a student’s name should link you to the Gradebook Student Information Screen for information about an individual student.
Technical Tip: To safeguard against loss of data from system timeout, periodically select the Save and Stay action and click Submit. When finished, select the Save and Continue action and click Submit.
6 Daily Activities
28
Score Overview
Under Daily Activities, click Score Overview and you should see the Gradebook Score Overview screen which allows you to view student scores in spreadsheet format.
You can also enter scores for an assignment by clicking on the assignment at the top of the column—the link should take you to the Gradebook Score Entry screen, see previous page.
Clicking on a student’s name should link you to the Gradebook Student Information Screen for information about an individual student.
Attendance
Under Daily Activities, click Attendance, and the Gradebook Attendance Calendar screen should appear.
Click the date link and the Gradebook Attendance screen for that date should appear.
6 Daily Activities
29
Recording Student Attendance
Use the Gradebook Attendance screen to enter attendance and participation information as described below and click Submit.
Set Attendance Status (or choose below) allows you to select the default attendance status for the day. If most of your students are present, select Present and click Submit. You will return to the same screen with every student’s attendance status listed as Present. You can then change an individual student’s Attendance Status by selecting the appropriate status for that student.
Attendance Status: Select the student’s attendance status for the day.
Participation: (Optional) Enter the student’s participation score for the day. These scores will only be included in the student’s grade if you have set up the Participation section on the Assignment Categories screen, see page 17. The value entered here should be based on the Participation Daily Possible Points value specified there.
Internal Comment: (Optional) Enter a comment regarding attendance or participation for this student on this date. Students do not see the comment.
Technical Tip: Gradebook Attendance requires that meeting dates have been scheduled for the course section. If you need to record participation for an unscheduled meeting date (such as a field trip), or a course section with no meeting dates (such as an online course), you can still record participation in Gradebook by creating a participation assignment using Gradebook Score Entry, page 27, Assignment Setup, page 24, or Assignment Builder, pages 22-23.
Technical Tip: To safeguard against loss of data from system timeout, periodically select the Save and Stay action and click Submit. When finished, select Save and Continue action and click Submit.
6 Daily Activities
30
Class Roster
Under Daily Activities, click Class Roster to view a list of students with contact information. You can access the Select Students for Email screen from this view.
Send E-Mail to Students
To compose and send an email to one or more students in this course section, click Send E-Mail. The Gradebook Student Select screen should appear with a list of students. Select an email option and the students you want to email and click Submit. The Send E-mail screen should appear as shown below. The list of students you selected should be displayed in the top portion of the screen. Use this screen to compose the email. You can use the remaining fields on this screen to send the email to additional people (including yourself). Enter the message and click Submit to send the email.
Last Date of Attendance
Not used at El Camino.
6 Daily Activities
31
Grade Report
The Gradebook Grade Report displays information about the student’s grades. You can choose the type of information that is shown.
On the Gradebook menu, under Reporting, click Grade Report. The Gradebook Grade Report screen (following page) should appear in the default view—Letter grade/percent.
7 Reporting
32
Grade Report – (cont)
Level of Detail—Use this field to see additional levels of detail. Select the Level of Detail you want and click Submit.
Level 1 – Letter Grade/Percentage: Shows the name of each student, cross-listed section in which the student is enrolled (if it's not the primary section), total calculated percentage, and associated letter grade. (Default view)
Level 2 – Category Totals: In addition to the details in Level 1, this level shows the description of each category, status showing whether the category was included in the calculation, weight assigned to the category (if Category Weighting is the Overall Calculation Method), calculated percentage for each category, and associated letter grade for each category.
Level 3 – Assignments: In addition to the details in levels 1 and 2, this level shows the status of the assignment, due date, weight (if Assignment Weighting is the Overall Calculation Method or category Calculation Method), possible points, raw score, calculated percentage, associated letter grade, and any comments entered for the assignment. This level of detail is what the student sees on the Student Gradebook Report screen.
Level 4 – Calculation Details: In addition to the details in levels 1, 2, and 3, this level shows all of the calculations that were used to determine the total grade percentage, see the next page for an example.
Note: Associated letter grades will be visible only if you have defined the grading scale, page 21.
Note: If you want to see grade details and other information for an individual student, click the name of that student.
7 Reporting
33
Gradebook Grade Report – Calculation Detail View
Gradebook Attendance Report
On the Gradebook menu under Reporting, click on Attendance Report. The Gradebook Attendance Report should appear giving you an overview of student attendance for the semester. You can click the Detail link if you want to see a detailed report for an individual student’s attendance. Click a student’s name if you want to access information about that student.
7 Reporting
34
Student Gradebook Report The Student Gradebook Report allows your students to view their assignments, scores, and other information that you have elected to show them. To view this report, the student logs on to the MyECC portal and, under Grades, Tests & Ed Plan, clicks Student Gradebook. A list of course sections which have Gradebooks should appear. The student clicks your section number to view the Student Gradebook Report for your class.
Showing or Restricting Information on the Student Gradebook You can set up your Gradebook to show assignment names and assignment scores, the assignment names but not the scores, or no assignments and no scores. You can do the same for attendance and participation. See pages 10 and 11 for more information.
7 Reporting
35
When you enter scores for assignments and participation, Gradebook calculates grades according to the setup. The calculated numeric (percentage) grades appear in the Forecast/Midterm Grading and Gradebook Final Grading screens. The letter grade that corresponds to the calculated numeric grade also appears in the Forecast/Midterm Grading and Gradebook Final Grading screens if you have completed the Define Grading Scale step, page 21.
Forecast/Midterm Grading
On the Gradebook menu, under Submit Grades, click Midterm Grading and you should see the Forecast/Midterm Grading screen, similar to the one below. The grades are calculated based on assignments due up to and including the current date. You can override letter grades as necessary. When you have letter grades entered for all students, click Submit.
Another screen, Forecast/Midterm Confirmation, should appear. Verify the grades on this screen. If you need to make changes, click ―Back‖ button at top of screen to the Forecast/Midterm Grading screen, enter the changes, and click Submit and you will return to the Grading Confirmation screen. Scroll to the bottom and click OK. These grades are now in the system and can affect whether your students can sign up for a subsequent class. You should get an email confirming your submission of grades. Caution: You can update or change forecast/midterm grades from Gradebook after they have been submitted. You cannot change final grades from Gradebook after they have been submitted, see the next
page.
8 Submit Grades
36
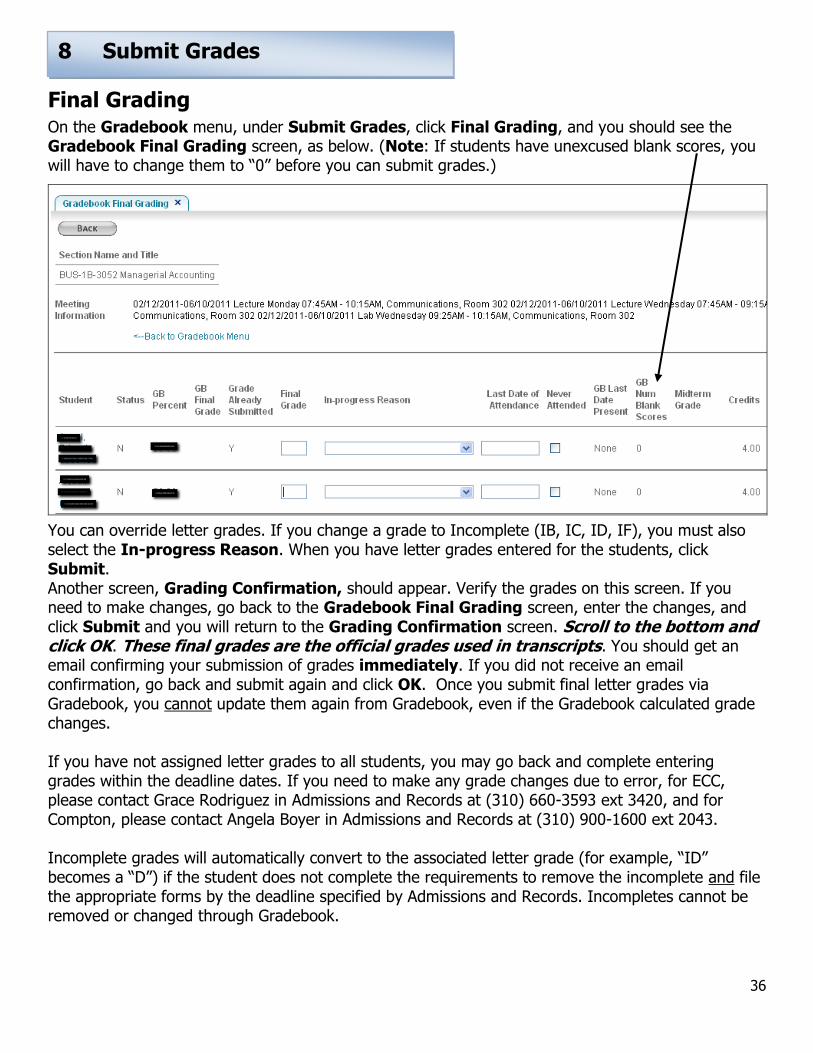
Final Grading
On the Gradebook menu, under Submit Grades, click Final Grading, and you should see the Gradebook Final Grading screen, as below. (Note: If students have unexcused blank scores, you will have to change them to ―0‖ before you can submit grades.)
You can override letter grades. If you change a grade to Incomplete (IB, IC, ID, IF), you must also select the In-progress Reason. When you have letter grades entered for the students, click Submit. Another screen, Grading Confirmation, should appear. Verify the grades on this screen. If you need to make changes, go back to the Gradebook Final Grading screen, enter the changes, and click Submit and you will return to the Grading Confirmation screen. Scroll to the bottom and click OK. These final grades are the official grades used in transcripts. You should get an email confirming your submission of grades immediately. If you did not receive an email confirmation, go back and submit again and click OK. Once you submit final letter grades via Gradebook, you cannot update them again from Gradebook, even if the Gradebook calculated grade changes. If you have not assigned letter grades to all students, you may go back and complete entering grades within the deadline dates. If you need to make any grade changes due to error, for ECC, please contact Grace Rodriguez in Admissions and Records at (310) 660-3593 ext 3420, and for Compton, please contact Angela Boyer in Admissions and Records at (310) 900-1600 ext 2043. Incomplete grades will automatically convert to the associated letter grade (for example, ―ID‖ becomes a ―D‖) if the student does not complete the requirements to remove the incomplete and file the appropriate forms by the deadline specified by Admissions and Records. Incompletes cannot be removed or changed through Gradebook.
8 Submit Grades
37
Required Hard Copy Documentation for Admissions & Records Print out the Gradebook Score Overview screen AND the Gradebook Final Grading screen as your Supplemental Documentation for grades. Print out the Gradebook Attendance Report screen as your Supplemental Documentation for attendance documentation OR fill out the green and yellow rosters during the semester as your Supplemental Documentation. Turn in your ―paper copy‖ Supplemental Documentation either by:
Dropping them off in Admissions in the ―On Line Grade Check‖ box; Sending them via campus mail; or Mailing them directly to Admissions via U.S. mail.
Please note that Admissions and Records must receive your supplemental documentation by the due date specified each semester. Please send the package to:
El Camino College Admissions and Records Office – SSC 101
Grace Rodriguez 16007 Crenshaw Boulevard
Torrance, CA 90506
8 Submit Grades
38
Set Minimum Category Requirements
If you want to set a minimum required percentage for a certain category of assignments or a specific assignment, such as a final exam, you can set up Gradebook to show when a student has not met that requirement. (Note: If the minimum score is for a specific assignment, set up that assignment as its own category.) Go to the Gradebook Setup Wizard menu, and under Step 2: Assignment Categories, click Set Minimum Category Requirements. The Category Minimums screen should appear. Enter the minimum percentage for appropriate categories and click Submit. If a student does not meet the percentage required, the Item Status field on the Gradebook Grade Report (Level of Detail = Category Totals, Assignments, or Calculation Details) will show the message ―FAILS TO MEET CATEGORY MINIMUM.‖ (The student should see the same message on the Student Gradebook Report.) Caution: Gradebook will NOT automatically assign a letter grade of D or F to a student who has not met the minimum requirements. If you decide to assign a non-passing grade to the student, you will have to manually change the letter grade on the Gradebook Final Grading screen, page 36, before you submit final grades.
Gradebook Copy Access
If you want to allow other faculty teaching the same course to copy your Gradebook general setup, go to the Gradebook Setup Wizard menu, and under Step 4: Accessibility, click Set Gradebook Copy Access, and the Gradebook Copy Access screen should appear. Check the box after Allow other faculty to copy this Gradebook and click Submit. Other faculty who teach the same course should now have access to your Gradebook general setup. They cannot see your students or assignments.
Permanently Delete Gradebook
If you want to delete your Gradebook and start over, first delete any scores that you have entered. Then go to the Gradebook Setup Wizard menu, and under Step 6: Delete Gradebook, click Permanently Delete Gradebook. The Delete the Setup screen should appear. Click Confirm Delete and you will return to the Gradebook Select Section screen, page 3. Now you can start over with a new Gradebook setup.
9 Optional Features
39
Is the ―Final Grade Submission‖ part of the Gradebook... official?
Yes, final grades submitted using ―ECC Gradebook‖ are official as soon as they are submitted. Once
you submit your grades, you will receive an email confirmation.
Do I still need to submit final grades through the other part of the Portal?
No, once you submit your grades through the Gradebook, there is no need to submit final grades the
―old way‖ through the ―Grading‖ link in the ECC portal.
Do I still need to submit paper copies to Admissions and Records?
Yes, you must turn in a ―paper‖ printed copy of the ―Gradebook Score Overview‖ and ―Gradebook
Grade Report‖ (default view) to Admissions and Records. You do not have to fill in and submit the
Grade Report that Admissions and Records sent to you at the beginning of the semester.
When you submit your final grades through the Gradebook, do you get an e-mail
verifying that grades were submitted?
Once you submit your grades, you will receive an email confirmation.
Can a final grade be changed?
Once submitted…NO, not through Gradebook. You can change a letter grade or override a letter
grade before you submit the final grades in Gradebook. If you need to change a grade after
electronically submitting grades, please contact Admissions and Records.
Can I submit my attendance roster to Admissions and Records through the Gradebook?
No, you must print out the ―Gradebook Attendance Report‖ from the Gradebook and attach it to the
Attendance form from Admissions & Records and turn it into Admissions & Records OR fill out the
green and yellow rosters during the semester & submit them to Admission & Records.
Is any browser more user friendly than the other?
Internet Explorer is the preferred browser. All three major browsers work, Internet Explorer, Firefox
and Safari for Mac.
Can Gradebook be used to e-mail students?
Yes, this feature is located under the Daily Activities section titled ―Send E-mail to Students.‖
How long do I have before I am ―timed-out‖?
There is no time limit. However, you should click ―Save and stay‖ or ―Save and continue‖ often just in
case. You will only be timed out if you do not keep the log in windows open at all times while in the
Portal.
10 FAQ’s
40
Can I enter grades in the Gradebook and have the grades ―invisible‖ to the students?
Yes, it is possible to make the entire Gradebook invisible to students.
Can I have grades for certain assignments invisible?
Yes, you can set up your Gradebook to show assignment names and assignment scores, the
assignment names but not the scores, or no assignments and no scores.
Will the Gradebook keep track of students who have dropped the course?
Yes, you can view the names of dropped students.
Do I still need to enter ―Forecast Grades‖ in the portal under the ―Grading‖ link if I use
the Gradebook?
No, you can ―Forecast Grades‖ by submitting from the ―Midterm Grading‖ link located in the
Gradebook menu. You must submit the ―Midterm‖ grade; Gradebook does not automatically submit
grades for you. If you use the Gradebook, you don’t need to ―Forecast‖ grades the ―old‖ way in the
portal under the ―Grading‖ link.
How long do students have access to their grades?
Students have access for 30 days after the class section ends.
Can you have individual scores unreported in Gradebook?
Only a score for a specific assignment can be unreported for an individual student.
Can you delete the Gradebook?
If you start to create a Gradebook and then want to erase all of the parameters that you entered and start over again, you can delete the setup. You must first delete any scores you have entered. See page 38 for more details.