45
Version 1.8 MYELT INSTRUCTOR GUIDE

Version 1.8
MYELT INSTRUCTOR GUIDE

2
TABLE OF CONTENTS ABOUT THIS MYELT INSTRUCTOR GUIDE ..................................................................................................................... 4
MYELT SOFTWARE AND HARDWARE REQUIREMENTS ................................................................................................. 5
MYELT COMPATIBLE OPERATING SYSTEMS AND BROWSERS ............................................................................................ 5
SYSTEM CHECK ERRORS ...................................................................................................................................................... 5
MYELT COURSE TERMINOLOGY AND RELATIONSHIPS.................................................................................................. 6
MYELT NAVIGATION .................................................................................................................................................. 7
HOW DO I REGISTER AS A NEW INSTRUCTOR? ................................................................................................................... 7
SIGNING INTO MYELT .......................................................................................................................................................... 9
OVERVIEW OF TABS .......................................................................................................................................................... 10
CREATING A COURSE IN MYELT ........................................................................................................................................ 11
COURSE SECTIONS ................................................................................................................................................... 13
HOW DO I COPY COURSES? ..................................................................................................................................... 15
COMMON COURSE KEY ISSUES ................................................................................................................................ 17
ASSIGNMENTS ................................................................................................................................................................... 19
HOW DO I CREATE AN ASSIGMENT? ........................................................................................................................ 19
HOW DO I CREATE AN EXAMVIEW TEST? ................................................................................................................ 21
ASSIGNMENT EDITING OPTIONS .............................................................................................................................. 23
MODIFYING ASSIGNMENT DUE DATES ....................................................................................................... 23
MODIFYING THE NUMBER OF TAKES ALLOWED......................................................................................... 24
HOW DO I COPY ASSIGNMENTS? ............................................................................................................................. 25
COMMON ASSIGNMENT ISSUES .............................................................................................................................. 27
ONLINE LESSON PLANNER ................................................................................................................................................. 28
STUDENT ENROLLMENT .................................................................................................................................................... 33
HOW DO MY STUDENTS REGISTER FOR MY COURSE? ............................................................................................ 33
HOW DO I ENROLL STUDENTS INTO MY COURSE? .................................................................................................. 35
GRADEBOOK AND REPORTS .............................................................................................................................................. 36
HOW DO I MONITOR STUDENT PROGRESS? ............................................................................................................ 36
HOW DO I ACCESS MY STUDENT’S AUDIO RECORDINGS?....................................................................................... 37
HOW TO RUN A GRADEBOOK REPORT .................................................................................................................... 40
TYPES OF GRADEBOOK REPORTS ............................................................................................................................. 41

3
TABLE OF CONTENTS (CONT.) MYELT STUDENT SUPPORT ....................................................................................................................................... 42
HOW DO I ENTER A NEW CONTENT ACCESS CODE? ......................................................................................................... 42
HOW DO I INPUT A NEW COURSE KEY? ............................................................................................................................ 42
I REGISTERED WITHOUT A COURSE KEY – WHAT SHOULD I DO? ..................................................................................... 43
MYELT COMMUNICATION BASICS ............................................................................................................................ 44
HOW DO I CONTACT MY STUDENTS? ............................................................................................................................... 44
HOW DO I CONTACT MY SALES REPRESENTATIVE? .......................................................................................................... 45
HOW DO I CONTACT TECHNICAL SUPPORT? .................................................................................................................... 45
CAUSES OF STUDENT AUDIO ISSUES ................................................................................................................................. 45

4
ABOUT THIS MYELT INSTRUCTOR’S GUIDE This guide is intended to provide guidelines for you to navigate the MYELT Learning Management System. This guide will
cover MYELT hierarchies, computer set up information, MYELT Navigation, Access, and Support Delivery. This guide
defines procedures that must be followed to ensure a positive user experience.
If you have any questions about the guide, please contact MYELT Technical Support at [email protected].

5
MYELT SOFTWARE AND HARDWARE REQUIREMENTS The hardware required is a PC, Mac, or Android mobile device with the approved software requirements identified
below. The recommended keyboards are any keyboards that allow you to enter English alphabet characters and
numbers. The recommended headphones and microphone are those that plug into your computer or mobile device and
allow you to record your voice. Using wireless headphones and microphone may result in poor scores for speaking
exercises. A minimum internet connection of 56k is required.
MYELT COMPATIBLE OPERATING SYSTEMS AND BROWSERS
Windows XP /Service Pack 3
Internet Explorer 7, 8, 9
Chrome
Firefox 3.5 & 3.6
Adobe Flash Player 9 or 10
Windows Vista /Service Pack 1
Internet Explorer 7, 8, 9
Chrome
Firefox 3.5 & 3.6
Adobe Flash Player 9 &10
Windows 7
Internet Explorer 8.0, 9
Chrome
Firefox 3.5 & 3.6
Adobe Flash Player 10
MAC
OS X 10.5
Firefox 3.6
Safari 4.0
Adobe Flash Player 10
SYSTEM CHECK ERRORS Each time you sign into MYELT; your computer will run a System Check to ensure your computer meets our minimum requirements. If you receive any errors, please refer to this section to solve the issues. If you are unable to resolve the errors using the resources below, please contact MYELT Technical Support at [email protected].
How do I turn off my pop-up blocker?
http://elt.heinle.com/MYELT/problems.html OR
http://www.wikihow.com/Disable-Popup-Blockers
How do I clear my Cache?
http://www.wikihow.com/Clear-Your-Browser's-Cache How do I update Java?
http://www.java.com/en/download/inc/windows_upgrade_ie.jsp How do I update FLASH?
http://kb2.adobe.com/cps/155/tn_15507.html
6
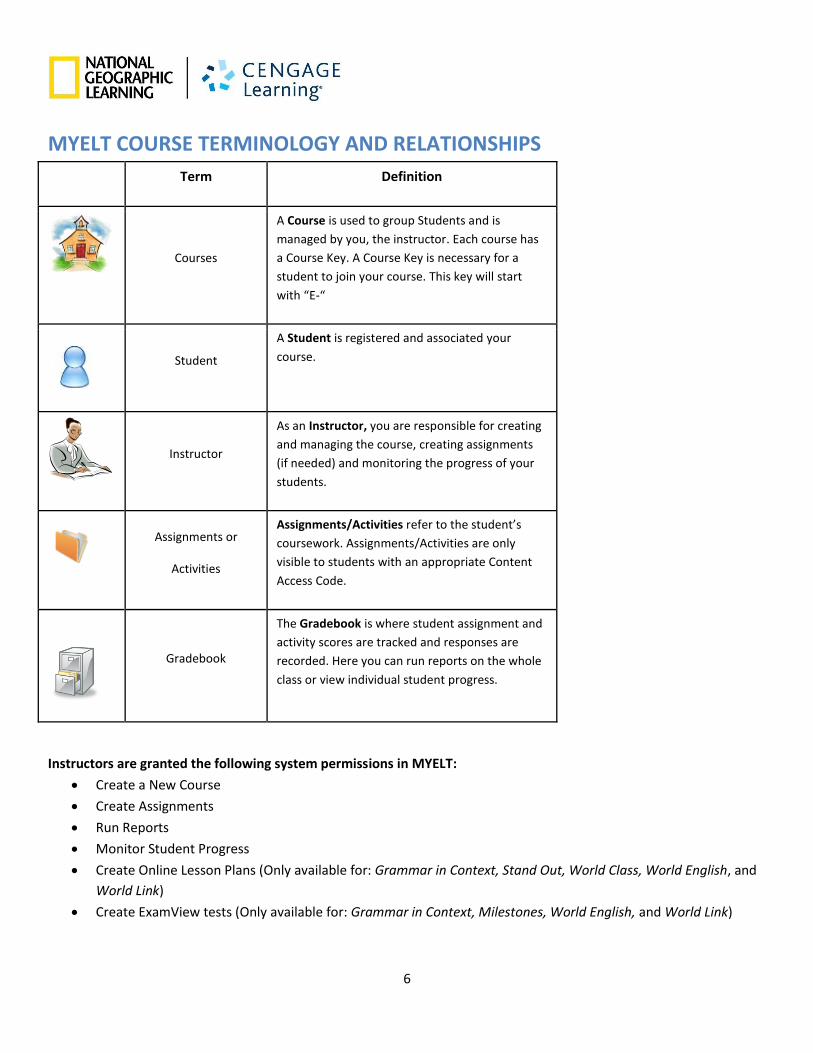
MYELT COURSE TERMINOLOGY AND RELATIONSHIPS
Term Definition
Courses
A Course is used to group Students and is
managed by you, the instructor. Each course has
a Course Key. A Course Key is necessary for a
student to join your course. This key will start
with “E-“
Student
A Student is registered and associated your
course.
Instructor
As an Instructor, you are responsible for creating
and managing the course, creating assignments
(if needed) and monitoring the progress of your
students.
Assignments or
Activities
Assignments/Activities refer to the student’s
coursework. Assignments/Activities are only
visible to students with an appropriate Content
Access Code.
Gradebook
The Gradebook is where student assignment and
activity scores are tracked and responses are
recorded. Here you can run reports on the whole
class or view individual student progress.
Instructors are granted the following system permissions in MYELT:
Create a New Course
Create Assignments
Run Reports
Monitor Student Progress
Create Online Lesson Plans (Only available for: Grammar in Context, Stand Out, World Class, World English, and
World Link)
Create ExamView tests (Only available for: Grammar in Context, Milestones, World English, and World Link)

7
MYELT NAVIGATION This section will explain important functions of MYELT that will allow you to navigate the system.
HOW DO I REGISTER AS A NEW INSTRUCTOR? 1. Open a web browser, and go to http://myelt.heinle.com/.
2. Select Create an Account from the New User area.
3. Select Instructor from the Registering area.

8
4. Fill in the requested information and select the materials to which you would like access. Once you
have made your selections, click Submit Request

9
5. Once you have submitted the form, you will receive an email confirming that you have successfully
submitted your request. Your log in information will be emailed to you within 24-72 hours after receipt
of your request.
NOTE: Please add [email protected] to your safe sender list to ensure delivery of
your log in information.
SIGNING INTO MYELT 1. Open your web browser, and go to https://myelt.heinle.com
2. Enter your Username and Password under the Returning User section and click
3. Your computer will now go through a System Check. If you receive any error messages, please refer to the
System Check Errors section on page 5.
4. You are now signed into MYELT and can begin using the system.

10
OVERVIEW OF TABS IN MYELT
If you have assigned any activities that require manual grading, the assignment will be listed under
the Home tab when a student has completed the activity.
Here you can create, manage, and delete courses. Any course you are enrolled in as the instructor
will appear under this tab.
Under the ‘Students’ tab you will see the students who are enrolled in each of your courses. You
can manage student enrollments under this tab as well.
Here you will be able to view your students’ scores and run reports on all students enrolled in the
course.
Here you will be able to create, manage, and delete assignments for your courses.
All of the books to which you have access will appear under this tab. You can demo any of the
activities your students will take by using the content listed here.
This tab is enabled when your account has been set up to use an Online Lesson Planner. To use the
Online Lesson Planner, select this tab and click Launch Online Lesson Planner
Here you can modify your account information and update your password. The answer to your
password reset security question is located here as well.
Click here to log out of your session.
Click here to access the MYELT help page. Here you will have access to guided tutorials, user
guides, system requirements, as well as our technical support contact form.

11
CREATING A COURSE IN MYELT 1. Sign into your MYELT Instructor Account
2. Click the tab
3. Click
4. Enter your course details in the Course Information area.
a. Course Name: At minimum, this needs to be filled in
b. Course Number: Additional information about your course
c. Course Starts On: If you set a date for the future in this field, the course will not be shown to your
students until that date – regardless of them being enrolled in the course beforehand
d. Course Ends On: If an end date is set, the course will no longer appear for students after the set end
date
5. Click
6. A Course Key is now generated. This Course Key must be copied down and distributed to your students for
them to gain access to your course.
NOTE: If you forget to copy down your Course Key, you may also locate the Course Key either on the
screen in Step 8 and also under your Courses tab.
After the below screen capture are definitions of the options available on the Generate Course Key Page:
COURSE KEY: refers to the key your students will need when signing up for MYELT to enroll in your course
o Generate a new code: Create a new Course Key if you wish to re-use the course
o Clear this code: Use this option when you wish to generate a new code
o Code Expiration Dates: Set these options if you wish to limit the amount of time the students have to
enroll in your course
o Save and return to the course summary: Click here in order to save the Course Key and any other
changes you have made

12
7. Once you’ve copied your Course Key, click Save and Return to Course Summary.
8. Once you click Save and return to the course summary, you will see the following screen. Below the screen
capture are definitions of the options presented to you at this point.
On the left is the basic information for the course and on the right are your editing options:
- Change
o Course Information: In this option you can add a description of the course or any information the
students may need to know.
o Course Key: Here you can regenerate the Course Key – this option comes in handy if you wish to re-use
your course for another semester and need a new course code.
- Create
o Section: You can create multiple sections of the course you originally created so that you don’t have to
create the same course over and over.
o Assignment: This is where you begin to create the assignments for the course.
o Student account: An instructor is able to create accounts for their students and then enroll the student
in their course. In this case, the student only has to input their Content Access Code once they login.
- View
o Syllabus: This will list the course information and all of the assignments.
o Students: This is the list of students enrolled in the course – you are able to enroll/de-enroll students
under this section.
o Assignments: You can view the list of the assignments you have already created and edit them here.
o Grades: Here, you can view your gradebook and edit student scores, if needed.

13
COURSE SECTIONS In MYELT you can create multiple sections under one main course. Please note that a student can only be enrolled in
one section at a time. If they try to register for a different section, their work will be lost in the class in which they are
currently enrolled. In order to set up a section, the master course must already exist.
TO CREATE A COURSE SECTION
1. Sign into your MYELT Instructor Account
2. Click the tab
3. Under the “Actions” column, click Create section
4. You will now be prompted to fill in your Section Name, Section Number, Section Start Date, and Section End Date
5. Once you have filled in the fields, click
6. A Section Course Key will now be generated. This is different than the master course’s Course Key and will need
to be distributed to any students who are enrolling in the section

14

15
HOW DO I COPY COURSES?
If you wish to re-use a course you have already set up or need to create multiple copies of the same course, you can use
the Copy Course feature. This will copy the entire course, including any assignments that have been created.
1. Sign into your MyELT Instructor Account.
2. Click on the Courses tab.
3. Check the box in front of the course you wish to copy.
4. At the top of your course list, click Copy. The page will refresh when the course has been copied.

16
5. Click Paste to insert the copied course to your list of courses.
6. A new window will now pop-up. On this pop-up, you can adjust the assignment dates. If you do not wish to
change any dates or have completed the date changes, click Paste Selected Items.
7. Your new course will now appear in your courses list as a ‘Copy Of (course name).’
8. To change the name of the course, click on your Course Name
9. On the right hand side, click Course Information
10. Here, you can input a new Course Name and click Save and Return to Course Summary. All of your other course
information will remain the same (course dates, assignments, etc.).

17
COMMON COURSE KEY ISSUES
Problem: When my students register, they are being told the Course Key does not work.
Solution(s):
1. Check to see the activation dates that were set for the Course Key or if the key has been disabled
a. Navigate to the tab.
b. Click on the Course Key for your class under the Course/Section Key column.
c. On the left:
i. Look under the Course Key. The third option says ‘Disable Course Key’ or ‘Enable Course Key.’
If it says ‘Enable Course Key’ – click on it so it says ‘Disable Course Key.’
d. On the right:
i. Look under Code Expiration Dates and see if the Course Key is set to start after the current date
or end prior to the current date.
If the dates fall in the incorrect range, correct the dates using the calendar feature
e. Once both sections have been checked, click
2. Check the course start/end dates.
a. Navigate to the tab.
b. Check the ‘Start Date’ and ‘End Date’ columns to see if the current date falls between the date range.

18
i. If the current date does not, follow steps C-F.
ii. If the current date does, check Solution #1 and #3 or email Technical Support at
c. Click on the course name.
d. On the right hand side, click Course Information under ‘Change…’
e. Correct the start and end dates for the course so that the current date falls within the time frame.
f. Click .
3. Make sure the students have the correct spelling of the Course Key. Symbols or letters and numbers often get
switched or misinterpreted.

19
ASSIGNMENTS This section will explain how to create assignments, manage due dates and modify custom options for your course.
HOW DO I CREATE AN ASSIGNMENT?
1. Click the tab.
2. Select your course from the drop down menu.
3. Click
4. Click the sign in front of the book from which you wish to select content to see the Table of Contents. NOTE –
if you wish to set up an ExamView assignment, please see section Creating an ExamView Assignment on page
16.
5. To select a book/unit/activity, check the box in front of the coursework. You can continue to expand down to
select specific activities.
6. Once you have selected all of the activities you would like to include, click .
7. If you have selected multiple assignments, you will see a pop-up message indicating that you have selected
multiple assignments and will now be taken to the assigning options page. Click OK.
8. You are now on the Assign page. Here you can customize how you would like the assignments to be made
available to your students. Follow these steps to complete the assignment setup:
a. Group Name: Input a name for the assignment(s) - The option of “Do Not Group Assignments” will break
them down into separate assignments like if you had just created a single assignment.

20
b. Takes Allowed: Choose how many “takes” you wish to allow your students to have.
c. Assignment Available: Choose when you want the assignment available and when it is due.
9. Once you have finished filling in the fields, click .
10. You have now created an assignment and will see the following screen. Click Return to Assignment List under
Other Actions to navigate to the main assignments section.

21
HOW DO I CREATE AN EXAMVIEW TEST?
This option is only available for Grammar in Context, Stand Out, World Class, World English and World Link.
1. Click the tab.
2. Select your course from the drop down menu.
3. Click
4. Click ExamView Content and click Update.
5. Click OK when a warning message pops up.
6. Once the page refreshes, click the sign next to your content to access the Test Banks.
7. Pick the Test Banks you wish to use and follow the steps the system prompts you with to set up the questions,
ordering, and overall aspects of the test. (See the following screenshots for examples of setup options).

22

23
ASSIGNMENT EDITING OPTIONS
MODIFYING ASSIGNMENT DUE DATES
- WHOLE CLASS
1. Navigate to the tab
2. Click on the Group Name for which you want to modify the dates.
3. Click Edit Group: Modify options for All Assignments in Group.
4. Modify the dates on the right hand side under ‘Available’ and ‘Due’ and click .
5. Continue to go through each group of assignments to change the dates. Make sure you are clicking on
the group and not the individual assignment.
- INDIVIDUAL STUDENT(S)
1. Navigate to the tab.
2. Click on the Group Name for which you want to modify the dates.
3. On the right hand side, click Modify Options for Assignments in Group, for Specific Students.

24
4. Select which student(s) you would like to modify and the assignment you would like modified and click
.
5. Modify the dates and click in the upper left hand corner.
MODIFYING THE NUMBER OF TAKES ALLOWED
1. Navigate to the tab.
2. Click on the Group Name for which you want to modify the number of takes.
3. Click Modify Options for all Assignment in Group.
4. On the left hand side, select the number of ‘Takes’ you would like to allow your students to have (including the
ones they already have).
5. Click .

25
HOW DO I COPY ASSIGNMENTS?
You may want to use the same set of assignments in multiple courses or re-use a set of assignments from an old course
in a new one. To copy assignments between courses, please follow these steps.
1. Sign into your MyELT Instructor Account.
2. Click on the Assignments tab.
3. From the drop down menu, select the course you wish to copy the assignments from.
4. If you have Assignment Groups set up, check the box in front of the Group Name for the assignments you wish
to copy. If you are using Individual Assignments, check the boxes in front of each assignment you want to copy.
26
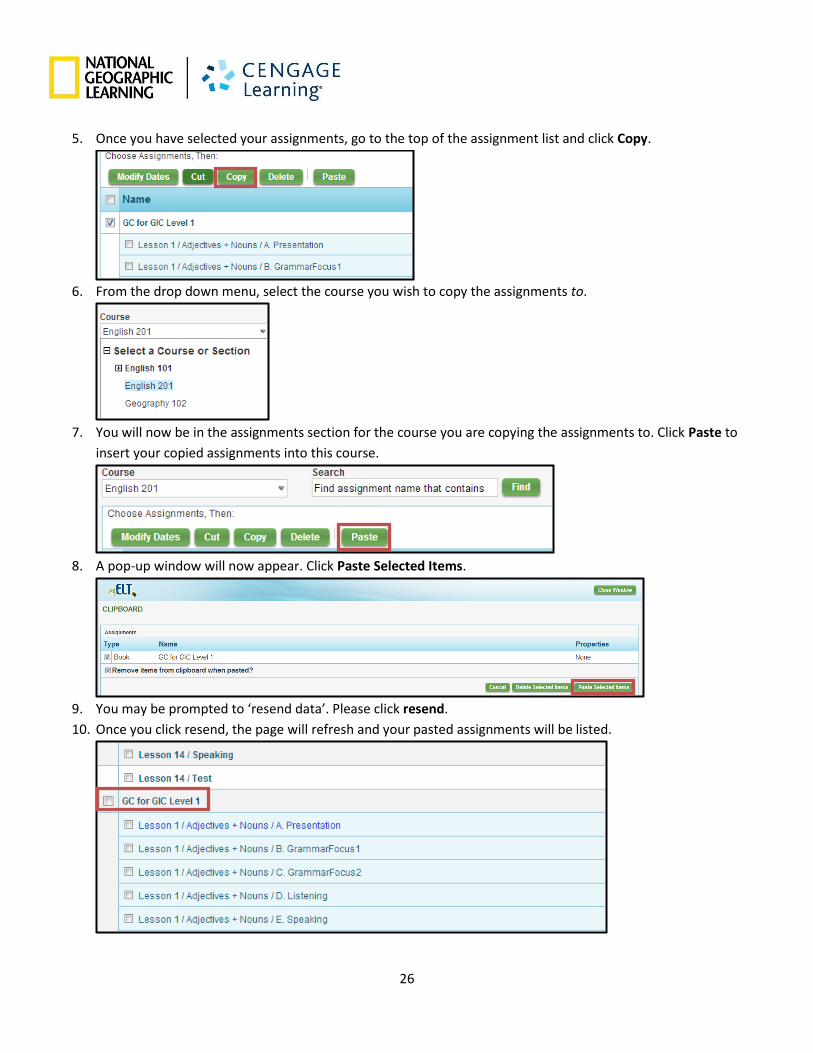
5. Once you have selected your assignments, go to the top of the assignment list and click Copy.
6. From the drop down menu, select the course you wish to copy the assignments to.
7. You will now be in the assignments section for the course you are copying the assignments to. Click Paste to
insert your copied assignments into this course.
8. A pop-up window will now appear. Click Paste Selected Items.
9. You may be prompted to ‘resend data’. Please click resend.
10. Once you click resend, the page will refresh and your pasted assignments will be listed.

27
COMMON ASSIGNMENT ISSUES
Problem: My students say they took the assignments, but I do not see their score.
Solution(s):
1. Check to see if the student has taken the assignments under their ‘My Activities’ tab.
a. Ask your student to check their ‘My Assignments’ tab and see if the assignment shows them as having
any ‘takes.’
b. You can also check your gradebook to see where the scores were recorded.
i. Navigate to the tab.
ii. Locate the student’s name and see if there is a score for the assignment they say they took.
iii. If there is no score, click in the upper right hand corner
iv. When the page refreshes, locate the student’s name and click on their name to view the scores
that are tied to their account.
v. If there are no scores for the assignment they claim they took, proceed to Solution 2.
2. Check to see if the student is clicking ‘Submit’ when completing the assignment.
a. If possible, ask the student to retake the assignment in front of you. Ensure that they have answered all
the questions and clicked ‘Submit’ prior to leaving the activity.
b. If the student cannot show you in person, ask them to retake the assignment at home and ensure that
they know that they need to click ‘Submit’ in order to record a score for the activity. In some cases, they
may need to move a scroll bar down to activate the submit button.
3. If neither option offers a solution, contact MYELT Technical Support at [email protected].

28
ONLINE LESSON PLANNER In this section you will learn how to use the Online Lesson Planner tool within MYELT. This planner is only available for
certain titles within MYELT. The products available for the Online Lesson Planner are Grammar in Context, Stand Out,
World Class, World Link, and World English.
HOW DO I CREATE AN ONLINE LESSON PLAN?
1. Sign into your MyELT Instructor Account.
2. Click the Lesson Planner tab. If you do not have the Lesson Planner tab on your account and you would like
access to this feature, please email MyELT Technical Support at [email protected].
3. Click Start Online Lesson Planner.
4. To begin the process of creating a lesson plan, click on Create a New Lesson Plan.

29
5. Once you see the setup form, begin to fill in your course information.
6. After clicking Next, you will be asked to enter dates and times for your course. NOTE: to set holidays, see step 7.
7. If you need to add in holidays to your timeframe, click Schedule More Holidays. If you do not need to add
Holidays, proceed to step 8.
a. You will be prompted to enter information about the holiday you wish to schedule. Along with being
able to schedule a holiday, under the Holiday drop down menu, you can choose Holiday, Event, or No-
Class Day.

30
b. Once you have input all of your information, click Add.
c. After you have added the holiday, click Back.
d. If you have more holidays to add, click Add New Holiday. You will go through steps a – c again. If you do
not have any additional holidays to add, click X in the upper right hand corner.
e. When you click X, you will be taken back to the original screen where you input your course days. You
will now see your holiday(s) listed under Holidays.
8. If you are done inputting information on the Set dates and class length form, click Save.
9. If you have not selected enough content to fill the course time you selected, you will see a pop-up message that
asks you if you want to add more content. A similar pop-up will occur if you have selected too much content for
the course time you selected.
a. If you do, click the X and go back to the Select Content tab.
b. If you do not, click Save a Plan.

31
10. After clicking Save a Plan, you will see an overview of the lessons you have set up. You can either click Go Home
or Go to the first available lesson plan.
a. If you clicked Go to first available lesson plan, you will be taken to the following screen where you have
the option to email, print, save, or edit the lesson plans you have created.

32
b. If you clicked Go Home, you will be taken to a listing of the lesson plans you have created. From this
page, you can create additional lesson plans by selecting ‘Create a new lesson plan.’
11. When you are done working the Online Lesson Planner, click Return to MyELT in the upper right hand corner.
This will navigate your back to the main section of MyELT.

33
STUDENT ENROLLMENT
HOW DO MY STUDENTS REGISTER FOR MY COURSE?
In order to register for MYELT, your students will need to have two pieces of information – a Content Access Code for
the book you are requiring for your course and a Course Key that is generated when you create your course in MYELT.
The students should take the following steps to register their account in MyELT.
1. Navigate to myelt.heinle.com.
2. Select Create an Account from the ‘New User’ area.
3. Select Student from the Registering area.
4. On the left hand side, input your Content Access Code and Course Key.

34
a. If you are not requiring your students to enroll in a course, they will not need a Course Key and should
register on the right hand side with their Content Access Code.
5. Enter your Account Information and click .
6. You are now registered for MYELT. Click Continue to MYELT to start working on your coursework.

35
HOW DO I ENROLL STUDENTS IN MY COURSE?
There may be some cases in which some of your students already have an account in MYELT. If you wish to enroll them
in your course yourself, you can do so following the steps below.
1. Navigate to the tab.
2. Click .
3. Search for your student and check the box in front of their name in the left hand column.
4. Click .
5. When the page refreshes, you will see your student listed under the column on the right hand side.

36
GRADEBOOK AND REPORTS
The Gradebook holds information on student progress in the coursework. You can run reports via the Gradebook on
each group or student.
HOW DO I MONITOR STUDENT PROGRESS?
1. Click the tab.
2. Select your course from the drop down menu.
3. You will now see all students enrolled in your course and a percentage score for each. If you wish to see the
scores for one particular student, click on their name.
4. You will now see the assignments the student has taken.
5. To see their answers, click on the Score.
6. To return to the list of all of your students, click (upper right hand corner).

37
HOW DO I ACCESS MY STUDENT’S AUDIO RECORDINGS?
For some of the activities in MYELT your students will be recording audio that will be saved to their gradebook. To access
this audio and listen to it, follow the steps outlined below.
1. Click on the tab
2. From the drop down menu, select the course from which you wish to listen to the student’s audio
3. Depending on how your course is set up, the audio will be located in two different locations.
a. ASSIGNMENTS
i. Click on the name of the student you wish to listen to the audio for
ii. You will now see the details of all assignments your student has taken.
iii. Under the ‘Notes’ column, click on the Audio Sample you wish to listen to.

38
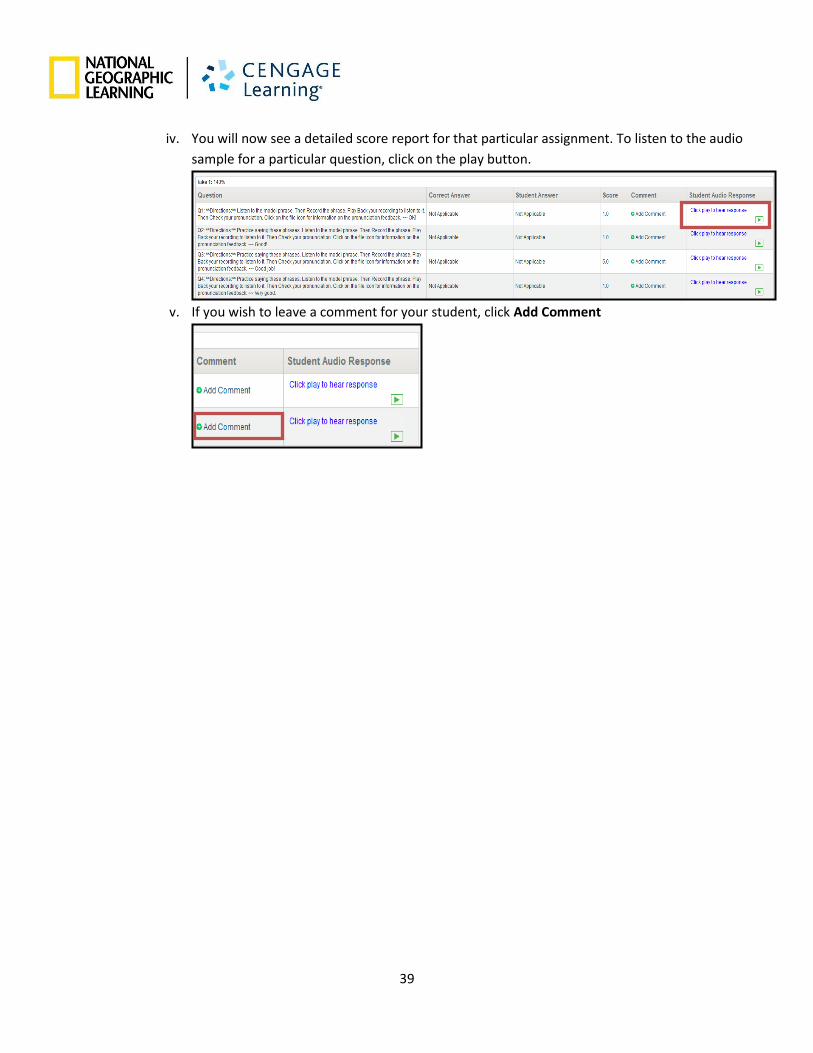
iv. You will now see a detailed score report for that particular assignment. To listen to the audio
sample for a particular question, click on the play button.
v. If you wish to leave a comment for your student, click Add Comment
b. NO-ASSIGNMENTS
i. In the upper right hand corner of your gradebook, select View All Activity Content
ii. To listen to the student’s audio samples, click on their name
iii. You will now see a list of the activities your student has completed. Click on Audio Samples for
the activity you wish to listen to.
39
iv. You will now see a detailed score report for that particular assignment. To listen to the audio
sample for a particular question, click on the play button.
v. If you wish to leave a comment for your student, click Add Comment

40
HOW TO RUN A GRADEBOOK REPORT
1. Click the tab.
2. Choose your course from the drop down menu.
3. Choose which report you wish to run from the Report Creator menu (on the right hand side). Click Go.
4. Follow instructions to customize report information.
5. Click on the right.
6. Your chosen report will now be displayed. You can choose to either print or export the report. If you chose to
export your report, select the type of file you would like to save your report in and click Save Report.
7. To run another report, click and repeat steps 1 – 5.

41
GRADEBOOK REPORTS AVAILABLE TO INSTRUCTORS
TO VIEW EXAMPLES OF THE REPORTS AND COLUMN DEFINITIONS, PLEASE SEE THE SUPPLEMENTAL GUIDE MyELT
Instructor Reports
Activity Statistics: This report shows the number of students who have taken a particular assignment in a course
and the range of grades and median, mean scores.
Scores, By Assignment: This report lists the students in a selected Course and the scores achieved by each of
these students for each assignment contained in the Course.
Scores, by Student (Details): Scores for all activities taken by user.
Scores, by Student (Summary): This report lists all students in a course their sign in data and the overall score
achieved for this course.
Scores, by Student (Summary, with Categories): This report lists all students in a course with their scores and
percentages.
Time Spent, by Student: This report lists all of the assignments taken by a student in a course, the book from
which the assignments were created, the date that work on the assignment was last taken and the score and the
total time spent by the student on the assignment in question.

42
MYELT STUDENT SUPPORT Your students may contact your with a technical support need for MyELT. This section will cover basic queries that will help you work with your students.
HOW DO I ENTER A NEW CONTENT ACCESS CODE? You may have some students who already have a MYELT account. They can add a new Content Access Code to their account using these steps.
1. Sign into your MYELT account.
2. Click in the upper right hand corner.
3. Input your new Content Access Code and click Use this Access Code.
4. You will receive a message confirming that your access code was accepted by MYELT.
HOW DO I INPUT A NEW COURSE KEY? You may have some students who already have a MYELT account. They can enroll in your course using these steps.
1. Sign into your MYELT account
2. Click the tab.
3. On the right hand side, click .
4. Enter your new Course Key and click Use this Course Key.
5. You will receive confirmation that your account was enrolled in your new course.

43
I REGISTERED WITHOUT A COURSE KEY – WHAT SHOULD I DO?
You may have a student who registered prior to receiving your Course Key. They can follow these steps to enroll in your course.
1. Sign into their MYELT Account.
2. Click the tab.
3. Click .
4. Enter your Course Key and click ‘Use This Course Key.’
5. A warning message will pop up asking you to sign out of MYELT. Click OK.
6. After being signed out, log-in as a Returning User.
7. You are now enrolled in your course!

44
MYELT COMMUNICATION BASICS
HOW DO I CONTACT MY STUDENTS? As an Instructor, you may contact individual, small groups, or all students enrolled in a course.
1. Select the tab.
2. Select the course which contains the students with which you want to communicate.
3. Click E-mail.
4. A new window will now pop-up. Check the box in front of the students you wish to email.
5. Scroll to the bottom of the student list to compose your message. Once you have completed your message, click
Send E-Mail.

45
HOW DO I CONTACT MY SALES REPRESENTATIVE? If you do not know who your sales representative is, you can locate them by navigating to
http://sites.cengage.com/RepFinder/search/natgeo
HOW DO I CONTACT TECHNICAL SUPPORT? Should you have questions that cannot be answered with the guide, please contact MYELT Technical Support at
[email protected]. You should receive a response within 24-72 business hours.
When contacting Technical Support, please provide the following information in your support request:
First and Last name
School Name
Operating System
Type of Browser
Content Access Code
Course Key (if applicable)
Brief description of problem
Screenshot of issue
CAUSES OF STUDENT AUDIO ISSUES Static: This can have several causes, including placing the microphone too close to the mouth, setting the input
volume too high, loose wires, or transmission problems. Avoid touching the microphone with your hands.
Breathing and bursts of air captured by the microphone: This is caused by improper microphone placement.
The microphone should be close to the mouth, but not directly in front of it.
Clipping: This is when the audio input is louder than the level supported by the hardware. This can be caused
because the microphone is too close to the speaker's mouth or because the input volume is set too high.
Background noise: This is caused when loud sounds are audible in the room. It is important to make sure that
there are no other sounds in the room besides the voice of the end-user.
Speak at a constant volume: Try to maintain the same speech level throughout your recording so as to avoid
fluctuation in your voice.
Dry mouth: In order to ensure clear and proper pronunciation, it’s important that one be hydrated. A dry
mouth can cause minor distortions in one’s speech. Make sure you drink water before you start a recording
activity.
Do not use the microphone built into a laptop or use a standalone microphone. The test must be completed
with an integrated headset (microphone plus earphone)
Adobe Flash Player Settings: before you start the audio recording exercises, you will be presented with the
Adobe Flash Player settings that you must check to Allow and Remember so that the system can record you
voice. After checking the two boxes, simply click the Close button to start your audio exercises.


