16
myGateway for Faculty North Orange County Community College District Information Services 1830 West Romneya Drive Anaheim, CA 92801 Helpdesk Phone: 714-808-4948 Email: [email protected]

myGateway
for Faculty
North Orange County Community College District
Information Services
1830 West Romneya Drive
Anaheim, CA 92801
Helpdesk
Phone: 714-808-4948
Email: [email protected]

myGateway For Faculty 2
Table of Contents Signing Into myGateway ........................................................................................................................................................ 3
Forgot Banner ID? ................................................................................................................................................................... 3
Forgot Password? ................................................................................................................................................................... 3
Navigation Menu .................................................................................................................................................................... 3
Faculty ..................................................................................................................................................................................... 4
Faculty Links ....................................................................................................................................................................... 5
My Courses ......................................................................................................................................................................... 5
Faculty Dashboard .............................................................................................................................................................. 6
Faculty Schedule ................................................................................................................................................................. 6
My Courses ......................................................................................................................................................................... 7
Content ........................................................................................................................................................................... 7
Adding a Subfolder ......................................................................................................................................................... 8
Adding a File/Photo/Video ............................................................................................................................................ 8
Preview a File .................................................................................................................................................................. 9
Searching for a Document ............................................................................................................................................ 10
Course List ..................................................................................................................................................................... 10
Course WIKI .................................................................................................................................................................. 10
Email ............................................................................................................................................................................. 11
Calendar ........................................................................................................................................................................ 12
Links .................................................................................................................................................................................. 13
Links to Google Drive ................................................................................................................................................... 13
Exporting and Importing Course Content (Copy Course Content).................................................................................. 13
Exporting Course Content ............................................................................................................................................ 13
Importing Course Content ............................................................................................................................................ 16

myGateway For Faculty 3
Signing Into myGateway Sign into myGateway with your Banner ID number (without the @). Your password is something that you create. If you
are unsure of your password, you can click on the “Forgot Password” link to change it.
Forgot Banner ID? If you can’t remember your Banner ID, there are a few things you
can do.
If you have an identification badge, the number is usually
on your badge.
If on campus, you can ask someone in your division office
to help you.
You can click on “Forgot username” on the NOCCCD CAS
home page, https://sso.nocccd.edu.
o This will walk you through a procedure that asks
for your email address and birthday.
o An email will be sent with a link that will give you
your Banner ID number.
Forgot Password? If you can't remember your password, you will need to go through
the procedure to change it. On the NOCCCD CAS home page,
https://sso.nocccd.edu, click on “Forgot Password.”
You will need to know what email address is listed in Banner as your “preferred” or default email address. As an
employee, this should be your campus email address.
You will be asked to enter in your preferred email address and the last 4 digits of your Banner ID number.
As long as the two things you entered match, myGateway will send an email with a unique link that will allow
you to change your password.
Click on the link to be taken to a page to create a new password. The password must be 8-20 characters and
you must use at least one letter and one number.
Navigation Menu Once you sign into myGateway, you will
see the main or home page. The
navigation menu is now on the side
instead of the top of the screen. Tabs are
now "Pages" in the new myGateway.
Click on any of the links to be taken to that
page. Example, click "Faculty" to go to the
Faculty page.

myGateway For Faculty 4
If you want to go back to the beginning, or the myGateway home page, click on “myGateway” shown at the very top of
the menu (white letters) or you can click "MyGateway" from the breadcrumbs under "MyGateway Home".
You will see four links at the top of the screen, to the left of the Sign Out link, depending on the size of the window you
are working on, they might appear as icons, of if maximized, as words:
Or
My Mail – or the envelope icon – will take you to the O365 log in page so that you can sign into your email account.
WebStar – or the star icon – will take you into WebStar.
My Sites – or the globe icon – will take you to a page that lists all the myGateway “groups” you belong to. Groups and
Course are now referred to as “Sites”.
Profile – or the person icon – will take you to your profile/account.
Faculty Click on the Faculty link from the left-hand navigation and you’re taken to the Faculty page:

myGateway For Faculty 5
Faculty Links This channel will have a list of links that are useful to faculty members.
Some links include:
- WebStar Faculty menu
- Cypress Parking System
- DegreeWorks
- Qualtrics
- Etc.
My Courses Select the current term to see what courses you are
teaching.
You can click on the course title to expand and see more
information about the Course Site in myGateway.
The house icon will take you to the myGateway site home page for that course. Here you can see members of the class,
add files, email the class, etc.
The wrench icon will allow you to configure which LMS (Learning Management System) you want to use for the course.
(Fullerton Blackboard, Cypress Blackboard or the Luminis site).
The envelope icon will allow someone to email the instructor.
myGateway For Faculty 6
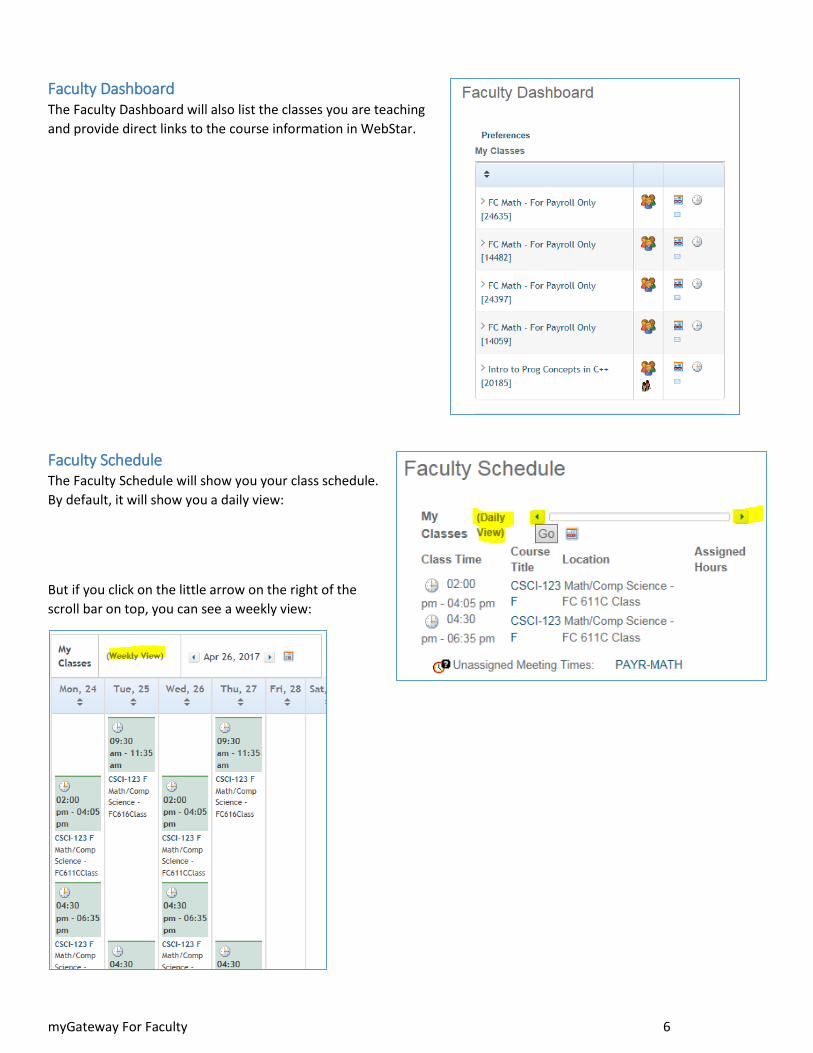
Faculty Dashboard The Faculty Dashboard will also list the classes you are teaching
and provide direct links to the course information in WebStar.
Faculty Schedule The Faculty Schedule will show you your class schedule.
By default, it will show you a daily view:
But if you click on the little arrow on the right of the
scroll bar on top, you can see a weekly view:

myGateway For Faculty 7
My Courses Click on a course listed in My Courses and it will expand showing you
options.
Click on the Home icon to be directed to the course’s site home page in
myGateway. Once on the home page, you can see things such as:
- Upcoming Events
- Members
- Recent Downloads
To the left you will have a navigation menu for the course page. Included in the menu is content, email, a calendar, links,
etc.
Content When you click on CONTENT from
the left-hand menu, you will have
folders for files, photos and videos
to make it easier for you to
manage the content that you
upload for the class. Note: the
folders FILES, FOLDERS, and VIDEO
are just default folders, you're free
to add subfolders or delete the
folders altogether and create your
own folders.

myGateway For Faculty 8
You can easily create subfolders or even move something by clicking on the down arrow for that folder:
Adding a Subfolder Click on “Add Subfolder”
Enter in the name and the description of the folder.
NOTE: You can sort files by Title, Create Date, Modify Date, etc.
If sorting alphabetically, and you want a folder to be listed at
the top, you might need to be creative in how you name it! You
can name the folder beginning with a number so that it is at the
top of the list.
Select who can view this folder.
Save.
Adding a File/Photo/Video Click in the folder you want the file, photo or video to be in.
Click on ADD. A dialogue box will open.
You can add a basic document or multiple documents at one time.
The options listed on the bottom (Luminis File, Luminis Photo and
Luminis Video) is an advanced technique that is similar to adding a
“hash tag” to the file. It basically adds that file/photo/video to a
“category” so that all files tagged in a similar manner will show up in
the Luminis folder regardless to where the file/photo/video was
actually uploaded to.

myGateway For Faculty 9
You can easily see what folder you are uploading the file to. It’slisted next to
the "Folder" label.
Browse to find the file you want to upload.
Give the file a Title and Description.
Select who can view this file.
Click on Publish.
Adding Multiple Documents
You can easily add multiple
documents by either selecting them
or “drag and drop” them into the
document box.
Preview a File Just click on the name of a file and you will see a preview of it. This will include the version, date it was last updated, and
a preview of the actual document:
EDIT will allow you to upload a new version of the same document. In the corner it will show the new version as 1.1.
Please note – uploading a new version of a document does not overwrite the original. Both versions will be available!

myGateway For Faculty 10
CHECKOUT is used for group collaboration. Someone can “check out” the document to edit it. This allows one user to
modify documents and stops others from modifying them until the document is checked back in.
NOTE: Students will see the document list and the download button. They will not see Edit, Checkout, etc. A student
WILL see versions of a document.
Searching for a Document You can easily search for any document anywhere on the course site by keyword be using the search function:
Course List Clicking on Course List will take you into the WebStar Faculty tab.
Course WIKI This is a course collaboration tool.
You can create information for
that particular course in a WIKI
environment.
Students can see the course WIKI
and add, modify, contents of the
wiki.

myGateway For Faculty 11
Email You can easily email your
students by clicking on
Email.
EXCEL – will create a list of your students in an excel format that you can download (download are only available to the
instructor).
PDF – will create a list of your students in a PDF format that you can download.
ALL MEMBERS – selects all members of the course to be recipients of the email message.
Or you select just the students you want to email. If you are looking for a particular student in a large course, you can
use the search box in the upper right corner to find a particular student.
Once you have selected the student(s), click on COMPOSE EMAIL.

myGateway For Faculty 12
From here it’s just like a normal email. The email works within
myGateway.
You have formatting choices (bold, italics, size, etc).
You can attach documents to the email by dragging and dropping the
files or clicking the "Upload" button to attach the files individually.
IMPORTANT NOTE: You can click on the envelope icon in the Faculty
Dashboard to email your class. However, this is a completely different
way (than the above) to email your students and some people can run
into difficulties. This uses whatever email program that is configured on
that particular PC to email.
If you are on campus, the computers here are configured to use Outlook
as the default email program. So Outlook will open.
If you are on your computer at home and your computer is set up to use
gmail as the default, gmail will open. This email will be from your
PERSONAL email address - not your campus email address!
Calendar Each course page has a calendar that you can use. You can enter in class times, or dates assignments are due, dates of
tests, etc.

myGateway For Faculty 13
Links Will take you to a section called Course Links. Here you can add links to anything that is related to the course.
Links to Google Drive On the Links page, myGateway also
provides the ability to link directly to
documents that are stored in Google
Drive. When linking to documents, you
will be prompted for your Google
username and password, before you
can select a document to link to.
Once linked, students can access the
document by clicking the links to the
documents. Example, clicking “Unix
Commands”, will take the user directly
to the document in Google Drive.
Exporting and Importing Course
Content (Copy Course Content) In the previous version of myGateway,
there was the ability to copy content from
a course in one term to a course in
another term. Example, copy “Spring
2016 ENGL 100” to “Spring 2017 ENGL
100”.
The solution in the new portal is to export
the contents of the course that needs to
be copied and then import those contents
into the new course.
Exporting Course Content Go to the course and click the
“Admin” link in the top navigation
on the page and then click “Site
Administration”.

myGateway For Faculty 14
From the Site Administration page, there will be links to “Export” and “Import” the site (course) contents. Click “Export”.
A page will popup and display the export options.

myGateway For Faculty 15
Type a meaningful LAR file name. Example, “ENGL100-Spring2017-
2017.lar”.
On the other export options, you will need to use your own
disgression based on what has changed in the course. If you only
need the content, then change the Pages options by unselecting all
page options and unselecting All Application options. After doing so,
your export page should look as follows:
Notice that none of the Pages or Applications are selected. Once
here, click “Export”. This will take you to your export page. See
below:
There is now an archive file for “ENGL100-Spring2017-2017.lar” This is basically a zip file of your course content that can
be imported into an existing course. Click the “ENGL100-Spring2017-2017.lar” download link to retrieve the course
content.

myGateway For Faculty 16
Importing Course Content
Go to the course and click the
“Admin” link in the top
navigation on the page and then
click “Site Administration” (See
the first steps of Exporting
Course Content). From the Site
Administration page, click on
“Import”. This will display the
import page, where you can
select the course content lar
file, “ENGL100-Spring2017-
2017.lar”
Once the file has been uploaded, click “Continue”.
The page will now show what archive is being importing and provide the ability to select what to import. Click
“Continue” to import the content.


