1 Name__________________ GLS 100: Physical Geology Structural Geology Lab INTRODUCTION Structural geology is the branch of geological sciences that examines the deformation of rock units and attempts to reconstruct the causes for the observed deformation. When a rock is placed under stress, it can behave in either a ductile or brittle manner depending on the local conditions (heat, pressure, nature of stress) at the time of deformation. If ductile deformation occurs, then the rocks are folded, and the resulting structure is a curved fold. If brittle deformation occurs, then the rock fractures, and if movement occurs along the fracture, the resulting structure is a fault. Stress can come in three different varieties: compressional (pushed together), tensional (pulled apart), or shear (sliding past). In the cases of compressional and shear stresses, either folds or faults can result. In the case of tensional stress, only faults will be formed. In this lab you will conduct a scaled-down geologic field investigation of a field area (lab room) and produce a geologic map of the area. You will then use your observations to determine the geologic structure present. This information will allow you to determine the type of stress that the region experienced, and will allow you to hypothesize as to the plate boundary type that your area represents.
Transcript
1
Name__________________ GLS 100: Physical Geology
Structural Geology Lab
INTRODUCTION
Structural geology is the branch of geological sciences that examines the deformation of rock units and
attempts to reconstruct the causes for the observed deformation.
When a rock is placed under stress, it can behave in either a ductile or brittle manner depending on the
local conditions (heat, pressure, nature of stress) at the time of deformation. If ductile deformation
occurs, then the rocks are folded, and the resulting structure is a curved fold. If brittle deformation
occurs, then the rock fractures, and if movement occurs along the fracture, the resulting structure is a
fault.
Stress can come in three different varieties: compressional (pushed together), tensional (pulled apart), or
shear (sliding past). In the cases of compressional and shear stresses, either folds or faults can result. In
the case of tensional stress, only faults will be formed.
In this lab you will conduct a scaled-down geologic field investigation of a field area (lab room) and
produce a geologic map of the area. You will then use your observations to determine the geologic
structure present. This information will allow you to determine the type of stress that the region
experienced, and will allow you to hypothesize as to the plate boundary type that your area represents.
2
Strike and Dip
In any discipline, it is necessary to adopt tools to use to be able to explain your observations. For
structural geologists, it is important to be able to describe how a given rock layer is oriented with respect
to compass direction and angle of tilt. We use two measurements, strike and dip, to describe this
orientation.
The figure below illustrates both strike and dip of an inclined rock bed. If you imagine a horizontal
surface (in this case we represent it with water level), the strike is simply the direction in which you
would walk if you followed the shoreline. Note that this can be one of two compass directions (If you
were walking northeast along the shoreline and turned around to walk the other way, you would be
walking southwest). The dip angle is the angle that the rock layer makes with the horizontal plane. The
dip angle can by 0 (horizontal), 90 (vertical) or somewhere in between (example shows dip of 30). Note
that there is also a dip direction, in this case to the east.
Structural geologists plot the rock type and strike and dip information on geologic maps, and then
interpret this information to determine what structural features are present in the region.
3
Folded Rocks
Hard, brittle rock may fold and not break if the stress is applied slowly and continuously over a very long period of time. Folds form purely from compressional stresses. Let's look at the anatomy of a fold...
Fold Types:
Syncline: Limbs dip towards the axial plane (shaped like a Smile - side view) Anticline: Limbs dip away from the axial plane (shaped like an 'A' - side view)
Anticlines and Synclines may be:
Symmetrical (the above pictures; axial plane is vertical; limbs dip at the same angle) Asymmetrical (picture below (side view; Asymmetrical Anticline); note how axial plane is tilted; limbs dip at different angles)
4
Broken Rocks
Joint: A break in a rock (crack) in which there is no relative movement of either side across the break.
Fault: A break in the Earth in which the rocks on either side of the break have been displaced (vertically and/or horizontally) relative to each other (see pictures below).
Strike-Slip fault: Movement of the Foot Wall and the Hanging Wall blocks is parallel to the strike of the fault plane. These faults form from shear stresses.
How do you name the strike-slip fault?
Just imagine you are standing on one side of the fault. How did the other side move relative to the side you're standing on? If it appeared to move left, it is a left-lateral strike-slip fault. If it appeared tomove right, it is a right-lateral strike-slip fault.
Dip-Slip fault: Movement of the Footwall and the Hanging Wall blocks is parallel to the dip direction of the fault plane. These faults form from tensional stresses or compressional stresses.
5
The picture on the previous page displays the "anatomy" of a Dip-Slip fault. Let's go
over it in more detail... Notice the terms 'Footwall Block' and 'Hanging wall Block'.
These are old mining terms for the two sides of the fault (where the rocks have moved relative to each other):
The side a miner could walk down (put his feet on) was called the 'Footwall Block'
The side a miner could hang his lantern on was called the 'Hanging Wall Block'
The Footwall and Hanging Wall Blocks are separated by the Fault Plane
The Fault Plane can be thought of as the plane in which the rocks slide past one another in opposite
directions Movement arrows are placed around the fault plane in order to indicate relative movement
of the fault blocks. There are 2 kinds of dip-slip faults: Normal and Reverse Dip-Slip Faults...
In Normal Faults, the Footwall Block moves UP relative to the Hanging Wall Block
An easy acronym is F.U.N. -Footwall Up = Normal These form from tensional ("pulling apart") stress
In Reverse Faults, the Footwall Block moves DOWN relative to the Hanging Wall
Block
An easy acronym is F.D.R. -Footwall Down = Reverse These form from compressional
("pushing together") stress
Another important observation regarding Dip-Slip faults is that they move older rocks next to younger rocks.
6
Map Symbols:
Strike and Dip
Horizontal Beds
Vertical Beds
Normal Fault: (Note that the arrow points in the direction the fault plane is dipping; it also (therefore) always points to the hanging wall block!)
Reverse Fault (Thrust): (Note that the 'teeth' point in the direction the fault plane is dipping; it also (therefore) points to the hanging wall block!)
Synclines: (Dark line marks fold axis; arrows denote direction limbs are dipping)
Anticlines: (Dark line marks fold axis; arrows denote direction limbs are dipping)
7
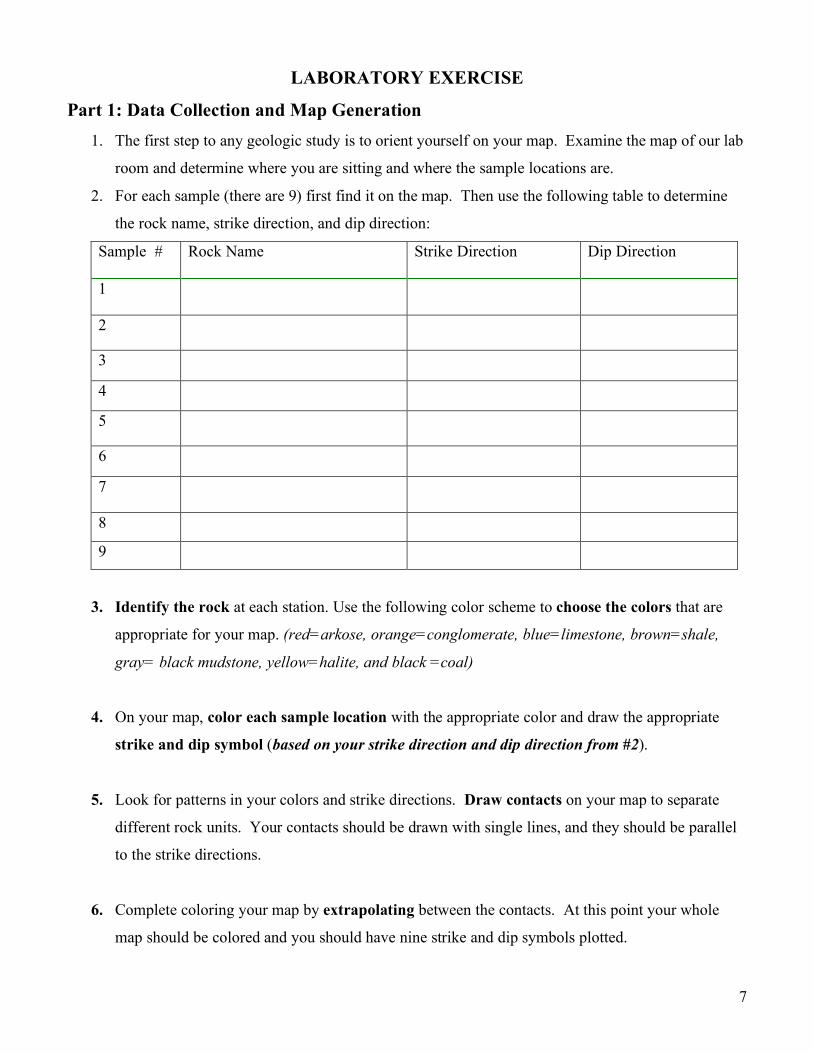
LABORATORY EXERCISE
Part 1: Data Collection and Map Generation 1. The first step to any geologic study is to orient yourself on your map. Examine the map of our lab
room and determine where you are sitting and where the sample locations are.
2. For each sample (there are 9) first find it on the map. Then use the following table to determine
the rock name, strike direction, and dip direction:
Sample # Rock Name Strike Direction Dip Direction
1
2
3
4
5
6
7
8
9
3. Identify the rock at each station. Use the following color scheme to choose the colors that are
appropriate for your map. (red=arkose, orange=conglomerate, blue=limestone, brown=shale,
gray= black mudstone, yellow=halite, and black =coal)
4. On your map, color each sample location with the appropriate color and draw the appropriate
strike and dip symbol (based on your strike direction and dip direction from #2).
5. Look for patterns in your colors and strike directions. Draw contacts on your map to separate
different rock units. Your contacts should be drawn with single lines, and they should be parallel
to the strike directions.
6. Complete coloring your map by extrapolating between the contacts. At this point your whole
map should be colored and you should have nine strike and dip symbols plotted.
8
Part 2: Creating a geologic cross section and stratigraphic column. 1. The line labeled A – A’ shows the location for which you will construct a cross section of your
field area.
2. Start by taking a piece of scrap paper and laying it out along line A – A’. Make a mark on the
paper at each contact between rock type.
3. Take your scrap paper and transfer the contact information to the blank cross section on the
bottom of your map.
4. Now use your dip directions to extrapolate the rock contacts below the surface of the ground.
5. Color your rock types the appropriate color.
6. Using your cross-section determine the relative ages of the rock units and fill in the
stratigraphic column below. Color and the number of each rock in the box and label the
rock type in the blanks on the right.
Part 3. Identifying the structure and probable tectonic setting 1. Using the information presented at the beginning of lab, what structural feature have you
found in your field area? _____________________________
2. What type of stress occurred in this region to produce the structure that you found?
_________________
3. Propose a plate boundary type at which this stress could have occurred.
__________________________
4. Finally, place the appropriate map symbol (see page 6) on your map to show the structure


![[Geology] Buckland W. 1836 - Geology and Mineralogy](https://static.documents.pub/doc/80x56/551dd45649795950198b4f64/geology-buckland-w-1836-geology-and-mineralogy.jpg)


