Page 1
Name____________________________
Math 145 The SIMPLEX Method for Optimization (Using EXCEL Solver)
Example:
Maximize: 21 128 xxz
Subject to:
0,0
7286
5608040
21
21
21
xx
xx
xx
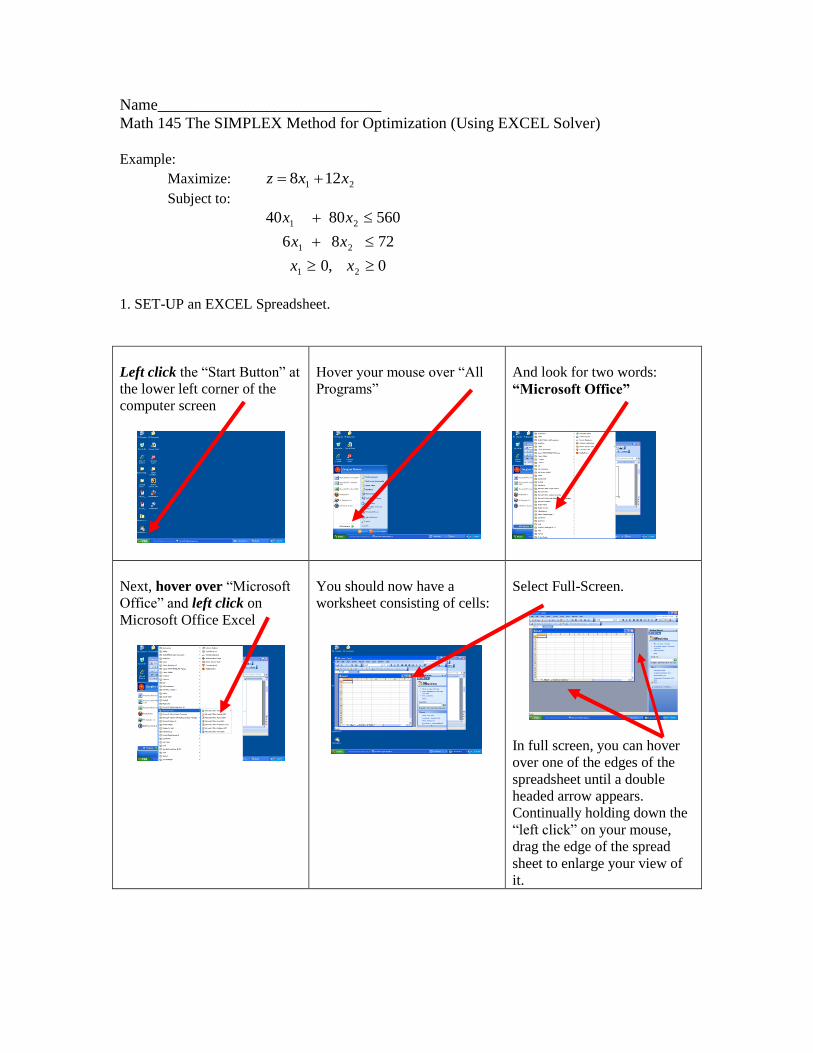
1. SET-UP an EXCEL Spreadsheet.
Left click the “Start Button” at
the lower left corner of the
computer screen
Hover your mouse over “All
Programs”
And look for two words:
“Microsoft Office”
Next, hover over “Microsoft
Office” and left click on
Microsoft Office Excel
You should now have a
worksheet consisting of cells:
Select Full-Screen.
In full screen, you can hover
over one of the edges of the
spreadsheet until a double
headed arrow appears.
Continually holding down the
“left click” on your mouse,
drag the edge of the spread
sheet to enlarge your view of
it.
Page 2
We will use the following format for the worksheet:
Name_____________________________ Date______________________
Math 145. Simplex Excel Solver
Page_______ Problem______
Objective Function (Target Cell):
First type =. Then the expression for z. Use mouse to select the cell below for x1 and x2.
z=
Variables (Changing Cells)
First type"=" followed by numerical zero in each cell below the x1 and x2.
x1 x2
Constraints: Please change coefficients and constants in each inequality in far left column
Expression: First type an =. Then the expression. Use the mouse to select x1 and x2.
Inequality: select from the drop down menu in excel.
Value: type the constant (without an equals).
Descriptions Expression: Inequality: Value:
40x1+80x2<=560 #REF! <= 560
6x1+8x2<=72 #REF! <= 72
Under OPTIONS "Non negative" will handle: x1>=0, x2>=0
Select OPTIONS and check:
( x ) Linear
( x ) Non-negative
( x ) OK
On the Solver, select:
( x ) SOLVE
( x ) Keep OK
When done, print the page.
Page 3
WHATCOM COMMUNITY COLLEGE
Excel 2010 Addendum
There is no TOOLS item in the menu at the top of the spreadsheet.
Instead, go to the DATA tab in the menu
Under DATA, you should see “SOLVER” in the upper right corner.
If you don’t, read about “ADDING SOLVER TO EXCEL” later in this addendum.
Select Solver
Page 4
Enter information from the cells in your spreadsheet as described in the handout, but
you do NOT use an OPTIONS selection in the WCC version of Excel. Instead you go to
the “Select a Solving Method box”, and select SIMPLEX LP from the drop down menu.
Then “Left click” the SOLVE button in the bottom line.
The rest of the instructions are the same.
Text Continued below
--------------------------------------------------------------------------------------
Page 5
Returning to solving the earlier example:
Maximize: 21 128 xxz
Subject to:
0,0
7286
5608040
21
21
21
xx
xx
xx
Start by typing on the worksheet, your name, date, Math 145 Simplex Excel Solver, the page and
problem number of the problem.
The objective function: 21 128 xxz will be entered in a “cell”, so the cell will be called the
“target cell”. See Picture Below. You will not type x1 or x2. Instead you will move your mouse
to the cell for the letter and “left click” on the cell.
Start with = in the cell. Please use the asterisk key for multiplication and move your mouse to the
variable cell: 8x1 + 12x2, for example, would be: 8 * select cell for x1 then “+” followed by 12 *
select cell for x2. Press ENTER.
Target cell (right of z = )
Changing cells
The values for the variables: x1 and x2 will be in their own cells. Since variables aren’t constant,
the cells for x1 and x2 will be called the changing cells. We begin by assigning zero to each of
these cells. Type = 0 (numeric zero) in the cell below x1. Do the same for x2. Press ENTER.
The inequalities to which the objective function will be subject are called “constraints”. We will
make a list of these constraints, by adding them under the Constraint Cells. One exception: we
will not add x1>=0, x2>=0 to this list. Later, when we select OPTIONS "Non negative", this will
handle x1>=0 and x2>=0.
The expression for each constraint will be in its own cell AND the constant (on the right side of
the inequality) will be in its own separate cell called the cell value. We will select a cell in order
to ADD the constraint. Later we will scroll through an excel list and select the correct
inequality from the list. Then we will continue to scroll to the cell value and select the
Page 6
appropriate cell holding the constant for a given inequality. Remember, we will not add x1>=0,
x2>=0 to this list. It will be handled later under OPTIONS.
For the first constraint: 40x1 + 80x2 < 560:
In column 1, we do not begin with an “=”. These cells are just describing the constraints. Type
the inequality here.
In column 2 (The Expression Column), Begin with =, type the expression 40x1 + 80x2 (NEVER
TYPE x1 or x2; instead select their cell), use the asterisk for multiplication. Press ENTER. Then
move to the next cell on the right.
In column 3 (The Inequality Column), we type the inequality as <= (later we will use the drop-
down menu to select the inequality symbol). Press ENTER. Move to the next cell on the right.
And in column 4 (The Value Column), we type the constant in the cell without using an “=”.
Press ENTER.
Repeat the process for the second constraint: 6x1 + 8x2 < 72
Press ENTER, so you are in a blank cell of the spreadsheet.
Now solve the problem. In the MENU at the top of the spreadsheet, select TOOLS.
On the drop-down menu, “Left click” the SOLVER.
Page 7
The following appears on your screen:
We are going to fill these boxes from our spreadsheet.
1. SET TARGET CELL.
a). Highlight what is currently in the Set Target Cell box and press “delete”
or “backspace” to erase it.
b). With the cursor still “flashing” in the “cleared” Set Target Cell, with your mouse
select the objective function cell in your spreadsheet that is to the right of “z =”. The cell
name will be set. Move to the next line in the Solver Parameters.
2. MAX or MIN? Check the problem.
Based on the problem you are solving (to maximize or to minimize), select “max” or
“min” on line 2 with a single click. If it is correct, do not change it. Do not change the
“Value of ” box on that line.
3. CHANGING CELLS
a). Left click in the long “By Changing Cells” box. A single vertical line will be flashing.
b). Go to the cell in the spreadsheet where x1 is zero, hold down the left “clicker” and
drag the cursor into the cell where x2 is also zero. Let up from the mouse. Both cell
locations should have been copied into the changing cells box.
4. ADD CONSTRAINTS
a). Delete any old constraints by selecting them and pressing the DELETE button on
the solver (not on the computer). b). “Left click” the “ADD” Button and you will see a “Cell Reference” box, an inequality
sign box, and a “Constraint Box”.
c). With the cursor in the “Cell Reference” box, “left click” the first constraint
“expression” cell on your spreadsheet that has a zero in it. “Tab” key over to the
inequality sign and select the correct inequality from the drop down menu. “Tab” key
once more to the constraint box. With your cursor in this box, “left click” on the first
constrain “Value” cell in your spreadsheet and the cell location will be copied. Click
“OK.”
Page 8
d). “Left click” the “ADD” Button again, and repeat the process for the second constraint.
Click “OK” when done.
5. OPTIONS (Right hand column of solver, third line down).
a). “Left click” the Options Button.
b). Ignore everything EXCEPT lines 6 and 7 . On these lines, please select (“left click” in
the box) the following:
( x ) Assume Linear Model
( x ) Assume Non-negative
6. EXIT OPTIONS
“Left-click” the OK button at the top of the right hand column of Solver Options.
7. SOLVE THE PROBLEM:
“Left-click” the SOLVE button at the top of the right hand column of the Solver
Parameters.
8. GET ANSWER.
a). When you see Solver Found a Solution, under REPORTS “left click” ANSWER.
Then select the OK button.
b). You will notice that the numbers under X1 and X2 on the spreadsheet are no
longer “0”. They are the answer to the problem. They are the ( X, Y ) that will
maximize or minimize your objective function. The maximum or minimum value for Z
will also be on your spreadsheet.
Page 9
ADDING SOLVER TO EXCEL 2010
From the Worksheet Window, select (left click) the FILE tab at the upper left corner.
From the drop-down menu, select OPTIONS from near the bottom of the list in the left
column.
Now select (left click) ADD-Ins near the bottom of the list also in the left column:
Page 10
At the bottom of the page, select Excel Add-in from the drop-down menu and press the
GO” button.
Check the Solver Add-in box and left click the OK button at the top of the right hand list
in the ADD-IN window.
The DATA Tab of your Excel Spreadsheet should have SOLVER in the upper right
corner.