22
1 Restoration of 1885-1890 Phonoharp Company Harp Celest Completed by Ron Cook April 2013 For Naomi Pye

1
Restoration of 1885-1890 Phonoharp Company Harp Celest
Completed by Ron Cook
April 2013
For Naomi Pye

2
Background Many types of zithers were commercially manufactured in both Europe and the United States during the late 19th and early 20th centuries. The most common was the concert zither, a fretted instrument with 30 to 40 strings. This is a difficult instrument to play and requires learning not only playing technique but also music notation. Around 1882, two companies, Menzenhauer and Phonoharp, began producing zithers that were much easier to play. Chord zithers became the biggest sellers, but they also produced smaller zithers, similar to psalteries, usually with 15 to 17 strings tuned to a C major scale. These were plucked like a small harp. The 17-string Harp Celest I restored is one of the earliest instruments made by the Phonoharp Company of Berwick, Maine, and similar to psalteries that have been around since medieval times. When this Harp Celest came to me, it was in poor shape and needed complete rebuilding. The following log chronicles the restoration process. History of the Phonoharp Company The Phonoharp Company was incorporated on April 27, 1892, in Maine, where it did business in both Berwick and Portland. Within a year the company had opened offices in Boston, eventually moving all there in 1897. The company produced instruments until 1926 and was dissolved in 1928. A new company, International Music Corporation, was established in 1926 and immediately sold to a group of investors including Oscar Schmidt and two executives who worked for Phonoharp. Oscar Schmidt Company is still in existence today, producing mainly autoharps. It produced chord zithers, based on the Phonoharp design, through the 1960s.
3
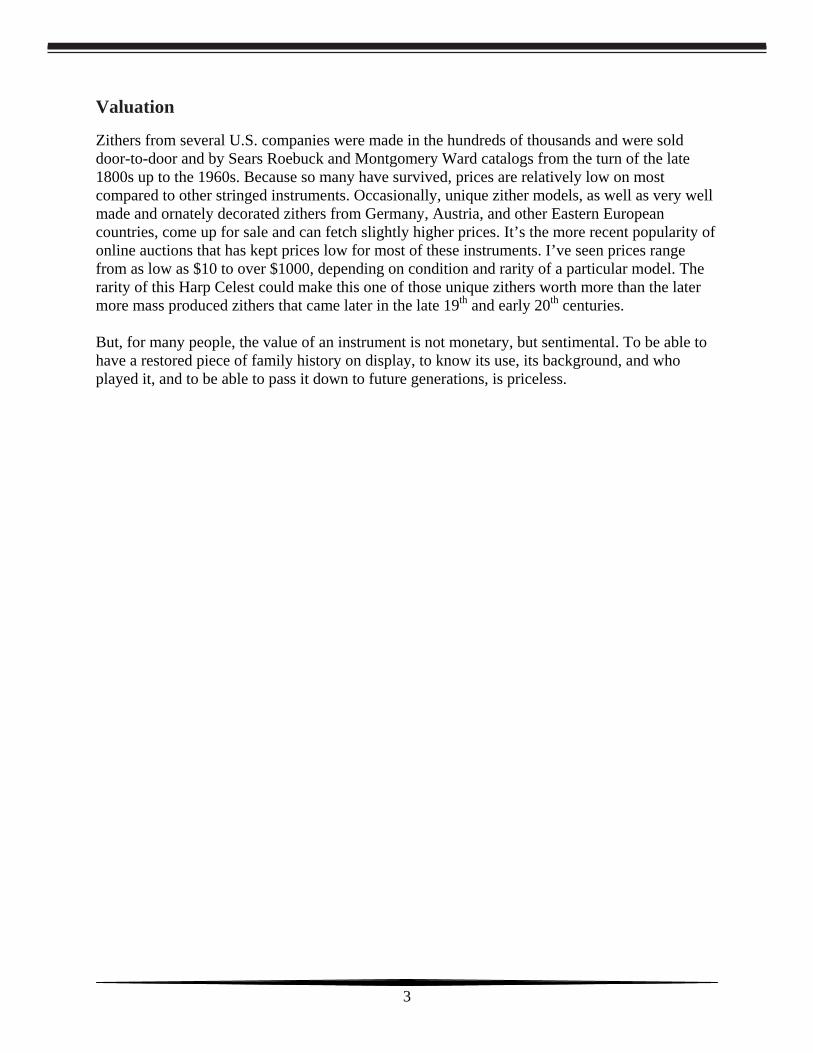
Valuation Zithers from several U.S. companies were made in the hundreds of thousands and were sold door-to-door and by Sears Roebuck and Montgomery Ward catalogs from the turn of the late 1800s up to the 1960s. Because so many have survived, prices are relatively low on most compared to other stringed instruments. Occasionally, unique zither models, as well as very well made and ornately decorated zithers from Germany, Austria, and other Eastern European countries, come up for sale and can fetch slightly higher prices. It’s the more recent popularity of online auctions that has kept prices low for most of these instruments. I’ve seen prices range from as low as $10 to over $1000, depending on condition and rarity of a particular model. The rarity of this Harp Celest could make this one of those unique zithers worth more than the later more mass produced zithers that came later in the late 19th and early 20th centuries. But, for many people, the value of an instrument is not monetary, but sentimental. To be able to have a restored piece of family history on display, to know its use, its background, and who played it, and to be able to pass it down to future generations, is priceless.

4
Harp Celest Day 1: Remove Strings and Assess Damage
On the first day, I always look over an instrument to see how much work is needed to repair or restore it. The obvious problems at first glance were the large cracks through the soundboard and back. To get a better look, I removed the strings. Glue joints, especially at the tail block, were coming apart, as was a small area at the tuning pin block. The surfaces were dirty, weathered, and the finish was faded. It needed a good cleaning. This instrument still has its label, which was worn and part of it missing, but you can just make out the Harp Celest name. On this first day, I also removed the very rusty tuning pins and metal bridge material.

5
Harp Celest Day 2: Clean Bridge Hardware and Tuning Pins
On the second day, I decided to begin restoration by cleaning the hardware. The bridges have steel rods that sit in little grooves that the strings go over. Without these rods, the strings would cut through the wood bridges. (This is often the case on cheaper “children’s” zithers.) The rods, like the tuning pins, were corroded and needed cleaning. I use an electric flexible shaft rotary tool with a fine wire brush to clean the tuning pins. To clean the bridge wires, I use 220 grit wet/dry sandpaper and 0000 (very fine) steel wool to remove the corrosion. One note about the tuning pins. In American zithers from that era, like this Harp Celest, tuning pins have standard right-hand threads. You tighten clockwise, loosen counter-clockwise. European zithers from the late 1800s and the early 1900s that I’ve worked on have tuning pins with left hand threads. To loosen them you turn clockwise. To tighten, you turn counter-clockwise.

6
Harp Celest Day 3: Remove Back
On Day 3, I removed the back. Traditionally, hide glue was used to bind woods together in instruments and furniture. Hide glue, known in ancient times as animal glue, has been around since the times of the pharaohs. It was always in a granule form and heated and mixed when needed. The good thing about hide glue is that it is reversible. By applying moisture and heat, hide glue becomes viscous again—and that’s just how I removed the back. I started at the tail block, where the back had already separated, and worked up both sides with a damp sponge and a flat-blade heating iron. The process is slow, and it took nearly 3 hours to work the back loose. As soon as the back came off, I could see why some of the damage occurred. There was water staining inside (noticeable on the right hand lower photo). This is what caused the lower glue joint to fail and what caused the cracking. Damp wood expands when wet, then, as it dries it shrinks and cracks form.

7
Harp Celest Day 4: Repair Cracks
The cracks on the back were not difficult to close up. Sideways clamping on my glue-up table fixed those. The top was the more difficult to fix. The crack running from the soundhole to the tuning pin block was not too hard, but the lower crack, from the soundhole to the tail block was a much wider shrinkage crack (from the moisture damage) and would require additional work.

8
Harp Celest Day 5: Re-glue Center Block & Add Cleats
Small zithers usually didn’t have any internal bracing. The only internal bracing on this Harp Celest was a single ½ inch wide and 2 ½ inches long block that tied the top to the back. When I removed the back, this small pine block split. However, it was easy enough to re-glue it. This day I also strengthened the crack repairs by gluing thin hardwood “cleats” over the weakened areas.

9
Harp Celest Day 6: Gluing Top and Side Separations
There were a few areas on the sides and top where the glue joints failed. I cleaned the areas with a fine, thin matt-knife blade, then injected glue into the joints and clamped them overnight.

10
Harp Celest Day 7: Major Crack Repair
The large shrinkage crack on the top couldn’t be closed up by clamping like I did with the other cracks. The original wood used on the Harp Celest was poplar. I happened to have some poplar scraps leftover from other projects, and I cut and sized a small piece to wedge in the crack. Once sized right, I glued it and clamped it overnight.

11
Harp Celest Day 8: More Crack Repairing
On Day 8 I trimmed and sanded the poplar insert and then installed cleats over all the top cracks.

12
Harp Celest Day 9: Cleaning Top & Re-gluing Back
Day 9 was the big day. I started by cleaning the top, then took the next few hours preparing and re-gluing the back to the frame. As you can see in the bottom photo, this takes quite a few clamps. I have around 100 clamps of several different types, each used for different purposes. The large wooden clamps are used to fasten areas with a large gluing surface. The smaller spool clamps, like I’m tightening in the photo, are luthier’s clamps. These are used to fasten edges, and are most commonly used to glue tops and/or back to the sides of guitars. For delicate work, I have clamps that apply very little pressure. For larger pieces, like furniture, I have clamps that can apply strong pressure.

13
Harp Celest Day 10: Cleaning Glue Residue
The next day, after removing all the clamps, I used a flat cabinet scraper to remove all the glue residue that squeezed out during the clamping process. I then used fine sandpaper to smooth it all out.

14
Harp Celest Days 11 through 14: Refinish Back
Applying finishes often takes several days. I used a black semi-gloss enamel to cover the back, waiting a day between coats. Nearly all zithers made in the U.S. had painted backs, usually because the woods used were not as nice as those used on the tops. Each day I’d rub the dry paint with 0000 steel wool before adding additional coats.

15
Harp Celest Day 15: Coat Note Card
Before applying stains to the top and sides, I needed to protect the note card. It was already slightly faded, and I knew applying stain over the top might fade it out even more, so I coated it with a clear varnish to protect it.

16
Harp Celest Days 16 through 20: Clean Out Tuning Pin Holes & Apply Stain Quite a bit of glue had seeped into the tuning pin holes, so I needed to clean them out before applying the reddish mahogany stain to the top and sides. Tuning pins, especially those in the U.S., are 3/16” in diameter. I used a 3/16” bit in my cordless drill to clean the holes, which it did quite effectively. Once the holes were cleaned out, I started another long finishing process using the mahogany stain.

17
Harp Celest Days 21 through 23: Stain Touchups
Because the replacement poplar piece in the top was so white, I needed to apply specially mixed stain to darken it to match the rest of the top. My mix was tung oil and colored pigment applied with cotton swabs.
18
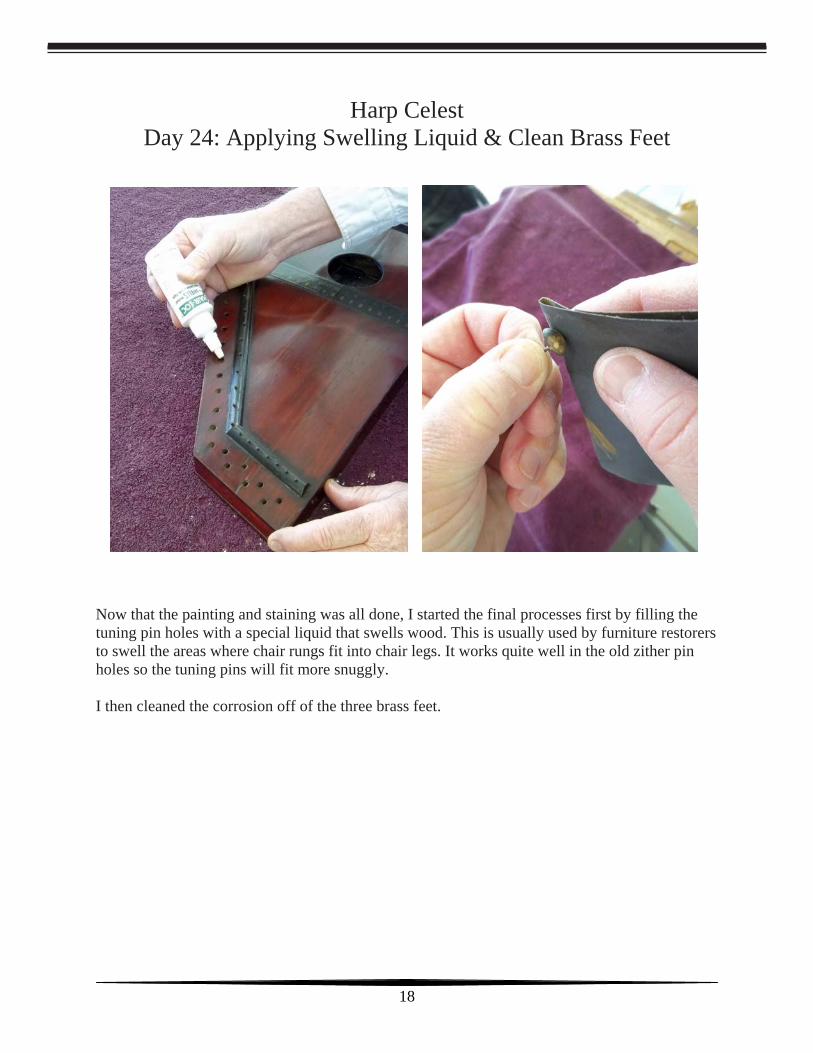
Harp Celest Day 24: Applying Swelling Liquid & Clean Brass Feet
Now that the painting and staining was all done, I started the final processes first by filling the tuning pin holes with a special liquid that swells wood. This is usually used by furniture restorers to swell the areas where chair rungs fit into chair legs. It works quite well in the old zither pin holes so the tuning pins will fit more snuggly. I then cleaned the corrosion off of the three brass feet.

19
Harp Celest Day 25: The Polishing Process & Reinstall Feet
The polishing process consists of rubbing the surfaces with powdered pumice, rottenstone, and paste wax. Pumice is a light abrasive, and rottenstone is a very light abrasive. I use a cotton pad soaked in mineral oil to rub the powders over the surfaces. This removes paint brush marks and dust that might have gotten embedded in the finishes. After the rottenstone application, the surface looks almost polished. The paste wax not only shines it up, but adds added surface protection. After polishing, I re-installed the brass feet.
20
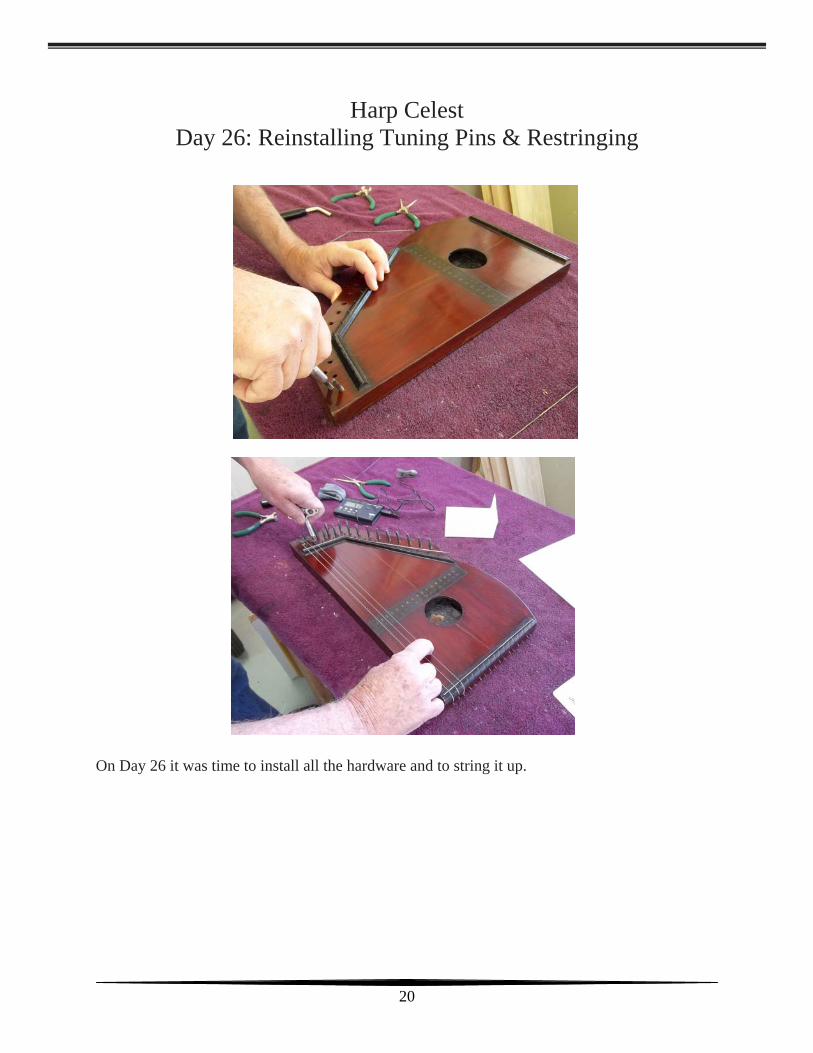
Harp Celest Day 26: Reinstalling Tuning Pins & Restringing
On Day 26 it was time to install all the hardware and to string it up.

21
Harp Celest Day 27: Completion
The last day was time to tune up the zither. I have a digital tuner that attaches to a part of the instrument with a clip, usually clipped to one of the tuning pins. When a string is plucked, the vibration is picked up through the clip, which has a contact microphone on it, and displays it on the tuner’s screen. With 17 strings, this took very little time. Like many zithers from this era, the tone is unique and very beautiful. I’m happy I was able to restore an instrument that is over 100 years old to be playable again. I’m sure that with continuous playing and good care, this Harp Celest should last another 100 years.
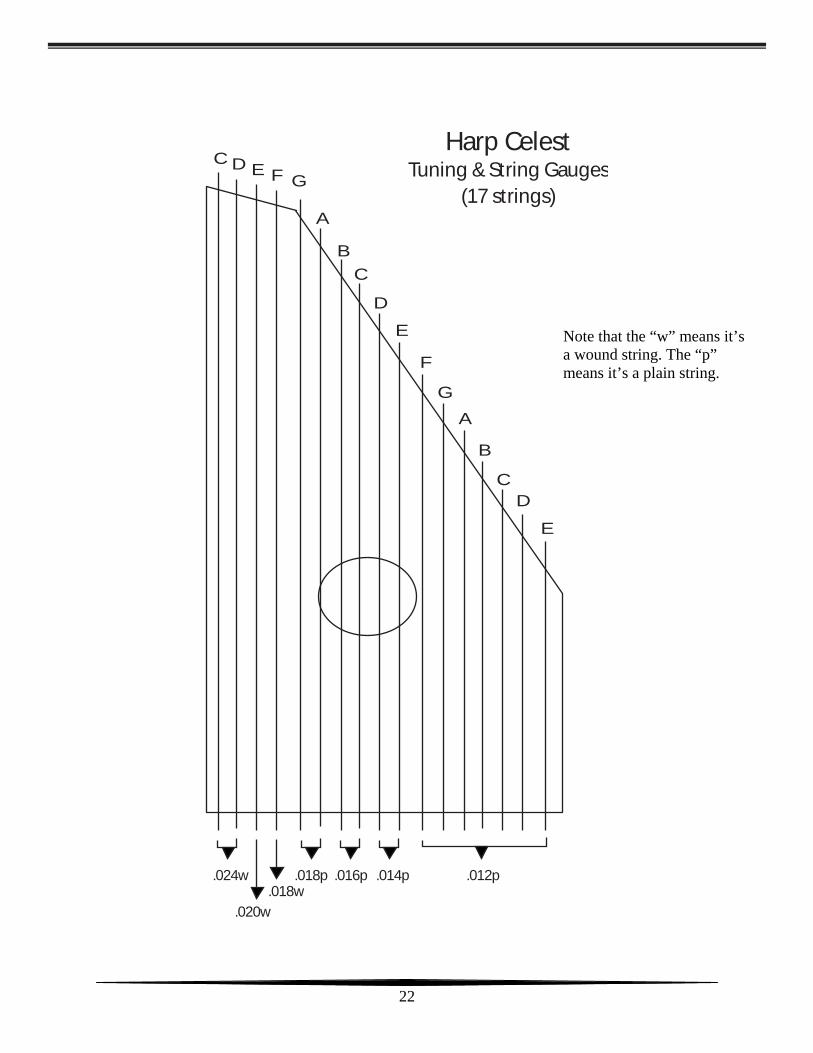
22
.024w
.020w
.018p.018w
.016p .014p .012p
C D
D
D
E
E
E
F
F
G
G
A
A
B
B
C
C
Harp CelestTuning & String Gauges
(17 strings)
Note that the “w” means it’s a wound string. The “p” means it’s a plain string.


