NATIONAL STUDENT INDEX NSI Web User Interface User Guide User Guide for the National Student Index Web Interface Version 1.9 – January 2020 National Student Index c/- Ministry of Education Service Desk Ministry of Education P O Box 1666 Wellington
Transcript
NATIONAL STUDENT
INDEX
NSI Web User Interface User Guide
User Guide for the National Student Index Web Interface
Version 1.9 – January 2020
National Student Index
c/- Ministry of Education Service Desk
Ministry of Education
P O Box 1666
Wellington
NSI Web User Interface Guide, Ministry of Education, v1.9 – January 2020 Page 2 of 69
1 Table of Contents
1 Table of Contents ................................................................................................ 2
14.7.3 Submit a challenge change. .................................................................. 69
NSI Web User Interface Guide, Ministry of Education, v1.9 – January 2020 Page 5 of 69
2 Introduction
2.1 Document Purpose
This document explains the prerequisites to enable a valid user to use the web interface of the National Student Index (NSI) system. It provides instructions for the NSI web functionality and advice on how to navigate your way through the web interface.
2.2 Document Audience
This document is written for users that access the NSI via the NSI web interface. This includes users who mainly access the NSI via their Student Management System or applications such as ENROL, TEC ERS, STEO or ELI.
2.3 Contacts
Requests for support in using the web interface of the NSI system should be made to the Ministry of Education Service Desk:
This section records any major updates applied to this document since version 0.1. Specifically, it lists the date, document version number, sections changed and a description of the changes.
Date Version Sections Changed Description of Changes
NSI Web User Interface Guide, Ministry of Education, v1.9 – January 2020 Page 6 of 69
Date Version Sections Changed Description of Changes
25/06/2015 1.3 3.5 What is an NSI record?
Appendix A added
Added explanation of the “Verification confirmed by MoE” field
Appendix A added which contains test scripts for users to complete as part of the familiarisation of the NSI Web User Interface
17/03/2016 1.4 Appendix A Updated NSI Compliance URL
20/10/2017 1.5 Various Incorporated changes from Release 1.2.1.3
17/05/2019 1.6 Various Updated MoE email addresses in various locations.
Updated ESSA to ESL in various locations.
3.7.3 – Added URL for access to GINs.
6.3.1 – Added information about case sensitivity.
8.3 – added information on birth_date_edit parameter – 90 days.
10.3 – change notifications – wording changes for clarity.
12.1 & 12.3 – Add information about needing to be Batch enabled to use Batch Upload in WebUI
Appendix A – Updated links from been page numbers to section numbers.
18/10/2019 1.7 4.3.4 Session time-out
14.3.3.2 Create a verified record with possible matches – Record B
14.4.3 Verification details update
Adding information on the new timeout countdown feature. 3 minute countdown starts when there has been no activity for 17 minutes. User can use functionality buttons to resume session or if 3 mins elapses user is automatically directed to NSI login screen. Updated wording “Permanent Resident” to “NZ Resident class visa”.
NZ Resident Class Visa applies to:
NZ Resident Visa; and
NZ Permanent Resident Visa
14/11/2019 1.8 4.3.4 Session time-out Removed wording relating to the new timeout countdown feature, as it was removed from release v1.5.
NSI Web User Interface Guide, Ministry of Education, v1.9 – January 2020 Page 7 of 69
Date Version Sections Changed Description of Changes
13/01/2020 1.9 3.7.3 Batch File Interface
Removing wording that refers GINs is on public website. Process has changed vendor must request GINs from Service Desk.
NSI Web User Interface Guide, Ministry of Education, v1.9 – January 2020 Page 8 of 69
3 About the NSI
3.1 What is the National Student Index?
The National Student Index (NSI) is a database system maintained by the Ministry of Education and is the education sector’s core register of learner identity data.
The NSI is used to allocate a unique identifier, a National Student Number (NSN) to every student in New Zealand. Each student should only be allocated one NSN which will be used throughout their early childhood, school and tertiary education.
An NSN will be allocated to a student when they first enrol in early childhood education, a school or tertiary education in New Zealand.
3.2 National Student Index queries
The day-to-day operation of the NSI is managed by the Ministry of Education's Service Desk. Specifically, the Service Desk is responsible for helping organisations to start using the NSI, establishing and maintaining user access privileges, distributing NSI documentation and informational material and providing ongoing technical and operational support.
Organisations and users can contact the Ministry's Service Desk with any related NSI questions or requests. Phone 0800 422 599 or email [email protected]
3.3 What can the NSI web interface be used to do?
The NSI web interface is available for organisations to perform searches on existing records, add new records, update existing records and to request that two or more duplicate NSI records be merged.
Organisations can use student information from the NSI for enrolment purposes as well as for reporting to the Ministry, TEC and NZQA.
3.4 Who needs an NSI record?
NSI records will be created for individuals who:
Enrol in a New Zealand Early Childhood Education service.
Enrol in a New Zealand school.
NSI Web User Interface Guide, Ministry of Education, v1.9 – January 2020 Page 9 of 69
Register for the NCEA
Enrol or seek to enrol with a tertiary organisation
3.5 What is an NSI record?
An NSI record is unique to a student and records basic identification details. The fields on an NSI record include:
Family name
Three Given names
Birth date (DoB)
Gender
Residential status
Record status
Date of death (if populated)
Alternative names
A preferred name indicator
Verification indicators for the name & birth date fields and for the residential status field
Note: The verification of a record can also be confirmed by a Ministry of Education user. This will be indicated on a student record the by “Verification confirmed by MoE” being set to Yes.
An NSI record can have one of two statuses with an associated Record status reason. These are:
1) Active – the record is in use by the NSI application. a. In use – the student record is used by the NSI application and can be
searched for and updated.
2) Inactive – the record has been made inactive for one of the following reasons: a. Merged duplicate (slave) – following the receipt of a request to merge
two or more student records. Once the merge request is processed, the duplicate record(s) will be marked as a ‘Slave’ record and linked to the ‘Master’ record.
b. Deceased – following the receipt of notification of a student’s death from an Organisation
c. Created in error – following the receipt of notification of an incorrectly created student.
d. Do not use – following the receipt of notification that this record should not be used.
NSI Web User Interface Guide, Ministry of Education, v1.9 – January 2020 Page 10 of 69
3.6 How do Organisations find out about changes to NSI data?
To ensure that changes to NSI records are communicated to organisations that need to know, a record of a student’s ‘relationship’ with an organisation is maintained by the NSI system. When an NSI record is added or updated by an organisation, that NSN is marked as having a ‘relationship’ with that organisation. This relationship will remain for a period (defined as the Student Provider Relationship “SPR” duration), after which it will expire. The SPR duration default for organisations is 1 year, This period may be modified on request from an organisation
Any changes made to an NSI record will be made available to all organisations that have registered to receive change notifications and have a current ‘relationship’ with the student. For example, if a Student’s Birth date is updated by an organisation, all the organisations which have a relationship that has not expired with that student will be notified.
Change notifications applicable to an organisation will be available for viewing on the NSI web interface. Files may be downloaded from the web interface or through the Batch Interface. To register your organisation to receive Change Notifications, or to change the SPR duration, please contact the MoE Service desk.
If the Ministry receives notification that a student is deceased, the change notification process will also be used to inform all organisations that have either a current or expired ‘relationship’ with the student.
For further information refer to Section 10: Changes to Student Records.
3.7 How can the NSI system be accessed?
The NSI system can be accessed by authorised people from approved organisations such as:
ECE Services
ENROL support staff
NZQA
Tertiary Education Organisations (e.g. Universities, Private Training Organisations)
Tertiary Education Commission (TEC)
Ministry of Education support staff
Organisations that use the Adult Literacy & Numeracy Assessment Tool (e.g Mitre 10 Mega, Griffins Food Ltd, & Z Energy Ltd)
NSI Web User Interface Guide, Ministry of Education, v1.9 – January 2020 Page 11 of 69
Organisations may wish to access the NSI through a chosen Student Management System (SMS). Individual SMS applications will integrate with the NSI through the REST and/or BATCH interfaces.
The NSI system can be accessed in any of three different ways. These three methods are all offered so that you can choose the combination best suited to your organisation. The options are:
3.7.1 Web Interface
A web interface for users to login to and perform functions over the Internet. This option is essentially an NSI application that offers all the necessary functionality an organisation will need from the NSI system. All users must have their own individual Education Sector Logon (ESL) username and password to log in to the NSI web interface.
The NSI web interface is not designed to be integrated with an SMS.
The NSI application has been upgraded to .Net v4.6.
3.7.2 REST Interface
The REST interface allows SMS systems to integrate with NSI data and functionality, over a standardised protocol. This allows the maintenance of your student records to remain in your SMS software, while sending and retrieving data from NSI in the background.
Integration with the REST interface requires custom development.
3.7.3 Batch File Interface
A batch file interface is available to allow organisations to submit requests for NSI searches, additions, updates, and merges and the creation/updating of student relationships. Depending on the SMS implementation, as actions are carried out on the SMS, batch files may accumulate an organisation’s requests for searches, additions, updates, and merge requests and the creation/updating of student relationships for the NSI system to perform.
The batch file is sent by the organisation to the NSI system for processing by the NSI system. For each batch file processed by the NSI, a result file is generated that
NSI Web User Interface Guide, Ministry of Education, v1.9 – January 2020 Page 12 of 69
reports the outcome of batch file processing. This result file will be available for organisations to download and will then need to be loaded into the SMS.
For more information on accessing the NSI via a Student Management System please refer to the Guide to Integrating the National Student Index (GINS) document. A copy of this document can be requested from the Ministry of Education Service Desk.
NSI Web User Interface Guide, Ministry of Education, v1.9 – January 2020 Page 13 of 69
4 NSI Web Interface
4.1 Overview
This section details the requirements for obtaining access to the NSI web interface and how to login using your own Education Sector account with your Username and Password.
4.2 Pre-Requisites
Before you can access the NSI the following conditions need to be met:
Organisations:
Organisations must have completed the NSI ‘Go Live’ process to be approved to access to NSI. This includes any necessary NSI testing, confirming your Organisation’s Student Provider Relationship duration and registering to receive Change Notifications.
Users:
Have an individual Education Sector Logon (ESL) account.
The MoE Service Desk must have enabled NSI Role/s on your Education Sector account.
Have access to a computer with a recommended web browser version and have JavaScript enabled on the web browser.
The following browser versions are supported by the Ministry at the time this document was written. (Supported means that the browser has been tested and is known to enable the core functionality of the NSI web interface).
Web Browser Internet Version
Internet Explorer 8.0.x, 9.0.x, 10.0.x, 11.0
Firefox 29.0.x – 48.0 (not tested)
Chrome 36.0.x - 78.0.x
Safari Not tested
The recommended screen resolution for using the NSI web interface is 1440 x 900. The NSI web interface display varies with the screen resolution selected.
NSI Web User Interface Guide, Ministry of Education, v1.9 – January 2020 Page 14 of 69
For any assistance with meeting these Pre-requisites contact the MoE Service Desk on 0800 422 599 or [email protected].
4.3 Logging into the NSI web interface
The NSI web interface URL is: https://nsi.education.govt.nz/
You should add the NSI web interface URL as a ‘favourite’ or ‘bookmark’ in your web browser/s to allow you to easily access the NSI web interface.
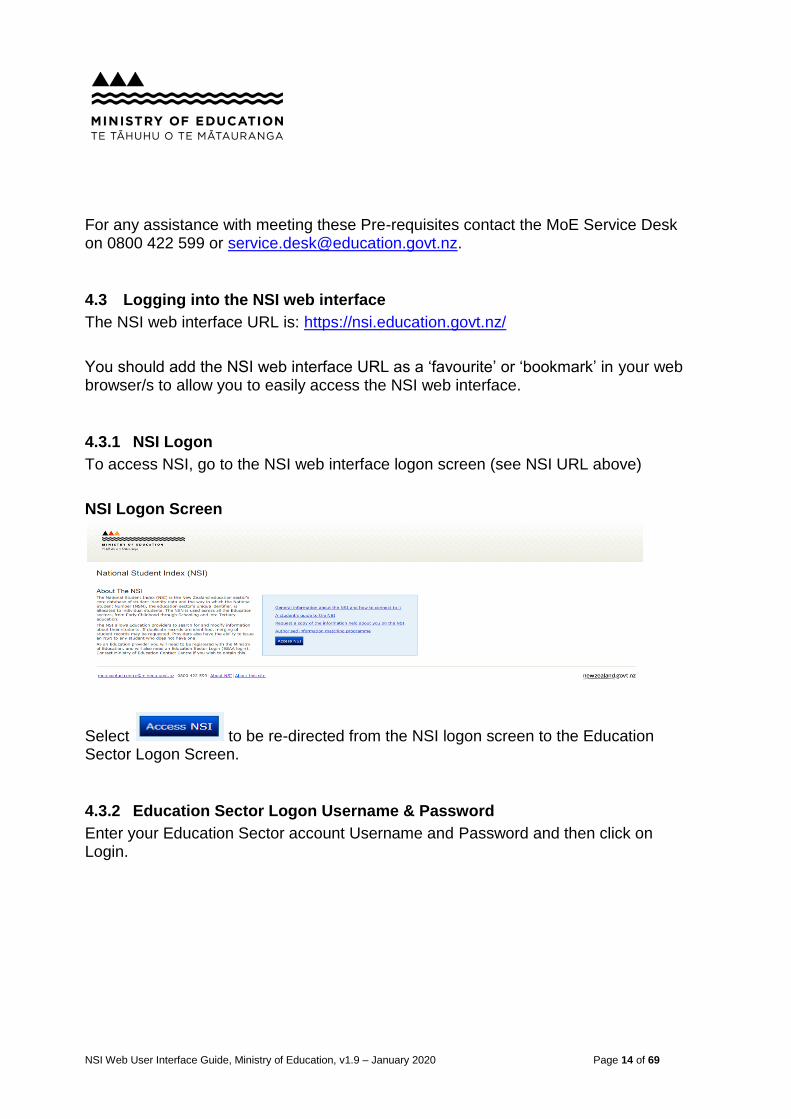
4.3.1 NSI Logon
To access NSI, go to the NSI web interface logon screen (see NSI URL above)
NSI Logon Screen
Select to be re-directed from the NSI logon screen to the Education Sector Logon Screen.
4.3.2 Education Sector Logon Username & Password
Enter your Education Sector account Username and Password and then click on Login.
NSI Web User Interface Guide, Ministry of Education, v1.9 – January 2020 Page 15 of 69
Education Sector Logon Screen
Note: If your userid is linked to multiple organisations, you will need to select which organisation you wish to use for accessing NSI. If you wish to access NSI using a different organisation, you will have to logout of NSI and log in again selecting the different organisation.
4.3.3 NSI Home Screen
If you logon successfully you will be redirected to the NSI Home screen.
If you are unsuccessful at logging in you could try the Forgotten your Password? link on the Education Sector Logon or else contact the Ministry of Education Service Desk for support.
NSI Home Screen
NSI Web User Interface Guide, Ministry of Education, v1.9 – January 2020 Page 16 of 69
4.3.4 Time Out – 20 minutes
For security reasons, the NSI web interface has a built in time out mechanism. This means that if you are logged into the NSI web interface and you do not perform any functions or refresh the screen for 20 minutes, your access to the NSI web interface will be terminated.
4.4 Log Out
When you are ready to logout of the NSI web interface the button is located at the very top right of the NSI web interface.
NSI Logged Out Screen
NSI Web User Interface Guide, Ministry of Education, v1.9 – January 2020 Page 17 of 69
5 Navigation within the NSI Web Interface
5.1 Overview
This section details the various ways in which you are able to navigate your way around the NSI web interface.
5.1.1 Main Menu
This is always visible near the top left of the NSI web interface. If you select one of the menu options you will be taken to that functional section of the web interface. The option you select will be highlighted in the main menu.
5.1.2 Fields
Fields that have a symbol [ ] next to them provide useful information related to that field. You can hover your mouse curser over the symbol to view the information.
Fields marked with a red asterix [*] are mandatory.
5.1.3 Action Buttons
There are buttons in NSI which perform actions. These buttons will perform the action noted on the button, or take you to a screen where you will be able to perform the action.
Those buttons which are only applicable to a screen under certain conditions will be disabled for users with security to view them (greyed out) until these conditions have been met.
NSI Web User Interface Guide, Ministry of Education, v1.9 – January 2020 Page 18 of 69
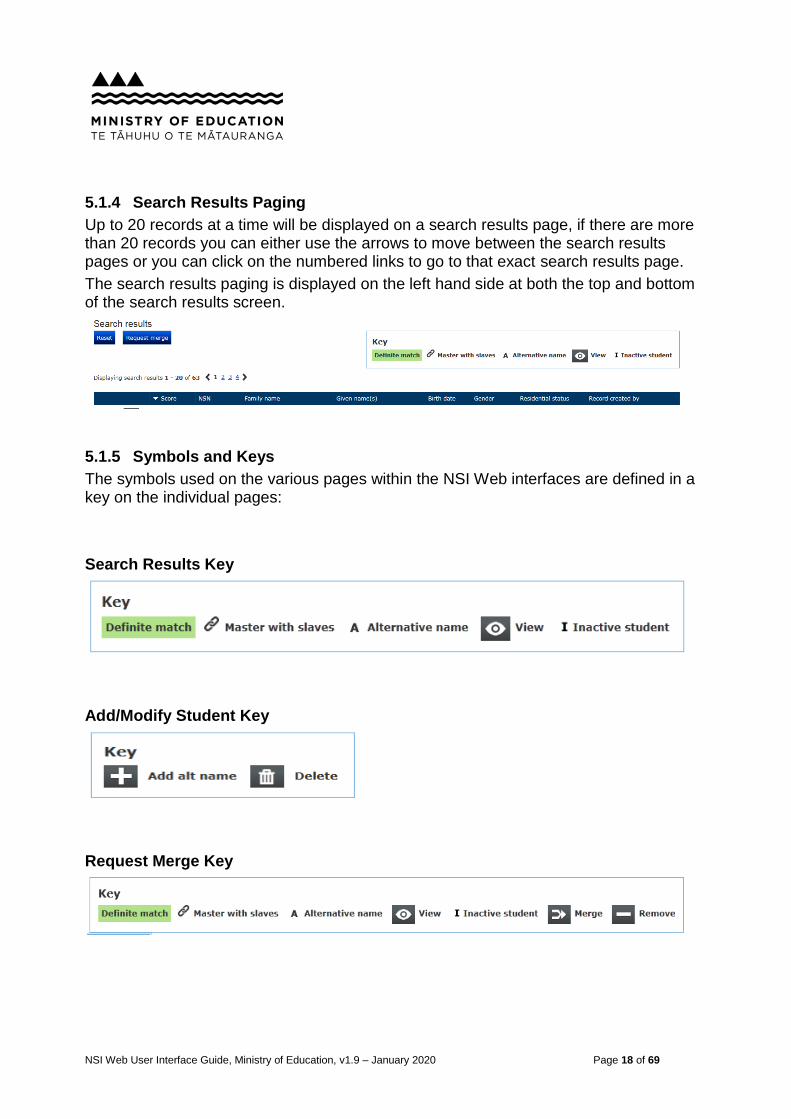
5.1.4 Search Results Paging
Up to 20 records at a time will be displayed on a search results page, if there are more than 20 records you can either use the arrows to move between the search results pages or you can click on the numbered links to go to that exact search results page.
The search results paging is displayed on the left hand side at both the top and bottom of the search results screen.
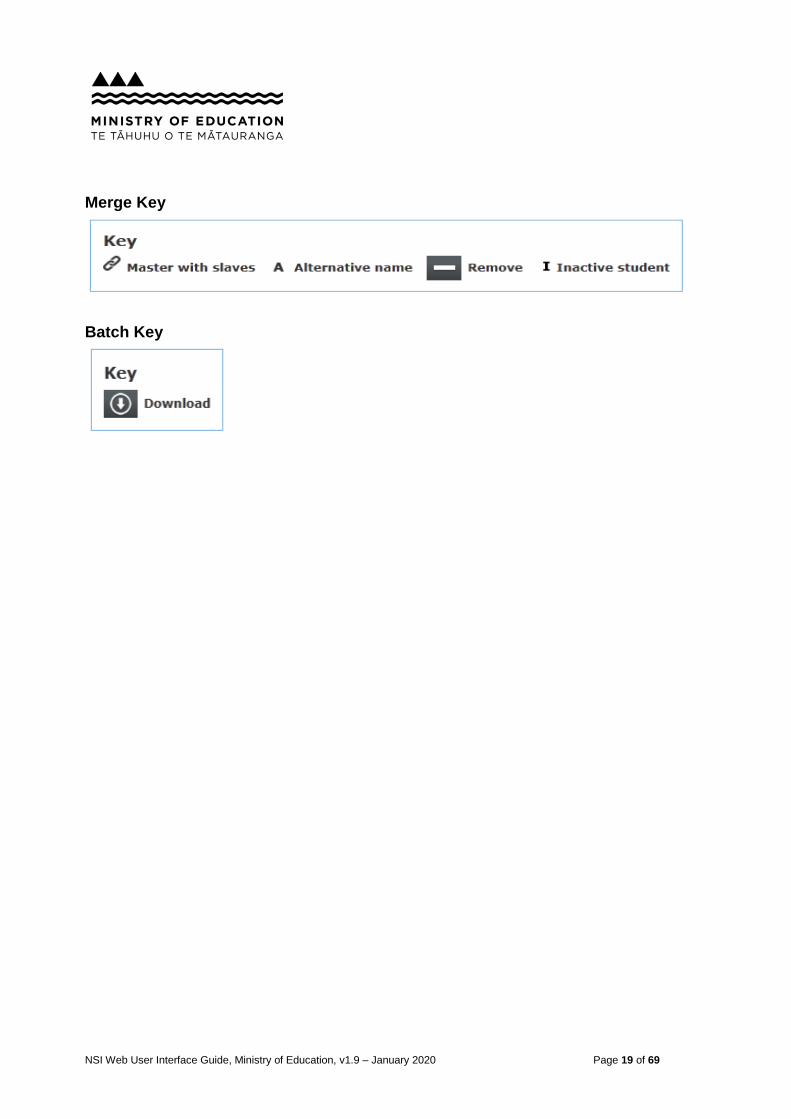
5.1.5 Symbols and Keys
The symbols used on the various pages within the NSI Web interfaces are defined in a key on the individual pages:
Search Results Key
Add/Modify Student Key
Request Merge Key
NSI Web User Interface Guide, Ministry of Education, v1.9 – January 2020 Page 19 of 69
Merge Key
Batch Key
NSI Web User Interface Guide, Ministry of Education, v1.9 – January 2020 Page 20 of 69
6 Search for a Student
6.1 Overview
The search facility is used to search for students in the NSI database. Searches can be performed using only the NSN (NSN search) or using a student’s name and other fields (Criteria search).
It is highly recommended that searches which do not include NSN, include the student’s full name (Family and Given name(s)) and Birth date. Providing this level of search criteria, will increase the reliability of search results.
NSN search: Direct lookup. The result will always be an exact match with one NSI record, unless the number does not exist within NSI or the number is invalid.
Criteria search: This will search for the student by the following parameters:
The main details used by the NSI Search software in a criteria search are:
Student name (‘main’ name and ‘alternative’ names will be searched); there will be some allowance for variance in spelling of names and additional given names.
Birth date, it is highly recommended the birth date is included in a criteria search to increase the reliability of search results. There will be some allowance for ‘close’ birth dates (e.g. 01/10/1988 and 01/10/1989).
A user can also submit the folliwng details in a Criteria search which have a lower weighting than the Student name and Birth date but can however affect the search result scores:
Gender; user can define the gender of the student record they are searching for. This can either be Male, Female or Unknown.
Residential status; if the Residential status of a student is known, a user can define the Residential status of the student record they are searching for.
Each record returned in a search will be given a score to indicate the accuracy of the returned record.
The score returned for each match is determined by the NSI Search software. The NSI Search software uses probabilistic matching which incorporates the following logic:
Transposed birth dates
NSI Web User Interface Guide, Ministry of Education, v1.9 – January 2020 Page 21 of 69
Variations in spelling
Phonetics, etc.
To start looking for a student you need to be in the Student Search screen – you can search using either the student’s NSN or the student’s name and/or birth date.
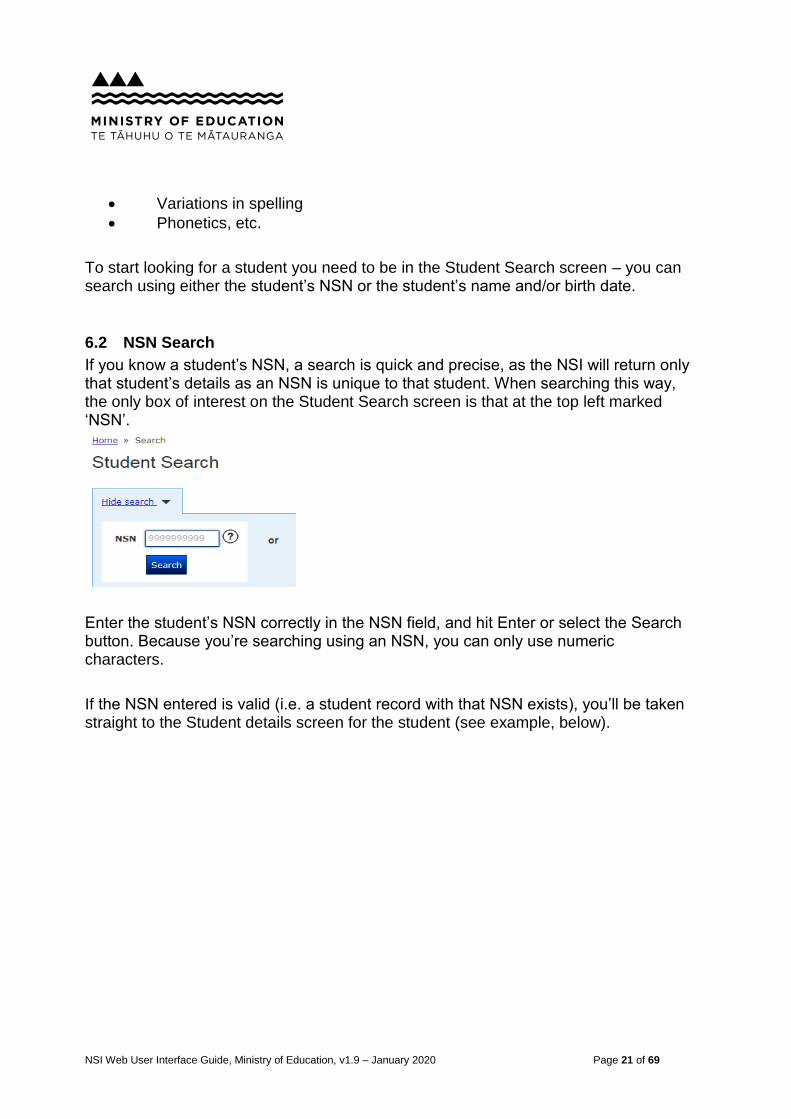
6.2 NSN Search
If you know a student’s NSN, a search is quick and precise, as the NSI will return only that student’s details as an NSN is unique to that student. When searching this way, the only box of interest on the Student Search screen is that at the top left marked ‘NSN’.
Enter the student’s NSN correctly in the NSN field, and hit Enter or select the Search button. Because you’re searching using an NSN, you can only use numeric characters.
If the NSN entered is valid (i.e. a student record with that NSN exists), you’ll be taken straight to the Student details screen for the student (see example, below).
NSI Web User Interface Guide, Ministry of Education, v1.9 – January 2020 Page 22 of 69
Student Details Screen
Important: Be sure to check that the student details match your details exactly to confirm you have the correct student record.
From here you may then choose to Challenge the record, view the History of the record, or Modify the record.
If the NSN you’ve entered:
does not exist in NSI, then a message will briefly appear at the bottom right of the screen as follows:
has invalid characters for an NSN (such as letters or blank spaces), then a message will appear at the top of the screen as follows:
NSI Web User Interface Guide, Ministry of Education, v1.9 – January 2020 Page 23 of 69
6.3 Criteria Search
If you don’t know a student’s NSN, you can search for them by their details such as name and birth date. As a minimum you need to enter two name components or a name and a Birth date to be able to search.
6.3.1 Searches on names in NSI
The NSI search assumes that the name you enter has the Given name(s) first, followed by the Family name. If you change the order of the names used in a search, you may find that the results differ a great deal.
For example, the name “William Rose” may give totally different results from the name “Rose William”. This means that it is best to enter the Given name(s) first, then the Family name.
The NSI search engine is generally case sensitive, however where the first name in a string of names is entered in the WebUI search field in full capitals, that name will be interpreted by the search engine as the “Family name”.
If you are not sure of your student’s details, it is a good idea to start with a broader search. If you search using their name only, you will be returned with a list of possible matches. This gives you the chance to scan through the list and see if any of these matches relates to the student you are looking for.
We recommend this type of searching if you know one of your students is in the NSI, but you just need to find their NSN.
If you know your student’s birth date details, then you can search using Given name(s), Family name, and date of birth. This type of searching ensures that a minimal number of results are returned with a higher degree of accuracy.
NSI Web User Interface Guide, Ministry of Education, v1.9 – January 2020 Page 24 of 69
When searching with a common name only, you may get this warning;
To ensure that you have completed a thorough search, you may wish to search for the student using the preferred or previous names that they have entered on their enrolment form, just in case they have an NSN under that name.
For example, if a student has entered their maiden name as a previous name on their enrolment form, you could search for them on the NSI using that name to see if they have an NSN under that name.
6.3.2 Criteria Search Results
After entering your student’s search criteria click the Search button, or press the Enter button. Below the Student Search section you will see the Search results section which will have any records displayed that match your search criteria as follows.
Student Name/Birth date Search Results Screen
The Key explains the symbols that may be presented in your search results. You can use the column headings to sort your results in ascending or descending order. If the search returns any definite matches to your search criteria, those results will be highlighted in green.
Please note – Alternative name matches: When performing a search all names matching the search criteria are returned. Alternative names as well as main names
NSI Web User Interface Guide, Ministry of Education, v1.9 – January 2020 Page 25 of 69
will be returned in the search results (where they match the criteria entered). The NSI is a means to identify a student and can hold multiple names for one student. Student records have a ‘main name’ and as many ‘alternative names’ as required.
Up to 20 records can be displayed at one time, and you may need to scroll down the screen to see all these results. You can also click on the Hide Search link from the Student Search to minimise the search criteria box. If you have more than 20 records returned you can use the arrow buttons and/or the page numbers to move between the search results. The maximum number of records that will be displayed in the search results section is 100.
6.4 Student Details
To view a students’ details click the view symbol or click on the NSN. The Student Details screen will be displayed.
NSI Web User Interface Guide, Ministry of Education, v1.9 – January 2020 Page 26 of 69
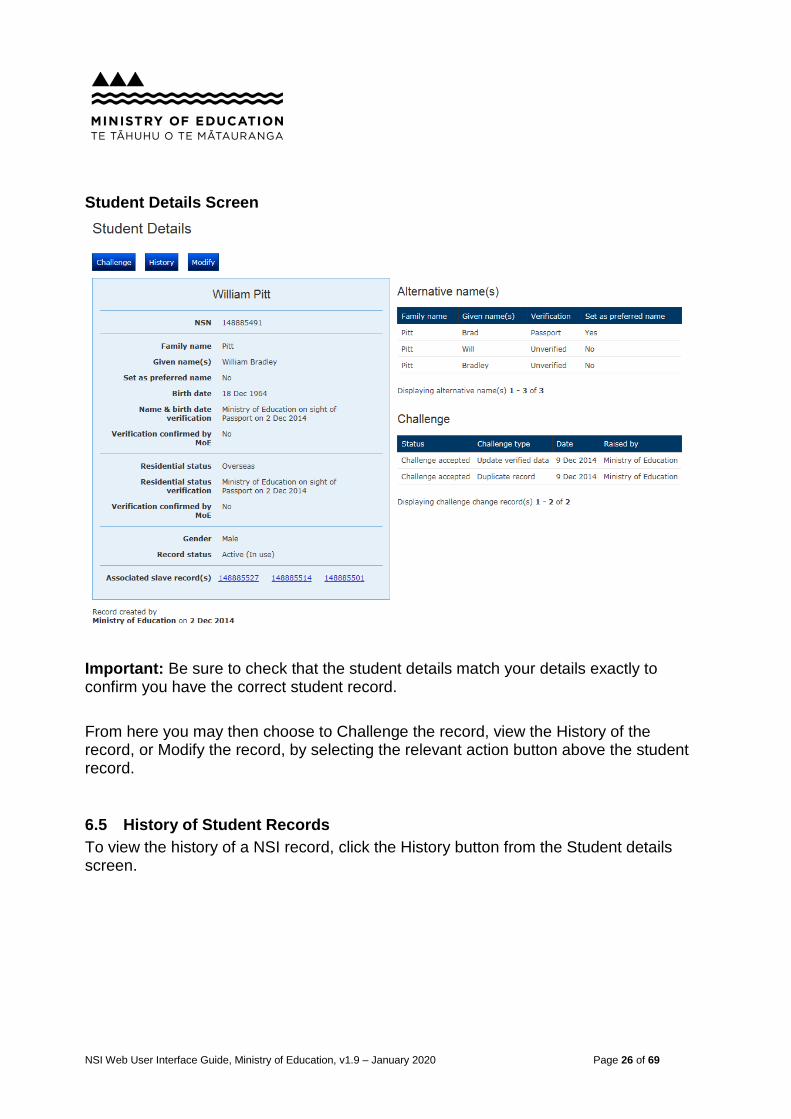
Student Details Screen
Important: Be sure to check that the student details match your details exactly to confirm you have the correct student record.
From here you may then choose to Challenge the record, view the History of the record, or Modify the record, by selecting the relevant action button above the student record.
6.5 History of Student Records
To view the history of a NSI record, click the History button from the Student details screen.
NSI Web User Interface Guide, Ministry of Education, v1.9 – January 2020 Page 27 of 69
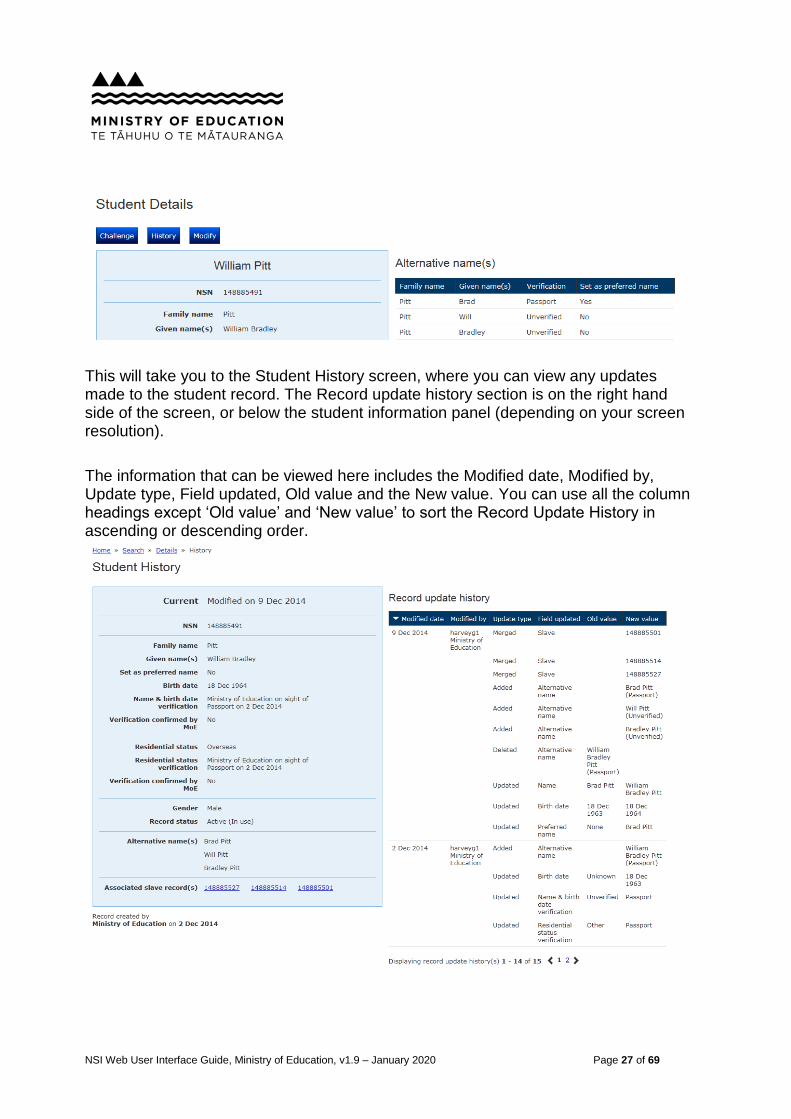
This will take you to the Student History screen, where you can view any updates made to the student record. The Record update history section is on the right hand side of the screen, or below the student information panel (depending on your screen resolution).
The information that can be viewed here includes the Modified date, Modified by, Update type, Field updated, Old value and the New value. You can use all the column headings except ‘Old value’ and ‘New value’ to sort the Record Update History in ascending or descending order.
NSI Web User Interface Guide, Ministry of Education, v1.9 – January 2020 Page 28 of 69
Up to 14 record updates can be displayed on the Record update history section, if there are more than 14 updates you can either use the arrows to move between the results pages or you can click on the numbered links to go to that exact history page. The paging buttons are displayed below the Record update history information.
NSI Web User Interface Guide, Ministry of Education, v1.9 – January 2020 Page 29 of 69
7 Add a New Student Record
7.1 Overview
The add student facility is used to create new student records in NSI. To add a student to the NSI you should first search to confirm that the student you wish to add does not already have an NSI record. This helps to avoid unintentionally creating a duplicate record.
7.2 Adding a New Student Record
From the Student Search section click the Add student button.
Student Search Screen
The Add Student screen already displays the details you entered from the search criteria. Check the fields are correctly entered, and carefully enter in all remaining relevant fields, ensuring all the mandatory fields (denoted by a red asterix) have been entered. Mandatory fields are Family name, Given name(s) and Birth date.
If you need to add an alternative name you can click the plus symbol next to the Alternative name(s) section of the screen.
NSI Web User Interface Guide, Ministry of Education, v1.9 – January 2020 Page 30 of 69
Add Student Screen
7.3 Verifying a New Student Record
When adding a student it is best practice to have the student documentation you need when entering a student record so that you can verify the record at the same time.
There are two main verification source indicators in the NSI add student screen:
Name and birth date verification
Residential status verification
The default status for these fields is unverified. There are three options in the drop down box for verifying a student record; Birth Certificate, Other or Passport.
NSI Web User Interface Guide, Ministry of Education, v1.9 – January 2020 Page 31 of 69
You must be careful using these verifications, as you are declaring that you’ve sighted documentation to confirm the student’s details, and once you’ve verified a student record, you cannot ‘unverify’ the record.
Important note: If the Unknown Birth date checkbox is selected the student’s name and birth date details cannot be verified.
7.4 Saving a New Student Record
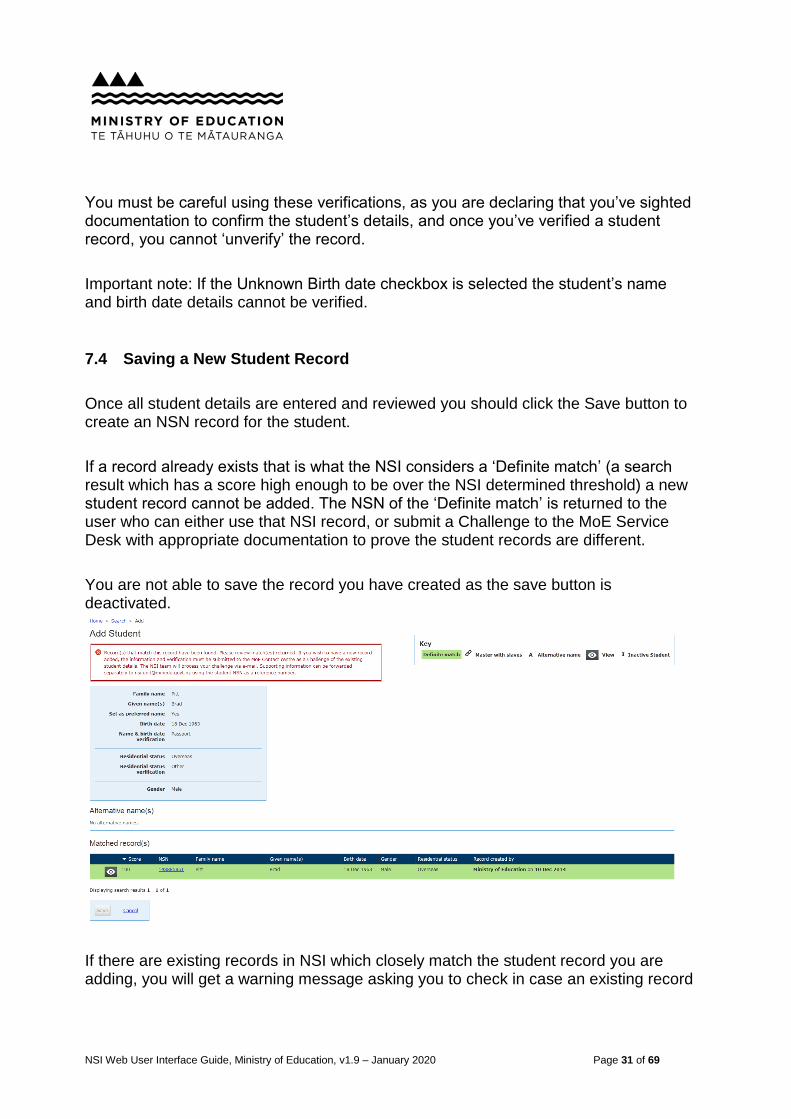
Once all student details are entered and reviewed you should click the Save button to create an NSN record for the student.
If a record already exists that is what the NSI considers a ‘Definite match’ (a search result which has a score high enough to be over the NSI determined threshold) a new student record cannot be added. The NSN of the ‘Definite match’ is returned to the user who can either use that NSI record, or submit a Challenge to the MoE Service Desk with appropriate documentation to prove the student records are different.
You are not able to save the record you have created as the save button is deactivated.
If there are existing records in NSI which closely match the student record you are adding, you will get a warning message asking you to check in case an existing record
NSI Web User Interface Guide, Ministry of Education, v1.9 – January 2020 Page 32 of 69
should be used. Scroll down and check the records to make sure a record does not exist for this student you wish to add. Once you are satisfied that no record exists for the student you can click the Confirm button. This will save a new record in the NSI.
If the new student record is saved successfully you will see a confirmation message indicating that the student record was successfully saved and the student details screen will now have a unique NSN displayed below the student’s name. Also the User’s Organisation name and the date of creation are recorded against the saved student record.
NSI Web User Interface Guide, Ministry of Education, v1.9 – January 2020 Page 33 of 69
8 Modify a Student Record
8.1 Overview
The modify facility is used to update existing NSI records. Modifying a record in the NSI requires that an NSN be provided to identify the record being changed. Modifications will be initiated when, for example, a student changes their name or residential status.
Changes to an NSI record will be notified to all organisations recorded in the NSI system as having an active “Student-Provider Relationship (SPR)” with the organisation.
8.2 Modify an Unverified Student Record
If a student’s details are unverified and you need to change them, on the Student Details screen, click on the Modify button, and make the changes to verify the student record.
Where a student’s name can be updated, full name details should be supplied. For example, if a student exists as ‘Sarah Wallace’ on the NSI and you wish to update the information to ‘Sarah Jane Wallis’, all of the Family Name and Given name(s) fields must be updated. When the Student record is saved successfully, the original main name will be added as an alternative name for the student. It is important to note that you will not be able to update the Family Name, at least one of the Given Name fields and the Birth date of a record in a single transaction.
If you need to add an alternative name you can click the plus symbol next to the New alternative name(s) section of the screen.
You can modify an unverified primary name to match an existing alternate name. The current primary name will become an alternate name and the current alternate name will be deleted. The verification for the Primary name will become the most relevant between what was entered when modifying the Primary name, or the verification that existed for the existing alternate name.
Make sure you click the Save button once you have entered your details to save the changes you have made to the student record.
NSI Web User Interface Guide, Ministry of Education, v1.9 – January 2020 Page 34 of 69
8.3 Modify/Challenge a Verified Student Record
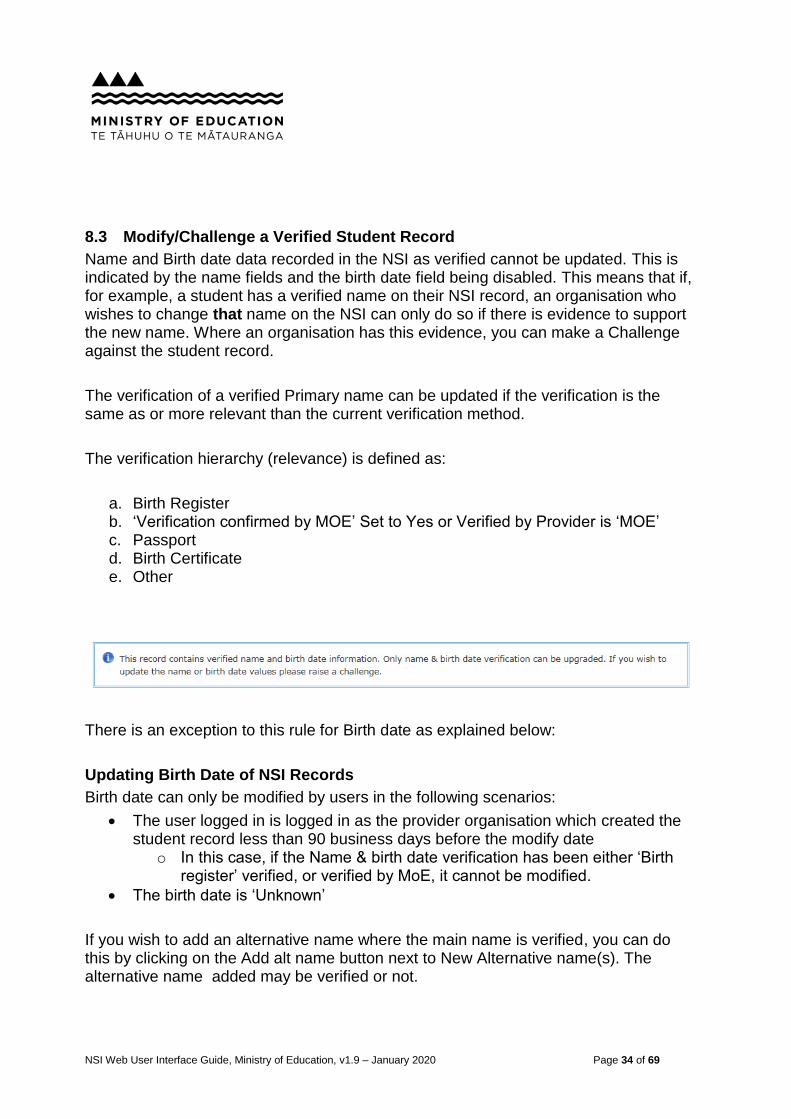
Name and Birth date data recorded in the NSI as verified cannot be updated. This is indicated by the name fields and the birth date field being disabled. This means that if, for example, a student has a verified name on their NSI record, an organisation who wishes to change that name on the NSI can only do so if there is evidence to support the new name. Where an organisation has this evidence, you can make a Challenge against the student record.
The verification of a verified Primary name can be updated if the verification is the same as or more relevant than the current verification method.
The verification hierarchy (relevance) is defined as:
a. Birth Register b. ‘Verification confirmed by MOE’ Set to Yes or Verified by Provider is ‘MOE’ c. Passport d. Birth Certificate e. Other
There is an exception to this rule for Birth date as explained below:
Updating Birth Date of NSI Records
Birth date can only be modified by users in the following scenarios:
The user logged in is logged in as the provider organisation which created the student record less than 90 business days before the modify date
o In this case, if the Name & birth date verification has been either ‘Birth register’ verified, or verified by MoE, it cannot be modified.
The birth date is ‘Unknown’
If you wish to add an alternative name where the main name is verified, you can do this by clicking on the Add alt name button next to New Alternative name(s). The alternative name added may be verified or not.
NSI Web User Interface Guide, Ministry of Education, v1.9 – January 2020 Page 35 of 69
Make sure you click the Save button once you have entered your alternative name details to save the changes you have made to the student record.
Updating verification of an existing alternate name
You can update the verification of an existing alternative name as long as the new verification is higher than the existing verification. This is done by adding a duplicate alternative name. The alternate name with the higher verification will remain on the record.
This update will be allowed and Bradley Pitt, verification = Other will be the alternate name on the NSI record.
NSI Web User Interface Guide, Ministry of Education, v1.9 – January 2020 Page 36 of 69
Modify Student Screen
NSI Web User Interface Guide, Ministry of Education, v1.9 – January 2020 Page 37 of 69
8.3.1 How to raise a Challenge
To raise a Challenge via the Modify Student screen click the Challenge button. This will bring up the Challenge Screen
There are 3 Challenge Types that can be raised:
Challenge Existing Details,
Duplicate Record,
Update Verified Data.
Fill out the mandatory fields and then click the Submit button to send an e-mail request for your challenge against the Student record. You should receive a confirmation message as below. A confirmation e-mail from the NSI system with the details of your challenge, will be sent to the email address provided.
NSI Web User Interface Guide, Ministry of Education, v1.9 – January 2020 Page 38 of 69
Any supporting documentation or information can be sent to the NSI Team at [email protected] using the student NSN as a reference.
The NSI Team will process your submitted challenge via e-mail.
A separate challenge is required for each student record that you wish to challenge.
8.3.2 Status for Challenges
The MoE Service Desk will update the status for challenges as progress is made on them.
Users can check this on NSI web interface by doing a search for the NSN. On the Student Details screen you can view the current status under the Challenge section of the record (on the right hand panel of record).
The following options may be displayed in the Challenge Status field;
Challenge raised,
Under investigation,
Document requested from Provider,
Awaiting information from Provider,
Awaiting information from DIA,
Challenge accepted,
Challenge rejected.
NSI Web User Interface Guide, Ministry of Education, v1.9 – January 2020 Page 39 of 69
Important note: If a student record has a Challenge with an ‘open’ status the student record cannot be merged until the Challenge has been closed.
Open Status are;
Challenge raised,
Under investigation,
Document requested from Provider,
Awaiting information from provider or
Awaiting information from DIA.
Closed Status are;
Challenge accepted or
Challenge rejected.
NSI Web User Interface Guide, Ministry of Education, v1.9 – January 2020 Page 40 of 69
9 Merge Requests
9.1 Overview
This facility is used when an organisation identifies that a student has mistakenly been assigned more than one NSI record. The merge request facility is used to request that multiple NSI records be merged. There are three potential outcomes of a merge request:
Merge approved: Where NSI determined criteria is met, the NSI records will be merged and the user will be notified of the master NSN to continue to use as the students NSN. In addition all organisations that have an active student provider relationship with the NSI records will be advised via the Change Notication process, provided the organisation has been set up to receive change notifications.
Merge requires manual intervention: Where NSI determined criteria for merge approval is not met, the merge request will be lodged with the MoE Service Desk to be considered and approved or declined as appropriate.
Merge denied: Where the submitted records are not appropriate for a merge request (e.g. too many NSNs submitted, Invalid NSNs submitted) the merge request will be denied. The user may need to rectify the error and re-submit the request.
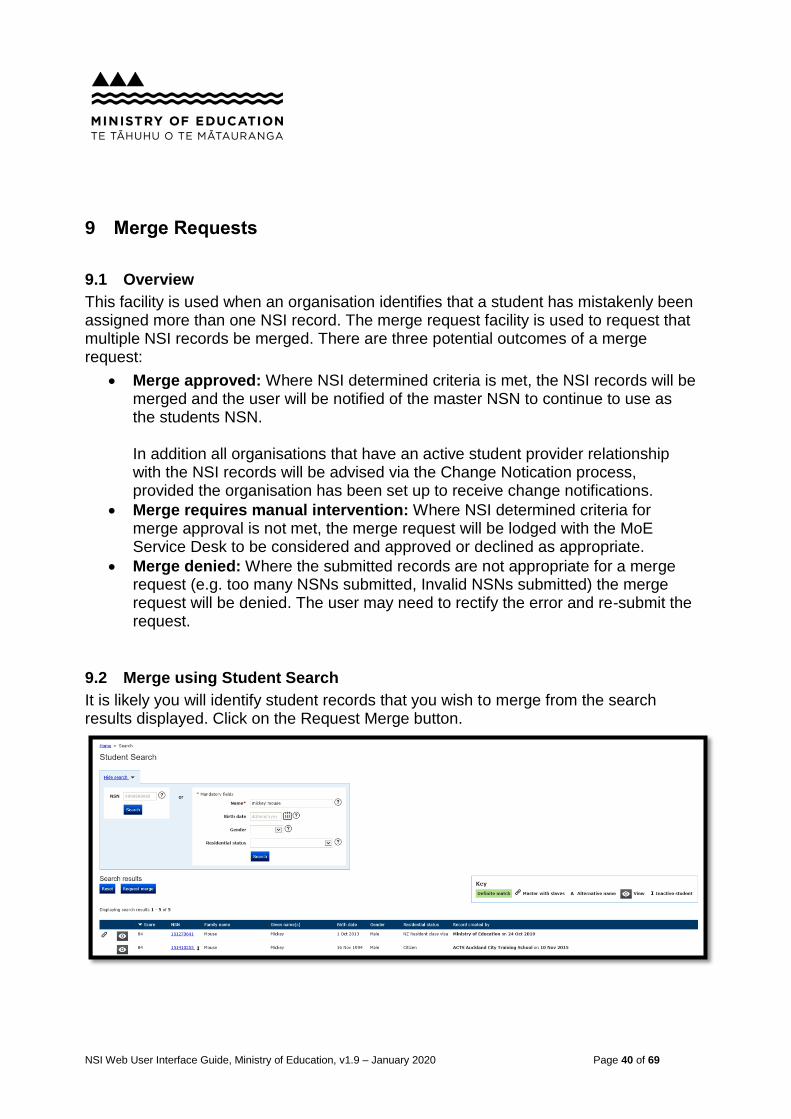
9.2 Merge using Student Search
It is likely you will identify student records that you wish to merge from the search results displayed. Click on the Request Merge button.
NSI Web User Interface Guide, Ministry of Education, v1.9 – January 2020 Page 41 of 69
Each row of the search results now has a Merge symbol next to the score of each record. Select the merge icon next to the records you wish to be merged. Up to 10 unique student records can be included in a merge request. If an NSN selected for merge has multiple rows (multiple names) on the search results, the merge icon will be removed from all of these rows once the NSN has been selected.
Scroll down to the bottom of the screen to view the merge request list that you have built up.
Carefully review all the records in this section - these are the records you actually do want to merge. You can click on the remove symbol if there are any records in this list that you do not want to be merged. Select the Merge Entry button to take you to the Merge Entry section of NSI.
NSI Web User Interface Guide, Ministry of Education, v1.9 – January 2020 Page 42 of 69
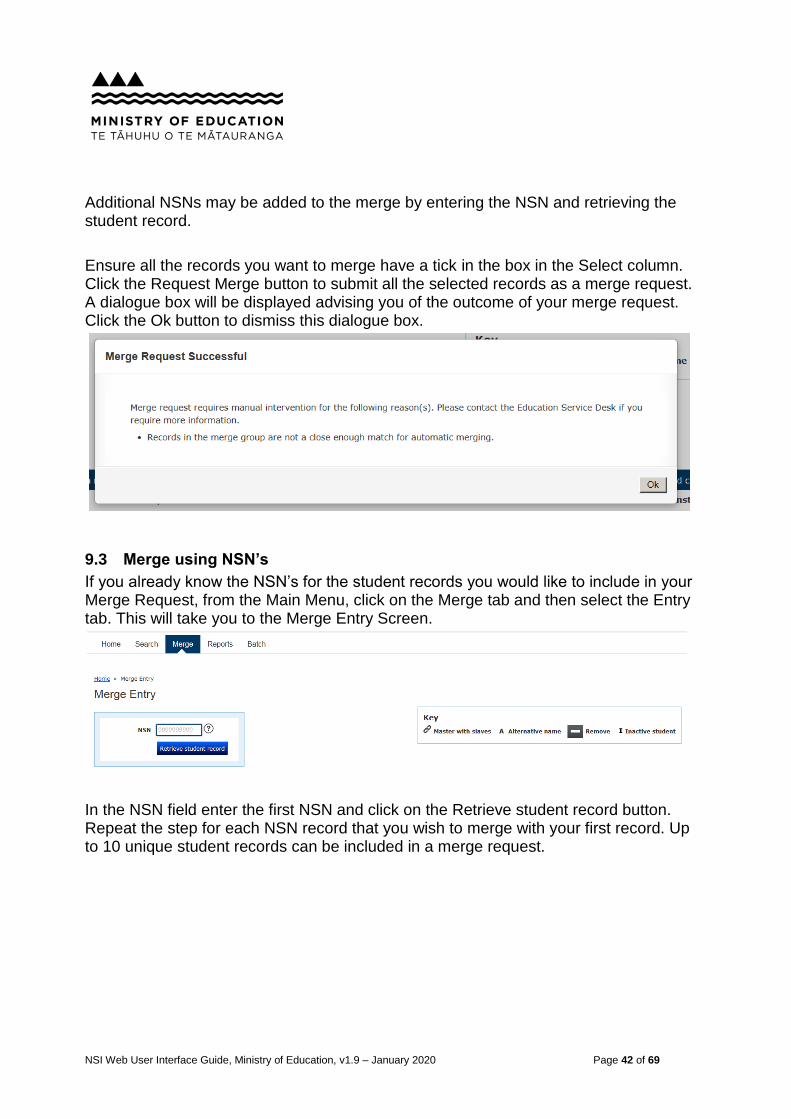
Additional NSNs may be added to the merge by entering the NSN and retrieving the student record.
Ensure all the records you want to merge have a tick in the box in the Select column. Click the Request Merge button to submit all the selected records as a merge request. A dialogue box will be displayed advising you of the outcome of your merge request. Click the Ok button to dismiss this dialogue box.
9.3 Merge using NSN’s
If you already know the NSN’s for the student records you would like to include in your Merge Request, from the Main Menu, click on the Merge tab and then select the Entry tab. This will take you to the Merge Entry Screen.
In the NSN field enter the first NSN and click on the Retrieve student record button. Repeat the step for each NSN record that you wish to merge with your first record. Up to 10 unique student records can be included in a merge request.
NSI Web User Interface Guide, Ministry of Education, v1.9 – January 2020 Page 43 of 69
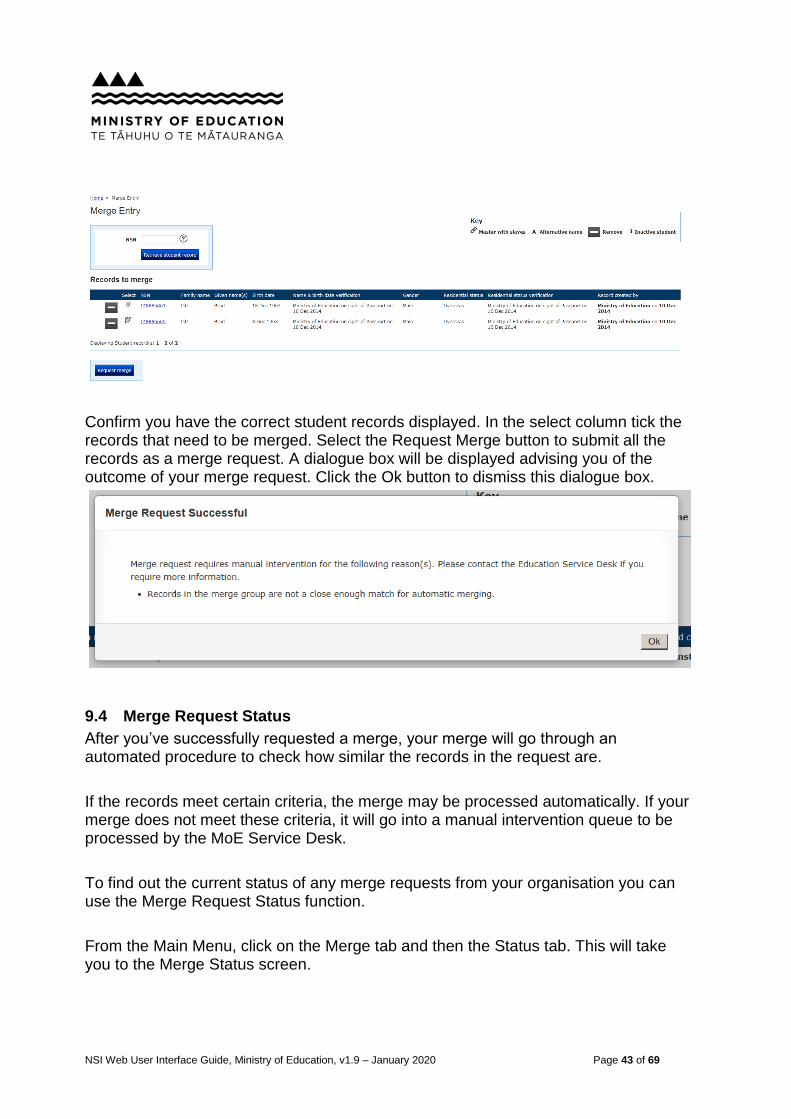
Confirm you have the correct student records displayed. In the select column tick the records that need to be merged. Select the Request Merge button to submit all the records as a merge request. A dialogue box will be displayed advising you of the outcome of your merge request. Click the Ok button to dismiss this dialogue box.
9.4 Merge Request Status
After you’ve successfully requested a merge, your merge will go through an automated procedure to check how similar the records in the request are.
If the records meet certain criteria, the merge may be processed automatically. If your merge does not meet these criteria, it will go into a manual intervention queue to be processed by the MoE Service Desk.
To find out the current status of any merge requests from your organisation you can use the Merge Request Status function.
From the Main Menu, click on the Merge tab and then the Status tab. This will take you to the Merge Status screen.
NSI Web User Interface Guide, Ministry of Education, v1.9 – January 2020 Page 44 of 69
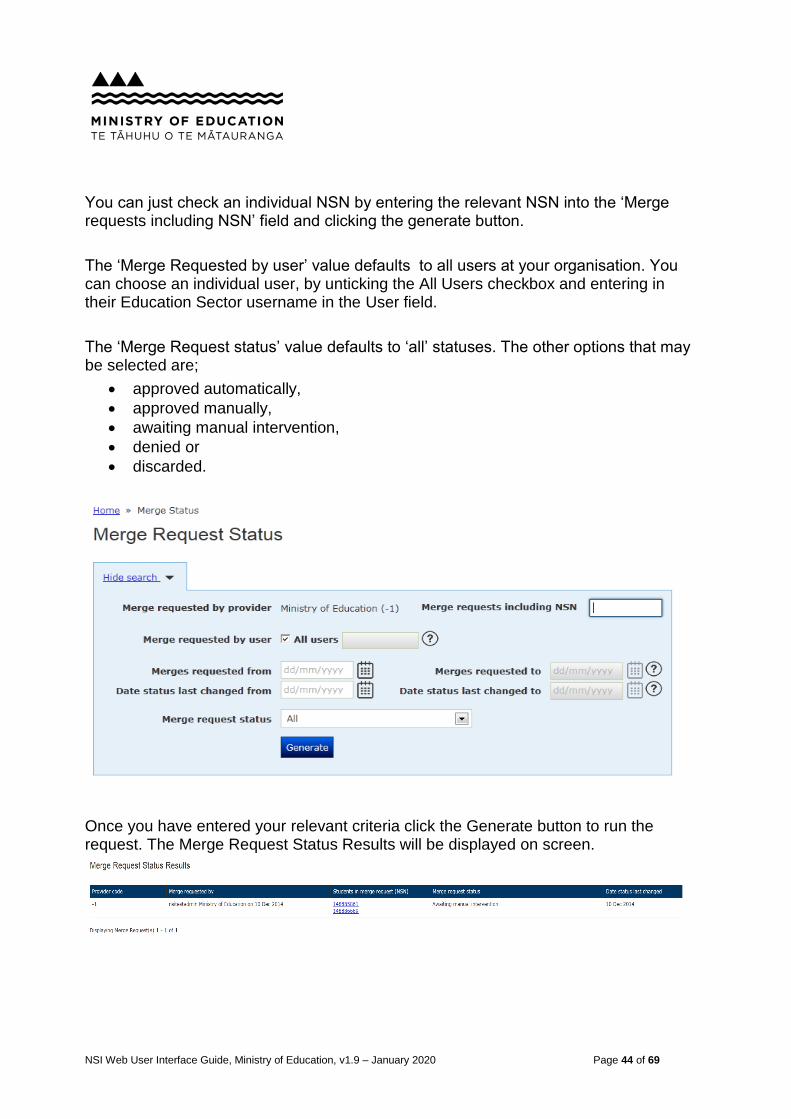
You can just check an individual NSN by entering the relevant NSN into the ‘Merge requests including NSN’ field and clicking the generate button.
The ‘Merge Requested by user’ value defaults to all users at your organisation. You can choose an individual user, by unticking the All Users checkbox and entering in their Education Sector username in the User field.
The ‘Merge Request status’ value defaults to ‘all’ statuses. The other options that may be selected are;
approved automatically,
approved manually,
awaiting manual intervention,
denied or
discarded.
Once you have entered your relevant criteria click the Generate button to run the request. The Merge Request Status Results will be displayed on screen.
NSI Web User Interface Guide, Ministry of Education, v1.9 – January 2020 Page 45 of 69
Any merge requests with a status of Awaiting manual intervention are required to be processed by the MoE Service Desk. Please contact the MoE Service desk if you require further information on merge requests with this status.
When a merge request is denied, you can view the reason for the denial via the Merge Request Status results.
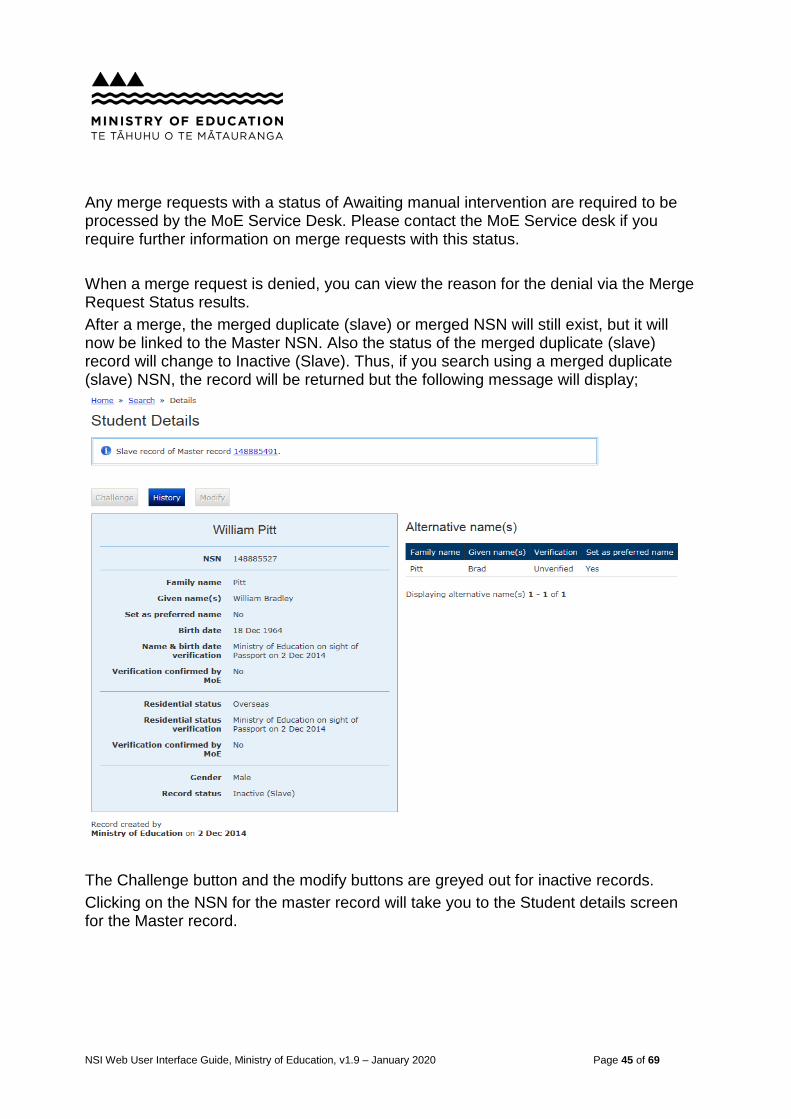
After a merge, the merged duplicate (slave) or merged NSN will still exist, but it will now be linked to the Master NSN. Also the status of the merged duplicate (slave) record will change to Inactive (Slave). Thus, if you search using a merged duplicate (slave) NSN, the record will be returned but the following message will display;
The Challenge button and the modify buttons are greyed out for inactive records.
Clicking on the NSN for the master record will take you to the Student details screen for the Master record.
NSI Web User Interface Guide, Ministry of Education, v1.9 – January 2020 Page 46 of 69
When a merge request is approved, the NSI system will automatically add / update the Student-Provider Relationship (SPR) on the master record from the relationships on the merged duplicate (slave) record(s).
When an unmerge request is processed, the NSI system will automatically update the SPR on the master record based on the state of the relationships at the time of the unmerge. (i.e. active or expired).
NSI Web User Interface Guide, Ministry of Education, v1.9 – January 2020 Page 47 of 69
10 Changes to Student Records
10.1 Overview
This section describes how your organisation can be updated about any changes that are made to your student’s NSI records.
10.2 Student-Provider Relationships
A Student-Provider Relationship (SPR) records the relationship between an organisation and a NSI record. The purpose of an SPR is to ensure organisations are notified of NSI record changes to student records which may impact them.
The list of students ‘SPR’s’ is maintained within the NSI. When an NSI record is added or updated by an organisation, an SPR is created (or updated if it already exists) between the student and the organisation.
Where a student is no longer a ‘current’ student at an organisation, the SPR between the organisation and that student will ‘expire’ but will not be deleted. This will allow historical relationship information to be recorded.
10.3 Change Notifications
The change notification facility communicates NSI student data changes to organisations that have requested to know about changes. Where an organisation has requested to receive change notifications, these will be generated for changes to NSI records that are recorded as having a current “Student-Provider Relationship (SPR)” with that organisation. Types of changes that will trigger a Change Notification include modifications to data (including verification), merges and unmerges. Alternative name details are not included in Change Notifications.
For further information see section section 3.6 for more information.
Organisations can retrieve change notifications via the web or batch interface.
When an organisation retrieves change notifications via the Web interface they can choose to either:
Receive/download changes made to student records since the last date (and time) change notifications were generated
NSI Web User Interface Guide, Ministry of Education, v1.9 – January 2020 Page 48 of 69
Users can request to view changes made over a specified time period (not exceeding six months prior to the date of the last change notification generated)
Viewing change notification does not update the Last Change Notification generated date. This date is only updated if you Download change notifications, and will default to the date generated (today’s date/time).
When an organisation retrieves change notifications via the Batch interface they can choose to:
Receive/download changes made to student records since the last date (and time) change notifications were downloaded for the organisation
When the NSI is notified of a student’s death, all organisations with either a current or expired SPR with the student will be notified of the student’s death via the change notification process.
You should regularly check your organisation’s Change Notifications to ensure that the data in your own records matches the data in the NSI.
If you agree with the change made, then you should update the data in your own records. If you disagree with the change made, then you should raise a Challenge, see section 8.3 for more information
10.3.1 View or Download Change Notifications on the NSI web interface
From the Main Menu, select the Batch Tab and then Results. This will take you to the Batch Results screen.
Click the Change Notifications button to be taken to the Generate change notification screen.
NSI Web User Interface Guide, Ministry of Education, v1.9 – January 2020 Page 49 of 69
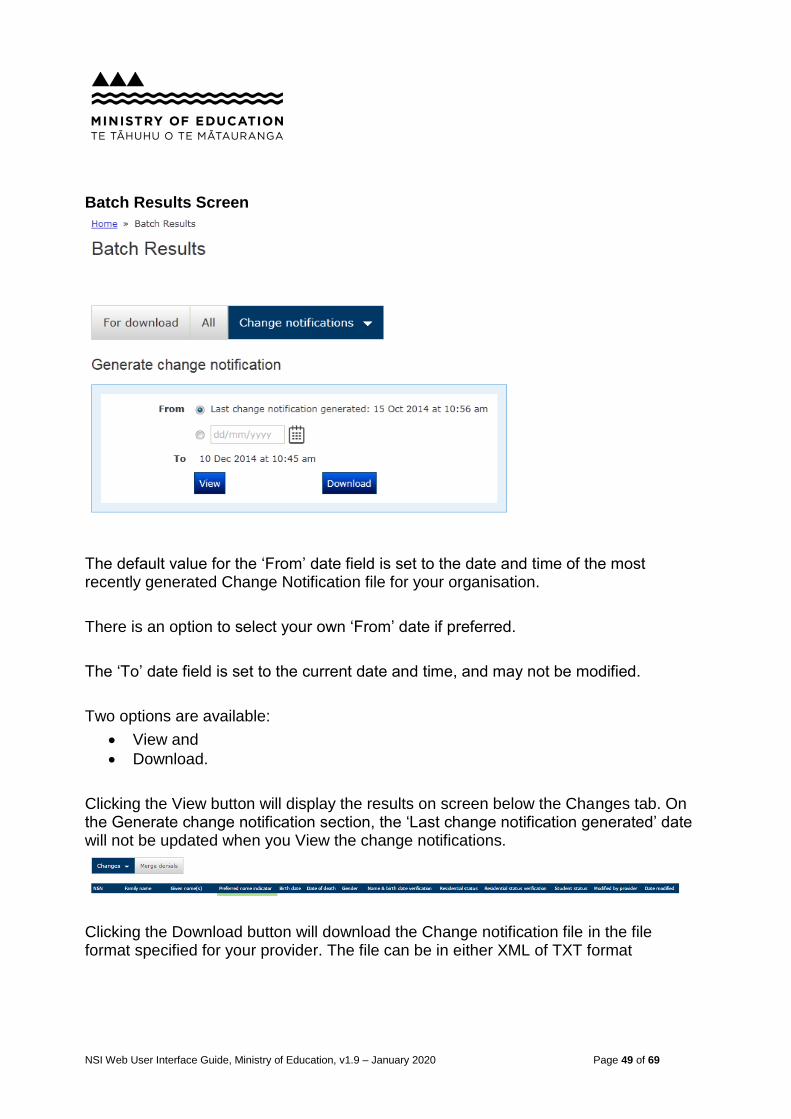
Batch Results Screen
The default value for the ‘From’ date field is set to the date and time of the most recently generated Change Notification file for your organisation.
There is an option to select your own ‘From’ date if preferred.
The ‘To’ date field is set to the current date and time, and may not be modified.
Two options are available:
View and
Download.
Clicking the View button will display the results on screen below the Changes tab. On the Generate change notification section, the ‘Last change notification generated’ date will not be updated when you View the change notifications.
Clicking the Download button will download the Change notification file in the file format specified for your provider. The file can be in either XML of TXT format
NSI Web User Interface Guide, Ministry of Education, v1.9 – January 2020 Page 50 of 69
On the Generate change notification section, the ‘Last change notification generated’ date will be updated when you Download the change notifications.
Once the Change notification file is generated, a dialog box will appear with three options;
Open the report,
Save the report or
Cancel the request.
The Change Notification file will have a list of your organisations valid SPR student records that have been changed and what those changes are.
10.3.2 No Change Notifications
If you choose View and no change notifications are found for your Date range, under the Changes Tab you will be presented with the message, No NSI record changes found.
If you choose Download and no change notifications are found for your Date range, a dialog box will appear with the message, There are no change notifications.
NSI Web User Interface Guide, Ministry of Education, v1.9 – January 2020 Page 51 of 69
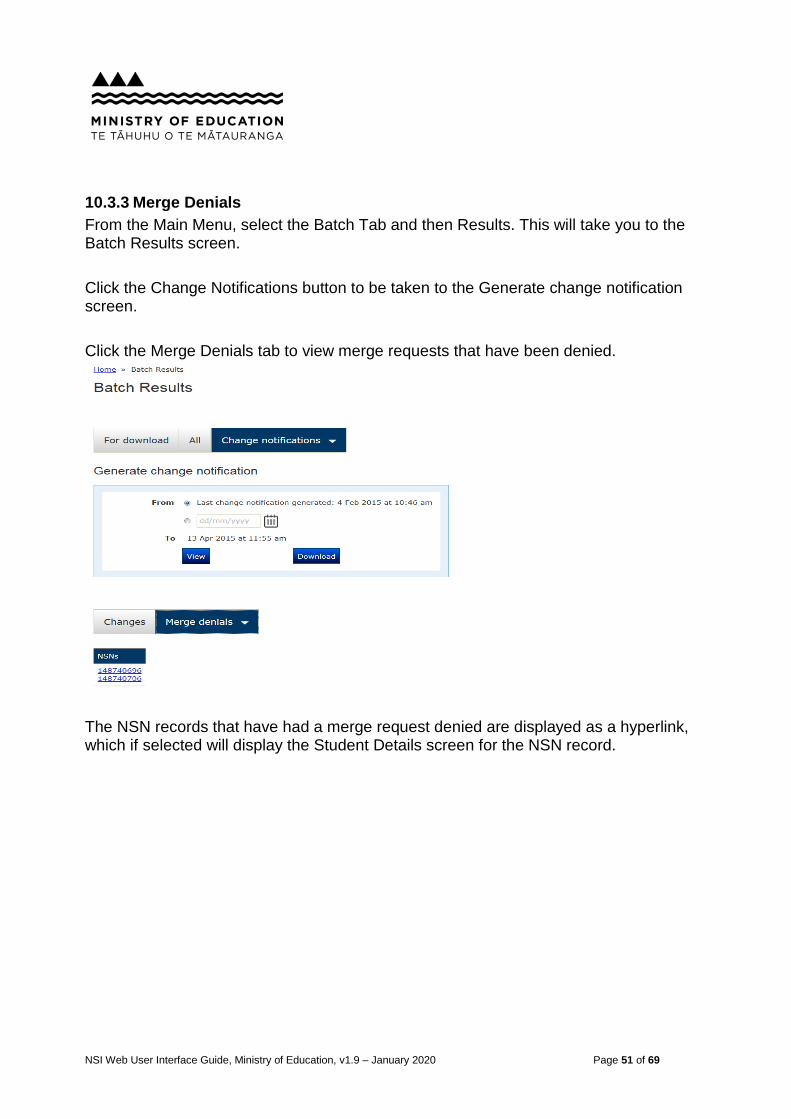
10.3.3 Merge Denials
From the Main Menu, select the Batch Tab and then Results. This will take you to the Batch Results screen.
Click the Change Notifications button to be taken to the Generate change notification screen.
Click the Merge Denials tab to view merge requests that have been denied.
The NSN records that have had a merge request denied are displayed as a hyperlink, which if selected will display the Student Details screen for the NSN record.
NSI Web User Interface Guide, Ministry of Education, v1.9 – January 2020 Page 52 of 69
11 Reporting
11.1 Transaction Activity Report
A Transaction Activity report detailing activities that are performed by your organisation’s users on the NSI can be obtained from the NSI web interface. Transaction types that can be reported on are:
All,
Add,
Merge Request or
Update.
From the Main Menu,click on Reports tab.
Your organisation name and code details will be displayed in the Transaction Activity Report selection criteria.
NSI Web User Interface Guide, Ministry of Education, v1.9 – January 2020 Page 53 of 69
The default value for the ‘User’ field is set to all users at your organisation. You can choose an individual user, by unticking the All Users checkbox and entering in the individual user’s Education Sector username in the User field.
Select the relevant Transaction type (default is All transactions) and date range (default is Current month).
Click the Generate button to create your report.
Once the Report is generated, a dialog box will appear with three options;
Open the report,
Save the report or
Cancel the request.
The Transaction Activity Report contains information about your organisations activity on the NSI for the users, dates and transactions you have requested.
NSI Web User Interface Guide, Ministry of Education, v1.9 – January 2020 Page 54 of 69
12 Batch Files – NSI Web Interface
12.1 Overview
This chapter is intended as a basic overview of the use of Batch files and how they can be processed via the NSI web interface.
Batch files are generated by Student Management Systems (SMSs), and are used by organisations with SMSs.
The batch file interface allows organisations to build up a batch of transactions for the NSI system to perform. Transactions can be accumulated over the course of a day (or any period that suits the organisation’s business processes).
Batch files can be uploaded via the NSI web interface for processing by the NSI system only if your organisation is Batch enabled. Refer to Section 3.7.3 for more information.
For each batch file processed by the NSI, a results file is generated that reports the outcome of the batch file processing. Results files are available for download from the web interface, and must then be loaded back into the SMS for final processing.
Batch files can be supplied in one of two formats: Pipe Delimited (.txt) or XML (.xml)
12.2 Types of Batch Files
Search (SEA) files – Used for searching for existing NSI records. Results file is labelled RES.
Update/Insert (UPI) files – Used for updating an existing NSI record (NSN present) or creating a new NSI record (no NSN present). Results file is labelled REU.
Merge (MER) files – Used for requesting merges between duplicate NSNs. Results file is labelled REM.
Active At (ATA) files – Used for updating/creating Student Provider Relationships for specified NSNs. Results file is labelled REA.
NSI Web User Interface Guide, Ministry of Education, v1.9 – January 2020 Page 55 of 69
Another important type of results file, the Change Notification file, is generated on request by the NSI system, and is available for download from the NSI web interface, or via the Batch interface. These files are labelled REC. Refer to section 10.3.1 for more information.
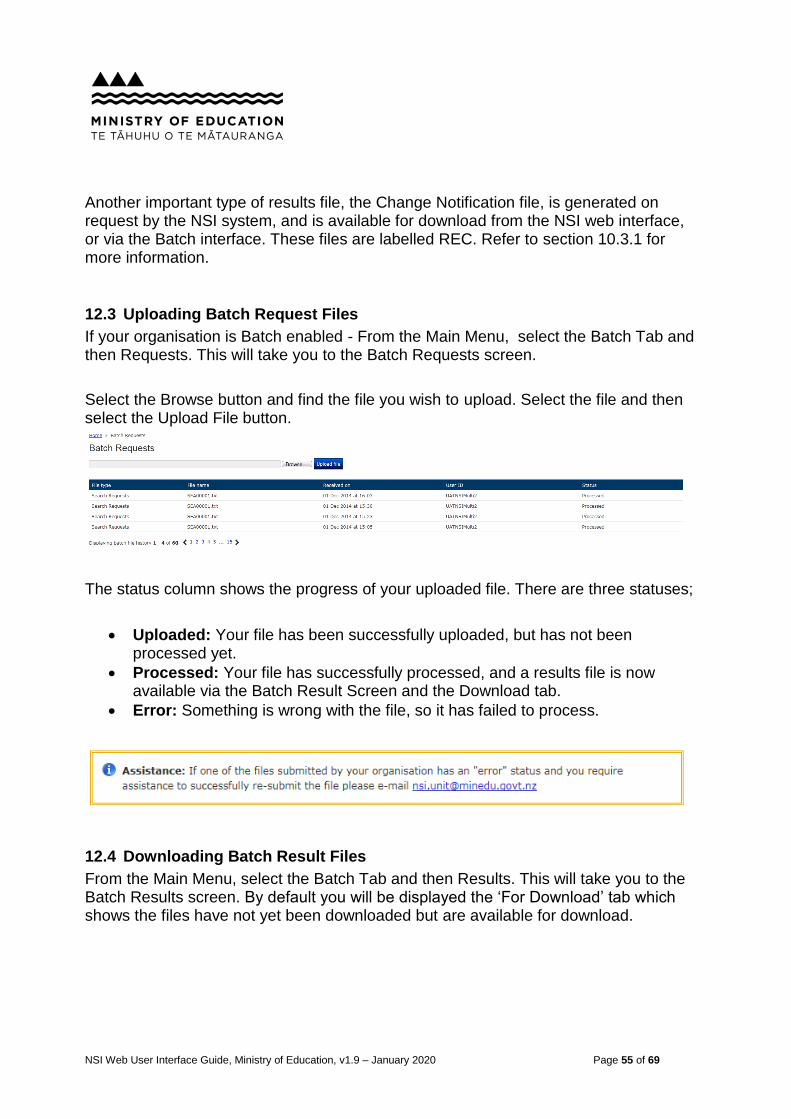
12.3 Uploading Batch Request Files
If your organisation is Batch enabled - From the Main Menu, select the Batch Tab and then Requests. This will take you to the Batch Requests screen.
Select the Browse button and find the file you wish to upload. Select the file and then select the Upload File button.
The status column shows the progress of your uploaded file. There are three statuses;
Uploaded: Your file has been successfully uploaded, but has not been processed yet.
Processed: Your file has successfully processed, and a results file is now available via the Batch Result Screen and the Download tab.
Error: Something is wrong with the file, so it has failed to process.
12.4 Downloading Batch Result Files
From the Main Menu, select the Batch Tab and then Results. This will take you to the Batch Results screen. By default you will be displayed the ‘For Download’ tab which shows the files have not yet been downloaded but are available for download.
NSI Web User Interface Guide, Ministry of Education, v1.9 – January 2020 Page 56 of 69
Click on the download icon or the filename of the file you wish to download and you will be prompted to open or save the file.
You should save the file to your computer then deal with it via your SMS according to your SMS Vendor’s instructions.
To view all of your organisations batch files (including files previously downloaded) you can click on the All tab.
Up to 4 records are displayed on the Batch Results screen, if there are more than 4 records you can either use the arrows to move between the results pages or you can click on the to go to that exact batch results page.
The numbered links are displayed on the left hand side at the bottom of the batch results page.
12.4.1 Files with an Error Status
Where a file has a Status of Error, you should contact the NSI Unit for more information as to why the file failed.
NSI Web User Interface Guide, Ministry of Education, v1.9 – January 2020 Page 57 of 69
The following message is displayed on the ‘All’ tab of the Batch Results screen.
NSI Web User Interface Guide, Ministry of Education, v1.9 – January 2020 Page 58 of 69
13 Frequently Asked Questions & Answers.
This section will be updated on an ongoing basis as we build up the knowledgebase for the National Student Index.
Can I add a student if I do not have their birth date?
Yes, when you are on the Add Student Screen, select the Unknown tick box underneath the birth date field.
Remember, the students name and birth date details cannot be verified when the birth date is unknown.
Should I add a person’s married name as an alternative name?
If the student provides valid verification, then add as alternative name and record the verification.
I have added an alternative name that is incorrect – How can I get it corrected or removed?
Alternative names can only be deleted from student record, and this can only be completed by the MoE Service Desk. You will need to contact the MoE Service Desk to request the alternative name be removed from the student record.
I have created a student record and verified the record but I have made a mistake with the birth date – can I modify this?
Verified birth date details may be modified if the student record was created within a certain time period and it was created by someone at your organisation. This time period is currently set at 90 days.
Outside of the time period, the verified record may not be modified.
You will need to send a Challenge, refer to section 8.3.1 for information on how raise a challenge.
I have created a student record and verified the record but I have made a mistake with the name – can I modify this?
Verified name details may not be modified by users.
NSI Web User Interface Guide, Ministry of Education, v1.9 – January 2020 Page 59 of 69
You will need to send a Challenge, refer to section 8.3.1 for information on how to raise a challenge
I have created a student record and verified the record but I have made a mistake with the residential status – can I modify this?
Verified residential status may be modified by users.
My student only has one name – How do I indicate this in the NSI application?
For all functions (Search, Add, Modify), when dealing with a student who has only one name please enter the name in the Family name field, and use the ‘~’ symbol for Given name1.
NSI Web User Interface Guide, Ministry of Education, v1.9 – January 2020 Page 60 of 69
14 Appendix A - Web Application Worksheet
14.1 Introduction
The purpose of this document is to give organisations the opportunity to have a hands-on play with the NSI TEST website.
14.1.1 Site Information:
TEST NSI site: https://nsi.compliance.education.govt.nz/
If you have any questions, please contact the MoE Service Desk by emailing [email protected].
14.1.2 Login details
For this worksheet, you should use your TEST Login. You may have your own live login as well – it is important not to get these confused.
NSI Web User Interface Guide, Ministry of Education, v1.9 – January 2020 Page 61 of 69
14.2 Search
14.2.1 Reference page
Please refer to the NSI Web Application User Guide, Section 6.
14.2.2 Search types
Select Search from the menu bar.
There are 3 basic search methods:
NSN search
Name search
Name and Birth date search
14.2.2.1 NSN search
When you search by NSN, you do not provide any other information in the search – you search on NSN alone.
E.g. Search for:
NSN 14000
NSN 13000000
14.2.2.2 Name search
It is a good idea to start with a broader search. If you search on just name (no date of birth, gender, or residential status) you will be returned with a list of possible matches.
This gives you the chance to scan through and see if any of these matches relates to the student you are looking for.
E.g. Search for:
Minnie Mouse
Mickey Mouse
Note that in these examples you are returned with a list of records to choose from. It is a good idea to use this search method if you are not sure if a student has an NSI record, and you want to check all the possible matches.
14.2.2.3 Name and date of birth
When you search using a Given name 1, Family name, and birth date as the search criteria you are performing a straight search. This type of searching ensures that a minimal number of results are returned.
NSI Web User Interface Guide, Ministry of Education, v1.9 – January 2020 Page 62 of 69
We recommend this type of searching if you already know one of your students is in the NSI, but you just need to find their NSN.
E.g. Search for:
Minnie Ann Mouse, 1/4/82
Mickey Mouse, 1/10/13
Note that in the examples above, only one record is returned for each search – this is a more precise search method. However, this search method can be limiting because you do not get to see other close matches.
NSI Web User Interface Guide, Ministry of Education, v1.9 – January 2020 Page 63 of 69
14.3 Add
14.3.1 Reference page
Please refer to the NSI Web Application User Guide, Section 7
14.3.2 Introduction
In order to insert a record into the NSI using the web application you need to perform a search first. Once you have looked at any possible matches, and are sure the student does not already have a record in the NSI, you can add the new student. If you do not search thoroughly first, you are more likely to create a duplicate record.
14.3.3 Add records
14.3.3.1 Create an Unverified record no possible matches – Record A
An Unverified record is a record with details that are not fully verified. i.e. either the Name & Birth date verification or the Residential status verification fields are set to Unverified.
If you add a student and the details closely do not match with other records in the NSI, you will not be prompted to confirm that you want to insert the record. When creating an Unverified record, you will need to confirm that you wish to create an unverified record.
Step Action
1 Search for the student, to ensure that there is no existing NSN for the student.
Details to enter:
Given name 1: Your own first name
Family name: Street name where your provider is located
Birth date: Today’s date – 10 years
Gender: Your gender
2 Click the Add Student button
3 Complete the details on the Add Student screen – do not enter any verification details
4 Press Save button
5 Confirm that you wish to add a record with Unverified details
6 Record the NSN in the box below
NSI Web User Interface Guide, Ministry of Education, v1.9 – January 2020 Page 64 of 69
This is Record A - NSN:
14.3.3.2 Create a Verified record with possible matches – Record B
A Verified record is a record with details that are fully verified. i.e. either the Name & Birth date verification or the Residential status verification fields are set to any value other than Unverified.
If you add a student and the details closely match with other records in the NSI (the score must be between 72 and 91), you will be prompted to confirm that you want to insert the record. The matching record(s) displayed is known as a possible match.
Step Action
1 Search for the student, possible matching record (Record A) will be displayed
Details to enter:
Family name: Name of your provider
Given name 1: Your own first name
Given name 2: Your own surname
Given name 3: Marie
Gender: Your gender
Birth date: Today’s date – 11 years
2 Click the Add Student button
3 Complete the details on the Add Student screen – enter the additional values:
Name/DoB verification: Birth certificate
Residential Status: NZ Resident class visa
Res Status verification: Passport
4 Click the Save button
5 System will display the following message:
Record(s) that closely match this record have been found. Please confirm whether you wish to add this record.
Click the Confirm button that you confirm that the record you are creating is not the record returned as a possible match.
NSI Web User Interface Guide, Ministry of Education, v1.9 – January 2020 Page 65 of 69
Step Action
6 Record the NSN in the box below
This is Record B - NSN:
14.3.3.3 Attempt to Create a record where definite match exists
If you add a student and the details exactly match with other records in the NSI (the score is equal to or greater than 92), you will not be able to create a duplicate record.
Step Action
1 Search for the student, definite matching record (Record A) will be displayed
Details to enter:
Given name 1: Your own first name
Family name: Street name where your provider is located
Birth date: Today’s date – 10 years
Gender: Your gender
2 Click the Add Student button
3 Complete the details on the Add Student screen – do not enter any verification details
4 Press Save button
5 Confirm that you wish to add a record with Unverified details
6 System will display the following message:
Record(s) that match this record have been found. Please review match(es) returned. If you wish to have a new record added, the information and verification must be submitted to the MoE Service Desk as a Challenge of the existing student details. The NSI team will process your challenge via e-mail. Supporting information can be forwarded separately to [email protected] using the student NSN as a reference number.
You will not be able to continue with the add. Click on the Cancel button to return to the Search screen
NSI Web User Interface Guide, Ministry of Education, v1.9 – January 2020 Page 66 of 69
14.4 Modify
14.4.1 Reference page
Please refer to the NSI Web Application User Guide, Section 8.
14.4.2 Introduction
If you search on the NSI and find a record that relates to one of your students, it is important to make sure that the details you have for the student in your own system match the details in the NSI. This may mean updating your own records with the NSI‟s details, or updating the NSI.
14.4.3 Verification details update
If an NSI record is Unverified, and you have a birth certificate or passport to update the details to verified, you can update the NSI.
Step Action
1 Search for the NSN of the Record A – created in the add section.
2 Open the record and check that all the details are correct and match what is held on the documentation you have sighted.
(As this is a test only, you do not actually have documentation. When using the real NSI, you must have actually sighted verification documentation in order to update a record in this way)
3 Press the Modify button and modify the record as required.
Details to update:
Name/DoB verification: Birth certificate
Residential Status: NZ Resident class visa
Res Status verification: Passport
4 Press Save button
5 Check that the updates have been saved to the student record
Notes on updating
If you update the details on a record, make sure you add in the verification source that you have sighted to verify these details. Always double check details before verifying and saving in the NSI. If in doubt, contact the MoE Service Desk by emailing [email protected].
NSI Web User Interface Guide, Ministry of Education, v1.9 – January 2020 Page 67 of 69
14.5 Merge request
14.5.1 Reference page
Please refer to the NSI Web Application User Guide, Section 9.
14.5.2 Introduction
If you find two or more records in the NSI that relate to the same person, you can request a merge.
14.5.3 Request merge – via the Merge Entry screen
Request a merge between Record A and Record B you created earlier
Step Action
1 Enter the NSN of Record A
2 Click on the Retrieve student record button
3 Enter the NSN of Record B
4 Click on the Retrieve student record button
5 Click on the select checkbox next to each NSN
6 Click on the Request merge button to submit the merge request. The system will advise you if the merge has been processed automatically or whether the merge request has been sent for manual intervention.
In the case the merge is automatically processed, the system will advise you what the new Master NSN is.
Notes on merging
A merge request should only be submitted if there is evidence to show that the records relate to the same student. If you submit a merge request for two records that are not entirely the same, but you have evidence to suggest that they are the same person, you may wish to submit a Challenge Change or email the MoE Service Desk stating your reasons and the evidence.
NSI Web User Interface Guide, Ministry of Education, v1.9 – January 2020 Page 68 of 69
14.6 Change notification files
14.6.1 Reference page
Please refer to the NSI Web Application User Guide, Section 10.
14.6.2 Introduction
Change notification files inform you of any changes made by another provider to records your organisation has a relationship with. They also inform you of the outcome of any merge requests you have submitted.
These files are generated and appear on the batch download screen.
14.6.3 Viewing change notification file
See Change Notifications sections for instructions on how to view and download any Change Notification files that exist for your provider.
NSI Web User Interface Guide, Ministry of Education, v1.9 – January 2020 Page 69 of 69
14.7 Challenge changes
14.7.1 Reference page
Please refer to the NSI Web Application User Guide, Section 8.3.
14.7.2 Introduction
Once you have viewed a Change Notification file, you may find that you disagree with changes that have been made to records.
14.7.3 Submit a challenge change.
Step Action
1 Enter the NSN of Record A
2 Click on the Challenge button
3 Select Challenge type of “Challenge existing details”
4 Enter TEST CHALLENGE in Reason box
5 Enter your email address in the Email box
6 Click on the Submit button to submit your challenge.


![Index [d3ms3kxrsap50t.cloudfront.net] · 2018-03-31 · and position National Nurses Week as an established recognition event. As of 1998, May 8 was designated as National Student](https://static.documents.pub/doc/80x56/5e6df69c942f3a49f73f331a/index-2018-03-31-and-position-national-nurses-week-as-an-established-recognition.jpg)
![Index [2idkwn1ht0xt3tltqkaih9tz-wpengine.netdna-ssl.com] · Participant and Lecturer in the 9ths National Student Biennial Award Carlos Raul Villanueva (National Student Award) Participant](https://static.documents.pub/doc/80x56/60a316b4cabe5f3e7665f8b6/index-2idkwn1ht0xt3tltqkaih9tz-participant-and-lecturer-in-the-9ths-national.jpg)