NAVY FAMILY ACCOUNTABILITY AND ASSESSMENT SYSTEM NFAAS Version 2.2 Navy Family Member’s Guide Version 1.3 11 February 2008 SPAWAR Systems Center Pacific 53560 Hull Street, Code 53255 San Diego CA 92152-5000
Transcript
NAVY FAMILY ACCOUNTABILITY
AND ASSESSMENT SYSTEM
NFAAS Version 2.2
Navy Family Member’s Guide
Version 1.3
11 February 2008
SPAWAR Systems Center Pacific 53560 Hull Street, Code 53255
San Diego CA 92152-5000
NFAAS Users Guide (Version 1.3) 22 April 2008
NFAAS_NFM_Users_Guide.doc Page 2 of 35
(THIS PAGE INTENTIONALLY LEFT BLANK)
NFAAS Users Guide (Version 1.3) 22 April 2008
NFAAS_NFM_Users_Guide.doc Page 3 of 35
Change History
The following Change History log contains a record of changes made to this document. Entries should be made in descending order, with most recent changes at the top of table.
Published / Revised Date Version Author(s)
Section / Nature of Change
11 Feb. 2008 1.3 Donna Williamson, Bill Adsit
Added Sections 1 and 2. Added sections on accounting and acronyms. Reviewed and Approved.
23 Jan. 2008 1.2 Bill Adsit Minor edits (Change tracking on) 16 Jan. 2008 1.1 Mark Wagner Updated 11 Jan. 2008 1.0 Bill Adsit Initial Version for NFAAS 2.1
NFAAS Users Guide (Version 1.3) 22 April 2008
NFAAS_NFM_Users_Guide.doc Page 4 of 35
Table of Contents 1 REASON FOR ACCESSING NFAAS ................................................................................. 5
1 Reason for Accessing NFAAS NFAAS is an event-based system used by the Navy following a disaster or event to help the Navy determine how and where Navy Family Members are. Navy Family Members include the Navy employee, including Reserves, Civilians, NAF/NEX employees, and their families. The Navy, following an event, not only needs to determine Command status (who can work) and what Navy property was damaged, but how the event impacted the Navy Employee personally. Navy Leadership wants to find out how you and your family are, were you evacuated, and how they can help in any need recovery efforts. The Navy used NFAAS to collect that information and track the recovery process. If an event (earthquake, hurricane, etc) happens where you live or work, expect that your Command is going to want to know how and where you are. During non-event times, you are not expected to continually update information in NFAAS. 2 Terms
a. EVENT – A disaster, terrorist attack, or other event, large or small, where the Navy has determined the need for Navy Family Members to provide the status (how are you), whereabouts (where are you), and complete a Needs Assessment (what do you need).
b. GAOI – Geographical Area of Interest – the area where the disaster or event occurred. Also know as the ‘affected area’.
c. AFFECTED – A Navy Family Member is flagged as ‘Affected’ if they live, work, or are temporarily in the area where the even happened. Being ‘Affected’ by an event is a temporary status, for only as long as the Navy determines. It is possible that you were not in area but were still flagged as in the affected area. If so, you can simply indicate that you were not in the affected area at the time of the event, and not impacted by the event.
d. INDIVIDUAL AUGMENTEE (IA) – A Service Member who is deployed away from his/her parent command to another location. Deployment could be in a war zone, or just to another location.
e. EVENT CASE - Following an event, any Navy Family that indicates a “need” by selecting a “Not Sure” or “Need Assistance” selection in the Needs Assessment survey will have an “Event Case” created in NFAAS. Creating this “Case” results in a Case Manager being assigned to contact you and assist you in recovering from the event. Case Managers are provided with the latest benefits information, and will work with you over time as you work toward recovering from the event.
f. IA CASE – An “IA Case” is automatically created when a Service Member is going to be or is already deployed as an Individual Augmentee (IA). The purpose for the IA Case being created is so that an IA Point of Contact (IA POC) can contact the family of the Individual Augmentee during the deployment to help with any areas that the Navy can provide assistance.
NFAAS Users Guide (Version 1.3) 22 April 2008
NFAAS_NFM_Users_Guide.doc Page 6 of 35
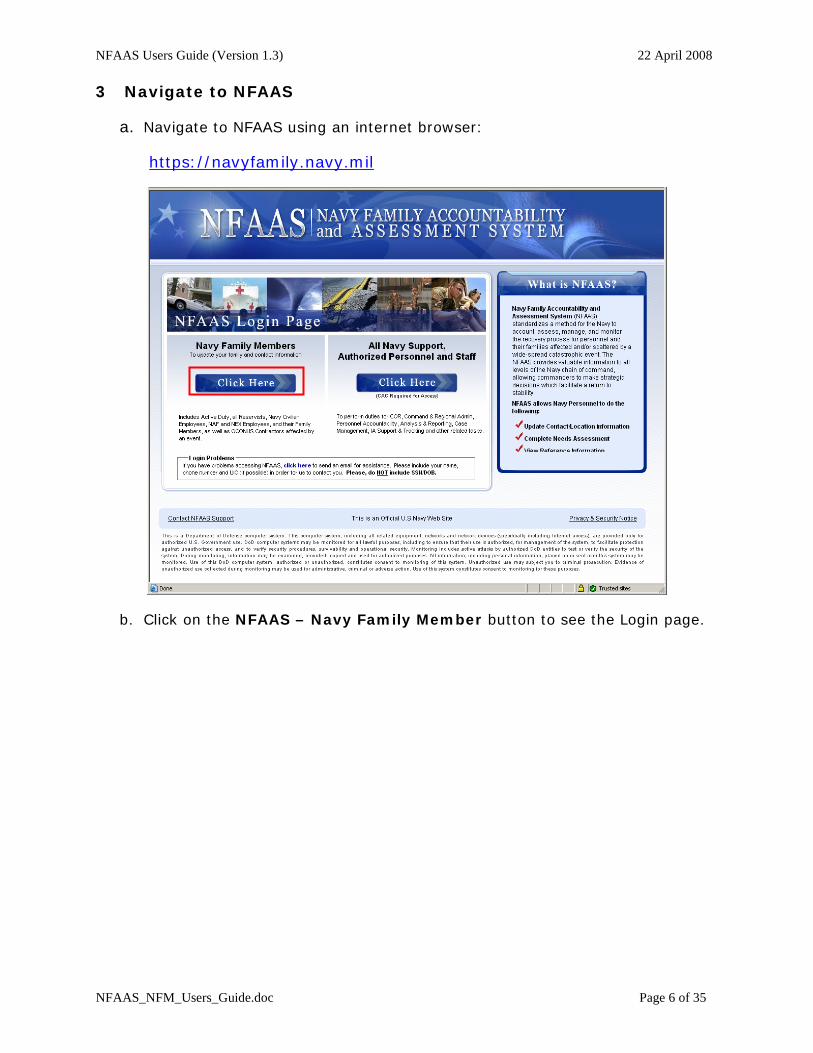
3 Navigate to NFAAS
a. Navigate to NFAAS using an internet browser:
https://navyfamily.navy.mil
b. Click on the NFAAS – Navy Family Member button to see the Login page.
a. Enter the Service Member’s Social Security Number (SSN).
b. Enter your password. As a first time login, your password will be the Service Member’s date of birth in the YYYYMMDD format. (E.g., 4 July 1976 would be entered as “19760704”).
c. Click the Submit button.
d. If you were in an area affected by an event or are an Individual Augmentee (IA), you will be taken to a new page and asked to verify and update your current location and contact information (See Section 6).
e. If you were not in an area affected by an event or are not an Individual Augmentee, you will see the following page:
• If you believe you have been affected, call the 24-hour Navy Emergency Call Center at 1-877-414-5358:
• If you have not been affected, you do not need to do anything else in NFAAS and can logout.
NFAAS Users Guide (Version 1.3) 22 April 2008
NFAAS_NFM_Users_Guide.doc Page 8 of 35
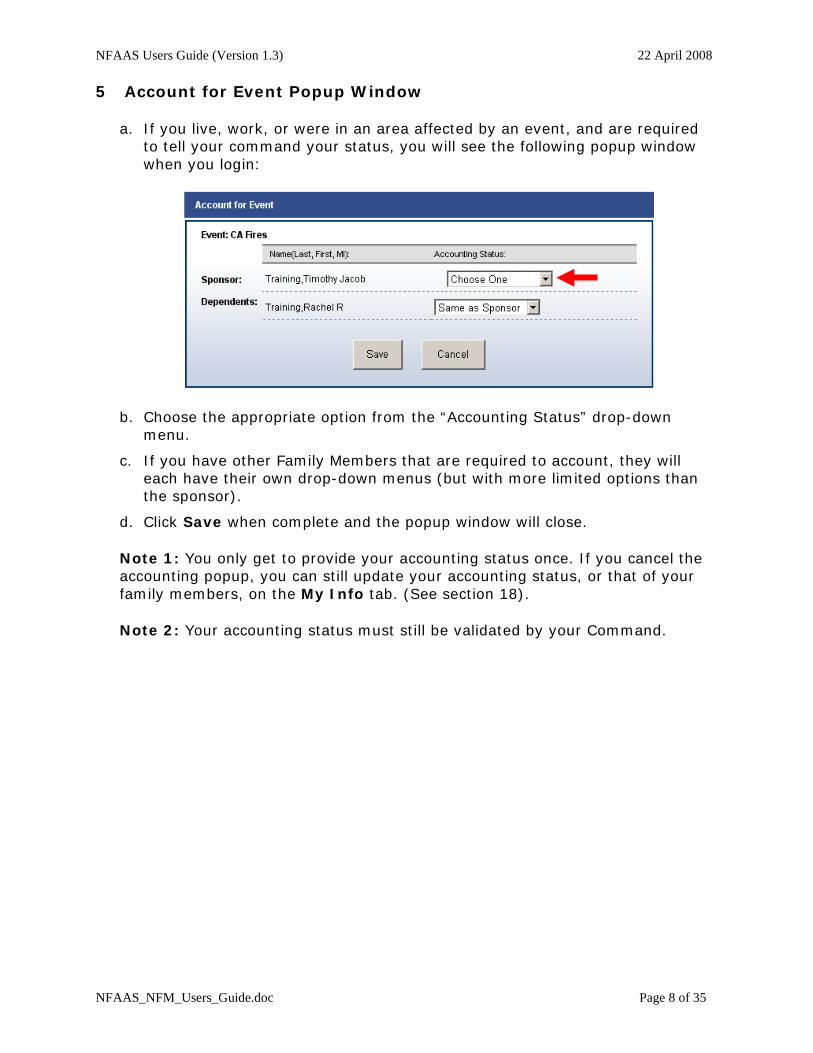
5 Account for Event Popup Window
a. If you live, work, or were in an area affected by an event, and are required to tell your command your status, you will see the following popup window when you login:
b. Choose the appropriate option from the “Accounting Status” drop-down menu.
c. If you have other Family Members that are required to account, they will each have their own drop-down menus (but with more limited options than the sponsor).
d. Click Save when complete and the popup window will close.
Note 1: You only get to provide your accounting status once. If you cancel the accounting popup, you can still update your accounting status, or that of your family members, on the My Info tab. (See section 18).
Note 2: Your accounting status must still be validated by your Command.
NFAAS Users Guide (Version 1.3) 22 April 2008
NFAAS_NFM_Users_Guide.doc Page 9 of 35
6 Verify and Update Current Info
a. If you live, work, or were in an area affected by an event, or are an Individual Augmentee, you will be asked to verify and update your current location and contact information
b. Some of the fields on this page may already contain previously entered location and contact information for you.
c. Verify, edit, and update information.
d. Provide any additional location, contact, and status information that you can.
e. When you have updated and completed the form to your satisfaction, click the Step 2 >> button to be taken to the Needs Assessment Survey Introduction page.
NFAAS Users Guide (Version 1.3) 22 April 2008
NFAAS_NFM_Users_Guide.doc Page 10 of 35
7 Needs Assessment Survey Introduction
a. If you live, work, or were in an area affected by an event, or are an Individual Augmentee, and the Navy has decided to assess for your needs, you will be presented with a Needs Assessment Survey.
b. The content on this page is designed to help familiarize you with the Needs Assessment Survey. Please take the time to read through the “Frequently Asked Questions” (FAQ).
c. You may easily return to this Introduction page at any point in the survey process by clicking on the Introduction / FAQ link on the left side of the page.
d. When you are finished reading through the introductory content, click on the Continue to Survey >> button and you will be taken to the Needs Assessment Survey itself.
NFAAS Users Guide (Version 1.3) 22 April 2008
NFAAS_NFM_Users_Guide.doc Page 11 of 35
8 Completing the Needs Assessment Survey
a. After clicking the Continue to Survey >> button (see Section 7), complete the Needs Assessment Survey by selecting one of the three radio buttons for each and every Category question:
i. “Not Affected” is a “No” answer to the Category Question.
ii. Choosing “Not Sure” for a Category will show all the choices without selecting any. If you click in any of the boxes, the “Not Sure” radio button changes to “Need Assistance”. You may want to select “Not Sure” if there is a category that you might have a need but aren’t sure yet. For example: I have been evacuated and I know my house is in an area that was flooded. So I think I will have a housing issue.
iii. “Need Assistance” is a “Yes” answer to the Category Question.
b. If needed, use the Comments fields for any Category in which you need assistance, or at the bottom of the survey to help the support team assist you properly.
c. Click the Continue >> Button at the end of the survey and you will see a survey submission confirmation.
NFAAS Users Guide (Version 1.3) 22 April 2008
NFAAS_NFM_Users_Guide.doc Page 12 of 35
9 Completing the IA Assessment Survey
a. After clicking the Continue to Survey >> button (see Section 7), complete the IA Assessment Survey by checking the boxes for each and every category in which you need assistance.
b. Checking a category box will expand the statement checkbox selection so that you can give a more detailed indication of your needs for that category.
c. If needed, use the Comments fields for any Category in which you need assistance, or at the bottom of the survey to help the support team assist you properly.
d. Click the Continue >> Button at the end of the survey and you will see a survey submission confirmation.
NFAAS Users Guide (Version 1.3) 22 April 2008
NFAAS_NFM_Users_Guide.doc Page 13 of 35
10 Survey Submission Confirmation
a. After completing the survey, you will be presented with a confirmation window advising that if you selected a “Not Sure” or “Need Assistance” in any category of the survey, that a Case Manager (see Terms in Section 2) will be assigned to contact you and provide assistance. The confirmation window also outlines what other options are available to you on the NFAAS site.
b. Click the Close button to close to close the confirmation window and you will be able review and edit your survey or browse the NFAAS site.
NFAAS Users Guide (Version 1.3) 22 April 2008
NFAAS_NFM_Users_Guide.doc Page 14 of 35
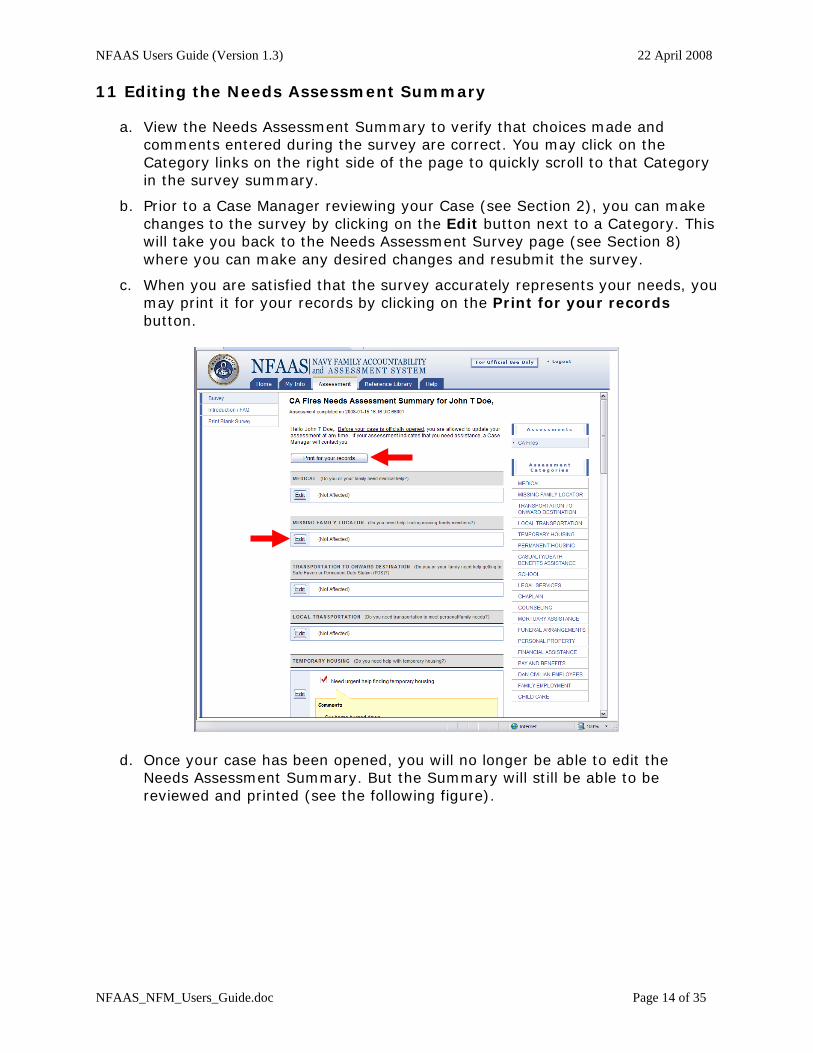
11 Editing the Needs Assessment Summary
a. View the Needs Assessment Summary to verify that choices made and comments entered during the survey are correct. You may click on the Category links on the right side of the page to quickly scroll to that Category in the survey summary.
b. Prior to a Case Manager reviewing your Case (see Section 2), you can make changes to the survey by clicking on the Edit button next to a Category. This will take you back to the Needs Assessment Survey page (see Section 8) where you can make any desired changes and resubmit the survey.
c. When you are satisfied that the survey accurately represents your needs, you may print it for your records by clicking on the Print for your records button.
d. Once your case has been opened, you will no longer be able to edit the Needs Assessment Summary. But the Summary will still be able to be reviewed and printed (see the following figure).
NFAAS Users Guide (Version 1.3) 22 April 2008
NFAAS_NFM_Users_Guide.doc Page 15 of 35
e. You may also add a comment to the Needs Assessment Summary at any time by clicking on the Add Comment button which will cause the Add Comment popup window to appear.
f. Type your comment into the comment field and click the OK button. The popup window will close and the Needs Assessment Summary page will refresh and confirm that your comment was submitted.
NFAAS Users Guide (Version 1.3) 22 April 2008
NFAAS_NFM_Users_Guide.doc Page 16 of 35
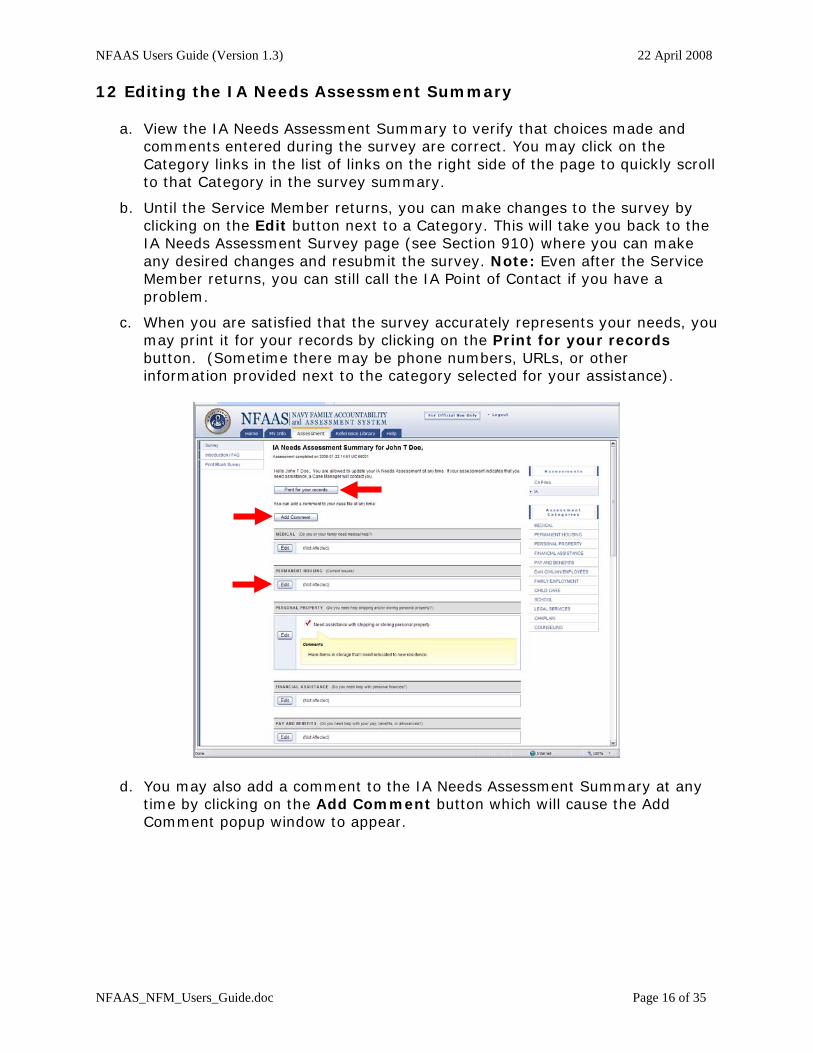
12 Editing the IA Needs Assessment Summary
a. View the IA Needs Assessment Summary to verify that choices made and comments entered during the survey are correct. You may click on the Category links in the list of links on the right side of the page to quickly scroll to that Category in the survey summary.
b. Until the Service Member returns, you can make changes to the survey by clicking on the Edit button next to a Category. This will take you back to the IA Needs Assessment Survey page (see Section 910) where you can make any desired changes and resubmit the survey. Note: Even after the Service Member returns, you can still call the IA Point of Contact if you have a problem.
c. When you are satisfied that the survey accurately represents your needs, you may print it for your records by clicking on the Print for your records button. (Sometime there may be phone numbers, URLs, or other information provided next to the category selected for your assistance).
d. You may also add a comment to the IA Needs Assessment Summary at any time by clicking on the Add Comment button which will cause the Add Comment popup window to appear.
NFAAS Users Guide (Version 1.3) 22 April 2008
NFAAS_NFM_Users_Guide.doc Page 17 of 35
e. Type your comment into the comment field and click the OK button. The popup window will close and the IA Needs Assessment Summary page will refresh and confirm that your comment was submitted.
NFAAS Users Guide (Version 1.3) 22 April 2008
NFAAS_NFM_Users_Guide.doc Page 18 of 35
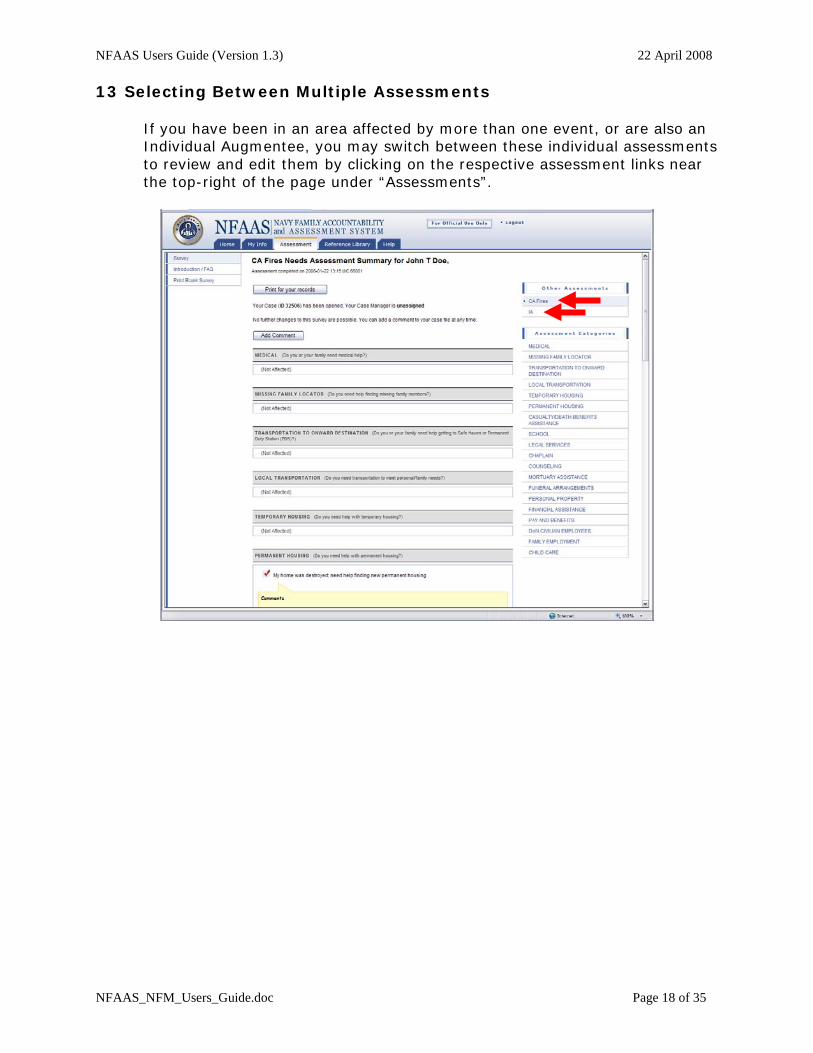
13 Selecting Between Multiple Assessments
If you have been in an area affected by more than one event, or are also an Individual Augmentee, you may switch between these individual assessments to review and edit them by clicking on the respective assessment links near the top-right of the page under “Assessments”.
NFAAS Users Guide (Version 1.3) 22 April 2008
NFAAS_NFM_Users_Guide.doc Page 19 of 35
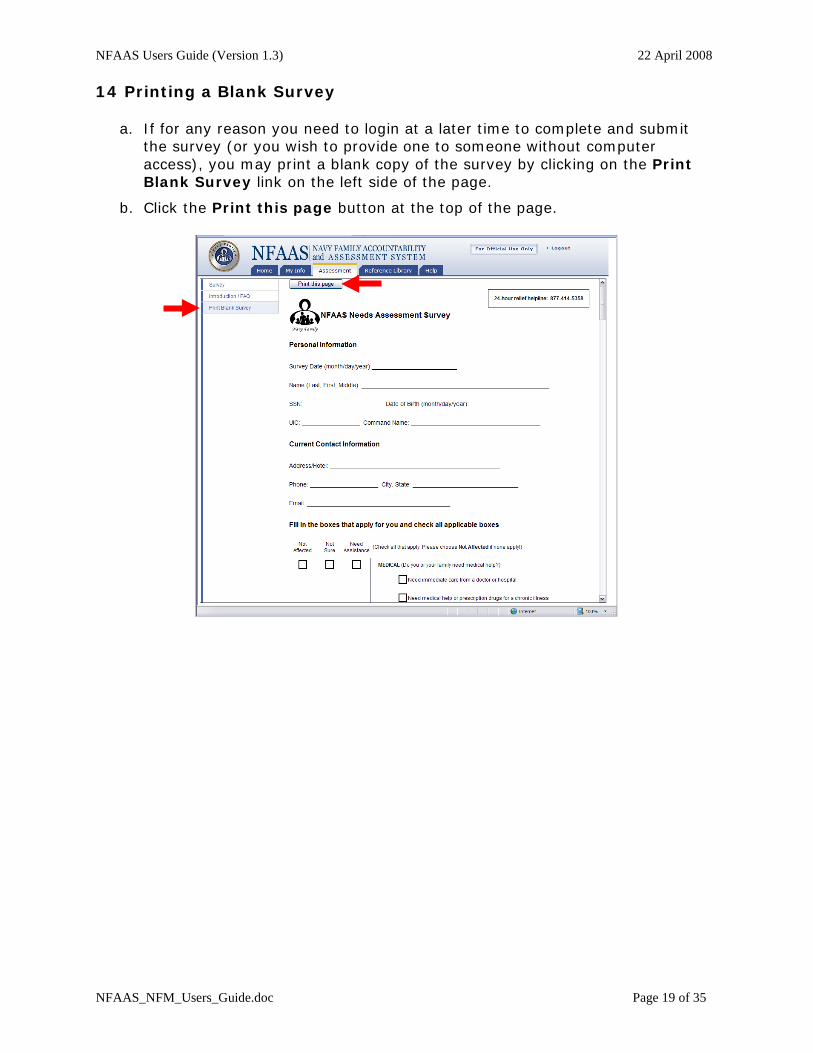
14 Printing a Blank Survey
a. If for any reason you need to login at a later time to complete and submit the survey (or you wish to provide one to someone without computer access), you may print a blank copy of the survey by clicking on the Print Blank Survey link on the left side of the page.
b. Click the Print this page button at the top of the page.
NFAAS Users Guide (Version 1.3) 22 April 2008
NFAAS_NFM_Users_Guide.doc Page 20 of 35
15 Viewing the Home Page
Clicking on the Home Tab will take you to the Home Page. This page provides information relative to any disaster or event that affects Navy personnel and will be updated often after a disaster.
NFAAS Users Guide (Version 1.3) 22 April 2008
NFAAS_NFM_Users_Guide.doc Page 21 of 35
16 Viewing the My Info Page
Clicking on the My Info Tab will take you to the My Info Page. This page contains personal information, location and contact information, and lists additional family members.
NFAAS Users Guide (Version 1.3) 22 April 2008
NFAAS_NFM_Users_Guide.doc Page 22 of 35
17 Updating Navy Member Info
a. On the My Info page, click the Edit button in the upper-right corner of the “Navy Member Info” frame.
b. In the “Edit Navy Member Info” popup window, update and add information as required.
c. The calendar icons can be used to choose Departure and Return Dates. (Departure and Return dates only apply if the Service Member is deployed).
d. When you have finished updating the information in the form, click the Save button.
e. The “Edit Navy Member Info” window will close and the My Info page will refresh and show the updated information in the Navy Member Info section.
NFAAS Users Guide (Version 1.3) 22 April 2008
NFAAS_NFM_Users_Guide.doc Page 23 of 35
18 Updating Accounting Status
If you cancelled the initial “Account for Event” popup, you can still update your accounting status on the My Info page.
a. Click the Edit button in the upper-right corner of the “Accounting Status” section.
Note: There won’t be an Edit button if your accounting status has already been provided (by you or your command). Contact your chain of command if you need to change any accounting statuses.
b. The “Account for Event” popup window will appear. Choose the appropriate option from the “Accounting Status” drop-down menu.
c. Click Save when complete and the “Accounting Status” section will refresh and display your changes.
Note: If you have other family members and they are required to account, they will be displayed with their own drop-down menus which will have different choices. You will not be able to save until you provide an accounting status for all family members!
NFAAS Users Guide (Version 1.3) 22 April 2008
NFAAS_NFM_Users_Guide.doc Page 24 of 35
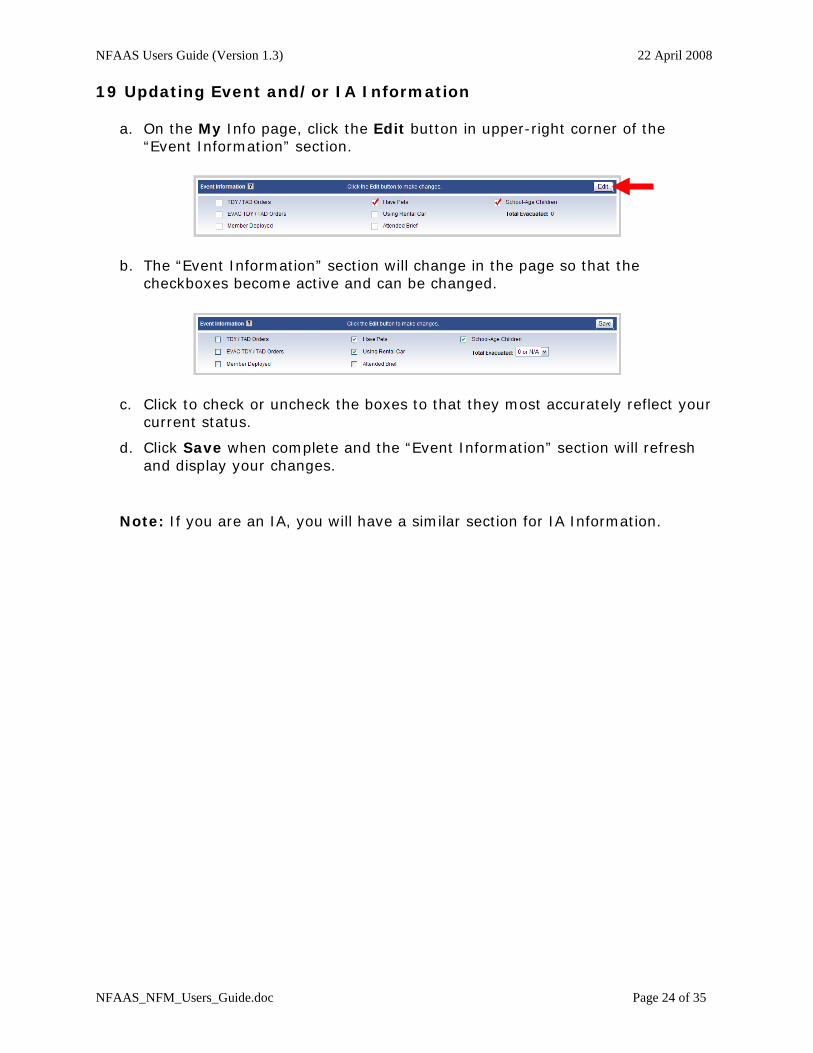
19 Updating Event and/or IA Information
a. On the My Info page, click the Edit button in upper-right corner of the “Event Information” section.
b. The “Event Information” section will change in the page so that the checkboxes become active and can be changed.
c. Click to check or uncheck the boxes to that they most accurately reflect your current status.
d. Click Save when complete and the “Event Information” section will refresh and display your changes.
Note: If you are an IA, you will have a similar section for IA Information.
NFAAS Users Guide (Version 1.3) 22 April 2008
NFAAS_NFM_Users_Guide.doc Page 25 of 35
20 Updating “Current” Location and Contact Info
a. On the My Info page, in the “Location and Contact Info” section, you can view and update your current location and contact information.
b. Current location contact and location information is only required if you have been identified as being in an affected area following an event. Under normal circumstances, outside of an event, this would either be blank or be the same as “Original”. Current location following an event would contain your actual location, which could be your original location (you did not evacuate), or an evacuated location. Providing this information allows the Command and Case Managers to contact you to provide assistance.
c. If it is not already selected, click on the Current label under the “Location Type” heading to view your current location and contact info under the “Address” and “Contact Info” headings to the right.
d. To update your current location and contact information, click the Edit button in upper-right corner of the “Event Information” section and the “Edit Location/Contact” window will appear.
e. Update the Current location and contact information and click the Save button. The window will close and the My Info page will refresh.
NFAAS Users Guide (Version 1.3) 22 April 2008
NFAAS_NFM_Users_Guide.doc Page 26 of 35
21 Updating “Original” Location and Contact Info
a. On the My Info page, in the “Location and Contact Info” section, you can view and update your original location and contact information (which would be the location and contact information you had before you left or were evacuated from an area affected by an event).
b. If it is not already selected, click on the Original label under the “Location Type” heading to view your Original location and contact info under the “Address” and “Contact Info” headings to the right. In most cases this information was added from a Navy Personnel system, but may not be up to date. If it is not accurate, please update it.
c. To update your Original location and contact information, click the Edit button in upper-right corner of the “Event Information” section and the “Edit Location/Contact” window will appear.
d. Update the Original location and contact information and click the Save button. The window will close and the My Info page will refresh.
NFAAS Users Guide (Version 1.3) 22 April 2008
NFAAS_NFM_Users_Guide.doc Page 27 of 35
22 Updating “Out of Town POC” Info.
a. On the My Info page, in the “Location and Contact Info” section, you can view and add or update the location and contact information for an “Out of Town POC” (some one who does not live in the affected area that would know where you are).
b. If it is not already selected, click on the Out of Town POC label under the “Location Type” heading to view the associated location and contact info under the “Address” and “Contact Info” headings to the right.
c. To update the “Out of Town POC” location and contact information, click the Edit button in upper-right corner of the “Event Information” section and the “Edit Location/Contact” window will appear.
d. Update the “Out of Town POC” location and contact information and click the Save button. The window will close and the My Info page will refresh.
NOTE: A Navy Family Member is not required to complete all the location fields. The purpose for the fields is to be able to have additional contact and location information if desired, and to be able to categorize that information.
NFAAS Users Guide (Version 1.3) 22 April 2008
NFAAS_NFM_Users_Guide.doc Page 28 of 35
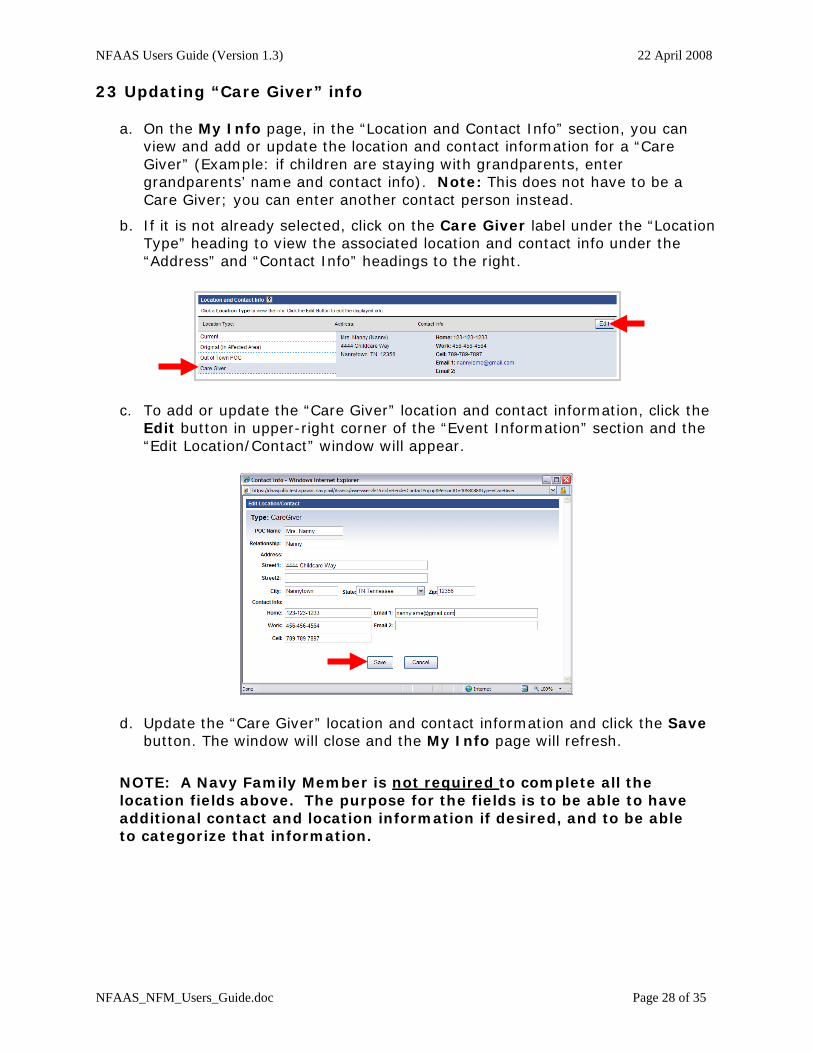
23 Updating “Care Giver” info
a. On the My Info page, in the “Location and Contact Info” section, you can view and add or update the location and contact information for a “Care Giver” (Example: if children are staying with grandparents, enter grandparents’ name and contact info). Note: This does not have to be a Care Giver; you can enter another contact person instead.
b. If it is not already selected, click on the Care Giver label under the “Location Type” heading to view the associated location and contact info under the “Address” and “Contact Info” headings to the right.
c. To add or update the “Care Giver” location and contact information, click the Edit button in upper-right corner of the “Event Information” section and the “Edit Location/Contact” window will appear.
d. Update the “Care Giver” location and contact information and click the Save button. The window will close and the My Info page will refresh.
NOTE: A Navy Family Member is not required to complete all the location fields above. The purpose for the fields is to be able to have additional contact and location information if desired, and to be able to categorize that information.
NFAAS Users Guide (Version 1.3) 22 April 2008
NFAAS_NFM_Users_Guide.doc Page 29 of 35
24 Adding Additional Family Members
a. On the My Info page, in the “Additional Family Members” section, you can view and add or update the location and contact information for additional family members
b. To add and additional family member, click on the Add Member button at the top-right of the “Additional Family Members” section. The “Add Additional Family Member” window will appear.
c. Enter the name and date of birth (DOB) for the family member you are adding. Indicate whether this family member has any special needs and, if so, what category of special needs they have by using the provided checkbox and pull-down menu. (You can click on the ? button to the right of the pull-down menu for a list of special needs category codes).
d. The Current Contact Info fields will be pre-populated with the current location and contact information that you provided for yourself. You can update this information as required for the family member you are adding.
Note: The date of birth can be approximate if unknown and can be changed later. It’s mainly used to determine children by current age.
NFAAS Users Guide (Version 1.3) 22 April 2008
NFAAS_NFM_Users_Guide.doc Page 30 of 35
e. When you have finished filling out the form, click the Save or Save and Add Another button. Clicking Save will close the window and refresh the My Info page. Clicking Save and Add Another will refresh the “Add Additional Family Member” window and confirm the saving of the member you just entered by displaying a confirmation message at the top of the window.
f. When you have finished adding the last family member, click the Save button and the window will close and My Info page will refresh to show the additional family members you have added.
g. Clicking on the names of any of the additional family members under the “Name” heading will display their associated location and contact info under the “Address” and “Contact Info” headings to the right.
NFAAS Users Guide (Version 1.3) 22 April 2008
NFAAS_NFM_Users_Guide.doc Page 31 of 35
25 Editing Additional Family Members
a. On the My Info page, in the “Additional Family Members” section, click on the name of the additional family member that you want to edit.
b. With the name of the additional family member you want to edit highlighted in blue, click the Edit button. The “Edit Family Member” window appears.
c. Edit the additional family member’s information in the form and click the Save button. The My Info page will refresh and you can click on the name of the family member you edited to view the changes you made.
NFAAS Users Guide (Version 1.3) 22 April 2008
NFAAS_NFM_Users_Guide.doc Page 32 of 35
26 Removing Additional Family Members
a. On the My Info page, in the “Additional Family Members” section, click on the name of the additional family member that you want to remove.
b. With the name of the additional family member you want to edit highlighted in blue, click the Remove button. A popup window will appear asking you to confirm the removal of the additional family member.
c. Click the OK button. The conformation window will close and the My Info page will refresh so that the additional family member you removed is no longer displayed in the list of additional family members.
d. The only time you may not be able to remove a family member if is there has been an event and you are indicated as living or working in the affected area. If the person you are attempting to remove is required to be accounted for, you will not be able to remove them until after the accounting process is done. If this is the reason you cannot delete them, you will see that in a popup box.
NFAAS Users Guide (Version 1.3) 22 April 2008
NFAAS_NFM_Users_Guide.doc Page 33 of 35
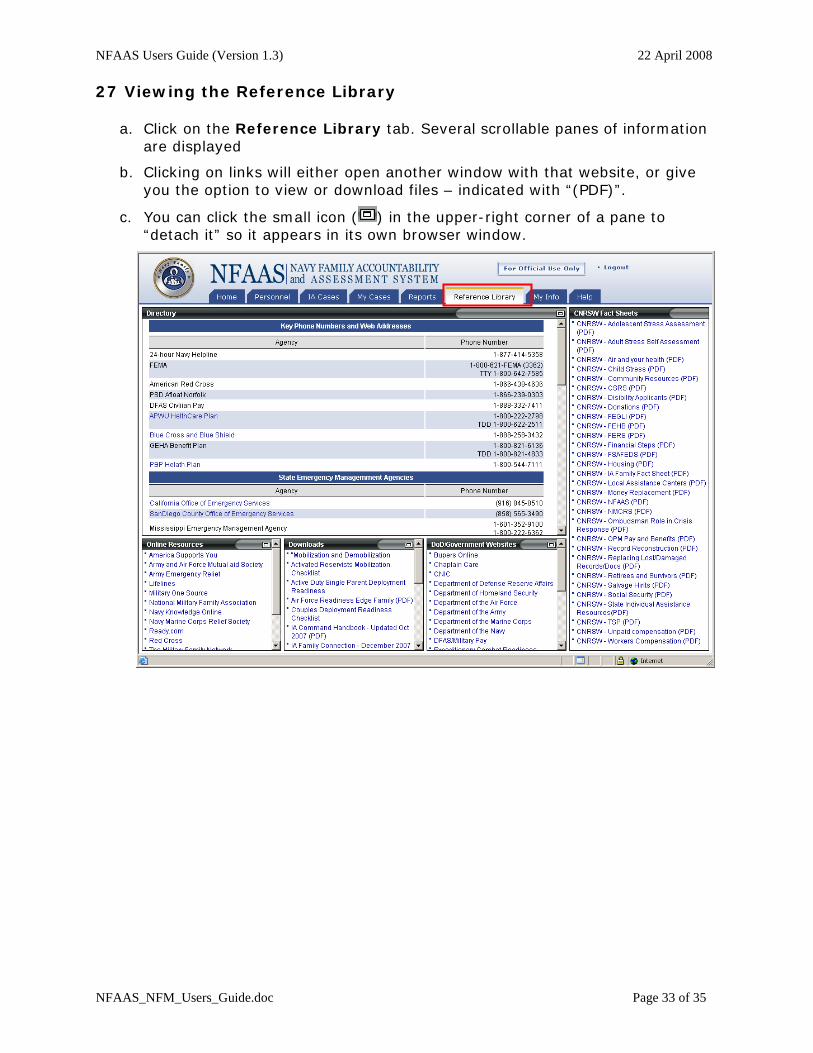
27 Viewing the Reference Library
a. Click on the Reference Library tab. Several scrollable panes of information are displayed
b. Clicking on links will either open another window with that website, or give you the option to view or download files – indicated with “(PDF)”.
c. You can click the small icon ( ) in the upper-right corner of a pane to “detach it” so it appears in its own browser window.
NFAAS Users Guide (Version 1.3) 22 April 2008
NFAAS_NFM_Users_Guide.doc Page 34 of 35
28 Viewing Help
a. Clicking on the Help tab will provide you with a page where you can submit feedback on the functionality and performance of the system. Any feedback you can provide would be greatly appreciated.
NFAAS Users Guide (Version 1.3) 22 April 2008
NFAAS_NFM_Users_Guide.doc Page 35 of 35
29 Acronyms
CAC Common Access Card
DEERS Defense Eligibility Enrollment System
DOB Date of Birth
EFM Exceptional Family Member
FAQ Frequently Asked Questions
FEMA Federal Emergency Management Agency
GAOI Geographical Area of Interest
IA Individual Augmentee
IA POC Individual Augmentee Point of Contact
NFAAS Navy Family Member Accountability and Assessment System
NFDA Navy Family Disaster Assistance
NFM Navy Family Member
PDF Portable Document Format (Adobe Acrobat format)