NCP engineering, Inc. ▪ 444 Castro Street ▪ Mountain View, CA 94041 ▪ T. +1.650.316.6273 ▪ E-mail: [email protected] www.ncp-e.com ▪ Technical specifications subject to change
Page 2 of 10
Quick Installation Guide
NCP Secure Client – Juniper Edition
Revision History
NCP Client Version Date Changes
9.23 Build 64 2011-01-06 Initial document
9.23 Build 72 2011-03-14 Updated Client version
This document outlines the installation and configuration of the Juniper NCP VPN client.
A. How to obtain the client software The NCP software can be downloaded from the NCP web site at the following URL: http://www.ncp-e.com/en/downloads/software.html Scroll down to the entry “NCP Secure Client - Juniper Edition“ and click on the Download button.
B. How to install the client software Extract the zip archive into a temporary folder. You will see a folder called “Disk 1” which contains the installation files. 1. From the Disk 1 folder execute “setup”
NCP engineering, Inc. ▪ 444 Castro Street ▪ Mountain View, CA 94041 ▪ T. +1.650.316.6273 ▪ E-mail: [email protected] www.ncp-e.com ▪ Technical specifications subject to change
Page 3 of 10
Installation Guide
NCP Client for Juniper
2. Follow the installation wizard step by step.
3. Click Yes on the License Agreement.
4. Setup Type is Typical. Click Next.
The client installer will sit here for a moment while installing the networking software. Please be patient.
5. At the end click Finish and reboot the computer. The restart is a required step and may not be skipped!
NCP engineering, Inc. ▪ 444 Castro Street ▪ Mountain View, CA 94041 ▪ T. +1.650.316.6273 ▪ E-mail: [email protected] www.ncp-e.com ▪ Technical specifications subject to change
Page 4 of 10
Installation Guide
NCP Client for Juniper
6. Once the computer is booted up again click Yes on the Confirmation dialogue.
7. On the next Confirmation screen select No – no need to create a profile at this point.
C. How to import a Profile into the client software Once the client is up and running you can import the provided connection profile as follows. 1. From the client UI chose Configuration - Profiles
NCP engineering, Inc. ▪ 444 Castro Street ▪ Mountain View, CA 94041 ▪ T. +1.650.316.6273 ▪ E-mail: [email protected] www.ncp-e.com ▪ Technical specifications subject to change
Page 5 of 10
Installation Guide
NCP Client for Juniper
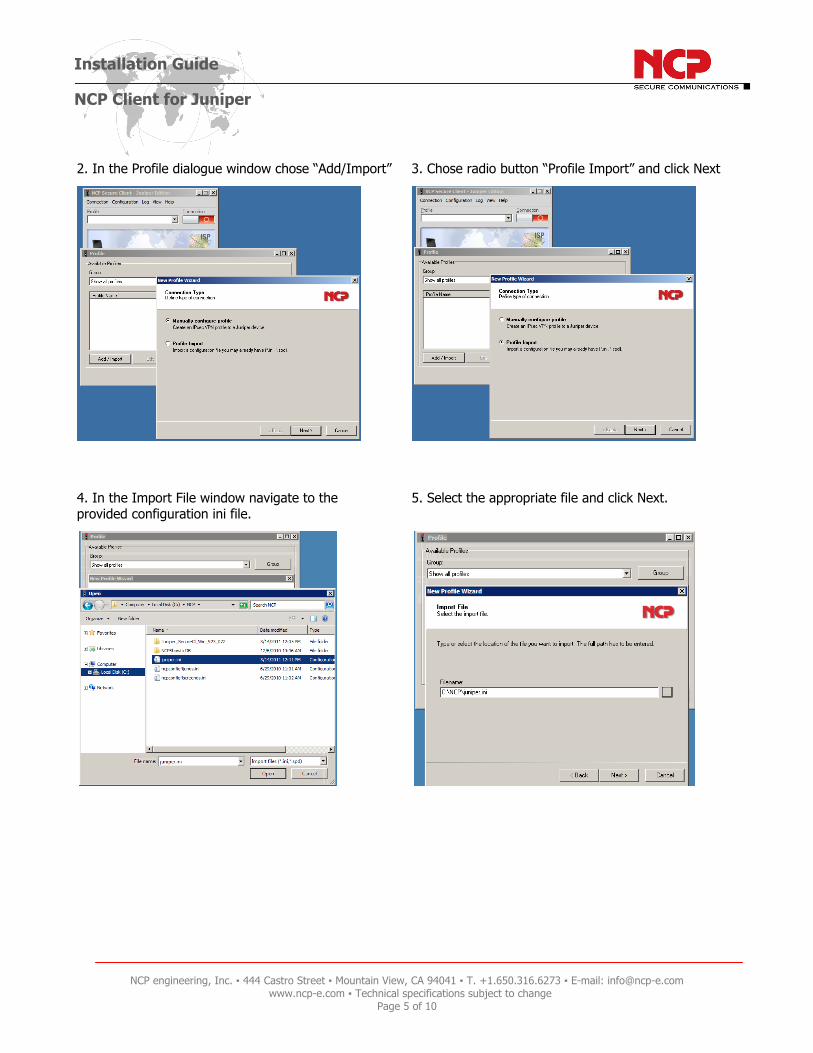
2. In the Profile dialogue window chose “Add/Import”
3. Chose radio button “Profile Import” and click Next
4. In the Import File window navigate to the provided configuration ini file.
5. Select the appropriate file and click Next.
NCP engineering, Inc. ▪ 444 Castro Street ▪ Mountain View, CA 94041 ▪ T. +1.650.316.6273 ▪ E-mail: [email protected] www.ncp-e.com ▪ Technical specifications subject to change
Page 6 of 10
Quick Installation Guide
NCP Secure Client – Juniper Edition
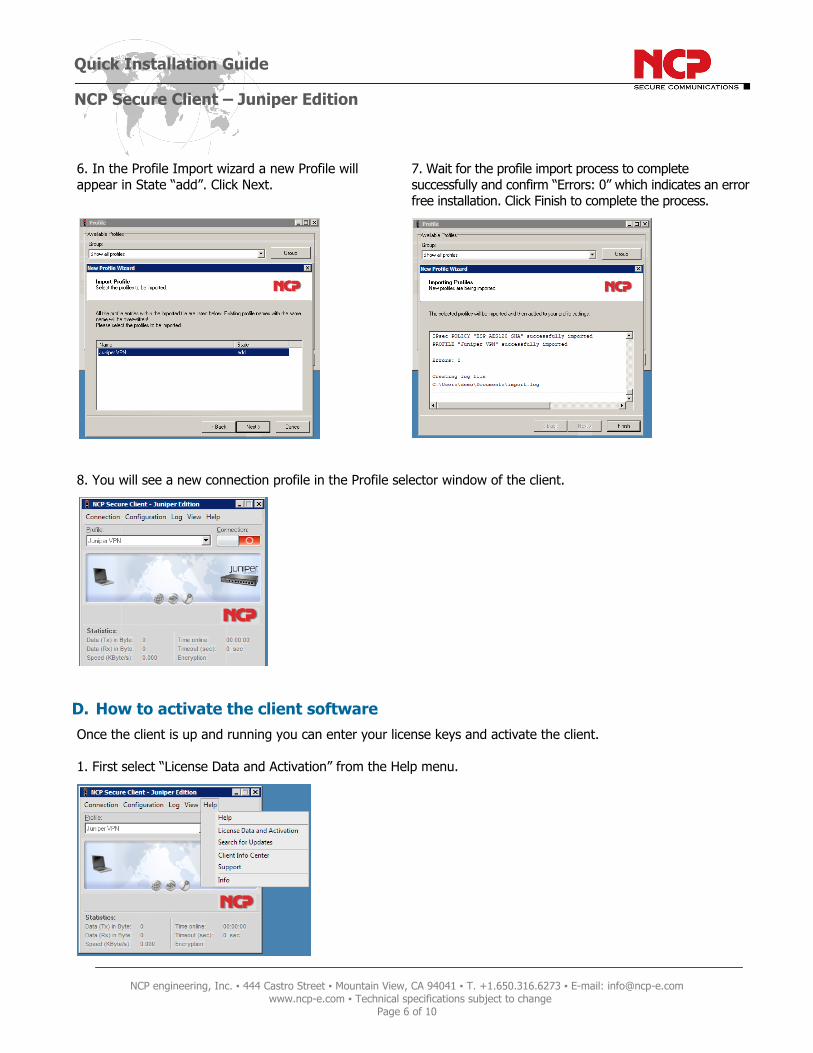
6. In the Profile Import wizard a new Profile will appear in State “add”. Click Next.
7. Wait for the profile import process to complete successfully and confirm “Errors: 0” which indicates an error free installation. Click Finish to complete the process.
8. You will see a new connection profile in the Profile selector window of the client.
D. How to activate the client software Once the client is up and running you can enter your license keys and activate the client. 1. First select “License Data and Activation” from the Help menu.
NCP engineering, Inc. ▪ 444 Castro Street ▪ Mountain View, CA 94041 ▪ T. +1.650.316.6273 ▪ E-mail: [email protected] www.ncp-e.com ▪ Technical specifications subject to change
Page 7 of 10
Quick Installation Guide
NCP Secure Client – Juniper Edition
2. In the License Data window select Activation.
3. Select Online Activation
NCP engineering, Inc. ▪ 444 Castro Street ▪ Mountain View, CA 94041 ▪ T. +1.650.316.6273 ▪ E-mail: [email protected] www.ncp-e.com ▪ Technical specifications subject to change
Page 8 of 10
Quick Installation Guide
NCP Secure Client – Juniper Edition
4. In the License Data window enter your License Key and Serial Number. Then click Next.
Now wait and observe for the Online Activation process to be completed.
5. Wait for the status “Successful software activation”. Then click Finish.
NCP engineering, Inc. ▪ 444 Castro Street ▪ Mountain View, CA 94041 ▪ T. +1.650.316.6273 ▪ E-mail: [email protected] www.ncp-e.com ▪ Technical specifications subject to change
Page 9 of 10
Quick Installation Guide
NCP Secure Client – Juniper Edition
6. Your client is now licensed and ready to use. Click on the Close button to finish the process.