Neater Arm Support (NAS) Instruction Manual User’s Version Note : for instructions on fitting and setting up the NAS please refer to Guidelines available to Neater Solutions’ Representatives. Neater Solutions Ltd. www.neater.co.uk September 2014
Transcript
Neater Arm Support
(NAS)
Instruction Manual
User’s Version
Note: for instructions on fitting and setting up the NAS please refer to Guidelines available to Neater Solutions’
Representatives.
Neater Solutions Ltd. www.neater.co.uk September 2014
1
Safety
• The NAS gives you some ability to move your arm. Inevitably, this results in certain dangers that the user
and any carer must assess for themselves and take reasonable precautions against. The following is a list
of potential dangers that Neater Solutions Limited has identified. Please read this list and all other instructions
carefully, but be aware that there may be other dangers that we have not identified.
• Do not operate the NAS when the chair is moving
• Do not operate the NAS when the chair is on a slope. Forward,
backward or sideways tilt of the chair could make your arm swing in a direction you cannot control.
• Do not move the chair if you are in doubt that your arm is in a
secured position. Dangers could arise such as your arm or part of the NAS getting caught whilst going through a doorway, near traffic or other dangerous machinery, or bumping into someone. The NAS moving arm can be parked by lowering onto the armrest of your chair or the whole of the NAS moving arm can be removed. If the additional fixed height bracket is fitted, the fixed height linked arm must be removed when moving the wheelchair as this arm cannot be parked.
• Ensure that you have control over the freedom of movement
the NAS gives you so that your arm or parts of the NAS mechanism do not cause any danger to yourself or others.
• Whenever using the NAS take the same precautions that you
would if you were reversing your wheelchair – i.e.: carefully check that it is safe to move.
• If there is any possibility that someone near the chair may
trap their fingers in any parts of the mechanism, do not operate the NAS either moving your arm in a horizontal plane or operating the switch(es) to lift the mechanism up and down.
2
• Do not operate other wheelchair functions such as backrest recline, if there is any possibility that someone near the chair may trap their fingers in any parts of the wheelchair or NAS mechanisms or between the NAS and the chair.
• Avoid moving or lifting any object that might be dangerous if
dropped or spilt - such as scalding hot liquids or cigarettes. Though the NAS itself is made of flame resistant materials, your clothes may not be and the NAS will not prevent a burn should you drop such an object that you then cannot reach to retrieve.
• Be aware that other dangers could exist in using the NAS
depending upon your circumstances. For instance, using it to help you eat could result in choking if you have difficulty with swallowing.
• Ask a physiotherapist to advise you on the use of the NAS. Its
use is usually of therapeutic benefit, but prolonged use could strain you. In particular:
o Ensure that the full travel of the NAS arm up and down does not cause you discomfort or even damage to your shoulder or other joints. An additional stop can be fitted inside the column to prevent it lifting your arm too high.
o Start by using the NAS for only one hour per day and then slowly build up your use of the device.
• The full movement of the NAS arm up and down in the column
should always leave at least 25mm gap in the main column groove to help reduce the chance of finger traps. Please understand however, that it is not possible to prevent such finger traps in all places in the NAS itself and between the NAS and the wheelchair or other objects for all vertical and horizontal positions of the arm.
• Do not connect any power supply to the NAS other than a 24
volt DC regulated power supply (minimum 4 amp) or equivalent properly charged battery pack or connection to the properly charged 24 volt battery pack of an electric wheelchair. Do not connect a battery charger to the NAS. Note: If the battery is low functions on the NAS such as the over-current cut-out may not work.
• The NAS control box connects the negative side of the 24 volt
supply to earth. Check this is compatible with your supply otherwise a short-circuit could occur.
• Do not connect power to the NAS if any covers are removed.
3
• Ensure that there are no trailing leads or cables that others might trip up on or that might get caught – for instance in the wheels of the chair.
• Do not use a NAS in any environment where there is electrical
or electronic equipment operating that is life supporting or near electrical equipment which could be dangerous should it fail.
• The switch(es) supplied should only be used with the NAS and
not with any other devices.
• Do not use the NAS in any way that could cause danger were the switch or switches to get stuck switched-on.
• Do not use the NAS in any way that could cause danger if it
stopped working.
• Ensure that there is a suitable headrest on your wheelchair to prevent your head from hitting the main column of the NAS. This could happen if the chair receives a jolt.
• The NAS has not been crash tested with different wheelchair
set-ups. However, the NAS has a very sturdy construction and tests have been carried out to simulate the forces that would be exerted by the NAS on its attaching brackets in a crash test. At the very least, when transporting the NAS in a vehicle, ensure that: 1. The NAS has been fitted to your wheelchair by a
representative of Neater Solutions. 2. The NAS moving arm is completely removed from the main
column. 3. If you travel in your wheelchair, it is essential that the
wheelchair is suitable for use as a seat in a vehicle (as stated by the wheelchair manufacturer). It is also essential that a headrest is fitted that is suitable for use in a vehicle as supplied by the wheelchair manufacturer to prevent your head hitting the main column of the NAS in the event of an accident. (In any case you should use such a headrest to prevent whiplash injury). If you have not been provided with a headrest suitable for use in a vehicle, do not use the wheelchair for this purpose.
4. The wheelchair is fastened into the vehicle following the manufacturer’s instructions.
4
• NAS is designed to comply with the essential requirements of the Medical Devices Directive Class 1 (EC Council Directive 93-52-EEC of 14 June 1993).
• Your wheelchair provider should have ensured that your
wheelchair satisfies any necessary safety criteria for your purposes. The NAS should only be fitted by a trained representative of Neater Solutions. Please take note of any safety advice in addition to the points here that the Neater Solutions representative may give you. A properly fitted NAS used correctly following the guidelines in this manual should not pose any significant health and safety risks beyond those detailed in this manual or by the Neater Solutions representative fitting the unit. For instance, the weight of the NAS is small compared to the wheelchair; it is positioned only a short distance back from the rear wheels' axis; it therefore does not significantly affect the performance of the wheelchair in incline tests.
• Please keep the NAS away from dirty, abrasive or corrosive
environments eg: avoid taking onto a beach.
• The NAS electronics control box, cables, switch(es) and any power units or batteries must not be disposed of in landfill.
5
Contents
Safety Contents
Neater Arm Support (NAS) - Description Attachment to wheelchair Set up Double Bracket Use both arms at once with the Fixed-Position Double Bracket Controls and switches Do not unplug the power when the arm is moving
Calibrating top and bottom limits of movement
Parking Removing the NAS moving arm Maintenance – Cleaning, Lubrication & Movement Range
Disposal -RoHS and WEEE
What to do if the arm goes slow or will not raise or lower NAS-Assist - additional assistance eg: to bring hand to mouth
6
Neater Arm Support (NAS) - Description
Originally developed by engineers at Cambridge University, the Neater Arm Support offers a “helping arm” to people with muscular weaknesses such as muscular dystrophy or motor neurone disease.
The device, which can be attached to the back of a wheelchair or to a separate stand, supports the weight of the user’s arm in a sling, enabling them to move their arm back and forth freely using their own muscle power. The sling is attached via an angled joint and a metal linkage with frictionless joints to an electrically powered mechanism, which lifts up and down. The user can control the height using a switch or switches that can be operated by the opposite hand or another part of the body. The NAS is usually attached to the user’s electric wheelchair and is powered from the wheelchair’s 24-volt battery pack. A separate stand is also available.
7
Attachment to wheelchair Limited Disclaimer
Neater Solutions and its representatives have attempted to develop systems for attaching the NAS to wheelchairs that minimise the potential damage to the chair. In the very unlikely event that damage to the wheelchair does result from fitting of the NAS, Neater Solutions’ liability is limited to that damage. Neater Solutions does not accept liability for damage to wheelchairs caused by other factors or by misuse of the wheelchair or the NAS. The compatibility of the NAS with different wheelchairs can only be assessed by Neater Solutions representatives. Regular checks must be made to ensure that the NAS is as securely attached to the chair as when it was fitted by the Neater Solutions representative. It is the responsibility of the user or their representative to ensure these regular checks. If there is any doubt as to the fitting of the NAS contact Neater Solutions for further information. The NAS should only be fitted to the wheelchair by a representative of Neater Solutions Limited. Read and pay attention to all the safety points at the beginning of this manual.
8
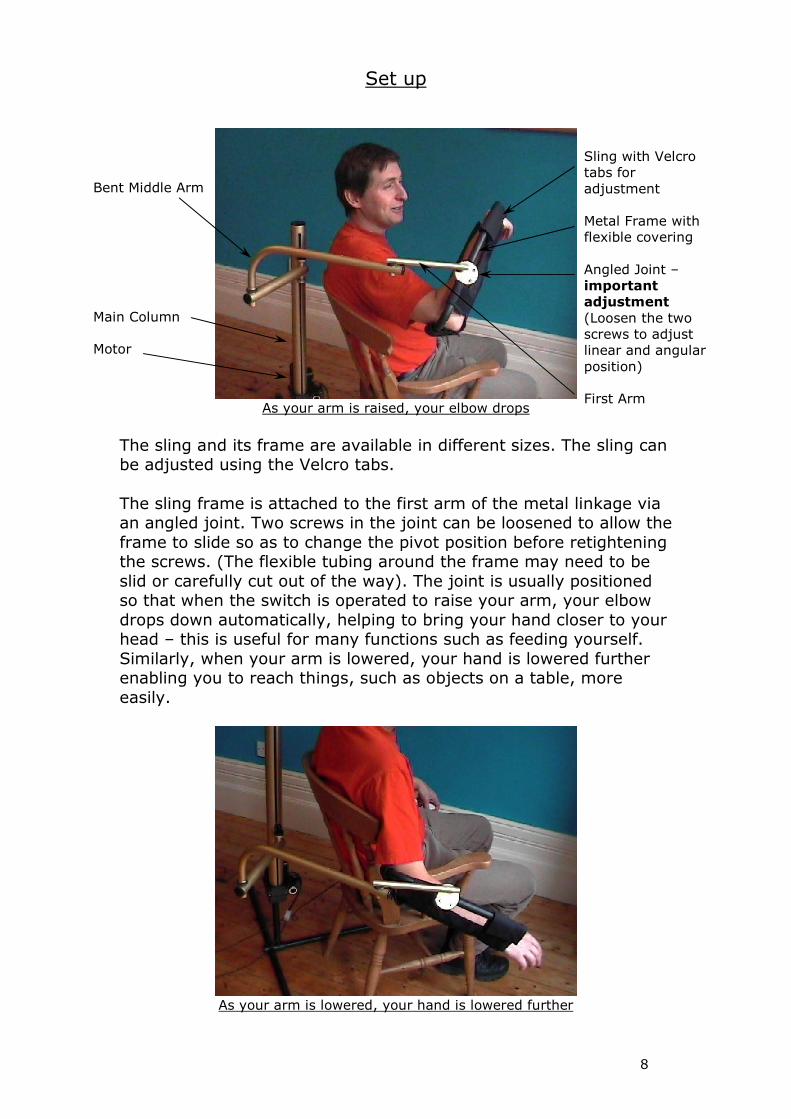
Set up
As your arm is raised, your elbow drops
The sling and its frame are available in different sizes. The sling can be adjusted using the Velcro tabs. The sling frame is attached to the first arm of the metal linkage via an angled joint. Two screws in the joint can be loosened to allow the frame to slide so as to change the pivot position before retightening the screws. (The flexible tubing around the frame may need to be slid or carefully cut out of the way). The joint is usually positioned so that when the switch is operated to raise your arm, your elbow drops down automatically, helping to bring your hand closer to your head – this is useful for many functions such as feeding yourself. Similarly, when your arm is lowered, your hand is lowered further enabling you to reach things, such as objects on a table, more easily.
As your arm is lowered, your hand is lowered further
Sling with Velcro tabs for adjustment Metal Frame with flexible covering Angled Joint – important
adjustment (Loosen the two screws to adjust linear and angular position) First Arm
Bent Middle Arm Main Column Motor
9
The angle of the frame in the joint can also be adjusted to allow the right balance of support without obstruction. Many people find it easier to use the NAS with the Angled
Joint the other way up from how it is shown in the pictures – ie: with the joint positioned below the hole for the sling frame and the tightening screws and slot at the top. Some people like to attach a strap to the sling to help hold their arm in place. (A strap can be looped around the frame or held to the sling itself using the Velcro covering underneath). With practice however, most feel their arm is quite secure in the sling even when lifting their arm high or reaching down low. An additional stop piece is available if necessary. This piece can be threaded onto the sling frame to help prevent the sling sliding on the frame. The bent middle arm is available in different lengths to allow maximum forward and backward reach whilst minimising how far the mechanism protrudes from the back or side of the chair. Ensure that the NAS gives the range of up and down movement you require. Depending upon your chair, the attachment system should allow the NAS to be attached at different heights if necessary. The range of vertical movement provided by the main column of the NAS is large. If necessary, it can be programmed to prevent lifting your arm too high. (see: “To calibrate top and bottom limits of movement”). This is important to prevent discomfort or even damage to your shoulder or other joints. A Mid Arm Extension Piece can be fitted between the Low Arm and Mid Arm on the Linked arm if the Low Arm would otherwise hit the handles on the back of the wheelchair when the arm is raised.
10
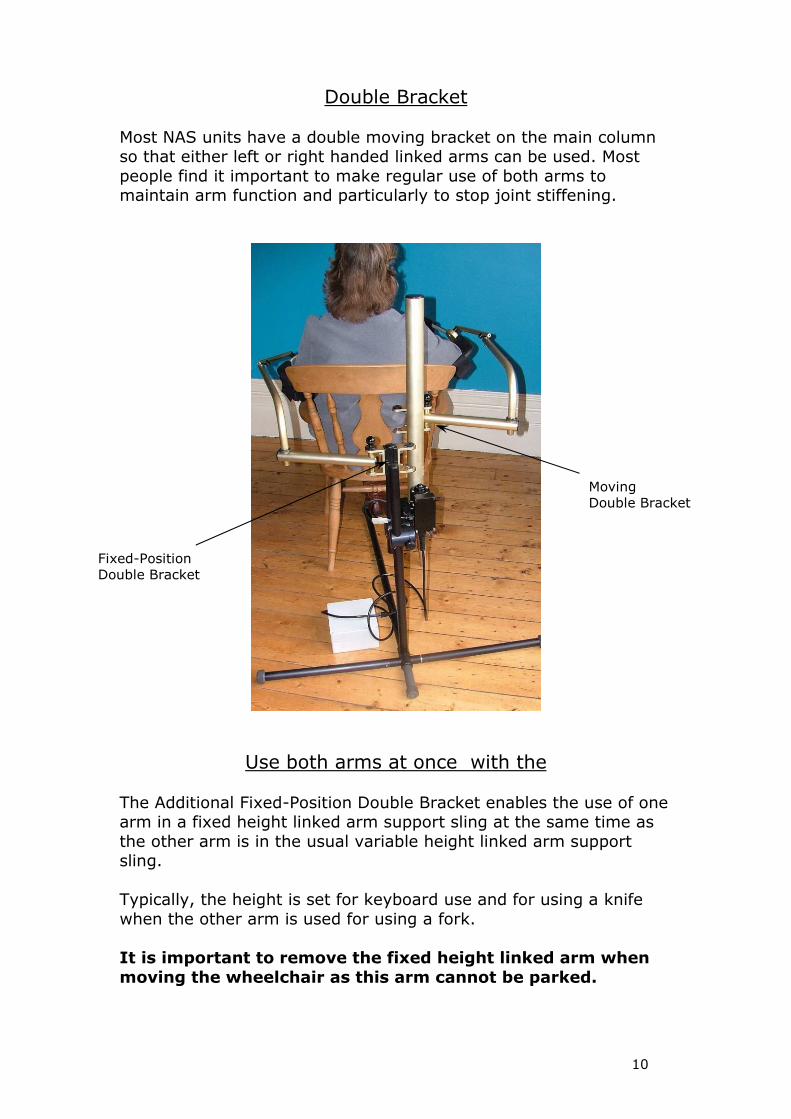
Double Bracket Most NAS units have a double moving bracket on the main column so that either left or right handed linked arms can be used. Most people find it important to make regular use of both arms to maintain arm function and particularly to stop joint stiffening.
Use both arms at once with the The Additional Fixed-Position Double Bracket enables the use of one arm in a fixed height linked arm support sling at the same time as the other arm is in the usual variable height linked arm support sling. Typically, the height is set for keyboard use and for using a knife when the other arm is used for using a fork.
It is important to remove the fixed height linked arm when
moving the wheelchair as this arm cannot be parked.
Fixed-Position Double Bracket
Moving Double Bracket
11
Controls and switches The NAS Control Box has no user serviceable parts. Do not
open it as you may damage the unit and invalidate your warranty.
The Control Box for the NAS usually takes its power from the electric wheelchair. Use only the lead supplied to plug between the recharge socket on the chair and the Control Box. After the power is switched on by plugging it into the power in this way, you must wait for approximately 2 seconds before the controls will respond. Generally, you can leave the unit plugged in – a “power down mode” limits the power drain when the NAS is not used. However, the Control Box should be unplugged from the power supply if left for extended periods of time without the battery being recharged - to avoid battery drain.
Do not unplug the power from the control box when the arm is moving. If you do, it can lose position memory and could hit and even jam against the physical end stops. If in doubt, you should re-calibrate the top and bottom limits (see instructions below). The up and down movement of the NAS is controlled using a single switch plugged into one of the three switch sockets. Each press and hold of the switch alternates movement up and down.
Control Box
If a switch socket becomes worn, swap over the covers and use another socket.
Power LED Speed Control (small knob) Power in (24V dc). Battery or regulated power supply only. Do NOT connect charger.
Spare Up/Down Switch Socket (shown with cover)
Up/Down Switch Socket (shown here with switch plugged in)
Spare Up/Down Switch Socket (shown with cover)
Wire To Motor
12
If you want to continue to move in the same direction rather than change direction, just click the switch briefly before clicking and holding the switch down again. The switch supplied as standard is very light to operate. It is also physically light enabling easy positioning – for instance as a head switch – using Velcro attachment. Other switches can also be used. A small knob on the underside of the control box is used to adjust the speed of vertical movement. Most users want the speed increased slightly as they get used to using the NAS. The NAS control box has a preset cut-out to prevent the motor being held stalled when the NAS arm hits an obstacle. When the motor has cut out in this way, the arm can only be moved at first in the opposite direction. Do not rely on this function to offer protection against any potential dangers such as finger traps. Our representative can adjust the cut-out setting for you. Inhibit Function (No longer a feature) Older NAS units prevented movement of the wheelchair when the NAS electric motor was running. This is a conventional inhibit function. Following a risk analysis, it is now considered safer not to interrupt chair movement in this way. Remember always to park the NAS linked arm first (or remove it completely) before you move the wheelchair.
Do not unplug the power from the control box when
the arm is moving. If you do, it can lose position memory and could hit and even jam against the physical end stops. If in doubt, you should re-calibrate the top and bottom limits (see instructions below).
Electronic top and bottom limits of movement It is possible to limit the range of vertical travel of the arm. This can be useful for reasons of comfort and ease of use – you can drive the arm up or down and it will stop itself at the preset end points. Care should be taken to avoid injury when setting the end limits.
It is important to ensure that any failure of the electronic end limits will not result in any danger ie: that it would be
safe if the arm were to move throughout the full range of vertical travel physically possible (ie to the physical stops
inside the main column) in the unlikely event that the electronic end limit system fails.
13
Calibration - setting Top and Bottom Limits When you first receive the NAS, it is important to learn how to calibrate it. We recommend practicing a few times.
Re-calibrate the NAS if the range of movement changes or if the moving bracket starts to hit top or bottom stops. To put the NAS into calibration mode:
1. Unplug the power from the NAS and wait 5 seconds to ensure the red LED is not lit.
2. Hold the switch down whilst you plug the power back in.
3. Let go of the switch. the red LED will flash: 3 flashes, pause, 3 flashes, pause, etc. to show it is in calibration mode.
Now follow instructions 4 to 7 below The NAS can also automatically call for recalibration (for instance if the battery voltage dropped low during operation). The up and down movement will become very slow and the red LED will flash: 3 flashes, pause, 3 flashes, pause, etc. to show it is in calibration mode. When this happens, Recalibrate the NAS by following these steps:
4. Click (push and let go of) the button 3 times quickly (at least as quick as the LED flashes) to start the calibration process.
5. The moving bracket moves down automatically until it reaches the end of its travel or hits an obstruction. (Older units will also stop if you push, hold and then let go of the switch again when you reach the position you want to set yourself as the bottom position). To prevent obstruction problems, in normal running mode, the NAS will move to a position about 1cm short of the position it reaches during calibration.
6. The moving bracket then moves up automatically until it reaches the other end of its travel or hits an obstruction. (Older units will also stop if you push, hold and then let go of the switch again when you reach the position you want to set yourself as the top position). To prevent obstruction problems, in normal running mode, the NAS will move to a position about 1cm short of the position it reaches during calibration.
7. The moving bracket then moves down automatically again and stops at a middle position.
Calibration is now complete and the NAS will operate as normal. Video instructions are also available: www.neater.co.uk/videos
14
If you want to start a recalibration sequence at some other time (for instance to set new top and bottom positions), you can do this by following these steps:
a) Unplug the power from the unit.
b) Wait approximately 10 seconds. (The red LED goes out)
c) Push and hold the button and make sure it remains pressed whilst you plug the power back in. (The red LED flashes: 3 flashes, pause, 3 flashes, pause, etc indicating calibration mode). You can then let go of the button.
d) Follow the steps 1 to 4 above. (If you do not start the
sequence within 10 seconds of plugging in the power, the unit will revert to normal operating mode and you will need to start from step a. if you want to recalibrate).
If you start the calibration sequence accidentally, you can just click the switch 3 times quickly to stop it. If the calibration was initiated by you plugging in the power with the button pressed (steps a to c above) then cancelling calibration will revert the unit to normal operating mode at full speed with the stops set as they were before. Power LED status:
Constantly Lit: Calibrated and power OK.
3 quick flashes, pause, 3 quick flashes, pause, etc: NAS requires calibration or during the calibration process. In this case, the NAS will only run slowly until calibrated and the power LED is constantly lit.
Blinking on approximately every 2.5 seconds: Battery voltage below 19volts - Motor will not operate.
Lit with Flicker (buzzing): Motor is stalled, Current limiter active. Batteries
Remember to charge your wheelchair batteries or separate batteries regularly eg: every night. If the NAS is not to be used for a few days, ensure it is disconnected from the batteries. Make sure that the power cable from the NAS does not hang down to the floor or catch on the castor or footplates (the NAS is fitted with the lead tied to the frame of the chair to prevent this happening). Replace batteries at intervals recommended by the wheelchair manufacturer.
15
Parking The sling can be “parked” by lowering the arm down onto the armrest of the chair so that it cannot then move. For some people, this enables them to get their arm in and out of the sling themselves.
Parked
The NAS should be set up in such a way that the linkage protrudes from the side of the chair as little as possible (ideally not at all) when the sling is parked. The attachment of the NAS onto the back of the chair should allow for the necessary adjustment. It is important to ensure proper parking of the NAS or otherwise ensure that your arm and the NAS cannot move
when the wheelchair is moving. This is particularly important when you move through doorways or near people, traffic or
other potential dangers. If in doubt and certainly when transporting in a vehicle, remove the NAS moving arm
completely.
16
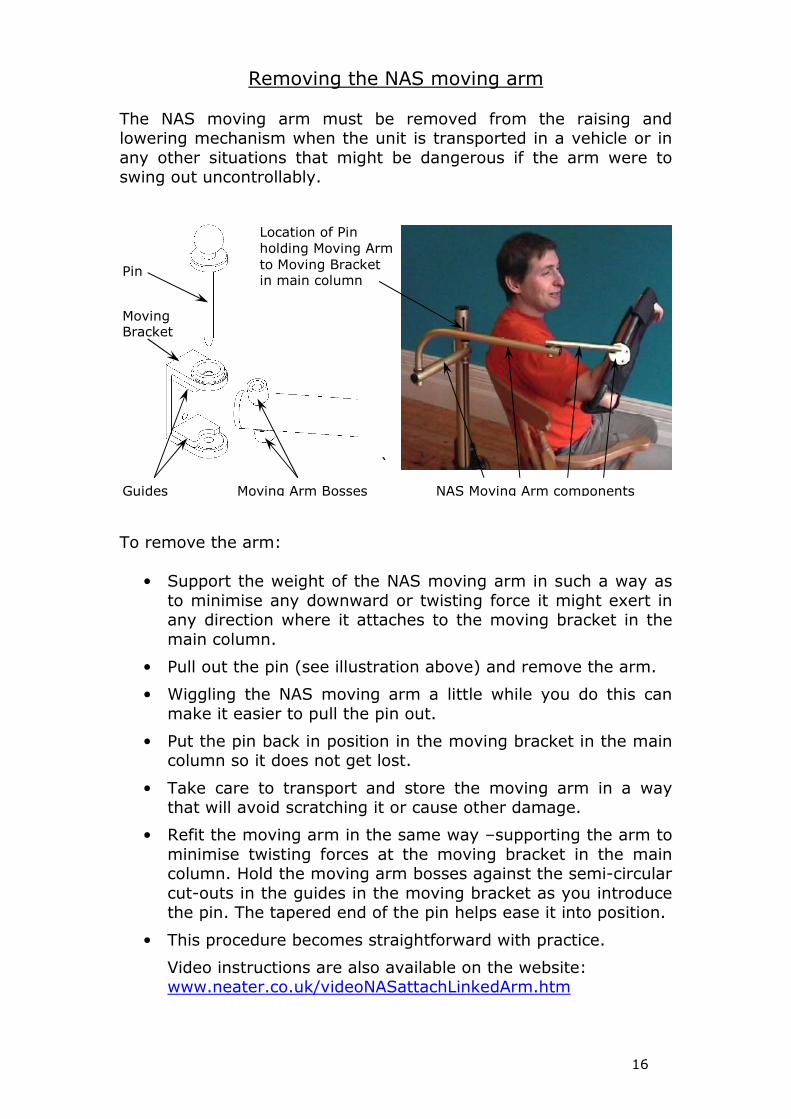
Removing the NAS moving arm The NAS moving arm must be removed from the raising and lowering mechanism when the unit is transported in a vehicle or in any other situations that might be dangerous if the arm were to swing out uncontrollably.
` To remove the arm:
• Support the weight of the NAS moving arm in such a way as to minimise any downward or twisting force it might exert in any direction where it attaches to the moving bracket in the main column.
• Pull out the pin (see illustration above) and remove the arm.
• Wiggling the NAS moving arm a little while you do this can make it easier to pull the pin out.
• Put the pin back in position in the moving bracket in the main column so it does not get lost.
• Take care to transport and store the moving arm in a way that will avoid scratching it or cause other damage.
• Refit the moving arm in the same way –supporting the arm to minimise twisting forces at the moving bracket in the main column. Hold the moving arm bosses against the semi-circular cut-outs in the guides in the moving bracket as you introduce the pin. The tapered end of the pin helps ease it into position.
• This procedure becomes straightforward with practice.
Video instructions are also available on the website: www.neater.co.uk/videoNASattachLinkedArm.htm
Location of Pin holding Moving Arm to Moving Bracket in main column
NAS Moving Arm components Guides Moving Arm Bosses
Pin
Moving Bracket
17
Cleaning & Maintenance The NAS has a 3 year warranty, if there are any problems with the functioning of the NAS Neater Solutions should be contacted. The NAS can be wiped clean with a damp cloth and a little detergent. Be careful not to allow water to flow into any of the joints.
The sling can easily be removed from its frame by undoing the Velcro straps. Wash by hand or use a low temperature machine wash (eg: Woollens setting). The arm joints are shielded ball and roller bearing that do not require lubrication. The lead screw in the main column and the inner surface of the main column benefit from light lubrication by spraying with adhesive chain lubricant once every few months. For any further maintenance the user should contact Neater Solutions. Check range of movement regularly.
Once a month, check that the range of vertical movement of the arm is as it was set and as you want it. In particular, check that the arm is coming to halt at least a centimetre before it hits the physical top and bottom plastic end stops inside the main column. If necessary, recalibrate. (See earlier instructions).
Disposal -RoHS and WEEE This equipment is exempt from the RoHS directive (as medical devices) as long as it is used to assist people with disabilities. Under the WEEE directive it should not be disposed of in the normal waste stream but be placed with separate collection for electrical and electronic equipment (or returned to Neater Solutions Limited). Producer Registration Number: WEE/GB0074UR/PRO
18
What to do if the arm goes slow or will not raise or lower First of all, check that all leads and switch(es) are properly plugged in and that the speed control has not been turned down (see Controls and Switches section). Ensure that the batteries have been recently charged. Unplug the power and plug it in again. If the LED is constantly lit when you plug the power in and the arm does not lift or raise at all, try a different switch. If just after you plug the power in the LED just blinks on occasionally rather than staying lit (single blinks not 3 quick flashes – see below), it is because the battery has fallen below 19 volts. The NAS will not operate as this could damage the batteries. Charge the batteries or replace them if necessary. If just after you plug the power in the LED gives 3 quick flashes, gap, 3 quick flashes, gap, etc and the arm will only raise and lower slowly whatever the speed control adjustment, then the NAS requires calibration. Follow the procedure “To calibrate top and bottom limits of movement” in the Controls and Switches section. The NAS goes into this mode for safety reasons if it detects a possibility that it may not know the height of the arm. This could happen if the arm was moving up or down when power was unplugged or dropped below 19 volts. Older serial number units also go into this mode periodically (typically once every 60 power-ons) as a calibration check. If the NAS calls for calibration very often please check that you have a good connection of the power plug and that the batteries are in good condition and charged regularly. Explanation: To keep weight down and to avoid the need to maintain two sets of batteries, the NAS usually takes its power from the wheelchair it is attached to. The NAS protects the batteries by for instance not operating at low voltage. For safety reasons it has to be cautious and call for recalibration if there is a possibility that position sensing may have been interrupted during movement.
19
NAS-Assist The NAS-Assist is an adaptation to the Neater Arm Support to further assist people with weak arms by automatically bringing their hand in towards their face as their arm is lifted. For some people the effect of the NAS-Assist is very significant; for instance enabling them to feed themselves. When the NAS-Assist is engaged the Yoke Bracket that holds the Linked Arm Assembly tilts over automatically when the Slider Assembly is lifted. This happens as the Roller contacts the Runner pushing the Tilting Assembly out. (See diagrams). Tilting the Yoke Bracket over like this, has the effect of making the user's arm come in towards their face.
NAS-Assist Engaged
(front/right hand side)
Yoke Bracket
(Pin and Linked
Arm removed)
Slider Assembly
NAS-Assist
Main Assembly
Tilting
Assembly
Roller
Runner
Disengage tilting by
pushing the Knob
in. Engage by
pulling it out.
Only Engage or
Disengage when the
Slider Assembly is
low enough for the
Roller to miss the
Runner.
Screw Stop Screw
in further to bias the tilt
of the Yoke Bracket up
slightly when it is not
actively tilted by the
mechanism. Unscrew it
to bias the other way.
NAS-Assist Disengaged
(behind/right hand side)
For further information: including video clips of the NAS-Assist being used visit: www.neater.co.uk


![Untitled-2 [contents.iptime.co.kr]contents.iptime.co.kr/~contents/link/NAS-I.pdf · 2018-10-01 · Windows 192.1680250 admin ipTIME NAS NAS ëë..l admin ipTIME NAS](https://static.documents.pub/doc/80x56/5f0814dc7e708231d4203dfa/untitled-2-contentslinknas-ipdf-2018-10-01-windows-1921680250-admin.jpg)


