9
14+ FOR AGES 14 AND UP PLEASE CAREFULLY READ ENTIRE MANUAL BEFORE FLYING ITEM NO. 35683 INSTRUCTION MANUAL

14+FOR AGES 14 AND UP
PLEASE CAREFULLY READ ENTIRE MANUAL BEFORE FLYING
ITEM NO. 35683
I N S T R U C T I O N M A N U A L

1. Important InstructionsThis product is not a toy but a precision piece of equipment with integrated technologies of mechanics, electronic, air dynamics and radio frequencies. In order to avoid accidents, the operator must read these instructions carefully. Use safety precautions when operating, if operated incorrectly, serious physical injury and/or property loss may occur.
This product is suitable for operators with previous hobby flying experience, age 14 and up.
Only fly in a safe environment that is legal for remote control flying.
We do not take any responsibility for the operation and control of this device and related safety responsibilities.
We entrust authorized dealers to provide technology support and after sales service, please contact your place of purchase with any operating questions or repairs.
(1)
(2)
(3)
(4)
(5)
2. Safety InstructionsOperate far away from obstacles and crowds.This drone has uncertain flying speed and conditions which present potential danger. Fly away from people and animals, high buildings, high voltage wiring, etc. Avoid bad weather conditions, wind, rain, thunder, and other conditions to ensure a safe and fun flying environment.
Avoid high temperatures.This drone is made of metal, carbon fiber, plastic, electronic components and other materials. Keep away from any heat source and avoid using in high temperatures such as hot sunny days to avoid transformation and broken parts resulting from the heat.
(1)
(2)
3. Flight EnvironmentThe inside of this drone is integrated with precision electric and mechanical parts, avoid water and wet environments. Water can enter the aircraft and result in part breakdown and accidents may occur.
(1)
(2)
(3)
(4)
(5)
4. Attention Before FlyingIt is recommended that the flying area is at least an area of 10ft x 10ft x 10ft.
Be sure that the transmitter and drone batteries are fully charged.
Be sure that the throttle is at its lowest position to avoid premature flight.
Before playing turn on the drone first, then turn on the transmitter. Incorrect operation may result in failure and the possible influencing of other devices in area.
Ensure that all plugs and wires are secure and in place, rocking during flight loosen over time.
Safety & Precautions
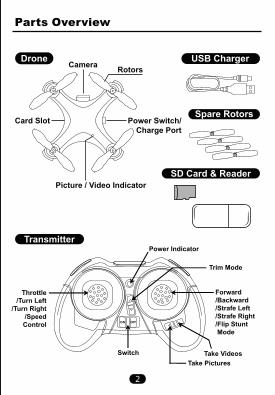
Spare Rotors
SD Card & Reader
Transmitter
USB Charger
Parts Overview
SwitchTake Pictures
Take Videos
Trim Mode
Forward/Backward/Strafe Left/Strafe Right/Flip Stunt Mode
Throttle/Turn Left
/Turn Right/SpeedControl
Power Indicator
DroneRotors
Power Switch/Charge Port
Picture / Video Indicator
Card Slot
Camera
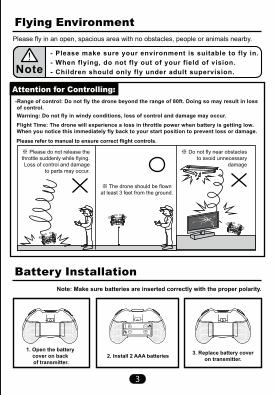
Flying Environment
Battery Installation
Please fly in an open, spacious area with no obstacles, people or animals nearby.
- Please make sure your environment is suitable to fly in.
-Range of control: Do not fly the drone beyond the range of 80ft. Doing so may result in loss of control. Warning: Do not fly in windy conditions, loss of control and damage may occur.
Flight Time: The drone will experience a loss in throttle power when battery is getting low. When you notice this immediately fly back to your start position to prevent loss or damage.
- When flying, do not fly out of your field of vision.- Children should only fly under adult supervision.
Please refer to manual to ensure correct flight controls.
Note: Make sure batteries are inserted correctly with the proper polarity.
1. Open the battery cover on back of transmitter.
2. Install 2 AAA batteries 3. Replace battery coveron transmitter.
Please do not release thethrottle suddenly while flying.Loss of control and damage
to parts may occur.
The drone should be flown at least 3 feet from the ground.
Do not fly near obstaclesto avoid unnecessary
damage

Drone Charging
Take Off Guide
Connect the drone to the USB charging cable as shown, insert USB into computer or any USB charging port. The USB charger will light up to indicate charging. When the light turns off charging is complete, disconnect drone promptly.
Follow the steps below to pair your transmitter to drone and start flying:
1. Ensure the transmitter is off and move the throttle stick to its lowest point. (Figure 1)
2. Switch the drone on and place on a level surface suitable to take flight from, the drones lights will be blinking.
3. Turn on transmitter and move the throttle stick all the way up (Figure 2) the transmitter will beep. Move all the way back down (Figure 3) and the transmitter will beep again to indicate pairing. The Drone will stop flashing at the same time.
You are now ready to fly.

Operation and ControlsAttention: Please understand the controls and movements of the drone during operation to prevent injury. During operation drone will lose some power as battery depletes, you will need to increase throttle to maintain flight.
Note: When drone is facing you, controls are reversed.
THROTTLE - Control the drone to make it ascend or descend.
DIRECTION - Control the rotation of the drone left or right with the throttle stick.
RUDDER - Control the forward and backward movement of drone.
AILERON - Control the drones left to right strafing movements.
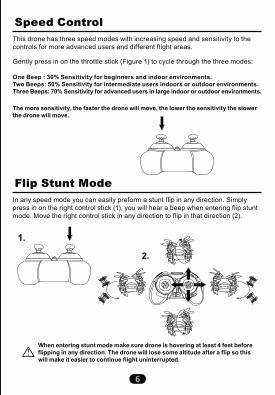
Speed ControlThis drone has three speed modes with increasing speed and sensitivity to the controls for more advanced users and different flight areas.
Gently press in on the throttle stick (Figure 1) to cycle through the three modes:
Flip Stunt ModeIn any speed mode you can easily preform a stunt flip in any direction. Simplypress in on the right control stick (1), you will hear a beep when entering flip stunt mode. Move the right control stick in any direction to flip in that direction (2).
One Beep : 30% Sensitivity for beginners and indoor environments.Two Beeps: 50% Sensitivity for intermediate users indoors or outdoor environments.Three Beeps: 70% Sensitivity for advanced users in large indoor or outdoor environments.
The more sensitivity, the faster the drone will move, the lower the sensitivity the slowerthe drone will move.
When entering stunt mode make sure drone is hovering at least 4 feet before flipping in any direction. The drone will lose some altitude after a flip so this will make it easier to continue flight uninterrupted.
1.
2.

Trimming Adjustment
Camera OperationPicture Operations:
Step 1 - Press Trim Mode to start process;
Step 2 - Use the Left and Right control sticks to adjust drone trim;
While flying the drone, press the picture button on the transmitter once to take a single picture. The indicator light will flash once to indicate image is captured and saved to the installed memory card.
Step 3 - Press the Trim Mode button again to stop adjusting trim;
Note: When in trim mode, the left and right control sticks can not be used tocontrol the direction of drone.
1. Turn Left Trim2. Turn Right Trim3. Strafe Left Trim
4. Forward Trim5. Strafe Right Trim6. Backward Trim

Accelerator Calibration
Video Operations:While flying the drone, press the video button on the transmitter once to startrecording video. The indicator light will turn on to indicate video is being recorded. Press the video button again to stop recording, the indicator light will turn off and the video is saved to the installed memory card.
Turn off drone and transmitter, turn on and pair again. Recharge drone battery. Replace transmitter batteries.If still not working, perform Accelerator Calibration.
Turn off drone and transmitter, turn on and pair again. If problem persists, check rotor blades and replace if damaged.
Can’t take off
Troubleshooting Maintenance MethodTroubleshooting of Drone
Rotors don’t workor drone is driftingon take off
When the drone flies unstable or drifts quickly in one direction you need to calibrate the accelerometer.
After flight, use the included card reader to view images and footage on any computer.
1. On a flat surface, pair the transmitter to the drone so it is ready to fly.2. Set the drones speed to maximum, 3 beeps. Keep the throttle at its lowest position.3. Push the left control stick to the bottom-left corner and the right control stick to the bottom-right corner. The drones lights will flash for 1-2 seconds to indicate calibration is complete.
Website: www.worldtechtoys.comEmail: [email protected]: (877) 498-8697 Monday - Friday / 9:00AM - 5:00PM / Pacific Time
WWW.WORLDTECHTOYS.COM
MADE IN CHINA
SPECIFICATIONS,COLORS AND CONTENT
MAY VARY FROM ILLUSTRATIONS


