NetBeans 6.5.1, GlassFish v 2.1, Web Space Server 10 Creating a Patient Lookup Visual Web JSF Portlet [email protected]July 2009 Table of Contents Abstract ................................................................................................................1 Introduction ..........................................................................................................1 Prerequisites........................................................................................................2 Determining Service Endpoint and WSDL Location.........................................2 Making Service Available for use in a Portlet ....................................................4 Add Web Space Server 10 to the list of Servers ..............................................6 Create Visual Web JSF Portlet ..........................................................................8 Summary ...........................................................................................................42 References ........................................................................................................42 Abstract SOA is sometimes shown as 4 layers with Presentation Layer (SOA 1) at the top. Each layer consumes services exposed by layers under it. Interfaces are described using WSDL. Web Services are the means to decouple functional layers. Functionality in one layer can be swapped in and out without disturbing other layers. Presentation layer is often implemented as JSR-168-compliant or JSR-286-compliant Portlets, exposed through a standards-based Portal. I will walk through development of a Visual Web JSF Portlet, which will use Facility- and Patient-related Web Service as data providers to implement search for Patient Details. I use the NetBeans 6.5.1 IDEfrom the GlassFish ESB v2.1 installation, the Portal Pack 3.0.1 NetBeans Plugin and the JSF Portal Bridge provided by the Web Space Server 10. The Portlet will use JSF components provided by Project Woodstock. The technology will be introduced in a practical manner. This is not a tutorial on JavaServer Faces, Visual Web JSF, Project Woodstock or Portlet development. Introduction In some views SOA is represented as a series of 4 layers: Presentation Layer (SOA 1), Business Process Layer (SOA 2), Business Service Layer (SOA 3) and Technical Layer (SOA 4). Typically each layer higher up in the hierarchy consumes services exposed by the layer under it. So the Presentation Layer would consume services provided by the Business Process or Business Service Layers. Service interfaces are described using Web Services Description Language (WSDL), sheltering service consumers from details of service implementation. Web Services are seen as the technical means to implement the decoupled functional layers in a SOA development. Decoupling allows implementations of business functionality at different layers to be swapped in and out without disturbing other layers in the stack. The SOA 1, Presentation Layer, is often implemented as JSR-168-compliant or JSR-286- complaint Portlets, exposed through a standards-based Portal.
Transcript
NetBeans 6.5.1, GlassFish v 2.1, Web Space Server 10 Creating a Patient Lookup Visual Web JSF Portlet
Table of Contents Abstract................................................................................................................1 Introduction..........................................................................................................1 Prerequisites........................................................................................................2 Determining Service Endpoint and WSDL Location.........................................2 Making Service Available for use in a Portlet....................................................4 Add Web Space Server 10 to the list of Servers ..............................................6 Create Visual Web JSF Portlet ..........................................................................8 Summary ...........................................................................................................42 References ........................................................................................................42
Abstract
SOA is sometimes shown as 4 layers with Presentation Layer (SOA 1) at the top. Each layer consumes services exposed by layers under it. Interfaces are described using WSDL. Web Services are the means to decouple functional layers. Functionality in one layer can be swapped in and out without disturbing other layers. Presentation layer is often implemented as JSR-168-compliant or JSR-286-compliant Portlets, exposed through a standards-based Portal.
I will walk through development of a Visual Web JSF Portlet, which will use Facility- and Patient-related Web Service as data providers to implement search for Patient Details. I use the NetBeans 6.5.1 IDEfrom the GlassFish ESB v2.1 installation, the Portal Pack 3.0.1 NetBeans Plugin and the JSF Portal Bridge provided by the Web Space Server 10. The Portlet will use JSF components provided by Project Woodstock. The technology will be introduced in a practical manner.
This is not a tutorial on JavaServer Faces, Visual Web JSF, Project Woodstock or Portlet development.
Introduction
In some views SOA is represented as a series of 4 layers: Presentation Layer (SOA 1), Business Process Layer (SOA 2), Business Service Layer (SOA 3) and Technical Layer (SOA 4). Typically each layer higher up in the hierarchy consumes services exposed by the layer under it. So the Presentation Layer would consume services provided by the Business Process or Business Service Layers. Service interfaces are described using Web Services Description Language (WSDL), sheltering service consumers from details of service implementation. Web Services are seen as the technical means to implement the decoupled functional layers in a SOA development. Decoupling allows implementations of business functionality at different layers to be swapped in and out without disturbing other layers in the stack. The SOA 1, Presentation Layer, is often implemented as JSR-168-compliant or JSR-286-complaint Portlets, exposed through a standards-based Portal.
The business idea behind the functionality developed in this walkthrough is that patients are looked after in various healthcare facilities. Healthcare workers need to lookup patient details such as their identifier, gender, birth date or address. A relational database holds patient details as well as other information of relevance such as descriptions of various coded values. Patient details are available through a web service. Facility list and details, used to narrow down the search for patients to a specific facility, are available through a web service. These web services will be used to construct the Portlet that will allow patient search and a display of patient details. This Portlet will be deployed to the Sun FOSS Web Space Server 10 Portal.
Previous documents in this series, see pre-requisites, walked the reader through the process of implementing GlassFish ESB v2.1-based web services which return facility list and facility details as well as patient details.
In this document I will walk through the process of developing a JSR-286-compliant Visual Web JSF Portlet, deployed to the Sun Web Space Server 10 Portal, which will use these Web Service as a data providers. We will use the NetBeans 6.5.1 IDE, which comes as part of the GlassFish ESB v2.1 installation, the Portal Pack 3.0.1 NetBeans Plugin and the JSF Portal Bridge infrastructure provided by the Web Space Server 10. The Portlet will be implemented as a Visual Web JavaServer Faces Portlet using JSF components provided by Project Woodstock.
Note that this document is not a tutorial on JavaServer Faces, Visual Web JSF, Project Woodstock components or Portlet development. Note also that all the components and technologies used are either distributed as part of the NetBeans 6.5, as part of the GalssFish ESB v2.1, as part of the Web Space Server 10 or are readily pluggable into the NetBeans IDE. All are free and open source.
Prerequisites
To work through this material certain pre-requisites have to be met.
It is assumed that:
• MySQL RDBMS is installed and available, as discussed in [1] • GlassFish ESB v2.1 is installed, as discussed in [2] • Sun Web Space Server Portal is installed, as discussed in [3] • Web Space Server is configured as discussed in [4] • Facility Service Web Service is implemented and deployed, as discussed in [5] • Patient Service Web Service is implemented and deployed, as discussed in [6]
Unless these pre-requisites are met, you will not be able to complete this walkthrough.
Determining Service Endpoint and WSDL Location
This document assumes that the portlet will use the web service developed elsewhere as a data provider. To make it possible we need to know the endpoint location of the service and the location of the WSDL. This information is available if one knows where to look.
Let’s open the FacilitySvc.wsdl document in project FacilitySvc_BM and inspect the properties of the soap:address node under the FacilitySvcService node.
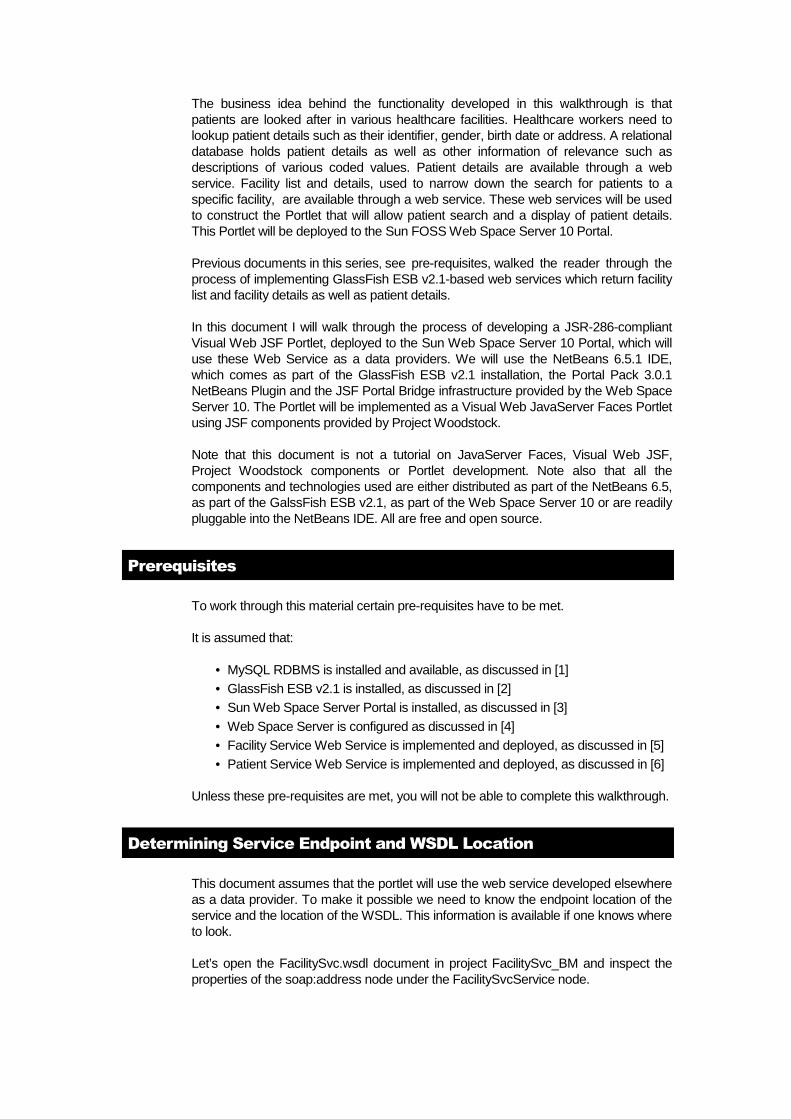
The HttpDefaultPort is the port which SOAP/HTTP BCs use. At CA deployment time this variable gets replaced with the actual port. To find out what this port is let’s switch to the Services tab in Netbeans, expand Servers, expand JBI, expand Binding Components, right-click sun-http-binding and choose Properties.
Observe the Default HTTP Port Number property value. For my installation this will be 29080. For a default installation it will be 9080. It can be changed.
So, the final service endpoint URL, from the soap:address Location property earlier, will be:
With this knowledge we can use these services in related projects.
Making Service Available for use in a Portlet
If you created a Facility Service Portlet, discussed in “NetBeans 6.5.1, GlassFish v 2.1, Web Space Server 10 - Creating a Healthcare Facility JSR286-compliant Portlet”, http://blogs.sun.com/javacapsfieldtech/entry/netbeans_6_5_1_glassfish, or “Healthcare Facility Mashup Portlet with Google Map - GlassFish v 2.1, Web Space 10, Web Service and REST Service”, http://blogs.sun.com/javacapsfieldtech/entry/healthcare_facility_mashup_portlet_with, the web service reference for the Facility Service will already be available for use. Since this is the first is a series of walkthroughs
concerning the Patient Service-related portlets, the Patient Service reference will not yet be in the NetBeans. Follow the steps to add the Patient Service web service reference, for use later.
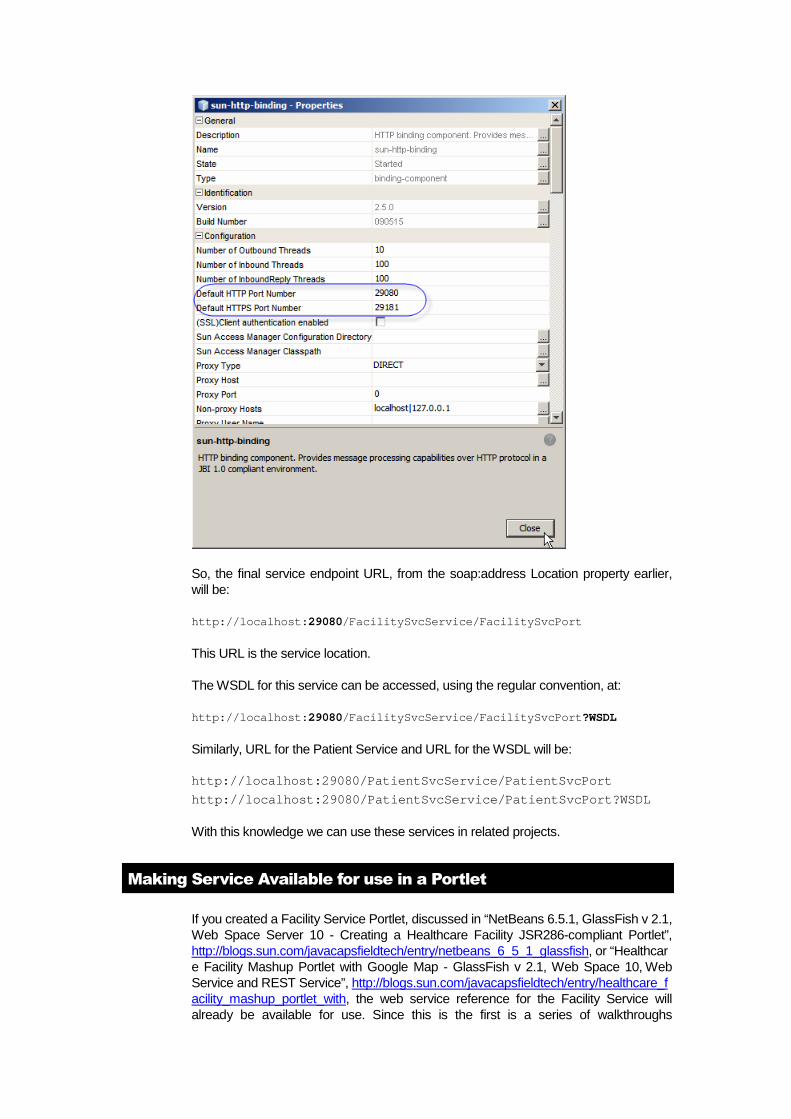
To make a web service available for use as a data provider in a web application, or a Portlet, we must “introduce” it to the NetBeans IDE. Switch to the Services Tab, Expand the Web Services node and locate the “__HC Services” node.
Right-click on the “__HC Services” node and choose Add Web Service...
Enter service WSDL URL and click OK. The service WSDL URL for me will be http://localhost:29080/PatientSvcService/PatientSvcPort?WSDL
Expand __HC Services -> PatientSvcPort, wait for the WSDL to be loaded and appropriate classes to be generated, compiled and packaged.
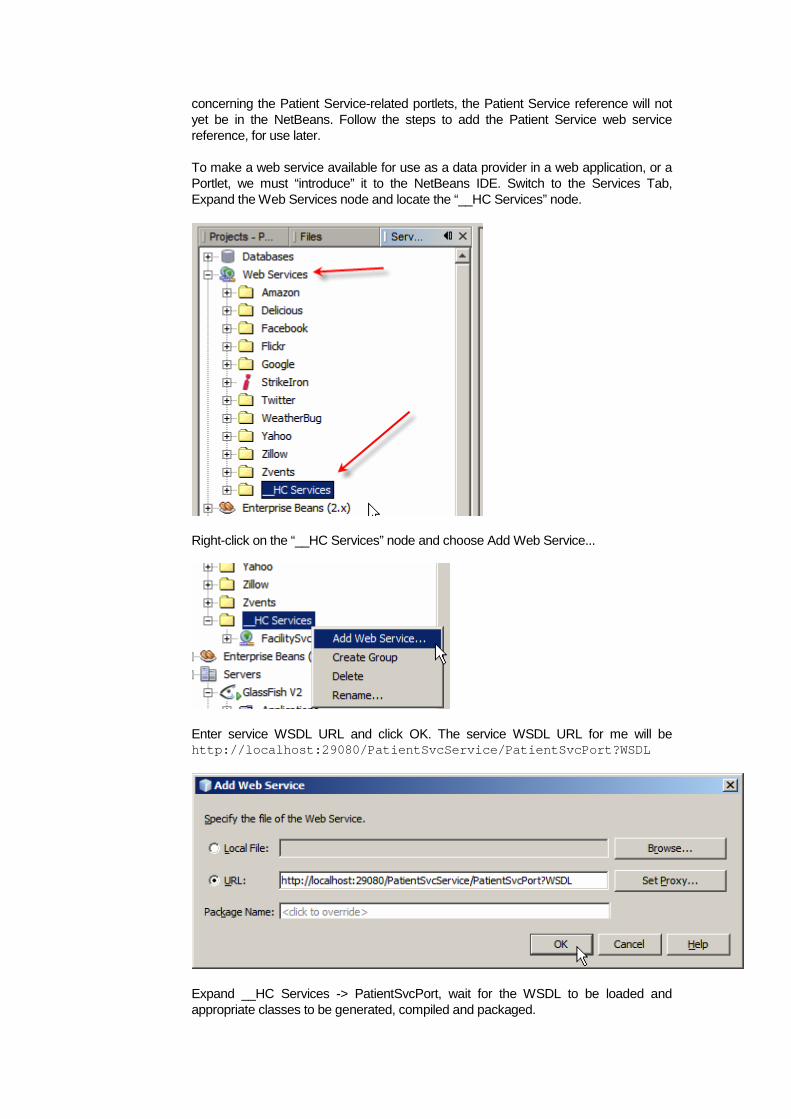
If all is well, we have valid references to service operations, ready to be used in web applications and portlets.
Add Web Space Server 10 to the list of Servers
Before we get to create a Portlet we must add the Web Space Server to the list of Servers in the Services Tab. If we created the Facilities Service Portlet, discussed in [8] this task will have already been accomplished. If not, follow on.
Switch to the Services Tab in NetBeans IDE, right-click Servers and choose Add Server.
Choose WebSpace 10.x (Porject WebSynergy) and click Next.
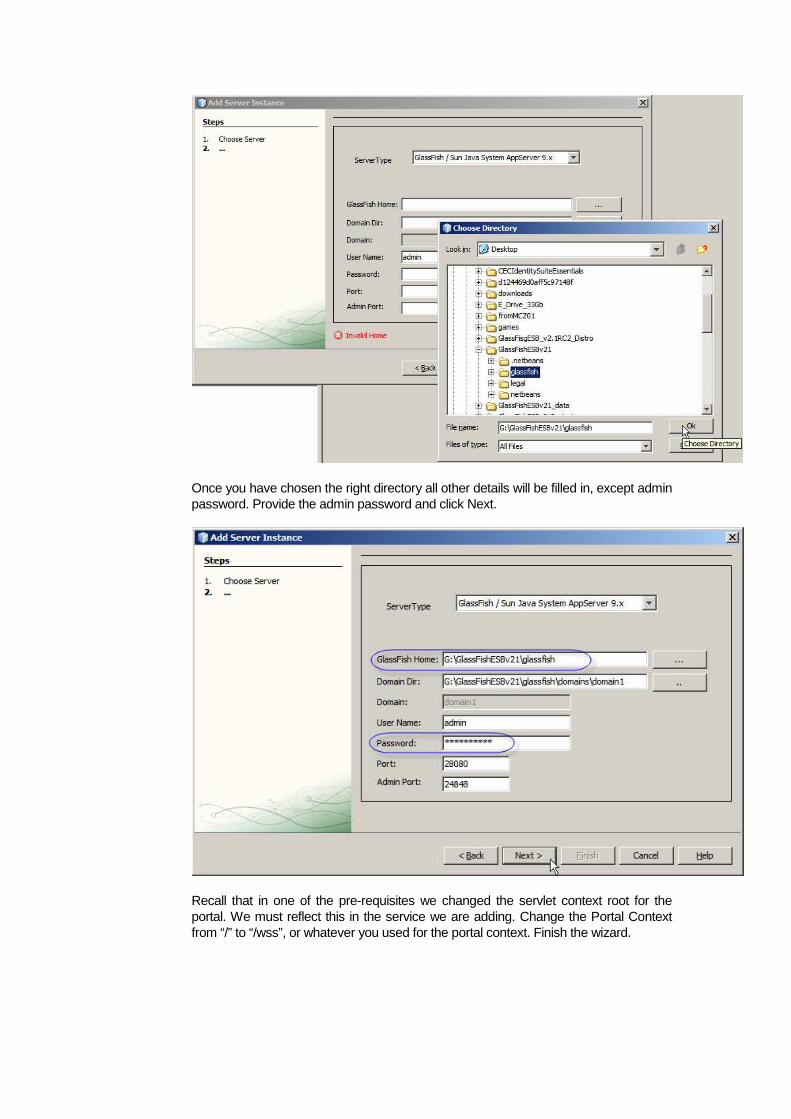
Locate the GlassFish Home directory (this will be the GlassFish instance to which you added WebSpace Server functionality).
Once you have chosen the right directory all other details will be filled in, except admin password. Provide the admin password and click Next.
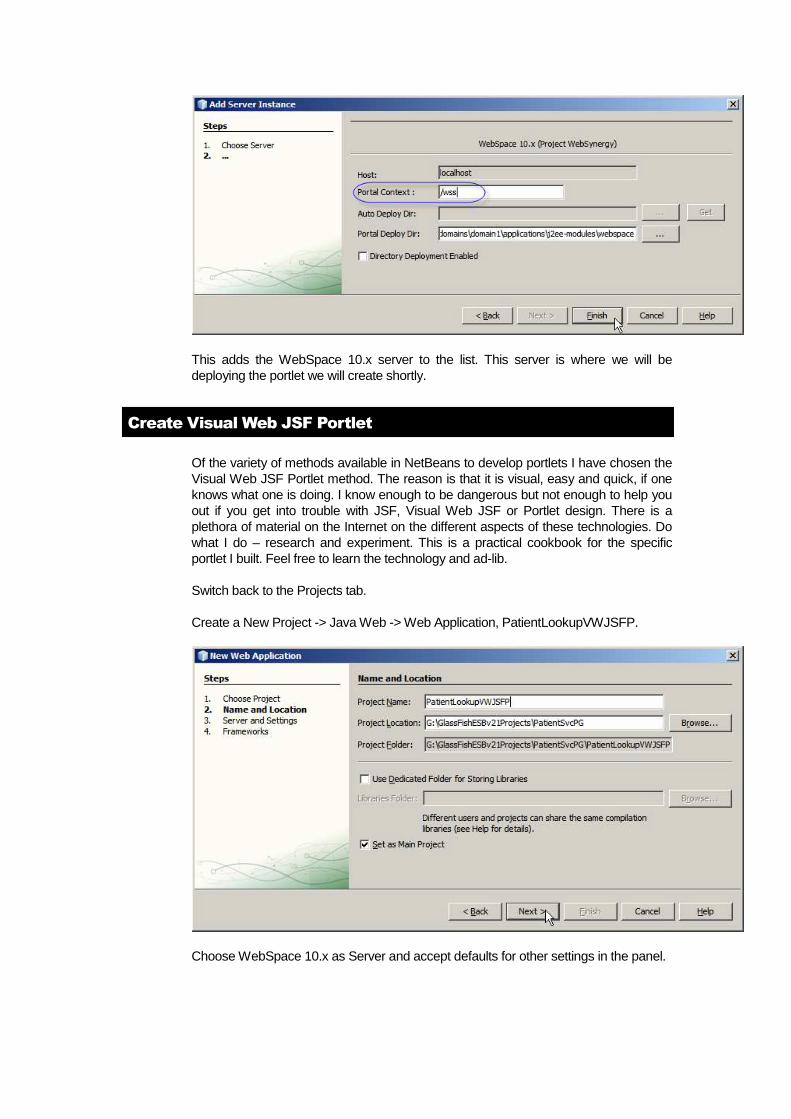
Recall that in one of the pre-requisites we changed the servlet context root for the portal. We must reflect this in the service we are adding. Change the Portal Context from “/” to “/wss”, or whatever you used for the portal context. Finish the wizard.
This adds the WebSpace 10.x server to the list. This server is where we will be deploying the portlet we will create shortly.
Create Visual Web JSF Portlet
Of the variety of methods available in NetBeans to develop portlets I have chosen the Visual Web JSF Portlet method. The reason is that it is visual, easy and quick, if one knows what one is doing. I know enough to be dangerous but not enough to help you out if you get into trouble with JSF, Visual Web JSF or Portlet design. There is a plethora of material on the Internet on the different aspects of these technologies. Do what I do – research and experiment. This is a practical cookbook for the specific portlet I built. Feel free to learn the technology and ad-lib.
Switch back to the Projects tab.
Create a New Project -> Java Web -> Web Application, PatientLookupVWJSFP.
Choose WebSpace 10.x as Server and accept defaults for other settings in the panel.
Choose portlet support but do not create a portlet.
Close index.jsp – we will not be using it.
Right-click on the project name and create New -> Visual Web JSF Portlet Page …
Name the page PatientLookup, provide Portlet Name (which must be an Identifier) and modify description and title text if you feel so inclined.
Finish.
Change the Height property of the portlet to 450px and width to 485px.
We are now ready to lay out our visual components.
Before we do that, a bit of discussion is in order.
This discussion takes me back to late 90s-early 2000s, when I spent time building one more web-based patient results reporting application, before AJAX, Web 2.0, Spring and suchlike frameworks and technologies. All I had to work with were the Apache Web Server, HTML 4.0, JavaScript 1.2, HTTP 1.1 and Internet Explorer 4 / 5.
As a server response to a GET requires the web browser would receive a stream of HTML, parse it, lay out the page and wait for the user to do something.
As a stream of HTML was being parsed the web browser would recognize tags with external references, for example a script with external source, an image with external source, etc.. While it would continue parsing the HTML stream it would create a separate stream to fetch and parse the resource referred to by the IMG, IFRAME, FRAME or SCRIPT tags it encountered.
The laying out of the page would not finish until all resources were fetched and parsed, possibly modifying the page in the process, or until the user clicked the STOP button, whichever came first.
Ordinarily, the browser would lay out page elements from top-left to bottom-right, unless told otherwise.
Once the page was laid out and displayed that was pretty much it, until and unless Dynamic HTML came into play.
Based on nesting of HTML tags within the page the web browser would construct a Document Object Model (DOM), a nested hierarchy of objects, where Page would be the outer container, head and body would be nested within it, heading, images, text, iframes, etc., would be nested within the body container, and so on.
Dynamic HTML relied on scriptability of the DOM, and browser’s willingness and ability to modify the visual appearance of a page as the DOM was changed by a script. All manner of interesting effects were invented, like “rollover” where appearance of a fragment of a page changed as the pointer passed over it, popup windoids, expandable trees, and so on.
All of this was happening at the client side. It was the web browser that was doing all the work once it fetched and parsed any input streams that were the HTML document and any documents referenced from that document, including contents of frames, inline frames, images and scripts.
Dynamic HTML allowed the page designer to defer specifying the content of a particular page element or change the content, therefore the appearance, of a particular component of a page, by triggering a script that would supply the content or change the content based on user interaction with page controls, time or completion of page load. Being able to change part of the page in response to user interaction, instead of having to refresh the entire page, eventually gave raise to AJAX and suchlike technologies.
For a while, browser wars between Microsoft and Netscape gave rise to almost monthly releases of new versions of Internet Explorer and Netscape browsers, annoying incompatibilities between browsers in how they implemented certain features or whether they implemented them at all, rendering differences, instabilities, etc.. With Netscape browser going to open source the Microsoft won the browser war and the web browser world went back to the “every now and then, not too often”,
release model, with what proprietary or standards-based features the maker felt like providing.
All the while a philosophical debate about page appearance vs. HTML purity raged. HTML purists insisted on keeping HTML simple and dedicated to “hinting” to the web browser how to lay out a particular component based on generic HTML tags, for example how to render header level 1 tag (H1), while appearance adherents insisted that HTML must provide the page author with total control over how elements are to be rendered, where they are to be places, etc.. This is not surprising as appearance adherents typically derived from the ranks of desktop publishing where control of appearance was what the money was being paid for. Eventually the HTML purists got pure HTML, taking sublime to ridiculous and turning HTML into XML Schema compliant XHTML just because they could. The page designers got their wish of total control over page appearance granted by web browser makers providing support for Cascading Style Sheets, including CSS-P, which stands for positioning.
Each element in a HTML document can be assigned a “style” attribute. The style attribute can specify things like absolute or relative positioning (relative being relative to the immediately enclosing container and absolute being absolute within the browser window), font size if the object is text, whether or not a component has borders and what kind of borders, whether or not the component is visible (appears on the page as user sees it), how much space it occupies (height, width), etc..
All of this discussion leads to the following points, which will have bearing on what follows:
1. Page is laid out from top to bottom, if relative positioning is used 2. Components are placed where specified, if absolute positioning is used 3. Components can be rendered (be part of the document object model) as invisible
(not show up to the user) 4. Rendering a component as invisible makes all components contained within it
rendered as invisible 5. Portlet is not a HTML document in its own right but rather it is a HTML fragment
which is rendered as a component within a Portal-constructed HTML page Let’s now discuss the portlet design for the Patient Lookup Portlet. The patient lookup web service, which we will use to get patient information, requires Facility Code and Local ID as input parameters. We need to allow the user to specify the values for these parameters before we can invoke the service, get the result and display it. [5] walks through implementation of the Facility Service which can return a list of facilities. We will use this service to populate a drop down list of facilities to allow the user to choose a facility rather then having to enter the code. We must require the user to enter the Local ID because we are not able to provide the list of Local IDs in a drop down. Once both pieces of information are available, we will require the user to click the “submit” button to pass this information to the back end server, get patient details, if any, and display them.
We have two sets of information – lookup parameters and patient details. Only one set should be visible at a time. We will take advantage of the ability to show and hide page components to give the appearance of multiple pages, one for each set of information. The lookup parameters and the patient details will be contained in separate Woodstock Layout Panel components, only one of which will be visible at any time. Each of these layout panels will contain components which will display appropriate information.
Let’s drag the Layout Panel to the canvas.
Some properties are visible directly in the properties palette. Others, like width, height, top and left, are accessible through the style property. To set them, click the ellipsis button next to the style property value and configure the properties through the dialogue box that appears.
Let’s set the following properties: id: lpFind, panelLayout:: GridLayout, style: mode: relative, top: 0, left: 0, width: 480px, height: 120px.
To allow us to manipulate layout panel attributes at runtime, we must add a binding attribute. Right-click on the layout panel and choose “Add Binding Attribute”.
Let’s now populate the layout panel with its visual elements.
Drag the Woodstock Basic -> Label component onto the canvas inside the lpFind layout panel and change its text property to read “Choose Facility”. Not that the panel is shown with a border to indicate that the component will be added to the panel.
Click the Ellipsis button next to the style property for this label and set font size to 12 points.
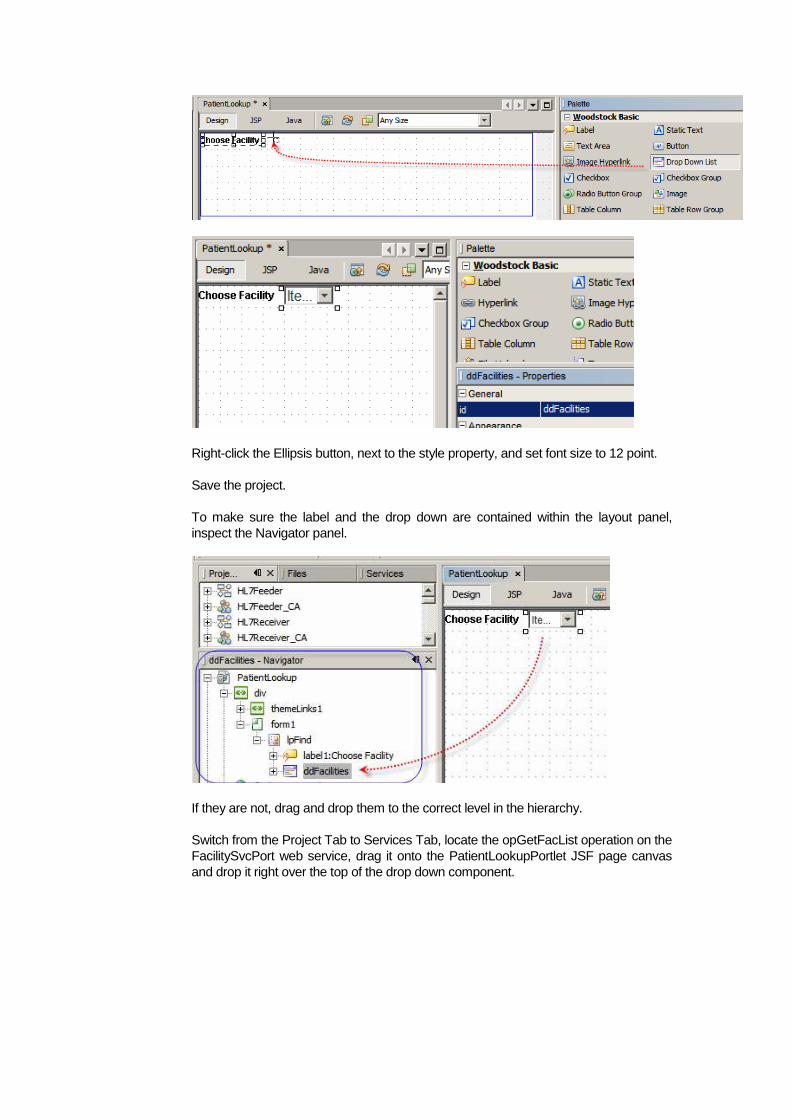
Drag Woodstock Basic -> Drop Down List component to the canvas to the right of the label. Change the General -> Id property of the component to ddFacilities.
Right-click the Ellipsis button, next to the style property, and set font size to 12 point.
Save the project.
To make sure the label and the drop down are contained within the layout panel, inspect the Navigator panel.
If they are not, drag and drop them to the correct level in the hierarchy.
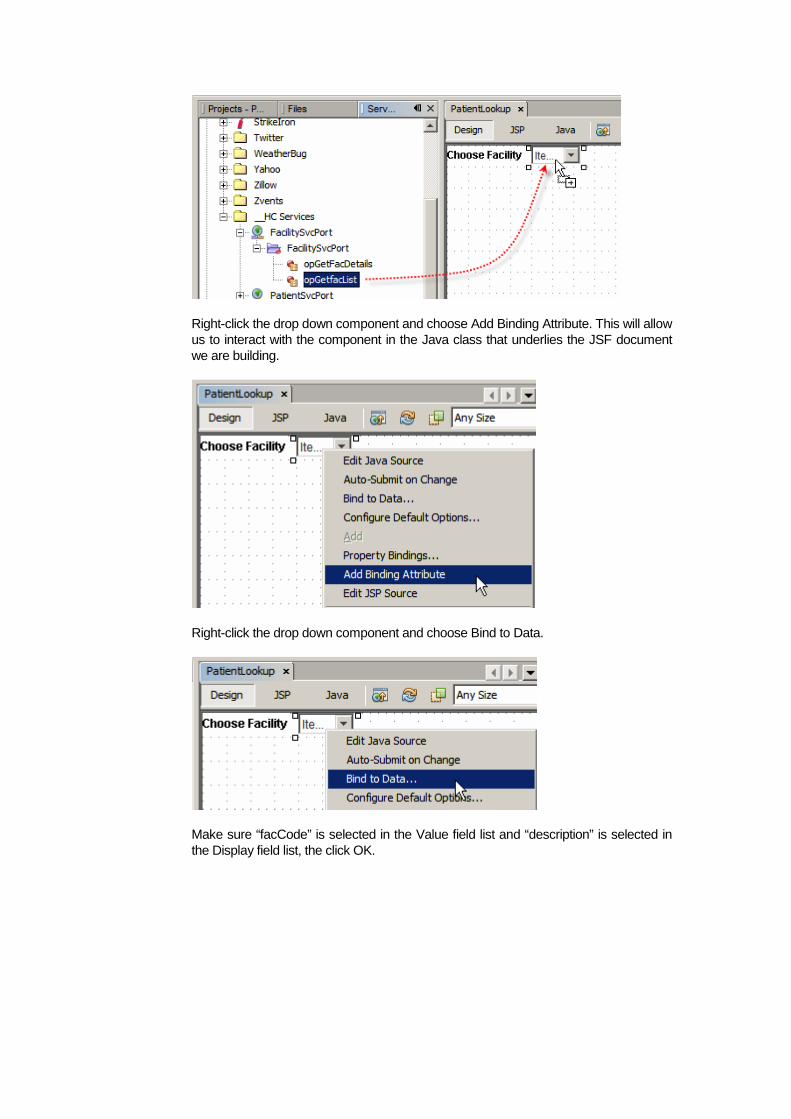
Switch from the Project Tab to Services Tab, locate the opGetFacList operation on the FacilitySvcPort web service, drag it onto the PatientLookupPortlet JSF page canvas and drop it right over the top of the drop down component.
Right-click the drop down component and choose Add Binding Attribute. This will allow us to interact with the component in the Java class that underlies the JSF document we are building.
Right-click the drop down component and choose Bind to Data.
Make sure “facCode” is selected in the Value field list and “description” is selected in the Display field list, the click OK.
Add another Label, set its text to “Enter Local ID” and set style: font-size to 12 points.
Drag a text field onto the canvas, name it fldLocalID, set style: font-size to 12 points, columns to 10, maxLength to 10, required to true, and toolTip to “Please enter a Local ID issued by the facility chosen above”. Once done, right-click the field and choose “Add Binding Property” to allow access to the field attributes in the Java class.
Add a Button to the canvas. Using the style property set left: 383px, top: 0px and width: 90px. Give the button the id of btnLookup and set text to “Lookup”.
Right-click the button and choose “Edit action Event Handler”. This will add a slab of Java code to the Java class underpinning the JavaServer Faces document we have been creating.
We will populate the body of this method later.
Switch back to the Design mode.
Recall that we checked the “required” checkbox. The JSF processor will ensure that some data is entered into the field. It will also indicate this by appending an asterisk to the label alongside the field if we get around to telling it that the label is indeed associated with a filed that is validated. Click on the filed fldLocalID and shift-control-drag from there onto the label with the text “Enter Local ID”.
Click on the label field and look at the context of the “for” property. It now contains the id of the field with which it is associated.
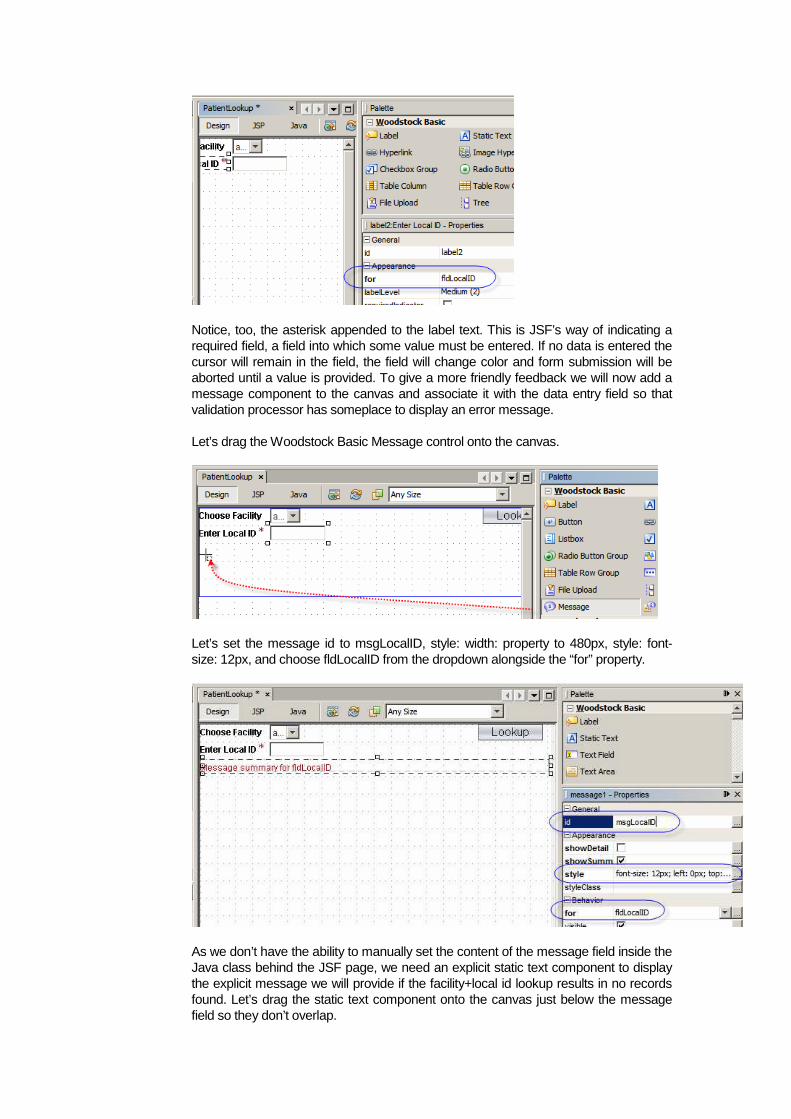
Notice, too, the asterisk appended to the label text. This is JSF’s way of indicating a required field, a field into which some value must be entered. If no data is entered the cursor will remain in the field, the field will change color and form submission will be aborted until a value is provided. To give a more friendly feedback we will now add a message component to the canvas and associate it with the data entry field so that validation processor has someplace to display an error message.
Let’s drag the Woodstock Basic Message control onto the canvas.
Let’s set the message id to msgLocalID, style: width: property to 480px, style: font-size: 12px, and choose fldLocalID from the dropdown alongside the “for” property.
As we don’t have the ability to manually set the content of the message field inside the Java class behind the JSF page, we need an explicit static text component to display the explicit message we will provide if the facility+local id lookup results in no records found. Let’s drag the static text component onto the canvas just below the message field so they don’t overlap.
Give the field the id: stMsgLocalID, set style properties font-size: 12px, width: 480px, left: 0px, top: 52px.
Make sure that there are at least 3 pixels between the upper edge of the msgLocalID and stMsgLocalID so you can manually select each one. If not, adjust the style property top to an appropriate value for either one or both components.
Right-click on the stMsgLocalID field and choose “Add Binding Attribute”. This will give us the ability to populate the value of this component with an appropriate message text in the Java class underlying the JSF page.
A look at the Navigator panel will show us the components we added so far and their nesting.
So far we have the lpFind layout panel populated with visual components that will allow the user to choose a facility, enter local id and submit the data to the back end for processing. We also have additional Java code to initialize the service invocation for the opGetFacList web service operation, which the framework will implicitly invoke for us, and some of the code that will get executed when the user clicks the Lookup button, including invocation of the opGetPatDetalis web service operation and handling of record not found and exception conditions. What we now need is a layout panel which will display data returned by the web service data provider and Java code required to populate the appropriate components.
Let’s switch to Design view and drag the Woodstock Layout Panel component below and outside the existing lpFind layout panel.
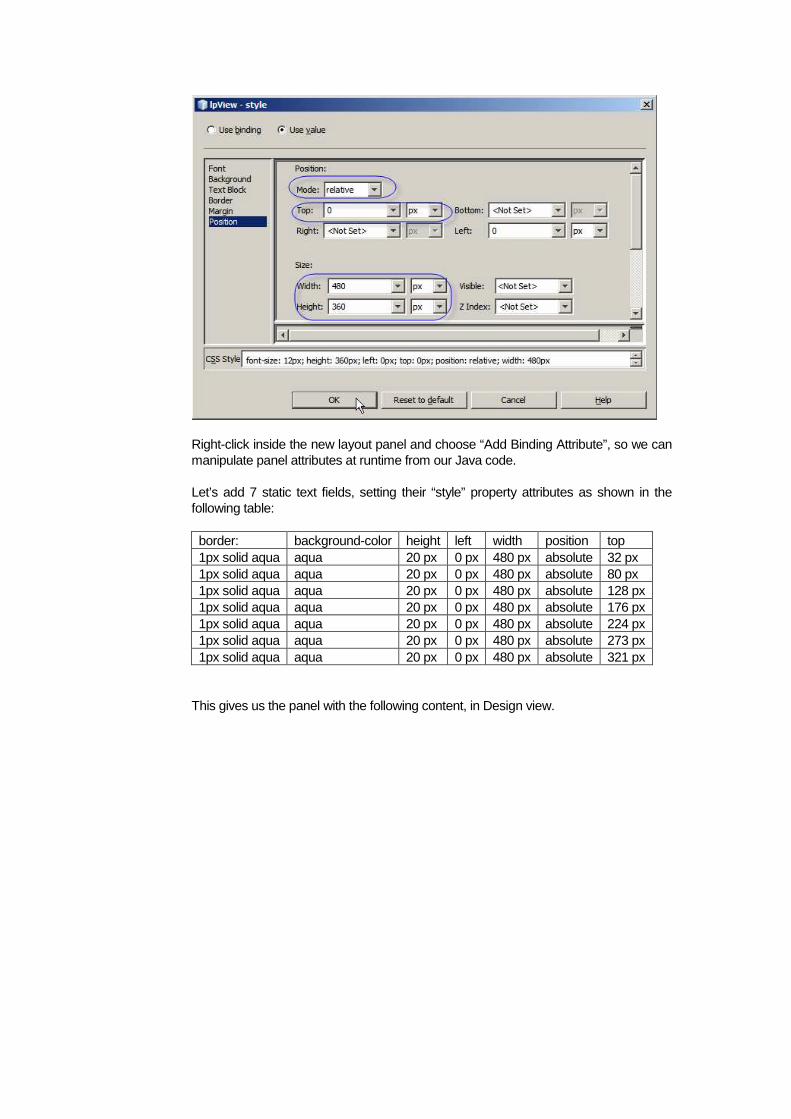
Give the new layout panel the id of lpView and change the panelLayout property to “Grid Layout”. Modify style property by setting font-size: 12px, Mode: relative, top: 0px, height: 360px, width: 480px.
Right-click inside the new layout panel and choose “Add Binding Attribute”, so we can manipulate panel attributes at runtime from our Java code.
Let’s add 7 static text fields, setting their “style” property attributes as shown in the following table:
border: background-color height left width position top 1px solid aqua aqua 20 px 0 px 480 px absolute 32 px 1px solid aqua aqua 20 px 0 px 480 px absolute 80 px 1px solid aqua aqua 20 px 0 px 480 px absolute 128 px 1px solid aqua aqua 20 px 0 px 480 px absolute 176 px 1px solid aqua aqua 20 px 0 px 480 px absolute 224 px 1px solid aqua aqua 20 px 0 px 480 px absolute 273 px 1px solid aqua aqua 20 px 0 px 480 px absolute 321 px
This gives us the panel with the following content, in Design view.
Let’s now add 12 label components to the lpView layout panel, setting their attributes as shown in the following table:
font-size top left text 12px 34 px 64 px Facility 12px 58 px 58 px Local ID 12px 82 px 27 px Patient Name 12px 250 px 55 px Address 12px 106 px 62 px Gender 12px 130 px 74 px Race 12px 154 px 31 px Ethnic Origin 12px 178 px 58 px Religion 12px 202 px 47 px Language 12px 226 px 24 px Marital Status 12px 298 px 2 px Medicare Number 12px 322 px 33 px Date of Birth
This gives us the panel with the following content, in Design view.
These are static components whose content will not change.
Let’s now add 13 static fields whose content will be set to the corresponding patient information. Set their id property and style property attributes as shown in the following table. Once you set the id and other properties, right-click each static field and choose “Add Binding Attribute”.
This gives us the panel with the following content, in Design view.
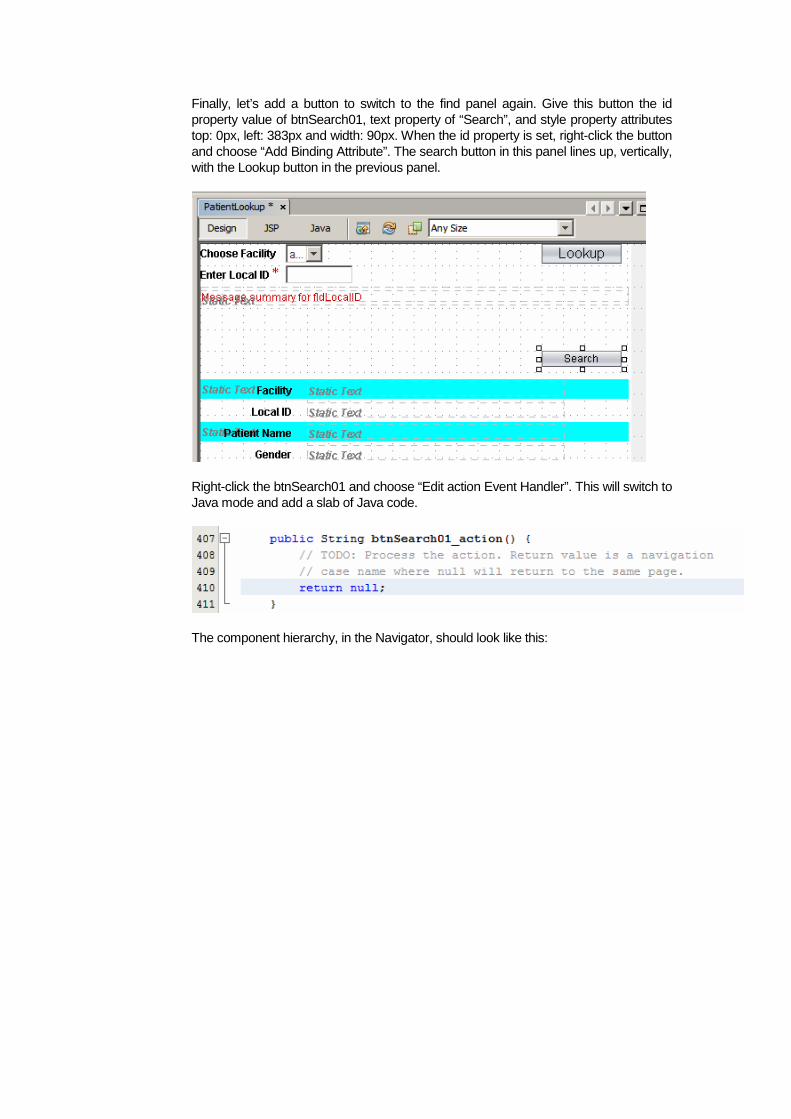
Finally, let’s add a button to switch to the find panel again. Give this button the id property value of btnSearch01, text property of “Search”, and style property attributes top: 0px, left: 383px and width: 90px. When the id property is set, right-click the button and choose “Add Binding Attribute”. The search button in this panel lines up, vertically, with the Lookup button in the previous panel.
Right-click the btnSearch01 and choose “Edit action Event Handler”. This will switch to Java mode and add a slab of Java code.
The component hierarchy, in the Navigator, should look like this:
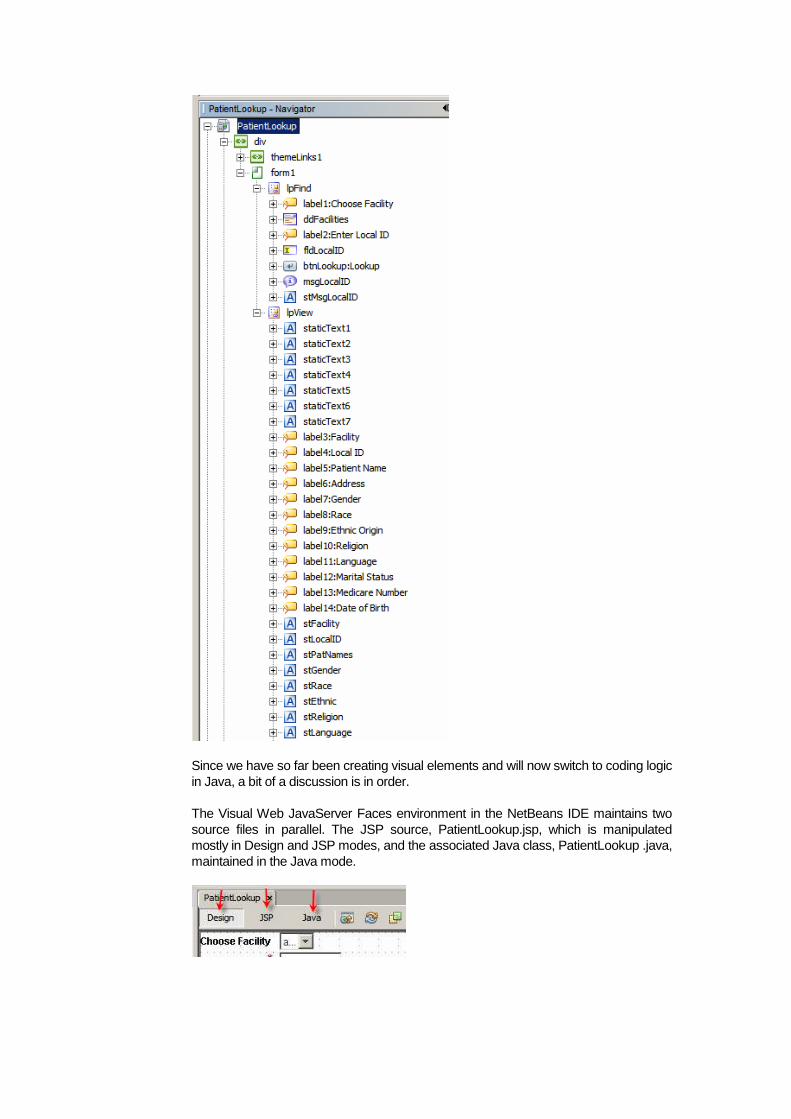
Since we have so far been creating visual elements and will now switch to coding logic in Java, a bit of a discussion is in order.
The Visual Web JavaServer Faces environment in the NetBeans IDE maintains two source files in parallel. The JSP source, PatientLookup.jsp, which is manipulated mostly in Design and JSP modes, and the associated Java class, PatientLookup .java, maintained in the Java mode.
The Java source has a number of lifecycle methods generated at the time the JSF portlet was added to the project. The ones normally used in a JSF application are:
In an ordinary JSF application these lifecycle methods are invoked at different times to do various things. The method name typically implies the function.
In a portlet the prerender() method is the method invoked before the HTML text is finalized and set to the browser. This is the place where initialization code that changes page appearance (sets visible/hidden, for example) would go. When a control that submits a form is activated, such as clicking a button, the pre-render method gets called first then the button’s action handler, if any. This is a bit odd but this is how the JSF Bridge seems to operate. When using JSF portlets through the JSF Bridge we must accept tht this is how things are. In our case this does not matter. In more complex cases it may.
When we dragged the opGetFacList web service operation onto the ddFacilities drop down, slabs of code got added to the Java source as well. Some of this code was added to the init() method to create and initialize objects related to the web service. Unlike the regular JSF application a portlet does not execute most of the lifecycle methods. The only useful method that gets invoked for a JSF portlet is the prerender() method. Since the init() method is not invoked implicitly, therefore the web service would not get initialized, we must invoke it explicitly form the prerender() method.
When we dragged the opGetFacList web service operation onto the ddFacilities drop down, appropriate Java code was added to the init() method and elsewhere in the Java class underlying the JSF document. What did not happen, was the initialization of the web service operation invocation. The opGetFacList expects an input message.
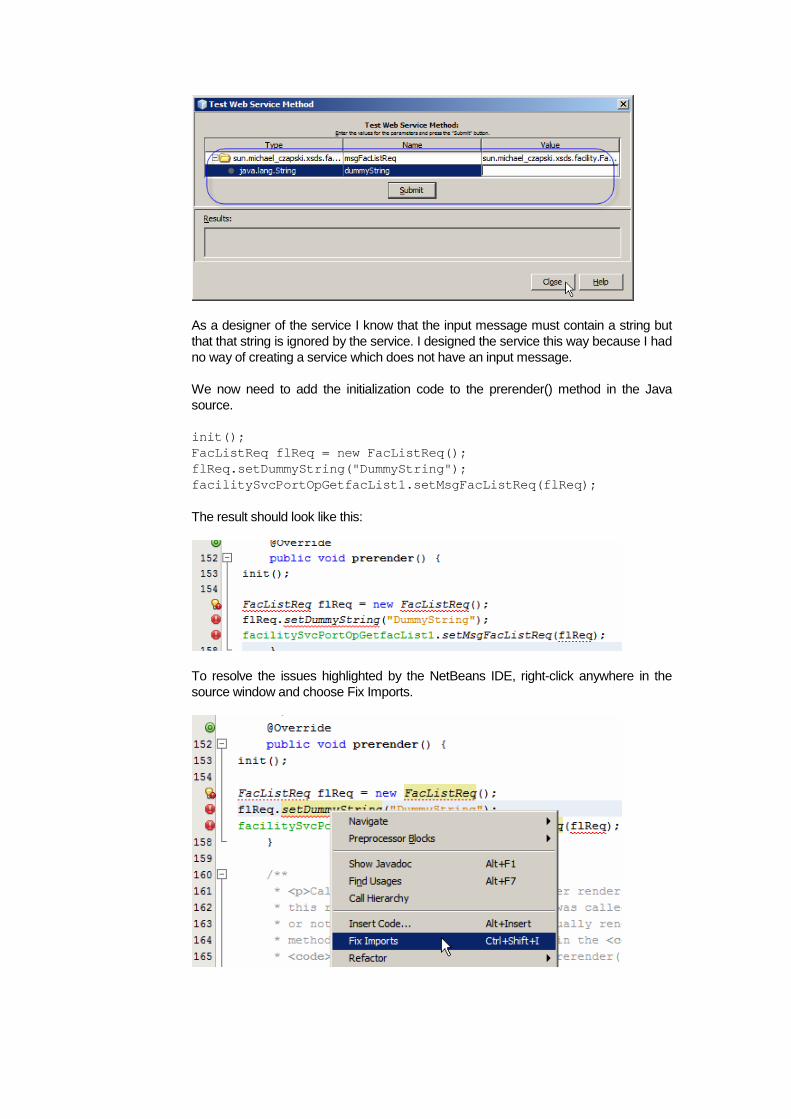
Switch to the Services tab, expand Web Services through to the opGetFacList, right click the opGetFacList and choose Test Method. A dialog box will appear which will show what the operation requires as a message.
As a designer of the service I know that the input message must contain a string but that that string is ignored by the service. I designed the service this way because I had no way of creating a service which does not have an input message.
We now need to add the initialization code to the prerender() method in the Java source.
init(); FacListReq flReq = new FacListReq(); flReq.setDummyString("DummyString"); facilitySvcPortOpGetfacList1.setMsgFacListReq(flReq);
The result should look like this:
To resolve the issues highlighted by the NetBeans IDE, right-click anywhere in the source window and choose Fix Imports.
Right-click anywhere in the source window and choose Format, to properly indent the code. These are some of the ways in which the NetBeans IDE assists in code development.
Add the following code to show the lpFind layout panel and to hide the lpView panel. On startup we need to display the lookup panel so the user can provide the facility code and local id. If the patient is found, the patient details fields will be populated, the lpFind panel will be hidden and the lpView panel will displayed.
This completes initialization.
To complete the portlet we need to add action code to the btnLookup_action() method, which as you may recall was created earlier, and to btnSearch01_action() method, also created earlier.
Switch to the Design mode, click the btnLookup button and choose “Edit action=>btnLookup_action() Event Handler. This will switch again to Java mode with the method cursor in the method body, ready for editing.
What we need to do, when the button is clicked, are:
1. clear error message static field, stMsgLocalID, in case there is an error text in there from a previous attempt to submit the form data
2. invoke patient lookup web service and verify that the record was found
3. if the record was not found, set the stMsgLocalID field to display an error message and return
4. if the record was found, extract field values from the result, set them to be displayed and set the visible properties of the lpFind to false and lpView to true so that the correct panel gets shown.
Replace the two comment lines with the following:
If you can not resolve the field stMsgLocalID check that you added the Binding Attribute.
This takes care of initializing the error message field (1).
In the left hand window switch to Services tab, expand the web services tree all the way to the opGetPatientDetails web service operation and drag that operation onto the source window before the “return null;” statement in the btnLookup_action() method.
Dismiss the Customize … dialog box by clicking OK.
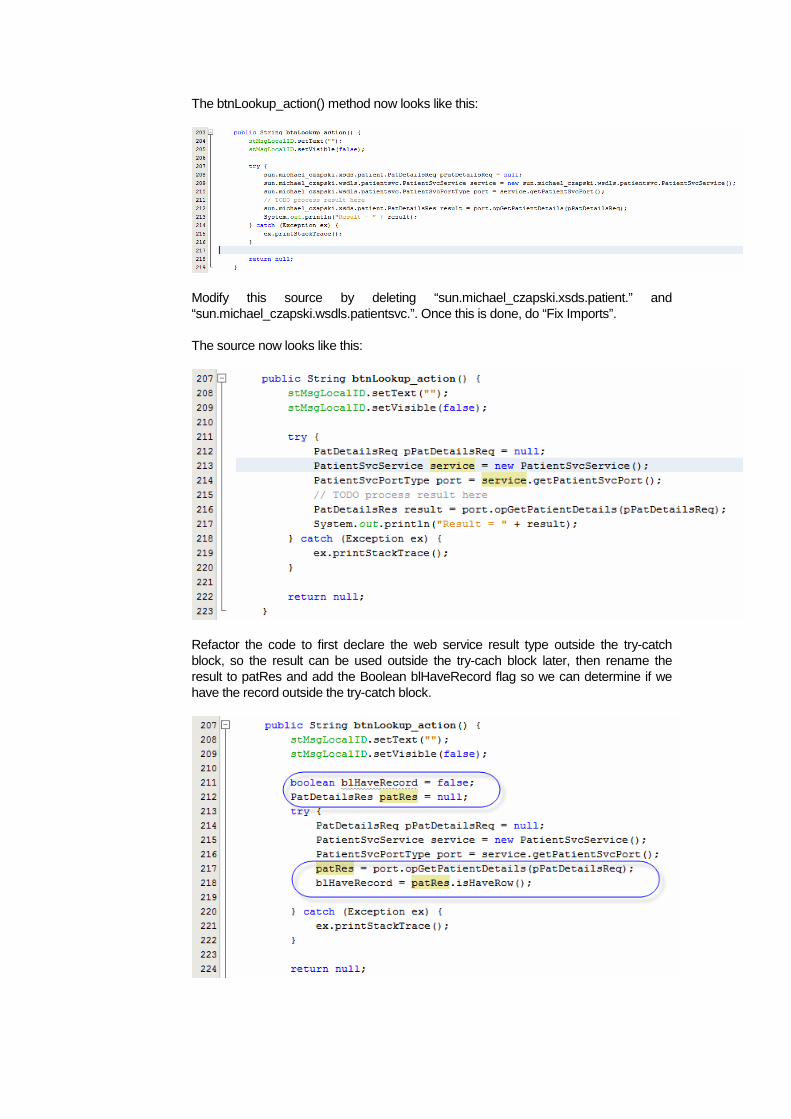
The btnLookup_action() method now looks like this:
Modify this source by deleting “sun.michael_czapski.xsds.patient.” and “sun.michael_czapski.wsdls.patientsvc.”. Once this is done, do “Fix Imports”.
The source now looks like this:
Refactor the code to first declare the web service result type outside the try-catch block, so the result can be used outside the try-cach block later, then rename the result to patRes and add the Boolean blHaveRecord flag so we can determine if we have the record outside the try-catch block.
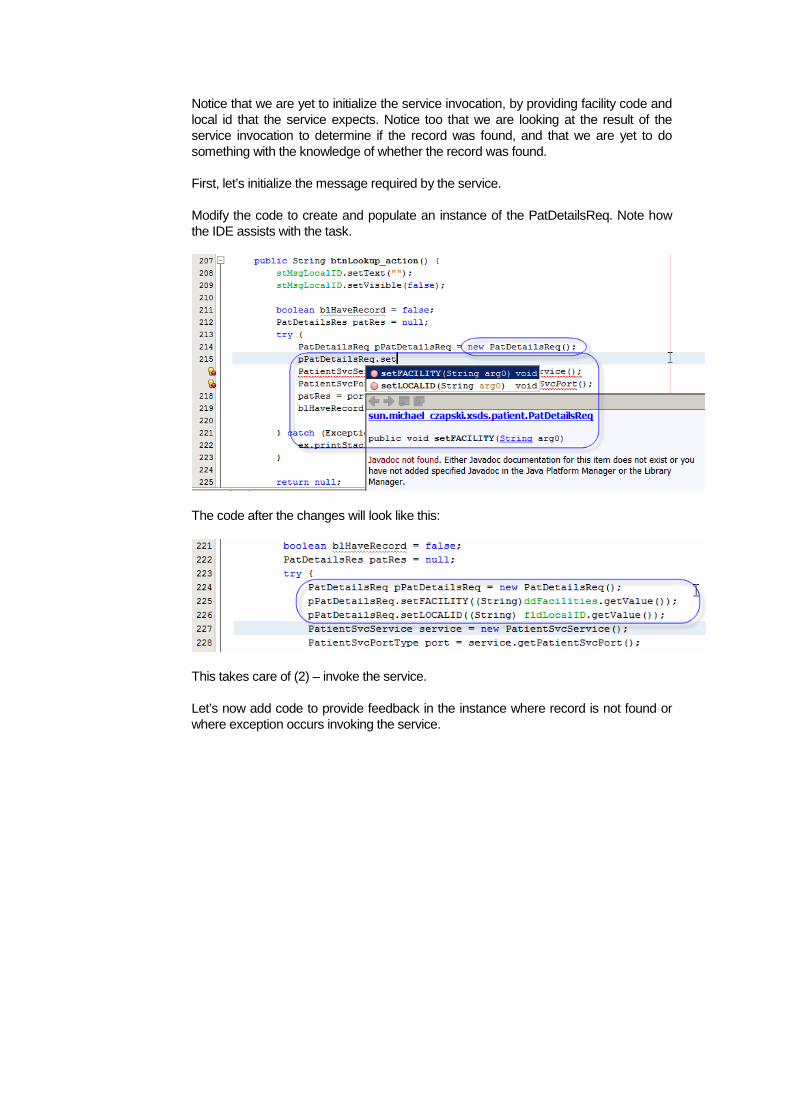
Notice that we are yet to initialize the service invocation, by providing facility code and local id that the service expects. Notice too that we are looking at the result of the service invocation to determine if the record was found, and that we are yet to do something with the knowledge of whether the record was found.
First, let’s initialize the message required by the service.
Modify the code to create and populate an instance of the PatDetailsReq. Note how the IDE assists with the task.
The code after the changes will look like this:
This takes care of (2) – invoke the service.
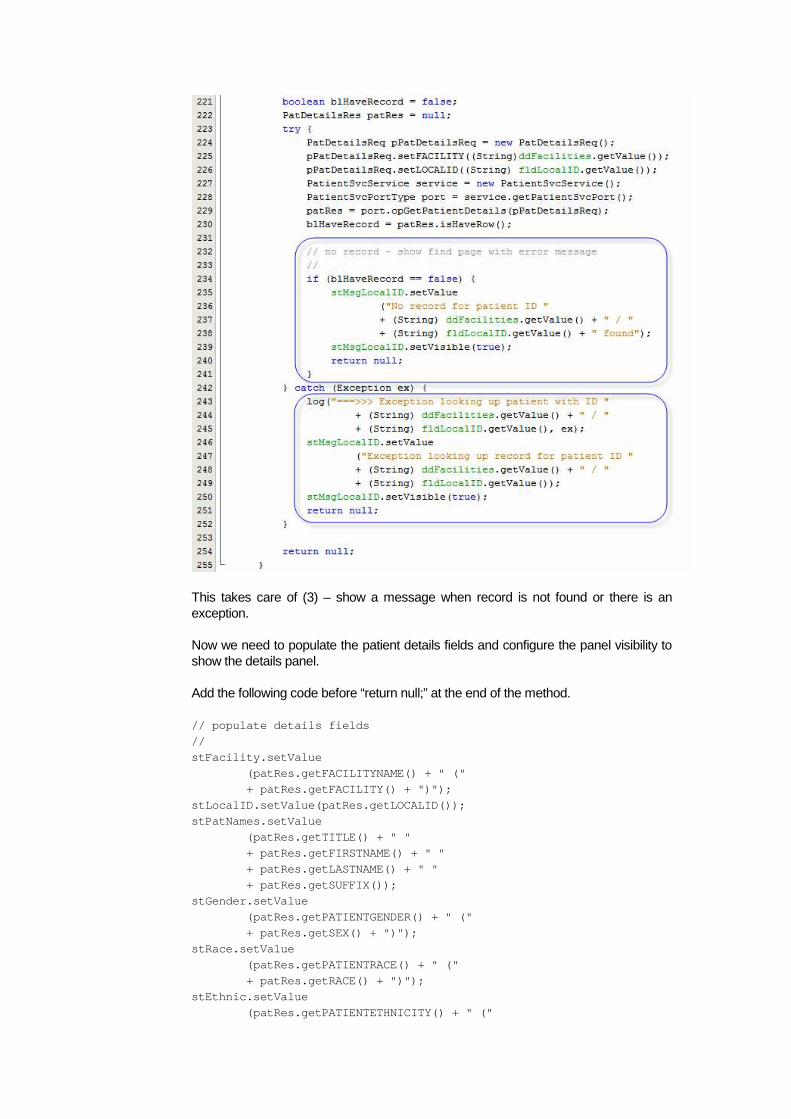
Let’s now add code to provide feedback in the instance where record is not found or where exception occurs invoking the service.
This takes care of (3) – show a message when record is not found or there is an exception.
Now we need to populate the patient details fields and configure the panel visibility to show the details panel.
Add the following code before “return null;” at the end of the method.
// populate details fields
//
stFacility.setValue
(patRes.getFACILITYNAME() + " ("
+ patRes.getFACILITY() + ")");
stLocalID.setValue(patRes.getLOCALID());
stPatNames.setValue
(patRes.getTITLE() + " "
+ patRes.getFIRSTNAME() + " "
+ patRes.getLASTNAME() + " "
+ patRes.getSUFFIX());
stGender.setValue
(patRes.getPATIENTGENDER() + " ("
+ patRes.getSEX() + ")");
stRace.setValue
(patRes.getPATIENTRACE() + " ("
+ patRes.getRACE() + ")");
stEthnic.setValue
(patRes.getPATIENTETHNICITY() + " ("
+ patRes.getETHNIC() + ")");
stReligion.setValue
(patRes.getPATIENTRELIGION() + " ("
+ patRes.getRELIGION() + ")");
stLanguage.setValue
(patRes.getPATIENTLANGUAGE() + " ("
+ patRes.getLANGUAGE() + ")");
stMStatus.setValue
(patRes.getMARITALSTATUS() + " ("
+ patRes.getMSTATUS() + ")");
stAddress1.setValue(patRes.getADDR1());
stAddress2.setValue
(patRes.getCITY() + ", "
+ patRes.getSTATE() + ", "
+ patRes.getPOSTCODE() + ", "
+ patRes.getCOUNTRY());
stSSN.setValue(patRes.getSSN());
stDOB.setValue(patRes.getDOB());
// have data, set to display details
//
lpFind.setVisible(!blHaveRecord);
lpView.setVisible(blHaveRecord);
Reformatted, the section of code will look like this:
This takes care of (4) – populate details.
Finally, complete the btnSearch01_action() method by adding the following code, which will clear the Local ID field, then set the panel visibility to hide the details panel and to show the lookup panel.
The portlet is almost ready.
Switch to the JSP mode, locate the line that starts with “<webuijsf:themeLinks binding="#{PatientLookup.themeLinks1} ", scroll to the far right and remove the text ‘webuiAll="true" ’. This attribute triggers refresh issues with Mozilla Firefox so, if you are using that browser, it is best to remove the attribute.
As you may or may not be aware, if we do nothing further, after the portlet gets deployed it will appear in the User Portlets category in the list of portlets. We would like it to appear in the “HC Portlets” category instead. To do this we need to modify the liferay-display.xml configuration file. Open this file and change the category tag’s name attribute.
Finally, switch to the project view, right-click the name of the project and choose Deploy. This assumes that Web Space Server runtime infrastructure is running.
Once the deployment completes successfully you will see messages similar to the following.
Start your favorite web browser, for example Mozilla Firefox, connect to http://localhost:28080/wss (change port if you use a different one, change portal context if you use different one) and sign in as a portal user. If you have no other user created there is always [email protected] with password admin.
If you worked your way through creation of the Facilities Portlet, discussed in [8], you will have the “HC Portlet” tab – skip this set of steps and proceed straight to adding the portlet to the “HC Portlet” page, otherwise continue on.
Click on Add Page.
Name the page “HC Portlet” and click Save.
Click on the HC Portlet tab to switch to that page.
Now let’s add the portlet to the portal page.
Pull down the “Welcome Admin User!” menu and choose Add Application
Expand User Portlets menu item and drag the HC Portlets -> Patient Lookup Portlet to the canvas.
You may need to right-click on the portlet and choose Reload to get the portlet to display properly.
Our portlet is now visible with facilities in the drop down and the data entry field for the local id.
When creating the Patient Service web service we created and populated a database table with seed data. Some of the facility/local id combinations are:
facility local_id last_name first_name middle_i
nitial
addr1 city state post_c
ode
count
ry
ARMC 0101018 WHITEHURST JULIA (null) 1/97
FARRINGDON
VILLAGE
WERRINGTON
DOWNS
NSW 2747 AU
ARMC 0439334 POHL ANNE-MARIE (null) 164 Edwin
Street North
Croydon NSW 2132 AU
ARMC 0461040 WESTWOOD JOKA (null) 1/97
FARRINGDON
VILLAGE
PENRITH NSW 2750 AU
ARMC 0468815 HARIHARAN JOSE EVASCO (null) 100 SMITH ST ST CLAIR NSW 2753 AU
ARMC 0498727 DEGRENIS DAGWOOD (null) 1/97
FARRINGDON
VILLAGE
NORTH SYDNEY NSW 2759 AU
ARMC 0532821 SANDERS GRACE (null) (null) WERRINGTON NSW 2750 AU
STC 100000 CAESAR JULIUS (null) Foro Romano ROME (null) (null) it
Choose “A RED MEDICAL CENTRE” (ARMC), enter 0101018 into the Local ID field and click Lookup.
In due course details are displayed.
Click the Search button, noting that the Local ID field is cleared. Without entering anything into the Local ID field click the Lookup button. Notice the error message.
Enter a local id which is not in the database, for example 11. Click the Lookup button and notice the error message.
This error message was explicitly set in the btnLookup_action() method when the web service invocation returned with no record.
This is it. This is what it took to develop a portlet, which used the Facilities Service web service and the Patient Service web service as a data providers, and deploy it to the Web Space Server 10 Portal.
Summary
In this document we walked through the process of developing a JSR-286-compliant Visual Web JSF Portlet, deployed to the Sun Web Space Server 10 Portal, which will used the Facility Service and the Patient Service Web Service as a data providers. We used the NetBeans 6.5.1 IDE, which comes as part of the GlassFish ESB v2.1 installation, the Portal Pack 3.0.1 NetBeans Plugin and the JSF Portal Bridge infrastructure provided by the Web Space Server 10. The Portlet was implemented as a Visual Web JavaServer Faces Portlet using JSF components provided by Project Woodstock.
Because the portlet used the web service data providers the interfaces between it and the data stores was defined in the appropriate WSDL definitions. The enterprise, where this portlet is used, can change the implementation of both web services and, as long as the interface does not change, the protlet will not need to change. This is how loose coupling is achieved in Service Oriented Architectures. The portlet is a component in the SOA Layer 1, Presentation Layer.
References
[1] MySQL Community Server and GUI Tools - Getting, Installing and Configuring, at http://blogs.sun.com/javacapsfieldtech/entry/mysql_community_server_and_gui.
[2] GlassFish ESB v2.1 download and installation, https://open-esb.dev.java.net/Downloads.html
[3] Adding Sun WebSpace Server 10 Portal Server functionality to the GlassFish ESB v2.1 Installation, http://blogs.sun.com/javacapsfieldtech/entry/adding_sun_webspace_server_10
[4] Making Web Space Server And Web Services Play Nicely In A Single Instance Of The Glassfish Application Server, http://blogs.sun.com/javacapsfieldtech/entry/making_web_space_server_and.
[5] GlassFish ESB v 2.1 - Creating a Healthcare Facility Web Service Provider, http://blogs.sun.com/javacapsfieldtech/entry/glassfish_esb_v_2_1
[6] GlassFish ESB v2.1, MySQL v5.1 - Creating a Patient Service Web Service Provider, http://blogs.sun.com/javacapsfieldtech/entry/glassfish_esb_v2_1_mysql1
[7] GlassFish ESB v2.1, MySQL v5.1 - Make HL7 v2.3.1 Delimited Messages from Custom Delimited Records with HL7 Encoder and HL7 BC, http://blogs.sun.com/javacapsfieldtech/entry/glassfish_esb_v2_1_mysql
[8] Healthcare Facility Mashup Portlet with Google Map - GlassFish v 2.1, Web Space 10, Web Service and REST Service, http://blogs.sun.com/javacapsfieldtech/entry/healthcare_facility_mashup_portlet_with