44
NetSuite OneWorld Implementation 2011 R2 Thomas Foydel Chapter No. 4 "Nailing OneWorld Basics"

NetSuite OneWorld Implementation 2011 R2
Thomas Foydel
Chapter No. 4 "Nailing OneWorld Basics"

In this package, you will find: A Biography of the author of the book
A preview chapter from the book, Chapter NO.4 "Nailing OneWorld Basics"
A synopsis of the book’s content
Information on where to buy this book
About the Author Thomas Foydel is a veteran of the software and software consulting industries. Tom's work history covers mainframes to Software as a Service. Since 2004, he has been president of SightLines Consulting, focusing on the implementation of NetSuite for organizations in e-commerce, wholesales distribution, software, and professional services. His previous stints with ADP, Oracle, and Ciber Enterprise Solutions laid the groundwork for his strong enthusiasm for Software as a Service and Agile software implementation. Tom has published articles on CRM and ERP in a number of widely read trade journals, and blogs regularly at http://sightlog.sightlinesconsulting.com and http://enterpriseirregulars.com.
This book required about eight months of late nights and weekends. Hopefully, I have not been too remiss in my home responsibilities, especially to my wife, Mary, and daughter, Haley. I feel like this book was a family effort in many ways, so a heartfelt "thank you" to you both, for all your love and support.
I would also like to thank the many NetSuite clients who, over the last seven years, have allowed SightLines the opportunity to understand their unique business models and implement creative solutions with them. Your entrepreneurial spirit is unforgettable.
For More Information: www.packtpub.com/netsuite-oneworld-implementation-2011-r2/book

NetSuite OneWorld Implementation 2011 R2 When I first heard of NetLedger in an internal Oracle e-mail around the turn of the century, it was one of those 'aha' moments that we all have in life. There was, at this time, a fledgling industry of Application Service Providers (ASPs), who offered to host enterprise software at a data center. But I was skeptical, since I could not see an economy of scale in the ASP model, and no economy of scale meant no competitive advantage. NetLedger, I believed, had the right technical and business model: Run multiple customer accounts or tenants on a single instance of the software. The model, now known as Software as a Service (SaaS), was scalable, reliable, and most importantly, competitively disruptive. Over the years, while NetLedger thrived, the ASP model all but disappeared.
NetLedger evolved into NetSuite, and at about the same time, I was ready to make a move out of Oracle Consulting, too. This was 2005, and the past six years have been challenging, successful, and a lot of fun. NetSuite not only continues to update its NetCRM+ and NetSuite offerings, but has added OneWorld to its stable of business management software, allowing it to serve organizations with multiple legal entities.
When the opportunity arose to write a book on OneWorld implementation, I jumped at the chance. I consider it an honor to have a title in the Packt Publishing house, and authorship seems a natural progression for me. I probably have two books this length in my blog articles over the years.
What I hope to accomplish in NetSuite OneWorld Implementation R2 is to provide the business and IT managers at small and medium enterprises with the answers to critical questions about OneWorld: What it is, how it works, and how to implement it from a new account through configuration, testing, customization, data migration, and go-live.
You may be looking at alternative business systems for your organization, or you may be on a OneWorld implementation team or seeking to join one; in any of these cases, this book has useful information that ought to help you participate thoroughly in your role.
To move from a blank screen to a completed book also means that I must take a realistic approach to the project. I cannot possibly answer every question about how the system works. OneWorld is a comprehensive system that covers a wide area of modern business system functionality. Hopefully, if I get you started down a welltravelled implementation path, you will have enough information and momentum to carry forward and establish your business model in your OneWorld account.
For More Information: www.packtpub.com/netsuite-oneworld-implementation-2011-r2/book

One idea that I have juggled with while writing is whether the book suggests that self-implementation is a good idea. Obviously, some organization do opt to implement OneWorld themselves, while others look to NetSuite partners. How you decide this question is your call, but again, I think this book helps you to formulate a strategy for implementation, regardless of the direction you decide to take. In either case, you must eventually have OneWorld system knowledge in house to succeed long term, and I hope this book provides the base understanding of OneWorld for new and experienced users alike.
Finally, while I believe this book will prove very helpful to those who are either in the process of looking at OneWorld for their organizations, or who have already decided on OneWorld, it is not the only resource at your disposal. If you have already purchased OneWorld there is a user forum where you can network with other users to learn more about the system. If you do not yet have access to an account, or you would simply like to pose your question to me, then you can always visit this book's site at http://owimplementation.com and post your question, concern, or issue in the comments section. I would be happy to answer any query or clarify any statement.
System selection and implementation are important challenges for any organization, and perhaps, even more important for small and medium enterprises who have less room for error. I take your challenge seriously and I sincerely hope that NetSuite OneWorld Implementation R2 proves a useful tool for your organization. Nothing would please me more than finding a torn, creased, underlined, notated, dog-eared copy of this book lying on a conference room table of a OneWorld customer.
For More Information: www.packtpub.com/netsuite-oneworld-implementation-2011-r2/book

What This Book Covers Chapter 1, What is NetSuite OneWorld, introduces the reader to OneWorld in the context of business management software. Meant primarily for those who are in the process of assessing OneWorld for their organization, we explain the main functions of the system and how they are used by various business models.
Chapter 2, OneWorld's Foundation, begins our discussion of OneWorld by focusing on the basics, such as navigation and security, and enabling the base functions and preferences of CRM and ERP. We also discuss much of the OneWorld foundation, including departments, classes, locations, and, most importantly, subsidiaries.
Chapter 3, OneWorld Implementation, discusses the implementation process for OneWorld from resources—who needs to be involved—to the actual project tasks that must be completed. We also focus on various implementation challenges and different approaches to implementation. Finally, we spend some effort on explaining agile implementation and why it fits the OneWorld implementation so well.
Chapter 4, Nailing OneWorld Basics, gets us started on the configuration of OneWorld with the view to the first prototype. In this chapter, we start to set up much of the system foundation including the chart of accounts, taxation, and the item catalog. Also, we discuss how to use location, department, and class across the system.
Chapter 5, Nuts and Bolts of OneWorld CRM, covers the configuration of the CRM modules, including sales, marketing, and customer service. We not only discuss the functions of these modules, but also how they are used by various business models and how the modules integrate with the rest of the OneWorld Suite. The reader will gain an excellent idea of how to use the CRM modules to the advantage of the business.
Chapter 6, Nuts and Bolts of OneWorld ERP, discusses the configuration of the operations modules of ERP, including purchasing, order management, inventory and warehouse management, selling and billing services, and e-commerce basics.
Chapter 7, Nuts and Bolts of OneWorld ERP—Financial Management, takes the configurations of the preceding chapter to the next step and covers the financial modules and functions from accounts payable to accounts receivable, from cash management to month-end close. This chapter concludes the work for the first prototype.
For More Information: www.packtpub.com/netsuite-oneworld-implementation-2011-r2/book
Chapter 8, OneWorld Customization and Advanced Configuration, starts the customization of the system with the view to the second prototype. Here we cover the customization of forms and roles, and the addition of fields, records, and workflows. The end result should be a prototype of the system that begins to look like your organization's business model in both concept and detail.
Chapter 9, OneWorld Data Migration, focuses on data migration and how and when to use the various data import tools to migrate data, including both entity and transaction data.
Chapter 10, Data Analysis, looks at data analysis in-depth with a review of search, the report writer, the financial report writer, and data presentation on dashboards.
Appendix, provides additional coverage of the key aspects of OneWorld implementation that we have not discussed so far. In this appendix, we provide some of our experience with the basic blocking and tackling of the implementation, in the hope of giving you a head start to complete your project successfully.
For More Information: www.packtpub.com/netsuite-oneworld-implementation-2011-r2/book

Nailing OneWorld BasicsIn the fi rst three chapters, we laid the groundwork of the OneWorld system and its implementation. Now we will start to dive into the details and start the actual OneWorld confi guration. Again, we will proceed with the confi guration, just as we would in a real implementation. The fi rst step is to take care of several of the basics and confi gure the legal entities with their currencies, languages, countries, and states.
There are also practical reasons to start here. The setup of the Chart of Accounts (COA) requires the subsidiaries to be set up, and the Item catalog depends on the COA, as does the import of the vendor fi le. There are many dependencies like this in OneWorld. We will point them out as we go along, but please understand that it is not a good idea to jump back and forth through the next few chapters, as we have been careful to take as many dependencies as possible into account. So these chapters contain logic, which is not always apparent to a person new to OneWorld.
After we get through some of the basics, we turn our attention to more signifi cant matters. Since the heart and soul of business is the Profi t and Loss (P&L) , the Balance Sheet, and the Cash Flow Statement, the next step is setting up the COA.
The COA is just the fi rst step in the confi guration of the OneWorld fi nancials. There are also the locations, departments, and classes. We started discussing these in Chapter 2, OneWorld's Foundation, and now we will complete a thorough examination of how these 'tags' are used in OneWorld transactions to provide you with fi ner fi nancial, sales, and operation reporting, and metrics.
In this chapter, we also begin to provide our judgment, based on experience, on topics such as when to use auto-numbering in OneWorld and when to avoid it. Of course, it is your account and you must make the fi nal decisions about how best to use OneWorld. Keep in mind though that just because you are offered functionality, it does not mean that you need to use it. Be judicious in your approach to deciding what to implement and what simply makes no sense in your business. A OneWorld implementation always goes smoothly when you have just what you need, neither more nor less.
For More Information: www.packtpub.com/netsuite-oneworld-implementation-2011-r2/book

Nailing OneWorld Basics
[ 106 ]
The major headings of this chapter are:
• Setting up the basics• The chart of accounts• Departments, classes, and locations• Naming and numbering in OneWorld• Advanced taxes• Setting up the Item catalog• Completing the accounting preferences
After completing this chapter, we'll be ready to start looking at actual transactions in OneWorld, and how to process the most important transactions for your organization.
Setting up the basics As we have mentioned at several points earlier in the book, confi guring OneWorld requires a ground-up approach. It is much like building a house. First we need a few basics, such as a foundation with access for water, electricity, and gas. Our foundation is the legal entities and the utilities are the currencies, languages, subsidiaries, and states.
Setting up currencies and currency exchange rates If your organization does business in multiple currencies, you need to set them up in a two-step process. First, make sure that you have enabled multiple currencies, by navigating to Setup | Company | Enable Features, and on the Company tab's International section, click on Multiple Currencies. You may also want to click Currency Exchange Rate Integration, which allows a nightly update of the currency exchange rate table. The alternative is to use the Default Exchange Rate (to root subsidiary currency) on the Currency setup, as seen in the next screenshot. In most cases, you will want to use the auto update.
Once you have enabled the features, you can navigate to Lists | Currencies | New to set up a new currency, as we have done in the following screenshot. Select the Format of the New Currency fi rst, as this fi lls in the Symbol and Format Sample fi elds automatically. Then you can enter the Name and the Default Exchange Rate. Note that the form requires a Default Exchange Rate, even if you plan to use the Automatic Update. If you have enabled the Currency Exchange Rate Integration, the Automatic Update box will have already been checked for you.
For More Information: www.packtpub.com/netsuite-oneworld-implementation-2011-r2/book

Chapter 4
[ 107 ]
This discussion of currencies probably raises questions for you about how you sell your products abroad. If, for example, you are a US-based company reporting in USD, then you can set up your items with a USD price and then use the currency exchange rate table to calculate the sale price per customer, per sales order, based on the customer's currency.
Alternatively, you can set up prices on your items to sell each item for a set amount in each currency in which you want to transact business. In this scenario, you do not use the currency exchange rate table.
The following screenshot depicts the Pricing tab of the Item setup form; item XYZ has a price in USD, because that is the currency of the root subsidiary and it also has a price in Brazilian REAL, and several other currencies. When sold to a Brazilian customer, the system uses the price setup for the REAL on the item pricing. If there is no REAL price, then the system uses the exchange rate table.
For More Information: www.packtpub.com/netsuite-oneworld-implementation-2011-r2/book

Nailing OneWorld Basics
[ 108 ]
Using the currency exchange rate table or setting up prices for each currency on each item is a decision dependent upon your business model. Retail businesses, or wholesale businesses with repeat business to the same customers, might want to set prices. However, if you sell on a one-time basis to other businesses or retail customers, you might want to use the currency exchange rate table. Many service-based organizations may wish to sell with the benefi t of currency exchange rates. It's a decision you need to make.
Setting up states/provinces/counties If you have a subsidiary in Brazil, then you must set up the Brazilian states in the system prior to setting up the subsidiary. Navigate to Setup | Company | States/Provinces/Counties and click New. Then you fi ll out the form, as shown in the following screenshot:
You can use a different short name if you wish, but it is not required. Now that we have our states and our currencies, we can get started with setting up the subsidiaries.
Setting up your organization's structure In Chapter 1, What is NetSuite OneWorld?, we introduced the idea of the organization's structure and suggested that you start putting this together in working format, so that when the time came to begin the OneWorld confi guration, you had the structure handy.
We should note here that OneWorld comes with a root subsidiary in your country, currency, and language (unless you specify otherwise to your sales person). If your organization is headquartered in Canada, then your root subsidiary will be based in Canada with the Canadian Dollar as its currency, and English or French as its language.
For More Information: www.packtpub.com/netsuite-oneworld-implementation-2011-r2/book

Chapter 4
[ 109 ]
We should also note here that subsidiary is the term used in OneWorld to describe every legal entity that is part of your organization, even the top-level holding company.
The fi rst thing to do is to open up your root subsidiary and then verify and complete the information. Navigate to Setup | Company | Subsidiaries and click on Subsidiaries. A form, like the one in the following screenshot, opens up:
This is known as the root subsidiary. Every OneWorld account comes with a root subsidiary. You can edit some of the information on this form and add information where needed. Notice that there is no fi eld for Subsidiary of, as there will be when we start to set up the rest of the subsidiaries.
Also note that this subsidiary has an intercompany account. OneWorld generates this account automatically for organizations that use the Intercompany Time and Expense option. These are normally service companies that have consultants who are employed by one subsidiary, but who may also work on projects in another subsidiary. If you do not have this option turned on, then you will not see this fi eld after saving the record. If you do have this option turned on, then you will see an intercompany account generated for each subsidiary you save. In the next section of this chapter, on the chart of accounts, you will learn how to complete the setup of this account for your books.
For More Information: www.packtpub.com/netsuite-oneworld-implementation-2011-r2/book

Nailing OneWorld Basics
[ 110 ]
Once your root subsidiary is correct, turn your attention to the other subsidiaries in the organization. Continue working from top to down, so that you can set up the hierarchy with the Subsidiary of fi eld, as depicted in the following image:
Notice that in the Subsidiary of fi eld, we chose HEADQUARTERS as the root subsidiary. This makes our Brazil Division a child of the root, thus establishing the hierarchy. Each additional subsidiary added to the system generates a subsidiary record at the a subsidiary record at the same level as or at a lower level than the Brazil Division.
Editing subsidiariesMake sure your data is correct before saving your subsidiaries; there are some fi elds such as Currency and Country that are not editable after you save. As you might have learned in your youth, measure twice and cut once. It's still good advice.
In the previous screenshot, note the list of languages in the pull-down menu. This is the current list of languages supported by OneWorld.
Also in the previous screenshot, there is a checkbox for Elimination. Depending on how your organization operates, you may need to add elimination subsidiaries to your hierarchy, in order to eliminate the value of transactions that take place between subsidiaries. As OneWorld rolls out automatic intercompany processes such as Intercompany Time and Expense or Intercompany Inventory Transfer Orders, there is less need for elimination journals, but one-off intercompany transactions are not unusual. If you want to use the Intercompany auto elimination feature, a best practice, you must setup an elimination subsidiary at every level of your hierarchy.
For More Information: www.packtpub.com/netsuite-oneworld-implementation-2011-r2/book

Chapter 4
[ 111 ]
So how do subsidiaries work? Before we go any further with the setup of the organization's subsidiaries, we would do well to stop and understand the complexity of the subsidiary functionality. We have created the following table to organize these ideas in a way that you can easily understand and refer to, as you move forward with the implementation:
Element Subsidiary treatment Customers A customer belongs to one and only one subsidiary. If
you have multiple subsidiaries doing business with the same customer, then you must set up a customer record for each subsidiary.
Projects Projects follow the subsidiary of the parent customer.Subcustomer Child customers must belong to the same subsidiary as
the parent.Vendors A vendor belongs to one and only one subsidiary. If multiple
subsidiaries are doing business with one vendor, then you must set up a vendor record for each subsidiary
Employees Each employee belongs to one and only one subsidiary. If an employee belongs to one subsidiary and works on a project belonging to another subsidiary, then their time and expenses generate an intercompany transaction.
Contacts Contacts belong to one and only one subsidiary. However, it is possible to link a contact from subsidiary A to a customer in subsidiary B. If you must set up the same customer for two subsidiaries, then they can share a single contact.
Partners A partner belongs to one and only one subsidiary. Each customer that the partner sets up in the system belongs to the same subsidiary as the partner.
Accounts An account may belong to one or more subsidiaries. You can restrict the subsidiaries, if needed. Major exception: Bank and credit card accounts belong to one and only one subsidiary. Also, your elimination receivable and payable accounts should be linked to just one subsidiary.
Items An item may belong to one or more subsidiaries. You can restrict the subsidiaries, if needed.
Sales order A sales transaction belongs to the same subsidiary as the customer; this includes all upstream transactions such as opportunities and quotes, and downstream transactions such as fulfi llments, invoices, billings, and payments.
Purchase order A purchase order belongs to the same subsidiary as the vendor; this includes all upstream and downstream transactions, such as requisitions, receipts, and bills.
For More Information: www.packtpub.com/netsuite-oneworld-implementation-2011-r2/book

Nailing OneWorld Basics
[ 112 ]
Element Subsidiary treatment Roles The delivered standard roles restrict records by the subsidiary
of the user, from the user's employee record. For example, the accountant role restricts access to records, by the subsidiary of the employee using the accountant role. If the accountant belongs to the Australian subsidiary, then he/she sees only the customers and vendors that also belong to the Australian subsidiary, and by the same token, he/she sees only the transactions of those customers and vendors.
Custom roles may have custom subsidiary restrictions. Giving the custom accountant role access to all of the APAC subsidiaries allows the accountant to see not only Australia, but also all of the records in New Zealand, Malaysia, and Japan, for example, and all of the transactions, too.
Locations Locations belong to one and only one subsidiary. This means that inventory belongs to a subsidiary and you receive inventory into a location of the subsidiary and release it from a location of a subsidiary. If need be, you can transfer inventory from one subsidiary to another (See Intercompany Inventory Transfers).
Departments and classes Departments and classes may be used by one or many subsidiaries, depending on what you select in their setup. There are no restrictions, except the ones you require.
Commission schedules Each commission schedule belongs to one and only one subsidiary. The employee must have access to the subsidiary of the customer through their role, and the customer must share the same subsidiary as the schedule, in order to calculate commissions.
Finally, we should note that OneWorld provides several functions for managing intercompany transactions. There are intercompany inventory transfers and intercompany time and expense. For other transactions there is also an intercompany journal which you can auto eliminate. We will discuss this more in Chapter 6, Nuts and Bolts of OneWorld ERP.
We have now completed the fi rst few steps in the OneWorld confi guration. Establishing your organization's hierarchical subsidiary setup is the fi rst major step toward eventually transacting business in the system. The previous table should serve the purpose of helping you to understand how OneWorld treats various elements in the context of subsidiaries, and it should also restrain any inclination to build a hierarchy substantially different from your actual legal subsidiaries.
For More Information: www.packtpub.com/netsuite-oneworld-implementation-2011-r2/book

Chapter 4
[ 113 ]
The chart of accounts When you fi rst open up your new OneWorld account and navigate, as the administrator, to List | Accounting | Accounts and click Accounts, you will see the delivered accounts. OneWorld comes with a basic list of accounts that any organization using OneWorld should probably have. These include a bank account, accounts payable, accounts receivable, income, cost of goods sold, and an expense account. There are also some accounts that OneWorld uses to manage certain transactions, such as the Inventory received not billed account, which is used to post the value of inventory until you bill the purchase order.
In the next screenshot, we want to point out that there are different ways of looking at the list of accounts. Notice in the image that we turned off Report Style in the footer, which adds the Edit column, and we selected the All option in View, adding the Type column.
Of course, when you fi rst open up this view in OneWorld, you have just a few accounts and they all have a zero balance.
For More Information: www.packtpub.com/netsuite-oneworld-implementation-2011-r2/book

Nailing OneWorld Basics
[ 114 ]
We make it a practice to use all of the delivered accounts that the business model requires. This means that we open them up one at a time and make the changes to them that our COA requires. In the following screenshot, we have opened up the delivered bank account. We changed the name, number, and some of the other information.
Some fi elds of note on the Chart of Accounts form, in the order of importance, are as follows:
1. Type: Each account must have a type. This is a OneWorld list that cannot be edited. You cannot change the Type after saving the record. If you make an error, you must ask the administrator to delete the account and then start over. Alternatively, you can make the account inactive.
2. Currency: The delivered accounts come in the currency of the account owner and cannot be changed. Also, after saving a new account, you cannot change the Currency.
3. Subsidiaries : The delivered accounts come in the subsidiary of the account owner, the root subsidiary as it is called. If the account works for all subsidiaries, you can click the Include Children box. This has the advantage of allowing all subsidiaries to use the account and also any future subsidiaries that you might add over time. Alternatively, you could select one or more subsidiaries from the multiple select list. Be aware that the subsidiary may not change after you use the account in a transaction.
4. Restrict to (Department, Class, Location) : These options are for security. To prevent some users from using an account, you can lock it down to users of a specifi c department, class, or location. This restriction must also be set on the user's role.
5. Subacccount of : This fi eld provides the functionality for account rollups. Remember that OneWorld rolls up accounts, by type, in the delivered fi nancial reports.
For More Information: www.packtpub.com/netsuite-oneworld-implementation-2011-r2/book

Chapter 4
[ 115 ]
6. 1099-MISC Category : If you are paying 1099 vendors, this fi eld is one of the required setups. Select a category from the drop-down list. In order to pay a vendor as a 1099 Contractor, you must associate an account with a 1099 category, make the vendor a 1099 contractor, and then add expenses lines to the vendor bill that charges a 1099 account.
There are several other fi elds on the form, and you'll notice that the fi elds change with different account types. If you have further questions, click on the label for the fi eld, or click on Help for instructions on the form and all of its fi elds.
In most cases, the implementation team adjusts the delivered accounts, adding the correct numbers, for example, and then imports the rest of the accounts through the Import function. We cover data migration and the import tool in detail in Chapter 9, OneWorld Data Migration.
Managing accounting periods At Setup | Accounting | Manage Accounting Periods, you will fi nd the current year opened with its fi scal quarters and periods. OneWorld comes with the fi rst year setup. As we are going to start testing transactions shortly, we suggest that you click the Set Up Year button and add a new year, especially if you are using billing schedules, revenue recognition, or amortization, since these transactions require the periods over which the schedules stretch to be open.
Departments, classes, and locationsOne of the most important questions in the early stages of the implementation is how the organization would like to see operational and fi nancial results. Of course, you can see the general ledger impact through the COA and the fi nancial reports, but often a high-level view does not have the detail necessary for decision making, and the G/L is not the place for every detail of the business, nor does it provide the trending data you might require.
The alternative to a granular G/L is the use of departments, classes, and locations. These fi elds can be used to tag your transactions and add further information that can be very useful when trying to understand business results and plan strategy. Instead of having income accounts for each major project line, you may, for example, opt to have multiple product lines expressed in the Class fi eld, giving yourself the option of looking at sales results across many product lines, while preserving the G/L's focus on the whole organization.
For More Information: www.packtpub.com/netsuite-oneworld-implementation-2011-r2/book

Nailing OneWorld Basics
[ 116 ]
Departments, classes, and locations not only tag your transactions, but also your employees and partners. For both partners and employees, the department, class, and location fi elds serve a security function, permitting or preventing them from seeing entity and transaction records in the system. For employees, the department, class, and location fi elds may also tag their time and expense transactions. We discuss security in detail in Chapter 8, Advanced Confi guration. For the current discussion, let's focus on how to tag our transactions.
It's also important to recognize that the behavior of the department, class, and location fi elds depends signifi cantly on where they are used on your transaction forms. A transaction form has two parts: the main line or header part where all of the data resides relating to the entity—a customer, a vendor, or an employee, or to this particular transaction such as tax rate, discount, and so on; and the line item columns, where all of the items or expenses related to the transaction are listed. We cover both business cases next. To set up departments, classes, and locations, navigate to Setup | Company | Classifi cations.
Apart from tagging transactions and providing additional security to the system, the department, class, and location fi elds are also used in commission schedules and other areas. If you have additional modules in your OneWorld account, take a look at how they use these fi elds before making your fi nal decisions.
Lastly, we should mention that before you make all of your Department, Class, and Location fi eld decisions, there are also some other ways to use OneWorld for reporting business results that are sometimes overlooked. One important method is the item hierarchy. When reporting sales by item, the system follows your hierarchy. If a group of items is the 'Child of' another item, the system reports sales results by parent and by child. This method often answers some important questions about what you are selling by looking at a multi-level item hierarchy.
Also, it is possible to tag customer records with a category, so that you can categorize sales by this fi eld, as in what industries you sell to, such as healthcare, education, commercial, and so on. This requires that you bring the category forward from the customer record to the transaction records, but this can be done with a little advanced confi guration.
Locations Let's look at locations fi rst, since these are probably the easiest category to understand for the simple reason that locations are where you keep inventory. If your organization buys, sells, assembles, kits, or otherwise manages, inventory, then you have one or more locations where this activity takes place.
For More Information: www.packtpub.com/netsuite-oneworld-implementation-2011-r2/book

Chapter 4
[ 117 ]
When you enable the features of your OneWorld account, there is an option for Multiple Locations. Navigate to Setup | Company | Enable Features, and open the Items and Inventory tab. Our recommendation is that you enable Multiple Locations, even if you have only one actual physical inventory location. Eventually, you will need to add another location, even if only for returns, and it's much easier to start with multiple locations than to change later. Also understand that once you turn on Multiple Locations and begin using the system, you cannot turn it off.
The idea is simply to purchase inventory into a location and sell it from a location. In between the purchase and the sale, the inventory may be transferred or distributed from one location to another.
In the context of OneWorld, the location fi eld has two important caveats. First, for any organization using OneWorld's Inventory feature, each location belongs to one and only one subsidiary. On the purchase side, this means that the vendor and the receiving location must both belong to the same subsidiary. Likewise, on the sale side, the customer and the location from which the order is being fulfi lled must belong to the same subsidiary.
If you receive goods into a location that belongs to the Canadian subsidiary and you want to sell to a customer who belongs to the US subsidiary, then you must fi rst perform an intercompany inventory transfer, moving the goods from the Canadian subsidiary's location to the US subsidiary's location.
Second, let's also note that locations are not linked directly to G/L accounts. The value of the inventory on the books follows the item setup; you must select an asset account when you set up the inventory item. As a result, the G/L account value is independent of the location. However, you can run reports that detail the value of inventory, by subsidiary and by location.
Any location may have one or more children. The Australian location may have child locations in Sydney and Perth. If you need to move inventory from Perth to Sydney, then you can do a simple inventory transfer, since they belong to the same subsidiary, and not the more complex intercompany inventory transfer. You may also bring inventory into the Australian location, and then distribute it to Perth and Sydney.
For More Information: www.packtpub.com/netsuite-oneworld-implementation-2011-r2/book
Nailing OneWorld Basics
[ 118 ]
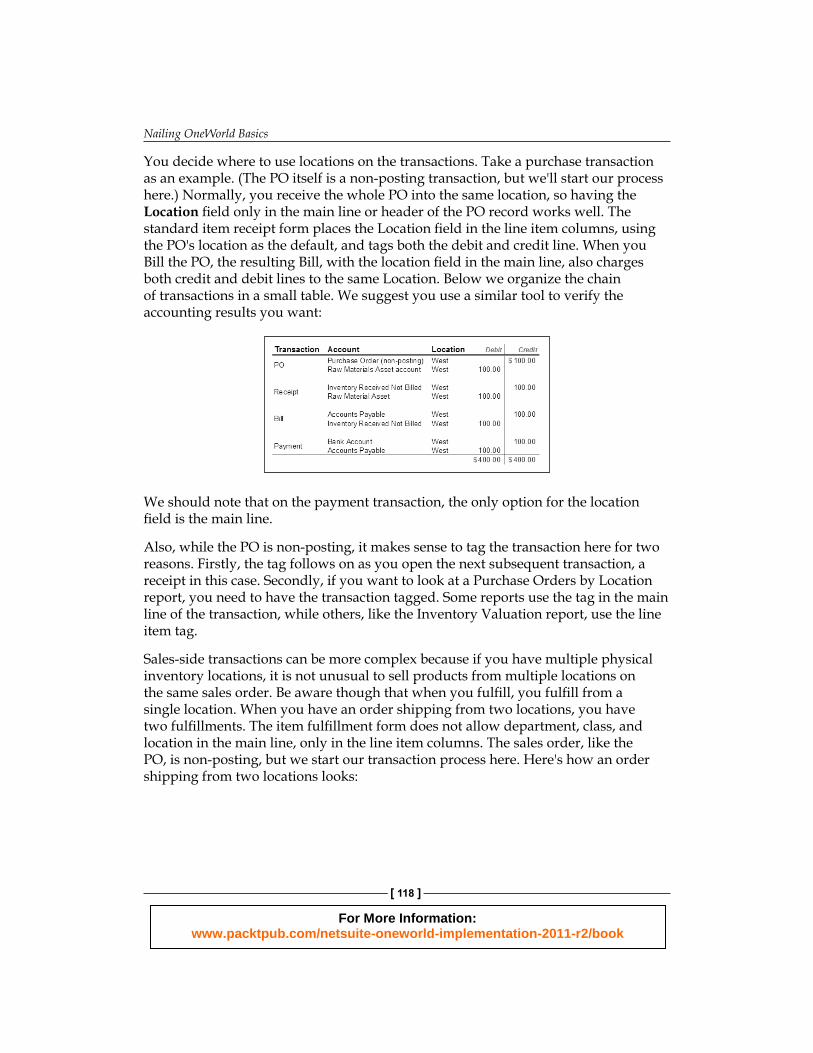
You decide where to use locations on the transactions. Take a purchase transaction as an example. (The PO itself is a non-posting transaction, but we'll start our process here.) Normally, you receive the whole PO into the same location, so having the Location fi eld only in the main line or header of the PO record works well. The standard item receipt form places the Location fi eld in the line item columns, using the PO's location as the default, and tags both the debit and credit line. When you Bill the PO, the resulting Bill, with the location fi eld in the main line, also charges both credit and debit lines to the same Location. Below we organize the chain of transactions in a small table. We suggest you use a similar tool to verify the accounting results you want:
We should note that on the payment transaction, the only option for the location fi eld is the main line.
Also, while the PO is non-posting, it makes sense to tag the transaction here for two reasons. Firstly, the tag follows on as you open the next subsequent transaction, a receipt in this case. Secondly, if you want to look at a Purchase Orders by Location report, you need to have the transaction tagged. Some reports use the tag in the main line of the transaction, while others, like the Inventory Valuation report, use the line item tag.
Sales-side transactions can be more complex because if you have multiple physical inventory locations, it is not unusual to sell products from multiple locations on the same sales order. Be aware though that when you fulfi ll, you fulfi ll from a single location. When you have an order shipping from two locations, you have two fulfi llments. The item fulfi llment form does not allow department, class, and location in the main line, only in the line item columns. The sales order, like the PO, is non-posting, but we start our transaction process here. Here's how an order shipping from two locations looks:
For More Information: www.packtpub.com/netsuite-oneworld-implementation-2011-r2/book

Chapter 4
[ 119 ]
We had the Location fi eld set at both the main line and the line item columns in the sales order and the invoice, allowing us the output above.
Some important points to consider here: The income statement is correct as revenue and cost of goods sold each fl ow to the correct location; the balance sheet, however, is going to be off for both locations. Running balance sheets based on department, class, and location is diffi cult, unless all of your transactions have these fi elds in the main line only. In the example above, if both items had shipped from the West location, and we charged all revenue to the West location, the balance sheet would be fi ne for the West location.
This may be a moot discussion for you, since it is more common to look at income statements by department, class, and location, and rare to try to look at balance sheets by these metrics. Also, our split order above does provide correct results for the Inventory Valuation report by location, as one example, as we have correctly tagged the two fulfi llments.
Lastly, when you create the location records, you determine whether or not the inventory is available for sale, and whether or not it is available in your web store, should you have a web store. These are two important distinctions deserving some thought. For example, if you have breakage that happens in the warehouse or that is returned to you, you can store it in a location, from which you do not resell it. By deselecting the Available for Sale option on the Location setup form, your operations team does not see this inventory when fulfi lling orders, preventing accidentally sending items in need of repair to a customer, or simply having the impression that sellable inventory levels are higher than they are.
For More Information: www.packtpub.com/netsuite-oneworld-implementation-2011-r2/book

Nailing OneWorld Basics
[ 120 ]
Departments and classes Departments and classes are less easily implemented than locations, for the simple reason that they are less defi ned by OneWorld. In other words, while they are easy to confi gure, their use and function are less well defi ned and follow your defi nitions. We have seen OneWorld accounts setup with widely varying defi nitions of these fi elds. What's right for you really depends on your reporting or security requirements. It is often diffi cult for an implementation team member to come up with these defi nitions, but with a little knowledge of these fi elds and a strong understanding of your own business, you can usually make these decisions without issues.
First, understand that the names 'Department' and 'Class' can be changed to fi t your needs. Departments are often profi t or cost centers, while classes may be a line of business, product line, service line, or revenue type; these are just a few of the labels that we have seen.
Second, these fi elds can be used on either the main line of the transaction, or in the line items, as we saw in our location discussion above. You may decide to use the department in the main line of the sales order and use the class in the line item columns, depending on your requirements.
When using one of these fi elds, like Class, for example, in the line item columns, it's common to set up the fi eld on the item record. This has the advantage of allowing you to select an item on a transaction line, and then have the class fi eld, for example, default from the item record automatically. If you sell light fi xtures and wish to report out sales fi gures based on the class of lights, then link a class to each item. Each time you select an item on a sales document, the class fi eld populates automatically. However, if you have your forms set up for line item columns entry of the class fi elds, and you have not populated the class fi eld on the item records, then you will have to select a value for this fi eld for each line item, a task for which your sales people may not have the patience.
The following image details how department, class, and location follow the G/L charges of an invoice with two items:
For More Information: www.packtpub.com/netsuite-oneworld-implementation-2011-r2/book

Chapter 4
[ 121 ]
Hopefully, these examples help you to begin formulating some ideas about how to set up the departments, classes, and locations. Keep in mind that while sales-side transaction forms might have a location at the line item, purchase-side transactions could very well have the opposite (location at the main line). Obviously, there are several decisions to make here, and the next table might be useful. We fi lled it in with sample data for an organization selling software and hardware. Perhaps a table like this will help you to formulate your organization's department/class/location fi elds:
Element What Dimension
Parent and Child
Sales Forms Purchase Forms
Department Sales: St Louis
Sales: Austin
Operations: St Louis
Operations: Austin
Sales: Sydney
Yes Main Line Main Line
Class Sale Type:
Channel: New Business
Channel: Upsell
Channel Renewal
Direct Sales: New Business
Direct Sales: Upsell
Direct Sales: Renewal
Yes Main Line Main Line
Location St Louis
Austin
Sydney
No Line Item Main Line
It is possible to make department, class, and location mandatory, either by setting the preference at Setup | Accounting | Accounting Preferences | General, or by making the fi elds mandatory per transaction form, which is more fl exible.
For More Information: www.packtpub.com/netsuite-oneworld-implementation-2011-r2/book

Nailing OneWorld Basics
[ 122 ]
Naming and numbering in OneWorld We mentioned previously that NetSuite allows you to rename many of the fi elds in the system to suit your business model. Customers can be renamed Clients, Sales Orders can be renamed Pro Forma Invoice, and Employees can be renamed Associates. It's really up to you. To get the idea, navigate to Setup | Company | Rename Records/Transactions. On this form, you can rename the entities and transaction types, as shown in the following screenshot:
This is a fairly straightforward process. Changes that you make here will cascade to all parts of the system. Should you change Customer to Client, you will see the word Client in every area of OneWorld, for example. Also, the transaction abbreviations are used in several areas of the system; change them carefully. Normally, transaction name changes are only required in one or two instances per account. Don't feel that you have to make changes just for the sake of making changes. Estimates, for example, are known as quotes in some industries, or as proposals in others.
After deciding on your naming conventions for OneWorld, navigate to Setup | Company | Auto-Generated Numbers. Here, you control the auto-numbering of both entities and transactions.
For More Information: www.packtpub.com/netsuite-oneworld-implementation-2011-r2/book

Chapter 4
[ 123 ]
Your fi rst question should be Do we need to number our entities? A OneWorld account owner might number their customers if, for example, they have a business-to-consumer model with the possibility of a duplicate Mary Browns. In this case, customer numbering makes sense. There is less of a case to make for an organization that sells business-to-business, as it would be highly unlikely to have multiple business customers with the same name. If you number customers, then you also number sub-customers and projects.
It is rare to number vendors or partners, though it can happen in certain instances. Employees are again a call that only you can make, but if you have several hundred employees, then there may be decent chance that you have two Jose Gonzalezes.
Numbering transactions is a more common requirement, and one that makes perfect sense. The next question is Do you want to use a prefi x for the transaction as well? We have seen everything from INV 999 to Inv2010 999. If you do use intelligence in your numbering, which frankly is unnecessary overkill, you may need to change it manually once a year.
There is also the possibility of using subsidiaries or locations as a prefi x to transactions. For example, you could use the prefi x BR for all transactions under the Brazilian subsidiary. The auto-numbering still happens, so your sales order is now SO-BR-999. You have to set this up on either the location or the subsidiary record, and also on the Auto-Generated Numbers form; there is a radio box you must click. In the following screenshot, we set up the sales orders to use the Prefi x SO-, have four numbers, start with 0, and Use Subsidiary is set to yes (clicked). As a result, OneWorld added the subsidiary code "USW."
You can also number some of the CRM data, such as Cases; this is recommended if you have a customer service department and schedules such as Revenue Recognition Schedules, again recommended if your business model has a lot of deferred revenue schedules.
For More Information: www.packtpub.com/netsuite-oneworld-implementation-2011-r2/book

Nailing OneWorld Basics
[ 124 ]
Keep in mind that naming and numbering OneWorld should, like all other tasks, focus on your business requirements. We have seen some customers who get carried away on these tasks and it is a real pain to change your decisions after you have a lot of data in the system. You can change your decisions, but it is not painless.
Advanced taxes Turning on Advanced Taxes for calculating sales tax is nearly a universal requirement for OneWorld customers. Even a service company operating under multiple legal entities in a single country, such as the US, requires multiple nexuses. You turn on the Advanced Taxes option by navigating to the Setup | Company | Enable Features | Accounting tab, and clicking on the Advanced Taxes option.
The advantages of Advanced Taxes include the ability to have multiple nexuses, each of which might treat a sales item's taxability differently, by virtue of tax schedules, and the ability to calculate complex sales taxes, such as the VAT taxes of Europe and Canada.
Essentially, when you turn on Advanced Taxes, the system allows you to generate multiple nexuses. A nexus is simply a tax jurisdiction, which carries certain taxability rules. For example, in the US, every state is a nexus. When you establish your countries and states, as we did in the previous chapter, and then use them to fi ll out the subsidiary record, the system automatically generates a tax nexus. You then manually add the other tax nexuses that your organization requires. You may not have a legal entity in every state, but since you have a sales person living and selling there, you may have to set up a tax nexus.
After completing your subsidiary structure, navigate to Setup | Accounting | Setup Taxes, where you can see all of the nexuses that have been generated by country, as shown in the following screenshot:
For More Information: www.packtpub.com/netsuite-oneworld-implementation-2011-r2/book

Chapter 4
[ 125 ]
In some cases, the nexus is the country, and in others, such as the US, you must set up the states as nexuses, since each of them has their own sales tax regimen.
There are also several other decisions to make on this form. Each country tab has a different set of questions. Go to the tab and then click the Help link at the top of the page to learn more about each country's tax setup.
Setting up a Nexus at Setup | Accounting | Nexuses | New is straightforward, as depicted in the following screenshot:
Once you set up the nexus, you can set up the following:
• Set up a vendor record for each nexus and set the vendor category to Tax Agency. This allows you to select the vendor record in the preferred tax agency fi eld on the Setup Taxes form.
• Enter your company's tax number in the vendor record's Account fi eld.
For More Information: www.packtpub.com/netsuite-oneworld-implementation-2011-r2/book

Nailing OneWorld Basics
[ 126 ]
• For each nexus, the system generates a tax control account. For the Colorado nexus that we set up in the previous screenshot, the system generated Sales Tax Payable CO. This account now appears in your G/L, so navigate to your Chart of Accounts, Setup | List | Accounting | Accounts and provide the account with a number.
• Finally, set up your Tax Schedules, under Setup | Accounting | Tax Schedules. The Tax Schedules are what you use to link your nexuses to the taxability of the items you buy and sell. For example, shipping charges that appear on sales documents are taxable in some jurisdictions and not taxable in others. To solve this problem, set up a Tax Schedule for shipping items and specify in the setup the nexuses which tax shipping and the nexuses which do not. Then link this new schedule to all of your shipping items. Follow the same process for other items that you sell. The following screenshot shows how the tax schedules work; on the US Nexuses tab we select all the states where the Product is taxable; and on the Non Us Nexuses tab we can select a different tax code for both purchase and sale transactions:
For More Information: www.packtpub.com/netsuite-oneworld-implementation-2011-r2/book

Chapter 4
[ 127 ]
For US subsidiaries, you also need to import the sales tax tables (unless you are using a third-party tax provider). Running this process, from Setup | Accounting | Import State Sales Tax Tables, brings into the system all individual tax codes used in a state. If you decided to use Tax Groups, that is, a set of tax codes for a particular address (for example, New York State code plus New York City code is a tax group), the system imports all of the tax codes and groups them for you.
You will also notice that on the Tax Schedule form , the VAT taxes require not only a sales tax code, but also a purchase tax code also.
Advanced Taxes take a fair amount of time, and for some countries, may require extensive manual setups. For the US states, you can import tax tables into the system. If you need to add other tax codes or groups, you may have to enter them manually, so make sure that you plan this task accordingly.
Setting up the Item catalog We are getting very close now to having a OneWorld system confi gured to the point where we actually run transactions. All of the work that we have done prior to the Item catalog setup was with the goal of transaction processing in mind, of course. Now with the Item catalog looming before us, let's understand what we have done so far and what's required for the next steps.
In many respects, the Item catalog is the crux of the system. The system behavior of what we buy (be it hours, widgets, or transportation services) and what we sell (again, anything under the sun that might be described as a product or service) results from how we set up the Item catalog, because many functions of the system intersect in the item setup.
For example, item behavior depends directly or indirectly on the subsidiaries, departments, classes, locations, chart of accounts, tax schedules, and units of measure confi gured in the system. Without these confi gurations, you cannot start to enter the catalog.
The Item catalog is the most important of the basic setups of OneWorld. In the following discussion, we try to lay out some of the important considerations you should keep top of mind before moving forward.
For More Information: www.packtpub.com/netsuite-oneworld-implementation-2011-r2/book

Nailing OneWorld Basics
[ 128 ]
Item types Let's start by taking a closer look at the item type. Navigate to Lists | Accounting | Items | New. This page displays a list of all the item types available to your account. You probably do not see all of the items in the following list, because you either have not purchased a module, such as Advanced Inventory, or you have not enabled a feature of the system. We cover the most popular item types as follows:
• Assembly/Bill of Materials : These items are produced from a number of member items, which are normally inventory items, but could be non-inventory or even other assemblies. An assembly tells the system which member items it requires and their quantities. The cost of the assembly is the sum of the costs of the member items. When you build an assembly, OneWorld credits the inventory of the member raw materials and decrements their counts. Likewise, the system debits the inventory of the fi nished assemblies and increments their count. After building an assembly, you can transfer it between locations or between subsidiaries. Assemblies can have any costing method: FIFO, LIFO, Standard, or Average.
° Serialized: This is an assembly sub-type and simply means that you are going to serialize every assembly you build with a unique number. Serialized assemblies operate much the same way as assemblies, the only difference being that a serialized assembly is always the top level; a serialized assembly can never be a member of another assembly. It is, however, possible for assemblies to be members of a serialized assembly. Serialized assemblies have specifi c costing, meaning that each serial-numbered unit has a specifi c cost , or alternatively standard costing.
° Lot Numbered: This is another assembly sub-type. Lots not only have a unique alpha-numeric identity in the system, but also an expiration date. Lot inventory is normally used for perishable goods. Lots use Lot Costing, meaning that every lot has its own cost or, alternatively, standard costing.
• Inventory Item : These are items that you have in stock, or possibly items that you drop ship, but may occasionally have in stock. Inventory items are purchased and used as members of assemblies, sold as members of kits or groups, or sold by themselves. They can use FIFO, LIFO, Standard, or Average cost methods (or Specifi c and Lot Costing, in the case of serialized inventory and lot inventory, respectively) and they may use a Unit of Measure. Apart from individual inventory items, there are also the following:
For More Information: www.packtpub.com/netsuite-oneworld-implementation-2011-r2/book

Chapter 4
[ 129 ]
° Lot Numbered: Purchase a lot of inventory with Lot or Standard Costing and a lot number and Expiration Date. These can also have units of measure. Sell before the expiration date.
° Serialized: These have Specifi c or Standard Costing and Serial Numbers.
• All three inventory item types: Inventory, Lot Numbered, and Serialized may also be set up as Matrix inventory (Red Shirt XL is an example of a matrix item). Matrix items allow you to show one item in your Web store or catalog, but manage the inventory of all possible combinations of the matrix.
• Item Group : These are very simple groups of items that you sell together. An Item Group must have at least one member, but it has no accounting itself; it simply follows the accounting of all the member items. Item groups make sales peoples' lives easier when you sell a certain confi guration of items regularly. It's an easy way to put several items on a sales document at once. It also allows you to hide the details of the group and simply display the price of the group to the customer. Also, item groups can be built on the fl y.
• Kit/Package : Kits lie somewhere between item groups and assemblies. There is no process to put kits together; it's something you do on the fl y. On the other hand, the kit has its own accounting separate from the members on the income side. The kit's cost of goods sold uses the COGS of its members. But you can enter a sales price for the kit, which may be more or less than the sum of the members' sale prices, and the system charges the revenue to whatever account you specify.
• Non-inventory Item : These come in three subtypes: for sale, for purchase, or for resale. We often use non-inventory items for resale, for drop ship items that we never intend to stock. A good example of a non-inventory for sale is a warranty or a support contract. A non-inventory item for purchase might be a warranty that you purchase from a vendor.
• Service : When you provide services to your customers, whether on a time and materials or fi xed bid model, or a combination, use the Service item. You can enter time against a service item; link it via a sales order to a project; or link it via a project to a sales orders. They also come in three sub-types: for sale, for purchase, and for resale, with the same general functionality as the non-inventory items.
These are the most important Item types. There are a few other item types that you will see, like Discount Items, which are self-explanatory.
For More Information: www.packtpub.com/netsuite-oneworld-implementation-2011-r2/book

Nailing OneWorld Basics
[ 130 ]
Setting up a well-thought-out item catalog makes the implementation move forward painlessly. Take your time and start with a couple of items for each item type your organization requires. Then, once you are comfortable with these setups, import the rest of your items through the import tool at Setup | Import/Export | Import CSV Records.
Item accounting Before getting started on item setup, we suggest that you open up the item setup form for each of the item types described previously to get a better sense of the accounting that takes place for each item type when you transact it in OneWorld.
For example, when you navigate to List | Accounting | Items | New and select the Inventory Item type, on the Standard Inventory item setup form, you see fi elds for Asset Account, Income Account, and COGS Account. When you purchase an inventory item, you debit the asset account, and when you fulfi ll an order for the item, you credit the asset account and debit the cost of goods sold account. Finally, when you generate the cash sale or the invoice, you credit the income account.
The setup of the accounts on any item type tells you the story of how the system expects you to use this item in your business. Your controller should have a thorough understanding of item accounting, before you make any fi nal decisions for the Item catalog.
Besides the accounts, there are other fi elds, which have a real impact on how the item transacts in the system; these are listed as follows:
• Units of Measure : Set up under Lists | Accounting | Units of Measure. UoM enables the Purchase, Stock, and Sale Units of a specifi c item to be different, while all relating to a base unit. For example, you might purchase an inventory item in a spool, stock in yards, and sell by the foot. The system makes the calculation for you, based on your UoM setup. UoM are used exclusively with inventory item types.
• Costing Method : The four options are ° FIFO, fi rst in fi rst out, tracks inventory as it comes in the door; as
it transacts through the system, FIFO uses the cost of the oldest inventory in stock as the cost of goods sold in order fulfi llment.
° LIFO, last in fi rst out, tracks inventory as it comes in the door; as it transacts through the system, LIFO uses the most recent purchase cost of the inventory as the cost of goods sold in order fulfi llment.
For More Information: www.packtpub.com/netsuite-oneworld-implementation-2011-r2/book

Chapter 4
[ 131 ]
° Average costing averages the cost of inventory from all purchases, and uses this average for the cost of goods sold in order fulfi llment.
° Standard Costing, by setting up your expected costs and then purchasing, assembling and selling at actual costs you can monitor costs variances.
Lot and Serialized inventory have costing specifi c to the lot or serial number, or standard costing.Set the default costing method in the Accounting Preferences | Items/Transactions tab. You probably need to consult your controller for advice on the best selection for your business model; manufacturing and distribution organizations have different takes on costing. Once you save an item, you cannot change the costing method.
• Variance Accounts : There can be variances in purchasing between the purchase price on the receipt and the bill, a variance between the quantity received on the receipt and on the bill, or between the exchange rate on the receipt and the rate on the bill. As a result, each month, as part of the accounting close, you can navigate to the Post Vendor Bill Variances form to post variances and clear the Inventory received not billed account. These three variance accounts work in conjunction with the Match Bill to Receipt fi eld. There are also three variance accounts for organizations using standard costing: Production Quantity, Production Price, and Purchase Price variance accounts.
• Match Bill to Receipt : You can set the default for this fi eld in your accounting preferences. This fi eld determines the method that you use to post vendor bill variances. To post the variance based on your vendor's bill, turn it on; or to post variance based on the purchase order, turn it off.
• Track Landed Cost : If you want to track landed costs on an item, the costs of getting product to your warehouse door that you add to the value of inventory and COGS on a purchase, then you must have this box checked. If you are using landed costs, then you should check this box, by default, for all inventory items.
• Tax Schedule : This tells the system how to treat this item for sales taxes by tax nexus, as we explained previously in Advanced Taxes.
• Drop Ship/Special Order : Checking either of these options allows you to identify items on sales orders that are either drop ship, direct from vendor to customer, or special order from vendor to you to customer. By identifying a line item as either drop ship or special order, you automatically generate a PO, or purchase order. You also can change the designation of an item from drop ship to special order, or vice versa, on the sales order line item.
For More Information: www.packtpub.com/netsuite-oneworld-implementation-2011-r2/book

Nailing OneWorld Basics
[ 132 ]
Groups, kits, and assemblies A few words on groups, kits, and assemblies are in order. Groups are the least functional of the three, being simply a collection of other items that you want to sell together. The advantage of a group is you can enter it as a single item on a sales order, and then let the system expand the entry to include a line for each member of the group, which makes life easy for sales people. The other advantage is that you have the option, when printing a sales document for a customer (estimate, sales order, packing slip, or invoice), of including all the members with their quantities, prices, and so on, or just the group item quantity and price. The group's price is simply the sum of its members. In effect, you do not show the customer how you arrived at the group's price, though internally this is readily visible. The G/L impact of the item group is simply the G/L impact of each individual item, meaning that the item group itself has no accounting.
One last note on groups is that you can put them together on the fl y, if need be. You may sell your products and services in multiple confi gurations, more than it makes sense to create them as individual group items, so create a single group with a single member and then add the rest on the sales form.
The Kit/Package is a way of selling a group of items and charging the group to the kit's income account. You might sell diving equipment and have different income accounts for bodysuits, accessories, and kits. The kit includes one or more members, such as a body suit, fi ns, a mask, and snorkel. The kit's income is charged to the kit's income account, and the cost of goods sold is charged to the members' COGS account. In the warehouse, you can pick a kit on the fl y, but in OneWorld, you cannot change a kit on the fl y, from a sales order form, for example. Whatever you defi ned as the kit, is what you sell as a kit.
An assembly is an item and a process. The assembly item has a number of members and a complete accounting setup. When you use the assembly process to produce an assembled unit, the system takes the value and count of the members from their 'raw materials' inventory and puts the value and count into the assembly's 'fi nished' goods inventory. From this point on, as you transact the assembly on a sale, the inventory count and value both transact from the assembly's accounts. The system allows you to also purchase an assembly, if you require this, but in most cases, you are doing light manufacturing when you use assemblies. Assemblies must be defi ned before being used; you cannot defi ne an assembly on the fl y.
For More Information: www.packtpub.com/netsuite-oneworld-implementation-2011-r2/book

Chapter 4
[ 133 ]
Groups, kits, and assemblies are important features of the system and are used by many different business models to sell products. They can also be used together. For example, you may sell an assembly you produce as part of an item group that includes a user manual in one of several languages, for example. Not every combination is possible, however. An assembly may include another assembly, and a serialized assembly may include other assemblies, but a serialized assembly cannot include another serialized assembly.
Matrix items A matrix item allows you to generate a single parent item with multiple child items, each of which has a different product confi guration. A shirt with three colors and three sizes is a single matrix item with nine different children. We transact the children through the system: purchasing, receiving, ordering, fulfi lling, and invoicing a large, red shirt. OneWorld offers you a process for generating the matrix item and all of the children, called the Matrix Item Assistant. This walks you through the process of generating the lists of values for the matrix and in the end, generates the parent item and its children. You must, however, edit the parent and add the rest of the data to the item, or correct the data, then save by clicking the Update Matrix button, which cascades all of your changes down to the child items.
Once you establish your matrix values, you can then simply use the Create Matrix Item process, which allows you to set up the parent item entirely, select the matrix values you want to use, and then click the Update Matrix button to generate the children.
Matrix items are popular for some organizations that sell online. With a matrix item, you set up and display a single item, the parent, with a box that allows the consumer to select the correct child item for them. Keep in mind that you need to add some code to the website to display only the child items that are in stock, if you sell from inventory.
Service items There is a lot to discuss in regards to product items, but we should not lose sight of service items. It is a rare OneWorld customer who does not offer some service or another to their customers, and more recently, OneWorld has made a large push into the service industry with both its own functionality and that of NetSuite's recent acquisitions.
For More Information: www.packtpub.com/netsuite-oneworld-implementation-2011-r2/book

Nailing OneWorld Basics
[ 134 ]
Service items for companies that have purchased Advanced Project Management, allow you to not only sell services, but also to generate projects and tasks directly from the sales order, or alternatively to link a project to a service item on a sales order. This is an important functionality for organizations that need to bill based on milestones, fi xed-bid contracts with set intervals, or even time- and material-based projects.
Managing inventory Setting up your inventory management can be as simple as telling the system for each item and each inventory location the reorder point and the preferred stock level. This setup is on the inventory item setup form, found in the Lists | Accounting | Items | New | Inventory Items | Inventory tab. Keep in mind that using this option means that, as an item's sales grow or slow, you may have to change these values. This can be done programmatically by exporting your item list and then importing it with new values.
Alternatively, under the Setup | Company | Enable Features | Items/Inventory tab, there is an option for Advanced Inventory. After turning this on, navigate to Setup | Accounting | Inventory Management Preferences and set the default preferences for your items and mass update items already in the system. Of course, you can also set these values for each item as you import or set them up in the system.
With its latest release, NetSuite now offers a Demand Planning module that allows you to use a num ber of input variables to determine required inventory levels, and then manage the supply chain for inventory also.
Item pricing Item pricing sometimes seems like an implementation unto itself. This is obviously an area of great concern to everyone in the organization, from management to sales and accounting. The value of what you sell is usually inextricably linked to how you sell, so move carefully here.
The good news is that OneWorld provides you with a lot of options. For organizations that sell products, you can offer different prices based on the customer's price level, such as silver, gold, or platinum, for example, combined with unit quantity. For more sophisticated quantity pricing, you can set up your own Quantity Pricing Schedules under Lists | Accounting. You can also use pricing groups that allow you to put items into a special group and then give individual customers customer pricing on the group. Price levels, by the way, are set up under Setup | Accounting | Accounting Lists.
Of course, pricing can also be customized on sales forms, which is a common practice for service-based organizations.
For More Information: www.packtpub.com/netsuite-oneworld-implementation-2011-r2/book

Chapter 4
[ 135 ]
Item vendors Setting up item vendors is an important feature for products-based companies, especially if you have multiple vendors for any item. Obviously, you must fi rst set up the vendor records, before adding a vendor to the item record. (See the Chapter 9, Data Migration, for more on vendor imports.) Also, if you do drop ship or special order, you must have a vendor on the item setup.
If you enable the Drop Ship feature, then you must set up the multiple vendor function. This adds a list of vendors to the item form, one of which must be the preferred vendor. Keep in mind that in OneWorld, the vendor and the customer must belong to the same subsidiary in order to drop ship or special order an item.
Each vendor can have their own price and volume pricing schedule as well.
Item display How items display on your sales documents is really up to you. Every item has a Name fi eld and a Display fi eld. If you use a display name, OneWorld uses the display name on the sales and purchase documents. If you do not use the display name, OneWorld uses the item name. If you check the Show Display Name with Item Codes option at Setup | Company | General Preferences, then the system shows the item name and the display name together.
Vendor names/codes are also available on purchase forms and documents.
Item imports As we mentioned previously, you can import your items at Setup | Import/Exports | Import CSV Records. We go into the details in Chapter 9, OneWorld Data Migration, but want to mention here that you can import records both to get started with the system, and to make changes, should you need to do so, such as prices, for example.
There are obviously a lot of options in the Item catalog setups and it's not always obvious which item type works best for the sales scenario that you are trying to manage in OneWorld. Our last point is to say that it makes a lot of sense to understand your organization's requirements fully, then set up a couple of items of the most appropriate type, and fi nally transact the item as many times as you need, for you and the end users to be comfortable that the setup is correct. Only then should you contemplate item imports.
For More Information: www.packtpub.com/netsuite-oneworld-implementation-2011-r2/book

Nailing OneWorld Basics
[ 136 ]
Completing the accounting preferences Now that we have a start on the Item catalog, we can look forward to transacting some purchases and sales in the system and sorting through the results for what we want and what we want to avoid. In Chapter 2, OneWorld's Foundation, we took a stab at setting up the Accounting Preferences, at Setup | Accounting | Accounting Preferences, but only worked through the fi rst two tabs. It's now time to return to this task and understand how the following options affect transaction processing. At this point, it is only important you know that the preferences below exist. As you start to test transactions in OneWorld, you gain an understanding of how these preferences operate in the system. Some preferences might be obvious for you to answer at this point, and others less so.
The Order Management tab These preferences are very important to how your OneWorld system operates for you.
First, for Sales Orders :
• Default Order Status: Do you want an order approval process?• Require Re-approval on Edit of Order: If you selected Pending Approval in
Default Order Status, then do you want the order to re-enter the approval process when edited?
• Send Email Confi rmation when Order Cancelled: Most appropriate for a web e-tailer.
• Default Location for Orders: Do you want to default the fulfi llment location?
Now, for Picking/Packing , two of the steps in product fulfi llment:
• Always Print Kit Items on Picking Tickets: Does the warehouse picker need the member items of a kit to print on the picking ticket?
• Show Uncommitted Items on Picking Tickets: Do you want items that are not available to be picked, to be printed on the picking ticket?
• Show Non-Inventory Items on Printed Forms: Do you need to show warranty items on picking tickets?
For More Information: www.packtpub.com/netsuite-oneworld-implementation-2011-r2/book

Chapter 4
[ 137 ]
• Show All Ordered Items on Packing Slips: Do you want every item on the sales order to show on the packing slip, regardless of whether it is in the package or not?
• Show Drop Ship Items on Packing Slips: If an item on the order is being drop shipped by a vendor, do we still show it with the items your organization picked and packed?
General Fulfi llment Preferences are next:
• Limit Status on Packing Slip Queue: Select a fi lter for the the packing function, either picked or packed.
• Fulfi ll Based on Commitment: When you process a sales order, you can commit inventory to a line item, based on Available Qty and Complete Qty, or you can choose Do Not Commit. Your choices here include Limit to Committed, Allow Uncommitted, and Ignore Commitment. How you handle these two determines how you allocate inventory among many orders.
• Default Items to Zero Received/Fulfi lled: On receipts and fulfi llments, do you want the system to default a zero in, which forces the employee to enter the correct amount?
• Allow Overage on Item Fulfi llments: Can you send more than the customer ordered? Might be useful if you have minimum order amounts, for example, which were not met on the sales order.
• Filter Bulk Fulfi llment Page by Location: Allows you to specify the location, before you start to do bulk fulfi llments on the Transaction | Sales | Fulfi ll Orders form.
• Send Order Fulfi lled Confi rmation Emails: This is especially important for web e-tailers, but can also be used by any organization delivering products through a shipper.
• Use Website Template for Fulfi llment Emails: If you have a website, you can use the same template for a web order as other orders.
• Build Based on Commitment: How do you want to build assemblies, based on work orders? If your WO says 5, do you want to allow the plant to build 10?
• Allow Overage on Assembly Builds: If you generate a Work Order for the assembly of 10 units, do you want to allow the plant to build 12?
For More Information: www.packtpub.com/netsuite-oneworld-implementation-2011-r2/book

Nailing OneWorld Basics
[ 138 ]
General Invoicing is next:
• Show Unfulfi lled Items on Invoices: Do you want your invoices to include items that you have not yet fulfi lled?
• Invoice in Advance of Fulfi llment: Do you want to invoice the customer, before fulfi lling the order?
• Convert Absolute Discounts to Percentage: Do you want to convert a dollar discount to a percent discount that will be spread across several invoices evenly? This applies to the sales order that has multiple invoices. Enabling this would spread the discount out evenly to each invoice, instead of taking it all on the fi rst invoice.
• Base Invoice Date on Billing Schedule Date: You have the option of setting the data and period of invoices and cash sales to the date identifi ed in the billing schedule or the date when you generate the invoice or cash sale.
For Drop Shipment Preferences :
• Drop Ship P.O Form: Select a default drop ship purchase order form.• Automatically Email Drop Ship P.Os: Check this is off, if you want to send
drop ship POs to vendors automatically when they are generated.• Queue Drop Ship P.Os for Printing: Alternatively, you can send drop ship
POs by e-mail.• Automatically Fax Drop Shop P.Os: Or you can send them by fax.• Limit Vendor List on Items: Limit the vendor list on the sales order line item
and on the order items form to the vendors linked to the item at item setup.• Include Committed Quantities: Do you want to include committed item
quantities in your drop ship PO?• Update Drop Ship Order Quantities Automatically Prior to Shipment: Do
you want to automatically update sales and purchase order quantities to be equal, before transacting?
• Drop Ship Fulfi llment Quantity Validation: How do you want to handle a drop ship fulfi llment that has a different quantity from the PO?
• Allow Both Marked Shipped Fulfi llments and Receipts on a Drop Shipment Line: Do you warn or prevent users from creating a receipt for a drop ship PO that already has a fulfi llment line?
For More Information: www.packtpub.com/netsuite-oneworld-implementation-2011-r2/book

Chapter 4
[ 139 ]
Purchase Order Preferences are for organizations using the PO function:
• Allow Expenses on Purchase Orders: Do you want to be able to add expenses to a PO? Do you need to bill expenses through to a customer?
• Enable Custom Purchase Order Approval Process: Do you want an approval process for purchases that are different from the delivered purchase approval process? The delivered process uses the employee's purchasing approver hierarchy. Using Suitefl ow, you can generate a custom workfl ow for PO approvals.
• Default Location for Purchase Orders: Do you want to have a default location for receiving?
If your organization uses purchase orders and advanced receiving, then you must take a look at these preferences:
• Bill in Advance of Receipt: Do you want to bill a PO and pay a vendor prior to receiving the product?
• Allow Overage on Item Receipts: Do you allow receipt quantities greater than the PO?
• Default Receiving Exchange Rate: Should the receipt's exchange rate default from the PO, or do you want the exchange rate as of the date of receipt?
• Use Purchase Order Rate on Bills: Do you want to pay the rate on the PO or the rate on the receipt, by default?
For organizations that have customers' or vendors' returns of products, or software in some cases, see the following preferences:
• Default Return Auth Status: Your choices are Pending Approval or Pending Return.
• Refund in Advance of Return: Refund a customer prior to receiving their return?
• Restock Returned Items: Do you want to put items that are returned right back into stock to sell? This option adds a Return to Stock button on the Receipts form.
• Write-Off Account for Returns: If you receive but do not restock a return, then the value gets written off to the account you select here.
• Default Vendor Return Auth Status: Your choices are Pending Approval or Pending Return, probably depends on the value of your returns.
• Credit in Advance of Vendor Return: Do you want to process a credit prior to returning goods to the vendor? This might be a useful option, if you want to make sure that you process a vendor credit against a payable.
For More Information: www.packtpub.com/netsuite-oneworld-implementation-2011-r2/book

Nailing OneWorld Basics
[ 140 ]
If you have inventory in multiple locations and need to ship it from one location and receive it into another location, then see the following:
• Default Transfer Order Status: Your choices are Pending Approval or Pending Fulfi llment, and they probably depend on the layers of hierarchy in your warehouse organization.
• Use Item Cost as Transfer Cost: When transferring items between locations, you can decide how you want to use the item's cost. If you enable this option, OneWorld uses the item cost as the declared shipping value only; but if you do not enable this option, then the transfer price becomes the item's cost on the receipt.
And for Vendor Bills
• Default Vendor Bill Status:Approved or Pending Approval
And for Approval Routing:
• Enable Custom Purchase Order Approval Routing: Click this on if you want to customize the process with SuiteFlow
• Enable Custom Vendor Bill Approval Routing: Click this if you want to customize the process with SuiteFlow.
The Time and Expenses tab If you have employees or contractors entering time for internal or customer projects, be it for payroll, billing, or both, see the Time Tracking preferences. If they enter expenses, then also see the Expense preferences. We have listed them all as follows:
• Show Projects Only for Time and Expense Entry: Show Projects only in the Customer/Project fi eld on the Time Entry form, or show both customers and projects
• Automatically Notify Supervisor: Send e-mail notifi cations to supervisors when new time and expenses entries are ready for approval
• Override Rates on Time Records: This option locks the rates on time entries and makes sure that invoices refl ect the rate shown on time entries
• Require Approvals on Time Records: Check this option to make sure that supervisors approve time records, before billing customers
For More Information: www.packtpub.com/netsuite-oneworld-implementation-2011-r2/book

Chapter 4
[ 141 ]
• Time Billable by Default: If you enable this preference, every new time entry is 'billable' by default
• Copy Time Memos to Invoices: Gives customers a short description of each time entry
• Show Planned Time in Time Entry: When you have tasks set up on projects, OneWorld can generate planned time entries for your project resources, allowing them to simply correct the hours and enter a memo
And for Expenses:
• Expenses Billable by Default: Enable depending on whether every new expense entry is 'billable' by default
• Items Billable by Default: Enable depending on whether every new item entry on a PO is 'billable' by default
• Combine Detail Items on Expense Reports: Expenses in the same category are combined into one line, if you enable this option
• Copy Expense Memos to Invoices: Provides your customers with a description of each expense line
SummaryIn this chapter, our goal was to get the system confi gured to the point where you could start running and looking at the transactions that are central to your business. Again, taking the approach that it is better to prototype early and often, we have tried to focus our efforts on setting up just enough to get our prototyping started, without tying our hands to a lot of key decisions, before we really understand them.
At this point, you should be able to start thinking about setting up a few test customers and vendors, a few items in your main item categories, and then perform some basic transactions. We walk you through this task over the next few chapters, as we look at the base setups and transactions in various, but common, business models.
For More Information: www.packtpub.com/netsuite-oneworld-implementation-2011-r2/book

Where to buy this book You can buy NetSuite OneWorld Implementation 2011 R2 from the Packt Publishing website: http://www.packtpub.com/netsuite-oneworld-implementation-2011-r2/book Free shipping to the US, UK, Europe and selected Asian countries. For more information, please read our shipping policy.
Alternatively, you can buy the book from Amazon, BN.com, Computer Manuals and most internet book retailers.
www.PacktPub.com
For More Information: www.packtpub.com/netsuite-oneworld-implementation-2011-r2/book


